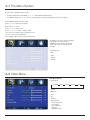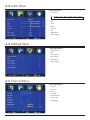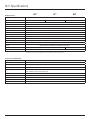
1
42" 47" 55"
42.1, 47.1, 55.1
STORM
™
O u t d o o r Te l e v i s i o n
USER M ANUAL
Serial No:_________________________
w w w. s e u r a . c o m
Thank you for selecting Séura’s Storm Outdoor Television.
This product has been inspected and packaged carefully before shipment.
Please read this guide before beginning installation.
WARNINGS
WARNING: TO PREVENT INJURY, THIS APPARATUS MUST BE SECURLY
ATTACHED TO THE WALL IN ACCORDANCE WITH THE INSTALLATION
INSTRUCTIONS.
CAUTION: DO NOT REMOVE PERMANENT COVERS. NO USER-SERVICEABLE
PARTS INSIDE. REFER SERVICING TO QUALIFIED SERVICE PERSONNEL.
BEWARE OF STATIC SENSITIVE PARTS.
3. Retain Instructions
The safety and operating instructions should be retained for future
reference.
WARNING :
To reduce the risk of electric shock do not remove cover (or back).
No user serviceable parts inside. Refer servicing to qualified service
personnel. To prevent fire or shock hazard, do not expose the bottom of
the set to splashing or driving rain. Do not submerge the product.
4. Heed Warnings
All warnings on the product and in the operating instructions should be
adhered to.
CAUTION:
5. Cleaning
Disconnect the unit from the electricity supply before cleaning. Do not
use abrasive cleaners. Use a damp cloth for cleaning.
Unauthorized tampering with the inside of the TV invalidates the warranty.
The manufacturer shall not warrant for any damage caused by improper
maintenance and/or repair work by third parties.
7. Ventilation
Your outdoor television utilizes Séura’s Activ™ Airflow system. Air is
circulated through the bottom of the set, through the product, and out the
back. Some heat also dissipates through the screen. This will get hot, but
need not cause concern.
Important safeguards for you and your new product:
Your product has been manufactured and tested with your safety in mind.
However, improper use can result in potential electrical shock or fire
hazards. To avoid defeating the safeguards that have been built into your
new product, please read and observe the following safety points when
installing and using your new product and save them for future reference.
Observing the simple precautions discussed in this operating guide can
help you get many years of enjoyment and safe operation from your
new television. This product complies with all applicable regulations and
voluntary safety standards.
8. Power Sources
This product should be operated only from the type of power source
indicated on the marking label. If you are not sure of the type of power
supply to your home, consult your supplying dealer.
9. Power Lead Polarization
This product is equipped with a three-wire grounding-type cord. This is a
safety feature.
1. Read Instructions
All safety and operating instructions should be read before the product is
operated.
10. Power Cord Protection
Power-supply cords should be routed so that they are not likely to be
walked on or pinched by items placed upon or against them, paying
particular attention to cords at plugs, convenience receptacles and the
point where they exit from the product.
2. Follow Instructions
All operating and use instructions should be followed.
2
WARNINGS (CONT)
11. Outdoor Antenna Grounding
If an outside antenna or cable system is connected to the product, be
sure the antenna or cable system is grounded so as to provide some
protection against voltage surges and built-up static charges . A “face
plate” also needs to be installed with an isolating capacitor to prevent any
damage from static.
d. If the product does not operate normally by following the operating
instructions. Adjust only those controls that are covered by the
operating instructions as an improper adjustment of other controls
may result in damage and will often require extensive work by a
qualified technician to restore the product to its normal operation.
e. If the product has been dropped or the cabinet has been damaged.
12. Lightning
For added protection for this product during a lightning storm, or when it
is left unattended and unused for long periods of time, unplug it from the
wall outlet and disconnect the antenna or cable system. This will prevent
possible damage to the product due to lightning and power-line surges.
f. If the product exhibits a distinct change in performance.
19. Replacement Parts
When replacement parts are required, be sure the service technician has
used replacement parts specified by Séura. Unauthorized substitutions
may result in fire, electric shock, or other safety hazards.
13. Power Lines
An outside antenna system should not be located in the vicinity of
overhead power lines or other electric light or power circuits, or where
it can fall into such power lines or circuits. When installing an outside
antenna system, extreme care should be taken to avoid contact with such
power lines or circuits, as contact with them might be fatal.
20. Please note:
The installation of your outdoor television should be carried out by a
technically competent and qualified person and must conform to all the
relevant regulations. If in doubt, please refer to your supplying dealer.
14. Grounding the product
This product must be grounded properly to comply with the safety
regulations in the country of use. If you are unsure of these regulations,
please consult a qualified electrician.
21. Power
This set operates on an AC supply; the voltage is indicated on the label
on the back cover. This appliance must be grounded at all times through
the chassis as well as through the power lead.
15. Servicing
Do not attempt to service this product yourself as opening or removing
permanent covers may expose you to dangerous voltages or other
hazards. Refer all servicing to qualified service personnel. If the TV does
not operate properly, switch it off and call your dealer.
22. Location
This outdoor television must be positioned according to the latest
regulations concerning the area it will be installed into. Position your TV
so that no bright light or sunlight will shine directly on the screen and
locate it at a suitable viewing height. Do not expose the TV to vibration,
excessive dust or extreme heat. Also ensure that the TV is placed in a
position that allows a free flow of air.
16. Mounting
The product should be mounted on a wall only as recommended in the
instructions.
23. Installation
It is the installer’s responsibility to ensure that the unit is installed and
sealed correctly as stated in these instructions and in conjunction with
the latest safety regulations.
17. Caution: Modifications
Do not attempt to modify this product in any way without written
authorization from Séura.
24. Proximity to Water
Do not install above pools or water that may splash into the product
from below. Do not spray the product from the bottom. Storm’s sheltered
media compartment is designed to withstand rain and weather conditions
from above and the sides. Spraying or splashing moisture from below will
damage the product and may cause a hazard to users.
18. Damage Requiring Service
Isolate this product from the main supply and refer servicing to qualified
service personnel under the following conditions:
a. If the power-supply cord or plug is damaged.
b. If the glass front has been damaged.
c. If there is ingress of water between the glass and the LCD screen.
3
Contents
CHAPTER 1
CHAPTER 4
Before Use
Menu
1-1 In The Box.................................................. 6
1-2 Parts........................................................... 6
1-3 Connections............................................... 7
1-4 Remote Control.......................................... 8
1-5 Insert Remote Control Batteries................. 9
1-6 Menu Controls on Remote......................... 9
1-7 Menu Configuration................................. 10
1-8 Basic Operation....................................... 10
4-1 The Menu System..................................... 17
4-2 Video Menu............................................... 17
4-3 Audio Menu............................................... 18
4-4 Settings Menu........................................... 18
4-5 Channel Menu........................................... 18
CHAPTER 5
Specifications
CHAPTER 2
5-1 Specifications............................................ 20
Installation
2-1 Before Installation.................................... 12
2-2 Recommended Location.......................... 12
2-3 Installation Instructions............................ 12
CHAPTER 5
Maintenance
6-1 Care and Maintenance.............................. 22
6-2 Troubleshooting......................................... 23
CHAPTER 3
Connection
3-1 Preparation............................................... 14
3-2 Connecting Power................................... 14
3-3 Connecting TV Antenna........................... 14
3-4 Connecting VIDEO (Composite)............... 14
3-5 Connecting HDMI..................................... 15
3-6 Connecting PC......................................... 15
3-7 Connecting Speaker Output.................... 15
3-8 Connecting RS-232 and USB.................. 15
4
1
Before Use
1-1 In The Box
1-2 Parts
1-3 Connections
1-4 Remote Control
1-5 Insert Remote Control Batteries
1-6 Menu Controls on Remote
5
1-1 In The Box
The following items are included with the product:
Storm Outdoor Television Product
Waterproof Remote Control
Power Cord
RECYCLE
Input/Output Cables and Adapters:
RS232/USB Cable Adapter
Audio Input Adapter
VGA Cable Adapter
Audio Output (RCA type) Adapter
HDMI Cables (2)
AV (Composite) Cable Adapter
Séura packaging is 100% recyclable. Please utilize
recycling facilities in your area to dispose of all
paper and plastic packaging materials.
Hex Key (Allen Wrench) for Removal of Filters
User Manual
1-2 Parts
On-unit
control
panel
Bezel and glass face
are removable for
serviceability and
cleaning. To remove,
unscrew hardware
around back edge
of bezel. Carefully
remove entire face
including glass
screen and bezel.
VOL
CH
MENU
INPUT
EXIT
6
1-3 Connections
Storm is equipped with a
large media compartment.
WIth room for extra cable
and break-out boxes, all
cabling is protected from the
elements.
To access, remove the
bottom cover by pushing
the two release buttons.
Make connections (details
in following pages). Wire
tie loops are provided for
securing cables. Re-position
the bottom cover into the
grooves on the TV and snap
into place. Cables may be
routed through the center
opening or around either
side.
ORM
™
CAUTION: Risk of electric shock.
Opening or removing permanent covers
results in void of warranty. Refer
servicing to qualified service personnel.
or Television
AUDIO
AUDIO
Most inputs require outdoor adapter
cables (included). ANTENNA, HDMI 1, and HDMI 2 doOUTPUT
not require adapters.
INPUT
HDMI 1
RS-232 / USB
Inputs and outputs are labeled on the back of the product. The label is shown here:
Input: 110-120V
50/60 Hz
Outdoor Television
M-42.1-BL
Serial: 1001
THIS DEVICE COMP
IS SUBJECT TO THE
(1) THIS DEVICE MAY
(2) THIS DEVICE MUS
INCLUDING INTERFE
47"
Input: 110-120V
50/60 Hz
STORM™ Outdoor Television
Model: STRM-47.1-BL
Serial: 1001
7
55"
Input: 110-120V
50/60 Hz
STORM™ Outdoor Television
Model: STRM-55.1-BL
Serial: 1001
1-4 Remote Control
2010 Remote Redesign
Final
REMOTE FUNCTIONS
1
2
1
Power
Turns television on and off
2
Last
Recalls last channel viewed
3
Closed Caption
Turns on/off subtitles
4
Guide
View available electronic program guide
5
Mute
Turns off/on audio
6
Sleep
Activates sleep timer
7
Zoom
Zoom current picture
8
Input
Selection of content input
9
Display
Display current program details
10
Number Pad
Numerical selection for channels
and settings
11
Enter
Confirms selection
12
Menu Controls
Allows navigation of main menu settings
13
Channel
Up/Down selection of channels
14
Volume
Up/Down selection of volume
3
4
5
6
guide
cc
last
mute
sleep
ok
12
7
zoom
8
input
display
menu
exit
9
13
channel
10
14
volume
enter
11
waterproof
Waterproof remote performs best within 20 ft (6 m) of the LCD and within 30º to the left or right of the display.
8
1-5 Insert Remote Control Batteries
2010 Remote Redesign
Remove the battery cover on theFinal
bottom of the remote using the
tool included or a coin.
Insert 2 AAA batteries.
Ensure waterproof ring is securely in place before returning cover.
Return cover and turn to “CLOSE” position.
guide
cc
last
1-6 Menu Controls on Remote
mute
2010 Remote Redesign
Final
Functions of the TV set can be controlled by the Menu Control Center on the remote
2010
Remote
Redesign
sleep
control. Familiarity with these functions
will provide easeokof operation.
Final
zoom
2010 Remote Redesign
Final
input
guide
cc
last
display
menu
exit
guide
cc
last
cc
last
Press MENU button on the remote
control to display main menu.
mute
guide
sleep
ok
Press menu control arrow buttons to
navigate through menus. Use the right
arrow (4) to move to sub menu of a
selected main menu.
channel
mute
zoom
mute
input
display
menu
exit
sleep
channel
sleep
ok
ok
volume
zoom
To change a selected menu setting,
use Menu control buttons (34).
enter
volume
zoom
enter
input
input
display
menu
display
menu
exit
exit
Press EXIT button to return from sub
menu to main menu or from main
menu to menu removal.
channel
waterproof
channel
9
w a t e r p r o o f volume
Final
guide
mute
sleep
cc
last
1-7 Menu Configuration
Press MENU to open the menu window. Navigate using 5 or 6 to select the desired menu. Press 4 or OK to enter the menu. Use 5 or 6 within
the selected menu to navigate to a submenu or setting to adjust. Press 4 or OK to enter the submenu or use 3 or 4 to adjust selected setting. Press
ok wait 10 seconds to exit the menu.
EXIT at any time, or
guide
cc
menu
exit
last
zoom
mute
input
display
sleep
ok
channel
zoom
2010 Remote Redesign
Final
input
display
menu
exit
volume
enter
channel
cc
guide
2010 Remote Redesign
Final
last
volume
mute
enter
sleep
cc ok
guide
last
waterproof
1-8 Basic Operation
zoom
mute
2010 Remote Redesign
Final
Power On / Off
input
sleep
zoom
input
display
menu
exit
ok / Standby button on the remote control or on the side panel to turn
Press the Power
on the unit.
Press Power / Standby button on the remote control or on the side panel again to
return the display to standby (off) mode.
waterproof
Selection
cc Mode
guidedisplay
of Input
menu
last
channel
exit
Press the Input button to display the input source menu.
Press 5 or 6 to select the input source you desire, then press OK to confirm.
mute
volume
channel
sleep
ok
enter
10
2
Installation
2-1 Before Installation
2-2 Recommended Location
2-3 Installation Instructions
11
2-1 Before Installation
Séura’s Storm outdoor television is mounted using a standard VESA pattern on the
back of the unit. VESA wall mounts are sold separately.
42"
47"
55"
300 x 600 mm
300 x 600 mm
400 x 800 mm
Séura’s Storm outdoor televisions weigh between 75 lbs and 115 lbs. Ensure that the
wall mount you choose is rated to hold at least this weight. Also verify that the wall or
mounting surface can support the necessary hardware and weight of the television.
Depending on the VESA mount, the bracket may cover part of the hot air outlet in the
back of the product. The bracket should not cover more than 1/3 of the opening.
Clearance of 1-1/4” is required on the top, sides, and bottom of the product.
Power Input: 110-120V, 50/60 Hz
VESA Wall Mount Sold Separately
2-2 Recommended Location
Séura’s Storm outdoor television has been
designed to perform outdoors. Even on a cloudy
day, there is much more light outdoors than inside
your home. For best viewing, it is recommended to
install in a location where the TV is shaded, with the
screen oriented away from direct sunlight.
Storm has been engineered to perform trouble
free even if rain or snow falls directly on the unit.
However, you may wish to choose a sheltered
location or cover the TV when not in use to reduce
the frequency that the TV needs to be cleaned.
IMPORTANT
The TV should not be installed directly over a flat surface if heavy or driving rain may
puddle and splash up onto the lower portion of the TV.
Direct sunlight on the TV screen will heat internal components and should be avoided.
2-3 Installation Instructions
1. Verify that all cables and power supply
are correctly prepared and located for the
installation of the outdoor television.
2. Install VESA Wall Mount according to the
manufacturer’s specifications. 3. Install Storm outdoor television according to
VESA Wall Mount manufacturer’s instructions.
4. Make necessary power and input/output
connections. Verify the remote functions
correctly.
12
3
Connection
3-1 Preparation
3-2 Connecting Power
3-3 Connecting TV Antenna
3-4 Connecting VIDEO (Composite)
3-5 Connecting HDMI
3-6 Connecting PC
3-7 Connecting Speaker Output
3-8 Connecting RS-232 and USB
WARNING
When connecting an external audio or video system
to your TV, ensure that all elements are switched off.
13
3-1 Preparation
Please read the relevant external equipment operation manual (BluRay
player, Set-top Box, etc.) carefully before making connections.
WEATHERPROOF CABLE EXAMPLE
RS-232 and USB cable shown
Cables are shipped with the product in a dedicated accessory box.
Locate the accessory box and ensure the following cables are included:
(1) Power Cord
(1) RS-232 and USB Adapter
(1) Audio Input Adapter
(1) VGA Cable Adapter
(1) Audio Output (RCA type) Adapter
(2) HDMI Cables
(1) AV (Composite) Cable Adapter
Weatherproof Connection
(to TV)
Standard Connection
(to Source)
Connection Label
Conventional Input
Illustration
Weatherproof Adapter
Illustration
3-2 Connecting Power
REQUIRES WEATHERPROOF ADAPTER
Connect included power cord to
the television.
Connect to appropriate Power
Source (GFCI outlet)
Power Input: 110-120V, 50/60 Hz
NOTE
Included power cord is appropriate for sheltered locations.
Install in accordance with local codes using a GFCI outlet.
The supplied cord may be modified for permanent
waterproof connections by a qualified electrician.
3-3 Connecting TV Antenna
Connect cable to TV Coaxial input connector with an outdoor or wall outlet antenna output.
Turn on the TV and use the input button on the remote to choose TV. Use the menu button
on the remote to choose cable or air, then run auto scan.
Watching Analog TV & Digital TV
Analog TV signal has a channel number structure of 1, 2, 3, 4, etc., but Digital TV signal has
a channel number structure of 1-1, 2-1, 3-1, 4-1, etc.
3-4 Connecting VIDEO (Composite)
REQUIRES WEATHERPROOF ADAPTER
Connect Video/Audio cables to the video ports of the TV and Standard Definition
camcorder, gaming consoles, VCR, DVD player or Set-Top box.
14
3-5 Connecting HDMI
Connect HDMI cable to HDMI port of TV and High Definition
Blu-Ray Player, DVD player, VCR, Set-Top box or camcorder.
3-6 Connecting PC
REQUIRES WEATHERPROOF ADAPTER
Connect 15-pin cable to 15-pin port on the TV and PC.
Connect audio cable to audio output of a PC (stereo jack) and PC audio input port of the TV.
3-7 Connecting Speaker Output
BACK OF UNITREQUIRES WEATHERPROOF ADAPTER
BOTTOM VIEW
Connect external speaker system to
television using RCA-type Audio Output.
Select “External Speakers” using the Sound
Selector Switch. This sends sound out of the
product via the RCA-type connection and
mutes internal speakers.
Important:
The audio output is not
amplified. External speakers
used with the Storm TV must be
powered or run off a receiver or
amplifier.
BACK OF UNIT
TV SCREEN
TV SCREEN
BACK OF UNIT
BACK OF UNIT
TV SCREEN
TV SCREEN
3-8 Connecting RS-232 and USB
Internal Speakers
Switch towards front of
the unit selects “Internal
Speakers”. Content will use
the product’s own down-firing
speakers for audio.
External Speakers
Switch towards back of
the unit selects “External
Speakers” via the “Audio
Output” cable and mutes the
internal speakers.
REQUIRES WEATHERPROOF ADAPTER
USB
Digital photos stored on a flash drive may be viewed individually or in slideshow mode using the supplied USB adapter cable.
To view pictures, connect the supplied cable to the RS-232/USB connection on the TV. Plug the USB flash drive into the
cable, and use the input button on your remote to choose USB.
RS-232
The supplied adapter cable also allows for external equipment to be connected to control of the TV using RS-232. This
feature may be utilized by your installer/AV integrator.
To begin control operation, connect the supplied cable to the RS-232/USB connection on the TV. Connect the cable to your
PC and begin programming.
Contact Seura at 800-957-3872 for specific RS-232 instructions and codes.
15
4
Menu
4-1 The Menu System
4-2 Video Menu
4-3 Audio Menu
4-4 Settings Menu
4-5 Channel Menu
16
4-1 The Menu System
Use the remote to navigate the menu system
• The buttons adjustment include MENU, 3, 4, 5, 6, OK or ENTER and EXIT buttons.
• Press MENU to begin. Press 5 or 6 button to select the pages. The pages are displayed in the following sequence
1) Press MENU to display the menu system.
2) Press 5 or 6 to select the menu pages.
3) Press OK or 4 to enter.
4) Press 5 or 6 to select an item.
5) Press 3, 4, 5, 6 to select or adjust a setting.
Note: If you do not make a selection within 10 seconds,
the menu screen closes automatically.
7) Press MENU or EXIT to return or exit the menu system.
The graphics at the top of the menu designate
the menu type. The selected menu is
highlighted in yellow. Use the right and left
arrows on the remote to select the desired
menu type.
Select Menu Type:
• Video
• Audio
• Settings
• Channel
4-2 Video Menu
Video Menu Options
• Picture Mode
Standard
Sports
• Contrast
• Brightness
• Color
• Tint
• Sharpness
• Advanced Video
• Color Temperature
• Zoom Mode
• Noise Reduction
• Overscan
• Adaptive Contrast
17
Theater
Custom
Vivid
4-2 Audio Menu
Audio Menu Options
• Sound Mode
Standard
News
• Bass
• Treble
• Balance
• Surround
• AVC
• Digital Output
• Audio Language
4-2 Settings Menu
Settings Menu Options
• Parental Controls
• Time
• Closed Caption
• Menu Settings
• VGA Settings
• Restore Default
4-2 Channel Menu
Channel Menu Options
• Air/Cable
• Auto Scan
• Favorite
• Show/Hide
• Channel Number
• Channel Label
• Signal Quality
18
Music
Movie
Sports
Custom
5
Specifications
5-1 Specifications
19
5-1 Specifications
42"
Display Features
47"
Display technology
55"
TFT-LCD
Screen Size
42"
47"
Resolution
55"
1080p
Native Resolution
1920 x 1080
Format
16:9
Tuner
ATSC
Response Time
6.5 ms
Contrast Ratio
4,000 : 1
Viewing Angle
178˚ Horizontal/Vertical
Brightness
700 cd/m2
Temperature Rating
-30°F to 140°F*
Humidity Rating
10% - 85%
Power Consumption
< 10W Standby/200W-330W In Use
Screen
High-Performance Anti-Reflective Tempered Safety Glass
Mount
VESA Pattern 300 x 600 mm
Remote Control
Séura Waterproof Remote Control
* Installation in direct, intense sunlight reduces the maximum permitted air temperature.
Connections and Terminals
Power Input
110-120V, 50/60 Hz
RS232
9-pin DB9 female
HDMI (qty 2)
480i, 480p, 576i, 576p, 720p and 1080i, and 1080p
VGA
15-pin D-sub female
AV (Composite)
Composite Video (yellow)
Audio Left/Mono (white), Audio Right (red)
PC Audio In
3.5mm Audio Input
Antenna
75ohms Coaxial Antenna
USB
Universal Serial Bus Connector Port
Internal Speakers
2 x 10W
Audio Output
RCA-type dual channel
20
VESA Pattern 400 x 800 mm
6
Maintenance
6-1 Care and Maintenance
6-2 Troubleshooting
21
6-1 Care and Maintenance
Screen Care
The Screen of the television is protected by a specially formulated anti-reflective glass. Use only mild, nonammoniated detergents and a soft cloth to clean. Harsh chemicals and abrasive agents can cause the coating
to scratch or flake, hindering television performance. Never scrape the glass with a razor blade.
Filter Care
Consider contacting
your installer/AV
integrator for annual
filter care and internal
cleaning of the glass
The blue composite filter located at the bottom of the product may require occasional cleaning or replacement
in especially dusty or smoky environments. Ensure the filter does not become clogged. Use a vacuum cleaner
to remove mild dust and debris. For extremely dirty or dusty filters, remove from the television and rinse
with water and mild detergent if necessary. Allow to dry completely before replacing. For replacement filters,
contact Séura at 1-800-957-3872.
Front Access (qualified personnel only)
If debris or moisture becomes trapped between the glass and the television screen, the front may be removed
for maintenance.
IMPORTANT
1) Using 4mm hex key (Allen wrench), unscrew the bezel using the back access screws around the edge.
Install and tighten all screws to
prevent water leakage.
2) Remove the metal bezel, glass, and o-ring from the front of the television.
3) Carefully clean. Ensure that no moisture is left on the glass or screen before replacing the bezel and glass.
4) Carefully reposition the o-ring seal into its groove. Replace the bezel and glass on the TV making sure the
o-ring seal does not become pinched or dislodged. Insert all screws without tightening, then tighten all
screws completely. For questions or assistance, call Séura at 1-800-957-3872.
22
Contact Seura for replacement
screws if necessary. Screws must
be of the correct metric size and
length to prevent damage to TV
bezel.
6-2 Troubleshooting
Before contacting service personnel, please read the following information. If you still
experience problems, contact your local dealer or qualified service personnel.
NOTE
TV-related Problems
Cooling fans automatically turn on and off and may
continue to run after the TV is powered off (standby).
Unclear display or sound
Check whether TV antenna is correctly connected.
Broadcasting may not be good in an area with bad reception or far away
from a station/network.
No image, partially or fully black screen
Verify the TV is receiving power. A red light on the front of the TV indicates that the TV has power (standby mode). The light changes to green
when the TV is on.
In extreme cases, the TV will shut down to prevent overheating. The TV overtemp protection will reset once the TV has cooled. Remove the TV
from direct sunlight. Overtemp shutdown may indicate a failure or blockage in the cooling system. Check the filters and that air is able to move
freely around the bottom and rear of the TV.
Can’t receive a specific channel
Before a digital channel can be viewed for the first time, it must be learned by running auto scan (see 4-2 channel menu).
It may be necessary to upgrade an analog antenna that requires aiming to a multi-directional digital antenna to make it possible for the TV to find
all available channels during auto scan.
No sound
Press the MUTE button.
Volume up by using volume control buttons.
Verify the “Sound Selector Switch” is in the appropriate position
Sound is automatically disable when there is no video signal.
PC Monitor-related problems
No image is displayed from PC
Check that the computer is outputing to the display. Some computers require a key to be pressed (such as Function F8) to send video to an
external display.
Check that the VGA cable is securely connected and that no pins are bent.
Use the input button on the remote to verify that VGA is selected.
No sound
The PC audio input is automatically muted unless a video signal is detected on the VGA input.
Additional Support
Work with your local Séura reseller for additional support and/or product questions.
For support directly from Séura’s customer service or technical support teams,
call toll-free 800-957-3872. Support teams are available weekdays 8:00am - 4:30 CST.
23
8 0 0 . 9 5 7. 3 8 7 2
w w w. seur a .com
Séura, Inc.
1230 Ontario Road
Green Bay, WI 54311
800.95.SEURA
t: 920.857.9069
f: 920.857.9490
© Séura 2012
All Rights Reserved
6-1-12