1
Sequence
Analysis
Guide
2nd Edition
CV B30
CXA 1G
CXA 3CG
Consensus
140
150
160
170
183
(126) 126
(126) CCGATCAACAGTCAGCGTGGCACACCAGCCACGTTTTGATCAAGCACTTCTGTTACCC
(125) CCGATCATTAGCAAGCGTGGCACACCAGCCATGTTTTGATCAAGCACTTCTGTTACCC
(125) CCGATCAACAGTCAGCGTGGCACACCAGCCACGTTTTGATCAAGCACTTCTGTTACCC
(126) CCGATCAACAGTCAGCGTGGCACACCAGCCACGTTTTGATCAAGCACTTCTGTTACCC
Preface
The material in this text has been partially derived from
the online notes for the UNMC course “Introduction to
Genetic Sequence Analysis” (BIOC/PAMM 873)
(http://molbio.unmc.edu/courses/coursenotes/Contents.html). While these notes were written and
edited by a number of different people over the years, the
material included in this manual was written at UNMC.
The present text is designed to serve as a stand-alone
introductory reference for faculty, students, and staff who
are using the sequence analysis programs available in the
Genetic Sequence Analysis Facility (GSAF) at UNMC
and the Bioinformatics Core Research Facility (BCRF) at
UNL. It is not intended as an exhaustive reference, but is
designed to serve as a resource for getting started, as a
quick reference for occasional users, and to help users
find where to get answers to questions that are not
covered in this manual. Frequent users will still find this
guide a useful reference material.
While based on the BIOC/PAMM 873 course text, the
material was extensively edited, rewritten, and
reorganized for this manual. Many new sections were
written for the present document, which will also be made
available for online access. Chapter 1 was written by
William Chaney (co-director of the GSAF and
coordinator of BIOC/PAMM 873), although it contains
some text originally written by the late Chad Price
(former system administrator of the GSAF). Eric Haas
(current system administrator of the GSAF) wrote most of
Chapters 2 and 3 (including text by Chad Price). Chapter
4 was written by W. Chaney. Appendix A was written by
W. Chaney, and he modified the Wisconsin Package and
Vector NTI help files for appendices B and C. E. Haas
and W. Chaney edited chapters written initially by the
other author.
This manual has been made specific for the use of the
GSAF at UNMC and the BCRF at UNL with respect to
gaining access to the programs and the availability of the
Vector NTI program, although investigators at other
institutions may find it useful if they also have the
Wisconsin Package and Vector NTI programs available.
Thus, the editors have selected material from a number of
sources, including the GCG and Vector NTI help
documents.
Support for this endeavor has been provided by the
University of Nebraska Research Initiative and the
National Institutes of Health Biomedical Research
Infrastructure Networks grant 5P20RR016469.
Preface to the Second Edition
All but our own copies of the Sequence Analysis Guide
disappeared from the Genetic Sequence Analysis Facility
within a few months of the first printing. This showed that
there was in fact a need for the kind of information we
were trying to compile. Whereas computer users tend to
read information from the screen, biologists generally
prefer paper held in their hands. The biologist who
struggled to use and understand GCG as it runs on a
remote computer called a “server” was the target audience
who inspired us to move the online notes into a selfcontained guide.
As the popularity of Vector NTI increased, it became
apparent that more information needed to be included
covering this new software. We have also taken the text
further from the online notes for this edition. Information
that was useful at one time but now clearly out of date has
been removed. For example, it was necessary at one time
to list requirements for a user to “get online” at the
University from their office. In 2006 it is difficult to find
a PC not connected to the network, and it is of course
standard practice for all necessary software to be bundled
with the computer.
Continued development of this guide was supported by
the University of Nebraska Research Initiative and the
National Institutes of Health Biomedical Research
Infrastructure Networks grant 5P20RR016469.
EJH
WGC
June 2007
Chapter 1: The Computing Environment ......................... 1
Introduction................................................................... 1
Using gsaf and biocomp2 ............................................. 6
UNIX Commands Introduction .................................. 15
UNIX Command Summary ........................................ 44
Chapter 2: Wisconsin Package Basics............................ 47
The Wisconsin Package.............................................. 47
CONFIGURING Graphics ......................................... 50
SeqLab ........................................................................ 52
Chapter 3: SeqWeb ......................................................... 70
The Wisconsin Package.............................................. 70
SeqWeb Organization................................................. 73
Running Programs ...................................................... 84
Chapter 4: Vector NTI Installation ................................. 89
System requirements................................................... 89
Licenses ...................................................................... 90
Vector NTI Installation............................................... 91
Chapter 5:Using Vector NTI ........................................ 101
Introduction to Vector NTI....................................... 101
Learning Vector NTI ................................................ 101
Functions Available .................................................. 106
Appendix A: Text Editors............................................. 157
vi ............................................................................... 158
Emacs........................................................................ 161
Pico ........................................................................... 164
Appendix B: GCG Short Descriptions ......................... 167
Appendix C: Vector NTI Suite Functions .................... 186
Appendix D: Installing SSH ......................................... 201
Chapter 1
The Computing Environment
INTRODUCTION
The analysis of DNA and protein sequences for predicted
biological properties, for assembly of sequences
determined in the laboratory, and for the determination of
similarity and homology between different sequences is
usually accomplished using computer programs designed
to quickly and efficiently perform these functions.
Although possible by hand in the past, the greatly
increased sizes of databases requires computer aided
analytical tools. At the UNMC Genetic Sequence
Analysis Facility (GSAF) and the UNL Bioinformatics
Core Research Facility (BCRF), there are several
computers and sequence analysis programs that can assist
molecular biologists with their research. The aim of this
document is to describe these programs and provide quick
guidelines for investigator at UNMC and UNL to start
using them.
Available Hardware
The GSAF offers access to a Sun Microsystems SunFire
V250 server with 2 processors running the Solaris
(UNIX) operating system and Wisconsin Package
software and to stand-alone PC's with the Vector NTI
package. Access to this system is free to UNMC staff and
students and to faculty and students at UNO and UNK.
The UNMC computer is named gsaf.unmc.edu.
1
The BCRF provides access to a Dell PowerEdge 6600
server with 4 processors running a Linux (UNIX-like)
operating system and the Wisconsin Package, to PC’s
with Vector NTI Advance10 and various other
bioinformatics tools. The BCRF computer is named
biocomp2.unl.edu. The BCRF also offers access to a web
cluster called biocore.unl.edu and a Linux cluster called
bioinfocore.unl.edu.
Operating System
The operating system is the first layer of software that
every computer needs to interface with the user and is
responsible for basic housekeeping duties such as keeping
data from each user in separate areas called "user
accounts". You may be familiar with operating systems
like Windows and Macintosh on personal computers. You
need to know a few basics of the UNIX operating system
if you plan to use the Wisconsin Package. The UNIX OS
has become increasingly popular among workstation
users, due to its flexibility and simplicity. A main feature
of the UNIX operating system is that it has both
multitasking (able to run more than one program at one
time) and multiuser (able to support many users
simultaneously) properties. The UNIX, Linux, Windows,
and Macintosh operating systems are used at the GSAF
and the BCRF in support of various sequence analysis
programs.
Software Available
A number of sequence analysis programs are available at
both facilities. We have purchased licenses to use the
Wisconsin Package and, through the generosity of the
INBRE at UNMC, the Vector NTI package. The
Wisconsin Package is also known as GCG, since it was
2
originally developed by the Genetics Computer Group,
Inc. (GCG, Inc.); a spinoff company of the University of
Wisconsin. The Wisconsin Package is currently a part of
Accelrys Corp (http://www.accelrys.com/). The Vector
NTI package was developed by the InforMax Inc., and
now is a product of Invitrogen Corporation
(http://www.invitrogen.com/).
Besides the above commercial software, several freeware
packages are installed on computers at both facilities.
These include PHYLIP, a well-known program for
phylogenetic analysis, and ClustalW, a reputed program
for sequence alignment. In addition, there are web-based
programs (e.g., EMBOSS, SRS,
Entrez, ReadSeq,
Primer3)
available
at
the
BCRF
website
(http://biocore.unl.edu), allowing the user to run them
though a web browser.
The Wisconsin Package
The Wisconsin Package follows a toolbox philosophy in
software design, meaning that the package consists of
many small programs (tools) as opposed to one large and
complex integrated application. The Wisconsin Package
was developed as a text-mode, command-line driven set
of programs: the user interfaces with the computer by
typing text commands. As windowing, mouse "clickable"
menu systems became popular with the availability of
more powerful inexpensive computers, GCG developed
an X Windows based version of the Wisconsin Package.
That graphical user interface to the Wisconsin Package,
known as SeqLab is available on gsaf and biocomp2.
SeqLab users can also learn the commands to use the textmode prompt in order to use the programs via a modem or
from systems which do not support an X Windows server.
Note that some of the command line GCG programs
produce graphical output. Methods to view these plots
without running SeqLab or to have them saved as
postscript files for printing will be shown in Chapter 2.
The Wisconsin Package (or GCG package) consists of
several sequence databases and a variety of powerful
sequence analysis tools. It is available for use on
computers running UNIX or Linux operating systems.
The computational power offered by the workstation
environment frequently provides the Wisconsin Package
programs a significant performance advantage over
comparable personal computer-based software. In
particular, sequence alignments and phylogenetic tree
constructions will take a few minutes or hours instead of
days on a PC. Software and database updates handled by
the system administrator(s), along with access to remote
databases, guarantee the user access to the most up-todate information and analysis tools available.
There is also a web interface to GCG called SeqWeb. To
utilize this, you must have a SeqWeb account. For
security reasons, your SeqWeb account is different from
your regular account on gsaf or biocomp2. These are
available by application through the web at
http://molbio.unmc.edu/
(UNMC
members)
or
http://biocore.unl.edu (UNL members). The Web browser
interface requires specific versions of Netscape or Internet
Explorer for PC or Macintosh users. See Chapter 3 for
more details.
3
4
Vector NTI
The Vector NTI package runs on a Windows or
Macintosh computer. Most biologists are familiar with
such computer environments. Instead of using the toolbox
philosophy as the Wisconsin package did, Vector NTI
uses the module and database concept. It has five
application modules, Vector NTI, AlignX, BioAnnotator,
ContigExpress, and GenomeBench, and a centralized
database. The database manages molecular data and
analysis results and links molecular data with the
application modules.
The program resides entirely in the user’s desktop
computer. The program occupies approximately 300 Mb
of space, mostly in the PFAM database, which is
maintained locally. If disk space is at a premium, this
database need not be installed, bringing the size to below
100 Mb. Rather than maintaining a local copy of the
whole Nucleotide and Protein databases, it utilizes the
existing databases and search algorithms at the National
Center for Biotechnology Information (NCBI). Other
internet accessible databases (as well as other NCBI
databases) are available through the Vector NTI
programs. An internet connection is essential for
communicating search requests and receiving results from
the NCBI server. An internet connection is also necessary
to use the Vector NTI dynamic license server. A simple
dial-up connection will work fine, since very little
information needs to be transferred from the NCBI web
site or to obtain a Vector NTI dynamic license from gsaf
(at UNMC). Free licenses are also available directly from
Invitrogen corporation. These licenses are one-year trial
licenses which are extendable as long as the user resides
at an academic institution.
Compared with GCG, Vector NTI has a good graphic
presentation capability and integrates a large number of
web programs. For example, restriction maps can be
quickly and nicely generated. Many web programs are
5
linked by Vector NTI for 3D-structure, sequence
comparison, gene prediction, and protein feature analyses.
Vector NTI will allow you to connect with the NCBI and
Distributed Annotation Server (DAS) systems over the
internet. These DAS systems include EnsEMBL, TIGR,
and the UCSC Genome Center. An introduction to
installation and use of Vector NTI is included in
Chapter 4 and 5.
USING GSAF AND BIOCOMP2
Obtaining an Account
Since the Wisconsin Package is available at both
facilities, there are a number of operating system-related
issues to be discussed before getting started. First, an
account can be obtained by filling out the application on
the GSAF web page (http://molbio.unmc.edu) and the
BCRF web page (http://biocore.unl.edu). Accounts on
gsaf are available to all UNMC faculty, students and staff
without charge. Accounts on biocomp2 and bioinfocore
are open to all faculty, staff, and students from all
Nebraska institutes of higher education.
After an account application is submitted, qualified
applicants will be provided with an account and added to
the email list for system information. This email list is the
primary method used to notify users of changes to the
system as they occur, including anticipated system
maintenance down-time and when databases are updated.
Accounts issued to students and post-docs at UNMC will
require annual renewal on July 1. Faculty and staff
accounts remain active indefinitely. At UNL the annual
renewal process for post-doc and student accounts is
6
handled through the individual’s direct manager or
advisor.
package installed if you want to run SeqLab (see below
for a list of X Windows server programs).
Security Note: Accounts issued are personal accounts. As
such, you should never divulge your password to anyone.
Also, do not write it down as that could compromise its
security. See the note below regarding good and bad
passwords! The System Administrator does not need your
password in order to work on your account if the need
arises. Because accounts are free, there is no reason to
share accounts with another member of your lab. This is
important for security reasons. There are mechanisms to
make all the files in your account available to fellow
laboratory workers if you want to share them as part of
your work. There are also mechanisms to keep other files
in your account private, so you don’t need to have
everything available to other lab members. These will be
described below and the system administrator can help
you set up your account to provide any access to your
files from other accounts that are needed.
If you wish to dial in with a modem, you will need to
have a subscription with an Internet Service Provider
(ISP). The GSAF facility does not provide a phone
number for direct dial-in access.
Setting up a Connection
Next, you will need to have some way to connect to a
remote computer and communicate with it. On the
UNMC campus, all of the computers in the ITS Computer
Clusters provide direct access to the GCG system using a
text-mode window. A few also support an X Windows
session through Microimages MI/X software. If you find
a cluster computer that does not have MI/X installed and
need X Windows, please contact the GSAF personnel and
they will request the software be installed. Most users will
also want to use their office or lab computer as a terminal.
This requires that you have ssh (secure shell) software
running on your computer and an X Windows server
7
In order to connect to gsaf, you will need an ssh (secure
shell) program. This provides the text mode access
described below. In order to use the GCG graphical user
interface (SeqLab), you will need to obtain a piece of
software called an X Windows Server. This software must
be running on your desktop PC in order to start SeqLab.
Microimages MI/X, an X Windows Server is available
through a dynamic license at UNMC. The Hummingbird
eXceed package is another option but the University does
not have a site license for this package. For Macintosh
systems running OS X, Darwin is freely available from
Apple Computer, Inc. or already installed. For OS 9 or
earlier, we recommend that you purchase a copy of the
White Pine (now Powerlan USA) eXodus X Windows
server from a commercial vendor. Access to SeqWeb can
be accomplished using most standard web browsers.
Some of you may have used a telnet program to connect
to a remote computer. An ssh program rather than telnet is
required at UNMC for security reasons and may be
obtained without cost from http://www.ssh.com/. An ssh
program is included with OS X or can be purchased for
earlier
versions
of
Macintosh
OS
from
http://www.macssh.com/.
8
Logging on to gsaf at UNMC
After access considerations are taken care of, you can
proceed to log on to the gsaf computer. Run ssh and click
on "Quick Connect". The Host Name is gsaf.unmc.edu
and User Name and password are given to you by the
system administrator when you request an account. Click
the Connect button and you will receive a prompt to enter
your password. If these were correctly entered, you will
establish a connection and will be greeted by the
operating system. The initial screens welcoming you after
a successful login will look similar to this:
SSH Secure Shell 3.2.9 (Build 283)
Copyright (c) 2000-2003 SSH Communications Security Corp http://www.ssh.com/
This copy of SSH Secure Shell is a non-commercial version.
This version does not include PKI and PKCS #11 functionality.
Last login: Mon Dec 12 2005 09:50:31 -0600 from host-137-197-64This is gsaf.unmc.edu
If you are not authorized to use this system, leave now.
This is the Genetic Sequence Analysis server for the
University of Nebraska Medical Center.
This system is for University research purposes only.
Any attempts at use for commercial purposes will be denied.
This system is NOT available for uses unrelated to research at
the University.
================================================================
In order to be compliant with HIPAA computer security
requirements, all GSAF users will need to change their passwords.
The new password rules will become effective on GSAF on March 17,
2003. All paswords must be at least eight characters and have one
number or special character and one capital letter.
You have mail.
================================================================
Welcome to the WISCONSIN PACKAGE
Version 10.3-UNIX
Installed on solaris
A wholly owned subsidiary of Pharmacopeia, Inc. All rights
reserved.
Published research assisted by this software should cite:
Wisconsin Package Version 10.3, Accelrys Inc., San Diego, CA
Databases available:
GenBank
Release 138.0
(10/2003)
EMBL (Abridged)
Release
76.0
(09/2003)
GenPept
Release 138.0
(10/2003)
PIR-Protein
Release
77.08 (08/2003)
NRL_3D
Release
28.0
(01/2001)
SWISS-PROT
Release
42.00 (10/2003)
SP-TREMBL
Release
25.0
(10/2003)
PROSITE
Release
18.08 (09/2003)
Pfam
Release
10.0
(07/2003)
Restriction Enzymes (REBASE)
09/2003)
Technical support see: http://www.accelrys.com/support/
Online help: % genhelp or
http://www.accelrys.com/support/bio/genhelp/
gsaf /usr/users/ehaas>
As a security precaution, the password will not appear on
the screen as you type it. After your password has been
validated, you will see some more welcome messages and
eventually the system prompt (often the percent % or
dollar sign $ is used as the prompt, but the gsaf system
uses the greater than symbol > ).
Note: Because ssh requires a password to connect,
the system administrator provides an initial
password for you. You may change your password
using the passwd command on gsaf or biocomp2.
More information can be found below.
Logging on to biocomp2 or bioinfocore at UNL
Run ssh and click on "Quick Connect". Type
biocomp2.unl.edu or bioinfocore.unl.edu in the Host
name field (depending upon the system to which you wish
to connect) and your user name in the User Name field.
Use the port number 22. Click on “Connect” In the
“Enter Password” dialog box, provide your password and
click OK. A window similar to the following will appear.
Copyright (c) 1982 - 2001, Accelrys Inc.
9
10
Unix systems are all case sensitive.
Upper or lower case letters matter for anything you type
to communicate with a Unix system. That is, capital letter
“A” is different than lower case “a”. This is different from
most personal computer operating systems, where upper
and lower case letters are treated the same. None of the
commands described later in this document will work if
you type their name in upper case letters. This includes
your user ID and password. In fact, use of mixed upper
and lower case in your password is recommended to make
it harder for someone to guess your password.
User-id
Note: these servers are by default only accessible from
within the UNL campus. If access from external addresses
is needed, this must be discussed with the Core Facility
Manager.
LOGGING ON TO A UNIX SYSTEM
Remote Access
When troubleshooting problems, it is often useful to keep
in mind that logging on to a Unix machine on campus
means that you are using programs on two different
computers simultaneously. The first is on your PC or
Macintosh. There, you are running a program to provide
some sort of terminal emulation to allow you to talk to the
Unix machine. The other computer on which you are
running programs is the Unix computer itself.
11
This is the text string by which other users on the system
identify who you are when you are logged in. You will be
assigned a user-id (also called a username) when you
request an account on a system. On our campus Unix
systems, user-id's are all lower case (Note that unlike
passwords, your user-id is not secret. Everyone can find it
out. Security for your files is provided by your
password.). Your login-id or user-id is typed in response
to the login: prompt, after you connect to gsaf.
Passwords
Your password is the key which enables you to log on to a
Unix system and use it. It is entered in response to the
password: prompt after you have given the system your
user-id at the login: prompt. Your password should never
be given to other people, as they can use it to log into
your account and do anything they want to your files. For
example, they could send email with any type of content
that will appear to come from you! Your password should
12
be some collection of upper and lower case letters,
numbers, and punctuation and must be at least eight
characters long. The more complex it is, the harder it is
for someone to guess it. All of the Unix systems on
campus are connected to Internet, and this is both a
tremendous advantage and a handicap. The advantages
start with the fact that you can access all sorts of useful
information located on computer systems throughout the
world through the World Wide Web and other
mechanisms. You can send and receive email to (or from)
any of these systems. The prime disadvantage is the fact
that there are people out there on Internet who would like
to get into your account. They have programs which will
use a dictionary and try every word in the dictionary (with
capitalization variations and using dictionaries from
languages other than English) as your password. Some of
these people are malicious (for no good reason, just like
the authors of the PC viruses), and some simply like the
challenge of trying to get in.
After entering the correct password, you will enter your
home directory, and will see a prompt on the screen.
At UNMC, your prompt will look like this:
gsaf.unmc.edu /usr/users/faculty/wchaney >
What this says is that the computer is gsaf.unmc.edu. The
current directory is /usr/users/faculty/wchaney.
When you first login you will enter your home directory,
in this case, wchaney. The gsaf computer is set up to
include your current directory in your promt, so if you
move to a different directory, this will change. Text that
you enter will appear after the >. Messages about
13
imminent system downtime due to system maintenance
will be provided here, as well as by email notification.
At UNL, your prompt will look like this:
[glu@biocomp ~]$
This says that the computer name is biocomp (which is in
the unl.edu domain). The username is glu and the current
directory is indicated by ~. As we will read shortly, this
represents the users home directory. Text that you type
will appear after the $.
Changing Passwords
On a Unix system, you can change your password at any
time using the passwd command (at UNL you may also
use the kpasswd command). This will enable you to
change your password to something that you can
remember easily, but hopefully will not be obvious to
others. Also, if you think that someone has found out
what your password is you can change it at any time. At a
minimum you will be required to change your password
every six months. What you type for a password will not
be displayed on the screen, either at the time you change
it, or at the time you log on to the system. This is a
security measure built into the system to prevent someone
from discovering your password by looking over your
shoulder.
If you forget your password, contact the system
administrator and your account will be reset so you can
choose a new password when you log on. For system
security reasons password files are stored in an encrypted
form, so even the system administrator cannot determine
14
what it is, and thus cannot retrieve it for you, but he/she
can give you a new one.
Logging Off a Unix System
To exit from a Unix system, use ^D (control-D - Press
the control key while also pressing the 'D' key). This will
always work on the campus-wide Unix machines. Typing
logoff or logout followed by the enter (return) key will
also work on the campus Unix systems.
UNIX COMMANDS INTRODUCTION
HINT: Try any command; it will not result in any
damage to the computer !!!
Learning to use a Unix computer is very unlike learning
to use laboratory equipment. You cannot hurt the
computer by pressing the wrong key. Computers, unlike
laboratory equipment, talk back to you. The screen and
keyboard are a mechanism for 2-way communication
between the computer and yourself. In order to learn to
use a computer efficiently you will need to login, follow
the directions, and explore things for yourself. Learning
by doing is one of the best ways to get oriented. It may be
possible to get into a position where you have no idea
what is going on, or how to get back to somewhere where
you do understand, but this is easily cured by
disconnecting from the computer (by closing your ssh
program) and logging back on again.
Anyone experienced in DOS has a head start learning
Unix. Like DOS, Unix commands are typed at a
command line. There are some important differences in
the way commands are entered or modified, however, and
these will be emphasized in the text that follows.
For UNIX commands themselves, the entire Unix users
manual is on-line in full-text form. It is accessed through
a command called man, which stands for manual. You are
strongly encouraged to read the man page for any
command you do not understand. However, since the man
pages are written to be of use to system administrators, as
well as users, do not be worried if you cannot understand
whole sections of the instructions provided.
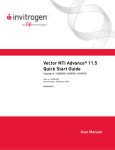
man
man is the generic command which provides access to the
manual pages. man, followed by a command name (e.g.
man lpr) will display the manual page(s) for the lpr
command on your screen. All man pages have the same
general format. For example:
man ls
results in a screen like this:
How to Get Help
Help for all of the sequence analysis related programs is
available
on
the
GSAF
Web
page
at:
http://molbio.unmc.edu. The left-hand side has a menu of
links to topics such as GCG help.
15
16
User Commands
ls(1)
NAME
ls - list contents of directory
SYNOPSIS
/usr/bin/ls [ -aAbcCdfFgilLmnopqrRstux1 ] [ file ... ]
/usr/xpg4/bin/ls [ -aAbcCdfFgilLmnopqrRstux1 ] [ file ... ]
DESCRIPTION
For each file that is a directory, ls lists the contents
of the directory; for each file that is an ordinary file,
ls repeats its name and any other information requested.
The output is sorted alphabetically by default. When no
argument is given, the current directory is listed. When
several arguments are given, the arguments are first sorted
appropriately, but file arguments appear before directories
and their contents.
and further down in the page, you see:
OPTIONS
The following options are supported:
-a
List all entries, including those that begin with
a dot (.), which are normally not listed.
-A
List all entries, including those that begin with
a dot (.), with the exception of the working
directory (.) and the parent directory (..).
On any man page for any command on the system, you
can expect to see these sections: NAME, SYNOPSIS,
DESCRIPTION, and OPTIONS.
The NAME section is always one line long and contains,
in 60 letters or less, a brief description of the function of
the command. All of the non-trivial words in this
description are indexed and man can use those indexed
17
words to find any command using the "-k" option
described below.
The SYNOPSIS section is a (very) terse summary,
without explanation, of all of the options available for a
given command.
The DESCRIPTION is a concise description of what the
command is supposed to do.
The OPTIONS section contains terse descriptions of each
option enumerated in the SYNOPSIS section.
man -k keyword
Unless you know the name of the command required for
any operation, you will be unable to access its man page.
Guessing is unlikely to help. For example, printing is a
common operation but it is not invoked by typing "print"
on the command line. Fortunately, Unix provides a
method to search for help on commands related to some
topic, such as printing.
man -k keyword will provide you with a list of
commands and file entries in the man pages that contain
the keyword which followed the -k on the command line.
For example: man -k print will provide you with a list
of all manual entries which have print as part of the
description of the entry. All user commands are in section
1 (one) of the manual pages and so searching for relevant
pages is much easier than simply groping through vast
numbers of irrelevant pages. Simply append the following
(see the section below on linking commands using pipes
"|") to your man -k command:
| grep 1 | more
18
So that you have a command which looks like
pwd command will be needed to tell you where you are in
the directory structure.
man -k password | grep 1 | more
Directories: Where am I?
man man
You can use man on itself to find more information on
how to use the man command. This is a worthwhile
exercise.
Arguments
Arguments on a Unix computer are those parameters
given to a program on the command line so that the
program knows how to behave and what files to act on.
So, arguments provide information to the command
telling it how to work. As an example, ls is the command
to list the contents of a directory. ls -l is ls with an
argument (-l) which tells it to provide the long listing of
a directory so that more information than just the file
name can be seen. More than one argument can be used,
such as ls –la, which tells the ls command to provide
the long listing of a directory (l) and to list all files (a)
All arguments must be separated from the commands to
which they refer by a space when you type them and are
often preceded with an "-", as in ls –l, although file and
directory names are only separated by a space.
pwd
pwd stands for print working directory. This command
will tell you where you are in the logical directory
structure. On gsaf and biocomp2, the command prompt is
set up to include the working directory, and you will see
the answer to this question as part of your command
prompt. On other systems, this may not be true and the
19
All Unix disk drives are divided into directories
equivalent to those on PCs. The idea for directories on
PCs came from Unix. On the Macintosh the equivalent
concept is the folder on the hard drive. A directory
structure on a disk drive is rooted in the directory called /
(root). Note that the Unix directory name separator
(delimiter) is the forward slash. As in Windows, all files
are found in directories, and all sub-directories are found
under the root directory. On your PC, the root directory is
prefaced by the drive letter, for example C:\. On a Unix
system, the physical drive is hidden from the casual user,
who does not need to know what drive something is on.
This is because the directory structures for all drives on
the machine are combined into a single logical structure.
Thus, a computer with the Unix operating system could
have eight different drives, but they will all be represented
within the single logical structure.
cd
cd stands for change directory
Whereas one can specify any directory by using the full
pathname, the following abbreviations are useful to save
keystrokes.
cd
used with no arguments changes directory
back to your home directory (symbolized as $HOME).
allows one to change to the directory above
the current directory in the file system's directory
hierarchy.
cd ..
20
cd ~jdoe will allow you to change to the home
directory of the user called jdoe (if you have permission
to do so).
The ~ symbol tells your shell to look in the password file
to find the actual path to the home directory of the user
jdoe. cd ~ is another way to tell the shell to return you to
your own home directory.
Whereas one can specify any directory by using the full
pathname, the following abbreviations are useful to save
keystrokes.
: A Single dot (.) stands for the current working
directory
.
: A Double dot (..) always refers to the directory
one level up in the structure
..
: The tilde asks the system to use the password file to
find a user home directory.
~
~/
: refers to your own home directory
~jdoe/ : refers to the home directory of the user called
jdoe.
: A forward slash (/), when used either alone, or as a
directory path or file name prefix, always refers to the
root directory of the entire system.
/
Being able to move through the directory structure can be
important. If you need to look at a file in someone else's
directory, you must first navigate to that folder.
21
mkdir
The mkdir command allows you to create a new
directory. When working on more than one project in
GCG involving different sequences, you should always
create a separate directory for each project, and keep the
sequences and output files for each project in the separate
directories.
rmdir
The rmdir command will allow you to remove (delete) a
directory. The directory must be empty and you must own
it (see below for an explanation of file ownership) in
order to remove it.
Finding and Naming Files.
Names of files on Unix systems are essentially unlimited
in length (up to 256 characters). Thus, a file name can,
and should, be long enough to be descriptive of the
contents of the file. For example, sv40.DNA.seq would be
a good name for a file containing the DNA sequence for
SV40 (simian virus 40). Note that Unix file names can
have spaces in them and they can have as many periods or
underscores as you need. Spaces make it very difficult to
manipulate the file, however, and should be avoided.
Other characters which make file name manipulation very
difficult include /,\, commas, semicolons, exclamation
points, and the & character.
Characters you should not use in filenames:
| ; , ! @ # $ ( ) < > / \ " ' ` ~ { } [ ] = + & ^ <space>
<tab>
22
Character delimiters you should use to make names easier
to read:
_ - . : (but note that the ":" has a special meaning in GCG)
NOTE: If a file is created with characters that
make its use difficult, all is not lost… By placing
the file name inside quotation marks, it can be
recognized. Making a replacement file with
generally
accepted
characters
is
then
recommended.
Wild cards assist the Unix user finding files. Wild cards
are the * and ? characters, so these characters also should
not be used in file names.
* stands for 0 or more characters, and can be used in
any place in a file name specification.
? stands for a single (1) character, and can also be used
in any place in a file name.
Unix understands wild cards. GCG does NOT use wild
cards in the same way.
Filename Conventions
Both UNIX and GCG have filename conventions. These
are suggested file names and are not required; but
following the conventions makes things much easier.
Within GCG, there some important conventions for
naming files which makes it much easier to manipulate
information within GCG. These conventions are that files
containing specific types of information end in certain
letters. These are:
23
The file contains an RNA or DNA sequence
in GCG format
The file contains an Amino Acid sequence
*.pep
(a peptide)
The file contains 2 or more aligned
*.msf
sequences and was created by pileup.
The file contains 1 or more sequences with
*.rsf
extra information placed there by GCG
version 9 or later.
The file is a text-version of a graphics file. It
must be printed or viewed by GCG from
*.figure
within the graphical interface to see the
graphics.
Where progname is the name of some GCG
*.progname program, this is the output from that
program including pretty, gap, and others.
The file is a list of sequences and may name
sequences either in some directory or
sequences which are in the GCG databases.
There is no restriction on what kind of
*.list
sequence is named here, so the list file may
contain names of DNA, RNA,. protein
sequences and also may contain the names
of other multiple sequence files such as msf
and rsf files.
GCG programs run within the graphical
interface always create output files with an
xxx_68.yyy
underscore followed by a number before the
first (and only) period in the file name.
*.seq
ls
As described above, ls lists the files in either the current
directory, or some other directory whose name you have
24
given as an argument. For example, ls /tmp will enable
you to see what files are in the /tmp directory, not matter
where you are on the system. ls also enables you to find
out more information about directories and files beyond
the name itself. Use ls -la to see all of the available
information about a directory or about files. The common
arguments used with ls include l (for a "long" listing), a
(to show all files), and g (to show group ownership) alone
or in combination with each other, and tcl (which
provides a time-sorted list) together.
By default, ls produces lexicographically sorted output.
This is a special sort type, that within lower case or upper
case letters is an alphabetical sort, but the sort occurs in
columns from left to right. Numbers do not sort in
numeric order when using a lexicographic sort. All
uppercase words come before all lower case words.
The most commonly used options for the ls command
are:
-l
Long or verbose output
gsaf /www/Other-tools> ls -l
total 58
-rw-r--r-- 1 cprice 16042 May 26 16:08
Bioinformatics-courses.html
lrwxrwxrwx 1 root 12 May 27 14:26 _themes ->
/www/_themes/
-rw-r—r-- 1 cprice 6564 May 27 11:57 index.html
-a
Show all files
gsaf /www/Other-tools> ls -a
./
courses.html
index.html
../
rock-page.html
-tcl
ls has a large number of options and the man page for ls
is recommended reading.
find
find is an extremely useful, if difficult to use command.
Use it to find a file in your collection of subdirectories
only if you know the exact name of the file. The usage is:
find . -name filename -print
where filename is the exact name of the file. Remember,
Unix is case sensitive, so Myfile.doc, MyFile.doc, and
myfile.doc are three different files in Unix. Wildcards can
be used to assist finding files when you are unsure of the
exact name. There are many more options. If you have
more complex needs, read the man page and be prepared
to spend time figuring it out.
gsaf /dr4/home4/admin/cprice/people/jose> find . name pileup_146.msf -print
./VP1-Epi/aligns/pileup_146.msf
gsaf /dr4/home4/admin/cprice/people/jose>
Bioinformatics-
Copying, renaming, and deleting files
_themes@
Unix filenames can include the full directory path as part
of the filename.
Sort output chronologically in descending order
25
gsaf /www/Other-tools> ls -tcl
total 58
lrwxrwxrwx 1 root 12 May 27 14:26 _themes ->
/www/_themes/
-rw-r--r-- 1 cprice 6564 May 27 11:57 index.html
-rw-r--r-- 1 cprice 33920 May 27 11:53 rockpage.html
-rw-r--r-- 1 cprice 16042 May 26 16:09
Bioinformatics-courses.html
cp
26
The cp command allows you to copy files. The copy can
be either to a file with the same name, or the file can be
renamed. The format is:
cp file1 file2
where file1 is the name (including the path) of the file
you want to copy, and file2 is the destination. The Unix
cp command always requires both a source filename and
a destination. The destination can be either a directory, in
which case no name change is presumed, or it may be a
new name. At the end of the cp command, there will be 2
copies of the file: the original and the new copy.
Example:
gsaf /dr4/home4/admin/cprice/tmp> cp
/tmp/class/fortuesday.seq .
gsaf /dr4/home4/admin/cprice/tmp>
The command above copies a file called fortuesday.seq
located in the /tmp/class/ directory to the current working
directory (/dr4/home/admin/cprice/tmp/) which is
represented by a single period. The copy will have the
same name (fortuesday.seq) as the original file, which
remains in the class directory located in this case in the
/tmp/class directory. In this example you are working in a
directory named tmp and are copying the program
fortuesday.seq that is in a directory named class, which is
located in a directory named tmp. By modifying the
command to identify the directory where the target file is
located, you can copy any file to which you have access
regardless of where it is in relationship to your current
directory. Likewise, you can also copy a file to a directory
other than your current working directory.
gsaf /dr4/home4/admin/cprice/tmp> cp
/tmp/class/fortuesday.seq ./new.seq
gsaf /dr4/home4/admin/cprice/tmp>
27
The command above also copies a file called
"fortuesday.seq" located in the /tmp/class directory to the
current working directory (/dr4/home/admin/cprice/tmp)
to a file with the name new.seq. Note that there is a name
change occurring here as well as a copy. The contents of
the copied file and the new file are, of course, identical.
This capability means that a "rename" command is not
needed.
mv
mv moves a file from one location (or name) to another.
At the end of the mv command, there will only be one
copy of the moved file: the one in the destination location.
The original is truly moved. For example,
mv file1 /etc
will move file1 to the /etc directory. The name will not
change. Also,
mv file1 /etc/name2
moves a file in the current directory called file1 to a new
location (the /etc directory), and renames it to a new name
(name2) at the same time.
NOTE: You must own the source file before you can
move it. Otherwise, the file permissions will prevent you
from 'moving' the file. Ownership of a file and file
permissions are covered below.
WARNING. If you use the mv command to move several
files to a directory, and do not get the directory name and
path correct, you will create a file having the name of the
intended directory, and you will overwrite all except the
last file moved to the "directory". You will lose the
contents of all but the last file in the list.
28
Usage:
rm
rm removes a file. It deletes the file. Unix files which are
deleted cannot be retrieved, except from a tape backup.
rm -i is a variation on the remove command which
forces rm to ask you if you are sure before deleting the
file. Accounts on gsaf are initially set up so when you
type rm you use the rm -i command. rm works with wild
cards, but if in doubt, you should always use ls with the
same wildcard combination to see which files are selected
before using rm to remove the files.
gsaf /dr4/home4/admin/cprice/tmp> ls *seq
fortuesday.seq install.seq
gsaf /dr4/home4/admin/cprice/tmp> rm *seq
rm: remove fortuesday.seq (yes/no)?
•
The space-bar <space> will cause more to scroll
through the next screen full of text,
•
The enter key <Enter> will scroll through the file
one line at a time
•
The 'q' key allows you to quit and return to the
command prompt.
less
less is an extension of the more command. It offers the
The above example uses both ls and rm in conjunction
with wildcards in order to predetermine which files will
be deleted before actually issuing the rm command.
option of not only continuously paging downward
through a file, but also of paging upward through portions
of the file you have already seen. less uses the same
commands as the pico and emacs editors for moving
forward and backward through a file.
cat
Usage:
cat stands for concatenate. It will print the contents of a
file to the screen for you so that you can look at the file. It
is normally used in conjunction with the | (called pipe)
and more commands (these are explained later in this
chapter).
more
more will display a file a single screen full at a time. You
can precede the file name with the command, as well as
use more following the | symbol.
Example:
more filename
29
•
less responds to the exact same commands as
more, but in addition,
•
the 'k' key causes the screen to scroll backward
through the file, and
•
the 'j' key scrolls downward one screen at a time.
Quotas
Because disk space can become limited, each account on
gsaf has a quota. You can’t have more than 20 Mb of files
in your account. You may only have 500 total files. If you
exceed your quota you won’t be able to save new files,
although you can still access your account and run
30
programs. The command quota –v will report your disk
usage. If you need more disk space because you have a
large number of files that you are actively working with,
contact the system administrator and your quota can be
increased. Quotas are to encourage users to get rid of files
that they no longer need, not to prevent them from using
the system to do necessary work.
Directory and File Permissions
Because multiuser computers may allow a number of
users to access information in an account, all files and
directories have permissions attached to them.
Permissions regulate who can read, write to, and execute
a file or directory. Each file or directory is owned by a
user on the system. One must have appropriate permission
to manipulate the directory or file in any manner,
including viewing the file contents or changing into a
directory. Only the owner of a file or directory (or the
system administrator) may alter the permissions on a file.
The ls -l command will show you not only the names of
the files in your current working directory, but it will also
show you the file permissions for each file. The chmod
command will allow you to change the permissions on
your files.
you to determine the owners of all files and directories
that reside in any directory.
Historically, the chown command in Unix has allowed the
owner of a file to give ownership to another user. The
chown command has been disabled on gsaf for security
reasons. However, you may still allow another user to
make a copy of a file you own. That user owns the copy
and can control how it is accessed by others. The next
section explains how this is accomplished.
Permissions
The user (referred to as user, or u) who created a file or a
directory controls who can have access to it. Access can
be limited to only the file owner (or user), restricted to
members of a group, or it can include any other person
capable of logging onto the computer. In the case of html
files, anyone in the world capable of using a browser
program over the internet, even if they do not have an
account on the computer, can be given access to the files.
It is important to recognize the special distinction of file
ownership. If you create a file, you own it. Ownership of
a file gives you, and only you, the authority to change the
permissions of a file. If you place a file, or a copy of a file
in another user’s directory, you will still own it, even if
that user has the capability of reading, altering, or
executing that file. Using the command ls –l enables
In terms of file permissions, three categories of people
exist. They are 1) the user, or owner of the file, 2) a
defined group of people to which the user belongs, and 3)
any other user with access to the system. The ability to
read, write, or execute a file can be changed for each of
these categories of people. Only the owner of the file can
change these permissions. Note that each ability (file
permission) is separate. For example, a file can be made
readable by anyone with an account on the system, but the
ability to alter the file can be reserved for only the file
owner. These categories and how to change between them
are defined below (Note that the system administrator is
able to view and execute all files and programs on the
system, regardless of the permissions that are set).
31
32
File Ownership
The first category is the user who owns the file. If you
have a file, or a directory that you do not wish anyone
else to be able to look at, you can set the file permissions
to exclude all other users. By making a directory available
only to the owner, even the names of files contained
within that directory can be made unavailable to anyone
other than the directory owner. Within a directory that is
accessible to others, some files may be restricted only to
the file owner while others may be open to all users.
The second category is defined as anyone in a Unix group
to which you belong. Thus, members of a research
laboratory can make data files available to all lab
members, but not to anyone else on the system. The
system administrator can help you set up a group. By
default, all members of one laboratory belong to the same
group on gsaf or biocomp2/bioinfocore.
The third category is any other person with an account on
the Unix system. Such a file can be read by anybody who
can log onto the system. Files that are part of web pages,
for example, need to have this access so people entering
the web site can see them.
Changing File Permissions
The ability to read, write, or execute a file can be altered
by the file owner, but not by anyone else. This is
accomplished by the chmod command. The chmod
command must be followed by the category of person
(user, group, or other represented by u, g, or o) the
operation (adding or removing a permission, + or -), the
type of access being changed (read, write, or execute
represented by r, w, or x) and finally the name of the
file(s) for which permissions are being modified.
33
How do you tell what the permissions and ownership of a
file is? When you use the ls -l command discussed
above, a long line of information is given. For example,
the ls -l command may give the following results:
drwxr-x--- 2 wchaney chaneylab
8192 Aug 15
12:01 comp
-rw-r----- 1 wchaney chaneylab 21123 Aug 15
11:57 p10slt.map
-rw-rw-rw- 1 wchaney chaneylab
2576 Aug 15
11:57 p10slt.seq
gsaf.unmc.edu /usr/users/faculty/wchaney/data>
What does this tell you? The last entry on the line is the
name of the file or directory. Thus, this directory contains
three entries, comp, p110slt.map, and p10slt.seq. Working
to the left, the next piece of information is the time and
date the file was created, followed by the size in bytes.
The next two columns show the group the file belongs to
(next to the file size, working from right to left) and the
present file owner. These files and directories are owned
by wchaney and belong to the chaneylab group.
Finally, the important aspects of this information needed
for access permissions are given in the left hand column.
There are ten characters there. The first one shows if this
is a directory, which is identified by a “d” or a file, which
has an “-“. As you can see, there is one directory (comp)
and two files (p10.slt and p10.map) in this listing. The
remaining nine entries (columns) tell you the file
permissions. The first three refer to the ability of the user
(owner) to read, write, and execute the file. The second
set of three refer to the ability of members of the same
Unix group to read, write, and execute the file. Finally,
the last three entries give read, write, and execute
permissions for others (anybody who has an account on
gsaf that is not the file owner and is not a member of the
same Unix group).
34
The two files named p10slt.map and p10slt.seq have read
and write permissions for the user. This means that the
file owner (wchaney) can read and alter (write) the
contents of these two files. Members of the group (named
chaneylab) can read and alter the contents of p10slt.seq,
but may only read the file p10slt.map and may not alter its
contents. Others may read and alter p10slt.seq but may
not read or alter p10slt.map.
The directory named comp in the example above raises an
interesting point. Normally the ability to execute a file
means to run a program. If you have a copy of the netblast
program in your folder on gsaf, you need execute
permissions in order to run that program. Both the user
and group have execute permissions set for the comp
directory in the example above. Is it possible to run a
directory? In Unix, both read and execute permissions are
required to view the contents of a directory. The
permissions associated with comp in the example allow
the user to view and alter the contents of the folder.
Members of the same Unix group may read the contents
of the comp folder, but they may not alter its contents (by
saving a new file in that directory, for example).
Usage:
chmod g+w Ch.one
Adds write privilege for group
users for the file Ch.one
chmod o-r Ch.one
Removes read privilege for others
chmod o+r Ch.one
Adds read privilege for others
(everybody)
35
Editing File Contents
Just like using Notepad on a Windows PC, it is possible to
edit text files on a Unix machine. There are several text
editors available on gsaf ranging from easy to use but
rather limited, to very powerful but rather complex.
Appendix A addresses several of the more popular text
editors that may be found on gsaf (and most Unix
computers).
Finding text strings
grep
grep allows one to find text strings within files. For
example, if you want to find out more information about a
user than the finger command will provide, you could
type:
grep username /etc/passwd
and grep will print all lines of the password file
containing username (for example, wchaney). The
differences between find and grep are important. find
will find files with a specific name. grep finds text strings
within a file:
36
gsaf /dr4/home4/admin/cprice/people/jose> grep
smith /etc/passwd
ljsmith:x:875:370:Larry
Smith:/dr4/home4/faculty/ljsmith:/bin/tcsh
dfsmith:x:273:40:David
Smith:/dr4/home4/faculty/dfsmith:/bin/tcsh
ssmith:x:3001:102:ShellySmith:/dr4/home4/faculty/
ssmith:/bin/tcsh
gsaf /dr4/home4/admin/cprice/people/jose>
Printing Basics
by default. The system administrator can help you make
these changes.
lpstat
lpstat is the command used to find out information
about printers on a Unix system and it will tell you printer
names, if the printer is working/not working, and almost
anything you want to know about a printer on the system.
Use the command:
UNIX printers almost always confuse new users. This is
because users are accustomed to a PC environment where
the printer directly connected to the PC is the one which
will be the default printer. This is NOT the case with
UNIX computers and printers. In order for a printer to be
used by the UNIX computer, it must know of the printers
existence. For most printers directly attached to a PC,
there is no way for this to happen. Remember, the PC is
being used as a terminal. However, as described below,
GCG includes a program named listfile that can print
a text file to the printer connected to your PC. This only
works if the ssh program is used to login to gsaf. If a
telnet program is used for gsaf access, listfile is not
functional.
lpstat -v
There will be a system default printer designated by the
system administrator. This is where all printouts go if a
specific destination is not set. You can set your default
printer destination with the command:
Use the command
setenv PRINTER queuename
where queuename is the name of the printer (e.g. molbiolex). Printer names may be found using the lpstat -v
command. Adding the setenv command as written above
to your .login file will make it so that your chosen
printer queue is the one you always send your printouts to
37
to list the printers on the system.
gsaf /dr4/home4/admin/cprice/tmp> lpstat -v|sort
device for Biochem-4si: /dev/Biochem-4si
system for ei-5hall: ei-5hall.unmc.edu
system for esh-4hall: esh-4hall.unmc.edu
system for esh-7hall: esh-7hall.unmc.edu
system for esh-8hall: esh-8hall.unmc.edu
system for molbio-lex: molbio-lex.unmc.edu
system for wittson-clstr: wh-3021-prt.unmc.edu
(...output shortened for space...)
gsaf /dr4/home4/admin/cprice/tmp>
Note that by using the pipe symbol (|) to send the output
of lpstat to the sort command, the list above was
alphabetized before it was displayed.
lpstat -t
to find out the complete status of all the printers on the
system. This command may take a minute or so to
complete, as it will attempt to talk to every printer on the
system, and any printers which are not working will cause
delays while the command waits for the (non-working)
printer to respond.
gsaf /dr4/home4/admin/cprice/tmp> lpstat -t
scheduler is running
38
First the queue names
system default destination: molbio-lex
device for Biochem-4si: /dev/Biochem-4si
Then the queue official status
Biochem-4si accepting requests since Tue May 11
11:44:07 CDT 1999
molbio-lex accepting requests since Aug 09 16:56
1999
Now lpstat attempts to get each printer to tell
it's actual status
printer Biochem-4si is idle. enabled since Thu
Aug 5 16:25:37 CDT 1999. available.
printer molbio-lex is idle. enabled since Aug 09
16:57 1999. available.
(...output shortened for space...)
gsaf /dr4/home4/admin/cprice/tmp>
default printer by using the setenv command, or you
must specify the printer as part of the command:
lp -PEI-6003 xyx
where EI-6003 is the name of the print queue to which
you want to print.
As they become available, other printers queues will be
added; so to find out what printers are available, type
lpstat -v at the command prompt.
lpq
lpq is the command to use if you want to see why your
print job is not appearing. lpstat -o provides the
information about print jobs queued up for any system
printer.
lp
The lp command is the primary way to print files on a
printer from Unix systems based on a variant of Unix
called System V. The server gsaf runs a variant of
System V, so this is the correct printing command. The
other printing command which comes from the other
major variant of Unix (BSD) is lpr, which works the
same as the lp command on gsaf. There is a database of
connected printers on all Unix systems (accessible via the
lpstat -v command), and the lp command allows you
to send output to any of the printers listed in the database.
The default printer for gsaf is called molbio-lex. It is
located in the GSAF office and prints either text or
postscript files. To print a file called xyx to the default
printer, type:
lp xyx
Local Printing
It has not been possible in the past to print from gsaf to a
printer connected to your Windows PC. The ssh program
makes this possible, however. The GCG command that
sends a print job through ssh to your PC is listfile. To
print a text file on gsaf named xyz.txt to your local
printer, type:
listfile xyz.txt
You will be prompted twice: first to allow gsaf to send
data to your PC, second to select a printer. Note that you
can access any printer that is available from your PC. This
includes printers available on the local network, not just
the printer connected directly to your computer.
Printer names are case sensitive. To print to a printer
other than molbio-lex, you must either specify your
This method will NOT work with the telnet program - you
must use ssh to connect to gsaf. Also, you cannot print
graphics files. Only text files will print properly.
39
40
Stringing Commands Together and Output Redirection
Running (and Stopping) Programs
As seen above, the pipe symbol " |" allows two or more
commands to be strung together on a command line. For
example:
To run a program on a Unix system, you simply type its
name.
cat *.seq | grep textstring
This combination allows you to search for a textstring in
all files ending in .seq. Wild cards are acceptable to grep.
You may wish to see if you can find a particular
nucleotide (or amino acid) sequence in the sequence files
in your directory. Substituting the sequence (e.g.
CGATCGAT) for textstring into this command will allow
you to perform that search.
> - greater than symbol
The greater-than symbol directs the output from the
previous command into a file. For Example:
To stop a program from running on a Unix system, you
may type ^C (control-C). This will cause the program to
stop immediately. Note, however, that when using some
terminal emulators, your screen may not have kept up
with the actual output from the program on the computer
itself, and so a ^C may not appear to take effect for some
time after you have entered it.
Internet Tools on gsaf
gsaf is a fully functional Unix computer. It has the same
utilities available on any Unix computer except where
they have been turned off for security reasons.
Electronic Mail
ls /etc > dir.contents
This will list the contents of the /etc directory to a file
called dir.contents. If dir.contents does not exist, it
will be created.
< - less than symbol
The less-than symbol takes the contents of the file whose
name follows it, and provides that as input to the
command whose name precedes the < symbol. For
example:
blastn < nucleotide.seq
This supplies the file named nucleotide.seq to the blastn
program for a search of the nucleotide sequence database.
41
While most users will be using a separate email system
(probably Lotus Notes at UNMC or UNL), email is also
available on all Unix systems. gsaf uses the default mail
program which comes with all Unix systems.
To receive email with mail, simply type the word mail at
the command prompt. If there is any email waiting for
you, you will be presented with a list of headers and a
very primitive interface. Type ? to obtain a list of usable
commands in the mail program. To send email, you must
type mail userid@systemname. You will then be asked
for the subject of the letter, and can type the text of your
message on succeeding lines. In order to use a text editor
(emacs, pico, and vi are available), put ~e as the first 2
characters on a blank line, and press the <Enter> key.
42
This will load an editor for you to use to compose your
message. The default editor is vi, however you may also
choose pico or emacs.
below, but they can also serve limited file management
needs since they allow the user to create directories, move
and rename files, etc.
For more help, type man mail at the Unix command
prompt.
ftp (sftp)
File Management.
Remember, the GCG WPI interface described in Chapters
2 and 3 is NOT a file manager. In order to move, remove,
copy, delete, and otherwise manipulate your files and
directories, you must either use the Unix commands
described earlier in this document, or use the program
dtfile. This program uses X Windows and requires an
X Windows server program such as eXodus or MI/X be
running on your local computer.
ssh
ssh (secure shell) is the preferred method to connect to
gsaf from any other computer on the internet or the
campus network. ssh is like telnet in that it allows you
to log into another computer on the internet from gsaf or a
different Unix host. ssh is more secure than telnet.
However, some computers do not support ssh. To run this
program on gsaf, type ssh hostname, where hostname is
the internet name of the computer to which you want to
connect.
The Windows version of the ssh program includes a
graphical version of the scp file transfer program. For
Macintosh users, a program called Fugu is available from
Research Systems Unix Group at University of Michigan
(http://rsug.itd.umich.edu/software/fugu/).
These
programs fill the same role as the ftp program described
43
While ssh lets you log into another computer, if you want
to transfer a file from your computer to gsaf, or to transfer
a file from gsaf to your or another computer, you will
need to use an sftp, or Secure File Transfer Protocol,
program. The ssh program for Windows has secure file
transfer capabilities built in. Fugu for Macintosh has this
ability as well.
Netscape and the Word Wide Web (WWW)
Netscape is available on gsaf if you are using an
X Windows server such as eXodus or MI/X. Another
computer housed in the facility, molbio.unmc.edu also is
a WWW server, so from any Web browser such as
Netscape, entering http://molbio.unmc.edu/ in the location
field will point your server to molbio and you will see a
Web page with help files for molbio available, as well as
links to other Web pages which are sequence analysis
related.
UNIX COMMAND SUMMARY
ls [filespec]
Displays the directory contents. If the optional
filespec parameter is given, the listing only
includes files whose names match the pattern.
rm [filespec]
Deletes the file(s) specified by filespec.
44
cp filename1 filename2
Creates a new file called filename2 containing
the contents of filename1.
mv filename1 filename2
Changes the name of filename1 to filename2
and optionally moves it to a new directory.
rm filename
Removes (deletes) a file from the disk.
man [topic ]
Displays helpful messages on Unix commands.
vi [filename]
Launches the vi program for an editing session on
filename. Also there are two other commonly used
editors called emacs and pico.
lp filename
prints a file.
| (pipe)
takes the results of one command and uses them as
input to another command
Logout (^D - control-D)
Ends your session.
CTRL-C (^C - control-C),
Ends processes.
45
46
Chapter 2
worthwhile to check the release numbers and dates every
once in a while to see if anything has changed since the
last time you used the system.
Wisconsin Package Basics
The GCG Philosophy
THE WISCONSIN PACKAGE
The Wisconsin Package is available on several operating
system platforms. The installation at UNMC is a Unix
version and is a Linux version at UNL. The Wisconsin
Package is accessible using the command-line, using an
X Windows interface (SeqLab) and using a Web browser
such as Netscape or Internet Explorer (SeqWeb). The
version available via the Web does not have all the
program features available in the other two versions of
GCG. Personal accounts for UNMC faculty, staff, and
students on the server gsaf.unmc.edu (gsaf for short) are
free. An online application form for new accounts may be
found at the GSAF web site (http://molbio.unmc.edu/).
Accounts at UNL are available through an application at
http://biocore.unl.edu/. When you log on to the remote
computer you get the Startup screen welcoming you to the
computer, as described in Chapter 1. At this point the
cursor awaits your input next to the prompt. To start using
any of the programs (tools) which make up the Wisconsin
Package you first need to initialize your session. This is
already done for you at UNMC and UNL. If you are able
to log onto gsaf or biocomp2, but GCG fails to start up for
some reason, contact the appropriate system
administrator.
The philosophy behind the Wisconsin suite of programs
is:
•
To provide a separate program for almost anything
you want to do.
•
Program options are always available at the
command line.
•
Results are sent to either a text file or to the
terminal screen.
•
Programs requiring intensive computation are run
in the background.
This philosophy can result in software that is not very
easy to use. However, this is not reason for despair. For
those with direct network connections, all of the GCG
programs can be used through an X Windows graphical
user interface called SeqLab.
Getting Help for GCG
After seeing the Startup screen a few times, you will
probably find that you tend to ignore it, but it is
All of the help files for the entire GCG set of program and
user manuals are loaded onto a Web server for you.
Currently, this site is http://molbio.unmc.edu/gcg-help/.
Since the primary interface to GCG is through graphical
methods, you can always run both the GCG graphical
interface (SeqLab) and your favorite Web browser at the
same time, viewing the help files for GCG and the actual
program interface simultaneously.
47
48
One thing that may have caught your eye in the GCG
welcome banner is the statement
Online Help is available with the command %
genhelp
This refers to the help files presented in a text-based
format that can be read in an ssh session. Don't type the
percent sign, it represents the system prompt (see
Chapter 1). genhelp provides most of the information
that is found in the Program Manual but in a somewhat
briefer form. Moreover, it is often more up-do-date than
the manual since small corrections and additions may be
made to the package in an "incremental release" without
the issuance of a new manual. After typing genhelp, you
will be presented with a list of topics on which help is
available. Instructions for use are given at the bottom of
the screen. Arrow keys are used to navigate through the
various topics. This help is set up to use a text-only web
browser known as lynx.
% genhelp
GCG Help (p 1 of 8)
GCG Help
[Program Manual | User's Guide | Data Files |
Databases ]
*
*
*
*
*
*
*
*
*
*
*
*
*
*
*
appendix_ii
appendix_iii
appendix_iv
appendix_v
appendix_vi
appendix_vii
assemble
backtranslate
bestfit
blast
breakup
chopup
circles
codonfrequency
codonpreference
-- press space for next page -Arrow keys: Up and Down to move. Right to
follow a link; Left to go back.
H)elp O)ptions P)rint G)o M)ain screen Q)uit
/=search [delete]=history list
CONFIGURING GRAPHICS
Normal use of the GCG package is through an interface
called X Windows. Some of the computers in the UNMC
Computer Clusters are already supplied with X Windows
servers to allow you to do this. This information was
presented in Chapter 1.
49
50
If you are using GCG from home with a low-speed dialup connection or from a location which does not have an
X Windows server, you will need to tell GCG to save
figures as graphics files rather than displaying them to
your computer screen. The command to do this is
setplot. You will be given several choices but will want
to choose postscript to have your results saved as a
postscript file. This file will be created when you run the
program that produces graphical output and will be named
program.eps, where program is the name of the routine
that created the output. For example, the plotfold
routine would produce a file named plotfold.eps. The eps
extension stands for Encapsulated PostScript.
Note also that one of the choices available through
setplot is ColorX for a color X Windows. If you choose
this, a window will open on your screen immediately
(provided you are running an X Windows server) but will
be empty until you run a program that creates graphical
output. This will be useful if you would like to see
graphics on your screen but are accessing the internet by a
dial-up connection. Because you are displaying only
graphics results rather than displaying everything through
X Windows (as you would with seqlab), this will be
possible over the phone line.
To display a previously created graphics file in this
window, the command you will use is figure. For
example, to display a graphic file named
plotfold_234.figure, you would type
SEQLAB
Prerequisites
Virtually any modern computer is sufficient to run
SeqLab. In practice, an old PC or Macintosh could be set
up as a dedicated SeqLab computer. Although a Pentium
II may not handle the newest office suites of programs, it
would be great for SeqLab.
You must be on the Internet! UNMC does not provide
dialup access that can use the SeqLab interface. If you are
subscribed to an Internet Service Provider (ISP) and have
connectivity faster than the V.90 standard (56K), you may
have a sufficiently fast connection to use SeqLab. It is
possible to use SeqLab from home if you have regular
modem access, but this will be excruciatingly slow and is
not recommended. However, the text-mode interface is
available using ssh after connecting to gsaf through any
ISP. If you use a provider that attaches through a Web
page interface, such as AOL, note that you can minimize
the page and then use an ssh program over the connection.
The same is true for sftp access (see previous chapter).
Startup Commands
You must have previously opened a window for
X Windows graphics display using the setplot
command for figure to work.
To run SeqLab, gsaf must know where to send your
X Windows information. If you are working at a
computer on campus, gsaf is generally able to figure this
out automatically. If not, you will need to follow the steps
below to tell gsaf where your SeqLab output should be
displayed.
51
52
figure plotfold_234.figure
Determine your computer's IP number or internet name.
On gsaf, the command to find out this information is:
gsaf> who -m
wchaney pts/6
Aug 9 10:24 (wchaneypc.unmc.edu)
The information in parentheses at the end of the output
line (in this case wchaneypc.unmc.edu) is your PC's
unique identification information for the internet. It is
either your machine name, in this case, or your IP address
if your machine is not named.
If you are on-campus at UNMC, your IP address is a
number of the form 137.197.xxx.yyy (all on-campus
numbers begin with 137.197). The xxx and yyy stand for
two additional numbers between 1 and 253. This set of
four numbers separated by three periods is your unique
addresses on the internet. If your on-campus computer has
a name, as in the example above, it will be in the form:
machinename.unmc.edu.
Information Technology Services has recently made
changes to the network that affect the output you will
receive when using the who -m command. If your oncampus computer does not have an internet name (like
wchaneypc.unmc.edu), your output from who -m will
look like the following:
wchaney
pts/6
Aug 9 10:24 (host-214-171.unmc.edu)
In this form, "host" represents "137.197." and the
numbers 214 and 171 are xxx and yyy, respectively in
these instructions.
53
The UNL campus host IP addresses are normally in the
form 129.93.xxx.yyy. To check your IP address on a Unix
machine at UNL, use /sbin/ifconfig. On a Windows
machine start a command shell via Start->Run->cmd and
enter ipconfig /all. The address you are looking for
starts with 129.93.
Explicit Steps For Unix Users
Perform the following steps (Once you are logged into the
UNIX system)
1. Verify that an X Windows package such as eXodus is
running on your PC or Macintosh.
2. Determine the address of the computer where your
X Windows output is being sent from gsaf by typing:
echo $DISPLAY
The response will be of the form
137.197.xxx.yyy:0.0
3. Find out the address of your PC by typing
who -m
See the previous section for details about the output from
this command. If the addresses returned in steps 2 and 3
are identical, you are ready to start SeqLab. If not,
proceed to step 4.
54
4. Set your DISPLAY variable by hand:
defined in your .login file, you must perform the Explicit
Steps for Unix Users above.
setenv DISPLAY 137.197.xxx.yyy:0.0
or
setenv DISPLAY wchaneypc.unmc.edu:0.0
Using the SeqLab Interface
depending upon whether your computer has an internet
name or just an IP address. Note that the :0.0 after the
name or address is required!
You may now start the SeqLab interface to the GCG
package.
gsaf /export/home/wchaney> seqlab &
The & runs SeqLab in the background. If you have a
small or low resolution screen, you may include the –
small option to seqlab (seqlab –small &). Note that
you will lose some information if you include the –small
option to seqlab. Specifically, the short description at the
top of each program window will be omitted to save
space.
If you always use the same PC or Macintosh for access to
GCG, you can permanently set your DISPLAY variable.
Use a text editor to edit the file called .login (a period
followed by the word login) in your home directory,
adding the setenv DISPLAY 137.197.xxx.yyy:0.0
(129.93.xxx.yyy:0.0 at UNL) command above as the
last line in the file. Be sure to replace xxx and yyy with
the correct values for your computer! Note that if you
subsequently log into gsaf (biocomp2/bioinfocore) from a
different PC and start SeqLab, your SeqLab display will
not be directed to the computer you are using! In order for
you to use the SeqLab from computers other than the one
55
You should first go to the SeqLab Options > User
Preferences > Output menu and select the option which
reads "Automatically display new output". This will
enable new output from any program to automatically
appear as a new window on your PC desktop when the
program has finished running. Once you have selected
this option, it will always be selected until you change it.
Three different windows will be useful when using
SeqLab:
•
SeqLab Main List window
•
Job Manager window
•
Output Manager window
SeqLab Main List Window
This is the window which provides access to all other
parts of the package. Across the top of the window, there
is a menu which offers sub-menus, each of which is a
major category of tasks that can be performed with the
GCG Package.
56
Functions Menu and Extensions Menu
This is where ALL of the main data manipulation
functionality resides. It is subdivided into other menus
based on type of functionality - database searching,
fragment assembly, etc. It also contains an alphabetical
listing of all the programs available in the SeqLab
Package.
This window is critical to using the WPI interface. ANY
sequence or list of sequences that you want to work with
must be listed here, and then selected. It is the "gateway"
to all other functionality. Its menu items are subdivided
by functionality.
MENU ITEMS on the SeqLab Main List Window
File Menu
Options Menu
This is the key to creating list files and working with lists
of sequences you have previously created. It is also
where you may add sequences from sequence files or
from a local database.
Edit Menu
Allows the user to change his or her Working Directory at
any time to keep files from separate projects in separate
directories. Also gives access to Preferences that control
the appearance and behavior of SeqLab on your computer
screen.
Allows you to remove sequences from the Main List
Window. Also allows you to change the order by which
sequences appear in the list.
The Working Directory is a concept in SeqLab that
deserves some attention. Whatever directory you
designate your Working Directory is the location where
57
58
all output from SeqLab functions will be placed. BLAST
results, peptides from translated nucleotide sequences,
etc. will be located in the Working Directory regardless of
the location of the sequence file upon which the operation
was formed. So a nucleotide sequence and the peptide
translation of the coding region could be located in
different directories if you are either careless about your
choice of Working Directory or if you choose to save
them this way. It is possible in SeqLab to select a
different Working Directory after you have been working
for a while. Any new results you generate will be located
in the new choice of Working Directory. Your old results
will be in your previously selected Working Directory.
The interplay between the Working Directory and
working list causes confusion for all new users of SeqLab.
Recall that the working list is a collection of sequences on
which you wish to perform operations in SeqLab (see
Seqlab Main List Window section above). The working
list is a file itself and must be saved in some directory.
The confusion arises because the directory in which your
working list is saved may be someplace other than your
Working Directory.
Windows Menu
Provides access to:
•
Job Manager Window
•
Output Manager
•
Database Browser
•
programs run previously during the current session
Job Manager Window
This is the window which tells you what jobs are running,
and you can scroll backwards through the record of the
previously run jobs (in the current session only) to see
which ones finished successfully and which ones did not.
Error messages for failed jobs are printed here.
Also note that you must have write permissions (see
Chapter 1, Permissions) for the directory that you select
as the Working Directory or your functions in SeqLab
will fail! The permissions for the directory can be
changed using the command line in your ssh connection
window.
59
60
Output Manager Window
This is where the programs place their results. If you just
ran a search, the output from the search will be an item on
the Output Manager window. You can examine the
output, and if it is the desired result, copy it to the Main
List Window for further manipulation. Programs which
produce a graphical image as their output will either
spontaneously display the image and place its name in the
output manager, or they will simply put the output file
name into the Output Manager’s window. You would
then need to click on the 'Display' button in the output
manager to see your results.
Through the output manager you may also save files with
a different name. Simply click on a file name in the output
list, then click Save As… You can then save the file with
a name that is both meaningful and memorable rather than
the default name. You also have the ability to recall
previously saved text or graphics files through the Output
Manager. Click on the button to Add Text File… or Add
Graphics File… and select a file. The name of the file
you choose will then be present in the Output Manager
and can be manipulated like any other file of the same
type (i.e. a sequence file or a graphics file) in SeqLab.
Database Browser
The Database Browser allows you to add sequences to
your working list. It can be accessed under the Windows
61
62
Menu but can also be found be selecting File → Add
Sequences From → Databases…
Programs
If you have run BLAST in SeqLab earlier in the current
session and would like once again to run BLAST, you
may find a menu entry for BLAST beneath the Database
Browser entry in the Windows Menu. This is intended to
speed access to frequently used programs. In theory you
will be able to find a program in this list more quickly
than you will by hunting through the Functions or
Extensions menus to find the desired program. This list of
programs is reset each time you end a session by quitting
SeqLab.
Important SeqLab Controls
SeqLab is primarily designed for users of 2-button mice,
although X Windows is designed to utilize mice with 3
buttons. Macintosh users will have to consult the manual
for their particular X Windows server to see how the
button-2 and button-3 (middle and right) functionality is
handled.
•
•
•
Select, move, and size windows.
•
Click and hold down to select an area to zoom
into in a graphics window.
Right mouse button: In SeqLab, clicking and
holding down the right mouse button on an option
in a program window causes a pop-up to display the
command-line parameter for that option.
Menus
Any Drop-down menu item with a > symbol at the right
side indicates that there is an additional menu available.
To view additional menus, click the original menu item
using your left mouse button. The new menu will appear.
To access an item in the new menu, simply click it!
If you decide you do NOT want to select an item from a
menu, move the mouse cursor completely off the item and
click (left button). If you already pressed the mouse
button down to select an item and change your mind,
continue holding the button down and slide the pointer off
the menu item. Then release the button.
Left mouse button: This is the primary selection and
manipulation tool.
•
Select 1 or more items in a window
•
Select commands from menus
•
Select or deselect buttons and manipulate
scroll bars
63
An Example of SeqLab Usage
All of this may seem a bit abstract but is really quite easy
after using SeqLab once. The remainder of this chapter is
an exercise showing how to retrieve a sequence from the
local databases and perform a simple restriction mapping
analysis using SeqLab.
64
To start, you will need a sequence to map. Any
manipulation in SeqLab requires your sequence of interest
first be added to the working list. This could be a
sequence file such as one obtained from the UNMC
Molecular Biology Core, a GenBank file you’d like to
import, or a sequence from a local database. The local
copies of the sequence databases provide a convenient
method to add sequences to the working list for use. To
obtain a sequence from the local databases, select the
"Databases..." option under the File Menu → Add
Sequences From:
GenEMBL and the asterisk (*). Type cxa and either press
the Enter key or click the button labeled Show Matching
Entries. A list of sequences will appear in the Entries:
column as shown in the Figure below. The asterisk is a
wild-card, so all of the sequences in the list begin with the
letters cxa. To work with one of these sequences, select it
in the list (by clicking it once with your mouse) and click
the button labeled Add to Main Window. You will need
to click “Close” to return to the SeqLab Main Window,
but now the new sequence will be at the top of your list of
sequences. For the following example choose the
sequence named cxa3cg.
A new window will open that allows you to browse for
sequences from any of the local databases. Select
GenEMBL in the left pane of the window. This will allow
you to browse nucleotide sequences in the combined
GenBank and EMBL databases.
In the text field beneath the words Database
Specification:, click between the colon (:) following
To perform any analysis on a sequence, you must click
the sequence once to select it. You can then select an
65
66
operation from the Functions menu. The function that
performs a restriction analysis of a nucleotide sequence is
named Map. You will find this under the Functions menu
in the Mapping category as the top item in the list of
mapping functions. (Click on Mapping in the Functions
menu and you will see these options.) Click on Map and a
new window will appear as shown in the figure below.
modify right on the window for the Map program. For
example, you may choose not to display a translation of
your nucleotide sequence by clicking "none" in the
Display Protein Translation Frames box. Clicking Run a
second time will start your restriction mapping using the
new options you have selected. Further options are
available by clicking the Options... button. This will
open a new window containing more parameters you may
change to tailor your analysis.
When a Map job runs successfully, your output will look
like the following figure. One screen of information is
shown here, but the scroll bars on the output window
allow you to see the remainder. You can examine the
output in detail or print copies for your notebook from
here.
At this point, you may simply click the Run button and
SeqLab will construct a restriction map of your sequence
and automatically display the results. (When you hit the
Run button for any program, all commands are run in
background). Notice that there are several options you can
67
68
Chapter 3
SeqWeb
THE WISCONSIN PACKAGE
SeqWeb is a World Wide Web interface to the Wisconsin
Package Programs. SeqWeb may be accessed at the
following web address:
http://gsaf.unmc.edu:8001/
http://biocomp2.unl.edu/
The colon and number at the end are required and you
will not find SeqWeb if you omit them!
All of the functions in SeqLab are similar to the Map
routine in the example above. If you can perform a
restriction mapping, you can mechanically perform any of
the routines available. Understanding the results and
tailoring the analysis is a separate issue.
Because of recent improvements, very specific versions of
the two most popular web browsers are required to use
SeqWeb. If you attempt to use a non-compatible version
of a browser, you will see a message giving you current
information about browser versions that will work with
SeqWeb.
SeqWeb Accounts
SeqWeb and your gsaf or biocomp2 account do NOT
share information and do not use the same folder
(directory) on gsaf or biocomp2. Thus, you must have a
separate SeqWeb account. This is done for security
reasons. The same web form used to request a new
account on gsaf.unmc.edu or biocomp2.unl.edu is used to
request a SeqWeb account. At UNMC, this form is
69
70
available through the Genetic Sequence Analysis Facility
web page (http://molbio.unmc.edu/). At UNL you may
find a link to the forms to request an account online at
http://biocore.unl.edu/. Click the Register button on the
top, and then click on the application form link.
A SeqWeb username and password are required. These
will be e-mailed to you after completion of the web form
requesting an account. This username and password is
also distinct from your gsaf, biocomp2, or bioinfocore
account, though the same username will be given
whenever possible so that it will be easier for you to
remember. If the SeqWeb password you are given is
difficult to remember, you can change this at any time
using the Preferences Manager of SeqWeb (discussed
later).
When you log in, a small window will open on the screen
asking for your username and password. Your username
will be echoed to the screen as you type. When you type
your password, asterisks (*) will appear on the screen
rather than the characters that you type. This is normal. If
somebody is looking over your shoulder as you type in
your password, they will not be able to read your
password from the screen.
Click either the image or the link below and you will see
the SeqWeb page (unless you are using an unsupported
browser, in which case you will see the Unsupported
Browser message).
After entering your username and password, you will see
the following:
71
72
SEQWEB ORGANIZATION
The SeqWeb page is organized into several frames.
Managers
The upper left frame controls the information that appears
below it in the frame on the lower left. The Managers
frame is shown selected in the image. This controls access
to the Sequence Manager, the Job Manager, Results
Manager and Preferences.
Preferences
This is where you can change your password. You can
also change the format in which files are saved should
you choose to save any files to your local computer.
Clicking on the PREFERENCES icon opens a new
window, shown below.
73
Sequence Manager
The Sequence Manager allows you to add new sequences
to your projects (discussed below). You can add
sequences from local copies of the major sequence
databases, or from sequences obtained elsewhere
(including your own sequencing projects). These can be
placed into SeqWeb through the clipboard function of
74
your computer or from a local (i.e. on your computer) file.
The figure below shows a Sequence Manager with several
sequences added to the list and available for analysis.
Utilizing sequences that which are present in the local
databases saves you disk space. This is because SeqWeb
adds a pointer to the relevant database sequence rather
than copying the entire sequence to your folder. To add
such a reference to a local database sequence, select List
> Add from Database…
75
You may search the database by entry name or accession
number. For example, you may know that Coxsackievirus
nucleotide sequences all begin with the letters cxa. Select
the desired nucleotide database and enter cxa* in the
blank for “Entry name or accession number.” The asterisk
(*) functions as a wild-card matching any or no characters
following the cxa. The result of this search is a list of all
database entries that begin with cxa as shown in the figure
below. You are then able to select any number of the
sequences shown and add them to the list of sequences for
analysis in your sequence manager.
76
Note that it is usually necessary to select Refresh from
the Edit menu of the SeqWeb Sequence Manager to view
the sequence you’ve just added to the list. This is a bug in
the program.
You may also add sequences to the sequence manager
from local files on your PC or Macintosh. Select List >
Add from Local File… You may then browse your disk
drives for a number of sequences at a time to be added to
your list.
77
There is one major limitation to this method. In order to
add a sequence from a local file to your SeqWeb
Sequence Manager, the local file must already be in GCG
format. If you obtain sequencing results from the UNMC
Molecular Biology Core Facility or from the sequencing
core at UNL, your sequence files will be in GCG format.
If you obtain a sequence from elsewhere, however, it is
likely that your results are not in a format directly
readable by SeqWeb. For this reason, another method is
available to enter sequences into SeqWeb. This is the
Clipboard described below.
78
Projects
The Sequence Manager also allows you to create more
than one project. You may be working on a pancreatic
cancer project and a cardiac virus project, for example.
These two projects are unlikely to share any nucleotide
sequences in common. To help you keep these sequences
organized, a project may be created for pancreatic cancer
and a second project may be created for cardiac viruses.
Each of your distinct sets of sequences may be include in
the appropriate project.
Creating projects helps organize your sequences
Using List > Add from Clipboard… allows you to
easily paste sequence information into a web based form.
Notice in the figure above that you also need to assign a
Name to the sequence and have the option to include a
one-line description of the file and a longer Reference
section. This can include standard reference information
such as publications describing the sequencing
experiment or references to pages in your notebook where
you designed primers to amplify this sequence. Further, if
you include a Feature Table in standard GenBank format,
SeqWeb will parse this information and include these
features in the sequence. For example, in the editor mode
of the Sequence Manager (shown below), you may click
on a CDS (Coding DNA Sequence) you have defined in
the Feature Table for a sequence in order to translate only
that portion of the sequence. One other nice feature of the
clipboard is that it will ignore spaces between nucleotides
or any residue numbers included in your sequence.
79
To create a new project, select Create from the Project
menu of the SeqWeb Sequence Manager. You may enter
a one-line description of the project in addition to a
project name. You may also select other SeqWeb users
from a list and give them membership in this project. This
gives everyone who belongs to a project access to the
same sequences.
80
Sequence Editor
You may also perform a limited amount of editing in the
Sequence Manager. For example, you can select a range
of a sequence and associate a "feature", such as an alpha
helix, with that portion of the sequence. To edit a
sequence, first select it from the list by clicking on it, then
choose Edit Selected Sequence from the Edit menu.
Many nucleotide and peptide sequences come with
features already defined for your use, and SeqWeb will
recognize these features if they are included in a standard
feature table. In the figure below, a CDS from the
GenBank entry for a Coxsackievirus B3 sequence has
been selected.
Notice in the figure that selecting the CDS by clicking on
the graphic representation also selects the corresponding
region in the sequence pane. This is useful for analyzing
only portions of a sequence. For example, if you want to
translate a DNA sequence to produce a protein sequence,
you would only want to translate the coding region. Any
5’ or 3’ flanking sequences in the DNA sequence file
should not be translated and would result in nonsense if
you were to do so. If a feature has not already been
defined for your use or simply to select a portion of your
sequence that doesn’t correspond to a feature, you may
select a range of nucleotides (or amino acids) by using
Select Range from the Edit menu. You may also simply
click and drag over a region of the sequence to select it. If
you want to add a feature to your sequence so that you
may easily select it, select the relevant nucleotides and
choose Add Feature from the Feature menu.
Job Manager
As in SeqLab, the SeqWeb Job Manager shows you the
status of jobs you have run in the current session. If you
are expecting results and have not yet seen them, this is a
good place to check.
Results Manager
The Results Manager allows you to re-examine results
from previous jobs. These need not have been run during
the current session (the most recent time that you have
opened SeqWeb). It is a good idea to check this page
occasionally and remove any results you no longer need.
All files take up space on disk and it is easy to use up
your quota.
81
82
Contents/Index
The top two choices in the upper left frame control access
to the SeqWeb functions. Clicking on Index displays an
alphabetical listing of all available programs in the lower
left frame. Each function is further split depending upon
the type of sequence you need to manipulate (Protein or
Nucleic Acid). Clicking on the appropriate link opens the
main window (the big frame on the right of your browser
window) to that program.
RUNNING PROGRAMS
As with SeqLab, it is possible to first run each program
using the default options. You may then change the values
of certain parameters to tailor your analysis. It is possible
to choose which sequence(s) you wish to analyze
including the start and end amino acid/nucleotide in case
you don't wish to analyze the entire sequence. A link to
the help files is always present in the lower right corner of
your web browser. Additionally, each changeable
parameter has its own hyperlink to the section of the help
files describing its function.
The Contents listing shows groups of functions in the
lower left frame. Clicking on the Comparison link in the
lower left frame, for example, scrolls the right-hand frame
to the top of the list of programs that compare two or
more sequences. This provides a mechanism to quickly
find a group of programs with similar functions. You may
not remember whether Gap or BestFit is the right program
for your current needs, but you can quickly read the
descriptions and decide which of these programs to try.
Most programs will be executed using the Run button at
the bottom of the page. For long analyses, such as
alignment of 100 nucleotide sequences, there is a button
marked Run In Background. Use this button any time
you need to close your browser window before the
program completes.
83
84
figure below). This window is similar to the Sequence
Editor but allows you to only select portions of the
sequence and not edit the sequence. In this case, clicking
on the CDS selects the region of the sequence in which
you are interested. Clicking OK returns you to the
previous window.
An Example Run
A simple nucleotide by nucleotide comparison of two
sequences may be performed using Gap in SeqWeb.
Select Globally align two nucleic acid sequences in the
SeqWeb main window. The Gap window will open.
After verifying that the cxa3cg sequence is selected, click
the Select Range button and a new window opens (see
After selecting the desired region, the Gap window shows
Begin and End nucleotide numbers that correspond to the
selected region. Now add another sequence to your list by
clicking the Database button beneath the words Add
from. (This button is not visible in the figure above but is
just out of view beneath the words Add from. Use the
scrollbar along the ride side of the web browser to view
this button.) The Add from Database window shown
previously will open. For the example, enter cxa3g and
add this sequence to your list. When you close this
window and return to Gap, only one sequence is visible in
85
86
In the figure, only one sequence is available in the list and
two sequences are needed for a Gap comparison. Further,
you are interested in comparing only the CDS in the
cxa3cg sequence to another sequence. You must select the
relevant region and add another sequence for comparison.
your sequence list. It is necessary to click the Refresh
button to see the sequence you’ve just added to the list.
Simply change the numbers and press Run to repeat the
analysis with your new parameters.
Click to select each of the two sequences then press the
Run button to begin the analysis. After a few seconds, a
new window opens with the results of the comparison.
The top of the results file shows information to remind
you which sequences you’ve compared. Scrolling down
with the bar on the right of the window shows the actual
alignment of the two sequences. You can save the results
as an HTML page with a meaningful name or print the
results using the print function of your web browser.
This first example did not take advantage of many options
available in a Gap analysis. Most of these options are
hidden from view when you first open the Gap window
but can be viewed by scrolling down the page (see figure
below). For instance, you may wish to change the gap
creation and extension penalties from the default values.
87
88
Installer, visit the Microsoft web site and download the
appropriate installer update.
Chapter 4
Vector NTI Installation
Unlike GCG, Vector NTI runs completely on your local
PC or Macintosh. You will need to install Vector NTI on
your computer and have a license established in order to
perform sequence analysis. The current versions are
Vector NTI Advance 10.1 for PC and Vector NTI Suite
7.1 for Macintosh. Detailed installation guides can be
downloaded from the Invitrogen website
(http://www.invitrogen.com/). This chapter will provide a
brief introduction of how to install Vector NTI on your
computer and a discussion of issues experienced with
software installation. Please contact the facility manager
at UNL or UNMC if you have questions. Note that Vector
NTI (version 9.1) is available on a number of computers
at UNMC through a dynamic license server.
The minimal requirements for Vector NTI Suite 7.1 for
Macintosh are Mac OS X v. 10.2.6 or above, Power Mac
G3 or G4, 450 Mb HD space, and 256 Mb RAM.
LICENSES
SYSTEM REQUIREMENTS
Invitrogen has recently changed its licensing policy and
offers one-year free, renewable licenses to academic
users. To request a free license, you must sign up for the
Vector NTI User Community at the Invitrogen web site
(http://www.invitrogen.com/). Invitrogen will verify that
you are affiliated with an academic institution prior to
activating your Vector NTI User Community account.
When you receive email confirming your membership in
the User Community, you may acquire a free license that
will activate Vector NTI on up to three computers.
Instructions given below will illustrate the process. One
major advantage of the free license is that an internet
connection is not required to use Vector NTI . The
disadvantages of a free license are that you must renew it
every year and that Invitrogen will not provide technical
support for you. You can choose to purchase technical
support Invitrogen. You may also find free assistance
from other members of the Vector NTI User Community
or from the managers of the core facilities at UNL or
UNMC.
The minimal system requirements for Vector NTI
Advance 10.1 are Microsoft Windows ME or above, 500
Mb HD space, 128 Mb RAM, and Microsoft Installer
Version 2. If disk space is at a premium, the PFAM
database need not be installed, which brings required disk
size to below 100 Mb. To update Microsoft Windows
UNMC also has a dynamic license allocation system to
provide use of the software to a large number of users on
a shared basis. We have licensed four modules available
in Vector NTI Advance, which are Vector NTI, AlignX,
BioAnnotator and ContigExpress.
You need to download Vector NTI Advance 10.1 or
Vector NTI Suite 7.1 from the Invitrogen website
(http://www.invitrogen.com/) to your computer in order to
install it.
89
90
Each time when you open a Vector NTI module, your
computer may be configured to automatically send a
request for a license to our dynamic license server (DLS).
If there is a license available on the server, you can run
the opened module. Otherwise, you must wait until the
DLS receives one license from someone who has
completed the job and quit Vector NTI. Therefore, it is
important to note that you must quit Vector NTI at the
completion of your use so others may access the shared
licenses. Also please note that the dynamic license server
at UNMC does not support Vector NTI version 10.0 or
newer for Microsoft Windows. You must obtain free
licenses directly from Invitrogen to run these newest
versions of the software.
c. Make sure to select a Complete setup when
given the choice of Complete or Custom.
d. Click Install and wait. In some cases you may
be asked if it is OK to restart the computer during
installation. This is OK. The installation will
resume when the computer restarts.
3. Configure the license manager:
a. Using the Windows Start menu, open the Vector
NTI License Manager (Start > Programs >
Invitrogen > Vector NTI Advance 10 > License
Manager).
VECTOR NTI INSTALLATION
The instructions in the following pertain to the version of
Vector NTI Advance 10.1 and Vector NTI Suite 7.1.
However, the instructions are suitable in most cases for
installations of Vector NTI in other versions.
Steps for installing Vector NTI Advance 10.1:
1. Double-click the Vector NTI Advance 10.exe file.
This will install both Vector NTI and the Database.
2. Follow the on-screen directions:
a. Accept the terms of the license agreement and
click Next.
b. Install the program and databases in the default
locations (C:\VNTI Databases and C:\Program
Files\Vector NTI 10 Distributive).
91
(Note that the liceense manager may also be
accessed from the Help menu of the Vector NTI
Molecule Display window or the Vector NTI
Explorer shown in Chapter 5.)
b. When the license manager opens, click the
Applications tab.
92
c. Click the Static button.
d. Copy the Hardware ID listed in the Static
License window. You will paste this into the
Vector NTI User Community at the Invitrogen
web site.
e. After you register this computer in the Vector
NTI User Community, you will receive a Key to
unlock the software. Paste the Key into the field
labeled Key: in the Static License window. Be
sure that your License #: is also properly filled in.
f. Click Apply and the software will be activated.
93
94
4. Set up the local databases. When starting Vector
NTI for the first time, Vector NTI creates an empty
database. You can choose to import an initial set of
database objects from Vector NTI archives that
include a large number of samples of DNA molecules,
proteins, enzymes, oligos, and gel markers.
Use the Windows Start menu to start Vector NTI (Start >
Programs > Invitrogen > Vector NTI Advance 10 >
Vector NTI).
d. Click Install and wait. In some cases you may
be asked if it is OK to restart the computer during
installation. This is OK. The installation will
resume when the computer restarts.
3. Configure the license manager:
a. Using the Windows Start menu, open the Vector
NTI License Manager (Start > Programs >
Invitrogen > Vector NTI Advance 9 > License
Manager).
Follow all the directions on screen, answering Yes or
clicking OK to all questions.
If you want to open the database window automatically
when Vector NTI is started. Select Options… from the
Edit menu and check the Open Local Explorer at
Startup box under the General tab of the window that
opens.
Steps for installing Vector NTI Advance 9.1:
1. Double-click the Vector NTI Advance 91.exe file.
This will install both Vector NTI and the Database.
2. Follow the on-screen directions:
a. Accept the terms of the license agreement and
click Next.
b. Install the program and databases in the default
locations (C:\VNTI Databases and C:\Program
Files\Vector NTI 9 Distributive).
(Note that the liceense manager may also be
accessed from the Help menu of the Vector NTI
Molecule Display window or the Vector NTI
Explorer shown in Chapter 5.)
b. When the license manager opens, click the
Applications tab.
c. Make sure to select a Complete setup when
given the choice of Complete or Custom.
95
96
f. Close this window, then click the button Set for
all applications, then Apply.
g. Click Close.
c. Click the Dynamic button.
d. Enter information in all fields including your
name, organization, and email address. Most
importantly, enter the internet address in "URL of
DLS" that was provided by the system
administrator at the GSAF.
e. Click the button that says Test connection to be
sure everything is set up correctly. Note: this step
requires an active internet connection.
Look for a message that says Connection OK in
the window that opens. If you do not receive a
Connection OK message, contact us for help.
97
4. Set up the local databases. When starting Vector
NTI for the first time, Vector NTI creates an empty
database. You can choose to import an initial set of
database objects from Vector NTI archives that
include a large number of samples of DNA molecules,
proteins, enzymes, oligos, and gel markers.
Use the Windows Start menu to start Vector NTI (Start >
Programs > Invitrogen > Vector NTI Advance 10 >
Vector NTI).
Follow all the directions on screen, answering Yes or
clicking OK to all questions.
If you want to open the database window automatically
when Vector NTI is started. Select Options… from the
Edit menu and check the Open Local Explorer at
Startup box under the General tab of the window that
opens.
98
Steps for installing Vector NTI Suite 7.1:
1. Double-click the installer program file.
2. Step through the Installation screens, following
the direction given in each.
3. At the completion of the installation process,
Vector NTI Suite License Manager automatically
opens. Click on the Dynamic License button to
open the License Server Connection dialog box
4. Type in the URL of Dynamic License Server
(DLS) and click the Connection button.
questions. Note: the installation creates a startup menu
called Invitrogen. You need to delete the ‘Informax
2003’ startup menu. Press the Windows start menu,
choose Start > Programs > Informax 2003, right
clicking and choose Delete.
Upgrade from Vector NTI Advance 9.1 to 10.0 (or
10.1)
It is not possible to upgrade to Vector NTI 10 from an
earlier version. However, you may keep concurrent copies
of Vector NTI 9 and 10 on your PC. You may also
uninstall version 9, but continue to use your local
database.
UPGRADING VECTOR NTI
Upgrade from Vector NTI Suite 8.0 to Advance 9.0
If you have already installed Vector NTI Suite 8.0 and
wish to upgrade to Vector NTI Advance 9.0, back up your
local databases prior to the upgrade.
You will be asked whether to uninstall Vector NTI
Suite 8.0. Select 'Yes.' Vector NTI 9 will install and
should connect to your existing database. In case of
problems, you will be able to restore your files from the
backup copy.
If you have customized settings in a previous version of
Vector NTI or have custom-created tools you wish to
update, instructions will be found in the
Installation_VNTI_Advance10.pdf file which can be
downloaded from Invitrogen website.
Upgrade from Vector NTI Advance 9.0 to 9.1
The upgrade of Vector NTI 9.1 is relatively easy. There is
no need for database backup. Click the
Vector NTI Advance 91.exe file, follow all directions on
the screen, and answer ‘Yes’ or click ‘OK’ to all
99
100
Chapter 5
Using Vector NTI
INTRODUCTION TO VECTOR NTI
Vector NTI is a comprehensive desktop application
integrated for biological data management and molecular
sequence analysis. It consists of a central database and
five application modules. The database stores molecule
data and analysis results and provides an interface for all
application modules. Vector NTI Advance for Windows
has the following modules: Vector NTI for sequence
creation, mapping, and analysis; AlignX for multiple
sequence alignment; BioAnnotator for nucleotide and
protein sequence analysis; ContigExpress for sequence
assembly and sequencing project management; and
GenomBench for analysis and annotation of reference
genomic DNA sequences. Vector NTI Suite for
Macintosh does not have GenomBench, and the
BioAnnotator module is named BioPlot in the Macintosh
version.
tutorials in Chapters 4-16 that provide step-by-step
instructions on use of the programs. The manual comes as
a PDF file. Adobe Acrobat reader, freely available from
Adobe Corporation must be installed on the local
computer in order to read PDF files.
Invitrogen has created several Macromedia Flash tutorials
that depict usage of the Vector NTI programs. These
tutorials are animated rather than static and are useful for
seeing the programs in action rather than reading the
manual. They may be downloaded from the Invitrogen
web site and are also distributed on the INBRE CD,
which is available through the UNMC Genetic Sequence
Analysis Facility. The Vector NTI User’s Manual is also
available on this CD. In any of the Vector NTI modules,
you can press the Help button, or select Help > Help
Topics menu for receiving assistance through the Online
Help.
This chapter provides a brief introduction to functions and
features in Vector NTI and presents practical examples
that assist the user learning this program.
LEARNING VECTOR NTI
How to get help
The Vector NTI User's Manual (over 600 pages) is
available at the Invitrogen web site. Note that it contains
101
102
Vector NTI database
Rather than using the file-folder structure to manage
sequences and analysis results, Vector NTI uses a
database. A database is a collection of information related
to certain objects. The Vector NTI database stores eight
types of objects: DNA/RNA molecules, protein
molecules, enzymes, oligos, gel markers, citations, blast
results, and analysis results.
The database is accessed and managed via a graphic user
interface called Vector NTI Explorer. The Explorer
window contains two panes named Subsets and Objects
(an example Object would be a DNA/RNA Molecule). In
the Subsets pane, you can create new subsets or
collections of related records, such as molecules used in
one research project. For example, a user may work on
multiple projects and related sequences. In different
subsets of the local Vector NTI database, related
sequences can be stored together. In the Object pane, one
can add new records (sequences) to the database, add
new user-fields to database objects, and change contact
information for each record. One can also format
references according to a bibliographic style required.
With the Explorer it is possible to perform database
searches with different parameters, such as Keyword,
Text, and Feature.
Launch Vector NTI database Explorer:
From the Windows Start menu, choose Programs >
Invitrogen > Vector NTI Advance 10 > Vector NTI
Explorer
Vector NTI Explorer Window
Molecule Display
Vector NTI takes into consideration general security by
providing database backup and restore functions. Regular
Database Cleanup (e.g., monthly) is suggested. Note that
in Vector NTI there is no single file containing all the
information for a database record. Do not try to transfer
files under the directory VNTI Database on your
computer. Instead use Import, Export, or other options to
transfer molecular data.
The Molecule Display window, also called Molecule
Viewer, is the primary interface to display and manipulate
DNA/RNA and protein molecules in the module Vector
NTI. It has a three-pane format including Sequence, Text,
and Graphics panes. The three panes are integrated to
reflect each other’s actions. The Sequence pane displays a
molecule’s nucleotide or amino acid sequence as well as
103
104
selected features, such as restriction sites. The Text pane
contains molecule information typically contained in a
GenBank record (e.g., general description, feature map,
original author) organized in hierarchical folders. The
Graphics pane is generated from the data in the molecule
file, including features, restriction sites, and motifs.
A restriction map is automatically displayed when you
open a DNA or RNA molecule. For a protein molecule,
an Analysis folder is automatically created in the Text
pane, rather than a Restriction Map folder as shown in the
following figure. The Protein Analysis folder includes
molecular weight, isoelectric point, and other physicochemical properties. All the information from the
Molecule Display window can be saved to a file in
formats such as GenBank or GenPept.
types of analysis such as PCR primer design and molecule
construction as described in the Examples section. The
Vector NTI module has basic sets of tools such as
creating a reverse complement molecule, finding open
reading frames, translating a region or the whole DNA
molecule, searching motifs, and finding restriction
enzyme sites. If an asterisk appears in a window title after
the name of the molecule, the molecule has been modified
and needs to be saved in the database to keep the changes.
To launch Vector NTI Molecule Display, do either one of
the following:
• From the Windows Start menu, choose Programs
> Invitrogen > Vector NTI Advance 10 >
Vector NTI, or
• Double click a molecule name (e.g., pBR322 )
within the Database Explorer.
FUNCTIONS AVAILABLE IN THE VECTOR NTI
PROGRAM SUITE
Designing primers for PCR and sequencing
Vector NTI Molecule Display window
With the Molecule Display window opened, you can load
and edit the sequence and features, and perform various
105
Vector NTI can design primers for PCR, hybridization
probes, and sequencing. Vector NTI takes into account
almost all parameters that may affect the primer selection,
which include parameters related to primer (e.g., Tm and
%GC), amplicon, structure, pairs, similarity, 3’ end,
uniqueness, qualities, and filters. Selecting reasonable
values for each of these parameters may be difficult for a
new user. In many cases, however, the default values
seem to work just fine. Vector NTI offers some attractive
functions not found in other programs, such as the ability
to design primers for long PCR, alignment PCR, and
106
multiplex PCR. Moreover, PCR products can be saved to
the database and used for molecule construction. This will
be shown in a later example.
Molecule construction
A strength of Vector NTI Advance and Vector NTI Suite
lies in the plasmid construction feature. It is easy to create
new molecules in Construction or Design modes.
Construction takes the regular way of cloning; i.e., the
user determines all the steps to be taken, which include
defining the cloning vector and inserts, choosing
restriction enzymes, and selecting the methods of
terminus modification. In the Design mode, new
molecules can be easily created with the aid of Vector
NTI. Users only need to define a list of donor and
recipient fragments; the choice of restriction sites and
terminus modification are handled by Vector NTI. The
Design process generates a new molecule as well as a
construction plan, which describes the best possible
restriction sites and recombinant strategy. One important
feature of the molecule design process is that the
construction plan can be adjusted based on specific needs
of the user by changing certain options. For example, the
user may permit partial digests for constructing new
molecules.
The Fragment Wizard of Vector NTI provides a step-bystep guideline in defining a new molecule fragment,
making the process of adding fragments quick and easy.
The user can reconstruct a previously built molecule using
the shortcut menu (right-click the molecule file) in the
Database Explorer window. This Reconstruct feature is
useful for making molecules that are similar to a
previously constructed molecule and for rebuilding
107
molecules that have failed a previous construction
attempt.
BioAnnotator (BioPlot for Macintosh)
The BioAnnotator module enables you to perform various
basic DNA/RNA and protein sequence analyses,
displaying the results as linear graphics in the Graphics
pane. BioAnnotator contains eight DNA/RNA analyses
(e.g., GC content and melting temperature) and 50 protein
analyses (e.g., antigenicity, hydrophobicity, and polarity).
Many of these analyses are related to each other, with
references provided in the manual and the Analysis list
setup window. Besides the graphic display, BioAnnotator
can perform Prosite, Pfam, and Blocks database searches,
and proteolytic analyses.
BioAnnotator window
108
AlignX and AlignX BLOCKS
AlignX performs multiple sequence alignments and
displays them with easily interpretable multi-color
graphics. Based on the popular Clustal W algorithm,
AlignX features include profile alignment, secondary
structure consideration, automatic consensus calculation,
graphic display of a phylogenetic tree, dot matrix
comparison, and some alignment editing capabilities. The
AlignX Display window is divided into four panes: Text
pane for the description of each molecule included in the
alignment project, Phylogenetic Tree pane for a
phylogeny, Graphics pane to view plots of various types
of analysis (e.g., alignment quality), and Alignment pane
to display aligned sequences and the consensus sequence.
The main features of AlignX are derived from a freeware
Clustal X (the graphic and enhanced version of Clustal
W). Two improvements compared to Clustal X are the
ability to display the neighbor-joining phylogeny
graphically and the dot matrix for pairwise alignments.
AlignX also provides the pairwise sequence identity,
divergence, and distance tables.
109
Sequence identity table
AlignX also allows the user to perform a very basic
manual alignment editing by shifting the position of gaps.
However, Clustal X’s flexibility to align only selected
regions or molecules directly in the existing alignment is
not included in AlignX. AlignX’s profile alignment is
limited and only one sequence or existing alignment can
be used as the profile (a sequence or alignment for other
sequences to be aligned against).
110
AlignX Blocks window
AlignX window
AlignX BLOCKS is an independent program available in
the AlignX module. It analyzes and identifies localized
sequence similarities (called blocks) among multiple
protein sequences. It is useful for examining conserved
regions, identifying functional domains, and presentation
of domain structures.
ContigExpress
The ContigExpress module assembles small fragments in
text or chromatogram formats into longer contiguous
sequences, i.e., contigs. You need to create a
ContigExpress project in order to work with
ContigExpress. ContigExpress can recognize files in
formats of GenBank, FASTA, ABI, SCF and others.
Fragments with chromatograms can be edited directly and
their changes can be tracked. Two methods, “pairwise”
and “linear”, are used for assembly. The pairwise
assembly is best for assembling ten or fewer fragments
whereas the linear assembly is best for eleven or more
fragments. The contigs can be saved in a GenBank,
EMBL, or FASTA format file.
One important feature of ContigExpress is that it
has many trimming functions for preassembly processing.
111
112
These include vector contamination trimming, end
trimming, and Phred quality value trimming.
sequences and analysis results, which is independent from
the Vector NTI database.
ContigExpress window
GenomBench window
GenomBench
GenomBench is Vector NTI Advance’s genome project
application. There is no Macintosh version yet. In
GenomBench, the user can search, retrieve, and store data
from several principle Distributed Annotation System
(DAS) servers such as UCSC and Ensembl. GenomBench
has a multi-pane interface including Overview pane, Info
pane, and Feature Map pane. GenomBench allows the
user to search public databases, edit sequence and
graphics, import and export annotated sequences, and
send annotated sequences to Vector NTI. It also provides
a means for mapping sequences onto genome regions
using Sim4 or Spidey genome alignment algorithms.
GenomBench maintains its own local database for storing
113
Internet tools
Vector NTI is integrated to make use of internet
resources. NCBI BLAST similarity search is fully
integrated into Vector NTI’s graphic interface. BLAST
has its own dialog window to manage various search
options and BLAST Viewer to view the BLAST results
graphically. Several protein sequence analyses (e.g.,
NNPREDICT, TMpred), similarity search (e.g., PSIBLAST), and pattern search (e.g., BLOCKS, PROSITE)
can be accessed directly from the Vector NTI interface.
The PFAM interface is available only on the Windows
version. PubMed/Entrez Search is another Vector NTI’s
graphic interface program for the popular NCBI search
tool. With Citation Table of Database Explorer and
114
Citation View, Vector NTI provides a practical
bibliography management tool complete with more than
50 journal reference styles.
EXAMPLES
3D-Mol
Create a new molecule from a text file
Go to the Molecule menu in the Molecule Display
window (not the database explorer window). Select
Create New Sequence > Using Sequence Editor
(DNA/RNA).
3D-Mol is a stand alone program included with Vector
NTI. It can generate a graphic presentation of three
dimensional structures downloaded from the Protein Data
Bank (PDB). 3D-Mol has many basic presentation
capabilities with a simple clean interface. It has more
flexibility than Cn3D (a freeware program from NCBI).
For example, 3-D Mol has a few useful functions as
calculating distances and angles between atoms. It is not
as powerful as Swiss-PDBViewer. However, simply as a
visualization tool, 3D-Mol is a sufficiently good and easy
to use software. On Macintosh, 3D-Mol requires the
“millions” color mode. It did not run with the “thousand”
color mode. Only one graphic format (BMP both for
Macintosh and Windows) is supported to save 3D images.
Adding New Sequences
A new window will open:
Tools Manager
Vector NTI provides a Tools Manager for customizing
items included in some menus. Tools Manager allows
users to add new menu items to open internet links, start
internet tools, or run programs or scripts. Because the
number of internet links and tools included in Vector NTI
is limited, this customization capability is a welcome
addition. It gives a possibility for Vector NTI to grow
with the users based on their research field.
115
116
Replace NEWMOL with a useful name for this molecule.
You can edit contact information for the person who
created or last modified this file by clicking the buttons
labeled About... When you are finished, click the tab at
the top of the window labeled DNA/RNA Molecule. The
following window will appear:
To paste in your sequence, click on the button labeled
Edit Sequence... A window like that below will appear.
You may simply copy the sequence from your text file
and click the Paste button. The sequence will
automatically be numbered, and any numbers in the
original text file will be ignored.
Be sure that Linear or Circular is selected to correspond
to your molecule of interest. By default, Circular is
selected; however, this is incorrect for the majority of
sequences. You may also choose in this window whether
your sequence is DNA or RNA. When you have made
your selections, click the Sequence and Maps tab at the
top of the window. The window will appear as follows:
117
118
Click OK to close the Edit Nucleotide Sequence window,
then OK again to close the new DNA molecule and open
it in Vector NTI. A restriction analysis using common
enzymes will automatically be performed and the results
will be shown in Vector NTI.
From NCBI
Frequently a researcher will want to use a sequence that
has already been deposited in the NCBI databases. This
can easily be accomplished if a GenBank Nucleotide
Identifier (NID) for the sequence of interest is known. For
this example, use the Coxsackievirus B3 complete
genome sequence which is deposited in GenBank with the
locus name cxa3cg. To automatically bring this sequence
into Vector NTI, select Tools > Open > Retrieve DNARNA by GenBank NID... from the Database Explorer
window. This is shown in the figure below.
119
Type cxa3cg into the window that opens and click OK.
Note that you could also have given the Accession
Number or gi number in the box shown above rather than
the LOCUS name. This works for peptide sequences as
well.
The new molecule will open in the Vector NTI Molecule
Display window after a short time. All of the annotation
and features that accompany the sequence will be
imported into Vector NTI. This allows the researcher to
easily select an interesting portion of the sequence for
further analysis. To perform most manipulations on the
molecule, you will first need to save a copy to your local
databases. This can be done by either selecting File >
Save As…or by clicking the icon which looks like a
120
)from the Vector NTI toolbar. You will
floppy disk (
see a window like the one shown below:
choice. A convenient interface to Entrez is included in
Vector NTI. Select Tools > Open > Retrieve From
NCBI Entrez Server… You will need to select a
database to search. Selecting the nucleotide database and
typing galectin will return nucleotide GenBank entries
that have the word galectin somewhere in the description
of the sequence. Note that not all of these sequences will
be galectins! They may be sequences that interact with
galectins or are similar to galectins.
You may also search the Protein database, Pubmed, and
Structure database at NCBI. Pubmed searches will return
a list of journal articles about your search term (e.g.
galectins). The Structure database contains the sequences
only, not the atomic coordinates, of all known structures
in the Protein Data Bank (PDB). This could be useful to
find out whether a structure is known for any galectins or
to find out if there are any known structures that are
homologous (inferred by sequence similarity) to your new
sequence.
By default your sequence will be saved in the MAIN
nucleotide or protein database, but you can choose to
place the sequence in any subset of the appropriate
sequence type, provided that subset has already been
created. Select the MAIN database or desired subset, type
a name for the sequence (or keep the default name), and
press OK.
Search results are opened by either double clicking the
number in the ID column, or dragging and dropping into
the Vector NTI Molecule Viewer.
A more complicated example to obtain a human galectin3 nucleotide sequence is presented in an exercise below.
Using Entrez
Entrez is a service that allows you to look up sequences
based upon their description rather than actual nucleotide
or peptide sequences. For example, you may be interested
in galectin sequences. Entrez searches the annotation
sections of database entries to find a keyword of your
121
122
Import in Batch
You can import sequences from a text file in batch. Drag
and drop it from your desktop into the Database Explorer
window. Note that sequences need to be in the FASTA
format and the first word in the comment line will be used
as the sequence name in the local Vector NTI database.
You can create a folder on your desktop and store several
GenBank files in it. Drag and drop the folder into the
Database Explorer window and the sequences will be
added to the Main folder (DNA/RNA Molecules or
Protein Moleculs).
Restriction Analysis
Any time a new DNA sequence is opened in Vector NTI,
a restriction analysis will automatically be performed and
the results will be displayed along with that molecule.
Any restriction sites found in the molecule will be
displayed in the graphics pane and will be clickable. Note
that unique enzyme recognition sites are maroon and nonunique are black. These graphics link to the appropriate
place in the sequence pane. The list of all searched
restriction sites along with the location of those found is
located in the text pane in a folder titled
Restriction/Methylation Map:
The example above shows the results for a commonly
used vector. Note that sites for only 10 restriction
enzymes are searched by default. If you would like to
search for other restriction sites, you must tell Vector NTI
to do so. Choose Analyses > Restriction Analyses >
Restriction Sites…
123
124
analysis so that sites of interest to you are sought upon
opening a molecule in Vector NTI.
With a molecule open in Vector NTI, press the Display
Setup button (
) or select View > Display Setup…
(You must load a molecule into VectorNTI for the View >
Display Setup… option to be available.)
Press the RMap Setup… button (
) and
be sure the enzymes of interest are selected. Enzymes
may be added to the list as shown in the section titles
Restriction Analysis above.
You may add to the list of enzymes by clicking the < Add
button and selecting from a list of known restriction
enzymes. You can create new enzymes using the local
Enzyme database if your desired enzyme is not in the list.
You also have the opportunity to show only Blunt cutting
enzymes, for example, or only enzymes that cut within a
certain region of the molecule. If you are interested in
finding only enzymes that give a single cut, type 1 in the
Ignore RENs having more than # sites. These options will
be useful in cloning experiments.
CHANGE DEFAULTS
The restriction analysis that is automatically performed
when opening a new molecule in Vector NTI may not
include sites for restriction enzymes commonly used in
your lab. The default list of restriction sites may not
appropriate for your interests. Fortunately, you can
change the default list of enzymes used for restriction
125
After selecting the desired enzymes, select (Default) in
the Setup Profile pulldown menu. Press Save Settings
As… then click OK.
NOTE: if you have already saved a molecule with custom
settings, those settings override the (new) Default
settings.
PCR and Cloning
A convenient method to obtain a gene of interest is to
order a clone from elsewhere. This has the advantage of
saving bench time for a little bit of money. The gene of
interest has been amplified and inserted into a plasmid,
and bacteria are then transformed to contain this plasmid.
The correct gene insert is verified, and the suppliers will
mail you bacteria containing the plasmid.
126
It will still be necessary in many cases for you to amplify
the desired gene and insert it into a different plasmid for
further manipulation or overexpression. In this section,
you will perform a virtual cloning experiment that mimics
the planning you would do to clone a human galectin-3
sequence from an ordered clone into the pcDNA3.1(+)
vector from Invitrogen.
It is necessary to obtain two different sequences for this
example. The first sequence is the Homo sapiens galectin3 sequence. Second is the vector sequence for
pcDNA3.1(+), which is included in your local databases if
you are using Vector NTI version 9 or newer.
Finding the Galectin-3 Sequence
For this exercise, you will obtain the Homo sapiens
galectin-3 sequence using the NCBI Entrez Server. You
want to find galectin-3 sequences that have been cloned
and are available for purchase. From the Vector NTI
menus, select Tools > Open > Retrieve from NCBI
Entrez Server… Select Nucleotide database (the default
is PubMed). In the search fields, type galectin-3 (with a
hyphen, as written here) and press the space bar. A second
search field will open. You want to find sequences from
humans, so type “homo sapiens” within quotes. If you
don’t enclose homo sapiens in quotes, this search term
will be split into two fields (and you won’t get any
results). A drop-down menu at the right side allows you to
restrict the search for the term “homo sapiens” to the
Organism field of GenBank records as shown below.
Note that the logical AND of your two search terms will
be returned. That is, you will find sequences that contain
the terms galectin-3 AND “homo sapiens.”
127
The results of this search will look something like that
shown below. Several of the sequences contain the words
cDNA clone in the Title. The third sequence in the list
below (Id: 37589086) is selected because a clone
spanning the complete CDS for human galectin-3 is
available for purchase from the IMAGE consortium
(http://image.llnl.gov/). Double-click this sequence to
open a copy in Vector NTI. Remember to save to your
local database before proceeding.
PCR Amplification of the CDS
If you order a clone from the IMAGE consortium or
another source, you will obtain bacteria transformed with
a plasmid that contains your sequence. It is desirable to
have a copy of the galectin-3 gene in another plasmid for
manipulation. You will use pcDNA3.1(+) from Invitrogen
for this example. If you are using Vector NTI Advance
(i.e. version 9 or newer), an entire subset of Invitrogen
vectors has been installed. You may simply select the
128
desired plasmid from the list and double-click to open a
copy in Vector NTI. If you are using an older version of
Vector NTI, you may obtain a copy of the pcDNA3.1(+)
sequence from the Invitrogen web site and import it as
shown in the examples above.
To sub-clone the galectin-3 sequence into another
plasmid, you will need to amplify the gene by PCR, then
insert (ligate) this product into your desired plasmid. For
the ligation to proceed, you will need restriction sites
flanking the gene (insert) that are compatible with sites in
the plasmid. Restriction analysis (see section above) of
the plasmid and insert sequences reveals that no such sites
exist for this project. For this reason, it will be necessary
to engineer restriction sites into your insert that are
compatible with site in the plasmid
It is easy to accomplish this with PCR. When designing
PCR primers, you may add nucleotides coding for
restriction sites at the 5’ end of each primer. If you make
these engineered restriction sites specific for different
enzymes, you can be assured of directionality during
ligation.
To design primers to amplify this sequence, choose
Analyses > Primer Design > Amplify Selection… A
new window will open with several tabs to set various
options for PCR. Press the button near the lower right
corner labeled More >> and the window will expand to
show more options as pictured below.
To start, select the CDS for galectin-3 by clicking on the
arrow in the graphic window of Vector NTI. The
corresponding region will be selected in the sequence
pane.
129
130
Near the bottom are buttons (labeled “…”) to attach
sequences coding for various restriction endonucleases to
the 5’ terminus of your sense and antisense primer. Click
the button for the sense primer and select EcoRI from the
list of Enzymes.
The recognition sequence for EcoRI (GAATTC) will be
pasted into the text box for attaching nucleotides to the 5’
end of the sense primer. Repeat this process for the
antisense primer, this time selecting XhoI. The PCR
product will have the recognition sequence for EcoRI at
the 5’ end and XhoI at the 3’ end. This will allow you to
directionally clone galectin-3 into pcDNA3.1(+) between
the EcoRI and XhoI sites by digesting the insert and the
plasmid with EcoRI and XhoI then ligating the products
together. (NOTE: it would be wise to include several
extra nucleotides at the 5’ end of the included restriction
sites. If you do not, restriction enzyme cleavage will not
be efficient and your cloning may fail!)
To complete the virtual cloning, you must edit both your
insert and plasmid sequences to reflect the results of PCR
and digestion with restriction enzymes. The galectin-3
sequence must be trimmed to reflect the portion that is
amplified by PCR and the extra nucleotides coding for
131
132
restriction sites must be added. This can be accomplished
by hand, but an automated procedure is available to
reduce the risk of error. To save the PCR product you
designed above into your local database, select the desired
product by clicking once with your mouse. The PCR
products will be found in the PCR Analysis folder in the
text pane in the upper left corner of the Vector NTI
window. After selecting the desired product, click the
right mouse button once and a menu will appear as shown
in the figure below.
Click (left button) Save to Database and Create
Window… This will both save a copy to your local
database and display the molecule for your immediate
inspection. You will be prompted to select a name for
your PCR product. Pick something that will be
meaningful to you in the future such as “Galectin-3 PCR
product with EcoRI and XhoI sites.” Choose which Subset
you like to save the molecule into and click OK. A new
window will open showing you the PCR construct with
restriction sites and arrows indicating where the PCR
primers hybridized.
133
The default restriction analysis that is performed on any
new molecule does not include the enzyme XhoI. Before
proceeding to the next step, perform a restriction analysis
on your PCR product, being sure to add XhoI to the list of
enzymes to use in the analysis. Refer to the Restriction
Analysis section above as needed.
Ligation
Although you could insert the PCR product sequence into
the desired portion of the pcDNA3.1(+) sequence by
hand, Vector NTI also has a mechanism to automate the
task. This will decrease the likelihood of errors during the
process. With the graphics pane active for your PCR
product, click the Add Fragment to Molecule Goal List
button (
) on the Vector NTI tool bar. This item can
also be found under the Cloning menu. Either method will
open a new window referred to as the Fragment Wizard:
134
to hold the shift key, this will not work! Click Finish,
then click Add to List in the new window.
You now need to add a fragment which is the EcoRI/XhoI
product of pcDNA3.1(+) to the list. Open a copy of
pcDNA3.1(+) which may be found in the Invitrogen
vectors subset or from the Invitrogen web site. You will
once again need to perform a restriction analysis to find
the XhoI site in the Multuple Cloning Site (MCS) of this
vector. The EcoRI site should have been located already,
but be sure to add this enzyme to the search set if it is not
already there.
Be sure that Construction fragment is checked and click
Next >. To define the 5’ terminus of the fragment, click
on the EcoRI site in the graphics pane (move the
Fragment Wizard to the side if necessary) and the
Fragment Wizard will automatically update.
Click Next >.
When the next window opens, hold down the shift key
and click the XhoI site in the graphics pane. If you forget
135
Add a new fragment to the goal list by clicking the Add
Fragment to Molecule Goal List button (
) as above.
(You may get an error message if you haven’t saved the
molecule since performing the restriction analysis. Simply
save a copy to your local database with a new name such
as “pcDNA3.1(+) XhoI”). This fragment will also be a
“Construction fragment,” but the order of restriction sites
will be opposite that of the insert. That is, the XhoI site
will be the 5’ end of the plasmid and its 3’ end will be the
EcoRI site. You will know that you have created this
fragment correctly because all of the sequence except a
short (33 nucleotide) sequence will be selected. (Don’t
forget to hold down the shift key when setting the 3’ end
of the fragment!)
The Open Goal List button (
) will allow you to
inspect the fragments you have defined for the cloning
project. Verify that the left and right termini for each
fragment are correctly defined.
136
When you are satisfied, press the Run button (
).
Name the new molecule something informative (see
figure below). The General Info… button allows you to
add a longer description of the molecule as well as adding
keywords to the entry for searches of your local database.
Notice that the constructed molecule should be circular if
ligation proceeds properly. Click the Construct button to
create the desired molecule. You will be prompted to
choose a subset in which to save the new molecule.
The features of the original fragments are preserved in the
new molecule. For example, the Galectin-3 (LGALS3)
region is present as a clickable feature in the graphics
pane.
When finished, the constructed molecule will be open for
you to inspect and your Fragments list will be empty.
Click close ( ) in the upper right corner of the lists
window.
137
138
Running a Virtual Gel
One of the handiest features of Vector NTI is the ability
to perform a virtual electrophoretic gel analysis of a
restriction digest and visualize the expected results. This
allows the researcher to choose restriction enzymes
yielding sufficient separation of fragments. It also gives
the researcher a visual basis for comparison with actual
results obtained in the laboratory.
To run a virtual gel, select Create New... from the Gel
menu of Vector NTI. It is not necessary to have the
molecule of interest opened prior to creating a new gel.
A Gel Setup window opens, allowing the user to select
the type of gel to simulate. Options include a constant
field agarose gel as well as constant and pulse field
polyacrylamide gel. Several parameters such as gel
concentration may be set in this window. Custom settings
may be saved for easy repetition. For this example a
constant field polyacrylamide gel will be created using the
default parameters obtained by selecting Example of
Polyacrylamide Gel from the Electrophoresis Profile
pulldown at the top of the window.
139
Click OK and Vector NTI will open a blank gel ready to
add samples and markers. To add a sample, click Create
Sample (
) from the Active Pane: menu bar. In the
image below, CXA3CG has been selected from the local
databases and the enzymes HindIII and SmaI have been
chosen for the analysis. Click Add to Gel and the new
sample lane will be added to the virtual gel. Create any
other samples that are desired and click Close.
140
The sizes of these fragments will be useful when selecting
appropriate markers for the analysis. To add marker lanes,
After sample lanes have been created, information about
fragment sizes can be found in the text pane of Vector
NTI.
141
click the Add Marker Lane button ( ) in the Active
Pane: menu bar. The Choose Database Gel Marker
window will open. In the example shown, SPP1-ECORI
would be a reasonable choice. Choose a marker and click
OK to add a marker lane to the virtual gel. It is possible to
add more than one marker lane to the gel to accommodate
differing fragment sizes.
142
Click on the number above any lane in the virtual gel and
a timer will open in the Active Pane: toolbar. By default,
this shows how the gel will appear after 15 minutes (0:15)
of run time. Click the left or right arrow to show the gel
appearance after more or less run time. For example, the
bands in this virtual gel will be sufficiently resolved after
1 hour of run time as shown in the image below. The
sample is in lane 1 and the marker in lane 2 in the image.
143
BLAST Searching
Any time you obtain a new sequence, it may be useful to
find whether the same or similar sequences are already
present in the databases. A good way to do this is to run a
BLAST search against the GenBank database at NCBI.
Vector NTI provides a convenient interface to perform
this type of database search. With the sequence of interest
(e.g., cxa3cg) open in Vector NTI, select BLAST Search
from the Tools menu. A prompt will appear asking
whether to search the whole sequence or just a selected
portion and to search the Direct or Complementary strand.
After making this selection, a new window will open
asking your choice of BLAST server. Most often the
choice will be NCBI BLAST server. This is the default,
although you may also choose another server to perform
the search.
144
After selecting a server, a new window will open (shown
below). This window shows the query sequence along
with a choice of the BLAST program to run and the
database to search. By default, BLAST 2.0 program will
run using blastn for a nucleotide search against the nr
(non-redundant) nucleotide database. Make any changes
necessary and press the Submit button near the upper
right corner.
This window shows the alignment of each "hit" or match
in the database with the query sequence. Only one
sequence at a time is aligned with the query sequence in
the lower portion of the window. To see the alignment of
any other of the BLAST "hits," click on the line
representing that sequence in the third window down on
the right hand side. In the example shown, one sequence
aligns with the entire length of the query, whereas several
more sequences align with the 5' (leftmost) portion of the
query sequence.
A new line will appear in the bottom section of the
BLAST Search window showing status of the BLAST
search in progress. When it says Finished, double-click
the molecule name to view the BLAST results:
145
It is easy to add blast “hit” sequences to your local
database for further manipulation. Expanding the contents
of the Hits folder in the left-hand window lists the
identities of all the sequences that were found by BLAST
searching. Each contains a hyperlink that will open a copy
of the sequence for viewing in Vector NTI. Some
manipulations will require that you save a copy to your
local database before proceeding. The sequence isn’t
146
saved in your local database unless you explicitly do so.
This can be accomplished as illustrated previously.
You can save BLAST search results into the database or
as a BLAST result file following the steps below: select
BLAST Results > Save As or press the Save As button
(
); select one of the three tabs in the Save As dialog
box, depending on your preferred destination.
Translating an Open Reading Frame
All of the annotation and features that accompany a
sequence record will be imported into Vector NTI. This
will allow the researcher to easily select an interesting
portion of the sequence for further analysis. Coxsackie
viruses have a single, long open reading frame that is
translated and post-translationally processed. This entire
open reading frame is labeled CDS (short for coding
DNA sequence) and has been selected in the figure below
(using the cxa3cg sequence retrieved in an earlier
example). Clicking on the large arrow in the graphics
pane of Vector NTI selects that portion of the sequence.
Notice that the arrow has been highlighted along with the
corresponding region in the sequence frame.
147
Any functions the user selects will act only on the
selected range of the sequence. It would be easy, for
example, to translate that region of DNA into a peptide
sequence. (The virus is actually RNA but the cDNA
sequence has been deposited in GenBank.) With this
region selected, translate the sequence into a peptide by
choosing Analyses > Translation > Into New Protein >
Direct Strand... as shown below.
148
Protein Analysis
A new window will open asking you to name the New
Protein Molecule:
A number of analyses may be carried out against a protein
sequence. The functions are available through the
Analyses menu. Some of these analyses are accomplished
through sites on the World Wide Web and are located
under the Web Analyses menu item. In these cases,
Vector NTI will paste the sequence into a web page for
that specific analysis. The user need only press the
Submit button for analysis to commence.
Other analyses are accomplished directly within
Vector NTI. With the molecule named Translation of
CXA3CG opened, double-click on the Analysis folder in
the Text Pane, you will find some physical and chemical
properties of this protein, which is analyzed automatically
when the protein molecule is opened.
Change the name as desired and click OK to create the
molecule and load it into Vector NTI. The new molecule
will automatically be saved in the Protein Molecules
(MAIN) database on the local PC.
It is also possible to display a translated peptide alongside
a nucleotide sequence within Vector NTI. It is not
possible to perform further analysis on the peptide
sequence using this method, but this enables the user to
quickly verify the translation of a nucleotide sequence.
149
150
You can also search for known sequence motifs in the
open protein sequence by selecting Analyses > Motifs…
A window like that shown in the following figure
appears:
To analyze the protein sequence for possible existence of
all of the listed motifs, click the first item in the list, then
hold down the shift key and select the last item in the list.
All motifs will be highlighted. Click OK. You will return
to the Protein Motifs Setup window, but all of the chosen
motifs will be present this time. Click OK to proceed with
the analysis. The results of your analysis will be displayed
in all three panes of Vector NTI. For example, the
graphics pane, which was previously a blank line for
Translation of CXA3CG, now lists several HLA-A2
motifs.
Click the Add… button and you will be presented with a
list of common motifs. Only five are built into
Vector NTI, but you may define your own motifs to add
to the list. (A comparison of your sequence against the
patterns in the Prosite database is available by selecting
Analyses > BioAnnotator > Prosite Search.)
HLA-A2 (100.0%)
HLA-A2 (100.0%)
HLA-A2 (100.0%)
HLA-A2 (100.0%)
HLA-A2 (100.0%)
HLA-A2 (100.0%)
HLA-A2 (100.0%)
HLA-A2 (100.0%)
HLA-A2 (100.0%)
HLA-A2 (100.0%)
Translation o f C XA3C G
2186 aa
151
152
On the menu bar, select Analyses > BioAnnotator >
Analyze Selected Molecule. This automatically opens the
BioAnnotator module. On the menu bar, select Analyses
> Analyses List, opening the following dialog box:
analyses to the Select Analyses list, click OK. The
appropriate analyses will be generated, and will appear in
the Graphics Pane. Double click on any analysis and the
relevant information regarding that analysis will appear.
You can edit the graphical output (i.e. color of the graph,
bar vs. linear graph etc) from this dialog box as well.
These analyses can be exported to Microsoft Word™, or
other programs by using the Camera icon (
). This will
copy the image to the Windows clipboard or to an image
file in wmf format.
REFERENCE MANAGEMENT
When you complete your experiment and data analysis,
the next thing you want to do is to write a paper to report
your findings. To write a paper, you need to know what
has been done in the area related to your work. Thus, you
have to deal with literature search. In this example, you
will use the integrated Entrez/Pubmed search function to
find references related to coxsackievirus. Open the
Pubmed/Entrez search window (In all modules, on the
menu bar, choose Tools > Open > Retrieve from NCBI
Entrez server), then type coxsackievirus in the Term
field; click Search button, search results are shown
similar to the following:
This box lists all of the analyses available for proteins.
Double click on any analysis and it will be added in the
Selected Analyses box. You can highlight any analysis
from the lower list and click on the
icon at the bottom
of the dialog box to remove it. After adding a few
153
154
literature database, click Citation > Save As, press
Database Citation tab, provide a meaningful citation
name, and click OK.
To generate bibliographies, select an entry from the
Citations database (in the Vector NTI Explorer), rightclick and choose Copy Tag, open your word processor
and paste the tag into a document. The pasted tag will
appear something like [A Baj et al., #201]. Save the
document to your desktop as coxsackievirus in Rich Text
Format (*.rtf), and Close the file.
Double click the citation ID and the Citation Viewer
window opens as in the figure below:
When you are ready to format your paper, go to the
Vector NTI Explorer. In the Citations database, choose
Table > Format manuscript…, click Browse and open
the coxsackievirus.rtf file. Select a reference format from
the list of available journals and click Start. Once
processing is complete click Close. Go to your desktop
and open the coxsackievirus.rtf file. Notice that a citation
appears at the end of the document.
The Text pane in the Citation Viewer contains
information such as General Description, Citation, Article
Authors, Journal and MeSH terms (short for Medical
Subject Headings). To save the citation into your local
155
156
the most commonly used editing keystrokes is presented
below. All three editors have more extensive help files
and tutorials in their online documentation, and a number
of tutorials may also be found on the Web. Finally, the
GSAF office has some books with descriptions of how to
use these editors that are available for users.
Appendix A
vi
Text Editors
While much of the work done by the gsaf user will entail
using existing programs to analyze files present in
databases or entered as part of a sequencing project, it is
sometimes necessary to edit files in your directory. This
can only be done if the user has permission to write to a
file. For obvious reasons, the basic system files and
programs needed to operate the gsaf computer, the
sequence analysis programs, and the database files cannot
be changed by the user, only by the system manager—
even then, with extreme caution. But, the user may need
to modify an existing database entry and save it as a new
file in a personal directory. This is permitted, while the
original database file remains unchanged. To accomplish
this, a text editor will be needed.
Sequences in GCG format can be edited using the SeqEd
program or the editor function of SeqLab. Alternatively,
the gsaf computer has a number of editors available for
use, as do most UNIX computers. The three most
commonly used ones available on gsaf are vi, Emacs, and
Pico. A brief description of each editor and a listing of
157
A basic text editor that is distributed with essentially all
UNIX systems is called vi (visual editor). It operates as a
modal editor. The program is in either a command mode
or an edit mode. When it is in the command mode, all of
the keystrokes that are entered are interpreted as
commands. When it is in the edit mode the keystrokes are
entered into the text as characters. However, the screen
looks the same in both command and edit modes. In order
to enter the command mode, hit the Esc key a few times.
vi is very powerful as a text editor, despite its modal
configuration, and it is available on essentially all Unix
systems. There is a tutorial book on vi available both in
the campus library, and the GSAF.
Starting vi
Starting to edit a file in vi is accomplished by typing the
command vi followed by the file name:
vi filename.hlp
If the file already exists in your current working directory,
the vi editor will be started and this pre-existing file will
158
be loaded into the editor. If the current working directory
does not contain a file with that name, a new file will be
created. Of course, a file with the same name could exist
in another directory that will be undetected when the vi
program looks in the current directory. Finally, if no
filename is given by typing vi without a filename, the
program will start and will prompt the user for a file name
when the program is exited.
Saving Files and Exiting vi
When exiting vi the edited file will be saved and the file
that was loaded and edited will be deleted. If the user
desires to save the original file, the file saved after editing
should be given a new name, such as filename2.hlp in the
example given above. Note that no backup files are
saved in vi.
l Move the cursor to the right one character position.
The up, down, left and right arrows also allow you to
navigate through the file one position at a time.
Cutting and Pasting/Deleting text
dd deletes the current line. A count (4 dd) deletes
that many lines. Whatever is deleted is placed
into the buffer.
p Paste the buffer contents after the current cursor
position or line.
x Delete character under the cursor. A count tells
how many characters to delete. The characters
will be deleted after the cursor.
yy yanks (copies) the current line. A count (4 yy)
yanks that many lines. Whatever is yanked is
placed into the buffer. The original copy is left
in place.
Selected vi Commands
Moving the Cursor Within the File
^B Scroll backwards one page. A count (^B 4) scrolls that
many (4) pages.
^F Scroll forwards one page. A count (^F4) scrolls that
many (4) pages.
h Move the cursor to the left one character position.
j Move the cursor down one line.
Inserting New Text
A Append at the end of the current line.
I Insert from the beginning of a line.
a Enter insert (append) mode, the characters typed in
will be inserted after the current cursor position.
i Enter insert mode, the characters typed in will be
inserted before the current cursor position.
k Move the cursor up one line.
159
160
Replacing Text
c Change until specification. “cc” changes the current
line. A count changes that many lines. cw changes the
current word.
r Replace one character under the cursor. Specify a count
to replace a number of characters.
Searching for Text or Characters
/ Search the file downwards for the string specified after
the /.
? Search the file upwards for a string specified after the ?.
separate command mode in Emacs. The text is presented
on the screen and can be modified by entering commands.
New text is added at the point of the cursor by typing it in.
Emacs has a built-in tutorial so that the new user can use
Emacs itself to learn Emacs. This tutorial goes through all
of the features necessary to do text editing, including
inserting, deleting, moving text blocks, saving and
retrieving files, and so forth. Once Emacs is started, the
tutorial is accessed by typing:
<esc>x help-with-tutorial
There is a tutorial book on Emacs available both in the
campus library and in the GSAF.
n Repeat last search given by ‘/’ or ‘?’.
Starting Emacs
Saving and Quitting
ZZ Exit the editor, saving if any changes were made.
Editing files in Emacs is initiated by typing Emacs
followed by the filename:
emacs filename
:w write out the file, saving any changes you have made
:wq write out the file and quit vi
:q! quit vi without saving any changes you have made
since the last save
EMACS
This will start the program and if this file already exists in
the current working directory it will be loaded into the
program. If the file does not exist, a new file will be
started with the filename used. Note that the complete file
name must be used. Extensions that are normally added in
Windows-based word processors, like .doc or .pdf are not
added in Emacs.
The Emacs editor is also available on gsaf. Emacs is a
very powerful editor that can perform many functions. It
works like the word processing editors that most users
will be familiar with. In contrast to vi, there is not a
161
162
Saving
Emacs
Files
and
Exiting
Although Emacs maintains a buffer that can help recover
a file if there is a system crash, it is not a bad idea to save
files occasionally. Files are saved in Emacs by using the
^x^s command. The file will be saved and data entry can
continue.
Exiting Emacs is accomplished using the ^x^c command.
If there has been no change in a file since the file was last
saved, the program will exit and return immediately to the
gsaf command line. However, if further file entries have
been made since the file was last saved, the program will
ask if the file should be saved before exiting Emacs. If
this is not done, all the entries since the file was saved
previously will be discarded.
Unlike vi, Emacs saves a backup file. This is the file you
loaded into Emacs when you started the session. The file
name will be the same with a tilde (~) added to it to
designate it as the Emacs backup file.
Emacs Commands
Listed below are some of the commands that can be used
for text entry and file manipulation in Emacs. These are
only a few of the available commands. The online help
and online tutorial will provide a more complete list of
Emacs tools.
163
^p
^n
^f
^b
^a
^e
^v
^v
^f
^b
^<
^>
^g
^x
^x
^x
^s
^r
^h
^h
^h
^h
^h
^h
^h
^x
^x
Up one line
Down one line
Forward one character
Backward one character
Beginning of line
End of line
Down one page
Up one page
Forward one word
Backward one word
Beginning of buffer
End of buffer
Quit current operation
^s Save the current buffer to disk
u Undo the last operation
^f Open a file from disk
i Search forward for a string
i Search backward for a string
t Use the interactive tutorial
f Display help for a function
v Display help for a variable
x Display what a key sequence does
a Search help for string/regexp
F Display the Emacs FAQ
I Read the Emacs documentation
r m Set a bookmark. Useful in searches
r b Jump to a bookmark.
PICO
Pico is a simple and easy to use editor associated with the
Pine email program. It is small, but has basic file editing
164
characteristics and has on-screen help at all times. The
commands are quite similar to Emacs as the editor was
modeled after Emacs, but with much reduced
functionality. Pico has 2 lines of help at the bottom of the
screen which should assist you in the basic editing
functions.
^O (F3)
^X (F2)
Output the current buffer to a file, saving it.
Exit pico, saving buffer.
For rudimentary editing tasks, pico is the recommended
editor.
Pico Commands
The following commands are available in pico (where
applicable, corresponding function key commands are in
parentheses). Many Pico commands are the same as
Emacs commands.
^G (F1)
^F
^B
^P
^N
^A
^E
^V (F8)
^Y (F7)
^W (F6)
^L
^D
^^
^R (F5)
Display this help text.
move Forward a character.
move Backward a character.
move to the Previous line.
move to the Next line.
move to the beginning of the current line.
move to the End of the current line.
move forward a page of text.
move backward a page of text.
Search for (where is) text, neglecting case.
Refresh the display.
Delete the character at the cursor position.
Mark cursor position as beginning of
selected text.
Insert an external file at the current cursor
position.
165
166
Appendix B
GCG Short Descriptions
DotPlot
The following information is modified from the GCG
online help.
This appendix lists and briefly describes programs in the
Wisconsin Package. Programs are grouped by function
and may appear under multiple functional headings. For
more information on using these programs, see the GCG
Program Manual.
COMPARISON
Pairwise Comparison
Gap
BestFit
FrameAlign
Compare
align two complete
sequences (global
alignment) via the
Needleman-Wunsch
algorithm
align the portion of two
sequences that best matches
(local alignment) using the
Smith-Waterman algorithm
local alignment between a
peptide sequence and the
codons in a nucleotide
sequence, potentially
including frame shifts
word match or
window/stringency
comparison of two
167
GapShow
ProfileGap
Multiple Comparison
PileUp
SeqLab
PlotSimilarity
Pretty
nucleotide or peptide
sequences sequences that
creates a file which may be
used to plot the similarity
between the sequences
using DotPlot
create a graphical depiction
of results from either
Compare or StemLoop
create a graph of
similarities and gaps of two
sequences previously
aligned using either Gap or
BestFit
align one or more
sequences to a profile
create a multiple sequence
alignment and plot a
dendrogram illustrating the
similarity between the
sequence
graphical interface to the
GCG programs
graphic display of the
average similarity between
sequences in a multiple
sequence alignment
re-display a multiple
sequence alignment,
calculating a consensus and
showing agreement and
disagreement with the
consensus in various
168
PrettyBox
MEME
ProfileMake
ProfileGap
Overlap
NoOverlap
OldDistances
formats; please note that a
threshold is used in the
calculation and not
indicated well; also note
that the alignment must be
calculated prior to Pretty
display a consensus using
shaded boxes (in PostScript
format)
search for motifs in
sequences that have not
been aligned
create a position specific
scoring matrix (PSSM)
from a set of aligned
sequences
align one or more
sequences to a profile
compare DNA sequences
(in both orientations)
indicating where they align;
great for contig assembly
where other routines fail
find regions that a set of
DNA sequences do not
have in common; i.e.
unique stretches of
sequence
create a table of similarities
between each combination
of sequences in an aligned
set
DATABASE SEARCHING
Reference Searching
search selected fields from
LookUp
the annotation section of
sequences in a database;
this search is fast because it
uses pre-indexed terms
search complete annotation
StringSearch
of a database of sequences
for a user-entered term
associate a name with a set
Names
of GCG data or reveal
currently existing
associations
Sequence Searching
BLAST
NetBLAST
FastA
169
search local sequence
databases for sequences
similar to your query
sequence using the popular
BLAST algorithm
like BLAST above but
searches the remote NCBI
sequence databases rather
than local sequence
databases; NCBI databases
are updated nightly, so
NetBLAST guarantees
access to the most current
sequence information;
NetBLAST results are
returned in GCG format
search a database for
sequences similar to a
query sequence using the
170
SSearch
TFastA
TFastX
FastX
FastA algorithm of Pearson
aned Lipman; FastA
searches are believed to be
more sensitive than BLAST
for nucleotide searches
searches a database for
sequences similar to a
query sequence using the
Smith-Waterman
algorithm; this is a very
sensitive search but may be
very slow for a large
database
use the FastA algorithm to
search a nucleotide
database with a protein
query sequence; nucleotide
sequences in the database
are translated in all six
reading frames prior to the
comparison
like TFastA but with
frameshifts; the protein
query sequence may match
a conceptual peptide
sequence created by joining
translation of nucleotides in
different reading frames of
the same strand
compares a nucleotide
sequence to a database of
protein sequences using the
FastA algorithm; both
strands of the nucleotide
query sequence are
171
FrameSearch
MotifSearch
ProfileSearch
ProfileSegments
FindPatterns
Motifs
translated, taking
frameshifts into account,
prior to the comparison
search for similarity
between protein and
nucleotide sequences,
accounting for frameshifts;
the query sequence can be
either a nucleotide or
peptide sequence and the
search set is the other type
of sequence
use a previously created
profile (usually created
with MEME) to search a
database for members of a
sequence family; may also
be used to annotate the
members of the sequence
family
search a database with a
profile created using
ProfileMake for members
of a sequence family
create optimal alignments
using the results of
ProfileSearch
search a database for
sequences containing short
sequence patterns, such a
promoter sequences,
entered by the user
search a protein sequence
for known patterns defined
in PROSITE such as Src172
WordSearch
Seqments
homology domains,
nucleotide-binding motifs,
and many others
find sequences in a
database that share a large
number of in-frame
common words (very short
sub-sequences) with the
query sequence
present the results of
WordSearch as alignments
SEQUENCE RETRIEVAL
copy sequences from the
Fetch
local GCG databases to
your directory
retrieve sequences from
NetFetch
NCBI databases for use in
GCG; may also be used to
retrieve the sequences
found with NetBLAST for
local use
EDITING AND PUBLICATION
edit sequences and create
SeqEd
new sequences from scratch
graphical (X Windows)
SeqLab
interface to the GCG
software
join fragments of sequences
Assemble
into one sequence file
display a previously created
Pretty
multiple alignment and
create a consensus
sequence
173
PrettyBox
Publish
PlasmidMap
LineUp
Figure
Red
EVOLUTION
PAUPSearch
PAUPDisplay
Distances
GrowTree
create a PostScript figure,
including box shading of
conserved regions, of a
previously created
alignment
create a plain text file, that
may be edited with a text
editor, from sequences
draw a circular plasmid
map graphic, possibly
including restriction sites
and sequence features such
as open reading frames
edit up to 30 sequences in a
multiple sequence
alignment; includes a
consensus
display a GCG graphic file
in an X Window previously
created with Setplot
format text for a PostScript
printer
GCG interface to the PAUP
molecular phylogeny
program
display phylogenetic trees
created with PAUPSearch
calculate distances
(substitutions) between all
pairs of sequences in an
alignment
create a phylogenetic tree
from the distance matrix
174
calculated by Distances
estimate the number of
substitutions per site in a
set of aligned sequences
Diverge
MEME
Repeat
FRAGMENT ASSEMBLY
GelStart, GelEnter,
GelMerge, GelAssemble,
GelView,
GelDisasessemble
SeqMerge
all part of the old method
for assembling sequencing
fragments in GCG;
SeqMerge is the preferred
method now.
the new and preferred
method for assembling
sequencing fragments in
GCG
GENE FINDING AND PATTERN RECOGNITION
plot the non-randomness of
TestCode
the composition of every
third base in a potential
coding sequence
plot third position GC bias
CodonPreference
and match to a codon
frequency table of three
forward frames for a
potential coding sequence
find open reading frames in
Frames
all six translations of a
nucleotide sequence
search for RNA polymerase
Terminator
terminators in a nucleotide
sequence
search for known sequence
Motifs
motifs (patterns associated
with a particular function)
175
FindPatterns
Composition
CodonFrequency
Correspond
Window
StatPlot
FitConsensus
Consensus
Xnu
from the PROSITE
dictionary
search for motifs in a set of
unaligned sequences
search for direct repeats in
sequences
search a sequence for
patterns defined by the
user; ambiguity characters
are allowed in the search
calculate the composition
of a sequence, including diand tri-nucleotide
frequency for nucleotide
sequences
display codon usage
compare codon frequencies
for usage tables calculated
with CodonFrequency
create a table of sequence
pattern frequencies for a
sliding window along a
nucleotide sequence
create a graph from the
output of Window
find the best fit of a
consensus to an individual
sequence and output
indicators of possible
matches
calculate a consensus
sequence for an alignment
of nucleotide sequences
replace tandem repeating
sequence characters with X
176
Seg
in a nucleotide sequence
replace low complexity
regions of proteins with X
characters
IMPORTING/EXPORTING
import a sequence into
Reformat
GCG using two adjacent
dots (..) as a signal to
separate annotation from
sequence
break a long GCG sequence
BreakUp
file into shorter pieces that
can be analyzed using GCG
break a file containing long
ChopUp
lines into multiple lines of
50 characters or fewer
convert a Staden formatted
FromStaden
sequence file into GCG
format
convert an EMBL
FromEMBL
formatted sequence file into
one or more GCG
formatted sequence files
convert a GenBank
FromGenBank
formatted sequence file into
one or more GCG
formatted sequence files
convert a PIRformatted
FromPIR
sequence file into one or
more GCG formatted
sequence files
convert a IntelliGenetics
FromIG
formatted sequence file into
GCG format
177
FromTrace
FromFasta
ToStaden
ToPIR
ToIG
ToFastA
GetSeq
Spew
MAPPING
Map
MapPlot
MapSort
convert ABI and SCF files
into GCG sequence format
convert a Fasta formatted
sequence file into one or
more GCG formatted
sequence files
convert a GCG sequence
file to Staden format
convert GCG sequence
file(s) to PIR format
convert GCG sequence
file(s) into IntelliGenetics
format
convert GCG sequence
file(s) to FastA format
read in a sequence from the
terminal and save in GCG
sequence format; the user
could, for example, type the
sequence in by hand
send out the sequence only
from a GCG sequence
formatted file to the
terminal in plain ASCII text
calculate a restriction map
for a nucleotide sequence
and show translations in
any combination of the six
reading frames
display restriction sites
graphically
perform a restriction
analysis and sort the
178
FingerPrint
PeptideMap
PlasmidMap
PeptideSort
PRIMER SELECTION
Prime
PROTEIN ANALYSIS
Motifs
ProfileScan
CoilScan
HTHScan
resulting fragments by size
predict the products of T1
ribonuclease digestion
like a restriction map but
for peptides, analysis is
performed for several
common chemical and
enzymatic cleavages
create a circular figure of a
nucleotide sequence with a
restriction analysis
sort the fragments of a
peptide map, sorting by
weight, position, or HPLC
retention; also gives
information about
composition of the peptides
design primers for PCR or
for sequencing
search for sequence
patterns in user’s sequence
defined in the Prosite
database
compare a peptide sequence
to a database of sequence
profiles to identify family
membership of the
unknown peptide
identify potential coiledcoil regions in a peptide
predict helix-turn-helix
179
SPScan
PeptideSort
Isoelectric
PeptideMap
PepPlot
PeptideStructure
PlotStructure
motifs in a peptide
sequence
scan a peptide for signal
peptides indicative of
classical peptide secretion
mechanisms
sort the fragments of a
peptide map, sorting by
weight, position, or HPLC
retention; also gives
information about
composition of the peptides
construct a figure showing
the charge of a peptide vs
pH
like a restriction map but
for peptides, analysis is
performed for several
common chemical and
enzymatic cleavages
construct a figure showing
several predictors of
secondary structure and
hydrophobicity for a
peptide sequence
predict secondary structure
of a peptide as well as
antigenicity, flexibility,
hydrophobicity and surface
probability; requires
PlotStructure to create
graphical output
graph the output of
PeptideStructure,
overlaying antigenicity,
180
Moment
HelicalWheel
Xnu
Seg
flexibility, hydrophobicity
or surface probability over
the secondary structure
predictions
calculate the hydrophobic
moment of a peptide,
assuming a helical
conformation
view a plot of a peptide
sequence looking down the
barrel of an alpha-helix,
indicating hydrophobic and
hydrophilic amino acids;
useful for identifying
potential amphiphilic
helices
replace tandem repeating
sequence characters with X
in a nucleotide sequence
replace low complexity
regions of proteins with X
characters
DNA/RNA SECONDARY STRUCTURE
use method of Zuker to
Mfold
predict secondary structure
of RNA or DNA
plot the results of an Mfold
PlotFold
calculation
identify inverted repeats in
StemLoop
a sequence that potentially
form stem-loop structures
graph the output of
DotPlot
StemLoop
181
TRANSLATION
Translate
BackTranslate
Map
ExtractPeptide
Pepdata
Reverse
Dataset
SEQUENCE UTILITIES
Reverse
Shuffle
translate a nucleotide
sequence
backtranslate a peptide
sequence into possible
nucleotide sequences with
options to predict the most
probable sequence or the
most ambiguous sequence
performs a restriction
analysis on a nucleotide
sequence but also will
translate in all six reading
frames
will take a translated in
sequence in Map output
and convert it to a GCG
peptide sequence file for
further analysis
translate a DNA sequence
in all six reading frames
reverse and potentially also
complement a nucleotide
sequence
create a GCG library,
accessible from the
Database Browser, from a
set of sequences
reverse and potentially also
complement a nucleotide
sequence
randomize a sequence
while preserving its
182
Simplify
Comptable
Corrupt
Xnu
Seg
Sample
DATABASE UTILITIES
DataSet
GCGtoBLAST
Sample
composition
reduce the alphabet of a
sequence, for example
representing all hydrophilic
amino acids with one letter
construct a scoring table
(distance matrix) for a
reduced alphabet sequence
using the output from
Simplify
introduce random deletions,
insertions and substitutions
to a nucleotide sequence
replace tandem repeating
sequence characters with X
in a nucleotide sequence
replace low complexity
regions of proteins with X
characters
extract random fragments
from sequence(s)
PRINTING/PLOTTING UTILITIES
print text files to a
LPrint
PostScript printer
prints a text file to a printer
ListFile
connected to the users
computer rather than a
printer connected to the
Unix server; works only
with ssh connections and
text files rather than
graphics (figure) files
choose a graphical output
SetPlot
device including printers, X
Windows sessions or
PostScript format file
draw a graphics (figure) file
Figure
to the current output device,
previously selected with
SetPlot
create a test pattern to
PlotTest
verify the integrity of your
graphics device
create a GCG library,
accessible from the
Database Browser, from a
set of sequences
create a BLAST searchable
dataset from a collection of
GCG format sequences
(NOT from a library
created with DataSet)
extract random fragments
from sequence(s)
FILE UTILITIES
Chopup
Replace
CompressText
OneCase
ShiftOver
183
break a file containing long
lines into multiple lines of
50 characters or fewer
substitute characters in a
sequence file
remove extra spaces from a
sequence file
make all characters of a
sequence file either UPPER
case or lower case
shift the lines of text in a
184
Detab
sequence file to the left (-)
or to the right (+)
replace tabs in a sequence
file with spaces
MISCELLANEOUS UTILITIES
redefine keys on your
SetKeys
keyboard for ease of use in
SeqEd, LineUp, etc.
import a sequence into
Reformat
GCG using two adjacent
dots (..) as a signal to
separate annotation from
sequence
format text for a PostScript
Red
printer
edit the logical names used
Name
by GCG to identify sets of
sequences
edit the symbols used by
Symbol
GCG to control operation
of the programs
Appendix C
Vector NTI Suite Functions,
What to Do, and How to
Proceed
Vector NTI module
To open Molecule Display window, click the Windows
start menu, choose Programs > Invitrogen > Vector
NTI Advance 10 > Vector NTI.
With the Molecule Display window opened, follow the
steps described in the following table for each specific
function to doing the analysis. Note some analyses may
need more steps to complete.
Function
Analysis
results
(Protein)
Back
translation
(Protein to
DNA)
185
What to do
• Molecular
weight, molar
extinction
coefficient,
isoelectric
point, etc
• Obtain a DNA
sequence
from a protein
sequence
186
How to proceed
In the Text Pane,
click on the
'Analysis' folder
1. Highlight a
protein molecule
region
2. Choose
Analyses > Back
Molecule
Cloning
(DNA/RNA)
•
•
•
Mutagenesis
(DNA/RNA)
•
Creates new
molecules
from
fragments of
other
molecules
Uses built-in
biological
knowledge to
design the
recombinant
process.
Create a
Gateway
clone
Search for
silent
mutations in
direct strand
187
Translation.
3. Click OK in the
Sequence Data
dialog box.
4. Choose
Translation
Table, and the
degerate level
appropriate in
the seq-BT
dialog box.
5. Use Camera
menu to save the
DNA sequence
to a file or
clipboard
On the menu bar,
choose Cloning >
Using
Construct/Design
procedure
(DNA/RNA) ... or
Gateway Cloning or
Add Fragment to
Goal List ...
Motif search
(DNA, RNA
and protein)
•
•
•
•
Oligo
analysis
(DNA/RNA)
•
•
Open reading
frame
(ORF)
•
Restriction
analyses
•
•
Select the whole
molecule or a region
On the menu bar,
choose Analyses >
•
•
or
complimentar
y strand
Mutagenesis >
Direct Strand or
Complimentary
Strand
Add new
motifs
Use Oligos
database
Search for
DNA/RNA
motifs
Search for
Protein motifs
Oligo
Thermodyna
mic Properties
Oligo
Duplexes,
palindromes,
repeats,
dimers,
hairpin loops
Search ORFs
On the menu bar,
choose Analysis >
Motifs
Restriction
sites
Restriction
fragment
RFLP
Find noncutting
To initiate RFLP
analysis:
1. On the menu
bar, choose
Analyses >
Restriction
Analyses >
188
On the menu bar,
choose Analyses >
Oligo Analyses >
Thermodynamic
Properties ... or
Oligo Diplexes ...
On the menu bar,
select Analyses >
Orfs
•
restriction
enzyme
Restriction
report
2.
3.
PCR analysis
(DNA/RNA)
•
•
•
•
•
Find PCR
primers
Amplify
Selection
Amplify
Features
Long PCR
PCR Using
Existing
Oligos
189
1.
2.
RFLP, opening
the Select
Molecules and
Enzymes for
RFLP Analysis
dialog box.
Select a
Database subset
and highlight
two molecules
that you want to
analyze in the
Source
Molecules
section; select an
Enzyme subset
and highlight an
enzyme in the
Source Enzymes
section.
Press the
Calculate button
to initiate RFLP
analysis.
In the Sequence
Pane or Graphic
Pane, select the
whole molecule
or a region
On the menu
bar, Choose
Analyses >
Primer Design >
PCR
amplification
•
•
•
•
Translation
(DNA/RNA
to Protein)
•
•
•
•
•
Multiplex
PCR
Alignment
PCR
Sequence
primer
Hybridization
probes
Translation of
a multicomponent
CDS
Translation
CDS with
splicing into
new protein
Translation of
feature into
new protein
Translation in
the Sequence
Pane
Translating
into a New
Protein
Molecule
190
method,
depending on the
type of PCR
analysis
To create a new
molecule by splicing
the intron/exon
feature:
1. Open the
molecule with the
intron/exon
feature in a
Molecule
Viewing window.
2. Select the
intron/exon
feature in the
Graphics Pane.
3. Choose File >
Create New
Sequence > Using
Splicing
(DNA/RNA/Prote
in) from the dropdown menu,
opening the
Create New
Molecule(s) by
Splicing dialog
box.
4. In the Source
Virtual gel
1. Restriction
analysis
2. RFLP
1.
2.
3.
4.
191
section of the
Create New
Molecule(s) by
Splicing dialog
box, enter the
appropriate
information, click
Proceed.
To create a gel,
choose Gel >
Create New,
choose
Electrophoresis
Profile, click OK
To create a gel
sample, choose
Gel > Create,
select a molecule
and enzymes,
click Add to Gel,
click close
To create a gel
marker, in the
Gel Viewer
window, choose
Edit > New >
Add Marker
Lane, choose a
marker, and
click OK
To Run the gel,
click within the
Gel pane to
activate it, use
the Animate
Web analyses
(DNA/RNA
and protein)
3. Analyze 3D
structure
4. Compare with
other
molecules
5. Search for
specific
features
6. Perform gene
prediction
7. Protein
feature search
8. Primer search
buttons to
stimulate the gel
run progression.
On the menu bar,
select Analyses >
Web Analyses > 3D
Structures or others
depending on the
analysis you want to
perform
AlignX module
To open AlignX module, click the Windows start menu,
choose Programs > Invitrogen > Vector NTI Advance
10 > AlignX.
192
Localized
sequence
(called block)
alignment
(Protein)
Sequence
alignment
(DNA/RNA
and Protein)
•
•
•
•
To perform AlignX
Blocks:
1. With Vector
NTI Explorer
opened, in the
Molecule Pane,
highlight the
molecules in
Text Pane, on
the menu bar,
choose Align >
AlignX Blocks
– Align
Selected
Molecules
2. With AlignX
Blocks window
opened,
highlight the
molecules again
in Text Pane; on
the menu bar,
choose Blocks
> Search for
blocks
To
perform
Multiple
alignments for AlignX:
1. With Vector
DNA and
NTI Explorer
protein
opened, in the
sequences
Molecule Pane,
Phylogentic
highlight the
Tree
molecules, on
Plots of
Locate,
analyze, and
edit blocks
among
multiple
protein
sequences
193
•
•
•
similarity and
sequence
complexity
Sequence
identity table
Dot matrix
plot
Alignment
PCR
the menu bar,
choose Align >
AlignX – Align
Selected
Molecules
2. With AlignX
window
opened,
highlight the
molecules again
in Text Pane; on
the menu bar,
choose Align >
Align Selected
Sequences
ContigExpress
To open ContigExpress module, click the Windows start
menu, choose Programs > Invitrogen > Vector NTI
Advance 10 > ContigExpress.
Sequence
assembly
•
•
•
Sequence
assembly
View and edit
the
Chromatogra
ms
Fragment
trimming
194
1. With
ContigExpress
Project Explorer
opened, go to
the Project
menu and select
Add Fragments
>, select your
fragment file
type from the
submenu list.
Select the
fragments in the
ContigExpress
Project
Explorer, on the
menu bar,
choose
Assemble >
Assemble
Selected
Fragments.
2. To view a
particular
fragment,
double-click on
it in the Project
Explorer list.
3. To trim a
fragment,
highlight it in
the Explorer, on
the menu bar,
choose Edit >
Trim Selected
Fragment ...
analysis
(DNA/RNA
and protein)
•
•
•
To open GenomBench module, click the Windows start
menu, choose Programs > Invitrogen > Vector NTI
Advance 10 > GenomBench.
Genomics
project
•
BioAnnotator
Annotation
•
9 DNA analyses:
195
With the
BioAnnotator
window opened, on
the menu bar, select
Analyses >
BioAnnotator >
Analyze Selected
Molecule
GenomBench
•
To open BioAnnotator module, click the Windows start
menu, choose Programs > Invitrogen > Vector NTI
Advance 10 > BioAnnotator.
GC content, nucleic
acid distribution,
etc
Over 50 protein
analyses: amino
acid composition,
antigenicity,
hydropathicity,
hydorphobicity, etc
ProSite, PFAM,
BLOCKS search
Proteolytic
cleavage analysis
•
•
Retrieve a
chromosome
from
compatible
DAS servers
Align
transcripts with
a genomic
sequence
Query UCSC
and
ENSEMBLE
Configure a
DAS server
196
To view a
chromosome from a
DAS server:
1. Choose File >
Open Sequence
and select the
DAS tab
2. Select UCSC
DAS Server in
the dropdown
menu
3. From the Source
field, select Apr.
2005 at UCSC
4. Highlight 2 in the
Name field then
click OK
Viewer
•
Vector NTI Database Explorer
•
To open Vector NTI Explorer module, click the Windows
start menu, choose Programs > Invitrogen > Vector
NTI Advance 10 > Vector NTI Explorer.
Data
•
management
Object –
create, edit,
delete
Subset –
create, dismiss
Import and
export data
Formatting
references
Contact
information
management
User field
management
•
•
•
•
•
To create a new
molecule in either of
the following five
ways:
1. Import molecules
2. Creating new
molecules from
scratch
3. Translation of
new protein
molecules
4. Construction of
new DNA/RNA
molecules
5. Design of new
DNA/RNA
molecules
Analysis
monitor
•
•
BLAST
Search/
BLAST
Viewer
•
•
•
•
•
dimensional
molecule structure
Align protein
chains, calculate
protein surfaces
PDB and M3D
format
DNA/RNA –
Spidey, Sim4
Proteins – Blocks,
Cleavage, Pfam,
Prosite
menu > Programs >
Invitrogen > Vector
NTI 9 > 3D
Molecule Viewer
Perform BLAST
searches against
GenBank
databases on the
NCBI server
Display BLAST
results in five-pane
format
Batch download of
hits
Annotate the query
molecule
Ultimate ORF
BLAST
To perform a
BLAST search:
1. Open a
molecule in the
Molecule
Viewer
2. Choose a region
3. Choose Tools >
BLAST Search
4. Check Selection
Only and click
OK
5. Check NCBI
BLAST
SERVER and
click OK
View a citation
Copy citations
generate
Choose the
Windows start
menu > Programs >
Invitrogen > Vector
Choose the
Windows start
menu > Programs >
Invitrogen > Vector
NTI 9 > Analysis
monitor
Other functions
Citation
viewer
3D
Molecule
•
Visualize and
manipulate 3197
Choose the
Windows start
•
•
•
198
bibliographics
NTI 9 > Citation
viewer
Choose the
Windows start
menu > Programs >
Invitrogen > Vector
NTI 9 > PubMedEntrez search
From the Windows
Start button, choose
Programs >
Invitrogen > Vector
NTI Advance 9 >
Utilities > Tools
Manager
PubMed/
Entrez
Search
•
Launch and
retrieve citations
and molecules
Tool
Manager
•
create a new web
link
adding a New tool
create a mew tool
to connect Vector
NTI to local or
remote programs
•
•
Utilities
•
•
•
•
•
•
•
GCG
Converter
•
GCG Converter
Matrix Editor
Tool Manager
Back Translation
Configurator of
LabShare Uplink
Database
Migration Utility
Oligo import
From the Windows
Start button, choose
Programs >
Invitrogen > Vector
NTI Advance 9 >
Utilities >
Convert sequence
in GCG file
formats
Choose the
Windows start
menu > Programs >
Invitrogen > Vector
NTI 9 > Utilities >
GCG Converter
199
200
Appendix D
Installing SSH
The ssh program allows you to connect to a remote Unix
computer such as gsaf.unmc.edu or biocomp2.unl.edu. If
you currently use a telnet program to connect to gsaf,
there are several reasons to switch from telnet to ssh. First
is legislation. HIPAA requires that use of insecure
programs such as telnet be limited wherever possible. ssh
also has several benefits such as easier file transfer
between gsaf and your desktop as well as allowing
printing from gsaf to your local printer.
Instructions below pertain to Windows users. The
Macintosh version of ssh can be found at
http://macssh.com/. Please note that the Macintosh
version of the secure file transfer program (MacSFTP)
must be downloaded separately from secure shell
(MacSSH). The instructions assume that you have a copy
of the INBRE CD from the UNMC Genetic Sequence
Analysis Facility. If you do not, you may download
SSHSecureShellClient-3.2.9.exe
from
http://www.ssh.com/.
1. Double-click SSHSecureShellClient-3.2.9.exe to install
the program on your computer.
2. Start the SSH Secure Shell Client. You will need to
change a few configurations. Select the "Settings..."
option under the Edit menu. Click on Tunneling and
check the box that says "Tunnel X11 connections" as
shown in the figure below.
201
3. With the SSH Client open, press either the Space bar or
Enter key to connect to gsaf. For Host Name, please type
gsaf.unmc.edu. The User Name is your gsaf login. Don't
worry about the port number or authentication method.
The default values are fine.
4. The first time you log into gsaf using ssh, you will
receive a message like that shown in the figure below.
Click the "Yes" button and you will be connected to gsaf.
You won't see this warning message again.
202
File Transfer:
One of the benefits of the SSH program is
improved file transfer between gsaf and your desktop.
Rather than opening a separate FTP (file transfer
protocol) session, an SSH Secure File Transfer window
opens when you start SSH. If you have already closed this
window, you may re-open it by clicking the
button in
the ssh toolbar. If you open a folder on your desktop, you
can transfer a file (or an entire folder) to the remote
machine (gsaf) by dragging between windows.
For example, I could click and drag any file on my
computer to the window titled "Remote Name" shown in
the figure below. This will copy the file to my home
directory on gsaf.
203
204