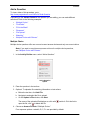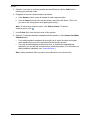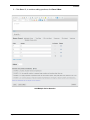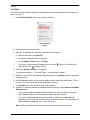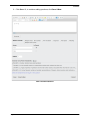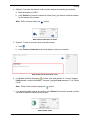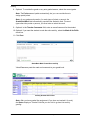
1
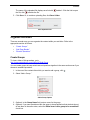
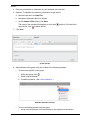
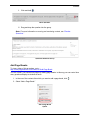
ProgressBook VirtualClassroom Teacher Guide
ProgressBook VirtualClassroom Teacher Guide
(This document is current for v14.7.0 or later.)
© 2015 Software Answers, Inc. All Rights Reserved. All other company and product names
included in this material may be Trademarks, Registered Trademarks or Service Marks of the
companies with which they are associated. Software Answers, Inc. reserves the right at any time
and without notice to change these materials or any of the functions, features or specifications of
any of the software described herein.
Software Answers, Inc.
6770 Snowville Rd., Suite 200
Brecksville, Ohio 44141
www.progressbook.com
www.software-answers.com
Change Log
The following Change Log explains by Product Version, Heading, Page and Reason where
changes in the ProgressBook VirtualClassroom Teacher Guide have been made.
Product
Version Heading
Page
Reason
14.7.0
“Welcome to VirtualClassroom”
1
Removed note that indicated VirtualClassroom is only
available for Default or Custom Setup 1 classes and for
assignments that are points based. It is now available
for all classes and mark types.
Added note that if your district does not enable
VirtualClassroom, you can still use all features of the
program except scheduling and previewing activities.
14.7.0
“Activities”
3
Updated screen shots throughout the chapter to show
the new “Add a Group” and “Add a Page Break” options
in the Actions drop-down list, the new look of the
Activity Builder menu, and the simplified text editor in
the Activity Builder.
14.7.0
“Add Content to Activities”
6
Added note describing the new “View as Student”
option. Added information about the new WIRIS™ math
editor and a link to the user manual.
14.7.0
“Add a Question”
9
Added two new sections to describe how to create the
new Matching and Multiple Choice with Pictures
types of questions.
14.7.0
“Upload a File”
24
Revised text and screen shot to reflect that the name of
an uploaded file is now a clickable link.
14.7.0
“Schedule and Link Activities to
Assignments”
31
Renamed section and two sub-sections to clarify that
when you link an activity to an assignment, you also
schedule it at that time.
14.7.0
“Link and Schedule Activities
from GradeBook”
31
Added note that the Name field on the Add an Activity
window now defaults to the text that you entered in the
Description field on the Assignment Details screen.
14.7.0
“Library”
39
Updated note indicating that the District Library is now
functional.
14.7.0
“Search My Library”
47
Added section.
14.7.0
“Copy and Paste Content”
56
Added section.
14.7.0
“Share Content with Others in
Your District”
57
Added section.
14.7.0
“Search for Shared District
Content”
61
Added section.
14.7.0
“Evaluate and Copy Shared
District Content”
66
Added section.
ProgressBook VirtualClassroom Teacher Guide
i
Change Log
Product
Version Heading
ii
Page
Reason
14.7.0
“Grade Activities”
79
Revised steps and added note that for mark types of
points or percent, the GradeBook Mark field now
automatically populates as you grade the activity.
Updated screen shots to show newly named Final
Assignment Mark area.
14.6.0
Entire Guide
N/A
Added links to instructional videos.
14.6.0
“Schedule and Link Activities to
Assignments”
31
Added new method of linking activities to assignments
through the VirtualClassroom “Schedule” function and
reorganized and rewrote some information.
14.6.0
“Grade Activities”
79
Added steps to mark individual questions for redo and
enter comments at the question level and updated
images of Activity Grading screen.
14.5.0
Entire Guide
N/A
Rewrote guide to show new VirtualClassroom product
that is fully integrated with GradeBook.
ProgressBook VirtualClassroom Teacher Guide
Table of Contents
Change Log
i
Welcome to VirtualClassroom
1
Activities
3
Create Activities .......................................................................................................... 3
Add Content to Activities ............................................................................................. 6
Add Text ................................................................................................................ 8
Add a Question ..................................................................................................... 9
Multiple Choice................................................................................................ 9
True/False ..................................................................................................... 12
Fill in the Blank .............................................................................................. 14
Response ...................................................................................................... 16
File Upload .................................................................................................... 18
Matching........................................................................................................ 19
Multiple Choice with Pictures ........................................................................ 22
Upload a File ....................................................................................................... 24
Organize Activities .................................................................................................... 25
Create Groups..................................................................................................... 25
Add Page Breaks ................................................................................................ 27
Reorder Questions .............................................................................................. 28
Edit Questions..................................................................................................... 29
Delete Questions................................................................................................. 30
Schedule and Link Activities to Assignments............................................................ 31
Link and Schedule Activities from GradeBook .................................................... 31
Link and Schedule Activities from VirtualClassroom ........................................... 35
View Linked Activities.......................................................................................... 38
Library
39
Understand My Library.............................................................................................. 39
Create eCourses ....................................................................................................... 40
Create eCollections................................................................................................... 42
Collaborate with Other Teachers............................................................................... 44
ProgressBook VirtualClassroom Teacher Guide
iii
Search My Library......................................................................................................47
My Library Basic Search ......................................................................................47
My Library Advanced Search...............................................................................48
Organize My Library...................................................................................................50
Edit Content .........................................................................................................50
Pin Content ..........................................................................................................51
Group Content .....................................................................................................52
Move Content.......................................................................................................53
Delete Content .....................................................................................................55
Copy and Paste Content......................................................................................56
Share Content with Others in Your District ................................................................57
View All Content that You Have Shared...............................................................59
Remove Your Shared Content .............................................................................60
Search for Shared District Content ............................................................................61
District Library Basic Search................................................................................61
District Library Advanced Search.........................................................................63
Evaluate and Copy Shared District Content ..............................................................66
View Content Details............................................................................................66
View Ratings and Reviews...................................................................................68
View Questions ....................................................................................................69
View Publishing History........................................................................................70
Copy to My Library...............................................................................................71
Copy Single Item............................................................................................71
Copy Multiple Items........................................................................................72
View All Content that You Have Copied...............................................................73
Rate and Review Content ....................................................................................74
Grading
77
Select Activities to Grade...........................................................................................77
Grade Activities..........................................................................................................79
iv
ProgressBook VirtualClassroom Teacher Guide
Welcome to VirtualClassroom
VirtualClassroom is a web-based learning management system (LMS) that is integrated with
GradeBook. It facilitates blended learning both inside and outside the classroom. Using
VirtualClassroom, you can create activities such as homework, quizzes, and tests for your
students to complete online in ProgressBook.
Your personal library within VirtualClassroom (My Library) lets you store content for reuse and
collaborate with other teachers to create content. You can publish content from your personal
library to the District Library to share with others in your district, or you can search the District
Library for content to copy to your own library.
Refer to the appropriate section as follows:
•
To create activities and link them to assignments, see “Activities.”
•
To manage activities and other content within the Library, see “Library.”
•
To grade activities, see “Grading.”
Note: Your district must enable VirtualClassroom in order for you to schedule or
preview activities. If VirtualClassroom is not enabled, you can still use all other
features of the program to create activities, build up your library, and share or
copy content.
ProgressBook VirtualClassroom Teacher Guide
1
Welcome to VirtualClassroom
This page intentionally left blank.
2
ProgressBook VirtualClassroom Teacher Guide
Activities
VirtualClassroom lets you create activities such as homework, quizzes and tests for your students
to complete online using ProgressBook. You link these activities to assignments in GradeBook.
Refer to the appropriate section as follows:
•
“Create Activities”
•
“Add Content to Activities”
•
“Organize Activities”
•
“Edit Questions”
•
“Delete Questions”
•
“Schedule and Link Activities to Assignments”
Create Activities
To view a video of this procedure, go to:
http://www.progressbook.com/Videos/VC/Create-Activities
You can create VirtualClassroom activities in your library.
Note: For information on managing the content in your personal library, see
“Library.”
1. On the Library screen My Library tab, hover over the My Workspace section until the
Actions button displays.
2. Click Actions, and select “Add an Activity.”
Create Activities
ProgressBook VirtualClassroom Teacher Guide
3
Activities
The Add an Activity window opens.
3. Enter a Name for the activity.
4. Optional: Enter a Description.
Create Activity
5. Optional: To attach academic standards to the activity:
a. In the Common Core/State Standards section, click Add.
b. On the Add Standards window, select the Content Area and Grade of the
standard(s) you want to add.
c. In the list of standards that displays, select the check box next to each standard you
want to add.
d. Click Save.
4
ProgressBook VirtualClassroom Teacher Guide
Activities
Add Standards
6. On the Add an Activity window, click Save.
Activity with Standards
ProgressBook VirtualClassroom Teacher Guide
5
Activities
The activity now displays in the My Workspace section of the Library screen.
Activity Created
Note: Once you create the activity, you can start adding content to it, such as
instructions, questions and reference material. See “Add Content to Activities.”
Add Content to Activities
After you create a VirtualClassroom activity, you can begin adding content to it. Content can
include instructions and reference material as well as questions and work for students to
complete.
Note: If you have the Principal or Curriculum role in GradeBook, you can create
content and share it with teachers. (You also have access to view a teacher’s
library. For details, see ProgressBook GradeBook Principal User Guide.)
Note: At any time while you add content to an activity, if VirtualClassroom is
enabled for your district, you can preview the activity as students will see it in
ProgressBook. To do so, on the Activity Builder screen, near the top right, click
the Actions button, and then select “View as Student.”
Add content to activities as follows:
1. On the Library screen My Library tab, hover over the activity until the Actions button
displays.
2. Click Actions, and select “Use Activity Builder.”
6
ProgressBook VirtualClassroom Teacher Guide
Activities
Add Content to Activities
3. On the Activity Builder screen, click
the type of content you want to add:
, and select one of the following options based on
•
Add Text – Add ungraded items such as instructions, videos and images
(See “Add Text.”)
•
Add a Question – Add a multiple choice, true/false, fill in the blank, response, file
upload, matching, or multiple choice with pictures type question for students to
answer (See “Add a Question.”)
•
Upload a File – Add a Word, PDF, PowerPoint or Excel file (See “Upload a File.”)
Add Content
ProgressBook VirtualClassroom Teacher Guide
7
Activities
4. Create and save all content for the activity. The activity itself auto saves.
Note: You can use the rich text toolbar to format text, change colors or add links
or video. For more information, see Knowledge Base Article #1947 and
http://docs.cksource.com/CKEditor_3.x/Users_Guide. The toolbar includes a
math equation editor (WIRIS™) represented by
. For information about how
to use the editor, go to http://www.wiris.com/editor3/docs/manual.
Note: For information on organizing content within an activity, such as reordering,
grouping and chunking questions, see “Organize Activities.”
Add Text
To view a video of this procedure, go to:
http://www.progressbook.com/Videos/VC/Add-Text
“Text” is any ungraded item, such as instructions to students about the activity and reference
materials such as videos and images.
1. In the Activity Builder menu, select “Add Text.”
Add Text Option
2. Enter instructions for the activity and/or links to external content.
3. Click Save.
Add Text
8
ProgressBook VirtualClassroom Teacher Guide
Activities
Add a Question
To view a video of this procedure, go to:
http://www.progressbook.com/Videos/VC/Add-Question
Depending on the Answer Format of the question you are adding, you can make different
selections. Refer to the following examples:
•
“Multiple Choice”
•
“True/False”
•
“Fill in the Blank”
•
“Response”
•
“File Upload”
•
“Matching”
•
“Multiple Choice with Pictures”
Multiple Choice
Multiple choice questions offer one or more incorrect answer choices and only one correct choice.
Note: If you want to use pictures as answer choices for multiple choice questions,
see “Multiple Choice with Pictures.”
1. In the Activity Builder menu, select “Add a Question.”
Add a Question
Option
2. Enter the question in the text box.
3. Optional: To upload a file containing information or instructions:
a. Below the text box, click Add File.
b. Navigate to and select the file to upload.
c. On the Upload a File window, click Start.
The name of the uploaded file displays as a link with
open the file; click
to delete the file.
beside it. Click the link to
4. Choose an Answer Format of “Multiple Choice.”
Four response options—coded A, B, C, D—are provided by default.
ProgressBook VirtualClassroom Teacher Guide
9
Activities
5. Optional: If you want to code the possible answers differently, edit the Code field by
entering your preferred codes.
6. Designate at least two response options as follows:
a. In the Answer column, enter the answer for each response option.
b. In the Is Correct column of the correct answer, select the radio button. (This is for
your use or the auto grader’s when grading the activity.)
Note: To add another response option, click Add an Answer. To delete a
response option, click
.
7. In the Points field, enter the point value of this question.
8. Optional: To associate academic standards with this question, in the Common Core/State
Standards area:
•
If you added academic standards at the activity level, select the check box beside
each standard that you want to associate with this specific question.
•
If you did not add standards at the activity level, or would like to add additional
standards, you can add and select them from within the question. (For information on
adding academic standards, see “Create Activities.”)
Note: Adding standards within a question also adds them to the entire activity.
10
ProgressBook VirtualClassroom Teacher Guide
Activities
9. Click Save. Or, to continue adding questions, click Save & New.
Add Multiple Choice Question
ProgressBook VirtualClassroom Teacher Guide
11
Activities
True/False
True/False questions require students to decide between two possible answers, such as true vs.
false or yes vs. no.
1. In the Activity Builder menu, select “Add a Question.”
Add a Question
Option
2. Enter the question in the text box.
3. Optional: To upload a file containing information or instructions:
a. Below the text box, click Add File.
b. Navigate to and select the file to upload.
c. On the Upload a File window, click Start.
The name of the uploaded file displays as a link with
open the file; click
to delete the file.
beside it. Click the link to
4. Choose an Answer Format of “True/False.”
Two response options – “True” and “False” – are provided by default.
5. Optional: If you want to use different response options, in the Answer column, enter each
response option.
6. In the Is Correct column of the correct response option, select the radio button. (This is
for your use or the auto grader’s when grading the activity.)
7. In the Points field, enter the point value of this question.
8. Optional: To associate academic standards with this question, in the Common Core/State
Standards area:
•
If you added academic standards at the activity level, select the check box beside
each standard that you want to associate with this specific question.
•
If you did not add standards at the activity level, or would like to add additional
standards, you can add and select them from within the question. (For information on
adding academic standards, see “Create Activities.”)
Note: Adding standards within a question also adds them to the entire activity.
12
ProgressBook VirtualClassroom Teacher Guide
Activities
9. Click Save. Or, to continue adding questions, click Save & New.
Add True/False Question
ProgressBook VirtualClassroom Teacher Guide
13
Activities
Fill in the Blank
Fill in the blank questions require students to complete a sentence by filling in the correct word or
phrase.
1. In the Activity Builder menu, select “Add a Question.”
Add a Question
Option
2. Enter the question in the text box.
3. Optional: To upload a file containing information or instructions:
a. Below the text box, click Add File.
b. Navigate to and select the file to upload.
c. On the Upload a File window, click Start.
The name of the uploaded file displays as a link with
open the file; click
to delete the file.
beside it. Click the link to
4. Choose an Answer Format of “Fill in the Blank.”
5. In the Correct Answer area, enter the correct response. (This is for your use or the auto
grader’s, if an exact match, when grading the activity)
6. In the Points field, enter the point value of this question.
7. Optional: To associate academic standards with this question, in the Common Core/State
Standards area:
•
If you added academic standards at the activity level, select the check box beside
each standard that you want to associate with this specific question.
•
If you did not add standards at the activity level, or would like to add additional
standards, you can add and select them from within the question. (For information on
adding academic standards, see “Create Activities.”)
Note: Adding standards within a question also adds them to the entire activity.
14
ProgressBook VirtualClassroom Teacher Guide
Activities
8. Click Save. Or, to continue adding questions, click Save & New.
Add Fill in the Blank Question
ProgressBook VirtualClassroom Teacher Guide
15
Activities
Response
Response questions require students to provide an open-ended response. They allow for a more
extended response than other question types.
1. In the Activity Builder menu, select “Add a Question.”
Add a Question
Option
2. Enter the question in the text box.
3. Optional: To upload a file containing information or instructions:
a. Below the text box, click Add File.
b. Navigate to and select the file to upload.
c. On the Upload a File window, click Start.
The name of the uploaded file displays as a link with
open the file; click
to delete the file.
beside it. Click the link to
4. Choose an Answer Format of “Response.”
5. In the Correct Answer Example area, enter one or more examples of an acceptable
response. (This is for your use when grading the activity.)
6. Optional: To allow students to upload a file containing their answer, select the Allow
students to upload content as an answer check box.
7. Optional: To make the rich text toolbar available to students to use in their response, select
the Allow students to use the rich text tool to answer the question check box.
8. In the Points field, enter the point value of this question.
9. Optional: To associate academic standards with this question, in the Common Core/State
Standards area:
•
If you added academic standards at the activity level, select the check box beside
each standard that you want to associate with this specific question.
•
If you did not add standards at the activity level, or would like to add additional
standards, you can add and select them from within the question. (For information on
adding academic standards, see “Create Activities.”)
Note: Adding standards within a question also adds them to the entire activity.
16
ProgressBook VirtualClassroom Teacher Guide
Activities
10. Click Save. Or, to continue adding questions, click Save & New.
Add Response Question
ProgressBook VirtualClassroom Teacher Guide
17
Activities
File Upload
File upload questions require students to provide their answer in a separate file that they upload
to the activity.
1. In the Activity Builder menu, select “Add a Question.”
Add a Question
Option
2. Enter the question in the text box.
3. Optional: To upload a file containing information or instructions:
a. Below the text box, click Add File.
b. Navigate to and select the file to upload.
c. On the Upload a File window, click Start.
The name of the uploaded file displays as a link with
open the file; click
to delete the file.
beside it. Click the link to
4. Choose an Answer Format of “File Upload.”
5. In the Points field, enter the point value of this question.
6. Optional: To associate academic standards with this question, in the Common Core/State
Standards area:
•
If you added academic standards at the activity level, select the check box beside
each standard that you want to associate with this specific question.
•
If you did not add standards at the activity level, or would like to add additional
standards, you can add and select them from within the question. (For information on
adding academic standards, see “Create Activities.”)
Note: Adding standards within a question also adds them to the entire activity.
18
ProgressBook VirtualClassroom Teacher Guide
Activities
7. Click Save. Or, to continue adding questions, click Save & New.
Add File Upload Question
Matching
Matching questions require students to match items from one column with the corresponding item
from the second column.
1. In the Activity Builder menu, select “Add a Question.”
Add a Question
Option
2. Enter the question (or instructions) in the text box.
ProgressBook VirtualClassroom Teacher Guide
19
Activities
3. Optional: To upload a file containing information or instructions:
a. Below the text box, click Add File.
b. Navigate to and select the file to upload.
c. On the Upload a File window, click Start.
The name of the uploaded file displays as a link with
open the file; click
to delete the file.
beside it. Click the link to
4. Choose an Answer Format of “Matching.”
A grid with two columns and six blank rows displays.
Grid for Answer Format of “Matching”
5. Optional: If you want to change the standard Item and Match column headings, click
and edit the names.
6. In the left-hand column, enter at least two items to match, providing the correct responses
in the corresponding row of the right-hand column.
Note: To add more rows to the grid, click Add more matches. To delete a row,
click
.
Note: Possible matches display for students in alphabetical order (text) or
ascending order (numbers).
7. Optional: To allow students to earn partial credit on this question, select the Allow partial
credit check box.
8. In the Points field, enter the point value of this question.
9. Optional: To associate academic standards with this question, in the Common Core/State
Standards area:
•
If you added academic standards at the activity level, select the check box beside
each standard that you want to associate with this specific question.
•
If you did not add standards at the activity level, or would like to add additional
standards, you can add and select them from within the question. (For information on
adding academic standards, see “Create Activities.”)
Note: Adding standards within a question also adds them to the entire activity.
20
ProgressBook VirtualClassroom Teacher Guide
Activities
10. Click Save. Or, to continue adding matching questions, click Save & New.
Add Matching Question
ProgressBook VirtualClassroom Teacher Guide
21
Activities
Multiple Choice with Pictures
Multiple choice with pictures questions offer one or more incorrect answer choices and only one
correct choice. You upload pictures to represent the possible answer choices.
Note: If you want to use words or phrases as the answer choices (rather than
pictures), see “Multiple Choice.”
1. In the Activity Builder menu, select “Add a Question.”
Add a Question
Option
2. Enter the question in the text box.
3. Optional: To upload a file containing information or instructions:
a. Below the text box, click Add File.
b. Navigate to and select the file to upload.
c. On the Upload a File window, click Start.
The name of the uploaded file displays as a link with
open the file; click
to delete the file.
beside it. Click the link to
4. Choose an Answer Format of “Multiple Choice w/Pics.”
Four response options—coded A, B, C, D—are provided by default.
5. Optional: If you want to code the possible answers differently, edit the Code field by
entering your preferred codes.
6. Designate at least two response options as follows:
a. In the Answer column, upload possible answers as follows:
i.
Click Add File.
ii. Navigate to and select the file to upload.
iii. On the Upload a File window, click Start.
The picture displays in the Answer column.
b. In the Is Correct column of the correct answer, select the radio button. (This is for
your use or the auto grader’s when grading the activity.)
Note: To add another response option, click Add an Answer. To delete a
response option, click
.
22
ProgressBook VirtualClassroom Teacher Guide
Activities
7. In the Points field, enter the point value of this question.
8. Optional: To associate academic standards with this question, in the Common Core/State
Standards area:
•
If you added academic standards at the activity level, select the check box beside
each standard that you want to associate with this specific question.
•
If you did not add standards at the activity level, or would like to add additional
standards, you can add and select them from within the question. (For information on
adding academic standards, see “Create Activities.”)
Note: Adding standards within a question also adds them to the entire activity.
9. Click Save. Or, to continue adding questions, click Save & New.
Add Multiple Choice with Pictures Question
ProgressBook VirtualClassroom Teacher Guide
23
Activities
Upload a File
To view a video of this procedure, go to:
http://www.progressbook.com/Videos/VC/Upload-File
You can upload a Word, PDF, PowerPoint or Excel file for students to use when completing the
activity.
Note: You can also upload a file at the question level. (See “Add a Question.”)
1. In the Activity Builder menu, select “Upload a File.”
Upload a File Option
2. Click Add File.
Upload a File
3. Navigate to and select the file to upload.
4. On the Upload a File window, click Start.
Start File Upload
24
ProgressBook VirtualClassroom Teacher Guide
Activities
The name of the uploaded file displays as a link with
the file; click
to delete the file.
beside it. Click the link to open
5. Click Save. Or, to continue uploading files, click Save & New.
Save Uploaded File
Organize Activities
There are several ways you can organize the content within your activities. Refer to the
appropriate section as follows:
•
“Create Groups”
•
“Add Page Breaks”
•
“Reorder Questions”
Create Groups
To view a video of this procedure, go to:
http://www.progressbook.com/Videos/VC/Add-Group
You can create groups to keep certain text and questions together in the same section even if you
choose to scramble questions.
1. In the row of the content after which you want to add a group, click
.
2. Select “Add a Group.”
Add a Group Option
3. Optional: In the Group Name field, enter a name for the group.
4. Optional: If you want questions within the group to be scrambled so that students do not
all see them in the same order, select the Allow items in this group to be scrambled?
check box.
ProgressBook VirtualClassroom Teacher Guide
25
Activities
5. Enter any instructions or information for your students in the text box.
6. Optional: To upload a file containing information or instructions:
a. Below the text box, click Add File.
b. Navigate to and select the file to upload.
c. On the Upload a File window, click Start.
The name of the uploaded file displays as a link with
open the file; click
to delete the file.
beside it. Click the link to
7. Click Save.
Create Groups
8. Add questions to the group using one or both of the following methods:
•
To add a new question to the group:
i.
Within the group, click
.
ii. Select “Add a Question.”
iii. Create the question. (See “Add a Question.”)
Add New Question to Group
•
To move an existing question into the group:
i.
26
Hover over the question until icons display on the right side of the screen.
ProgressBook VirtualClassroom Teacher Guide
Activities
ii. Click and hold
.
Move Question
iii. Drag and drop the question into the group.
Note: For more information on moving and reordering content, see “Reorder
Questions.”
Questions Added to Group
Add Page Breaks
To view a video of this procedure, go to:
http://www.progressbook.com/Videos/VC/Add-Page-Break
You can “chunk” your content into pages by adding page breaks. In this way you can control how
many questions display to students at once.
1. In the row of the content after which you want to add a page break, click
.
2. Select “Add a Page Break.”
Add a Page Break
Option
ProgressBook VirtualClassroom Teacher Guide
27
Activities
The following page break symbol displays in the area of your proposed page break.
3. Click Save.
Add Page Break
Reorder Questions
To view a video of this procedure, go to:
http://www.progressbook.com/Videos/VC/Reorder-Questions
You can reorder questions in an activity to change the sequence in which they display.
Note: You can also use these steps to reorder other types of content within an
activity.
1. Hover over the question you want to reorder until icons display on the right side of the
screen.
2. Click and hold
.
Reorder Questions
28
ProgressBook VirtualClassroom Teacher Guide
Activities
3. Drag the question to the area where you want to move it until a green line displays.
4. Drop the question in that location.
Drag to new area. Drop
when green line displays.
Drag and Drop Question
The questions display in the newly selected order.
Questions Reordered
Edit Questions
To view a video of this procedure, go to:
http://www.progressbook.com/Videos/VC/Edit-Questions
You can edit questions in your activities.
Note: You can also use these steps to edit other types of content within an
activity.
1. In the Activity Builder, hover over the question you want to edit until icons display on the
right side of the screen.
ProgressBook VirtualClassroom Teacher Guide
29
Activities
2. Click
.
Edit Questions
3. Make any desired changes.
4. Click Save.
Edit Question
Delete Questions
To view a video of this procedure, go to:
http://www.progressbook.com/Videos/VC/Delete-Questions
You can delete questions from your activities.
Note: You can also use these steps to delete other types of content within an
activity.
1. In the Activity Builder, hover over the question you want to delete until icons display on
the right side of the screen.
30
ProgressBook VirtualClassroom Teacher Guide
Activities
2. Click
.
Delete Questions
3. On the confirmation window, click Delete.
Schedule and Link Activities to Assignments
You can link an activity to one or more of your existing assignments in GradeBook and schedule
the time for students to work on the activity in ProgressBook.
Refer to the appropriate section as follows:
•
To link an activity to an assignment from within GradeBook, see “Link and Schedule
Activities from GradeBook.”
•
To link an activity to an assignment from within VirtualClassroom, see “Link and Schedule
Activities from VirtualClassroom.”
•
To view the activities you have linked to assignments, see “View Linked Activities.”
Link and Schedule Activities from GradeBook
To view a video of this procedure, go to:
http://www.progressbook.com/Videos/VC/Link-GradeBook-Activity
1. On the Class Dashboard, click an assignment to which you want to link an activity.
Select Assignment to Link Activity
The Assignment Marks screen displays.
ProgressBook VirtualClassroom Teacher Guide
31
Activities
2. Click the Main tab.
Assignment Marks Screen
The Assignment Details screen displays.
3. Select the VirtualClassroom Activity? check box.
Assignment Details Screen
A new section opens in which you can specify details about the activity you want to link to
this assignment.
4. Choose one of the following options:
•
If you have already created the activity you want to link:
i.
Click Select Activity.
Select Activity
32
ProgressBook VirtualClassroom Teacher Guide
Activities
ii. On the Select an Activity window, select the activity.
iii. Click Select.
Select an Activity
•
If you have not yet created the activity you want to link, click Add Activity and create
the new activity.
Note: The Name field on the Add an Activity window defaults to the text that you
entered in the Description field on the Assignment Details screen. For more
information on creating activities, see “Create Activities.”
Add Activity
ProgressBook VirtualClassroom Teacher Guide
33
Activities
The activity is now linked to the GradeBook assignment and displays in the Activity field
on the Assignment Details screen.
5. In the Allow students to work on the activity from field, enter or select the date and time
when students can begin working on the activity.
6. Optional: Specify details about the activity using any or all of the following options:
•
To set an end date and time when students can no longer work on the activity, in the
(Allow students to work on the activity) to field, enter or select the date and time.
(For example, you might allow two days for students to complete online homework
but a period of only 45 minutes on a specific date and time for students to complete
an online test.)
•
To allow students to view their answers after they submit the activity to be graded,
select the Allow students to view their answers? check box.
•
If you want VirtualClassroom to auto grade true/false, multiple choice, matching, fill in
the blank (exact match), and multiple choice with pictures type questions, select the
Auto-grade? check box.
•
To scramble questions within the activity so that students do not all see the questions
in the same order, select the Scramble the questions? check box.
7. Click Save.
Specify Activity Details
A Notifications message displays briefly to confirm that your changes are saved.
Save Confirmation
8. Optional: To view, edit or remove (unlink) the activity, click the appropriate button.
Note: Once any student begins the activity, these buttons are disabled.
34
ProgressBook VirtualClassroom Teacher Guide
Activities
Activity Options
Note: To view the activity linked to the assignment on the Class Dashboard, see
“View Linked Activities.”
Link and Schedule Activities from VirtualClassroom
To view a video of this procedure, go to:
http://www.progressbook.com/Videos/VC/Link-VirtualClassroom-Activity
1. On the Library screen My Library tab, hover over the activity you want to schedule until
the Actions button displays.
2. Click Actions, and select “Schedule.”
Select Activity to Link
3. On the scheduling window that opens, select or create an assignment to which to link this
activity:
i.
To link to an existing assignment, in the Select an Assignment drop-down lists,
select an existing course, grading period and assignment.
ii. To create a new assignment, click Add an Assignment.
ProgressBook VirtualClassroom Teacher Guide
35
Activities
Link activity to
existing assignment.
Create new assignment
and link activity to it.
Link Activity to Assignment
4. In the Assignment Details section, confirm or update the assignment details. (For more
information on these fields, see ProgressBook GradeBook Teacher Guide.)
Note: Generally, the total point value of the activity should match the point value
of the assignment. However, you can make the assignment worth fewer points
than the activity if you want to let students earn extra credit.
36
ProgressBook VirtualClassroom Teacher Guide
Activities
5. In the Classes section drop-down list, select the class(es) for which you want to schedule
this activity.
6. In the Students section, select the student(s) to whom you want to assign this activity.
7. In the Options section, confirm or update the assignment options. (For more information
on these options, see ProgressBook GradeBook Teacher Guide.)
8. In the VirtualClassroom Activity Options section, in the Allow students to work on the
activity from field, enter or select the date and time when students can begin working on
the activity.
9. Optional: Specify details about the activity using any or all of the following options:
•
To set an end date and time when students can no longer work on the activity, in the
(Allow students to work on the activity) to field, enter or select the date and time.
(For example, you might allow two days for students to complete online homework
but a period of only 45 minutes on a specific date and time for students to complete
an online test.)
•
To allow students to view their answers after they submit the activity to be graded,
select the Allow students to view their answers? check box.
•
If you want VirtualClassroom to auto grade true/false, multiple choice, matching, fill in
the blank (exact match), and multiple choice with pictures type questions, select the
Auto-grade? check box.
•
To scramble questions within the activity so that students do not all see the questions
in the same order, select the Scramble the questions? check box.
10. Optional: Attach standards to the activity.
Note: For information on attaching standards, see “Create Activities.”
11. Click Save.
The scheduling window displays the scheduled activity.
12. Optional: On this window, you can edit the activity, unschedule it or schedule it for
additional classes using the options shown.
Edit or
unschedule
the activity.
Schedule the activity
for additional classes.
Activity Scheduled
Note: To view the activity linked to the assignment on the Class Dashboard, see
“View Linked Activities.”
ProgressBook VirtualClassroom Teacher Guide
37
Activities
View Linked Activities
To view a video of this procedure, go to:
http://www.progressbook.com/Videos/VC/View-Linked-Activities
1. On the Class Dashboard screen Assignments tab, note the
icon beside any
assignment, indicating it has a VirtualClassroom activity linked to it.
Activity Linked to Assignment
2. Click the Activities tab, and review the status of all activities and your students’ progress
in completing them in the following columns:
•
View – Indicates whether you have allowed students to view their answers after
submitting the activity for grading:
– Students can view their answers.
– Students cannot view their answers.
•
– Number of students who have not completed the activity
Note: To see which students have not completed the activity, hover over the
number to display a list of student names.
•
– Number of students who have submitted the activity for grading
Status of Activities
38
ProgressBook VirtualClassroom Teacher Guide
Library
The VirtualClassroom Library is an area to create activities and other materials and organize
them in a way that you can easily reuse them.
Note: Currently, only the personal library (My Library tab) and District Library
are functional. In upcoming releases, the Private Libraries and Public Library
will be available to let you purchase content and share content with educators
outside of your district.
•
For information on the layout of your personal library, see “Understand My Library.”
•
For information on creating activities and content, see “Activities.”
•
To create areas to store activities and resources for your classes, see “Create eCourses.”
•
To create areas to store additional materials, see “Create eCollections.”
•
To work with other teachers to create and share activities, see “Collaborate with Other
Teachers.”
•
To find an activity or topic in your library, see “Search My Library.”
•
To organize and maintain your library content, see “Organize My Library.”
•
To share content with others in your district, see “Share Content with Others in Your
District.”
•
To search for content shared by others in your district, see “Search for Shared District
Content.”
•
To copy content shared by others in your district, see “Evaluate and Copy Shared District
Content.”
Understand My Library
On the Library screen My Library tab, you can use the following areas to store and organize your
content:
•
My eCourses – Activities that you are ready to use; grouped into courses for reuse in
future classes (See “Create eCourses.”)
•
My eCollections – Additional teaching and reference materials or documentation (See
“Create eCollections.”)
•
My Workspace – Activities you are currently developing (See “Create Activities.”)
•
My Collaborations – Activities you are developing with other staff members (See
“Collaborate with Other Teachers.”)
ProgressBook VirtualClassroom Teacher Guide
39
Library
My Library
Create eCourses
To view a video of this procedure, go to:
http://www.progressbook.com/Videos/VC/Create-eCourses
You can create eCourses to store activities that you are ready to use and want to group together
for a specific course.
1. Hover over the My eCourses section until the Actions button displays.
2. Click Actions, and select “Add an eCourse.”
40
ProgressBook VirtualClassroom Teacher Guide
Library
Create eCourses
The Add an eCourse window opens.
3. Enter a Name for the eCourse.
4. Optional: Enter a Description.
5. Optional: Attach standards to the eCourse.
Note: For information on attaching standards to content, see “Create Activities.”
6. Click Save.
Create eCourse
ProgressBook VirtualClassroom Teacher Guide
41
Library
The eCourse now displays in the My eCourses section of My Library with several default
folders.
eCourse Created
Note: Once you create the eCourse, you can start adding content to it by creating
modules (units) and uploading files. You can also drag and drop content from
other sections, such as My Workspace. (See “Organize My Library.”)
Create eCollections
To view a video of this procedure, go to:
http://www.progressbook.com/Videos/VC/Create-eCollections
You can create eCollections to store additional teaching and reference materials or
documentation that you do not want grouped in an eCourse.
1. Hover over the My eCollections section until the Actions button displays.
2. Click Actions, and select “Add an eCollection.”
Create eCollections
42
ProgressBook VirtualClassroom Teacher Guide
Library
The Add an eCollection window opens.
3. Enter a Name for the eCollection.
4. Optional: Enter a Description.
5. Optional: Attach standards to the eCollection.
Note: For information on attaching standards to content, see “Create Activities.”
6. Click Save.
Create eCollection
The eCollection now displays in the My eCollections section of My Library.
eCollection Created
Note: Once you create the eCollection, you can start adding content to it by
creating modules (units), adding questions and activities and uploading files. You
can also drag and drop content from other sections, such as My Workspace.
(See “Organize My Library.”)
ProgressBook VirtualClassroom Teacher Guide
43
Library
Collaborate with Other Teachers
To view a video of this procedure, go to:
http://www.progressbook.com/Videos/VC/Collaborate-with-Teachers
You can work together with other teachers (as well as principals and curriculum directors) to
create and share eCourses and eCollections. For example, you might want to write the content
for one chapter while other staff members write the other chapters.
Note: While you are collaborating on an item, it is not available for you to link to
an assignment or schedule for students to work on.
1. Hover over the eCourse or eCollection on which you want to collaborate until the Actions
button displays.
2. Click Actions, and select “Collaborate.”
Collaborate
The Collaborators window opens with your name displayed as the owner of the
collaboration.
3. On the line(s) beneath your name, type at least the first three letters of the last name of
each of your co-author(s) until they display in a list.
4. Select one name on each line.
5. Click Save.
44
ProgressBook VirtualClassroom Teacher Guide
Library
Add Collaborators
Since you are the main author of the collaboration, the eCourse or eCollection displays to you in
its original location with
to indicate it is in collaboration.
Collaboration Created
Note: The collaboration item displays in the My Collaborations section for your
co-authors.
ProgressBook VirtualClassroom Teacher Guide
45
Library
6. After all authors have added their content (or at any time if you wish to stop collaborating),
you can end the collaboration entirely or remove only some co-authors.
a. Hover over the eCourse or eCollection on which you want to stop collaborating until
the Actions button displays.
b. Click Actions, and select “Collaborate.”
End Collaboration
c. On the Collaborators window, in the row of the co-author(s) you want to remove,
click Delete.
d. Click Save.
Delete Collaborators
46
ProgressBook VirtualClassroom Teacher Guide
Library
Ending a collaboration has the following effects:
•
For you: If you removed all co-authors, the
row of the eCourse or eCollection.
icon no longer displays in the
•
For your co-authors: The collaboration item no longer displays in the My
Collaborations section. Instead, a copy displays in the My Workspace
section.
Search My Library
You can locate specific topics or activities in your library using the search feature.
•
To search using only key words as your search criteria, see “My Library Basic Search.”
•
To search using additional criteria such as author’s name, standards, or type of library
item, see “My Library Advanced Search.”
My Library Basic Search
To quickly find something in your library, perform a basic search using a single word or phrase.
1. On the Library screen, My Library tab, enter a key word or phrase in the Enter Search
Criteria field, and then click Search.
My Library – Basic Search
Items in My Library that contain that word or phrase in their name or description display
in a grid. You can sort the results on any column by clicking the column heading.
My Library – Basic Search Results
ProgressBook VirtualClassroom Teacher Guide
47
Library
2. Optional: To take action on an item (for instance, to add more questions to an activity or
schedule a time for students to work on it), in the Actions column, click
and select the
action you wish to take.
My Library Advanced Search
To search for a library item by author name, item type(s), standard(s), key word, or a combination
of those options, use the Advanced Search feature.
1. On the Library screen, My Library tab, click Advanced Search.
My Library – Advanced Search Link
The search area expands to include advanced search fields.
My Library – Advanced Search Area
2. In the advanced search area, use one or more of the following search options:
•
In the Enter an Author (Last Name, First Name) field, enter a full or partial name.
•
In the Select a Type(s) ... drop-down list, select the check box next to the type(s) of
items you want to find.
•
To search on a standard, next to the Select a Standard(s) ... field, click
.
The Add Standards window displays.
i.
On the Add Standards window, select the Content Area and Grade of the
standard(s) you want to find.
ii. In the list of standards that displays, select the check box next to each standard
you want to search on.
48
ProgressBook VirtualClassroom Teacher Guide
Library
iii. Click Save.
Search on Standards
•
In the Enter Search Criteria field, enter a key word or phrase.
3. Click Search.
Items in My Library matching your search criteria display in a grid. You can sort the results
on any column by clicking the column heading.
My Library – Advanced Search Results
ProgressBook VirtualClassroom Teacher Guide
49
Library
4. Optional: To take action on an item (for instance, to add more questions to an activity or
schedule a time for students to work on it), in the Actions column, click
and select the
action you wish to take.
Organize My Library
You can manage your library content in the following ways:
•
To edit the properties of existing content, see “Edit Content.”
•
To create a space to view and work on a particular piece of content, see “Pin Content.”
•
To organize content into groups within the library, see “Group Content.”
•
To reorder content within the library, see “Move Content.”
•
To delete content from the library, see “Delete Content.”
•
To copy and paste content into another area of the library, see “Copy and Paste Content.”
Edit Content
To view a video of this procedure, go to:
http://www.progressbook.com/Videos/VC/Edit-Content
You can edit the properties of an eCourse, eCollection, collaboration, module, activity or question.
1. Hover over the item you want to edit until the Actions button displays.
2. Click Actions and select “Edit Properties.”
Edit Properties
3. On the edit window, make any needed changes.
50
ProgressBook VirtualClassroom Teacher Guide
Library
4. Click Save.
Edit Content
Pin Content
To view a video of this procedure, go to:
http://www.progressbook.com/Videos/VC/Pin-Content
If you want to make a certain item in your library stand out so it is easier to find and work on, you
can “pin” it so that it remains visible even when its section is collapsed.
1. Hover over the item you want to pin until the Actions button displays.
2. Click Actions and select “Pin.”
Pin Content
ProgressBook VirtualClassroom Teacher Guide
51
Library
The content item now displays on the left side of the screen and remains there even if you
collapse the section in which it resides.
Note: To unpin the item, click
.
Content Pinned
Group Content
You can organize your content by grouping items into modules (such as “units”) and folders.
Wherever these items are available for you to add, they display as selections when you click
Actions.
1. Add the modules and folders that you need.
Group Content
52
ProgressBook VirtualClassroom Teacher Guide
Library
2. Drag and drop content into the modules and folders as needed. (See “Move Content.”)
Content Grouped
Move Content
To view a video of this procedure, go to:
http://www.progressbook.com/Videos/VC/Move-Content
You can move content around in your library by dragging and dropping it. For example, you can
drag and drop activities to reorder them. Or you can move an activity from My Workspace to a
unit in My eCourses.
Note: When you drag and drop items that are in collaboration, this creates a copy
of the content rather than moving it.
1. Click and hold the item you want to move.
2. Drag the item to the area where you want to move it.
ProgressBook VirtualClassroom Teacher Guide
53
Library
As you drag the item,
the icon changes to
displays along with it. When you reach any valid drop location,
.
Move Content
3. Drop the item in the new location.
Drag to
new area
and drop.
Drag and Drop Content
54
ProgressBook VirtualClassroom Teacher Guide
Library
The content displays in the new location.
Content Moved
Delete Content
To view a video of this procedure, go to:
http://www.progressbook.com/Videos/VC/Delete-Content
You can delete any content except for activities that are scheduled.
1. Drag and drop the content to the Recycle Bin.
Note: For more information on moving content using the drag and drop method,
see “Move Content.”
Delete Content
ProgressBook VirtualClassroom Teacher Guide
55
Library
2. On the confirmation window, click Delete.
Confirm Delete
Note: To undelete content, drag and drop it from the Recycle Bin to another
location.
Copy and Paste Content
You can copy and paste many items within your library. This functionality is available for an item
if the “Copy” and “Paste” options in the Actions drop-down list are enabled.
Note: You can only paste questions into an activity that students have not started.
1. Hover over the item you want to copy until the Actions button displays.
2. Click Actions and select “Copy.”
Copy Library Item
3. Hover over the activity or area where you want to paste the copied item until the Actions
button displays.
56
ProgressBook VirtualClassroom Teacher Guide
Library
4. Click Actions and select “Paste.”
Paste Library Item
The copied content now displays in the new location.
Item Pasted
Share Content with Others in Your District
You can share content with others in your district by publishing it to the District Library. You can
publish an eCourse, a single module or an eCollection as follows:
1. Hover over the item you want to share until the Actions button displays.
2. Click Actions and select “Publish/UnPublish.”
Publish
ProgressBook VirtualClassroom Teacher Guide
57
Library
The Publish window displays with Name and Description already completed (based on
what you designated when you created the item).
3. In the Subjects drop-down list, select the check box next to the subject(s) covered in the
content you are sharing.
4. In the Grade Levels drop-down list, select the check box next to the grade level(s) to
which the content applies.
5. Optional: In the Key Words field, enter one or more words that describe the item so others
can easily find it in a search of the library.
6. Read the District Library disclaimer statement and select the check box to indicate you
agree; then click Publish to my District Library.
The item is published to the District Library and the status displays.
Published Content Status
Note: If you are updating content that you previously published, the status
indicates when you last updated it, the rating others gave it, and the number of
times it has been copied. Click Apply Changes and describe the changes in the
text field provided; then click Update.
Note: To view a list of all content that you have shared, see “View All Content that
You Have Shared.”
58
ProgressBook VirtualClassroom Teacher Guide
Library
View All Content that You Have Shared
After you publish material from your personal library to the District Library, you can view a list of
all content you have shared.
1. On the Library screen, District Library tab, in the View by area, click My Published
Content.
A list of all content you have published displays in a grid.
Note: You can sort the grid by clicking a column header. The Times Copied
column displays how many times others have copied an item.
Other
teachers
have
copied
this item
six times.
View Shared (Published) Content
2. Optional: To bookmark an item (or unbookmark it), click
.
3. Optional: To take action on an item (for instance, to review details about a course or
activity or to view course ratings and comments), in the Actions column, click
and
select the action you wish to take.
Note: For information on the actions you can take, see “Evaluate and Copy
Shared District Content.”
ProgressBook VirtualClassroom Teacher Guide
59
Library
Remove Your Shared Content
At any time, you can remove content that you published to the District Library.
1. In My Library, hover over the item you want to stop sharing until the Actions button
displays.
2. Click Actions and select “Publish/UnPublish.”
Remove Shared Content
3. On the Publish window, click UnPublish.
The content is now removed from the District Library.
Shared Content Removed
Note: Teachers who previously copied the content to their personal libraries can
still use their copy of the material.
60
ProgressBook VirtualClassroom Teacher Guide
Library
Search for Shared District Content
The District Library stores content that you and other district staff create and publish to share
with others in your school district. You can locate specific topics or activities in the District Library
by using the search feature.
•
To search using only key words as your search criteria, see “District Library Basic
Search.”
•
To search using additional criteria such as subject, grade level, author’s name, type of
library item, or standards, see “District Library Advanced Search.”
District Library Basic Search
To perform a basic search using a single word or phrase:
1. On the Library screen, District Library tab, enter a key word or phrase in the Enter
Search Criteria field, and then click Search.
Note: If you prefer to search using criteria such as subject, grade level, author’s
name, type of library item, or standards, see “District Library Advanced Search.”
District Library – Basic Search
Items in the District Library that contain that word or phrase in their name or description
display in a grid.
2. Optional: To filter the search results, click one of the View by buttons as follows:
•
My Published Content – view only items that you have published (For information on
sharing your content, see “Share Content with Others in Your District.”)
•
My Copied Content – view only content that you have already copied to your
personal library (For information on copying shared district content, see “Evaluate
and Copy Shared District Content.”)
•
My Bookmarks – view only items that you have bookmarked
Note: In all views, you can sort the grid by clicking any column header except Sel
and Actions.
ProgressBook VirtualClassroom Teacher Guide
61
Library
Note: The Times Copied column displays how many times others have copied
an item (numeral only) or how many times you copied an item (numeral and
).
Other
teachers
have
copied
this item
six times.
Item is
bookmarked
You have
copied
these
items
once.
District Library – Basic Search Results (Sorted on Grades Column)
3. Optional: To bookmark an item of interest (or unbookmark it), click
.
4. Optional: To take action on an item (for instance, to view details about a course or activity,
view course ratings and comments, or copy an item to your personal library), in the
Actions column, click
and select the action you wish to take.
Note: For information on the actions you can take, see “Evaluate and Copy
Shared District Content.”
62
ProgressBook VirtualClassroom Teacher Guide
Library
District Library Advanced Search
To search for a library item by subject, grade level, author’s name, type of library item, standards,
key word, or a combination of those options, use the Advanced Search feature.
1. On the Library screen, District Library tab, click Advanced Search.
Note: To search using only key words as your search criteria, see “District Library
Basic Search.”
District Library – Advanced Search Link
The search area expands to include advanced search fields.
2. In the advanced search area, use one or more of the following search options:
•
In the Select a Subject(s) drop-down list, select the check box next to the subject(s)
for which you want to search.
•
In the Select a Grade Level(s) drop-down list, select the check box next to the grade
level(s) for which you want to search.
•
In the Enter an Author (Last Name, First Name) field, enter a full or partial name.
•
In the Select a Type(s) ... drop-down list, select the check box next to the type(s) of
items you want to find.
•
To search on a standard, next to the Select a Standard(s) ... field, click
.
District Library – Advanced Search Area
ProgressBook VirtualClassroom Teacher Guide
63
Library
The Add Standards window displays.
i.
On the Add Standards window, select the Content Area and Grade of the
standard(s) you want to find.
ii. In the list of standards that displays, select the check box next to each standard
you want to search on.
iii. Click Save.
Search on Standards
•
In the Enter Search Criteria field, enter a key word or phrase.
3. Click Search.
Items in the District Library matching your search criteria display in a grid. You can sort
the results on any column by clicking the column heading.
4. Optional: To filter the search results, click one of the View by buttons as follows:
•
My Published Content – view only items that you have published (For information on
sharing your content, see “Share Content with Others in Your District.”)
•
My Copied Content – view only content that you have already copied to your
personal library (For information on copying shared district content, see “Evaluate
and Copy Shared District Content.”)
•
My Bookmarks – view only items that you have bookmarked
Note: In all views, you can sort the grid by clicking any column header except Sel
and Actions.
64
ProgressBook VirtualClassroom Teacher Guide
Library
Note: The Times Copied column displays how many times others have copied
an item (numeral only) or how many times you copied an item (numeral and
).
Other
teachers
have
copied
this item
twice.
Item is
bookmarked
You have
copied
these
items
once.
District Library – Advanced Search Results (Sorted on Grades Column)
5. Optional: To bookmark an item of interest (or unbookmark it), click
.
6. Optional: To take action on an item (for instance, to view details about a course or activity,
view course ratings and comments, or to copy an item to your personal library), in the
Actions column, click
and select the action you wish to take.
Note: For information on the actions you can take, see “Evaluate and Copy
Shared District Content.”
ProgressBook VirtualClassroom Teacher Guide
65
Library
Evaluate and Copy Shared District Content
After locating items of interest in the District Library (see “Search for Shared District Content” ),
you can view details about them and read reviews from other teachers to help determine whether
you want to copy them to your personal library. Refer to the appropriate topic as follows:
•
To view an item’s description, the academic standards tied to it, and a hierarchy that
shows all related material, see “View Content Details.”
•
To check ratings and reviews for an eCourse or Module, see “View Ratings and
Reviews.”
•
To view individual questions, see “View Questions.”
•
To view updates to an eCourse, eCollection, or module, see “View Publishing History.”
•
To copy content to your personal library, see “Copy to My Library.”
•
To view all content that you have copied, see “View All Content that You Have Copied.”
•
To rate and review content, see “Rate and Review Content.”
View Content Details
Viewing the details of library content can help you determine whether it is suitable for your
curriculum. You can view details of any library item as follows:
1. In the row of the item about which you want to see details, click the Actions button.
2. Select “View Details.”
View Details
The Details window opens and displays the name and description of the item, along with
a list of academic standards that are tied to it.
66
ProgressBook VirtualClassroom Teacher Guide
Library
3. Optional: To view this item within its hierarchy, click Show More.
Details Window
A hierarchy of other related items displays.
Details Window – Expanded
4. Optional: Click any item in the hierarchy to see its description and a list of academic
standards tied to it.
ProgressBook VirtualClassroom Teacher Guide
67
Library
5. Optional: To copy an item (and all of its sub-items) to your personal library, click Copy.
Note: You can copy a single question or activity, or an entire module or course.
The Details window closes, a confirmation message briefly displays, and the Times
Copied column displays the number of times you have copied the item. (For more
information, see “View All Content that You Have Copied.”)
Item Successfully Copied
Note: A list of items you copied displays in the My Copied Content view in the
District Library. Copies of the items are created in the Copied Content folder in
the My Workspace area of My Library. To modify content or schedule activities,
you must first move them out of Copied Content.
View Ratings and Reviews
It may be helpful to know other teachers’ evaluation of content as you decide what to copy to your
personal library. The Rating column of the District Library search results displays the average
number of stars (on a scale of 1-5) that others have rated an eCourse, eCollection or module. The
number in parentheses indicates how many times the item has been rated. You can read reviewer
comments as follows:
1. In the row of the eCourse, eCollection, or module, click the Actions button.
2. Select “Show Ratings & Reviews.”
Average rating is slightly
more than four stars
Rating is based
on four reviews.
Show Ratings & Reviews
68
ProgressBook VirtualClassroom Teacher Guide
Library
The Reviews window opens, allowing you to scroll through and read comments about the
material.
Reviews Window
Note: To help other teachers in your district, after you have used content that you
copied from the District Library, you can provide your feedback about the
material. See “Rate and Review Content.”
View Questions
To determine if you want to copy an individual question, you can first open it and review it.
1. In the row of the question you want to view, click the Actions button.
2. Select “View this Item.”
View this Item
ProgressBook VirtualClassroom Teacher Guide
69
Library
The View Question window opens and displays the question in read-only format.
View Question Window
View Publishing History
To see information about updates to content in the District Library (for instance, when someone
adds new activities to a module or new modules to a course), you can view the publishing history
for an eCourse, eCollection, or module as follows:
1. In the row of the eCourse, eCollection, or module, click the Actions button.
2. Select “View Publishing History.”
View Publishing History
70
ProgressBook VirtualClassroom Teacher Guide
Library
The Publishing History window displays the date and comments for each revision.
Publishing History Window
Copy to My Library
When you find content that you would like to use in your own classes, you can copy items to your
personal library (My Library).
•
To copy an individual item, see“Copy Single Item.”
•
To copy multiple items at once, see “Copy Multiple Items.”
Copy Single Item
1. In the row of the item you want to copy, click the Actions button.
2. Select “Copy to My Library.”
Copy to My Library
ProgressBook VirtualClassroom Teacher Guide
71
Library
A confirmation message briefly displays, and the Times Copied column displays the
number of times you have copied the item.
Item Successfully Copied
Note: A copy of the item is created in the Copied Content folder in the My
Workspace area of My Library. To modify it or add it to your other materials, you
must first move it out of Copied Content.
Note: To copy multiple items at once, see “Copy Multiple Items.”
Copy Multiple Items
1. In the Sel column, select the check box corresponding to the items you want to copy.
2. Click Copy Selected Items.
Copy Multiple Items
A confirmation message briefly displays, and the Times Copied column displays the
number of times you have copied the items.
Multiple Items Successfully Copied
72
ProgressBook VirtualClassroom Teacher Guide
Library
Note: Copies of the items are created in the Copied Content folder in the My
Workspace area of My Library. To modify content or schedule activities, you
must first move them out of Copied Content.
Note: To copy an individual item, see “Copy Single Item.”
View All Content that You Have Copied
You can see a list of all content that you have copied from the District Library to your personal
library.
1. On the Library screen, District Library tab, in the View by area, click My Copied
Content.
A list of all content that you have copied displays in a grid.
Note: You can sort the grid by clicking a column header. The Times Copied
column displays how many times you have copied an item.
View Copied Content
2. Optional: To bookmark an item (or unbookmark it), click
ProgressBook VirtualClassroom Teacher Guide
.
73
Library
3. Optional: To take action on an item (for instance, to review details about a course or
activity or to view course ratings and comments), in the Actions column, click
and
select the action you wish to take.
Note: The My Copied Content view is essentially a historical view of all content
you have copied from the District Library. Actual copies of the items are created
in the Copied Content folder in the My Workspace area of My Library. To
modify the content for use in your classes and to schedule activities, you must first
move them out of Copied Content.
Note: For information on the actions you can take, see “Evaluate and Copy
Shared District Content.”
Rate and Review Content
After you have used content that you copied from the District Library, you can provide your
feedback about the material as follows:
1. In the row of the eCourse, eCollection, or module, click the Actions button.
2. Select “Show Ratings & Reviews.”
Average rating is slightly
more than four stars
Rating is based
on four reviews.
Show Ratings & Reviews
The Reviews window opens.
74
ProgressBook VirtualClassroom Teacher Guide
Library
3. Click Create a Review.
Create a Review
4. In the review area, complete the requested information:
a. Click the number of stars you rate the material (on a scale of 1-5).
b. Enter a headline that briefly describes your evaluation.
c. Enter a few sentences that explain your experience with the material and what you
find valuable. If you have suggestions for improvement, include them as well.
5. Click Save.
Review Area
ProgressBook VirtualClassroom Teacher Guide
75
Library
This page intentionally left blank.
76
ProgressBook VirtualClassroom Teacher Guide
Grading
As students complete and submit their online activities, the activities display in your grading
queue. VirtualClassroom automatically grades the multiple choice, true/false, fill in the blank
(exact match), multiple choice with pictures, and matching type questions that you have set to auto
grade. You must grade the remaining questions and then post all grades to GradeBook.
Note: Even if an entire activity is made up of auto graded questions, you must still
open the activity to post the mark to GradeBook.
Refer to the appropriate section as follows:
•
“Select Activities to Grade”
•
“Grade Activities”
Select Activities to Grade
Activities that are ready for you to grade display in a grading queue as students complete them.
You can review all of the activities to grade and filter and sort the list as needed to display the
activities you want to grade at this time.
1. On the Activities to Grade screen, review the activities that are ready for you to grade,
noting the following important information:
•
Hrs – The time the student spent working on the activity; also known as “seat time”
•
#Tries – Number of times the student has attempted the activity (if you sent the
activity back to the student by marking it for “redo”)
•
Late? – Displays as “Late” if the student submitted the activity after it was due
Activities to Grade
ProgressBook VirtualClassroom Teacher Guide
77
Grading
2. Optional: To sort the list of activities on any column, click the column heading.
3. Optional: To filter the list of activities, select a Class and/or Assignment whose activities
you want to grade at this time.
Filter Activities to Grade
The screen updates to display only the activities that are ready to grade that meet your
filter criteria.
Filtered List of Activities to Grade
78
ProgressBook VirtualClassroom Teacher Guide
Grading
Grade Activities
At any time after a student completes and submits an online activity, you can begin grading it.
Note: Before starting your grading, if you want to filter the grading queue to
display only specific activities to grade, see “Select Activities to Grade.”
1. On the Activities to Grade screen, select an activity to grade by clicking the student’s
name.
Select Activity to Grade
2. On the Activity Grading screen, review the student’s answers, noting the following
symbols:
– Correct answer (auto graded); Points earned = the maximum of possible
– Incorrect answer (auto graded); Points earned = 0
– Answer for you to grade; Points earned = blank
ProgressBook VirtualClassroom Teacher Guide
79
Grading
Review Student’s Answers
3. Optional: If you want to filter the content to view less information, in the drop-down list at
the top-right of the screen (which defaults to “View all content”), select a different option:
•
“View all questions” – Displays questions and answers but no additional content (such
as text or videos)
•
“View questions to grade” – Displays only the questions and answers for you to grade
(non auto graded answers)
Filter Questions to Grade
80
ProgressBook VirtualClassroom Teacher Guide
Grading
4. Optional: If you want the student to take another attempt at answering any question:
a. Mark the answer as “ReDo.”
b. In the Points field, enter the number of points (if any) you want to award the student
for this attempt at the answer.
Note: “ReDo” answers display the
symbol.
Mark Individual Question for Redo
5. Optional: To enter a comment about a specific answer:
a. Click
.
b. In the Teacher Comments text box that displays, enter your comment.
Enter Comments at the Answer Level
6. If ungraded questions (displaying
) remain, mark each answer as “Correct” (assigns
Points earned = maximum possible), “Incorrect” (assigns Points earned of “0”) or “Partial
Credit.”
Note: “Partial Credit” answers display the
symbol.
7. If you awarded partial credit to any answer, in the Points field, enter the number of points
you want to award the student for the answer.
Award Partial Credit
ProgressBook VirtualClassroom Teacher Guide
81
Grading
8. Optional: To override the grade on any auto graded answer, select the correct grade.
Note: The Points earned update automatically, but you can override them to
assign partial points.
Note: As you grade each question, for mark types of points or percent, the
GradeBook Mark field automatically populates the student’s mark. For mark
types other than points or percent, you must enter or select the mark.
9. Optional: In the Teacher Comments field, enter an overall comment for the student.
10. Optional: If you want the student to redo the entire activity, select the Mark all for ReDo
check box.
11. Click Post.
GradeBook Mark Posted Successfully
VirtualClassroom posts the mark and comments to your grade book.
Activity Graded and Posted
Note: After you have graded the assignment (if you have not marked it for redo),
the Status displays a “Graded” link that you can click to go back into activity
grading.
82
ProgressBook VirtualClassroom Teacher Guide
Grading
12. Optional: To continue grading activities in the order in which they display in your queue
(taking into account any sorting or filtering you selected), on the Activity Grading screen,
move through the list using the
buttons.
Move Through Grading Queue
ProgressBook VirtualClassroom Teacher Guide
83
Grading
This page intentionally left blank.
84
ProgressBook VirtualClassroom Teacher Guide