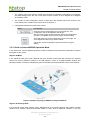
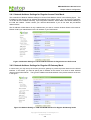
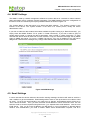
1
ABLELink®
AW5300
Wireless Access Point
User’s Manual
Version 1.3
Last Update: February 6, 2009
TEL: 886-3-5508137
FAX: 886-3-5508131
http://www.atop.com.tw
AW5300 Wireless Access Point
Version 1.3
Important Announcement
The information contained in this document is the property of Atop Technologies, Inc. and is supplied for
the sole purpose of operation and maintenance of Atop products. No part of this publication is to be used
for any other purposes, and it is not to be reproduced, copied, disclosed, transmitted, stored in a retrieval
system, or translated into any human or computer language, in any form, by any means, in whole or in
part, without the prior explicit written consent of Atop Technologies, Inc.
Copyright © 2008 Atop Technologies, Inc.
All rights reserved.
All other product names referenced herein are registered trademarks of their respective companies.
Published by
Atop Technologies, Inc.
2F, No. 146, Sec. 1, Tung-Hsing Rd.
Jubei, Hsinchu 30261
Taiwan, R.O.C.
Tel: 886-3-5508137
Fax: 886-3-5508131
www.Atop.com.tw
Copyright © 2008 Atop Technologies, Inc.
All rights reserved
AW5300 Wireless Access Point
FCC WARNING
Class B for this product
This product has been tested and found to comply with the limits for the Class B digital device, pursuant to
Part 15 of the FCC Rules. These limits are designed to provide reasonable protection against harmful
interference in a residential installation. This equipment generates uses and can radiate radio frequency
energy, and if not installed and used in accordance with the instructions, it may cause harmful interference
to radio communications. However, there is no guarantee that interference will not occur in a particular
installation. If this equipment does cause harmful interference to radio or television reception, which can
be determined by turning the equipment off and on, the user is encouraged to try to correct the
interference by one of the following measures:
•
Reorient or relocate the receiving antenna.
•
Increase the separation between this equipment and the receiver.
•
Connect this equipment into an outlet on a circuit different from that to which the receiver
is connected.
•
Consult the dealer or an experienced radio/TV technician for help.
This product complies with Part 15 of the FCC Rules. Operation is subject to the following two
conditions: (1) This device may not cause harmful interference, and (2) this device must accept
any interference received, including interference that may cause undesired operation.
FCC Caution: Any change or modification not expressively approved by the party responsible for
compliance could void the user's authority to operate this equipment.
IMPORTANT NOTE:
FCC Radiation Exposure Statement:
This product complies with FCC radiation exposure limits set forth for an uncontrolled environment. This
product should be installed and operated with the minimum distance of 20 cm between the radiator and
your body. This product must not be co-located or operated in conjunction with any other antenna or
transmitter. IEEE 802.11b/g operation of this product in the U.S.A. is firmware-limited to channels 1
through 11.
UL Notice for Power supplier
The series of AW5300 products are intended to be supplied by a Listed Power Unit marked with “LPS”,
“Limited Power Source” or “Class 2” and output rate 9~48VDC, 1.0 A minimum, or use the recommended
power supply listed in “Optional Accessories”.
Copyright © 2008 Atop Technologies, Inc.
All rights reserved
AW5300 Wireless Access Point
Table of Contents
Table of Contents
CHAPTER 1. INTRODUCTION ................................................................................................................. 1-2
1.1. PRODUCT OVERVIEW.......................................................................................................................... 1-2
1.2. SPECIAL FEATURES ............................................................................................................................ 1-2
1.2.1. Fast Handoff.............................................................................................................................. 1-2
1.2.2. Smart Routing ........................................................................................................................... 1-3
1.2.3. Wireless Client Isolation............................................................................................................ 1-3
1.3. FEATURES.......................................................................................................................................... 1-3
1.4. ORDERING INFORMATION .................................................................................................................... 1-3
1.4.1. Optional Accessories................................................................................................................. 1-4
CHAPTER 2. GETTING STARTED ........................................................................................................... 2-2
2.1. INSIDE THE PACKAGE .......................................................................................................................... 2-2
2.2. FRONT & REAR PANELS ...................................................................................................................... 2-2
2.3. FIRST TIME INSTALLATION ................................................................................................................... 2-2
2.3.1. Web Configuration Overview .................................................................................................... 2-3
2.3.2. Guide to Select AW5300 Operation Mode ................................................................................ 2-4
Regular AP Mode............................................................................................................................. 2-4
Regular AP Gateway Mode ............................................................................................................. 2-4
Wireless Bridge Mode ..................................................................................................................... 2-5
Wireless WDS Hybrid AP Mode ...................................................................................................... 2-5
Wireless WDS Hybrid AP Gateway Mode ....................................................................................... 2-6
Dynamic WDS systems ................................................................................................................... 2-6
2.4. FACTORY DEFAULT SETTINGS ............................................................................................................. 2-7
CHAPTER 3. BASIC CONFIGURATION................................................................................................... 3-2
3.1. ADMINISTRATOR LOGIN ....................................................................................................................... 3-2
3.2. DEVICE OPERATION MODE.................................................................................................................. 3-2
3.3. WIRELESS NETWORK CONFIGURATION ................................................................................................ 3-3
3.3.1. Basic Wireless Settings............................................................................................................. 3-3
3.3.2. Configuring Wireless Security ................................................................................................... 3-3
3.4. NETWORK ADDRESS CONFIGURATION ................................................................................................. 3-4
3.4.1. Network Address Settings for Regular Access Point Mode ...................................................... 3-5
3.4.2. Network Address Settings for Regular AP Gateway Mode ....................................................... 3-5
3.4.3. Network Address Settings for Wireless Bridge Mode ............................................................... 3-6
3.4.4. Network Address Settings for Wireless WDS Hybrid Mode...................................................... 3-6
3.4.5. Network Address Settings for Wireless WDS Hybrid Gateway Mode ...................................... 3-6
3.5. CONFIGURATION FLOW GUIDE ............................................................................................................ 3-7
3.5.1. Regular AP Mode Configuration................................................................................................ 3-7
3.5.2. Regular AP Gateway Mode Configuration ................................................................................ 3-9
3.5.3. Wireless Bridge Mode Configuration ...................................................................................... 3-11
3.5.4. WDS Hybrid Mode Configuration............................................................................................ 3-13
3.5.5. WDS Hybrid Gateway Mode Configuration............................................................................. 3-15
3.6. CHANGING ADMINISTRATOR AND USER PASSWORD ............................................................................ 3-18
Copyright © 2008 Atop Technologies, Inc.
All rights reserved
AW5300 Wireless Access Point
Table of Contents
3.7. UPGRADING FIRMWARE .................................................................................................................... 3-18
3.8. RESTORE TO FACTORY DEFAULT ....................................................................................................... 3-19
CHAPTER 4. WEB CONSOLE CONFIGURATION .................................................................................. 4-2
4.1. OVERVIEW INFORMATION .................................................................................................................... 4-2
4.2. WIRELESS SETTINGS .......................................................................................................................... 4-2
4.2.1. Basic Settings ........................................................................................................................... 4-2
4.2.2. Security Settings ....................................................................................................................... 4-4
4.2.3. WDS Settings (For Wireless Bridge and WDS Hybrid Modes Only) ........................................ 4-5
4.2.4. Advanced Settings .................................................................................................................... 4-6
4.3. NETWORK SETTINGS .......................................................................................................................... 4-6
4.3.1. LAN Interface ............................................................................................................................ 4-6
LAN Interface................................................................................................................................... 4-6
Manual Settings............................................................................................................................... 4-6
DNS Server...................................................................................................................................... 4-6
WLAN Interface ............................................................................................................................... 4-7
4.3.2. WDS Interface........................................................................................................................... 4-7
4.4. SNMP SETTINGS ............................................................................................................................... 4-8
4.5. EMAIL SETTINGS ................................................................................................................................ 4-8
4.6. DHCP SERVER .................................................................................................................................. 4-9
4.7. FIREWALL & FILTERING ..................................................................................................................... 4-10
4.7.1. Wired MAC Filtering ................................................................................................................ 4-10
4.7.2. Wireless MAC Filtering (For Wireless AP and WDS Hybrid Modes Only) .............................. 4-10
4.7.3. Ethernet Type Filtering ............................................................................................................ 4-11
4.7.4. IP Filtering ............................................................................................................................... 4-12
4.7.5. TCP/UDP Port Filtering ........................................................................................................... 4-12
4.7.6. Wireless Client Isolation.......................................................................................................... 4-13
4.8. SYSTEM SETUP ................................................................................................................................ 4-13
4.8.1. User & Password Settings ...................................................................................................... 4-13
4.8.2. Date/Time Settings.................................................................................................................. 4-14
4.8.3. Alert Event............................................................................................................................... 4-14
4.8.4. Firmware Upgrade .................................................................................................................. 4-15
4.8.5. Configuration Backup & Restore............................................................................................. 4-16
4.9. SYSTEM STATUS............................................................................................................................... 4-17
4.9.1. Site Monitor ............................................................................................................................. 4-17
4.9.2. Mobile Table ............................................................................................................................ 4-17
4.9.3. WDS Table .............................................................................................................................. 4-17
4.9.4. Traffic Log & Statistics ............................................................................................................. 4-18
4.9.5. DHCP Status ........................................................................................................................... 4-19
4.10. REBOOT AND RESTORE DEFAULT SETTINGS..................................................................................... 4-19
CHAPTER 5. SPECIFICATIONS ............................................................................................................... 5-1
HARDWARE SPECIFICATIONS...................................................................................................................... 5-1
SOFTWARE SPECIFICATIONS ...................................................................................................................... 5-1
Copyright © 2008 Atop Technologies, Inc.
All rights reserved
AW5300 Wireless Access Point
Table of Contents
LED INDICATORS ....................................................................................................................................... 5-2
WARRANTY POLICY ................................................................................................................................ 5-3
Copyright © 2008 Atop Technologies, Inc.
All rights reserved
AW5300 Wireless Access Point
Table of Figures
Table of Figures
Figure 1-1 Sample of Network Topology for Wireless Connection .............................................. 1-2
Figure 2-1 AW5300 Front Panel .................................................................................................. 2-2
Figure 2-2 How to Connect Antenna and Cables to the Device .................................................. 2-3
Figure 2-3 Web Configuration Overview...................................................................................... 2-3
Figure 2-4 Sample Topology of AW5300 in Regular AP Mode .................................................... 2-4
Figure 2-5 Sample Topology of AW5300 in Regular AP Gateway Mode ..................................... 2-5
Figure 2-6 Sample Topology of AW5300 in Wireless Bridge Mode ............................................. 2-5
Figure 2-7 Sample Topology of AW5300 in Wireless WDS Hybrid AP Mode .............................. 2-6
Figure 2-8 Sample Topology of AW5300 in Wireless WDS Hybrid AP Gateway Mode............... 2-6
Figure 2-9 Sample Topology of AW5300 using dynamic WDS connection ................................. 2-7
Figure 3-1 Authentication Dialog for Administrator Login ............................................................ 3-2
Figure 3-2 Device Operation Mode Setting Page........................................................................ 3-2
Figure 3-3 Basic Settings of Wireless Connection of Access Point............................................. 3-3
Figure 3-4 Wireless Security Settings.......................................................................................... 3-4
Figure 3-5 Network Setting on LAN and WLAN Interface for Regular Access Point mode......... 3-5
Figure 3-6 Network Setting on LAN and WLAN Interface for Regular AP Gateway mode.......... 3-5
Figure 3-7 Network Settings on LAN interface for Wireless Bridge mode................................... 3-6
Figure 3-8 Network Settings on LAN interface for Wireless WDS Hybrid mode ......................... 3-6
Figure 3-9 Network Settings on LAN interface for Wireless WDS Hybrid Gateway mode.......... 3-7
Figure 3-10 Regular AP Mode Configuration: Step 1 .................................................................. 3-8
Figure 3-11 Regular AP Mode Configuration: Step 2................................................................... 3-8
Figure 3-12 Regular AP Mode Configuration: Step 3 .................................................................. 3-8
Figure 3-13 Regular AP Mode Configuration: Step 4 and 5 ........................................................ 3-9
Figure 3-14 Regular AP Gateway Mode Configuration: Step 1 ................................................... 3-9
Figure 3-15 Regular AP Gateway Mode Configuration: Step 2 ................................................. 3-10
Figure 3-16 Regular AP Gateway Mode Configuration: Step 3 ................................................. 3-10
Figure 3-17 Regular AP Gateway Mode Configuration: Step 4 and 5 ....................................... 3-10
Figure 3-18 Wireless Bridge Mode Configuration: Step 1 ......................................................... 3-11
Figure 3-19 Wireless Bridge Mode Configuration: Step 2 ......................................................... 3-11
Figure 3-20 Wireless Bridge Mode Configuration: Step 3 ......................................................... 3-12
Figure 3-21 Wireless Bridge Mode Configuration: Step 4 ......................................................... 3-12
Figure 3-22 Wireless Bridge Mode Configuration: Step 5 and 6 ............................................... 3-12
Figure 3-23 WDS Hybrid Mode Configuration: Step 1............................................................... 3-13
Figure 3-24 WDS Hybrid Mode Configuration: Step 2............................................................... 3-14
Figure 3-25 WDS Hybrid Mode Configuration: Step 3............................................................... 3-14
Figure 3-26 WDS Hybrid Mode Configuration: Step 4............................................................... 3-14
Figure 3-27 WDS Hybrid Mode Configuration: Step 5 and 6..................................................... 3-15
Figure 3-28 WDS Hybrid Gateway Mode Configuration: Step 1................................................ 3-16
Figure 3-29 WDS Hybrid Gateway Mode Configuration: Step 2 and 3 ..................................... 3-16
Figure 3-30 WDS Hybrid Gateway Mode Configuration: Step 4................................................ 3-16
Figure 3-31 WDS Hybrid Gateway Mode Configuration: Step 5................................................ 3-17
Figure 3-32 WDS Hybrid Gateway Mode Configuration: Step 6................................................ 3-17
Figure 3-33 WDS Hybrid Gateway Mode Configuration: Step 7 and 8 ..................................... 3-17
Figure 3-34 The User & Password Settings in System Setup ................................................... 3-18
Figure 3-35 Firmware upgrade in System Setup ....................................................................... 3-18
Figure 3-36 Firmware upgrading in progress. Please do not power off the device ................... 3-19
Figure 3-37 Reboot device or reset the device to factory default settings. ............................... 3-19
Figure 4-1 Overview Web Page and Configuration Menu ........................................................... 4-2
Figure 4-2 The Basic Settings of Wireless Network configuration............................................... 4-3
Figure 4-3 The snapshots of site monitor of surrounding networks............................................. 4-3
Figure 4-4 Wireless Security Settings.......................................................................................... 4-5
Figure 4-5 The Wireless Settings of WDS Hybrid Operation Mode............................................. 4-5
Figure 4-6 The Wireless Settings of Advanced Wireless Parameters ......................................... 4-6
Figure 4-7 The Network Settings for LAN & WLAN Interface...................................................... 4-7
Figure 4-8 The WDS IP Settings of Network Settings ................................................................. 4-7
Figure 4-9 SNMP Settings ........................................................................................................... 4-8
Copyright © 2008 Atop Technologies, Inc.
All rights reserved
AW5300 Wireless Access Point
Figure 4-10 Email Settings for Alert Notification .......................................................................... 4-9
Figure 4-11 DHCP Server Settings .............................................................................................. 4-9
Figure 4-12 Wired MAC Filtering Settings ................................................................................. 4-10
Figure 4-13 Wireless MAC Filtering (for Wireless AP and WDS Hybrid mode only) ................. 4-11
Figure 4-14 Ethernet Type Filtering ........................................................................................... 4-11
Figure 4-15 IP Network Type Filtering ....................................................................................... 4-12
Figure 4-16 TCP/UDP Port Type Filtering.................................................................................. 4-12
Figure 4-17 Wireless Client Isolation Settings ........................................................................... 4-13
Figure 4-18 User and Password Settings .................................................................................. 4-14
Figure 4-19 Date and Time Settings .......................................................................................... 4-14
Figure 4-20 Alert Event Settings ................................................................................................ 4-15
Figure 4-21 Firmware Upgrade Settings.................................................................................... 4-16
Figure 4-22 Firmware Upgrading in Progress............................................................................ 4-16
Figure 4-23 Configuration Backup & Restore ............................................................................ 4-16
Figure 4-24 Site Monitor Snapshot ............................................................................................ 4-17
Figure 4-25 Mobile Table shows the Associated Mobile Station................................................ 4-17
Figure 4-26 WDS Table shows the status of the WDS interface ............................................... 4-18
Figure 4-27 Traffic Log and Network Statistics .......................................................................... 4-18
Figure 4-28 DHCP Status Snapshots ........................................................................................ 4-19
Figure 4-29 Reboot and Restore Default Settings..................................................................... 4-19
Copyright © 2008 Atop Technologies, Inc.
All rights reserved
AW5300 Wireless Access Point
Table of Tables
Table of Tables
Table 2-1 Factory Default Settings............................................................................................... 2-8
Table 4-1 Summary of Security Modes in Wireless Security Settings ......................................... 4-4
Copyright © 2008 Atop Technologies, Inc.
All rights reserved
AW5300 Wireless Access Point
Chapter 1 Introduction
Chapter 1
Introduction
Product Overview
Special Features
Fast Handoff
Smart Routing
Wireless Client Isolation
Features
Ordering information
Optional Accessories
Copyright © 2008 Atop Technologies, Inc.
All rights reserved
1-1
AW5300 Wireless Access Point
Chapter 1 Introduction
Chapter 1. Introduction
1.1. Product Overview
The AW5300 Wireless Access Point is one of our wireless product lines to provide a wireless connectivity
to wireless clients or mobile stations to create a complete mobile and wireless network for your industrial
wireless networking. For example, you can connect serial devices to our product SW5001 Wireless Serial
Server and connect the SW5001 to AW5300 Wireless Access Point device. This setting can connect serial
devices to a local area network or a backbone network as shown in Figure 1-1. The AW5300 Wireless
Access Point provides several functionalities to support the mobile and wireless networking.
AW5300 supports five operation modes:
•
Regular AP
•
Regular AP Gateway
•
Wireless Bridge
•
Wireless WDS Hybrid AP
•
Wireless WDS Hybrid AP Gateway
Figure 1-1 Sample of Network Topology for Wireless Connection
1.2. Special Features
The AW5300 Wireless Access Point has several special features that will help network operators or IT
specialists to improve wireless network performance and to increase business productivity. The special
features are described as follow.
1.2.1. Fast Handoff
The AW5300 employs an advanced algorithm for fast roaming for mobile stations that roam across
several coverage networks or cells very often. It is suitable for warehouse management where forklifts or
Copyright © 2008 Atop Technologies, Inc.
All rights reserved
1-2
AW5300 Wireless Access Point
Chapter 1 Introduction
mobile carts are moving around a large warehouse area that is deployed with several wireless access
points. By deploying a smart beacon management at the wireless access point and the mobile station, the
hand-off process delay which typically takes 1-4 seconds for open security can be reduce to be less than
0.5 second.
This feature is only available to Atop Wireless products. However, it is backward compatible to IEEE
802.11 standard wireless stations, and can be used together with other standard wireless access points
and stations.
1.2.2. Smart Routing
WDS protocol shares the same wireless medium with regular traffic from wireless stations. Due to the
limited wireless bandwidth, typical WDS traffic can tremendously reduce the overall network throughput.
By deploying smart routing technique, our access point smartly filters all redundant traffics on both wired
and wireless interfaces, improving the overall network performance.
1.2.3. Wireless Client Isolation
This special feature deploys intelligent network isolation to create a virtual network among wireless clients.
We can prevent the communication among wireless clients into two levels (1) blocking all communication
among wireless clients or (2) allowing only wireless clients associated to the same AP to communicate to
each other. This is to help operators to separate malicious traffic from guest or public wireless LAN to
flood the main wireless control network. It provides more network security, preventing possible data
flooding due to virus, worm or spam.
1.3. Features
The AW5300 Wireless Access Point includes several features as follow.
o
IEEE 802.11b/g 54Mbps wireless network
o
Smart Routing
o
Fast Handoff
o
Wireless Client Isolation
o
Firewall & Packet Filtering
o
Wireless Link Security: Open, WEP, WPA-PSK, WPA2-PSK, WPA, WPA2, IEEE
802.1x/RADIUS
o
WDS security: Open, WEP, TKIP, CCMP(AES) Encryption
o
Metal housing with IP50.
o
Operating Temperature: 0 to 60°C
o
Storage Temperature: -40 to 70°C
o
15kV ESD protection for serial ports
o
Configuration via Web Server, or our Windows-based utility programs
o
Optional standard 2.4GHz High-gain antenna
o
Upgradeable firmware via network connection
1.4. Ordering information
AW53x0-x STD
Wireless Access Point with one Ethernet LAN
Copyright © 2008 Atop Technologies, Inc.
All rights reserved
1-3
AW5300 Wireless Access Point
Chapter 1 Introduction
1.4.1. Optional Accessories
US315-12 (US)
AC100~240V/DC12V, US plug
USE315-12 (EU)
AC100~240V/DC12V, EU plug
HG055
5.5dBi antenna, SMA (R) Female connector with 180cm cable
HG110
11dBi antenna, SMA (R) Female connector with 60cm cable
HG110-C600N
N-male to N -female connector with 600cm cable
Copyright © 2008 Atop Technologies, Inc.
All rights reserved
1-4
AW5300 Wireless Access Point
Chapter 2 Getting Started
Chapter 2
Getting Started
Inside the Package
Front & Rear Panels
First Time Installation
Web Configuration Overview
Guide to Select AW5300 Operation Mode
Regular AP Mode
Regular AP Gateway Mode
Wireless Bridge Mode
Wireless WDS Hybrid AP Mode
Wireless WDS Hybrid AP Gateway Mode
Dynamic WDS systems
Factory Default Settings
Copyright © 2008 Atop Technologies, Inc.
All rights reserved
AW5300 Wireless Access Point
Chapter 2 Getting Started
Chapter 2. Getting Started
2.1. Inside the Package
NOTE:
•
One AW5300 Industrial Wireless Access Point
•
One 4 dBi antenna
•
One Ethernet Cross-over Cable
•
The Quick Start Guide
•
The Product CD
•
Two Wall-mounting kits
•
One Product Warranty Card
Notify your sales representative immediately if any of the above items is missing or
damaged upon delivery.
2.2. Front & Rear Panels
SMA Antenna
Connector
LED indication
for WDS
connections
LED indication
for AP mode
LED indication
for WDS mode
LED indication
Wireless
activity
LED indication
for system
status
10/100Mbps
Ethernet port
3-Pin Terminal
Block for Power
Supply
Reset button for
factory default
setting
Figure 2-1 AW5300 Front Panel
2.3. First Time Installation
•
Prepare necessary cables, DC adapter, and power cord.
•
Install the antenna to the SMA Antenna Connector
•
Place AW5300 in a desired location and connect it to LAN via Ethernet cable with RJ45
connector.
•
Plug in AW5300 to DC-9-48V power source (with power jack or 3-pin terminal bock
connector).
•
The buzzer will beep once and the RUN LED will blink if AW5300 functions normally. For
LED Status, see Chapter 5.
Copyright © 2008 Atop Technologies, Inc.
All rights reserved
2-2
AW5300 Wireless Access Point
Chapter 2 Getting Started
•
Connect your computer to the LAN. The default configuration of AW5300 is set to regular
AP mode with fixed IP address of 10.0.50.200 with the default gateway of 10.0.50.1.
Access the web configuration of AW5300 at http://10.0.50.200. Refer to the next section
for further setting.
•
Optionally, you can use SerialManager configuration utility in the Product CD to configure
AW5300 device. Refer to SerialManager user guide for more details.
Figure 2-2 How to Connect Antenna and Cables to the Device
2.3.1. Web Configuration Overview
AW5300 web configuration is divided into five operations for easy configuration to suit customer needs.
The web configuration page is composed of two frames. The left frame is the menu frame and the right
frame is the main configuration frame.
Figure 2-3 Web Configuration Overview
Copyright © 2008 Atop Technologies, Inc.
All rights reserved
2-3
AW5300 Wireless Access Point
Chapter 2 Getting Started
•
The content of the menu frame is varied upon the device’s operation mode setting. For example,
the WDS settings menu item will not be shown when the device is set to Regular AP or Regular
AP Gateway mode.
•
The content of main configuration frame is varied upon the selected menu item chosen in the
menu frame which is listed on the top as shown in Figure 2-3.
•
Configuration frames have three main buttons.
Button
Functionality
Save the current configuration input on the page only. The
configuration will not be applied to the device.
We recommend users to use this button before the configuration
process is completed and then press “Apply” at the last step.
Save and apply the current configuration input on the page. On
some pages, the device may need to reboot.
Cancel the current configuration input and show the original
setting.
2.3.2. Guide to Select AW5300 Operation Mode
In this section we overview different operation modes of AW5300 and provide some examples of network
topologies of each mode.
Regular AP Mode
In the regular access point mode, AW5300 acts as a wireless access point that connects any wireless
clients to a wired or Ethernet network on its LAN interface. It acts as a bridge between wireless and
Ethernet interface. The device transparently joins the wireless and wired networks into the same network.
Figure 2-4 Sample Topology of AW5300 in Regular AP Mode
Regular AP Gateway Mode
In this regular access point gateway mode, AW5300 acts as a wireless gateway that creates a private
network of all wireless clients and forwards traffics to other wired or Ethernet networks on its LAN
Copyright © 2008 Atop Technologies, Inc.
All rights reserved
2-4
AW5300 Wireless Access Point
Chapter 2 Getting Started
interface. All wireless clients are hidden behind the AP. Refer to Firewall & Filtering section for how to
configure the AP to provide flexible access controls for wireless clients.
Figure 2-5 Sample Topology of AW5300 in Regular AP Gateway Mode
Wireless Bridge Mode
In this mode, AW5300 deploys Wireless Distribution System protocol (WDS) that enables the wireless
interconnection among access points. It acts as a wireless bridge between the Ethernet network on its
LAN interface and the network of its coupling AW5300 devices. The maximum of concurrent WDS
connection is four. By installing one AW5300 Wireless Bridge mode at each Ethernet network, we can
connect all wired clients on those devices’ LAN interfaces as one single Ethernet network.
Figure 2-6 Sample Topology of AW5300 in Wireless Bridge Mode
Wireless WDS Hybrid AP Mode
In this mode, AW5300 acts as a wireless access point and also a wireless bridge. It connects wireless
clients and wired clients on its LAN interface and joins them with the network of its coupling AW5300
devices through WDS connection. The maximum of concurrent WDS connection is four.
By installing one AW5300 Wireless WDS Hybrid AP mode at each network, we can transparently connect
all wired and wireless clients on those devices’ LAN and WLAN interfaces as one single network.
Copyright © 2008 Atop Technologies, Inc.
All rights reserved
2-5
AW5300 Wireless Access Point
Chapter 2 Getting Started
Figure 2-7 Sample Topology of AW5300 in Wireless WDS Hybrid AP Mode
Wireless WDS Hybrid AP Gateway Mode
In this mode, AW5300 acts as a wireless gateway that creates a private network of its wired and wireless
clients and forward traffics to the networks of its WDS coupling AW5300 devices. All wired and wireless
clients are hidden behind the AP. Each coupling WDS networks are different subnets.
Figure 2-8 Sample Topology of AW5300 in Wireless WDS Hybrid AP Gateway Mode
Dynamic WDS systems
Our AW5300 allows both static and dynamic WDS connections among access points.
In WDS static mode, the coupling AW5300 devices have to input the MAC addresses of each other in their
WDS configuration. For example, to coupling the connection between the AW5300 device A and device B,
Copyright © 2008 Atop Technologies, Inc.
All rights reserved
2-6
AW5300 Wireless Access Point
Chapter 2 Getting Started
the device A has to put the MAC address of the device B and vice versa. With this setting, the WDS
connection is more secure but is limited up to four fixed coupling of AW5300 devices per configuration.
In WDS dynamic mode, the device allows any AW5300 devices to connect to it as long as they can
provide accurate security WDS key. The device supports up to four concurrent couplings at a time. The
WDS connection will be disconnected after 10 seconds of idle connection. By setting AW5300 to wireless
WDS Hybrid AP gateway mode and enabling dynamic WDS, the device can connect to more than multiple
networks, providing more flexibility than AP client technology which limits only one network connection.
One example of dynamic WDS systems is mobile equipment stations which have a set of instruments
connecting in a cart or a vehicle. These stations can provide services for different services on demand.
With this topology, we can set the mobile equipment station, AW5300_3, to use dynamic WDS. Meanwhile,
the service sites, AW5300_1 and AW5300_2, use static WDS by input the MAC address of AW5300_3.
Figure 2-9 Sample Topology of AW5300 using dynamic WDS connection
2.4. Factory Default Settings
The AW5300 has two network interfaces, Ethernet and wireless network interfaces. The default settings of
both interfaces and the username and password for first-time-installation are shown below.
Default IP addresses
Interface
Ethernet port
WLAN Port
Username
Password
Device IP
10.0.50.200
192.168.0.1
Subnet Mask
255.0.0.0
255.255.255.0
admin
(Blank)
Other default settings are shown in the following table.
Note
Parameters marked with † are available only in Wireless Bridge, Wireless WDS Hybrid AP
and Wireless WDS Hybrid AP Gateway modes.
Copyright © 2008 Atop Technologies, Inc.
All rights reserved
2-7
AW5300 Wireless Access Point
Chapter 2 Getting Started
Table 2-1 Factory Default Settings
Parameter
Overview
Operation mode
Wireless
Basic: SSID
Basic: Channel
Basic: SSID Broadcast
Basic: Wireless Mode
Basic: Fast Handoff Mode
Security settings: Authentication Mode
Security settings: Encryption Type
WDS settings: Encryption Type†
WDS settings: Dynamic Mode†
WDS settings: Key†
WDS settings: WDS List†
Advanced Settings: Country Region
Advanced Settings: Country Code
Advanced Settings: Transmit Rate
Advanced Settings: Basic Rate
Advanced Settings: Beacon Period
Advanced Settings: DTIM Period
Advanced Settings: Tx Power
Advanced Settings: Fragmentation Threshold
Advanced Settings: RTS Threshold
Network Settings
LAN: DHCP (Obtain an IP Address Automatically)
LAN: IP Address
LAN: Subnet Mask
LAN: Default Gateway
LAN: Preferred DNS
LAN: Alternate DNS
WLAN: IP Address (Only used in Regular AP Gateway mode)
WLAN: Subnet Mask (Only used in Regular AP Gateway mode)
WDS: DHCP (Obtain an IP Address Automatically)
WDS: IP
WDS: Subnet Mask
WDS: Gateway
WDS: Default Gateway
SNMP Settings
System Contact
System Name
System Location
SNMP Service
Read Community
Write Community
SNMP Trap Server
E-mail Settings
Sender
Receiver
SMTP Server
Authentication
User name
Password
Default Values
Regular AP
AW5300
Auto
Enable
802.11b/g MIXED
Disable
Open
NONE
NONE
Disable
(BLANK)
(Not set)
US (Channel 1-11)
TH(Thailand)
Auto
15 Mbps
100 milliseconds
3 milliseconds
100%
2346 bytes
2347 bytes
Disable
10.0.50.200
255.0.0.0
10.0.50.1
168.95.1.1
(Blank)
192.168.0.1
255.255.255.0
Enable
(Blank)
(Blank)
(Blank)
WDS1 = Selected;
WDS2-4 = Not selected
Contact
Name
Location
Disable
public
private
0.0.0.0
(Blank)
(Blank)
(Blank)
Disable
(Blank)
(Blank)
Copyright © 2008 Atop Technologies, Inc.
All rights reserved
2-8
AW5300 Wireless Access Point
Chapter 2 Getting Started
DHCP Server
DHCP
From IP Address
To IP Address
Netmask
Lease Time (Minutes)
Static Connection
Firewall & Filtering
Wired MAC Filtering
Wireless MAC Filtering
IP Filtering
Wireless Client Isolation
System Setup
User Name
Password
Date/Time Settings: NTP (Obtain date/time automatically)
Date/Time Settings: NTP Server
Date/Time Settings: Time Zone
Manual Time Settings: Date
Manual Time Settings: Time
Alert Event: Cold Start
Alert Event: Warm Start
Alert Event: Authentication Failure
Alert Event: IP Address Changed
Alert Event: Password Changed
Trap Alert: Cold Start
Trap Alert: Warm Start
Trap Alert: Authentication Failure
NOTE:
Disable
(Blank)
(Blank)
(Blank)
21600
(Not set)
Disable
Disable
Disable
Disable
admin
(BLANK)
Disable
pool.ntp.org
GMT
1 January 2006
0:00:00
Disable
Disable
Disable
Disable
Disable
Disable
Disable
Disable
One may press the “Reset” button on the front panel with a paper clip for 5 seconds to
restore the device to the factory default settings.
You can also restart the device or restore the device to the factory default settings using
Web Console Configuration.
Copyright © 2008 Atop Technologies, Inc.
All rights reserved
2-9
AW5300 Wireless Access Point
Chapter 3 Basic Configuration
Chapter 3
Basic Configuration
Administrator Login
Device Operation Mode
Wireless Network Configuration
Basic Wireless Settings
Configuring Wireless Security
Network Address Configuration
Network Address Settings for Regular Access Point Mode
Network Address Settings for Regular AP Gateway Mode
Network Address Settings for Wireless Bridge Mode
Network Address Settings for Wireless WDS Hybrid Mode
Network Address Settings for Wireless WDS Hybrid Gateway Mode
Configuration Flow Guide
Regular AP Mode Configuration
Regular AP Gateway Mode Configuration
Wireless Bridge Mode Configuration
WDS Hybrid Mode Configuration
WDS Hybrid Gateway Mode Configuration
Changing Administrator and User Password
Upgrading Firmware
Restore to Factory Default
Copyright © 2008 Atop Technologies, Inc.
All rights reserved
AW5300 Wireless Access Point
Chapter 3 Basic Configuration
Chapter 3. Basic Configuration
This chapter gives basic configuration steps and configuration flows for each of operation mode.
We divide the instructions into 6 steps as follow.
Step 1: Administrator Login
Step 2: Device Operation Mode
Step 3: Wireless Network Configuration
Step 4: Network Configuration
Step 5: Changing Administrator Password
Step 6: Upgrading Firmware (Optional)
3.1. Administrator Login
On the web browser, ex. Microsoft Internet Explorer or Mozilla Firefox, enter the IP address of the device
on the URL. Example: http://10.0.50.200 or http://your-device-IP
The authentication screen as shown in Figure 3-1 shall appear. Enter username and password then click
on “OK”. The default user name is admin and password is null (leave it blank).
Figure 3-1 Authentication Dialog for Administrator Login
3.2. Device Operation Mode
Once the administrator logins, the overview screen as shown in Figure 3-2 shall appear. Select the
operation mode of the device based on the guideline provided in Section 2.3.2 and click on “Save
Settings” to go to the next step.
Figure 3-2 Device Operation Mode Setting Page
Copyright © 2008 Atop Technologies, Inc.
All rights reserved
3-2
AW5300 Wireless Access Point
Chapter 3 Basic Configuration
3.3. Wireless Network Configuration
Wireless configuration includes the basic Wi-Fi setting and wireless security setting as follows.
3.3.1. Basic Wireless Settings
To set up a wireless network, several parameters are needed as shown in Figure 3-3. Input the SSID or
network name of your network, and the channel number of your access point. The SSID and the channel
number should be unique to prevent degraded performance from radio interference and SSID confliction.
You can use “View site monitor” to know about the SSID and channel number of surrounding access
points in the device’s coverage area. Select “Automatic Channel Select” to let the device automatically
assign the best available channel number.
The SSID Broadcast is the function to allow any wireless client to search for this access point presence. It
is enabled by default. When the SSID Broadcast is disabled, wireless clients need to manually input the
SSID in their wireless client configuration, increasing network security to prevent an access from
unsolicited clients.
You can also specify “Wireless Mode” of this access point according to your need. The 802.11b/g MIXED
mode is set by default and it will be mostly compatible with all wireless clients.
The Fast-Handoff should be enabled when you want to reduce the hand-off time of wireless client devices.
This feature is only available to Atop Wireless products. The combination of Atop AW5300 and SW500x
products will reduce the handoff-time which typically takes 1-4 seconds to 0.5 second when the security is
off. If the security is on, the handoff time is reduced by half. Note that this feature is backward compatible
to IEEE 802.11 standard wireless stations. So our device can be used together with other standard
wireless access points and stations.
Once the configuration is done, click on “Save Settings” to go to the next step.
Figure 3-3 Basic Settings of Wireless Connection of Access Point
3.3.2. Configuring Wireless Security
Wireless Security Settings provide the network security according to user’s need. By default, the wireless
security is disabled. The default authentication mode is open without any encryption.
Three security modes are supported: WEP, WPA, and WPA2. The client authentication in WPA and WPA2
modes are divided into Pre-shared Key and RADIUS.
It is recommended to use WPA2 pre-shared key mode. To setup the WPA2 pre-shared key mode, select
authentication mode to WPA2-PSK and encryption type to AES. Input the security password into the
passphrase and confirmed passphrase boxes. The wireless clients need to input the same passphrase in
their wireless configurations to receive the access grant.
Copyright © 2008 Atop Technologies, Inc.
All rights reserved
3-3
AW5300 Wireless Access Point
Chapter 3 Basic Configuration
Below is the recommended security configuration.
Security
Type
Authentication
mode
Encryption
type
Password
Open
OPEN
NONE
N/A
WEP
OPEN
WEP
Password input in WEP table. Four entries are
allowed. Wireless clients can use any of these
passwords by specifying corresponding key index
in their wireless configuration. The selected key
index is used by default when the AW5300
communicates to its wireless clients.
WPA-PSK
WPA-PSK
TKIP
Password in passphrase
WPA2-PSK
WPA2-PSK
AES
Password in passphrase
More advanced settings of the wireless security using RADIUS server can be found in Web Console
Configuration.
Once the configuration is done, click on “Save Settings” to go to the next step.
Figure 3-4 Wireless Security Settings
3.4. Network Address Configuration
The network addressing configurations are slightly different for each mode of device’s operation. Please
follow the following instructions according to the device’s operation mode.
Copyright © 2008 Atop Technologies, Inc.
All rights reserved
3-4
AW5300 Wireless Access Point
Chapter 3 Basic Configuration
3.4.1. Network Address Settings for Regular Access Point Mode
The screenshot of Network Address settings for Access Point Mode is shown in the following figure. The
IP address of the device can be obtained automatically from DHCP Server, or it can be set up manually.
To set the device IP address manually, a pre-assigned IP Address, Subnet Mask, and Default Gateway of
the LAN are needed. Please contact your network administrator if you do not have the pre-defined
values of them.
The IP Address of DNS Server is only needed when you want to connect wireless clients to the Internet.
Please contact your administrator for the IP address of your DNS Server.
Figure 3-5 Network Setting on LAN and WLAN Interface for Regular Access Point mode
3.4.2. Network Address Settings for Regular AP Gateway Mode
In some case, you may set up the access point as a gateway to provide a private network on the WLAN
interface. In this mode, you need to specify the IP Address of this device as a router to other wireless
clients in the private network. The typical IP Address and Subnet Mask of the private network are shown
in the figure.
Figure 3-6 Network Setting on LAN and WLAN Interface for Regular AP Gateway mode
Copyright © 2008 Atop Technologies, Inc.
All rights reserved
3-5
AW5300 Wireless Access Point
Chapter 3 Basic Configuration
3.4.3. Network Address Settings for Wireless Bridge Mode
In Wireless Bridge mode, you can obtain an IP address automatically using DHCP. Otherwise, you can
manually specify the device’s IP address, Subnet Mask and Default Gateway. If you need wired clients
to connect to the Internet, please also specify IP address of your network DNS server. Please consult
your network administrator if you do not have any pre-assigned IP address.
Figure 3-7 Network Settings on LAN interface for Wireless Bridge mode
3.4.4. Network Address Settings for Wireless WDS Hybrid Mode
The network address setting for the device working in Wireless WDS Hybrid mode without router functions
is similar to that in Wireless Bridge mode. The address setting for the device in Wireless WDS mode with
router functions is shown in the following figure.
Figure 3-8 Network Settings on LAN interface for Wireless WDS Hybrid mode
3.4.5. Network Address Settings for Wireless WDS Hybrid Gateway Mode
In additional to the WDS Hybrid Mode, you may configure the device to server as a gateway where it can
create a subnet on the WLAN interface. In this mode, you need to specify the IP Address of this device as
a router to other wireless clients in the private network.
Copyright © 2008 Atop Technologies, Inc.
All rights reserved
3-6
AW5300 Wireless Access Point
Chapter 3 Basic Configuration
Figure 3-9 Network Settings on LAN interface for Wireless WDS Hybrid Gateway mode
3.5. Configuration Flow Guide
This section gives the guideline for administrator to set the device accordingly based on the device’s
operation mode.
3.5.1. Regular AP Mode Configuration
The configuration flow of the Regular AP Mode is shown below.
Step 1: On
“Overview”
page, choose
“Regular AP”
operation mode
and click “Save
Settings”.
Step 2: On
“Basic Settings”
page, change
the SSID as
you wish and
click “Save
Settings”.
Step 3: On
“Security
Settings” page,
setup the
security
functions as
you wish, and
click “Save
Settings”.
Step 4: On
“LAN & WLAN
Interfaces”
page, enter the
“IP Address”,
“Subnet Mask”
and “Default
Gateway”
according to
your network
configuration.
Copyright © 2008 Atop Technologies, Inc.
All rights reserved
3-7
Step 5: Click
“Apply” to save
the settings and
activate the
current
configurations.
AW5300 Wireless Access Point
Chapter 3 Basic Configuration
Figure 3-10 Regular AP Mode Configuration: Step 1
Figure 3-11 Regular AP Mode Configuration: Step 2
Figure 3-12 Regular AP Mode Configuration: Step 3
Copyright © 2008 Atop Technologies, Inc.
All rights reserved
3-8
AW5300 Wireless Access Point
Chapter 3 Basic Configuration
Figure 3-13 Regular AP Mode Configuration: Step 4 and 5
3.5.2. Regular AP Gateway Mode Configuration
The configuration flow of the Regular AP Mode is shown below.
Step 1: On
“Overview”
page, choose
“Regular AP
Gateway”
operation mode
and click “Save
Settings”.
Step 2: On
“Basic Settings”
page, change
the SSID as
you wish and
click “Save
Settings”.
Step 3: On
“Security
Settings” page,
setup the
security
functions as
you wish, and
click “Save
Settings”.
Step 4: On
“LAN & WLAN
Interfaces”
page, enter the
“IP Address”,
“Subnet Mask”
and “Default
Gateway”
according to
your network
configuration.
Figure 3-14 Regular AP Gateway Mode Configuration: Step 1
Copyright © 2008 Atop Technologies, Inc.
All rights reserved
3-9
Step 5: Click
“Apply” to save
the settings and
activate the
current
configuration.
AW5300 Wireless Access Point
Chapter 3 Basic Configuration
Figure 3-15 Regular AP Gateway Mode Configuration: Step 2
Figure 3-16 Regular AP Gateway Mode Configuration: Step 3
Figure 3-17 Regular AP Gateway Mode Configuration: Step 4 and 5
Copyright © 2008 Atop Technologies, Inc.
All rights reserved
3-10
AW5300 Wireless Access Point
Chapter 3 Basic Configuration
3.5.3. Wireless Bridge Mode Configuration
The configuration flow of the Wireless Bridge Mode is shown below.
Step 1: On
“Overview”
page,
choose
“Wireless
Bridge”, and
click “Save
Settings”.
Step 2: On
“Basic
Settings”
page,
uncheck the
“Automatic
Channel
Select” and
choose a
specific
channel.
This should
be similar to
that of the
peer WDS.
Click “Save
Settings”.
Step 3: On
“Security
Settings”
page, setup
the security
as you
desire, and
click “Save
Settings”.
Step 4: On
“WDS
Settings”
page, enter
the WDS
peer MAC
address and
click “Save
Settings”.
Step 5: On
“Local Area
Networks”
page, enter
the “IP
Address”,
“Subnet
Mask” and
“Default
Gateway”.
Figure 3-18 Wireless Bridge Mode Configuration: Step 1
Figure 3-19 Wireless Bridge Mode Configuration: Step 2
Copyright © 2008 Atop Technologies, Inc.
All rights reserved
3-11
Step 6: Click
“Apply” to
save the
settings and
to activate
the current
configuration
s.
AW5300 Wireless Access Point
Chapter 3 Basic Configuration
Figure 3-20 Wireless Bridge Mode Configuration: Step 3
Figure 3-21 Wireless Bridge Mode Configuration: Step 4
Figure 3-22 Wireless Bridge Mode Configuration: Step 5 and 6
Copyright © 2008 Atop Technologies, Inc.
All rights reserved
3-12
AW5300 Wireless Access Point
Chapter 3 Basic Configuration
3.5.4. WDS Hybrid Mode Configuration
The configuration flow of the WDS Hybrid Mode is shown below.
Step 1: On
“Overview”
page,
choose the
“WDS
Hybrid”
mode in
“Overview”
page, and
click “Save
Settings”.
Step 2: On
“Basic
Settings”
page,
uncheck the
“Automatic
Channel
Select” and
choose the
channel.
This should
be similar to
that of a
peer WDS.
Click “Save
Settings”.
Step 3: On
“Security
Settings”
page, setup
the security
functions as
you desire,
and click
“Save
Settings”.
Step 4: On
“WDS
Settings”
page, enter
the WDS
peer MAC
address and
click “Save
Settings”.
Step 5: On
“Local Area
Network”
page, enter
the “IP
Address”,
“Subnet
Mask” and
“Default
Gateway”.
Figure 3-23 WDS Hybrid Mode Configuration: Step 1
Copyright © 2008 Atop Technologies, Inc.
All rights reserved
3-13
Step 6: Click
“Apply”
to
save
the
settings and
activate the
current
configuration
s.
AW5300 Wireless Access Point
Chapter 3 Basic Configuration
Figure 3-24 WDS Hybrid Mode Configuration: Step 2
Figure 3-25 WDS Hybrid Mode Configuration: Step 3
Figure 3-26 WDS Hybrid Mode Configuration: Step 4
Copyright © 2008 Atop Technologies, Inc.
All rights reserved
3-14
AW5300 Wireless Access Point
Chapter 3 Basic Configuration
Figure 3-27 WDS Hybrid Mode Configuration: Step 5 and 6
3.5.5. WDS Hybrid Gateway Mode Configuration
The configuration flow of the WDS Hybrid Gateway Mode is shown below.
Step 1: In “Overview”
page, choose the
“WDS Hybrid
Gateway” mode and
the menu “WDS
Settings” and “WDS
Interface” will appear
on the left menu bar.
Click “Save Settings”.
Step 2: On “Basic
Settings” page,
uncheck the
“Automatic Channel
Select” and choose
the channel. This
should be similar to
that of a peer WDS.
Step 3: On the same
page, change the
SSID (Network Name)
if you desire, and click
“Save Settings”.
Step 4: On “Security
Settings” page, setup
the security functions
as you desire, and
click “Save Settings”.
Step 5: On “WDS
Settings” page, enter
the WDS peer MAC
address and click
“Save Settings”.
Step 6: On “Local
Area Network” page,
enter the “IP Address”,
“Subnet Mask” and
“Default Gateway” of
your network and click
“Save Settings”.
Step 7: On “WDS
Interfaces” page, enter
the “IP”, “Netmask”
and “Gateway” of
WDS1-WDS4 network
interface (optional).
Step 8: Click “Apply”
to save the settings
and to activate the
current configurations.
Copyright © 2008 Atop Technologies, Inc.
All rights reserved
3-15
AW5300 Wireless Access Point
Chapter 3 Basic Configuration
Figure 3-28 WDS Hybrid Gateway Mode Configuration: Step 1
Figure 3-29 WDS Hybrid Gateway Mode Configuration: Step 2 and 3
Figure 3-30 WDS Hybrid Gateway Mode Configuration: Step 4
Copyright © 2008 Atop Technologies, Inc.
All rights reserved
3-16
AW5300 Wireless Access Point
Chapter 3 Basic Configuration
Figure 3-31 WDS Hybrid Gateway Mode Configuration: Step 5
Figure 3-32 WDS Hybrid Gateway Mode Configuration: Step 6
Figure 3-33 WDS Hybrid Gateway Mode Configuration: Step 7 and 8
Copyright © 2008 Atop Technologies, Inc.
All rights reserved
3-17
AW5300 Wireless Access Point
Chapter 3 Basic Configuration
3.6. Changing Administrator and User Password
After the above setting, it is recommended to change the administrator (admin) password to keep your
access point secure from unauthorized access. The screenshot of User & Password Settings is shown
in Figure 3-34. To change the Administrator password, put “admin” as the “User name”, and the default
password as the “Old password”. Put in your new administrator password as “New password”, and
repeat it again in “Repeat new password”. Click “Apply” to save your new password.
Figure 3-34 The User & Password Settings in System Setup
3.7. Upgrading Firmware
Once in a while, you may need to upgrade the access point’s firmware for bug fixes or new features. To
upgrade the firmware, go to System Setup menu and select Firmware Upgrade as shown in Figure 3-35.
Click “Browse” to where your new firmware downloaded area. Before clicking the “Upload” button,
please make sure that the device has a reliable power source that it will not restart during the firmware
upgrading. Then, click “Upload” to upgrade the new firmware. Figure 3-36 shows the firmware upgrading
in progress. Please do not restart or power off the device. The device will automatically restart after the
upgrading is complete. The firmware upgrading process should take about 1 minute. For some
parameters, you may need to reconfigure them again after the firmware upgrade.
Figure 3-35 Firmware upgrade in System Setup
Copyright © 2008 Atop Technologies, Inc.
All rights reserved
3-18
AW5300 Wireless Access Point
Chapter 3 Basic Configuration
Figure 3-36 Firmware upgrading in progress. Please do not power off the device
3.8. Restore to Factory Default
In some case that you forget the administrator password or wrongly configure some parameters, you may
want to reset the device to factory default settings. To do such that, tick the “Reset” and click “Reboot” to
reboot your device with a factory default setting as shown in Figure 3-37.
Figure 3-37 Reboot device or reset the device to factory default settings.
Copyright © 2008 Atop Technologies, Inc.
All rights reserved
3-19
AW5300 Wireless Access Point
Chapter 4 Web Console Configuration
Chapter 4
Web Console Configuration
Overview Information
Wireless Settings
Basic Settings, Security Settings, WDS Settings (For Wireless Bridge and WDS
Hybrid Modes Only), Advanced Settings
Network Settings
LAN Interface, WDS Interface
SNMP Settings
Email Settings
DHCP Server
Firewall & Filtering
Wired MAC Filtering, Wireless MAC Filtering (For Wireless AP and WDS Hybrid
Modes Only), Ethernet Type Filtering, IP Filtering, TCP/UDP Port Filtering,
Wireless Client Isolation
System Setup
User & Password Settings, Date/Time Settings, Alert Event, Firmware Upgrade,
Configuration Backup & Restore
System Status
Site Monitor, Mobile Table, WDS Table, Traffic Log & Statistics, DHCP Status
Reboot and Restore Default Settings
Copyright © 2008 Atop Technologies, Inc.
All rights reserved
AW5300 Wireless Access Point
Chapter 4 Web Console Configuration
Chapter 4. Web Console Configuration
In this chapter, we explain AW5300 Wireless Access Point device configuration for all functionalities using
a Web Browser in the following sections.
4.1. Overview Information
Once the Username and Password are correctly entered, the Overview Web Page is shown as follows.
The Settings menu is the left column. The overview web page of the device may be slightly different
according to the operation mode.
Figure 4-1 Overview Web Page and Configuration Menu
4.2. Wireless Settings
In Wireless Settings, there are basic settings, Security settings, Advanced settings, and specific settings
such as WDS settings for Wireless Bridge and WDS Hybrid modes.
4.2.1. Basic Settings
The Basic Settings include the configuration of basic wireless network functions as shown in Figure 4-2.
SSID (Network Name)
It is used to identify the device wireless network. It can be an alphanumeric word with no space. In a
regular Access Point mode, It must be unique in your network environment. You can click on “View site
monitor” to check other wireless networks in your area. The sample snapshot of “View site monitor” is
shown in Figure 4-3. In Wireless Bridge mode and WDS Hybrid mode, the SSID must be the same as
that of the other wireless networks. You can also use “View site monitor” to find SSID of the other network.
Copyright © 2008 Atop Technologies, Inc.
All rights reserved
4-2
AW5300 Wireless Access Point
Chapter 4 Web Console Configuration
Channel
The channel is used by the device to transfer data over a wireless link. In a Regular Access Point mode,
It must be unique in a wireless environment. It is recommended to use non-overlapping channels, which
are channel number 1, 6, and 11. You can click “View site monitor” to view the channel used by other
networks. In Wireless Bridge and WDS Hybrid mode, the channel used by the device should be the
same as that used by the other network. You can select “Automatic Channel Select” to let the device
select the channel automatically.
SSID Broadcast
The SSID is by default set to be broadcast so that mobile stations can search and automatically associate
with the device. However, this may expose the device to unauthorized access if the device is not set up
with any wireless security (See Security Settings to set up the wireless security). To prevent the SSID
being broadcast, you can disable the SSID Broadcast. When the SSID Broadcast is disabled, you must
enter the SSID on a mobile station manually to connect to this device.
Wireless Mode
The device can operate in different wireless modes according to IEEE 802.11b only mode, IEEE 802.11g
only mode, or the 802.11 b/g Mixed mode. In the IEEE 802.11b/g Mixed mode, the device will support
both IEEE 802.11b and 802.11g types of mobile stations. In IEEE 802.11b mode, the device can support
the data rate up to 11 Mb/b. In IEEE 802.11g mode, the device can support the date rate up to 54 Mbps.
Fast-Handoff Mode
The Fast-Handoff mode is a special mode to reduce the time delay due to the standard handoff procedure
as stated in IEEE 802.11 standard. In a large wireless network that is composed of several access
points, the handoff process takes place when a mobile station is roaming from one access point to another.
By enabling this mode, the delay of the handoff process is reduced. The Fast-Handoff mode will only
operate on the devices in AW5300 Series. The Fast-Handoff mode is not supported in Wireless Bridge
operation mode.
Figure 4-2 The Basic Settings of Wireless Network configuration
Figure 4-3 The snapshots of site monitor of surrounding networks
Copyright © 2008 Atop Technologies, Inc.
All rights reserved
4-3
AW5300 Wireless Access Point
Chapter 4 Web Console Configuration
4.2.2. Security Settings
The Wireless Security Settings define the security modes of the wireless network. There are two
different security functions, Authentication and Encryption. There are three different authentication modes:
Open, Shared, and WPA. Additionally, three different encryption types: WEP, TKIP, and AES. The
summary of security modes is shown in Table 4-1.
Table 4-1 Summary of Security Modes in Wireless Security Settings
Authentication Mode
Encryption Type
WEP Mode
Open
WEP
WPA Mode
WPA
TKIP
WPA2 Mode
WPA
AES
WEP Mode
The Wired Equivalent Privacy (WEP) mode is the original security mode provided by IEEE 802.11
standard, and it has many known weaknesses. It is recommended not to use this mode. However, this
mode is supported in many legacy wireless clients.
The authentication mode configured as “Open” means there is no authentication when a mobile station is
connected to the device. For Encryption using WEP to encrypt messages transmitted between a mobile
station and the device, a secret key is needed to be shared with the device and any mobile station before
the connection. The key is called WEP key, which is selected from the key list that has 4 different keys.
The WEP key is a set of Hexadecimal numbers (The number 0-9 and A-F) that is 10 digits or 26 digits
long. The WEP key can also be set with a String of 5 or 13 characters. The longer key size tends to
provide stronger security.
The examples of WEP keys are shown as follow. The sample of the 10 digit hexadecimal key is
“1234567890” or the 26 digit key is “11223344556677889900ABCDEF”. The 5 character WEP key is, for
example, “ABCDE” or “HELLO”. The 13 character WEP is, for example, “THISISYOURKEY”
In the WEP encryption type, any data transmitted over the wireless link is encrypted with the WEP key
using RC4 encryption algorithm.
WPA Mode
The Wi-Fi Protected Access (WPA) mode is a new security mode that fixed the security weakness in WEP
mode. The WPA mode provides a new way of authentication using Encapsulated Authentication Protocol
(EAP) and new encryption types such as TKIP and AES.
The EAP-PSK is the EAP authentication mode with Pre-Shared Key (PSK). This mode is sometimes
called WPA-Personal mode. This is commonly used for a home or office network that has no RADIUS
server. To utilize this mode, you need to set up a Passphrase. The Passphrase is a set of words that
are longer than a password. It can be a phrase or a sentence. The example of Passphrase is “This is your
new wireless network”. The Passphrase will be used again when to set up a connection of a mobile
station. The maximum length of the passphrase is 64 characters.
The EAP-TTLS or PEAP is the EAP authentication mode using RADIUS server that is commonly used.
This mode is sometimes called WPA-Enterprise mode. To utilize this mode, the IP address of a RADIUS
server is needed. The UDP port used by the RADIUS server is by default set to Port 1812 according to
RFC2138 standard. Finally, the Shared Secret that was set up in the RADIUS server is needed to allow
this device to talk to the RADIUS server. Please contact your network administrator for the IP Address,
the RADIUS Port, and the Shared Secret of the RADIUS server in your network.
The Encryption types used in WPA mode are TKIP and AES. The TKIP encryption is an improvement of
WEP encryption based on RC4 algorithm, and it is supported in most legacy access points. Its security
strength is unknown. The AES (Advanced Encryption Standard) is the newest encryption standard that is
known to be strong against known attacks. It is part of the newest wireless security protocol known as
WPA2 or IEEE 802.11i. It is strongly recommended to use AES encryption if your wireless devices
support it.
Copyright © 2008 Atop Technologies, Inc.
All rights reserved
4-4
AW5300 Wireless Access Point
Chapter 4 Web Console Configuration
Figure 4-4 Wireless Security Settings
4.2.3. WDS Settings (For Wireless Bridge and WDS Hybrid Modes Only)
The WDS Hybrid operation mode provides the ability to connection local device both wired and wireless to
another wireless network. The configuration of WDS Settings is shown in Figure 4-5. The device can
connect up to 4 WDS systems by entering their MAC addresses in the configuration. The security of the
connection is provided according to security standards as previously explained.
Figure 4-5 The Wireless Settings of WDS Hybrid Operation Mode
Copyright © 2008 Atop Technologies, Inc.
All rights reserved
4-5
AW5300 Wireless Access Point
Chapter 4 Web Console Configuration
4.2.4. Advanced Settings
The Advanced Settings of the device provide the details of wireless network parameters for tuning network
performance. The parameters for the tuning are shown in Figure 4-6. In most case, you do not need to
change the parameters. You may only change “Country Region” and “Country Code” to comply with your
country regulation. The changes of the other parameters will affect the performance of the network.
Please change the parameters with some caution.
Figure 4-6 The Wireless Settings of Advanced Wireless Parameters
4.3. Network Settings
4.3.1. LAN Interface
LAN Interface
The device may get an IP address from DHCP server connected on the LAN interface. To check “Obtain
an IP Address Automatically”, the device will get an IP Address automatically.
Manual Settings
The device may be set with an IP address manually when there is no DHCP Server in the network. The
IP address and Subnet Mask are mandatory. The Default Gateway address will be necessary if you
need to connect the device and associated mobile stations to the Internet.
DNS Server
To connect the device and associated mobile stations to the Internet, DNS address is needed to resolve
the URL and any domain name. The Preferred DNS will be utilized first, and if it is failed, the Alternate
DNS will be utilized. The DNS servers’ IP addresses will be assigned automatically if you enable “Obtain
IP address automatically” (from DHCP server). Otherwise, you need to contact your network
administrator for DNS server address.
Copyright © 2008 Atop Technologies, Inc.
All rights reserved
4-6
AW5300 Wireless Access Point
Chapter 4 Web Console Configuration
WLAN Interface
In Regular AP mode, the device may function as a router to provide a private network on the WLAN
interface to mobile stations. When “Router Mode” is enabled, you need to set the Router IP address and
Subnet Mask.
Figure 4-7 The Network Settings for LAN & WLAN Interface
4.3.2. WDS Interface
In WDS Hybrid operation mode, the device will be act as a router to be part of the WDS networks.
Enable “Router Mode” to setup a WDS network as shown in Figure 4-8. Next is to fill in the IP Address,
Subnet Mask, and Gateway of the other WDS networks, or if your network has DHCP server, you can
enable DHCP function to obtain an IP Address automatically. The WDS network can connect up to 4
routers. At least one of the routers is needed to be set as Default Gateway.
Figure 4-8 The WDS Interface settings of Network Settings
Copyright © 2008 Atop Technologies, Inc.
All rights reserved
4-7
AW5300 Wireless Access Point
Chapter 4 Web Console Configuration
4.4. SNMP Settings
The SNMP is used by network management software to monitor devices in a network to retrieve network
status information and to configure network parameters. The SNMP Settings shows the configuration of
this device to let it be viewed by a third-party SNMP software as shown in Figure 4-9.
The “System Name” is the field which is by default the MAC address. The “System Location” is the
location of the device. The “System Contact” is the name of a contact person, usually the device
administrator name.
If you wish to make the device status information available for public viewing by a “Read Community”, you
simply check the SNMP “Enable”. Fill in “public” in “Read Community”. If you wish to allow a group of
people called “private” to change the device parameters, enter “private” in “Write Community”. In some
case that the device raises an alert due to some incidents, a trap, an unsolicited message sent by SNMP
Agent to SNMP trap server. To set up a “SNMP Trap Server”, fill in the IP Address of the trap server
designed to collect all alert messages. Any change made will take effect after the device is restarted.
Figure 4-9 SNMP Settings
4.5. Email Settings
In some case that the device raises an alert and/or warning message, the device will send an email to a
user’s mailbox to get some attention. Email Settings allows users to set up the device to be able to send
an email. To set up the email sending, you need to put a “Sender” email address which will be put in
“From” filed of the email. Then, you fill in “Receiver” email address to which the email is sent. You can
send the email to several recipients using Semicolon (;) to separate each email address. Next is to set
Email Server. First, you fill in the IP address of a Mail Server in your local network. If the Mail Server
needs a user authentication, you need to enable “SMTP server authentication required”, and fill in
Copyright © 2008 Atop Technologies, Inc.
All rights reserved
4-8
AW5300 Wireless Access Point
Chapter 4 Web Console Configuration
Username and Password of a user to access the mail server for email sending. Please contact your
network administrator for Mail Server IP address and the Username and the Password.
Figure 4-10 Email Settings for Alert Notification
4.6. DHCP Server
In some local network such as SOHO network, there is no workstation or server to serve as a DHCP
Server to assign an IP address to client automatically. This device can serve as the DHCP Server to
statically or dynamically assign an IP address to mobile clients or any computer. To enable such
functionality, you check “DHCP Enabled”. Then, you need to fill in the IP Address Range including the
“From IP Address” and “To IP Address”. Then, fill in the Subnet Mask of the IP address. The “Lease
Time” is the duration in minutes that the assigned IP Address to a device will belong to the device. Once
it is expired, the IP address may be assigned to any other device.
You can also assign a static IP address to a mobile client. The static IP address means that it will never be
expired. It can be only assigned to the mobile client. To statically assign an IP address, check on the
small box in front of each line, and then fill in the “Host Name”, the IP Address that you want to be
assigned, and the MAC address of the mobile client.
Figure 4-11 DHCP Server Settings
Copyright © 2008 Atop Technologies, Inc.
All rights reserved
4-9
AW5300 Wireless Access Point
Chapter 4 Web Console Configuration
4.7. Firewall & Filtering
In this section, we explain the configuration for Firewall and Packet Filtering. It is available to filter
packets based on different criteria such as MAC address, the type of Ethernet packet, IP address, and
TCP/UDP port number. The filtering methods provide sort of security to prevent unauthorized or
malicious packets to prevent your device and the associated network from some attacks.
4.7.1. Wired MAC Filtering
The “Wired MAC Filtering” provides the filter to allow or to deny packets to go through Wired or
LAN/Ethernet interface. To enable the Wired MAC Filtering, select “Only allow MAC Address” or “Only
deny MAC Address”, and fill in MAC Address of any Ethernet device whose packets would be allowed or
denied in the Access Control List. The Settings of Wired MAC Filtering is shown in Figure 4-12.
Figure 4-12 Wired MAC Filtering Settings
4.7.2. Wireless MAC Filtering (For Wireless AP and WDS Hybrid Modes Only)
The device is also able to provide a packet filter based on MAC address on Wireless interface as well.
To set up the “Wireless MAC Filtering”, enabling the “Only allow MAC address” or “Only deny MAC
address”, and filling in the desired MAC address of any wireless station to allow or to deny packets,
respectively.
Copyright © 2008 Atop Technologies, Inc.
All rights reserved
4-10
AW5300 Wireless Access Point
Chapter 4 Web Console Configuration
Figure 4-13 Wireless MAC Filtering (for Wireless AP and WDS Hybrid mode only)
4.7.3. Ethernet Type Filtering
The Ethernet Type Filtering is able to allow or to deny Ethernet packets based on their type. This is to
prevent some undesired packet to the device and the associated network. To enable this filtering, select
the “Only allow MAC address” or “Only deny MAC address.” Then, enter Ethernet type and Protocol of the
packet you want to allow or to deny. Then, select the Interface to which this filter is applied. To enable
or disable each filter (based on Ethernet type), you can check or uncheck the mark in front of the filter,
respectively.
To set up an Ethernet Type Filter, you may fill in “0x” followed by a four-digit hexadecimal number, e.g.
0xF0F0 to filter NETBUI type message or 0x8035 to filter RARP type message.
Figure 4-14 Ethernet Type Filtering
Copyright © 2008 Atop Technologies, Inc.
All rights reserved
4-11
AW5300 Wireless Access Point
Chapter 4 Web Console Configuration
4.7.4. IP Filtering
The “IP Filtering” enables the packet filtering based on the IP protocol, the source address and the
destination address. To add a filter, select the “Only allow MAC address” or “Only deny MAC address”.
Then, adding IP code of the protocol, the Protocol name, the source address and the destination address.
Each filter only provides one-way filtering. To create a two-way filtering, you need to add two filters, each
of which is for one-way filtering. Then, select the Interface to which the filter is applied. The enable or
disable each filter, you can check or uncheck the mark in front of the line of the filter.
Figure 4-15 IP Network Type Filtering
4.7.5. TCP/UDP Port Filtering
The “TCP/UDP Port Filtering” is a filtering method to allow or to deny packets based on TCP or UDP port
number. To enable the TCP/UDP Port Filtering, select the “Only allow MAC address” or “Only deny MAC
address”. Then, filling in Port number and its associated Application name, and selecting the type of the
protocol that could be TCP, UDP or both. Then, you select the Interface you want this filter to be applied.
The enable or disable each filter, you can check or uncheck the mark in front of the line of the filter.
Figure 4-16 TCP/UDP Port Type Filtering
Copyright © 2008 Atop Technologies, Inc.
All rights reserved
4-12
AW5300 Wireless Access Point
Chapter 4 Web Console Configuration
4.7.6. Wireless Client Isolation
The Wireless Client Isolation feature utilizes an advanced filtering technique to create a virtual interface
for wireless interfaces between wireless clients. The isolation is enabled to prevent data traffic flowing
between clients to increase client security and to prevent unnecessary traffic between clients. This
feature allows operators to integrate wireless field devices and wireless-enabled computer using the same
wireless network where our AW5300 Wireless Access Point acts as the wireless access point.
This feature is only available in our AW5300 Wireless Access Point. It offers three modes for operations
according to operator need.
•
No Blocking: This feature is disabled. The wireless access point does not isolate wireless
clients. Hence, it allows any communication among all wireless clients.
•
This AP Only: This allows any associated wireless clients to communicate with other
wireless clients that associate with this AP only.
•
Across APs: This allows any communication of wireless clients across APs. It does not
allow associated wireless clients to communicate with wireless clients on this AP.
•
Block all: This will block any communication between one wireless client and any other
wireless clients. This only allows a wireless client to communicate to wired clients.
Figure 4-17 Wireless Client Isolation Settings
4.8. System Setup
4.8.1. User & Password Settings
The User & Password Setting is for user account changing. To change the administrator password, put in
“admin” as Username and the default password, or the old password if it is ever changed. Then, fill in a
new password in “New Password” and in “Repeat new password” to reconfirm the new password.
Copyright © 2008 Atop Technologies, Inc.
All rights reserved
4-13
AW5300 Wireless Access Point
Chapter 4 Web Console Configuration
Figure 4-18 User and Password Settings
4.8.2. Date/Time Settings
The date and time of the device is important to some functions that need date and time to operate. To
set up date and time of the device, you can manually set up Date and Time, or you can use Network Time
Protocol (NTP) to synchronize the time of the device with a Time Server. To synchronize time
automatically, check “Obtain an date/time automatically” and then fill in the IP address or the hostname of
an NTP Server. If you fill in the hostname, the DNS server must be set up for the device. Then, you
can select the Time Zone of the device.
Figure 4-19 Date and Time Settings
4.8.3. Alert Event
There are five events that the device is triggered:
•
Cold Start (The case of power interruption)
Copyright © 2008 Atop Technologies, Inc.
All rights reserved
4-14
AW5300 Wireless Access Point
Chapter 4 Web Console Configuration
•
Warm Start (The case that the device is reset by Reset Button)
•
Authentication Failure (The case of incorrect username or password is entered)
•
IP Address Changed (The case that the device’s IP is changed)
•
Password Changed (The case that the administrator password is changed)
Any one of these five triggers an “Alert Event”, and subsequently the need to notify responsible personnel
by email or to set a trap on the SNMP Trap Server. See “Email Settings” section, to set up the email
addresses to which the alert message is sent. See “SNMP Settings” section to set up a SNMP trap server.
Alert messages of all events can be sent out in an email, but only in the first three events in which the
SNMP Server can trap as shown in Figure 4-20.
Figure 4-20 Alert Event Settings
4.8.4. Firmware Upgrade
In a meanwhile, we may provide a new firmware in form of a file for the device that fixes bugs and
provides better performance. It is very important that the device must NOT be turned off or powered off
during the firmware upgrading. To upgrade a new firmware, copy the new firmware file to your computer,
and then click “Browse” to find the new firmware file as shown in Figure 4-21. Before upgrading the
firmware, please make sure that the device has a reliable power source that it will not be powered off or
restarted during the upgrading process. Then, click “Upload” to upload the new firmware to the device.
After clicking the “Upload” button, the progression of the uploading is shown as shown in Figure 4-22.
Please wait until the uploading process is finished. Once, the upload is successful; the device will restart
by itself. The upgrading process should take around 1 minute.
Copyright © 2008 Atop Technologies, Inc.
All rights reserved
4-15
AW5300 Wireless Access Point
Chapter 4 Web Console Configuration
Figure 4-21 Firmware Upgrade Settings
Figure 4-22 Firmware Upgrading in Progress
4.8.5. Configuration Backup & Restore
Once all the configurations are set and the device is working properly. You may want to back up your
configuration. The backup can be used when the new firmware is uploaded and it is reset to a factory
default settings. The backup can also be used to set other similar devices without going through several
configuration steps.
To backup your configuration, click “Backup”, and a pop-up dialog is prompt for saving the backup file on
your computer. It is important NOT to modify the saved configuration file by any editor. Any
modification to the file may corrupt the file, and it may not be used for restore.
To restore the configuration backup, click “Browse” to locate the backup file, and then click “Upload” to
upload the configuration backup file to the device. Once, the backup file is successfully uploaded; the
device will restart.
Figure 4-23 Configuration Backup & Restore
Copyright © 2008 Atop Technologies, Inc.
All rights reserved
4-16
AW5300 Wireless Access Point
Chapter 4 Web Console Configuration
4.9. System Status
The menu settings provide the information of the device status as shown in the following sections.
4.9.1. Site Monitor
The Site Monitor allows users to view the other wireless networks in the surrounding areas. The Site
Monitor provides information of other access points such as SSID, MAC Address, Channel used, the RSSI
(Received Signal Strength Indicator), and Security protocol used by the other access points. The “Site
Monitor” can be helpful when setting the SSID and the Channel of this device to avoid the SSID name and
Channel collision to prevent unexpected errors or degraded performance.
It will take a while for the “Site Monitor” function to gather information of the surrounding wireless
networks.
Figure 4-24 Site Monitor Snapshot
4.9.2. Mobile Table
When the device is working in Wireless AP mode or the Hybrid WDS mode, the administrator can monitor
the mobile clients associated to this device using “Mobile Table” menu.
The “Mobile Table” on the “System Status” menu shows the status of the mobile clients in the wireless
network. Figure 4-25 shows the information of associated mobile clients. It shows the MAC addresses,
the number of received and transmitted packet as well as the transmission rate of the wireless link.
Figure 4-25 Mobile Table shows the Associated Mobile Station
4.9.3. WDS Table
When the device is working in Wireless Bridge mode or Hybrid WDS mode, the administrator can monitor
the other wireless networks using WDS interfaces connected with this device using “WDS Table” menu.
Copyright © 2008 Atop Technologies, Inc.
All rights reserved
4-17
AW5300 Wireless Access Point
Chapter 4 Web Console Configuration
The “WDS Table” on the “System Status” menu shows the status of the other WDS networks that are
connected with this device. Figure 4-26 shows the sample of the status of another WDS network on
“ra1” interface. It shows the MAC address of the interface and the number of received and transmitted
packets as well as the current transmission rate of the wireless link.
Figure 4-26 WDS Table shows the status of the WDS interface
4.9.4. Traffic Log & Statistics
The Traffic Log & Statistics shows the information of the wireless network and the status. You can set up
the “Refresh Rate” of the traffic log viewing. The default is 30 seconds. The high refresh rate would
increase the CPU load of the device.
Figure 4-27 Traffic Log and Network Statistics
Copyright © 2008 Atop Technologies, Inc.
All rights reserved
4-18
AW5300 Wireless Access Point
Chapter 4 Web Console Configuration
4.9.5. DHCP Status
The DHCP Status shows the list of DHCP clients that receive IP addresses from this device when the
device distributes the IP addresses using DHCP protocol. The list shows mobile stations MAC addresses,
IP addresses, Type, and Status.
Figure 4-28 DHCP Status Snapshots
4.10. Reboot and Restore Default Settings
To manually reboot the device, you may click “Reboot”, and the device will restart. In some case, you
may want to reset the device to factory default. To do such that, you check “Reset” and then click
“Reboot” to restart the device with a factory default settings.
Figure 4-29 Reboot and Restore Default Settings
Copyright © 2008 Atop Technologies, Inc.
All rights reserved
4-19
AW5300 Wireless Access Point
Specifications
Chapter 5. Specifications
Hardware Specifications
CPU
Flash Memory
RAM Memory
Interface
Watchdog
Debug Port
Wireless LAN
Ethernet
Power
Mechanical
Environment
Interface
150 MHz RISC with MMU support
8 MB for Program and Data
2MB for Bootloader
SDRAM: 32 MB
Mini-PCI Slot (for Wireless Module)
Hardware Watchdog Reset
RS-232
FCC Certified IEEE 802.11 b/g
802.11b Data Rates: 11/5.5/2/1 Mbps
802.11g Data Rates: 54/48/36/24/18/12/9/6/5.5/2/1 Mbps
Operating Channels: 802.11b/g: 11 (North America), 13 (Europe), 14
(Japan)
Security: WEP, WPA, WPA2, TKIP, AES, 802.1x
WEP Encryption Length: 64 bit and 128 bit
Tx Power 11b: 14 dBm, 11g: 13 dBm
Rx Sensitivity: -66 dBm @ 54 Mbps, -80 dBm @ 11Mbps
802.11b/g Outdoor Range: 980 ft. / 300 m
Antenna Connector: Reverse SMA
Topologies: Infrastructure
802.3u 10/100BaseTX Ethernet LAN
Protection: Built-in 1.5 kV Magnetic Isolation
Input: DC 24V - 48V
Consumption: 4.5 W @ Tx Mode
H x W x D: 90 mm x 45 mm x 75 mm
Operating: 0 to 60 C, 5 to 95% RH
Storage: -40 to 75 C, 5 to 95% RH
4 dBi antenna
5.5 dBi antenna (optional)
Software Specifications
Protocols
Advanced Features
Configuration
Client OS Support
Interface
Wireless Security
HTTP, DHCP, TCP/IP, RADIUS, DNS, SNMP, NTP
Fast Handoff, Smart Route, Wireless Client Isolation, Advanced
Firewall & Packet Filtering,
Web-based management
Windows 95/98/2000/ME/NT/XP, UNIX and Macintosh
Antenna : 4 dBi antenna, 5.5 dBi antenna (optional)
AP-STA: OPEN/WEP/WPA/WPA2/RADIUS
WDS: OPEN/WEP/TKIP/CCMP(AES) Encryption
Copyright © 2008 Atop Technologies, Inc.
All rights reserved
5-1
AW5300 Wireless Access Point
LED indicators
Name
Color
Message
RUN
(Blinking Green)
The device is running
AP
(Steady Green)
Device is running in Regular AP modes
WDS
(Steady Green)
Device is running in WDS modes
WLAN
(Blinking Green)
There is on-going traffic over WLAN interface
WDS1-4
(Steady Green)
Show the WDS connection is established
The device can be operated into one of five modes, Regular AP, Regular AP Gateway, Wireless Bridge,
WDS Hybrid, and WDS Hybrid Gateway. To identify the device operating mode, two LEDs, AP and WDS,
are used as shown in the following table.
Operation
Mode
Regular
AP
Regular
AP
Gateway
Wireless
Bridge
WDS
Hybrid
AP
WDS
Copyright © 2008 Atop Technologies, Inc.
All rights reserved
WDS
Hybrid
Gateway
AW5300 Wireless Access Point
Warranty Policy
Warranty Conditions
Products supplied by Atop Technologies are covered in this warranty for sub-standard performance or
defective workmanship. The warranty is not, however, extended to goods damaged in the following
circumstances:
(a)
Excessive forces or impacts
(b)
War or an Act of God: wind storm, fire, flood, electric shock, earthquake
(c)
Use of unqualified power supply, connectors, or maintenance procedure
(d)
Replacement with unauthorized parts
RMA and Shipping Costs Reimbursement
Customers shall always obtain an authorized "RMA" number from Atop before shipping the goods to be
repaired to Atop.
When in normal use, a sold product shall be replaced with a new one within 3 months after purchase. The
shipping cost from the customer to Atop will be reimbursed by Atop.
After 3 months and still within the warranty period, it is up to Atop whether to replace the unit with a new
one; normally, as long as a product is under warranty, all parts and labor are free of charge to the
customers.
After the warranty period, the customer shall cover the cost for parts and labor.
Three months after purchase, the shipping cost from the customer to Atop will not be reimbursed, but the
shipping cost from Atop to the customer will be paid by Atop.
Limited Liability
Atop shall not be held responsible for any consequential losses from using Atop’s product.
Warranty Period
Wireless Access Point: 5 years
Copyright © 2008 Atop Technologies, Inc.
All rights reserved