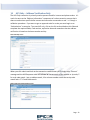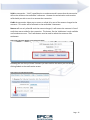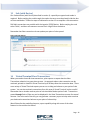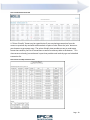
1
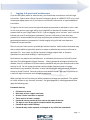
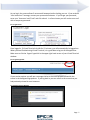
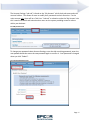
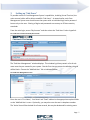
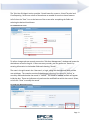
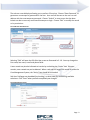
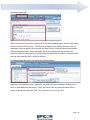
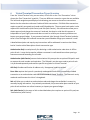
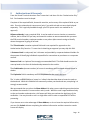
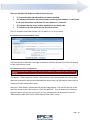
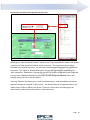
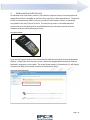
Virtual Terminal
User Manual for Direct
Users
Table of Contents
1
Introduction .......................................................................................................................................... 3
2
Logging In & password maintenance .................................................................................................... 4
3
Setting up “Sub-Users” ......................................................................................................................... 7
4
Navigation ........................................................................................................................................... 10
5
Virtual Terminal Profile Page .............................................................................................................. 12
6
Virtual Terminal Transaction Types Overview .................................................................................... 14
7
Offline Point of Sale and Virtual Terminal .......................................................................................... 15
8
Authorizations & Reversals ................................................................................................................. 16
9
Authorization (with Device) ................................................................................................................ 21
10
AVS Only – Address Verification Only ............................................................................................. 22
11
Force Sale ........................................................................................................................................ 23
12
Sale Transaction .............................................................................................................................. 23
13
Sale (with Device)............................................................................................................................ 26
14
Virtual Terminal View Transactions ................................................................................................ 26
14.1
Transaction Search ...................................................................................................................... 27
14.2 Predefined Reports & CSV Export ................................................................................................... 28
15 Frequently Asked Questions (FAQ’s) ..................................................................................................... 31
Page 2
1
Introduction
With Virtual Terminal you can;
•
•
•
Authorize bankcard transactions via the internet, when your server connection is lost!
Voice Authorizations and 3rd party devices can be costly and unnecessary most of the
time. In those rare instances when you are using offline point of sale Virtual Terminal
provides you with a cost effective, PCI compliant, way to obtain authorizations and valid
approval codes, protecting your sales and your bottom line.
Independently process ‘sale’ transactions for bank cards. Before using this capability,
you must make sure that you are familiar with the impact that it has on your accounting
and inventory processes.
Use ‘View Transactions’ to search, view or print reports on bankcard transactions
posted in your Point of Sale system. This component of Virtual Terminal provides
access to limited maintenance and extensive report for your bankcard activity.
Virtual Terminal is an application contained within the web based ‘Core Management System’
and access is controlled by user security attached to your login. The Core Management System
also contains ‘Core Reporting’ which allows you to access secure web based bank card reports
and your electronic bankcard statements.
1.0.1 Core Management Home Screen
Page 3
2
Logging In & password maintenance
If you are the system owner or administrator, you should have received an e-mail with login
instructions. Please contact Epicor Payment Exchange by phone at 1-800-322-3077 or by e-mail
at [email protected] if you have not received this information or require additional
instructions.
To login for the first time; enter the login and temporary password as indicated on your e-mail.
For the main account your login will be your 8 digit MID or Merchant ID number and your
password will be your 9 digit Federal Tax ID. If you are logging in as a ‘sub-user’ your e-mail will
indicate your user ID and temporary password. If you are a sub-user or have reset your
password it is recommended that you copy and paste your password from the e-mail. System
generated passwords are composed of a rather lengthy string of mixed case characters.
Passwords are caps sensitive.
There is only one ‘main account’ provided per business location. Multi-location businesses may
wish to also establish a login which permits an owner or administrator access to all stores or
merchant ID’s. Your trainer, the Epicor Payment Exchange support desk, or Payment
Operations can assist with building a “reporting user ID”.
Each location may require that multiple users, or individuals, have access to Virtual Terminal
and other ‘Core Management System’ features. Sharing passwords and logins should not be
allowed, since it is a violation of PCI data security standards and puts your business and its data
security at risk. For this reason the primary account holder (business owner or system
administrator) may establish ‘Sub-users’ or other individual logins with passwords, that have
access to Virtual Terminal. Once set up by the main account holder ‘sub-users’ will receive an
e-mail with login instructions and a temporary password.
When you login for the first time you will be prompted to change your password. This applies
to a main account or any ‘sub-user’ accounts. Use good judgment in creating passwords and
apply the following rules.
Passwords must be;
•
•
•
•
•
•
•
•
8 characters or more
Must have at least 1 upper case letter
At least 1 lower case letter is required
There must be at least 1 number.
Passwords cannot contain the first name or last name of the user.
The login or user ID may not be contained within the password
Passwords expire within 90 days
Passwords may not be repeated, or changed to any of the last 4 passwords
Page 4
As you log in the system allows 3 unsuccessful attempts before locking you out. If you receive a
“user locked out” message, contact your system administrator. If you forget your password,
enter your ‘Username’ and ‘Email’ and click submit. In a few minutes you will receive an e-mail
with a temporary password.
2.0.1 Login Screen
Once logged in, if Virtual Terminal sits idle for 15 minutes, you will automatically be logged out.
When you have finished using Virtual Terminal, it is a good idea to log out of the application.
Make sure to click the ‘logout’ hyperlink in the upper right hand corner of your Virtual Terminal
window.
2.0.2 Logout Hyperlink
If your session expires you will see a message similar to the one displayed below with the
screen in the background grayed out. If you log back in you can return to the screen that you
had previously viewed in most instances.
2.0.3 Expired Session Message
Page 5
The Account Settings “sub-tab” is found on the “My Account” tab for both sub-users and main
account holders. This allows all users to modify their passwords at their discretion. For the
main account only, there will be a ‘Sub User’ “sub-tab” or selection under the ‘My Account’ tab:
this is used to establish and maintain other users on the system providing access for others
within your business.
2.0.4 My Account Tab
To change your password select Account Settings, enter the old or existing password, enter the
new password and then enter the new password again to confirm it. Your password is changed
when you click “Submit”.
2.0.5 Account Settings Screen
Page 6
3
Setting up “Sub-Users”
To provide access to Core Management System’s capabilities, including Virtual Terminal, the
main account holder will be able to establish “Sub-Users”. As stated earlier, each Core
Management System user should access the system with an individual login and a password
known only to the user. Sharing of logins and passwords are contrary to PCI data security
standards.
From the main login, access “My Account” and then select the “Sub-Users” tab or hyperlink.
3.0.1 Sub-Users selection from My Account Tab
The “Sub-User Management” window displays. This window’s grid may contain a list of subusers once they are created in your system. But the first time you access the window, the grid
will be blank. Choose the “Add Sub-User” link as indicated below;
3.0.2 Sub-User Management screen
Enter the user’s ‘First Name’, ‘Last Name’ and ‘Email’ address in the appropriate required fields
on the ‘Add Sub-User’ screen. Optionally, you may also enter the user’s telephone number.
The ‘Active’ box will be checked for all new records, but may be deselected for existing users.
Page 7
The ‘Sub-User Privileges’ section provides 2 check boxes for access to; Virtual Terminal and
Core Reporting. Select one or both of these boxes as needed for access to these features.
Left click on the “Save” icon at the bottom of the screen after completing the fields and
selecting the desired check boxes.
3.0.3 Add Sub-User screen
To edit or change sub-user records, access the “Sub-User Management” window and locate the
desired user record in the grid. If there are many records, you may perform a ‘Search’ by
entering information in the header fields and choosing “Search”.
The rows in the grid contain the ‘Username’, or login, along with the required fields and the
user privileges. The row also contains 2 check boxes indicating if the record is “Active” or
currently used and whether the record is “Locked”. If a record is “Locked” a check will appear
inside the box. These are indicators only and must be modified from within the record. Select,
or left click “View” to modify the record.
3.0.4 Sub-User Management Screen
Page 8
The sub-user record displays allowing you to perform 3 functions. Choose “Reset Password” to
generate a new temporary password for the user. An e-mail will be sent to the user’s e-mail
address with the new temporary password. Choose “Unlock” to reset a user that has been
locked out due to too many unsuccessful attempts to login. Choose “Edit” to modify the record
or its permissions.
3.0.5 Sub-User Record Screen
Selecting “Edit” will open the Edit Sub-User screen as illustrated in 3.1.6. You may change the
first name, last name, e-mail and phone fields.
A user record may also be indicated as inactive by unchecking the “Active” box. Sub-user
records, once created may not be deleted. When a sub-user no longer has reason to access the
Core Management System, the “Active” box should be unchecked.
Sub-User Privileges may be added (by checking), or taken away (by unchecking) available
selections. Click “Save” when you have completed your changes.
3.0.6 Edit Sub-User Screen
Page 9
4
Navigation
If you are the primary user you should have access to all of the Core Management System’s
capabilities displayed on the illustration below (4.0.1). If you are not using the main account,
your access (and the resulting view) may be different. Access will be determined by the
privileges assigned in your sub-user record by your manager or system administrator. The
Home tab displays links for up to 3 primary areas; these areas are also displayed as tabs and
may be accessed from there as well. If you wish to process credit card authorizations, you will
select ‘Virtual Terminal’. The ‘Reporting’ link or ‘tab’ leads to ‘Core Reporting’ and allows you
to access a variety of reports, search tools and transaction summaries. As you read in section 2,
“My Account” allows you to change your password, and if you are using the main account, you
can see and setup sub-users and also provide them with security to access functions within
virtual terminal.
Accessing Virtual Terminal is easy! You will find its ‘tab’ on the top allowing you access or you
can select the Virtual Terminal link on the Home tab.
4.0.1 Core Management System “Home” tab
On the Virtual Terminal tab you will find that you can navigate from the Navigation links in the
body of the page or by clicking on a ‘sub-tab’. The selections include; Run Transactions, View
Transactions, Profile and Help. Run Transactions and View Transactions are the most accessed
and are described below.
Page 10
4.0.2 Virtual Terminal tab
When you click Run Transaction, you will see a ‘left hand navigation pane’ with links providing
access to features and functions. The left hand navigation pane displays selections that are
dependent upon the specific tab or sub-tab you have chosen. A feature called ‘bread crumbs’
displays the path you have taken and allows you to see at glance how you arrived at the
particular screen you are viewing. Any field name preceded with an asterisk is a required field
and you must make an entry in order to proceed.
4.0.3 Virtual Terminal Run Transactions tab showing navigation features
Hyperlinks are displayed in blue. Hyperlinks may lead you to other windows allowing you to
enter or view additional information. Hover your cursor over any blue underlined field to
display a ‘callout’ describing the field. This is a great ‘learn as you go’ tool!
Page 11
4.0.4 Hyperlink & Callout Illustration
Hyperlink
“Callout”
From time to time you may notice a “Progress Window” indicating that information is being
processed in the Core Management System.
4.0.5 Progress Window
5
Virtual Terminal Profile Page
When you choose “Virtual Terminal” you’ll notice links to 4 distinct functions, Run transactions,
View Transactions, Profile and Help. Before accessing the other capabilities, let’s take a look at
the ‘profile’ link and explore its contents.
5.0.1 Profile Link on Virtual Terminal tab
Page 12
From your primary store login you will see a screen similar to the one shown below (5.1.2).
Sub-users will notice less information on their Profile page; the POS information section will not
be displayed.
At the top you will find ‘General Information’ about your business. Simply verify that this
information is correct.
There are 3 key pieces of POS information, or ‘credentials’ that you need to know about. Those
are; the account token, account ID and acceptor ID. The ‘account token’ consists of 72
characters and provides encryption and security for your data. The account ID is assigned by
Epicor Payment Exchange and the Acceptor ID is your Merchant ID or MID.
The “Card Types Accepted” section lists the types of cards that you can use.
Important phone numbers are shown at the bottom of your profile page. Make sure to check
your actual profile page for the correct phone numbers rather than using the ones displayed on
illustration 5.0.2!
5.0.2 Profile screen
Page 13
6
Virtual Terminal Transaction Types Overview
From the ‘Virtual Terminal’ tab, you can select, or left click on the “Run Transaction” tab or
choose the ‘Run Transaction’ hyperlink. There are different transaction types that are available.
The left hand navigation pane displays links allowing you access to the various transactions.
Notice that the selections reference Credit and Debit transactions. PIN Debit Sale transactions
require a specially encrypted card reader and PIN pad device. The encrypted card reader is also
required for Authorization (with Device) and Sale (with Device). Sale transactions allow you to
obtain approval and charge the customer’s bankcard, but keep in mind that this process is
independent of your Eagle system and does not track or relieve your inventory and does not
impact your general ledger. If you process a bankcard ‘sale’ through Virtual Terminal, and also
enter it into the Eagle as a bankcard transaction you will double charge your customer’s card!
A detailed description and step by step instructions will be addressed in sections that follow,
but let’s look at a brief description of each transaction type.
Authorization Only is used primarily for obtaining a valid authorization code when in offline
point of sale. It may also be used to validate a customer’s credit worthiness when opening a
house account and extending line of credit.
Authorization (with Device) same as Authorization Only except that an optional PIN pad is used
to capture the card number and expiration. The PIN pad is not the same used at point of sale.
It is purchased separately and contains specific encryption for Virtual Terminal.
AVS Only Provides verification of address only. No approval code is provided.
Force Sale requires the input of a previously used approval code from a cancelled or voided
transaction or an authorization code obtained outside of Virtual Terminal. This feature is rarely
used and could increase the risk of a chargeback.
Sale will allow you to obtain an authorization code and charge the cardholder’s account by
manually keying information. As previously mentioned, this process takes place outside of your
point of sale and does not relieve inventory or impact your general ledger.
Sale (with Device) is the same as Sale as described above, but requires an optional Pin pad; see
“Authorization (with Device)”.
Page 14
6.0.1 Run Transaction tab
7
Offline Point of Sale and Virtual Terminal
Your normally seamless payment card authorization system is not available when you are in
offline point of sale. Most often an offline situation occurs due to maintenance on your Eagle
server. High speed internet connections are generally quite dependable in most areas and in
these rare instances you can use Virtual Terminal to obtain a valid approval code. You may
copy the approval code and enter it on your Eagle’s offline point of sale screen as illustrated in
the following section.
Offline transactions, as you know, must be uploaded to the server from the point of sale
terminal when connection is re-established. With option 5417 “Upload offline bankcards…” set
to “Yes”, your credit card transactions and the approval codes that you obtain through Virtual
Terminal are captured and stored for settlement along with any live point sale transactions.
After you have uploaded your offline transactions you must check the spooled report
maintenance screen and view report “MRGOPOS” to validate that all transactions have
uploaded. You must also view report “MRGPROT” to make sure that your credit card
transactions and information have uploaded.
Should you find yourself without a high speed internet connection, obtain a ‘Voice
Authorization’ for ALL offline bankcard transactions! While inconvenient, and more time
consuming than your normal high speed bankcard processing, getting approvals protects both
you, and the legitimate bankcard holder!
Note: PIN Debit transactions cannot be used for offline point of sale. Process a debit card as a
credit card transaction.
Page 15
8
Authorizations & Reversals
From the Virtual Terminal tab select ‘Run Transaction’ and then click the “Authorization Only”
link. Card numbers must be keyed.
Complete all the required fields, those with asterisks, and as many of the optional fields as you
wish. Enter the subtotal and a tax amount (only if you wish to break out tax to be displayed
separately. This is typically handled through your POS system and is not needed for an
approval).
Reference Number is not a required field. It can be used to insert an invoice or transaction
number, but in offline POS you may not know this number so we recommend that you enter
the POS terminal number, employee number or any other alpha numeric string to identify
where the approval is going to be used.
The Ticket Number is another optional field and is not required for approvals or the
Authorization Only function. To save time in obtaining an approval you may skip this field.
A Customer Code is rarely used, but it is known and provided by corporate bankcard holders for
the purpose of identifying individuals responsible for transactions or purchases on a corporate
account.
Name on Card is an ‘optional’ but strongly recommended field. This field should contain the
name printed on the front of the bankcard presented to the cashier.
The Card Number (account number) of course is mandatory and is entered without spaces or
dashes.
The Expiration field is mandatory and has dropdowns for the month and year.
The ‘v’ code or CVV2 field has a ‘popup’ or ‘callout’ that describes how to locate the code on
the bankcard. While this field does not necessarily reduce your bankcard rate, completing it is
strongly recommended.
We recommend that you select the Show Address link when you are obtaining an authorization
to validate the customer’s house number and zip code. While the card is approved based only
on the card number and expiration, this feature will help you evaluate the legitimacy of the
cardholder. You may choose to use it on high dollar sales in order to expedited POS offline
processing.
If you choose not to take advantage of Show Address, or do not have the required information,
you can click Submit without completing the address information and the transaction results
screen will display.
Page 16
8.0.1 Authorization details screen
Identify transaction
or temrinal
Enter tax separately or
combine in “Subtotal”
field. “Total” field reflects
“Subtotal” plus “Tax”.
Optional field
Access address & complete information for
validation against cardholder address on file.
All you really need for address verification is a house number and a zip code. Of course you
should complete the other fields if you wish to capture that information. Click “Submit” after
all entries have been made.
8.0.2 Show Address – Address Information screen
In the ‘Transaction Results’ screen an “AP (Approved)” message displays in green font, if the
transaction was approved. You will also see an “AVS Response Code” and a “CVV Response”
field if either were entered on the previous screens. The “Transaction ID” is a unique number
assigned by the processor and is not to be used as the approval code.
Page 17
There are multiple AVS Response codes that you may see;
•
•
•
•
“Y” means that both zip code and house number matched,
“N” indicates that neither the house number nor the zip code matched. In which case
it is at your discretion as to whether the sale remains or is ‘reversed’.
“A” indicates that the house number matched but not the zip code
“Z” indicates a zip code match but not the house number.
The CVV response code field indicates “M” for match or “N” for no match.
8.0.3 Authorization Transaction Results screen
If the transaction is declined, a message as shown at the lower portion of the slide, will display
on the original entry screen.
8.0.4 Authorization ‘Error’ message banner
The button, “View Transaction Details” takes you to a screen that provides more information
about the transaction and also provides additional options but you will need to view or print a
receipt to find the authorization code.
Select the “View Receipt” button and the receipt image displays. You can click the link at the
top of the screen to print the receipt or “Close the Window”. You can notate the 6 character
approval code or you can use your cursor to ‘copy’ the approval and then paste it into the
‘Authorization Code’ field of your Offline Point of Sale ‘totals’ screen.
Page 18
8.0.5 View Receipt /OPOS Totals & Approval code placement
Selecting the “View Transaction Details” button on the ‘Transaction Results’ screen, will display
a summary of fields specifically related to the transaction. The transaction time is always
indicated in the central time zone. You will notice several buttons displayed at the bottom of
the screen. The “Capture” button allows you to convert the approval only transaction to a
‘sale’ transaction: Remember, if you do this you will lose visibility of the sale in your Eagle and
if you process a duplicate bankcard in your Eagle you will charge the customer twice! We
strongly advise you not to use this feature.
Choosing “Reverse” will allow you to ‘undo’ the authorization….and immediately restore the
approved amount to customer’s ‘open to buy’. You should ‘Reverse’ any approval that is not
used at Point of Sale or offline point of sale. There are ‘misuse fees’ that may apply if an
authorization is obtained and not used on a sale transaction!
Page 19
8.0.6 Transaction Details screen
“Capture” may
charge the
customer’s
bankcard & could
result in a double
charge.
“Reverse” unused authorizations
to avoid ‘misuse’ fees!
When you select “Reverse” the ‘Transaction Information’ window displays and you must then
select ‘Submit’ or ‘Cancel’…clicking submit completes the reversal process.
8.0.7 Reversal action confirmation screen
The ‘Transaction results’ screen displays, confirming that the transaction was reversed!
8.0.8 Reversal Transaction Result screen
Page 20
9
Authorization (with Device)
As indicated in our overview in section 6, this selection requires the use of an encrypted card
reader/PIN pad that is available for purchase from your Epicor sales representative. The Igenico
iPP320, as shown below, differs from your normal POS card readers in that it is specifically
encrypted for the use of Virtual Terminal. This device may result in increased speed and
accuracy but your purchase decision should be based on your business practices and the
frequency that you utilize offline point of sale.
9.0.1 Ingenico iPP320
If you use the Ingenico device, select Authorization (with Device) and the screen shown below
displays. Simply make sure that your cursor is within the designated block and then slide the
bankcard’s mag-stripe on the reader. The screen shown above, in illustration 9.0.1, will display.
Complete the fields as instructed in section 8 “Authorization Only”.
9.0.2 Authorization (with Device)
Page 21
10
AVS Only – Address Verification Only
The AVS Only transaction is primarily used to prevent fraud for internet and phone orders. It’s
much the same as the “Address Information” component of a sale transaction; except that it
does not authorize a specific dollar amount and cannot be converted to a sale… it is simply a
validation procedure. If you want to get an approval code for a sale you must begin as an
“Authorization” transaction. To access AVS only, click on the link as described on this slide and
complete the required fields; Card number, expiration date and remember that the address
verification is based on the house number and zip.
10.0.1 AVS Only screen
When you click submit and look at the transaction results screen you’ll simply see a “Success”
message and the AVS Response code will indicate “N” for no match of the address or zip code, Z
for a zip code match – but no address match, A for a house number match but no zip code
match and a “Y” if both fields match.
10.0.2 AVS Transaction Results screen
Page 22
11
Force Sale
Force Sale should be used only in rare instances when a Sale transaction must be posted and
there is no other means by which to do it. This transaction type will, unlike the Authorization
Only, will post a charge to the cardholder’s account. As shown below an Approval Number is
required. The approval number may be from a previous voided transaction that was not used
on a sale, or it may be a number obtained via voice authorization.
Unless special circumstances exist, you should post all transactions through your point of sale
system whenever possible! If you have questions about Force Sale, please contact your trainer
or the Epicor Payment Exchange Advice Line representative.
11.0.1 Force Sale screen
12
Sale Transaction
As cited several times earlier, Sale transactions should not be used outside of your Point of Sale
system except in special circumstances. You should be familiar with the impact on your
inventory and accounting applications and you should know how to enter the appropriate
adjustments for sales posted using Virtual Terminal.
A Sale transaction is quite similar to using Authorization Only, except that in addition to
obtaining an approval, the customer’s bank card is charged. If a transaction is then posted to
point of sale for the same amount and using the same approval code you may double charge
the bank card.
Notice that the Sale screen shown below is quite similar to the Authorization Only screen. If
you use Virtual Terminal to post sales, you may also wish to enter values in the following fields
to help lower interchange rates;
Page 23
Ticket Number may be any 6 character alpha numeric value. The value does not have to be
unique and simply entering a “1” in this field will reduce your interchange rate.
+Show Address is a link that expands the screen allowing the entry of address information.
Your Virtual Terminal can validate the house number and zip code against the address on file
for the bankcard. Providing this information can reduce your interchange rates for a Sale
transaction.
You should also consider using the following optional fields for posting Sale transactions;
Name on Card is not a required field but it is strongly recommended that you enter the name
exactly as it appears on the bank card presented by the customer.
Tax is optional and not necessarily recommended when simply obtaining an authorization.
However, if you plan to use Virtual Terminal for Sales and provide a printed receipt to your
customer from the ‘View Receipt’ button, you may wish to list the tax amount separate from
the sub total.
12.0.1 Sale screen
When you click Submit and the Sale transaction is approved, the Transaction Details provides
buttons that allow you to;
Page 24
Void the transaction. “Void” is possible prior to settlement and it means that the transaction
will not be visible on the cardholder’s statement. However the authorization code remains
valid should you wish to use it to recreate the transaction.
Credit the transaction allows you to return or refund all or part of the amount charged to the
customer. This action will be reflected on the cardholder’s statement.
Reverse will not only refund & undo the amount charged, it will restore the customer’s line of
credit that was set aside for the transaction. This button, like the Void button is only available
until settlement occurs. The Credit button must be used to refund the customer after
settlement.
12.0.2 Sale Transaction Details screen selection buttons
Following the use of any of these 3 buttons you must confirm the action you are taking by
clicking Submit at the confirmation screen.
12.0.3 Reversal confirmation window
Page 25
13
Sale (with Device)
Like ‘Authorization (with Device) described in section 9, a specially encrypted card reader is
required. Before swiping the card through the reader the cursor must be placed inside the box
as illustrated below. Follow the steps as indicated in section 12 to complete a Sale transaction.
PIN Debit transactions are possible with the Ingenico iPP320 device. Before swiping the card
select ‘Debit’, and then ask customer to enter their 4 digit PIN on the device.
Remember that Sale transactions do not update your point of sale system!
13.0.1 Sale (with Device)
14
Virtual Terminal View Transactions
When you need to locate & view transactions, print reports or export data the View
Transactions selection is a great place to start. An approval code or sale transaction can be
retrieved, printed or viewed in Virtual Terminal up to 30 days after the transaction date. There
are a variety of Virtual Terminal reports you can run to help you balance to your point of sale
system. You can also maintain transactions from this area of Virtual Terminal, but be careful!
Remember that a mistake made at point of sale should be fixed at point of sale. Transactions
posted through Point of Sale may not be displayed in the View Transactions screens for several
minutes. But at the end of the day you can generate a summary report to help make sure that
your bankcard transactions balance to your point of sale activity.
We will describe the predefined reports, export capability along with some of the other
features in the sections that follow.
Page 26
14.0.1 View Transactions tab
14.1 Transaction Search
After clicking the Transaction Search link, you can search by ‘Transaction ID’, ‘Reference
Number’, ‘Amount’, ‘Terminal ID’, ‘Status’, Type’ or for a date range. You can use one field or a
combination of fields to find a transaction. Once you have entered your search criteria, click
the “Search” button. Keep in mind that the ‘Terminal ID’ field does not correspond to your
Eagle terminal ID. The Terminal ID referenced here is specifically for credit authorization and
processing purposes. Often it is the same through a specific store location.
If you are using a date range, please notice that the time defaulting on the ‘begin date’ and ‘End
Date’ fields is 12:00AM, or midnight. This is particularly relevant if you want to include the
transactions for the ‘End Date’. When the ‘Search results’ screen displays, you can simply view
it, print it or download it to an Excel/Csv file. You can also click on the Transaction ID links
(indicated by arrow below) to view the transaction details screen.
14.1.1 Transaction Search screen
Page 27
The transaction details screen will display button selections based upon the transaction type
and whether or not it has settled. Notice that the Credit Card Sale, shown below, no longer
displays the Void & Reverse buttons that would have been visible prior to settlement.
14.1.2 Transaction Details screen
Unless a transaction was posted through Virtual Terminal, it should not be credited, reversed or
voided from this screen. Remember that errors made in point of sale should be fixed through
point of sale.
14.2 Predefined Reports & CSV Export
To view & balance your transactions to point of sale reports, Virtual Terminal offers several
‘predefined’ formats, or reports. For each of the reports listed, you can view a summary or
view the details, or both. Print or export your data as needed.
The data shown below is the default view of the Transactions report for ‘Last 30 Days’. Clicking
on the individual transaction ID links, allow you to view an individual transaction’s details, as
illustrated above in 14.1.2 Transaction Details Screen.
In the following paragraphs we’ll explore Additional Transaction Views including; Summary,
Detailed, Printer Friendly, Download to Excel/CSV.
Page 28
14.2.1 Predefined Report – Last 30 Days transactions screen
When you click the Summary view link, a new window will populate with the Date, Card type
subtotals, and Total fields displayed. Click or select ‘print’ to print the summary view or choose
‘Download to Excel/csv’ to load the fields into a spreadsheet.
14.2.2 Summary transaction screen
If you select the ‘Detailed View’ link a new window will populate with the transaction details.
The details included are: Transaction ID, Approval #, Ticket #, Reference #, Amount, Type,
Status, Name, Card Type, Card #, Expiration, Result, Date and Time. You can also print this view
or download it to Excel as a .csv file.
Page 29
14.2.3 Detailed transaction view
A “Printer Friendly” format may be a good choice if you are viewing transactions from the
current or previous day and wish to balance back to point of sale. Select the ‘print’ button on
your browser to get a paper copy. The printer friendly view provides an easy to read report
format that contains your list of transactions as well as a summary table at the bottom. This
view serves as a handy ‘pre-settlement’ report that provides card totals by type and a detailed
transaction list.
14.2.4 Printer Friendly transaction view
Page 30
The ‘Amount’ column in the detail view shown above, should be not be totaled since it may
contain mixed transaction types. For a declined authorization the amount will still display even
though the transaction never went through.
Finally you can create a .csv file, and bring your data into an excel spreadsheet or use it in
another application.
14.2.5 CSV File screen
15 Frequently Asked Questions (FAQ’s)
The following section includes a list of questions and answers that are often discussed during live
training sessions.
What do I do if I have trouble logging in or accessing Virtual Terminal?
If you are the account owner or system administrator and you cannot login after carefully following the
‘welcome e-mail’ instructions, you may contact Epicor Payment Exchange Support; by phone, 800-3223077 or by e-mail, [email protected]. Sub-accounts, or those not using the primary account
login, should consult with their system administrators. If your account is ‘locked out’ your administrator
must ‘unlock’ your account. If you forget your password, you may request a new one by entering your
login and e-mail address in the ‘Forgot your Password?’ section of the login screen (described in Chapter
2).
After requesting a new password, I received 2 e-mails containing different passwords, which one do I
use?
Always choose the password contained in the most recent e-mail. Due to network traffic or other
system issues, an e-mail response may be delayed. If a 2nd reset request is made the password from the
original request becomes invalid.
Page 31
I have multiple locations and I would like to have access to each location without having to login each
time I want to view a different location.
If you have more than a single location using Epicor Payment Exchange we can create a ‘Reporting User
ID’. This login is for reporting purposes, and is most applicable for Core Reporting, allowing you to
choose which store’s reports or statements you wish to view. To utilize Virtual Terminal you will need to
select and login to the individual store in which you wish to process or view transactions.
Does an entry in the ‘CVV2’ field help reduce my rates & fees?
While a matching entry does not impact bankcard rates or fees, we strongly recommend that you use
this field to help reduce the potential for chargebacks, and fraud.
If I enter matching address information in AVS, does this help my rates?
Entering a house number and zip code that matches the bankcard record on file can help reduce
interchange fees for Sale transactions posted in Virtual Terminal, but it will serve only to validate an
address for Authorizations. Only the house number and zip code are used for comparison but we
recommend capturing the entire address. Taking this step can reduce the potential for chargebacks, and
fraud.
Can I use Virtual Terminal’s ‘AVS Only’ feature to validate phone orders or internet orders?
Yes. This is a great tool to use if you only process a few ‘MOTO’ transactions; that is, mail
order/telephone orders. If your business does a large volume of these types of transactions you may
wish to contact your sales representative and discuss ways that you can save on processing for MOTO.
Does Virtual Terminal allow me to process debit card sales?
Debit card transactions require specifically encrypted PIN pads, allowing customers to securely enter
their 4 digit personal identification number. As we mentioned earlier, we do not recommend that you
post credit card sale transactions through Virtual Terminal unless absolutely necessary, since inventory
and accounting applications are not updated.
Will I find my batch settlement information in Virtual Terminal’s ‘View transactions’ tab?
For comprehensive reporting you should access the ‘Reporting’ tab in your Core Management
System. You can view the pre-defined report labeled ‘Today’, in order to view or print the
transactions that will settle for the current day. You will need the appropriate security for
access.
Page 32