1
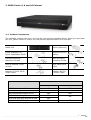
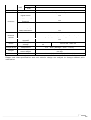
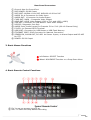
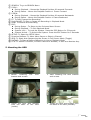
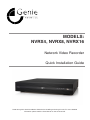
MODELS: NVRX4, NVRX8, NVRX16 Network Video Recorder Quick Installation Guide Read through this Quick Installation Guide before installing and using this unit. For more detailed information please read the User Manual on the enclosed CD. Table of Contents 1. Main Features ........................................................................................... 2 Powerful & Flexible ...................................................................................... 2 Easy To Use................................................................................................ 2 2. NVRX Series 4, 8 and 16-Channel .............................................................. 3 2-1. Product Components ............................................................................. 3 2-2. Specification ........................................................................................ 4 2-3. Front Panel .......................................................................................... 6 2-4. Rear Panel ........................................................................................... 6 3. Basic Mouse Functions .............................................................................. 7 4. Basic Remote Control Functions ................................................................ 7 5. Mounting the HDD ..................................................................................... 8 6. Quick Setup............................................................................................... 9 1 1. Main Features Powerful & Flexible Real Time Recording Resolution 4-Ch: 120fps@D1, 120fps@1280 x 720 and 120fps@1920 x1080 8-Ch: 240fps@D1, 240fps@1280 x 720 and 240fps@1920 x1080 16-Ch: 480fps@D1, 480fps@1280 x 720 and 480fps@1920 x1080 Quadraplex Recording + Search + Archiving + Network Dual Stream Dual Stream is the most powerful technology to separately encode the recording and network frames of the DVR. The recording and network frames can be respectively selected in the DVR setup. This means users are able to set the frame rate according to their own needs; for fast network speeds and/or to minimise network traffic whilst keeping full recording frames. Simultaneous Video and Spot Monitor Outputs 1 VGA (1024 x 768) + 1 CVBS 1 VGA (1280 x 1024) + 1 (or 2) Spot Easy To Use Quick Setup: Automatic HDD Capacity Calculation NVRX products support the most convenient solution for a first time NVR set up. Enter the days for the recording duration and the DVR sets up the recording parameters (such as resolution, frame rate and quality). It is a useful and easy way for the end user to estimate how long the HDD can record for. Individual Channel Operation The resolution for each channel can be set individually. This feature provides the end user with easy HDD maintenance and to efficiently get high video quality on a specific channel. For instance, to get a higher resolution on a camera covering a cash till position. Remote Setup This product provides the user with a convenient management solution using the remote configuration single client and multi client software and web viewer via Internet Explorer. User is able to control the Display, Recording, Device etc. of the DVR from a remote site; wherever it is. Mobile Viewer (iPhone, Android) Mobile applications make real time monitoring available anytime, anywhere. Currently, iPhone and Android applications are ready. Search “NVRX Manager” on the Apple store and Google Play (Android). It’s free. S.M.A.R.T S.M.A.R.T is the function which checks the hard disk health status at regular intervals. Hard disks have moving parts and are very temperature and shock sensitive. User sets a specific temperature, and when the temperature inside the NVRX is exceeded, the NVRX gives the end user notification by beeping and alarming before the situation becomes troublesome. 2 2. NVRX Series 4, 8 and 16-Channel 2-1. Product Components The package contains the main unit and the components specified below. When you purchase the unit, please check to ensure the components specified below are included. NVRX Unit Mouse (Optional) Client Software CD / Quick Installation Guide Remote Control / Battery DVDRW Mounting Bracket & Screws / / / HDD Mounting Bracket & Screw / HDD & DVDRW Fixing Screws HDD Data Power Cable Adaptor (DC12V 5A) & Power Cable Adapter 48V 2A & Power Cable 4, 8 and 16-Channel NVRX DVD-RW Version Basic Version HDD Data Power Cable 1EA 2EA HDD mounting Bracket 1EA 2EA HDD Mounting Bracket Screw 4EA 8EA DVD-RW Mounting Bracket 1EA DVD-RW Mounting Bracket Screw 4EA HDD/DVD-RW Fixing Screw 8EA NA 8EA 3 2-2. Specification MODEL Input Video Audio Event Serial Network Live IP Camera Resolution Main Monitor Output Sub Monitor IP Camera (Network) Input Local Input (RCA) Local Output Output (RCA) Audio Codec IP Camera (Network) Sensor Local Input In (Terminal Block) Local Alarm Output (Terminal Block) Motion Detection (from IP Camera) RS232C RS485 Private (IP Camera, Auto Connection) LAN (IP Camera, Remote Access) Protocols Frame Rate Playback Backup Storage NVRX8 NVRX16 4 (20Mbps) 8 (40Mbps) 16 (40Mbps) Max. 1920x1080 VGA and HDMI CVBS 4 8 16 4 8 16 1 G.711 4 16 8 4 1 Yes Yes, Diagnostic Only Yes 4 PSE 8 PSE 8 PSE 10/100 Base-T TCP/IP, UDP, DHCP, HTTP, NTP, SMTP, RTP, RTSP, ONVIF Recording Mode Max. 120fps Max. 240fps Max. 480fps 120fps@D1 240fps@D1 480fps@D1 120fps@1280x720 240fps@1280x720 480fps@1280x720 120fps@1920x1080 240fps@1920x1080 480fps@1920x1080 Continuous / Motion / Sensor / Schedule / Manual Pre Recording Max. 20 Minutes Post Recording Max. 60 Seconds Search Quick Search, Date/Time, Event, Archive, Log Frame Rate Recording NVRX4 Multi-Decoding 1, 4 1, 4, 8 1, 4, 8, 16 Playback Speed x0.25, x0.5, x2, x4, x8, x16, x32, x64 Media USB drive, External HDD, DVD-R, Network File Format BMP, AVI, Proprietary Format Huge Backup Capacity of 1x HDD No. of HDD Internal HDD’s e-SATA Yes (Max. 24 hours) 2Tb 3Tb 2 1 4 USB User I/F Features Network Access Power Temperature Weight Dimensions Front 1 Rear 1 Input Method Front Buttons, IR, Mouse, Keyboard Controller Dynamic DNS Yes (Free DDNS) Digital Zoom Yes Daylight Saving NTP (Network Time Protocol) S.M.A.R.T Yes Internal Beep Yes Multi-Language Yes eMail Notification Yes 3G Mobile iPad / iPhone / Android Web Viewer Windows (IE, Chrome, Firefox, Safari), MAC(TBD) PC Client Remote Setup and Upgrade Power Supply Voltage Operation Temperature Unit Weight Gross Weight Unit Dimension Single (Mac) / CMS (Windows) (64 channels) Yes Yes Yes DC12V 5A + 48V 1A DC12V 5A + 48V 2A 5°C - 40°C (Storage: -10°C - +50°C) 4.1 Kgs 6.2 Kgs 380mm (W) x 340mm (H) x 72mm (D) Please note that specification and unit exterior design are subject to change without prior notification 5 2-3. Front Panel NVRX Series Front Panel Table 3.1.1. NVRX Series Front LED’s and Ports Description LED is on when power is applied to the system. POWER HDD LED is on when the system is recording video data LAN LED is on when connected to the network ALARM LED is on when alarm output is turned on This port is for archiving footage onto an USB device (USB2.0 connector) USB PORT 2-4. Rear Panel l l Do not power this system on before all the connections are completed. Make sure all the connections are properly secured. Faulty connection may result in the system being damaged. 5 NVRX4 14 2 1 3 6 4 7 8 11 15 13 12 5 NVRX8, NVRX 16 9 2 1 3 4 6 10 11 7 8 14 13 15 12 6 Rear Panel Connectors Ground: Use for Ground Port POE POWER: DC48V Input POE PORT: NVRX4 4-Port POE, NVRX8 & 16 8-Port PoE AUDIO IN: 4 Connectors for Audio Input AUDIO OUT: 1 Connector for Audio Output CVBS OUT: MAIN – Composite Video Output HDMI OUT: HDMI Video Output (1280 x 720, and 1920 x 1080) VGA OUT: Connector for VGA Monitor. Main Video Output RS232C: Diagnostic Port Only AUDIO Ports: Audio Inputs for Channels 5-8 or 5-16 (8 & 16-Channel Only) E-SATA: 1x External SATA Terminal USB PORT: Connector for USB Mouse or USB Flash Memory ETHERNET PORT: RJ45 Connector for Network Connection SENSOR IN, ALARM OUT, RS-485: 4x Sensor Inputs, 1x Alarm Output and RS-485 for PTZ ⑮ POWER: DC12V Input ① ② ③ ④ ⑤ ⑥ ⑦ ⑧ ⑨ ⑩ ⑪ ⑫ ⑬ ⑭ 3. Basic Mouse Functions ① Left Button: SELECT Function ② Wheel: MOVEMENT Function on a Drop-Down Menu 4. Basic Remote Control Functions ① ID: To Set the Remote Control ID. ② REC: To Start and Stop Manual Recording 7 ③ SEARCH: To go to SEARCH Menu. ④ F/ADV: During Playback – Moves the Playback Position 60 seconds Forwards During Pause – Moves the Playback Position 1 Frame Forward ⑤ F/REW: During Playback – Moves the Playback Position 60 seconds Backwards During Pause – Moves the Playback Postion 1 Frame Backward ⑥ FF: To Fast Forward the Recording. ⑦ PLAY/PAUSE: To Play or Pause the Recording in Playback Mode ⑧ REW: To Rewind the Recording ⑨ ESC: During Setup – To Retun to the Preivous Menu Screen During Playback – To Exit Playback Mode System Lock – To Lock the System. Press the ESC Button for 5 Seconds System Unlock – To Unlock the System. Press the ESC Button for 5 Seconds ⑩ SETUP: To Open the SETUP Menu ⑪ Direction Buttons: To Move Menu Items or Select a Channel ⑫ SEQ: To Start Auto Sequencing the Screen in Full Screen Mode (Toggle) ⑬ BACKUP: To Start a Backup Operation in Live or Playback Mode ⑭ 0~9: To Select a Channel, or Enter a NVRX ID Number, or Use as a Number Key 5. Mounting the HDD 1. Before installing the bracket and screws. HDD 2. After installing the HDD bracket and screws. 3. Install the HDD and Bracket onto the base of the case (inside). 4. Install the HDD and Bracket onto the base of the case (outside). 8 5. After connecting the power and data cables to the HDD. 6. A picture after installation of the HDD. 6. Quick Setup 1. NVRX LOGIN 2. NVRX Network Quick Setting Default Password is “1111” 2-1. NVRX Network Quick Setting ① DHCP : Generate IP automatically ② STATIC : Set the fixed IP Set STATIC IP Set PORT 9 3. IP CAMERA Quick Setting ① CHANNEL: Select the channel. ② VENDOR: Select the camera brand. ③ SCAN: Find a camera automatically when the camera is connected with same IP sharer or distributor. ④ IP / PORT / PROTOCOL: Set the network when connected to a WAN. ⑤ NAME: Set the NVR Name. ⑤ PREVIEW: Check the camera screen before closing the window. ⑥ OK: Press “OK” when setting is complete. IP S CAN 4. SEARCH, PLAYBACK Select: Click” Button Select the Date Search Time Bar Select the Time Playback For more detailed information about set-up, search, playback etc., please read the User Manual which is on the enclosed CD. 10 GENIE CCTV LTD. CCTV House, City Park, Watchmead, Welwyn Garden City, Hertfordshire, AL7 ILT Tel: +44 (0) 1707 330541 Fax: +44 (0) 1707 330543 www.geniecctv.com Edition. GN-September 2013