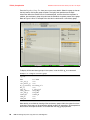
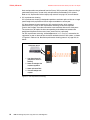
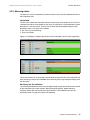
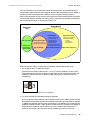
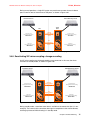
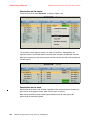
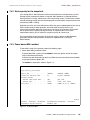
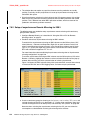
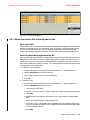
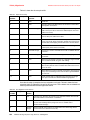
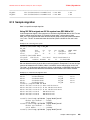
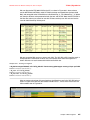
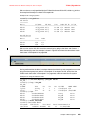
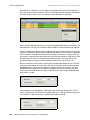
1
Front cover Draft Document for Review January 23, 2011 12:42 pm SG24-7759-01 IBM XIV Storage System: Copy Services and Migration Learn details of the Copy Services and Migration functions Explore practical scenarios for Snapshot and Mirroring Review Host Platform Specific Considerations Bert Dufrasne Roger Eriksson Wilhelm Gardt Jana Jamsek Nils Nause Markus Oscheka Carlo Saba ibm.com/redbooks Eugene Tsypin Kip Wagner Alexander Warmuth Axel Westphal Ralf Wohlfarth Draft Document for Review January 23, 2011 12:42 pm 7759edno.fm International Technical Support Organization IBM XIV Storage System: Copy Services and Migration August 2010 SG24-7759-01 7759edno.fm Draft Document for Review January 23, 2011 12:42 pm Note: Before using this information and the product it supports, read the information in “Notices” on page xi. Second Edition (August 2010) This edition applies to Version 10.2.2 of the IBM XIV Storage System Software and Version 2.5 of the IBM XIV Storage System Hardware. This document created or updated on January 23, 2011. © Copyright International Business Machines Corporation 2010. All rights reserved. Note to U.S. Government Users Restricted Rights -- Use, duplication or disclosure restricted by GSA ADP Schedule Contract with IBM Corp. Draft Document for Review January 23, 2011 12:42 pm 7759edno.fm iii 7759edno.fm iv IBM XIV Storage System: Copy Services and Migration Draft Document for Review January 23, 2011 12:42 pm Draft Document for Review January 23, 2011 12:42 pm 7759TOC.fm Contents Notices . . . . . . . . . . . . . . . . . . . . . . . . . . . . . . . . . . . . . . . . . . . . . . . . . . . . . . . . . . . . . . . . . xi Trademarks . . . . . . . . . . . . . . . . . . . . . . . . . . . . . . . . . . . . . . . . . . . . . . . . . . . . . . . . . . . . . . xii Preface . . . . . . . . . . . . . . . . . . . . . . . . . . . . . . . . . . . . . . . . . . . . . . . . . . . . . . . . . . . . . . . . xiii The team who wrote this book . . . . . . . . . . . . . . . . . . . . . . . . . . . . . . . . . . . . . . . . . . . . . . . xiii Now you can become a published author, too! . . . . . . . . . . . . . . . . . . . . . . . . . . . . . . . . . . . xv Comments welcome. . . . . . . . . . . . . . . . . . . . . . . . . . . . . . . . . . . . . . . . . . . . . . . . . . . . . . . . xv Stay connected to IBM Redbooks . . . . . . . . . . . . . . . . . . . . . . . . . . . . . . . . . . . . . . . . . . . . xvi Chapter 1. Snapshots . . . . . . . . . . . . . . . . . . . . . . . . . . . . . . . . . . . . . . . . . . . . . . . . . . . . . 1 1.1 Snapshots architecture . . . . . . . . . . . . . . . . . . . . . . . . . . . . . . . . . . . . . . . . . . . . . . . . . . 2 1.2 Snapshot handling . . . . . . . . . . . . . . . . . . . . . . . . . . . . . . . . . . . . . . . . . . . . . . . . . . . . . 9 1.2.1 Creating a snapshot . . . . . . . . . . . . . . . . . . . . . . . . . . . . . . . . . . . . . . . . . . . . . . . . 9 1.2.2 Viewing snapshot details . . . . . . . . . . . . . . . . . . . . . . . . . . . . . . . . . . . . . . . . . . . 11 1.2.3 Deletion priority . . . . . . . . . . . . . . . . . . . . . . . . . . . . . . . . . . . . . . . . . . . . . . . . . . . 12 1.2.4 Restore a snapshot . . . . . . . . . . . . . . . . . . . . . . . . . . . . . . . . . . . . . . . . . . . . . . . . 14 1.2.5 Overwriting snapshots . . . . . . . . . . . . . . . . . . . . . . . . . . . . . . . . . . . . . . . . . . . . . 15 1.2.6 Unlocking a snapshot . . . . . . . . . . . . . . . . . . . . . . . . . . . . . . . . . . . . . . . . . . . . . . 16 1.2.7 Locking a snapshot . . . . . . . . . . . . . . . . . . . . . . . . . . . . . . . . . . . . . . . . . . . . . . . . 18 1.2.8 Deleting a snapshot . . . . . . . . . . . . . . . . . . . . . . . . . . . . . . . . . . . . . . . . . . . . . . . 18 1.2.9 Automatic deletion of a snapshot . . . . . . . . . . . . . . . . . . . . . . . . . . . . . . . . . . . . . 19 1.3 Snapshots consistency group . . . . . . . . . . . . . . . . . . . . . . . . . . . . . . . . . . . . . . . . . . . . 20 1.3.1 Creating a consistency group . . . . . . . . . . . . . . . . . . . . . . . . . . . . . . . . . . . . . . . . 21 1.3.2 Creating a snapshot using consistency groups. . . . . . . . . . . . . . . . . . . . . . . . . . . 24 1.3.3 Managing a consistency group . . . . . . . . . . . . . . . . . . . . . . . . . . . . . . . . . . . . . . . 25 1.3.4 Deleting a consistency group . . . . . . . . . . . . . . . . . . . . . . . . . . . . . . . . . . . . . . . . 29 1.4 Snapshot with remote mirror . . . . . . . . . . . . . . . . . . . . . . . . . . . . . . . . . . . . . . . . . . . . . 30 1.5 MySQL database backup example . . . . . . . . . . . . . . . . . . . . . . . . . . . . . . . . . . . . . . . . 30 1.6 Snapshot example for a DB2 database . . . . . . . . . . . . . . . . . . . . . . . . . . . . . . . . . . . . 36 Chapter 2. Volume copy . . . . . . . . . . . . . . . . . . . . . . . . . . . . . . . . . . . . . . . . . . . . . . . . . . 2.1 Volume copy architecture . . . . . . . . . . . . . . . . . . . . . . . . . . . . . . . . . . . . . . . . . . . . . . . 2.2 Performing a volume copy . . . . . . . . . . . . . . . . . . . . . . . . . . . . . . . . . . . . . . . . . . . . . . 2.3 Creating an OS image with volume copy . . . . . . . . . . . . . . . . . . . . . . . . . . . . . . . . . . . 43 44 44 45 Chapter 3. Remote Mirroring . . . . . . . . . . . . . . . . . . . . . . . . . . . . . . . . . . . . . . . . . . . . . . 3.1 XIV Remote Mirroring overview . . . . . . . . . . . . . . . . . . . . . . . . . . . . . . . . . . . . . . . . . . 3.1.1 XIV Remote Mirror terminology. . . . . . . . . . . . . . . . . . . . . . . . . . . . . . . . . . . . . . . 3.1.2 XIV Remote Mirroring modes . . . . . . . . . . . . . . . . . . . . . . . . . . . . . . . . . . . . . . . . 3.2 Mirroring schemes. . . . . . . . . . . . . . . . . . . . . . . . . . . . . . . . . . . . . . . . . . . . . . . . . . . . . 3.2.1 Peer designations and roles . . . . . . . . . . . . . . . . . . . . . . . . . . . . . . . . . . . . . . . . . 3.2.2 Operational procedures . . . . . . . . . . . . . . . . . . . . . . . . . . . . . . . . . . . . . . . . . . . . 3.2.3 Mirroring status . . . . . . . . . . . . . . . . . . . . . . . . . . . . . . . . . . . . . . . . . . . . . . . . . . . 3.3 XIV Remote Mirroring usage . . . . . . . . . . . . . . . . . . . . . . . . . . . . . . . . . . . . . . . . . . . . . 3.4 XIV Remote Mirroring actions . . . . . . . . . . . . . . . . . . . . . . . . . . . . . . . . . . . . . . . . . . . . 3.4.1 Defining the XIV mirroring target. . . . . . . . . . . . . . . . . . . . . . . . . . . . . . . . . . . . . . 3.4.2 Setting the maximum initialization and synchronization rates. . . . . . . . . . . . . . . . 3.4.3 Connecting XIV mirroring ports . . . . . . . . . . . . . . . . . . . . . . . . . . . . . . . . . . . . . . . 3.4.4 Defining the XIV mirror coupling and peers: volume. . . . . . . . . . . . . . . . . . . . . . . 49 50 50 51 53 54 56 57 60 64 64 68 69 70 © Copyright IBM Corp. 2010. All rights reserved. v 7759TOC.fm Draft Document for Review January 23, 2011 12:42 pm 3.4.5 Activating an XIV mirror coupling . . . . . . . . . . . . . . . . . . . . . . . . . . . . . . . . . . . . . 75 3.4.6 Adding volume mirror coupling to consistency group mirror coupling. . . . . . . . . . 75 3.4.7 Normal operation: volume mirror coupling and CG mirror coupling . . . . . . . . . . . 76 3.4.8 Deactivating XIV mirror coupling: change recording . . . . . . . . . . . . . . . . . . . . . . . 77 3.4.9 Changing role of slave volume or CG . . . . . . . . . . . . . . . . . . . . . . . . . . . . . . . . . . 78 3.4.10 Changing role of master volume or CG. . . . . . . . . . . . . . . . . . . . . . . . . . . . . . . . 79 3.4.11 Mirror reactivation and resynchronization: normal direction . . . . . . . . . . . . . . . . 80 3.4.12 Reactivation, resynchronization, and reverse direction. . . . . . . . . . . . . . . . . . . . 81 3.4.13 Switching roles of mirrored volumes or CGs. . . . . . . . . . . . . . . . . . . . . . . . . . . . 81 3.4.14 Adding a mirrored volume to a mirrored consistency group . . . . . . . . . . . . . . . . 81 3.4.15 Removing a mirrored volume from a mirrored consistency group . . . . . . . . . . . 83 3.4.16 Deleting mirror coupling definitions . . . . . . . . . . . . . . . . . . . . . . . . . . . . . . . . . . . 84 3.5 Best practice usage scenarios . . . . . . . . . . . . . . . . . . . . . . . . . . . . . . . . . . . . . . . . . . . 85 3.5.1 Failure at primary site: switch production to secondary . . . . . . . . . . . . . . . . . . . . 85 3.5.2 Complete destruction of XIV 1 . . . . . . . . . . . . . . . . . . . . . . . . . . . . . . . . . . . . . . . 86 3.5.3 Using an extra copy for DR tests . . . . . . . . . . . . . . . . . . . . . . . . . . . . . . . . . . . . . 87 3.5.4 Creating application-consistent data at both local and the remote sites . . . . . . . . 87 3.5.5 Migration . . . . . . . . . . . . . . . . . . . . . . . . . . . . . . . . . . . . . . . . . . . . . . . . . . . . . . . . 87 3.5.6 Adding data corruption protection to disaster recovery protection . . . . . . . . . . . . 88 3.5.7 Communication failure . . . . . . . . . . . . . . . . . . . . . . . . . . . . . . . . . . . . . . . . . . . . . 89 3.5.8 Temporary deactivation and reactivation . . . . . . . . . . . . . . . . . . . . . . . . . . . . . . . 89 3.6 Planning . . . . . . . . . . . . . . . . . . . . . . . . . . . . . . . . . . . . . . . . . . . . . . . . . . . . . . . . . . . . 89 3.7 Advantages of XIV mirroring . . . . . . . . . . . . . . . . . . . . . . . . . . . . . . . . . . . . . . . . . . . . . 90 3.8 Mirroring events . . . . . . . . . . . . . . . . . . . . . . . . . . . . . . . . . . . . . . . . . . . . . . . . . . . . . . 90 3.9 Mirroring statistics . . . . . . . . . . . . . . . . . . . . . . . . . . . . . . . . . . . . . . . . . . . . . . . . . . . . . 90 3.10 Boundaries . . . . . . . . . . . . . . . . . . . . . . . . . . . . . . . . . . . . . . . . . . . . . . . . . . . . . . . . . 90 3.11 Using the GUI or XCLI for Remote Mirroring actions . . . . . . . . . . . . . . . . . . . . . . . . . 91 3.11.1 Initial setup . . . . . . . . . . . . . . . . . . . . . . . . . . . . . . . . . . . . . . . . . . . . . . . . . . . . . 91 3.11.2 Remote mirror target configuration . . . . . . . . . . . . . . . . . . . . . . . . . . . . . . . . . . . 96 3.11.3 XCLI examples . . . . . . . . . . . . . . . . . . . . . . . . . . . . . . . . . . . . . . . . . . . . . . . . . 101 3.12 Configuring Remote Mirroring . . . . . . . . . . . . . . . . . . . . . . . . . . . . . . . . . . . . . . . . . . 102 Chapter 4. Synchronous Remote Mirroring . . . . . . . . . . . . . . . . . . . . . . . . . . . . . . . . . 4.1 Synchronous mirroring configuration . . . . . . . . . . . . . . . . . . . . . . . . . . . . . . . . . . . . . 4.1.1 Volume mirroring setup and activation . . . . . . . . . . . . . . . . . . . . . . . . . . . . . . . . 4.1.2 Consistency group setup and configuration . . . . . . . . . . . . . . . . . . . . . . . . . . . . 4.1.3 Coupling activation, deactivation, and deletion . . . . . . . . . . . . . . . . . . . . . . . . . . 4.2 Disaster recovery . . . . . . . . . . . . . . . . . . . . . . . . . . . . . . . . . . . . . . . . . . . . . . . . . . . . 4.3 Role reversal . . . . . . . . . . . . . . . . . . . . . . . . . . . . . . . . . . . . . . . . . . . . . . . . . . . . . . . . 4.3.1 Switching roles . . . . . . . . . . . . . . . . . . . . . . . . . . . . . . . . . . . . . . . . . . . . . . . . . . 4.3.2 Change role . . . . . . . . . . . . . . . . . . . . . . . . . . . . . . . . . . . . . . . . . . . . . . . . . . . . 4.4 Resynchronization after link failure . . . . . . . . . . . . . . . . . . . . . . . . . . . . . . . . . . . . . . . 4.4.1 Last consistent snapshot . . . . . . . . . . . . . . . . . . . . . . . . . . . . . . . . . . . . . . . . . . 4.4.2 Last consistent snapshot timestamp . . . . . . . . . . . . . . . . . . . . . . . . . . . . . . . . . . 4.5 Synchronous mirror step-by-step scenario . . . . . . . . . . . . . . . . . . . . . . . . . . . . . . . . . 4.5.1 Phase 1: setup and configuration . . . . . . . . . . . . . . . . . . . . . . . . . . . . . . . . . . . . 4.5.2 Phase 2: disaster at primary site. . . . . . . . . . . . . . . . . . . . . . . . . . . . . . . . . . . . . 4.5.3 Phase 3: recovery of the primary site . . . . . . . . . . . . . . . . . . . . . . . . . . . . . . . . . 4.5.4 Phase 4: switching production back to the primary site . . . . . . . . . . . . . . . . . . . 103 104 104 108 110 111 112 112 112 114 114 114 115 116 117 120 123 Chapter 5. Asynchronous remote mirroring. . . . . . . . . . . . . . . . . . . . . . . . . . . . . . . . . 127 5.1 Asynchronous mirroring configuration. . . . . . . . . . . . . . . . . . . . . . . . . . . . . . . . . . . . . 128 5.1.1 Volume mirroring setup and activation . . . . . . . . . . . . . . . . . . . . . . . . . . . . . . . . 128 vi IBM XIV Storage System: Copy Services and Migration Draft Document for Review January 23, 2011 12:42 pm 7759TOC.fm 5.1.2 Consistency group configuration. . . . . . . . . . . . . . . . . . . . . . . . . . . . . . . . . . . . . 5.1.3 Coupling activation, deactivation, and deletion . . . . . . . . . . . . . . . . . . . . . . . . . . 5.2 Role reversal . . . . . . . . . . . . . . . . . . . . . . . . . . . . . . . . . . . . . . . . . . . . . . . . . . . . . . . . 5.3 Resynchronization after link failure . . . . . . . . . . . . . . . . . . . . . . . . . . . . . . . . . . . . . . . 5.4 Disaster recovery . . . . . . . . . . . . . . . . . . . . . . . . . . . . . . . . . . . . . . . . . . . . . . . . . . . . 5.5 Mirroring process . . . . . . . . . . . . . . . . . . . . . . . . . . . . . . . . . . . . . . . . . . . . . . . . . . . . 5.5.1 Initialization process . . . . . . . . . . . . . . . . . . . . . . . . . . . . . . . . . . . . . . . . . . . . . . 5.5.2 Ongoing mirroring operation . . . . . . . . . . . . . . . . . . . . . . . . . . . . . . . . . . . . . . . . 5.5.3 Mirroring consistency groups . . . . . . . . . . . . . . . . . . . . . . . . . . . . . . . . . . . . . . . 5.5.4 Ad-hoc snapshots . . . . . . . . . . . . . . . . . . . . . . . . . . . . . . . . . . . . . . . . . . . . . . . . 5.5.5 Mirroring special snapshots . . . . . . . . . . . . . . . . . . . . . . . . . . . . . . . . . . . . . . . . 5.6 Detailed asynchronous mirroring process . . . . . . . . . . . . . . . . . . . . . . . . . . . . . . . . . . 5.7 Asynchronous mirror step-by-step illustration . . . . . . . . . . . . . . . . . . . . . . . . . . . . . . . 5.7.1 Mirror initialization . . . . . . . . . . . . . . . . . . . . . . . . . . . . . . . . . . . . . . . . . . . . . . . . 5.7.2 Remote backup scenario . . . . . . . . . . . . . . . . . . . . . . . . . . . . . . . . . . . . . . . . . . 5.7.3 DR testing scenario. . . . . . . . . . . . . . . . . . . . . . . . . . . . . . . . . . . . . . . . . . . . . . . 5.8 Pool space depletion . . . . . . . . . . . . . . . . . . . . . . . . . . . . . . . . . . . . . . . . . . . . . . . . . . 133 139 144 149 149 150 150 151 151 152 154 155 158 158 159 160 164 Chapter 6. Open Systems considerations for Copy Services. . . . . . . . . . . . . . . . . . . 6.1 AIX specifics . . . . . . . . . . . . . . . . . . . . . . . . . . . . . . . . . . . . . . . . . . . . . . . . . . . . . . . . 6.1.1 AIX and Snapshots . . . . . . . . . . . . . . . . . . . . . . . . . . . . . . . . . . . . . . . . . . . . . . . 6.1.2 AIX and Remote Mirroring. . . . . . . . . . . . . . . . . . . . . . . . . . . . . . . . . . . . . . . . . . 6.2 Copy Services using VERITAS Volume Manager. . . . . . . . . . . . . . . . . . . . . . . . . . . . 6.3 HP-UX and Copy Services . . . . . . . . . . . . . . . . . . . . . . . . . . . . . . . . . . . . . . . . . . . . . 6.3.1 HP-UX and XIV snapshot . . . . . . . . . . . . . . . . . . . . . . . . . . . . . . . . . . . . . . . . . . 6.3.2 HP-UX with XIV Remote Mirror. . . . . . . . . . . . . . . . . . . . . . . . . . . . . . . . . . . . . . 6.4 VMware Virtual Infrastructure and Copy Services. . . . . . . . . . . . . . . . . . . . . . . . . . . . 6.4.1 Virtual machine considerations regarding Copy Services. . . . . . . . . . . . . . . . . . 167 168 168 171 173 176 176 177 179 179 Chapter 7. IBM i considerations for Copy Services . . . . . . . . . . . . . . . . . . . . . . . . . . . 7.1 IBM i functions and XIV as external storage . . . . . . . . . . . . . . . . . . . . . . . . . . . . . . . . 7.1.1 IBM i structure . . . . . . . . . . . . . . . . . . . . . . . . . . . . . . . . . . . . . . . . . . . . . . . . . . . 7.1.2 Single-level storage . . . . . . . . . . . . . . . . . . . . . . . . . . . . . . . . . . . . . . . . . . . . . . 7.1.3 Auxiliary storage pools (ASPs) . . . . . . . . . . . . . . . . . . . . . . . . . . . . . . . . . . . . . . 7.2 Boot from SAN and cloning . . . . . . . . . . . . . . . . . . . . . . . . . . . . . . . . . . . . . . . . . . . . . 7.3 Setup of our implementation . . . . . . . . . . . . . . . . . . . . . . . . . . . . . . . . . . . . . . . . . . . . 7.4 Snapshots with IBM i. . . . . . . . . . . . . . . . . . . . . . . . . . . . . . . . . . . . . . . . . . . . . . . . . . 7.4.1 Solution benefits . . . . . . . . . . . . . . . . . . . . . . . . . . . . . . . . . . . . . . . . . . . . . . . . . 7.4.2 Disk capacity for the snapshots . . . . . . . . . . . . . . . . . . . . . . . . . . . . . . . . . . . . . 7.4.3 Power-down IBM i method . . . . . . . . . . . . . . . . . . . . . . . . . . . . . . . . . . . . . . . . . 7.4.4 Quiescing IBM i and using snapshot consistency group. . . . . . . . . . . . . . . . . . . 7.4.5 Automation of the solution with snapshots . . . . . . . . . . . . . . . . . . . . . . . . . . . . . 7.5 Synchronous Remote Mirroring with IBM i . . . . . . . . . . . . . . . . . . . . . . . . . . . . . . . . . 7.5.1 Solution benefits . . . . . . . . . . . . . . . . . . . . . . . . . . . . . . . . . . . . . . . . . . . . . . . . . 7.5.2 Planning the bandwidth for Remote Mirroring links. . . . . . . . . . . . . . . . . . . . . . . 7.5.3 Setup of synchronous Remote Mirroring for IBM i . . . . . . . . . . . . . . . . . . . . . . . 7.5.4 Scenario for planned outages . . . . . . . . . . . . . . . . . . . . . . . . . . . . . . . . . . . . . . . 7.5.5 Scenario for unplanned outages . . . . . . . . . . . . . . . . . . . . . . . . . . . . . . . . . . . . . 7.6 Asynchronous Remote Mirroring with IBM i . . . . . . . . . . . . . . . . . . . . . . . . . . . . . . . . 7.6.1 Benefits of asynchronous Remote Mirroring . . . . . . . . . . . . . . . . . . . . . . . . . . . . 7.6.2 Setup of asynchronous Remote Mirroring for IBM i . . . . . . . . . . . . . . . . . . . . . . 7.6.3 Scenario for planned outages and disasters. . . . . . . . . . . . . . . . . . . . . . . . . . . . 187 188 188 188 189 189 190 192 192 193 193 196 201 203 203 204 204 205 207 211 211 212 213 Chapter 8. Data migration . . . . . . . . . . . . . . . . . . . . . . . . . . . . . . . . . . . . . . . . . . . . . . . 215 Contents vii 7759TOC.fm viii Draft Document for Review January 23, 2011 12:42 pm 8.1 Overview . . . . . . . . . . . . . . . . . . . . . . . . . . . . . . . . . . . . . . . . . . . . . . . . . . . . . . . . . . . 8.2 Handling I/O requests . . . . . . . . . . . . . . . . . . . . . . . . . . . . . . . . . . . . . . . . . . . . . . . . . 8.3 Data migration steps . . . . . . . . . . . . . . . . . . . . . . . . . . . . . . . . . . . . . . . . . . . . . . . . . . 8.3.1 Initial connection setup . . . . . . . . . . . . . . . . . . . . . . . . . . . . . . . . . . . . . . . . . . . . 8.3.2 Creating a data migration volume on XIV . . . . . . . . . . . . . . . . . . . . . . . . . . . . . . 8.3.3 Activate a data migration on XIV. . . . . . . . . . . . . . . . . . . . . . . . . . . . . . . . . . . . . 8.3.4 Define the host on XIV and bring host online . . . . . . . . . . . . . . . . . . . . . . . . . . . 8.3.5 Complete the data migration on XIV . . . . . . . . . . . . . . . . . . . . . . . . . . . . . . . . . . 8.4 Command-line interface . . . . . . . . . . . . . . . . . . . . . . . . . . . . . . . . . . . . . . . . . . . . . . . 8.4.1 Using XCLI scripts or batch files . . . . . . . . . . . . . . . . . . . . . . . . . . . . . . . . . . . . . 8.4.2 Sample scripts . . . . . . . . . . . . . . . . . . . . . . . . . . . . . . . . . . . . . . . . . . . . . . . . . . 8.5 Manually creating the migration volume . . . . . . . . . . . . . . . . . . . . . . . . . . . . . . . . . . . 8.6 Changing and monitoring the progress of a migration . . . . . . . . . . . . . . . . . . . . . . . . 8.6.1 Changing the synchronization rate . . . . . . . . . . . . . . . . . . . . . . . . . . . . . . . . . . . 8.6.2 Monitoring migration speed. . . . . . . . . . . . . . . . . . . . . . . . . . . . . . . . . . . . . . . . . 8.6.3 Monitoring migration via the XIV event log . . . . . . . . . . . . . . . . . . . . . . . . . . . . . 8.6.4 Monitoring migration speed via the fabric . . . . . . . . . . . . . . . . . . . . . . . . . . . . . . 8.6.5 Monitoring migration speed via the non-XIV storage . . . . . . . . . . . . . . . . . . . . . 8.7 Thick-to-thin migration. . . . . . . . . . . . . . . . . . . . . . . . . . . . . . . . . . . . . . . . . . . . . . . . . 8.8 Resizing the XIV volume after migration . . . . . . . . . . . . . . . . . . . . . . . . . . . . . . . . . . . 8.9 Troubleshooting . . . . . . . . . . . . . . . . . . . . . . . . . . . . . . . . . . . . . . . . . . . . . . . . . . . . . 8.9.1 Target connectivity fails . . . . . . . . . . . . . . . . . . . . . . . . . . . . . . . . . . . . . . . . . . . 8.9.2 Remote volume LUN is unavailable . . . . . . . . . . . . . . . . . . . . . . . . . . . . . . . . . . 8.9.3 Local volume is not formatted . . . . . . . . . . . . . . . . . . . . . . . . . . . . . . . . . . . . . . . 8.9.4 Host server cannot access the XIV migration volume. . . . . . . . . . . . . . . . . . . . . 8.9.5 Remote volume cannot be read . . . . . . . . . . . . . . . . . . . . . . . . . . . . . . . . . . . . . 8.9.6 LUN is out of range . . . . . . . . . . . . . . . . . . . . . . . . . . . . . . . . . . . . . . . . . . . . . . . 8.10 Backing out of a data migration. . . . . . . . . . . . . . . . . . . . . . . . . . . . . . . . . . . . . . . . . 8.10.1 Back-out prior to migration being defined on the XIV . . . . . . . . . . . . . . . . . . . . 8.10.2 Back-out after a data migration has been defined but not activated . . . . . . . . . 8.10.3 Back-out after a data migration has been activated but is not complete. . . . . . 8.10.4 Back-out after a data migration has reached the synchronised state . . . . . . . . 8.11 Migration checklist. . . . . . . . . . . . . . . . . . . . . . . . . . . . . . . . . . . . . . . . . . . . . . . . . . . 8.12 Device-specific considerations . . . . . . . . . . . . . . . . . . . . . . . . . . . . . . . . . . . . . . . . . 8.12.1 EMC CLARiiON. . . . . . . . . . . . . . . . . . . . . . . . . . . . . . . . . . . . . . . . . . . . . . . . . 8.12.2 EMC Symmetrix and DMX . . . . . . . . . . . . . . . . . . . . . . . . . . . . . . . . . . . . . . . . 8.12.3 HDS TagmaStore USP . . . . . . . . . . . . . . . . . . . . . . . . . . . . . . . . . . . . . . . . . . . 8.12.4 HP EVA . . . . . . . . . . . . . . . . . . . . . . . . . . . . . . . . . . . . . . . . . . . . . . . . . . . . . . . 8.12.5 IBM DS3000/DS4000/DS5000 . . . . . . . . . . . . . . . . . . . . . . . . . . . . . . . . . . . . . 8.12.6 IBM ESS E20/F20/800 . . . . . . . . . . . . . . . . . . . . . . . . . . . . . . . . . . . . . . . . . . . 8.12.7 IBM DS6000 and DS8000. . . . . . . . . . . . . . . . . . . . . . . . . . . . . . . . . . . . . . . . . 8.13 Sample migration . . . . . . . . . . . . . . . . . . . . . . . . . . . . . . . . . . . . . . . . . . . . . . . . . . . 216 217 220 221 226 230 231 232 234 237 237 238 240 240 242 242 242 243 243 244 247 247 248 249 249 249 250 250 250 250 250 251 251 254 255 256 257 257 258 260 261 263 Chapter 9. SVC migration with XIV . . . . . . . . . . . . . . . . . . . . . . . . . . . . . . . . . . . . . . . . 9.1 Steps to take when using SVC migration with XIV . . . . . . . . . . . . . . . . . . . . . . . . . . . 9.2 XIV and SVC interoperability. . . . . . . . . . . . . . . . . . . . . . . . . . . . . . . . . . . . . . . . . . . . 9.2.1 Firmware versions. . . . . . . . . . . . . . . . . . . . . . . . . . . . . . . . . . . . . . . . . . . . . . . . 9.2.2 Copy functions . . . . . . . . . . . . . . . . . . . . . . . . . . . . . . . . . . . . . . . . . . . . . . . . . . 9.2.3 TPC with XIV and SVC . . . . . . . . . . . . . . . . . . . . . . . . . . . . . . . . . . . . . . . . . . . . 9.3 Zoning setup . . . . . . . . . . . . . . . . . . . . . . . . . . . . . . . . . . . . . . . . . . . . . . . . . . . . . . . . 9.3.1 Capacity on demand . . . . . . . . . . . . . . . . . . . . . . . . . . . . . . . . . . . . . . . . . . . . . . 9.3.2 Determining XIV WWPNs . . . . . . . . . . . . . . . . . . . . . . . . . . . . . . . . . . . . . . . . . . 9.3.3 Hardware dependencies . . . . . . . . . . . . . . . . . . . . . . . . . . . . . . . . . . . . . . . . . . . 273 274 274 274 275 275 275 276 277 278 IBM XIV Storage System: Copy Services and Migration Draft Document for Review January 23, 2011 12:42 pm 7759TOC.fm 9.3.4 Sharing an XIV with another SVC cluster or non-SVC hosts . . . . . . . . . . . . . . . 9.3.5 Zoning rules . . . . . . . . . . . . . . . . . . . . . . . . . . . . . . . . . . . . . . . . . . . . . . . . . . . . 9.4 Volume size considerations for XIV with SVC. . . . . . . . . . . . . . . . . . . . . . . . . . . . . . . 9.4.1 SCSI queue depth considerations . . . . . . . . . . . . . . . . . . . . . . . . . . . . . . . . . . . 9.4.2 XIV volume sizes . . . . . . . . . . . . . . . . . . . . . . . . . . . . . . . . . . . . . . . . . . . . . . . . 9.4.3 Creating XIV volumes that are exactly the same size as SVC VDisks . . . . . . . . 9.4.4 SVC 2TB volume limit . . . . . . . . . . . . . . . . . . . . . . . . . . . . . . . . . . . . . . . . . . . . . 9.4.5 MDisk group creation . . . . . . . . . . . . . . . . . . . . . . . . . . . . . . . . . . . . . . . . . . . . . 9.4.6 SVC MDisk group extent sizes . . . . . . . . . . . . . . . . . . . . . . . . . . . . . . . . . . . . . . 9.5 Using an XIV for SVC quorum disks . . . . . . . . . . . . . . . . . . . . . . . . . . . . . . . . . . . . . . 9.6 Configuring an XIV for attachment to SVC . . . . . . . . . . . . . . . . . . . . . . . . . . . . . . . . . 9.6.1 XIV setup steps . . . . . . . . . . . . . . . . . . . . . . . . . . . . . . . . . . . . . . . . . . . . . . . . . . 9.6.2 SVC setup steps . . . . . . . . . . . . . . . . . . . . . . . . . . . . . . . . . . . . . . . . . . . . . . . . . 9.7 Data movement strategy overview . . . . . . . . . . . . . . . . . . . . . . . . . . . . . . . . . . . . . . . 9.7.1 Using SVC migration to move data . . . . . . . . . . . . . . . . . . . . . . . . . . . . . . . . . . . 9.7.2 Using VDisk mirroring to move the data . . . . . . . . . . . . . . . . . . . . . . . . . . . . . . . 9.7.3 Using SVC migration with image mode. . . . . . . . . . . . . . . . . . . . . . . . . . . . . . . . 9.8 Using SVC migration to move data to XIV . . . . . . . . . . . . . . . . . . . . . . . . . . . . . . . . . 9.8.1 Determine the required extent size and VDisk candidates . . . . . . . . . . . . . . . . . 9.8.2 Create the MDisk group . . . . . . . . . . . . . . . . . . . . . . . . . . . . . . . . . . . . . . . . . . . 9.8.3 Migration . . . . . . . . . . . . . . . . . . . . . . . . . . . . . . . . . . . . . . . . . . . . . . . . . . . . . . . 9.9 Using VDisk mirroring to move the data . . . . . . . . . . . . . . . . . . . . . . . . . . . . . . . . . . . 9.9.1 Determine the required extent size and VDisk candidates . . . . . . . . . . . . . . . . . 9.9.2 Create the MDisk group . . . . . . . . . . . . . . . . . . . . . . . . . . . . . . . . . . . . . . . . . . . 9.9.3 Set up the IO group for mirroring . . . . . . . . . . . . . . . . . . . . . . . . . . . . . . . . . . . . 9.9.4 Create the mirror . . . . . . . . . . . . . . . . . . . . . . . . . . . . . . . . . . . . . . . . . . . . . . . . . 9.9.5 Validating a VDisk copy . . . . . . . . . . . . . . . . . . . . . . . . . . . . . . . . . . . . . . . . . . . 9.9.6 Removing the VDisk copy . . . . . . . . . . . . . . . . . . . . . . . . . . . . . . . . . . . . . . . . . . 9.10 Using SVC migration with image mode. . . . . . . . . . . . . . . . . . . . . . . . . . . . . . . . . . . 9.10.1 Create image mode destination volumes on the XIV . . . . . . . . . . . . . . . . . . . . 9.10.2 Migrate the VDisk to image mode . . . . . . . . . . . . . . . . . . . . . . . . . . . . . . . . . . . 9.10.3 Outage step . . . . . . . . . . . . . . . . . . . . . . . . . . . . . . . . . . . . . . . . . . . . . . . . . . . 9.10.4 Bring the VDisk online. . . . . . . . . . . . . . . . . . . . . . . . . . . . . . . . . . . . . . . . . . . . 9.10.5 Migration from image mode to managed mode . . . . . . . . . . . . . . . . . . . . . . . . 9.10.6 Remove image mode MDisks . . . . . . . . . . . . . . . . . . . . . . . . . . . . . . . . . . . . . . 9.10.7 Use transitional space as managed space . . . . . . . . . . . . . . . . . . . . . . . . . . . . 9.10.8 Remove non-XIV MDisks . . . . . . . . . . . . . . . . . . . . . . . . . . . . . . . . . . . . . . . . . 9.11 Future configuration tasks . . . . . . . . . . . . . . . . . . . . . . . . . . . . . . . . . . . . . . . . . . . . . 9.11.1 Adding additional capacity to the XIV . . . . . . . . . . . . . . . . . . . . . . . . . . . . . . . . 9.11.2 Using additional XIV host ports . . . . . . . . . . . . . . . . . . . . . . . . . . . . . . . . . . . . . 9.12 Understanding the SVC controller path values . . . . . . . . . . . . . . . . . . . . . . . . . . . . . 9.13 SVC with XIV implementation checklist . . . . . . . . . . . . . . . . . . . . . . . . . . . . . . . . . . 278 278 278 279 280 282 282 282 282 283 285 285 287 289 289 290 290 291 291 292 292 293 293 294 294 295 296 297 297 297 299 300 300 301 302 302 302 303 303 303 304 305 Related publications . . . . . . . . . . . . . . . . . . . . . . . . . . . . . . . . . . . . . . . . . . . . . . . . . . . . IBM Redbooks publications . . . . . . . . . . . . . . . . . . . . . . . . . . . . . . . . . . . . . . . . . . . . . . . . Other publications . . . . . . . . . . . . . . . . . . . . . . . . . . . . . . . . . . . . . . . . . . . . . . . . . . . . . . . Online resources . . . . . . . . . . . . . . . . . . . . . . . . . . . . . . . . . . . . . . . . . . . . . . . . . . . . . . . . How to get IBM Redbooks publications . . . . . . . . . . . . . . . . . . . . . . . . . . . . . . . . . . . . . . . Help from IBM . . . . . . . . . . . . . . . . . . . . . . . . . . . . . . . . . . . . . . . . . . . . . . . . . . . . . . . . . . 307 307 307 307 307 308 Index . . . . . . . . . . . . . . . . . . . . . . . . . . . . . . . . . . . . . . . . . . . . . . . . . . . . . . . . . . . . . . . . . 309 Contents ix 7759TOC.fm x IBM XIV Storage System: Copy Services and Migration Draft Document for Review January 23, 2011 12:42 pm Draft Document for Review January 23, 2011 12:42 pm 7759spec.fm Notices This information was developed for products and services offered in the U.S.A. IBM may not offer the products, services, or features discussed in this document in other countries. Consult your local IBM representative for information on the products and services currently available in your area. Any reference to an IBM product, program, or service is not intended to state or imply that only that IBM product, program, or service may be used. Any functionally equivalent product, program, or service that does not infringe any IBM intellectual property right may be used instead. However, it is the user's responsibility to evaluate and verify the operation of any non-IBM product, program, or service. IBM may have patents or pending patent applications covering subject matter described in this document. The furnishing of this document does not give you any license to these patents. You can send license inquiries, in writing, to: IBM Director of Licensing, IBM Corporation, North Castle Drive, Armonk, NY 10504-1785 U.S.A. The following paragraph does not apply to the United Kingdom or any other country where such provisions are inconsistent with local law: INTERNATIONAL BUSINESS MACHINES CORPORATION PROVIDES THIS PUBLICATION "AS IS" WITHOUT WARRANTY OF ANY KIND, EITHER EXPRESS OR IMPLIED, INCLUDING, BUT NOT LIMITED TO, THE IMPLIED WARRANTIES OF NON-INFRINGEMENT, MERCHANTABILITY OR FITNESS FOR A PARTICULAR PURPOSE. Some states do not allow disclaimer of express or implied warranties in certain transactions, therefore, this statement may not apply to you. This information could include technical inaccuracies or typographical errors. Changes are periodically made to the information herein; these changes will be incorporated in new editions of the publication. IBM may make improvements and/or changes in the product(s) and/or the program(s) described in this publication at any time without notice. Any references in this information to non-IBM Web sites are provided for convenience only and do not in any manner serve as an endorsement of those Web sites. The materials at those Web sites are not part of the materials for this IBM product and use of those Web sites is at your own risk. IBM may use or distribute any of the information you supply in any way it believes appropriate without incurring any obligation to you. Information concerning non-IBM products was obtained from the suppliers of those products, their published announcements or other publicly available sources. IBM has not tested those products and cannot confirm the accuracy of performance, compatibility or any other claims related to non-IBM products. Questions on the capabilities of non-IBM products should be addressed to the suppliers of those products. This information contains examples of data and reports used in daily business operations. To illustrate them as completely as possible, the examples include the names of individuals, companies, brands, and products. All of these names are fictitious and any similarity to the names and addresses used by an actual business enterprise is entirely coincidental. COPYRIGHT LICENSE: This information contains sample application programs in source language, which illustrate programming techniques on various operating platforms. You may copy, modify, and distribute these sample programs in any form without payment to IBM, for the purposes of developing, using, marketing or distributing application programs conforming to the application programming interface for the operating platform for which the sample programs are written. These examples have not been thoroughly tested under all conditions. IBM, therefore, cannot guarantee or imply reliability, serviceability, or function of these programs. © Copyright IBM Corp. 2010. All rights reserved. xi 7759spec.fm Draft Document for Review January 23, 2011 12:42 pm Trademarks IBM, the IBM logo, and ibm.com are trademarks or registered trademarks of International Business Machines Corporation in the United States, other countries, or both. These and other IBM trademarked terms are marked on their first occurrence in this information with the appropriate symbol (® or ™), indicating US registered or common law trademarks owned by IBM at the time this information was published. Such trademarks may also be registered or common law trademarks in other countries. A current list of IBM trademarks is available on the Web at http://www.ibm.com/legal/copytrade.shtml The following terms are trademarks of the International Business Machines Corporation in the United States, other countries, or both: AIX® AS/400® BladeCenter® DB2® DS4000® DS6000™ DS8000® FlashCopy® i5/OS® IBM® iSeries® PowerHA™ POWER® Redbooks® Redpaper™ Redbooks (logo) System i® System p® System Storage™ System x® Tivoli® TotalStorage® XIV® ® The following terms are trademarks of other companies: Snapshot, and the NetApp logo are trademarks or registered trademarks of NetApp, Inc. in the U.S. and other countries. Oracle, JD Edwards, PeopleSoft, Siebel, and TopLink are registered trademarks of Oracle Corporation and/or its affiliates. SAP, and SAP logos are trademarks or registered trademarks of SAP AG in Germany and in several other countries. Microsoft, Windows, and the Windows logo are trademarks of Microsoft Corporation in the United States, other countries, or both. UNIX is a registered trademark of The Open Group in the United States and other countries. Linux is a trademark of Linus Torvalds in the United States, other countries, or both. Other company, product, or service names may be trademarks or service marks of others. xii IBM XIV Storage System: Copy Services and Migration Draft Document for Review January 23, 2011 12:42 pm 7759pref.fm Preface This IBM® Redbooks® publication provides a practical understanding of the XIV® Storage System copy and migration functions. The XIV Storage System has a rich set of copy functions suited for various data protection scenarios, which enables clients to enhance their business continuance, data migration, and online backup solutions. These functions allow point-in-time copies, known as snapshots and full volume copies, and also include remote copy capabilities in either synchronous or asynchronous mode. These functions are included in the XIV software and all their features are available at no additional charge. The various copy functions are reviewed under separate chapters that include detailed information about usage, as well as practical illustrations. This book also explains the XIV built-in migration capability, and presents migration alternatives based on the San Volume Controller (SVC). Note: GUI and XCLI illustrations included in this book were created with an early version of the 10.2.2 code, as available at the time of writing. There could be minor differences with the XIV 10.2.2 code that is publicly released. This book is intended for anyone who needs a detailed and practical understanding of the XIV copy functions. The team who wrote this book This book was produced by a team of specialists from around the world working at the International Technical Support Organization, San Jose Center. Bertrand Dufrasne is an IBM Certified Consulting I/T Specialist and Project Leader for System Storage™ disk products at the International Technical Support Organization, San Jose Center. He has worked at IBM in various I/T areas. He has authored many IBM Redbooks publications and has also developed and taught technical workshops. Before joining the ITSO, he worked for IBM Global Services as an Application Architect. He holds a Masters degree in Electrical Engineering from the Polytechnic Faculty of Mons (Belgium). Roger Eriksson is a STG Lab Services consultant, based in Stockholm, Sweden and working for the European Storage Competence Center in Mainz, Germany. He is a Senior Accredited IBM Product Service Professional. Roger has over 20 years experience working on IBM servers and storage, including Enterprise and Midrange disk, NAS, SAN, System x®, System p® and Bladecenters. He has been working with consulting, proof of concepts and education mainly with XIV product line since December 2008, working with both clients and various IBM teams worldwide. He holds a Technical Collage Graduation in Mechanical Engineering. Wilhelm Gardt holds a degree in Computer Sciences from the University of Kaiserslautern, Germany. He worked as a software developer and subsequently as an IT specialist designing and implementing heterogeneous IT environments (SAP®, Oracle®, AIX®, HP-UX, SAN etc.). In 2001 he joined the IBM TotalStorage® Interoperability Centre (now Systems Lab Europe) in Mainz where he performed customer briefings and proof of concepts on IBM © Copyright IBM Corp. 2010. All rights reserved. xiii 7759pref.fm Draft Document for Review January 23, 2011 12:42 pm storage products. Since September 2004 he is a member of the Technical Pre-Sales Support team for IBM Storage (Advanced Technical Support). Jana Jamsek is an IT Specialist for IBM Slovenia. She works in Storage Advanced Technical Support for Europe as a specialist for IBM Storage Systems and the IBM i (i5/OS®) operating system. Jana has eight years of experience in working with the IBM System i® platform and its predecessor models, as well as eight years of experience in working with storage. She has a master degree in computer science and a degree in mathematics from the University of Ljubljana in Slovenia. Nils Nause is a Storage Support Specialist for IBM XIV Storage Systems and is located at IBM Mainz, Germany. Nils joined IBM is summer 2005, responsible for Proof of Concepts (PoCs) and delivering briefings for several IBM products. In July 2008 he started working for the XIV post sales support, with the special focus on Oracle Solaris attachment, as well as overall security aspects of the XIV Storage System. He holds a degree in computer science from the university of applied science in Wernigerode, Germany. Markus Oscheka is an IT Specialist for Proof of Concepts and Benchmarks in the Disk Solution Europe team in Mainz, Germany. His areas of expertise include setup and demonstration of IBM System Storage and TotalStorage solutions in various environments like AIX, Linux®, Windows®, VMware ESX and Solaris. He has worked at IBM for nine years. He has performed many Proof of Concepts with Copy Services on DS6000/DS8000/XIV, as well as Performance-Benchmarks with DS4000/DS6000/DS8000/XIV. He has written extensively in various IBM Redbooks and act also as the co-project lead for these Redbooks, including DS6000/DS8000® Architecture and Implementation, DS6000/DS8000 Copy Services, and IBM XIV Storage System: Concepts, Architecture and Usage. He holds a degree in Electrical Engineering from the Technical University in Darmstadt. Carlo Saba iis a Test Engineer for XIV in Tucson, AZ. He has been working with the product since shortly after its introduction and is a Certified XIV Administrator. Carlo graduated from the University of Arizona in 2007 with a BSBA in MIS and minor in Spanish. Eugene Tsypin is an IT Specialist who currently works for IBM STG Storage Systems Sales in Russia. Eugene has over 15 years of experience in the IT field, ranging from systems administration to enterprise storage architecture. He is working as Field Technical Sales Support for storage systems. His areas of expertise include performance analysis and disaster recovery solutions in enterprises utilizing the unique capabilities and features of the IBM XIV Storage System and others IBM storage, server and software products. Kip Wagner is an Advisory Product Engineer for XIV in Tucson, Arizona. He has more than 24 years experience in field support and systems engineering and is a Certified XIV Engineer and Administrator. Kip was a member of the initial IBM XIV product launch team who helped design and implement a world wide support structure specifically for XIV. He also helped develop training material and service documentation used in the support organization. He is currently the team leader for XIV product field engineering supporting customers in North and South America. He also works with a team of engineers from around the world to provide field experience feedback into the development process to help improve product quality, reliability and serviceability. Alexander Warmuth is a Senior IT Specialist in IBM's European Storage Competence Center. Working in technical sales support, he designs and promotes new and complex storage solutions, drives the introduction of new products and provides advice to customers, business partners and sales. His main areas of expertise are: high end storage solutions, business resiliency, Linux and storage. He joined IBM in 1993 and is working in technical sales support since 2001. Alexander holds a diploma in Electrical Engineering from the University of Erlangen, Germany. xiv IBM XIV Storage System: Copy Services and Migration Draft Document for Review January 23, 2011 12:42 pm 7759pref.fm Axel Westphal is working as an IT Specialist for Workshops and Proof of Concepts at the IBM European Storage Competence Center (ESCC) in Mainz, Germany. He joined IBM in 1996, working for Global Services as a System Engineer. His areas of expertise include setup and demonstration of IBM System Storage products and solutions in various environments. Since 2004 he is responsible for stroage solutions and Proof of Concepts conducted at the ESSC with DS8000, SAN Volume Controller and XIV. He has been a contributing author to several DS6000™ and DS8000 related IBM Redbooks publications. Ralf Wohlfarth is an IT Specialist in the IBM European Storage Competence Center in Mainz, working in technical sales support with focus on the IBM XIV Storage System. In 1998 he joined IBM and has been working in last level product support for IBM System Storage and Software since 2004. He had the lead for post sales education during a product launch of an IBM Storage Subsystem and resolved complex customer situations. During an assignment in the US he acted as liaison into development and has been driving product improvements into hardware and software development. Ralf holds a master degree in Electrical Engineering, with main subject telecommunication from the University of Kaiserslautern, Germany. Thanks to the authors of the previous edition: Aubrey Applewhaite, David Denny, Jawed Iqbal, Christina Lara, Lisa Martinez, Rosemary McCutchen, Hank Sautter, Stephen Solewin, Anthony Vandewerdt, Ron Verbeek, Pete Wendler, Roland Wolf. Special thanks to Rami Elron for his help with and advice on many of the topics covered in this book. Thanks to the following people for their contributions to this project: John Bynum, Iddo Jacobi, Aviad Offer, Moriel Lechtman, Jim Segdwick, Brian Sherman, Juan Yanes Now you can become a published author, too! Here's an opportunity to spotlight your skills, grow your career, and become a published author - all at the same time! Join an ITSO residency project and help write a book in your area of expertise, while honing your experience using leading-edge technologies. Your efforts will help to increase product acceptance and customer satisfaction, as you expand your network of technical contacts and relationships. Residencies run from two to six weeks in length, and you can participate either in person or as a remote resident working from your home base. Find out more about the residency program, browse the residency index, and apply online at: ibm.com/redbooks/residencies.html Preface xv 7759pref.fm Draft Document for Review January 23, 2011 12:42 pm Comments welcome Your comments are important to us! We want our books to be as helpful as possible. Send us your comments about this book or other IBM Redbooks publications in one of the following ways: Use the online Contact us review Redbooks form found at: ibm.com/redbooks Send your comments in an e-mail to: [email protected] Mail your comments to: IBM Corporation, International Technical Support Organization Dept. HYTD Mail Station P099 2455 South Road Poughkeepsie, NY 12601-5400 Stay connected to IBM Redbooks Find us on Facebook: http://www.facebook.com/pages/IBM-Redbooks/178023492563?ref=ts Follow us on twitter: http://twitter.com/ibmredbooks Look for us on LinkedIn: http://www.linkedin.com/groups?home=&gid=2130806 Explore new Redbooks publications, residencies, and workshops with the IBM Redbooks weekly newsletter: https://www.redbooks.ibm.com/Redbooks.nsf/subscribe?OpenForm Stay current on recent Redbooks publications with RSS Feeds: http://www.redbooks.ibm.com/rss.html xvi IBM XIV Storage System: Copy Services and Migration Draft Document for Review January 23, 2011 12:42 pm 7759ch_Snapshot.fm 1 Chapter 1. Snapshots The XIV Storage System has a rich set of copy functions suited for various data protection scenarios, which enables clients to enhance their business continuance, data migration, and online backup solutions. This chapter provides an overview of the snapshot function for the XIV product. A snapshot is a point-in-time copy of a volume’s data. The XIV snapshot is based on several innovative technologies to ensure minimal degradation of or impact on system performance. Snapshots make use of pointers and do not necessarily copy all the data to the second instance of a volume. They efficiently share cache for common data, effectively working as a larger cache than would be the case with full data copies. A volume copy is an exact copy of a system volume and differs in approach to a snapshot in that a full data copy is performed in the background. With these definitions in mind, we explore the architecture and functions of snapshots within the XIV Storage System. © Copyright IBM Corp. 2010. All rights reserved. 1 7759ch_Snapshot.fm Draft Document for Review January 23, 2011 12:42 pm 1.1 Snapshots architecture Before we begin discussing snapshots we provide a short review of XIV’s architecture. For more information refer to IBM XIV Storage System: Architecture, Implementation, and Usage, SG24-7659. The XIV system consists of several servers with 12 disk drives each and memory that acts as cache. All the servers are connected to each other and certain servers act as interface servers to the SAN and the host servers (Figure 1-1). Server Network (FC/Ethernet) Module 4 Module 5 Module 6 Module 7 Module 8 Module 9 Ethernet Switch 1 Switch 2 Module 1 Module 2 Module 15 Module 3 Module 10 Module 11 Module 12 Module 13 Module 14 Figure 1-1 XIV architecture: modules and disk drives 2 IBM XIV Storage System: Copy Services and Migration 7759ch_Snapshot.fm Draft Document for Review January 23, 2011 12:42 pm When a logical volume or LUN is created on an XIV system, the volume’s data is divided into pieces 1 MB in size, called partitions. Each partition is duplicated for data protection and the two copies are stored on disks of different modules. All partitions of a volume are pseudo-randomly distributed across the modules and disk drives, as shown in Figure 1-2. XIV Architecture • Split volume data in 1MB partitions • Maintain a copy of each partition • Store both copies in different modules • Spread data of a volume across all disk drives pseudo randomly Volume D ata Module 1 Da ta M odule 2 D ata Module 3 Figure 1-2 XIV architecture: distribution of data Chapter 1. Snapshots 3 7759ch_Snapshot.fm Draft Document for Review January 23, 2011 12:42 pm A logical volume is represented by pointers to partitions that make up the volume. If a snapshot is taken of a volume, the pointers are just copied to form the snapshot volume, as shown in Figure 1-3. No space is consumed for the snapshot volume up to now. Vol • Logical volume and its partitions: Partitions are spread across all disk drives and actually each partition exists two times (not shown here) Vol snap Vol snap • A snapshot of a volume is taken. Pointers point to the same partitions as the original volume • There is an update of a data partition of the original volume. The updated partition is written to a new location. Figure 1-3 XIV architecture: snapshots When an update is performed on the original data, the update is stored in a new position and a pointer of the original volume now points to the new partition, whereas the snapshot volume still points to the old partition. Now we use up more space for the original volume and its snapshot and it has the size of a partition (1 MB). This method is called redirect-on-write. 4 IBM XIV Storage System: Copy Services and Migration 7759ch_Snapshot.fm Draft Document for Review January 23, 2011 12:42 pm It is important to note that data on a volume comprises two fundamental building blocks. Metadata is information about how the data is stored on the physical volume and the data itself in the blocks. Metadata management is the key to rapid snapshot performance. A snapshot points to the partitions of its master volume for all unchanged partitions. When the data is modified, a new partition is allocated for the modified data. In other words, the XIV Storage System manages a set of pointers based on the volume and the snapshot. Those pointers are modified when changes are made to the user data. Managing pointers to data enables XIV to instantly create snapshots, as opposed to physically copying the data into a new partition. Refer to Figure 1-4. Data layout before modification Empty Empty Snapshot Pointer to Partition Volume A Volume Pointer to Partition Host modifies data in Volume A Empty Volume A Snapshot Pointer to Partition Snapshot of A Volume Pointer to Partition Figure 1-4 Example of a redirect-on-write operation The actual metadata overhead for a snapshot is small. When the snapshot is created, the system does not require new pointers because the volume and snapshot are exactly the same, which means that the time to create the snapshot is independent of the size or number of snapshots present in the system. As data is modified, new metadata is created to track the changes to the data. Note: The XIV system minimizes the impact to the host for write operations by performing a redirect-on-write operation. As the host writes data to a volume with a snapshot relationship, the incoming information is placed into a newly allocated partition. Then the pointer to the data for the master volume is modified to point at the new partition. The snapshot volume continues to point at the original data partition. Because the XIV Storage System tracks the snapshot changes on a partition basis, data is only copied when a transfer is less than the size of a partition. For example, a host writes 4 KB of data to a volume with a snapshot relationship. The 4 KB is written to a new partition, but in order for the partition to be complete, the remaining data must be copied from the original partition to the newly allocated partition. The alternative to redirect-on-write is the copy on write function. Most other systems do not move the location of the volume data. Instead, when the disk subsystem receives a change, it copies the volume’s data to a new location for the point-in-time copy. When the copy is complete, the disk system commits the newly modified data. Therefore, each individual modification takes longer to complete, as the entire block must be copied before the change can be made. Chapter 1. Snapshots 5 7759ch_Snapshot.fm Draft Document for Review January 23, 2011 12:42 pm Storage Pools and Consistency Groups A storage pool is a logical entity that represents storage capacity. Volumes are created in a storage pool and snapshots of a volume are within the same storage pool. Because snapshots require capacity as the source and the snapshot volume differ over time, space for snapshots must be set aside when defining a storage pool (Figure 1-6). A minimum of 34GB of snapshot space should be allocated. A value of 80% of the volume space is recommended. A storage pool can be resized as needed as long as there is enough free capacity in the XIV Storage System. Terminology Storage Pool • Storage Pool – Administrative construct for controlling usage of data capacity Consistency Group • Volume – Data capacity spreads across all disks in IBM XIV system Volume Volume • Snapshot – Point in time image – Same storage pool as source • Consistency group – Multiple volumes that require consistent snapshot creation – All in same storage pool • Snapshot group – Group of consistent snapshots Figure 1-5 XIV terminology 6 IBM XIV Storage System: Copy Services and Migration Snapshot Snapshot Snapshot Group Draft Document for Review January 23, 2011 12:42 pm 7759ch_Snapshot.fm Figure 1-6 Creating a storage pool with capacity for snapshots An application can utilize many volumes on the XIV Storage System. For example, a database application can span several volumes for application data and transaction logs. In this case, the snapshot for the volumes must occur at the same moment in time so that the data and logs are consistent. The consistency group allows the user to perform the snapshot on all the volumes assigned to the group at the same moment in time, therefore enforcing data consistency. The XIV Storage System creates a special snapshot related to the remote mirroring functionality. During the recovery process of lost links, the system creates a snapshot of all the volumes in the system. This snapshot is used if the synchronization process fails. The data can be restored to a point of known consistency. A special value of the deletion priority is used to prevent the snapshot from being automatically deleted. Refer to 1.4, “Snapshot with remote mirror” on page 30, for an example of this snapshot. Automatic snapshot deletion If the storage assigned to the snapshot is completely utilized, the XIV Storage System implements a deletion mechanism to protect itself from overutilizing the set pool space. Manual deletion of snapshots is further explained in 1.2.8, “Deleting a snapshot” on page 18. If you know in advance that an automatic deletion is possible, a pool can be expanded to accommodate additional snapshots. This function requires that there is available space on the system for the storage pool. See Figure 1-7. Chapter 1. Snapshots 7 7759ch_Snapshot.fm Draft Document for Review January 23, 2011 12:42 pm Snapshot space on a single disk Snapshot free partition Snapshot 2 Utilization before a new allocation Snapshot 1 Snapshot 3 Snapshot 3 Snapshot 2 Snapshot 1 Snapshot 3 Snapshot 3 allocates a partition and Snapshot 1 is deleted, because there must always be at least one free partition for any subsequent snapshot. Snapshot 2 Snapshot free partition Figure 1-7 Diagram of automatic snapshot deletion Each snapshot has a deletion priority property that is set by the user. There are four priorities, with 1 being the highest priority and 4 being the lowest priority. The system uses this priority to determine which snapshot to delete first. The lowest priority becomes the first candidate for deletion. If there are multiple snapshots with the same deletion priority, the XIV system deletes the snapshot that was created first. Refer to 1.2.3, “Deletion priority” on page 12 for an example of working with deletion priorities. XIV Asynchronous Mirroring leverages snapshots technology. First a snapshot of the original volume is created on the primary site (Master). Then the data is replicated to the volume on the secondary site (Slave). After an initialization phase the differences between the Master snapshot and a snapshot reflecting the initialization state are calculated. A synchronization process is established that replicates the differences only from the Master to the Slave. Refer to Chapter 5, “Asynchronous remote mirroring” on page 127 for details on XIV Asynchronous Mirroring. The snapshots that are created by the Asynchronous Mirroring process are protected from manual deletion by setting the priority to 0. Nevertheless the automatic deletion mechanism that frees up space upon space depletion in a pool will proceed with these protected snapshots if there is still insufficient space after the deletion of unprotected snapshots. In this case the mirroring between the involved volumes is deactivated before the snapshot is deleted. Unlocking a snapshot A snapshot also has a unique ability to be unlocked. By default, a snapshot is locked on creation and is only readable. Unlocking a snapshot allows the user to modify the data in the snapshot for post-processing. When unlocked, the snapshot takes on the properties of a volume and can be resized or modified. As soon as the snapshot has been unlocked, the modified property is set. The modified property cannot be reset after a snapshot is unlocked, even if the snapshot is relocked without modification. 8 IBM XIV Storage System: Copy Services and Migration Draft Document for Review January 23, 2011 12:42 pm 7759ch_Snapshot.fm In certain cases, it might be important to duplicate a snapshot. When duplicating a snapshot, the duplicate snapshot points to the original data and has the same creation date as the original snapshot, if the first snapshot has not been unlocked. This feature can be beneficial when the user wants to have one copy for a backup and another copy for testing purposes. If the first snapshot is unlocked and the duplicate snapshot already exists, the creation time for the duplicate snapshot does not change. The duplicate snapshot points to the original snapshot. If a duplicate snapshot is created from the unlocked snapshot, the creation date is the time of duplication and the duplicate snapshot points at the original snapshot. 1.2 Snapshot handling The creation and management of snapshots with the XIV Storage System is simple and easy to perform. This section guides you through the life cycle of a snapshot, providing examples of how to interact with the snapshots using the GUI. This section also discusses duplicate snapshots and the automatic deletion of snapshots. 1.2.1 Creating a snapshot Snapshot™ creation is a simple and easy task to accomplish. Using the Volumes and Snapshots view, right-click the volume and select Create Snapshot. Figure 1-8 depicts how to make a snapshot of the ITSO_Volume volume. Figure 1-8 Creating a snapshot The new snapshot is displayed in Figure 1-9. The XIV Storage System uses a specific naming convention. The first part is the name of the volume followed by the word snapshot and then a number or count of snapshots for the volume. The snapshot is the same size as the master volume. However, it does not display how much space has been used by the snapshot. Figure 1-9 View of a new snapshot From this view shown in Figure 1-9, there are other details: Chapter 1. Snapshots 9 7759ch_Snapshot.fm Draft Document for Review January 23, 2011 12:42 pm First is the locked property of the snapshot. By default, a snapshot is locked, which means the it is write inhibited at the time of creation. Secondly, the modified property is displayed to the right of the locked property. In this example, the snapshot has not been modified. You may want to create a duplicate snapshot, for example, if you want to keep this snapshot as is and modify another snapshot. The duplicate has the same creation date as the first snapshot, and it also has a similar creation process. From the Volumes and Snapshots view, right-click the snapshot to duplicate. Select Duplicate from the menu to create a new duplicate snapshot. Figure 1-10 provides an example of duplicating the snapshot ITSO_Volume.snapshot_00001. Figure 1-10 Creating a duplicate snapshot After selecting Duplicate from the menu, the duplicate snapshot is displayed directly under the original snapshot. Note: The creation date of the duplicate snapshot in Figure 1-11 is the same creation date as the original snapshot. The duplicate snapshot points to the master volume, not the original snapshot. Figure 1-11 View of the new duplicate snapshot Example 1-1 provides an example of creating a snapshot and a duplicate snapshot with the Extended Command Line Interface (XCLI). In the following examples we use the XIV Session XCLI. You could also use the XCLI command. In this case, however, specify the configuration file or the IP address of the XIV that you are talking to as well as the user ID and password. Use the XCLI command to automate tasks with batch jobs. For simplicity, we used the XIV Session XCLI in our examples. Example 1-1 Creating a snapshot and a duplicate with the XCLI Session snapshot_create vol=ITSO_Volume snapshot_duplicate snapshot=ITSO_Volume.snapshot_00001 After the snapshot is created, it must be mapped to a host in order to access the data. This action is performed in the same way as mapping a normal volume. 10 IBM XIV Storage System: Copy Services and Migration Draft Document for Review January 23, 2011 12:42 pm 7759ch_Snapshot.fm Important: A snapshot is an exact replica of the original volume. Certain hosts do not properly handle having two volumes with the same exact metadata describing them. In these cases, you must map the snapshot to a different host to prevent failures. Creation of a snapshot is only done in the volume’s storage pool. A snapshot cannot be created in a storage pool other than the one that owns the volume. If a volume is moved to another storage pool, the snapshots are moved with the volume to the new storage pool (provided that there is enough space). 1.2.2 Viewing snapshot details After creating the snapshots, you might want to view the details of the snapshot for creation date, deletion priority, and whether the volume has been modified. Using the GUI, select Snapshot Tree from the Volumes menu, as shown in Figure 1-12. Figure 1-12 Selecting the Snapshot Tree view The GUI displays all the volumes in a list. Chapter 1. Snapshots 11 7759ch_Snapshot.fm Draft Document for Review January 23, 2011 12:42 pm Scroll down to the snapshot of interest and select the snapshot by clicking its name. Details of the snapshot are displayed in the upper right panel. Looking at the volume ITSO_Volume, it contains a snapshot 00001 and a duplicate snapshot 00002. The snapshot and the duplicate snapshot have the same creation date of 2010-10-06 11:42:00, as shown in Figure 1-13. In addition, the snapshot is locked, has not been modified, and has a deletion priority of 1 (which is the highest priority, so it will be deleted last). Figure 1-13 Viewing the snapshot details Along with these properties, the tree view shows a hierarchal structure of the snapshots. This structure provides details about restoration and overwriting snapshots. Any snapshot can be overwritten by any parent snapshot, and any child snapshot can restore a parent snapshot or a volume in the tree structure. In Figure 1-13, the duplicate snapshot is a child of the original snapshot, or in other words, the original snapshot is the parent of the duplicate snapshot. This structure does not refer to the way the XIV Storage System manages the pointers with the snapshots, but is intended to provide an organizational flow for snapshots. Example 1-2 shows the snapshot data output in the XCLI Session. Due to space limitations, only a small portion of the data is displayed from the output. Example 1-2 Viewing the snapshots with XCLI session snapshot_list vol=ITSO_Volume Name ITSO_Volume.snapshot_00001 ITSO_Volume.snapshot_00002 Size (GB) 17 17 Master Name ITSO_Volume ITSO_Volume Consistency Group Pool itso itso 1.2.3 Deletion priority Deletion priority enables the user to rank the importance of the snapshots within a pool. For the current example, the duplicate snapshot ITSO_Volume.snapshot_00002 is not as important as the original snapshot ITSO_Volume.snapshot_00001. Therefore, the deletion priority is reduced. If the snapshot space is full, the duplicate snapshot is deleted first even though the original snapshot is older. 12 IBM XIV Storage System: Copy Services and Migration Draft Document for Review January 23, 2011 12:42 pm 7759ch_Snapshot.fm To modify the deletion priority, right-click the snapshot in the Volumes and snapshots view and select Change Deletion Priority, as shown in Figure 1-14. Figure 1-14 Changing the deletion priority After clicking Change Deletion Priority, select the desired deletion priority from the dialog window and accept the change by clicking OK. Figure 1-15 shows the four options that are available for setting the deletion priority. The lowest priority setting is 4, which causes the snapshot to be deleted first. The highest priority setting is 1, and these snapshots are deleted last. All snapshots have a default deletion priority of 1, if not specified on creation. Figure 1-15 Lowering the priority for a snapshot Figure 1-16 confirms that the duplicate snapshot has had its deletion priority lowered to 4. As shown in the upper right panel, the delete priority is reporting a 4 for snapshot ITSO_Volume.snapshot_00002. Figure 1-16 Confirming the modification to the deletion priority To change the deletion priority for the XCLI Session, specify the snapshot and new deletion priority, as illustrated in Example 1-3. Example 1-3 Changing the deletion priority for a snapshot snapshot_change_priority snapshot=ITSO_Volume.snapshot_00002 delete_priority=4 Chapter 1. Snapshots 13 7759ch_Snapshot.fm Draft Document for Review January 23, 2011 12:42 pm The GUI also lets you specify the deletion priority when you create the snapshot. Instead of selecting Create Snapshot, you select Create Snapshot (Advanced), as shown in Figure 1-17). Figure 1-17 Create Snapshot Advanced A panel is presented that allows you to specify the deletion priority, but it also allows you to use your own volume name for the snapshot. Figure 1-18 Advanced snapshot options 1.2.4 Restore a snapshot The XIV Storage System provides the ability to restore the data from a snapshot back to the master volume, which can be helpful for operations where data was modified incorrectly and you want to restore the data. From the Volumes and Snapshots view, right-click the volume and select Restore. This action opens a dialog box where you can select which snapshot is to be used to restore the volume. Click OK to perform the restoration. 14 IBM XIV Storage System: Copy Services and Migration Draft Document for Review January 23, 2011 12:42 pm 7759ch_Snapshot.fm Figure 1-19 illustrates selecting the Restore action on the ITSO_Volume volume. Figure 1-19 Snapshot volume restore After you perform the restore action, you return to the Volumes and Snapshots panel. The process is instantaneous, and none of the properties (creation date, deletion priority, modified properties, or locked properties) of the snapshot or the volume have changed. Specifically, the process modifies the pointers to the master volume so that they are equivalent to the snapshot pointer. This change only occurs for partitions that have been modified. On modification, the XIV Storage System stores the data in a new partition and modifies the master volume’s pointer to the new partition. The snapshot pointer does not change and remains pointing at the original data. The restoration process restores the pointer back to the original data and frees the modified partition space. If a snapshot is taken and the original volume later increases in size, you can still do a restore operation. The snapshot still has the original volume size and will restore the original volume accordingly. The XCLI Session (or XCLI command) provides more options for restoration than the GUI. With the XCLI, you can restore a snapshot to a parent snapshot (Example 1-4). Example 1-4 Restoring a snapshot to another snapshot snapshot_restore snapshot=ITSO_Volume.snapshot_00002 target_snapshot=ITSO_Volume.snapshot_00001 1.2.5 Overwriting snapshots For your regular backup jobs you can decide whether you always want to create new snapshots (and let the system delete the old ones) or whether you prefer to overwrite the existing snapshots with the latest changes to the data. For instance, a backup application requires the latest copy of the data to perform its backup operation. This overwrite operation modifies the pointers to the snapshot data to be reset to the master volume. Therefore, all pointers to the original data are lost, and the snapshot appears as new. Storage that was allocated for the data changes between the volume and its snapshot is released. From either the Volumes and Snapshots view or the Snapshots Tree view, right-click the snapshot to overwrite. Select Overwrite from the menu and a dialog box opens. Click OK to validate the overwriting of the snapshot. Figure 1-20 illustrates overwriting the snapshot named ITSO_Volume.snapshot_00001. Chapter 1. Snapshots 15 7759ch_Snapshot.fm Draft Document for Review January 23, 2011 12:42 pm Figure 1-20 Overwriting a snapshot It is important to note that the overwrite process modifies the snapshot properties and pointers when involving duplicates. Figure 1-21 shows two changes to the properties. The snapshot named ITSO_Volume.snapshot_00001 has a new creation date. The duplicate snapshot still has the original creation date. However, it no longer points to the original snapshot. Instead, it points to the master volume according to the snapshot tree, which prevents a restoration of the duplicate to the original snapshot. If the overwrite occurs on the duplicate snapshot, the duplicate creation date is changed, and the duplicate is now pointing to the master volume. Figure 1-21 Snapshot tree after the overwrite process has occurred The XCLI performs the overwrite operation through the snapshot_create command. There is an optional parameter in the command to specify which snapshot to overwrite. If the optional parameter is not used, a new snapshot volume is created. Example 1-5 Overwriting a snapshot snapshot_create vol=ITSO_Volume overwrite=ITSO_Volume.snapshot_00001 1.2.6 Unlocking a snapshot At certain times, it may be beneficial to modify the data in a snapshot. This feature is useful for performing tests on a set of data or performing other types of data-mining activities. There are two scenarios that you must investigate when unlocking snapshots. The first scenario is to unlock a duplicate. By unlocking the duplicate, none of the snapshot properties are modified, and the structure remains the same. This method is straightforward and provides a backup of the master volume along with a working copy for modification. To unlock the snapshot, simply right-click the snapshot and select Unlock, as shown in Figure 1-22. 16 IBM XIV Storage System: Copy Services and Migration Draft Document for Review January 23, 2011 12:42 pm 7759ch_Snapshot.fm Figure 1-22 Unlocking a snapshot The results in the Snapshots Tree window show that the locked property is off and the modified property is on for ITSO_Volume.snapshot_00002. Even if the volume is relocked or overwritten with the original master volume, the modified property remains on. Also note that in Figure 1-23 the structure is unchanged. If an error occurs in the modified duplicate snapshot, the duplicate snapshot can be deleted, and the original snapshot duplicated a second time to restore the information. Figure 1-23 Unlocked duplicate snapshot For the second scenario, the original snapshot is unlocked and not the duplicate. Figure 1-24 shows the new property settings for ITSO_Volume.snapshot.00001. At this point, the duplicate snapshot mirrors the unlocked snapshot, because both snapshots still point to the original data. While the unlocked snapshot is modified, the duplicate snapshot references the original data. If the unlocked snapshot is deleted, the duplicate snapshot remains, and its parent becomes the master volume. Figure 1-24 Unlocked original snapshot Because the hierarchal snapshot structure was unmodified, the duplicate snapshot can be overwritten by the original snapshot. The duplicate snapshot can be restored to the master volume. Based on the results, this process does not differ from the first scenario. There is still a backup and a working copy of the data. Unlocking a snapshot is the same as unlocking a volume (Example 1-6). Chapter 1. Snapshots 17 7759ch_Snapshot.fm Draft Document for Review January 23, 2011 12:42 pm Example 1-6 Unlocking a snapshot with the XCLI Session commands vol_unlock vol=ITSO_Volume.snapshot_00001 1.2.7 Locking a snapshot If the changes made to a snapshot must be preserved, you can lock an unlocked snapshot. Figure 1-25 shows locking the snapshot named ITSO_Volume.snapshot.00001. From the Volumes and Snapshots panel, right-click the snapshot to lock and select Lock. Figure 1-25 Locking a snapshot The locking process completes immediately, preventing further modification to the snapshot. In Figure 1-26, the ITSO_Volume.00001 snapshot shows that both the lock property is on and the modified property is on. Even though there has not been a change to the snapshot, the system does not remove the modified property. Figure 1-26 Validating that the snapshot is locked The XCLI lock command (vol_lock), which is shown in Example 1-7, is almost a mirror operation of the unlock command. Only the actual command changes, but the same operating parameters are used when issuing the command. Example 1-7 Locking a snapshot vol_lock vol=ITSO_Volume.snapshot_00001 1.2.8 Deleting a snapshot When a snapshot is no longer needed, you can delete it. Figure 1-27 illustrates how to delete a snapshot. In this case, the modified snapshot ITSO_Volume.snapshot.00001 is no longer 18 IBM XIV Storage System: Copy Services and Migration Draft Document for Review January 23, 2011 12:42 pm 7759ch_Snapshot.fm needed. To delete the snapshot, right-click it and select Delete from the menu. A dialog box appears requesting that you validate the operation. Figure 1-27 Deleting a snapshot Figure 1-28 no longer displays the snapshot ITSO_Volume.snapshot.00001. Note that the volume and the duplicate snapshot are unaffected by the removal of this snapshot. In fact, the duplicate becomes the child of the master volume. The XIV Storage System provides the ability to restore the duplicate snapshot to the master volume or to overwrite the duplicate snapshot from the master volume even after deleting the original snapshot. Figure 1-28 Validating the snapshot is removed The delete snapshot command (snapshot_delete) operates the same as the creation snapshot. Refer to Example 1-8. Example 1-8 Deleting a snapshot snapshot_delete snapshot=ITSO_Volume.snapshot_00001 Important: If you delete a volume, all snapshots associated with the volume are also deleted. 1.2.9 Automatic deletion of a snapshot The XIV Storage System has a feature in place to protect a storage pool from becoming full. If the space allocated for snapshots becomes full, the XIV Storage System automatically deletes a snapshot. Figure 1-29 shows a storage pool with a single 17 GB volume labeled XIV_ORIG_VOL. The host connected to this volume is sequentially writing to a file that is stored on this volume. While the data is written, a snapshot called XIV_ORIG_VOL.snapshot.00006 is created, and one minute later, a second snapshot is taken (not a duplicate), which is called XIV_ORIG_VOL.snapshot.00007. Figure 1-29 Snapshot before the automatic deletion Chapter 1. Snapshots 19 7759ch_Snapshot.fm Draft Document for Review January 23, 2011 12:42 pm With this scenario, a duplicate does not cause the automatic deletion to occur. Because a duplicate is a mirror copy of the original snapshot, the duplicate does not create the additional allocations in the storage pool. Approximately one minute later, the oldest snapshot (XIV_ORIG_VOL.snapshot_00006) is removed from the display. The storage pool is 51 GB in size, with a snapshot size of 34 GB, which is enough for one snapshot. If the master volume is unmodified, many snapshots can exist within the pool, and the automatic deletion does not occur. If there were two snapshots and two volumes, it might take longer to cause the deletion, because the volumes utilize different portions of the disks, and the snapshots might not have immediately overlapped. To examine the details of the scenario at the point where the second snapshot is taken, a partition is in the process of being modified. The first snapshot caused a redirect on write, and a partition was allocated from the snapshot area in the storage pool. Because the second snapshot occurs at a different time, this action generates a second partition allocation in the storage pool space. This second allocation does not have available space, and the oldest snapshot is deleted. Figure 1-30 shows that the master volume XIV_ORIG_VOL and the newest snapshot XIV_ORIG_VOL.snapshot.00007 are present. The oldest snapshot XIV_ORIG_VOL.snapshot.00006 was removed. Figure 1-30 Snapshot after automatic deletion To determine the cause of removal, you must go to the Events panel under the Monitor menu. As shown on Figure 1-31, the event “SNAPSHOT_DELETED_DUE_TO_POOL_EXHAUSTION” is logged. The snapshot name XIV_ORIG_VOL.snapshot.00006 and timestamp 2010-10-06 16:59:21 are also logged for future reference. Figure 1-31 Record of automatic deletion 1.3 Snapshots consistency group A consistency group comprises multiple volumes so that a snapshot can be taken of all the volumes at the same moment in time. This action creates a synchronized snapshot of all the volumes and is ideal for applications that span multiple volumes, for example, a database application that stores its data files on multiple volumes. When creating a backup of the database, it is important to synchronize the data so that it is consistent. 20 IBM XIV Storage System: Copy Services and Migration Draft Document for Review January 23, 2011 12:42 pm 7759ch_Snapshot.fm 1.3.1 Creating a consistency group There are two methods of creating a consistency group. The first method is to create the consistency group and add the volumes in one step. The second method creates the consistency group and then adds the volumes in a subsequent step. If you also use consistency groups to manage remote mirroring, you must first create an empty consistency group, mirror it, and later add mirrored volumes to the consistency group. Restriction: Volumes in a consistency group must be in the same storage pool. A consistency group cannot include volumes from different pools. Starting at the Volumes and Snapshots view, select the volume that is to be added to the consistency group. To select multiple volumes, hold down the Shift key or the Ctrl key to select/deselect individual volumes. After the volumes are selected, right-click a selected volume to bring up an operations menu. From there, click Create a Consistency Group With Selected Volumes. Refer to Figure 1-32 for an example of this operation. Figure 1-32 Creating a consistency group with selected volumes After selecting the Create option from the menu, a dialog window appears. Enter the name of the consistency group. Because the volumes are added during creation, it is not possible to change the pool name. Figure 1-33 shows the process of creating a consistency group. After the name is entered, click Create. Figure 1-33 Naming the consistency group The volume consistency group ownership can be seen under Volumes and Snapshots. As in Figure 1-34, the three volumes contained in the itso pool are now owned by the ITSO_CG consistency group. The volumes are displayed in alphabetical order and do not reflect a preference or internal ordering. Chapter 1. Snapshots 21 7759ch_Snapshot.fm Draft Document for Review January 23, 2011 12:42 pm Figure 1-34 Viewing the volumes after creating a consistency group In order to obtain details about the consistency group, the GUI provides a panel to view the information. Under the Volumes menu, select Consistency Groups. Figure 1-35 illustrates how to access this panel. Figure 1-35 Accessing the consistency group view This selection sorts the information by consistency group. The panel allows you to expand the consistency group and see all the volumes owned by that consistency group. In Figure 1-36, there are three volumes owned or contained by the ITSO_CG consistency group. In this example, a snapshot of the volumes has not been created. Figure 1-36 Consistency Groups view From the consistency group view, you can create a consistency group without adding volumes. On the menu bar at the top of the window, there is an icon to add a new consistency group. By clicking the Add consistency group icon shown in Figure 1-37, a creation dialog box 22 IBM XIV Storage System: Copy Services and Migration Draft Document for Review January 23, 2011 12:42 pm 7759ch_Snapshot.fm appears, as shown in Figure 1-33 on page 21. Then provide a name and the storage pool for the consistency group. Figure 1-37 Adding a new consistency group When created, the consistency group appears in the Consistency Groups view of the GUI (Figure 1-38). The new group does not have any volumes associated with it. A new consistency group named ITSO_CG2 is created. The consistency group cannot be expanded yet, because there are no volumes contained in the consistency group ITSO_CG2. Figure 1-38 Validating new consistency group Using the Volumes view in the GUI, select the volumes to add to the consistency group. After selecting the desired volumes, right-click the volumes and select Add To Consistency Group. Figure 1-39 shows two volumes being added to a consistency group: itso_volume_4 itso_volume_5 Chapter 1. Snapshots 23 7759ch_Snapshot.fm Draft Document for Review January 23, 2011 12:42 pm Figure 1-39 Adding volumes to a consistency group After selecting the volumes to add, a dialog box opens asking for the consistency group to which to add the volumes. Figure 1-40 adds the volumes to the ITSO_CG consistency group. Clicking OK completes the operation. Figure 1-40 Selecting a consistency group for adding volumes Using the XCLI Session (or XCLI command), the process must be done in two steps. First, create the consistency group, then add the volumes. Example 1-9 provides an example of setting up a consistency group and adding volumes using the XCLI. Example 1-9 Creating consistency groups and adding volumes with the XCLI cg_create cg=ITSO_CG pool=itso cg_add_vol cg=ITSO_CG vol=itso_volume_01 cg_add_vol cg=ITSO_CG vol=itso_volume_02 1.3.2 Creating a snapshot using consistency groups When the consistency group is created and the volumes added, snapshots can be created. From the consistency group view on the GUI, select the consistency group to copy. As in Figure 1-41, right-click the group and select Create Snapshot Group from the menu. The system immediately creates a snapshot group. 24 IBM XIV Storage System: Copy Services and Migration Draft Document for Review January 23, 2011 12:42 pm 7759ch_Snapshot.fm Figure 1-41 Creating a snapshot using consistency groups The new snapshots are created and displayed beneath the volumes in the Consistency Groups view (Figure 1-42). These snapshots have the same creation date and time. Each snapshot is locked on creation and has the same defaults as a regular snapshot. The snapshots are contained in a group structure (called a snapshot group) that allows all the snapshots to be managed by a single operation. Figure 1-42 Validating the new snapshots in the consistency group Adding volumes to a consistency group does not prevent you from creating a single volume snapshot. If a single volume snapshot is created, it is not displayed in the consistency group view. The single volume snapshot is also not consistent across multiple volumes. However, the single volume snapshot does work according to all the rules defined previously in 1.2, “Snapshot handling” on page 9. With the XCLI, when the consistency group is set up, it is simple to create the snapshot. One command creates all the snapshots within the group at the same moment in time. Example 1-10 Creating a snapshot group cg_snapshots_create cg=ITSO_CG 1.3.3 Managing a consistency group After the snapshots are created within a consistency group, you have several options available. The same management options for a snapshot are available to a consistency group. Specifically, the deletion priority is modifiable, and the snapshot or group can be unlocked and locked, and the group can be restored or overwritten. Refer to 1.2, “Snapshot handling” on page 9, for specific details about performing these operations. Chapter 1. Snapshots 25 7759ch_Snapshot.fm Draft Document for Review January 23, 2011 12:42 pm In addition to the snapshot functions, you can remove a volume from the consistency group. By right-clicking the volume, a menu opens. Click Remove From Consistency Group and validate the removal on the dialog window that opens. Figure 1-43 provides an example of removing the itso_volume_1 volume from the consistency group. Figure 1-43 Removing a volume from a consistency group Removing a volume from a consistency group after a snapshot is performed prevents restoration of any snapshots in the group. If the volume is added back into the group, the group can be restored. 26 IBM XIV Storage System: Copy Services and Migration Draft Document for Review January 23, 2011 12:42 pm 7759ch_Snapshot.fm To obtain details about a consistency group, you can select Snapshots Group Tree from the Volumes menu. Figure 1-44 shows where to find the group view. Figure 1-44 Selecting the Snapshot Group Tree Chapter 1. Snapshots 27 7759ch_Snapshot.fm Draft Document for Review January 23, 2011 12:42 pm From the Snapshots Group Tree view, you can see many details. Select the group to view on the left panel by clicking the group snapshot. The right panes provide more in-depth information about the creation time, the associated pool, and the size of the snapshots. In addition, the consistency group view points out the individual snapshots present in the group. Refer to Figure 1-45 for an example of the data that is contained in a consistency group. Figure 1-45 Snapshots Group Tree view To display all the consistency groups in the system, issue the XCLI cg_list command. Example 1-11 Listing the consistency groups cg_list Name itso_esx_cg itso_mirror_cg nn_cg_residency db2_cg sync_rm ITSO_i_Mirror itso_srm_cg Team01_CG ITSO_CG ITSO_CG2 Pool Name itso itso Residency_nils itso 1_Sales_Pool ITSO_IBM_i ITSO_SRM Team01_RP itso itso More details are available by viewing all the consistency groups within the system that have snapshots. The groups can be unlocked or locked, restored, or overwritten. All the operations discussed in the snapshot section are available with the snap_group operations. 28 IBM XIV Storage System: Copy Services and Migration 7759ch_Snapshot.fm Draft Document for Review January 23, 2011 12:42 pm Example 1-12 illustrates the snap_group_list command. Example 1-12 Listing all the consistency groups with snapshots snap_group_list Name db2_cg.snap_group_00001 ITSO_CG.snap_group_00001 ITSO_CG.snap_group_00002 last-replicated-ITSO_i_Mirror most-recent-ITSO_i_Mirror CG db2_cg ITSO_CG ITSO_CG ITSO_i_Mirror ITSO_i_Mirror Snapshot Time 2010-09-30 13:26:21 2010-10-12 11:24:54 2010-10-12 11:44:02 2010-10-12 13:21:41 2010-10-12 13:22:00 Deletion Priority 1 1 1 1 1 1.3.4 Deleting a consistency group Before a consistency group can be deleted, the associated volumes must be removed from the consistency group. On deletion of a consistency group, the snapshots become independent snapshots and remain tied to their volume. To delete the consistency group, right-click the group and select Delete. Validate the operation by clicking OK. Figure 1-46 provides an example of deleting the consistency group called ITSO_CG2. Figure 1-46 Deleting a consistency group In order to delete a consistency group with the XCLI, you must first remove all the volumes one at a time. As in Example 1-13, each volume in the consistency group is removed first. Then the consistency group is available for deletion. Deletion of the consistency group does not delete the individual snapshots. They are tied to the volumes and are removed from the consistency group when you remove the volumes. Example 1-13 Deleting a consistency group cg_remove_vol vol=itso_volume_1 cg_remove_vol vol=itso_volume_2 cg_remove_vol vol=isto_volume_3 cg_delete cg=ITSO_CG Chapter 1. Snapshots 29 7759ch_Snapshot.fm Draft Document for Review January 23, 2011 12:42 pm 1.4 Snapshot with remote mirror XIV has a special snapshot (shown in Figure 1-47) that is automatically created by the system. During the recovery phase of a remote mirror, the system creates a snapshot on the target to ensure a consistent copy. Important: This snapshot has a special deletion priority and is not deleted automatically if the snapshot space becomes fully utilized. When the synchronization is complete, the snapshot is removed by the system because it is no longer needed. The following list describes the sequence of events to trigger the creation of the special snapshot. Note that if a write does not occur while the links are broken, the system does not create the special snapshot. The events are: 1. 2. 3. 4. Remote mirror is synchronized. Loss of connectivity to remote system occurs. Writes continue to the primary XIV Storage System. Mirror paths are reestablished (here the snapshot is created) and synchronization starts. Figure 1-47 Special snapshot during remote mirror synchronization operation For more details about remote mirror refer to Chapter 4, “Synchronous Remote Mirroring” on page 103. Important: The special snapshot is created regardless of the amount of pool space on the target pool. If the snapshot causes the pool to be overutilized, the mirror remains inactive. The pool must be expanded to accommodate the snapshot, then the mirror can be reestablished. 1.5 MySQL database backup example MySQL is an open source database application that is used by many web programs. For more information go to: http://www.mysql.com The database has several important files: The database data The log data The backup data The MySQL database stores the data in a set directory and cannot be separated. The backup data, when captured, can be moved to a separate system. The following scenario shows an 30 IBM XIV Storage System: Copy Services and Migration Draft Document for Review January 23, 2011 12:42 pm 7759ch_Snapshot.fm incremental backup of a database and then uses snapshots to restore the database to verify that the database is valid. The first step is to back up the database. For simplicity, a script is created to perform the backup and take the snapshot. Two volumes are assigned to a Linux host (Figure 1-48). The first volume contains the database and the second volume holds the incremental backups in case of a failure. Figure 1-48 XIV view of the volumes On the Linux host, the two volumes are mapped onto separate file systems. The first file system xiv_pfe_1 maps to volume redbook_markus_09, and the second file system xiv_pfe_2 maps to volume redbook_markus_10. These volumes belong to the consistency group MySQL Group so that when the snapshot is taken, snapshots of both volumes are taken at the same moment. To perform the backup you must configure the following items: The XIV XCLI must be installed on the server. This way, the backup script can invoke the snapshot instead of relying on human intervention. Secondly, the database must have the incremental backups enabled. To enable the incremental backup feature, MySQL must be started with the --log-bin feature (Example 1-14). This feature enables the binary logging and allows database restorations. Example 1-14 Starting MySQL ./bin/mysqld_safe --no-defaults --log-bin=backup The database is installed on /xiv_pfe_1. However, a pointer in /usr/local is made, which allows all the default settings to coexist, and yet the database is stored on the XIV volume. To create the pointer, use the command in Example 1-15. Note that the source directory must be changed for your particular installation. You can also install the MySQL application on a local disk and change the default data directory to be on the XIV volume. Example 1-15 MySQL setup cd /usr/local ln -s /xiv_pfe_1/mysql-5.0.51a-linux-i686-glibc23 mysql The backup script is simple, and depending on the implementation of your database, the following script might be too simple. However, the following script (Example 1-16) does force an incremental backup and copies the data to the second XIV volume. Then the script locks the tables so that no more data can be modified. When the tables are locked, the script initiates a snapshot, which saves everything for later use. Finally, the tables are unlocked. Example 1-16 Script to perform backup # Report the time of backing up date # First flush the tables this can be done while running and # creates an incremental backup of the DB at a set point in time. /usr/local/mysql/bin/mysql -h localhost -u root -p password < ~/SQL_BACKUP Chapter 1. Snapshots 31 7759ch_Snapshot.fm Draft Document for Review January 23, 2011 12:42 pm # Since the mysql daemon was run specifying the binary log name # of backup the files can be copied to the backup directory on another disk cp /usr/local/mysql/data/backup* /xiv_pfe_2 # Secondly lock the tables so a Snapshot can be performed. /usr/local/mysql/bin/mysql -h localhost -u root -p password < ~/SQL_LOCK # XCLI command to perform the backup # ****** NOTE User ID and Password are set in the user profile ***** /root/XIVGUI/xcli -c xiv_pfe cg_Snapshots_create cg="MySQL Group" # Unlock the tables so that the database can continue in operation. /usr/local/mysql/bin/mysql -h localhost -u root -p password < ~/SQL_UNLOCK When issuing commands to the MySQL database, the password for the root user is stored in an environment variable (not in the script, as was done in Example 1-16 for simplicity). Storing the password in an environment variable allows the script to perform the action without requiring user intervention. For the script to invoke the MySQL database, the SQL statements are stored in separate files and piped into the MySQL application. Example 1-17 provides the three SQL statements that are issued to perform the backup operation. Example 1-17 SQL commands to perform backup operation SQL_BACKUP FLUSH TABLES SQL_LOCK FLUSH TABLES WITH READ LOCK SQL_UNLOCK UNLOCK TABLES 32 IBM XIV Storage System: Copy Services and Migration 7759ch_Snapshot.fm Draft Document for Review January 23, 2011 12:42 pm Before running the backup script, a test database, which is called redbook, is created. The database has one table, which is called chapter, which contains the chapter name, author, and pages. The table has two rows of data that define information about the chapters in the redbook. Figure 1-49 shows the information in the table before the backup is performed. Figure 1-49 Data in database before backup Now that the database is ready, the backup script is run. Example 1-18 is the output from the script. Then the snapshots are displayed to show that the system now contains a backup of the data. Example 1-18 Output from the backup process [root@x345-tic-30 ~]# ./mysql_backup Mon Aug 11 09:12:21 CEST 2008 Command executed successfully. [root@x345-tic-30 ~]# /root/XIVGUI/xcli -c xiv_pfe snap_group_list cg="MySQLGroup" Name CG Snapshot Time Deletion Priority MySQL Group.snap_group_00006 MySQL Group 2008-08-11 15:14:24 1 [root@x345-tic-30 ~]# /root/XIVGUI/xcli -c xiv_pfe time_list Time Date Time Zone Daylight Saving Time 15:17:04 2008-08-11 Europe/Berlin yes [root@x345-tic-30 ~]# Chapter 1. Snapshots 33 7759ch_Snapshot.fm Draft Document for Review January 23, 2011 12:42 pm To show that the restore operation is working, the database is dropped (Figure 1-50) and all the data is lost. After the drop operation is complete, the database is permanently removed from MySQL. It is possible to perform a restore action from the incremental backup. For this example, the snapshot function is used to restore the entire database. Figure 1-50 Dropping the database The restore script, shown in Example 1-19, stops the MySQL daemon and unmounts the Linux file systems. Then the script restores the snapshot and finally remounts and starts MySQL. Example 1-19 Restore script [root@x345-tic-30 ~]# cat mysql_restore # This resotration just overwrites all in the database and puts the # data back to when the snapshot was taken. It is also possible to do # a restore based on the incremental data; this script does not handle # that condition. # Report the time of backing up date # First shutdown mysql mysqladmin -u root -p password shutdown # Unmount the filesystems umount /xiv_pfe_1 umount /xiv_pfe_2 #List all the snap groups /root/XIVGUI/xcli -c xiv_pfe snap_group_list cg="MySQL Group" #Prompt for the group to restore echo "Enter Snapshot group to restore: " read -e snap_group 34 IBM XIV Storage System: Copy Services and Migration 7759ch_Snapshot.fm Draft Document for Review January 23, 2011 12:42 pm # XCLI command to perform the backup # ****** NOTE User ID and Password are set in the user profile ***** /root/XIVGUI/xcli -c xiv_pfe snap_group_restore snap_group="$snap_group" # Mount the FS mount /dev/dm-2 /xiv_pfe_1 mount /dev/dm-3 /xiv_pfe_2 # Start the MySQL server cd /usr/local/mysql ./configure Example 1-20 shows the output from the restore action. Example 1-20 Output from the restore script [root@x345-tic-30 ~]# ./mysql_restore Mon Aug 11 09:27:31 CEST 2008 STOPPING server from pid file /usr/local/mysql/data/x345-tic-30.mainz.de.ibm.com.pid 080811 09:27:33 mysqld ended Name CG Snapshot Time Deletion Priority MySQL Group.snap_group_00006 MySQL Group 2008-08-11 15:14:24 1 Enter Snapshot group to restore: MySQL Group.snap_group_00006 Command executed successfully. NOTE: This is a MySQL binary distribution. It's ready to run, you don't need to configure it! To help you a bit, I am now going to create the needed MySQL databases and start the MySQL server for you. If you run into any trouble, please consult the MySQL manual, that you can find in the Docs directory. Installing MySQL system tables... OK Filling help tables... OK To start mysqld at boot time you have to copy support-files/mysql.server to the right place for your system PLEASE REMEMBER TO SET A PASSWORD FOR THE MySQL root USER ! To do so, start the server, then issue the following commands: ./bin/mysqladmin -u root password 'new-password' ./bin/mysqladmin -u root -h x345-tic-30.mainz.de.ibm.com password 'new-password' Alternatively you can run: ./bin/mysql_secure_installation which also gives the option of removing the test databases and anonymous user created by default. strongly recommended for production servers. This is See the manual for more instructions. Chapter 1. Snapshots 35 7759ch_Snapshot.fm Draft Document for Review January 23, 2011 12:42 pm You can start the MySQL daemon with: cd . ; ./bin/mysqld_safe & You can test the MySQL daemon with mysql-test-run.pl cd mysql-test ; perl mysql-test-run.pl Please report any problems with the ./bin/mysqlbug script! The latest information about MySQL is available on the Web at http://www.mysql.com Support MySQL by buying support/licenses at http://shop.mysql.com Starting the mysqld server. You can test that it is up and running with the command: ./bin/mysqladmin version [root@x345-tic-30 ~]# Starting mysqld daemon with databases from /usr/local/mysql/data When complete, the data is restored and the redbook database is available, as shown in Figure 1-51. Figure 1-51 Database after restore operation 1.6 Snapshot example for a DB2 database Guidelines and recommendations on how to use the IBM XIV Storage System in database application environments are given in the IBM Redbook IBM XIV Storage System: Host Attachment and Interoperability, SG24-7904-00. The following example scenario illustrates how to prepare a DB2® database on an AIX operation system for storage-based snapshot backup and then perform snapshot backup and restores. 36 IBM XIV Storage System: Copy Services and Migration 7759ch_Snapshot.fm Draft Document for Review January 23, 2011 12:42 pm IBM offers the Tivoli® Storage FlashCopy® Manager software product to automate creation and restore of consistent database snapshots backups and to off load the data from the snapshot backups to an external backup/restore system like Tivoli Storage Manager (TSM). The above mentioned IBM Redbook includes an overview chapter about Tivoli Storage FlashCopy Manager. For more details visit these IBM Internet pages: http://www.ibm.com/software/tivoli/products/storage-flashcopy-mgr http://publib.boulder.ibm.com/infocenter/tsminfo/v6 XIV storage system and AIX OS environments In this example, the database is named XIV and stored in the file system /db2/XIV/db2xiv. The file system /db2/XIV/log_dir is intended to be used for the database log files. Figure 1-52 and Example 1-21 show the XIV volumes and the AIX file systems that were created for the database. Figure 1-52 XIV volume mapping for the DB2 database server Example 1-21 AIX volume groups and file systems created for the DB2 database $ lsvg rootvg db2datavg db2logvg $ df -g Filesystem GB blocks /dev/hd4 2.31 /dev/hd2 1.75 /dev/hd9var 0.16 /dev/hd3 5.06 /dev/hd1 1.00 /dev/hd11admin 0.12 /proc /dev/hd10opt 1.69 /dev/livedump 0.25 /dev/db2loglv 47.50 /dev/db2datalv 47.50 Free %Used 0.58 75% 0.14 92% 0.08 46% 2.04 60% 0.53 48% 0.12 1% 1.52 10% 0.25 1% 47.49 1% 47.31 1% Iused %Iused Mounted on 19508 12% / 38377 46% /usr 4573 19% /var 7418 2% /tmp 26 1% /home 5 1% /admin - /proc 2712 1% /opt 4 1% /var/adm/ras/livedump 4 1% /db2/XIV/log_dir 56 1% /db2/XIV/db2xiv Preparing the database for recovery All databases have logs associated with them. These logs keep records of database changes. When a new DB2 database is created, circular logging is the default behavior which means DB2 uses a set of transaction log files in round-robin mode. With this type of logging, Chapter 1. Snapshots 37 7759ch_Snapshot.fm Draft Document for Review January 23, 2011 12:42 pm only full, offline backups of the database are allowed. In order to perform an online backup of the database, the logging method must be changed to archive. See Example 1-22 This DB2 configuration change enables consistent XIV snapshot creation of the XIV volumes (that the database is stored on) while the database is online, restore of the database using snapshots and a roll forward of the database changes to a desired point in time. Example 1-22 Changing DB2 logging method Connect to DB2 as a database administrator to change the database configuration. $ db2 connect to XIV Database Connection Information Database server = DB2/AIX64 9.7.0 SQL authorization ID = DB2XIV Local database alias = XIV $ db2 update db cfg using LOGARCHMETH1 LOGRETAIN $ db2 update db cfg using NEWLOGPATH /db2/XIV/log_dir After the archive logging method has been enabled, DB2 requests a database backup. $ db2 connect reset $ db2 backup db XIV to /tmp $ db2 connect to XIV Note: Before the snapshot creation ensure that the snapshot includes all file systems relevant for the database backup. If in doubt, the dbpath view shows this information. See Example 1-23. The output only shows the relevant lines for better readability. Example 1-23 DB2 dbpath view $ db2 select path from sysibmadm.dbpaths /db2/XIV/log_dir/NODE0000/ /db2/XIV/db2xiv/ /db2/XIV/db2xiv/db2xiv/NODE0000/sqldbdir/ /db2/XIV/db2xiv/db2xiv/NODE0000/SQL00001/ 38 IBM XIV Storage System: Copy Services and Migration 7759ch_Snapshot.fm Draft Document for Review January 23, 2011 12:42 pm The AIX commands df and lsvg (with the -l and -p options) identify the related AIX file systems and device files (hdisks). The XIV utility xiv_devlist shows the AIX hdisk names and the names of the associated XIV volumes. Using XIV snapshots for database backup The following procedure creates a snapshot of a primary database for use as a backup image. This procedure can be used instead of performing backup database operations on the primary database. Step 1: Suspend write I/O on the database $ db2 set write suspend for database Step 2: Create XIV snapshots While the database I/O is suspended, generate a snapshot of the XIV volume(s) the database is stored on. A snapshot of the log file is not created to be able to recover to a certain point-in-time instead just going back to the to the last consistent snapshot image after database corruption occurs. Example 1-24 shows the xcli commands the create a consistent snapshot. Example 1-24 XCLI commands to create a consistent XIV snapshot XIV LAB 3 1300203>>cg_create cg=db2_cg pool=itso Command executed successfully. XIV LAB 3 1300203>>cg_add_vol vol=p550_lpar1_db2_1 cg=db2_cg Command executed successfully. XIV LAB 3 1300203>>cg_snapshots_create cg=db2_cg Command executed successfully. Step 3: Resume database write I/O After the snapshot has been created, database write I/O can be resumed. $ db2 set write resume for db Figure 1-53 shows the newly created snapshot on the XIV graphical user interface. Chapter 1. Snapshots 39 7759ch_Snapshot.fm Draft Document for Review January 23, 2011 12:42 pm Figure 1-53 XIV snapshot of the DB2 database volume Restoring the database from the XIV snapshot If a failure occurs on the primary system, or data is corrupted requiring a restore from backup, follow the steps outlined below to bring the database to the state before the corruption occurred. In a productive environment a forward recovery to a certain point-in-time might be required. In this case the DB2 recover command requires other options, but the following process to handle XIV storage system and operating system is still valid. Step 1: Terminate database connections and stop the database $ db2 connect reset $ db2stop Step 2: On the AIX system un-mount the file system(s) the database resides in and deactivate the volume group(s) # umount /db2/XIV/db2xiv # varyoffvg db2datavg Step 3: Restore the data volume(s) from the XIV snapshot Example 1-25 CLI command to restore a XIV snapshot XIV LAB 3 1300203>>snap_group_restore snap_group=db2_cg.snap_group_00001 Warning: ARE_YOU_SURE_YOU_WANT_TO_RESTORE_SNAPGROUP y/n: Command executed successfully. Step 4: On the AIX system activate the volume group(s) and mount the file system(s) the database resides in # varyonvg db2datavg # mount /db2/XIV/db2xiv Step 5: Start the database instance: $ db2start 40 IBM XIV Storage System: Copy Services and Migration Draft Document for Review January 23, 2011 12:42 pm 7759ch_Snapshot.fm Step 6: Initialize the database From the DB2 view the XIV snapshot of the database volume(s) creates a split mirror database environment. The database was in write suspend mode when the snapshot was taken. Thus the restored database is still in this state and the split mirror must be used as a backup image to restore the primary database. The DB2 command db2inidb must to run to initialize a mirrored database before the split mirror can be used. $ db2inidb XIV as mirror DBT1000I The tool completed successfully. Step 7: Roll forward the database to the end of the logs and check if a database connect works $ db2 rollforward db XIV complete $ db2 connect to XIV Database Connection Information Database server = DB2/AIX64 9.7.0 SQL authorization ID = DB2XIV Local database alias = XIV Chapter 1. Snapshots 41 7759ch_Snapshot.fm 42 IBM XIV Storage System: Copy Services and Migration Draft Document for Review January 23, 2011 12:42 pm Draft Document for Review January 23, 2011 12:42 pm 7759ch_Volume_Copy.fm 2 Chapter 2. Volume copy The XIV Storage System provides the ability to copy a volume into another volume. This valuable feature, known as volume copy, is best used for duplicating an image of the volume when the data residency is extremely long and the information diverges after the copy is complete. © Copyright IBM Corp. 2010. All rights reserved. 43 7759ch_Volume_Copy.fm Draft Document for Review January 23, 2011 12:42 pm 2.1 Volume copy architecture The volume copy feature provides an instantaneous copy of data from one volume to another volume. By utilizing the same functionality of the snapshot, the system modifies the target volume to point at the source volume’s data. After the pointers are modified, the host has full access to the data on the volume. After the XIV Storage System completes the setup of the pointers to the source data, a background copy of the data is performed. The data is copied from the source volume to a new area on the disk, and the pointers of the target volume are then updated to use this new space. The copy operation is done in such a way as to minimize the impact to the system. If the host performs an update before the background copy is complete, a redirect on write occurs, which allows the volume to be readable and writable before the volume copy completes. 2.2 Performing a volume copy Performing a volume copy is a simple task. The only requirements are that the target volume must be created and formatted before the copy can occur. If the sizes of the volumes differ, the size of the target volume is modified to match the source volume when the copy is initiated. The resize operation does not require user intervention. Figure 2-1 illustrates making a copy of volume xiv_vol_1. The target volume for this example is xiv_vol_2. By right-clicking the source volume, a menu appears and you can then select Copy this Volume. This action causes a dialog box to open. Figure 2-1 Initiating a copy volume process 44 IBM XIV Storage System: Copy Services and Migration Draft Document for Review January 23, 2011 12:42 pm 7759ch_Volume_Copy.fm From the dialog box, select xiv_vol_2 and click OK. The system then asks you to validate the copy action. The XIV Storage System instantly performs the update process and displays a completion message. When the copy process is complete, the volume is available for use. Figure 2-2 provides an example of the volume selection. Figure 2-2 Target volume selection To create a volume copy with the XCLI, the source and target volumes must be specified in the command. In addition, the -y parameter must be specified to provide an affirmative response to the validation questions. See Example 2-1. Example 2-1 Performing a volume copy xcli -c “XIV LAB 01 EBC”-y vol_copy vol_src=xiv_vol_1 vol_trg=xiv_vol_2 2.3 Creating an OS image with volume copy This section describes another usage of the volume copy feature. In certain cases, you might want to install another operating system (OS) image. By using volume copy, the installation can be done immediately. Usage of VMware simplified the need for SAN boot. However, this example can be applied to any OS installation in which the hardware configuration is similar. VMware allows the resources of a server to be separated into logical virtual systems, each containing its own OS and resources. When creating the configuration, it is extremely important to have the hard disk assigned to the virtual machine to be a mapped raw LUN. If the hard disk is a VMware File System (VMFS), the volume copy fails because there are duplicate file systems in VMware. In Figure 2-3, the mapped raw LUN is the XIV volume that was mapped to the VMware server. Chapter 2. Volume copy 45 7759ch_Volume_Copy.fm Draft Document for Review January 23, 2011 12:42 pm Figure 2-3 Configuration of the virtual machine in VMware To perform the volume copy: 1. Validate the configuration for your host. With VMware, ensure that the hard disk assigned to the virtual machine is a mapped raw LUN. For a disk directly attached to a server, the SAN boot must be enabled and the target server must have the XIV volume discovered. 2. Shut down the source server or OS. If the source remains active, there might be data in memory that is not synchronized to the disk. If this step is skipped, unexpected results can occur. 3. Perform volume copy from the source volume to the target volume. 4. Power on the new system. A demonstration of the process is simple using VMware. Starting with the VMware resource window, power off the virtual machines for both the source and the target. The summary described in Figure 2-4 shows that both XIV Source VM (1), the source, and XIV Source VM (2), the target, are powered off. Figure 2-4 VMware virtual machine summary Looking at the XIV Storage System before the copy (Figure 2-5), xiv_vmware_1 is mapped to the XIV Source VM (1) in VMware and has utilized 1 GB of space. This information shows that the OS is installed and operational. The second volume, xiv_vmware_2, is the target volume for the copy and is mapped to XIV Source VM (2) and is 0 in size. At this point, the OS has not been installed on the virtual machine and thus the OS is not usable. Figure 2-5 The XIV volumes before the copy 46 IBM XIV Storage System: Copy Services and Migration Draft Document for Review January 23, 2011 12:42 pm 7759ch_Volume_Copy.fm Because the virtual machines are powered off, simply initiate the copy process as just described. Selecting xiv_vmware_1 as the source, copy the volume to the target xiv_vmware_2. The copy completes immediately and is available for usage. To verify that the copy is complete, the used area of the volumes must match, as shown in Figure 2-6. Figure 2-6 The XIV volumes after the copy After the copy is complete, power up the new virtual machine to use the new operating system. Both servers usually boot up normally with only minor modifications to the host. In this example, the server name we had to changed because there were two servers on the network with the same name. Refer to Figure 2-7. Figure 2-7 VMware summary showing both virtual machines powered on Chapter 2. Volume copy 47 7759ch_Volume_Copy.fm Draft Document for Review January 23, 2011 12:42 pm Figure 2-8 shows the second virtual machine console with the Windows operating system powered on. Figure 2-8 Booted Windows server 48 IBM XIV Storage System: Copy Services and Migration Draft Document for Review January 23, 2011 12:42 pm 7759ch_Mirror.fm 3 Chapter 3. Remote Mirroring The Remote Mirroring function of the XIV Storage System provides a real-time copy between two or more storage systems supported over Fibre Channel (FC) or iSCSI links. This feature provides a method to protect data from site failures. Remote Mirroring can be a synchronous copy solution where write operations are completed on both copies (local and remote sites) before they are considered to be complete (see Chapter 4, “Synchronous Remote Mirroring” on page 103). This type of remote mirroring is normally used for short distances to minimize the effect of I/O delays inherent to the distance to the remote site. Remote Mirroring can also be an asynchronous solution were consistent sets of data are copied to the remote location at specified intervals and host I/O operations are complete after writing to the primary (see Chapter 5, “Asynchronous remote mirroring” on page 127). This is typically used for long distances between sites. Note: For asynchronous mirroring over iSCSI links, a reliable, dedicated network must be available. It requires consistent network bandwidth and a non-shared link. Unless otherwise noted, this chapter describes the basic concepts, functions, and terms that are common to both XIV synchronous and asynchronous mirroring. © Copyright IBM Corp. 2010. All rights reserved. 49 7759ch_Mirror.fm Draft Document for Review January 23, 2011 12:42 pm 3.1 XIV Remote Mirroring overview The purpose of mirroring is to create a set of consistent data that can be used by production applications in the event of problems with production volumes or for other purposes. XIV remote mirroring is application and operating system independent, and does not require server processor cycle usage. 3.1.1 XIV Remote Mirror terminology It is worth going through and becoming familiar with several terms used throughout the next chapters involving remote mirroring. A number of terms, meanings, and usage with regards to XIV and synchronous remote mirroring are noted below: Local site: This site is made up of the primary storage and the servers running applications with the XIV Storage System. Remote site: This site holds the mirror copy of the data on another XIV Storage System and usually standby servers as well. In this case, the remote site is capable of becoming the active production site with consistent data available in the event of a failure at the local site. Primary: This denotes the XIV designated under normal conditions to serve hosts and have its data replicated to a secondary XIV for disaster recovery purposes. Secondary. This denotes the XIV designated under normal conditions to act as the mirror (backup) for the primary, and that could be set to replace the primary if the primary fails. Consistency groups (CG): A consistency group is a set of related volumes on the same XIV Storage System that are treated as a single consistent unit. Consistency groups are supported within Remote Mirroring. Coupling: This is the pairing of volumes or consistency groups (CGs) to form a mirror relationship between the source of the replication (master) and the target (slave). Peer : This is one side of a coupling. It can either be a volume or a consistency group. However, peers must be of the same type (that is, both volumes or CGs). Whenever a coupling is defined, a role is specified for each peer. One peer is designated as the master and the other peer is designated as the slave. Role: This denotes the actual role that the peer is fulfilling: – Master : A role that indicates that the peer serves host requests and acts as the source for replication. Changing a peer’s role to master from slave may be warranted after a disruption of the current master’s service either due to a disaster or to planned service maintenance. – Slave: A role that indicates that the peer does not serve host requests and acts as the target for replication. Changing a peer’s role to slave from master may be warranted after the peer is recovered from a site/system/link failure or disruption that led to the promotion of the other peer from slave to master. Changing roles can also be done in preparation for supporting a planned service maintenance. Sync job: This applies to async mirroring only. It denotes a synchronization procedure run by the master at specified user-configured intervals corresponding to the asynchronous mirroring definition or upon manual execution of a dedicated XCLI command (the related command is mirror_create_snapshot). The resulting job is dubbed snapshot mirror sync job or ad-hoc sync job, or manual sync job in contrast with a scheduled sync job. The sync job entails synchronization of data updates recorded on the master since the creation time of the most recent snapshot that was successfully synchronized. 50 IBM XIV Storage System: Copy Services and Migration 7759ch_Mirror.fm Draft Document for Review January 23, 2011 12:42 pm Asynchronous schedule interval: This applies to asynchronous mirroring only. It represents, per given coupling, how often the master automatically runs a new sync job. For example, if the pertinent mirroring configuration parameter specifies a 60-minute interval, then during a period of 1 day, 24 sync jobs will be created. Recovery Point Objective (RPO): The RPO is a setting that is only applicable to asynchronous mirroring. It represents an objective set by the user implying the maximal currency difference considered acceptable between the mirror peers (the actual difference between mirror peers can be shorter or longer than the RPO set). An RPO of zero indicates that no currency difference between the mirror peers is acceptable. An RPO that is greater than zero indicates that the replicated volume is less current or lags somewhat behind the master volume, and that there is a potential for certain transactions that have been run against the production volume to be rerun when applications come up on the replicated volume. For XIV asynchronous mirroring, the required RPO is user-specified. The XIV system then reports effective RPO and compares it to the required RPO. Connectivity, bandwidth, and distance between the XIV system that contains the production volume and the XIV system that contains the replicated copy directly impact RPO. More connectivity, greater bandwidth, and less distance typically enable a lower RPO. 3.1.2 XIV Remote Mirroring modes As mentioned in our introduction, XIV supports both synchronous mirroring and asynchronous mirroring: XIV synchronous mirroring XIV synchronous mirroring is designed to accommodate a requirement for zero RPO. To ensure that data is also written to the Secondary XIV (slave role), an acknowledgement of the write operation to the host is only issued after the data has been written to both XIV systems. This ensures the consistency of mirroring peers. A write acknowledgement is sent to the host once the write data has been cached into two separate XIV modules at each site. This is depicted in Figure 3-1. Host Server 1 2 4 1. Host Write to Master XIV (data placed in cache of 2 Modules) 2. Master replicates to Slave XIV (data placed in cache of 2 Modules) 3 Local XIV (Master) Remote XIV (Slave) 3. Slave acknowledges write complete to Master 4. Master acknowledges write complete to application Figure 3-1 XIV synchronous mirroring Chapter 3. Remote Mirroring 51 7759ch_Mirror.fm Draft Document for Review January 23, 2011 12:42 pm Host read operations are performed from the Primary XIV (master role), whereas writing is performed at the primary (master role) and replicated to the Secondary XIV systems. Refer to 4.5, “Synchronous mirror step-by-step scenario” on page 115, for more details. XIV asynchronous mirroring XIV asynchronous mirroring is designed to provide a consistent replica of data on a target peer through timely replication of data changes recorded on a source peer. XIV Asynchronous mirroring exploits the XIV snapshot function, which creates a point-in-time (PiT) image. In XIV asynchronous mirroring, successive snapshots (point-in-time images) are made and used to create consistent data on the slave peers. The system sync job copies the data corresponding to the differences between two designated snapshots on the master (most_recent and last_replicated). For XIV asynchronous mirroring, acknowledgement of write complete is returned to the application as soon as the write data has been received at the local XIV system, as shown in Figure 3-2. Refer to 5.6, “Detailed asynchronous mirroring process” on page 155, for details. Application Server 1 3 2 1. Host Write to Master XIV (data placed in cache of 2 Modules)) 2. Master acknowledges write complete to application 4 Local XIV (Master) 3. Master replicates to Slave 4. Slave acknowledges write complete Figure 3-2 XIV asynchronous mirroring 52 IBM XIV Storage System: Copy Services and Migration Remote XIV (Slave) 7759ch_Mirror.fm Draft Document for Review January 23, 2011 12:42 pm 3.2 Mirroring schemes Mirroring, whether synchronous or asynchronous, requires two or more XIV systems. The source and target of the asynchronous mirroring can reside on the same site and form a local mirroring or they can reside on different sites and enable a disaster recovery plan. Figure 3-3 shows how peers can be spread across multiple storage systems and sites. Replication Scheme XIV System E XIV System B XIV System A Mirrored CG Master Mirrored Mirrored CG Master Mirrored Vol Master Storage Pool Mirrored CG Slave XIV System D XIV System C Mirrored Vol Slave Mirrored Vol Slave Mirrored Vol Master Mirrored CG Slave Storage Pool Storage Pool Figure 3-3 Mirroring replication schemes Up to 16 targets can be referenced by a single system. A system can host replication sources and separate replication targets simultaneously. In a bi-directional configuration, an XIV system concurrently functions as the replication source (master) for one or more couplings, and as the replication target (slave) for other couplings. If production applications are eventually running at both sides, the applications at each site are independent from each other to ensure data consistency in case of a site failure. Figure 3-3 illustrates possible schemes for how mirroring can be configured. Chapter 3. Remote Mirroring 53 7759ch_Mirror.fm Draft Document for Review January 23, 2011 12:42 pm Figure 3-4 shows remote mirror connections as shown in the XIV GUI. Figure 3-4 XIV GUI showing the remote mirror connections 3.2.1 Peer designations and roles A peer (volume or consistency group) is assigned either a master or a slave role when the mirror is defined. By default, in a new mirror definition, the location of the master designates the primary system, and the slave designates the secondary system. A mirror must have exactly one primary and exactly one secondary. The actual function of the peer is determined based on the peer role (see below). Important: A single XIV can contain both master volumes and CGs (mirroring to another XIV) and slave volumes and CGs (mirroring from another XIV). Peers in a master role and peers in a slave role on the same XIV system must belong to different mirror couplings. 54 IBM XIV Storage System: Copy Services and Migration Draft Document for Review January 23, 2011 12:42 pm 7759ch_Mirror.fm The various mirroring role status options are: Designations: – Primary: the designation of the source peer, which is initially assigned the master role – Secondary: the designation of the target peer, which initially plays the slave role Role status: – Master: denotes the peer with the source data in a mirror coupling. Such peers serve host requests and are the source for synchronization updates to the slave peer. In synchronous mirroring, slave and master roles can be switched (switch_role command) if the status is synchronized). For both synchronous and asynchronous mirroring, the master can be changed (change_role command) to a slave if the status is inactive. – Slave: denotes the active target peer in a mirror. Such peers do not serve host requests and accept synchronization updates from a corresponding master. A slave LUN could be accessed in read-only mode by a host. In synchronous mirroring, slave and master roles can be switched (switch_role command) if the status is synchronized. For both synchronous and asynchronous mirroring, a slave can be changed (change_role command) to a master regardless of the synchronization state. As a master the LUN accepts write I/Os. The change_role and switch_role commands are relevant to disaster recovery situations and failover scenarios. Consistency group With mirroring (synchronous or asynchronous), the major reason for consistency groups is to handle a large number of mirror pairs as a group (mirrored volumes are consistent). Instead of dealing with many volume remote mirror pairs individually, consistency groups simplify the handling of many pairs considerably. Important: If your mirrored volumes are in a mirrored consistency group you cannot do mirroring operations like deactivate or change_role on a single volume basis. If you want to do this, you must remove the volume from the consistency group (refer to “Removing a volume from a mirrored consistency group” on page 110 or “Removing a volume from a mirrored consistency group” on page 137). Consistency groups also play an important role in the recovery process. If mirroring was suspended (for example, due to complete link failure), data on different slave volumes at the remote XIV are consistent. However, when the links are up again and resynchronization is started, data spread across several slave volumes is not consistent until the master state is synchronized. To preserve the consistent state of the slave volumes, the XIV system automatically creates a snapshot of each slave volume and keeps it until the remote mirror volume pair is synchronized (the snapshot is kept until all pairs are synchronized in order to enable restoration to the same consistent point in time). If the remote mirror pairs are in a consistency group, then the snapshot is taken for the whole group of slave volumes and the snapshots are preserved until all pairs are synchronized. Then the snapshot is deleted automatically. Chapter 3. Remote Mirroring 55 7759ch_Mirror.fm Draft Document for Review January 23, 2011 12:42 pm 3.2.2 Operational procedures Mirroring operations involve configuration, initialization, ongoing operation, handling of communication failures, and role switching activities. The following list defines the mirroring operation activities: Configuration Local and remote replication peers are defined by an administrator who specifies the master and slave peers roles. These peers can be volumes or consistency groups. The secondary peer provides a backup of the primary. Initialization Mirroring operations begin with a master volume that contains data and a formatted slave volume. The first step is to copy the data from the master volume (or CG) to the slave volume (or CG). This process is called initialization. Initialization is performed once in the lifetime of a mirror. After it is performed, both volumes or CGs are considered to be synchronized to a specific point in time. The completion of initialization marks the first point-in-time that a consistent master replica on the slave is available. Details of the process differ depending on the mirroring mode (synchronous or asynchronous). Refer to 4.5, “Synchronous mirror step-by-step scenario” on page 115, for synchronous mirroring and 5.6, “Detailed asynchronous mirroring process” on page 155, for asynchronous mirroring. Ongoing operation After the initialization process is complete, mirroring ensues. In synchronous mirroring, normal ongoing operation means that all data written to the primary volume or CG is first mirrored to the slave volume or CG. At any point in time, the master and slave volumes or CGs will be identical except for any unacknowledged (pending) writes. In asynchronous mirroring, ongoing operation means that data is written to the master volume or CG and then replicated on the slave volume or CG at specified intervals. Monitoring The XIV System effectively monitors the mirror activity and places events in the event log for error conditions. Alerts can be set up to notify the administrator of such conditions. You must have set up SNMP trap monitoring tools or e-mail notification to be informed about abnormal mirroring situations. Handling of communication failures From time to time the communication between the sites might break down. The master continues to serve host requests, yet mirroring will only resume once the link is restored. Events will be generated for link failures. Role switching (synchronous mirroring only) If required, mirror peer roles of slave and master can be switched. A role switching is always initiated at the master site. Usually, this is done for certain maintenance operations or because of a drill that tests the disaster recovery procedures. Role change In case of a disaster at the primary site, the master peer might fail. To allow read/write access to the volumes at the remote site, the volume’s role must be changed from slave to master. A role change only changes the role of the XIV volumes or CGs to which the command was addressed. Remote mirror peer volumes or CGs are not changed automatically. That is why changing roles on both mirror sides if mirroring is to be restored is imperative (if possible). 56 IBM XIV Storage System: Copy Services and Migration Draft Document for Review January 23, 2011 12:42 pm 7759ch_Mirror.fm 3.2.3 Mirroring status The status of a mirror is affected by a number of factors such as the links between the XIVs or the initialization state. Link status The link status reflects the connection from the master to the slave volume or CG. A link has a direction (from local site to remote or vice versa). A failed link or a failed secondary system both result in a link error status. The link state is one of the factors determining the mirror operational status. Link states are as follows: OK: link is up and functioning Error: link is down Figure 3-5 and Figure 3-6 depict how the link status is reflected in the XIV GUI, respectively. Figure 3-5 Link up Figure 3-6 Link down If there are several links (at least two) in one direction and one link fails, this usually does not affect mirroring as long as the bandwidth of the remaining link is high enough to keep up with the data traffic. Monitoring the link utilization The mirroring bandwidth of the links must be high enough to cope with the data traffic caused by the changes on the master volumes. During the planning phase, before setting up mirroring, monitor the write activity to the local volumes. The bandwidth of the links for mirroring must be as large as the peak write workload. Chapter 3. Remote Mirroring 57 7759ch_Mirror.fm Draft Document for Review January 23, 2011 12:42 pm After mirroring has been implemented, from time to time monitor the utilization of the links. The XIV statistics panels allow you to select targets to show the data traffic to remote XIV Systems, as shown in Figure 3-7. Figure 3-7 Monitoring link utilization Mirror operational status Mirror operational status is defined as either operational or non_operational. Mirroring is operational if: – – – – The activation state is active. The link is UP. Both peers have different roles (master or slave). The mirror is active. Mirroring is non_operational if: – The mirror is inactive. – The link is in an error state or deactivated (link down). Synchronous mirroring states Note: This section only applies to synchronous mirroring. The synchronization status reflects the consistency of the data between the master and slave volumes. Because the purpose of the remote mirroring feature is to ensure that the slave volumes are an identical copy of the master volumes, this status indicates whether this objective is currently being achieved. 58 IBM XIV Storage System: Copy Services and Migration 7759ch_Mirror.fm Draft Document for Review January 23, 2011 12:42 pm The following states or statuses are possible. Initializing The first step in remote mirroring is to create a copy of all the data from the master volume or CG to the slave volume or CG. During this initial copy phase, the status remains initializing. Synchronized (master volume or CG only)/consistent (slave volume or CG only) This status indicates that all data that has been written to the master volume or CG has also been written to the slave volume or CG. Ideally, the master and slave volumes or CGs must always be synchronized. However, this does not always indicate that the two volumes are absolutely identical in case of a disaster because there are situations when there might be a limited amount of data that was written to one volume, but that was not yet written to its peer volume. This means that the write operations have not yet been acknowledged. These are also known as pending writes or data in flight. Unsynchronized (master volume only)/inconsistent (slave volume only) After a volume or CG has completed the initializing stage and achieved the synchronized status it can become unsynchronized (master) or inconsistent (slave). This occurs when it is not known whether all the data that has been written to the master volume has also been written to the slave volume. This status can occur in the following cases: – The communications link is down and as a result certain data might have been written to the master volume, but was not yet written to the slave volume. – Secondary XIV is down. This is similar to communication link errors because in this state, the Primary XIV is updated, whereas the secondary is not. – Remote mirroring is deactivated. As a result, certain data might have been written to the master volume and not to the secondary volume. The XIV keeps track of the partitions that have been modified on the master volumes and when the link is operational again or the remote mirroring is reactivated. These changed partitions can be sent to the remote XIV and applied to the slave volumes there. Asynchronous mirroring states Note: This section only applies to asynchronous mirroring. The mirror states can be one of the following: Inactive: The synchronization process is disabled. It is possible to delete a mirror. Initializing: The initial copy is not done yet. Synchronization does not start until the initialization completes. When initialization is complete, the synchronization process is enabled. It is possible to run sync jobs and copy data between master and slave. The possible synchronization states are: – RPO_OK: Synchronization has completed within the specified sync job interval time (RPO). – RPO_Lagging: Synchronization has completed but took longer that the specified interval time (RPO). Chapter 3. Remote Mirroring 59 7759ch_Mirror.fm Draft Document for Review January 23, 2011 12:42 pm 3.3 XIV Remote Mirroring usage Remote Mirroring solutions can be used to address multiple types of failures and planned outages, from events affecting a single XIV system or its components, to events affecting an entire data center or campus, or events affecting an entire geographical region. When the production XIV system and the disaster recovery (DR) XIV system are separated by increasing distance, disaster recovery protection for more levels of failures is possible, as illustrated in Figure 3-8. A global distance disaster recovery solution protects from single-system failures, local disasters, and regional disasters. Remote Mirroring Single System Failure • Component failures • Single system failures High Availability Local Disaster • Terrorist Attacks • Human Error • HVAC failures • Power failures • Building Fire • Architectural failures • Planned Maintenance Regional Disasters • Electric grid failures • Natural disasters - Floods - Hurricanes - Earthquakes Metro Distance Recovery Global Distance Recovery IBM System StorageTM © 2009 IBM Corporation 3 Figure 3-8 Disaster recovery protection levels Several configurations are possible: Single-site high-availability XIV Remote Mirroring configuration Protection for the event of a failure or planned outage of an XIV system (single-system failure) can be provided by a zero-distance high-availability (HA) solution including another XIV system in the same location (zero distance). Typical usage of this configuration is an XIV synchronous mirroring solution that is part of a high-availability clustering solution including both servers and XIV storage systems. Figure 3-9 shows a single-site high-availability configuration (where both XIV systems are in the same data center). Figure 3-9 Single site HA configuration 60 IBM XIV Storage System: Copy Services and Migration Draft Document for Review January 23, 2011 12:42 pm 7759ch_Mirror.fm Metro region XIV Remote Mirroring configuration Protection for the event of a failure or planned outage of an entire location (local disaster) can be provided by a metro distance disaster recovery solution, including another XIV system in a different location within a metro region. The two XIV systems may be in different buildings on a corporate campus or in different buildings within the same city (typically up to approximately 100 km apart). Typical usage of this configuration is an XIV synchronous mirroring solution. Figure 3-10 shows a metro region disaster recovery configuration. Figure 3-10 Metro region disaster recovery configuration Out-of-region XIV Remote Mirroring configuration Protection for the event of a failure or planned outage of an entire geographic region (regional disaster) can be provided by a global distance disaster recovery solution including another XIV system in a different location outside the metro region. (The two locations may be separated by up to a global distance.) Typical usage of this configuration is an XIV asynchronous mirroring solution. Figure 3-11 shows an out-of-region disaster recovery configuration. Figure 3-11 Out-of-region disaster recovery configuration Chapter 3. Remote Mirroring 61 7759ch_Mirror.fm Draft Document for Review January 23, 2011 12:42 pm Metro region plus out-of-region XIV mirroring configuration Certain volumes may be protected by a metro distance disaster recovery configuration, and other volumes may be protected by a global distance disaster recovery configuration, as shown in the configuration in Figure 3-12. Typical usage of this configuration is an XIV synchronous Mirroring solution for a set of volumes with a requirement for zero RPO, and an XIV asynchronous mirroring solution for a set of volumes with a requirement for a low, but non-zero RPO. Figure 3-12 shows a metro region plus out-of-region configuration. Figure 3-12 Metro region plus out-of-region configuration Using snapshots Snapshots can be used with Remote Mirroring to provide copies of production data for business or IT purposes. Moreover, when used with Remote Mirroring, snapshots provide protection against data corruption. 62 IBM XIV Storage System: Copy Services and Migration 7759ch_Mirror.fm Draft Document for Review January 23, 2011 12:42 pm Like any continuous or near-continuous remote mirroring solution, XIV Remote Mirroring cannot protect against software data corruption because the corrupted data will be copied as part of the remote mirroring solution. However, the XIV snapshot function provides a point-in-time image that may be used for rapid restore in the event of software data corruption (that occurred after the snapshot was taken), and XIV snapshot may be used in combination with XIV Remote Mirroring, as illustrated in Figure 3-13. Remote Mirroring Point in Time Copy Local Disaster Data Corruption Single System Failure • Component failures • Single system failures Point In Time Disk Backup, Extra Copies High Availability • • • • • • • Regional Disasters Terrorist Attacks Human Error HVAC failures Power failures Building Fire Architectural failures Planned Maintenance • Electric grid failures • Natural disasters - Floods - Hurricanes - Earthquakes Metro Distance Recovery Global Distance Recovery IBMS stemStorageTM 8 Figure 3-13 Combining snapshots with Remote Mirroring Note that recovery using a snapshot warrants deletion and recreation of the mirror. XIV snapshot (within a single XIV system) Protection for the event of software data corruption can be provided by a point-in-time backup solution using the XIV snapshot function within the XIV system that contains the production volumes. Figure 3-14 shows a single-system point-in-time online backup configuration. IBM System StorageTM © 2009 IBM Corporation 9 Figure 3-14 Point-in-time online backup configuration XIV local snapshot plus Remote Mirroring configuration An XIV snapshot of the production (local) volume may be used in addition to XIV Remote Mirroring of the production volume when protection from logical data corruption is required in addition to protection against failures and disasters. The additional XIV snapshot of the production volume provides a quick restore to recover from data corruption. An additional Snapshot of the production (local) volume may also be used for other business or IT purposes (for example, reporting, data mining, development and test, and so on). Chapter 3. Remote Mirroring 63 7759ch_Mirror.fm Draft Document for Review January 23, 2011 12:42 pm Figure 3-15 shows an XIV local snapshot plus Remote Mirroring configuration. Figure 3-15 Local snapshot plus Remote Mirroring configuration XIV remote snapshot plus Remote Mirroring configuration An XIV snapshot of the consistent replicated data at the remote site may be used in addition to XIV Remote Mirroring to provide an additional consistent copy of data that can be used for business purposes such as data mining, reporting, and for IT purposes, such as remote backup to tape or development, test, and quality assurance. Figure 3-16 shows an XIV remote snapshot plus Remote Mirroring configuration. Figure 3-16 XIV remote snapshot plus Remote Mirroring configuration 3.4 XIV Remote Mirroring actions These XIV Remote Mirroring actions are the fundamental building blocks of XIV Remote Mirroring solutions and usage scenarios. 3.4.1 Defining the XIV mirroring target In order to connect two XIV systems for remote mirroring, each system must be defined to be a mirroring target of the other. An XIV mirroring target is an XIV system with volumes that receive data copied through XIV remote mirroring. Defining an XIV mirroring target for an XIV system simply involves giving the target a name and specifying whether Fibre Channel or iSCSI protocol will be used to copy the data. For a practical illustration refer to 3.11.2, “Remote mirror target configuration” on page 96. 64 IBM XIV Storage System: Copy Services and Migration Draft Document for Review January 23, 2011 12:42 pm 7759ch_Mirror.fm XIV Remote Mirroring copies data from a peer on one XIV system to a peer on another XIV system (the mirroring target system). Whereas the basic underlying mirroring relationship is a one-to-one relationship between two peers, XIV systems may be connected in several different ways: XIV target configuration: one-to-one The most typical XIV Remote Mirroring configuration is a one-to-one relationship between a local XIV system (production system) and a remote XIV system (DR system), as shown in Figure 3-17. This configuration is typical where there is a single production site and a single disaster recovery (DR) site. Target S M Figure 3-17 One-to-one target configuration During normal remote mirroring operation, one XIV system (at the DR site) will be active as a mirroring target. The other XIV system (at the local production site) will be active as a mirroring target only when it becomes available again after an outage and switch of production to the DR site. Changes made while production was running at the DR site are copied back to the original production site, as shown in Figure 3-18. Target S M Figure 3-18 Copying changes back to production In a configuration with two identically provisioned sites, production may be periodically switched from one site to another as part of normal operation, and the XIV system that is the active mirroring target will be switched at the same time. (The mirror_switch_roles command allows for switching roles in both synchronous and asynchronous mirroring. Note that there are special requirements for doing so with asynchronous mirroring.) Chapter 3. Remote Mirroring 65 7759ch_Mirror.fm Draft Document for Review January 23, 2011 12:42 pm XIV target configuration: synchronous and asynchronous one-to-one XIV supports both synchronous and asynchronous mirroring (for different peers) on the same XIV system, so a single local XIV system could have certain volumes synchronously mirrored to a remote XIV system, whereas other peers are asynchronously mirrored to the same remote XIV system as shown in Figure 3-19. Highly response-time-sensitive volumes could be asynchronously mirrored and less response-time-sensitive volumes could be synchronously mirrored to a single remote XIV. Figure 3-19 Synchronous and asynchronous peers XIV target configuration: fan-out A single local (production) XIV system may be connected to two remote (DR) XIV systems in a fan-out configuration, as shown in Figure 3-20. Both remote XIV systems could be at the same location, or each of the two target systems could be at a different location. Certain volumes on the local XIV system are copied to one remote XIV system, and other volumes on the same local XIV system are copied to a different remote XIV system. This configuration may be used when each XIV system at the DR site has less available capacity than the XIV system at the local site. Target Target Figure 3-20 Fan-out target configuration 66 IBM XIV Storage System: Copy Services and Migration 7759ch_Mirror.fm Draft Document for Review January 23, 2011 12:42 pm XIV target configuration: synchronous and asynchronous fan-out XIV supports both synchronous and asynchronous mirroring (for different peers) on the same XIV system, so a single local XIV system could have certain peers synchronously mirrored to a remote XIV system at a metro distance, whereas other peers are asynchronously mirrored to a remote XIV system at a global distance, as shown in Figure 3-21. This configuration may be used when higher priority data is synchronously mirrored to another XIV system within the metro area, and lower priority data is asynchronously mirrored to an XIV system within or outside the metro area. Target Target Figure 3-21 Synchronous and asynchronous fan-out XIV target configuration: fan-in Two (or more) local XIV systems may have peers mirrored to a single remote XIV system in a fan-in configuration, as shown in Figure 3-22. This configuration must be evaluated carefully and used with caution because it includes the risk of overloading the single remote XIV system. The performance capability of the single remote XIV system must be carefully reviewed before implementing a fan-in configuration. This configuration may be used in situations where there is a single disaster recovery data center supporting multiple production data centers, or when multiple XIV systems are mirrored to a single XIV system at a service provider. Target Figure 3-22 Fan-in configuration Chapter 3. Remote Mirroring 67 7759ch_Mirror.fm Draft Document for Review January 23, 2011 12:42 pm XIV target configuration: bi-directional Two different XIV systems may have different volumes mirrored in a bi-directional configuration, as shown in Figure 3-23. This configuration may be used for situations where there are two active production sites and each site provides a DR solution for the other. Each XIV system is active as a production system for certain peers and as a mirroring target for other peers. S Target Target M Figure 3-23 Bi-directional configuration 3.4.2 Setting the maximum initialization and synchronization rates The XIV system allows a user-specifiable maximum rate (in MBps) for remote mirroring coupling initialization, and a different user-specifiable maximum rate for re-synchronization. The initialization rate and resynchronization rate are specified for each mirroring target using the XCLI command target_config_sync_rates. As such, if different rates are required for different volumes for a single remote target XIV system, multiple logical targets may be defined for the single physical remote XIV system. The actual effective initialization or synchronization rate will also be dependent on the number and speed of connections between the XIV systems. The maximum initialization rate must be less than or equal to the maximum sync job rate (asynchronous mirroring only), which must be less than or equal to the maximum resynchronization rate. The defaults are: Maximum initialization rate: 100 MBps Maximum sync job: 300 MBps Maximum resync rate: 300 MBps 68 IBM XIV Storage System: Copy Services and Migration 7759ch_Mirror.fm Draft Document for Review January 23, 2011 12:42 pm 3.4.3 Connecting XIV mirroring ports After defining remote mirroring targets, one-to-one connections must be made between ports on each XIV system. For an illustration of these actions using the GUI or the XCLI, refer to 3.11, “Using the GUI or XCLI for Remote Mirroring actions” on page 91. FC ports For XIV Fibre Channel (FC) ports, connections are unidirectional—from an initiator port (port 4 is configured as a Fibre Channel initiator by default) on the source XIV system to a target port (typically port 2) on the target XIV system. Use a minimum of four connections (two connections in each direction, from ports in two different modules, using a total of eight ports) to provide availability protection. Refer to Figure 3-24. 9 8 7 6 Data, 5 , Mgt 4 Data, , FC SAN FC SAN Mgt 9 8 7 6 Data, 5 , Mgt 4 Data, , Mgt Figure 3-24 Connecting XIV mirroring ports (FC connections) In Figure 3-24, the solid lines represent mirroring connections used during normal operation (the mirroring target system is on the right), and the dotted lines represent mirroring connections used when production is running at the disaster recovery site and changes are being copied back to the original production site (mirroring target is on the left.) XIV Fibre Channel ports may be easily and dynamically configured as initiator or target ports. iSCSI ports For iSCSI ports, connections are bi-directional. Use a minimum of two connections (with each of these ports in a different module) using a total of four ports to provide availability protection. In Figure 3-25 on page 70, the solid lines represent data flow during normal operation and the dotted lines represent data flow when production is running at the disaster recovery site and changes are being copied back to the original production site. Chapter 3. Remote Mirroring 69 7759ch_Mirror.fm Draft Document for Review January 23, 2011 12:42 pm 9 8 7 Data, , DMatgat , , Mgt IP Network IP Network 9 8 7 Data, , DMatgat , , Mgt Figure 3-25 Connecting XIV mirroring ports (iSCSI connections) Note: For asynchronous mirroring over iSCSI links, a reliable, dedicated network must be available. It requires consistent network bandwidth and a non-shared link. 3.4.4 Defining the XIV mirror coupling and peers: volume After the mirroring targets have been defined, a coupling or mirror may be defined, creating a mirroring relationship between two peers. Before discussing actions involved in creating mirroring pairs, we must introduce the basic XIV concepts used in the discussion. Storage pools, volumes, and consistency groups An XIV storage pool is a purely administrative construct used to manage XIV logical and physical capacity allocation. An XIV volume is a logical volume that is presented to an external server as a logical unit number (LUN). An XIV volume is allocated from logical and physical capacity within a single XIV storage pool. The physical capacity on which data for an XIV volume is stored is always spread across all available disk drives in the XIV system The XIV system is data aware. It monitors and reports the amount of physical data written to a logical volume and does not copy any part of the volume that has not been used yet to store any actual data. 70 IBM XIV Storage System: Copy Services and Migration 7759ch_Mirror.fm Draft Document for Review January 23, 2011 12:42 pm In Figure 3-26, seven logical volumes have been allocated from a storage pool with 40 TB of capacity. Remember that the capacity assigned to a storage pool and its volumes is spread across all available physical disk drives in the XIV system. 40TB Storage Pool Figure 3-26 Storage pool with seven volumes With Remote Mirroring, the concept of consistency group represents a logical container for a group of volumes, allowing them to be managed as a single unit. Instead of dealing with many volume remote mirror pairs individually, consistency groups simplify the handling of many pairs considerably. An XIV consistency group exists within the boundary of an XIV storage pool in a single XIV system (in other words, you can have different CGs in different storage pools within an XIV storage system, but a CG cannot span multiple storage pools). All volumes in a particular consistency group are in the same XIV storage pool. In Figure 3-27, an XIV storage pool with 40 TB capacity contains seven logical volumes. One consistency group has been defined for the XIV storage pool, but no volumes have been added to or created in the consistency group. 40TB Storage Pool CG Figure 3-27 Consistency group defined Volumes may be easily and dynamically (that is, without stopping mirroring or application I/Os) added to a consistency group. Chapter 3. Remote Mirroring 71 7759ch_Mirror.fm Draft Document for Review January 23, 2011 12:42 pm In Figure 3-28, five of the seven existing volumes in the storage pool have been added to the consistency group in the storage pool. One or more additional volumes may be dynamically added to the consistency group at any time. Also, volumes may be dynamically moved from another storage pool to the storage pool containing the consistency group, and then added to the consistency group. 40TB Storage Pool CG Figure 3-28 Volumes added to the consistency group Volumes may also be easily and dynamically removed from an XIV consistency group. In Figure 3-29, one of the five volumes has been removed from the consistency group, leaving four volumes remaining in the consistency group. It is also possible to remove all volumes from a consistency group. 40TB Storage Pool CG Figure 3-29 Volume removed from the consistency group Dependent write consistency XIV Remote Mirroring provides dependent write consistency, preserving the order of dependent writes in the mirrored data. Dependent write consistency is also referred to as crash consistency or power-loss consistency, and applications and databases are developed to be able to perform a fast restart from volumes that are consistent in terms of dependent writes. 72 IBM XIV Storage System: Copy Services and Migration 7759ch_Mirror.fm Draft Document for Review January 23, 2011 12:42 pm Dependent writes: normal operation Applications or databases often manage dependent write consistency using a 3-step process such as the sequence of three writes shown in Figure 3-30. Even when the writes are directed at different logical volumes, the application ensures that the writes are committed in order during normal operation. 2) Update Record DB 1) Intend to update DB Log 3) DB updated Figure 3-30 Dependent writes: normal operation Dependent writes: failure scenario In the event of a failure, applications or databases manage dependent writes, as shown in Figure 3-31. If the database record is not updated (step 2), the application does not allow DB updated (step 3) to be written to the log. x 2) Update Record DB 1) Intend to update DB 3) DB updated Log Figure 3-31 Dependent writes: failure scenario Just as the application or database manages dependent write consistency for the production volumes, the XIV system must manage dependent write consistency for the mirror target volumes. Chapter 3. Remote Mirroring 73 7759ch_Mirror.fm Draft Document for Review January 23, 2011 12:42 pm If multiple volumes will have dependent write activity, they may be put into a single storage pool in the XIV system and then added to an XIV consistency group to be managed as a single unit for remote mirroring. Any mirroring actions are taken simultaneously against the mirrored consistency group as a whole, preserving dependent write consistency. Mirroring actions cannot be taken against an individual volume pair while it is part of a mirrored CG. However, an individual volume pair may be dynamically removed from the mirrored consistency group. XIV also supports creation of application-consistent data in the remote mirroring target volumes, as discussed 3.5.4, “Creating application-consistent data at both local and the remote sites” on page 87. Defining mirror coupling and peers After the remote mirroring targets have been defined, a coupling or mirror may be defined, creating a mirroring relationship between two peers. The two peers in the mirror coupling may be either two volumes (volume peers) or two consistency groups (CG peers), as shown in Figure 3-32. SITE 1 SITE 2 Production DR Test/Recovery Servers M Volume Coupling/Mirror Defined Volume Coupling/Mirror Defined Volume Coupling/Mirror Defined P/M CG Coupling/Mirror Defined M Volume Peer Designated Primary Consistency Group Peer Primary Designation (P) Master Role (M) M S S Volume Peer Designated Secondary S S/S Consistency Group Peer Secondary Designation (S) Slave Role (S) Figure 3-32 Defining mirror coupling Each of the two peers in the mirroring relationship is given a designation and a role. The designation indicates the original or normal function of each of the two peers—either primary or secondary. The peer designation does not change with operational actions or commands. (If necessary, the peer designation may be changed by explicit user command or action.) The role of a peer indicates its current (perhaps temporary) operational function (either master or slave). The operational role of a peer may change as the result of user commands or actions. Peer roles typically change during DR testing or a true disaster recovery and production site switch. When a mirror coupling is created, the first peer specified (for example, the volumes or CG at site 1, as shown in Figure 3-32) is the source for data to be replicated to the target system, so it is given the primary designation and the master role. The second peer specified (or automatically created by the XIV system) when the mirroring coupling is created is the target of data replication, so it is given the secondary designation and the slave role. 74 IBM XIV Storage System: Copy Services and Migration 7759ch_Mirror.fm Draft Document for Review January 23, 2011 12:42 pm When a mirror coupling relationship is first created, no data movement occurs. 3.4.5 Activating an XIV mirror coupling When an XIV mirror coupling is first activated, all actual data existing on the master is copied to the slave. This process is referred to as initialization. XIV Remote Mirroring copies volume identification information (that is, physical volume ID/PVID) and any actual data on the volumes. Space that has not been used is not copied. Initialization may take a significant amount of time if a large amount of data exists on the master when a mirror coupling is activated. As discussed earlier, the rate for this initial copy of data can be specified by the user. The speed of this initial copy of data will also be affected by the connectivity and bandwidth (number of links and link speed) between the XIV primary and secondary systems. As an option to remove the impact of distance on initialization, XIV mirroring may be initialized with the target system installed locally, and the target system may be disconnected after initialization, shipped to the remote site and reconnected, and mirroring reactivated. If a remote mirroring configuration is set up when a volume is first created (that is, before any application data has been written to the volume), initialization will be very quick. When an XIV consistency group mirror coupling is created, the CG must be empty so there is no data movement and the initialization process is extremely fast. The mirror coupling status at the end of initialization differs for XIV synchronous mirroring and XIV asynchronous mirroring (see “Synchronous mirroring states” on page 58 and “Storage pools, volumes, and consistency groups” on page 70), but in either case, when initialization is complete, a consistent set of data exists at the remote site. See Figure 3-33. SITE 1 SITE 2 Production DR Test/Recovery Servers M Volume Coupling/Mirror Active Volume Coupling/Mirror Active Volume Coupling/Mirror Active P/M CG Coupling/Mirror Active M Volume Peer Designated Primary Consistency Group Peer Primary Designation (P) Master Role (M) M S S Volume Peer Designated Secondary S S/S Consistency Group Peer Secondary Designation (S) Slave Role (S) Figure 3-33 Active mirror coupling 3.4.6 Adding volume mirror coupling to consistency group mirror coupling Once a volume mirror coupling has completed initialization, the master volume may be added to a mirrored consistency group in the same storage pool (note that with each mirroring type Chapter 3. Remote Mirroring 75 7759ch_Mirror.fm Draft Document for Review January 23, 2011 12:42 pm there are certain additional constraints, such as same role, target, schedule, and so on). The slave volume is automatically added to the consistency group on the remote XIV system. In Figure 3-34, three active volume couplings that have completed initialization have been moved into the active mirrored consistency group. SITE 1 SITE 2 Production DR Test/Recovery Servers P/M Consistency Group Peer Primary Designation (P) Master Role (M) S/S CG Coupling/Mirror Active Consistency Group Peer Secondary Designation (S) Slave Role (S) Figure 3-34 Consistency group mirror coupling One or more additional mirrored volumes may be added to a mirrored consistency group at a later time in the same way. It is also important to realize that in a CG all volumes have the same role. Also, consistency groups are handled as a single entity and, for example, in asynchronous mirroring, a delay in replicating a single volume affects the status of the entire CG. 3.4.7 Normal operation: volume mirror coupling and CG mirror coupling XIV mirroring normal operation begins after initialization has completed successfully and all actual data on the master volume at the time of activation has been copied to the slave volume. During normal operation, a consistent set of data is available on the slave volumes. Normal operation, statuses, and reporting differ for XIV synchronous mirroring and XIV asynchronous mirroring. Refer to Chapter 4, “Synchronous Remote Mirroring” on page 103, and Chapter 5, “Asynchronous remote mirroring” on page 127, for details. 76 IBM XIV Storage System: Copy Services and Migration 7759ch_Mirror.fm Draft Document for Review January 23, 2011 12:42 pm During normal operation, a single XIV system may contain one or more mirrors of volume peers as well as one or more mirrors of CG peers, as shown in Figure 3-35. Site 1 Site 2 Production Servers DR Test/Recovery Servers Target XIV 2 XIV 1 Volume Peer Designated Primary Master Role M Volume Coupling/Mirror Active Volume Peer Designated Secondary Slave Role S CG Coupling/Mirror CG Peer Designated Primary Master Role CG Peer Designated Secondary Slave Role Active M S Figure 3-35 Normal operations: volume mirror coupling and CG mirror coupling 3.4.8 Deactivating XIV mirror coupling: change recording An XIV mirror coupling may be deactivated by a user command. In this case, the mirror transitions to standby mode, as shown in Figure 3-36. Site 1 Site 2 Production Servers DR Test/Recovery Servers Volume Peer Designated Primary Master Role CG Peer Designated Primary Master Role M Volume Coupling/Mirror Standby Volume Peer Designated Secondary Master Role S CG Coupling/Mirror Standby M S CG Peer Designated Secondary Master Role Figure 3-36 Deactivating XIV mirror coupling: change recording During standby mode, a consistent set of data is available at the remote site (site 2, in our example). The currency of the consistent data ages in comparison to the master volumes, and the gap increases while mirroring is in standby mode. Chapter 3. Remote Mirroring 77 7759ch_Mirror.fm Draft Document for Review January 23, 2011 12:42 pm In synchronous mirroring, during standby mode, XIV metadata is used to note which parts of a master volume have changed but have not yet been replicated to the slave volume (because mirroring is not currently active). The actual changed data is not retained in cache, so there is no danger of exhausting cache while mirroring is in standby mode. When synchronous mirroring is reactivated by a user command or communication is restored, the metadata is used to resynchronize changes from the master volumes to the slave volumes. XIV mirroring records changes for master volumes only. If it is desirable to record changes to both peer volumes while mirroring is in standby mode, the slave volume must be changed to a master volume. Note that in asynchronous mirroring, metadata is not used and the comparison between the most_recent and last_replicated snapshots indicates the data that must be replicated. Planned deactivation of XIV remote mirroring may be done to suspend remote mirroring during a planned network outage or DR test, or to reduce bandwidth during a period of peak load. 3.4.9 Changing role of slave volume or CG When XIV mirroring is active, the slave volume or CG is locked and write access is prohibited. To allow write access to a slave peer, in case of failure or unavailability of the master, the slave volume role must be changed to the master role. Refer to Figure 3-37. Site 1 Site 2 Production Servers Volume Peer Designated Primary Master Role CG Peer Designated Primary Master Role DR Test/Recovery Servers M Volume Coupling/Mirror Standby M CG Coupling/Mirror Standby M M Volume Peer Designated Secondary Master Role CG Peer Designated Secondary Master Role Figure 3-37 Changing role of slave volume or CG Changing the role of a volume from slave to master allows the volume to be accessed. In synchronous mirroring, changing the role also starts metadata recording for any changes made to the volume. This metadata may be used for resynchronization (if the new master volume remains the master when remote mirroring is reactivated). In asynchronous mirroring, changing a peer's role automatically reverts the peer to its last_replicated snapshot. When mirroring is in standby mode, both volumes may have the master role, as shown in the following section. When changing roles, both peer roles must be changed if possible (the 78 IBM XIV Storage System: Copy Services and Migration 7759ch_Mirror.fm Draft Document for Review January 23, 2011 12:42 pm exception being a site disaster or complete system failure). Changing the role of a slave volume or CG is typical during a true disaster recovery and production site switch. 3.4.10 Changing role of master volume or CG During a true disaster recovery, to resume production at the remote site a slave must have its role changed to the master role. In synchronous mirroring, changing a peer role from master to slave allows the slave to accept mirrored data from the master and cause deletion of metadata that was used to record any changes while the peer had the master role. In asynchronous mirroring, changing a peer's role automatically reverts the peer to its last_replicated snapshot. If at any point in time the command is run on the slave (changing the slave to a master), the former master must first be changed to the slave role (upon recovery of the primary site) before changing the secondary role back from master to slave. Both peers may temporarily have the master role when a failure at site 1 has resulted in a true disaster recovery production site switch from site 1 to site 2. When site 1 becomes available again and there is a requirement to switch production back to site 1, the production changes made to the volumes at site 2 must be resynchronized to the volumes at site 1. In order to do this, the peers at site 1 must change their role from master to slave, as shown in Figure 3-38. Site 1 Site 2 Production Servers DR Test/Recovery Servers Volume Peer Designated Primary Slave Role CG Peer Designated Primary Slave Role Volume Coupling/Mirror S Standby M CG Coupling/Mirror Standby S M Volume Peer Designated Secondary Master Role CG Peer Designated Secondary Master Role Figure 3-38 Changing role to slave volume and CG Chapter 3. Remote Mirroring 79 7759ch_Mirror.fm Draft Document for Review January 23, 2011 12:42 pm 3.4.11 Mirror reactivation and resynchronization: normal direction In synchronous mirroring, when mirroring has been in standby mode, any changes to volumes with the master role were recorded in metadata. Then when mirroring is reactivated, changes recorded in metadata for the current master volumes are resynchronized to the current slave volumes. Refer to Figure 3-39. Site 1 Site 2 Production Servers DR Test/Recovery Servers Target XIV 2 XIV 1 Volume Peer Designated Primary Master Role CG Peer Designated Primary Master Role M Volume Coupling/Mirror Active Volume Peer Designated Secondary Slave Role S CG Coupling/Mirror Active M S CG Peer Designated Secondary Slave Role Figure 3-39 Mirror reactivation and resynchronization: normal direction The rate for this resynchronization of changes can be specified by the user in MBps using the XCLI target_config_sync_rates command. When XIV mirroring is reactivated in the normal direction, changes recorded at the primary peers are copied to the secondary peers. Examples of mirror deactivation and reactivation in the same direction are: Remote mirroring is temporarily inactivated due to communication failure and then automatically reactivated by the XIV system when communication is restored. Remote mirroring is temporarily inactivated to create an extra copy of consistent data at the secondary. Remote mirroring is temporarily inactivated via user action during peak load in an environment with constrained network bandwidth. 80 IBM XIV Storage System: Copy Services and Migration 7759ch_Mirror.fm Draft Document for Review January 23, 2011 12:42 pm 3.4.12 Reactivation, resynchronization, and reverse direction When XIV mirroring is reactivated in the reverse direction, as shown in the previous section, changes recorded at the secondary peers are copied to the primary peers. The primary peers must change the role from master to slave before mirroring can be reactivated in the reverse direction. See Figure 3-40. SITE 1 SITE 2 Production Servers DR Test/Recovery Servers Remote Target Volume Peer Designated Primary Slave Role CG Peer Designated Primary Slave Role Volume Coupling/Mirror Active S Volume Peer Designated Secondary Master Role M CG Coupling/Mirror Active S M CG Peer Designated Secondary Master Role Figure 3-40 Reactivation and resynchronization A typical usage example of this scenario is when returning to the primary site after a true disaster recovery with production switched to the secondary peers at the remote site. 3.4.13 Switching roles of mirrored volumes or CGs When mirroring is active and synchronized (consistent), the master and slave roles of mirrored volumes or consistency groups may be switched simultaneously. Role switching is typical for returning mirroring to the normal direction after changes have been mirrored in the reverse direction after a production site switch. Role switching is also typical for any planned production site switch. Host server write activity and replication activity must be paused very briefly before and during the role switch. 3.4.14 Adding a mirrored volume to a mirrored consistency group First make sure that the following constraints are respected: Volume and CG must be associated with the same pool Volume is not already part of a CG Command must be issued only on the master CG Command must not be run during initialization of volume or CG Chapter 3. Remote Mirroring 81 7759ch_Mirror.fm Draft Document for Review January 23, 2011 12:42 pm The volume mirroring settings must be identical to those of the CG: – – – – – Mirroring type Mirroring role Mirroring status Mirroring target Target pool Both volume synchronization status and mirrored CG synchronization status is either RPO OK for asynchronous mirroring or Synchronized for synchronous mirroring. To add a volume mirror to a mirrored consistency group (for instance, when an application needs additional capacity): 1. Define XIV volume mirror coupling from the additional master volume at XIV 1 to the slave volume at XIV 2. 2. Activate XIV remote mirroring from the additional master volume at XIV 1 to the slave volume at XIV 2. 3. Monitor initialization until it is complete. Volume coupling initialization must be complete before the coupling can be moved to a mirrored CG. 4. Add the additional master volume at XIV 1 to the master consistency group at XIV 1. (The additional slave volume at XIV 2 will be automatically added to the slave consistency group at XIV 2.) In Figure 3-41, one volume has been added to the mirrored XIV consistency group. The volumes must be in a volume peer relationship and must have completed initialization SITE 1 SITE 2 Production DR Test/Recovery Servers M/P S/S CG Coupling/Mirror Active Consistency Group Peer Primary Designation (P) Master Role (M) Consistency Group Peer Secondary Designation (S) Slave Role (S) Figure 3-41 Adding a mirrored volume to a mirrored consistency group Refer also to 3.4.4, “Defining the XIV mirror coupling and peers: volume” on page 70, and 3.4.6, “Adding volume mirror coupling to consistency group mirror coupling” on page 75, for additional details. 82 IBM XIV Storage System: Copy Services and Migration 7759ch_Mirror.fm Draft Document for Review January 23, 2011 12:42 pm 3.4.15 Removing a mirrored volume from a mirrored consistency group If a volume in a mirrored consistency group is no longer being used by an application or if actions must be taken against the individual volume, it can be dynamically removed from the consistency group. To remove a volume mirror from a mirrored consistency group: 1. Remove the master volume from the master consistency group at site 1. (The slave volume at site 2 will be automatically removed from the slave CG.) 2. When a mirrored volume is removed from a mirrored CG, it retains its mirroring status and settings and continues remote mirroring until deactivated. In Figure 3-42, one volume has been removed from the example mirrored XIV consistency group with three volumes. After being removed from the mirrored CG, a volume will continue to be mirrored as part of a volume peer relationship. Site 1 Site 2 Production DR Test/Recovery Servers P/M P/M P/M Consistency Group Peer Primary Designation (P) Master Role (M) Volume Coupling/Mirror Active Volume Coupling/Mirror Active CG Coupling/Mirror Active S/S S/S S/S Consistency Group Peer Secondary Designation (S) Slave Role (S) Figure 3-42 Removing a mirrored volume from a mirrored CG Chapter 3. Remote Mirroring 83 7759ch_Mirror.fm Draft Document for Review January 23, 2011 12:42 pm 3.4.16 Deleting mirror coupling definitions When an XIV mirror coupling is deleted, all metadata and mirroring definitions are deleted, and the peers do not have any relationship at all (Figure 3-43). However, any volumes and consistency groups mirroring snapshots remain on the local and remote XIV systems. In order to restart XIV mirroring, a full copy of data is required. Site 1 Production Servers Site 2 DR Test/Recovery Servers Figure 3-43 Deleting mirror coupling definitions Typical usage of mirror deletion is a one-time data migration using remote mirroring. This includes deleting the XIV mirror couplings after the migration is complete. 84 IBM XIV Storage System: Copy Services and Migration 7759ch_Mirror.fm Draft Document for Review January 23, 2011 12:42 pm 3.5 Best practice usage scenarios The following best practice usage scenarios begin with the normal operation remote mirroring environment shown in Figure 3-44. Site 1 Site 2 Production Servers DR Test/Recovery Servers Target XIV 2 XIV 1 Volume Peer Designated Primary Master Role CG Peer Designated Primary Master Role M Volume Coupling/Mirror Active Volume Peer Designated Secondary Slave Role S CG Coupling/Mirror CG Peer Designated Secondary Slave Role Active M S Figure 3-44 Remote Mirroring environment for scenarios 3.5.1 Failure at primary site: switch production to secondary This scenario begins with normal operation of XIV remote mirroring from XIV 1 to XIV 2, followed by a failure at XIV 1 with the assumption that the data already existing on the XIV system at XIV 1 will be available for resynchronization when XIV 1 is repaired and returned to operation. 1. XIV remote mirroring may have been deactivated by the failure. 2. Change the role of the peer at XIV 2 from slave to master. This allows the peer to be accessed for writes from a host server, and also causes recording of any changes in metadata for synchronous mirroring. For asynchronous mirroring, changing the role from slave to master causes the last replicated snapshot to be restored to the volume. Now both XIV 1 and XIV 2 peers have the master role. 3. Map the master (secondary) peers at XIV 2 to the DR servers. 4. Bring the XIV 2 peers (now with the master role) online to the DR servers to begin production workload at XIV 2. 5. When the failure at XIV 1 has been corrected and XIV 1 is available, deactivate mirrors at XIV 1 if they are not already inactive. 6. Unmap XIV 1 peers from servers if necessary. 7. Change the role of the peer at XIV 1 from master to slave. 8. Activate remote mirroring from the master peers at XIV 2 to the slave peers at XIV 1. This starts resynchronization of production changes from XIV 2 to XIV 1. 9. Monitor the progress to ensure that resynchronization is complete. Chapter 3. Remote Mirroring 85 7759ch_Mirror.fm Draft Document for Review January 23, 2011 12:42 pm 10.Quiesce production applications at XIV 2 to ensure that application-consistent data is copied to XIV 1. 11.Unmap master peers at XIV 2 from DR servers. 12.For asynchronous mirroring, monitor completion of sync job and change the replication interval to never. 13.Monitor to ensure that no more data is flowing from XIV 2 to XIV 1. 14.Switch roles of master and slave. XIV 1 peers now have the master role and XIV 2 peers now have the slave role. 15.For asynchronous mirroring, change the replication schedule to the desired interval. 16.Map master peers at XIV 1 to the production servers. 17.Bring master peers online to XIV 1 production servers. 3.5.2 Complete destruction of XIV 1 This scenario begins with normal operation of XIV remote mirroring from XIV 1 to XIV 2, followed by complete destruction of XIV 1. 1. Change the role of the peer at XIV 2 from slave to master. This allows the peer to be accessed for writes from a host server. 2. Map the new master peer at XIV 2 to the DR servers at XIV 2. 3. Bring the XIV 2 peer (now with a master role) online to XIV 2 DR servers to begin production workload at XIV 2. 4. Deactivate XIV remote mirroring from the master peer at XIV 2 if necessary. (It may have already been deactivated by the XIV 1 failure.) 5. Delete XIV remote mirroring from the master peer at XIV 2. 6. Rebuild XIV 1, including configuration of the new XIV system at XIV 1, the definition of remote targets for both XIV 1 and XIV 2, and the definition of connectivity between XIV 1 and XIV 2. 7. Define XIV remote mirroring from the master peer at XIV 2 to the slave peer at XIV 1. 8. Activate XIV remote mirroring from the master peer at XIV 2 to the slave peer at XIV 1. This causes a full copy of all actual data on the master peer at XIV 2 to the slave volume at XIV 1. 9. Monitor initialization until it is complete. 10.Quiesce the production applications at XIV 2 to ensure that all application-consistent data is copied to XIV 1. 11.Unmap master peers at XIV 2 from DR servers. 12.For asynchronous mirroring, monitor completion of the sync job and change the replication interval to never. 13.Monitor to ensure that no more data is flowing from XIV 2 to XIV 1. 14.You can do a switch roles, which simultaneously changes the role of the peers at XIV 1 from slave to master and changes the role of the peers at XIV 2 from master to slave. 15.For asynchronous mirroring, change the replication schedule to the desired interval. 16.Map master peers at XIV 1 to the production servers. 17.Bring master peers online to XIV 1 production servers. 86 IBM XIV Storage System: Copy Services and Migration 7759ch_Mirror.fm Draft Document for Review January 23, 2011 12:42 pm 18.Change the designation of the master peer at XIV 1 to primary. 19.Change the designation of the slave peer at XIV 2 to secondary. 3.5.3 Using an extra copy for DR tests This scenario begins with normal operation of XIV remote mirroring from XIV 1 to XIV 2. 1. Create a Snapshot or volume copy of the consistent data at XIV 2. (The procedure is slightly different for XIV synchronous mirroring and XIV asynchronous mirroring. For asynchronous mirroring, consistent data is on the last replicated snapshot.) 2. Unlock the snapshot or volume copy. 3. Map the snapshot/volume copy to DR servers at XIV 2. 4. Bring the snapshot/volume copy at XIV 2 online to DR servers to begin disaster recovery testing at XIV 2. 5. When DR testing is complete, unmap the snapshot/volume copy from XIV 2 DR servers. 6. Delete the snapshot/volume copy if desired. 3.5.4 Creating application-consistent data at both local and the remote sites This scenario begins with normal operation of XIV remote mirroring from XIV 1 to XIV 2. This scenario may be used when the fastest possible application restart is required. 1. No actions are taken to change XIV remote mirroring. 2. Briefly quiesce the application at XIV 1 or place the database into hot backup mode. 3. Ensure that all data has been copied from the master peer at XIV 1 to the slave peer at XIV 2. 4. Issue Create Mirrored Snapshot at the master peer. This creates an additional snapshot at the master and slave. 5. Resume normal operation of the application or database at XIV 1. 6. Unlock the snapshot or volume copy. 7. Map the snapshot/volume copy to DR servers at XIV 2. 8. Bring the snapshot or volume copy at XIV 2 online to XIV 2 servers to begin disaster recovery testing or other functions at XIV 2. 9. When DR testing or other use is complete, unmap the snapshot/volume copy from XIV 2 DR servers. 10.Delete the snapshot/volume copy if desired. 3.5.5 Migration A migration scenario involves a one-time movement of data from one XIV system to another (for example, migration to new XIV hardware.) This scenario begins with existing connectivity between XIV 1 and XIV 2. 1. Define XIV remote mirroring from the master volume at XIV 1 to the slave volume at XIV 2. 2. Activate XIV remote mirroring from the master volume at XIV 1 to the slave volume at XIV 2. 3. Monitor initialization until it is complete. Chapter 3. Remote Mirroring 87 7759ch_Mirror.fm Draft Document for Review January 23, 2011 12:42 pm 4. Deactivate XIV remote mirroring from the master volume at XIV 1 to the slave volume at XIV 2. 5. Delete XIV remote mirroring from the master volume at XIV 1 to the slave volume at XIV 2. 6. Remove connectivity between the XIV systems at XIV 1 and XIV 2. 7. Redeploy the XIV system at XIV 1 if desired. 3.5.6 Adding data corruption protection to disaster recovery protection This scenario begins with normal operation of XIV remote mirroring from XIV 1 to XIV 2 followed by creation of an additional snapshot of the master volume at XIV 1 to be used in the event of application data corruption. To create a dependent-write consistent snapshot, no changes are required to XIV remote mirroring. 1. Periodically issue Create Mirrored Snapshot at the master peer. This creates an additional snapshot at the master and slave. 2. When production data corruption is discovered, quiesce the application and take any steps necessary to prepare the application to be restored. 3. Deactivate and delete mirroring. 4. Restore production volumes from the appropriate snapshots. 5. Bring production volumes online and begin production access. 6. Remove remote volumes from the consistency group. 7. Delete or format remote volumes. 8. Delete any mirroring snapshots existing at the production site. 9. Remove production volumes from the consistency group. 10.Define and activate mirroring. Initialization results in a full copy of data. If an application-consistent snapshot is desired, the following alternative procedure is used: 1. Periodically quiesce the application (or place into hot backup mode). 2. Create a snapshot of the production data at XIV 1. (The procedure may be slightly different for XIV synchronous mirroring and XIV asynchronous mirroring. For asynchronous mirroring, a duplicate snapshot or a volume copy of the last replicated snapshot may be used.) 3. As soon as the snapshot or volume copy relationship has been created, resume normal operation of the application. 4. When production data corruption is discovered, deactivate mirroring. 5. Remove master peers from the consistency group at XIV 1 if necessary. (Slave peers will be automatically removed from the consistency group at XIV 2.) 6. Delete mirroring. 7. Restore the production volume from the snapshot or volume copy at XIV 1. 8. Delete any remaining mirroring-related snapshots or snapshot groups at XIV 1. 9. Delete secondary volumes at XIV 2. 10.Remove XIV 1 volumes (primary) from the consistency group. 11.Define remote mirroring peers from XIV 1 to XIV 2. 12.Activate remote mirroring peers from XIV 1 to XIV 2 (full copy is required). 88 IBM XIV Storage System: Copy Services and Migration Draft Document for Review January 23, 2011 12:42 pm 7759ch_Mirror.fm 3.5.7 Communication failure This scenario begins with normal operation of XIV remote mirroring from XIV 1 to XIV 2 followed by a failure in the communication network used for XIV remote mirroring from XIV 1 to XIV 2. 1. No action is required to change XIV remote mirroring. 2. When communication between the two XIV systems is not available, XIV remote mirroring is automatically deactivated and changes to the master volume are recorded in metadata. 3. When communication between the XIV systems at XIV 1 and XIV 2 is restored, XIV mirroring is automatically reactivated, resynchronizing changes from the master at XIV 1 to the slave at XIV 2. 3.5.8 Temporary deactivation and reactivation This scenario begins with normal operation of XIV remote mirroring from XIV 1 to XIV 2, followed by user deactivation of XIV remote mirroring for a period of time. This scenario may be used to temporarily suspend XIV remote mirroring during a period of peak activity if there is not enough bandwidth to handle the peak load or if the response time impact during peak activity is unacceptable. 1. Deactivate XIV remote mirroring from the master volume at XIV 1 to the slave volume at XIV 2. Changes to the master volume at XIV 1 will be recorded in metadata for synchronous mirroring. 2. Wait until it is acceptable to reactivate mirroring. 3. Reactivate XIV remote mirroring from the master volume at XIV 1 to the slave volume at XIV 2. 3.6 Planning The most important planning considerations for XIV Remote Mirroring are those related to ensuring availability and performance of the mirroring connections between XIV systems, as well as the performance of the XIV systems. Planning for snapshot capacity usage is also extremely important. To optimize availability, XIV remote mirroring connections must be spread across multiple ports on different adapter cards in different modules, and must be connected to different networks. To optimize capacity usage, the number and frequency of snapshots (both those required for asynchronous replication and any additional user-initiated snapshots) and the workload change rates must be carefully reviewed. If not enough information is available, a snapshot area that is 30% of the pool size may be used as a starting point. Storage pool snapshot usage thresholds must be set to trigger notification (for example, SNMP, e-mail, SMS) when the snapshot area capacity reaches 50%, and snapshot usage must be monitored continually to understand long-term snapshot capacity requirements. Chapter 3. Remote Mirroring 89 7759ch_Mirror.fm Draft Document for Review January 23, 2011 12:42 pm 3.7 Advantages of XIV mirroring XIV remote mirroring provides all the functions typical of remote mirroring solutions in addition to the following advantages: Both synchronous and asynchronous mirroring are supported on a single XIV system. XIV mirroring is supported for consistency groups and individual volumes and mirrored volumes may be dynamically moved into and out of mirrored consistency groups. XIV mirroring is data aware. Only actual data is replicated. Synchronous mirroring automatically resynchronizes couplings when a connection recovers after a network failure. Both FC and iSCSI protocols are supported, and both may be used to connect between the same XIV systems. XIV mirroring provides an option to automatically create slave volumes. XIV allows user specification of initialization and resynchronization speed. 3.8 Mirroring events The XIV system generates events for user actions, failures, and changes in mirroring status. These events can be used to trigger SNMP traps and send e-mails or text messages. Thresholds for RPO and for link disruption may be specified by the user and trigger an event when the threshold is reached. 3.9 Mirroring statistics The XIV system provides Remote Mirroring performance statistics via both the graphical user interface (GUI) and the command-line interface (XCLI) using the mirror_statistics_get command. Performance statistics from the FC or IP network components are also extremely useful. 3.10 Boundaries With Version 10.2, the XIV Storage System has the following boundaries or limits: Maximum remote systems: The maximum number of remote systems that can be attached to a single primary is 16. Number of remote mirrors: The combined number of master and slave volumes (including in mirrored CG) cannot exceed 512. Distance: Distance is only limited by the response time of the medium used. Use asynchronous mirroring when the distance causes unacceptable delays to the host I/O in synchronous mode. Consistency groups are supported within Remote Mirroring. The maximum number of consistency groups is 256. 90 IBM XIV Storage System: Copy Services and Migration 7759ch_Mirror.fm Draft Document for Review January 23, 2011 12:42 pm Snapshots: Snapshots are allowed with either the primary or secondary volumes without stopping the mirror. There are also special-purpose snapshots used in the mirroring process. Space must be available in the storage pool for snapshots. Master and slave peers cannot be the target of a copy operation and cannot be restored from a snapshot. Peers cannot be deleted or formatted without deleting the coupling first. Master volumes cannot be resized or renamed if the link is operational. 3.11 Using the GUI or XCLI for Remote Mirroring actions This section illustrates Remote Mirroring definition actions through the GUI or XCLI. 3.11.1 Initial setup When preparing to set up Remote Mirroring, take the following questions into consideration: Will the paths be configured via SAN or direct attach, FC or iSCSI? Is the desired port configured as an initiator or a target? – The port 4 default configuration an initiator. – Port 2 is suggested as the target port for remote mirror links. – Ports can be changed if needed. How many pairs will be copied? This is related to the bandwidth needed between sites. How many secondary machines will be used for a single primary? Remote Mirroring can be set up on paths that are either direct or SAN attached via FC or iSCSI protocols. For most disaster recovery solutions, the secondary system will be located at a geographically remote site. The sites will be connected using either SAN connectivity with Fibre Channel Protocol (FCP) or Ethernet with iSCSI. In certain cases, using direct connect might be the option of choice if the machines are located near each other and could be used for initialization before the target XIV Storage System is moved to the remote site. Bandwidth considerations must be taken into account when planning the infrastructure to support the Remote Mirroring implementation. Knowing when the peak write rate occurs for systems attached to the storage will help with the planning for the number of paths needed to support the Remote Mirroring function and any future growth plans. When the protocol has been selected, it is time to determine which ports on the XIV Storage System will be used. The port settings are easily displayed using the XCLI Session environment and the command fc_port_list for Fibre Channel or ipinterface_list for iSCSI. There must always be a minimum of two paths configured within Remote Mirroring for FCP connections, and these paths must be dedicated to Remote Mirroring. These two paths must be considered a set. Use port 4 and port 2 in the selected interface module for this purpose. For redundancy, additional sets of paths must be configured in different interface modules. Fibre Channel paths for Remote Mirroring have slightly more requirements for setup, and we look at this interface first. Chapter 3. Remote Mirroring 91 7759ch_Mirror.fm Draft Document for Review January 23, 2011 12:42 pm As seen in Example 3-1, in the Role column each Fibre Channel port is identified as either a target or an initiator. Simply put, a target in a Remote Mirror configuration is the port that will be receiving data from the other system, whereas an initiator is the port that will be doing the sending of data. In this example, there are three initiators configured. Initiators, by default, are configured on FC:X:4 (X is the module number). In this highlighted example, port 4 in module 6 is configured as the initiator. Example 3-1 The fc_port_list output command >> fc_port_list Component ID Status 1:FC_Port:4:1 OK 1:FC_Port:4:2 OK 1:FC_Port:4:3 OK 1:FC_Port:4:4 OK 1:FC_Port:5:1 OK 1:FC_Port:5:2 OK 1:FC_Port:5:3 OK 1:FC_Port:5:4 OK 1:FC_Port:6:1 OK 1:FC_Port:6:2 OK 1:FC_Port:6:3 OK 1:FC_Port:6:4 OK 1:FC_Port:9:1 OK 1:FC_Port:9:2 OK 1:FC_Port:9:3 OK 1:FC_Port:9:4 OK 1:FC_Port:8:1 OK 1:FC_Port:8:2 OK 1:FC_Port:8:3 OK 1:FC_Port:8:4 OK 1:FC_Port:7:1 OK 1:FC_Port:7:2 OK 1:FC_Port:7:3 OK 1:FC_Port:7:4 OK >> Currently Functioning yes yes yes yes yes yes yes yes yes yes yes yes yes yes yes yes yes yes yes yes yes yes yes yes WWPN 5001738000130140 5001738000130141 5001738000130142 5001738000130143 5001738000130150 5001738000130151 5001738000130152 5001738000130153 5001738000130160 5001738000130161 5001738000130162 5001738000130163 5001738000130190 5001738000130191 5001738000130192 5001738000130193 5001738000130180 5001738000130181 5001738000130182 5001738000130183 5001738000130170 5001738000130171 5001738000130172 5001738000130173 Port ID 00030A00 0075002E 00750029 00750027 00611000 0075001F 00021D00 00000000 00070A00 006D0713 00000000 0075002F 00DDEE02 00FFFFFF 00021700 00021600 00060219 00021C00 002D0027 002D0026 006B0F00 00681813 00021F00 00021E00 Role Target Target Target Initiator Target Target Target Initiator Target Target Target Initiator Target Target Target Initiator Target Target Target Initiator Target Target Target Initiator The iSCSI connections are shown in Example 3-2 using the command ipinterface_list. The output has been truncated to show just the iSCSI connections in which we are interested here. The command also displays all Ethernet connections and settings. In this example we have two connections displayed for iSCSI—one connection in module 7 and one connection in module 8. Example 3-2 The ipinterface_list command >> ipinterface_list Name Type IP Address Network Mask itso_m8_p1 iSCSI 9.11.237.156 255.255.254.0 itso_m7_p1 iSCSI 9.11.237.155 255.255.254.0 92 IBM XIV Storage System: Copy Services and Migration Default Gateway MTU 9.11.236.1 4500 9.11.236.1 4500 Module 1:Module:8 1:Module:7 Ports 1 1 Draft Document for Review January 23, 2011 12:42 pm 7759ch_Mirror.fm Alternatively, a single port can be queried by selecting a system in the GUI, followed by selecting Mirror Connectivity (Figure 3-45). Figure 3-45 Selecting Mirror Connectivity Click the connecting links between the systems of interest to view the ports. Right-click a specific port and select Properties, the output of which is shown in Figure 3-46. This particular port is configured as a target. Figure 3-46 Port properties displayed with GUI Chapter 3. Remote Mirroring 93 7759ch_Mirror.fm Draft Document for Review January 23, 2011 12:42 pm Another way to query the port configuration is to select the desired system, click the curved arrow (at the bottom right of the window) to display the ports on the back of the system, and hover the mouse over a port, as shown in Figure 3-47. This view displays all the information that is shown in Figure 3-46 on page 93. Figure 3-47 Port information from the patch panel view Similar information can be displayed for the iSCSI connections using the GUI, as shown in Figure 3-48. This view can be seen either by right-clicking the Ethernet port (similar to the Fibre Channel port shown in Figure 3-48) or by selecting the system, then selecting Hosts and LUNs iSCSI Connectivity. This sequence displays the same two iSCSI definitions that are shown with the XCLI command. Figure 3-48 iSCSI connectivity By default, Fibre Channel ports 2 and 4 (target and initiator, respectively) from every module are designed to be used for Remote Mirroring. For example, port 4 module 8 (initiator) on the local machine is connected to port 2 module 8 (target) on the remote machine. When setting up a new system, it is best to plan for any Remote Mirroring and reserve these ports for that purpose. However different ports could be used as needed. In the event that a port role does need to be changed, you can change the port role with both the XCLI and the GUI. Use the XCLI fc_port_config command to change a port, as shown in Example 3-3. Using the output from fc_port_list, we can get the fc_port name to be used in the command, changing the port role to be either initiator or target, as needed. 94 IBM XIV Storage System: Copy Services and Migration 7759ch_Mirror.fm Draft Document for Review January 23, 2011 12:42 pm Example 3-3 XCLI command to configure a port fc_port_config fc_port=1:FC_Port:4:3 role=initiator Command completed successfully fc_port_list Component ID Status 1:FC_Port:4:3 OK Currently Functioning yes WWPN Port ID Role 5001738000130142 00750029 Initiator To perform the same function with the GUI, select the primary system, open the patch panel view, and right-click the port, as shown in Figure 3-49. Figure 3-49 Configure ports Selecting Configure opens a configuration window, as shown in Figure 3-50, which allows the port to be enabled (or disabled), its role defined as target or initiator, and, finally, the speed for the port configured (Auto, 1 Gbps, 2 Gbps, or 10 Gbps). Figure 3-50 Configure port with GUI Chapter 3. Remote Mirroring 95 7759ch_Mirror.fm Draft Document for Review January 23, 2011 12:42 pm Planning for Remote Mirroring is important when determining how many copy pairs will exist. All volumes defined in the system can be mirrored. A single primary system is limited to a maximum of 16 secondary systems. Volumes cannot be part of an XIV data migration and a remote mirror volume at the same time. Data migration information can be found in Chapter 8, “Data migration” on page 215. 3.11.2 Remote mirror target configuration The connections to the target (secondary) XIV system must be defined. We assume that the physical connections and zoning have been set up. Target configuration is done from the mirror connectivity menu. The first step is to add the target system. To do this right-click the system image and select Create Target, as shown in Figure 3-51. Figure 3-51 Create target Then define the type of mirroring to be used (mirroring or migration) and the type of connection (iSCSI or FC), as shown in Figure 3-52. Figure 3-52 Target type and protocol Next, as shown in Figure 3-53 on page 97, connections are defined by clicking the line between the two XIV systems to display the link status detail screen. 96 IBM XIV Storage System: Copy Services and Migration Draft Document for Review January 23, 2011 12:42 pm 7759ch_Mirror.fm Figure 3-53 Define connections Chapter 3. Remote Mirroring 97 7759ch_Mirror.fm Draft Document for Review January 23, 2011 12:42 pm Connections are easily defined by clicking Show Auto Detected Connections. This shows the possible connections and provides an Approve button to define the detected connections. Remember that for FCP ports an initiator must be connected to a target and the proper zoning must be established for the connections to be successful. The possible connections are shown in light grey, as depicted in Figure 3-54. Figure 3-54 Show possible connections Connections can also be defined by clicking a port on the primary system and dragging the the corresponding port on the target system. This is shown as a blue line in Figure 3-55. 98 IBM XIV Storage System: Copy Services and Migration Draft Document for Review January 23, 2011 12:42 pm 7759ch_Mirror.fm Figure 3-55 Graphically define a connection Releasing the mouse button initiates the connection and then the status can be displayed, as shown in Figure 3-56. Figure 3-56 Define connection and view status Right-click a path and you have options to Activate, Deactivate, and Delete the selected path, as shown in Figure 3-57. Chapter 3. Remote Mirroring 99 7759ch_Mirror.fm Draft Document for Review January 23, 2011 12:42 pm Figure 3-57 Paths actions menu To delete the connections between two XIV systems you have to delete all paths between the two systems and afterwards in the Mirroring Connectivity display delete the target system as shown in Figure 3-58. Figure 3-58 Delete Target XIV 100 IBM XIV Storage System: Copy Services and Migration Draft Document for Review January 23, 2011 12:42 pm 7759ch_Mirror.fm 3.11.3 XCLI examples XCLI commands can be used to configure connectivity between the primary XIV system and the target or secondary XIV system (Figure 3-59). target_define target="WSC_1300331" protocol=FC xiv_features=yes target_mirroring_allow target="WSC_1300331" target_define target="WSC_6000639" system_id=639 protocol=FC xiv_features=yes target_mirroring_allow target="WSC_6000639" target_port_add fcaddress=50017380014B0183 target="WSC_1300331" target_port_add fcaddress=50017380027F0180 target="WSC_6000639" target_port_add fcaddress=50017380014B0193 target="WSC_1300331" target_port_add fcaddress=50017380027F0190 target="WSC_6000639" target_port_add fcaddress=50017380027F0183 target="WSC_6000639" target_port_add fcaddress=50017380014B0181 target="WSC_1300331" target_connectivity_define local_port="1:FC_Port:8:4" fcaddress=50017380014B0181 target="WSC_1300331" target_port_add fcaddress=50017380027F0193 target="WSC_6000639" target_port_add fcaddress=50017380014B0191 target="WSC_1300331" target_connectivity_define local_port="1:FC_Port:9:4" fcaddress=50017380014B0191 target="WSC_1300331" target_connectivity_define target="WSC_6000639" local_port="1:FC_Port:8:4" fcaddress="50017380027F0180" target_connectivity_define target="WSC_6000639" local_port="1:FC_Port:9:4" fcaddress="50017380027F0190" Figure 3-59 Define target XCLI commands XCLI commands can also be used to delete the connectivity between the primary XIV System and the secondary XIV system (Figure 3-60). target_connectivity_delete local_port="1:FC_Port:8:4" fcaddress=50017380014B0181 target="WSC_1300331" target_port_delete fcaddress=50017380014B0181 target="WSC_1300331" target_connectivity_delete local_port="1:FC_Port:8:4" fcaddress=50017380027F0180 target="WSC_6000639" target_port_delete fcaddress=50017380027F0180 target="WSC_6000639" target_connectivity_delete local_port="1:FC_Port:9:4" fcaddress=50017380014B0191 target="WSC_1300331" target_port_delete fcaddress=50017380014B0191 target="WSC_1300331" target_connectivity_delete local_port="1:FC_Port:9:4" fcaddress=50017380027F0190 target="WSC_6000639" target_port_delete fcaddress=50017380027F0190 target="WSC_6000639" target_port_delete target="WSC_6000639" fcaddress="50017380027F0183" target_port_delete target="WSC_6000639" fcaddress="50017380027F0193" target_delete target="WSC_6000639" target_port_delete target="WSC_1300331" fcaddress="50017380014B0183" target_port_delete target="WSC_1300331" fcaddress="50017380014B0193" target_delete target="WSC_1300331" Figure 3-60 Delete target XCLI commands Chapter 3. Remote Mirroring 101 7759ch_Mirror.fm Draft Document for Review January 23, 2011 12:42 pm 3.12 Configuring Remote Mirroring Configuration tasks differ depending on the nature of the coupling. Synchronous and asynchronous mirroring are the two types of coupling supported. Refer to Chapter 4, “Synchronous Remote Mirroring” on page 103, for specific configuration tasks related to synchronous mirroring and Chapter 5, “Asynchronous remote mirroring” on page 127, for specific configuration tasks related to asynchronous mirroring. 102 IBM XIV Storage System: Copy Services and Migration Draft Document for Review January 23, 2011 12:42 pm 7759ch_Sync_Mirror.fm 4 Chapter 4. Synchronous Remote Mirroring This chapter describes the features of synchronous remote mirroring, the options that are available, and procedures for setting it up and recovering from a disaster. © Copyright IBM Corp. 2010. All rights reserved. 103 7759ch_Sync_Mirror.fm Draft Document for Review January 23, 2011 12:42 pm 4.1 Synchronous mirroring configuration The mirroring configuration process involves configuring volumes or consistency groups (CGs). When a pair of volumes/CGs point to each other, it is referred to as a coupling. We assume that the links between the local and remote XIV storage systems have already been established, as discussed in 3.11.2, “Remote mirror target configuration” on page 96. 4.1.1 Volume mirroring setup and activation Volumes/CGs that participate in mirror operations are configured in pairs. These pairs are called peers. One peer is the source of the data to be replicated and the other is the target. The source has the role of master and is the controlling entity in the mirror. The target has the role of slave, which is controlled by operations performed by the master. When initially configured, one volume is considered the source (master role and resides at the primary system) and the other is the target (slave role and resides at the secondary system). This designation is associated with the volume and its XIV system and does not change. During various operations the role may change (master or slave), but one system is always the primary and the other is always the secondary. To create a mirror you can use the XIV GUI or the XCLI. Using the GUI for volume mirroring setup In the GUI select the primary XIV and select Mirroring in the GUI, as shown in Figure 4-1. Figure 4-1 Selecting Remote Mirroring To create a mirror: 1. Select Create Mirror, as shown in Figure 4-2, and specify the source volume or master for the mirror pair (Figure 4-3 on page 105). Figure 4-2 Selecting Create Mirror 104 IBM XIV Storage System: Copy Services and Migration 7759ch_Sync_Mirror.fm Draft Document for Review January 23, 2011 12:42 pm There are other ways to create a mirror pair from within the GUI. If you are in the Volumes and Snapshots list panel you can right-click a volume and select Create Mirror from there. The Create Mirror dialogue box is displayed (Figure 4-3). Figure 4-3 Create Mirror parameters 2. Complete the following information: – Sync Type Select Sync as the sync type for synchronous mirroring. (We discuss asynchronous mirroring in Chapter 5, “Asynchronous remote mirroring” on page 127.) – Master CG / Volume This is the volume/CG at the primary site to be mirrored. You can select the volume/CG from a list. The consistency groups are shown in bold and they are at the end of the list. – Target System This is the XIV at the secondary site that will contain the slave or target volumes. You can select the secondary system from a list of known targets. – Create slave If selected, the slave volume will be created automatically. If left unselected you must create the volume manually. If you have not yet created the target volumes on the secondary XIV, you can check mark the Create Slave option. In this case you must also select the storage pool in which the volume will be created on the target XIV. This pool must already exit on the target XIV. The secondary XIV system will automatically create a target volume of the same size as the source volume. If you specified a consistency group instead of a volume, this option is not available. A slave consistency group must already exist at the remote site. – Slave Pool This is the storage pool on the secondary XIV system that will contain the mirrored slave volumes. This pool must already exit. This option is only available if you check marked the Create Slave option. Chapter 4. Synchronous Remote Mirroring 105 7759ch_Sync_Mirror.fm Draft Document for Review January 23, 2011 12:42 pm – Slave CG / Volume This is the name of the slave volume/CG. If you selected the Create Slave option, the default is to use the same name as the source, but this can be changed. If you did not check mark the Create Slave option, you can select the target volume or a consistency group from a list. If a target volume already exists on the secondary XIV, it must have exactly the same size as the source volume, otherwise a mirror cannot be set up. In this case use the Resize function of the XIV to adjust the capacity of the target volume to match the capacity of the source volume. Once mirroring is active, you can resize the source volume and the target volume will be automatically resized to match the source volume. 3. Once all the appropriate entries have been completed, click Create. A coupling is created and is in standby (inactive) mode, as shown in Figure 4-4. In this state data is not yet copied from the source to the target volume. Figure 4-4 Coupling on the primary XIV in standby (Inactive) mode A corresponding coupling is automatically created on the secondary XIV, and it is also in standby (Inactive) mode, as shown in Figure 4-5. Figure 4-5 Coupling on the secondary XIV in standby (Inactive) mode Repeat steps 1–3 to create additional couplings. Using XCLI for volume mirroring setup Tip: When working with the XCLI session or the XCLI from a command line, the windows look similar and you could inadvertently address the wrong XIV system with your command. Therefore, it is a good idea to issue a config_get command to verify that you are addressing the intended XIV system. To do this: 1. Open an XCLI session on the XIV at the local site (primary XIV) and run the mirror_create command (Example 4-1). Example 4-1 Create remote mirror coupling >> mirror_create target="XIV MN00035" vol="itso_win2008_vol2" slave_vol="itso_win2008_vol2" remote_pool="test_pool" create_slave=yes Command executed successfully. 106 IBM XIV Storage System: Copy Services and Migration 7759ch_Sync_Mirror.fm Draft Document for Review January 23, 2011 12:42 pm 2. To list the couplings on the primary XIV, run the mirror_list command (Example 4-2). Note the status of Initializing is used when the coupling is in standby (inactive) or is initializing. Example 4-2 Listing mirror couplings >> mirror_list Name itso_win2008_vol1 itso_win2008_vol2 Mirror Type sync_best_effort sync_best_effort Mirror Object Volume Volume Role Master Master Remote System XIV MN00035 XIV MN00035 Remote Peer itso_win2008_vol1 itso_win2008_vol2 Active no no Status Initializing Initializing Link Up yes yes 3. To list the couplings on the secondary XIV, run the mirror_list command, as shown in Example 4-3. Note that the status of Initializing is used when the coupling is in standby (inactive) or initializing. Example 4-3 Newly created slave volumes >> mirror_list Name itso_win2008_vol1 itso_win2008_vol2 Mirror Type sync_best_effort sync_best_effort Mirror Object Volume Volume Role Slave Slave Remote System XIV MN00019 XIV MN00019 Remote Peer itso_win2008_vol1 itso_win2008_vol2 Active no no Status Initializing Initializing Link Up yes yes Repeat steps 1–3 to create additional mirror couplings. Activating the remote mirror coupling using the GUI To activate the mirror, proceed as follows: 1. On the primary XIV, go the Remote Mirroring menu and highlight all the couplings that you want to activate, right-click, and select Activate, as shown in Figure 4-6. Figure 4-6 Activating a mirror coupling Figure 4-7 shows the coupling in the Initialization state. Figure 4-7 Remote mirroring status on the primary XIV Chapter 4. Synchronous Remote Mirroring 107 7759ch_Sync_Mirror.fm Draft Document for Review January 23, 2011 12:42 pm 2. On the secondary XIV, go to the Remote Mirroring menu to see the status of the couplings (Figure 4-8). Note that due to the time lapse between Figure 4-7 on page 107 and Figure 4-8 being taken they do show different statuses. Figure 4-8 Remote mirroring statuses on the secondary XIV 3. Repeat steps 1–2 until all required couplings are activated and are synchronized/consistent. Activating the remote mirror coupling using the XCLI Proceed as follows: 1. On the primary XIV, run the mirror_activate command (Example 4-4). Example 4-4 Activating the mirror coupling >> mirror_activate vol=itso_win2008_vol3 Command executed successfully. 2. On the primary XIV, run the mirror_list command to see the status of the couplings (Example 4-5). Example 4-5 List remote mirror statuses on the primary XIV >> mirror_list Name itso_win2008_vol1 itso_win2008_vol2 itso_win2008_vol3 Mirror Type sync_best_effort sync_best_effort sync_best_effort Mirror Object Volume Volume Volume Role Master Master Master Remote System XIV MN00035 XIV MN00035 XIV MN00035 Remote Peer itso_win2008_vol1 itso_win2008_vol2 itso_win2008_vol3 Active yes yes yes Status Synchronized Synchronized Synchronized Link Up yes yes yes 3. On the secondary XIV, run the mirror_list command to see the status of the couplings (Example 4-6). Example 4-6 List remote mirror statuses on the secondary XIV >> mirror_list Name itso_win2008_vol1 itso_win2008_vol2 itso_win2008_vol3 Mirror Type sync_best_effort sync_best_effort sync_best_effort Mirror Object Volume Volume Volume Role Slave Slave Slave Remote System XIV MN00019 XIV MN00019 XIV MN00019 Remote Peer itso_win2008_vol1 itso_win2008_vol2 itso_win2008_vol3 Active yes yes yes Status Consistent Consistent Consistent Link Up yes yes yes 4. Repeat steps 1–3 to activate additional couplings. 4.1.2 Consistency group setup and configuration IBM XIV Storage System leverages its consistency group capability to allow for mirroring numerous volumes at once. Setting a consistency group to be mirrored is done by first creating a consistency group, then setting it to be mirrored, and only then populating it with volumes. A consistency group must be created at the primary XIV and a corresponding consistency group at the secondary XIV. The names of the consistency groups can be different. When creating a consistency group, you also must specify the storage pool. To create a mirrored consistency group first create a CG on the primary and secondary XIV Storage System. Then select the CG at the primary and specify Create Mirror, as shown in Figure 4-9. 108 IBM XIV Storage System: Copy Services and Migration 7759ch_Sync_Mirror.fm Draft Document for Review January 23, 2011 12:42 pm Figure 4-9 Create Mirror CG The Create Mirror dialog shown in Figure 4-10 is displayed. Be sure to specify the mirroring parameters that match the volumes that will be part of that CG. Figure 4-10 Sync mirrored CG Now you can add mirrored volumes to this consistency group. All volumes that you are going to add to the consistency group must be in that pool on the primary XIV and in one pool on the secondary XIV. Adding a new volume pair to a mirrored consistency group requires the volumes to be mirrored exactly as the other volumes within this consistency group. Important: All volumes that you want to add to a mirroring consistency group must be defined in the same pool at the primary site and must be in one pool at the secondary site. Chapter 4. Synchronous Remote Mirroring 109 7759ch_Sync_Mirror.fm Draft Document for Review January 23, 2011 12:42 pm Adding a mirrored volume to a mirrored CG Adding a volume to a CG requires that: The volume is on the same system as the consistency group. The volume belongs to the same storage pool as the consistency group. The command must be issued only on the master CG. The command must not be run during initialization of volume or CG. The volume mirroring settings must be identical to those of the CG: – Mirroring type – Mirroring role – Mirroring status – Mirroring target – Target pool Also, mirrors for volumes must be activated before volumes can be added to a mirrored consistency group. It is possible to add a mirrored volume to a non-mirrored consistency group and have this volume retain its mirroring settings. Removing a volume from a mirrored consistency group When removing a volume from a mirrored consistency group on the primary system, the corresponding peer volume will be removed from the peer consistency group on the secondary system. Mirroring is retained with the same configuration as the consistency group from which it was removed. Synchronous mirroring and snapshot consistency group A volume can be in only one consistency group. Because consistency groups can be used for snapshot (see 1.3, “Snapshots consistency group” on page 20) and Remote Mirroring, confusion can arise. Define separate and specific CG for snapshot and Remote Mirroring. 4.1.3 Coupling activation, deactivation, and deletion Mirroring can be manually activated and deactivated per volume or CG pair. When it is activated, the mirror is in active mode. When it is deactivated, the mirror is in inactive mode. These modes have the following functions: Active Mirroring is functioning. Data written to the primary system is propagated to the secondary system. Inactive Mirroring is deactivated. The data is not being written to the slave peer, but writes to the master volume are being recorded and can later be synchronized with the slave volume. Inactive mode is used mainly when maintenance is performed at the secondary site or on the secondary XIV. In this mode, the slave volumes do not generate alerts that the mirroring has failed. The mirror has the following characteristics: When a mirror is created, it is always initially in inactive mode. A mirror can only be deleted when its is in inactive mode. A Consistency Group can only be deleted if it does not contain any volumes 110 IBM XIV Storage System: Copy Services and Migration Draft Document for Review January 23, 2011 12:42 pm 7759ch_Sync_Mirror.fm Transitions between the two states can only be performed from the XIV that contains the master. In a DR situation, a role change changes the slave peers (at the secondary system) to a master role (so that production can resume at the secondary). When the primary site is recovered, and before the link is resumed, the master must be changed to a slave (change_role). Deletion When a mirror pair (volume/CG) is inactive, the mirror relationship can be deleted. When a mirror relationship has been deleted, the XIV forgets everything about the relationship. If you want to set up the mirror again, the XIV must copy the entire volume from the source to the target. Note that when the mirror is deleted, the slave volume becomes a normal volume again, but the volume is locked, which means that it is write protected. To enable writing to the volume go to the Volumes list panel. Right-click the volume and select Unlock. The slave volume must also be formatted before it can be part of a new mirror. Formatting also requires that all snapshots of that volume be deleted. 4.2 Disaster recovery There are two broad categories of disaster, one that destroys the primary site or the data there and one that makes the primary site or the data there unavailable but that leaves the data intact. However, within these broad categories there are a number of situations that may exist. Some of these and the recovery procedures are considered below: A disaster that makes the XIV at the primary site unavailable but the site itself and the servers there are still available In this scenario the volumes/CG on the XIV at the secondary site can be switched to master volumes/CG, servers at the primary site can be redirected to the XIV at the secondary site, and normal operations can start again. When the XIV at the primary site is recovered, the data can be mirrored from the secondary site back to the primary site. When the volume/CG synchronization is complete, the peer roles can be switched back to the master at the primary site, the slave at the secondary site and the servers redirected back to the primary site. A disaster that makes the entire primary site and data unavailable In this scenario, the standby (inactive) servers at the secondary site (if implemented) are activated and attached to the secondary XIV to continue normal operations. This requires changing the role of the slave peers to become master peers. After the primary site is recovered, the data at the secondary site can be mirrored back to the primary site to become synchronized once again. If desired, a planned site switch can then take place to resume production activities at the primary site. See 4.3, “Role reversal” on page 112, for details related to this process. A disaster that breaks all links between the two sites but both site remain running In this scenario the primary site continues to operate as normal. When the links are reestablished the data at the primary site can be resynchronized with the secondary site. See 4.4, “Resynchronization after link failure” on page 114, for more details. Chapter 4. Synchronous Remote Mirroring 111 7759ch_Sync_Mirror.fm Draft Document for Review January 23, 2011 12:42 pm 4.3 Role reversal With synchronous mirroring, roles can be modified by either switching or changing roles. Switching roles must be initiated on the master volume/CG when remote mirroring is operational. As the task name implies, it switches the master role to the slave role and at the same time the slave role to the master role. Changing roles can be performed at any time (when a pair is active or inactive) for the slave, and for the master when the coupling is inactive. A change role reverts only the role of that peer. 4.3.1 Switching roles Switching roles exchanges the roles of master and slave volumes or CGs. It can be performed after the remote mirroring function is in operation and the pair is synchronized. After switching roles, the master volume or CG becomes the slave volume or CG and vice versa. There are two typical reasons for switching roles. These are: Drills/DR tests Drills can be performed to test the functionality of the secondary site. In a drill, an administrator simulates a disaster and tests that all procedures are operating smoothly and that documentation is accurate. Scheduled maintenance To perform maintenance at the primary site, operations can be switched to the secondary site prior to the maintenance. This switchover cannot be performed if the master and slave volumes or CG are not synchronized/consistent. Normally, switching the roles requires shutting down the servers at the primary site first, changing SAN zoning and XIV LUN masking to allow access to the secondary site volumes, and then restarting the servers with access to the secondary XIV. However, in certain clustered environments, this takeover could be automated. 4.3.2 Change role In a disaster at the primary site, a role change at the secondary site is the normal recovery action. Assuming that the primary site is down and the secondary site will become the main production site, changing roles is performed at the secondary (now production) site first. Later, when the primary site is up again and communication is reestablished you also change the role at the primary site to a slave to be able to establish remote mirroring from the secondary site back to the normal production primary site. Once data has been synchronized from the secondary site to the primary site, you can perform a switch role to once again make the primary site the master copy. 112 IBM XIV Storage System: Copy Services and Migration 7759ch_Sync_Mirror.fm Draft Document for Review January 23, 2011 12:42 pm Changing the slave peer role The role of the slave volume/CG can be changed to the master role, as shown in Figure 4-11. After this changeover, the following is true: The slave volume/CG is now the master. The coupling has the status of unsynchronized. The coupling remains inactive, meaning that the remote mirroring is deactivated. This ensures an orderly activation when the role of the peer on the other site is changed. Figure 4-11 Change role of a slave consistency group The new master volume/CG (at the secondary site) starts to accept write commands from local hosts. Because coupling is not active, in the same way as for any master volume, metadata maintains a record of which write operations must be sent to the slave volume when communication resumes. After changing the slave to the master, an administrator must change the original master to the slave role before communication resumes. If both peers are left with the same role (master), mirroring cannot be restarted. Slave peer consistency When the user is changing the slave volume/CG to a master volume or master consistency group and a snapshot of the last consistent state exists that was produced during the process of resynchronizing (as a result of a broken link, for instance), the system reverts the slave to the last consistent snapshot. See 4.4.1, “Last consistent snapshot” on page 114 for more information on last consistent snapshots. Changing the master peer role When coupling is inactive, the master volume/CG can change roles. After such a change the master volume/CG becomes the slave volume/CG. Unsynchronized master becoming a slave volume or consistency group When a master volume/CG is inactive, it is also in an unsynchronized state, and it might have a backlog of uncommitted data. The uncommitted changes will potentially be lost when the volume/CG becomes a slave volume/CG, as this data must be reverted to match the data on the peer volume, which is now the new master volume. In this case, an event is created, summarizing the size of the changes that were lost. The uncommitted data has now switched its semantics, and instead of representing updates that the primary peer (former master, now slave) needs to update on the secondary peer (old slave, new master), metadata now represents updates that must be replicated from the secondary to the primary. Upon re-establishing the connection, the primary volume/CG (current slave volume/CG) updates the secondary volume/CG (new master volume/CG) with this uncommitted data, and it is the responsibility of the secondary peer to synchronize these updates to the primary peer. Chapter 4. Synchronous Remote Mirroring 113 7759ch_Sync_Mirror.fm Draft Document for Review January 23, 2011 12:42 pm Reconnection when both sides have the same role Situations where both sides are configured to the same role can only occur when one side was changed. The roles must be changed to have one master and one slave (volume/CG). Change the volume roles as appropriate on both sides before the link is resumed. If the link is resumed and both sides have the same role, the coupling will not become operational. To solve this problem, the user must use the change role function on one of the volumes and then activate the coupling. 4.4 Resynchronization after link failure When synchronization between the peers has been interrupted, for example, by a failure of all links or the pairs have been suspended by a command, you probably want to resume the mirroring after the problems are resolved. Resynchronization can be performed in any direction given that one peer has the master role and the other the slave role. When there is a temporary failure of all links from the primary XIV to the secondary XIV, you re-establish the mirroring in the original direction after the links are up again. Also, if you suspended mirroring for a disaster recovery test at the secondary site, you might want to reset the changes made to the secondary site during the tests and re-establish mirroring from the primary to the secondary site. If there was a disaster and production is now running on the secondary XIV, re-establish mirroring first from the secondary XIV to the primary XIV and later on switch mirroring to the original direction from the primary XIV to the secondary XIV. In any case, the slave peers usually are in a consistent state up to the moment when resynchronization starts. During the resynchronization process, the peers (volume/CG) are inconsistent. To preserve consistency, the XIV at the slave side automatically creates a snapshot of the involved volumes or, in case of a consistency group, a snapshot of the entire consistency group before transmitting any data to the slave volumes. 4.4.1 Last consistent snapshot Before a resynchronization process is initiated, the system creates a snapshot of the slave volume/CG. A snapshot is created to ensure the usability of the slave volume/CG in case of a primary site disaster during the resynchronization process. If the master volume/CG is destroyed before resynchronization is completed, the slave volume/CG might be inconsistent because it might have been only partially updated with the changes that were made to the master volume. To handle this situation, the secondary XIV always creates a snapshot of the last consistent slave volume/CG after reconnecting to the primary XIV and before starting the resynchronization process. No snapshot is created for couplings that are in the initialization state. The snapshot is preserved until a volume pair is synchronized again, or in case of remote mirror consistency groups, until all volumes of the consistency group are synchronized. 4.4.2 Last consistent snapshot timestamp A timestamp is taken when the coupling between the master and slave volume/CG becomes non-operational. This timestamp specifies the last time that the slave volume/CG was consistent with the master (Figure 4-12). 114 IBM XIV Storage System: Copy Services and Migration 7759ch_Sync_Mirror.fm Draft Document for Review January 23, 2011 12:42 pm If there is a disaster at the primary (master) site, the snapshot taken at the secondary (slave) site can be used to restore the slave volumes to a consistent state, ready for production. Important: You must delete the mirror relation at the secondary site before you can restore the last consistent snapshot to the target volumes. Figure 4-12 Snapshot during a resync 4.5 Synchronous mirror step-by-step scenario In 4.1, “Synchronous mirroring configuration” on page 104, we explained the steps required to set up, operate, and deactivate the mirror. In this section, we go through a scenario to demonstrate synchronous mirroring. We assume that all configuration has taken place for us to start configuring the remote mirroring couplings. In particular, we assume that: A host server exists and has volumes assigned at the primary site. Two XIV systems have been connected to each other over FC or iSCSI. A standby server exists at the secondary site. Note: When using the XCLI commands quotation marks (“ “) must be used to enclose names that include spaces. If they are used for names without spaces the command still works. The examples in this scenario contain a mixture of commands with and without quotation marks. This scenario discusses the following phases: Setup and configuration Perform initial setup, activate coupling, write data to three volumes, and prove that the data has been written and that the volumes are synchronized. Simulating a disaster at the primary site The link is broken between the two sites to simulate that the primary site is unavailable, the slave volumes are changed to master volumes, the standby server at the secondary site has LUNs mapped to the XIV at the secondary site, and new data is written. The primary site recovery The old master volumes at the primary site are changed to slave volumes and data is mirrored back from the secondary site to the primary site. Failback to the primary site When the data is synchronized the volume roles are switched back to the original roles (that is, master volumes at the primary site and slave volumes at the secondary site) and the original production server (at the primary site) is used. Chapter 4. Synchronous Remote Mirroring 115 7759ch_Sync_Mirror.fm Draft Document for Review January 23, 2011 12:42 pm 4.5.1 Phase 1: setup and configuration In our sample scenario, we have a Windows 2008 server with three LUNs at the primary site and communication has been configured between the XIVs at the primary and secondary sites. After the couplings have been created and activated, as explained under 4.1, “Synchronous mirroring configuration” on page 104, the environment will be as illustrated in Figure 4-13. Primary Site Active Inactive Data Flow Production W indows 2008 Server Secondary Site Standby W indows 2008 Server FC Link FC Link Data Mirroring FC Link Primary XIV Figure 4-13 Environment with remote mirroring activated 116 IBM XIV Storage System: Copy Services and Migration Secondary XIV Draft Document for Review January 23, 2011 12:42 pm 7759ch_Sync_Mirror.fm 4.5.2 Phase 2: disaster at primary site In this phase of the scenario we simulate a disaster at the primary site. All communication has been lost between the primary and secondary sites due to a complete power failure or a disaster. This is depicted in Figure 4-14. Primary Site Standby Windows 2008 Server Data Flow Production Windows 2008 Server Secondary Site FC Link FC Link Primary XIV Secondary XIV Figure 4-14 Primary site disaster Role changeover at the secondary site using the GUI We now change roles for the slave volumes at the secondary site and make them master volumes so that the standby server can write to them. 1. On the secondary XIV go to the Remote Mirroring menu and right-click a coupling and select Change Role (Figure 4-15). Figure 4-15 Remote mirror change role Chapter 4. Synchronous Remote Mirroring 117 7759ch_Sync_Mirror.fm Draft Document for Review January 23, 2011 12:42 pm Figure 4-15 on page 117 shows that the synchronization status is still consistent for the couplings that are yet to be changed. This is because this is the last known state. When the role is changed the coupling is automatically deactivated. Role changeover at the secondary site using the XCLI We now change roles for the slave volumes at the secondary site and make them master volumes so that the standby server can write to them. 1. On the secondary XIV open an XCLI session and run the mirror_change_role command (Example 4-7). Example 4-7 Remote mirror change role >> mirror_change_role vol=itso_win2008_vol2 new_role=master Warning: ARE_YOU_SURE_YOU_WANT_TO_CHANGE_THE_PEER_ROLE_TO_MASTER Y/N: Y Command executed successfully. 2. To view the status of the coupling run the mirror_list command, as shown in Example 4-8. Example 4-8 List mirror couplings >> mirror_list Name itso_win2008_vol1 itso_win2008_vol2 itso_win2008_vol3 Mirror Type sync_best_effort sync_best_effort sync_best_effort Mirror Object Volume Volume Volume Role Master Master Slave Remote System XIV MN00019 XIV MN00019 XIV MN00019 Remote Peer itso_win2008_vol1 itso_win2008_vol2 itso_win2008_vol3 Active no no yes Status Unsynchronized Unsynchronized Consistent Link Up yes yes yes Example 4-8 shows that the synchronization status is still consistent for one of the couplings that is yet to be changed. This is because this reflects the last known state. When the role is changed, the coupling is automatically deactivated. 3. Repeat steps 1–2 to change roles on other volumes. 118 IBM XIV Storage System: Copy Services and Migration 7759ch_Sync_Mirror.fm Draft Document for Review January 23, 2011 12:42 pm Map volumes on standby server and continue working At this point we map the relevant mirrored volumes to the standby server. For details on how to do this mapping refer to IBM XIV Storage System: Architecture, Implementation, and Usage, SG24-7659. Once the volumes are mapped, we continue working as normal. This is simulated by adding additional data to the server, as illustrated in Figure 4-16. Figure 4-16 Additional data added to the standby server Environment with production now at the secondary site Figure 4-17 illustrates production at the secondary site. Primary Site Production Windows 2008 Server Secondary Site Standby Windows 2008 Server FC Link Primary XIV Data Flow Data Flow Active FC Link Secondary XIV Figure 4-17 Production at secondary site Chapter 4. Synchronous Remote Mirroring 119 7759ch_Sync_Mirror.fm Draft Document for Review January 23, 2011 12:42 pm 4.5.3 Phase 3: recovery of the primary site In this phase the primary site is recovered and communication between the primary and secondary sites is restored. We assume that it was not totally damaged and that the data at the primary site is still there (so we can do a resync). Data is being written from the standby server to the secondary XIV. At the primary site the original Windows 2008 production server is now switched off, as illustrated in Figure 4-18. Primary Site Standby Windows 2008 Server Active Down FC Link FC Link Data Flow Production Windows 2008 Server Secondary Site Mirroring Inactive FC Link Primary XIV Secondary XIV Figure 4-18 Primary site recovery Role changeover at the primary site using the GUI We are now going to change roles for the master volumes at the primary site and make them slave volumes. Before doing this, ensure that the original production server is shut down. 1. On the primary XIV go to the Remote Mirroring menu. The synchronization status will probably be inactive. Select one coupling (if you select several couplings, you cannot change the role), right-click, and select Change Role, as shown in Figure 4-19. Figure 4-19 Change master volumes to slave volumes on the primary XIV 2. You will be prompted to confirm the role change. Select OK to confirm (Figure 4-20). 120 IBM XIV Storage System: Copy Services and Migration 7759ch_Sync_Mirror.fm Draft Document for Review January 23, 2011 12:42 pm Figure 4-20 Roll change confirmation Once you have confirmed, the role is changed to slave, as shown in Figure 4-21. Figure 4-21 New role as slave volume 3. Repeat steps 1–2 for all the volumes that must be changed. Role changeover at the primary site using the XCLI We now change roles for the master volumes at the primary site with the XCLI and make them slave volumes. Before doing this, ensure that the original production server is shut down. 1. On the primary XIV open an XCLI session and run the mirror_change_role command (Example 4-9). Example 4-9 Change master volumes to slave volumes on the primary XIV >> mirror_change_role vol=itso_win2008_vol2 Warning: ARE_YOU_SURE_YOU_WANT_TO_CHANGE_THE_PEER_ROLE_TO_SLAVE Y/N: Y Command executed successfully. 2. To view the status of the coupling run the mirror_list command, as shown in Example 4-10. Example 4-10 List mirror couplings >> mirror_list Name itso_win2008_vol1 itso_win2008_vol2 itso_win2008_vol3 Mirror Type sync_best_effort sync_best_effort sync_best_effort Mirror Object Volume Volume Volume Role Slave Slave Master Remote System XIV MN00035 XIV MN00035 XIV MN00035 Remote Peer itso_win2008_vol1 itso_win2008_vol2 itso_win2008_vol3 Active no no no Status Inconsistent Inconsistent Unsynchronized Link Up yes yes yes 3. Repeat steps 1–2 to change other couplings. Chapter 4. Synchronous Remote Mirroring 121 7759ch_Sync_Mirror.fm Draft Document for Review January 23, 2011 12:42 pm Reactivating the remote mirror coupling using the GUI To reactivate the remote mirror coupling using the GUI: 1. On the secondary XIV go the Remote Mirroring menu and highlight all the couplings that you want to activate. Right-click and select Activate, as illustrated in Figure 4-22 and Figure 4-23. Figure 4-22 Reactivating a mirror coupling Figure 4-23 Synchronization status 2. On the primary XIV go to the Remote Mirroring menu to check the statuses of the couplings (Figure 4-24). Note that due to the time lapse between Figure 4-23 and Figure 4-24 being taken they do show different statuses. Figure 4-24 Remote mirroring statuses on the secondary (local) XIV 3. Repeat steps 1–2 until all required couplings are reactivated and synchronized. Reactivating the remote mirror coupling using the XCLI To reactivate the remote mirror coupling using the XCLI: 1. On the secondary XIV run the mirror_activate command, as shown in Example 4-11. Example 4-11 Reactivating the mirror coupling >> mirror_activate 122 vol=itso_win2008_vol2 IBM XIV Storage System: Copy Services and Migration 7759ch_Sync_Mirror.fm Draft Document for Review January 23, 2011 12:42 pm Command executed successfully. 2. On the secondary XIV run the mirror_list command to see the status of the couplings, as illustrated in Example 4-12. Example 4-12 List remote mirror statuses on the secondary XIV >> mirror_list Name itso_win2008_vol1 itso_win2008_vol2 itso_win2008_vol3 Mirror Type sync_best_effort sync_best_effort sync_best_effort Mirror Object Volume Volume Volume Role Master Master Master Remote System XIV MN00019 XIV MN00019 XIV MN00019 Remote Peer itso_win2008_vol1 itso_win2008_vol2 itso_win2008_vol3 Active yes yes no Status Synchronized Synchronized Unsynchronized Link Up yes yes yes 3. On the primary XIV run the mirror_list command to see the status of the couplings, as shown in Example 4-13. Example 4-13 List remote mirror statuses on the primary XIV >> mirror_list Name itso_win2008_vol1 itso_win2008_vol2 itso_win2008_vol3 Mirror Type sync_best_effort sync_best_effort sync_best_effort Mirror Object Volume Volume Volume Role Slave Slave Master Remote System XIV MN00035 XIV MN00035 XIV MN00035 Remote Peer itso_win2008_vol1 itso_win2008_vol2 itso_win2008_vol3 Active yes yes no Status Consistent Consistent Unsynchronized Link Up yes yes yes 4. Repeat steps 1–3 to activate additional couplings. Environment with remote mirroring reactivated Figure 4-25 illustrates production at the secondary site. Primary Site Standby Windows 2008 Server Active Down FC Link FC Link Data Flow Production Windows 2008 Server Secondary Site Data Mirroring FC Link Primary XIV Secondary XIV Figure 4-25 Mirroring reactivated 4.5.4 Phase 4: switching production back to the primary site At this stage we have mirroring reactivated with production at the secondary site. We now want to switch production back to the primary site. This involves doing the following: Shut down the servers. Switch peer roles. Switch from the standby server to the original production server. Chapter 4. Synchronous Remote Mirroring 123 7759ch_Sync_Mirror.fm Draft Document for Review January 23, 2011 12:42 pm Role switchover using the GUI To switch over the role using the GUI: 1. At the secondary site, ensure that all the volumes for the standby server are synchronized and shut down the servers. 2. On the secondary XIV go to the Remote Mirroring menu, highlight the required coupling, and select Switch Roles (Figure 4-26). Figure 4-26 Switch roles 3. You are prompted for confirmation. Select OK. Refer to Figure 4-27 and Figure 4-28 on page 124. Figure 4-27 Switch role confirmation Figure 4-28 Switch role to slave volume on the secondary XIV 4. Go to the Remote Mirroring menu on the primary XIV and check the status of the coupling. It must show the peer volume as a master volume (Figure 4-29). 124 IBM XIV Storage System: Copy Services and Migration 7759ch_Sync_Mirror.fm Draft Document for Review January 23, 2011 12:42 pm Figure 4-29 Switch role to master volume on the primary XIV 5. Reassign volumes back to the production server at the primary site and power it on again. Continue to work as normal. Figure 4-30 on page 126 shows that all the new data is now back at the primary site. Role switchover using the XCLI To switch over the role using the XCLI: 1. At the secondary site, ensure that all the volumes for the standby server are synchronized and shut down the servers. 2. On the secondary XIV open an XCLI session and run the mirror_switch_roles command, as shown in Example 4-14. Example 4-14 Switch from master volume to slave volume on secondary XIV >> mirror_switch_roles vol=itso_win2008_vol2 Command executed successfully. 3. On the secondary XIV, to list the mirror coupling run the mirror_list command (Example 4-15). Example 4-15 Mirror statuses on the secondary XIV >> mirror_list Name itso_win2008_vol1 itso_win2008_vol2 itso_win2008_vol3 Mirror Type sync_best_effort sync_best_effort sync_best_effort Mirror Object Volume Volume Volume Role Slave Slave Master Remote System XIV MN00019 XIV MN00019 XIV MN00019 Remote Peer itso_win2008_vol1 itso_win2008_vol2 itso_win2008_vol3 Active yes yes no Status Consistent Consistent Unsynchronized Link Up yes yes yes 4. On the primary XIV run the mirror_list command to list the mirror couplings, as shown in Example 4-16. Example 4-16 Mirror statuses on the primary XIV >> mirror_list Name itso_win2008_vol1 itso_win2008_vol2 itso_win2008_vol3 Mirror Type sync_best_effort sync_best_effort sync_best_effort Mirror Object Volume Volume Volume Role Master Master Master Remote System XIV MN00035 XIV MN00035 XIV MN00035 Remote Peer itso_win2008_vol1 itso_win2008_vol2 itso_win2008_vol3 Active yes yes no Status Synchronized Synchronized Unsynchronized Link Up yes yes yes 5. Reassign volumes back to the production server at the primary site and power it on again. Continue to work as normal. Figure 4-30 shows that all the new data in now back at the primary site. Chapter 4. Synchronous Remote Mirroring 125 7759ch_Sync_Mirror.fm Draft Document for Review January 23, 2011 12:42 pm Figure 4-30 Production server with mirrored data reassigned at the local site Environment back to its production state The environment is now back to its production state with mirroring from the primary site to the secondary site, as shown in Figure 4-31. P rim a ry S ite A ctive In active Data Flow P ro d uctio n W in do w s 20 0 8 S e rve r S e co nd ary S ite S tan db y W ind ow s 20 08 S e rve r FC Link F C L ink D a ta M irrorin g F C Link P rim ary X IV Figure 4-31 Environment back to production state 126 IBM XIV Storage System: Copy Services and Migration S e co n da ry X IV Draft Document for Review January 23, 2011 12:42 pm 7759ch_Async_Mirror.fm 5 Chapter 5. Asynchronous remote mirroring This chapter describes the basic characteristics, options, and available interfaces for asynchronous remote mirroring. It also includes step-by-step procedures for setting up and removing the mirror. Asynchronous mirroring is the volume or consistency group synchronization attained through a periodic, recurring activity that takes a snapshot of a designated source and updates a designated target with differences between that snapshot and the last replicated version of the source. Unlike other implementations, XIV asynchronous mirroring supports multiple consistency groups with different recovery point objectives. XIV asynchronous mirroring supports multiple targets, 512 mirrored pairs, scheduling, event reporting, and statistics collection. Asynchronous mirroring enables replication between two XIV volumes or consistency groups (CG) that does not suffer from the latency inherent to synchronous mirroring, thereby yielding better system responsiveness and offering greater flexibility for implementing disaster recovery solutions. © Copyright IBM Corp. 2010. All rights reserved. 127 7759ch_Async_Mirror.fm Draft Document for Review January 23, 2011 12:42 pm 5.1 Asynchronous mirroring configuration The mirroring configuration process involves configuring volumes and CGs. When a pair of volumes or consistency groups point to each other, it is referred to as a mirror. We assume that the links between the local and remote XIV storage systems have already been established, as discussed in 3.11.2, “Remote mirror target configuration” on page 96. 5.1.1 Volume mirroring setup and activation Volumes or consistency groups that participate in mirror operations are configured in pairs. These pairs are called peers. One peer is the source of the data to be replicated and the other is the target. The source has the role of master and is the controlling entity in the mirror. The target has the role of slave, which is controlled by operations performed by the master. When initially configured, one volume is considered the source (resides at the primary system) and the other is the target (resides at the secondary system). This designation is associated with the volume and its XIV system and does not change. During various operations the role may change (master or slave) but one system is always the primary and the other is always the secondary. Asynchronous mirroring is initiated at defined intervals. This is the sync job schedule. A sync job entails synchronization of data updates recorded on the master since the last successful synchronization. The sync job schedule will be defined for both the primary and secondary system peers in the mirror. This provides a schedule for each peer and will be used when the peer takes on the role of master. The purpose of the schedule specification on the slave is to set a default schedule for an automated failover scenario. The system suppports the following schedule intervals: 20s (min_interval), 30s, 1m, 2m, 5m, 10m, 15m, 30m, 1h, 2h, 3h, 6h, 8h, 12h, 24h. Consult your IBM representative to set the optimum schedule interval based on your RPO requirements. A schedule set as NEVER means that no sync jobs will be automatically scheduled. See 5.6, “Detailed asynchronous mirroring process” on page 155. In addition to schedule-based snapshots, a dedicated command to run a mirror snapshot can be issued manually. These ad-hoc snapshots are issued from the master and initiate a sync job that is queued behind outstanding sync jobs. See 5.5.4, “Ad-hoc snapshots” on page 152. The XIV GUI automatically creates schedules based on the RPO selected for the mirror being created. The interval can be set in the mirror properties panel or must be explicitly specified through the XCLI. Tip: XIV allows you to set a specific RPO and schedule interval for each mirror coupling. Slave volumes must be formatted before they are configured as part of a mirror. This means that the volume must not have any snapshots and must be unlocked. To create a mirror you can use the XIV GUI or the XCLI. Both methods are illustrated in the following sections. 128 IBM XIV Storage System: Copy Services and Migration 7759ch_Async_Mirror.fm Draft Document for Review January 23, 2011 12:42 pm Using the GUI for volume mirror setup To create a mirror select the master peer (volume or CG) and select Create Mirror (Figure 5-1). Figure 5-1 Select volume to be mirrored Then specify Sync Type as Async, select the slave peer (volume or CG), and specify an RPO value. Set the Schedule Management field to XIV Internal to create automatic synchronization using scheduled sync jobs, as shown in Figure 5-2. Figure 5-2 Create Mirror Chapter 5. Asynchronous remote mirroring 129 7759ch_Async_Mirror.fm Draft Document for Review January 23, 2011 12:42 pm The slave volume must be unlocked and created as formatted, which also means that it cannot have any Snapshots. When creating a mirror, the slave peer (volume or CG) can also be created automatically on the target XIV System. To do this, select Create Slave and specify the slave pool name and the slave volume or CG name, as shown in Figure 5-3. Figure 5-3 Create Mirror and slave volume If schedule type External is selected when creating a mirror, no sync jobs will run for this mirror and the interval will be set to Never, as illustrated in Figure 5-4. Figure 5-4 Mirror with external schedule 130 IBM XIV Storage System: Copy Services and Migration 7759ch_Async_Mirror.fm Draft Document for Review January 23, 2011 12:42 pm When volumes are to be placed in a consistency group, they must all have the same mirroring properties. Using the Mirror Properties panel, the Never interval can be changed to match the other volumes created (Figure 5-5). Figure 5-5 Mirror Properties The Mirroring panel shows the current status of the mirrors. The synchronization of the mirror must be initiated manually using the Activate action, as seen in Figure 5-7 on page 133. In Figure 5-6, notice that the selected RPO is displayed for the mirror created. Figure 5-6 Mirroring status inactive Note that sync type mirrors do not have an RPO value. Chapter 5. Asynchronous remote mirroring 131 7759ch_Async_Mirror.fm Draft Document for Review January 23, 2011 12:42 pm Using XCLI for volume mirroring setup Tip: When working with the XCLI session or the XCLI command, the windows look similar and you could address the wrong XIV system with your command. Therefore, it might be helpful to always first issue a config_get command to verify that you are working with the right XIV system. Example 5-1 illustrates the use of XCLI commands to set up a mirror volume. Example 5-1 XCLI commands for mirror volume setup -- Mirror itso_volume_1 (select slave volume) schedule_create schedule=forty_sec interval=00:00:40 schedule_create schedule=forty_sec interval=00:00:40 (on target system) mirror_create vol=itso_volume_1 slave_vol=itso_volume_1 type=async_interval target="XIV LAB 3 1300203" schedule=forty_sec remote_schedule=forty_sec rpo=90 remote_rpo=90 -- Mirror itso_volume_2 (create slave volume) mirror_create vol=itso_volume_2 create_slave=yes remote_pool=itso slave_vol=itso_volume_2 type=async_interval target="XIV LAB 3 1300203" schedule=forty_sec remote_schedule=forty_sec rpo=90 remote_rpo=90 -- Mirror itso_volume_3 (never schedule) mirror_create vol=itso_volume_3 create_slave=yes remote_pool=itso slave_vol=itso_volume_3 type=async_interval target="XIV LAB 3 1300203" schedule=never remote_schedule=never rpo=90 remote_rpo=90 -- Mirror itso_volume_4 (sync) mirror_create vol=itso_volume_4 create_slave=yes remote_pool=itso slave_vol=itso_volume target="XIV LAB 3 1300203" -- Change schedule itso_volume_3 (master) schedule_create schedule=thirty_sec interval=00:00:30 mirror_change_schedule vol=itso_volume_3 schedule=thirty_sec -- Change schedule itso_volume_3 (slave) schedule_create schedule=thirty_sec interval=00:00:30 mirror_change_schedule vol=itso_volume_3 schedule=thirty_sec 132 IBM XIV Storage System: Copy Services and Migration Draft Document for Review January 23, 2011 12:42 pm 7759ch_Async_Mirror.fm Activating the remote mirror coupling using the GUI To activate the mirror, on the primary XIV go the Remote Mirroring menu and highlight all the couplings that you want to activate, right-click, and select Activate, as shown in Figure 5-7. Figure 5-7 Activate mirror As seen in Figure 5-8, the Mirroring panel now shows the status of the active mirrors as RPO OK. All the async mirrors have the same mirroring status. Note that Sync Mirrors show the status as synchronized. Figure 5-8 Mirror status active 5.1.2 Consistency group configuration IBM XIV Storage System leverages its consistency group capability to allow for mirroring numerous volumes at once. The system creates snapshots of the master consistency groups at user-configured intervals and synchronizes these point-in-time snapshots with the slave. Setting the consistency group to be mirrored is done by first creating a consistency group, then setting it to be mirrored, and only then populating it with volumes. A consistency group must be created at the primary XIV and a corresponding consistency group at the secondary XIV. The names of the consistency groups can be different. When creating a consistency group, you also must specify the storage pool. All volumes that you are going to add to the consistency group must be in that pool on the primary XIV and in one pool at the secondary XIV. Adding a new volume pair to a mirrored consistency group requires the volumes to be mirrored exactly as the other volumes within this consistency group. Volume pairs with different mirroring paramters will be modified to match those of the CG when attempting to add them to the CG with the GUI. Chapter 5. Asynchronous remote mirroring 133 7759ch_Async_Mirror.fm Draft Document for Review January 23, 2011 12:42 pm Important: All volumes that you want to add to a mirroring consistency group must be defined in the same pool at the primary XIV and must be in one pool at the secondary XIV. It is possible to add a mirrored volume to a non-mirrored consistency group and have this volume retain its mirroring settings. To create a mirrored consistency group first create a CG on the primary and secondary XIV Storage System. Then select the primary CG and specify Create Mirror (Figure 5-9). Figure 5-9 Create mirrored CG The consistency group must not contain any volume when you create the mirror, and be sure to specify mirroring parameters that match the volumes that will be part of this CG, as shown in Figure 5-10. The status of the new mirrored CG is now displayed in the Mirroring panel. Figure 5-10 Async mirrored CG 134 IBM XIV Storage System: Copy Services and Migration 7759ch_Async_Mirror.fm Draft Document for Review January 23, 2011 12:42 pm Adding a mirrored volume to a mirrored consistency group The mirrored volume and the mirrored consistency group must have the following attributes: The volume is on the same system as the consistency group. The volume belongs to the same storage pool as the consistency group. Both the volume and the consistency group do not have outstanding sync jobs, either scheduled or manual. The volume and consistency group have the same synchronization status. The volume’s and consistency group’s special snapshot (known as last-replicated snapshot) have identical timestamps. This means that the volumes must have the same schedule and at least one interval has passed since the creation of the mirrors. For more information about asynchronous mirroring special snapshots refer to 5.5.5, “Mirroring special snapshots” on page 154. Also, mirrors for volumes must be activated before volumes can be added to a mirrored consistency group. This activation results in the initial copy being completed and sync jobs being run to create the special last-replicated snapshots (refer to Figure 5-7 on page 133). As seen in Figure 5-11, the Mirror panel now shows the status of the active mirrors as RPO OK. All the async mirrors and the mirrored CG have the same mirroring status. Note that sync mirrors shows the status as synchronized. Figure 5-11 Mirror status active To add volumes to the mirrored CG, the mirroring parameters must be identical, including the last-replicated timestamps. The RPO and schedule will be changed to match the values set for the mirrored consistency group. The volumes must have the same status (RPO OK). It is possible that during the process the status may change or the last-replicated timestamp may not yet be updated. If an error occurs, verify the status and repeat the operation. Go to the Mirroring panel and verify the RPO and status for the volumes to be added to the CG. Select each volume and specify to Add To Consistency Group (Figure 5-12). Figure 5-12 Volumes and snapshots Chapter 5. Asynchronous remote mirroring 135 7759ch_Async_Mirror.fm Draft Document for Review January 23, 2011 12:42 pm Then specify the mirrored consistency group, as shown in Figure 5-13. Figure 5-13 Select Mirrored CG The Mirroring panel now shows the consistency group as a group of volumes, all with the same status for both the master CG (Figure 5-14) and the slave CG (Figure 5-15 on page 136). Figure 5-14 Master CG status Figure 5-15 Slave CG status 136 IBM XIV Storage System: Copy Services and Migration 7759ch_Async_Mirror.fm Draft Document for Review January 23, 2011 12:42 pm The Consistency Groups panel shows the last-replicated snapshots, and if the sync job is currently running there will be a most-recent snapshot, as can be seen in Figure 5-16. Figure 5-16 Mirrored CG: most-recent snapshot Removing a volume from a mirrored consistency group When removing a volume from a mirrored consistency group, the corresponding peer volume will be removed from the peer consistency group. Mirroring is retained with the same configuration as the consistency group from which it was removed. All ongoing consistency groups’ sync jobs keep running. Asynchronous mirroring and snapshot consistency groups A volume can be in only one consistency group. Because consistency groups can be used for snapshot and remote mirroring, confusion can arise. Define separate and specific CG for snapshot and remote mirroring. XCLI commands for consistency group configuration Example 5-2 illustrates the use of XCLI commands for configuring consistency groups. Example 5-2 XCLI commands for CG configuration -- Activate async mirrors mirror_activate vol=itso_volume_1 mirror_activate vol=itso_volume_2 mirror_activate vol=itso_volume_3 -- Activate mirror CG mirror_activate cg=itso_volume_cg -- add volume to CG with changing RPO mirror_change_schedule vol=itso_volume_1 schedule=forty_sec schedule_delete schedule=xiv_gui_schedule_40_1287480863781 mirror_change_remote_schedule vol=itso_volume_1 schedule=forty_sec mirror_change_rpo vol=itso_volume_1 rpo=90 remote_rpo=90 cg_add_vol cg=itso_volume_cg vol=itso_volume_1 -- Primary Mirror Status Chapter 5. Asynchronous remote mirroring 137 7759ch_Async_Mirror.fm Draft Document for Review January 23, 2011 12:42 pm >> mirror_list -t local_peer_name,sync_type,current_role,target_name,remote_peer_name,active,sync_state,sched ule_name,last_replicated_snapshot_time,specified_rpo Name Mirror Type Role Remote System Remote Peer Active Status Schedule Name Last Replicated RPO itso_volume_1 async_interval Master XIV LAB 3 1300203 itso_volume_1 yes RPO OK xiv_gui_schedule_40_1287480917640 2010-10-19 14:17:20 0:01:30 itso_volume_2 async_interval Master XIV LAB 3 1300203 itso_volume_2 yes RPO OK xiv_gui_schedule_40_1287480917640 2010-10-19 14:17:20 0:01:30 itso_volume_3 async_interval Master XIV LAB 3 1300203 itso_volume_3 yes RPO OK xiv_gui_schedule_40_1287480917640 2010-10-19 14:17:20 0:01:30 itso_volume_4 sync_best_effort Master XIV LAB 3 1300203 itso_volume_4 yes Synchronized itso_volume_cg async_interval Master XIV LAB 3 1300203 itso_volume_cg yes RPO OK xiv_gui_schedule_40_1287480917640 2010-10-19 14:17:20 0:01:30 -- Secondary Mirror Status >> mirror_list -t local_peer_name,sync_type,current_role,target_name,remote_peer_name,active,sync_state,sched ule_name,last_replicated_snapshot_time,specified_rpo Name Mirror Type Role Remote System Remote Peer Active Status Schedule Name Last Replicated RPO itso_volume_1 async_interval Slave XIV LAB 01 EBC itso_volume_1 yes RPO OK xiv_gui_schedule_40_1287480917640 2010-10-19 14:22:00 0:01:30 itso_volume_2 async_interval Slave XIV LAB 01 EBC itso_volume_2 yes RPO OK xiv_gui_schedule_40_1287480917640 2010-10-19 14:22:00 0:01:30 itso_volume_3 async_interval Slave XIV LAB 01 EBC itso_volume_3 yes RPO OK xiv_gui_schedule_40_1287480917640 2010-10-19 14:22:00 0:01:30 itso_volume_4 sync_best_effort Slave XIV LAB 01 EBC itso_volume_4 yes Consistent itso_volume_cg async_interval Slave XIV LAB 01 EBC itso_volume_cg yes RPO OK xiv_gui_schedule_40_1287480917640 2010-10-19 14:22:00 0:01:30 >> sync_job_list Job Object Local Peer Source State Part of CG Job Type Volume itso_volume_1 last-replicated-itso_volume_1 active yes scheduled Volume itso_volume_2 last-replicated-itso_volume_2 active yes scheduled Volume itso_volume_3 last-replicated-itso_volume_3 active yes scheduled CG itso_volume_cg last-replicated-itso_volume_cg active no scheduled -- Remove from mirrored consistency group cg_remove_vol vol=itso_volume_1 138 IBM XIV Storage System: Copy Services and Migration Target most-recent-itso_volume_1 most-recent-itso_volume_2 most-recent-itso_volume_3 most-recent-itso_volume_cg 7759ch_Async_Mirror.fm Draft Document for Review January 23, 2011 12:42 pm 5.1.3 Coupling activation, deactivation, and deletion Mirroring can be manually activated and deactivated per volume or CG pair. When it is activated, the mirror is in active mode. When it is deactivated, the mirror is in inactive mode. These modes have the following functions: Active Mirroring is functioning and the data is being written to the master and copied to the slave peers at regular intervals. Inactive Mirroring is deactivated. The data is not being replicated to the slave peer, but writes to the master peer are being recorded and can later be replicated to the slave volume. Inactive mode is used mainly when maintenance is performed on the secondary XIV system. The mirror has the following characteristics: When a mirror is created, it is always initially in inactive mode. A mirror can only be deleted when its is in inactive mode. Transitions between the two states can only be performed from the XIV with the master. In a DR situation a role change changes the slave peers (at the secondary system) to a master role (so that production can resume at the secondary). However, until the primary site is recovered, the role of its volumes cannot be changed from master to slave. In this case, both sides have the same role. When the primary site is recovered and before the link is resumed, you must first change the role from master to slave at the primary (see also 5.3, “Resynchronization after link failure” on page 149, and 5.4, “Disaster recovery” on page 149). The mirroring is terminated by deactivating the mirror and is required for the following actions: Terminating or deleting the mirroring Stopping the mirroring process – For a planned network outage – To reduce network bandwidth – For a planned recovery test The deactivation pauses a running sync job and no new sync jobs will be created as long as the active state of the mirroring is not restored. However, the deactivation does not cancel the status check by the master and the slave. The synchronization status of the deactivated mirror is calculated as though the mirror was active. Deactivating a mirror results in the synchronization status becoming RPO_Lagging via XCLI when the specified RPO time is exceeded. This means that the last-replicated snapshot is older than the specified RPO. The GUI will show the mirror as Inactive. Chapter 5. Asynchronous remote mirroring 139 7759ch_Async_Mirror.fm Draft Document for Review January 23, 2011 12:42 pm Change RPO and interval The required RPO can be changed as illustrated in Figure 5-17 and the GUI selects a new interval for the schedule. For example, as shown in Figure 5-18, the RPO was changed to 2 minutes (00:02:00). The schedule selected is min_interval (00:00:20). This schedule can then be changed from the Properties panel. There is a selection list of available intervals, as shown in Figure 5-19 on page 141. Figure 5-17 Change RPO Figure 5-18 New RPO value 140 IBM XIV Storage System: Copy Services and Migration 7759ch_Async_Mirror.fm Draft Document for Review January 23, 2011 12:42 pm Figure 5-19 Change CG interval Using XCLI commands to change RPO and schedule interval Example 5-3 illustrates the use of XCLI commands to change the RPO and schedule interval. Example 5-3 XCLI commands for changing RPO and schedule interval -- change RPO to 2 min and adjust schedule time interval mirror_change_rpo cg=itso_volume_cg rpo=120 remote_rpo=120 schedule_change schedule=forty_sec interval=00:00:50 -y schedule_rename schedule=forty_sec new_name=fifty_sec ---- on secondary schedule_create schedule=fifty_sec interval=00:00:50 mirror_change_schedule cg=itso_volume_cg schedule=fifty_sec schedule_delete schedule=forty_sec Chapter 5. Asynchronous remote mirroring 141 7759ch_Async_Mirror.fm Draft Document for Review January 23, 2011 12:42 pm Deactivation on the master To deactivate a mirror select Deactivate, as shown in Figure 5-20. Figure 5-20 Mirror CG deactivate The activation state changes to inactive, as shown in Figure 5-21. Subsequently, the replication pauses (and records where it paused). Upon activation, the replication resumes. Note that an ongoing sync job resumes upon activation. No new sync job will be created until the next interval. Figure 5-21 Mirror CG inactive Deactivation on the slave Deactivation on the slave is not available, regardless of the state of the mirror. However, the peer role can be changed to master, which sets the status to inactive. Note that for consistency group mirroring, deactivation pauses all running sync jobs pertaining to the consistency group. 142 IBM XIV Storage System: Copy Services and Migration 7759ch_Async_Mirror.fm Draft Document for Review January 23, 2011 12:42 pm Using XCLI commands for deactivation and activation Example 5-4 shows XCLI commands for CG deactivation and activation. Example 5-4 XCLI commands for CG deactivation and activation -- Deactivate mirrored CG mirror_deactivate cg=itso_volume_cg -- Activate mirrored CG mirror_activate cg=itso_volume_cg Deletion When a mirror pair (volume pairs or a consistency group) is inactive, the mirror relationship can be deleted. When the mirror is deleted, the XIV forgets everything about the mirror. If you want to set up the mirror again, the XIV must do an initial copy again from the source to the target volume. When the mirror is part of a consistency group, the mirror must first be removed from the mirrored CG. For a CG, the last-replicated snapgroup for the master and the slave CG must be deleted or disbanded (making all snapshots directly accessible) after deactivation and mirror deletion. This CG snapgroup is recreated with only the current volumes after the next interval completes. The last-replicated snapshots for the mirror can now be deleted, allowing a new mirror to be created. All existing volumes in the CG need to be removed before a new mirrored CG can be created. Note that when the mirror is deleted, the slave volume becomes a normal volume again, but the volume is locked, which means that it is write protected. To enable writing to the volume go to the Volumes list panel, select the volume, right-click it, and select Unlock. The slave volume must also be formatted before it can be part of a new mirror. Formatting also requires all snapshots of that volume to be deleted. XCLI commands for mirror deletion Example 5-5 illustrates the use of XCLI commands for mirror deletion. Example 5-5 XCLI commands for mirror deletion -- Delete mirror cg_remove_vol vol=itso_volume_3 -y mirror_deactivate vol=itso_volume_3 -y mirror_delete vol=itso_volume_3 -y -- Format slave volume snap_group_disband snap_group=last-replicated-itso_volume_cg snapshot_delete snapshot=last-replicated-itso_volume_3 vol_unlock vol=itso_volume_3 vol_format vol=itso_volume_3 -- Delete snapshots on Master snap_group_disband snap_group=last-replicated-itso_volume_cg snapshot_delete snapshot=last-replicated-itso_volume_3 Chapter 5. Asynchronous remote mirroring 143 7759ch_Async_Mirror.fm Draft Document for Review January 23, 2011 12:42 pm 5.2 Role reversal Changing roles can be performed at any time (when a pair is active or inactive) for the slave, and for the master when the mirror is inactive. A change role reverts only the role of that peer. The single operation to switch roles is only available for the master peer when both the master and slave XIV systems are accessible. However, the direction of the mirror can be reversed by following a process of multiple change role operations. Change role In a disaster at the primary site, a role change at the secondary site is the normal recovery action. Assuming that the primary site is down and that the secondary site will become the main production site, changing roles is performed at the secondary (now production) site first. Later, when the primary site is up again and communication is re-established, you also change the role at the primary site to slave to be able to establish mirroring from the secondary site back to the primary site. This completes a switch role operation. Changing the slave peer role The role of the slave volume or consistency group can be changed to the master role, as shown in Figure 5-22. Figure 5-22 Change role of a slave consistency group As shown in Figure 5-23 on page 145, you are then prompted to confirm the role change (role reverse). 144 IBM XIV Storage System: Copy Services and Migration 7759ch_Async_Mirror.fm Draft Document for Review January 23, 2011 12:42 pm Figure 5-23 Verify change role After this changeover, the following is true: The slave volume or consistency group is now the master. The last-replicated snapshot is restored to the volumes The coupling has the status of inactive (Figure 5-24). Figure 5-24 Slave becomes master The coupling remains in inactive mode (Figure 5-25). This means that remote mirroring is deactivated. This ensures an orderly activation when the role of the peer on the other site is changed. Figure 5-25 Original master becomes inactive The new master volume or consistency group starts to accept write commands from local hosts. Since coupling is not active in the same way as for any master volume, a log is maintained of which write operations must be sent to the slave volume when communication resumes. After changing the slave to the master, an administrator must also change the original master to the slave role before communication resumes (Figure 5-26). If both peers are left in the same role (master), mirroring cannot be restarted. Chapter 5. Asynchronous remote mirroring 145 7759ch_Async_Mirror.fm Draft Document for Review January 23, 2011 12:42 pm Figure 5-26 Change role of a master consistency group Slave peer consistency When the user is changing the slave volume or consistency group to a master volume or master consistency group, they may not be in a consistent state. Therefore, the volumes are automatically restored to the last-replicated snapshot. Changing the master peer role When a peer role is changed from slave to master, then the mirror automatically becomes inactive because both volumes are a master (Figure 5-25 on page 145). When coupling is inactive, the master volume or consistency group can change roles. After such a change the master volume or consistency group becomes the slave volume or consistency group (Figure 5-27). Figure 5-27 Original master becomes slave Unsynchronized master becoming a slave volume or consistency group When a master volume (or consistency group) is inactive, it is also not consistent with the previous slave. Any changes made after the last replicated snapshot time will be lost when the volume (CG) becomes a slave volume (CG). The data will be restored to the last replicated snapshot to match the data on the peer volume, which is now the new master volume. 146 IBM XIV Storage System: Copy Services and Migration 7759ch_Async_Mirror.fm Draft Document for Review January 23, 2011 12:42 pm Upon re-establishing the connection, the primary volume or consistency group (current slave volume/CG) is updated from the secondary volume/CG (new master volume/CG) with data that was written to the secondary volume after the last replicated snapshot timestamp. Reconnection when both sides have the same role Situations where both sides are configured to the same role can only occur when one side was changed. The roles must be changed to have one master and one slave (volume or consistency group). Change the volume roles as appropriate on both sides before the link is resumed. If the link is resumed and both sides have the same role, the coupling does not become operational. The user must use the change role function on one of the volumes and then activate the mirroring. Peer reverts to last-replicated snapshot. See 5.5.5, “Mirroring special snapshots” on page 154. Switch roles Switch roles is a useful command when performing a planned site switch by reversing replication direction. It is only available when both the master and slave XIV systems are accessible. Mirroring needs to be active and synchronized (RPO OK) in order to issue the command via the GUI. The command to switch roles may only be issued for a master volume or CG as shown in Figure 5-28. Figure 5-28 Switch roles of a master consistency group As shown in Figure 5-29 on page 148 you are then prompted to confirm the switch roles. In our example, the async mirrored itso_volume_cg has now returned to its original state and remains Active and RPO OK (Figure 5-30 on page 148). Chapter 5. Asynchronous remote mirroring 147 7759ch_Async_Mirror.fm Draft Document for Review January 23, 2011 12:42 pm Figure 5-29 Verify switch roles Figure 5-30 Original master back with initial role Using XCLI commands to change and switch roles Figure 5-31 shows an example of using XCLI commands to change and switch roles. -- Slave change role mirror_change_role cg=itso_volume_cg -y -- Master change role mirror_change_role cg=itso_volume_cg -y -- Master switch role mirror_switch_roles cg=itso_volume_cg -y -- Activate new Master mirror_activate cg=itso_volume_cg Figure 5-31 XCLI change and switch roles 148 IBM XIV Storage System: Copy Services and Migration 7759ch_Async_Mirror.fm Draft Document for Review January 23, 2011 12:42 pm 5.3 Resynchronization after link failure When a link failure occurs, the primary system must start tracking changes to the mirror source volumes so that these changes can be copied to the secondary once recovered. When recovering from a link failure, the following steps are taken to synchronize the data: Asynchronous mirroring sync jobs proceed as scheduled. Sync jobs are restarted and a new most-recent snapshot is taken. See 5.5.5, “Mirroring special snapshots” on page 154. The primary system copies the changed data to the secondary volume. Depending on how much data must be copied, this operation could take a long time, and the status remains RPO_Lagging. 5.4 Disaster recovery There are two broad categories of disaster: One that destroys the primary site or destroys the data there One that makes the primary site or the data there unavailable, but leaves the data intact However, within these broad categories there are a number of situations that may exist. Some of these and the recovery procedures are considered below: A disaster that makes the XIV at the primary site unavailable, but leaves the site itself and the servers there still available In this scenario the volumes/CG on the XIV at the secondary site can be switched to master volumes/CG, servers at the primary site can be redirected to the XIV at the secondary site, and normal operations can start again. When the XIV at the primary site is recovered the data can be mirrored from the secondary site back to the primary site. A full initialization of the data is usually not needed. Only changes that take place at the secondary site are transferred to the primary site. If desired, a planned site switch can then take place to resume production activities at the primary site. See 5.2, “Role reversal” on page 144, for details related to this process. A disaster that makes both the primary site and data unavailable. In this scenario, the standby (inactive) servers at the secondary site are activated and attached to the secondary XIV to continue normal operations. This requires changing the role of the slave peers to become master peers. After the primary site is recovered, the data at the secondary site can be mirrored back to the primary site. This most likely requires a full initialization of the primary site because the local volumes may not contain any data. See 5.1, “Asynchronous mirroring configuration” on page 128, for details related to this process. When initialization completes the peer roles can be switched back to master at the primary site and the slave at secondary site. The servers are then redirected back to the primary site. See 5.2, “Role reversal” on page 144, for details related to this process. A disaster that breaks all links between the two sites but both sites remain running In this scenario the primary site continues to operate as normal. When the links are reestablished the data at the primary site can be resynchronized with the secondary site. Only the changes since the previous last-replicated snapshot are sent to the secondary site. Chapter 5. Asynchronous remote mirroring 149 7759ch_Async_Mirror.fm Draft Document for Review January 23, 2011 12:42 pm 5.5 Mirroring process This section explains the overall asynchronous mirroring process, from initialization to outgoing operations. The asynchronous mirroring process generates snapshots of the master at user-configured intervals and synchronizes these snapshots with the slave (see “Snapshot life-cycle” on page 155). 5.5.1 Initialization process The mirroring process starts with an initialization phase: 1. Read requests are served from the master. Upon each write operation to the master, the master writes the data locally (primary site) and acknowledges the write operation. 2. Before any actual synchronization of a master can commence, a most-recent snapshot of the master is created. This snapshot determines the scope of replication for the initialization phase and the data to be replicated can be determined. 3. The most-recent data is copied to the slave and a last-replicated snapshot of the slave is taken (Figure 5-32). Initialization Job completes Initialization Sync Job Master peer Slave peer most-recent last-replicated Data to be replicated Primary site Figure 5-32 Initialization process completes 150 IBM XIV Storage System: Copy Services and Migration Secondary site 7759ch_Async_Mirror.fm Draft Document for Review January 23, 2011 12:42 pm 4. The most-recent snapshot on the master is renamed to last-replicated. This snapshot is identical to the data in the last-replicated snapshot on the slave (Figure 5-33). Master’s last-replicated snapshot created Initialization phase ends Master peer Slave peer most-recent > last-replicated ast-replicated last-replicated Secondary site Primary site Figure 5-33 Ready for ongoing operation 5. Sync jobs can now be run to create periodic consistent copies of the master volumes or consistency groups on the slave system. See 5.6, “Detailed asynchronous mirroring process” on page 155. 5.5.2 Ongoing mirroring operation Following the completion of the initialization phase, the master examines the synchronization status at scheduled intervals and determines the scope of the synchronization. The following process occurs whenever a synchronization is started: 1. A snapshot of the master is created. 2. The master calculates the differences between the master snapshot and the most recent master snapshot that is synchronized with the slave. 3. The master establishes a synchronization process called a sync job that replicates the differences from the master to the slave. Only data differences are replicated. Details of this process can be found in 5.6, “Detailed asynchronous mirroring process” on page 155. 5.5.3 Mirroring consistency groups The synchronization status of the consistency group is determined by the status of all volumes pertaining to this consistency group. The activation and deactivation of a consistency group affects all of its volumes. Role updates concerning a consistency group affect all of its volumes. It is impossible to directly activate, deactivate, or update the role of a given volume within a consistency group. It is not possible to directly change the schedule of an individual volume within a consistency group. Chapter 5. Asynchronous remote mirroring 151 7759ch_Async_Mirror.fm Draft Document for Review January 23, 2011 12:42 pm 5.5.4 Ad-hoc snapshots In addition to using the schedule-based option, you can manually issue a dedicated command on the master system to run a mirror snapshot. These are called ad-hoc snapshots. They can be issued regardless of whether the mirror pairing has a schedule or not. The action initiates a sync job that is queued behind exisitng outstanding sync jobs and creates an adhoc snapshot on the master and slave system. The mirror snapshot: Accommodates a need for adding manual replication points to a scheduled replication process. Creates application-consistent replicas (in cases where consistency is not achieved via the scheduled replication). The following characteristics apply to the manual initiation of the asynchronous mirroring process: Multiple mirror snapshot commands can be issued – there is no maximum limit, aside from space limitations, on the number of mirror snapshots that can be issued manually. A mirror snapshot running when a new interval arrives delays the start of the next interval-based mirror scheduled to run, but does not cancel the creation of this sync job. The interval-based mirror snapshot will be cancelled only if the running snapshot mirror (ad-hoc) has never finished. Other than these differences, the manually initiated sync job is identical to a regular interval-based sync job. GUI steps to create an ad-hoc snapshot To create an ad-hoc snapshot using the XIV GUI, highlight the desired async mirrored volume or CG, right-click and select Create Mirrored Snapshot as seen in Figure 5-34. Figure 5-35 on page 153 shows the window that appears to name the ad-hoc snapshot. Enter the desired snapshot name and click Sync. Figure 5-34 Create Mirrored Snapshot 152 IBM XIV Storage System: Copy Services and Migration 7759ch_Async_Mirror.fm Draft Document for Review January 23, 2011 12:42 pm Figure 5-35 Snap and Sync - Naming the ad-hoc snapshot For this example, you can now verify the ad-hoc snapshot group has been created on the master and slave system by looking under the Consistency Groups window of the GUI as shown in Figure 5-36 and Figure 5-37 on page 153 respectively. Figure 5-36 Verify ad-hoc snapshot creation on master Figure 5-37 Verify ad-hoc snapshot creation on slave Chapter 5. Asynchronous remote mirroring 153 7759ch_Async_Mirror.fm Draft Document for Review January 23, 2011 12:42 pm XCLI commands for ad-hoc snapshots Figure 5-38 illustrates some XCLI commands for ad-hoc snapshots. -- Create ad-hoc snapshot mirror_create_snapshot cg=itso_volume_cg name=itso_volume_cg.mirror_snapshot_1 slave_name=itso_volume_cg.mirror_snapshot_1 -- List current and pending sync jobs sync_job_list -- Cancel all snapshot mirrors (ad-hoc sync jobs) mirror_cancel_snapshot cg=itso_volume_cg -y -- List statistics on past sync jobs mirror_statistics_get cg=itso_volume_cg Created Started 2010-10-25 21:04:10 2010-10-25 21:04:10 2010-10-25 21:05:00 2010-10-25 21:05:00 2010-10-25 21:05:50 2010-10-25 21:05:50 ... Finished Job Size (MB) 2010-10-25 21:04:10 0 2010-10-25 21:05:01 0 2010-10-25 21:05:50 0 Figure 5-38 XCLI ad-hoc snapshot commands 5.5.5 Mirroring special snapshots The status of the synchronization process and the scope of the sync job are determined through the use of the following two special snapshots: most-recent snapshot This snapshot is the most recent taken of the master system, either a volume or consistency group. This snapshot is taken prior to the creation of a new sync job. This entity is maintained on the master system only. last-replicated snapshot This is the most recent snapshot that has been fully synchronized with the slave system. This snapshot is duplicated from the most-recent snapshot after the sync job is complete. This entity is maintained on both the master and the slave systems. 154 IBM XIV Storage System: Copy Services and Migration 7759ch_Async_Mirror.fm Draft Document for Review January 23, 2011 12:42 pm Snapshot life-cycle Throughout the sync job life cycle, the most-recent and last-replicated snapshots are created and deleted to denote the completion of significant mirroring stages. This mechanism bears the following characteristics and limitations: The last-replicated snapshots have two available time stamps: – On the master system: the time that the last-replicated snapshot is copied from the most-recent snapshot – On the slave system: the time that the last-replicated snapshot is copied from the master system No snapshot is created during the initialization phase. Snapshots are deleted only after newer snapshots are created. A failure in creating a last-replicated snapshot caused by space depletion is handled in a designated process. See 5.8, “Pool space depletion” on page 164, for additional information. Ad-hoc sync job snapshots that are created by the Create Mirrored Snapshot operation are identical to the last-replicated snapshot until a new sync job runs. Table 5-1 indicates which snapshot is created for a given sync job phase. Table 5-1 Snapshots and sync job phases Sync job phase most-recent snapshot last-replicated snapshot Details 1 New interval starts. Created on the master system 2 Calculate the differences. 3 The sync job is complete. Created on the slave system The last-replicated snapshot on the slave system is created from the snapshot that has just been mirrored. 4 Following the creation of the last-replicated snapshot. Created on the master system The last-replicated snapshot on the master system is created from the most-recent snapshot. The most-recent snapshot is created only if there is no sync job running. The difference between the most-recent snapshot and the last-replicated snapshot is transferred from the master system to the slave system. 5.6 Detailed asynchronous mirroring process After initialization is complete, sync job schedules become active (unless schedule=never or Type=external is specified for the mirror). This starts a specific process that replicates a consistent set of data from the master to the slave. This process uses special snapshots to preserve the state of the master and slave during the synchronization process. This allows the changed data to be quantified and provides synchronous data points that can be used for disaster recovery. See 5.5.5, “Mirroring special snapshots” on page 154. Chapter 5. Asynchronous remote mirroring 155 7759ch_Async_Mirror.fm Draft Document for Review January 23, 2011 12:42 pm The sync job runs and the mirror status is maintained at the master system. If a previous sync job is running, a new sync job will not start. The following actions are taken at the beginning of each interval: 1. most-recent snapshot is taken of the volume or consistency group: a. Host I/O is halted. b. The snapshot is taken to provide a consistent set of data to be replicated. c. Host I/O resumes. 2. Changed data is copied to the slave: a. The difference between the most-recent and last-replicated snapshots is determined. b. This changed data is replicated to the slave. Refer to Figure 5-39. Sync job starts The sync job data is being replicated Sync Job Master peer most-recent Slave peer last-replicated last-replicated Data to be replicated Primary site Figure 5-39 Sync job starts 156 IBM XIV Storage System: Copy Services and Migration Secondary site 7759ch_Async_Mirror.fm Draft Document for Review January 23, 2011 12:42 pm 3. A new last-replicated snapshot is created on the slave. This snapshot preserves the consistent data for later recovery actions if needed. Refer to Figure 5-40. Sync Job completed …and a new last-replicated snapshot is created that represents the updated slave peer’s state. Master peer most-recent Slave peer last-replicated last-replicated Secondary site Primary site Figure 5-40 Sync job completes 4. The most recent-snapshot is renamed on the master (Figure 5-41): a. The most recent data is now equivalent to the data on the slave. b. Previous snapshots are deleted. c. The most-recent snapshot is renamed to last-replicated. New master last-replicated snapshot created In one transaction - the master first deletes the current last-replicated snapshot and then creates a new last-replicated snapshot from the most-recent snapshot. Interval sync process is now complete The master and slave peers have an identical ‘restore time point ‘ to which they can be reverted. This facilitates, among other things, mirror peer switching. most-recent > last-replicated Master peer Slave peer last-replicated last-replicated Primary site Secondary site Figure 5-41 New master’s last replicated snapshot The next sync job can now be run at the next defined interval. Chapter 5. Asynchronous remote mirroring 157 7759ch_Async_Mirror.fm Draft Document for Review January 23, 2011 12:42 pm Mirror synchronization status Synchronization status is checked periodically and is independent of the mirroring process of scheduling sync jobs. Refer to Figure 5-42 for a view of the synchronization states. Example: RPO = Interval Sync Job starts and replicates to Slave the Master state at t0 Master Slave Interval t0 t0’ Interval Interval t1 t2 RPO_OK t1’ Interval t3 RPO_Lagging If RPO is equal to or lower than the difference between the current time (when the check is run) and the timestamp of the last_replicated_snapshot, then the status will be set to RPO_OK Interval Interval t4 tn RPO_OK If RPO is higher than the difference between the current time (when the check is calculated) and the timestamp of the last_replicated_snapshot, then the status will be set to RPO_LAGGING Figure 5-42 Synchronization states The possible synchronization states are: Initialization Synchronization does not start until the initialization completes. RPO_OK Synchronization has completed within the specified sync job interval time (RPO). RPO_Lagging Synchronization has completed but took longer than the specified interval time (RPO). 5.7 Asynchronous mirror step-by-step illustration In the previous sections, the steps taken to set up, synchronize, and remove mirroring, utilizing both the GUI and the XCLI were explained. In this section we provide an asynchronous mirror step-by-step illustration. 5.7.1 Mirror initialization At this point, we are continuing after the setup illustrated in 5.1, “Asynchronous mirroring configuration” on page 128, which assumes that the Fibre Channel ports have been properly defined as source and targets, the Ethernet switch has been updated to jumbo frames, and all the physical paths are in place. 158 IBM XIV Storage System: Copy Services and Migration Draft Document for Review January 23, 2011 12:42 pm 7759ch_Async_Mirror.fm Mirrored volumes have been placed into a mirrored consistency group and the mirror has been initialized and has a status of RPO OK. See Figure 5-43 and Figure 5-44. Figure 5-43 Master status after setup Figure 5-44 Slave status after setup 5.7.2 Remote backup scenario One possible scenario related to the secondary site is to provide a consistent copy of data that is used as a periodic backup. This backup copy could be copied to tape or used for data-mining activities that do not require the most current data. This is accomplished by creating a duplicate of the last_replicated snapshot of the slave consistency group. This new snapshot can then be mounted to hosts and backed up to tape or used for other purposes. Chapter 5. Asynchronous remote mirroring 159 7759ch_Async_Mirror.fm Draft Document for Review January 23, 2011 12:42 pm GUI steps to duplicate a snapshot group From the Consistency Groups panel select Duplicate, as shown in Figure 5-45. Figure 5-45 Duplicate last-replicated snapshot A new snapshot is created with the same timestamp as the last-replicated snapshot (Figure 5-46). Figure 5-46 Duplicate snapshot XCLI command to duplicate a snapshot group Figure 5-47 illustrates the snap_group_duplicate command. -- Duplicate last-replicated snap_group_duplicate snap_group=last-replicated-itso_volume_cg Figure 5-47 XCLI to duplicate a snapshot group 5.7.3 DR testing scenario It is important to verify disaster recovery procedures. This can be accomplished by using the remote volumes with hosts at the recovery site to verify that the data is consistent and that no data is missing (due to volumes not being mirrored). This process is partly related to making 160 IBM XIV Storage System: Copy Services and Migration Draft Document for Review January 23, 2011 12:42 pm 7759ch_Async_Mirror.fm slave volumes available to the hosts, but it also includes processes external to the XIV system commands. For example, the software available on the remote hosts and user access to those hosts must also be verified. This example only covers the XIV system commands. GUI steps for DR testing The process begins by changing the role of the slave volumes to master volumes. This results in the mirror being deactivated. The remote hosts can now access the remote volumes. See Figure 5-48, Figure 5-49, and Figure 5-50 on page 161. Figure 5-48 Change slave role to master Figure 5-49 Verify change role Figure 5-50 New master volumes Chapter 5. Asynchronous remote mirroring 161 7759ch_Async_Mirror.fm Draft Document for Review January 23, 2011 12:42 pm After the testing is complete the remote volumes are returned to their previous slave role See Figure 5-51, Figure 5-52, and Figure 5-53 on page 162. Figure 5-51 Change role back to slave Figure 5-52 Verify change role Figure 5-53 Slave role restored Any changes made during the testing are removed by restoring the last-replicated snapshot, and new updates from the primary site will be transferred to the secondary site when the mirror is activated again (Figure 5-54 through Figure 5-56). 162 IBM XIV Storage System: Copy Services and Migration Draft Document for Review January 23, 2011 12:42 pm 7759ch_Async_Mirror.fm Figure 5-54 Activate mirror at primary site Figure 5-55 Master active Figure 5-56 Slave active Chapter 5. Asynchronous remote mirroring 163 7759ch_Async_Mirror.fm Draft Document for Review January 23, 2011 12:42 pm XCLI commands for DR testing Figure 5-57 shows the steps and the corresponding XCLI commands required for DR testing. -- Change slave to master mirror_change_role cg=itso_volume_cg >> mirror_list -t local_peer_name,sync_type,current_role,target_name,active Name Mirror Type Role Remote System Active itso_volume_4 sync_best_effort Master XIV LAB 3 1300203 yes itso_volume_cg async_interval Master XIV LAB 3 1300203 yes itso_volume_1 async_interval Master XIV LAB 3 1300203 yes itso_volume_2 async_interval Master XIV LAB 3 1300203 yes itso_volume_3 async_interval Master XIV LAB 3 1300203 yes -- Change back to slave mirror_change_role cg=itso_volume_cg >> mirror_list -t local_peer_name,sync_type,current_role,target_name,active Name Mirror Type Role Remote System Active itso_volume_4 sync_best_effort Master XIV LAB 3 1300203 yes itso_volume_cg async_interval Slave XIV LAB 3 1300203 no itso_volume_1 async_interval Slave XIV LAB 3 1300203 no itso_volume_2 async_interval Slave XIV LAB 3 1300203 no itso_volume_3 async_interval Slave XIV LAB 3 1300203 no -- Activate master on local site mirror_activate cg=itso_volume_cg >> mirror_list -t local_peer_name,sync_type,current_role,target_name,active Name Mirror Type Role Remote System Active itso_volume_4 sync_best_effort Master XIV LAB 3 1300203 yes itso_volume_cg async_interval Slave XIV LAB 3 1300203 yes itso_volume_1 async_interval Slave XIV LAB 3 1300203 yes itso_volume_2 async_interval Slave XIV LAB 3 1300203 yes itso_volume_3 async_interval Slave XIV LAB 3 1300203 yes Figure 5-57 XCLI commands for DR testing 5.8 Pool space depletion The asynchronous mirroring process relies on special snapshots (most-recent, last-replicated) that require and consume space from the pool snapshot reserve. An adequate amount of snapshot space depends on the workload characteristics and the intervals that you set for sync jobs. Observing your application over time allows you to eventually fine tune the percentage of pool space to reserve for snapshots. Tip: Set appropriate pool alert thresholds to be warned ahead of time and be able to take proactive measures to avoid any serious pool space depletion situations. 164 IBM XIV Storage System: Copy Services and Migration 7759ch_Async_Mirror.fm Draft Document for Review January 23, 2011 12:42 pm The XIV system has a sophisticated built-in multi-step process to cope with pool space depletion on the slave or on the master before it eventually deactivates the mirror. If a pool does not have enough free space to accommodate the storage requirements warranted by a new host write, the system progressively deletes snapshots within that pool until enough space is made available for successful completion of the write request. The multi-step process is outlined below; the system will proceed to the next step only if there is still insufficient space to support the write request after execution of the current step. Upon depletion of space in a pool with mirroring, the following takes place: STEP 1: deletion of unprotected (*) snapshots of (1) non-mirrored volumes; (2) completed and outstanding Snapshot Mirrors (a.k.a. ad-hoc sync jobs) STEP 2: deletion of the snapshot of any outstanding (pending) scheduled sync job STEP 3: automatic deactivation of mirroring and deletion of the snapshot designated the most_recent snapshot (except for the special case described in step 5 below) STEP 4: deletion of the last_replicated snapshot. STEP 5: deletion of the most_recent snapshot created when activating the mirroring in Change Tracking state. STEP 6: deletion of protected (*) snapshots (new step for v10.2.2) (*)The XIV system introduces the concept of protected snapshots. With the command pool_config_snapshots a special parameter is introduced that sets a protected priority value for snapshots in a specified pool. Pool snapshots with a delete priority value smaller than this parameter value are treated as 'protected snapshots' and will generally be only deleted after unprotected snapshots are (with the only exception being a snapshot mirror (ad-hoc) snapshot when its corresponding job is in progress). Notably, two mirroring related snapshots will never be deleted: the last-consistent snapshot (synchronous mirroring) and the last-replicated snapshot on the Slave (asynchronous mirroring). Note: The deletion priority of mirroring-related snapshots is set implicitly by the system and cannot be customized by the user. The deletion priority of the asynchronous mirroring last-replicated and most-recent snapshots on the master is set to 1. The deletion priority of the asynchronous mirroring last-replicated snapshot on the slave and the synchronous mirroring last-consistent snapshot is set to 0. By default the parameter protected_snapshot_priority in pool_config_snapshots is 0. Non-mirrored snapshots are created by default with a deletion priority 1. Important: If the protected_snapshot_priority in pool_config_snapshots is changed, then the system and user created snapshots with a deletion priority nominally equal or lower than the protected setting will be deleted only after the internal mirroring snapshots are. This means that if the protected_snapshot_priority in pool_config_snapshots is changed to 1, then all system and user created snapshots with deletion priority 1 (which includes ALL snapshots created by the user if their deletion priority was not changed) will be protected and will be deleted only after internal mirroring snapshots are if pool space is depleted and the system needs to free space. Chapter 5. Asynchronous remote mirroring 165 7759ch_Async_Mirror.fm Draft Document for Review January 23, 2011 12:42 pm Pool space depletion on the slave Pool space depletion on the slave means that there is no room available for the last_replicated snapshot. In this case, the mirroring is deactivated. 166 IBM XIV Storage System: Copy Services and Migration Draft Document for Review January 23, 2011 12:42 pm 7759ch_OS_specifics.fm 6 Chapter 6. Open Systems considerations for Copy Services In this chapter, we describe the basic tasks that you should perform on the individual host systems when using the XIV Copy Services. We explain how to bring Snapshot target volumes online to the same host as well as to a second host. This chapter covers various UNIX® platforms and VMware. © Copyright IBM Corp. 2010. All rights reserved. 167 7759ch_OS_specifics.fm Draft Document for Review January 23, 2011 12:42 pm 6.1 AIX specifics In this section we describe the steps needed to use volumes created by the XIV Copy Services on AIX hosts. 6.1.1 AIX and Snapshots The snapshot functionality is to copy the pointers of a source volume and create a snapshot volume. If the source volume is defined to the AIX Logical Volume Manager (LVM), all of its data structures and identifiers are copied to the snapshot as well. This includes the Volume Group Descriptor Area (VGDA), which contains the Physical Volume Identifier (PVID) and Volume Group Identifier (VGID). For AIX LVM, it is currently not possible to activate a Volume Group with a physical volume that contains a VGID and a PVID that is already used in a Volume Group existing on the same server. The restriction still applies even if the hdisk PVID is cleared and reassigned with the two commands listed in Example 6-1. Example 6-1 Clearing PVIDs #chdev -l <hdisk#> -a pv=clear #chdev -l <hdisk#> -a pv=yes Therefore, it is necessary to redefine the Volume Group information about the snapshot volumes using special procedures or the recreatevg command. This will alter the PVIDs and VGIDs in all the VGDAs of the snapshot volumes, so that there are no conflicts with existing PVIDs and VGIDs on existing Volume Groups that reside on the source volumes. If you do not redefine the Volume Group information prior to importing the Volume Group, then the importvg command will fail. Accessing a Snapshot volume from another AIX host The following procedure makes the data of the snapshot volume available to another AIX host that has no prior definitions of the snapshot volume in its configuration database (ODM). This host that is receiving the snapshot volumes can manage the access to these devices in the following way: If the host is using LVM or MPIO definitions that work with hdisks only, follow these steps: 1. The snapshot volume (hdisk) is new to AIX, and therefore the Configuration Manager should be run on the specific Fibre Channel adapter: #cfgmgr -l <fcs#> 2. Find out which of the physical volumes is your snapshot volume: #lsdev -C |grep 2107 3. Certify that all PVIDs in all hdisks that will belong to the new Volume Group were set. Check this information using the lspv command. If they were not set, run the following command for each one to avoid the importvg command failing: #chdev -l <hdisk#> -a pv=yes 4. Import the snapshot Volume Group: #importvg -y <volume_group_name> <hdisk#> 168 IBM XIV Storage System: Copy Services and Migration Draft Document for Review January 23, 2011 12:42 pm 7759ch_OS_specifics.fm 5. Vary on the Volume Group (the importvg command should vary on the Volume Group): #varyonvg <volume_group_name> 6. Verify consistency of all file systems on the snapshot volumes: #fsck -y <filesystem_name> 7. Mount all the snapshot file systems: #mount <filesystem_name> The data is now available. You can, for example, back up the data residing on the snapshot volume to a tape device. The disks containing the snapshot volumes may have been previously defined to an AIX system, for example, if you periodically create backups using the same set of volumes. In this case, there are two possible scenarios: If no Volume Group, file system, or logical volume structure changes were made, then use procedure 1 (“Procedure 1” on page 169) to access the snapshot volumes from the target system. If some modifications to the structure of the Volume Group were made, such as changing the file system size or the modification of logical volumes (LV), then it is recommended to use procedure 2 (“Procedure 2” on page 169) and not procedure 1. Procedure 1 For this procedure, follow these steps: 1. Unmount all the source file systems: #umount <source_filesystem> 2. Unmount all the snapshot file systems: #umount <snapshot_filesystem> 3. Deactivate the snapshot Volume Group: #varyoffvg <snapshot_volume_group_name> 4. Create the snapshots on the XIV. 5. Mount all the source file systems: #mount <source_filesystem> 6. Activate the snapshot Volume Group: #varyonvg <snapshot_volume_group_name> 7. Perform a file system consistency check on the file systems: #fsck -y <snapshot_file_system_name> 8. Mount all the file systems: #mount <snapshot_filesystem> Procedure 2 For this procedure, follow these steps: 1. Unmount all the snapshot file systems: #umount <snapshot_filesystem> 2. Deactivate the snapshot Volume Group: #varyoffvg <snapshot_volume_group_name> Chapter 6. Open Systems considerations for Copy Services 169 7759ch_OS_specifics.fm Draft Document for Review January 23, 2011 12:42 pm 3. Export the snapshot Volume Group: #exportvg <snapshot_volume_group_name> 4. Create the snapshots on the XIV. 5. Import the snapshot Volume Group: #importvg -y <snapshot_volume_group_name> <hdisk#> 6. Perform a file system consistency check on snapshot file systems: #fsck -y <snapshot_file_system_name> 7. Mount all the target file systems: #mount <snapshot_filesystem> Accessing the Snapshot volume from the same AIX host In this section we describe a method of accessing the snapshot volume on a single AIX host while the source volume is still active on the same server. The procedure is intended to be used as a guide and may not cover all scenarios. If you are using the same host to work with source and target volumes, you have to use the recreatevg command. The recreatevg command overcomes the problem of duplicated LVM data structures and identifiers caused by a disk duplication process such as snapshot. It is used to recreate an AIX Volume Group (VG) on a set of target volumes that are copied from a set of source volumes belonging to a specific VG. The command will allocate new physical volume identifiers (PVIDs) for the member disks and a new Volume Group identifier (VGID) to the Volume Group. The command also provides options to rename the logical volumes with a prefix you specify, and options to rename labels to specify different mount points for file systems. Accessing Snapshot volumes using the recreatevg command In this example, we have a Volume Group containing two physical volumes (hdisks) and wish to create snapshot volumes for the purpose of creating a backup. The source volume group is src_snap_vg, containing hdisk2 and hdisk3. The target volume group will be tgt_snap_vg, containing the snapshots of hdisk2 and hdisk3. Perform these tasks to make the snapshot volumes available to AIX: 1. Stop all I/O activities and applications that access the source volumes. 2. Create the snapshot on the XIV for hdisk2 and hdisk3 with the GUI or xcli. 3. Restart applications that access the source volumes. 4. The snapshots will now have the same volume group data structures as the source volumes hdisk2 and hdisk3. Clear the PVIDs from the target hdisks to allow a new Volume Group to be made: #chdev -l hdisk4 -a pv=clear #chdev -l hdisk5 -a pv=clear The output of lspv command shows the result in Example 6-2. 170 IBM XIV Storage System: Copy Services and Migration Draft Document for Review January 23, 2011 12:42 pm 7759ch_OS_specifics.fm Example 6-2 lspv output before recreating the volume group # lspv hdisk2 hdisk3 hdisk4 hdisk5 00cb7f2ee8111734 00cb7f2ee8111824 none none src_snap_vg src_snap_vg None None active active 5. Create the target volume group and prefix all file system path names with /backup, and prefix all AIX logical volumes with bkup: recreatevg -y tgt_flash_vg -L /backup -Y bkup vpath4 vpath5 You must specify the hdisk names of all disk volumes participating in the volume group. The output from lspv, shown in Example 6-3, illustrates the new volume group definition. Example 6-3 lspv output after recreating the volume group # lspv hdisk2 hdisk3 hdisk4 hdisk5 00cb7f2ee8111734 00cb7f2ee8111824 00cb7f2ee819f5c6 00cb7f2ee819f788 src_snap_vg src_snap_vg tgt_snap_vg tgt_snap_vg active active active active An extract from /etc/filesystems in Example 6-4 shows how recreatevg generates a new file system stanza. The file system named /prodfs in the source Volume Group is renamed to /bkp/prodfs in the target volume group. Also, the directory /bkp/prodfs is created. Notice also that the logical volume and JFS log logical volume have been renamed. The remainder of the stanza is the same as the stanza for /prodfs. Example 6-4 Target file system stanza /bkp/prodfs: dev vfs log mount check options account = = = = = = = /dev/bkupfslv01 jfs2 /dev/bkuploglv00 false false rw false 6. Perform a file system consistency check for all target file systems: #fsck -y <target_file_system_name> 7. Mount the new file systems belonging to the target volume group to make them accessible. 6.1.2 AIX and Remote Mirroring When you have the primary and secondary volumes in a Remote Mirror relationship, it is not possible to read the secondary volumes, unless the roles are changed from slave to master. To be able to read the secondary volumes, they must also be synchronized. Therefore, if you are configuring the secondary volumes on the target server, it is necessary to terminate the copy pair relationship. When the volumes are in the consistent state, the secondary volumes can be configured (cfgmgr) into the target system’s customized device class (CuDv) of the ODM. This will bring in the secondary volumes as hdisks and will contain the same physical volume IDs (PVID) as the primary volumes. Because these volumes are new to the system, there is no conflict with Chapter 6. Open Systems considerations for Copy Services 171 7759ch_OS_specifics.fm Draft Document for Review January 23, 2011 12:42 pm existing PVIDs. The Volume Group on the secondary volumes containing the logical volume (LV) and file system information can now be imported into the Object Data Manager (ODM) and the /etc/filesystems file using the importvg command. If the secondary volumes were previously defined on the target AIX system, but the original Volume Group was removed from the primary volumes, the old volume group and disk definitions must be removed (exportvg and rmdev) from the target volumes and redefined (cfgmgr) before running importvg again to get the new volume group definitions. If this is not done first, importvg will import the volume group improperly. The volume group data structures (PVIDs and VGID) in ODM will differ from the data structures in the VGDAs and disk volume super blocks. The file systems will not be accessible. Making updates to the LVM information When performing Remote Mirroring between primary and secondary volumes, the primary AIX host may create/modify or delete existing LVM information from a Volume Group. However, because the secondary volume is not accessible when in a Remote Mirroring relationship, the LVM information in the secondary AIX host would be out-of-date. Therefore, scheduled periods should be allotted where write I/Os to the primary Remote Mirroring volume can be quiesced and file systems unmounted. At this point, the copy pair relationship can be terminated and the secondary AIX host can perform a learn on the volume group (importvg -L). When the updates have been imported into the secondary AIX host’s ODM, you can establish the Remote Mirror and Copy pair again. As soon as the Remote Mirroring pair has been established, immediately suspend the Remote Mirroring. Because there was no write I/O to the primary volumes, both the primary and secondary are consistent. The following example shows two systems, host1 and host2, where host1 has the primary volume hdisk5 and host2 has the secondary volume hdisk16. Both systems have had their ODMs populated with the volume group itsovg from their respective Remote Mirror and Copy volumes and, prior to any modifications, both systems’ ODM have the same time stamp, as shown in Example 6-5. Example 6-5 Original time stamp root@host1:/> getlvodm -T itsovg 4cc6d7ee09109a5e root@host2:/> getlvodm -T itsovg 4cc6d7ee09109a5e Volumes hdisk5 and hdisk16 are in the synchronized state, and the volume group itsovg on host1 is updated with a new logical volume. The time stamp on the VGDA of the volumes gets updated and so does the ODM on host1, but not on host2. To update the ODM on the secondary server, it is advisable to suspend the Remote Mirror and Copy pair prior to performing the importvg -L command to avoid any conflicts from LVM actions occurring on the primary server. When the importvg -L command has completed, you can reestablish the Remote Mirror. 172 IBM XIV Storage System: Copy Services and Migration Draft Document for Review January 23, 2011 12:42 pm 7759ch_OS_specifics.fm 6.2 Copy Services using VERITAS Volume Manager In the following section we describe special considerations for Snapshots and Remote Mirroring on Solaris systems with VERITAS Volume Manager (VxVM) support. Snapshots with VERITAS Volume Manager In many cases, a user will make a copy of a volume so that the data can be used by a different machine. In other cases, a user may want to make the copy available to the same machine. VERITAS Volume Manager assigns each disk a unique global identifier. If the volumes are on different machines, this does not present a problem. However, if they are on the same machine, you have to take some precautions. For this reason, the steps that you should take are different for the two cases. Snapshot to a different server One common method for making a Snapshot of a VxVM volume is to first freeze the I/O to the source volume, issue the snapshot, and import the new snapshot onto a second server. In general, the steps for performing this process are as follows: 1. 2. 3. 4. 5. Unmount the target volume on Server B. Freeze the I/O to the source volume on Server A. Create a snapshot. Thaw the I/O to the source volume on Server A. Mount the target volume on Server B. Snapshot to the same server The simplest way to make the copy available to the source machine is to export and offline the source volumes. In Example 6-6, volume lvol is contained in Disk Group vgsnap. This Disk Group consists of two devices (xiv0_4 and xiv0_5). When that disks are taken offline, the snapshot target becomes available to the source volume, and can be imported. Example 6-6 Making a snapshot available by exporting the source volume #halt I/O on the source by unmounting the volume umount /vol1 #create snapshot, unlock the created snapshot and map to the host here #discover newly available disks vxdctl enable #deport the source volume group vxdg deport vgsnap #offline the source disk vxdisk offline xiv0_4 xiv0_5 #now only the target disk is online #import the volume again vxdg import vgsnap #recover the copy vxrecover -g vgsnap -s lvol #re-mount the volume mount /dev/vx/dsk/vgsnap/lvol If you want to make both the source and target available to the machine at the same time, it is necessary to change the private region of the disk, so that VERITAS Volume Manager allows the target to be accessed as a different disk. Here we explain how to simultaneously mount snapshot source and target volumes to the same host without exporting the source volumes Chapter 6. Open Systems considerations for Copy Services 173 7759ch_OS_specifics.fm Draft Document for Review January 23, 2011 12:42 pm when using VERITAS Volume Manager. Check with VERITAS and IBM on the supportability of this method before using it. It is assumed that the sources are constantly mounted to the SUN host, the snapshot is performed, and the goal is to mount the copy without unmounting the source or rebooting. After the target volumes have been assigned, then issue vdctl enable command. The following procedure refers to these names: vgsnap2: The name of the diskgroup that is being created. vgsnap: The name of original disk group . Use the following procedure to mount the targets to the same host: 1. Discover newly available disk issue the command vxdctl enable # vxdctl enable 2. Check that the new disk are available using command vxdisk the new disk shoul be presented in output as s only disk with mismatch uids. # vxdisk list 3. Import available disk onto the host in new disk group issue the command vxdg # vxdg -n <name for the new disk group> -o useclonedev=on,updateid -C import name of the original disk group> 4. Apply the journal log to the volume located into the disk group #vxrecover -g <name of new disk group> -s <name of the volume> 5. Mount the file system located in disk groups # mount /dev/vx/dsk/<name of new disk group/<name of the volume> /<mount point> The process looks like it shown in Example 6-7. Example 6-7 Importing the snapshot on same host simultaneously with using of original disk group # vxdctl enable # vxdisk list DEVICE TYPE DISK GROUP STATUS xiv0_0 auto:cdsdisk vgxiv02 vgxiv online xiv0_4 auto:cdsdisk vgsnap01 vgsnap online xiv0_5 auto:cdsdisk vgsnap02 vgsnap online xiv0_8 auto:cdsdisk online udid_mismatch xiv0_9 auto:cdsdisk online udid_mismatch xiv1_0 auto:cdsdisk vgxiv01 vgxiv online # vxdg -n vgsnap2 -o useclonedev=on,updateid -C import vgsnap VxVM vxdg WARNING V-5-1-1328 Volume lvol: Temporarily renumbered due to conflict # vxrecover -g vgsnap2 -s lvol # mount /dev/vx/dsk/vgsnap2/lvol /test # ls /test VRTS_SF_HA_Solutions_5.1_Solaris_SPARC.tar VRTSaslapm_Solaris_5.1.001.200.tar VRTSibmxiv-5.0-SunOS-SPARC-v1_307934.tar.Z lost+found # vxdisk list DEVICE TYPE DISK GROUP STATUS xiv0_0 auto:cdsdisk vgxiv02 vgxiv online xiv0_4 auto:cdsdisk vgsnap01 vgsnap online 174 IBM XIV Storage System: Copy Services and Migration 7759ch_OS_specifics.fm Draft Document for Review January 23, 2011 12:42 pm xiv0_5 xiv0_8 xiv0_9 xiv1_0 auto:cdsdisk auto:cdsdisk auto:cdsdisk auto:cdsdisk vgsnap02 vgsnap01 vgsnap02 vgxiv01 vgsnap vgsnap2 vgsnap2 vgxiv online online clone_disk online clone_disk online Remote Mirroring with VERITAS Volume Manager In the previous section we described how to perform a snapshot and mount the source and target file system on the same server. Here we describe the steps necessary to mount a Remote Mirrored secondary volume onto a server that does not have sight of the primary volume. It assumes that the Remote Mirroring pair has been terminated prior to carrying out the procedure. After the secondary volumes have been assigned, it is necessary to reboot the Solaris server using reboot -- -r or, if a reboot is not immediately possible, then issue devfsadm. However, a reboot is recommended for guaranteed results. Use the following procedure to mount the secondary volumes to another host: 1. Scan devices in the operating system device tree: #vxdctl enable 2. List all known disk groups on the system: #vxdisk -o alldgs list 3. Import the Remote Mirror disk group information: #vxdg -C import <disk_group_name> 4. Check the status of volumes in all disk groups: #vxprint -Ath 5. Bring the disk group online: #vxvol -g <disk_group_name> startall or #vxrecover -g <disk_group_name> -sb 6. Perform a consistency check on the file systems in the disk group: #fsck -V vxfs /dev/vx/dsk/<disk_group_name>/<volume_name> 7. Mount the file system for use: #mount -V vxfs /dev/vx/dsk/<disk_group_name>/<volume_name> /<mount_point> When you have finished with the mirrored volume, we recommend that you perform the following tasks: 1. Unmount the file systems in the disk group: #umount /<mount_point> 2. Take the volumes in the disk group offline: #vxvol -g <disk_group_name> stopall 3. Export disk group information from the system: #vxdg deport <disk_group_name> Chapter 6. Open Systems considerations for Copy Services 175 7759ch_OS_specifics.fm Draft Document for Review January 23, 2011 12:42 pm 6.3 HP-UX and Copy Services The following section describes the interaction between XIV Copy Services and Logical Volume Manager (LVM) on HP-UX. Write access to the Copy Services target volumes is either allowed for XIV Copy Services or for HP-UX. LVM commands must be used to disable host access to a volume before XIV Copy Services take control of the associated target volumes. After Copy Services have been terminated for the target volumes LVM commands can be used to enable host access. 6.3.1 HP-UX and XIV snapshot The following procedure must be followed to permit access to the snapshot source and target volumes simultaneously on an HP-UX host. It could be used to make an additional copy of a development database for testing or to permit concurrent development, to create a database copy for data mining that will be accessed from the same server as the OLTP data, or to create a point-in-time copy of a database for archiving to tape from the same server. This procedure must be repeated each time you perform a snapshot and want to use the target physical volume on the same host where the snapshot source volumes are present in the Logical Volume Manager configuration. The procedure can also be used to access the target volumes on another HP-UX host. Target preparation In order to prepare the target system, carry out the following steps: 1. If you did not use the default Logical Volume Names (lvolnn) when they were created, create a map file of your source volume group using the vgexport command using the preview (-p) option: #vgexport -p -m <map file name> -p /dev/<source_vg_name> Tip: If the target volumes are accessed by a secondary (or target) host, this map file needs to be copied to the target host. 2. If the target volume group exists, remove it using the vgexport command. The target volumes cannot be members of a Volume Group when the vgimport command is run: #vgexport /dev/<target_vg_name> 3. Shut down or quiesce any applications that are accessing the snapshot source. Snapshot execution To execute the procedure, you must carry out the following steps: 1. Quiesce or shut down the source HP-UX application(s) to cease any updates to the primary volumes. 2. Perform the XIV snapshot. 3. When the snapshot is finished, change the Volume Group ID on each DS Volume in the snapshot target. The volume ID for each volume in the snapshot target volume group must be modified on the same command line. Failure to do this will result in a mismatch of Volume Group IDs within the Volume Group. The only way to resolve this issue is to perform the snapshot again and reassign the Volume Group IDs using the same command line: vgchgid -f </dev/rdsk/c#t#d#_1>...</dev/rdsk/c#t#d#_n> 176 IBM XIV Storage System: Copy Services and Migration Draft Document for Review January 23, 2011 12:42 pm 7759ch_OS_specifics.fm Note: This step is not needed if another host is used to access the target devices. 4. Create the Volume Group for the snapshot target volumes: #mkdir /dev/<target_vg_name> #mknod /dev/<target_vg_name>/group c <lvm_major_no> <next_available_minor_no> Use the lsdev -C lvm command to determine what the major device number should be for Logical Volume Manager objects. To determine the next available minor number, examine the minor number of the group file in each volume group directory using the ls -l command. 5. Import the snapshot target volumes into the newly created volume group using the vgimport command: #vgimport -m <map file name> -v /dev/<target_vg_name> </dev/dsk/c#t#d#_1>...</dev/dsk/c#t#d#_n> 6. Activate the new volume group: #vgchange -a y /dev/<target_vg_name> 7. Perform a full file system check on the logical volumes in the target volume group. This is necessary in order to apply any changes in the JFS intent log to the file system and mark the file system as clean. #fsck -F vxfs -o full -y /dev/<target_vg_name>/<logical volume name> 8. If the logical volume contains a VxFS file system, mount the target logical volumes on the server: #mount -F vxfs /dev/<target_vg_name>/<logical volume name> <mount point> When access to the snapshot target volume(s) is no longer required, unmount the file systems and deactivate (vary off) the volume group: #vgchange -a n /dev/<target_vg_name> If no changes are made to the source volume group prior to the subsequent snapshot, then all that is needed is to activate (vary on) the volume group and perform a full file system consistency check, as shown in steps 7 to 8. 6.3.2 HP-UX with XIV Remote Mirror When using Remote Mirror with HP-UX, LVM handling is similar to using snapshots, apart from the fact that the volume group should be unique to the target server, so there should not be a need to perform the vgchgid command to change the physical volume to volume group association. Here is the procedure to bring Remote Mirror target volumes online to secondary HP-UX hosts: 1. Quiesce the source HP-UX application to cease any updates to the primary volumes. 2. Change the role of the secondary volumes to master in order to enable host access. 3. Rescan for hardware configuration changes using the ioscan -fnC disk command. Check that the disks are CLAIMED using ioscan -funC disk. The reason for doing this is that the volume group may have been extended to include more physical volumes. 4. Create the Volume Group for the Remote Mirror secondary. Use the lsdev -C lvm command to determine what the major device number should be for Logical Volume Manager objects. To determine the next available minor number, examine the minor number of the group file in each volume group directory using the ls -l command. Chapter 6. Open Systems considerations for Copy Services 177 7759ch_OS_specifics.fm Draft Document for Review January 23, 2011 12:42 pm 5. Import the Remote Mirror secondary volumes into the newly created volume group using the vgimport command. 6. Activate the new volume group using the vgchange command with the -a y option. 7. Perform a full file system check on the logical volumes in the target volume group. This is necessary in order to apply any changes in the JFS intent log to the file system and mark the file system as clean. 8. If the logical volume contains a VxFS file system, mount the target logical volumes on the server. If changes are made to the source volume group, they should be reflected in the /etc/lvmtab of the target server. Therefore, it is recommended that periodic updates be made to make the lvmtab on both source and target machines consistent. Use the above standard procedure but include the following steps before activating the volume group: a. On the source HP-UX host export the source volume group information into a map file using the preview option: #vgexport -p -m <map file name> b. Copy the map file to the target HP-UX host. c. On the target HP-UX host export the volume group. d. Recreate the volume group using the HP-UX mkdir and mknod commands. e. Import the Remote Mirror target volumes into the newly created volume group using the vgimport command. When access to the Remote Mirror target volume(s) is no longer required, unmount the file systems and deactivate (vary off) the volume group: #vgchange -a n /dev/<target_vg_name> Where appropriate reactivate the XIV Remote Mirror in normal or reverse direction. If copy direction is reversed, the master and slave roles and thus the source and target volumes are also reversed. 178 IBM XIV Storage System: Copy Services and Migration Draft Document for Review January 23, 2011 12:42 pm 7759ch_OS_specifics.fm 6.4 VMware Virtual Infrastructure and Copy Services The section is not intended to cover every possible use of Copy Services with VMware; rather, it is intended to provide hints and tips that will be useful in many different Copy Services scenarios. When using Copy Services with the guest operating systems, the restrictions of the guest operating system still apply. In some cases, using Copy Services in a VMware environment may impose additional restrictions. 6.4.1 Virtual machine considerations regarding Copy Services Before creating snapshot, it is important to prepare both the source and target machines to be copied. For the source machine, this typically means quiescing the applications, unmounting the source volumes, and/or flushing memory buffers to disk. See the appropriate sections for your operating systems for more information about this topic. For the target machine, typically the target volumes must be unmounted. This prevents the operating system from accidentally corrupting the target volumes with buffered writes, as well as preventing users from accessing the target LUNs until the snapshot is logically complete. With VMware, there is an additional restriction that the target virtual machine must be shut down before issuing the snapshot. VMware also performs caching, in addition to any caching the guest operating system might do. To be able to use the FlashCopy target volumes with ESX Server, you need to make sure, that the ESX Server can see the target volumes. Beside checking the SAN zoning and the host attachment within the XIV, you may need a SAN rescan issued by the Virtual Center. If the Snapshoted LUNs contain a VMFS file system, the ESX host will detect this on the target LUNs and add them as a new datastore to its inventory. The VMs stored on this datastore can then be opened on the ESX host. To assign the existing virtual disks to new VMs, in the Add Hardware Wizard panel, select Use an existing virtual disk and choose the .vmdk file you want to use. See Figure 6-1. If the Snapshoted LUNs were assigned as RDMs, the target LUNs can be assigned to a VM by creating a new RDM for this VM. In the Add Hardware Wizard panel, select Raw Device Mapping and use the same parameters as on the source VM. Note: If you do not shut down the source VM, reservations may prevent you from using the target LUNs. Chapter 6. Open Systems considerations for Copy Services 179 7759ch_OS_specifics.fm Draft Document for Review January 23, 2011 12:42 pm Figure 6-1 Adding an existing virtual disk to a VM VMware ESX server and Snapshots In general there are two different ways Snapshots can be used within VMware Virtual Infrastructure: Either on raw LUNs that are attached via RDM to a host or on LUNs that are used to build up VMFS datastores which store VMs and virtual disks. Snapshots on LUNs used for VMFS datastores Since version 3 all files a virtual machine is made up from, are stored on VMFS partitions (that is usually: configuration, BIOS and one or more virtual disks). Therefore the whole VM is most commonly stored in one single location. Since snapshot operations are always done on a whole volume this provides an easy way to create point in time backups of whole virtual machines. Nevertheless you have to make sure that the data on the VMFS volume is consistent. Therefore the VMs located on this datastore must be shut down before initiating the snapshot on XIV. Since a VMFS datastore can contain more than one LUN, the user has to make sure all participating LUNs are mirrored using snapshot to get a complete copy of the datastore. 180 IBM XIV Storage System: Copy Services and Migration Draft Document for Review January 23, 2011 12:42 pm 7759ch_OS_specifics.fm Figure 6-2 shows an ESX host with 2 virtual machines, using each one virtual disk. The ESX host has one VMFS datastore consisting of 2 XIV LUNs “1” and “2”. In order to get a complete copy of the VMFS datastore, both LUNs must be placed into consistency group and then a snapshot is taken. By using snapshots on VMFS LUNs, it is easy to create backups of whole VMs. Figure 6-2 Using Snapshot on VMFS volumes Snapshot on LUNs used for RDM Raw device mappings (RDM) can be done in two ways: In physical mode, the LUN is mostly treated as any other physical LUN. In virtual mode the virtualization layer provides features like snapshots that are normally only available for virtual disks. In virtual compatibility mode you have to make sure that the LUN you are going to copy is in a consistent state. Depending on the disk mode and current usage you may have to append the redo-log first to get a usable copy of the disk. If persistent or nonpersistent mode is used, the LUN can be handled like a RDM in physical compatibility mode. For details and restrictions, check the SAN Configuration Guide, at: http://www.vmware.com/support/pubs/vi_pubs.html The following paragraphs are valid for both compatibility modes. However, keep in mind that extra work on the ESX host and/or VMs might be required for the virtual compatibility mode. Chapter 6. Open Systems considerations for Copy Services 181 7759ch_OS_specifics.fm Draft Document for Review January 23, 2011 12:42 pm Using Snapshot within a virtual machine In Figure 6-3, a LUN, which is assigned to a VM via RDM, is copied using snapshot on a IBM XIV Storage System. The target LUN is then assigned to the same VM by creating a second RDM. After issuing the snapshot job HDD1 and HDD2 have the same content. For virtual disks, this can simply be achieved by copying the .vmdk files on the VMFS datastore. However, the copy is not available instantly as with snapshot; instead you will have to wait until the copy job has finished duplicating the whole .vmdk file. Figure 6-3 Using Snapshot within a VM - HDD1 is the source for target HDD2 182 IBM XIV Storage System: Copy Services and Migration Draft Document for Review January 23, 2011 12:42 pm 7759ch_OS_specifics.fm Using Snapshot between two virtual machines This works in the same way as using snapshot within a virtual machine, but the target disks are assigned to another VM this time. This might be useful to create clones of a VM. After issuing the snapshot job, LUN 1’ can be assigned to a second VM, which then can work with a copy of VM1's HDD1. (See Figure 6-4). Figure 6-4 Using snapshot between two different VMs - VM1's HDD1 is the source for HDD2 in VM2 Using snapshot between ESX Server hosts This scenario shows how to use the target LUNs on a different ESX Server host. This is especially useful for disaster recovery if one ESX Server host fails for any reason. If LUNs with VMFS are duplicated using snapshot, it is possible to create a copy of the whole virtual environment of one ESX Server host that can be migrated to another physical host with only few efforts. Chapter 6. Open Systems considerations for Copy Services 183 7759ch_OS_specifics.fm Draft Document for Review January 23, 2011 12:42 pm To be able to do this, both ESX Server hosts must be able to access the same snapshot LUN. (See Figure 6-5.) Figure 6-5 Snapshot between 2 ESX hosts In Figure 6-5 we are using snapshot on consistency group which are include 2 volumes. LUN 1 is used for a VMFS datastore while LUN 2 is assigned to VM2 as a RDM. These two LUNs are then copied with snapshot and attached to another ESX Server host. In ESX host 2 we now assign the vdisk that is stored on the VMFS partition on LUN 1' to VM3 and attach LUN 2' via RDM to VM4. By doing this we can create a copy of ESX host 1's virtual environment and use it on ESX host 2. Note: If you use snapshot on VMFS volumes and assign them to the same ESX Server host, the server doesn't allow the target to be used since the VMFS volume identifiers have been duplicated. To circumvent this, VMware ESX server provides the possibility of VMFS Volume Resignaturing. For details about resignaturing, check page 112 and the following pages in the SAN Configuration Guide, available at: http://www.vmware.com/support/pubs/vi_pubs.html ESX and Remote Mirroring It is possible to use Remote Mirror with all three types of disks. However, in most environments, raw System LUNs in physical compatibility mode are preferred. As with snapshots, using VMware with Remote Mirror contains all the advantages and limitations of the guest operating system. See the individual guest operating system sections for relevant information. However, it may be possible to use raw System LUNs in physical compatibility mode. Check with IBM on the supportability of this procedure. 184 IBM XIV Storage System: Copy Services and Migration Draft Document for Review January 23, 2011 12:42 pm 7759ch_OS_specifics.fm At a high level, the steps for creating a Remote Mirror are as follows: 1. Shut down the guest operating system on the target ESX Server. 2. Establish remote mirroring from the source volumes to the target volumes. 3. When the initial copy has completed and the volumes are now is syncronized, suspend or remove the Remote Mirroring relationships. 4. Issue the Rescan command on the target ESX Server. 5. If not already assigned to the target virtual machine, assign the mirrored volumes to the target virtual machine. Virtual disks on VMFS volumes should be assigned as existing volumes, while raw volumes should be assigned as RDMs using the same parameters as on the source host. 6. Start the virtual machine and, if necessary, mount the target volumes. In Figure 6-6 we have a similar scenario as in Figure 6-5, but now the source and target volumes are located on two different XIV. This setup can be used for disaster recovery solutions where ESX host 2 would be located in the backup data center. Figure 6-6 Using Remote Mirror and Copy functions In addition, we support integration of VMware Site Recovery Manager with IBM XIV Storage System over IBM XIV Site Replication Adapter for VMware SRM. Chapter 6. Open Systems considerations for Copy Services 185 7759ch_OS_specifics.fm 186 IBM XIV Storage System: Copy Services and Migration Draft Document for Review January 23, 2011 12:42 pm Draft Document for Review January 23, 2011 12:42 pm 7759ch_IBM_i_specifics.fm 7 Chapter 7. IBM i considerations for Copy Services In this chapter, we describe the basic tasks that you should perform on IBM i systems when using the XIV Copy Services. © Copyright IBM Corp. 2010. All rights reserved. 187 7759ch_IBM_i_specifics.fm Draft Document for Review January 23, 2011 12:42 pm 7.1 IBM i functions and XIV as external storage To better understand solutions using IBM i and XIV, it is necessary to have basic knowledge of IBM i functions and features that enable external storage implementation and usage. The following functions are discussed in this section: IBM i structure Single level storage 7.1.1 IBM i structure IBM i is the newest generation of operating system previously known as AS/400® or I5/OS. It runs in a partition of POWER servers or Blade servers, as well on System i and some System p models. A partition of POWER server can host one of the following operating systems: IBM i, Linux, or AIX that are configured and managed through a Hardware Management Console (HMC) that is connected to the IBM i via an Ethernet connection. In the remaining of this chapter, we refer to an IBM i partition in POWER server or Blade server, simply as partition. 7.1.2 Single-level storage IBM i uses single-level storage architecturel. This means that the IBM i sees all disk space and the main memory as one storage area, and uses the same set of virtual addresses to cover both main memory and disk space. Paging in this virtual address space is performed in 4-KB pages. Single-level storage is graphically depicted in Figure 7-1. I5/OS Partition Single-Level Storage Main Memory Figure 7-1 Single level storage When the application performs an input output (IO) operation, the portion of the program that contains read or write instructions is first brought into main memory where the instructions are then executing. 188 IBM XIV Storage System: Copy Services and Migration Draft Document for Review January 23, 2011 12:42 pm 7759ch_IBM_i_specifics.fm With the read request, the virtual addresses of the needed record are resolved and for each page needed, storage management first checks if it is in the main memory. If the page is there, it is used for resolving the read request. But if the corresponding page is not in the main memory, it must be retrieved from disk (page fault). When a page is retrieved, it replaces a page that was recently not used; the replaced page is swapped to disk. Similarly, writing a new record or updating an existing record is done in main memory, and the affected pages are marked as changed. A changed page remains in main memory until it is swapped to disk as a result of a page fault. Pages are also written to disk when a file is closed or when write to disk is forced by a user through commands and parameters. Also, database journals are written to the disk. A subject in IBM i is anything that exists and occupies space in storage and on which operations can be performed. For example, a library, a database file, a user profile, a program, are objects in IBM i. 7.1.3 Auxiliary storage pools (ASPs) IBM i has a rich storage management heritage. From the start, the System i platform made managing storage simple through the use of disk pools. For most customers, this meant a single pool of disks called the System Auxiliary Storage Pools (ASPs). Automatic use of newly added disk units, RAID protection, and automatic data spreading, load balancing, and performance management makes this single disk pool concept the right choice. However, for many years, customers have found needs for additional storage granularity, including the need to sometimes isolate data into a separate disk pool. This is possible with User ASPs. User ASPs provide the same automation and ease-of-use benefits as the System ASP, but provide additional storage isolation when needed. With software level Version 5, IBM i takes this storage granularity option a huge step forward with the availability of Independent Auxiliary Storage Pools (IASPs). 7.2 Boot from SAN and cloning Traditionally, System i hosts have required the use of an internal disk as a boot drive or Load Source unit (LSU or LS). The Boot from SAN support has been available since i5/OS V5R3M5. IBM i Boot from SAN is supported on all types of external storage that attach to IBM i (natively or with Virtual I/O Server), this includes XIV storage. For requirements for IBM i Boot from SAN with XIV refer to the Redpaper™ IBM XIV Storage System with the Virtual I/O Server and IBM i, REDP-4598-00. Boot from SAN support enables IBM i customers to take advantage of Copy services functions in XIV. These functions allow them to perform an instantaneous copy of the data held on XIV logical volumes. Therefore, when they have a system that only has external LUNs with no internal drives, they are able to create a clone of their IBM i system. Important: When we refer to a clone, we are referring to a copy of an IBM i system that only uses external LUNs. Boot (or IPL) from SAN is therefore a prerequisite for this function. Why consider cloning By using the cloning capability, you can create a complete copy of your entire system in minutes. You can then use this copy in any way you want, for example, you could potentially Chapter 7. IBM i considerations for Copy Services 189 7759ch_IBM_i_specifics.fm Draft Document for Review January 23, 2011 12:42 pm use it to minimize your backup windows, or protect yourself from a failure during an upgrade, maybe even use it as a fast way to provide yourself with a backup or test system. You can use the remote copy of volumes for disaster recovery of your production system in case of failure e or disaster on primary site. When you use cloning You need enough free capacity on your external storage unit to accommodate the clone. In case Remote Mirroring is used you need enough bandwidth on the links between the XIV at primary site and the XIV at the secondary site. The clone of a production system runs in a separate logical partition (LPAR) in POWER or Blade server , and therefore you need enough resources to accommodate it. In case of Remote Mirroring you need an LPAR in POWER server or Blade at the remote site where you will implement the clone. You should not attach a clone to your network until you have resolved any potential conflicts that the clone has with the parent system. Note: Besides cloning, IBM i provides yet another way of using Copy Services on external storage: copying of an Independent Auxiliary Storage Pool (IASP) in a cluster. Implementations with IASP are not supported on XIV. 7.3 Setup of our implementation In our illustration of XIV Copy functions with IBM i , we use the following setup: System p6 model 570 – Two partitions with VIOS V2.2.0 – An LPAR with IBM i V7.1 is connected to both VIOS with Virtual SCSI (VSCSI) adapters IBM XIV model 2810 connected to both VIOS with two 8 Gbps Fibre Channel adapters in each VIOS Each connection between XIV and VIOS is done through one host ports in XIV, each host port via a separate Storage Area Network (SAN) Note: It is advised to connect multiple host ports in XIV to each adapter in the host server, however for the purpose of our example, we only connected one port in XIV to each VIOS. IBM i disk capacity in XIV: – 8 * 137.4 GB volumes are connected to both VIOS Note: The volume capacity stated above is the net capacity available to IBM i. For more information about the XIV usable capacity for IBM i refer to the Redpaper IBM XIV Storage System with the Virtual I/O Server and IBM i, REDP-4598-00. – The corresponding disk units in each VIOS are mapped to the VSCSI adapter assigned to IBM i partition – Since the volumes are connected to IBM i via two VIOS, IBM i Multipath was automatically established for those volumes. As can be seen in Figure 7-2 the IBM i resource name for the XIV volumes starts with DPM which denotes that the disk units are in Multipath. – IBM i Boot from SAN is implemented on XIV 190 IBM XIV Storage System: Copy Services and Migration 7759ch_IBM_i_specifics.fm Draft Document for Review January 23, 2011 12:42 pm Figure 7-2 shows the Display Disk Configuration Status screen in IBM i System Service Tools (SST). Display Disk Configuration Status ASP Unit 1 1 2 3 4 5 6 7 8 Serial Number Resource Type Model Name Y37DQDZREGE6 Y33PKSV4ZE6A YQ2MN79SN934 YGAZV3SLRQCM YS9NR8ZRT74M YH733AETK3YL Y8NMB8T2W85D YS7L4Z75EUEW 6B22 6B22 6B22 6B22 6B22 6B22 6B22 6B22 050 050 050 050 050 050 050 050 DMP002 DMP003 DMP015 DMP014 DMP007 DMP005 DMP012 DMP010 Status Unprotected Configured Configured Configured Configured Configured Configured Configured Configured Hot Spare Protection N N N N N N N N Press Enter to continue. F3=Exit F5=Refresh F11=Disk configuration capacity F9=Display disk unit details F12=Cancel Figure 7-2 XIV volumes in IBM i Multipath Configuration for snapshots: For the purpose of our experimentation, we used one IBM i LPAR for both production and backup. The LPAR was connected with two VIO Servers. Before IPLing the IBM i clone from snapshots we un-mapped the virtual disks from the production IBM i, and we mapped the corresponding snapshot hdisks to the same IBM i LPAR, in each VIOS. Obviously, in real situations, you should use two IBM i LPARs (production LPAR and backup LPAR). The same two VIOS can be used to connect each production and backup LPAR. In each VIOS, the snapshots of production volumes will be mapped to the backup IBM i LPAR. Configuration for Remote Mirroring For the purpose of our experimentation, we used one IBM i LPAR for both production and Disaster Recovery. Before IPL ing the IBM i clone from the Remote Mirror secondary volumes we un-mapped the virtual disks of production IBM i, and we mapped the hdisks of mirrored secondary volumes to the same IBM i LPAR, in each VIOS. Again, in real situations, you should use two IBM i LPARs (production LPAR and Disaster recovery LPAR), each of them in a different POWER server or blade server, each of them connected with two different VIOS. Chapter 7. IBM i considerations for Copy Services 191 7759ch_IBM_i_specifics.fm Draft Document for Review January 23, 2011 12:42 pm 7.4 Snapshots with IBM i Cloning of system from the snapshots can be employed in IBM i backup solutions. Saving of application libraries, objects or an entire IBM i system to tape, is done from the clone of a production system that resides in a separate logical partition in the POWER server: It is called a backup partition (LPAR). This solution brings many benefits, the main ones are described in the next section. As is discussed in “Single-level storage” on page 188, IBM i data is kept in the main memory until t swapped to disk as a result of page fault. Before cloning the system with snapshots it is necessary to make sure that the data was flushed from memory to disk. Otherwise the backup system that is then IPLed from snapshots wouldn’t be consistent (up-to-date) with the production system; even more important, the backup system wouldn’t use consistent data which can cause the failure of IPL. Some IBM i customers prefer to power-down their systems before creating or overwriting the snapshots, to make sure that the data is flushed to disk. Or, they force IBM i system to restricted state before creating snapshots. However, in many IBM i centers it is difficult or impossible to power-down the production system every day before taking backups from the snapshots. Instead, one may use the IBM i quiesce function provided in V6.1 and later. The function writes all pending changes to disk and suspends database activity within an auxiliary storage pool (ASP). The database activity remains suspended until a Resume is issued. This is known as quiescing the ASP. When cloning the IBM i, you should use this function to quiesce the sysbas which means quiescing all ASPs except independent ASPs. If there are Independent ASPs in your system they should be varied-off before cloning. When using this function, it is better to setup the XIV volumes in a consistency group. Further in this section we describe both approaches: power-down IBM i, and with consistency groups and quiescing the system ASP. 7.4.1 Solution benefits Taking IBM i backups form the separate LPAR provides the following benefits to an IBM i center: The production application downtime is only is as long as it takes to power down the production partition, take a snapshot or overwrite the snapshot of the production volumes, and IPL the production partition (IPL is normal). Usually, this time is much shorter than the downtime experienced when saving to tape without a Save While Active function. Note: Save While Active function allows to save IBM i objects to tape without the need to stop updates on these objects. Save to tape is usually a part of batch job the duration of which is critical for an IT center. This makes it even more important to minimize the production downtime during the save. The performance impact on the production application during the save to tape operation is minimal since it does not depend on IBM i resources in the production system. This solution can be implemented together with Backup, Recovery, and Media Services for iSeries® (BRMS), an IBM i software for saving application data to tape. 192 IBM XIV Storage System: Copy Services and Migration 7759ch_IBM_i_specifics.fm Draft Document for Review January 23, 2011 12:42 pm 7.4.2 Disk capacity for the snapshots If the storage pool is about to become full because of redirect-on-write operations, the XIV Storage System automatically deletes a snapshot. IBM i deletion of a snapshot while the backup partition is running, would cause crash of the backup system. To avoid such situation consider allocating enough space to the storage pool to accommodate snapshots for the time your backup LPAR is running. Snapshot must have at least 34 GB allocated. Since the space neded depends on the size of LUNs and the locality of write operations, we recommend to allocate initialy a very conservative estimation about 80% of the source capacity to the snapshots. Then monitor how snapshot space is growing during the backup. If snapshots don't use all the of theallocated capacity, you can adjust the snapshot capacity to a lower value. For an explanation on how to monitor the snapshot capacity, refer to the IBM Redbooks publication, IBM XIV Storage System: Architecture, Implementation, and Usage, SG24-7659-01. 7.4.3 Power-down IBM i method To clone IBM i using XIV snapshots, perform the following steps: 1. Power-down IBM i production system To power-down IBM i system use the PWRDWNSYS command. Specify to end the system using a controlld end time delay. In the scenario with Snapshots you don’t want IBM i to restart immediately after shutdown, so you specify Restart option *NO. The PWRDWNSYS command is shown in Figure 7-3 Power Down System (PWRDWNSYS) Type choices, press Enter. How to end . . . . . . . . Controlled end delay time Restart options: Restart after power down Restart type . . . . . . IPL source . . . . . . . . . . . . . . *CNTRLD 10 *CNTRLD, *IMMED Seconds, *NOLIMIT . . . . . . . . . *NO *IPLA *PANEL *NO, *YES *IPLA, *SYS, *FULL *PANEL, A, B, D, *IMGCLG F3=Exit F4=Prompt F5=Refresh F13=How to use this display F10=Additional parameters F24=More keys Bottom F12=Cancel Figure 7-3 Power-down IBM i Chapter 7. IBM i considerations for Copy Services 193 7759ch_IBM_i_specifics.fm Draft Document for Review January 23, 2011 12:42 pm After you confirm to Power-down the system, IBM i starts to shutdown; you can follow the progress by observing SRC codes in the Hierarchical Management Console (HMC) of the POWER server or, as in our example, of the System p server. Once shut-down the system shows as Not Activated in the HMC, as can be seen in Figure 7-4. Figure 7-4 IBM i LPAR Not Activated 2. Create snapshots of IBM i volumes You create the snapshot only the first time you execute this scenario. For subsequent executions, you may just use overwrite the snapshot. In the XIV GUI expand Volumes -> Volumes and Snapshots, as can be seen in Figure 7-5. 194 IBM XIV Storage System: Copy Services and Migration 7759ch_IBM_i_specifics.fm Draft Document for Review January 23, 2011 12:42 pm Figure 7-5 XIV GUI Volumes and Snapshots In the Volumes and Snapshots windown, right click on each IBM i volume and click Create Snapshot, The snapshot volume is immediately created and it shows in the XIV GUI. Notice that the snapshot volume has the same name as the original volume with suffix “snapshot” appended to it. The GUI also shows the date and time the snapshot was created. For details on how to create snapshots, refer 1.2.1, “Creating a snapshot” on page 9. In every day usage it is a good idea to overwrite the snapshots: you create the snapshot only the first time, then you overwrite it every time you need to take a new backup. Overwrite operation modifies the pointers to the snapshot data, therefore the snapshot appears as new. Storage that was allocated for the data changes between the volume and its snapshot is released. For details on how to overwrite snapshots, refer 1.2.5, “Overwriting snapshots” on page 15 3. Unlock the snapshots This action is needed only after you create snapshots. The created snapshots are locked, which means that a host server can only read data from them, but their data an not be modified. For IBM i backup purposes the data on snapshots must be available for reads and writes so it is necessary to unlock the volumes before using them for cloning IBM i. To unlock the snapshots use the Volumes and Snapshots windoe in XIV GUI, right-click on each volume you want to unlock, and click on Unlock. Note that ffter overwriting the snapshotsm you don’t need to unlock them again. For details on how to create snapshots, refer 1.2.5, “Overwriting snapshots” on page 15 4. Connect the snapshots to the backup IBM i LPAR Chapter 7. IBM i considerations for Copy Services 195 7759ch_IBM_i_specifics.fm Draft Document for Review January 23, 2011 12:42 pm You map the snapshot volumes to VIO Systems and map the corresponding virtual disks to IBM i adapters only the first time you use this aproach. For subsequent executions, the existing mappings are used, and you just have to rediscover the devices in each VIOS with the cfgdev command. In each VIOS map the disk devices to the Virtual SCSI Server adapter to which the IBM i client adapter is assigned, by using command mkvdev: mkvdev -vdev hdisk16 -vadapter vhost0 Once the relevant disk devices are mapped VSCSI adapters that connect to IBM i, they become part of the hardware configuration IBM i LPAR.I 5. IPL the IBM i backup system from snapshots. In the HMC of POWER server IPL IBM i backup partition, by selecting the LPAR and choosing Operations -> Activate from the pop-up menu, as can be seen in Figure 7-6. Figure 7-6 IPL of IBM i backup LPAR The backup LPAR now hosts the clone of the production IBM i. Before using it for the backups make sure that it is not connected to the same IP addresses and network attributes as the production system. For more information, refer to the IBM Redbooks publication, IBM i and IBM System Storage: A Guide to Implementing External Disks on IBM i, SG24-7120-01. 7.4.4 Quiescing IBM i and using snapshot consistency group To clone IBM i with using XIV Snapshots with consistency group and the IBM i quiesce function, perform the following steps: 1. Create a consistency group and add IBM i volumes to it. For details on how to create the consistency group, refer to 1.3, “Snapshots consistency group” on page 20. The consistency group Diastolic used in our example is shown in Figure 7-7. 196 IBM XIV Storage System: Copy Services and Migration 7759ch_IBM_i_specifics.fm Draft Document for Review January 23, 2011 12:42 pm Figure 7-7 Volumes in consistency group 2. Quiesce the sysbas in IBM i and suspend transactions To quiesce IBM i data to disk use the IBM i command CHGASPACT *SUSPEND. In this command, we recommend to set the parameter Suspend Timeout to 30 seconds and Suspend Timeout Action to *END, as can be seen in Figure 7-8. When executing this command IBM i flushes as much as possible transaction data from memory to disk, then it waits for the specified time-out to get all current transactions to their next commit boundary and does not let them continue past that commit-boundary. If the command succeeded after the time-out, the non-transaction operations are suspended and data that is non-pinned in the memory is flushed to disk. For detailed information about quescing data to disk with CHGASPACT refer to the Redbook IBM i and IBM System Storage: A Guide to Implementing External Disks on IBM i,SG24-7120-01, and the Redpaper DS8000 Copy Services for IBM i with VIOS, REDP-4584-00 and the Redbook Implementing PowerHA for IBM i,SG24-7405-00. Chapter 7. IBM i considerations for Copy Services 197 7759ch_IBM_i_specifics.fm Draft Document for Review January 23, 2011 12:42 pm Change ASP Activity (CHGASPACT) Type choices, press Enter. ASP device . . . . . . Option . . . . . . . . Suspend timeout . . . Suspend timeout action F3=Exit F4=Prompt F24=More keys . . . . . . . . . . . . . . . . . > *SYSBAS . > *SUSPEND . 30 . *end F5=Refresh F12=Cancel Name, *SYSBAS *SUSPEND, *RESUME, *FRCWRT Number *CONT, *END Bottom F13=How to use this display Figure 7-8 Quiesce data to disk After the command CHGASPACT is successfully performed IBM issues the message indicating that the access to sysbas is suspended, see Figure 7-9. MAIN IBM i Main Menu System: T00C6DE1 Select one of the following: 1. 2. 3. 4. 5. 6. 7. 8. 9. 10. 11. User tasks Office tasks General system tasks Files, libraries, and folders Programming Communications Define or change the system Problem handling Display a menu Information Assistant options IBM i Access tasks 90. Sign off Selection or command ===> F3=Exit F4=Prompt F9=Retrieve F12=Cancel F23=Set initial menu Access to ASP *SYSBAS is suspended. Figure 7-9 Access to sysbas suspended 198 IBM XIV Storage System: Copy Services and Migration F13=Information Assistant 7759ch_IBM_i_specifics.fm Draft Document for Review January 23, 2011 12:42 pm 3. Create snapshots of IBM i volumes in the consistency group You create the snapshot only the first time this scenario is executed. AFor subsequent executions, you may just use overwrite the snapsho. In the Volumes and Snapshots windown, right click on each IBM i volume and click Create Snapshot, The snapshot volume is immediately created and it shows in the XIV GUI. Notice that the snapshot volume has the same name as the original volume with suffix “snapshot” appended to it. The GUI also shows the date and time the snapshot was created. For details on how to create snapshots, refer 1.2.1, “Creating a snapshot” on page 9. In every day usage it is a good idea to overwrite the snapshots: you create the snapshot only the first time, then you overwrite it every time you need to take a new backup. Overwrite operation modifies the pointers to the snapshot data, therefore the snapshot appears as new. Storage that was allocated for the data changes between the volume and its snapshot is released. For details on how to overwrite snapshots, refer 1.2.5, “Overwriting snapshots” on page 15 4. Resume transactions in IBM i After snapshots are created resume the transactions in IBM i with command CHGASPACT with option *RESUME, which is shown in Figure 7-10. Change ASP Activity (CHGASPACT) Type choices, press Enter. ASP device . . . . . . . . . . . Option . . . . . . . . . . . . . *sysbas *resume F3=Exit F4=Prompt F24=More keys F12=Cancel F5=Refresh Name, *SYSBAS *SUSPEND, *RESUME, *FRCWRT Bottom F13=How to use this display Figure 7-10 Resume transactions in IBM i Look for the IBM i message Access to ASP *SYSBAS successfully resumed, to be sure that the command was successfully performed. 5. Unlock the snapshots in the consistency group This action is needed only after you create snapshots. The created snapshots are locked, which means that a host server can only read data from them, but their data an not be modified. Before IPL-ing IBM i from the snapshots you have to unlock them to make them accessible for writes as well. For this, use the Consistency Groups screen in XIV GUI, right-click on the snapshot group and select Unlock form the pop-up menu. Note that ffter overwriting the snapshotsm you don’t need to unlock them again. For details on how to create snapshots, refer 1.2.5, “Overwriting snapshots” on page 15 Chapter 7. IBM i considerations for Copy Services 199 7759ch_IBM_i_specifics.fm Draft Document for Review January 23, 2011 12:42 pm 6. Connect the snapshots to Backup LPAR You map the snapshot volumes to VIO Systems and map the corresponding virtual disks to IBM i adapters only the first time you use his solution. All the next times the exiting mappings are used, you just have to rediscover the devices in each VIOS by cfgdev command. Perform the following steps to connect the snapshots in the snapshot group to backup partition: a. In the Consistency Groups screen select the snapshots in the snapshot group, right click to any of them and select Map selected volumes, as is shown in Figure 7-11. Figure 7-11 Map the snapshot group b. In the next GUI window select the host or cluster of hosts to map the snapshots to. In our example we map them to the two VIO Systems that connect to IBM i LPAR. Note: Here the term cluster refers just to the host names and their WWPNs in XIV, it doesn’t mean that VIO Systems would be in an AIX cluster. In each VIOS rediscover the mapped volumes and map the corresponding devices to the VSCSI adapters in IBM i. 7. IPL IBM i backup system from snapshots IPL backup LPAR as is described in step 5 on page 196. Note: when you power-down production system before taking snapshots the IPL of backup system shows previous system end as normal, while with quiescing data to disk before taking snapshots the IPL of backup LPAR shows previous system end as abnormal, as can be seen in Figure 7-12. 200 IBM XIV Storage System: Copy Services and Migration 7759ch_IBM_i_specifics.fm Draft Document for Review January 23, 2011 12:42 pm Operating System IPL in Progress 10/01/10 IPL: Type . . . . . . . . Start date and time . Previous system end . Current step / total Reference code detail . . . . . . . . . . . . . . . . . . . . . . . . . . . . . . : : : : : 12:57:24 Attended 10/01/10 12:56:17 Abnormal 35 49 C900 2AA3 20 AC 0400 IPL step Commit recovery Journal recovery - 2 > Database recovery - 2 Damage notification end - 2 Spool initialization - 2 Time Elapsed 00:00:05 00:00:00 00:00:00 Time Remaining Figure 7-12 Abnormal IPL after quiesce data 7.4.5 Automation of the solution with snapshots Many IBM i environments require their backup soluiton with shapshots to be fully automated, so that they can runit with a sinlge command, or even schedule it for a certain time in day. Automation for such scenario can be provided in an AIX or Linux system, using XCLI scripts to manage snapshots, and Secure Shell (SSH) commands to IBM i LPAR and the HMC. Note: IBM i must be setup for receiving SSH commands. For instructions how to set it up refer to the Redpaper Securing Communications with OpenSSH on IBM i5/OS which can be obtained from the following web page: http://www.redbooks.ibm.com/redpapers/pdfs/redp4163.pdf In our example, we use the AIX script that performs the following actions: 1. Send SSH command CHGASPACT ASPDEV(*SYSBAS) OPTION(*SUSPEND) SSPTIMO(30) to produciton IBM i to suspend transactions and quiesce Sysbas data to disk 2. Send XCLI command to overrite the snapshot group, or create a new one if there isn’t one. We use XCLI commands cg_snapshots_create cg=CG_NAME snap_group=SNAP_NAME and cg_snapshots_create cg=CG_NAME overwrite=SNAP_NAME 3. Unlock the snapshot group by XCLI command snap_group_unlock snap_group=SNAP_NAME 4. Send the command CHGASPACT ASPDEV(*SYSBAS) OPTION(*RESUME) to production IBM i to resume suspended transactions 5. Send the SSH command Chapter 7. IBM i considerations for Copy Services 201 7759ch_IBM_i_specifics.fm Draft Document for Review January 23, 2011 12:42 pm ioscli cfgdev to each VIOS to re-discover the snapshot devices 6. Send the SSH command chsysstate -m hmc_ibmi_hw -r lpar -o on -n hmc_ibmi_name -f hmc_ibmi_prof to POWER® HMC to start the backup LPAR that is connected to snapshot volumes The script for our example is shown in the Example 7-1. Example 7-1 #!/bin/ksh [email protected] XCLI=/usr/local/XIVGUI/xcli XCLIUSER=itso XCLIPASS=password XIVIP=1.2.3.4 CG_NAME=ITSO_i_CG SNAP_NAME=ITSO_jj_snap [email protected] hmc_ibmi_name=IBMI_BACKUP hmc_ibmi_prof=default_profile hmc_ibmi_hw=power570 [email protected] [email protected] # Suspend IO activity ssh ${ssh_ibmi} 'system "CHGASPACT ASPDEV(*SYSBAS) OPTION(*SUSPEND) SSPTIMO(30)"' # Check, whether snapshot already exists and can be overwritten # otherwise create a new one and unlock it (it's locked by default) ${XCLI} -u ${XCLIUSER} -p ${XCLIPASS} -m ${XIVIP} -s snap_group_list snap_group=${SNAP_NAME} >/dev/null 2>&1 RET=$? # is there a snapshot for this cg? if [ $RET -ne 0 ]; then # there is none, create one ${XCLI} -u ${XCLIUSER} -p ${XCLIPASS} -m ${XIVIP} cg_snapshots_create cg=${CG_NAME} snap_group=${SNAP_NAME} # and unlock it ${XCLI} -u ${XCLIUSER} -p ${XCLIPASS} -m ${XIVIP} snap_group_unlock snap_group=${SNAP_NAME} fi # overwrite snapshot ${XCLI} -u ${XCLIUSER} -p ${XCLIPASS} -m ${XIVIP} cg_snapshots_create cg=${CG_NAME} overwrite=${SNAP_NAME} # resume IO activity ssh ${ssh_ibmi} 'system "CHGASPACT ASPDEV(*SYSBAS) OPTION(*RESUME)"' # rediscover devices 202 IBM XIV Storage System: Copy Services and Migration 7759ch_IBM_i_specifics.fm Draft Document for Review January 23, 2011 12:42 pm ssh ${ssh_vios1} 'ioscli cfgdev' ssh ${ssh_vios2} 'ioscli cfgdev' # start the backup partition ssh ${ssh_hmc} "chsysstate -m ${hmc_ibmi_hw} -r lpar -o on -n ${hmc_ibmi_name} -f ${hmc_ibmi_prof}" Note: In the backup IBM i LPAT it is necessary to change the IP addresses and newtork attributes so that they don’t collide with the ones in the production LPAR. For this you may use the startup CL program that in backup IBM i; example of such program can be found in the IBM Redbooks publication: IBM i and IBM System Storage: A Guide to Implementing External Disks on IBM i, SG24-7120-01. You may also want to automate the saving to tape in BRMS, by scheduling the save in BRMS. After the save the library QUSRBRM must be transferred to the production system. 7.5 Synchronous Remote Mirroring with IBM i Synchronous remote mirroring used with IBM i boot from SAN provides the functionality for cloning a production IBM i system at a remote site. The remote clone is used to continue production workload in case of planned outages, or disaster at the local site, and therefore provides a Disaster Recovery (DR) solution for an IBM i center. A stand-by IBM i LPAR is needed at the DR site. After the switchover of mirrored volumes during planned or un-planned outages, perform an IPL of the stand-by partition from the mirrored volumes at the DR site. This ensures continuation of the the production workload in the clone. Typically, synchronous mirroring is used for DR sites located at shorter distances, and for IBM i centers that require a near zero Recovery Point Objective (RPO). On the other hand, clients that use DR centers located at long distance and who can cope with a little longer RPO would rather implement Asynchronous Remote Mirroring. It is recommended to use consistency groups with synchronous mirroring for IBM i in order to simplify management of the solution and to provide consistent data at the DR site after re-snychronization following a link failure. 7.5.1 Solution benefits Synchronous Remote Mirroring with IBM i offers the following major benefits: It can be implemented without any updates or changes to the production IBM i. The solution does not require any special maintenance on the production or stand-by system partition. Practically, the only required task is to set up the synchronous mirroring for all the volumes making up the partition entire disk space. Once done, no further actions are required. Since synchronous mirroring is completely handled by the XIV system, this scenario does not use any processor or memory resources from either the production or remote IBM i partitiona. This is different from other IBM i replication solutions, which require some CPU resources from the production and recovery partitions. Chapter 7. IBM i considerations for Copy Services 203 7759ch_IBM_i_specifics.fm Draft Document for Review January 23, 2011 12:42 pm 7.5.2 Planning the bandwidth for Remote Mirroring links In addition to the points specified in 3.6, “Planning” on page 89, it is very important to provide enough bandwidth for the connection links between the primary and secondary XIV used for for IBM i mirroring. Proceed as follows to determine the needed bandwidth (MB/sec): 1. Collect IBM i performance data. Do the collection over at least a one-week period, and if applicable, during heavy workload such as when running end-of-month jobs. For more information about IBM performance data collection refer to the IBM Redbooks publication, IBM i and IBM System Storage: A Guide to Implementing External Disks on IBM i, SG24-7120. 2. Multiply the writes/sec by the reported transfer size to get the write rate (MB/sec) for the entire period over which performance data was collected. 3. Look for the highest reported write rate. Size the Remote mirroring connection so that the bandwidth can accommodate the highest write rate. 7.5.3 Setup of synchronous Remote Mirroring for IBM i The following steps are needed to setup the synchronous remote mirroring with consistency group for IBM i volumes 1. Configure Remote Mirroring as described in “Using the GUI or XCLI for Remote Mirroring actions” on page 91 2. Establish and activate synchronous mirroring for IBM i volumes as is described in 3.12, “Configuring Remote Mirroring” on page 102. 3. Activate the mirroring pairs as is described in “Synchronous mirroring configuration” on page 104. Figure 7-13 shows the IBM i mirroring pairs used in our scenario during the initial synchronization: Some of the mirroring pairs are already in synchronized status while some of them are still in Initialization state with reported percentage synchronized volume. Figure 7-13 Synchronizing of IBM i mirrored pairs 204 IBM XIV Storage System: Copy Services and Migration 7759ch_IBM_i_specifics.fm Draft Document for Review January 23, 2011 12:42 pm 4. Create mirror consistency group and activate mirroring for the CG on both primary and secondary XIV systems. Setting a consistency group to be mirrored is done by first creating a consistency group, then setting it to be mirrored, and only then populating it with volumes. A consistency group must be created at the primary XIV and a corresponding consistency group at the secondary XIV. The names of the consistency groups can be different. To activate the mirror for the CG, in the XIV GUI Consistency Groups for the primary XIV, right-click on the created consistency group and select Create Mirror. For details, refer to 4.1.2, “Consistency group setup and configuration” on page 108. 5. Add the mirrored volumes to the consistency group Note: When adding the mirrored volumes to the consistency group all volumes and the CG must have the same status. So the mirrored volumes should be synchronized before you add them to the consistency group, and the CG should be activated, so that all of them have status Synchronized In primary XIV system select the IBM i mirrored volumes, right-click and select Add to Consistency Group,. Figure 7-14 shows the consistency group in synchronized status for our scenario. Figure 7-14 CG in synchronized status 7.5.4 Scenario for planned outages Many IBM i IT centers minimize the downtime during planned outages (such as for server hardware maintenance or installing program fixes) by switching their production workload to the DR site during the outage. Note: The switching mirroring roles scenario is suitable for planned outages during which the IBM i system is powered-down. For planned outages with IBM i running, consider changing the mirroring roles scenario. Chapter 7. IBM i considerations for Copy Services 205 7759ch_IBM_i_specifics.fm Draft Document for Review January 23, 2011 12:42 pm With synchronous mirroring, perform the following steps to switch to the DR site for planned outages: 1. Power-down the production IBM i system as is described in 1., “Power-down IBM i production system” on page 193. 2. Switch the XIV volumes mirroring roles To switch the roles of mirrored XIV volumes, use the GUI for the primary XIV, and in the Mirroring window right-click on the consistency group that has the IBM i mirrored volumes, then select Switch Roles, as is shown in Figure 7-15. Figure 7-15 Switch the roles of mirrored volumes for IBM i Confirm to switch the roles in your consistency group by clicking OK in the Switch Roles pop-up dialog. Once the switch is performed, the roles of mirrored volumes are reversed: the IBM i mirroring consistency group on the primary XIV is now Slave and the consistency group on the secondary XIV is now Master. This is shown in Figure 7-16 where you can also , observet hat the status of CG at the primary site is now Consistent, and at the secondary site, it is Synchronized. Figure 7-16 Mirrored CG after switching the roles 206 IBM XIV Storage System: Copy Services and Migration 7759ch_IBM_i_specifics.fm Draft Document for Review January 23, 2011 12:42 pm 3. Make the mirrored secondary volumes available to the stand-by IBM i Note: You may want to have the secondary volumes mapped to the adapters in VIO Servers, and their corresponding hdisks mapped to virtual adapters in sthe tand-by IBM i at all times. In such a case you need to do this setup only the first time you recover from mirrored volumes; from then on. the devices will be mapped so you just have to re-discover them. We assume that the following steps are done at DR site: – The physical connection of XIV to the adapters in VIO Servers – The hosts and optionally clusters are defined in XIV – The ports of adapters in VIO Servers are added to the hosts in XIV To connect the mirrored volumes to DR IBM i system perform the following steps: a. Map the secondary volumes to the WWPNs of adapters as is described in 6., “Connect the snapshots to Backup LPAR” on page 200. b. In each VIOS discover the mapped volumes by using the cfgdev command c. In each VIOS, map the devices (hdisks) that correspond to the secondary volumes, to the virtual adapters in the stand-by IBM i, as is described in 4., “Connect the snapshots to the backup IBM i LPAR” on page 195. 4. IPL stand-by IBM i LPAR Perform IPL of the disaster recovery IBM i LPAR as described in 5., “IPL the IBM i backup system from snapshots.” on page 196. Since the production IBM i was powered-down the, IPL of its clone at the DR site is normal (Previous system shutdown was normal). If both production and DR IBM i are in the same IP network, it is necessary to change the IP addresses and network attributes of the clone att the DR site. For more information about this refer to the IBM Redbooks publication IBM i and IBM System Storage: A Guide to Implementing External Disks on IBM i, SG24-7120-01 After the production site is available again, you can switch back to the regular production site, by executing the following steps: 1. Power-down the DR IBM i system as is described in 1., “Power-down IBM i production system” on page 193. 2. Switch the mirroring roles of XIV volumes as is described in 2., “Switch the XIV volumes mirroring roles” on page 206. Note: when switching back to the production site you must initiate the role switching on the secondary (DR) XIV, since role switching must be done on the master peer. 3. In each VIOS at the primary site, rediscover the mirrored primary volumes by performing the cfgdev command 4. Perform an IPL of the production IBM i LPAR as is described in 5., “IPL the IBM i backup system from snapshots.” on page 196. Since the DR IBM i was powered-down, the IPL of its clone in production site is now normal (Previous system shutdown was normal) 7.5.5 Scenario for unplanned outages In case of failure at the production IBM i, caused by any unplanned outage od the primary XIV system or disaster, recover your IBM i at the DR site from mirrored secondary volumes. For our scenario, we simulated the failure of production IBM i by un-mapping the virtual disks from IBM i virtual adapter in each VIOS, so that IBM i missed the disks and entered the DASD attention status. The SRC code showing this status can be seen in Figure 7-17. Chapter 7. IBM i considerations for Copy Services 207 7759ch_IBM_i_specifics.fm Draft Document for Review January 23, 2011 12:42 pm Figure 7-17 IBM i DASD attention status at disaster Follow these steps: 1. Change the peer roles at the secondary site To change the roles of secondary mirrored volumes from slave to master perform the following steps: a. In the GUI of the secondary XIV, select Remote -> Mirroring b. Right-click on the mirroring consistency group that contains the IBM i volumes and select Change Role. Confirm to change the role of the slave peer to master. Changing of the roles stops mirroring. Its status is shown as Inactive on the secondary site, and the secondary peer becomes master. The primary peer keeps the master role too, and the mirroring status on the primary site shows as synchronized. This can be seen in Figure 7-18 which shows the secondary IBM i consistency group after changing the roles, and in Figure 7-19 showing the primary peer. Figure 7-18 Secondary peer after changing the role Figure 7-19 Primary peer after changing the role 208 IBM XIV Storage System: Copy Services and Migration 7759ch_IBM_i_specifics.fm Draft Document for Review January 23, 2011 12:42 pm 2. Make the secondary volumes available to the stand-by IBM i We assume that the physical connections from XIV to the POWER server at the DR site are already established. The following steps are required to make the secondary mirrored volumes available to IBM i at the DR site: a. In the secondary XIV, map the mirrored IBM i volumes to the adapters in VIOS, as is described in 4., “Connect the snapshots to the backup IBM i LPAR” on page 195. b. In each VIOS in POWER serverat the DR site, use the cfgdev command to re-discover the secondary mirrored volumes. c. In each VIOS, map the devices that correspond to XIV secondary volumes to virtual host adapters for IBM i, as is described in 4., “Connect the snapshots to the backup IBM i LPAR” on page 195. You may want to keep the mappings of secondary volumes in XIV and in VIOS. In this case the only needed step is to re-discover the volumes in VIOS with cfgdev. 3. IPL IBM i at the DR site IPL the stand-by IBM i LPAR on DR site, as is described in 5., “IPL the IBM i backup system from snapshots.” on page 196. IPL is abnormal (Previous system termination was abnormal) as can be seen in Figure 7-20. After recovery there might be damaged objects in the IBM i, since the production system suffered a disaster. They are reported by operator messages and can be usually fixed by appropriate procedures in IBM i. The message about Damaged object in our example, is shown in Figure 7-21. Licensed Internal Code IPL in Progress 10/11/10 IPL: Type . . . . . . . . Start date and time . Previous system end . Current step / total Reference code detail . . . . . . . . . . . . . . . . . . . . . . . . . . . . . . : : : : : IPL step Journal Recovery IFS Initialization >Data Base Recovery Journal Synchronization Commit Recovery 12:09:53 Attended 10/11/10 12:09:43 Abnormal 10 16 C6004057 Time Elapsed 00:00:01 00:00:01 Time Remaining 00:00:00 00:00:00 Item: Current / Total . . . . . . : Sub Item: Identifier . . . . . . . . : Current / Total . . . . . . : Figure 7-20 IPL of stand-by LPAR after disaster Chapter 7. IBM i considerations for Copy Services 209 7759ch_IBM_i_specifics.fm Draft Document for Review January 23, 2011 12:42 pm Display Messages Queue . . . . . : Library . . . : Severity . . . : QSYSOPR QSYS 60 System: Program . . . . : Library . . . : Delivery . . . : T00C6DE1 *DSPMSG *BREAK Type reply (if required), press Enter. Subsystem QBASE active when system ended. Subsystem QSYSWRK active when system ended. Subsystem QSERVER active when system ended. Subsystem QUSRWRK active when system ended. Subsystem QSPL active when system ended. Subsystem QHTTPSVR active when system ended. 455.61M of 490.66M for shared pool *INTERACT allocated. Damaged object found. Bottom F3=Exit F13=Remove all F11=Remove a message F16=Remove all except unanswered F12=Cancel F24=More keys Figure 7-21 Damaged object in IBM i after disaster recovery If both production and DR IBM i are in the same IP network it is necessary to change the IP addresses and network attributes of the clone at the DR site. For more information about this refer to the IBM Redbooks publication, IBM i and IBM System Storage: A Guide to Implementing External Disks on IBM i, SG24-7120-01. Once the production site is back, failover to the normal production system as follows: 1. Change the role of primary peer to slave On primary XIV, select Remote -> Mirroring in the GUI, right-click on the consistency group of IBM i volumes, and select Deactivate from the pop-up menu, then right-click again and select Change Role. Confirm to change the peer role from master to slave. Now the mirroring is still inactive, and the primary peer became slave, so the scenario is prepared for mirroring from DR site to production site. The primary peer status is shown in Figure 7-22. Figure 7-22 Primary peer after changing the roles 210 IBM XIV Storage System: Copy Services and Migration 7759ch_IBM_i_specifics.fm Draft Document for Review January 23, 2011 12:42 pm 2. Activate the mirroring In the GUI of the secondary XIV, select Remote -> Mirroring, right-click on the consistency group for IBM i volumes, and select Activate. Now the mirroring started in the direction from secondary to primary peer. At this point only the changes made on the DR IBM i system during the outage need to be synchronized, and the mirror synchronization typically takes very little time. Once the mirroring is synchronized: 3. Power-down the DR IBM i Power-down the IBM i on DR site, as is described in 1., “Power-down the production IBM i system as is described in 1., “Power-down IBM i production system” on page 193.” on page 206. 4. Switch peer roles On teh secondary XIV, switch the mirroring roles of volumes as is described in 2., “Switch the mirroring roles of XIV volumes as is described in 2., “Switch the XIV volumes mirroring roles” on page 206.” on page 207. 5. Re-discover primary volumes in VIOS In each VIOS on primary site rediscover the mirrored primary volumes by issuing a cfgdev command. 6. IPL production IBM i Perform IPL of production IBM i LPAR as is described in 5., “IPL the IBM i backup system from snapshots.” on page 196 7.6 Asynchronous Remote Mirroring with IBM i In this section we describe Asynchronous Remote Mirroring of the local IBM i partition disk space. This solution provides continuous availability with a recovery site located at a long distance while minimizing performance impact on production. In this solution, the entire disk space of production IBM i LPAR resides on the XIV, to allow boot from SAN. Asynchronous Remote Mirroring for all XIV volumes belonging to the production partition is established with another XIV located at the remote site. In case of an outage at the production site a remote stand-by IBM i LPAR takes over the production workload with the capability to IPL from Asynchronous Remote Mirroring secondary volumes. Thanks to the XIV Asynchronous Remote Mirroring design, the impact on production performance is minimal; on the other hand the recovered data at the remote site is typically lagging production data, due to the asynchronous natutre, although usually just slighltly behind. For more information about the XIV Asynchronous Remote Mirroring design and implementation, refer to “Remote Mirroring” on page 49. 7.6.1 Benefits of asynchronous Remote Mirroring Solutions with asynchronous mirroring provide significant benefits to and IBM i center, some of them are as follows: The solution provides replication of production data over long distances while minimizing production performance impact. Chapter 7. IBM i considerations for Copy Services 211 7759ch_IBM_i_specifics.fm Draft Document for Review January 23, 2011 12:42 pm The solution does not require any special maintenance on the production or standby partition. Practically, the only required task is to set up Asynchronous mirroring for the entire IBM i disk space. Since Asynchronous mirroring is entirely driven by the XIV storage systems, this solution does not use any processor or memory resources from the IBM i production and remote partition. This is different from other IBM i replication solutions, which use some of the production and recovery partitions resources 7.6.2 Setup of asynchronous Remote Mirroring for IBM i The following steps are needed to setup asynchronous remote mirroring with consistency group for IBM i volumes 1. Configure Remote Mirroring as is described in “Using the GUI or XCLI for Remote Mirroring actions” on page 91 2. Establish and activate asynchronous mirroring for IBM i volumes. To establish the asynchronous mirroring on IBM i volumes use the GUI on primary XIV, select Volumes -> Volumes and Snapshots. Right-click on each volumes to mirror and select Create Mirror from the pop-up menu. In the Create Mirror window, specify Synch Type Asynch, specify the target XIV system and the slave volume to mirror to, desired RPO and schedule management XIV Internal. For more information about establishing Asynchronous mirroring refer to “Asynchronous mirroring configuration” on page 128. To activate asynchronous mirroring on IBM i volumes use the GUI on primary XIV, select Remote -> Mirroring, highlight the volumes to mirror and select Activate from the pop-up window. After activating, the initial synchronization of mirroring is performed. Figure 7-23 shows the IBM i volumes during initial synchronization, some of them already in the status RPO OK, one in RPO lagging status, and some not yet synchronized. Figure 7-23 Initial synchronization of Asynchronous mirroring for IBM i volumes 3. Create a consistency group for mirroring on both primary and secondary XIV system, and activate mirroring on the CG, as is described in 4., “Create mirror consistency group and activate mirroring for the CG on both primary and secondary XIV systems.” on page 205. Note that when activating the asynchronous mirroring for the CG, you must select the same options as selected when activating the mirroring for the volumes. 212 IBM XIV Storage System: Copy Services and Migration 7759ch_IBM_i_specifics.fm Draft Document for Review January 23, 2011 12:42 pm Before adding the volumes to the consistency group, the mirroring on all CG and the volumes must be in the same status. Figure 7-24 shows the mirrored volumes and the CG, before adding the volumes to CG in our example. The status of all of them is RPO OK. Figure 7-24 Status before adding volumes to CG 4. Add the mirrored IBM i volumes to the consistency group as is described in 5., “Add the mirrored volumes to the consistency group” on page 205. 7.6.3 Scenario for planned outages and disasters For our scenario, we simulated the failure of production IBM i by un-mapping the virtual disks from IBM i virtual adapter in each VIOS, so that IBM i missed the disks and entered the DASD attention status. When you need to switch to the DR site for planned outages or as a result of a disaster, perform the following steps: 1. Change the role of secondary peer from slave to master Select Remote -> Mirroring in the GUI for the secondary XIV. Right click on the mirrored consistency group and select Change Role. Confirm to change the role of the slave peer to master. 2. Make the mirrored secondary volumes available to the stand-by IBM i We assume that the physical connections from XIV to POWER server on DR site are already established at this point. Re-discover the XIV volumes in each VIOS with command cfgdev, then map them to the virtual adapter of IBM i, as is described in 3., “Make the mirrored secondary volumes available to the stand-by IBM i” on page 207. 3. IPL IBM i and continue production workload at the DR site as is described in 3., “IPL IBM i at the DR site” on page 209 After the primary site is available again: 1. Change the role of primary peer from master to slave On primary XIV, select Remote -> Mirroring in the GUI, right-click on the consistency group of IBM i volumes, and select Deactivate from the pop-up menu, then right-click again and select Change Role. Confirm to change the peer role from master to slave. Chapter 7. IBM i considerations for Copy Services 213 7759ch_IBM_i_specifics.fm Draft Document for Review January 23, 2011 12:42 pm 2. Re-activate the asynchronous mirroring from secondary peer to primary peer In the GUI of the secondary XIV go to Remote -> Mirroring, right-click on the consistency group for IBM i volumes, and select Activate. Now the mirroring started in the direction from secondary to primary peer. At this point only the changes made on DR IBM i system during the outage need to be synchronized, so the synchronization of mirroring typically takes very little time. In case the primary mirrored volumes don’t exist anymore after the primary site is available again, you have to delete the mirroring in XIV on DR site. Then, establish the mirroring anew with the primary peer on DR site, and activate it. 3. Power-down DR IBM i Once the mirroring is synchronized and before switching back to production site power-down DR IBM i LPAR so that all data are flushed to disk on DR site. Power-down DR IBM i as is described in 1., “Power-down IBM i production system” on page 193 4. Change the role of the primary peer from slave to master 5. Change the role of the secondary peer from master to slave 6. Activate mirroring 7. IPL production IBM i and continue production workload IPL production IBM i LPAR as is described in 7., “IPL IBM i backup system from snapshots” on page 200. Once the system is up and running the production workload can resume on primary site 214 IBM XIV Storage System: Copy Services and Migration Draft Document for Review January 23, 2011 12:42 pm 7759ch_Migration.fm 8 Chapter 8. Data migration This chapter introduces the XIV Storage System embedded data migration function, which is used to migrate data from a non-XIV storage system to the XIV Storage System. The XIV data migration function is included in the base XIV software and is very easy to deploy. This chapter includes usage examples and troubleshooting information. At a very high level, the steps to migrate to XIV using the XIV Data Migration function are: 1. Establish connectivity between source device and XIV. The source storage device must have Fibre Channel or iSCSI connectivity with the XIV. 2. Collect configuration. Detail the configuration of the LUNs to be migrated. 3. Perform data migration: – Stop/unconfigure all I/O from source-original LUNs. – Start data migration in XIV. – Map new LUNs to host and discover new LUNs through XIV. – Start all I/O on new XIV LUNs. © Copyright IBM Corp. 2010. All rights reserved. 215 7759ch_Migration.fm Draft Document for Review January 23, 2011 12:42 pm 8.1 Overview Whatever the reason for your data migration, it is always desirable to avoid or minimize disruption to your business applications. Whereas there are many options available for migrating data from one storage system to another, the XIV Storage System includes a data migration feature that enables the easy movement of data from an existing storage system to the XIV Storage System. This feature enables the production environment to continue functioning during the data transfer with only one brief period of downtime for your business applications. Figure 8-1 illustrates a high-level view of what the data migration environment could look like. Figure 8-1 Data migration simple view The IBM XIV Data Migration solution offers a smooth data transfer, because it: Requires only a single short outage to switch LUN ownership. This enables the immediate connection of a host server to the XIV Storage System, providing the user with direct access to all the data before it has been copied to the XIV Storage System. Synchronizes data between the two storage systems using transparent copying to the XIV Storage System as a background process with minimal performance impact. Supports data migration from practically all storage vendors. Can be using Fibre Channel or iSCSI. Can be used to migrate SAN boot volumes. The XIV Storage System manages the data migration by simulating host behavior. When connected to the storage device containing the source data, XIV looks and behaves like a SCSI initiator, which in common terms means that it acts like a host server. After the connection is established, the storage device containing the source data believes that it is receiving read or write requests from a host, when in fact it is the XIV Storage System doing a block-by-block copy of the data, which the XIV is then writing onto an XIV volume. 216 IBM XIV Storage System: Copy Services and Migration Draft Document for Review January 23, 2011 12:42 pm 7759ch_Migration.fm During the background copy process, the host server is connected to the XIV Storage System. The XIV Storage System handles all read and write requests from the host server, even if the data is not resident on the XIV Storage System. In other words, during the data migration, the data transfer is transparent to the host and the data is available for immediate access. It is important that the connections between the two storage systems remain intact during the entire migration process. If at any time during the migration process the communication between the storage systems fails, the process also fails. In addition, if communication fails after the migration reaches synchronised status, writes from the host will fail if the source updating option was chosen. The situation is further explained in the 8.2, “Handling I/O requests” on page 217. The process of migrating data is performed at a volume level, as a background process. The data migration facility in XIV firmware revisions 10.1 and later supports the following: Up to four migration targets can be configured on an XIV (where a target is either one controller in an active/passive storage device or one active/active storage device). XIV firmware revision 10.2.2 increased the number of targets to 8. The target definitions are used for both Remote Mirroring (RM) and data migration (DM). Both DM and RM functions can be active at the same time. An active/passive storage device with two controllers can use two target definitions unless only one of the controllers is used for the migration. The XIV can communicate with host LUN IDs ranging from 0 to 512 (in decimal). This does not necessarily mean that the non-XIV disk system can provide LUN IDs in that range. You may be restricted by the ability of the non-XIV storage controller to use only 16 or 256 LUN IDs depending on hardware vendor and device. Up to 4000 LUNs can be concurrently migrated. Important: During the discussion in this chapter, the source system in a data migration scenario is referred to as a target when setting up paths between the XIV Storage System and the donor storage (the non-XIV storage). This terminology is also used in Remote Mirroring, and both functions share the same terminology for setting up paths for transferring data. 8.2 Handling I/O requests The XIV Storage System handles all I/O requests for the host server during the data migration process. All read requests are handled based on where the data currently resides. For example, if the data has already been migrated to the XIV Storage System, it is read from that location. However, if the data has not yet been migrated to the IBM XIV storage, the read request comes from the host to the XIV Storage System, which in turn retrieves the data from the source storage device and provides it to the host server. The XIV Storage System handles all host server write requests and the non-XIV disk system is now transparent to the host. All write requests are handled using one of two user-selectable methods, chosen when defining the data migration. The two methods are known as source updating and no source updating. Chapter 8. Data migration 217 7759ch_Migration.fm Draft Document for Review January 23, 2011 12:42 pm An example of selecting which method to use is shown in Figure 8-2. The check box must be selected to enable source updating, shown here as Keep Source Updated. Without this box checked, changed data from write operations is only written to the XIV. Figure 8-2 Keep Source Updated check box Source updating This method for handling write requests ensures that both storage systems (XIV and non-XIV storage) are updated when a write I/O is issued to the LUN being migrated. By doing this the source system remains updated during the migration process, and the two storage systems remain in sync after the background copy process completes. Similar to synchronous Remote Mirroring, the write commands are only acknowledged by the XIV Storage System to the host after writing the new data to the local XIV volume, then writing to the source storage device, and then receiving an acknowledgement from the non-XIV storage device. An important aspect of selecting this option is that if there is a communication failure between the target and the source storage systems or any other error that causes a write to fail to the source system, the XIV Storage System also fails the write operation to the host. By failing the update, the systems are guaranteed to remain consistent. Change management requirements determine whether you choose to use this option. No source updating This method for handling write requests ensures that only the XIV volume is updated when a write I/O is issued to the LUN being migrated. This method for handling write requests decreases the latency of write I/O operations because write requests are only written to the XIV volume and are not written to the non-XIV storage system. It must be clearly understood that this limits your ability to back out a migration, unless you have another way of recovering updates that were written to the volume being migrated after migration began. If the host is being shutdown for the duration of the migration then this risk is mitigated. Note: It is not recommended to ‘Keep source updated’ if migrating a boot LUN. This is so you can quickly back out of a migration of the boot device if a failure occurs. 218 IBM XIV Storage System: Copy Services and Migration Draft Document for Review January 23, 2011 12:42 pm 7759ch_Migration.fm Multi-pathing with data migrations There are essentially two types of enterprise storage systems when it comes to multi-pathing: Active/active: These are storage systems where volumes can be active on all of the storage system controllers at the same time (whether there are two controllers or more). These systems support IO activity to any given volume down two or more paths. These types of systems typically support load balancing capabilities between the paths with path failover and recovery in the event of a path failure. The XIV is such a device and can utilize this technology during data migrations. Examples of IBM products that are active/active storage servers are the DS6000, DS8000, ESS F20, ESS 800, and SVC. Note that the DS6000 and SVC are examples of storage servers that have preferred controllers on a LUN-by-LUN basis, but that if attached hosts ignore this preference, a potential consequence is the risk of a small performance penalty. If your non-XIV disk system supports active/active then you can carefully configure multiple paths from XIV to non-XIV disk. The XIV load balances the migration traffic across those paths and it automatically handles path failures. Active/passive: These are storage platforms where any given volume can be active on only one controller at a time. These storage devices do not support I/O activity to any given volume down multiple paths at the same time. Most support active volumes on one or more controllers at the same time, but any given volume can only be active on one controller at a time. An example of an IBM product that is an active/passive storage device is the DS4700. Migrating from an active/active storage device If your non-XIV disk system supports active/active LUN access then you can configure multiple paths from XIV to the non-XIV disk system. The XIV load balances the migration traffic across these paths. This may lead to the temptation to configure more than two connections or to increase the initialization speed to a very large value to speed up the migration. However, the XIV only synchronizes one volume at a time per target (with four targets, this means that four volumes could be being migrated at once). This means that the speed of the migration from each target is determined by the ability of the non-XIV storage device to read from the LUN currently being migrated. Unless the non-XIV storage device has striped the volume across multiple RAID arrays, the migration speed is unlikely to exceed 250–300 MBps (and could be much less), but this is totally dependant on the non-XIV storage device. Important: If multiple paths are created between an XIV and an active/active storage device, the same SCSI LUN IDs must be used for each LUN on each path, or data corruption may occur. It is also recommended that a maximum of two paths per target is configured. Defining more paths will not increase througput. With some storage arrays defining more paths adds complexity and increase the chances to configuration issues and corruption. Migrating from an active/passive storage device Because of the active/active nature of XIV, special considerations must be made when migrating data from an active/passive storage device to XIV. A single path is configured between any given non-XIV storage device controller and the XIV system. Many users decide to perform migrations with the host applications offline, due to the single path. Define the target to the XIV per non-XIV storage controller (controller, not port). Define at least one path from that controller to the XIV. All volumes active on the controller can be migrated using the defined target for that controller. For example, suppose the non-XIV storage device contains two controllers (A and B): Chapter 8. Data migration 219 7759ch_Migration.fm Draft Document for Review January 23, 2011 12:42 pm – Define one target (called, for example, ctrl-A) with at least one path between the XIV and one controller on the non-XIV storage device (for example, controller A). All volumes active on this controller can be migrated by using this target. When defining the XIV initiator to the controller, be sure to define it as not supporting fail-over if the option is available on the non-XIV storage array. By doing so, volumes that are passive on the A controller are not presented to the XIV. Check your non-XIV storage device documentation for how to do this. – Define another target (called, for example, ctrl-B) with at least one path between the XIV and controller B. All volumes active on controller B can be migrated to the XIV by using this target. When defining the XIV initiator to the controller, be sure to define it as not supporting failover if this an option. By doing so, volumes that are passive on controller B are not presented to the XIV. Check your non-XIV storage device documentation for how to do this. Figure 8-3 Active/Passive as multiple targets Note: If your controller have two target ports (DS4700 for example) both can be defined as links for that controller target. Make sure that the two target links are connected to separate XIV modules.It will then make you redundant in case of a module failure. Note: Certain examples shown in this chapter are from a DS4000® active/passive migration with each DS4000 controller defined independently as a target to the XIV Storage System. If you define a DS4000 controller as a target do not define the alternate controller as a second port on the first target. Doing so causes unexpected issues such as migration failure, preferred path errors on the DS4000, or very slow migration progress. 8.3 Data migration steps The high-level steps required when migrating a volume from a non-XIV system to the IBM XIV Storage System are: 1. Initial connection setup: – Zone or cable the XIV to the non-XIV storage device. – Define XIV to a non-XIV storage device (as a host). – Define non-XIV storage device to XIV (as a migration device). 2. Create a data migration volume on XIV. – Perform pre-migration tasks for the host being migrated: 220 • Back up your data. • Shut down your host or application or unmount the file system. IBM XIV Storage System: Copy Services and Migration 7759ch_Migration.fm Draft Document for Review January 23, 2011 12:42 pm • Perform point-in-time copy of original non-XIV volume if available. • Unzone host from non-XIV storage. – Define and test the data migration volume. • On non-XIV storage, map volumes away from host and map them instead to XIV. • On XIV, create data migration and test it. 3. Activate data migration on XIV. – On XIV, activate data migration. 4. Define the host on XIV and bring host online. – Zone host to XIV. – On XIV, map volumes to host. – Bring the host online • Update host hba drivers and firmwares. • Install Host Attachment Kit and detect volumes. 5. Complete the data migration on XIV. – On XIV, monitor the migration. – On XIV, delete the migration. Each step is further explained in the sections that follow. 8.3.1 Initial connection setup For the initial connection setup, start by zoning or cabling XIV to the system being migrated. Zone or cable the XIV to the non-XIV storage device Because the non-XIV storage device views the XIV as a host, the XIV must connect to the non-XIV storage system as a SCSI initiator. Therefore, the physical connection from the XIV must be from initiator ports on the XIV (which by default for Fibre Channel is port 4 on each active interface module). The initiator ports on the XIV must be fabric attached (in which case they will need to be zoned to the non-XIV storage system). Two physical connections from two separate modules on two separate fabrics are recommended for redundancy (although redundant pathing will not be possible on active/passive controllers). It is also possible that the host may be attached via one medium (such as iSCSI), whereas the migration occurs via the other (such as Fibre Channel). The host-to-XIV connection method and the data migration connection method are independent of each other. Depending on the non-XIV storage device vendor and device, it may be easier to zone the XIV to the ports where the volumes being migrated are already present. In this manner no reconfiguration of the non-XIV storage device may be required. For example, in EMC Symmetrix/DMX environments, it is easier to zone the fiber adapters (FAs) to the XIV where the volumes are already mapped. At the completion of this step you will have: 1. Run cables from port 4 on each selected XIV interface module to a fabric switch 2. Zoned the XIV initiator ports (whose WWPNs end in 3) to the selected non-XIV storage device host ports using single initiator zoning (each zone contains one initiator port and one target port). Chapter 8. Data migration 221 7759ch_Migration.fm Draft Document for Review January 23, 2011 12:42 pm Figure 8-4 depicts a fabric-attached configuration. It shows that module 4 port 4 is zoned to a port on the non-XIV storage via fabric A. Module 7 port 4 is zoned to a port on the non-XIV storage via fabric B. Figure 8-4 Fabric attached Define XIV to the non-XIV storage device (as a host) Once the physical connection between the XIV and non-XIV storage device is complete, the XIV initiator (WWPN) must be defined on the non-XIV storage device. The process to achieve this is vendor and device dependent because you must use the non-XIV storage device management interface. Therefore, refer to the non-XIV storage vendor’s documentation on how to configure hosts to the non XIV storage device, since the XIV is seen as a host to the non-XIV storage. If you have already zoned the XIV to the non-XIV storage device, then the WWPNs of the XIV initiator ports (that end in the number 3) will appear in the WWPN drop-down list. This is depending on the non-XIV storage device and storage management software. If they are not there then you must manually add them (this might imply that you need to map a LUN0, or that the SAN zoning has not been done correctly). The XIV must be defined as a Linux or Windows host to the non-XIV storage device. If the non-XIV device offers several variants of Linux, you can choose SuSE Linux or RedHat Linux or Linux x86. This defines the correct SCSI protocol flags for communication between the XIV and non-XIV storage device. The principal criterion is that the host type must start LUN numbering with LUN ID 0. If the non-XIV storage device is active/passive, check to see whether the host type selected affects LUN failover between controllers, such as DS4000 (see 8.12.5, “IBM DS3000/DS4000/DS5000” on page 258, for more details). There may also be other vendor-dependant settings. Section 8.12, “Device-specific considerations” on page 254, contains additional information. 222 IBM XIV Storage System: Copy Services and Migration 7759ch_Migration.fm Draft Document for Review January 23, 2011 12:42 pm Define non-XIV storage device to XIV (as a migration target) Once the physical connectivity is made and the XIV has been defined to the non-XIV storage storage device, the non-XIV storage device must be defined on the XIV. This includes defining the storage device object, defining the WWPN ports on the non-XIV storage device, and defining the connectivity between the XIV and the non-XIV storage device. 1. In the XIV GUI go to the Remote Migration Connectivity panel. 2. Click Create Target, which brings up the menu shown in Figure 8-6. The choices that must be configured are: – Target Name: Type in a name of your own choice. – Target Protocol: Choose FC from the pull-down menu. Click Define. Figure 8-5 Create target for the non-XIV device Note: If Create Target is greyed out and can not be clicked you have reached maximum amount of targets, targets are both migration targtes and mirror targets. Figure 8-6 Defining the non-XIV storage device Chapter 8. Data migration 223 7759ch_Migration.fm Draft Document for Review January 23, 2011 12:42 pm Tip: The data migration target is represented by an image of a generic rack. If you must delete or rename the migration device do so by right-clicking the image of that rack. 3. Click on the gray line to get to the Migration connectivity From DS4700-ctrl-B view (Figure 8-7). Figure 8-7 Click on the grey line 4. On the dark box that is part of the defined target, right-click and choose Add Port (Figure 8-8). Figure 8-8 Defining the target port a. Enter the WWPN of the first (fabric A) port on the non-XIV storage device zoned to the XIV. There is no drop-down menu of WWPNs, so you must manually type or paste in the correct WWPN. Be careful not to make a mistake. It is not necessary to use full colons to separate every second number. It makes no difference if you enter a WWPN as 10:00:00:c9:12:34:56:78 or 100000c912345678. 224 IBM XIV Storage System: Copy Services and Migration 7759ch_Migration.fm Draft Document for Review January 23, 2011 12:42 pm b. Click Add. 5. Enter another port (repeating step 3) for those storage devices that support active/active multi-pathing. This could be the WWPN that is zoned to the XIV on a separate fabric. 6. Connect the XIV and non-XIV storage ports that are zoned to one another. This is done by clicking and dragging from port 4 on the XIV to the port (WWPN) on the non-XIV storage device to where the XIV is zoned. In Figure 8-9 the mouse started at module 9 port 4 and has nearly reached the target port. The connection is currently colored blue and turns red when the mouse connects to port 1 on the target. Figure 8-9 Dragging a connection between XIV and migration target Chapter 8. Data migration 225 7759ch_Migration.fm Draft Document for Review January 23, 2011 12:42 pm In Figure 8-10 the connection from module 9 port 4 to port 1 on the non-XIV storage device is currently active, as noted by the green color of the connecting line. This means that the non-XIV storage system and XIV are connected and communicating (indicating that SAN zoning was done correctly. The correct XIV initiator port was selected. The correct target WWPN was entered and selected, and LUN 0 was detected on the target device). If there is an issue with the path, the connection line is red. Figure 8-10 Non-XIV storage device defined Tip: Depending on the storage controller, ensuring that LUN0 is visible on the non-XIV storage device down the controller path that you are defining helps ensure proper connectivity between the non-XIV storage device and the XIV. Connections from XIV to DS4000 or EMC DMX or Hitachi HDS devices require a real disk device to be mapped as LUN0. However, the IBM ESS 800, for instance, does not need a LUN to be allocated to the XIV for the connection to become active (turn green in the GUI). The same is true for EMC CLARiiON. 8.3.2 Creating a data migration volume on XIV Perform the steps explained below. Perform pre-migration tasks for the host being migrated To perform pre-migration tasks: 1. Back up the volumes being migrated. A full restorable backup must be created prior to any data migration activity. It is a best practice to verify the backup and to verify that all the data is restorable and that there are no backup media errors. 226 IBM XIV Storage System: Copy Services and Migration Draft Document for Review January 23, 2011 12:42 pm 7759ch_Migration.fm 2. Shut down the application/host. Before the actual migration can begin the application must be quiesced. This ensures that the application data is in a consistent state. Because the host may need to be rebooted a number of times prior to the application data being available again, also consider the following steps: – Set applications to not automatically start when the host operating system restarts. – Stop file systems from being automatically remounted on boot. For UNIX-based operating systems consider commenting out all affected file system mount points in the fstab or vfstab. Note: In clustered environments you could work with only one node until the migration is complete, so consider shutting down all other nodes in the cluster. 3. Perform a point-in-time copy of the volume on the non-XIV storage device (if that function is available on the non-XIV storage). This point-in-time copy is a gold copy of the data that is quiesced prior to starting the data migration process. Do this before changing any host drivers or installing new host software, particularly if you are going to migrate boot from SAN volumes. 4. Unzone host from non-XIV storage.The host must no longer access the non-XIV storage system once the data migration is activated. The host must perform all I/O through the XIV. Define and test data migration volume To do this: 1. Allocate the non-XIV volume to XIV. The volumes being migrated to the XIV must be allocated via LUN mapping to the XIV. The LUN ID presented to the XIV must be a decimal value from 0 to 512. If it uses hexadecimal LUN numbers then the LUN IDs can range from 0x0 to 0x200, but must be converted to decimal when entered into the XIV GUI. The XIV does not recognize a host LUN ID above 512 (decimal). Figure 8-11 shows LUN mapping using a DS4700. It depicts the XIV as a host called XIV_Migration_Host with four DS4700 logical drives mapped to the XIV as LUN IDs 0 to 3. Figure 8-11 Non-XIV LUNs defined to XIV When mapping volumes to the XIV it is very important to note the LUN IDs allocated by the non-XIV storage. The methodology to do this varies by vendor and device and is documented in greater detail in 8.12, “Device-specific considerations” on page 254. Chapter 8. Data migration 227 7759ch_Migration.fm Draft Document for Review January 23, 2011 12:42 pm Important: You must unmap the volumes away from the host during this step, even if you plan to power the host off during the migration. The non-XIV storage only presents the migration LUNs to the XIV. Do not allow a possibility for the host to detect the LUNs from both the XIV and the non-XIV storage. 2. Define data migration object/volume. Once the volume being migrated to the XIV is allocated to the XIV, a new data migration (DM) volume can be defined. The source volume from the non-XIV storage system and XIV volume must be exactly the same size, therefore most of the cases its easiest to let XIV create the target LUN for you, discussed in the following section. Important: You cannot use the XIV data migration function to migrate data to a source volume in an XIV remote mirror pair. If you need to do this, migrate the data first and then create the remote mirror after the migration is completed. If you want to manually create the volumes on the XIV, consult 8.5, “Manually creating the migration volume” on page 238. Preferably, instead continue with the next step. XIV volume automatically created The XIV has the ability to determine the size of the non-XIV volume and create the XIV volume quickly when the data migration object is defined. This method is easy, which helps avoid potential issues when manually calculating the real block size of a volume. 1. In the XIV GUI go to the floating menu Remote Migration. 2. Right-click and choose Define Data Migration. This brings up a panel like that shown in Figure 8-12. – Destination Pool: Choose the pool from the drop-down menu where the volume will be created. – Destination Name: Enter a user-defined name. This will be the name of the local XIV volume. – Source Target System: Choose the already defined non-XIV storage device from the drop-down menu. Important: If the non-XIV device is active/passive, then the source target system must represent the controller (or service processor) on the non-XIV device that currently owns the source LUN being migrated. This means that you must check, from the non-XIV storage, which controller is presenting the LUN to the XIV. 228 IBM XIV Storage System: Copy Services and Migration 7759ch_Migration.fm Draft Document for Review January 23, 2011 12:42 pm Figure 8-12 Define Data Migration object/volume – Source LUN: Enter the decimal value of the host LUN ID as presented to the XIV from the non-XIV storage system. Certain storage devices present the LUN ID as hex. The number in this field must be the decimal equivalent. Ensure that you do not accidentally use internal identifiers that you may also see on the source storage systems management panels. In Figure 8-11 on page 227, the correct values to use are in the LUN column (numbered 0 to 3). – Keep Source Updated: Check this if the non-XIV storage system source volume is to be updated with writes from the host. In this manner all writes from the host will be written to the XIV volume, as well as the non-XIV source volume, until the data migration object is deleted. Note: It i not recommended to ‘Keep Source Updated’ if migrating the boot LUN. This is so you can quickly back out of a migration of the boot device if a failure occurs. Click Define and the migration appears as shown in Figure 8-13. Figure 8-13 Defined data migration object/volume Note: Define Data Migration will query the configuration of the non-XIV storage system and create an equal sized volume on XIV, to check if you can read from the non-XIV source volume you need to Test Data Migration. On some active/passive non-XIV storage systems the configuration can be read over the passive controller, but Test Data Migration will fail. 3. Test the data migration object. Right-click to select the created data migration object and choose Test Data Migration. If there are any issues with the data migration object the test fails, reporting the issue found. See Figure 8-14. Chapter 8. Data migration 229 7759ch_Migration.fm Draft Document for Review January 23, 2011 12:42 pm Figure 8-14 Test Data Migration Tip: If you are migrating volumes from an Microsoft® Cluster Server (MSCS) that is still active, then testing a migration may fail due to the reservations placed on the source LUN by MSCS. You must bring the cluster down properly to get the test to succeed. If the cluster is not brought down properly, errors will occur either during the test or when activated. The scsi reservation must then be cleared in order for the migration to succeed. 8.3.3 Activate a data migration on XIV Once the data migration volume has been tested the process of the actual data migration can begin. When data migration is initiated, the data is copied sequentially in the background from the non-XIV storage system volume to the XIV. The host reads and writes data to the XIV storage system without being aware of the background I/O being performed. Note: Once activated, the data migration can be deactivated, but after deactivating the data migration the host is no longer able to read or write to the migration volume and all host I/O stops. Do not deactivate the migration with host I/O running. If you want to abandon the data migration prior to completion consult the back-out process described in section 8.10, “Backing out of a data migration” on page 250. Activate the data migration. Right-click to select the data migration object/volume and choose Activate. This begins the data migration process where data is copied in the background from the non-XIV storage system to the XIV. Activate all volumes being migrated so that they can be accessed by the host. The host has read and write access to all volumes, but the background copy occurs serially volume by volume. If two targets (such as non-XIV1 and non-XIV2) are defined with four volumes each, two volumes are actively copied in the background—one volume from non-XIV1 and another from non-XIV2. All eight volumes are accessible by the hosts. Figure 8-15 shows the menu choices when right-clicking the data migration. Note the Test Data Migration, Delete Data Migration, and Activate menu items, as these are the most-used commands. 230 IBM XIV Storage System: Copy Services and Migration Draft Document for Review January 23, 2011 12:42 pm 7759ch_Migration.fm Figure 8-15 Activate data migration 8.3.4 Define the host on XIV and bring host online Zone host to XIV Zone the host to XIV. The host must be directed (via SAN fabric zoning) to the XIV instead of the non-XIV storage system. This is because the XIV is acting as a proxy between the host and the non-XIV storage system. The host must no longer access the non-XIV storage system once the data migration is activated. The host must perform all I/O through the XIV. Define the host being migrated to the XIV Prior to performing data migrations and allocating the volumes to the hosts, the host must be defined on the XIV. Volumes are then mapped to the hosts or clusters. If the host is to be a member of a cluster, then the cluster must be defined first. However, a host can be moved easily from or added to a cluster at any time. This also requires that the host be zoned to your XIV target ports via the SAN fabric. 1. To define a cluster (optional): a. In the XIV GUI go to the floating menu Host and Clusters Host and Clusters. b. Choose Add Cluster from the top menu bar. c. Name: Enter a cluster name in the provided space. d. Click OK. 2. To define a host: a. In the XIV GUI go to the floating menu Host and Clusters Hosts and Clusters. b. Choose Add Host from the top menu bar. i. Name: Enter a host name. ii. Cluster: If the host is part of a cluster, choose the cluster from the drop-down menu. iii. Click Add. iv. Select the host and right-click to bring up a menu, from which you choose Add Port. i. Port Type: Choose FC from the drop-down menu. ii. Port Name: This is a drop-down menu of WWPNs that are logged into the XIV but that have not been assigned to a host. WWPNs can be chosen from the drop-down menu or entered manually. iii. Click Add. Chapter 8. Data migration 231 7759ch_Migration.fm Draft Document for Review January 23, 2011 12:42 pm iv. Repeat the above steps to add all the HBAs of the host being defined. Map volumes to host on XIV. Once the data migration has been started, you can use the XIV GUI or XCLI to map the migration volumes to the host. When mapping volumes to hosts on the XIV, LUN ID 0 is reserved for XIV in-band communication. This means that the first LUN ID that you normally use is LUN ID 1. This includes boot-from-SAN hosts. You may also choose to use the same LUN IDs as were used on the non-XIV storage, but this is not mandatory. Important: The host cannot read the data on the non-XIV volume until the data migration has been activated. The XIV does not pass through (proxy) I/O for a migration that is inactive. If you use the XCLI dm_list command to display the migrations, ensure that the word Yes appears in the Active column for every migration. Bring the host online. Once the volumes have been mapped to the host server, the host can be brought online. Perform host administrative procedures. The host must be configured using the XIV host attachment procedures. These include removing any existing/non-XIV multi-pathing software and installing the native multi-pathing drivers, recommended patches and XIV Host attachment Kit as stated in the XIV Host Attachment Guides. Install the most current HBA driver and firmware at this time. One or more reboots may be required. Documentation and other software can be found here: http://www.ibm.com/support/search.wss?q=ssg1*&tc=STJTAG+HW3E0&rs=1319&dc=D400&dtm When volume visibility has been verified, the application can be brought up and operations verified. Note: In clustered environments, it is usually recommended that only one node of the cluster be initially brought online after the migration is started, and that all other nodes be offline until the migration is complete. Once complete, update all other nodes (driver, host attachment package, and so on), as the primary node was during the initial outage (see step 5 in “Perform pre-migration tasks for the host being migrated” on page 226). 8.3.5 Complete the data migration on XIV Figure 8-16 Data migration progress To complete the data migration, perform the following sequence of steps: Data migration progress. Figure 8-16 shows the progress of the data migrations. The status bar can be toggled between GB remaining, percent complete, and hours/minutes remaining. Figure 8-16 shows four data migrations, one of which has started background copy and three of which 232 IBM XIV Storage System: Copy Services and Migration Draft Document for Review January 23, 2011 12:42 pm 7759ch_Migration.fm have not. Only one migrations is being copied at this same time because there is only one target (DS4700_Ctrl_B). After all of a volume’s data has been copied, the data migration achieves synchronization status. After synchronization is achieved, all read requests are served by the XIV Storage System. If source updating was selected the XIV will continue to write data to both itself and the outgoing storage system until the data migration is deleted. Figure 8-17 shows a completed migration. Figure 8-17 Data migration complete Delete data migration Once the synchronization has been achieved, the data migration object can be safely deleted without host interruption. Important: If this is an online migration, do not deactivate the data migration prior to deletion, as this causes host I/O to stop and possibly causes data corruption. Right-click to select the data migration volume and choose Delete Data Migration, as shown in Figure 8-18. This can be done without host/server interruption. Figure 8-18 Delete Data Migration Note: For safety purposes, you cannot delete an inactive or unsynchronized data migration from the Data Migration panel. An unfinished data migration can only be deleted by deleting the relevant volume from the Volumes Volumes & Snapshots section in the XIV GUI. Chapter 8. Data migration 233 7759ch_Migration.fm Draft Document for Review January 23, 2011 12:42 pm 8.4 Command-line interface All of the XIV GUI operation steps can be performed using the XIV command-line interface (XCLI) either through direct command execution or through batch files containing numerous commands. This is especially helpful in migration scenarios involving numerous LUNs. This section lists the XCLI command equivalent of the GUI steps shown above. A full description of all the XCLI commands can be found in the XCLI Users Guide available at the following IBM Web site: http://publib.boulder.ibm.com/infocenter/ibmxiv/r2/topic/com.ibm.help.xiv.doc/docs /GC27-2213-02.pdf Every command issued in the XIV GUI is logged in a text file with the correct syntax. This is very helpful for creating scripts. If you are running the XIV GUI under Microsoft Windows, look for a file titled guicommands_< todays date >.txt, which will be found in the following folder: C:\Documents and Settings\ < Windows user ID >\Application Data\XIV\GUI10\logs All of the commands given on the next few pages are effectively in the order in which you must execute them, starting with the commands to list all current definitions (which will also be needed when you start to delete migrations). List targets. Syntax target_list List target ports. Syntax target_port_list List target connectivity. Syntax target_connectivity_list List clusters. Syntax cluster_list List hosts. Syntax host_list List volumes. Syntax vol_list List data migrations. Syntax dm_list Define target (Fibre Channel only). Syntax target_define target=<Name> protocol=FC xiv_features=no Example target_define target=DMX605 protocol=FC xiv_features=no Define target port (Fibre Channel only). Syntax target_port_add fcaddress=<non-XIV storage WWPN> target=<Name> Example target_port_add fcaddress=0123456789012345 target=DMX605 Define target connectivity (Fibre Channel only). Syntax 234 target_connectivity_define local_port=1:FC_Port:<Module:Port> fcaddress=<non-XIV storage WWPN> target=<Name> IBM XIV Storage System: Copy Services and Migration Draft Document for Review January 23, 2011 12:42 pm Example 7759ch_Migration.fm target_connectivity_define local_port=1:FC_Port:5:4 fcaddress=0123456789012345 target=DMX605 Define cluster (optional). Syntax cluster_create cluster=<Name> Example cluster_create cluster=Exch01 Define host (if adding host to a cluster). Syntax host_define host=<Host Name> cluster=<Cluster Name> Example host_define host=Exch01N1 cluster=Exch01 Define host (if not using cluster definition). Syntax host_define host=<Name> Example host_define host=Exch01 Define host port (Fibre Channel host bus adapter port). Syntax host_add_port host=<Host Name> fcaddress=<HBA WWPN> Example host_add_port host=Exch01 fcaddress=123456789abcdef1 Create XIV volume using decimal GB volume size. Syntax vol_create vol=<Vol name> size=<Size> pool=<Pool Name> Example vol_create vol=Exch01_sg01_db size=17 pool=Exchange Create XIV volume using 512 byte blocks. Syntax vol_create vol=<Vol name> size_blocks=<Size in blocks> pool=<Pool Name> Example vol_create vol=Exch01_sg01_db size_blocks=32768 pool=Exchange Define data migration. If you want the local volume to be automatically created: Syntax dm_define target=<Target> vol=<Volume Name> lun=<Host LUN ID as presented to XIV> source_updating=<yes|no> create_vol=yes pool=<XIV Pool Name> Example dm_define target=DMX605 vol=Exch01_sg01_db lun=5 source_updating=no create_vol=yes pool=Exchange If the local volume was pre-created: Syntax dm_define target=<Target> vol=<Pre-created Volume Name> lun=<Host LUN ID as presented to XIV> source_updating=<yes|no> Example dm_define target=DMX605 vol=Exch01_sg01_db lun=5 source_updating=no Test data migration object. Syntax dm_test vol=<DM Name> Example dm_test vol=Exch_sg01_db Activate data migration object. Syntax dm_activate vol=<DM Name> Example dm_activate vol=Exch_sg01_db Map volume to host/cluster. Chapter 8. Data migration 235 7759ch_Migration.fm Draft Document for Review January 23, 2011 12:42 pm – Map to host: Syntax map_vol host=<Host Name> vol=<Vol Name> lun=<LUN ID> Example map_vol host=Exch01 vol=Exch01_sg01_db lun=1 – Map to cluster: Syntax map_vol host=<Cluster Name> vol=<Vol Name> lun=<LUN ID> Example map_vol host=Exch01 vol=Exch01_sg01_db lun=1 Delete data migration object. If the data migration is synchronized and thus completed: Syntax dm_delete vol=<DM Volume name> Example dm_delete vol=Exch01_sg01_db If the data migration is not complete it must be deleted by removing the corresponding volume from the Volume and Snapshot menu (or via the vol_delete command below). Delete volume (not normally needed). Challenged volume delete (cannot be done via a script, as this command must be acknowledged): Syntax vol_delete vol=<Vol Name> Example vol_delete vol=Exch_sg01_db If you want to perform an unchallenged volume deletion: Syntax vol_delete -y vol=<Vol Name> Example vol_delete -y vol=Exch_sg01_db Delete target connectivity. Syntax target_connectivity_delete local_port=1:FC_Port:<Module:Port> fcaddress=<non-XIV storage device WWPN> target=<Name> Example target_connectivity_delete local_port=1:FC_Port:5:4 fcaddress=0123456789012345 target=DMX605 Delete target port. Fibre Channel Syntax target_port_delete fcaddress=<non-XIV WWPN> target=<Name> Example target_port_delete fcaddress=0123456789012345 target=DMX605 Delete target. Syntax target_delete target=<Target Name> Example target_delete target=DMX605 Change Migration Sync Rate 236 Syntax target_config_sync_rates target=<Target Name> max_initialization_rate=<Rate in MB> Example target_config_sync_rates target=DMX605 max_initialization_rate=100 IBM XIV Storage System: Copy Services and Migration 7759ch_Migration.fm Draft Document for Review January 23, 2011 12:42 pm 8.4.1 Using XCLI scripts or batch files In order to execute a XCLI batch job, it is best to use the XCLI (versus the XCLI Session). Setting environment variables in Windows You can remove the need to specify user and password information for every command by making that information an environment variable. Example 8-1 shows how this is done using a Windows command prompt. First the XIV_XCLIUSER variable is set to admin, then the XIV_XCLIPASSWORD is set to adminadmin. Then both variables are confirmed as set. If necessary, change the user ID and password to suit your setup. Example 8-1 Setting environment variables in Microsoft Windows C:\>set XIV_XCLIUSER=admin C:\>set XIV_XCLIPASSWORD=adminadmin C:\>set | find "XIV" XIV_XCLIPASSWORD=adminadmin XIV_XCLIUSER=admin To make these changes permanent: 1. 2. 3. 4. 5. 6. Right-click the My Computer icon and select Properties. Click the Advanced tab. Click Environment Variables. Click New for a new system variable. Create the XIV_XCLIUSER variable with the relevant user name. Click New again to create the XIV_XCLIPASSWORD variable with the relevant password. Setting environment variables in UNIX If your are using a UNIX-based operating system export the environment variables as shown in Example 8-2 (which in this example is AIX). In this example the user and password variables are set to admin and adminadmin and then confirmed as being set. Example 8-2 Setting environment variables in UNIX root@dolly:/tmp/XIVGUI# export XIV_XCLIUSER=admin root@dolly:/tmp/XIVGUI# export XIV_XCLIPASSWORD=adminadmin root@dolly:/tmp/XIVGUI# env | grep XIV XIV_XCLIPASSWORD=adminadmin XIV_XCLIUSER=admin To make these changes permanent update the relevant profile, making sure that you export the variables to make them environment variables. Note: It is also possible to run XCLI cmd’s without setting environment variables with the -u and -p switches. 8.4.2 Sample scripts With the environment variables set, a script or batch file like the one in Example 8-3 can be run from the shell or command prompt in order to define the data migration pairings. Chapter 8. Data migration 237 7759ch_Migration.fm Draft Document for Review January 23, 2011 12:42 pm Example 8-3 Data migration definition batch file xcli -m 10.10.0.10 source_updating=no xcli -m 10.10.0.10 source_updating=no xcli -m 10.10.0.10 source_updating=no xcli -m 10.10.0.10 source_updating=no xcli -m 10.10.0.10 source_updating=no xcli -m 10.10.0.10 source_updating=no xcli -m 10.10.0.10 source_updating=no xcli -m 10.10.0.10 source_updating=no xcli -m 10.10.0.10 source_updating=no xcli -m 10.10.0.10 source_updating=no dm_define vol=MigVol_1 target=DS4200_CTRL_A lun=4 create_vol=yes pool=test_pool dm_define vol=MigVol_2 target=DS4200_CTRL_A lun=5 create_vol=yes pool=test_pool dm_define vol=MigVol_3 target=DS4200_CTRL_A lun=7 create_vol=yes pool=test_pool dm_define vol=MigVol_4 target=DS4200_CTRL_A lun=9 create_vol=yes pool=test_pool dm_define vol=MigVol_5 target=DS4200_CTRL_A lun=11 create_vol=yes pool=test_pool dm_define vol=MigVol_6 target=DS4200_CTRL_A lun=13 create_vol=yes pool=test_pool dm_define vol=MigVol_7 target=DS4200_CTRL_A lun=15 create_vol=yes pool=test_pool dm_define vol=MigVol_8 target=DS4200_CTRL_A lun=17 create_vol=yes pool=test_pool dm_define vol=MigVol_9 target=DS4200_CTRL_A lun=19 create_vol=yes pool=test_pool dm_define vol=MigVol_10 target=DS4200_CTRL_A lun=21 create_vol=yes pool=test_pool With the data migration defined via the script or batch job above, an equivalent script or batch job to execute the data migrations then must be run, as shown in Example 8-4. Example 8-4 Activate data migration batch file xcli xcli xcli xcli xcli xcli xcli xcli xcli xcli -m -m -m -m -m -m -m -m -m -m 10.10.0.10 10.10.0.10 10.10.0.10 10.10.0.10 10.10.0.10 10.10.0.10 10.10.0.10 10.10.0.10 10.10.0.10 10.10.0.10 dm_activate dm_activate dm_activate dm_activate dm_activate dm_activate dm_activate dm_activate dm_activate dm_activate vol=MigVol_1 vol=MigVol_2 vol=MigVol_3 vol=MigVol_4 vol=MigVol_5 vol=MigVol_6 vol=MigVol_7 vol=MigVol_8 vol=MigVol_9 vol=MigVol_10 8.5 Manually creating the migration volume The local XIV volume can be pre-created before defining the data migration object. This is not the recommended option due to it being prone to manual calculation errors. This requires the size of the source volume on the non-XIV storage device to be known in 512 byte blocks, as the two volumes (source and XIV volume) must be exactly the same size. Finding the actual size of a volume in blocks or bytes can be difficult, as certain storage devices do not show the exact volume size. This may require you to rely on the host operating system to provide the real volume size, but this is also not always reliable. For an example of the process to determine exact volume size, consider ESS 800 volume 00F-FCA33 depicted in Figure 8-26 on page 248. The size reported by the ESS 800 Web GUI is 10 GB, which suggests that the volume is 10,000,000,000 bytes in size (because the ESS 800 displays volume sizes using decimal counting). The AIX bootinfo -s hdisk2 command reports the volume as 9,536 GiB, which is 9,999,220,736 bytes (because there are 238 IBM XIV Storage System: Copy Services and Migration 7759ch_Migration.fm Draft Document for Review January 23, 2011 12:42 pm 1,073,741,824 bytes per GiB). Both of these values are too small. When the volume properties are viewed on the volume information panel of the ESS 800 Copy Services GUI, it correctly reports the volume as being 19,531,264 sectors, which is 10,000,007,168 bytes (because there are 512 bytes per sector). If we created a volume that is 19,531,264 blocks in size this will be correct. When the XIV automatically created a volume to migrate the contents of 00F-FCA33 it did create it as 19,531,264 blocks. Of the three information sources that were considered to manually calculate volume size, only one of them must have been correct. Using the automatic volume creation eliminates this uncertainty. If you are confident that you have determined the exact size, then when creating the XIV volume, choose the Blocks option from the Volume Size drop-down menu and enter the size of the XIV volume in blocks. If your sizing calculation was correct, this creates an XIV volume that is the same size as the source (non-XIV storage device) volume. Then you can define a migration: 1. In the XIV GUI go to the floating menu Remote Migration. 2. Right-click and choose Define Data Migration (Figure 8-12 on page 229). – Destination Pool: Choose the pool from the drop-down menu where the volume was created. – Destination Name: Chose the pre-created volume from the drop-down menu. – Source Target System: Choose the already defined non-XIV storage device from the drop-down menu. Important: If the non-XIV device is active/passive, the source target system must represent the controller (or service processor) on the non-XIV device that currently owns the source LUN being migrated. This means that you must check from the non-XIV storage, which controller is presenting the LUN to the XIV. – Source LUN: Enter the decimal value of the LUN as presented to the XIV from the non-XIV storage system. Certain storage devices present the LUN ID as hex. The number in this field must be the decimal equivalent. – Keep Source Updated: Check this if the non-XIV storage system source volume is to be updated with writes from the host. In this manner all writes from the host will be written to the XIV volume, as well as the non-XIV source volume until the data migration object is deleted. Click Define. 3. Test the data migration object. Right-click to select the created data migration volume and choose Test Data Migration. If there are any issues with the data migration object the test fails reporting the issue that was found. See Figure 8-14 on page 230 for an example of the panel. If the volume that you created is too small or too large you will receive an error message when you do a test data migration, as shown in Figure 8-19. If you try and activate the migration you will get the same error message. You must delete the volume that you manually created on the XIV and create a new correctly sized one. This is because you cannot resize a volume that is in a data migration pair, and you cannot delete a data migration pair unless it has completed the background copy. Delete the volume and then investigate why your size calculation was wrong. Then create a new volume and a new migration and test it again. Chapter 8. Data migration 239 7759ch_Migration.fm Draft Document for Review January 23, 2011 12:42 pm Figure 8-19 XIV volume wrong size for migration 8.6 Changing and monitoring the progress of a migration It is possible to speed up or slow down the migration process, as well as monitor its rate. 8.6.1 Changing the synchronization rate There is only one tunable parameter that determines the speed at which migration data is transferred between the XIV and defined targets. There are two other tunable parameters that apply to XIV Remote Mirroring (RM): max_initialization_rate The rate (in MBps) at which data is transferred between the XIV and defined targets. The default rate is 100 MBps and can be configured on a per-target basis. In other words, one target can be set to 100 MBps while another is set to 50 MBps. In this example a total of 150 MBps (100+50) transfer rate is possible. If the transfer rate that you are seeing is lower than the initialization rate, this may indicate that you are exceeding the capabilities of the non-XIV disk system to operate at that rate. If the migration is not being done with attached hosts off-line, consider dropping the initialization rate to a very low number initially to ensure that there that the volume of migration I/O does not interfere with other hosts using the non-XIV disk system. Then slowly increase the number while checking to ensure that response times are not affected on other attached hosts. If you set the max_initialization_rate to zero, then you will stop the background copy, but hosts will still be able to access all activated migration volumes. max_syncjob_rate This parameter (which is in MBps) is used in XIV remote mirroring for synchronizing mirrored snapshots. It is not normally relevant to data migrations. However, the max_initialization_rate cannot be greater than the max_syncjob_rate, which in turn cannot be greater than the max_resync_rate. In general, there is no reason to ever increase this rate. max_resync_rate This parameter (which is in MBps) is again used for XIV remote mirroring only. It is not normally relevant to data migrations. This parameter defines the resync rate for mirrored pairs. Once remotely mirrored volumes are synchronized, a resync is required if the replication is stopped for any reason. It is this resync where only the changes are sent 240 IBM XIV Storage System: Copy Services and Migration Draft Document for Review January 23, 2011 12:42 pm 7759ch_Migration.fm across the link that this parameter affects. The default rate is 300 MBps. There is no minimum or maximum rate. However, setting the value to 400 or more in a 4 Gbps environment does not show any increase in throughput. In general, there is no reason to ever increase this rate. Increasing the max_initialization_rate parameter may decrease the time required to migrate the data. However, doing so may impact existing production servers on the non-XIV storage device. By increasing the rate parameters, more outgoing disk resources will be used to serve migrations and less for existing production I/O. Be aware of how these parameters affect migrations as well as production. You could always choose to only set this to a higher value during off-peak production periods. The rate parameters can only be set using XCLI, not via the XIV GUI. The current rate settings are displayed by using the -x parameter, so run the target_list -x command. If the setting is changed, the change takes place on the fly with immediate effect so there is no need to deactivate/activate the migrations (doing so blocks host I/O). In Example 8-5 we first display the target list and then confirm the current rates using the -x parameter. The example shows that the initialization rate is still set to the default value (100 MBps). We then increase the initialization rate to 200 MBps. We could then observe the completion rate, as shown in Figure 8-16 on page 232, to see whether it has improved. Example 8-5 Displaying and changing the maximum initialization rate >> target_list Name SCSI Type Connected Nextrazap ITSO ESS800 FC yes >> target_list -x target="Nextrazap ITSO ESS800" <XCLIRETURN STATUS="SUCCESS" COMMAND_LINE="target_list -x target="Nextrazap ITSO ESS800""> <OUTPUT> <target id="4502445"> <id value="4502445"/> <creator value="xiv_maintenance"/> <creator_category value="xiv_maintenance"/> <name value="Nextrazap ITSO ESS800"/> <scsi_type value="FC"/> <xiv_target value="no"/> <iscsi_name value=""/> <connected value="yes"/> <port_list value="5005076300C90C21,5005076300CF0C21"/> <num_ports value="2"/> <system_id value="0"/> <max_initialization_rate value="100"/> <max_resync_rate value="300"/> <max_syncjob_rate value="300"/> <connectivity_lost_event_threshold value="30"/> <xscsi value="no"/> </target> </OUTPUT> </XCLIRETURN> >> target_config_sync_rates target="Nextrazap ITSO ESS800" max_initialization_rate=200 Command executed successfully. Chapter 8. Data migration 241 7759ch_Migration.fm Draft Document for Review January 23, 2011 12:42 pm Important: Just because the initialization rate has been increased does not mean that the actual speed of the copy increases. The outgoing disk system or the SAN fabric may well be the limiting factor. In addition, you may cause host system impact by over-committing too much bandwidth to migration I/O. 8.6.2 Monitoring migration speed If you want to monitor the speed of the migration you can use the Data Migration panel, as shown in Figure 8-16 on page 232. The status bar can be toggled between GB remaining, percent complete, or hours/minutes remaining. However, if you wish to monitor the actual MBps, you must use an external tool. This is because the performance statistics displayed using the XIV GUI or using XIV Top do not include data migration I/O (the back end copy). They do, however, show incoming I/O rates from hosts using LUNs that are being migrated. 8.6.3 Monitoring migration via the XIV event log The XIV event log can be used to confirm when a migration started and finished. From the XIV GUI go to Monitor Events. On the Events panel use the Type drop-down menu to select dm and then click Filter. In Figure 8-20 the events for a single migration are displayed. In this example the events must be read from bottom to top. You can sort the events by date and time by clicking the Date column in the Events panel. Figure 8-20 XIV Event GUI 8.6.4 Monitoring migration speed via the fabric If you have a Brocade-based SAN, use the portperfshow command and verify the throughput rate of the initiator ports on the XIV. If you have two fabrics you may need to connect to two different switches. If multiple paths are defined between XIV and non-XIV disk system, the XIV load balances across those ports. This means that you must aggregate the throughput numbers from each initiator port to see total throughput. Example 8-6 shows the output of the portperfshow command. The values shown are the combined send and receive throughput in MBps for each port. In this example port 0 is the XIV Initiator port and port 1 is a DS4800 host port. The max_initialization_rate was set to 50 MBps. Example 8-6 Brocade portperfshow command FB1_RC6_PDC:admin> portperfshow 0 1 2 3 4 5 6 7 8 9 10 11 12 13 14 15 Total ====================================================================================== 50m 50m 14m 14m 2.4m 848k 108k 34k 0 937k 0 27m 3.0m 0 949k 3.0m 125m 242 IBM XIV Storage System: Copy Services and Migration 7759ch_Migration.fm Draft Document for Review January 23, 2011 12:42 pm If you have a Cisco-based SAN, start Device Manager for the relevant switch and then select Interface Monitor FC Enabled. 8.6.5 Monitoring migration speed via the non-XIV storage The ability to display migration throughput varies by non-XIV storage device. For example, if you are migrating from a DS4000 you could use the performance monitoring panels in the DS4000 System Manager to monitor the throughput. In the DS4000 System Manager GUI, go to Storage Subsystem Monitor Performance. Display the volumes being migrated and the throughput for the relevant controllers. You can then determine what percentage of I/O is being generated by the migration process. In Figure 8-21 you can see that one volume is being migrated using a max_initialization_rate of 50 MBps. This represents the bulk of the I/O being serviced by the DS4000 in this example. Figure 8-21 Monitoring a DS4000 migration 8.7 Thick-to-thin migration When the XIV migrates data from a LUN on a non-XIV disk system to an XIV volume, it reads every block of the source LUN, regardless of contents. However, when it comes to writing this data into the XIV volume, the XIV only writes blocks that contain data. Blocks that contain only zeroes are not written and do not take any space on the XIV. This is called a thick-to-thin migration, and it occurs regardless of whether you are migrating the data into a thin provisioning pool or a regular pool. While the migration background copy is being processed, the value displayed in the Used column of the Volumes and Snapshots panel drops every time that empty blocks are detected. When the migration is completed, you can check this column to determine how much real data was actually written into the XIV volume. In Figure 8-22 the used space on the Windows2003_D volume is 4 GB. However, the Windows file system using this disk shown in Figure 8-24 on page 245 shows only 1.4 GB of data. This could lead you to conclude wrongly that the thick-to-thin capabilities of the XIV do not work. Figure 8-22 Thick-to-thin results The reason that this has occurred is that when file deletions occur at a file-system level, the data is not removed. The file system re-uses this effectively free space but does not write zeros over the old data (as doing so generates a large amount of unnecessary I/O). The end result is that the XIV effectively copies old and deleted data during the migration. It must be clearly understood that this makes no difference to the speed of the migration, as these blocks have to be read into the XIV cache regardless of what they contain. Chapter 8. Data migration 243 7759ch_Migration.fm Draft Document for Review January 23, 2011 12:42 pm If you are not planning to use the thin provisioning capability of the XIV, this is not an issue. Only be concerned if your migration plan specifically requires you to be adopting thin provisioning. Writing zeros to recover space One way to recover space before you start a migration is to use a utility to write zeros across all free space. In a UNIX environment you could use a simple script like the one shown in Example 8-7 to write large empty files across your file system. You may need to run these commands many times to use all the empty space. Example 8-7 Writing zeros across your file system # The next command will write a 1 GB mytestfile.out dd if=/dev/zero of=mytestfile.out bs=1000 count=1000000 # The next command will free the file allocation space rm mytestfile.out In a Windows environment you can use a Microsoft tool known as sdelete to write zeros across deleted files. You can find this tool in the sysinternals section of Microsoft Technet. Here is the current URL: http://technet.microsoft.com/en-us/sysinternals/bb897443.aspx If you instead choose to write zeros to recover space after the migration, you must initially generate large amounts of empty files, which may initially appear to be counter-productive. It takes several days for the used space value to decrease after the script or application is run. This is because recovery of empty space runs as a background task. 8.8 Resizing the XIV volume after migration Because of the way that XIV distributes data, the XIV allocates space in 17 GB portions (which are exactly 17,179,869,184 bytes or 16 GiB). When creating volumes using the XIV GUI this aspect of the XIV design becomes readily apparent when you enter a volume size and it gets rounded up to the next 17 GB cutoff. 244 IBM XIV Storage System: Copy Services and Migration Draft Document for Review January 23, 2011 12:42 pm 7759ch_Migration.fm If you chose to allow the XIV to determine the size of the migration volume, then you may find that a small amount of extra space is consumed for every volume that was created. Unless the volume sizes being used on the non-XIV storage device were created in multiples of 16 GiB, then it is likely that the volumes automatically created by the XIV will reserve more XIV disk space than is actually made available to the volume. An example of the XIV volume properties of such an automatically created volume is shown in Figure 8-23. In this example the Windows2003_D drive is 53 GB in size, but the size on disk is 68 GB on the XIV. Figure 8-23 Properties of a migrated volume What this means is that we can resize that volume to 68 GB (as shown in the XIV GUI) and make the volume 15 GB larger without effectively consuming any more space on the XIV. In Figure 8-24 we can see that the migrated Windows2003_D drive is 53 GB in size (53,678,141,440 bytes). Figure 8-24 Windows D drive at 53 GB Chapter 8. Data migration 245 7759ch_Migration.fm Draft Document for Review January 23, 2011 12:42 pm To resize a volume go to the Volumes Volumes & Snapshots panel, right-click to select the volume, then choose the Resize option. Change the sizing method drop-down from Blocks to GB and the volume size is automatically moved to the next multiple of 17 GB. We can also use XCLI commands, as shown in Example 8-8. Example 8-8 Resize the D drive using XCLI >> vol_resize vol=Windows2003_D size=68 Warning: ARE_YOU_SURE_YOU_WANT_TO_ENLARGE_VOLUME Y/N: Y Command executed successfully. Because this example is for a Microsoft Windows 2003 basic NTFS disk, we can use the diskpart utility to extend the volume, as shown in Example 8-9. Example 8-9 Expanding a Windows volume C:\>diskpart DISKPART> list volume Volume ### ---------Volume 0 Volume 4 Ltr --C D Label ----------Windows2003 Fs ----NTFS NTFS Type ---------Partition Partition Size ------34 GB 64 GB Status --------Healthy Healthy Info -------System DISKPART> select volume 4 Volume 4 is the selected volume. DISKPART> extend DiskPart successfully extended the volume We can now confirm that the volume has indeed grown by displaying the volume properties. In Figure 8-25 we can see that the disk is now 68 GB (68,713,955,328 bytes). Figure 8-25 Windows 2003 D drive has grown to 64 GB In terms of when to do the re-size, a volume cannot be resized while it is part of a data migration. This means that the migration process must have completed and the migration for 246 IBM XIV Storage System: Copy Services and Migration Draft Document for Review January 23, 2011 12:42 pm 7759ch_Migration.fm that volume must have been deleted before the volume can be resized. For this reason you may choose to defer the resize until after the migration of all relevant volumes has been completed. This also separates the resize change from the migration change. Depending on the operating system using that volume, you may not get any benefit from doing this re-size. 8.9 Troubleshooting This section lists common errors that are encountered during data migrations using the XIV data migration facility. 8.9.1 Target connectivity fails The connections (link line) between the XIV and non-XIV disks system on the migration connectivity panel remain colored red or the link shows as down. There are several reasons this can happen: On the Migration Connectivity panel, verify that the status of the XIV initiator port is OK (Online). If not, check the connections between the XIV and the SAN switch. Verify that the Fibre Channel ports on the non-XIV storage device are set to target, enabled and online. Check whether SAN zoning is incorrect or incomplete. Verify that SAN fabric zoning configuration for XIV and non-XIV storage device are active. Check SAN switch nameserver that both XIV ports and non-XIV storage ports has logged in correct. Verify that XIV and non-XIV has logged into the switch with right speed. Perhaps the XIV WWPN is not properly defined to the non-XIV storage device target port. The XIV WWPN must be defined as a Linux or Windows host. – If the XIV initiator port is defined as a Linux host to the non-XIV storage device, change the definition to a Windows host. Delete the link (line connections) between the XIV and non-XIV storage device ports and redefine the link. This is storage device dependent and is caused by how the non-XIV storage device presents a pseudo LUN-0 if a real volume is not presented as LUN 0. – If the XIV initiator port is defined as a Windows host to the non-XIV storage device, change the definition to a Linux host. Delete the link (line connections) between the XIV and non-XIV storage device ports and redefine the link. This is storage device dependent and is caused by how the non-XIV storage device presents a pseudo LUN-0 if a real volume is not presented as LUN 0. – If the above two attempts are not successful, assign a real disk/volume to LUN 0 and present to the XIV. The volume assigned to LUN-0 can be a very small unused volume or a real volume that will be migrated. Offline/Online the XIV Fiber channel port: Go to the Migration Connectivity panel, expand the connectivity of the target by clicking on the link between XIV and the target system, and highlight the port in question, right-click, and choose Configure. Choose No in the second row drop-down menu (Enabled) and click Configure. Repeat the process, choosing Yes for Enabled. Change the port type from Initiator to Target and then back to Initiator. This forces the port to completely reset and reload. Go to the Migration Connectivity panel, expand the connectivity of the target by clicking on the link between the XIV and target system, highlight the port in question, right-click, and choose Configure. Choose Target in the third row drop-down menu (Role) and click Configure. Repeat the process, choosing Initiator for the role. Chapter 8. Data migration 247 7759ch_Migration.fm Draft Document for Review January 23, 2011 12:42 pm 8.9.2 Remote volume LUN is unavailable This error typically occurs when defining a DM and the LUN ID specified in the Source LUN field is not responding to the XIV. This can occur for several reasons: The LUN ID (host LUN ID or SCSI ID) specified is not allocated to the XIV on the ports identified in the target definition (using the Migration Connectivity panel). You must log on to the non-XIV storage device to confirm. The LUN ID is not allocated to the XIV on all ports specified in the target definition. For example, if the target definition has two links from the non-XIV storage device to the XIV, the volume must be allocated down both paths using the same LUN ID. The XIV looks for the LUN ID specified on the first defined path. If it does not have access to the LUN it will fail even if the LUN is allocated down the second path. The LUN must be allocated down all paths as defined in the target definition. If two links are defined from the target (non-XIV) storage device to the XIV, then the LUN must be allocated down both paths. Incorrect LUN ID: Do not confuse a non-XIV storage device's internal LUN ID with the SCSI LUN ID (host LUN ID) that is presented to the XIV. This is a very common oversight. The source LUN must be the LUN ID (decimal) as presented to the XIV. The Source LUN ID field is expecting a decimal number. Certain vendors present the LUN ID in hex. This must be translated to decimal. Therefore, if LUN ID 10 is on a vendor that displays its IDs in hex, the LUN ID in the DM define is 16 (hex 10). An example of a hexadecimal LUN number is shown in Figure 8-26, taken from an ESS 800. In this example you can see LUN 000E, 000F, and 0010. These are entered into the XIV data migration definitions as LUNs 14, 15, and 16, respectively. See 8.12, “Device-specific considerations” on page 254, for more details. The LUN ID allocated to the XIV has been allocated to an incorrect XIV WWPN. Make sure that the proper volume is allocated to the correct XIV WWPNs. If multiple DM targets are defined, the wrong target may have been chosen when the DM was defined. Sometimes when volumes are added after the initial connectivity is defined the volume is not available. Go to the Migration Connectivity panel and delete the links between the XIV and non-XIV storage device. Only delete the links. There is no need to delete anything else. Once all links are deleted, recreate the links. Go back to the DM panel and recreate the DM. (See item 5 under in “Define non-XIV storage device to XIV (as a migration target)” on page 223). Figure 8-26 ESS 800 LUN numbers 248 IBM XIV Storage System: Copy Services and Migration 7759ch_Migration.fm Draft Document for Review January 23, 2011 12:42 pm The volume on the source non-XIV storage device may not have been initialized or low-level formatted. If the volume has data on it then this is not the case. However, if you are assigning new volumes from the non-XIV storage device then perhaps these new volumes have not completed the initialization process. On ESS 800 storage the initialization process can be displayed from the Modify Volume Assignments panel. In Figure 8-26 on page 248 the volumes are still 0% background formatted, so they will not be accessible by the XIV. So for ESS 800, keep clicking Refresh Status on the ESS 800 Web GUI until the formatting message disappears. 8.9.3 Local volume is not formatted This error occurs when a volume that already exists is chosen as the destination name and has already been written either from a host or a previous DM process that has since been removed from the DM panel. To get around this error do one of the following tasks: Use another volume as a migration destination. Delete the volume that you are trying to migrate to and then create it again. Go to the Volumes Volumes and Snapshots panel. Right-click to select the volume and choose Format. Warning: This deletes all data currently on the volume without recovery. A warning message is displayed to challenge the request. 8.9.4 Host server cannot access the XIV migration volume This error occurs if you attempt to read the contents of a volume on a non-XIV storage device via an XIV data migration without activating the data migration. This happens if the migration is performed without following the correct order of steps. The server should not attempt to access the XIV volume being migrated until the XIV shows that the migration is initializing and active (even if the progress percentage only shows 0%) or fully synchronized. Note: This may also happen in a cluster environment where the XIV is holding a scsi reservation. Make sure all nodes of a cluster are shutdown prior to starting a migration. The XCLI command reservation_list will list all scsi reservations held by the XIV. Should a volume be found with reservations where all nodes are offline, the reservations may be removed using the xcli command reservation_clear. See xcli documentation for further details. 8.9.5 Remote volume cannot be read This error occurs when a volume is defined down the passive path on an active/passive multi-pathing storage device. This can occur in several cases: Two paths were defined on a target (non-XIV storage device) that only supports active/passive multi-pathing. XIV is an active/active storage device. Defining two paths on any given target from an active/passive multi-pathing storage device is not supported. Redefine the target with only one path. Another target can be defined with one connection to the other controller. For example, if the non-XIV storage device has two controllers, but the volume can only be active on one at time, controller A can be defined as one target on the XIV and controller B can be defined as a different target. In this manner, all volumes that are active on controller A can be migrated down the XIV A target and all volumes active on the B controller can be migrated down the XIV B target. Chapter 8. Data migration 249 7759ch_Migration.fm Draft Document for Review January 23, 2011 12:42 pm When defining the XIV initiator to an active/passive multi-pathing non-XIV storage device, certain storage devices allow the initiator to be defined as not supporting failover. The XIV initiator should be configured to the non-XIV storage device in this manner. When configured as such, the volume on the passive controller is not presented to the initiator (XIV). The volume is only presented down the active controller. Refer to “Multi-pathing with data migrations” on page 219 and 8.12, “Device-specific considerations” on page 254, for additional information. 8.9.6 LUN is out of range XIV currently supports migrating data from LUNs with a LUN ID less than 513 (decimal). This is usually not an issue, as most non-XIV storage devices, by default, present volumes on an initiator basis. For example, if there are three hosts connected to the same port on a non-XIV storage device, each host can be allocated volumes starting at the same LUN ID. So for migration purposes you must either map one host at a time (and then re-use the LUN IDs for the next host) or use different sequential LUN numbers for migration. For example, if three hosts each have three LUNs mapped using LUN IDs 20, 21, and 22, for migration purposes, migrate them as LUN IDs 30, 31, 32 (first host); 33, 34, 35 (second host); and 36, 37, 38 (third host). Then from the XIV you can again map them to each host as LUN IDs 20, 21, and 22 (as they were from the non-XIV storage). If migrating from an EMC Symmetrix or DMX there are special considerations. Refer to 8.12.2, “EMC Symmetrix and DMX” on page 256. 8.10 Backing out of a data migration For change management purposes, you may be required to document a back-out procedure. There are four possible points in the migration process where a back-out may occur. 8.10.1 Back-out prior to migration being defined on the XIV If a data migration definition does not exist yet, then no action must be taken on the XIV. You can simply zone the host server back to the non-XIV storage system and un-map the host server’s LUNs away from the XIV and back to the host server, taking care to ensure that the correct LUN order is preserved. 8.10.2 Back-out after a data migration has been defined but not activated If the data migration definition exists but has not been activated, then you can follow the same steps as described in 8.10.1, “Back-out prior to migration being defined on the XIV” on page 250. To remove the inactive migration from the migration list you must delete the XIV volume that was going to receive the migrated data. 8.10.3 Back-out after a data migration has been activated but is not complete If the data migration shows in the GUI with a status of initialization or the XCLI shows it as active=yes, then the background copy process has been started. If you deactivate the migration in this state you will block any I/O passing through the XIV from the host server to the migration LUN on the XIV and to the LUN on the non-XIV disk system. You must shut down the host server or its applications first. After doing this you can deactivate the data 250 IBM XIV Storage System: Copy Services and Migration 7759ch_Migration.fm Draft Document for Review January 23, 2011 12:42 pm migration and then if desired you can delete the XIV data migration volume. Then restore the original LUN masking and SAN fabric zoning and bring your host back up. Important: If you chose to not allow source updating and write I/O has occurred after the migration started, then the contents of the LUN on the non-XIV storage device will not contain the changes from those writes. Understanding the implications of this is important in a back-out plan. 8.10.4 Back-out after a data migration has reached the synchronised state If the data migration shows in the GUI as having a status of synchronised, then the background copy has completed. In this case back-out can still occur because the data migration is not destructive to the source LUN on the non-XIV storage device. Simply reverse the process by shutting down the host server or applications and restore the original LUN masking and switch zoning settings. You may need to also reinstall the relevant host server multi-path software for access to the non-XIV storage device. Important: If you chose to not allow source updating and write I/O has occurred during the migration or after it has completed, then the contents of the LUN on the non-XIV storage device do not contain the changes from those writes. Understanding the implications of this is important in a back-out plan. 8.11 Migration checklist There are three separate stages to a migration cut over. First, prepare the environment for the implementation of the XIV. Second, cut over your hosts. Finally, remove any old devices and definitions as part of a clean up stage. For site setup, the high-level process is: 1. 2. 3. 4. 5. Install XIV and cable it into the SAN. Pre-populate SAN zones in switches. Pre-populate the host/cluster definitions in the XIV. Define XIV to non-XIV disk as a host. Define non-XIV disk to XIV as a migration target and confirm paths. Then for each host the high-level process is: 1. 2. 3. 4. 5. 6. Update host drivers, install Host Attachment Kit and then shut down the host. Disconnect/un-zone the host from non-XIV storage and then zone the host to XIV. Map the host LUNs away from the host instead of mapping them to the XIV. Create XIV data migration (DM). Map XIV DM volumes to the host. Bring up the host. When all data on the non-XIV disk system has been migrated, perform site clean up: 1. Delete all SAN zones related to the non-XIV disk. 2. Delete all LUNs on non-XIV disk and remove it from the site. Chapter 8. Data migration 251 7759ch_Migration.fm Draft Document for Review January 23, 2011 12:42 pm Table 8-1 shows the site setup checklist. Table 8-1 Physical site setup Task Number Completed Where to perform Task 1 Site Install XIV. 2 Site Run fiber cables from SAN switches to XIV for host connections and migration connections. 3 Non-XIV storage Select host ports on the non-XIV storage to be used for migration traffic. These ports do not have to be dedicated ports. Run new cables if necessary. 4 Fabric switches Create switch aliases for each XIV Fibre Channel port and any new non-XIV ports added to the fabric. 5 Fabric switches Define SAN zones to connect hosts to XIV (but do not activate the zones). You can do this by cloning the existing zones from host to non-XIV disk and swapping non-XIV aliases for new XIV aliases. 6 Fabric switches Define and activate SAN zones to connect non-XIV storage to XIV initiator ports (unless direct connected). 7 Non-XIV storage If necessary, create a small LUN to be used as LUN0 to allocate to the XIV. 8 Non-XIV storage Define the XIV on the non-XIV storage device, mapping LUN0 to test the link. 9 XIV Define non-XIV storage to the XIV as a migration target and add ports. Confirm that links are green and working. 10 XIV Change the max_initialization_rate depending on the non-XIV disk. You may want to start at a smaller value and increase it if no issues are seen. 11 XIV Define all the host servers to the XIV (cluster first if using clustered hosts). Use a host listing from the non-XIV disk to get the WWPNs for each host. 12 XIV Create storage pools as required. Ensure that there is enough pool space for all the non-XIV disk LUNs being migrated. Once the site setup is complete, the host migrations can begin. Table 8-2 shows the host migration check list. Repeat this check list for every host. Task numbers that are colored red must be performed with the host application offline. Table 8-2 Host Migration to XIV task list Task number Where to perform Task 1 Host From the host, determine the volumes to be migrated and their relevant LUN IDs and hardware serial numbers or identifiers. 2 Host If the host is remote from your location, confirm that you can power the host back on after shutting it down (using tools such as an RSA card or BladeCenter® manager). 3 Non-XIV Storage Get the LUN IDs of the LUNs to be migrated from non-XIV storage device. Convert from hex to decimal if necessary. 252 Completed? IBM XIV Storage System: Copy Services and Migration 7759ch_Migration.fm Draft Document for Review January 23, 2011 12:42 pm Task number Completed? Where to perform Task 4 Host Shut down the application. 5 Host Set the application to not start automatically at reboot. This helps when performing administrative functions on the server (upgrades of drivers, patches, and so on). 6 Host UNIX servers: Comment out disk mount points on affected disks in the mount configuration file. This helps with system reboots while configuring for XIV. 7 Host Shut down affected servers. 8 Fabric Change the active zoneset to exclude the SAN zone that connects the host server to non-XIV storage and include the SAN zone for the host server to XIV storage. The new zone should have been created during site setup. 9 Non-XIV storage Unmap source volumes from the host server. 10 Non-XIV storage Map source volumes to the XIV host definition (created during site setup). 11 XIV Create data migration pairing (XIV volumes created on the fly). 12 XIV Test XIV migration for each volume. 13 XIV Start XIV migration and verify it. If you want, wait for migration to finish. 14 Host Boot the server. (Be sure that the server is not attached to any storage.) 15 Host Co-existence of non-XIV and XIV multi-pathing software is supported with an approved SCORE(RPQ) only. Remove any unapproved multi-pathing software 16 Host Install patches, update drivers, and HBA firmware as necessary. 17 Host Install the XIV Host Attachment Kit. (Be sure to note prerequisites.) 18 Host At this point you may need to reboot (depending on operating system) 19 XIV Map XIV volumes to the host server. (Use original LUN IDs.) 20 Host 21 Host Verify that the LUNs are available and that pathing is correct. 22 Host Unix Servers: Update mount points for new disks in the mount configuration file if they have changed. Mount the file systems. 23 Host Start the application. 24 Host Set the application to start automatically if this was previously changed. 25 XIV Monitor the migration if it is not already completed. 26 XIV When the volume is synchronized delete the data migration (do not deactivate the migration). 27 Non-XIV Storage Un-map migration volumes away from XIV if you must free up LUN IDs. 28 XIV Consider re-sizing the migrated volumes to the next 17 GB boundary if the host operating system is able to use new space on a re-sized volume. 29 Host If XIV volume was re-sized, use host procedures to utilize the extra space. Chapter 8. Data migration 253 7759ch_Migration.fm Task number Completed? 30 Draft Document for Review January 23, 2011 12:42 pm Where to perform Task Host If non-XIV storage device drivers and other supporting software were not removed earlier, remove them when convenient. When all the hosts and volumes have been migrated there are two site clean up tasks left, as shown in Table 8-3. Table 8-3 Site cleanup check list Task number Completed? Where to perform Task 1 XIV Delete migration paths and targets. 2 Fabric Delete all zones related to non-XIV storage including the zone for XIV migration. 3 Non-XIV storage Delete all LUNs and perform secure data destruction if required. 8.12 Device-specific considerations The XIV supports migration from practically any SCSI storage device that has Fibre Channel interfaces. This section contains device-specific information, but it is not an exhaustive list. Ensure that the following requirements are understood for your storage device: LUN0 Do we need to specifically map a LUN to LUN ID zero? This determines whether you will have a problem defining the paths. LUN numbering Does the storage device GUI or CLI use decimal or hexadecimal LUN numbering? This determines whether you must do a conversion when entering LUN numbers into the XIV GUI. Multipathing Is the device active/active or active/passive? This determines whether you define the storage device as a single target or as one target per internal controller or service processor. Definitions Does the device have specific requirements when defining hosts? Converting hexadecimal LUN IDs to decimal LUN IDs When mapping volumes to the XIV it is very important to note the LUN IDs allocated by the non-XIV storage. The methodology to do this varies by vendor and device. If the device uses hexadecimal LUN numbering then it is also important to understand how to convert hexadecimal numbers into decimal numbers, to enter into the XIV GUI. Using a spreadsheet to convert hex to decimal Microsoft Excel and Open Office both have a spreadsheet formula known as hex2dec. If, for example, you enter a hexadecimal value into spreadsheet cell location A4, then the formula to convert the contents of that cell to decimal is =hex2dec(A4). If this formula does not appear to work in Excel then add the Analysis ToolPak (within Excel go to the Tools menu Add ins Select Analysis ToolPak). 254 IBM XIV Storage System: Copy Services and Migration Draft Document for Review January 23, 2011 12:42 pm 7759ch_Migration.fm Using Microsoft calculator to convert hex to decimal Start the calculator with the following steps: 1. 2. 3. 4. Selecting Program Files Programs Accessories Calculator. From the View drop-down menu change from Standard to Scientific. Select Hex. Enter a hexadecimal number and then select Dec. The hexadecimal number will have been converted to decimal. Given that the XIV supports migration from almost any storage device, it is impossible to list the methodology to get LUN IDs from each one. 8.12.1 EMC CLARiiON The following considerations were identified specifically for EMC CLARiiON: LUN0 There is no requirement to map a LUN to LUN ID 0 for the CLARiiON to communicate with the XIV. LUN numbering The EMC CLARiiON uses decimal LUN numbers for both the CLARiiON ID and the host ID (LUN number). Multipathing The EMC CLARiiON is an active/passive storage device. This means that each storage processor (SP-A and SP-B) must be defined as a separate target to the XIV. You could choose to move LUN ownership of all the LUNs that you are migrating to a specific SP and simply define only that SP as a target. But the recommendation is to define separate XIV targets for each SP. Moving a LUN from one SP to another is known as trespassing. Note: Some of the newer Clariions (CX3, CX4) use ALUA when presenting LUNS to the host and therefore appear to be an active/active storage device. ALUA is effectively masking which SP owns a LUN on the backend of the Clariion. Though this appears as an active/active storage device, ALUA could cause performance issues with XIV migrations if configured using active/active storage device best practices (i.e. two paths for each target). This is because LUN ownership could be switching from one SP to another in succession during the migration with each switch taking CPU and IO cycles. Note: You may configure two paths to the SAME SP to two different XIV interface modules for some of redundancy. This will not protect against a trespass, but may protect from a XIV hardware or SAN path failure. Requirements when defining the XIV If migrating from an EMC CLARiiON use the settings shown in Table 8-4 to define the XIV to the CLARiiON. Ensure that Auto-trespass is disabled for every XIV initiator port (WWPN) registered to the Clariion. Chapter 8. Data migration 255 7759ch_Migration.fm Draft Document for Review January 23, 2011 12:42 pm Table 8-4 Defining an XIV to the EMC CLARiiON Initiator information Recommended setting Initiator type CLARiiON Open HBA type Host Array CommPath Enabled Failover mode 0 Unit serial number Array 8.12.2 EMC Symmetrix and DMX The considerations discussed in this section were identified specifically for EMC Symmetrix and DMX. LUN0 There is a requirement for the EMC Symmetrix or DMX to present a LUN ID 0 to the XIV in order for the XIV Storage System to communicate with the EMC Symmetrix or DMX. In many installations, the VCM device is allocated to LUN-0 on all FAs and is automatically presented to all hosts. In these cases, the XIV connects to the DMX with no issues. However, in newer installations, the VCM device is no longer presented to all hosts and therefore a real LUN-0 is required to be presented to the XIV in order for the XIV to connect to the DMX. This LUN-0 can be a dummy device of any size that will not be migrated or an actual device that will be migrated. LUN numbering The EMC Symmetrix and DMX, by default, does not present volumes in the range of 0 to 512 decimal. The Symmetrix/DMX presents volumes based on the LUN ID that was given the volume when the volume was placed on the FA port. If a volume was placed on the FA with a LUN ID of 90, this is how it is presented to the host by default. The Symmetrix/DMX also presents the LUN IDs in hex. Thus, LUN ID 201 equates to decimal 513, which is greater than 512 and is outside of the XIV's range. There are two disciplines for migrating data from a Symmetrix/DMX where the LUN ID is greater than 512 (decimal). Re-map the volume One way to migrate a volume with a LUN ID higher than 512 is to re-map the volume in one of two ways: Map the volume to a free FA or an FA that has available LUN ID slots less than hex 200 (decimal 512). In most cases this can be done without interruption to the production server. The XIV is zoned and the target defined to the FA port with the lower LUN ID. Re-map the volume to a lower LUN ID, one that is less than 200 hex. However, this requires that the host be shut down while the change is taking place and is therefore not the best option. LUN-Offset With EMC Symmetrix Enginuity code 68 - 71 code, there is an EMC method of presenting LUN IDs to hosts other than the LUN ID given to the volume when placed on the FA. In the Symmetrix/DMX world, a volume is given a unique LUN ID when configured on an FA. Each volume on an FA must have a unique LUN ID. The default method (and a best practice of presenting volumes to a host) is to use the LUN ID given to the volume when placed on the FA. In other words, if 'vol1' was placed on an FA with an ID of 7A (hex (0x07a) decimal 122), 256 IBM XIV Storage System: Copy Services and Migration 7759ch_Migration.fm Draft Document for Review January 23, 2011 12:42 pm this is the LUN ID that is presented to the host. Using the lunoffset option of the symmask command, a volume can be presented to a host (WWPN initiator) with a different LUN ID than was assigned the volume when placed on the FA. Because it is done at the initiator level, the production server can keep the high LUNs (above 128) while being allocated to the XIV using lower LUN IDs (below 512 decimal). Migrating volumes that were used by HP-UX For HP-UX hosts attached to EMC Symmetrix there is a setting known as Volume_Set_Addressing that can be enabled on a per-FA basis. This is required for HP-UX host connectivity but is not compatible with any other host types (including XIV). If Volume_Set_Addressing (also referred to as the V bit setting) is enabled on an FA, then the XIV will not be able to access anything but LUN 0 on that FA. To avoid this issue, map the HP-UX host volumes to a different FA that is not configured specifically for HP-UX. Then zone the XIV migration port to this FA instead of the FA being used by HP-UX. in most cases, EMC symmetrix/DMX volumes can be mapped to an additional FA without interruption. Multipathing The EMC Symmetrix and DMX are active/active storage devices. 8.12.3 HDS TagmaStore USP In this section we discuss HDS TagmaStore USP. LUN0 There is a requirement for the HDS TagmaStore Universal Storage Platform (USP) to present a LUN ID 0 to the XIV in order for the XIV Storage System to communicate with the HDS device. LUN numbering The HDS USP uses hexadecimal LUN numbers. Multipathing The HDS USP is an active/active storage device. 8.12.4 HP EVA The following requirements were determined after migration from a HP EVA 4400 and 8400. LUN0 There is no requirement to map a LUN to LUN ID 0 for the HP EVA to communicate with the XIV. This is because by default the HP EVA presents a special LUN known as the Console LUN as LUN ID 0. LUN numbering The HP EVA uses decimal LUN numbers. Multipathing The HP EVA 4000/6000/8000 are active/active storage devices. For HP EVA 3000/5000, the initial firmware release was active/passive, but a firmware upgrade to VCS Version 4.004 made it active/active capable. For more details see the following Web site: Chapter 8. Data migration 257 7759ch_Migration.fm Draft Document for Review January 23, 2011 12:42 pm http://h21007.www2.hp.com/portal/site/dspp/menuitem.863c3e4cbcdc3f3515b49c108973a8 01?ciid=aa08d8a0b5f02110d8a0b5f02110275d6e10RCRD Requirements when connecting to XIV Define the XIV as a Linux host. To check the LUN IDs assigned to a specific host: 1. 2. 3. 4. 5. 6. Log in into Command View EVA.h. Select the storage on which you are working. Click the Hosts icon. Select the specific host. Click the Presentation tab. Here you will see the LUN name and the LUN ID presented. To present EVA LUNs to XIV: 1. Create the host alias for XIV and add the XIV initiator ports that are zoned to EVA. 2. From the Command View EVA, select the active Vdisk that must be presented to XIV. 3. Click the Presentation tab. 4. Click Present. 5. Select the XIV host Alias created. 6. Click the Assign LUN button on top. 7. Specify the LUN ID that you want to specify for XIV. Usually this is the same as was presented to the host when it was accessing the EVA. 8.12.5 IBM DS3000/DS4000/DS5000 The following considerations were identified specifically for DS4000 but apply for all models of D3000, DS4000, and DS5000 (for purposes of migration they are functionally all the same). For ease of reading, only the DS4000 is referenced. LUN0 There is a requirement for the DS4000 to present a LUN on LUN ID 0 to the XIV to allow the XIV to communicate with the DS4000. It may be easier to create a new 1 GB LUN on the DS4000 just to satisfy this requirement. This LUN does not need to have any data on it. LUN numbering For all DS4000 models, the LUN ID used in mapping is a decimal value between 0 to 15 or 0 to 255 (depending on model). This means that no hex-to-decimal conversion is necessary. Figure 8-11 on page 227 shows an example of how to display the LUN IDs. Defining the DS4000 to the XIV as a target The DS4000 is an active/passive storage device. This means that each controller on the DS4000 must be defined as a separate target to the XIV. You must take note of which volumes are currently using which controllers as the active controller. Preferred path errors The following issues can occur if you have misconfigured a migration from a DS4000. You may initially notice that the progress of the migration is very slow. The DS4000 event log may contain errors, such as the one shown in Figure 8-27. If you see the migration volume fail between the A and B controllers, this means that the XIV is defined to the DS4000 as a host 258 IBM XIV Storage System: Copy Services and Migration 7759ch_Migration.fm Draft Document for Review January 23, 2011 12:42 pm that supports ADT/RDAC (which you should immediately correct) and that either the XIV target definitions have paths to both controllers or that you are migrating from the wrong controller. Figure 8-27 DS4000 LUN fail over In Example 8-10 the XCLI commands show that the target called ITSO_DS4700 has two ports, one from controller A (201800A0B82647EA) and one from controller B (201900A0B82647EA). This is not the correct configuration and should not be used. Example 8-10 Incorrect definition, as target has ports to both controllers >> target_list Name ITSO_DS4700 SCSI Type FC Connected yes >> target_port_list target=ITSO_DS4700 Target Name Port Type Active ITSO_DS4700 FC yes ITSO_DS4700 FC yes WWPN 201800A0B82647EA 201900A0B82647EA iSCSI Address iSCSI Port 0 0 Instead, two targets should have been defined, as shown in Example 8-11. In this example, two separate targets have been defined, each target having only one port for the relevant controller. Example 8-11 Correct definitions for a DS4700 > target_list Name DS4700-ctrl-A DS4700-ctrl-B SCSI Type FC FC Connected yes yes >> target_port_list target=DS4700-Ctrl-A Target Name Port Type Active DS4700-ctrl-A FC yes WWPN 201800A0B82647EA iSCSI Address iSCSI Port 0 >> target_port_list target=DS4700-Ctrl-B Target Name Port Type Active DS4700-ctrl-B FC yes WWPN 201900A0B82647EA iSCSI Address iSCSI Port 0 Note: Some of the DS4000 storage devices (ex. DS4700) have multiple target ports on each controller, it will not help you to attach more target ports from the same controller, as XIV don't have multipathing capabilities. Only one path per controller should be attached. Defining the XIV to the DS4000 as a host Use the DS Storage Manager to check the profile of the DS4000 and select a host type for which ADT is disabled or failover mode is RDAC. To display the profile from the DS Storage Manager choose Storage Subsystem View Profile All. Then go to the bottom of the Chapter 8. Data migration 259 7759ch_Migration.fm Draft Document for Review January 23, 2011 12:42 pm Profile panel. The profile may vary according to NVRAM version. In Example 8-12 select the host type for which ADT status is disabled (Windows 2000). Example 8-12 Earlier NVRAM versions HOST TYPE Linux Windows 2000/Server 2003/Server 2008 Non-Clustered ADT STATUS Enabled Disabled In Example 8-13 choose the host type that specifies RDAC (Windows 2000). Example 8-13 Later NVRAM versions HOST TYPE Linux Windows 2000/Server 2003/Server 2008 Non-Clustered FAILOVER MODE ADT RDAC You can now create a host definition on the DS4000 for the XIV. If you have zoned the XIV to both DS4000 controllers you can add both XIV initiator ports to the host definition. This means that the host properties should look similar to Figure 8-28. After mapping your volumes to the XIV migration host, you must take note of which controller each volume is owned by. When you define the data migrations on the XIV, the migration should point to the target that matches the controller that owns the volume being migrated. Figure 8-28 XIV defined to the DS4000 as a host 8.12.6 IBM ESS E20/F20/800 The following considerations were identified for ESS 800. LUN0 There is no requirement to map a LUN to LUN ID 0 for the ESS to communicate with the XIV. LUN numbering The LUN IDs used by the ESS are in hexadecimal, so they must be converted to decimal when entered as XIV data migrations. It is not possible to specifically request certain LUN IDs. In Example 8-14 there are 18 LUNs allocated by an ESS 800 to an XIV host called NextraZap_ITSO_M5P4. You can clearly see that the LUN IDs are hex. The LUN IDs given in the right-hand column were added to the output to show the hex-to-decimal conversion 260 IBM XIV Storage System: Copy Services and Migration 7759ch_Migration.fm Draft Document for Review January 23, 2011 12:42 pm needed for use with XIV. An example of how to view LUN IDs using the ESS 800 Web GUI is shown in Figure 8-26 on page 248. Restriction: The ESS can only allocate LUN IDs in the range 0 to 255 (hex 00 to FF). This means that only 256 LUNs can be migrated at one time on a per target bases. In other words more than 256 LUNs may be migrated if more than one target is used. Example 8-14 Listing ESS 800 LUN IDs using ESSCLI C:\esscli -s 10.10.1.10 -u storwatch -p specialist list volumeaccess -d "host=NextraZap_ITSO_M5P4" Tue Nov 03 07:20:36 EST 2009 IBM ESSCLI 2.4.0 Volume -----100e 100f 1010 1011 1012 1013 1014 1015 1016 1017 1018 1019 101a 101b 101c 101d 101e 101f LUN ---0000 0001 0002 0003 0004 0005 0006 0007 0008 0009 000a 000b 000c 000d 000e 000f 0010 0011 Size(GB) -------10.0 10.0 10.0 10.0 10.0 10.0 10.0 10.0 10.0 10.0 10.0 10.0 10.0 10.0 10.0 10.0 10.0 10.0 Initiator ---------------5001738000230153 5001738000230153 5001738000230153 5001738000230153 5001738000230153 5001738000230153 5001738000230153 5001738000230153 5001738000230153 5001738000230153 5001738000230153 5001738000230153 5001738000230153 5001738000230153 5001738000230153 5001738000230153 5001738000230153 5001738000230153 Host ------------------NextraZap_ITSO_M5P4 NextraZap_ITSO_M5P4 NextraZap_ITSO_M5P4 NextraZap_ITSO_M5P4 NextraZap_ITSO_M5P4 NextraZap_ITSO_M5P4 NextraZap_ITSO_M5P4 NextraZap_ITSO_M5P4 NextraZap_ITSO_M5P4 NextraZap_ITSO_M5P4 NextraZap_ITSO_M5P4 NextraZap_ITSO_M5P4 NextraZap_ITSO_M5P4 NextraZap_ITSO_M5P4 NextraZap_ITSO_M5P4 NextraZap_ITSO_M5P4 NextraZap_ITSO_M5P4 NextraZap_ITSO_M5P4 (LUN (LUN (LUN (LUN (LUN (LUN (LUN (LUN (LUN (LUN (LUN (LUN (LUN (LUN (LUN (LUN (LUN (LUN ID ID ID ID ID ID ID ID ID ID ID ID ID ID ID ID ID ID is is is is is is is is is is is is is is is is is is 0) 1) 2) 3) 4) 5) 6) 7) 8) 9) 10) 11) 12) 13) 14) 15) 16) 17) Multipathing The ESS 800 is an active/active storage device. You can define multiple paths from the XIV to the ESS 800 for migration. Ideally, connect to more than one host bay in the ESS 800. Because each XIV host port is defined as a separate host system, ensure that the LUN ID used for each volume is the same. There is a check box on the Modify Volume Assignments panel titled “Use same ID/LUN in source and target” that will assist you. Figure 8-31 on page 267 shows a good example of two XIV host ports with the same LUN IDs. Requirements when defining the XIV Define each XIV host port to the ESS 800 as a Linux x86 host. 8.12.7 IBM DS6000 and DS8000 The following considerations were identified for DS6000 and DS8000. LUN0 There is no requirement to map a LUN to LUN ID 0 for a DS6000 or DS8000 to communicate with the XIV. Chapter 8. Data migration 261 7759ch_Migration.fm Draft Document for Review January 23, 2011 12:42 pm LUN numbering The DS6000 and DS8000 use hexadecimal LUN IDs. These can be displayed using DSCLI with the showvolgrp -lunmap xxx command, where xxx is the volume group created to assign volumes to the XIV for data migration. Do not use the Web GUI to display LUN IDs. Multipathing with DS6000 The DS6000 is an active/active storage device, but each controller has dedicated host ports, whereas each LUN has a preferred controller. If I/O for a particular LUN is sent to host ports of the non-preferred controller, the LUN will not fail over, but that I/O may experience a small performance penalty. This may lead you to consider migrating volumes with even LSS numbers (such as volumes 0000 and 0200) from the upper controller and volumes with odd LSS numbers (such as volumes 0100 and 0300) from the lower controller. However, this is not a robust solution. Define the DS6000 as a single target with one path to each controller. Multipathing with DS8000 The DS8000 is an active/active storage device. You can define multiple paths from the XIV to the DS8000 for migration. Ideally, connect to more than one I/O bay in the DS8000. Requirements when defining the XIV In Example 8-15 a volume group is created used a type of SCSI Map 256, which is the correct type for a RedHat Linux host type. A starting LUN ID of 8 is chosen to show how hexadecimal numbering is used. The range of valid LUN IDs for this volume group are 0 to FF (0 to 255 in decimal). An extra LUN is then added to the volume group to show how specific LUN IDs can be selected by volume. Two host connections are then created using the Red Hat Linux host type. By using the same volume group ID for both connections, we ensure that the LUN numbering used by each defined path will be the same. Example 8-15 Listing DS6000 and DS8000 LUN IDs dscli> mkvolgrp -type scsimap256 -volume 0200-0204 -LUN 8 migrVG CMUC00030I mkvolgrp: Volume group V18 successfully created. dscli> chvolgrp -action add -volume 0205 -lun 0E V18 CMUC00031I chvolgrp: Volume group V18 successfully modified. dscli> showvolgrp -lunmap V18 Name migrVG ID V18 Type SCSI Map 256 Vols 0200 0201 0202 0203 0204 0205 ==============LUN Mapping=============== vol lun ======== 0200 08 (comment: use decimal value 08 in XIV GUI) 0201 09 (comment: use decimal value 09 in XIV GUI) 0202 0A (comment: use decimal value 10 in XIV GUI) 0203 0B (comment: use decimal value 11 in XIV GUI) 0204 0C (comment: use decimal value 12 in XIV GUI) 0D 0205 0E (comment: use decimal value 14 in XIV GUI) dscli> mkhostconnect -wwname 5001738000230153 -hosttype LinuxRHEL -volgrp V18 XIV_M5P4 CMUC00012I mkhostconnect: Host connection 0020 successfully created. dscli> mkhostconnect -wwname 5001738000230173 -hosttype LinuxRHEL -volgrp V18 XIV_M7P4 CMUC00012I mkhostconnect: Host connection 0021 successfully created. dscli> lshostconnect Name ID WWPN HostType Profile portgrp volgrpID 262 IBM XIV Storage System: Copy Services and Migration 7759ch_Migration.fm Draft Document for Review January 23, 2011 12:42 pm =========================================================================================== XIV_M5P4 0020 5001738000230153 LinuxRHEL Intel - Linux RHEL 0 V18 XIV_M7P4 0021 5001738000230173 LinuxRHEL Intel - Linux RHEL 0 V18 8.13 Sample migration Here is a specific example migration. Using XIV DM to migrate an AIX file system from ESS 800 to XIV In this example we migrate a file system on an AIX host using ESS 800 disks to XIV. First we select a volume group to migrate. In Example 8-16 we select a volume group called ESS_VG1. The lsvg command shows that this volume group has one file system mounted on /mnt/redbk. The df -k command shows that the file system is 20 GiB in size and is 46% used. Example 8-16 Selecting a file system root@dolly:/mnt/redbk# lsvg -l ESS_VG1 ESS_VG1: LV NAME TYPE LPs PPs loglv00 jfs2log 1 1 fslv00 jfs2 20 20 root@dolly:/mnt/redbk# df -k Filesystem 1024-blocks Free %Used /dev/fslv00 20971520 11352580 46% PVs 1 3 LV STATE open/syncd open/syncd MOUNT POINT N/A /mnt/redbk Iused %Iused Mounted on 17 1% /mnt/redbk We now determine which physical disks must be migrated. In Example 8-17 we use the lspv commands to determine that hdisk3, hdisk4, and hdisk5 are the relevant disks for this VG. The lsdev -Cc disk command confirms that they are located on an IBM ESS 2105. We then use the lscfg command to determine the hardware serial numbers of the disks involved. Example 8-17 Determine the migration disks root@dolly:/mnt/redbk# lspv hdisk1 0000d3af10b4a189 rootvg hdisk3 0000d3afbec33645 ESS_VG1 hdisk4 0000d3afbec337b5 ESS_VG1 hdisk5 0000d3afbec33922 ESS_VG1 root@dolly:~/sddpcm# lsdev -Cc disk hdisk0 Available 11-08-00-2,0 Other SCSI Disk Drive hdisk1 Available 11-08-00-4,0 16 Bit LVD SCSI Disk Drive hdisk2 Available 11-08-00-4,1 16 Bit LVD SCSI Disk Drive hdisk3 Available 17-08-02 IBM MPIO FC 2105 hdisk4 Available 17-08-02 IBM MPIO FC 2105 hdisk5 Available 17-08-02 IBM MPIO FC 2105 active active active active root@dolly:/mnt# lscfg -vpl hdisk3 | egrep "Model|Serial" Machine Type and Model......2105800 Serial Number...............00FFCA33 root@dolly:/mnt# lscfg -vpl hdisk4 | egrep "Model|Serial" Machine Type and Model......2105800 Serial Number...............010FCA33 root@dolly:/mnt# lscfg -vpl hdisk5 | egrep "Model|Serial" Chapter 8. Data migration 263 7759ch_Migration.fm Draft Document for Review January 23, 2011 12:42 pm Machine Type and Model......2105800 Serial Number...............011FCA33 These volumes are currently allocated from an IBM ESS 800. In Figure 8-29 we use the ESS Web GUI to confirm that the volume serial numbers match with those determined in Example 8-17 on page 263. Note that the LUN IDs here are those used by ESS 800 with AIX hosts (IDs 500F, 5010, and 5011). They are not correct for the XIV and will be changed when we re-map them to the XIV. Figure 8-29 LUNs allocated to AIX from the ESS 800 Because we now know the source hardware we can create connections between the ESS 800 and the XIV and the XIV and Dolly (our host server). First, in Example 8-18 we identify the existing zones that connect Dolly to the ESS 800. We have two zones, one for each AIX HBA. Each zone contains the same two ESS 800 HBA ports. Example 8-18 Existing zoning on the SAN Fabric zone: ESS800_dolly_fcs0 10:00:00:00:c9:53:da:b3 50:05:07:63:00:c9:0c:21 50:05:07:63:00:cd:0c:21 zone: ESS800_dolly_fcs0 10:00:00:00:c9:53:da:b2 50:05:07:63:00:c9:0c:21 50:05:07:63:00:cd:0c:21 We now create two new zones. The first zone connects the initiator ports on the XIV to the ESS 800. The second and third zones connects the target ports on the XIV to Dolly (for use after the migration). These are shown in Example 8-19. All six ports on the XIV clearly must have been cabled into the SAN fabric. Example 8-19 New zoning on the SAN Fabric zone: ESS800_nextrazap 50:05:07:63:00:c9:0c:21 50:05:07:63:00:cd:0c:21 50:01:73:80:00:23:01:53 50:01:73:80:00:23:01:73 zone: nextrazap_dolly_fcs0 10:00:00:00:c9:53:da:b3 50:01:73:80:00:23:01:41 264 IBM XIV Storage System: Copy Services and Migration Draft Document for Review January 23, 2011 12:42 pm zone: 7759ch_Migration.fm 50:01:73:80:00:23:01:51 nextrazap_dolly_fcs1 10:00:00:00:c9:53:da:b2 50:01:73:80:00:23:01:61 50:01:73:80:00:23:01:71 We then create the migration connections between the XIV and the ESS 800. An example of using the XIV GUI to do this was shown in “Define target connectivity (Fibre Channel only).” on page 234. In Example 8-20 we use the XCLI to define a target, then the ports on that target, then the connections between XIV and the target (ESS 800). Finally, we check that the links are active=yes and up=yes. We can use two ports on the ESS 800 because it is an active/active storage device. Example 8-20 Connecting ESS 800 to XIV for migration using XCLI >> target_define protocol=FC target=ESS800 xiv_features=no Command executed successfully. >> target_port_add fcaddress=50:05:07:63:00:c9:0c:21 target=ESS800 Command executed successfully. >> target_port_add fcaddress=50:05:07:63:00:cd:0c:21 target=ESS800 Command executed successfully. >> target_connectivity_define local_port=1:FC_Port:5:4 fcaddress=50:05:07:63:00:c9:0c:21 target=ESS800 Command executed successfully. >> target_connectivity_define local_port=1:FC_Port:7:4 fcaddress=50:05:07:63:00:cd:0c:21 target=ESS800 Command executed successfully. >> target_connectivity_list Target Name Remote Port FC Port IP Interface Active ESS800 5005076300C90C21 1:FC_Port:5:4 yes ESS800 5005076300CD0C21 1:FC_Port:7:4 yes Up yes yes We now define the XIV as a host to the ESS 800. In Figure 8-30 we have defined the two initiator ports on the XIV (with WWPNs that end in 53 and 73) as Linux (x86) hosts called Nextra_Zap_5_4 and NextraZap_7_4. Figure 8-30 Define the XIV to the ESS 800 as a host Chapter 8. Data migration 265 7759ch_Migration.fm Draft Document for Review January 23, 2011 12:42 pm Finally, we can define the AIX host to the XIV as a host using the XIV GUI or XCLI. In Example 8-21 we use the XCLI to define the host and then add two HBA ports to that host. Example 8-21 Define Dolly to the XIV using XCLI >> host_define host=dolly Command executed successfully. >> host_add_port fcaddress=10:00:00:00:c9:53:da:b3 host=dolly Command executed successfully. >> host_add_port fcaddress=10:00:00:00:c9:53:da:b2 host=dolly Command executed successfully. Once the zoning changes have been done and connectivity and correct definitions confirmed between XIV to ESS and XIV to AIX host, we take an outage on the volume group and related file systems that are going to be migrated. In Example 8-22 we unmount the file system, vary off the volume group, and then export the volume group. Finally, we rmdev the hdisk devices. Example 8-22 Removing the non-XIV file system root@dolly:/# umount /mnt/redbk root@dolly:/# varyoffvg ESS_VG1 root@dolly:/# exportvg ESS_VG1 root@dolly:/# rmdev -dl hdisk3 hdisk3 deleted root@dolly:/# rmdev -dl hdisk4 hdisk4 deleted root@dolly:/# rmdev -dl hdisk5 hdisk5 deleted If the Dolly host no longer needs access to any LUNs on the ESS 800 we remove the SAN zoning that connects Dolly to the ESS 800. In Example 8-18 on page 264 this was the zone called ESS800_dolly_fcs0. 266 IBM XIV Storage System: Copy Services and Migration Draft Document for Review January 23, 2011 12:42 pm 7759ch_Migration.fm We now allocate the ESS 800 LUNS to the XIV, as shown in Figure 8-31, where volume serials 00FFCA33, 010FCA33, and 011FCA33 have been unmapped from the host called Dolly and remapped to the XIV definitions called NextraZap_5_4 and NextraZap_7_4. We do not allow the volumes to be presented to both the host and the XIV. Note that the LUN IDs in the Host Port column are correct for use with XIV because they start with zero and are the same for both NextraZap Initiator ports. Figure 8-31 LUNs allocated to the XIV We now create the DMs and run a test on each LUN. The XIV GUI or XCLI could be used. In Example 8-23 the commands to create, test, and activate one of the three migrations is shown. We must run each command for hdisk3 and hdisk4 also. Example 8-23 Creating one migration > dm_define target="ESS800" vol=”dolly_hdisk3” lun=0 source_updating=yes create_vol=yes pool=AIX Command executed successfully. > dm_test vol=”dolly_hdisk3” Command executed successfully. > dm_activate vol=”dolly_hdisk3” Command executed successfully. After we create and activate all three migrations, the Migration panel in the XIV GUI looks as shown in Figure 8-32. Note that the remote LUN IDs are 0, 1, and 2, which must match the LUN numbers seen in Figure 8-31. Figure 8-32 Migration has started Chapter 8. Data migration 267 7759ch_Migration.fm Draft Document for Review January 23, 2011 12:42 pm Now that the migration has been started we can map the volumes to the AIX host definition on the XIV, as shown in Figure 8-33, where the AIX host is called Dolly. Figure 8-33 Map the XIV volumes to the host Now we can bring the volume group back online. Because this AIX host was already using SDDPCM, we can install the XIVPCM (the AIX host attachment kit) at any time prior to the change. In Example 8-24 we confirm that SDDPCM is in use and that the XIV definition file set is installed. We then run cfgmgr to detect the new disks. We then confirm that the disks are visible using the lsdev -Cc disk command. Example 8-24 Rediscovering the disks root@dolly:~# lslpp -L | grep -i sdd devices.sddpcm.53.rte 2.2.0.4 C F IBM SDD PCM for AIX V53 root@dolly:/# lslpp -L | grep 2810 disk.fcp.2810.rte 1.1.0.1 C F IBM 2810XIV ODM definitions root@dolly:/# cfgmgr -l fcs0 root@dolly:/# cfgmgr -l fcs1 root@dolly:/# lsdev -Cc disk hdisk1 Available 11-08-00-4,0 16 Bit LVD SCSI Disk Drive hdisk2 Available 11-08-00-4,1 16 Bit LVD SCSI Disk Drive hdisk3 Available 17-08-02 IBM 2810XIV Fibre Channel Disk hdisk4 Available 17-08-02 IBM 2810XIV Fibre Channel Disk hdisk5 Available 17-08-02 IBM 2810XIV Fibre Channel Disk A final check before bringing the volume group back ensures that the Fibre Channel pathing from the host to the XIV is set up correctly. We can use the AIX lspath command against each hdisk, as shown in Example 8-25. Note that in this example the host can connect to port 2 on each of the XIV modules 4, 5, 6, and 7 (which is confirmed by checking the last two digits of the WWPN). Example 8-25 Using the lspath command root@dolly:~/# lspath -l hdisk5 -s available -F"connection:parent:path_status:status" 5001738000230161,3000000000000:fscsi1:Available:Enabled 5001738000230171,3000000000000:fscsi1:Available:Enabled 5001738000230141,3000000000000:fscsi0:Available:Enabled 5001738000230151,3000000000000:fscsi0:Available:Enabled 268 IBM XIV Storage System: Copy Services and Migration Draft Document for Review January 23, 2011 12:42 pm 7759ch_Migration.fm We can also use a script provided by the XIV Host Attachment Kit for AIX, called xiv_devlist. An example of the output is shown in Example 8-26. Example 8-26 Using xiv_devlist root@dolly:~# xiv_devlist XIV devices =========== Device Vol Name XIV Host Size Paths XIV ID Vol ID -----------------------------------------------------------------------------hdisk3 dolly_hdisk3 dolly 10.0GB 4/4 MN00023 8940 hdisk4 dolly_hdisk4 dolly 10.0GB 4/4 MN00023 8941 hdisk5 dolly_hdisk5 dolly 10.0GB 4/4 MN00023 8942 Non-XIV devices =============== Device Size Paths ----------------------------------hdisk1 N/A 1/1 hdisk2 N/A 1/1 We can also use the XIV GUI to confirm connectivity by going to the Hosts and Clusters Host Connectivity panel. An example is shown in Figure 8-34, where the connections match those seen in Example 8-25 on page 268. Figure 8-34 Host connectivity panel Having confirmed that the disks have been detected and that the paths are good, we can now bring the volume group back online. In Example 8-27 we import the VG, confirm that the PVIDs match those seen in Example 8-17 on page 263, and then mount the file system. Example 8-27 Bring the VG back online root@dolly:/# /usr/sbin/importvg -y'ESS_VG1' hdisk3 ESS_VG1 root@dolly:/# lsvg -l ESS_VG1 ESS_VG1: LV NAME TYPE LPs PPs PVs LV STATE MOUNT POINT loglv00 jfs2log 1 1 1 closed/syncd N/A fslv00 jfs2 20 20 3 closed/syncd /mnt/redbk root@dolly:/# lspv hdisk1 0000d3af10b4a189 rootvg active hdisk3 0000d3afbec33645 ESS_VG1 active hdisk4 0000d3afbec337b5 ESS_VG1 active hdisk5 0000d3afbec33922 ESS_VG1 active root@dolly:/# mount /mnt/redbk root@dolly:/mnt/redbk# df -k Filesystem 1024-blocks Free %Used Iused %Iused Mounted on /dev/fslv00 20971520 11352580 46% 17 1% /mnt/redbk Chapter 8. Data migration 269 7759ch_Migration.fm Draft Document for Review January 23, 2011 12:42 pm Once the sync is complete it is time to delete the migrations. Do not leave the migrations in place any longer than they need to be. We can use multiple selection to perform the deletion, as shown in Figure 8-35, taking care to delete and not deactivate the migration. Figure 8-35 Deletion of the synchronized data migration Now at the ESS 800 Web GUI we can un-map the three ESS 800 LUNs from the Nextra_Zap host definitions. This frees up the LUN IDs to be reused for the next volume group migration. After the migrations are deleted, a final suggested task is to re-size the volumes on the XIV to the next 17 GB cutoff. In this example we migrate ESS LUNs that are 10 GB in size. However, the XIV commits 17 GB of disk space because all space is allocated in 17 GB portions. For this reason it is better to resize the volume on the XIV GUI from 10 GB to 17 GB so that all the allocated space on the XIV is available to the operating system. This presumes that the operating system can tolerate a LUN size growing, which in the case of AIX is true. We must unmount any file systems and vary off the volume group before we start. Then we go to the volumes section of the XIV GUI, right-click to select the 10 GB volume, and select the Resize option. The current size appears. In Figure 8-36 the size is shown in 512 byte blocks because the volume was automatically created by the XIV based on the size of the source LUN on the ESS 800. If we multiply 19531264 by 512 bytes we get 10,000,007,168 bytes, which is 10 GB. Figure 8-36 Starting volume size in blocks We change the sizing methodology to GB and the size immediately changes to 17 GB, as shown in Figure 8-37. If the volume was already larger than 17 GB, then it will change to the next interval of 17 GB. For example, a 20 GB volume shows as 34 GB. Figure 8-37 Size changed to GB 270 IBM XIV Storage System: Copy Services and Migration Draft Document for Review January 23, 2011 12:42 pm 7759ch_Migration.fm We then get a warning message. The volume is increasing in size. Click OK to continue. Now the volume is really 17 GB and no space is being wasted on the XIV. The new size is shown in Figure 8-38. Figure 8-38 Resized volumes Vary on the VG again to update AIX that the volume size has changed. In Example 8-28 we import the VG, which detects that the source disks have grown in size. We then run the chvg -g command to grow the volume group, then confirm that the file system can still be used. Example 8-28 Importing larger disks root@dolly:~# /usr/sbin/importvg -y'ESS_VG1' hdisk3 0516-1434 varyonvg: Following physical volumes appear to be grown in size. Run chvg command to activate the new space. hdisk3 hdisk4 hdisk5 ESS_VG1 root@dolly:~# chvg -g ESS_VG1 root@dolly:~# mount /mnt/redbk root@dolly:/mnt/redbk# df -k Filesystem 1024-blocks Free %Used Iused %Iused Mounted on /dev/fslv00 20971520 11352580 46% 17 1% /mnt/redbk We can now resize the file system to take advantage of the extra space. In Example 8-29 the original size of the file system in 512 byte blocks is shown. Example 8-29 Displaying the current size of the file system Change/Show Characteristics of an Enhanced Journaled File System Type or select values in entry fields. Press Enter AFTER making all desired changes. File system name NEW mount point SIZE of file system Unit Size Number of units [Entry Fields] /mnt/redbk [/mnt/redbk] 512bytes [41943040] Chapter 8. Data migration 271 7759ch_Migration.fm Draft Document for Review January 23, 2011 12:42 pm We change the number of 512 byte units to 83886080 because this is 40 GB in size, as shown in Example 8-30. Example 8-30 Growing the file system SIZE of file system Unit Size + Number of units 512bytes [83886080] The file system has now grown. In Example 8-31 we can see the file system has grown from 20 GB to 40 GB. Example 8-31 Displaying the enlarged file system root@dolly:~# df -k /dev/fslv00 41943040 272 40605108 IBM XIV Storage System: Copy Services and Migration 4% 7 1% /mnt/redbk Draft Document for Review January 23, 2011 12:42 pm 7759ch_SVC_Migration.fm 9 Chapter 9. SVC migration with XIV This chapter discusses data migration considerations for the XIV Storage System when used in combination with the IBM SAN Volume Controller (SVC). It presumes that you have an existing SVC and that you are replacing back-end disk controllers with a new XIV or simply adding an XIV as a new managed disk controller. The combination of SVC and XIV allows a client to benefit from the high-performance grid architecture of the XIV while retaining the business benefits delivered by the SVC (such as higher performance via disk aggregation, multivendor and multi-device copy services, and data migration functions). The order of the sections in this chapter address each of the requirements of an implementation plan in the order in which they arise. This chapter does not, however, discuss physical implementation requirements (such as power requirements), as they are already addressed in the book IBM XIV Storage System: Architecture, Implementation, and Usage, SG24-76599, found here: http://www.redbooks.ibm.com/Redbooks.nsf/RedbookAbstracts/sg247659.html?Open © Copyright IBM Corp. 2010. All rights reserved. 273 7759ch_SVC_Migration.fm Draft Document for Review January 23, 2011 12:42 pm 9.1 Steps to take when using SVC migration with XIV There are six considerations when placing a new XIV behind an SVC: “XIV and SVC interoperability” on page 274 “Zoning setup” on page 275 “Volume size considerations for XIV with SVC” on page 278 “Using an XIV for SVC quorum disks” on page 283 “Configuring an XIV for attachment to SVC” on page 285 “Data movement strategy overview” on page 289 9.2 XIV and SVC interoperability Because SVC-attached hosts do not communicate directly with the XIV, there are only two interoperability considerations: 9.2.1, “Firmware versions” on page 274 9.2.2, “Copy functions” on page 275 9.2.1 Firmware versions The SVC and XIV both have minimum firmware requirements. Whereas the versions given here are current at the time of writing, they may have since changed. Confirm them by visiting the IBM Systems Storage Interoperation Center (SSIC) at: http://www.ibm.com/systems/support/storage/config/ssic/index.jsp SVC firmware The first SVC firmware version that supported XIV was 4.3.0.1. However, the SVC cluster should be on at least SVC firmware Version 4.3.1.4 or more preferably the most recent level available from IBM. You can display the SVC firmware version by viewing the cluster properties in the SVC GUI or by using the svcinfo lscluster command specifying the name of the cluster. The SVC in Example 9-1 is on SVC code level 4.3.1.5. Example 9-1 Displaying the SVC cluster code level using SVC CLI IBM_2145:SVCSTGDEMO:admin> svcinfo lscluster SVCSTGDEMO code_level 4.3.1.5 (build 9.16.0903130000) XIV firmware The XIV should be on at least XIV firmware Version 10.0.0.a. The XIV firmware version is shown on the All Systems front page of the XIV GUI. The XIV in Figure 9-1 is on version 10.0.1.b (circled on the upper right in red). Figure 9-1 Figure 9-1Version 10.0.1.b 274 IBM XIV Storage System: Copy Services and Migration 7759ch_SVC_Migration.fm Draft Document for Review January 23, 2011 12:42 pm The XIV firmware version can also be displayed by using an XCLI command as shown in Example 9-2, where the example machine is on XIV firmware Version 10.0.1.b. Example 9-2 Displaying the XIV firmware version xcli -m 10.0.0.1 -u admin -p adminadmin version_get Version 10.0.1.b Note that an upgrade from XIV 10.0.x.x code levels to 10.1.x.x code levels is not concurrent (meaning that the XIV is unavailable for I/O during the upgrade). 9.2.2 Copy functions The XIV has many advanced copy and remote mirror capabilities, but for XIV volumes being used as SVC MDisks (including image mode VDisk/MDisks), none of these functions can be used. If copy and mirror functions are needed, they should be performed using the equivalent functional capabilities in the SVC (such as SVC FlashCopy and SVC Metro and Global Mirror). This is because XIV copy functions are not aware of un-destaged write cache data resident in the SVC cache. Whereas it is possible to disable SVC write-cache (when creating VDisks), this method is not supported by IBM for VDisks resident on XIV. 9.2.3 TPC with XIV and SVC XIV code levels 10.1.0.a and later support the use of Tivoli Storage Productivity Center (TPC) via an embedded SMI-S agent in the XIV. Subsequently, if you want to use TPC in conjunction with XIV then you your XIV must be code level 10.1.0.a (or later). TPC itself must be Version 4.1 (or later). Refer to the “Recommended Software Levels for SAN Volume Controller” documentation for your SVC code level to identify the latest recommended TPC for Disk software version via the following Web site: http://www.ibm.com/storage/support/2145 9.3 Zoning setup One of the first tasks when implementing XIV is to add the XIV to the SAN fabric so that the SVC cluster can communicate with the XIV over the Fibre Channel. The XIV can have up to 24 Fibre Channel host ports. Each XIV reports a single World Wide Node Name (WWNN) that is the same for every XIV Fibre Channel host port. Each port also has a unique and persistent World Wide Port Name (WWPN), which means that we can potentially zone 24 unique WWPNS from an XIV to an SVC cluster. However, the current SVC firmware has a requirement that one SVC cluster cannot detect more than 16 WWPNs per WWNN, so at this time there is no value in zoning more than 16 ports to the SVC. Because the XIV can have up to six interface modules with four ports per module, it is better to use just two ports on each module (allowing up to 12 ports total). Chapter 9. SVC migration with XIV 275 7759ch_SVC_Migration.fm Draft Document for Review January 23, 2011 12:42 pm When a partially populated XIV has a hardware upgrade to add usable capacity, more data modules are added. At particular points in the upgrade path, the XIV will get more usable Fibre Channel ports. In each case, we use half the available ports to communicate with an SVC cluster (we do this to facilitate growth as modules are added). Depending on the total usable capacity of the XIV, not all interface modules have active Fibre Channel ports. Table 9-1 shows which modules will have active ports as capacity grows. You can also see how many XIV ports we zone to the SVC as capacity grows. Table 9-1 XIV host ports as capacity grows XIV modules Total usable capacity (TB) Total XIV host ports XIV host ports to zone to an SVC cluster Active interface modules Inactive interface modules 6 27.26 8 4 4:5 6 9 43.09 16 8 4:5:7:8 6:9 10 50.29 16 8 4:5:7:8 6:9 11 54.65 20 10 4:5:7:8:9 6 12 61.74 20 10 4:5:7:8:9 6 13 66.16 24 12 4:5:6:7:8:9 14 73.24 24 12 4:5:6:7:8:9 15 79.11 24 12 4:5:6:7:8:9 Another way to view the activation state of the XIV interface modules is shown in Table 9-2. As additional capacity is added to an XIV, additional XIV host ports become available. Where a module is shown as inactive, this refers only to the host ports, not the data disks. Table 9-2 XIV host ports as capacity grows Module 27 TB 43 TB 50 TB 54 TB 61 TB 66 TB 73 TB 79 TB Module 9 host ports Not present Inactive Inactive Active Active Active Active Active Module 8 host ports Not present Active Active Active Active Active Active Active Module 7 host ports Not present Active Active Active Active Active Active Active Module 6 host ports Inactive Inactive Inactive Inactive Inactive Active Active Active Module 5 host ports Active Active Active Active Active Active Active Active Module 4 host ports Active Active Active Active Active Active Active Active 9.3.1 Capacity on demand If the XIV has the Capacity on Demand (CoD) feature, then all Fibre Channel interface ports are present and active (usable) at the time of install, regardless of how much usable capacity has been purchased. 276 IBM XIV Storage System: Copy Services and Migration 7759ch_SVC_Migration.fm Draft Document for Review January 23, 2011 12:42 pm 9.3.2 Determining XIV WWPNs XIV WWPNs are in the format 50:01:73:8x:xx:xx:RR:MP which break out as follows: 5 0:01:73:8 x:xx:xx RR M P The WWPN format (1, 2, or 5, where XIV is always format 5) The IEEE OID for IBM (formerly registered to XIV) Determined by IBM manufacturing and unique for every XIV rack Rack ID (starts at 01) Module ID (ranges from 4 to 9) Port ID (0 to 3, although port numbers are 1–4) 91 93 90 92 91 81 93 83 90 80 92 82 71 73 70 72 61 63 60 62 91 51 93 53 90 50 92 52 41 43 40 42 Module 9 Module 8 Module 7 Module 6 Module 5 Module 4 Port 2 Port 4 Port 1 Port 3 Figure 9-2 XIV WWPN determination In Figure 9-2, the MP value (module/port, which make up the last two digits of the WWPN) is shown in each small box. The diagram represents the patch panel found at the rear of the XIV rack. To display the XIV WWPNs use the back view on the XIV GUI or the XCLI fc_port_list command. In the output example shown in Example 9-3 the four ports in module 4 are listed. Example 9-3 Listing XIV Fibre Channel host ports fc_port_list Component ID 1:FC_Port:4:4 1:FC_Port:4:3 1:FC_Port:4:2 1:FC_Port:4:1 Status OK OK OK OK Currently Functioning yes yes yes yes WWPN 5001738000350143 5001738000350142 5001738000350141 5001738000350140 Chapter 9. SVC migration with XIV 277 7759ch_SVC_Migration.fm Draft Document for Review January 23, 2011 12:42 pm 9.3.3 Hardware dependencies There are two Fibre Channel HBAs in each XIV interface module. From a physical perspective: Ports 1 and 2 are on the left-hand HBA (viewed from the rear). Ports 3 and 4 are on the right-hand HBA (viewed from the rear). From a configuration perspective: Ports 1, 2, and 3 are in SCSI target mode by default. Port 4 is set to SCSI initiator mode by default (for XIV replication and data migration). For availability and performance use ports 1 and 3 for SVC and general host traffic. If you have two fabrics, place port 1 in the first fabric and port 3 in the second fabric. 9.3.4 Sharing an XIV with another SVC cluster or non-SVC hosts It is possible to share XIV host ports between an SVC cluster and non-SVC hosts, or between two different SVC clusters. Simply zone the XIV host ports 1 and 3 on each XIV module to both SVC and non-SVC hosts as required. You can instead choose to use ports 2 and 4, although in principle these are reserved for data migration and remote mirroring. For that reason port 4 on each module is by default in initiator mode. If you want to change the mode of port 4 to target mode, you can do so easily from the XIV GUI or XCLI. However, you may also need an RPQ from IBM. Contact your IBM XIV representative to discuss this. 9.3.5 Zoning rules The XIV-to-SVC zone should simply contain all the XIV ports in that fabric and all the SVC ports in that fabric. In other words one big zone. This recommendation is relatively unique to SVC. If you zone individual hosts directly to the XIV (instead of via SVC), then you should always use single-initiator zones where each switch zone contains just one host (initiator) HBA WWPN and up to six XIV host port WWPNs. For SVC, ensure that the following rules are followed: With current SVC firmware levels, no more than 16 WWPNs from a single WWNN should be zoned to an SVC cluster. Because the XIV has only one WWNN, this means that no more than 16 XIV host ports should be zoned to a specific SVC cluster. If you use the recommendations in Table 9-1 on page 276 this restriction should not be an issue. All nodes in an SVC cluster must be able to see the same set of XIV host ports. Operation in a mode where two nodes see a different set of host ports on the same XIV will result in the controller showing on the SVC as degraded and the system error log will request a repair action. If the one big zone per fabric rule is followed, then this requirement is met. 9.4 Volume size considerations for XIV with SVC There are several considerations when migrating data onto XIV using SVC. Volume sizes is clearly an important one. 278 IBM XIV Storage System: Copy Services and Migration Draft Document for Review January 23, 2011 12:42 pm 7759ch_SVC_Migration.fm 9.4.1 SCSI queue depth considerations The SVC uses one XIV host port as a preferred port for each MDisk (assigning them in a round-robin fashion). A best practice is to therefore configure sufficient volumes on the XIV to ensure that: Each XIV host port will receive closely matching I/O levels. The SVC will utilize the deep queue depth of each XIV host port. Ideally, the number of MDisks presented by the XIV to the SVC should be a multiple of the number of XIV host ports, from one to four. However, there is good math to support this. The XIV can handle a queue depth of 1400 per Fibre Channel host port and a queue depth of 256 per mapped volume per host port:target port:volume tuple. However, the SVC sets the following internal limits: The maximum queue depth per MDisk is 60. The maximum queue depth per target host port on an XIV is 1000. Based on this knowledge, we can determine an ideal number of XIV volumes to map to the SVC for use as MDisks by using this algorithm: Q = ((P x C) / N) / M This breaks out as follows: Q The calculated queue depth for each MDisk P The number of XIV host ports (unique WWPNs) visible to the SVC cluster (should be 4, 8, 10, or 12 depending on the number of modules in the XIV) N The number of nodes in the SVC cluster (2, 4, 6, or 8) M The number of volumes from the XIV to the SVC cluster (detected as MDisks) C 1000 (which is the maximum SCSI queue depth that an SVC will use for each XIV host port) If a 2-node SVC cluster is being used with 12 ports on IBM XIV System and 48 MDisks, this yields a queue depth that as follows: Q = ((12 ports*1000)/2 nodes)/48 MDisks = 125 Because 125 is greater than 60, the SVC uses a queue depth of 60 per MDisk. If a 4-node SVC cluster is being used with 12 host ports on the IBM XIV System and 48 MDisks, this yields a queue depth that as follows: Q = ((12 ports*1000)/4 nodes)/48 MDisks = 62 Because 62 is greater than 60, the SVC uses a queue depth of 60 per MDisk. Chapter 9. SVC migration with XIV 279 7759ch_SVC_Migration.fm Draft Document for Review January 23, 2011 12:42 pm This leads to the following recommended volume sizes and quantities for 2-node and 4-node SVC clusters. Table 9-3 XIV volume size and quantity recommendation Modules Total usable capacity (TB) XIV host ports Volume size (GB) Volume quantity Ratio of volumes to XIV host ports Approximate left over space (TB) 6 27.26 4 1632 16 4 1.14 9 43.09 8 1632 26 3.3 0.65 10 50.29 8 1632 30 3.7 1.32 11 54.65 10 1632 33 3.3 0.79 12 61.74 10 1632 37 3.7 1.35 13 66.16 12 1632 40 3.3 0.87 14 73.24 12 1632 44 3.7 1.42 15 79.11 12 1632 48 4.0 0.76 If you have a 6-node or 8-node cluster, the formula suggests that you must use much larger XIV volumes. However, currently available SVC firmware does not support an MDisk larger than 2 TB, so it is simpler to continue to use the 1632 GB volume size. When using 1632 GB volumes, there is leftover space. That space could be used for testing or for non-SVC direct-attach hosts. If you map the remaining space to the SVC as an odd sized volume then VDisk striping is not balanced, meaning that I/O is not be evenly striped across all XIV host ports. Tip: If you only provision part of the usable space of the XIV to be allocated to the SVC, then the calculations above no longer work. You should instead size your MDisks to ensure that at least two (and up to four) MDisks are created for each host port on the XIV. 9.4.2 XIV volume sizes All volume sizes shown on the XIV GUI use decimal counting (109), meaning that 1 GB = 1,000,000,000 bytes. However, a GB using binary counting (using 230 bytes, more accurately referred to as a GiB) counts 1 GiB as 1,073,741,824 bytes (ideally called a GiB to differentiate it from a GB where size is calculated using decimal counting). By default the SVC uses MiB and GiB (binary counting method) when displaying MDisk and VDisk sizes. However, the SVC still uses the term MB in the SVC GUI and MB or GB in the SVC CLI output when displaying volume and disk sizes (the SVC CLI displays capacity in whatever unit it decides is the most human readable). By default the XIV uses GB (decimal counting method) in the XIV GUI and CLI output when displaying volume sizes. 280 IBM XIV Storage System: Copy Services and Migration Draft Document for Review January 23, 2011 12:42 pm 7759ch_SVC_Migration.fm It also must be clearly understood that a volume created on an XIV is created in 17 GB increments, which are not exactly 17 GB. In fact, the size of an XIV 17 GB volume can be described in four ways: GB 17 GB (decimal), as shown in the XIV GUI, but actually rounded down to the nearest GB (see the number of bytes below). GiB 16 GiB (binary counting where 1 GiB = 230 bytes). This is exactly 16 GiB. Bytes 17,179,869,184 bytes. Blocks 33,554,432 blocks (each block being 512 bytes). Thus, XIV is using binary sizing when creating volumes, but displaying it in decimal and then rounding it down. The recommended volume size for XIV volumes presented to the SVC is 1632 GB (as viewed on the XIV GUI). There is nothing special about this volume size, it simply divides nicely to create on average four XIV volumes per XIV host port (for queue depth purposes). The size of a 1632 GB volume (as viewed on the XIV GUI) can be stated in four ways: GB 1632 GB (decimal), as shown in the XIV GUI, but rounded down to the nearest GB (see the number of bytes below). GiB 1520 GiB (binary counting where 1 GiB = 230 bytes). This is exactly 1520 GiB. Bytes 1,632,087,572,480 bytes. Blocks 3,187,671,040 blocks (each block being 512 bytes). Note that the SVC reports each MDisk presented by XIV as 1520 GiB. Figure 9-3 shows what the XIV reports. Figure 9-3 An XIV volume sized for use with SVC If you right-click the volume in the XIV GUI and display properties, you will be able to see that this volume is 3,187,671,040 blocks. If you multiply 3,187,671,040 by 512 (because there are 512 bytes in a SCSI block) you will get 1,632,087,572,480 bytes. If you divide that by 1,073,741,824 (the number of bytes in a binary GiB), then you will get 1520 GiB, which is exactly what the SVC reports for the same volume (MDisk), as shown in Example 9-4. Example 9-4 An XIV volume mapped to the SVC IBM_2145:SVCSTGDEMO:admin>svcinfo lsmdisk -bytes id name status mode capacity ctrl_LUN_# 9 mdisk9 online unmanaged 1632087572480 0000000000000007 controller_name XIV IBM_2145:SVCSTGDEMO:admin>svcinfo lsmdisk id name status mode capacity 9 mdisk9 online unmanaged 1520.0GB controller_name XIV ctrl_LUN_# 0000000000000007 Chapter 9. SVC migration with XIV 281 7759ch_SVC_Migration.fm Draft Document for Review January 23, 2011 12:42 pm 9.4.3 Creating XIV volumes that are exactly the same size as SVC VDisks To create an XIV volume that is exactly the same size as an existing SVC VDisk you can use the process documented in 9.10.1, “Create image mode destination volumes on the XIV” on page 297. This is only for a transition to or from image mode. 9.4.4 SVC 2TB volume limit The XIV can create volumes of any size up to the entire capacity of the XIV. However, in the current release of SVC firmware (including release 5.1), the largest MDisk that an SVC can detect is 2 TiB in size (which is 2048 GiB). To create this volume on the XIV, create a volume sized 2199 GB (because 2199 GB = 2048 GiB). However, the recommended volume size for SVC is 1632 GB (1520 GiB). In Figure 9-4 there are three volumes that will be mapped to the SVC. The first volume is 2199 GB (2 TiB), but the other two are larger than that. Figure 9-4 XIV volumes larger than 2 TiB When presented to the SVC, the SVC reports all three as being 2 TiB (2048 GiB), as shown in Example 9-5. Example 9-5 2 TiB volume size limit on SVC IBM_2145:SVCSTGDEMO:admin>svcinfo lsmdisk id name status 9 mdisk9 online 10 mdisk10 online 11 mdisk11 online mode unmanaged unmanaged unmanaged capacity 2048.0GB 2048.0GB 2048.0GB Because there was no benefit in using larger volume sizes do not follow this example. Always ensure that volumes presented by the XIV to the SVC are 2199 GB or smaller (when viewed on the XIV GUI or XCLI). 9.4.5 MDisk group creation All volumes presented by the XIV to the SVC are represented on the SVC as MDisks and should be placed into one managed disk group. All VDisks created in this managed disk group should be created as striped and striped across all MDisks in the group. This ensures that we stripe SVC host I/O evenly across all the XIV host ports. 9.4.6 SVC MDisk group extent sizes SVC MDisk groups have a fixed extent size. This extent size affects the maximum size of an SVC cluster. When migrating SVC data from other disk technology to XIV, change the extent size at the same time. This not only allows for larger sized SVC clusters, but also ensures that 282 IBM XIV Storage System: Copy Services and Migration 7759ch_SVC_Migration.fm Draft Document for Review January 23, 2011 12:42 pm the data from each extent best utilizes the striping mechanism in the XIV. Because the XIV divides each volume into 1 MB partitions, the MDisk group extent size in MB should exceed the maximum number of disks that are likely to exist in a single XIV footprint. For many customers this means that an extent size of 256 MB is acceptable (because 256 MB covers 256 disks where a single XIV rack has only 180 disks). However, strongly consider using an extent size of 1024 MB because this covers the possibility of a 5-rack XIV with 900 disks. In terms of the available SVC extent sizes and the effect on maximum SVC cluster size, see Table 9-4. Table 9-4 SVC extent size and cluster size MDisk group extent size Maximum SVC cluster size 16 MB 64 TB 32 MB 128 TB 64 MB 256 TB 128 MB 512 TB 256 MB 1024 TB 512 MB 2048 TB 1024 MB 4096 TB 2048 MB 8192 TB 9.5 Using an XIV for SVC quorum disks The SVC cluster uses three MDisks as quorum disks. It uses a small area on each of these MDisks to store important SVC cluster management information. If you are replacing non-XIV disk storage with XIV, ensure that you relocate the quorum disks before removing the MDisks. Review the tip at the following Web site: http://www.ibm.com/support/docview.wss?uid=ssg1S1003311 To determine whether removing a managed disk controller requires quorum disk relocation, run a script to find the MDisks that are being used as quorum disks, as shown in Example 9-6. This script can be run safely without modification. Example 9-6 shows two MDisks on the DS6800 and one MDisk on the DS4700. Example 9-6 Identifying the quorum disks IBM_2145:SVCSTGDEMO:admin>svcinfo lsmdisk -nohdr | while read id name status mode mdisk_grp_id mdisk_grp_name capacity ctrl_LUN controller_name mdisk_UID; do svcinfo lsmdisk $id | while read key value; do if [ "$key" == "quorum_index" ]; then if [ "$value" != "" ]; then echo "Quorum index $value : mdisk $id ($name), status=$status, controller=$controller_name"; fi; fi; done; done Quorum index 0 : mdisk 0 (mdisk0), status=online, controller=DS6800_1 Quorum index 1 : mdisk 1 (mdisk1), status=online, controller=DS6800_1 Quorum index 2 : mdisk 2 (mdisk2), status=online, controller=DS4700 Chapter 9. SVC migration with XIV 283 7759ch_SVC_Migration.fm Draft Document for Review January 23, 2011 12:42 pm If your SVC uses firmware Version 5.1 or later, we simply use the svcinfo lsquorum command, as shown in Example 9-7. Example 9-7 Using the svcinfo lsquorum command on SVC code level 5.1 and later IBM_2145:mycluster:admin>svcinfo lsquorum quorum_index status id name controller_id 0 online 0 mdisk0 0 1 online 1 mdisk1 1 2 online 2 mdisk2 2 controller_name DS6800_1 DS6800_1 DS4700 active yes no no To move the quorum disk function, we specify three MDisks that will become quorum disks. Depending on your MDisk group extent size, each selected MDisk must have between 272 MB and 1024 MB of free space. Execute the svctask setquorum commands before you start migration. If all available MDisk space has been allocated to VDisks then you will not be able to use that MDisk as a quorum disk. Table 9-5 shows the amount of space needed on each MDisk. Table 9-5 Quorum disk space requirements for each of the three quorum MDisks Extent size (in MB) Number of extents needed by quorum Amount of space per MDisk needed by quorum 16 17 272 MB 32 9 288 MB 64 5 320 MB 128 3 384 MB 256 2 512 MB 1024 1 1024 MB 2048 1 2048 MB In Example 9-8 there are three free MDisks. They are 1520 GiB in size (1632 GB). Example 9-8 New XIV MDisks detected by SVC IBM_2145:SVCSTGDEMO:admin>svcinfo lsmdisk -filtervalue mode=unmanaged id name status mode capacity 9 mdisk9 online unmanaged 1520.0 GB 10 mdisk10 online unmanaged 1520.0 GB 11 mdisk11 online unmanaged 1520.0 GB In Example 9-9 the MDisk group is created using an extent size of 1024 MB. Example 9-9 Creating an MDIsk group IBM_2145:SVCSTGDEMO:admin>svctask mkmdiskgrp -name XIV -mdisk 9:10:11 -ext 1024 MDisk Group, id [4], successfully created 284 IBM XIV Storage System: Copy Services and Migration 7759ch_SVC_Migration.fm Draft Document for Review January 23, 2011 12:42 pm In Example 9-10 the MDisk group has 4,896,262,717,440 free bytes (1520 GiB x 3). Example 9-10 Listing the free capacity of the MDisk group IBM_2145:SVCSTGDEMO:admin>svcinfo lsmdiskgrp -bytes 4 free_capacity 4896262717440 All three MDisks are set to be quorum disks, as shown in Example 9-11. Example 9-11 Setting XIV MDisks as quorum disks IBM_2145:SVCSTGDEMO:admin>svctask setquorum -quorum 0 mdisk9 IBM_2145:SVCSTGDEMO:admin>svctask setquorum -quorum 1 mdisk10 IBM_2145:SVCSTGDEMO:admin>svctask setquorum -quorum 2 mdisk11 The MDisk group has now lost free space, as shown in Example 9-12. Example 9-12 Listing free space in the MDisk group IBM_2145:SVCSTGDEMO:admin>svcinfo lsmdiskgrp -bytes 4 free_capacity 4893041491968 This means that free capacity fell by 3,221,225,472 bytes, which is 3 GiB or 1 GiB per quorum MDisk. Note: In this example all three quorum disks were placed on a single XIV. This may not be an ideal configuration. The Web tip referred to at the start of this section has more details about best practice, but in short you should try and use more than one managed disk controller if possible. 9.6 Configuring an XIV for attachment to SVC First we must configure the XIV. 9.6.1 XIV setup steps The XIV GUI is remarkably easy to use, so we do not reproduce a series of XIV GUI images. This section provides the setup steps using the XIV XCLI. They are reproduced mainly to show the flow of commands rather than to indicate a preference for XCLI over the XIV GUI. 1. Define the SVC cluster to the XIV as in Example 9-13. An SVC cluster consists of several nodes, with each SVC node being defined as a separate host. Example 9-13 Define the SVC Cluster to the XIV cluster_create cluster="SVC_Cluster1" Chapter 9. SVC migration with XIV 285 7759ch_SVC_Migration.fm Draft Document for Review January 23, 2011 12:42 pm 2. Define the SVC nodes to the XIV (as members of the cluster), as shown in Example 9-14. By defining each node as a separate host, we can get more information about individual SVC nodes from the XIV performance statistics display. Example 9-14 Define the SVC nodes to the XIV host_define host="SVC_Node1" cluster="SVC_Cluster1" host_define host="SVC_Node2" cluster="SVC_Cluster1" 3. Add the SVC host ports to the host definition of the first SVC node, as shown in Example 9-15. Example 9-15 Define the WWPNs of the first SVC node host_add_port host_add_port host_add_port host_add_port host="SVC_Node1" host="SVC_Node1" host="SVC_Node1" host="SVC_Node1" fcaddress="5005076801101234" fcaddress="5005076801201234" fcaddress="5005076801301234" fcaddress="5005076801401234" 4. Add the SVC host ports to the host definition of the second SVC node, as shown in Example 9-16. Example 9-16 Define the WWPNs of the second SVC node host_add_port host_add_port host_add_port host_add_port host="SVC_Node2" host="SVC_Node2" host="SVC_Node2" host="SVC_Node2" fcaddress="5005076801105678" fcaddress="5005076801205678" fcaddress="5005076801305678" fcaddress="5005076801405678" 5. Repeat steps 3 and 4 for each SVC I/O group. If you only have two nodes then you only have one I/O group. 6. Create a storage pool. In Example 9-17 the command shown creates a pool with 8160 GB of space and no snapshot space. The total size of the pool is determined by the volume size that you choose to use. We do not need snapshot space because we cannot use XIV snapshots with SVC MDisks. Example 9-17 Create a pool on the XIV pool_create pool="SVCDemo" size=8160 snapshot_size=0 Important: You must not use XIV thin provisioning pools with SVC. You must only use regular pools. The command shown in Example 9-17 creates a regular pool (where the soft size is the same as the hard size. This does not stop you from using thin provisioned VDisks on the SVC. 7. Create the volumes in the pool, as shown in Example 9-18. Example 9-18 Create XIV volumes for use by the SVC vol_create vol_create vol_create vol_create vol_create 286 size=1632 size=1632 size=1632 size=1632 size=1632 pool="SVCDemo" pool="SVCDemo" pool="SVCDemo" pool="SVCDemo" pool="SVCDemo" IBM XIV Storage System: Copy Services and Migration vol="SVCDemo_1" vol="SVCDemo_2" vol="SVCDemo_3" vol="SVCDemo_4" vol="SVCDemo_5" 7759ch_SVC_Migration.fm Draft Document for Review January 23, 2011 12:42 pm 8. Map the volumes to the SVC cluster using available LUN IDs (starting at zero), as shown in Example 9-19. Example 9-19 Map XIV volumes to the SVC cluster map_vol map_vol map_vol map_vol map_vol cluster="SVC_Cluster1" cluster="SVC_Cluster1" cluster="SVC_Cluster1" cluster="SVC_Cluster1" cluster="SVC_Cluster1" vol="SVCDemo_1" vol="SVCDemo_2" vol="SVCDemo_3" vol="SVCDemo_4" vol="SVCDemo_5" lun="0" lun="1" lun="2" lun="3" lun="4" Important: Only map volumes to the SVC cluster (not to individual nodes in the cluster). This ensures that each SVC node sees the same LUNs with the same LUN IDs. You must not allow a situation where two nodes in the same SVC cluster have different LUN mappings. Tip: The XIV GUI normally reserves LUN ID 0 for in-band management. The SVC cannot take advantage of this, but is not affected either way. In Example 9-19 we started the mapping with LUN ID 0, but if you used the GUI you will find that by default you start with LUN ID 1. 9. If necessary, change the system name for XIV so that it matches the controller name used on the SVC. In Example 9-20 we use the config_get command to determine the machine type and serial number. Then we use the config_set command to set the system_name. Whereas the XIV allows a long name with spaces, SVC can only use 15 characters with no spaces. Example 9-20 Setting the XIV system name >> config_get machine_serial_number=6000081 machine_type=2810 system_name=XIV 6000081 timezone=-39600 ups_control=yes >> config_set name=system_name value="XIV_28106000081" The XIV configuration tasks are now complete. 9.6.2 SVC setup steps Assuming that the SVC is zoned to the XIV, we now switch to the SVC and run the following SVC CLI commands: 1. Detect the XIV volumes: svctask detectmdisk Chapter 9. SVC migration with XIV 287 7759ch_SVC_Migration.fm Draft Document for Review January 23, 2011 12:42 pm 2. List the newly detected MDisks, as shown in Example 9-21, where there are five free MDisks. They are 1520 GiB in size (1632 GB). Example 9-21 New XIV MDisks detected by SVC IBM_2145:SVCSTGDEMO:admin>svcinfo lsmdisk id name status mode capacity 9 mdisk9 online unmanaged 1520.0GB 10 mdisk10 online unmanaged 1520.0GB 11 mdisk11 online unmanaged 1520.0GB 12 mdisk12 online unmanaged 1520.0GB 13 mdisk13 online unmanaged 1520.0GB -filtervalue mode=unmanaged ctrl_LUN_# controller_name 0000000000000000 controller2 0000000000000001 controller2 0000000000000002 controller2 0000000000000003 controller2 0000000000000004 controller2 3. Create an MDisk group, as shown in Example 9-22, where an MDisk group is created using an extent size of 1024 MB. Example 9-22 Create the MDisk group IBM_2145:SVCSTGDEMO:admin>svctask mkmdiskgrp -name XIV -mdisk 9:10:11:12:13 -ext 1024 MDisk Group, id [4], successfully created Important: Adding a new managed disk group to the SVC may result in the SVC reporting that you have exceeded the virtualization license limit. Whereas this does not affect operation of the SVC, you continue to receive this error message until the situation is corrected (by either removing the MDisk Group or increasing the virtualization license). If the non-XIV disk is not being replaced by the XIV then ensure that an additional license has been purchased. Then increase the virtualization limit using the svctask chlicense -virtualization xx command (where xx specifies the new limit in TB). 4. Relocate quorum disks if required as documented in “Using an XIV for SVC quorum disks” on page 283. 5. Rename the controller from its default name. A managed disk controller is given a name by the SVC such as controller0 or controller1 (depending on how many controllers have already been detected). Because the XIV can have a system name defined for it, aim to closely match the two names. Note, however, that the controller name used by SVC cannot have spaces and cannot be more than 15 characters long. In Example 9-23 controller number 2 is renamed to match the system name used by the XIV itself (which was set in Example 9-20 on page 287). Example 9-23 Rename the XIV controller definition at the SVC IBM_2145:SVCSTGDEMO:admin>svcinfo lscontroller id controller_name ctrl_s/n vendor_id product_id_low 0 controller0 13008300000 IBM 1750500 1 controller1 NETAPP LUN 2 controller2 IBM 2810XIV- product_id_high LUN-0 IBM_2145:SVCSTGDEMO:admin>svctask chcontroller -name "XIV_28106000081" 2 288 IBM XIV Storage System: Copy Services and Migration Draft Document for Review January 23, 2011 12:42 pm 7759ch_SVC_Migration.fm 6. Rename all the SVC MDisks from their default names (such as mdisk9 and mdisk10) to match the volume names used on the XIV. An example of this is shown in Example 9-24 (limited to just two MDisks). You can match the ctrl_LUN_# value to the LUN ID assigned when mapping the volume to the SVC (for reference also see Example 9-18 on page 286). Be aware that the ctrl_LUN field displays LUN IDs using hexadecimal numbering, whereas the XIV displays them using decimal numbering. This means that XIV LUN ID 10 displays as ctrl_LUN ID A. Example 9-24 Rename the MDisks IBM_2145:SVCSTGDEMO:admin>svcinfo lsmdisk -filtervalue mdisk_grp_id=4 id name status mode mdisk_grp_id capacity ctrl_LUN_# 9 mdisk9 online managed 4 1520.0GB 0000000000000000 10 mdisk10 online managed 4 1520.0GB 0000000000000001 controller_name XIV_28106000081 XIV_28106000081 IBM_2145:SVCSTGDEMO:admin>svctask chmdisk -name SVCDemo_1 mdisk9 IBM_2145:SVCSTGDEMO:admin>svctask chmdisk -name SVCDemo_2 mdisk10 IBM_2145:SVCSTGDEMO:admin>svcinfo lsmdisk -filtervalue mdisk_grp_id=4 id name status mode mdisk_grp_id capacity ctrl_LUN_# 9 SVCDemo_1 online managed 4 1520.0GB 0000000000000000 10 SVCDemo_2 online managed 4 1520.0GB 0000000000000001 controller_name XIV_28106000081 XIV_28106000081 Now we must follow one of the migration strategies, as described in the 9.7, “Data movement strategy overview” on page 289. 9.7 Data movement strategy overview There are three possible data movement strategies that we detail in this section and in subsequent sections. 9.7.1 Using SVC migration to move data You can use standard SVC migration to move data from MDisks presented by a non-XIV disk controller to MDisks resident on the XIV. This process does not require a host outage, but does not allow the MDisk group extent size to be changed. At a high level, the process is as follows: 1. We start with existing VDisks in an existing MDisk Group. We must confirm the extent size of that MDisk group. We call this the source MDisk group. 2. We create 1632 GB sized volumes on the XIV and map these to the SVC. 3. We detect these new MDisks and use them to create an MDisk group. We call this the target Mdisk group. The target MDisk group must use the same extent size as the source MDisk group. 4. We migrate each VDisk from the source MDisk group to the target MDisk group. 5. When all the VDisks are migrated we can choose to delete the source MDisks and the source MDisk group (in preparation for removing the non-XIV storage). We discuss this method in greater depth in 9.8, “Using SVC migration to move data to XIV” on page 291. Chapter 9. SVC migration with XIV 289 7759ch_SVC_Migration.fm Draft Document for Review January 23, 2011 12:42 pm 9.7.2 Using VDisk mirroring to move the data We can use the VDisk copy (mirror) function introduced in SVC firmware Version 4.3 to create two copies of the data, one in the source MDisk group and one in the target MDisk group. We then remove the VDisk copy in the source MDisk group and retain the VDisk copy present in the target MDisk group. This process does not require a host outage and allows us to move to a larger MDisk group extent size. However, it also uses additional SVC cluster memory and CPU while the multiple copies are managed by the SVC. At a high level the process is as follows: 1. We start with existing VDisks in an existing MDisk Group. The extent size of that MDisk group is not relevant. We call this MDisk group the source MDisk group. 2. We create 1632 GB sized volumes on the XIV and map these to the SVC. 3. We detect these XIV MDisks and create an MDisk group using an extent size of 1024 MB. We call this MDisk group the target Mdisk group. 4. For each VDisk in the source MDisk group, we create a VDisk copy in the target MDisk group. 5. When the two copies are in sync we remove the VDisk copy that exists in the source MDisk group (which is normally copy 0 since it existed first, as opposed to copy 1, which we created for migration purposes). 6. When all the VDisks have been successfully copied from the source MDisk group to the target MDisk group, we can choose to delete the source MDisks and the source MDisk group (in preparation for removing the non-XIV storage) or split the VDisk copies and retain copy 0 for as long as necessary. We discuss this method in greater depth in 9.9, “Using VDisk mirroring to move the data” on page 293. 9.7.3 Using SVC migration with image mode This migration method is used when: The extent size must be changed but VDisk mirroring cannot be used, perhaps because the SVC nodes are already constrained for CPU and memory. Because the SVC must be on 4.3 code to support XIV (SVC code level 4.3 being the level that brought in VDisk mirroring), having downlevel SVC firmware is not a valid reason. We want to move the VDisks from one SVC cluster to a different one. We want to move the data away from the SVC without using XIV migration. In these cases we can migrate the VDisks to image mode and take an outage to do the relocation and extent re-size. There will be a host outage, although it can kept very short (potentially in the order of seconds or minutes). At a high level the process is as follows: 1. We start with existing VDisks in an existing MDisk group. Possibly the extent size of this MDisk group is small (say 16 MB). We call this the source MDisk group. 2. We create XIV volumes that are the same size (or larger) than the existing VDisks. This may need extra steps, as the XIV volumes must be created using 512 byte blocks. We map these specially sized volumes to the SVC. 290 IBM XIV Storage System: Copy Services and Migration 7759ch_SVC_Migration.fm Draft Document for Review January 23, 2011 12:42 pm 3. We migrate each VDisk to image mode using these new volumes (presented as unmanaged MDisks). The new volumes move into the source MDisk group as image mode MDisks and the VDisks become image mode VDisks. 4. We can now remove all the Image Mode MDisks from the source MDisk group. This is the disruptive part of this process. They are now unmanaged MDisks, but the data on these volumes is intact. We could at this point map these volumes to a different SVC cluster or we could remove them from the SVC altogether (in which case the process is complete). 5. We create a new managed disk group that contains only the image mode VDisks, but using the recommended extent size (1024 MB) and present the VDisks back to the hosts. We call this the transition MDisk group. The host downtime is now over. 6. We create another new managed disk group using free space on the XIV, using the same large extent size (1024 MB). We call this the target MDisk group. 7. We migrate the image mode VDisks to managed mode VDisks, moving the data from the transition MDisk group created in step 5 to the target MDisk Group created in step 6. The MDisks themselves are already on the XIV. 8. When the process is complete, we can delete the source MDisks and the source MDisk group (which represent space on the non-XIV storage controller) and the transitional XIV volumes (which represent space on the XIV). 9. We can then use the transitional volume space on the XIV to create more 1632 GB volumes to present to the SVC. These can be added into the existing MDisk group or used to create a new one. This method is detailed in greater depth in 9.10, “Using SVC migration with image mode” on page 297. 9.8 Using SVC migration to move data to XIV This process migrates data from a source MDisk Group to a target Mdisk group using the same Mdisk group extent size. These is no interruption to host I/O. 9.8.1 Determine the required extent size and VDisk candidates We must determine the extent size of the source MDisk group. In Example 9-25 MDisk Group ID 1 is the source group and has an extent size of 256. Example 9-25 Listing MDisk groups IBM_2145:SVCSTGDEMO:admin>svcinfo lsmdiskgrp id name status mdisk_count vdisk_count capacity extent_size free_capacity 0 MDG_DS6800 online 2 0 399.5GB 16 399.5GB 1 Source_GRP online 1 1 50.0GB 256 45.0GB We then must identify the VDisks that we are migrating. We can filter by MDisk Group ID, as shown in Example 9-26, where there is only one VDisk that must be migrated. Example 9-26 Listing VDisks filtered by MDisk group IBM_2145:SVCSTGDEMO:admin>svcinfo lsvdisk -filtervalue mdisk_grp_id=1 id name status mdisk_grp_id mdisk_grp_name capacity type 5 migrateme online 1 Source_GRP 5.00GB striped Chapter 9. SVC migration with XIV 291 7759ch_SVC_Migration.fm Draft Document for Review January 23, 2011 12:42 pm 9.8.2 Create the MDisk group We must create volumes on the XIV and map them to the SVC cluster. Presuming that we have done this, we then detect them on the SVC, as shown in Example 9-27. Example 9-27 Detecting new MDisks IBM_2145:SVCSTGDEMO:admin>svctask detectmdisk IBM_2145:SVCSTGDEMO:admin>svcinfo lsmdiskcandidate id 9 10 11 12 13 IBM_2145:SVCSTGDEMO:admin>svcinfo lsmdisk -filtervalue mode=unmanaged id name status mode capacity ctrl_LUN_# controller_name 9 mdisk9 online unmanaged 1520.0GB 0000000000000007 XIV 10 mdisk10 online unmanaged 1520.0GB 0000000000000008 XIV 11 mdisk11 online unmanaged 1520.0GB 0000000000000009 XIV 12 mdisk12 online unmanaged 1520.0GB 000000000000000A XIV 13 mdisk13 online unmanaged 1520.0GB 000000000000000B XIV We then create an Mdisk group called XIV_Target using the new XIV MDisks, with the same extent size as the source group. In Example 9-28 it is 256. Example 9-28 Creating an MDisk group IBM_2145:SVCSTGDEMO:admin>svctask mkmdiskgrp -name XIV_Target -mdisk 9:10:11:12:13 -ext 256 MDisk Group, id [2], successfully created We confirm the new MDisk group is present. In Example 9-29 we are filtering by using the new ID of 2. Example 9-29 Checking the newly created MDisk group IBM_2145:SVCSTGDEMO:admin>svcinfo lsmdiskgrp -filtervalue id=2 id name status mdisk_count vdisk_count capacity extent_size 2 XIV_Target online 5 1 7600.0GB 256 free_capacity 7600.0GB 9.8.3 Migration Now we are ready to migrate the VDisks. In Example 9-30 we migrate VDisk 5 into MDisk group 2 and then confirm that the migration is running. Example 9-30 Migrating a VDisk IBM_2145:SVCSTGDEMO:admin>svctask migratevdisk -mdiskgrp 2 -vdisk 5 IBM_2145:SVCSTGDEMO:admin>svcinfo lsmigrate migrate_type MDisk_Group_Migration progress 0 migrate_source_vdisk_index 5 migrate_target_mdisk_grp 2 max_thread_count 4 migrate_source_vdisk_copy_id 0 292 IBM XIV Storage System: Copy Services and Migration 7759ch_SVC_Migration.fm Draft Document for Review January 23, 2011 12:42 pm When the lsmigrate command returns no output, the migration is complete. Once all Vdisks have been migrated out of the Mdisk group, we can remove the source MDisks and then remove the source Mdisk group, as shown in Example 9-31. Example 9-31 Removing non-XIV MDisks and MDisk group IBM_2145:SVCSTGDEMO:admin>svcinfo lsmdisk -filtervalue mdisk_grp_id=1 id name status mode capacity ctrl_LUN_# controller_name 8 mdisk8 online managed 50.0GB 00000000000000070 DS6800_1 IBM_2145:SVCSTGDEMO:admin>svctask rmmdisk -mdisk 8 1 IBM_2145:SVCSTGDEMO:admin>svctask rmmdiskgrp 1 Important: Scripts that use VDisk names or IDs will not be affected by the use of VDisk migration, as the VDisk names and IDs do not change. 9.9 Using VDisk mirroring to move the data This process mirrors data from a source MDisk group to a target Mdisk group using a different extent size and with no interruption to the host. 9.9.1 Determine the required extent size and VDisk candidates We must determine the source MDisk group. In Example 9-32 MDisk group ID 1 is the source. Example 9-32 Listing the MDisk groups IBM_2145:SVCSTGDEMO:admin>svcinfo lsmdiskgrp id name status mdisk_count vdisk_count capacity 0 MDG_DS68 online 2 0 399.5GB 1 Source online 1 1 50.0GB extent_size 16 256 free_capacity 399.5GB 45.0GB We then must identify the VDisks that we are migrating. In Example 9-33 we filter by ID. Example 9-33 Filter VDisks by MDisk group IBM_2145:SVCSTGDEMO:admin>svcinfo lsvdisk -filtervalue mdisk_grp_id=1 id name status mdisk_grp_id mdisk_grp_name capacity type 5 migrateme online 1 Source_GRP 5.00GB striped Chapter 9. SVC migration with XIV 293 7759ch_SVC_Migration.fm Draft Document for Review January 23, 2011 12:42 pm 9.9.2 Create the MDisk group We must create volumes on the XIV and map them to the SVC cluster. Presuming that we have done this, we then detect them on the SVC, as shown in Example 9-34. Example 9-34 Detecting new MDisks and creating an MDisk group IBM_2145:SVCSTGDEMO:admin>svctask detectmdisk IBM_2145:SVCSTGDEMO:admin>svcinfo lsmdiskcandidate id 9 10 11 12 13 IBM_2145:SVCSTGDEMO:admin>svcinfo lsmdisk -filtervalue mode=unmanaged id name status mode capacity ctrl_LUN_# controller_name 9 mdisk9 online unmanaged 1520.0GB 0000000000000007 XIV 10 mdisk10 online unmanaged 1520.0GB 0000000000000008 XIV 11 mdisk11 online unmanaged 1520.0GB 0000000000000009 XIV 12 mdisk12 online unmanaged 1520.0GB 000000000000000A XIV 13 mdisk13 online unmanaged 1520.0GB 000000000000000B XIV We then create an MDisk group called XIV_Target using the new XIV MDisks (with the same extent size as the source group, in this example 256), as shown in Example 9-35. Example 9-35 Creating an MDisk group IBM_2145:SVCSTGDEMO:admin>svctask mkmdiskgrp -name XIV_Target -mdisk 9:10:11:12:13 -ext 256 MDisk Group, id [2], successfully created We confirm that the new MDisk group is present. In Example 9-36 we are filtering by using the new ID of 2. Example 9-36 Checking the newly created MDisk group IBM_2145:SVCSTGDEMO:admin>svcinfo lsmdiskgrp -filtervalue id=2 id name status mdisk_count vdisk_count capacity extent_size 2 XIV_Target online 5 1 7600.0GB 256 free_capacity 7600.0GB 9.9.3 Set up the IO group for mirroring The IO group requires reserved memory for mirroring. First check to see whether this has been done. In Example 9-37 it has not been setup yet on I/O group 0. Example 9-37 Checking the I/O group for mirroring IBM_2145:SVCSTGDEMO:admin>svcinfo lsiogrp 0 id 0 name io_grp0 node_count 2 vdisk_count 6 host_count 2 flash_copy_total_memory 20.0MB flash_copy_free_memory 20.0MB remote_copy_total_memory 20.0MB 294 IBM XIV Storage System: Copy Services and Migration Draft Document for Review January 23, 2011 12:42 pm 7759ch_SVC_Migration.fm remote_copy_free_memory 20.0MB mirroring_total_memory 0.0MB mirroring_free_memory 0.0MB We must assign space for mirroring. Assigning 20 MB will support 40 TB of mirrors. In Example 9-38 we do this on I/O group 0 and confirm that it is done. Example 9-38 Setting up the I/O group for VDisk mirroring IBM_2145:SVCSTGDEMO:admin>svctask chiogrp -size 20 -feature mirror 0 IBM_2145:SVCSTGDEMO:admin>svcinfo lsiogrp 0 id 0 name io_grp0 node_count 2 vdisk_count 6 host_count 2 flash_copy_total_memory 20.0MB flash_copy_free_memory 20.0MB remote_copy_total_memory 20.0MB remote_copy_free_memory 20.0MB mirroring_total_memory 20.0MB mirroring_free_memory 20.0MB 9.9.4 Create the mirror Now we create the mirror. In Example 9-39 we create a mirror copy of VDisk 5 into MDisk group 2. Remember Mdisk group 2 has a different extent size than Mdisk group 1. Example 9-39 Creating the VDisk mirror IBM_2145:SVCSTGDEMO:admin>svctask addvdiskcopy -mdiskgrp 2 5 Vdisk [5] copy [1] successfully created In Example 9-40 we can see the two copies (and also that they are not yet in sync). Example 9-40 Monitoring mirroring progress IBM_2145:SVCSTGDEMO:admin>svcinfo lsvdiskcopy 5 vdisk_id vdisk_name copy_id status sync primary mdisk_grp_id mdisk_grp_name capacity 5 migrateme 0 online yes yes 1 SOURCE_GRP 5.00GB 5 migrateme 1 online no no 2 XIV_Target 5.00GB In Example 9-41 we display the progress percentage for a specific VDisk. Example 9-41 Checking the VDisk sync IBM_2145:SVCSTGDEMO:admin>svcinfo lsvdisksyncprogress 5 vdisk_id vdisk_name copy_id progress estimated_completion_time 5 migrateme 0 100 5 migrateme 1 30 090831110818 Chapter 9. SVC migration with XIV 295 7759ch_SVC_Migration.fm Draft Document for Review January 23, 2011 12:42 pm In Example 9-42 we display the progress of all out-of-sync mirrors. If a mirror has reached 100% it is not listed unless we specify that particular VDisk. Example 9-42 Displaying all VDisk mirrors IBM_2145:SVCCLUSTER_DC1:admin>svcinfo lsvdisksyncprogress vdisk_id vdisk_name copy_id progress 21 arielle_8 1 42 24 mitchell_17 1 83 32 sharon_1 1 3 estimated_completion_time 091105193656 091105185432 091106083130 If copying is going too slowly, you could choose set a higher syncrate when you create the copy. You can also increase the syncrate from the default value of 50 (which equals 2 MBps) to 100 (which equals 64 MBps). This change affects the VDisk itself and isvalid for any future copies. Example 9-43 shows the syntax. Example 9-43 Changing the VDisk sync rate IBM_2145:SVCSTGDEMO:admin>svctask chvdisk -syncrate 100 5 Once the estimated completion time passes, we can confirm that the copy process is complete for VDisk 5. In Example 9-44 the sync is complete. Example 9-44 VDisk sync completed IBM_2145:SVCSTGDEMO:admin>svcinfo lsvdisksyncprogress 5 vdisk_id vdisk_name copy_id progress estimated_completion_time 5 migrateme 0 100 5 migrateme 1 100 9.9.5 Validating a VDisk copy If you want to confirm that the data between the two VDisk copies is the same, you can run a validate. This compares the two copies. The command itself completes immediately, but the validate runs in the background. In Example 9-45 a validate against VDisk 5 is started and then monitored until it is complete. This validation step is not mandatory and is normally only needed if an event occurred that makes you doubt the validity of the mirror. It is documented here in case you want to add an extra layer of certainty to your change. Example 9-45 Validating a VDisk mirror IBM_2145:SVCSTGDEMO:admin>svctask repairvdiskcopy -validate 5 IBM_2145:SVCSTGDEMO:admin>svcinfo lsrepairvdiskcopyprogress 5 vdisk_id vdisk_name copy_id task 5 migrateme 0 validate 5 migrateme 1 validate IBM_2145:SVCSTGDEMO:admin>svcinfo lsrepairvdiskcopyprogress 5 vdisk_id vdisk_name copy_id task 5 migrateme 0 5 migrateme 1 296 IBM XIV Storage System: Copy Services and Migration progress 57 57 est_completion 091103155927 091103155927 progress est_completion 7759ch_SVC_Migration.fm Draft Document for Review January 23, 2011 12:42 pm 9.9.6 Removing the VDisk copy Now that the sync is complete, we can remove copy 0 from the VDisk so that the VDisk continues to use only copy 1 (which should be on the XIV). We have two methods of achieving this. We can either split the copies or we can just remove one copy. Removing a VDisk copy In Example 9-46, we remove copy 0 from VDisk 5. This effectively discards the VDisk copy on the source MDisk group. This is simple and quick but has one disadvantage, which is that you must mirror the data back if you decide to back out the change. Example 9-46 Removing VDisk copy IBM_2145:SVCSTGDEMO:admin>svctask rmvdiskcopy -copy 0 5 Splitting the VDisk copies In Example 9-47 we split the VDisk copies, moving copy 0 (which is on the source MDisk group) to become a new unmapped VDisk. This means that copy 1 (which is on the target XIV MDisk group) continues to be accessed by the host as VDisk 5. The advantage of doing this is that the original VDisk copy remains available if we decide to back out (although it may no longer be in sync once we split the copies). An additional step is needed to discreetly delete the new VDisk that was created when we performed the split. Example 9-47 Splitting the VDisk copies IBM_2145:SVCSTGDEMO:admin>svctask splitvdiskcopy -copy 0 -name mgrate_old 5 Virtual Disk, id [6], successfully created Important: Scripts that use VDisk names or IDs should not be affected by the use of VDisk mirroring, as the VDisk names and IDs do not change. However, if you choose to split the VDisk copies and continue to use copy 0, it will be a totally new VDisk with a new name and a new ID. 9.10 Using SVC migration with image mode This process converts VDisks on non-XIV storage to image mode MDisks on the XIV that can then be reassigned to a different SVC or released from the SVC altogether. Because of this extra step, the XIV requires sufficient space to hold both transitional volumes (for image mode MDisks) and the final destination volumes (for managed mode MDisks). 9.10.1 Create image mode destination volumes on the XIV On the XIV we must create one new volume for each SVC VDisk that we are migrating (which must be the same size as the source VDisk, or larger). These are to allow transition of the VDisk to image mode. To do this, we must determine the size of the VDisk so that we can create a matching XIV volume. Chapter 9. SVC migration with XIV 297 7759ch_SVC_Migration.fm Draft Document for Review January 23, 2011 12:42 pm When an SVC volume is created we normally specify a size in GiB (binary GB). For instance, Example 9-48 creates a 10 GiB Vdisk in Mdisk group 1. Example 9-48 Create a transitional VDisk svctask mkvdisk -mdiskgrp 1 -iogrp 0 -name migrateme -size 10 -unit gb Now to make a matching XIV volume we can either make an XIV volume that is larger than the source VDisk or one that is exactly the same size. The easy solution is to create a larger volume. Because the XIV creates volumes in 16 GiB portions (that display in the GUI as rounded decimal 17 GB chunks), we could create a 17 GB LUN using the XIV and then map it to the SVC (in this example the SVC host is defined by the XIV as svcstgdemo) and use the next free LUN ID, which in Example 9-49 is LUN ID 12 (it is different every time). Example 9-49 XIV commands to create transitional volumes vol_create size=17 pool="SVC_MigratePool" vol="ImageMode" map_vol host="svcstgdemo" vol="ImageMode" lun="12" The drawback of using a larger volume size is that we eventually end up using extra space. So it is better to create a volume that is exactly the same size. To do this we must know the size of the VDisk in bytes (by default the SVC shows the VDisk size in GiB, even though it says GB). In Example 9-50 we first choose to display the size of the VDisk in GB. Example 9-50 Displaying a VDisk size in GB IBM_2145:SVCSTGDEMO:admin>svcinfo lsvdisk -filtervalue mdisk_grp_id=1 id name status mdisk_grp_id mdisk_grp_name capacity 6 migrateme online 1 MGR_MDSK_GRP 10.00GB Example 9-51 displays the size of the same VDisk in bytes. Example 9-51 Displaying a VDisk size in bytes IBM_2145:SVCSTGDEMO:admin>svcinfo lsvdisk -filtervalue mdisk_grp_id=1 -bytes id name status mdisk_grp_id mdisk_grp_name capacity 6 migrateme online 1 MGR_MDSK_GRP 10737418240 Now that we know the size of the source VDisk in bytes, we can divide this by 512 to get the size in blocks (there are always 512 bytes in a standard SCSI block). 10,737,418,240 bytes divided by 512 bytes per block is 20,971,520 blocks. This is the size that we use on the XIV to create our image mode transitional volume. Example 9-52 shows an XCLI command run on an XIV to create a volume using blocks. Example 9-52 Create an XIV volume using blocks vol_create size_blocks=20971520 pool="SVC_MigratePool" vol="ImageBlocks" 298 IBM XIV Storage System: Copy Services and Migration 7759ch_SVC_Migration.fm Draft Document for Review January 23, 2011 12:42 pm The XIV GUI volume creation panel is shown in Figure 9-5. (We must change the GB drop-down to blocks.) Figure 9-5 Creating an XIV volume using blocks Having created the volume, on the XIV we now map it to the SVC (using the XIV GUI or XCLI). Then, on the SVC, we can detect it as an unmanaged MDisk using the svctask detectmdisk command. 9.10.2 Migrate the VDisk to image mode We now migrate the source VDisk to image mode using the MDisk that we created for transition. These examples show an MDisk that is 16 GiB (17 GB on the XIV GUI). This example also shows what will eventually happen if you do not exactly match sizes. In Example 9-53 we first identify the source VDisk number (by listing VDisks per MDisk group) and then identify the candidate MDisk (by looking for unmanaged MDisks). Example 9-53 Identifying candidates IBM_2145:SVCSTGDEMO:admin>svcinfo lsvdisk -filtervalue mdisk_grp_id=1 id name status mdisk_grp_id mdisk_grp_name 5 migrateme online 1 MGR_MDSK_GRP capacity 10.00GB IBM_2145:SVCSTGDEMO:admin>svcinfo lsmdisk -filtervalue mode=unmanaged id name status mode capacity ctrl_LUN_# controller_name 9 mdisk9 online unmanaged 16.0GB 00000000000000C XIV In Example 9-53 we identified a source VDisk(5) sized 10 GiB and a target MDisk(9) sized 16 GiB. Now we migrate the VDisk into image mode without changing MDisk groups (we stay in group 1, which is where the source VDisk is currently located). The target MDisk must be unmanaged to be able to do this. If we migrate to a different MDisk group, the extent size of the target group must be the same as the source group. The advantage of using the same group is simplicity, but it does mean that the MDisk group contains MDisks from two different controllers (which is not the best option for normal operations). Example 9-54 shows the command to start the migration. Example 9-54 Migrate a VDisk to image mode svctask migratetoimage -vdisk 5 -mdisk 9 -mdiskgrp 1 Chapter 9. SVC migration with XIV 299 7759ch_SVC_Migration.fm Draft Document for Review January 23, 2011 12:42 pm In Example 9-55, we monitor the migration and wait for it to complete (no response means that it is complete). We then confirm that the MDisk shows as in image mode and the VDisk shows as image type. Example 9-55 Monitoring the migration IBM_2145:SVCSTGDEMO:admin>svcinfo lsmigrate IBM_2145:SVCSTGDEMO:admin> IBM_2145:SVCSTGDEMO:admin>svcinfo lsmdisk id name status mode mdisk_grp_id mdisk_grp_name capacity 9 mdisk9 online image 1 MGR_MDSK_GRP 16.0GB IBM_2145:SVCSTGDEMO:admin>svcinfo lsvdisk id name status mdisk_grp_id mdisk_grp_name capacity 5 migrateme online 1 MGR_MDSK_GRP 10.00GB type image We must confirm that the VDisk is in image mode or data loss will occur in the next step. At this point we must take an outage. 9.10.3 Outage step At the SVC we un-map the volume (which disrupts the host) and then remove the VDisk. At the host we must have unmounted the volume (or shut down the host) to ensure that any data cached at the host has been flushed to the SVC. However, at the SVC itself, if there is still write data in cache for this VDisk, then you will get a not empty message. You can check whether this is the case by displaying the fast_write_state for the VDisk with an svcinfo lsvdisk command. You must wait for the data to flush out of cache, which may take several minutes. The commands shown in Example 9-56 apply to a host whose Host ID is 2 and the VDisk ID is 5. Example 9-56 Removing the source VDisk IBM_2145:SVCSTGDEMO:admin>svctask rmvdiskhostmap -host 2 5 IBM_2145:SVCSTGDEMO:admin>svctask rmvdisk 5 IBM_2145:SVCSTGDEMO:admin>svcinfo lsmdisk id name status mode mdisk_grp_id mdisk_grp_name 9 mdisk9 online unmanaged capacity 16.0GB The MDisk is now unmanaged (even though it contains customer data) and could be mapped to a different SVC cluster or simply mapped directly to a non-SVC host. 9.10.4 Bring the VDisk online We now create a new managed disk group with an extent size of 1024, but no MDisks. We could have done this earlier, but it is a very quick step. In Example 9-57 we create MDisk group 2. Example 9-57 Creating a new MDisk group IBM_2145:SVCSTGDEMO:admin>svctask mkmdiskgrp -name image1024 -ext 1024 MDisk Group, id [2], successfully created 300 IBM XIV Storage System: Copy Services and Migration 7759ch_SVC_Migration.fm Draft Document for Review January 23, 2011 12:42 pm We now use the unmanaged MDisk to create an image mode VDisk in the new MDisk group and map it to the relevant host. Notice in Example 9-58 that the host ID is 2 and the VDisk number changed to 10. Example 9-58 Creating the image mode VDisk IBM_2145:SVC:admin>svctask mkvdisk -mdiskgrp 2 -iogrp 0 -vtype image -mdisk 9 -name migrated Virtual Disk, id [10], successfully created IBM_2145:SVC:admin>svctask mkvdiskhostmap -host 2 10 Virtual Disk to Host map, id [2], successfully created We can now reboot the host (or scan for new disks) and the LUN will return with data intact. Important: The VDisk ID and VDisk names were both changed in this example. Scripts that use the VDisk name or ID (such as those used to automatically create flashcopies) must be changed to reflect the new name and ID. 9.10.5 Migration from image mode to managed mode We now must migrate the VDisks from image mode on individual image mode MDisks to striped mode VDisks in a managed mode MDisk group. First we create a new managed disk group using volumes on the XIV intended to be used as the final destination. In Example 9-59, five volumes, each 1632 GB, were created on the XIV and mapped to the SVC. These are detected as 1520 GiB (because 1632 GB on the XIV GUI equals 1520 GiB on the SVC GUI). At a certain point the MDisks must also be renamed from the default names given by the SVC using the svctask chmdisk -name command. Example 9-59 Listing free MDisks IBM_2145:SVCSTGDEMO:admin>svcinfo lsmdisk -filtervalue mode=unmanaged id name status mode capacity ctrl_LUN_# 14 mdisk14 online unmanaged 1520.0GB 0000000000000007 15 mdisk15 online unmanaged 1520.0GB 0000000000000008 16 mdisk16 online unmanaged 1520.0GB 0000000000000009 17 mdisk17 online unmanaged 1520.0GB 000000000000000A 18 mdisk18 online unmanaged 1520.0GB 000000000000000B controller XIV XIV XIV XIV XIV We create a MDisk group using an extent size of 1024 MB with the five free MDisks. In Example 9-60 MDisk group 3 is created. Example 9-60 Creating target MDisk group IBM_2145:SVCSTGDEMO:admin>svctask mkmdiskgrp -name XIV_Target -mdisk 14:15:16:17:18 -ext 1024 MDisk Group, id [3], successfully created We then migrate the image mode VDisk (in our case VDisk 5) into the new MDisk group (in our case group 3), as shown in Example 9-61. Example 9-61 Migrating the VDisk IBM_2145:SVCSTGDEMO:admin>svctask migratevdisk -mdiskgrp 3 -vdisk 5 Chapter 9. SVC migration with XIV 301 7759ch_SVC_Migration.fm Draft Document for Review January 23, 2011 12:42 pm The VDisk moves from being in image mode in MDisk group 1 to being in managed mode in MDisk group 3. Notice in Example 9-62 that it is now 16 GB instead of 10 GB. This is because we migrated it initially onto a 16 GB image mode MDisk. We should have created a 10 GB image mode MDisk. Example 9-62 VDisk space usage IBM_2145:SVCSTGDEMO:admin>svcinfo lsvdisk id name status mdisk_grp_id 5 migrated online 3 mdisk_grp_name XIV_Target capacity 16.00GB In Example 9-63, we monitor the migration and wait for it to complete (no response means that it is complete). Example 9-63 Checking that the migrate is complete IBM_2145:SVCSTGDEMO:admin>svcinfo lsmigrate IBM_2145:SVCSTGDEMO:admin> We can clean up the transitional MDisk (which should now be unmanaged), as shown in Example 9-64. Example 9-64 Removing the transitional MDisks and MDisk groups IBM_2145:SVCSTGDEMO:admin>svctask rmmdisk -mdisk 9 2 IBM_2145:SVCSTGDEMO:admin>svctask rmmdiskgrp 2 9.10.6 Remove image mode MDisks We can then unmap and delete the transition volume on the XIV to free up the space and reuse that space for other migrations. The XCLI commands shown in Example 9-65 are run on the XIV (you can also use the XIV GUI). Example 9-65 Unmapping and deleting the transitional volume unmap_vol host="svcstgdemo" vol="ImageMode" vol_delete vol="ImageMode" 9.10.7 Use transitional space as managed space Provided that all volumes are migrated from non-XIV disk to XIV disks, we can now take the space on the XIV that was reserved for the transitional image mode MDisks and create new 1632 GB volumes to assign to the SVC. These volumes can be put into the existing MDisk group or a new MDisk group. 9.10.8 Remove non-XIV MDisks The non-XIV disk controllers MDisks still exist. We can remove these MDisks and their MDisk group. Then using the non-XIV disk interface we can un-map these LUNS from the SVC and reuse or remove the non-XIV disk controller. 302 IBM XIV Storage System: Copy Services and Migration Draft Document for Review January 23, 2011 12:42 pm 7759ch_SVC_Migration.fm 9.11 Future configuration tasks The section documents additional tasks that may be necessary after installation and migration is complete. 9.11.1 Adding additional capacity to the XIV If and when additional capacity is added to a partially populated XIV, take the following steps: 1. IBM adds the additional modules as a hardware upgrade (known as an MES). The additional capacity appears as free space once the IBM Service Representative has completed the process to equip these modules. Note: If the XIV has the Capacity on Demand (CoD) feature, then no hardware change or license key is necessary to use available capacity that has not yet been purchased. The customer simply starts using additional capacity as required until all available usable space is allocated. The billing process to purchase this capacity occurs afterwards. 2. From the Pools section of the XIV GUI, right-click the relevant pool and resize it depending on how the new capacity will be split between any pools. If all the space on the XIV is dedicated to a single SVC then there must be only one pool. 3. From the Volumes by Pools section of the XIV GUI, add new volumes of 1632 GB until no more volumes can be created. (There will be space left over, which can be used as scratch space for testing and for non-SVC hosts.) 4. From the Host section of the XIV GUI, map these new volumes to the relevant SVC cluster. This completes the XIV portion of the upgrade. 5. From the SVC, detect and then add the new MDisks to the existing managed disk group. Alternatively, a new managed disk group could be created. Remember that every MDisk uses a different XIV host port, so a new MDisk group ideally contains several MDisks to spread the Fibre Channel traffic. 6. If new volumes are added to an existing managed disk group, it may be desirable to rebalance the existing extents across the new space. To explain why an extent rebalance may be desirable, the SVC uses one XIV host port as a preferred port for each MDisk. If a VDisk is striped across eight MDisks, then I/O from that VDisk will be potentially striped across eight separate I/O ports on the XIV. If the space on these eight MDisks is fully allocated, then when new capacity is added to the MDisk group, new VDisks will only be striped across the new MDisks. If additional capacity supplying only two new MDisks is added, then I/O for VDisks striped across just those two MDisks is only directed to two host ports on the XIV. This means that the performance characteristics of these VDisks may be slightly different, despite the fact that all XIV volumes effectively have the same back end disk performance. The extent rebalance script is located here: http://www.alphaworks.ibm.com/tech/svctools 9.11.2 Using additional XIV host ports If additional XIV host ports are zoned to an SVC, then the SVC automatically rebalances its preferences across all available XIV host ports (provided that we do not exceed the current SVC limit of 16 WWPNs per WWNN). Depending on the number of modules in an XIV, not all Chapter 9. SVC migration with XIV 303 7759ch_SVC_Migration.fm Draft Document for Review January 23, 2011 12:42 pm the additional Fibre Channel ports are active. However, they are enabled as more modules are added. The suggested host port to capacity ratios are shown in Table 9-6. Table 9-6 XIV host port ratio as capacity grows Total XIV modules Capacity allocated to one SVC cluster (TB) XIV host ports zoned to one SVC cluster 6 27 4 9 43 8 10 50 8 11 54 10 12 61 10 13 66 12 14 73 12 15 79 12 To use additional XIV host ports, run a cable from the SAN switch to the XIV and attach to the relevant port on the XIV patch panel. Then zone the new XIV host port to the SVC cluster via the SAN switch. No commands must be run on the XIV. 9.12 Understanding the SVC controller path values If you display the detailed description of a controller as seen by SVC, for each controller host port you will see a path value. Because each MDisk has a preferred XIV host port, the path_count is the number of MDisks using that port multiplied by the number of SVC nodes (commonly 2 or 4). In Example 9-66 the SVC cluster has two nodes and can access six XIV volumes (MDisks), so 6 volumes times 2 nodes means 12 paths. These 12 paths will be distributed in a round-robin fashion across all accessible XIV host ports. Because in this example there are six XIV ports zoned to the SVC, there will be two paths per port. We can confirm is that the SVC is utilizing all six XIV interface modules. In Example 9-66 XIV interface modules 4 through 9 are all clearly zoned to the SVC (because the WWPN ending in 71 is from XIV module 7, the module with WWPN ending in 61 is from XIV module 6, and so on. To decode the WWPNs use the process described in 9.3.2, “Determining XIV WWPNs” on page 277. Example 9-66 Path count as seen by SVC IBM_2145:SVCSTGDEMO:admin> svcinfo lscontroller 2 id 2 controller_name XIV WWNN 5001738000510000 mdisk_link_count 6 max_mdisk_link_count 12 degraded no vendor_id IBM product_id_low 2810XIVproduct_id_high LUN-0 304 IBM XIV Storage System: Copy Services and Migration 7759ch_SVC_Migration.fm Draft Document for Review January 23, 2011 12:42 pm product_revision 10.0 ctrl_s/n allow_quorum yes WWPN 5001738000510171 path_count 2 max_path_count 2 WWPN 5001738000510161 path_count 2 max_path_count 2 WWPN 5001738000510182 path_count 2 max_path_count 2 WWPN 5001738000510151 path_count 2 max_path_count 2 WWPN 5001738000510141 path_count 2 max_path_count 2 WWPN 5001738000510191 path_count 2 max_path_count 2 9.13 SVC with XIV implementation checklist Table 9-7 contains a checklist that can be used when implementing XIV behind SVC. It presumes that the XIV has already been installed by the IBM Service Representative. Table 9-7 XIV implementation checklist Task number Completed? Where to perform Task 1 SVC Increase SVC virtualization license if required. 2 XIV Get XIV WWPNs. 3 SVC Get SVC WWPNs. 4 Fabric Zone XIV to SVC (one big zone). 5 XIV Define the SVC cluster as a cluster. 6 XIV Define the SVC nodes as hosts. 7 XIV Add the SVC ports to the hosts. 8 XIV Create a storage pool. 9 XIV Create 1632 GB volumes in the pool. 10 XIV Map the volumes to the SVC cluster. 11 XIV Rename the XIV. 12 SVC Detect the MDisk. 13 SVC Rename the XIV controller. 14 SVC Rename the XIV MDisks. Chapter 9. SVC migration with XIV 305 7759ch_SVC_Migration.fm Task number 306 Completed? Draft Document for Review January 23, 2011 12:42 pm Where to perform Task 15 SVC Create an MDisk group. 16 SVC Relocate the quorum disks if necessary. 17 SVC Identify VDisks to migrate. 18 SVC Mirror or migrate your data to XIV. 19 SVC Monitor migration. 20 SVC Remove non-XIV MDisks. 21 SVC Remove non-XIV MDisk group. 22 Non-XIV Storage Unmap LUNs from SVC. 23 SAN Remove zone that connects SVC to non-XIV disk. 24 SVC Clear 1630 error that will have been generated by task 23 (unzoning non-XIV disk from SVC). IBM XIV Storage System: Copy Services and Migration Draft Document for Review January 23, 2011 12:42 pm 7759bibl.fm Related publications The publications listed in this section are considered particularly suitable for a more detailed discussion of the topics covered in this book. IBM Redbooks publications For information about ordering this publication, refer to “How to get IBM Redbooks publications” on page 307. This document might be available in softcopy only: IBM XIV Storage System: Architecture, Implementation, and Usage, SG24-7659 Other publications These publications are also relevant as further information sources: IBM XIV Storage System Application Programming Interface, GA32-0788 IBM XIV Storage System User Manual, GC27-2213 IBM XIV Storage System: Product Overview, GA32-0791 IBM XIV Storage System Planning Guide, GA32-0770 IBM XIV Storage System Pre-Installation Network Planning Guide for Customer Configuration, GC52-1328-01 Online resources These Web sites are also relevant as further information sources: IBM XIV Storage System Information Center: http://publib.boulder.ibm.com/infocenter/ibmxiv/r2/index.jsp IBM XIV Storage Web site: http://www.ibm.com/systems/storage/disk/xiv/index.html System Storage Interoperability Center (SSIC): http://www.ibm.com/systems/support/storage/config/ssic/index.jsp How to get IBM Redbooks publications You can search for, view, or download IBM Redbooks publications, Redpapers, Technotes, draft publications and Additional materials, as well as order hardcopy IBM Redbooks publications, at this Web site: ibm.com/redbooks © Copyright IBM Corp. 2010. All rights reserved. 307 7759bibl.fm Draft Document for Review January 23, 2011 12:42 pm Help from IBM IBM Support and downloads ibm.com/support IBM Global Services ibm.com/services 308 IBM XIV Storage System: Copy Services and Migration 7759IX.fm Draft Document for Review January 23, 2011 12:42 pm Index Symbols _Define_Target_(Legacy 223 _Pre-Data_Migration_Steps 226 _Toc227991967 221 _Toc227991968 221 _Toc227991969 222 _Toc227991970 223 _Toc227991971 226 _Toc227991972 226 _Toc227991973 226 _Toc227991974 227 _Toc227991975 230 _Toc227991976 232 _Toc227991977 232 A activation states 59 Active/Active 219 active/active 217, 219, 225, 249, 254 active/cctive 219 Active/Passive 219 active/passive 217, 219, 221, 249, 254 ADT 259–260 AIX 171 FlashCopy 168 application-consistent data 86–87 ASP quiescing 192 Asynchronous mirroring 49–53, 105, 127–128, 135, 137, 149–150 asynchronous mirroring 212 automatic deletion 7, 9, 19–20 changing role 205 cluster 230–232 communication failure 89 config_get 106 Consistency Group 20 consistency group 7, 21, 55, 70, 151 add volume 71, 81, 110 configuration 133 create 21 delete 29 expand 22 given volume 151 maximum number 90 new snapshots 25 other volumes 133 remove volume 72, 83, 110, 137 setup 108 Storage Pool 21, 23 synchronization status 135, 151 consistency group (CG) 7, 20–22, 24, 50, 54–55, 71, 104–105, 108–110, 127, 205 consistent state 108 copy functions xiii, 1 copy on write 5 copy pairs 96 Copy Services 176 HP-UX 176 using VERITAS Volume Manager SUN Solaris 173 coupling 50, 104 crash consistency 72 Create Mirror 104 Create Slave 105 D B background copy 44, 217–218, 230, 239 backup xiii, 1, 9–10 backup script 31, 33 Backup, Recovery, and Media Services for iSeries (BRMS) 192 BRMS 192 C cache 243 candidate MDisk 299 Capacity on Demand (CoD 276 cctive/passive 219 cfgdev 196, 207, 211 cfgmgr 171 CG 50 cg_list 28 change role 55, 78, 112, 114, 120, 144 © Copyright IBM Corp. 2010. All rights reserved. D3000 258 Damaged object 209 data corruption protection 88 Data Migration 215–217, 224 target 217 data migration xiii, 1, 96, 215–217 back-out 230, 250–251 checklist 251 monitoring 240 object 228–230, 238 steps 220, 232, 250 synchronization 233 Data Migration (DM) volume 228 deactivation 89 define connections 97 delete snapshot 8, 18 deletion priority 7–8, 11–13 dependent writes 72 designation 55 309 7759IX.fm Destination Name 228, 239 Destination Pool 229, 239 detectmdisk 287, 292, 294 Device Manager 243 Disaster Recovery 111, 149 Disaster Recovery (DR) 50, 53, 55, 111, 114, 127, 155, 160 Disaster Recovery protection 88 diskpart 246 dm_list 232, 234 DR test 78, 87, 112 DR testing GUI steps 161 DS4000 220, 222, 226, 258 DS5000 258 DS6000 219, 261–262 DS8000 219, 261–262 duplicate 9–10 Duplicate Snapshot 9–10, 88 duplicate snapshot 9–10, 12 creation date 9–10, 12 creation time 9 Draft Document for Review January 23, 2011 12:42 pm host_add_port host 286 HP-UX 176–177 I IBM XIV data migration solution 216 storage 217 image mode 275, 282, 290, 297 Migration 301 SVC migration 297 importvg 172 initialization 56, 75 initialization rate 68, 240–241 initializing state 107 initiator 91–92, 94, 216, 220–221 interval 51 IO group 294 ipinterface_list 91–92 iSCSI 91 iSCSI ports 69 K E environment variables 237 ESS 219, 226, 238, 260 Ethernet 91 Ethernet switch 158 event log 242, 258 exportvg 172 extent size 282–284 new managed disk group 291 F fail-over 219–220, 250 failure 50 fan-in 67 fan-out 67 fc_port_config 94–95 fc_port_list 91, 94 Fibre Channel 91 Fibre Channel (FC) 49, 64, 69 Fibre Channel ports 69, 94, 158 FlashCopy 176, 189 HP-UX 176 G GiB 280–282 Graphical User Interface Remote Mirroring performance statistics 90 Graphical User Interface (GUI) 9, 11, 69, 91 GUI example 158 GUI step 160 H Host Attachment Procedure 232 host server 216–217, 232 I/O requests 217 310 KB 5 Keep Source Updated 218, 229, 239 L last consistent snapshot 114 timestamp 114 last_consistent 113 last_replicated 78 last_replicated snapshot 78–79, 135, 145–146, 154 license 288, 303, 305 link failure 114 link failure 149 link status 57 link utilization 57 Linux x86 222, 261 local site 50, 57, 66, 105–106, 111, 144, 149, 162 Master volumes 115 old Master volumes 115 lock Snapshot 32 Logical Unit Number (LUN) 55, 70 LUN ID 217, 227, 229, 232 LUN mapping 227 LUN numbering 222, 254 LUN0 222, 226, 252, 254 LUNs 189 LVM 172 M managed mode 297, 301–302 map_vol host 298 Master 50, 55 Master peer 56, 85–87, 111, 129, 146 master peer actual data 86 Deactivate XIV remote mirroring 86 IBM XIV Storage System: Copy Services and Migration 7759IX.fm Draft Document for Review January 23, 2011 12:42 pm remote mirroring 86 XIV remote mirroring 86 Master role 52, 54–55, 74, 104, 111–112, 114, 139, 144 Master volume 5, 10, 15–16, 51, 56, 59, 79, 110, 112–114, 145–146 periodic consistent copies 151 master volume 5, 9, 14 actual data 76 additional Snapshot 88 Changing role 79 Deactivate XIV remote mirroring 88–89 duplicate snapshot 10, 19 identical copy 58 Reactivate XIV remote mirroring 89 XIV remote mirroring 82 max_initialization_rate 240–242 max_resync_rate 240–241 max_syncjob_rate 240–241 MDisk 279, 281 MDisk group 282–284 free capacity 285 image mode VDisk 301 MDisks 275, 279–280 metadata 5, 11, 78 Microsoft Excel 254 migration speed 219, 240 Mirror initialization 56 ongoing operation 56 mirror activation 75 delete 84 reactivation 80 resynchronization 80 Mirror coupling 70, 74 deactivate 77 mirror coupling 75 mirror_activate 122 mirror_change_role 118 mirror_create_snapshot 50 mirror_lis 107 mirror_list 123, 125 mirror_list command 107–108 mirror_statistics_get 90 mirrored Cg mirrored volume 83 Mirrored consistency group mirrored volume 82 Mirroring statistics 90 status 57 mirroring activation 104 setup 104 target 64 mirroring schemes 53 most_recent 78 most_recent Snapshot 137, 149–150, 154 MSCS Cluster 230 Multipathing 254–255, 257, 261 MySQL 30 N naming convention 9 no source updating 217–218 normal operation 65, 69, 111, 149 data flow 69 O OK button 13–14 ongoing operation 56 Open Office 254 open systems AIX and FlashCopy 168 AIX and Remote Mirror and Copy 171 Copy Services using VERITAS Volume Manager, SUN Solaris 173 HP-UX and Copy Services 176 HP-UX and FlashCopy 176 HP-UX with Remote Mirror and Copy 177 SUN Solaris and Copy Services 173 Windows and Remote Mirror and Copy 173 operating system (OS) 45, 47–48 original snapshot 9–10, 12 duplicate snapshot points 9 mirror copy 20 outage unplanned 207 overwrite 194, 199 P page fault 189 peer 50, 54 designations 55 role 55 pointer 5, 15, 31 Point-in-Time (PIT) 52 Point-in-Time (PiT) 52 point-in-time copy 227 port configuration 94 port role 94 portperfshow 242 ports 94, 158 power loss consistency 72 Primary 50, 55, 74 Primary site Failure 85 primary site 56, 79, 81, 85, 109, 111, 134, 139, 144, 149 full initialization 149 Master volumes 120–121 Master volumes/CG, servers 149 production activities 149 production server 125 Role changeover 120–121 primary system 92, 95 source volumes 149 Primary XIV 52, 59, 101, 133 Index 311 7759IX.fm primary XIV Master volume 125 Mirror statuses 108, 123 original direction 114 Remote Mirroring menu 124 Slave volumes 120–121 Q queue depth 279, 281 R RDAC 259–260 reactivation 89 Recovery Point Objective (RPO) 51, 127 recreatevg 170 Redbooks Web site Contact us xv RedHat 222, 262 redirect on write 5, 20, 44 Remote Mirror 30, 49–50, 91–92 activate 122 Remote Mirror and Copy 171, 177 HP-UX 177 remote mirror pair 228 Remote Mirroring 7, 21, 49–51, 58, 103–104, 107, 110, 137 actions 64 activate 133 delete 143 function 91 implementation 91 planning 89 usage 60 remote mirroring 94 consistency groups 50, 90 Fibre channel paths 91 first step 59 single unit 74 synchronous 103 XIV systems 64 remote site 49–50, 56, 105, 111, 115, 144, 149, 159, 162 secondary peers 81 Slave volumes 115 standby server 115 resize 91, 239, 245–246 resize operation 44 Resynchronization 80, 85, 114 resynchronization 114, 149 role 50, 54–55, 78 change 56 changing 205 switching 56, 205 role reversal 144 RPO 51, 131, 140 RPO_Lagging 59, 139 RPO_OK 59 312 Draft Document for Review January 23, 2011 12:42 pm S SAN boot 45, 216 SAN connectivit 91 SAN LUNs 189 Save While Active 192 schedule 128, 140 schedule interval 51 Schedule Management 129 schedule_create schedule 132, 141 SCSI initiator 221 SDDPCM 268 Secondary 50, 55 secondary site 109–113, 134, 144, 149 mirror relation 115 remote mirroring 112 Role changeover 117–118 secondary XIV 50–51, 59, 106, 114, 133, 139 corresponding consistency group 133 Mirror statuses 108, 123 Slave volume 124 single XIV footprint 283 rack 283 Storage Pool 70 system 60, 63, 67 single-level storage 188 Slave 50, 55 Slave peer 52, 78, 110–111, 114, 129–130, 139 slave peer consistent data 52 Slave Pool 105 Slave role 51, 74, 104, 112–114, 145, 161–162 Slave volume 54–57, 59, 105, 107, 110–111, 128, 130 Changing role 78 consistent state 55 whole group 55 snap_group 28, 34 snap_group_duplicate 160 Snapshot automatic deletion 7, 9, 20 creation 9, 28 deletion priority 8, 12–13 details 28 duplicate 9–10 last_consistent 113 last_replicated 154 lock 32 most_recent 154 restore 34–35 size 28 snapshot 1, 7 delete 8, 18 duplicate 9–10 last consistent 114 locked 8, 10 naming convention 9 snapshot group 25, 27 snapshot volume 4–6, 16 snapshot_delete 19 Snapshot/volume copy 87 IBM XIV Storage System: Copy Services and Migration 7759IX.fm Draft Document for Review January 23, 2011 12:42 pm SNMP traps 90 Source LUN 229, 239, 248 source MDisk group extent size 289 Image Mode MDisks 291 Source Target System 228, 239 source updating 217–218, 233, 251 source updating option 217 SRC codes 194 standby 106 state 55 consistent 108 initializing 107 Storage Pool 7, 11, 19 additional allocations 20 Storage pool consistency group 72 different CG 71 existing volumes 72 storage pool 71, 105, 108, 110, 133, 135, 305 storage system 111, 149, 215–216, 218 SUN Solaris Copy Services 173 Remote Mirror and Copy with VERITAS Volume Manager 175 SuSE 222 SVC 273–275 firmware version 274, 284, 290 MDisk group 282, 289, 291 mirror 275, 295 quorum disk 283 zone 275 zoning 275 SVC cluster 274–276 svcinfo lsmdisk 281–283 svctask 284–285, 287 svctask chlicense 288 switch role 112 switch roles 81 switch_role 55 switching role 205 sync job 50–52, 128–129, 137, 139 most_recent snapshot 154 schedule 128 Sync Type 105 Synchronised 217 synchronization 233, 240 rate 68 status 58 Synchronized 108 synchronized 236, 240 synchronous 49 synchronous mirroring 51 syncrate 296 System i Disk Pool 189 System i5 external storage 188 Hardware Management Console (HMC) 188 structure 188 subject 189 T target 64, 92–93, 217–219, 226 Target System 105 target volume 44, 46, 105–106, 115, 143 target_config_sync_rates 68 target_config_sync_rates. 80 target_list 234, 241 Test Data Migration 229–230, 235, 239 the 85 thick to thin migration 243 thin provisioning 243–244 TPC (Tivoli Storage Productivity Centre) 275 transfer rate 240 U unplanned outage 207 V VDisk 275, 280, 282 progress percentage 295 striping 280 VDisk 5 copy 0 297 VDisk copy 290, 296 VDisks 275, 282, 284 virtualization license 288 virtualization license limit 288, 303, 305 VMware 45–46 VMware File System (VMFS) 45 vol_copy 45 vol_lock 18 volume resize 91 Volume Copy 43, 45 OS image 45 volume copy 1, 44–45, 87 volume mirror coupling 75–77, 82 setup 129 W Windows 173 write access 78 WWPN 222, 224, 226, 234, 247, 275, 277 X XCLI 10, 12–13, 68–69, 90–91, 94, 104, 106, 108, 128, 132, 137 XCLI command 50, 80, 95, 106, 132, 160, 275, 277, 298 XCLI example 101 XCLI session 10, 12, 15, 106, 118, 121, 132 XIV 1, 5, 49–51, 127–129, 273–275 end disk controllers 273 XIV 1 82, 86 additional Master Volume 82 Index 313 7759IX.fm available, deactivate mirrors 85 Complete destruction 86 complete destruction 86 Deactivate mirror 85 Map Master peers 86 Master consistency group 82 Master peer 87 production data 88 remote mirroring peers 88 remote targets 86 Slave peer 86 Slave volume 86 volume copy 88 XIV remote mirroring 86–87 XIV system 85, 88 XIV systems 88–89 XIV 2 82, 85 additional Slave volume 82 consistency group 82 Disaster Recovery testing 87 DR servers 86 other functions 87 production applications 86 production changes 85 production workload 85–86 Slave peer 87 Slave volume 82, 87, 89 Unmap Master peers 86 XIV asynchronous mirroring 52, 61–62, 75–76, 127 XIV Command Line Interface (XCLI) 234 XIV GUI 54, 57, 104, 128, 274, 277–278 Host section 303 Pools section 303 XIV host port 278–279, 281 XIV mirroring 62, 64, 69–70, 76, 78, 80 Advantages 90 XIV remote mirroring 60–61, 63 normal operation 85–87 Planned deactivation 78 user deactivation 89 XIV Storage System xiii, 1, 5, 7, 49, 91, 215–216, 273 XIV Storage System 43–45, 50, 71, 90 XIV subsystem 5, 8 XIV system 2, 51–53, 128, 130, 132 available disk drives 70 available physical disk drives 71 mirroring connections 89 planned outage 60 single Storage Pool 74 XIV mirroring target 64 XIV Snapshot function 63 XIV volume 45–46, 56, 70, 82, 127, 280–282 xiv_devlist 269 XIVPCM 268 Z zoning 221–222, 231, 247 314 IBM XIV Storage System: Copy Services and Migration Draft Document for Review January 23, 2011 12:42 pm (0.5” spine) 0.475”<->0.873” 250 <-> 459 pages (1.0” spine) 0.875”<->1.498” 460 <-> 788 pages (1.5” spine) 1.5”<-> 1.998” 789 <->1051 pages 7759spine.fm 315 To determine the spine width of a book, you divide the paper PPI into the number of pages in the book. An example is a 250 page book using Plainfield opaque 50# smooth which has a PPI of 526. Divided 250 by 526 which equals a spine width of .4752". In this case, you would use the .5” spine. Now select the Spine width for the book and hide the others: Special>Conditional Text>Show/Hide>SpineSize(-->Hide:)>Set . Move the changed Conditional text settings to all files in your book by opening the book file with the spine.fm still open and File>Import>Formats the Conditional Text Settings (ONLY!) to the book files. Draft Document for Review January 23, 2011 12:42 pm IBM XIV Storage System: Copy Services and Migration IBM XIV Storage System: Copy Services and Migration IBM XIV Storage System: Copy Services and Migration IBM XIV Storage System: Copy Services and Migration (0.2”spine) 0.17”<->0.473” 90<->249 pages (0.1”spine) 0.1”<->0.169” 53<->89 pages Conditional Text Settings (ONLY!) to the book files. 316 (2.5” spine) 2.5”<->nnn.n” 1315<-> nnnn pages 7759spine.fm To determine the spine width of a book, you divide the paper PPI into the number of pages in the book. An example is a 250 page book using Plainfield opaque 50# smooth which has a PPI of 526. Divided 250 by 526 which equals a spine width of .4752". In this case, you would use the .5” spine. Now select the Spine width for the book and hide the others: Special>Conditional Text>Show/Hide>SpineSize(-->Hide:)>Set . Move the changed Conditional text settings to all files in your book by opening the book file with the spine.fm still open and File>Import>Formats the Draft Document for Review January 23, 2011 12:42 pm IBM XIV Storage System: Copy Services and Migration IBM XIV Storage System: Copy Services and Migration (2.0” spine) 2.0” <-> 2.498” 1052 <-> 1314 pages Draft Document for Review January 23, 2011 12:43 pm Back cover ® IBM XIV Storage System: Copy Services and Migration Learn details of the Copy Services and Migration functions Explore practical scenarios for Snapshot and Mirroring Review Host Platform Specific Considerations This IBM® Redpaper Redbooks® publication provides a practical understanding of the XIV® Storage System copy and migration functions. The XIV Storage System has a rich set of copy functions suited for various data protection scenarios, which enables clients to enhance their business continuance, data migration, and online backup solutions. These functions allow point-in-time copies, known as snapshots and full volume copies, and also include remote copy capabilities in either synchronous or asynchronous mode. These functions are included in the XIV software and all their features are available at no additional charge. The various copy functions are reviewed under separate chapters that include detailed information about usage, as well as practical illustrations. This book also explains the XIV built-in migration capability, and presents migration alternatives based on the San Volume Controller (SVC). ® INTERNATIONAL TECHNICAL SUPPORT ORGANIZATION BUILDING TECHNICAL INFORMATION BASED ON PRACTICAL EXPERIENCE IBM Redbooks are developed by the IBM International Technical Support Organization. Experts from IBM, Customers and Partners from around the world create timely technical information based on realistic scenarios. Specific recommendations are provided to help you implement IT solutions more effectively in your environment. For more information: ibm.com/redbooks SG24-7759-01 ISBN 0738434221