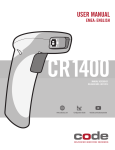
1
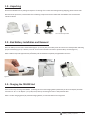
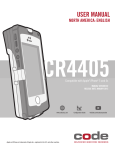
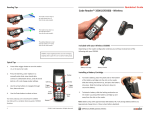
User Manual
Code
Reader™ 4405
Compatible with Apple® iPhone® 5 and 5s
Manual Version 01
Release Date: February 2014
D018433_01_CR4405_User_Manual
D018433_01_CR4405_User_Manual Apple and iPhone are trademarks of Apple Inc., registered in the U.S. and other countries.
Statement of Agency Compliance
The Code Reader™ 4405 (CR4405) has been tested for compliance with FCC regulations and was found to be compliant with
all applicable FCC Rules and Regulations.
IMPORTANT NOTE: To comply with FCC RF exposure compliance requirements, this device must not be co-located or operate
in conjunction with any other antenna or transmitter.
CAUTION: Changes or modifications not expressly approved by the party responsible for compliance could void the user’s
authority to operate the equipment.
The CR4405 has been tested for compliance to CE standards and guidelines and was found to conform to applicable CE
standards, specifically the EMC requirements EN 55024, ESD EN 61000-4-2, Radiated RF Immunity EN 61000-4-3, ENV 50204,
EFT EN 61000-4-4, Conducted RF Immunity EN 61000-4-6, EN 55022, Class B Radiated Emissions, and Class B Conducted
Emissions.
The CR4405 has been tested and certified in compliance with the Technical Regulations Conformity Certification of Specified
Radio Equipment (ordinance of MPT N°.37. 1981), Article 2, Paragraph 1, Item 19.
Code voids product warranty if the hard case has been opened or tampered with in any way.
The CR4405 meets all safety and quality standards in accordance to EN 60950-1:2006/A11:2009/A1:2010.
CR4405 FCC Compliance
NOTE: This equipment has been tested and found to comply with the limits for a Class B digital device, pursuant to part 15
of the FCC Rules. These limits are designed to provide reasonable protection against harmful interference in a residential
installation. This equipment generates, uses and can radiate radio frequency energy and, if not installed and used in
accordance with the instructions, may cause harmful interference to radio communications. However, there is no guarantee
that interference will not occur in a particular installation.
If this equipment does cause harmful interference to radio or television reception, which can be determined by turning the
equipment off and on, the user is encouraged to try to correct the interference by one or more of the following measures:
• Reorient or relocate the receiving antenna.
• Increase the separation between the equipment and receiver.
• Connect the equipment into an outlet on a circuit different from that to which the receiver is connected.
• Consult the dealer or an experienced radio/TV technician for help.
This device complies with part 15 of the FCC Rules. Operation is subject to the following two conditions: (1) This device may
not cause harmful interference, and (2) this device must accept any interference received, including interference that may
cause undesired operation.
D018433_01_CR4405_User_Manual
Code Reader™ 4405 User Manual
Copyright © 2014 Code Corporation.
All Rights Reserved.
The software described in this manual may only be used in accordance with the terms of its license agreement.
No part of this publication may be reproduced in any form or by any means without written permission from Code Corporation. This includes
electronic or mechanical means such as photocopying or recording in information storage and retrieval systems.
NO WARRANTY. This technical documentation is provided AS-IS. Further, the documentation does not represent a commitment on the part of Code
Corporation. Code Corporation does not warrant that it is accurate, complete or error free. Any use of the technical documentation is at the risk
of the user. Code Corporation reserves the right to make changes in specifications and other information contained in this document without prior
notice, and the reader should in all cases consult Code Corporation to determine whether any such changes have been made. Code Corporation
shall not be liable for technical or editorial errors or omissions contained herein; nor for incidental or consequential damages resulting from the
furnishing, performance, or use of this material. Code Corporation does not assume any product liability arising out of or in connection with the
application or use of any product or application described herein.
NO LICENSE. No license is granted, either by implication, estoppel, or otherwise under any intellectual property rights of Code Corporation. Any
use of hardware, software and/or technology of Code Corporation is governed by its own agreement.
The following are trademarks or registered trademarks of Code Corporation:
CodeXML®, Maker, QuickMaker, CodeXML® Maker, CodeXML® Maker Pro, CodeXML® Router, CodeXML® Client SDK, CodeXML® Filter, HyperPage,
CodeTrack, GoCard, GoWeb, ShortCode, GoCode®, Code Router, QuickConnect Code, Rule Runner®, Cortex®, CortexRM, CortexMobile, Code, Code
Reader, CortexAG, CortexStudio, CortexTools, Affinity®, CortexDecoder, CortexJPOS, and CortexOPOS.
Apple and iPhone are trademarks of Apple Inc., registered in the U.S. and other countries. App Store and iTunes are trademarks of Apple Inc.
All other product names mentioned in this manual may be trademarks of their respective companies and are hereby acknowledged.
The software and/or products of Code Corporation include inventions that are patented or that are the subject of patents pending. U.S. Patents:
6997387, 6942152, 7014113, 7070091, 7097099, 7353999, 7519239, 7621453, 8001550, 8011584.
The Code Reader software uses the Mozilla SpiderMonkey JavaScript engine, which is distributed under the terms of the Mozilla Public License
Version 1.1. The Code Reader software is based in part on the work of the Independent JPEG Group.
Code Corporation, 12393 S. Gateway Park Place, Suite 600, Draper, UT 84020. www.codecorp.com
D018433_01_CR4405_User_Manual
Table of Contents
1.0 - Unpacking.............................................................................................................................................. 1
2.0 - Sled Battery Installation and Removal..................................................................................................... 1
3.0 - Charging the CR4405 Sled....................................................................................................................... 1
3.1 - Docking the Sled in the Charging Station................................................................................................. 2
3.2 - USB Direct Connection to Sled................................................................................................................ 3
4.0 - Charging a Spare Sled Battery................................................................................................................. 3
5.0 - iPhone Installation in the Sled................................................................................................................. 3
6.0 - Battery Charge Times.............................................................................................................................. 4
7.0 - Powering On the iPhone and Sled Reader............................................................................................... 4
8.0 - Sled Battery Status Indication................................................................................................................. 5
9.0 - Using the CR4405................................................................................................................................... 5
10.0 - Symbologies Defaulted On.................................................................................................................... 6
11.0 - Symbologies Defaulted Off.................................................................................................................... 6
12.0 - Reading Ranges..................................................................................................................................... 6
13.0 - CR4405 Sled Reader Configuration........................................................................................................ 6
14.0 - CR4405 Communication Modes............................................................................................................ 7
15.0 - Power Management............................................................................................................................. 7
16.0 - Software Development Kit (SDK)........................................................................................................... 8
17.0 - Using CortexMobile™............................................................................................................................ 8
18.0 - Good Read Indicators.......................................................................................................................... 10
19.0 - CortexMobile Used For Demonstrations.............................................................................................. 10
20.0 - Battery Life Management via the SDK ................................................................................................ 10
21.0 - CR4405 Dimensions............................................................................................................................ 11
22.0 - Charging Station Dimensions.............................................................................................................. 11
23.0 - Sled Reader ID and Firmware Version.................................................................................................. 12
24.0 - Upgrading CR4405 Firmware............................................................................................................... 13
25.0 - CR4405 Maintenance.......................................................................................................................... 13
D018433_01_CR4405_User_Manual
1.0 - Unpacking
Remove the CR4405 from its packing and inspect it for damage. If the reader was damaged during shipping, please contact Code.
Based on the kit purchased, a combination of the following components will be included with the CR4405. Note: Kit does NOT
include an iPhone.
Charging Station
Battery
USB Cable
Power Supply
Torx™ T6 Security Screws
2.0 - Sled Battery Installation and Removal
Place the battery into the sled as shown below (Figure 1). Once in place, the battery latch will swivel into a locked position indicating
proper installation (Figure 2). If desired, a Torx T6 screw can be inserted in the latch to prevent battery removal (Figure 3).
NOTE: Batteries ship with approximately 50% battery life and should be completely charged before initial use.
Figure 1
Figure 2
Figure 3
3.0 - Charging the CR4405 Sled
There are two ways to charge the CR4405: 1) Docking the sled in the Charging Station powered by an AC-to-DC adapter (hereafter
referred to as “AC” or “AC adapter”) or by USB, and 2) Directly connecting the sled to a USB powered cable.
NOTE: The first charging option (AC powered Charging Station) is recommended for fast charge time.
D018433_01_CR4405_User_Manual
1
3.1 - Docking the Sled in the Charging Station
1. Plug the barrel side of the AC adapter or USB charge cable into the power jack of the charging station (Figure 4).
2. Plug the AC adapter into the wall outlet (Figure 5) or USB cable into a computer’s USB port (Figure 6).
Figure 4
Figure 5
Figure 6
3. Insert the sled (with battery installed) in the larger front bay (Figure 7).
4. Two banks each consisting of four charge status LED indicators are located on the front of the Charging Station. All four LEDs
of LED Bank 1 will rapidly flash indicating readiness to charge, and will then display the sled’s battery status as shown below in
Figure 8.
Sled Battery Status
LED Display On Charging Station
91 – 100%
61 – 90%
31 – 60%
0 – 30%
Figure 8
Figure 7
5. During charging, the LED located at the top right corner of the sled (Figure 9) will also light up according to Figure 10.
Sled Battery Status While Charging
Sled LED Behavior
96 – 100%
Solid green
31 – 95%
Flashes green
11 – 30%
Flashes yellow
0 – 10%
Flashes red
Figure 10
Figure 9
D018433_01_CR4405_User_Manual
2
3.2 - USB Direct Connection to Sled
1. Plug the Micro-B side of the USB cable into the sled (Figure 11).
2. Plug the other side of the USB cable into a computer USB port (Figure 6).
3. During charging, the LED located at the top right corner of the sled (Figure 9) will light up according to Figure 10.
NOTE: The USB cable provided was custom developed to reduce charge time. Using a non-Code cable may significantly increase the charge time.
Figure 11
4.0 - Charging a Spare Sled Battery
A spare sled battery can be docked for charging in the rear bay of the Charging Station (Figure 12). Similar to LED Bank 1, upon
battery insertion all four LEDs of LED Bank 2 will rapidly flash indicating readiness to charge, and then display spare battery status
according to Figure 8.
Spare Battery Cartridge
Rear Charging Bay
Rear Charging Bay LEDs
Figure 12
5.0 - iPhone Installation in the Sled
Open the three security latches on the sled (Figure 13). Slide the phone on to the connector (Figure 14). Close the cover and secure
the latches. Phone removal is done in reverse. Be careful to not bend the electrical connector outward while sliding the phone away
from it.
Connector
Security
Latches
Figure 14
Figure 13
D018433_01_CR4405_User_Manual
3
6.0 - Battery Charge Times
Depending on the configuration of power supply, CR4405 sled, iPhone, and spare battery docked in the Charging Station, charge time
can be as little as 2-4 hours.
7.0 - Powering On the iPhone and Sled Reader
With the phone inserted in the sled, if the phone is off, press the button on the top of the sled to turn it on (Figure 15).
Power On
Home Button
Figure 15
Figure 16
The CR4405 sled can be powered on by pressing the scan button on the right side of the sled (Figure 17). The sled’s upper right
LED (Figure 17) will flash red, pause for approximately 10 seconds to boot up, then flash green indicating the sled is ready for use.
Powering off the reader is done by pivoting the battery latch counter-clockwise to unlock and removing the battery (Figure 2).
If you wish to wake the reader from sleep, simply push the scan button and the barcode illumination LEDs will flash, indicating the
CR4405 is ready to scan. If the reader sleeps for 2 hours it will power off. Press the scan button to power it back on. The LED will
flash red, boot up, and then flash green, ready to scan.
LED
Scan Button
Figure 17
D018433_01_CR4405_User_Manual
4
8.0 - Sled Battery Status Indication
When the sled is disconnected from the Charging Station or USB cable, pressing the scan button once will cause the LED status
indicator located at the top right corner of the sled (Figure 18) to light up according to Figure 19.
Sled Battery State While Not Charging
Sled LED Behavior
31 – 100%
None
11 – 30%
Flashes yellow 3 times
0 – 10%
Flashes red 3 times
Figure 19
Figure 18
9.0 - Using the CR4405
With the iPhone inserted, navigate to the Home Screen and touch the Notes icon as an example. Notes is a standard iPhone
application that can receive scanned in data as if it were entered via a keyboard.
NOTE: The CR4405 sled’s default communication mode which supports this type of scanning is called iPhone Keyboard Mode.
Press the scan button on the right side of the CR4405 (Figure 17). Two blue bars emitting from the reader shine from targeting LEDs.
Center the blue bars in the middle of a barcode (Figure 20). When the barcode is in the reader’s field of view and at the optimal
distance (4” from the barcode), the reader will automatically read the barcode and the sled LED will flash green once. The data will
display in the Notes app. If the sled does not successfully read the barcode, then the sled LED status indicator will not flash. The
Notes screen shot (Figure 21) below shows 3 instances of a sample barcode scanned in.
Figure 20
Figure 21
D018433_01_CR4405_User_Manual
5
10.0 - Symbologies Defaulted On
The following symbologies are enabled by default. To turn symbologies on or off, scan the symbology barcodes located in the
CR4405 Configuration Guide located on our website at http://www.codecorp.com/files.php.
Aztec
Codabar
Code 39
Data Matrix Rectangle
All GS1 DataBar
Interleaved 2 of 5
Code 93
Code 128
Data Matrix
MSI Plessey
PDF417
QR Code
UPC/EAN/JAN
11.0 - Symbologies Defaulted Off
Code barcode readers can read a number of symbologies that are not enabled by default. For a complete list (and the configuration
barcodes to enable those symbologies), please reference the CR4405 Configuration Guide located on our website at
www.codecorp.com/files.php.
12.0 - Reading Ranges
CR4405 Performance
Test Barcode
Min Inches (mm)
Max Inches (mm)
3 mil Code 39
3.1” (80 mm)
4.0” (102 mm)
7.5 mil Code 39
1.3” (33 mm)
7.2” (182 mm)
10.5 mil GS1 DataBar
0.8” (20 mm)
8.7” (220 mm)
13 mil UPC
1.1”(28 mm)
11.0” (280 mm)
5 mil Data Matrix
1.7” (43 mm)
4.5” (115 mm)
6.3 mil Data Matrix
1.3” (33 mm)
5.9” (150 mm)
10 mil Data Matrix
0.8” (20 mm)
7.1” (180 mm)
20.8 mil Data Matrix
1.1” (28 mm)
13.5” (343 mm)
Note: Working ranges are a combination of both the wide and high density fields. All samples were high quality barcodes
and were read along a physical center line at a 10° angle. Default AGC settings were used. Accuracy= +/- 10%.
13.0 - CR4405 Sled Reader Configuration
The CR4405 can be configured for specific tasks, data manipulation, or operational modes by scanning configuration barcodes
found in the CR44x5 Configuration Guide at www.codecorp.com/files.php.
D018433_01_CR4405_User_Manual
6
14.0 - CR4405 Communication Modes
The CR4405 has four communication modes, with an associated configuration barcode by the same name in the CR44X5
Configuration Guide.
Communication Mode
Description
iPhone Keyboard Communication Mode (default)
This mode allows you to scan data into an iPhone 5/5s
application like Notes or a spreadsheet, as if you were manually
entering in data (e.g. from the on-screen keyboard).*
iPhone App Communication Mode
This mode allows you to scan data into an iPhone 5/5s
application built around the CR44x5 SDK library.
USB Downloader Mode
This mode allows for USB communication with CortexTools
installed on a computer. CortexTools™ is a utility that is used for
firmware upgrades and other diagnostic tasks.
USB Pass-Through Mode
The purpose of this mode is to allow the iPhone to sync its data
with iTunesSM via a USB cable connected to a computer.
This mode is automatically activated only: 1) When the sled
becomes directly connected (i.e. not through a charging station)
to a powered USB cable, or 2) When the USB Pass-Through
configuration barcode is scanned.
In this mode the sled can still scan configuration barcodes, but
cannot read and display barcodes. If the sled was in Keyboard
Mode or App Mode before becoming directly connected to a
powered USB cable, the sled can become enabled for barcode
reading by simply unplugging the USB cable causing the sled
to revert to the last communication mode set. You can also
scan the Keyboard Mode or App Mode configuration barcode if
needed.
* It should be noted that certain third party apps do not allow data to be “tabbed” even though such configurations may be set in the
CR4405 reader. For example, some spreadsheet programs require human touch on a new cell in which to enter new data, rather than
Prefix-Tab or Suffix-Tab configuration to prompt the cursor to automatically move to a new cell.
15.0 - Power Management
Power Management Codes
Description
Sleep Timer (N minutes)
This timer puts the sled to sleep after N minutes of inactivity,
thus conserving power. The default value for N is 1 minute.
Enable iPhone Charging via Sled
This power scheme consists of the sled always providing
back-up power to the iPhone, until the sled battery level drops
to 15% or less (this value can be modified).
Disable iPhone Charging via Sled
This power scheme consists of the sled never providing back-up
power to the iPhone, thus preserving its own power for the
sole purpose of scanning.
Intelligent Charging
This power scheme is addressed later in this document.
D018433_01_CR4405_User_Manual
7
16.0 - Software Development Kit (SDK)
Code developed an SDK for the CR4405 that contains the tools necessary to assist in the development of an iPhone software
application that can communicate with the sled and provide benefits like battery status indication and advanced power management.
The SDK contains documentation and source code for the CortexMobile demonstration app. The source code provides examples on
how to access the relevant library elements to communicate with the CR4405 firmware. The SDK is available on Code’s website.
17.0 - Using CortexMobile
CortexMobile is an iPhone 5/5s software application developed by Code to demonstrate the CR4405’s capabilities. This software app
can serve as a reference for programmers who use Code’s SDK to build other apps which can be downloaded to the iPhone from
the App Store SM. The sled must be in iPhone App Communication Mode to run Code SDK-based applications. After downloading
CortexMobile, click on its icon located on the Home Screen.
After the CortexMobile “splash page” is briefly displayed, the main scan page will appear (Figure 22). The scan screen includes a
“soft” scan button with a window above it to display barcodes read. The screen also includes a sled battery status icon at the upper
right corner, just below the iPhone battery status icon. Barcodes can be read by either pressing the soft scan button or the physical
button to the right of the sled. All data can be cleared out simultaneously by pressing the Clear All button.
If the phone does not establish communication with the sled, “n/c” will appear in place of the sled battery status icon and the soft
scan button will be grayed out (Figure 23). This may happen if the sled is in some mode other than iPhone App Communication
Mode. If this is the case, scan the configuration barcode for iPhone App Communication Mode in the Configuration Guide.
iPhone battery status icon
Sled battery status icon
Scanned barcoded data
Figure 22
Figure 23
D018433_01_CR4405_User_Manual
8
Sometimes the soft scan button will be grayed out and the sled battery status icon will have “zzz” overlaid on it (Figure 24). This
means CortexMobile is active but the sled is asleep. To wake the reader a message (Figure 25) will prompt you to press the scan
button on the side of the CR4405 (Figure 17). After pressing the button, the battery status will then be updated and the soft scan
button activated indicating readiness to scan.
Pressing the Info button on the bottom navigation bar takes you to a screen that gives version and status information of the reader,
firmware, etc (Figure 26).
Figure 24
Figure 25
Figure 26
The Advanced button directs you to the Terminal screen where commands can be sent directly to the sled firmware and responses
can be received via the associated Response window (Figure 27). This is typically beneficial to advanced technical users. Please
contact Code for additional information. The Help screen describes the various features of CortexMobile (Figure 28).
Figure 27
Figure 28
D018433_01_CR4405_User_Manual
9
18.0 - Good Read Indicators
Along with displaying the barcode data and the sled LED flashing green, CortexMobile is programmed to have the phone beep
once when a barcode is successfully read. An app developer can choose a variety of audible feedback indicators as dictated by the
capability of the iPhone. Vibration via the phone can also be an option.
19.0 - CortexMobile Used For Demonstration
To optimize battery life a default time of 1 minute is set for sled inactivity before going to sleep. When you start up CortexMobile
the sleep timer automatically changes from 1 minute to 15 minutes. This allows for convenient demonstration without concern
for the sled going to sleep prematurely. The next time the sled re-boots, the sleep timer setting reverts to the default value of 1
minute.
20.0 - Battery Life Management via the SDK
Power consumption generally depends on scanner and iPhone usage. CortexMobile can demonstrate the SDK’s ability to implement
a sophisticated power management scheme called Intelligent Charging that allows the sled battery to provide power necessary
for scanning and back-up power to a connected iPhone. The sled can do this by monitoring the battery levels of both itself and the
iPhone.
NOTE: Although Intelligent Charging is a default setting on the reader, it can only be implemented if the sled is in iPhone App
Communication Mode and running an SDK-based app. Otherwise the sled will always charge the iPhone until the sled’s battery level
drops to 15% or less.
NOTE: Intelligent Charging can be deactivated by scanning the configuration barcode for one of the other two charge modes
available (Enable iPhone Charging via Sled or Disable iPhone Charging via Sled).
To accomplish Intelligent Charging, CR4405 firmware settings have been created to define key thresholds, which are:
•
•
•
“Sled Battery Reserve Level.” This default sled battery threshold is 40%, which means that 40% of the CR4405 battery charge (if
available) will be allocated to scanning for approximately 12 hours, assuming 100 scans per hour.
“Sled Battery Critical Level.” This default sled battery threshold is 15%, below which the CR4405 will no longer provide back-up
power to the iPhone, and will reserve power only for scanning and sled management.
“iPhone Battery Critical Level.” This default iPhone battery threshold is 25%, below which the CR4405 will primarily charge the
iPhone depending on the sled battery level.
IF the…
Then…
iPhone Battery
Sled Battery
Sled
Is at any level
> 40%
WILL charge the iPhone
> 25%
15% < X < 40%
WILL NOT charge the iPhone
< 25%
15% < X < 40%
WILL charge the iPhone
Is at any level
< 15%
WILL NOT charge the iPhone
iPhone & Sled Battery Status Icon Display
(Example)
D018433_01_CR4405_User_Manual
10
21.0 - CR4405 Dimensions (in inches)
22.0 - Charging Station Dimensions (in inches)
D018433_01_CR4405_User_Manual
11
23.0 - Sled Reader ID and Firmware Version
There are two ways to identify the reader ID and firmware version. Ensure that the iPhone 5/5s is installed in the sled, and then:
1. Ensure iPhone App Communication Mode is enabled. Look on the CortexMobile Info Screen.
2. Ensure iPhone Keyboard Communication Mode is enabled. Find the Reader ID and Firmware Version configuration code in the
Configuration Guide, and scan that code into Notes. You will see a text string indicating your firmware version and CR4405 ID
number (see below).
Reader ID and Firmware
You will see a text string indicating your firmware version and CR4405 ID number (see below):
iVVVVWWWWXXXXSSSSSSSSSSAOODYYYYHHIIIIJJJJKKKKLLLL<TAB>Z…Z
i indicates ‘I’ string output;
VVVV is the application firmware version number;
WWWW is the core application firmware version number;
XXXX is reserved for the radio firmware version number;
SSSSSSSSSS is the Reader’s serial number (ten digits);
A is the current execution state:
“A” means core is running
OO is the OEM identifier;
D is the display type:
YYYY is the flash file system version number. Reserved;
“0” or “N” is no display device
“D” is the standard Keypad/Display
HH is the hardware revision;
IIII is the hardware type identifier: 0012 indicates a CR4405
JJJJ is the boot application version;
KKKK is the operating system kernel version;
LLLL is the root file-system version;
<TAB> is the ASCII TAB character;
Z…Z is the decoder version: a null terminated string of printable ASCII characters. Without a decoder.ini file, the order of the
decoders listed here indicates the order of use.
Example: Xap/i07140714blue0020276289A06D0000030012002100791001-CD+SQ
D018433_01_CR4405_User_Manual
12
24.0 - Upgrading CR4405 Firmware
The CR4405 sled’s firmware can be updated by downloading firmware to a PC from http://www.codecorp.com/downloads.php. The
firmware can then be loaded on the sled via the provided USB cable connected directly to the PC running CortexTools. The sled must
be in USB Downloader Mode. During the firmware upgrade the sled’s upper right LED will flash yellow. When finished, be sure to
unplug the USB cable and return the sled to the communication mode set before putting it in USB Downloader Mode.
25.0 - CR4405 Maintenance
The CR4405 needs only minimum maintenance to operate. The tips below are maintenance suggestions.
Enhancing the CR4405’s Touchscreen Capacitive Cover
The CR4405 contains a transparent capacitive cover that helps protect the iPhone and seals out moisture and debris. The cover is
resistant to abrasion, corrosion, thermal exposure and impact. A scratch resistant material is also applied to both sides of the cover
during the manufacturing process. The cover is tightly stretched and attached to the sled case to provide ruggedness and troublefree touch response from the iPhone’s screen. For best operation, caution should be taken to ensure that the iPhone screen is free
from dirt, oils, and additional protective covers (e.g. mylar stickers).
Cleaning the CR4405 Scanner Window
The CR4405 scanner window should be clean to allow the best performance of the device. The scanning window is the clear plastic
piece inside the head of the sled. Avoid touching the window. Your CR4405 uses CMOS technology that is much like a digital camera.
A dirty window may stop the CR4405 from reading barcodes.
Technical Support and Returns
To modify any default settings, download the CR4405 Configuration Guide at www.codecorp.com/files.php and scan the appropriate
code. For user specific configurations, contact Application Engineering at Code [email protected].
For all returns Code will issue an RMA number which must be placed on the packing slip when the reader is returned.
Visit http://www.codecorp.com/codesupport.php for more information.
26.0 - Warranty
Code’s CR4405 carries a standard one year limited warranty as described herein. Customers may purchase either a one or two year
CodeOne extended warranty plan. Please contact a Code representative for more information.
Limited Warranty
Code manufactures its hardware products in accordance with industry-standard practices. Code warrants its products will be free
from defects in materials and workmanship, provided that the products are used under normal operating condition intended by the
Manufacturer. This warranty is provided to the original owner only and is not transferable to any third party. This warranty is subject
to any and all accompanying disclaimers, limitations and other terms of this section.
Warranty periods are not extendable beyond 5 years. CodeOne extended warranty programs are available and must be purchased
within 90 days of purchase. Please refer the CodeOne Data Sheet for program pricing and terms and conditions.
Exclusions
No warranty herein contained or set out shall apply to any product (i) which has been repaired, altered or tampered with unless
done or approved by Code, (ii) which has not been maintained in accordance with any operating or handling instructions supplied by
Code, (iii) which has been subjected to unusual physical or electrical stress, immersion in fluids, puncture, crushing, misuse, abuse,
power shortage, improper power supply such as incorrect voltage or wrong polarity, negligence or accident, or (iv) which has been
used other than in accordance with the product operating and handling instructions. Preventive maintenance is the responsibility of
the customer and is not covered under this warranty.
D018433_01_CR4405_User_Manual
15
Warranty Coverage and Procedure
During the warranty period, Code will repair or replace defective products returned to Code’s service center in the US. For
worldwide warranty service, go to http://www.codecorp.com/technical-support.php and fill out a service request. Customer
will be issued a case number. Case will be routed into the support queue within Code. Customer will be contacted within one
business day of submission. Code representative will work with customer to troubleshoot solution and attempt to restore
reader to proper functionality. If the Code representative determines that it cannot be restored programmatically and deems
a hardware issue is found a Return Material Authorization (RMA) Number will be assigned and customer will be instructed to
return the product to Code.
Products must be shipped in the original or comparable packaging, with shipping and insurance charges prepaid. Only parts
listed in the original RMA should be sent and will be accepted. Code will pay for return shipping and insurance of repaired or
replacement products worldwide. Code will use new or refurbished parts at its discretion and will own all parts removed from
repaired products. Customer will pay for any pre-shipped replacement product in case it does not return the replaced product to
Code within 7 days of receipt of the replacement product. The process for return and customer’s charges will be in accordance
with Code’s Exchange Policy in effect at the time of the exchange. Customer accepts full responsibility for its software and
data including the appropriate backup thereof. Repair or replacement of a product during warranty will not extend the original
warranty term.
Return time frames are listed in the chart above. For RMA’s not covered under warranty as outlined in the exclusion section,
customer will be required to pay the non-covered warranty fee as listed in the chart above.
General
EXCEPT FOR THE WARRANTIES STATED ABOVE, CODE DISCLAIMS ALL WARRANTIES, EXPRESS OR IMPLIED,ON PRODUCTS
FURNISHED HEREUNDER, INCLUDING WITHOUT LIMITATION IMPLIED WARRANTIES OF MERCHANTABILITY AND FITNESS FOR A
PARTICULAR PURPOSE AND NON-INFRINGEMENT.
The stated express warranties are in lieu of all obligations or liabilities on part of Code for damages, including without limitation,
special, indirect, or consequential damages arising out of or in connection with the use or performance of the product. Seller’s
liability for damages to buyer or others (regardless of the form of action, whether by contract, warranty, tort, malpractice, and/
or otherwise) resulting from the use of any product, shall in no way exceed the purchase price of said product. In no event shall
Code be liable for any consequential, special, indirect, incidental or punitive damages, or for any loss of profits, revenue or data,
even if Code has been advised of the possibility thereof.
D018433_01_CR4405_User_Manual
14