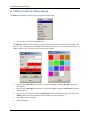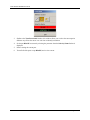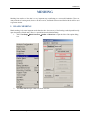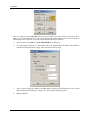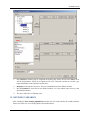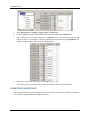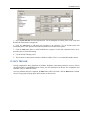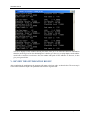
1
eta/DYNAFORM OP Training Manual Version 5.9.2.1 Engineering Technology Associates, Inc. 1133 E. Maple Road, Suite 200 Troy, MI 48083 Tel: (248) 729-3010 Fax: (248) 729-3020 Email: [email protected] Engineering Technology Associates, Inc., ETA, the ETA logo, and eta/DYNAFORM are the registered trademarks of Engineering Technology Associates, Inc. All other trademarks or names are the property of the respective owners. ©1998-2014 Engineering Technology Associates, Inc. All rights reserved. TABLE OF CONTENTS TABLE OF CONTENTS INTRODUCTION....................................................................................................................... IV DATABASE MANIPULATION .................................................................................................. 1 I. Creating an eta/DYNAFORM Database and Analysis Setup ............................................................... 1 II. Editing Parts in the Database ................................................................................................................ 4 III. Current Part........................................................................................................................................... 5 MESHING ..................................................................................................................................... 7 I. Blank Meshing ...................................................................................................................................... 7 II. Meshing Surface Data........................................................................................................................... 9 III. Mesh Check And Repair ..................................................................................................................... 12 INCSOLVER SETUP ................................................................................................................. 16 I. II. III. IV. V. VI. Define the Binder from the Lower Tool.............................................................................................. 16 INCSOLVER Interface ....................................................................................................................... 20 Define Tools........................................................................................................................................ 21 Defining the Blank Material and Tool Control ................................................................................... 24 Define Drawbead ................................................................................................................................ 28 Submit Job .......................................................................................................................................... 34 POST PROCESSING (with eta/POST) .................................................................................... 36 I. II. III. IV. Reading the Results File into the Post Processor ................................................................................ 36 Animating FLD................................................................................................................................... 38 Plotting Single Frames ........................................................................................................................ 39 Check the forming Result ................................................................................................................... 40 OPTIMIZATION ........................................................................................................................ 42 I. II. III. IV. V. VI. Entering Optimizaion Interface .......................................................................................................... 42 Defining Variables .............................................................................................................................. 43 Defining Responses ............................................................................................................................ 44 Run the job.......................................................................................................................................... 45 Review the Optimization Result ......................................................................................................... 46 Compare the optimized result with original result .............................................................................. 50 MORE ABOUT eta/DYNAFORM 5.9.2.1 ................................................................................ 54 CONCLUSION ........................................................................................................................... 55 eta/DYNAFORM Training Manual III INTRODUCTION Welcome to the eta/DYNAFORM 5.9.2.1 Optimization Training Manual. The eta/DYNAFORM is the unified version of the DYNAFORM-PC and UNIX platforms. This manual is meant to give the user a basic understanding of finite element modeling for line bead optimization, as well as displaying the optimization results. It is by no means an exhaustive study of the optimization techniques and capabilities of eta/DYNAFORM. For more detailed study of eta/DYNAFORM, the user is urged to attend an eta/DYNAFORM training seminar. This manual details a step-by-step sheet metal optimization simulation process through the INCSolver interface process. Users should take the time to learn these setup processes as it is different from the traditional setup process, such as AutoSetup. INCSolver is a nonlinear transient dynamic finite element program using explicit scheme to solve equations of motion, commonly referenced as “incremental code” or “explicit code”. INCSolver uses the SMP (Shared Memory Processing) computing scheme to take full advantage of multiple-CPU, multiple-core and multiple-thread configurations of latest computing platforms in Windows environment. Optimization is designed to adopt “SHERPA” through Red Cedar / HEEDS's SDK as the optimization engine. Build a “Black Box” solution with a set of simple Dialog Box for DYNAFORM users, mainly tool & die designers, to define the parameters and optimization objectives, etc. OP module combined INCSolver and “SHERPA” engine to optimize the blank outline, lubricant, binder press and line bead. In this manual, mainly introduce the drawbead optimization process. The other optimization is similar. Note: IV This manual is intended for the application of all eta/DYNAFORM platforms. Platform interfaces may vary slightly due to different operating system requirements. This may cause some minor visual discrepancies in the interface screen shots and your version of eta/DYNAFORM that should be ignored. eta/DYNAFORM Training Manual DATABASE MANIPULATION DATABASE MANIPULATION I. CREATING AN ETA/DYNAFORM DATABASE AND ANALYSIS SETUP Start eta/DYNAFORM 5.9.2.1 For workstation/Linux users, enter the command “df5921” (default) from a UNIX shell to start eta/DYNAFORM5.9.2.1. For PC users, double click the eta/DYNAFORM 5.9.2.1 (DF5921) icon from the desktop or choose eta/DYNAFORM from the program group. After starting eta/DYNAFORM, a default database file Untitled.df is created. Users will begin by importing CAD or CAE files to the current database. Import files 1. From the menu bar, select FileImport. Change the file format to “LINE DATA (*.lin)”. Go to the training files located in the CD provided along with the eta/DYNAFORM installation. Locate two data files: die.lin and blank.lin. Then, import both files and click OK to dismiss the Import File dialogue window. eta/DYNAFORM Training Manual 1 DATABASE MANIPULATION After reading in all of the data files, verify the display looks the same as the illustration shown above. The parts are displayed in the isometric view which is the default view setting of eta/DYNAFORM. Note: 2. 2 Icons may appear different depending on platform. Other functions on the Toolbar will be discussed further in the next section. You can also refer to the eta/DYNAFORM User’s Manual for information about all of the Toolbar functions. Save the database to the designated working directory. Go to FileSave as, type “optraining”, and click Save to dismiss the dialogue window. eta/DYNAFORM Training Manual DATABASE MANIPULATION Database Unit Click UserSetupAnalysis Configuration menu. The default unit system for a new eta/DYNAFORM database is mm, Newton, Second and Ton. The default setting for draw type is double action (toggle draw). The user is able to change these default settings from the UserSetupAnalysis Configuration menu. Note: Draw Type should accord with press type in practice. The parameters define the working direction of default punch and die. If you are not sure or operating new technique, you should select User Defined. You can also refer to the eta/DYNAFORM User’s Manual for information about all of the Draw Type functions. File Types Eta/DYNAFORM has the ability to read the following types of input files: 1. IGES (*.igs, *.iges) 2. VDA (*.vda, *.vdas) 10. NX (*.prt) 11. PROE (*.prt, *.asm) 3. LINE DATA (*.lin) 12. 4. DXF (*.dxf) 13. Parasolid(*.x_t) 5. STL (*.stl) 14. SolidWorks(*.sldprt; *.sldasm) 6. ACIS (*.sat) 15. 7. CATIA4 (*.model) 16. NASTRAN (*.dat; *.nas) 8. CATIA5 (*.CATPart; *.CATProduct) 17. ABAQUS (*.inp) 9. STEP (*.stp; *.step) 18. DYNAIN (*dynain*) eta/DYNAFORM Training Manual INVENTOR(*.ipt) LSDYNA (*.dyn, *.mod, *.k) 3 DATABASE MANIPULATION II. EDITING PARTS IN THE DATABASE The Edit Part command is used to edit part properties and delete parts. 1. From the above menu, click the Edit button. The Edit Part dialogue will be displayed, with a list of all the parts that are defined in the database. The parts are listed with the part name and identification number. From here, you can modify the part name, ID number and part color. You can also delete parts from the database. 4 2. Select the part C003V000 from the part list. Change the Name by inputting BLANK in the field as shown below. 3. Select the part C002V000 from the part list. Change the Name by inputting LOWTOOL in the field as shown below. 4. Once you have entered the new name (LOWTOOL) and selected the desired part color, click on the Modify button located at the bottom left of the dialogue to make the changes. 5. Click OK to end this operation. 6. Save your database. eta/DYNAFORM Training Manual DATABASE MANIPULATION Note: Designers often model only one surface of upper or lower die. The other die face will offset from the mating surface. In this case, we suppose the surface is the lower tool. And the upper tool will offset from the surface later. So we give the part name LOWTOOL. III. CURRENT PART All lines, surfaces, and elements which were created will automatically be placed into the current part. When creating new lines, surfaces, or elements, always make sure the desired part is set as current. Note: 1. When auto-meshing surfaces, the user does have the option of assigning the created mesh to the parts that contain the individual surface data. In other words, you can keep the mesh in the original parts, rather than have them all created in the current part. This will be dealt with later. To change the current part, click on the Current Part dialogue in the Display Options dialogue. Or select PartsCurrent on Menu bar. 2. The Current Part dialogue window will be displayed. eta/DYNAFORM Training Manual 5 DATABASE MANIPULATION 6 3. Similar to the Turn Part On/Off window, this window allows you to select the current part in different ways. Place the cursor over each icon to identify its function. 4. Set the part BLANK as current by selecting the part name from the Select by Name list that is displayed. 5. Practice setting the current part. 6. Turn off all of the parts except BLANK, and set it as current. eta/DYNAFORM Training Manual MESHING MESHING Meshing from surface or line data is a very important step contributing to a successful simulation. There are many methods of creating mesh, however in this exercise, the Blank Generator and Surface Mesh will be used to generate meshes. I. BLANK MESHING Blank meshing is the most important mesh function since the accuracy of the forming results depends heavily upon the quality of blank mesh. There is a special function for blank meshing. 1. Select UserSetupBlank GeneratorOutline on Menu bar to open the Select Line option dialog box. 2. The Select Line dialogue window is shown as below. eta/DYNAFORM Training Manual 7 MESHING There are 4 lines in the part BLANK. Switch the way of Select Line to the fourth one. Select the lines, one-by-one by left clicking on them. This Select Line dialogue window allows you to select the line(s) in different ways. Place the cursor over each icon and button to identify its function. 8 3. After selection. Select OK to open BLANK MESH option dialog box. 4. User can change tool radius to 3. This number reflects the tightest radii in the model. The smaller the radii the finer the blank mesh; a larger value will result in coarser mesh. 5. After you have entered the variable, press OK, and the program will automatically save the created blank mesh as another BLK part. Compare your mesh with the following picture. 6. Save the database. eta/DYNAFORM Training Manual MESHING II. MESHING SURFACE DATA Most of the meshing done in eta/DYNAFORM is carried out using the Surface Mesh function. This function will automatically create a mesh based on the provided surface data. This is a very quick and easy way of meshing the tools. 1. Turn off the part BLK and turn on the part LOWTOOL. Set the part LOWTOOL as current. 2. Select UserSetupPreprocess on Menu bar or click the SURFACE MESH button bar. 3. Select Surface Mesh from the Element tab as shown below. eta/DYNAFORM Training Manual on Tool 9 MESHING 4. Note: 10 In the displayed Surface Mesh dialogue window, default values will be used for all fields. Chordal deviation controls the number of elements along the line/surface curvature; Angle controls the feature line; Gap Tol. controls whether two adjacent surfaces are connected. eta/DYNAFORM Training Manual MESHING 5. Choose the Select Surfaces button from Surface Mesh dialogue. 6. From the Select Surface dialogue, choose the Displayed Surf icon. Note: All of the displayed surfaces will turn to white. This verifies they have been selected. This dialogue window allows you to select the surface(s) in different ways. Place the cursor over each icon and button to identify its function. 7. Click the Apply button on the Surface Mesh dialogue. 8. The mesh will be created and will be displayed in white. To accept the mesh, click the Yes button when prompted, “Accept Mesh?” in the Surface Mesh dialogue. Check your mesh with the mesh displayed below. eta/DYNAFORM Training Manual 11 MESHING 9. Press Exit on the Surface Mesh dialogue to exit the function. Now that we have all the parts meshed, you can turn off the surfaces and lines by turning off Surfaces and Lines in the Display Option dialogue. This makes it easier to view the mesh. Save the changes. 10. Save the database. III. MESH CHECK AND REPAIR As the mesh has been created, its quality has to be checked to verify that there aren’t any defects that could cause potential problems in the simulation. All the utilities used for checking the mesh are located under the UserSetupPreprocessModel Check/Repair on the Menu bar. 12 eta/DYNAFORM Training Manual MESHING As shown above, the Model Check/Repair dialogue consists of several functions that enable the users to check the quality of mesh. Only two of the functions are described in this training manual. Please refer to eta/DYNAFORM online help for information regarding to the remaining functions. Auto Plate Normal 1. Click Auto Plate Normal from the Model Check/Repair dialogue. A new dialogue will be displayed. 2. The displayed dialogue prompts you to pick an element to check all the active parts or an individual part for element normal consistency. Select an element on the part LOWTOOL. 3. An arrow will be displayed showing the normal direction of the selected element. A prompt will ask “Is normal direction acceptable?” eta/DYNAFORM Training Manual 13 MESHING Clicking Yes will check all elements and reorient the part as needed to the direction that is displayed. Clicking No will check all elements and reorient as needed to the opposite of the direction that is displayed. In other words, click Yes if you want the normal to point in the direction of the displayed arrow, or No if you want it to be the opposite. As long as the normal direction of most elements in a part is consistent, the program will accept that. If half of the total element’s normal is pointing upward and other half pointing downward, the result will be flawed. Note: In this case, we will offset upper tool from the lower tool by the normal direction. So click Yes to make sure the normal to point in the direction of the displayed arrow. 4. Now that the LOWTOOL elements are consistent, check the rest of the parts in the database. Turn off all the parts and turn each one at a time. Check the normal direction and make sure it is consistent. 5. Once all the normal directions are consistent, turn on all of the parts and save the changes. Display Model Boundary This function will check the mesh for any gaps or holes, and highlight them so you can manually correct the problem. 1. Select Display Model Boundary from the Model Check dialogue window. Minor gaps in the tool mesh are acceptable. Blank mesh should not contain any gaps unless the blank is lanced or is designed with gaps. Click the isometric view and make sure that your display looks like the following. 14 eta/DYNAFORM Training Manual MESHING 2. Turn off all of the elements and nodes from the Display Options dialogue (Note: the boundary lines are still displayed). This allows you to inspect any small gaps that might be difficult to see when the mesh is displayed. The results are shown in the following picture. 3. Check for overlapping elements and minimum element size. Delete the duplicate elements if there were found. 4. Save your database. Save the changes to your initial database and make a note of this file name. We will use this file later in this training manual to perform INCSolver and Optimization with SHERPA. This manual will first detail the INCSolver process, then the Optimization with SHERPA. Skip to the INCSolver of this manual if you are already familiar with the INCSolver interface and analysis setup procedure. eta/DYNAFORM Training Manual 15 INCSOLVER SETUP INCSOLVER SETUP Before entering the INCSolver interface we will need to separate the binder run-out (lower ring) and punch (upper tool) from the lower tool. This will allow the INCSolver to automatically generate the die from this run-out. This procedure is common to all INCSolver models that require a binder and punch. I. DEFINE THE BINDER FROM THE LOWER TOOL The next step is to separate the Binder from the LOWTOOL, and Move Elements on Run-out of LOWTOOL into Binder. 16 1. Turn on LOWTOOL and turn off all other parts. 2. Create a new part called Binder. This part will hold the elements that we separate from the LOWTOOL. Click PartsCreate on Menu bar. 3. Enter BINDER in the name field. Click OK to create the part. 4. The part BINDER has been created and set as the current part automatically. 5. Click PartsAdd… To Part on Menu bar. eta/DYNAFORM Training Manual INCSOLVER SETUP 6. The Add…To Part window appears as above. Click the Element(s) button as shown above. 7. The program displays the Select Elements window as shown in next page. The easiest way to select all elements of the ring is to switch the view to the XY plane on the Tool Bar, then select the Spread icon, press and drag the left mouse button on the Angle Slider to set a small angle. Since the Ring surface is flat, set the smallest angle you can select (e.g. 2 as one degree). eta/DYNAFORM Training Manual 17 INCSOLVER SETUP 8. 18 Click any element on the outer-ring of LOWTOOL. eta/DYNAFORM Training Manual INCSOLVER SETUP All elements in the flat area before an element angle change of larger than 2 degrees should be highlighted. Compare your display to the preceding image. If your results differ, repeat the above steps to re-select. 9. Select OK on the Select Elements window. You will find the number of elements (887) is shown on the left side of the Element(s) button as below. 10. Click Apply, and all selected elements are moved into BINDER. 11. Turn on only BINDER and display the part using Top view. The program displays the result as the following. If the result differs, repeat the above steps. eta/DYNAFORM Training Manual 19 INCSOLVER SETUP 12. Save the changes. II. INCSOLVER INTERFACE 20 1. Select the OP menu, OP INCSolver. 2. As shown in the following the INCSolver menu, the undefined tools are highlighted in red. The user needs to select the draw type and available tool first. In this application, the draw type is “Single action” or Inverted draw. The available tool is the lower tool. 3. Define the blank and tools by clicking the appropriate buttons. eta/DYNAFORM Training Manual INCSOLVER SETUP III. DEFINE TOOLS The parts LOWTOOL and BINDER are meshed and can be defined as the Binder and Lower Tool respectively. To define the Binder: 1. Click the Binder button, and then select the Select Part button from the Define Tool dialog window. eta/DYNAFORM Training Manual 21 INCSOLVER SETUP 22 2. Add from the Define Binder window. 3. Select the part name from the part list: BINDER. eta/DYNAFORM Training Manual INCSOLVER SETUP Repeat the same procedure to define the Lower Tool. Once both tools have been defined, the color in the INCSolver window will be changed to green as shown in the following picture. eta/DYNAFORM Training Manual 23 INCSOLVER SETUP IV. DEFINING THE BLANK MATERIAL AND TOOL CONTROL 1. Click the Blank button from the INCSolver GUI, and add the previously defined blank BLK the blank list. 2. The user needs to define the material and thickness. For the blank thickness, the user may enter the number in the thickness field. In this case, we will set it to 0.7mm. 3. The blank material can be selected from the Material Library under the material definition window. In this case, we will import the mat. The Material Definition window will be shown as in the image below. Click the Import button and select fender.mat as in the below figure. Then Click the Open button to import the material. 24 eta/DYNAFORM Training Manual INCSOLVER SETUP eta/DYNAFORM Training Manual 25 INCSOLVER SETUP 26 4. The imported material will be shown as in the image below. It lists all the parameters of the material. 5. Click OK to use the imported material parameters (following image) (Note: ETA makes no guarantees as to the validity or accuracy of the generic material models in the material library. Users should contact their material suppliers to determine material parameters). To complete the material definition, click OK from the material dialogue and return to the INCSolver interface. Save the changes. 6. Use the default Tool Travel Velocity and Binder Close Velocity. Toggle on the Lower Binder Force and Lower Binder Travel and set the values as in the following figure. Save the database. 7. Select Apply, and the program will automatically create mating tools, position the tools and generate the corresponding travel curves. eta/DYNAFORM Training Manual INCSOLVER SETUP 8. Select Preview to check the tooling motion. 9. Compare your display with the illustration shown below. eta/DYNAFORM Training Manual 27 INCSOLVER SETUP V. DEFINE DRAWBEAD Next step is to define the drawbead for the simulation analysis. 1. 28 Click the Drawbead button to open the Drawbead dialog box, as illustrated in the following figure. eta/DYNAFORM Training Manual INCSOLVER SETUP 2. Click the Import button, as illustrated in the following figure. 3. Switch the file type to iges and select the drawbead file drawbead.igs. eta/DYNAFORM Training Manual 29 INCSOLVER SETUP 4. 30 Use the default mesh parameters and click Apply to generate the line drawbead, as shown in the figure below. eta/DYNAFORM Training Manual INCSOLVER SETUP eta/DYNAFORM Training Manual 31 INCSOLVER SETUP 5. Select all the Draw beads in the left side list. Click Select in Lock tool and select BNDR0000 from the Select Part list. Click OK to exit. Lock the drawbead to part BNDR0000. 6. Once the sheet is defined, the program will calculate the full lock force. We can set force Percentage (%) for each draw bead respectively according to the flowing condition of material. Select the first drawbead and input the percentage 40. 32 eta/DYNAFORM Training Manual INCSOLVER SETUP 7. Repeat the above operations to set force percentage for each drawbead respectively. Percentages for all drawbeads are set to 40. 8. Click Exit to exit the Drawbead dialog box. The following are the description of other functions in the INCSolver interface: • Lance and Trim allows the user to define Lancing and Trimming stages. • Advanced allows the user to change default parameters related to INCSolver. • Help brings some tips for the user about the INCSolver simulation. • Submit Job brings the user to the analysis menu. • Report allows the user to check the formability report. • Exit will allow the user to exit the INCSolver menu. eta/DYNAFORM Training Manual 33 INCSOLVER SETUP VI. SUBMIT JOB After verifying the tool motion is correct, we can define the final parameters and run the analysis. 1. Click Submit Job button to display the Submit Job dialogue window shown below. 2. Click the Submit button to run the job. It is recommended that new users use the default control parameters (For more information about them, please refer to the INCSolver User’s Manual). The solver displays a DOS window, showing the status of the job. You will notice that some model information is given. After the program is completed, Move the result into new directory named Original_Result. Then next step is to Proceed to section POST PROCESSING (with eta/POST) for post-processing. 34 eta/DYNAFORM Training Manual INCSOLVER SETUP Again, the eta/DYNAFORM INCSolver interface is designed to help the user to quickly setup a standard draw simulation. The user is encouraged to learn the traditional, a more flexible way of setting up a draw simulation. eta/DYNAFORM Training Manual 35 POST PROCESSING (with eta/POST) POST PROCESSING (with eta/POST) The eta/POST reads and processes all the available data in the d3plot file (For more information about them, please refer to eta-post User’s Manual). In this case, we will just read the fas file which is generated from INCSolver. I. READING THE RESULTS FILE INTO THE POST PROCESSOR To execute eta/POST, click Post-Process from eta/DYNAFORM menu bar. The default path for eta/POST is C:\Program Files\Dynaform 5.9.2.1. In this directory, double click the executable file, EtaPostProcessor.exe. The eta/POST can also be accessed from the programs listing under the start menu under eta/DYNAFORM 5.9.2.1. The eta/DYNAFORM Menu Bar 1. 36 From the File menu of eta/POST, select Open. The Open File dialogue will be displayed. eta/DYNAFORM Training Manual POST PROCESSING (with eta/POST) 2. Select INCSolver (fas) from the Files of Type list. This option will allow you to read in the fas file. Navigate to the directory where the result files were saved, be sure you have the correct file of type selected, pick the fas file, and click Open, as shown in the figure below. eta/DYNAFORM Training Manual 37 POST PROCESSING (with eta/POST) 3. The fas file is now completely read in. You are ready to process the results using the result manipulation menu bar as shown below. II. ANIMATING FLD eta/POST can animate deformation, thickness, FLD and various strain/stress distribution of the blank. In this case, we mainly focus on the FLD. To do this, refer to the following examples. FLD 38 1. Pick FLD from the result manipulation menu bar. 2. Select Middle from the Current Component list. 3. Set FLD parameters (n, t, r, etc.) from FLD Curve Option. 4. Select Edit FLD Window to define location of FLD plot on the display window. 5. Click Play button and the animation will begin. 6. Click Stop button. eta/DYNAFORM Training Manual POST PROCESSING (with eta/POST) III. PLOTTING SINGLE FRAMES Sometimes it is more convenient to view single frames rather than the entire animation. To do this, select Single Frame from the Frame combo box. Then, select with your mouse, the frame you would like to view from the frame list. Users can also drag the slider of frame number to select the frame accordingly. eta/DYNAFORM Training Manual 39 POST PROCESSING (with eta/POST) IV. CHECK THE FORMING RESULT In this step, we check the forming result based on the FLD plotting. Turn off all parts except BLANK part, and then plot the last frame, as shown below. The formed result will be displayed as shown below. Some regions are crack and it is unacceptable in actual engineering. Then next step is to Proceed to section Optimization (with SHERPA) for optimization. 40 eta/DYNAFORM Training Manual POST PROCESSING (with eta/POST) eta/DYNAFORM Training Manual 41 OPTIMIZATION OPTIMIZATION As shown above, the forming result is not good and we need to modify the forming parameters to get a better result. In the forming process, the line bead force is an important factor. So in this case, we mainly illustrate how to optimize the drawbead, and the blank outline, lubricant, binder press force are similar with that of the drawbead. Before entering the Optimization interface, the user should complete the forming of INCSolver. The user can click the Optimization submenu located at the below of OP menu to display the interface. I. ENTERING OPTIMIZAION INTERFACE Click Optimization in the menu bar, then the program will pop up the Sheet Forming Optimization interface and prompt the user to define basic parameters. 42 eta/DYNAFORM Training Manual OPTIMIZATION 1. Once INCSolver forming setup is completed the forming stage will be shown on the Source list. It will list all parameters, which can be optimized. The user is allowed to define the variable, type, range and baseline on the right frame shown above. 2. Responses list all response objectives. They are calculated based on the defined variables. 3. No. of Evaluation is also based on the defined variables. 10 is the default value when you enter Optimization interface. 4. The user is allowed to set Thinning value. II. DEFINING VARIABLES After entering the Sheet Forming Optimization interface, the user needs to define the variables from the Source list. In this case, we will only optimize the Drawbead force. eta/DYNAFORM Training Manual 43 OPTIMIZATION 1. Select Drawbead under forming_<single_action> in Source List. 2. Click the Add button, and then all defined drawbeads will be added to the Variable frame. 3. Some Variables use the default variable type: Continuous. As for some drawbeads with the same numerical value, we can define the relations of dependence between them by using Depend On. The detailed variable setting is illustrated in the following figure. 4. Change the variable range (The range is the multiple of 5) to 5. 80. 5. The baseline is just the defined bead force value in INCSolver, and it is not modified here. III. DEFINING RESPONSES When variable definition has been completed we need to define the responses for variables. The Response is the output file which includes the variable performance. 44 eta/DYNAFORM Training Manual OPTIMIZATION 1. Select Crack and Safe from the Responses list. For the simulation we mainly focus on the Crack and Wrinkle like Performance in output file. 2. Click the Add button to add these two responses as the Objective. Use the default option and normalizing factor. This operation will build the link between variable and response. 3. Click the Add button below to add Constraints for responses. Set the Safe constraint Limit to 99%, and others just use the default setting. 4. Use the default Thinning values. 5. The Iterations are based on the number of defined variables. There is a recommended number shown. IV. RUN THE JOB Having completed the above definitions of Variables, Responses, and control parameters, next we will run job with INCSolver and SHERPA/Heeds. Firstly, the user should have the license file of Dynaform and SHERPA. They are different licenses. Once the definition has been completed, the Run button will be activated. Click the Run button to submit the job. The program will pop up the DOS window, as shown below. eta/DYNAFORM Training Manual 45 OPTIMIZATION The solver displays a DOS window showing the status of the job. You will notice that more information about the model is given, but the calculating time is hard to get. Since we are using adaptive mesh and the model will re-mesh for several times. Also, the number and speed of CPU influence it. However, it does give you a general idea. V. REVIEW THE OPTIMIZATION RESULT After completing the optimization, the program will return to the best value, as shown below. The next step is to check the result and compare the optimized result with the original result. 46 eta/DYNAFORM Training Manual OPTIMIZATION 1. You will notice that the Result button is activated, and the process status turns in red, indicating the calculation is completed. 2. The program provides two ways to review the result. One is clicking the Result button on optimization GUI, and the other is selecting Result Viewer from the OP submenu, as shown below. 3. After completing the optimization the Result button is activated. Click the Result button to review the calculated result, as shown below. eta/DYNAFORM Training Manual 47 OPTIMIZATION 48 4. The program will automatically select the best five results from all calculation results and list the corresponding Performance, Variable and Response. The user can select any one of the results and then click the View button and the program will automatically switch to eta/Post to process the result. When users view and accept the optimization result they are allowed to assign the drawbead value after the optimization to the drawbead defined in INCSolver by clicking the Apply button. The result in the first line is selected as the optimization result by default. 5. In the Graph, the user can check the defined responses related to variables. Cycle and the Response “Crack” are selected as X Axis and Y Axis respectively, and the program will display the relationship between Crack and Cycle, as shown below. eta/DYNAFORM Training Manual OPTIMIZATION 6. Cycle and the Response “Safe” are selected as X Axis and Y Axis respectively, and the program will display the relationship between Safe and Cycle, as shown below. 7. Toggle on the Dynamic option and click on the relationship dynamically. eta/DYNAFORM Training Manual icon, and the program will show the 49 OPTIMIZATION 8. Select the optimal result in the first line and click the View Best button, and the program will automatically open the result in the Post Processer, as shown below. VI. COMPARE THE OPTIMIZED RESULT WITH ORIGINAL RESULT The next step is similar to the previous one about Post-Processing. We will introduce the main procedure to compare the optimized result with original one. FLD Pick FLD from the result manipulation menu bar. 50 eta/DYNAFORM Training Manual OPTIMIZATION Plotting Single frames eta/DYNAFORM Training Manual 51 OPTIMIZATION Check the optimized forming result: Compare the two results: Original result 52 eta/DYNAFORM Training Manual OPTIMIZATION Design optimization result: Conclusion: After the Design Optimization, the crack/split area is significantly reduced, as shown on the forming limit diagram (FLD) . eta/DYNAFORM Training Manual 53 MORE ABOUT eta/DYNAFORM 5.9.2.1 MORE ABOUT eta/DYNAFORM 5.9.2.1 The eta/DYNAFORM 5.9.2.1 configuration file is located under both the installation directory and My Documents directory. Inside the eta/DYNAFORM 5.9.2.1 installation directory, there is a file called dynaformdefault.config. Many key default parameters are included in this file. When the user opens eta/DYNAFORM 5.9.2.1 for the first time, the program will automatically create a file called dynaformdefault.config under My Documents directory. The configuration file locates in the “My Documents” directory of the current user’s PC, for example, C:\Documents and Settings\Andy\My Documents\ETA\Dynaform5.9.2(Windows XP), C:\Users\Andy\My Documents\ETA\Dynaform5.9.2 (Windows 7). The user can open this file and change these default parameters, or click OptionEdit Default Config from Menu bar to edit these default parameters in the dialog box. The modified default values in the dialog box will be saved in the configuration file under My Documents directory. The configuration file under My Documents directory will take precedence over the one under the installation directory. For UNIX/Linux users, the dynaformdefault.config file is located under both the installation directory and the user’s home directory (/home/Andy/ETA/Dynaform5.9.2). The dynaformdefault.config file located under the installation directory will take precedence over the one located in the user home directory. 54 eta/DYNAFORM Training Manual CONCLUSION CONCLUSION This concludes the training guide’s basic overview of eta/DYNAFORM 5.9.2.1. This manual is meant to give the user a basic understanding of finite element modeling for forming analysis, as well as displaying the forming results. It is by no means an exhaustive study of the simulation techniques and capabilities of eta/DYNAFORM. For more detailed study of eta/DYNAFORM, the user is urged to attend an eta/DYNAFORM training seminar. Please refer to the eta/DYNAFORM User’s Manuals and the LS-DYNA Keyword User’s Manuals for detailed explanation of individual functions and analysis settings. eta/DYNAFORM Training Manual 55