1
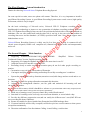
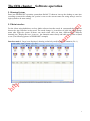
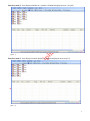
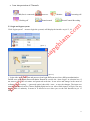
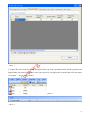
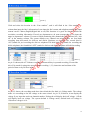
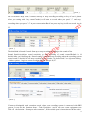
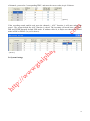
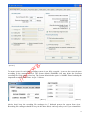
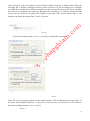
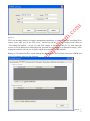
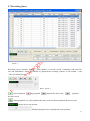
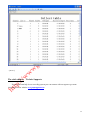
Voicesoft Telephone Recording System VSP32 User Manual Table of Contents The First Chapter: System Introduction…………………………………………………………… .2 The Second Chapter: Functions……………………………………………………………………..2 The Third Chapter: Technic Parameter………………………………………………….3 The Fourth Chapter: System Installation…………………………………………………………….3 4.1 Hardware Installation……………………………………………………………….………3 4.2 Software Installation……………………………………………………………………..…4 The Fifth Chapter : Software Operation………………………………………….…………..……...5 5.1 Startup System………………………………………………………………………….…..5 5.2 Main interface…………………………………………..…………………………………..5 5.3 Login System……………………………………………………………………………….9 5.4 Database select setting………………………….…………………………………………..11 5.5 Recording Setting………….……………………………………………………………….11 5.6 System Setting………………………………..…………………………………………….15 5.7 Recording Query…………………………..……………………………………………….21 The Sixth Chapter Technic Support…………………………………………………………………..24 1 The First Chapter System Introduction Thanks for choosing Voicesoft Series Telephone Recording System! On some special occasion, must save phone call content. Therefore, it is very important to install a good Phone Recording System. A good Phone Recording System must record correct, high quality call content, which is easy to inquire . On the basic technology of Voicesoft series, Voicesoft VSP-32 Telephone recording system breakthrough in technology to improve a new generation of telephone recording products. Voicesoft VSP-32 Telephone Recording System can slove the problem about both sides conversation sound no imbalance, like one side sound small, and the other side is too big, it also can solve the problem of recording data more and the database (ACCESS) speed deal with slow. Now, it can support more kinds database to use. Voicesoft Phone Recording System is widely used in few lines user. It used in commercial call, electric power dispatch, hotline call, complain call, financial and stock, traffic and transportation, and so on. The Second Chapter Main function Supporting WindowsXP/WIN2003/VISTA/WIN7/WIN2008 Simplified Chinese Version, Traditional Chinese Version, English operation system. 2. Supporting 192 channels telephone recording at the same time in one PC. 3. Adopt the newest PCI interface recording card. 4. Recording clearly to make sure that coversation party do not feel other people recording or monitor. 5. Can monitor every real-time conversation of Extension 6. Can inquire and play phone recording and backup file swiftly according user‟s condition. 1. System has automation back-up function,extension record,calls charge and no record and so on functions. 8. Incoming call and Out-going call number automatically detection. 9. Advanced call management function ,can list ,print and statistical all incoming call and out-going call number. 10. Can set 4 disk at most, which is harddisk or subarea. If system hard disk will be fully occupied,it will delete previous record content so that system can operate continuously . 11. Multi-way of starting record –pressure control ,Key control,Soud control. 12. Start time of recording can be set freely,can record some duration ,or record whole a day. 13. Provide the different compression rate,and can satisfy the different user‟s need,20G HD can save recording file about 1500hours. 14. Routes are suitable for direct Outside lines,Extension lines,ISDN analogue lines. 15. If system hard disk will be fully occupied,it will delete previous record content so that system can operate continuously. 16. Direction confirmation.Can discriminate Calling –in and Calling –out direction. 7. 2 17. 18. 19. 20. 21. 22. 2 classes of password adopted,do relative operation according to different authorization. Complete recording log-can record all system operation. Popup client incoming call detail information. Network query and listen recording. Channels AGC function. Support more kinds free database mode, ACCESS-MDB/MSSQL/MYSQL and more kinds data. System default status: 1. 2. 3. 4. 5. 6. User name:admin Password:admin. Can monitor all the channels. The recording direction is all recording . The storage route of recording file is:C\TxRec\. The recording duration is 24hours. The startup way of recording is Pressure control. The Third Chapter Technic Parameter - Size : 205mm X 106mm X 15mm - Resistance : > 8 M Ω - Signal Noise Proportion : >= 38dB - Recording distortion : =< 2% - Frequency : 300 – 3400 Hz - Date rate : ADPC 16 Khz - Collection rate :8 Kbps each channel - Sound Output rate 50mW (earphone driver) - Echo suppression ratio playback ≥40Db - Recording and playback decode format: CCITT A/µ-Law 64kbps, IMA ADPCM 32kbps - Recording time: No limit - Temperature : -20 0C ÷ + 85 0C - Humidity : 5% ÷ 85% The Fourth chapter System Installation In order to make Voicesoft Phone Recording System operate normally, we recommend PC requirement according the following: Windows XP operation system above. CPU Speed > Pentium Dual-core E5800 3.2GH Can use PCI slot, more than one USB connection. Memory :2 GB Harddisk>500G ( It can increase the HD size according to the telephone conversation frequency ) Audio box Other equipment for PC normal operation. 3 4.1 Hardware installation: Installation step: 1、Power off,then, plug out power connector. 2、.Screw off the screws of computer lid,and debus the computer box. 3、Install your recording card to PCI slot and fixup well. 4、Insert your USB software dog into the USB port of PC. 5. Connect the telephone line to corresponding phone interfact . 32ch recording card diagram (Pic 4.1.3) 4.2 Software installation 1、After installing the PCI recording card ,when you startup the PC,it will appear the guide with “find out the new hardware”. 2. Insert the Voicesoft recording system CD, find the file “T3 Driver-setup”,dblclick and according to the installation guide to finish the operation , until finish the driver installation. 3. Installing the main program of recording system, find “T3 Setup.exe” folder in CD,according the guide to finish the installation of main program.After finish the installation of software,it will have T3 shortcut in your desktop automatically and you can dblclick to startup. 4 The fifth chapter Software operation 5.1 Startup System Enter into WINDOWS7 operation system,then dbclick T3 shortcut icon on the desktop to enter into recording system.After running the system it can see the current status.For using safety,it need to login system to do some setting. 5.2 Main interface For the client using habit,there are four kinds software interface mode in system,and the client can choose the App. Interface as they need. The mode change is ,it can direct to click the mode change menu after login the system..It shows one mode when click one time, different mode different channels size. Display the icon ,it can see the channels status clearly and cable connection well,and so on. (The following picture in WINDOWS7 example) Interface mode 1: Large icons displayed, showing a relatively small number of channels.( Pic 1) (pic.1) 5 Interface mode 2: Icon displayed moderate , number of channels displayed more. (As pic2) (pic2) Interface mode 3: Icon displayed small, number of channels displayed most.(As pic3) (Pic 3) 6 Interface mode 4: Icon displayed smaller, but it can display the detail channels status information. (As pic 4) (Pic.4) Description of the status of icon: :It will display off line status,if no connect recording card well.(As pic5 ) (Pic5) Cable has connected well,it will in idle status if not pickup the phone. (As pic 6). (Pic.6) Dial- in telephone, it display ringing status,ring times,incoming call number,incoming call time and so on information. As pic7. 7 (Pic 7) Dial –in call or pickup call it is conversation status. Dial -out number,time and duration of conversation and so on information it will be recorded. It can choose the icon and click right to monitor when in conversation.(Pic8) (pic8) After finish the call,it will become one recording in the interface below. Dbclick to play back recording content .Click right, it can choose the designated to play or Save As. As pic 9,10,11. (pic9) (pic10) (pic11) The software can show the space of HD capability , the storage of recording times,system time ,login system user name and so on.. As pic 12. (pic.12) 1. When the system run main interface , recording system is in working status. 2. Monitor:System can monitor lively. Once the user click icon of one line twice,can monitor conversation at the line.Click twice to cancel monitor or stop monitor.Only can monitor one channel at one time. 10 3. Icon interpretation of Channels: Idle(line is connected) Hooking off Disconnect Sound control Monitor Incoming call Sound Control Recording 5.3 Login and logout system Click “login system” menu to login the system,it will display the interface as pic 13,14. (pic13) (pic14) 1. Login:After input user name and password,can login.Different users have different authorization. Default user name:admin,Password:admin Remark:It can tick the “Auto Login” in selection box, if not want to input the user name and password each time. It can select and change in the menu of software “system setting‟ ---“password option‟,then click „enter „ to save the changes. The input user name and password can be Chinese,English,digital and so on. After finish input,it will give the user proper limits of authority. It means it is allowed to use when you see the tick function.As pic 15 shown: 11 (pic15) 2. Logout:The user need user name and password to do some operatation.After finish operation,can logout.Other user must login before enter into system. It can logout the system when click the menu of “Logout ” .As pic 16,17 shown. (Pic16) (Pic17) 12 5.4 Setting of Database select It supports more kinds database system according to the user‟s need, the system can connect Access/MSSQL/MYSQL and more kinds database to use. Default is Access-MDB database, If want to use MSSQL/MYSQL database ,it need to install the database system well in your PC first,then choose the correct database setting ,it can use after you testing successful . Remark:Before you using the recording system ,it should be choosed the correct database system, or it will miss some data in you change the new database..As pic 18,19 shown. (pic17) (pic18) 5.5 Recording Setting (pic19) Click the menu „Recording setting” to enter into recording setting column. As pic 19,20 shown: 11 (pic20) Click and select the location in the “Line number” ,and it will flash in the “Line number” column,then input the line‟s information,(It can input the line‟s name and telephone number,the input content can be Chinese,English,Digital and so on.)This function it is good for Stat.and search the correlative recording information .If need use department to do some manage,then it can input the name in departmeter column. If want to forbid monitoring this channel,then it can cancel the “tick off” in the monitor column. The system default every channel can monitor.There are four kinds recording item,ALL,stands for dial-out and dial-in telephone are opened. The second kind is “OUT,stands for just recording the dial out telephone.The third kind is IN,stands for recording the dial in telephone ,the fourth kind “OFF”,stands for dial out and dial in telephone all forbid recording. (Pic21) As pic 21 shown,tick off ”24 hours recording”,it means all day is openned recording, If cancel the tick off ,it stands for using time open or forbid recording. 1,2,3,4 start time and end time of the period of time set by 24-hour input. (pic22) As pic 22 shown, the recording mode have three kinds,the first kind it is Voltage mode. The voltage mode it is according to the line voltage to do some control. As pic 23,24 shown, it can display the voltage if you input the need test channels number. Pickup the call display hook off voltage . Off the call display hook on voltage. The system default is Voltage mode, default hook off voltage is 12,hook on voltage it is 18. (pic23) 12 (pic24) The second kind is Digit mode, it means start-up or stop recording according to key of user‟s phone. After you setting with “key control”mode,it will start to record when you press“ *” and stop recording when you press “ #” in your conversation.But if not press any key,it will not record. As pic 25: (pic25) The third kind is Sound Control: Start-up or stop recording according to the sound of line. Sound Sensitivity:Adjust sound sensitivity to start recording of sound control.Default is 18 decibel.After you choosing the “Sound control”,it will start-up recording when the recording system sound reach 18 decibel.It will stop recording when it under 18 decibel and 5 sec.(System Setting --Others options –-begin to count recording seconds.) As pic 26,27. (Pic26) (Pic27) If want to distinguish each extension record when your recording system is connected with PBX system. It can use the function about “ Take Extension “,and it can save some equipment cost. Tick off the function “ Startup to take extension”, If the outside port is inconsistent with the order 13 of channels, you need to "corresponding TRK", and enter the correct order,As pic 28 shown. (pic28) If the recording sound small,it need open the channels “ AGC” function, it will auto enlarge the sound . The system default the AGC function is closed. The incoming call mode have two kinds, FSK and DTMF.Normally default FSK mode. If without caller id ,it maybe not choose the correct mode in FSK or DTMF. (As pic 29 shown). (Pic.29) 5.6 System Settings 14 (Pic.30) To ensure space for each disk recording system is not fully occupied, it can set the reserved space according to the customer‟s need. The system default 1000MB,it will auto delete the foremost recording file if this space is used up. The system default delete space is 100MB. Please backukp the important recording file on time. As pic 31 shown. (Pic31) (Pic32) Advise don‟t keep the recording file catalogue in C disk,and protect the system from virus. Recording file catalogue should be keep in the other disk,it can keep safety even if you reinstall the 15 system in future. Can set 4 catalogue at most,which is different memory at different disk. When the recording file is fulled in catalogue one,then system will auto save the recording file in catalogue two.When the recording file is fulled in catalogue two,the system will auto keep the file in catalogue three,and so on catalogue three and four. But when the recording file is fulled in catalog four,the system will auto delete the foremost file 100MB of each disk. (The system default value ,it can change in the menu „Recording Data”. As pic 32 shown. pic.33) To ensure the sound quality ,it use 1:1 to save the recording file at present. Pic 34 If the file is more important, please use the double backup. Tick off “Backup file storage place” in the menu “Recording File Backup”.. In the place of select to save file, advise not set two folder at the same recording catalogue) .As pic 34 shown. (Pic35) 16 (Pic.36) FTP is an automatic backup of remote management capabilities, it can auto send the recording file to remote server after you set the FTP server. Please tick off the FTP auto backup in the menu of „ Recording file backup”. (As pic 35),,and click setting, it will appear the pic 36), then input the correct server IP address,user name,password ,port and save place and so on parameter setting . After testing successful,it will can use. Or please check the network or server problem. Backup to CD automatically it means backup the recording file by CD mode,it need use CDRW and some CD software when use this function. (Pic.37) 17 Prohibit recording by special number:If want to prohibit recording by special number,please choose the option “Number option”. “Prohibit extension recording “ it means add the extensioin no. of not want to record .(As pic 37 shown). (Pic.38) „Password option “ it sets the user using software permissions and management. Click “add “ button ,and input the new user name and password, then gives different levels of management authority. If the user want to use please open the permissions .. The user can click “delete “ option to delete the user .It need to click “Save modify” after finish the operation.(As pic 38) 18 (Pic.41) Prefix filtering is in line with outgoing or incoming numbers in the non-standard case, or the increased filtered, displayed the same number and the actual number. For example: Dial a phone number of Virtual Network to dial 9 or 0 before the exit, in order to allow recording system shows the number of the original number,then it can set as pic 41.Input “9” or „0” in “prefix” column,and tick off “ prefix filter‟. Input “0” in number intercept length ,it means intercept all the number. “8” stands for filter the first number, then an interception from the beginning number 1 to 8 ,and the excess number is not displayed.Interception mode selects “ All”,stands for all the outgoing and incoming call number is intercepted. Selecting “ OUT” stands for filter the outgoing call number. “IN” stands for filter the incoming call number. Automatically increase the prefix number is mainly to make up for some specified number prefix. For example: Input 0755 in menu “ Incoming call prefix”.8, 0 means the number of calls for the 8-digit number if the automatic increase in 0755 in front of the other digits before automatically increase the number 0. 19 (Pic42) Select the default time query in menu “ recording query auto load the data” of “ Other options”. Time setting longer,the query data bigger and memory source more and more. System has two kinds play mode ,there are “playback by recording card “ and “playback by sound card “. “Playback by recording card” connecting the earphone to the recording card, and listen the telephone recording directly . Advise selecting the sound card to playback . Because sound card playback it is built by system,it also can playback by other player. Tick off “Start the software automatically when you start the PC”, the software will run auto when you open PC. 20 5.7 Recording Query (Pic43) Recording Query interface display “Total number of current record, Cumulative talk time,File size and information. Select and dbclick to playback the recording content ,it will remark “ read “ after you finish playing . Player(pic44) start to playback the next record stop playback playback the last record playback Startup playback Cyc,after playback the last record,it will auto playback the next record. Display the play time dynamic Playback progress bar,it can playback at any position. 21 Volume control (Pic.45) General inquiries is by “Channels,Trunk, Ringing times,Ext. ,Lines number,Department,Dial number,Remark,Time,Dial in,Dial out,Unanswered call,Importance” and some condition to inquire. It will display the result when it contain this condition . The condition smaller,the inquire time shorter.. It will display the query results after enter the condition. It can open the months file database if want to inquire the other months data. The inquiry result can be printed out the reports or exported the EXCEL.(As pic 46,47 shown.) 22 (Pic.46) 23 (Pic.47) The sixth chapter Technic Supports If you need some help in our recording system,you can connect with our agent or get some information in our website www.giaiphapghiam.com 24