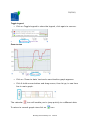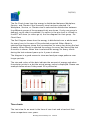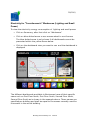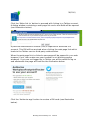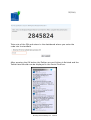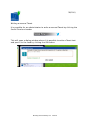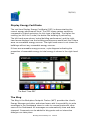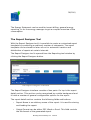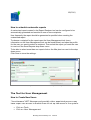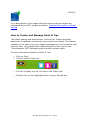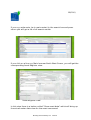
1
1(100)
Workplace Footprint Tracker
Generic User Guide & Reference Manual
This Generic User Guide & Reference Manual of the Workplace Footprint
Tracker (WFT), the energy management and the energy visualization
service from Building Sustainability Ltd (BSL), describes the use of the
most important features available on the WFT dashboard. Details of how
to access the many dashboard views are usually obvious to the user and
not described in detail here. Some special and optional features like the
WFTBox (Digital signage on clients web) and the EMW (Energy Manager's
Work Bench) are described in detail in separate documents. The user is
encouraged to "click around" on the dashboard to learn how it works.
There is no risk of destroying anything by mistake on the ordinary
dashboard. All critical parameter settings are done on special dashboards
protected by password and accessible only to trained users.
The Workplace Footprint Tracker (WFT) is a cloud- and web-based system
and service for Energy, Sustainability, and Building Managers to monitor
and manage energy usage (and generation) in buildings and workplaces,
factories, and complete portfolios of buildings. It is also a tool to engage
building occupants in energy saving actions through contests and digital
signage. The WFT comprises basic functions such as smart metering,
automatic metering management (AMM), a multi utility solution, near real
time energy visualisation for behaviour change, energy management and
energy analysis functions, reporting, and user administration. The access
to and usage of these features are described below.
In case of problems please refer to the Reference Manual below in the first
place, or any relevant optional description, or if no solution is found please
send a mail to: [email protected]
“The behaviour of occupants in a building can have as much impact on
energy consumption as the efficiency of equipment”. World Business
Council for Sustainable Development
Building Sustainability Ltd. ©2014
2(100)
An example of a dashboard view.
Version
v1.0
v1.1
v1.2
v1.3
v1.4
v1.5
v1.6
v1.7
Description of
changes
Report Designer feature
Issue Date
12-11-20
13-02-07
13-03-15
13-04-02
13-07-05
13-10-02
13-12-23
14-04-28
Building Sustainability Ltd. ©2014
Approved by
T Johnson
H Holmlund
H Holmlund
M Söderman
H Holmlund
H Holmlund
H Holmlund
M Söderman
3(100)
Table of Contents
How the WFT Works (A Short Introduction)...............................................5
How to Log-In to the WFT.........................................................................5
The Campus Feature.................................................................................7
Layout Functions of the Dashboard .........................................................8
The RAG Chart......................................................................................8
The Line Graph (Primary View)............................................................9
Simple Status Box..............................................................................11
Green Hints & tips..............................................................................12
Pie Charts and Dot Diagrams (Secondary View)................................13
Time charts........................................................................................14
How to Navigate around the Dashboard.................................................15
To Change Building.............................................................................16
Consumption Presented for Different Periods....................................17
Consumption Presented with Different Units.....................................17
Electricity Total Summary..................................................................18
The "yoursitename" Total Hints & tips................................................18
Electricity for "Yoursitename's" Workzones (Lighting and Small Power)
...........................................................................................................19
Electricity for "Yoursitename's" Services (E.g Kitchen, Lifts, Servers,
Hot water)..........................................................................................20
Electricity for "Yoursitename's" Climate (E.g HVAC (Heating,
Ventilation, Air Conditioning), Fans, Boilers, Heaters, Heat pumps)...20
Hierachical Dashboard SearchHierachical Meter Group Structure.....21
Weather..............................................................................................24
League Table......................................................................................24
Renewables........................................................................................26
Gas.....................................................................................................27
District Heating..................................................................................27
Waste.................................................................................................28
Sensors..............................................................................................28
Total Energy.......................................................................................30
Floor maps / Rag Energy site maps....................................................31
Behaviour Change..................................................................................32
Display Energy Certificate......................................................................39
The Blog..................................................................................................39
The Tool for Reporting ............................................................................47
Building Sustainability Ltd. ©2014
4(100)
Detailed Information about Reports and Their Recommended Use. . .49
The Report Designer Tool........................................................................56
How to schedule automatic reports...................................................60
The Tool for User Management...............................................................60
How to Create New Users...................................................................60
Permission Groups..............................................................................62
How to Set Target Values........................................................................62
How to Create and Manage Hints & Tips................................................64
Manual Input of Meter Readings.............................................................66
Management of Air Conditioning............................................................68
The Configuration Tool............................................................................68
Change of Building Parameters..........................................................68
Additional League Tables....................................................................69
Smart Phone App...............................................................................70
Energy Manager's Workbench................................................................71
Work Bench Overview........................................................................72
Asset Register.........................................................................................76
Usage.................................................................................................78
Project Tool.............................................................................................82
Digital Signage.......................................................................................86
Digital Signage Dashboard.................................................................86
View Types.........................................................................................89
Row coloring.......................................................................................94
Support Issues........................................................................................95
Detailed Description of Target Setting and How Targets Are Used by the
WFT.........................................................................................................96
Introduction........................................................................................96
Understanding How The Target Function Works ................................97
Use of The Admin Tool to Set Targets .....................................................98
Building Sustainability Ltd. ©2014
5(100)
How the WFT Works (A Short Introduction)
The WFT collects meter readings (i.e. accumulated energy values) from all
kinds of energy meters. These values are stored in a data base together
with the time they were read. The WFT then calculates the energy
consumption (or generation in case of renewables) for individual meters
and groups of meters. The data (readings and consumption) is presented
in different types of diagrams and reports and used by a number of
analysis and control functions. The access to and the use of the diagrams
and features are described below.
To be able to use the WFT in the most efficient way for qualified energy
management it is necessary that the meters are correctly installed and
that it is known what asset(s) they measure. The names of the assets
should be the same as the client's organisation usually uses.
How to Log-In to the WFT
The dashboard can be viewed on most browsers. (Internet Explorer 6.0 is
not supported)
•
•
Open up your web browser
Type in URL www.workplacetracker.com/yoursitename
[yoursitename is a placeholder for the name of your site in the WFT
(in the example below we use "/cereb" as in many other cases in
this document, but other sites are are also used because all
functions are not available everywhere)]
The following page is displayed.
Building Sustainability Ltd. ©2014
6(100)
Log-In Page
• Click in the Username field and type in your Username
• Click in the Password field and type in your Password
• Click “Continue” button or press the "return" key
A Username and a Password are issued through the Manager of your WFT
service or by BSL.
The first Dashboard displayed is usually the "All Buildings" summary view,
please see below. If there is only one building in "yoursitename" the actual
building summary view will be displayed directly as in the example on
page 2 above. Other options are possible, please ask BSL.
For a description of the Building Summary view please see "Layout
functions of the Dashboard" below.
There is no risk whatsoever to destroy anything by “clicking
around” on the dashboards!
Users are encouraged to try the different buttons to learn how to
use the WFT.
Only trained users with the appropriate authority are able to
change any critical data in the WFT and such changes are usually
performed from another and special dashboard, which is not
available from the standard and basic dashboard.
If you have problems logging on to the Workplace Footprint Tracker
application, send email to [email protected]
Building Sustainability Ltd. ©2014
7(100)
The "All Buildings" view
The "All Buildings" view provides a quick view of the summarized energy
consumption (kWh) of the last 24 hours for all buildings connected to the
WFT in the left line diagram. It also shows the power per square meter
(Watt/m²) for each building during the previous hour in the right bar chart.
It is possible to show consumption for other periods by clicking on the
respective calender icon. By clicking on "Units" the presentation can be
changed to cost of energy or CO2 emmission.
The Campus Feature
Some clients may have many buildings within a campus or large area
connected to the WFT. In such cases the list of buildings under "All
Buildings" may become long and difficult to understand. Then the Campus
Feature will help because instead of going directly to a building, the WFT
shows a clickable map of the campus (or area). Point and click on a
building and the WFT will display the corresponding energy dashboard.
Please see the example below.
All buildings are also be accessible from the drop-down list in the middle.
Please see the yellow frame. Usually the buildings are accessed from the
drop-down list at the top, but that is now used to navigate between the
campus areas
Building Sustainability Ltd. ©2014
8(100)
The Campus View
Layout Functions of the Dashboard
The basic Dashboard i.e. the individual building's view has 3 main
indicator areas; RAG (Red/Amber/Green) indicator, a line graph with 3
lines (2 lines for Day view) and a digital display of cost and kWh (Status
box). In most cases for recent implementations the Status box is replaced
by a Hints & Tips box.
The RAG Chart
The RAG charts displays how the actual consumption relates to the target.
- If the consumption is lower than the target a green "thumbs up" is
shown.
- If the consumption is close (within 95%) to the target a yellow
"thumbs-up" is shown,
- otherwise a red "thumbs-down" is shown.
Building Sustainability Ltd. ©2014
9(100)
A RAG indicator
(Red/Amber/Green)
To show the actual
consumption
relative to the set
target
A line diagram with 3 lines
showing the actual
consumption/cost/emission
for the last day, week,
month, or year, the trend
and the set target with
consideration to seasonal
changes. In case of the
”Day” view the trend line is
not shown and replaced by
the actual temperature if
the Degree Day option is
included.
Basic Dashboard View
The Status Box. A digital
display and a bar diagram
showing the current status of
consumption and cost.
Previous hour, day, and
month are shown depending
on the selected period (day,
week, month). If year is
selected, the accumulated
values for this year so far are
shown.
On some dashboards the
”Hints & Tips” are shown
instead in this position. Please
see Hints & Tips below.
The Line Graph (Primary View)
The line graph contains a ‘Toggle Legend’ to explain coloured line meaning
and a ‘Zoom to date’ feature to enable a quick and easy viewing of
previous data. There is also a printer icon, which when pressed will create
a printout of the line diagram. If Degree Days normalization is
implemented there is also a thermometer icon, which will present a light
blue temperature line in the diagram.
Building Sustainability Ltd. ©2014
10(100)
Toggle Legend
•
Click on Toggle Legend to show the legend, click again to remove.
Zoom to date
•
Click on ‘Zoom to date’ text and a new timeline graph appears.
•
Click & hold mouse button and drag across, then let go, to see time
line in main graph.
The calendar
icon will enable you to jump quickly to a different date.
To return to normal graph view click on
icon
Building Sustainability Ltd. ©2014
11(100)
The Printer Icon
Click on the Printer icon and a printout of the shown line graph is
generated. It is recommended to use landscape view on the printer.
The Thermometer Icon
Click on the Thermometer icon and the light grey temperature line will be
visible and a degree Celsius scale appears to the right of the line diagram.
Click again and the line and scale disappear. This feature is only available
when the Degree Day normalization option has been implemented and the
WFT has actual temperature data for the building concerned. The
temperature data is retrieved from an external temperature data base.
Simple Status Box
Displays normally a picture of the building being monitored, but any
picture provided by the WFT client may be used.
The Status Box is on recent dashboards replaced with the Hints & Tips Box
on the basic view. In these cases the Status Box is moved to the
secondary view, which is accessed by clicking on the green arrow to the
right.
Building Sustainability Ltd. ©2014
12(100)
A performance indicator bar
with blue arrow positioned to
buildings energy
performance. This is
dependent on targets being
set. With no target the blue
arrow is always to the left.
The Status Box (example 1)
Large bold text showing current
consumption (kWh) or average power
(kW) for the last hour. The cost of
that consumption is also shown. The
bottom figure is the mean
consumption for the specific hour
calculated over all measured days.
Another example is shown below.
In this case the WFT collects meter data
every half hour and the top text is the
average power (kW) during the last
measured half hour. (The energy consumed
in kWh during this half hour is half of this
value.)
The mid text is the cost of the energy
consumed during the last hour.
The bottom figure is the mean
consumption for the specific hour
calculated over all measured days.
The Status Box (example 2)
Green Hints & tips
This feature is to display bite-size environmental and energy conservation
messages. By default a selection of general knowledge energy Hints &
Tips are available.
Building Sustainability Ltd. ©2014
13(100)
This box usually replaces the Status box in the primary view and the
Status box is moved to the secondary view, which is accessed by clicking
on the green arrow to the right on the dashboard.
Hints & Tips Box
There is option to add your own company’s best practice energy
messages to inform building occupants, please refer to section ‘How to
Create and Manage Hints & Tips’
Pie Charts and Dot Diagrams (Secondary View)
The dashboard also implements pie charts and dot diagrams. Click on the
green arrow to the right of the Hints & Tips and the pie chart is displayed.
The same view also displays the Status Box. To display the dot diagram,
click on the green arrow to the right of the Status Box. Beside the dot
diagram, the Carbon Emission is shown in kg CO2. To go back to the pie
chart and the line chart, just click on the left hand arrow.
Pie Chart View
Building Sustainability Ltd. ©2014
14(100)
The Pie Chart shows how the energy is distributed between Workplace,
Service, and Climate if the Summary view has been selected. If a
Workplace, Service, or Climate view is selected the distribution between
the different groups of those respectively are shown. If only one group is
defined, no pie chart is available. If a sector in the pie chart is clicked on,
the WFT will show (or rather go to) the line diagram for that group. Pie
Chart View
The Dot Diagram shows how the energy is distributed over a whole week
for every hour in the case of Day selected as period. When Week is
selected the diagram shows the consumption for every day during the last
6 weeks. When Month is selected the energy for every day during the last
8 months is shown. When Year is selected the energy for every month
during the last metered years up to 4 years is shown.
The diagram is a good means to show and analyze usage patterns over
longer periods.
The size and colour of the dots indicate the amount of energy and when
the pointer points to a dot the actual energy value is displayed. Please see
example below where Friday week 35 is pointed at.
Dot Chart View
Time charts
The Last view for an asset is the time of use chart and a barchart that
show comparisons over years.
Building Sustainability Ltd. ©2014
15(100)
Time-of-use and yearly view
The Time-of-use consumption shows how the energy consumption varies
during the course of the day/week/month/year. Out of office consumption
is defined as the consumption between 'Office End of Day' and 'Office
Start of Day'. These properties can be set in the Configuration Page.
The Barchart displays the last halfhour consumption compared to the
same day and hour last year. And if you have selected the week view, it is
the last day that is compared with the corresponding day last year. For the
month view it is the last month that is compare. And for the year view it is
the whole year consumption that is compared with previous years.
How to Navigate around the Dashboard
Depending on what kind of energy the WFT is metering and/or what
features there are implemented, different views are available. This is
shown by the large picture icons at the bottom of the dashboard. The
most common icons are shown below:
Total energy, Sensor values, Gas, Renewables, League Table, Weather, Electricity, Log out
Feature Icons 1
Building Sustainability Ltd. ©2014
16(100)
The DEC (Real time Display Energy Certificate) is found under "Total
energy"
The Meter list (All meters implemented in the WFT) is found under
"League Table"
Weather data from a local weather station is found under "Weather" if
available
Some dashboards also have icons for Water and Meeting rooms when such
features are implemented. Please see below:
Water
Meeting rooms
Feature Icons 2
Move your mouse over the large feature (picture) icons. Only icons which
represent implemented features are shown. The next example below is
from another site.
•
Click on picture “Electricity” to view electrical data.
To Change Building
•
Click on downpointing arrow beside "All Buildings" or "Building
name" just under the Workplace Footprint Tracker heading (Available
only if there are more than one building)
•
Click on building name and the building will be selected (The list is
available only if there are more than one building)
Building Sustainability Ltd. ©2014
17(100)
•
List of Buildings
If there is a large number of buildings and they are located to a
campus or a defined area, the Campus Feature may have been
included. Please see Campus Feature above.
Consumption Presented for Different Periods
The graphical information can be changed from a daily view to weekly,
monthly or yearly view. The day view is default when opening the
dashboard.
To change time period:
•
Click on Period
•
Select week/month/year
Selection of Periods
The period you have selected will remain and be used for all subsequent
views until you change period again!
Consumption Presented with Different Units
To change units:
•
Click on Units
•
Click on C02/Costs/kWh
Selection of Units
Building Sustainability Ltd. ©2014
18(100)
Electricity Total Summary
To return to default graph:
•
Click on Summary , view “Total Electricity” (The usual default graph)
or click on any other ("Total") icon to the right of the "Total
Electricity" to show the corresponding data.
Summary Views
The "yoursitename" Total Hints & tips
The summary page, Yoursitename Total usually contains a slide show of
general environmental hints & tips. More information on editing and
updating the Hints & tips can be found in section ‘How to Create and
Manage Hints & Tips’.
Hints & Tips Box
Building Sustainability Ltd. ©2014
19(100)
Electricity for "Yoursitename's" Workzones (Lighting and Small
Power)
To view the electricity energy consumption of lighting and small power:
•
Click on Summary, after that click on “Workzones”
•
Click on blue dotted arrow or use mouse wheel to scroll across
The blue dotted arrow is only shown if all dashboards cannot be
presented within the yellow frame below.
•
Click on the dashboard view you want to see and the dashboard is
displayed
Selection of Dashboard Views for Workzones
The different dashboards available in Workzones have all their specific
name such as First Floor North, First Floor South, Second Floor North,
Second Floor South as is shown in the example above. These names are
specified per building and shall be equal to the names normally used for
the assets in the actual building.
Building Sustainability Ltd. ©2014
20(100)
Electricity for "Yoursitename's" Services (E.g Kitchen, Lifts,
Servers, Hot water)
To view the energy use by kitchens, lifts, servers, plant rooms, and
domestic hot water etc use Service:
•
•
•
Click on Summary/Workzones/Services/Climate, after that click on
“Services”
All metered dashboard options appear
Click on the dashboard view you want to see and the dashboard is
displayed. Please see the example below within the yellow frame.
Selection of Dashboard Views for Services
Electricity for "Yoursitename's" Climate (E.g HVAC (Heating,
Ventilation, Air Conditioning), Fans, Boilers, Heaters, Heat pumps)
To view the energy use for HVAC, fans, boilers, heat pumps etc use
Climate:
•
•
•
Click on Summary/Workzones/Services/Climate,
All metered dashboard options appear
After that click on “Climate”
Click on the dashboard view you want to see and the dashboard is
displayed. Please see the example below within the yellow frame.
Building Sustainability Ltd. ©2014
21(100)
Selection of Dashboard Views for Climate
Hierachical Dashboard SearchHierachical Meter Group Structure
For sites (buildings) with a large number of meters, there is a hierachical
structure to make it easier to access the respective dashboard. This is
shown in the example above where the energy consumption is displayed
for North West Corner. To get this view just click on Summary, then point
at Climate, point at North West Corner and finally click on next North West
Corner. The diagram shows the energy consumption over time for the two
subgroups of North West Corner stacked upon each other and presented
as kWh/h, which is equal to kW i.e. the average power for the
measurement period, which is half hour in this case. To get the actual
Building Sustainability Ltd. ©2014
22(100)
energy consumed for each half hour, just click on the "Half hour energy"
button and the diagram is changed as shown below:
Stacked Energy Consumption for Groups
This type of chart are also called area chart. When the lines are stacked
upon each other, what you see on the left y-axis for the topmost line is
actually the sum of all lines. If you click on the "Unstack" and on the
Thermometer buttons, you will get the view below:
Unstacked Consumption for Groups with Temperature Line
When the lines are unstacked the consumption for each meter (left y-axis)
is displayed separately. The subgroups of North West Corner are Cooling
and Ventilation as is shown by the Legend in the diagram. If you want to
analyze these subgroups more in detail, just point and click on any of the
dots on the respective curve, and you will see a box:
If you click on "Open Ventilation (kWh/h)" you will come to a new diagram
with the components of Ventilation. If you click on "Formula description"
you will get a box with the names of the variables making up the
Ventilation. Please see below:
Building Sustainability Ltd. ©2014
23(100)
Access to Energy Details and Formulas
Formula Description for a Group
If you click on "Open Air Handling Units 1 and 3" above you will get the
view for this singel meter. Please see below. In the same way as in this
example you may navigate in your own hierachy and find all the groups
and all the single meter points.
Line Diagram with Temperature Line for an Asset
Building Sustainability Ltd. ©2014
24(100)
Weather
In the case the building has a local weather station connected to the WFT
the Weather icon is available. Clicking on this icon presents the actual
weather station data. Please note that this weather information is not
taken from the same source as the temperature line in the diagrams,
which comes from a temperature data base on the Internet.
Weather Station View
The current weather for Yoursitename is normally updated every hour
displaying the temperature, humidity, wind speed and sun intensity or
what may be available in the used weather station.
League Table
The League Table is intended to create competitions in energy savings
between different workzone user groups. In setting targets for each floor
the green/red arrows will change according to the energy performance on
all groups. It is required to set targets for all workzones to enable the
League Table to perform correctly. Please see the detailed information
about how targets are set at the end of the manual.
Building Sustainability Ltd. ©2014
25(100)
League Table
The League Table dashboard is also used to display a ‘Meter List’ with a
summary of the meter names with their kilowatthour for the previous hour
or a selected longer period.
Use the scroll bar to see all meters in the list.
Meter List
Building Sustainability Ltd. ©2014
26(100)
If you click on a line in the League Table or in the Meter List, detailed
information about the asset concerned will be shown in the box to the
right.
Renewables
The renewables section usually contains Heat Pumps, Photovoltaics, Wind
Generators, and Solar Hot water or whatever renewable energy source
that is used in the building (i.e. in "yoursitename") and connected to the
WFT; all the graphs can be view by day/week/month/year. It is not
available if no renewables are connected to the WFT.
Renewables View
It is possible to construct special graphs that directly shows the difference
between used energy and gained energy for heat pumps and similar
equipment. This is shown in the example below:
The Total Geothermal graph displays the red line as total geothermal
electricity and the green line as the total geothermal renewable energy.
Building Sustainability Ltd. ©2014
27(100)
Used and Gained Energy Graph
Gas
The Gas section displays information from gas meters connected to the
WFT.
The Gas Graph
District Heating
The District Heating section displays data from heat meters. These values, like the
gas values, will be added to the total energy consumption data. It is also possible to
add values for district cooling and those values will also be added to the total energy
page, however no summaries are made in the district heating section.
Building Sustainability Ltd. ©2014
28(100)
Waste
Waste data will usually be entered manually (see section about manual input) but it
will be displayed as any other data. However when the data is displayed it will be
divided depending on how much of the waste has been recycled and not. The
Recycling rate numbers are configured by the system administrator, please contact
[email protected] if you want to make changes.
Sensors
The Sensors section displays all sensors connected to the WFT. Typical
sensors are: Temperature, Flow, and Level. Sensors for Voltage, Current,
and Power can also be included.
Many sites do not have any sensors connected to the WFT, which means
that the icon is not available.
Some examples below.
Building Sustainability Ltd. ©2014
29(100)
Example View (Flow and return temperatures)
Sensor Dashboard View
Example View (Different Groups of Sensors)
Access to Groups of Sensors
Example View (Photovoltaics Monitoring)
Photovoltaics sensors can also be monitored by the WFT. The example
shows electrical data but any type of sensor can be monitored like solar
radiance and surface temperature.
Building Sustainability Ltd. ©2014
30(100)
Photovoltaics Sensor View
Total Energy
The Total Energy section displays all the energy used in the building. Other
totals like Hot Water Consumption and Gas Total can also be displayed.
More than one Total is possible. The Display Energy Certificate (DEC) is
also located in this section.
Total Energy Display
Building Sustainability Ltd. ©2014
31(100)
Floor maps / Rag Energy site maps
It is possible to add floor maps for a whole building or for individual floors
in a building. In this floor map it is possible to add clickable zones, i.e. a
workzone can be marked and when clicking on it that particular workzone
will be displayed.
It is also possible to tie this floor areas (workzones) with the actual
consumption and target data. With this feature we can highlight those
areas that are consuming more than the target or below the target:
- If the consumption is lower than the target the area will be displayed
with a green shade.
- If the consumption is close (within 95%) to the target the zone will be
displayed in orange.
- If the consumption is above the target the zone will be red.
- If data is missing for that zone, the colour will be blue.
Building Sustainability Ltd. ©2014
32(100)
Behaviour Change
Communicative behaviour change features have long been embedded
within the Workplace Footprint Tracker, such as the League Table, Hints
And Tips and Comparison Charts.
In more recent releases of the Workplace Footprint Tracker, we have been
developing innovative interaction-driven features. These features can be
found under the menu name ‘Greener Life’.
Within Greener Life, three different tools are displayed: ‘Count Me In!’,
‘OurVoice’ and ‘The Talking Building’. These tools are also available
from the digital signage and from the Footprint Tracker smart app
(available on Google Play and Apple App Store).
These tools go beyond pushing information to passive consumers but
instead create an interactive environment. The aim is to inspire building
occupants and their peers. By focusing on community and social
incentives we enable all building inhabitants to participate in the daily
tasks of working with behaviour change.
Count Me In!
Once people make a promise they do try to keep it, particularly to
themselves.
Count Me In! is a tool for publicly committing to a pledge. Any user of the
Workplace Footprint Tracker can ask the building occupants to pledge to
change their energy consumption behaviour.
All dashboard users are able to add pledges. Each added pledge can be
illustrated with a picture (from a predefined set of pictures).
Building Sustainability Ltd. ©2014
33(100)
When committing to a pledge (by pressing the ‘Commit’ button), the user
must add their email address. This means the committer does not
necessarily have to be the same person as the one who is logged on to
the dashboard.
Users may also add pictures and comments by selecting ‘Share your Ideas
on the Menu. This can be seen as a kind of graffiti board where users can
share ideas and experiences of a particular pledge.
Users can see who has committed to the pledge and the graffiti board if
you press the pledge description or headline. Clicking the headline again
will switch you back to the main menu.
Building Sustainability Ltd. ©2014
34(100)
OurVoice
Imagine you only have the budget to authorise one project from a whole
list of projects with similar payback. Well, why not ask your building
occupants which one they would prefer?
OurVoice is an information sharing tool. The Community can add whatever
information they wish and opinions can be collected via surveys.
This Tool is very simple to use. It consists of two views; information view or
question view. To create a survey or collect opinions, you need to create
question views. To do this, select the type of question from the drop-down
list and tick the checkbox asking whether users should be able to add
comments.
Building Sustainability Ltd. ©2014
35(100)
To see the current answers and comments, click the headline or the
picture.
The Talking Building
Now your buildings truly come alive!
The Talking Building allows project milestones and energy benchmarks to
be automatically communicated to the public using Twitter. Followers will
also be able to actually interact with the building, asking for energy and
resource related information. The building will automatically respond to
these requests, providing the user with live and real-time information. In
effect, a social flow will be created between the building and those using
it.
The Twitter feed will be available on the dashboard, public digital signage
screens and even mobile devices.
A prerequisite for using the Social Flow is an existing twitter account. For
setting up such an account please refer to http://twitter.com
First time
Initially the Social Flow box on the Greener Life page will look like the
illustration below and before a Twitter feed will be displayed a link needs
to be created between the dashboard and the Twitter account.
Building Sustainability Ltd. ©2014
36(100)
Click the ‘Make link to’ button to proceed with linking to a Twitter account.
A dialog window containing a web page link and a text field will be opened
(see illustration below).
A personal identification number (PIN) is required to authorise the
account. This PIN will be received when clicking the web-page link which
leads to the Twitter service third-party authorisation.
When the web page link is clicked a new page will be opened in your web
browser (if not, then make sure your browser is not blocking popup
windows). If you are not logged on to Twitter you will be asked to log on
and afterwards the page will look like the illustration below.
Click the ’Authorise app’ button to receive a PIN code (see illustration
below).
Building Sustainability Ltd. ©2014
37(100)
Take note of the PIN and return to the dashboard where you enter the
code into the textfield
After pressing the OK button the Twitter account linking is finished and the
Twitter feed should now be displayed in the Social Flow box.
Building Sustainability Ltd. ©2014
38(100)
Writing a manual Tweet
It is possible for an administrator to write a manual Tweet by clicking the
Social Flow box header.
This will open a dialog window where it is possible to write a Tweet text
and post it to the feed by clicking the OK button.
Building Sustainability Ltd. ©2014
39(100)
Display Energy Certificate
The real time Display Energy Certificate (DEC) is demonstrating the
current energy performance level. The DEC shows carbon emissions
compared to typical emissions for this type of building. The higher the
ranking (on the A to G scale) the better the building is performing.
The left hand arrow shows 'actual building performance' and the right
hand arrow displays how the building performance would look like if there
were no renewable energy sources. The right hand arrow is not shown for
buildings without any renewable energy sources.
If there are renewable energy sources, a pie diagram indicating the
proportion of renewable energy to total energy is shown in the right hand
box.
The Real Time DEC
The Blog
The Blog in the Workplace Footprint Tracker (WFT) provides the client's
Energy Manager and other authorized users with the possibility to write
messages in the Dashboard views in order to communicate with other
users of the Dashboard. All messages are automatically time and date
stamped. Comments can be added to blog posts and an interactive
dialogue can take place.
Building Sustainability Ltd. ©2014
40(100)
The purpose of the Blog is to provide the Energy Manager (or any
authorized person) with a means to comment on specific occurrences in
the charts and to interactively communicate with the occupants and other
users of the WFT.
The Blog can also be used for storing of any energy management or
behaviour change documentation related to the use of the WFT and
energy use investigations.
Blog posts can be created from the line charts and from the Blog view.
The Blog is opened by clicking on the Blog link at the top left hand corner
of the dashboard. To go back to the normal dashboard, just click the Back
link in the same position.
A typical Blog view is shown below:
A typical Blog view
To create a blog post from a line chart (needs authorization), just click on
a dot on the line and a pop up window for input of the post is presented.
Click on Submit and the message is posted on the Blog together with line
chart. Viewers of the dashboard may post comments to the messages.
Please see example below:
Building Sustainability Ltd. ©2014
41(100)
Creation of Blog post from line chart
The availability of blog messages are shown in the line charts as yellow
squares around the originating dots.
Availability of Blog post indication
Building Sustainability Ltd. ©2014
42(100)
The post is available in the Blog:
The Blog post created above
In the Blog view it is possible to handle posts (Add document, Update
documents, Remove document links, Edit, Delete, Revert to old revision,
View old revision and export a blog entry to a PDF document). Just click on
the name of the poster and a drop down list comes up.
It is also possible to create new posts directly and to create new
Categories as well as editing/deleting Categories. Please see the yellow
frames below.
Administration of Blog posts etc
Building Sustainability Ltd. ©2014
43(100)
The figure below shows the input form for new Blog posts
New post input form
Whenever a blog post is saved you will be presented with a dialog window
asking if you want to send an email reminder about this blog entry or if
you want to push it as a tweet. Tick the box/boxes you want to choose and
click the ok-button.
Twitter integration
With Twitter integration activated for your WFT customer account it is
possible for you to push blog messages as tweets to your Twitter feed.
After saving a blog entry you will be presented with a dialog window
where you find the text ”Push this entry as a tweet?”. Tick the box next to
this text and click the ok-button and the message will be added to your
Twitter feed.
Building Sustainability Ltd. ©2014
44(100)
Configuration
If it is the first time you are pushing a blog message to Twitter you have to
give permission to the WFT for sending tweets to your feed. Please note
that this does not mean your Twitter password is stored in the WFT and it
will not be possible for the WFT to do anything else to your Twitter account
besides pushing the blog texts selected by you to your twitter feed.
You will be presented with a dialog window looking like the image below.
By clicking the link your browser will open the webpage depicted below.
Enter your Twitter username and password and click the button ”Authorize
App”.
Building Sustainability Ltd. ©2014
45(100)
Clicking the button will give a PIN code, see image below.
By entering this PIN code in the dialog window textfield and pressing the
ok-button you have linked your WFT customer account to the Twitter feed.
This procedure is only necessary the first time you are using the Twitter
functionality of the WFT blog.
Building Sustainability Ltd. ©2014
46(100)
Tweet formatting
A tweet is limited to 140 characters which means that any blog text
exceeding that length needs to be shortened for the Twitter feed. If you
are posting a longer blog text the WFT will give you the opportunity to
shorten that text before pushing it to Twitter.
A dialog window (see image 4) containing a textfield will be opened. The
textfield will contain your full blog message and the number of characters
in your post is presented below the textfield.
Edit your text until you are down to 140 characters (or, if a chart image is
attached to the post, 117 characters) and then press the ok-button.
Pressing Cancel will mean that your blog entry is not sent as a tweet but it
will still be stored as an entry in your blog.
Building Sustainability Ltd. ©2014
47(100)
The Tool for Reporting
The WFT is designed to produce reports in different formats and export
data into Excel, PDF and CSV files. Reports can be created from a
predefined set of generic report templates or from customized report
templates by using the Report Designer tool.
Access to Reports
To access the reports:
•
•
Click on the Tools option located at the bottom of the dashboard
window.
Click the blue Report icon at the bottom of the Dashboard
A small window is now opened. From this window it is possible to populate
a generic report template by using the different check-boxes and menus
to select type, assets, period and output format.
The number and types of fields in the report form depends on which type
of report is selected. See below for all available report types.
The Report Designer tool is accessed from this window by clicking on the
Report Designer button (more information below on how to use the Report
Designer).
Building Sustainability Ltd. ©2014
48(100)
Report Selection Window
•
Select report type
The following table explains briefly each report type:
Type of report
Raw Data
Description
The recorded date, accumulative
meter readings and kWh values on
every 30mins or hourly readings.
This report outputs the basic data
(meter readings) and can be used
to analyze details of the
consumption and the consistency
of data.
Consumption per meter
A graph displays the meters
consumption in kWh over a
day/month/year time duration. CO2
and cost for the period is provided
too.
CSV format cannot be used,
Out of hours usage
The energy consumption during
Office Hours and Out of Office
hours is provided as text.
Comparison over time
A graph shows the consumption in
kWh for the selected date
(day/week/year) compared with the
previous date. CO2 and cost for the
periods are provided too.
Building Sustainability Ltd. ©2014
49(100)
CSV format cannot be used.
Comparison with last year
A graph shows the consumption in
kWh for the selected date
(day/week/year) compared with the
same date previous year (if data is
available for that year).
CSV format cannot be used.
Comparison with another
asset
A graph displays a selected meter
against another chosen meter over
the same time period. CO2 and
cost for the period is provided too.
CSV format cannot be used.
All meters in a building
Automatically defaults to the entire
building once selected. A
histogram graph indicates the
highest energy demanding areas of
the building if PDF format is used.
If you use XLS format, the data will
be output as table format.
CSV format cannot be used.
Energy statement
Weather ReadingsThis
This is for all meters in the building
by selecting a month. A summary
of the total energy (kWh) used
during this month for day and night
including costs, for the Main
Groups, and for all Assets in
tabular form as a PDF. It also
provides a comparison with the
previous 12 months in PDF format.
Excel format only provides data for
Assets.
CSV format cannot be used.
This option is only available if
outside temperature is available on
the dashboard.
This report will produce a list of
half-hourly temperature readings
during the last 24 hours or daily
temperature readings the last
month.
Displays the league table for the
selected building. Only the
workzones are included in the
leaguetable.
Leaguetables
Table of Reports
Building Sustainability Ltd. ©2014
50(100)
•
•
•
•
•
Select Assets/meters or Sensors
◦ Assets contain; all assets which have a meter connected to the
WFT.
◦ Sensors contain; all sensors connected to the WFT (if any).
Certain types of reports are not available for sensors as they
would not make sense.
If the report is of a type where different assets are compared you
should select one or more additional assets to compare with.
Select the period the report shall cover e.g.
hour/day/week/month/year. Which periods are available to choose
from depends on the type of report.
Select output format (Use CSV if data shall be exported to other
systems, use Excel if you are going to process or manipulate data in
Excel, use PDF if you are going to include diagrams in reports and
presentations. Excel files are in some operating systems and some
spread sheet software shown as write protected so if you want to
process or manipulate the data, you have to create a copy after
download.)
Click OK
The meter readings for the selected period are exported as a file in the
selected format. If your browser stops the download, just click accept file
and click the OK button again. The csv-file can be imported into Excel for
further processing. Please note that semi-colon is used as a data
separator, not comma, except for "Out of hours usage" which uses
comma.
Detailed Information about Reports and Their Recommended Use
Most reports types are easy to specify and their use is quite obvious, but a
few may require a detailed description.
The Raw Data Report
The example below shows a Raw Data report for one meter (Ground floor)
compared with two other meters (First floor and AC energy).
Building Sustainability Ltd. ©2014
51(100)
A Raw Data Report
The "Date" column shows when the meter was read and the "Ground floor
energy consumption" provides the actual meter reading (accumulated
value) in kWh. The Accumulated values is only displayed for single meter
selections (i.e. no additional assets have been selected).
The "Energy consumption previous hour" is the difference between the
meter reading and the previous meter reading (i.e. the meter reading on
the row above subtracted from the meter reading).
The last two columns in the example above show the consumption for the
same period but for two other meters. The meter readings (i.e. the
accumulated values) are not shown for these meters in this report. To view
the accumulated readings, a Raw Data report where they are the primary
meter has to be generated.
If you want to process the data yourself, we recommend you to use actual
meter readings (i.e. the accumulated values).
If the reading time does not show consecutive hours and there is a zero in
the consumption column, this will indicate there is one or a number of
missing readings. If the reason is a communication failure, the missing
data will usually be automatically collected by the WFT within a day or
less, as readings are stored in the meters for up to more than a month.
If the reason is a power failure, no values can be collected but the meter
reading when power is back will be the same as before the failure, or at
least less than a normal hourly or half hourly consumption.
An indication of communication problems is that the meter reading after
the zero is what could be expected for the time the reading was done. In
case this type of problem happens very often and affects all meters at the
Building Sustainability Ltd. ©2014
52(100)
same time one should check the GPRS connection, i.e. GSM signal
strength. Remedy can be change or relocation of the GSM antenna,
change of GSM provider, or change of the location of the GPRS gateway
(The Meshnet Master) in the building.
If it just affects a single meter the remedy is usually a better antenna for
this meter, or if that does not solve the problem, the addition of a mesh
network relay point.
In case of frequent communication problems please contact BSL
[email protected]
The Out of Hours Usage Report
This report shows the total energy used during office hours (weekends and
holidays excluded) and during non office hours as well as the average
consumption per hour for the period specified.
The example below shows the output of a typical Out of Hours Usage
report in PDF format for September 2012.
An Out of Office Energy Usage Report
The Consumption per Meter Report
This report is useful when you want to follow the performance of a specific
asset over a selected time period. An alternative is to use the "Print"
button below the line diagrams on the dashboard.
Building Sustainability Ltd. ©2014
53(100)
A Consumption per Meter Report
The Comparison over Time Report
This report is useful to show how the performance of an asset may have
changed from a previous time period.
A Comparison over Time Report
Building Sustainability Ltd. ©2014
54(100)
The All Meters in a Building Report
The purpose of this report is provide an easy means to show which assets
have the highest consumption in order to decide where energy saving
actions may yield the best result.
The output is either a PDF with a bar chart:
An All Meters in a Building PDF Report
Or an Excel sheet with a list:
All Meters in a Building XLS Report
Building Sustainability Ltd. ©2014
55(100)
The Energy Statement Report
The Energy Statement brings a complete overview of the consumption
and costs for the requested month and the preceding 12 months. It
provides day and night energy use and cost, it shows the totals for the
consumption areas (Workzones, Climate, Services) for each month, and
the total consumption for each asset for each month.
Parts of the Energy Statement Report
Building Sustainability Ltd. ©2014
56(100)
The Energy Statement can be used for tenant billing, general energy
reporting, or for the energy manager to get a compact overview of the
consumption.
The Report Designer Tool
With the Report Designer tool it is possible to create a customised report
template by combining an arbitrary number of subreports. The report
template can be stored for later use or for automatic creation and
distribution of reports at certain intervals.
The Report Designer tool is opened from the Reporting tool window by
clicking the Report Designer button.
The Report Designer interface
The Report Designer interface consists of two parts. On top is the report
detail section. This section can be recognised by a white background and
it holds a number of general configuration options for the report.
The report detail section contains the following fields and buttons:
•
Report Name is an arbitrary name of the report. It is used for storing
and loading the report.
•
Output Format can be either PDF, Word or Excel. This field controls
the file format of the generated report.
Building Sustainability Ltd. ©2014
57(100)
•
Frequency can be one of the following: Daily, Weekly, Bi-weekly,
Monthly or Quarterly. This determines how often the report should
be automatically generated. A report only generates automatically if
one or more recipients configured. See below for instructions on how
to configure a recipient for the report.
•
Pressing the Print button will instantly generate and download the
report. When pressing the button a dialog window with a field for
selecting a date will be displayed. By selecting a date and pressing
the OK button a report will be generated. Depending on the number
of subreports this operation can take a while to complete.
•
By pressing the Store button the report will be saved and can be
used at another time or for creating automatic reports.
•
The List of Reports button will open a list of all previously created
reports. Clicking on the name of a report in the list will open the
definition of that report.
List of Reports
Each report configuration contains one or more subreports. These are
represented in the Report Designer as sections with blue background.
Each such section represents a subreport configuration and the order of
these sections will determine the order of the subreports in the final report
document.
The ordering of the sections can be changed by drag and drop. Click and
hold a blue section and then drag it into its new place before releasing the
mouse button.
Each subreport section contains a number of configuration parameters. To
configure a subreport first select Report Type for the subreport. This will
affect which configuration parameters are available.
Building Sustainability Ltd. ©2014
58(100)
The following types of subreports are available:
Type of subreport
Accumulated consumption
Description
Shows a table of consumption data
for one or more assets for the
selected period.
Monthly consumption past
five years
Displays a table with the monthly
consumption for the last five years.
If five years of data is not
available, all available data will be
displayed.
Consumption for one or
more assets
Displays a linechart with the
consumption for one or more
assets during the selected period.
Consumption compared
with last year/week/month
A linechart displaying a line for the
consumption during the period and
an additional line for the
consumption the same period last
year.
Accumulated savings
Displays how much energy has
been saved during the period for
one or more selected assets. The
accumulated savings are
calculated by comparing with the
estimated consumption.
Project savings
Display the accumulated savings
for all completed projects in the
selected building. The savings will
be displayed in % as well as in
actual numbers (kWh and £).
Savings for one or more
assets
Displays a linechart showing the
savings for the selected assets
during the period.
CuSum chart, accumulated
savings
Creates a CuSum linechart for the
selected asset. The CuSum is
created by comparing with the
estimated consumption, which
means that this report can only be
used for data with a target set.
Largets deviations from
target
To give an understanding of which
parts of a building is not
performing well this subreport
displays a list of all assets that are
not performing in line with the
Building Sustainability Ltd. ©2014
59(100)
target consumption for the
selected building.
Day/Night deviations
This subreport will display the four
assets, within each category (e.g.
Climate, Workzones, Services), with
the worst ratio between day and
night energy consumption. The
night ratio is displayed as a
percentage of the consumption
during the day.
Benchmark
The benchmark subreport
highlights assets with a
consumption higher than a certain
benchmark value. The benchmark
value is expressed as a percentage
of the estimated consumption. E.g.
a benchmark value of 15 will make
the report highlight all assets with
a consumption higher than 15%
compared to the estimated
consumption.
Leaguetables
Displays the league table for the
selected building. Only the
workzones are included in the
leaguetable.
Weekly out-of-hours
This subreport displays a
breakdown of weekdays for one
week and, using a barchart,
compares the out-of-hours
consumption with the office hour
consumption.
Energy statement
Displays a complete overview of
the consumption and costs for the
requested month and the
preceding 12 months.
All meters in a building
This subreport will show a
complete list of all the meters in
the selected building along with
their consumption during the
selected period.
Out-of-hours usage
Displays a table with details on the
consumption during office hours
and out-of-office hours.
Building Sustainability Ltd. ©2014
60(100)
How to schedule automatic reports
A customized report created in the Report Designer tool can be configured to be
automatically generated and emailed to one or more recipients.
How frequently the report should be generated is specified when creating the
customized report.
To choose a recipient for the report open the User Management tool (more
information on the User Management tool can be found below) and open the profile
for the user you want to select as recipient. Then select the report you want the user
to receive in the Send Reports drop down menu.
To be able to select more than one report click on the little plus icon next to the drop
down menu.
Click Save to store the settings.
The user profile window with the report drop down selected
The Tool for User Management
How to Create New Users
"Yoursitename" WFT Manager and possibly other appointed persons may
have super user access to enable them to set up new users in the system.
•
•
Click on Tools
Click on User Management
Building Sustainability Ltd. ©2014
61(100)
The following User Management window is displayed.
User Management Window
In the User Management there are three options “Me/others/New”
User Preference type
Me
Description
Displays your own WFT ID
details
Others
Able to see all the other
WFT users and view their
details
New
To set up a new person in
WFT
To set up a new user:
•
Click on New
•
Enter First name and Last name
•
Enter a unique email address in User login ID (this must be an active
email address)
•
Enter password (this is case sensitive)
Building Sustainability Ltd. ©2014
62(100)
•
Enter organisation name
•
Enter email address
•
Select one of the User Access role from the drop down list
User Preferences Window
Once you click ‘Save’ an automatic email will be sent confirming log on
details to the new user.
Permission Groups
Permission groups are a special feature in the WFT intended to limit
access to certain types of data e.g. electricity to certain user groups. It is
specifically useful for educational institutions which use the WFT as an
educational tool. The permission group names will only contain specifically
chosen data for students to have access to. The feature can also be used
by other WFT clients with similar needs.
New permission groups can be added into the WFT by sending an email to
[email protected] containing group name and data that is to be
accessed by the group.
How to Set Target Values
Targets can be configured in a couple of different ways. First of all you
must configure an overall target reduction, i.e. how much you aim to save
during the current year. This parameter can be set in the configuration
page (see The Configuration Tool). In addition you must set the Overall
building energy consumption, with this estimate on this years
consumption we can calculate this years target consumption (as
Building Sustainability Ltd. ©2014
63(100)
theEstimate * (1-target reduction)). The picture below show how such a
setting can look like:
If you look at the picture you can also see a button “Get Yearly
Consumption”. If you press that button the system will calculate an
estimate of the total yearly consumption. This estimate is based on last
years consumption, and if such data is missing it will use as much past
data as possible to make the calculation.
For individual assets targets can be configured in three ways. Either by
manually setting them through the Workplace Tracker Admin Tool which is
only available to authorized users. Or through the Asset Register, if you
have opened the view of an asset, you may see a button “Target value for
this asset”. If pressing that button you will see a view similar to the
picture below. And if the button “Store this value” is pressed, the new
target value will be saved.
However, the preferred option is to have the system set these target
automatic. If no manual target has been seet (i.e. neither of the options
above) the the targets will be automatically configured based on past
consumption. If no data is present (i.e. when we have a newly installed
meter), we have to wait for one week before the target will be set (and
these targets are calculated each Tuesday at 3:30 in the morning). When
we have one full week of data we can estimate the yearly consumption for
that asset by multiplying with (“number of days this year” divided by 7).
As more data is present we will adjust that estimate to something better. If
we have one full year of data we will use that as an estimate. And if we
have the last year data it will be used.
If you have questions about the targets, please send us an email to
[email protected].
Building Sustainability Ltd. ©2014
64(100)
For a description of the target setting function and how targets are
calculated by the WFT, please see below: Detailed Description of Target
Setting.
How to Create and Manage Hints & Tips
The useful energy and environment ‘hints & tips’ feature provides
awareness on greener methods to save carbon and money. The feature
enables you to enter your own unique messages into the system for site
users to view. Only people with administration access such as the
"Yoursitename" WFT Manager would have the access rights.
To access the administration of Hints & Tips:
•
•
Click on Tools
Click on Hints & Tips icon
•
Tick the ‘Display this tip’ to view on the slide show
•
Double click on the highlighted line to open Tip edit box
Building Sustainability Ltd. ©2014
65(100)
Administration of Hints & Tips
To create a new tip:
•
Click on the ‘Add tip’ button
•
The ‘Edit this tip’ box is displayed
•
Type in Green Tip text
•
Click on ‘Choose picture’ to select an image from your desktop or
drive
•
Click on’ Save’
•
If the green tip only should be available to some users it is possible
to select an access role with the drop down list “Restricted view”.
Edit Tip Window
Building Sustainability Ltd. ©2014
66(100)
Manual Input of Meter Readings
In some cases there is no automatic reading of certain meters. This is
often the case for water meters, which then can be read manually and the
reading input into the WFT. Click on the Manual input icon (red frame
below) and the input box opens.
Input date and meter reading (the actually read and accumulated meter
value) in the box and click on Save and close the box. The WFT
automatically calculates the consumption and uses the data in diagrams
and reports in the same way as for automatic meter reading. Manual
reading should only be used for meters that move slowly and/or a
daily/monthly reading is sufficient.
For gas, water and electrical meters it is the accumulated value that
should be entered. The Consumption values will be automatically
calculated, however remember that if a faulty value is entered it is not
possible to delete that value. In a later release we will add the possibility
to change already entered values, but for now it is important that the
values are entered correctly. If an incorrect value is entered, we can
change the data manually, if so contact our support.
For waste data, it is not the accumulated value that should be entered,
but the consumption since the last input. But like water or gas meters the
Building Sustainability Ltd. ©2014
67(100)
values can be entered how frequent or infrequent you wish. Remember
that what is entered is the consumption since the last reading, that means
before the first value is entered you will need to enter a “start”-value, i.e.
if the first value concerns Januari 2012, you must first enter a zero for the
1st of January 2012, as below:
Then you can enter the consumption value for January, but remember to
set the log-date as the first day of the new month, like the picture below.
For waste data it is possible to change a faulty value, however when
entering the date, you must enter a time that is not 00:00 but any other
hour for that date. It is also important that all data is changed from the
faulty data and forward.
Building Sustainability Ltd. ©2014
68(100)
Management of Air Conditioning
The WFT contains an optional feature to control the Air Conditioning (AC)
in meeting rooms and other areas which are not continuously used. When
this option is implemented the WFT has an interface to AC controller and
another interface to a suitable scheduler e.g. from BSL's partner People
Cube.
The availability of and access to this feature is indicated by the
thermometer icon under the Tools menu. Please see the yellow frame in
the figure above. Details of how to manage the air conditioning are
provided in a separate user manual for sites with this option included.
Control of Air Conditioning
The Configuration Tool
The tool is started by clicking on the icon
and it makes it possible to
change some building parameters and to create new and customized
League Tables. Please see examples below.
Change of Building Parameters
Building Sustainability Ltd. ©2014
69(100)
Change of Building Parameters
The example shows some of the Building Parameters which can be
changed through the tool. It will vary between sites. Some parameters
may be changed only through the administrative pages of the WFT, which
requires additional authentication.
The Target values are very important for the data displayed on the
Dashboard, it is therefore important that the target reduction is set to
what you want to achieve. And the current total energy consumed per
year must be set. If you have trouble to get a good figure for that number
we have a button “Get Yearly Consumption”, which will help you to
calculate an estimated value.
Additional League Tables
Creation of Customized League Tables
This example shows how to build customized League Tables. Select the
Building, give the League Table a name (Headline), select the assets to be
included in the table from the drop down lists, and click on "Save League
Building Sustainability Ltd. ©2014
70(100)
Table". The new League Table is created and the horizontal and circulating
asset list will get a new icon for direct access to the League Table:
Second League Table Access
Each building can have many league tables. And the Leaguetables can
also be displayed on the digital signage.
In order to remove assets from a table, select the blank line at the top of
the drop down list and click on "Save League Table". To remove the whole
table, just remove all assets and click on "Save League Table".
Smart Phone App
WFT has an optional smart phone app. If that feature has been activated it
is possible to make additional configurations from the configuration page.
First of all the administrator must set the pin code, i.e. the code the users
must enter to be able to see customer's page, see picture below.
It is also possible to define which charts the users shall be able to see. If
nothing is configured the users will not be able to see any building data at
all, i.e. the unauthenticated users are only able to see the assets
configured on this page.
Building Sustainability Ltd. ©2014
71(100)
Energy Manager's Workbench
An optional feature of the WFT is the Energy Manager's Workbench (EMW).
It contains tools that help the Energy Manager or anyone working with
energy usage analysis to analyse the details of the energy use in order to
find all areas where energy is wasted and to keep track of the results of
any investments in energy efficiency. It provides CuSum analysis,
Regression analysis, Degree Day Normalization, and extended comparison
tools.
The availability of the EMW is indicated by the Wrench icon under the
Tools menu. Upon opening the EMW an arrow is displayed with the Wrench
icon. Clicking on this Wrench & arrow icon will close the EMW.
Work Bench Availability
Click on the icon and the work bench is displayed:
Energy Manager's Work Bench
Select type of chart (E.g. Degree Day Normalization as in the example
below), asset, possible additional assets (for comparison), dates, check
Building Sustainability Ltd. ©2014
72(100)
Base Temperature and change if required (15.5 °C is default), mark
whether Heating or Cooling Degree Days. Click on Create Chart and a
chart as below is created.
Degree Day Normalization on EMW
A more comprehensive description of the Energy Manager's Workbench
and how to use it is available in a separate document, but below is a short
overview.
Work Bench Overview
The following tools are available in the Workbench and all charts are
possible to print:
CuSum Charts
CuSum charts of the energy consumption can be created for any asset
and any time period to quickly detect any deviations from normal
behaviour. The charts clearly indicate if there are savings or increased
consumption. It is the perfect tool to trace the effect of any investments or
Building Sustainability Ltd. ©2014
73(100)
actions in energy saving measures. A decreasing line directly shows the
savings. Historical data is used to calculate the normal behaviour.
Regression Charts
Regression Analysis charts shall only be used for assets whose energy
consumption is related to the weather. The analysis shows the relation
between the outdoor temperature (expressed as Degree Days) and the
energy consumption and indicates if the consumption is as expected in
relation to the changing weather. The charts also show the size of any
Base Load, which is independent of the weather. The energy consumed
(y-axis) during every day in the selected period is plotted in the diagram
(a scatter diagram) at the actual Degree Day (x-axis). A line, which best
approximates the dots, is calculated using the least square method. The
line crosses the y-axis at the Base Load and the slope of the line indicates
how weather dependent the energy consumption is. A horizontal line
would indicate no dependence at all. An important indicator is the R²
value, which shows how good the correlation is between the weather and
the energy consumption. R² has a value between 0 (zero) and 1 (one). A
value near 1 indicates a high correlation - i.e. the analysis produces a
good estimate of the energy consumed at a certain Degree Day. A value
near 0 indicates a low correlation, which e.g. can indicate that there are
other factors that affect the energy consumption than just the weather.
Degree Day Normalization Charts
Building Sustainability Ltd. ©2014
74(100)
Degree Day Normalization shall also only be used for assets and groups of
assets whose energy consumption is related to the weather. The chart
shows the actual consumption divided with the estimated consumption
based on Degree Day normalisation. It displays how much of the
consumption that is not explained by Degree Days, i.e. by outdoor
temperature. The y-axis shows the relation (kWh/kWh) and e.g. a straight
line at 1.0 indicates that there is a perfect agreement between the actual
measured consumption and the estimate based on Degree Day
normalised historical data. A value of 1.5 says that about 50% of the
consumption cannot be explained by outdoor temperature (Degree Days)
but instead of other factors. The charts can therefore be used to identify if
there are other factors (plant faults, erroneous settings, incorrectly
connected meters, unforeseen user behaviour, etc.) that affects the
energy consumption.
Time Comparison Charts
These charts are used to compare between different months and years for
the same asset. They can be used for any type of asset and they will
directly show if the consumption has increased or decreased over time.
Assets Comparison Charts
These charts are used to compare between different assets. They are
useful to detect differences in usage patterns between assets of the same
type in a building or between buildings. Any type of asset can be included.
Building Sustainability Ltd. ©2014
75(100)
For sites where the Workbench is included and hourly temperature data
are available, such data can be presented on certain charts when pressing
a button with a thermometer icon.
Explanation of Terms:
CuSum: CuSum is the cumulative sum of "actual consumption" minus
"normal estimated consumption" over a selectable time period.
Regression: Regression analysis is a statistical tool for the investigation
of relationships between variables, in this case between energy
consumption and Degree Days.
Degree Days: Degree Days are the sum of all outdoor temperature
degrees below (in case of heating) or above (in case of cooling) the Base
Temperature for all days (or periods) within the period concerned.
Base Temperature: The Base Temperature is the outdoor temperature at
which no heating or cooling is necessary. The Base Temperature is
normally different for heating and cooling. A commonly used value for
heating in the UK is 15.5ºC, but it should be specific for each building and
depends on insulation and building usage.
Base Load: The Base Load of a building is the energy consumption of
every asset that is not directly related to the weather such as lighting,
small power, and kitchen.
Building Sustainability Ltd. ©2014
76(100)
Asset Register
The Asset Register is an extension to the Workplace Footprint Tracker
(WFT). It is a database with information on all assets directly involved in
energy management and connected to the WFT.
The Asset Register is a tool for the facility and energy managers which will
help them in the daily work of energy analysis to save energy and reduce
carbon footprint. The Register will make it easier to track savings
associated with assets and modifications of assets and also to make it
easier to manage building assets and their characteristics related to
energy efficiency.
The Asset Register provides a number of benefits, e.g.:
•
•
•
•
All energy related Asset information is collected in one place
Asset information is easily accessible
Supports follow up of energy saving actions until the result has been
evaluated
Automatically produces metering schematics
The Asset Register does not replace a traditional full scale asset
management tool, but supports the energy manager specifically. Unlike
usual Asset Management Systems the Assets in the WFT tool are
organised based on their energy consumption and the fact that the
consumption is measured by the WFT. The Asset Register is thus an
integrated feature of the advanced energy management tools of the WFT.
The content in the Asset Register starts being built already during the
initial set-up of the WFT and during the install of meters and sensors. This
is done through the BSL Intranet and the feature is available to authorized
staff. The database will therefore mirror and describe the structure of the
actual physical WFT installation and it will therefore enable the printout of
a correct metering schematic.
The Asset Register can be accessed and read by anybody with WFT access
rights but only those with the additional right to administer the Blog will
have Write access.
Building Sustainability Ltd. ©2014
77(100)
The Asset Register contains the following basic data and features and the
possibility to store documents, annotations, comments, and a list of
sub-assets if required.
Parent Reference
This is used to organise the assets in a hierarchy. You only need to define
the assets parent or if it doesn't have one just leave it blank. When this
hierarchy is configured it is possible to produce a metering hierarchy
schedule for the building concerned.
Asset Name and Building
The name of the asset used in the WFT. If possible this should comply with
the usual name of the asset. The name of the building to which the asset
belongs is also stored.
Document
An arbitrary number of documents describing the asset can optionally be
stored in the register.
End Use
The Purpose of this field is to give a short description of how the asset is
used. In some cases the asset is a meter which is monitoring a group of
assets. In that case the description should describe all intended use, e.g.
Lights and Power. The Field has a predefined set of descriptions. If none of
those suits the asset you can write your own description.
Asset Location
Describes where the asset is located. Free text can be used.
Meter Location
If there is a meter associated with this asset, the location of the meter is
described here.
Asset Characteristics
It is possible to define an arbitrary number of properties for the asset.
That is done through the list of value-property pairs which includes
optional properties like 'Input Rating', 'Output Rating', 'Asset Code', 'Serial
Number', 'Supplier', 'Manufacturer', Maintenance Subcontractor, 'Year
Building Sustainability Ltd. ©2014
78(100)
Installed', 'Cost', 'Designer', 'Contractor', 'Current Transformer', and
'Other'.
Asset Comments
This field provides the possibility to add any comment on or description of
the asset concerned as free text.
Sub Assets
Because of the restriction (due to the energy management nature of this
register) that all assets must be metered most assets will usually have a
number of sub-assets. These sub-assets can be described in a list of name
and comments. An example is a meter that measures both lighting and
small power. Lighting is one sub asset and small power is another.
Search
For all assets all fields are indexed and therefore it is possible to search all
properties of an asset. The Search string is case-insensitive, however the
search can only be performed on full words.
All matches are listed and each row in the resulting list can be selected.
Please see Search Results below.
Printouts
It is possible to order printout of "All Assets in a Building" with some
important and associated data in PDF format and when "Parent"
information is available, a Metering Schematic"
Usage
The Asset Register is accessed by clicking the green "i" icon in the left
hand 'Total Electricity' box. This will bring up the Asset Register View as
shown below:
Building Sustainability Ltd. ©2014
79(100)
Asset Register View and Input Form
After data has been input or modified, click the "Save" button and the
Asset Register is updated.
To print a list of all assets of the building concerned (Gurdon Institute in
this case) click the button "Print of assets" and a PDF will be generated,
which is downloaded and can be printed.
If you click the button to the right “Target value for this asset” you will see
a popup window (see below) which displays the current estimated
consumption for this asset. You will have the option to change that value
and store it. The Targets you see in the line charts and in the league tables
are based on this value (multiplied with the target reduction).
To close the Asset Register window, just click on the x in the top right
corner.
If you click on "Search" at the top left of the Asset Register window, you
will get the search field as is shown below:
Asset Search Form
Building Sustainability Ltd. ©2014
80(100)
If you e.g. write main (as in main meter) in the search box and press
return you will get a list of all search results:
Search Results
If you click on a line e.g. Main Incomer North West Corner, you will get the
corresponding Asset Register view:
Asset Register View
In this view there is a button called "Show asset data" which will bring up
the actual meter data view for the asset concerned:
Building Sustainability Ltd. ©2014
81(100)
Meter Data View
If you click on "Printouts" in the Asset Register view you will get to a view
with a number of possible printouts, e.g. the Metering Schematic and the
"All Assets" for the building concerned.
Asset Scheme for a building
The All Assets printout which you get when clicking on "Print all assets"
button contains the most important information for the assets like:
Description
Type
Location
Manufacturer
Power rating
Building Sustainability Ltd. ©2014
82(100)
Project Tool
The Project tool is an integrated part of the WFT dashboard. With this tool
it is possible to keep track of projects and prioritise them based on how
much carbon or money they will save.
The list of projects is accessible from a button in the toolsmenu.
The Main view of the Project Tool displays the current set of projects. You
can use the middle menu (see red stroke below) to filter the set of
projects. And with the drop-down-list ”Sort by” you can define how the
projects should be sorted, either by ”Biggest savings”, ”Quickest Return
on Investment” or ”Cheapest”.
The Rows for the list of projects have different colours depending on these
settings:
- If the project has been completed the row will have a greenish colour.
- If the project has been set to On hold, the row will be blue.
- Otherwise the colour will depend on the priority, with the highest priority
(1) will be red and the lowest priority (5) will be yellow/orange and the
others in between these colours.
Building Sustainability Ltd. ©2014
83(100)
If you want to edit an existing project, just select the row from the list of
projects. To create a new project select the ”New”-button (see picture
below).
From the Asset Register it is possible to see which projects are involving a
particular asset. Just press the button named ”Display Associated
Projects” and if such projects exists they will be listed in the Project Tool.
All entries in the blog can be tagged with the project. In the blog window,
in the right column there is a button, ”Projects”, clicking it will display the
current set of projects.
Whenever a project is saved it will be possible to add a blog entry about
the change. See picture:
For each project it will be possible to define a set of properties (see picture
below); e.g. the name of the project, a reference number, descriptions and
next actions. There is a field for defining the project type and there you
Building Sustainability Ltd. ©2014
84(100)
have a predefined set of types. If you want to define your own project
type, that is possible, just delete the previous defined project type and
enter your own type.
To the right in this view you can see a summary of the project
characteristics, for example Return on Investment and the amount of
carbon saved by this project. Essential for these calcualtions is the current
consumption level. That amount can be defined in the bottom left text
box. But if you define the set of assets (one or more) this project concerns,
it is possible to automatically calculate the current consumption level.
Press the button ”Get Yearly Consumption” and you will see the popup
window below. If you want to use that value for the yearly consumption
(i.e. estimated yearly consumption before any savings), just press the
button ”Use this value”.
”Target Saving” is the yearly savings (in percent) of the current
consumption we will see as a result of this project. This number should be
expressed as a number between 0 and 1, i.e. if we write 0.05 we think
that this project will result in a 5% saving of the yearly consumption.
Reports of the current set of projects (as defined by the filter drop down
lists) can be created by choosing the ”Reports” button, see below. This
Building Sustainability Ltd. ©2014
85(100)
report contains beside the project properties also the calculations;
Payback (return-on-investment), energy savings also expressed as carbon
saved and money saved.
This report can also be automatically emailed to project members on a
monthly basis. To to that select the User Management tool and for each
user who should have this report select ”Send monthly project reports”.
Building Sustainability Ltd. ©2014
86(100)
Digital Signage
A Workplace Footprint Tracker digital signage feed is a stream of
information that contains text messages, image illustrations and graphics
with live real-time data from The Workplace Footprint Tracker. Texts and
images in the feed can be content managed using the Building
Sustainability online digital signage dashboard.
Every digital signage feed contains a number of views where each view is
displaying a certain message or information. By default the views in a
feed are alternating automatically at a configurable rate, but in the case
of using touchscreens it is also possible to build navigational hierarchies
and let the user navigate themselves among the different views by
pushing the screen.
For each view a schedule can be set. I.e. a start date and an end date
defining when that particular view should be displayed. Each view can
also be assigned a certain priority to control how often that particular view
should be displayed when the views are alternating.
Digital Signage Dashboard
The dashboard can be found at http://signageadmin.workplacetracker.com
or by clicking the Building Sustainability logo at the bottom of the
Workplace Footprint Tracker energy dashboard.
With this tool the user can:
- Add new views (Only text and image views).
- Delete views (Only text and image views).
- Set schedules for the views.
- Set priorities for the views.
- Change the order of the views.
- Manage the text and image content of the views.
Building Sustainability Ltd. ©2014
87(100)
Please note that it is not possible to use the dashboard for making any
changes to views containing charts. To make changes to such feeds,
please file a support request to [email protected].
When logging on to the dashboard you will be presented with a screen
looking like the illustration below. At the top of the screen there is a drop
down menu. This menu is used for selecting which feed to edit. Clicking
the menu and selecting a feed will open a page containing all information
for that feed.
Below the drop down menu there will be a number of rows. Each row is a
representation of one particular view in the feed and the row will contain
all information for that view.
Change order
Order number
Frequency
Scheduling
Preview
Building Sustainability Ltd. ©2014
Delete
88(100)
Order number
Each row starts with a row order number. By changing this number, the
order in which the views alternate in the feed is changed. The order can
be changed by either clicking the row number or by clicking one of the
arrows on the right.
Frequency
This controls how often the view should appear on the screen.
•
Often; The view is displayed every circulation of views.
•
Frequent; The view is displayed in two thirds of all circulations.
•
Seldom; The view is displayed at about every fifth circulation.
•
Never; The view is never displayed in the automatic circulation.
Scheduling
Views that should be displayed only during a certain period of time can be
set according to a schedule. Checking the box “Set schedule” will bring up
the form displayed below.
Enter the interval start date and time in the field on the left and the
interval end date in the field on the right.
Preview
Clicking this button will display how the view will look on the public
screen.
Building Sustainability Ltd. ©2014
89(100)
Delete
Clicking this button will remove the view from the feed. Before deleting
the user will be prompted whether it is certain the view should be
removed. By confirming the view will immediately be removed from the
list of rows. Please note that the delete operation will not take effect
unless the the button ”Store and publish” is pressed.
Once removed from the feed, this operation cannot be undone.
Change order
The two green arrows on the right side of every view can be used to
change the order of the views. By clicking the button with the upwards
pointing arrow the view will be shifted one position earlier in the
circulation. And clicking the downwards pointing arrow will shift the view
one position later.
View Types
There are three basic view types; Text, Image and Chart. Views of the
types Image or Text can be content managed by the user. Chart views can
not be content managed and changes to such feeds needs to be filed as
support requests to [email protected].
There are also hybrid view types, i.e. views containing both charts and
content manageable text or image blocks (see examples below).
Image View
This type of view is used for displaying an image in the feed. For this type
of view the standard black frame of the Workplace Footprint Tracker is not
used. The image is the only content of this type of view.
For reasons of user experience it is recommended to keep the image file
size below 500 kilobytes.
Building Sustainability Ltd. ©2014
90(100)
The input row for the text view looks like below.
Button for uploading image
An image can selected by clicking the button “Choose picture (Image)”.
The image must be available on the local disk drive. After an image has
been selected the upload button will change to preview the image as a
small thumbnail image.
Text View
This type of view is used for displaying a text. It is also possible to attach
an image illustration to the view. The length of text is limited by the space
on the screen. The available space for the text is depending on whether
an image is attached and on the width of that image. Use the preview
function to determine if the text is too long and change the text until it fits
into the view.
The image can be any size, but if too big it will be scaled down. Common
aspect ratios like e.g. 4:3, 5:3 or 3:2 does usually work well. For reasons of
user experience please keep the image file size below 400 kilobytes.
For the advanced user it can be useful to know that for additional styling
of the text html5 markup is allowed in the text. Please note that incorrect
use of html markup may break the digital signage feed.
The input row for the text view looks like below.
The text input
form
A button for uploading an image
illustration
Building Sustainability Ltd. ©2014
91(100)
Text view without image
Text view with image
Chart View
The chart views are displaying charts containing live data from the
Workplace Footprint Tracker. These views can not be content managed or
deleted and this is highlighted in the user interface by a red background
of the input row.
The input row for the chart view looks like below.
Although it is not possible to delete or content manage the chart views it
is still possible to reorder or set schedules to the chart views.
Building Sustainability Ltd. ©2014
92(100)
To change a chart view or to have it removed from the feed please contact
Building Sustainability by sending a support request to
[email protected].
Chart view with line chart
Chart view with line chart and
status chart
Hybrid View
In some cases it is desirable to display a text and/or an image next to a
chart. This can be accomplished by using a hybrid view. This is basically a
chart view that contains a block of content (text and/or image) that can be
managed by the user. The view can not be removed from the feed and can
only be added to the feed by the Building Sustainability support.
Building Sustainability Ltd. ©2014
93(100)
The hybrid view input row looks like below.
The text input
form
A button for uploading an image
illustration
A hybrid view with text and image next
to a linechart
A hybrid view with a content
manageable block between two charts
Building Sustainability Ltd. ©2014
94(100)
Navigation Views
An advanced feature of the Workplace Footprint Tracker digital signage is
the possibility to build navigational hierarches of views. This is useful
when the feed is displayed on a touchscreen device and what it means is
that instead of the automatic rotation of views the visitor navigate
manually between pages by clicking on the screen. This feature is not
covered in this user guide as it is customer specific. For more information
on this feature please contact [email protected].
Row coloring
Rows with white background color contain content manageable text
and/or image information.
Rows with red background contain charts with live resource usage data.
Rows with green background color are newly added and have not been
stored yet.
Row for chart view with text and image content
Newly added row
Row with content manageable text and image
Building Sustainability Ltd. ©2014
95(100)
Support Issues
For support issues or questions regarding the Workplace Footprint Tracker
feel free to email them to [email protected] one of the technical
team members will contact you to resolve the problem.
Building Sustainability Ltd. ©2014
96(100)
Detailed Description of Target Setting and How Targets
Are Used by the WFT
Introduction
The Workplace Footprint Tracker (WFT) has a function to specify a target
for the desired reduction in energy consumption.
The Target is used to enable the WFT to display:
- The RAG indicator (RAG = Red/Amber/Green), which provides a quick
signal to the user about the status of the energy reduction at the moment
of viewing, and
- The green target line in the line diagram that also shows actual
hourly/daily/weekly/monthly/yearly energy consumption as a red line.
Please note that if targets are not set for buildings and individual
meters neither the RAG indicator nor the green target line will be
shown correctly on the dashboard.
The desired reduction is specified as a percentage of the current long term
average consumption adjusted for hourly, daily, and monthly variations
and it is set through the WFT administration system. E.g. if the goal is to
reduce the energy consumption with 10%, the Target Reduction should be
set to 10%. When this reduction level is reached, the RAG indicator shows
amber light. If the reduction is less than the target, the indicator is red,
and if the reduction exceeds the goal the indicator is green.
The energy consumption target value in kWh is calculated automatically
by the WFT for each type of view period based on an estimated yearly
consumption, the actual consumption and the desired reduction. The
actual consumption is used to automatically adapt the target value to
variations in consumption over days, weeks and months.
A consequence of this is that it will take a week before all target lines and
the corresponding RAG indicators show correct values on the Dashboard in
a newly started WFT. The reason is that the actual consumption values are
not available until the displayed period has elapsed and the weight factors
cannot be calculated.
Building Sustainability Ltd. ©2014
97(100)
Understanding How The Target Function Works
The WFT collects half hourly or hourly energy consumption data from
meters in real time and such data is always available via different types of
reports and charts. To make the Dashboard easy to understand all
presentation is by full hours, days, weeks, months, and years. In a Day
View e.g. the actual energy consumption is shown as a red line connecting
dots which represent the consumption for the hour preceeding the dot.
Beside the consumption values the linecharts is usually also displaying a
green target line. These target values are also used in many other charts,
for example the RAG chart to compare the actual consumption with the
target consumption. The target is calculated as follows:
For each hour the long term average (longtermaverageHour) is calculated
and stored. It is also shown in the status chart to the right on the
Dashboard. The shown average refers to the period specified for the
actual dashboard view, i.e. if you are looking at the day view you will see
a line chart with hourly values for the last 24 hour and in the status chart
you will see the value for the last hour (or last half hour) and the average
value for that particular hour (or half hour). It is a moving average so it
only display how the consumption has looked like recently for the period.
A weight factor (currentHourWeight) is calculated as:
longtermaverageHour divided by (dailyAverageConsumption / 24). This
weight factor will show how much a particular hourly value is above or
below an estimated daily value if that value had a uniform distribution
over the day.
As soon as weekly and monthly average consumptions are available the
corresponding weight factors are calculated (currentWeekWeight and
currentMonthWeight) in a corresponding way.
The value for each hour (represented by the green dot) for the green line
is then calculated as: (1 – targetreduction) x (TOTYEAR /
numberOfHoursThisYear) x currentHourWeight x currentWeekWeight x
currentMonthWeight. So lets say that we have a target reduction of 5%,
the total energy consumed per year, i.e. TOTYEAR, has been set to
100000, then we can calculate an unweighted hourly target as
(1-0.5)*(100000/8760) = 10.85kWh. If we then multiply this value with the
hourly, weekly and monthly weights we will have the actual target.
Building Sustainability Ltd. ©2014
98(100)
After a year the manually set value of TOTYEAR can be manually updated
with the measured actual average value for the last year
(longtermaverageYear). In this way the WFT will incite the building users
to continuously strive for energy savings according to the set target.
For individual meters for which targets have been set, the green line is
calculated in a similar way but TOTYEAR is replaced by TARGET VALUE, i.e.
the target value set for that particular meter (this is explained in the
chapter “How to Set Target Values”).
For Groups which are composed of a number of individual meters, no
TARGET VALUE shall be manually specified because the target values are
automatically calculated by the WFT using the corresponding individual
meter values.
Use of The Admin Tool to Set Targets
This is only possible for users that have access to the Admin Tool. If you
don't have such authority, please contact Building Sustainability Ltd
Please note again that if targets are not set for buildings and individual
meters neither the RAG indicator nor the green target line will be shown
correctly on the dashboard.
Building Sustainability Ltd. ©2014
99(100)
List of Figures
Log-In Page.............................................................................6
The "All Buildings" view..........................................................7
The Campus View...................................................................8
Basic Dashboard View............................................................9
The Status Box (example 1).................................................12
The Status Box (example 2).................................................12
Hints & Tips Box...................................................................13
Pie Chart View.......................................................................13
Dot Chart View......................................................................14
Time-of-use and yearly view.................................................15
Feature Icons 1.....................................................................15
Feature Icons 2.....................................................................16
List of Buildings....................................................................17
Selection of Periods..............................................................17
Selection of Units..................................................................17
Summary Views....................................................................18
Hints & Tips Box...................................................................18
Selection of Dashboard Views for Workzones.......................19
Selection of Dashboard Views for Services...........................20
Selection of Dashboard Views for Climate............................21
Stacked Energy Consumption for Groups.............................22
Unstacked Consumption for Groups with Temperature Line.22
Access to Energy Details and Formulas................................23
Formula Description for a Group...........................................23
Line Diagram with Temperature Line for an Asset................23
Weather Station View...........................................................24
League Table.........................................................................25
Meter List..............................................................................25
Renewables View..................................................................26
Used and Gained Energy Graph............................................27
The Gas Graph......................................................................27
Sensor Dashboard View........................................................29
Access to Groups of Sensors.................................................29
Photovoltaics Sensor View....................................................30
Total Energy Display.............................................................30
The Real Time DEC...............................................................39
A typical Blog view................................................................40
Creation of Blog post from line chart....................................41
Availability of Blog post indication........................................41
The Blog post created above................................................42
Administration of Blog posts etc...........................................42
New post input form.............................................................43
Access to Reports.................................................................47
Report Selection Window......................................................48
Building Sustainability Ltd. ©2014
100(100)
Table of Reports....................................................................49
A Raw Data Report...............................................................51
An Out of Office Energy Usage Report..................................52
A Consumption per Meter Report.........................................53
A Comparison over Time Report...........................................53
An All Meters in a Building PDF Report.................................54
All Meters in a Building XLS Report.......................................54
Parts of the Energy Statement Report..................................55
The Report Designer interface..............................................56
List of Reports.......................................................................57
The user profile window with the report drop down selected
..............................................................................................60
User Management Window...................................................61
User Preferences Window.....................................................62
Administration of Hints & Tips..............................................65
Edit Tip Window....................................................................65
Control of Air Conditioning....................................................68
Change of Building Parameters............................................69
Creation of Customized League Tables.................................69
Second League Table Access................................................70
Work Bench Availability........................................................71
Energy Manager's Work Bench.............................................71
Degree Day Normalization on EMW......................................72
Asset Register View and Input Form.....................................79
Asset Search Form................................................................79
Search Results......................................................................80
Asset Register View..............................................................80
Meter Data View...................................................................81
Asset Scheme for a building.................................................81
Building Sustainability Ltd. ©2014