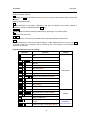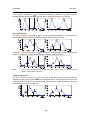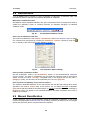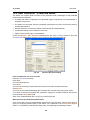
1
YL-Clarity
YL-Clarity
User Guide
User Guide
ENG
Tel: +82-31-428-8700
Fax: +82-31-428-8779
Email: [email protected]
www.younglin.com
© 2008 Young Lin Instrument Co., Ltd
899-6, Young Lin Bldg., Hogye-dong,
Anyang, Gyeonggi-do,
The Republic of Korea
I
Using this document
The User's Manual offers users of the YL-Clarity chromatographic station a detailed
description of controls, a procedure for processing the first analysis, detailed guidance
concerning the fundamental types of analyses and calibrations as well as copious additional
information about the options and variants relevant for working with the station. Chapters 1, 2,
and 3 are earmarked for beginners who will quickly find the required information there. Once
the user has become acquainted with the fundamental procedures of the station, turn to
Chapter 10 - Troubleshooting, for a list of the most common problems encountered when
working with the YL-Clarity station.
The Reference Guide contains summary information regarding all commands and error
messages. The User's Manual presupposes that the user is coming to the station with some
prior knowledge of the fundamental concepts (such as file, directory, path, etc.) of Windows
operating systems.
The following fonts are used in the manual to highlight parts of the text:
Open
Instrument
WORK1
Enter
RUNNING
Istd
-
Commands and items - bold
Window titles - Sans Serif, bold
Filenames and directories – uppercase lettering
Key designations – Sans Serif, boxed
Available states of the station - uppercase, Italics
Values of parameters - Italics.
Passages that do not apply to the Lite version of YL-Clarity
Young Lin Instrument Co., Ltd
II
YL-Clarity
Contents
Contents
1
INTRODUCTION ................................................................................................................ 1
1.1
Description of the YL-Clarity Station............................................................................... 1
1.2
Updating of program ....................................................................................................... 1
2
STATION CONTROL ......................................................................................................... 3
2.1
Windows ......................................................................................................................... 3
2.2
Icons and Toolbars ......................................................................................................... 3
2.3
Mouse Control................................................................................................................. 4
2.4
Keyboard Control ............................................................................................................ 4
2.5
Tables ............................................................................................................................. 6
2.5.1
Editing...................................................................................................................... 6
2.5.2
Adding and Deleting Lines....................................................................................... 7
2.5.3
Local menus of tables.............................................................................................. 7
2.5.4
Configuring Tables................................................................................................... 7
2.6
Clipboard......................................................................................................................... 8
2.7
File Selection .................................................................................................................. 9
2.8
Saving Files .................................................................................................................. 10
2.9
Recording all station operations (Audit Trail)
3
................................................ 11
STRUCTURE OF YL-CLARITY STATION WINDOWS................................................... 12
3.1
Structure of YL-Clarity windows
..................................................................... 12
3.1.1
YL-Clarity window
................................................................................... 13
3.1.2
Instrument Window
................................................................................. 13
3.1.3
Chromatogram Window ......................................................................................... 13
3.1.4
Calibration Window................................................................................................ 13
3.1.5
Sequence Window................................................................................................. 13
3.2
4
Structure of YL-Clarity Lite windows............................................................................. 14
CHROMATOGRAM MEASUREMENT AND EVALUATION........................................... 15
4.1
Measurement ................................................................................................................ 15
4.2
Processing the Analysis................................................................................................ 16
4.2.1
Method................................................................................................................... 17
4.2.2
Chromatogram....................................................................................................... 18
4.3
Fundamental Procedure of Analysis............................................................................. 18
4.3.1
Single Analysis ...................................................................................................... 18
4.3.1.1 External Control of Analysis Run ....................................................................... 22
4.3.1.2 Continuous (Preliminary) Measurement Processing ......................................... 22
III
YL-Clarity
Contents
4.3.1.3 Control of External Devices ............................................................................... 22
4.3.1.4 Automatic Functions after Analysis Termination................................................ 24
4.3.2
Batch Measurement of Analyses - Sequence ....................................................... 25
4.3.2.1 Passive Sequence ............................................................................................. 25
4.3.2.2 Active Sequence without Control ....................................................................... 26
4.3.2.3 Active Sequence with Control
............................................................. 27
4.3.2.4 Sequence Table and Its Creation ...................................................................... 27
4.3.2.5 Procedure of Sequence Measurements ............................................................ 29
4.3.3
4.4
5
Batch Processing of Analyses
................................................................ 30
DDE synchronization with other programs ................................................................... 31
CHROMATOGRAM ......................................................................................................... 33
5.1
Displaying a Chromatogram ......................................................................................... 33
5.2
Display Characteristics ................................................................................................. 33
5.2.1
Chromatogram Description and Display................................................................ 34
5.2.2
Description and Format of Displayed Axes ........................................................... 34
5.2.3
Descriptive Labels and Lines................................................................................. 35
5.3
Operations Involving Several Chromatograms - Overlay ............................................. 36
5.3.1
Resizing and Relocating Chromatograms ............................................................. 38
5.3.2
Mathematical Operations....................................................................................... 38
5.3.3
Three-dimensional View of Chromatograms ......................................................... 39
5.4
Chromatogram Modifications ........................................................................................ 39
5.4.1
Baseline Modifications ........................................................................................... 40
5.4.2
Peak Modifications................................................................................................. 43
5.4.3
Working with Groups of Peaks .............................................................................. 46
5.4.4
The Selection of Conditions That Restrict Integration ........................................... 47
5.4.5
Separation Parameters.......................................................................................... 47
5.4.6
The Integration Table............................................................................................. 48
6
CALCULATIONS AND CALIBRATION .......................................................................... 49
6.1
Result Table.................................................................................................................. 49
6.2
Table of Peak Parameters
6.3
Types of Integration Calculations ................................................................................. 50
............................................................................. 50
6.3.1
Non-calibrated Calculations - Uncal ...................................................................... 52
6.3.2
External Standard Method - ESTD ........................................................................ 52
6.3.3
Internal Standard Methods - ISTD......................................................................... 52
6.4
Description of the Calibration File................................................................................. 53
6.4.1
Main Calibration Table........................................................................................... 53
6.4.2
Compound Calibration Tables ............................................................................... 54
6.4.3
Calibration Curve ................................................................................................... 55
IV
YL-Clarity
Contents
6.5
How to Create Calibration............................................................................................. 57
6.6
Creating Additional Concentration Levels..................................................................... 58
6.7
Manual Calibration ........................................................................................................ 59
6.8
Recalibration ................................................................................................................. 60
6.9
Manual Recalibration .................................................................................................... 60
6.10
Multidetector calibration ................................................................................................ 61
6.11
Calibration File Modification.......................................................................................... 61
6.11.1
Default Parameter Settings ................................................................................... 62
6.11.2
Response Factor and Free Calibration.................................................................. 62
6.11.3
Selection of Calibration Units ................................................................................ 62
6.12
Correction for Differences in Injected Amount .............................................................. 63
6.13
Peak Identification in Calibrated Calculations .............................................................. 63
6.13.1
"Reference Peak" Method ..................................................................................... 63
6.13.2
Resolving Instances of Overlapping Identification Windows ................................. 65
6.13.3
Updating Retention Times ..................................................................................... 65
7
REPORTS ........................................................................................................................ 66
7.1
Reporting Procedure..................................................................................................... 66
7.2
Report Style Files.......................................................................................................... 67
7.3
Printer Selection............................................................................................................ 67
7.4
Report Style Selection .................................................................................................. 67
7.5
Report Style Modification .............................................................................................. 67
8
IMPORT............................................................................................................................ 70
9
EXPORT ........................................................................................................................... 71
9.1
Conjoint text export of Chromatogram and the Corresponding Results....................... 71
9.2
Exporting results to a database .................................................................................... 73
9.3
Exporting the Summary table ....................................................................................... 73
9.4
Exporting a chromatogram ........................................................................................... 73
9.5
Exporting Chromatograms as Vector Pictures.............................................................. 73
10
TROUBLESHOOTING ..................................................................................................... 74
10.1
Running the Program.................................................................................................... 74
10.1.1
YL-Clarity Lite ........................................................................................................ 74
10.1.2
YL-Clarity
................................................................................................ 74
10.2
Signal Displaying and Measurement ............................................................................ 75
10.3
Sequence...................................................................................................................... 76
10.4
Processing and Displaying Chromatograms................................................................. 76
10.5
Chromatogram Modification.......................................................................................... 78
10.6
Calibration ..................................................................................................................... 79
V
YL-Clarity
10.7
11
Contents
Calibrated Calculations ................................................................................................. 79
YL-CLARITY FILES AND DIRECTORIES ...................................................................... 81
11.1
Directories ..................................................................................................................... 81
11.2
Files............................................................................................................................... 82
11.2.1
Chromatograms (*.PRM) ....................................................................................... 82
11.2.2
Template Method Files (*.MET)............................................................................. 82
11.2.3
Calibration Files (*.CAL) ........................................................................................ 82
11.2.4
Sequence Files (*.SEQ) ........................................................................................ 83
11.2.5
Report Style Files (*.STY) ..................................................................................... 83
11.2.6
Password File (CLARITY.PSW)
11.2.7
Configuration File (CLARITY.CFG) ....................................................................... 83
11.2.8
Desktop File (CLARITY.DSK)................................................................................ 84
11.2.9
Archive Files (*.DGZ)
11.2.10
............................................................. 83
.............................................................................. 84
Project Files (*.PRJ)........................................................................................... 84
11.3
File Sharing................................................................................................................... 84
11.4
File Locking................................................................................................................... 85
11.5
Marking Changes in a File Not Yet Saved.................................................................... 85
12
STATION SETTINGS
12.1
........................................................................................ 86
System Configuration Setting ....................................................................................... 86
12.1.1
Number of Instruments .......................................................................................... 87
12.1.2
Description of Instruments and graphical symbols................................................ 87
12.2
User Accounts - Protected Mode.................................................................................. 88
12.3
Instrument Locking........................................................................................................ 89
12.4
User Settings ................................................................................................................ 90
13
14
WORKING WITH DIRECTORIES AND PROJECTS ...................................................... 91
13.1.1
Instrument Directory Selection .............................................................................. 91
13.1.2
Projects.................................................................................................................. 91
BACKING UP AND RESTORING FILES AND PROJECTS
............................ 93
14.1.1
Backup................................................................................................................... 93
14.1.2
Restoring Files....................................................................................................... 94
15
GLOSSARY ..................................................................................................................... 96
16
LIST OF PICTURES....................................................................................................... 101
17
INDEX............................................................................................................................. 103
VI
YL-Clarity
User Guide
1 Introduction
1.1 Description of the YL-Clarity Station
The YL-Clarity chromatographic station is an effective program used to acquire, process
and evaluate data from any standard, commercially available gas/liquid chromatograph. The
station can process analyses containing hundreds of peaks with varying widths from tenths of
a second to tens of minutes.
Due to the adjustable range (anywhere from ± 156 mV up to ± 10 V) of the inlet A/D converter
the station can be directly connected to the output of almost any chromatograph.
YL-Clarity collects chromatographic data independently ("in the background") while the user
analyses previously acquired data, corrects the baseline, performs calibrated or uncalibrated
calculations, or runs other programs. Results can be printed on any printer, and the printout
layout adapted to the user's needs through a host of adjustable parameters. Tables, data and
displayed chromatograms can be exported as files or inserted directly to other programs running
under Windows.
Calibrated calculations by the external or internal standard method may be performed using the
calibration files. Each calibration file can contain an arbitrary number of components, each
calibrated at up to 20 concentration levels.
YL-Clarity is also equipped to automatically process all data acquired from CSW stations.
The full version involves these extra features:
Data can be acquired simply by using the control module from chromatographs with a digital
output.
YL-Clarity can be configured to allow measurement on up to four chromatographs
simultaneously, each of which can be equipped with up to 4 detectors. YL-Clarity is also
equipped to support the cooperation between chromatographs and autosamplers, and tools for
supporting the requirements of the FDA’s 21 CFR Part 11 guideline.
1.2 Updating of program
Updates to the purchased version of YL-Clarity are provided free of charge. We are constantly
developing the YL-Clarity station to meet the needs of our customers. Should you have any
problem with the station, please do not hesitate to let us know. Whether it concerns
inadequacies in the existing functions or suggestions for improvements, we welcome and take
seriously, user opinion as part of our job.
Who’s afraid of the Internet?
For easier communication with the developer’s team, we have prepared special web sites on
which you can learn about a range of interesting information and on which you can inform us of
any improvements you would like made, where you can meet other users and mutually
exchange experience upon solution of ordinary problems with chromatographic work. All sites
are easily accessible from the home page of the Young Lin company at the address
www.younglin.com.
We would like to draw your attention to several sections of the website:
1
YL-Clarity
User Guide
Downloads – Product Updates
Offers updates to the station. Registered users may obtain the latest versions of their station.
Support - Technical Support
The easiest way to connect with our user support is via e-mail. You may of course also contact
us by telephone or fax. Technical support enables you to determine the source of a fault and
notify us with information we need to be able to help you to solve any problem you may have.
Support – Frequently Asked Questions
The FAQ section summarizes and addresses some of our customers most frequently asked
questions and provides the answers.
User Forum
The Users Forum is a place where users are able to exchange experiences they have had with
Young Lin chromatographic stations and any connected technical or methodological problems
that may have occurred while measuring chromatographic analyses.
Naturally our technicians carefully monitor this forum and answer questions regarding the use of
YL-Clarity, but it is also not impossible for another user to have had the same problem as you
may be experiencing and have an idea of how to solve it.
Automatic check of last available version
Should your computer be connected to the Internet, you may make use of automatic checking
of the last available update. In the main YL-Clarity window use the Help – Check for Updates
command. The command will compare the number of the last available version on the Internet
server with the version you have installed. Should a newer version now be available, a dialog
with the number of the new version will appear and you may download the new version.
After downloading, the YL-Clarity station will automatically shut-down and run the installation
program. The program will take you step-by-step through the installation of the updated version.
These updates are only available to registered users. Registration is accomplished by using the
Help - Register command.
2
YL-Clarity
User Guide
2 Station Control
Although the YL-Clarity station operates similarly to other programs that run in Windows, we
would like to provide brief descriptions of basic Windows concepts.
2.1 Windows
Main windows
The YL-Clarity station has a hierarchical structure. Instrument consists of up to four major
windows; the Instrument, Chromatogram, Calibration, and Sequence windows. When any of
these windows are opened the corresponding icon along with the name will be displayed in the
MS Windows taskbar.
Note:
If you find too many icons displayed in the taskbar distracting, uncheck the Show Windows
on the Taskbar checkbox from the User Options - General dialog (accessible from the
Instrument window using the View - Options command).
Modal windows
Some open windows - called modal windows - prevent the user from working in any other
window until the modal window is closed. The Open File dialog for selecting files is an example
of a modal window.
MS Windows shortcuts
The following fundamental key combinations used to facilitate work with windows:
Alt + F4
Closes the current window
Esc
Closes a dialog
Alt + Tab
Switches between windows of all currently running programs
F1
Invokes the context-sensitive online help
2.2 Icons and Toolbars
Icons
Icons are small graphical symbols that facilitate invoking some functions or windows. All icons
have the corresponding counterparts in menu commands.
Toolbars
Toolbars are panels containing icons. Toolbars are usually situated below the title bar, but can
be moved to any place on the screen.
The YL-Clarity station contains several predefined toolbars that may be customised (icons can
be added or removed); the user can also create his/her own toolbar.
Scheme of data processing
The Instrument windows display a special arrangement of icons that reflect the typical
procedure of a measurement and chromatogram processing. The corresponding
3
YL-Clarity
User Guide
commands can be invoked in any order (the displayed arrangement merely facilitates
orientation and assists one in following the appropriate procedures for working). Note the three
or
symbols that correspond to the first three items of the Postrun Setting dialog.
2.3 Mouse Control
As with most Windows programs, the YL-Clarity station is most easily navigated and controlled
using the mouse . YL-Clarity makes use of both the left and right mouse buttons, the
fundamental concepts of which are explained below.
Clicking
“Clicking” is a term for pressing the left mouse button when the mouse cursor (the arrow) is
pointing to the desired location such as an icon, a button, an edit line, etc. In most instances,
left clicking will replace the function of the Enter key.
Double-clicking
• Clicking the left mouse button twice in rapid succession in the same location is most often
used to select a file or highlight an entire word in the edit line.
• Customized function of the double-click can be set in all graphs using the Doubleclick
means command from the User Options – General dialog (accessible from the Instrument
window using the View –Options command).
Clicking with the right mouse button
• Typically displays the local menu.
• In graphs: Right clicking to zoom can be set using the Zoom button command from the User
Options - General dialog (accessible from the Instrument window using the View –Options
command).
Mouse wheel
The standard scrolling function of the mouse wheel has been extended for the YL-Clarity
station to facilitate navigation in Chromatogram, Data Acquisition and Calibration graphs.
Wheel only
Shifts a chromatogram cut-out up or down
SHIFT
+ wheel
Shifts cut-out left/right
CTRL
+ wheel
Enlarges or reduces a chromatogram cut-out
2.4 Keyboard Control
The station may also be operated strictly from the keyboard. The following is an illustration of
the functions of some of the keys and key combinations (striking multiple keys simultaneously).
Keyboard shortcuts of the MS Windows system:
Enter
Applies or implements the selected command. The command that has been selected will be
highlighted in the menu; in a dialog the borderline of the button will be emphasized by a
continuous or broken line).
4
YL-Clarity
User Guide
From the menu the required command can be selected using the cursor keys, and from a
window using the Tab key.
Esc
In a dialog, the Esc key substitutes for the Cancel key and will close a dialog without saving the
changes.
Hides an expanded menu.
Tab
Gradual selection of commands, parameters, edit lines and buttons in the active window. A
selection is usually completed using the Enter key.
Spacebar
Rapidly switches between selected parameters by checking or un-checking them
Alt
Selects the first menu item.
Alt + letter
Rapidly selects a command or parameter that has the selected letter underscored.
Insert
Switches between the insert and overwrite regimes. When editing text lines you may use Insert
to decide whether new characters will be inserted at the cursor position or will overwrite the
characters to the right.
Keyboard shortcuts of the YL-Clarity:
Shortcut
Function
F1
Help
F2
Edit table mode
CTRL + 1 ( 2 , 3 , 4 )
Open instrument (Login)
CTRL + N
New file
CTRL + A
Select all items in the list/table
CTRL + O
Open file (Open)
CTRL + S
Save file (Save)
CTRL + W
Close current file (Close)
CTRL + SHIFT + W
Close all opened files (Close All)
CTRL + P
Print (Print)
CTRL + X
Cut (Cut)
CTRL + C
Copy (Copy)
CTRL + V
Insert (Paste)
CTRL + Z
Cancel the last command (Undo)
CTRL + SHIFT + Z
Repeat the last command (Redo)
CTRL + I
Insert and create lines (Paste Insert)
DEL
Erase the table field
CTRL + -
Display the previous cut-out (Previous
Zoom)
CTRL + +
Display the next cut-out (Next Zoom)
Validity
Everywhere
5
Tables
Chromatogram,
Calibration,
Data Acquisition
YL-Clarity
User Guide
CTRL + *
Display in original size (Unzoom)
CTRL + R
Start an analysis (Run Single)
CTRL + Q or
F5
Start a sequence (Start, Run
Sequence)
CTRL + SPACE
Pause a sequence (Pause) / Resume
running of a set sequence (Resume)
CTRL + B
Immediately terminate a sequence
(Abort)
CTRL + H
Process the sample currently being
measured without terminating the
analysis (Snapshot)
CTRL + T or
SHIFT + F5
Terminate a sequence after the
completion of a sample measurement
(Stop)
CTRL + Down
Skip the current sample (Skip).
CTRL + Left
Repeat an injection from the current
vial (Repeat Injection)
CTRL + E
Reset the flags in the Sts. column
(Reset Status (Sts.))
Insert
Adds the selected device to the
instrument ( ). If no device is
selected, opens Add Device dialog.
Delete
Data Acquisition
Sequence,
Data Acquisition
Sequence
System
Configuration
Clears the selected device from the
instrument ( ).
2.5 Tables
Because tables in the Windows environment are not standardised, the following essential
characteristics of tables used in the YL-Clarity program are presented below.
2.5.1 Editing
Entering new values
Values can be directly entered in individual cells (provided the table cells are editable).
Note:
Some tables, such as the Result Table as well as tables from files that have been opened
for reading only, cannot be modified.
After first clicking a cell, you may then enter a new value that replaces the previous one. By
double-clicking or pressing the function key F2 the cell will be transferred to the edit mode.
If, after clicking, an
arrow button is displayed, the cell represents a list of values prepared in
advance. Click the arrow and select the appropriate value from the list.
Move among the cells by means of the cursor keys.
Once the first cell has been entered the next row will automatically be created.
The row being entered is assessed in its entirety for error during these modifications and can
only be abandoned after all errors have been corrected.
6
YL-Clarity
User Guide
If the requested row is not visible, locate it using of the vertical scroll bar displayed on the right
or by using the cursor keys. It is also possible to enlarge or maximize a window and display all
rows of a table.
Changing values in cells without predefined values
Click anywhere inside the cell and enter the new value (the old value will be erased).
Text can be edited after double-clicking anywhere inside the existing value or pressing F2 .
2.5.2 Adding and Deleting Lines
A new line will automatically be created once the first cell has been filled in. The user may edit
the new line only after the accuracy of the preceding line has been verified.
The easiest way to delete a line is by first selecting it (using the grey button at the beginning of
the row) and then pressing the Delete key.
2.5.3 Local menus of tables
Invoke the local menu by clicking any cell with the right mouse button.
The local menu contains commands from the Edit menu:
• The Select All command for selecting all cells in the table.
• Fuction Undo/Redo for cancelling or renewing applied changes in tables.
• Commands for working with the Clipboard: Copy, Cut, Paste, and Paste
Insert.
• Commands for configuring the table - Setup Columns, Restore Default
Columns, Hide Column(s), Show Hidden Column(s)
• Commands specific for the given table.
2.5.4 Configuring Tables
All tables enable the user to adjust the width of columns, the order of columns, potentially also
the sorting method.
How to change the column width
To change the width of a selected column move the mouse cursor to the right border of the grey
field of the heading (the cursor will change its shape to ). Click and hold the left mouse button
then drag to change the column width.
Double-click at the above location to adjust the column width to accommodate the longest
string of text.
Several columns may also be selected at once (changing the width of any one will change the
widths of all).
How to change the order of columns
Left click on the grey header of the required column. Click again and hold down while dragging
the cursor left or right to the desired location for the column. As soon as a thin red line appears at
the location where you want to move the left border of the column, release the left button.
How to sort items in a table
Items (lines) of a column are ordered by default according to the first column or the order in
which the lines have been created. To reorder a table according to some other column doubleclick the heading of that column to sort in ascending order; repeat the process to sort the table
7
YL-Clarity
User Guide
in the descending order. Some tables (e.g. the Integration Table) cannot be reordered, or
reordering must be first permitted by the Enable Sort command from the local menu.
Displaying and hiding columns
The result tables in the Chromatogram window and tables in the Calibration window can be
extensively reconfigured using the Setup Columns command from the local or Edit menu.
Once invoked, the Setup Columns dialog will open. From here, the user can select the columns
to be displayed and define their order.
Creating of new column with definition of calculation
Invoke the Add Column command to open the Add User Column dialog. Here the user can
create a new column for the table using a predefined calculation formula. User columns can be
displayed in the Result and Summary tables.
2.6 Clipboard
Using the clipboard
All data in tables and parameters may be transferred to other locations in the station or even to
and from other programs simply using the Cut, Copy and Paste commands.
Within the YL-Clarity station it is possible to use the clipboard to copy text labels and lines
between chromatograms.
Note: A typical example of this feature is the use of the table calculator (Excel) to easily prepare an
extensive sequence table. This can then be easily transferred using the Copy and Paste
commands into the Sequence window.
Copying data to the clipboard
The values of all parameters and the content of any fields of the tables may be transferred to
any other places or other programs of the Windows system with the help of the clipboard. The
Clipboard is a temporary memory that is shared within the entire Windows system, into which
or Cut
command. You then locate these in
you enter the selected value using the Copy
another place using the command Paste . In some tables you also use the
Paste Insert function (keys Ctrl + I ), which does not rewrite the original content of the table but
instead adds new lines above the currently selected line.
These commands can be found in either the Edit or the local menu of the tables. Also, using
the Copy ( Ctrl + C) , Cut ( Ctrl + X) and Paste ( Ctrl + V) commands is possible.
Selecting an area to be copied
Use the left mouse button and the grey buttons at the top and to the left of all tables to select a
contiguous area. All cells passed by the mouse cursor with the left button held down will be
highlighted. The grey buttons to the left select the entire row, those on top select the entire
column; the top-left button selects the entire table. To select a contiguous area use a
combination of the SHIFT key and the cursor key. The combination Ctrl + A or the command
Select all from the local menu selects the entire table (see Chapter 2.5.3 - Local menus of
tables, p. 7).
Note:
Editable tables are (after selecting all cells of the table) copied to the Clipboard without
header.
Non-editable tables are copied with header.
8
YL-Clarity
User Guide
Automatically filling table fields with repeating values.
When entering data into the tables it may occur that you need to fill in an area of the table with
periodically repeating information. The Paste command automatically supports this need. It is
sufficient enough to copy information into the clipboard that is to be repeated and then indicate
the area where data is to be inserted using the Paste command.
Note: Automatic data entry applies to both lines and columns. Should you thus wish to insert periodically
repeating lines, remember to insert them whole into the clipboard (including any empty columns).
Deleting values
Often times selected values can be deleted by the Delete command or the Del key.
2.7 File Selection
Open any file using the Open command. The Open X dialog will first be displayed (where X
stands for the type of file; a chromatogram, a method, etc.)
A list of all files of the given type from the current directory is displayed on the left (the path is
shown in the title bar).
Information about the file
icon, the items
If you click any file and have the panel with a detailed view of the file open by
below indicate a detailed description of the file, the name of the author, the version, potentially a
preview of the data.
Opening a file
Use the OK button or double-click on the filename to display a file. If the station is operating in
the password-protected mode and you do not possess the necessary authorisation to access
the file, an error message will appear.
Changing the directory
If you wish to open a file from another directory, click the Look In (combo box) pull-down menu
to inspect and change the current path.
The following icons are displayed in the top-right portion of the window. They allow the user to
directly return to the current directory.
- Current project (storing the template methods).
-
The common project COMMON (storing the report styles)
-
Data subdirectory of the current project (storing chromatograms)
-
Calibration subdirectory of the current project (storing calibration
files and standards)
Ordering files
Files are ordered alphabetically by default. To order files either by date/time, size, or when last
icon and sort the files by double-clicking the heading of
saved, set a detailed view using the
the corresponding column. Double-clicking again will sort the list in reverse order. The ordering
mode is indicated by the icon in the column heading.
Filtering displayed files
While the filename is being entered in the File Name field only files beginning in the already
entered text will be displayed. If you wish to find files containing a given text not at the beginning
of the filename, start by entering either * in the File Name item or the corresponding number of
question marks.
9
YL-Clarity
User Guide
Filtering file types
The File Type field selects the type of files to be displayed.
Selecting All Files (*.*) will display all of the files in the current directory regardless of whether
they have the same extension that has been ascribed to the relevant file type.
Simultaneous opening of several files
If the OVERLAY mode has been enabled, several chromatograms can be selected in the
Chromatogram window.
To affect a contiguous selection click the first file, then press and hold down the Shift key and
click the last file to be selected. All chromatograms will be highlighted and subsequently read in
by clicking the OK button or striking the Enter key.
Use the Ctrl key to select files other than contiguous files. Press and hold down the Ctrl key
while clicking on the files to be selected one by one. Confirm the selection by clicking OK or
pressing Enter .
2.8 Saving Files
Use Save to automatically save changes effected in the file without changing the name or
directory of the file.
The Save As command saves the file under a different name and/or in a different directory
from which the file was opened. When invoked, the Save As dialog will display the original
filename and directory of the file. Enter a new name in the File Name field and select another
directory using the Look In field (also known as the, “combo box”) and use the File Type field to
save the file in another format.
Note:
The File Type item converts files between the CSW17 CSW32 and YL-Clarity stations in
both directions.
Fig. 1.
Note:
The Save As dialog
It is not advisable to save files outside of the current project folder.
10
YL-Clarity
User Guide
2.9 Recording all station operations
(Audit Trail)
Station Audit Trail
The YL-Clarity station keeps a log of all of the operations that it performs. Records of the
station’s operations are saved in the LOG sub-folder in the station’s main folder. All operations
performed during a single day (24 hour period) are saved into a file that is named by the date
the operation was completed using the LOG suffix. This file can be displayed in the Daily Audit
Trail tab. The Session tab limits the displayed operations only to those that have been
performed since last running the session.
Local Audit Trails of individual files
Apart from recording all station operations the station also keeps detailed records of all
operations of sequence, calibration and chromatogram files. These records are part of each file
and can be displayed using the corresponding Window - Audit Trail command from Sequence,
Chromatogram or Calibration windows.
What are the Audit Trails useful for?
• Logging station activity is one of the essential steps that need to be made in order to fulfill the
conditions of Good Laboratory Practice (GLP).
• Due to the existence of recorded information in the log table we can easily analyse the
conditions that may lead to errors or instability in the station. The program also enables
you to send information regarding system settings and a record of the last two days of station
operations when the station has been improperly terminated.
Note: Before sending an e-mail with information regarding error(s), you have the option to check and
modify its content or add comments for our user support. The message will be sent only after you
have approved it.
• The Audit Trail also functions as a journal of sorts. If, for example, you are unable to recall
the name of a file to which you had exported the results of a performed analysis, you can
search for that file in the Audit Trails for the given period, arrange the lines according to type
of events and check the exports.
11
YL-Clarity
User Guide
3 Structure of YL-Clarity station windows
The following Figure shows the fundamental structure of YL-Clarity stations.
Fig. 2.
Fundamental Structure of YL-Clarity Stations
3.1 Structure of YL-Clarity windows
YL-Clarity stations are organised hierarchically.
The full version can measure on multiple instruments simultaneously. After starting the station
the main YL-Clarity window will appear and display the symbols of up to four instruments. The
Instrument window for measuring and processing analyses from connected detectors can be
opened by clicking the chromatograph icon and, if need be, entering the user's name and
password.
12
YL-Clarity
User Guide
3.1.1 YL-Clarity window
The fundamental purpose of the main YL-Clarity window is to select which instrument is to be
used for a particular measurement. The window can be also used to configure the station, select
the base directories for data storage, set up the digital outputs, and select the favored method
for logging station activities.
Most commands in the main YL-Clarity window are enabled only when all Instrument windows
are closed.
3.1.2 Instrument Window
All tools necessary for working with a single chromatograph are brought together in the
Instrument window.
The Instrument window contains an information table, status line and analysis-processing
diagram.
• Each Instrument window opens independent dialogs, so it is possible to control the
proceeding of analyses on multiple instruments simultaneously.
• Windows are distinguished by line colour in the analysis-processing diagram and instrument
name in the header or potentially in the project (= directory) name in the Status bar.
3.1.3 Chromatogram Window
This is the fundamental window for displaying, modifying and evaluating chromatograms. Open
icon in the Instrument window or at the end of menu bars in other
the window by clicking the
YL-Clarity windows.
3.1.4 Calibration Window
The Calibration window is designed to create, modify and display calibration curves. Open the
Calibration window using the
icon from the Instrument window or using the Window –
Calibration command from any window. Refer to the Getting Started manual for hints on how
to create and use a simple calibration.
3.1.5 Sequence Window
This window defines the sequences of multiple analyses. Open the window by clicking on the
icon from the Instrument window or the Window – Calibration command from any window.
13
YL-Clarity
User Guide
3.2 Structure of YL-Clarity Lite windows
When using the YL-Clarity Lite version the Instrument window labeled as YL-Clarity Lite will
appear after starting the station instead of the main window for selecting the instrument.
In contrast to the full version you will find here commands that are in the full version part of the
main YL-Clarity window:
• In the File menu the Digital Outputs command
• In the Help menu the Register, Check for Updates, Send Report by Email, User Code,
YL-Clarity Online and About commands.
For Chromatogram, Calibration and Sequence windows applies the same description like in the
full version (chapters 3.1.3 - 3.1.5).
In contrast to the full version, YL-Clarity Lite does not contain the following features:
• Simultaneous measurement on multiple instruments
• Logging of the station’s activities - Audit Trail
• Advanced setting of access rights, layouts - User Accounts
• Setting up the Station - System Configuration
• Offline batch processing of multiple chromatograms - Batch
• User columns in result tables - Create User Column
• Direct control of GC, LC and AS using add on control modules – GC/LC/AS Control, GC/LC
Monitor.
• Backing up of files and projects – Archive
• Electronic signatures – Sign
• Additional advanced functions useful for working in bigger laboratories
14
YL-Clarity
User Guide
4 Chromatogram Measurement and Evaluation
This Chapter provides a comprehensive review of all the possible ways to measure a single or a
series of chromatograms.
4.1 Measurement
A complete measurement is comprised of the data acquisition from a detector, the digital
integration of the measured data, and storage of the results on the hard disk.
Individually, an Instrument window can be in any one of the following individual states,
regardless of the state of other Instrument windows:
STOP
- A measurement is not in progress and may not be
started by an external signal.
WAITING
- A measurement is not in progress and the station
is waiting for the external "start" signal before it
can begin.
RUNNING
- An analysis is in progress.
PAUSED
- Indicates a suspended sequence.
RUNNING/PAUSED
- The sequence will be suspended after the current
analysis has been completed.
IDLE
- The state of active sequence after the
measurement has been finished and before the
confirming signal will be sent from the station to
the autosampler. The duration of IDLE state can
be customized by the user.
CONTROL
-
WAITING FOR READY
-
Data acquisition has completed and the control
program of the directly controlled chromatograph
or the LC pumps is concluding its run.
The active sequence has been started, station is
waiting for the READY signal from the directly
controlled device.
Measurement with the YL-Clarity station is comprised of the following steps:
• The A/D converter transforms the analog signal to a 24-bit binary number representing the
integral value over a given time.
• Due to the design of the converter, it is possible to obtain a true integral. The Young Lin A/D
converter permanently integrates the input voltage while standard sampling converters with
approximation transfer, only sample voltage at discrete time intervals.
Note:
This does not apply to detectors with digital output for which a control module is available
(e.g. HP 5890, 6890, etc.) where the data is transferred to YL-Clarity through the RS-232
serial line.
• The above binary number will then pass through a digital filter that filters out all parasitic
components originating, e.g., from power voltage fluctuations.
15
YL-Clarity
User Guide
• Individual binary numbers (data items) are read from the converter at a specified rate. Each
partial integral occupies four bytes.
• Data samples are temporarily stored in the operating memory and then sent to the hard disk
approximately once per minute as a buffer. In the TMP subdirectory of the main station
directory (C:\CLARITY\TMP by default) a file $CHXRUN.RAW (where X stands for the
instrument number) is thus created for storing the so-called raw data. This ensures that very
long chromatograms can be measured since the capacity of the hard disk is much higher
than the capacity of the operating memory.
Selecting the sampling rate
In the field of fast measurements on capillary columns and microcolumns in particular you would
be glad to make use of one of the preset sampling rates. The setup is a part of the method file
and can be changed using the Method - Acquisition - Sample Rate command from the
Instrument window. Changing the sampling rate affects the chromatogram size.
Note:
The available scopes of sampling speed depend upon the type of converter used.
4.2 Processing the Analysis
Processing chromatographic data means identification of all peaks in the chromatogram, its
identification and quantification and determining the proper baseline. The YL-Clarity station is
equipped with a standard algorithm for processing chromatographic data. The algorithm
requires that the Peak Width and Threshold parameters be set. These parameters are a part
of the template method file and will be transferred to the chromatogram after an analysis is
terminated.
Peak Width
The parameter decides on the peak width at half height (expressed in minutes) of peaks
occurring in the processed analysis. The value should approximately correspond to the
parameter W05 (peak width at half height). For peaks of different width the value should be set
according to the narrowest one.
Threshold
The parameter is entered in millivolts, is independent of peak width and discriminates between a
useful signal and noise. If a peak has to be included in integration or measured then the height
between the beginning and apex of that peak should be at least twice as high as the value of
this parameter.
Both parameters fundamentally influence the quality of the resulting chromatogram with regard
of peak detection (determination of peak beginning and end and the correct baseline).
Accordingly, in creating a template method used for each class of analyses pay appropriate
attention to the optimum setting of the two parameters. Although the setting is not too critical
(the result will be the same within a certain range of values), their incorrect selection must be
subsequently corrected by operations with the chromatogram (see Chapter 5.4 Chromatogram Modifications on page 39). These additional operations should not
substantially change the selected baseline, rather eliminate some phenomena that the peak
detection algorithm is unable to cope with (e.g., tangential separation, identification of the
solvent peak, ban on detection during the period of column switching, etc.). Some practical
guidelines referring to setting up these parameters are in Chapter 10.4 - Processing and
Displaying Chromatograms on page 76. In general, the minimal width of detected peaks
(expressed as the distance between the peak start and end) is directly proportional to Peak
Width and inversely proportional to Threshold. Moreover, the Threshold parameter prevents
erroneous assignment of noise to spurious peaks.
16
YL-Clarity
User Guide
In addition to the above two obligatory parameters stated in the firs two lines of the Integration
table, a number of further parameters can be set in the Integration table allowing for automatic
integration of complicated chromatograms. These parameters are described in detail in the
chapter 5.4 - Chromatogram Modifications on pg. 39
4.2.1 Method
The method file constitutes a tool used to achieve facile description and setting of all
measurement conditions and to attain high reproducibility of measurements performed with the
YL-Clarity station.
The method is divided into a number of sections, of which each is reserved one tab of the
Method Setup dialog.
Event Table
-
Section for control of the inputs.
Measurement
-
Section with description of measuring conditions and
possible setting of length of measurement or automatic
subtraction of desired chromatogram.
Acquisition
-
Section with parameters that are related to a signal
measurement. This includes attenuation, sampling rate,
control of digital outputs through the Event Table, etc.
Integration
-
Section with integration parameters for the correct
identification of peaks and determination of the baseline.
Calculation
-
Section summarising calculation parameters for setting the
type of calibration calculations.
Advanced
-
Section with settings of chromatogram subtraction and
column calculations.
AS Control
-
Section for potential direct autosampler control.
LC/GC Control
-
Section for potential direct control of a chromatograph or
pump
The template method file is accessible from the Instrument window using commands from the
File menu.
Note:
Carefully select the method for measuring a chromatogram, in particular with regard to
attenuation, duration of analysis, the limiting integration parameters and the selection of the
calibration file. For example the parameters from the Acquisition tab should be checked
prior to starting an analysis, since they cannot be modified later!
Once an analysis is terminated, a copy of the method file will be stored with the created
chromatogram.
This ensures that most parameters will be available and may be changed in the already
measured chromatogram. These are found in the relevant tabs of the Chromatogram window
using commands from the Method and Results menus.
Note:
The layout of individual commands does not completely correspond to the tabs of the
Method Setup dialog.
This is mostly due to the fact that parameters from the
Chromatogram - Acquisition dialog serve for information only and cannot be changed.
17
YL-Clarity
User Guide
4.2.2 Chromatogram
Raw data processing results in the creation of a chromatogram (file extension *.PRM).
Chromatograms consist of three basic parts: a copy of the model method, the raw data, and the
chromatogram (with identified peaks and a marked baseline).
Chromatograms can be displayed (in either the Chromatogram or the Calibration window),
printed, and the file contents exported to the Clipboard or to a text file. Chromatograms of
individual projects are stored in either the data or the calibration subdirectory. Rapidly switch
and
icons in the Open Chromatogram dialog.
between the subdirectories using the
Note:
If you prefer not to have the chromatograms separated in the above manner, select identical
names of the two subdirectories (Analysis Subdir. and Calibration Subdir.) when
establishing a new project in the Project Setup window.
To obtain detailed information about the active chromatogram invokes the Method Measurement command from the Chromatogram window.
4.3 Fundamental Procedure of Analysis
The following chapters present directives informing about various methods of analysis
processing. The basic procedure is also described in the Getting Started manual in the First
Analysis chapter. Additional information is also available in chapter 10.2 - Signal Displaying
and Measurement on page 75.
4.3.1 Single Analysis
This chapter describes a comprehensive procedure of analysis processing and takes most
options the station has to offer into account. Some additional variants are discussed in
subsequent chapters.
Instrument selection
Click the instrument icon (found in the main YL-Clarity window) that represents the
chromatograph you wish to use in the analysis. Fill in your name or, while in the protected
mode, select your User Name and enter the Password. Then click the OK button to open the
corresponding Instrument window.
Setting up measurement conditions
All parameters and data items referring to the measurement are summarised in the Method
Setup - Measurement and Acquisition tabs of the template method. These are first displayed
using the
and
icons, or by using the Method - Measurement (Acquisition)
command from the Instrument window. The name of the template method will be displayed in
the Information table. If you prepare another template method during the measurement, the
name of this current template method will be displayed in the header of the Instrument window.
Setting up the maximum input voltage
The input range (attenuation) is defined by the Range item in the Method Setup - Acquisition
dialog, and must be higher than the maximum output voltage of the employed detector. On the
other hand, it is improper to measure small voltages with, say, the 10-V range, since this would
reduce resolution and accuracy of the measurement. If you intend to measure negative voltages,
18
YL-Clarity
User Guide
check the Bipolar checkbox in the A/D converter setup dialog (accessible from the System
Configuration dialog by double-clicking on the A/D converter (INT7, U-PAD, etc.) icon.
Note:
In case of multidetector measurement, it is necessary to set the range values for each
detector separately using Select detector item in the Method Setup - Acquisition dialog.
Monitoring the baseline drift and noise
icon or the Monitor – Data Acquisition
Open the Data Acquisition window using the
command from the Instrument window.
The signals from all detectors will automatically be identified and displayed within the range set
in the Time and Voltage fields.
When the displayed range is unsatisfactory, change the values in the Time and/or Voltage
fields and confirm the change by pressing Enter where the signal will be displayed with the new
zoom.
Use the left mouse button to zoom in on any one of the cuts.
To resume from the original magnification that was specified in the Time and Voltage field,
double-click the left mouse button.
The station will store selected cuts; to see them use the Previous and Next Zoom, commands
respectively.
Note:
In a zoomed-in cut the window will no longer be automatically redrawn (the same is true
when the base range of the window has been exceeded).
Starting an analysis
icon or the Analysis - Single command to open the Single Analysis dialog where
Use the
the analysis can be controlled.
Fig. 3.
The Single Analysis Window
Fill in header of the analysis in the Analysis group.
If you check the Calibration standard checkbox the chromatogram will be automatically stored
in the CALIB subfolder.
Check the template method using the Method button.
Having injected the sample run the analysis using the Run button
The control of an analysis through an external signal is described in chapter 4.3.1.1 - External
Control of Analysis Run on page 22.
Note:
Measurement can also be run by using the Analysis – Run Single command, or using the
icon from the Data Acquisition window.
19
YL-Clarity
User Guide
Monitoring the analysis
By default the range of the signals from detectors will not be automatically identified during
analysis. The fixed range defined in the Time… to… and Voltage… to… fields will always be
displayed. When the preset values are exceeded the window will not be automatically redrawn.
Note:
The values entered in the Time and Voltage fields do not in any way limit the scope of the
acquired data. The maximum voltage range is defined by the Range items from the Method
Setup - Acquisition dialog. The duration of an analysis may only be restricted by checking
the Enable Autostop checkbox and setting the Run Time field from the Method Setup Measurement dialog.
Background chromatogram:
You can also compare the analysis that is in progress to a completed chromatogram by invoking
the File - Set Background Chromatogram command and selecting the chromatogram that is
to be displayed in grey in the background of the Data Acquisition window. The chromatogram in
the background will only appear after the current analysis has been started.
Automatic subtraction of Chromatogram:
In addition to comparing the measured signal with the background chromatogram (see above),
the YL-Clarity station also offers the ability to subtract a chromatogram automatically. Set the
desired chromatogram in the Chromatogram field and select the
method for automatic subtraction in the Matching field from the Method Setup – Measurement
dialog. The station will either simply subtract the chromatogram from the currently measured
signal or will attempt to displace the subtracted chromatogram with the measured
chromatogram. A more detailed description is provided in the Reference Guide.
Display the subtraction chromatogram in the background of the Data Acquisition window by
using the File – Show Solvent Chromatogram command. The status bar of the Data
Acquisition window will indicate which chromatogram is to be subtracted.
Fig. 4.
Status bar of the Data Acquisition window
Setting up the processing parameters
The measured chromatogram will be integrated and evaluated according to the parameters of
the template specified in Method Setup - Integration and Calculation tabs.
Especially check the following parameters:
Peak Width
-
Enter the width of the narrowest peak expected (in the
Method setup – Integration dialog)
Threshold
-
Enter the half height of the lowest expected peak
(Method setup - Integration)
Calibration File
-
Set the calibration file that contains the table of
compounds used for their identification as well as the
calibration curves used to calculate the actual amounts
(in the Method setup - Calculation dialog).
20
YL-Clarity
User Guide
Preparation for analysis termination
Check the Setting - Postrun command from the Instrument window regarding which activities
will proceed after the processing of measured data.. See Chapter 4.3.1.4 - Automatic
Functions after Analysis on page 24 for additional information.
Invoke the Analysis - Single command to open the Single Analysis dialog and inspect the
Chromatogram File Name field.
Up to 254 characters, including spaces and national characters, may be entered. The following
characters are however, not allowed: / \ : * ? " < > | .
When employed in the normal operation, the automated naming option is very useful. The
station uses a set of variables such as the sample number, and current date, etc. that are
preceded by the “%”character. Once an analysis has been terminated each such variable will be
substituted by the topical value. Variables may be combined and the topical value will be
displayed in parentheses above the Chromatogram File Name field and in the Information
table of the Instrument window. For additional details refer to the Reference Guide, chapter
Single - in the Chromatogram File Name section.
Assistant for setting file name
icon next to the File Name field in the Single Analysis dialog to open the
Click on the
assistant that will utilize individual variables to compose file names. Simply select the required
function, click on it and the assistant automatically adds the corresponding variable to the file
name.
1.
In some instances the application will save the chromatogram under a special name, using the
first free eight-digit number starting at 00000000.*. This is designed specifically for situations
where a risk that measured data might be lost or existing data overwritten exists:
-The
user
has
cancelled
the
invitation
to
enter
a
new
chromatogram name using the Cancel command.
-The application was unable to display a message requesting that the new chromatogram name
be entered, since e.g. some other message was displayed at that time.
End of analysis
Activate the Stop button in the Single Analysis dialog. Depending on the settings affected in the
preceding two articles, the analysis will then terminate and the measured data will be saved,
potentially evaluated, displayed and printed.
Activation of the Run button will terminate the analysis in the same way, run the next analysis
and continuously measure a series of analyses.
Note:
An analysis can also be terminated using the Analysis – Stop, Abort commands (
,
icons) from the Data Acquisition window.
Displaying results
The ability to have chromatograms automatically displaying in the Chromatogram and
Calibration windows depends on the setting of the corresponding checkboxes from the Postrun
Setting dialog.
and
icons and then have the chromatograms
Open the windows manually using the
displayed using the File - Open or File - Open Standard commands.
21
YL-Clarity
User Guide
Data evaluation
Invoke the Results - Result Table command to display the table of integration results in the
Chromatogram - Integration window. See Chapter 6 - Calculations and Calibration on page 49
for a detailed description (including the procedure used to obtain calibrated results).
Presentation of results
The results of an analysis can be automatically printed, exported (see Chapter 7 - Reports on
page 66) and processed by another program (e.g. Excel), which will be automatically run after
termination of the analysis. All based on the settings in the Postrun Setting dialog. See Chapter
4.3.1.4 - Automatic Functions after Analysis on page 24 for additional details.
4.3.1.1
External Control of Analysis Run
Analyses can also be run and terminated using an external signal: from a chromatograph, an
auxiliary button on the cable or a sampling valve (depending on your configuration and program
installation). The External Start/Stop checkbox from the Method Setup - Measurement dialog
enables external control. Items in the synonymous section decide on the external control mode.
The Down and Up items decide whether the station will react to the ascending (leading) or
descending (trailing) edge of the external pulse.
The Start Only item specifies that the external signal will only start analyses (subsequently
manually terminated), either by the Stop command or by checking the Enable Autostop
checkbox.
Fig. 5.
External Start/Stop section of the Measurement tab
The Start-Restart item decides on whether the external signal will stop the currently running
analysis and immediately start the next one (continuous series of analyses).
The Start-Stop item specifies that the external signal will only terminate the currently running
analysis, and the start of the next analysis will wait for an additional external signal.
4.3.1.2
Continuous (Preliminary) Measurement Processing
While an analysis is running the already acquired part can be evaluated (while the analysis
continues) using the Snapshot command from the Single Analysis or Data Acquisition windows.
This command is almost identical to the Stop command but does not stop the analysis. The
Snapshot is suitable e.g. for a preliminary evaluation of a prolonged analyses.
The Snapshot does not increment the counter of the analyses (%n) and a warning message
regarding an eventual overwrite of the existing chromatogram will be displayed only when the
Snapshot command has been used in the analysis for the first time. Any changes will then be
overwritten by next use of the Snapshot command or after the end of the analysis in progress.
4.3.1.3
Control of External Devices
The YL-Clarity station (when using A/D converter) is able to control external devices equipped
with control inputs (pumps, temperature programmers, autosamplers, etc.). The Event Table,
included in each method, can control up to eight inputs on the internal or four inputs on the
external A/D converter. Each line of the table defines a single condition - event - and, if the
condition is satisfied, a set a specified output to the prescribed value. Examples of events: the
expiration of a preset analysis time - Time, the decrease of a detector signal below or increase
22
YL-Clarity
User Guide
above, a preset value measured either from zero - Input or from the value at the start of the
current analysis - Input Rel.
When contradictory requirements involving a single output occur, the last command issued will
be in control.
When using a multi-detector measurement there will be a separate Event Table controlling the
outputs of the A/D converter and containing the corresponding channel for each detector.
Event Table creation and modification
To display the Event Table invoke the Method Setup – Event Table dialog command from the
Instrument window.
Fig. 6.
Event Table
A new line will automatically be appended once the previous line has been correctly filled in.
Active sequences use some of the digital outputs for
synchronising the station with chromatographic equipment.
Should you use an active sequence, ensure that you do not use
those specific outputs in the Events Table. Active sequences are
described in chapter 4.3.2.2 – Active Sequence without
Control on page 26.
Manual setting of control outputs
Control outputs can also be manually managed using the System – Digital Outputs command.
Invoking the command will open the Digital Output Control XXX Board dialog (where XXX stands
for the name of the A/D board that is used or selected). The first column, Initial State, is
earmarked to set up the default state of the outputs each time the program is run. The second
column, Current State, sets the topical state of the outputs and enables the user to change it
immediately.
Fig. 7.
Digital Output Control for the U-PAD2.
23
YL-Clarity
User Guide
A Description column is provided so that notes explaining the meaning of individual digital
outputs may be entered.
4.3.1.4
Automatic Functions after Analysis Termination
The station always allows actions to be performed after each analysis has terminated.
Note:
Similar actions can be performed with batch processed chromatograms using the Batch
command. See chapter 4.3.3 - Batch Processing of Analyses on pg. 30 for additional
details.
Fig. 8.
Postrun Setting
Set up is accomplished using the Setting - Postrun command from the Instrument window.
Invoking the command will open the Postrun Setting dialog that contains commands for the
automatically displaying the chromatogram, printing a report, exporting the chromatogram, and
running another application. The setting of the first three items corresponds to, and can be
and
controlled by, the
the Instrument window.
"traffic signs" next to the corresponding
,
and
icons in
Automatic displaying of the chromatogram
To set a chromatogram to be automatically displayed in the Chromatogram window, check the
Open Chromatogram Window checkbox from the PostRun Setting dialog or switch to the
sign next to the
icon in the Instrument window. If the OVERLAY mode is operative,
chromatograms will be displayed one by one and overlaid.
To set a chromatogram to be automatically displayed in the Calibration window, check the Open
sign next to
Calibration Window checkbox from the PostRun Setting dialog or switch to the
the
icon in the Instrument window.
The automatic display will be suspended if the OVERLAY mode is not operative and a
chromatogram is currently opened that contains some unsaved changes, or if the number of
displayed chromatograms has reached the limit (20 by default) set in the Maximum
Chromatograms in Overlay from the User Options – General dialog.
Note:
When the Maximum Chromatograms in Overlay limit has been reached the first opened
chromatogram will be closed.
24
YL-Clarity
User Guide
Automated reporting
Use the Print Results checkbox from the PostRun Setting dialog or the
traffic sign next to
the icon
in the Instrument window to enable automatic chromatogram printing. printing will
be done according to the report style set by the File - Report Setup command from the
Instrument window. In a sequence analyses, the report style must be defined in the
corresponding line of the sequence table. Printing is conditional on both the report style
specified in the Sequence Table and the checked Print Results checkbox.
Automatic export
Check the Automatic Export checkbox to have selected data automatically exported to a file or
to the Clipboard. The export mode depends on the setting in the Export Chromatogram dialog
(accessible using the Setting – Export Data command from the Instrument window) or the File
– Export Data command from the Chromatogram window.
Automatic running of another application
If the Run Program field contains a name of an application (e.g. EXCEL.EXE) and the
Parameters field contains optional parameters of that application (for Excel e.g. the name of the
button to
working sheet or macro file), that application will automatically be run. Use the
search for the required application including the relevant full path. If the Only with export
checkbox has been checked, the application will only be run when the Automatic Export
checkbox has also been checked.
4.3.2 Batch Measurement of Analyses - Sequence
The station enables batch measurement of analyses (also known as sequence measurements
or simple sequences) to be performed, in particular in connection with autosamplers. For this it
is possible to select an active or passive operation. The running and duration of individual
analyses is controlled either by the station (active sequence) or by the autosampler (passive
sequence).
4.3.2.1
Passive Sequence
Passive sequences can either be used with autosamplers that decide on the injection time, or
by manual injection. In this regime the station will only react to signals that informs about
effected injection. This means that there are no special conditions required to make an
additional connection between the autosampler and the chromatograph.
Once a sequence has been started using the Run command from the Sequence window, the
sequence will pass from the STOP to the WAITING state where it awaits the external, starting
signal from the autosampler.
Once that signal arrives the analysis starts and the station assumes the RUNNING state.
One injection cycle
Measurement (analysis)
(STOP)
WAITING
WAITING
Run
Sequence
RUNNING
(Autostop)
1st injection
Fig. 9.
(WAITING)
RUNNING
2nd injection
Time Diagram of a Passive Sequence
25
time
YL-Clarity
User Guide
If the External Start/Stop (from the Method Setup - Acquisition dialog of the corresponding
template method) has been set to Start-Restart, the next external signal will run the following
analysis.
An analysis can be also terminated by checking the Enable Autostop checkbox in the Method
Setup - Measurement dialog of the corresponding template method.
4.3.2.2
Active Sequence without Control
Active sequences are used to increase the reliability of co-operation between the station,
autosampler and chromatograph when an autosampler without autonomous control is being
employed. An active sequence is also necessary for the intelligent control of some selected
autosamplers by means of a special control module (see the next chapter 4.3.2.3 - Active
Sequence for additional details).
The autosampler must be equipped with one starting input and one confirmation output. Once a
sequence has been run using the Run command from the Sequence window, the station will
send an authorising signal and await confirmation from the autosampler. The station will begin a
measurement after confirmation has been received. The run will terminate after the time that
has been specified in the Enable Autostop parameter (from the corresponding method) has
expired and the station has remained in the IDLE state for the period that has been defined in
the Idle Time field. Thereafter a new authorisation signal will be sent to the autosampler and the
station will await its confirmation.
The above cycle will be repeated for all the measurements listed in the sequence table. If the
sequence table has to be updated, a sequence may be suspended using the Pause command;
the command can be invoked anytime, but the sequence that is in the RUNNING state will only
be suspended the next time the station switches over to either the IDLE or the WAITING FOR
READY state. Invoke the Resume command to continue the sequence.
Conditions underlying start of an active sequence
1.
2.
3.
A checked Active Sequence checkbox in the Sequence - Options dialog.
A checked Enable Autostop checkbox in each method included in the sequence table.
Creation of a logical loop:
• the relevant digital output should be connected to the confirmation autosampler input,
• the output signal from the autosampler should be connected to the corresponding
external digital output.
The default
assignment of
digital outputs is
as follows:
Note:
Instrume
nt
Output
1
2
3
4
All
OUT1
OUT2
OUT3
OUT4
DGND
Output pin Nr. on the connector
UPAD
INT5 INT7
UPAD
INT7
Relay
Relay
5
23
4
22
1
11
31
14
34
19
11
31
1
12, 30
13, 32
-15, 33
-16, 35
8, 27
13, 32
-
Should you be using an active sequence, be sure not to process these outputs in the Events
Table.
26
YL-Clarity
User Guide
One injection cycle
M easurement (analysis)
(STOP)
WAITING
WAITING
IDLE
Start
Run
program Sequence
1st inj.
enable
OUT0-6
(digital
output)
IN1-4
(digital
input)
Given by the value
Initial from theDigital
Outputs window
Fig. 10.
4.3.2.3
RUNNING
Autostop
1st injection
Autosampler
broadcasts injection
(BREAK)
WAITING
IDLE
Resume
2nd inj.
enable
RUNNING
time
2nd
injection
The program returns the original digital output
Time Scheme and Succession of Signals in an Active Sequence
Active Sequence with Control
For selected types of autosamplers we supply a software module that directly selects the
injection sequence and time. The interconnection for active sequences is usually then made
using a serial communication cable between the PC and the autosampler.
A detailed description will be found in a separate manual.
4.3.2.4
Sequence Table and Its Creation
A sequence measurement is defined in the sequence table, where each line specifies the
measurement of one or several samples. The table including the auxiliary data is stored in
a sequence file. In order to perform a certain measurement it is sufficient to select a suitable
sequence file and start the sequence.
Displaying the Sequence window
icon or invoke the Analysis - Sequence command
To display the Sequence window click the
from the Instrument window. The last used sequence file will be displayed.
Fig. 11.
Sequence
Editing a sequence table
A new line will automatically be appended each time the SV (Start Vial) cell has been filled in or
the Run checkbox has been checked.
At the same time, the following remaining mandatory items will be automatically filled in i.e.,
copied from the preceding line (except for EV and I/V items):
- the last position.
• EV (End Vial)
• I/V -
the number of injections from the position.
27
YL-Clarity
User Guide
• Sample ID - Inj. Volume -
the values that are included in the chromatogram header.
• File Name
- the name under which the chromatogram will be saved.
• Std, Lvl
- the calibration standard and the level to be recalibrated.
• Method Name
- the name of the method to be used for measuring the analyses
performed according to the given line.
• Report Style
- the name of the report style used.
Automatic numbering for multiple measurements from a single line
If more than one sample is to be measured from any given line (EV should by at least one
higher than the SV) or if several injections are to be effected from any given line (I/V higher than
one), the template of the chromatogram name should contain the %v and %i variables. In the
default set-up the program will automatically add the missing variables. To switch off this
automatic correction, change the Format item from Automatic to Manual in the Options dialog
(Sequence - Options).
Save the completed sequence file using the File - Save command or Save As.
Changing the order of lines
The order of lines in the sequence table can be changed using the drag and drop function with
the mouse. Multiple lines can be dragged simultaneously.
• Point the cursor to the number of the line to be dragged. The cursor will change to .
• Left click the mouse button, hold and select the other lines to be dragged
• Release the mouse button then click and hold it again anywhere over the highlighted lines.
• Drag the cursor to the newly desired location of the selected lines. The location will be
indicated by a red hairline.
• Release the mouse button.
The lines can also be moved using the
Edit menu.
Line Up and
Line Down commands from the
Selection of lines for measurement
In practice it may happen that you have defined a sequence table for more extensive analyses
but you currently only need to use a few lines of this table.
One possibility is to mark the lines in the Run column. Larger tables can be edited using the
following commands from the Edit menu:
Mark for Run
-
Includes selected lines for measurement – the
checkboxes in the Run column will be checked.
Clear Run Marks
-
Excludes the selected lines from the measurement –
the checkboxes in the Run column will be
unchecked.
Invert Run Marks
-
Inverts the status of the checkboxes in the selected
lines. Lines that have been checked will be
unchecked and vice-versa.
Another option is to write the individual lines (1,3,7) or groups of lines (1-4, 6-7) in the Run
Lines field from the Sequence Options dialog.
28
YL-Clarity
4.3.2.5
User Guide
Procedure of Sequence Measurements
1. Opening the sequence window
To open the Sequence window either click the
command from the Instrument window.
icon or invoke the Analysis – Sequence
2. Selecting a sequence file
Open the requested sequence file using the File Open command or by clicking the
icon.
3. Inspecting the content of the sequence table and the files used
Inspect all parameters in the displayed Sequence Table, eventually also check all method files
used: click anywhere in a line with the required template method and display its contents either
icon.
using the Sequence - Edit Current Method command or by clicking the
4. Inspecting the validity of the Sequence Table.
YL-Clarity automatically inspects, whether it will be possible to perform the analyses from the
displayed Sequence Table. It controls the existence of specified template methods, validity of
chromatogram names, the possibility of overwriting files. Invalid lines are indicated with a cross
in the Sts. column. Point the mouse cursor to the respective cell to display a detailed description
of the problem. Detailed description can be also displayed using the Sequence – Check
Sequence command (
icon).
5. Running the sequence
To run the sequence use the command Sequence – Run Sequence, (
icon) from the
Sequence or Data Acquisition window. The sequence will turn to the WAITING state; only then
will it be possible to start the measurement of the first sample using an external signal from
autosampler.
If the external signal arrives before the sequence is run using the
Run command (i.e., in the STOP state), a single analysis will be
run according to the setting in the Single Analysis dialog.
6. The measurement process
Measurement proceeds along individual lines of the table. Each line may define several
measurements of the same sample in I/V item, or measurements of more than one sample
under identical conditions - SV and EV items.
7. Information about the running sequence
Information will both be displayed in the status bar at the bottom of the Sequence window and in
the Information table of the Instrument window. Both places will display the name of the
analysis in progress, the position of the vial and potentially the serial number of the injection
from that position. The Instrument window also shows the template method used and the first
two items of the chromatogram header, Sample and Sample ID.
8. Measurement processing in sequence analyses
The template method file listed in the current line of the sequence table in the Method Name
column determines the method of measurement and sample processing. Printed reports, if
requested, are controlled by the Report Style cells.
Two conditions must be met for printing:
29
YL-Clarity
User Guide
The report style must be selected in all lines of the Sequence table from which you would like to
print report.
The Print Results checkbox from the Postrun Setting dialog (also indicated and controlled using
the
Note:
sign next to the
icon in the Instrument window) must be checked.
All parameters and commands of the Single Analysis dialog will be ignored if a sequence is
running.
Displaying chromatograms, printing, exporting and running other applications during the
sequence run are also defined in the Postrun Setting dialog or by the
Instrument window, and are thus common to the entire sequence.
and
signs from the
4.3.3 Batch Processing of Analyses
The station allows for batch processing already measured chromatograms. Chromatograms
selected for batch processing will be subject to operations that are analogous to those included
in the Postrun Setting dialog.
The Analysis - Batch command from the Instrument window will open the Batch dialog.
Fig. 12.
Batch
The File Type command determines what should be processed: chromatograms, calibration
standards or sequences. A list of the corresponding files in the current project is then shown in
the left column.
Sequence processing
If a sequence is to be batch-processed, all chromatograms measured during the sequence’s
last run will be included. Any missing chromatograms (not measured, deleted or measured at
any of the preceding runs of the selected sequence) will be ignored.
Note:
Chromatograms are sought according to an internal (hidden) list of actually measured
chromatograms. It is because the File Name column may contain variables that would
prevent the relevant chromatogram to be unequivocally identified (date, time, serial number,
etc.).
Also, processing here will only be comprised of the selected operations that are listed in the
right-hand part of the Batch dialog.
30
YL-Clarity
User Guide
Comprehensive sequence processing
The Complete Processing command performs repeated processing according to the topical
contents of the sequence table. The headers of all chromatograms will be overwritten and the
method actually specified in the sequence table will be employed; recalibration will be carried
out if required.
Processing according to the current template method
If you wish to process chromatograms according to the currently opened template method in the
Instrument window, check the Reprocess by Instrument Method checkbox from the Batch
dialog (all parameters listed in the Method Setup - Integration and Calculation tabs will be used).
Selection of multiple chromatograms to be processed
To select multiple files, hold down the Ctrl key while left-clicking the mouse on the file name (an
second click will cancel the selection). To select a contiguous list of files, left-click the first
desired file, hold down the Shift key and click the last desired file - all interjacent files will be
selected.
Pay attention to Select All ( Ctrl + A ) and Unselect All commands, which are self-explanatory.
Processing order
The items in the list of files can be sorted alphabetically in ascending (item Normal) or
descending order (item Backward) by filename (Sort by: Name) or date saved (Sort by:
Time).
Processing proper
Start the processing using the Proceed command. If no chromatogram or sequence has been
selected, the command will merely save the current settings of the Batch window.
The Open Chromatogram Window through Run Program checkboxes are the same as those
in the Postrun Setting window. See Chapter 4.3.1.4 - Automatic Functions after Analysis on
page 24 for additional details.
4.4 DDE synchronization with other programs
DDE (Dynamic Data Exchange) is a technique the Windows system uses for transferring data
between individual applications running under Windows. By means of DDE another application
may follow the status of the YL-Clarity station and control a co-operating device accordingly.
The YL-Clarity station behaves like a DDE Server. Other programs can be connected to the
YL-Clarity station through the following variables:
Service Name :
"Clarity"
Topic Name
:
"Status"
Item Names
:
"Channels", "Channel1" through "Channel4".
The item "Channels" assumes values from 0 to 4 depending on the number of open Instruments.
The items "ChannelsX" (with X= 1 - 4) indicate the status of individual instruments as follows:
Value:
-2
-
Meaning:
Instrument not installed
-1
-
Instrument closed
0
-
Instrument is disabled
1
-
Instrument is in STOP state
2
-
Instrument is in WAITING state
31
YL-Clarity
User Guide
3
-
Instrument is in RUN state
4
-
Instrument is in IDLE state
5
-
Instrument is in BREAK state
You may use one of the following Clipboard formats for transferring data: cf_Text, cf_CSV and
cf_XITable.
32
YL-Clarity
User Guide
5 Chromatogram
The YL-Clarity station enables the user to apply a number of operations to chromatograms.
Among them are baseline modification (including the method used for drawing the baseline),
shifting peak beginnings and ends, creating new peaks, combining peaks into groups (as well
as subsequent joint integration), and selecting limiting parameters for peaks to be included in
integration.
The effected operations will be stored with the chromatogram and may be used in subsequent
analyses, thus enhancing reproducibility of the obtained results. Because of YL-Clarity’s intuitive
mouse operations and the auxiliary icons, all operations are simple and facile.
Any part of the chromatogram can be zoomed in to define the exact location of the intended
operation. Multiple chromatograms can be simultaneously displayed in the Overlay mode and
subsequently subjected to mathematical operations.
5.1 Displaying a Chromatogram
Chromatograms are displayed in the Chromatogram window, which is opened using the
icon from the Instrument window, or the Window - Chromatogram command from other
windows. It is also possible to have the window open automatically after the completion of a
measurement.
Unless the OVERLAY mode has been enabled, the chromatogram that is currently displayed
will close before another one can be displayed. The size of the chromatogram is such that it will
fill the entire area of the graph. To close the displayed chromatogram(s), invoke either of the
File - Close or Close All commands.
Indicative graph
In addition to the main graph, a smaller, indicative graph can be displayed using the Preview
Graph command from the Display menu or through the local menu. The chromatogram will
always be shown in the indicative graph at the base magnification and will contain any cut
displayed in the main graph.
Zooming in
Point with the mouse to any corner of the cut that is to be zoomed in on. Left click and hold the
mouse button then drag the cursor to the opposite corner of the cut. Release the button so as
to display the magnified selected cut in the main graph. The station will remember the last cuts
and
icons or the Display - Previous
so that they can be displayed one by one using the
(Next) Zoom commands. The
icon or the Display - Unzoom command will display the
chromatogram in the original size.
Note:
The implicit size is determined by the Scale Y Mode field from the Graph Properties –
Signals dialog or when the Range - Fixed item has been checked using the From… To…
fields from the Graph Properties – Axes dialog.
5.2 Display Characteristics
In view of the many available options for displaying chromatograms, axes, tags and other
information, a separate dialog Graph Properties containing several tabs is devoted to these
settings. Open the dialog by the command Display - Properties from the main menu or
Properties from the local menu (to pop up the local menu click with the right mouse button).
Parameters are organised in several tabs described below.
33
YL-Clarity
User Guide
Global setting
It is convenient to set a number of parameters common to other graphs (chromatograms in
other instruments, the Calibration and Data Acquisition windows); the station therefore offers a
global setting for some parameters by the command View - Options in the Instrument window.
The opened User Options dialog offers the Graph, Axes Appearance, Signals and Curves and
Gradient tabs devoted to the setting of graphs. If you check the items Use User Options on
synonymous tabs in Chromatogram, Calibration and Data Acquisition windows, the
corresponding parameters will be taken over from this global setting.
Note:
The setting is stored in a file; in the unprotected mode the file is CLARITY.DSK and is
common to all instruments. See Chapter 11.2.8 - Desktop File (CLARITY.DSK) on page 84
for additional details.
5.2.1 Chromatogram Description and Display
Select the information to be displayed in the Graph Properties - Graph dialog.
Fig. 13.
Graph Properties - Graph
5.2.2 Description and Format of Displayed Axes
The display of axes can be specified in the Graph Properties – Axes Appearance dialog.
Fig. 14.
Graph Properties - Time Axis dialog
34
YL-Clarity
User Guide
The thickness and colour of the axes are set using the Line Width and Color commands. The
Title Font, Value Font and Units Font commands determine which fonts will be used for axes
description, values and units.
Note:
Further settings, such as the customisation of descriptive labels, units and determining
whether to convert between the original and new units at both axes or display the
chromatogram in a fixed rendition (fixed range of the axes), can be set in the Graph
Properties – Time Axis and Voltage Axis dialogs.
Fixed rendition
Fixed rendition means that both axes will have a fixed range regardless of the actual
chromatogram size. The range is always supplied in base units (milivolts and minutes) using the
From…To… parameters in the Range section. The specified values will apply only if the Fixed
checkbox has been checked.
Axis format:
Select the desired format for the axes in the Graph Properties – Time Axis and Voltage Axis
dialogs.
You may hide the axis by unchecking the Visible checkbox. Enter the required title in the Title
field.
It is possible to shift the axes - Offset or change their scale - Scale. Using the Units field set
the units to be displayed on the axes. The units are only displayed on the axes of the main
graph and not in the results tables and thus, are for informational purposes only.
How to set actual units on the axis
In chromatographic practice it happens that it may be better to display the absorbency units
(AU) instead of voltage. The procedure for setting AU is as follows:
1.
Open the Graph Properties - Voltage Axis dialog.
2.
Verify that the Visible checkbox has been checked.
3.
Select the name of the axis in the Title field, e.g. “Absorbancy units” and the
abbreviation of units “AU” in the Units Type field.
4.
In the Units Type item select whether you wish to display the axis with a fixed scope of
values – Fixed, or whether the station is to automatically convert values to decimal
multiples (these will be expressed by the prefix before the name of the unit e.g. mili,
micro, kilo, … etc.) – Auto.
5.
Ascertain what voltage corresponds to 1 AU and enter its inverse value into the Scale
field. For example, if 1 AU corresponds to a voltage of 2V, enter the value 0.5 into the
Scale item.
5.2.3 Descriptive Labels and Lines
The main graph can contain descriptive labels and lines. Both can be situated in the graph area
or anchored to the active chromatogram.
Descriptive label location
Invoke the Chromatogram - Create Label - Text command from the menu or from the local
menu to display a dedicated cursor. Move the cursor to the intended location of the new
descriptive label. Doubleclick to open the Text Label dialog where you can enter the text of the
label in the Text field, select the font in the Font item, and decide which point the nearest
chromatogram point or to the graph border will be “fixed” to.
35
YL-Clarity
User Guide
Anchoring to chromatogram
To anchor a label to the active chromatogram, check the Assign to Active Chromatogram
parameter. Invoke the Anchor (Text Alignment) command to decide which point the nearest
chromatogram point or to the graph border will be “fixed” to.
Line location
Invoke the Create Label - Line command from the Chromatogram menu or from the local
menu to display a dedicated cursor. Move the cursor to the location of the future line beginning,
left click and hold the left mouse button to draw a line. Release the button once the desired end
point has been reached and the Line Label dialog will open. This is where you can specify the
type of line end, as well as the colour and type of the line, and its thickness in Arrows, Line
Style and Line Width items.
Note:
Lines with a thickness exceeding one pixel will always be shown as continuous.
You may anchor the line to the active chromatogram by selecting the Assign to Active
Chromatogram parameter.
Modifying descriptive labels and lines
A previously created label or line can be modified anytime by double-clicking on it with the left
mouse button or right clicking on it with the mouse button. Labels and lines can also be moved
or resized using the "handles" (similar to those used in standard drawing applications), which
can be invoked by clicking any point on the label or line. Hold down the left mouse button and
drag to move the object, and then release the mouse button to drop it at the desired location.
The object size can similarly be changed using the relevant handles. When a label height has
been changed the font size will adapt accordingly.
Deleting labels and lines
Delete the selected label or line (that with the displayed handles) using the Delete key or the
Remove Labels - Selected command from the Chromatogram menu or the local menu.
To delete all labels and lines from a graph invoke the Remove Labels - From Workplace
command.
To delete all labels and lines from an active chromatogram invoke the Remove Labels - From
Active Chromatogram command.
To delete all labels and lines invoke the Remove Labels - Remove All command.
Note:
Labels and lines anchored to an active chromatogram will be stored with that chromatogram.
Labels and lines attached to the graph area are a part of the desktop file (extension *.DSK).
Printing descriptions and lines
Set which type of descriptions and lines are to be printed in the print style found in the Report
Setup – Chromatogram dialog. Either the lines or descriptions that are linked to the
chromatogram and/or to the workplace or simply as they are currently displayed on the screen
will be printed.
Note:
This feature may also be used for hiding of your working symbols and notes that should not
be printed in the final print output.
5.3 Operations Involving Several Chromatograms Overlay
The OVERLAY mode is where several chromatograms can be simultaneously displayed.
36
YL-Clarity
User Guide
OVERLAY mode enable
To enable the OVERLAY mode, use the Overlay command from the File menu, the
icon, or
double-click the OVERLAY inscription displayed to the right on the status bar.
icon, the coloured
,
The active OVERLAY mode will be indicated by the activated
and
icons in the Overlay toolbar, and the OVERLAY inscription in the right-hand part of the
status bar.
Displaying multiple chromatograms
A practically unlimited number of chromatograms can be simultaneously displayed using either
icon. Chromatograms can be displayed by
the File - Open command or by clicking the
repeatedly invoking the Open command or by selecting several chromatograms in the Open
Chromatogram dialog.
Each chromatogram will be displayed in a dedicated colour. The
icons are assigned to the first eight displayed chromatograms. Refer to the Chromatogram
menu for a comprehensive list of all displayed chromatograms.
To select multiple files hold down the Ctrl key while left clicking the mouse button (a second
click will cancel the selection). To select a contiguous sequence of files, left click the first file to
be selected with the mouse button, hold down the Shift key and then click on the last file to be
selected.
Note:
The number of chromatograms that can be simultaneously opened in the Overlay mode is in fact
limited by the Maximum Chromatograms in Overlay field from the User Options – General
dialog. The implicit value is 20 and the maximum can be set to 10,000.
Active chromatogram
One chromatogram (signal) (usually the last one displayed) - is active, and all displayed
information and commands will only refer to that chromatogram. The name of the active
chromatogram will be displayed in the title bar of the Chromatogram window and in the headers
of all tables. The correspondingly coloured icon will be indented. To select another
chromatogram as active click on the correspondingly coloured icon or select the chromatogram
from the Chromatogram List dialog.
Fig. 15.
The Overlay Toolbar
Changing chromatogram colour
To change the colour of any of the first eight chromatograms, simply click the icon of the
chromatogram whose colour you wish to change and then on an empty icon with the desired
colour. The colour of the icons and the chromatogram will change accordingly.
Closing a chromatogram
To close the current chromatogram, invoke the Close command from the File menu or click the
icon.
Invoke the Close All command to close all displayed chromatograms.
Disabling the OVERLAY mode
To disable the OVERLAY mode, click the Overlay command from the File menu or the indented
icon.
The station will invite you to save modified chromatograms that are about to be closed.
37
YL-Clarity
User Guide
When the OVERLAY mode has been disabled only the current chromatogram will be displayed
in the graph.
5.3.1 Resizing and Relocating Chromatograms
The current chromatogram can be resized and moved independently in horizontal and vertical
directions. This makes it easier to "match" two chromatograms, e.g., to subtract the solvent
peak or to modify a chromatogram with erroneous retention times. These modifications are
made using the Move commands and Scale from the Chromatogram Overlay submenu or by
and
icons.
using the
Modification procedure
Invoke the command, place the mouse cursor at any part of the main graph, click and hold down the
mouse button while slowly dragging in the desired direction (the chromatogram will move and
change its size). Once the requested location or size has been reached, release the mouse button.
Displaying/changing values
The values by which the chromatogram has been changed are shown in the Line Charts tab of
the Graph Properties window in parameters Offset X (Y) and Multiplier X (Y). The
chromatogram can be directly modified by changing the values of these parameters. Invoke the
Origin command to return to the original size and location.
Saving the effected changes
The chromatogram that has been modified as described above will become a mere graphical
curve, i.e., the baseline and the peak descriptions will disappear. To create a full-bodied
chromatogram from the curve, invoke the Overlay - Operation - Copy command, followed by
the File - Save command. See Chapter 5.3.2 - Mathematical Operations for additional
information.
5.3.2 Mathematical Operations
Some basic mathematical operations over chromatograms can be performed using the Overlay
- Operation command from the Chromatogram menu by clicking the
icon.
Fig. 16.
The Mathematical Operations Dialog
38
YL-Clarity
User Guide
In the opened Mathematical Operations dialog, click the colour of the first chromatogram in the
left Chrom A column, select the required operation in the middle Operation column, and select
the second chromatogram, if any, in the right Chrom B column.
The Result field will display the automatically suggested name of the resulting curve.
The created chromatogram will not be saved and will be cancelled when the window is closed. If
you want to preserve it, save it using the Save or Save As command.
If you check the Save As checkbox the resulting chromatogram will be automatically saved
under the name displayed in the Result field, which will be then editable.
The result is automatically integrated and evaluated according to the template method selected
in the Instrument window.
The method associated with the original chromatogram will
never be used when a copy has been created or differentiation
performed using the Copy and Differentiate commands,
respectively. It is only used for a copy that has been created
using the File - Save As command!
Any chromatogram created or modified in this way will be labelled in the report with the
"Mathematically reprocessed" inscription.
5.3.3 Three-dimensional View of Chromatograms
To display chromatograms in a 3-D view invoke the 3D View command, to cancel the view
invoke the Clear 3D command, both are from the Chromatogram - Overlay submenu. The two
straight lines displayed by the 3D View command are used to set up the angle and depth of the
three-dimensional view. All chromatograms will be regularly displaced along the selected line.
The displacement is governed by the Offset X and Offset Y fields from the Graph Properties Signals dialog. The Clear 3D command zeroes the above offsets and, accordingly, displays all
chromatograms in their original positions. The original positions of individual chromatograms are
set using the Original command, again from the Graph Properties – Signals dialog.
5.4 Chromatogram Modifications
By default, each chromatogram is integrated according to the parameters from the Integration
Table displayed in the Chromatogram - Integration window. When using multi-detector
chromatograms each signal will have its own independent Integration Table.
The Integration Table contains all parameters from the template method. These parameters can
be modified and filled in either directly in the integration table or using the commands from the
Chromatogram – Baseline, Peak and Integration submenus.
Note:
The station automatically checks for instances of baseline crossing. After each operation the
baseline will be corrected to prevent baseline crossing (the station either shifts the peak
beginning or peak end to the nearest possible point or refuses to perform the requested
operation). If the peak’s beginning or end has been manually shifted, it may happen that the
station refuses to place the point at the requested position, since it detected that the
baseline would intersect the signal, and will place the point at the nearest possible location.
39
YL-Clarity
User Guide
Fig. 17.
Chromatogram - Integration
The order and hierarchy of parameters and commands that affect an integration
1. Peak detection using the Peak Width and Threshold parameters starts from the time
indicated in the Integration Start parameter.
2. An attempt then follows to draw the baseline to the valley according to the ValleyToValley
Slope parameter, followed by automatic tangential separation according to the remaining
two parameters of the Separation section.
3. The Integration Table is applied.
4. A check of possible baseline/signal intersection is performed.
5. Finally, all peaks that fail to satisfy at least one of the parameters specified in the
Rejections section are excluded.
Note:
It follows from the above that separation parameters will not be applied, e.g., to manually
added peaks and their effect might be suppressed, e.g., by using the Together and Valley
commands specified in the integration table.
Major commands and global parameters are explained and their effect illustrated in the following
chapters.
General modification procedure
Click the corresponding icon on the Baseline and Peak toolbars or from the Chromatogram Baseline (Peak) menu to initiate the manual chromatogram modification procedure. The mouse
cursor will be displayed at approximately the centre of the active chromatogram as a vertical line
with an arrow pointing to the signal level. Point the mouse cursor to the location where you wish
to effect the requested operation and left click the mouse button. If an interval operation is
involved, a second vertical line will appear and the second point can be similarly selected. The
user can cancel the operation anytime using the right mouse button or the Esc key.
Repeated usage of selected operation
If you want to use a certain operation several times, it is advantageous to hold Ctrl button before.
After selecting the operation and releasing the Ctrl button you will be able to repeat selected
operation until you chose another function or press the Esc button.
5.4.1 Baseline Modifications
The Baseline submenu and the corresponding toolbar contain the commands used for
modifying the baseline operations and eliminating peaks from an integration.
40
YL-Clarity
User Guide
Fig. 18.
The Baseline Toolbar
Validity Interval
Two vertical lines delimit the interval of validity. Once the command has been invoked, the left
vertical line will appear. Use the mouse to drag the line to the desired position and confirm the
move by left clicking the mouse button. Move the right vertical line to the desired position using
the same method. The confirmation of the move will invoke the command. The command can
be abandoned at anytime by right clicking the mouse button or pressing the Esc key.
Operations involving peaks will only be performed with peaks
that are completely enclosed between the two vertical lines.
Records of modifications
All accomplished modifications will be stored in the integration table, where any operation can
be subsequently cancelled or corrected. An integration table from another chromatogram or
another method can be also used. See Chapter 5.4.6 - The Integration Table on page 48 for
additional details.
Peak deletion
icon will exclude all selected peaks from an integration. Only
Using the Lock command or
peaks that are completely contained in the selected interval will be excluded.
Baseline through a valley
icon to force the baseline into all the valleys situated between
Use the Valley command or
the interval lines. In the event this might result in having the baseline intersect with the signal,
the station will prevent the intersection by automatically shifting the peak beginning or end. This
operation is opposite to the Together command.
41
YL-Clarity
User Guide
Baseline between separating verticals
The Together command or
icon introduces separating verticals to all valleys that are
situated between the interval lines. This operation is opposite to the Valley command.
Horizontal baseline
icon forces a horizontal baseline from the beginning of
The Forw. Horizontal command or
the first peak inside the selected interval beneath all peaks inside the interval.
The Back. Horizontal command or
icon draws a horizontal baseline from the end of the last
peak that is inside the selected interval beneath all peaks inside the interval.
Note:
Should the horizontal baseline intersect the signal inside a peak, no forced horizontal
baseline will possible for that peak.
Tangential separation
icon cuts off all of the peaks (riders) that are situated on
The Front Tangent command or
the leading edge of the first peak and after the selected interval. Place the left interval line to left
of the first peak to be cut off, and then place the right interval line inside the starting of the peak
from which the cut-off is to be affected.
42
YL-Clarity
User Guide
The Tail Tangent command or icon cuts off all peaks (riders) that situated on the tailing edge
of the last peak and before the selected interval. Place the left interval line inside the peak that
carries the tailing riders to be cut off, the right interval line behind the end of the last peak to be
so cut off.
Interchanging positive/negative
icon interchanges all apexes that are inside the interval to
The Clamp Neg. command or
valleys and vice-versa, thus turning negative peaks from a group into positive ones.
Declaring negative peaks to be disturbances
icon eliminates from integration negative peaks that are in fact
The Cut Neg. command or
disturbances. Neither the beginning nor the end of the preceding positive peak will be affected.
Declaring peaks to be baseline
The Reject Negative command or
icon excludes negative peaks from an integration without
declaring them to be disturbances. The beginning of the subsequent peak or the end of the
preceding peak (if any) will be shifted to the original apex of the negative peak.
5.4.2 Peak Modifications
The Peak submenu and the corresponding toolbar contain peaks operations with.
43
YL-Clarity
User Guide
Fig. 19.
The Peaks Toolbar
The positions of peak beginnings and ends as well as of valleys or separating vertical lines can
be changed. Invoke the command, move the cursor to the required location and click to confirm.
Abandon the command may be at anytime by right clicking the mouse button or hitting the Esc
key. Since only a single peak beginning or end can be shifted to any place selected on the
chromatogram without shifting the apex, it is unnecessary to specify the peak to which the
operation refers.
Note:
The preceding sentence does not apply to tangential separations where, if the required
location lies inside the main peak, modification of the tangentially separated peaks is given
preference.
Shifting the peak beginning
icon defines a new position of the peak beginning. In the event the
The Start command or
peak beginning is shifted before the end of the preceding peak, a vertical line will separate
those peaks and its position will coincide with the new peak beginning. If the peaks are
separated by a vertical line or connected at the valley and the peak beginning is shifted closer
to the apex, the peaks will be separated.
Shifting the peak end
The End command or icon defines a new position of a peak end. In the event the peak end is
shifted behind the beginning of the following peak, a vertical line will separate those peaks and
its position will coincide with the new peak end. If the peaks are separated by a vertical line or
connected at the valley and the peak end is shifted closer to the apex, the peaks will be
separated.
44
YL-Clarity
User Guide
Change the valley or vertical separating line
The Both command or
icon defines a new position for a valley or the vertical line that
separates the peaks. The common point can be shifted to any location between the apexes of
the two peaks. Should the resulting baseline intersect the signal, the peaks will be separated.
Adding new peaks
Interval lines set the beginning/end of a new peak. The apex is automatically determined at a
location between the maximum and minimum (depending on peak orientation) between the
peak beginning and end. A new peak cannot be added in the area of tangentially separated
peaks.
Adding a positive peak
icon creates a new positive peak. If the beginning or end of
The Add Positive command or
the created peak falls inside a neighbouring peak, the peaks will be separated by a vertical line
that may either be placed at the beginning or end of the created peak.
Adding a negative peak
icon creates a new negative peak. If the beginning or end of
The Add Negative command or
the created peak falls inside a neighbouring peak, the peaks will be separated by a vertical line
that may either be placed at the beginning or end of the created peak.
45
YL-Clarity
User Guide
Manual apex determination
Owing to the automatic determination of peak apex, the following procedure must be used to
place the apex at a specific location (especially when defining monotonic peaks). First, using the
Lock command, cancel the peak with the incorrectly assigned apex and add a new peak using
the Add Positive or Add Negative command as required. This is done so that its beginning or
end (depending on the position of the maximum of a positive or minimum of a negative peak)
will coincide with the position of the intended apex. To finish, shift the beginning or end of the
peak to the appropriate location using the Start or End commands.
The Solvent peak
icon designates a peak to be a solvent peak. The letter "S",
The Solvent Peak command or
before the peak number in the graph, indicates the designation of the peak. Solvent peaks are
neither included in integration nor listed in the Result Table. More than one peak may be
designated as a solvent peak.
Recording accomplished modifications
All operations accomplished will be stored in the integration table and, accordingly, any
operation can be cancelled or corrected. An Integration table from another chromatogram or
another method can also be used. See Chapter 5.4.6 - The Integration Table for additional
details.
5.4.3 Working with Groups of Peaks
Peaks can be combined in groups and subsequently integrated together, Each group is
assigned a single-letter identifier and, accordingly, the maximum number of groups is 26. The
Chromatogram -Peak- Peak Groups command or
icon from the Peak toolbar are
earmarked for working with groups and will open the Groups dialog.
Fig. 20.
The Groups Dialog
46
YL-Clarity
User Guide
Adding a peak to a given group
Enter the group identifier in the ID field and invoke the Add command.
Use the displayed interval vertical lines to select the peak(s) to be included in the group. By
repeated use of the command other then neighbouring peaks can be added to a group.
To highlight the fact that a peak is included in a group the corresponding group identifier will be
shown after the peak number. The Result Table also then comprises the integration results for
the created groups. No peak may be included in more than one group.
If a selected peak has been previously assigned to a certain group, it will be transferred to the
new group.
Deleting peaks from a group
Enter the group identifier in the ID field and invoke the Delete command.
Use the displayed interval vertical lines to select the peak(s) to be deleted from the group.
If the selected group is a member of another group, its membership remains intact.
List of existing groups
The Existing Groups list specifies all groups containing at least one peak.
Group name
If a calibrated calculation has been enabled and the employed calibration file contains calibrated
groups, the list will display their names as defined in the calibration file.
Editing the group name
Group names cannot be changed in the Groups dialog since they are derived from the names
shown in the calibration file, and can thus be only changed in the main calibration table of the
relevant calibration file.
5.4.4 The Selection of Conditions That Restrict Integration
The Rejection section in the Integration tab can be used to exclude from integration peaks that
do not satisfy certain criteria.
All peaks whose Area, Height or width at half height - Half Width are smaller than or equal to
the specified values will be excluded from integration, in other words, they are neither displayed
in the chromatogram nor included in the Result Table.
This way (particularly with the Height parameter) you can get rid of small, insignificant peaks
that confuse the results without affecting the baseline that runs under the remaining peaks.
5.4.5 Separation Parameters
The Separation section in the Integration tab can be used to change the baseline below nonseparated peaks.
See the Reference Guide for additional information.
47
YL-Clarity
User Guide
Valley To Valley Slope – Specifies the maximum slope of the baseline
Tangent Area Ratio – Constitutes the first condition imposed on tangential separation
Tangent Slope Ratio - The condition is satisfied if the ratio of slopes of the second and the first
peak exceeds the specified value.
5.4.6 The Integration Table
The Integration Table contains a list of "manual" chromatogram modifications, i.e., the
commands from the Baseline, Group, Integration and Peak submenus. Each operation is
identified by its name and the range of validity.
For commands with a range of validity that is defined by an interval (Lock, Add Positive, etc.),
the integration table contains the limits of the validity interval.
For commands that are defined by a single point (Start, End and Both), the integration table
contains the retention time of the peak that is involved and the new distance relative to the
retention time.
Note:
This approach to a certain extent removes any potential inaccuracies that originate from
differences in retention times determined in various analyses.
The Integration Table for new chromatograms:
You can prepare the integration table for new chromatograms before measuring the
chromatogram in the Method Setup – Integration dialog. This dialog you may open using the
Method - Integration command from the Instrument window.
Using an integration table from another method to measure new chromatograms:
Display the integration table in the Method Setup dialog using the Method - Integration
command from the Instrument window. Here, the local menu contains the Copy From
command. After invoking this command, select the corresponding chromatogram or method.
This operation is irreversible.
Note: It is necessary to differentiate between the creation of an entire new method from the current
chromatogram using the Save as Template command from only copying the integration table using
the Copy From command.
Using a method or only the integration table from another chromatogram:
The Method menu in the Chromatogram window contains amongst other elements, two sets of
commands for copying methods or only the integration tables alone from other chromatograms:
Copy (Integration Table) from a Model
Copying a method (or only an integration table) from a chromatogram which was previously
indicated as the model using the Set Model command. Above all this possibility is used when
cloning an integration table from one chromatogram to several various chromatograms.
Copy (Integration Table) from Template Method
Use the method (or only integration table) from a template method. Template methods are
saved with the *.MET suffix and are used for measuring new chromatograms.
Copy (Integration Table) from Chromatogram
Use the method (or only integration table) from another chromatogram.
48
YL-Clarity
User Guide
6 Calculations and Calibration
The YL-Clarity chromatographic station offers several types of calibration and non-calibration
calculations and is able to assess the quality of a measurement using calculated peak and
column parameters. Extensive mixtures can be calibrated at up to twenty concentration levels,
including the calibration of groups of compounds. Semi-automatic calibration and automated,
multiple recalibrations of the same level are also possible (even for sequential analyses). The
YL-Clarity station incorporates the reference peak method for reliably identifying calibrated
compounds.
6.1 Result Table
The Result Table is in the Results tab (opened or hidden using the Results - Result Table
command) and always contains the topical values that refer to the current chromatogram; any
changes will immediately be reflected in the table.
Fig. 21.
Table of Uncalibrated Results
Results are displayed depending on the parameter settings in the right-hand side of the tab. The
arrangement of columns is governed using the Setup Columns command. In the following text
we describe the default layout of the table, which is the result of the Restore Default Columns
command. Both commands can be found in the Edit menu.
In addition to the serial peak number, the retention time and width-at-half-height of all peaks,
absolute calibration values and percentages, names and types of compounds, are displayed for
uncalibrated results.
By setting the calibration file in the Calibration File (Peak Table) field using the Set button and
selecting one of the calibration calculations in the Calculation item, the absolute calibrated
values and percentages as well as the names and types of compounds will also be displayed.
See Chapter 6.3 - Types of Integration Calculations on page 50 and the Reference Guide for
a more detailed description of individual calibration calculations.
Fig. 22.
Example of Calibrated Results Table
49
YL-Clarity
User Guide
6.2 Table of Peak Parameters
For the purposes of Good Laboratory Practice and to verify the suitability of the employed
system, calculations have been extended to include some special parameters such as
asymmetry, the capacity factor, column efficiency, and resolution. These calculations can be
found in the Performance tab. This tab is implicitly hidden, use the View – Show Tables –
Performance Tables or Results – Performance Table commands to display it.
Fig. 23.
Table of Peak Parameters
Calculation method
Use the Column Calculation parameter from the Performance tab to select one of the two
available calculations:
1. According to statistical moments - Statistical Moments
This constitutes the most accurate integral calculation based directly on the values measured
for a given peak. The calculation provides top-quality results for well-separated peaks at a
reasonable signal-to-noise ratio and sufficient number of partial integrals for individual peaks.
The underlying formulae are listed in the Reference Guide.
2. From width-at-half-height - From width at 50 %.
This represents the standard calculation method based on the measured width-at-half-height
and the assumed Gaussian peak shape. This method often leads to deviations from the actual
efficiency for real chromatographic peaks.
Note:
To ensure that the capacity factor has been correctly calculated, do not forget to specify the
dead retention time - (Unretained Peak Time) and also the column length necessary for
calculating the relative efficiency (Column Length).
6.3 Types of Integration Calculations
Generally speaking, the result of a chromatographic analysis, representing the amount of a
compound, is either the area or height of the corresponding chromatographic peak or group of
peaks. However, the same amounts of different compounds elicit different detector responses.
To take this fact into account while calculating the amount, one must know the detector
sensitivity under the given measurement conditions. In other words, the calibration curve of the
compound in question, representing the response as a function of the amount of the compound.
Calibration curves are stored in a calibration file; the latter can contain an arbitrary number of
calibration curves that correspond to the compounds that are present in a mixture. The
Calibration window is earmarked for creating and modifying calibration curves. Calibration
calculations respect the differences in detector sensitivity vis-à-vis individual compounds at
various concentrations. Concurrent calibration of several compounds from a single injection may
register potential interactions between the calibration compounds as well. If a tentative
evaluation of the amount of the compound is sufficient for your purposes, use the uncalibrated
calculation where no calibration curve is required.
50
YL-Clarity
User Guide
The YL-Clarity station offers two fundamental calibration calculations - the external standard
method (ESTD) and the internal standard method (ISTD). Each can be based on peak height or
peak area. It is always mandatory to select the appropriate calibration file and enter any
additional parameters that are necessary for the selected type of calculation. This can be done
either, in advance in the template method (Method Setup - Calculation dialog), or in the righthand section of the Chromatogram - Results window for already measured chromatograms.
Note:
The calculation method is defined using the Calculation item in the right-hand section of the
Results tab and not by the Display Mode parameter from the calibration file (in the
Calibration Options dialog), since the latter merely decides on how the calibration curves
are displayed. Regardless, the calibration file always contains all data necessary for any
type of calculation.
Calculation of percentages
The ratio of Amount and Dilution fileds from the chromatogram header (specified in Single
Analysis or Sequence windows) specifies the overall amount of components in calculation of
percentages in Chromatogram – Results window. These parameters can also be modified later
in the right part of the Chromatogram – Results window.
If the Amount field is left blank (= 0), the total amount (Total row value of Amount column in the
Results table) will be computed as the sum of calibrated amounts of all compounds (also
including unidentified compounds, if Response Factor from Unidentified Peaks field is nonzero).
If the Amount field is provided (non zero) its value will be substituted for the Total row value of
Amount column in the Results table. The Amount% column values will be then calculated with
it as a base. The Dilution field multiplies the values in the Amount column.
Thus, if the sample weight will be entered in the Sample field and the volume used for
dissolving the sample in the Dilution field, using the same units as are used in the calibration
(i.e. calibration is in mg/l, weight in mg, solvent volume in litres) the user will get the percentage
of compound in the original sample in the Amount% column of the Results table.
For example:
The amount 5 mg/l was found for 100 mg sample dissolved in 100 ml (0,1 l).
The result in the Amount% column will be: 5 mg/l * 0,1 l / 100 mg = 0,5%
Attention! In evaluation of peak groups the total response used in the calculation of percentages
includes contributions from individual groups and separate peaks (i.e., peaks not
included in any group). It is important to keep this fact in mind when some peak is
calibrated separately as well as a part of some group.
Calculation of unidentified peaks
For peaks that are not identified in the calibration file the Response Factor parameter is used
in the calculation instead of a value read off the calibration curve. The default value is 0, so the
unidentified peaks will not be applied.
51
YL-Clarity
User Guide
6.3.1 Non-calibrated Calculations - Uncal
Without a calibration file the amounts can be only expressed as percentages of the overall area
or height of all chromatograms.
The two types of non-calibrated calculations assume that the detector sensitivity is the same for
all compounds and that all compounds present in the injected sample were actually detected.
Since the first assumption is very rarely met, non-calibrated calculations are primarily used to
obtain a preliminary, semi-quantitative result.
Note:
Non-calibrated calculations are also used by default in instances where a calibrated
calculation has been selected but not all required conditions have been met, no calibrated
compound was identified in the chromatogram or the requested calibration file was not found.
The type of calculation that is actually being employed will always be indicated in the header
of the table of integration results (Results) together with a reason for why the required
calculation could not be performed.
6.3.2 External Standard Method - ESTD
Calculating using the external standard method respects differences in detector sensitivity to
various compounds, and provides the amounts of individual compounds and their percentages
in the injected sample.
The drawback of the external standard method is that it is extremely sensitive to both the
injected amount and measuring conditions. To eliminate any possible errors it is mandatory to
maintain the highest precision of injected amounts (autosamplers) and frequently rebuild the
calibration files using recalibration so that they reflect potential changes in characteristics of the
detector and the chromatographic system as a whole. The above drawbacks are in part
removed in the internal calibration methods.
6.3.3 Internal Standard Methods - ISTD
Calculations that use the internal calibration method respect the different detector’s sensitivity
to various compounds and to a certain extent, eliminate errors that originate from differences in
the injected amount. The methods provide the amounts of individual components present in the
sample and their percentages.
In the internal standard method, a compound - internal standard - will be added to the
calibration mixture. That compound is known as the internal standard. A known amount of the
internal standard must be then added to each analysed sample. It thus follows that the internal
standard itself must not be originally present in the calibration mixture or in the analysed sample.
Note:
In selecting the internal standard take into account the sample composition and the
chromatographic conditions. The internal standard should be very pure and stable, must not
react with any analyte, and should provide a well-separated peak. Furthermore, it must be
soluble in the sample and the sensitivity of the detector vis-à-vis the internal standard and
other components of the sample should be similar.
Since the internal standard is present in the calibration mixtures and in each sample, changes in
chromatographic conditions and in the injected amount affect the peak of the internal standard
in the same manner as the peaks of other injected compounds. This circumstance is taken into
account in the calculation and ensures high reproducibility of the obtained results.
The YL-Clarity station uses two procedures for calculating the internal standard method. The
appropriate method is automatically selected depending on whether the same amount of the
internal standard in all calibration standards and in unknown samples is being used.
52
YL-Clarity
User Guide
a) The same amount of the internal standard is used and it is neither specified in an
unknown sample nor in the calibration file
A relative calibration curve is compiled and used in the calculation, where the ratio of responses
of the compound in question and the internal standard is plotted against the internal standard
response on the vertical axis and the Amount of the compound on the horizontal axis.
b) The different amount of the internal standard has been set both in unknown sample
and in calibration file
The actual amounts are calculated from a relative calibration curve, where the ratio of
responses of the analyte and the internal standard on the vertical axis is plotted against the ratio
of the amount of the analyte and the amount of the internal standard on the horizontal axis.
Note:
The compilation of both types of variables requires that the calibration file contains at least
one level at which both the analyte in question and the internal standard have been
measured. If this condition is not met the relative calibration curve cannot be compiled and
the N/A (not available) inscription will be displayed instead of results in all chromatograms
that have been evaluated according to this calibration.
Note:
If the amount of internal standard was only filled-in on one side (the ISTD Amount
parameter is left blank in the header of the relevant chromatogram or the Amount column in
the internal standard compound in the calibration file), the internal standard method cannot
be applied. In all chromatograms that have been evaluated according to this calibration, only
the uncalibrated calculation will be used.
6.4 Description of the Calibration File
The calibration file contains data items needed for the compilation of calibration curves. In
addition to the table of amounts and responses, other information , like the compound name,
retention time, number of recalibrations, etc. is listed for each compound. The data contained in
the calibration file is presented in two tables. The main calibration table lists data of all
compounds that are common to all calibration levels, while the compound tables contain data
referring to individual compounds at all levels, including the calibration curve.
Note:
All data items that are stored in several locations will always be updated after each change.
Naturally, when a modified calibration file is used to process the displayed chromatogram,
the changes will immediately be taken into account.
Multidetector calibration
For multidetector chromatograms the calibration file can simultaneously contain a set of
calibration curves for up to four signals. The number of displayed signals can be set in the
Number of Signals item from the Calibration Options dialog. All displayed figures apply to the
current signal whose name will be displayed in the header of the global calibration table or in the
header of the graph of the calibration curve. Select the desired signal using the Calibration –
Set Signal command or the coloured button from the toolbar. The figures that are common to all
signals will be displayed in black. The figures that are specific for each detector will be displayed
in the colour of the appropriate signal.
6.4.1 Main Calibration Table
The global calibration table is available from the Compounds tab of the Calibration window.
icon. The table
Open the window using the Window - Calibration command or the
summarises data about all compounds that are common to all levels: The name of the
compound, retention time, the two identification time windows, compound type (Peak Type),
53
YL-Clarity
User Guide
global response coefficient (Response Factor) used in free calibration. The columns labelled
Level X contain data of the current calibration level.
Fig. 24.
The Main Calibration Table
The table can be displayed above or below the calibration standard graph - see the View Table Up command.
6.4.2 Compound Calibration Tables
Calibration tables of individual compounds are available - together with the calibration
curves and other parameters - from tabs of individual compounds in the Calibration window.
Display the relevant tab by double-clicking its name or the first grey field of the
corresponding line in the main calibration table.
The table lists values for all levels of the relevant compound: level number in the first column,
responses in the Response column, and amounts at individual levels in the Amount column.
The Response Factor column contains level-specific response factors equal to the amount
divided into the response at that level. The Rec. No. column displays the number of eventual
recalibrations of the point.
Note:
The level-specific Response Factor is merely an indicative value. When the free calibration
is to be employed the global response factor taken from the main calibration table will
always be used.
Display and calculate areas or heights?
The base (either the peak area or peak height) of the displayed response, of the level response
factor, of the correlation equation and of the displayed curve is determined by the Response
Base field.
54
YL-Clarity
User Guide
Fig. 25.
The Compound Calibration Table
Optional validity of points:
Individual points may be temporarily left out or on the other hand included into the calculation of
the calibration curve. A point is omitted from the calculation by cancelling the indication in the
Used column in the calibration table of substance. An invalid point is illustrated in the graph by a
circle.
Note:
An invalid point in the calibration curve behaves as if it were not present. For example,
indicating an invalid point at the end of the curve will change the scope of the axes. This will
cause the circle, representing an invalid point, to be shown outside of the displayed area of
the graph. Only the circles of those invalid points, behind which will still be at least one valid
point (cross), can be seen.
6.4.3 Calibration Curve
The calibration curve is displayed together with the compound calibration table. The curve is
plotted as the dependence of the response on the amount. The curve will be not displayed,
though, if the correlation equation cannot be compiled for the selected type of correlation. Each
calibrated level is displayed using a cross in the graph; points for recalibrated values at some
levels, if any, will be displayed with asterisks (the number of recalibrations is apparent from the
Rec. No. column.)
55
YL-Clarity
User Guide
Fig. 26.
Example of Relative Calibration Curve for the ISTD Method
Any part of the curve can be zoomed in using the left mouse button; return to any of the
previous magnifications or to the original cut using the Previous Zoom commands ( icon),
Next Zoom (
icon) or Unzoom (
icon), respectively, or display a grid using the
synonymous command. All the above graphical functions are the same as in the Chromatogram
or Data Acquisition windows (e.g. Chapter 5.1 - Displaying a Chromatogram on page 33).
Type of curve fit equation
The type of correlation is defined in Curve Fit Type item; Origin item decides on how the coordinates of the origin will be handled: the Ignore Origin option ignores the origin while with the
Compute with Origin option the origin is considered to be one of the calibration points; this
means that the resulting curve is influenced by, but need not pass through, the origin; the Curve
Passes Through Origin option will always force the correlation curve to pass through the origin.
Correlation equation
The Equation item displays the plot of the calibration curve and the corresponding correlation
equation (except for the Point to Point segmented line type of fit, Free Calibration and Sigmoid
interlining), with X representing the amount and Y the response. The curve and the
corresponding equation need not to always be displayed and, especially in instances of thirdorder polynomial correlation, the algorithm that is used to calculate the coefficients of the
equation, may fail for some extreme values of amounts and responses. To remedy such
situations, use another curve fit type or normalise the entered values.
Tightness of fit
The Correlation Factor item contains the calculated correlation coefficient - a number from the
interval <0; 1>, characterising the tightness of fit.
Note:
In the event that the degree of the correlation equation is the same as the number of
calibration levels (for the Ignore Origin option already for a degree less by one) the
correlation coefficient will be one (1) since such a curve will pass through all points.
Weighting
This method can increase the influence of points with lower concentration on the calculation of
the interlined curve. Weighting can be related to either the amount of compound in the given
point of calibration curve (1/Amount or 1/Amount2) or to the response of the compound in the
given point of the calibration curve (1/Response or 1/Response2).
56
YL-Clarity
User Guide
6.5 How to Create Calibration
The following chapters describe the procedure used to create and modify calibration files. The
station provides for both automatic and manual calibration and recalibration of individual peaks
or groups, or jointly for all compounds (peaks and groups).
1. Create the calibration file
Create a new calibration file using the File - New command from the Calibration window.
2. Display a calibration standard
Unless you intend to create an "artificial" calibration, you must display in the calibration window,
the relevant calibration standard at a certain level. To do that, invoke the Open Standard
icon to display a list of all chromatograms from the calibration
command or click the
subdirectory of the current project. Use the
icon to display chromatograms from the data
subdirectory.
3. Selecting calibration parameters
Check the toolbar to determine whether has been set.
The number box indicates the calibration level. Automatic means that data for individual
compounds will automatically be transferred to the calibration table and Calibration indicates
the calibration regime (contrary to recalibration regime).
4. Transferring individual compounds data to the calibration table
Use any of the following commands from the Calibration submenu or the corresponding icon to
transfer compound data contained in the calibration standard to the calibration file:
Add All
-
Add all peaks identified in the calibration standard.
-
If the calibration table is empty, all peaks and groups from
the calibration standard will be calibrated. If the calibration
table already contains compounds, then only these
compounds will be calibrated.
-
Only the selected peak will be calibrated.
-
Only the group containing the peak selected using the
cursor will be calibrated.
Add Existing
Add Peak
Add Group
5. Supplying known amounts and other data items
Enter all known amounts for all compounds in the Amount column below the calibration level Level 1.
Update the compound name in the Compound Name column.
6. How to display and check the calibration curve?
Click the tab with the name of compound whose calibration curve you want to see; the
calibration table, the calibration curve and parameters of that compound will be displayed.
7. How to redisplay the main calibration table and the standard?
Click the General tab.
8. Saving the calibration file
To save the calibration file invoke the File - Save command.
57
YL-Clarity
User Guide
9. How to use the calibration file?
icon.
Open the Chromatogram window using the Window - Chromatogram command or the
Open the chromatogram to be evaluated using the calibration that has just been created.
Set the created calibration file using the Set command in the right-hand side of the Results tab.
Do not forget to set the appropriate type of calibration calculation in the Calculation item.
If all went well, the Amount column of the result table should now contain the amounts for all
calibrated and identified peaks.
6.6 Creating Additional Concentration Levels
Once the first calibration level has been created, continue to calibrate at the next levels. Any
number of compounds can be calibrated at each level regardless of whether or not they have
been calibrated at the lower levels. Moreover, compounds from different calibration standards
can be calibrated at a single level.
1. How to set another calibration level?
Each time a calibration file is opened the first calibration level will always be selected.
arrows from the toolbar or Calibration – Set Level command to change the
Use the
calibration level. If the Automatic - Calibrate regime has been enabled, the current calibration
level will change in conformity with the following rules:
- The Add All and Add Existing commands set and calibrate the first completely free level.
-
The Add Peak or Add Group commands always set and calibrate the first free level of the
relevant compound.
To prevent the program from automatically selecting calibration levels, enable the Manual
Calibration regime on the toolbar. See Chapter 6.7 - Manual Calibration for additional details.
2. Reading in another calibration standard
Invoke the Open Standard command to select and display another calibration standard
corresponding to the preset calibration level.
3. Transferring compound data to the calibration table
Invoke any of the following commands:
Add All
-
Add Existing
Add Peak
Add Group
-
Add all peaks identified in the calibration
standard.
If the calibration table contains compounds
already calibrated on previous level, it will look
for and eventually calibrate these compounds
also at the current level.
Only the peak selected using the cursor will be
calibrated.
Only the group containing the peak selected
using the cursor will be calibrated.
4. Supply known amounts
Enter all known amounts for all compounds in the Amount column below the calibration level Level x.
58
YL-Clarity
User Guide
5. Repeat steps 2 to 4 for all calibration levels required
Note:
Thanks to the character of the YL-Clarity station, any change in the calibration file will
immediately be reflected in the result tables of all chromatograms that use it. In other words,
it is not necessary to save changes using the File - Save command to update the result
table.
6. How are peaks assigned to compounds in the calibration table?
The retention time of each peak you wish to calibrate using the Add Peak command will be
compared with the identification windows of already calibrated compounds. If identified with any
of them (i.e., if the retention time lies within the interval < Ret. Time - Left Window; Ret. Time +
Right Window>, its retention time will be added at the next level. Otherwise a new calibrated
compound will be established.
If the calibration proceeds under the Add Existing command, only identified compounds will be
calibrated in the above manner, in other words, you cannot add new compounds in this manner.
Identifying a calibration using the Add Group command will only proceed according to the
group identifier.
7. Updating retention times of compounds
The retention time of any compound can be changed manually in the Retention Time column at
anytime.
The retention time is also automatically updated during each new calibration or recalibration of
the compound in question. The updated retention time is taken as the arithmetic mean of all
values established using existing (re)calibrations of that compound.
The automatic update can be switched off by unchecking the Update Retention Time item in
the Calibration Options dialog.
6.7 Manual Calibration
If you wish to acquire full control over the calibration process, reset the Automatic parameter to
Manual in the toolbar.
Fig. 27.
The Calibrate Peak Dialog
After using certain of the Add All, Add Existing, Add Peak, Add Group commands in the
manual regime, the Calibrate Peak (Group) dialog will be displayed for each compound, in which
you may immediately amend and enter all data on the calibrated compound. For the Add All
command you can then skip the calibration of the currently displayed compound using the Skip
button. The Abort button terminates the whole calibration process. The amount of the calibrated
compound is entered in Amount field in the displayed dialog.
59
YL-Clarity
User Guide
6.8 Recalibration
The YL-Clarity station provides for facile recalibration (modification of calibration files). The
procedure is similar to that which has already described for calibration.
What does recalibration mean?
Recalibration means repeated calibration at a given concentration level. The purpose is either to
update the calibration points or increase precision by repeated averaging at individual
calibration levels.
Fig. 28.
The Calibration Window Toolbar
How is the recalibration mode set?
The mode of recalibration is set in Mode - Recalibration field in the Calibration Options dialog.
The command can be opened by invoking the Calibration - Options command, using the
icon, or directly in the main toolbar of the calibration window.
Fig. 29.
The Calibration Options Dialog
How to set the recalibration mode?
Set the recalibration mode in the Recalibration section of the aforementioned Calibration
Options window. The result of recalibration can be either the arithmetic mean of all previous
values and the new value - Average, a weighted mean of the original and the new value –
(Weight) or, finally, the old value can be replaced by the new one –(Replace).
How to prevent recalibrating using incorrect values?
The maximum allowable difference in per cent between the new and the existing value can be
specified in the Search Criteria field; in this manner you can forbid automatic recalibration
using values that fall outside the permitted range. In manual recalibration the Over message in
Departure column will appear if the permitted difference has been exceeded. Enter zero to
disallow the condition.
6.9 Manual Recalibration
As with calibration you may choose between manual and automatic recalibration. In the former
instance the appropriate Recalibrate Peak (Group) dialog containing all data that can be changed
directly will open each time a compound has been selected.
60
YL-Clarity
User Guide
Fig. 30.
The Recalibrate Peak Dialog
The window offers a selection of the recalibrated level and contains the compound name, the
total amount of recalibrations already effected, and the recalibration table. The first calibration of
the compound is included in the number of recalibrations, and is reset to 1 each time
recalibration of the Replace type has been undertaken. The Cancel command will skip the
recalibration of the currently displayed compound, and the Abort button will terminate the
recalibration of all compounds.
The recalibration table contains the previous and current values of the two responses, the
amount (including the units), and the absolute and relative deviations. A differing amount (if any)
will be recalibrated in the same manner as the responses. The Default Injected Amount item
offers a more suitable method for correcting differences in the injected amount - see Chapter
6.12.
The Over message will appear in the Departure column each time a permitted deviation (set in the
Search Criteria field) has been exceeded.
6.10 Multidetector calibration
Calibration and recalibration for multidetector measurement is performed in the same way as
the single-detector described in the previous chapters. When the multi-detector calibration
standard has been loaded and the calibration of the first signal has been calibrated another
signal may be selected using the Calibration – Set Signal or using corresponding colour
symbol from the toolbar. It is not necessary to fill in all figures for each signal. For example, the
Compound Name, Retention Time and Amount are common for all signals. Common
columns are displayed in black type.
Note:
A multidetector calibration can also be created using the single-detector calibration
standards. Then you will have to enable the calibration of further signals in the calibration file
using the Number of Signals command from the Calibration Options dialog.
6.11 Calibration File Modification
All data in calibration files can be changed unless dimmed.
The manual modification of responses
The Enable Response Value Change checkbox from the Calibration Options dialog must be
checked prior to any manual modification of the values of responses. The number of
recalibrations is reset to one (1) when a response has been manually changed.
Deleting a compound
To delete a compound invoke the Calibration - Delete Compound command or click the
icon.
61
YL-Clarity
User Guide
"Artificial" calibration
It is not a problem to create a calibration curve from the known response factor or response
without using a calibration standard. Add a new compound to the global calibration table by
simply filling in any cell in the last free line. Once the entry has been confirmed using the Enter
key, the remaining data will be automatically supplemented and can be subsequently modified.
6.11.1 Default Parameter Settings
Invoke the Calibration - Options command to open the Calibration Options dialog, and then
click the Defaults tab.
Fig. 31.
The Calibration Options - Defaults Dialog
Default values of some selected parameters for new compounds in the current calibration file
can be selected here.
6.11.2 Response Factor and Free Calibration
The calibration file lists two response factors for each compound.
Level-specific response factor
For each calibrated level the compound table lists the response factors in the synonymous item.
The factor is calculated as amount divided into response at a given level and is only indicative.
Global response factor
The main calibration table contains the column for setting the global response factor –
(Response Factor), used instead of values calculated from the calibration equation when the
Free Calibration applies.
Free calibration can be selected in the selected compound tab of the Curve Fit Type item. Free
calibration is indicated with the Free inscription in the Peak Type column from the Result table
in the Chromatogram - Results window.
6.11.3 Selection of Calibration Units
The amount entered in the calibration table can be expressed in any units. The type of units is
specified in the Units - Compound field of the Calibration Options dialog.
The units stated there will be shown at all amounts in the table, in the graph and also in the
Results table in the Chromatogram window.
62
YL-Clarity
Note:
User Guide
The user can specify their own units in Units after Scaling item of the Results table.
6.12 Correction for Differences in Injected Amount
Different injected amounts of both the calibration and unknown samples can be adjusted to a
common value. If the Default Injected Volume checkbox has been checked and a value has
been entered in the Calibration Options dialog, each response used in calibration, recalibration
or evaluation will be multiplied by a correction factor calculated as the ratio of the above value
and the value of Inj. Volume from the chromatogram header.
Unless the Default Injected Volume checkbox has been checked, the Inj. Volume parameter
serves for informational purposes only.
If you change the entered value, you can invoke the Update Calibration Responses command
to recalculate all responses by multiplying them by the ratio of the old and the new value.
If the Default Injected Volume checkbox has been unchecked, the last recalculated values of
responses will remain valid regardless of any changes made in Inj. Volume item.
Owing to the linear interpolation that replaces the actual dependence between the amount and
the response, it is advisable to only use the above correction for small deviations originating,
e.g., from the difficulty of achieving a reproducible injection in gas chromatography.
6.13 Peak Identification in Calibrated Calculations
This chapter deals exclusively with the identification of separate peaks, since the identification
of peak groups proceeds according to respective single-letter identifiers.
One may reasonably expect that compounds contained in a calibration file will be identified with
peaks in the measured chromatogram. To this end the user specifies identification windows
relative to the relevant retention time for each compound in the calibration file. If a peak exists in
the chromatogram whose retention time falls within the identification window, it will be assigned
to the corresponding compound from the calibration file. In calibrated calculations, the
calibration curve for that particular compound will subsequently be used for the peak thus
identified. If there are several peaks inside the identification widow, the peak whose retention
time is the closest to the retention time of the calibrated compound will be identified.
Peak identification is used not only in calibrated calculations but in recalibration and multilevel
calibration as well. Chapter 6.13.2 explains how the station resolves possible instances of overlapping
identification windows.
6.13.1 "Reference Peak" Method
The process of peak identification may sometimes be complicated with changes in retention times
brought about by changes of measurement conditions, use of different methods, changes in
characteristics of the chromatographic system, or simply by random error. The method of reference
peaks eliminates a substantial part of these complications, resulting in reliable identification of peaks
in the chromatogram.
Compounds marked as reference in the calibration file will be identified first. The difference
between the retention time of a reference compound and that of the corresponding reference
peak in the chromatogram is then used to correct the retention times of the other (nonreference) compounds listed in the calibration file. The non-reference compounds are then
identified according to the retention times so corrected.
The reference peak method will automatically be applied if at least one compound in the
calibration file has been marked as reference, either in the main calibration table, the Peak
Type item, or in the tab of the relevant compound of the Compound Type item accessed by
selecting Refer. The peak of the internal standard can also be marked as reference peak by
selecting RISTD.
63
YL-Clarity
User Guide
If several peaks fall within the identification window of the reference peak, the largest of them
(determined according to how the peak area or height has been set in the Response Base
item) will be identified.
A reference peak not originally identified in the chromatogram
cannot be subsequently identified inside the newly calculated
intervals.
The method used to correct the retention times of the non-reference peak is apparent from the
following Figure:
Fig. 32.
Scheme of the Reference Peak Method
The difference between the actual retention times of reference peaks, Ti, and the retention
times listed in the calibration file, T'i, is used to determine, by linear interpolation (linear
extrapolation for non-reference peaks past the last reference peak), the correction that is to be
applied to the retention times of non-reference peaks.
The following relations apply to the i-th peak in individual segments between the A, B, C etc.
reference peaks:
In segment A (before the first reference Tc = To ⋅ T ′1
i
i T1
peak)
In segment B (between two reference Tc = T ′1 + (To − T 1) ⋅ T ′ 2−T ′1
i
i
T 2−T 1
peaks)
In segment C (behind the last reference Tc = To ⋅ T ′ 2
i
i T2
peak)
Toi
- Original retention time of peak i
Tci
-
Corrected retention time of peak i
T'i
Ti
-
Retention time of the reference peak in the calibration file
-
Retention time of the reference peak in the sample.
Identification windows relative to the retention times so corrected are used to identify nonreference peaks. The method used to resolve overlapping identification windows construed in
the above manner is described in the following chapter. The reference peak method will provide
the most reliable results if reference peaks are distributed fairly uniformly across the entire
chromatogram.
The calculated, corrected retention times of non-reference peaks apply only to identification during
calibration, recalibration or calibrated calculations, and are not substituted for retention times of
compounds in the calibration file or the sample. Updating retention times of compounds included in
the calibration file is described in Chapter 6.13.3
64
YL-Clarity
User Guide
6.13.2 Resolving Instances of Overlapping Identification
Windows
It is not necessary to monitor whether or not the neighbouring identification windows overlap.
Prior to the identification process proper, the YL-Clarity station will check the identification
windows of individual compounds and resolve instances of overlapping by reducing some
identification windows.
This method is elucidated in the following Figure.
LW1
RT1
RW1
RT2
LW2
RW2
No overlap
1/2
1/2
Overlap divided uniformly
1/2
1/2
Overlap divided uniformly (limited by the retention time on the right)
1/2
1/2
Overlap divided uniformly (limited by the retention time on the left)
1/2
1/2
Overlap divided uniformly between the retention times
LW/RW = left/right identification window
Fig. 33.
Resolving Overlapping Identification Windows
The corrected identification windows remain in effect only during the identification process and
do not replace the windows specified in the calibration file.
6.13.3 Updating Retention Times
Retention times of compounds tend to eventually shift and, accordingly, difficulties with the
identification of calibrated compounds in the chromatogram may sometimes be encountered. To
avoid this problem, the YL-Clarity station provides for an automatic update of the retention
times of calibrated compounds in each subsequent (re)calibration by registering any potential
shifts in retention time. This process results in the reliable identification of calibrated compounds.
Enable the automatic update by checking the Update Retention Time checkbox in the
Calibration Options dialog. The retention times listed in the calibration file will be updated as an
arithmetic mean of the new time and all times established in previous (re)calibrations of the
given compound.
65
YL-Clarity
User Guide
7 Reports
The YL-Clarity station provides for an arbitrary part of the obtained results to be printed at any
printer registered in the Windows environment.
7.1 Reporting Procedure
1. Where to initiate a report?
The YL-Clarity station enables reports to be printed from many dialogs. The menus of most
icon or the Report button. Always select the
windows contain the Report Setup command ,
window that contains the data you wish to include in the report. Different report styles are preset
in each dialog, but can be modified or replaced at will.
Fig. 34.
The Report Setup Dialog
2. Selecting a printer
Check and, if need be, select a printer using the Printer command, including setting the quality
and size of the printout.
3. What will be printed?
Look through all tabs in the left-hand side of the Report Setup window and check or change
what will be printed. The name of the report style containing these settings will be displayed in
the title bar of the window.
4. Selecting a different report style
In some instances it is more convenient to use a different report style instead of modifying the
current report style. Invoke the Open command to list all the report styles that are stored in the
COMMON directory.
5. How will the printout look?
Use the Preview command to see what will be actually printed.
6. Printing reports
To start printing the report, invoke the Print command. The dialog showing the printer settings
will appear once again to enable the user to verify that the settings are correct, determine the
number of copies to be printed, select the scope of printed pages, etc.
66
YL-Clarity
User Guide
7.2 Report Style Files
A report style is really a template that contains a list of all the sections to be printed and the
report layout (size and type of the font, borders, spaces, etc.). During the printing process
proper, the actual values or files are merely inserted into the corresponding sections. Each
report style is then stored in the corresponding report style file where its contents can be
displayed and modified. The adapted report style can be saved under the same or different
name as a new report style. All activities are concentrated in the Report Setup dialog. Report
styles are stored in the COMMON subdirectory and are common to all instruments and projects.
7.3 Printer Selection
Printer selection is the only part of the Report Setup dialog that is not included in the report style
and is shared by the whole station; in other words, it is not possible to set different printers or
different print quality at individual parts of the station. The list of available printers, their set-up
and the connection with the computer all constitute a part of the Windows system and the
station takes it over in its entirety.
Start the selection using the Printer command. Select the appropriate printer using the
button; this will display a list of all printers that are registered with the Windows operating
system. While the station is running, click the line that contains the requested printer to make it
the current printer. The Properties command, beside the line with the printer name, opens a
dialog where the print size, quality and other parameters can be set. The layout of the window
differs among individual printers.
7.4 Report Style Selection
The name of the preset report style is displayed in the title bar of the Report Setup dialog. Invoke
the Open command to see a list of all the available report styles. Click the name of the report
style to display some additional data items, like the author's name in the Created By field or a
description of the report style in the Description field. Select the style either using the OK
button or directly by double-clicking the style name. Alternatively, you can enter the name of the
style in the Filename field. The New command creates a new, empty style.
7.5 Report Style Modification
Each report style is divided into individual segments, and a separate tab is reserved for each
such segment to the left of the Report Setup window.
symbol will be printed. Double-click the tab of the corresponding
Segments preceded by the
tab to include or exclude that segment from the report. The
symbol corresponds to the Print
item in the top-left corner of each tab.
Most segments are further subdivided. The On New Page checkbox decides whether the
segment will be printed on a new page or not.
67
YL-Clarity
User Guide
Global parameters that apply to all segments
The first tab, Page Setup, defines the parameters common to the printout in its entirety.
Fig. 35.
The Page Setup tab
Use the Form Font commands and the Value Font to select the type, size and properties of the
employed font: Form Font will be used to print headings, Value Font for the data items proper.
The commands in Margins section decide on the page margins, the Between command
specifies the space between individual parts of the printout; all parameters are in millimetres.
Heading
The second tab, Lab. Header, contains the laboratory header. Up to ten lines of text can be
entered and will appear in the header of the first page or alternatively in the header of all pages
in the printout, according to how the On 1st Page Only item has been set. The header can be
framed (using the Border item) and printed on grey background (using the Grey Background
item). The Number of Lines field specifies the number of lines per page. A separate font type,
icon, and the text aligned
font size and characteristics can be selected for each line using the
using the
,
, and
icons.
Fig. 36.
An Example of a Laboratory Header
The contents of all printed segments outside the Report Header can be specified in more detail
in the corresponding tab. The Method and Sequence segments always comprise several parts of
the relevant files. The Results segment enables the user to decide whether the table of
integration results, summary table or the table of column parameters will be printed. The
Calibration segment allows the user to decide whether all valid or only current level and
calibrated compounds will be printed.
68
YL-Clarity
User Guide
Printing the chromatogram
Parameters from the Chromatogram segment define the orientation and size of the printed
chromatogram. Orientation item is used to select the orientation, location and size of the
chromatogram. When the Portrait item has been selected, the chromatogram will be printed
across the page (with the time axis parallel to the text). The chromatogram will occupy the entire
page width and, unless a fixed height is specified by the Fixed Height command, the default
height will be 2/3 of the page. When the Landscape item has been selected, the chromatogram
will be printed on a separate page with the time axis along the longer side of the page. Use the
No. of Pages parameter to print the chromatogram on several pages.
Printing in Colour
The station is able to print on colour printers. Chromatograms, descriptive labels and lines will
be printed in colour.
69
YL-Clarity
8
User Guide
Import
The YL-Clarity station provides complex possibilities for chromatogram imports in the following
AIA, TXT and EZ Chrom formats. Importation can be performed using the File – Import
Chromatogram command from the Chromatogram window. Select the desired directory and
file(s) to import in the Open Files to Import dialog. Files can be filtered to display only the files of
a selected type using the Files of Type listbox.
Attention! Imported chromatograms will be processed using the current template method opened in
the Instrument window and not using the method of the currently opened chromatogram!
Importation of multiple files at once
Multiple files can be selected at once in the Open Files to Import dialog. A separate dialog
window will subsequently be opened for each imported file.
AIA format
The format of AIA files is quite strict in the form but the content is not fixed. Thanks to this the
AIA file may contain various customized items. The Import AIA File dialog is designed to include
an unpacking tree to make it easier to verify which items are present in the file. The AIA format
is designated for single-detector chromatograms only.
Text format
A chromatogram saved in the text format may (but does not have to) contain a header that
describes the conditions of the measurement and (obligatory) data of up to four subsequent
chromatographic curves which come one after another. Data can be in one column (voltage) or
in two columns (time and voltage). The conversion program determines, according to the
content of the individual imported text files, the most appropriate settings for importation. The
automatic setting can be manually modified.
Text format EZChrom ASCII
This format utilizes the *.ASC suffix and from the text format used by the YL-Clarity station only
differs in the header with different names of individual items.
70
YL-Clarity
User Guide
9 Export
The YL-Clarity station allows conjoint text export of results and chromatogram to either the
Clipboard or a file, export of results to a database file, text export of the summary table. It is also
possible to export the chromatogram in various formats (AIA, Text, EZChrom ASCII); moreover,
chromatograms can be exported in the vector picture format.
9.1 Conjoint text export of Chromatogram and the
Corresponding Results
The Export Data command (invoked by clicking the
icon from the Instrument window or in
the Chromatogram window) is used to export data as text.
In the Instrument window, the Export Data command will only set up the mode to export
automatically (Postrun function) after an analysis has terminated. The Export command in the
Chromatogram window is earmarked for manually exporting the active chromatogram. In both
instances the Export Data dialog will open.
Fig. 37.
The Export Chromatogram Dialog
What may be exported?
The Export Data command enables the user to export data from the Results Table (Result
table checkbox), from the column parameters table (Column item), chromatogram header
(Chromatogram Header checkbox), calculation parameters (Calculation parameters
checkbox), statistical moments (Moments checkbox) and also the chromatogram
(Chromatogram checkbox), all in a user-defined format. When a chromatogram is to be
exported, the Chromatogram section will be made available where the user can select the time
axis (X Axis checkbox) and either the chromatogram in its entirety or only the currently
displayed part (All Data or Displayed items) to be exported.
In what format is the chromatogram exported?
The chromatogram is exported as one or two columns of values separated by a character
selected from Text Format item. The Fixed format adds the required number of spaces
between values of different length to ensure that they are properly aligned in columns of equal
width.
The first column contains time in minutes, the second column voltage in mV. The time increment
is taken from Time Step field. Each voltage is calculated as arithmetic mean of all voltages
within the specified time increment. If zero has been entered, the data will be transferred with
the minimum time increment of the chromatogram in question (defined by the sampling rate Sample Rate). If a value larger than the chromatogram duration has been specified as the time
71
YL-Clarity
User Guide
increment, the result will be a single number representing the voltage that is averaged over the
entire chromatogram.
No other data (baseline, marks, retention times, descriptive labels) are exported. In this instance
the Headers checkbox will insert headings of individual columns. The Full Format checkbox
will insert the chromatogram header at the beginning of the exported text.
In what format is the Results Table exported?
A character taken from the Text Format item will separate the values of individual cells of the
table. The Fixed format adds the required number of spaces between values of a different
length in order to align them into columns of equal width.
The Headers item adds headers to individual table columns. The Full Format item appends the
name, date and time of chromatogram creation to each line of the table.
Which characters may be used as separators?
Characters for separating individual columns are selected in the Text Format item. If the
Delimited by - Comma, Delimited by - Semicolon or Delimited by - Tab item has been
selected, the corresponding separator will be inserted between individual data items. To
preserve the layout of the table use the Fixed format; this format inserts the number of spaces
necessary for properly aligning values (unless a proportional font such as the System font, is
being used) between individual data items. This selection is suitable for exporting data to text
editors when creating final reports.
Note:
The Fixed format is suitable when a document is to be left “as it is”, without further
amendments. To classify sections of reports into a document in the text editor, create a
separate style, which, for example, could be named “YL-Clarity report” and will use a
disproportionate type font. Then apply this style to passages that have been copied from the
report of the station. On the other hand, the Delimited format is more suitable if further
amendments to the report are to be made by removing or adding lines in tables etc. Most of
the advanced text editors contain a function that formats text that is separated by a selected
symbol into a table.
Destination of exported data
The Clipboard item exports the data to the Windows Clipboard. To export to a text file, select
the File item and specify the filename in the File Name field. If you wish to enter the name of an
existing file, invoke the Browse command to search for the file.
Automatically assigned filenames
If the File Name field has been left blank, data will be transferred to a file of the same name as
a chromatogram with the *.TXT extension.
Target directories for export
If File Name field does not specify a path, the text file will be stored in the same directory as the
exported chromatogram.
Export to a single file
The user can append the exported data at the end of an existing file; to do that check the
Append item.
72
YL-Clarity
User Guide
9.2 Exporting results to a database
If dBase File item from the Export Data dialog has been checked, the data will be exported in
the *.DBF format. In this case, only the Results Table will be exported to the file in the full
format regardless of whether or not Full Format has been checked.
9.3 Exporting the Summary table
The Export Summary Table command will invoke the Open File to Export Summary Table
dialog for entering the filename and directory.
Individual items of the summary table are found separated by a tab in the exported file.
9.4 Exporting a chromatogram
Exportation of the chromatographic curve to the AIA (*.CDF), text (*.TXT), Multidetector text
format (*.CHR) or EZChrom ASCII (*.ASC) format. The Export Chromatogram command
invokes the Export Chromatogram dialog where the file format, detector, and target directory are
to be entered.
Note:
If you do not set any filename, the name of the exported chromatogram with the appropriate
suffix will be used as default.
9.5 Exporting Chromatograms as Vector Pictures
The Export - Export As Picture to File or Export As Picture to Clipboard commands export
all displayed chromatograms including all descriptive labels, headers and lines in the vector
format *.WMF (Windows metafile).
What is a vector format?
In the vector format a chromatogram can easily be incorporated, modified and printed at a high
quality using a text editor or a graphical application (Word, Excel, Corel Draw, etc.), since it is
exported as a set of individual line segments connecting all its points.
What are the advantages of the vector format over the bitmap format?
Displaying and printing a vector picture is not restricted by the size of the graph in the
Chromatogram window, which otherwise affects the quality and size of data exported as a
bitmap. The size of the exported *.WMF file will be smaller than the size of the bitmap file.
Note:
In other words, contrary to a bitmap, a vector picture can be arbitrarily magnified and
contracted without any adverse effect on its quality or file size.
A detailed procedure for copying a chromatogram to an MS Word document
Display the requested chromatogram in the Chromatogram window.
Invoke the Export - Export as Picture to Clipboard command.
Run MS Word and open the target document.
Point the cursor to the location where the chromatogram picture is to be inserted and select
Edit - Insert from the main menu.
The inserted picture can be magnified or contracted and modified once double-clicked.
1.
2.
3.
4.
73
YL-Clarity
User Guide
10 Troubleshooting
This chapter summarises problems most often encountered when working with the YL-Clarity
station. Problems are listed in chronological order in which they might occur in a typical working
procedure.
10.1 Running the Program
10.1.1 YL-Clarity Lite
Demo inscription in the header of the Instrument window
The demonstration version of the program has mistakenly been run. The demonstration version
will have the serial number displayed in the About dialog in the form 99-999. Open the window
using the Help - About command.
Message Demo - Wrong S/N in the Instrument window
The serial number of the station listed in the About dialog (open the dialog using the Help About command) differs from the number on the A/D Converter board.
Message Demo - Missing HW in the Instrument window
• The A/D board has either not been found or has been damaged.
• INT7 board driver has either not been installed or is inoperative.
10.1.2 YL-Clarity
Demo inscription in the header of the main station window
The demonstration version of the program has mistakenly been run. The demonstration version
will have the serial number displayed in the About YL-Clarity window in the form 99-999. Open
the window using the Help - About command from the main YL-Clarity window.
Message Demo - Wrong S/N in the main station window
The serial number of the station listed in the About dialog (open the window using the Help About from the main YL-Clarity window command) differs from the number on the A/D
Converter board or in the protective Sentinel key.
Message Demo - Missing HW in the main station window
• The A/D board or the protective Sentinel key has either not been found or has been
damaged.
• INT7 board driver or the protective Sentinel key has either not been installed or is
inoperative.
• The driver module of the A/D board or the protective Sentinel key has not been registered.
• The A/D board driver has not been activated.
• The driver of the INT5 board has not been configured.
• A different base address or interrupt has been set on the board and in the INT5 driver.
74
YL-Clarity
User Guide
• A conflict has occurred between the base address or the interrupt of the INT5 board and the
base address or the interrupt of some other computer device.
• The interrupt set on the INT5 board is not reserved for ISA slots in the BIOS setting of the
PC.
You have either forgotten the password or intend to cancel the password-protected
mode
If the station is operating in the protected mode and you have forgotten the password, copy the
original CLARITY.PSW file from the PGM subdirectory of the installation CD to the main station
directory. This will shift the station to the unprotected mode, but be aware that all the settings in
the User Accounts dialog will be lost.
10.2 Signal Displaying and Measurement
The
icon is dimmed and accompanied by the Disabled message,
and the Data Acquisition command is inoperative.
• No source for the detector signal has been assigned to the instrument (usually a channel of
the A/D converter board). Open the System Configuration dialog using the System Configuration command and select the appropriate signal source on the Instrument1 (2-4)
tab in Acquisition item.
• The instrument you are you using has exceeded the number of instruments purchased (e.g.,
it is impossible to measure on a third instrument if only two have been purchased).
• You are using the Offline version of YL-Clarity. Invoke the Help - About command from the
main YL-Clarity window to display the About dialog and check the serial number. The serial
number format of the Offline version is 98-XXX…
No signal is being displayed in the Data Acquisition window.
• Probably an incorrect range has been selected, so that the current value of the signal lies
outside the displayed range. Change the Time and Voltage parameters, preferably to their
respective maximum values. Alternately, you may select the floating range using the View Floating Axes command, which enables the station to choose the appropriate setting for
displaying the signal.
• A cut that lies outside the signal is being displayed. Cancel the cut by using the Unzoom
command ( Ctrl + * or the
icon).
• You have mistakenly set the same colour for both the curve and the background. Invoke
Properties from the local menu and check the assignment of colours.
Data acquisition terminated prematurely.
Verify that the Enable Autostop has not been enabled in the Method Setup - Measurement.
Data acquisition has prematurely terminated or started repeatedly.
Probably a false start signal has occurred in the instrument where an external signal start has
been enabled - contact your vendor.
75
YL-Clarity
User Guide
Redeeming data from an analysis.
An emergency situation might occur during while acquiring data (power failure, computer
malfunction, disk error, disk full etc.) causing an interruption. If you consider data from the
interrupted analysis to be important, you can redeem it. First remove the cause of the underlying
failure, and then invoke the Data Recovery command from the Single Analysis dialog. The
interrupted analysis will then be saved as a valid chromatogram.
Disk full
If a requested operation cannot be performed because the disk is full, you have several options:
• Delete files that are no longer needed from any directories other than YL-Clarity.
• Archive or delete unnecessary chromatograms or entire projects. With the Archive
command in the Instrument window, open the Backup – Create Archive dialog. Either archive
the older chromatograms on another disk or erase them using the Delete Selected Files
command.
10.3 Sequence
The Run command and icon are inactive (dimmed)
A Single Analysis is running. Check the status in the Instrument window. Single Analysis can be
terminated from the Single Analysis dialog or Data Acquisition window.
See the first bullet of the chapter 10.2 - Signal Displaying and Measurement.
10.4 Processing and Displaying Chromatograms
A saved chromatogram has been "lost".
Chromatograms are either stored in the data or calibration subdirectory depending on the
setting of the Calibration Standard parameter in the Single Analysis dialog. When selecting a
or
icons.
chromatogram do not forget to display the corresponding subdirectory using the
A file contains an incorrect chromatogram
• Verify that the correct project has been selected, since files of identical names can exist in
several directories.
• Maybe you have overwritten the original chromatogram using another one by entering the
name of an already existing chromatogram in the Chromatogram File Name field
(inadvertently ignoring the warning against possible overwrite). It is essential to keep in mind
that, when the Enable Overwrite toggle in the Single Analysis dialog has been checked,
newly created files will overwrite any old ones.
A completed chromatogram appears clipped from above or from below
• First verify that the chromatogram is not clipped only clipped on the monitor because of the
Properties - Axes - Range - Fixed command.
• If the chromatogram is clipped from above, the detector signal was apparently cut off either
because of a too low range setting in the Range item of the Method Setup - Acquisition
dialog, or was already cut off in the detector because of an excessive preset range or the
injection of an extremely concentrated sample.
76
YL-Clarity
User Guide
• If negative voltage values are missing from the chromatogram, the Bipolar item in the
Method Setup - Acquisition dialog was probably left unchecked; this item enables the
measurement of a negative detector signal.
There is an excessive noise in the chromatogram
A measurement was possibly made using an unsuitable connection between the chromatograph
and the computer (e.g., the detector cable of the YL-Clarity station was not shielded). Another
reason might be a defective chromatograph or converter board. Check the chromatograph (e.g.
using a recorder), or contact your vendor.
Small peaks exhibit a staircase shape or excessive noise
Possibly the full measuring range of the converter is not being utilised. If the voltage of the
maximum peak of interest is at least 10x smaller that the voltage range set in the Range item in
the Method Setup - Acquisition dialog, use a lower range.
Some peaks are not being detected
• Check whether the limiting integration conditions are improperly set using the Rejection item
in the Integration tab of the Chromatogram window. These parameters are included in the
method file and might even prevent integration of correct peaks if the selected method is
inappropriate.
• If you use the integration algorithm with the default values (Peak Width = 0.1 min., Threshold
= 0.1 mV), the very narrow peaks occurring at the beginning of analysis might be ignored.
Try reducing the Peak Width. If this leads to the detection of many small, spurious peaks,
set the Threshold to a value higher than the height of these spurious peaks. It must be
stressed that the detection of peaks always depends on an interplay of the above two
parameters, and changing only one of them not always produces the expected results (see
Chapter 4.2 for additional details).
• If none of the above two remedial measures was successful in recognising some undetected
peaks, the peaks involved are probably highly distorted so that their shape fails to satisfy the
elementary conditions for peak detection. In this event use manual integration
(Chromatogram - Peak - Add Positive (Negative)).
Too many peaks are detected
For a very noisy signal the algorithm might erroneously interpret the noise as a high number of
small peaks. Working with such chromatograms is very confusing and the speed of all
operations decreases dramatically.
• Increase the value of Threshold.
• Make the chromatogram more lucid by reducing the number of detected peaks using the
Rejection command to appropriately set the integration conditions.
• In some instances it might be advisable to ban undesirable peaks using the Baseline - Lock
command.
Incorrectly detected peaks
• When the Threshold value is too high, the beginning of some peaks might be placed too
high on the leading peak edge. This can be corrected using the Chromatogram - Peak
Start command. An alternative automatic remedy may be tried by entering a lower value in
the Threshold field.
77
YL-Clarity
User Guide
• When the Threshold value is too high, the narrow peaks may not be detected or a group of
unseparated peaks may be integrated as a single peak. If this happens, decrease the value
of the Peak Width parameter. With very narrow peaks it is advisable to verify that the
chromatogram was not measured with a too low sampling rate (Sample Rate). E.g. when
the chromatogram has been measured using a 10 Hz sampling rate, the decreasing of the
Peak Width parameter under the value 0.07 min will have no effect. It is then necessary to
measure the chromatogram again with an increased sampling rate.
• If the Peak Width parameter is too low, a group of peaks might be separated (the peaks in
the group are not separated by a vertical line). If this is the case, raise the value of the Peak
Width.
In general, the width of detected peaks (measured as the distance between the peak beginning
and end) is proportional to the value of the Peak Width and inversely proportional to the value
of the Threshold (see Chapter 4.2 - Processing the Analysis for additional details).
10.5 Chromatogram Modification
Added peaks or other chromatogram modifications have been "lost"
• You have probably failed to save the chromatogram after effected modifications.
• The integration table was mistakenly deleted or replaced by another one.
The "manual integration" procedure
In the event that manual integration commands have been invoked (Chromatogram - Peak
Add Positive (Negative)), keep in mind that the manually added peaks will be stored
exclusively in the integration table, just like all other chromatogram modifications.
How to shift the peak apex
As the peak apex location is automatically determined, no instruments will be available for
shifting it. If it is still necessary to shift the peak apex to some other location, use the procedure
described at the beginning of chapter 5.4.2 - Peak Modification on page 43.
Dividing the chromatogram into regular integration areas (slices)
In connection with some types of data evaluation it is necessary to divide the chromatogram into
segments of equal length and integrate them separately. The simplest way to achieve this is to
forbid all existing peaks across the chromatogram using the Baseline - Lock command then
divide the chromatogram into individual segments by repeatedly invoking the Add Positive
(Negative) command and "tune up" the segments by editing the integration table. In some
instances the commands for baseline modification may be needed.
The peak beginning/end cannot be shifted to the requested location, or the required
baseline modification cannot be accomplished
A command aimed at baseline or peak modification will sometimes not conform to the user's
desire because the algorithm employed for automated baseline modification will not allow it. The
reason for this is that the station has detected an attempt that would cause the signal to cross
the baseline and so it automatically shifts the point in question out of the way.
A new peak cannot be added
There was probably an attempt to add a new peak to an area occupied by the apex of another
peak or to the region of tangential separation.
78
YL-Clarity
User Guide
Cancellation of a command in the integration table had unexpected consequences
All of the commands involving baseline or peak modification, including those that do not have
the required effect, are incorporated in the integration table. At the moment a command is
cancelled, the originally ineffective commands may assert themselves. It is therefore
recommended to maintain only functional commands in the integration table. In this manner the
table will also be kept within manageable limits, a feature that will effect the speed of additional
modifications.
10.6 Calibration
Some peaks have not been calibrated
New peaks can be added to an already calibrated file only by using the Add Peak or
Add Group commands but not by using the Add All command. The latter only calibrates all
peaks from the calibration standard for an empty calibration file; in other instances the
command only calibrates the already existing peaks.
A peak has been erroneously calibrated as a new compound.
The deviation in the retention time of the affected peak exceeds the size of the identification
window. Increase the values stored in the Left (Right) Window items or, alternately, use the
reference peak method (see Chapter 6.13.1 - "Reference Peak" Method on page 63).
Note:
When applying the reference peak method keep in mind that the modified retention time of a
compound might differ significantly from the retention time actually measured. Thus, also if
two original retention times are identical, the peak identification could fail because the
modified retention time may wander outside the limits given by the identification window.
Neither the calibration curve nor the corresponding calibration equation is displayed
• The Curve Fit Type item is set to Free Calibration. (The curve fit for new compounds is set
using the Curve Fit Type parameter in the Calibration Options - Defaults dialog.)
• The system was unable to compile the calibration equation for the given type of curve fit.
Change the type or normalise all amounts (e.g. by dividing/multiplying all values entering the
calibration by 100 and then specify the Scale Factor = 100 or 0.01 in each affected
chromatogram).
10.7 Calibrated Calculations
The requested type of calibrated calculation was not used
If the required type of calculation is not specified in the Results table, all the conditions that
underlie its use have probably failed to be satisfied. See Chapter 6.3.3 - Internal Standard
Methods - ISTD on pg. 52 and the Reference Guide for additional details.
The following are the most often encountered underlying errors:
• Use of the incorrect calibration file or too narrow identification windows.
• For an ISTD calculation the calibration file must contain the compound marked ISTD.
• In ISTD calculations with different amounts of internal standard when it has either been set in
only an unknown sample or only in the calibration file. The station will then not be able to
recognize whether it is missing from one or is surplus of another. Therefore, YL-Clarity would
rather choose an uncalibrated calculation instead of an incorrect variant of the ISTD
calculation.
79
YL-Clarity
User Guide
• In ISTD calculations with the same amount of internal standard when it has either been set in
only an unknown sample or the calibration file. The station is then not able to recognize
whether it is missing from one or is surplus of another. So YL-Clarity would rather choose an
uncalibrated calculation instead of an incorrect variant of the ISTD calculation.
The type of a peak is displayed as Free in the Results Table
• The free calibration has been used in the Fit Type item of the relevant compound. This
means that the amount of the relevant compound has not been read off the calibration curve;
instead, the global response factor –(Resp. Factor) from the main calibration table was used.
80
YL-Clarity
User Guide
11 YL-Clarity Files and Directories
Since the chromatographic station uses a relatively large number of directories and files of
various types, and moreover these can be shared in several windows, it is prudent to present an
overview.
11.1 Directories
The YL-Clarity station can be installed in any directory on any hard disk. After an installation
has completed, the main directory will contain the following fundamental files:
CLARITY.EXE
The executable program of the YL-Clarity station.
Clarity Lite.EXE
The executable program of the YL-Clarity Lite station.
*.DLL
Dynamically loaded auxiliary libraries, that contains in particular
modules for data acquisition and direct chromatograph control.
*.HLP, *.CNT, *.GID
Online help files.
*.DTA
Data files of simulated analyses used in the demo version.
CLARITY.PSW
The file that summarises the access rights of all users including their
passwords.
CLARITY.CFG
The configuration file of the station.
CLARITY.DSK
A default station desktop file.
*.DSK
A station desktop files of individual users.
*.TXT
A text file that contains topical information.
The main directory contains the following subdirectories:
COMMON
A subdirectory that stores common methods and report styles.
PROJECTS A subdirectory that contains a list of all projects.
BACK
A subdirectory with backup copies of configuration files of the previous
version (after updating the station).
DOCPDF
A directory with an electronic version of all manuals in *.PDF format.
CB20, INT7, UPAD, SENTINEL
Directories with backup copies of PnP device
drivers.
IMAGES
A directory with symbols of the selected chromatographs
SOUNDS
A directory with the default sounds assigned to selected events.
TMP
The directory for storing temporary data during acquisitionand backup
copies of the last two measured chromatograms from each instrument.
WORK
The basic project directories, assigned to one station instrument.
LOG
A directory with the station audit trail files.
Each project directory can contain the following files:
*.MET
Template methods.
*.SEQ
Sequence files.
DATA
Data subdirectory containing the following files:
*.PRM
Chromatograms
CALIB
Calibration subdirectory containing the following files:
*.PRM
Calibration standards
*.CAL
Calibration files
A more detailed description of the structure of subdirectories can be found in Chapter 13 Working with Directories and Projects on page 91.
81
YL-Clarity
User Guide
11.2 Files
11.2.1 Chromatograms (*.PRM)
Each chromatogram contains the following:
• A header that specifies the date and time of an analysis, name of the analyst and the
parameters of the sample.
• Original raw data of the whole analysis from up to four detectors.
• Chromatograms from up to four detectors with the originally detected baseline
• Method describing the progress of a measurement, its modifications and evaluation.
• A link to the name of the calibration file being used.
• Storage of all methods including the calibration files from all the states in which they were
ever saved, printed or exported.
• Descriptive labels and lines (only those attached to the signals).
• A record of all chromatogram changes – Chromatogram Audit Trail
• An electronic signature.
11.2.2 Template Method Files (*.MET)
Each template method file specifies the conditions under which the chromatogram will be
measured and evaluated.
The content of the template method file is copied to each chromatogram at the moment an
analysis is terminated.
The Template Method File contains the following:
• Indicative information (the column and mobile phase used, the type of detector employed
and its settings, etc.).
• Parameters of the input converter, detector selection and a table for controlling the control
outputs according to defined events for up to four detectors.
• An integration table for up to four detectors.
• The name of the calibration file and calculation parameters.
• The parameters used for direct chromatograph and autosampler control (optional).
11.2.3 Calibration Files (*.CAL)
The calibration files contain calibration curves for a practically unlimited number of compounds
for up to four detectors.
Any calibrated chromatogram contains a link to the calibration file and also a copy of all the
calibration files that where present at the moment of saving, printing or exporting changed
comparing to the last saved version.
Note:
The calibration file also contains a record of all the changes performed: Calibration Audit
Trail.
82
YL-Clarity
User Guide
11.2.4 Sequence Files (*.SEQ)
The sequence files enable one to perform a series of measurements. Each sequence file
contains the relevant sequence table and some auxiliary parameters. Each line of the sequence
table in fact describes the method of measurement and evaluation to be used for one or more
injected samples.
Note:
The sequence file also contains a record of all performed changes in the Sequence Audit
Trail.
11.2.5 Report Style Files (*.STY)
A report style decides what will be printed and how. The following information can be printed as
part of a report:
• The measurement description and conditions.
• The chromatograms and calibration curves.
• Tables of results.
• Sequence tables.
The user can also:
• Select page characteristics (borders, numbering) and font.
• Define the headers printed on individual pages.
The station is supplied with a number of pre-defined report styles. The user can modify them at
will or create his or her own.
11.2.6 Password File (CLARITY.PSW)
Access rights of all users are stored in this file, provided the station operates in the protected
mode. To change the access rights invoke the User Accounts command from the main YLClarity window. Refer to Chapter 12.2 - User Accounts - Protected Mode on page 88 for
additional details.
11.2.7 Configuration File (CLARITY.CFG)
This file stores the current settings, especially the hardware configuration of the YL-Clarity
station.
Note:
A backup copy - BACKUP.CFG - is created during station installation. In the event the
CLARITY.CFG file is for any reason damaged, you will be notified and the backup copy will
automatically be used.
It contains:
• The number of displayed instruments and their names.
• The list and configuration of the installed A/D and D/A converters, modules for direct control
of chromatographs, pumps and autosamplers.
• Assignment of the above devices to individual instruments.
• Configuration (appearance) of the main YL-Clarity window.
83
YL-Clarity
User Guide
11.2.8 Desktop File (CLARITY.DSK)
The CLARITY.DSK file contains the following:
• Settings referring to size, visibility and location of all non-modal (non-dialog) windows of the
station.
• A configuration of all graphs and tables.
• A user-specific configuration of the station, available from the User Options dialog.
• Name of the project to be opened (.prj).
• Print styles. These are not dependent on the project, you may use the same print style in
several projects.
The full version features:
• In the protected mode any user can use his or her own, dedicated DSK file. The filename is
specified in the Desktop File item of the User Accounts dialog.
11.2.9 Archive Files (*.DGZ)
The *.DGZ archives are files to which all the archived data are compressed. *.DGZ archive is
not the same as *.ZIP archive in the fact that files cannot be added to it. Instead, the files from
the archive have to be extracted, the old archive must be deleted and finally a new one with the
original and added files should be created.
11.2.10 Project Files (*.PRJ)
These files contain the information on the directories to which the user files will be stored, as
well as on recently opened files.
11.3 File Sharing
The YL-Clarity station allows files to be shared with another station. Sharing means that the
station that first opens the file can modify it. In all other stations the file will be opened only for
reading (indicated by an READ ONLY inscription after the filename).
How to facilitate file sharing over a LAN network?
For the occasional display of individual files from other YL-Clarity stations it is sufficient to use
the standard Open File dialog, manually navigate to My Network Places and to then select the
desired computer.
For a regular access of files over the network it is better to use the System – Directories
command from the main YL-Clarity window. In the displayed dialog use the
button next to
the desired instrument to select the main directory of the distant station. When opening this
instrument you will only have to select the desired project.
Note:
Files cannot be shared among instruments within a single station. The only exception is files
of the report styles, which can be shared.
Note:
Since files are stored in project directories, the same name of a file that is open in several
instruments does not necessarily mean that the files are identical, since in most instances
each instrument has its own project directory. The same holds true of chromatograms in the
data and calibration subdirectories.
84
YL-Clarity
User Guide
11.4 File Locking
In some instances the ability of the station to work with certain files is restricted to prevent a
collision that may corrupt measured data.
• The parameters of the current template method from the tab in the Method Setup –
Acquisition, LC, GC or AS dialogs cannot be modified while an analysis is in progress.
• While a sequence is in progress, all already measured calibration files, including the one in
progress, will be locked.
11.5 Marking Changes in a File Not Yet Saved
For most files the MODIFIED notice after the filename indicates that the effected modifications
have not yet been saved. The station always alerts to situations where such changes may be
lost (e.g., when the station is closed or when a new file is being opened), and will offer the
option to save the changes.
85
YL-Clarity
User Guide
12 Station Settings
In the interest of extensive utilisation the station contains a number of commands that allow
settings to be customised. These features include everything from selecting the number of
instruments and connected detectors, to creating users' access rights, customising the desktop
appearance and configuring the settings of individual instruments and current projects.
12.1 System Configuration Setting
Invoke the System - Configuration command from the main window to display the system
settings of the YL-Clarity station saved in the CLARITY.CFG file. A foundation set-up will have
already been made during the installation procedure.
Fig. 38.
The System Configuration dialog
The command opens the System Configuration dialog. Using this command will display a list of
all installed and configured devices and control modules in the left and the configuration of
individual instruments in the Instrument 1 – 4 tabs in the right.
How to add a device to the left list?
Below the list (Setup Control Modules) is the Add button, which displays the list of all currently
available device drivers in the Available Control Modules dialog. The dialog contains all drivers
that you have installed including those you can’t use due to licenses not purchased. Click the
Add button or double-click the name of a device to transfer it to the list.
Note:
Being listed in the file does not necessarily imply that the device is present, correctly
installed or properly connected.
The configuration dialog of the device involved will open first. If an A/D or D/A converter is
involved the station will attempt to find the converter during the set-up. If the attempt to
communicate with the converter has been successful, the configuration dialog of the converter
is shown, allowing the user to enter custom signal names and units. Then the device is shown in
86
YL-Clarity
User Guide
the left-hand list of the System Configuration dialog and its free channels can be assigned to
individual instruments of the station.
Note:
Communication with modules for direct control of chromatographs, digital pumps and
autosamplers will only be checked when the instrument from which the user would like to
control these devices is being opened. Accordingly, during the configuration process, one
cannot establish whether the communication set-up is correct.
How to assign individual devices to station instruments?
Switch to the corresponding instrument tab in the right part of the System Configuration dialog.
In the Setup Control Modules list (on the left) select the desired device and add it to the
instrument using the
button or the mouse to drag and drop the device.
Each station instrument you wish to use for measuring chromatograms must have the correct
signal source assigned:
• Channel(s) of the A/D converter (internal INT5/INT7 or external U-PAD).
• A digital output(s) from the chromatograph to which an available control module has been
connected (e.g. HP 6890, etc.).
How to remove the device?
Select the device to be removed from the list in the corresponding InstrumentX tab of the
System Configuration dialog.
Use the
button or drag and drop with mouse to remove the selected device from the
displayed instrument.
Use the
button to remove all devices from the displayed instrument.
INT5 board setup
The ISA board of A/D converters (INT5) is not equipped with a Plug and Play system and so the
configuration has to be done manually. Specify the connection between YL-Clarity and the A/D
converter board Interrupt and Base Address items. The values set here must coincide with the
setting of the jumpers on the converter board, otherwise data acquisition will be inoperative. It is
recommended that you note these parameters, e.g., in the corresponding table provided at the
end of the Reference Guide.
12.1.1 Number of Instruments
Up to 4 instruments may be set in the No. of Instruments item regardless of the number of
instruments in your version. The excess instruments (so called Offline instruments will be fully
functional for evaluating analyses that are proceeding in other instruments (although not for
data acquisition).
12.1.2 Description of Instruments and graphical symbols
To make the work with the station more comprehensible the user can assign a name to each
instrument (using the Name field), select the type of attached chromatograph (in the Type of
Chromatogram item) and assign arbitrary images to represent opened and closed
chromatographs by clicking the images below the Image for Closed (Opened) Chroamtogram
inscriptions.
Once the configuration is saved, the main YL-Clarity window will display the assigned names
and the symbol of each instrument.
87
YL-Clarity
User Guide
12.2 User Accounts - Protected Mode
The station can operate what is known as the protected mode. Advantages of the protected
mode include the following:
• The data and station configuration are protected against intervention from unauthorised or
inexperienced persons.
• The station can be locked during a proceeding measurement to protect it from being used by
unauthorised persons.
• Several users can work with the station simultaneously and independently,
• Customised settings can be saved for each user.
• Ability to electronically sign a chromatogram
Invoke the System - User Accounts command from the main YL-Clarity window to open the
User Accounts dialog where changes can be made and the protected mode set.
Fig. 39.
The User Accounts Dialog
How to establish a new user account?
Open the User Accounts dialog.
Press New.
Fill in the following items:
User Name
The name of the analyst entered here will be stored in all files created by that user.
Desktop File
The name of the customised desktop file is entered here. Several users may share the file.
If no name is entered, the desktop file created by copying the CLARITY.DSK file will have its
name entered in User Name field.
Each newly created desktop file is a copy of CLARITY.DSK file.
What activities should be banned/allowed?
Once a new user's account is established, that user can enjoy all rights. Some access rights or
rights for modifying specified parts of the station can be banned in the User Access Rights
section. It is advisable to ban standard users from accomplishing the following activities:
88
YL-Clarity
User Guide
• Access to setting user passwords - User Accounts
• Access to system configuration of the station - Configuration
• Access to setting the station log output – Audit Trail.
On the contrary, any ban on chromatogram modification (Chromatogram) is unnecessarily
restrictive.
How to allow certain users to only work with certain instruments?
It is possible to allow certain users only to work with certain instruments by using the Access to
item.
How to restrict certain users from using or updating files?
Permit files to only be read using the Read Only item or to be read and updated using the
Read/Write item. If no item is checked your files will be inaccessible to other users.
Under which conditions do files cease to be protected?
• Files are protected as long as your account exists and cease to be protected once the mode
has been changed to the unprotected state.
• Files read into another YL-Clarity station where you do not have an account will be
accessible.
How to cancel an existing account?
Select the name of the user to be eliminated from the list in User List.
Invoke the Delete command. (It is still possible to cancel elimination from the list by striking the
Cancel button.)
All files created by the eliminated user will then be accessible to all users after the station is run
for the next time.
If all users are eliminated the station will pass to the unprotected regime when run for the next
time.
How to change the access rights of a user?
Select the name of the user whose rights you wish to modify from User List. All items will then
refer to that user and can be changed.
The effected change may still be cancelled using the Cancel command.
How to transfer the station to the unprotected mode?
Eliminate all users one by one from the list using the Delete command. When the window is
then closed the station will be unprotected and files with originally restricted access will now be
accessible.
What if you forget the password?
In this instance transfer the station to the unprotected mode by copying the CLARITY.PSW file
from the PGM directory on the installation disk to the main station directory. This remedy
however cancels all user access rights previously set.
12.3 Instrument Locking
In the protected mode any open instrument can be locked to protect it against unauthorised
intervention during the user's absence. To lock an instrument, invoke the Lock command from
89
YL-Clarity
User Guide
the Lock menu in the main YL-Clarity window. All activities (running a sequence, printing a
report, batch processing, etc.) will continue unabated in the locked instrument.
Unlock the instrument by either repeatedly invoking the Lock command or by clicking on the
chromatograph symbol and entering the password of the user who opened that instrument.
12.4 User Settings
The station automatically saves the settings of visibility, size and location of all non-modal
windows, the configuration of all graphs and tables, and all user-specific settings available from
the User Options dialog.
The settings are saved in the CLARITY.DSK desktop file. In the protected mode the settings are
saved in the file specified in Desktop File field for each user listed in the User Accounts dialog.
Thus, in the protected regime each user can have his or her station appearance settings
customised.
The settings of all windows, graphs and tables are instrument-specific.
The parameters specified in the User Options are common to all instruments used by a user.
90
YL-Clarity
User Guide
13 Working with Directories and Projects
The station enables a base directory to be assigned to each instrument as well as for the
storage of analyses in different projects.
13.1.1 Instrument Directory Selection
Invoke the Directories command in the Main station window to specify a different base directory
for storing projects for each instrument. The above command is especially suitable if the YLClarity station is a part of a computer network where either several stations or several “YLClarity Offline” evaluation programs are operative.
By default, all instruments use the main station directory, usually C:\CLARITY. Instrument
directories are stored in the CLARITY.CFG configuration file.
At least one project directory is assumed to exist in the instrument directory; the former is
described in PROJECT subdirectory. If no instrument directory, no PROJECT subdirectory and
no project directory exists you will be queried as to whether or not you wish to create the
corresponding directory or project.
13.1.2 Projects
A project is an ensemble of different analysis data and accessories, used as basic organisation
unit for sorting data and auxiliary files.
For example, it may be used for sorting data of certain compound determination, for different
series of samples, or for data from certain time period.
Whenever an instrument starts, it opens that project which was used the last time by any user
on this instrument. Projects contain paths to last opened chromatograms, calibrations, reports,
sequences and methods. When a project is opened by any user, these last opened files are
opened automatically.
*.prj file:
The project files are named as *.prj. They are contained in the PROJECT directory, situated in
the working directory (by default “CLARITY”). The main function of the project file is to specify
another directory, having the same name and containing relevant stored data.
Project directory:
The project directory contains template methods, sequence files, report styles and also two
subdirectories, DATA and CALIB. The data subdirectory stores chromatograms, the calibration
subdirectory stores calibration standards and calibration files. To switch between the calibration
and
icons in the File Open
and data subdirectories when selecting files click either of the
Chromatogram dialog.
By default, files from the current project are displayed in each instrument. Use the icons and
commands from the File Open dialog to select a file from any other directory.
To facilitate sharing files common to several projects (e.g. report styles) the station contains the
COMMON directory. Click the
icon in the File Open dialog to switch to the COMMON
directory.
Instrument directories:
There is a possibility to set different working directories for different instruments. This can be
done in the Instrument Directories for Projects dialog, which is opened by the System
91
YL-Clarity
User Guide
Directories command in the YL-Clarity window. The directories specifications are stored in
configuration file (clarity.cfg) and are common for all users.
Note: In the above image the Instrument 2 shares projects with another YL-Clarity station that has been
installed on a networked computer named MyColleaguesPC.
Each item specifies the working directory for the corresponding instrument. If an item is left
blank, the working directory will be set to the directory from which the executable file
CLARITY.EXE was run (C:\CLARITY by default). This directory may be set any time by the
command Default.
How to establish a new project?
Create a new project in the Instrument window using the File – Project command, which opens
the Project Setup dialog, and in this dialog press the New button.
After first entering the project name you may then modify the names of the data and calibration
subdirectories.
How to store chromatograms and calibration standards in the same directory?
Select the same name for the two subdirectories in the Project Setup dialog (the Analysis and
Calibration Subdir items).
How to open another project?
Select a new project using the File - Project - Open command. A project can be opened in
several instruments and can be shared by other YL-Clarity programs across a computer
network.
92
YL-Clarity
User Guide
14 Backing up and Restoring Files and Projects
The YL-Clarity station provides tools for backing up and restoring all data and working files.
14.1.1 Backup
The File - Archive command from the Instrument window is earmarked for backing up data.
When invoked the command will open the Archive tab of the Backup dialog.
How to select the type of files to be archived?
The type of files to be archived is specified using the File Type item. Also in addition to all the
YL-Clarity files, entire projects can be archived (i.e., all files identified in a specified project
directory and all its subdirectories).
Fig. 40.
The Backup – Create Archive Dialog
How to select files to be archived?
The list shown in the upper part of the Archive tab contains all the files of the selected type from
the current project.
Select a file by clicking the filename. Several files can be selected by clicking their names one
by one while holding down the Ctrl key.
The meaning of the Select All Files button should be self-evident.
Where will the files be archived?
Specify the destination (another directory, disk or computer) in the Target item. The path can
either be entered directly or selected using the … button.
In what format are files stored in the target location?
If the Without Compressing item has been checked, files will be stored unchanged as
individual files, otherwise all archived files will be compressed and stored as a single file under a
selected name.
93
YL-Clarity
User Guide
Will the files be copied or moved?
If the Move to Archive item has been checked, the file(s) will be moved to the destination
specified in the Target field (i.e., deleted from the original directory).
What is the total size of files to be archived?
The overall size is indicated above the list of the selected files, in the Selected Size item.
How to sort files in the list?
Double-click the header of each column to sort the entire table according to that column.
Double-click again to sort the files in the reverse order.
Backing up calibration standards
If chromatograms are to be archived, the Calibration Standard item displays the contents of
the calibration subdirectory.
Archiving files from the COMMON directory
Check From Common item to archive files that are stored in the COMMON directory.
How to delete files?
Invoke the Delete Selected Files command. This command cannot be reversed from within the
YL-Clarity station!
14.1.2 Restoring Files
The File Restore command from the instrument window restores files from any directory to the
current project. When invoked, the Restore Archive tab from the Backup dialog opens. This is
very similar to the Create Archive tab.
To which location will be files restored?
The Restore command always restores files to the current project whose name is shown in the
title bar of the Backup dialog.
From which location will be files restored?
The source location (other directory, disk, or computer) can be specified in the Source item.
Either enter the path directly or use the
button to browse.
94
YL-Clarity
User Guide
Fig. 41.
The Backup – Restore Archive dialog.
The other items and commands are analogous to those listed in the Archive tab described in
Chapter 14 - Backing up and Restoring Files and Projects on page 93.
95
YL-Clarity
User Guide
15 Glossary
The following list of often used or differing terms is providing to prevent misunderstandings and
errors .
21 CFR Part 11
This is a directive stipulating the conditions under which a company may use electronic
records and signatures. The directive is mandatory for companies that use computer
system designed for manufacturing or distributing products that are subject to regulation by
the FDA (known as, “regulated products”).
Access rights
A system that governs the activities that specified users are allowed to perform. Among
other things, a user may be restricted in their authorisation to change fundamental station
settings, access certain instruments, inspect or change the data of other users, etc.
Active chromatogram
The chromatogram name that is displayed in the header of the Chromatogram window. All
data being displayed and operations performed will only relate to this active chromatogram.
The name of the active chromatogram is highlighted in the key by bold letters.
Active chromatogram signal
When performing a multi-detector measurement, each chromatogram file may contain a
record from up to four detectors (this is what we call “signals”). The active signal in the
chromatogram is the signal whose name is being displayed behind the name of the
chromatogram in the window header and header of the tables (divided by a hyphen).
The name of the active signal together with the name of the chromatogram will be
highlighted by bold letters in the legend of the graph.
Active calibration signal
When performing a multi-detector measurement, each calibration file may contain
calibration curves for up to four signals.
The active signal (i.e. its table or curve) of the calibration will be highlighted in the header of
the calibration table or curve by its name. At the same time, all values that are signal
specific will be displayed in the same colour as the active signal.
Active detector
A detector whose measurement and calculation parameters are displayed in the Acquisition
or Calculation tabs in the Method Setup dialog with the help of the Select Detector field.
The field is only visible when performing a multi-detector measurement.
Calibrated group
A group of peaks calibrated as a single component.
Calibration file (Calibration)
Contains calibration curves and further data for calibrated calculations. When performing a
multi-detector measurement, each substance will have its own calibration curves for all
detectors.
Calibration standard
A chromatogram containing known amounts of some compounds that is used to
calibrate/recalibrate at a specified calibration level.
Channel
Part of the converter that enables the independent collection of data from one single
detector.
96
YL-Clarity
User Guide
YL-Clarity Offline (Eval, Lock, Evaluation Version, etc.)
A version of the YL-Clarity station that, although otherwise fully functional, does not allow
for data acquisition. This version utilises a protective key that is inserted in the printer or
USB port of the computer.
Clipboard
A Windows tool that uses the Copy, Cut and Paste commands for the simple transfer of
data between items, including those in other applications.
Closed window
A closed window is invisible and its activity has been terminated. A window is usually
closed using the Close command (cf. Hidden window).
Configuration of the station
Sets the number of instruments and their allocation to the A/D converter, directly controlled
chromatographs and autosamplers and pumps.
Data processing string
A series of operations comprising the entire procedure used for everything from processing
data from an analysis to printing the report. This procedure is graphically displayed in the
Instrument window using icons that represent the main commands.
Desktop file - extension DSK
A file used to store the size, location and appearance of all windows and parameters of the
instruments.
Direct control of chromatograph (autosampler, pumps)
An integrated additional module for selected chromatographs (pumps and autosamplers)
enabling the direct control and monitoring of selected parameters.
Electronic signature
An electronic signature is an analogy for doing to electronic documents what we do to
paper ones and must fulfil the same function as a handwritten signature. Meaning that it is
a similar process of marking a document for protection and that it must be unique, clear and
ensure the immutability of the document.
File sharing
YL-Clarity enables file sharing between multiple stations. Any changes (saving) of such files
are enabled only in the station that first opened it. Modifications performed with the shared
file will take effect in the other stations only after the file has been reloaded.
YL-Clarity does not enable file sharing between instruments of a single station.
YL-Clarity does enable projects to be shared between multiple instruments of the same
station.
Attention! Using the same file name in multiple instruments at once does not mean that you are
using the same file, because each instrument must have a different project directory. In
other words it is not possible to share projects or files among instruments of the same
station.
GLP
Good Laboratory Practice (GLP) is an internationally agreed upon system for ensuring and
monitoring the quality of laboratory work. This is verified and its fulfilment confirmed by the
issuance of a certificate.
97
YL-Clarity
User Guide
Hidden window
A window that is not visible or has been “hidden”. Its activity has not been terminated but
rather suspended or is proceeding in the background. Click the minimise button
to hide
a window (cf. Closed window).
Information table
A table in the Instrument window displaying the name, the measurement methods, and the
identification of the measured chromatogram.
Instrument
(a) A part of the program designated to measure and evaluate analyses that share a
common time base (from one chromatograph). The instrument is indicated by the
Instrument window (see chapter 3.1.2 - Instrument Window on pg. 13.), from which
further windows can be opened, e.g. Chromatogram, Calibration, etc. Detectors and
control modules can be configured into individual instruments (see).
(b) Sometimes also a chromatograph.
Instrument directory
The directory identified in the main YL-Clarity window for each instrument, where projects
(i.e. project directories) are sought.
Integration Table
Constitutes a part of the method and contains a list of all modifications of the baseline or
peaks that have been or will be affected in the chromatogram measured by that method.
Locked file (READ ONLY)
A file that can only be read and never modified.
Locked instrument
An instrument in the protected mode with locked control. Lock mode can be activated using
a command from the Lock submenu in the main YL-Clarity window. An instrument is both
locked and unlocked by the same password.
Main station directory
The directory where the executable file of the station (CLARITY.EXE) is stored
(C:\CLARITY by default). The same directory contains the project directories, including the
project directory PROJECTS, the common directory COMMON, and all configuration files.
Method file - extension MET
A template method file with a description of all parameters affecting an analysis.
Model method
A chromatogram method marked as Model Method that can be easily used with other
chromatograms by invoking the Copy from Model command.
Multi-detector configuration (measurement)
The ability to measure, save and evaluate a single analysis by simultaneously using a
signal from multiple detectors.
Password
A string of a maximum of eight characters that are necessary for working in the protected
mode with the station.
Printout
The layout of individual parts of analysis results and the setting of parameters controlling
the resulting report. The layout is defined by the employed report style.
98
YL-Clarity
User Guide
Project directory
Used to store all working files of an instrument in which the homonymous project has been
opened.
Project file - extension PRJ
The file specifies the directories in which all user files will be stored.
Protected mode
A regime that enables only authorised users (users who have an account assigned in the
User Accounts dialog) to work with the station and access data.
Raw data file - RAW
A file used in previous versions of the CSW10 - 17 and for the external PAD unit containing
non-analysed and non-adjusted data of the analysis. The CSW32 and YL-Clarity stations
save raw data directly into the chromatogram file.
Report style
An outline determining which and how analytical results will be incorporated into a report
and subsequently printed. Each report style will be stored in a separate report style file.
Report style file - extension STY
A file storing information that determines what to print and how to print it.
Sequence file - extension SEQ
A file that defines an automatic sequence of analyses.
Splitter
A resettable bar that divides certain windows (e.g., the Chromatogram or Calibration
windows) into individual panes. The bar can be moved to change the size of individual
panes.
SST
The System Suitability Test is an integrated module designated to validate the
chromatographic system on the basis of evaluation of chromatograms obtained from the
YL-Clarity station.
Station configuration
Determines the number and arrangement of instruments and their interconnection to the
A/D converter board, directly controlled and description of connected detectors.
Status table
A table displayed in the Instrument window, containing the names of system files, the status
of the analysis currently in progress, potentially the retention time and identification number
of a sample.
System files
The decisive files for working with the station and individual data files: project, method,
report style, sequence and calibration files.
Tabs
A tab is where several windows are "stacked". The system is frequently used in dialogs and
also in the Chromatogram and Calibration windows. Click the corresponding tab to switch
over to another tab.
Template method
A method file that serves as a template for new analyses. It is always stored directly in the
project directory. Its name is displayed in the Information Table and its contents are always
copied to the newly created chromatogram.
99
YL-Clarity
User Guide
Toolbar
A block of icons that lead to commands. Each toolbar can be situated anywhere on the
screen and be configured by accessing the View - Customize command in the window or
by right clicking the mouse button to access the local menu.
Unprotected mode
A regime of the station that enables any user to work with the station and access its data.
Window title bar
Title bar is the upper band of each window. It is comprised a button to used activate the
control menu of the window, the window name, and the minimise and maximise buttons.
100
YL-Clarity
User Guide
16 List of Pictures
Fig. 1.
The Save As dialog................................................................................................. 10
Fig. 2.
Fundamental Structure of YL-Clarity Stations ........................................................ 12
Fig. 3.
The Single Analysis Window................................................................................... 19
Fig. 4.
Status bar of the Data Acquisition window ............................................................. 20
Fig. 5.
External Start/Stop section of the Measurement tab .............................................. 22
Fig. 6.
Event Table ............................................................................................................. 23
Fig. 7.
Digital Output Control for the U-PAD2. ................................................................... 23
Fig. 8.
Postrun Setting........................................................................................................ 24
Fig. 9.
Time Diagram of a Passive Sequence ................................................................... 25
Fig. 10. Time Scheme and Succession of Signals in an Active Sequence ......................... 27
Fig. 11. Sequence ................................................................................................................ 27
Fig. 12. Batch ....................................................................................................................... 30
Fig. 13. Graph Properties - Graph ....................................................................................... 34
Fig. 14. Graph Properties - Time Axis dialog ....................................................................... 34
Fig. 15. The Overlay Toolbar ............................................................................................... 37
Fig. 16. The Mathematical Operations Dialog ..................................................................... 38
Fig. 17. Chromatogram - Integration.................................................................................... 40
Fig. 18. The Baseline Toolbar.............................................................................................. 41
Fig. 19. The Peaks Toolbar.................................................................................................. 44
Fig. 20. The Groups Dialog.................................................................................................. 46
Fig. 21. Table of Uncalibrated Results................................................................................. 49
Fig. 22. Example of Calibrated Results Table ..................................................................... 49
Fig. 23. Table of Peak Parameters ...................................................................................... 50
Fig. 24. The Main Calibration Table..................................................................................... 54
Fig. 25. The Compound Calibration Table ........................................................................... 55
Fig. 26. Example of Relative Calibration Curve for the ISTD Method ................................. 56
Fig. 27. The Calibrate Peak Dialog ...................................................................................... 59
Fig. 28. The Calibration Window Toolbar............................................................................. 60
Fig. 29. The Calibration Options Dialog ............................................................................... 60
Fig. 30. The Recalibrate Peak Dialog .................................................................................. 61
Fig. 31. The Calibration Options - Defaults Dialog .............................................................. 62
Fig. 32. Scheme of the Reference Peak Method................................................................. 64
Fig. 33. Resolving Overlapping Identification Windows....................................................... 65
Fig. 34. The Report Setup Dialog ........................................................................................ 66
Fig. 35. The Page Setup tab ................................................................................................ 68
Fig. 36. An Example of a Laboratory Header ...................................................................... 68
Fig. 37. The Export Chromatogram Dialog .......................................................................... 71
Fig. 38. The System Configuration dialog............................................................................ 86
101
YL-Clarity
User Guide
Fig. 39. The User Accounts Dialog ...................................................................................... 88
Fig. 40. The Backup – Create Archive Dialog...................................................................... 93
Fig. 41. The Backup – Restore Archive dialog. ................................................................... 95
102
YL-Clarity
User Guide
17 Index
3D View, 39
Access rights, 96
Acquisition. see Data Acquisition
Active
Sequence, 26
Add
All, 57
Group, 57
Negative peak, 45
Peak, 57
Positive peak, 45
Amount, 51
Analysis
Batch Processing, 30
description, 15
external control, 22
preliminary processing, 22
processing, 16
Anchor (Text Alignment), 36
Area, 47
Arrows, 36
Assign to Active Chromatogram, 36
Automated reporting, 25
Automatic
Functions after Analysis Processing, 24
Axes
Fixed rendition, 35
Back. Horizontal, 42
Baseline
drift and noise, 19
Modifications, 40
toolbar, 41
Batch
command, 24
dialog, 30
Between, 68
Bipolar, 19
Both, 45
Calculation
description, 49
ESTD, 52
ISTD, 52
non-calibrated, 52
percentages, 51
unidentified peaks, 51
Calibrate
Calibrate Group, 59
Calibrate Peak, 59
Calibrated group, 96
Calibration
"artificial", 62
calibration curve, 55
Compound tables, 54
description, 49
How to create one?, 57
level, 58
Manual, 59
Standard, 96
Table, 53, 54
units, 62
Calibration File, 20
description, 53
modification, 61
Calibration Options
Defaults, 62
window, 60
Cancel, 5
Chromatogram, 33
3D View, 39
Colour, 37
Descriptive labels, 35
displaying, 33
Modifications, 39
window, 18
Clamp Neg., 43
CLARITY.EXE, 98
Clear 3D, 39
Clipboard, 8, 97
Color, 35
Compound Calibration Table
window, 55
Compute with Origin, 56
Concentration Levels, 58
Control of External Devices, 22
Copy
From, 48
From Model, 48
Copy from Model, 98
Correlation
equation, 56
103
YL-Clarity
User Guide
Factor, 56
Create Label, 35
CSW32 Evaluation, 97
Curve fit equation, 56
Curve Passes Through Origin, 56
Cut Neg., 43
Data
processing string, 97
Data Acquisition
disabled, 75
no signal, 75
premature termination, 75
sampling rate, 16
Data evaluation, 22
Default Injected Amount, 61
Default Injected Volume, 63
Delete, 9
Demo
Demo - Missing HW, 74
Demo - Wrong S/N, 74
message, 74
Departure, 61
Descriptive label, 35
Digital Output Control
window, 23
Digital Outputs
setting, 23
Dilution, 51
Directory, 9
Down, 22
Drift, 19
Enable Autostop, 22, 26
Enable Sort, 8
End, 44
Equation
correlation, 56
curve fit, 56
EV, 27
Evaluation Version, 97
Event Table, 23
creation & modification, 23
description, 22
Export, 71
as text, 71
chromatogram in vectors, 73
Export Chromatogram window, 71
formats, 71
Results Table, 72
to database, 73
to MS Word, 73
External
Devices, 22
Standard Method, 52
Start/Stop, 22, 26
Files
$CHXRUN.RAW, 16
CLARITY.EXE, 98
Filtering, 9
Information, 9
multiple files, 10
Open, 9
Ordering, 9
Saving, 10
Fixed Height, 69
Form Font, 68
Forw. Horizontal, 42
From width at 50 %
command description, 50
From…To…, 35
Front Tangent, 42
Graph Properties
Axes, 35
Graph, 34
Groups, 46
Half Width, 47
Height, 47
Hidden window, 97, 98
I/V, 27
Identification Windows, 65
Ignore Origin, 56
Indicative graph, 33
Inj. Volume, 28, 63
Instrument
Directory, 98
window, 13
Integration
Calculations, 50
conditions, 47
Integration Table, 46, 48
manual, 78
Start, 40
Table - Description, 98
Internal Standard Methods, 52
ISTD
ISTD2, 53
ISTD3, 53
104
YL-Clarity
User Guide
Identification, 63
Peak Type, 63
Peak Width, 16, 20, 40, 77
problems with detection, 77
Toolbar, 44
Portrait, 69
Postrun
command, 21, 24
dialog, 24
window, 24
Previous Zoom, 19, 56
Print
chromatogram, 69
in Colour, 69
printer selection, 67
printer selection, 66
Printout, 98
Project
directory, 99
file, 99
Protected mode, 99
Range, 18
Recalibration
description, 60
manual, 60
Reference Peak
method description, 63
scheme, 64
Reject Negative, 43
Rejection, 40, 47
Report Setup
command, 66
Lab. Header, 68
Page Setup, 68
window, 66, 67
Report Style, 67
Reports
description, 66
Response
Global response factor, 62
manual modification, 61
Response Base, 54
Response factor, 62
Response Factor, 54
Response Factor, 51
Restore Default Columns, 49
Result Table
description, 49
Keyboard Shortcuts, 5
Landscape, 69
Line Style, 36
Line Width, 35, 36
Lock, 41, 97, 98
Locked File, 98
Locked Instrument, 98
Look In, 9
Lvl, 28
Main station directory, 98
Manual
Calibration, 59
Integration, 78
modification of responses, 61
Recalibration, 60
Mathematical Operations
window, 38
Measurement
preliminary processing, 22
sampling rate, 16
Method, 17
Method Setup
Acquisition, 76
Measurement, 75
Model method, 98
Move, 38
Next Zoom, 19, 56
No. of Pages, 69
Noise, 19
excessive, 77
setting parameters, 16
Offline, 75
On New Page, 67
Only with export, 25
Orientation, 69
Over, 61
Overlay
disable, 37
mode, 37
Toolbar, 37
PAD, 99
Page Setup, 68
Parameters, 25
Password, 98
Peak
Adding new, 45
delete (Lock), 41
Groups, 46
105
YL-Clarity
User Guide
Results
Display, 21
Presentation, 22
Retention Time
correction, 64
updating, 59, 65
Run
command, 19, 25, 26
Run Program, 25
Sequence, 29
RUNNING, 15, 25
Sample ID, 28
Sample Rate, 16
Save, 10
Save As
command, 10
dialog, 10
Scale, 38
Scheme of data processing, 3
Search Criteria, 61
Select all, 8
Separation, 47
Sequence, 25
Active, 26
problem solving, 76
run, 29
Sequence Table, 27
window, 27
Setup Columns, 8, 49
Shortcuts, 5
Single Analysis, 19
Slices, 78
Snapshot, 22
Solvent Peak, 46
Start, 44
Start-Restart, 22
Start-Stop, 22
Station configuration, 99
Statistical Moments, 50
Status Table, 99
Std, 28
Stop
command, 21, 22
state, 15, 25
SV, 27
System files, 99
Tables
Changing values, 7
Configuring, 7
Entering new values, 6
Local menus, 7
Tail Tangent, 43
Tangential separation, 42
Template method, 99
Text Label, 35
Threshold, 20, 40, 77
Time, 19
Time… to, 20
Title Font, 35
Together, 42
Toolbars, 3
Units Font, 35
Unprotected mode, 100
Unzoom, 56
Up, 22
Update Retention Time, 65
User
Accounts, 99
Validity Interval, 41
Valley, 41
Value Font, 35, 68
Voltage, 19
Voltage… to…, 20
WAITING, 15, 25
Window
Calibration, 13
Chromatogram, 13
Clarity, 13
Instrument, 13
Sequence, 13
Zooming, 33
106