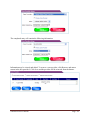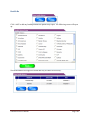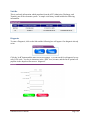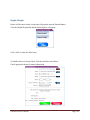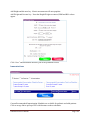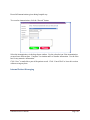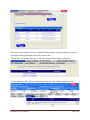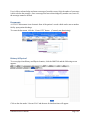
1
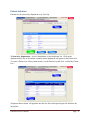
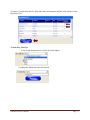
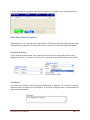
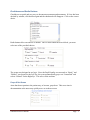
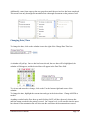
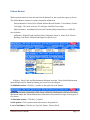
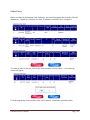
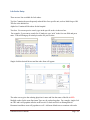
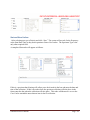
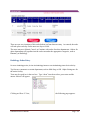
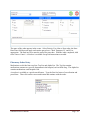
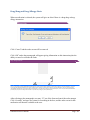
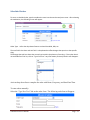
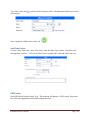
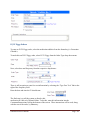
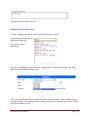
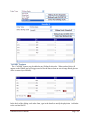
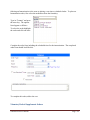
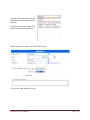
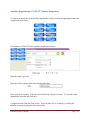
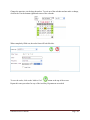
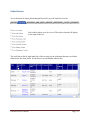
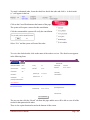
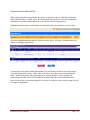
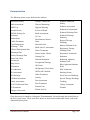
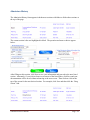
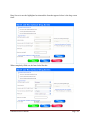
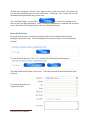
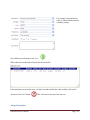
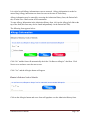
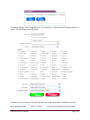
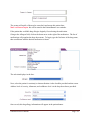
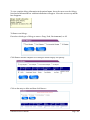
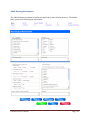
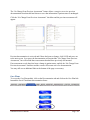
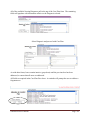
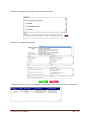
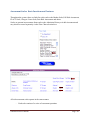
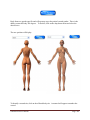
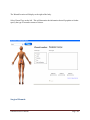
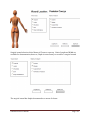
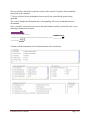
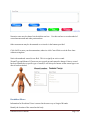
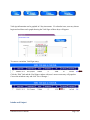
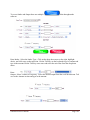
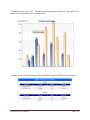
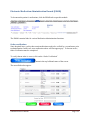
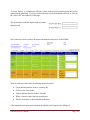
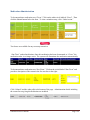
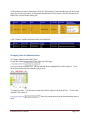
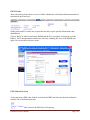
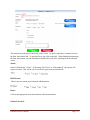
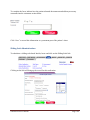
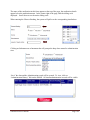
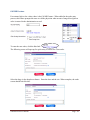
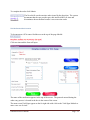
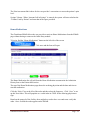
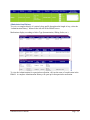
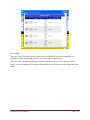
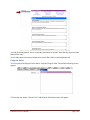
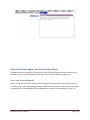
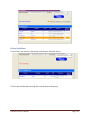
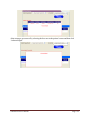
ChartSmart EMR User’s Manual Table of Contents Logging In 3 Patient Selection 4 Search Basic Functions of ChartSmart 6 Changing Date & Time 8 Patient Banner 9 Order Entry Tabs 10 Lab 11 Radiology 14 Pharmacy 15 Interaction Alerts 16 Scheduled Orders 17 One-Time Orders 18 PRN and IV/IV Piggy Orders 19 Sliding Scale Insulin Orders 20 PCA Medications 22 Immunizations 23 Vitamins/Herbal Supplement Orders 24 Ancillary Department: PT/OT/ST, Dietary, Respiratory Order Review Physician Order Sheet (POS) Documentation 25 27 29 30 Admission History 30 Entering Home Medications Information 32 Allergy Information 34 Adult Nursing Assessment 39 Care Plans 41 ChartSmart User’s Manual Page - 1 - Assessment Scales: Basic Functions and Features 44 Braden Scale 45 Wounds 47 Vital Signs 55 Intake/Output 58 Electronic Medication Administration Record 60 Order Verification 60 Medication Administration 62 Changing Administration Time 63 EMAR Links 64 PRN Administration 64 Sliding Scale Administration 66 Call MD Feature 68 IV/IV Piggy 69 PCA Medication Administration 71 Home Medications in EMAR 72 Administration History 73 Care Card 74 Patient Info 77 Health Hx 79 Visit Hx 80 Diagnosis 80 Problem List 82 Height/Weight 83 Immunizations 84 Internal Patient Messaging ChartSmart User’s Manual 85 Page - 2 - Logging In To log in: The Employee ID will consist of letters and numbers. The password must be at least six characters in length, will require one capital letter and at least one number. Enter user login, type in the password, and click the Log In button. An error entering the password will create the following message: The system allows three attempts to enter the password correctly. If entered incorrectly three consecutive times, the system will place a lock on the account and a hospital or system administrator must unlock it before continuing. Successful log in will take user to the Patient Selection screen. ChartSmart User’s Manual Page - 3 - Patient Selection Patients may be selected by department or by Look Up. To Search by Department: Access a department via the drop down list. Click on the department and a list of all patients currently in that department will appear in the Patient List. To create a Patient List: Select patient name(s) via the Patient List and click “Add to My Patient List.” All patient names chosen will populate onto this list. Each subsequent login will default to the created list. ChartSmart User’s Manual Page - 4 - To remove a patient from the list: Select the name of the patient and then click “Remove from My Patient List.” To Search by Look Up: Click on the drop down list to select the search option. Complete the information and click Search. ChartSmart User’s Manual Page - 5 - Click on selection box and then “Add to My Patient List” to complete your unique patient list. Basic ChartSmart Functions ChartSmart is a very easy and user-friendly system of electronic documentation and order entry. Throughout the system there are drop-down boxes, text boxes, check boxes and radial buttons. Drop-Down Boxes To use the drop down function, click on the down arrow located to the right of the box and highlight the choice. If a choice is made in error, repeat the step and click on the correct choice. Text Boxes Text boxes are available to add more specific information on a patient. Text boxes have infinite character storage so narratives are not limited. A scroll bar will appear once a certain amount of space has been populated. ChartSmart User’s Manual Page - 6 - Checkboxes and Radio Buttons Checkboxes are quick and easy ways to document assessments and treatments. If a box has been checked by mistake, click that box again and the checkmark will disappear. Click on the correct choice. Radio buttons allow one answer or another. Once a radio button has been clicked, you must select one of the provided choices. The system was designed to use logic. Since the Pupil Equality was assessed as “Equal,” and “Dilated” was chosen for the Left Eye, the system automatically grays out “Constricted” and selects “Dilated” for the Right Eye. This saves clicks and time. Grayed Out Areas Areas that do not pertain to the patient stay, or become, grayed out. This saves time in documentation as the nurse may quickly move on to the next area. ChartSmart User’s Manual Page - 7 - Additionally, some forms open up but stay grayed out until the previous box has been completed. This ensures not only thorough documentation but a thorough assessment on the patient as well. Changing Date/Time To change the date, click on the calendar icon to the right of the Change Date/Time box. A calendar will pull up. Once a date has been selected, the new date will be highlighted, the calendar will disappear, and the desired date will appear in the Date/Time field. To exit out and not make a change, click on the X at the bottom right hand corner of the calendar. To change the time, highlight the current time and type in the desired time. Change AM/PM as needed. Anything recorded on the flow sheet up until clicking SAVE will have the newly chosen date and time stamp recorded in the patient’s record. On a report level, it will state the time the nurse has chosen for documentation but will also state the actual time the documentation occurred. ChartSmart User’s Manual Page - 8 - Patient Banner When a patient name has been selected from the Patient List, the record then opens up for use. The Patient Banner contains at-a-glance important information: Patient Identifiers: Name, Date of Birth, Medical Record Number, Visit Number, Gender Vital Signs: The most recent set of Vital Signs with Date/Time stamp Physician names: Attending Physician and Consulting Physician names are visible for easy reference Additional: Height/Weight, Smoking Status, Diagnosis, Room #, Alerts, Diet, Glucose Reading, Code Status, and Isolations appear for quick views Allergies: Drug, Food, and Environmental allergens are noted. More detailed information about allergies may be found by holding your cursor over the allergen. To Minimize banner: Click the [-] symbol on the right side of the banner: Minimized banner has Patient Identification information only and allows larger viewing area of flow sheets. To Maximize banner: Click the [+] symbol. Switch patient: Click on patient name and return to the patient list. Leave ChartSmart: Click the red “Log Out” button. Do not click X. ChartSmart User’s Manual Page - 9 - Order Entry Orders are added by department (Lab, Radiology, etc) and will populate into an Order Chart by department. Submit as a whole to save time, or submit as each order set is completed. To cancel an order in the cart, click on the order and then “Cancel Orders.” The following screen will appear: Click the appropriate choice and the order will be deleted. Submit the remaining orders. ChartSmart User’s Manual Page - 10 - Lab Order Entry There are two lists available for Lab orders: Top list: Contains the most frequently ordered labs for a specific unit, such as Med-Surg or OB. This list is the default list. Alpha list: Contains all lab orders for the hospital. Text box: For a more precise search, type in the specific order via the text box. For example, if you want to search for a Urinalysis, type “urin” in the free text field and press enter. That will bring up all urinalysis orders for you to select. Single click the desired lab test and the order form will appear: The order screen gives the ordering physician’s name and lists the name of the lab in RED. Multiple orders for the same Specimen Type may be ordered together. For example, single click on CBC and it will populate onto the order screen. Go back and click on Hemoglobin & Hematocrit and those tests will populate as well. Add more blood tests or continue with order. ChartSmart User’s Manual Page - 11 - Stat and Now Orders After selecting tests, go to Priority and click “Stat.” The system will not ask for the Frequency or the Start Date/Time as they do not pertain to Stat or Now orders. The Specimen Type is the only other required field. A completed Stat order will appear as follows: If this is a specimen that Nursing will collect put a check mark in the box and enter the date and time of the collection. If this is an order where the specimen collection will take place in the future enter the date when the collection will take place. This order will then move over to the Care Card to remind the nurse that an item is due for collection. ChartSmart User’s Manual Page - 12 - Routine and Timed Orders Go to Priority and click “Routine.” All fields including Frequency, Start Date/Time and Specimen Type will be required. For Lab orders which will occur for more than one day, select number of days for test to run. Choose Start Date/Time, Specimen Type, and Nurse or Lab to Collect (if desired) Add to Cart. The order will now populate into the cart. To change the date/time a test is to begin, click on the Calendar icon and select date. Then change the time via the drop-down feature. Specimen in Lab: Check this box if the lab has already been collected and sent to lab. Nursing Collect: Click on this feature if Nursing has collected or will collect the specimen Lab Collect: Click on this feature if Lab has collected the specimen. Add this order to the cart: ChartSmart User’s Manual Page - 13 - There are now two iterations of this order broken out from that one entry. As entered, the order will take place each day for the next two days at 18:00. The nurse may now Submit, Cancel, or Continue with orders for other departments. Orders for other departments will populate into the order cart under the appropriate categories, such as Pharmacy or Radiology. Radiology Order Entry To enter a Radiology order, click on the Radiology button to see the Radiology items for the facility. Top lists are common to a certain department, such as Med-Surg or OB. Alpha Listings are for the entire facility. Tests may be typed in via the text box. Type “chest” into the text box, press enter and the answer choices will appear. Clicking on Chest 2- View, ChartSmart User’s Manual the following page appears: Page - 14 - The name of the order appears in the center. Select Priority. For a Stat or Now order, the Start Date/Time field does not apply and remains grayed out. Check Transport, IV, and O2 as appropriate. The final step is to enter the reason for procedure. With the order completed, Add to the Cart or Cancel. A text box is available for special instructions as needed. Pharmacy Order Entry Medications are divided into two lists: Top List and Alpha List. The Top list contains medications common to a specific department in the hospital, such as Med-Surg. The Alpha list contains medications used hospital-wide. A text box is available as a quick search feature. Type the first few letters of a medication and press Enter. Then click on the correct medication and continue with the order. ChartSmart User’s Manual Page - 15 - Drug/Drug and Drug/Allergy Alerts When a medication is selected, the system will give an Alert if there is a drug-drug or drugallergy interaction. Click “Cancel” and the order screen will be removed. Click “OK” and a drug monograph will appear giving information on this interaction plus the ability to cancel or override the order. Drug - Allergy Interaction << Drug - Allergy Interaction The use of Tylenol Oral Suspension 80 MG/0.8ML (Acetaminophen) may result in an allergic reaction based on a reported history of allergy to Tylenol (Acetaminophen). The use of Tylenol Oral Tablet 325 MG (Acetaminophen) may result in an allergic reaction based on a reported history of allergy to Tylenol (Acetaminophen). The use of Tylenol Oral Liquid 166.67 MG/5ML (Acetaminophen) may result in an allergic reaction based on a reported history of allergy to Tylenol (Acetaminophen). The use of Tylenol Oral Liquid 500 MG/15ML (Acetaminophen) may result in an allergic reaction based on a reported history of allergy to Tylenol (Acetaminophen). After referring to the monograph, user may “X” out of the form and cancel the order attempt. Click “Override” and type in a reason for overriding in the box, and the order screen for this medication will become available to the user. ChartSmart User’s Manual Page - 16 - Scheduled Orders To enter a scheduled order, type the medication name into the text box and press enter. After selecting the medication, the following screen will appear: Order Type: Utilize the drop-down feature to select Scheduled, PRN, etc. The next field is the Dose and Unit field. A drop down box offers dosages that pertain to that specific drug. The dosages that pull are those that currently exist within the pharmacy formulary. If the order dose is not available from this list, click on “Type Free Text.” Any information previously filled in will disappear. Activate drop-down lists to complete the order with Route, Frequency, and Start Date/Time. To enter orders manually: Select the “Type Free Text” link on the order form. The following order form will appear: ChartSmart User’s Manual Page - 17 - To go back, select the will reappear. link beside the Frequency field. All information filled in previously Once completed, add this order to the cart. One Time Orders To enter a One Time order, select “One Time” from the Order Type section. Frequency will auto-populate “one time.” Select Start Date/Time to complete the order and Add to the Cart. PRN Orders Select PRN Meds from the Order Type. This selection will prompt a “PRN reason” drop down box. Select the appropriate reason and complete the order. ChartSmart User’s Manual Page - 18 - IV/IV Piggy Orders To enter an IV/IV Piggy order, select the medication additive from the formulary (i.e. Potassium Chloride). To make this an IV/IV Piggy order, select IV/IV Piggy from the Order Type drop down menu. Next, select dose and frequency from the respective drop-downs: There is still an option to enter free text information by selecting the “Type Free Text” link to the right of the frequency field. Enter the date and time the IV should start: The final step is to tell the system to dissolve this medication in 1000 ml of Normal Saline. To do this, enter this information into the Comments/Instructions field at the bottom of the screen. These instructions will be read, along with the rest of the order, by Pharmacy. ChartSmart User’s Manual Page - 19 - Add the completed order to the cart. Sliding Scale Insulin Orders To enter a sliding scale insulin order, first choose the type of insulin. Type in the name of the insulin and press the enter key. Click on the correct medication. The order will default to a one-time order. Change this by clicking on the Order Type drop down menu and selecting Sliding Scale. After selecting Sliding Scale as the order type, there are three options. Enter a sliding scale set up by the hospital, enter a sliding scale set up by the physician, or enter an entirely new sliding scale from beginning to end. ChartSmart User’s Manual Page - 20 - “Call MD” Feature The “Call MD” feature may be added to any Sliding Scale order. When ordered, this will appear on the EMAR and will trigger an alert for the nurse when an out-of-range blood glucose value is entered (see EMAR). In the body of the sliding scale order form, type in the details to notify the physician. Add order to the cart and SAVE. ChartSmart User’s Manual Page - 21 - PCA Medications To enter a PCA Medication, select a PCA Medication from the formulary by single-clicking. The order screen will appear: Enter the PCA protocol by clicking in the first field and tabbing over to complete each subsequent field. Add the order to the cart. Immunizations ChartSmart User’s Manual Page - 22 - Ordering an Immunization is the same as placing a one time or scheduled order. To place an Immunization order, first select the medication from the formulary. Type in “Tetanus” and press the enter key. The options listed appear as follows: To select the order highlight the order and click one time. Complete the order form including the scheduled time for the immunization. The completed order form should look like this: To complete this order, add to the cart. Vitamins/Herbal Supplement Orders ChartSmart User’s Manual Page - 23 - To place a Vitamin Order, type the name of the Vitamin and press the enter key. Select the order with a single click and the order form will open up. When complete the order screen will look like this: To save this order, Add to the Cart. ChartSmart User’s Manual Page - 24 - Ancillary Departments: PT/OT/ST, Dietary, Respiratory To enter an order for any of the ancillary departments, simply click on the appropriate button and complete the order form. For example, a PT/OT/ST order would be completed as follows: Enter the Order Type first: In the next field, type the order name into the order box: Next, enter the Frequency. Select the desired list from a drop down menu. To select the order, highlight the selection and click once. Complete the Start Date and Time Fields. Leave the date as it is or change by clicking the calendar icon and selecting the desired start date. ChartSmart User’s Manual Page - 25 - Change the start time via the drop-down box. To exit out of the calendar and not make a change, click on the X at the bottom right hand corner of the calendar. When completely filled out, the order form will look like this: To save the order, click on the “Add to Cart” button at the top of the screen. Repeat this same procedure for any of the Ancillary Departments as needed. ChartSmart User’s Manual Page - 26 - Order Review To see the status of orders placed through NurseSoft, go to the Order Review tab. Select which orders are to be viewed. The orders selected will display to the right of this list. The scroll bar on the far right hand side of the screen gives the indication that there are further orders below the items listed. Scroll down to see the hidden orders below. ChartSmart User’s Manual Page - 27 - To cancel a submitted order, locate the check box beside the order and click it. A check mark () will appear in the box. Click on the Cancel/Exit button at the bottom of the page The system will request a reason for this cancellation. Click the reason and the system will verify the cancellation. Select “Yes” and the system will cancel the order. To review the Order details, click on the name of the order to review. The detail screen appears in the following form: Order Information Order Review Result Original Order Information for : GLUCOSE, CSF Medical Record Number : 259446 Priority : Patient Last Name : ABAJIAN HULICK Frequency : Patient First Name : DARLEEN Start Date : 4/5/2012 Dept : Radiology Start Time : 13:50 Room number : 102B Patient visit Number : 11070388 Item Number : Batch number : Order Number : Stat Ordered By CP : ALEXANDER Entered D/T : 4/5/2012 1:50:08 PM Entered By : Steven Summersell Cancelled D/T : Iterations : Cancelled By : Specimen Type : Cervicovaginal Nurse Collected : Yes Specimen in Lab : No Cancelled Reason : 4212 Order Entry Questions/Answers : Special Instructions : Subsequent Order Information Status : Not Acknowledged Sched Date/Time : 4/5/2012 1:50:00 PM Acknowledged Date/Time : Acknowledged By : Order Processed D/T : Order Processed : Print Order Detail The user can also click the “Result” tab form this page and the user will be able to view all of the results for that particular lab order. There is also a print function located at the bottom of this screen. ChartSmart User’s Manual Page - 28 - Physician Order Sheet (POS) When a physician enters an order into the system, it must first come to ChartSmart through a Physician Order Sheet, or POS. Here, the nursing staff will verify the order and complete the information required to submit that order to the various Ancillary departments. Highlighted patient names on the Patient List will notify the nurse that there are new orders: Select the highlighted patient and the “Physician Order Sheet” will open. Pending orders will display according to department: Certain orders will require further information to be provided by the nurse such as Specimen Type and Transport to a study. Other orders will require only that a nurse acknowledge the order. Should a physician wish to discontinue an existing pharmacy order, nursing will acknowledge the order via the POS and then discontinue the order via the EMAR module. Once all orders have been acknowledged by the nurse, the patient’s name on the patient list will no longer be highlighted. ChartSmart User’s Manual Page - 29 - Documentation The following forms are pre-built into the software: Admission History Glasgow Child Scale Adult Assessment Glucose Monitoring Pediatric Admission History AIMS Test Hygiene/Dressing Pediatric Assessment Alcohol Screen In Case of Death Pediatric Developmental APGAR Scoring for Newborns Intake Assessment Pediatric Discharge Plan IV Care Braden Scale Miscellaneous Nurses’ Notes Pediatric Discharge Summary Cardio Treatments Physical Therapy Discharge Case Management Discharge Plan Mucositis Scale Clinical Participation Note Neuro Treatments Respiratory Therapy Discharge Plan Discharge Plan Neurovascular Checks Respiratory Treatments Dietary Discharge Plan Nursing Care Restraints Drains and Tubes Assessment Nutrition Hydration Richmond AgitationSedation Scale Drug Screen Elimination ER Admission ER Assessment ER Discharge Fall Risk Assessment Family Assessment FLACC Behavioral Pain GI Treatments Glasgow Coma scale Multi-Line IV assessment Occupational Therapy OR Count OR Operative Flow Sheet OR Pre-OP Checklist Ortho Treatments Ostomy Pain Assessment Pain Treatments Pastoral Care Patient Activity Ramsey Sedation Scale Riker Agitation-Sedation Scale Skin Treatments Smoking Screen Social Services Discharge Speech Therapy Discharge Teaching Urinary Treatments Wounds Flow sheets may be found by clicking the “Documentation” tab and locating the desired form to the left of your screen. These same flow sheets are also located within other forms, such as the Admission History form. ChartSmart User’s Manual Page - 30 - Admission History The Admission History form appears in broken out sections with links to all the other sections at the top of the page. The current section is the one highlighted in black. The question and answer choices appear below: After filling out this section, click Next to save your information and proceed to the next listed section. Alternately, if you wish to choose a screen out of the listed order, click Save and your documentation will be saved without advancing to the next screen. Then click on a link at the top of the screen for the next desired section. For example, click Save and then click the “Drug Screen” link. ChartSmart User’s Manual Page - 31 - Drug Screen is now the highlighted section and the form that appears below is the drug screen form: When completely filled out, the form looks like this: ChartSmart User’s Manual Page - 32 - With the form completed, click the “Next” button to move to the next section. This action will save the data and display the next section of the form. Clicking the “Save” button will save the information and open another drug screen form. The “Teaching” button – pictured here: is a link and a reminder to the nurse to enter Teaching information. Once Teaching documentation is completed and Saved the user is taken back to the original form; in this case Admission History. Home Medications Home Medications may be pulled up and edited with each new hospital admission and throughout the patient’s stay. The Teaching button is present for quick access to medication teaching. To enter Home Medications Click “Yes” and the Home Medications button appears: The Home Medications button is now active. Click this form and the Home Medication form will open. Use the drop down boxes to complete all fields. ChartSmart User’s Manual Page - 33 - For example, enter an Insulin order as a Home Medication for a diabetic patient. Now add these medications to the cart. When added, the medication will pull into the cart below. If the medication is entered in error, click the checkbox beside the order and then click on the “Remove from Cart” button. This will remove the order from the cart. Allergy Information ChartSmart User’s Manual Page - 34 - It is critical to add Allergy information as soon as assessed. Allergy information is needed to ensure Drug/Allergy interactions are alerted to users at the time of Order Entry. Allergy information may be entered by accessing the Admission History form, the Patient Info tab, or in the Flow Chart section of Documentation. To enter Allergy Information in the Admission History form, click on the Allergy Info link at the top of the form (this form may also be found independently via the Patient Info Tab). The following form appears below: Click “No” and the form will automatically check the “No Known Allergies” checkbox. Click Next to save and move on to the next screen. Click “Yes” and the Allergies button will appear. Click on the Allergies button and a new form will populate over the Admission History form. ChartSmart User’s Manual Page - 35 - To Add an Allergy: Select Drug Allergies, Food Allergies, or Environmental Allergies and click “Add.” The following form will appear: If unable to assess a patient’s allergies and there are no family members available to answer these questions, select: ChartSmart User’s Manual and enter reason in the text box provided. Page - 36 - The system will notify of the need to come back and assess this patient later: This will be noted in the Patient Banner as a reminder. If the patient has verifiable drug allergies begin by first selecting the medication. Going to the Allergen field, click on the down arrow to the right of the medication. The list of medications will populate the drop down menu. To begin, type the first letter of the drug name, then scroll down until the desired medication is found. The selection displays in the box: Next, select the patient’s reaction(s) to that medication via the checklist provided on that screen. Address level of severity, informant, and confidence level via the drop down boxes provided. Once saved, this drug allergy information will appear in the patient banner. ChartSmart User’s Manual Page - 37 - To view complete allergy information in the patient banner, hover the cursor over the Allergy listed and an information box with that information will appear. Move the cursor away and the box disappears. To Remove an Allergy: First select which type of allergy to remove: Drug, Food, Environmental, or All. Click Remove and the complete list of allergies in that category will pull up: Click on the entry to delete and then click Remove. ChartSmart User’s Manual Page - 38 - The allergy has been removed from the active record and placed in a view-only section where it will remain as a permanent part of the record. Further Allergy entries will now be done in the Patient Info section of the chart. When a patient chart is initially opened where allergies have not yet been addressed, the following alert will open up in the center of the chart: Click “OK” and the Allergy section will open up. Proceed as described earlier. Once Allergies have been addressed for this patient, the alert will no longer pop up. ChartSmart User’s Manual Page - 39 - Adult Nursing Assessment The Adult Nursing Assessment is broken out into body systems from head-to-toe. The default body system is the Neurological Assessment. ChartSmart User’s Manual Page - 40 - Documentation is completed by clicking on selections as well as free text boxes with unlimited space for narrative notes. Areas that do not pertain will stay or become grayed out, expediting movement throughout the screens. Once documentation is completed, clicking SAVE or NEXT will record the data as part of the patient’s record. SAVE will save the documentation but not advance to the next body system, allowing the nurse to choose which system to address next. NEXT will save the documentation and advance to the next body system on the list. Once saved, the system puts a link at the bottom of the page recording the date and time of the entry (see circled date/time stamp above). This link will provide a review of the documentation entered. If the care provider who authored this documentation is the one reviewing it, there is the ability to modify it. If not authored by that care provider, the documentation is reviewable by another care provider but that care provider cannot modify it. Throughout the documentation process, there are “NurseMinder” buttons located in flow sheets that open up additional forms that pertain to this area of documentation. For instance, a Neuro Tx button appears at the bottom of the Neurological Assessment screen. These links will open up over the existing screen and once closed, the user will be taken right back to their last screen making navigation very quick and easy. Reassessment When the time comes to reassess the patient during a shift a new option becomes available: ChartSmart User’s Manual Page - 41 - The “No Change From Previous Assessment” feature allows a caregiver to review previous documentation from that shift and choose to save that information if patient status is unchanged. Click the “No Change From Previous Assessment” checkbox and the previous assessment will appear: Previous documentation is reviewed and if there has been no change, click SAVE and move on to the next screen. In a report, the documentation will not include “No Change From Previous Assessment,” but will include those assessments that had been previously documented. If an assessment reveals there has been a change in patient status, unclick the “No Change From Previous Assessment” checkbox and the screen will become active for documentation. You may still access additional links at the bottom of the page as necessary. Care Plans To access the Care Plan module, click on the Documentation tab and click on the Care Plan link beneath the list of ChartSmart documentation forms. ChartSmart User’s Manual Page - 42 - All of the available Nursing Diagnoses pull at the top of the Care Plan form. The remaining fields will populate with information relative to the Diagnosis selected. Select Diagnosis and proceed with Care Plan. As with other forms, boxes remain inactive (grayed out) until the previous box has been addressed, to ensure that all areas are addressed. All fields are required in the Care Plan flow sheet. A reminder will prompt the user to address a forgotten area. ChartSmart User’s Manual Page - 43 - Narrative notations may be made in the text boxes provided. Example of a completed care plan: When a care plan is saved, it will populate at the bottom of the screen in a box of saved items. ChartSmart User’s Manual Page - 44 - Assessment Scales: Basic Functions and Features Throughout the system, there are links for scales such as the Braden Scale, Fall Risk Assessment, FLACC Scale, Glasgow Coma Scale, Pain Risk Assessment and others. Scales are present in assessment forms such as the Admission History or Adult Assessment and may also be accessed separately via the Flow Chart selection box. All risk assessment scales operate in the same manner: - Each scale consists of a series of assessment questions. ChartSmart User’s Manual Page - 45 - - Each answer has a corresponding numeric value which the system will auto-populate. Note below, “No Impairment” has been selected and has a numeric value of “4.” The system auto populates the “4” into the Sensory Score. - The system will identify any questions that have been missed and alert you to complete. ChartSmart User’s Manual Page - 46 - - Once complete, the system will compute the final assessment score for you, thereby eliminating calculation errors. - Once a score has been calculated, a list of suggested nursing interventions will be given (such as with the Braden Scale and Fall Risk Assessment) based on that score. - Risk assessments should be completed within 24 hours of admission and repeated as needed throughout the hospital stay. Wound Assessment The Wound Assessment flow sheet may be accessed individually via the flow chart selection box or through the Integumentary and Musculo-skeletal links of the Adult Assessment flow sheet. ChartSmart User’s Manual Page - 47 - Body forms are gender-specific and will open up as per the patient’s noted gender. There is the ability to turn this body 360 degrees. To do this, click on the drop down menu and select the desired view. The new position will display. To identify a wound site, click on the affected body site. A numeral will appear to number the wound. ChartSmart User’s Manual Page - 48 - The Wound Location will display to the right of the body. Select Wound Type on the left. This will determine the information that will populate to further specify the type of wound or means of closure. Surgical Wounds: ChartSmart User’s Manual Page - 49 - Surgical wound selection elicits Means of Closure to open up. Notice Length and Width are available for documentation; however, Depth is not necessary to record for a surgical wound. The surgical wound has Staples documented as a means of closure. ChartSmart User’s Manual Page - 50 - The user will have the ability to upload a picture of the wound, if a picture of the wound has been saved to the computer. 1st the use will need to use the dropdown box to specify the wound for the picture being uploaded. The “select” dropdown will populate the # corresponding with every wound that has been documented. Once a wound is selected, the user can use the attach button to attach a picture the same way as attaching a document to an email. Upload Documents Please click on Browse to attach a document: --Select-Select from the currently available wounds to attach the image (Only used to associate multiple images to 1 wound): Attach Please click on attach: Continue with documentation of care and assessment of the wound area. ChartSmart User’s Manual Page - 51 - Narrative notes may be charted via the infinite text box. Use this text box to record method of wound measurement and other pertinent data. Other assessments may be documented or reviewed via the buttons provided. Click SAVE to enter your documentation, otherwise click Cancel/Exit to exit the flow chart without saving data. Notice the numbered wound is now Red. This is to signify an active wound. Wound Type and Means of Closure are now grayed out and cannot be changed. Once a wound has been identified as a specific type of wound, it will always be known as that wound type even after it has been healed. Decubitus Ulcers Information for Decubitus Ulcers is entered in the same way as Surgical Wounds. Identify the location of the wound on the body. ChartSmart User’s Manual Page - 52 - Identify the Wound Type as Decubitus. This will open up a box labeled Decubitus Stage. Select the correct stage based on the wound assessment. The system will base further assessment questions on the information entered. Record the size and depth of the wound. In the Wound Care Notes at the bottom of the form, note the method of measurement used. ChartSmart User’s Manual Page - 53 - With the wound assessment complete, click Save to record this as part of the patient’s permanent record. For further documentation on this wound, click on the wound and the assessment area will open up. When the wound heals, document this by clicking into the “Healed” box just below the size boxes. ChartSmart User’s Manual Page - 54 - When healed, the wound will turn green and is no longer an active wound. No further documentation may be entered on a healed wound. If the wound were to reoccur, click as close as possible to that same wound site and a new number will appear. For review of care on all wounds or to Remove documentation, click on the Review button and the following screen will appear: ChartSmart User’s Manual Page - 55 - Click on the appropriate checkbox to remove an entry, if necessary. Only the user who entered the information may remove it. Other users will have read-only access. Vital Signs Links are available throughout the software for ChartSmart User’s Manual Page - 56 - easy access to this much-used function. To access, click on the link once and the form will open up. To enter a set of Vital Signs type in the value then hit the TAB key. If there is a required site for that value, the TAB key will move to that field. To enter a site, Tab over to the desired box and either use the down arrow on the computer keyboard, or click on the drop down arrow on the screen and make the selection from that menu. Once Vitals and site boxes have been entered, click Save. These values will be graphed and added to the patient’s record. ChartSmart User’s Manual Page - 57 - Vitals are graphed by Temperature, BP, and Pulse. Graphs may be viewed separately by clicking the corresponding buttons. View all graphs at once by clicking Graphs button. ChartSmart User’s Manual Page - 58 - Vital sign information can be graphed in 5-day increments. Via calendar icons, user may choose begin and end dates and a graph showing the Vital Signs of those days will appear. To remove a mistaken Vital Signs entry: Click the “Edit” link and the Vital Signs window with user’s most recent entry will populate. Correct the mistaken entry and click “Save Changes. “ Intake and Output ChartSmart User’s Manual Page - 59 - To access Intake and Output there are multiple software. links throughout the Enter Intake: Select the Intake Type. Click on the drop down arrow to the right, highlight choice, and click once on that selection. Hit the TAB key on the keyboard to go to Amount and type in the amount. Hit the TAB key once more and select the unit value from the drop down menu. Enter Output: Select Volume or Frequency. Select the desired output from the scroll down menu. Tab over to the Amount section and type in the amount. ChartSmart User’s Manual Page - 60 - To finish this entry, click “Save.” The entries graph at the bottom of the form. The gold bars are Intake Values and the Blue bars are output values. All entries are also added in text format per shift (shown) and in 24 Shift Totals (not shown): ChartSmart User’s Manual Page - 61 - Electronic Medication Administration Record (EMAR) To document the patient’s medications, click the EMAR tab to open this module: The EMAR contains links for various Medication Administration functions. Order verification Some hospitals have a policy that certain medications need to be verified by a second nurse prior to administration. In this case, new medication orders will first appear gray. To become active, Order Verification must be completed. To verify that an order is correct, click on the “Order Verification” button in the top left hand corner of the screen. The unverified orders appear: ChartSmart User’s Manual Page - 62 - To Verify Orders: A second nurse will look at these orders and check them against the written order from the physician. If correct, each medication may be individually selected, or, click on the “Select All” box at the top of the page. The second nurse will then sign in with user name and password. Once orders have been verified, the new medications become active in the EMAR. There are different color codes for different medication types: Green indicates that the order is currently due Gold is a One Time Order Yellow indicates that the Order is Overdue White is an active order but not currently due Black is an inactive or discontinued medication A discontinued medication will remain on the EMAR for 24 hours before falling off. ChartSmart User’s Manual Page - 63 - Medication Administration To document that a medication was “Given:” Click on the white circle labeled “Given”. Then click the Submit button below the form. To clear a mistaken entry, click “Undo Action.” Text boxes are available for any necessary narratives. “One Time” ordered medication: Once this medication has been documented as “Given,” the medication order is no longer active. The system will discontinue the medication automatically: To document that a medication was “Not Given:” Click on the circle labeled “Not Given” and provide a description of the reason in the free text box to the right: Click “Submit” and the order pulls to the bottom of the page. Administration details including the reason for not giving the medication are included. ChartSmart User’s Manual Page - 64 - To Discontinue an active medication: Click the “Discontinue” button and then provide the reason in the free text box provided. A discontinued medication will be inactive, but will remain on the EMAR for 24 hours before falling off: Click “Submit” and the medication order will turn black. Changing Time of Administration To Change Administration Date/Time: Locate the Administration Date/Time at the top of the page: Now click on the calendar Icon. The current date shows highlighted in yellow and red. Click on the desired date and the calendar will go away. To change the time: Use the arrows in the time field to adjust to the desired time. To leave the calendar, click on the X. Now the system shows that the documentation time is 0800. ChartSmart User’s Manual Page - 65 - EMAR Links Above the primary form, there is a series of links which make verification and documentation of medications quick and easy: Sliding Scale and PCA orders are set apart because they require specific information when administered. Click on the PCA order located on the EMAR and the PCA record box will open up over the EMAR. SAVE documentation and the box will close, enabling full view of the EMAR once again. Box is movable with your cursor. PRN Administration To document on a PRN order, find the section labeled PRN and select the desired medication from the list of medications present: Once selected, the PRN form will open up: ChartSmart User’s Manual Page - 66 - The medication order appears at the top of the screen. To the far right there is instant access to the Pain Assessment link. To open the form, just click on the link. When finished documenting the Pain Assessment, save the information and the form will close, returning to the medication screen. Status: Status is defaulted to “Given.” If choosing “Not Given” or “Discontinued,” the system will request a reason. This will be a free text field to type in any needed details. PRN Reason: Choose just one reason per medication administration. Route: Click on the appropriate route and continue with documentation. Patient Tolerated: ChartSmart User’s Manual Page - 67 - To complete the form, indicate how the patient tolerated the treatment and add any necessary comments into the comments section below. Click “Save” to record this information as a permanent part of the patient’s chart. Sliding Scale Administration To administer a sliding scale based Insulin, locate and click on the Sliding Scale link. Clicking on the link will bring up the record for this medication. ChartSmart User’s Manual Page - 68 - The name of the medication in this form appears at the top of the page, the medication details appear below the medication name. In the center-right of the page, find the sliding scale displayed. Scroll down to see the entire sliding scale. When entering the Glucose Reading, the system will pull over the corresponding insulin dose. Clicking on Subcutaneous or Intramuscular will prompt the drop down menu for administration sites. “Save” the data and the Administration record will be created. To view, click on “Administration History” link on the EMAR. All insulin administration records will be visible. ChartSmart User’s Manual Page - 69 - Call MD Feature For extreme high or low values, there is the Call MD feature. When added in the order entry process, this feature prompts the nurse to call the physician when an out-of-range blood glucose value is entered in the administration record. To enter the new order, click the blue link: The following screen will open up for quick entry of a new One Time order: Select the drug via the drop down feature. Enter the dose and the site. When complete, the order screen should look like this: ChartSmart User’s Manual Page - 70 - To complete the order click Submit. The Novolin R was the one-time order issued by the physician. The system documents that the care provider gave this insulin in the Left Arm and discontinues the medication because it was a one-time order. PCA Medication Administration To document on a PCA pump, find the area at the top of the page labeled: Click one time and the form will open. The name of the medication appears in the top of the screen. The protocol entered during the order entry process is located in the box in the center of the screen. The most recent Vital Signs appear on the far right side with a link to the Vital Signs Module to enter a new set of vitals. ChartSmart User’s Manual Page - 71 - The Pain Assessment link is there for the care provider’s convenience to assess the patient’s pain level. Syringe Volume: When “Amount Left in Syringe” is entered, the system will auto-calculate the “Volume Used by Patient” and enter that in the space provided. Home Medications The ChartSmart EMAR allows the care provider to activate Home Medications from the EMAR page without having to return to the Order Entry module. To begin, find the “Home Medications” button on the left side of the screen. Click once and the form will open. The Home Medication list will pull from the Home Medication assessment in the Admission History form or the Patient Info section. The top of the Home Medications page shows the ordering physician and the date and time to start the medication. Click the “Select” box at the left of the order and then select the frequency. Click “Save” to set up this New Order. This will populate as a verbal order in CPOE for the ordering physician to sign. Based on the protocol of the facility, there might be a need to have a second nurse verify this order. Once verified the order appears on the EMAR. ChartSmart User’s Manual Page - 72 - Administration History To review a complete history of a patient’s drug profile throughout the length of stay, select the “Administration History” button on the left side of the EMAR screen. Medications display according to Order Type (Immunization, Sliding Scales, etc.) To view the Administration for a particular medication, click on the name of a medication in the EMAR. A complete Administration History will open up for that particular medication. ChartSmart User’s Manual Page - 73 - Care Card The Care Card is a real-time guide to patient care and should be referred to frequently via ChartSmart rather than printing out the Care Card to plan out patient care. The Care Card is divided into Nursing Categories which may be viewed by groups as show below, or as one continuous flow sheet with the ability to scroll down to each category and view orders. ChartSmart User’s Manual Page - 74 - Orders on the Care Card are generated from the Order Entry system either directly from the Nursing Order section: Or by selecting “Nursing to Collect” in a standard lab order: ChartSmart User’s Manual Page - 75 - Orders flow to the Care Card and are separated by category. An alert for specimen collection shows up in RED at the top of the Care Card and may be accessed by clicking the NurseCollect link which will take user to the specimen collection list. All specimens for Nursing collection will populate in this section: ChartSmart User’s Manual Page - 76 - Select the specimen and press the “Completed” button to show this order has been filled. Orders will cross out in green but will remain on the list for easy reference of all past specimen orders. Once all specimens have been collected, the alert at the top of the page disappears. ChartSmart User’s Manual Page - 77 - Patient Info This section allows the user to enter many different types of information under the same Tab. Much of this information populates onto the Patient Banner such as Code Status, Diagnosis, and most recent Height/Weight and Vital Signs. Other information under this section includes patient demographic information which populates over from the registration process and may only be viewed in the EMR. Many of the links have already been covered in this manual (such as Allergies and Home Meds). Tabs are presented in order of appearance in this section: Review This link gives an overview of all the links in the Patient Info section. This is a read-only section. No documentation is done under the Review section. Alerts and Isolation Select the appropriate checkboxes and click “Save.” Content will populate onto the banner. Care Providers Click “Add” to list a care provider’s name. Use the drop-down feature to select a provider. Click the checkbox if this is the Primary Care Provider and Select Provider’s Role. ChartSmart User’s Manual Page - 78 - The completed entry will contain the following information: Information may be viewed and edited. To remove a care provider, click Remove and enter a reason in the box provided. Click Save and the provider will be removed from the banner. ChartSmart User’s Manual Page - 79 - Health Hx Click “Add” to add any health problems the patient may report. The following screen will open up: Saved information will appear as noted and may be edited as necessary: ChartSmart User’s Manual Page - 80 - Visit Hx This is read-only information which populates from the ADT (Admission, Discharge, and Transfer) part of the electronic system. A sample visit history would include the following information: Diagnosis To enter a Diagnosis, click on the link and the following box will appear if no diagnosis already exists: Click the “Add” button and the order screen will appear. You can search for a diagnosis by text or by ICD9 code. You key in characters in the “filter” box, hit enter, and the list of options will populate in the dropdown box next to “diagnosis”. ChartSmart User’s Manual Page - 81 - Click “Save” and the diagnosis will be saved in three areas: Patient Banner, Diagnosis link, and Problem List. To remove a diagnosis, click the checkbox and then click “Remove.” To add another diagnosis, click “Add” and proceed as noted above. Problem List The Problem List is derived in the same way diagnoses are generated via a 3-tier system and include much of the same information; however, there is also a section to Change Status to Resolved, Active, or Inactive. All diagnoses will flow into the Problem List. Problem List entries will not flow into the Diagnosis section. ChartSmart User’s Manual Page - 82 - Height/Weight Entries will be stored in this section and will populate onto the Patient Banner. Click the Height/Weight link and the following box will appear: Click “Add” to make the initial entry. To add this data to a Growth Chart, click the checkbox noted below. Check appropriate boxes for Admit information. ChartSmart User’s Manual Page - 83 - Add Height and hit enter key. Metric measurement will auto-populate. Add Weight and hit enter key. Now that Height/Weight are entered, BMI and BSA values appear. Click “Save” and information becomes part of the permanent record. Immunizations Current Recommended Immunization Schedules are available for pediatric and adult patients. Click on an age link to pull up a PDF with literature on these schedules. ChartSmart User’s Manual Page - 84 - Record all immunizations given during hospital stay. To record an immunization, click the “Record” button. Select the immunization via the drop-down window. Use the calendar icon if the immunization occurred on a different date. Complete Vaccination and Lot Number information. Use the Note box for any narrative information. Click “Save” to make this a part of the patient record. Click “Cancel/Exit” to leave this section without saving any data. Internal Patient Messaging ChartSmart User’s Manual Page - 85 - This system of messaging allows for confidential information to be passed along to caregivers without becoming a permanent part of the patient record. Click on the “Check Patient Messages” link and a listing of all messages will appear: Click on a patient’s name and you will be taken to the message within the patient’s chart: ChartSmart User’s Manual Page - 86 - User is able to acknowledge and answer messages from this screen. Only the author of a message is able to delete the message. Once a message has been acknowledged by another user, however, the message cannot be deleted. Documents A CCD/CCR document is an electronic form of the patient’s record which can be sent to another facility upon patient discharge. To create the document, click the “Create CCR” button. (Currently not functioning) History & Physical To access physician History and Physical entries, click the H&P Tab and the following screen appears: Click on the date under “Current Visit” and the note for that date/time will appear: ChartSmart User’s Manual Page - 87 - As with all documentation, this is a read-only document for anyone other than the physician who authored the entry. Access other physician-entered information via the blue links located within this tab. Progress Notes To access physician Progress Note entries, click the Progress Note Tab and the following screen appears: Click on the date under “Current Visit” and the note for that date/time will appear: ChartSmart User’s Manual Page - 88 - Clinical Decision Support and Alerts in ChartSmart ChartSmart includes a number of Alerts and Clinical Decision Support features which serve to both aid care givers in documentation and order entry as well as improve patient care. New Order Acknowledgment Nurses will be alerted to new orders, patient messages, and critical lab values with each log in. Clicking on the patient name brings the nurse to the Physician Order Screen where all new orders are waiting to be acknowledged before continuing on to respective departments (see pg. 29). ChartSmart User’s Manual Page - 89 - Critical Lab Values Critical Lab Value alerts are also noted on the Patient Selection Screen. Click on the red link and a message box with all alerts will open up. ChartSmart User’s Manual Page - 90 - Alert messages are removed by selecting the box next to the patient’s name and then click “Acknowledged.” ChartSmart User’s Manual Page - 91 -