1
Restaurant Enterprise Series (RES)
Version 3.2 – Service Pack 5
ReadMe First
About This Document
ReadMe First is a comprehensive guide to the new features,
enhancements, and revisions added since the Version 3.2 release of the
MICROS Restaurant Enterprise Series (RES 3000) software. Text is
organized by Service Pack:
Service Pack 5 — Revision D
Service Pack 4 — Revision C
Service Pack 3 — Revision B
Service Pack 2 — Revision A
Service Pack 1
MD0003-065
Revision D
May 2, 2005
Page 1 of 814
About This Document
MD0003-065
Revision D
May 2, 2005
Page 2 of 814
Service Pack 5
Service Pack 5
In keeping with the original RES 3.2 ReadMe First, information is
divided into self-contained chapters, one for each of the following RES
products:
3700 Point-of-Sale (POS) System
Kitchen Display System (KDS)
Cash Management (CM)
Guest Service Solutions (GSS)
Product Management (PM)
Labor Management (LM)
Financial Management (FM)
RES Platform
For clarity, product information is further divided into three sections:
What’s New
What’s Enhanced
What’s Revised
Each section begins with an introduction and includes a table that
summarizes the features and functionality incorporated in this version of
the software. The table provides hypertext links to supplementary text
and graphics about the selected topics.
For more information on these features, and step-by-step instructions for
configuring them, refer to the product’s Online Reference Manual,
installed with the MICROS Documentation and available on the RES
CD.
MD0003-065
Revision D
May 2, 2005
Page 3 of 814
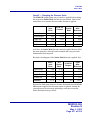
3700 POS
What’s New
3700 POS
What’s New
New Features
Summarized
A new feature is defined as one that provides capabilities that were not
available in previous versions of the application.
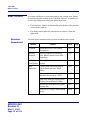
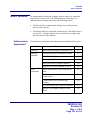
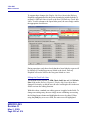
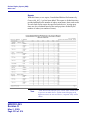
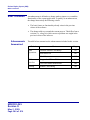
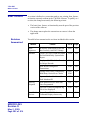
The table below summarizes the new features included in this version.
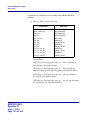
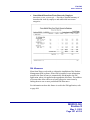
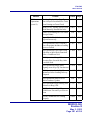
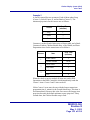
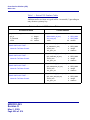
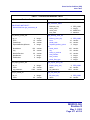
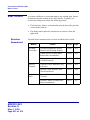
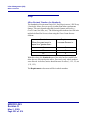
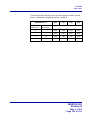
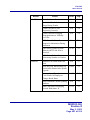
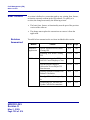
Module
Delivery
Dispatch
MD0003-065
Revision D
May 2, 2005
Page 4 of 814
Feature
View Order History and Reopen Closed
Checks
Page
5
3700 POS
What’s New
New Features
Detailed
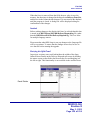
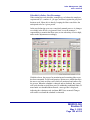
Delivery Dispatch
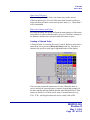
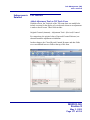
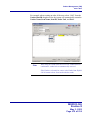
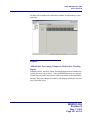
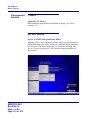
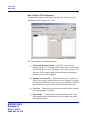
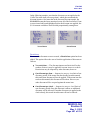
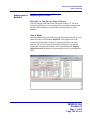
View Order History and Reopen Closed Checks
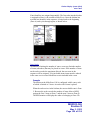
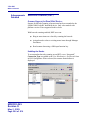
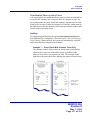
With this release, users will be able to view and reopen closed checks
from within the Delivery Dispatch module. To support this feature, a new
[History] button was added to the main Delivery Dispatch screen.
During operations, clicking this button will launch a new Check Search
form.
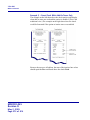
From here, users can click the [List Checks] button to display all the
closed checks for the selected Business Date. (By default, the system
will use the current business date.) Users can also filter the list by first
entering values in one or more of the following:
Business Date (lists checks for selected date only)
Begin Time
End Time
Check Number
Check Owner (lists active employees only)
Revenue Center
Order Type
MD0003-065
Revision D
May 2, 2005
Page 5 of 814
3700 POS
What’s New
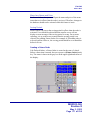
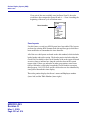
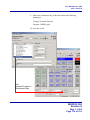
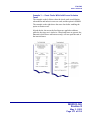
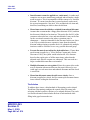
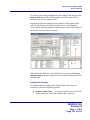
To locate checks for a particular customer, users can click the [Customer
Find] button to open a GSS-driven Customer Selection/View/
Modification Screen. When the customer is found, press the one of the
following buttons to return to the Check Search form:
[Accept] — Lists checks for the current customer only.
[Accept All] — Lists checks for all customers that meet the selection
criteria.
For example, when searching for customers with a last name of
“Smith”, the user may press the [Find Next] button to page through
the records of all customers who match this criteria. However, when
the [Accept All] button is pressed, the system will list checks for all
of customers whose last name is “Smith,” not just the current
selection.
Once initiated, the [Customer Find] button will turn white, as a visual
cue that a search is in progress. The button will remain white until the
[Clear Form] button is pressed to delete the current filter, or the user
presses the [Customer Find] button to return to the customer selection
form and presses [Cancel]. At that point, the user can either define a new
search or simply press the [List Checks] button to show all entries.
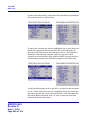
Edit/Reopen Closed Check
Once the list is generated, users can highlight an entry and press the
[Open Check] button to redisplay it through POS operations. By default,
the check will be in Edit Mode, which allows the user to void and modify
the tender only.
To add, modify, or delete other transaction items, the check must be
reopened first. To do this, the following options must be enabled in POS
Configurator:
Reopen Closed Check (Revenue Centers | RVC Transactions |
Delivery) — When enabled, using the [Open Check] button in
Delivery Dispatch will automatically reopen the check in POS
Operations — provided that the user is privileged to do so. (NEW)
MD0003-065
Revision D
May 2, 2005
Page 6 of 814
3700 POS
What’s New
Reopen closed checks (POS Configurator | Employees | Employee
Classes | Guest Checks | Guest Check Control) — When enabled,
allows members of the selected employee class to perform this
function.
Default delivery pickup screen (System | Order Types) — From the
drop-down list, specify the touchscreen to be used when reopening a
check from within Delivery Dispatch. If an entry is not selected, the
system will use the employee’s Default Touchscreen (Employees |
Employee Classes | Clock In/Sign-In).
MD0003-065
Revision D
May 2, 2005
Page 7 of 814
3700 POS
What’s Enhanced
What’s Enhanced
An enhancement is defined as a change made to improve or extend the
functionality of the current 3700 POS application. To qualify as an
enhancement, the change must satisfy the following criteria:
The basic feature or functionality already exists in the previous
release of the software.
The change adds to or extends the current process. This differs from a
revision (i.e., a bug fix) which corrects a problem not caught in the
previous release of the software.
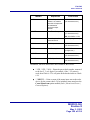
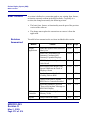
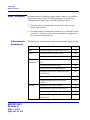
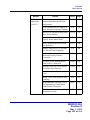
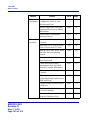
Enhancements
Summarized
The table below summarizes the enhancements included in this version.
Module
MD0003-065
Revision D
May 2, 2005
Page 8 of 814
Feature
Page
CA/EDC
Authorization Code Spacing
9
POS
Configurator
Combo Groups Quantity of Items
Increased to 999
10
POS
Operations
Open Check Block Settlement Change
10
Print Block Settlement Summary
10
Revised Combo Meal Consolidation
11
3700 POS
What’s Enhanced
Enhancements
Detailed
CA/EDC
Authorization Code Spacing
During operations, customers who wish to pay by credit card must first
obtain authorization from their credit card processor. This is done by
swiping the credit card through a magnetic card reader or entering the
card information manually. If the transaction is approved, the credit card
processor returns an Authorization Code which is either transmitted
directly to the POS System or manually entered by the POS operator.
Because each credit card company has its own format, the Authorization
Code varied in length, type (numeric or alphanumeric), and in the use of
empty spaces (leading, trailing, or interspersed between the digits). In the
past, the system would record the Authorization Code exactly as entered.
However, during settlement, the blank spaces in the entries were
systematically removed before submitting the records to the credit card
processor. This would cause problems for some of the credit card
transactions, which required the spaces to match the records.
To resolve this issue, the credit card function (Caedc.dll), which acts as a
handler for the settlement process, was modified to leave the
Authorization Code unchanged from the original entry. This is now the
default behavior.
To accommodate credit cards that may have problems processing the
extra spaces, a Registry value has been added that will allow users to
continue to remove the extra spaces during settlement.
To do this:
1. Open Regedit to
\\HKLM\SOFTWARE\MICROS\Common\CCSClient
2. Create a new DWORD value called ExcludeAuthSpaces.
3. Right-click on the new entry and select Modify.
4. In the Value Data field, enter a “1” to enable this option.
MD0003-065
Revision D
May 2, 2005
Page 9 of 814
3700 POS
What’s Enhanced
POS Configurator
Combo Groups Quantity of Items Increased to 999
In previous releases, the system limited the quantity that could be set for
an individual menu item within a combo group to nine. This led to
awkward workarounds for side groups that exceeded more than 10 items.
For example, to differentiate between combo meals with 6, 12, and 24
chicken nuggets, the user would create separate chicken nugget combo
groups (Sales | Combo Meals | Combo Groups), each with a Quantity of
1. The menu items would then be labeled Chicken Nuggets (6), Chicken
Nuggets (12), and Chicken Nuggets (24).
To simplify configuration, the Quantity field has been increased from a
maximum of 9 to a maximum of 999 items.
POS Operations
Open Check Block Settlement Change
The open check block settlement option allows an employee to close all
open checks with a single cash transaction. To improve useability, the
cash payment algorithm has been modified to fire the cash drawer when
the first open check is settled. Previously, the cash drawer would remain
closed during a block settlement.
Print Block Settlement Summary
With this release, users can now control whether a summary chit will be
printed when using the open check block settlement function. Previously,
the summary would be printed automatically.
To support this change, a new option Print Block Settlement Summary
(Revenue Center | RVC Printing | Options) was added to POS
Configurator. When enabled (the default setting), the system will
automatically print a summary as part of the settlement process. If the
option is disabled, the summary will only be printed if an error is posted.
MD0003-065
Revision D
May 2, 2005
Page 10 of 814
3700 POS
What’s Enhanced
Revised Combo Meal Consolidation
Previously, when consolidating combo meals with the same parent, but
different sides, the system would sort all like side items together. This
made it difficult for the server to figure what actually went with a
particular combo meal.
To resolve this problem, a change was made to the consolidation
algorithm. Now, when two or more combo meals are ordered with the
same combo parent but different sides, the second combo meals sides
will be appended below the first set of side items.
For example, if the server rang up:
1 Kids meal
1 Chicken
1 Fries
+
1 Kids meal
1 Chicken
1 Fries
the system would display:
2 Kids Meal
2 Chicken
2 fries
However, if another Kid’s meal is added but with a different parent item,
the display would read:
3 Kids Meal
2 Chicken
2 Fries
1 Burger
1 Fries
MD0003-065
Revision D
May 2, 2005
Page 11 of 814
3700 POS
What’s Revised
What’s Revised
A revision is defined as a correction made to any existing form, feature,
or function currently resident in the 3700 POS software. To qualify as a
revision, the change must satisfy the following criteria:
The basic form, feature, or functionality must be part of the previous
version of the software.
The change must replace the current item or remove it from the
application.
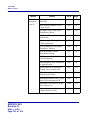
Revisions
Summarized
The table below summarizes the revisions included in this version.
Module
MD0003-065
Revision D
May 2, 2005
Page 12 of 814
Feature
CR ID
Page
Common
MDSHttpService Fails Without
Explanation
N/A
14
Delivery
Dispatch
Delivery Dispatch Occasionally
Fails When Launched From POS
Operations
N/A
14
POS
Configurator
Clear All Totals Requires Reboot of
System
N/A
14
POS
Operations
Cover Counts Post Differently in
Check Detail and Sales Detail
Tables
N/A
15
Memory Error Occurs During Full
Database Download on a WS4
20058
15
PMS Sales Itemizers Wrong When
Voiding Prorated Partial Tenders
17518
16
Reopened Check Does Not Update
Amount Due
N/A
16
Team Service Usage Causes Posting
Errors
19624
16
3700 POS
What’s Revised
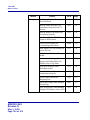
Module
POS
Operations
(cont’d.)
Setup
Feature
CR ID
Page
Touch Item Discount Consolidates
with Service Charge When Both
Applied to Check
N/A
17
Void-Void of Condiment While
Direct Voiding Loses Void Status
19210
17
N/A
17
Remote Install Fails on Clients
Running Windows XP SP2
MD0003-065
Revision D
May 2, 2005
Page 13 of 814
3700 POS
What’s Revised
Revisions
Detailed
Common
MDSHttpService Fails Without Explanation
CR ID #: N/A
Occasionally, the MDShttpService would crash without any discernable
reason. The cause of the crash was traced to the MDSHttpTransport.dll
and/or the MDSBroker.dll. To correct the problem, the proxy library was
modified and will create a new broker object to use for communications,
should an error situation occur. In addition, the MDSSysUtilsProxy will
log an appropriate message instead of crashing the MDSHTTPService.
Delivery Dispatch
Delivery Dispatch Occassionally Fails When Launched
From POS Operations
CR ID #: N/A
Attempts to launch Delivery Dispatch from POS Operations would
occasionally result in a system failure. This was caused by an incorrect
value in the Delivery Zone Info Line field, which has been corrected.
POS Configurator
Clear All Totals Requires Reboot of System
CR ID #: N/A
After using the ‘Clear All Totals’ option, the auto-incrementing fields in
the database (i.e., trans_seq) would not reset back to 1 unless the
database engine was restarted. To avoid confusion, a reminder was added
to POS Configurator. Now, after clearing totals, the system will display
the message "Clear Totals complete. This system must be rebooted."
MD0003-065
Revision D
May 2, 2005
Page 14 of 814
3700 POS
What’s Revised
POS Operations
Cover Counts Post Differently in Check Detail and Sales
Detail Tables
CR ID #: N/A
When ringing menu items that add to the cover count, the number of
covers would posted differently in the Check Detail and Sales Detail
tables if a 100% discount was applied and the option Negative checks do
not add to cover count was enabled. The covers would be incorrectly
posted to the Check Detail table.
In a related issue, cover counts would post incorrectly when one of the
counted menu items was returned and the check was then split. In this
case, the Check Detail table would correctly delete the cover count for
the returned item and apply the remaining covers to the appropriate split
check. In the Sales Detail table, the cover count for the returned item was
not deleted and the remaining covers would be applied to each of the split
checks.
Both problems have been corrected.
Memory Error Occurs During Full Database Download on a
WS4
CR ID #: 20058
When running POS Operations on a WS4, changes made to the system’s
configuration would trigger an insufficient memory error on the Client
workstation when the full database was downloaded.
Similarly, the WS4 would report an “Error initializing Com interface,”
when the device was switched from Front-of-House, to Back-of-House,
and then to Front-of-House again.
Although the symptoms were slightly different, both problems were the
result of memory allocation problems on the WS4. This has been
corrected.
MD0003-065
Revision D
May 2, 2005
Page 15 of 814
3700 POS
What’s Revised
PMS Sales Itemizers Wrong When Voiding Prorated Partial
Tenders
CR ID #: 17518
After applying and then voiding a partial PMS tender, if a user rang up
additional items, the system failed to post the details to the appropriate
sales itemizers. Since the itemizer totals were incorrect, the wrong values
were being sent to the PMS. This has been corrected.
Reopened Check Does Not Update Amount Due
CR ID #: N/A
After reopening a closed check, if the user rang up additional menu
items, the system would include them in the display but failed to add the
prices to an updated Amount Due. This problem has been corrected.
Team Service Usage Causes Posting Errors
CR ID #: 19624
After paying out a team service check, the system would occasionally
error out when attempting to post the totals to the database. The problem
occurred when two employees with different shift_seqs were assigned to
the same team, causing the stored procedure sp_post_empl_cum to fail.
This has been corrected.
MD0003-065
Revision D
May 2, 2005
Page 16 of 814
3700 POS
What’s Revised
Touch Item Discount Consolidates With Service Charge
When Both Applied to a Check
CR ID #: N/A
Previously, if a user applied a touch item discount and a service charge to
the same check, the system would consolidate the two values, incorrectly
changing the value of the discount.
For example, if a 10% discount was applied to a $5.00 menu item, the
amount of the discount was –$0.50. However, if the check total was
$10.00 and a 15% gratuity was added, the system would calculate the
gratuity ($1.50) and then add it to the discount. Consequently, the value
of the discount would be incorrectly changed to $1.00 (i.e., $1.50 – 0.50
= $1.00).
This problem has been corrected.
Void-Void of Condiment While Direct Voiding Loses Void
Status
CR ID #: 19210
When direct voiding a menu item with condiments, if a mistake was
made and the user pressed void-void (last-item void) to erase the
previous entry, POS Operations would lose the VOID status, but remain
in the condiment selection. This allowed the user to enter positively
priced condiments to a voided menu item. It has been corrected.
Setup
Remote Install Fails on Clients Running Windows XP SP2
CR ID #: N/A
When performing a remote install on a client running Windows XP
Service Pack 2, the client would reboot but then failed to start Netsetup.
This problem has been corrected.
MD0003-065
Revision D
May 2, 2005
Page 17 of 814
Kitchen Display System (KDS)
What’s New
Kitchen Display System (KDS)
What’s New
There are no new features in this version of the software.
What’s Enhanced
An enhancement is defined as a change made to improve or extend the
functionality of the current KDS application. To qualify as an
enhancement, the change must satisfy the following criteria:
The basic feature or functionality already exists in the previous
release of the software.
The change adds to or extends the current process. This differs from a
revision (i.e., a bug fix) which corrects a problem not caught in the
previous release of the software.
Enhancements
Summarized
The table below summarizes the enhancements included in this version.
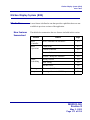
Module
KDS
Controller
MD0003-065
Revision D
May 2, 2005
Page 18 of 814
Feature
Real-Time Status Posting
Page
19
Kitchen Display System (KDS)
What’s Enhanced
Enhancements
Detailed
KDS Controller
Real-Time Status Posting
The KDS Controller was modified to support real-time posting of
updates to the KDS database. The change will provide more accurate and
timely data for Speed of Service Reports and any third-party applications
that use the KDS data.
Background
In previous releases, KDS posting was an optional process, setup through
POS Configurator. During operations, the system would save KDS data
to an internal file (KdsPost.dat). Periodically, the data would be posted to
the KDS database using a scheduled external program, KPM.exe.
As part of setup, users would specify the amount of time between posting
intervals. The recommended period was 15 minutes, though the interval
could be set as low as a few seconds. (If set to 0, posting was disabled.)
However, since the system relied on an external mechanism to post the
data, the drain on system resources made it impractical to run at the
shorter intervals required for near real-time posting.
Solution
To address the problem, the posting executable (KPM.exe) has been
eliminated and its functionality has been incorporated into the KDS
Controller. The removal of this interim process allows the system to
speed up the posting of KDS data.
This change also means that the following fields are no longer needed
and have been removed from the POS Configurator (System | Kitchen |
Posting):
Post Interval
Post Exe
Post Arguments
For reporting purposes, KDS can still be configured to post transaction
details to up to 3 user-specified text files. Refer to KDS Version 3.2 (SP5)
Posting File Specification, MD0003-066, Rev. A, for more on this topic.
MD0003-065
Revision D
May 2, 2005
Page 19 of 814
Kitchen Display System (KDS)
What’s Revised
What’s Revised
A revision is defined as a correction made to any existing form, feature,
or function currently resident in the KDS software. To qualify as a
revision, the change must satisfy the following criteria:
The basic form, feature, or functionality must be part of the previous
version of the software.
The change must replace the current item or remove it from the
application.
Revisions
Summarized
The table below summarizes the revisions included in this version.
Module
KDS
Controller
KDS Display
MD0003-065
Revision D
May 2, 2005
Page 20 of 814
Feature
CR ID
Page
“All Prep Done” Order Does Not
Display Properly in DOM When
Using Expo Station Only
N/A
21
Consolidation Does Not Work
Properly With DOM Enabled
N/A
21
“Do Not Sort” Option Not
Working With Combo Meals
13340
22
KDS Crashes When Bumping
Items on a WinCE Device
N/A
22
Kitchen Display System (KDS)
What’s Revised
Revisions
Detailed
KDS Controller
‘All Prep Done’ Order Does Not Display Properly in DOM
When Using Expo Station Only
CR ID #: N/A
With DOM enabled (RVC Transactions | Quick Service), if the site was
using an Expo KDS display (and no other prep stations), completed
orders were not being posted as “All Prep Done.” If the option No expo
done before prep done (System | Kitchen) was also enabled, users could
not bump the order from the Expo monitor. This problem has been
corrected.
Consolidation Does Not Work Properly With DOM Enabled
CR ID #: N/A
With DOM enabled (RVC Transactions | Quick Service), KDS failed to
consolidate menu items properly even though the Do Not Consolidate
option (Devices | Order Devices | Options) had been cleared. For
example, if a user rang up a Burger Combo, Burger Combo, Burger, and
Medium Fries, the system would incorrectly display:
2
1
2
1
2
Burger
Burger
Med Fries
Med Fries
Soda
when the correct result should have been:
3 Burger
3 Med Fries
2 Soda
This has been corrected.
MD0003-065
Revision D
May 2, 2005
Page 21 of 814
Kitchen Display System (KDS)
What’s Revised
KDS Display
‘Do Not Sort’ Option Not Working With Combo Meals
CR ID #: 13340
When ringing a combo meal, the KDS device would post order details
out of sequence even though the option Do not sort (Devices | Devices |
Options) had been enabled. In this case, the combo meal would be sorted
to the top of the check with all single items posted below the combo
meal. This has been corrected.
KDS Crashes When Bumping Items on a WinCE Device
CR ID #: N/A
When running KDS on WinCE devices (WS4 or DCU), the display
application would crash under the following conditions:
Start an order using the Rush or VIP buttons before entering the
first menu item. This only occurred if DOM was enabled (RVC
Transactions | Quick Service).
Pressing a numbered Done key (Done 3, Done 4, etc.) that was
higher than the number of orders displayed.
Rapidly bumping many chits by either holding down the Done
key or pressing it repeatedly.
These problems have been corrected.
MD0003-065
Revision D
May 2, 2005
Page 22 of 814
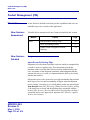
Cash Management (CM)
What’s New
Cash Management (CM)
What’s New
There are no new feature in this version of the software.
What’s Enhanced
There are no enhancements in this version of the software.
What’s Revised
There are no revisions in this version of the software.
MD0003-065
Revision D
May 2, 2005
Page 23 of 814
Guest Services Solution (GSS)
What’s New
Guest Services Solution (GSS)
What’s New
New Features
Summarized
A new feature is defined as one that provides capabilities that were not
available in previous versions of the application.
The table below summarizes the new features included in this version.
Module
Screen
Designer
MD0003-065
Revision D
May 2, 2005
Page 24 of 814
Feature
Required Fields
Page
25
Guest Services Solution (GSS)
What’s New
New Features
Detailed
Screen Designer
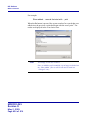
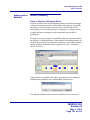
Required Fields
The new Required Field feature allows GSS screen designers to specify
which fields must be completed before a record can be saved to the
database.
To program this feature, users simply right-click the selected object in the
backoffice form and specify whether it is a “Required Field” or “Not
Required Field” (default). When selected, an asterisk will mark each
required field to indicate its status.
MD0003-065
Revision D
May 2, 2005
Page 25 of 814
Guest Services Solution (GSS)
What’s New
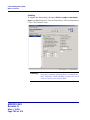
When the Customer form is opened through POS operations, required
fields will be shown with a red background. Once an entry is made, the
background will change to white.
To ensure compliance, an error message will display if the user attempts
to save the record before all required fields have been completed.
Note
MD0003-065
Revision D
May 2, 2005
Page 26 of 814
GSS has no way to verify whether the required data is accurate
or complete, only that something has been entered in the field —
a blank space will suffice. It is up to the user to ensure that useful
information has been provided.
Guest Services Solution (GSS)
What’s Enhanced
What’s Enhanced
An enhancement is defined as a change made to improve or extend the
functionality of the current GSS application. To qualify as an
enhancement, the change must satisfy the following criteria:
The basic feature or functionality already exists in the previous
release of the software.
The change adds to or extends the current process. This differs from a
revision (i.e., a bug fix) which corrects a problem not caught in the
previous release of the software.
Enhancements
Summarized
The table below summarizes the enhancements included in this version.
Module
POS
Interface
Feature
Page
Address Auto-Complete Enhancement
28
Invalid Street Authorization
30
MD0003-065
Revision D
May 2, 2005
Page 27 of 814
Guest Services Solution (GSS)
What’s Enhanced
Enhancements
Detailed
POS Interface
Address Auto-Complete Enhancement
The address filter in the Customer information form was modified to
display a list of matching street addresses during data entry. Now, when a
user begins to type a street number and/or name in the Address 1 field,
the system will automatically drop-down a list of up to 10 possible
entries. If more than 10 matches exist, only the first 10 will be displayed.
Since the list is populated dynamically, the pool of entries will decrease
as more of the address is entered.
If Postal Code Recognition (POS Configurator | GSS | Delivery) is
enabled, and a postal code was entered first, the drop-down list will
return the first 10 entries from within the specified postal code.
This functionality has been added to both the GSS backoffice form and
the POS front-of-house customer dialogs.
Address validation was designed for use with Delivery Zone Mapping.
As such, it only works when the following options are also enabled in
POS Configurator (GSS | Delivery):
Validate Delivery Streets
Validate Block Numbers
Background
GSS allows users to create a delivery area database that includes the
street names, range of building numbers, and related postal codes for
every building within their business service area. When a new customer
is entered into the system, the program checks to see if the street address
is valid and within the business’ defined geographic area.
MD0003-065
Revision D
May 2, 2005
Page 28 of 814
Guest Services Solution (GSS)
What’s Enhanced
In the past, when entering customer data, the system would automatically
complete the street address with the first record that matched the typed
entry. For example, suppose the delivery area included the following
range of addresses:
1-100 Ashland Court
1-200 Ashland Street
2-50 Westland Drive
3-75 Westland Building, Main Street
If, during data-entry, the user typed “33” in the Address 1 field, the
system would automatically return the first entry that satisfied this
criteria — 33 Ashland Court. If the customer’s address was 33 Westland
Drive, the user could either edit the street name or use the search key to
page through the possible entries, one record at a time. This could be a
tedious and time-consuming task. By providing a list, instead of a single
entry, the change improves speed of service and allows the user to move
onto the next task.
Configuration Changes
No options were added for this enhancement. However, the POS user’s
customer selection form must be modified to support a drop-down list of
addresses. To do this:
1. Open the GSS Backoffice | Screen Designer and open the
customer screen .
2. Lengthen the Address 1 field to accommodate multiple entries.
The control box should overlap the fields below. This will not
affect their functionality; it will simply allow the address field to
display the drop-down list.
3. Save and close.
MD0003-065
Revision D
May 2, 2005
Page 29 of 814
Guest Services Solution (GSS)
What’s Enhanced
Invalid Street Authorization
With this release, users must now be privileged to accept a customer
record with an invalid street address. The change was needed reduce the
number of incomplete or incorrectly entered records cluttering the
database.
Procedure
When adding a customer record, if the street address cannot be found in
the current Delivery Zone database, a dialog box displays asking if the
user wants to accept the invalid address. If the user selects [Yes], the
system will check to see if the user is privileged to do. If not, an
authorization dialog will display. The user can then have a privileged
employee approve the request.
If the dialog box is cleared without obtaining authorization, the system
will not allow the user to exit the Address 1 field without entering a valid
address.
Once the entry is authorized, the customer record can be completed and
saved to the customer database. The Delivery Zone database is not
affected by the entry.
New Option
To enable this feature, a new employee privilege was added in POS
Configurator. The option Accept Invalid Street (Employees | Employee
Classes | Privileges | GSS Privileges) should be checked for those
employees who will be allowed to use this feature.
MD0003-065
Revision D
May 2, 2005
Page 30 of 814
Guest Services Solution (GSS)
What’s Revised
What’s Revised
A revision is defined as a correction made to any existing form, feature,
or function currently resident in the GSS software. To qualify as a
revision, the change must satisfy the following criteria:
The basic form, feature, or functionality must be part of the previous
version of the software.
The change must replace the current item or remove it from the
application.
Revisions
Summarized
The table below summarizes the revisions included in this version.
Module
Feature
GSS Back
Office
Unable to Access Keyboard
Screen
POS Interface
Performance Issue With AutoAddress Completion
CR ID
Page
N/A
32
19318
32
MD0003-065
Revision D
May 2, 2005
Page 31 of 814
Guest Services Solution (GSS)
What’s Revised
Revisions
Detailed
GSS Back Office
Unable to Access Keyboard Screen
CR ID #: N/A
In the GSS Back Office application, attempting to open the Screen
Designer | Keyboard form would cause an error message to display and
the software to hang. This problem has been corrected.
POS Interface
Performance Issue With Address Auto-Completion
CR ID #: 19318
When entering an address on the GSS Customer form, there was a
noticeable hesitation/pause between typing the first numbers or letters
and the appearance of the characters on the screen. This performance
issue was corrected by coding changes made for the Auto-Address
Complete Enhancement (page 28).
MD0003-065
Revision D
May 2, 2005
Page 32 of 814
Product Management (PM)
What’s New
Product Management (PM)
What’s New
There are no new features in this version of the software.
What’s Enhanced
There are no enhancements in this version of the software.
MD0003-065
Revision D
May 2, 2005
Page 33 of 814
Product Management (PM)
What’s Revised
What’s Revised
A revision is defined as a correction made to any existing form, feature,
or function currently resident in the PM software. To qualify as a
revision, the change must satisfy the following criteria:
The basic form, feature, or functionality must be part of the previous
version of the software.
The change must replace the current item or remove it from the
application.
Revisions
Summarized
The table below summarizes the revisions included in this version.
Module
Feature
N/A
35
Vendor Not Retrieved When
Using Lists
Reports
Inventory Cost of Sales
Summary Reports
19244
36
Inventory Potential Revenue
Report
19243
37
Inventory Reports Taking Too
Long to Run
18485,
18486,
18487
37
Inventory Variance Report
19677
38
Menu Engineering Reports
19045
38
Menu Item Theoretical Cost of
Sales and Menu Engineering
Reports
N/A
39
Error Occurs When Closing
Periods Containing Large
Numbers of Transactions
N/A
40
18877
40
Recipe Items Deleted
Improperly
May 2, 2005
Page 34 of 814
Page
Ordering
Setup
MD0003-065
Revision D
CR ID
Product Management (PM)
What’s Revised
Revisions
Detailed
Ordering
Vendor Not Retrieved When Using Lists
CR ID #: N/A
When creating a new order using an Item List filter, the correct vendors
were not being pulled into the form. This occurred when the following
options were also enabled:
Allow unit and quantity to be saved in list (PM | Setup | PM
Parameters | General)
Override default purchase units with list units (PM | Setup |
PM Parameters | General)
Allow unit conversion (PM | Setup | Order Classes | Options)
The problem, which was traced to the stored procedure that retrieves
vendor bids, has been corrected.
MD0003-065
Revision D
May 2, 2005
Page 35 of 814
Product Management (PM)
What’s Revised
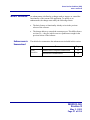
Reports
The table below describes the PM report changes in this Service Pack:
Report
Inventory Cost
of Sales
Summary
Report
CR ID #: 19244
MD0003-065
Revision D
May 2, 2005
Page 36 of 814
Area Modified
Template,
Stored
Procedurea
Description
When running an Inventory
Cost of Sales (COS) Summary
report, the Net Receipts for a
Major Group were understated
by the value of the Production
Items. This, in turn, was
causing the Actual Usage to be
understated; in other words,
Actual Usage = Opening Stock
+ Net Receipts – Closing
Stock).
To resolve this problem, the
value of Production Items was
removed from the internal
calculation of Net Receipts and
given its own Property Item
Credit entry at the bottom of
the report. As a result, for
individual rows, the previous
method for determining
accuracy by equating Opening
Stock + Net Receipts to Closing
Stock + Actual COS is no
longer valid. However, the
values in the Property Totals
row will be accurate.
Product Management (PM)
What’s Revised
Inventory
Potential
Revenue
Template,
Stored
Procedureb
After declaring production, the
actual and theoretical usage
values in the Inventory
Potential Revenue report were
incorrectly added twice for
production items - once after
production and again after that
item is sold. To correct this
problem, a production credit
was added to the report to back
out the production usage costs.
This will allow the Inventory
Potential Revenue and the
Theoretical Cost of Sales Detail
reports to balance.
Stored
Procedure and
Templatesc
The following Inventory
reports would either hang or
take an unacceptably long time
to complete when run via
Reports Explorer:
CR ID #: 19243
Inventory
Reports
CR ID #: 18485,
18486, 18487
Inventory Variance Report
Inventory Item Usage
Analysis Report
Inventory Potential
Revenue Report
This has been corrected.
MD0003-065
Revision D
May 2, 2005
Page 37 of 814
Product Management (PM)
What’s Revised
Inventory
Report Variance
Stored
Procedured
The Inventory Variance Report
was showing inaccurate data
for the Actual Usage Value
and Variance Value fields. If
the return was the only
"receipt" transaction for a
business date (or the first, or if
the user returned more than
received on the business date)
the value of the receipt would
be incorrectly posted as
positive. This has been
corrected.
Templatee
When running the Menu
Engineering Reports
(consolidated and nonconsolidated), the Weighted
Average Net Sales Price totals
were incorrect when the
prorated discount option was
enabled. The discount amount
was added to the menu item
instead of subtracted. This has
been corrected.
CR ID #: 19677
Menu
Engineering
Reports
CR ID #: 19045
MD0003-065
Revision D
May 2, 2005
Page 38 of 814
Product Management (PM)
What’s Revised
Menu Item
Theoretical Cost
of Sales
and
Menu
Engineering
Reports
Template,
Stored
Proceduree,f
CR ID #: NA
a
When running the Menu Item
Theoretical Cost of Sales report
or the Menu Engineering
reports (consolidated and nonconsolidated), the values in the
Weighted Average Net Sales
Price column were incorrect.
Instead of using the weight
total for open quantity items,
the system used the sls_cnt
from the dly_sys_cmpst_mi_ttl
table. The Total Quantity value
was also incorrect. These
problems have been corrected.
Files Changed:
InvenCOSSumm.rpt
speo_R_inven_cos_summary.sql
b
Files Changed:
InvenPotentialRevenue.rpt
speo_R_inven_var_info.sql
c
Files Changed:
speo_R_inven_var_info
InvenCostSalesDtl.rpt
InvenItmUsgAny.rpt
InvenPotentialRevenue.rpt
InvenVar.rpt
d
Files Changed:
speo_inven_do_itm_rcpt
e
Files Changed:
RecipeMenuEngCondEx.rpt
RecipeMenuEng.rpt
f
Files Changed:
RecipeTheoCost.rpt
speo_R_menu_info.sql
MD0003-065
Revision D
May 2, 2005
Page 39 of 814
Product Management (PM)
What’s Revised
Setup
Error Occurs When Closing Periods Containing Large
Numbers of Transactions
CR ID #: N/A
When closing multiple periods, an error would occur if the system had
many (millions) of inventory item transaction detail records that had not
been moved into the closed period transaction tables. To correct the
problem, the stored procedure speo_inven_closed_prd_move was
modified. Now, when closing periods, the procedure will move records
one business date at a time, instead of attempting to move ALL
transactions in one large batch. After each closed business date, the
records will be committed. This should prevent the error and, in the event
that the stored procedure fails, only the business date currently being
moved will be rolled back.
Recipe Items Deleted Improperly
CR ID 18877
Previously, users were able to delete inventory items configured as
Recipe Item (PM | Setup | Inventory Items | General), even if they were
included in an existing recipe. This would result in a range of problems,
from missing data for recipes that included the deleted items to incorrect
inventory reports. The problem has been corrected.
MD0003-065
Revision D
May 2, 2005
Page 40 of 814
Labor Management (LM)
What’s New
Labor Management (LM)
What’s New
New Features
Summarized
A new feature is defined as one that provides capabilities that were not
available in previous versions of the application.
The table below summarizes the new features included in this version.
Module
LM Setup
New Features
Detailed
Feature
Page
Autoscheduling With Skill Level
Requirements
41
LM Setup
Autoscheduling With Skill Level Requirements
With this release, managers can now specify the skill levels needed when
autoscheduling weekly assignments. Previously, the autoscheduler only
looked for employees who fit the job type and availability (i.e., date and
time) requirements. By adding skill levels, managers have an additional
tool for balancing labor costs against the site’s operational needs.
For example, if projected sales on Sunday mornings are low — only one
employee needed — the manager might schedule someone with a skill
level of Expert. Working alone, it makes sense to have someone who can
handle tasks quickly and proficiently. Later, when the day becomes
busier and more staff members have shown up, the manager might decide
that an Average skill level is sufficient.
Since wages generally increase with experience, this functionality allows
managers to schedule staff members when and where their skills can be
most effective.
MD0003-065
Revision D
May 2, 2005
Page 41 of 814
Labor Management (LM)
What’s New
Skill level requirements are part of LM’s Staff Requirements/Auto
Scheduling Requirements feature. Licensing is required. In addition,
the related forms will not be displayed or editable unless the current user
is privileged (LM Setup | General | Security Access) to do so.
Configuration Changes
To support this functionality, a new Skill Level Requirements form (LM
Setup | Staff Requirements) was added. Depending on the number of staff
required, the form allows a user to specify how many employees will be
needed at each skill level for each day of the week, part of the day, and
type of job selected.
Skill levels (shown as columns in the above form) are defined in the Skill
Levels form (LM Setup | Time and Attendance). Up to 20 skill levels may
be defined. (For more on this topic, refer to the Skill Level Modifications
topic, beginning on page 49).
The actual number of staff/sections required in a given day/daypart
should coincide with the number specified in the Edit Requirements form
in the Scheduling application.
MD0003-065
Revision D
May 2, 2005
Page 42 of 814
Labor Management (LM)
What’s New
Setup
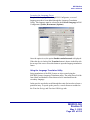
To configure the skill level requirements:
1. Open LM Setup and select Staff Requirement | Skill Level
Requirements.
2. From the drop-down lists at the top of the form, select a Job type,
Day of the Week, and Daypart.
3. Click the
icon to add a new record.
4. In the column Requirements/Sections, specify the number of
employees needed for that row’s skill level requirements to take
effect.
5. For each record, enter the number of employees required at each skill
level (e.g., Expert, Proficient, Beginner, etc.). These are defined in the
LM Setup | Time and Attendance | Skill Levels form.
Initially, the system will assign all of the employees to the last
column, the default Any Level. This value will decrease dynamically
by the number of skilled positions added in the row. The sum of all
entries may not exceed the number entered under Requirements/
Sections.
Note
Skill Level Requirements are only applicable when the
number of employees scheduled equals the number defined in
the row. Once the number of employees changes
(e.g.,increments from 2 to 3 people), the system will cease to
schedule employees based on the 2-person requirement.
If a record is not defined for 3 people/sections, the system will
apply the default and schedule any available staff member
who can do the job.
If the number of employees required is less than the number
available at a particular skill level, the system will not
subsitute a less qualified employee but will leave that part of
the schedule blank. A manual adjustments will be required.
6. Repeat for each Job, Day of the Week, and Daypart.
MD0003-065
Revision D
May 2, 2005
Page 43 of 814
Labor Management (LM)
What’s New
Copy Wizard
To speed setup, a Copy Wizard was added to facilitate copying skill level
requirements from one job, day of the week, and daypart, to another.
To launch the Wizard:
1. Press the Copy button above the table on the Skill Level
Requirements form. A welcome screen is displayed. Press Next to
continue.
2. By default the Copy From fields will be populated with the current
selection shown in the drop-down lists of the Skill Level
Requirements form.
3. Confirm or change the entries, as needed. When the selection is
correct, press Next to continue. A blank Copy To form will be
displayed.
MD0003-065
Revision D
May 2, 2005
Page 44 of 814
Labor Management (LM)
What’s New
4. Select a Job, Day of the Week, and Daypart from the drop-down
lists or select All to apply the requirement to every entry in that field.
Press Next to continue.
5. If the Copy To files are empty, the system will copy the data and
close the Wizard.
If skill level requirements have already been defined, an error
message will display informing the user of the preexisting criteria and
asking for confirmation to overwrite. Press Next to continue and
write the files.
MD0003-065
Revision D
May 2, 2005
Page 45 of 814
Labor Management (LM)
What’s New
Editing Assignments
Once the assignments are generated, managers should review the results
and make the necessary additions and changes to the schedules.
With the addition of skill level requirements, a new option was added to
the Weekly Assignments form that allows users to move an employee’s
entire schedule (row) to another employee based on their skill level. To
do this:
1. Right-click on the name of the current employee. A pop-up menu
displays.
2. Select Send Row to an Employee to open the next nested menu and
select one of the following options:
MD0003-065
Revision D
May 2, 2005
Page 46 of 814
with the same skill levels
with different skill levels
who can’t work all the jobs
Labor Management (LM)
What’s New
3. Highlight one of the selections to display a list of employees who fit
the criteria. The list includes names and the job/skill levels for which
they are qualified.
4. Select an employee. The event nodes will be automatically moved
and the totals adjusted accordingly.
MD0003-065
Revision D
May 2, 2005
Page 47 of 814
Labor Management (LM)
What’s Enhanced
What’s Enhanced
An enhancement is defined as a change made to improve or extend the
functionality of the current LM applications. To qualify as an
enhancement, the change must satisfy the following criteria:
The basic feature or functionality already exists in the previous
release of the software.
The change adds to or extends the current process. This differs from a
revision (i.e., a bug fix) which corrects a problem not caught in the
previous release of the software.
Enhancements
Summarized
The table below summarizes the enhancements included in this version.
Module
MD0003-065
Revision D
May 2, 2005
Page 48 of 814
Feature
Page
LM Setup
Skill Level Modifications
49
Scheduling
Assigning an Employee’s Section for a
Shift
51
Auto-Scheduling by Name
54
Labor Management (LM)
What’s Enhanced
Enhancements
Detailed
LM Setup
Skill Level Modifications
To facilitate the addition of skill level requirements during scheduling,
the Skill Levels form (LM Setup | Time and Attendance) was modified to
support a fixed number (20) of records. Previously, users could enter an
unlimited number of entries.
Note
When upgrading from a previous version, the system will
automatically post the first 20 entries to the new Skill Levels
table. If more than 20 skill levels have been defined, the
additional entries will be copied to the database, but will not be
accessible through the application interface.
The new form provides users with 20 pre-programmed row positions.
Additional rows cannot be added, nor existing rows deleted. To configure
skill levels, labels may be entered in any of the 20 row positions. Blank
rows may be interspersed between entries.
MD0003-065
Revision D
May 2, 2005
Page 49 of 814
Labor Management (LM)
What’s Enhanced
During operations, the system will ignore empty records and display, in
columns or drop-down lists, the skill level names in the order provided.
Since the names are just labels, they can be modified at any time.
Changes will propagate automatically to the following forms where Skill
Levels options are available:
HR (or POS Configurator) | Employees Setup | Hourly Job
HR (or POS Configurator) | Employee Setup | Salary Job
LM Setup | Staff Requirements | Skill Level Requirements
Scheduling | Schedule Place Holder Setup
Once a skill level is selected on one of these forms, the label cannot be
moved or deleted from the form until all links to it have been deleted.
MD0003-065
Revision D
May 2, 2005
Page 50 of 814
Labor Management (LM)
What’s Enhanced
Scheduling
Assigning an Employee’s Section for a Shift
When setting up weekly assignments, users can now specify where each
employee will be working during a scheduled shift or time event. This is
done by linking the time event to one of the Sections defined in POS
Configurator (Revenue Center | RVC Table Seating | Seating Sections).
To create the link, users simply right-click the selected time event on the
Weekly Assignments form, highlight the new Assign Section option and
choose from the list of predefined Sections. Assignments can be deleted
by choosing No Section from the pop-up list.
Note
Section assignments made through the Scheduling application
are for LM report purposes only. The entries made here will not
change Table or Section assignment made via POS Configurator
or Manager Procedures.
MD0003-065
Revision D
May 2, 2005
Page 51 of 814
Labor Management (LM)
What’s Enhanced
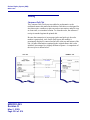
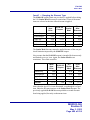
Reports
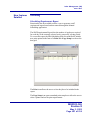
As part of this enhancement, two reports were modified to include the
new section assignment information:
Individual Employee Schedule
Section
Assignment
MD0003-065
Revision D
May 2, 2005
Page 52 of 814
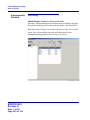
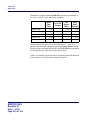
Labor Management (LM)
What’s Enhanced
Employee Schedule by Employee
Section
Assignment
MD0003-065
Revision D
May 2, 2005
Page 53 of 814
Labor Management (LM)
What’s Enhanced
Auto-Scheduling by Name
In the past, when auto-scheduling weekly assignments, the system would
select employees alphabetically by last name. As a result, employees
whose last names began with letters A through E, for example, would be
scheduled first and more often than those whose names began with W
through Z. If a lot of employees were qualified for a particular job,
relative to the requirements for that job, then employees whose last
names began with Z might never be auto-scheduled.
To correct this imbalance, the auto-scheduling functionality has been
reprogrammed to select employees in a more random fashion. For those
who prefer the previous functionality, the option Use alphabetical
preference (legacy) (Scheduling | Weekly Assignments | Options |
Miscellaneous) was also added. When checked, this option will revert to
scheduling available employees alphabetically. By default, this option is
disabled.
MD0003-065
Revision D
May 2, 2005
Page 54 of 814
Labor Management (LM)
What’s Revised
What’s Revised
A revision is defined as a correction made to any existing form, feature,
or function currently resident in the LM software. To qualify as a
revision, the change must satisfy the following criteria:
The basic form, feature, or functionality must be part of the previous
version of the software.
The change must replace the current item or remove it from the
application.
Revisions
Summarized
The table below summarizes the revisions included in this version.
Module
Feature
CR ID
Page
Forecasting
Revenue Center Historical Totals
Incorrect
19450
56
Human
Resources
‘Allow sub-minimum wage pay’
Option Causes Incorrect
Override Overtime Rate
Calculation
N/A
56
Reports
Employee Schedule
18991
57
MD0003-065
Revision D
May 2, 2005
Page 55 of 814
Labor Management (LM)
What’s Revised
Revisions
Detailed
Forecasting
Revenue Center Historical Totals Incorrect
CR ID #: 19450
Previously, in a multiple revenue center environment, the system was
using incorrect historical data when forecasting labor requirements.
Instead of making calculations for each revenue center based on its own
Historical Totals, the system was making those calculations based on the
total combined sales for all the revenue centers. This problem has been
corrected.
Human Resources
‘Allow sub-minimum wage pay’ Option Causes Incorrect
Override Overtime Rate Calculation
CR ID #: N/A
When configuring an employee's hourly job in a store with LM licensing,
if that employee has the Allow sub-minimum wage pay option selected,
any new Override pay rate will have their corresponding Override
overtime rate incorrectly calculated. The Override Overtime Rate (OOR)
will be the Overtime wage multiplier X the minimum wage, regardless of
the value entered in Override Pay Rate. This has been corrected.
MD0003-065
Revision D
May 2, 2005
Page 56 of 814
Labor Management (LM)
What’s Revised
Reports
The table below describes the LM report changes in this Service Pack:
Report
Employee
Schedule
CR ID #: 18991
a
Area Modified
Templatea
Description
When running the Employee
Schedule report, the Day 1
entry did not display the date as
set in the Microsoft Control
Panel Regional Options.
Instead of pulling the System
Default Short Format (used for
Days 2-7), it was hard-coded to
the MM/DD/YYYY format.
This has been corrected.
Files Changed:
SchedEmp.rpt
MD0003-065
Revision D
May 2, 2005
Page 57 of 814
Financial Management (FM)
What’s New
Financial Management (FM)
What’s New
There are no new features in this version of the software.
What’s Enhanced
There are no enhancements in this version of the software.
What’s Revised
There are no revisions in this version of the software.
MD0003-065
Revision D
May 2, 2005
Page 58 of 814
RES Platform
Introduction
RES Platform
Introduction
This chapter comprises changes made to RES Platform, which includes
the following applications:
MICROS Desktop
License Manager
Reports Explorer
Language Translation Utility
What’s New
There are no new features in this version of the software.
What’s Enhanced
There are no enhancements in this version of the software.
What’s Revised
There are no revisions in this version of the software.
MD0003-065
Revision D
May 2, 2005
Page 59 of 814
RES Platform
What’s Revised
MD0003-065
Revision D
May 2, 2005
Page 60 of 814
Service Pack 4
Service Pack 4
In keeping with the original RES 3.2 ReadMe First, information is
divided into self-contained chapters, one for each of the following RES
products:
3700 Point-of-Sale (POS) System
Kitchen Display System (KDS)
Cash Management (CM)
Guest Service Solutions (GSS)
Product Management (PM)
Labor Management (LM)
Financial Management (FM)
RES Platform
For clarity, product information is further divided into three sections:
What’s New
What’s Enhanced
What’s Revised.
Each section begins with an introduction and includes a table that
summarizes the features and functionality incorporated in this version of
the software. The table provides hypertext links to supplementary text
and graphics about the selected topics.
For more information on these features, and step-by-step instructions for
configuring them, refer to the product’s Online Reference Manual,
installed with the MICROS Documentation and available on the RES
CD.
MD0003-065
Revision D
May 2, 2005
Page 61 of 814
3700 POS
What’s New
3700 POS
What’s New
New Features
Summarized
A new feature is defined as one that provides capabilities that were not
available in previous versions of the application.
The table below summarizes the new features included in this version.
Module
MD0003-065
Revision D
May 2, 2005
Page 62 of 814
Feature
Page
Hand-Held
Terminals
(HHT)
Fujitsu BPad
63
POS
Operations
Printer Destination Selection
68
SIM
Test_Dsvc
70
Test_Dsvc_Ttl
71
Validate_Mag_Track
72
3700 POS
What’s New
New Features
Detailed
Hand-Held Terminals (HHT)
Fujitsu BPad
With this release, RES support has been added for using the Fujitsu BPad
hand-held devices. This section provides instructions for installing the
POS operating system (RES 3.2 sp3 build 3.2.51.965 or higher) on the
BPad device (BPAD.12).
Note
Because of limited screen space,all numeric and alphanumeric
keypad buttons have been removed from the BPAD version of
manager procedures. Numeric data can be entered via the
hardware keyboard and alphanumeric via the software input
panel (press F1).
Configure the Server
Follow these steps to set up the server to use the Fujitsu BPad device:
1. Open the MICROS Control Panel and set the Restaurant status to Off.
2. Copy the BPadSetup.exe file to the \Micros directory on the Server.
3. Double-click on BPadSetup.exe. A zip file window will display.
4. Check the two files in the window and select the Unzip button from
the popup window. Setup will unzip the files and copy then to a
\BPadSetup folder. When the process is complete, the message
“Files Unzipped Successfully” will display.
5. Click OK to close the message box. The setup program will finish
installing, creating the following directory tree:
\MICROS\RES\Cal\BPad\ — This is the root of the BPad tree.
It contains the necessary POSLoader.cab file required for the
hand-held setup
\MICROS\RES\Cal\BPad\FlashDisk\MICROS\ — Contains
the Bitmaps, Etc, and Txt folders that store specific files to
download to the hand-held device (i.e., OpsDisplaySys.cfg)
MD0003-065
Revision D
May 2, 2005
Page 63 of 814
3700 POS
What’s New
6. Ensure that ActiveSync is installed on the Server. If not:
Go to the Microsoft website (\www.microsoft.com) and navigate
to Windowsmobile | Downloads.
Select the ActiveSync option and choose the most up-to-date
version of the software (currently this is Version 3.7.1).
Select a language for the download.
Click Accept to acknowledge the licensing agreement and
download the software.
Configure the Fujitsu Hand-Held Device
If version BPad.11 or higher is installed, the POSLoader will
automatically upgrade the hand-held device once the Server setup (as
described above) is complete and the device is rebooted by pressing the
RESET button on the back of the hand-held. No further setup is required.
If a previous version of the operating system (BPad.10 or lower) was
installed on the hand-held device, go to page 67 and complete the steps
under Removing MICROS from the Fujitsu BPad before proceding.
Follow these steps to setup the Fujitsu hand-held unit. These steps also
apply to a clean (first-time) installation:
1. Turn on the hand-held device by holding down the Power button
(directly under the F1 button). The screen displays the following
message: “The contents of memory has been lost. Touch ‘Restore’ to
recover the application program.”
2. Click the Restore button.
3. Follow the system prompts to calibrate the touch screen.
4. Click OK when the Date/Time/Time Zone dialog displays. These
setting will be configured later. Wait while the device reboots. The
NETWLAN1 setup screen will display.
MD0003-065
Revision D
May 2, 2005
Page 64 of 814
3700 POS
What’s New
5. Configure the appropriate Wireless Network and select OK.
NOTE: Double-click the network icon in the Task Bar to verify that
the network connection is active, with a valid IP Address. If using a
Static IP Address, the following configuration steps may be required:
Click Start | Settings | Control Panel.
Select Network and Dialup Connection.
Select NETWLAN1.
Specify the IPAddress information.
Click OK.
Recheck the IP Address using the Network icon in the Task Bar.
6. Double-click the time in the Task Bar to configure the Date, Time,
and TimeZone settings. Click OK when finished.
7. On the hand-held device, select Start | Programs | ActiveSync to
initiate an ActivesSync session.
NOTE: It is not necessary to establish a Partnership on the Server.
If the message “Found New Hardware” displays on the Server, install
the appropriate USB driver supplied by Fujitsu before proceding.
If the connection continues to fail, it may be necessary to unplug and
reconnect the USB cable to the Fujitsu cradle to complete the
connection.
8. Go to the Server. From the Windows Explorer, copy the
POSLoader.ARMV4I.CAB file from the \MICROS\RES\Cal\
BPad folder to the root directory of Mobile Device. This should be
listed after the local drives.
9. Once the file has been copied, disconnect the ActiveSync session on
the hand-held device by double-clicking the ActiveSync icon on the
Task Bar and selecting Disconnect from the popup menu.
MD0003-065
Revision D
May 2, 2005
Page 65 of 814
3700 POS
What’s New
10. On the hand-held device, select Start | Programs | Windows Explorer.
11. Double-click on the POSLoader.ARMV4I.CAB file. When
prompted, verify that the installation path is \Flashdisk\System and
click OK to continue.
12. Navigate to the Windows folder and double-click on
POSLoadInstaller.exe.
13. After reboot, the MICROS POS Configuration utility will
automatically begin.
14. Complete the POS Configuration, as required. When finished, the
device will reboot automatically. As soon as the device begins the
reboot process, press and hold down the SFT and CAN buttons
simultaneously, until the BPad Configuration screen appears.
NOTE: If the BPad configuration screen does not appear, repeat by
performing a warm reboot pressing the RESET button on the back of
the device while holding down the SFT-CAN buttons.
15. When the BPad Configuration screen displays, click the option “0.
End.” A progress bar is shown as the system settings are saved to the
FlashDisk for permanent storage. When finished, the device will
power off.
16. Power on the BPad. The Mobile MICROS Startup Message Box
displays.
17. Click Continue and wait while the BPad installs all RES files. When
complete, the message “POS Client Software Download/Update
finished.”
18. Click OK in the corner of the hand-held device to launch POS
Operations.
MD0003-065
Revision D
May 2, 2005
Page 66 of 814
3700 POS
What’s New
Removing MICROS from the Fujitsu BPad
Follow these steps to remove the RES operating system from a Fujitsu
BPad device:
1. On the hand-held device, select Start | Programs | ActiveSync to
initiate an ActivesSync session.
NOTE: If MICROS applications are active, pressing the SFT-CAN
buttons is the only way to access the Start button. Also,
It is not necessary to establish a Partnership on the Server.
If the message “Found New Hardware” displays on the Server,
install the appropriate USB driver supplied by Fujitsu before
proceding.
If the connection continues to fail, it may be necessary to unplug
and reconnect the USB cable to the Fujitsu cradle to complete the
connection.
2. Go to the Server. From the Windows Explorer, copy the
UninstallMICROS.exe file from the \MICROS\RES\Cal\BPad\
Flashdisk folder to the Mobile Device\Flashdisk folder. This should
be listed after the local drives.
3. Once the file has been copied, disconnect the ActiveSync session on
the hand-held device by double-clicking the ActiveSync icon on the
Task Bar and selecting Disconnect from the popup menu.
4. On the hand-held device, select Start | Programs | Windows Explorer.
5. Navigate to the \Flashdisk folder and double-click
UninstallMICROS.exe.
6. When the process is complete, the message “MICROS Startup File
Removal is now complete” will display. Click the OK button. The
BPad will roboot.
7. Remove the battery cover from the back of the hand-held unit.
MD0003-065
Revision D
May 2, 2005
Page 67 of 814
3700 POS
What’s New
8. Depress the Full Reset button located beneath the battery.
9. Reset the battery and replace the cover. MICROS RES is now
removed from the hand-held device.
POS Operations
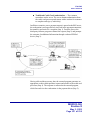
Printer Destination Selection
During setup, workstations are linked to one or more default printers
(POS Configurator | Devices | User Workstations | Printers). A selection
is made for each type of print job required (e.g., guest checks, receipts,
time cards, validation chits, etc.).
In the past, the only way to change the printer destination was through
the device’s settings in POS Configurator. This is not always practical.
During operations, temporary conditions (equipment malfunction, an
unexpected rush of customers) could result in too many workstations
printing to the same device, or an active workstation printing to an
inconvenient location.
This was especially true for hand-held units. Since hand-held units are
not fixed to a particular station, a server working in section A (for
example) could easily be assigned a unit linked to a section B printer.
Consequently, a lot of time could be wasted walking back and forth to
retrieve guest checks, credit card vouchers, etc.
MD0003-065
Revision D
May 2, 2005
Page 68 of 814
3700 POS
What’s New
The Solution
To improve service, the ability to override a workstation’s default printer
was added. Now, when a print job is initiated, the system can be
programmed to display a list of available printer. User’s simply select and
press OK to send the job to that device.
If the printer is not accessible at the time of selection, the system will
automatically go to the workstation’s designated Local Backup Printer.
Note
This feature does not affect journal printing, backup journal
printing, or local backup printing.
New Options in POS Configurator
To support this feature, two new options were added to POS
Configurator:
Enable Printer Destination Selection (Devices | User Workstations
| Options) — When checked, overrides the workstation’s default
printer when a print job is initiated. Provides a list of available printer
devices where the print job may be sent.
Printer destination selection (Devices | Devices | Printer
Definition) — When checked, includes the device as an alternative to
a workstation’s default printer.
NOTE: If selected, the device will be available to every workstation
where the printer override option is enabled.
MD0003-065
Revision D
May 2, 2005
Page 69 of 814
3700 POS
What’s New
SIM
The following SIM variables were added in this release:
Test_Dsvc
Function
This command may be used to verify a discount or service charge. An
amount or percentage can be passed with the function when checking a
discount or service charge that is not a preset item.
Syntax (entered as a single line)
Test_Dsvc Obj_Num
or
Test_Dsvc Obj_Num, Value
Argument/Description
Obj_Num — The object number of the discount or service charge.
Value — Optional value that is the amount or percentage to be applied.
Example
Event inq:1
Test_Dsvc 202, 5.00 // Open $ Discount
InfoMessage “Open $ Discount, $5.00”, @Test_Dsvc_Ttl
EndEvent
MD0003-065
Revision D
May 2, 2005
Page 70 of 814
3700 POS
What’s New
Test_Dsvc_Ttl
Function
This system variable is used to return the value of a discount or service
charge. It is initialized to zero at the beginning of each SIM event and
also prior to running a Test_Dsvc test.
Type/Size
$12
Syntax
@Test_Dsvc_Ttl
Usage
This variable is read-only.
MD0003-065
Revision D
May 2, 2005
Page 71 of 814
3700 POS
What’s New
Validate_Mag_Track
Function
This system variable allows users to swipe and read magnetic card data
when initiated as part of a SIM input command.
Type/Size
N1
Syntax
@Validate_Mag_Track
Example
Event inq:1
var account_num: a19
var track1_data : a79
var track2_data: a79
@validate_mag_track = 0
// disable track 2 validation
window 1,40
displayMSinput 1, 2, accountnum{m1, 1, 1, 19}, “Enter Account
Number”, 0, 0, track1_data{m1,*},””
windowinput
waitforclear
window 2, 40
display 1, 2, “Account Number:”, account_num
if@MAGSTATUS = “Y”
display 2, 2, “As read from credit card.”
else
display 2, 2, “As entered from keyboard.”
endif
waitforclear
EndEvent
MD0003-065
Revision D
May 2, 2005
Page 72 of 814
3700 POS
What’s New
Note
When a SIM event is executed, the variable defaults to a state of 1 (true),
which validates track 2 data.
The variable may be set to 0 (false), which directs the script to bypass
track 2 validation. This allows sites to read a magnetic identification card
with blank track 2 data.
MD0003-065
Revision D
May 2, 2005
Page 73 of 814
3700 POS
What’s Enhanced
What’s Enhanced
An enhancement is defined as a change made to improve or extend the
functionality of the current 3700 POS application. To qualify as an
enhancement, the change must satisfy the following criteria:
The basic feature or functionality already exists in the previous
release of the software.
The change adds to or extends the current process. This differs from a
revision (i.e., a bug fix) which corrects a problem not caught in the
previous release of the software.
Enhancements
Summarized
The table below summarizes the enhancements included in this version.
Module
MD0003-065
Revision D
May 2, 2005
Page 74 of 814
Feature
Page
Manager
Procedures
Added Messages About Employee and
Menu Item Wizards
75
POS
Configurator
Added Discount Restrictions Per Seat
75
POS
Operations
Forgive Cover Counts on Menu Items
75
Tax Calculations Involving Subtotal
Discounts on a Seat-Filtered Check
77
Reports
Credit Card Batch Report
78
SIM
Magnetic Track 3 Support on OPOS
Devices
79
3700 POS
What’s Enhanced
Enhancements
Detailed
Manager Procedures
Added Messages About Employee and Menu Item Wizards
By design, Manager Procedures does not support the use of the
Employee or Menu Item Wizards on a hand-held device. To avoid
confusion, when either of these buttons is pressed on an HHT, a message
box will display explaining the limitation.
POS Configurator
Added Discount Restrictions Per Seat
POS Operations was modified to include two new options for limiting
discounts during check operations. The limitations were added to the
Restrictions radio box (Sales | Discount/Service | Discounts) in POS
Configurator. They are only applicable to touch item discounts:
One discount per seat — Imposes its own per seat limit on the
number of discounts allowed. If the seat has already been
discounted, this discount will not be applied. If the seat has not
been discounted yet, this discount will be taken but no other
discounts will be allowed.
One discount of this type per seat — Applies this discount once
per seat and ignores any attempt to apply the discount again.
POS Operations
Forgive Cover Counts on Menu Items
One of the methods used to track covers (i.e., number of guests) is by
counting certain classes of menu items. For example, if entrées are
configured to add to the cover count, then every time an entrée is posted,
the system increments the guest count. (This can also be applied to nonpriced condiment such as As Entrée or Split Item).
MD0003-065
Revision D
May 2, 2005
Page 75 of 814
3700 POS
What’s Enhanced
With this release, the discount feature has been modified to allow users to
forgive menu item cover counts, when the discount is applied. The
enhancement affects any and all cover counts, whether added by the
menu item or by one of its (non-priced) condiments.
Background
At some sites, employees receive bonuses based on their sales
performance. This may be defined as the amount spent per guest (on
average) which is calculated as follows:
Net Sales Totals
Cover Count
=
Avg/Guest
In the past, if the customer received a discount for a counted menu item,
the system would subtract the price from the check total, but the cover
count would remain the same. This seemed reasonable. After all, the
guest was still served, even if the menu item was free.
Unfortunately, for the employee (who had no control over the discount),
there were unintended consequences. Reducing the net sales total without
changing the cover count, resulted in a lower per guest average. This, in
turn, could reduce or eliminate the employee’s bonus.
The Solution
To resolve this problem, a new Forgive Cover Count option (Sales |
Discount/Service | Discounts) was added in POS Configurator. When
enabled, and the discount is applied to a (parent) menu item, the option
directs the system to forgive the relevant cover counts.
To work, the following conditions must also be true:
MD0003-065
Revision D
May 2, 2005
Page 76 of 814
The discount is an item discount.
The discounted menu item is configured to Add to cover count
(Sales | Menu Item Classes | Prce/Totals).
The option Use seat count for cover count (Revenue Center |
RVC Seats) is disabled.
3700 POS
What’s Enhanced
The Results
The system forgives all covers associated with a discounted menu item.
For example, suppose two customers decide to share a Lobster entrée.
The original menu item adds one to the cover count, while the condiment
Split Entrée adds a second one. The Lobster menu item has now added
(properly) two guests to the cover count total. If, at the end of the meal,
the customers present a discount coupon for the Lobster dinner, the
system will remove both covers when the discount is applied.
Negative cover counts are not allowed. If a discount is applied more than
once to the same menu item, the cover count(s) will be forgiven only
once. On the other hand, if the menu items were entered as a quantity
(e.g., 3 Steaks), applying an item discount to the quantity line item, will
forgive all three covers.
Tax Calculations Involving Subtotal Discounts on a SeatFiltered Check
After applying a subtotal discount to a guest check that had been filtered
by seat, any attempt to exit seat filtering could cause the taxes to
recalculate incorrectly when the discount was configured to forgive one
or more taxes.
The issue arose because the system was calculating its discount taxable
sales adjustments based on the rest of the menu item detail on the check.
When filtering by seat, the set of menu items was artificially limited to
the menu items for that seat. If the filter was then exited, the discount was
recalculated based on all the applicable menu items for all seats. This
could create a problem as the tax per seat might not add up to the tax per
check, provided that the check included other applicable menu items that
were not included in the seat filter.
MD0003-065
Revision D
May 2, 2005
Page 77 of 814
3700 POS
What’s Enhanced
To resolve the issue, POS Operations was modified so that the base total
taxable sales adjustments are calculated differently when a subtotal
discount is configured to Allow seat filter exit (Sales | Discount/Service
| Discounts). The new calculation will adjust all appropriate taxable sales
by the full amount of the discount, which will be correct for discounts
that forgive zero or one tax rate. Because the adjustment amount is
always equal to the full amount of the discount and is not based on the
totals of the rest of the applicable menu items, the taxable sales
calculation will be the same in or out of filter seat.
Note
This functionality should only be used with discounts that have
the Reset Itemizers option enabled. Otherwise the same discount
could be applied again and again to the same totals.
Reports
Credit Card Batch Transfer Status Report
The format of the Credit Card Batch Transfer Status report (cc_002.rpt)
has been changed. With this release, if an error is recorded during a batch
settlement, the message
*** Warning!!!- Batch has NOT settled. Please contact support.***"
will be printed in 24-point bold type across the top of the report. The
change was added to highlight important conditions that require
immediate attention from the user.
MD0003-065
Revision D
May 2, 2005
Page 78 of 814
3700 POS
What’s Enhanced
SIM
Magnetic Track 3 Support on OPOS Devices
Track 3 support for the magnetic stripe reader has been extended for use
with OPOS devices. Previously, this functionality was only available on
MICROS PCWSs.
This function is used to read in and store Track 3 data which can then be
accessed through an ISL script using an MSR-related command, such as
Input:
input track3_data{m3, *}
where m3 specifies to read track 3 data, and * specifies to read all fields
from the track.
To work properly, the workstation must have an OPOS driver that
support reading in Track 3 data.
MD0003-065
Revision D
May 2, 2005
Page 79 of 814
3700 POS
What’s Revised
What’s Revised
A revision is defined as a correction made to any existing form, feature,
or function currently resident in the 3700 POS software. To qualify as a
revision, the change must satisfy the following criteria:
The basic form, feature, or functionality must be part of the previous
version of the software.
The change must replace the current item or remove it from the
application.
Revisions
Summarized
The table below summarizes the revisions included in this version.
Module
Common
MD0003-065
Revision D
May 2, 2005
Page 80 of 814
Feature
CR ID
Page
Constant SQL Searches for Autofire
Checks Slows Performance
18870
85
Restarting Backup Server Causes
POS Operations to Hang
19310
85
Credit Card
Server
CCS Sends Previous GB Response
to New Batch Open Request
N/A
85
Database
Carry-Over Check Totals Calculated
Incorrectly During DST Time
Changes
13892,
13893
86
Carry-Over Check Totals Posted
Incorrectly
13878,
15196
86
Changes Made for Team Service
Causes Employee Reports to Run
Slowly
18763
87
Inserting New Transaction Detail
Causes Error in Totals Posting
18534
87
Stored Procedure Fails When
Reposting Labor Totals
18549
87
3700 POS
What’s Revised
Module
Feature
CR ID
Page
Delivery
Dispatch
Configuration Utility Always
Displays Six Order Types
N/A
88
Hand-Held
Devices
New Templates Missing After
Upgrade
16980
88
Manager
Procedures
Incorrectly Allows Edit of Closed
Time Cards
N/A
89
Language of Signed-In Employee
Changes Unexpectedly
N/A
89
Windows Taskbar Displays After
Closing Manager Procedures
N/A
89
Adding New Menu Item Price
Record Overrides Existing Record
18853
90
Hebrew Font Not Printing Properly
in Reference Fields
18944
90
Kitchen Theme Order Devices
Identical After Upgrade
18793
90
Negatives Prices Cannot Be Entered
in Menu Items Form
19352
90
POS Configurator Allows Edit of
EM Corporate Controlled Menu
Items
18812
91
Secondary Authentication Req’d
Defined Incorrectly in Help Files
19175
91
Stored Procedure Missing From
Autosequence Selection List
N/A
91
POS
Configurator
MD0003-065
Revision D
May 2, 2005
Page 81 of 814
3700 POS
What’s Revised
Module
POS
Operations
MD0003-065
Revision D
May 2, 2005
Page 82 of 814
Feature
CR ID
Page
Check Total Does Not Send Comma
as Decimal Separator When
Running TMS
N/A
92
Combo Discount Overrides Not
Working Properly
N/A
92
Combo Menu Items Lost After
Previous Round Auto-Combo
Recognition
N/A
92
Cover Counts Incorrect When Using
Seat Filters
N/A
93
Delayed Orders That are Prepaid
Not Sent To Order Devices
N/A
93
Forgive Cover Count Does Not
Work After Check Transfer
N/A
93
ILDS Pours Voided Items Twice
19458
93
Insert Condiment Hangs at
Alphanumeric Screen When
Reference Required
18474
94
Last Item Discounts Do Not Work
on Menu Items With Required
Condiments
19124
94
Last Item Void Prompts for Previous
Item’s Min/Max Condiments
19379
94
Menu Item Validation Chits Printing
Incorrectly
N/A
95
Multiple Discounts and Itemizers on
Same Check Do Not Calculate
Correctly
17172
95
OPS08x10 Font Difficult to
Differentiate Between Numerals 6
and 8 in Check Detail
17123
95
3700 POS
What’s Revised
Module
POS
Operations
(cont’d.)
Feature
CR ID
Page
Required Condiments Not Adding
To Cover Count
17469
96
Split Check/Edit Seat Functions Do
Not Share Menu Items Evenly
16436
96
Split Check Sorts by Menu Item
Instead of by Seat
N/A
96
Subtotal Discounts Ignore Combo
Discount Override
N/A
96
Subtotal Discounts and Tax
Calculated Incorrectly on Large
Sums
16669
97
Subtotal Discounts With Combo
Override Option Calculate
Incorrectly
19148
97
Tax Amount Not Forgiven If
Discount Amount is Greater Than
317.00
19251
97
Tax on Auto Gratuity Does Not
Report Properly
18578
97
Tax Calculations Involving Subtotal
Discounts on a Seat Filtered Check
17281
17380
98
Tax Posted Incorrectly With Seat
Filtering
17664
98
Touch Item Discounts Not Handling
Restrictions Properly
N/A
98
Touch Item Discounts Not Working
Properly With Consolidated Menu
Items
N/A
98
18869
99
Touch Void of Priced Condiment
Does Not Reduce Amount Due
MD0003-065
Revision D
May 2, 2005
Page 83 of 814
3700 POS
What’s Revised
Module
POS
Operations
(cont’d.)
Feature
CR ID
Page
Tracking Totals Incorrectly Reset to
0.00 for Previous Shifts
19498
99
Transferred Checks Reported As
Carried Over
19220
99
N/A
100
Error Occurs When Running EM
Reports
16964
100
System Sales Reports Show
Incorect Carried Over Check Count
and Amount
19233
101
Time Period Reports Take Too Long
to Run
18561
101
Weight Descriptor Truncated if
Reference Entry Equals 19
Characters
Reports
MD0003-065
Revision D
May 2, 2005
Page 84 of 814
Setup
Unattended Setup Not Upgrading
Win 2000 Clients
N/A
101
SIM
@Dtl_Ord_Dev_Output Always
Returns Zero
18948
102
getRxMsg Command Terminates
Event Prematurely
14748
102
POS Operations Does Not Always
Provide Window For ISL Response
16852
102
3700 POS
What’s Revised
Revisions
Detailed
Common
Constant SQL Searches for Autofire Checks Slows
Performance
CR ID #: 18870
During operations, the system is constantly requesting a list of checks to
be included in the workstations’ open check SLUs and table object
screens. With the addition of autofire features (timed order, delayed
orders, future orders), the number of SQL queries required to keep the
workstations updated could potentially reduce system performance.
To address this issue, code was added that would allow the system to
cache any pending autofire checks in memory. The cache will remain in
memory for at least 10 seconds.
Restarting Backup Server Causes POS Operations to Hang
CR ID #: 19310
Previously, POS Operations would hang on all workstations after
rebooting the backup server machine, or restarting the backup server
service. The problem was caused when a check transfer had occured
prior to the system going into Backup Server Mode. This has been
corrected.
Credit Card Server
CCS Sends Previous GB Response to New Batch Open
Request
CR ID #: N/A
During credit card settlement, if the Settle.exe was closed before the
Credit Card Server (CCS) sent the GB response for the current batch, the
system would retain that response until the next batch was generated. As
soon as the Batch Open request was made, the GB response from the
previous batch would be sent. This caused the settlement records to be
incorrectly counted.
MD0003-065
Revision D
May 2, 2005
Page 85 of 814
3700 POS
What’s Revised
To correct the problem, changes were made to the CCS to ensure that
only one settlement client may be active at a time. Also, if a previous
settlement client exits without properly notifying CCS, the old
connection will be terminated when a new settlement request is received.
Database
Carry-Over Check Totals Calculated Incorrectly During DST
Changes
CR ID #: 13892, 13893
Previously, carry-over and outstanding checks were incorrectly reported
during a changeover to Daylight Savings Time (DST). This occurred
because the system was not compensating for the one-hour time shift
when comparing local check start times to GMT. This has been corrected.
Carry-Over Check Totals Posted Incorrectly
CR ID #: 13878, 15196
Because of multiple problems with report totals involving carry-over and
outstanding checks, the process by which data are reported has been
reprogrammed.
Instead of going back through the trans_dtl table to find the correct
amount, two new tables — dly_sys_rvc_carry_over_ttl and
shift_emp_carry_over_ttl — have been added. These tables will be
populated with the correct carry-over amounts when the business date or
shift is incremented. When a report is called, the system, revenue center,
or employee totals tables will be populated from these tables. This way
should be faster, simpler and most importantly, always correct.
No changes to reports or EM were needed. The new tables have been
added to appropriate purge and clear totals scripts.
MD0003-065
Revision D
May 2, 2005
Page 86 of 814
3700 POS
What’s Revised
Changes Made for Team Service Causes Employee Reports
to Run Slowly
CR ID #: 18763
When adding the team service feature, changes made to the database
were causing many of the the employee reports to run slowly. This has
been corrected.
Inserting New Transaction Detail Causes Error in Totals
Posted
CR ID #: 18534
When a new transaction is inserted into the database, the system adds
records to the detail tables in the following order:
1. Chk_dtl
2. Trans_dtl
3. Sale_dtl
Previously, if totals were posted in the fraction of a second between step
2 and step 3 — before the values for this new transaction technically
existed — the transaction would post, but the values would not be added
to the site's totals. This has been corrected.
Stored Procedure Fails When Reposting Labor Totals
CR ID #: 18549
When running POS reports, if the site kept a large amount of time card
data, the stored procedure micros.splm_repost_all_labor_seven_days
would fail causing the error "Too many temporary tables in connection"
to display. This problem has been corrected.
MD0003-065
Revision D
May 2, 2005
Page 87 of 814
3700 POS
What’s Revised
Delivery Dispatch
Configuration Utility Always Displays Six Order Types
CR ID #: N/A
The Delivery Dispatch Configuration Utility (DDCU) uses the order
types defined through the POS Configurator (System | Order Types) to
populate the list box on its own Order Type tab.
In the previous release, the DDCU would consistently list six order types,
even when less than six records had been defined. To do this, the last
record would be displayed as many times as necessary to complete a list
of six. For example, if five order types were defined in POS
Configurator, the DDCU would list the fifth order type twice. If only one
order type was configured, that entry would be listed six times.
This problem has been corrected.
Hand-Held Devices
New Templates Missing After Upgrade
CR ID #: 16980
After upgrading to RES 3.2 Service Pack 3, the following templates that
were added in Service Pack 1 were missing from the drop-down list in
POS Configurator | Devices | Touchscreens:
417 HH Info Pad3
418 HH Large Detail2
419 HH Small Detail3
This problem has been corrected.
MD0003-065
Revision D
May 2, 2005
Page 88 of 814
3700 POS
What’s Revised
Manager Procedures
Incorrectly Allows Edit of Closed Time Card
CR ID #: N/A
When editing time cards records through Manager Procedures, if the user
selected an entry from a closed time period, the system would open the
record and allow changes to be made to it. This has been corrected.
Language of Signed-In Employee Changes Unexpectedly
CR ID #: N/A
When using Manager Procedures, a user’s default language would
change if a second user signed-in on another client with a different
language requirement.
Once the second user opened Manager Procedures on his workstation,
the language preference of the first user would be ignored. As soon as the
first user changed screens, the text would display in the language of the
second user.
This problem has been corrected.
Windows Taskbar Displays After Closing Manager
Procedures
CR ID #: N/A
After launching Manager Procedures from POS Operations, the
Windows taskbar would be incorrectly brought to the foreground when
Manager Procedures was exited. This problem has been corrected.
NOTE: To prevent the taskbar from displaying while Manager
Procedures is run, press the Windows Start button, and select Settings |
Taskbar & Start Menu. When the Properties window displays, clear the
Always on Top check box.
MD0003-065
Revision D
May 2, 2005
Page 89 of 814
3700 POS
What’s Revised
POS Configurator
Adding New Menu Item Price Record Overrides Existing
Record
CR ID #: 18853
When adding a second price record to a menu item with only one price
record defined, the system would overwrite the existing record instead of
adding a second entry. This problem has been corrected.
Hebrew Font Not Printing Properly in Reference Fields
CR ID #: 18944
When using a Hebrew font to enter data in a reference field, the system
displayed and printed the text as a string of question marks (i.e., ??????)
instead of the proper Hebrew characters. This has been corrected.
Kitchen Theme Order Devices Identical After Upgrade
18793
When applying a RES 3.2 service pack upgrade, the system incorrectly
modified the Kitchen Theme records in POS Configurator. After the
upgrade, every record listed the same order devices as those in active
kitchen theme entry. This problem has been corrected.
Negative Prices Cannot Be Entered in Menu Items Form
CR ID #: 19352
When entering menu item prices in POS Configurator (Sales | Menu Item
| Prices), the form would not accept a negative entry. This problem has
been corrected.
MD0003-065
Revision D
May 2, 2005
Page 90 of 814
3700 POS
What’s Revised
POS Configurator Allows Edit of EM Corporate Controlled
Menu Items
CR ID #: 18812
After editing and saving a menu item in POS Configurator, the system
would allows EM stores to change prices on corporate-controlled menu
items. This problem has been corrected.
Secondary Authentication Req’d Defined Incorrectly in Help
Files
CR ID #: 19175
Context-sensitive help for the option Secondary authentication req’d
(Employees | Employee Classes | Clock In/Sign In) was incorrectly
defined. The text was changed to read as follow:
When checked, members of this class who swipe their ID (mag) card to
authorize a POS transaction for another employee will be required to
validate the action by entering their PC Application ID (Employees |
Employee Setup | Security).
Stored Procedure Missing From Autosequence Selection List
CR ID #: N/A
The MICROS.spgs_revoke_unfinalized_check_transactions entry
(#7107) was missing from the drop-down list of Stored Procedures
provided in POS Configurator | Reporting | Autosequence Steps | Stored
Proc tab. This procedure was added in the last release to allow the end
user to revoke unfinalized GSS transactions, such as AR Tenders, Gift
Redemptions, Gift Value Add, or Gift Sales. The oversight has been
corrected.
MD0003-065
Revision D
May 2, 2005
Page 91 of 814
3700 POS
What’s Revised
POS Operations
Check Total Does Not Send Comma as Decimal Separator
When Running TMS
CR ID #: N/A
When using the Table Management System (TMS), the POS interface
would consistently pass currency values with a comma as the decimal
separator, if the system had been programmed (System | Restaurant |
Currency) to use a comma. To avoid confusion, a change was made to the
PMSInterface.dll. This change transfers responsibility for currency
formats to the TMS software, which controls it through the regional
settings.
Combo Discount Override Not Working Properly
CR ID #: N/A
When using a combo discount override, the system failed to correctly
calculate both dollar and percentage subtotal discounts that were set to
assume full amount. This occurred in sites where the following options
were also enabled:
Enable Touch Item Discounting (System | Restaurant | Options)
Discount depleted amount (Sales | Discount/Service |
Discounts)
This problem has been corrected.
Combo Menu Items Lost After Previous Round Auto-Combo
Recognition
CR ID #: N/A
When using the auto-combo recognition feature to combo a group of
items that included both previous-round and current-round menu items,
the system would not refire the previously sent items. This caused order
device output to show the system voided items but not the newly created
items. This problem has been corrected.
MD0003-065
Revision D
May 2, 2005
Page 92 of 814
3700 POS
What’s Revised
Cover Counts Incorrect When Using Seat Filters
CR ID #: N/A
Previously, if seat filtering was used to close one or more seats on a guest
check, the system would create a new check for the selected seats,
transferring the check detail but not the covers. This has been corrected.
Delayed Orders That are Prepaid Not Sent to Order Devices
CR ID #: N/A
Previously, if a delayed check was created and then paid to cash before
its autofire time, the system would show a prompt at the appointed time,
but would not send the items to the proper order devices. This has been
corrected.
Forgive Cover Count Does Not Work After Check Transfer
CR ID #: N/A
After transferring a check between employees, the new check owner
could not apply a discount that forgave cover counts without first service
totaling the check and then picking it back up. Any attempt to apply the
discount immediately after transfer would fail to remove the cover count.
This has been corrected.
ILDS Pours Voided Items Twice
CR ID #: 19458
When using the Post Voids to ILDS option (Devices | Devices | ILDS), if
a user entered, then voided a beverage in the same round, the system
would send the void before the original menu item. Because the void was
sent first — and negative counts are not allowed — the LDS would
ignore the minus sign and would allow the user to dispense two drinks,
instead of none. This problem has been corrected.
MD0003-065
Revision D
May 2, 2005
Page 93 of 814
3700 POS
What’s Revised
Insert Condiment Hangs at Alphanumeric Screen When
Reference Required
CR ID #: 18474
When using the 'Insert Condiment' function to add a reference required
item, the system would display the alphanumeric keypad to enter the
information, but would fail as soon as the Enter button was pressed. The
error message "No Entries Exist" would display, but the system would
not allow the user to clear or exit the alphanumeric screen.
At this point, the user could cancel the transaction, but only if the site was
not using DOM. If DOM was enabled, transaction cancel would also fail.
The workstation would have to be restarted to return to normal
functionality.
This problem has been corrected.
Last Item Discounts Do Not Work on Menu Items With
Required Condiments
CR ID #: 19124
Traditional last item discounts cannot be applied to a menu item with
required condiments. If attempted, the system views the condiment as the
last item entered, which results in the error "No sales to discount."
To workaround this issue, users apply the last item discount before
adding the required condiments to the menu item. Recently, this
procedure did not work properly, resulting in the error message
“Condiment entry required.” This has been corrected.
Last Item Void Prompts for Previous Item’s Min/Max
Condiments
CR ID #: 19379
After entering a menu item with required min/max condiments, if the
user selected, then voided another menu item linked to the same
condiment group, POS Operations would remove the second item and
begin prompting for the unfulfilled min/max condiments of the first. This
problem, which only occurred with last item voids, has been corrected.
MD0003-065
Revision D
May 2, 2005
Page 94 of 814
3700 POS
What’s Revised
Menu Item Validation Chits Printing Incorrectly
CR ID #: N/A
When printing validation chits for menu items, the system would print
the first chit correctly, listing the first menu item’s name and price.
However, each additional chit would also print the first menu item
(instead of the next ordered menu item) along with a cumulative price
total for that item and the items that preceded it.
For example, if three menu items were ordered, the validation chits
would print as follows:
Name (Item 1) & Price (Item 1)
Name (Item 1) & Price (Items 1 + 2)
Name (Item 1) & Price (Items 1 + 2 + 3)
This problem has been corrected.
Multiple Discounts and Itemizers on Same Check Do Not
Calculate Correctly
CR ID #: 17172
When two or more discounts were applied to a check using two or more
itemizers, the discounts would not calculate properly. This problem has
been corrected.
OPS08x10 Font Difficult to Differentiate Between Numerals
6 and 8 in Check Detail
CR ID #: 17123
When posting transaction on a WS4, the design of the imbedded
OPS08x10 Font made it difficult to differentiate between numeric
characters of “6” and “8” in the check detail. This has been corrected.
MD0003-065
Revision D
May 2, 2005
Page 95 of 814
3700 POS
What’s Revised
Required Condiments Not Adding to Cover Count
CR ID #: 17469
When using required condiments that were configured to Add to cover
count (Sales | Menu Item Classes | Price/Totals), the system failed to
increment the cover count for the first condiment item. All required
condiments after that, would be added correctly. This problem has been
corrected.
Split Check/Edit Seat Functions Do Not Share Menu Items
Evenly
CR ID #: 16436
When using the split check or edit seat functions, menu items were not
shared evenly across checks or seats. Only the first item was shared
evenly; the rest of the items were moved to the last check. This has been
corrected.
Split Check Sorts by Menu Item Instead of by Seat
CR ID #: N/A
Previously, when viewing check detail in the Split Check screen, the
system would incorrectly list the items in the order in which they were
entered, instead of sorting them by seat. This problem has been corrected.
Subtotal Discounts Ignore Combo Discount Override
CR ID #: N/A
When applying a subtotal discount to a check, the system failed to
exclude from the discount calculation, menu items ordered as part of a
combo meal group where the following override options were enabled:
Combo discount override (Sales | Combo Meals | Combo
Groups)
Override combo discount (Sales | Discount/Service | Options)
This problem has been corrected.
MD0003-065
Revision D
May 2, 2005
Page 96 of 814
3700 POS
What’s Revised
Subtotal Discounts and Tax Calculated Incorrectly on Large
Sums
CR ID #: 16669
When applying a subtotal discount to a transaction that is equal to or
greater than 1,000,000, the system would forgive the subtotal amount,
but would calculate the tax for the entire amount. This problem has been
corrected.
Subtotal Discounts With Combo Override Option Calculate
Incorrectly
CR ID #: 19148
When applying a subtotal discount with the option Override combo
discount enabled, the system failed to calculate the subtotals correctly,
which in turn, caused the taxes to be wrong. This was true whenever the
discount was applied, regardless of whether combo meal items had been
ordered. This has been corrected.
Tax Amount Not Forgiven If Discount Amount is Greater
Than 317.00
CR ID #: 19251
When applying a discount, the system failed to forgive the tax on
discount amounts greater than 317.00. This has been corrected.
Tax on Auto-Gratuity Does Not Report Properly
CR ID #: 18578
When posting sales totals, the system would consistly deplete the Auto
Service Charge itemizer by the inclusive tax amount. This should only
have been done if the following options were enabled on the System |
Restaurant | Taxes form in POS Configurator:
Enable US tax or Canadian VAT
VAT By The Item Tax
This problem has been corrected.
MD0003-065
Revision D
May 2, 2005
Page 97 of 814
3700 POS
What’s Revised
Tax Calculations Involving Subtotal Discounts on a Seat
Filtered Check
CR ID #: 17281, 17380
When using discounts on filtered seats the total tax of the combined
checks is incorrect. The resolve this issue, changes were made to the code
as described in the Enhancement section, beginning on page 77.
Tax Posted Incorrectly With Seat Filtering
CR ID #: 17664
Taxes were incorrectly posted to gross receipts when the option Do not
post tax to tax tip totals (POS Configurator | Revenue Center | RVC
Taxes) was selected and seats were filtered when the check was closed.
This, in turn, resulted in faulty time card data being used to update the
Employee Detail reports. The problem has been corrected.
Touch Item Discounts Not Handling Restrictions Properly
CR ID #: N/A
When applying a touch item discount, the system would limit the number
of times the discount could be applied, even when no restrictions had
been programmed for it. This problem has been corrected.
Touch Item Discounts Not Working Properly With
Consolidated Menu Items
CR ID #: N/A
When applying a touch item discount to a previously consolidated menu
item (e.g., 3 Hamburgers), the system would apply the discount to one
item only and prevent the user from reapplying it to the rest. This
problem only occurred if the selected menu items were consolidated after
service total. It did not affect menu items entered as a quantity. The
problem has been corrected.
MD0003-065
Revision D
May 2, 2005
Page 98 of 814
3700 POS
What’s Revised
Touch Void of Priced Condiment Does Not Reduce Amount
Due
CR ID #: 18869
Previously, if a priced condiment was added to a menu item, then
highlighted and voided, the condiment was removed from the detail, but
the cost of the condiment remained in the check total. This has been
corrected.
Tracking Totals Incorrectly Reset to 0.00 For Previous Shifts
CR ID #: 19498
After incrementing employee shifts, tracking totals would reset to 0.00
the next time that totals were posted if the employee tracking included
any one of the following tracking total items:
KDS SOS Total
KDS Parked Orders
KDS Prep Time
Consequently, employee and cashier detail reports would no longer
include totals for a previous shift, once a shift was incremented. This
problem has been corrected.
Transferred Checks Reported as Carried Over
CR ID #: 19220
When transferring checks between employees, any that were started
before the receiving employee signed into the system were not posting
correctly in the database. This was reflected in the employee reports,
which showed an outstanding balance for the person who started (and
transferred) the check, while reporting a carried over check for the
employee who received it. This has been corrected.
MD0003-065
Revision D
May 2, 2005
Page 99 of 814
3700 POS
What’s Revised
Weight Descriptor Truncated if Reference Entry Equals 19
Characters
CR ID #: N/A
When entering a weighted menu item, if the combined reference entry for
that item was 19 characters or greater, the last letter(s) of the weight
descriptor were truncated to fit on a single line. To correct the problem,
the system will now wrap the entry, moving the weight and its descriptor
to the next line in the check detail.
Reports
The table below describes the report changes in this Service Pack:
Report
EM Reports
CR ID #: 16964
MD0003-065
Revision D
May 2, 2005
Page 100 of 814
Area Modified
Stored
Procedurea
Description
When running an EM Report,
the following message would
display:
"Error reported from Crystal
report engine...Error 723- failed
to open a rowset."
followed by:
"Error #519- No print window
is open."
The problem was due to a
coding error which has been
corrected.
3700 POS
What’s Revised
System Sales
Stored
Procedureb
CR ID #: 19233
Time Period
Reports
Stored
Procedurec
CR ID #: 18561
a
When running a System Sales
report, the Carried Over Count
and Amount totals were
incorrectly calculated. The
problem was due to stored
procedure errors, which failed
to count checks with zero
balances or overwrote carried
over balances with the wrong
amounts. Both issues have been
corrected.
Previously, if a database was
set up with multiple revenue
centers and many overlapping
time periods, reports could take
too long to run. The problem
was resolved by optimizing the
stored procedure
(sp_R_rvc_time_prd_ttls) used
to select the data.
Files Changed:
speo_R_get_list
b
Files Changed:
sp_post_cum; sp_getSysChkCarrriedOver
b
Files Changed:
sp_R_rvc_time_prd_ttls
Setup
Remote/Unattended Install Not Upgrading Win 2000 Clients
CR ID #: N/A
On sites running RES 3.2 SP3 HF1, attempts to apply a later version of
the service pack failed to update the Win 2000 clients using remote/
unattended installation. This problem has been corrected.
MD0003-065
Revision D
May 2, 2005
Page 101 of 814
3700 POS
What’s Revised
SIM
@Dtl_Ord_Dev_Output Always Returns a Zero
CR ID #: 18948
When using the SIM variable @Dtl_Ord_Dev_Output to determine the
order device output for a menu item detail entry, the system would return
all zeros instead of the appropriate hexadecimal value. This has been
corrected.
getRxMsg Command Terminates Event Prematurely
CR ID #: 14748
When using the SIM command getRxMsg to send a message from the
POS Server to the SIM server, any interruption in the network connection
would terminate the event without completing the script, preventing the
user from determining the cause of the error. This has been corrected.
POS Operations Does Not Always Provide Window For ISL
Response
CR ID #: 16852
When running a SIM script, POS Operations would prompt for user input
but would occasionally fail to provide a window for the SIM response.
This problem has been corrected.
MD0003-065
Revision D
May 2, 2005
Page 102 of 814
Kitchen Display System (KDS)
What’s New
Kitchen Display System (KDS)
What’s New
New Features
Summarized
A new feature is defined as one that provides capabilities that were not
available in previous versions of the application.
The table below summarizes the new features included in this version.
Module
Common
New Features
Detailed
Feature
Page
MICROS Restaurant Display Controller
(RDC)
103
Common
MICROS Restaurant Display Controller (RDC)
The new MICROS Restaurant Display
Controller (RDC) provides an
inexpensive alternative to traditional
PC-based KDS systems. The RDC is
equipped with Microsoft® Windows®
CE.Net 5.0, an embedded operating
system that allows for quick and easy
installation in an existing RES 3.2 SP4
(or higher) System.
Physically, the RDC device takes up
little space. The unit measures a
compact 5.5” W x 5.1 D x 1.4” H, and
weighs less than 10 lbs (5 kg). The use
of solid-state components and passive
MD0003-065
Revision D
May 2, 2005
Page 103 of 814
Kitchen Display System (KDS)
What’s New
cooling elements improves reliability by eliminating the mechanisms
most likely to fail — hard drives and fans. In addition, the unit can
operate within an extended range of temperature (0°–50°C or 32°–131°F)
and humidity (0–90%), making it an ideal choice for kitchen
environments.
MICROS Client Loader Application (CAL)
The RDC comes pre-loaded with the MICROS Client Application
Loader (CAL) software. The CAL is an intelligent software agent
designed to remotely manage the software on the RDC.
To install a unit, simply plug in a network and power cable, attach a
keyboard or bump bar, and press the power button. The CAL will
automatically locate and identify the MICROS servers on the network.
Once the user answers a few simple questions (e.g., select a server,
network node, etc.), the RDC is ready to go. From that point on, CAL
manages the software updates, ensuring that the RDC is always running
the current version of the software.
RES Applications Supported
KDS Display Application is supported on this device. Programming of
this KDS Display client is the same as a PC-based client, with one
exception. To support the RDC hardware, a new entry (Display
Controller) was added to (and should be selected from) the Workstation
Type drop-down list (Devices | Network Node | Network).
Limitations
The following issues and limitations are noted in this release:
MD0003-065
Revision D
May 2, 2005
Page 104 of 814
The RDC does not support a direct connection for printers. If a
runner’s chit is configured to print from an order device, then the
order device’s runner’s chit printer must be attached to either a
Win32 or WS4 client.
The KDS display application running on a RDC device will not
log messages to the 3700d.log.
Kitchen Display System (KDS)
What’s New
RDC clients show up as lightweight clients (similar to WS4
clients) in MICROS Control Panel but cannot have their verbosity
set at this time.
Users cannot remote reboot an RDC client using
remotereboot.exe.
The clock setting for the RDC display is not synchronized with
the server. This is a display issue only — it does not affect order
times posted to the database.
MICROS Bump Bar
RDC supports the use of the standard MICROS KP3000 bump bar. As
always, users can map the bump bar functions through POS Configurator
(Devices | KDS Bump Bars) by linking a key’s scan code to a selected
activity.
The bump bar can also be used during setup to make the selections
required by the CAL. In this case, CAL ignores preset functionality and
uses numeric keys one through four to process the selections (Up, Down,
OK, and Esc).
The following template illustrates the location and functions on a
standard 2x10-button keypad.
MD0003-065
Revision D
May 2, 2005
Page 105 of 814
Kitchen Display System (KDS)
What’s New
CAL Setup
To install an RDC client, follow these steps:
1. Plug in the network and power cable, attach a keyboard or bump bar,
and press the power button. A dialog box displays as CAL begins to
search for all of the MICROS servers currently on the network.
2. When the operation is complete, CAL displays a list of the servers.
3. Use the Up/Down Arrows on the bump bar or keyboard to scroll the
list and highlight the required server. Click OK to accept the entry.
MD0003-065
Revision D
May 2, 2005
Page 106 of 814
Kitchen Display System (KDS)
What’s New
4. Once a server is identified, a list of the RDC workstations is
displayed, along with their current status. To be included on the list,
the device must have been added to the system through POS
Configurator..
5. Use the Up/Down Arrows on the keyboard or bump bar to highlight
a selection and press Save/OK to accept.
6. CAL automatically loads the RES application software.
MD0003-065
Revision D
May 2, 2005
Page 107 of 814
Kitchen Display System (KDS)
What’s Enhanced
What’s Enhanced
There are no enhancements in this version of the software.
What’s Revised
A revision is defined as a correction made to any existing form, feature,
or function currently resident in the KDS software. To qualify as a
revision, the change must satisfy the following criteria:
The basic form, feature, or functionality must be part of the previous
version of the software.
The change must replace the current item or remove it from the
application.
Revisions
Summarized
The table below summarizes the revisions included in this version.
Module
Display
Application
Feature
CR ID
Page
KDS and RES Versions Do Not
Match
N/A
110
No Space Between Zone Label
and Letter Identifier
N/A
110
19219
110
WS4 Not Responding to ‘Beep on
New Order’ Option
MD0003-065
Revision D
May 2, 2005
Page 108 of 814
Kitchen Display System (KDS)
What’s Revised
Module
KDS
Controller
Reports
Feature
CR ID
Page
‘Do Not Sort’ Option Not Working
with DOM Enabled
18767
110
KDS Controller Crashes When
Items Voided
19698
111
Recall Last Does Not Return
Checks in Correct Order
18262
111
Review Order Does Not Work
Properly with DOM Enabled
N/A
111
Subtotal Displays Whether or Not
Option is Enabled
N/A
111
Consolidated Kitchen
Performance Reports Incorrect
Order Totals With SIPS Enabled
N/A
112
Drive-Thru Line Times Not
Included on QSR Speed-ofService Reports
18966
112
System QSR - Speed of Service
Summary (All Order Types) Errors
Out
18233
112
MD0003-065
Revision D
May 2, 2005
Page 109 of 814
Kitchen Display System (KDS)
What’s Revised
Revisions
Detailed
Display Application
KDS and RES Version Do Not Match
CR ID #: N/A
In the previous release, the build versions for the KDS display
application did not match that of the RES software. This has been
corrected.
No Space Between Zone Label and Letter Identifier
CR ID #: N/A
When using KDS Zones, the zone identifier would display as a single
word “ZoneA”, without a space separating the label/letter combination
(e.g., “Zone A). This has been corrected.
WS4 Not Responding to ‘Beep on New Order’ Option
CR ID #: 19219
When using a WS4 as a KDS station, the device failed to Beep on New
Order even though the option (Devices | Order Devices | KDS | Options)
had been enabled. This problem has been corrected.
KDS Controller
‘Do Not Sort’ Option Not Working With DOM Enabled
CR ID #: 18767
When using Dynamic Order Mode (DOM), the system would sort all
items sent to a KDS order device, even if the Do not sort option (Devices
| Order Devices | Options | Sorting) had been enabled. This problem has
been corrected.
MD0003-065
Revision D
May 2, 2005
Page 110 of 814
Kitchen Display System (KDS)
What’s Revised
KDS Controller Crashes When Items Voided
CR ID #: 19698
After ordering a menu item whose condiments were configured to Print
without parent on order chit (Sales | Menu Item Classes | Print/
Display), any attempt to void the parent menu item would cause KDS
Controller to fail. The problem was caused by a coding issue related to
the distribution of the voided items to different order devices. This has
been corrected.
Recall Last Does Not Return Checks in Correct Order
CR ID #: 18262
When using the Recall Last function key, the KDS Controller failed to
recall checks in the proper sequence (i.e., the reverse order in which they
were bumped from the screen). This has been corrected.
Review Order Does Not Work Properly With DOM Enabled
CR ID #: N/A
With Dynamic Order Mode enabled, if the user added items to a chit
while in Review Order mode, the system would exhibit the following
incorrect behaviors:
The Reviewed chit would display Alert color changes.
Bumping the order from an Expo station would bump all
reviewed chits from the Prep stations as well.
These problems have been corrected.
Subtotal Displays Whether or Not Option is Enabled
CR ID #: N/A
When using certain chit layout types, the order device would include a
Subtotal line in the check detail even if the option Display subtotal (POS
Configurator | Devices | Order Devices | Dynamic Order Mode) was
disabled. This problem has been corrected.
MD0003-065
Revision D
May 2, 2005
Page 111 of 814
Kitchen Display System (KDS)
What’s Revised
Reports
The table below describes the KDS report changes in this Service Pack:
Report
Consolidated
Kitchen
Performance
Area Modified
Stored
Procedurea
CR ID #: N/A
QSR Speed of
Service Reports
Stored
Procedureb
CR ID #: 18966
System QSR Speed of Service
Summary (All
Order Types)
Stored
Procedurec
CR ID #: 18233
a
Files Changed:
spkds_R_kitchen_performance
MD0003-065
Revision D
May 2, 2005
Page 112 of 814
Description
When running the Consolidated
Kitchen Performance report
(KDS_002.rpt), the system
would consistently overstate
the number of menu items by
attributing multiple items to
each suborder when the option
Single Item Per Suborder
(SIPS) was enabled. This has
been corrected.
When running any of the QSR
Speed of Service reports (RVC
or System), the system
consistently failed to include
the Line time entries for DriveThru orders. Instead, a dashed
line was inserted in the column
instead of a numeric value. This
has been corrected.
Attempts to run the System
QSR - Speed of Service
Summary (All Order Types)
(KDS0007.rpt) would fail and
the report would error out. The
problem occurred when the
report included checks that had
been parked more than once in
the same active period. This
problem has been corrected.
Kitchen Display System (KDS)
What’s Revised
b
Files Changed:
c
Files Changed:
spkds_R_qsr_sos
spkds_R_qsr_sos,
spkds_R_sys_park
MD0003-065
Revision D
May 2, 2005
Page 113 of 814
Cash Management (CM)
What’s New
Cash Management (CM)
What’s New
New Features
Summarized
A new feature is defined as one that provides capabilities that were not
available in previous versions of the application.
The table below summarizes the new features included in this version.
Module
CM Interface
New Features
Detailed
Feature
Till Reference Number
Page
114
CM Interface
Till Reference Number
With this release, cashiers can now be required to assign a reference
number to their tills. This number can be used by site managers to
double-check actual till counts against the electronic entries posted
through Cash Management.
Reference numbers are optional. If implemented, the cashier will be
prompted for an entry prior to starting a till count. To reduce errors,
corrections will be allowed. In addition, the system can be configured to
validate the format before accepting the entry.
New Options
To support this functionality, two new options have been added to the CM
| Configure | Options form:
Require Reference for Till and Server Bank Counts — When
checked, prompts the user for an alphanumeric reference (up to 32
digits) before counting a till.
MD0003-065
Revision D
May 2, 2005
Page 114 of 814
Cash Management (CM)
What’s Enhanced
Enforce MOD10 Validation on Reference Entry — When checked,
checks the reference entry to ensure that it passes Mod10 and Luhn
validation. This option is greyed out unless the Require Ref for Till
and Server Bank Counts has been enabled.
What’s Enhanced
There are no enhancements in this version of the software.
MD0003-065
Revision D
May 2, 2005
Page 115 of 814
Cash Management (CM)
What’s Revised
What’s Revised
A revision is defined as a correction made to any existing form, feature,
or function currently resident in the CM software. To qualify as a
revision, the change must satisfy the following criteria:
The basic form, feature, or functionality must be part of the previous
version of the software.
The change must replace the current item or remove it from the
application.
Revisions
Summarized
The table below summarizes the revisions included in this version.
Module
CM Interface
Revisions
Detailed
Feature
Calculation Error Prohibits
Transfer of Foreign Currency
CR ID
Page
18646
116
CM Interface
Calculation Error Prohibits Transfer of Foreign Currency
CR ID #: 18646
When transfering foreign currency between tills, an error message would
display if the numerical amount of foreign currency was greater than the
equivalent base amount in US dollars (USD).
For example, suppose that the exchange rate of USD to Pesos is 5 to 1. If
a cashier has 100 Pesos in his drawer, the equivalent base amount would
be $20 USD. When the cashier attempted to transfer 100 Pesos to another
till, the system failed to evaluate the exchange rate correctly and instead,
posted the error message "Amount exceeds maximum allowed.”
This problem has been corrected.
MD0003-065
Revision D
May 2, 2005
Page 116 of 814
Guest Services Solution (GSS)
What’s New
Guest Services Solution (GSS)
What’s New
There are no new features in this version of the software.
What’s Enhanced
There are no enhancements in this version of the software.
MD0003-065
Revision D
May 2, 2005
Page 117 of 814
Guest Services Solution (GSS)
What’s Revised
What’s Revised
A revision is defined as a correction made to any existing form, feature,
or function currently resident in the GSS software. To qualify as a
revision, the change must satisfy the following criteria:
The basic form, feature, or functionality must be part of the previous
version of the software.
The change must replace the current item or remove it from the
application.
Revisions
Summarized
The table below summarizes the revisions included in this version.
Module
Database
GSS Interface
Feature
CR ID
Page
18909
119
New Records Not Being Added to
GSS Coupon Status Table
N/A
119
Caller ID Cannot Find Customer
Record if Phone Number Fields 2
through 4 Are Blank
18963
119
Deleting Last Export Query Hides
All of Them
N/A
120
New Recurring Charges Posted to
Database with Negative Term
Period Type
N/A
120
Recurring Charges Lists Only One
Record
N/A
120
Unable to Access Keyboard
Screen
N/A
120
18969
121
Conversion Error Occurs After
Upgrading a RES 3.1 Database
Wrong Customer Information
Used When Records Added at
Two Workstations Simultaneously
MD0003-065
Revision D
May 2, 2005
Page 118 of 814
Guest Services Solution (GSS)
What’s Revised
Revisions
Detailed
Database
Conversion Error Occurs After Upgrading a RES 3.1
Database
CR ID #: 18909
When upgrading from RES 3.1 to RES 3.2 Service Pack 3, an error
occurred when the system was unable to locate certain GSS-related tables
and/or views. These were removed as part of the GSS integration in the
core RES product. The error was a programming oversight in the
database conversion process that has been corrected.
New Records Not Being Added to GSS Coupon Status Table
CR ID #: N/A
Previously, when a new coupon was created, the system failed to add a
record in the GSS Coupon Status table. This, in turn, made it impossible
for the system to track or redeem any of the coupons that were being
awarded as part of a bonus plan. This has been corrected.
GSS Interface
Caller ID Search Cannot Find Customer Record If Phone
Number Fields 2-4 Are Blank
CR ID #: 18963
When using Caller ID Search (Short Customer Screen), the system could
not locate the customer record by phone number, if the record did not
include entries in the Phone Number 2-4 fields. This problem has been
corrected.
MD0003-065
Revision D
May 2, 2005
Page 119 of 814
Guest Services Solution (GSS)
What’s Revised
Deleting Last Export Query Hides All of Them
CR ID #: N/A
Previously, if a user highlighted and deleted the last query in the Export
Wizard, the system would clear entries from the display list (but not from
the database). To view the rest of the entries, the user would have to close
and reopen the GSS Back Office application to redisplay them. This has
been corrected.
A similar problem occurred when deleting the last entry from the list of
Coupons or Gift Certificates. It too has been corrected.
New Recurring Charges Posted to Database with Negative
Term Period Type
CR ID #: N/A
When adding a new entry in the GSS Back Office | Accounts Receivable |
Recurring Charges form, selections made from the Term Type dropdown list were incorrectly saved to the database as negative values. This
prevented the system from properly applying the recurring charge. In
addition, when the record was recalled through the application, the field
would be blank. These problems have been corrected.
Recurring Charges Lists One Record Only
CR ID #: N/A
When opening the Recurring Charges form (GSS Back Office | Accounts
Receivable), the system would only display the first record in the list,
regardless of how many records had been entered. This has been
corrected.
Unable to Access Keyboard Screen
CR ID #: N/A
In the GSS Back Office application, attempting to open the Screen
Designer | Keyboard form would cause an error message to display and
the software to hang. This problem has been corrected.
MD0003-065
Revision D
May 2, 2005
Page 120 of 814
Guest Services Solution (GSS)
What’s Revised
Wrong Customer Information Used When Records Added at
Two Workstations Simultaneously
CR ID #18969
In the past, the system did not always print the correct customer
information to a check, when two or more workstations were adding
customer data at the same time. During operations, if the update/accept
buttons were pressed (nearly simultaneously) at two different
workstations, both customer records would be saved to the GSS database,
but the second customer’s information would be added to both active
checks. This problem has been corrected.
MD0003-065
Revision D
May 2, 2005
Page 121 of 814
Product Management (PM)
What’s New
Product Management (PM)
What’s New
There are no new features in this version of the software.
What’s Enhanced
There are no enhancements in this version of the software.
What’s Revised
A revision is defined as a correction made to any existing form, feature,
or function currently resident in the PM software. To qualify as a
revision, the change must satisfy the following criteria:
The basic form, feature, or functionality must be part of the previous
version of the software.
The change must replace the current item or remove it from the
application.
Revisions
Summarized
The table below summarizes the revisions included in this version.
Module
Reports
MD0003-065
Revision D
May 2, 2005
Page 122 of 814
Feature
CR ID
Page
Inventory Cost of Sales
Summary
19087
123
Stock on Hand Report
19513
123
Product Management (PM)
What’s Revised
Revisions
Detailed
Reports
The table below describes the report changes in this Service Pack:
Report
Inventory Cost
of Sales
Summary
Area Modified
Stored
Procedurea
CR ID #: 19087
Stock on Hand
Report
Stored
Proceduresb
CR ID #: 19513
a
Description
Previously, if a user rang up
multiple quantities for a menu
item by using the [ @ ] key, the
posting procedure would only
update the composite totals
tables with a sales_cnt of 1.
This would cause the Inventory
Cost of Sales Summary report
to be incorrect. This problem
has been corrected.
Previously, if a report was run
with a date range starting on the
last day of the closed period,
the inventory totals would be
incorrect. Not all of the data
would be added. This problem
has been corrected.
Files Changed:
sp_post_cmpst_mi_cum
sp_post_fixed_prd_cmpst_mi_cum
b
Files Changed:
speo_R_get_dates
speo_R_inven_info
MD0003-065
Revision D
May 2, 2005
Page 123 of 814
Labor Management (LM)
What’s New
Labor Management (LM)
What’s New
New Features
Summarized
A new feature is defined as one that provides capabilities that were not
available in previous versions of the application.
The table below summarizes the new features included in this version.
Module
Database
MD0003-065
Revision D
May 2, 2005
Page 124 of 814
Feature
New Job Code Tables Added
Page
125
Labor Management (LM)
What’s New
New Features
Detailed
Database
New Job Code Tables Added
The procedures for posting labor data have been modified to include job
code totals by fixed period. Previously, only labor category totals were
posted.
The additions represent structural and coding changes only and are
transaparent to the end user. The new job code totals will provide custom
report writers with more detailed labor cost information. At this time,
there are no new report templates available through RES.
Note
Reports are being developed for the MICROS web portal,
MyMicros.net. See your MICROS representative for more on this
topic.
Programming Changes
To obtain the new data, changes were made to the following stored
procedures:
sp_post_time_prd_time_card_ttls
sp_adjust_time_prd_time_card_ttls
sp_ComputeFixedPeriodLabor
sp_ComputeSpecialFixedPeriodLabor
sp_ComputeFixedPeriodOtherPay
sp_PurgeHistory
MD0003-065
Revision D
May 2, 2005
Page 125 of 814
Labor Management (LM)
What’s New
To store the job code data, two new tables were added to the RES
database:
Dly_sys_fixed_prd_job_code_ttls
Field Name
business_date
fixed_period_seq
store_id
job_seq
job_cat_seq
reg_hrs
reg_ttls
ovt_hrs
ovt_ttls
non_rvc_reg_hrs
non_rvc_reg_ttls
non_rvc_ovt_hrs
non_rvc_ovt_ttls
Data Type
DATETIME (PK)
SEQ_NUM (PK)
SEQ_NUM (PK)
SEQ_NUM (PK)
SEQ_NUM
HOURS8_2
LABOR_TOTAL
HOURS8_2
LABOR_TOTAL
HOURS8_2
LABOR_TOTAL
HOURS8_2
LABOR_TOTAL
Foreign keys:
CFK1dly_sys_fixed_prd_job_code_ttl — store_id references
rest_def.store_id (restricts delete)
CFK2dly_sys_fixed_prd_job_code_ttl — fixed_period_seq
references fixed_period_cfg.fixed_period_seq (restricts delete)
CFK3dly_sys_fixed_prd_job_code_ttl — job_seq references
job_def.job_seq (restricts delete)
CFK4dly_sys_fixed_prd_job_code_ttl — job_cat_seq references
job_cat_def.job_cat_seq (restricts delete)
MD0003-065
Revision D
May 2, 2005
Page 126 of 814
Labor Management (LM)
What’s New
Dly_rvc_fixed_prd_job_code_ttl
Field Name
business_date
fixed_period_seq
store_id
job_seq
rvc_seq
job_cat_seq
reg_hrs
reg_ttls
ovt_hrs
ovt_ttls
Data Type
DATETIME (PK)
SEQ_NUM (PK)
SEQ_NUM (PK)
SEQ_NUM (PK)
SEQ_NUM (PK)
SEQ_NUM
HOURS8_2
LABOR_TOTAL
HOURS8_2
LABOR_TOTAL
Foreign Keys:
CFK1dly_rvc_fixed_prd_job_code_ttl — store_id references
rest_def.store_id (restricts delete)
CFK2dly_rvc_fixed_prd_job_code_ttl — fixed_period_seq
references fixed_period_cfg.fixed_period_seq (restricts delete)
CFK3dly_rvc_fixed_prd_job_code_ttl — job_seq references
job_def.job_seq (restricts delete)
CFK4dly_rvc_fixed_prd_job_code_ttl — job_cat_seq references
job_cat_def.job_cat_seq (restricts delete)
CFK5dly_rvc_fixed_prd_job_code_ttl — rvc_seq references
rvc_def.rvc_seq (restricts delete)
MD0003-065
Revision D
May 2, 2005
Page 127 of 814
Labor Management (LM)
What’s Enhanced
What’s Enhanced
There are no enhancements in this version of the software.
What’s Revised
A revision is defined as a correction made to any existing form, feature,
or function currently resident in the LM software. To qualify as a
revision, the change must satisfy the following criteria:
The basic form, feature, or functionality must be part of the previous
version of the software.
The change must replace the current item or remove it from the
application.
Revisions
Summarized
The table below summarizes the revisions included in this version.
Module
CR ID
Page
Job Code Totals Tables Do Not
Have Permissions Set
N/A
129
micros.frgn_student_dtl Table
Missing Permissions
19135
129
Documentation
Including Tips on Time Card
Reports
19286
129
Human
Resources
Default New Hire Status Not
Entered Correctly
N/A
130
Payroll
Grid Incorrectly Refreshes
Clock-Out Times
19364
130
‘Other Pay’ Detail Posted
Prematurely
19451
130
N/A
131
Database
Scheduling
MD0003-065
Revision D
May 2, 2005
Page 128 of 814
Feature
Preferred Time Assignments Not
Working with Auto-Scheduling
Labor Management (LM)
What’s Revised
Revisions
Detailed
Database
Job Code Totals Tables Do Not Have Permissions Set
CR ID #: N/A
The following job code totals tables were added to the database without
the proper permissions:
dly_sys_fixed_prd_job_code_ttl
dly_rvc_fixed_prd_job_code_ttl
This has been corrected.
micros.frgn_student_dtl Table Missing Permissions
CR ID #: 19135
Previously, users were unable to create or run a custom report using data
from the micros.frgn_student_dtl table. The problem occurred because
the table did not have permissions granted to any user. It required DBA
authority to access or even read. This has been corrected.
Documentation
Including Tips on Time Card Reports
CR ID #: 19286
When running LM time card or payroll reports, jobs that are configured
to receive tips (POS Configurator | Employees | General) will not be
included in the employee sales and tip totals unless one of the following
options is also enabled:
Declare direct tips on clock-out
Declare indirect tips on clock-out
To avoid confusion, on-line help files have been modified to include this
requirement.
MD0003-065
Revision D
May 2, 2005
Page 129 of 814
Labor Management (LM)
What’s Revised
Human Resources
Default New Hire Status Not Entered Correctly
CR ID #: N/A
When entering a new employee record, the system failed to set the
default hire status as New. Instead, the user would have to toggle the
radio buttons from New to Transferred or Borrowed and back to New
again in order to set the proper value. This has been corrected.
Payroll
Grid Incorrectly Refreshes Clock-Out Times
CR ID #: 19634
The Payroll Preprocessing | Time Card grid would not refresh the Clock
Out time column properly, when scrolling up or down. This problem,
which only occurred when the screen was minimized, has been corrected.
‘Other Pay’ Detail Posted Prematurely
CR ID #: 19451
Previously, when Other Pay records were created for future business
dates (e.g., when posting records for salaried jobs), the entries were being
marked as posted before the actual date was reached. This has been
corrected.
MD0003-065
Revision D
May 2, 2005
Page 130 of 814
Labor Management (LM)
What’s Revised
Scheduling
Preferred Time Assignments Not Working With AutoScheduling
CR ID #: N/A
When auto-scheduling weekly assignments, the system would ignore the
preferred time periods specified by the employees (HR | Availability).
This has been corrected.
MD0003-065
Revision D
May 2, 2005
Page 131 of 814
Financial Management (FM)
What’s New
Financial Management (FM)
What’s New
There are no new features in this version of the software.
What’s Enhanced
There are no enhancements in this version of the software.
What’s Revised
There are no revisions in this version of the software.
MD0003-065
Revision D
May 2, 2005
Page 132 of 814
RES Platform
Introduction
RES Platform
Introduction
This chapter comprises changes made to RES Platform, which includes
the following applications:
MICROS Desktop
License Manager
Reports Explorer
Language Translation Utility
MD0003-065
Revision D
May 2, 2005
Page 133 of 814
RES Platform
What’s New
What’s New
New Features
Summarized
A new feature is defined as one that provides capabilities that were not
available in previous versions of the application.
The table below summarizes the new features included in this version.
Module
License
Manager
New Features
Detailed
Feature
Support for the MICROS Stored Value
Card (SVC) Interface
Page
134
License Manager
Support for SVC Interface
RES 3000 now supports the installation and use of the MICROS Stored
Value Card (SVC) interface to perform gift and loyalty card transactions
through one or more stored value card host systems. The product is
available as an add-on application to the RES 3700 POS System. For
more information, refer to the Products page on the MICROS website or
contact your MICROS representative.
Configuring License Manager
To accommodate this product, a new field — the SVC Gift Card
activation code — was added to the POS 3700 tab in License Manager.
Once the key code is entered, press the [Reload] button to update the
registry setting.
MD0003-065
Revision D
May 2, 2005
Page 134 of 814
RES Platform
What’s Enhanced
What’s Enhanced
There are no enhancements in this version of the software.
What’s Revised
A revision is defined as a correction made to any existing form, feature,
or function currently resident in the software. To qualify as a revision, the
change must satisfy the following criteria:
The basic form, feature, or functionality must be part of the previous
version of the software.
The change must replace the current item or remove it from the
application.
Revisions
Summarized
The table below summarizes the revisions included in this version.
Module
Feature
CR ID
Page
Database
Rebuilt Database Does Not Signal
When Complete
16813
136
Language
Translation
Utility
No Entries Provided for Full-/PartTime Foreign Student Fields
19150
136
Reports
Explorer
Editing Dashboard’s Contest List
in Reports Explorer Causes
Application to Hang
N/A
136
MD0003-065
Revision D
May 2, 2005
Page 135 of 814
RES Platform
What’s Revised
Revisions
Detailed
Database
Rebuilt Database Does Not Signal When Complete
CR ID #: 16813
When running the Rebuild Database Utility to convert decimal places in
a database, the screen would display a "Stopping the Database" message
but would not close when the rebuild process was complete. This has
been corrected.
Language Translation Utility
No Entries Provided for Full-/Part-Time Foreign Student
Fields
CR ID #: 19150
The lang_string_def table did not include entries for the following
options, available through the Human Resources application:
Part-time foreign student
Full-time foreign student
Consequently, users were unable to translate these options using the
translation utility. This problem has been corrected.
Reports Explorer
Editing Dashboard’s Contest List in Reports Explorer
Causes Application to Hang
CR ID #: N/A
If the user edited the Dashboard's Contest List through Report Explorer,
it was possible that Report Explorer would hang. To resolve the issue,
access to the Dashboard lists is no longer allowed in Reports Explorer
MD0003-065
Revision D
May 2, 2005
Page 136 of 814
Service Pack 3
Service Pack 3
In keeping with the original RES 3.2 ReadMe First, information is
divided into self-contained chapters, one for each of the following RES
products:
3700 Point-of-Sale (POS) System
Kitchen Display System (KDS)
Cash Management (CM)
Guest Service Solutions (GSS)
Product Management (PM)
Labor Management (LM)
Financial Management (FM)
RES Platform
For clarity, product information is further divided into three sections:
What’s New
What’s Enhanced
What’s Revised.
Each section begins with an introduction and includes a table that
summarizes the features and functionality incorporated in this version of
the software. The table provides hypertext links to supplementary text
and graphics about the selected topics.
For more information on these features, and step-by-step instructions for
configuring them, refer to the product’s Online Reference Manual,
installed with the MICROS Documentation and available on the RES
CD.
MD0003-065
Revision D
May 2, 2005
Page 137 of 814
3700 POS
What’s New
3700 POS
What’s New
New Features
Summarized
A new feature is defined as one that provides capabilities that were not
available in previous versions of the application.
The table below summarizes the new features included in this version.
Module
Support for the MICROS Guest
Connection Application
140
Manager
Procedures
RES 3000 Dashboard
144
Order
Scheduling
Autofire Server
157
Dining Courses
159
Timed Fire
164
Delayed Order
166
Future Orders
169
Access KDS from POS
178
Mark Orders from POS
180
Team Service
182
Touch Refill
195
Touch Reorder
203
Ckemplopt[ ]
207
Dtl_name_two
208
Event Dtl_Changed
209
PMSSeqNum
210
VoidDetail( )
211
SIM
May 2, 2005
Page 138 of 814
Page
Interfaces
POS
Operations
MD0003-065
Revision D
Feature
3700 POS
What’s New
Module
SIM
(Cont’d.)
Feature
Page
Discount/Service Charge Itemizer Values:
212
DscI[ ]
DepDscI[ ]
DscIttl[ ]
SvcI[ ]
SvcIttl[ ]
213
214
215
216
217
Order Scheduling
218
Chk_Autofire_Time
Chk_Delayed_Order
Chk_Future_Order
Dtl_Autofire_Time[ ]
Dtl_Dining Course[ ]
Dtl_Prep_Time[ ]
219
220
221
222
223
224
MD0003-065
Revision D
May 2, 2005
Page 139 of 814
3700 POS
What’s New
New Features
Detailed
Interfaces
Support for the MICROS Guest Connection Application
With this release, the 3700 POS interface has been modified to support
MICROS Guest Connection software.
Guest Connection is a browser-based application that manages restaurant
reservations and seating, captures guest history, and provides a
communication link to the MICROS POS System. Guest Connection is
designed for the multi-property location, allowing a central reservation
office to take reservations for all of the restaurants at a site.
Among the features supported by 3700 POS interface, the system will be
able to:
Begin a check on the POS when a guest is seated.
Display the table status, such as meal served, check printed,
check paid, table cleared, etc. A table's status can be reset from
either Guest Connection or the POS.
Send a message to Guest Connection to bus, clear, or close a
table.
Send and update a guest’s order history. This includes information
such as: contact information, preferences, birthday and
anniversary dates, and credit card information. Comments and
special requests can also be attached to the reservation and to the
customer's guest history record.
Limitations
Among the Guest Connection features not supported by 3700 POS are:
Dining course statuses
For more information about this product, refer to the Guest Connection
Online Installation Guide and the Guest Connection User’s Manual, both
of which are installed with the software.
MD0003-065
Revision D
May 2, 2005
Page 140 of 814
3700 POS
What’s New
Configuring the Interface
As with other external programs, 3700 POS users who want to use Guest
Connection will need to establish an interface to the application and set
up an appropriate number of touch keys in POS Operations. The
procedures for doing this are as follows:
1. Open the POS Configurator and go to Devices | Interfaces | General.
2. Add a new Guest Connection record with the following properties:
Outgoing Message Name — TMS 3700
Timeout — 20
Network Node — Server
Number ID Digits — 9
Backup Interface — (n/a)
Log Transactions — (not necessary)
SIM Interface — (must be checked)
Interface Type — TCP
3. Go to the Interfaces tab and enter the following:
TCP Server Name — Enter the IP address of the RES Server.
TCP Port Number — 5012
4. Save the record. Go to Devices | Touchscreen Designer.
5. Select the appropriate screen(s) on which to add the five SIM Inquire
keys required for Guest Connection. Configure each key as follows:
Legend — Enter the button name
Category — SIM/PMS Inquire
Interface — Guest Connection
MD0003-065
Revision D
May 2, 2005
Page 141 of 814
3700 POS
What’s New
Inquire Number — Enter the number that corresponds to the
selected SIM function:
1 — Bus/Clear Table
2 — Clean
3 — Close
4 — Transfer (Performed from within the check after Transfer)
5 — Add Check (Must be performed after Add Check, from
within the newly combined check).
Note
Touchscreen locations for SIM keys is subject to the needs
and preferences of the user.
MICROS recommends placing Inquires 1-3 on the Table
Layout Screen, as they may be used without opening a check
or signing into the system. However, Inquires 4 and 5 should
be placed on a screen that provides easy access from within
a check.
6. Save and go to Revenue Center | RVC Table Seating and confirm that
tables have been set up for each revenue center. If corresponding
table numbers are not programmed, Guest Connection will be unable
to initiate a guest check on the 3700 POS when a guest is seated.
7. Save and close POS Configurator.
8. On the RES Server, open the Window’s Explorer and navigate to the
\Micros\RES\POS\etc folder.
9. Rename the TMSInterface.isl to pms#.isl, where # is the number of
the TMS 3700 interface created for Guest Connection in POS
Configurator | Devices | Interfaces.
For example: If the TMS 3700 interface was number 2 on the
Interface form, then the TMSInterface.isl script should be renamed
pms2.isl.
MD0003-065
Revision D
May 2, 2005
Page 142 of 814
3700 POS
What’s New
10. Open the TMSInterface.ini file and change the following settings to
match the user’s system:
[SETTINGS]
UWSSEQ —The uws_seq
from micros.uws_def of the
3700 Server.
[TMS-CONNECTION]
(Client)
port — The port that the Guest
Connection listens to. This must
match the value in the
MICROSPORT value in Guest
Connection (Maintenance |
Look Ups | System | PARAM).
ip — The IP address of the
server where the Guest Connection interface service
(GC2MICROS.exe) is installed.
[3700-CONNECTION]
(Server)
port — The port number of the 3700 Interface. This value must
match the TCP Port Number defined in POS Configurator |
Devices | Interfaces for the Guest Connection interface.
11. Save and close the .ini file.
12. From the Windows Start menu, go to Settings | Control Panel |
Administrative Tools | Services.
13. Right-click on Micros TMS Interface and select Restart.
The service will write messages to the 3700d.log file. This file can be
viewed using logviewer. To view every message sent between the
3700 and Guest Connection, set Verbosity to 10 in the Control Panel.
MD0003-065
Revision D
May 2, 2005
Page 143 of 814
3700 POS
What’s New
Manager Procedures
RES 3000 Dashboard
The Dashboard utility provides instant access to critical information that
allows a restaurant manager to make more informed decisions to improve
service, reduce costs, and increase sales. The Dashboard contains
multiple panels of the latest sales and kitchen performance information
that is updated every minute and labor information that is updated every
15 minutes.
More detailed information can be accessed by using the drill-down links
located in each of the data panels described below:
Sales Information
This panel provides instant up-to-the minute sales information, including
time period sales information. You will know when sales have increased
or decreased significantly from the last 15 minute time period.
MD0003-065
Revision D
May 2, 2005
Page 144 of 814
3700 POS
What’s New
Kitchen/Speed of Service Information
This panel provides instant access to how your kitchen is performing. For
table service environments, you will know your average prep times, how
many "late" orders there have been in the last 15 minutes, and which
items have been 86'd. For quick service environments, you will know
how many orders are in the queue, how many orders are "parked", and
how many orders are "late".
Labor Information
This panel provides instant access to your labor cost in dollars as well as
the labor as a percentage of sales. Also, you will instantly know that you
have clocked-in employees who are approaching overtime, so that
managers can make real-time labor cost saving decisions.
Employee Information
This panel provides real-time information on who are your best
performing employees based on net sales, item sales or group sales. Also,
you can set up a competition that drives sales and displays employees in
the best performance order.
Configuring the RES 3000 Dashboard
Configuring the Restaurant Environment
1. Open the Configurator | System | Dashboard form.
2. From the General tab, specify the Restaurant type by selecting one
of the following radio button:
Quick service restaurant
Table service restaurant
3. Click the Save button.
MD0003-065
Revision D
May 2, 2005
Page 145 of 814
3700 POS
What’s New
Configuring Sales Information
1. Open the Configurator | System | Dashboard form and select the
Alert Levels tab.
2. In the Sales alert box, enter a threshold percentage value for the
Yellow alert field. During operations, the Sales drill-down button
will change to yellow when sales increases or decreases by this
amount from the previous 15-minute time period.
3. In the Sales alert box, enter a threshold percentage value for the Red
alert field. During operations, the Sales drill-down button will
change to red when sales increases or decreases by this amount from
the previous 15-minute time period.
4. Click the Save button.
Configuring Kitchen/Speed of Service Information
1. Open the Configurator | System | Dashboard form.
2. Select the Display KDS Information option from the General tab
for alert times to display in the Kitchen panel. Note: If this option is
cleared, only 86'd items appear in the Kitchen panel.
3. Click the Save button.
4. Go to the Alert Levels tab.
5. In the KDS alert count box, enter a threshold value for the Yellow
alert field. During operations, the number of orders that entered alert
status during the last four 15-minute time periods are displayed.
6. In the KDS alert count box, enter a threshold value for the Red alert
field. During operations, the number of orders that entered alert status
during the last four 15-minute time periods are displayed.
7. Click the Save button.
MD0003-065
Revision D
May 2, 2005
Page 146 of 814
3700 POS
What’s New
Configuring Labor Information
1. Open the Configurator | System | Dashboard form and select the
Alert Levels tab.
2. In the Overtime alert box, enter a threshold amount in the Hours
until overtime field. This value is used to identify employees who
are nearing overtime for the current work week. For example, if the
threshold is set to 30, any employee who has worked 30+ hours will
be automatically added to the Approaching Overtime list on the
Labor Panel.
3. In the Overtime alert box, enter a threshold amount in the Overtime
alert hours field. This value is used to identify employees who have
worked more than the regular number of hours for the current work
week. For example, if the threshold is set to 40, any employee who
has worked 40+ hours will be listed in red on the Labor Panel.
Note
If the option to display all employees is selected in Configurator
| System | Dashboard | General, all employees that have worked
during the current labor week are displayed. If the option to
display all employees is cleared, only the employees that have
reached the alert status will be displayed.
4. In the Employees in overtime alert box, enter a threshold
percentage value for the Yellow alert field. During operations, the
Employees drill-down button will change to yellow when the
percentage of employees in overtime exceeds this amount.
5. In the Employees in overtime alert box, enter a threshold
percentage value for the Red alert field. During operations, the
Employees drill-down button will change to red when the percentage
of employees in overtime exceeds this amount.
MD0003-065
Revision D
May 2, 2005
Page 147 of 814
3700 POS
What’s New
6. In the Labor cost alert box, enter a threshold percentage value for
the Yellow alert field. During operations, the Labor drill-down
button will change to yellow when the labor cost percentage exceeds
this amount.
7. In the Labor cost alert box, enter a threshold percentage value for
the Red alert field. During operations, the Labor drill-down button
will change to red when the labor cost percentage exceeds this
amount.
8. Click the Save button.
Configuring Employee and Contest Information
Employee Information
1. Open the Configurator | System | Dashboard form.
2. Select Display All Employees from the General tab to show all
employees who have worked the current business day and have
posted sales.
Or
Clear the Display All Employees option from the General tab to
show only those employees that are currently clocked-in and have
posted sales for the current business day.
3. Click the Save button.
Contest Information
1. Open the Configurator | System | Dashboard form.
2. Select Run Employee Contests from the General tab. If this option
is selected, the Contests button appears on the Employee panel of the
Dashboard.
MD0003-065
Revision D
May 2, 2005
Page 148 of 814
3700 POS
What’s New
3. Select Display Contest Information in Employee Panel from the
General tab to show the employee contest tracking information.
If this option is selected, the total number of contest items sold and
the total sales for each clocked-in employee (with sales for the
current business date) are displayed.
If this option is cleared, the total guest count and total sales are
displayed for each clocked-in employee with sales for the current
business date.
4. To define a contest, select Edit List from the Contest List tab to
launch the List Wizard.
5. Select the appropriate Contest List Type. The contest name cannot
be changed. Only one contest can be configured at a time.
6. Select Next.
7. Choose the items to track for the contest and click Next.
8. Select Finish.
9. Click the Save button.
Setting Employee Access to the Dashboard
1. Open the Configurator | Employees | Employee Classes form.
2. Select the Use dashboard option on the Procedures tab for each
Employee Class that is allowed to access the Dashboard.
3. Specify which panels of information will be displayed for members
of this employee class by checking one or more of these options:
View sales
View kitchen
View labor
View employees
View contests
MD0003-065
Revision D
May 2, 2005
Page 149 of 814
3700 POS
What’s New
4. Click the Save button.
Configuring a Dashboard Manager Procedures Touchscreen Key
1. Add a new record named Dashboard in System | External Programs.
Set the following options:
Option
Setting
User Interface
Windows
Run Style
Normal
Run in separate virtual machine
Enabled
Working Directory
..\bin
Command Line
procedures.exe -o
2. Add a [Manager Procedures] key in Devices | Touchscreen
Designer. Set the following options:
Option
Setting
Category
External Program
Program
Dashboard (the External Program
defined above)
3. Restart POS Operations for the [Manager Procedures] key to appear
on the touchscreen.
MD0003-065
Revision D
May 2, 2005
Page 150 of 814
3700 POS
What’s New
Configuring Totals Posting
The Dashboard refreshes automatically every minute, but if no
information has changed (no totals posting has been run) the displayed
information remains the same. In order to display meaningful
information on the Dashboard, totals posting should be configured as
shown below:
Totals
Frequency
Sales
124 - Time Period Sales
Every 1 minute
130 - System Sales and Tracking
Every 1 minute
Employee
115 - Employee Sales
Every 1 minute
Contest
157 - Load Dashboard Totals Information*
Every 1 minute
Labor
133 - Time Card Totals
Every 15 minutes
142 - Post Time Period Labor Totals
Every 15 minutes
132 - Job Code Totals
Every 15 minutes
Kitchen/Speed of Service
Kitchen Speed of Service (Configured in
Configurator | System | Kitchen | Posting)
Every 1 minute
86’d Board
No posting necessary
All Panels
157 - Load Dashboard Totals Information
(This should be the last step in the
autosequence.)
Every 1 minute
*Updates as part of the All Panels autosequence.
MD0003-065
Revision D
May 2, 2005
Page 151 of 814
3700 POS
What’s New
Note
It is recommended that you disable (Skip) any existing sales and
labor posting and create separate posting autosequences for the
Dashboard with the recommended frequencies shown above.
Make sure that you are not posting multiple times with your
existing posting and with the new Dashboard posting.
Using the Dashboard
Accessing the Dashboard
1. Press the [Dashboard Manager Procedures] key on the touchscreen
Or
Launch the Manager Procedures application and press the Dashboard
icon.
2. The Dashboard application appears.
MD0003-065
Revision D
May 2, 2005
Page 152 of 814
3700 POS
What’s New
Viewing Sales Information
The Sales information panel provides current time period and daily totals
for the following information:
Net Sales
Check Count (Table Service Only)
Guest Count (Table Service Only)
Transaction Count (Quick Service Only)
Discounts
Voids
Cancels
The Sales button changes to yellow when the Current Net Sales amount
increases or decreases from the previous 15-minute time period by the
amount defined in POS Configurator | System | Dashboard | General |
Sales alert | Yellow alert. The Sales button changes to red when the Net
Sales amount increases or decreases from the previous 15-minute time
period by the amount defined in POS Configurator | System | Dashboard
| General | Sales alert | Red alert.
Click the Sales button to drill-down to a horizontal bar graph view of
time period sales.
MD0003-065
Revision D
May 2, 2005
Page 153 of 814
3700 POS
What’s New
Viewing Kitchen/Speed of Service Information
The Kitchen/Speed of Service information panel provides kitchen
performance information, including the following:
86'd Items (Table Service Only)
Counter Time (Quick Service Only)
Drive Thru Time (Quick Service Only)
Park Time (Quick Service Only)
If you are running in a QSR environment, click the [SOS] (Speed of
Service) button to drill-down to a screen that displays the average times
for the last 15-minute time period and previous hour for the following:
Order time
Line time
Window time
Pickup time
Viewing Labor Information
The Labor information panel provides real-time data for:
labor costs
labor as a percentage of sales
employees who are approaching overtime
MD0003-065
Revision D
May 2, 2005
Page 154 of 814
3700 POS
What’s New
The Labor button changes to yellow when either of the following
conditions occurs:
Number of employees in overtime exceeds the percentage defined in
POS Configurator | System | Dashboard | Alert Levels | Employees in
overtime alert | Yellow alert
Labor cost percentage exceeds the percentage defined in POS
Configurator | System | Dashboard | Alert Levels | Labor cost alert |
Yellow alert
The Labor button changes to red when either of the following conditions
occurs:
Number of employees in overtime exceeds the percentage defined in
POS Configurator | System | Dashboard | Alert Levels | Employees in
overtime alert | Red alert
Labor cost percentage exceeds the percentage defined in POS
Configurator | System | Dashboard | Alert Levels | Labor cost alert |
Red alert
Click the Labor button to drill-down to sales, labor cost, and labor as a
percentage of sales information in 15-minute increments.
MD0003-065
Revision D
May 2, 2005
Page 155 of 814
3700 POS
What’s New
Viewing Employee Information
The Employee Information panel displays the following for all
employees with sales on the current shift:
Number of guest checks (Table Service Only)
Sales (Table Service Only)
Average per check (Table Service Only)
All clocked in employees (Quick Service Only)
Till assignment (Quick Service Only)
Cash pull alert (Quick Service Only)
Count (Table Service or Quick Service with contests)
Amount (Table Service or Quick Service with contests)
Click the Employee button to drill-down to a spreadsheet-style report
with sales, check, guest, discount, service charge, no sale, void, and
transaction cancel information for each employee. You can also further
drill-down to an Employee Sales graph.
Click the Contest button to drill-down to a spreadsheet-style employee
report with counts for each contest item.
MD0003-065
Revision D
May 2, 2005
Page 156 of 814
3700 POS
What’s New
Order Scheduling
To serve guests more efficiently, several new features were added to the
RES POS System that will allow wait staff to schedule when orders are
sent to the kitchen. The problem is addressed in two ways:
1. By allowing servers to schedule the firing of items on a guest
check. This approach ensures that the meal is presented smoothly,
without delays between courses, and fresh from the kitchen.
2. By allowing entire orders to be scheduled and fired at a future
date/time. This approach could be used for catered affairs, hotel
“doorhangers”, or other situations where an order is taken one or
more days in advance of the actual service, order pick-up, or
delivery.
Autofire Server
The “Autofire Server” is responsible for monitoring checks for timed
events and initiating the appropriate response. The process — referred to
as autofiring — is designed to run in the background and fire between
current transaction. In this release, each workstation doubles as an
autofire server.
During POS Operations, an idle workstation will periodically poll the
server for checks with menu items that are due to be fired. If any are
found, the checks will be picked up automatically by the autofire server
and the relevant menu items will be sent to the remote order printers or
KDS display. The check will then be updated and saved.
Each workstation will attempt to handle its own checks. However, if a
check is not picked up within 2 minutes of its autofire time (e.g., the
owning workstation is in the middle of another transaction), any other
idle workstation can pick up the check and fire the appropriate menu
items. If all the workstations are in use, the system must wait until one is
free before firing menu items that have exceeded their wait period.
MD0003-065
Revision D
May 2, 2005
Page 157 of 814
3700 POS
What’s New
Menu items will not be fired from any check that has been picked up by a
workstation. The check must be service totaled first before the overdue
menu items can be sent to the kitchen. Once the items are fired, a banner
will be printed/displayed at the top of the order, indicating that the items
were delayed.
Warning!
When using the autofire features, the [Service Total] and
[Print] keys must be configured with the ‘Keep Held Status’
option selected (POS Configurator | Sales | Tender/Media |
Service TTL).
If the keys are set to‘Fire Order’, the system will ignore the
timer and fire all items when the check is service totaled or
printed.
BSM and SAR
Autofire features work in both Backup Server Mode (BSM) and
Standalone Resiliency (SAR) mode. However, because these modes are
only active when the workstation has experienced some communications
difficulty, there is a possibility that menu items will be delayed or sent
twice.
For example, suppose the network is down and the workstations are
switched to standalone mode. In this mode, a workstation can only
autofire its own checks. If the workstation remains inside a transaction
for an extended period of time, orders may be delayed well past their
autofire time.
On the other hand, suppose only one of the workstations is switched to
standalone mode. In this case, it’s conceivable that the menu items will
be fired twice — once from the standalone workstation, and once from a
networked workstation. The system will try to avoid this by checking
before an order is activated to see if it has already been posted in the
database.
To assist the users, checks sent from workstations operating in either
standalone or backup server mode will include a banner across the top
indicating the status of the workstation that fired the menu items. It will
be up to the kitchen staff to make sure that these menu items are not
duplicated.
MD0003-065
Revision D
May 2, 2005
Page 158 of 814
3700 POS
What’s New
Autofire Features
The following new features employ the autofire server to control how
menu items are organized, selected, and acted on in the RES System:
POS
Dining Courses
Timed Fire
Delayed Orders
Future Orders
KDS
Dining Courses
Item Timing
Kitchen Zones
These features may be used separately or with existing RES functionality.
Results will vary, depending on the options selected.
This section describes the features from the POS perspective. For
information on the related KDS functionality, refer to the KDS Order
Scheduling topics, beginning on page 324.
Dining Courses
Dining Courses were designed for use in table-service restaurants as a
way to organize menu items into logical serving groups. (e.g., drinks,
appetizers, entrées, desserts). By itself, the feature is a simple labeling
device that allows the user to do three things:
Select all the menu items on a check that belong to the same
course number.
Determine the order (by course number) in which menu items are
selected.
Print a course header before the appropriate menu items on the
order output device (e.g., remote order printer, KDS display, or
KDS chit printer).
Up to 64 courses may be programmed.
MD0003-065
Revision D
May 2, 2005
Page 159 of 814
3700 POS
What’s New
Selecting Courses
During POS Operations, members of a dining course can be selected
using the new [Select Course] function key. When this key is pressed, all
unfired items belonging to the lowest-numbered course are highlighted in
the check detail. The Course identifier is displayed in the yellow status
box at the top of the screen.
If a dining course has no unfired items, the system will skip it and move
on to the next unfired course. By pressing the [Select Course] key
multiple times, the user can cycle through all of the courses, highlighting
each group of menu items, one at a time. Items from the previous course
are deselected automatically.
After cycling through all the available dining courses, the system will
deselect all items and then start over again with the lowest unfired
course.
Modifying the Course Menu Items
The [Select Course] key does nothing more than highlight menu items.
Its value lies in its ability to recognize and select multiple items with one
keystroke. Once the items are selected, other function keys may be used
to apply discounts or service charges to them, split them between checks,
transfer or void them, place them on hold, or fire them to the kitchen.
MD0003-065
Revision D
May 2, 2005
Page 160 of 814
3700 POS
What’s New
Feature Comparison
This feature is separate from (and should not be confused with) the
courses used in Fixed-Price Meals. The following table illustrates the
basic differences between the two:
Dining Courses
Fixed-Price Meals
A Dining Course is a label assigned
to a menu item class. It’s purpose is
to organize and select menu items
as a group.
A Fixed-Price Meal is a menu item
that includes two or more courses at
a preset price.
Attributes:
Uses courses defined on the
Sales | Descriptors | Dining
Courses forms. Up to 64 courses
are allowed.
Identifies menu items by links to
the Dining Course drop-down
box (Sales | Menu Item Classes |
Description).
Places no restrictions on the
number of menu items ordered
per course.
Does not assign price at the
course level. Prices accrue
based on the menu items
selected.
Includes [Select Course]
function key to highlight next
unfired group of menu items.
Can be configured to print
courses in order with a course
header above each group.
Attributes:
Uses courses defined on the
Sales | Courses forms. Up to 16
courses are allowed.
Requires the creation of a Fixed
Price menu item (parent).
The parent menu item is linked
to a menu item class with the
option Fixed price meals (Sales
| Menu Item Classes | Price/
Totals) selected.
Specifies the number and type of
courses included in the fixedprice meal (Sales | Courses |
Course Selection).
Uses Course Membership
groups (Sales | Courses |
Course Membership) to
determine which menu items to
present for course selection.
Limits the customer to one menu
item selection per course.
Posts the priced assigned to the
Fixed-Price Meal only. Prices
assigned to menu items are
overridden when used as a
course selection.
MD0003-065
Revision D
May 2, 2005
Page 161 of 814
3700 POS
What’s New
Enabling the Feature
To support the feature, the following additions and modifications were
made in POS Configurator:
Sales | Descriptors | Dining Courses (new tab)
Dining Course Seq — A system provided sequence number for
each dining course. When used with a timed firing option, this
number determines the order in which a course of menu items
will be sent to the kitchen.
Name — Allows the user to enter a descriptor (up to 12
characters) for each course.
Minimum/Maximum Preparation Time — Sets the minimum/
maximum amount of time that the system should wait before
sending this course to the kitchen.
Note
Course timings are affected by whether or not individual
items times are set. To work properly, either ALL or
NONE of the items must have a minimum prep time set.
For more on these options, refer to the KDS-related
discussion of Dining Courses beginning on page 324 and
of Item Timings on page 332.
Sales | Menu Item Classes | Description
Dining Course — Links the menu item class to one of 64 dining
courses. Allows the system to identify and highlight all members
of the same dining course with a single touch key selection.
Sales | Menu Item Classes | General Options
Items are...Appetizers — [Deleted from form.]
Note
MD0003-065
Revision D
May 2, 2005
Page 162 of 814
Although the option has been removed from the POS
Configurator screen, the column will remain in the
database table to accommodate users who rely on it for
custom KDS applications.
3700 POS
What’s New
Devices | Order Devices | Options
Print Dining Course Header — When checked, prints the
course header on the order chit for each new course. Course
headers are printed below the order type and above the seat
identifier.
Devices | Touchscreen Designer (new function key)
Category: Dining Courses — Highlights all the unfired items
belonging to the next dining course on the check. The key may be
pressed multiple times to cycle through the dining courses.
MD0003-065
Revision D
May 2, 2005
Page 163 of 814
3700 POS
What’s New
Timed Fire
Timed Fire is one of three new features designed for scheduling orders in
the kitchen. The other two are Delayed Orders and Future Orders.
With Timed Fire, servers control the pace of a meal, by scheduling when
the menu items will be sent to the kitchen. This makes Timed Fire
especially useful with Dining Courses. For example, when a check with
multiple courses is opened, the server can program the drinks and
appetizers to fire immediately. Ten minutes later, the entrées can be sent
to the kitchen, followed 15 minutes later by the desserts.
This feature is similar to Hold and Fire functionality, except that the
server does not have to return to the POS workstation to fire the next set
of menu items.
Using the Feature
Timed Fire can only be applied to unfired menu items. Before service
totaling, one or more menu items is highlighted and the [Timed Fire] key
is pressed. A dialog box displays, prompting the user to specify (in
seconds) when the menu item(s) should be fired to the kitchen.
If no menu items are selected, the system assumes that the timed fire
should be applied to all unfired items. This does not include items that
are already on hold or were previously timed to fire.
MD0003-065
Revision D
May 2, 2005
Page 164 of 814
3700 POS
What’s New
On an open check, timed-fire menu items are designated in the check
detail by the letter “F” after the entry. Held items are followed by the
letter “H”.
If a highlighted menu item is on hold when the [Timed Fire] key is
pressed, the system will remove the hold and set the timer to fire at the
selected interval. If a selected menu item is already timed, the system will
reset the timer to the newly entered interval.
Timed menu items may be changed up until the moment they are fired to
the kitchen.
Until the check is closed,
users will be able to tell at a
glance which orders contain
timed-fire menu items. The
checks/tables representing
those orders on the pick-up
screens will be highlighted in
blue.
Check/tables containing
orders with held items are
highlighted in magenta.
MD0003-065
Revision D
May 2, 2005
Page 165 of 814
3700 POS
What’s New
Delayed Orders
Delayed Order is the second of three new features designed for
scheduling orders in the kitchen. The other two are Timed Fire and
Future Order.
A Delayed Order refers to a check whose menu items are entered and
posted immediately to sales, but are timed to fire later in the business day.
For example, a lunch order might be placed early in the day, but is not
going to be picked up until noon. By entering the check early — and
scheduling it to fire at 11:45 a.m. — the system assumes responsibility
for sending the order to the kitchen at the appropriate time, and the
customer is assured of picking up a freshly prepared meal.
Restrictions and Limitations
A Delayed Order can be picked up and its menu items added, modified,
or voided until the moment they are fired to the kitchen. The autofire
time can also be changed. There are limitations, however.
The following features cannot be applied to a Delayed Order:
Hold Items
Timed Fire
Edit Check
Split Check
Add Check
Block Settle
Seat Filter
Send Order
Suspend
Chaining
Menu Item Availability
Because Delayed Orders post immediately to sales, all menu items must
be available at the time the order is created. For limited items, availability
counts will be decremented when the check is entered.
MD0003-065
Revision D
May 2, 2005
Page 166 of 814
3700 POS
What’s New
Menu Item Effectivity
When creating a Delayed Order, only menu items with a current
effectivity date may be selected. If the menu item becomes ineffective
before the Delayed Order is activated, a generic name (i.e., “Menu Item”)
will be substituted.
Menu Item Names and Prices
For Delayed Orders, the system will post the name and price of the menu
items that are in effect when the order is activated. Therefore, changes to
the database should not be activated while this feature is in use.
Creating a Delayed Order
A Delayed Order is created at the start of a check. Before a menu item is
entered, the server presses a [Delayed Order] touch key. The status is
shown in the grey box in the upper right-hand corner of the display.
The server then enters the menu items as usual. When the check is
service totaled, the system displays a numeric keypad and prompts for
the date (mmdd) and time (hhmm) that the order should be fired. Time
entries are based on a 12-hour clock, using 15-minute intervals (e.g.,
0745, 1130). A dialog box allows the user to clarify AM or PM.
MD0003-065
Revision D
May 2, 2005
Page 167 of 814
3700 POS
What’s New
Once these values are
entered, the server is
prompted to confirm the
date and time.
If the entry is correct, the Yes button is pressed and the order is added to
the open check SLU screen and to reports. As with other timed orders,
the table objects and open checks will be bordered in blue until after the
menu items are fired.
Alternate Method
Servers can front-load the firing time by using the numeric keypad to
enter a four-digit value (hhmm) before pressing the [Delayed Order]
key. In this case, the firing time is based on a 24-hour clock (e.g., 0715,
1030, 1430). A date is not required because the system assumes that the
items will be fired at the next occurrence of the timed value. For
example, entering:
[0] [7] [1] [5] [Delayed Order]
will set the delayed order time to 7:15 a.m., today or tomorrow,
depending on whether the order was entered before or after 7:15 am.
Once the timer is set, menu items are entered as usual. When the check is
service totaled, the system bypasses the date/time prompts and displays
the confirmation dialog box directly. The server can confirm the entry by
pressing the Yes button, or press No to clear the screen and launch the
date/time dialog boxes.
Caveat
Technically, Delayed Orders should be programmed to fire in the current
business day, since that is when the sales are recorded. They can,
however, be programmed up to 90 days in advance. (Orders scheduled
for another business date should be entered as Future Orders. See feature
description, beginning on page 169, for more information.)
MD0003-065
Revision D
May 2, 2005
Page 168 of 814
3700 POS
What’s New
Scheduling a Delayed Order outside the current business date will impact
other processes. For example, servers will not be able to exit POS
Operations unless they are privileged to clock out with open checks or
have a manager approval to do so. In addition, any autosequence that is
programmed to look for open checks before running (e.g., end-of-shift,
end-of-day) will fail if a Delayed Order is still active.
Future Orders
Future Orders is the last of three new features designed for scheduling
orders in the kitchen. The other two are Timed Fire and Delayed Orders.
A Future Order refers to a check whose menu items are entered without
posting to sales or firing to the kitchen until the date and time specified.
Future Orders can be entered up to 90 days in advance. This makes the
feature ideal for catering businesses where orders are placed for a large
group (e.g., business conferences, banquets, wedding receptions) prior to
the actual event.
Restrictions and Limitations
A Future Order can be picked up and its menu items added, modified, or
voided until the moment they are fired to the kitchen. The autofire time
can also be changed. There are limitations, however.
Orders that have not been fired to the kitchen (i.e., future or delayed
orders) will be deleted from the Server when totals are cleared, but not
removed the Backup Server. Should the server connection fail, and the
POS clients go into backup server mode (BSM), the future orders will
redisplay. These orders will persist on the Backup Server until that device
is rebooted.
Other features that cannot be applied to a Future Order include:
Cash Management
Discounts Requiring a Till ID
Service Charges Requiring a Till ID
MD0003-065
Revision D
May 2, 2005
Page 169 of 814
3700 POS
What’s New
POS Operations
Payments
PMS Payments
Credit Card Authorizations and Payments (Initial
Authorization is allowed)
Hold Items
Timed Fire
Edit Check
Split Check
Add Check
Block Settle
Seat Filter
Send Order
Suspend
Chaining
Team Service
Guest Services Solutions
Redeeming Gift Certificates
Redeeming Coupons
Accounts Receivable Account Charges
Activate Gift Certificates
Value Add Gift Certificates
Menu Item Availability
With Future Orders, the system does not check for menu item availability
or decrement the availability count until the order is activated. However,
since this is an unattended process, the system will activate the order
even if there are insufficient items available.
Menu Item Effectivity
When creating a Future Order, only menu items with a current effectivity
date may be selected. If the menu item is ineffective when the Future
Order is activated, a generic name (i.e., “Menu Item”) will be substituted.
MD0003-065
Revision D
May 2, 2005
Page 170 of 814
3700 POS
What’s New
Menu Item Names and Prices
For Future Orders, the system will post the name and price of the menu
items that are in effect when the order is activated. Therefore, changes to
the database should not be activated while this feature is in use.
Serving Periods
Future Orders will post to the serving period in effect when the order is
activated. Users should be advised that the autofire server will not
display an error message if the serving period is wrong. For accurate
reporting, it is up to the users to ensure that the serving period is set
correctly for pending Future Orders. For example, if a breakfast order is
to be activated at 6:00 a.m., the serving period should be set to Breakfast
before 6:00 a.m.
Creating a Future Order
Like Delayed Orders, a Future Order is created at the start of a check.
Before a menu item is entered, the server presses a [Future Order] touch
key. The status is shown in the grey box in the upper right-hand corner of
the display.
MD0003-065
Revision D
May 2, 2005
Page 171 of 814
3700 POS
What’s New
The server then enters the menu items as usual. When the check is
service totaled, the system displays a numeric keypad and prompts for
the date (mmdd) and time (hhmm) that the order should be fired. Time
entries are based on a 12-hour clock, using 15-minute intervals (e.g.,
0745, 1130). A dialog box allows the user to clarify AM or PM.
Once these values are
entered, the server is
prompted to confirm the
date and time.
If the entry is correct, the Yes button is pressed and the order is added to
the Future Orders SLU screen and to reports. The check will be stored in
the database, but will not display as an object on the touchscreens until
the scheduled business date. At that time, the table objects and open
checks will be bordered in blue until after the menu items are fired. The
system will not start timing the open check until it is actually sent to the
kitchen.
Warning!
When updating the system’s Time Zone setting, users must stop/
start RES services before attempting to run POS Operations.
This will resynchronize the RES application time zones (which
are set on startup) with those on the updated POS clients.
Failure to do so, or to reboot the system, will cause errors when
using the Future Order feature.
Activating a Future Order
When creating a Future Order, users should keep in mind that the date
and time provided by a customer represents the date and time the order is
expected to be ready. This is not how the system interprets these values.
For the system, scheduled dates and times are considered activation
values. When a Future Order is activated, all the menu items on that order
are immediately fired to the kitchen. This means the customer may arrive
expecting the order to be ready, only to discover that it has just been sent
to the kitchen.
MD0003-065
Revision D
May 2, 2005
Page 172 of 814
3700 POS
What’s New
One solution is for the user to modify the activation time to allow for
preparation. However, given the lead time between when a Future Order
is entered and when it is activated, preparation times may be difficult to
project. To address this issue, an option (Future/Delayed Order Offset
Time) was added that allows users to back out the scheduled activation
time by a predefined number of minutes. The offset value is linked to
order type.
For example, if the average preparation time for a pick-up order is 15
minutes, the user can program future pick-up orders to fire 15 minutes
earlier than the scheduled time.
Assigning an Employee
The amount of time between order entry and activation can also make it
difficult to assign the check to a server. Schedules can change, employees
may quit, or the workload may be unevenly distributed among the
servers.
To address this problem, a Future Order Employee option (System |
Order Types) was added that would allow a user to name the employee
who will be assigned all of the Future Orders once they are activated. For
example, the orders can all be posted to the manager, who can then
transfer them to an available server.
Note
The Future Order and Open Check SLUs have a display limit of
500 checks at a time. Checks in excess of this limit will not
display until an earlier check has been closed.
Reports
As part of the Future Order feature, two new report templates have been
added. The Employee Future Guest Check reports (chk_105.rpt, 80- and
40-column versions) provide a summary of the orders that are scheduled
for a future date or range of dates. Checks are listed by revenue center
and grouped by the employee who entered the original check. The check
amount and time-to-fire are also included.
Samples of each report are provided below.
MD0003-065
Revision D
May 2, 2005
Page 173 of 814
3700 POS
What’s New
80-Column Report
MD0003-065
Revision D
May 2, 2005
Page 174 of 814
3700 POS
What’s New
40-Column Report
MD0003-065
Revision D
May 2, 2005
Page 175 of 814
3700 POS
What’s New
Summary
Order Scheduling — Comparison of Features
Timed Fire
Uses programmed Touch Key:
Category: Transaction
Function: Timed Fire
Prompts user to specify how
long (in seconds) before menu
items will be fired.
Delayed Order
Uses programmed Touch Key:
Category: Transaction
Function: Delayed Order
Prompts user to specify date/
time when menu items will be
fired.
May include an offset time
(hhmm) for order preparation.
This value ensures that the
Menu items can have different
delayed order is READY at the
firing times on same check (e.g.,
stated date and time.
especially useful with dining
Applies to all menu items on the
courses).
check.
Items are fired in the current
Usually fired in the current busibusiness date.
ness date. May be delayed up
Permits add/modify/void of
to 90 days before firing.
menu items until order is fired.
Permits add/modify/void of
Allows changes to firing time
menu items until order is fired.
until order is fired.
Allows changes to firing time
Posts sales to database/reports
until order is fired.
when menu items are entered.
Posts sales to database/reports
when check is entered.
Applies to highlighted menu
items only.
Server cannot clock out with
Delayed Order still assigned.
Some autosequences may not
run with Delayed Orders in system.
Future Order
Uses programmed Touch Keys:
Category: Transaction
Function: Future Order
Category: Check Access
Function: Future Orders SLU
Category: Check Access
Function: Print Future Orders
SLU
Prompts user to specify date/
time when menu items will be
fired.
May include an offset time
(hhmm) for order preparation.
This value ensures that the
future order is READY at the
stated date and time.
Applies to all menu items on the
check.
Timed to fire on a future business date. Checks can be
entered up to 90 days in
advance.
Permits add/modify/void of
menu items until order is fired.
Allows changes to firing time
until order is fired.
Posts sales to database/reports
when check is activated.
Does not affect whether a
server can clock-out or an
autosequence can run.
MD0003-065
Revision D
May 2, 2005
Page 176 of 814
3700 POS
What’s New
Enabling the Autofire Features
To support the autofire features, the following function keys were added
in POS Configurator:
Devices | Touchscreen Designer
Timed Fire (Category: Transaction) — When pressed, prompts
the user for the amount of time (in seconds) that the system
should wait before firing the highlighted items.
Delayed Order (Category: Transaction) — When pressed,
designates the check as a Delayed Order. Allows the user to
specify the date and time that all of the menu items on the check
will be fired to the kitchen. Delayed Orders are usually entered in
the same business day in which they will be fired.
Future Order (Category: Transaction) — When pressed,
designates the check as a Future Order. Allows the user to specify
the date and time that all of the menu items on the check will be
fired to the kitchen. Future Orders may be entered up to 120 days
in advance of the activation date.
Future Orders SLU (Category: Check Operations) — When
pressed, prompts the user to specify a business date. If any Future
Orders are found for this date, displays them on the workstation
screen.
Print Future Orders SLU (Category: Check Operations) —
When pressed, prompts the user to specify a business date. If any
Future Orders are found for this date, the system will print them,
one check at a time, to the workstation’s report printer.
Revenue Center | RVC Posting
Future Order Employee — From the drop-down list, select the
employee to whom all future orders will post once they are
activated. If this field is blank when a future order is activated, the
check will post to the employee who entered it into the system.
This will be true even if that employee is not clocked into the
system.
MD0003-065
Revision D
May 2, 2005
Page 177 of 814
3700 POS
What’s New
System | Order Types
Future/Delayed Order Offset Time — Specifies the amount of
time (hhmm) prior to the entered fire time that a Future or
Delayed Order should be sent to the kitchen.
This option allows users to enter the exact date and time that the
customer wants his order to be ready. For example, assuming that
the average time to prepare a pick-up order is the same (e.g., 30
minutes), all newly activated orders of this type will be
automatically fired 30 minutes before the time entered.
SIM
Several new SIM variables were added to handle order scheduling
(dining course, autofire features). For more information, refer to the
descriptions of each of these SIM variables, beginning on page 218.
POS Operations
Access KDS From POS
A new external program has been added that allows a POS user on an
Eclipse or WS4, to switch the system’s focus to the KDS display.
The program — SwitchTo.exe — is run from a command-line prompt,
called within the POS application. (For more information on the
SwitchTo program, refer to Appendix J in the Restaurant Enterprise
Series Version 3.2 — Service Pack 3 Setup Instructions, MD-0003-058,
Rev. B (spinstall_rmf.pdf), located in the documentation folder on the
CD.)
MD0003-065
Revision D
May 2, 2005
Page 178 of 814
3700 POS
What’s New
Enabling the Feature
This section describes how to configure a POS touchscreen key that will
bring the KDS application to the foreground and switch the focus to it.
1. Open the POS Configurator | System | External Programs.
2. Add a new program record called Start KDS.
3. Set the following parameters:
User Interface — Console
Run Style — Normal
Command Line — C:\MICROS\RES\POS\bin>SwitchTo.exe
KDS (where C represents the local drive where the MICROS
application resides.)
4. Save the record.
5. Go to Devices | Touchscreen Designer and add a touch key to one of
the screens to switch to the KDS application:
[Start KDS] — Category: External Program
Program: Start KDS
MD0003-065
Revision D
May 2, 2005
Page 179 of 814
3700 POS
What’s New
Mark Orders From POS
The Mark Orders feature allows a user to place an order on "hold" so that
it cannot be bumped from the KDS station. This feature is helpful in
situations where a drive-thru customer has paid, but the order is not
ready. The order is "parked," or put aside, until the customer receives the
items, after which it can be unmarked and bumped.
In the past, orders could only be marked at the KDS station itself. To
improve efficiency, the feature has been extended to the POS side. A new
function has been added to allow users to park an order on a KDS station
from the POS workstation.
Enabling the Feature
To enable the feature on the POS workstation, a touch key must be added
to one of the screens via POS Configurator (Devices | Touchscreen
Designer):
[Mark Order] — Category: KDS Function
Function: KDS Mark
Once an order has been service totaled, any POS operator can use the
[Mark Order] key to park the order in the kitchen. When the key is
pressed, a numeric dialog box is displayed, prompting for the number of
the check to be parked. The user enters the check number and presses the
green check mark to continue.
Note
MD0003-065
Revision D
May 2, 2005
Page 180 of 814
Since the order must be service totaled first, the Mark Order
feature cannot be used in the middle of an order (i.e., with
Dynamic Order Mode’s Fire-on-fly option).
3700 POS
What’s New
Marking an order affects all KDS stations where the order is displayed.
The order displays with a highlighted magenta border.
The order may not be bumped from the KDS display until it is unmarked.
This may be done from any POS workstation in the revenue center where
it was originally marked. It can also be unmarked or bumped from the
KDS display.
To unmark an order, the POS user simply presses the [Mark Order] key
to open the numeric dialog and enters the check number again. As long as
the order is still in the system, the key will act as toggle to turn the Mark
feature on and off.
MD0003-065
Revision D
May 2, 2005
Page 181 of 814
3700 POS
What’s New
Team Service
The Team Service feature allows restaurants or banquet halls to manage
large tables or groups by assigning a set of employees (or ad hoc team) to
handle the check on the POS System. Previously, checks could only be
assigned to one employee at a time.
With this feature, all designated team members will be able to create,
pick-up, and ring items on a team check. Any restrictions placed on an
employee’s check privileges will be overridden for team members
accessing a team check.
Restrictions will still apply to tendering functions. Team members may
not post payments or discounts to a check unless they have been
privileged to do so.
Note
Non-team members may pick-up, add menu items, or post
payments to a team check as they would for any other check —
but only if the appropriate privileges were assigned through
POS Configurator (Employees | Employee Classes | Guest
Checks | Other Employee’s Checks).
Once the check is closed, employee sales and tip totals are distributed
among the team members. This distribution is based on a percentage or
portion of the totals assigned to each member of the team.
The system does not attempt to post or redistribute system sales totals to
all of the team members. Sales totals are only posted to the check owner
(i.e., the person who started the team check). All other team members are
considered to be transaction employees.
Non-team members who contribute to a check will not be credited with
sales or included in the allocation of tips.
Note
MD0003-065
Revision D
May 2, 2005
Page 182 of 814
A team check cannot be saved as a future order.
3700 POS
What’s New
Team Membership
Team membership is designed to be both flexible and temporary. In most
cases, a team is assembled for a specific event or occasion (a banquet, a
group celebration, or just an unusually large party of customers). After
the event is over and the check is paid, the need for that particular team is
also ended. At that point, the team can be disbanded by simply deleting
the team definition.
Note
There are no time limits on how long a team may remain in the
system before it is used. That is, teams may be set up long before
the date that the team is actually needed.
However, once a check has been assigned to a team, that team
must be closed at the end of the business day. Otherwise, labor
totals and time card entries will not be posted for that team’s
checks.
The POS system can support multiple teams simultaneously, and
employees may belong to more than one team at a time. For a team to be
valid, at least one employee must be assigned. Up to 32 team members
are allowed.
Once a team is created, members may be added and removed as required.
However, all team members must be clocked in at some point between
the time the team is defined and when it is deleted. Failure to do so will
cause team sales/tip totals to post incorrectly.
Finally, team membership does not interfere with an employee’s ability to
handle other (non-team) checks. Team members can have both types of
checks open at the same time.
MD0003-065
Revision D
May 2, 2005
Page 183 of 814
3700 POS
What’s New
Enabling the Feature
To support the Team Service feature, changes were made in two RES
applications — POS Configurator and Manager Procedures.
POS Configurator
Before defining a team, set the following options in POS Configurator:
Current round post to transaction employee (Revenue Center |
RVC Posting | Options) — Clear this option to ensure that sales totals
post only to the check employee.
Allow Team Membership (Employees | Employee Classes |
Options) — This option is used to specify the types of employees
who are eligible for team membership. When enabled, anyone who is
linked to this employee class will be included in the list (in Manager
Procedures) of potential team members.
Note
This option should only be activated for employee classes
whose members post transactions to a check. Including other
types of employees (e.g., busboys, cooks) will result in
inaccuracies in the system sales reports.
Manager Procedures
The responsibility for assembling and monitoring team activity is usually
associated with a manager, and is primarily handled through Manager
Procedures. For this purpose, new Team Service forms and functionality
have been added.
Create a Team
To create a new team:
1. Open Manager Procedures and press the Other button to display a
list of optional features.
Note
This feature is not available on a hand-held device.
2. Select Edit Team Service to open the Team Service form.
MD0003-065
Revision D
May 2, 2005
Page 184 of 814
3700 POS
What’s New
3. Select the Add New Team button to open the main form.
4. Enter a unique Team Name. Because more than one team may be
active at a time, be as descriptive as possible (e.g., Mike Rose
Luncheon, Banquet Team 1, etc.).
5. Select the team members. To do this, highlight a name from the list of
eligible employees on the right. Shift it to the table on the left using
the [ < ] directional button.
Employees can be removed from the team by highlighting the name
in the membership list and moving it back to the eligible list using the
[ > ] directional button.
Repeat until the list of team members is correct.
MD0003-065
Revision D
May 2, 2005
Page 185 of 814
3700 POS
What’s New
6. Specify the percentage of sales/tip totals to be allocated to each
member of the team. There are two ways to do this:
a) Press the [Allocate Percentage] button at the bottom of the
screen. An equal percentage of the total will be assigned to each
member of the team.
b) Double-click a cell in the Allocation column. When the data field
opens, enter a value. Move to the next row and repeat until a
percentage has been specified for all of the team members. The
sum of all entries must equal 100%.
MD0003-065
Revision D
May 2, 2005
Page 186 of 814
3700 POS
What’s New
7. Press OK to save the record. If the entries are acceptable, the screen
will close and the user will be returned to the main Team Service
form.
If the sum of the percentage allocated was less than 100%, an error
message will be displayed in red at the bottom of the screen. Adjust
the numbers and press the OK button again.
Although not a requirement, it is assumed that each member of the
team will be allocated a share of its sales/tips. If the percentage
assigned to any of the team members is “0”, the system will request
confirmation before proceeding.
Press Yes to accept and save the record.
MD0003-065
Revision D
May 2, 2005
Page 187 of 814
3700 POS
What’s New
Edit a Team
Managers are free to add or remove members from a team at any time,
including while the team has open checks on the system. Only those
employees who are part of the team when the check is closed will be
included in the final accounting.
For example, if an employee is added to a team after a check is opened,
the distribution of sales and tips is adjusted to include the changes in
everyone’s percentages. The new team member is not penalized for being
added late, but will receive his/her full share based on the entire value of
the check.
On the other hand, employees who are removed from a team check
before the check is closed, receive no credit for their contributions to the
check totals.
To edit a team:
1. Open Manager Procedures and press the Other button to display a
list of optional features.
2. Select Edit Team Service to open the Team Service form. A list of
current team is displayed.
MD0003-065
Revision D
May 2, 2005
Page 188 of 814
3700 POS
What’s New
3. Highlight the team name and press the Edit Team button to open the
form.
4. Make changes as needed. Users may:
Modify the team name.
Add/remove team members using the directional arrow buttons.
At least one member must be assigned to the team for the record
to be saved.
Change the percentage values in the allocation column. The sum
of all entries must equal 100%.
5. Press OK to save the changes.
Delete a Team
Teams may be deleted from the system as long as there are no open
checks assigned to them. This action does not affect an employee’s
ability to handle other checks, either alone or as a member of another
active team.
To delete a team:
1. Open Manager Procedures and press the Other button to display a
list of optional features.
2. Select Edit Team Service to open the Team Service form. A list of
current teams is displayed.
3. Highlight an entry and press the [Close A Team] button. The team
will be removed from the list.
Or,
Press the [Close All Teams] button to delete all of the team entries.
MD0003-065
Revision D
May 2, 2005
Page 189 of 814
3700 POS
What’s New
Print a Team List
Each time a change is made to an existing team (e.g., members are added
or removed, or the percent allocated to a member is modified), a new
timestamped version of that team is saved in the database.
Team versions are important because they provide a history of
membership activity. This allows a manager to determine which
employees were assigned to a team on a given day. It can also be used to
evaluate the relative productivity of certain teams by comparing
membership to activity during each of the check’s transaction rounds.
To run a team history report:
1. Open Manager Procedures and press the Other button to display a
list of optional features.
2. Select Edit Team Service to open the Team Service form.
3. Press the [Print Team List] button. The data range form is displayed.
4. Select a Start Date for the report by highlighting a day on the
calendar and pressing the OK button. Use the arrow buttons to
navigate to the correct month/year, if necessary.
MD0003-065
Revision D
May 2, 2005
Page 190 of 814
3700 POS
What’s New
5. When the prompt changes at the top of the screen, highlight the End
Date for the report and press the OK button. The results of the report
will be displayed on the screen.
Using the Feature
For employees, the main difference between handling team and non-team
checks occurs when the check is opened and the team affiliation is
applied. Once it is started, the system requires no special procedures to
pick-up, post to, or close a team check. There are a few limitations,
however:
Ownership of a team check can only be transferred to another team
member. It cannot be transferred to another team or added to a nonteam check. (Non-team checks may be added to a team check.)
Block transfer is not permitted. Team checks may be block settled,
but only by the check owner.
Team checks may be split, but will retain their team affiliation for
each of the newly created checks.
MD0003-065
Revision D
May 2, 2005
Page 191 of 814
3700 POS
What’s New
Starting a Team Check
Follow these steps to create a team check:
1. Sign into the POS System and select one of the begin check options.
When a check is started, the system looks to see if the signed-in
employee is a member of a team. If so, a dialog box is displayed
asking if this is to be a team check.
2. Select Yes. If the employee is a member of more than one team, a list
of those teams will be displayed.
3. Select a team and press OK to start the team check.
4. Enter a table number, guest count, and the first round of menu items.
Once the check is service totaled, it is made available to other members
of the team as part of their open check SLU. To assist the servers, team
checks may be distinguished from non-team checks by a double asterisk
(**) in front of the check number.
MD0003-065
Revision D
May 2, 2005
Page 192 of 814
3700 POS
What’s New
Tips for Successful Team Service
Team Service is not difficult to set up or to use. However, because the
feature affects the way sales are posted and reported, the following steps
should be taken to ensure that it works properly:
Assign a team leader. This is the person who will be responsible for
opening and closing all of the team checks. Doing so will ensure that
all checks are closed properly at the end of the event.
Make sure that the revenue center posts only to the check owner. This
is done by disabling the Current round posts to transaction
employee option in POS Configurator (Revenue Center | RVC
Posting | Options).
When setting up a team, do not include employees who do not post to
sales (e.g., busboys, cooks, etc.).
Make sure that all team members clock into the system while the
Team record is still active (i.e., between when the team is defined and
when it is deleted).
Post all Revenue Center and System totals before incrementing the
shift.
Close all teams that were active (i.e., opened/closed a check) during
the current business day. Teams must be closed prior to posting labor
totals (i.e., running stored procedure #143, Update Time Cards with
Sales and Tips). Failure to do so may cause totals to post more than
once.
Reports
Two new standard reports have been added for this feature. Both reports
are available under the Other category in the Autosequences and Reports
application.
Historical Team Definitions (team_def.RPTv3.2.102) — Details the
composition of all of the teams that were added or modified during
the selected date range. This report can also be run through Manager
Procedures by selecting the Print Team List (see page 190).
MD0003-065
Revision D
May 2, 2005
Page 193 of 814
3700 POS
What’s New
Employee Sales and Tip Totals by Team (emp_205_1.rpt) —
Provides a summary of sales and tip information (by employee) for
each member of a Team.
Note
MD0003-065
Revision D
May 2, 2005
Page 194 of 814
The UWS Employee Tip Report does not support team service.
Sites using this feature should run the 40-column Employee Tip
report instead.
3700 POS
What’s New
Touch Refill
A Touch Refill feature has been added to the 3700 POS. When applied to
a menu item, it allows customers to be charged once for the item, but
receive multiple servings or refills. To control costs, only one refill is
allowed for each parent menu item per service round. A limit may be
placed on the number of refills allowed before additional charges incur.
Defining the Refill Order
Touch Refill speeds up the process of refilling an order by reducing (or
eliminating) the number of keystrokes required to obtain another serving
of the menu item. This can be done at two levels: 1) when the menu item
is programmed, and 2) when the refill item is ordered.
Programming Options
During programming, users can save order time by reducing the number
of items that the system will prompt for when a refill is required.
For example, suppose a restaurant offers a refillable Seafood Platter.
With it, customers select from several types of fish (flounder, tuna, mahimahi) that can be prepared a number of ways (baked, fried, blackened).
In addition, the price of the dinner includes a choice of vegetable, house
salad, and bread.
When programming this menu item, the user can direct the system to
prompt for the fish selection (both type and prep style) and the choice of
vegetable, but skip the house salad and bread, for which there are no
alternative selections.
Operational Selections
During operations, users can save time not only by reducing the number
of prompted choices, but by skipping the prompts entirely.
MD0003-065
Revision D
May 2, 2005
Page 195 of 814
3700 POS
What’s New
For example, when the customer requests an exact refill of a previous
order, there is no reason to prompt for any condiment selection. When
programming the touchscreens, users can add separate functions keys —
one for interactive (prompted) refills, and one for automatic (identical)
refills. The auto refill function allows the user to duplicate a previous
round by simply highlighting the selection and pressing a [Refill Auto]
key. No other keystrokes are required.
Note
Touch Refill does not support re-posting of an entire group of
consolidated menu items. When selected, only one of the
customer orders will be refilled per service round.
For example, if four customers order the refillable Shrimp
Feast menu item, and the display is set to consolidate, the order
will be posted as:
4 Shrimp Feast
If the server highlights this menu item and presses a [Refill]
touch key, the system changes the detail to read as follows:
3 Shrimp Feast
1 Shrimp Feast
1 Refill Shrimp Feast
To unconsolidate and refill the rest of the customer orders, the
user must highlight and apply the [Refill] key three more times,
service totaling between each selection.
Altering the Selection
With Touch Refill, customers have the option of changing their menu
item selection in each service round. That flexibility allows the system to
support All-You-Can-Eat functionality. Typically, with an All-You-CanEat menu item, customers choose from groups of comparably priced
dishes. Substitutions within these groups are freely allowed.
MD0003-065
Revision D
May 2, 2005
Page 196 of 814
3700 POS
What’s New
Example 1
The Mike Rose Grill offers an All-You-Can-Eat Pasta special for a
price of $7.95. The menu item allows customers to mix and match
their choice of pasta (spaghetti, tortellini, fettucini) and sauce
(marinara, pesto, or alfredo). All selections have unlimited refills.
George orders the pasta special,
selecting Fettucini Alfredo for his first
serving. When the food arrives, the
sauce is a little rich for George’s taste, so
in the next service round, he decides to
try the Spaghetti with Marinara instead.
When the check is service totaled, the
item is listed as a refill.There are no
additional charges.
Pricing Issues
Occasionally, when refilling a menu item, the price of a refill selection
may be greater than that of the original (e.g., instead of choosing a plain
sauce, the customer adds a meat topping). When this occurs, the system
automatically calculates the price difference and adds it to the customer’s
bill.
Example 2
Once again, the Mike Rose Grill offers an All-You-Can-Eat Pasta
special for a price of $7.95. The menu item allows customers to mix
and match their pasta (spaghetti, tortellini, fettucini) and sauce
(marinara, pesto, or alfredo) combinations. This time, a choice of
meat topping (meatballs, chicken, or shrimp) is also available, but
subject to a charge of $1.00, $2.00, or $3.00, respectively. All
selections have unlimited refills.
MD0003-065
Revision D
May 2, 2005
Page 197 of 814
3700 POS
What’s New
Once again, George orders the pasta
special, selecting Fettucini Alfredo for
his first serving. The menu item is
posted to the guest check for the base
price of $7.95.
When the time comes to order a refill,
George decides to try the Tortellini with
Shrimp and Pesto sauce. Because he is
adding a shrimp topping, a charge of
$3.00 (the difference between the
original menu item and that of the priced
condiment) is added to the guest check.
Additional charges can also incur when the refill choices involve
differentially priced items from the same condiment group (e.g., an order
with meatball topping versus one with chicken). When that happens, the
system determines the highest-priced condiment selected, checks to see
how much has already been charged for this condiment group, and, if
applicable, applies the difference to the refill selection.
Example 2a
Instead of ordering Fettucini Alfredo the first time around, George
orders the Spaghetti and Meatballs. In this case, the system charges
$7.95 for the All-You-Can-Eat Pasta menu item, and an additional
$1.00 for the meat topping.
In the second round, George places a
refill order for Tortellini with Shrimp
and Pesto sauce. This time, the system
applies a refill charge of only $2.00.
This is the difference between the
original order with meat topping
(Meatballs) and the refill price (with
Shrimp):
$ 3.00 (Shrimp)
– 1.00 (Meatballs)
$ 2.00 (Refill Charge)
MD0003-065
Revision D
May 2, 2005
Page 198 of 814
3700 POS
What’s New
Refill Limits
Users can limit the number of refills available to the customer. This
limitation can be applied to parent menu items (e.g., All-You-Can-Eat
Pasta) as well as to the condiment items linked to it (pasta, sauce, meat
toppings). A different number of refills can be applied to each.
Using the menu items in Example 2, suppose that the restaurant allows
unlimited refills of the pasta/sauce combinations, but limits the meat
toppings to 2 refills (three servings in all). In this case, the charge for the
main menu item (pasta) will be posted only once, regardless of the
number of refills. However, the charge for the meat topping will be
applied the first time the customer orders a meat topping, and again on
the third refill with a meat topping.
Determining Best Price
Touch Refill is designed to extend the maximum price benefit to the
customer. Before posting a refill charge to the guest check, the system
reviews all of the service rounds to determine whether the refill
limitations have been reached and if an additional charge is required.
If the refill request includes a priced item with limited servings, the
system will scan the entire order, counting the number of restricted items
already received. Remember, since the customer can choose different
items for each refill, the number of rounds may not equal the number of
restricted items served. Touch Refill ensures that the customer receives
the maximum number of servings for each priced item, regardless of
when — during the course of the service — those items are served.
Example 3
George is on his third serving of All-You-Can-Eat Pasta at the Mike
Rose Cafe. In the first round, he ordered Fettucini Alfredo ($7.95)
and added a meat topping — Chicken — for an additional charge of
$2.00. The pasta selections are unlimited, but meat toppings allow
only one refill (2 servings in all).
MD0003-065
Revision D
May 2, 2005
Page 199 of 814
3700 POS
What’s New
For the second round, George ordered
plain Spaghetti Marinara (no meat
topping). By the third, he decided that he
preferred the Fettucini Alfredo with
Chicken and requested that as his next
refill.
Although this is George’s third serving
overall, it is only the second where a
meat topping was added. As such, it is
within the refill limits designated for
that condiment group. This is true
whether George orders the Chicken or
another member of the meat topping group.
Note
The example assumes that the refill condiment price is equal to
or less than that already charged for a meat topping. Had
George selected Shrimp as his refill topping, the price
differential (as described in Example 2a) would be applied.
Exceeding the Refill Limit
During the meal, if the customer exceeds the number of servings allowed,
a new charge must be applied. When the limit is exceeded on a main
selection (parent item), the serving is considered a separate purchase and
the full menu item price is charged.
Suppose, however, that the parent item has unlimited refills, but restricts
the number of refills on its priced condiments (e.g., a third meat topping
when the limit is two). The customer must be charged for the extra
condiment — but how much?
To provide the best possible price to the customer, the system again
reviews the entire check. In addition to counting the number of
condiments served, the system groups them according to price. If the
customer received three servings of the priced item, and the refill limit is
2 servings, the two highest-priced items will be counted first. When the
new refill charge is then added to the check, it will be for the price level
assigned to the remaining item.
MD0003-065
Revision D
May 2, 2005
Page 200 of 814
3700 POS
What’s New
Example 4
George is on his third serving of All-You-Can-Eat Pasta at the Mike
Rose Cafe. In the first round, he ordered Fettucini Alfredo ($7.95)
and added a meat topping — Chicken — for an additional charge of
$2.00. The pasta selections are unlimited, but meat toppings allow
only one refill (2 servings in all).
For the second round, George ordered Spaghetti Marinara with
Meatballs. Although this refill also includes a meat topping, it is
priced lower than the Chicken ($1.00). No additional charges are
incurred.
When George orders his second refill (third round), he decides that he
preferred the Fettucini Alfredo with Chicken. This represents
George’s third serving where a meat topping was added. The
condiment group only allows for two. George must be charged for an
extra meat topping.
In order to give George the best possible price, the system ignores the
order in which the toppings were served. The two servings of
Chicken are grouped and priced as one item/refill combination. The
remaining serving is charged, but at the lower (Meatball) price.
MD0003-065
Revision D
May 2, 2005
Page 201 of 814
3700 POS
What’s New
New Options in POS Configurator
To support the feature, the following options have been added in POS
Configurator:
Sales | Menu Item Classes | Refill Options (new tab):
Allow Refills — When checked, allows members of this menu
item class to be refilled. Refills are limited to the number
specified in the Max Refill Count.
Max Refill Count — Specifies the maximum number of refills
allowed for members of this menu item class. Up to 99 refills are
allowed.
Refill Descriptor — Allows the user to enter a label that
identifies refill items when printed on the order chit. Up to 12
characters are allowed.
Refill labels are appended in front of the menu item, which may
cause the menu item name to be truncated.
Sales | Condiments | Condiment Selection:
Skip on Refill — When checked, passes over the specified
condiment selection when the parent menu item is refilled. This
option is used to save time by presenting only those condiments
that might be changed by the customer or might result in
additional charges.
For example, suppose the customer orders the all-you-can-eat
pasta, which includes the house salad, bread, and a choice of
sauces and meat toppings. All items are refillable. However,
when a refill is requested, the server needs to know the type of
pasta the customer wants, the sauce selection, and the choice of
meat topping. The salad and bread selections do not change and
do not need to be entered every time.
MD0003-065
Revision D
May 2, 2005
Page 202 of 814
3700 POS
What’s New
Devices | Touchscreen Designer:
Touch Re-Fill (Automatic) — Assigned to a function key
(Category: Transaction) in POS Operations. When the user
highlights a refillable menu item in the check detail and presses
this touch key, the system automatically rings the menu item with
the same required condiment selections. Allowed condiments
must be entered manually. If programmed, some original
condiment selections may be skipped.
Touch Re-Fill (Interactive) — Assigned to a function key
(Category: Transaction) in POS Operations. When the user
highlights a refillable menu item in the check detail and presses
this touch key, the system rings the menu item and prompts the
user for the required condiment selections. If programmed, some
original condiment selections may be skipped.
Touch Reorder
The Touch Reorder feature speeds up the order-entry process by allowing
a user to highlight a previously rung menu item and, with the press of a
function key, add another one to the guest check.
Background
Previously, the only way to reorder an existing menu item was through
the Repeat Round feature. Repeat Round was intended for situations
where customers want to order the same set of items in another round.
The best example of this is a group of customers at a restaurant bar who
tell the bartender, "We'll have another round." Instead of ringing up each
drink again, this feature allows the bartender to pick up their guest check
and, by pressing one key, duplicate the existing items.
Unfortunately, Repeat Round feature has it’s limitations. For one thing, to
be repeatable, menu items had to be a member of a menu item class
where this program option was enabled. Once a repeatable item was
ordered, any use of the [Repeat Round] function key would add all
repeatable items to the next service round — whether or not the customer
ordered it.
MD0003-065
Revision D
May 2, 2005
Page 203 of 814
3700 POS
What’s New
For example, assume that three restaurant/bar customers order nachos,
chicken wings, and three bowls of chili in addition to their drinks. Only
the drinks are programmed as repeat items. When the first round of
drinks is finished, two of them tell the bartender, "We'll have another
round." The third one asks for water and another bowl of chili instead.
In this situation, using the [Repeat Round] key produces inadequate
results. Because of the programming, the drinks will ring up — all three
of them — but the chili will not. To correct the order, the bartender must
void the third drink from the round and then ring up the bowl of chili.
New Functionality
Touch Reorder adds flexibility to the reordering process. With Touch
Reorder, users are not limited to preprogrammed menu items, but are free
to choose any menu item that is already on the guest check. (The
exception is for weighed menu items, which must be entered and priced
individually.)
Reordered items can be selected from any service round, including the
current one. Because a reorder represents a new purchase, there are no
limits on the number of reordered items allowed.
Using the Feature
Touch Reorder provides two ways (automatic and interactive)to ring up a
menu item. Automatic reordering allows a user to ring an exact duplicate
of any item already included in the check. With Interactive reorders, only
the parent menu item is posted automatically. Required condiments are
displayed as for any new menu item. This allows a user to make changes
to the selections, if required.
Note
MD0003-065
Revision D
May 2, 2005
Page 204 of 814
Touch Reorder does not support re-posting of an entire group of
consolidated menu items. When selected, only one of the
customer orders will be added at a time. To reorder more than
one, simply press the [Reorder] touch key the appropriate
number of times.
3700 POS
What’s New
New Options in POS Configurator
To support the feature, the following options have been added in POS
Configurator:
Devices | Touchscreen Designer:
Touch Re-Order (Automatic) — Assigned to a function key
(Category: Transaction) in POS Operations. When the user
highlights a menu item in the check detail and presses this touch
key, the system automatically rings the menu item with the same
required condiment selections. Allowed condiments are also
duplicated.
Touch Re-Order (Interactive) — Assigned to a function key
(Category: Transaction) in POS Operations. When the user
highlights a menu item in the check detail and presses this touch
key, the system rings the menu item and prompts the user for the
required condiment selections. Allowed condiments can also be
selected.
Feature Comparison
Although similar in nature, Touch Reorder, Touch Refill, and Repeat
Round have distinctly different uses and functionality.
To assist the user, the following table was included. It provides a
comparison of the configuration issues and operational uses of each of
these features.
MD0003-065
Revision D
May 2, 2005
Page 205 of 814
3700 POS
What’s New
Touch Refill
Requires programmed Touch Key
(Devices | Touchscreen Designer)
Category: Transaction
Function: Touch Re-Fill
(automatic or interactive)
Touch Reorder
Repeat Round
Requires programmed Touch Requires programmed Touch
Key (Devices | Touchscreen
Key (Devices | Touchscreen
Designer)
Designer)
Category: Transaction
Function: Touch Re-Order
(automatic or interactive)
Category: Transaction
Function: Repeat Round
Menu items must be programmed to
Menu items must be proAllow Refills (Sales | Menu Item Classes Items can be reordered, from
grammed to repeat. This is
any round, an unlimited num| Refill Options).
done by enabling the
ber of times.
Include in repeat round
A Max refill count may be specified for
option (Sales | Menu Item
Items must be highlighted to
each parent menu item and condiment
Classes | General Options).
be reordered.
selection. Limitations can be different for
each part of the refill.
When [Repeat Round] key
If a consolidated menu item
is pressed, automatically
is highlighted, only one reor Items must be highlighted to be refilled.
posts repeatable items from
dered menu item will be
Only one refill is permitted per menu item,
last round only
posted at a time.
per service round.
Charges for each repeat
If a consolidated menu item is highlighted, Items may be highlighted
menu item.
and reordered multiple times
only one refill will be posted in that service
in a service round.
round. To refill the rest, the check must be
Charges at current menu
service totaled and the consolidated items
level price unless menu item
Automatic reorder — Dupliselected/refilled again. Repeat until all of
is programmed to Repeat
cates the highlighted items
the consolidated items have been refilled.
previous round’s level
(parent and required condi(Sales | Menu Item Classes |
ments) exactly. Allowed con Automatic refill — Duplicates the highGeneral Options).
diments are also duplicated.
lighted items (parent and required condiments) exactly.
Interactive reorder —
Duplicates the parent item
Interactive refill — Duplicates the parent
and redisplays the required
item and redisplays required condiments
condiments for selection.
for selection. Changes are permitted.
Changes are permitted.
Condiment groups can be programmed to
Does not prompt for allowed
Skip on Refill (Sales | Condiments | Concondiments.
diment Selection). Allowed condiments
are not displayed.
Uses the same menu item
class option as Repeat
Refills are free, within programmed limits
Round when deciding what
(i.e., maximum number allowed).
to charge.
If a refill includes a higher priced condiment than was previously selected, only Charges at current menu
level price unless menu item
the price difference will be added to the
is programmed to Repeat
total.
previous round's level
Allows user to define a Refill Descriptor
(Sales | Menu Item Classes |
to identify refill items on the check.
General Options).
MD0003-065
Revision D
May 2, 2005
Page 206 of 814
3700 POS
What’s New
SIM
The following SIM variables were added in this release:
Ckemplopt[ ]
Function
This system variable is an array containing the setting of SIM employee
privilege options 1-4, which are defined for the employee who started the
check.
Type/Size
N1
Syntax
@Ckemplopt[expression]
Example
event MI
InfoMessage @ Ckemplopt[2]
endevent
Note
When the SIM script is executed, the variable should return a 1 (true) if
the employee who started the check has the SIM privilege specified in the
expression.
Using the Example script shown above, if a bartender with no SIM
privileges picks up a check that was started by a server who had a SIM
privilege of 2, then an info box with a value of ‘1’ should display.
Usage
This variable is read-only.
MD0003-065
Revision D
May 2, 2005
Page 207 of 814
3700 POS
What’s New
Dtl_type_two
Function
This system variable is used to return the Name 2 value from the menu
item record.
Type/Size
A12
Syntax
@Dtl_name_two
Example
for cnt = 1 to @numdtlt
if @dtl_type[cnt] = “M”
format str as “Cnt=”, cnt, “ Type”,@dtl_type[cnt], “ Name=”,
@Dtl_name_two[cnt]
InfoMessage str
endif
endfor
Usage
This variable is read-only.
Only Name 2 menu item values will be returned. If detail item does not
have a Name 2, it will return an empty string.
MD0003-065
Revision D
May 2, 2005
Page 208 of 814
3700 POS
What’s New
Event Dtl_Changed
Syntax
Event Dtl_Changed
Description
This event is fired after the all totals have been updated to reflect changes
made in the check detail during a POS operation (e.g., using auto-combo
recognition, modifying condiments, voiding items, etc.).
The event will only fire once per POS operation.
Example
event Dtl_Changed
var msg : A50
format msg as "Number of detail items is now : ", @numdtlt
infomessage msg
endevent
MD0003-065
Revision D
May 2, 2005
Page 209 of 814
3700 POS
What’s New
PMSSeqNum
Function
This system variable provides the interface sequence number
(interface_def.interface_seq) of the current interface. This value is used
when executing a keyboard macro that runs another SIM inquire (INQ)
event.
Type/Size
N9
Syntax
@PMSSeqNum
Example
event inq : 1
//call inquire event 2
loadKybdMacro key(24,(16384 + 2) + @PMSSeqNum)
endevent // inq : 1
event inq : 2
waitForClear “Running inquire event 2”
endevent // inq : 2
Note
This variable can be used to look up the sequence number from the
database. However, this does not work for interfaces that need to run in
BSM mode.
Currently the interface sequence number must be looked up by the
installer (via DBISQL) and entered into a configuration file.
Usage
This variable is read-only.
MD0003-065
Revision D
May 2, 2005
Page 210 of 814
3700 POS
What’s New
VoidDetail ( )
Function
This function is used to void an item from the check detail.
Syntax
VoidDetail(expression)
Description/Argument
Expression — Uses any valid expression that evaluates to a valid detail
number in the range 1 to @NumDtlt.
Example
The following example attempts to void all menu items in the previous
and current rounds:
var i : N9
for i = 1 to @NumDtlt
if (@Dtl_Type[i] = “M”)
voidDetail(i)
endif
endfor
Note
This function will “fail” silently. For example, if the expression is outside
the range 1 to @NumDtlt, the function does not report an error. In
addition, if the expression evaluates to a detail item that cannot be voided
(i.e., part of a combo meal), the function will not void the item, and does
not report an error.
The detail is voided as a “system” void. This method avoids prompting
the user for authorization when it is otherwise required. This includes
voiding of previous round items.
MD0003-065
Revision D
May 2, 2005
Page 211 of 814
3700 POS
What’s New
Discount/Service Charge Itemizer Values
When redeeming a stored-value card (i.e., gift card) against a guest check
amount, the reduction may be applied in the form of a discount. The
amount of the discount is decided by the SVC host (an external system),
based on its own business rules and logic which are unknown to RES.
This can cause problems when dealing with open amount discounts.
For example, depending on the menu items and other discounts on the
check, it is possible that a discount is not valid because the itemizers do
not contain offsetting amount. This is true if (a) no menu items on the
check contribute to the discount’s itemizers, or (b) another discount has
been applied and the itemizers were reset.
In the past, SIM had no easy way to determine if the discount could be
applied to the guest check before the card was swiped, or to inform the
user when it could not. To correct this problem, several new SIM
variables have been added. These variables allow the user to determine
the value of current sales totals available for discount, the amount
available by itemizer type, and the amount of the discounts that have
already been applied to the check.
The discount/service charge variables are:
DscI[ ]
DepDscI[ ]
DscIttl[ ]
SvcI[ ]
SvcIttl[ ]
Detailed information on each of these variables is provided below.
MD0003-065
Revision D
May 2, 2005
Page 212 of 814
3700 POS
What’s New
DscI[ ]
Function
This variable provides access to the current amount in the discount
itemizer. Totals are affected by the reset itemizer.
Type/Size
$12
Syntax
@DscI[Expression]
Usage
This variable is read-only.
The array limits of the expression are from 1 to 8.
This variable will return the totals posted to the discount itemizer
specified by the array index. For example, if the array index
references @DscI[1], any totals posted to Discount Itemizer #1 will
be returned.
MD0003-065
Revision D
May 2, 2005
Page 213 of 814
3700 POS
What’s New
DepDscI[ ]
Function
This variable provides access to the current amount in a depleted
discount itemizer. This value only exists when the Touch Item Discount
feature is enabled. Totals are NOT affected by the reset itemizer; that is,
the reset option is not configurable when the Touch Item Discount feature
is enabled.
Type/Size
$12
Syntax
@DepDscI[Expression]
Usage
This variable is read-only.
The array limits of the expression are from 1 to 8.
This variable will return the depleted totals for the discount itemizer
specified by the array index. For example, if the array index
references @DepDscI[1], the depleted totals posted to Discount
Itemizer #1 will be returned.
MD0003-065
Revision D
May 2, 2005
Page 214 of 814
3700 POS
What’s New
DscIttl[ ]
Function
This variable provides access to the total amounts of each discount in the
discount itemizer. Totals are affected by the reset itemizer.
Type/Size
$12
Syntax
@DscIttl[Expression]
Usage
This variable is read-only.
The array limits of the expression are from 1 to 8.
This variable will return the discount amounts posted to the discount
itemizer specified by the array index. For example, if the array index
references @DscIttl[1], any discount totals posted to Discount
Itemizer #1 will be returned.
MD0003-065
Revision D
May 2, 2005
Page 215 of 814
3700 POS
What’s New
SvcI[ ]
Function
This variable provides access to the current amount in the service charge
itemizer. Totals are affected by the reset itemizer.
Type/Size
$12
Syntax
@SvcI[Expression]
Usage
This variable is read-only.
The array limits of the expression are from 1 to 8.
This variable will return the totals posted to the service charge
itemizer specified by the array index. For example, if the array index
references @SvcI[1], any totals posted to Service Charge Itemizer #1
will be returned.
MD0003-065
Revision D
May 2, 2005
Page 216 of 814
3700 POS
What’s New
SvcIttl[ ]
Function
This variable provides access to the total amounts of each service charge
in the service charge itemizer. Totals are affected by the reset itemizer.
Type/Size
$12
Syntax
@SvcIttl[Expression]
Usage
This variable is read-only.
The array limits of the expression are from 1 to 8.
This variable will return the sum of the services charges posted to the
service charge itemizer specified by the array index. For example, if
the array index references @SvcIttl[1], any service charge totals
posted to Service Charge Itemizer #1 will be returned.
MD0003-065
Revision D
May 2, 2005
Page 217 of 814
3700 POS
What’s New
Order Scheduling
SIM events will fire normally when a Delayed or Future Order is entered.
No SIM events will fire when the autofire server activates a check.
To enable the SIM scripts to handled Delayed and Future Orders
differently, the following SIM variables have been added:
Chk_Autofire_Time
Chk_Delayed_Order
Chk_Future_Order
Dtl_Autofire_Time[ ]
Dtl_Dining Course[ ]
Dtl_Prep_Time[ ]
Detailed information for each of these variables is provided below.
MD0003-065
Revision D
May 2, 2005
Page 218 of 814
3700 POS
What’s New
Chk_Autofire_Time
Function
This system variable is used to return the next autofire activation time (if
any) for the check. This can be the activation time for delayed or future
orders or the next fire times for checks with timed fire items.
Type/Size
A17
Syntax
@Chk_Autofire_Time
Example
event inq : 16
window 8, 60
var row: n2 = 1
display row, 2, "Autofire Time = ", @chk_autofire_time
waitforclear
endevent
Usage
This variable is read-only.
MD0003-065
Revision D
May 2, 2005
Page 219 of 814
3700 POS
What’s New
Chk_Delayed_Order
Function
This system variable indicates whether the check is a delayed order. A
delayed order is a check where sales post at the end of each service
round, but the items on the check do not print until the check’s delayed
order time.
Type/Size
N1
Syntax
@Chk_Delayed Order
Example
event inq : 16
window 8, 60
var row: n2 = 1
row = row + 1
display row, 2, "Delayed Order = ", @chk_delayed_order
waitforclear
endevent
Usage
This variable is read-only.
MD0003-065
Revision D
May 2, 2005
Page 220 of 814
3700 POS
What’s New
Chk_Future_Order
Function
This system variable indicates whether the check is a future order. A
future order is a check where sales do not post or print until the check’s
future order time.
Type/Size
N1
Syntax
@Chk_Future_Order
Example
event inq : 16
window 8, 60
var row: n2 = 1
row = row + 1
display row, 2, "Future Order = ", @chk_future_order
waitforclear
endevent
Usage
This variable is read-only.
MD0003-065
Revision D
May 2, 2005
Page 221 of 814
3700 POS
What’s New
Dtl_Autofire_Time[ ]
Function
This system variable indicates the time, if any, that the referenced item
will automatically print in the kitchen.
Type/Size
A17
Syntax
@Dtl_Autofire_Time [dtl_index]
Example
event inq : 16
window 8, 60
var dtl_index: n2 = 17
row = row + 1
display row, 2, @dtl_name[dtl_index], " Autofire Time = ",
@dtl_autofire_time[dtl_index]
waitforclear
endevent
Usage
This variable is read-only.
MD0003-065
Revision D
May 2, 2005
Page 222 of 814
3700 POS
What’s New
Dtl_Dining_Course[ ]
Function
This system variable indicates the dining course associated with the
referenced menu item.
Type/Size
N2
Syntax
@Dtl_Dining_Course[dtl_index]
Example
event inq : 16
window 8, 60
var dtl_index: n2 = 17
row = row + 2
display row, 2, @dtl_name[dtl_index], " Dining Course = ",
@dtl_dining_course[dtl_index], " Prep Time = ",
@dtl_prep_time[dtl_index]
waitforclear
endevent
Usage
This variable is read-only.
MD0003-065
Revision D
May 2, 2005
Page 223 of 814
3700 POS
What’s New
Dtl_Prep_Time[ ]
Function
This system variable indicates the kitchen prepartion time associated
with the referenced menu item.
Type/Size
N2
Syntax
@Dtl_Prep_Time[dtl_index]
Example
event inq : 16
window 8, 60
var dtl_index: n2 = 17
row = row + 2
display row, 2, @dtl_name[dtl_index], " Dining Course = ",
@dtl_dining_course[dtl_index], " Prep Time = ",
@dtl_prep_time[dtl_index]
waitforclear
endevent
Usage
This variable is read-only.
MD0003-065
Revision D
May 2, 2005
Page 224 of 814
3700 POS
What’s Enhanced
What’s Enhanced
An enhancement is defined as a change made to improve or extend the
functionality of the current 3700 POS application. To qualify as an
enhancement, the change must satisfy the following criteria:
The basic feature or functionality already exists in the previous
release of the software.
The change adds to or extends the current process. This differs from a
revision (i.e., a bug fix) which corrects a problem not caught in the
previous release of the software.
Enhancements
Summarized
The table below summarizes the enhancements included in this version.
Module
Feature
Page
Database
Date Format Change for ResSIMDb Users
227
Delivery
Dispatch
Additional Display Functionality in BSM
227
GSS/SIM Info Lines
227
Resizing the Split Panels
229
Sizing the Delivery Dispatch Window
230
Support for Delivery Dispatch on WS4
231
Allow Open-Priced Combo Meal Parent
Item
231
Allow Send Order After Credit
Authorization
231
Combo Meal Guest Check/Receipt
Printing
232
Previous Round Auto-Combo Recognition
239
Reason Code Support with Menu Item
Waste
243
POS
Operations
MD0003-065
Revision D
May 2, 2005
Page 225 of 814
3700 POS
What’s Enhanced
Module
Printing
Reports
Transaction
Analyzer
MD0003-065
Revision D
May 2, 2005
Page 226 of 814
Feature
Page
Blank Lines in Headers
248
MICROS Macros Extended to All
Headers/Trailers
248
Override Menu Item Name by Order
Device
250
Trailers by Order Device
250
Report Item Discounts as Subtotal
Discounts
251
Void Tracking Totals Added
252
Credit Card Security
253
Future Orders Support
254
3700 POS
What’s Enhanced
Enhancements
Detailed
Database
Date Format Change for ResSIMDb Users
Due to changes in the application, external users accessing the MICROS
database via ResSIMDb.exe should be aware that the date format has
changed.
The old format was entered as:
MM-DD-YYYY HH:MM:SS
05-20-2004 00:00:00
The new format is:
YYYY-MM-DD HH:MM:SS
2004-05-20 00:00:00
Delivery Dispatch
Additional Display Functionality in BSM
During operations, driver information for checks assigned in normal
mode are blanked out when the system enters backup server mode. With
this release, any new checks transferred to a driver while in BSM will
now display the Driver Time Out.
GSS/SIM Info Lines
With the integration of GSS, changes were made to the way Delivery
Dispatch handles customer information on delivery checks. In addition to
the traditional SIM lines, users can now select from lines configured on
either the GSS | Guest Check Info Lines or Delivery Info Lines forms in
POS Configurator. The information used by Delivery Dispatch depend
on the check’s order type (i.e., delivery orders will use the Delivery Info
lines; non-delivery orders will use the guest check info lines. (For
information on the changes in GSS functionality, refer to the section
beginning on page 383.)
MD0003-065
Revision D
May 2, 2005
Page 227 of 814
3700 POS
What’s Enhanced
To support these changes, the Display Info Lines form in the Delivery
Dispatch configuration utility has been expanded to include both the 16
original 16 SIM Info Lines as well as the new GSS Delivery Check Info
Lines. To add a column to the Open Order panel, the user simply enables
the appropriate check boxes.
During operations, only those checks that have been linked to a guest will
be displayed. If multiple guests are linked to the check, Delivery
Dispatch will use the info for the first guest linked to a seat.
Editing the Check Info Lines
The method used to edit the 16 SIM Check Info Line and 16 GSS Info
Line fields on the Delivery Dispatch | Display Info Lines tab as been
changed. Previously, to edit the text, the user would right-click in the text
field to activate the editing function.
With this release, standard text editing process is applied to the fields. To
change an existing entry, the user simply inserts a blinking cursor using
the left-hand mouse button and highlights the text to be edited. When
using the [Tab] key to access a field, the entire text will highlighted.
MD0003-065
Revision D
May 2, 2005
Page 228 of 814
3700 POS
What’s Enhanced
When the focus is removed from the field, the new value is saved in
memory, the descriptor is changed in the drop-down Delivery Zone List,
and the text in the column header changes. It is not stored in the database
until the program is closed. A dialog box will be displayed asking for
confirmation of the changes.
Caution!
Before making changes to the display info lines, be advised that this data
is stored in the RES\Micros\POS\Bin\DeliveryDispatch.lng file, rather
than the RES\Micros\POS\Etc\DeliveryDispatch.cfg. This is to allow
for multiple language entries.
Please note that when RES Setup is run, any changes to the Language file
will be overwritten. To ensure that the changes are not lost, be sure to
save that file before running the upgrade.
Resizing the Split Panel
In previous versions, users could redistribute the widths of the Open
Orders/Drivers Panels on the Delivery Dispatch split screen by holding
the mouse cursor on the divider bar between the two and dragging it to
the left or right. This functionality is not available in the current release.
Panel Divider
MD0003-065
Revision D
May 2, 2005
Page 229 of 814
3700 POS
What’s Enhanced
To resize now, an option has been added to the Delivery Dispatch
Configuration Utility that allows users to manually set the Driver
Window Width. The option consists of a slide bar which may be
adjusted within the range of 600 to 100 pixels by moving the bar to the
left or right. A text box (to the left) displays the current setting. This
number will change automatically as the bar is shifted.
When changing panel widths, keep in mind that the combined width of
the Open Orders and Driver Panels is fixed at 800 pixels. Therefore, any
change to the Driver window will increase/decrease the width of the
Open Orders Panel. A setting of 400 will produce panels of equal size.
Adjust width of
Driver Panel by
sliding bar left/right.
Sizing the Delivery Dispatch Window
With this release, users will no longer be able to set the size of the
Delivery Dispatch window. Instead, the application will automatically
adjust to the size of the display monitor, opening a window that is
approximately 80% of the viewable screen.
MD0003-065
Revision D
May 2, 2005
Page 230 of 814
3700 POS
What’s Enhanced
Support for Delivery Dispatch on WS4
Delivery Dispatch is now available for use on the Workstation 4 (WS4).
As with Win32 clients, the WS4 uses the default parameters defined at
the server. Or, if the user prefers, the WS4 may be configured locally. To
retain these custom settings, the option Client configuration overrides
server must be enabled on the Display Options tab of the Delivery
Dispatch Configuration Utility.
To run Delivery Dispatch, the WS4 must include at least 128 MB RAM
and a 64 MB or larger compact flash.
Limitation
Changes made in the Delivery Dispatch configuration are not
implemented until the program is restarted. For Win32 clients, the new
parameters are uploaded each time POS operations is restarted. This is
not true on the WS4. To implement changes to the Delivery Dispatch, the
WS4 must be manually restarted.
POS Operations
Allow Open-Priced Combo Meal Parent Item
Combo Meal programming has been enhanced to allow the selection of
an open-priced menu item as the combo meal parent item. Previously,
only priced menu items were allowed.
To create an open-priced combo meal, the parent item must be linked to a
menu item class where the option Preset prices (Sales | Menu Item
Classes | Price / Totals) is disabled. The rest of the combo meal setup
process remains the same.
During operations, when an open-priced combo meal is selected, the user
will be prompted to enter an amount. As always, if any of the main and
side group items that comprise the combo meal are also priced, those
values will be considered an upcharge or a downcharge (if negative) to
the final price of the combo meal.
MD0003-065
Revision D
May 2, 2005
Page 231 of 814
3700 POS
What’s Enhanced
Allow Send Order After Credit Authorization
With this release, users can now post and send current round menu items
to the kitchen (via a [Send Order] key) after obtaining a credit
authorization in the same round. Previous versions of the software did
not permit this functionality. This was designed to protect credit card
authorizations, which were not posted until the check was actually
service totalled. Keeping the check open while sending current round
items increased the risk that the credit authorization would not be saved if
the user decided to cancel the round or if POS Operations was interrupted
due to an operator error or system failure.
It also allows users to create a 2-step macro that can submit a credit card
authorization and then, upon receipt of it from the Credit Card Service,
automatically send the current round menu items without service
totalling the check.
To setup, create a [Service Total] key with the Send Order option
enabled (POS Configurator | Sales | Tender/Media | Service Ttl), then
create a macro with the following steps:
1. Function Number — Credit Authorization
2. Tender/Media Number — Service total you created.
Combo Meal Guest Check/Receipt Printing
In the past, when a combo meal was ordered, the system could only print
or display the results one way — as a combo parent item, followed by an
indented list of the actual menu items and condiments.
With this release, combo functionality now supports:
Consolidating combo meals
Changing the menu item print class
The added functionality allows users to control the amount of combo
detail that will be printed, and at which output devices. This, in turn,
improves service by streamlining the order, reducing print time, and
making the receipt easier to read.
MD0003-065
Revision D
May 2, 2005
Page 232 of 814
3700 POS
What’s Enhanced
Combo Meal Consolidation
To enable consolidation, a new Consolidate Combo Meal option was
added in POS Configurator. The option is applied at the revenue center
level and affects both main and side items having the same type of combo
meal parent item.
When active, the price of each combo meal (of the same type) is rolled up
into the consolidated parent item. This is true even when an upcharge
(e.g., large coke/large fries as shown below) has been added to one of
them.
Rules and Restrictions
In determining what will and will not be consolidated, the following rules
and restrictions are applied:
Consolidated items must be part of the same combo meal type. In
other words, items from the Burger Combo meal cannot be
consolidated with items from the Roast Beef combo meal.
Consolidated items must be at the same combo group — Main
menu items will only consolidate with identical main items, side 1
items will only consolidate with identical side 1 items, etc.
MD0003-065
Revision D
May 2, 2005
Page 233 of 814
3700 POS
What’s Enhanced
For example, suppose the Burger Combo offers a choice of a
cheeseburger or a hamburger as the main menu item; fries or onion
rings as side 1; and a beverage choice (soda, ice tea, or lemonade) as
the side 2 selection.
If the customer ordered 2 Burger Combos — 1 with a cheeseburger,
medium fries, and medium ice tea, and 1 with a hamburger, medium
onion rings, and medium ice tea — the only elements that would
consolidate would be the Burger Combo parent items and the 2 ice
teas.
Consolidated items must be at the same price level — Small sizes can
only be paired with other smalls, mediums with mediums, etc.
Combo parent items that have touch
item discounts will not consolidate
unless the option Consolidate Touch
Item Discount (Revenue Centers | RVC
Print Design | Guest Checks) is also
enabled. The consolidated discount
items will be printed beneath the combo
meals to which they are attached.
All menu items (parent combo items,
main items, or side items) that have
condiments programmed to print on guest checks or receipts will not
consolidate.
MD0003-065
Revision D
May 2, 2005
Page 234 of 814
3700 POS
What’s Enhanced
Print Class Overrides
Print classes define when a menu item is included in the order output
(e.g., chit, guest check, customer receipt, etc.), and if so, on which remote
device(s) the menu items will be printed.
In previous releases, print classes were configured exclusively at the
menu item level. This meant that the same output specifications were
used whether the menu item was ordered à la carte or as part of a combo
meal.
With this release, a new Print Class option has been added to the Combo
Group form in POS Configurator. The option allows user to change the
print specifications by overriding the print class at the combo meal menu
item level. Among the advantages, this option allows users to:
1. Limit combo detail — Users no longer have to print every menu
item associated with a combo meal. Instead, they can opt to print the
combo meal parent item on a guest check, without printing the main
and side items.
2. Change the remote devices — Users can redirect combo meal menu
items to a different output printer. This can be useful if the combo
meal requires different preparation or packaging than à la carte items.
MD0003-065
Revision D
May 2, 2005
Page 235 of 814
3700 POS
What’s Enhanced
The following graphic illustrates how override print classes could be
used to redefine the combo meal order output:
MD0003-065
Revision D
May 2, 2005
Page 236 of 814
3700 POS
What’s Enhanced
New Options in POS Configurator
To accommodate these changes, two new options have been added in
POS Configurator. They are:
Consolidate Combo Meal (Revenue Center | RVC Print Design |
Guest Checks) — When checked, consolidates similar combo meal
parent and side items on the guest check and customer receipts. Side
items must be of the same menu level (e.g., small, medium, or large)
to consolidate.
Print Class (Sales | Combo Meals | Combo Groups) — Allows the
user to override the menu item’s default print class. The option
provides enormous flexibility in determining when and where a
combo group side item will print.
The override option only applies to the current menu item, in its role
as a member of the selected combo group. It does not apply to other
members of the same combo group, which must be configured
individually. Nor does it apply to the same menu item when included
in another combo group.
If an override print class is not selected, the combo item reverts to the
menu item’s default print class.
MD0003-065
Revision D
May 2, 2005
Page 237 of 814
3700 POS
What’s Enhanced
Combining the Options
The combo printing enhancements can be used separately or together,
depending on the user’s preferences or needs.
The following diagram illustrates the results when combo consolidation
is used with/without a print class override to suppress the combo main
and side items:
MD0003-065
Revision D
May 2, 2005
Page 238 of 814
3700 POS
What’s Enhanced
Previous Round Auto-Combo Recognition
Auto-combo recognition is the process by which the system builds a
combo meal (with the appropriate discounts) from existing menu item
selections. Typically, the function is invoked by pressing a programmed
auto-combo recognition key after all the menu items have been rung.
In previous releases, combo meals could only be generated from items
entered in the current service round. With this release, the feature was
enhanced to include menu item detail posted in previous service rounds.
The change extends the usability of the Combo Meal feature to Table
Service Restaurants, which typically have multiple service rounds. It may
also be applied to Drive-Thru operations.
Example
Burger Bill’s offers a Cheeseburger Combo Meal (sandwich, medium
fries, and medium drink) for $5.95.
Samantha enters the drive-thru and orders a cheeseburger ($3.00) and
medium soda ($1.25). The server tells her the check total ($4.25 plus
tax) and directs her to the service window to pick up her meal. When
she gets to the window, Samantha decides to add a medium fry
($2.50) to the order, making it a combo meal. Instead of voiding and
re-ringing the check (or charging $6.75 for three à la carte items), the
cashier simply adds the fries and applies an auto-combo key.
Limitations
Some restrictions still apply. As before, when creating a combo meal the
selected menu items may not:
be voids or returns
have item discounts
be a part of a subtotal discount calculation or service charge
have been sent to a remote line-by-line printer
be part of an existing combo meal or fixed-price meal
be a weighed item, condiment, or commissioned item
MD0003-065
Revision D
May 2, 2005
Page 239 of 814
3700 POS
What’s Enhanced
Security
In making this modification, there is some concern about the potential for
user fraud. For example, a server could ring up several service rounds of
items, then print and present the check to the customer. After collecting
the full amount, the server could theoretically bring the check back up,
auto-combo the menu items, and then pocket the difference.
To reduce the probability of this happening, an option was added to limit
the approval of some combo meals to privileged employees only. When
activated, non-privileged employees can still initiate auto-combo
recognition. However, once a combo meal is identified as using menu
items from a previous service round, the employee will be required to
enter an authorization code before the combo meal is allowed.
Activating the Process
Programming changes are not apparent until a potential combo meal is
found. To activate the auto-combo feature, users still convert menu items
from à la carte selections to combo meals using one of three methods:
Auto-Combo Key — Provides the most direct method for creating
combo meals from an ad hoc list of menu items. When the [AutoCombo] key is pressed, the system scans the entire check detail and
attempts to create instances of combos from the selections.
Auto-Combo by Order Type — Provides the same functionality as
the [Auto-Combo] key without requiring a separate touchscreen
button. The process is simply assigned to an order type key (e.g.,
[Eat-In], [To Go], [Delivery]) in POS Configurator. Auto-combo
recognition is triggered when one of these keys is selected.
Manual Combo Recognition — Requires the user to highlight
potential combo meal combinations before pressing the [Combo]
key.
If the system is configured to require confirmation (i.e., the Do not
confirm auto-combo recognition option is disabled on the Sales |
Combo Meals | Revenue Center Options tab), a dialog box will be
displayed when a match is found. This dialog box lists the proposed
combo meal and its price, and then lists the menu items that will be
turned into a combo meal along with their à la carte prices.
MD0003-065
Revision D
May 2, 2005
Page 240 of 814
3700 POS
What’s Enhanced
A comparison of the
two prices is provided,
showing the amount
saved by ordering the
combo meal.
At that point, if the
system is configured
to use previous round
items, the following
actions will occur
when the Yes button is
pressed:
If the combo meal is formed from current round items only, those
items will be automatically converted to a combo meal.
If the combo meal includes previous round items, and the user is
privileged to accept them, the combo meal will be generated.
If the combo meal includes previous round items, and the user is not
privileged, a manager authorization dialog will display. The server
will be prompted for a valid authorization code before the items can
be converted to a combo meal.
After the first combo meal is posted from an [Auto-Combo] or
[Order Type] key, the system will continue to scan the detail,
presenting the next combo meal combination for approval. The
process will be repeated until no more combinations are found.
If the auto-combo feature was invoked manually (i.e., by highlighting
multiple items and then pressing the [Combo] key), the action is
considered complete once a combo meal is generated. The system
will not present additional instances automatically. Instead, the user
must reselect the items and repeat the process until no more combo
meals can be generated from the detail.
MD0003-065
Revision D
May 2, 2005
Page 241 of 814
3700 POS
What’s Enhanced
Tracking System Voids
To convert previous round menu items to combo meals, the system must
void the à la carte items (which have already been posted to the database)
and ring them up in the current round as a part of a combo meal. The
problem with doing so, is that it skews report totals by inflating the
number of actual voids.
To resolve the issue, a new System Voids mechanism has been added.
The mechanism is used to flag (in the database) voids of previous round
items that are not true deletions, but items repackaged as combo meals.
A corresponding System Voids tracking total type has been added as
well. The new tracking total type can be added to custom reports,
allowing users to track them separately from conventional User Voids.
Side Benefits
System Voids have been applied to existing combo meal functions
involving a similar use of previous round voids:
Side Item Substitution
Upsizing/Downsizing Menu Items
Insert/Modify Condiment (only allowed in revenue centers using
dynamic order mode)
These voids are also counted in the System Voids tracking totals.
New Options in POS Configurator
To extend the functionality to previous round selection, two new options
have been added in POS Configurator:
Allow auto-combo recognition of previous round items (Sales |
Combo Meals | Revenue Center Options) — When checked allows
the system to build a combo meal from menu items in all service
rounds. If cleared, the auto-combo recognition feature will only
consider items from the current service round.
MD0003-065
Revision D
May 2, 2005
Page 242 of 814
3700 POS
What’s Enhanced
ACR of prev. round items (Employees | Employee Classes |
Transactions | Transaction Control) — When checked, allows
member of this employee class to authorize combo meals created
using previous service round menu items. If cleared, members of this
employee class will be prompted for a manager authorization.
Combo meal approval is only required if the preceding option (Allow
auto-combo recognition using previous round items) is enabled. It
does not apply when combo meals are generated from current round
items only.
Reason Code Support With Menu Item Waste
The Menu Item Waste feature was designed to track inventory items
consumed, but not sold through the POS. Items may be wasted for a
number of reasons, including:
Spillage
Incomplete use of an ingredient in a recipe (i.e., the cost of a full
unit is applied even though less was required, and the rest was not
salvageable for future recipes)
Spoilage (includes ingredients with limited shelf life, product
contamination, or equipment malfunctions)
Rejection (e.g., customer didn't like, cook/server delivered wrong
item, or too many items were prepared and were not sold in a
timely fashion)
When inventory is wasted by one of these methods, the manager records
the event by signing onto any user workstation, pressing a pre-configured
[Declare Waste] key, and ringing the wasted inventory or menu items to
a special "Waste" check. When complete, the check is closed and the
results are saved to the database.
MD0003-065
Revision D
May 2, 2005
Page 243 of 814
3700 POS
What’s Enhanced
Reasons
In the past, there was no way to distinguish between menu items that
were rejected by the customer and those wasted for other reasons. All
items were simply lumped into a generic waste category. To improve
accountability, users needed a way to assign waste items to multiple
categories. This would help managers locate the site’s problem areas,
identify tasks and processes that need improvement, and have more
control over the inventory.
To support these goals, a new Use with waste check box was added to
the POS Configurator | System | Reasons form. The option is activated
during setup by linking it to one or more of the reason descriptors entered
in the system.
MD0003-065
Revision D
May 2, 2005
Page 244 of 814
3700 POS
What’s Enhanced
During operations, when the manager is ready to declare the waste items,
a Waste check is once again initiated. After each item is entered, a dialog
box is displayed listing all of the predefined waste reasons.
To link the waste code, the manager simply selects one and presses [OK]
to assign the item to that category.
Note
The decision to categorize waste items is entirely optional. If
none of the reason codes are linked to the Use as waste option,
the dialog box will not be displayed when a Waste check is
initiated and the menu items are added.
MD0003-065
Revision D
May 2, 2005
Page 245 of 814
3700 POS
What’s Enhanced
Reports
To quantify the results, two new reports are included with this
enhancement. They are available under the Other category in the
Autosequences and Reports application.
Consolidate Menu Item Waste Reason by Menu Item
(menuitem_waste_reason_mi.rpt) — Provides a detailed summary of
wasted menu items by reason code.
MD0003-065
Revision D
May 2, 2005
Page 246 of 814
3700 POS
What’s Enhanced
Consolidated Menu Item Waste Reason by Employee
(menuitem_waste_reason.rpt) — Provides a detailed summary of
wasted menu items by employee and subdivided into reason
categories.
PM Allowances
Menu Item Waste works with or without the installation of the Product
Management (PM) software. When PM is installed, waste information
posted in the front of house is automatically fed through to the PM
application, where it is applied to the appropriate allowance. The addition
of reason codes allows the user to better categorize waste items by
linking them to one or more predefined PM allowances.
For information on how this feature is used in the PM application, refer
to page 484.
MD0003-065
Revision D
May 2, 2005
Page 247 of 814
3700 POS
What’s Enhanced
Printing
Blank Lines in Headers
Previously, there was no way to force a blank line to print in a header
(Sales | Descriptors | Headers). Empty lines entered during programming
would simply be ignored when the guest check, customer receipt, or
order chit was printed. That functionality has been changed.
With this release, the system can reproduce all six lines included in a
header definition, inserting blank lines for any that only contain spaces.
Lines that are left empty will be ignored during printing. This
enhancement will allow users greater flexibility in defining the layout of
the check/receipt header.
MICROS Macros Extended to All Headers/Trailers
The use of specialized MICROS macros — first developed for the
personal check feature — has been extended to all headers and trailers.
These macros are designed to print transaction information as well as
customer-specific account data pulled directly from a personal check.
(For more on this feature, refer to the topic Payment Authorization for
Personal Checks, beginning on page 560).
A list of the original macros is recapped below:
MACRO
MD0003-065
Revision D
May 2, 2005
Page 248 of 814
Represents
Print Format
^^ACCT
Personal Check
Account Number
0000000000000
(13 digits max.)
^^AMT
Total Amount of the
Tender
0000000000000.000
(17 characters max)
^^CHK#
Check Sequence
Number in database
0000000000
(10 characters max.)
3700 POS
What’s Enhanced
MACRO
Represents
Print Format
^^CSH
Cashier Object Number
If there is no cashier,
then this will represent
the transaction
employee object
number.
0000000000
(10 characters max.)
^^DATE
Date/Time Stamp
MM/DD/YYYY TIME
(17 characters max)
EX: 01/13/2004 11:34
^^PCHK
Check Number of
Personal Check
000000 (6 digits max.)
^^RVC
RVC Object Number
0000000000
(10 characters max.)
^^RT
Bank Routing Number
000000000
(9 digits max.)
^^TMED
Tender/Media Name
AAAAAAAAAAAA
(12 characters max.)
^^UWS
UWS Object Number
0000000000
(10 characters max.)
In addition, four new macros have been added for this release:
^^C2, ^^C3, ^^C4 — Prints the guest check number, truncated
to the last 2, 3, or 4 digits. For example, if the ^^C2 macro is
used, then Check # 1234 will print on the header/trailer as Check
# 34.
^^MICNT — Prints a count of the menu items sent to the order
device for the current check. To be included, items must have the
Count Menu Item option enabled (Sales | Menu Item Classes |
General Options).
MD0003-065
Revision D
May 2, 2005
Page 249 of 814
3700 POS
What’s Enhanced
Override Menu Item Name by Order Device
With this release, users can now specify which menu item names (Sales |
Menu Items | Definition | General) will be printed/displayed at each order
output device. For example, the system could be configured to show both
the first and second names on the KDS display, but only print the second
name at the cold line printer.
To support this change, a new option Override Menu Item Name to
Print (Devices | Order Devices | Options | Sorting/Formatting) was
added in POS Configurator. The option comprises a check box and three
radio buttons (Name 1 Only, Name 2 Only, and Both Names). The radio
buttons are greyed out until the check box is enabled.
This option overrides the selection made in the Print on Order Printers
box (Sales | Menu Item Classes | Print/Display).
Trailers by Order Device
Remote order printing has been enhanced to support the addition of
trailers on the order chit. In the past, only headers were allowed.
To accommodate this change, a new Trailer drop-down option has been
added to the Order Devices | General form in POS Configurator. This
option must be specified for each affected order device.
MD0003-065
Revision D
May 2, 2005
Page 250 of 814
3700 POS
What’s Enhanced
Reports
Report Item Discounts as Subtotal Discounts
Discount functionality has been modified to allow item discounts to be
added to the subtotal discount amount on system reports. Previously, item
discounts were tracked and reported separately. The change allows sites
to show gross sales figures (inclusive of discounts) on all reports.
Enabling the Feature
To accommodate the change, a new option — Report as Subtotal
Discount (Sales | Discount/Service | Discounts) — has been added to the
POS Configurator. When enabled, this option directs the system to
include the designated item discount in the subtotal discount amount on
all sales and menu item detail reports.
Discounts must be programmed individually. Any item discount that is
not configured to report with the subtotal discounts will continue to post
in the Item Discount fields.
Operational Changes
Once the item discounts are configured, they are applied to menu items
as before. The difference is only apparent when the reports are run. The
results can be seen in the following:
Sales Detail Reports (System, Revenue, Employee, Cashier, Serving
Period, Time Period). In the profiles section, discounts of this type
are included in the Subtotal Discount amount. The Item Discount
field will be zero.
Tracking Totals. When running a report with major, family, and menu
item tracking total types, sales are posted as Gross Sales.
Menu Item Detail Reports (Major, Family, Menu Item Group, Menu
Item). Discounts of this type are included in the Subtotal Discount
field at the bottom of the report. the Item Discount field will be zero.
This feature does not affect the way Net Sales are calculated or posted on
the Sales Detail reports.
MD0003-065
Revision D
May 2, 2005
Page 251 of 814
3700 POS
What’s Enhanced
Void Tracking Totals Added
Tracking totals allow a manager to produce reports with customized
totals information not available on standard reports. Each tracking total
includes a name, a quantity, and a value amount. The name is a descriptor
programmed in the Tracking Group form. The count is the number of
specified items that were posted. The value is the sum of the associated
dollar amounts.
Among the tracking total types supported by the 3700 POS are item
voids. In the past, the system was unable to differentiate between types of
voids, but instead grouped the results into a single predefined total.
With this release, the Void tracking total type has been subdivided into
the following groups:
1. Manager Voids
2. Current Round Voids (i.e., error corrections)
3. Previous Round Voids
4. All Voids
Now, when the user selects Voids as the Tracking Total Type in POS
Configurator (Reporting | Tracking Groups), the system will populate the
Tracking Total Number field with the list of void options.
At this time, these tracking totals are only available for use with System,
Revenue Center, and Time Period tracking.
MD0003-065
Revision D
May 2, 2005
Page 252 of 814
3700 POS
What’s Enhanced
Transaction Analyzer
Credit Card Security
By default, the system masks a credit card number (all but the last four
digits) and its expiration date (all digits) from any printout or display
device where it might be viewed by an unauthorized person. This
includes workstation displays, hardware devices (pole displays, handhelds, PinPads), as well as system reports, journals, and log entries.
With this release, the ability to mask credit card numbers has been
extended to reports run via Transaction Analyzer. Reference entries
associated with a credit card number are also excluded. (Reference
entries attached to menu items, discounts, service charges, or other
tenders are not affected.)
Disabling the Option
To accommodate merchants who, for a variety of reasons, may not want
to mask all credit card data, the following option (added in the previous
release) may be selected:
Override Credit Card Masking (Employees | Employee Classes |
Privileges | Privilege Options) — When checked, this option allows
members of the employee class to view/print credit card numbers and
expiration dates in reports run via Transaction Analyzer.
MD0003-065
Revision D
May 2, 2005
Page 253 of 814
3700 POS
What’s Enhanced
Future Orders Support
With the addition of the Future Orders feature, changes were made to
Transaction Analyzer (TA) to allow for custom reports based on future
order transaction details. Users can also differentiate between future
orders for training and non-training employees. As before, all TA report
criteria is specified by the user.
New Fields in TA
To support this feature, two new check boxes were added to the TA/
Personnel tab:
Future Orders — Analyzes future order transactions posted by
regular employees.
Future Training Orders — Analyzes future order transactions
posted by employees in training.
The label box that incorporates the Non-Training and Training check
boxes has been expanded to include the two new options, and the label
has been changed to Check Status. More than one check box can be
selected, depending on the range of transactions to be analzyed.
MD0003-065
Revision D
May 2, 2005
Page 254 of 814
3700 POS
What’s Revised
What’s Revised
A revision is defined as a correction made to any existing form, feature,
or function currently resident in the 3700 POS software. To qualify as a
revision, the change must satisfy the following criteria:
The basic form, feature, or functionality must be part of the previous
version of the software.
The change must replace the current item or remove it from the
application.
Revisions
Summarized
The table below summarizes the revisions included in this version.
Module
Feature
CR ID
Page
Autoseq and
Reports
Unable to Access Reports Screen
When All Autosequences are
Configured to Hide on Run Screen
14709
266
CA/EDC
Closing Batch Settlement Before
Completion Causes Error Message
N/A
266
Editing a Closed Check During
Credit Card Batch Creation Causes
System to Double-Bill
13747
267
System Incorrectly Allows Multiple
Settlement Processes to Run
Concurrently
17906
267
3700d.exe Fails Occasionally on
Licensing Error
18039
268
N/A
268
14619
269
Common
DSM Fails to Reload CrumMDS.dll
Control
Panel
System Does Not Restore Prior
Minimized Instance of Control
Panel
MD0003-065
Revision D
May 2, 2005
Page 255 of 814
3700 POS
What’s Revised
Module
Database
Delivery
Dispatch
Hand-Held
Devices
MD0003-065
Revision D
May 2, 2005
Page 256 of 814
Feature
CR ID
Page
Clearing Totals for Demo Sales
Incorrectly Resets Current Business
Date Tracking Totals
15448
270
Conversion Failure Results in
Unuseable Database
N/A
270
Error Occurs During Manual
Conversion of RES 3.0 SP5
Database
N/A
271
KDS Tracking Totals Not Posting
17339
271
POS Operations Hangs if Check
Tendered During Totals Purge
16802
272
Time Card Posting Fails When
Converting from Local To GMT for
Records Entered During Daylight
Saving Time Changeover
15509
272
Changes Made at Server Are Not
Passed to Clients
N/A
272
Configuration Changes Not Sent to
Win95 Clients
N/A
273
Delivery Dispatch Configuration
Produced Unexpected Database
Error
16159
273
Japanese iPAC Not Working
Properly
16918
273
Memory Error Received When
Downloading Database With Large
Number of Condiment Selections
N/A
274
POS Loader Does Not Start on
Japanese iPAQ
N/A
274
‘Tare Weight’ Edit Box Missing in
Manager Procedures Forms
N/A
274
3700 POS
What’s Revised
Module
Manager
Procedures
POS
Configurator
Feature
CR ID
Page
Clear Button Not Working Properly
N/A
275
Currency Conversion Rate Only
Displays 2 Digits
17033
275
Editing Combo Group Items
Generates Error Message
17085
275
Error Received When Editing Menu
Item With No Effective Prices
N/A
275
Override Overtime Rate Not
Updating When New Override Rate
Added
17923
276
‘Select Combo Menu Item’ Screen
Sorts Incorrectly
17259
276
System Incorrectly Saves Time
Cards Records With Overlapping
NULL Time Out Values
17222
276
Time Cards Incorrectly Saved With
‘Null’ Clock-Out Time
17903
276
Unable to Clear Condiment Fields
15091
277
Unable to Edit Previous Time Card
Record While Employee Clocked In
17744
277
Allowed Two PC-Based KDS
Devices to Link to Same Network
Node
N/A
277
Changing Touchscreen Name Does
Not Update Version Name for EM
16929
278
Current Effective Price Does Not
Always Display in POS
Configurator
N/A
278
Employees Able to Change
Privileges to Higher Level Via Table
View
N/A
278
MD0003-065
Revision D
May 2, 2005
Page 257 of 814
3700 POS
What’s Revised
Module
POS
Configurator
(cont’d.)
POS
Operations
MD0003-065
Revision D
May 2, 2005
Page 258 of 814
Feature
CR ID
Page
Employees Allowed to Access PC
Applications Without Proper ID
14658
279
Hourly Employee’s Record Can Be
Saved Without Selecting Primary
Job
N/A
279
IP Address Incorrectly Allows
Spaces
N/A
280
Network Node Baud Rate Missing
After Upgrade
N/A
280
Quick Count Form Does Not Save
Records Correctly
N/A
280
Quick Count Form Does Not Accept
Unit Entries in European-Style
Numerical Format
15521
280
Report Template Search Criteria
Reduced to Name and Number
17950
281
Search for Menu Item Record
Defaults to Number Field Instead of
Name1
N/A
281
Using Ampersand (&) in Condiment
Group Name Creates Mnemonic
Character in Label
N/A
281
Assertion Failure Received After
Running SIM Scripts
17505
282
Authorization Window for Clocked
Out Employee Cannot Be Cleared
11792
282
Auto-Combo Recognition Results in
Outstanding Amount in System
Reports
N/A
282
Auto-Service Charge Causes
Negative Balance With Split Checks
11248
283
3700 POS
What’s Revised
Module
POS
Operations
(cont’d.)
Feature
CR ID
Page
Cannot Cancel Check After Using
Send Function
18234
283
Clock-Out Grace Period Not
Working
16260
283
Combo Meal Does Not Allow Void
of Current Round Condiments
17738
283
Combo Meal Error Occurs When
Making SLU Selection Followed by
Required Condiment Selection
16859
284
Combo Meal Side Items Not
Voiding Correctly
17759
284
Combo Meal SIM Variables Not Set
Correctly
16184
284
Combo Meal Substitutions Do Not
Highlight Correct Menu Items
N/A
285
17121
285
N/A
285
Condiments Incorrectly Allowed on
Service Charges
14833
286
Condiment Option ‘Print without
parent on order chit’ Not Working
Properly
17700
286
Condiment Pass Thru Prevents
Automatic Add of Single or Default
Combo Items
14912
286
Daily OT Hours Not Included on
Time Chits or Timecards
16106
287
Combo Meal Substitutions Do Not
Work Properly When Item Has Min/
Max Condiments
Combo Meal Substitutions
Prevented in Previous Round
MD0003-065
Revision D
May 2, 2005
Page 259 of 814
3700 POS
What’s Revised
Module
POS
Operations
(cont’d)
MD0003-065
Revision D
May 2, 2005
Page 260 of 814
Feature
CR ID
Page
N/A
287
16517
287
Edit Seat Changes Order of Items
Entered
N/A
288
Edit Seat With FIxed Price Meals
Allow Unlimited Course Items
14855,
14941
288
Guest /Check Counts Incorrect
When Using Seated Filtering Before
Tender
16028
288
Inclusive Taxes Not Calculated
Correctly When Using Item
Discounts with VAT Enabled
17227
288
Inclusive Taxes Not Recalculated
After Using Price Override
15737
289
Insert/Change Condiment Does Not
Work with Changing Menu Levels/
Sub-Menu Levels
17269
289
Insert/Change Condiment Prevented
With Previous Round Items When
DOM Enabled
N/A
289
‘Invalid Card’ Error When Track 1
and 2 Data Do Not Match
16488
289
Item Discount Not Applied
Correctly to Direct Void Item
17375
290
Korean Characters Not Used In
Reference Entries
17027
290
Daylight Savings Time Results in
Out of Memory Error on WS4
Discounts Not Calculating Correctly
When Applied to Multiple Discount
Itemizers
3700 POS
What’s Revised
Module
POS
Operations
(cont’d.)
Feature
CR ID
Page
Masking Tax by Order Type Does
Not Always Prevent Inclusive Taxes
from Printing on Guest Check
N/A
290
Menu Level 1 Pricing Always Used
With Manually Entered Barcodes
16851
291
Name2 Not Printing on Local Order
Receipt Printer
N/A
291
Open Check Block Settlement
Reports Incorrectly
17507
291
POS Operations Fails If Currency
Piece Descriptor Includes a Leading
Space or Period
17617
291
POS Operations Fails When Using
Edit Seat or Split Check Functions
After a Condiment Void
17866
291
POS Operations Hangs When
Pressing Price Override Key After
Last Item Void
N/A
292
POS Operations Hangs When
Signing in on a Pop-Up Touchscreen
12356
292
POS Operations Locks Up When
Minimized After Loading Delivery
Dispatch
16157
293
N/A
293
POS Operations Stops Sending Pour
Releases to Berg LDS
17757
293
POS Performance Slow When
DOM Set to Fire-on-Fly or Fire-onNext
17949
294
Priced Condiments Not Voiding
Properly
16489
294
POS Operations Stalls on WS4
While Database Updates
MD0003-065
Revision D
May 2, 2005
Page 261 of 814
3700 POS
What’s Revised
Module
POS
Operations
(cont’d.)
Feature
CR ID
Page
N/A
294
Remote Order Chits Printing in an
Incorrect Format
17590
295
Repeat Round With Auto Menu
Levels Produces Wrong Prices
17758
295
‘Send’ Key Fails to Insert/Modify
Previous Round Condiments
N/A
295
Sorting by Seat Causes Slowdown
in POS Operations on Ultra
Workstation
18013
295
Substituting a Combo Meal Menu
Item with References Posts
Reference to Wrong Item
N/A
296
Swiped Auth ‘n Pay Credit Card
Settles as a Manual Entry
N/A
296
Taxable Totals Posted Incorrectly
After Subtotal Discounts Applied
17985
296
Threshold Prompt for GST Tax
Invoice Displays Incorrectly
18033
296
N/A
297
17842
297
N/A
297
Touch Void of Condiments
Removes Check Detail
14872
298
Touch Void of Condiments Fails to
Call SIM Event
14865
298
Prorated Subtotal Discount Not
Tracking Properly
Touch Item Discount Amounts Not
Applied Correctly with One
Unpriced Condiment
Touch Item Discounts Disabled
When New EM Store Added
Touch Item Discounts Not Applied
Correctly After Direct Voids
MD0003-065
Revision D
May 2, 2005
Page 262 of 814
3700 POS
What’s Revised
Module
POS
Operations
(cont’d.)
Feature
CR ID
Page
Transactions on Licensed Site
Posting to Demo Business Date
16778
298
Voiding an Item Discount Does Not
Update Sales Totals Correctly
15985
298
N/A
299
Cannot Suppress Bitmap Name on
Printers that Do Not Support Logo
Printing
14958
299
Credit Card Voucher Prints With
Large Space Between First and Last
Names
18174
299
Disk File Name is Incorrect When
WinCE Client is in SAR Mode
16226
300
Euro Currency Conversion Not
Printing to Journal
6864
300
Menu Item and Tender Detail Does
Not Print to Journal After Upgrade
18114
300
Consolidated RVC Family Group
Sales Detail Errors if Revenue
Center’s Object and Sequence
Numbers Do Not Match
15937
301
Credit Card Batch Detail Report
Fails if RVC Number Exceeds 3
Digits
N/A
301
Daily Consolidated Menu Item
Sales Detail/Summary
15806
302
Daily Consolidated Revenue Center
Menu Item Sales Detail Reports
Incorrect Subtotal Discounts
18047
302
Voiding a Returned Item Causes
Totals to Post Incorrectly
Printing
Reports
MD0003-065
Revision D
May 2, 2005
Page 263 of 814
3700 POS
What’s Revised
Module
Reports
(cont’d.)
MD0003-065
Revision D
May 2, 2005
Page 264 of 814
Feature
CR ID
Page
Daily Revenue Center Discount
Reports Show Incorrect
16501
303
Daily System Sales Detail Prints
With Too Much White Space
Between Order Types
15145
303
Employee Detail Shows Incorrect
Outstanding Balance After Check
Transfers
12639
303
Employee Detail Tracking and
Order Type Totals Do Not Match
12642
304
Employee Time Card and Job Detail
Reports Mismatched Job Codes
15997
304
Menu Item Sales Detail Does Not
Report More Than One Discount
17190
305
Menu Item Waste Reports Incorrect
Totals
17422
305
Revenue Center Menu Item Sales
Detail Report Error When RVC
Sequence Number Does Not Equal
RVC Object Number in the
Database
N/A
305
Revenue Center Serving Period
Detail Reports Incorrect Totals
When Checks Transferred Between
16446
306
System Menu Item Sales Detail
Report Missing Net Sales Total
N/A
306
Subtotals Do Not Print Immediately
in Grand Totals Section of System/
Revenue Center Menu Item Sales
Detail
N/A
307
3700 POS
What’s Revised
Module
Setup
SIM
Transaction
Analyzer
Feature
CR ID
Page
Error Occurs After Applying a RES
3.2 Service Pack to an Upgraded
RES 3.1 System
18389
309
Installing Crystal 9 Prevents User
From Opening POS Configurator or
Autosequences and Reports
14475
309
MDAC Version 2.8 Causes
CrumCSS.dll Reload to Fail
17271
310
Service Pack Installation Fails
14493
311
‘Dtl_has_printed’ Incorrectly Lists
Items Fired in Previous Round
N/A
311
SIM Events Executed Even if User
Authorization Canceled
N/A
311
SIM Performance Slower in RES
Version 3.2 Software
N/A
311
Using SIM Variables @trdtl,
@trdtlr, or @trdtlt Cause Debug
Error to Display
17656
312
N/A
312
Running a Discount Report for One
Week Takes Too Long to Complete
MD0003-065
Revision D
May 2, 2005
Page 265 of 814
3700 POS
What’s Revised
Revisions
Detailed
Autosequences and Reports
Unable to Access Reports Screen When All Autosequences
are Configured to Hide on Run Screen
CR ID #: 14709
Users could not access the Autosequences and Reports module, if every
autosequence listed in POS Configurator | Autosequences | Reports was
configured with the Hide on Run Screen option checked. Attempts to
open the application and log on would cause a error message to display,
and/or the module to close automatically. This problem has been
corrected.
CA/EDC
Closing Batch Settlement Before Completion Causes Error
Message
CR ID #: N/A
During a credit card batch settlement, if the user canceled the process by
closing the CC window or ending the application through the task
manager, the error message
returned error code [-1073741510]
would be posted in the 3700d.log.
The problem occurred because the interruption failed to produce an
orderly shutdown of the application. This has been corrected.
MD0003-065
Revision D
May 2, 2005
Page 266 of 814
3700 POS
What’s Revised
Editing a Closed Check During Credit Card Batch Creation
Causes System to Double-Bill
CR ID #: 13747
When editing a closed check with credit card tenders, if a credit card
batch was created before the reopened check was closed, the credit card
tender would be prematurely added to the batch file. This would cause
the customer to be billed twice under the following circumstances:
The credit card tender was voided and the check paid to cash. In
this case, voiding the tender did not remove the charge from the
previous credit card batch. The credit card was billed anyway.
The credit card tender was voided and replaced with another
credit card tender (either to the original card or to another credit
card). The original charge was not removed from the previous
credit card batch. The new charge was posted with the next credit
card batch.
To correct these problems, the system now excludes from batch files, any
records that are currently open on a workstation.
System Incorrectly Allows Multiple Settlement Processes to
Run Concurrently
CR ID #: 17906
Previously, problems could occur during credit card settlement because
the system failed to prevent users from running more than one instance of
the Settle.exe process at a time. This has been corrected.
Now, if the user attempts to start a second instance of the Settle.exe (e.g.,
from a command line, as part of an autosequence, or through the credit
card application), an error message will display indicating the system
“Failed to initialize the CAEDC.dll.” The program will be exited and
may be restarted once the settlement process has been completed.
MD0003-065
Revision D
May 2, 2005
Page 267 of 814
3700 POS
What’s Revised
Common
3700d.exe Fails Occasionally on Licensing Error
CR ID #: 18039
On startup, the files used by the 3700d.exe to manage the licensing of
RES components would occasionally receive the wrong version number
from the system driver, which in turn, made it impossible to identify the
correct operating system. The problem, which caused the application to
crash, has been corrected.
DSM Fails to Reload CrumMDS.dll
CR ID #: N/A
During frequent update requests (e.g., making database changes and
reloading the SQL Database Server from Control Panel), the DSM would
fail while attempting to reload the Crum libraries. This problem has been
corrected.
MD0003-065
Revision D
May 2, 2005
Page 268 of 814
3700 POS
What’s Revised
Control Panel
System Does Not Restore Prior Minimized Instance of
Control Panel
CR ID #: 14619
Previously, when opening a second instance of cpanel.exe, the system
failed to restore the previous instance of the application if that instance
was minimized on the toolbar. Instead, the second instance would
(correctly) end process without returning the original instance view to
normal display. This has been corrected for the Control Panel as well as
the following RES applications:
3700 POS (all applications except POS Operations)
Cash Management Back Office
Enterprise Management (all applications)
Financial Management
Labor Management (all applications)
Product Management (all applications)
MICROS Desktop
MD0003-065
Revision D
May 2, 2005
Page 269 of 814
3700 POS
What’s Revised
Database
Clearing Totals for Demo Sales Incorrectly Resets Current
Business Date Tracking Totals
CR ID #: 15448
Previously, when using sp_clear_demo_sales to clear demo date sales
totals from the database, the system would incorrectly reset the current
business date tracking group totals. Consequently, the following tables
were purged without regard to the business date associated with the data:
dly_srv_prd_trk_ttl_temp
dly_rvc_fixed_prd_trk_ttl_temp
dly_rvc_trk_ttl_temp
dly_sys_fixed_prd_trk_ttl_temp
dly_sys_trk_ttl_temp
shift_cshr_trk_ttl_temp
shift_rvc_cshr_trk_ttl_temp
shift_emp_trk_ttl_temp
shift_rvc_emp_trk_ttl_temp
Tracking totals already posted for the current date were cleared. Only
those tracking totals posted after the demo sales were cleared would be
reported for that business date. Previous business date tracking group
totals were not affected.
The stored procedure has been corrected.
Conversion Error Results in Unuseable Database
CR ID #: N/A
Previously if a manual database conversion failed or was interrupted for
any reason, the database would be left in an unusable state, due to
changes made to the lang_string_def table. Further attempts to convert
that DB would fail. This has been corrected.
MD0003-065
Revision D
May 2, 2005
Page 270 of 814
3700 POS
What’s Revised
Error Occurs During Manual Conversion of RES 3.0 SP5
Database
CR ID #: N/A
Previously, after upgrading to RES 3.2 from RES 3.0 SP5, with GSS 1.0
SP3, attempts to manually convert the database would fail and the
following message would be received:
Error in file C:\Micros\database\data\Scripts.sql
at line 28326
Column '0' not found.
The problem was caused by structural changes that were overlooked in
the conversion process. This has been corrected.
KDS Tracking Totals Not Posting
CR ID #: 17339
The following problems were observed when running reports using KDS
tracking totals:
If an employee did not have a cashier association and the cashier
report (CSHR_701.rpt) was run, KDS tracking totals would not post
and the report would fail.
If serving periods were not configured and a serving period report
was run, KDS tracking totals would not post and the report would
fail.
If a sales detail report was run in the middle of a transaction (i.e., the
suborders had not been doned on the KDS prep stations) or before
KDS posting occurred, the sales totals would post, but the KDS
tracking totals would not. KDS totals for the current transaction
would not be included in the report until the next transaction was
rung up.
These problems have been corrected.
MD0003-065
Revision D
May 2, 2005
Page 271 of 814
3700 POS
What’s Revised
POS Operations Hangs if Check Tendered During Totals
Purge
CR ID #: 16802
Previously, the system would hang if a user attempted to tender a check
while historical totals were being purged from the database. Once the
purge procedure was complete, operations would resume. This interfered
with businesses that were open around the clock (i.e., on a 24-hour basis).
The problem has been corrected.
Time Card Posting Fails When Converting from Local To
GMT for Records Entered During Daylight Saving Time
Changeover
CR ID #: 15509
Previously, if a site was configured to auto-adjust for daylight savings
time (DST), an error message would be generated when attempting to
convert local time to GMT for records entered during the hour of the
changeover. Time card posting would subsequently fail for these records,
which, in turn, affected job report data. This problem has been corrected.
This issue only occurs if you are set to the +10:00 Canberra Australia
time zone.
Delivery Dispatch
Changes Made at the Server Are Not Passed to Clients
CR ID #: N/A
Previously, Delivery Dispatch would send changes down to the Clients at
any time. However, to improve performance, the system will only check
the Server for an updated Delivery Dispatch configuration file the first
time the Driver Dispatch form is opened:
MD0003-065
Revision D
May 2, 2005
Page 272 of 814
After a reboot of a WS4
After POS Operations is restarted on a Win32 client
3700 POS
What’s Revised
Configuration Changes Not Sent to Win95 Clients
CR ID #: N/A
Previously, configuration changes made on the Server to Delivery
Dispatch were not being sent to the Win95 Clients. This problem has
been corrected.
Delivery Dispatch Configuration Produced Unexpected
Database Error
CR ID #: 16159
Previously, if the Number of Info Lines (POS Configurator |Revenue
Center | RVC Interfaces Systems Interface Module (SIM)) had been set to
zero, the system would display the error message ‘Unexpected DB Error
Not Found." error when Delivery Dispatch was started with at least one
check open. This has been corrected.
Hand-Held Devices
Japanese iPAC Not Working Properly
CR ID #: 16918
When using the Japanese iPAC version of the PocketPC device, some of
the RES services were not starting properly. As a result, POS Operations
was taking an inordinately long time to load. Once Operations was
started, orders were not being sent to the KDS and the user was unable to
print to a printer connected to the workstation. These problems have been
corrected.
MD0003-065
Revision D
May 2, 2005
Page 273 of 814
3700 POS
What’s Revised
Memory Error Received When Downloading Database With
Large Number of Condiment Selections
CR ID #: N/A
When downloading a database with more than 228 condiment selections
to a hand-held unit (HHT), an “Unexpected Database Error Insufficient
Memory" error was received. The HHT would complete the download
after the error. However, during POS Operations, the condiment
selections would not work properly, even though all other functionality
was present. This problem has been corrected.
POS Loader Does Not Start on Japanese iPAQ
CR ID #: N/A
After upgrading the RES server, users were unable to start the POS
Loader on a Japanese iPAQ. This is because the POS Loader is only
installed on the Symbol hand-held devices that MICROS re-sells.
To correct the problem, users must manually install the POS Loader to a
non-Symbol device (such as the Japanese iPAQ), then add a shortcut to
the Windows\LoadDaemon in that devices startup folder.
‘Tare Weight’ Edit Box Missing in Manager Procedures
CR ID #: N/A
When accessing Manager Procedures from a hand-held device, weighted
menu items could not be modified because the Tare Weight field was
missing from the Edit Menu Items form. This has been corrected.
MD0003-065
Revision D
May 2, 2005
Page 274 of 814
3700 POS
What’s Revised
Manager Procedures
Clear Button Does Not Work Properly
CR ID #: N/A
When editing a menu item record through Manager Procedures, any
attempt to reset a value to NULL using an available Clear button would
cause an error message to display when the record was saved. The
problem, which involved incompatible data types, has been corrected.
Currency Conversion Rate Only Displays 2 Digits
CR ID #: 17033
When using Manager Procedures to update a currency conversion rate,
the system allows the user to enter a value up to 6 decimal places, but
will only display 2 of them. For example, if the user enters a conversion
rate of .123456, closes and reopens the form, the entry displays .12. This
problem has been corrected.
Editing Combo Group Items Generates Error Message
CR ID #: 17085
When editing a combo group via Manager Procedures, if the user edited a
second (different) item from the same group, the program would hang
and an error message would display. The problem occurred because the
menu item price ID from the first selection was not being cleared once
the change was posted or the transaction canceled. This has been
corrected.
Error Generated When Editing Menu Items With No
Effective Prices
CR ID #: N/A
When editing a menu item through Manager Procedures, users would
receive an error message if the menu item selected had no effective prices
linked to it. This has been corrected.
MD0003-065
Revision D
May 2, 2005
Page 275 of 814
3700 POS
What’s Revised
Override Overtime Rate Not Updating When New Override
Rate Added
CR ID #: 17923
Previously, when adding a new override rate through Manager
Procedures (Employees | Edit Job Info), the system failed to update the
employee’s Override Overtime Rate. This problem has been corrected.
‘Select Combo Menu Item’ Screen Sorts Incorrectly
CR ID #: 17259
The system failed to sort records properly on the ‘Select Combo Menu
Item’ screen (Manager Procedures | Combo Groups | Edit Price
Records). In the list of displayed records, if the user clicked between the
Number and Name columns, the arrow would shift to the correct column
header, but the list would not sort properly. Also, the Locate by (Name/
Number) field did not update to the correct data type. These problems
have been corrected.
System Incorrectly Saves Time Cards Records With
Overlapping NULL Clock Out Values
CR ID #: 17222
When editing time card records through Manager Procedures, the
validation check performed when the changes were saved was ignoring
time card records with 'NULL' clock out times (i.e. employees who were
still clocked in). This could leave the time card in the database with no
clock out time. This problem has been corrected.
Time Cards Incorrectly Saved With ‘Null’ Clock-Out Time
CR ID #: 17903
Previously, if an employee clocked out through POS operations while
their time card was being changed in Manager Procedures, the record
would be saved with the original clock_out_date_time, which in this case
is NULL. The system would then overwrite the record that was changed
through operations and essentially clock the employee in again. As a
result, there would be two records with NULL clock out times in the
database. This problem has been corrected.
MD0003-065
Revision D
May 2, 2005
Page 276 of 814
3700 POS
What’s Revised
Unable to Clear Condiment Fields
CR ID #: 15091
When editing a menu item through Manager Procedures, attempts to save
after clearing a required or allowed condiment field would cause the error
message “Condiment is invalid.” to display. This has been corrected.
Unable to Edit Previous Time Card Record While Employee
Clocked In
CR ID #: 17744
When using Manager Procedures, attempts to edit a past time card record
while the employee was clocked in would fail, causing the error message
“Selected dates overlap another timecard record” to display. This has
been corrected.
POS Configurator
Allowed Two PC-Based KDS Devices to Link to Same
Network Node
CR ID #: N/A
In the past, users were not prohibited from linking multiple KDS devices
to the same network node. This created problems when using multiple
panels and bump bars. In some instances, items were not being sent to the
appropriate panels. This has been corrected. Users will no longer be able
to link a device to a node that has already been assigned.
MD0003-065
Revision D
May 2, 2005
Page 277 of 814
3700 POS
What’s Revised
Changing Touchscreen Name Does Not Update Version
Name for EM
CR ID #: 16929
Previously, if the user changed the name of a touchscreen in POS
Configurator (Devices | Touchscreens), the system failed to save the
name to the appropriate field (cfg_version_def.version_name) in the
database. Consequently, when Touchscreen Designer was opened on an
EM Corporate server, the Version Name field would be blank. This has
been corrected.
Current Effective Price Does Not Always Display in POS
Configurator
CR ID #: N/A
Previously, when a price record expired (i.e., the date/time entered in the
Effective To field passed), the new price would not always display in
POS Configurator. This has been corrected.
Employees Able to Change Privileges to Higher Level Via
Table View
CR ID #: N/A
After accessing POS Configurator, employees were able to change their
privileges to a higher level by switching to Table View and typing in an
entry. This problem was corrected by changing the cells from data-entry
fields to filtered drop-down lists, where the user’s options include only
the current level and below.
MD0003-065
Revision D
May 2, 2005
Page 278 of 814
3700 POS
What’s Revised
Employees Allowed to Access PC Applications Without
Proper ID
CR ID #: 14658
Previously, employees who had not been assigned a PC application ID
in POS Configurator (Employees | Employees | Security) were able to log
onto a RES application using their Password ID. If the application was
accessed via POS Operations, the employee’s identifier would be passed
automatically before launching the program.
Once the application was opened, the system would enforce existing
security privileges and/or limitations. For example, if an employee had
not been assigned access privileges in POS Configurator, the password
ID would allow him to open the application, but would not allow him to
do anything. This was causing confusion at some sites, and a request was
made that the system enhance security by preventing access to an
application unless a proper PC application ID had been entered.
To accommodate this request — without inconveniencing sites that
preferred the existing functionality — a new option was added in POS
Configurator. The option, Access to apps using password ID
(Employees | Employee Classes | Privileges | Privilege Options), retains
the original access procedures. That is, it allows a customer to use
password IDs to log onto RES applications. This option is active by
default.
Users who want to enforce security by requiring a PC application ID will
need to disable (clear) the option for relevant employee classes.
Hourly Employee’s Record Can Be Saved Without Selecting
Primary Job
CR ID #: N/A
When updating an hourly employee’s record, users were able to deselect
the check box designating that person’s Primary job (Employees |
Employees | Hourly Job) and then save the record without selecting
another job. The error message for this form would not display until the
user attempted to select another employee record. This has been
corrected. Users will no longer be able to save this form if a Primary job
has not been checked.
MD0003-065
Revision D
May 2, 2005
Page 279 of 814
3700 POS
What’s Revised
IP Address Incorrectly Allows Spaces
CR ID #: N/A
Previously, when entering an IP Address in POS Configurator (Devices |
Network Node | Network), the system would accept an entry that
included a space between the values. This was inappropriate and would
cause problems during operations. It has been corrected. Now, any
attempt to save a record with a space in the IP Node will cause the error
message “IP Address has an invalid format.” to display.
Network Node Baud Rate Missing After Upgrade
CR ID #: N/A
After installing the RES service pack, the system failed to load the Baud
Rate values in the drop-down list on the Devices | Network Node | Com
Ports form in POS Configurator. The user would have to close and
reopen the application to get the field to populate. This has been
corrected.
Quick Count Form Does Not Save Records Correctly
CR ID #: N/A
When assigning items in the Quick Count form, if the user entered
different ingredient quantities for different price levels of the same menu
item, the system would change all entries to the last value entered before
the form was closed. This has been corrected.
Quick Count Form Does Not Accept Unit Entries in
European-Style Numerical Format
CR ID #: 15521
When updating a menu item’s unit value in the Detail field of a price
record (Sales | Quick Count | Item Assignment), the system would not
accept numbers posted in the European style (i.e., with commas used as
decimal markers) even though the device’s regional settings were
configured to use European formats. This has been corrected.
For convenience, a save button (
) was added. This eliminates the
need to press the Enter key or double-click the Edit box to save the
changes.
MD0003-065
Revision D
May 2, 2005
Page 280 of 814
3700 POS
What’s Revised
Report Template Search Criteria Reduced to Name and
Number
CR ID #: 17950
When running a search on the Report Templates form, the selectable
criteria in the Field Name drop-down list was incorrectly limited to the
report Name and Number. In previous releases, users could conduct a
search based on any of the other fields, including: Report Class
(rpt_class_seq), Hide on run screen, Last Updated By, Use list
(ob_use_list), 40-column report (product_mask), and Template Filename.
This has been corrected. Users may now search for a template based on
all of the field names.
Search for Menu Item Record Defaults to Number Field
Instead of Name1
CR ID #: N/A
When using the search feature (binoculars icon) to locate a menu item
record, the pop-up dialog would default to the Number field instead of
Name1. This has been corrected.
Using Ampersand (&) in Condiment Group Name Creates
Mnemonic Character in Label
CR ID #: N/A
Previously, if an ampersand symbol (&) was used in an entry for the
Condiment Group Name (e.g., Surf&Turf), the system failed to recognize
it as part of the name. Instead, when generating a label for this group on
the Condiment Memberships form, the system would convert the
ampersand character to a mnemonic on the letter immediately after the
ampersand. An underscore would indicate the mnemonic character (e.g.,
SurfTurf). This allowed a user to toggle the checkbox on/off by pressing
Alt + the mnemonic. In this example, Alt+T would toggle the checkbox
for SurfTurf. This has been corrected. The ampersand is now correctly
displayed as a part of the label.
MD0003-065
Revision D
May 2, 2005
Page 281 of 814
3700 POS
What’s Revised
POS Operations
Assertion Failure Received After Running SIM Scripts
CR ID #: 17505
When running a SIM script containing the split() command using
character sequences starting with an '&' and containing extended ASCII
characters (i.e., value greater than 127), POS Operations would fail and
the following assertion error would display:
Debug Assertion Failed!
Program: C:\micros\res\pos\bin\OPS.exe
File: isctype.c
Line: 68
Expression:(unsigned)(c + 1) <= 256
This problem has been corrected.
Authorization Window for Clocked Out Employee Cannot Be
Cleared
CR ID #: 11792
When the system is configured to allow override of a signed-in employee
(POS Configurator | Devices | UWS | Begin Check with Operator ID),
and you try to sign in with a clocked-out employee, when the system
prompted for authorization to begin a check for a clocked out employee
you could not cancel the authorization screen. Only entering a valid
authorization ID would allow you to continue. This problem has been
corrected.
Auto-Combo Recognition Results in Outstanding Amount in
System Reports
CR ID #: N/A
When applying an auto-combo recognition key to an inclusively taxed
menu item, the system would back the inclusive taxes out of net sales
totals twice. This resulted in an outstanding amount when the Daily
System Sales Detail (sys_101.rpt) report was run. The problem has been
corrected.
MD0003-065
Revision D
May 2, 2005
Page 282 of 814
3700 POS
What’s Revised
Auto Service Charge Causes Negative Balance With Split
Checks
CR ID #: 11248
Previously, if a site was configured to apply auto service charges, any
attempt to split a check after an [Exempt Auto Service Charge] key was
pressed would result in a negative outstanding balance in the system
reports between Checks Begun and Check Paid. To correct this problem,
the system will no longer allow a check to be split once the auto service
charge has been exempted. The user will have to split the check first, then
apply the [Exempt Auto Service Charge] key.
Cannot Cancel Check After Using Send Function
CR ID #: 18234
After using the Send key to fire selected items to the kitchen, the system
would not allow a user to void the check using the Cancel Transaction
key. Instead, the error message: "Cannot cancel after printing,” would be
displayed. This has been corrected.
Clock-Out Grace Period Not Working
CR ID #: 16260
When clocking out of the system, employees who were within the early
or late clock-out grace period would still be prompted for manager
authorization. This has been corrected.
Combo Meal Does Not Allow Void of Current Round
Condiments
CR ID #: 17738
Previously, when ringing up a combo meal, the system would not allow
touch-voids of any condiment selection entered in the current round.
Instead, the user would have to void the entire combo meal and re-ring it
to make the change. This was implemented to address indexing options
in the check detail.
Since then, the functionality has proved to be too limiting for the enduser. By request, the feature has been rolled back to allow voids of
current round condiments.
MD0003-065
Revision D
May 2, 2005
Page 283 of 814
3700 POS
What’s Revised
Combo Meal Error Occurs When Making SLU Selection
Followed by Required Condiment Selection
CR ID #: 16859
When ringing up a combo meal, a "No Entries Exist" error would be
generated if one part of the meal was selected from a SLU and the next
part had a required condiment. To correct this problem, users need to
make sure that the SLU style of the side item groups is configured to be
pop-up, instead of staydown.
Combo Meal Side Items Not Voiding Correctly
CR ID #: 17759
After entering a combo meal, errors would occur if the user attempted to
change the selection by directly voiding a combo side item and entering
another in its place. When rebuilding the combo meal, the system would
incorrectly allow more side items to be enter than was allowed. This has
been corrected.
Combo Meal SIM Variable Not Set Correctly
CR ID #: 16184
When ringing up a combo meal, POS Operations failed to correctly
populate the appropriate SIM variables:
@dtl_is_combo_parent
@dtl_is_combo_main
@dtl_is_combo_side
In the database, the parent item was flagged as both the parent and main
item, while the main combo item was flagged as a side item. This
problem has been corrected.
MD0003-065
Revision D
May 2, 2005
Page 284 of 814
3700 POS
What’s Revised
Combo Meal Substitutions Do Not Highlight Menu Items
Correctly
CR ID #: N/A
Previously, when substituting part of a combo meal, the user could not
change the menu item focus once the Substitute screen was displayed.
This has been corrected.
For example, if a Burger combo was entered and the user highlights the
Fries and presses the [Substitute] key, the starch choices are displayed.
If the user changes his mind and highlights the Soda menu item, a
message dialog will display indicating "Item not part of combo group".
Once the OK button is pressed to clear the message, the system will
display the beverages selection screen to complete the Soda substitution.
Combo Meal Substitutions Do Not Work Properly When Item
Has Min/Max Condiments
CR ID #: 17121
Previously, substituting combo meal sides with menu items that had min/
max condiments would cause an error message to display. This problem
has been corrected.
Combo Meal Substitutions Prevented in Previous Round
CR ID #: N/A
Previously, POS Operations would not allow a combo meal substitution
under the following conditions:
the selected item was fired to the kitchen in a previous service
round,
the user tried to substitute more than one side item in the same
service round (items could be from the same/different combo
meals), or
the substitution involved menu items included in a previous round
auto-combo recognition.
These problems have been corrected.
MD0003-065
Revision D
May 2, 2005
Page 285 of 814
3700 POS
What’s Revised
Condiments Incorrectly Allowed on Service Charges
CR ID #: 14833
Previously, if the user rang in a menu item followed by a service charge,
then added condiments, the system would incorrectly apply the
condiments to the service charge item. When the check was service
totaled and picked up again, the condiments would no longer display.
However, if the condiments were priced, the additional amounts would
still be included in the check total. This would cause a discrepancy
between the sum of the check detail items and the actual displayed check
total. This issue also affected the system’s ability to correctly split/share
the check.
To correct this problem, programming changes were made to ensure that
the last check detail item is a menu item or item discount when an
allowed condiment is rung in. Priced and non-priced condiments will no
longer be added to a service charge, subtotal discount, credit card
authorization, or a partial payment. Item discounts will still allow
condiment entry.
Condiment Option ‘Print without parent on order chit’ Not
Working Properly
CR ID #: 17700
Previously, when ordering a condiment that had been configured to Print
without parent on order chit (Sales | Menu Item Classes | Print/
Display), the system failed to print the condiment items at their
designated remote order printer. This has been corrected.
Condiment Pass Thru Prevents Automatic Add of Single or
Default Combo Items
CR ID #: 14912
During combo meal entry, menu items should add automatically to the
check detail. For example, if there is a default item within one of the
combo groups, that item should add automatically. Or if a combo group
only contains a single menu item, that item should be added
automatically.
MD0003-065
Revision D
May 2, 2005
Page 286 of 814
3700 POS
What’s Revised
In the previous release, condiment pass thru was interfering with this
process. During combo entry, if the user pressed the min/max Exit key to
pass thru a condiment selection, the default selection for the next combo
meal side item was not added automatically.
This problem has been corrected.
Daily OT Hours Not Included on Time Chits or Timecards
CR ID #: 16106
Previously, if the option Exclude daily from weekly overtime (POS
Configurator | Employees | Time and Attendance | General) was selected,
the daily overtime hours were not being included in the cumulative
weekly hours that appear on the POS time chit or timecard. This has been
corrected.
Daylight Savings Time Results in Out of Memory Error on
WS4
CR ID #: N/A
When moving to Daylight Savings Time (DST), the time change
triggered a download of bitmap files to the WS4. This caused problems
for the WS4 system memory in that every transaction rung afterwards
increased the amount of Program Memory used. Eventually, an out-ofmemory error occurred. This problem has been corrected.
Discounts Not Calculating Correctly When Applied to
Multiple Discount Itemizers
CR ID #: 16517
When applying a subtotal discount that was configured for multiple
discount itemizers, the system would apply the first instance of the
discount to the check total, then apply subsequent discounts to the
itemizer group that contained the largest menu item total. Once this total
was zeroed out, an error message would display stating that the
maximum discount had been taken. This problem has been corrected.
MD0003-065
Revision D
May 2, 2005
Page 287 of 814
3700 POS
What’s Revised
Edit Seat Changes the Order of Items Entered
CR ID #: N/A
After ringing up several menu items, if the user pressed the Edit Seat
function, the order of entries would be changed. The problem was caused
by an override of the edit check sort function, which has been corrected.
Edit Seat With FIxed Price Meals Allow Unlimited Course
Items
CR ID 14855, 14941
When using Edit Seat with a fixed-price meal, the user was able to move
the non-priced course items to another seat and then add more non-priced
course items to the original seat. This could be done repeatedly on the
same check, effectively allowing multiple seats to receive non-priced
menu items based on the same fixed-price meal. This has been corrected.
Guest /Check Counts Incorrect When Using Seated Filtering
Before Tender
CR ID #: 16028
Previously, if the user applied seat filtering before tendering a guest
check. the system failed to post the correct values for guest counts and
check counts. In addition, if the option Use seat count as cover count
(POS Configurator | Revenue Center | RVC Seats) was enabled, the cover
count would also be wrong. These problems have been corrected.
Inclusive Taxes Not Calculated Correctly When Using Item
Discounts with VAT Enabled
CR ID #: 17227
When applying an item discount to a check that contains inclusive tax,
the tax is not calculated or reported correctly if the option VAT by the
total or VAT by the round (System | Restaurant | Taxes) was enabled.
This was also causing incorrect net sales totals on the System Major
Group Sales Detail and System Daily Sales reports. Both problems have
been corrected.
MD0003-065
Revision D
May 2, 2005
Page 288 of 814
3700 POS
What’s Revised
Inclusive Taxes Not Recalculated After Using Price Override
CR ID #: 15737
After using the Price Override function on a menu item linked to an
inclusive tax rate, the system failed to recalculate the tax collected to
match the overridden menu item price. The tax collected remained that of
the original menu item price. This has been corrected.
Insert/Change Condiment Does Not Work With Changing
Main/Sub-Menu Levels
CR ID #: 17269
When using main and sub-menu levels to apply condiment prefixes,
users were unable to correctly insert or modify a condiment selection.
The modify function would use the menu level of the condiment that was
being replaced, while the insert function would use the menu level of the
parent menu item. Both of these have been modified to apply the
condiment prefix linked to the current main/sub-menu level.
Insert/Change Condiment Prevented With Previous Round
Items When DOM Enabled
CR ID #: N/A
Previously, POS users were unable to insert or change a condiment on a
previous round item when Dynamic Order Mode (DOM) was enabled at
the revenue center. This problem has been corrected.
‘Invalid Card’ Error When Track 1 and 2 Data Do Not
Match
CR ID #: 16488
Previously, when swiping a credit card, if the Track 1 data did not match
Track 2 values, an ‘Invalid Card’ error message would display. To
resolve the problem for countries that do not use Track 1 data, validation
of Track 1 data is now configurable via the following registry key:
KEY : "HKLM\SOFTWARE\MICROS\3700\OPS"
VAL : "SuppressTrack1Validation" DWORD : 0 = OFF, 1 = ON
MD0003-065
Revision D
May 2, 2005
Page 289 of 814
3700 POS
What’s Revised
When the registry value is successfully read, POS Operations will log the
following message:
"Setting SuppressTrack1Validation flag to <value>"
where <value> is the value read from the registry.
The data read from Track 1 is not modified in any way when this registry
key is set. It only affects the behavior of POS Operations in validating the
track data on the card. When the registry value is set to '1', the code that
validates Track 1 data (by comparing it to Track 2) is skipped.
Item Discount Not Applied Correctly to Direct Void Item
CR ID #: 17375
When applying a discount (touch or last item) to a direct void menu item,
the discount amount would always post as a 0.00 in the check detail. This
is incorrect. Voided discounts should be posted as positive values,
reducing the amount of the menu item void (against which they are
applied) and increasing the check total. This problem has been corrected.
Korean Characters Not Used in Reference Entries
CR ID #: 17027
After setting Korean as the default language (Control Panel | Regional
Settings | General) and default input locale (Control Panel | Regional
Settings | Input Locale), POS Operations failed to use Korean language
characters when a reference entry was typed. This has been corrected.
Masking Taxes by Order Type Does Not Always Prevent
Inclusive Taxes From Printing On Guest Checks
CR ID #: N/A
Previously, if the system was configured to Print Separate Tax Lines
(RVC | RVC Print Design | Guest Check), and the user rang in an item
with inclusive taxes, the inclusive tax amount would be printed on the
guest check, even if the order type was set to mask inclusive taxes. This
has been corrected. The tax line will no longer print when masked by
order type.
MD0003-065
Revision D
May 2, 2005
Page 290 of 814
3700 POS
What’s Revised
Menu Level 1 Pricing Always Used With Manually Entered
Barcodes
CR ID #: 16851
When using a Barcode NLU key to manually enter menu items, the
system would automatically use menu item price level 1 regardless of the
price level assigned to that barcode. (This did not occur if the barcode
was scanned.) This has been corrected.
Name2 Not Printing on Local Order Receipt Printer
CR ID #: N/A
When using a local order printer, the device failed to include the menu
item’s Name2 entry, even though a second name was defined and the
configuration option was set to print Both Names or Name 2 Only. This
has been corrected.
Open Check Block Settlement Reports Incorrectly
CR ID #: 17507
When using Open Check Block Settlement, the system was reporting
more checks closed than the total available (e.g., 17 checks were printed
when only 16 checks were open). The problem was caused by a leftover
check in the print buffer which was inadvertently included. This has been
corrected.
POS Operations Fails if Currency Piece Descriptor Includes
Leading Space or Period
CR ID #: 17617
Previously, if the user configured a Piece Descriptor (POS Configurator
| System | Restaurant | Currency) that started with an empty space or a
period, any attempt to start POS Operations would fail and an unexpected
database error would display. To correct this problem, users will no
longer be allowed to save a record that includes these types of characters.
POS Operations Fails When Using Edit Seat or Split Check
Functions After a Condiment Void
CR ID #: 17866
MD0003-065
Revision D
May 2, 2005
Page 291 of 814
3700 POS
What’s Revised
After voiding a condiment, any attempt to modify the check using the
edit seat or split check functions would cause POS Operations to fail. For
split checks, the runtime error would occur immediately. For checks
involving an edited seat, the error would occur when the check was final
tendered. This problem has been corrected.
POS Operations Hangs When Pressing Price Override Key
After Last Item Void
CR ID #: N/A
After applying a price override to a menu item, if the user performed a
last item void then pressed the price override key again, POS Operations
would hang, display an unhandled exception error.
The problem occurred because the user was attempting to void the price
override, while the system was voiding the menu item itself. When the
price override key was pressed again, there was no menu item to change.
To correct this problem, when the price override key is pressed the
second time, the system will display the error message “No entries this
round.”
POS Operations Hangs When Signing in on a Pop-Up
Touchscreen
12356
When signing into POS Operations using an alpha-numeric pop-up
touchscreen, the system was prematurely closing the pop-up window
(i.e., after the first numeric character was entered). If the user attempted
to sign-in a second time, the error message “Employee Not Found”
would be displayed and the system would hang. At this point, selecting
the Cancel or Clear buttons on the numeric pop-up screen had no effect.
The user had to close and reopen POS Operations to continue.
MD0003-065
Revision D
May 2, 2005
Page 292 of 814
3700 POS
What’s Revised
Upon further investigation, it was found that the problem only occurred if
the option Do not clear screen after transaction (Devices | User
Workstation | Options) had been set in POS Configurator. Apparently,
when the pop-up screen closed on initial sign-in, the system did not clear
the entered values from the RAM. When the user tried to enter the
employee ID the second time, the system would append the new entry to
the partial entry from the previous attempt. The composite number would
then trigger the “Employee Not Found” error message.
This problem has been corrected.
POS Operations Locks Up When Minimized After Loading
Delivery Dispatch
CR ID #: 16157
After loading and then exiting the Delivery Dispatch application, any
attempt to minimize POS Operations would fail, causing the workstation
to lock up. This has been corrected.
POS Operations Stalls on WS4 While Database Updates
CR ID #: N/A
While ringing a transaction on a WS4, the Update bar would often
display on screen, interrupting operations until the database update cycle
completed. This could take up to 20 seconds. The problem has been
corrected.
POS Operations Stops Sending Pour Releases to Berg LDS
CR ID #: 17757
During normal operations using a Berg Liquor Dispensing System
(LDS), the POS system would stop sending pour messages to the LDS.
The LDS would continue to ring pour requests, but the POS would not
respond. This problem has been corrected.
MD0003-065
Revision D
May 2, 2005
Page 293 of 814
3700 POS
What’s Revised
POS Performance Slow When DOM Set to Fire-on-Fly or
Fire-on-Next
CR ID #: 17949
When ordering on a Win32 or WS4 client, system performance was
extremely slow if POS operations was configured for dynamic order
mode (DOM) and set to either fire-on-fly or fire-on-next. This has been
corrected through changes to operations and the KDS Controller.
However, it should be noted that to run well on a WS4, the display device
cannot be set to LCD mode.
Priced Condiments Not Voiding Properly
CR ID #: 16489
When previous round condiments were voided, the system would remove
the condiment line item (including price) from the check, but would not
adjust the transaction details (i.e., net sales total and outstanding
amount). The check could then be closed, leaving an outstanding balance
without an open check The results were then posted incorrectly to the
Sales Detail Report. This has been corrected.
In addition, to ensure that totals post correctly, the following operations
are no longer allowed:
Voiding of previous round condiments (priced or not priced).
Voiding of current round condiments that have been fired to the
kitchen.
Prorated Subtotal Discount Not Tracking Properly
CR ID #: N/A
Previously, when applying a subtotal discount to items that were shared,
the system failed to report the sales correctly in the tracking total section
of system reports. The discount amount was improperly included in this
section. This has been corrected.
MD0003-065
Revision D
May 2, 2005
Page 294 of 814
3700 POS
What’s Revised
Remote Order Chits Printing in an Incorrect Format
CR ID #: 17590
Previously, when printing a remote order chit, the system would add a
number of blank lines between the menu item and price. The problem
seemed to occur only when the system was setup to print the active menu
level with the menu item. This has been corrected.
Repeat Round With Auto Menu Levels Produces Wrong
Prices
CR ID #: 17758
When using the repeat round key with auto menu levels configured, the
system was pulling the wrong sub-level price for the selected menu item.
This has been corrected.
‘Send’ Key Fails to Insert/Modify Previous Round
Condiments
CR ID #: N/A
In a DOM-enabled revenue center, attempts to insert/modify a previous
round condiment after using a ‘Send’ key resulted in the error message
‘Condiment not allowed.’ This has been corrected.
Sorting by Seat Causes Slowdown in POS Operations on
Ultra Workstation
CR ID #: 18013
When using an Ultra workstation, the POS system was much slower to
print, split checks, or view operations by seat when the Sort by seat
option (Devices | Order Devices | Options | Sorting/Formatting) was
enabled for that device. This problem has been corrected.
MD0003-065
Revision D
May 2, 2005
Page 295 of 814
3700 POS
What’s Revised
Substituting a Combo Meal Menu Item with References
Posts Reference to Wrong Item
CR ID #: N/A
When substituting items in a Combo Meal, if the item to be changed
belongs to a menu item class where a reference is required, the system
would substitute the menu item, but would then link the reference entry
to the last menu item on the check. This problem has been corrected.
Swiped Auth ‘n Pay Credit Card Settles as Manual Entry
CR ID #: N/A
When using an Auth ‘n Pay credit card, the payment was saved as a
manually entered card number in the database. This caused settlement to
send this card as a manually entered transaction to the credit card
processor. It has been corrected.
Taxable Totals Posted Incorrectly After Subtotal Discounts
Applied
CR ID#: 17985
During operations, if a site was using VAT taxes configured to post
taxable totals only, and a subtotal discount that forgives the VAT tax rate
was applied, the taxable sales totals would be posted incorrectly. The
variance was usually .01, and would only appear in specific combinations
of the check subtotal, VAT % amount, and discount amount. This
problem has been corrected.
Threshold Prompt for GST Tax Invoice Displays Incorrectly
CR ID #: 18033
GST taxes can be configured to prompt the user to print a tax invoice if
the posted amount exceeds a set amount. Previously, the prompt was
being generated when the tender amount exceeded the threshold, rather
than when the amount due (final tender) exceeds the threshold. This has
been corrected.
MD0003-065
Revision D
May 2, 2005
Page 296 of 814
3700 POS
What’s Revised
Touch Item Discount Amounts Not Applied Correctly With
One Unpriced Condiment
CR ID #: N/A
When an amount-type Touch Item Discount was applied to a menu item
with 1 unpriced condiment, the discount amount did not calculate
properly. It was half the value it should be.
This problem would also occur if a menu item had one or more priced
condiments followed by 1 unpriced condiment. It does not happen if the
menu item had two or more unpriced condiment, or if the Touch Item
Discount was a percentage.
This problem has been corrected.
Touch Item Discounts Disabled When New EM Store Added
CR ID #: 17842
When using Enterprise Management software, the option Enable Touch
Item Discounting (System | Restaurant | Options) was automatically
disabled at the Corporate Office for all the stores every time a new store
was added in the MECU. This problem has been corrected.
Touch Item Discounts Not Applied Correctly After Direct
Void
CR ID #: N/A
When a user voids a menu item after applying a touch item discount, the
check detail will include both positively and negatively priced menu
items. Previously, if the user then applied another touch item discount to
the check, the check totals would be incorrectly calculated. To correct
this problem, users will no longer be able to apply a Touch Item Discount
to detail that contains both positively and negatively priced items.
Instead, an error message will display.
In addition, if the user applied a touch item discount without first
selecting a menu item (i.e., relied on system to autoselect the appropriate
detail), the user interface would not be updated to reflect the selection
state. This could cause problems if the user attempted to change the
selection criteria. This has also been corrected.
MD0003-065
Revision D
May 2, 2005
Page 297 of 814
3700 POS
What’s Revised
Touch Void of Condiments Fails to Call SIM Event
CR ID #: 14865
When performing a current round void of a condiment item, the system
failed to generate the corresponding mi_error_correct_items event. This
problem has been corrected.
Touch Void of Condiments Removes Check Detail
CR ID #: 14872
When performing a current round void of a condiment item, the system
removes the entries from the detail instead of posting a negative item to
offset the void. This action is by design, even though it differs from the
way regular menu items are handled.
Transactions on Licensed Site Posting to Demo Business
Date
CR ID #: 16778
When entering transactions at a licensed site, if the connection to the
3700 System Service was lost, the Database Service would assume the
system was in demo mode and post the entries using the 2015 (demo)
business date. This has been corrected.
Voiding an Item Discount Does Not Update Sales Totals
Correctly
CR ID #: 15985
When touch voiding an item discount from a check, the discount amount
was not being voided from the Family, Major, and Menu Item group
reports. As a result, sales totals on these reports were incorrect. This
problem has been corrected.
MD0003-065
Revision D
May 2, 2005
Page 298 of 814
3700 POS
What’s Revised
Voiding a Returned Item Causes Totals to Post Incorrectly
CR ID #: N/A
Previously, when a user returned multiples of a menu item (e.g., 2 Return
Crab cake vs Return Crab Cake, Return Crab Cake), then attempted to
touch void only part of the returns, the totals for that check would be
posted incorrectly. The check would have a positive balance instead of a
negative one. This has been corrected.
Printing
Cannot Suppress Bitmap Name on Printers that Do Not
Support Logo Printing
CR ID #: 14958
When a logo is included in the header/trailer of a print job, the print
controller extracts the file name from the record and replaces it with the
appropriate graphic image. This is not possible when printing to a disk
file or slip printer, which do not support logo printing. In this situation,
the system would incorrectly print the logo file name instead.
To correct the problem, the print control function has been updated to
suppress the logo file name from print jobs sent to a disk file or slip
printers.
Credit Card Voucher Prints With Large Space Between First
and Last Names
CR ID #: 18174
When printing a credit card voucher, a large gap would be inserted
between the customer’s first and last names. This has been corrected.
MD0003-065
Revision D
May 2, 2005
Page 299 of 814
3700 POS
What’s Revised
Disk File Name is Incorrect When WinCE Client is in SAR
Mode
CR ID #: 16226
Previously, if a disk file was created on a WinCE device (WS4 or HHT)
while in SAR Mode, the system would append the command line
arguments to the file name. This has been corrected.
Euro Currency Conversion Not Printing in Journal
CR ID #: 6864
After programming the POS Configurator to accept and use the Euro
currency (System | Restaurant | Currency), the system would print the
correct conversion values on the guest checks, but failed to write them in
the journal file. This has been corrected.
Menu Item and Tender Detail Does Not Print to Journal
After Upgrade
CR ID #: 18114
After installing RES 3.2 Service Pack 2, menu items and tenders were not
being printed to the journal file. The check header, totals, and employee
name would all print correctly, but none of the line item detail was
included. The problem only occurred when the option Do not print FPM
course items on check (Revenue Center | RVC Print Design | Options |
Detail) was enabled. This has been corrected.
MD0003-065
Revision D
May 2, 2005
Page 300 of 814
3700 POS
What’s Revised
Reports
The table below describes the report changes in this Service Pack:
Report
Consolidated
RVC Family
Group Sales
Detail
Area Modified
Templatea
CR ID #: 15937
Credit Card
Batch Detail
CR ID #: N/A
Templateb
Description
When running the Consolidated
RVC Family Group Sales
Detail (or any report using the
fg_r002.rpt template) for a
particular revenue center, errors
were generated if the selected
revenue center had an object
(record) number that was
different from its sequence
number. The errors did not
occur when the report was
taken for all revenue centers.
This problem has been
corrected.
Previously, the system was
unable to run the Credit Card
Batch Detail report
(CC_001.rpt) for a revenue
center whose object number
was greater than 3 digits (i.e.,
>999). Attempts to do so would
cause a SQL error to be
generated. This has been
corrected.
MD0003-065
Revision D
May 2, 2005
Page 301 of 814
3700 POS
What’s Revised
Daily
Consolidated
Menu Item Sales
Detail and
Summary
Reports
Templatec
CR ID #: 15086
Daily
Consolidated
Revenue Center
Menu Item Sales
Detail Report
CR ID #: 18047
MD0003-065
Revision D
May 2, 2005
Page 302 of 814
Templated
When running either the Daily
Consolidated Menu Item Sales
Detail (MI_S101.rpt) or the
Daily Consolidated Menu Item
Sales Summary (MI_S102.rpt)
report, the Grand Total at the
bottom (end) of the report was
consistently lower than the net
sales shown in other reports.
The problem occurred because
the template failed to include
price/menu levels 5 to 10 in the
formulas used to calculate the
net sales and total sales
quantities. This has been
corrected.
When running the Daily
Revenue Center Menu Item
Sales Detail Report
(mi_R002.rpt), the formulas
used to calculate the grand total
other discount and the revenue
center discount totals were
posting incorrectly if the RVC
seq_num and obj_num were
not the same. This has been
corrected.
3700 POS
What’s Revised
Daily Revenue
Center
Discounts
Templatee
CR ID#: 16501
Daily System
Sales Detail
Templatef
CR ID #: 15145
Employee Detail
CR ID #: 12639
Templateg
The Daily Revenue Center
Discounts and Daily Revenue
Center Discounts Detail
reports have been modified to
show the net amount of the
discount (i.e., only the amount
of the discount that applied to
the actual menu item total)
instead of the gross amount of
the discount (i.e., the amount of
the discount that applied to
both the menu item total and
the tax).
This makes the reports
consistent with other reports
that include discount totals.
When running the 40-column
Daily System Sales Detail
(sys_101.rpt) report, a gap of
one to two inches of blank
space would be included
between order type sales totals.
This has been corrected.
The Employee Detail Totals
(emp_101_2.rpt) posted an
incorrect Outstanding Balance
for employees who had added/
transferred checks during their
shift. The problem was caused
by a calculation error in a
stored procedure. This has been
corrected.
MD0003-065
Revision D
May 2, 2005
Page 303 of 814
3700 POS
What’s Revised
Employee Detail
by Revenue
Center
Template and
Stored
Proceduresh
CR ID #: 12642
Employee Time
Card and Job
Detail
CR ID #: 15997
MD0003-065
Revision D
May 2, 2005
Page 304 of 814
Templatei
When running the Employee
Detail by Revenue Center
report (emp_701.rpt), the
tracking and order type totals
did not match if covering
multiple revenue centers with
multiple order types.
The problem occurred because
the order type totals were
incorrectly duplicated and
summed, which caused net
sales to be doubled. This has
been corrected.
When running the Employee
Time Card and Job Detail
Report (time_002.rpt), job
codes did not match the job
type under which the employee
clocked in. For example, if an
employee clocked in as a 201
Bartender, but had a second job
as a 202 Server, the report
would list the job as 201
Server.
The problem occurred because
the query used to build the job
list did not cross-reference the
date range. Additionally, this
caused the totals section to
include a job code entry for the
employee’s second (or 3rd, 4th,
etc) job, even though only one
job had been worked during the
reports date range. These
problems have been corrected.
3700 POS
What’s Revised
Menu Item Sales
Detail
Stored
Procedurej
CR ID #: 17190
Menu Item
Waste Detail
Templatek
CR ID #: 17422
RVC Menu Item
Sales Detail
CR ID #: N/A
Templatel
Previously, if menu items and
item discounts were not rung in
the same service round and
totals were posted between the
service rounds, the item
discounts would not appear on
the menu item detail reports.
The problem affected both
touch item and prorated
subtotal discounts. This has
been corrected.
When running a Menu Item
Waste Report (summary or
detail), the system failed to post
waste totals before printing the
report. This resulted in
inaccurate reports. The problem
was solved by creating two new
views to prevent conflicts
between the reports while
trying to access the database.
Previously, an error message
would occur when running the
RVC Menu Item Sales Detail
report for a revenue center
whose object number was
different from its sequence
number. This has been fixed.
MD0003-065
Revision D
May 2, 2005
Page 305 of 814
3700 POS
What’s Revised
RVC Serving
Period Detail
Stored
Procedurem
After transferring checks
between employees in different
revenue centers (but with the
same serving period), the
Outstanding, Checks Begun,
Checks Paid, Transferred In,
and Transferred Out count and
amount fields were reported
incorrectly on the RVC Serving
Period Detail report
(srv_r101.rpt).
Additionally, if the revenue
centers are using different
serving periods, then the
Transferred In amounts would
not show up in the reports for
the receiving revenue center.
These problems have been
corrected.
Templaten
When running the System
Menu Item Sales Detail report
(mi_s001.rpt), the Daily Net
Sales Amount label would
print, but the actual amount was
missing. This has been fixed.
CR ID #: 16446
System Menu
Item Sales
Detail
CR ID #: N/A
MD0003-065
Revision D
May 2, 2005
Page 306 of 814
3700 POS
What’s Revised
System/Revenue
Center Menu
Item Sales
Detail
Templates and
Stored
Procedureso
CR ID #: N/A
System/Revenue
Center Menu
Item Sales
Summary
Templates p
CR ID #: 18199
When running either a System
or Revenue Center Menu Item
Sales Detail report that
included subtotal discount data,
the Other Discount field in the
Grand Totals Section (at the
end of the report) would not
update until after the report was
displayed. To get the correct
Subtotal Discount Grand Total
to print, the report would have
to be run twice. This has been
corrected.
When running either a System
or a Revenue Center Menu
Item Sales Summary report, the
report would fail due to a
‘division by zero’
programming error. This has
been corrected.
a
Files Changed:
FG_R010.rpt
FG_R101.rpt
FG_R002.rpt
FG_R012.rpt
FG_R111.rpt
MI_R001.rpt
MI_R101.rpt
b
Files Changed:
CC_001.rpt
c
Files Changed:
MI_S101.rpt
MI_S102.rpt
d Files
Changed:
MI_R002.rpt
e
Files Changed:
dly_rvc_dsc.rpt
dly_rvc_dsc_dtl.rpt
f
Files Changed:
sys_101_rpt
MD0003-065
Revision D
May 2, 2005
Page 307 of 814
3700 POS
What’s Revised
g
Files Changed:
emp_101_2.rpt
h
Files Changed:
emp_701.rpt
sp_R_rvc_employee_trk
sp_P_rvc_employee_trk
i Files
Changed:
time_102.rpt
j
Files Changed:
sp_post_mi_cum
k
Files Added:
v_R_menuitem_mi_waste
v_R_menuitem_waste
l
Files Changed:
MI_R001.rpt
m
Files Changed:
sp_post_srv_prd_cum
n Files
Changed:
MI_S001.rpt
MD0003-065
Revision D
May 2, 2005
Page 308 of 814
o
Files Added:
sp_R_rvc_menuitem_fam_grp
sp_R_sys_menuitem_fam_grp
sp_P_menuitem
Files Changed:
MI_R001.rpt
MI_S001.rpt
p
Files Changed:
MI_S101.rpt
MI_R101.rpt
3700 POS
What’s Revised
Setup
Error Occurs After Applying a RES 3.2 Service Pack to an
Upgraded RES 3.1 System
CR ID #: 18389
After upgrading a POS-only installation from RES 3.1 to a RES 3.2, the
following error message would occur when applying a 3.2 service pack
update:
HumanResources.exe (or LM.exe, RptExpl.exe) Entry point
not found
The procedure entry point_getpassword_@12
could not be located in the dynamic link
library dbsecurity.dll
The problem occurred because the HumanResources.exe, LM.exe, and
RptExpl.exe files were not being updated during the RES 3.2 upgrade.
This has been corrected.
Installing Crystal 9 Prevents User From Opening POS
Configurator or Autosequences and Reports
CR ID #: 14475
MICROS currently installs, uses, and supports Crystal Reports Version
9.20.465. However, when installing Crystal 9 on the MICROS Server
running RES Version 3.2 software, the user was unable to access POS
Configurator or the Autosequences and Reports Modules. Attempts to do
so would cause the following error message to display:
“POS Configurator requires Crystal Reports Version 9.2.0.465. Version
9.2.2.634 is currently installed.”
MD0003-065
Revision D
May 2, 2005
Page 309 of 814
3700 POS
What’s Revised
To resolve the issue, MICROS recommends the following:
Do NOT install Crystal software on a live site. Instead, install the
software in a test environment in order to validate the Crystal
templates. Once this is done, the templates can be moved to a
MICROS system for testing with POS Operations via an
autosequence.
If necessary, install Crystal 9 with MICROS V3.2 in a lab
environment. To access the POS Configurator and Autosequences
and Reports modules, make the following change to the registry:
HKEY_LOCAL_MACHINE | Software | Micros | Common |
ValidVersion | CRPE — Change this value from 9.2.0.465 to the
version of the CRPE32.dll required for the version of Crystal.
NOTE: Once this registry setting is changed, users will no longer
be able to print Crystal reports from the workstations via a
touchscreen key in POS Operations that is linked to an
autosequence. This is because the AutoseqServ does not use the
registry setting to check for Valid Versions of Crystal.
MDAC Version 2.8 Causes CrumCSS.dll Reload to Fail
CR ID #: 17271
Whenever a change is made to a CA/EDC driver, a resdbs update is
triggered which alerts DSM to reload CrumCCS.dll to distribute the
change to clients.
After updating the system to MDAC Version 2.8, the CrumCCS.dll failed
to reload. When this happened, the DSM entered into a fatal loop of
starting the reload function, failing, and starting again. The cycle
continued until all virtual memory was used and the system shut down.
This has been corrected.
MD0003-065
Revision D
May 2, 2005
Page 310 of 814
3700 POS
What’s Revised
Service Pack Installation Fails
CR ID #: 14493
When applying a service pack to the RES 3.2 database, installation would
fail with the message “Error No PK value for FK CFK2MI_PRODUCT_
STATUS.” The problem occurred at sites that did not configure cost
center records using a contiguous block of sequence numbers. That is, if
the site has 10 cost centers (with sequence numbers 1, 3, 4, 5, 6, 11-15),
the system was unable to update all records by skipping past the unused
sequence numbers until the maximum number of records had been
checked. This problem has been corrected.
SIM
‘Dtl_has_printed’ Incorrectly Lists Items Fired in Previous
Round
CR ID #: N/A
When using the SIM variable ‘Dtl_has_printed’, the system was
incorrectly reporting all items fired to the kitchen in the previous round
along with the current round items. This problem has been corrected.
SIM Events Executed Even If User Authorization Canceled
CR ID #: N/A
When voiding items from a check, the system would present an
authorization dialog and then execute the SIM event even if the user
pressed Cancel or entered an invalid authorization code. This problem
has been corrected.
SIM Performance Slower in RES Version 3.2 Software
CR ID #: N/A
When running a SIM script, system performance was considerably
slower for sites using RES 3.2 (rather than RES 3.1) and on a
Workstation 4 rather than an Eclipse workstation. This has been
corrected.
MD0003-065
Revision D
May 2, 2005
Page 311 of 814
3700 POS
What’s Revised
Using SIM Variables @trdtl, @trdtlr, or @trdtlt Cause Debug
Error to Display
CR ID #: 17656
Previously, using the SIM variables @trdtl, @trdtlr, or @trdtlt to display
or print a check’s transaction details would cause an access violation or
debug error to display. This problem has been corrected.
Transaction Analyzer
Running a Discount Report for One Week Takes Too Long to
Complete
CR ID #: N/A
System performance was slow when running a Discount Report through
transaction analyzer (TA) for all discounts over a period of a week. The
problem was corrected by amending the underlying tables and views
used to collect and organize the data.
MD0003-065
Revision D
May 2, 2005
Page 312 of 814
Kitchen Display System (KDS)
What’s New
Kitchen Display System (KDS)
What’s New
New Features
Summarized
A new feature is defined as one that provides capabilities that were not
available in previous versions of the application.
The table below summarizes the new features included in this version.
Module
Feature
Page
KDS
Controller
New Command Line Parameter
314
KDS
Operations
Claim Order
315
Launch Dashboard
318
Review Order
319
Toolbar / Bump Bar Additions
322
Dining Courses
324
Item Timing
332
Kitchen Zones
348
Printing
Customer Deli Chit
354
Setup
Creating a Customized KDS Layout
358
Order
Scheduling
MD0003-065
Revision D
May 2, 2005
Page 313 of 814
Kitchen Display System (KDS)
What’s New
New Features
Detailed
KDS Controller
New Command Line Parameter
The ExeKDScmd.exe program has been updated to accept a new -N
(node name) command line parameter. This allows users to send a
command to any KDS workstation with an installed KDS Controller.
Previously, commands could only be programmed to run locally.
Example
To send a ‘done all active orders’ message to another workstation
(node pcws01), the user would execute the following command line
prompt:
ExecuteKDScmd.exe -D -N pcws01
The program has also been modified to display a help message if no
parameters are provided.
MD0003-065
Revision D
May 2, 2005
Page 314 of 814
Kitchen Display System (KDS)
What’s New
KDS Operations
Claim Order
The Claim Order feature allows KDS operators to self-assign orders from
the KDS display. To do this, the operator selects an order on the screen,
then presses a designated toolbar or bump bar key to lay claim to it. The
system acknowledges the action by placing a colored border around the
order. To keep track of ownership, a different color touch key is used by
each active KDS operator.
This feature is only available on the WS4.
Usage
The Claim Order feature was designed for a production-line environment
(e.g., a deli counter or bakery) where order-takers ring up checks and
place them in a common bin to be picked up and filled by the next
available operator. Since there is no way to know who will be free to fill
it — and more than one employee may be working from the same
monitor — every order is sent to every KDS display.
MD0003-065
Revision D
May 2, 2005
Page 315 of 814
Kitchen Display System (KDS)
What’s New
To claim an order, the available operator selects it from the display and
presses a color-coded [Claim] key on the toolbar (or bump bar). The
number (and color) of [Claim] keys will vary, depending on the setup.
Note
Ownership of a particular color key cannot be programmed.
Typically, each operator will be informally assigned a color at
the start of the shift. It is the responsibility of the operators to
ensure that the keys are used properly.
Once an order is claimed, it cannot be returned to the general pool. If, for
some reason, an operator cannot complete an order, it can be reassigned.
To do this, another employee must select it and press her own [Claim]
key. The border color will be changed accordingly.
Claimed orders will override the Marked Order function regardless of the
status of the Bump marked items option (Devices | Order Devices |
KDS | Options).
Finished orders are cleared from the KDS display in the usual way — by
highlighting and selecting the [Done] key. If a claimed order is recalled,
it will redisplay using the border color of the person who last handled it.
Border colors are not displayed when an order is reviewed.
Enabling the Feature
To support this feature, eight new KDS function keys have been added in
POS Configurator (Devices | KDS Toolbars or KDS Bump Bars). These
keys are hard-coded to display the specified color when an order is
claimed:
MD0003-065
Revision D
May 2, 2005
Page 316 of 814
Claim Order Blue
Claim Order Cyan
Claim Order Grey
Claim Order Magenta
Claim Order Orange
Claim Order Pink
Kitchen Display System (KDS)
What’s New
Claim Order Red
Claim Order Yellow
Note
When selecting a color for the claim order keys, users must
consider what works best for their particular configuration. Not
all colors will show up clearly on all displays, and the use of
some colors (yellow, red, magenta) may be confused with other
KDS functionality (alert statuses, marked orders).
Because of programming limits on color selection, more
function keys have been offered than would be used at a normal
site. This should provide ample choice for this feature to work
properly in any configuration.
MD0003-065
Revision D
May 2, 2005
Page 317 of 814
Kitchen Display System (KDS)
What’s New
Launch Dashboard
The new RES 3000 Dashboard gives restaurant operators an up-to-theminute view of vital operational statistics, displayed on the screen and
updated every 60 seconds. A comprehensive discussion of this feature is
included in the 3700 POS section, beginning on page 144.
As part of this release, users can access the Dashboard on any properly
configured PC- or WS4-based KDS client.
To support this, a new Launch Dashboard function key has been added
in POS Configurator. Users will need to modify the device’s toolbar or
bump bar configuration (Devices | KDS Toolbars or KDS Bump Bars) by
adding the button to the selected KDS layout.
During operations, the toolbar button is distinguished by the following
icon:
Launch Dashboard
Using the Feature
When the [Launch Dashboard] button is pressed, a security log-in
screen is displayed. Once the password is entered, the Dashboard will
open.
Employees must be privileged to view the Dashboard. Privileges are
assigned by employee class, which controls not only who may view the
restaurant data, but which panels of the Dashboard (e.g., Kitchen, Sales,
Labor, etc.) will be included in the display.
MD0003-065
Revision D
May 2, 2005
Page 318 of 814
Kitchen Display System (KDS)
What’s New
Review Order
With this release, KDS users will be able to retrieve and review a doned
order without restarting the order timer. This will allow managers to audit
an old order without skewing the preparation times reported in the Speedof-Service reports.
Background
In the past, managers or KDS operators who wished to review a
completed KDS order could recall the order to an active KDS station
using the [Recall] function key on a KDS bump bar or toolbar. In doing
so, the user would reactivate the clock used to track order preparation
time. The timer would continue to run, posting additional seconds/
minutes to the total, until it was bumped again from the KDS display.
Example
Check 101 is sent to the kitchen at 12:00. The order is prepared and
bumped from the KDS display at 12:15. Preparation time for the
order is 15 minutes.
At 12:45, the manager recalls Check 101 to view one of the order
entries. A minute later, at 12:46, the check is bumped again. The
preparation time for the order is now posted in the database as 46
minutes.
Function Keys
To review an old order without distorting actual preparation times, four
new KDS function keys have been added in POS Configurator (Devices |
KDS Toolbars or KDS Bump Bars). Their behavior is similar to Recall
keys, except that using them does not reactivate the order timer. They are:
Review — Displays a list of the last 50 orders or the last 15
minutes of orders that were marked DONE. Users can then select
one of the orders and redisplay it on the KDS monitor.
Review Last — Displays the last order that was marked DONE
in the kitchen.
MD0003-065
Revision D
May 2, 2005
Page 319 of 814
Kitchen Display System (KDS)
What’s New
Review Last P1 — Used in conjunction with a split order screen.
Displays the last order that was marked DONE on Panel 1 of the
KDS monitor.
Review Last P2 — Used in conjunction with a split order screen.
Displays the last order that was marked DONE on Panel 2 of a
KDS monitor.
Using the Feature
Once the function keys have been added, the user can review a bumped
order by pressing the appropriate toolbar or bump bar key. On the toolbar,
the buttons are distinguished by the following icons:
Review Last
Review All
When a bumped order is selected for review, the system returns it to the
current order queue and places it at the top (front) of the list.
To distinguish the check, the [ ] icon is
posted in the upper right-hand corner,
identifying it as review only. The order
timer remains static, displaying the
number of minutes posted when actual
preparations were complete.
Other icons and indicators such as Item
Status, Other Station Status, and Alert
Timers will update while the order is displayed. An order will NOT
change to All Prep Done or Oldest All Prep Done while it is being
reviewed.
When the user is finished, the order is simply bumped again to return it to
the doned order queue. The bumped order will not be reprinted.
MD0003-065
Revision D
May 2, 2005
Page 320 of 814
Kitchen Display System (KDS)
What’s New
Limitations
The following limitations should be noted when using the [Review]
function keys:
Orders can only be reviewed from the station where they were
originally bumped.
An order that is under review cannot be recalled to the same KDS
station from the Review state.
Orders that are in review cannot be parked.
KDS Platforms
Review Order functionality works on all KDS platforms, including
Win32, WS4, and SEI (non-graphical) displays.
MD0003-065
Revision D
May 2, 2005
Page 321 of 814
Kitchen Display System (KDS)
What’s New
Toolbar / Bump Bar Additions
The list of sample toolbar and bump bar layouts (included with the
MICROS shell database) has been updated to support the new KDS
features included in this release. As always, these are provided for the
convenience of the MICROS user and cannot be edited. If the sample is
not suitable, a custom layout may be defined.
KDS Toolbars
Two new toolbars were added and may be selected in POS Configurator
(Devices | KDS Toolbars). They are:
Prep Toolbar Sample 2 — includes the following buttons:
Home
Arrow Left
Order Started
Select and Done
Recall
Review
Summary Expanded
Arrow Right
End
SOS Toolbar Sample 2 — includes the following buttons:
Home
Page Left
Recall
Review
Done
Table Detail
Page Right
End
MD0003-065
Revision D
May 2, 2005
Page 322 of 814
Kitchen Display System (KDS)
What’s New
KDS Bump Bars
Three new bump bars were added and may be selected in POS
Configurator (Devices | KDS Bump Bars). A sample of each is provided
below:
MICROS Sample 2
QSR Automation KP3000 1
QSR Automation KP3000 2
MD0003-065
Revision D
May 2, 2005
Page 323 of 814
Kitchen Display System (KDS)
What’s New
Order Scheduling
Several new features were added that allow a restaurant to control how
menu items are organized, selected, and acted on in the RES System.
They are:
POS
KDS
Dining Courses
Dining Courses
Timed Fire
Item Timing
Delayed Orders
Kitchen Zones
Future Orders
These feature can be used separately or with existing RES functionality.
Results will vary, depending on the options selected.
This section describes the features from the KDS perspective. For
information on the related POS features, refer to the POS Order
Scheduling topics, beginning on page 157.
Dining Courses
Dining Courses are used in table service restaurants as a way to control
the order in which menu items are prepared and served during a meal.
Course preparation times (minimum and maximum) can also be
specified.
Maximum prep times ensure that the next course of items is sent to the
kitchen, in the event that the KDS operator fails to bump the current
course selections. Minimum prep times are generally not used unless the
system is also programmed for item timings. (Refer to the topic on page
332 for more on this functionality.) Otherwise, the minimum prep times
simply extend the maximum number of minutes that the system will wait
before sending the next course, if the current course is not bumped from
the KDS display.
MD0003-065
Revision D
May 2, 2005
Page 324 of 814
Kitchen Display System (KDS)
What’s New
Background
In previous versions, users could divide menu items into two groups —
appetizers and entrées. The entrées could then be held until the appetizers
were bumped from the kitchen. This prevented the meal from being
served all at once or having entrées sit in the kitchen until the appetizers
were cleared.
In this release, the number of configurable dining courses has been
extended to 64. During operations, the POS system will fire courses in
the order in which they are listed in the database. That is, menu items
belonging to the lowest numbered course (e.g., Course 1) will be sent
first, followed by Course 2, and then Course 3, etc. If no Course 2 items
have been ordered, the system will skip to Course 3. This process is
repeated until all the menu items have been sent.
Note
In the past, tables displayed on an SOS KDS station would
change to blue when the last entrée was bumped in the kitchen.
This was used to indicate that only the dessert items remained.
With the addition of dining courses, this has been modified.
Now, if dining courses are enabled, tables will turn blue when
the first item from any of the courses numbered 2 through 64
has been bumped from the KDS display.
For clarity, course names can be assigned by the user (e.g., aperitifs,
appetizers, entrées, desserts, etc.). Menu items are linked to a dining
course through their menu item class.
Note
When updating from a previous version, any menu items
configured as appetizers/non-appetizers will be automatically
converted to Dining Courses 1 and 2, respectively.
MD0003-065
Revision D
May 2, 2005
Page 325 of 814
Kitchen Display System (KDS)
What’s New
Timing the Courses
Users have two ways to control the pace at which the courses are served:
Manual Send — When the check is service totaled, the server sends
the first Course to the kitchen. The rest of the menu items are placed
on hold until that course is bumped from the check. The server then
selects and fires the next course of menu items.
Automatic Send — When the check is service totaled, the system
sends the first course to the kitchen immediately. The rest of the
courses are fired sequentially, at predefined intervals. This is done by
setting a minimum and maximum preparation times for each. These
values represent the minimum and the maximum amount of time that
the system should wait before firing this course to the kitchen.
Example
A customer places a lunch order for soup and salad at the Mike Rose
Café. At this restaurant, soups and salads belong to separate courses.
The maximum prep times for Course 1 and 2 are 4 minutes and 6
minutes, respectively.
When the check is service totaled, the soup course (Course 1) is fired
immediately. A few minutes later, the soup is done and bumped from
the KDS display. Once this happens, Course 2 is sent. By the time the
customer has finished his soup, the salad is ready to be picked up in
the kitchen.
If the soup is not bumped from the KDS display, the system will wait
until the maximum prep time for that course (4 minutes) and
automatically send the salad. This ensures that the customer is not left
waiting in the event that the operator forgets to bump a menu item in
a timely fashion.
MD0003-065
Revision D
May 2, 2005
Page 326 of 814
Kitchen Display System (KDS)
What’s New
Enabling the Feature
To support the feature, the following additions and modifications were
made in POS Configurator. The descriptions in this section are based on
the assumption that item timings are not being used:
Sales | Descriptors | Dining Courses (new tab)
Dining Course Seq — A system-provided sequence number for
each dining course. This number determines when a course (and
its related menu items) will be fired to the kitchen.
Name — Allows the user to enter a descriptor (up to 12
characters) for each course.
Minimum Preparation Times — Sets the amount of time (in
addition to the maximum prep time) that the KDS Controller
should wait for the current course to be all prep done and bumped
before sending the next course to the kitchen. This option is not
applicable to the first dining course.
Maximum Preparation Time — Sets the maximum amount of
time that the KDS Controller should wait for this course to be all
prep done and bumped before sending the next course to the
kitchen.
Sales | Menu Item Classes | Description
Dining Course — Allows the user to link a menu item class to
one of 64 dining courses.
Sales | Menu Item Classes | General Options
Items are...Appetizers — [Deleted checkbox from form.]
Note
Although the option has been removed from the POS
Configurator screen, the column will remain in the
database table to accommodate users who rely on it for
custom KDS applications.
MD0003-065
Revision D
May 2, 2005
Page 327 of 814
Kitchen Display System (KDS)
What’s New
Sales | Menu Item Classes | Print/Display
Override Parent Dining Course (formerly Override items are
appetizers) — When selected, overrides the display
characteristics associated with a menu item’s parent dining
course. This option is usually assigned to a condiment menu item
class. It is used to change how another menu item is handled by
the KDS.
For example, suppose a condiment menu item class is configured
with a Dining Course set to Course 3 – As Entrée.
When the condiment is applied to a menu item whose own
(parent) dining course is Course 2 – As Appetizer, KDS will track
the menu item as if it were a Course 3 item, (i.e., using the colors
and alert timers associated with an entrée).
System | Kitchen/KDS | Options
Display next course after previous course done (formerly
Display non-appetizers after appetizers done) — When
selected, prevents the KDS from displaying more than one Dining
Course at a time (per order). To work, two or more Dining
Courses must be configured and Dynamic Order Mode must be
disabled.
If this option is cleared, the system will ignore courses and send
all menu items immediately.
Wait for prep suborder — Specifies the number of seconds that
the KDS should wait for prep suborders before displaying an
expo order as all prep done. A value of 1 or 2 is recommended.
This option is required when using dining courses. It also ensures
that voided suborders are handled properly.
MD0003-065
Revision D
May 2, 2005
Page 328 of 814
Kitchen Display System (KDS)
What’s New
Adding a Course Header
When setting up dining courses, users have the option of including the
course header on the printed runners chit or the KDS chit display. (List
mode is not supported in this release.)
To do this, the Print Course Header option (Devices | Order Devices |
Options | Sorting/Formatting) was enhanced to include dining courses.
Originally, this option only supported fixed-priced meals (Sales |
Courses).
When enabled, the layout of course headings is similar to the way seats
are handled. That is, the name is centered above the items with a string of
asterisks before and afterwards, to pad out the line.
Chits can support both dining courses and seats. If both are configured,
the user determine how the menu items will be sorted on the chit through
the Sort by seat option:
If the option is enabled, the menu items will be ordered first by
seat, then by course.
If the option is disabled, the menu items will be ordered by course
first, then by seat number.
MD0003-065
Revision D
May 2, 2005
Page 329 of 814
Kitchen Display System (KDS)
What’s New
Reports
With this feature, a new report, Consolidated Kitchen Performance by
Course (kds_002_1.rpt) has been added. This report is divided into time
periods and displays the number of orders, menu items, alerts, and recalls
for each food course sent to the specified order device. Average prep
times are also calculated based on the total prep time divided by the
number of orders (not number of items).
Note
MD0003-065
Revision D
May 2, 2005
Page 330 of 814
A line item will be listed for every course where a menu item
was sent to an order device. If menu items belonging to 64
different courses are sent to a device, a separate entry will be
shown.
Kitchen Display System (KDS)
What’s New
Existing Reports
The increase in the number of courses also affects the following (preexisting) KDS reports:
Consolidated KDS Kitchen Performance (kds_002.rpt)
Daily KDS Guest Experience (kds_001.rpt)
Daily KDS Guest Experience Summary (kds_004.rpt)
Daily KDS Order Aging (kds_003.rpt)
The format of each of these reports divided menu item detail into two
groups: appetizers and entrées.
In this release, items rung up in Course 1 will be displayed under
appetizers, regardless of actual course programming. Items rung up in
Course 2 to 64 will be grouped together in the entrée section.
MD0003-065
Revision D
May 2, 2005
Page 331 of 814
Kitchen Display System (KDS)
What’s New
Item Timings
The Item Timings feature ensures that all items in an order are prepared
and ready to go at the same time. To use this feature, a preparation time is
assigned to each menu item. These values determine how long the menu
item will be held (relative to the rest of the order) before it is fired to the
kitchen.
Item times can be used with or without dining courses. If used with
dining courses, all items within that course must have a prep time set to a
value greater than zero. The item fire times are then calculated from the
baseline of the course’s start time.
To work properly, the option Single item per suborder (Devices | Order
Devices | KDS | Options) must be set. This option ensures that each item
will be displayed separately.
KDS Controller
Unlike Timed Fire events, all menu items are sent from the POS side
when the check is service totaled. However, with item timings, it is up to
the KDS Controller to determine when a menu item will be fired and
actually display on the KDS device.
Timing by Order
Absent dining courses, menu item preparation times determine how long
it should take to prepare all the items on an order. To do this, the KDS
Controller reviews the group of menu items that were sent by POS
Operations. The item/suborder with the longest preparation time is fired
immediately. This becomes the order’s minimum prep time.
Fire times for the rest of the menu items are then calculated to ensure that
they are all ready at the same time. This is done by subtracting each
item’s prep time from the order prep time. The result is the amount of
time that the KDS Controller will wait before firing that item.
MD0003-065
Revision D
May 2, 2005
Page 332 of 814
Kitchen Display System (KDS)
What’s New
Example 1
A customer orders a hamburger, french fries, and soft drink. The
established preparation time for a hamburger is 10 minutes, followed
by 4 minutes for the fries, and 1 minute for the drink. Because 10
minutes is the longest prep time for this check, this becomes the
baseline for firing all of the suborders.
As soon as the check is service totaled, the hamburger is fired. Since
the fries will only take 4 minutes to prepare, they are fired at the 6minute mark (or 4 minutes before the hamburger is finished.) The
drink (which only takes a minute to prepare) is not displayed on the
KDS screen until 9 minutes after the order was posted. As illustrated
below, all items should be finished at the same time.
MD0003-065
Revision D
May 2, 2005
Page 333 of 814
Kitchen Display System (KDS)
What’s New
Timing by Dining Course
When dining courses are enabled, menu item preparation times have a
slightly different function, depending on whether minimum and
maximum preparation times have been established for the dining courses
themselves.
Note
To work properly with dining courses, prep times must be set for
ALL or NONE of the menu items. If set, the value of a menu item
prep time must be greater than zero.
Using Minimum Prep Times
Minimum prep times ensure that a dining course will not be served
before a certain amount of time has passed. This keeps the system from
rushing the presentation of menu items simply because the preparation
time is less than expected.
If menu item prep times are also specified, the system will consider
whether the individual prep time is larger or smaller than the stated
course minimum. If the item prep times are less, each item will be
delayed a suitable amount of time so that its readiness will coincide with
the course minimum.
On the other hand, if any of the items requires more than the course’s
minimum prep time, that item will be fired immediately. The item prep
time will become the default minimum prep time and the firing times for
the rest of the items will be adjusted accordingly.
MD0003-065
Revision D
May 2, 2005
Page 334 of 814
Kitchen Display System (KDS)
What’s New
Example 2
A check is started for two customers. Each of them orders Soup
(Course 1), Salad (Course 2), and an Entrée (Course 3). The
minimum prep times for the courses are as follows:
Course
Min Prep Time
(minutes)
1 — Soup
1
2 — Salad
3
3 — Entrée
5
Customer A orders French Onion soup, a House salad, and a Steak.
Customer B orders Chicken Noodle soup, a Chef Salad, and Pasta.
Preparation times for the menu items are as follows:
Course
1
2
3
Item
French Onion
Chicken Noodle
Prep Time
(minutes)
1
30 sec
House Salad
1
Chef Salad
2
Steak
5
Pasta
4
When the check is service totaled, all items are sent by POS
Operations to the KDS Controller, which immediately sends the
Course 1 items. Course 2 and 3 items are held.
Of the Course 1 items sent, the one with the longest menu item
preparation time (1 minute) is the French Onion soup. This item is
fired immediately. Because this is the first course, the longest item
prep time becomes the default minimum course prep time. Thirty
seconds later, the Chicken Noodle soup is fired.
MD0003-065
Revision D
May 2, 2005
Page 335 of 814
Kitchen Display System (KDS)
What’s New
If all goes as planned, one minute after the order was sent, Course 1 is
all prep done on the KDS displays. As soon as it is bumped, Course 2
is sent to the Expo station. The 1-minute mark becomes the starting
point for Course 2.
The system now considers the Course 2 variables, which include a
minimum prep time of 3 minutes. Since the item prep times for the
Chef and House Salads are less than the course minimum, the system
will calculate the fire times for these items to ensure that all prep
done occurs 3 minutes after Course 2 was sent (i.e., the 4-minute
mark).
The Chef Salad (prep time of 2 minutes) is fired 1 minute after the
Course 2 start time (or the 2-minute mark). The House Salad (prep
time of 1 minute) is fired at the 3-minute mark. At the 4-minute mark,
the Course 2 items reach all prep done. When Course 2 is bumped
from the Expo, the Course 3 items are sent.
MD0003-065
Revision D
May 2, 2005
Page 336 of 814
Kitchen Display System (KDS)
What’s New
The system now considers the Course 3 variables, which include a
minimum prep time of 5 minutes. Since the item prep time for Steak
is also 5 minutes, that item is fired immediately. One minute later, the
Pasta item is fired so that both items can be all prep done at the same
time. This happens at the 9-minute mark. Course 3 is then bumped
from the KDS display.
In the preceding example, notice that Course 2’s minimum prep time
takes effect as soon as Course 1 is bumped. Since both of the salad prep
times are shorter than the minimum, the fire times are delayed long
enough to ensure that they are both ready at Course 2’s minimum prep
time. Again, by not starting the longest item immediately, the minimum
course time is preserved. This, in turn, allows the customer to have a
reasonable amount of time to finish the current course, before the next
course is served.
Suppose, however, that in Course 2, the customer ordered a Cajun
Chicken Salad with an item prep time of 3½ minutes, instead of the Chef
Salad. Since Course 2’s minimum prep time is only 3 minutes, the Cajun
Chicken Salad would be fired as soon as the Course 2 items were sent.
The House Salad would be fired 2½ minutes later, to ensure that both
salads are all prep done at the 4½-minute mark.
Maximum Prep Times
A course’s minimum prep time represents the point when its menu items
are expected to be all-prep-done. It does not guarantee that they will be,
or that, if they are, the KDS operator will remember to bump them from
the display. This could be problematic since, typically, the next course is
not sent until the first course is actually bumped. This is where
maximum prep times are needed.
Maximum prep times represent the longest amount of time that the KDS
Controller will wait for the current course to reach all prep done, before
sending the next course to the KDS display.
Suppose, for example, that the menu items in Example 2 had not be done
and bumped as expected.
MD0003-065
Revision D
May 2, 2005
Page 337 of 814
Kitchen Display System (KDS)
What’s New
Example 3
Recapping the order defined in Example 2, a check is started for two
customers. Each of them orders Soup (Course 1), Salad (Course 2),
and an Entrée (Course 3). The minimum prep times are unchanged
but now maximum prep times have been added:
Min Prep Time
(minutes)
Max Prep Time
(minutes)
1 — Soup
1
2
2 — Salad
3
4
3 — Entrée
5
6
Course
Customer A orders French Onion soup, a House salad, and a Steak.
Customer B orders Chicken Noodle soup, a Chef Salad, and Pasta.
Preparation times for the menu items are as follows:
Course
1
2
3
Item
French Onion
Chicken Noodle
Prep Time
(minutes)
1
30 sec
House Salad
1
Chef Salad
2
Steak
5
Pasta
4
When the check is service totaled, all items are sent by POS
Operations to the KDS Controller, which immediately sends the
Course 1 items. Course 2 and 3 items are held.
MD0003-065
Revision D
May 2, 2005
Page 338 of 814
Kitchen Display System (KDS)
What’s New
Again, among the Course 1 items sent, the French Onion soup has the
longest menu item preparation time (1 minute). This item is fired
immediately. And again, because this is the first course, the longest
item prep time becomes the default minimum course prep time.
Thirty seconds later, the Chicken Noodle soup is fired, with the
expectation that both menu items will be done at the 1-minute mark.
If Course 1 is not bumped at 1-minute (the expected point of all prep
done), its maximum prep time (2 minutes) becomes relevant. At the
2-minute mark, the KDS Controller assumes that the operator forgot
to bump Course 1 and begins to calculate when to send Course 2 to
the Expo station. This is done by combining the item prep time of the
longest menu item (French Onion soup, 1 minute) to the maximum
prep time of the first course (2 minutes). Three minutes after the start
of the check, the Course 2 items are sent.
MD0003-065
Revision D
May 2, 2005
Page 339 of 814
Kitchen Display System (KDS)
What’s New
Since Course 2 has a minimum prep time of 3 minutes, and the menu
item with the longest prep time is the Chef Salad (2 minutes), the
KDS Controller will wait one more minute (the 4-minute mark)
before firing that item. At the 5-minute mark, the House Salad is
fired, with the expectation that both salad items will reach all prep
done at the 6-minute mark.
If Course 2 is not bumped at the expected minimum prep time, the
KDS Controller will again determine how long to wait before sending
Course 3 items to the Expo Station. For the second and all subsequent
courses, this is done by combining the current course’s minimum
prep time or the longest item prep time (whichever is greater) with
the course’s maximum prep time and adding the sum of these two to
the current course start time. The result becomes the start time for the
next course.
In this case, if Course 2 is not bumped, the calculation would be as
follows:
3 min
Minimum Prep
Time or
Longest Item
Prep Time
(whichever is
greater)
+
4 min
Maximum
Prep Time
+
3 min
Current Course
Start Time
=
10 min
Next Course
Start Time
Once the Course 3 items are sent, the system considers that moment
the start point for scheduling the Course 3 items. The longest menu
item prep time is compared to the course’s minimum prep time. Since
the Steak prep time is 5 minutes and that is equal to the minimum
prep time, the Steak item is fired immediately. One minute later, the
Pasta (prep time = 4 minutes) is fired. All prep done for this course is
expected to be 5 minutes after the start point (10-minute mark) or 15
minutes after the check was service totaled.
MD0003-065
Revision D
May 2, 2005
Page 340 of 814
Kitchen Display System (KDS)
What’s New
No Minimum/Maximum Prep Times
If dining courses are used, but no minimum and maximum prep time
were established, the KDS Controller will not start the next course until
the previous course is bumped from the display. This is true whether or
not item prep times have been set.
Once a course is started, the item/suborder with the longest preparation
time is fired immediately. This becomes the course’s minimum prep time.
Fire times for the rest of the menu items will be calculated accordingly.
Enabling the Feature
To support item timings, the following additions and modifications were
made in POS Configurator. Options selected will vary, depending on
wheather dining courses are also being used:
Sales | Menu Items | Definitions | General
Preparation Time — Sets the amount of time required to prepare
this menu item.
Entries are made by pressing the clock
icon to access the spin-edit controls in
the pop-up dialog box. The maximum
allowed number of minutes is 59.
Seconds can only be set in increments of
0, 15, 30, or 45.
Select the Subtract check box if the
prep time is to be a negative value. Negative prep times are
usually assigned to a condiment menu item as a way to modify
the prep time of another menu item.
For example, if the prep time for a Steak (medium temp) is 6
minutes, but the customer wants it rare, the prep time for the Rare
condiment would be -2 minutes. That would set the prep time for
the Steak at 4 minutes.
MD0003-065
Revision D
May 2, 2005
Page 341 of 814
Kitchen Display System (KDS)
What’s New
Sales | Descriptors | Dining Courses (new tab)
Minimum Preparation Time — Used when dining courses and/
or item timings are defined. Sets the minimum amount of time (in
addition to the longest item prep time) that the KDS Controller
should wait for the current course to be all prep done and bumped
before sending the next course to the kitchen. This option is not
applicable to the first dining course.
If item prep times are supplied, and none is longer than the
minimum prep time, the individual fire times for each menu item
should be staggered so that they can reach all prep done at the
same (minimum) prep time.
If the course contains an item whose prep time is greater than the
minimum, the KDS Controller will fire that item immediately.
The longest item prep time will replace this minimum prep time
as the new course minimum. All other items in the course will be
delayed a suitable amount of time to ensure that they reach all
prep done at the same time.
Entries are made by clicking the
appropriate cell to access the spin-edit
controls in the pop-up dialog box. The
maximum allowed number of minutes is
59. Seconds can only be set to the values
0, 15, 30, or 45.
This value may not exceed the
Maximum Preparation Time entry.
Maximum Preparation Time — Sets the maximum amount of
time that the KDS Controller should wait for this course to be all
prep done and bumped before calculating when to send the next
course to the kitchen. Entries are made by clicking in the
appropriate cell and opening the spin-edit dialog box described
above.
If used, the maximum prep times must be greater than or equal to
the minimum prep time. The default value for this field is zero,
indicating that a limit has not been imposed on maximum prep
times.
MD0003-065
Revision D
May 2, 2005
Page 342 of 814
Kitchen Display System (KDS)
What’s New
If not used, operators MUST manually bump a course before the
next one will be sent to the kitchen.
System | Kitchen/KDS | Options — Once the menu item and dining
course prep times have been defined, the following options determine
whether the system sends items to the kitchen based on course times,
item times, or a combination of both. The options are:
Display next course after previous course done (formerly
Display non-appetizers after appetizers done) — When
selected, prevents the KDS from displaying more than one Dining
Course at a time (per order). To work, two or more Dining
Courses must be configured and Dynamic Order Mode must be
disabled.
If this option is cleared, the system will ignore courses and send
all menu items immediately.
Wait for prep suborder — Specifies the number of seconds that
the KDS should wait before for prep suborders before displaying
an expo order as all prep done. A value of 1 or 2 is recommended.
This option is required when used with any of the timed fire
events.
The following matrix illustrates how each of these options should be
set to control when the menu items are fired:
Display next course after
previous course done
Wait for prep
suborderr
Courses Only
Enable
Enable
Courses and Item Timing
Enable
Enable
Item Timing Only
Disable
Enable
None*
Disable
Disable
To Fire Items by
*This effectively turns off the timed fire feature. However, to work properly, users must also delete the Dining Course entries (Sales | Menu
Item Classes | Description).
MD0003-065
Revision D
May 2, 2005
Page 343 of 814
Kitchen Display System (KDS)
What’s New
Displaying the Order Chit
Once a check is sent, Expo and SOS stations will show all the items in an
order. If Dining Courses are enabled, only items in the current course will
be displayed.
If the KDS layout included item statuses, the indicator displayed next to
each item will show whether each item has been sent, fired on a prep
station, or doned. An additional item status has been created to show
when an item has been “Started.” (For more on this change, refer to the
Item Start First enhancement beginning on page 365.)
The following is an example of the status indicators used with item
timings.
SEI KDS
Item timing statuses are also available on SEI KDS stations. However,
because icons are not available, the indicators are shown as follows:
MD0003-065
Revision D
May 2, 2005
Page 344 of 814
Kitchen Display System (KDS)
What’s New
Voiding Timed Items
During the meal, it is not unusual for a customer to change his mind
about a selection and either request something else or cancel the item
entirely. With timed fire, all menu items are sent to the KDS Controller as
soon as the check is service totaled and immediately displayed at the
Expo station. How the void is handled depends on whether the canceled
item has been fired to the prep station, and whether another item(s) has
been added in its place.
The following table illustrates how the KDS Controller will handle menu
item voids in a timed fire environment. In all cases, it is assumed that the
option Single item per suborder (Devices | Order Devices | KDS |
Options) has been enabled:
Action
EXPO
PREP
Check is Service
Totaled
All items displayed. Longest
item is Fired to prep station.
Fired suborder displayed.
Menu item voided
before it is fired to
prep station.
No new items are
rung.
Void chit added to display.
Status of voided item is changed
to Done on original chit.
Void chit is displayed with
unnamed item.
MD0003-065
Revision D
May 2, 2005
Page 345 of 814
Kitchen Display System (KDS)
What’s New
Action
EXPO
Menu item voided
before it is fired to
prep station.
New item is
added to check.
Chit displayed with new and
voided menu items. Status of
both items is fired.*
Status of voided item is changed
to Done on original chit.
*If more than one item is added,
the item with the longest prep
time will be fired first. Other
item(s) will be timed to fire
based on when this item is
expected to be done.
MD0003-065
Revision D
May 2, 2005
Page 346 of 814
PREP
Void chit is displayed with
unnamed item.
New chit displayed for added
menu item.
Previously fired suborder
unchanged.
Kitchen Display System (KDS)
What’s New
Action
Menu item voided
after it is fired to
the prep station.
New item is
added to check.
EXPO
Same as above.
PREP
Void chit is displayed with item
named.
New chit displayed for added
menu item.
Previously fired suborder
unchanged.
MD0003-065
Revision D
May 2, 2005
Page 347 of 814
Kitchen Display System (KDS)
What’s New
Kitchen Zones
In many restaurants, kitchens have designated collection points or
‘zones’ where the components of an order are placed before being carried
out to the customer. This saves time when the order is ready, by having
the server or food runner make one stop to pick up the order, instead of
pausing at several stations.
With this release, an automated zoning feature has been added to KDS.
When enabled, each new order coming into the kitchen is automatically
assigned to its own kitchen zone. The zone location is identified for each
order on the KDS display, so that kitchen staff knows where to place the
suborders as they are completed.
Zone Identifier
Zone identifiers are also printed on runner chits, to inform the servers
where their orders are located.
This feature does not work if Dynamic Order Mode is enabled.
Zone Limits
The number of zones is configurable, up to a maximum of 26 zones.
To avoid confusion with other header information (i.e., check number,
tables, numbers, guest counts), the zone identifier is converted to the
corresponding letter of the English alphabet (i.e., 1 = A, 2 = B, 3 = C,
etc.). If four kitchen zones are configured, only the letters A-D will be
used.
MD0003-065
Revision D
May 2, 2005
Page 348 of 814
Kitchen Display System (KDS)
What’s New
Zone identifiers are assigned sequentially. The first order into the kitchen
is assigned to Zone A, the second to Zone B, etc. Once the kitchen has
used the last identifier in the sequence, it loops back to the beginning
(Zone A) and cycles through again, as shown below.
Item Limits
In addition to limiting the number of zones, users may limit the number
of items (suborders) that may be placed in a zone. If the number of items
on the order exceeds the maximum allowed, the next zone in the
sequence will be assigned. To be included, menu items must be ordered
in the same service round. Modifiers are not included in the count.
Example
The kitchen at the Mike Rose Café is configured with 4 zones, each
of which is limited to 5 items. An order with 8 items is placed.
When the order arrives in the kitchen, the next available zone is Zone
C. Because the order exceeds the number of items allowed, KDS
assigns the first 5 items to Zone C and the next 5 items to Zone D.
The KDS monitor will display the order as belonging to Zone CD.
MD0003-065
Revision D
May 2, 2005
Page 349 of 814
Kitchen Display System (KDS)
What’s New
If, on arrival, the next available zone had been Zone D, the order
would have been assigned to Zones D and A — Zone A marking the
beginning of the next cycle of kitchen zones.
Zone Identifier
Zone Layouts
For this feature, several new KDS layouts have been added. The layouts
are based on existing KDS formats (both chit and list types) which have
been modified to accommodate the zone identifier.
All of the new chit layouts are based on the chit standard, which includes
both a header and trailer section. The header portion includes either the
Check ID (if available) or the Check Number of the order (upper left) and
an active timer to indicate how long the order has been in the system
(upper right). If there are suborders at other prep stations, status icons
(one per suborder) will display beneath the Check Number to monitor
their progress. Void, VIP, Rush, and Recalled orders are also identified by
icons placed beneath the timer display.
The trailer portion displays the Server's name and Employee number
(lower left) and the Table Number (lower right.)
MD0003-065
Revision D
May 2, 2005
Page 350 of 814
Kitchen Display System (KDS)
What’s New
In most cases, the zone identifier is located at the top of the order,
between the header line and the menu items. However, if the chit layout
includes an order type, the zone identifier will be moved to the bottom,
just above the footer line.
Order Type
Zone Identifier
For list layouts, a separate column has been added.
MD0003-065
Revision D
May 2, 2005
Page 351 of 814
Kitchen Display System (KDS)
What’s New
Selecting the Zone Layout
KDS Layouts are specified for each KDS device by selecting a Device
Layout type from the drop-down list in the POS Configurator (Devices |
Devices | KDS Display). KDS Zone Layouts are distinguished from other
layouts by the letter “Z” at the end of the name. Unless otherwise
indicated, all layouts are used on a PC-standard KDS client.
The new layouts are:
MD0003-065
Revision D
May 2, 2005
Page 352 of 814
114 SE-Std-OT Z — Standard chit layout with order type and
zone identifier. This layout is used with SEI KDS Client.
300 Chit-Std w/Item Status Z — Standard chit layout with
individual item statuses and zone identifier.
301 Chit-Std-DOM Z — Standard chit layout with zone
identifier. This layout is used with Dynamic Order Mode 1, which
includes item status indicators. Both headers and trailers are
provided.
302 Chit-Std-OT — Standard chit layout with order type and
zone identifier.
304 Chit-Std-OT w/Item Status Z — Standard chit layout with
order type, item status entries, and zone identifier.
305 List-Std-OT Z — Standard list layout with order type and
zone identifier columns.
306 List-Tbl-OT Z — Standard list layout with table numbers,
order type, and zone identifier columns.
307 Chit-Std-DOM2-OT Z — Standard chit layout with order
type and zone identifier. This layout is used with Dynamic Order
Mode 2, which includes item status indicators. Only the header is
provided.
308 Chit-DOM-OT Z — Chit layout with order type and zone
identifier. This layout is used with Dynamic Order Mode 3, which
includes item status indicators, but does not include headers or
trailers.
Kitchen Display System (KDS)
What’s New
309 Chit-Std-OT-Seat Z — Standard chit layout with order
type, seat numbers, and zone identifier.
310 List-Chk#-OT Z — Standard list layout with check number,
order type, and zone identifer columns.
New Fields in POS Configurator
In addition to the new KDS layouts, two new options have been added to
the System | Kitchen | Options form in POS Configurator:
Number of Zones — Allows the user specify the number of
zones available for KDS to assign to prepared orders. The zone
number will correspond to a letter of the alphabet. Up to 26 zones
can be defined.
If a 0 (the default value) is entered, kitchen zones will not be
used.
When the option Display next course after previous course
done is enabled, the system treats each as a separate order for
purposes of assigning kitchen zones. Zone identifiers are applied
only when the course is sent to the KDS displays — not when the
original order is entered into the system.
Max Items Per Zone — Allows the user to specify the maximum
number of suborders that can be added to a zone. Entries must be
between 0-999.
If a 0 (the default value) is entered, one zone will be used for the
entire order.
MD0003-065
Revision D
May 2, 2005
Page 353 of 814
Kitchen Display System (KDS)
What’s New
Printing
Customer Deli Chit
The Customer Deli Chit layout was added as an alternative to the
traditional runner chit printed in the kitchen. Deli chits were designed for
sites that require customers to place an order at one station, and pick it up
at a later time, or at another location. To claim the order, the customer’s
receipt is matched against the printed chit.
Because the transaction is in two parts (order and pick-up), the order
number is particularly vital. On the Deli layout, this number is
prominently displayed, centered and in bold, at the top and bottom of the
chit. All other information contained in the original runner chit is also
included, but arranged in a slightly different sequence. A comparison of
the two styles is shown below:
MD0003-065
Revision D
May 2, 2005
Page 354 of 814
Kitchen Display System (KDS)
What’s New
Enabling
To support this feature, a new option has been added in POS
Configurator:
Print deli chit (Devices | Order Devices | KDS | Options) —
When enabled, directs the selected printer device to override the
traditional runner chit layout and replace it with the Deli chit.
NOTE: Deli chits cannot be reprinted.
This feature will only work if the following option is also enabled:
Primary Runner Chit Printer (System | Kitchen | Options) —
Specifies which printer will be used for printing deli and runner
chits in the kitchen.
In addition, users must select one of the following options (Devices |
Order Devices | KDS | Options) to specify when the deli chit should be
printed:
Print on expo done — Prints when the order is marked Expo
done. If there are no Expo devices in use (i.e., the system uses
only Prep displays), then Expo done will occur automatically as
soon as the last Prep order is marked done.
Print on prep done — Prints as soon as the Prep station order is
marked done.
Print on all prep done — Prints when the last Prep order is
marked done.
MD0003-065
Revision D
May 2, 2005
Page 355 of 814
Kitchen Display System (KDS)
What’s New
Creating a Matching Customer Receipt
Many of the features added in this release were designed so that users
could create a customer receipt and matching deli chit. By giving the
customers a receipt on order and providing an exact replica of the order
chit, the likelihood of a customer picking up the wrong order would be
substantially reduced.
Given that the deli chit is hard-coded, it will be necessary for the user to
modify the customer receipt to match. To do this, the following steps
should be taken in POS Configurator:
1. Create a Deli Receipt Header:
Go to Sales | Descriptors | Header and add a new record.
Skip Header Line 1
In Header Line 2, enter the following text, plus MICROS Macro
for inserting the check/order number:
Order #
^^CHK
2. Create a Deli Receipt Trailer
Go to Sales | Descriptors | Trailer and add a new record.
In Trailer Line 1, enter the MICROS Macro for inserting the
check/order number:
Order #
^^CHK
Skip Trailer Line 2
In Trailer Line 3, enter the MICROS Macro for counting the
menu items:
^^MICnt
3. Set the Revenue Center Options
MD0003-065
Revision D
May 2, 2005
Page 356 of 814
Go to Revenue Center | RVC Print Design and select the Deli
revenue center.
On the Guest Checks tab, check the Do not print guest count
option.
Kitchen Display System (KDS)
What’s New
On the Options tab, clear the Print employee name double wide
option.
Go to the Headers tab. From the Customer Receipt Header
drop-down list, select the new Deli Receipt header.
Go to the Trailers tab. From the Customer Receipt Trailer dropdown list, select the new Deli Receipt trailer.
4. Because the Deli chit only prints Name 1, make sure that the
customer receipt is similarly configured. This can be done in one of
two places:
Print on Check/Receipt (Sales | Menu Item Classes | Print
Display) — Select Name 1 Only.
Override Menu Item Name to Print (Devices | Order Devices |
Options | Sorting/Formatting) — Select Name 1 option.
Summary
A review of the receipt configuration (what is standard and what will
need to be changed) is summarized in the figure below:
MD0003-065
Revision D
May 2, 2005
Page 357 of 814
Kitchen Display System (KDS)
What’s New
Setup
Creating a Customized KDS Layout
MICROS provides a number of preformatted chit and list layouts for
displaying orders on a KDS monitor. These layouts cover a range of
styles, representing the restaurant industry’s more commonly used
designs.
Most sites will have no problem finding a layout suitable to their needs.
For those that can’t, the system does not support updating an existing
template. It does, however, allow users to create and add a layout of their
own.
This section describes the procedures for adding a new KDS chit/list
layout to the database.
1. Open the MICROS Control Panel and set the Database status to ON.
2. From the POS Configurator (Devices | Devices | Kitchen Display |
General), note the object number of the KDS Display Layout that
most closely matches user requirements. For illustration purposes,
Chit-Standard w/Item Status (object number 3) will be used here. A
portion of the sql file is shown below.
3. From the Windows Start Menu, select Run and type in dbisql to
open the Interactive SQL. On the Login tab, enter the User ID and
Password to access the database. Press OK to continue.
MD0003-065
Revision D
May 2, 2005
Page 358 of 814
Kitchen Display System (KDS)
What’s New
The next step in adding a new template is to create a record in the
kds_layout_def table. This layout entry specifies the format (chit or list)
as well as font sizes and the color of the panels and alerts.
4. From the Command box, enter the following code to export the
selected record from the kds_layout_def table to a text file:
SELECT * from MICROS.kds_layout_def
WHERE
obj_num = 3;
OUTPUT TO
c:\tmp\kdslayout.txt format ascii;
NOTE: Users may want to create a second file in a text format (e.g.,
OUTPUT TO
c:\tmp\kdslayout2.txt format text;
The ‘text’ format displays data in table form, with column headings
to identify the fields to be changed. A comparison of the export
results is illustrated below:
MD0003-065
Revision D
May 2, 2005
Page 359 of 814
Kitchen Display System (KDS)
What’s New
5. Edit the exported ascii text file.
Change the kds_layout_seq number and the obj_num to a value
greater than 10000. This value must be a unique entry in the
kds_layout_def table.
Assign the layout a new name.
Modify other fields, as required by user. The list of valid color
values are as follows:
0
1
2
3
4
5
6
7
8
9
10
11
12
13
Default
Black
White
Blue
Cyan
Dark Gray
Gray
Light Gray
Green
Magenta
Orange
Pink
Red
Yellow
Save the text file.
6. From the Command box, enter the following code to import the new
entry into the kds_layout_def table:
INPUT INTO
Micros.kds_layout_def
FROM
c:\tmp\kdslayout.txt format ascii;
COMMIT;
MD0003-065
Revision D
May 2, 2005
Page 360 of 814
Kitchen Display System (KDS)
What’s New
With a KDS template record created, the next step is to change the layout
itself. This is done through by adding a corresponding record to the
kds_layout_element_def table.
7. From the Command box, enter the following code to export the
selected record from the kds_layout_element_def table to a text file:
SELECT kled.*
FROM
MICROS.kds_layout_element_def kled,
MICROS.kds_layout_def kld
WHERE
kled.kds_layout_seq = kld.kds_layout_seq AND
kld.obj_num = 3;
ORDER BY
kds_layout_element_seq;
OUTPUT TO
c:\tmp\kdslayout_element.txt format ascii;
8. Edit the exported ascii text file.
Change the kds_layout_seq number to match the obj_number
assigned to the new KDS template record in Step 5.
Add/modify/delete the elements, as required. For clarity, a list of
the available kds_layout_elements is provided below:
kds_elem_seq
name
element_id
1
Table Number
TblNum
2
Check Number
ChkLabel11
3
Table/Group
ChkLabel12
4
Check Reference
ChkLabel13
5
Transaction Operator
TransOper
6
Check Owner
ChkOwner
MD0003-065
Revision D
May 2, 2005
Page 361 of 814
Kitchen Display System (KDS)
What’s New
kds_elem_seq
MD0003-065
Revision D
May 2, 2005
Page 362 of 814
name
element_id
7
Revenue Center Name
RvcName
8
Order Type
OTypeName
9
Header Text
HdrText
10
Trailer Text
TlrText
11
Check Open Time
ChkOpnTime
12
Service Total Time
SvcTtlTime
13
Elapsed Time
ElapsedTime
14
Order Priority Indicator
Priority
15
Other Prep Status
OtherPrepStat
16
Item Name
ItemName
17
Item Price
ItemPrice
18
Item Quantity
ItemQty
19
Seat Number
SeatNum
20
Seat Separator Line
SeatSeparator
21
Void Indicator
SpecialFlags
22
Modifier Name
ModifierName
23
Modifier Price
ModifierPrice
24
Modifier Quantity
ModifierQty
25
Order Body
OBodyInfo
26
Narrow Separator Line
NarSepLine
27
Wide Separator Line
WideSepLine
28
Double Separator Line
DblSepLine
29
Item Status
ItemStatus
31
Check Total
CheckTotal
32
Item Count
ItemCount
Kitchen Display System (KDS)
What’s New
kds_elem_seq
name
element_id
33
UWS Number
UWSNum
35
Combo Meal Name
ComboName
36
Combo Meal Quantity
ComboQty
37
Combo Meal Price
ComboPrice
38
Zone Label
ZoneLabel
Save the text file.
9. From the Command box, enter the following code to import the new
entry into the kds_layout_element_def table:
INPUT INTO
Micros.kds_layout_element_def
FROM
c:\tmp\kdslayout_element.txt format ascii;
COMMIT;
10. Open POS Configurator and go to the Devices | Devices | Kitchen
Display | General form. The new KDS layout should be included in
the Display Layout drop-down list.
MD0003-065
Revision D
May 2, 2005
Page 363 of 814
Kitchen Display System (KDS)
What’s Enhanced
What’s Enhanced
An enhancement is defined as a change made to improve or extend the
functionality of the current application. To qualify as an enhancement,
the change must satisfy the following criteria:
The basic feature or functionality already exists in the previous
release of the software.
The change adds to or extends the current process. This differs from a
revision (i.e., a bug fix) which corrects a problem not caught in the
previous release of the software.
Enhancements
Summarized
The table below summarizes the enhancements included in this version.
Module
KDS
Operations
MD0003-065
Revision D
May 2, 2005
Page 364 of 814
Feature
Page
Disallow Double-Click Bump
365
Item Start First
365
Mark First
367
POS
Interface
Support for KDS on WS4
368
WS4 Start Menu Modification
368
Printing
Runner Chit Printing
369
Kitchen Display System (KDS)
What’s Enhanced
Enhancements
Detailed
KDS Operations
Disallow Double-Click Bump
Current KDS functionality allows users to double-touch (or double-click
if using a mouse) an order to clear it from the screen. This time-saving
feature is standard and requires no additional programming to activate. In
the past, this also meant it could not be turned off — a disadvantage for
hurried users who might inadvertently double-select (and thus bump) the
wrong order.
With this release, a new option Disable double touch bump (Devices |
Order Devices | KDS | Options) has been added in POS Configurator.
When checked, the option overrides the double-click feature for the
designated KDS display. To bump an order, then, the user will have to
select it and press a programmed [Done] key (or use the combined
[Select and Done] key) on the station’s toolbar or bump bar.
This option only works on WS4 clients.
Item Start First
The Start First feature allows a user to select the first order on the KDS
station and mark it as “started.” The change in menu item status is
indicated on the order chit by an open circle icon to the left of the menu
item.
Start First icons are only visible if the user has selected a KDS layout that
includes item statuses.
An item must be started on all relevant prep stations before the item
status will be set. For example, if an order includes the menu item Steak
Salad, which is sent to both cold and hot KDS stations, the menu item
must be started on both the hot and cold KDS displays before the status
icon is changed to "started" (open circle).
MD0003-065
Revision D
May 2, 2005
Page 365 of 814
Kitchen Display System (KDS)
What’s Enhanced
Enabling the Feature
To support this feature, the following additions were made to the KDS
Function drop-down list in the Devices | KDS Bump Bars and KDS
Toolbars forms in POS Configurator:
MD0003-065
Revision D
May 2, 2005
Page 366 of 814
Order Started — Sets the status of the highlighted order to
“started”.
Order Started P1 — On split panel displays, applies the Order
Started function to suborders in the first panel.
Order Started P2 — On split panel displays, applies the Order
Started function to orders in the second panel.
Order Started First — Selects the first order on the display and
sets the status to “started”. If an order is already highlighted,
simply marks that order instead.
Order Started First P1 — On split panel displays, applies the
Start First function to orders in the first panel.
Order Started First P2 — On split panel displays, applies the
Start First function to orders in the second panel.
Kitchen Display System (KDS)
What’s Enhanced
Mark First
The Mark Orders feature allows a user to place an order on "hold" so that
it cannot be bumped from the KDS station. This feature is helpful in
situations where a drive-thru customer has paid, but the order is not
ready. The order is "parked," or put aside, until the customer receives the
items, after which it can be unmarked and bumped.
With this release, the feature has been expanded to include three new
functions:
Mark First — Selects the first order on the display and marks it
to be held. If an order was selected already, simply marks that
order instead.
Mark First P1 — On split panel displays, applies the Mark First
function to orders in the first panel.
Mark First P2 — On split panel displays, applies the Mark First
function to orders in the second panel.
Enabling the Feature
Mark First buttons are programmed in POS Configurator | Devices | KDS
bump bar or KDS toolbar by linking a Scan Code to the appropriate KDS
Function.
These features also work in conjunction with the Bump Marked Items
option which is configured in Devices | Order Devices | KDS. If the
Bump Marked Items option is disabled, a KDS user cannot bump a
marked order from the KDS display. The order must be unmarked first
from that particular KDS station before it can be bumped.
Marking an order affects all stations where the order is displayed. The
order displays with a highlighted magenta border. Only the KDS station
user who marked it is required to unmark it. All other stations may bump
the order as usual.
MD0003-065
Revision D
May 2, 2005
Page 367 of 814
Kitchen Display System (KDS)
What’s Enhanced
POS Interface
Support for KDS on WS4
Support for the KDS display application has been enhanced to allow
users to use the MICROS Workstation 4 as a fully functional, graphical
Kitchen Display client. The look-and-feel of the new KDS clients is
consistent with PC-based devices, and has full graphical capability
including icons and speed-of-service mode.
Setup for the KDS on WS4 is similar to the PC-based (Win32) clients,
with the following changes:
WS4 Start Menu Modification
With this release, the Windows start menu on the WS4 has been changed
from
Start | Programs | MICROS Applications | Start POS Operations
to
Start | Programs | MICROS Applications | Start RES.
The change will allow the system to start both POS Operations and KDS
Displays, depending on the configuration in the MDSHosts file.
MD0003-065
Revision D
May 2, 2005
Page 368 of 814
Kitchen Display System (KDS)
What’s Enhanced
Printing
Runner Chit Printing
In previous releases, RES only supported the use of a single runner chit
printer and one backup printer per system kitchen. This was true
regardless of the number of KDS order devices operating in that kitchen.
During busier shifts, service response times could be affected as staff
members waited for their chits to be processed in the common printer
queue.
To remove a potential bottleneck, printer options were expanded to allow
for multiple runner chit printers. Each KDS device can now be linked to a
different printer — or even its own runner chit printer. Backup printers
can also be specified. These options will override the kitchen’s printer
setting, but only for the specified KDS device. If a printer option is not
selected at the order device level, the system will revert to the kitchen’s
default.
Note
To work, a Primary Runner Chit Printer (System | Kitchen |
Options) must be specified.
If the defined kitchen printer is set for 32 columns and the order
device printer is set for 40 columns, then the chit will print in 32
columns but with a 40 column format.
To avoid this problem, make sure the number of columns
specified for the kitchen printer is the same as those set for the
order device printer, or that the same device is selected for both
options.
MD0003-065
Revision D
May 2, 2005
Page 369 of 814
Kitchen Display System (KDS)
What’s Enhanced
The following diagram illustrates the logic used by the system to
determine where a KDS device will send its runner chits once they are
marked as done:
Using Kitchen Themes
The Kitchen Themes feature allows a site to preprogram multiple
configuration scenarios and to store them by user-defined name in the
system database. To change the order direction and output of the entire
restaurant, managers can simply activate a new theme.
The assignment of primary and backup runner chit printers to specific
KDS devices also extends to the kitchen themes feature.
MD0003-065
Revision D
May 2, 2005
Page 370 of 814
Kitchen Display System (KDS)
What’s Enhanced
Enabling
To accommodate multiple runner chit printers, a new Printer Definition
tab was added to the Devices | Order Devices | KDS form in POS
Configurator. This tab contains the following options:
Primary Runner Chit Printer — Allows the user to specify
where the selected KDS device will print its runner chits when an
order is marked done.
Backup Runner Chit Printer — Allows the user to specify
where the selected KDS device will print its runner chits in the
event that its designated primary runner chit printer has failed.
These two options were also added to the Devices | Kitchen Themes |
KDS Options tab. As always, options associated with a particular theme
are only implemented when that kitchen theme is active.
MD0003-065
Revision D
May 2, 2005
Page 371 of 814
Kitchen Display System (KDS)
What’s Revised
What’s Revised
A revision is defined as a correction made to any existing form, feature,
or function currently resident in the KDS software. To qualify as a
revision, the change must satisfy the following criteria:
The basic form, feature, or functionality must be part of the previous
version of the software.
The change must replace the current item or remove it from the
application.
Revisions
Summarized
The table below summarizes the revisions included in this version.
Module
Display
Application
Feature
CR ID
Page
Bump Bar Ignored After Period of
Heavy Use
18380
373
Items Not Consolidating on
Summary Condensed and
Summary Expanded Displays
14624
373
N/A
373
15345
373
N/A
374
Orders Redirected to Another
KDS Device Cannot be Recalled
18064
374
Reloading Database Causes an
"Error receiving data" Message on
KDS DOS Display
N/A
374
18036
374
N/A
375
KDS Display Locks Up on Cancel
After Recall
KDS Posting Fails When Using
Special Characters in Check or
Employee Name
Lockup Occurs After DoubleClicking Table in KDS
MD0003-065
Revision D
May 2, 2005
Page 372 of 814
KDS
Controller
KDS Display Lock Up Due to
Memory Leaks
Reports
Daily KDS Order Aging
Kitchen Display System (KDS)
What’s Revised
Revisions
Detailed
Display Application
Bump Bar Ignored After Period of Heavy Use
CR ID #: 18380
After a period of heavy use, the KDS display application would stop
responding to input from the bump bar device. This problem has been
corrected.
Items Not Consolidating on Summary Condensed and
Summary Expanded Displays
CR ID #: 14624
When using the Summary Condensed or Summary Expanded options
on a KDS display, the system failed to consolidate menu items correctly
in the list view of items. The consolidation behavior varied, depending on
whether the items were rung up individually, in quantities, or using both
methods on the same check. This problem has been corrected.
KDS Display Locks Up On Cancel After Recall
CR ID #: N/A
During KDS operations, the display application would hang when the
user selected Cancel after pressing a function key that required user input
(e.g., Recall, Review, etc.). This problem has been corrected.
KDS Posting Fails When Using Special Characters in Check
or Employee Name
CR ID #: 15345
When ringing up a check that included a special character (e.g.,
apostrophe, European character, back slash, etc.) as part of the check or
employee names, the system would fail to post KDS totals to the
database. This, in turn, resulted in inaccurate or incomplete KDS reports.
This has been corrected.
MD0003-065
Revision D
May 2, 2005
Page 373 of 814
Kitchen Display System (KDS)
What’s Revised
Lockup Occurs After Double-Clicking Table in KDS
CR ID #: N/A
Previously, when attempting to view check detail by double-clicking a
table on the SOS KDS display, the KDS client would intermittently fail.
The problem was caused by an internal conflict in the programming
which has been corrected.
Orders Redirected to Another KDS Device Cannot be
Recalled
CR ID #: 18064
Previously, if a KDS order device was configured to redirect to another
KDS station, than any order sent to that redirect station could be recalled.
This problem has been corrected.
Reloading Database Causes an "Error receiving data"
Message on KDS DOS Display
CR ID #: N/A
Previously, when the user minimized the KDS display screen after
reloading the database, an “Error receiving data” message would be
shown on the DOS screen. The message was part of the system’s internal
dialog and did not affect the results. It was confusing for the user,
however, and has since been removed.
KDS Controller
KDS Display Lock Up Due to Memory Leak
CR ID #: 18036
During operations, the KDS Controller was allocating memory which it
failed to free when it was no longer needed. Memory leaks would occur
when a new order was added, when a suborder status was updated, when
a suborder was added, or when a suborder was done. The summary
dialog could also result in a memory leak. This problem has been
corrected.
MD0003-065
Revision D
May 2, 2005
Page 374 of 814
Kitchen Display System (KDS)
What’s Revised
Reports
The table below describes the KDS report changes in this Service Pack:
Report
Daily KDS
Order Aging
CR ID #: N/A
Area Modified
a
Template
Description
The Daily KDS Order Aging
report (KDS_003.rpt) included
several columns of data whose
titles consisted of numeric
ranges (0-5, 6-10, 11-15, etc.)
without identifying what those
ranges represent. To clarify, the
column header ‘Minutes Until
Done’ has been added to the
report template above these
columns.
Files Changed:
a
KDS_003.rpt
MD0003-065
Revision D
May 2, 2005
Page 375 of 814
Cash Management (CM)
What’s New
Cash Management (CM)
What’s New
There are no new features in this version of the software.
What’s Enhanced
An enhancement is defined as a change made to improve or extend the
functionality of the current application. To qualify as an enhancement,
the change must satisfy the following criteria:
The basic feature or functionality already exists in the previous
release of the software.
The change adds to or extends the current process. This differs from a
revision (i.e., a bug fix) which corrects a problem not caught in the
previous release of the software.
Enhancements
Summarized
The table below summarizes the enhancements included in this version.
Module
User
Interface
MD0003-065
Revision D
May 2, 2005
Page 376 of 814
Feature
Page
Added Adjustment Totals to Till Totals
Form
377
Allow CM Client to Inherit Login ID
378
Filter by Active Employee
380
List Assigned Employees Names on Tills
Form
380
Cash Management (CM)
What’s Enhanced
Enhancements
Detailed
User Interface
Added Adjustment Totals to Till Totals Form
With this release, the Totals tab of the Till count sheet was modified to
include a section for the display of revised totals whenever an adjustment
is made to the till count. These fields include:
Original Counted (Amount) + Adjustment Total = (Revised) Counted
For comparison, the original values (Expected/Counted/Variance) are
shown beneath the adjustment calculations.
In other changes, the Closed By and Counted By name and date fields
were consolidated into two fields at the top of the form.
MD0003-065
Revision D
May 2, 2005
Page 377 of 814
Cash Management (CM)
What’s Enhanced
Allow CM Client to Inherit Login ID
With RES, users can launch the Cash Management Back Office
application from a POS workstation by linking the external program to a
touchscreen key in POS Operations. Typically, this key is configured as a
Procedure on the Manager’s screen.
In the past, when the button was pressed, the system would start the
CMBO.exe and present the user with a security screen to enter his/her
login ID. This was a redundant step, given that the employee is already
logged into POS Operations.
To save time, the setup procedures have been modified to allow POS
Operations to pass the user’s login ID to the CM Back Office program.
This is done by having the external program execute the macro:
$(MICROS_DIR_POS)\bin\cmbo.exe $(LoginID)
when calling the application.
Enabling
Follow these steps to pass the Login ID when Cash Management is
started:
1. From the POS Configurator, select System | External Programs.
2. Add an entry for the CMBO Login.
3. From the User Interface drop-down, select Windows.
4. From the Run Style drop-down, select Normal.
5. In the Command Line field, enter
$(MICROS_DIR_POS)\bin\cmbo.exe $(LoginID)
6. Save the record and close this form.
7. Open the Devices | Touchscreen Designer form.
8. Open the Managers screen.
MD0003-065
Revision D
May 2, 2005
Page 378 of 814
Cash Management (CM)
What’s Enhanced
9. Add a new touchscreen key to the form and set the following
parameters:
Category: External Program
Program: CMBO Login
10. Save the record.
Link
External Program to
Touchscreen Key
MD0003-065
Revision D
May 2, 2005
Page 379 of 814
Cash Management (CM)
What’s Enhanced
Filter by Active Employee
In the past, when assigning an employee to a till or server bank (CM |
Tills/Server Banks | Assign/Unassign Employees), the system would
display a list of all employees with records in the database. This included
employees whose service had been terminated.
With this release, the Unassigned Employees list has been filtered to
include only those employees who are active, but not yet assigned to the
selected till/server bank.
List Assigned Employees Names on Tills Form
The CM user interface was modified to include an Assigned Employees
column on the Tills form. This column provides a list of all employees
who have been assigned to the till during its life cycle (from opening to
deposit). This includes employees who were assigned and then
unassigned, since they share responsibility for any overages/shortages
that may have occurred while handling the till.
The list of names is also included in the Till reports.
MD0003-065
Revision D
May 2, 2005
Page 380 of 814
Cash Management (CM)
What’s Revised
What’s Revised
There are no revision in this version of the software.
MD0003-065
Revision D
May 2, 2005
Page 381 of 814
Guest Services Solution (GSS)
What’s New
Guest Services Solution (GSS)
What’s New
New Features
Summarized
A new feature is defined as one that provides capabilities that were not
available in previous versions of the application.
The table below summarizes the new features included in this version.
Module
GSS
Interface
SIM
MD0003-065
Revision D
May 2, 2005
Page 382 of 814
Feature
Page
Redesigned GSS Back Office
Configuration and Database Structure
383
Support for GSS on WS4 and Hand-Held
Devices
446
CustomerInfo
447
CustomerInfoLine[ ]
448
CustomerSeq[ ]
449
Guest Services Solution (GSS)
What’s New
New Features
Detailed
GSS Interface
Redesigned GSS Back Office Configuration and Database
Structure
With this release, the GSS Back Office application has been significantly
redesigned to more fully integrate it into the RES 3000 system. Among
the changes and improvements included in this release are:
License Manager — Moved licensing for GSS from the GSS Back
Office to the License Manager application.
POS Configurator — Changed the setup requirements for linking to
the GSS database. Added new options for assigning GSS privileges
and configuring headers and trailers for guest checks when GSS is
running. Added a new GSS section of forms for configuring the GSS
Back Office application.
GSS Configurator — Deleted the Guest Loyalty Configurator forms
from the GSS Back Office application.
GSS/SIM Functions — Replaced SIM Inq Events with POS
functions when configuring touchscreen keys.
Accounts Receivable — Changed A/R tender setup. Allow links to
more than one POS tender key.
Gift Card/Certificates — Changed gift card/certificate setup. Allow
links to more than one POS tender key.
Transaction Two-Phase Commit — Redefined the process for
posting GSS tender transactions in two phases — once in the GSS
database when the tender is initiated, and then in the POS when the
transaction is finalized. Created a new report to identify the
unfinalized GSS transactions along with a process for resolving and
removing them from the database.
Delivery Dispatch — Added user permissionss for configuring
delivery zone maps.
MD0003-065
Revision D
May 2, 2005
Page 383 of 814
Guest Services Solution (GSS)
What’s New
Printing Check Info Lines — Changed the way Guest Check and
Delivery Info Lines are configured and printed.
Caller ID — Added support for the Rochelle 2050 Caller ID device.
Autosequences and Reports — Created a new GSS category and
moved all of the GSS reports to it from the Other category.
Report Templates — Modified all of the report templates to support
the database changes (i.e., table names, field names and types, record
ID numbers, etc.).
Database Changes — GSS table and column names as well as field
types were modified to adhere to RES database standards. To reduce
data redundancy, some GSS-specific columns have been moved to
the RES database tables. The changes to the database also required
updates to all stored procedures, triggers, and views that access GSSrelated data.
Support File Changes — Modified the GSS SQL support scripts
(used to clean the data out of GSS tables) to reflect changes to the
database tables. Information on these files, as well as the updated
versions, are available to customer on the MICROS web site under
the GSS Product Support Section.
Additional information regarding the structural and operational changes
for many of these items is described in detail below.
MD0003-065
Revision D
May 2, 2005
Page 384 of 814
Guest Services Solution (GSS)
What’s New
License Manager
Registration for the software license keys associated with the GSS
module have been moved from the Licensing tab in the GSS Configurator
to the License Manager application, where a new Guest Services
Solutions tab has been added. Licensing of the application is done
automatically through the DSM interface.
MD0003-065
Revision D
May 2, 2005
Page 385 of 814
Guest Services Solution (GSS)
What’s New
POS Configurator
Many of the options used by POS Configurator to support GSS have been
replaced by new options on other forms. The following table maps the
setup changes implemented for functions that were previously managed
through the POS Configurator.
Purpose
Link POS to GSS
Back Office
Specify Employee
Privileges
Previous Versions
Current Release
Devices | Interfaces
GSS | Restaurant
• All fields
• GSS Enabled
Employees | Employee Classes |
Privileges | Privilege Options
Employees | Employee Classes |
Privileges | GSS Privileges
• SIM Privilege 1 — Allows employees to:
• Log in to GSS Back Office
• View Customers, Coupons, Gift
Certificates, Export Queries, Bonus
Plans
• Edit Delivery Area Street Mapping
• Update/Add Customers
•
•
•
•
•
•
•
•
• SIM Privilege 2 — Allows employees to:
• Edit POS Screens
Add/Update Customer
Use Screen Designer
Add/Update Plans and Awards
Allow Point Adjustments
Add/Update A/R Info
Allow A/R Transactions
Add/Update Queries
Edit Delivery
• SIM Privilege 3 — Allows employees to:
• Update/Add Coupons, Gift
Certificates, Export Queries, Bonus
Plans
• SIM Privilege 4 — Allows employees to:
• Edit GSS Configuration
• Adjust Customer Bonus Points
• Update/Add Accounts Receivable
Set up Gift Card/
Gift Certificate as
menu item to post
sales at time of
purchase.
MD0003-065
Revision D
May 2, 2005
Page 386 of 814
Sales | Menu Items | Options
• External Type (Gift Activation or Gift
Add Value)
Guest Services Solution (GSS)
What’s New
Purpose
Previous Versions
Sales | Discount/Service | Options
Set up Gift Card/
Certificate to post
as service charge
when redeemed.
Post to Accounts
Receivables
Redeem Gift
Certificate
Configure POS
Touch Keys
Current Release
• External Type (Gift Activation or Gift
Add Value)
Devices | Touchscreen Designer
Sales | Tender/Media | Tender
• Category: SIM/PMS Inquire 23
• External Type (AR Charge)
Devices | Touchscreen Designer
Sales | Tender/Media | Tender
• Category: SIM/PMS Inquire 17
• External Type (Gift Redemption)
Devices | Touchscreen Designer
Devices | Touchscreen Designer
• Category: SIM/PMS Inquire
• Category: GSS Functions*
*See section on GSS/SIM Functions for
more on this topic.
Printing GSS
Headers/Trailers
(Previously selected through GSS
Configurator on the Groups/Misc tab.)
Revenue Center | RVC Print Design | GSS
Printing (Sets options for the revenue
center.)
and
Devices | Order Devices | GSS Printing
(Overrides RVC options at the order device
level.)
• Guest Info Print Format
• Delivery Info Print Format
• Delivery Note Print Format
• Delivery Time Print Format
In addition to these changes, a new GSS section has been added in POS
Configurator. The forms that comprise this section contain most of the
options previously configured through the GSS (Guest Loyalty)
Configurator in the GSS Back Office application.
MD0003-065
Revision D
May 2, 2005
Page 387 of 814
Guest Services Solution (GSS)
What’s New
The following table lists the new options in each of the GSS forms and
maps them to their previous location in the GSS Configurator.
POS
Configurator
Form
GSS | Accounts
Receivable |
General
Option
Charge Description
Previous GSS
Configurator Form
Accounts Receivable
Charge GL Account
Interest Charge Description
Interest GL Account
Invoice Template
Batch Report Template
Months to Keep Invoices
Require CC on file?
GSS | Accounts
Receivable |
Account Terms
Description
Account Terms
Period
Start
Percent
Minimum Amount
GSS | Bonus Plans
Auto Promote Name
Bonus Plan
Threshold
GSS | Card Setup
Location of the Customer Account on the Guest Card
• Track #
• Start Position
• Length
Location of the Number on the Gift Card
• Track #
• Start Position
• Length
Print Gift Certificates on Guest Check Printer
MD0003-065
Revision D
May 2, 2005
Page 388 of 814
Operations
(listed as separate
Bronze, Silver, Gold,
Platinum, Diamond
Upgrade Plans)
General
Guest Services Solution (GSS)
What’s New
POS
Configurator
Form
GSS Delivery
Option
Delivery Time (minutes)
Previous GSS
Configurator Form
Operations
Prompt for Delivery Time
Validate Delivery Streets
Validate Block Numbers
Postal Code Recognition
GSS | GL Account
Use Address Verification in Back Office
N/A
GL Account Number
GL Accounts
GL Account Name
GSS | Groups
Group Name
Groups/Misc.
GSS | Restaurant |
General
Number of Records to Keep:
• Customer Totals
• Customer Details
General
Phone Number Mask
General
Caller ID Server
N/A
Define Customer Field Names
General
Retain Inactive Customers (Days)
N/A
GSS Enabled
N/A
Customer Name in Check ID
N/A
Payable To (For Invoices)
Store Info
GSS | Restaurant |
Guest Check
Information
Lines 1 through 16
Guest Check
Information
GSS | Restaurant |
Delivery Check
Information
Lines 1 through 16
Delivery Check
Information
MD0003-065
Revision D
May 2, 2005
Page 389 of 814
Guest Services Solution (GSS)
What’s New
GSS Configurator
The Guest Loyalty Configurator has been deleted in this release. All of
the administrative functions associated with the application’s
maintenance (i.e., database size, user permissions, check/printer formats,
etc.) have been moved to the POS Configurator. Licensing has been
moved to the License Manager.
GSS/SIM Functions
GSS functions are no longer initiated from POS Operations through the
SIM interface. A new GSS category has been added in POS Configurator
(Devices | Touchscreen Designer) that allows users to replace the SIM
Inq events with a comparable GSS function call when adding a
touchscreen key.
Converting SIM Events
GSS sites upgrading to Service Pack 3 will need to convert existing SIM
Inquire events linked to touchscreen keys and macro definitions. To do
this, a new INQ2GSS.exe program has been provided. When run, the
program will automatically convert existing SIM Inquire events to the
appropriate GSS functions.
The procedure for converting these events is as follows:
1. Delete the pms#.isl (where # = the object number assigned to the
old GSS interface in POS Configurator | Devices | Interfaces)
from the Micros\RES\pos\etc folder.
2. Run the conversion program by opening a DOS window and
typing c:\Micros\.RES\GSS\bin\INQ2GSS.exe # (where # = the
object number assigned to the GSS interface) and then pressing
[Enter].
When the conversion program is executed, the DOS prompt will return
the message “Converting PMS INQ # to GSS Function Key Codes,”
followed by “Execute Success!” when the process is complete.
MD0003-065
Revision D
May 2, 2005
Page 390 of 814
Guest Services Solution (GSS)
What’s New
It should be noted that this update process is only applicable to SIM
Inquire events #1-26. The program will not automatically convert usergenerated SIM Inquire functions (#101-150) linking GSS bonus awards
to POS tenders. These must be manually programmed once the system is
upgraded. Failure to do so, will result in an error message (e.g., Inq Event
Not Found) when the tender key is applied.
Example
To convert a SIM Inq 101 tender, linked to a Cash tender, the user
should:
1. Open POS Configurator and select System | Macros.
2. Create a macro that includes the following steps:
3.
Function GSS = Award Bonus Points
Function GSS = Get Customer Awards
Tender Media = Cash
Go to Devices | Touchscreen Designer.
4. Select the screen with the GSS Cash key, and click on the button.
5. From the Category drop-down list, select Macros.
6. Select the GSS Cash macro, created in the Step 2, from the dropdown list provided.
7. Save and exit.
Note
Steps will change, depending on the key requirements. For
example, in some sites, users may want to post the bonus points
and awards before tendering, allowing the customer to see the
final total before payment. In that case, a macro would be
configured to call the two GSS award functions only. This
would be applied to the check before it was tendered.
MD0003-065
Revision D
May 2, 2005
Page 391 of 814
Guest Services Solution (GSS)
What’s New
List of SIM-to-GSS Functions
The following table maps the old SIM Inquire functions to the new POS
function. A description is provided for each, along with any additions,
deletions, and changes in functionality.
SIM Inq
Number
GSS Function
Description
1
Customer Main Dlg
Look up customer record using the main screen and
assign to active seat.
2
Customer Alt Dlg
Look up customer record using the alternate screen and
assign to active seat.
3
Customer Main Hist Dlg
Look up customer record using the main screen and
assign to active seat. Display order history, if available.
4
Customer Alt Hist Dlg
Look up customer record using the alternate screen and
assign to active seat. Display order history, if available.
5
Customer Card Srch Dlg
Look up customer record from swiping guest card and
assign to active seat.
6
(Legacy Caller ID
Implementation)
NO LONGER SUPPORTED
7
Customer View Dlg
Look up customer record without adding to check.
8
Remove Customer
Remove customer assignment from active seat.
9
View Order History
View customer’s order history. Prompt for customer if
one is not assigned to active seat.
10
Customer Progress
Report
Print customer progress report. Lookup customer
without seat assignment, if customer is not assigned to
active seat.
11
Manager Reprint Award
Reprint customer coupon and gift certificate awards.
Lookup customer without seat assignment, if customer
is not assigned to active seat.
12
Manager Add Award
Add customer coupon award. Lookup customer without
seat assignment, if customer is not assigned to active
seat.
13
Reinitialize
Reinitialize GSS database, including delivery zone
information and Caller ID.
14
Check GC Value
Check Gift Certificate/card value.
15
Caller ID Log On
Log on delivery operator for Caller ID.
MD0003-065
Revision D
May 2, 2005
Page 392 of 814
Guest Services Solution (GSS)
What’s New
SIM Inq
Number
GSS Function
Description
16
Caller ID Log Off
Log off delivery operator for Caller ID.
17
(Formerly: Redeem Gift
Certificate/Card)
NO LONGER SUPPORTED
A tender can now have an External Type of “Gift
Redemption.’
18
Redeem Coupon
Redeem coupon, prompting for coupon ID and
incremeting coupon redeem count.
19
Check Order History
View customer order history. Does not prompt if
customer is not assigned to active seat. Does not
display order history window if no history exists.
20
Customer Force Main
Hist Dlg
Lookup customer using the main screen. Display order
history (if available) and assign to active seat. Performs
a transaction cancel if no customer is selected.
21
Customer Force Alt Hist
Dlg
Lookup customer using the alternate screen. Display
order history (if available) and assign to active seat.
Performs a transaction cancel if no customer is
selected.
22
(Formerly: Reinitialize
Database Post-SAR)
NO LONGER SUPPORTED
Same as Reinitialize GSS Database.
23
(Formerly: Accounts
Receivable Charge)
NO LONGER SUPPORTED
A tender can now have an External Type of “AR
Charge.’
24
Store Guest Credit Card
Store customer credit card information. Lookup
customer without seat assignment, if customer is not
assigned to active seat.
25
Auth Guest Credit Card
Authorize customer credit card information. Lookup
customer without seat assignment, if customer is not
assigned to active seat.
26
Assign Guest Card
Assign a guest card. Lookup customer without seat
assignment, if customer is not assigned to active seat.
NEW
Get Customer Awards
Customer get awards. Does not prompt if customer is
not assigned to the active seat.
NEW
Award Bonus Points
Process bonus points, but only for seats in the current
seat filter.
MD0003-065
Revision D
May 2, 2005
Page 393 of 814
Guest Services Solution (GSS)
What’s New
Accounts Receivable
Accounts Receivable (AR) tenders are now configured entirely within
the POS Configurator. Previously, users would add the tender in POS
Configurator and then link it to the AR Tender field in the GSS Back
Office. Only one AR tender was allowed.
With this release, a new External Type option was added to the Tender
tab (Sales | Tender/Media). Now, after adding the AR tender, the user
defines it as an AR Charge by selecting that entry from the drop-down list
provided.
By including this option in POS Configurator, users can now create more
than one AR tender key. Separate keys could be used, for example, when
posting to Corporate versus personal accounts.
Gift Cards/Certificates
The gift card/certificate (GC) feature was enhanced to support multiple
open or preset amounts for the same GC entry. In previous releases, this
had been a strict one-to-one relationship. That is, a gift card could be
configured either as a fixed amount (e.g., $20) or as an open value, the
amount of which would be entered when purchased.
By expanding the definition, GSS users can now create a generic gift
card type (e.g., Gold Card) and link it to several open/preset amounts
(i.e., $10, 20, or $50). The change gives managers better control over gift
card values while simplifying the programming requirements.
Configuring the Gift Cards/Certificates
To set up a gift card/certificate, users begin by creating a GC record in
POS Configurator. Depending on the site’s accounting practices, gift
cards/certificates may be set up as either menu items or service charges.
The procedures for doing so are unchanged from previous releases —
with one exception.
MD0003-065
Revision D
May 2, 2005
Page 394 of 814
Guest Services Solution (GSS)
What’s New
With this release, a new External Type drop-down field was added to the
Options tab for both menu items and service charges. During setup, this
field is used to determines how the specified item will be handled during
POS operations. The options are:
Gift Activation — Creates a new gift card/certificate and posts
an initial sum to it.
Gift Add Value — Adds an additional amount to an existing gift
card.
Once the menu item/service charge records are created, the entries are
linked to a gift card or certificate as defined in the GSS Back Office
application. To do this:
1. Open the GSS program and select Gift Certificates.
2. Select an existing GSS Certificate from the side panel or click the
icon to add a new one. Complete the fields to define the print and
expiration dates, redemption options, and refund methods. (These
fields are unchanged from the previous release.)
3. Specify the menu items/service charges associated with the current
gift card/certificate. The updated GSS application provides two new
radio boxes for filtering out possible selections.
The Action Type radio box filters out menu items based on the
value set in the External Type described above.
If the Initial Sale button is selected, only Gift Activation
items will be listed.
If the Add Value button is selected, only Gift Add Value items
will be shown.
The Sale Type radio box limits choices to Menu Items and
Service Charges. When a selection is made, the accompanying
drop-down box lists only those GC records that satisfy both
criteria.
MD0003-065
Revision D
May 2, 2005
Page 395 of 814
Guest Services Solution (GSS)
What’s New
4. Once a selection is made from the drop-down list, click the blue plus
icon to add it to the current GC record. The entry will be included in
the table on the right. (Items may be removed from the list by
selecting and pressing the minus icon.)
Once an entry has been included in the table, it is no longer included
in the drop-down list of selections.
5. Repeat Steps 3 and 4 until all of the relevant menu items/service
charges have been added. Save and exit.
Redeeming Gift Cards/Certificates
Gift card/certificate tenders are now programmed entirely within the POS
Configurator. Previously, users would create a tender in POS
Configurator which could then be selected from the Gift Certificate
Tender field in the GSS Back Office. Because of these limitations, only
one GC tender was allowed.
Like AR tenders, GC tender setup involves the new External Type
option added to the Tender tab (Sales | Tender/Media). Once the record is
added, it is configured as a Gift Redemption by selecting that entry from
the drop-down list provided. This procedure allows users to create more
than one GC tender key.
MD0003-065
Revision D
May 2, 2005
Page 396 of 814
Guest Services Solution (GSS)
What’s New
Transaction Two-Phase Commit
To improve resiliancy in the integrated POS system, checks that include
either an accounts receivable (AR) tender or a gift card/certificate (GC)
transaction are now posted to GSS in two phases.
The first phase occurs when the GSS transaction key is pressed in the
current round of an open check. The system prompts for an ID number
and the server responds by swiping the gift card or keying in the gift
certificate number. Once the customer/account is identified, the entry is
added as an unfinalized transaction and the account balance or gift card/
certificate value is duly updated in the GSS database. It will remain in
this state until the service round is complete.
The second phase occurs when the check is service totaled or closed. At
that point, transaction items from the round are posted in the POS
database. The state of the GSS entry is changed to finalized.
Advantage
There are advantages to posting GSS transactions in two steps. In the
case of AR tenders, the unfinalized transaction acts as a temporary hold
on the customer’s account until the service round is complete. This
prevents a post to the account that exceeding its credit limit.
The process also provides a backup record in the event of an unexpected
loss of power. Should this occur in the middle of a GSS transaction (i.e.,
after the transaction is posted, but before the service round is committed),
the transaction can be revoked based on information contained in the
unfinalized entry. This is particularly useful if the customer has already
left and the gift card or certificate number is not readily available.
Revoking Unfinalized Transactions
Unfinalized transactions remain in the system until they are actively
removed by the manager. To manage this process, a new report and a
stored procedure have been included in this release.
MD0003-065
Revision D
May 2, 2005
Page 397 of 814
Guest Services Solution (GSS)
What’s New
The GSS Unfinalized Transactions report is used to identify the
incomplete GSS entries. The report is available through the
Autosequences and Reports module, or may be added to an end-of-night
autosequence. If included in the end-of-night process, the report will not
actually print unless unfinalized transactions are found.
Note
MICROS recommends running the report prior to resolving
unfinalized transactions. However, it is not required.
To clear the incomplete transactions, users must run the new stored
procedure, spggs_revoke_unfinalized_check_transactions, either
manually or as part of an autosequence. When run, the procedure will
only remove unfinalized GSS transactions on checks that were closed or
purged from the system.
Delivery Dispatch
With this release, a new Edit Delivery option was added in POS
Configurator (Employees | Employee Classes | Privileges | GSS
Privileges). When checked, the option allows member of the selected
employee class to edit delivery area information through the Delivery
Area Editor (GSS Back Office | Edit | Delivery Area Street Mapping).
Printing Check Info Lines
GSS allows the user to add guest and delivery information to various
areas of a guest check or order chit. For dine-in customers, this
information may include the customer’s name, ID number, and any guest
loyalty information that may be relevant. For delivery customers, the user
would also add an address, phone numbers, and directions for delivery.
This section describes the steps used to set up guest and delivery checks
in the reconfigured GSS application.
MD0003-065
Revision D
May 2, 2005
Page 398 of 814
Guest Services Solution (GSS)
What’s New
Configuring the Check Info Lines
As part of the integration, check info lines have been moved from the
GSS configuration utility to POS Configurator (GSS | Restaurant). As
before, separate forms allow the user to create different Guest Check and
Delivery Check formats. The system determines which format to use
based on the current check’s order type. Checks that are configured with
the Delivery Type option enabled (System | Order Types), will use the
Delivery Check Information. All other checks will use the Guest Check
Information.
GSS allows the user to configure up to 16 lines of custom information for
inclusion on a guest or delivery check. The lines may be comprised of
hard-coded text and one or more tokens (or variables). The tokens are
linked to columns of information in the customer’s record in the GSS
database. Up to 43 pieces of information are currently available:
{Active}
{AddressLineOne
{AddressLineTwo}
{Birthday}
{CardNumber}
{City}
{Complaints}
{ContactFirstname}
{ContactLastName}
{ContactTitle}
{Country}
{CourtesyTitle}
{CreationDate}
{CustomerSeq}
{DeliveryNotes}
{EmailAddress}
{Extension}
{FaxNumber}
{GroupName}
{Hoax}
{Honor}
{LastOrder}
{Notes}
{OrderCount}
{OrderTotal}
{PhoneNumber}
{PhoneNumber2}
{PhoneNumber3}
{PhoneNumber4}
{PostalCode}
{StateOrProvince}
{StoreName}
{User-defined_1 through
User-defined_10}
{Zone}
When configuring the check info lines, tokens must include the curly
brackets in order for the application to recognize them as a database
fields. If the curly brackets are omitted, the entry will be displayed as
literal text.
MD0003-065
Revision D
May 2, 2005
Page 399 of 814
Guest Services Solution (GSS)
What’s New
In addition, the following setup issues should be noted:
MD0003-065
Revision D
May 2, 2005
Page 400 of 814
In previous releases, SIM scripts were used to handle the printing
of GSS check info lines. However, since SIM scripts could be
used for other purposes, it was possible for check info lines to be
overwritten by other SIM functions. Now that customer
information is defined through the POS Configurator, this will no
longer occur. The system will now print all of the dedicated GSS
check info lines as well as any information that may be added as
part of a SIM script.
The first line in the Guest Check Information and Delivery Check
Information form may be edited by the user. In previous releases,
this was hard-coded to print the customer’s ID.
Journal information always prints before the header.
The {CustomerSeq} token was added in this release. It is used to
print out the customer’s sequence number, ID.
The {User-defined} tokens refer to the 10 custom data-entry
fields that can be added to the GSS database through POS
Configurator (GSS Restaurant | General). When the record is
saved, the field name is added to the Other Info drop-down list
on the Customers form in the GSS application, and the field name
Guest Services Solution (GSS)
What’s New
is applied to one of ten extra form objects available on custom
Screen Designs.
Custom fields
created in POS
and implemented in GSS
When using the 3700 Driver Delivery feature, the {Zone} field
must be placed on a line by itself. A sample set of Delivery check
info lines is shown below.
MD0003-065
Revision D
May 2, 2005
Page 401 of 814
Guest Services Solution (GSS)
What’s New
Placing the Check Info Lines
Once the check info lines are configured, the next step is to determine
where they will be printed on their respective guest or delivery checks.
With delivery checks, users can also add the delivery time and any
delivery notes relevant to the order.
Placement of the check info lines can be configured for the revenue
center (Revenue Center | RVC Print Design | GSS Printing) or for a
particular order device printer (Devices | Order Devices | GSS Printing).
Users specify where the guest/delivery information will print by selecting
one of the following option from each of the drop-down lists:
Do Not Print
Before Header
After Header
After Trailer
Before Header & After Header
Before Header & After Trailer
After Header & After Trailer
Before Header & After Header & After Trailer
Multiple Customers on a Check
Among the print changes for GSS is the ability to print information for
multiple customers on the same guest check or receipt. To do this, seat
handling must be enabled (Revenue Center | RVC Seats).
MD0003-065
Revision D
May 2, 2005
Page 402 of 814
Guest Services Solution (GSS)
What’s New
When the order is printed, the system will add the following:
Non-Delivery Checks
1 Customer — All of the check info lines are printed.
2 or More Customers — The first two lines from the Guest
Check Information form are printed for each customer.
Delivery Customers
1 Customer — All of the check info lines are printed.
2 or More Customers — All of the Delivery Check Information
lines are printed for the first customer. The first two lines are
printed for each of the remaining customers.
It should be noted that customer information will only be printed for a
customer if there is check detail associated with the seat.
Also, when using seat handling with GSS, be sure to enable the option
Use seat numbers with add check. Otherwise, when two checks are
added, the system will automatically post all of the added check’s detail
to Seat 0 of the destination check. Any GSS customers on the original
check will be lost in the transfer.
Caller ID
GSS has added support for the Rochelle 2050 Caller ID Computer
Adapter. This device can handle up to four phone lines, can be connected
by a Serial or USB connection, and is compatible with a number of
additional phone systems, includes those used in the UK, Europe, and the
Middle East.
With this change, GSS can now support the connection of multiple
devices to the Caller ID service. Registry settings will need to be
modified to enable the additional devices. For programming information,
refer to the Restaurant Enterprise Series 3.2 – Service Pack 3 Setup
Instructions, MD0003-058, Revision B, available with the upgrade
software.
MD0003-065
Revision D
May 2, 2005
Page 403 of 814
Guest Services Solution (GSS)
What’s New
Autosequences and Reports
The Reports tab in the Autosequences and Reports module has been
modified to include a separate category for GSS reports. Previously, GSS
reports were listed in the Other category. The list of GSS reports is
shown below. Items in bold represent new reports added for this release:
Report Name
MD0003-065
Revision D
May 2, 2005
Page 404 of 814
Template Name
GSS AR Account Balance
AR_account_balance.rpt
GSS AR Aging Report
AR_agingreport.rpt
GSS AR Audit Report
AR_audit.rpt
GSS AR Credit Limit Report
AR_credit_limit.rpt
GSS AR Customer Transaction History
AR_cust_trans_hist.rpt
GSS Batch Detail Report
AR_batch_detail.rpt
GSS CP Coupon Potential
CP_potential.rpt
GSS Credit Hold Report
CreditHold.rpt
GSS Customer B-day All
GSS_bday_all.rpt
GSS Customer B-day Specific Month
GSS _bday.rpt
GSS Customer List
Customer_001.rpt
GSS Customer List (w/Phone)
Customer_002.rpt
GSS Customer List (by Group)
Customer_003.rpt
GSS Customer List (Detailed)
Customer_004.rpt
GSS Customer List (w/E-mail)
Customer_005.rpt
GSS Customer Listing
GSS_customer_001.rpt
GSS Customer Listing by Group
GSS_customer_002.rpt
GSS Daily GC Report
DailyGCReport.rpt
GSS Enroll Form
Enroll.rpt
GSS GC Liability
GC_liability.rpt
GSS Unfinalized Transactions
GSSUnfinalizedTransactions.rpt
Enroll.rpt (40-column)
40 Column\Enroll.rpt
Guest Services Solution (GSS)
What’s New
Report Templates
Standard GSS report templates have been updated to support the changes
made to the RES and GSS databases. The updated reports will not require
any adjustments from a GSS user after installing the service pack.
However, users who have created custom reports will have to manually
adjust their templates (or rewrite them entirely) to accommodate the new
and/or revised database, column, and field names.
Database Changes
As part of the integration process, GSS table and column names and field
types were modified to adhere to RES database standards. To reduce data
redundancy, some GSS-specific columns have been moved to the RES
database tables. The changes to the database also required updates to all
stored procedures, triggers, and views that access GSS-related data.
This section documents the changes through the following tables:
Table 1 — Revised GSS Database Tables
Table 2 — Deleted GSS Database Tables
Table 3 — RES POS Database Additions for GSS
Table 4 — Stored Procedures, Triggers, and Views Modified for GSS
Table 5 — GSS Domain Values
Table 6 — GSS RES Table and Domain Value Views
MD0003-065
Revision D
May 2, 2005
Page 405 of 814
Guest Services Solution (GSS)
What’s New
Table 1 — Revised GSS Database Tables
Additions and/or revisions are typed in blue. An asterisk (*) preceding an
entry denotes a primary key.
Table 1 — Revised GSS Database Tables
Previous Versions
Current Release
gss_abbreviations_dtl
*pk_id
fk_fullwords
name
gss_abbreviation_dtl
4
4
40
integer
integer
varchar
*abbreviation_dtl_seq
full_word_seq
name
4
4
40
SEQ_NUM
SEQ_NUM
varchar
gss_actionable_ar_transaction_dtl
TABLE DOES NOT EXIST .....
Added for Tw-Phase Commit
*ar_transaction_seq
check_num
chk_open_tm
4
4
8
SEQ_NUM
integer
datetime
4
4
8
SEQ_NUM
integer
datetime
gss_actionable_gift_certificate_dtl
TABLE DOES NOT EXIST .....
Added for Tw-Phase Commit
*gift_certificate_dtl_seq
check_num
chk_open_tm
gss_actionable_gift_redemption_dtl
TABLE DOES NOT EXIST .....
Added for Tw-Phase Commit
*gift_redemption_dtl_seq
check_num
chk_open_tm
4
4
8
SEQ_NUM
integer
datetime
4
4
8
SEQ_NUM
integer
datetime
gss_actionable_gift_value_add_dtl
TABLE DOES NOT EXIST .....
Added for Tw-Phase Commit
MD0003-065
Revision D
May 2, 2005
Page 406 of 814
*gift_value_add_dtl_seq
check_num
chk_open_tm
Guest Services Solution (GSS)
What’s New
Table 1 — Revised GSS Database Tables
Previous Versions
Current Release
gss_ar_accounts_dtl
seq_num
*pk_id
fk_store_id
fk_group_id
fk_arterm_id
CreationDate
ContactFirstName
ContactLastName
AddressLineOne
AddressLineTwo
City
StateOrProvince
PostalCode
Country
ContactTitle
PhoneNumber
Extension
Faxnumber
EmailAddress
CurrentTotal
LastCharge
LastInvoice
LastPayment
Notes
CreditLimit
CreditHold
PrePaid
CardNumber
ExpireDate
Description
TaxID
gss_ar_account_def
4
4
4
4
4
8
30
50
50
50
50
20
20
50
50
30
30
30
50
19
8
8
8
255
19
1
1
30
8
255
20
integer
integer
integer
integer
integer
smalldatetime
varchar
varchar
varchar
varchar
varchar
varchar
varchar
varchar
varchar
varchar
varchar
varchar
varchar
money
smalldatetime
smalldatetime
smalldatetime
varchar
money
bit
bit
varchar
smalldatetime
varchar
varchar
*ar_account_seq
group_seq
ar_terms_seq
creation_date
contact_first_name
contact_last_name
address_line_1
address_line_2
city
state_or_province
postal_code
country
contact_title
phone_number
extension
fax_number
email_address
–>gss_ar_account_status
–>gss_ar_account_status
–>gss_ar_account_status
–>gss_ar_account_status
notes
credit_limit
credit_hold
pre_paid
card_number
expire_date
description
tax_id
4
SEQ_NUM
4
4
8
30
50
50
50
50
20
20
50
50
30
30
30
50
SEQ_NUM
SEQ_NUM
datetime
varchar
varchar
varchar
varchar
varchar
varchar
varchar
varchar
varchar
varchar
varchar
varchar
varchar
254
18
varchar
MONEY18
LOGICAL
LOGICAL
varchar
datetime
varchar
varchar
30
8
254
20
MD0003-065
Revision D
May 2, 2005
Page 407 of 814
Guest Services Solution (GSS)
What’s New
Table 1 — Revised GSS Database Tables
Previous Versions
Current Release
gss_ar_account_status
TABLE DOES NOT EXIST .....
Moved fields from gss_ar_accounts_dtl
gss_ar_batches_dtl
seq_num
*pk_id
CreationDate
Posted
PostedDate
Name
4
4
8
1
8
100
integer
integer
smalldatetime
bit
smalldatetime
varchar
MD0003-065
Revision D
May 2, 2005
Page 408 of 814
SEQ_NUM
MONEY18
datetime
datetime
datetime
*ar_batch_dtl_seq
creation_date
posted
posted_date
name
4
8
8
100
SEQ_NUM
datetime
LOGICAL
datetime
varchar
4
8
4
18
18
8
SEQ_NUM
datetime
SEQ_NUM
MONEY18
MONEY18
datetime
4
SEQ_NUM
8
4
30
8
4
4
4
18
4
4
datetime
SEQ_NUM
varchar
datetime
SEQ_NUM
integer
integer
MONEY18
SEQ_NUM
SEQ_NUM
gss_ar_invoice_dtl
4
4
40
integer
integer
varchar
gss_ar_recurring_charges_dtl
seq_num
*pk_id
fk_store_id
creation_date
operator_id
description
transaction_start
fk_glaccount_id
term_period
term_period_type
Amount
fk_araccount_id
fk_group_id
4
18
8
8
8
gss_ar_batch_dtl
gss_ar_invoices_dtl
*pk_id
fk_fullwords
name
*ar_account_seq
current_total
last_charge
last_payment
last_invoice
*ar_invoice_dtl_seq
creation_date
ar_account_seq
prev_amt
invoice_amt
last_printed
gss_ar_recurring_charge_dtl
4
4
4
8
4
30
8
4
4
4
19
4
4
integer
integer
integer
smalldatetime
integer
varchar
smalldatetime
integer
integer
integer
money
integer
integer
*ar_recurring_charge_dtl_
seq
creation_date
emp_seq
description
transaction_start
gl_account_seq
term_period
term_period_type
amount
ar_account_seq
group_seq
Guest Services Solution (GSS)
What’s New
Table 1 — Revised GSS Database Tables
Previous Versions
Current Release
gss_ar_terms_def
seq_num
*pk_id
fk_store_id
creation_date
operator_id
description
term_period
term_period_type
term_period_start
term_percent
min_amt
gss_ar_terms_def
4
4
4
8
4
255
4
4
4
4
19
integer
integer
integer
smalldatetime
integer
varchar
integer
integer
integer
integer
money
gss_ar_rtransactions_dtl
seq_num
*pk_id
fk_araccount_id
fk_glaccount_id
fk_customer_id
fk_store_id
fk_batch_id
fk_invoice_id
fk_glperiod_id
posted
transaction_type
transaction_date
operator_id
treference
transaction_amt
recurring
check_num
chk_open_tm
4
SEQ_NUM
8
4
254
4
4
4
4
18
datetime
SEQ_NUM
varchar
integer
integer
integer
integer
MONEY18
*ar_transaction_dtl_seq
ar_account_seq
gl_account_seq
customer_seq
4
4
4
4
SEQ_NUM
SEQ_NUM
SEQ_NUM
SEQ_NUM
ar_batch_dtl_seq
ar_invoice_dtl_seq
gl_period_seq
posted
transaction_type
transaction_date
emp_seq
treference
transaction_amt
ar_recurring_charge_dtl_
seq
check_num
chk_open
finalized
void
payment_check
4
4
4
SEQ_NUM
SEQ_NUM
SEQ_NUM
LOGICAL
char
datetime
SEQ_NUM
varchar
MONEY18
SEQ_NUM
*ar_terms_seq
creation_date
emp_seq
description
term_period
term_period_type
term_period_start
term_percent
min_amt
gss_ar_transaction_dtl
4
4
4
4
4
4
4
4
4
1
1
8
4
30
19
4
integer
integer
integer
integer
integer
integer
integer
integer
integer
bit
char
smalldatetime
integer
varchar
money
integer
4
8
integer
smalldatetime
1
8
4
30
18
4
4
8
integer
datetime
LOGICAL
LOGICAL
NAME16
MD0003-065
Revision D
May 2, 2005
Page 409 of 814
Guest Services Solution (GSS)
What’s New
Table 1 — Revised GSS Database Tables
Previous Versions
Current Release
gss_ar_trx_ref_dtl
seq_num
*pk_id
fk_charge_id
fk_payment_id
payment_amt
gss_ar_trx_ref_dtl
4
4
4
4
19
integer
integer
integer
integer
money
gss_ar_x_ref_dtl
seq_num
*pk_id
fk_araccount_id
fk_customer_id
SEQ_NUM
SEQ_NUM
SEQ_NUM
MONEY18
4
4
4
SEQ_NUM
SEQ_NUM
SEQ_NUM
*audit_trail_dtl_seq
ar_account_seq
gl_account_seq
customer_seq
4
4
4
4
SEQ_NUM
SEQ_NUM
SEQ_NUM
SEQ_NUM
ar_batch_dtl_seq
ar_invoice_dtl_seq
transaction_type
transaction_date
emp_seq
transaction_amt
4
4
1
8
4
18
SEQ_NUM
SEQ_NUM
char
datetime
SEQ_NUM
MONEY18
4
40
4
18
SEQ_NUM
varchar
SEQ_NUM
MONEY18
gss_ar_x_ref_dtl
4
4
4
4
integer
integer
integer
integer
gss_audit_trail_dtl
seq_num
*pk_id
fk_araccount_id
fk_glaccount_id
fk_customer_id
fk_store_id
fk_batch_id
fk_invoice_id
transaction_type
transaction_date
operator_id
transaction_amt
4
4
4
18
*ar_trx_ref_dtl_seq
charge_seq
payment_seq
payment_amt
*ar_x_ref_dtl_seq
ar_account_seq
customer_seq
gss_audit_trail_dtl
4
4
4
4
4
4
4
4
1
8
4
19
integer
integer
integer
integer
integer
integer
integer
integer
char
smalldatetime
integer
money
gss_auto_bonus_level_def
TABLE DOES NOT EXIST .....
Moved fields from gss_diner_cfg
MD0003-065
Revision D
May 2, 2005
Page 410 of 814
*auto_bonus_level_seq
name
bonus_plan_seq
threshold
Guest Services Solution (GSS)
What’s New
Table 1 — Revised GSS Database Tables
Previous Versions
Current Release
gss_award_coupon_dtl
TABLE DOES NOT EXIST .....
Moved fields from gss_customer_awards_dtl
*award_coupon_dtl_seq
bonus_seq
customer_seq
coupon_seq
uws_seq
emp_seq
award_date
coupon_amount
last_print_date
print_count
4
4
4
4
4
4
8
18
8
4
SEQ_NUM
SEQ_NUM
SEQ_NUM
SEQ_NUM
SEQ_NUM
SEQ_NUM
datetime
MONEY18
datetime
integer
4
4
4
4
4
4
8
18
4
SEQ_NUM
SEQ_NUM
SEQ_NUM
SEQ_NUM
SEQ_NUM
SEQ_NUM
datetime
MONEY18
integer
4
SEQ_NUM
4
4
4
4
4
4
8
18
8
4
SEQ_NUM
SEQ_NUM
SEQ_NUM
SEQ_NUM
SEQ_NUM
SEQ_NUM
datetime
MONEY18
datetime
integer
gss_award_discount_dtl
TABLE DOES NOT EXIST .....
Moved fields from gss_customer_awards_dtl
*award_discount_dtl_seq
bonus_seq
customer_seq
dsvc_seq
uws_seq
emp_seq
award_date
discount_amount
Issue_count
gss_award_gift_certificate_dtl
TABLE DOES NOT EXIST .....
Moved fields from gss_customer_awards_dtl
*award_gift_certificate_dtl
_seq
bonus_seq
customer_seq
gift_certificate_seq
gift_certificate_dtl_seq
uws_seq
emp_seq
award_date
gift_certificate_amount
last_issue_date
Issue_count
MD0003-065
Revision D
May 2, 2005
Page 411 of 814
Guest Services Solution (GSS)
What’s New
Table 1 — Revised GSS Database Tables
Previous Versions
Current Release
gss_bonus_coupon_dtl
TABLE DOES NOT EXIST .....
Moved fields from gss_bonus_def
*bonus_seq
coupon_seq
gss_bonus_def
4
4
SEQ_NUM
SEQ_NUM
4
40
4
4
4
SEQ_NUM
varchar
integer
integer
integer
gss_bonus_def
seq_num
*pk_id
fk_bonus_method
fk_reset_type
fk_period_type
fk_bonus_action
4
4
40
4
4
4
integer
integer
varchar
integer
integer
integer
fk_bonus_action
4
integer
integer
money
smalldatetime
smalldatetime
fk_bonus_plan
bonus_amount
effective_date
expire_date
4
19
8
8
action_item_id
4
integer
repeat_type
min_chk_value
bonus_threshold
1
4
4
bit
integer
integer
*bonus_seq
name
bonus_method
reset_type
period_type
–>gss_bonus_(coupon/discount/gift_certificate)_dlt
bonus_plan_seq
bonus_amount
effective_date
expire_date
4
18
8
8
SEQ_NUM
MONEY18
datetime
datetime
–>gss_bonus_(coupon/discount/gift_certificate)_dtl
repeat_type
min_chk_value
bonus_threshold
4
4
LOGICAL
integer
integer
4
4
SEQ_NUM
SEQ_NUM
4
SEQ_NUM
4
4
SEQ_NUM
SEQ_NUM
4
4
SEQ_NUM
SEQ_NUM
gss_bonus_discount_dtl
TABLE DOES NOT EXIST .....
Moved fields from gss_bonus_def
*bonus_seq
dsvc_seq
gss_bonus_family_group_dtl
TABLE DOES NOT EXIST .....
Moved fields from gss_bonus_items_dtl
*bonus_family_group_dtl_
seq
bonus_seq
fam_grp_seq
gss_bonus_gift_certificate_dtl
TABLE DOES NOT EXIST .....
Moved fields from gss_bonus_def
MD0003-065
Revision D
May 2, 2005
Page 412 of 814
*bonus_seq
gift_certificate_seq
Guest Services Solution (GSS)
What’s New
Table 1 — Revised GSS Database Tables
Previous Versions
Current Release
gss_bonus_major_group_dtl
TABLE DOES NOT EXIST .....
Moved fields from gss_bonus_items_dtl
*bonus_major_group_dtl_
seq
bonus_seq
maj_grp_seq
4
SEQ_NUM
4
4
SEQ_NUM
SEQ_NUM
4
SEQ_NUM
4
4
SEQ_NUM
SEQ_NUM
4
40
SEQ_NUM
varchar
gss_bonus_menu_item_dtl
TABLE DOES NOT EXIST .....
Moved fields from gss_bonus_items_dtl
gss_bonus_plans_def
seq_num
*pk_id
name
local
IsDefault
gss_bonus_plan_def
4
4
40
1
1
integer
integer
varchar
bit
bit
gss_bonus_point_multipliers_def
seq_num
*pk_id
fk_bonus_def
dow
start_hour
end_hour
multiplier
*bonus_menu_item_dtl_s
eq
bonus_seq
mi_seq
*bonus_plan_seq
name
is_default
LOGICAL
gss_bonus_point_multiplier_def
4
4
integer
integer
4
2
2
2
2
integer
smallint
smallint
smallint
smallint
*bonus_point_multiplier_s
eq
bonus_seq
dow
start_hour
end_hour
multiplier
4
SEQ_NUM
4
2
2
2
2
SEQ_NUM
smallint
smallint
smallint
smallint
MD0003-065
Revision D
May 2, 2005
Page 413 of 814
Guest Services Solution (GSS)
What’s New
Table 1 — Revised GSS Database Tables
Previous Versions
Current Release
gss_coupon_def
seq_num
*pk_id
fk_store_id
name
fk_expire_type
expire_number
expire_date
text1
text2
text3
text4
text5
text6
text1_attr
text2_attr
text3_attr
text4_attr
text5_attr
text6_attr
issue_from
issue_to
issued_cnt
redeemed_cnt
gss_coupon_def
4
4
4
40
4
4
8
40
40
40
40
40
40
4
4
4
4
4
4
8
8
4
4
integer
integer
integer
varchar
integer
integer
smalldatetime
varchar
varchar
varchar
varchar
varchar
varchar
integer
integer
integer
integer
integer
integer
smalldatetime
smalldatetime
integer
integer
*coupon_seq
name
expire_type
expire_number
expire_date
text1
text2
text3
text4
text5
text6
text1_attr
text2_attr
text3_attr
text4_attr
text5_attr
text6_attr
issue_from
issue_to
–>gss_coupon_status
–>gss_coupon_status
4
40
4
4
8
40
40
40
40
40
40
4
4
4
4
4
4
8
8
SEQ_NUM
varchar
integer
integer
datetime
varchar
varchar
varchar
varchar
varchar
varchar
integer
integer
integer
integer
integer
integer
datetime
datetime
gss_coupon_status
TABLE DOES NOT EXIST .....
Moved fields from gss_coupon_def
MD0003-065
Revision D
May 2, 2005
Page 414 of 814
*coupon_seq
issued_cnt
redeemed_cnt
4
4
4
SEQ_NUM
integer
integer
Guest Services Solution (GSS)
What’s New
Table 1 — Revised GSS Database Tables
Previous Versions
Current Release
gss_customer_bonus_dtl
seq_num
*pk_id
fk_customer_plans
fk_bonus_def
last_reset_date
curr_points
curr_points_adj
hist_points
hist_points_adj
award_count
gss_customer_bonus_dtl
4
4
4
4
8
4
4
4
4
4
integer
integer
integer
integer
smalldatetime
integer
integer
integer
integer
integer
gss_customer_dtl
seq_num
*pk_id
fk_store_id
fk_group_id
CreationDate
ContactFirstName
ContactLastName
AddressLineOne
AddressLineTwo
City
StateOrProvince
PostalCode
Country
ContactTitle
PhoneNumber
PhoneNumber2
PhoneNumber3
PhoneNumber4
Extension
FaxNumber
EmailAddress
Birthday
*customer_bonus_dtl_seq
customer_plan_dtl_seq
bonus_seq
last_reset_date
curr_points
curr_points_adj
hist_points
hist_points_adj
award_count
4
4
4
8
4
4
4
4
4
SEQ_NUM
SEQ_NUM
SEQ_NUM
datetime
integer
integer
integer
integer
integer
4
SEQ_NUM
4
8
30
50
50
50
50
20
20
50
50
30
30
30
30
30
30
50
8
SEQ_NUM
datetime
varchar
varchar
varchar
varchar
varchar
varchar
varchar
varchar
varchar
varchar
varchar
varchar
varchar
varchar
varchar
varchar
datetime
gss_customer_def
4
4
4
4
8
30
50
50
50
50
20
20
50
50
30
30
30
30
30
30
50
8
integer
integer
integer
integer
smalldatetime
varchar
varchar
varchar
varchar
varchar
varchar
varchar
varchar
varchar
varchar
varchar
varchar
varchar
varchar
varchar
varchar
smalldatetime
*customer_seq
group_seq
creation_date
contact_first_name
contact_last_name
address_line_1
address_line_2
city
state_or_province
postal_code
country
contact_title
phone_number_1
phone_number_2
phone_number_3
phone_number_4
extension
fax_number
email_address
birthday
MD0003-065
Revision D
May 2, 2005
Page 415 of 814
Guest Services Solution (GSS)
What’s New
Table 1 — Revised GSS Database Tables
Previous Versions
Current Release
gss_customers_dtl (con’t.)
OrderCount
OrderTotal
LastOrder
Notes
Active
Zone
Hoax
CardNumber
Complaints
DeliveryNotes
CourtesyTitle
Honor
UserDefined_1
UserDefined_2
UserDefined_3
UserDefined_4
UserDefined_5
UserDefined_6
UserDefined_7
UserDefined_8
UserDefined_9
UserDefined_10
CCCardNumber
CCExpireDate
gss_customer_def (con’t.)
4
19
8
255
1
10
1
30
255
255
20
30
255
255
255
255
255
50
50
50
50
50
30
10
integer
money
smalldatetime
varchar
bit
varchar
bit
varchar
varchar
varchar
varchar
varchar
varchar
varchar
varchar
varchar
varchar
varchar
varchar
varchar
varchar
varchar
varchar
varchar
gss_customer_plans_dtl
seq_num
*pk_id
fk_cust_id
fk_bonus_plan_id
MD0003-065
Revision D
May 2, 2005
Page 416 of 814
–>gss_customer_status
–>gss_customer_status
–>gss_customer_status
notes
active
zone
hoax
card_number
complaints
delivery_notes
courtesy_title
honor
user_defined_1
user_defined_2
user_defined_3
user_defined_4
user_defined_5
user_defined_6
user_defined_7
user_defined_8
user_defined_9
user_defined_10
cc_card_number
cc_expire_date
phone_data_1
phone_data_2
phone_data_3
phone_data_4
254
10
30
254
254
20
30
254
254
254
254
254
50
50
50
50
50
30
10
30
30
30
30
varchar
LOGICAL
varchar
LOGICAL
varchar
varchar
varchar
varchar
varchar
varchar
varchar
varchar
varchar
varchar
varchar
varchar
varchar
varchar
varchar
varchar
varchar
varchar
varchar
varchar
varchar
gss_customer_plan_dtl
4
4
4
4
integer
integer
integer
integer
*customer_plan_dtl_seq
customer_seq
bonus_seq
4
4
4
SEQ_NUM
SEQ_NUM
SEQ_NUM
Guest Services Solution (GSS)
What’s New
Table 1 — Revised GSS Database Tables
Previous Versions
Current Release
gss_customer_status
TABLE DOES NOT EXIST .....
Moved fields from gss_customers_dtl
gss_delivery_zones_def
*pk_id
Zone
PostalCode
ExpectedDeliveryMinutes
StreetName
City
StateOrProvince
StartNumber
EndNumber
4
10
20
4
integer
varchar
varchar
integer
100
50
20
4
4
varchar
varchar
varchar
integer
integer
SEQ_NUM
integer
MONEY18
datetime
*delivery_zone_seq
zone
postal_code
expected_delivery_minut
es
street_name
city
state_or_province
start_number
end_number
street_filter_type
4
10
20
4
SEQ_NUM
varchar
varchar
integer
100
50
20
4
4
4
varchar
varchar
varchar
integer
integer
integer
gss_export_query_def
4
40
1024
integer
varchar
varchar
gss_full_words_dtl
*pk_id
name
4
4
18
8
gss_delivery_zone_def
gss_export_queries_def
*pk_id
name
sql_statement
*customer_seq
order_count
order_total
last_order
*export_query_seq
name
sql_statement
4
40
1024
SEQ_NUM
varchar
varchar
4
40
SEQ_NUM
varchar
gss_full_word_def
4
40
integer
varchar
*full_word_seq
name
MD0003-065
Revision D
May 2, 2005
Page 417 of 814
Guest Services Solution (GSS)
What’s New
Table 1 — Revised GSS Database Tables
Previous Versions
Current Release
gss_gift_certificate_def
gss_gift_certificate_def
integer
integer
integer
varchar
smalldatetime
smalldatetime
integer
seq_num
*pk_id
fk_store_id
name
sell_from
sell_to
fk_expire_type
4
4
4
50
8
8
4
gift_item_num
4
integer
expire_type_number
expire_date
redeem_after_expired
allow_partial_redeem
allow_refund
fk_refund_method
UseGiftCards
PromptForNames
4
8
1
1
1
4
1
1
integer
smalldatetime
bit
bit
bit
integer
bit
bit
IsServiceCharge
gift_item_num2
isservicecharge2
1
4
1
bit
integer
bit
MD0003-065
Revision D
May 2, 2005
Page 418 of 814
4
*gift_certificate_seq
name
sell_from
sell_to
expire_type
50
8
8
4
SEQ_NUM
varchar
datetime
datetime
integer
–>gss_gift_certificate_(mi/svc)_dtl
expire_type_number
expire_date
redeem_after_expired
allow_partial_redeem
4
8
inteter
datetime
LOGICAL
LOGICAL
refund_method
use_gift_cards
prompt_for_names
4
integer
LOGICAL
LOGICAL
–>gss_gift_certificate_(mi/svc)_dtl
–>gss_gift_certificate_(mi/svc)_dtl
–>gss_gift_certificate_(mi/svc)_dtl
Guest Services Solution (GSS)
What’s New
Table 1 — Revised GSS Database Tables
Previous Versions
Current Release
gss_gift_certificates_dtl
seq_num
*pk_id
fk_cert_type_id
sold_date
expire_date
sold_value
current_value
date_redeemed
redeem_count
gss_gift_certificate_dtl
4
4
4
8
8
19
19
8
4
integer
integer
integer
smalldatetime
smalldatetime
money
money
smalldatetime
integer
transfer_to
4
integer
Purchaser
Recipient
card_data
emp_obj
40
40
40
4
varchar
varchar
varchar
integer
*gift_certificate_dtl_seq
gift_certificate_seq
sold_date
expire_date
sold_value
current_value
date_redeemed
redeem_count
4
4
8
8
18
18
8
4
SEQ_NUM
SEQ_NUM
datetime
datetime
MONEY18
MONEY18
datetime
integer
–>gss_gift_certificate_tramsfer_dtl
purchaser
recipient
card_data
emp_seq
check_num
chk_open_tm
finalized
void
40
40
40
4
4
8
varchr
varchar
varchar
SEQ_NUM
integer
datetime
LOGICAL
LOGICAL
4
SEQ_NUM
4
4
SEQ_NUM
SEQ_NUM
LOGICAL
4
SEQ_NUM
4
4
SEQ_NUM
SEQ_NUM
LOGICAL
gss_gift_certificate_mi_dtl
TABLE DOES NOT EXIST .....
Moved fields from gss_gift_certificate_def
*gift_certificate_mi_dtl_se
q
gift_certificate_seq
mi_seq
is_value_add
gss_gift_certificate_svc_dtl
TABLE DOES NOT EXIST .....
Moved fields from gss_gift_certificate_def
*gift_certificate_svc_dtl_s
eq
gift_certificate_seq
dsvc_seq
is_value_add
MD0003-065
Revision D
May 2, 2005
Page 419 of 814
Guest Services Solution (GSS)
What’s New
Table 1 — Revised GSS Database Tables
Previous Versions
Current Release
gss_gift_certificate_transfer_dtl
TABLE DOES NOT EXIST .....
Moved fields from gss_gift_certificate_dtl
gss_gift_redemptions_dtl
seq_num
*pk_id
fk_gift_certificate_id
tran_date
amount
emp_obj
4
4
4
8
19
4
integer
integer
integer
smalldatetime
money
integer
MD0003-065
Revision D
May 2, 2005
Page 420 of 814
SEQ_NUM
SEQ_NUM
*gift_redemption_dtl_seq
gift_certificate_dtl_seq
tran_date
amount
emp_seq
check_num
chk_open_tm
finalized
void
4
4
8
18
4
4
8
SEQ_NUM
SEQ_NUM
datetime
MONEY18
SEQ_NUM
integer
datetime
LOGICAL
LOGICAL
4
4
8
18
4
4
8
SEQ_NUM
SEQ_NUM
datetime
MONEY18
SEQ_NUM
integer
datetime
LOGICAL
LOGICAL
4
20
40
SEQ_NUM
varchar
varchar
gss_gift_value_add_dtl
4
4
4
8
19
4
integer
integer
integer
smalldatetime
money
integer
gss_gl_accounts_def
seq_num
*pk_id
number
name
4
4
gss_gift_redemption_dtl
gss_gift_value_adds_dtl
seq_num
*pk_id
fk_gift_certificate_id
tran_date
amount
emp_obj
*transfer_from_seq
transfer_to_seq
*gift_value_add_dtl_seq
gift_certificate_dtl_seq
tran_date
amount
emp_seq
check_num
chk_open_tm
finalized
void
gss_gl_account_def
4
4
20
40
integer
integer
varchar
varchar
*gl_account_seq
number
name
Guest Services Solution (GSS)
What’s New
Table 1 — Revised GSS Database Tables
Previous Versions
Current Release
gss_gl_periods_def
seq_num
*pk_id
name
start_date
end_date
closed
gss_gl_period_def
4
4
40
8
8
1
integer
integer
varchar
smalldatetime
smalldatetime
bit
gss_groups_def
*pk_id
fk_store_id
GroupName
CreationDate
ContactFirstName
ContactLastName
AddressLineOne
AddressLineTwo
City
StateOrProvince
PostalCode
Country
ContactTitle
PhoneNumber
Extension
FaxNumber
EmailAddress
OrderCount
OrderTotal
LastOrder
Notes
Active
*gl_period_seq
name
start_date
end_date
closed
4
40
8
8
SEQ_NUM
varchar
datetime
datetime
LOGICAL
4
30
8
30
50
50
50
50
20
20
50
50
30
30
30
50
SEQ_NUM
varchar
datetime
varchar
varchar
varchar
varchar
varchar
varchar
varchar
varchar
varchar
varchar
varchar
varchar
varchar
gss_group_def
4
4
30
8
30
50
50
50
50
20
20
50
50
30
30
30
50
4
19
8
255
1
integer
integer
varchar
smalldatetime
varchar
varchar
varchar
varchar
varchar
varchar
varchar
varchar
varchar
varchar
varchar
varchar
varchar
integer
money
smalldatetime
varchar
bit
*group_seq
group_name
creation_date
contact_first_name
contact_last_name
address_line_1
address_line_2
city
state_or_province
postal_code
country
contact_title
phone_number
extension
fax_number
email_address
–>gss_group_status
–>gss_group_status
–>gss_group_status
notes
archives
254
varchar
LOGICAL
MD0003-065
Revision D
May 2, 2005
Page 421 of 814
Guest Services Solution (GSS)
What’s New
Table 1 — Revised GSS Database Tables
Previous Versions
Current Release
gss_group_status
TABLE DOES NOT EXIST .....
Moved fields from gss_group_def
*group_seq
orderr_count
order_total
last_order
4
4
18
8
SEQ_NUM
integer
MONEY18
datetime
4
4
4
4
18
4
4
4
4
4
SEQ_NUM
SEQ_NUM
SEQ_NUM
integer
MONEY18
integer
integer
integer
LOGICAL
integer
SEQ_NUM
4
4
20
SEQ_NUM
SEQ_NUM
varchar
gss_order_mi_dtl
TABLE DOES NOT EXIST .....
Moved fields from gss_order_dtl
*order_mi_dtl_seq
order_ttl_seq
mi_seq
item_count
item_total
price_level
price_level_orig
cndmnt_grp
allow_reorder
combo_num
combo_seq
gss_order_ref_dtl
TABLE DOES NOT EXIST .....
Moved fields from gss_order_dtl
MD0003-065
Revision D
May 2, 2005
Page 422 of 814
*order_ref_dtl_seq
order_mi_dtl_seq
ref
Guest Services Solution (GSS)
What’s New
Table 1 — Revised GSS Database Tables
Previous Versions
Current Release
gss_order_ttl
seq_num
*pk_id
fk_customer_id
fk_store_id
favorite
check_num
chk_clsd_tm
chk_open_tm
chk_delivery_tm
chk_ttl
chk_tax
itemizer_1
.
.
.
itemizer_16
gss_order_ttl
4
4
4
4
4
4
8
8
8
19
19
19
integer
integer
integer
integer
integer
integer
smalldatetime
smalldatetime
smalldatetime
money
money
money
19
money
gss_diner_cfg
*pk_id
fk_store_id
ContactFirstName
ContactLastName
AddressLineOne
AddressLineTwo
City
StateOrProvince
PostalCode
Country
PhoneNumber
PhoneMask
FaxNumber
Moved field from gss_rest_def
*order_ttl_seq
customer_seq
favorite
check_num
chk_clsd_tm
chk_open_tm
chk_delivery_tm
chk_ttl
chk_tax
> REMOVED
.
.
.
> REMOVED
4
4
SEQ_NUM
SEQ_NUM
4
8
8
8
18
18
LOGICAL
integer
datetime
datetime
datetime
MONEY18
MONEY18
4
30
50
SEQ_NUM
varchar
varchar
30
30
varchar
varchar
120
varchar
gss_restaurant_def
4
4
30
50
50
50
50
20
20
50
30
30
30
integer
integer
varchar
varchar
varchar
varchar
varchar
varchar
varchar
varchar
varchar
varchar
varchar
*restaurant_seq
contact_first_name
contact_last_name
–>v_gss_rest_def
–>v_gss_rest_def
–>v_gss_rest_def
–>v_gss_rest_def
–>v_gss_rest_def
–>v_gss_rest_def
–>v_gss_rest_def
phone_mask
fax_number
payable_to
MD0003-065
Revision D
May 2, 2005
Page 423 of 814
Guest Services Solution (GSS)
What’s New
Table 1 — Revised GSS Database Tables
Previous Versions
Current Release
gss_diner_cfg (cont.)
MICROSSystemVer
OrderTotalsToKeep
OrderDetailsToKeep
GiftCertificateTmed
DollarDiscountNumber
PercentDiscountNumber
PrintGiftCertOnRoll
ServerHostName
CardNumberTrack
CardNumberStart
CardNumberLen
GiftCardNumberTrack
GiftCardNumberStart
GiftCardNumberLen
PromptDeliveryTime
InterfaceSeq
InqToTender1
.
.
.
InqToTender50
CheckInfoLine_1
.
.
.
CheckInfoLine16
DelCheckInfoLine1.
.
.
.
DelCheckInfoLine16
DeliveryCheckZones
DeliveryCheckBlocks
CustomerNameInChkID
gss_restaurant_def (cont.)
30
4
4
varchar
integer
integer
4
4
4
integer
integer
integer
1
80
4
4
4
4
4
4
1
bit
varchar
integer
integer
integer
integer
integer
integer
bit
4
4
integer
integer
\
4
integer
/
80
varchar
80
80
varchar
varchar
80
1
1
1
varchar
bit
bit
bit
order_totals_to_keep
order_details_to_keep
May 2, 2005
Page 424 of 814
integer
integer
> REMOVED: Set in MICROS.tmed_def
> REMOVED: Set in gss_bonus_discount_def
> REMOVED: Set in gss_bonus_discount_def
print_gift_cert_on_roll
caller_id_server
card_number_track
card_number_start
card_number_len
gift_card_number_track
gift_card_number_start
gift_card_number_len
prompt_delivery_time
80
4
4
4
4
4
4
LOGICAL
varchar
integer
integer
integer
integer
integer
integer
LOGICAL
|
| REMOVED:
|
Replaced with New OPS Functionality
|
check_info_line_1
.
.
.
check_info_line_16
del_chek_info_line_1
.
.
.
del_check_info_line_16
delivery_check_zones
delivery_check_blocks
customer_name_in_chk_
id
MD0003-065
Revision D
4
4
80
varchar
80
80
varchar
varchar
80
varchar
LOGICAL
LOGICAL
LOGICAL
Guest Services Solution (GSS)
What’s New
Table 1 — Revised GSS Database Tables
Previous Versions
Current Release
gss_diner_cfg (cont.)
AutoBonusLevel_1
AutoBonusLevel_1_Amo
unt
.
.
.
AutoBonusLevel_5
AutoBonusLevel_5_Amo
unt
gss_restaurant_def (cont.)
4
4
integer
integer
4
4
integer
integer
DeliveryTime
4
integer
OrderTypeIsDel_1
.
.
.
OrderTypeIsDel_8
TimeInHeader
InfoInHeader
TimeInTrailer
InfoInTrailer
DBVersion
ARTender
1
bit
–>gss_auto_bonus_level_def
–>gss_auto_bonus_level_def
.
.
.
–>gss_auto_bonus_level_def
–>gss_auto_bonus_level_def
–>gss_auto_bonus_level_def
delivery_time
4
integer
\
| REMOVED:
|
Set in order_type_def
1
1
1
1
1
4
4
bit
bit
bit
bit
bit
integer
integer
/
> REMOVED: See MICROS.rvc_add_def
>
and MICROS.order_device_def
>
>
> REMOVED: Set in MICROS.tmed_def
MD0003-065
Revision D
May 2, 2005
Page 425 of 814
Guest Services Solution (GSS)
What’s New
Table 1 — Revised GSS Database Tables
Previous Versions
Current Release
gss_diner_cfg (cont.)
RequireCCOnFile
ChargeDescription
ChargeGLAccount
InterestDescription
InterestGLAccount
BatchTemplate
InvoiceTemplate
InvoicesToKeep
UserDefinedText01
.
.
.
UserDefinedText10
MD0003-065
Revision D
May 2, 2005
Page 426 of 814
gss_restaurant_def (cont.)
1
30
4
30
4
256
256
4
20
bit
varchar
integer
varchar
integer
varchar
varchar
integer
varchar
20
varchar
require_cc_on_file
charge_description
charge_gl_account_seq
interest_description
interest_gl_account_seq
batch_template
invoice_template
invoices_to_keep
user_defined_text_1
user_defined_text_2
user_defined_text_3
user_defined_text_4
user_defined_text_5
user_defined_text_6
user_defined_text_7
user_defined_text_8
user_defined_text_9
user_defined_text_10
postal_code_recognition
retain_inactive_customer
_days
back_office_use_delivery
name
enabled
30
4
30
4
254
254
4
20
20
20
20
20
20
20
20
20
20
16
LOGICAL
varchar
SEQ_NUM
varchar
SEQ_NUM
varchar
varchar
integer
varchar
varchar
varchar
varchar
varchar
varchar
varchar
varchar
varchar
varchar
LOGICAL
LOGICAL
LOGICAL
NAME16
LOGICAL
Guest Services Solution (GSS)
What’s New
Table 1 — Revised GSS Database Tables
Previous Versions
Current Release
gss_screen_design_dtl
*pk_id
DialogID
ResourceID
x
y
w
h
flag
font
taborder
gss_screen_design_def
4
128
4
4
4
4
4
4
4
4
integer
varchar
integer
integer
integer
integer
integer
integer
integer
integer
*screen_design_seq
dialog_id
resource_id
x
y
w
h
flag
font
tab_order
4
128
4
4
4
4
4
4
4
4
SEQ_NUM
varchar
integer
integer
integer
integer
integer
integer
integer
integer
MD0003-065
Revision D
May 2, 2005
Page 427 of 814
Guest Services Solution (GSS)
What’s New
Table 2 — Deleted GSS Database Tables
Additions and/or revisions are typed in blue. An asterisk (*) preceding an
entry denotes a primary key.
Table 2 — Deleted GSS Database Tables
Table Name
Reason
gss_activation_codes_dtl
*pk_id
PartNumber
ActivationCode
4
80
80
integer
varchar
varchar
License Manager Updates
4
4
40
integer
integer
varchar
See Table 5 — GSS Domain Values
4
4
40
integer
integer
varchar
See Table 5 — GSS Domain Values
4
4
4
4
4
integer
integer
integer
integer
integer
Replaced by:
gss_bonus_menu_item_dtl
gss_bonus_family_group_dtl
gss_bonus_major_group_dtl
4
4
40
integer
integer
varchar
See Table 5 — GSS Domain Values
4
4
40
integer
integer
varchar
See Table 5 — GSS Domain Values
gss_bonus_actions_cfg
*pk_id
type
name
gss_bonus_item_types_cfg
*pk_id
type
name
gss_bonus_items_dtl
seq_num
*pk_id
fk_bonus_def
fk_bonus_item_type
number
gss_bonus_method_types_cfg
*pk_id
type
name
gss_bonus_period_types_cfg
*pk_id
type
name
MD0003-065
Revision D
May 2, 2005
Page 428 of 814
Guest Services Solution (GSS)
What’s New
Table 2 — Deleted GSS Database Tables
Table Name
Reason
gss_bonus_reset_types_cfg
*pk_id
type
name
4
4
40
integer
integer
varchar
See Table 5 — GSS Domain Values
gss_cfg_update_dtl
*pk_id
update_tm
status
4
8
4
integer
smalldatetime
integer
4
4
4
4
4
4
19
4
4
8
8
4
1
integer
integer
integer
integer
integer
integer
money
integer
integer
smalldatetime
smalldatetime
integer
bit
4
4
4
40
integer
integer
integer
varchar
New Update Mechanism
gss_customer_awards_dtl
seq_num
*pk_id
fk_cust_id
fk_bonus_action
fk_bonus_def
action_item
bonus_amount
ws_id
server_id
award_date
last_print_date
print_count
cert_created
Replaced by:
gss_award_coupon_dtl
gss_award_discount_dtl
gss_award_gift_certificates_dtl
gss_dsvc_def
*pk_id
obj_num
seq_num
name
Using MICROS.dsvc_def
MD0003-065
Revision D
May 2, 2005
Page 429 of 814
Guest Services Solution (GSS)
What’s New
Table 2 — Deleted GSS Database Tables
Table Name
Reason
gss_emp_def
*pk_id
emp_seq
emp_obj
emp_id
emp_class
last_name
first_name
sim_priv_1
sim_priv_2
sim_priv_3
sim_priv_4
Using MICROS.emp_def
4
4
4
10
4
40
40
1
1
1
1
integer
integer
integer
varchar
integer
varchar
varchar
char
char
char
char
4
4
40
integer
integer
varchar
See Table 5 — GSS Domain Values
4
4
4
40
integer
integer
integer
varchar
Using fam_grp_def
4
4
4
40
integer
integer
integer
varchar
New OPS functionality
4
4
4
40
integer
integer
integer
varchar
Using maj_grp_def
gss_expiration_types_cfg
*pk_id
type
name
gss_fam_grp_def
*pk_id
obj_num
seq_num
name
gss_interface_def
*pk_id
obj_num
seq_num
name
gss_maj_grp_def
*pk_id
obj_num
seq_num
name
MD0003-065
Revision D
May 2, 2005
Page 430 of 814
Guest Services Solution (GSS)
What’s New
Table 2 — Deleted GSS Database Tables
Table Name
Reason
gss_mi_def
*pk_id
obj_num
seq_num
name
Using mi_def
4
4
4
40
integer
integer
integer
varchar
4
4
4
4
4
19
4
50
4
4
4
4
4
4
1
integer
integer
integer
integer
integer
money
integer
varchar
integer
integer
integer
integer
integer
integer
char
Replaced by:
gss_order_mi_dtl
gss_order_ref_dtl
4
4
40
1
integer
integer
varchar
bit
Using order_type_def
4
4
40
integer
integer
varchar
See Table 5 — GSS Domain Values
gss_order_dtl
seq_num
*pk_id
fk_order_totals_id
dtl_type
item_count
item_total
item_num
item_desc
item_fam_grp
item_maj_grp
fk_artransaction_id
item_combo
item_mlvl
item_slvl
item_type
gss_order_type_def
*pk_id
seq_num
name
is_delivery
> Added as new def bit in
order_type_def
gss_refund_methods_cfg
*pk_id
type
name
MD0003-065
Revision D
May 2, 2005
Page 431 of 814
Guest Services Solution (GSS)
What’s New
Table 2 — Deleted GSS Database Tables
Table Name
Reason
gss_rest_def
*pk_id
store_id
name
addr_line_1
addr_line_2
addr_city
addr_state
addr_postal_code
payable_to
4
4
40
80
80
40
40
20
120
integer
integer
varchar
varchar
varchar
varchar
varchar
varchar
varchar
4
4
50
50
integer
integer
varchar
varchar
4
4
4
40
integer
integer
integer
varchar
4
4
20
1
1
1
1
integer
integer
varchar
bit
bit
bit
bit
Using rest_def
> Moved to gss_restaurant_def
gss_text_attributes_cfg
*pk_id
type
name
cmd_str
See Table 5 — GSS Domain Values
gss_tmed_def
*pk_id
obj_num
seq_num
name
> Added as new def bit in tmed_def
gss_uws_def
*pk_id
obj_num
name
AutoKeyboard
CallerID
IsDelivery
AutoHideCallerID
MD0003-065
Revision D
May 2, 2005
Page 432 of 814
Using uws_def
\
| Added as new def bits in uws_def
|
/
Guest Services Solution (GSS)
What’s New
Table 3 — RES Database Additions for GSS
Table 3 — RES Database Additions
New Fields in Existing Tables
MICROS.emp_class_def
ob_gss_back_office
ob_gss_screen_design
ob_gss_bns_crtfct_cpn_cfg
ob_gss_bonus_points_adjust
ob_gss_ar_configuration
ob_gss_ar_posting
ob_gss_export_import
ob_gss_configuration
ob_gss_delivery_edit
1
1
1
1
1
1
1
1
1
LOGICAL
LOGICAL
LOGICAL
LOGICAL
LOGICAL
LOGICAL
LOGICAL
LOGICAL
LOGICAL
1
LOGICAL
4
integer
1
1
1
1
LOGICAL
LOGICAL
LOGICAL
LOGICAL
MICROS.order_type_def
ob_gss_delivery
MICROS.tmed_def
external_type
MICROS.uws_def
ob_gss_auto_kybd
ob_gss_delivery
ob_gss_caller_id
ob_gss_auto_hide_caller_id
New RES POS Database Table
MICROS.gst_info_dtl
*chk_seq
*seat
customer_seq
num_guest_lines
line_01
.
.
.
line_16
delivery_format
4
2
4
2
24
SEQ_NUM
smallint
SEQ_NUM
smallint
varchar
24
varchar
LOGICAL
MD0003-065
Revision D
May 2, 2005
Page 433 of 814
Guest Services Solution (GSS)
What’s New
Table 4 — Stored Procedures, Triggers, and Views Modified for GSS
Table 4 — Stored Procedures, Triggers, and Views
Modified for GSS
GSS Stored Procedures
spgss_add_ar_account
spgss_add_ar_batch
spgss_add_ar_transaction
spgss_add_ar_transactionNR
spgss_add_audit_row
spgss_add_bonus_def
spgss_add_bonus_plan
spgss_add_bonus_plan_multiplier
spgss_add_coupon
spgss_add_customer
spgss_add_customer_to_bonus_plan
spgss_add_customerAward
spgss_add_gc_redemption
spgss_add_gc_value_add
spgss_add_gift_certificate
spgss_add_gift_certificateDef
spgss_add_gl_period
spgss_add_order_ttl
spgss_add_query
spgss_add_recurring_charge
spgss_apply_batch
spgss_auto_apply_payment
spgss_award_customer_coupon
spgss_award_customer_discount
spgss_award_customer_gift_certificate
spgss_calc_account_interest
spgss_cancel_actionable_check_transaction
MD0003-065
Revision D
May 2, 2005
Page 434 of 814
Guest Services Solution (GSS)
What’s New
Table 4 — Stored Procedures, Triggers, and Views
Modified for GSS
GSS Stored Procedures (cont.)
spgss_clear_actionable_check_transaction
spgss_clear_ar_history
spgss_clear_payments
spgss_count_unfinalized_check_transactions
spgss_create_account_invoice
spgss_create_account_invoiceNR
spgss_create_interest
spgss_create_invoices
spgss_create_tr_x_ref
spgss_finalize_transaction
spgss_freq_diner_nightly
spgss_get_gl_balances
spgss_get_unpaid_charges
spgss_get_unpaid_transactions
spgss_insert_actionable_check_ar_transaction
spgss_insert_actionable_check_gift_certificate
spgss_insert_actionable_check_gift_redemption
spgss_insert_actionable_check_gift_value_add
spgss_on_insert_bonus_def
spgss_post_recurring_charges
spgss_purge_customer_orders
spgss_purge_orders
spgss_redeem_gift_certificate
spgss_purge_customer_orders
spgss_purge_orders
spgss_redeem_gift_certificate
spgss_refresh_diner_data_3700
spgss_remove_ar_account
spgss_remove_customer
spgss_remove_customerNC
spgss_remove_gift_certificate
spgss_remove_gift_certificateHistory
spgss_remove_gift_certificateNC
spgss_remove_inactive_customers
spgss_remove_inactive_customers_when_expired
MD0003-065
Revision D
May 2, 2005
Page 435 of 814
Guest Services Solution (GSS)
What’s New
Table 4 — Stored Procedures, Triggers, and Views
Modified for GSS
GSS Stored Procedures (cont.)
spgss_reset_all_bonus_plan_definitions
spgss_reset_bonuses
spgss_retro_link_bonus_plans
spgss_revoke_actionable_check_transactions
spgss_revoke_actionable_check_transactionsNR
spgss_revoke_unfinalized_check_transactions
spgss_transfer_actionable_check_transactions
spgss_update_auto_bonus_levels
spgss_update_bonus_def
spgss_update_cust_bonus
spgss_update_invoice_print_time
spgss_void_actionable_check_transactions
spgss_void_ar_transaction
spgss_void_gift_certificate
spgss_void_gift_redemption
spgss_void_gift_value_add
GSS Triggers on Tables
gss_customer_plan_dtl
gss_gift_redemptin_dtl
gss_gift_value_add_dtl
gss_restaurant_def
GSS Views
v_dsvc_def
v_emp_class_def
v_gss_bonus_action_cfg
v_gss_bonus_item_type_cfg
v_gss_bonus_method_type_cfg
v_gss_bonus_period_type_cfg
v_gss_bonus_reset_type_cfg
v_gss_cfg
v_gss_dsvc_def
v_gss_emp_def
v_gss_expiration_type_cfg
MD0003-065
Revision D
May 2, 2005
Page 436 of 814
Guest Services Solution (GSS)
What’s New
Table 4 — Stored Procedures, Triggers, and Views
Modified for GSS
GSS Views (cont.)
v_gss_customer_export_columns
v_gss_customer_export_data
v_gss_fam_grp_def
v_gss_maj_grp_def
v_gss_mi_def
v_gss_order_type_def
v_gss_refund_method_cfg
v_gss_rest_def
v_gss_text_attribute_cfg
v_gss_tmed_def
v_gss_uws_def
v_R_aging_report
v_R_gc_date_view
v_R_gc_date_view_redeem
v_R_gc_date_view_value_add
v_R_gc_date_view_value_new
v_tmed_def
vsc_order_type_def
MD0003-065
Revision D
May 2, 2005
Page 437 of 814
Guest Services Solution (GSS)
What’s New
Table 5 — GSS Domain Values
Table 5 — GSS Domain Values
GSS_BONUS_ACTIONS
‘Dollar Amount Discount’
‘Percentage Discount’
‘Award Coupon’
‘Award Gift Certificate’
GSS_BONUS_ACTIONS
‘Menu Item’
‘Family Group’
‘Major Group’
GSS_METHOD_TYPES
‘By Order Count (Check Count)’
‘By Order Value (Check Value)’
‘By Menu Item Count’
‘By Menu Item Value’
‘By Family Group Count’
‘By Family Group Value’
‘By Major Group Count’
‘By Major Group Value’
GSS_BONUS_PERIOD_TYPES
‘Never Reset’
‘Daily’
‘Weekly’
‘Monthly’
‘Yearly’
GSS_BONUS_RESET_TYPES
‘Reset this definition only’
‘Reset all definitions in this plan’
MD0003-065
Revision D
May 2, 2005
Page 438 of 814
Guest Services Solution (GSS)
What’s New
Table 5 — GSS Domain Values
GSS_EXPIRATION_TYPES
‘No Expiration’
‘# of Days’
‘# of Weeks’
‘# of Months’
‘# of Years’
‘Fixed Expiration Date’
GSS_FUNCTION
‘Customer Main Dlg’
‘Customer Alt Dlg’
‘Customer Main Hist Dlg’
‘Customer Alt Hist Dlg’
‘Customer Card Srch Dlg’
‘Get Customer Awards’
‘Customer View Dlg’
‘Remove Customer’
‘View Order History’
‘Customer Progress Report’
‘Manager Reprint Award’
‘Manager Add Award’
‘Reinitialize’
‘Check GC Value’
‘Caller ID Log On’
‘Caller ID Log Off’
‘Award Bonus Points’
‘Redeem Coupon’
‘Check Order History’
‘Customer Force Main Hist Dlg’
‘Customer Force Alt Hist Dlg’
‘Store Guest Credit Card’
‘Auth Guest Credit Card’
‘Assign Guest Card’
MD0003-065
Revision D
May 2, 2005
Page 439 of 814
Guest Services Solution (GSS)
What’s New
Table 5 — GSS Domain Values
GSS_INFO_PRINT_FMT
‘Do Not Print’
‘Before Header’
‘After Header’
‘After Trailer’
‘Before Header & After Header’
‘Before Header & After Trailer’
‘After Header & After Trailer’
‘Before Header, After Header, & After Trailer’
GSS_REFUND_METHODS
‘No Refund’
‘Cash Back’
‘Retain Partial Value’
‘Issue New Certificate’
GSS_TEXT_ATRIBUTES
‘Normal’
‘Dbl High’
‘Red’
GSS_EXT_CMD_STRINGS
‘’
‘\x11’
‘\x13’
GSS_TERM_PERIOD_START
‘Charge Date’
‘Invoice Date’
GSS_TERM_PERIOD_TYPE
‘Day’
‘Month’
‘Year’
MD0003-065
Revision D
May 2, 2005
Page 440 of 814
Guest Services Solution (GSS)
What’s New
Table 6 — GSS RES Table and Domain Value Views
Table 6 — GSS RES Table and Domain Value Views
GSS RES Table Views
MICROS.v_gss_customer_export_columns
column_id
column_name
MICROS.v_gss_customer_export_data
customer_seq
group_seq
creation_date
contact_first_name
contact_last_name
address_line_1
address_line_2
city
state_or_province
postal_code
country
contact_title
phone_number_1
phone_number_2
phone_number_3
phone_number_4
extension
fax_number
email_address
active
notes
birthday
hoax
zone
card_number
complaints
MD0003-065
Revision D
May 2, 2005
Page 441 of 814
Guest Services Solution (GSS)
What’s New
Table 6 — GSS RES Table and Domain Value Views
MICROS.v_gss_customer_export_data (cont’d.)
delivery_notes
courtesy_title
honor
user_defined_1
user_defined_2
user_defined_3
user_defined_4
user_defined_5
user_defined_6
user_defined_7
user_defined_8
user_defined_9
user_defined_10
cc_card_number
cc_expire_date
order_count
order_total
last_order
MICROS.v_gss_dsvc_def
dsvc_seq
obj_num
name
type
preset
is_amt
amt
external_type
MD0003-065
Revision D
May 2, 2005
Page 442 of 814
Guest Services Solution (GSS)
What’s New
Table 6 — GSS RES Table and Domain Value Views
MICROS.v_gss_emp_def
emp_seq
Id
obj_num
pc_appl_Id
last_name
first_name
ob_gss_back_office
ob_gss_screen_design
ob_gss_bns_crtfct_cpn_cfg
ob_gss_bonus_points_adjust
ob_gss_delivery_edit
ob_gss_override_cc_masking
ob_gss_ar_configuration
ob_gss_ar_posting
ob_gss_export_import
ob_gss_configuration
lang_seq
MICROS.v_gss_fam_grp_def
fam_grp_seq
obj_num
name
MICROS.v_gss_maj_grp_def
maj_grp_seq
obj_num
name
MICROS.v_gss_order_type_def
order_type_seq
name
ob_gss_delivery
MD0003-065
Revision D
May 2, 2005
Page 443 of 814
Guest Services Solution (GSS)
What’s New
Table 6 — GSS RES Table and Domain Value Views
MICROS.v_gss_mi_def
mi_seq
obj_num
name
fam_grp_seq
maj_grp_seq
external_type
MICROS.v_gss_rest_def
store_id
rest_name
addr_line_1
addr_line_2
addr_city
addr_state
addr_postal_code
addr_cntry
phone_1
phone_2
lang_seq
MICROS.v_gss_tmed_def
tmed_seq
obj_num
name
external_seq
MICROS.v_gss_uws_def
uws_seq
obj_num
name
ob_gss_auto_kybd
ob_gss_delivery
ob_gss_caller_id
ob_gss_auto_hide_caller_id
MD0003-065
Revision D
May 2, 2005
Page 444 of 814
Guest Services Solution (GSS)
What’s New
Table 6 — GSS RES Table and Domain Value Views
GSS Domain Value Views
MICROS.v_gss_bonus_actions_cfg
type
name
lang_seq
MICROS.v_gss_bonus_item_type_cfg
type
name
lang_seq
MICROS.v_gss_bonus_method_type_cfg
type
name
lang_seq
MICROS.v_gss_bonus_period_type_cfg
type
name
lang_seq
MICROS.v_gss_expiration_type_cfg
type
name
lang_seq
MICROS.v_gss_refund_method_cfg
type
name
lang_seq
MICROS.v_gss_text_attribute_cfg
type
name
lang_seq
MD0003-065
Revision D
May 2, 2005
Page 445 of 814
Guest Services Solution (GSS)
What’s New
Support for GSS on WS4 and Hand-Held Devices
With this release, GSS can now be run on Workstation 4 (WS4) and
hand-held terminal (HHT) devices. These devices use the Win CE
operating system. Previously, GSS could only be run on a Win 32
platform.
Note
Because of memory constraints, GSS cannot be run on a 2800
device (which also uses a Win CE operating system).
The WS4 and hand-held units can support nearly all of the GSS
functionality, with the following requirements and limitations:
WS4
Requires 64 MB or larger compact flash.
Requires 128 MB of RAM. This is the minimum amount
necessary to function properly. Less than that will result in
‘memory low’ warnings.
Hand-Held Devices
Uses a different Customer Dialog screen. This screen contains
only the customer’s name and phone number fields along with the
button required to Accept, Add, Cancel, Find, Update, or
Navigate through the customer records.
As a result of this implementation, the Screen Designer has no
control over the placement of the hand-held Customer Dialog
fields or buttons.
MD0003-065
Revision D
May 2, 2005
Page 446 of 814
Caller ID is not supported.
Guest Services Solution (GSS)
What’s New
SIM
The following GSS-related SIM variables were added in this release.
CustomerInfo
Function
This system variable is used to retrieve the specified customer
information.
Type/Size
N2
Syntax
@CustomerInfo
Example
Event Inq: 1 // Display Customer Info
var i : N2
InfoMessage “CustomerSeq”, @CustomerSeq[@Seat]
@CustomerInfo = @Seat
For i = 1 to 16 step 1
If @CustomerInfoLine[i] <> ““
InfoMessage “Customer Info”, @CustomerInfoLine[i]
EndIf
EndFor
EndEvent
Usage
The array limits for the expression are 0 to 32.
This system variable can be used for both read and write functions.
MD0003-065
Revision D
May 2, 2005
Page 447 of 814
Guest Services Solution (GSS)
What’s New
CustomerInfoLine[]
Function
This system variable is used to retrieve the information from the
specified GSS Guest Check/Delivery Info line number.
Type/Size
String, 80
Syntax
@CustomerInfoLine[expression]
Example
Event Inq: 1 // Display Customer Info
var i : N2
InfoMessage “CustomerSeq”, @CustomerSeq[@Seat]
@CustomerInfo = @Seat
For i = 1 to 16 step 1
If @CustomerInfoLine[i] <> ““
InfoMessage “Customer Info”, @CustomerInfoLine[i]
EndIf
EndFor
EndEvent
Usage
The array limits for the expression are 1 to 16.
This variable relies on the @CustomerInfo system variable to specify
the seats on which customer information is returned.
This system variable is read-only.
MD0003-065
Revision D
May 2, 2005
Page 448 of 814
Guest Services Solution (GSS)
What’s New
CustomerSeq[]
Function
This system variable is used to set or get the customer sequence value for
the supplied seat number index.
Type/Size
N9
Syntax
@CustomerSeq[expression]
Example
Event Inq : 1 // Add Customer
var cust : N9
input cust, “Customer Number to Add”
@CustomerSeq[@Seat] = cust
EndEvent
Event Inq : 2 // Remove Customer
@CustomerSeq[@Seat] = 0
EndEvent
Usage
The array limits for the expression are 0 to 32.
This system variable can be used for both read and write functions.
MD0003-065
Revision D
May 2, 2005
Page 449 of 814
Guest Services Solution (GSS)
What’s Enhanced
What’s Enhanced
An enhancement is defined as a change made to improve or extend the
functionality of the current application. To qualify as an enhancement,
the change must satisfy the following criteria:
The basic feature or functionality already exists in the previous
release of the software.
The change adds to or extends the current process. This differs from a
revision (i.e., a bug fix) which corrects a problem not caught in the
previous release of the software.
Enhancements
Summarized
The table below summarizes the enhancements included in this version.
Module
POS
Configurator
MD0003-065
Revision D
May 2, 2005
Page 450 of 814
Feature
Automatically Remove Inactive
Customers from Database
Page
451
Guest Services Solution (GSS)
What’s Enhanced
Enhancements
Detailed
POS Configurator
Automatically Remove Inactive Customers from Database
With this release, an option was added that would allow GSS users to
specify how many days to keep the records of inactive customers before
removing them from the database. Until now, customer records had to be
removed manually.
To automate this process, a new data-entry field — Retain Inactive
Cust. Days (POS Configurator | GSS | Restaurant | General) — was
added to the application. The default value is zero.
To enable this option, a user must enter a value greater than zero; the
system will not remove any records if the default value is not changed. In
addition, customers must be designated as inactive by setting the Active
drop-down list to “FALSE” on the Customer Selection/View/
Modification screen. Only customers marked as inactive, whose last
order was recorded x number of days prior to the current date, will be
removed from the database.
MD0003-065
Revision D
May 2, 2005
Page 451 of 814
Guest Services Solution (GSS)
What’s Revised
What’s Revised
A revision is defined as a correction made to any existing form, feature,
or function currently resident in the GSS software. To qualify as a
revision, the change must satisfy the following criteria:
The basic form, feature, or functionality must be part of the previous
version of the software.
The change must replace the current item or remove it from the
application.
Revisions
Summarized
The table below summarizes the revisions included in this version.
Module
Accounts
Receivable
Delivery
Dispatch
Frequent
Diner
MD0003-065
Revision D
May 2, 2005
Page 452 of 814
Feature
CR ID
Page
Accounts Maintenance Search
Function Not Working Properly
12500
455
Cannot Invoice Account Once
Interest Has Accumulated
12389
455
Charge on Account Feature Not
Calculate Properly
16721
456
Caller ID Closes When ESC Key
is Pressed
15119
456
Delivery Times Incorrect After
Check Transferred
14132
456
Bonus Definitions Do Not Reset
Correctly
N/A
457
Gratuities Added Toward Bonus
Plan Accumulations
14131
457
Guest Services Solution (GSS)
What’s Revised
Module
Gift Cards/
Certificates
GSS
Configurator
POS Interface
Feature
CR ID
Page
N/A
458
Gift Certificate Value Incorrectly
Retained After Redemption
18355
458
Support Files Do Not Remove Gift
Card Detail
14125
459
Void of a Gift Card Tender Not
Recorded Properly
N/A
459
Customer Search by Phone
Number Fails if Entry is Not
Formatted Using Configured
Phone Mask
N/A
460
Dates Incorrectly Loaded When
New Accounts Received Record
Added
13184
460
Export Wizard Not Saving Query
Details
N/A
460
Adding a New Customer Requires
Additional Confirmation
N/A
461
Bonus Plans Not Automatically
Assigned to New Customer
14650
461
Cannot Add GSS Records After
Upgrade from RES 3.0
16553
461
Gift Card Incorrectly Redeemed
When Rounding Error Message
Acknowledged
14468
461
GSS Inquire Keys 3, 4, and 9
(Using Order History) Not
Compatible With Menu Items
Using Min/Max Condiments
15076
462
Cannot Assign Multiple Gift
Cards/Certificates After Error
MD0003-065
Revision D
May 2, 2005
Page 453 of 814
Guest Services Solution (GSS)
What’s Revised
Module
Feature
CR ID
Page
POS Interface
(cont’d.)
POS Operations Fails if Backspace
Key Used to Edit Customer
Record
15205
462
N/A
462
Postal Code Recognition Enters
Wrong Street
MD0003-065
Revision D
May 2, 2005
Page 454 of 814
Guest Services Solution (GSS)
What’s Revised
Revisions
Detailed
Accounts Receivable
Account Maintenance Search Function Not Working
Properly
CR ID #: 12500
When searching for a record in the Accounts Receivable | Account
Maintenance form, the search feature was unable to locate an account
name when provided with the beginning letter in that name. Instead, it
was returning the first record that included the letter in its name. This has
been corrected.
Now, when the user enters a single letter and searches the database, the
system will display the first account that it locates. If the FIND key is
pressed again, the system will move on to the next record beginning with
that letter.
NOTE: Records are located in the order in which the account name was
entered in the database (i.e., by sequence number, not alphabetical order).
Therefore, if there are three accounts beginning with the letter “M”
(Mulligan’s, Mad Hatters, and Micros), and user is searching for the
“Micros” account by entering the letter “M”, the first record that will be
displayed will be “Mulligan’s.” The user will have to press the FIND key
twice more to cycle to the “Micros” record, or be more specific in
defining the search criteria.
Cannot Invoice Account Once Interest Has Accumulated
CR ID #: 12389
When creating invoices, an error message would display if the
customer’s account was configured to generate interest and interest had
already accumulated. This has been corrected.
MD0003-065
Revision D
May 2, 2005
Page 455 of 814
Guest Services Solution (GSS)
What’s Revised
Charge on Account Feature Does Not Calculate Properly
CR ID #: 16721
When posting to a customer account, the system would accept multiple
charges (totalling more than the credit limit) to the same account as long
as the individual charges did not exceed the limit. This also occurred
when prepaying accounts.
For example, if an account was prepaid $10 and had a credit limit of 0,
the customer could charge a $35 check by entering 4 charges of $9.99
each ($39.96 total).
This problem has been corrected.
Delivery Dispatch
Caller ID Closes When ESC Key is Pressed
CR ID #: 15119
Previously, if Caller ID was open (i.e., the buttons had focus) and the
ESC button was pressed, the system would close Caller ID instead of
simply canceling the previous selection. This problem has been
corrected.
Delivery Times Incorrect After Check Transferred
CR ID #: 14132
When using GSS with Delivery Plus, the Leave By and Target Delivery
Times were incorrectly listed on the check once it was transferred to the
driver through Delivery Dispatch. This problem has been corrected.
MD0003-065
Revision D
May 2, 2005
Page 456 of 814
Guest Services Solution (GSS)
What’s Revised
Frequent Diner
Bonus Definitions Do Not Reset Correctly
CR ID #: N/A
A bonus plan may included multiple definitions, with some of them
configured to Reset this definition only, and others set to Rest all
definitions in this plan. After each transaction, the system reviews the
list of definitions and awards bonus points where applicable. If enough
points are accrued in toward any of these definitions, an award is made.
Previously, when calculating bonus points, the system would process the
definitions in the order in which they were listed in the bonus plan. In
doing so, if a definition was configured to reset all to zero, and an award
was made to that definition, the system would immediately clear the
bonus points from every definition in the plan — including those on the
list that had not yet been processed. This could result in the customer not
receiving an earned award.
To correct this problem, the procedures were modified to include a
review of all bonus definitions prior to assignment of points. Definitions
that are configured to reset all after an award will be held up until all of
the other awards have been processed. In the event that there are two
definitions in the plan configured to reset all definitions, and both
definitions have reached the threshold for award, the system will process
the first one listed.
Gratuities Added Toward Bonus Plan Accumulation
CR ID #: 14131
Due to confusion regarding the selection of a bonus method, users were
unintentionally including gratuities in the total used to determine points
accumulated toward bonus awards. To clarify the selections, additional
information was provided in the GSS online documentation (GSS |
Maintenance | Bonus Plans and Coupons | Creating a Bonus Plan).
MD0003-065
Revision D
May 2, 2005
Page 457 of 814
Guest Services Solution (GSS)
What’s Revised
Gift Cards/Certificates
Cannot Assign Multiple Gift Cards/Certificates After Error
CR ID #: N/A
When an error is encountered (or clear is pressed) while swiping a gift
card or assigning a number to a gift certificate, the system displays the
error message "invalid card", then "press enter to try another card".
Previously, if an error occurred while purchasing multiple gift cards or
gift certificates, the system would allow the user to complete the current
gift card/certificate, then terminate the transaction. This made it
impossible to assign values to any remaining gift cards or gift
certificates. To avoid this problem, the system no longer allows bulk
purchase of gift cards/certificates. Users must now enter and program
each item separately.
Gift Certificate Value Incorrectly Retained After Redemption
CR ID #: 18355
When checking the value of a non-refundable gift certificate that had
been redeemed for less than its total value, the system would display the
amount not spent. This mislead the customer, who assumed that the
remaining amount could be applied to another purchase. The problem has
been corrected.
MD0003-065
Revision D
May 2, 2005
Page 458 of 814
Guest Services Solution (GSS)
What’s Revised
Support Files Do Not Remove Gift Card Detail
CR ID #: 14125
When using support files to clear the GSS Accounts and GSS Customers
tables, the system failed to remove any Gift Cards data that may have
been created during testing and training. To correct this problem, two
support file groups were created:
1. GSSRemoveGCDtl — Removes ALL Gift Card/Certificate
Associated Details, Definitions persist
Use with dbupdkey.dat to clear the following tables:
gss_gift_certificates_dtl
gss_value_adds_dtl
gss_gift_redemptions_dtl
gss_customer_awards_dtl — where award is a gift certificate/ card
gss_bonus_def — where bonus is a gift certificate/card
2. GSSRemoveGCDef — Removes ALL Gift Card/Certificate
Definitions and Gift Card/Certificate Associated Details
Use with dbupdkey.dat to clear the following tables:
gss_gift_certificates_dtl
gss_value_adds_dtl
gss_gift_redemptions_dtl
gss_customer_awards_dtl — where award is a gift certificate/ card
gss_bonus_def — where bonus is a gift certificate/card
gss_gift_certificate_Def
Void of a Gift Card Tender Not Recorded Properly
CR ID #: N/A
After paying by gift card, if the user voided the payment and applied a
different tender, the POS System would display the transactions
correctly, but failed to add back the voided amount to the gift card total.
The result was double payment by the customer. This has been corrected.
MD0003-065
Revision D
May 2, 2005
Page 459 of 814
Guest Services Solution (GSS)
What’s Revised
GSS Configurator
Customer Search by Phone Number Fails if Entry is Not
Formatted Using Configured Phone Mask
CR ID #: N/A
When searching for a customer record by phone number, the system was
unable to find a match if the format of the entry differed from the one
specified in the phone mask configuration. This would occur, for
example, if a customer was added via Caller ID, which often displays the
phone number differently from the preformatted phone mask. This
problem has been corrected.
Dates Incorrectly Loaded When New Accounts Receivable
Record Added
CR ID 13184
When adding a new account in GSS | Accounts Receivable, the following
fields were automatically populated with the current date and time:
Last Charge
Last Invoice
Last Payment
This is incorrect. These fields should remain blank until a charge,
invoice, or payment has been received or created. The problem has been
corrected.
Export Wizard Not Saving Query Details
CR ID #: N/A
When creating a new query in the GSS Export Wizard, entries in the
Current Filters field were not being saved to the database. This has been
corrected.
MD0003-065
Revision D
May 2, 2005
Page 460 of 814
Guest Services Solution (GSS)
What’s Revised
POS Interface
Adding a New Customer Requires Additional Confirmation
CR ID #: N/A
Previously, when a search of the database failed to locate a customer
record during POS Operations, if the user answered Yes when prompted
to add a new record, he would then have to press [Update] and [Accept]
to create a new entry.
To simplify this process, users can now press [Accept] to add the
customer to the database and also to the check.
Bonus Plans Not Automatically Assigned to New Customers
CR ID #: 14650
New customers added through POS Operations were not automatically
signed up to existing bonus plans, even though the option GSS | Bonus
Plans | Automatically assign this plan to new customers was enabled.
(Customers added through the GSS Back Office program were added
properly.) This problem has been corrected.
Cannot Add GSS Records After Upgrade from RES 3.0
CR ID #: 16553
After upgrading from RES 3.0 to RES 3.2, users were unable to access or
add records in the GSS application (which was added after RES 3.0). The
problem occurred because GSS was attempting to write information in
the converted database to store ID 1, which did not yet exist. This has
been corrected.
Gift Card Incorrectly Redeemed When Rounding Error
Message Acknowledged
CR ID #: 14468
MD0003-065
Revision D
May 2, 2005
Page 461 of 814
Guest Services Solution (GSS)
What’s Revised
With the rounding option enabled in POS Operations, if a user swiped a
GSS Gift Card and entered a non-rounded amount, an error message
would correctly display. However, when the user pressed OK to clear the
message window, the system would deduct the incorrect amount from the
gift card anyway. This has been corrected.
GSS Inquire Keys 3, 4, and 9 (Using Order History) Not
Compatible With Menu Items Using Min/Max Condiments
CR ID #: 15076
When using GSS Inquire Keys 3, 4, or 9 to start a check (i.e., customer
selections based on previous order history), the system failed to post all
of the order if it contained a min/max condiment and the minimum
number of condiments had been selected. That is, everything after the
menu item with the minimum condiments was omitted from the new
check. This has been corrected.
POS Operations Fails If Backspace Key Used to Edit
Customer Record
CR ID #: 15205
Previously, POS Operations would fail if the user pressed the backspace
key while editing any of the fields on the GSS select/modify/add
customer screen. This problem has been corrected.
Postal Code Recognition Enters Wrong Street
CR ID #: N/A
When using the postal code recognition feature to complete a customer’s
address, if the database included two or more streets with similar names,
the system would automatically populate the postal code/street address
with the entry that had the shortest street name.
MD0003-065
Revision D
May 2, 2005
Page 462 of 814
Guest Services Solution (GSS)
What’s Revised
For example, assume that the database includes the following:
Postal Code
Address Line 1
MainE9e
Main
StoneD8e
Mainstone
If the user entered Postal Code StonD8e, then started to type the street
address, the form would automatically fill in the correct name
(Mainstone). However, as soon as the user tabbed to the next field,
Address Line 1 would change to the shorter entry (Main) and the Postal
Code would revert to MainE9e. This problem has been corrected.
MD0003-065
Revision D
May 2, 2005
Page 463 of 814
Product Management (PM)
What’s New
Product Management (PM)
What’s New
New Features
Summarized
A new feature is defined as one that provides capabilities that were not
available in previous versions of the application.
The table below summarizes the new features included in this version.
Module
Inventory
MD0003-065
Revision D
May 2, 2005
Page 464 of 814
Feature
Page
Associate Barcodes with Inventory Items
465
Inventory on the Handheld
466
Ordering
Add Vendor Item ID
478
Setup
End-of-Night Pre-Close: Check PM Status
481
Product Management (PM)
What’s New
New Features
Detailed
Inventory
Associate Barcodes with Inventory Items
With this release, users can now track inventory in the system by using
the unique barcode identifier associated with each item. Barcode entries
can be entered manually or scanned in for each count unit associated with
an item.
To accommodate this feature, a new Barcode form was added to PM
(Setup | Inventory Items).
Barcodes entries are defined by highlighting a menu item and completing
the following three fields:
Unit — From the drop-down list, select the unit size associated with
this entry.
Barcode — Enter or scan the barcode value for this item.
Description — Enter an optional description of this item.
MD0003-065
Revision D
May 2, 2005
Page 465 of 814
Product Management (PM)
What’s New
Inventory on the Handheld
With this release, users can now utilize the MICROS handheld device to
count inventory. This dramatically improves the inventory count process
by allowing a user to barcode scan items and enter quantities. Previously,
count sheets were printed and completed and then quantities were
manually entered into Product Management.
In order to scan items, a unique barcode identifier is associated with each
item/unit by scanning or manually entering the barcode. A barcode can
be assigned using the new functionality added to the PM Desktop
application or by using the Inventory hand held application.
The Inventory hand held application also allows users to perform
inventory counts and to check current Stock On Hand quantities for all
defined inventory items. Once a count has been started, it can be
performed outside the wireless connection range, which may be
necessary for certain store rooms and freezers.
Note
Inventory on the Handheld is supported using the following
handheld configurations:
• Symbol 2800 with Windows 2002 CE
• Symbol 8800 with Windows 2003 CE
Configuring Inventory on the Handheld
Configuring Devices
1. Define a new device (i.e. PM HHT) in Devices | Network Node.
2. Add a new device in Devices | Devices and link the network node you
just created.
3. Add the new PC HHT device in the Devices | User Workstations form
and set the Type field to Handheld.
4. To use barcode scanning, add a scanner device on the Devices | User
Workstations | Peripherals tab. Set the connection type to Integrated.
MD0003-065
Revision D
May 2, 2005
Page 466 of 814
Product Management (PM)
What’s New
5. Select the appropriate revenue center, such as Restaurant to assign the
handheld touchscreens.
Configuring a PM Inventory Touchscreen Key
1. Add a new record call PM Procedures in System | External Programs.
Set the following options:
Option
Setting
User Interface
Windows
Run Style
Normal
Run in separate virtual
machine
Enabled
Working Directory
$(MICROS_DIR_POS)\bin
Command Line
$(MICROS_DIR_POS)\bin\PMprocedures.exe
Note
A touchscreen key can be added to navigate directly to a
function in PM procedures by using the following command line
switches:
/0 Main Form
/1 Enter New Count
/2 Modify/Reconcile Count
/3 Stock on Hand
/4 Barcodes
2. Add a [PM Procedures] key in Devices | Touchscreen Designer. Set
the following options:
Option
Setting
Category
External Program
Program
PM Procedures (the External Program defined
above)
MD0003-065
Revision D
May 2, 2005
Page 467 of 814
Product Management (PM)
What’s New
3. Restart POS Operations for the [PM Procedures] key to appear on
the touchscreen.Enabling the Transcriber
Note
In a wireless environment, the first time PM is launched using
the touchscreen key, the “Some components necessary to run
PM Procedures is missing. Would you like to install them
now?” message displays.
Select Yes from this message box to install the components.
By enabling the Pocket PC Transcriber, handwriting recognition can be
used in the PM Inventory application. This simplifies the entry of count
data by allowing the user to write rather than using the keyboard device.
To enable the Transcriber:
1. Select Transcriber from the Input Device drop-down in the lower
right-hand corner of the screen.
2. Select OK from the information screen.
3. Verify that the Vertical text direction arrow is displayed.
4. Set the Transcriber to Numeric Input Only by clicking the “a”
button (next to the Text Direction Arrow) until “1/2” is displayed.
This improves the recognition of numeric characters.
Setting Up Microsoft ActiveSync
If you are not using wireless networking with your hand held device, you
must install Microsoft’s ActiveSync software on your server and
handheld. ActiveSync software may be on the CD that came with your
handheld or it can be downloaded from:
http://www.microsoft.com/windowsmobile/downloads
MD0003-065
Revision D
May 2, 2005
Page 468 of 814
Product Management (PM)
What’s New
Complete the installation instructions included with the ActiveSync
software download. Once ActiveSync is functioning, use the steps below
to setup a WINS Server and verify the ActiveSync network connection.
Note
The following instructions may vary depending on the type of
handheld device being used.
Before proceeding, make sure the green ActiveSync icon is displayed in
the lower right-hand corner of the task bar on the server. This indicates
the handheld device is communicating with the server.
Setting up the Micros PM Inventory Files on the Handheld
1. Locate the \\Micros\Common\ISAPI\ directory on the server.
2. Copy the symbol.all.arm.cab file to the Temp directory on the
handheld device.
3. Double-click on the symbol.all.arm.cab file from the Temp directory
on the handheld to install the necessary CAB files.
4. Create a \\Micros\Bin\ directory on the handheld device.
5. Locate the \\Micros\RES\CAL\HHT\Micros\Bin\ directory on the
server.
6. Copy the PMPPC.exe file to the \\Micros\Bin\ directory on the
handheld.
Setting Up a WINS Server
1. Tap Start | Settings | Control Panel on the handheld device.
Or
Select Settings | Connections | Network Adapters for handheld
devices without a Control Panel.
2. Double tap the Network (or Network Adaptor) icon to launch the
Network Configuration Applet.
MD0003-065
Revision D
May 2, 2005
Page 469 of 814
Product Management (PM)
What’s New
3. Select the Network Adapter being used and tap Properties.
4. If using a static IP address, click on Use specific IP address and enter
the number.
If using DHCP, click on Use server-assigned IP address.
5. Click on the Name Servers tab and enter the IP address of the
MICROS Server for the Primary WINS Server.
Note
To locate the IP address of the MICROS Server:
Click Start | Run on the server PC.
Type cmd in the Address box and select OK.
In the Windows Command Console (DOS window) type
ipconfig /all and press Enter.
The TCP/IP configuration displays, including the IP
Address for the server PC.
6. Tap OK to return to the Control Panel.
7. Perform a soft reset of the handheld terminal.
Verify the ActiveSync Network Connection
1. Open ActiveSync on the server PC.
2. Select File | Connection Settings. Note: Refer to your handheld
manual for information on accessing theses settings. Some handheld
devices may not have these menu selections or option settings.
3. Select Allow network (Ethernet) and Remote Access Service (RAS)
server connection with this desktop computer and click OK.
Setting the Server IP Address in the PM Inventory Application
1. On the handheld, select Programs | File Explorer.
2. Locate the \\MICROS\BIN directory.
MD0003-065
Revision D
May 2, 2005
Page 470 of 814
Product Management (PM)
What’s New
3. Click on the PMPPC.exe file. The PM Inventory Login screen is
displayed.
4. Click on Settings located at the bottom of the screen.
5. Enter the IP address of the Server, in the Server field, and click OK.
6. You are now ready to login and begin using the PM Inventory
application using ActiveSync.
Note: If you are unable to log into PM Inventory, refer to your handheld
device manual and re-check all network settings.
Using Inventory on the
Handheld
Starting the PM Inventory
Application/Logging In
1. Press the [PM Inventory]
key added using the
Configuring a PM
Inventory Touchscreen Key
instructions in the previous
configuration section.
2. Enter your MICROS ID on
the login screen. Note: You
must be able to
communicate with the
server in order to log in.
3. The main PM Inventory
screen displays.
MD0003-065
Revision D
May 2, 2005
Page 471 of 814
Product Management (PM)
What’s New
The following options are available from the main PM Inventory screen:
Enter new count — Select this option to begin a new inventory count or
to check the status of a previously started count.
Modify/reconcile count — Select this option to modify, reconcile or
cancel a previously started count.
Stock on hand — Select this option to view current stock on hand
quantities.
Barcodes — Select this option to associate barcodes to inventory items
and units.
Settings — Select this option to view the current communication status
and server IP address.
Logoff — Select this option to return to the log in screen.
Help — Select this option to display HTML help for this form.
Entering New Counts
1. Select Enter New Count from the main PM Inventory screen. A list
of count tasks are displayed along with the task names and the date/
time of the last count. Note: The hand held device must be online to
start a new count.
2. Choose the desired count task from the Select Count screen and click
Select from the menu. Multiple count tasks may be selected.
Use the Cost Center drop-down to filter the list of count tasks by cost
center or to display count tasks for All cost centers. This field is
grayed out if only one cost center is configured.
The yellow exclamation icon displays next to count tasks that are
currently being counted. The green check mark icon displays next to
count tasks that are available to be counted.
MD0003-065
Revision D
May 2, 2005
Page 472 of 814
Product Management (PM)
What’s New
3. From the count entry form,
select the date of the count.
Note: The count date cannot
be changed once a count is
started. The count must be
cancelled and a new one
started to change the count
date.
4. Select the inventory item to
be counted from the dropdown list or barcode scan the
item. Notice that the item
name is displayed along with
the storage location (in
parentheses) where it can be
found.
Inventory items are automatically selected when a barcode is
scanned. If the scanned item does not exist in the count, the user will
be asked if he wants to link an item to the scanned barcode. Note:
This prompt will only display if the user is privileged to enter
barcodes.
5. Enter the counts for each of the current item’s defined units. Major
and Alternate units are those defined in the PM application for this
inventory item.
If a unit count field is selected that already has a quantity entered, an
additional numeric entry field appears for entering a quantity. This
additional quantity is automatically added to the original count when
selecting another unit count field.
Note
Use the Count Summary tab to view all of the items in the count
task. If an item is selected from the Count Summary screen, the
selected item is automatically displayed on the Edit Item Count
tab for entry/editing of the item’s count quantities.
Items that have already been counted display in maroon on the
Count Summary tab.
MD0003-065
Revision D
May 2, 2005
Page 473 of 814
Product Management (PM)
What’s New
6. Click Save from the menu. Confirm the operation when the prompt
appears.
Note
The handheld device must be online (in range of the wireless
hub or placed in the cradle for Active Sync) in order to save the
count task.
7. If you wish to reconcile the count when saving, answer Yes to the
corresponding prompt. If you answer No, the count is saved without
reconciling and the count status is set to “Count in Progress”.
Modifying/Reconciling Counts
1. Select Modify/reconcile
count from the main PM
Inventory screen.
2. Select Started to display
all of the count sessions
that are currently in
progress or select
Reconciled to display all of
the count sessions that have
been reconciled.
Use the Filter option from
the menu to filter the list of
counts by All (the default),
Today, and Yesterday.
3. To modify a count task,
choose the task and click
Select from the menu.
To reconcile a count task, choose the task and click Reconcile from
the menu. Confirm the operation when the prompt appears.
To cancel the count task, choose the task and click Cancel from the
menu. Confirm the operation when the prompt appears.
MD0003-065
Revision D
May 2, 2005
Page 474 of 814
Product Management (PM)
What’s New
Viewing Stock on Hand
1. Select Stock on hand from the main PM Inventory screen.
Note
The handheld device must be online (in range of the wireless
hub or placed in the cradle for Active Sync) in order to check
stock on hand.
2. From the Stock on Hand
screen, select the Cost
Center of the item.
3. Select the Item, Group, or
List from the Stock on
Hand screen and click
Details from the menu.
Detailed information
displays for the selected
inventory item.
The yellow exclamation
icon indicates that an item’s
stock on hand is outside of
the item’s predefined
limits.
Use the Clear option to
remove the currently
selected item from the stock on hand list.
Use the Clear all option to remove all items from the stock on hand
list.
Use the Refresh option to refresh the stock on hand quantities from
the server.
4. Click OK to return to the Stock on Hand screen.
MD0003-065
Revision D
May 2, 2005
Page 475 of 814
Product Management (PM)
What’s New
Assigning Barcodes to Items
1. Select Barcodes from the main PM Inventory screen.
2. From the Assign Barcodes
screen, choose the item to
assign a barcode and click
New from the menu
Use the Unit drop-down to
filter the barcode list for a
particular unit.
Or
Scan an item.
3. Enter the barcode and a
description and click OK to
save the barcode
assignment. Enter the
barcode and a description
and click OK to save the
barcode assignment. If the barcode has been scanned, the barcode
field is automatically populated with the barcode string.
Note
Barcodes can also be associated with items using the PM
Desktop application (Setup | Inventory Items | Barcode).
4. Select a barcode from the Item Barcodes or Unsaved Barcodes tab
and click Details to view the details about a barcode, including its
status.
MD0003-065
Revision D
May 2, 2005
Page 476 of 814
Product Management (PM)
What’s New
Deleting Barcodes from Items
1. Select Barcodes from the main PM Inventory screen.
2. From the Assign Barcodes screen, choose the item and click Delete
from the menu.
3. The barcode is moved to the Unsaved Barcodes list. Note: Deleted
barcodes are not deleted from the server until the Save button is
clicked.
Troubleshooting
“Unable to connect to the remote server” message when trying to log in
Ensure that POS Operations runs correctly on the handheld device
Verify that the IP address entered on the Settings form is the same as
the IP address of the MICROS server. Note: You must Exit and
Restart the PM Inventory application after changing the server’s IP
address.
Verify that the handheld’s network connection has been configured
properly on the Menu | Settings | Connection tab.
Verify that the MICROS Cash Management service is running. Stop
and restart the MICROS Cash Management service.
Unable to scan barcodes with the handheld device
Barcode scanning is only available when performing a count or
assigning barcodes.
The battery power is low.
A “Timeout” error occurred
The server is too busy for the handheld’s data request. Click OK and
attempt to perform the function again.
MD0003-065
Revision D
May 2, 2005
Page 477 of 814
Product Management (PM)
What’s New
Ordering
Add Vendor Item ID
When ordering or receiving items, users can quickly enter and confirm
vendor pricing information using a new Vendor Item ID option. Vendor
Item IDs represent the internal product codes assigned to each item in
the vendor’s inventory. This is the number the vendor uses when tracking
orders in their own system. The number is listed on the packing slips and
invoices when the shipment is delivered to the customer.
Enabling the Feature
Vendor Item IDs are entered on the PM | Setup | Vendors | Items tab.
The alphanumeric field supports up to 16 characters. A unique value
must be entered for each item/vendor/unit combination.
Once the identifiers have been entered into the database, they can be
selected from the Vendor Item ID drop-down list on a variety of order
forms and receipts to speed up the data-entry process.
MD0003-065
Revision D
May 2, 2005
Page 478 of 814
Product Management (PM)
What’s New
For example, when creating an order, if the user selects ‘1002’ from the
Vendor Item ID drop-down list, the system will automatically return the
Vendor Name, Item Name, Item ID, Order Unit, and Price.
Note
When using the Vendor Item ID to select the vendor/item/unit
combination, vendor bids are automatically retrieved.
If the Vendor is selected first, entries in the Vendor Item ID field
will be limited to those associated with that vendor.
MD0003-065
Revision D
May 2, 2005
Page 479 of 814
Product Management (PM)
What’s New
Similarly, when an order is received, users can enter the Vendor Item ID
to compare/confirm that the items they received are consistent with what
was ordered from the vendor.
MD0003-065
Revision D
May 2, 2005
Page 480 of 814
Product Management (PM)
What’s New
Setup
End-of-Night Pre-Close: Check PM Status
In a large organization, with multiple sites and a large employee base, it
is inevitable that certain inventory management conditions will arise that
prevent a store from performing a final close during regular end-of-cycle
reporting. These conditions include:
Negative inventories
Open inventory counts
Suspended receipts
Suspended transfers
To ensure that managers are completing their inventory management
tasks in a timely fashion, a new end-of-night process has been designed.
The process, which is set up through the Autosequences and Reports
module, includes a new external program, PMCloseCheck.exe. When
executed, the program reviews the database for problems with negative
inventories, open inventory counts, suspended receipts, and suspended
transfers. If one or more of these conditions exists, the autosequence will
be terminated and an error message will be displayed detailing the
problem. To assist the user, a PRINT button is included to printout a hard
copy of the issues that need rectified. Once they have been fixed, the user
can rerun the Pre-Close Autosequence to complete the process.
Configuring the Autosequence
Follow these steps to program the autosequence:
Set up a new External Program, to be called as part of the
End-of-Night Pre-Close Autosequence.
1. Open POS Configurator | System | External Programs.
2. Add a new program record and enter a name (i.e., PM Final Close
Status).
MD0003-065
Revision D
May 2, 2005
Page 481 of 814
Product Management (PM)
What’s New
3. Set the program options as follows:
4.
User Interface = Windows
Run Style = Minimized
Working Directory = c:\micros\res\eo\bin (where c: refers to
your Micros Drive Letter)
Command Line = c:\micros\res\eo\bin\PMCloseCheck.exe
Save the record.
Make this new external program the first step in the PreClose Autosequence:
1. Open POS Configurator | Reporting | Autosequence Steps.
2. Choose Pre Close from the Select an Autosequence drop-down
list.
3. Add a new first step and enter the following:
Number = 1
Type = External Program
Skip Step = False
Select the 'PM Final Close Status' external program from the
drop-down list.
Under the Error Action tab, program the following to ensure
that the autosequence will stop if all PM Final Close
conditions are not resolved:
MD0003-065
Revision D
May 2, 2005
Page 482 of 814
Error Action = Stop
Error Message (programmable) = insert an instructional
message here (e.g., ***** Re-Run Pre-Close After
Satisfying PM Inventory Conditions ***)
Save the record.
Product Management (PM)
What’s Enhanced
What’s Enhanced
An enhancement is defined as a change made to improve or extend the
functionality of the current application. To qualify as an enhancement,
the change must satisfy the following criteria:
The basic feature or functionality already exists in the previous
release of the software.
The change adds to or extends the current process. This differs from a
revision (i.e., a bug fix) which corrects a problem not caught in the
previous release of the software.
Enhancements
Summarized
The table below summarizes the enhancements included in this version.
Module
Feature
Page
Allowances
Support for Multiple POS Waste Reasons
484
Ordering
Use Alternate Units With Vendor Bids
485
Receiving
Add/Modify Reference Info Fields
485
MD0003-065
Revision D
May 2, 2005
Page 483 of 814
Product Management (PM)
What’s Enhanced
Enhancements
Detailed
Support for Multiple POS Waste Reasons
In the past, customers using PM allowances could not differentiate
between waste items that were entered through POS Operations.
Previous versions of the 3700 POS provided a single waste category for
recording items via a front-of-house terminal.
To better manage and define waste, changes were made in both the 3700
POS and PM applications to allow users to define multiple waste
categories. On the POS side, this was done by extending reason code
functionality to menu items wasted from a front-of-house terminal. (An
explanation of the POS enhancement is provided on page 243.) On the
PM side, the configuration of allowances was modified to provide a link
between them and the new POS reason codes.
Now, during operations, if a manager opens a Waste check at a front-ofhouse terminal and enters a menu item, the system will prompt for a
Waste reason. Once the reason is entered and accepted, the transaction
information is inserted into the PM application and the appropriate PM
allowance is automatically applied.
Enabling
To support this functionality a new POS Allowance Assignment grid
was added to the bottom of the PM | Setup | PM Parameters | Allowances
tab.
To create a link, click in the POS Reason column and select one of the
predefined reason codes. Move to the Allowance column and select an
allowance from the drop-down list provided. The same allowance may be
linked to more than one POS reason. However, a POS reason can only be
linked to one allowance type.
This procedure is optional. Wasted menu items whose POS reason is
NOT linked to a specific allowance will be automatically consigned to
the Default POS Allowance.
MD0003-065
Revision D
May 2, 2005
Page 484 of 814
Product Management (PM)
What’s Enhanced
Ordering
Use Alternate Units with Vendor Bids
When adding inventory items to a new order, the system automatically
loads the item’s purchase unit. In the past, if PM was configured to use
vendor bids, and if the vendor’s bid unit differed from the purchase unit
(e.g., bottles/12 oz. versus case/24), the system would pull in the bid and
convert it to the purchase units.
With this release, a new option, Override purchase unit with vendor
bid unit (Setup | PM Parameters | Ordering), has been added in the PM
configuration utility. When checked, the system will automatically
populate the bid unit field with the alternate unit used by the selected
vendor.
This option does not work unless the Allow unit conversions option
(Setup | Order Classes | Options) is also enabled.
Receiving
Add/Modify Reference Info Fields
For clarity, the Reference Info field (PM | Receiving forms) has been
expanded from one to three data fields. The original alphanumeric field
was renamed Reference Info 1. As before, it allows the user to insert
notes or optional information relevant to the current invoice or packing
slip. To supplement this data, two new fields were added:
Reference Info 2 — A second alphanumeric field. As with Reference
Info 1, this field provides additional information relevant to the
invoice or packing slip. Up to 40 characters is allowed.
Reference Number — A numeric field. Allows the user to insert a
numeric identifier (e.g., check number, purchase order number,
approval code, etc.). Up to 9 digits is allowed.
MD0003-065
Revision D
May 2, 2005
Page 485 of 814
Product Management (PM)
What’s Revised
What’s Revised
A revision is defined as a correction made to any existing form, feature,
or function currently resident in the PM software. To qualify as a
revision, the change must satisfy the following criteria:
The basic form, feature, or functionality must be part of the previous
version of the software.
The change must replace the current item or remove it from the
application.
Revisions
Summarized
The table below summarizes the revisions included in this version.
Module
Inventory
Feature
CR ID
Page
15134
488
Costs Not Updating Properly to
All Cost Centers
N/A
488
Count Form Opens With Focus on
Last Record
N/A
489
Declared Allowance Not
Depleting Stock Lots Properly
N/A
489
Inventory Task Calendar Records
Wrong Business Date
17160
489
Manually Entered Unit Causes
Error When Inventory Item Added
N/A
489
16848
490
N/A
490
Change in Default Storage
Location in PM Not Passed to
Stores in EM
Physical Count Entry Cannot Be
Saved When Using Comma as
Decimal Symbol
Ordering
MD0003-065
Revision D
May 2, 2005
Page 486 of 814
On-Hand Quantity Incorrect After
Changing Cost Center
Product Management (PM)
What’s Revised
Module
Reports
Setup
Transfers
Feature
CR ID
Page
N/A
491
Inventory Cost of Sales Detail
Reports Incorrect Average Usage
Cost
15806
491
Inventory Cost of Sales Detail
Report Runs Too Slowly
17665
491
Inventory Cost of Sales Summary
N/A
492
Inventory Count Extension Report
N/A
492
Inventory Variance Report
Missing Data for Last Day of Last
Closed Period
18112
492
Menu Item Theoretical Cost of
Sales Returns Incorrect Totals
15716
493
Menu Item Theoretical Cost of
Sales Returns No Data
17046
493
Inventory Item Batch Recipes
Cannot Be Saved if Item Class is
Changed
16888
494
Production Form Not Refreshing
Current Cost Data
N/A
494
Security Access Not Enforced in
Two Instances
N/A
495
Incorrect Cost When Transferring
Zero or Negative Stock
N/A
495
Transferred Inventory Items Not
Posting Correctly
15487
495
Inventory Cost of Sales Detail
Reports Incorrect Menu Item
Prices
MD0003-065
Revision D
May 2, 2005
Page 487 of 814
Product Management (PM)
What’s Revised
Revisions
Detailed
Inventory
Change in Default Storage Location in PM Not Passed to
Stores in EM
CR ID #: 15134
When updating an inventory item in PM, users can change the default
storage location by adding the item to a second storage location and then
changing the default on the PM | Setup | Inventory Items | Classes/
Groups tab.
Previously, when the changes were made via EM at the Corporate level,
they would not be received correctly when sent to the Stores. Instead of
checking for a previous default and then switching the storage locations,
the Stores simply added another default location. Consequently, stores
could end up with multiple default locations for the inventory items.
Therefore, any attempt to delete an item from any of these locations
resulted in the error: "Storage location is set as Default storage location
for this inventory item".
To correct the problem, the system check for a previous default storage
location has been moved from the user interface to the database level.
This ensures that changes made at the form level will be validated and
updated by the store’s database.
Costs Not Updating Properly at All Cost Centers
CR ID #: N/A
When using multiple cost centers, if the system was programmed to
Maintain the same cost for an item in all cost centers (Setup | PM
Parameters | Cost Centers), the system would only update the usage cost
at a revenue center where the inventory item had been received. All other
cost centers would show a value of zero. This has been corrected.
MD0003-065
Revision D
May 2, 2005
Page 488 of 814
Product Management (PM)
What’s Revised
Count Form Opens With Focus on Last Record
CR ID #: N/A
When opening the Inventory | Enter Counts form, the focus was
incorrectly placed on the last record in the grid, instead of the first. This
has been corrected.
Declared Allowance Not Depleting Stock Lots Properly
CR ID #: N/A
When declaring an allowance (either through PM or the POS
Operations), the system failed to deplete the correct stock lot. This has
been corrected.
Inventory Task Calendar Records Wrong Business Date
CR ID #: 17160
When using the Inventory Task Calendar, if the user selected and entered
a count for a previous date, the system would record the count date
correctly, but would post the current date as the business date. This has
been corrected. Now, when a count is post-dated, the business date and
count date will be recorded as the same.
Manually Entered Unit Causes Error When Inventory Item
Added
CR ID #: N/A
When adding a new inventory item, if the unit value was manually
entered (e.g., the user typed in EA to retrieve the unit EACH) rather than
selected it from the drop-down list, the following error occurred when the
record was saved:
[Sybase]...Integrity constraint violation: Column 'usage_unit_seq'in
table 'inven_itm_def' cannot be NULL.
The problem was due to a coding limitation in the way the system
recognized and recorded data-entry events. This has been corrected.
MD0003-065
Revision D
May 2, 2005
Page 489 of 814
Product Management (PM)
What’s Revised
Physical Count Entry Cannot Be Saved When Using Comma
as Decimal Symbol
CR ID #: 16848
When counting inventory, entries could not be saved or reconciled if the
regional settings were configured to use commas as the decimal
separator. Whole number entries were not affected. This problem has
been corrected.
Ordering
On-Hand Quantity Incorrect After Changing Cost Centers
CR ID #: N/A
When creating an order in a multi-cost center environment, a change in
the cost center could cause the on-hand quantity to be calculated
incorrectly. The number of items would be reported in the major unit
instead of the order unit. This has been corrected.
MD0003-065
Revision D
May 2, 2005
Page 490 of 814
Product Management (PM)
What’s Revised
Reports
The table below describes the PM report changes in this Service Pack:
Report
Inventory Cost
of Sales Detail
Area Modified
Stored
Procedurea
CR ID #: N/A
Inventory Cost
of Sales Detail
Templateb
CR ID#: 15806
Inventory Cost
of Sales Detail
Report Runs Too
Slowly
CR ID #: 17665
Stored
Procedurec
Description
When running the Inventory
Cost of Sales Detail report, the
system called a stored
procedure using the wrong
sequence of steps to convert
inventory item prices into
major unit prices (i.e.,
multiplying when it should
have divided, and vice-versa).
This was causing a sudden
increase in the cost of a menu
item. The problem has been
corrected.
When running the Inventory
Cost of Sales Detail report, the
system would report unusually
high values for the Average
Usage Cost on very low or zero
usage items. The variance was
caused by a rounding
discrepancy between the report
template and the stored
procedure that it called. This
has been fixed.
Running the Inventory Cost of
Sale Detail Report
(InvenCOSDtl.rpt) was taking
hours to complete. The delay
was traced to a specific stored
procedure,
speo_R_inven_var_info, which
was modified to improve
performance.
MD0003-065
Revision D
May 2, 2005
Page 491 of 814
Product Management (PM)
What’s Revised
Inventory Cost
of Sales
Summary
Stored
Procedured
Previously, when the Inventory
Cost of Sales Summary was run
for an open report period, the
results failed to include a value
for the opening stock on hand.
The problem was traced to a
stored procedure, which was
passing an incorrect date
required by the system to
populate the temp tables used
to calculate this entry. It has
been corrected.
Template
When running an inventory
count where the sort order is by
storage location and then by
item, the Inventory Count
Extension Report
(InvenCntExten.rpt,
InvenCntExtenPreview.rpt) was
not printing in the same order
(alphabetical) as either the
Count Sheet or the display. This
problem has been corrected.
Previously, the Inventory
Variance Report did not always
include the detail for the last
day of the latest period. This
occurred only if the selected
end date was the last day of the
latest closed period. The
problem was caused by a
programming error in the way
the stored procedure handled
date ranges. This has been
corrected.
CR ID #: N/A
Inventory Count
Extension
Report
CR ID #: N/A
Inventory
Variance Report
CR ID #: 18112
MD0003-065
Revision D
May 2, 2005
Page 492 of 814
Stored
Proceduree
Product Management (PM)
What’s Revised
Menu Item
Theoretical Cost
of Sales Report
Stored
Procedure f
CR ID #: 15716
Menu Item
Theoretical Cost
of Sales Report
Stored
Proceduresg
CR ID #: 17046
The stored procedure used to
calculate menu item costs was
excluding the cost of the
condiments. This was causing
incorrect totals in the Menu
Item Theoretical Cost of Sales
Report. It has been corrected.
Previously, if a user added an
existing check to a new check,
and then applied a discount to
the new check, it would cause
composite totals posting to fail.
This resulted in an ilcg_seq
error which prevented the
Menu Item Theoretical Cost of
Sales (RecipeTheoCost.rpt)
from returning any data. The
problem has been corrected.
Files Changed:
a speo_inven_itm_last_cost
b
InvenCostSalesDet.rpt
c speo_R_inven_var_info
d sp_R_cos_summary
e speo_R_inven_var_info
f speo_R_menu_info
g sp_post_cmpst_mi_cum,
sp_post_fixed_prd_cmpst_mi_cum
MD0003-065
Revision D
May 2, 2005
Page 493 of 814
Product Management (PM)
What’s Revised
Setup
Inventory Item Batch Recipes Cannot Be Saved if Item Class
is Changed
CR ID #: 16888
When adding a new Batch Recipe inventory item, users were unable to
save the record if the default entry in the Item Class field had been
changed. The problem occurred because the system failed to stop users
from deleting system-defined Item Classes (Setup | Item Classes) and
then changing the selection on the inventory item form (Setup | Inventory
Items | Classes/Groups).
To resolve the issue, both actions are now explicitly prohibited. That is,
an error message will display when the user tries to:
Delete system-defined Item Class records 1 and 2 (PM | Setup |
Item Classes).
Error Message: "The item class is a system defined item class,
you may not delete it."
Change the default Item Class assigned to an inventory item
record (Setup | Inventory Items | Classes/Groups).
Error Message: "Inventory class cannot be changed, inventory
item is linked to a menu item."
Production Form Not Refreshing with Current Cost Data
CR ID #: N/A
After opening PM | Setup | Recipes, if the user selected a Production Item
and clicked on the Production tab; the Current Cost information would
display a negative value. To display the correct (positive) value, the user
had to temporarily change the focus by selecting another recipe above (or
below) and then re-selecting the original batch recipe item. This problem
has been corrected.
MD0003-065
Revision D
May 2, 2005
Page 494 of 814
Product Management (PM)
What’s Revised
Security Access Not Enforced in Two Instances
CR ID #: N/A
Previously, the system failed to enforce security restrictions placed on
users through the PM Back Office application (Setup | Security Access).
Specifically, users who were assigned view-only privileges with regard to
PM Cost Center records (Setup | PM Parameters | Cost Centers) and to
the Reports Explorer, could still add, modify, and delete entries. This
problem has been corrected.
Transfers
Incorrect Cost When Transferring Zero or Negative Stock
CR ID #: N/A
Previously, when transferring an item with zero or negative stock on hand
between cost centers, the cost on the transfer was zero. The problem,
which occurs when maintaining costs across cost centers, has been
corrected.
Transferred Inventory Items Not Posted Correctly
CR ID #: 15487
When transferring inventory items into a cost center (after a previously
suspended, unedited transfer), the inventory items were not included in
the Inventory Stock on Hand report, or when entering counts. This
problem has been corrected.
MD0003-065
Revision D
May 2, 2005
Page 495 of 814
Labor Management (LM)
What’s New
Labor Management (LM)
What’s New
New Features
Summarized
A new feature is defined as one that provides capabilities that were not
available in previous versions of the application.
The table below summarizes the new features included in this version.
Module
Scheduling
MD0003-065
Revision D
May 2, 2005
Page 496 of 814
Feature
Scheduling Requirements Report
Page
497
Labor Management (LM)
What’s New
New Features
Detailed
Scheduling
Scheduling Requirements Report
Functionality has been added to allow a user to generate a staff
requirements report based on data entered through the Manual
Scheduling application.
The SRG Requirements Report lists the number of employees required
for each day of the currently selected week, grouped by serving period.
To access this report, the Edit Scheduling form was modified to include
new print options in the form of a Print and a Page Setup icon above the
data grid.
The Print icon allows the user to select the jobs to be included in the
report.
The Page Setup icon opens a standard print setup box to allow the user to
select a printer and set the print requirements.
MD0003-065
Revision D
May 2, 2005
Page 497 of 814
Labor Management (LM)
What’s New
Running the Report
To generate a report, the user enters a date in the Week field. The report
will be run for the 7-day period (Sunday thru Saturday) in which the
specified date falls. The default entry is the current business date.
Users can select a Job from
the drop-down list provided,
or press the Print icon to
open the Job Selection form.
To add one or more jobs to
the report, the user simply
highlights the appropriate
entries from the Unselected
Jobs list and moves them to
the Selected Jobs list using
the arrow buttons. When the
jobs list is complete, the OK
button is pressed and the
report is sent to the
designated printer.
A separate report will be printed for each. A sample of the report is
shown below.
MD0003-065
Revision D
May 2, 2005
Page 498 of 814
Labor Management (LM)
What’s Enhanced
What’s Enhanced
An enhancement is defined as a change made to improve or extend the
functionality of the current application. To qualify as an enhancement,
the change must satisfy the following criteria:
The basic feature or functionality already exists in the previous
release of the software.
The change adds to or extends the current process. This differs from a
revision (i.e., a bug fix) which corrects a problem not caught in the
previous release of the software.
Enhancements
Summarized
The table below summarizes the enhancements included in this version.
Module
Feature
Page
Forecasting
Added Daypart Names to Forecast Screen
500
Reports
Added Labor Percentage Columns to
Daily Labor Tracking Report
501
Setup
Allow Decimal Numbers for Standards
502
Enforce Maximum Hours Foreign Student
Can Work
503
MD0003-065
Revision D
May 2, 2005
Page 499 of 814
Labor Management (LM)
What’s Enhanced
Enhancements
Detailed
Forecasting
Added Daypart Names to Forecast Screens
Previously, when generating a forecast that involved multiple day parts,
the system would group the results under the header “Day Part Totals.”
With this release, changes were made to the format of the Forecast Edit
screen. Now, when multiple day parts are defined in the Labor
Management Setup program (Forecasting | Day Parts),
MD0003-065
Revision D
May 2, 2005
Page 500 of 814
Labor Management (LM)
What’s Enhanced
the data will be displayed as individual columns of information, by day
part name.
Reports
Added Labor Percentage Columns to Daily Labor Tracking
Report
With this release, the Daily Labor Tracking Report has been enhanced to
include two new sets of values: 1) the scheduled labor costs as a percent
of total forecast, and 2) the percent actual cost relative to the total dollar
amount. These percentages are listed by job category and shown for each
day of the labor week.
MD0003-065
Revision D
May 2, 2005
Page 501 of 814
Labor Management (LM)
What’s Enhanced
Setup
Allow Decimal Numbers for Standards
The Standard-to-Requirement ratio (LM | Staff Requirements | SRG Setup
| Standards) allows users to specify at what point labor requirements
change. This ratio depends upon the forecast element selected (e.g.,
Cover Count, Net Sales, etc.). The following table indicates how the ratio
might be defined for Servers when using the Guest Count forecast
element:
Standard
When the guest count is
equal to or greater than...
1
10
20
Requirement
...increase Servers to...
2
3
4
With this release, the Standards part of the ratio has been modified to
allow the use of decimal point entries. Previously, only whole numbers
were allowed. As before, entries should increase in value (1, 12.5, 25, not
1, 25, 12.5).
The Requirements value must still be in whole numbers.
MD0003-065
Revision D
May 2, 2005
Page 502 of 814
Labor Management (LM)
What’s Enhanced
Enforce Maximum Hours Foreign Student Can Work
To support the new European Foreign Student Labor Laws, a new stored
procedure (splm_TerminateFrgnEmps.sql) has been added. The stored
procedure is designed to run as part of the End-of-Day autosequence. It’s
purpose is to count the number of days worked by employees whose
personnel records indicate that they are foreign students.
Currently, the law specifies that:
Part-time students can work a maximum of 4 hours per day for no
more that 180 work days.
Full-time students can work a maximum of 8 hours per day for no
more than 90 work days.
Once the student-employee has worked the maximum number of days
allowed by law, his/her employee status is automatically set to
Terminated. Attempts to clock in after this date will be denied.
The change does not affect employees who are clocked in when the
business date changes, but will occur at the start of their next shift.
Note
This stored procedure does not monitor the number of hours an
employee works, only the number of days. Employees cannot
extend the number of eligible workdays by logging less than the
maximum 4 hours (if part-time) or 8 hours (if full-time).
However, users should be aware that this is a simple counting
mechanism. Turning the option off and then on again in an
employee’s record WILL reset the counter to zero.
MD0003-065
Revision D
May 2, 2005
Page 503 of 814
Labor Management (LM)
What’s Enhanced
Enabling the Feature
To support this feature, two new options were added in the POS
Configurator (Employees | Employees | POS):
Part-time foreign student — When checked, counts the number
of work days clocked by this employee and prevents him or her
from clocking in once the maximum number of workdays for
part-time foreign students (180 days) has been reached.
Full-time foreign student — When checked, counts the number
of work days clocked by this employee and prevents him or her
from clocking in once the maximum number of workdays for fulltime foreign students (90 days) has been reached.
New Report
As part of this enhancement, a new Terminated Foreign Students report
(TermFrgnEmps.rpt) was added. The report lists the names and
termination dates of employees who exceeded the workdays limit
imposed by the Foreign Student Labor Law during a specified date range.
A sample of the report is provided below:
MD0003-065
Revision D
May 2, 2005
Page 504 of 814
Labor Management (LM)
What’s Revised
What’s Revised
A revision is defined as a correction made to any existing form, feature,
or function currently resident in the LM software. To qualify as a
revision, the change must satisfy the following criteria:
The basic form, feature, or functionality must be part of the previous
version of the software.
The change must replace the current item or remove it from the
application.
Revisions
Summarized
The table below summarizes the revisions included in this version.
Module
Feature
CR ID
Page
Forecasting
Error Occurs When Setting
Comma as Decimal Placeholder
N/A
507
Human
Resources
Change of User-Defined Marital
Status Causes Error
16088
507
Error Received if Application
Closed with Availability Form
Minimized
N/A
507
Form Does Not Reset After
Adding Employee Record for
Minor
N/A
508
Premium Pay Rates Fail to Post if
Two Records Have Same GMT
Date/Time
15822
508
System Incorrectly Allows for
Duplicate Time Cards Entries
15908
508
Time Card Adjustments Not
Updating Other Tables Properly
15786
509
Payroll
Preprocessing
MD0003-065
Revision D
May 2, 2005
Page 505 of 814
Labor Management (LM)
What’s Revised
Module
Reports
MD0003-065
Revision D
May 2, 2005
Page 506 of 814
Feature
CR ID
Page
Daily Labor Tracking Report
15800
509
Employee Payroll Summary Does
Not Show Premium Pay Values for
Closed Labor Periods
18161
510
Job Earnings Summary
16405
510
Labor Management (LM)
What’s Revised
Revisions
Detailed
Forecasting
Error Occurs When Setting Comma as Decimal Placeholder
CR ID #: N/A
Previously, if the computer's Regional Settings (Windows Start Menu |
Control Panel | Regional Settings) were configured to use a comma as
the decimal place holder, then any attempt to generate a labor forecast
would result in the SQL error
Insert value list does not match column list:
Wrong number of values for INSERT.
This problem has been corrected.
Human Resources
Change of User-Defined Marital Status Causes Error
CR ID #: 16088
After adding a new record to the W4_MAR_STAT entry in LM | General
| User Defined Domain, an error message would be displayed when the
user tried to select this option as an employee’s Marital Status (Human
Resources | Employee Setup | Exemptions). This has been corrected.
Error Received if Application Closed with Availability Form
Minimized
CR ID #: N/A
Once the Availability form was opened, any attempt to close the Human
Resources application while the form was minimized would cause the
application to fail and would cause multiple Access violation errors to
display. This problem has been corrected.
MD0003-065
Revision D
May 2, 2005
Page 507 of 814
Labor Management (LM)
What’s Revised
Form Does Not Reset After Entering Employee Record for
Minor
CR ID #: N/A
When adding new employees, once a record for a minor was entered, the
system would continue to prompt for work permit/age certificate
information for all other new hires, regardless of age. This continued
until the form was closed and reopened. It has been corrected.
Payroll Preprocessing
Premium Pay Rates Fail to Post if Two Records Have Same
GMT Date/Time
CR ID #: 15822
Previously, when posting premium pay rates to the database, the system
would fail if two records were found for the same job with the same
GMT date/time in the historical job rates table. The problem, which was
caused by error in the stored procedure, splm_ProcessPremiumPay, has
been corrected.
System Incorrectly Allows for Duplicate Time Card Entries
CR ID #: 15908
When editing a time card via payroll preprocessing or manager
procedures, users could modify and save one record to exactly match
another existing record. This resulted in the loss of the first time card’s
data while creating a duplicate record of the second. The problem has
been corrected.
MD0003-065
Revision D
May 2, 2005
Page 508 of 814
Labor Management (LM)
What’s Revised
Time Card Adjustments Not Updating Other Tables Properly
CR ID #: 15786
When posting an adjustment or deletion to a time card in the Sydney
Time Zone (GMT+10.00), labor data contained in other tables was
incorrectly updated. The problem occurred because the system was
posting the current date field based on local time, rather than GMT.
Also, Payroll Preprocessing was not properly identifying DST when DST
began in the previous calendar year. For example, in Australia DST
begins in October and ends in March. When checking for DST, the
system assumed that the DST begin dates were in the same year as the
DST end dates.
These problems have been corrected.
Reports
The table below describes the LM report changes in this Service Pack:
Report
Daily Labor
Tracking Report
CR ID #: 15800
Area Modified
Stored
Procedurea
Description
Previously, when running the
Daily Labor Tracking Report
(SchedDlyLaborTracking.rpt),
the system displays the correct
date range, but failed to show
the correct day of the week for
the start of that date range. The
first day was always listed as
Sunday, regardless of the
calendar date entered. This
problem has been corrected.
MD0003-065
Revision D
May 2, 2005
Page 509 of 814
Labor Management (LM)
What’s Revised
Employee
Payroll
Summary
Stored
Procedureb
CR ID #: 18161
Job Earnings
Summary
Templatec
CR ID #: 16405
When running the Employee
Payroll Summary report,
premium pay values were no
longer reported once the labor
period was closed. This has
been corrected.
Vacation and sick time
calculations were incorrectly
included the Other Pay column
of the Job Earnings Summary
report, even after these records
had been deleted from the
database. This problem has
been corrected.
Files Changed:
a
speo_R_dly_labor
b
c
MD0003-065
Revision D
May 2, 2005
Page 510 of 814
splm_R_payroll_summary, splm_ExportPayrollSummary
PayrollPre.exe
Financial Management (FM)
What’s New
Financial Management (FM)
What’s New
There are no new features in this version of the software.
What’s Enhanced
There are no enhancements in this version of the software.
What’s Revised
There are no revision in this version of the software.
MD0003-065
Revision D
May 2, 2005
Page 511 of 814
RES Platform
Introduction
RES Platform
Introduction
This chapter comprises changes made to RES Platform, which includes
the following applications:
MICROS Desktop
Export Utility
License Manager
Reports Explorer
Language Translation Utility
What’s New
MD0003-065
Revision D
May 2, 2005
Page 512 of 814
There are no new features in this version of the software.
RES Platform
What’s Enhanced
What’s Enhanced
An enhancement is defined as a change made to improve or extend the
functionality of the current application. To qualify as an enhancement,
the change must satisfy the following criteria:
The basic feature or functionality already exists in the previous
release of the software.
The change adds to or extends the current process. This differs from a
revision (i.e., a bug fix) which corrects a problem not caught in the
previous release of the software.
Enhancements
Summarized
The table below summarizes the enhancements included in this version.
Module
Feature
Page
Common
Updated CAL Server
514
MICROS
Desktop
Access to GSS Forms From Start Menu
514
Reports
Explorer
Save Report Directly to.XLS File
515
MD0003-065
Revision D
May 2, 2005
Page 513 of 814
RES Platform
What’s Enhanced
Enhancements
Detailed
Common
Updated CAL Server
RES installation program has been updated to deploy CAL Server
version 1.0.2.3.
MICROS Desktop
Access to GSS Forms from Start Menu
With this release, GSS configuration forms can be accessed through the
MICROS Desktop. The forms, which were added during the integration
of GSS in the 3700 POS Configurator, are reached by selecting Start
Micros | System Configuration | GSS from the Desktop menu bar, as
shown below.
MD0003-065
Revision D
May 2, 2005
Page 514 of 814
RES Platform
What’s Enhanced
Reports Explorer
Save Reports Directly to .XLS File
Functionality was added that allows users to send a report directly to a
file when running Reports Explorer from a command line. This is useful
when run as an external program in an autosequence.
To save a report to file, a command line prompt is entered using the /FN
switch as follows:
rptexpl/FN:<node num>
When the command is executed, the file is saved in Microsoft Excel
(.xls) format in the \MICROS\Common\etc directory. The report file is
named as follows:
<Report Name>_<Date>_<Time>
where <Date> and <Time> are the date and time when the report file was
saved. For example:
InventoryExtension_2004-07-06_14-36-32.xls
MD0003-065
Revision D
May 2, 2005
Page 515 of 814
RES Platform
What’s Revised
What’s Revised
A revision is defined as a correction made to any existing form, feature,
or function currently resident in the software. To qualify as a revision, the
change must satisfy the following criteria:
The basic form, feature, or functionality must be part of the previous
version of the software.
The change must replace the current item or remove it from the
application.
Revisions
Summarized
The table below summarizes the revisions included in this version.
Module
MD0003-065
Revision D
May 2, 2005
Page 516 of 814
Feature
CR ID
Page
MICROS
Desktop
MICROS Desktop Does Not Load
Properly
16353
517
Export Utility
Quick Books Interface Not
Formatting Properly
N/A
517
License
Manager
Hand-Held Devices Do Not
Display as Licensed
16631
517
RES Platform
What’s Revised
Revisions
Detailed
MICROS Desktop
MICROS Desktop Does Not Load Properly
CR ID 16353
Previously, when setting up the MICROS Desktop, users were able to
save a record without filling in all the required fields on the Desktop
Items tab. This would cause an error to display the next time the user
attempts to open the MICROS Desktop. The problem has been corrected.
Export Utility
Quick Books Interface Not Formatting Correctly
CR ID #: N/A
When creating a Quick Books file using the Export Utility, the system
would drop the first character "!" from the first line, and shift sales data
by one field. The formatting errors caused problem when importing the
data into the Quick Books application. This has been corrected.
License Manager
Hand-Held Devices Do Not Display as Licensed
CR ID 16631
Hand-held client activation codes were incorrectly marked with a red
“X” in License Manager (3700 POS | Clients), even though the same
codes were shown to be licensed in MICROS Control Panel. The display
did not affect device usability, but was confusing to the end-user. This
problem has been corrected.
MD0003-065
Revision D
May 2, 2005
Page 517 of 814
RES Platform
What’s Revised
MD0003-065
Revision D
May 2, 2005
Page 518 of 814
Service Pack 2
Service Pack 2
In keeping with the original RES 3.2 ReadMe First, information is
divided into self-contained chapters, one for each of the following RES
products:
3700 Point-of-Sale (POS) System
Kitchen Display System (KDS)
Cash Management (CM)
Guest Service Solutions (GSS)
Product Management (PM)
Labor Management (LM)
Financial Management (FM)
RES Platform
For clarity, product information is further divided into three sections:
What’s New
What’s Enhanced
What’s Revised.
Each section begins with an introduction and includes a table that
summarizes the features and functionality incorporated in this version of
the software. The table provides hypertext links to supplementary text
and graphics about the selected topics.
For more information on these features, and step-by-step instructions for
configuring them, refer to the product’s Online Reference Manual,
installed with the MICROS Documentation and available on the RES
CD.
MD0003-065
Revision D
May 2, 2005
Page 519 of 814
3700 POS
What’s New
3700 POS
What’s New
New Features
Summarized
A new feature is defined as one that provides capabilities that were not
available in previous versions of the application.
The table below summarizes the new features included in this version.
Module
May 2, 2005
Page 520 of 814
Page
HHT
Symbol PPT8846 PocketPC
521
Manager
Procedures
Combo Meal Price Changes through
Manager Procedures
527
POS
Operations
Decimal Shift Rounding
529
Min/Max Values for Discounts and
Service Charges
534
Round by Tender
538
Currency, Quantity, and Weight
Descriptors
540
Printing
MD0003-065
Revision D
Feature
3700 POS
What’s New
New Features
Detailed
Hand-Held Terminals (HHT)
Symbol PPT 8846 Pocket PC
With this release users will now be able to configure and use the Symbol
PPT 8846 hand-held device. This device is a more robust version of the
Symbol PPT 2800, currently supported by RES.
As with the Symbol 2800 devices, the PPT 8846 model utilizes
Microsoft’s Pocket PC, a Window-powered, embedded software platform
that creates a mobile interface with the look of a desktop PC. The
Windows CE environment allows users to run multiple applications at
once and is designed to be used on corporate networks.
The PPT 8846 supports an operational Magnetic Stripe Reader and an
integrated Scanner device. (Instructions for setting up and using barcode
scanner are provided in the Enhancements section, Scanner Support for
Hand-Held Devices, beginning on page 544).
Configuring the Device
Merchants can purchase their Symbol PPT 8846 hand-held devices either
from MICROS or from an outside vendor. Units purchased from
MICROS are preconfigured for use in a RES environment. Units
purchased from an outside vendor will require more extensive setup.
This section provides instructions for configuring a Symbol PPT 8846
device. Users who have purchased from outside vendors should execute
all of the steps described below. Units purchased from MICROS can
begin at Step 6.
MD0003-065
Revision D
May 2, 2005
Page 521 of 814
3700 POS
What’s New
Definitions
The following definitions are provided
for the terms and during setup of the
PPT 8846:
Function Button — Refers to the
button on the front of the device,
lower right-hand corner. (Shaped
like a half-moon.)
Cold Boot — Remove the back
cover and depress the small white
“reset” button while simultaneously
depressing the Function button.
Replace the back cover and hit the
red Power button (lower left-hand
side).
Warm Boot — Simultaneously
press the large yellow Enter button, the Function button, and either
of the yellow buttons on the side of the device. This will restart the
unit.
Four-Finger Press — Once at a time, press the following buttons:
F1, F4, Function, and F1 (again). This will cause the Start icon to
display in the top left corner.
NOTE: The button labels F1 and F4 are for illustration purposes
only. Other models may have blank keys or use icons as labels. The
key sequence used here will not be affected by the change.
Procedures
These steps are required to configure a new PPT 8846 to use RES:
1. Set the PPT 8846 for the first sync:
MD0003-065
Revision D
May 2, 2005
Page 522 of 814
From the Windows Start menu, select ActiveSync | Tools |
Options | Options.
Check Enable PC sync using this connection.
3700 POS
What’s New
Check Maintain connection.
Press OK twice to exit the form.
Press the x button (upper right corner) to close.
2. Download an install ActiveSync.
Go to the Microsoft website (www.microsoft.com) and select
Downloads.
From the drop-down box, select ActiveSync.
Select the most up-to-date version of ActiveSync. (Currently, this
is Version 3.7.1).
Double-click MSASYNC.EXE to begin installation. Follow the
on-screen instructions provided.
3. Establish a partnership.
Set the PPT 8846 device into the cradle connected to the Server.
From the Server’s Start Menu, select Programs | Microsoft
ActiveSync. This should bring up a new window and
automatically detect the hand-held device.
Go to the Set Up a Partnership screen.
Select Guest Partneship and press Next.
4. Copy the POSLoader to the PPT 8846 device.
Check to see which version of RES software is running on the
RES POS system.
If running RES 3.2 Service Pack 2, open the Windows Explorer
on the Server and copy the POSLoader.ARM.CAB file from the
MICROS\RES\CAL\HHT folder to the Mobile Device\My Pocket
PC\Windows\Start Menu folder.
MD0003-065
Revision D
May 2, 2005
Page 523 of 814
3700 POS
What’s New
From the MICROS website, download a copy of the
POSLoader.ARM.CAB file to a Temp folder on the Server.
Copy this file from the Temp folder to the Mobile Device\My
Pocket PC\Windows\Start Menu folder. If prompted about
converting files copied to a mobile device, click OK.
Exit ActiveSync by removing the device from the cradle.
On the HHT, select Start | POSLoader to install the files.
NOTE: The PPT 8846 will only work with RES 3.2 Service Pack 2 or
higher. Earlier versions of RES will not support this device.
5. (Optional) Set up the optional Magnetic Stripe Reader.
Go to the MICROS website and download a copy of the
MSRDriver.ARM.CAB file to a Temp folder on the Server.
Establish/reestablish an ActiveSync connection as described in
Step 3.
Copy this file from the Temp folder to the Mobile Device\My
Pocket PC\Windows\Start Menu folder.
Exit ActiveSync by removing the device from the cradle.
On the HHT, click Start | MSRDriver.ARM.CAB to install the
files. (Once the files are installed, this option will be removed
from the Start menu.)
NOTE: If the MSRDriver.ARM.CAB option is not present on the
Start menu, it may mean that the user has exceeded the maximum
number of files that may be displayed on the Start menu (i.e., it is
not an installation failure). Before reinstalling, select the
Programs option to manually locate the file.
MD0003-065
Revision D
May 2, 2005
Page 524 of 814
3700 POS
What’s New
6. Set up the PPT 8846.
Perform a cold boot on the hand-held device. The device will
whirr slightly before displaying the Pocket PC splash screen.
Tap the screen to display directions for calibration and time-zone
setup. Proceed as required.
7. Set up the POS and LAN.
When the Starting Mobile Micros screen is displayed, press
Continue.
Select the POS Client Type and click OK.
Select the Backlight and Backlight settings and press OK to
continue.
Tap the icon in the lower right-hand corner of the screen. Choose
Find WLANs.
On the Networks screen, select the access point and press
Connect. (If the list of Available WLANs is blank, press the
Search button to locate and display the options.)
If using WEP encryption, go to the Encryption tab and set your
encryption level.
Go to the IP Config tab and set the system-specific IP
Connection Type.
Press OK to close the Networks screen.
Press OK until you get to the Configure Network Adaptors
screen. Set the 802.11b Adapter Setting and any other settings
that may be required. Press OK to close this screen.
Press OK again to open the Connections screen and select the
Advanced tab. Tap on the top “Select Networks” box. In the first
drop-down field, set the Internet connection to My Work Network.
Press OK to close this screen.
MD0003-065
Revision D
May 2, 2005
Page 525 of 814
3700 POS
What’s New
MD0003-065
Revision D
May 2, 2005
Page 526 of 814
Press OK again to open the POS Clients Config screen.
Enter the HHT Name of this PPT 8846 device as well as the
Server IP Address. Press OK to accept. A message will display
indicating that the system will restart. Click OK to proceed.
The HHT will reboot. When the system returns to the Mobile
MICROS Startup screen, press Continue. The POS Loader will
automatically load files and reboot the PPT 8846 (four times).
When finished loading files, a message displays indicating that
software updates have been installed. Press OK to continue into
3700 POS Operations.
3700 POS
What’s New
Manager Procedures
Combo Meal Price Changes Through Manager Procedures
Functionality has been expanded to allow users to add, modify, and
delete combo menu item pricing records through Manager Procedures.
To accommodate the change, a Combo Groups section has been added to
the module. The section is modeled after the Menu Items feature and
includes three new forms for selecting the combo menu items to be
changed.
The first of these is the Combo Groups form, which can be opened by
clicking the Combo Groups icon from the navigation bar at the top of the
page. It includes a list of all the Combo Groups currently in the system..
To change a price record, the user selects a Combo Group from the list
and presses the Add Price Record or the Edit Prices button. This opens
the second of the new forms, which lists all of the menu items included in
the combo group.
MD0003-065
Revision D
May 2, 2005
Page 527 of 814
3700 POS
What’s New
Once a menu item is selected, the user presses the Edit key to open the
last new screen, the combo item pricing form.
From this form, the user can add or edit prices for up to 10 menu levels.
Effectivity dates can be entered or changed as well. When the data entry
is complete, the user presses OK to accept the record or Cancel to exit
the form without saving.
If this is a new record, all of the data entry fields will be blank. If the user
is editing an existing records, available pricing data will be displayed and
a Delete Price Record button will be included at the bottom of the
screen.
MD0003-065
Revision D
May 2, 2005
Page 528 of 814
3700 POS
What’s New
POS Operations
Decimal Shift Rounding
Decimal Shift Rounding was implemented for countries where the
smallest denominations of currency contain several digits of minor
significance to the transaction. Before tendering payment, these digits
may represent values that cannot be paid with the existing denominations
— they must first be rounded up or down to the nearest currency unit.
Typically, this occurs after currency conversion, percentage discount,
service charges, or tenders have been applied.
Background
Traditionally, when rounding a transaction or currency amount, users had
the option of rounding to the last or second-to-last digit (i.e., the least
signficant digits). This worked fine in general, but presented problems
for countries whose currency base included a large number of digits (e.g.,
the Turkish lire, South Korean won, Lebanese pound).
Example
The Turkish lire (TL) comprises three coins (a 10,000 TL, 25,000 TL
and 50,000 TL), and several paper denominations, the smallest of
which is the 100,000 TL. (The exchange rate between the TL and the
US$ is approximately 1,500,000 TL to 1 US$.)
A customer orders a continental breakfast (coffee and sweet rolls)
which is priced at 10,000,000 TL. Along with the order, he presents
the server with a discount coupon for 1/3 off the price of the
breakfast. At the end of the meal, the server tenders the guest check,
which now totals 6,666,666 TL (price minus discount).
Question: if the lowest denomination of currency is the 10,000 TL,
how much should be paid by the customer?
The obvious answer is either 6,670,000 TL or 6,660,000 TL. That is, the
server should either round the amount up or down, to the nearest unit of
currency.
MD0003-065
Revision D
May 2, 2005
Page 529 of 814
3700 POS
What’s New
The problem is that existing options do not support rounding to the
nearest ten thousand. As noted, rounding options are limited to the last
and next-to-last digits. And, depending on the number of decimal places
used by the database, the digits used for rounding could be on either side
of the decimal point.
The following diagram illustrates what happens if the traditional
rounding options are imposed.
The Solution
Decimal Shift Rounding allows the system to move the decimal point
leftward before applying the rounding criteria. Once the amount is
rounded, the system returns the decimal to its original location for
payment in standard currency units.
Users may specify the number of insignificant digits that may be shifted
prior to rounding. Up to 7 digits are allowed.
MD0003-065
Revision D
May 2, 2005
Page 530 of 814
3700 POS
What’s New
Calculating the Decimal Shift
The key to using this option is to figure out how many decimal places
will need to be shifted (i.e., how many of the digits are insignificant to
the rounding process). The number is determined by the lowest denomination of the currency used and will depend on two related factors:
The rounding options applied to the base amount — Depending
on how they are combined, the system will round the last or nextto-last digit (Round by Tens Digit) to the nearest 0, 5, or 10 unit
(Round to the nearest 10).
The number of decimal places defined in the database — Determines whether the rounding takes place before (zero decimal
places) or after (one or more decimal places) the decimal point.
The following example illustrates what happens when the 6,666,666 TL
total is rounded in a zero-decimal database using 3 insignficant digits.
This scenario also assumes that the user has selected the following
rounding options:
Round to the nearest tens (e.g., to the nearest 0 or 10)
Round the tens digit (i.e., the next to last significant digit)
MD0003-065
Revision D
May 2, 2005
Page 531 of 814
3700 POS
What’s New
A more complete diagram of how the options affect the rounding total is
provided below:
MD0003-065
Revision D
May 2, 2005
Page 532 of 814
3700 POS
What’s New
Enabling
To support this option, the following field was added to POS
Configurator:
Insgnificant Digits — From the drop-down list, select the
number of places that the decimal point will be shifted leftward
before applying the rounding criteria and returning the decimal to
its original location.
Decimal Shift Rounding can be applied to a currency, a tender, a discount
or service charge, or to the check total itself. As such, the option is
available on several forms in POS Configurator. Please note that the
selection box is disabled unless the corresponding rounding option has
been selected.
Sales | Currency — Always round this currency
Sales | Tender/Media | Tender — Enable Tender Rounding
Revenue Center | RVC Posting | Options — Enable total due
rounding
Revenue Center | RVC Discount/Service — Enable rounding for
discounts / service charges
MD0003-065
Revision D
May 2, 2005
Page 533 of 814
3700 POS
What’s New
Min/Max Values for Discounts and Service Charges
With this release, users will now be able to set minimum and maximum
values for discounts and service charges. They can be either open or
preset values, and calculated as a percent or dollar amount.
Using With Open Discounts/Service Charges
The clearest use for min/max values is with an open discount or service
charge. By design, the user is prompted to enter a percentage or amount
when an open item key is pressed. This feature ensures that the user entry
falls within the minimum and maximum range. If not, an error message is
displayed and the entry is disallowed.
Using With Preset Discounts/Service Charges
Preset discounts and service charges are more complicated, in that presets
are created with a default value. Depending on the type, this value is
entered in either the Percent or Amount fields on the Discount/Service |
General tab in POS Configurator.
During operations, the default is applied automatically to the guest check,
unless the user attempts to override it. This is done by entering an amount
(or percent) before pressing the discount/service charge key. When an
override attempt occurs, the system checks to see if:
The entry is within the established min/max range.
The user is privileged to override the default.
The default value of a preset item may be outside the range of defined
min/max values. However, if the user attempts to override the default, the
system will enforce the min/max requirements.
MD0003-065
Revision D
May 2, 2005
Page 534 of 814
3700 POS
What’s New
Example #1 — Preset Amounts
A restaurant wants to create a coupon that allows a $5 discount for any
party of 2, and a $10 discount for any party of 4. The restaurant will also
allow a discount of $2.50 for a single diner. Because the restaurant has
had problems when using these types of coupons, only the manager is
privileged to override the default amount. However, the discount’s
default setting of "single diner" (i.e., $2.50) may be applied by any
server.
To program the discount, the following values are entered:
Amount = 2.50 (This is the default value.)
Minimum Amount = $2.50
Maximum Amount = $10.00
During operations, a Server is handed the coupon for $5 off a party of 2.
The Server’s actions (and the System response) depends on the
following:
For a party of 1:
The Server presses the discount key. The default value of the discount
($2.50) is applied automatically to the customer’s check.
For a party of 2:
The Server enters "5", "0", "0" (i.e., $5.00) and presses the discount
key. The system immediately prompts for manager authorization to
override the discount. The manager enters her authorization code or
swipes her card. The $5.00 is discounted from the check total.
Alternatively:
The Server enters "5", "0", "0", "0" (i.e., $50.00) and presses the
discount key. The system immediately prompts for manager
authorization to override the discount. The manager enters her
authorization code or swipes her card. An error message is displayed,
indicating that the discount is greater than the maximum allowed.
MD0003-065
Revision D
May 2, 2005
Page 535 of 814
3700 POS
What’s New
Example #2 — Preset Percentages
A restaurant wants to create a coupon that allows a 50% discount for two
people sharing a $10 appetizer. However, if only one person comes in and
orders the $10 appetizer, the allowed discount is only 25%. If three or
more people share the $10 appetizer, then the discount increases to 75%.
No additional discounts are allowed.
To program the discount, the following values are entered:
Percent = 50% (This is the default value.)
Minimum Percent = 25%
Maximum Percent = 75%
During operations, a Server is handed the coupon for 50% off a $10
appetizer for two. The Server’s actions (and the System response)
depends on the following:
For a party of 2:
The Server presses the discount key. The default value of the discount
(50%) is applied automatically. The final price of the appetizer is
$5.00.
For a party of 1:
The Server enters "2" and "5" (i.e., 25%) and then presses the
discount key. The system checks to see if the Server is privileged to
override the discount. If so, a 25% discount is applied to the
appetizer, reducing the price to $7.50.
For a party of 3:
The Server enters "7" and "5" (i.e., 75%) and then presses the
discount key. The system checks to see if the Server is privileged to
override the discount. If so, a 75% discount is applied to the
appetizer, reducing the price to $2.50.
MD0003-065
Revision D
May 2, 2005
Page 536 of 814
3700 POS
What’s New
For a party of 4:
The Server enters "1", "0", "0" (i.e., 100%) and then presses the
discount key. The system checks to see if the Server is privileged to
override the discount. If so, a 100% discount is calculated. However,
the validation check by the system determines that this discount
exceeds the maximum of 75%. An error message is displayed.
Enabling the Feature
To support Min/Max Values, the following options were added to POS
Configurator:
Sales | Discount/Service | Min/Max Values (new tab)
Minimum Percent — Sets the minimum percentage for this
discount or service charge that may be applied to a guest check.
Maximum Percent — Sets the maximum percentage for this
discount or service charge that may be applied to a guest check.
Minimum Amount — Sets the minimum amount for this
discount or service charge that may be applied to a guest check.
Maximum Amount — Sets the maximum amount for this
discount or service charge that may be applied to a guest check.
Note
Maximum values must be greater than the Minimum.
When applied to a discount, entering a minimum value (percent
or amount) will disable the Limit Discount check box on the
Options tab.
Alternatively, the feature will not be enabled if a minimum
value is entered and the corresponding maximum value
(amount or percent) is left blank or set to zero.
Employees | Employee Classes | Options
Override disc/srvc chrg amt — When checked, allows a
member of the employee class to override a preset discount or
service charge.
MD0003-065
Revision D
May 2, 2005
Page 537 of 814
3700 POS
What’s New
Round by Tender
In some countries, the smallest denominations of currency (e.g., pennies)
are considered bothersome to handle and are no longer required for
settling cash trnasactions. The same cannot be said for electronic
payments (e.g., credit cards, gift cards, etc.), which are typically tracked
to the lowest coin or least significant currency digit.
In the past, users who wanted to avoid coins could program the system to
round to a higher denomination. The rounding options were applied at
the revenue center level and affected the amount due in the check total
itself. This was fine for cash transactions, but was unacceptable when
dealing with electronic accounts.
To resolve this problem, the Round by
Tender feature was added. The feature
consists of three new rounding
options which may be applied to
individual tender keys. The entry on
the right illustrates how a cash tender
would be posted.
Enabling the Feature
To support tender rounding the
following options were added in POS Configurator on the Sales | Tender/
Media | Tender form:
Enable Tender Rounding — When checked, rounds the tender
amount applied to a guest check.
Round Tender to Nearest 10 — When selected, rounds the tender
amount to the nearest 0 or 10 unit. When cleared, rounds the tender to
the nearest 0, 5, or 10 unit.
Rounding Based on Tens Digit — When selected, rounds the tender
amounts based on the second least significant digit (i.e., the tens
digit). When cleared, rounds the tender amount to the nearest whole
number (i.e., to the last digit).
MD0003-065
Revision D
May 2, 2005
Page 538 of 814
3700 POS
What’s New
The following table illustrates how the same amounts would be posted
when a combination of rounding options is enabled:
Amount Due –>
Round to
Nearest 10
Round to
Tens Digit
X
X
2.53
2.47
2.62
2.32
Rounds to:
2.50
2.50
2.60
2.30
2.55
2.45
2.60
2.30
X
3.00
2.00
3.00
2.00
X
2.50
2.50
2.50
2.50
MD0003-065
Revision D
May 2, 2005
Page 539 of 814
3700 POS
What’s New
Printing
Currency, Quantity, and Weight Descriptors
With this release, users will be able to include quantity and price
descriptors in the POS display and guest check printouts. The option to
print a currency symbol before a menu item unit price has also been
added.
Quantity Descriptor
When a quantity of menu items is ordered, the system precedes the menu
item name with a numerical value, followed by the @ symbol and the
price of a single item:
3 Crab Cakes @ 5.00
The quantity descriptor allows the user to identify the quantity value with
a label:
QTY 3 Crab Cakes @ 5.00
Quantity descriptors are not used with weighed menu items.
Piece Descriptors
As part of the menu item quantity price, a new piece descriptor has been
added. This descriptor indicates the relationship between the quantity
ordered and the line-item price. For example:
QTY 3 Crab Cakes @ 5.00/ea.
Currency Descriptor
Currency descriptors were modified to now print on guest checks and
receipts whenever a currency amount prints. The descriptor precedes the
monetary amount.
MD0003-065
Revision D
May 2, 2005
Page 540 of 814
3700 POS
What’s New
To work, the option Print menu item unit price (Revenue Center | RVC
Print Design | Options) must be enabled. In addition, users will have to
activate this option by checking the new Print currency descriptor
check box in POS Configurator. In the past, an entry in the Descriptor
field would automatically enable the function.
New Fields in POS Configurator
To support these descriptor enhancements, the following options were
added to the System | Restaurant | Currency form in POS Configurator:
Quantity descriptor — Allows the user to insert a text descriptor
(e.g., Qty) before the number of menu items ordered. This descriptor
will be shown as part of the line item in a pole display and will be
printed as part of a guest check and journal entry. Up to 4 characters
are allowed.
Piece descriptor — Allows the user to append a unit descriptor (e.g.,
“pc”, “ea”) to the item price. This descriptor indicates the relationship
between the number of items ordered and the price of the menu item.
It is added after the menu item price and is separated from it by a “/”,
as shown below:
3 Shrimp Cktl @ $6.75/ea
$13.50
Print currency descriptor — When checked, prints the currency
symbol entered in the Descriptor field before every monetary entry
(unit, quantity, subtotal or total) associated with the current
transaction.
MD0003-065
Revision D
May 2, 2005
Page 541 of 814
3700 POS
What’s Enhanced
What’s Enhanced
An enhancement is defined as a change made to improve or extend the
functionality of the current 3700 POS application. To qualify as an
enhancement, the change must satisfy the following criteria:
The basic feature or functionality already exists in the previous
release of the software.
The change adds to or extends the current process. This differs from a
revision (i.e., a bug fix) which corrects a problem not caught in the
previous release of the software.
Enhancements
Summarized
The table below summarizes the enhancements included in this version.
Module
Scanner Support for Hand-Held Devices
544
ILDS
ILDS/MMX for WinCE Devices
546
Void Support for Credit and Debit
546
Condiment Groups Increased From 64 to
256
547
Credit Authorization Prompts
548
Credit Card Security Enhancements
549
External Electronic Payments with Debit/
Credit Cards
550
Japanese Tax Changes
555
Payment Authorization for Personal
Checks
560
Enhanced Guest Check Trailer
570
Print Itemized Taxes on Guest Check
571
Slip Printing on the Workstation 4
574
Supervised Printing from a WinCE
Workstation
578
Printing
May 2, 2005
Page 542 of 814
Page
HHT
POS
Operations
MD0003-065
Revision D
Feature
3700 POS
What’s Enhanced
Module
Setup
SIM
Feature
Page
Customized Installation Procedures
580
GR Version of CAL and WS4 Platform
581
Event Begin_Check
581
Event Pickup_Check
581
MD0003-065
Revision D
May 2, 2005
Page 543 of 814
3700 POS
What’s Enhanced
Enhancements
Detailed
Hand-Held Terminals (HHT)
Scanner Support for Hand-Held Devices
Support for barcode scanning of menu items has been extended to the
Symbol 2800 PocketPC hand-held device. Only color models with
platform version 28 are supported in this release.
With barcode scanning enabled, HHT users can:
Ring in menu items on a check by scanning the barcode.
Assign barcode values to existing menu items through Manager
Procedures.
Read scanner data using a SIM input function key.
Enabling the Device
To accommodate barcode scanning on an HHT, a new “Integrated”
Connection Type was added to the User Workstation | Peripherals form
in POS Configurator. When selected, the scanner format button is
displayed.
MD0003-065
Revision D
May 2, 2005
Page 544 of 814
3700 POS
What’s Enhanced
Press this button to open the form and select the
scanner formats that will be used with this
device. The following types are supported:
UPC A
UPC E
EAN 8
EAN 13
Custom
At least one format must be defined before the
record can be saved.
Note
Changes made to the scanner format after the hand-held
terminal has been configured and used will not be automatically
uploaded to the device. To implement a change in format, the
HHT client must be rebooted.
Assigning Barcodes to Menu Items
Once the HHT is configured, the integrated scanner can be used to add
barcode information to menu items that are already in the database. This
is done through Manager Procedures using the following steps:
1. Sign onto the HHT device and select Manager Procedures.
2. Open the Barcodes form and select the Add Barcode Entry button.
3. Press the yellow scan button on the hand-held device and scan the
barcode label on the menu item.
4. Link the barcode to an existing Menu Item.
5. Select a Price Level for the menu item.
6. (Optional) Enter an Override Price and Override Cost for the menu
item.
7. Press OK to save the record.
MD0003-065
Revision D
May 2, 2005
Page 545 of 814
3700 POS
What’s Enhanced
ILDS
ILDS/MMX Interface for WinCE Devices
With this release, support for the International Liquor Dispensing System
(ILDS) has been extend to the WinCE platforms (Hand-Held and WS4).
Previously, ILDS was only configurable on Win32 clients.
To do this, programming changes were implemented that allow POS
clients to communicate via the MMX transport driver.
Void Support for Credit and Debit
With this release, the POS functionality was enhanced to support posting
of void transactions between the POS System and the ILDS device when
the ILDS is configured in Credit and Debit mode (i.e., ‘MICROS and
LDS’ mode).
Previously, if an item was rung and sent to the ILDS, and that same item
was then voided, the transaction would be posted to the POS suspense
file, but was not passed on to the ILDS device. This created an imbalance
between the ILDS and MICROS Systems.
Enabling
To support this functionality, a new option, Post Voids to LDS, was
added to POS Configurator (Revenue Center | RVC Transactions). With
the option enabled, ILDS items can be voided using a direct (transaction)
void. The process is as follows:
1. A drink item is sent from the ILDS to the MICROS POS.
2. The ILDS operator picks up the check and realizes that the wrong
drink was poured.
3. To void the incorrect item, the ILDS operator selects [Void] and then
rings the incorrectly entered drink item.
MD0003-065
Revision D
May 2, 2005
Page 546 of 814
3700 POS
What’s Enhanced
4. The ILDS operator posts the correct drink item to the check.
Note
Once a drink item is posted from the ILDS to the POS, the ILDS
operator cannot void the item by simply highlighting it and
pressing the void key. Doing so will remove the line item from
the current check, but will not update the ILDS. When the next
customer arrives, and the ILDS operator posts a drink for him,
the new check will include both the new customer’s drink item
and the old (voided) item.
POS Operations
Condiment Groups Increased from 64 to 256
A condiment group is a subset of all of the condiment menu items
currently in the system. Condiment groups are linked to regular menu
items and are used to limit the condiment choices offered when a regular
menu item is ordered.
Previously, users were able to define up to 64 condiment groups. With
this release, the number has been expanded to 256. All related
functionality remains the same.
MD0003-065
Revision D
May 2, 2005
Page 547 of 814
3700 POS
What’s Enhanced
Credit Authorization Prompts
When a credit card is tendered for payment, the provider may require
additional information from the customer before authorizing the request.
If the customer is unable to answer correctly, the transaction is canceled.
This added security precaution allows the system to verify the identity of
the person using the credit card before the account is affected.
To support this process, three new functions have been added. The
functions are:
process_ca_prompt(..) — This is a higher level function that calls
either the get_ca_alpha_prompt_response() function or the
get_ca_menu_prompt_response() function, depending on the type
of information required, and then resubmits the credit authorization
with this additional data.
get_ca_alpha_prompt_response(..) — This function prompts the
user for additional alphanumeric information using the default
keyboard screen.
get_ca_menu_prompt_response(..) — This function prompts the
user for a numerical selection from a standard Select Dialog Box. The
options are determined by the text in the original credit authorization
response.
Authorization prompts are returned, for example, when a check is
currently opened and when a check is service totaled while an
authorization is in progress and later picked up.
MD0003-065
Revision D
May 2, 2005
Page 548 of 814
3700 POS
What’s Enhanced
Credit Card Security Enhancements
In response to evolving credit card security guidelines, additional
controls have been added to the 3700 POS System.
With this release, the system provides default masking of a credit card
number (all but the last four digits) and its expiration date (all digits)
from any printout or display device where it might be viewed by an
unauthorized person. This includes workstation displays, hardware
devices (pole displays, hand-helds, PinPads), as well as system reports,
journals, and log entries.
To accommodate merchants who, for a variety of reasons, may not want
to mask all credit card data, two options were added that provide some
flexibility to the user:
Override Credit Card Masking (Employees | Employee Classes |
Privileges | Privilege Options) — When checked, this option allows
members of the employee class to view/print credit card numbers and
expiration dates in reports run via the Credit Card Utility.
Mask Cardholder Name (Sales | Tender/Media | CC Tender) —
When checked, masks the credit cardholder’s name from any printout
or display device where it might be viewed by an unauthorized
person. This includes workstation displays, hardware devices (pole
displays, hand-helds, PinPads), as well as system reports, journals,
and log entries.
If checked, the cardholder name will not be stored in the MICROS
database and will also be masked from reports run through the Credit
Card Utility. This is true even if the option Override Credit Card
Masking has been selected.
This option overrides the revenue center option to print cardholder
name on credit card voucher (Revenue Center | RVC Credit Cards |
Printing | Do not print customer name on voucher).
MD0003-065
Revision D
May 2, 2005
Page 549 of 814
3700 POS
What’s Enhanced
External Electronic Payments with Debit/Credit Cards
The RES POS System has been modified to support the processing of
electronic payment transactions (both credit and debit) using external
(third-party) software. This software is responsible for the customer input
requirements, communication protocols, and bank messaging formats
needed to process credit and debit transactions.
Payment software is installed on the RES Server independently of the
MICROS applications, and requires a compatible credit card driver. At
this time, only the Tender Response driver (CaTR.dll) supports this
capability.
The External payment option is modeled after (and provides an
alternative to) Canadian-style debit transactions with NetCMS. The
enhancement supports existing functionality, including charged tips,
partial payments, and requests for cash back.
The advantage of using this method is that all debit and credit
transactions are handled through a single tender record, linked to one
credit card driver. With an external tender, the POS workstation simply
relays the request and a check total and waits for a reply. It is the
responsibility of the external application to identify the card type, gather
relevant account information and customer add-ons (e.g., tips and cash
back amounts), compose a suitable payment request, and forward it all to
the credit card processor.
Description
External payment requests are initated by the POS workstation in one of
three ways:
MD0003-065
Revision D
May 2, 2005
Page 550 of 814
Card Swiped Via PINPad — The customer swipes his own card
(credit or debit) through a tethered PINPad device and responds
directly to prompts for account information.
Card Swiped on POS Workstation — The cashier swipes the
card (credit or debit) at the workstation and hands it back to the
customer. The customer keys in account and transaction
information via a tethered PINPad device.
3700 POS
What’s Enhanced
Traditional Credit Card Authorization — The customer
surrenders card to server. The server obtains authorization from
the credit card processor and returns with a voucher for customer
to complete and sign. (Credit Only)
In all three scenarios, once a payment request is passed to the RES server,
the workstation is no longer directly involved in the payment transaction,
but stands by and waits for a response (Step 1). From the Server, the
third-party software program evaluates the request (Step 2) and prompts
the customer for additional information through a tethered PINPad
device (Step 3).
Having collected the necessary data, the external program generates an
appropriate credit or debit purchase request and sends it to the credit card
processor (Step 4). The response is returned to the external program,
which forwards it to the workstation via the payment driver (Step 5).
MD0003-065
Revision D
May 2, 2005
Page 551 of 814
3700 POS
What’s Enhanced
The authorization message includes one or more of the following items:
Card type (debit, credit)
Account information (track data, card number, expiration date)
Payment amount
Tip amount
Cashback amount
Voucher information (for printing)
At the workstation, the payment response for a credit transaction is added
to the check as a credit authorization. Authorization requests are settled
as a batch process, which means that payment is not made until
settlement. As such, credit transactions may be changed at any time prior
to settlement.
Debit transactions are finalized when the response is returned. They are
not editable once the check is closed.
Enabling
To support this functionality, a new External payment option has been
added to the Type field in POS Configurator (Sales | Tender/Media |
General). When linked to a payment tender (debit or credit), the system
directs the payment request to the third-party application which then
handles the credit authorization.
To implement this feature, at least one new tender record must be
programmed in POS Configurator and linked to a touchscreen key on the
POS workstation. External tenders are programmed like any other credit
card tender, with the following exception:
On the General tab:
Type = External
On the Tender tab:
MD0003-065
Revision D
May 2, 2005
Page 552 of 814
Reference required — Check option if the customer’s card will
be swiped at the PINPad.
3700 POS
What’s Enhanced
Clear the option if the customer’s card will be swiped at the POS
workstation.
Note
Users may opt to create two External payment keys, to
allow the card to be swiped at the workstation or on the
PINPad. Regardless of how the card is swiped, requests
for information from the customer will be displayed on
the PINPad device.
Clear the Assume paid in full option to allow for partial
payments.
From the Charged Tip drop-down list, select the service charge
that will be used with this tender key.
On the Credit Auth tab:
CA Driver and EDC Driver = CaTR
CA Tip % = 0
Initial Auth Amount = 0
Do NOT configure Preambles.
Configuring the Tender Response Driver
At this time, the Tender Response driver (TR.dll) is the only driver
available to 3700 POS users that supports external payments. The
following settings represent the suggested configuration for this driver in
POS Configurator | Devices | CA/EDC Drivers.
On the Driver tab:
Driver Code = TR
On the System tab:
CSS Port Arbitration — This field is neded to provide
compatibility with the Credit Card Server. It should always be 0.
MD0003-065
Revision D
May 2, 2005
Page 553 of 814
3700 POS
What’s Enhanced
MD0003-065
Revision D
May 2, 2005
Page 554 of 814
Host IP Address: Port — Enter the IP address and port of the
primary host connection. This field is only used if TCP/IP is
enabled.
Backup IP Address: Port — Enter the IP address and port of the
backup host connection. Backup connections are triggered when
the system cannot establish communications via the primary host
address. This field is only valid if TCP/IP is enabled.
Currency Code — Enter the 3-digit number assigned by the
Credit Card Processor to identify the type of currency used. In the
USA, the code is 840.
Country Code — Enter the 3-digit number assigned by the
Credit Card Processor to identify the country in which the
merchant is located. In the USA, the code is 840.
City (Zip) Code — Enter the 3-digit number assigned by the
Credit Card Processor to further identify the merchant location
wthin a country. In the USA, the 5- or 9-digit Zip Code for the
merchant is used. Merchants located outside of the USA will be
assigned a number by the Credit Card Processor.
Time Zone — Enter the 3-digit number assigned by the Credit
Card Processor that is used to calculate the local time zone within
the Tender Retail System (i.e., standard local time zone
differential from Greenwich Mean Time (GMT)).
Merchant City — Enter the city where the merchant is located.
Merchant State — Enter the 2-character state/province code
assigned by the Credit Card Processor that is used to identify the
merchant. The two characters entered here must correspond to the
state/province that prints on the credit card voucher.
3700 POS
What’s Enhanced
Japanese Tax Changes
The Japanese government levies a national Consumption Tax (currently
at 5%) on all retail goods and services. Until a few years ago, Japan also
levied a 3% Local (Excise) tax, which was only applied when the taxable
sales exceeded 7500 Yen (¥) per guest. Both were add-on taxes (i.e.,
charged to the customer in addition to the stated price of the item).
In 1998, Japan eliminated the Local tax requirement. At the time, no
coding changes were necessary. Users could simply delete the second tax
rate or set it to 0.
In 2004, Japan revised the Consumption Tax, changing the calculation
method from an add-on to an inclusive tax. With inclusive taxes, the tax
amount is already figured into the displayed price of the menu item. For
example, if a menu item is priced at 100 Yen (¥), that amount comprises
95 ¥ for the menu item and 5 ¥ for the obligatory 5% Consumption Tax.
POS Changes
Revisions to the Japanes Tax Code required few structural changes to the
3700 POS System. Most of the operational issues are embedded in the
software code and are only relevant when the POS Configurator option
Enable Japan Tax (Restaurant | System | Taxes) is selected.
MD0003-065
Revision D
May 2, 2005
Page 555 of 814
3700 POS
What’s Enhanced
The following table lists the operations that comprise the Japanese tax
feature. For comparison, the current and previous implementation of
these feature are included.
Current Version
Implements Tax Rate 1 as the
Consumption Tax. This rate must
be configured as an inclusive tax.
Applies the selected rounding
option to the tax totals only. The
method used depends on whether
the Japan Tax Calculation is set
to Round Result (up) or
Truncate Result (down).
Calculates taxes by item and by
check total. Stores both values in
the database for inclusing in
system reports.
Only includes tax totals on
printed check when Print
Separate Tax Lines (Revenue
Center | RVC Print Design |
Guest Checks) is enabled.
Guest check tax totals based on
the “Inclusive Tax by Check”
data.
MD0003-065
Revision D
May 2, 2005
Page 556 of 814
Previous Version
Implemented Tax Rates 1 and 2
as the Consumption Tax and
Excise Tax, respectively. Both
tax rates must be configured as
add-on taxes.
Applied the selected rounding
option to the tax, discount, and
service charge totals. The method
used depends on whether the
Round Japan Tax option is
checked (rounded/up) or cleared
(truncated/down).
Calculated and posted taxes by
item (as is consistent with add-on
taxes).
Itemized the tax totals
(Consumption and Excise) on the
printed guest check.
Guest check tax total based on
sum of individual menu item
taxes.
3700 POS
What’s Enhanced
Changes to POS Configurator
Supporting the operational changes, the following configuration options
were added or modified for this release:
Enable Japan Tax (System | Restaurant | Taxes) — When checked,
this option directs the system to implement the operational rules
governing Japanese taxes. These rules include using the first Tax
Rate entry (Sales | Tax Rates) as the Consumption Tax for all goods
and services. It also activates tax rounding, based on the method
selected in the Japan Tax Calculation option.
Japan Tax Calculation (formerly Round Japan Tax) — This
option was changed from a check box to a radio button to clarify the
choices. If Round Result is selected, the tax calculation will be
rounded up to the nearest whole number (e.g., 7.5 ¥ = 8 ¥). If
Truncate Result is selected, the tax calculation will be rounded
down (e.g., 7.5 ¥ = 7 ¥).
Print Separate Tax Lines (Revenue Center | RVC Print Design |
Guest Checks) — When checked, prints a separate tax line for each
rate collected against the current guest check. If this option is not
selected, the tax totals will not be included. (For more on this option,
refer to the section Print Itemized Tax Totals on Guest Checks,
beginning on page 571).
System Reports
For reporting purposes, Japanese inclusive taxes are calculated twice and
stored in separate columns in the database. The first calculation uses the
traditional method, based on individual menu items. That is, the tax is
calculated for each menu item on a guest check. The sum of the taxes is
reported as the Tax Collected column.
The second calculation is new with this release, and is based on the check
total itself. The results are shown in the Check Tax Collected column of
system reports. A new Tracking Total Type — Inclusive Tax by Check
— allows users to include the check taxes totals in custom reports.
MD0003-065
Revision D
May 2, 2005
Page 557 of 814
3700 POS
What’s Enhanced
Finally, six new tax report templates were created for the Japanese tax
feature:
Consolidated Japanese Tax Totals by Revenue Center
(tax_r002_japan.rpt)
Consolidated Japanese Tax Totals (tax_s002_japan.rpt)
Daily Japanese Tax Totals by Revenue Center
(tax_r001_japan.rpt) — both 80- and 40-column
Daily Japanese Tax Totals (tax_s001_japan.rpt) — both 80- and
40-column
The templates are modified versions of the standard Revenue Center and
System Tax Reports and include two new columns of data. The first
column shows the Check Tax Collected data, based on the new tracking
total type. The second column is a Rounding Total, which is based on the
formula:
Check Tax Collected — Tax Collected.
A sample of the 80-column daily Japanese Tax Totals is shown below:
MD0003-065
Revision D
May 2, 2005
Page 558 of 814
3700 POS
What’s Enhanced
The following is a 40-column version of the same report:
MD0003-065
Revision D
May 2, 2005
Page 559 of 814
3700 POS
What’s Enhanced
Payment Authorization for Personal Checks
In the past, if a customer wanted to pay using a personal check, the
system relied on the cashier (or manager) to verify check information and
approve the transaction.
With this release, the tender feature was enhanced to include support for
electronic authorization of personal checks. The process is similar to a
debit card transaction, and includes the ability to add a charged tip or to
request cash back. Threshold values (minimum and maximum amount)
can be established for cashback requests. An authorization step can also
be programmed into the personal check procedure, but is not required.
Note
Cashback requests are programmed as service charges, which
allows them to be subtracted from Cash totals on system reports.
For information on setting up cashback limits, refer to the
section Min/Max Values for Discounts/Service Charges,
beginning on page 534 of this document.
The Personal Check feature was designed to work with an electronic
payment driver. At this time, there are no MICROS drivers that support
this feature.
Although not required, the feature is designed to work with the Epson
TM-H6000 series of multi-station printers. These printers include both a
MICR (magnetic ink character recognition) device and a slip endorsement device, which allows them to read bank account information from
the front of a personal check, and the ability to print endorsement/
franking information on the back.
In the absence of an Epson TM-H6000 printer, users will be able to enter
checking account information manually and to annotate or stamp an
endorsement on the back of the check.
MD0003-065
Revision D
May 2, 2005
Page 560 of 814
3700 POS
What’s Enhanced
Using the Feature
To use the personal check feature, the cashier presses a programmed
[Personal Check] payment key. Through a series of prompts, the cashier
is asked to enter the check amount, place the physical check into the
MICR device, and enter the customer’s social security number (optional).
When the [Enter] key is pressed, the MICR device pulls the check in,
reads the bank routing data from the check surface. If a personal check
tender is not linked to an electronic payment driver, the system simply
prints the endorsement on the back, and closes the check.
If a payment driver is installed, the system pauses after reading the bank
rounting data and composes an electronic message for the bank
processor. When confirmation is received back, the transaction resumes.
The endorsement is printed on the back and the check is closed.
Optional Processes
In addition to handling a basic transaction, the Personal Check feature
also supports the following:
Tips — Before the guest check is tendered, the cashier can include a
tip amount in the total. The check is processed as before, except that
the entered Check Amount includes the tip.
Cash back — If the Check Amount entered is greater than the
transaction total, the system assumes the difference is a cashback
request. A confirmation dialog is displayed. Once the customer
agrees with the amount, the check is processed as before. The
cashback amount is displayed on the POS screen as “Change Due.”
Partial Payments — If cashback and tips are going to be part of a
partial tender transaction, the cashier applies the other payments
before entering the check tender.
Voids — Personal checks may be voided by creating a new guest
check, pressing the [Void] key and ringing up the items. When the
payment key is pressed, the user will need to reinsert the check into
the printer to allow the MICR to reread the bank information and
reprocess the tender as a negative amount. Afterwards, the check may
be returned to the customer.
MD0003-065
Revision D
May 2, 2005
Page 561 of 814
3700 POS
What’s Enhanced
Error Handling
The Personal Check feature is designed to work in both standalone and
backup server mode. The system should proceed as usual, with no
apparent change in processes.
Should the Epson 6000 MICR device fails during a transaction, an error
message will be displayed and the system will prompt the user to enter
the check information manually. Similarly, if the franking device is
unable to print the endorsement on the check, an error message will be
shown. Once the cashier clears this message, the check will be ejected
from the printer. The check will be closed as usual.
Endorsement/Franking Information
The check trailer feature has been enhanced to support printing
customized franking information on the back of the check. Some of this
information is customer-specific and can be pulled from the check itself.
To do this, a series of pseudo-macros (similar to the ISL event feature)
were added. They are used to incorporate the account data when the
trailer is printed.
The following table lists the available macros:
MACRO
MD0003-065
Revision D
May 2, 2005
Page 562 of 814
Represents
Print Format
^^ACCT
Personal Check
Account Number
0000000000000
(13 digits max.)
^^AMT
Total Amount of the
Tender
0000000000000.000
(17 characters max)
^^CHK#
Check Sequence
Number in database
0000000000
(10 characters max.)
^^CSH
Cashier Object Number
If there is no cashier,
then this will represent
the transaction
employee object
number.
0000000000
(10 characters max.)
3700 POS
What’s Enhanced
MACRO
Represents
Print Format
^^DATE
Date/Time Stamp
MM/DD/YYYY TIME
(17 characters max)
EX: 01/13/2004 11:34
^^PCHK
Check Number of
Personal Check
000000 (6 digits max.)
^^RVC
RVC Object Number
0000000000
(10 characters max.)
^^RT
Bank Routing Number
000000000
(9 digits max.)
^^TMED
Tender/Media Name
AAAAAAAAAAAA
(12 characters max.)
^^UWS
UWS Object Number
0000000000
(10 characters max.)
MD0003-065
Revision D
May 2, 2005
Page 563 of 814
3700 POS
What’s Enhanced
Defining the Personal Check Trailer
Trailers are defined on the Descriptors | Trailer form in POS
Configurator. The use of macros is illustrated in the text lines below:
For comparison, the following examples show how incorporating the
macros in the definition translates into a printed trailer:
MD0003-065
Revision D
May 2, 2005
Page 564 of 814
From Programming:
To Printed Check:
^^DATE
^^RVC ^^UWS ^^CSH ^^CHK
^^TMED
$^^AMT
For Deposit Only
Mike Rose Cafe 1234567890
NATIONAL CITY BANK
Account # 0300000123
01/13/2004
11:34
1512 01 000999 0045
Check
$1.00
For Deposit Only
Mike Rose Cafe 1234567890
NATIONAL CITY BANK
Account # 0300000123
^^ACCT
^^RT
^^PCHK
9876543210
43556677898
RETURN CHECKS TO:
NATIONAL CITY BANK
Cleveland, Ohio
ACCT#: 0300000123
RETURN CHECKS TO:
NATIONAL CITY BANK
Cleveland, Ohio
ACCT#: 0300000123
3322
3700 POS
What’s Enhanced
Chaining Trailers
Typically, a trailer is limited to 12 lines of text. However, franking
information can require up to 40 lines. To accomplish this, an option was
added that allows a user to chain trailers and print them serially on the
guest check. This option is only available for use with the Personal
Check feature.
To chain trailers:
1. Open POS Configurator and got to the Sales | Descriptors | Trailers
tab.
2. Add a new record. Enter a name that indicates it is the first part of the
Personal Check trailer (e.g., PCheck #1).
3. Enter the first 12 lines of the trailer and save the record.
4. Add a second record and identify it as accordingly (e.g. PCheck #2).
Enter the next 12 lines of the trailer and save. Repeat this step until all
of the trailers lines have been programmed. Up to 40 lines is allowed.
5. Click the
icon to open the table view.
6. With the first
Personal Check
record highlighted,
locate the column
labeled Next Trailer.
Right-click in the cell
to open the dropdown list and select
the second trailer.
7. Repeat Step 6,
linking the second
trailer to the third,
and the third to the fourth (if applicable).
8. Save all records and close the form.
MD0003-065
Revision D
May 2, 2005
Page 565 of 814
3700 POS
What’s Enhanced
Using the Epson TM-H6000 Printer
The Epson TM-H6000 is a multi-station printer that provides for roll,
slip, MICR (magnetic ink character recognition), and franking capability
from the same device. The last two features (MICR and franking) make it
an ideal printer for use with the Personal Check feature. However, the
following limitations should be noted:
The device must be configured for local use only. No other client
workstation should send print jobs to this device, nor should it be
configured as a backup printer.
Tasks are handled serially. For example, a MICR operation must be
completed before a guest check print job can be processed.
Line-by-line printing is not supported, as this will interfere with
MICR functionality.
The device is only supported on a Windows workstation. Win CE
workstations (WS4s or HHTs) are not supported in this release.
Enabling
OPOS setup for this device is version-specific. It requires Epson OPOS
ADK Version 2.30E SP3 OPOS 1.7 or higher. Users who do not have the
correct OPOS driver can download it from the Epson website.
To properly setup a TM-H6000 or TM-H6000II OPOS printer, the
following configuration should be used:
1. Create the OPOS device definition using the Epson Setup POS
application.
Warning!
MD0003-065
Revision D
May 2, 2005
Page 566 of 814
Do not setup a Logical Device Name (LDN) for
the device. The default name of ‘TM-H6000’ or
‘TM-H6000II’ should be used.
3700 POS
What’s Enhanced
2. Configure the device in POS Configurator:
Open the Devices | Devices form and create two new printer
records:
— A roll printer (OPOS receipt)
— A slip printer (OPOS slip)
Go to the Printer Interface tab. Enter the same OPOS device
name and configure as follows for both devices:
— Check the Use polled status option
— Clear the Do not release print at end of print job option
Note
This option is enabled by default when an OPOS
printer is defined. Failure to disable this option
will cause OPOS to hold onto the printer after the
print job, preventing the MICR device from
reading the check information or otherwise
operating properly.
Open the Devices | User Workstations form. Select the
workstation that will use this printer.
Go to the Printers tab. Link the device to all relative printer
types.
Go to the Peripherals tab. Add a new record to the list of
peripherals and configure as follows:
— Peripheral Type = MICR
— Connection Type = OPOS
— Device Name = TM-H6000 or TM-H6000II
Open the Revenue Center | RVC Printing form. Select the revenue
center where the printers will reside. Go to the Options tab and
check the Disable slip printer eject option.
MD0003-065
Revision D
May 2, 2005
Page 567 of 814
3700 POS
What’s Enhanced
New Fields in POS Configurator
To support this functionality the following options have been added to
POS Configurator:
Sales | Tender/Media | Personal Check (new tab)
Personal Check — Indicates that the selected tender is a personal
check. When checked, this option allows the tender to read the
bank check number, bank routing information, and bank account
number. It addition, it disables the following forms/options:
All fields on the CC Tender tab.
All fields on the Credit Auth tab.
Print endorsement on the Printing tab.
Print French personal check on the Printing tab.
To use this tender type for personal check authorizations, a
custom electronic payment driver must also be installed.
Authorization required — When enabled, requires the user to
select a check driver for use with this tender.
Check Driver — Specifies the electronic payment driver from a
list of installed drivers.
Prompt for Social Security Number — When enabled, prompts
the user to enter the customer’s social security number before
continuing the transaction.
Prompts for cashback amount — When enabled, prompts the
employee to specify how much cash the customer is requesting
from his bank account via the highlighted tender/media. Selecting
this option allows the system to:
Provide cashback through prompting
Verify an overtender
Prompt for payment amount
Note
MD0003-065
Revision D
May 2, 2005
Page 568 of 814
This option is invalid unless the Debit Card box is
checked.
3700 POS
What’s Enhanced
Sales | Tender/Media | Printing
Print franking information — When enabled, prints the
franking information on the back of the personal check. The
franking lines are programmed on the Descriptors | Trailers form.
This option is used instead of Print endorsement, and only
applies to personal checks. It will only work if the Personal
Check option (Sales | Tender/Media | Personal Check) is
enabled.
Employees | Employee Classes | Transactions
Authorize personal check override — When enabled, allows
members of this employee class to accept the personal check after
receiving tentative approval from the processor.
Typically, this override option has to be enabled in the check
driver.
Revenue Center | RVC Print Design | Personal Check (new tab)
Franking Information — From a drop-down list of trailers,
allows the user to specify which one will be used as the
endorsement text printed on the back of a personal check.
Revenue Center | RVC Touchscreens | Touchscreens | Workstation
Personal Check Alpha Screen — Allows the user to select the
touchscreen to be displayed on the workstation when the user
needs to manually enter information for a personal check.
Revenue Center | RVC Touchscreens | Touchscreens | Hand-Held
Personal Check Alpha Screen — Allows the user to select the
touchscreen to be displayed on a hand-held device when the user
needs to manually enter information for a personal check.
MD0003-065
Revision D
May 2, 2005
Page 569 of 814
3700 POS
What’s Enhanced
Printing
Enhanced Guest Check Trailer
Print configuration of the guest check has been modified to include a
second, optional trailer. When defined, the trailer will be printed between
the check detail and the check totals.
With a second trailer, businesses can
encourage customer feedback by
incorporating a survey form, menu
suggestion box, or other marketing
information in the guest check itself.
Custom SIM scripts may be used to refine
the format and to limit how often this
information is printed — perhaps every 6th
or 8th check.
The placement of the trailer between the
check detail and totals ensures that the
customer will see the information. In
return, the customer’s response (or lack
thereof ) will be sure to make its way back
to management.
Enabling
To support this feature, a new Guest Check
Detail Trailer option was added to POS
Configurator (Revenue Center | RVC Print
Design | Trailers). The option consists of a
drop-down box, which lists all of the trailers currently in the system. Any
trailer selected in this field will be printed in the detail area the check. In
other words, this field determines the trailer’s location, not its content.
As with regular trailers, the text of the guest check detail trailer is defined
on the Sales | Descriptors | Trailer form.
MD0003-065
Revision D
May 2, 2005
Page 570 of 814
3700 POS
What’s Enhanced
Print Itemized Taxes on Guest Check
A new print option was added that allows users to include an itemized list
of taxes in the summary area of a guest check or customer receipt. The
list is printed after the check Totals and includes a separate line for each
of the active tax rates. Unlike the existing Tax Total line, which sums up
the add-on taxes only, the itemized values represent all taxes (add-on and
inclusive) incurred on the check.
Enabling
To support this print function, the option Print separate tax lines has
been added to POS Configurator (Revenud Center | RVC Print Design |
Guest Checks). When checked, the system will automatically calculate
and itemize the taxes charged to the customer.
Example 1 – Guest Check With Inclusive Taxes Only
The example on the left shows how the check totals would display
when inclusive taxes are used and the option is disabled. With
inclusive taxes, there is no separate tax total. The example on the
right shows the same check after enabling the option to itemize taxes.
MD0003-065
Revision D
May 2, 2005
Page 571 of 814
3700 POS
What’s Enhanced
Example 2 – Guest Check With Add-On Taxes Only
The example on the left shows how the check totals would display
when add-on taxes are used and the option is disabled. (This is the
traditional view.) The example on the right shows how the check
would be formatted if the option to itemize taxes was enabled.
Because the taxes are all add-on, the sum of the itemized tax values
should equal the Tax total listed above the check Total.
MD0003-065
Revision D
May 2, 2005
Page 572 of 814
3700 POS
What’s Enhanced
Example 3 — Guest Checks With Add-On and Inclusive
Taxes
The example on the left shows how the check totals would display
when add-on and inclusive taxes are used, and the option is disabled.
The example on the right shows the same check after enabling the
option to itemize taxes.
In both checks, the tax on the food items are applied as add-ons,
while the beverage tax is inclusive. When both taxes are present, the
Tax total (which shows add-on taxes only) will not equal the sum of
the itemized taxes.
MD0003-065
Revision D
May 2, 2005
Page 573 of 814
3700 POS
What’s Enhanced
Slip Printing on the Workstation 4
Print functionality for the Workstation 4 (WS4) was enhanced to support
a local slip printer. This feature coincides with the addition of supervised
printing on a WinCE workstation (see page 578 below).
The WS4 currently supports three types of slip printers:
Epson TM-290 Slip (Standard)
Epson TM-295 Slip (290 Emul.)
Epson TM-295 (Standard)
Note
OPOS Slip printers are only supported on Win32 workstations.
Background
MICROS has historically distributed (and will continue to distribute) an
Epson TM-290 printer and a modified version of the TM-295 model. The
TM-295 printer is not a true TM-295, but includes a special firmware
chip that allows it to emulate TM-290 behavior. The distinction is
important to RES users. The majority of non-MICROS resellers who sell
the TM-295 are, in fact, providing a standard TM-295 printer. In the past,
this model was not compatible with RES software.
To resolve the issue, MICROS has added support for a Standard TM-295
printer in this release. The enhancement has necessitated the following
changes in way that the POS Configurator defines Printer types for the
RS-232 Interface (Devices | Devices | Printer Definitions):
MD0003-065
Revision D
May 2, 2005
Page 574 of 814
The existing Epson TM-290, TM-295 Slip entry was changed to
Epson TM-290, TM-295 (290 Emul.). This value should be used
to configure a TM-290 printer or a TM-295 in 290 emulation
mode.
A new Epson TM-295 entry was added. This value should be used
for standard TM-295 printers.
3700 POS
What’s Enhanced
Model Differences
Once of the consequences of supporting the standard TM-295 is that
users must differentiate between their device models and program
accordingly. In an established site, where users may not have access to
purchasing records, this could be difficult. For one thing, there are no
obvious physical differences between a standard TM-295 and the TM295 with 290 emulation. Instead, product variations are found in the
internal coding structure.
During operations, an improperly configured printer may appear to work
correctly in some areas and fail in other. Typically, the following
behaviors are observed:
TM-295 (290 Emul.) configured in Standard Mode — Display
an error message indicating that a Printer Communication error
has occurred whenever a print job is executed.
TM-295 Standard configured in 290 Emulation Mode —
Reacts as follows:
Successfully executes the print job, but at a much slower rate.
On completion of the print job, ejects the form to the back of
the printer instead of the front.
Depending on the platform and/or timing, generates a “Form Out
of Place” error after the form has been ejected.
Note
Existing customers who are upgrading to RES 3.2 sp2 will need
to check their slip printer settings after installation. Any
printers that were defined as ‘Epson TM-290, TM-295 Slip’ will
be automatically converted to the new ‘Epson TM-290, TM-295
(Emul.)’ entry.
If a customer is also using standard TM-295 printers, they will
need to be redefined using the new ‘Epson TM-295’ setting.
MD0003-065
Revision D
May 2, 2005
Page 575 of 814
3700 POS
What’s Enhanced
Slip Printer Self-Test
The only reliable way to ensure that the printer is using the correct
configuration is to perform a printer self-test and check the internal
firmware version.
To run a printer self-test:
1. Press the Release button to release the paper clamp.
2. Turn off the printer.
3. Place a form in the printer so that it is fully inserted into the slip
station.
4. Hold down the Release button and simultaneously turn the printer
back on.
5. Let go of the Release button.
The printer should start printing on the inserted form. The version
information is printed on the first line of the self-test, so the printer
may be turned off after this is printed.
6. Remove the form. The version number will be written as follows
(where X.XX could be any series of digits):
MD0003-065
Revision D
May 2, 2005
Page 576 of 814
Version X.XX EP — Indicates a TM-295 Printer in 290
Emulation mode.
Version X.XX ESC/POS — Indicates a Standard TM-295
Printer.
3700 POS
What’s Enhanced
Other Considerations
In addition to configuring the devices, the following options are affected
when setting up a WS4 Slip Printer:
Do not prompt for backup printing (Revenue Center | RVC
Printing | Options) — When checked, disables supervised
printing at the revenue center level. However, since slip printing
requires supervision, this option is overridden for WS4 printers.
Disable Slip Eject (Revenue Center | RVC Printing | Options) —
When checked, does not eject the form from a slip printer after
the job is finished or a change form request is processed.
Print Guest Check (Employees | Employee Classes | Printing)
— When the ‘By Round’ radio box is checked, prints the
transaction detail at the end of every service round. In addition,
slip printers can be configured to print each round on the same
form by ensuring that an appropriate number of line feeds has
been added to the beginning of each round’s print job data. This
positions the form to resume printing immediately after the
previous round’s detail.
Error Recovery
If an error occurs during printing on a WS4 slip printer, an error dialog
will be displayed along with the option to Resume printing. When the
print job is resumed, the system will start over, either at the beginning of
the print job or, if this is a multi-form task, at the top of the current page.
This behavior differs from the process used by the Win32 workstations.
When an error occurs on a Win32 slip printer, the system resumes with
the line immediately after the last line sent to the printer.
COM Limitation
The COM4 and COM5 ports on the WS4 operate in both RS232 and
RS422 (IDN) mode. This design creates a limitation on the number of
signal wires that can be used for RS232 mode. Specifically, the signal
wires that allow a serial device to communicate using hardware flow
control are not available on these ports.
MD0003-065
Revision D
May 2, 2005
Page 577 of 814
3700 POS
What’s Enhanced
Because the TM-295 is required to use hardware flow control (see
revision note on page 604), it cannot be used on COM 4 or COM5 on the
WS4. This is true for COM4 on the Eclipse, which also operates in
RS232/RS422 mode.
Supervised Printing from a WinCE Workstation
In previous releases, RES configuration only allowed for unsupervised
printing from a WinCE workstation to a local (attached) printer, or to a
remote printer attached to a Win32 or WS4 workstation.
With this release, local supervised printing has been extended to the RES
Win32 CE workstations, which include the Mobile MICROS hand-held
(HHT) and Workstation 4 (WS4) units. The enhancement provides
supervised support for:
HHT
Roll printing for the Extech S3500THS (infrared belt printer; for
the HHT only)
File printing
WS4
Roll printing for all supported roll printer
Slip printing for the Epson TM-290 slip printer
File printing
Remote supervised printing from a WinCE workstation is not supported.
Verbosity
In addition to the changes to the print module, the following changes
were made to the verobosity:
MD0003-065
Revision D
May 2, 2005
Page 578 of 814
Altered the CE PrintManager and PrintControllerCE projects to
use the existing Win32 registry values for their verbosity settings.
Removed the CE Print Manager and CE Print Controller entries
from the Verbosity tab in Control Panel.
3700 POS
What’s Enhanced
Background
Order device printing can be divided into two general categories:
Unsupervised — POS Operations does not monitor or allow a user
to affect a print job once it is sent to the printer.
After the operator initiates a print job, the message “Printing — One
Moment Please,” is displayed while the information is assembled.
When the data is passed on, the system automatically resumes normal
POS operations.
If an error occurs during printing, the print job is redirected to the
designated backup printer or, if no backup printer is defined, the job
is aborted and an error message is relayed to the user.
Supervised — POS Operations monitors print activity until the task
is completed
After the operator initiates a print job, POS Operations displays the
message “Printing — One Moment Please,” as the information is
assembled and passed on to the printer. The system waits at the
current touchscreen until the print job is complete or an error occurs.
If an error does occur during printing, the operator is presented with
options for handling it. Depending on the programming, the operator
may choose to send the print job to the designated backup printer (if
any), abort the print job (if backup is not defined), or resume (retry)
printing on the primary print device. The resume option allows a user
to fix the error by closing a lid, clearing a paper jam, etc., before
continuing to print.
MD0003-065
Revision D
May 2, 2005
Page 579 of 814
3700 POS
What’s Enhanced
Limitations
The option to use supervised or unsupervised printing is set at the
Revenue Center level. To accommodate the limitations imposed on
WinCE clients, the following rules are observed:
Supervised print jobs sent to a remote Roll printer will be
automatically converted to an unsupervised (i.e., non-interactive)
print job and processed accordingly.
Supervised print jobs sent to a remote Slip printer will be aborted.
An error dialog will be displayed to the operator indicating that an
invalid printer configuration is in use.
Slip printers may not be used as the backup print device. When a
print job is targeted for a printer that uses a slip printer as its
backup, the system automatically converts it to a supervised print
job, even if the Revenue Center option (Do not prompt for
backup printing) is disabled. In this situation, an error dialog
will be displayed indicating that an invalid printer configuration
is in use.
Line-by-line print options (which required supervised printing)
are ignored when a print job originates from a WinCE
workstation. The print job is only sent to the printer when the
entire print job is assembled.
Customized Installation Procedures
Installation procedures for RES products and software upgrades have
been enhanced to accommodate Sites with complicated Client/Server
configurations. These have been included as Appendix I in the RES 3.2
Service Pack 2 — Setup Instruction manual, MD0003-058 Rev. A.
MD0003-065
Revision D
May 2, 2005
Page 580 of 814
3700 POS
What’s Enhanced
GR Versions of CAL and WS4 Platform Added
The McrsCAL and PlatformUpdate folders have been updated with the
General Release (GR 1) files to ensure that the most recent WS4 platform
and CAL updates are installed with the RES package.
With this release, RES Setup will now install WS4 CAL V1.0.2.27 and
WS4 Platform V4.0.5.3 (GR 1).
SIM
Event Begin_Check
Syntax
Event BEGIN_CHECK
Example
event BEGIN_CHECK
errormessage “Check Begun Check Number is “, @Chnum
endevent
Event Pickup_Check
Syntax
Event PICKUP_CHECK
Example
event PICKUP_CHECK
errormessage “Check Picked up “, “Num detail = “, @Numdtl
endevent
MD0003-065
Revision D
May 2, 2005
Page 581 of 814
3700 POS
What’s Revised
What’s Revised
A revision is defined as a correction made to any existing form, feature,
or function currently resident in the 3700 POS software. To qualify as a
revision, the change must satisfy the following criteria:
The basic form, feature, or functionality must be part of the previous
version of the software.
The change must replace the current item or remove it from the
application.
Revisions
Summarized
The table below summarizes the revisions included in this version.
Module
Feature
Bi-Weekly Autosequences Do Not
Run Correctly After DST Change
14163
588
Database
Check Carry Over Count and Totals
Do Not Match Daily System Sales
Report
13878
588
Employee Shift Totals Not Posted
As Unique Records
15319
589
Error When Posting KDS
Transactions
15263
589
Posting Slows Down Considerably
With Many Carried Over Checks
15063,
15901
589
Separate Batches Not Created for
Each Merchant ID
15732
590
Error Returned if No Check Info
Lines Programmed
N/A
590
15453
590
N/A
590
Last Line of DeliveryDispatch.lng
File Is Not Displayed
Hand-Held
Devices
May 2, 2005
Page 582 of 814
Page
Autosequences
Delivery
Dispatch
MD0003-065
Revision D
CR ID
Output From SIM Windows
Command Displays Incorrectly
3700 POS
What’s Revised
Module
Liquor
Dispensing
System
(LDS)
Manager
Procedures
Feature
CR ID
Page
Items Generated from the ILDS Are
Not Transferred Back to the POS
System
15003
591
NALDS Does Not Handle Menu
Levels and Sub-Levels Properly
15525
591
NALDS Does Not Post Pour When
Sequence Number is Zero
15567
591
Editing Records Where Entry
Begins With Double-Quote Causes
System Error
15136
592
Relabeled Buttons on ‘Select a Time
Card Record’ Form
N/A
592
15578
592
‘Waiting/Loading’ Icon Remains on
HHT Screen After Page is Loaded
N/A
593
Access to Employee Forms Missing
After Upgrade
16016
593
Clearing Sales Totals Does Not
Clear CM Totals
15047
593
‘Find’ Options Missing From Menu
Item Forms
N/A
594
Language Error Received With EM
Installed
15573
594
Language Translation Errors
Received After Upgrade
N/A
594
Restaurant Form Does Not Open on
EM Database When Language is
Not US English
N/A
594
Unable to Load on a Win CE
Workstation When Server Has 2
NIC Cards Installed
POS
Configurator
MD0003-065
Revision D
May 2, 2005
Page 583 of 814
3700 POS
What’s Revised
Module
POS
Operations
MD0003-065
Revision D
May 2, 2005
Page 584 of 814
Feature
CR ID
Page
Assertion Failure Received After
Running SIM Scripts
15703
595
Auto Service Charge Exempt Key
Does Not Work
15768
595
Cancel Order After Void Posts
Incorrect Values While in Dynamic
Order Mode
16198
595
Change Due Does Not Always
Display in Detail Area
15352
596
Check Info Lines Incorrectly
Assigned After Block Transfer
N/A
596
Combo Meal Does Not Consolidate
Properly
N/A
596
Combo Meals Not Returning to
Original Screen
12168
596
Credit Card Finalize Fails When
Using Thousand Separator
14779
597
Currency Conversion Not Rounding
Correctly
15125
597
Currency Not Displaying Rounded
Base Amount After Conversion
N/A
597
Discount NLU Does Not Work
When Touch Item Discounts
Enabled
N/A
598
Discounts Programmed with
Multiple Tax Rates Produces
Incorrect Net Sales Totals
15692
598
Edit Seat With Fixed Price Meals
Allows Unlimited Course Items
14855
598
3700 POS
What’s Revised
Module
POS
Operations
(cont’d.)
Feature
CR ID
Page
15570
599
ILDS Generates Error if Employee
Name Includes European Characters
N/A
599
Inclusive Tax on Shared Menu Items
Does Not Recombine
12158
599
Insert Condiment Not Working
Properly With Combo Meals
16710
599
Insert Condiment Removes Menu
Item Reference
15673
600
Masking Duplicate SLUs Prevents
SLU Screen From Displaying
N/A
600
Negative Transactions Post
Incorrectly During Currency
Conversion
15388
600
No Grace Period Warning When
Software Key is Removed
16649
600
Opening a Delivery Check Results
in Override Error Message
16250
601
Select Send Allows Items to be Sent
Twice
16356
601
Shared Check Total Incorrect After
Rounding
N/A
601
Suspend/Resume Function Causes
POS Operations to Crash When
Authorization is Required
14687
601
Table Status Function Causes POS
Operations to Crash
15781
602
EM Clients Not Removing
Unsubscribed Menu Items From
Touchscreens
MD0003-065
Revision D
May 2, 2005
Page 585 of 814
3700 POS
What’s Revised
Module
POS
Operations
(cont’d.)
Feature
CR ID
Page
Tendering Converted Currency Fails
with Thousand Separator
16463
602
Unable to Ring New/Revised
Combo Meals After System
Upgrade
15704
602
Voiding a Discounted Menu Item
Produces Incorrect Sales and Tax
Totals
15690
602
Voiding a Min/Max Condiment
From a Combo Meal Deletes All
Combo Items
15401
603
Voiding a Required Condiment
From a Combo Meal Hangs POS
Operations
15422
603
Voiding Items Prior to Cancel Order
Creates Outstanding Balance
16035
603
N/A
604
16288
604
Formatting Errors Occur When
Using Epson TM-295 Slip Printer
on Win2K Workstation
N/A
604
GST Item Indicator Not Printing
16298
605
N/A
605
Journal Header Missing Detail
15701
606
Menu Item Name Prints Incorrectly
on Order Chit
14895
606
Win32 Client Does Not Detect
Communications Failure with
Epson TM-295 Printer
WS4 Must Be Rebooted to Receive
Barcode/Menu Item Updates
Printing
IrDA Printer Fails to Identify Itself
When Output Sent to Backup
Printer
MD0003-065
Revision D
May 2, 2005
Page 586 of 814
3700 POS
What’s Revised
Module
Printing
(cont’d.)
Reports
Setup
SIM
Feature
CR ID
Page
Menu Items With Condiments Print
Incorrectly on Stand-Alone Roll
Printer
16121
607
Print Manager Erroneous Reports an
“Invalid Printer” Error
N/A
607
Remote Supervised Printing to the
Backup Crashes POS Operations
N/A
607
Thai Tax Information Not Printing
N/A
607
XML Translation File Fails to Print
Correctly
N/A
608
Consolidated Food Cost Report
16081
608
Employee Closed Check Report
N/A
609
Menu Item Sales Detail
16403
609
RVC Time Period Detail Report
15585
610
Time Period Menu Item Reports
14022
610
40-column Reports Not Completed
if Greater than 64K
16442
611
Menu Item Reports Always Sort by
Family Group
16083
611
Reports Prompt for Parameter When
Run as Autosequence
15583
611
File Missing From Installation
15989
611
Upgrading a WS4 No Longer
Requires User Intervention
15204
611
Displaying Error Message of 80
Characters Crashes POS Operations
15204
612
MDSHTTP Service Crashes After
SIM Error Returned Multiple Times
N/A
612
MD0003-065
Revision D
May 2, 2005
Page 587 of 814
3700 POS
What’s Revised
Revisions
Detailed
Autosequences
Bi-Weekly Autosequences Do Not Run Correctly After DST
Change
CR ID #: 14163
Biweekly autosequences (both those with a repeat period and those
without) were not correctly taking into account daylight saving time
when calculating their next run times. If the configured start date and the
current date were separated by a DST change date, the scheduled time of
the autosequence would be off by one hour. This has been corrected.
Database
Check Carry Over Count and Totals Do Not Match Daily
System Sales Totals
CR ID #: 13878
Previously, the count and amount associated with checks carried over
from a previous business day did not match the totals reported in the
Daily System Sales reports (sys101.rpt). The problem was related to
when revenue center transactions were posted, and whether they were
included in the periodic recalculation of system totals. This has been
corrected.
MD0003-065
Revision D
May 2, 2005
Page 588 of 814
3700 POS
What’s Revised
Employee Shift Totals Not Posted as Unique Records
CR ID #: 15319
Previously, the procedure for posting employee shift totals to the
database involved the use of a controlled value. This value was created
by combining the employee seq number, followed by zero, followed by
the shift seq number. As a result, the control value was not unique, and
caused posting to fail for specific shifts. The following illustrates how
two employees (Emp 3 and Emp 301) could end up with the same control
value:
Emp seq 3, shift 1057 = 3 0 1057 = 301057
Emp seq 301, shift 57 = 301 0 57 = 301057
Whichever shift posted first would prevent the other shift from posting.
this problem has been corrected.
Error When Posting KDS Transactions
CR ID 15263
Previously, the system was unable to post KDS transactions in a cashier
environment. This, in turn, caused reports using KDS tracking totals to
fail. The problem was caused by an error in the stored procedure
sp_post_cshr_trk_sys_rvc_cal, which has been corrected.
Posting Slows Down Considerably With Many Carried Over
Checks
CR ID: 15063, 15901
When posting totals, system performance slowed noticeably as the
number of “carried over” checks increased in the database. The problem
was linked to a coding error in the following stored procedures:
sp_post_cum
sp_post_emp_cum
sp_post_rvc_emp_cum.
This has been corrected.
MD0003-065
Revision D
May 2, 2005
Page 589 of 814
3700 POS
What’s Revised
Separate Batches Not Created for Each Merchant ID
CR ID #: 15732
When using the multiple merchant feature of the VisaK and CES drivers,
the stored procedure sp_CreateCCBatch was not creating separate
batches for each merchant. Consequently, batches could not be settled
because they contained records with different merchant numbers. This
problem has been corrected.
Delivery Dispatch
Error Returned if No Check Info Lines Programmed
CR ID #: N/A
After service totaling a check whose order type is sent to Delivery
Dispatch, the system would report an error message if check info lines
were not configured in the Delivery Dispatch Configuration Utility. This
problem has been corrected.
Last Line of DeliveryDispatch.lng File Is Not Displayed
CR ID #: 15453
When running the Delivery Dispatch module, the system consistently
failed to display the last line of check information in the display. This
was traced to the algorithm that handled the DeliveryDispatch.lng
translation file, which read the last line, but did not copy it into its
internal text list. This problem has been corrected.
Hand-Held Devices
Output From SIM Windows Command Displays Incorrectly
CR ID #: N/A
Previously, when using the Windows command in an ISL file, it was
possible to have the output display improperly on a hand-held device.
This has been corrected.
MD0003-065
Revision D
May 2, 2005
Page 590 of 814
3700 POS
What’s Revised
Liquor Dispensing System (LDS)
Items Generated from the ILDS Are Not Transferred Back to
the POS System
CR ID #: 15003
The ILDS does not work in both directions. When a drink is rung up on
the POS System, it is sent to the ILDS system without any problems.
However, if the same item is posted from the ILDS, it does not get sent to
the MICROS system. This problem has been corrected.
NALDS Does Not Handle Menu Levels and Sub-Levels
Properly
CR ID #: 15525
When using the NALDS to pour a drink, if the main and sub menu levels
specified by the NALDS device are both set to 0, the device should
default to the levels used by POS Operations. Instead, the NALDS would
ignore the operational menu level (and sub-level) and default to Menu
Level 1 (sub-level 1). This has been corrected.
NALDS Does Not Post Pour When Sequence Number is Zero
CR ID #: 15567
When powering up the NALDS, the initial sequence number of 0 failed
to register as a pour. This has been corrected.
Also, during POS Operations, if the NALDS device lost power
temporarily (i.e., was turned off and on), the com port class would
generates a break event that blocked all subsequent transmissions until
the break condition was cleared. When the power was recycled, the
system would reinitialize the NALDS sequence, sending two messages in
a row with a sequence number of 0. The second entry would be treated as
a duplicate pour, instead of as a new order. These problems have also
been corrected.
MD0003-065
Revision D
May 2, 2005
Page 591 of 814
3700 POS
What’s Revised
Manager Procedures
Editing Records Where Entry Begins With Double-Quote
Causes System Error
CR ID #: 15136
When editing employee or menu item records through Manager
Procedures, if the entry name began with a double-quote (e.g., “Dave
Smith” or “Deli Special”), and the search criteria only included part of
the name (e.g., “Dave or “Deli), a system error would occur when the
Next or Previous arrow buttons was pressed. This problem has been
corrected.
Relabeled Buttons On ‘Select a Time Card Record’ Form
CR ID #: N/A
The OK and Cancel buttons on the ‘Select a Time Card Record’ form
were changed to Edit and Back. The relabeling was done to make the
form consistent with others in Manager Procedures | Employees | Edit
Time Card. The change does not affect functionality.
Unable to Load on a Win CE Workstation When Server Has
2 NIC Cards Installed
CR ID #: 15578
When attempting to open Manager Procedures on a Win CE workstation
(WS4 or HHT), an error message would occur if the RES Server had two
NIC cards installed. The problem was caused by an improper reference to
the machine name instead of the IP Address of the URL This has been
corrected.
MD0003-065
Revision D
May 2, 2005
Page 592 of 814
3700 POS
What’s Revised
‘Waiting/Loading’ Icon Remains on HHT Screen After Page
is Loaded
CR ID #: N/A
When running Manager Procedures on a hand-held device, if the user
attempted to navigate to another page before the current page had
finished loading, the "Waiting/Loading" icon would display constantly.
Forms could be changed and used, but the icon would never clear. This
problem has been corrected.
POS Configurator
Access to Employee Forms Missing After Upgrade
CR ID #: 16016
After upgrading to 3.2 SP1, the following options were inadvertently
removed from the POSCfg Form drop-down list on the Configurator
Access form:
Employees | Employees
Employees | Jobs
Employees | Job Sections
Employees | Time & Attendance
Employees | Overtime Levels
System | Reasons
This has been corrected.
Clearing Sales Totals Does Not Clear CM Totals
CR ID #: 15047
Previously, after using the POS Configurator | Totals | Clear Sales Totals
option, the Cash Management totals were not being cleared. This has
been corrected.
MD0003-065
Revision D
May 2, 2005
Page 593 of 814
3700 POS
What’s Revised
‘Find’ Options Missing From Menu Item Forms
CR ID #: N/A
In RES Version 3.2, the Field Name drop-down list used to locate menu
item records through POS Configurator | Record | Find was changed
from all fields on an open Menu Item form to the Name and Number
fields only. This has been corrected.
Language Error Received With EM Installed
CR ID #: 15573
When running in an EM environment, if the Default Language field
(POS Configurator | System | Restaurant | Options) was not set to
English US, then any attempt to open POS Configurator would cause the
error message "TMLangMgr: Database not assigned" to be displayed.
This problem has been corrected.
Language Translation Errors Received After Upgrade
CR ID #:
When upgrading to RES Version 3.2 with a database that included a
second language, the system would not convert all of the foreign
language text strings correctly. This problem would cause a form to either
not open (with an error message displayed) or open with incomplete or
incorrectly translated fields. This has been corrected.
Restaurant Form Does Not Open on EM Database When
Language is Not US English
CR ID #: N/A
Previously, the POS Configurator | System | Restaurant form failed to
open when run on an EM corporate database where the Current
Language was not set to US English. The problem was caused by a
mismatch between the number of options to be translated and the number
of translation strings. This has been corrected.
MD0003-065
Revision D
May 2, 2005
Page 594 of 814
3700 POS
What’s Revised
POS Operations
Assertion Failure Received After Running SIM Scripts
CR ID #: 15703
When running a SIM script containing either the split() or rxmsg()
functions that included a character value greater than 127, POS
Operations could fail and the following assertion error would display:
---------------------Debug Assertion Failed!
Program: C:\micros\res\pos\bin\OPS.exe
File: isctype.c
Line: 68
Expression:(unsigned)(c + 1) <= 256
------------------------
This problem has been corrected.
Auto Service Charge Exempt Key Does Not Work
CR ID #: 15768
Previously, when using an [Auto Service Charge Exempt] key to
remove a autoservice charge, the system failed to subtract the amount of
the charge from the check totals. This problem has been corrected.
Cancel Order After Void Posts Incorrect Values While In
Dynamic Order Mode (DOM)
CR ID #: 16198
When using Dynamic Order Mode (DOM), if the user voided an item,
then canceled the order, the system would post incorrect values to the
database. These values affected the net sales, tax collected, checks begun
amount, checks paid amount, void, credit total and cancel amounts
reported on the Daily System Sales Detail (sys101.rpt). The problem has
been corrected.
MD0003-065
Revision D
May 2, 2005
Page 595 of 814
3700 POS
What’s Revised
Change Due Does Not Always Display in Detail Area
CR ID #: 15352
When overtendering a check, the ‘Change Due’ amount was not always
shown in the detail area on the UWS screen. This has been corrected.
Check Info Lines Incorrectly Assigned After Block Transfer
CR ID #: N/A
When transferring multiple checks using the block transfer function, the
system failed to keep the check info lines with the correct checks.
Instead, the check info lines for the first check in the block transfer would
be repeated for all entries. This problem has been corrected.
Combo Meal Does Not Consolidate Properly
CR ID #: N/A
When using Dynamic Order Mode with the Do Not Consolidate option
(POS Configurator | Devices | Order Devices | Options) disabled, the
system failed to consolidate combo menu items on a suborder even
though the combo meal title was not sent with the suborder. This problem
has been corrected.
Example with parent combo sent:
1 Burger Combo
Cheeseburger
Fries
Coke
1 Burger Combo
Cheeseburger
Fries
Coke
1 Cheeseburger
Example with parent combo not sent:
3 Cheeseburger
2 Fries
2 Coke
MD0003-065
Revision D
May 2, 2005
Page 596 of 814
3700 POS
What’s Revised
Combo Meals Not Returning to Original Screen
CR ID #: 12168
Previously, when ringing a combo meal, you were not being returned to
the original screen where the combo meal was rung. This has been
corrected.
Credit Card Finalize Fails When Using Thousands
Separator
CR ID #: 14779
Previously, if the option Ops uses thousands separator (System |
Restaurant | Currency) was enabled, an "Entry too large" error would be
received when the user tried to finalize a credit card for a check amount
of $1000.00 or more. This has been corrected.
Currency Conversion Not Rounding Correctly
CR ID 15125
Previously, if a check was tendered in a secondary currency (e.g., pesos),
and the primary currency (e.g., U.S. dollars) was configured to require
rounding, the system failed to round the tender amount after the currency
conversion. This resulted in an invalid format. The error message
“Amount Entered Must be Round” was displayed and the check could
not be closed. The problem has been corrected.
Currency Not Displaying Rounded Base Currency After
Conversion
CR ID #: N/A
With rounding enabled for both the currency (Sales | Currency) and the
revenue center (Revenue Center | RVC Posting | Options), the system
failed to show the base currency as a rounded amount after currency
conversion. This has been corrected.
MD0003-065
Revision D
May 2, 2005
Page 597 of 814
3700 POS
What’s Revised
Discount NLUs Do Not Work With Touch Item Discounts
Enabled
CR ID #: N/A
After enabling touch item discounting (POS Configurator | System |
Restaurant), if the user entered one or more menu items and then applied
a discount SLU (i.e., used the “normal” discounting process), the system
would respond by displaying the error message “Discount Not Found.”
This occurred because touch item discounting failed to pass the correct
discount keycode. The problem has been corrected.
Discounts Programmed with Multiple Tax Rates Produces
Incorrect Net Sales Totals
CR ID #: 15692
When using discounts, whose tax class included multiple tax rates, the
system would report incorrect net sales figures in the Daily System Sales
Detail report. This problem has been corrected.
Edit Seat With FIxed Price Meals Allow Unlimited Course
Items
CR ID 14855
When using Edit Seat with a fixed-price meal, the user was able to move
the non-priced course items to another seat and then add more non-priced
course items to the original seat. This could be done repeatedly on the
same check, effectively allowing multiple seats to receive non-priced
menu items based on the same fixed-price meal. This has been corrected.
MD0003-065
Revision D
May 2, 2005
Page 598 of 814
3700 POS
What’s Revised
EM Clients Not Removing Unsubscribed Menu Items From
Touchscreens
CR ID #: 15570
While running POS Operations in an EM environment, if a store received
a packet that added new menu items and unsubscribed existing items, the
clients would automatically include the new items but failed to remove
the items that had been unsubscribed. This meant users could continue to
select menu items even after their Effective To date had passed. To post
the changes and update the touchscreens, the user had to stop and restart
POS Operations. This problem has been corrected.
ILDS Generates Error if Name Includes European
Characters
CR ID #: N/A
Previously, if a Menu Item or Employee name was defined with a
European character at the beginning, any attempt to use the ILDS to
select that entry would fail and an error message would be generated.
This problem has been corrected.
Inclusive Tax on Shared Menu Items Does Not Recombine
CR ID #: 12158
If an inclusive tax menu item was shared across seats, the inclusive tax
amount was not being included when the check was recombined. This led
to balancing problems where the Checks Paid Total was different from
the Checks Begun Total. This has been corrected.
Insert Condiment Not Working Properly With Combo Meals
CR ID #: 16710
When ringing a combo, the system would occasionally prevent a user
from inserting more than one condiment, even though the selected combo
meal menu item was programmed to allow it. The problem was caused
by a code error, in which the system determined allowed condiment
status based on the last combo menu item listed, instead of the menu item
to which it was being added. This has been corrected.
MD0003-065
Revision D
May 2, 2005
Page 599 of 814
3700 POS
What’s Revised
Insert Condiment Removes Menu Item Reference
CR ID #: 15673
After highlighting a menu item with a reference (e.g., an open food or
weighed menu item), if a condiment was added to the menu item, the
system would remove the reference from the check. This problem has
been corrected.
Masking Duplicate SLUs Prevents SLU Screen From
Displaying
CR ID #: N/A
Menu Item SLUs would display blank placeholders for duplicate items
when the Mask Duplicate Items option (POS Configurator | Devices |
Touchscreens | Styles) was enabled. This was pushing other nonduplicate items off the screen, and could require the user to page down to
see the first item. This problem has been corrected.
Negative Transactions Post Incorrectly After Currency
Conversion
CR ID #: 15388
Previously, if a check with negative transaction items was converted to
another currency before payment, the system would not carry over the
negative values, but recorded them as positive. This resulted in an
imbalance in the reported change due amounts and in tracking total
information. The problem has been corrected.
No Grace Period Warning When Software Key is Removed
CR ID #: 16649
POS Operations was not notifying the user when a valid software key
failed or was removed from the Server. Instead of advising the user that
the system was operating in grace period — and specifying how long
until it expired — operations would begin as usual, but would become
inoperable once the grace period ended. The error message “Not
Licensed” would then display. This problem has been corrected.
MD0003-065
Revision D
May 2, 2005
Page 600 of 814
3700 POS
What’s Revised
Opening a Delivery Check Results in Override Error
Message
CR ID #: 16250
When running Delivery Dispatch on a workstation, if the user attempted
to open a check that has been transferred to a driver, the system would
display the message "Check is owned by PCWSxx Override Check
Owned By Offline UWS?" The problem occurred because the
workstation failed to check in for updates once the Delivery Dispatch
screen was up for approximately 3 minutes. This has been corrected.
Select Send Allows Items to be Sent Twice
CR ID #: 16356
When using Hold and Fire with the Selective Send option enabled (Sales
| Tender/Media | Service TTL), the system would incorrectly send items
to the kitchen twice — once when the [Send Order] key is pressed and
again when check is service totaled. This problem has been corrected.
Shared Check Total Incorrect After Rounding
CR ID #: N/A
When sharing a check with rounding options enabled, the system would
divide the total and then round each share separately. This was causing
the combined check total to be significantly different from the original
amount due. To correct the problem, the check total will be rounded first
and then shared between the customers.
Suspend/Resume Function Causes POS Operations to Crash
When Authorization is Required
CR ID #: 14687
If a site was configured to use the Suspend/Resume option (POS
Configurator | Revenue Center | RVC Transactions | General), any
attempt to perform a check operation that involved an Authorization
request would cause the system to hang. This problem has been
corrected.
MD0003-065
Revision D
May 2, 2005
Page 601 of 814
3700 POS
What’s Revised
Table Status Function Causes POS Operations to Crash
CR ID #: 15781
When checking the status of a table, if the guest check is using check ID
numbers, an error message would be generated and POS Operations
would crash. The problem was caused by limitations in the buffer array
size, which as been corrected.
Tendering Converted Currency Fails With Thousands
Separator
CR ID #: 16463
When tendering a check, any attempt to convert the currency would fail
if the thousands separator was in use (System | Restaurant | Currency |
Ops uses thousands separator). This problem has been corrected.
Unable to Ring New/Revised Combo Meals After System
Upgrade
CR ID #: 15704
After converting a database from RES Version 3.1 to Version 3.2 SP1, if
the user added a new combo meal or made changes to an existing combo
meal, any attempt to ring those menu items through POS Operations
would fail and the error message "Combo Meal Has No Menu Items In
Group would be displayed." This problem has been corrected.
Voiding a Discounted Menu Item Produces Incorrect Sales
and Tax Totals
CR ID #: 15690
When voiding a menu item with a discount, the system failed to adjust
sales and tax totals for the voided items. For example, if the menu item
tax was an add-on, neither the taxable sales nor the tax collected against
those sales were deleted from the totals. If the menu item tax was
inclusive, the system would void the tax collected, but still recorded the
taxable sales. This problem has been corrected.
MD0003-065
Revision D
May 2, 2005
Page 602 of 814
3700 POS
What’s Revised
Voiding a Min/Max Condiment From a Combo Meal Deletes
All Combo Items
CR ID #: 15401
When ordering a combo meal, if a user entered and then voided a
condiment configured as part of a Min/Max selection, the system was
unable to exit the option once the combo meal was completed. As soon as
the next, non-combo item was added to the check, POS Operations would
generate the error message "Menu item not part of the combo group".
Clicking OK to the error message would result in the removal of the
previous combo meal and all of its related side items and condiments.
This problem has been corrected.
Voiding a Required Condiment From a Combo Meal Hangs
POS Operations
CR ID #: 15422
When ordering a combo meal linked to a required condiment with a Min/
Max range, POS Operations would hang if the user entered and then
voided an allowed condiment that was not configured with a Min/Max
range (e.g., an allowed condiment hardcoded on the required condiment
SLU screen).
POS Operations would not allow any other check activity until the
required number of condiments was posted, but would deny access to the
condiment keys to correct the problem.
These issues have been corrected.
Voiding Items Prior to Cancel Order Creates Outstanding
Balance
CR ID #: 16035
Previously, if items were voided on a guest check prior to using the
Cancel Order key, the check would close, but the balance of the check
(after voids) would be included in the net sales and outstanding amount
columns in the Daily System Sales Detail Report. This problem has been
corrected.
MD0003-065
Revision D
May 2, 2005
Page 603 of 814
3700 POS
What’s Revised
Win32 Client Does Not Detect Communications Failure with
Epson TM-295 Printer
CR ID #: N/A
When printing from a Win32 workstation to an Epson TM-295 slip
printer, the system was unable to detect when a communications failure
had occurred. For example, if the serial cable from the printer was
disconnected when a print job was sent to it, POS Operations would
displays the message "Check Not In Place" instead of detecting the
problem and informing the user of a “Printer Communication Failure.”
This has been corrected.
WS4 Must Be Rebooted to Receive Barcode/Menu Item
Updates
CR ID #: 16288
After scanning in a new barcode through Manager Procedures, users
were unable to ring up the menu item on a WS4 (by scanning the
barcode) without first rebooting the workstation. The problem was
caused by a sharing conflict between POS Operations and Manager
Procedures over use of the scanner. This has been corrected.
Printing
Formatting Errors Occur When Using Epson TM-295 Slip
Printer on Win2K Workstation
CR ID #: N/A
When printing to an Epson TM-295 slip printer from a Win2k
workstation, all of the print jobs (guest checks, receipts, reports) were
formatted incorrectly. To correct the problem, the following changes
were made:
MD0003-065
Revision D
May 2, 2005
Page 604 of 814
PControl.exe was modified to use hardware flow control for TM295 printers only. Other printers will continue to use the old com
port settings.
3700 POS
What’s Revised
WinCE MicrosDevices.dll was changed to use hardware flow
control. This allows the same TM-295 printer to e swapped
between a Win32 and WS4 workstation without adjusting the dip
switch settings.
With these programming changes, the correct dip switch/software
serial port settings for the TM-295 printer are now:
POS Configurator | Devices | Network Node | Com Port tab:
Baud Rate : 9600
Parity Type: None
Num Data Bits: 8
Stop Bits: 1
Dip Switch 2 set to ON — Sets the buffer size to 35 bytes.
All other switches set to OFF — Sets COM Port parameters and
hardware flow control.
GST Item Indicator Not Working
CR ID 16298
When using the Australian GST, items that were excluded from this tax
were not printing with an asterisk (*) beisde them, as required by the
option. This problem has been corrected.
IrDA Printer Fails to Identify Itself When Output Sent to a
Backup Printer
CR ID #: N/A
Previously, if a print job failed on a hand-held device’s IrDA printer and
the output was redirected to a backup printer, the "BACKUP FROM
<device name>" label would not print on the guest check or order chit.
This problem has been corrected.
MD0003-065
Revision D
May 2, 2005
Page 605 of 814
3700 POS
What’s Revised
Journal Header Missing Detail
CR ID #: 15701
When printing a check entry to the journal, the first and third lines of the
header detail were missing. Instead of printing:
==============================
Tbl 12/1
Chk 2254
70 Abbott
CE: 70
CC: 0
Trn 5
Oct09'03
Gst 1
PCWS2
TC: 0
10:46AM
============================
the check entry read like a time-clock entry:
==============================
70 Abbott
Trn 5
PCWS2
Oct09'03 10:46AM
============================
This problem has been corrected.
Menu Item Name Prints Incorrectly on Order Chit
CR ID #: 14895
When using menu levels, if the options Menu level name (Sales | Menu
Item Classes | Print/Display) and Broadcast secondary print jobs to all
printers (Devices | Order Devices | Options) are enabled, the menu level
prefix will print but the first 5 letters of the menu item name are dropped
from the secondary print job on the order device chit.
For example, if the customer ordered a small Shrimp Cocktail, the menu
item would print on the order chit as “Sm p Cocktail”. This problem
has been corrected.
MD0003-065
Revision D
May 2, 2005
Page 606 of 814
3700 POS
What’s Revised
Menu Items With Condiments Print Incorrectly on StandAlone Roll Printer
CR ID #: 16121
Previously, if the option Suppress blank lines (POS Configurator |
Devices | Order Devices | Options) was disabled, the system failed to
insert a blank line between items when printing menu items with
condiments. This problem only occurred when the order was sent from a
WS4 to a stand-alone roll printer configured as a remote order device. It
has been corrected.
Print Manager Erroneously Reports an “Invalid Printer”
Error
CR ID #: N/A
When running a thermal roll printer via IDN as a check printer, the
PManager.dll was unable to validate the printer configuration and
erroneously reported it as an invalid printer in the 3700.d log. This
problem has been corrected.
Remote Supervised Printing to the Backup Crashes POS
Operations
CR ID #: N/A
When using remote supervised printing with the print line-by-line option
enabled, if the check/receipt printer failed and the print job was sent to
backup, an error occurred that would crash POS Operations. The problem
only occurred after the third print job in a row was sent to backup. This
has been corrected.
Thai Tax Information Not Printing
CR ID #: N/A
After enabling the Thai tax and setting the appropriate print options, the
Thai tax information was not printing to guest checks or journals. This
has been corrected.
MD0003-065
Revision D
May 2, 2005
Page 607 of 814
3700 POS
What’s Revised
XML Translation File Fails To Print Correctly
CR ID #: N/A
Previously, if an XML translation file contained a translation rule with
one or more character values of zero, the rule would not be interpreted
properly and resulted in garbled text being sent to the printer. This
occurred, for example, when using an XML translation file to support
double-byte printing on an IDN printer. This has been corrected.
Reports
The table below describes the POS report changes in this Service Pack:
Report
Consolidated
Food Cost
Report
CR ID #: 16081
MD0003-065
Revision D
May 2, 2005
Page 608 of 814
Area Modified
Templatea
Description
When running the Consolidated
Food Cost Report
(ConsFoodCost.rpt), the
extended costs and food cost
percentages were not being
summed by group on the whole
report. To correct the problem,
the report template was
modified to include group
totals lines and a report totals
line.
3700 POS
What’s Revised
Employee
Closed Check
Report
Templateb
CR ID #: N/A
When running an employee
closed check report, with a
revenue center whose object
number is 4 digits or more, the
following SQL error is
received:
SqlState = 3700.
native error code = -131.
Error message = [Sybase]
[ODBC Driver][Adaptive
Server Anywhere]
Syntax error or access
violation: near',' in
rvc_obj_num = 2[,]222.
The problem was caused by an
error when converting numbers
to a text string in the report
template. This has been
corrected.
Menu Item Sales
Detail Report
CR #: 16403
Template
When running the Menu Item
Sales Detail Report
(MI_S001.rpt) as part of an
autosequence, the report was
taking an excessively long time
to complete and would
occasionally cause the system
to time out. The problem was
resolved by streamlining the
data selection criteria.
MD0003-065
Revision D
May 2, 2005
Page 609 of 814
3700 POS
What’s Revised
RVC Time
Period Detail
Report
Stored
Procedurec
CR ID #: 15585
Time Period
Menu Item
Reports
Stored
Procedure
CR ID #: 14022
a
Files Changed:
ConsFoodCost.rpt,
sp_R_cons_food_cost_ttls
b
Files Changed:
chk_102.rpt
c
Files Changed:
sp_R_sys_time_prd_ttls
sp_R_rvc_time_prd_ttls
d
Files Changed:
sp post_tm_prd_mi_cum
MD0003-065
Revision D
May 2, 2005
Page 610 of 814
When running the Revenue
Center Time Period Detail
Report (tp_r101.rpt) over
multiple dates, the system
tracking totals were reported
incorrectly. For example, if the
date range was 2 days, the
tracking totals would be
doubled on the report. The
problem was due to a coding
error in the stored procedures
and affected all time period
reports. This has been corrected
When running any of the Time
Period Menu Item reports, the
system was taking too long to
post the data and print the
report. Sites with a high
number of transactions could
take hours to complete, giving
the user the impression that the
system was hanging. The
problem was linked to a stored
procedure, which lacked the
necessary primary key to index
the files more quickly. This has
been corrected.
3700 POS
What’s Revised
40-Column Reports Not Completed if Greater than 64K
CR ID #: 16442
Previously, when running a 40-column report from POS Operations, the
report would stop functioning when the file size reached 64K. This has
been corrected.
Menu Item Reports Always Sort by Family Group
CR ID #: 16083
When running one of the Menu Item Reports, and sorting by Major
Group or Menu Item Group, the generated report would always sort by
Family Group. This problem has been corrected.
Reports Prompt for Parameter When Run as Autosequence
CR ID #: 15583
When running a report through an autosequence, if the report template
requires a parameter value (e.g., date range, object range) that was
already programmed in the autosequence steps, the system would still
prompt for the value before printing the report. This has been corrected.
Setup
File Missing From Installation
CR ID #: 15989
During installation of the RES 3.2 service pack 1 upgrade, the system
failed to add the PMtext.txt file to the MICROS\RES\CAL\WS4\
packages\WS4RES folder. This has been corrected.
Upgrading a WS4 No Longer Requires User Intervention
CR ID #: 16163
Previously, when a WS4 installed a new platform, user intervention
would be required to select the server name and client names. This is no
longer necessary.
MD0003-065
Revision D
May 2, 2005
Page 611 of 814
3700 POS
What’s Revised
SIM
Displaying Error Message of 80 Characters Crashes POS
Operations
CR ID #: 15204
When executing a SIM script, if the system returned a message
containing more than 80 characters, POS Operations would crash. To
correct the problem, the allowed length of the message has been
increased.
MDSHTTP Service Crashes After SIM Error Returned
Multiple Times
CR ID #: N/A
When using SIM to query the database, an exception error would be
generated if the query resulted in an empty recordset. When the user
clicked OK, a second message would be displayed indicting that “There
are no matching records.” Pressing OK again would exit the query.
However, if this process was repeated, it could cause the
MDSHTTPService to become unstable and crash. This problem has been
corrected.
MD0003-065
Revision D
May 2, 2005
Page 612 of 814
Kitchen Display System (KDS)
What’s New
Kitchen Display System (KDS)
What’s New
There are no new features in this version of the software.
What’s Enhanced
An enhancement is defined as a change made to improve or extend the
functionality of the current KDS application. To qualify as an
enhancement, the change must satisfy the following criteria:
The basic feature or functionality already exists in the previous
release of the software.
The change adds to or extends the current process. This differs from a
revision (i.e., a bug fix) which corrects a problem not caught in the
previous release of the software.
Enhancements
Summarized
The table below summarizes the enhancements included in this version.
Module
POS
Operations
Feature
Page
Order Number Done for PC-based KDS
614
MD0003-065
Revision D
May 2, 2005
Page 613 of 814
Kitchen Display System (KDS)
What’s Enhanced
Enhancements
Detailed
POS Operations
Order Number Done for PC-based KDS
The Order Number Done feature allows a user to select an order by
(positional) number and bump it from the screen. This speeds up system
response time by combining the Select and Done features into a single
process.
In the previous release, Order Number Done was only available on SEI
KDS displays. This release extends the functionality to PC-based KDS
display devices.
MD0003-065
Revision D
May 2, 2005
Page 614 of 814
Kitchen Display System (KDS)
What’s Revised
What’s Revised
A revision is defined as a correction made to any existing form, feature,
or function currently resident in the KDS software. To qualify as a
revision, the change must satisfy the following criteria:
The basic form, feature, or functionality must be part of the previous
version of the software.
The change must replace the current item or remove it from the
application.
Revisions
Summarized
The table below summarizes the revisions included in this version.
Module
Feature
CR ID
Page
15261
616
Database
KDS Tracking Totals Fail to Post
KDS
Controller
Combo Meal Does Not
Consolidate Properly
N/A
616
Reload Not Completed After
Changes Made in POS
Configurator
N/A
616
MD0003-065
Revision D
May 2, 2005
Page 615 of 814
Kitchen Display System (KDS)
What’s Revised
Revisions
Detailed
Database
KDS Tracking Totals Fail to Post
CR ID #: 15261
Previously, if a check was bumped twice in the same fixed period, the
KDS tracking total, 'PREP TIME', would cause the posting of tracking
totals to fail because there were two prep times for one check in the same
fixed period. The error affected the following stored procedures:
sp_post_sys_tm_prd_trk_cum
sp_post_cshr_cum
sp_post_rvc_cshr_trk_cum
sp_post_tm_prd_trk_sys_rvc_cal
sp_post_srv_prd_trk_sys_rvc_cal
This problem has been corrected
KDS Controller
Combo Meal Does Not Consolidate Properly
CR ID #: N/A
When using Dynamic Order Mode with the Do Not Consolidate option
(POS Configurator | Devices | Order Devices | Options) disabled, the
system failed to consolidate combo menu items on a suborder even
though the combo meal title was not sent with the suborder. This problem
has been corrected.
Reload Not Completed After Changes Made in POS
Configurator
CR ID #: N/A
When using SEI OASys KDS after making configuration changes, the
KDS Controller was not completing its reload of the database, which
caused the system to fail. This problem has been corrected.
MD0003-065
Revision D
May 2, 2005
Page 616 of 814
Cash Management (CM)
What’s New
Cash Management (CM)
What’s New
New Features
Summarized
A new feature is defined as one that provides capabilities that were not
available in previous versions of the application.
The table below summarizes the new features included in this version.
Module
User
Interface
Feature
Page
Hide/View Totals Before Till or Server
Bank Is Counted
618
Single Accountability for Tills and Server
Banks
619
View Safe Counts
620
MD0003-065
Revision D
May 2, 2005
Page 617 of 814
Cash Management (CM)
What’s New
New Features
Detailed
User Interface
Hide/View Totals Before Till or Server Bank is Counted
With this release, users can determine whether system totals will be
viewable or not before a till or server bank is counted. Previously, the
default setting was to always display totals.
To accommodate this change, a new option, Display Totals for
Uncounted Tills and Server Banks was added to the Configuration |
Options form of the Cash Management program. When checked, the
system will include totals on the following:
The Expected Value field on the Totals tab of a countsheet.
The Balance field on any till or server bank report.
The Item totals on any till or server bank report.
If cleared, totals will not be shown on any of the reports until after the
till/server bank has been counted. If a report is run, the totals will be
blank and the message “Not authorized to view detail.” will be displayed.
Once the till or server bank is counted, the user can press the OK button
on the count sheet to finalize it and display the totals.
MD0003-065
Revision D
May 2, 2005
Page 618 of 814
Cash Management (CM)
What’s New
Single Accountability for Tills and Server Banks
Previously, Cash Managerment allowed users to assign more than one
employee to the same till or server bank. This could present problems in
sites where individual accountability was important. For example, if a
manager forgot that a till was already assigned, there was no mechanism
to prevent another employee from being assigned to it as well. Later, if a
question arose from the count, there was no way to determine which of
the assigned employees was responsible.
With this release, a new option, Allow Multiple Employees to be
Assigned to a Till, was added to the Configuration | Options form in the
Cash Management program. The option allows a site to determine when
single accountability will be enforced for till/server bank assignments.
If checked, the system will operate as before, allowing a manager to
assign multiple employees to a single till. If cleared, however, any
attempt to assign a second employee to a previously assigned till will
result in the error message, “You may not assign more than one employee
at a time to a till.”
MD0003-065
Revision D
May 2, 2005
Page 619 of 814
Cash Management (CM)
What’s New
View Safe Counts
A new feature has been added in this release which allows the user to
view the latest safe count or any previous count that has not yet been
purged from the database.
To access this feature, the user opens the main form for Safes and selects
one of the active entries. If the safe has been counted at least once, the
option to View Counts will be displayed in the task list on the right. When
the option is selected, the View Counts form opens with a list of all count
records currently held for that safe. The list of entries is organized (in
descending order) by date and time.
To view a count, the user simply highlights one of the entries. The results
are displayed in the open panel on the right.
The format of the count sheets is similar to till and server bank counts.
That is, a separate tab is provided for each type of CM tender counted,
along with a Totals tab that summarizes the results.
MD0003-065
Revision D
May 2, 2005
Page 620 of 814
Cash Management (CM)
What’s New
What’s
Enhanced
An enhancement is defined as a change made to improve or extend the
functionality of the current application. To qualify as an enhancement,
the change must satisfy the following criteria:
The basic feature or functionality already exists in the previous
release of the software.
The change adds to or extends the current process. This differs from a
revision (i.e., a bug fix) which corrects a problem not caught in the
previous release of the software.
Enhancements
Summarized
The table below summarizes the enhancements included in this version.
Module
Feature
Page
POS
Interface
Linking Discounts/Service Charges to
Assigned Tills
622
User
Interface
Hide Toolbar and Menu Items From NonPrivileged Employees
622
Provide Employee Name and Time
Closed/Counted for Tills/Server Banks
623
MD0003-065
Revision D
May 2, 2005
Page 621 of 814
Cash Management (CM)
What’s New
Enhancements
Detailed
POS Interface
Linking Discounts/Service Charges to Assigned Tills
In the past, if a discount was applied to a check while Cash Management
was active, the system would look for the employee’s till assignment and,
if one was not found, would display the error message “Till assignment is
required for this revenue center.” This was not always correct.
In a Drive-Thru situation, the order taker does not have an assigned till.
Nor do employees who are using the server banking method.
To correct this oversight, the option Cash Management Till Required
was added in POS Configurator (Sales | Discount/Service | Options).
When enabled, the system prevents a user from applying the selected
discount or service charge unless a cash management till is assigned.
The option is only valid if Cash Management is active (e.g., CM |
Configuration | Options | Enable POS Posting is checked) and the
selected accounting method is Cashiering or None.
User Interface
Hide Toolbar and Menu Items from Non-Privileged
Employees
Previously, when an employee opened Cash Management, the complete
framework of forms, toolbar icons, and menu item selection lists would
be presented. If the employee was not privileged to use a feature (e.g.,
open a till, make deposits, view totals), he or she would have no way of
knowing until the task was selected and the error message “Not
Authorized” was displayed.
To avoid unnecessary confusion, the display options for the user interface
have been changed. Now, when an employee opens the Cash
Management program, the system will display only those features and
functions that he or she is privileged to use.
MD0003-065
Revision D
May 2, 2005
Page 622 of 814
Cash Management (CM)
What’s New
For example, if an employee is not allowed to make configuration
changes, the Configuration icon will be removed from toolbar and menu
bar selections. This, in turn, prevents the user from viewing any of the
Configuration tasks.
Assigning Rights
Access privileges for Cash Management’s forms and functions are not
assigned in the CM module, itself. Instead, access is derived from the
options selected in POS Configurator | Employees | Employee Classes |
Cash Management forms. For example, if the option Deposit from till is
enabled for members of the Server employee class, the system assumes
that all servers will be able to view both tills and deposits.
Provide Employee Name and Time Closed/Counted for Tills/
Server Banks
Count sheets have been updated to include the name of the employee
who closed or counted a till or server bank along with the time that the
task was completed. When counting or viewing a count, this information
is displayed at the top of the Totals tab.
MD0003-065
Revision D
May 2, 2005
Page 623 of 814
Cash Management (CM)
What’s Revised
What’s Revised
A revision is defined as a correction made to any existing form, feature,
or function currently resident in the CM software. To qualify as a
revision, the change must satisfy the following criteria:
The basic form, feature, or functionality must be part of the previous
version of the software.
The change must replace the current item or remove it from the
application.
Revisions
Summarized
The table below summarizes the revisions included in this version.
Module
Feature
CR ID
Page
CM
Configuration
Cash Pull Alert Not Working With
Server Banks
15343
625
Tender/Media Still Displayed in
CM After POS Items Deleted
15828
625
Count Sheet Totals Not Showing
Correct Number of Digits for
Foreign Currency
N/A
625
Foreign Currencies Not Displayed
Correctly in Tills
N/A
626
Random Error Messages Received
When Using CM Service
16596
626
Rounding Creates Imbalance in
Totals After Currency Conversion
15674
626
Transaction Not Posted When
Tendering to Cash after Currency
Conversion
N/A
626
Unable to Open Till Through POS
Operations
16776
627
Voided Foreign Currency Posted
Incorrectly
13290
627
POS Interface
MD0003-065
Revision D
May 2, 2005
Page 624 of 814
Cash Management (CM)
What’s Revised
Revisions
Detailed
CM Configuration
Cash Pull Alerts Not Working With Server Banks
CR ID 15343
To correct an inconsistency in the design, the Cash Pull Threshold
option was removed from the CM | Configuration | Server Bank
Template. Since cash pulls are not used in a server banking environment,
the function was never fully implemented. Removing the option
eliminates confusion for the user/programmer.
Tender/Media Still Displayed in CM After POS Items Deleted
CR ID #: 15828
After deleting tender/media and discount/service charge records from the
database through POS Configurator, the records continued to be
displayed in the CM | Configuration | POS Items form. This has been
corrected.
POS Interface
Count Sheet Totals Not Showing Correct Number of Digits
for Foreign Currency
CR ID #: N/A
When counting foreign currency, the system would display Count Sheet
Totals in two-decimal format, regardless of the number of digits
programmed in the database. For 3-decimal currencies, this amounted to
truncation or rounding of the totals. This has been corrected.
MD0003-065
Revision D
May 2, 2005
Page 625 of 814
Cash Management (CM)
What’s Revised
Foreign Currencies Not Displayed Correctly in Tills
CR ID #: N/A
Previously, when viewing a till in cash management, foreign currencies
would be displayed with no decimal places. Counting the till would
display the full amount correctly. This has been corrected so that the
process of both viewing a till and counting a till will display the full value
of foreign currencies.
Random Error Messages Received When Using CM Service
CR ID #: 16596
When running the Cash Management program, the system would trigger
random errors when connecting to the Cash Management Service or
when executing service calls. The error messages included range check
errors, problems connecting to the server, and an inability to perform the
selected operation. These problems have been corrected.
Rounding Creates Imbalance in Totals After Currency
Conversion
CR ID #: 15674
Previously, if a Revenue Center was configured to round totals with the
options Round Total due to nearest 10 and Round based on 10 digits
selected (POS Configurator | Revenue Centers | RVC Posting | Options),
an imbalance was created between POS Operations and the Cash
Management modules during currency conversion. The expected amount
and counted amount did not balance when counting the foreign currency.
This problem has been corrected.
Transaction Not Posted When Tendering to Cash After
Currency Conversion
CR ID #: N/A
Previously, when using a foreign currency conversion key and then
tendering to cash, the system failed to post the transaction in cash
management. This has been corrected.
MD0003-065
Revision D
May 2, 2005
Page 626 of 814
Cash Management (CM)
What’s Revised
Unable to Open Till Through POS Operations
CR ID #: 16776
When attempting to open a till from POS Operations, the user would
receive the error message “Unable to communicate...” The problem
occurred because POS Operations kept timing out before the transaction
was completed at the server. This has been corrected.
Voided Foreign Currency Posted Incorrectly
CR ID #: 13290
When voiding a tender using a foreign currency conversion, the system
would add the voided amount, rather than subtract it. This caused the
View a Till (or Server Bank) report to be incorrect by double the amount
of the voided tender. This problem has been corrected.
MD0003-065
Revision D
May 2, 2005
Page 627 of 814
Guest Services Solution (GSS)
What’s New
Guest Services Solution (GSS)
What’s New
There are no new features in this version of the software.
What’s Enhanced
An enhancement is defined as a change made to improve or extend the
functionality of the current application. To qualify as an enhancement,
the change must satisfy the following criteria:
The basic feature or functionality already exists in the previous
release of the software.
The change adds to or extends the current process. This differs from a
revision (i.e., a bug fix) which corrects a problem not caught in the
previous release of the software.
Enhancements
Summarized
The table below summarizes the enhancements included in this version.
Module
GSS
Configurator
MD0003-065
Revision D
May 2, 2005
Page 628 of 814
Feature
Postal Codes Recognition for Deliveries
Page
629
Guest Services Solution (GSS)
What’s Enhanced
Enhancements
Detailed
GSS Configurator
Postal Code Recognition for Deliveries
With this release, Delivery+ users will be able to auto-locate a customer
address using a postal code and street number only. This enhancement
supplements the existing feature, which populated the delivery address
based on the entered street name.
Note
This feature was designed for use in locations where postal
codes and streets (or sides of streets) have a 1:1 relationship
(e.g., the United Kingdom)
Configuration Changes
To support the change, two new fields were added to the Guest Loyalty
Configuration utility:
Postal Code Recognition (Operations tab) — When checked,
cross-references the Postal Code and Street Number (entered
via the Delivery screen) with the System’s delivery area maps and
automatically uploads the complete customer address from the
database.
To work, the Validate Block Numbers option (this tab) must be
enabled. In addition, the workstation’s Order Type option must
be set up for delivery (Guest Loyalty Configurator | Workstation/
Order Types).
Street Filter (Delivery Area Editor) — Allows the user to narrow
the search field by limiting the numerical part of the street address
to one of the following:
Odd Only — Checks only the odd-numbered units on this
street.
Even Only — Checks only the even-numbered units on this
street.
Both — Checks all units on this street (both odd and even) for
a match.
MD0003-065
Revision D
May 2, 2005
Page 629 of 814
Guest Services Solution (GSS)
What’s Revised
What’s Revised
A revision is defined as a correction made to any existing form, feature,
or function currently resident in the GSS software. To qualify as a
revision, the change must satisfy the following criteria:
The basic form, feature, or functionality must be part of the previous
version of the software.
The change must replace the current item or remove it from the
application.
Revisions
Summarized
The table below summarizes the revisions included in this version.
Module
POS Interface
MD0003-065
Revision D
May 2, 2005
Page 630 of 814
Feature
CR ID
Page
Address Line Not Updating
Properly
13365
631
New Customer Info Not Saved
With Caller ID
13570
631
Non-Decimal Fields Limited to 1
Digit
15840
631
Guest Services Solution (GSS)
What’s Revised
Revisions
Detailed
POS Interface
Address Line Not Updating Properly
CR ID #: 13365
When modifying a record on the Customer Selection/View/Modify screen,
the Address Line 1 field failed to save the changes when the UPDATE
button was clicked. This problem has been corrected.
New Customer Info Not Saved with Caller ID
CR ID #: 13570
When using caller id, if the incoming order was from a new customer
(i.e., no information on the customer screen except the phone number),
the user would enter the appropriate data, but the system would not create
a record once the ACCEPT button was pressed. This problem has been
corrected.
Non-Decimal Fields Limited to 1 Digit
CR ID #: 15840
Previously, users were limited to a single character when entering data
into a field that contained no decimal places. In addition, the system
would insert a decimal point on the right side of the users input even
though it was not required. This has been corrected.
MD0003-065
Revision D
May 2, 2005
Page 631 of 814
Product Management (PM)
What’s New
Product Management (PM)
What’s New
There are no new features in this version of the software.
What’s Enhanced
There are no enhancements in this version of the software.
MD0003-065
Revision D
May 2, 2005
Page 632 of 814
Product Management (PM)
What’s Revised
What’s Revised
A revision is defined as a correction made to any existing form, feature,
or function currently resident in the PM software. To qualify as a
revision, the change must satisfy the following criteria:
The basic form, feature, or functionality must be part of the previous
version of the software.
The change must replace the current item or remove it from the
application.
Revisions
Summarized
The table below summarizes the revisions included in this version.
Module
Feature
CR ID
Page
Calculating Current Period Cost
Produced ‘Division by Zero’ Error
16481
635
‘Division by Zero’ Error Posted
15870,
15093
635
Declaring Waste Allowance for
Batch Item With Negative
Quantity Causes Error
N/A
635
Error When Saving Count Past
Threhold Date
N/A
636
Inventory Count Tasks Will Not
Post After Interruption
14662
636
Post on Demand Causes RePosting of Transactions
16059
636
Invoicing
Unable to Change Invoice ID
From Packing Slip Form
16003
637
Ordering
Purchase Unit Incorrect When
Using Bid Conversion
16468
637
Inventory
MD0003-065
Revision D
May 2, 2005
Page 633 of 814
Product Management (PM)
What’s Revised
Module
Feature
CR ID
Page
‘Prior Period Corrections’ Posting
Incorrectly
15309
637
Unable to Receive Without
Purchase Order to Multi-Cost
Centers
15300
638
Inventory Cost of Sales Average
Use Cost Incorrect
15805
638
Inventory Cost of Sales Percentage
is Incorrect
16536
638
Inventory Cost of Sales Summary
Overstates Net Receipts
N/A
639
Summary Totals for Stock Days is
Incorrect on Inventory Potential
Revenue Report
12677
639
Recipe Cost Report Fails When
Duplicated Ingredients Found
N/A
640
Schedules
Accounting Periods Query Causes
PM to Hang
N/A
640
Setup
Allow Improper Link Between
Recipe and Ingredients
N/A
640
Clear PM Totals Not Deleting
Rows in _Old Tables
15162
641
Enabling Depletion When POS
Waste Transactions are Present
Causes PM Posting to Fail
N/A
641
Receiving
Reports
MD0003-065
Revision D
May 2, 2005
Page 634 of 814
Product Management (PM)
What’s Revised
Revisions
Detailed
Inventory
Calculating Current Period Cost Produced ‘Division by
Zero’ Error
CR ID #: 16481
Previous attempts to calculate the current period cost (Setup | Inventory
Items | Cost Information) on production items with a cost and quantity of
0 would result in a ‘division by zero’ error. The problem was caused by
an error in the stored procedure speo_get_itm_cost_info.sql. When called
to calculate the cost, it did not protect against a 0 on-hand quantity. This
has been corrected.
‘Division by Zero’ Error Posted
CR ID #: 15870, 15093
When receiving a zero quantity for an item, where the quantity on hand
was already zero, the system would incorrectly post a ‘division by zero’
error. The problem was corrected by changes to the following stored
procedures:
speo_inven_do_itm_rcpt
speo_inven_itm_last_cost_open_prd
speo_inven_itm_last_cost_closed_prd
Declaring Waste Allowance for Batch Item With Negative
Quantity Causes Error
CR ID #: N/A
During production, if a batch recipe item fell to a negative quantity when
a waste allowance was declared, the system would incorrectly set the last
cost value for that item to zero. This has been corrected.
MD0003-065
Revision D
May 2, 2005
Page 635 of 814
Product Management (PM)
What’s Revised
Error Saving Count Past Threshold Date
CR ID #: N/A
When saving an Inventory Count, if the user exceeded the 'Prior date
count threshold', then any attempt to update and save that count would
result in the following error: "Cannot focus a disabled or invisible
window". The count was not recoverable and had to be deleted and reentered. This issue has been corrected.
Inventory Count Tasks Will Not Post After Interruption
CR ID #: 14662
After starting a count task through the Inventory Schedule form (PM |
Tasks | Inventory Tasks), if a large amount of PM transactions was
posting, the hourglass cursor would appear (indicating an activity in
progress), but the actual count form would never display.
If the user exited PM in this state, PM was unable to save count details
for that task the next time it was run. The process would appear to work.
That is, the Inventory Count form would display and the user would be
able to enter the data and save. However, when the form closed and the
tasking calendar was redisplayed, the green check mark (indicating a
completed count) would not appear next to the selected task. If the user
reopened the count, all of the entered data would be missing.
This problem has been corrected.
Post on Demand Causes Re-Posting of Transactions
CR ID #: 16059
After creating a receipt for a previous business date, if the user posted
transactions to the database (with Post on Demand enabled), the system
would incorrectly post transactions for items not on the receipt, from the
date of the receipt forward, including those already posted. This problem
has been corrected.
MD0003-065
Revision D
May 2, 2005
Page 636 of 814
Product Management (PM)
What’s Revised
Invoicing
Unable to Change Invoice ID From Modify Packing Slip
Form
CR ID #: 16003
When reconciling packing slips to invoices from the Invoices | Review &
Reconcile Packing Slips form, the Invoice ID field was disabled (greyed
out) and would not allow a user to add/modify an entry. This problem has
been corrected.
Ordering
Purchase Unit Incorrect When Using Bid Conversion
CR ID #: 16468
When creating an order, if the vendor bid is in a unit different than the
purchase unit, the price will be wrong when an order is created. This
occurs when the option Allow unit conversion is enabled (Setup | Order
Classes | Options). This problem has been corrected.
Receiving
‘Prior Period Corrections’ Posting Incorrectly
CR ID #: 15309
A return posted to prior accounting periods can be saved as a 'prior period
correction'. Previously, when this was done, the quantity of the return
would post correctly (as a negative entry), but the price was entered as a
positive value. For returns, both should be negative. This problem has
been corrected.
MD0003-065
Revision D
May 2, 2005
Page 637 of 814
Product Management (PM)
What’s Revised
Unable to Receive Without Purchase Order to Multi-Cost
Centers
CR ID #: 15300
Previously, when an inventory item was delivered on a single invoice to
multiple cost centers, saving the invoice would sometimes fail. Also, if
the invoice was received without a purchase order, AND if the inventory
item used a vendor ID number, the invoice could not be saved. The
system would generate the error message: "This vendor item ID already
exists." Both problems have been corrected.
Reports
The table below describes the PM report changes in this Service Pack:
Report
Inventory Cost
of Sales Detail
Area Modified
Templatea
CR ID #: 15805
Inventory Cost
of Sales Detail
CR ID #: 16536
MD0003-065
Revision D
May 2, 2005
Page 638 of 814
Templatea
Description
When running the Inventory
Cost of Sales Detail report, the
system would report unusually
high values for the Average
Usage Cost on very low or zero
usage items. The variance was
caused by a rounding
discrepancy between the report
template and the stored
procedure that it called. This
has been fixed.
When running the Inventory
Cost of Sales Detail report, the
Cost of Sales % values were
being calculated incorrectly.
The problem was due to an
error in the way the template
reduced the cost of sales
percentages for the various cost
groups. This has been fixed.
Product Management (PM)
What’s Revised
Inventory Cost
of Sales
Summary
Stored
Procedureb
CR ID #: N/A
Inventory
Potential
Revenue Report
Templatec
CR ID #: 12677
Recipe Cost
Report
Stored
Procedured
CR ID #: N/A
When running the Inventory
Cost of Sales Summary, the
"Net Receipts" column on the
report included inventory item
and production item receipts.
This caused both net receipts
and actual usage to be
overstated. This has been
corrected.
When running the Inventory
Potential Revenue Report, the
number of stock days for
individual items was listed
accurately, but the summary
totals were incorrect. This has
been fixed.
When running the Recipe Cost
Report, a database error would
occur if the system located a
recipe that had two ingredients
(one a sub-recipe and one an
inventory item) with the same
ingrd_type_seq. This has been
fixed.
a
File changed:
InvenCostSalesDet.rpt
b
File changed:
speo_cos_R_summary
c
File changed:
InventoryPotentialRevenue.rpt
d
File changed:
speo_R_recipe_info
MD0003-065
Revision D
May 2, 2005
Page 639 of 814
Product Management (PM)
What’s Revised
Schedules
Accounting Periods Query Causes PM to Hang
CR ID #: N/A
In an Enterprise Management environment, it was possible for PM to
hang when entering the Inventory Schedule task where count tasks had
been scheduled on a period basis. The problem was due to an error in the
query’s “order-by” clause which is used to calculated inventory count
tasks by period. It was not ordering the accounting period information
correctly. This has been corrected.
Setup
Allows Improper Link Between Recipe and Ingredients
CR ID #: N/A
When defining a recipe, users were able to select as ingredients,
inventory items that referenced themselves.
For example, suppose that two recipes were created in PM | Setup |
Recipes.
Recipe A was for a Caesar Salad. The ingredients were Romaine
Lettuce, Salad Dressing Portion, Parmesan Cheese, and a Bread
Roll.
Recipe B was for Bread Rolls.
Because Bread Rolls are created on the premises, they are designated on
the Inventory Items form as a Recipe Item, which means they must be
linked to an appropriate bread recipe. A drop-down list of available
recipes is provided.
MD0003-065
Revision D
May 2, 2005
Page 640 of 814
Product Management (PM)
What’s Revised
In the past, when the user opened this list, the system would display all
recipes, including the Ceasar Salad selection and any other recipe that
included Bread Rolls as an ingredient. In other words, it was possible for
a user to link the Bread Rolls item to a recipe in which it was an
ingredient itself. This problem has been corrected.
Clear PM Totals Not Deleting Rows in _Old Tables
CR ID #: 15162
After upgrading to RES 3.2, clearing PM totals failed to purge data from
the following ‘_old’ tables:
dly_rvc_fixed_prd_cmpst_mi_ttl_old
dly_fixed_prd_cond_ttl_old
dly_rvc_cmpst_mi_ttl_old
dly_rvc_cond_ttl_old
dly_sys_fixed_prd_cmpst_mi_ttl_old
dly_fixed_sys_cond_ttl_old
dly_sys_cmpst_mi_ttl_old
dly_sys_cond_ttl_old
This was interfering with the site’s ability to delete menu items. The
problem has been corrected.
Enabling Depletion When POS Waste Transactions are
Present Causes PM Posting to Fail
CR ID #: N/A
Previously, when depletion was enabled in PM, the system was not
setting the last_trans_seq correctly if there were any POS Waste
transactions. If POS Waste transactions were entered for a date in a
closed PM period, than PM posting would fail. This problem has been
corrected.
MD0003-065
Revision D
May 2, 2005
Page 641 of 814
Labor Management (LM)
What’s New
Labor Management (LM)
What’s New
There are no new features in this version of the software.
What’s Enhanced
An enhancement is defined as a change made to improve or extend the
functionality of the current application. To qualify as an enhancement,
the change must satisfy the following criteria:
The basic feature or functionality already exists in the previous
release of the software.
The change adds to or extends the current process. This differs from a
revision (i.e., a bug fix) which corrects a problem not caught in the
previous release of the software.
Enhancements
Summarized
The table below summarizes the enhancements included in this version.
Module
Database
Enhancements
Detailed
Feature
Repost Labor Totals
Page
642
Database
Repost Labor Totals
The splm_repost_all_labor_seven_days has been modified. With this
release, the number of days to repost labor totals has been changed from
7 to 10 days.
MD0003-065
Revision D
May 2, 2005
Page 642 of 814
Labor Management (LM)
What’s Revised
What’s Revised
A revision is defined as a correction made to any existing form, feature,
or function currently resident in the LM software. To qualify as a
revision, the change must satisfy the following criteria:
The basic form, feature, or functionality must be part of the previous
version of the software.
The change must replace the current item or remove it from the
application.
Revisions
Summarized
The table below summarizes the revisions included in this version.
Module
Manual
Scheduling
Reports
Setup
Feature
CR ID
Page
Daily Line Up Report Displays
Breaks Incorrectly
N/A
644
Scheduled Breaks Not Copied
When Creating a New Schedule
15166
644
Employee Earnings Summary
Report
15290
645
Employee Time Card Report
15865
646
Labor Summary Report
15561
646
Default Regular Rate Cannot Be
Same for Two or More Sections
N/A
647
Overtime Calculations Incorrect
When Deploying Pay Rate
Changes on an EM Database
15207
647
MD0003-065
Revision D
May 2, 2005
Page 643 of 814
Labor Management (LM)
What’s Revised
Revisions
Detailed
Manual Scheduling
Daily Line Up Report Displays Breaks Incorrectly
CR ID #: N/A
When adding a break to an employee shift assignment (Enterprise Office
| Scheduling | Weekly Assignments), if the user entered a start time for the
break other than the default, the break would not display properly on the
Daily Line Up Gantt report. This problem has been corrected.
Scheduled Breaks Not Copied When Creating New Schedule
CR ID #: 15166
Previously, when creating a new schedule from either a previous week’s
schedule or from a template that contained scheduled breaks, the breaks
were not being carried over. This problem has been corrected.
MD0003-065
Revision D
May 2, 2005
Page 644 of 814
Labor Management (LM)
What’s Revised
Reports
The table below describes the LM report changes in this Service Pack:
Report
Employee
Earnings
Summary
Report
CR ID #: 15290
Area Modified
Template
Description
When running the Employee
Earnings Summary report
(PPEmpEarningsSummary.rpt,
the following problems were
found:
• The service charge field was
displayed without a decimal
separator (e.g., 5.68 became
568).
• The report was not formatted
correctly to display the service
charge total under the correct
header.
• The service charge field in
the Totals line was rounding to
the nearest whole dollar.
These problems have been
corrected.
MD0003-065
Revision D
May 2, 2005
Page 645 of 814
Labor Management (LM)
What’s Revised
Employee Time
Card Report
Stored
Procedurea
CR ID #: 15865
Labor Summary
Report
Stored
Procedureb
CR ID #: 15561
a
File changed:
sp_post_time_card_dtl_ttl
b
File changed:
sp_R_time_prd_time_crd_ttl
MD0003-065
Revision D
May 2, 2005
Page 646 of 814
When an employee changes
revenue centers immediately
after signing in, the system
writes two records to time card
detail. The first one assigns
0.00 values for clock-in/-out
times. The second one starts the
current clock-in and assigns a
null for the clock-out time.
When an employee clocks out,
the system should only update
the second record.
Instead, when an employee
clocked out, the system would
update both records, taking the
hours recorded for the first
record and adding them to the
second. This would double the
accumulated hours posted for
an employee for the day. This
has been fixed.
The Labor Summary Report
displayed zeros instead of data.
The problem was caused when
the stored procedure
sp_R_time_prd_time_crd_ttl
was unable to post to a database
table because of a numeric
constraint in one of the labor
columns. This has been fixed..
Labor Management (LM)
What’s Revised
Setup
Default Regular Rate Cannot be Same for Two or More
Sections
CR ID #: N/A
Previously, if more than one section was configured on the EM Corporate
server, any attempt to change a section’s default regular rate to the same
rate as another section would cause an Integrity Constraint Violation
error. Certain rate values would also trigger a business rule warning,
which resulted in the same error condition. This left the form in such a
state that it had to be closed and reopened. This problem has been
corrected.
Overtime Calculations Incorrect When Deploying Pay Rate
Changes on an EM Database
CR ID #: 15207
Previously, if an EM Corporate site was managing jobs with multiple
sections, then any changes made to the default pay rate on the EM Server
would cause the system to post incorrect Overtime Calculations. These
rates were then deployed to the EM stores. This has been corrected.
MD0003-065
Revision D
May 2, 2005
Page 647 of 814
Financial Management (FM)
What’s New
Financial Management (FM)
What’s New
There are no new features in this version of the software.
What’s Enhanced
There are no enhancements in this version of the software.
What’s Revised
There are no revision in this version of the software.
MD0003-065
Revision D
May 2, 2005
Page 648 of 814
RES Platform
Introduction
RES Platform
Introduction
This chapter comprises changes made to RES Platform, which includes
the following applications:
MICROS Desktop
License Manager
Reports Explorer
Language Translation Utility
MD0003-065
Revision D
May 2, 2005
Page 649 of 814
RES Platform
What’s New
What’s New
New Features
Summarized
A new feature is defined as one that provides capabilities that were not
available in previous versions of the application.
The table below summarizes the new features included in this version.
Module
MICROS
Desktop
New Features
Detailed
Feature
Support for an HTML Button that Closes
the Desktop
Page
650
MICROS Desktop
Support for an HTML Button that Closes the Desktop
With this release, the MICROS Desktop can now be shut down from an
HTML button, provided that the current Desktop user has permissions to
terminate the Desktop program. When the button is clicked, the Desktop
will close in a controlled manner, ensuring that all running plug-ins are
safely exited first. This button is not provided during installation, but
must be added by the user. Knowledge of HTML programming is
required.
In addition to closing the desktop, the HTML button can be configured to
automatically execute a batch file on shutdown. The batch file must be
placed in the same directory as the MicrosDesktop.exe.
Setup
Follow these steps to add an HTML button and batch file to the Desktop
operation:
1. Create an HTML button using the following code:
<param name=”Command” value=”Desktop.Control:Exit”>
(Closes the Desktop and runs the batch file.)
or
MD0003-065
Revision D
May 2, 2005
Page 650 of 814
RES Platform
What’s New
<param name=”Command” value=”Desktop.Control:ExitNoScript>
(Closes the Desktop without running the batch file, regardless of
whether the file(s) have been added to the directory.)
2. Create the batch file(s) that will be run when the Desktop is closed.
The batch file must be called either DesktopShutdown.bat or
DesktopShoutdownHidden.bat. The files differ in that the
DesktopShutdownHidden.bat file will not display in a command
window. As such, this file must not require any user interaction or the
system may appear to hang when the file is executed.
3. On exit, the system will look for the DesktopShutdown.bat file first.
If it is not found, the DesktopShutdownHidden.bat will be run.
4. Copy the batch file(s) to the same folder as the MicrosDesktop.exe.
MD0003-065
Revision D
May 2, 2005
Page 651 of 814
RES Platform
What’s Enhanced
What’s Enhanced
An enhancement is defined as a change made to improve or extend the
functionality of the current application. To qualify as an enhancement,
the change must satisfy the following criteria:
The basic feature or functionality already exists in the previous
release of the software.
The change adds to or extends the current process. This differs from a
revision (i.e., a bug fix) which corrects a problem not caught in the
previous release of the software.
Enhancements
Summarized
The table below summarizes the enhancements included in this version.
Module
Language
Translation
Utility
MD0003-065
Revision D
May 2, 2005
Page 652 of 814
Feature
Page
Translation Support for Data String Filters
653
RES Platform
What’s Enhanced
Enhancements
Detailed
Language Translation Utility
Translation Support for Data String Filters
The language translation feature allows a user to convert existing labels
and data fields for all the forms in POS Configurator from US English to
another language. This could be done in two places: 1) through the
Language Modify Translation form in POS Configurator, and 2) through
the MICROS Language Translation utility.
Because of the size and complexity of the RES applications, creating a
translation file is a time-consuming process. With each system upgrade,
fields can be added or changed. Locating and translating the new and
modified fields could be tedious as well.
To improve useability, search and filtering options were added in the
translation features to reduce the amount of time required to locate text
strings.
Using the POS Configurator
In the past, when an option was added or modified, the user could update
the translation file by locating the field through the Translation forms in
POS Configurator, and entering text in the second language. To narrow
down the search, the user could apply a data filter (in the form of three
check boxes), directing the system to Show All, Show Changed, or Show
Added records only.
With this release, the filtering mechanism was altered and enhanced to
allow the user to search for specific text strings. The check boxes were
replaced by three related fields which are used to build the search criteria.
The first of these is a drop-down list which contains the original filtering
options (e.g., Show All, Show Added, Show Changed). The second dropdown list narrows the search to (...records, ...records that contain, and
...records that begin with...). The final field allows the user to type in a
text string to complete the filter.
MD0003-065
Revision D
May 2, 2005
Page 653 of 814
RES Platform
What’s Enhanced
For example:
Show added... records that start with... print
When the Go button is pressed, the system searches for records that were
added since the previous version that begin with the word “print.” The
results are displayed in the Translation form.
Note
Text strings are not case-sensitive.
Once an Added record is modified, it is no longer include when
the “Show Added” filter is used. It will now be listed as a
“Changed” entry.
MD0003-065
Revision D
May 2, 2005
Page 654 of 814
RES Platform
What’s Enhanced
Accessing the Language Forms
To update the language files through POS Configurator, a second
language must have been added through the Language Translation
Utility. This language must be selected as the Current Language in POS
Configurator (System | Restaurant | Options).
Once the option is set, the option Enable translation mode is displayed.
When this box is checked, the Translate button is shown in the blue title
bar at top of the screen. Press this button to open the language translation
forms.
Using the Language Translation Utility
String translations of the POS System are also created using the
MICROS Systems Language Translation utility. The utility lists all of the
form labels and database values that need to be translated into the
secondary language.
In the past, the user had to scroll through the entire list in order to locate a
particular entry. To speed up the process, a search feature was added to
the Translate Strings and Translate DB Strings tabs.
MD0003-065
Revision D
May 2, 2005
Page 655 of 814
RES Platform
What’s Enhanced
To locate a record, the user now enters a text string in the Search field at
the top of the form. The process is not case-sensitive and partial entries
are allowed.
When the Go button is pressed, the system scans the list. If a match is
found, the records grid is redisplayed, with the cursor focus shifting to
the first entry that satisfies the search criteria.
Note
Unlike the filters applied through the Language Modify
Translation forms in POS Configurator, this search mechanism
only looks for records that begin with the entered text string.
Additional Changes
In previous versions, users were able to change the default text strings
provided with the US English version of the software. This was causing
confusion with some of the back office applications, such as Cash
Management and Manager Procedures. To correct the problem, users will
no longer be able to make changes to the default US English language
file, but will be required to add a new language in the Language
Translation Utility for the modified entries.
MD0003-065
Revision D
May 2, 2005
Page 656 of 814
RES Platform
What’s Revised
What’s Revised
A revision is defined as a correction made to any existing form, feature,
or function currently resident in the RES software. To qualify as a
revision, the change must satisfy the following criteria:
The basic form, feature, or functionality must be part of the previous
version of the software.
The change must replace the current item or remove it from the
application.
Revisions
Summarized
The table below summarizes the revisions included in this version.
Module
Language
Translation
Utility
Feature
Import Language Feature is Only
Reliable When Importing to an
Identical Version Database
CR ID
Page
15626
658
MD0003-065
Revision D
May 2, 2005
Page 657 of 814
RES Platform
What’s Revised
Revisions
Detailed
Language Translation Utility
Import Language Feature is Only Reliable When Importing
to an Identical Version Database
CR ID 15626
Previously, when importing a language file, users had to ensure the
database receiving the information had applied the same upgrades, in the
same order as the database from which the export file was generated. If
the databases did not follow identical upgrade paths, the import process
would result in incorrect entries or would fail before completion.
To correct this problem, changes were made to the format of the language
file when exported from a previous version of the software. The changes
make it possible for an exported file to be imported into a database
regardless of its update history.
Because the revised process relies on “intelligent” handling of translated
strings, the import feature is slower than it used to be. To assist the user, a
progress bar was added to provide visual feedback while the file is being
imported.
Changes to the import feature also affect the following:
A US English language file can no longer be exported or
imported.
When importing a language file for a language that has not been
created (through the Language Translation Utility), the system
will create it automatically.
Previously, if the language did not exist prior to the import
attempt, an error message would be displayed and the process
would be aborted. The user would have to create the record
before attempting to import the language file again.
MD0003-065
Revision D
May 2, 2005
Page 658 of 814
When importing a language file for a language that has does exist,
a warning will be displayed, alerting the user that any translations
already in the database may be overwritten with this file. User
confirmation is required before the import process continues.
Service Pack 1
Service Pack 1
In keeping with the original RES 3.2 ReadMe First, information is
divided into self-contained chapters, one for each of the following RES
products:
:3700 Point-of-Sale (POS) System
Kitchen Display System (KDS)
Cash Management (CM)
Guest Service Solutions (GSS)
Product Management (PM)
Labor Management (LM)
Financial Management (FM)
RES Platform
For clarity, product information is further divided into three sections:
What’s New
What’s Enhanced
What’s Revised.
Each section begins with an introduction and includes a table that
summarizes the features and functionality incorporated in this version of
the software. The table provides hypertext links to supplementary text
and graphics about the selected topics.
For more information on these features, and step-by-step instructions for
configuring them, refer to the product’s Online Reference Manual,
installed with the MICROS Documentation and available on the RES
CD.
814
MD0003-065
Revision D
May 2, 2005
Page 659 of 814
3700 POS
What’s New
3700 POS
What’s New
New Features
Summarized
A new feature is defined as one that provides capabilities that were not
available in previous versions of the application.
The table below summarizes the new features included in this version.
Module
POS
Operations
New Features
Detailed
Feature
Page
Menu Item Tax Override
660
Touch Item Discount
663
POS Operations
Menu Item Tax Override
The Menu Item Tax Override feature is used to modify the tax rate
applied to certain categories of products (e.g., baked goods, candy, ice
cream), based on the size or number of items purchased. This option
allows businesses to distinguish between menu items sold as singleserving prepared foods and those sold in bulk, as grocery items.
Background
Most governments (national and local) do not tax food items unless they
are consumed on the premises or involved some local preparation. For
example, in an ice cream parlor, a hand-dipped cone is considered a
prepared food (taxable), while a half-gallon container is a grocery item
(tax exempt). Similarly, a single donut purchased at a bakery is taxed as a
prepared food, but a box of donuts is not.
MD0003-065
Revision D
May 2, 2005
Page 660 of 814
3700 POS
What’s New
The distinction between prepared foods and groceries is related to the
size of the purchase and (indirectly) the level of service provided to the
customer. Items purchased in bulk require no extra labor from the seller
and are therefore taxed at the grocery rate. Smaller amounts — whether
prepackaged or à la carte — imply some interaction with a clerk or
server. As such, they are taxed at a higher, goods-and-services rate.
In the past, RES users had no way to distinguish between prepared foods
and grocery-like purhases. Restaurants with in-house bakeries, for
example, could not scan an order, count menu items from a particular
category, and then determine an appropriate tax rate. Whether the
customer ordered one donut or 10, when the check was service totaled,
the prevailing tax rate for donuts menu items would be applied.
The Solution
To fine-tune the taxes, the Menu Item Tax Override feature was added to
the 3700 POS. With this feature, the user creates a group of related menu
items called a menu item quantity group. This quantity group is linked to
a different tax rate — usually lower — than the tax rate assigned to the
individual menu items.
To enable the Menu Item Tax Override, the user specifies a threshold
value (e.g., six donuts), below which the basic tax rate applies. When a
donut order is rung up, the system counts the number of menu items
present. If the number is less than the threshold (i.e., 5 or less), the basic
rate is applied. If the number ordered is 6 or greater, the system overrides
the basic rate and applies the quantity tax rate.
Members of a quantity item tax group do not have to belong to the same
menu item class to be included in the rate. To illustrate, suppose the
business defines a Bakery Quantity Group, which includes menu items
such as a donut, tart, cookie, brownie, and slice of pie or cake. Each item
is a single-serving size. The quantity threshold is set at 6 items.
During operations, a customer orders 2 cookies, 1 brownie, and 2 tarts
(for a total of 5 items). Because the threshold has not been met, when the
check is service totaled, the menu items are taxed at their basic rate. If the
customer adds one or more items, the threshold of 6 items is met and the
quantity tax rate is applied instead.
MD0003-065
Revision D
May 2, 2005
Page 661 of 814
3700 POS
What’s New
New Fields in POS Configurator
To support this feature, a new Menu Item Quantity Groups form was
added under POS Configurator | Sales.
The form contains the following options:
MD0003-065
Revision D
May 2, 2005
Page 662 of 814
Menu Item Quantity Group — Specifies a name for the
quantity group (e.g., Desserts). When a menu item is selected, the
system will check to see if it belongs to one of these groups. If so,
the item will be counted against the threshold for determining
when the new tax rate is applied.
Quantity for activation — Specifies the point (i.e., number of
items or servings) at which the new tax rate is applied. Less than
this number, and the basic menu item tax rate will be used. Shared
items and items on split checks are not included in the count.
Tax Class — Indicates the new tax rate that takes affect when the
activation quantity is reached.
Menu Items — Lists the menu items that belong to this menu
item quantity group. Menu items can only belong to one menu
item quantity group.
3700 POS
What’s New
Touch Item Discount
This feature provides flexibility in the application of discounts in the
3700 POS System. With Touch Item Discounting, a user can select one or
more menu items before applying the discount. The system will
determine whether the menu items qualify for the discount and apply it
accordingly. If more than one discount is applied, the system will
calculate and subtract subsequent discount amounts from the depleted
price of the affected menu items.
Touch Item Discounting supports existing discount options and taxrelated functionality. Touch-item discounts may be used in combination
with item and subtotal discounts.
Background
In the past, 3700 POS users had two ways to apply discounts:
By Item — Applied to one menu item at a time during the current
service round. The discount is posted as a separate line item
immediately after the menu item entry.
By Check — Applied to a group of menu items after the check is
subtotaled. This discount calculation is based only on menu items
linked to the same itemizer number as the subtotal discount.
Although these discount methods have worked reasonably well, there
have been limitations:
Item discounts can only be applied to last item. Once a new item is
rung, the user cannot apply a menu item discount to any other entry in
the service round without voiding subsequent entries.
Item discounts cannot be applied to a previous service round.
Once the round is service totaled, the ability to apply a discount to
posted menu items is lost. To adjust the check, you must delete the
old menu item, add a new one, and apply the discount before the
check is service totaled again.
MD0003-065
Revision D
May 2, 2005
Page 663 of 814
3700 POS
What’s New
Item discounts cannot be applied to a combo meal. A combo meal
comprises two or more menu items packaged and sold under a single
menu item price. This is incompatible with the concept of a “last item
discount.” If a menu item discount is posted against a combo meal,
the system interprets the “last item” to be an unpriced side item and,
therefore, has nothing on which to base the discount.
Menu items cannot be added or excluded from subtotal discount.
Assume that a restaurant has a Happy Hour discount of 50%, and that
the discount is linked to a bar itemizer. This works fine for 99% of the
customers who order beer, wine, and mixed drinks. It may not be fine
for the occasional customer who orders a premium wine or
champagne — items not intended for the discount. In this case, there
is no way to exclude the more expensive items from the subtotal
discount without ringing a separate check. Or, alternatively, multiple
itemizers could be created to cover every possible discount group.
Percent discounts do not adjust for depleted balance. If more than
one discount is applied (e.g., a Free Dessert Coupon and a Senior
Discount of 10%), the system would calculate the 10% discount
based on the regular price of all the menu items, rather than the
adjusted total, after the coupon was subtracted. This can result in a
larger combined discount than was intended.
Multiple discounts are not regulated. Since the system relies on the
user to determine when more than one discount is allowed, a user
could apply several menu item and subtotal discounts until the check
is zeroed out.
Menu item discounts cannot be split across checks. Once a
discount is applied to a check, the user cannot split discounted menu
items without voiding the discount first.
The Solution
To address these issues, a third method of discounting was developed.
Touch Item Discounting combines the control offered by menu item
selection with the keystroke efficiency of a subtotal discount. The result
is a flexible alternative that includes the best of both methods while
filling in the gaps between the two.
MD0003-065
Revision D
May 2, 2005
Page 664 of 814
3700 POS
What’s New
Enabling
As with all discounts, touch-item discounts are defined in POS
Configurator and linked to a pre-programmed touchscreen key. Itemizers
are used to create a subset of menu items against which the touch-item
discount may be posted. The value of the discount may be defined as
either:
Percent — The amount of the discount is computed as a
percentage of the total value of the menu items selected.
Amount — The discount is a fixed amount applied against all
items selected.
The discount can be either preset or open. If open, the user will be
prompted to enter a value at the time the [Touch-Item Discount] key is
pressed. Should the user enter a value greater than the sum of the selected
menu item prices, an error message indicating “Discount Amount Too
Large” will be displayed and no discount will be applied.
Unlike menu item and subtotal discounts, Touch Item Discounting must
be activated at the System | Restaurant level. If it is not, touch-item
discounts will behave as menu item discounts..
Note
In an EM environment, this feature cannot be enabled until the
RES version on the Corporate Server is at v3.2 SP1 or higher.
All stores in the enterprise must also be upgraded to the same
version for Touch Item Discount to be managed from Corporate.
Applying a Discount
During operations, the user rings up menu items without worrying about
discounts. At any point in the process, the user can touch-select one or
more of the menu items and apply the discount. Selections do not have to
be from the current service round.
When the [Touch-Item Discount] key is pressed, the system confirms
that the selected menu items are linked to the same itemizer group(s) as
the discount. This action only takes a moment and is transparent to the
user.
MD0003-065
Revision D
May 2, 2005
Page 665 of 814
3700 POS
What’s New
For those items that qualify, a discount will be posted directly beneath the
affected menu items, as shown below:
If, among the selections, the user has highlighted one or more entries not
linked to an appropriate discount itemizer, the system will apply the
discount to the relevant items only and ignore the rest. This situation is
illustrated in the following example, where two appetizers (food
itemizer) have been selected, along with two drinks (beverage itemizer).
For illustration purposes, the discount key applies to food items only.
Touch Item Discounting can be as specific or as general as the user needs
it to be. If none of the menu items are highlighted before the touch-item
discount is pressed, the system will scan the entire check and apply that
discount to all relevant menu items. To work, at least one menu item
must satisfy the discount criteria.
MD0003-065
Revision D
May 2, 2005
Page 666 of 814
3700 POS
What’s New
In the following samples, note that the discount was not applied to the
Coffee/Tea menu item (a beverage item), which does not match the
discount itemizer. Also note that in the Amount Discount sample, the
$1.00 Off discount has been amortized across all of the food items. If one
or more items had been highlighted before the discount was applied, the
$1.00 amount would have been divided proportionally among them.
Restrictions
To ensure that discounts are not overused, a Restrictions option has been
added. This option allows the user to limit the application of discounts as
follows:
No restrictions — The discount imposes no limits itself on the
number of times it may be applied to a menu item or to a check.
Restrictions may be imposed by other discounts, however.
One discount per item — Imposes its own per item limit of one
discount, period. If the menu item has already been discounted,
this touch-item discount will not be applied. If the menu item has
not been discounted, this discount will be taken. However, no
other discount will be accepted against the menu item.
One discount per check — Imposes its own per check limit of
one discount, period. Once this discount is taken, no additional
discounts will be allowed. If another discount was applied to the
check already, this touch-item discount will not be allowed.
MD0003-065
Revision D
May 2, 2005
Page 667 of 814
3700 POS
What’s New
One discount of this type per item — Applies the discount once
per menu item and ignores any attempt to apply the discount a
second time.
One discount of this type per check — Applies the discount
once per check and ignores any attempt to apply the discount
again.
Note
Per check restrictions limit the number of times (instances)
that a discount can be applied to a guest check. They do not
limit the number of menu items that may be discounted
during a particular instance.That is controlled by discount
itemizers
Using Multiple Discounts
RES has always allowed users to apply more than one discount to the
same guest check. Until now, the process was straightforward — menu
item discounts were applied immediately after the item was ordered;
subtotal discounts were applied before the check was presented for
payment.
With this feature, discounts can be applied to any number of menu items
and at any time before payment. This flexibility, along with the new
Restrictions options, means that users need to be more aware of the
consequences of when and how a discount is applied.
For example, assume that a customer presents a $1.00 Off Coupon at the
time his meal is ordered, then requests the ten-percent Senior Meal
discount when the check is paid. Depending on the conditions under
which they are used, the same two discounts can result in a wide range of
totals due.
The following examples illustrate how the type of limitations placed on a
discount, as well as the order in which it is taken, affect the final check
total when multiple discounts are applied. As before, the discounts only
apply to food items; Coffee/Tea is linked to a beverage itemizer and is
therefore not included in the discount calculations.
MD0003-065
Revision D
May 2, 2005
Page 668 of 814
3700 POS
What’s New
Case #1 — Changing the Discount Type
The $1.00 Off coupon (limit one per check) is applied before taking
the 10% Senior Meal discount (no restrictions). None of the menu
items are selected at the time either discount is applied:
Menu
Item
Price
Onion Soup
Cheeseburger
Apple Pie
Coffee/Tea
Subtotal
5.00
4.95
4.50
1.25
15.70
$1.00 Off
Coupon
– 0.35
– 0.34
– 0.31
-– 1.00
10%
Senior
Meal
n/a
Price
After
Discount
4.65
4.61
4.19
1.25
14.70
The Senior Meal discount cannot be applied because of the one-percheck limitation imposed by the $1.00 Off coupon.
Next, assume that the $1.00 Off coupon is intended for desserts only
and limited to one per item. Again, the Senior Meal has no
restrictions. The results would be:
Menu
Item
Price
Onion Soup
Cheeseburger
Apple Pie
Coffee/Tea
Subtotal
5.00
4.95
4.50
1.25
15.70
$1.00 Off
Coupon
10%
Senior
Meal
– 0.50
– 0.50
– 1.00
– 1.00
– 1.00
Price
After
Discount
4.50
4.45
3.50
1.25
13.70
Notice that the Apple Pie is not discounted, even though it is a food
item, linked to the same itemizer as the Senior Meal discount. The
previously applied $1.00 Off discount prohibits a second discount
from being applied, but only on that menu item.
MD0003-065
Revision D
May 2, 2005
Page 669 of 814
3700 POS
What’s New
Alternatively, suppose that the $1.00 Off restriction was changed to
one of this type per check. the results would be:
Menu
Item
Price
Onion Soup
Cheeseburger
Apple Pie
Coffee/Tea
Subtotal
5.00
4.95
4.50
1.25
15.70
$1.00 Off
Coupon
– 1.00
– 1.00
10%
Senior
Meal
– 0.50
– 0.50
– 0.35
-– 1.35
Price
After
Discount
4.50
4.45
3.15
1.25
13.35
In this situation, the Apple Pie is discounted twice — once as a
specific item discount, and then as part of the Senior Meal discount.
Because of the restrictions placed on it, the $1.00 Off discount cannot
be used against any other menu items on this check.
Notice, too, that the senior discount is calculated against the depleted
menu item price (3.50), not the original (4.50) price.
MD0003-065
Revision D
May 2, 2005
Page 670 of 814
3700 POS
What’s New
Case #2 — Changing the Discount Order
The $1.00 Off coupon (limit one per check) is applied before taking
the ten-percent Senior Meal discount (no restrictions). None of the
menu items are selected at the time either discount is applied:
Menu
Item
Price
Onion Soup
Cheeseburger
Apple Pie
Coffee/Tea
Subtotal
5.00
4.95
4.50
1.25
15.70
$1.00 Off
Coupon
– 0.35
– 0.34
– 0.31
-– 1.00
10%
Senior
Meal
n/a
Price
After
Discount
4.65
4.61
4.19
1.25
14.70
As before, the Senior Meal discount cannot be applied because all of
the menu items have already been discounted and a one-per-check
limitation has been imposed.
But looks what happens if the Senior Meal discount is applied first:
Menu
Item
Price
Onion Soup
Cheeseburger
Apple Pie
Coffee/Tea
Subtotal
5.00
4.95
4.50
1.25
15.70
10%
Senior
Meal
– 0.50
– 0.50
– 0.45
-– 1.45
$1.00 Off
Coupon
n/a
Price
After
Discount
4.50
4.45
4.05
1.25
14.25
Because the food menu items are already discounted when the $1.00
Off coupon is applied, the discount coupon is ignored. Instead, the
system posts an error message indicating a restriction exists that
limits discounts to one per check.
MD0003-065
Revision D
May 2, 2005
Page 671 of 814
3700 POS
What’s New
Case #3 — Changing Both Discount Type and Order
Returning to the original example, the $1.00 Off coupon (limit one
per check) is applied before taking the ten-percent Senior Meal
discount (no restrictions). None of the menu items are selected at the
time either discount is applied:
Menu
Item
Price
Onion Soup
Cheeseburger
Apple Pie
Coffee/Tea
Subtotal
5.00
4.95
4.50
1.25
15.70
$1.00 Off
Coupon
– 0.35
– 0.34
– 0.31
0.00
– 1.00
10%
Senior
Meal
n/a
Price
After
Discount
4.65
4.61
4.19
1.25
14.70
Next, assume that the Senior Meal discount is applied first and the
$1.00 Off coupon is changed to one of this type per check:
Menu
Item
Price
Onion Soup
Cheeseburger
Apple Pie
Coffee/Tea
Subtotal
5.00
4.95
4.50
1.25
15.70
10%
Senior
Meal
– 0.50
– 0.50
– 0.45
-– 1.45
$1.00 Off
Coupon
– 0.35
– 0.34
– 0.31
– 1.00
Price
After
Discount
4.15
4.11
3.74
1.25
13.25
Because the unrestricted Senior Meal discount was applied first, the
system had no problem applying the $1.00 Off coupon. Once the
second discount is applied, however, the user will not be able to apply
it again to this check.
MD0003-065
Revision D
May 2, 2005
Page 672 of 814
3700 POS
What’s New
On the other hand, if the Senior Meal discount is applied first and the
$1.00 Off coupon is changed to one of this type per item, the user
would be able to apply the discount multiple times — once to each
food item in the guest check. The results would be as follows:
Menu
Item
Price
Onion Soup
Cheeseburger
Apple Pie
Coffee/Tea
Subtotal
5.00
4.95
4.50
1.25
15.70
10%
Senior
Meal
– 0.50
– 0.50
– 0.45
-– 1.45
$1.00 Off
Coupon
– 1.00
– 1.00
– 1.00
-– 3.00
Price
After
Discount
3.50
3.45
3.05
1.25
11.25
The system would allow multiple use of the discount as long as the
menu items were selected and discounted separately.
If multiple items are highlighted when the [$1.00 Off] key is pressed,
the system will subtract $1.00 from the check total, amortizing the
amount of the single discount among all the selected items. No
further discounting will be allowed for any of those items:
Menu
Item
Price
Onion Soup
Cheeseburger
Apple Pie
Coffee/Tea
Subtotal
5.00
4.95
4.50
1.25
15.70
10%
Senior
Meal
– 0.50
– 0.50
– 0.45
-– 1.45
$1.00 Off
Coupon
– 0.50
– 0.50
– 1.00
Price
After
Discount
4.00
3.95
4.05
1.25
13.25
MD0003-065
Revision D
May 2, 2005
Page 673 of 814
3700 POS
What’s New
Applying Discounts to Combo Meals
In the past, item discounts could not be applied to a combo meal. Combo
meals were typically listed as a priced menu item, with the components
of the meal listed as either priced or unpriced line items beneath it. When
a menu item discount was applied to a combo meal, the system looked
for the last item posted and, finding an unpriced item, was unable to
calculate a discount.
Touch Item Discounting solves this problem by allowing a user to touchselect the priced combo menu item before the discount is applied. The
discount is listed after the last item in the combo meal and is printed as
one discount for the entire set of combo menu items.
Applying Discounts to Menu Item with Priced Condiments
In the past, applying discounts to menu items with priced condiments
was also problematic. To apply an item discount to the menu item, the
discount had to occur immediately after the menu item was rung, and
before any condiments were entered. If the user waited until the last
priced condiment was added, the discount would be applied to the last
item selected -- the priced condiment.
Touch Item Discounting solves this problem by allowing a user to touchselect the menu item after the condiments are added. This will highlight
the item and all of its condiments. When the discount is applied, it is
listed after the last condiment and is printed as one discount for the entire
set of menu items and condiments.
Behind the scenes in both scenarios (combo meals and menu items with
priced condiments), the system calculates and applies individual item
discounts to each of the priced items. For combo meals, this means a
separate discount line item is noted for the combo parent and any main or
side items that have a price associated with them. Similarly, a discount is
calculated for a menu item and each of it’s priced condiments.
These discount details are available through the system reports.
MD0003-065
Revision D
May 2, 2005
Page 674 of 814
3700 POS
What’s New
Voiding Discounts
With touch-item functionality, discounts can be removed from a check as
easily as they can be applied. The options are:
Last item void — Removes the discount from all of the menu items
to which it had been applied by double-clicking the [Void] key. To
work, the discount must be the last transaction posted. This is the
current functionality.
Touch item void — Removes the highlighted discount line items
only. More than one line item may be selected.
Voided discount line items do not have to be from the same service
round, originate from the same instance of discount, or even be the
same discount type. Once a discount is applied to a menu item, it is
itemized and considered a separate entry so that a percent discount
can be highlighted and removed at the same time as an amount
discount.
Note
Voiding part of an amount discount will not automatically
recalculate the discount on the remaining items.
For example, a $1.00 Off coupon applied to two Apple Pie
menu items will be split evenly at $0.50 each. If one of the
Apple Pies is deleted, the discount on the other one will
remain $0.50. The system will not adjust the discount to
$1.00 on the remaining Apple Pie item.
To reinstate the full discount, you must delete all related
discount line items, then select the remaining menu items
and apply the discount again.
MD0003-065
Revision D
May 2, 2005
Page 675 of 814
3700 POS
What’s New
Consolidating Discounts
When a touch item discount is applied to a check, the system
automatically calculates the value of the discount for each affected line
item. A separate discount line item is then listed below each of them.
During operations, this level of detail is
advantageous to the servers as they
confirm, modify, and remove
discounts. Printed out, it provides an
unnecessarily long and confusing
check to the customer.
To simplify the guest check, an option
was added to consolidate discounts
(Revenue Center | RVC Print Design).
When enabled, the system will print
the menu items as they are entered,
with discounts listed at the bottom of
the check. If more than one type of
discount is applied, a separate entry
will be provided for each.
The system will continue to itemize
discounts in the display and to post
detailed results in the database.
Summary
With touch item discounting, users can:
Touch-select one or more menu items and apply a discount.
Apply discounts at any time — not just in the current service round.
De-select one or more menu items, effectively subtracting them from
the discount calculation.
Apply discounts to combo meals, main and side items.
Apply discounts to priced condiments linked to a menu item.
MD0003-065
Revision D
May 2, 2005
Page 676 of 814
3700 POS
What’s New
Combine touch-item discounts with menu item and subtotal
discounts.
New Fields in POS Configurator
To support the feature, the following options were added to the POS
Configurator:
Enable Touch Item Discounting (System | Restaurant | Options) —
When checked, allows a user to define a touch-item discount. Makes
additional functionality available to menu item and subtotal
discounts. When cleared, treats touch-item discounts as if they were
menu item discounts, applying it to the last item only.
Touch item (Sales | Discount/Service | Discount) — When checked,
designates the discount as a touch-item discount. During POS
operations, the system will apply the discount to all of the selected
menu items, provided they are linked to the same itemizer as the
discount itself.
This option is only available if the Item Discount option (Sales |
Discount/Service Charge | Discount) is also enabled.
Restrictions (Sales | Discount/Service | Discount) — Allows the user
to specify how the discount will be applied.
Consolidate Touch Item Discounts (Revenue Center | RVC Print
Design | Guest Checks) — When checked, prints a discount amount
at the bottom of the check for each discount type.
Note
This option only affects the printed check. The display
screen will continue to show a discount line item beneath
each applicable menu item.
Reports
Two new reports are included with this feature. They are available under
the Sales category in the Autosequences and Reports application.
MD0003-065
Revision D
May 2, 2005
Page 677 of 814
3700 POS
What’s New
RVC Discounts Detail (dly_rvc_dsc_dtl.rpt) — Provides a detailed
report of all discounted guest checks. Entries are sorted by date,
revenue center, employee, and check number, respectively. Discounts
are itemized by types and, in the case of item discounts, include the
menu items associated with each. Subtotal discounts do not list
associated menu items.
MD0003-065
Revision D
May 2, 2005
Page 678 of 814
3700 POS
What’s New
RVC Discounts Summary (dly_rvc_dsc.rpt) — Provides a summary
report of guest check discounts. Entries are sorted by date, revenue
center, employee, and check number, respectively.
MD0003-065
Revision D
May 2, 2005
Page 679 of 814
3700 POS
What’s Enhanced
What’s Enhanced
An enhancement is defined as a change made to improve or extend the
functionality of the current 3700 POS application. To qualify as an
enhancement, the change must satisfy the following criteria:
The basic feature or functionality already exists in the previous
release of the software.
The change adds to or extends the current process. This differs from a
revision (i.e., a bug fix) which corrects a problem not caught in the
previous release of the software.
Enhancements
Summarized
The table below summarizes the enhancements included in this version.
Module
May 2, 2005
Page 680 of 814
Page
CA/EDC
Credit Card Security
682
Database
Daylight Savings Time
683
Support for Closing Pay Periods on a
mymicros.net Site
683
‘Cancel’ Button Added to Set Hour/Set
Minute Panels
684
Time Clock Edit Screen Navigation
684
Mobile
MICROS
Minimum Signal Strength
686
POS
Operations
Combo Meal Override Pricing
687
Consolidate Combo Side/Child Items on
Remote Printers
687
Epson TM-H6000 Support via OPOS
Interface
688
MICROS Pole Display Support for
Cyrillic Characters
690
Order Device Printing Enhancements
690
Manager
Procedures
MD0003-065
Revision D
Feature
3700 POS
What’s Enhanced
Module
SIM
Feature
Page
@CCAuth_Count
693
KDS Functions
694
@TblObjNum
694
@VoidStatus
695
MD0003-065
Revision D
May 2, 2005
Page 681 of 814
3700 POS
What’s Enhanced
Enhancements
Detailed
CA/EDC
Credit Card Security
In keeping with guidelines from credit card issuers, additional changes
and enhancements were made in the way RES handles and processes
credit card information.
With this release, complete credit card track data will no longer be stored
in the database. Track 1 data will be completely removed and Track 2
data will be altered so that all discretionary information is replaced with
zeros.
In addition, all secondary authorizations — whether initiated by the
server using the existing number on the check or triggered automatically
when the amount due exceeds the secondary floor limits — will be
treated as manually swiped authorizations and no track data will be sent.
Enabling
To support this functionality, a new Security tab was added to POS
Configurator | System | Restaurant form. Included on this form is the
Secure track data option. When this option is checked, the security
enhancements are applied whenever credit card transactions are saved..
Warning!
Customers who are upgrading to RES Version 3.2 sp1 from a
previous version, and who are using SIM scripts, file exports,
etc., should be informed that modification may be required to
any custom programs that read or manipulate this data.
For additional information on credit card stripe format, please
refer to http://www.magtek.com/documentation/public/
99800004-1.pdf.
MD0003-065
Revision D
May 2, 2005
Page 682 of 814
3700 POS
What’s Enhanced
Database
Daylight Savings Time
To accommodate the time shift between Daylight Savings Time and
Standard Time, the system will reload the database for each of its POS
clients. This will be true any time there is a DST change.
Support for Closing Pay Periods on a mymicros.net site
A stored procedure has been added that will allow any 3700 site running
Time and Attendance and using mymicros.net to close a payroll period
and collect time card information in mymicros.net.
When run, the procedure will globally set the ob_exported column to
“True” in the Time Card Detail table, effectively closing the payroll
period for all records.
Sample End of Pay Period Configuration
1. Define or edit the “End of week/pay period” autosequence.
2. Make sure all employees are clocked out. To do this, add Stored Proc
112 "Clock out an employee" The Source field should be obj_num
and on the Range field should be "All".
3. Post all labor totals. To do this add the following stored procedures.
This needs to be done so that all labor values are up-to-date when
posted to mymicros.net..
Stored Proc 133 "Post time card totals".
Stored Proc 132 "Post job code totals".
Stored Proc 142 "Post time prd time card totals".
MD0003-065
Revision D
May 2, 2005
Page 683 of 814
3700 POS
What’s Enhanced
4. Run the new stored procedure that will close the pay period. Add
Stored Proc 9703 "Set Ob Exported True.” This will set the pay
period labor flag to closed.
Warning!
Please keep in mind that the time data is polled by the
mymicros.net.
For example, if mymicros.net polls the site at 3:30 a.m.,
your End of Pay Period autosequence should run after your
end-of-day, but prior to the mymicros.net upload.
Also, once run, time cards will not be editable in Manager
Procedures. This is now a closed period.
Manager Procedures
‘Cancel’ Button Added to Set Hour/Set Minute Window
When adjusting a time card record, if the manager opened the hour or
minute panels by clicking the Set Minute or Set Hour button, it was not
apparent that the panel could be closed by simply clicking the buttons
again. To avoid confusion, a Cancel button was added to each panel to
allow the manager to close without editing.
Time Clock Edit Screen Navigation
After making time clock adjustments through Manager Procedures, a
user can opt to either accept or cancel the changes by pressing an
appropriate touchscreen button.
In the past, the user had only two choices: 1) [OK] to accept the changes,
or 2) [Cancel] to revert to saved. Once a button was pressed, the system
would return to the previous selection screen. From there, the user could
select another record or (if no further changes were required) navigate
backwards through several screens to exit the program.
MD0003-065
Revision D
May 2, 2005
Page 684 of 814
3700 POS
What’s Enhanced
To reduce keystrokes and speed up the editing process, two new buttons
were added to the bottom of the Time Card Edit form.
The new buttons provide the following functionality:
[OK and Done] — Saves the changes and exits the program.
[Cancel and Done] — Exits the program without saving
changes.
When either of these keys is pressed, the system backs out of the
Manager Procedures program. How far back depends on where Manager
Procedures was launched from:
If launched through POS Operations, the [OK (or Cancel) and
Done] button returns the user directly to POS Operations.
If launched from outside of POS Operations (i.e., from the Start
Menu), pressing the [OK (or Cancel) and Done] button returns
the user to Manager Procedures’ main ‘Welcome’ screen.
These options are only available on the Win32 and WS4 workstations.
MD0003-065
Revision D
May 2, 2005
Page 685 of 814
3700 POS
What’s Enhanced
Mobile MICROS
Minimum Signal Strength
During POS operations, Mobile MICROS hand-held units communicate
with the system’s Server via high-frequency radio signals. The signal
strength required to ensure reliable data transfers (without risk of
annoying timeouts and retries) can vary between sites. Factors such as
the number of access points used, the level of customer activity, and even
the physical environment of the restaurant, can affect site performance.
In the previous release, the minimum signal strength required for most
sites was determined to be 30%. This value was fixed for all hand-held
units, and could not be adjusted for individual circumstances. When the
signal strength dipped below 30%, the user would be prompted with the
following error message “Low Signal Strength, Retry?” The message
would continue to display until the user moved to a location where the
signal was stronger.
The problem with hard-coding a value was that the error message
reflected the strength of the signal — not the status of the communication
link. In practice, even if the hand-held unit was functioning well, an error
would be triggered if the signal strength fell below 30%.
With this release, control over the minimum signal strength prompt was
passed to the user in the form of a configuration option. This option
allows the site to set its own optimum value, on a scale of 0–75%. The
default setting remains at 30%. A setting of 0% will effectively disable
the prompt.
Enabling
To support this functionality, the option Minimum Signal Strength was
added to the Mobile MICROS Setup. To set the option, select Programs |
MICROS Setup | Configure POS | POS Client Configuration | RF Signal,
and enter a value from 0-75% in the Minimum Signal Strength field.
MD0003-065
Revision D
May 2, 2005
Page 686 of 814
3700 POS
What’s Enhanced
POS Operations
Combo Meals Override Pricing
Combo meal menu items have been modified to allow for multiple
override prices with effective dates. This change allows combo meal
pricing to be managed in the same way as menu item pricing.
A combo meal menu item can be assigned multiple sets of 10-price
records. To determine which set is applicable, each record is assigned
starting and ending dates indicating when those prices will be in effect.
Effectivity dates (which refer to the first and last dates that a combo meal
price will be available to the customer) are used to pass on permanent
price increases, seasonal discounts, or month-long specials.
If EM is installed, the combo menu item price form will allow the user to
view the current price group for the underlying menu item as well as the
price tier assigned to the price. When a new price is added, the user will
need to select a price tier and will be prompted for a default effective date
prior to opening the Combo Meals form.
POS Configurator Changes
To be consistent with this functionality, the combo meal Effective To and
Effective From options were moved from the General tab to the Prices
tab (POS Configurator | Sales | Combo Meals | Combo Groups).
Consolidate Combo Side/Child Items on Remote Printers
Consolidation is the system’s ability to recognize identical menu items
when they are ordered (1 fries, 1 fries) and to roll them into a single line
item preceded by the quantity (2 fries). This arrangement provides a
clearer, more organized list of menu items; conserves valuable real estate
on the monitor; while keeping the chit length short and succinct.
MD0003-065
Revision D
May 2, 2005
Page 687 of 814
3700 POS
What’s Enhanced
In the past, use of the consolidation option only affected combo meal
orders sent to a KDS display or when output to a guest check printer.
With this release, a new option was added. This option is used to
consolidate identical side/child items belonging to the same combo meal
when output to a remote printer.
For clarity, combo meal main and side/child items are indented beneath
the combo meal selection. This is consistent with the KDS and guest
check options. Samples of consolidated and non-consolidated chits are
shown below:
Note
This option only affects combo meals and is independent
of other consolidation options.
Enabling
To support the new functionality, a Sort Combo Side Items check box
was added in POS Configurator | Devices | Order Devices.
Epson TM-H6000 Support via OPOS interface
With this release, MICROS now supports the TM-H6000 multi-station
printer for slip and roll printing via the Epson OPOS interface. The 3700
POS supports slip and roll printing when done independently of each
other. The system cannot be configured to print to both printers
simultaneously.
MD0003-065
Revision D
May 2, 2005
Page 688 of 814
3700 POS
What’s Enhanced
Examples of supported printing include:
guest check printing to slip, report printing to roll
guest check roll printer, validation slip printer
guest check slip printer, time card roll printer
time card slip printer, guest check roll printer
Enabling
To properly setup a TM-H6000 or TM-H6000II OPOS printer, the
following configuration should be used:
1. Create the OPOS device definition using the Epson Setup POS
application.
Warning!
Do not setup a Logical Device Name (LDN) for
the device. The default name of ‘TM-H6000’ or
‘TM-H6000II’ should be used.
2. Configure the device in POS Configurator:
Open the Devices | Devices form and create two new printer
records:
— A roll printer (OPOS receipt)
— A slip printer (OPOS slip)
Go to the Printer Interface tab. Enter the same OPOS device
name and check the Use polled status option for both devices.
Open the Revenue Center | RVC Printing form. Select the revenue
center where the printers will reside. Go to the Options tab and
check the Disable slip printer eject option.
MD0003-065
Revision D
May 2, 2005
Page 689 of 814
3700 POS
What’s Enhanced
MICROS Pole Display Support for Cyrillic Characters
Support for the Cyrillic (Russian) language was added to the IEE Pole
Display.
Order Device Printing Enhancement
Order device printing has been enhanced to reduce the length of order
chits. Previously, order chits could become lengthy for large parties and
interfere with kitchen operations. Now, blank detail lines on an order chit
can be suppressed and the seat number may be printed on the same line as
the menu item.
Suppressing Blank Detail Lines
Select the POS Configurator | Devices | Order Devices | Options |
Suppress blank lines option to prevent blank lines from printing
between menu items in the detail section of the order chit. In order to
select the Suppress blank lines option, the Show secondary print items
option must be selected first. Note that selecting the Show secondary
print items option without selecting any of the other secondary printing
options does not enable secondary printing.
Note
Previously, the Suppress blank lines option only applied to
printing secondary print items. Now, this option allows
you to suppress blank lines for any items on the printed
order chit. This option is not supported with KDS devices.
Printing Seat Number with Menu Item
Select the Print seat number with menu item option (POS
Configurator | Devices | Order Devices) to print the seat number on the
same line as the menu item without the seat descriptor, and to the right of
the menu item name.
MD0003-065
Revision D
May 2, 2005
Page 690 of 814
3700 POS
What’s Enhanced
When this option is selected, the following options are greyed out (i.e.,
not available):
Print voids in red on order chits (Revenue Center | RVC Print
Design | Options)
Print seat number (Devices | Order Devices | Options)
Print SKU numbers (Revenue Center | RVC Transactions | Retail)
Multiple condiments per line (Devices | Order Devices | Options)
Formatting Examples
Previously, the order chit output would print with the seat number on a
separate line as shown below:
RESTAURANT
---EXPO PRINTER---
1 MICROS M
----------------------Tbl 1/1
Gst 1
----------------------S1
1 CAESAR SAL
S2
1 MINESTRONE
S3
1 PRAWNS
----------------------CHK 1234
Jan16'02 01:00PM
MD0003-065
Revision D
May 2, 2005
Page 691 of 814
3700 POS
What’s Enhanced
Now, with the Print seat number with menu item option selected, the
order chit prints with the quantity, menu item name, and seat number on
one line as shown below:
RESTAURANT
---EXPO PRINTER---
1 MICROS M
----------------------Tbl 1/1
Gst 1
----------------------1
1
1
CAESAR SAL
MINESTRONE
PRAWNS
1
2
3
----------------------CHK 1234
Jan16'02 01:00PM
With the Print seat number with menu item option selected, voided items
display with the void banner (as shown below) rather than the -V void
descriptor that optionally appeared on the same line as the menu item.
RESTAURANT
---EXPO PRINTER---
1 MICROS M
----------------------Tbl 1/1
Gst 1
----------------------1 CAESAR SAL 1
VVVV Void VVVV
1 MINESTRONE 2
1 PRAWNS
3
----------------------CHK 1234
MD0003-065
Revision D
May 2, 2005
Page 692 of 814
Jan16'02 01:00PM
3700 POS
What’s Enhanced
SIM
@CCAuth_Count
This system variable is used to return the number of untendered credit
authorizations that are in the current seat filter.
Type/Size
N9
Syntax
InfoMessage “CCAuth_Count”,@CCAuth_Count
Example
//Cancel event if Credit Auths Exist
Event Inq : 1
if @CCAuth_Count > 0
errormessage "Not allow after credit card auth"
exitcancel
endif
//do something useful...
EndEvent
//"Credit Auths Exist, Abort Payment?"
Sub PrepareBybassCreditAuths
if @CCAuth_Count > 0
LoadKybdMacro @KEY_CLEAR
endif
EndEvent
MD0003-065
Revision D
May 2, 2005
Page 693 of 814
3700 POS
What’s Enhanced
KDS Functions
A new KEY_TYPE_FUNCTION(35) key type was added to the SIM for
processing KDS-related functions. The first variable available for use
with the KDS function is KDS_Done_Order(1). Other KDS-related
functions will be added later.
The Key_KDS_Order_Done(1) key variable allows a user to bump a
specified KDS order. When the system encounters the new key (either
through SIM or a macro), it triggers POS Operation to prompt the user
for a closed check number and a KDS-enabled remote order device.
Example
Event Inq : 1
InfoMessage “About to process key (35,1)”
LoadKybdMacro key (35,1)
EndEvent
@TblObjNum
This system variable is used to return the table number (i.e., object
number) assigned through POS Configurator. The variable should be
used in place of the @TblNum variable, which reported the database
sequence number, rather than the table object number.
Type/Size
N9
Syntax
InfoMessage “Table Object Number",@tblobjnum
Example
Event Final_Tender
InfoMessage "Table Object Number",@tblobjnum
EndEvent
MD0003-065
Revision D
May 2, 2005
Page 694 of 814
3700 POS
What’s Enhanced
@VoidStatus
This system variable is used to determine the current void status of the
transaction.
Detail
Variable: @VOIDSTATUS
Values: Y or N
Argument/Description
This variable is required for the Diebold interface, which uses INQ
events to apply discounts/service charges to a guest check.
When invoked, an INQ event has no internal mechanism for checking the
current void status of OPS. Void status determines whether the discount/
service charge will be added to or subtracted from the guest check. This
variable provides that system check for the user, displays a message box,
and prompts for confirmation prior to completing the transaction.
Example
Event Inq : 1
if (@VOIDSTATUS = “Y”)
infoMessage “Test @VOIDSTATUS”,
“OPS is in void or transaction void mode”
else
infoMessage “Test @VOIDSTATUS”,
“OPS is not in void or transaction void mode”
endif
endevent // inq: 1
MD0003-065
Revision D
May 2, 2005
Page 695 of 814
3700 POS
What’s Revised
What’s Revised
A revision is defined as a correction made to any existing form, feature,
or function currently resident in the 3700 POS software. To qualify as a
revision, the change must satisfy the following criteria:
The basic form, feature, or functionality must be part of the previous
version of the software.
The change must replace the current item or remove it from the
application.
Revisions
Summarized
MD0003-065
Revision D
May 2, 2005
Page 696 of 814
The table below summarizes the revisions included in this version.
Module
Feature
CR ID
Page
Autoseq and
Reports
40-Column Reports Only Printing
First Line
14667
707
Credit Card Batch Transfer Report
Returns No Data
14191
707
Credit Card Batch Transfer Status
Report Lists Omitted Records
Multiple Times
14188
707
Daily System Menu Item Sales
Detail
12242
708
Menu Item Listing Ignores
Selected Ranges
N/A
708
Reports with Major, Family, and
Menu Item Groups Do Not
Display Correct Data
N/A
708
System Time Period Detail Report
N/A
709
Verbosity Too High When Report
Run Via an Autosequence
N/A
709
WS4 Fails to Print Reports from
Autosequences
N/A
709
3700 POS
What’s Revised
Module
CA/EDC
Feature
CR ID
Page
N/A
710
14789
710
Credit Card Drivers Not
Registering Correctly
N/A
710
Credit Card Server Logging
Disproportionate to Verbosity
Level Set
N/A
710
NDC Driver Unable to Process
Request for Information During
Settlement
N/A
711
14705
711
VISA Driver Fails to Print
Referencing Number on Voucher
N/A
711
Database Call Failed With Fatal
Error
N/A
711
Error Received When Setting Up
Extech IrDA Printer After System
Upgrade
15044
712
Running Stored Procedure to
Clock Out/In All Employees
Changes Break Status
14827
712
N/A
712
15314
712
Batch Settlement Error
Credit Card Batch Settlement
Hangs During Tranfer
VISA Driver Crashes System
When An HTTP 404 Error is
Received
Database
Slow Performance When Updating
Database
Time Card Detail Not Purging
Records With Status ‘R’
MD0003-065
Revision D
May 2, 2005
Page 697 of 814
3700 POS
What’s Revised
Module
Manager
Procedures
MD0003-065
Revision D
May 2, 2005
Page 698 of 814
Feature
CR ID
Page
Access Given to Restricted Menu
Items
15150
713
Access Violation When Running
Under Non-Admin NT User
Account
N/A
713
Add Employee Wizard is
Incorrectly Prompting for Job
N/a
713
Allows Clock-In Adjustment
Ahead of Current Time
14988
714
Application Not Posting to 3700d
Log
N/A
714
Authorizations Not Accepted
Properly
N/A
714
Changing Prices on Menu Item
Assignment Form Causes Internet
Explorer Script Error
N/A
714
Changing Serving Periods on an
HHT Causes System Error
N/A
715
Editing Time Card Causes OT
Miscalculation
N/A
715
Employee ID Not Displaying on
HHT
N/A
715
Employee Sign-In Error if
Assigned Job Has No Overriding
Employee Class
14643
716
Error When Changing Business
Date on an HHT
N/A
716
Incremented Employee Shifts are
Not Easily Identified
N/A
716
3700 POS
What’s Revised
Module
Feature
CR ID
Page
Menu Item ‘Alternate SLU’ Field
Missing
N/A
716
Multiple Price Records With the
Same Effectivity Dates Incorrectly
Allowed
N/A
717
Number Pad Icons Not Working
on Hand-Held Device
N/A
717
Quick Count Entries Not Saved
N/A
717
Serving Period Change Causes
System Error
14464
717
N/A
718
14918
718
Time Card Adjustment Does Not
Prompt for Clocked Out Employee
N/A
718
Touchscreen Buttons
Unresponsive on Ultra
Workstation
N/A
718
Using Drill Down Icon on HHT
Causes System Error
N/A
719
Mobile
MICROS
Templates Do Not Display Items
Marked as “Hold” or “Previous
Round”
14813
719
Peripherals
Debug Error Registered When
Scale in Motion
14780
720
Manager
Procedures
(cont’d.)
Skip Selection Screen When Only
One Price Record
Time Card Adjustments Altered
Clock-Out Status
MD0003-065
Revision D
May 2, 2005
Page 699 of 814
3700 POS
What’s Revised
Module
POS
Configurator
Feature
CR ID
Page
Employee Cannot Access POS
Configurator | Devices | User
Workstations Form
14633
720
Kitchen Themes Do Not Update
Automatically on Newly Added
Workstation
14383
721
N/A
721
14718
721
Auto-Start Level ‘Front of House’
Fails to Restart Win 32 Clients
N/A
722
Backup Server Only Works When
On Same Drive as Operating
System
14982
722
Check Info Lines Not Updating
After Touch Void
N/A
722
Check Read Detail Failure
Attempting to Pick Up Check
Owned by Another Workstation
15167
722
Chinese Characters Not Handled
Correctly
N/A
723
Clearing Manager’s Authorization
of Previous Round Void Executes
SIM Void Event
14767
723
Clients Writing Too Much Info to
3700d Log
15041
723
Condiment Masking By Employee
Class Not Working
N/A
723
Condiment Selection Not Exiting
Properly With Direct Void
15035
724
Partial Printer Configuration
Incorrectly Saved
POS
Operations
MD0003-065
Revision D
May 2, 2005
Page 700 of 814
Australian GST Not Rounding
Correctly
3700 POS
What’s Revised
Module
POS
Operations
(cont’d.)
Feature
CR ID
Page
Discounts Not Posted Properly for
Non-Taxable Menu Items
N/A
724
Error Alarm Beeps Continuously
When Control Panel Status Set to
Database
14223
724
Error Attempting to Move Credit
Auth to Another Seat
13665
724
Error Attempting to Tender Check
With Seat Filtering and Voiding
Credit Card Payment
15089
725
Error Communicating with Credit
Card Server
N/A
725
Error Occurs When Loading POS
Operations on Win 95 Clients
14602
725
Error Occurs When Seat Filtering
Check With a Large Number of
Guests and Items
15090
725
Final Tender to a Credit Card
Causes POS Operations to Exit
N/A
726
Font Does Not Display Correct
European Characters in Check
Detail
N/A
726
Insert Condiment Causes Seat
Handling to Fail
N/A
726
Invalid Track 1 for Credit Cards
13913
727
Mag Card Swipe Not Working on
WS4
14466
727
Menu Item SLUs Display Blanks
When Mask Duplicate Items
Selected
15001
727
MD0003-065
Revision D
May 2, 2005
Page 701 of 814
3700 POS
What’s Revised
Module
POS
Operations
(cont’d.)
Feature
CR ID
Page
Network Communications Failure
with WS4
N/A
727
Non-Standard Magnetic Cards
Causes Errors
N/A
728
No Open Check Found When
Transferring Checks
N/A
728
On-Demand Receipt Printing Not
Functioning
N/A
728
Peripherals Not Working When
Client is Restarted
14354
728
Pop-Up Employees Not Signed
Out After a ‘No-Sale’
N/A
729
POS Maintenance Causes
Workstation Lockup
N/A
729
POS Operations Display Windows
Clear Prematurely
14572
729
POS Operations Does Not Return
to Sign-In Screen
N/A
729
POS Operations Failure When
Printing Price on Order Chit
14357
730
POS Splash Screen Not
Displaying on Clients
14069
730
N/A
730
Rounding Totals Incorrect When
Set to Nearest .05
12900
730
Salaried Employees Unable to
Change Revenue Center
14359
730
Reloading Database From Control
Panel Sets Restaurant to OFF
MD0003-065
Revision D
May 2, 2005
Page 702 of 814
3700 POS
What’s Revised
Module
POS
Operations
(cont’d.)
Feature
CR ID
Page
Security Login Redisplayed When
Calling an External Program from
OPS
14517
731
Selecting a Course Menu Item
Causes Other Items to be Selected
12162
731
‘Send Order and Stay’ Function
Not Posting Properly
14916
731
Subtotal Discounts Applied
Incorrectly to Large Totals
14978
731
N/A
732
Taxable Sales Incorrect When
Multiple Tax Rates are
Discountedi
14641
732
Touchscreen Default SLUs Not
Generating
14809
732
Touch Void Followed by a Direct
Void of a Combo Meal Causes a
Negative Balance
10131
732
VAT Tax Option Not Saved at EM
Corporate
13904
733
Voiding a Discount With CM
Enabled Results in Error
12128
733
N/A
733
14250
734
Table Pickup Displays All Open
Checks
Voiding a Partial Tender Linked to
a SIM Event Removes Wrong
Items
WS4 Unable to Access Previous
Checks in SAR Mode
MD0003-065
Revision D
May 2, 2005
Page 703 of 814
3700 POS
What’s Revised
Module
Printing
Feature
CR ID
Page
Background Voucher Printing
Does Not Work
N/A
734
Backup Printer Re-Direct Not
Functioning Properly From CE
Devices
N/A
734
Backup Runner Chit Printer Not
Functioning Properly
N/A
735
Confidence Test on WS4 Fails on
Output to IDN Printers
N/A
735
14458
735
KDS Runner Chit Not Printing on
Serial TM-T88
N/A
735
KDS Runner Chit Prints Wrong
Width
N/A
735
Line-by-Line Printing of Customer
Receipt Fails When KDS Uses
DOM in Fire-on-Fly Mode
N/A
736
Print Error Displays When
Reloading System
N/A
736
10018
737
N/A
737
Slip Printer Hangs When Printing
Second Page
14655
737
Slow Performance When Running
Multiple IDN Printers from a WS4
N/A
738
Guest Check Printing Not
Consolidating Menu Items
Print ‘Total” on Credit
Authorization Voucher
Serial Printers Incorrectly
Wrapping Text
MD0003-065
Revision D
May 2, 2005
Page 704 of 814
3700 POS
What’s Revised
Module
Printing
(cont’d.)
Setup
SIM
Feature
CR ID
Page
WS4 Locks Up During Operations
N/A
738
WS4 Not Printing to IDN Printers
with ID Greater than 9
N/A
738
WS4 Unable to Print Multiple
Reports in Succession
N/A
738
ConnAdvisor Service Not
Installed Properly
N/A
739
DSM Unable to Send Jobs to
Check-in Clients
N/A
739
DSMInterface Cannot Handle 15Character Computer Name
11200
739
Remote Reboot of Multiple
Clients Prevents Setup Completion
N/A
740
Running Setup on NT Client
Changes Date Format
N/A
740
WS4 Cannot Handle IP Address
With Leading Zeros in an Octet
N/A
740
WS4 Compact Flash Warning
N/A
740
@PMSNumber Returns Incorrect
Value
N/A
741
Applied Discount Fails to Run
SIM Event
14031
741
Applied Tender Fails to Run SIM
Event
14038
741
Correcting a Discount Error Runs
Wrong SIM Event
14015
741
Correcting a Service Charge Error
Runs Wrong SIM Event
14035
741
Correcting a Tender Error Runs
Wrong SIM Event
14039
742
MD0003-065
Revision D
May 2, 2005
Page 705 of 814
3700 POS
What’s Revised
Module
SIM
(cont’d.)
MD0003-065
Revision D
May 2, 2005
Page 706 of 814
Feature
CR ID
Page
Direct Void of a Tender Runs
Wrong SIM Event
14037
742
Function ‘Fopen’ Does Not
Truncate Overwritten Files
14048
742
Function ‘Fread’ Does Not
Remove Linefeed Character
N/A
742
Function ‘Fwrite’ Missing Return
14047
742
SIM Idle Events Continue to Run
During Clock In/Out
15038
743
SIM Variable Not Prorated With
Partial Tenders for Negative
Transactions
N/A
743
svc_void_event Not Firing
14036
743
Touch Void Discount Does Not
Run SIM Event
14017
743
Touch Void Menu Items Runs
Wrong SIM Event
14014,
14019
743
3700 POS
What’s Revised
Revisions
Detailed
Autosequences and Reports
40-Column Reports Only Printing First Line
CR ID #: 14667
At sites where Crystal Reports is loaded on the RES Server and the
version of Crystal is 9.2.2 or higher, 40-column reports will only print the
first line of the report. The problem was caused by a change in the
Crystal Reports File Export engine. Modifications were made to the 3700
printer driver to resolve the issue.
Reports
The table below describes the 3700 report changes in this Service Pack:
Report
Credit Card
Batch Transfer
Status
Area Modified
Templatea
When running the Credit Card
Batch Transfer Status Report
(cc_002.rpt), the system returned
headers only without supplying
any data. This has been corrected.
Templatea
Before transferring a batch of
credit card transactions, if the user
opted to omit (hold back) any of
the records, the transfer status
report would print the omitted
records once for every record in
the batch. This problem has been
corrected.
CR ID #: 14191
Credit Card
Batch Transfer
Status
CR ID #: 14188
Description
MD0003-065
Revision D
May 2, 2005
Page 707 of 814
3700 POS
What’s Revised
Report
Daily System
Menu Item Sales
Detail Report
Area Modified
Template
CR ID #: 12242
Menu Item
Listing Report
Templateb
CR ID #: N/A
Reports with
Major, Family,
or Menu Item
Groups
CR ID #: N/A
MD0003-065
Revision D
May 2, 2005
Page 708 of 814
Templatec
Description
Pro-rated subtotal discounts were
not being posted correctly if the
Daily System Menu Item Sales
Detail Report (mi_s001.rpt) was
run after the menu item was posted
but before the discount had been
applied. Running the report a
second time (after the check was
paid) failed to pick up the discount
as well. This problem has been
corrected.
Previously, if the Menu Item Detail
Report (menudef.rpt) was included
in an autosequence or was selected
through the AutoSequences and
Report module, the system would
print all menu items instead of
providing a subset for the range
specified. This problem has been
corrected.
NOTE: The autosequence listing
report is also affected by this issue.
This report can no longer allow for
ranges of autosequences to be
printed.
Templates based on Major, Family,
or Menu Item group selections
consistently reported family group
data, regardless of the group or
subrange selected when run via an
autosequence. This has been
corrected.
3700 POS
What’s Revised
Area Modified
Report
System Time
Period Detail
Stored
Procedured
CR ID #: N/A
Description
Previously, if an employee was
clocked in across multiple business
dates, the labor totals in the System
Time Period Detail (tp_s101.rpt)
would not balance with other labor
reports. This problem has been
corrected.
a
Templates changed:
cc_002.rpt
b
Templates changed:
MenuDef.rpt
c
Templates changed:
ConsFoodCost.rpt
fg_rXXX.rpt
fg_sXXX.rpt
menudef.rpt
menuitem_waste_mi.rpt
mi_rXXX.rpt
mi_sXXX.rpt
d
File changed:
sp_GetLaborSecsForCurrentBusinessDate
Verbosity Too High When Report Run Via Autosequence
CR ID #: N/A
When running an 80-column report via a scheduled autosequence, the
print engine would log at full verbosity even when the verbosity level
was set to 0. This problem has been corrected.
WS4 Fails to Print Reports from Autosequences
CR ID #: N/A
Previously, the system failed to produce a report when printing on a
Workstation 4 using an autosequence key. The problem was due to an
error in the autosequence driver. This has been corrected.
MD0003-065
Revision D
May 2, 2005
Page 709 of 814
3700 POS
What’s Revised
CA/EDC
Batch Settlement Error
CR ID #: N/A
Previously, if an error occurred during the batch settlement process, the
system would restart rather than skip the failed batch and move on to the
next one. This resulted in the duplication of some batch settlement
records. The problem has been corrected.
Credit Card Batch Settlement Hangs During Transfer
CR ID #: 14789
During settlement, the Credit Card Batch Utility (creditcards.exe) would
lock up while attempting to close the transaction after transferring all of
the records. This problem has been corrected.
Credit Card Drivers Not Registering Correctly
CR ID #: N/A
When configuring credit card drivers, the system failed to create registry
keys for all of the entries if there were multiple merchants defined for
each. This problem has been corrected.
Credit Card Server Logging Disproportionate to Verbosity
Level Set
CR ID #: N/A
The Credit Card Server was continuously writing to the error log, even
when the verbosity level was set to 0. This problem has been corrected.
MD0003-065
Revision D
May 2, 2005
Page 710 of 814
3700 POS
What’s Revised
NDC Driver Unable to Process Request for Information
During Settlement
CR ID #: N/A
During settlement, the NDC driver did not respond properly to a request
for clarification from the credit card processor. The NDC driver
improperly handled the NAK (negative response) message by
transmitting data for the wrong batch record. In some cases, this caused
the settlement process to crash. This problem has been corrected.
VISA Driver Crashes System When An HTTP 404 Error is
Received
CR ID #: 14705
When using the HTTP communications method, the VISA driver would
crash the credit card system if an Error 404 (Not Found) status was
received. This has been corrected.
VISA Driver Fails to Print Reference Number on Voucher
CR ID #: N/A
After receiving a credit authorization, the system failed to print the 12character reference number on the credit card voucher. This problem has
been corrected.
Database
Database Call Failed With Fatal Error Reported
CR ID #: N/A
Occasionally, during normal operations, the system would prompt to
enter SAR mode even though the system appeared to be functioning
properly. If SAR mode was disabled, an “Unexpected Database Error”
would display. A check of the log file indicated a database call had failed
and recorded a fatal error. The problem was caused by a communications
error in the ping utility, Connection Advisor. This has been corrected.
MD0003-065
Revision D
May 2, 2005
Page 711 of 814
3700 POS
What’s Revised
Error Received When Setting Up Extech IrDA Printer After
System Upgrade
CR ID #: 15044
When upgrading from a RES 3.1 database to RES 3.2 (hot fix 2), POS
Configurator would display a Primary Constraint Violation Error when
trying to set up an IrDA Extech S3500THS printer. The problem was
related to a scripting error in the database conversion process which has
been corrected. Upgrades from RES 3.1 to RES 3.2, general release
version, were not affected.
Running Stored Procedure to Clock Out/In All Employees
Changes Break Status
CR ID #: 14827
Previously, if stored procedure 108, Clock In/Out All Employees, was
run when employees were on a scheduled break, those employees were
incorrectly clocked back in. This has been corrected.
Slow Performance When Updating Database
CR ID #: N/A
Occasionally, after making changes through POS Configurator and then
reloading the SQL Database through the Control Panel, DSM would
monopolize CPU time which, in turn, caused the system to error out. This
has been corrected.
Time Card Detail Not Purging Records With Status “R”
CR ID #: 15314
When running the Purge History stored procedure, the system failed to
remove time card detail that contained a status “R,” indicating that the
employee had switched revenue centers between checks. This problem
has been corrected.
MD0003-065
Revision D
May 2, 2005
Page 712 of 814
3700 POS
What’s Revised
Manager Procedures
Access Given to Restricted Menu Items
CR ID #: 15150
Previously, managers were able to modify prices and other attributes on
menu items even though the No access from Mgr. Procedures option
(POS Configurator | Menu Items | Definitions | Options) had been
enabled. This problem has been corrected.
Access Violation Occurs When Running Under Non-Admin
NT User Account
CR ID #: N/A
Previously, if a user without administrative privileges ran a procedure
from POS Operations while logged onto a RES server running Windows
NT (4.0 or Win 2000), any subsequent attempt to run Manager
Procedures from the Windows Start menu would trigger an access
violation. This problem has been corrected.
Note: This problem only affects the Win32 platform (not WS4 or
Handhelds).
Add Employee Wizard is Incorrectly Prompting for Job
CR ID #: N/A
When adding a new employee through Managers Procedure, the Add
Employee Wizard would require the user to select a Job even though the
clock-in and clock-out functions were not enabled at that site — that is.,
the option Enable Time Clock Schedule (POS Configurator |
Employees | Time and Attendance | Time Clock Schedule) had been
disabled. This problem has been corrected.
MD0003-065
Revision D
May 2, 2005
Page 713 of 814
3700 POS
What’s Revised
Allows Clock-In Adjustments Ahead of Current Time
CR ID #: 14988
When making a time card adjustment on a clocked-in employee, the
system would allow the user to reset the clock-in time to a point in the
future. As a result, labor reports were reporting costs as negative values.
This problem has been corrected.
Application Not Posting to 3700d Log
CR ID #: N/A
In RES version 3.2, changes made via Manager Procedures were not
being posted to the 3700d log. This has been corrected. Also, to assist in
troubleshooting errors, the system will now identify the exact page where
each entry is made.
Authorizations Not Accepted Properly
CR ID #: N/A
Previously, when an employee signed into POS Operations and attempted
to perform a procedure for which he or she was not privileged, the system
correctly displayed an authorization dialog box. Any attempt to then
enter the Authorization ID of a privileged employee would result in an
error message stating "Invalid ID." This problem has been corrected.
Note: In the scenario above, the original ID used to sign into POS
Operations was the employee ID. When the Authorization dialog box
appears, it will be asking for their PC Application ID.
Changing Prices on Menu Item Assignment Form Causes
Internet Explorer Script Error
CR ID #: N/A
Attempts to change menu item prices through the Menu Item Assignment
form would cause the system to display an Internet Explorer script error
when run on the Ultra workstation. The problem was caused by a
programming error with the number pad keys. This has been corrected on
all forms that contain a number pad.
MD0003-065
Revision D
May 2, 2005
Page 714 of 814
3700 POS
What’s Revised
Changing Serving Periods on an HHT Causes System Error
CR ID #: N/A
When changing the serving period on a hand-held device, the following
error message would display regardless of whether the revenue center
had serving periods enabled: A System error has occured Please close
and restart the application. This has been corrected.
Editing Time Card Causes Overtime Miscalculation
CR ID #: N/A
When editing time cards through Manager Procedures, the system was
not correcting the record sequence number if a date change placed them
before previous time card entry.
For example, suppose there were three time card records, dated the 9th,
11th, and 12th. If the manager edited the date of the third record from the
12th to the 10th, the third record would be moved to second place in the
time card detail table, but the sequence number (as shown below) would
not be updated.
tm_card_seq = 1 clk_in_date_tm = 09-09-2003 12:00 clk_out_date_tm = 09-09-2003 16:00
tm_card_seq = 3 clk_in_date_tm = 09-10-2003 12:00 clk_out_date_tm = 09-10-2003 16:00
tm_card_seq = 2 clk_in_date_tm = 09-11-2003 12:00 clk_out_date_tm = 09-11-2003 16:00
Failure to update the sequence was causing problems with overtime
calculations and was contrary to the method used for payroll
preprocessing. This has been corrected.
Employee ID Not Displaying on HHT
CR ID #: N/A
Previously, the current employee ID was not being displayed when
accessed through Manager Procedures on a hand-held device. In
addition, the browser on a hand-held device did not recognize employees
who had signed on by swiping their employee card. Both problems have
been corrected.
MD0003-065
Revision D
May 2, 2005
Page 715 of 814
3700 POS
What’s Revised
Employee Sign-In Error if Assigned Job Has No Overriding
Employee Class
CR ID #: 14643
Previously, when an employee assigned to a job not linked to an
Overriding Employee Class (POS Configurator | Employees | Jobs |
General) attempted to sign-in through Manager’s Procedures, the process
would fail and a security error would be posted. This problem has been
corrected.
Error When Changing Business Date on HHT
CR ID #: N/A
Previous attempts to change the business date on a hand-held device
failed if the system was configured to use the European date format. This
has been corrected.
Incremented Employee Shifts are Not Easily Identified
CR ID #: N/A
When incrementing an employee shift via procedures accessed through a
command line switch (procedures /7 or procedures /8), for example
through POS Operations, the system provided no obvious visual cue
(other than changing the shift number) to let the user know when a
change had been made. To avoid confusion, the system was modified to
display a message, in red, indicating the name and shift number of the
last employee record changed.
Menu Item ‘Alternate SLU’ Field Missing
CR ID #: N/A
When adding the Alternate SLU option (POS Configurator | Sales |
Menu Items | Definition | General) in the previous release, a similar field
was inadvertently omitted from the Menu Item Assignment form and the
Add Menu Item Wizard in Manager Procedures. This oversight has been
corrected.
MD0003-065
Revision D
May 2, 2005
Page 716 of 814
3700 POS
What’s Revised
Multiple Price Records With the Same Effectivity Dates
Incorrectly Allowed
CR ID #: N/A
Previously, in manager procedures you could set multiple price records to
have the same Effective From dates. We have now updated manager
procedures to follow the same rules as POS configurator. Multiple price
records with the same Effective From dates are no longer allowed.
Number Pad Icons Not Working on Hand-Held Device
CR ID #: N/A
When updating an employee ID through Manager Procedures on a
Mobile MICROS hand-held device, the touchscreen numeric keyboard
failed to respond to data entries. However, since the hand-held device
included an electronic keypad, the touchscreen icons were unnecessary
and were removed from the display.
Quick Count Entries Not Saved
CR ID #: N/A
Changes made to the Quick Count form were not being saved if the
European date format (POS Configurator | System | Restaurant |
Options) was enabled. The problem was due to an error in the way the
system interpreted and passed the formatted date string. It has been
corrected.
Serving Period Change Causes System Error
CR ID #: 14464
Attempts to select and change the serving period through Manager
Procedures was causing the system to hang. The problem was caused by
a faulty application of permissions with regard to changing serving
periods outside the user’s revenue center. This problem has been
corrected.
MD0003-065
Revision D
May 2, 2005
Page 717 of 814
3700 POS
What’s Revised
Skip Selection Screen When Only One Price Record
CR ID #: N/A
To improve useability, the system will skip the ‘Select a Price Record’
screen if there is only one price record associated with the selected menu
item. The system will simply default to the ‘Set Price for ---’ screen.
The screen is only skipped when entering procedures through the Start
Menu on the Server or on a Win32 Client. Accessing menu item prices
through OPS will not skip the screen.
Time Card Adjustments Altered Clock-Out Status
CR ID #: 14918
When editing the latest time card entry for a clocked-out employee, the
manager was able to clear the clock-out date without resetting the
employee’s status to clocked-in. In effect, this created an open time card
record while allowing the employee to clock-in a second time through
POS Operations. To correct the problem, the Clear button was removed
from the Edit Time Card form.
Time Card Adjustment Does Not Prompt for Clocked-In
Employees
CR ID #: N/A
When making a time card adjustment on a hand-held device, the system
failed to display the appropriate prompt when a clocked-in employee was
selected (i.e., “Employee currently clocked in, do you want to clock
out?). This has been corrected.
Touchscreen Buttons Unresponsive on Ultra Workstation
CR ID #: N/A
Touchscreen buttons on several of the Manager Procedures forms
(notably the Edit Employee ID form) would not register consistently, but
required several touches before they would respond. The problem
occured on the Ultra workstation and was linked to a specific button type.
This has been corrected.
MD0003-065
Revision D
May 2, 2005
Page 718 of 814
3700 POS
What’s Revised
Using Drill Down Icon on HHT Causes System Error
CR ID #: N/A
Previously, if a user attempted to change an employee assignment via
Manager Procedures on a HHT device, a system error would be
generated when the drill down icon next to the Employee Class, Cashier
or Revenue Center fields was selected. Instead of moving to the next
screen, the application would simply reload the current form. This
problem has been corrected.
Mobile MICROS
Templates Do Not Indicate Items Marked as “Hold” or
“Previous Round”
CR ID #: 14813
Previously, hand-held devices were unable to display the annotation of
items marked as either “held” or “previous round.” This was due to the
font size used in the check detail area of the display screens, which was
too large to accommodate all of the information in the available space.
To solve the problem, three new templates were added to the
Touchscreen templates drop-down list (POS Configurator | Devices |
Touchscreens) for use with hand-held devices:
417 HH Info Pad3
418 HH Large Detail2
419 HHSmall Detail3
These templates are duplicates of existing templates, except that they use
a smaller font size in the check detail area. This provides enough room
for the missing notations to be displayed on the screen.
MD0003-065
Revision D
May 2, 2005
Page 719 of 814
3700 POS
What’s Revised
Peripherals
Debug Error Registered When Scale in Motion
CR ID #: 14780
When using a weight scale with an NT or Win2K client, attempts to ring
up an item while the scale was in motion resulted in a debug error.
Pressing the Retry button would then display the Scale in motion error.
However, if the error was in POS Operations, it could not be reached
without a keyboard or mouse. In this case a reboot is required. This
problem has been corrected.
POS Configurator
Effectivity Date/Time Entries Incorrectly Allowing Seconds
CR ID #: N/A
Previously, when assigning effectivity dates to menu items (POS
Configurator | Menu Items Prices), users were able to bypass the date/
time pop-up window and enter time values in seconds and milliseconds.
If a row was inserted and the effectivity dates were blank, the system
would default to the current datetime, which also posted time to the
millisecond. This is incorrect and could, under certain circumstances,
interfering with system pricing. To resolve the issue, the system will now
truncate all time entries to the minute, regardless of how they are entered.
Employee Cannot Access POS Configurator | Devices |
Workstations Form
CR ID #: 14633
Users were unable to access the POS Configurator | Devices | User
Workstations form, regardless of the privilege level assigned to them
through their employee class. This problem has been corrected.
MD0003-065
Revision D
May 2, 2005
Page 720 of 814
3700 POS
What’s Revised
Kitchen Themes Do Not Update Automatically on Newly
Added Workstation
CR ID #: 14383
After adding a new workstation to a site with existing kitchen themes,
users were unable to switch to an alternate kitchen theme without
manually reloading the KDS Controller from the Control Panel. This
problem has been corrected.
Partial Printer Configuration Incorrectly Saved
CR ID #: N/A
When adding a new print device record to the POS Configurator |
Devices | Devices, the system failed to prompt for required fields on the
Printer Definition (i.e., Printer Type, Printer Interface Type) and
Printer Interface (i.e., IDN ID, Com Port) forms when the record was
saved. This has been corrected.
POS Operations
Australian GST Not Rounding Correctly
CR ID #: 14718
When using the Australian GST, decimal place values were consistently
rounding downward to the nearest 0.05 instead of rounding up or down as
required. For example, values ending in 0.01 or 0.02, should have been
rounded down to 0.00, while values ending in 0.03 and 0.04 should be
rounded up to 0.05. This problem has been corrected.
MD0003-065
Revision D
May 2, 2005
Page 721 of 814
3700 POS
What’s Revised
Autostart Level ‘Front of House’ Fails to Restart Win 32
Clients
CR ID #: N/A
Occasionally, when the restaurant was programmed for autostart level 3,
Front of House (POS Configurator | System | Restaurant |
Descriptions), restarting the system would launch POS Operations on the
server and the WS4 clients, but would fail to start POS Operations on any
of the Win 32 clients (95, NT, 2K). This problem has been corrected.
Backup Server Only Works When On Same Drive as
Operating System
CR ID #: 14982
The backup server failed to create the synchronization directory required
to replay transactions when not installed on the same drive as the
operating system. This problem has been corrected.
Check Info Lines Not Updating After Touch Void
CR ID #: N/A
When using touch-void to cancel a partial tender, the system failed to
reset certain database flags. This was preventing the check info lines
from updating on subsequent checks. The problem was caused by a
scripting error which has been corrected.
Check Read Detail Failure Attempting to Pick Up Check
Owned by Another Workstation
CR ID #: 15167
Previously, if a check was opened on one workstation, then editied and
service totaled on another workstation, any attempt to pick the check
back up on either workstation would result in the error message “Check
Open Read Failure.” This problem has been corrected.
MD0003-065
Revision D
May 2, 2005
Page 722 of 814
3700 POS
What’s Revised
Chinese Characters Not Handled Correctly
CR ID #: N/A
Previous attempts to display or log entries using Chinese double-byte
characters resulted in garbled or incorrectly rendered text. The problem
was due to a coding error in the handling of multibyte strings. This has
been corrected.
Clearing Manager’s Authorization of Previous Round Void
Executes SIM Void Event
CR ID #: 14767
After clearing a manager’s authorization of a previous round void, POS
Operations would execute the SIM void event even though a void did not
take place. This problem has been corrected.
Clients Writing Too Much Info to 3700d Log
CR ID #: 15041
In previous versions, workstations were logging extra messages to the
3700d.log file. This additional logging was causing the log files to grow.
This has been corrected.
Condiment Masking by Employee Class Not Working
CR ID #: N/A
During POS Operations, the system failed to mask condiment groups by
employee class even though the correct options were selected in POS
Configurator (Sales | Condiments | Condiment Groups | Required
Condiment Masking | Employee Classes). This problem has been
corrected.
MD0003-065
Revision D
May 2, 2005
Page 723 of 814
3700 POS
What’s Revised
Condiment Selection Not Exiting Properly with Direct Void
CR ID #: 15035
After ringing a condiment with the Condiment Min/Max feature enabled
and attempting to perform a direct void on the menu item, the “Cannot
Exit Condiment Group, 1 Condiment(s) Required” message was
displaying. POS Operations was still requiring the minimum number of
condiments even though the menu item had been voided. This has been
corrected.
Discounts Not Posted Properly for Non-Taxable Menu Items
CR ID #: N/A
When applying discounts (both item and subtotal) to non-taxable menu
items, POS Operations would calculate and display the discount
correctly, but failed to post the adjusted price to the database. This was
reflected in the Non-Taxable column of the Daily System Tax Totals
(TAX_S001.rpt), which reported those sales at non-discounted prices.
This problem has been corrected.
Error Alarm Beeps Continuously When Control Panel Status
Set to Database
CR ID #: 14223
Previously, if the Control Panel status was set to database or higher, the
system would sound a continous error alarm. The problem was a system
default setting that automatically beeped when there were inactive or
disconnected printer devices. This has been corrected.
Error Attempting to Move Credit Auth to Another Seat
CR ID #: 13665
Previously, an “Unhandled Exception” error would occur in POS
Operations when attempting to move a credit authorization onto another
seat using the Edit Seat function. This has been corrected.
MD0003-065
Revision D
May 2, 2005
Page 724 of 814
3700 POS
What’s Revised
Error Attempting to Tender Check With Seat Filtering and
Voiding Credit Card Payment
CR ID #: 15089
When using seat filtering, if credit card payment is posted and then
voided, any subsequent attempt to tender the check will cause the system
to error. This has been corrected.
Error Communicating With Credit Card Server
CR ID #: N/A
When attempting to run credit card transactions, the system would
occasionally return an error message indicating it could not communicate
with the credit card server. The problem was attributed to confusion in
identifying which authorization threads belonged to which clients,
especially after the server had been shut down and restarted. This has
been corrected.
Error Occurs When Loading POS Operations on Win 95
Client
CR ID #: 14602
After rebooting on a customer’s system, a database error occurred while
loading the menu item base definitions on a Win 95 Client. The internal
error occurred when the size of the database file exceeded one MB. This
problem has been corrected.
Error Occurs When Seat Filtering Check With a Large
Number of Guests and Items
CR ID #: 15090
After ringing a check with 10 or more guests, a check read detail error
would occur if seat filtering was active while menu items were moved or
when the check was closed to cash. This has been corrected.
MD0003-065
Revision D
May 2, 2005
Page 725 of 814
3700 POS
What’s Revised
Final Tender to a Credit Card Causes POS Operations to
Exit
CR ID #: N/A
Attempts to finalize a credit card tender would cause the system to crash
when the option Confirm Customer Signature (POS Configurator |
Revenue Center | RVC Credit Cards | General) was enabled. This
problem has been corrected.
Font Does Not Display Correct European Characters in
Check Detail
CR ID #: N/A
The OPS08x10.ttf font has been updated to completely conform to the
Windows Latin 1 (Ansi) codepage (1252) (without the new Euro
symbol). Previously, the arrangement of the character set would cause the
wrong European characters to display in the check detail area of the
screen.
Note: Some drawing characters that were in the old font have been
removed as they are not part of the 1252 codepage. Depending on
demand, these characters may be added back in a future version of the
font at the proper Unicode character positions.
Insert Condiment Causes Seat Handling to Fail
CR ID #: N/A
When using the insert condiment feature, the system failed to turn off
Insert mode after the condiment was entered and before the next menu
item was rung. If the next item was a condiment, the condiment would
not be linked to the parent item and could become orphaned when sorting
by seats. This was particularly problematic when using the edit seat
feature, which assumes that all items on a seat will be in the correct order.
This, in turn, places the check in a state where it can no longer be picked
up by POS Operations after a service total. This problem has been
corrected.
MD0003-065
Revision D
May 2, 2005
Page 726 of 814
3700 POS
What’s Revised
Invalid Track 1 for Credit Cards
CR ID #: N/A
Due to increased variability in the format used to write expiration dates
on Track 1 and Track 2 of some credit cards, verification by comparison
is not considered reliably useful. Programming code that tries to verify
expiration dates by comparing Track 1 and Track 2 data has been
removed. In the future, only the Account Numbers will be compared and
verified.
Mag Card Swipe Not Working on WS4
CR ID #: 14466
On a WS4, attempts to authorize certain transactions (e.g., transaction
cancel or cash drawer assignment) by swiping a mag card were ignored
by the system. (Authorization was accepted if manually entered,
however.) This problem has been corrected.
Menu Item SLUs Display Blanks When Mask Duplicate
Items Selected
CR ID #: 15001
Menu Item SLUs would display blank placeholders for duplicate items
when the Mask Duplicate Items option (POS Configurator | Devices |
Touchscreens | Styles) was enabled. This was pushing other nonduplicate items off the screen, and could require the user to page down to
see the first item. This problem has been corrected.
Network Communications Failure with WS4
CR ID #: N/A
Attempts to print to local or remote order devices attached to a WS4
device would fail if the system was in backup server mode (BSM). The
problem was caused by a failure in the MDSHTTP service on the WS4.
This has been corrected.
MD0003-065
Revision D
May 2, 2005
Page 727 of 814
3700 POS
What’s Revised
Non-Standard Magnetic Cards Causes Errors
CR ID #: N/A
When using non-standard magnetic cards, the system had difficulty
interpreting data because of the choice of field separators used by those
cards. This confusion could cause corruption of the stack. This problem
has been corrected.
No Open Checks Found When Transferring Checks
CR ID #: N/A
When adding a check to another check using the Transfer SLU button,
the system would display an error message indicating that “No Open
Checks Found.” This problem has been corrected.
On-Demand Receipt Printing Not Functioning
CR ID #: N/A
After tendering a check, the system would pause briefly and display the
message "Ready for your next entry" before changing to "Sign in, enter
your ID." This is incorrect. The proper response was to wait for the ondemand button to be selected and then print the receipt. This problem has
been corrected.
Peripherals Not Working When Client is Restarted
CR ID #: 14354
When a client workstation was shut down then restarted while the system
was at front of house, POS Operations would start before the PCWS API
driver had started or fully initialized itself. This, in turn, prevented the
peripherals from working. This problem has been corrected.
MD0003-065
Revision D
May 2, 2005
Page 728 of 814
3700 POS
What’s Revised
Pop-Up Employees Not Signed Out After a ‘No-Sale’
CR ID #: N/A
Previously, if a pop-up employee was signed in and pressed a no-sale
key, the system would execute the command (i.e., open the cash drawer)
and then wait for the employee to press another key before continuing.
This was by design for regular employees, but confusing to pop-up
employees who expected to be automatically signed-out and returned to
the revenue center’s Sign-In Screen. To resolve the problem, pop-up
users will now be prompted to press a Clear button after a No-Sale to
complete the transaction.
POS Maintenance Causes Workstation Lockup
CR ID #: N/A
While POS Operations was performing maintenance on a workstation, an
error in the maintenance routine was causing an endless loop that tied up
the workstation CPU and significantly impaired the system’s response
time for other operations. This problem has been corrected.
POS Operations Display Windows Clear Prematurely
CR ID #: 14572
When using the touchscreen “1 Classic Style” template at 800x600
resolution for POS Operations, the SIM selection window was clearing
instantly, as if it had not been generated at all. The error was attributed to
a missing parameter in the OpsDisplaySys.cfg file, which has now been
corrected.
POS Operations Does Not Return to Sign-In Screen
CR ID #: N/A
Previously, POS Operations failed to detect when an employee was
signed out automatically and therefore was not returning to the default
sign-in screen once the predefined auto sign-out time has elapsed. This
problem has been corrected.
MD0003-065
Revision D
May 2, 2005
Page 729 of 814
3700 POS
What’s Revised
POS Operations Failure When Printing Price on Order Chit
CR ID #: 14357
After sending an order, POS Operations would fail if the order included a
menu item configured to Print price on order chit (Sales | Menu Item
Classes | Print/Display). This problem has been corrected.
POS Splash Screen Not Displaying on Clients
CR ID #: 14069
Previously, when running the POS Control Panel, the splash screen was
slow to respond or did not display at all on the clients. The problem was
caused by excessive CPU usage by the preview order file. This has been
corrected.
Reloading Database from Control Panel Sets Restaurant to
‘OFF’
CR ID #: N/A
After affecting a change through POS Configurator, if the database was
reloaded through the Control Panel, the system would ignore the current
operational state and set the system to OFF. This problem has been
corrected.
Rounding Totals Incorrect When Set to Nearest .05
CR ID E: 12900
The Totals Due amount on a guest check was not rounding to the nearest
.05 even though the option Enable totals due rounding was active (POS
Configurator | Revenue Center | RVC Posting | Options). The problem
was traced to a conflict with the option Round GST totals up (POS
Configurator | Revenue Center | RVC Posting | Options). This has been
corrected.
Salaried Employees Unable to Change Revenue Center
CR ID #: 14359
Previously, a salaried employee who was not required to clock in/out was
not being allowed to change revenue centers. This has been corrected.
MD0003-065
Revision D
May 2, 2005
Page 730 of 814
3700 POS
What’s Revised
Security Login Redisplayed When Calling an External
Program From POS Operations
CR ID #: 14518
When calling an external program from POS Operations (e.g., through
the Autosequence and Reports module), the security dialog was being
redisplayed even though a privileged employee was already signed in.
This problem has been corrected.
Selecting a Course Menu Item Causes Other Items to be
Selected
CR ID #: 12162
Previously, when attempting to highlight a course item on a check, other
(non-course) menu items on the check were also being highlighted. If
you attempted to void the course item, the other menu items that were
highlighted were also voided. This has been corrected.
‘Send Order and Stay’ Function Not Posting Properly
CR ID #: 14916
When ringing menu items linked to multiple tax rates (e.g., both
inclusive and add-on taxes), use of the ‘Send Order and Stay’ function
would invoke the wrong order type and cause the system to overstate net
sales by the amount of the inclusive tax. As a result, incorrect totals were
posted in the sales detail reports. This problem has been corrected.
Subtotal Discounts Applied Incorrectly to Large Totals
CR ID #: 14978
When applying a subtotal discount to checks that total six non-decimal
digits or greater (>= 100,000.00), the system was calculating an incorrect
amount. This has been corrected.
MD0003-065
Revision D
May 2, 2005
Page 731 of 814
3700 POS
What’s Revised
Table Pickup Displays All Open Checks
CR ID #: N//A
When using the table objects function to pick up a check after it has been
split and service totaled, the system would display all open checks
currently in the system instead of just the checks for the selected table.
This problem has been corrected.
Taxable Sales Incorrect When Multiple Tax Rates
Discounted
CR ID #: 14641
Taxable sales were being calculated incorrectly when menu items linked
to different tax classes were on the same transaction, and a discount
(affecting multiple tax rates) was applied. This has been corrected.
Touchscreen Default SLUs Not Generating
CR ID #14809
After selecting a touchscreen that included a default SLU option, the
system would display all of the screen’s hard-coded buttons, but failed to
generate the SLU'd items. This has been corrected.
Touch Void Followed by a Direct Void of a Combo Meal
Causes Negative Balance
CR ID #: 10131
If two combo meals were entered, and the second was “touch voided,”
then using “void-void” to delete the last item of the first combo meal
resulted in a negative check balance. The problem was caused when
previously voided entries were incorrectly removed from the check
detail, which created an imbalance in the check amount. This has been
corrected.
MD0003-065
Revision D
May 2, 2005
Page 732 of 814
3700 POS
What’s Revised
VAT Tax Option Not Saved at EM Corporate
CR ID #: 13904
When configuring an EM Corporate database, the system failed to retain
the correct VAT Tax Method if the option selected was either VAT by
the round or VAT by the item (POS Configurator | System | Restaurant
| Options). The database would record the change and send the correct
data to the stores. However, once the Restaurant form was reopened, the
option would revert to the default setting Post taxable totals only. This
problem has been corrected.
Voiding a Discount With Cash Management Enabled Results
in Error
CR ID #: 12128
Attempts to void a discount on a guest check when Cash Management
was enabled resulted in a OPS error when the check was tendered. The
problem was due to an error in the stored procedure sp_InsertDsvcDtlEx,
which was passing an incorrect Till ID. This has been corrected.
Voiding a Partial Tender Linked to a SIM Event Removes
Wrong Items
CR ID #: N/A
Previously, if a partial tender was applied to a check using a SIM event
(e.g., a senior discount, promotional coupon, etc.) and other items were
then rung up (menu items, service charges, discounts, etc.), any attempt
to void the partial tender would remove it and all items added afterwards.
This problem has been corrected.
MD0003-065
Revision D
May 2, 2005
Page 733 of 814
3700 POS
What’s Revised
WS4 Unable to Access Previous Checks in SAR Mode
CR ID #: 14250
Previously, if a WS4 lost connection to the server and shifted to standalone resiliancy (SAR) mode, the user was unable to access any of the
previously rung checks. However, once the network connection was reestablished, all checks (including those rung during SAR mode) were
again available to the WS4.
The lack of access to previous checks was caused during OPS startup,
when the system failed to check for SAR mode before deleting current
check files. This problem has been corrected.
Printing
Background Voucher Printing Does Not Work
CR ID #: N/A
The system failed to automatically print a guest voucher after credit
authorization even though the revenue center had been properly
configured for background voucher printing. This problem has been
corrected.
Backup Printer Re-Direct Not Functioning Properly From
CE Devices
CR ID #: N/A
When printing from a CE client (either HHT or WS4), if the primary
printer failed, the system would display an error message indicating that
the output was being directed to the backup printer. At that point, the
backup printer would fail and no further error messages would be
displayed. The problem was caused by an error in the print manager,
which has been corrected.
MD0003-065
Revision D
May 2, 2005
Page 734 of 814
3700 POS
What’s Revised
Backup Runner Chit Printer Not Functioning Properly
CR ID #: N/A
Previously, if the primary runner chit printer was down when an order
was bumped from a KDS display, the system failed to forward it to the
designated backup runner chit printer. The problem was caused by an
error in the KDS print manager. This has been corrected.
Confidence Test on WS4 Fails on Output to IDN Printers
CR ID #: N/A
The WS4 Confidence Test consistently generated the error “No Response
from Printer” when connected to IDN printers with an ID greater than 9,
regardless of the function selected (i.e., Test Print, Red/Black, Printer
Version, etc.). The problem was caused by a formatting error in the way
Confidence Test forwarded the printer ID. This has been corrected.
Guest Check Printing Not Consolidating Menu Items
CR ID #: 12318
While upgrading from RES Version 2.6 to 3.0, an error was introduced
that prevented menu items from consolidating when printing receipts.
The problem typically occurred in a fast transaction environment where
the check was not service totaled before tendering. This has been
corrected.
KDS Runner Chit Not Printing on Serial TM-T88
CR ID #: N/A
Previously, the system failed to print a runner chit if the primary or
backup chit printer device was a serial TM-T88. The problem was a
configuration issue, which has been corrected.
KDS Runner Chit Prints Wrong Width
CR ID #: N/A
When printing a runner chit to a 40-column thermal printer, the system
reduces the check width to 32-column, which causes the lines to wrap.
The problem was linked to a configuration issue, which has been
corrected.
MD0003-065
Revision D
May 2, 2005
Page 735 of 814
3700 POS
What’s Revised
Line-by-Line Printing of Customer Receipt Fails When KDS
Uses DOM in Fire-on-Fly Mode
CR ID #: N/A
POS Operations would lock up during order entry if the server was a
member of an employee class configured for line-by-line printing of
customer receipts. The problem occurred only when KDS with dynamic
order mode (DOM) was enabled (POS Configurator | Devices | Order
Devices | Dynamic Order Mode) and when the DOM type was set to
either ‘Fire on the Fly’ or ‘Fire on Next.’ This has been corrected.
Print Error Displays When Reloading System
CR ID #: N/A
Periodically, when ringing checks, the system will display an error
message indicating that the device printer is not installed. This happens
even when the printer had been operating normally and does not prevent
the user from entering checks once the error message is cleared.
The problem arises whenever the system is reloading. Typically, this is
something the user has initiated — either by altering a printer definition
or by reloading the SQL Database Server from Control Panel. Any
change or reload causes the printer definitions to be temporarily removed
and then restored. If a print request occurs at that moment, the system is
temporarily unable to locate the printer and, therefore, displays the error
message.
Changes have been made to minimize the window, but users should be
advised that it can still occur.
MD0003-065
Revision D
May 2, 2005
Page 736 of 814
3700 POS
What’s Revised
Print ‘Total’ on Credit Authorization Voucher
CR ID #: 10018
Traditionally, when paying by credit card, customers were presented with
a credit authorization voucher that listed a subtotal and cashback amount
(if applicable), and provided space for them to enter a tip, a total, and a
signature.
In this release, the voucher format was modified to accommodate Auth ‘n
Pay transactions where the charged tip and the cashback amounts are
both zero. Since no additional monies will be added to the check, the
subtotal text is replaced by a printed Total.
Serial Printers Incorrectly Wrapping Text
CR ID #: N/A
Previously, when a TMU200 or U300 serial printer was configured as an
order device printer and connected to a WS4, orders would print with the
text wrapped around to the next line and extra spaces in between items.
The problem was caused by the addition of an extra space character at the
beginning of a line when using either of these serial printers. This has
been corrected.
Slip Printer Hangs When Printing Second Page
CR ID #: 14655
When printing a check with multiple pages to a slip printer, the system
would print the first page, eject the slip, and then immediately send the
order to the order devices without printing the rest of the check. Check
detail was not being saved because the entire check never printed. In
addition, the interruption in process was causing POS Operations to
hang. This problem has been corrected.
MD0003-065
Revision D
May 2, 2005
Page 737 of 814
3700 POS
What’s Revised
Slow Performance When Running Multiple IDN Printers
from a WS4
CR ID #: N/A
System performance was slow when running multiple ID printers from a
single WS4 workstation. The problem occurred as each device competed
for use of the shared COM port. When a printer was using the COM port,
it would lock it to prevent access by other IDN printers,which then
paused until the COM port was unlocked. If too many print jobs were
sent during this time, error messages could display with incorrect
information. For example, you may have received an error message
indicating a paper jam, though no actual jam had occurred. These issues
have been corrected.
WS4 Locks Up During Operations
CR ID #: N/A
Workstation 4 devices would occasionally lock up during operations. The
problem was due to memory leaks caused by the print controller after
each print job. This has been corrected.
WS4 Not Printing to IDN Printers with ID Greater than 9
CR ID #: N/A
Previously, WS4 was unable to print to IDN printers with an ID greater
than 9. The problem was caused by incorrect formatting in the IDN
message header for device IDs 10 through 15. This has been corrected.
WS4 Unable to Print Multiple Reports in Succession
CR ID #: N/A
When printing multiple reports from a Workstation 4 (WS4), IDN
Express and Thermal printers failed to properly handle second, third,
and/or subsequent reports. The problems ranged from incomplete results
to a complete failure to respond. The autocut feature was also
inconsistent. Modification were made in the IDN print driver (pcprint.dll)
to correct the problems.
MD0003-065
Revision D
May 2, 2005
Page 738 of 814
3700 POS
What’s Revised
Setup
ConnAdvisor Service Not Installed Properly
CR ID #: N/A
Occasionally, when running RES setup from a server with RAID, the
system failed to install the ConnAdvisor service to the Win 2K clients.
This problem has been corrected.
DSM Unable to Send Jobs to Checked-In Clients
CR ID #: N/A
In certain scenarios, DSM was not sending a client its configuration
updates because the client was marked as disconnected. This caused the
client's configuration information to be out-of-date until the SQL
Database Server was reloaded in Control Panel or the client was
rebooted.
The problem occurred because DSM was incorrectly marking clients as
disconnected when it attempted (and failed) to send jobs to the them
before the server had created an MDSHosts.XML file. These jobs are
always sent to the client when it checks-in to the server.
The problem has been corrected.
DSMInterface Cannot Handle 15-Character Computer
Name
CR ID #: 11200
Previously, the DSMInterface.dll was unable to read the servername from
the registry if the name was 15 characters long. Although the maximum
length allocated for the servername was 15 characters, the system
actually requires 16 characters to read it (15 for the servername + 1 for a
terminating NULL character). This has been corrected.
MD0003-065
Revision D
May 2, 2005
Page 739 of 814
3700 POS
What’s Revised
Remote Reboot of Multiple Clients Prevents Setup
Completion
CR ID #: N/A
Previously, after running setup, the server would remotely reboot all
clients simultaneously. In a system with a large number of hard-drive
clients, that many simultaneous connections to netsetup could prevent
some of the them from completing properly. This problem has been
corrected. Now, the system will reboot all CE clients first and then reboot
each hard-drive client with a 30-second gap between each of them.
Running Setup on NT Client Changes Date Format
CR ID #: N/A
After running Setup on an NT client, the date format was changed from
the user’s preferred configuration to the default American format of
mm\dd\yyyy. This created problems for countries outside the United
States. It has been corrected.
WS4 Cannot Handle IP Addresses With Leading Zeros in an
Octet
CR ID #: N/A
When configuring IP addresses on the server, clients, or especially in Pos
Configurator, be advised that the use of leading zeros in an IP address is
not supported by TCP/IP. Any number beginning with a zero will be
interpreted as an octal number, as opposed to a decimal number. This will
lead to networking errors.
WS4 Compact Flash Warning
CR ID #: N/A
Users should be advised that powering off either the WS4 or the Server
during an upgrade to a new version of RES can cause the WS4’s compact
flash to become corrupt. This can also occur if you pull the power cord
out of the WS4 while it is writing to the compact flash.
MD0003-065
Revision D
May 2, 2005
Page 740 of 814
3700 POS
What’s Revised
SIM
@PMSNumber Returns Incorrect Value
CR ID #: N/A
When running @PMSNumber, the system returned invalid data instead
of the appropriate object number. This has been corrected.
Applied Discount Fails to Run SIM Event
CR ID #: 14031
When ringing a check and applying a discount, the system fails to run the
appropriate SIM event. This has been corrected.
Applied Tender Fails to Run SIM Event
CR ID #: 14038
When ringing a check and applying a tender, the system fails to run the
appropriate SIM event. This has been corrected.
Correcting a Discount Error Runs Wrong SIM Event
CR ID #: 14015
When performing an error correction (Void-Void) on a discount, the
system was using the wrong SIM Event. Instead of running
dsc_error_correct, POS Operations would run mi_error_correct_items.
This has been corrected.
Correcting a Service Charge Error Runs Wrong SIM Event
CR ID #: 14035
When performing an error correction (Void-Void) of a service charge, the
system would run the wrong SIM event (i.e., mi_error_correct_items
instead of svc_error_correct) This has been corrected.
MD0003-065
Revision D
May 2, 2005
Page 741 of 814
3700 POS
What’s Revised
Correcting a Tender Error Runs Wrong SIM Event
CR ID #: 14039
When performing an error correction (Void-Void) of a service charge, the
system would run the wrong SIM event (i.e., mi_error_correct_items
instead of tdr_error_correct) This has been corrected.
Direct Void of a Tender Runs Wrong SIM Event
CR ID #: 14037
When voiding a tender from a check, the system would run the wrong
SIM event (i.e., running tndr_error_correct_items instead of tndr_void).
This has been corrected.
Function ‘Fopen’ Does Not Truncate Overwritten Files
CR ID #: 14048
When overwritting a previous file using the SIM function Fopen, the
system failed to remove extraneous data and simply replaced characters
on a one-for-one basis. For example, if the existing file contained 20
characters and the replacement file contained 10 characters, only the first
10 characters would be overwritten. This problem has been corrected.
Now, when a file is overwritten, the old data is flushed and the new
information is inserted.
Function ‘Fread’ Does Not Remove Linefeed Character
CR ID #: N/A
When reading in a file using the SIM function Fread, the system would
remove the newline (NL) character but would leave in the linefeed or
carriage return (CR) as the last character of the last variable populated.
This has been corrected — both items will now be removed.
Function ‘Fwrite’ Missing Return
CR ID #: 14047
When using the SIM function Fwrite to add a line of data to a file, the
system failed to mark the end of a line with a new line character. This has
been corrected.
MD0003-065
Revision D
May 2, 2005
Page 742 of 814
3700 POS
What’s Revised
SIM Idle Events Continue to Run During Clock In/Out
CR ID #: 15038
During Clock In/Clock Out operations, the system continued to run SIM
Idle events and in some cases, failed to reset the idle counter when the
procedure was completed. This inteferred with normal clock-in/clock-out
functionality and caused interruptions and time delays as the user waited
for the event to run. This problem has been corrected.
SIM Variables Not Prorated with Partial Tenders for
Negative Transactions
CR ID #: N/A
Previously, when performing a negative transaction, the partial tenders
were not prorating the SIM variables properly to all the sales itemizers.
Instead, the first tender applied would post the entire check total to the
sales itemizers, regardless of the amount of the tender. This has been
corrected.
svc_void_event Not Firing
CR ID #: 14036
When touch-voiding a service charge from a check, the service charge
would be removed without firing the svc_void event through SIM. This
problem has been corrected.
Touch Void Discount Does Not Run SIM Event
CR ID #: 14017
After touch-selecting a discount on a check, the system failed to run the
dsc_void event when the [Void] button was pressed. This problem has
been corrected.
Touch Void Menu Items Runs Wrong SIM Event
CR ID #: 14014
Previously, using a touch-void to remove a menu item from a check, the
system would run the wrong SIM event (i.e., mi_error_correct_items
instead of mi_void_items). This has been corrected.
MD0003-065
Revision D
May 2, 2005
Page 743 of 814
Kitchen Display System (KDS)
What’s New
Kitchen Display System (KDS)
What’s New
There are no new features in this version of the software.
What’s Enhanced
An enhancement is defined as a change made to improve or extend the
functionality of the current application. To qualify as an enhancement,
the change must satisfy the following criteria:
The basic feature or functionality already exists in the previous
release of the software.
The change adds to or extends the current process. This differs from a
revision (i.e., a bug fix) which corrects a problem not caught in the
previous release of the software.
Enhancements
Summarized
The table below summarizes the enhancements included in this version.
Module
User
Interface
MD0003-065
Revision D
May 2, 2005
Page 744 of 814
Feature
Toolbar/Bumpbar Functionality
Page
745
Kitchen Display System (KDS)
What’s Enhanced
Enhancements
Detailed
User Interface
Toolbar/Bumpbar Functionality
To improve useability, two new functions were added to the list of
programmable options for the KDS Toolbar and Bumpbar features. They
are:
Minimize — Minimizes the active KDS display.
Show OPS — Brings the locally running POS Operations
window to the foreground of the screen.
Icons are provided for each new function and are displayed on the button
along with the user-defined Legend.
Enabling
To activate the new functionality:
1. Open the POS Configurator and select Devices | KDS Tool Bars or
Devices | KDS Bump Bars.
2. Select a toolbar or bumpbar from the list of names provided.
3. Select a toolbar position or bumpbar key location from the grid.
4. Right-click in the KDS Function column to open the drop-down list.
Notice that the list now includes a Minimize and a Show OPS entry.
5. Select one and complete the rest of the form, as required.
6. Save and close.
MD0003-065
Revision D
May 2, 2005
Page 745 of 814
Kitchen Display System (KDS)
What’s Revised
What’s Revised
A revision is defined as a correction made to any existing form, feature,
or function currently resident in the KDS software. To qualify as a
revision, the change must satisfy the following criteria:
The basic form, feature, or functionality must be part of the previous
version of the software.
The change must replace the current item or remove it from the
application.
Revisions
Summarized
The table below summarizes the revisions included in this version.
Module
KDS
Controller
User
Interface
MD0003-065
Revision D
May 2, 2005
Page 746 of 814
Feature
CR ID
Page
Access Error Violation Occurs
During System Reload
N/A
747
KDS Controller Unable to Close
With System
N/A
747
Item Done Status Disappears
When Combo Meal Entered
N/A
747
Items Not Consolidating on
Summary Condensed and
Summary Expanded Displays
14624
748
Touch Void Removes Too Many
Items
12396
748
Kitchen Display System (KDS)
What’s Revised
Revisions
Detailed
KDS Controller
Access Violation Error Occurs During System Reload
CR ID #: N/A
Occasionally, in a large system environment, the KDS Controller would
post an access error violation during a reload of the system. This problem
has been corrected.
KDS Controller Unable to Close with System
CR ID #: N/A
When setting the system from Front-of-House to OFF via the Control
Panel, the KDS Controller would start the KPM application in an attempt
to update the database but was unable to complete. This was causing the
system to hang. This problem has been corrected.
User Interface
Item Status Disappears When Combo Meal Entered
CR ID #: N/A
When adding a combo meal to a previously doned chit, the system would
delete the item status markers associated with any non-combo items.
Previously doned Combo meals were not affected when a new Combo
meal was rung.
The problem occurred when the POS was configured for dynamic order
mode (DOM) with either Fire on Fly and Fire on Next. This has been
corrected.
MD0003-065
Revision D
May 2, 2005
Page 747 of 814
Kitchen Display System (KDS)
What’s Revised
Items Not Consolidating on Summary Condensed and
Summary Expanded Displays
CR ID #: 14624
When selecting the Summary Condensed or Summary Expanded options
on a KDS display, the system failed to consolidate multiple like items.
This problem has been corrected.
Touch Voiding Removes Too Many Items
CR ID #: 12396
Previously, if a line item with multiple quantities (e.g., 5 Chicken &
Chips) was touch voided, the POS System would (appropriately) delete a
single menu item from the active check, but the KDS display would
delete all of the menu items. The problem occurred only when dynamic
order mode (DOM) was enabled (POS Configurator | Devices | Order
Devices | Dynamic Order Mode) and when the DOM type was set to
‘Fire on the Fly.’ This has been corrected.
MD0003-065
Revision D
May 2, 2005
Page 748 of 814
Cash Management (CM)
What’s New
Cash Management (CM)
What’s New
New Features
Summarized
A new feature is defined as one that provides capabilities that were not
available in previous versions of the application.
The table below summarizes the new features included in this version.
Module
User
Interface
Feature
Welcome/Summary Page
Page
750
MD0003-065
Revision D
May 2, 2005
Page 749 of 814
Cash Management (CM)
What’s New
New Features
Detailed
User Interface
Welcome/Summary Page
Included in this release is a new Welcome screen, displayed once the user
logs onto the CM application. The Welcome screen provides a
convenient summary of system status, including information about open
tills, safes, and deposit (both current and previous days). An Alerts
section is also included, offering convenient reminders of unfinished
business from the previous shift or business day.
This form can also be accesed from the menu and toolbar.
MD0003-065
Revision D
May 2, 2005
Page 750 of 814
Cash Management (CM)
What’s New
What’s
Enhanced
An enhancement is defined as a change made to improve or extend the
functionality of the current application. To qualify as an enhancement,
the change must satisfy the following criteria:
The basic feature or functionality already exists in the previous
release of the software.
The change adds to or extends the current process. This differs from a
revision (i.e., a bug fix) which corrects a problem not caught in the
previous release of the software.
Enhancements
Summarized
The table below summarizes the enhancements included in this version.
Module
User
Interface
Feature
Page
Adjusting Counted Tills and Server Banks
752
Enabling Safes and Deposits
753
Touchscreen Number Pads
754
Viewing Receptacles and Running Reports
756
MD0003-065
Revision D
May 2, 2005
Page 751 of 814
Cash Management (CM)
What’s New
Enhancements
Detailed
User Interface
Adjusting Counted Tills and Server Banks
In the past, CM users were able to adjust till and server bank counts from
a previous business day, as long as the receptacles had not been
deposited.
To limit access to this functionality, the Allow Adjustments to Counted
Tills and Server Banks from Previous Business Dates option was
added to the CM | Configuration | Options | Main form.
The default setting is enabled. Users must clear this box to prohibit
employees from making adjustments to a previous day’s till or server
bank.
MD0003-065
Revision D
May 2, 2005
Page 752 of 814
Cash Management (CM)
What’s New
Enabling Safes and Deposits
Not all customer sites have a need for the Safes and the Deposits features.
However, as part of the CM interface, users were presented with a
number of choices related to configuring, creating, and modifying safe
and deposit records.
To avoid confusion, options to disable these features — Safes and
Deposits — have been added to the CM Configurator. When disabled, the
system will hide the Safe and the Deposits icons from the CM main
toolbar. Without a toolbar icon, the user will not have access to the Safes
or Deposits forms.
Once a feature is disabled, all references to it — including related options
— will be hidden on all remaining forms and Views. For example, if the
user opts to disable Safes, the drop-down list for the Default Safe
Template (CM | Configuration | Options | Default Templates) will no
longer display. Similarly, the Days to Keep Safes field will be hidden on
the Purging form, and all Summary information concerning safes will be
removed from the Welcome page.
These options may be controlled by Corporate in an EM Environment.
Enabling
To support the enhanced functionality, two new fields were added to the
CM | Configuration | Options | Main form:
Safes Enabled — When checked, allows user access to the Safe
feature and all related forms and options. This is the default
setting.
When cleared, disables the Safes feature and hides from view the
Safes icon and all related forms, options, and other references.
Deposits Enabled — When checked, allows user access to the
Deposits feature and all related forms and options. This is the
default setting.
When cleared, disables the Deposits feature and hides from view
the Deposits icon and all related forms, options, and other
references.
MD0003-065
Revision D
May 2, 2005
Page 753 of 814
Cash Management (CM)
What’s New
Touchscreen Number Pads
To improve useability, a touchscreen-friendly number pad was added to
the layout of the Till Count and Adjust Count screens. With this addition,
a user can access and modify the forms from a Front-of-House terminal
without requiring a keyboard for data entry.
Samples of the amended screens are shown below.
Till Count
MD0003-065
Revision D
May 2, 2005
Page 754 of 814
Cash Management (CM)
What’s New
Adjust Count
MD0003-065
Revision D
May 2, 2005
Page 755 of 814
Cash Management (CM)
What’s New
Viewing Receptacles and Running Reports
In this release, the procedures for viewing the status of one or more
receptacles (i.e., tills, server banks, safes, and deposits) and for
previewing reports have been modified. In doing so, changes have been
made to the Cash Management Back Office user interface.
Views
Instead of automatically generating a report, the View and View All
buttons will open a new form, which lists the receptacle(s) as line-item(s)
in a grid.
This preliminary view provides no details about the contents of the
receptacles. It merely identifes relevant items, indicates their state and
location, and identifies who has responsibility or access to them.
MD0003-065
Revision D
May 2, 2005
Page 756 of 814
Cash Management (CM)
What’s New
In-depth information about any of the entries may be obtained by
highlighting a line-item and clicking the new Show Details button which
has been added to the icon bar above the grid. A secondary details screen
will then be displayed.
Reports
To view a report the user must now click the Print Preview button. For
consistency, the format has been changed from HTML to Quick Reports.
Other noteworthy changes include:
Reports are printed in landscape by default.
To accomodate a sizeable list, employees are now displayed
below the other data.
A “Close Time” entry is now provided for Tills and Server Banks.
References to a particular (template) version are no longer
applicable.
MD0003-065
Revision D
May 2, 2005
Page 757 of 814
Cash Management (CM)
What’s Revised
What’s Revised
A revision is defined as a correction made to any existing form, feature,
or function currently resident in the CM software. To qualify as a
revision, the change must satisfy the following criteria:
The basic form, feature, or functionality must be part of the previous
version of the software.
The change must replace the current item or remove it from the
application.
Revisions
Summarized
The table below summarizes the revisions included in this version.
Module
Backoffice
Application
POS Interface
Feature
CR ID
Page
Access Violation Occurs When
Closing CM
N/A
760
Rounding Error When Counting
Till
15168
760
Employee Assigned to Till Does
Not Use Correct Employee Class
N/A
760
14788
761
N/A
761
14067
761
N/A
761
Non-Privileged Employee
Allowed to Access Adjust Till
Start Amount
Starting Amount Excluded From
Balance Calculation
Ten-digit ID Not Working on SignIn
Transferring to a Till Does Not
Update Cash Pull Accumulator
MD0003-065
Revision D
May 2, 2005
Page 758 of 814
Cash Management (CM)
What’s Revised
Module
Reports
Setup
Feature
CR ID
Page
Charged Tips Not Deducting From
Cash Due on View Till
14433
762
No ‘Closed Till’ Time on View
Till
N/A
762
Set Default Orientation to
Landscape Mode
N/A
762
Cash Pull Definition Allows
Incorrect Tender Media Type
N/A
762
Error Message During Hot Fix
Installation
N/A
763
MD0003-065
Revision D
May 2, 2005
Page 759 of 814
Cash Management (CM)
What’s Revised
Revisions
Detailed
Backoffice Application
Access Violation Occurs When Closing CM
CR ID #: N/A
Occasionally, when a user attempted to close the CM application on the
back-of-house server, an error message would briefly display and then
the program would simply crash. This problem has been corrected.
Rounding Error When Counting Till
CR ID #: 15168
When attempting to deposit a till, the system would occasionally display
an error stating that “the value entered exceeded the amount available.”
This occurred when the counted till contained a non-cash item that was
counted past the number of decimal digits set for the currency in POS
Configurator (i.e., the currency was configured for 2 decimal places, and
the user entered a value with 3 decimal places). In this case, the system
failed to round the entry to the proper number of digits. This problem has
been corrected.
POS Interface
Employee Assigned to Till Does Not Use Correct Employee
Class
CR ID #: N/A
Previously, when an employee was assigned to a till, the system failed to
use the overriding employee class for the job under which the employee
clocked-in. Instead, the default employee class was used. This has been
corrected. Now, the default employee class is only used if no employee
class was designated for the job.
MD0003-065
Revision D
May 2, 2005
Page 760 of 814
Cash Management (CM)
What’s Revised
Non-Privileged Employee Allowed to Access Adjust Till Start
Amount
CR ID #: 14788
Non-privileged employees were able to access the CM | Tills | Adjust
Starting Amount form even though they lacked proper authorization. The
problem occurred because the access privilege level of the previous
authorized user was retained even though that user had signed out of POS
Operations.
When a non-priviledged employee tried to access this form without a
previous authorized user, POS Operations would crash.
Both problems have been corrected.
Starting Amount Excluded From Balance Calculation
CR ID #: N/A
When starting a till, if the opening transaction occurred while the starting
balance was being transferred, the system failed to include the starting
amount in subsequent balance calculations. This has been corrected.
Ten-digit ID Not Working on Sign-In
CR ID #: 14067
Previously, an error message was received when a user attempted to signin to the Cash Management application using a 10-digit employee ID.
Sign-in failed both for keyed and card-swipe entries. This problem has
been corrected.
Transferring to/from a Till Does Not Update Cash Pull
Accumulator
CR ID #: N/A
When transferring cash to or from a till, the system failed to count the
transferred monies against the threshold set for the cash pull accumulator.
As a result, the system was not accurately notifying the user when a cash
pull was required. This has been corrected.
MD0003-065
Revision D
May 2, 2005
Page 761 of 814
Cash Management (CM)
What’s Revised
Reports
Charged Tips Not Deducting From Cash Due on View Till
CR ID #: 14433
When viewing a till, the system failed to account properly for tips
charged as part of the credit card finalization. Consequently, the cash
total reported by CM was consistently overstated by the amount of the
charged tips. This problem has been corrected.
No ‘Closed Time’ on View Till
CR ID #: N/A
When viewing a till or a server bank report, the system failed to include a
column indicating when the receptacle was closed. This problem has
been corrected.
Set Default Orientation to Landscape Mode
CR ID #: N/A
When viewing Till and Server Bank reports, the system now displays
records horizontally, as columns of data across the page (i.e., landscape
orientation). This is consistent with other reports in the system.
Setup
Cash Pull Definition Allows Incorrect Tender Media Type
CR ID #: N/A
During CM setup, the application allowed a user to define one or more of
the existing tender media keys as a cash pull operation (CM |
Configuration | POS Items). This is incorrect. Only tender media of type
'Pickup' should be allowed as a cash pull operation.
To correct the problem, the Is Cash Pull Operation check box will be
disabled for all other POS Items.
MD0003-065
Revision D
May 2, 2005
Page 762 of 814
Cash Management (CM)
What’s Revised
Error Counting Till
CR ID #: N/A
When running RES Version 3.2 Hot Fix 1, an error would occur if Cash
Management (CM) was previously installed and if there were totals in the
CM database tables. The error was due to two foreign keys linked to the
cm_count_calc_item_dtl table. This error caused the system to disallow
the counting of a till. This problem has been corrected.
MD0003-065
Revision D
May 2, 2005
Page 763 of 814
Guest Services Solution (GSS)
What’s New
Guest Services Solution (GSS)
What’s New
There are no new features in this version of the software.
What’s Enhanced
An enhancement is defined as a change made to improve or extend the
functionality of the current application. To qualify as an enhancement,
the change must satisfy the following criteria:
The basic feature or functionality already exists in the previous
release of the software.
The change adds to or extends the current process. This differs from a
revision (i.e., a bug fix) which corrects a problem not caught in the
previous release of the software.
Enhancements
Summarized
The table below summarizes the enhancements included in this version.
Module
Import/Export
Wizard
MD0003-065
Revision D
May 2, 2005
Page 764 of 814
Feature
Revised User Interface for Customer
Import Wizard
Page
765
Guest Services Solution (GSS)
What’s Enhanced
Enhancements
Detailed
Import/Export Wizard
Revised User Interface for Import Wizard
The GSS Import Wizard has been redesigned for RES 3.2. The new
interface simplifies the conversion process by matching columns from
the old database tables to corresponding columns in the new GSS
database.
How It Works
After launching the Import Wizard from the GSS main menu bar, the user
enters the name of the database Input File. GSS supports all of the
commonly used database formats. To interpret the format correctly,
however, the user must specify the number of fields in a record and
identify the characters that separate them. Once defined, the Display
Import Preview File button is pressed and the results are presented in a
table.
MD0003-065
Revision D
May 2, 2005
Page 765 of 814
Guest Services Solution (GSS)
What’s Enhanced
Keep in mind that each line in the preview table represents a single
record from the old database, as defined by the user. Therefore, if 12
fields are specified, the preview window will attempt to load the old
database into exactly 12 columns of data.
If the user has erred — and there are 16 fields, not 12 — the Import
Wizard will not truncate the remaining fields, but will wrap them around
to the next record. In other words, fields 13 through 16 of the first record
will be posted under columns 1 through 4 of the second. Data for the
second record will shift as well, beginning in column 5 and wrapping
around to the next row (record 3).
On the other hand, if there are only 8 fields to a record and the user has
entered 12, the extra four columns will not be left blank. Instead, data
will begin to wrap at column 9 of the first row and continue until all of
the old database fields have been listed.
To correct the table structure, the user simply changes the number of
input fields from 10 to 12 and reloads the preview window. This process
can be repeated as often as needed until all the fields from the old
database are correctly identified and aligned.
Alignment is critical to importing the data. With the
table structure set, the column numbers are used to
link useable fields from the old database to an
appropriate GSS field. These numbers are listed in the
left-hand column beneath the Assign Link button.
Entries on the right represent the column headings of
the GSS table into which the old data will be imported.
Linking Data
To create a link, the user selects a column number
from the old database table, highlights a matching GSS column header,
and presses the Assign Link button. Both selections are moved to the
display box on the right (beneath the Remove Link button).
MD0003-065
Revision D
May 2, 2005
Page 766 of 814
Guest Services Solution (GSS)
What’s Enhanced
To remove a link, simply highlight one of the linked fields and press the
Remove Link button. The column number and GSS header will be
returned to the list of available entries.
Repeat the selection/assignment process until all of the useable fields
from the old database are linked to fields in the new GSS database.
Notice that the system dynamically builds the new table (at the bottom of
the form) as each new link is assigned.
When all useable fields have been linked, the user presses the Process
Database Import button to import the selected information into the GSS
database table.
Configurator Changes
To accommodate the changes to the Import Wizard, the form was
modified to include the following options:
Database Table Name — (read only) Lists the name of the GSS
database table into which the old data will be imported.
MD0003-065
Revision D
May 2, 2005
Page 767 of 814
Guest Services Solution (GSS)
What’s Enhanced
MD0003-065
Revision D
May 2, 2005
Page 768 of 814
Input File — Specifies the full path and name of the old database
file to be imported.
Guest Services Solution (GSS)
What’s Enhanced
String Delimiter — Identifies the character used to separate
strings within a database field. Selections may be made by either
typing in the character in the box on the left or the Windows
ANSI code in the box on the right. When an entry is made in
either box, the corresponding value is displayed in the other.
# Input Fields — Indicates the number of columns of data in the
old database file.
Field Separator — Specifies the character used to separate fields
in the import file. Selections may be made by either typing in the
character in the box on the left or the Windows ANSI code in the
box on the right. When an entry is made in either box, the
corresponding value is displayed in the other.
Record Separator — Specifies the character used to separate
records in the import file. Selections may be made by either
typing in the character in the box on the left or the Windows
ANSI code in the box on the right. When an entry is made in
either box, the corresponding value is displayed in the other.
Display Import File Preview — When the button is pressed,
displays records from the import file based on the number of
input fields defined by the user. If 10 fields were specified, then
10 columns will be displayed. The preview box allows the user to
confirm the accuracy of the columns of data before importing the
data.
Assign Link — Links a column # from the old database to the
GSS Column Name where the data will be imported. Entries in
either of these lists may be considered available variables.
Remove Link — Reverses a link between the old database
column # and a GSS Column Name and them to their respective
list of available variables.
Process Database Import — When pressed, converts the old
database according to the selected link criteria.
MD0003-065
Revision D
May 2, 2005
Page 769 of 814
Guest Services Solution (GSS)
What’s Revised
What’s Revised
A revision is defined as a correction made to any existing form, feature,
or function currently resident in the GSS software. To qualify as a
revision, the change must satisfy the following criteria:
The basic form, feature, or functionality must be part of the previous
version of the software.
The change must replace the current item or remove it from the
application.
Revisions
Summarized
The table below summarizes the revisions included in this version.
Module
Accounts
Receivable
MD0003-065
Revision D
May 2, 2005
Page 770 of 814
Feature
CR ID
Page
‘GSS Create AR Interest’ Stored
Procedure Fails to Complete
N/A
772
Negative Adjustments Not
Working in Transaction Posting
N/A
772
Numeric Entries Causing System
Errors
14983
772
Unable to Print Invoice Reports
14700
772
Autoseq and
Reports
Customer Reports
N/A
773
Customers
Amended ‘CC Number’ Label
N/A
773
Delivery
Plus
‘Validate Street’ Option Not
Working Properly
N/A
774
Import/
Export
Wizard
Customer Import Wizard Not
Working Properly
14492
774
Guest Services Solution (GSS)
What’s Revised
Module
POS Interface
Feature
CR ID
Page
Bonus Plans Not Automatically
Assigned to Customers
14651
774
Customer Info Removed With
Touch Void of Menu Item
13793
775
OPS Crashes After Multiple Uses
of GSS Inq: 1 Key
14280
775
Slow Performance When
Tendering a Check with Customer
Name
10163
775
MD0003-065
Revision D
May 2, 2005
Page 771 of 814
Guest Services Solution (GSS)
What’s Revised
Revisions
Detailed
Accounts Receivables
‘GSS Create AR Interest’ Stored Procedure Fails to
Complete
CR ID #: N/A
When running Autosequences and Reports, the system failed to complete
any autosequence that included the stored procedure 7104, GSS Create
AR Interest. This has been corrected.
Negative Adjustments Not Working in Transaction Posting
CR ID #: N/A
Previously, you could not make a negative adjustment in GSS | AR |
Transaction Posting. This has been corrected.
Numeric Entries Causing System Errors
CR ID #: 14983
Previously, if the backspace key was pressed while the cursor was in a
numeric field with a default value of 0.00, the GSS application would
close and an error message would be generated. This has been corrected.
Also, when entering a Transaction Amount in GSS (Accounts
Receivables | Transaction Posting), the system would automatically
append ‘0.00’ to whatever number was entered. That is, if the user
entered “50”, the number was displayed as “500.00”. This problem has
been corrected.
Unable to Print Invoice Reports
CR ID #: 14700
When running invoice reports from GSS, if the logged in user’s profile
included printer settings with an orientation different than the one
configured for the default printer, the system was unable to resolve the
mismatch and would abort the print job. This has been corrected. Now, in
the event of a conflict, the system will automatically use the orientation
specified for the default printer.
MD0003-065
Revision D
May 2, 2005
Page 772 of 814
Guest Services Solution (GSS)
What’s Revised
Autosequences and Reports
The table below describes the GSS report changes in this Service Pack:
Report
GSS Customer
Reports
Area Modified
Templatea
CR ID #: N/A
Description
GSS customer reports would list an
entry for all 4 customer phone
number fields, even when the field
was blank (i.e., contained all
zeroes). This created an
unnecessarily long report. To solve
the problem, only actual (non-zero)
phone numbers are now listed,
which results in a shorter, more
readable report.
Templates changed:
GSS_customer_001.rpt (GSS Customer List)
GSS_customer_002.rpt (GSS Customer Listing by Group)
Customer_002.rpt (GSS Customer List w/Phone)
Customer_004.rpt (GSS Customer List Detailed)
Customers
Amended ‘CC Number’ Label
CR ID #: N/A
Corrected the ‘CC Card Number’ on the GSS | Customer form to read
‘CC Number’.
MD0003-065
Revision D
May 2, 2005
Page 773 of 814
Guest Services Solution (GSS)
What’s Revised
Delivery Plus
‘Validate Street’ Option Not Working Properly
CR ID #: N/A
With the Validate Delivery Street and Validate Block Number options
enabled (GSS | File | Configure | Operations), attempts to enter a new
customer address resulted in the error message “Not in Delivery Zone.”
This occurred even though the streets had been properly mapped to their
delivery area (GSS Backoffice | Edit | Delivery Area Street Mapping).
This problem has been corrected.
Import/Export Wizard
Customer Import Wizard Not Working
CR ID #: 14492
Attempts to launch the Customer Import Wizard from the GSS
Configurator | File | Import Customer option on the menu bar drop-down
list failed to start the procedure. This problem has been corrected.
POS Interface
Bonus Plans Not Automatically Assigned to New Customers
CR ID #: 14651
New customers added through POS Operations were not automatically
signed up to existing bonus plans, even though the option GSS | Bonus
Plans | Automatically assign this plan to new customers was enabled.
(Customers added through the GSS Back Office program were added
properly.) This problem has been corrected.
MD0003-065
Revision D
May 2, 2005
Page 774 of 814
Guest Services Solution (GSS)
What’s Revised
Customer Info Removed with Touch-Void of Menu Item
CR ID #: 13793
When starting a check, and inserting information into the Guest Check
Info Lines via a SIM script, any attempt to add and then touch-void a
menu item would cause the info to be removed from the check. This
problem has been corrected.
OPS Crashes After Multiple Uses of GSS Inq: 1 Key
CR ID #: 14280
In the past, repeated use of the GSS Inq:1 key to open the Customer form
would eventually cause OPS to hang. This problem has been corrected.
Slow Performance when Tendering a Check with Customer
Name
CR ID #: 10163
Previously, performance was slow when tendering large checks with a
customer name added. Now, the time required to tender a check in this
situation has been greatly improved.
MD0003-065
Revision D
May 2, 2005
Page 775 of 814
Product Management (PM)
What’s New
Product Management (PM)
What’s New
New Features
Summarized
A new feature is defined as one that provides capabilities that were not
available in previous versions of the application.
The table below summarizes the new features included in this version.
Module
Setup
New Features
Detailed
Feature
Page
Auto-Reconcile Packing Slips
776
Close Accounting Periods
777
Vendor Fields to Support Electronic
Ordering
778
Setup
Auto-Reconcile Packing Slips
Shipment received without a purchase order are usually accompanied by
a vendor’s invoice or packing slip. These documents provide the
merchant with a list of the items delivered and an itemized bill for the
cost. Acceptance of the shipment constitutes acknowledgment that the
contents are correct. As such, it is important that the delivery be closely
checked and verified.
PM provides users with a system for receiving merchandise that includes
three layers of review and accountability. It begins when the shipment
arrives. In Step 1, the delivery is verified and the results are entered in the
Item Receipts form (PM | Receiving | Without Purchase Order). In Step
2, the entries are reviewed and the packing slip is reconciled with the
invoice (PM | Invoices | Review and Reconcile Packing Slips). In Step 3,
reconciled invoices are approved for payment (PM | Invoices | Approve
Invoices for Payment).
MD0003-065
Revision D
May 2, 2005
Page 776 of 814
Product Management (PM)
What’s New
In a large organization, each step of the process may involve a different
individual. But in smaller business, the person receiving the shipment
might be the same person who reconciles the invoice and approves it for
payment. In that case, the checks and balances provided by the 3-step
process become a unnecessary redundancy.
To speed up the Receiving process, the option to Automatically
reconcile packing slips to invoice (PM | Setup | PM Parameters |
Invoice Control) was added in this release. When enabled, items received
and entered into the system on a packing slip are reconciled when the
Item Receipts form is saved, and the corresponding invoice is
automatically approved for payment. This reduces the 3-step process is to
a single form.
Note
It should be noted that PM already allows users to auto-approve
reconciled invoices. When this option is enabled, the option to
Automatically approve reconciled invoices (Setup | PM
Parameters | Invoice Control) is enabled as well
This feature will not work if there are any vendors whose
receiving documents do not include prices.
Close Accounting Periods
Most businesses check the status of their enterprise through periodic
reports. These reports usually cover activities during a predefined
timeframe or accounting period (e.g., monthly, quarterly, yearly). As
such, they cannot be generated until the accounts are balanced and the
period has closed.
In the past, closing an accounting period was a manual process. Once the
end date of a period passed, the manager would review and complete
outstanding invoices, delete suspended activities, and reset negative
stock to zero. Then, and only then, could the accounting period be
officially closed and the data incorporated into a system report.
MD0003-065
Revision D
May 2, 2005
Page 777 of 814
Product Management (PM)
What’s New
For larger organizations — particularly those involving a corporate office
and multiple sites — the constant pressure to ensure that stores have
entered the required information was repetitive and time-consuming. To
improve efficiency, a feature was added that would allow a business to
effectively “schedule” the closing of accounting periods.
To support the functionality, two new options were added to PM | Setup |
PM Parameters | Inventory form:
Auto-close accounting periods — Select this box to have the
system automatically close the accounting period after a specified
period of time. Before auto-closing the period, the system will
check for and cancel suspended activities such as invoices or
counts that fall within the period’s begin and end dates, and reset
all negative stock items to zero.
Number of days before auto-closing accounting periods —
Enter the number of days after the end-date of the period that the
system will wait before closing the accounting period. This
option is not available unless the Auto-close accounting periods
box is checked.
Vendor Fields to Support Electronic Ordering
When ordering electronically, vendors require specific product names,
codes, and other information to ensure that the correct items are shipped
to the customer. This information is part of the Electronic Data
Information (EDI) system and is available to consumers through the
vendor’s product catalog.
To support the EDI system, the following fields were added to the PM |
Setup | Vendors | Items form:
MD0003-065
Revision D
May 2, 2005
Page 778 of 814
Vendor Item Product Name — Enter the name used by the
vendor to identify the inventory item (e.g., chicken, buffalo
wings).
SCC Number — Enter the Suppliers Catalog Code (SCC)
number associated with this inventory item.
Product Management (PM)
What’s New
Product Brand Name — Enter the brand name (e.g., Tyson’s
Chicken, Bud Light, Thomas’ English Muffins) of the inventory
item.
Additional Info — Enter descriptive text or other information
relevant to this inventory item. Up to 18 alphanumeric characters
are allowed.
Additional Info 2 — Enter an additional numeric reference for
this inventory item. Up to 18 characters are allowed.
MD0003-065
Revision D
May 2, 2005
Page 779 of 814
Product Management (PM)
What’s Enhanced
What’s Enhanced
There are no enhancements in this version of the software.
What’s Revised
A revision is defined as a correction made to any existing form, feature,
or function currently resident in the PM software. To qualify as a
revision, the change must satisfy the following criteria:
The basic form, feature, or functionality must be part of the previous
version of the software.
The change must replace the current item or remove it from the
application.
Revisions
Summarized
The table below summarizes the revisions included in this version.
Module
MD0003-065
Revision D
May 2, 2005
Page 780 of 814
Feature
CR ID
Page
N/A
784
Database
Error Posting Transactions on
Former mymicros.net Site
Inventory
Cost of Inventory Items Posted as
Negative Values
15201
784
Declared Allowances Do Not
Deplete Correctly
14952
784
Error When Transfering Menu
Items in Units Other Than Main
Unit
14844
784
Inventory Incorrectly Adds Counts
From Multiple Cost Centers
14009
785
Inventory Tasks Not Checking or
Reconciling Properly
N/A
785
Product Management (PM)
What’s Revised
Module
Inventory
(cont’d.)
Ordering
Receiving
Feature
CR ID
Page
New Inventory Items Not
Displayed in Application
14205
785
Posting Condiment Item Fails
When Parent Not Linked to Recipe
14805
786
Theoretical Usage Value Set to
Zero Even When Cost is Posted
14701
786
Weighted Average Cost Not
Updating If Menu Items Receipts
Entered for Past Business Days
14198
786
Autosequence Fails to Run if
Order is Replaced
N/A
787
Changing Unit Does Not Update
Earliest Order Delivery Date
N/A
787
Cost Centers Not Working
Correctly When Ordering Through
Item Lists
N/A
787
Order Rejected if Cost Center ID
Greater Than 9
N/A
788
Order Items Not Sorting Properly
14886
788
Adjustments Incorrectly Saved on
Receipts Without Inventory Items
15031
788
Allowing a Return Causes
Negative Stock Balance
N/A
788
Business Rule Violation Does Not
Clear
N/A
789
Item Quantity Cannot Be 0
N/A
789
MD0003-065
Revision D
May 2, 2005
Page 781 of 814
Product Management (PM)
What’s Revised
Module
Reports
Feature
CR ID
Page
Inventory Cost of Sales Summary
Report
14425
789
Inventory Count Sheets
12838
790
N/A
790
Order Purchase Report
14056
790
Receipt Return Journal Report
14847
790
Recipe Cost Reports
10494
791
Recipe Cost and Recipe
Assignment Reports
14584
791
Reports Explorer Incorrectly
Referencing Cost Centers
N/A
792
Count Does Not Reconcile
Properly Through Preview
N/A
792
Counts Not Updating Properly
N/A
792
Order Form Not Opening Through
Schedules
N/A
793
Sales and Labor Not Displaying in
Schedule
N/A
793
Inventory Count Extension
Preview Report
Schedules
MD0003-065
Revision D
May 2, 2005
Page 782 of 814
Product Management (PM)
What’s Revised
Module
Setup
Transfers
Feature
CR ID
Page
12484
793
Cannot Post Receipt After
Cancelling a Count
N/A
793
Changing Inventory Valuation or
Posting Method Causes Error
N/A
794
Closing Parameters Form After
Receiving POs Causes Access
Violation
N/A
794
EM Sites Cannot Enable Cost
Centers in Version 3.2
N/A
794
Form Not Opening After
Conversion with Second Language
N/A
794
Par Levels Cannot Be Set to Zero
N/A
795
Quantity Field Not Populated
When Transfering From an Item
List
12262
795
N/A
795
Allow Payment Term Override
Not Working
Transfer Prices Incorrectly
Updated When Allowance Created
in the Past
MD0003-065
Revision D
May 2, 2005
Page 783 of 814
Product Management (PM)
What’s Revised
Revisions
Detailed
Database
Error Posting Transactions on Former mymicros.net Site
CR ID #: N/A
Previously, when a site connected to the mymicros.net web portal
stopped using the portal for data collection, the system failed to reset the
internal triggers used to populate the database tables. Over time, this
caused the posting of PM receipts to fail. This problem has been
corrected.
Inventory
Cost of Inventory Items Posted as Negative Values
CR ID #: 15201
After declaring production in which the quantity of a menu item was
reduced to less than zero, if a receipt was posted for that menu item
without bring the inventory to a positive level, then declaring production
a second time would cause the cost of the inventory item to be posted as a
negative value. This problem has been corrected.
Declared Allowances Do Not Deplete Correctly
CR ID #: 14952
Previously, when an allowance is declared for a recipe (PM | Inventory |
Declare Allowance), it would not deplete correctly. This has been
corrected.
Error When Transfering Menu Items in Units Other Than
Main Unit
CR ID #: 14844
When using multiple cost centers, transfering menu items using units
other than the main unit would result in an inventory error. The problem
was caused by incorrect code in the stored procedure
speo_inven_update_xfer_cost.sql. This has been corrected.
MD0003-065
Revision D
May 2, 2005
Page 784 of 814
Product Management (PM)
What’s Revised
Inventory Incorrectly Adds Counts From Multiple Cost
Centers
CR ID #: 14009
When scheduling tasks for an inventory count, the system incorrectly
allowed a user to include count tasks from multiple cost centers in the
results. Since the results of the inventory were reduced to a single line
item record for the primary (i.e., selected) cost center, this produced a
distorted result. The problem has been corrected.
Inventory Tasks Not Checking Status or Reconciling
Properly
CR ID #: N/A
When starting inventory tasks the system was performing all of the
necessary status checks or reconciling properly. This was causing the
following problems:
If multiple instances of an inventory task were scheduled during a
day, the system would allow two or more of them to be opened
simultaneously without requiring the user to reconcile or close
one instance before opening another one.
Counts started outside of the Managers Schedule were not
filtering out counts that had been started from within the
Managers Schedule.
These problems have been corrected.
New Inventory Items Not Displayed in Application
CR ID #: 14205
Additions to the PM inventory were not being included in the updated
inventory list at sites where both multiple cost centers and storage
locations were not being used. This was caused by a filtering error in the
view that populates the Inventory Items form. The problem has been
corrected.
MD0003-065
Revision D
May 2, 2005
Page 785 of 814
Product Management (PM)
What’s Revised
Posting Condiment Item Fails When Parent Not Linked to
Recipe
CR ID #: 14805
When posting totals, PM attempts to link condiments to a parent menu
item, which the system identified as the most recently posted menu item.
Previously, if the parent item was not linked to a product, it never posted,
and the condiment would be (incorrectly) linked to whatever menu item
was posted before the parent. If no menu item was posted prior to the
parent item, the process would fail. Since the introduction of dynamic
order mode (DOM), this problem has occurred more frequently.
To resolve the issue, PM posting was modified. Now, if the first item
posted is a condiment, the system will link the item to itself, thereby
preventing a posting failure.
Theoretical Usage Value Set to Zero Even When Cost is
Posted
CR ID #: 14701
Previously, if a site was using Last Cost, and the current on-hand quantity
for an item was changed to 0.00 (i.e., was either < or > 0 previously,
indicating that this was not the first transaction entered for this item), the
posting procedure would incorrectly set the theoretical usage value to
zero for the next usage transaction. This problem has been corrected.
Weighted Average Cost Not Updating If Menu Items Receipts
Entered for Past Business Days
CR ID #: 14198
Previously, if receipts for inventory items were entered for a previous
business day, the system would not adjust the weighted average cost
(WAC) of that menu item for that day. This resulted in incorrect totals in
the Theoretical Cost of Sales Report (RecipeTheoCost.rpt). The problem
has been corrected.
MD0003-065
Revision D
May 2, 2005
Page 786 of 814
Product Management (PM)
What’s Revised
Ordering
Autosquence Fails to Run If Order is Replaced
CR ID #: N/A
After configuring the Run order autosequence option (PM | Setup | PM
Parameters | Ordering), the system failed to run the ordering
autosequence if an item was added or replaced on the order (Ordering |
Review/Modify Placed... ). This problem has been corrected.
Changing Unit Does Not Update Earliest Order Delivery
Date
CR ID #: N/A
In PM, vendors can be linked to an inventory item more than once with
different bid units and override lead times assigned to each entry. When
an item is ordered, the system automatically determines the Earliest
delivery date based on the Unit and Vendor selected.
In the past, if the Unit was changed, but the Vendor remained the same,
the system failed to update the Earliest delivery date for the entry. This
problem has been corrected.
Cost Centers Not Working Correctly When Ordering
Through Item Lists
CR ID #: N/A
In a multiple cost center environment, when an order was scheduled
based on an Item List, the system was not pulling in the cost center
associated with that list. Instead, it was pulling in the default cost center
linked to the inventory item itself. This problem has been corrected.
MD0003-065
Revision D
May 2, 2005
Page 787 of 814
Product Management (PM)
What’s Revised
Order Rejected if Cost Center ID Greater Than 9
CR ID #: N/A
When using 10 or more cost centers, the system would post an error
message if an order was created using a cost center ID greater than 9.
This was caused by a problem with the stored procedure that populates
the order table. It has been corrected.
Order Items Not Sorting Properly
CR ID #: 14886
When displaying a modified, suspended, or received order, the list of
items was not sorting properly. This problem has been corrected.
Receiving
Adjustments Incorrectly Saved on Receipts Without
Inventory Items
CR ID #: 15031
When receiving without a purchase order, the system allowed users to
make adjustments to invoices with zero quantity items or no items at all,
and then save the results. This has been corrected. Now, if the receipt
does not have at least 1 item with all required information, the user will
be prompted to cancel the receipt when it is saved.
Allowing Return Causes Negative Stock Balance
CR ID #: N/A
When receiving with a purchase order, if a user included a return of
items, it was possible for the stock balance to end up negative. The
problem occurred because, while processing the Receive with PO form,
the system was not checking the return quantity against stock on hand.
This has been corrected. The system will now check returns against both
the current inventory and what’s being received. In addition, a business
rule violation will be generated if the quantity of the return would create
a negative stock on hand
MD0003-065
Revision D
May 2, 2005
Page 788 of 814
Product Management (PM)
What’s Revised
Business Rule Violation Does Not Clear
CR ID #: N/A
When receiving with a purchase order, any attempt by the user to clear
the Quantity field, or enter a value of ‘0’ would cause a business rule
violation (BRV) to display. The BRV would not go away and the user
was required to cancel the form and start over again. This has been
corrected.
Item Quantity Cannot Be 0
CR ID #: N/A
When modifying a receipt, the system would not allow a user to correct
an item quantity by setting it to 0. This problem has been corrected.
Reports
The table below describes the PM report changes in this Service Pack:
Report
Inventory Cost of
Sales Summary
CR ID #: 14425
Area Modified
Stored
Procedurea
Description
When running the Inventory Cost
of Sales Summary Report
(InvenCOSSumm.rpt), the Actual
Cost of Sales was calculated
incorrectly, sometimes indicating
zero actual cost of sales,
sometimes displaying irregular
values. The problem was caused
when the actual cost of sales was
reduced by the theoretical item
usage before being reported, which
in turn, caused the actual usage
values to be incorrect. This
problem has been corrected.
MD0003-065
Revision D
May 2, 2005
Page 789 of 814
Product Management (PM)
What’s Revised
Report
Inventory Count
Sheets
Area Modified
Template
CR ID #: 12838
Inventory Count
Extension
Preview Report
Template
CR ID #: N/A
Order Purchase
Report
Template
CR ID #: 14056
Receipt Return
Journal Report
CR ID #: 14847
MD0003-065
Revision D
May 2, 2005
Page 790 of 814
Template
Description
Previously, when printing
Inventory Count Sheets, multiple
storage locations were printing per
page when the first sort order was
storage locations. Now, only one
storage location prints per page.
Previously, the Inventory Count
Extension Preview Report
(InvenCntExtenPreview.rpt) did
not match the sort order of the
printed Count Sheet. This made it
difficult for users to verify report
data. Therefore, changes were
made in the template to allow the
report to sort in the same order as
the count sheets.
In previous versions, the
OrderPurchase.rpt and the
OrderPurchasePONum.rpt failed
to provide needed cost center
information. Accordingly, the
report was reorganized, printing
the results in groups by Cost
Center name.
The Receipt Return Journal Report
showed incorrect totals when it
failed to multiply the adjustment
rate by the quantity of items
received. This has been corrected.
Product Management (PM)
What’s Revised
Report
Recipe Cost
Report and
Recipe High Cost
Report
Area Modified
Stored
Procedureb
CR ID #: 10494
Recipe Cost and
Recipe
Assignment
Reports
Templates
CR ID #: 14584
Description
In running either the Recipe Cost
(RecipeCost.rpt) or Recipe High
Cost (RecipeHigh.rpt) report, the
system failed to take into account
an ingredient's override yield when
calculating the final cost. The
problem was caused by an error in
a stored procedure, which has been
corrected.
The Recipe Cost and Recipe
Assignment reports would
incorrectly calculate VATs when
one or more tax rates existed. This,
in turn, created incorrect item and
recipe cost data.
Because the VAT calculation was
only relevant to the item price, all
references to the VAT and Net
Price fields were removed from
these reports.
File Changed:
speo_R_cos_summary.sql
b
File Changed:
speo_R_recipe_info.sql
MD0003-065
Revision D
May 2, 2005
Page 791 of 814
Product Management (PM)
What’s Revised
Reports Explorer Incorrectly Referencing Cost Centers
CR ID #: N//A
Before running a report through the Reports Explorer, the system
required the user select a cost center, even though the multiple cost
centers option was disabled.
Once the report was launched (i.e., the RUN button was pressed) the
report Wizard would advance to the second screen (bypassing the cost
center selection screen). However, if the user clicked the BACK button,
the cost center selection screen would still be displayed.
Both problems have been corrected.
Schedules
Count Does Not Reconcile Properly Thru Preview
CR ID #: N/A
Previous attempts at reconciling counts through the preview form were
failing because the system would automatically close the count entry
form without updating the count status in the schedule. This problem has
been corrected.
Counts Not Updating Properly
CR ID #: N/A
Previously, the system failed to track counts that were started through the
Inventory | Enter Counts form and saved but not reconciled. By not
checking the status of manually started tasks, the system inadvertently
allowed a user to start a second count by going through the Manager’s
Task Schedule. This problem has been corrected.
MD0003-065
Revision D
May 2, 2005
Page 792 of 814
Product Management (PM)
What’s Revised
Order Form Not Opening Through Schedules
CR ID #: N/A
Previously, attempts to open an order form created through the schedule
would fail if the order contained an invalid item (i.e., one with an expired
effective date or with an effective date was in the future). This has been
corrected. Now, when the order is open, expired items or those with a
future expiration date will not be included on it.
Sales and Labor Not Displaying in Schedules
CR ID #: N/A
Results for the Daily and Weekly Sales and Daily and Weekly Labor
categories would not display in the Manager’s Log if the selected
currency symbol did not use the same number of characters as the default
currency. This problem has been corrected.
Setup
Allow Payment Term Override Not Working
CR ID #: 12484
When setting up the vendors, if the Payment terms option (Setup |
Vendors | Payment Information) was set to Net X Days, a user was able
to change the payment terms in Receiving even though the Allow
payment term override check box had not been enabled. This problem
has been corrected.
Cannot Post Receipts After Cancelling a Count
CR ID #: N/A
Previously, when the option Allow receipts to be posted relative to
counts was enabled (Setup | PM Parameters | Receiving), if a count was
started and then cancelled for the day, then any subsequent attempt to
save a receipt would generate an error or lock up the system. This
problem has been corrected.
MD0003-065
Revision D
May 2, 2005
Page 793 of 814
Product Management (PM)
What’s Revised
Changing Inventory Valuation or Inventory Posting Method
Causes Error
CR ID #: N/A
During PM setup, attempts to change the selected radio button in the
Inventory Valuation Method or Inventory Posting Method options
(PM | PM Parameters | Inventory) would cause an error message to
display. This problem has been corrected.
Closing Parameters Form After Receiving POs Causes
Access Violation
CR ID #: N/A
Previously, the system would generate an access error violation if the
user attempted to close the Setup | PM Parameters form after closing a
purchase order through the Receiving | With PO form. This problem was
caused by a mix up in the order in which calls were processed by the
database. This has been corrected.
EM Sites Cannot Enable Cost Centers in Version 3.2
CR ID #: N/A
Previously, the multiple cost center, multiple currency, and storage
location options could not be enabled if a customer was running RES 3.2
and EM 3.2 at corporate or RES 3.2 at any of the stores. The problem was
due to an error in the version check logic, which required stores to be
running Version 3.1 instead of Version 3.1 or higher. This problem has
been corrected.
Form Not Opening After Conversion with Second Language
CR ID #: N/A
Previously, the PM Parameters form was not opening after converting a
database with a second language and attempting to open the form using
an employee assigned the second language. This has been corrected.
MD0003-065
Revision D
May 2, 2005
Page 794 of 814
Product Management (PM)
What’s Revised
Par Levels Cannot be Set to Zero
CR ID #: N/A
Previously, once a value was assigned to a record in the Par Level field
(PM | Setup), the system would reject any effort to either change the
value to zero or delete the par level entry (i.e., set the field to null). This
problem has been corrected.
Transfers
Quantity Field Not Populating When Transferring From an
Item List
CR ID #: 12262
When transferring inventory between cost centers, the system failed to
include the quantity of items being transferred if based on a predefined
Item List. This problem has been corrected.
NOTE: To work properly, the following Inventory item list options
(PM | Setup | PM Parameters | General) must be enabled at the time the
list is saved and/or transferred:
Allow unit and quantity to be saved in list
Override default purchase units with list units
Override order quantity calculations with list quantities
Transfer Prices Incorrect When Allowance Created in the
Past
CR ID #: N/A
When creating an allowance for a previous business date, the system
would incorrectly recalculate the price of those transferred items that
were not in the inventory item’s major unit and were received after the
allowance date. This problem has been corrected. Transfer costs are
correctly updated when using a unit other than the major unit.
MD0003-065
Revision D
May 2, 2005
Page 795 of 814
Labor Management (LM)
What’s New
Labor Management (LM)
What’s New
There are no new features in this version of the software.
What’s Enhanced
An enhancement is defined as a change made to improve or extend the
functionality of the current application. To qualify as an enhancement,
the change must satisfy the following criteria:
The basic feature or functionality already exists in the previous
release of the software.
The change adds to or extends the current process. This differs from a
revision (i.e., a bug fix) which corrects a problem not caught in the
previous release of the software.
Enhancements
Summarized
The table below summarizes the enhancements included in this version.
Module
Manual
Scheduling
MD0003-065
Revision D
May 2, 2005
Page 796 of 814
Feature
Page
Enforce Employee Maximum Hours
797
Schedule by Labor Cost Percentage
799
Labor Management (LM)
What’s Enhanced
Enhancements
Detailed
Manual Scheduling
Enforce Employee Maximum Hours
Previous versions of the LM/Scheduling software relied on the manager
to know the maximum number of hours that each employee was legally
allowed to work in a given time period, and to schedule him or her
accordingly. For sites with many types of employees, working a variety
of shifts and hours, keeping everyone within their limits could be
problematic.
To improve accuracy, an option was added to allow the system to monitor
an employee’s schedulable hours. When enabled, scheduling changes are
checked automatically to ensure that no employee exceeds the maximum
number of hours specified in his/her employee file (HR | Availability |
Weekly Min/Max).
If more hours are scheduled than allowed, a message box is displayed,
indicating that a business rule violation (BRV) has occurred.
The updated schedule will not be saved until the hours are corrected.
MD0003-065
Revision D
May 2, 2005
Page 797 of 814
Labor Management (LM)
What’s Enhanced
Enabling
To support this functionality, the option Enforce employee maximum
hours was added to the LM | Time and Attendance | Time and Attendance
| Time Clock Schedule form.
Warning!
MD0003-065
Revision D
May 2, 2005
Page 798 of 814
Once this option is enabled, you will not be able to schedule
an employee without first defining his/her available hours
(HR | Availability | Weekly Min/Max). Failure to do so will
result in a business rule violation (BRV).
Labor Management (LM)
What’s Enhanced
Schedule by Labor Cost Percentage
When setting up work schedules, managers try to balance the employee
requirements (i.e., number of, job type, and hours) against the projected
business need. Often, this is done by keeping the labor costs below the
anticipated sales for a given period.
In the past, balancing costs was a completely manual process. As changes
were made in the Weekly Assignments form, it was the manager’s
responsibility to monitor the labor costs, to note when they were too high,
and to make adjustments accordingly.
With this release, the process for monitoring and containing labor costs
has been automated. In LM configuration, options were added that allow
the user to set limits on labor costs which are monitored and enforced by
the system. When the schedule is changed and recalculated, the system
will verify that the revised labor costs are within the predefined limits. If
more hours are scheduled than allowed, a message box is displayed,
indicating that a business rule violation (BRV) has occurred. Changes
will not be saved until the schedule is corrected.
MD0003-065
Revision D
May 2, 2005
Page 799 of 814
Labor Management (LM)
What’s Enhanced
Enforcement is based on labor costs as a percent of the Forecasted Sales,
not as a fixed amount. In addition, the labor percentage is calculated on
the total schedule, not a particular job or job category.
Labor percentages are only generated if RES Forecasting software is in
use. If not installed, or if there is no forecast element linked in LM |
General | Restaurant, the Labor Cost % field will display “No
Forecast.”
Enabling
To support this functionality, two new fields were added to the to the LM
| Time and Attendance | Time and Attendance | Time Clock Schedule
form:
MD0003-065
Revision D
May 2, 2005
Page 800 of 814
Enforce schedule labor percentage — When checked, the
system will verify that the labor costs as a percent of Forcasted
Sales does not exceed the site’s predefined limit. The check
occurs each time the user recalculates the schedule.
Max scheduled labor percentage — Allows the user to set a
limit (by percentage) on labor costs.
Labor Management (LM)
What’s Revised
What’s Revised
A revision is defined as a correction made to any existing form, feature,
or function currently resident in the LM software. To qualify as a
revision, the change must satisfy the following criteria:
The basic form, feature, or functionality must be part of the previous
version of the software.
The change must replace the current item or remove it from the
application.
Revisions
Summarized
The table below summarizes the revisions included in this version.
Module
Feature
CR ID
Page
Forecasting
Forecasts Incorrect When Using
Historical Data Based on Less
Than 7 Periods
N/A
803
Manual
Scheduling
Outdated Schedules Not Purged
From Database
N/A
803
Overtime Not Being Calculated
Properly‘
N/A
803
Slow Performance When Filtering
Large Employee Database By Job
Category
14594
803
Employee Status Not Updating
Properly When Clocked Out on
Break
12594
804
Incorrect Amounts After Deleting
a Time Card Entry
N/A
804
Job List Not Updating Properly
N/A
804
Overtime Does Not Calculate
Properly
15149
804
Employee Availability Report
14670
805
Employee Time Card Detail
14472
805
Payroll
Preprocessing
Reports
MD0003-065
Revision D
May 2, 2005
Page 801 of 814
Labor Management (LM)
What’s Revised
Setup
Forecast Drivers Missing From
Installation
15057
806
Overtime Not Accumulating
Properly
14411
806
Purge Fails When Employees
Work Past Scheduled Shift
14622
806
N/A
807
State/Province Records Not
Selectable
MD0003-065
Revision D
May 2, 2005
Page 802 of 814
Labor Management (LM)
What’s Revised
Revisions
Detailed
Forecasting
Forecasts Incorrect When Using Historical Data Based on
Less Than 7 Periods
CR ID #: N/A
When generating a forecast, the system failed to recognize nonscheduled work days from the imported database. For example, if the
Number of periods (LM | Forecast setup) was set to 7, but the historical
totals indicated a 6-day work week (e.g., closed on Sunday), the system
would use data from the following week to complete the forecast. This
has been corrected.
Manual Scheduling
Outdated Schedules Not Purged From Database
CR ID #: N/A
In previous releases, the system failed to purge time clock schedules that
had exceeded the Number of days to store schedules variable as defined
on the LM | Time and Attendance form. This problem has been corrected.
Overtime Not Being Calculated Properly
CR ID #: N/A
When using consecutive-day overtime (e.g., calculating at an overtime
rate, any hours worked on the 7th consecutive day), the scheduling
application would not calculate the scheduled overtime properly. This
problem has been corrected.
Slow Performance When Filtering Large Employee
Database By Job Category
CR ID #: 14594
During Manual Scheduling, attempts to filter a large number of employee
records by job category took an unacceptably long time to complete. This
problem has been corrected.
MD0003-065
Revision D
May 2, 2005
Page 803 of 814
Labor Management (LM)
What’s Revised
Payroll Preprocessing
Employee Status Not Updating Properly When Clocked Out
on Break
CR ID #: 12594
Previously, if an employee clocked out on a break (paid or unpaid) and
the clock-out status was changed thru Payroll Preprocessing, the system
failed to update the employee’s time clock status to match. This problem
has been corrected.
Incorrect Amounts After Deleting a Time Card Entry
CR ID #: N/A
Previously, if a time card entry was posted and then the record was
deleted from Payroll Pre-Processing, the hours and pay amounts were
being reset to zero, but the tip amounts, service charges, and
commissions were not getting backed out of the totals. This has been
corrected.
Job List Not Updating Properly
CR ID #: N/A
When attempting to adjust a time card through payroll preprocessing, the
system occasionally failed to update the drop-down list of jobs with the
most recent records. The problem has been corrected.
Overtime Does Not Calculate Properly
CR ID #: 15149
Previously, if a job was set up with a zero default rate and a linked
overtime level with any daily overtime, the system would calculate the
wrong regular and overtime hours. This problem has been corrected.
MD0003-065
Revision D
May 2, 2005
Page 804 of 814
Labor Management (LM)
What’s Revised
Reports
The table below describes the LM report changes in this Service Pack:
Report
Employee
Availability
Area Modified
Stored
Procedurea
CR ID #: 14670
Employee Time
Card Detail
Report
Stored
Procedureb
CR ID #: 14472
Description
Previously, a system error was
generated if a user attempted to run
the Employee Availability Report
without having any job skills
defined in LM | Time and
Attendance | Skill Levels. This has
been corrected.
The Employee Time Card Detail
report (PPWeeklyTimeSheet.rpt)
was only sorting by date and not by
date-time, causing multiple time
card records for the same date to
appear out of order. This problem
has been corrected.
aFile
changed:
speo_R_emp_avail.sql
bFile changed:
speo_R_emp_info.sql
MD0003-065
Revision D
May 2, 2005
Page 805 of 814
Labor Management (LM)
What’s Revised
Setup
Forecast Drivers Missing From Installation
CR ID #: 15057
The following forecast drivers (and related stored procedures), added in a
RES Version 3.0 service pack, were missing from the RES 3.2 General
Release version:
SysFamGrpCntImport.dll
RvcFamGrpCntImport.dll
This has been corrected.
Overtime Not Accumulating Properly
CR ID #: 14411
An error in a database stored procedure was prematurely activating
overtime rates for employees. This problem has been corrected.
Purge Fails When Employees Work Past Scheduled Shift
CR ID #14622
When running a purge, if an employee works longer than the scheduled
shift and into the next business day (i.e., scheduled 4 PM–11 PM and
works 4 PM–1 AM), a primary key violation would occur and the purge
would fail. This has been corrected.
In addition, by default the system retains data for both the current pay
period and the previous pay period. Errors occurred in sites where the
dates of the time card records exceeded the Number of days to store
schedules (POS Configurator | Employees | Time and Attendance | Time
Card Schedules). To correct this problem, the purge process was
modified to use the pay period start date as its reference point for deleting
time card schedule data from the system.
MD0003-065
Revision D
May 2, 2005
Page 806 of 814
Labor Management (LM)
What’s Revised
State/Province Names Not Selectable
CR ID #: N/A
During setup, new entries added to the State/Province form (LM |
General | Country Descriptor) that included an abbreviation of three
letters would populate the drop-down list on the Labor Laws form (LM |
Rules Laws), but could not be selected. This problem has been corrected.
MD0003-065
Revision D
May 2, 2005
Page 807 of 814
Financial Management (FM)
What’s New
Financial Management (FM)
What’s New
There are no new features in this version of the software.
What’s Enhanced
There are no enhancements in this version of the software.
MD0003-065
Revision D
May 2, 2005
Page 808 of 814
Financial Management (FM)
What’s Revised
What’s Revised
A revision is defined as a correction made to any existing form, feature,
or function currently resident in the FM software. To qualify as a
revision, the change must satisfy the following criteria:
The basic form, feature, or functionality must be part of the previous
version of the software.
The change must replace the current item or remove it from the
application.
Revisions
Summarized
The table below summarizes the revisions included in this version.
Module
Feature
CR ID
Page
Reports
Unable to Close Periods Because
of Balancing Issue
N/A
810
Transaction
Journal
Negative Entries Not Accepted in
a Workbook
14627
810
N/A
810
Unable to Split Negative Entries
Across Multiple Accounts
MD0003-065
Revision D
May 2, 2005
Page 809 of 814
Financial Management (FM)
What’s Revised
Revisions
Detailed
Reports
Unable to Close Periods Because of Balancing Issue
CR ID #: N/A
Previous attempts to close a period failed when the totals did not balance.
The problem was linked to a rounding error which has been corrected.
Transaction Journal
Negative Entries Not Accepted in a Workbook
CR ID #: 14627
When entering data in a Transaction Journal workbook, the system would
not accept entries with a negative value. This problem has been
corrected.
Unable to Split Negative Entries Across Multiple Accounts
CR ID #: N/A
When entering data in a Transaction Journal workbook for an open
period, the system would not allow the user to spread the total value of a
negative entry across multiple accounts on the detail form. This problem
has been corrected.
MD0003-065
Revision D
May 2, 2005
Page 810 of 814
RES Platform
Introduction
RES Platform
Introduction
This chapter comprises changes made to RES Platform, which includes
the following applications:
MICROS Desktop
License Manager
Reports Explorer
What’s New
There are no new features in this version of the software.
What’s Enhanced
There are no enhancements in this version of the software.
MD0003-065
Revision D
May 2, 2005
Page 811 of 814
RES Platform
What’s Revised
What’s Revised
A revision is defined as a correction made to any existing form, feature,
or function currently resident in the RES software. To qualify as a
revision, the change must satisfy the following criteria:
The basic form, feature, or functionality must be part of the previous
version of the software.
The change must replace the current item or remove it from the
application.
Revisions
Summarized
The table below summarizes the revisions included in this version.
Module
May 2, 2005
Page 812 of 814
CR ID
Page
MICROS
Desktop
Employee Setup Configurator
Access Not Licensed
15000
813
License
Manager
Incorrect Registry Key Added
During License Setup
14419
813
New Client Entry Not Prompting
for Commit
N/A
813
‘Out of Bound’ Error Occurs
When Using Keyboard
N/A
813
Reports Explorer Does Not
Minimize Correctly Through
Desktop
N/A
814
Reports
Explorer
MD0003-065
Revision D
Feature
RES Platform
What’s Revised
Revisions
Detailed
MICROS Desktop
Employee Setup Configurator Access Not Licensed
CR ID #: 15000
In an LM Lite environment, employee-related configuration selections
were missing from the MICROS Desktop menu unless the site was fully
licensed for LM. This problem has been corrected.
License Manager
Incorrect Registry Key Added During License Setup
CR ID #: 14419
During a new RES installation, if a user made changes on the License
Manager | POS 3700 page and then saved it before a single client was
configured, the system would add a generic and unlicensed ‘Client’ key
to the registry. Without a properly licensed client, the system would post
an error message when the user attempted to reload Licensing. This
problem has been corrected.
New Client Entry Not Prompting for Commit
CR ID #: N/A
When entering a new client key into the License Manager, the system
failed to enable the green checkmark to commit the new entry to the
registry. This problem has been corrected.
‘Out of Bound’ Error Occurs When Using Keyboard
CR ID #: N/A
When viewing the list of Activation Codes (License Manager | POS
3700 | Clients), if the user highlighted a record and then pressed the
keyboard’s Down arrow, the system would automatically insert a new
row at the spot of the cursor. Using the form’s Rollback button would
delete the record, but subsequent attempts to select a record from the list
would result in an ‘Out of Bounds’ error. This has been corrected.
MD0003-065
Revision D
May 2, 2005
Page 813 of 814
RES Platform
What’s Revised
Reports Explorer
Reports Explorer Does Not Minimize Correctly Through
Desktop
CR ID #: N/A
Previously, when the Reports Explorer module was minimized through
the desktop, it would disappear. The only way to reacquire the running
program was to press ALT-TAB and navigate the icons to the open
application. This has been corrected.
MD0003-065
Revision D
May 2, 2005
Page 814 of 814