1
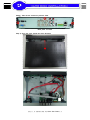
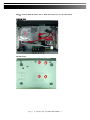
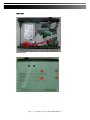
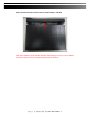
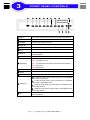
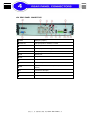
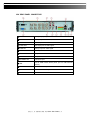
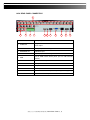
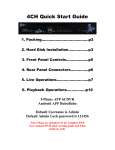
4CH/8CH/16CH DVR
Quick Start Guide
1. Packing........................................P.2
2. Hard Disk Installation................P.3
3. Front Panel Controls..................P.7
4. Rear Panel Connectors..............P.8
I-Phone & Android (IWatch DVR 2)
Default Username is Admin
Default Admin Lock password is 123456
Note: Please see CD included for complete User
manual quick start guide CMS software and
much more
1. DVR
2. Quick Start
3. IR Remote Control
4. Battery
5. CD
6. Hard Disk Mount
7. Screws
8. Power Adapter
9. SATA Cord
Note: Standard shipping products do not include HDD
2012.11.17 4CH/8CH/16CH-J02 Quick Start Guide P.2
Step
) Take out the screws as pictures show.
Back panel 3 screws
Step 2) Open the cover follow the arrow direction.
2012.11.17 4CH/8CH/16CH-J02 Quick Start Guide P.3
Step
) Connect SATA & Power wire to Hard Disk and put it on the rack mount.
(4CH/8CH HDD)
Fix HDD screw
2012.11.17 4CH/8CH/16CH-J02 Quick Start Guide P.4
(16CH HDD)
Fix HDD screw
2012.11.17 4CH/8CH/16CH-J02 Quick Start Guide P.5
Step 4) Put the cover back and fix it with 3 screws as Step 1 indicated.
Note: After installation, please initialize Hard Disk before starting to record. For more detailed
information, please check out User Manual Utility Setup for reference.
2012.11.17 4CH/8CH/16CH-J02 Quick Start Guide P.6
USB 2.0
Port for USB external devices (Rear port for USB mouse device)
T-SRH
Display the search menu.
FREEZE
In LIVE mode, freeze the screen.
BACKUP
In LIVE mode, press to display the BACKUP menu.
REC
Start or stop recording.
PLAY
Play back in normal speed.
MENU/II
In LIVE mode, press to display menu. In PLAYBACK mode, press
to pause playback.
MUTE
Enable / Disable key tone.
LED Display
Power: Power is on.
HDD: Hard disk is in use.
LAN: Connected to the internet (in red: Remote user logged in).
REC: Recording.
PLAY: Playing back.
IR Sensor
Input sensor for the remote control.
ZOOM
In LIVE or PLAYBACK mode, enlarge the display of a channel.
STATUS
In LIVE mode, display STATUS menu.
In SETUP mode, press to move cursor up. In PLAYBACK
mode, press to slow down.
Arrow Keys
In SETUP mode, press to move cursor down. In PLAYBACK
mode, press to stop playing back.
In SETUP mode, press to increase value. In PLAYBACK mode
press to play forwards.
In SETUP mode, press to reduce value. In PLAYBACK mode,
press to play rewind.
OK
In SETUP mode, press to enter sub menu. In Live mode, switch to
full screen display.
2012.11.17 4CH/8CH/16CH-J02 Quick Start Guide P.7
4CH REAR PANEL CONNECTORS
HDMI
HDMI port. (Option)
VIDEO IN
BNC input ports for cameras, 4 in total.
SPOT
SPOT output.
AUDIO OUT
RCA output port for audio signal.
AUDIO IN
RCA input port for audio signal.
LAN
Network port.
VGA
VGA port.
MAIN
BNC port for the main monitor.
EXTERNAL I/O
External I/O port.
USB
Port for USB mouse device (Front port for USB external
devices)
IR
IR extension cable jack.
DC 12V
Socket for a DC 12V input.
e-SATA
e-SATA Port
2012.11.17 4CH/8CH/16CH-J02 Quick Start Guide P.8
8CH REAR PANEL CONNECTORS
HDMI
HDMI port. (Option)
VIDEO IN
BNC input ports for cameras, 8 in total.
SPOT
SPOT output.
AUDIO OUT
RCA output port for audio signal.
AUDIO IN
RCA input port for audio signal.
LAN
Network port.
VGA
VGA port.
MAIN
BNC port for the main monitor.
EXTERNAL I/O
External I/O port.
USB
Port for USB mouse device (Front port for USB external
devices)
IR
IR extension cable jack.
DC 12V
Socket for a DC 12V input.
e-SATA
e-SATA Port
2012.11.17 4CH/8CH/16CH-J02 Quick Start Guide P.9
16CH REAR PANEL CONNECTORS
1
2
3
4
1. VIDEO IN
5
6
7
8
9
10
11
12
BNC input ports for cameras, 16 in total.
BNC port for the main monitor.
2. CVBS OUT
SPOT output.
3. AUDIO IN
RCA input port for audio signal.
4. EXTERNAL I/O
External I/O port.
5. AUDIO OUT
RCA output port for audio signal.
6. USB
Port for USB mouse device (Front port for USB external
devices)
7. IR
IR extension cable jack.
8. HDMI
HDMI port
9. VGA
VGA port.
10. LAN
Network port.
11. eSATA
External SATA hard disks port for expanding recording space.
12. DC 12V
Socket for a DC 12V input.
2012.11.17 4CH/8CH/16CH-J02 Quick Start Guide P.10