1
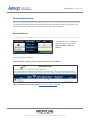
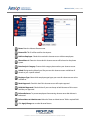
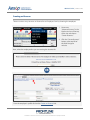
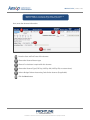
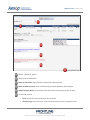
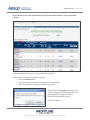
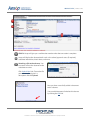
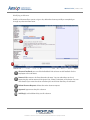
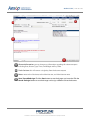
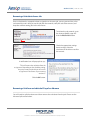
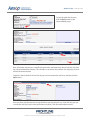
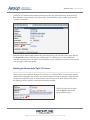
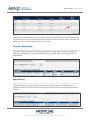
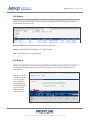
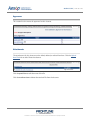
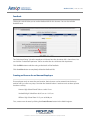
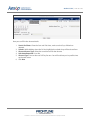
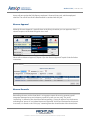
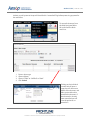
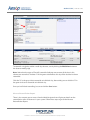
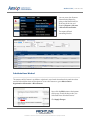
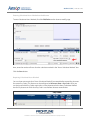
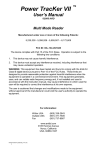
Web Navigator User Manual
Absence Data
April - ©2013 Frontline Technologies, Inc.
Confidential - Information in this document should not be distributed unless explicitly authorized.
ABSENCE DATA | PAGE 2 of 26
Absence Data Overview
The Absence Data settings enable you to add new absence reasons or modify existing ones. You
have the ability to create absences, modify absences and assign substitutes.
Absence Reasons
From the menu bar at the top of
the web navigator site, select
Reference Data > Absence
Reason.
Creating an Absence Reason
When employees register absences, they choose from a list you define.
Add an absence reason by clicking the Add Absence Reason Type link.
April - ©2013 Frontline Technologies, Inc.
Confidential - Information in this document should not be distributed unless explicitly authorized.
ABSENCE DATA | PAGE 3 of 26
Name: Enter the Absence Reason name.
External ID: This ID will be used for data imports.
Public to Employee: Check this to make this absence reason visible to employees.
Phone Menu #: Choose in what order this absence reason will be heard on the phone
system.
Data Analysis Category: Choose which category best matches your absence reason.
School: Designate the School Level. Do you want this absence reason available to all
schools or just a specific school?
Employee Type: Select which employee type/types you want this absence reason to be
available to.
Needs Approval: Check this box if this absence reason will require approval.
Hold Until Approved: Check this box if you want Aesop to hold absences of this reason
until they are approved.
Enforce Balances: To prevent employees from entering absences once their balance is
exhausted.
Enforce Notes to Administrator: Make the “Notes to Administrator” field a required field.
Click Apply Changes to save the Absence Reason.
April - ©2013 Frontline Technologies, Inc.
Confidential - Information in this document should not be distributed unless explicitly authorized.
ABSENCE DATA | PAGE 4 of 26
Creating an Absence
There are various ways to enter an Absence for an Employee. Start by choosing the employee:
1. Hover over
“Absence/Vacancy” in the
black menu bar at the top
of the site and choose
“Create Absence.”
2. Click the “Create Absence”
button at the top left of
the Web Navigator
website.
Now, select the employee that you are creating the absence for.
OR
From the employee’s profile click on the Create an Absence link.
April - ©2013 Frontline Technologies, Inc.
Confidential - Information in this document should not be distributed unless explicitly authorized.
ABSENCE DATA | PAGE 5 of 26
Important Note: Do not press the BACK button while creating an
absence – Click the Cancel button to get out of the process.
Next, enter the absence information.
Enter the Start and End Dates of the absence.
Choose the Absence Reason type.
Choose if a substitute is required for this absence.
Choose the Absence Type (Full Day, Half Day AM, Half Day PM, or custom times).
Select a Budget Code or Accounting Code for the absence (if applicable).
Click the Next button.
April - ©2013 Frontline Technologies, Inc.
Confidential - Information in this document should not be distributed unless explicitly authorized.
ABSENCE DATA | PAGE 6 of 26
Review “Hold Until” option.
Verify absence information.
Notes to Substitute: notes for the substitute from the employee.
Notes to Administrator: notes viewable only by the principle from the employee.
Administrator’s Notes: private notes from the administrator regarding this absence.
Finalize the absence
•
•
Save: Aesop will automatically find the substitute
Save & Assign: You will assign a sub with whom you have pre-arranged absence.
April - ©2013 Frontline Technologies, Inc.
Confidential - Information in this document should not be distributed unless explicitly authorized.
ABSENCE DATA | PAGE 7 of 26
If you choose to Save & Assign the absence, you will now need to choose a sub to assign to the
absence.
Find the substitute you wish to assign and click the Assign link
If you cannot find the pre-arranged sub’s name:
• Click the View All button
• Aesop will display why the sub is unavailable or not qualified
• You can override the system by clicking the Assign link
When you click the Assign button you will see
a pop up asking you to confirm that you have
prearranged this assignment with the
substitute you are about to assign.
Click OK to confirm.
April - ©2013 Frontline Technologies, Inc.
Confidential - Information in this document should not be distributed unless explicitly authorized.
ABSENCE DATA | PAGE 8 of 26
CONF #: Aesop will give you a confirmation number when the transaction is complete.
Aesop will display the absence details such as the school, approval status (if required),
substitute information, date & times, and more.
Attaching a file to the absence: You
can attach a file to the absence for the
substitute to review.
Click Upload New link. Choose the file
you want to upload, give it a
description and click Upload.
Now you have successfully added a document
to this absence.
You can edit documents linked to this absence
by clicking the Edit link.
April - ©2013 Frontline Technologies, Inc.
Confidential - Information in this document should not be distributed unless explicitly authorized.
ABSENCE DATA | PAGE 9 of 26
Modifying an Absence
Modify an Absence allows you to assign a sub, delete the absence partially or completely, or
change any absence information.
Absence Feedback: you can click the feedback links to leave or edit feedback for the
employee or the substitute.
Remove Sub: removes sub from the entire absence. You can select the user who is
requesting the sub be removed: Navigator User, School, Substitute, or Employee. You can
also choose if you want the sub to see other jobs on this date after they are removed.
Delete Absence Request: deletes the entire absence request.
Approval: approve or deny this absence
Add Day(s): add additional days to this absence
April - ©2013 Frontline Technologies, Inc.
Confidential - Information in this document should not be distributed unless explicitly authorized.
ABSENCE DATA | PAGE 10 of 26
Absence Information: you can change any information regarding this absence request
including Date, Reason, Type, Times, and Budget and Pay Codes
Trash Can Icon: this will remove a single day from the absence request
Notes: notes to the Substitute, to the Administrator, and Administrator notes
Save / Save & ReAssign: Click the Save button to save the changes you’ve made. Click the
Save & ReAssign button to save the changes and assign a different sub to the absence.
April - ©2013 Frontline Technologies, Inc.
Confidential - Information in this document should not be distributed unless explicitly authorized.
ABSENCE DATA | PAGE 11 of 26
Removing a Substitute from a Job
Once a substitute has accepted or been assigned to an absence job, you may remove him or her
and control the sub’s ability to see the job after the removal, notify the sub of the removal, and
keep the sub from seeing jobs in the near future.
To initiate the sub removal, go to
the absence Modify page and
click the Edit/Delete button.
Check the appropriate settings
boxes to adjust what the
substitute will be able to see after
the removal.
A notification box will pop up that says:
“This will remove the substitute from the
assignment. Depending on the checkbox setting,
they may or may not be able to still see this
assignment in the future. Do you want to
continue?”
Click the OK button.
Removing a Sub from an Individual Day of an Absence
You will need to split the absence and then remove the substitute from the job. Please see the
Absence Split section below.
April - ©2013 Frontline Technologies, Inc.
Confidential - Information in this document should not be distributed unless explicitly authorized.
ABSENCE DATA | PAGE 12 of 26
To split the multi-day absence,
click the Split button on the
absence Modify page.
Now, choose the day that you would like to remove the substitute from. We will split this day from
the current confirmation number. This will allow us to remove the sub from this single day, instead
of from the entire absence.
Check the “Split Individual” box for the day you want to remove the sub from, and then click the
Split button.
Once you have split the absence, Aesop will inform you that the split was successful and give you
a link to the split day (under a new confirmation number). Click the confirmation number.
April - ©2013 Frontline Technologies, Inc.
Confidential - Information in this document should not be distributed unless explicitly authorized.
ABSENCE DATA | PAGE 13 of 26
Clicking on this confirmation number will take you to the day split from the rest of the absence.
Now repeat the steps covered in the “Removing A Substitute from a Job” section to remove the
sub from this absence.
Now that you’ve removed the sub from this split absence day, you can add a new sub by clicking
the Assign Sub button on the Absence modify page. This will bring up a list of qualified and
available subs, where you can choose the substitute to assign. (See details on how to find and add
a sub on Page 7 of this help guide).
Splitting an Absence with “Split At” Feature
There are two ways to split an absence. First, you can use “split individual” as seen in the previous
section of this help guide. The second is the “split at” feature. Instead of splitting a single day from
a multi-day absence, the “split at” feature allows you to choose an absence date at which every
day following will be split into a separate confirmation number.
To split the multi-day absence,
click the Split button on the
absence Modify page.
April - ©2013 Frontline Technologies, Inc.
Confidential - Information in this document should not be distributed unless explicitly authorized.
ABSENCE DATA | PAGE 14 of 26
Now click the radio button on the day that you would like to split the absence. Click Split and now
you will have two absences (two confirmation numbers) with two days each. The first absence will
be for 4/16 & 4/17 and the second will be for 4/18 & 4/19.
Absence / Vacancy Log
This report allows you to view all activity for a particular absence and research who created the
absence, who modified it, and when. Everything that has happened to an absence over time is
detailed here.
Approval Log
This report allows you to view approval activity for a particular absence. It will show you any
approval activity for an absence such as when approval emails were sent and who approved the
absence.
April - ©2013 Frontline Technologies, Inc.
Confidential - Information in this document should not be distributed unless explicitly authorized.
ABSENCE DATA | PAGE 15 of 26
Call History
Which substitutes were called by Aesop, and which substitutes called into Aesop, and what was
the outcome of the phone call.
Direction (I/O): Inbound call from sub or outbound call to sub
Status: Accepted, Rejected, Rejected – End Calls, Aborted
Line: Answer, Busy, No Answer, Intercept
Call History
Clicking this tab allows you to see a list if all qualified and available subs for this job. To Assign a
sub to the job click the Assign link If you do not see the sub you want to assign on the list of
available subs.
Click the “View All”
radio button to see
a list of subs that
are not qualified
and available and
to see why they are
not. You may be
able to override
and assign them.
April - ©2013 Frontline Technologies, Inc.
Confidential - Information in this document should not be distributed unless explicitly authorized.
ABSENCE DATA | PAGE 16 of 26
Approvers
This section lists the names of approvers for this absence.
Attachments
File attachments for this absence can be added, deleted, or edited from here. Click the Upload
New Files link to add a file to the absence.
Click the pencil icon to edit the name of the file
Click the trash can icon to delete the attached file from the absence
April - ©2013 Frontline Technologies, Inc.
Confidential - Information in this document should not be distributed unless explicitly authorized.
ABSENCE DATA | PAGE 17 of 26
Feedback
Clicking this tab will allow you to see the feedback left for this absence. You can also edit the
feedback here.
The “Substitute Rating” (what the employee said about how the substitute did) is shown here. You
can click the “Substitute Experience” tab to see what the sub said about their experience.
Click the Edit button to edit the rating or the details of the feedback.
Click the delete button to completely delete the feedback left.
Creating an Absence for an Itinerant Employee
If an employee works at more than one location, their absences can be entered into the Aesop
website with just a few easy steps. Consider the schedule below. A teacher works at three separate
locations each day:
Hamner High School from 07:30 a.m. to 09:15 a.m.
Vanderbilt High School from 09:45 a.m. to 11:45 a.m.
Williams High School from 12:15 p.m. to 03:00 p.m
First, create a new absence by clicking the Create Absence button in the Web Navigator.
April - ©2013 Frontline Technologies, Inc.
Confidential - Information in this document should not be distributed unless explicitly authorized.
ABSENCE DATA | PAGE 18 of 26
Now you can fill in the absence details:
1. Start & End Dates: Enter the Start and End dates; make sure the Days of Week are
selected.
2. Schools: While holding down the Ctrl key highlight the schools they will be absent from
3. Absence Reason Type: Select the correct reason for the absence
4. Substitute Required: Yes or No
5. Absence Type: You can leave at Full Day for now. You will be able to put in specific times
on the next screen
6. Click Next
April - ©2013 Frontline Technologies, Inc.
Confidential - Information in this document should not be distributed unless explicitly authorized.
ABSENCE DATA | PAGE 19 of 26
Enter the absence information according to the schedule. Change the Date Range, School,
Absence Reason, Start and End times for each line entry.
Once you have completed entering the absence information, click the Next button.
Now you have the
option to add notes
to the absence.
Enter notes to the
Sub, to the
Administrator, or
add administrator’s
notes.
When you are
finished, click Save.
April - ©2013 Frontline Technologies, Inc.
Confidential - Information in this document should not be distributed unless explicitly authorized.
ABSENCE DATA | PAGE 20 of 26
Aesop will now update the Daily Report, employee’s Absence History tab, and the employee’s
calendar. The sub will see all the school locations associated with this job.
Absence Approval
Although Absence Approval is typically done at the Principal website you can approve or deny
absence requests via the Web Navigator site as well.
Please refer to Absence Approval [Chapter 12] or the Absence Approval Topical Guide for further
instructions.
Absence Reconcile
Reconciling absences at the school level is an important aspect of ensuring accurate payroll
integration between Aesop and whatever payroll/HR system you are using. The act of
“reconciling” is defined as the school level contact putting a “stamp of approval” on the absence,
indicating that “person A” was indeed absent and “person B” did in fact substitute for this person.
In essence, it is viewed as the “OK to pay” stemming from the school location. Most districts that
April - ©2013 Frontline Technologies, Inc.
Confidential - Information in this document should not be distributed unless explicitly authorized.
ABSENCE DATA | PAGE 21 of 26
tie their payroll system to Aesop will check for this “reconciled” flag before processing payment for
the substitute.
To reconcile absences from
the Web Navigator follow
this path from the black
menu bar.
1.
2.
3.
4.
Enter a date range
Choose School
Choose “Filled” or “Unfilled” or “Both”
Click Submit
Clicking on the individual
number link will open a
page that will show more
details of the absences and
allow you to edit and/or
reconcile the absences. If
the absence has already
been reconciled you will
have the option to unreconcile it.
April - ©2013 Frontline Technologies, Inc.
Confidential - Information in this document should not be distributed unless explicitly authorized.
ABSENCE DATA | PAGE 22 of 26
Here absence details such as Absence Reason and Budget and Pay codes can be edited.
To Reconcile an Absence mark the Reconcile circle and click Apply Changes.
If you would like to keep changes made to the details of an absence but not reconcile the
absence then mark the “No Action” circle before you click Apply Changes.
You can also click the Edit link to bring up the absence in an edit mode if you would like to
change details such as date or times in the absence.
Note: If you are reconciling a multi-day absence that has days in the future Aesop will only
reconcile up to the current date. You cannot reconcile absence days that have not occurred yet.
Reconciling A Multi-Day Absence
Aesop also allows you to reconcile a multi-day absence at the Modify Absence page one day at a
time rather than reconciling the whole confirmation number at once. This brings the absence
reconciliation down to the absence day level and not the absence request level. As you can see in
the screen shot below, by clicking the “U” or “R” on the absence day record, you can mark certain
days as reconciled while other days remain un-reconciled.
April - ©2013 Frontline Technologies, Inc.
Confidential - Information in this document should not be distributed unless explicitly authorized.
ABSENCE DATA | PAGE 23 of 26
To reconcile a single day within a multi-day absence, start by clicking the Edit/Delete button on
the absence modify page.
Note: Notice that the status of ‘Partially’ reconciled indicates one or more of the days in this
absence are reconciled. The letter ‘R’ in the green circle Reflects this day of the absence has been
reconciled.
Click the “U” in the grey circle to reconcile an individual day, alternatively you can click the “R” in
the green circle to un-reconcile an individual day.
Once you’ve finished reconciling, be sure to click the Save button.
Absence Reconciliation Report
There is also a report you can access from the Web Navigator that will give you details on the
reconciliation status of absences in your system. Follow these steps to get to the Absence
Reconciliation Report.
April - ©2013 Frontline Technologies, Inc.
Confidential - Information in this document should not be distributed unless explicitly authorized.
ABSENCE DATA | PAGE 24 of 26
You can access the Absence
Reconciliation Report by
going to the Black Menu Bar
at the top of the site and
choosing Reports > Absence
> Absence Reconciliation.
The report will look
something like this:
Substitute Hours Worked
The purpose of this feature is to define a substitute’s actual work time when their work time does
not coincide with the times of the absence. To turn this feature on, go to Master Data >
Organization Information > Miscellaneous.
Now, click the Edit button at the bottom
of the page. Check the box under “Use
Substitute Hours Worked Feature.”
Click Apply Changes.
April - ©2013 Frontline Technologies, Inc.
Confidential - Information in this document should not be distributed unless explicitly authorized.
ABSENCE DATA | PAGE 25 of 26
Entering Substitute Hours Worked on the Absence
To enter Substitute Hours Worked, first click Edit/Delete on the absence modify page.
Now, enter the number of hours that the substitute worked in the “Hours Substitute Worked” box.
Click the Save button.
Requiring Substitute Hours Worked
You can choose to require that “Hours Substitute Worked” be entered before reconciling absences
for certain Pay Codes. This feature can be configured at Reference Data > Pay Codes. Here, you
can designate which Pay Codes require that a value be entered in the Hours Substitute Worked
box for any absence in which that Pay Code is used before absence reconciliation.
April - ©2013 Frontline Technologies, Inc.
Confidential - Information in this document should not be distributed unless explicitly authorized.
ABSENCE DATA | PAGE 26 of 26
Phone and E-Mail Notification Regarding Absences
Aesop will notify your Substitutes and Campus Users about absences.
Subs will receive phone and email notifications in the following situations:
•
•
•
•
•
Single day absence deleted
Sub removed from absence
All days of a multiple day absence deleted
They are assigned as a permanent sub
Preferred Sub Alert
Subs will receive only email notification in the following situations:
•
•
Start date of the absence changes
Sub is assigned to a job
Campus Users will receive Event Notification emails in the following situations:
•
•
•
•
•
•
When an absence is created
When an absence is filled by a sub
When a sub is assigned to an absence
When an absence is edited
When a sub is removed from a job
When an absence is cancelled
April - ©2013 Frontline Technologies, Inc.
Confidential - Information in this document should not be distributed unless explicitly authorized.