1
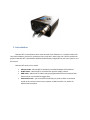
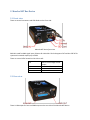
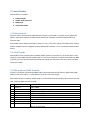
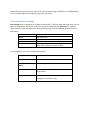
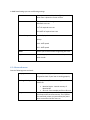
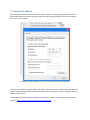
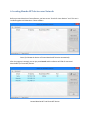
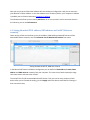
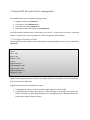
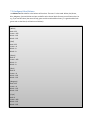
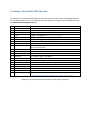
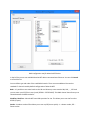
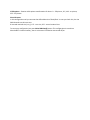
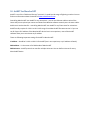
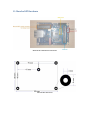
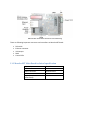
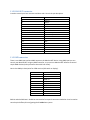
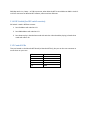
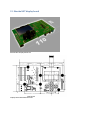
Moncha.NET User Manual Contents Moncha.NET User Manual ............................................................................................................................ 1 1. Introduction ........................................................................................................................................... 3 2. Moncha.NET Box Device............................................................................................................................ 4 2.1 Front view ............................................................................................................................................ 4 2.2 Rear view ............................................................................................................................................. 4 3. Control modes ........................................................................................................................................... 5 3.1 Ethernet mode .................................................................................................................................... 5 3.2 ArtNET mode ....................................................................................................................................... 5 3.3 DMX mode and DMX channels ............................................................................................................ 5 3.4 Stand-alone mode ............................................................................................................................... 6 3.5 Stand-alone mode for DIP switch version ........................................................................................... 6 4. Display and settings ................................................................................................................................... 7 4.1 Main menu .......................................................................................................................................... 7 4.2 Draw and laser settings ....................................................................................................................... 8 4.3 Advanced menu ................................................................................................................................... 9 5. Computer IP address ............................................................................................................................... 10 6. Locating Moncha.NET devices over Network .......................................................................................... 11 6.1 Setting Moncha.NET IP address, DMX address and ArtNET Universe remotely ............................... 12 7. Moncha.NET SD card text files configuration.......................................................................................... 13 7.1 Configure Brightness Maps ............................................................................................................... 13 7.2 Configure Color Balance .................................................................................................................... 14 7.3 Configure Color Fades ....................................................................................................................... 15 7.4 Configure startup settings ................................................................................................................. 16 8 Configure Moncha.NET DMX Channels .................................................................................................... 17 9. Uploading animations to Moncha.NET ............................................................................................... 20 10. ArtNET for Moncha.NET ........................................................................................................................ 22 11. Moncha.NET Hardware ......................................................................................................................... 23 11.1 Moncha.NET Main Board technical specification............................................................................ 24 11.2 ILDA OUT connector ........................................................................................................................ 25 11.3 DMX connector................................................................................................................................ 25 11.4 DIP Switch (for DIP switch version) ................................................................................................. 26 11.5 Control LEDs .................................................................................................................................... 26 12. Moncha.NET display board ................................................................................................................... 27 1. Introduction Moncha.NET is latest Ethernet laser show controller from Showtacle. It is a perfect solution for laser show hobbyists, but also for professional users, who don’t require high scan rate for professional graphics. Moncha.NET is distributed as OEM board with display integrated into your laser system or as a box version. Moncha.NET works in four modes: Ethernet mode –Moncha.NET is completely controlled by Moncha.NET software. ArtNET mode – Moncha.NET is controlled over popular ArtNET protocol. DMX mode – Moncha.NET is able to play preprogrammed effects and complete laser shows and you can use DMX to trigger them. Stand-alone mode – you can let Moncha.NET play any show or effect or animation stored on SD-card even without any computer or DMX controller. It’s perfect for advertisement purposes. 2. Moncha.NET Box Device 2.1 Front view There are several connectors and LED diodes on the front side: Moncha.NET device front view DMX IN is used for DMX signal input, Ethernet for LAN cable. SD-Card supports FAT and also FAT32 file system with maximal capacity up to 32GB. There are control LEDs located on this side as well: Red Blue Yellow Green There is some image at laser output Device is in Ethernet mode Device is in DMX mode Device is ON 2.2 Rear view There is ILDA output for laser and DMX output on the rear side of the Moncha.NET device. 3. Control modes Moncha works in 4 modes: 1. 2. 3. 4. Ethernet mode ArtNET mode (since 2.5) DMX mode Stand-alone mode 3.1 Ethernet mode Ethernet mode is active when the Moncha.NET software is connected. It is highest priority mode. The DMX or Stand-alone mode is turned off when Moncha.NET software connects to Moncha.NET over Ethernet cable. Moncha.NET uses IP address 192.168.1.X, where X is set in main menu (please check Main menu section below). IP address can be changed only when Moncha.NET software is *not* connected to Moncha.NET device. 3.2 ArtNET mode Moncha.NET can be controlled over standard ArtNET protocol since version 2.5 of the firmware. It uses exactly the same DMX channels as DMX mode. It’s just more convenient to use Ethernet cable than DMX (it allows you to run the Moncha/Fiesta software to upload your animations and then control complete show over ArtNET). 3.3 DMX mode and DMX channels If there’s no Ethernet connected and DMX cable is connected, Moncha.NET works in DMX mode. DMX address is set by DIP switch – it uses switches 1 to 9 (0 to 512 value range). When Moncha.NET is in DMX or ArtNET mode, it receives DMX channels and plays all the shows from SDcard. Following DMX channels are used: 1 2 3 4 5 6 7 8 9 10 Position X Position Y Rotation Size X Size Y Brightness Scan rate Animation Animation Speed Animation Direction 128 - middle 128 - middle 0 (0 degree) – 255 (360 degree) 0 (0%) – 255 (100%) 0 (0%) – 255 (100%) 0 (0%) – 255 (100%) 0 (default), 1 (slowest) – 255 (fastest) 0 (none), 1 – 255 (animation from SD-card) 0 (0% - stop) – 128 (100%) – 255 (300%) 0 – 127 (normal direction), 128 – 255 (opposite) – this is working only for files up to 255 frames 11 12 13 14 15 16 17 Red Green Blue Dark Blue Position X Fine Position Y Fine Rotation Fine 0 – default, 1 (0%) – 255 (100%) 0 – default, 1 (0%) – 255 (100%) 0 – default, 1 (0%) – 255 (100%) 0 – default, 1 (0%) – 255 (100%) Fine position for X Fine position for Y Fine rotation Since version 2.5 you can use extended DMX channels for Moncha.NET or even define order of DMX channel functions. 3.4 Stand-alone mode Stand-alone mode is the lowest priority mode. In Stand-alone mode you can play any show stored on SDcard. You can also adjust device drawing settings using practical menu on display for display versions. Check Display and settings section. 3.5 Stand-alone mode for DIP switch version With DIP switch you set which show to play (switches 1 – 8) and you start your show using DIP switch 10. Notes: 1. When switch 10 is in off position, stand-alone is not working. 2. If DMX or Ethernet has been used, Stand-alone mode is disabled. It’s protection in case of loss of DMX or Ethernet signal. 3. It is possible to set size, position and all the remaining drawing settings using autoplay.txt file stored on the card. 4. Display and settings Basic stand-alone screen contains following information: You can use up and down arrows to select file to play from SD-card. With right button you can display Main menu. 4.1 Main menu There are following options in Main menu: Laser settings Draw settings Play All Default file IP Address DMX Address Display test Load settings Save settings Reset settings Advanced >> About … Here you can define drawing size, position, invert and brightness for all modes (Ethernet, DMX or stand-alone). Allows you to display draw settings for Stand-alone mode (Size, Position, …) Plays all files from SD-card. It’s perfect for disco, if you use supplied SD-card with many complete laser shows. Sets default file, which will start to play after Moncha.NET is turned on. Set IP address of the device Set DMX address of the device Displays single white beam at the laser output Loads Stand-alone mode settings from internal memory Store stand-alone mode settings into device internal memory Reset settings to default state Advanced menu Display basic information about Moncha.NET device (Version, Run hours, Serial number, …) You can select specific settings using right button. Moncha.NET has internal memory, where it can store all Draw settings, Default file, IP and DMX address. You can Load/Save/Reset these settings using menu commands. 4.2 Draw and laser settings Laser Settings menu is applied for all 3 modes of Moncha.NET – Ethernet, DMX and Stand-alone. You can adjust drawing settings of the laser output for stand-alone mode using this Draw menu. It’s good to select some file to play and adjust these settings while playing. There are following properties to set in both menus: Size X Size Y Position X Position Y Rotation Set horizontal size Set vertical size Horizontal position Vertical position Rotate picture around depth axis (Z), it’s practical when laser is placed on uneven surface In Laser Settings you can also set following properties: Invert X Invert horizontal axis Invert Y Invert vertical axis Red, Green, Blue 1, Blue 2 Set intensity of each of 4 color channels. Safe card is On Allows you to turn on/off safe card (special for Kvant lasers). Safety type You can set type of safety algorithm using this settings (for Kvant lasers only). In DMX Draw Settings you can set following settings: Rotation Rotate picture around depth axis (Z), it’s practical when laser is placed on uneven surface Scan-rate Set scan-rate for the images: 0-default scan-rate 1-1% of required scan-rate 255-100% of required scan-rate Animation speed Speed of played animation: 0-Stop 128 – 100% speed 255 – 300% speed Color Allows you to recolor whole image using one color Repeat If checked, played animation or show is repeated when it ends 4.3 Advanced menu Contains following items and tools: Display Test Allows you to display test patterns on your laser. It’s good to check if your laser is working properly. Settings Priority Allows you to set, if the Laser Settings should be read from: Play All Start Moncha Device - internal memory of Moncha.NET SD-card – from autoplay.txt file on SD-card If this is checked, the device will start playing all the shows on SD-card after startup. This is perfect for small clubs, where you just need to play some laser scenes after the laser turns on. 5. Computer IP address Your computer IP address must be set to 192.168.1.X, where X is arbitrary (but different than any of Moncha.NET devices) by default. But if you require to use different IP address family, since firmware version 2.5 this is possible. IP address of your computer can be set in Local Area Connection Properties We have a convention of using IP address 192.168.1.22 for the computer. And we recommend to set IP address of Moncha.NET devices to 192.168.1.100 and more. This way you prevent setting the same IP address of two devices. The easiest way to find out how to change your computer IP address exactly please watch our quick tutorial at https://www.youtube.com/watch?v=Rp-rOzRmrPQ. 6. Locating Moncha.NET devices over Network Before you start Moncha or Fiesta software, you have to use “Search for Laser Devices” tool. This one is installed together with Moncha or Fiesta software. Search for Showtacle devices will locate Moncha.NET devices automatically After the program is started, you can just press Search and the software will find all connected Moncha.NET (or Fiesta.NET) devices. Located Moncha.NET and Fiesta.NET devices Now you can just press OK and the software will save the device configuration. And you can now start your Moncha or Fiesta software. In case the software hasn’t found any device, your computer IP address is probably not set. Please read section Computer IP Address. The software also allows you to manually Add device. Or in case you don’t want to use some device in the software, you can use Delete device. 6.1 Setting Moncha.NET IP address, DMX address and ArtNET Universe remotely Latest version of Search tool allows you to set IP address, DMX address and ArtNET universe of the Moncha.NET device remotely. Just click Advanced->Set IP Moncha.NET Address from menu. Setting the Moncha.NET IP, DMX and Universe In the Moncha.NET Devices IP Address Configurator you can define full IPv4 address, IP mask, DMX address and DMX universe remotely from your computer. This saves a lot of work especially at huge laser show events with more than 3 lasers. The tool will first find all connected Moncha.NET devices. Then you can set every property of each device. After you’ve finished the setting, just click Apply and all the devices remember the settings in their internal memory. 7. Moncha.NET SD card text files configuration Moncha.NET allows you to configure following settings: 1. 2. 3. 4. Brightness maps using map.txt file. Color balance using balance.txt file. Color fade curves using fades.txt file. Stand-alone mode start settings using autoplay.txt. All the files must be stored in card’s root directory! You can use ‘;’ to make notes in the files – all the text behind ‘;’ is ignored. It’s easier to generate first 3 files using Moncha.NET software. 7.1 Configure Brightness Maps Moncha.NET allows you to define up to 8 independent rectangular brightness areas. They are defined in map.txt file: [Area] Left = -100 Right = 100 Bottom = -100 Top = 0 BrightnessLeft = 0 BrightnessRight = 100 BrightnessTop = 100 BrightnessBottom = 0 ;Brightness = 100 There can be more [Area] sections in the file. Left, Right, Bottom and Top defines area size and position. All 4 values are from -100 to 100. Brightness of the area can be defined in two ways: Using Brightness setting – all the area will use same brightness from 0 to 100 Using Brightness Left, Right, Top or Bottom – defines intensity of the image on left, right, top or bottom area edge. E.g. when BrightnessBottom is 0 and BrightnessTop is 100, Moncha.NET will fluently fade image from top to bottom. 7.2 Configure Color Balance Use balance.txt file to define color balance of the colors. There are 7 colors used: White, Red, Green, Blue, Magenta, Cyan and Yellow and you can define color channel levels for every one of these colors. So e.g. if you use RGV laser (the one with red, green and ultra-violet 405nm lasers), it is good to add a little green color to the blue (it will look more like blue). [White] Red = 255 Green = 255 Blue1 = 255 Blue2 = 255 [Red] Red = 255 Green = 0 Blue1 = 0 Blue2 = 0 [Green] Red = 0 Green = 255 Blue1 = 0 Blue2 = 0 [Blue] Red = 0 Green = 0 Blue1 = 255 Blue2 = 255 [Magenta] Red = 255 Green = 0 Blue1 = 255 Blue2 = 255 [Cyan] Red = 0 Green = 255 Blue1 = 255 Blue2 = 255 [Yellow] Red = 255 Green = 255 Blue1 = 0 Blue2 = 0 The color balance works the same as in Fiesta(.NET) software. 7.3 Configure Color Fades Sometimes your laser turns on at e.g. 30% of the fade range and is at maximal brightness at e.g. 60% of the fade range. Then it’s good to use color fade curves to enhance color fade. You can use fades.txt file to solve this problem: [Red] Point=0,0 Point=255, 255 [Green] Point=0,0 Point=255, 255 [Blue1] Point=0,0 Point=255, 255 [Blue2] Point=0,0 Point=255, 255 So to solve your 30%-60% example for e.g. red color, you would need to write: [Red] Point=0,0 Point=1,76 Point=250, 153 Point=255, 255 (76 s approximately 30% of 0-255 range, 153 is 60% od 0-255 range). 7.4 Configure startup settings Moncha.NET auto play settings file allows you to define DMX values (from DMX menu), which will be applied and used at start. If you need to use autoplay.txt file for display versions of Moncha.NET, please go to Advanced menu -> Sett. Priority and check SD-card (otherwise Moncha will use values stored in its internal memory). All values work like using DMX controller: [Autoplay] SizeX = 255 SizeY = 255 PosX = 128 PosXFine = 0 PosY = 128 PosYFine = 0 Brightness = 255 RotZ = 0 RotZFine = 0 Scanrate = 0 AnimSpeed = 128 Red = 0 Green = 0 Blue1 = 0 Blue2 = 0 FileToPlay=1 Few important details: AnimSpeed=128 is the default speed to play synchronized files ;AnimSpeed=255 is 4x faster ;FileToPlay - if it's 0, or > 255, or if it's not used and auto play uses file defined by DIP switch 8 Configure Moncha.NET DMX Channels Since version 2.5 of Moncha.NET firmware you can define order and also number of used DMX channels for your Moncha.NET device. In the installation directory (typically C:\Program Files (x86)\Moncha 4) you have MonchaUsersConfigurator.exe file. 1 2 3 4 5 6 7 8 9 10 Position X Position Y Rotation Size X Size Y Brightness Scan rate Animation Animation Speed Animation Direction 11 12 13 14 15 16 17 18 19 20 21 22 Red Green Blue Dark Blue Position X Fine Position Y Fine Rotation Fine Bank Size X Fine Size Y Fine Strobe Visible points 128 - middle 128 - middle 0 (0 degree) – 255 (360 degree) 0 (0%) – 255 (100%) or 0 (-100%) – 255 (100%) 0 (0%) – 255 (100%) or 0 (-100%) – 255 (100%) 0 (0%) – 255 (100%) 0 (default), 1 (slowest) – 255 (fastest) 0 (none), 1 – 255 (animation from SD-card) 0 (0% - stop) – 128 (100%) – 255 (300%) 0 – 127 (normal direction), 128 – 255 (opposite) – this is working only for files up to 255 frames 0 – default, 1 (0%) – 255 (100%) 0 – default, 1 (0%) – 255 (100%) 0 – default, 1 (0%) – 255 (100%) 0 – default, 1 (0%) – 255 (100%) Fine position for X Fine position for Y Fine rotation 0 – root directory, 1 – 255 forces to use directories named “001” to “255” Fine size X Fine size Y 0 – no strobe, 1 – 255 sets strobe speed 0 (100% points visible) – 127 (0% points visible) - from the start 128 (0% points visible) -255 (100% points visible) - from the end Complete list of available Moncha.NET DMX channels (blue are optional) DMX configuration tool for Moncha.NET devices In the left list you can see available Moncha.NET devices connected over Ethernet. You can click Search to refresh the list. You can define type and order of the used DMX channels. There are some additional channels to standard 17 channels used by default configuration of Moncha.NET: Bank – it’s possible to use more banks on the SD card. Directory name must be 001, 002, … , 255. And you can store up to 255 files in every bank (EFF001 – EFF255.MNT). This DMX channel then allows you to choose between the different banks. SizeXFine, SizeYFine – Moncha.NET uses 16bit precision for size. This allows you to use size from 0 to 65535 (2 bytes). Strobe – hardware strobe effect allows you to turn on/off picture quickly. 1 – slowest strobe, 255 – fastest strobe. Visible points – favorite visible points transformation for lasers. 0 – full picture, 127, 128 – no picture, 255 – full picture. Size with Invert In this configuration tool you can now also define behavior of SizeX/SizeY. In case you check this, the size DMX channels can do invert too: 0-inverted maximal size (x or y), 127 – zero size, 255 – normal maximal size. To store your configuration just press Write DMX Config button. This configuration is stored into Moncha.NET’s internal memory, thus is active even if the device was turned off/on. 9. Uploading animations to Moncha.NET You can create and upload frames to Moncha.NET SD-Card using Moncha.NET software. It is even possible to upload to more devices at once, which is very practical by DMX-controlled laser shows. Thanks to brightness maps it is even possible to make the DMX laser show safe. You can find upload scenes dialog in Tools->Upload scenes in Moncha.NET software menu. Following window will be displayed: Upload scenes dialog On the left side you can see animations, which will be exported to SD-Card. You can change animation to any scene from your workspace. Just select Choose Scene and you’ll be able to pick any scene from workspace. The remaining settings can be used to prepare your animation suitable for DMX control. Start Time sets start time of the animation, End Time end of the animation. Using these settings you can make your animation loop-able. Number of frames determines number of frames of the exported animation. It is recommended to use less than 256 frames – like this you’ll be able to control direction of the animation (using channel 10). Frames per seconds determine speed of playing of the frames. We recommend keeping it at 35, like this the animation is smooth. When you set all your desired animations, you can export your scenes to SD-Card or to Moncha.NET devices directly. You can also export all animations or only one. 10. ArtNET for Moncha.NET ArtNET is one of the “DMX over Ethernet” protocol. It’s used by wide range of lightning consoles. You can find more information about the ArtNET at www.artisticlicence.com. Controlling Moncha.NET over ArtNET is very convenient – you can use Ethernet cables to wire all the lasers and you can upload your scenes and shows from Moncha software remotely over the same cables. And there is another benefit – controlling Moncha.NET over ArtNET is very fluent even for animations. ArtNET usually requires IP 2.X.X.X or 10.X.X.X IP range. Since Moncha.NET firmware version 2.5 you can set all 4 bytes of IP address of the Moncha.NET device. But in our experience, most of the ArtNET software allow you to use almost any IP address. There are following important settings for ArtNET in Moncha.NET: IP address – should be 2.X.X.X or 10.X.X.X for ArtNET (but in our experience, any IP address will work). DMX address – it’s the same as for DMX mode of Moncha.NET DMX universe – ArtNET protocol can transfer multiple Universes. You can define Universe for every Moncha.NET device. 11. Moncha.NET Hardware Moncha.NET Main Board Connectors Moncha.NET board size Moncha.NET board with connectors and numbering There are following important connectors and controllers on Moncha.NET board: DIP switch Ethernet connector ILDA output DMX Control LEDs 11.1 Moncha.NET Main Board technical specification Required power 12V, 0.5A DMX connectors Power connector ILDA Out Display board connector (ILDA switch) IDC10 Screw terminal IDC26 IDC20 11.2 ILDA OUT connector Is used to control your laser scanners and laser color. Here is the pin description: Pin 1 2 3 4 5 6, 10, 12, 14, 16, 18, 20, 24, 26 7 8 9 11 13 15 17 19 21, 22, 23 25 Function AXIS X + AXIS X AXIS Y + AXIS Y Blank GND ILDA Connect to pin 7 Connect to pin 8 Red Green Blue Dark Blue Yellow Cyan Not connected Shutter 11.3 DMX connector There is one DMX input and one DMX output on the Moncha.NET device. Using DMX input you can control your Moncha.NET using any DMX-controller, or you can use Moncha.NET software to control simple DMX devices (and synchronize them with laser show). Here is the DMX pin description for OEM versions (DIP switch or display): Pin 1 2 3 4 5 6 7 8 9 10 Function GND In DMX In DMX In + GND Out 1 DMX Out 1 DMX Out 1 + GND Out 2 GND Out 2 DMX Out 2 DMX Out 2 + DMX in and also DMX out 1 should be connected to front panel connectors. DMX Out 2 can be used to control optical effects/mirrors/gratings built inside laser system. DMX Out works in a 2 ways – as THRU connector, when Moncha.NET is controlled over DMX in. And it’s real OUT connector for Moncha.NET software, when used over Ethernet. 11.4 DIP Switch (for DIP switch version) DIP switch is used in different context: 1. Sets IP address with switches 1-8. 2. Sets DMX address with switches 1-9. 3. Sets show to play in Stand-alone mode with switches 1-8 and enables playing in Stand-alone mode with switch 10. 11.5 Control LEDs They are located on the Moncha.NET board (or Moncha.NET box), but you can also use connector to mount them on your case. LED 1 2 3 4 5, 6 Function Laser DMX Ethernet Power GND 12. Moncha.NET display board Moncha.NET Display board size Display board detailed dimensions Display board connectors Display board technical details Required Power +24V, 150mA (usually connected from scanner power supply) Power connector Screw terminal ILDA Out connector IDC26 External ILDA in IDC26 Moncha.NET ILDA in IDC26 Moncha.NET Control Input IDC20 Safety key NSL25-02 Connector function ILDA Out – connected to scanner drivers and laser module drivers External ILDA in – front panel external ILDA in (used for other controllers) Moncha.NET ILDA in – Moncha.NET ILDA out is connected to this connector Moncha.NET Control Input – control connector for Moncha.NET main board Safety key – when shorted, enables laser output (from Moncha.NET ILDA or External ILDA)