1
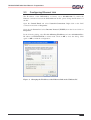
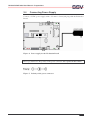
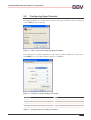
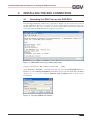
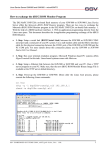
DIL/NetPC DNP/9200
Board Revision 1.1
Installing an SSH Connection
User Manual
SSV Embedded Systems
Heisterbergallee 72
D-30453 Hannover
Phone: +49 (0)511/40 000-0
Fax:
+49 (0)511/40 000-40
E-mail: [email protected]
For further information regarding our products please visit us at www.dilnetpc.com
Manual Revision: 1.1
Date: 2006-07-24
DIL/NetPC DNP/9200 User Manual – Introduction
CONTENT
1
INTRODUCTION............................................................................................................... 3
1.1
Safety Guidelines ......................................................................................................................3
1.2
Conventions ..............................................................................................................................3
1.3
Hardware Requirements............................................................................................................4
1.4
Software Requirements .............................................................................................................4
2
PREPARATIONS .............................................................................................................. 5
2.1
Serial Link between Evaluation Board and PC.........................................................................5
2.2
Ethernet Link between Evaluation Board and PC ....................................................................6
2.3
Configuring Ethernet Link ........................................................................................................7
2.4
Connecting Power Supply.........................................................................................................8
2.5
Configuring HyperTerminal .....................................................................................................9
3
INSTALLING THE SSH CONNECTION.......................................................................... 10
3.1
Uploading the SSH Files on the DNP/9200............................................................................10
3.2
Installing the SSH Files on the DNP/9200 .............................................................................11
3.3
Starting an SSH Connection ...................................................................................................12
3.4
Login as root ...........................................................................................................................13
4
HELPFUL LITERATURE................................................................................................. 14
CONTACT ............................................................................................................................. 14
DOCUMENT HISTORY ......................................................................................................... 14
SSV EMBEDDED SYSTEMS
2
DIL/NetPC DNP/9200 User Manual – Introduction
1
INTRODUCTION
This document describes how to install an SSH (Secure Shell Protocol) connection on the
DNP/9200 with a Windows-PC. For further information about the individual components
of this product you may follow the links from our website at
http://www.dilnetpc.com.
Our website contains a lot of technical information, which will be updated in regular
periods.
The SSH shell script ssh-dnp9200.sh will install:
•
OpenSSL 0.9.8a
•
OpenSSH 4.1p1
OpenSSL Lib supports
Message Digest: md2, md4, md5, rmd160, sha, sha1
Cipher: aes-128-cbc, aes-128-ecb, aes-192-cbc, aes-192-ecb, aes-256-cbc, aes-256-ecb
base64, bf, bf-cbc, bf-cfb, bf-ecb, bf-ofb (blowfish), cast, cast-cbc, cast5-cbc, cast5-cfb,
cast5-ecb, cast5-ofb, des, des-cbc, des-cfb, des-ecb, des-ede, des-ede-cbc, des-ede-cfb,
des-ede-ofb, des-ede3, des-ede3-cbc, des-ede3-cfb, des-ede3-ofb, des-ofb, des3, desx
(Triple DES), idea, idea-cbc, idea-cfb, idea-ecb, idea-ofb, rc2, rc2-40-cbc, rc2-64-cbc,
rc2-cbc, rc2-cfb, rc2-ecb, rc2-ofb.
1.1
Safety Guidelines
Please read the following safety guidelines carefully! In case of property or personal
damage by not paying attention to this document and/or by incorrect handling, we
do not assume liability. In such cases any warranty claim expires.
ATTENTION: Observe precautions for handling – electrostatic sensitive device!
•
Discharge yourself before you work with the device, e.g. by touching a heater of
metal, to avoid damages.
•
Stay grounded while working with the device to avoid damage through electrostatic
discharge.
1.2
Conventions
Convention
bold
italic
monospace
Usage
Important terms
Filenames, user inputs and command lines
Pathnames, internet addresses and program code
Table 1: Conventions used in this Document
SSV EMBEDDED SYSTEMS
3
DIL/NetPC DNP/9200 User Manual – Introduction
1.3
Hardware Requirements
The following hardware is needed to install an SSH connection on the DNP/9200:
•
One PC with Windows XP and one unused COM port
•
One Evaluation Board (e.g. EVA9) with mounted DNP/9200 and one COM port
•
One plug-in power supply (5 VDC)
•
One Ethernet cross-over cable
•
One null modem cable
1.4
Software Requirements
•
ssh-dnp9200.sh for Linux Kernel version 2.4 or ssh-sftp-dnp9200.sh for Linux
Kernel version 2.6 (Starter Kit CD directory CD:\Linux\SSH)
•
PuTTY (Starter Kit CD directory CD:\Putty-Win32)
PuTTY is a small terminal software with SSH support. PuTTY works without
installation, just run the putty.exe. PuTTY is freeware. You may also look for a newer
version of PuTTY in the internet at
http://www.chiark.greenend.org.uk/~sgtatham/putty.
SSV EMBEDDED SYSTEMS
4
DIL/NetPC DNP/9200 User Manual – Preparations
2
PREPARATIONS
2.1
Serial Link between Evaluation Board and PC
Setup the serial link between the Evaluation Board and your PC. Use the null modem
cable for this connection.
The serial link is for communication between the DNP/9200 and your PC via
HyperTerminal. Connect one end of the null modem cable with the COM1 port of your
PC. Connect the other end with the COM1 port of the Evaluation Board.
Figure 1: Serial link between Evaluation Board and PC
Please make sure that the PC COM port supports 115.200 bps and is unused.
SSV EMBEDDED SYSTEMS
5
DIL/NetPC DNP/9200 User Manual – Preparations
2.2
Ethernet Link between Evaluation Board and PC
Setup the Ethernet link between the Evaluation Board and your PC. Use an Ethernet
cross-over cable for this connection.
The Ethernet link is for the SSH connection between the DNP/9200 and your PC.
Connect one end of the Ethernet cross-over cable with the LAN interface of your PC and
the other end with the LAN interface of the Evaluation Board.
Figure 2: Ethernet link between Evaluation Board and PC
SSV EMBEDDED SYSTEMS
6
DIL/NetPC DNP/9200 User Manual – Preparations
2.3
Configuring Ethernet Link
The IP address of the DNP/9200 is ex factory set to 192.168.0.126. To enable the
Ethernet connection between the DNP/9200 and the PC, please change the IP address of
the PC.
Open the Control Panel and select Network Connections. Right click on the LAN
connection and click on Properties.
Open the tab General and select Internet Protocol (TCP/IP) from the list and click on
Properties.
In the following dialog select Use the following IP address and enter 192.168.0.254 as
IP address and 255.255.255.0 as subnet mask. Click on OK to close the dialog. Click
again on OK to finish the configuration.
Figure 3: Changing the IP address of the Ethernet link on the Windows PC
SSV EMBEDDED SYSTEMS
7
DIL/NetPC DNP/9200 User Manual – Preparations
2.4
Connecting Power Supply
Connect a 5 VDC power supply with a 5.5 mm x 2.5 mm jack plug with the Evaluation
Board.
Figure 4: Power supply for the Evaluation Board
Please pay attention to the polarity of the power connector: the + pole is in the center!
Figure 5: Polarity of the power connector
SSV EMBEDDED SYSTEMS
8
DIL/NetPC DNP/9200 User Manual – Preparations
2.5
Configuring HyperTerminal
Run HyperTerminal on your PC. Enter a name for the new connection. In the next dialog
select COM1 for the connection.
Figure 6: Direct connection setup with HyperTerminal
Now change the connection parameters to the values of table 1. Make sure, that you use
the COM1 port of your PC and that it supports 115.200 bps.
Figure 7: Parameter setup with HyperTerminal
Parameter
Speed
Data Bits
Parity
Stop Bits
Protocol
Value
115.200 bps
8
None
1
No (Xon/Xoff, RTS/CTS or similar)
Table 2: Setup parameters for HyperTerminal
SSV EMBEDDED SYSTEMS
9
DIL/NetPC DNP/9200 User Manual – Installing the SSH Connection
3
INSTALLING THE SSH CONNECTION
3.1
Uploading the SSH Files on the DNP/9200
Start the HyperTerminal connection you created in chapter 2.5. If you have not powered
up the Evaluation Board so far, please do it now. Wait until the Linux boot process
finishes (this may take a few seconds). You will see the Linux login prompt. Enter the
user name root and hit Return if Linux asks for a password.
Figure 8: DNP/9200 boot messages and login prompt
Change to the directory tmp with the command cd ../tmp.
Open Transfer > Send file… from the menu bar and select the ssh-dnp9200.sh (Linux
Kernel 2.4) or the ssh-sftp-dnp9200.sh (Linux Kernel 2.6) from the Starter Kit CD-ROM
directory CD:\Linux\SSH. Choose Zmodem with Crash Recovery as protocol and
send the file.
Figure 9: Selecting SSH file for transfer
SSV EMBEDDED SYSTEMS
10
DIL/NetPC DNP/9200 User Manual – Installing the SSH Connection
3.2
Installing the SSH Files on the DNP/9200
Change to the directory tmp if you are not already there and enter the command
sh ssh-dnp9200.sh to start the installation. The SSH files will be installed
automatically in the directory flash.
Figure 10: Installing the file ssh-dnp9200.sh
Generating the SSH keys may take a while, please be patient. Reboot the DNP/9200,
when the installation is complete.
Figure 11: SSH installation complete
After the reboot the DNP/9200 is ready for an SSH connection.
SSV EMBEDDED SYSTEMS
11
DIL/NetPC DNP/9200 User Manual – Installing the SSH Connection
3.3
Starting an SSH Connection
Run the putty.exe on the PC. Enter the IP address of the DNP/9200 (192.168.0.126),
select SSH as protocol and click on Open.
Figure 12: Configuring PuTTY
Before the SSH session starts, PuTTY shows an alert, that the host key of the server is
unknown. Click Yes to save the key permanently. Click No, if you want to connect just
once.
Figure 13: PuTTY security alert
The username as well as the password for the SSH session is guest.
In the directory /home/guest you can store and/or modify your own files.
It is also possible to login as root, please refer to chapter 3.4.
SSV EMBEDDED SYSTEMS
12
DIL/NetPC DNP/9200 User Manual – Installing the SSH Connection
Figure 14: PuTTY SSH session as ‘guest’
To gain root permissions while working as guest enter the command su (“superuser”) and
hit Return if Linux asks for a password.
3.4
Login as root
Before you can login as root in a Telnet session, you have to set a password for root.
Open a serial connection (HyperTerminal), start Linux, login as root and enter the
command passwd. Just follow the instructions on the screen.
Please note: The root password is temporary. After a reset of the DNP/9200 you
have to set the root password again.
SSV EMBEDDED SYSTEMS
13
DIL/NetPC DNP/9200 User Manual – Document History
4
HELPFUL LITERATURE
• Hardware Reference Evaluation Board DNP/EVA9
• First Steps Starter Kit DNP/SK23
CONTACT
SSV Embedded Systems
Heisterbergallee 72
D-30453 Hannover / Germany
Phone: +49 (0)511/40 000-0
Fax:
+49 (0)511/40 000-40
E-mail: [email protected]
Internet: www.dilnetpc.com
DOCUMENT HISTORY
Revision
1.0
1.1
Date
2006-04-25
2006-07-24
Remarks
first version
chapter 1.1 and 1.2 added, chapter 3.1 and 3.3 modified
Name
WBU
WBU
The content of this document can change any time without announcement. There is taken over no guarantee
for the accuracy of the statements. The user assumes the entire risk as to the accuracy and the use of this
document. Information in this document is provided ‘as is’ without warranty of any kind. Some names within
this document can be trademarks of their respective holders.
© 2006 SSV EMBEDDED SYSTEMS. All rights reserved.
SSV EMBEDDED SYSTEMS
14