1
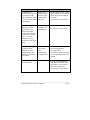
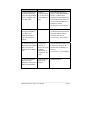
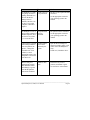
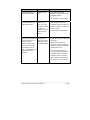
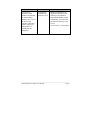
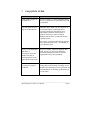
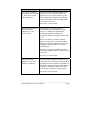
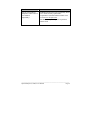
FUJITSU HANDYDRIVE DATA (USB-2) EDITION
USER'S MANUAL
INDEX
Important Update.............................................................................................3
1. INTRODUCTION ......................................................................................5
1.1. General unit description................................................................................5
1.2. Connecting the HandyDrive to a computer ...............................................6
1.3. Connecting the HandyDrive to a hub..........................................................9
1.4. About the USB 2 interface ..........................................................................11
2. MACINTOSH USERS.............................................................................12
2.1. Installing the extension................................................................................12
2.2. Formatting the HandyDrive disk...............................................................13
2.3. Disconnecting the HandyDrive ..................................................................14
2.4. MacOS issues ................................................................................................14
3. WINDOWS 98, WINDOWS 98SE AND WINDOWS Me USERS ...15
3.1. Installing the driver .....................................................................................15
3.1.1. Installing the driver under Windows 98 and Windows 98SE ......15
3.1.2. Installing the driver under Windows Me.......................................16
3.2. Creating and formatting the partition ......................................................16
3.2.1. Formatting the partition..................................................................18
3.3. Disconnecting the HandyDrive ..................................................................19
3.3.1. Drive disconnection under Windows 98 and Windows 98SE .....19
3.3.2. Drive disconnection under Windows Me......................................19
3.4. Windows 98 and Windows 98SE issues ....................................................19
4. WINDOWS 2000 PROFESSIONAL, WINDOWS XP HOME
EDITION AND PROFESSIONAL USERS..........................................21
4.1. Installing the HandyDrive driver...............................................................21
4.2. Creating and formatting the partition ......................................................21
4.2.1. Formatting the partition..................................................................22
4.3. Disconnecting the HandyDrive ..................................................................23
4.4. Windows 2000 Professional and Windows XP Home Edition and
Professional issues ........................................................................................23
5. LINUX USERS .........................................................................................25
6. PROBLEM SOLVING QUICK GUIDE ..............................................26
7. FAQ QUICK GUIDE...............................................................................32
8. Warranty.....................................................................................................35
___________________________________________________________________________
Fujitsu HandyDrive (USB-2) User's Manual:
Page 2
Important Update
Your Fujitsu HandyDrive is now supplied pre-formatted as a single
FAT 32 DOS partition. For most users this will mean the drive is
useable straight out of the box without the need to Format and
Partition the drive (see below for exceptions) please skip those parts
of the user manuals and refer to the driver installations sections as
required.
Windows 2000 & XP.
The drive is supplied formatted as a FAT 32 partition, you may prefer or need the
drive to be NTFS formatted, in which case please refer to the user manual to
reformat the drive
APPLE
The HandyDrive’s user manual assumes the handy drive is unformatted. Since MAC
OS’s generally treat DOS formatted disks as read only resources you will need to
perform a few simple steps to convert the DOS formatted HandyDrive to be a fully
read / writeable disk.
Mac OS/9
Connect the HandyDrive to the Apple System.
A Drive Icon will appear on the desktop labelled ‘HandyDrive’.
From the Apple menu, select “Control Panels”, “Extensions Manager” .
Clear the “File Exchange” check box, and click Restart.
Once the system restarts, you will be prompted to initialise the drive. Enter a name
for the drive and from the dropdown select the “Mac OS extended” format and click
Initialise.
___________________________________________________________________________
Fujitsu HandyDrive (USB-2) User's Manual:
Page 3
After the format has completed a drive icon will appear on your desktop with the
name you supplied in step 5.
To re-enable File Exchange, follow step 3 above, and click on the File Exchange
checkbox, ensure a check mark appears, and click Restart .
Your Fujitsu HandyDrive is now ready for use.
Mac OSX
Select OS disk on the OS10 desktop
Double click on the Application folder to open it
Double click on the Utility folder
Double click on “Disk Utility”
Click “Drive Setup” button
Click on the icon representing the new drive
Enter a name for the drive, Set the formatting options as required ie, MAC OS, Unix
etc
Click on the “Partition” button, a confirmation dialog box will appear, confirm your
request, the drive will now be formatted and partitioned. Once this completes the
drive will reappear on the desktop with the name you supplied
Your Fujitsu HandyDrive is now ready for use.
___________________________________________________________________________
Fujitsu HandyDrive (USB-2) User's Manual:
Page 4
1.
INTRODUCTION
1.1. General unit description
The USB-2 HandyDrive Data Edition is an external hard disk unit, powered through
a USB cable.
The following 5 items are delivered in the standard HandyDrive package:
1.
2.
3.
4.
5.
HandyDrive Data Edition unit
CD-ROM with drivers
User’s Manual
USB cable
Double connection USB cable
HandyDrive Options – available separately:
• External Power Supply - Part No. AOF-4012
The HandyDrive is compatible with the following operating systems, meaning the
following operating systems, include native support for this device:
• Windows Me (Millennium)
• Windows 2000 Professional
• Windows XP Home Edition and Professional
• MacOS 9.1 and later
• MacOS X
• Linux.(kernel 2.4.x)
Operating systems requiring additional drivers (included on the enclosed
HandyDrive Driver CD-ROM) are:
• Windows 98/98SE
• MacOS 9.0
___________________________________________________________________________
Fujitsu HandyDrive (USB-2) User's Manual:
Page 5
1.2. Connecting the HandyDrive to a computer
The HandyDrive can be hot-plugged/unplugged into the USB port of the portable or
desktop computer. This means that on systems supporting Plug and Play, connecting
or disconnecting the unit can take place while the system is up and running, without
the need to reboot the system. The drive will then be auto-detected.
The LEDs on the HandyDrive flash while the disk is reading/writing. Do not move
or disconnect the unit while the LEDs are flashing.
When connecting the HandyDrive to the computer for the very first time, the
HandyDrive icon will only appear in My Computer or Windows Explorer and the
disk will thus only be accessible after at least one partition has been created (see the
section corresponding to your operating system).
The HandyDrive can be powered in either of two modes:
• Bus-Powered mode - powered via the system's USB bus without an external
power supply or
• Powered mode - powered from an external power supply.
Bus powered mode requires that the system can supply sufficient power via its USB
ports either from the system’s root port or from the USB hub where the unit is
connected.
How do I know that sufficient power is being delivered to the HandyDrive?
If the USB bus power level is sufficient the HandyDrive's LEDs will light up and the
motor will spin up.
Should the HandyDrive be connected to a USB port not supplying sufficient current
or voltage levels to operate the disk drive, then
• either the drive's motor will not spin-up and a slight ticking noise will be
produced by the drive's heads,
• or the system will not be able to recognize and/or access the drive.
___________________________________________________________________________
Fujitsu HandyDrive (USB-2) User's Manual:
Page 6
It is also possible that the drive's motor can spin-up and the system recognizes the
drive OK, but random errors or system crashes occur during the normal usage. To
solve this, see the following section.
How to solve a low USB power level problem?
Try the following steps in this order:
1. Double connection USB cable
The HandyDrive is delivered with a special USB-2 cable adapter, that can be
connected on one side to two USB ports (either system or hub ports), and on the
other side to two USB devices.
Once the cable is connected to two USB ports, the HandyDrive must be connected to
the device connector labelled “HANDYDRIVE”, and the second device connector
(labelled “MOUSE) can be connected to any other Low Power USB device (i.e.
mouse, keyboard, joystick or other devices powered by their own power supply).
This cable adapter can solve the problem of USB ports with limited current supply.
Some systems may fail in their function due to low voltage on the USB ports, in
which case please use the external power supply.
___________________________________________________________________________
Fujitsu HandyDrive (USB-2) User's Manual:
Page 7
• Use the “HANDYDRIVE” port to
connect the
HandyDrive.
System side
connectors:
connect to two
USB systems or
hub ports.
• Use the “MOUSE”
port to connect any
Low Power USB
device, i.e. mouse,
keyboard, or other
Self-Powered
devices.
• Both system side
connectors are
connected to two
USB ports.
• The HandyDrive is
connected to the
“HANDYDRIVE”
port of the double
connection cable.
2. Use the external power supply to power the HandyDrive.
To use the HandyDrive powered by the external power supply, the power switch on
the HandyDrive must be switched to ‘EXT’. Otherwise the unit will still try to draw
power from the USB cable.
Please contact your dealer/reseller to purchase the optional HandyDrive external
power supply.
___________________________________________________________________________
Fujitsu HandyDrive (USB-2) User's Manual:
Page 8
1.3. Connecting the HandyDrive to a hub
The HandyDrive can be connected to the system’s root port, or to a hub port.
There are two kinds of USB hubs:
• Bus-Powered hubs - powered directly through the USB cable
• Self-Powered hubs - powered by their own power supply
1. Using Bus-Powered hubs (Hubs without an external power supply)
Generally speaking, Bus Powered hubs are designed to supply power only to Low
Power devices (those drawing 100mA or less, i.e. keyboards, mouse devices,
joysticks, or those powered by their own power supply).
As the HandyDrive draws more than 100mA, the HandyDrive external power supply
must be used when connected to a Bus-Powered hub.
HandyDrive
External
Power
Supply
___________________________________________________________________________
Fujitsu HandyDrive (USB-2) User's Manual:
Page 9
Note: Depending on the hub’s particular design, there may be some incompatibility
between the Bus-Powered hub and the HandyDrive, so that the system cannot work
with the HandyDrive even if the external power supply is used.
2. Self-Powered hubs (Hubs with own power supply)
In general, Self-Powered hubs can deliver a sufficient power level to the
HandyDrive, so that the HandyDrive's external power supply is not needed.
HandyDrive
Note: Should sufficient power not be delivered by the Self-Powered hub, the double
connection cable provided with the HandyDrive can be used to connect the unit to
two hub’s ports (see the above section How to solve a low USB power level
problem?).
___________________________________________________________________________
Fujitsu HandyDrive (USB-2) User's Manual:
Page 10
1.4. About the USB 2 interface
When the HandyDrive is connected to an USB-2 port, the maximum data transfer
rate is 480 Mbps.
In the absence of USB-2 ports on your system, the unit will function correctly when
connected to USB-1 ports but the data transfer rate will of course be much lower, i.e
a maximum of 12 Mbps.
My system does not have USB-2 ports available. What can I do?
If the system does not have USB-2 ports available, an USB-2 host adapter card
supporting your operating system can be installed.
Before purchasing an USB-2 host adapter card, read the manufacturer’s
documentation to check the following points:
• Provides USB-2 support for YOUR Operating System. (OS’s prior to
Windows 98, 1st Edition and MacOS 10.0.x cannot support USB-2.)
• PC environments containing a 266 or 333 MHz Pentium processor with 64
MB RAM are usually required.
• Macintosh environments of the type Beige G3 rev. B Power Macintosh or
later are normally required.
To be able to work with your USB-2 HandyDrive Data Edition in the USB-2 mode,
the installed USB-2 ports must be installed and recognized by your operating system.
___________________________________________________________________________
Fujitsu HandyDrive (USB-2) User's Manual:
Page 11
2.
MACINTOSH USERS
2.1. Installing the extension
The HandyDrive is supplied with extensions for MacOS 9.0.
Note: The HandyDrive is supported under the operating systems MacOS 9.1 and
later and under MacOS X by the MacOS native USB-1 extensions.
To install the driver extension, follow the steps below:
• Insert the HandyDrive’s CD-ROM into the CD-ROM drive of your computer.
• Select the CD-ROM icon and run the appropriate installer program.
• Follow the on-screen instructions to have the extensions loaded and installed.
Once the extension is installed and the system has been restarted, the HandyDrive
can be connected.
___________________________________________________________________________
Fujitsu HandyDrive (USB-2) User's Manual:
Page 12
2.2. Formatting the HandyDrive disk
The HandyDrive is supplied un-formatted. Before it can be used it must be formatted
as follows:
For MacOS 9.x
When a new HandyDrive is connected to the system, it will be automatically
detected as an unreadable disk.
A dialog box will pop up. Enter a name there for the new drive. Then press Initialise.
To change the format of a previously formatted HandyDrive, run Finder. Then click
on the ‘Special’ tab, and select Erase Disk.
Note: File sharing must be turned off and the Drive Icon of the HandyDrive must be
selected before Erase Disk is run.
For MacOS X
Run Applications – Utilities – Disk Utility. Select the Drive Setup icon, then the
Partition tab. Select the partition type required, enter a name for the new partition,
and click on the partition button displayed in the warning window presented.
Once the HandyDrive is formatted, its icon will appear on the desktop about 15 to 20
seconds after being connected.
If reformatting of the HandyDrive is required at any other time, you may do that by
executing the Erase Disk utility from the Finder's Special drop-down menu ( 9.x) or
the Disk Utility (MacOS X, located in the Utilities folder).
See section 2.4. about MacOS issues on mounting and ejecting devices, and
on creating DOS (FAT-32) volumes.
___________________________________________________________________________
Fujitsu HandyDrive (USB-2) User's Manual:
Page 13
2.3. Disconnecting the HandyDrive
Before disconnecting the HandyDrive, please Eject the disk by dragging its
icon over the Trash can icon.
After the HandyDrive’s icon has disappeared from the desktop, the
HandyDrive can be safely disconnected.
See section 2.4.
2.4. MacOS issues
• If the HandyDrive is already formatted to the DOS format, the Erase Disk dialog
box (MacOS 9.x) will only allow the disk to be reformatted to the DOS format.
Should the disk be required to be formatted to the HFS or HFS+ format, the
DOS partition must be previously deleted (either by FDISK under Windows
98/Me or by the Disk Administrator under Windows 2000/XP).
• MacOS 10.0.x does not adequately support the DOS format. It is recommended
NOT to use DOS volumes under this environment.
• MacOS 10.1.x does support the DOS format, but DOS volumes created by the
Disk Utility are incompatible with Windows. Additionally, both MacOS 9 and
X can take several minutes in mounting the volume on the desktop. Should
Windows compatibility be required, the DOS volume can be created under
MacOS 9 or under Windows. This volume is mounted on the desktop within the
normal 15 to 20 seconds time.
• When mounting or un-mounting the volume, sometimes it is necessary to move
the mouse to have the icon mounted on or un-mounted from the desktop under
MacOS X.
___________________________________________________________________________
Fujitsu HandyDrive (USB-2) User's Manual:
Page 14
3. WINDOWS 98, WINDOWS 98SE AND
WINDOWS Me USERS
3.1. Installing the driver
3.1.1. Installing the driver under Windows 98 and Windows 98SE
• Insert the HandyDrive's CD-ROM into the CD-ROM drive of your computer.
• The Autorun file in the CD-ROM will be automatically executed and the
install window will appear.
• Select the Install Driver option and follow the on-screen instructions.
• At the end of the installation, the system must be restarted.
Note: If the Autorun files from CD-ROM are not automatically executed by the
system, please execute the Autorun.exe file in the CD-ROM's root directory by
double clicking on it from the Windows Explorer.
Once the driver is installed, the HandyDrive can be re-connected at any time.
Windows will
• detect the New Hardware,
• automatically find the previously installed driver and
• automatically re-install the HandyDrive back into the operating system.
If the HandyDrive is connected to the system before the driver has been
installed, then the New Hardware Install Wizard of Windows will be
executed and will ask for a manufacturer's driver. In this case please cancel
the Install Wizard and proceed to install the driver using the procedure
explained above.
___________________________________________________________________________
Fujitsu HandyDrive (USB-2) User's Manual:
Page 15
3.1.2. Installing the driver under Windows Me
No additional driver is required. The drive is supported by the Windows Me native
USB Mass Storage driver.
3.2. Creating and formatting the partition
If the HandyDrive has already been partitioned, its icon will appear in My Computer
and in the Windows Explorer when being connected. You may skip the rest of this
section and go to section 3.2.1.
The drive's icon will only appear in My Computer or in the Windows
Explorer after the partition has been created.
If not, the partition must be created.
If more than one partition is going to be created under Windows 98 or
Windows 98SE, please read carefully in advance the section 3.4. Windows
98 and Windows 98SE issues.
The partition must be created by the FDISK utility. To do that you should select in
sequence Start, Run, enter FDISK in the dialog box and select Accept. The FDISK
screen will appear.
In the first screen, the YES option (the default) must be selected by pressing the
Return ↵ key, to enable the compatibility with big hard disks.
The main FDISK screen is then shown. Select Option 5:
Change the actual hard disk unit, by typing the number 5 and pressing the Return
↵ key. In the next screen, each hard disk installed in the system is shown,
numbered starting with number 1. Enter the number specifying the target hard disk
to be partitioned.
To determine which number corresponds to the HandyDrive, you must look at the
third column (Mbytes), where the capacity of every hard disk is shown. As disk
capacity is shown in the binary notation (1 Megabyte = 1,048,576 bytes), the
capacity shown by FDISK is somewhat lower than the real disk capacity expressed
___________________________________________________________________________
Fujitsu HandyDrive (USB-2) User's Manual:
Page 16
in the decimal notation (1 Megabyte = 1,000,000 bytes). Therefore, the different
HandyDrive capacities shown by FDISK are approximately:
• 20 GB HandyDrive: 19,077 Mbytes
• 30 GB HandyDrive: 28,770 Mbytes
• 40 GB HandyDrive: 37,25 Mbytes
In addition, the second column (“Drv”), where the logical letter assigned to each
partition is shown, will be empty for the HandyDrive, and the fourth column
(“Free”), where the free space available in each hard disk is shown, will show
exactly the same capacity as the third column (“Mbytes”), as no partitions have been
created so far.
Remember that the HandyDrive will NEVER be the disk number 1, as the
disk number 1 is always the system disk, that is, the disk containing the C:
partition, where the Operating System boots from.
Once the HandyDrive number and the Return ↵ key have been entered, the initial
FDISK menu screen (5 options) is shown again.
Now, select option 1 (default):
Create a DOS partition or logical unit, by pressing the Return ↵ key.
On the next screen select option 1 (default):
Create a DOS primary partition, by pressing the Return ↵ key.
A new screen asking if the new DOS primary partition will occupy all of the
available disk space is shown. Most users will want to create a single DOS partition
occupying all of the available disk space. To do this, the default option (YES) must
be selected.
Other options, such as creating an Extended partition with one or more Logical
Drives on it, is only recommended for advanced users, used to dealing with disk
partitions and disk partitioning tools such as FDISK (see section 3.4. Windows 98
and Windows 98SE issues).
Once the partition has been created and the confirmation screen has been shown, the
ESC key must be pressed to get back to the initial FDISK menu screen (5 options).
The ESC key must then be pressed again to exit from FDISK, and then a dialog is
___________________________________________________________________________
Fujitsu HandyDrive (USB-2) User's Manual:
Page 17
shown advising that the system must be restarted for the changes made to take effect.
Close the FDISK windows by clicking on the [X] box located at the upper right
corner of the window.
As the HandyDrive is a hot-plug USB device, it is not really necessary to restart
Windows. All that it is needed is to disconnect and reconnect the HandyDrive. After
that, the HandyDrive’s icon will appear in My Computer and in the Windows
Explorer (under Windows Me, before disconnecting the HandyDrive, please follow
the steps specified in section 3.3.).
3.2.1. Formatting the partition
Once the partition has been created, it must be formatted. The following steps can
also be followed if reformatting the partition is required at any other time:
• In My Computer or in the Windows Explorer, locate the HandyDrive icon or
letter. If you are not really sure about which icon or letter is the HandyDrive
assigned to, you may select the Stop and Eject Hardware icon in the Task Bar
(see section 3.3.) so that all removable drives along with their assigned logical
letter will be shown.
• Click with the right mouse button on the HandyDrive icon or letter, so that the
drop-down menu will appear.
• From the drop-down menu, select the Format option. The Format Disk window
will appear.
• Select Complete Format.
• You may wish to give the partition a name by entering a volume name in the
LABEL box.
• Select the Start button.
• A warning message is shown. Select Accept.
• At the end of the formatting process, it is recommended that the option to run
Scandisk is accepted to verify the new partition before use
The formatting process is now complete. The HandyDrive can now be accessed and
data can be read/written on it.
Note: The partition is formatted to the FAT-32 file system, so it is compatible with
MacOS and Linux.
___________________________________________________________________________
Fujitsu HandyDrive (USB-2) User's Manual:
Page 18
3.3. Disconnecting the HandyDrive
3.3.1. Drive disconnection under Windows 98 and Windows 98SE
IMPORTANT: Before disconnecting or switching-off the drive, close any
files and applications opened on or making use of the HandyDrive.
Once this is done, wait for the LED on the drive to stop flashing. Once the LED is
fully on, indicating drive activity has stopped, it can be safely disconnected.
3.3.2. Drive disconnection under Windows Me
IMPORTANT: Before disconnecting or switching-off the HandyDrive, it
must be stopped using the "Stop and Eject Hardware" utility, located at the
right side of the Task Bar (look for the icon of a PCMCIA card with an
arrow above it
).
By selecting this icon (double clicking on it with the left mouse button), all
removable drives along with their respective logical letters will be shown. Select the
HandyDrive and select Safely Remove (W98/SE) or Stop (Windows Me). Once the
confirmation dialog box is shown, the HandyDrive can be safely disconnected.
3.4. Windows 98 and Windows 98SE issues
This section includes VERY IMPORTANT information, applicable only
when two or more partitions are being created in the HandyDrive.
If only one partition, using the full capacity of the HandyDrive is being
created, this section can be skipped.
Due to a limitation in the Windows 98 and Windows 98SE FORMAT utility, no
Logical Unit in Extended partitions containing one or more Logical Units created on
a USB or 1394 (Firewire) hard disk drive can start above 8 GB.
This means, the sum of the capacity of the primary partition plus the capacities of all
Logical Units except the last one, cannot be greater than 8 GB. For example, if we
___________________________________________________________________________
Fujitsu HandyDrive (USB-2) User's Manual:
Page 19
have a 20 GB HandyDrive where a 5 GB primary partition and a 15 GB extended
partition containing two Logical Units have been created, the first Logical Unit
cannot be greater than 3 GB, so that the sum of the primary partition plus the Logical
Units (except the last one) is not greater than 8 GB (5 GB + 3 GB = 8 GB).
A general rule to check this requirement is met, is that the last Logical Unit created
in the HandyDrive must have a capacity greater than the total HandyDrive capacity
minus 8 GB. This means:
• On the 20 GB HandyDrive, the last Logical Unit must have a capacity greater
than 12 GB,
• On the 30 GB HandyDrive, the last Logical Unit must have a capacity greater
than 22 GB.
• On the 40 GB HandyDrive, the last Logical Unit must have a capacity greater
than 32 GB.
Windows Me does not have this limitation, so that any combination of primary
partition and logical units within the extended partition can be created and formatted.
___________________________________________________________________________
Fujitsu HandyDrive (USB-2) User's Manual:
Page 20
4. WINDOWS 2000 PROFESSIONAL, WINDOWS
XP HOME EDITION AND PROFESSIONAL USERS
4.1. Installing the HandyDrive driver
No additional driver is required. The USB Mass Storage driver embedded into
Windows 2000 Professional, Windows XP Home Edition and Professional supports
the HandyDrive.
4.2. Creating and formatting the partition
If the disk has already been partitioned, its icon will appear in My Computer and in
the Windows Explorer. You may skip the rest of this section and go to section 4.2.1.
Otherwise, the partition must be created.
The HandyDrive's icon will not appear in My Computer or in the Windows
Explorer until after the partition has been created.
The partition must be created using the Disk Management software of the operating
system as follows:
Log in to the system with Administrator rights.
To find the Disk Administrator ….
In Windows XP:
Select in sequence, Start.., Control Panel..., Performance & Maintenance…,
Administrative Tools..., Computer Management.
In Windows 2000
Select in sequence, Start.., Settings..., Control Panel..., Administrative Tools...,
Computer Management.
Then, Select Disk Management under the Storage branch in the left hand pane.
___________________________________________________________________________
Fujitsu HandyDrive (USB-2) User's Manual:
Page 21
If the Disk Management tool asks for permission to write a signature onto the disk,
YES must be selected. Otherwise the HandyDrive will be put in off-line status, and
you will not be able to create the partition.
The HandyDrive unit will be that one showing the corresponding capacity, and with
its graph showing the whole span as Unassigned. You must right-click on the
unassigned space on the graph and select the Create Partition option. The Create
Partition Wizard is then executed.
4.2.1. Formatting the partition
The partition may be formatted from within the Create Partition Wizard (one-step
creation and formatting procedure), or it can be formatted afterwards either from the
Disk Administrator or from My Computer or Windows Explorer (by the Format
option within the drive's right mouse button's drop-down menu). FAT-32 or NTFS
file systems can be selected. Should compatibility with Macintosh or with Windows
98/Me be required, FAT-32 format must be selected.
See section 4.4. Windows 2000 Professional, Windows XP Home Edition and
Professional issues about creating FAT-32 partitions and about Windows
2000's Disk Administrator.
___________________________________________________________________________
Fujitsu HandyDrive (USB-2) User's Manual:
Page 22
4.3. Disconnecting the HandyDrive
Before disconnecting the HandyDrive, it must be stopped by the "Stop and
Eject Hardware" utility, located at the right side of the Task Bar (look for
the icon of a PCMCIA card with an arrow above it
).
By selecting this icon, all removable drives along with their respective logical letters
will be shown. Select the HandyDrive and select Stop. Once the confirmation dialog
box is shown, the HandyDrive can be safely disconnected.
See next section 4.4. Windows 2000 Professional and Windows XP Home
Edition and Professional issues, about XP´s issue when stopping devices.
4.4. Windows 2000 Professional and Windows XP
Home Edition and Professional issues
• Due to a limitation in the Windows 2000 Professional’s Disk Administrator,
when a one-step partition creation and formatting process is executed, it may be
possible that a formatting error will be reported. In this case, the partition
(already created) must be selected and formatted again.
• Due to a limitation in Windows XP Home Edition and Professional, USB disks
cannot be ejected if a view of them is open on the Windows Explorer or My
Computer (an error message is reported by the Stop and Eject utility, stating that
some program is making use of the device). To be able to Stop and Eject the
HandyDrive, make sure to close or change the view on the Windows Explorer
or My Computer, then run the Stop and Eject utility again.
• Windows 2000 and XP cannot format partitions greater that 32 GB according to
the FAT-32 file system. If a partition greater than 32 GB is created, then:
o Under Windows XP, NTFS is the only available choice when using for
formatting the Disk Administrator or the Format option of the drive’s dropdown menu.
o Under Windows 2000, FAT-32 is an available option when formatting by
___________________________________________________________________________
Fujitsu HandyDrive (USB-2) User's Manual:
Page 23
using the Disk Administrator, but after the formatting procedure the error
message “Volume size is too large” is shown.
o Under Windows 2000, FAT and FAT-32 are available options when
formatting by using the Format option of the drive’s drop-down menu, but in
both cases the error message “Windows could not finish formatting” is
shown.
To be able to format a partition to the FAT-32 file system, the maximum size that
can be specified in the Wizard is 32,768 MB under Windows XP, and 32,769
MB under Windows 2000. Due to this limitation, should a FAT-32 partition be
required on a 40 GB HandyDrive, at least two partitions must be created.
Alternatively, a whole 40 GB FAT-32 partition can be created and formatted
under Windows 98/SE/Me, whose formatting tool does not have that limitation,
and then used under Windows 2000, XP as a single 40 GB partition.
___________________________________________________________________________
Fujitsu HandyDrive (USB-2) User's Manual:
Page 24
5.
LINUX USERS
The correct functionality of the HandyDrive USB-2 Data Edition has been tested
under the USB-1 mode of operation with the following Linux distributions, by using
the USB-1 drivers included in the kernel:
• Mandrake 8.1 (kernel 2.4.8),
• SuSE 7.2 (kernel 2.4.4), and
• SuSE 7.3 (kernel 2.4.10)
Experimental USB-2 support is being added to Linux from kernel 2.5. Tests have
been conducted under kernel 2.5.5 with favourable results, but as kernel versions
2.5.x are still in their experimental testing phase, waiting for the next stable version
is recommended to use the HandyDrive under the USB-2 mode.
The first stable version including USB-2 support will be 2.4.18, and there are also
updates available for earlier kernel versions 2.4.x.
For more information about the HandyDrive use under Linux, please visit our web
site:
http://www.fel.fujitsu.com
___________________________________________________________________________
Fujitsu HandyDrive (USB-2) User's Manual:
Page 25
6.
PROBLEM SOLVING QUICK GUIDE
Problem
Root cause
Solution
The HandyDrive's LEDs The HandyDrive is • Use the special double
do not light when
not receiving
connection USB cable to connect
connecting the drive to the sufficient power.
the HandyDrive to the computer
computer or to a selfor to the hub.
powered hub (powered by
Use
the Fujitsu approved external
•
its own power supply).
power supply to operate the
HandyDrive in the Self-Powered
mode.
See section 1.2. in the manual.
Ticking noise from the
disk’s motor and heads is
produced when
connecting the
HandyDrive to the
computer or to a selfpowered hub, and the
LEDs do not light
permanently (they flash
all the time).
The HandyDrive is • Use the special double
not receiving
connection USB cable to connect
sufficient power.
the HandyDrive to the computer
or to the hub.
• Use the Fujitsu approved external
power supply to operate the
HandyDrive in the Self-Powered
mode.
See section 1.2. in the manual.
The disk’s motor does
The HandyDrive is • Use the special double
spin-up and the drive is
not receiving
connection USB cable to connect
recognized by the system, sufficient power
the HandyDrive to the computer
but read/write operation is
or to the hub.
not stable, and/or system
• Use the Fujitsu approved external
hangs during the normal
power supply to operate the
operation of the drive.
HandyDrive in the Self-Powered
mode.
See section 1.2. in the manual.
___________________________________________________________________________
Fujitsu HandyDrive (USB-2) User's Manual:
Page 26
Problem
Root cause
Solution
The HandyDrive is
connected to the external
power supply, but the
disk’s motor does not spin
up, or read/write operation
is still unstable.
The disk is not
being powered by
the power supply,
but through the
USB cable.
• The HandyDrive's power switch
must be switched to the external
power supply position marked
with EXT.
See section 1.2. in the manual.
When connecting the
The hub is not
HandyDrive to a Buscompatible with
Powered hub, I get a
the HandyDrive.
message that the hub
cannot deliver sufficient
power level to the USB
device, even if the
HandyDrive is being
powered by its own power
supply.
When disconnecting or
powering down the
HandyDrive, I get a
message that an USB
device has been unsafely
disconnected.
I can’t find a formatting
tool under MacOS.
• Use a Self-Powered hub.
See section 1.3. in the manual.
The device has not • The device must be stopped
been stopped
before disconnecting or
before
powering it down.
disconnecting or
See the Disconnecting procedure
powering it down.
for your operating system in the
manual.
• You can format with the Erase
Disk option within the Finder's
Special menu, or by using the
Disk Utility (MacOS X).
See section 2.2. in the manual.
___________________________________________________________________________
Fujitsu HandyDrive (USB-2) User's Manual:
Page 27
Problem
Root cause
I want my HandyDrive to
be formatted to the HFS+
system, but only the DOS
option is available in the
Erase Disk utility.
The disk is
• You must delete the FAT-32
actually formatted
partition with FDISK (Windows
acc. to the FAT-32
98/Me), or with the Disk
system (MacOS 9
Administrator (Win2000 or XP).
issue).
Then the Erase Disk utility will
let you format according to the
HFS/HFS+ systems.
See section 2.4. in the manual.
When connecting/
ejecting the HandyDrive,
the volume is not
mounted/unmounted
in/from my MacOS X
desktop.
MacOS X issue
The Windows 98 driver is
not automatically installed
when I insert the CDROM into the CD-ROM
drive.
The automatic
• Open the Windows Explorer and
execution of
execute the Autorun.exe file
Autorun files at the located in the CD-ROM's root
CD-ROM
directory.
insertion time is
See section 3.1.1. in the manual.
not enabled in the
system.
A yellow or red mark is
The driver has not
shown next to the
been correctly
HandyDrive in the Device installed.
Manager (Win98/98SE).
Solution
• Sometimes the volume is not
mounted/unmounted in/from the
MacOS X desktop until the
mouse has been moved.
See section 2.4. in the manual.
• Reinstall the driver.
___________________________________________________________________________
Fujitsu HandyDrive (USB-2) User's Manual:
Page 28
Problem
Root cause
Solution
The HandyDrive's LEDs
are lighting, the motor is
spinning and the drive is
shown in the Device
Manager with no
problems, but I don’t see
the drive’s icon in My
Computer or Windows
Explorer.
The drive has not
been partitioned.
• The drive must be partitioned and
formatted.
See the appropriate section for
your operating system in the
manual.
The HandyDrive's icon is The partition has
shown in My Computer or not been
Windows Explorer, but I formatted.
get an error every time I
try to access the drive.
• The partition must be formatted.
See the appropriate section for
your operating system in the
manual.
Under Windows 98/98SE,
when running FDISK to
create the partition, the
option 5, “Change the
actual disk unit” is not
available, or when
selecting the option 5, the
HandyDrive is not shown
in the drives list.
The HandyDrive
has not been
detected by the
system.
• Open the Device Manager to
check for possible yellow or red
marks next to the HandyDrive
entry.
In that case, reinstall the driver.
When creating and
formatting the partition
under Windows 2000's
Disk Manager, I get the
error that the partition
could not be formatted.
Windows 2000
issue
• Select the newly created
partition, and format it again.
See section 4.4. in the manual.
___________________________________________________________________________
Fujitsu HandyDrive (USB-2) User's Manual:
Page 29
Problem
Root cause
Solution
I cannot Stop the device
under Windows 2000.
Windows 2000
issue
• Open and close the Disk
Manager, and then try to stop the
HandyDrive again.
See section 4.4. in the manual.
I cannot Stop the device
under Windows XP.
There is some
• Close all open views of the
open view of the
HandyDrive in My Computer or
HandyDrive in My
Windows Explorer, and then try
Computer or
to stop it again.
Windows Explorer See section 4.4. in the manual.
(Windows XP
issue).
When trying to format the
partition to the FAT-32
file system under
Windows 2000 or XP, I
always get the error that
“the volume size is too
large” or “Windows could
not finish the format
operation”.
The partition is
• Format the partition to the NTFS
larger than 32 GB
file system.
(Windows 2000
• Should you need FAT-32
and XP limitation).
partitions, you must divide the
disk space into several partitions
smaller than 32 GB.
• You can create and format a
FAT-32 partition larger than 32
GB under Windows 98/98SE
and Me. It will be accessible
under Windows 2000 and XP.
See section 4.4. in the manual.
___________________________________________________________________________
Fujitsu HandyDrive (USB-2) User's Manual:
Page 30
Problem
Root cause
Solution
I can access my
HandyDrive under
Windows 2000 and XP,
but under Windows
98/Me the drive’s icon is
not shown in My
Computer or Windows
Explorer. The Device
Manager shows no
problems with the
HandyDrive.
The partition is
formatted to the
NTFS file system.
• Windows 98 and Me do not
support the NTFS file system.
Should you need Windows
2000/XP and Windows 98/Me
compatibility, you must format
the partition to the FAT-32 file
system.
See section 4.2.1. in the manual.
___________________________________________________________________________
Fujitsu HandyDrive (USB-2) User's Manual:
Page 31
7.
FAQ QUICK GUIDE
Question
Answer
Can I boot the computer off
the HandyDrive?
• NO not as of today. To do that, USB Mass Storage
Devices would need to be supported directly by the
system BIOS.
How many partitions can I
create on my HandyDrive?
• Should the disk be blank, only one volume can be
created under MacOS 9. Should the disk be
previously partitioned, each partition can be
individually reformatted, but the number of
partitions or their sizes cannot be changed.
• Multiple partitions can be created under all other
operating systems.
See sections “Creating and formatting the partition”
and “Operating System issues”, corresponding to
your operating system.
Can I access the HandyDrive • NO, not as of today. USB is not supported under
under DOS, or
DOS. The only way to have the HandyDrive
accessible under DOS would be if it could be
if booting the system off a
supported directly by the system BIOS.
Windows start disk, or
if booting Windows in the
System Symbol Only mode?
Can I access the HandyDrive • As of today, the only system supporting USB Mass
by booting off a floppy or
Storage Devices when booting off a floppy or CDCD-ROM?
ROM is Linux. Boot floppies can be generated, and
microdistributions are available on CD-ROM from
several parties.
___________________________________________________________________________
Fujitsu HandyDrive (USB-2) User's Manual:
Page 32
Question
Answer
I have not got any USB 2.0 • You may connect the USB-2 HandyDrive to an
port in my PC, but only USB
USB-1 port, or you can install an USB-2 host
1.1. How can I access the
adapter card in your system (in this case, please
USB-2 HandyDrive?
check whether the card supports your operating
system in the USB-2 mode). The USB-2 transfer
rate is 40x the USB-1 rate.
See section 1.3. in the manual.
Which operating systems are • The HandyDrive is compatible with all
compatible with the
environments supporting USB Mass Storage
HandyDrive? Are any
Devices, i.e. Windows 98/98SE/Me/2000
drivers needed?
Professional and XP Home Edition and
Professional, MacOS 9.x and MacOS X,and Linux
2,4,x.
• Drivers are available for Windows 98/98SE,
MacOS (except for 10.0.x). On the other hand,
MacOS 9.0.4 and later and MacOS X support the
HandyDrive under the USB-1 mode with no
additional driver.
• No drivers are needed for: Windows Me/2000
Professional, XP Home Edition, XP Professional or
Linux 2,4,x.
See section 1.1. in the manual.
How can I format the
HandyDrive to have MacWindows compatibility?
• You must format the partition to the FAT-32 file
system (Mac calls it DOS format). DOS formatting
by MacOS X is NOT compatible with Windows, so
that the DOS format must be done under MacOS 9
or Windows. Additionally, MacOS 10.0.x does
NOT adequately support the DOS file system.
See section 2.4. in the manual.
___________________________________________________________________________
Fujitsu HandyDrive (USB-2) User's Manual:
Page 33
Question
Answer
How can I work with my
• USB Mass Storage Devices are supported by kernel
HandyDrive under Linux? Is
2.4.x. Details are fully explained in a
there Windows
comprehensive technical bulletin available at our
compatibility?
web site www.fel.fujitsu.com.
• For Windows compatibility, FAT-32 partitions
must be used.
___________________________________________________________________________
Fujitsu HandyDrive (USB-2) User's Manual:
Page 34
8. Warranty
http://www.fel.fujitsu.com
WARRANTY CARD
END-USER LIMITED PRODUCT WARRANTY
Fujitsu warrants that this HandyDrive (‘Product’) will be free from any defect in material or
workmanship, and shall perform in accordance with its specification, for a period of 24 months from
the date of purchase. Fujitsu’s sole liability for breach of this warranty shall be (at its option) to
replace or repair the defective Product to the Customer, carriage paid.
This warranty does not extend to Product, which becomes defective resulting from damage in the
course of transportation, or by handling, storage, operation, use or maintenance in a manner or
environment not conforming to the instructions or specifications of Fujitsu. This warranty does not
extend to Product, which is altered or modified such as by the removal or replacement of parts, or
minor electrical or mechanical maladjustment.
This warranty is in lieu of all other warranties, whether implied by statute or otherwise, and which are
hereby excluded. Fujitsu shall not be liable for any loss of profits or incidental or consequential loss
for whatever reason.
In order to receive warranty service during the applicable warranty period, the Product must be
returned by the purchaser or his/her agent, in its original container or equivalent, to the original point
of purchase. A proof of purchase, the date purchased, seller’s name and address, model and serial
number must accompany the returned product for warranty service claims. Product repairs will be
completed within approximately 30 days of receipt of the product.
After expiration of the warranty service coverage, repair services are available at an additional cost.
Please contact the point of sale. This warranty is applied in EU and EFTA countries only.
___________________________________________________________________________
Fujitsu HandyDrive (USB-2) User's Manual:
Page 35