1
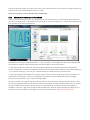
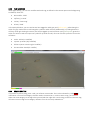
6.3.5 MAGNIFIER MODE As an additional tool, you can activate the magnifier tool by pressing the ‘m’ key. This will display a cropped version of the image next to your mouse pointer that you can zoom into using the mouse wheel. Note: existing tags will NOT be displayed within the magnifying tool! In addition, you can add various image filters to the magnifying tool by pressing the appropriate button: g: switches on/off solarised filter h: switch on/off the equalised histogram filter j: switches invert filter on/off k: switch on/off the autocontrast filter l: switches on/off posterised filter u: switches on/off unsharp filter s: switches on/off smart sharpen filter (experimental feature) 6.3.6 THE GENERAL PANEL After toggling the general panel, you will see a floating window displaying a scaled down version of the current picture. Upon left clicking on the panel picture, you will quickly pan to the selected area as indicated by the rectangle. There are two additional buttons below the panel image: Gps panel: Toggles display of an additional panel containing the spatial metadata of the current image file (if available in green, else displayed in red). If the coordinates are displayed in green and you click on the coordinates, a browser window will open and display the position on Google MapsTM Info panel: Toggles display of an additional panel containing the summary of the session 6.3.7 SAVING THE SESSION At any time, you can select ‘Save Session (Ctrl-S)’ by clicking File -> Save Session (Ctrl-S) or simply hit ctrl + S In order to save your current session in a single file named using your username and the ‘.TiD’ suffix. You can resume from this file any time you want to.