1
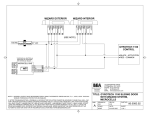
IZAAC / LEMARCHAND / PERRIN / PIEDNOIR
January the 23th 2003
Design of Differential Encoders for the Talrik II Robot
Design of Differential Encoders for the Talrik II Robot
Georgia Tech Lorraine, School of ECE
January the 24th 2003
ECE 8873 / Project 1
Dr. HECK
Marie-Laure PIEDNOIR
Nicolas PERRIN
Ronan LEMARCHAND
Jérôme IZAAC
ECE 8873
Georgia Tech Lorraine, School of ECE
-1-
IZAAC / LEMARCHAND / PERRIN / PIEDNOIR
January the 23th 2003
Design of Differential Encoders for the Talrik II Robot
Abstract
The Talrik II robot has two motorized wheels, and a third one which follows the move of the
two others. When we want the robot to go straight forward or straight backward, we need to
apply exactly the same command to the two motors, and when we want it to turn on the right
or on the left, we have to make a wheel turn faster than the other.
This is really simple in theory, but in facts we cannot always be sure of what we send to the
motors, and, more important, how they react.
In order to automate the motion, we need a feedback; this means that we have to know at each
time the angular speed of each motor, to control if the robot follows the desired path.
That is the reason why we decided to add two coders on the motorized wheels.
Each coder, after being mounted on the axis of each motor and wheel, sends a signal that can
be measured and computed by the micro controller in order to find the speed at which each
wheel rotates.
This report will explain which encoders and encoding wheels will be mounted on the Talrik II
robot, the way to fix them to the axes and to make them communicate to the Motherboard of
our robot, and an explanation on how to retrieve the position and the speed of our robot,
analysing the signals emitted by them.
ECE 8873
Georgia Tech Lorraine, School of ECE
-2-
IZAAC / LEMARCHAND / PERRIN / PIEDNOIR
January the 23th 2003
Design of Differential Encoders for the Talrik II Robot
Abstract ...................................................................................................................................... 2
I.
Incremental encoder principle............................................................................................ 4
II.
Choice of the encoder......................................................................................................... 9
A.
B.
Category 1: encoders whose price is higher than 100 Euros.......................................... 9
Category 2 : encoders whose price is lower than 30 Euros......................................... 11
1. Example 1: HEDS-5500........................................................................................... 11
2. Example 2: 120EN-128-C24 .................................................................................... 12
C. Category 3: encoders whose price is between 30 Euros and 100 Euros ...................... 13
1. Example 1: HEDS-9000........................................................................................... 13
2. Example 2: HEDS-9040 and HEDS-9140 ............................................................... 14
III.
A.
B.
IV.
A.
B.
C.
D.
V.
Physical description of the measure module ................................................................ 15
Physical constraints ...................................................................................................... 15
Solution proposed......................................................................................................... 16
Interfacing encoder with the robot – Electrical constraints.......................................... 19
Electrical constraints of the encoders........................................................................... 19
Constraints of the robot ................................................................................................ 20
Solution ........................................................................................................................ 21
Interfacing the encoders with the robot........................................................................ 22
1. Interface board MSCC11 with the robot .................................................................. 22
2. Connect encoders to MSCC11 board ....................................................................... 23
The algorithm ................................................................................................................... 24
A.
B.
C.
D.
VI.
How to count the ticks?................................................................................................ 24
How to measure the position........................................................................................ 25
How to measure the speed............................................................................................ 26
Program for the onboard computer .............................................................................. 27
Ordering ....................................................................................................................... 28
Conclusion................................................................................................................................ 30
ECE 8873
Georgia Tech Lorraine, School of ECE
-3-
IZAAC / LEMARCHAND / PERRIN / PIEDNOIR
January the 23th 2003
Design of Differential Encoders for the Talrik II Robot
I. Incremental encoder principle
An incremental encoder system is a sensor that detects movements through optical detections
of holes. It is composed of two parts: the code wheel and the encoder.
The code wheel is a piece of metal on which are regularly pierced holes on its outline:
Scheme :
Wheel
Holes
Coder
The code wheel goes inside the encoder in which
the holes are tested.
To test if a hole is present or not, a source light is
present on a side of the wheel and a photodiode
is on the other side. The logical level of the
electrical signal changes if the photodiode
receives light or not.
Volts
Volts
time
Hole
time
no Hole
When the wheel rotates, holes and solid parts pass between the photodiode and the light
source. The signal emitted by the photodiode switches between high and low logic level:
Volts
time
Assuming the wheel rotates in only one way, the measure of the rotation done by the wheel
can be deduced by counting the number of state’s changes of the signal.
ECE 8873
Georgia Tech Lorraine, School of ECE
-4-
IZAAC / LEMARCHAND / PERRIN / PIEDNOIR
January the 23th 2003
Design of Differential Encoders for the Talrik II Robot
Assuming the wheel has a constant speed, the speed can be deduced by measuring the
frequency of the signal’s fundamental.
The previous paragraph has shown how the position and the speed of a one way rotating
wheel can be measured. Now we will explain how the direction of the wheel can be measured.
A second device (light source/photodiode) is added but shifted in space. Therefore the signal
it emits is shifted in time
A B
A B
1
A B
2
So the second signal is out of phase by +90 degrees or -90 degrees depending on the way the
wheel is rotating.
ECE 8873
Georgia Tech Lorraine, School of ECE
-5-
3
IZAAC / LEMARCHAND / PERRIN / PIEDNOIR
January the 23th 2003
Design of Differential Encoders for the Talrik II Robot
Direct way (the wheel moves in the way of the arrow of the previous scheme):
Volts
on
channel A
time
Volts
on
channel B
time
1
2
3
Reverse way (the wheel moves in the opposite way of the arrow):
Volts
on
channel A
time
Volts
on
channel B
time
3
2
1
The most common way to measure the difference of phase is to measure the logical state of
one of the channels each time the other channel change its state.
An example is shown on the following diagrams where Trigger is written: the measure of the
logical state of the channel B is triggered by the rising front of the channel A. To save this
data, a flip/flop can be used to store the measured value.
Signal of channel B
DATA
OUTPUT
Signal of channel A
Signal of the Direction of the wheel
CLOCK
triggered on rising front
Flip-Flop
Depending on the way the wheel is spinning, the signal of the direction remains on low or
high level between each time the flip-flop is triggered. If the wheel rotates in one constant
way, the direction signal will remain on the same logical level.
ECE 8873
Georgia Tech Lorraine, School of ECE
-6-
IZAAC / LEMARCHAND / PERRIN / PIEDNOIR
January the 23th 2003
Design of Differential Encoders for the Talrik II Robot
Direct way (the wheel moves in the way of the arrow):
Volts
on
channel A
time
Volts
on
channel B
time
Volts
on
Direction
Trigger
time
Trigger
Reverse way (the wheel moves in the opposite way of the arrow):
Volts
on
channel A
time
Volts
on
channel B
time
Volts
on
Direction
Trigger
time
Trigger
However we could also use the micro controller of the Talrik II to measure the direction of the
wheels by analyzing the channels A and B. There is no difference between the two solutions,
concerning the connections: each of them uses two pins.
Computer
Computer
Direction
Flip/Flop
Channel A
Channel B
Channel A
Encoder
Channel B
Encoder
ECE 8873
Georgia Tech Lorraine, School of ECE
-7-
IZAAC / LEMARCHAND / PERRIN / PIEDNOIR
January the 23th 2003
Design of Differential Encoders for the Talrik II Robot
Between the two solutions we have chosen to use the hardware detection of the direction for
the following reasons:
•
The hardware solution spares computing time on the onboard computer.
•
The Flip/Flop prize is very low (and it save software development costs). So, the price
difference between the two solutions is small.
ECE 8873
Georgia Tech Lorraine, School of ECE
-8-
IZAAC / LEMARCHAND / PERRIN / PIEDNOIR
January the 23th 2003
Design of Differential Encoders for the Talrik II Robot
II. Choice of the encoder
The constraints are the following:
•
We need two encoders (one per wheel).
•
Each encoder must provide two channel quadrature outputs (channels A and B).
•
The precision on the position of the robot must be below two centimeters.
•
The voltage supply of the encoder must be a single 5V supply, since the voltage
provided by the robot for the captor is a single 5V supply.
•
The component must fit in the physical space that is available on the robot.
(See: III.Physical description of the measure module)
•
The price of the component should not be too high.
Based on their price we categorize three different types of optical encoders. We will now
underline the main characteristics of each category and the criteria of choice that will help us
to select one of the available encoder.
The three categories are:
•
the encoders whose price is higher than 100 Euros
•
the encoders whose price is between 30 Euros and 100 Euros
•
the encoders whose price is lower than 30 Euros
A. Category 1: encoders whose price is higher than 100 Euros
These optical encoders offer a very high precision. They are easy to set up since they are
already assembled. However they are clearly unaffordable. Moreover we must consider that
we need one encoder per wheel so the price should be multiplied by two.
ECE 8873
Georgia Tech Lorraine, School of ECE
-9-
IZAAC / LEMARCHAND / PERRIN / PIEDNOIR
January the 23th 2003
Design of Differential Encoders for the Talrik II Robot
Here is an example of an optical encoder of this category:
Figure: RI58-S/0360AS.41KBPG
Price: 385.7 Euros
Reference: RI58-S/0360AS.41KBPG
Features (taken from the datasheet):
universal industrial encoder
up to 40,000 step with 10,000 pulses
high signal accuracy
flexible due to many flange and connectors variants
suitable for high shocks loads
The datasheet of the component is available at: www.farnell.com/datasheets/27383.pdf
It is needless to consider more precisely the encoders of this category, since their prices
prevent us from choosing them for our design.
Conclusion: the encoders of this category should not be chosen.
ECE 8873
Georgia Tech Lorraine, School of ECE
- 10 -
IZAAC / LEMARCHAND / PERRIN / PIEDNOIR
January the 23th 2003
Design of Differential Encoders for the Talrik II Robot
B. Category 2 : encoders whose price is lower than 30 Euros
This category of encoder is mainly composed of encoders whose prices are typically between
40 Euros and 50 Euros. These encoders have the advantage of being already assembled.
Obviously their characteristics are not as good as those of the encoders of the category 1, but
are still acceptable.
Let us consider some encoders of this category:
1. Example 1: HEDS-5500
Figure: HEDS-5500
Price: 44.97 Euros
Reference: HEDS-5500
Features (taken from the datasheet):
two channel quadrature outputs
quick and easy assembly
no signal adjustments required
resolution up to 1024 counts per revolution
single 5V supply
The datasheet of the component is available at: http://www.farnell.com/datasheets/7725.pdf
ECE 8873
Georgia Tech Lorraine, School of ECE
- 11 -
IZAAC / LEMARCHAND / PERRIN / PIEDNOIR
January the 23th 2003
Design of Differential Encoders for the Talrik II Robot
2. Example 2: 120EN-128-C24
Figure: 120EN-128-C24
Price: 39.39 Euros
Reference: 120EN-128-C24
Features (taken from the datasheet):
two channel quadrature outputs
128 counts per revolution
single 5V supply
The resolution of the encoder depends on the number of counts per revolution. With this
encoder we can see that the cheaper it is, the lower the resolution is.
The datasheet of the component is available at: http://www.farnell.com/datasheets/5064.pdf
Conclusion: The encoders of this category could be chosen. Although they are
not the cheapest ones, they are not too expensive and their main
advantage is to be already assembled, which makes them easier and
quicker to mount.
ECE 8873
Georgia Tech Lorraine, School of ECE
- 12 -
IZAAC / LEMARCHAND / PERRIN / PIEDNOIR
January the 23th 2003
Design of Differential Encoders for the Talrik II Robot
C. Category 3: encoders whose price is between 30 Euros and 100
Euros
The different encoders grouped in this category are the cheapest encoders we could find.
These encoders are not assembled and this is the main reason why they are low cost
components.
1. Example 1: HEDS-9000
Figure: HEDS-9000
Price: 22.55 Euros
Reference: HEDS-9000
Features (taken from the datasheet):
two channel quadrature outputs
2000 counts per revolution
single 5V supply
small size
easy to mount
no signal adjustment required
ECE 8873
Georgia Tech Lorraine, School of ECE
- 13 -
IZAAC / LEMARCHAND / PERRIN / PIEDNOIR
January the 23th 2003
Design of Differential Encoders for the Talrik II Robot
The datasheet of the component is available at: http://www.farnell.com/datasheets/2616.pdf
2. Example 2: HEDS-9040 and HEDS-9140
The appearance of these encoders is exactly the same as the encoder HEDS-9000. The main
differences are the following (taken from the datasheet):
The HEDS-9040 and HEDS-9140 are three-channel optical incremental encoder modules.
These modules provide the same performances found in the HEDS-9000 two-channel
encoder. The HEDS-9040 and 9140 have two channel quadrature outputs plus a third channel
index output. The output of channel I (index) is an index impulse which is generated once for
each full rotation of the code wheel.
Price: 24.97 Euros
Reference: HEDS-9040
Features of the HEDS-9040 (taken from the datasheet):
two channel quadrature outputs and index impulse
2000 counts per revolution (So the precision constraint is repected)
single 5V supply
small size
easy to mount
no signal adjustment required
The datasheet of the component is available at: http://www.farnell.com/datasheets/6186.pdf
Conclusion: We have decided to choose the component HEDS-9040 because it is
one of the cheapest encoders that we found. Moreover with this
component we also have an index pulse that could be useful in the
future.
ECE 8873
Georgia Tech Lorraine, School of ECE
- 14 -
IZAAC / LEMARCHAND / PERRIN / PIEDNOIR
January the 23th 2003
Design of Differential Encoders for the Talrik II Robot
III.
Physical description of the measure module
A. Physical constraints
The motorized wheels have an environment as described in the following picture
(Picture taken from under the robot):
Wheel
Motor
74 mm
5 mm
ECE 8873
Georgia Tech Lorraine, School of ECE
- 15 -
IZAAC / LEMARCHAND / PERRIN / PIEDNOIR
January the 23th 2003
Design of Differential Encoders for the Talrik II Robot
B. Solution proposed
We first looked for an incremental encoder tiny enough but with a reasonable prize.
The space between the motor and the wheel is very limited: 5 mm
The code wheel has a diameter of 25, 4 mm and is hollowed for a 4 mm diameter axis.
The dimensions of the coder/code wheel are shown on the following diagram
25.4 mm
ECE 8873
Georgia Tech Lorraine, School of ECE
- 16 -
IZAAC / LEMARCHAND / PERRIN / PIEDNOIR
January the 23th 2003
Design of Differential Encoders for the Talrik II Robot
To add the code wheel and the encoder, we have to match two main constraints, which are to
fix the encoder and to prevent the wheel from moving out of its axis
Any misalignment of the code wheel and the encoder would result in inaccurate measures. To
prevent any tilt from the wheel we will add a longer axis that will be fixed on a base fixed on
the Talrik II through existing screws and bolts. The base will also be used to fix the encoder.
The following picture shows the base. It is made of pieces of wood.
22 mm
20.96 mm
90 degrees
9 mm
28.15 mm
11 mm
Note: only the measures shown on the above picture are important for the measure precision.
ECE 8873
Georgia Tech Lorraine, School of ECE
- 17 -
IZAAC / LEMARCHAND / PERRIN / PIEDNOIR
January the 23th 2003
Design of Differential Encoders for the Talrik II Robot
Here is a diagram of the assembly of the axis (in red) the base (in green), the encoder (in
blue), the code wheel (in dark grey) to the Talrik II:
The following picture shows the measure device once assembled on the Talrik II:
ECE 8873
Georgia Tech Lorraine, School of ECE
- 18 -
IZAAC / LEMARCHAND / PERRIN / PIEDNOIR
January the 23th 2003
Design of Differential Encoders for the Talrik II Robot
IV.
Interfacing encoder with the robot – Electrical constraints
Now that we have decided to use 2 encoders HEDS-9040 – one for each motorized wheel –
we have to find out how to interface them with the robot.
A. Electrical constraints of the encoders
The HEDS-9040 datasheet provides the following electrical configuration:
(Taken from HEDS-9040 datasheet)
As shown above, each encoder has 5 pins:
-
Pin 1 or ground pin,
-
Pins 2,3 and 5 or I, A and B digital outputs,
-
Pin 4 or Vcc pin.
It is also explained in the datasheet that the encoder requires 3 2.7 kΩ (+/- 10 %) pull-up
resistors (one for each digital output) as shown above on the picture. These pull-up resistors
should be placed as close as possible to the encoder itself (within 4 feet).
ECE 8873
Georgia Tech Lorraine, School of ECE
- 19 -
IZAAC / LEMARCHAND / PERRIN / PIEDNOIR
January the 23th 2003
Design of Differential Encoders for the Talrik II Robot
Datasheet also provides the following encoder’s electrical characteristics array:
(Taken from HEDS-9040 datasheet)
Line 2 shows that each encoder requires a typical Vcc about 5V.
Here is a summary of electrical constraints brought by the encoders:
-
Type of outputs: Channels A, B and I are digital outputs.
-
Power requirements: Vcc = 5V.
-
3 2.7 kΩ (+/- 10 %) pull-up resistors to be mounted between I, A and B outputs and
Vcc.
B. Constraints of the robot
The robot is composed of 2 main boards:
-
Processor board MRC11,
-
Sensor expansion board MRSX01.
As for the robot’s internal communication system between components, processor board
comes with a 60-pin male header processor I/O bus. This bus communicates with MRSX01
board through a ribbon. MRSX01 board features 20 analog inputs and 2 digital inputs.
Talrik II communicates through logic signals: 5V and ground, coding the 2 logical states 1
and 0.
ECE 8873
Georgia Tech Lorraine, School of ECE
- 20 -
IZAAC / LEMARCHAND / PERRIN / PIEDNOIR
January the 23th 2003
Design of Differential Encoders for the Talrik II Robot
Also, when needed, up to 2 sensor expansion boards MSCC11 can be mounted on the robot.
Each board comes with 8 analog I/O channels and 8 digital inputs. It communicates with
MRC11 board via Serial Peripheral Interface or Serial Communications Interface.
MSCC11 board provides the following information:
Each digital input is made of 3 pins: one Vcc pin, one signal pin and one ground pin, where
Vcc = 5V.
C. Solution
Now we are going to see if the constraints of the encoders are compliant with the robot’s
ones.
As we use 2 encoders we need 4 digital inputs on the robot (A and B channel from first
sensor, A and B channels from second sensor). But the robot initially has only 2 digital inputs
(on MRSX01 expansion board as explained previously). Thus we need to add one expansion
board MSCC11 on the robot. These digital inputs fit the 5V-Vcc requirements.
Regarding the ordering of MSCC11 board, there are 2 possibilities:
-
Buy non-assembled board, price 30 $,
-
Or buy already assembled board, price 66 $.
Also, as we use 2 encoders we need 2*3 = 6 2.7 kΩ (+/- 10 %) pull-up resistors.
These can be ordered at Farnell.
We also need some material to mount MSCC11 board, a 6-wire C2325 ribbon connect it to
the robot and a 6-AA NiCd battery pack to power it up.
To sum up, we need the following to interface encoders with the robot:
-
One additional MSCC11 sensor expansion board, 30 or 60 $,
-
6 2.7 kΩ (+/- 10 %) resistors,
-
one 6-wire C2325 communication ribbon,
- a 6-AA NiCd battery pack
ECE 8873
Georgia Tech Lorraine, School of ECE
- 21 -
IZAAC / LEMARCHAND / PERRIN / PIEDNOIR
January the 23th 2003
Design of Differential Encoders for the Talrik II Robot
If we choose to order non-assembled MSCC11, we should make sure we also have the
following material (as quoted in MSCC11 assembly manual posted on MEKATRONIX’s
website):
“
-
Soldering iron,
-
60/40 rosin core 0.032 diameter electronics solder,
-
Small diagonal cutters for cutting wire and headers,
-
Needle nose pliers,
-
Wire stripers,
-
Hot glue gun and hot glue,
-
Masking tape.
“
D. Interfacing the encoders with the robot
1. Interface board MSCC11 with the robot
•
Communicate with the MRC processor board
MSCC11 additional board needs to be linked to MRC11 processor board to communicate
with the main program and send it data from the 2 encoders.
As said before, MSCC11 communicates with MRC11 through Serial Peripherical Interface
(SPI) or Serial Communications Interface (SCI) via a 6-wire C2325 MEKATRONIX™
ribbon. We decide to make them communicate via SCI.
The ribbon should connect J54 plug on MSCC11 board to SCI jumper on MRC11.
The ribbon can be purchased on www.mrrobot.com assembled or not.
ECE 8873
Georgia Tech Lorraine, School of ECE
- 22 -
IZAAC / LEMARCHAND / PERRIN / PIEDNOIR
January the 23th 2003
Design of Differential Encoders for the Talrik II Robot
Here are the current descriptions and prices found on the website:
“
C2325a:
6-Wire Serial Ribbon Cable: 6 ft long with 1x6 female connectors on each end. Price:
9.95 $
C2325u:
6-Wire Serial Ribbon Cable KIT: 3 ft of ribbon wire + connector(s) to make the
C2325a.
Price: 4.95$
”
•
Supply power to the MSCC11 board
When reading MSCC11’s assembly manual, we find out that MSCC11 is powered up using a
6-AA NiCd battery pack connected to the battery connections on board: J52 and J53. J52[1]
and J53[1] should receive plus terminal and J52[3] and J53[3] minus terminal. (using
notations as in the manual page 9)
The 6-AA NiCd battery pack can be the Talrik Junior’s one, purchasable at
MEKATRONIX™ sellers’.
2.
Connect encoders to MSCC11 board
On MSCC11 board, plugs J44 to J51 can receive the 8 digital inputs. A header is composed of
a processor PortE input (inner rail), a Vcc input (middle rail) and a ground input (outer rail).
The connecting is done as follows:
S1
5V
S1
Grnd
5V
J47
J46
J45
J44
Grnd
S1
5V
Grnd
S1
2.7 kΩ
5V
Grnd
2.7 kΩ
Vcc
Vcc
A I B Grnd
A I B Grnd
ENCODER 2
ENCODER 1
ECE 8873
Georgia Tech Lorraine, School of ECE
- 23 -
IZAAC / LEMARCHAND / PERRIN / PIEDNOIR
January the 23th 2003
Design of Differential Encoders for the Talrik II Robot
V. The algorithm
A. How to count the ticks?
The most difficult part is to detect when the value in the encoder changes, and so we need to
make the micro controller check very carefully what happens in the encoder.
Depending on the type of wheel chosen, the number of ticks per rotation varies between 256
and 2,000 and the maximal frequency accepted by the encoder is about 100 kHz, which means
that it is able to count a speed between 100,000/2,000 = 50 and 100,000/256 = 290 rotations
in a second.
The diameter of the robot wheel is 7.4 cm.
π*7.4*50 = 1162 cm/sec = 11.62 m/sec and π*7.4*290 = 6741 cm/sec = 67 m /sec !
These maximal speeds are pretty high for a robot such as the Talrik II.
We need to use this values in order to set the frequency on which the micro controller will
check what happens in the encoder.
In order to check if a tick has appeared, we should check with the micro controller at a
frequency which is at least twice as high as the encoder’s one (if possible)
Current
1
1
0
0
1
1
0
0
1
1
Time
In red: impulses or ticks in the encoder
In black: instants when the micro controller checks
ECE 8873
- 24 -
Georgia Tech Lorraine, School of ECE
IZAAC / LEMARCHAND / PERRIN / PIEDNOIR
January the 23th 2003
Design of Differential Encoders for the Talrik II Robot
We can see that, at this frequency, when the value measured by the controller changes, it
means that a tick has appeared. The number of ticks is the total number of changes in the
values measured by the micro controller divided by 2.
A good way should be to create a secondary module, whose aim should be to count the
number of impulses received and to store them until another module asks for this number.
B. How to measure the position
We have seen that it should be very useful to use a first module to count the number of ticks
emitted by the encoders.
The first operation to measure the position is to evaluate the distance and the way the robot
moves.
Due to the flip-flop device mounted between the encoder and the micro controller, we can get
the way of the motion very easily.
The distance is easy to get too:
Assuming that
∑ ticks
is the total number of ticks emitted by the encoder (and received by
the micro controller) and n the number of holes in the encoder wheel,
∑ ticks
n
is the number
of rotations that the wheel has done.
So, the distance (D) is given by the formula:
D=
where R is the radius of the wheel =
2.∑ ticks.π .R
n
7.4
= 3.7
2
This works quite very well if the robot goes straight.
If it turns, we have to compute the angles between the straight position and the actual position
for each wheel.
ECE 8873
Georgia Tech Lorraine, School of ECE
- 25 -
IZAAC / LEMARCHAND / PERRIN / PIEDNOIR
January the 23th 2003
Design of Differential Encoders for the Talrik II Robot
C. How to measure the speed
The speed is equal to the distance divided by the time, as this formula shows:
v=
dx ∆x
=
dt ∆t
We have already explained how to measure the distance.
We need to create a module which will ask the first module the number of ticks it has
received, at a very precise frequency.
This time period should be much higher than the one on which the first module checks the
signals of the encoders (between 50 or 100 ns for example).
This module will ask how many ticks have been emitted, will compute the distance covered
by the robot and divide this value by the time period.
Example:
Given that the encoding wheel has 2,000 holes, at a time period of 100 ns, the module gets
6,000 ticks then 8,000 then 6,000.
It means that the wheel of the robot has done 3 turns in 100 ns, then 4 during the same amount
of time, then 3 again.
The instantaneous speed will be:
First 3* π * 2 * R/100*10^(-3) cm/sec
Then 4* π * 2 * R/100*10^(-3) cm/sec
And then 3* π * 2 * R/100*10^(-3) cm/sec
The hardest part is to choose an accurate frequency. There is a trade-off between a high
frequency demanding much on the CPU and a low frequency that can result in a loss of
information. We have seen earlier that the maximum frequency accepted by the encoder is
100 kHz, so we shouldn’t choose a frequency higher than 200 kHz.
ECE 8873
Georgia Tech Lorraine, School of ECE
- 26 -
IZAAC / LEMARCHAND / PERRIN / PIEDNOIR
January the 23th 2003
Design of Differential Encoders for the Talrik II Robot
D. Program for the onboard computer
The software is made of two functions that are triggered through timers.
Wait for x milliseconds
Where x < (2.Max frequency of Channel A) -1
1
Measure the state of the two signals
No
Signal A changed state?
Yes
Test Way Signal
Way Signal is high
2a
Way Signal is low
Increment T register
2b
Decrement T register
Wait for y.x milliseconds
Where x is the same x from the other function
And y < maximum value that T register can count
1
Compute the distance in millimeters
(T Register contains 2 times the number of holes counted)
2
Zero T register and update position value
ECE 8873
Georgia Tech Lorraine, School of ECE
- 27 -
IZAAC / LEMARCHAND / PERRIN / PIEDNOIR
January the 23th 2003
Design of Differential Encoders for the Talrik II Robot
VI.
Ordering
Here is a summary sheet of all the parts that need to be ordered:
ORDER CONFIRMATION
Recipient : Material needed to mount a differential encoder on robot Talrik II™
Contact
Dr. HECK
Delivery address
Company
Georgia Tech Lorraine
Account no.
Date
xxxx-xxx
29 janvier, 2003
Georgia Tech Lorraine
2, avenue Marconi
57000 METZ
FRANCE
Address
2, avenue Marconi
Post code
Town
57000
METZ, FRANCE
Our reference
Position
Quantity
Terms
Method of delivery
Description
Quantity
Delivery terms
Price
Discount %
Your reference
Total
Where to buy
1
MSCC11E2U: Unassembled
board & components with
MC68HC811E2
50
2.7 kΩ (+/- 10 %)
resistors
2.95
euros
=
2.80$
0
2.80$ Farnell
1
C2325u: 6-Wire Serial
Ribbon Cable KIT: 3 ft of
ribbon wire +
connector(s) to make the
C2325a
4.95$
0
4.95$ www.mrrobot.com
1
AANCSB6: 6-AA NiCd
battery pack
11.95$
0 11.95$ www.mrrobot.com
1
HEDS-9040 Hewlett-Packard
3-way optical encoder
24.97
euros
=
23.67$
0 23.67$ Farnell
29.95$
ECE 8873
0 29.95$ www.mrrobot.com
Georgia Tech Lorraine, School of ECE
- 28 -
IZAAC / LEMARCHAND / PERRIN / PIEDNOIR
January the 23th 2003
Design of Differential Encoders for the Talrik II Robot
1
Piece of wood for the
base
About
2$
0
About In Cora
2$ supermarket or
Castorama
Total
exc.
66.32$
VAT in %
TOTAL
66.32$
S = REQUESTED DELIVERY
B = REQUESTED DELIVERY TIME
REST = NOT DELIVERED
As some parts are ordered on French sites and others on American ones, we converted euros
prices in dollars with a ratio of 1$ = 1.055 Euro.
We assumed that material such as glue, screws and bolts are available in the laboratory.
Resistors are ordered in 50-quantity as it is not possible to buy smaller packs.
We ordered non-assembled MSCC11 board and C2325 ribbon. Both are available assembled.
The total with assembled MSCC11 and C2325 is 107.32 $.
Also, there may be some additional costs due to shipping charges and VAT.
ECE 8873
Georgia Tech Lorraine, School of ECE
- 29 -
IZAAC / LEMARCHAND / PERRIN / PIEDNOIR
January the 23th 2003
Design of Differential Encoders for the Talrik II Robot
Conclusion
To design a differential encoder on Talrik II we first analysed physical constraints of the robot
(space around wheels, positioning sensor), then we compared various available coders and
chose the encoder that fitted our requirements.
Then we determined how to interface the coders on the robot by analysing electrical
constraints through documentation of MEKATRONIX robot and boards. We made an
estimation of material costs.
Finally we developed the algorithm to compute the position and the speed of the robot.
The resulting documentation provides :
-
an ordering list of needed parts including prices and where to buy them,
-
detailed explanations on how to mount the encoders on the wheels and how to
interface them with the robot.
-
a detailed description of the algorithm to compute the position and the speed of the
robot
-
an attached file : Talrik.exe, a video sequence showing the assembly procedure of the
encoder on the robot as described in part III above. To run the video, double-click the
file. (This video was modelled and rendered using LightWave3D and compressed into
a stand-alone EXE file with BINK VIDEO) The distances used to model the parts are
the real ones: the schemes of the part III can be used to build the device.
ECE 8873
Georgia Tech Lorraine, School of ECE
- 30 -
IZAAC / LEMARCHAND / PERRIN / PIEDNOIR
January the 23th 2003
Design of Differential Encoders for the Talrik II Robot
-
References
Robot’s website :
www.mekatronix.com
Talrik II’s assembly manual :
http://www.mekatronix.com/manuals/talrik/tam.pdf
Talrik II’s user manual :
http://www.mekatronix.com/manuals/talrik/tum.pdf
MSCC11 assembly manual :
http://www.mekatronix.com/manuals/PCB/mscc11am.pdf
MRSX01 expansion board assembly manual :
http://www.mekatronix.com/manuals/PCB/mscc11am.pdf
MRC11 microcontroller assembly manual :
http://www.mekatronix.com/manuals/PCB/mrc11am.pdf
MEKATRONIX’s distributors :
www.mrrobot.com
HEDS-9040 datasheet :
http://www.farnell.com/datasheets/6186.pdf
Collins Dictionaries :
http://wordreference.com/
Image synthesis program :
http://www.newtek.com/
Components:
http://www.farnell.com
http://www.radiospares.com
ECE 8873
Georgia Tech Lorraine, School of ECE
- 31 -