1
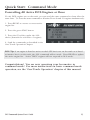
2
Chapter 2
Quick Start In Command Mode
Overview................................................
Using The Remote...............................
Accessing The Engine.........................
Selecting & Starting The Engine.......
Making The Engine Go......................
Reversing Direction.............................
Basic Sounds.........................................
Shutting Down The Engine...............
"Jumping” Between Active Engines..
Controlling ALL Engines At Once...
14
15
16
17
19
20
21
21
22
22
23
DCS Command System User’s Guide
Quick Start: Command Mode
Setting Up And Using DCS - An Overview
Setting up the DCS system for simple command mode operation is quick and easy. The
eight steps below are all that is required to begin operating a single Proto-Sound 2.0
equipped engines in command mode on a simple layout. Each step is explained in more
detail on pages 16 - 23.
1. Connect the TIU Voltage In Channel to the Transformer Terminals.
Connect the black negative (-) and red positive (+) wires from your transformer to the
TIU’s black and red banana jacks (respectively) on the “Fixed Voltage In1” channel.
Make sure the connections are tight.
2. Connect the TIU Out Channels To The Track. Connect wires from
the red and black “Fixed (DCS) Out1” banana jacks to your track or lock-on. If you
connect directly to the track, red (hot) must be connected to the center rail and black
(ground) to the outer rail.
3. Put four AAA batteries in the handheld.
4. Put a Proto-Sound 2.0 equipped engine on your track.
5. Turn on your transformer and increase the throttle to 18 Volts (or
between ¾ and full power for older transformers).
6. Add the engine into the remote’s memory - see Using The Remote and
Accessing The Locomotive beginning on page 16.
7. Select and Start Up the engine - see Selecting and Starting The Locomotive
on page 18.
8. Make the engine go by rolling up the throttle - see Making The Engine
Go, Reversing Direction and Basic Sounds beginning on page 20.
DCS Command System User’s Guide
15
Quick Start: Command Mode
Using the Remote
When using the thumbwheel to scroll up
and down, whether to change a locomotive’s speed or to scroll through features,
you should roll gently over the thumbwheel; do not press too hard. The
thumbwheel is pressed down to select
and activate features, as discussed in the
“Advanced Locomotive Operation”
section.” Do not attempt to scroll and
press at the same time.
When accessing Menu functions, you will
use a combination of button presses and
thumbwheel scrolls to access and move
through menus, as described in the
“Advanced Operation” chapter.
The two Fixed and two Variable channels of the TIU are built differently and serve different functions, although the same DCS signal is sent to the track on all four channels.
Variable channels have internal circuitry that allows them to vary track voltage from
within the channel. That means you can vary the voltage on tracks connected to a
Variable channel from the DCS handheld. These channels are perfect for tracks on
which you want to run conventional mode engines (e.g., original Proto-Sound, PostWar,
etc.) via the DCS handheld.
Fixed channels are straight throughputs. That is, the voltage that enters these channels is
the same voltage that comes out, with no voltage variation within the TIU. These channels are ideally meant for command mode operation only. There is, however, one way to
set up Fixed tracks so that you can operate conventionally via the DCS handheld. If you
are using a Z-4000® to power tracks connected to the Fixed channels, you may set up a
Z-4000 remote receiver (Item No. 40-4002) for those throttles. The DCS handheld is
designed to communicate with the Z-4000 remote receiver, and it can vary track voltage
that way. Please see the “Advanced Wiring” section of this manual in the “Universal
Locomotive and Accessory Operation” chapter for more information about this option.
16
DCS Command System User’s Guide
Quick Start: Command Mode
Accessing the Locomotive
NOTE: When you first
power up the track, your
Proto-Sound 2.0 locomotive
remains silent and dark.
This is normal; it is in
Command Mode and will
not start up until you tell it
to. The instructions below
With a single M.T.H. Proto-Sound 2.0 engine (and tender
will tell you how to access
if the engine has one) on the track and voltage applied to
and operate that locomotive.
the track, press the Menu Button and complete the steps
diagrammed below.
When a Proto-Sound 2.0 engine is placed on a track connected to a TIU, the DCS system will bring it up in command mode by default. Because DCS command operation differs in some fundamental ways from conventional
operation, please read this section in full before running
your trains in command mode.
1. Press the Gray MENU
button to bring up the four
main menus in the DCS system.
2. Using the thumbwheel, scroll down the
menu list until you arrive at System.
3. Press the thumbwheel to enter the
System Menu. Your screen should reveal
at the bottom that you are in the System
Menu.
Note: Pressing the S2 Softkey
under S/U provides a shortcut
to the Engine Setup Menu
DCS Command System User’s Guide
17
Quick Start: Command Mode
4. Scroll and select Engine Setup from the
available choices in the System Menu.
5. Scroll and select Add Engine from the
available choices in the Engine Setup Menu.
Wait until the LCD says the engine was
added and returns to the engine menu
addressing that engine. Because M.T.H.
features the SmartRead system, your
engine tells the TIU its name and you do
not need to enter any information in
order to add the engine. The LCD will
show you the engine you have added.
If you want to add additional engines,
remove the added engine from the track,
place the new engine on the track, and
repeat steps 1 and 2. You need to
complete these steps only once per
engine, when you first add it to your
system, not each time you place a
previously added engine on the track.
Adding Many Engines
6. Scroll and select Add MTH Engine
from the available choices in the Engine
Setup Menu.
If you own several Proto-Sound 2.0
engines and anticipate buying many others, you may find it convenient to establish a dedicated programming track
rather than removing all other engines
from your track every time you add a
new one. Please see the “Advanced
Wiring” section of this manual in the
“Universal Locomotive and Accessory
Operation” chapter for instructions.
See the System Menu/Engine Setup section in the “Menu Operation” chapter(s)
of this book for instructions on renaming, renumbering, or deleting your
engines.
18
DCS Command System User’s Guide
Quick Start: Command Mode
1. When all Proto-Sound 2.0 engines are
added, put the ones you want to run on
the track and press READ to put them
on the active engine list.
3. Press START UP (3 on the keypad)
to activate the lights and smoke and
initiate the engine start-ip sounds.
2. Press the green ENG button and
scroll the thumbwheel until the arrow
points to the engine that you want to
address. Press the thumbwheel to select
the engine.
4. Your locomotive is now ready to run.
You need to press the START UP button every time you want to run an engine
in a new session.
DCS Command System User’s Guide
19
Quick Start: Command Mode
Active and Inactive Engines
Once an engine is added to your system, it will remain in place and always appear on the
LCD engine list until you delete the engine. To make it easier to manage the engines
being used in a given session, there are Active and Inactive engine lists. Engines currently
in use are on the Active list, while other engines wait on the Inactive list until they are
activated.
You may update the Active and Inactive lists any time you change the locomotives on the
track simply by pushing the READ button, or you may change the status of each engine
individually.
To activate an engine on the inactive list, scroll so that the arrow is pointing to it in the
engine list and press the thumbwheel to move the engine to the active list. Proto-Sound
2.0 engines must be on a powered track to be activated.
To inactivate an engine on the active list, scroll so the arrow is pointing to it in the engine
list and press the S1 key (under INA) to move the engine to the inactive list.
DCS Tip: Operators who remove engines from the track when not in use will find
READ the easier method, while those who park their engines in a roundhouse – still on
the track – will prefer to change engine status individually.
Making the Engine Go
There is no neutral in DCS command
mode; the default start-up direction is
forward. You simply roll the thumbwheel up to make the locomotive go
forward. The LCD display on the DCS
remote will display the engine’s speed in
SMPH (scale miles per hour). Roll the
thumbwheel down to slow or stop the
engine.
20
DCS Command System User’s Guide
Quick Start: Command Mode
Reversing Direction
Because there is no neutral in DCS command mode,
DCS engines go directly from forward to reverse.
There are two ways to change directions in command
mode:
Press the red DIR (Direction) button while you are in motion to drop the locomotive’s
speed to 0 smph and change its direction. Wait for the engine to come to a complete
stop, then roll the thumbwheel to the desired speed in the new direction.
OR
Scroll back to 0 SMPH, wait for the engine to come to a complete stop, press DIR, and
then roll the thumbwheel to the desired speed and the new direction. Pressing Direction
once takes you directly from forward to reverse and vice-versa.
If you roll the thumbwheel to 0 SMPH then
resume motion without pressing Direction, the
engine will remain in its current direction. If you
mistakenly press “Direction” to stop the engine but
want to continue in the same direction, press
“Direction” one more time.
Note: If you roll up the
thumbwheel before the engine
comes to a complete stop, the
engine will continue in the same
direction.
Basic Sounds
The yellow BELL and white W/H buttons operate the bell and horn the same way in
command mode that they do in conventional mode:
Horn/Whistle - The horn/whistle will sound for as long as you depress the button. It
will stop when you release the button. The Proto-Sound 2.0 horn/whistle’s ending
sounds are designed to vary with the amount of time you hold the button.
Bell - To sound the bell, firmly press and release the Bell button. To turn the bell off,
press and release the Bell button again. The bell will continue to ring from the time you
turn it on until you press and release the button again to turn it off. When you turn it off,
the bell sound effect fades out, ringing fainter until it stops, just like a real bell.
DCS Command System User’s Guide
21
Quick Start: Command Mode
Shut Down
1. To shut down the locomotive at the
end of a session, stop the engine.
2. Press the Shut Down key (6) to turn
off the sound, smoke, and lights. The
locomotive will play a short series of realistic shutdown sounds before it falls
silent. Repeat with all active engines.
Note that power is still on the track after
shut down.
3. Press and hold ON/OFF button (S5)
until the LCD shows that the handheld is
saving data. It will soon turn off. If you
forget to turn off the remote, it will
power down automatically after 10 minutes of non-use. Turn off your transformer.
Moving Between Active Engines
When more than one engine is addressed
and operating, you can easily move among
the different engines and control each in
turn.
1. Press the green ENG button.
2. Scroll the thumbwheel until the arrow
points to the engine you want to address,
and press the thumbwheel to select it.
22
DCS Tip: When you press ENG, the
arrow will point at the last engine
addressed, allowing you to jump easily
back-and-forth between two engines.
This Jump function works like the
“Last” or “Previous Channel” button
on a TV remote control.
DCS Command System User’s Guide
Quick Start: Command Mode
Controlling All Active DCS Engines at Once
If only DCS engines are on the track, you can send the same command to them all at the
same time. To issue the same command to all active Proto-Sound 2.0 engines simultaneously:
1. Press READ to ensure a correct active
engine list.
2. Press the green ENG button.
3. Press the S3 softkey under the ALL
choice (beneath the scroll list of engines)
4. Send the commands as described in the
One-Touch Operation Chapter.
DCS Tip: if an engine is listed as active on the LCD but is not on the track or is listed
as inactive but is on the track, the ALL command will not work. Press READ to update
the active engine list. Active TMCC engines will not respond in ALL mode.
Congratulations! You are now operating your locomotive in
command mode! For more instructions on basic command mode
operation, see the “One-Touch Operation” chapter of this manual.
DCS Command System User’s Guide
23