1
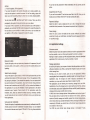
Poftable 9.7 inch MID
User Manual
Thank yd vsy mrdr fur dr@sing this model. Previous .eading to this
manual is vsy imporftt for your first using.
All the qEnt stErt be exactly corect, but they are all kep updating,
incfudng tt€ sdbe, ouuook and features. And we would not give any extra
press*atir tu ttE pcible modifiction,
IibEI Ph* tm
off the unit before charging. The indicator @uld be red
full charged. The charging process
wlH dragiE id tm to be green when
wflH last tD 3 lE s.
tAnentinI
a Do mt stre lrE unit in high temperature, wet or dusty room.
a FEEtlhe mft from dropping or being collided, or the TFT screen would
@Edo f'E drc the proper volume, high volume would injure your eaE.
O Pt€E dErge the unit when it:
A- The battery icon in red (power shortage)
B- Tum off automatically
c.
Function key out of work
lAttention I
we won't be responsible for the unit damage caused by any other
non-standard adaptor.
*
Non-WaterProof
be
1. Basic Function
1.1 Hardwarc specification
2. Unit Details.........
......................_........ 4
T-flash 128M-32G
4.1O Date & Time....-.,...-.
4. 1 1 About device......--------
...............,,,..,................26
27
1.2
Sduare
OS
Android2.3, android3.oU/I
Browser
Gooqle
MKV(H.264HP),RM/RMVB,
FLV. AVI
1 /2 suoDort 1080P
MP3,APE,FLAC,AAC,AC3,W
Video
Music
Pictures
E-mail
GPS
IPEG.BMP.GIF.PNG.TIFF
Gmail
Gdddle mao
2. Unit Details
3. Before Using
3.1 Battery
The first two tjme's charge please make as 10 hou6, kom th€
en
only charge 3 hou6.
- :
:
-e, vo-
(Notel fhis taID u* built-in polymer battery, exclusive dBrgs is a
must fd unit drarging.
-- Power 5ar wrll roll when charging.
-- Pows bar will stop roll and turn to green when charging nnisrE.
-- In order to prolong the seruice life of the MID, please only dwlE : eaeexhaust
5e baftery for
3.2 Turn
Ltrg
the firet two times.
onloff
press 'Power' to turn on/off the MID.
3.3 Connect with
PC
MID can be connected with PC via USB cable, then, the user can transfer ms:
pictures and other files between MID and PC. These files can be stored in TF c=
or MID flash.
Warning ! Do please follow your PC's instruction when you connect the MID wit:
it or its memory card to avoid files
damage.
1
2
3
4
5
q
7
I
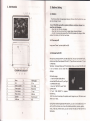
Menu
,Esc
I
' Desk top
s-tDr "
bLto"
: Front carl€ E
i Rearcam
Povref
Smaker
I USB
I
'l
hosr
'Z
'i
't
':
':
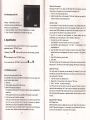
USB cable usage
1. Use the incident USB cable to
HDMI outpul
Micro USB
connect the MID with your PC, you'll get
a CONNECTION notice.
2. Open the "NOTICE", touch "USB
Reset hole
CONNECTED".
Tf slot
F'mh^n6
3. Touch "USB DEVICE' to prepare
trensferring.
After the above three steps, the system would recognize your USB device and
rItC
show you a notice.
DCin
SIM slot
During files transferring between MID and PC, you can not visit USB device or TF
card via MID, and also can not use the related application (Gmera, gallery,
music, video etc). What's more, you can not share the data on MID with PC via
USB cable.
Network Information:
3,4 Disconnect with
Normally, if the Wi-Fi is on, when you MID detect Wi-Fi web opened, the web
should show on the below of it. You could touch it direcuy to link.
1. If Wi-Fi is not closed, please open it.
2. Select the web inform on the screen of "Wi-Fi set", then yw Gn cncel to
select the options to quit receiving data.
PrC
! Please follow yilr PCs
instruction to disconnect USB d€vte 6
memory card to avoid fi16 lod1. Open the "NOTICE', toqdr'nn r OFF Lr$ DEV]CE orTFCARD,,.
2. Touch "TURN OFF USB DEVICE TTFCARD'@ grb menu.
Warning
Add Wi-Fi web:
You could add Wi-Fi web so that MID can remember it, the related
-f6y data
and link wit}l the web auto when come to the coverage. If thre 6 rct a U/i-Fi
network name (SSID) broadcast, you need to add the network to @r€t. And
you @n add the web where it is not covered by the Wi-Fi,
If
you want to connect the web protected, you should conta(t wjth ilre
administEtor to get the password or other necessary safety data.
4. Specification
1. If
you do not open Wi-Fi, please open,
If you add Wi-Fi when first set MID, the Wi-Fi
er!d, r.irE6 8. i€Esk, privacy and other
application mode in 'SETTINGS' |]ffi(settingsl foucfr I
(the top .i?tu ffi'
r :Jts main menu, and then
You can adjust MID display,
3
lthe rightmost) to the 'SETnHGS'
You can also enter the 'SETTTNGS"
."€L
n,ra h
=.rcr
I,
then
O.
Open wi-Fi and connect with Wi-Fi yreo
If you add Wi.Fi web when y@ set tlID
=E
you can come to step4 directly.
1. Touch set:
2. Touch wireless, web, and Wi-Fi
bt
fr
m
4.
Touch add Wi-Fi web on the screen
of
is open already.
"Wi-Fi Set". ( On the bottm
cf :ie
web detected list)
3. Input the SSID of the web, if the web is protected, Please toudr 'sfetyoptions then touch the deployment of security measures on the netrc.t
type.
4. Input all the necessary security data,
5. Touch save.
MID should connect with the wireless web. And the system should sye all tlE
data you put in. So when you come to this coverage, MID should connect auto.
Delete Wi-Fi web
4.1 Wireless and web
3.
2.
You could @ncel Wi-fl web that you kept already. For example, if you do not
want MID to connect the Wi-Fi web auto, or you will not use the web any mffe,
tu trc,
the Wi-Fi is open. And
re
Select Wi-Fi and you Gn open it
The equipment should En to firld ttE lt'i-F rrb.-DE web is protected with
locked icon.
If the equipment find a web y@ E b6.e, t{ID sold connect with it.
Touch the web and it @uld be mnedeaIf the web is open, the system sh@ld 6k tru if yB rent to link with this
web. Then you can just toudr link. If dE neb s piot(ted, the systerm
should alert you to put in the passsd r ct s a"d4e.
After linking the web, you could -t m Yyr-Fi: ".Ere olrthe web on the screen,
the speed, sfety, address and ffi
thi(E rejat€a 6 ihe web."
you could cancel it from MID.
1. lf you do not open wifi, please open it.
2. Keep touch on the web name on the screen of "Wi-Fi set:
3. Touch 'not save" the web on the dialog.
Your MID could connect with kinds of web and equipment include 3G web for
video and data transferring, Wi-Fi web, wire and bluetooth data tGnsfering.
And you can connect MID with computer so that you could send d@ment from
MID and though USB connection or portable mobile network platfom to share
the data.
Advanced Wi-Fi Setting:
Wi-Fi sleep term:
Select the options to open a dialog and you can set "Sleep when the screen is
closed"," sleep when charging" or " never sleep" to quit connect with Wi-Fi web,
If you do not use sleep term, more power will be wasted.
'MAC address:
This is the MAC address that MID
@rEd wi-Fi
IP address
This option is for you to 6nned to fvi-f netErk for MID specified Internet
Prottrol ( unless you st MID IP wiut *djE aleadY)
IP setting:
If you select static IP already, Y@ @n r ttp 1P S€ltings" to manually enter
the IP address of MID and ot'E Ddwk s.itirEs, ratlEr than using the DHCP
protocol for Wi-Fi network of its m
Connect with Bluetmth equip(Ett
ndEt
s€tilgF.
ttrhnology. With this
Bluetooth is a short-6.8e wirEjs mtatirc
technology, the equipmst @ld qdEBe ttE (ft in 8 meteB.
The most common BrEtooti dtriE, itdJ(3€ a all s listening to music for
headphones, car hands-frE ktts, 6 rE[ 6 b@9s and cell phones and other
portable devices
There are many kinds of protools tD d€frE mudGtion standard Bluetooth
devices with Bluetmth GPat,illE
r€ed to @st the Bluetooth wireless
To connect to a Bluetooth devi-,
'ut ffi xID deyic6 connected, you will
devices of MID. The fiEt tire with tt!€a
need to both 'paired' I that ttEY stdsgrd i'tr to establish a secure
the paired device.
connection with each other. Lattr, yo @ cilT sEt
Turn it off when do not use bluetoath tD #rd tt€ battery life. You may also
need to turn off Bluet@th. In flight nrcde" *trott! is tumed off.
Stus icon
The following "status bar" on behaff dttE B!ffit
E
I
conn".,,o
bluet@th alcady
Open or close bluetooth
1,
2.
Press Menu, then touch the s€ttings tD
Touch wireless and web wtrk.
3.
Select or quit bluetooth and
yil a
Change the name of bluetooth:
opa ttE 'S€ttings" application
ogq!
r de
it-
onnects with other
MID have a common name of bluet@th ddal}y, Wfs
tlE tEre',llD
m related equipment.
equipment though bluetooth, you ddd
fy.
You could change the name to make it 65ir b dst
1. Touch setting to open setting appli@tim.
2. Touch wireless, network and blu€tooth qE by me. And it will open
"bluetooth setting" screen.
3. If the bluetooth is not open, pl€e seled Brr€bdr and open it.
4. Touch the name of bluetooth, ths put h m re and the touch yes.
Make the bluetooth of MID paired.
not make the MID connected with the other before the MID paired. After
they paired, the status should continue unless you quit it.
1. Touch setting so that you can open the setting appliction.
2. Touch setting of wireless, network and bluetooth one by m.
3. If the bluetooth is not open, please select bluetooth and opsr iL Your MID
should scn the bluetooth of other equipment auto in the cwerage.
4, If you Gn not find the equipment you want to pair, then yN stHld *t the
other equipment in the status of "detected"
5. If you MID stop scn before you make the other equipment in the slatus of
"detected-, please touch scan to find equipment.
6. In the list of' bluetooth setting", touch the ID of other equipmfft, ttH the
MID could be paired. If the system ask you to input the password' plee Ey
the nomal ones such as " 0000 " ot "1234" Or co6idsing the
instructment of your bluetooth setting. If paired successtully, the tllD sh@ld
get connection with the related equipment.
You can
After connecting with the bluetooth
You can connect bluetooth equipment after paired. For example, yil @ld
change the equipment or reconnect the MID when you come to the @rage.
1. Touch setting to open the setting application;
2. Touch setting of wireless, network and bluet@th one by one;.
3. If you do not open bluetooth, please select and open it;
4. In the list of equipment, please touch to connect the equipmmt paired
already. If there is no equipment you want to pair in the list, pt6* toudr
scaning to find the equipment. If the MID is conn'ected w-tth the equipmt
already, it shows connected
You can quit pair of the equipment to clear all the paired infmatim'
1. On the screen of the bluetooth setting, keep touch on the equipmst;
2. Touch cancelling pair in the menu to quit pair with the bluetooiir.
Connect with the virtual private network
When use virtual private network (VPN), you can be protected frm extemal
connections to the local network of resources within the network. BusiEc,
schools and other institutions are generally deployed VPN; so, even ifth€ us is
not connected to the park or a wireless network, you cn al$ aG locl
network resources" There are many systems that Gn prot6t the VPN' Some
system use security certificate or other programms so that the web cn b€ used
by the one authorized only.
Add Virtual Private Network (VPN)
1. Open setting application by touching;
2, Touch setting of wireless, network and bluetooth one by one;
3.
4.
5,
6.
Touch the menu add VPI{;
Touch the style of VFr' y@
1,
mnt;
Following the adminstEtor of dre rreb, -t t}E VPN setting on the screen;
Touch save menu and th€ s}dsn rif kEep ttE VPN in the list
Connect with VPN
1. Open setting appliGt m by tqrdr;
2. Touch setting of wirels, rEtwk
-d ilrefDdr one by one. The system
should show the VPN yu add aa.Ed, o ttE ffi;
3. Touch the VPN you mnt to qrr€rl rri6;
4. Put the data required in the dalog -d ttE tDrrdr @nnect;
After connectwith to VPil, )Du rt be tofumed qned already on the status. If
stop connection, you will be informed afso- And yqr @n return VPN setting to
get connection again with ttP irfomr*in
Quit connection to VPt{
Open the "notifictim'pand, nrd tsE turdr ttE Hifi@tion" panel and then
touch the notice in the VPt{ sn€rtim slahE
Edit VPN
1.
2.
3,
4.
5.
6.
Open setting applictions by tildiE;
Touch setting of wirel6s, netymk VPi sdiEr Attd dre system should list
the VP you add already;
Keep touch on the VPN you mnt to edt;
Touch Edit network in the dialoq;
Edit VPN setting as required
Touch keep menu
3.
4.
5.
Open setting applications by tqrdl.ng;
Touch wireless, network VPil s€lting. And ttE slstetn
add already;
Keep touch on the VPN yw mnt b dd*;
Delete the VPN in the dialog;
And then there should be a dialog to as* tou aF.J are
please touch yes.
6.
"ok"
7.
Edit a name for the certificte and touch "ok".If you do not s€t a pasword.
The system will alter you to do that. Put in the new password ard tqldr y6.
Then you @n use the network protected. And for security p.oblsn, the
system should delete the certificate auto.
Connect to Mobil Network
Connect the 3G network receiving panel seruice you buy frcm the
sfidld
sre
list the VPN you
to delete the VPN,
Using security certificate
If youf organization's VPN orWiF'i nehEt -t Lp srity certificates, you need
obtain and save it in your MID. Thm cn pa. rit'l th€ VPt{ or Wi-Fi.
If your network administEtor allos )rcu to dilmload the certificate from the
site, then download the certificte, yil will be prunpted for the password
credential storage.
Install the security certificate from TF card of MID
wird6
service supplier with the OTG connection, the system should configured to u*
your provide/s 3G network on the data transmission.
Your MID is configured to use many Mobil netlvork operatoE. ( This MID $pport
EVDO/WCDMA/rD-SCDMA and other 3G network standard) Ifyou cn notfind a
network after the OTG connect with the 3G panel after power opened, ple6e
contact with the 3G operator to get the details of the connection infolmti(n.
The mobil network available will change due to different place, In the initial
state, the MID is configured with the one which r*eive the data most quildy.
There are different icons in the status list to tell you the network style )EU
I
I
Delete VPN
1.
2.
2.
3.
4.
5.
Copy the certifiGte from your computer to the mt dirEttry of TF crd ( it
means not in a folder)
Open setting applications by touching
Touch ID and sfety;
Touch "Install from TF card"
Touch the name of the certificte you want to install;
If the system ask you to put in the password, please do as require and tocft
Mdhil 1G N^ cidnal
Mobil 3G Fly model (With this model, the bluetmth is
E
Mobil
3G
network using
a
Mobil
3G
network roaming
If you add Google account in your MID and connect with the Google *ryke I
that you can set the Gmail, calendar and backup togethet then the kil d the
network should turn white; If you do not have a Google account, tr)Du Mnect
the one not linked with the WI-Fi network, the icon of the 3G mobile network
should stay gEy.
When you connect with the slow network and you are receiving large data, it is
better for you to delay the task and start it when you connect with the network
of quick speed.
Enabled Data
Quit to select this option to prevent your MID to tEnsfer data over any mobile
l1
I
I
network, If you are tEveling, without using data plan, and do not want the
lcal mobile networks charge y@ for data 6age, then this setting is useful,
Uncheck this setting does not prevent ysr ilID
(such as Wi-Fi or Bluetooth) to tEnsfs data.
thrugh
other wireless networks
First, You must be equipped with a network interface( which @lled systal head
Make sure the network you are using now
1.
2.
Open the setting appliction by tildring it;
Touch the name of wirels, n€tsffik and motile
ret connection one by one;
The operation will select name of y@r wiEl6 $pplitr in the list.
Stop data service when Gming
Roaming data
After quit selecting the optim, if yo @ tlct Yisit the network of your own
operator, the system should *@ your r,lID Eiving data from other opectors,
If you are not in the network @ Ey of )uJroDsau. you cound be forbidden to
get data from other supplis. If yor brEi|E dc not include 3G data.roaming,
this action will help you mtrd dE ost oa 3G llttrn€t access.
1. Open setting appli@Um by toudt it;
2, Touch the name of wirds, network and mobib net connection one by one;
After canceling to select data roaming, yo @H get the data alsb by wi-Fi.
Edit new connection
Name of the connection
m which you can select the
Select this option and you @n open API{ ffi"
mobile access point for your configuEtir- Arld fo. ttE usinq method of the tool
on the screen, you could ask helP fom losr Asato(. You need to get the APN
of your connection (APN)
and related setting if you want to dBngE tlE m
after checking with your supplier.
1. Open setting application by toudting it;
2. Touch the name of wireless, netwtrk. and l'lotil nctwork;
3.
Touch the APN and edit lt.
ort@ch the
APN. Touch the options that
ned edit,
llw
I
and then touch set new
and )ou @n put in the APN setting
from the wireless supplier
4. After edit, you can press menu I and yo cDH touch save
5. lf you set new APN, you muld u* it after yd tqJdl APN on the screen.
Netwofk Operator
srdl
for and display your MID
with 3G mobile network module with a mpatible mobile network, or
automatically select the prefered mobile network. For opeGtoE, the difference
between the specific charges. please consuft ydr opeEtor
Select this option opens a screen for systm tD
If you have a high require on the network speed and the WI-Fi and 3G network
you have already @n not receive your requirement. the MID have another
connection directly. It is same connection with your pc by Ethmd.
also), one side is One side in your home network port on the otlrer end
connected to the OTG interface unit. Then the MID could conned to intemet.
But you need set it up:
The icon followinq shows the status with the Ethernet
E
E
Can not get the Ethernet signal
Get connection to the Ethernet
Ethemet setting
Touch 'set- then it shows "wireless and network Ethernet set'tlH tNdr
Ethemet *tting, Then if your wire web is open, MID should connect auto.
Static IP Settings
If you need to enter the IP address in a wired Ethernet connection to tlle
environment, please contact the administrator to enter the IP ( it is the $me
with Pc).
Touch menu "setting", " wireless and network", 'Ethernet setting", 'Static IP
setting" and choose using the static IP. Enter the IP address, gateway, net m6k,
DNS1 or DNS2 as the information supplier by the administretor Then if y@
enter the right one, Ethelnet icon in the status bar will display a @nnection
network of animation. After stopping, the icon should change to connect or not
connect,
4,2 Sound settings
You can use the "Sound Settings" configuration on the touch
rcn
of your l.lID
to click the sound, e-mail arrival reminding, update the appli@tion upgcde,
memo reminding, keyboard touching, or through the way of ring and volume to
remind you when the alarm rings. You can also use these settings to adjust the
volume of music or other media with audio as well as some related sttings.
Silent mode
Select the option to mute all the sounds of MID, except for the music, vid@ and
other media as well as all the audio that you set for the alam clck. (You must
mute the media and alarm in the own application.)
Volume
Connected to the Ethernet
Select the option to open a dialog box for you to set the ringtone, play media
t2
t3
(music, video, etc.) and volume of notifiGtim ringtones. If you cancel the
selection of using same volume for the dngbn€s and notification tones, then
you Gn set the notification ringtmel wlume irdividually.
Select this option, system will switch the screen to a corEspondrE
mode automatically if you place the MID horizontally or vsticalv.
MID ringtones
Animation
Select the option to open a dialog box for)mu b dl@se MID alerts (such as
alarm clock, memo reminding) to playfDrringtoiE. You can touch a ringtone
to listen.
Select the option to open a dialog box for you to make the folloryhg seGinqs:
Notification ringtone
Select the option to open a dhlog bo(
be played when rGiving notiffirE
Button operating tone
Select this option, you will play a
forF.r b drGe the ringtones which will
Yc a h.rdr a ringtone to listen.
srtd U*H u*rg
Rotate the screen automatically
display the animation tmnsitim €ftcts wtH
executing some opeEtions or all the supportive operations. Wheths you wH
like not to display any optional animation effects in the MID. (But t ib setting
Gnnot control the animation effects of all the applications.)
whether you would like
I
I
dE MID keyboard buttons.
brrc
to
Screen timeout
Select the option to open a dialog box for you to set the time interEl tftd t E
screen dimmed away from the last time you touch the screen tr Fess the
button. In orderto extend the battery's seryice time as much as p6iHe, pae
st the shortst timmut according to the convenienc.
Selection operating tone
4,4 Location and security settings
To select this option, the system will play a sound afyou
icons and other items whidr respon* to ttE
Screen locked tone
To select this option. system will play a
hjdirg
toudr the keyboard,
opeEtion on the screen.
By using the "L@Uon and Security.Settings,'! not only can you set the prEfttt€d
ani sharing information when you are seardtang fu
infomation and using the application of detecting loction (such as maps), brn
also can conflguEte the settings which are conductive to prctecting NID and its
settings for using
srd ;tsr tt€ sdrs
is lcked or
unlocked.
data.
Sense of touch
Select this option, the MID will vib6te!fiody rfEr yErJ tD.dr the eft keys and
perform other operations. (Depends m tlE cufqirati(n-of your MID)
Using the wireless network
To sele& this option, the system will determine your apprcximate lircatim
according to the infomation which is provided by WI-FI and mobile nehtsk, 6r
you to'map" or in use when you perform the searching opeEtims.
Using GPS Satellites
4.3 Display settings
To
You can use the "Display Htings' to @nfigucte
other settings of the scren.
satellite signal receiving system (depending on your configuEtim m MID) to
loGte your position, the accuracy is within a few metere. (ie, "stret.lerrd'). The
GPS accuracy depends on whether the actual weather is fine or not and oths
factoE.
tl€ rcn
brightness and
I
I
select the option, system will use the MID'S Global Positioning System (GPS)
Screen locked settings
Briqhtness
Select the option to open a dialog box fur you to adjust $e brightness of the
screen. You can use the sliderto set the briJht E l*l according to your needs
at any time when using the MID, In orderto e)cerld ttE battery's seryice time as
much as possible, please select the darkest
comfort level.
t4
briJhtn6
according
to your
You Gn lock the screen, thus only you Gn unlock it, and then surf the Intsnet.
access data, purchase applietion etc.
1, Touch screen locked settings
If you have configured the screen lock already, then you can change the $reen
locking way or lock the screen off by touching to change the screen locked
15
t
I
i
If you have not set password for these credentials, then you cnnot
settings.
2.
Touch the pattern, PIN or password
If you touch the pattem, then system will guide you to create a pattern, you
must draw this pattem to unlck the ssen. For the first setting, system will
show you a brief counseling manual to show how to create unlocked pattern.
You can press menu
E,
and then touci -help' to review, Then, you will be
prompted by the system to dEw and re-dEw your own pattern.
If you touch a PIN or pa$word, you will be prompted to set a PIN number or
password, you must enter the PIN number or pa$word to unlock the screen. By
the next time you tum the MID on q wake up the screen, you must draw your
own pattern or PIN number, or passord to unlGk the screen,
us
this
option.
Instali from the TF card
If you use the removable TF crd to store user files in the MID, then you Gn
install security certificate from the TF card by touching the option.
Password settings
Select the option to open a dialog box for you to set or change the srity
credentials stored passwords. Your password requires at least 8 chaccts.
Clear storage
Select this option, system will delete all the security certificates and related
credentials through your conflrmation, and clear the security password whidr is
for specified storege.
4.5 Application Settings
Irnknown source
Select the option means that system is allowed to install the applications whk$
Password visible
this option, when you input every dlaredeE of the password, they wlll
be shown shortly in the system, so that yN Gn ffi the contents that you are
inputting.
To select
Select device manager
touch the option to open screens, in whidr list tne applications that you have
authorized the limitation of MID device manager. To touch the application of this
list can stop its limitation, If you exsute this opeEtion, thus your accounts will
lose some functions of the appli@tion. (Sudr as the function that synchronize
the new e-mail or calendar event to the HID), until you restore the limitation of
the application. If you stop the limitation of eme appliGtions by the above
mentioned ways, however, these accounLs o, the applications needs the
limitation, then, unless you delete the related accounts, otherwise, normally
you will receive tips on how to restore the limitation when you are trying to use
these applications.
To
Using security credentials
this option, the applications cn acc6s s@rity certificates in the MID,
related password and other credentials'encrypted stoEge, You can establish
the connection between some types of VPN and wi-Fi by using these credentials
To select
are from website, e-mail, or other sources except the Android e-market.
Warning! In order to protect your MID and personal data, please only downl€d
applications from trusted sources. (Such as Android e-market)
Manage applications
By touching this option, you can open a list which lists all applications and other
softwares installed on your MID, as well as their respective sizes and the t@ls
which manage them.
Normally, you only need to install, open and use the applictions without
worrying about how to manage them; operating system will manage the way of
applications using the storage and other resources automatiGlly. But
sometimes, you may need to learn about them in detail in the MID.
MID applications use the following two memories; storage device and RAM.
Applications will use the storage device to store itself and all the fi16, settings
and other data used by itseli Applications will also use RAM (used for temPoBry
storage and fast access memo'ry) when running.
All i4IDs have internal storage devices. Most applications and various typs of
files and data which are used bi them are stored in this memory. Opecting
system will strictly manage and Grefully protect the interoal stoEge devie,
since it may contain your private information. When connecting the MID to your
computer by USB cable, you cannot look up the internal mass stoEge devices
and contents in the CF card,
Your MID may own internal mass storage devices or removable TF card,
t'7
depending on your MID configuEtion. When you connect the MID to a computer,
you can look up the contents in the stoEge, you Gn also copy the files to this
storage or copy files from it. Sme applictids will set the storage desiqn as
default or optional stoEge lGUm, instsd of interfal mass storage.
Operating system also manag€ the way that applictions using the MID'S RAM.
The System only allows tne appliGtim and its component processes and
seruices to use RAM a@rding bUE rEeds. Sy*m may store your processes
which are used recendy in t{Al,l, I tlEt the pff€ses can restart quickly
when you open them. But if systs rcquiE t re RAM for new activities, it will
clear the corrsponding cdE.
You Gn directly manage the way tftatappliatirc using the stoEge device, you
can also manage them indire(iy thslgh Erkrc methods when usirig the MID.
For instance:
. lnstall or uninstall the appliztim.
. Download fils frcm brcwser, Gmil and ds applications.
a Create files,
. Delete files which have ben dmtBded ff cted.
a Using a computer to @py fi15 to inteml rc stomge device or TF Grd ,
or delete files fi'om intemal mass storagE da,ioe or TF card.
. Changing the installed lGtion of th€ app0cdirc, to instail them to the
internal mass storage device, tr instal tD OE TF crd in MID.
Sine operating system will manage tlrc uEy appl-ations using RAM, you may
rarely need to manage it. Howeve, yd stin @ mitor the way applications
using RAM, and stop the abnormal apdi@ti.,E
"Appl:cations Management' scren @taiG fuutab6; each of them lists related
applications and its components. Thm b a dEt in the bottom of every tab
which is for displaying the memory spc ara milau€ memory space occupied
by the items in the list.
. To touch one of the applictioE, plooeses, orwic in the list, you can
rdsrt
details; you en also perform the
changing the setli.rgs, sbpdng and installing. (Depends
open a screen listed the
a
.
a
l
i
I
I
I
I
a
operations such as
on the option).
To touch the downloaded tab, you Gn look up the applications which are
downloaded from "e-market' and drtr |,gl,E.
To touch all the tabs you €n lmk upall itda[€d appliGtions in the MID. The
list contains applications whicfi are bind€d with your MID, and the ones
which are downloaded frcm other l,w|.E.
To touch the tab in TF card, you cn look up the applications installed in it.
The selected items are installed in the TF Gard. The unselected ones are
installed in the internal mass stoGge dryice of the MID, but these items
have been designed, which cn be moved a@rding to the needs.
To touch a running tab, you @n lmk up a running or cched appli€tion and
process.
It
.
When viewing the tabs in downloaded, all, and TF card, lDu d st
by pressing the menu button to switch list order by nam tr siE-
S16
Obtain details about applications
1, Touch appliction management screen.
2.
Touch an appliGtion, process or seruice.
"Appliction Infomation" of each application will list its name arld Eirn, and
detailed infmation of the application. According to the differere dmfcti(m
and its r@re, the screen may al$ contain a variety of buttrc, data hr you
to manage applications, forcibly stop and uninstall applications. l|ffitile, t E
screen will also list information type about your MID and detailed infurmatim d
data which Gn be accessed to applications.
of applications contain different types of information arddtol,
indude the following:
Ys @n use a stop button to forcedly end abnormal applictim.
If you inSall applictions from "e-market" or other resourcs, thm F, a
Diffesrttyp6
but
a
.
mlly
use uninstall button to delete applications and all the related
settings fi'om the MID.
d# td
Storage
Providing infomation of MID memory space which is
Gupied by rdated
applications.
To delete an appli€tion's settings and other data, you 6n t@ch the dear d&
button.
You can use move to internal mass storage device or move to TF Grd buttoo. tD
change some applications' storage location.
Cache
application stores the data in the temporary storage a€ of ttE HID, tlH
system will list the amount of stored infomation and prcvke dear GdE
If
button.
Default startup
If you have configured an application to a default startup mode of a partiolar
fila type, then you Gn remove the relevant settings in here.
Limitation
It lists all kinds of information and data which applictions
have
rightsb
aG.
Running services
Gn monitor the runninq applietions and the Gche size of RAM whidl is
occupied by the process, and stop these applictions and pffis6 if necessry.
You
l9
1,
2.
Touch application management screen.
Touch a running tab.
3,
Press the menu button
-,
occupied by files and other data, not just the space o@pied by applicUons
in the list.
The "Storage" part of application details screen can detailed display the
memory which the application uses. If you can move this appli@tim, then
this move button is effective.
To touch move to TF card storage device, you can move the main part of the
application out from the internal mass stomge device.
To touch move to internal mass storage device, you Gn mrye the
appliGtion back to internal storage device of the MID.
ano tnen touch the service of displaying cache
process or displaying currently running seryice, to switch them back and
forth, "Running" tab can display the arently running or cached processing
applications, proces*s and sewics, and display the RAM size they occupied.
The chart in the bottom of sen cn display Gcupied RAM amount and
available RAM. You @n touci the abnomal appliGtions, processes and
seruices, and then touch the stop button on the opening screen. You can also
touch the report button, to send details of abnmal application about the
M1D to corresponding developer.
Important! To stop an appliction or opeEting system process and service will
stop an ancillary function or more functions in the MID. To restore full
functionality, you may need to rstart the device.
Battery power usage
.
To
a
@nsumption between applications and system resources.
Tum off the wireless devices that you do not use. If you do not
a
and Bluet@th, then you can turn them off in the settings. Lows the
brightness of scren and shorter the standby time of the screen.
If you do not automatically synchronize Gmail, Google Calendar and otl6
applications, please turn off this function. You Gn use power to onEol
widgets, to check and control status of wireless device, display ffi
betwen two charges. You can also monitor the condition of battay
Uninstall applications
You can uninstall applications which are downlGded from "e-market" and other
resources.
1. Open the "Application Management' rcn.
2. Touch the downloaded tab.
3. Touch the appllcations which need to b€ uninstalled.
4. Touch the uninstall button.
5. Touch "Yes" button when inqui16 you wh€liEr you are sure to uninstall the
application or not on the screen.
Change the applicatlon's storage location
to TF crd storage devices of the
MID, instead of internal mass stoEge deviG. However, other applications will
set the storage loction to changeable status. The following tips may be helpful
to you: You can remove some large appliGums frm the internal storage device,
so that you will not need to make mm for other applictions which does not
provide this option, Some large appli@tions are designed for the above
mentioned reasons,
1, Touch application management screen.
2. Touch tabs in the TF card,
a The tab lists applications which must or may store in the TF card of the
device. Each application will list the space @cupied by its own internal
storage device, (All the applications will @@py a small amount of internal
storage space no matter what it store in the internal storage device or not.)
. System will select the applications stored in the TF crd storage device.
a Chart in the bottom will display @cupied stocge space and available space
of the TF card storage device in the lvllD. This amount includes space
Some applications will set the storege
lmtim
touch this ite'm, you will open a list, which will list all the applkztirc ttEt
have consumed the battery's electricity since the last charging for ttE l'llD.
To tum off the unntressary functions can extend the battery's u99e tire
a
u*
Yyl-FI
brightness and synchronize.
If you know about that there will be no 3G mobile network or WI-FI netwotk
nearby, then you can switch to the Airplane mode. To *arch for 3G mobile
network automatically will make the MID consume more power
Monitor and control applications with power consumPtion
At the time, the screen will display the applications which coosme the most
battery power If the applications that you've downloaded consume tm mu(il
power, you can turn them off through this option on the $ren.
At this moment, the "power usage" screen will list the applications which are
21
consuming battery power in descending order, The consuming chart in the top of
screen will display the consumption 6te sine the last charge of the MlD, it will
also display the length of time by using the battery for running.
To touch the application of "power uege" on the $reen, you will know about the
power consumption details. The infomation types are different for different
applications. Buttons which included by sme appliGtions can open a screen,
which provide some settings to adjust the appliGtion's power consumption.
To touch the power charge, you cn op€n a rcn, which will detailed display
when the wireless device of the MID, ren and other functions use the battery.
Development
3. Select the ac@unt which you want to add.
Including the settings for developing Andrcid applictions.
USB debugging
select this option means the debugging tols m tfie computer are allowed to
communicate with MID through the USB onnedion.
To
Keep the arousal status
to prevent the systm ftm darkening and locking the
screen when charging between MID and drarg€r or USB device connection
which provides power
Selecting the option
Permitted simulation site
Selecting this option means it is allow€d to e the developing tools of the
computer to control own position whici MID displays, instead of using the MID's
own internal tools to achieve the above purp6e.
4. Input the a@mt's info accords to the instruction steps show.
5. Configure a@unt
The system may request you configure the data which will be synchrcnized with
your MID, details depend on the accountt type.
After configured, system will add the account into Synchrcnous list; then the
info can be connected with your MID.
4.6 Account Synchronous s€t
Delete account
The info like contact, email, @lendar sclEdule... from your account of Google,
Microsoft Exchange Activesync or other a@nt Gn b€ synchronized with your
MID.
You may delete one account, and the relevant info will be deleted
also.
Add or Delete accounts
1. Select relevant interface, the interiace will show your curent synchronous
setup€nd account list.
frm ywr ilID
But, for your registered Google account, it only €n be deleted upoo y@r
personal info be deleted at first.
1. Select relevant interface, the interface will show your curent syncfiM@s
setup and account list.
2. Select the account which you want to delete.
3. Select deleting account.
4. Confirm the deleting instruction-
2. Select adding account.
Normal synchronous setup steps
1. Click setuD, ooen "synchronous setup" interface
The account's all info or part info alreadv be synchrcnized with your
g
I
The account's info hasn't be synctrrcnized with your MID
Ihe selected info will be synchmized witi your MID
2. Through selected or deleted bac*gmnd data, yil Gn control the data
whether to be transfered when the appliGtirc and wice are not be used.
If cancelthe deleted option, you ned to refres,l ttE renu / email, or else Gmail
will stop receiving new mails. *Glendar will autorBtl6lly stop.
synchms
s€tJp, y@ @n set whether the
modified info in MID to be syndlrcnized with inEn€t or not.
If cancel the deleted option, y@ need to opsr ttE interface 'Account
Synchronous st ", slect the a@nt whiJt yil want to syrchronize.
Manually syndrrcnize the info:
1) Open the interfae -Aeount Syndrre sct ";
2) select the acount whidr y@ want to sylidmiE;
3. Through selected or deleted
3)
Press Menu,
select'syndrmize".
Delete the content from MID'S mass storage orTF card.
Select this option Gn permanently delete the data from
in order to relea* space for MID running.
mas storage qTF crd,
4.9 Language & keyboard settings
Y@ @H sd€(t the language and the keyboard by using the "LanguagE &
k€ryboild -tting6Sdect bnguag€. When click select language. The language will show for yar
clxrie.
4,7 Privas,
Return to factory set
After selected this option, system will pop q* a dialog box, for you deleting all
the data in the MID'S intemal stoEge, indudkrg: G@gle account, all other
arcount, system applictions and otts do[iloaded appli@tions. Reset MID
won't delete any downloaded updated qdern soft waE.
4.8 Storage 6etup
This device uses TF card to stdre
photc,
moyies and music.
Insert the TF crd when device shutdown, put the @rd (metal face below) into
the TF card slot, when TF @rd corectly insted into device, the device will
sound "Pa!.
Insert the TF crd when device is open, the systm will automatically read and
inst?ll the boot programs.
Remove the TF card safely
When the device is shutdown, you can remove the TF @rd at any time; when
the MID is on power, please firstly uninstall the stoGge 6rd, in order to avoid
any damage to the card,
1) Select setting, open setting
2) Select "storage";
3) Select "delete", the TF card prcgram will be deleted.
After then, you Gn remove the TF card safely.
-
appli@tion;
l,r*r dictionary \ryhfl click user dictionary. You could get a word list wfiidr tlu
add into the didiomry. Touch the word to revise or delete the opeEtion. CAi*
the menu, and ciGe add to add the new word.
Andrcid keyboard *tting. It fit for the screen keyboard of the MID. The
auto-Gpitaliation function is only used in the English keyboard.
Sound on key pt,s. Ch@se this item. There will b€ a sound when you dk* ttE
screen keyboard.
Popup on key pr6s. Cancel choose this item. You muld prevent the keyb@rd
show the big key icon when you touch the key.
Touch to corect words, When you touch every word, and t,le keybGrd have
other suggestion forthe word, The system will show a underline underthe wffd.
Cancel this item to stop this function
Auto-capitalization. Click this item. When you use the sen keyboard, tfE
operate will change the fist letter which after the full point into Gpitalization.
Show settings key. Choose this item to open the dialog box to c}|oce if ycu
want to add the function of show setting key in the keyb@rd (ye @ld q@te
the operation only when you install the keyboard orother input m€{'lod. And if
wants to show or hide the setting key.
Input language. Click this item to open the language llst for yilr drrie.
Show suggestion. Click this item, The operate will show the suggested wsds
X,ll5-l[fl$?;,"
.spacebar and punctuation automati@[y insrt hisrrtishted
word
Using screen keyboard, You could type the words by screen keyboad. The
keyboard will be auto opened with some application. But in eme applkation,
only could open the keyboard when you touch the words lrhid! y@ want to b€
revised.
Automatic. Cancel this item. You could set the date, time, time z@e youBelf.
And not get the date from internet
Set date. If you cancel the automatic, the system will open a dialog box for you
to set the date
Select time zone. If you cancel the automatic, the system will open a dialog box
for you to set the time zone.
Set time. If you @ncel the automatic, the system will open a dialog box for you
to set the time.
1. If there are some word in the word field. The opecte will set the insertion
point in the place which you touci. And show ttE label of insertion point. You
could move the insertion point by this label to drc the correct location, then,
you could add more words. You al$ @uld drc one or more words, and copy,
cut, paste them.
2. Click the
teyE. ne
next letter whicfi you input will change into
capitalization. When you re-click this i@n, All
changed into capitalization.
3. Click the
keyg,
Use 24-hour fomat. Select this item- The system will show 24 houE forrot. Ftr
example: 13;00,but not 1 r0O PM
Select date fomat, Select this item to open the dialog box to set tlE date
formate.
tlE letter
in the keyboard will be
mind
you to chang€ the input
the dialog box will pop-up to
method or set the keyboard.
4. click the delete
please press
keytll
to click the wtrd in the left of the cursor. After input,
E ,o.;o.",6"
4.11 About devace
keyb@rd.
Input number, symbol and other characts.
dot
mve the fing'er, and then relax'
Touch and press some key in the fir* line,
You could input the black number,
If there is some alternative chaEcter, the $spef,sions point will be show in the
bottom of the key,
Touch the vowel letter or "C",'N" or'S- to open a window to move the vowel
letter, or other alterriive letter or number.
click the slgnal key lI to change it betwffi from number and signal. Click the
"Alt" to check other signal. And click this key again to change it into the original
keyboard.
Touch and lqng press the full stop key to open a window with some usual signal.
Touch some key. There will be a enlarge vffiion appear up the keyboard' If
theBare some alternatives, there will b€ a suspension point show in the bottom
of the key.
Status: Select this item to open the status screen. It includes the battery status,
Wifi status, Mobile network type, Bluetooth address, up time.
Battery status: After touch this item. The system will list tie procdure and
operate system after last charging. All is list by the electricity quanuty.
Legal information: Click it to get know more information of the legal.
Model number: The model information of the MID
Android version: The information of the operate system,
Version information; The system will show the information of MID hardware and
operate system,
5. Application
4.10 Date & Time
You could set the way of the date shown. You also could set the date where you
locate. And not get the date from the intemet.
26
vids, player, photo
and so on. Customer could download the procedure prom the market,
The unit only be pre-installed part ofthe procedure, such as
6. Answer the questi,on
.
d
the
llfD
.
MID cn't be turned on1. Check the quantity of elecuonic
2. Connect the adaptor with tlle l'lID b dotSae ch€ck it.
afterclrtlitg. Pl€s connect the sales.
3. If you still Gn't tum on the
'/lID
4. Please press the €erye key. And t E Fes tfE power key to turn it on.
The screen is flash or the MID is suidr d &r tlE picture is appear.
.
No sound on the @rPhone
f.
Low battery,
Pl@*
charge iL
1. Please check the volume setiing is O2; Please chtrk if the music fil€ Ls b.otEr- PteE ts-y to play other music to
confirm that. If the file is brcken, t Ee my be sre noise'
. Can't copy the file, and cant plaY t E rrllsic efL
conflm ifthe compuEdldthepaayshave been corfnected'
sDE b fr..check if the USB @ble tt b.&L
1.
Please
2.
Please check if the memory
3.
Please
4. If the connection
.
System
with the USB
(*
is sbpped.
eror
on the MID after reserye frRestore the factory settings.
1. Tum
2.
2t