1
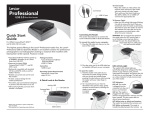
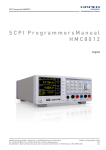
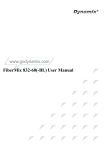
On choosing friends:
“Life is too short to hang out with people who aren’t resourceful.”
23231 E La Palma Ave, Yorba Linda, CA 92887
Tel: (714) 868-0438 | Fax: (714) 526-2018
Email: [email protected]
Website: www.atronvision.com
User Manual
If you have any further question or need help, please contact our technical support.
1-866-974-8282 (9am – 5pm PST, Mon – Fri)
Please visit atronvision.com for full user manual and FAQs.
BEFORE USING THE PRODUCT
Thank you for purchasing our product. Our product features high resolution for optimum Response
Time. This allows our customers to enjoy action and gaming media to maximum potential.
• Before using this product, please read quick Setup guide book for installation.
• Please keep this guide book accessible for future reference.
• When installing the product on the wall it is recommended to contact a professional company for
installation.
- The product may fall and break or cause personal injury if installation of the wall mount is faulty.
• Do not install the product in a vehicle or place exposed to dust, moisture, oil, or smoke.
- An electrical shock or fire may result.
• Do not use or keep combustible spray or a flammable substance near the product.
- An explosion or fire may result.
• Do not hold the monitor upside down or move it by holding the stand.
- The product may fall and break or cause a personal injury.
WARNING
• Do not expose this product to direct sunlight, heat, or any hot object. Otherwise, the product life
span may be reduced, or fire may result.
• Do not let water enter the DC power device or get the device wet.
- This may cause a fire or an electric shock as a result.
- Avoid using product outdoors where it can be exposed to rain or snow.
- Be careful not to get the DC power adapter wet, including while washing the floor.
• Ensure the vents are not blocked by tablecloths or curtains.
- This may cause a fire as a result from increased internal temperature.
• If the product generates a strange noise, a burning smell, or smoke, remove the power cord immediately and contact Customer Service Center.
- This may cause a fire or an electric shock as a result.
• Do not insert a metallic object(paperclip, coin, hair pin, etc.) or inflammable object(paper, match, etc.)
into the vent or ports of the product.
- If water or any foreign substance enters the product, be sure to power off the product, remove
the power cord, and contact Customer Service Center. Product failure, an electric shock, or fire
may result.
• Avoid installing the product in a narrow space with bad ventilation, such as bookshelf or wall closet.
- Otherwise, a fire may result due to an increased internal temperature from poor ventilation.
• Do not touch the power plug with wet hands.
- Otherwise, an electrical shock may result.
• During a lightning or thunderstorm, power off the product and remove the power cable.
- An electrical shock or fire may result.
• Do not use a damaged power cord, damaged plug, or loose power outlet.
- An electrical shock or fire may result.
• Do not plug many products into the same electrical outlet.
- Otherwise, the outlet may overheat and could cause a fire or power surge to the device.
• Do not attempt to disassemble, repair, or modify the product on your own.
- An electric shock or fire may result.
• Do not bend or pull the power cord with force. Do not weigh the power cord down or apply any unnecessary pressure. Do not lift product by the power cord.
- A damaged power cord may cause an electric shock or fire.
• Do not put the DC power adapter near to any heating apparatus.
- Otherwise, a fire may result.
• Wipe the monitor screen with a clean, soft and dry cloth. Wet a soft and dry cloth in water and wring
thoroughly to clean the exterior of the monitor.
- Do not apply a cleaning agent that contains alcohol, solvent, or surfactant to the monitor.
- Do not spray water or detergent directly on the product.
CHECKING THE COMPONENTS
PARTS
BASIC MODEL
Monitor and Stand Base
Dual-Link DVI Cable
Power Cable and DC Power Adapter
Audio Cable
• LOS :
Select “Line of Sight” Mode
• HOT :
HOT Key
• SOURCE :
Select Screen Mode
• MENU :
Menu OSD (On Screen Display) Button
• VOL / ◀ / ▼ : Volume Button, Down Key
• 4:3 / ▶ / ▲ : Adjust Aspect Ratio Button, Up Key
• POWER :
Remote Controller (Option)
Monitor Power On/Off Button
Quick Setup Guide
* If any components are missing, then please contact the dealer where you purchased the product. The appearance of the
components may differ from the images shown. Components may vary depending on the country.
* The above specifications are funtion to change withoutnotice to improve quality.
OSD MANUAL
MAIN MENU
Press the MENU button on the control panel to activate the OSD menu window.
1. BRIGHTNESS
2. IMAGE
Press the ◀ and ▶ to sdjust the position of selected function.
Press the ◀ and ▶ to sdjust the position of selected function.
- BRIGHTNESS : Adjust display brightness
- CONTRAST : Adjust display contrast
- HOT KEY :
To set up application mode
[STANDARD / TEXT / MOVIE / GAME(1, 2, 3) / ECO
/ Low Blue Light(1, 2, 3)]
- DCR :
Dynamic cotrast ON/OFF
- LOS :
To choose LOS(Line of Sight) function [LOS1 / LOS2 / LOS3]
-
H . POSITION :
V . POSITION :
CLOCK :
PHASE :
ASPECT :
Adjust the images horizontal position
Adjust the images vertical position
Adjust the image clock to reduce the vertical noise
Adjust the image phase to reduce the horizontal noise
Adjust the images aspect ratio
[AUTO / WIDE SCREEN / 4:3]
IMAGE
BRIGHTNESS
BRIGHTNESS
50
H . POSITION
50
CONTRAST
50
V . POSITION
50
CLOCK
50
PHASE
50
ECO [HOT KEY]
OSD
GAME 1
DCR
OFF
LOS
LOS 1
OSD
ASPECT
WIDE
OSD MANUAL
3. COLOR TEMP .
4. OSD SETTING
Press the ◀ and ▶ to sdjust the position of selected function.
Press the ◀ and ▶ to sdjust the position of selected function.
-
COLOR TEMP :
RED :
GREEN :
BLUE :
To choose color temperature
Fine-tune red color temperature
Fine-tune green color temperature
Fine-tune blue color temperature
-
LANGUAGE :
OSD H . POS :
OSD V . POS :
OSD TIMER :
TRANSPARENCY :
To choose the language in OSD menu
Adjust OSD horizontal position
Adjust OSD vertical position
Adjust OSD display time
Adjust OSD transparency
COLOR TEMP .
COLOR TEMP .
OSD
OSD SETTING
LANGUAGE
NORMAL
RED
50
OSD H . POS .
50
GREEN
50
OSD V . POS .
50
BLUE
50
OSD TIMER
50
TRANSPARENCY
50
OSD
OSD MANUAL
5. RESET
6. MISC
Press the ◀ and ▶ to sdjust the position of selected function.
Press the ◀ and ▶ to sdjust the position of selected function.
- IMAGE AUTO ADJUST : Automatically adjust the image horizontal/vertical position
focusing and clock
- COLOR AUTO ADJUST : To adjust the color white balance
- RESET :
Restore to factory settings
- AUTO POEWRDOWN : Auto power down when no signal
[ON / OFF]
- SIGNAL SOURCE :
- AUDIO SELECT :
- VOLUME :
VGA (Analog) signal input
HDMI (Digital) signal input
To choose audio type
[ANALOG / DIGITAL]
Speaker volume adjustment (with audio)
RESET
OSD
MISC
IMAGE AUTO ADJUST
SIGNAL SOURCE
COLOR AUTO ADJUST
AUDIO SELECT
RESET
VOLUME
AUTO POWERDOWN
OFF
OSD
VGA
50
TROUBLESHOOTING GUIDE
To perform self-troubleshooting please review the following conditions that you may be experiencing.
• Power on the product.
• Disconnect the cable from the product.
• If the message NO SIGNAL appears, the product is working normally.
There is no sound.
• Check the connection of the power cable or audio cable.
• Check the power switch, turn ON/OFF.
• Check the volume.
• Check the PC audio volume.
There is no image or image is displayed in black and white only.
• Adjust Brightness and Contrast.
• Check the cable connection to PC.
The screen appears to shake or flicker and sound is unstable.
• Remove any accessories (video extension cable, etc.) and try again.
• Change the settings or check the resolution.
The DC power adapter is hot.
• This is a result of a product with the adapter or may be the result of a defective product. Contact
Customer Service Center or purchase a new DC power adapter.
No Signal.
• Check that the cable is properly connected to the product.
• Check that the device is connected to all cables correctly and is powered on.
The screen is too bright or too dark.
• Press MENU button, go to SETTINGS and FACTORY RESET.