1
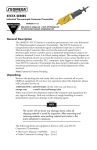
PALM Probe Users Manual EIT Inc. 108 Carpenter Drive Sterling, VA 20164 Phone: 703-707-9067 Fax: 703-478-0815 Email: [email protected] Internet: www.eitinc.com EIT GUIV 0006201 REV B 3/02 PALM Probe Users Manual 2002 Electronic Instrumentation and Technology, Inc. (EIT, Inc.) Sterling, VA USA All rights reserved PALM Probe is protected by United States Patent D451, 413 PALM Probe is a trademark of EIT, Inc. 2 Table of Contents 1. Palm Probe Overview Introduction Diagram Of Unit Theory Of Operation 2. Preparation For Use Manual Conventions Equipment Markings 3. Unit Operation Description of PALM Probe and its Features PALM Probe Displays 4. Interpretation and Understanding of PALM Probe Readings Introduction Irradiance Readings and Values Sample and Hold UV Energy Density Collection Techniques Coordination with EIT On-line Monitoring Equipment Process Control 5. Maintenance PALM Probe Batteries Calibration Product Warranty Warranty Returns Non-Warranty Returns Troubleshooting 6. PALM Probe Specifications 7. Appendix Metric System Basics List of Figures and Illustrations 3 1. PALM Probe Overview Introduction The PALM Probe radiometer from EIT addresses UV measurement and process control in areas where it has been difficult to pass a radiometer through the process. The use of UV inks and coatings has grown in label and web markets and the PALM Probe offers safe, reliable measurement for these and other applications. The word PALM is an acronym for Production Ambient Light Measurement. The PALM Probe has an extremely wide dynamic range and is capable of measuring from very low to high levels of UV light. The physical conditions inside a UV curing chamber are harsh. There are wide temperature variations that an instrument must withstand. A tremendous amount of electrical energy is needed to excite the mercury and/or other additives in the UV bulb in order for the bulb to emit UV radiation. The PALM Probe is designed to withstand the harsh physical conditions of the UV curing chamber as well as protect the operator (and instrument) from the high electrical energy present. Figure 1-Photo of PALM Probe 4 Diagram of Unit 7 8 6 3 4 5 2 1 Figure 2- Drawing of the PALM Probe # Name 1 2 Input Aperture Light Guide 3 SELECT Button 4 RUN/STOP Button 5 Probe Body 6 Underside 7 Rear Cap-Battery Cover 8 Display Description (Operational details of the PALM Probe can be found in Section 3-Unit Operation) Opening where light enters the instrument Ceramic coated non-conductive probe inserted into UV chamber Allows the unit to switch between watts, joules and seconds Starts and stops a reading. Starting also clears previous reading Contains optics, display, battery and electronics Summary Instructions, Contact Information, Serial Number & Model Number Access to battery compartment, calibration label LCD display 5 Theory Of Operation Ultraviolet, visible and infrared light radiation impinges on the Input Aperture at the tip of the PALM Probe Light Guide. The light is diffused as it passes through the Input Aperture at the tip of the Probe. The diffused light is directed down the Light Guide of the PALM Probe to a UV filter and photodetector. The UV filter blocks the visible and infrared spectra and passes only the UV channel of interest to the photodetector. The photodetector converts the light energy to a current that is proportional to its intensity. The signal is conditioned, digitized, processed and displayed on the LCD of the PALM Probe. 2. Preparation For Use Fresh batteries are inserted into the PALM Probe during the initial calibration and it is ready to use. EIT strongly suggests that the operator thoroughly read the PALM Probe User’s Manual to become familiar with the unit before attempting to use it. Manual Conventions The following conventions are used in this manual: WARNING Statements that identify conditions or practices which may result in personal injury or loss of life CAUTION Statements that identify conditions or practices which may result in damage to the equipment or other property Notes to the operator appear throughout the PALM Probe User’s Manual to aid in the understanding and operation of the unit. Equipment control and indicator names appear in all capital letters, i.e. “SELECT” button. The terms watt and joule are not capitalized while the letter abbreviations (W, J) are. Equipment controls and indicators that are unmarked have their first letters capitalized only, i.e. “Battery Cover”. PALM is always capitalized and is an acronym for Production Ambient Light Measurement. Terminology, definitions and conventions come from and follow RadTech’s Glossary of Terms for Ultraviolet Curing Process Design and Measurement. 6 Equipment Markings Each PALM Probe contains a Serial Number and Model Number. This can be found on the sticker attached to the bottom of the unit below the Quick Instructions on the unit. The UV bandwidth that the unit measures can be determined from the three digits following the model number of the unit. PRB-365- EIT UVA Measures 320-390 nm PRB-313- EIT UVB Measures 280-320 nm PRB-405- EIT UVV Measures 395-445 nm Each PALM Probe contains a Calibration Sticker, which is attached to the Battery Cover. The Calibration Sticker contains the date of calibration, initials of the calibrating technician and the calibration expiration date. 3. Unit Operation WARNING-ELECTRICAL SHOCK! Risk of electric shock. UV cure systems contain high voltages. Refer to the UV system documentation for further information. WARNING-ULTRAVIOLET RADIATION! Risk of exposure to ultraviolet radiation. Although this product is not a source of UV light, it is used in a UV environment. Refer to the UV system documentation for recommended protective measures including eye and skin protection. WARNING-HIGH TEMPERATURE! The Light Guide of the PALM Probe may be hot when removing it after exposure to UV radiation. WARNING-INSTRUMENT DAMAGE! The Light Guide of the PALM Probe was not designed for permanent installation or extended time readings in a UV system. The Light Guide should not be exposed to temperatures above 750ºF (400ºC) for extended periods of time. CAUTION-INSTRUMENT DAMAGE! Read the manual completely before using the PALM Probe to avoid damaging the instrument. 7 Description of PALM Probe and its Features (Numbers refer to the diagram on page 5 of the manual) Input Aperture Light enters the unit through the opening at the tip of the Light Guide. The Input Aperture and Light Guide should be kept clean and should not be inserted into 1 liquids. The protective window over the Input Aperture contains a diffuser and appears ‘cloudy’ to the human eye. If necessary, clean the Light Guide and Input Aperture window only with Isopropyl Alcohol and a lint free cloth. After cleaning the Input Aperture with Isopropyl Alcohol, the input window may turn clear. The user must wait for all of the alcohol to evaporate and allow the window to return to its normal ‘cloudy’ state before use. Light Guide 2 The Light Guide is constructed of aluminum and then coated with a non-conductive material to insulate and protect the user from accidental shock while taking measurements. The Probe Body is also isolated from the Light Guide by a non-conductive Delrin block. To prevent damage to the unit, the PALM Probe should be stored in the supplied protective case when it is not being used. Buttons The RUN/STOP and SELECT buttons are membrane switches. The buttons are raised and can be easily located, identified and operated without having to look at them. A gentle push is all that is needed to operate the switches. Press either RUN/STOP or the SELECT button to turn the unit on. SELECT The SELECT membrane switch toggles the unit between watts/cm2 (W/cm2), joules/cm2 (J/cm2) and seconds. The SELECT switch can be used while the unit is actively taking a reading or after the data has been collected. 3 RUN/STOP 4 The RUN/STOP membrane switch toggles the unit between Run and Stop modes. Data collection begins immediately when the RUN/STOP switch is pressed. Entering Run Mode also clears the previous reading. 8 Probe Body 5 Underside 6 Rear Cap 7 The Probe Body contains the detection optics, electronics, battery and display functions of the unit. Access to the batteries is provided through the Rear Cap of the Probe Body. There are no user serviceable parts inside the Probe Body. The Probe Body can be held with either an ‘over’ or ‘under’ hand type of grip. A right-handed ‘over’ the unit grip allows the membrane switches to be operated with the right thumb. A right-handed ‘under’ the unit grip allows the membrane switches to be operated with either the middle or first finger on the right hand. The left hand can also easily operate the unit with either an over or under grip. Summary operating instructions and EIT contact information is printed on the bottom of the Probe Body. The Rear Cap provides access to the PALM Probe batteries. There are no user serviceable parts inside the Probe Body. Battery Life Battery life is estimated at 25 hours of continuous use on the PALM Probe. The LCD will display LO BATT when approximately 45 minutes remain on the batteries. Access is provided through the Rear Cap to change the batteries. Remove the four screws to access the two AA batteries. Use only alkaline 1.5V replacement batteries. Use of rechargeable batteries is not recommended. Refer to Section 5 of this Users Manual for a diagram and detailed instructions on changing the batteries. Display 8 The Display enables viewing of the LCD. The Display should be cleaned only with a damp, lint free cloth. The Liquid Crystal Display (LCD) is located under the display window. A diagram of the LCD is shown and described in the next section under PALM Probe displays. (Pages 11-13) 9 Additional PALM Probe features Auto Range The PALM Probe has a very wide dynamic range that automatically adjusts itself for the user. The PALM Probe measures UV light from approximately 100 microwatts/cm2 (µW/cm2) up to 10 watts/cm2 (W/cm2) in whichever wavelength band (UVA, UVB, and UVV) was installed when the unit was manufactured. Readings below 100 µW/cm2 are possible and will be displayed on the LCD. The decimal point in the LCD ‘floats’ over three places to cover the wide dynamic range on the unit. The “m” in both the mW/cm2 and mJ/cm2 on the LCD display may be present or absent to allow the unit to display a wide range of numbers. It is important to carefully observe (and record) the readings obtained with the PALM Probe, noting the position of the decimal point and the units displayed on the LCD Auto Off The PALM Probe will enter an off mode 10 minutes after the last button activity. The last reading is saved when the unit enters off mode. Pushing either button will turn the unit back on and the last reading will be displayed. Manual Off The PALM Probe can also be turned off manually. A long (greater than 0.5 second) RUN/STOP press will turn the unit off. Audible Beeper The PALM Probe is equipped with an Audible Beeper that is used to confirm membrane switch operation. The Beeper will sound whenever a membrane switch is pushed. 10 PALM Probe Displays The following section of the manual explains the PALM Probe Display. The display is intuitive and easy to read. The best way to become familiar with the PALM Probe is to actually take some readings with it. The following figure shows all available LCD segments on the PALM Probe. In operation, the user will not see all of the segments at the same time. Indicates UV bandwidth of unit “Flashes” when collecting data Low Battery warning Units Displaywatts, joules or seconds 4-digit display with floating decimal point Probe Body temperature-displayed when entering run mode Figure 3. Full segment PALM Probe LCD Display The following section goes over the various displays the user will see when the PALM Probe is used. Button or Membrane Switch action is described in the box on the left with a diagram of the PALM Probe LCD on the right. 11 Figure 4. Unit Turn On SELECT or RUN/STOP wakes the unit up. The display will show the firmware revision (PX.XX) for approximately 2 seconds before showing the information from the last reading. The display starts with watts and the user can use the SELECT button to scroll from watts to joules to seconds on the display. Figure 5. Entering and Collecting Data Pressing RUN/STOP while in Stop mode will start a new collection. The PALM Probe will clear the previous reading, display the Probe Body temperature and enter the new data collection or run. SELECT push during Run or Stop Mode toggles Unit Value displayed between watts, joules or seconds. The LCD will flash ‘Run’ during data collection. The LCD first displays the same unit value that was on the display before starting the data run. Data collection begins immediately. If the unit is in Seconds Mode, the timer will start counting while the temperature number is being displayed for approximately two seconds. Flashing 12 To stop collecting data, push the RUN/STOP button. Display stays on the unit value that was last on the LCD screen while collecting data. SELECT press toggles the unit between the watts, joules and seconds displays of the last run. The watts displayed will be the peak irradiance seen by the unit during data collection. Information is stored in the unit until it is cleared prior to a new run. Unit turns off automatically after 10 minutes of button inactivity. Figure 6-Manual Turn Off To manually turn off the PALM Probe, push the RUN/STOP button for greater than 0.5 second. The audible beeper will sound and when the RUN/STOP button is released, the LCD will display “OFF”, then power the unit off. 4. Interpretation and Understanding of PALM Probe Readings Introduction The PALM Probe radiometer is designed to allow the user to easily collect UV Irradiance and Energy Density information from a UV curing system. Once this information is collected, the user has to understand how to interpret and apply this information to achieve process control for a particular application. Three values are available on the PALM Probe display once a reading or run has been made. The SELECT button allows the user to toggle between watts-joules-seconds after the data collection is finished. Most users will find that the irradiance value is the most important value collected by the PALM Probe for process control. 13 Irradiance Readings and Values The PALM Probe has the ability to measure irradiance over a very wide dynamic range. It has the ability to measure very low amounts of UV that are found in ambient room light up to very intense amounts found in the most powerful UV curing systems. UV Irradiance is the radiant power arriving at a surface from all forward angles, per unit area. The PALM Probe uses square centimeter (cm2) as the unit area for reporting irradiance. (Intensity, a generic term with a variety of meanings is also commonly used to mean irradiance, which is the preferred term.) It is important when talking about irradiance to also define a wavelength range. The wavelength range that the PALM Probe reports will depend on the filter-detector combination installed in the unit when it was ordered. (Refer to Section 2 of this manual under equipment markings if you need to determine the UV bandwidth of your particular instrument.) It is also important to talk about angular or spatial response when talking about irradiance. Most EIT Instruments exhibit a cosine or near cosine response in the optics because most coatings are thought to respond to UV radiation in a cosine fashion. The PALM Probe in order to be durable and withstand the sustained high temperature environment extremely close to the UV source has a narrower spatial response. Light arriving at very low incident angles to the Input Aperture does not get measured. Normalized Response Cos Response Curve of Palm Probe (metal tip) 1.1 1.0 0.9 0.8 0.7 0.6 0.5 0.4 0.3 0.2 0.1 0.0 -90 -80 -70 -60 -50 -40 -30 -20 -10 0 Ideal Cos Response Palm Probe-New Optics 10 20 30 40 50 60 70 80 90 Angle (deg.) Figure 7-Spatial response 14 The PALM Probe displays the irradiance values in watts or milliwatts per square centimeter (W/cm2 or mW/cm2) on the LCD. The user has to carefully note the position of the decimal point in the reading and whether or not the display is showing W/cm2 or mW/cm2 on the display. The floating decimal point on the numerical display allows values as low as 0.001 mW/cm2 or 1 µW/cm2. For help in understanding prefixes and symbols ‘milli’ (m) and ‘micro’ (µ) please see the section on metric system basics in the appendix. The PALM Probe is designed to measure UV Irradiance values up to 10 watts/cm2, which is higher than UV irradiance values of most current UV sources. Sample and Hold When collecting irradiance data with the PALM Probe, the display will change as the Input Aperture changes position under the UV source. As the Input Aperture moves into the focused peak irradiance area of the UV source, the reading will increase. UV housing and reflected light Profile of UV irradiance (y-axis) vs. time, obtained with EIT PowerMAPTM Figure 8-Irradiance variations 15 Variations in irradiance may also be seen when the PALM Probe is moved along the length of a UV bulb in addition to moving the Probe in and out of the focus of the UV lamp. The PALM Probe display will automatically change ranges as the irradiance level of the UV light fluctuates. It is important to carefully observe the location of the decimal point and corresponding units (mW/cm2 or W/cm2) on the LCD. Pressing the RUN/STOP button, while in Run Mode, will stop the collection of data. The highest irradiance value recorded by the PALM Probe will be the value displayed on the LCD. The PALM Probe uses a digital processor with an effective sample rate of 5Hz. UV Energy Density UV Energy Density is the radiant energy arriving at a surface per unit area. It is the time integral of irradiance. (One watt for one second is equal to one joule.) The PALM Probe calculates and displays the Energy Density values in joules or millijoules per square centimeter (J/cm2 or mJ/cm2) on the LCD. (Dose is a common but loosely used term that has been adopted from other technologies for Energy Density.) Pushing the SELECT button will toggle the display from watts to joules while the unit is in the Run or Stop mode. The energy density is an integration of irradiance values over a given elapsed time. For a given time exposure, the higher the irradiance values, the higher the UV Energy Density. As with irradiance values, it is also important to carefully observe the location of the decimal point and corresponding units (J/cm2 or mJ/cm2) on the LCD. The floating decimal point on the numerical display allows the PALM Probe to start displaying Energy Density at 0.001 mJ/cm2 or 1 µJ/cm2. For help in understanding metric system prefixes and symbols ‘milli’ (m) and ‘micro’ (µ) please see the appendix at the end of the PALM Probe manual. The PALM Probe can accumulate UV Energy Density values up to 9995 joules/cm2. Collection Techniques Consistent collection and positioning techniques must be used in order to obtain consistent readings that can be used for process control. Placement of the PALM Probe in the same location in the UV system is important to get repeatable irradiance values. Figures 9-13 describe several of the accessories available from EIT to assist in the placement of the PALM Probe Input Aperture. 16 When collecting Energy Density readings, the PALM Probe has a built in timer to allow you to monitor the ‘time component’ of the Energy Density reading. Press SELECT in order to move to the Seconds display on the PALM Probe. Figure 9-EIT PALM Probe Locking Ring The Locking Ring slides over the Light Guide and allows the user to consistently place the PALM Probe at the same depth in the UV system for each reading. A Locking Ring is supplied standard with each PALM Probe. Figure 10-EIT PALM Probe Locator Kit The PALM Probe Locator Kit allows the Light Guide to be placed in the same location each time a measurement is made. The Locator Kit can be mounted in either an external or internal position on the housing based on the available space on in UV housing/system. The Locator Kit is available with or without a hinged door. In mounting locations where the UV light may be a hazard, the door protects the user from stray UV light. All Locator Kit Figures shown with the door. (Also see Figures 11 -13). 17 Mounting Holes Figure 11-Locator Kit Template UV System housing UV Source Figure 12-Locator Kit External Mount on UV System 18 UV System housing UV Source Figure 13-Locator Kit-Internal Mount on UV System Coordination with EIT On-line Monitoring Equipment The readings from the PALM Probe can be coordinated with the readings obtained from any of EIT On-line monitoring displays. One of the EIT UV sensors needs to be installed in the lamp housing where it either gets a direct view of the UV or a representative sample of the UV being produced by a system. When conditions are ideal (clean reflector, new UV lamps), the EIT displays can be set to read 100% UV intensity. Baseline readings of the UV intensity can be obtained with the PALM Probe. The UV will generally decrease over time as the reflectors and UV bulbs change. The readings displayed on the EIT On-line monitors can be compared to the readings on the PALM Probe. The On-line monitors can provide continuous monitoring including alarm functions and feedback information. The PALM Probe also allows users to compare readings between systems. Process Control Each UV process has an optimal process ‘window’ reaction takes place producing the desired results in cured. The ‘window’ is specific and is based application process and UV chemistry being used. in which the UV the product being on the substrate, Operating in the 19 defined process ‘window’ increases the chances of producing a quality product acceptable to the end user. Regular UV measurement and recordings of the measurements on a log increases the chance of staying within a particular ‘process window’. The process log can be as simple as keeping track of the readings on a clipboard next to the UV cure station. The process log will minimize down time, increase product throughput and drive preventative maintenance programs. A table can be easily made to track the variables specific to your process. Date Lamp # Process Speed (fpm) Lamp Setting WPI Minimum Irradiance Needed Measured Irradiance Figure 14-Sample Process Control Worksheet 5. Maintenance PALM Probe The PALM Probe should be stored in the protective padded carrying case when it is not being used. Do not immerse the PALM Probe Light Guide or Probe Body in any liquids. If needed, the Probe Body can be wiped down with a damp lint free cloth and dried before storage. The Light Guide also needs to be kept clean. The Light Guide and Input Aperture can be cleaned with Isopropyl Alcohol and a lint free cloth. Be careful not to scratch the Input Aperture. The protective window over the Input Aperture contains a diffuser and appears ‘cloudy’ to the human eye. After cleaning the Input Aperture with Isopropyl Alcohol the input window may turn clear. The user must wait for all of the alcohol to evaporate and allow the window to return to its normal ‘cloudy’ state before use. 20 Batteries The PALM Probe uses two AA batteries. Battery life is estimated at 25 hours of continuous use on the PALM Probe. The LCD will display LO BATT when approximately 45 minutes remain on the batteries. Access is provided through the Rear Cap to change the batteries. Remove the four screws to access the two AA batteries. Use only alkaline 1.5V replacement batteries. Use of rechargeable batteries is not recommended. Battery orientation indicators are engraved under the battery door. When looking into the unit, the battery on the left should be inserted with the negative side to the Rear Cap. The battery on the right should be inserted with the positive side out toward the Rear Cap. Please refer to Figure 15 to assist in changing the batteries. There are no user serviceable parts inside the Probe Body. Calibration Information End View Rear Cap removed Figure 15-PALM Probe Rear Cap-Battery Chamber Calibration EIT, Inc. recommends that the PALM Probe be calibrated every six months. The calibration expiration date is located on the calibration sticker, which is located on the Rear Cap. A Return Material Authorization number is not needed when shipping the unit back for calibration. It is recommended that the unit be carefully boxed and shipped back to EIT in the protective case provided with the unit. Be sure to include your company name and a contact person, daytime telephone number, fax number or email address with the unit. Payment is expected at the time of calibration unless other arrangements have been made with the Customer Service Supervisor. 21 Return the unit to: EIT-IM (Instrument Markets) 108 Carpenter Drive Sterling, VA USA 20164 Information on calibration can also be found on the EIT website: www.eitinc.com Product Warranty EIT, Inc. warrants that all goods described in this manual shall be free from defects in material and workmanship. Such defects must become apparent within six months after delivery of the goods to the buyer. EIT’s liability under this warranty is limited to replacing or repairing the defective goods at our option. EIT shall provide all materials and labor required to adjust, repair, and/or replace the defective goods at no cost to the buyer only if the defective goods are returned, freight prepaid to EIT during the warranty period. EIT, Inc. shall be relieved of all obligations and liability under this warranty if: 1. 2. 3. 4. The user operates the device with any accessory, equipment, or part not specifically approved, manufactured or specified by EIT, Inc., unless the buyer furnished reasonable evidence that such installations were not a cause of the defect. This provision shall apply to any accessory, equipment, or part that does not affect the proper operation of the device. Upon inspection, the goods show evidence of becoming defective or inoperable due to abuse, mishandling, misuse, accident, alteration, negligence, improper installation, lack of routine maintenance, or other causes beyond our control. The goods have been repaired, altered, or modified by other than EIT authorized personnel The buyer does not return the defective goods, freight prepaid to EIT within the applicable warranty period There are no warranties that extend beyond the description on the face hereof. This warranty is in lieu of-and is exclusive of-any and all other expressed, implied or statutory warranties or representations. This includes merchantability and fitness, as well as any and all other obligations or liabilities of EIT, Inc. EIT Inc. shall not be responsible for consequential damages resulting from malfunctions of the goods described in this manual. 22 No person, firm or corporation is authorized to assume for EIT, Inc. any obligation or liability not expressly provided herein except in writing duly executed by an officer of EIT, Inc. If any portion of this agreement is invalidated, the remainder of the agreement shall remain in full force and effect. This warranty shall not apply to any instrument or component not manufactured by EIT, Inc. Calibration/Repair Warranty The warranty for repair service and periodic calibration is as stated for a new unit, above, except that the warranty period is ninety (90) days. Warranty Returns When returning the unit under warranty, please return the PALM Probe in the original or equivalent packaging to EIT, Inc. You will be responsible for damage incurred from inadequate packaging. The purchaser is responsible for insuring the unit during transportation to EIT, Inc. Equipment repaired under warranty will be returned to the user with no charge for the repair or shipping. EIT will notify you of repairs not covered by warranty and their cost prior to performing any work on the equipment. EIT, Inc. reserves the right to make changes in design at any time without incurring any obligation to install the same on units previously purchased. A Return Materials Authorization (RMA) is required when shipping the unit back for warranty service. Contact EIT via phone, fax, email or our web site to obtain an RMA. Include your company name, address, telephone number, fax number and email address on your shipping documents. You will be advised of the expected turnaround time on the unit once it is received and evaluated at EIT. Ship the unit freight prepaid, to: EIT-IM 108 Carpenter Drive Sterling, VA USA 20164 23 Non-warranty Returns The Instrument Markets group of EIT provides repair service. Repair service on calibrated units includes calibration after the repairs are effected. Please return the equipment in the original or equivalent packaging. You will be responsible for damage incurred from inadequate packaging. The customer is responsible for insuring the unit during transportation to EIT, Inc. A Return Materials Authorization (RMA) is not required when shipping the unit back for calibration or repair. Include your company name, address, telephone number, fax number and email address on your shipping documents. You will be advised of the expected turnaround time on the unit once it is received and evaluated at EIT. Ship the unit freight prepaid, to: EIT-IM 108 Carpenter Drive Sterling, VA USA 20164 Troubleshooting The PALM Probe has been engineered and manufactured to offer years of reliable service. The unit is checked each time that it is returned to EIT for calibration. Internal error checking occurs regularly. In the event of an internal error, the error code display below appears. Many of the error codes will correct themselves with a push of the RUN/SELECT button. If the error does not correct itself, the user should note the error code and contact EIT. Error codes are also listed below in Figure 16. Error Code E-00 E-01 E-02 E-03 Error EEPROM Acknowledge Error EEPROM Check Sum Error Watch Dog Time Out Uninitialized EEPROM Figure 16-LCD Error Code Display 24 6. Specifications-PALM Probe Radiometer Electrical Specifications UV Range UV Spectral Response UV Accuracy Display User Interface Operating Temperature Range Time-out period Batteries Battery Life 100µW/cm2-10W/cm2 UVA 320-390 nm, UVB 280-320 nm, UVV 395-445 nm ± 5% Typical, ± 10 % Maximum LCD, 4 digit with floating decimal point Two push button membrane switches 0-70°C, Probe Body temperature 10 Minutes Two “AA” 1.5 V Alkaline 25 Hours, LO Battery warning with 45 minutes left 750ºF (400ºC) on a continuous basis, much higher for measurement length exposures 0-9995 J/cm2 5 Hz Light Guide Temperature Resistance Total Energy Density Effective Sample Rate Mechanical Specifications Overall Length 25.75” (65.4 cm) Probe Body Length 7.5” (19.0 cm) Light Guide Length 18.25” (46.4 cm) Weight 21 ounces (596 grams) Materials Aluminum, non-conductive ceramic coating, Delrin Carrying Case Scuff resistant nylon cover, cut polyurethane interior 7. Appendix Metric System Basics In the metric system, the units are represented by the base unit of measure, which is often preceded by a prefix, letter or symbol indicating the multiplication factor with respect to the base unit. Unit centi milli micro nano Symbol c m µ n Fraction 1/100 1/1000 1/1,000,000 (million) 1/1,000,000,000 (billion) Exponent 10-2 10-3 10-6 10-9 25 The base unit for length measurement is the meter (m). Common prefixes used in the metric system for length are centimeter, millimeter or kilometer. Each prefix indicates the relationship of the units to the original meter. Centimeter is 1/100th of a meter, millimeter is 1/1000th of a meter and kilometer is 1000 meters. Different portions of UV in the electromagnetic spectrum as often identified by their wavelengths described in nanometer (nm) units. For example, EIT’s UVA instruments measure between 320-390 nm. The watt (W) is the base unit used to measure power in the metric system. The joule (J) is the base unit used to measure energy in the metric system. The same numerical value can be expressed several ways based on what units you attach to the numbers. For example: 1J = 1000 mJ = 1,000,000 µJ 3W = 3000 mW = 3,000,000 µW List of Figures and Illustrations Figure 1. Figure 2. Figure 3. Figure 4. Figure 5. Figure 6. Figure 7. Figure 8. Figure 9. Figure 10. Figure 11. Figure 12. Figure 13 Figure 14. Figure 15. Figure 16. Photo of PALM Probe Drawing of Unit Full Segment LCD Display Unit Turn On Entering and Collecting Data Manual Turn Off Spatial Response Irradiance Variations PALM Probe Locking Ring PALM Probe Locator Kit PALM Probe Locator Kit Template Locator Kit External Mounting Locator Kit Internal Mounting Sample Process Control Log PALM Probe Rear Cap-Battery Chamber Error Code LCD EIT GUIV0006201 REV B 3/02 26