1
for
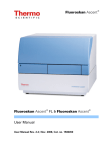
Fluoroskan Ascent,
Fluoroskan Ascent FL &
Fluoroskan Ascent CF
User's Guide
Copyright
Copyright 1997–2002 Thermo Labsystems. All rights reserved.
Reproduction of Ascent Software or the accompanying user
documentation in whole or in part is prohibited.
Trademarks
Labsystems + logo, Fluoroskan and Fluoroskan Ascent are registered
trademarks of Thermo Labsystems.
Ascent Software is a trademark of Thermo Labsystems.
Microsoft, Windows, Windows NT and MS-DOS are registered
trademarks of the Microsoft Corporation.
IBM is a registered trademark of the International Business Machines
Corporation.
Pentium is a registered trademark of the Intel Corporation.
All other trademarks, registered trademarks and copyrights are property
of their respective holders.
Disclaimer
Thermo Labsystems reserves the right to change its products and
services at any time to incorporate technological developments. This
manual is subject to change without notice.
Although this manual has been prepared with every precaution to ensure
accuracy, Thermo Labsystems assumes no liability for any errors or
omissions, nor for any damages resulting from the application or use of
this information.
No liability for consequential damages
Thermo Labsystems shall not be liable for any damages whatsoever
arising out of the use or inability to use this product.
ii
Ascent Software
User’s Guide
Software version 2.6
Revision 3.0, Mar. 2002
Copyright 1997–2002
Cat. no. 1506610
Table of Contents
1
1.1
1.2
1.3
1.3.1
1.3.2
1.3.3
1.3.4
1.3.4.1
1.3.4.2
1.3.4.3
1.3.5
1.3.6
1.3.7
1.3.8
1.3.9
1.3.10
1.3.11
1.3.12
1.3.13
1.3.14
1.3.15
1.4
1.5
1.5.1
1.5.2
1.5.3
1.5.4
1.5.5
1.5.5.1
1.5.5.1.1
1.5.5.1.2
1.5.5.1.3
Overview.................................................................................... 1-1
Introduction................................................................................ 1-1
Product support ......................................................................... 1-3
Getting started ........................................................................... 1-4
System hardware requirements .......................................... 1-4
Instrument hardware requirements..................................... 1-4
Software requirements......................................................... 1-5
Before installation................................................................. 1-6
Microsoft Windows language settings ........................... 1-6
Letters permitted with Ascent Software installation ...... 1-6
Printer settings ................................................................. 1-6
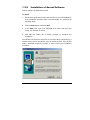
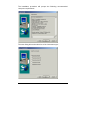
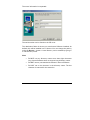
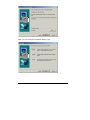
Installation of Ascent Software ............................................ 1-7
Instrument setup ................................................................ 1-12
Instrument communication................................................ 1-13
Dispensers .......................................................................... 1-13
Filter Pair validation ............................................................ 1-13
Password ............................................................................ 1-14
Quick start ........................................................................... 1-15
Opening Sessions............................................................... 1-15
Example Sessions .............................................................. 1-16
Creating a new Session...................................................... 1-16
Using Help........................................................................... 1-17
Configuration ........................................................................... 1-18
Basic concepts ......................................................................... 1-19
Session................................................................................ 1-19
Desktops ............................................................................. 1-19
Procedure Desktop............................................................. 1-19
Steplist ................................................................................ 1-20
Steps ................................................................................... 1-21
General step................................................................... 1-23
Area definition ................................................................... 1-24
Layout ................................................................................ 1-25
Settings .............................................................................. 1-26
Ascent Software
User’s Guide
iii
1.5.5.1.4
RunStatus ...........................................................................1-28
1.5.5.2
1.5.5.3
1.5.5.4
1.5.5.5
1.5.5.6
1.5.5.7
1.5.5.8
1.5.5.9
1.5.6
1.5.7
1.5.7.1
1.5.8
1.5.9
1.6
1.7
1.8
1.8.1
1.8.1.1
1.8.1.2
1.8.1.3
1.8.1.4
1.8.1.5
1.8.1.6
1.8.1.7
1.8.1.8
1.8.2
1.8.3
1.8.4
1.8.5
1.9
1.10
1.10.1
1.10.2
1.10.3
1.10.4
Measure step.................................................................. 1-28
Incubate step.................................................................. 1-29
Shake step ...................................................................... 1-29
Dispense step (not CF)................................................... 1-29
Dispense And Measure step (not CF) ........................... 1-29
Pause step ...................................................................... 1-30
Save/Load step............................................................... 1-30
Print step ........................................................................ 1-30
Area definition..................................................................... 1-30
Layout.................................................................................. 1-32
Fill dialog ........................................................................ 1-34
Template ............................................................................. 1-36
Results Desktop .................................................................. 1-40
Printing ..................................................................................... 1-41
Using tools ............................................................................... 1-41
Making applications ................................................................. 1-42
Creating your own Session ................................................ 1-42
Selecting the Template .................................................. 1-42
General step ................................................................... 1-42
Selecting the measurement area .................................. 1-42
Defining the plate layout................................................ 1-42
Selecting Steps to the Procedure.................................. 1-43
Defining parameters to Steps........................................ 1-43
Processing results and reports...................................... 1-43
Executing the Session ................................................... 1-44
Executing loops of steps .................................................... 1-46
Modifying an existing session............................................ 1-47
Example applications.......................................................... 1-47
Running an application from the example applications ... 1-48
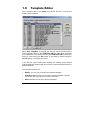
Template Editor........................................................................ 1-49
Managing files .......................................................................... 1-50
Opening and saving Sessions............................................ 1-50
File structures...................................................................... 1-51
Importing and exporting..................................................... 1-51
Backup................................................................................. 1-51
2
2.1
2.1.1
2.1.2
Procedure Desktop .................................................................... 2-1
Menus (procedure) .................................................................... 2-1
General .................................................................................. 2-1
Session .................................................................................. 2-3
iv
Ascent Software
User’s Guide
2.1.2.1
2.1.2.2
2.1.2.3
2.1.2.4
2.1.2.5
2.1.2.6
2.1.2.7
2.1.3
2.1.3.1
2.1.3.2
2.1.3.3
2.1.3.4
2.1.3.5
2.1.3.6
2.1.4
2.1.4.1
2.1.4.2
2.1.4.3
2.1.4.4
2.1.4.5
2.1.5
2.1.5.1
2.1.5.1.1
2.1.5.2
2.1.5.2.1
2.1.5.2.2
2.1.5.2.3
2.1.5.2.4
2.1.5.2.5
2.1.5.2.6
2.1.5.3
2.1.5.4
2.1.5.5
2.1.5.6
2.1.5.6.1
2.1.5.6.2
2.1.5.6.3
2.1.5.6.4
2.1.5.6.5
2.1.5.6.6
2.1.5.7
2.1.5.8
New... ............................................................................... 2-3
Open................................................................................. 2-4
Save.................................................................................. 2-6
Save As... ......................................................................... 2-6
Print... ............................................................................... 2-8
Recently used file list....................................................... 2-8
Exit.................................................................................... 2-9
View....................................................................................... 2-9
Desktop Bar...................................................................... 2-9
Status Bar ....................................................................... 2-10
Tool Bar .......................................................................... 2-10
Tabs Bar ......................................................................... 2-11
Procedure....................................................................... 2-11
Results............................................................................ 2-11
Execute ............................................................................... 2-12
Procedure....................................................................... 2-12
Plate In............................................................................ 2-12
Plate Out......................................................................... 2-12
Prime (not CF) ................................................................ 2-12
Empty (not CF) ............................................................... 2-13
Steps ................................................................................... 2-14
General ........................................................................... 2-14
Session lock ....................................................................... 2-15
Area definition................................................................ 2-17
Point ................................................................................... 2-18
Middle Point....................................................................... 2-19
Whole Well......................................................................... 2-20
Horizontal Diagonal ........................................................... 2-21
Vertical Diagonal................................................................ 2-22
Remove .............................................................................. 2-22
Layout............................................................................. 2-23
Settings .......................................................................... 2-32
RunStatus ....................................................................... 2-36
Measure.......................................................................... 2-37
Single ................................................................................. 2-38
Dual .................................................................................... 2-40
Kinetic ................................................................................ 2-41
Dual kinetic ........................................................................ 2-42
Scanning ............................................................................ 2-42
Monitor............................................................................... 2-43
Dispense (not CF) .......................................................... 2-44
Dispense And Measure (not CF) ................................... 2-45
Ascent Software
User’s Guide
v
2.1.5.9
2.1.5.10
2.1.5.11
2.1.5.12
2.1.5.13
2.1.5.14
2.1.5.15
2.1.5.16
2.1.5.17
2.1.5.18
2.1.6
2.1.6.1
2.1.6.2
2.1.6.3
2.1.6.4
2.1.6.4.1
Incubate .......................................................................... 2-47
Shake.............................................................................. 2-49
Pause .............................................................................. 2-51
Save/Load ...................................................................... 2-54
Print ................................................................................ 2-56
Remove .......................................................................... 2-57
Inactivate ........................................................................ 2-57
Activate .......................................................................... 2-58
Print Current Step .......................................................... 2-58
Print All Steps ................................................................ 2-58
Setup ................................................................................... 2-59
Plate Templates.............................................................. 2-59
Filters .............................................................................. 2-62
Password ........................................................................ 2-65
Dispensers (not CF)........................................................ 2-66
Default settings ..................................................................2-66
2.1.6.5
2.1.6.6
2.1.6.7
2.1.7
2.1.8
Colors ............................................................................. 2-68
Printout ........................................................................... 2-69
Instrument Status........................................................... 2-73
Options ................................................................................ 2-77
Help ..................................................................................... 2-79
3
3.1
3.1.1
3.1.1.1
3.1.1.2
3.1.1.3
3.1.1.4
3.1.2
3.1.2.1
3.1.2.2
3.1.2.3
3.1.2.4
3.2
3.2.1
3.2.2
3.2.2.1
3.2.2.2
3.2.2.3
3.2.2.4
Results Desktop......................................................................... 3-1
General (results)......................................................................... 3-1
Standard Sheets.................................................................... 3-1
Measurements ................................................................. 3-1
Curves............................................................................... 3-3
Steps................................................................................. 3-3
RunStatus ......................................................................... 3-3
Basic operations.................................................................... 3-3
Sheet names..................................................................... 3-3
Sheet types and properties ............................................. 3-3
Linking sheets................................................................... 3-4
Enable/Disable values...................................................... 3-4
Menus (results)........................................................................... 3-5
General .................................................................................. 3-5
Session .................................................................................. 3-7
New................................................................................... 3-7
Open ... ............................................................................. 3-7
Save .................................................................................. 3-7
Save As ............................................................................ 3-7
vi
Ascent Software
User’s Guide
3.2.2.5
3.2.2.6
3.2.2.7
3.2.3
3.2.3.1
3.2.3.2
3.2.3.3
3.2.3.4
3.2.3.5
3.2.3.6
3.2.3.7
3.2.3.8
3.2.3.9
3.2.3.10
3.2.3.11
3.2.4
3.2.4.1
3.2.4.2
3.2.4.3
3.2.4.4
3.2.4.5
3.2.4.6
3.2.4.7
3.2.4.8
3.2.4.9
3.2.4.10
3.2.5
3.2.5.1
3.2.5.2
3.2.5.3
3.2.5.4
3.2.5.5
3.2.5.6
3.2.5.7
3.2.5.8
3.2.5.9
3.2.6
3.2.6.1
3.2.6.2
3.2.6.3
3.2.6.4
Print ... .............................................................................. 3-7
Last five sessions............................................................. 3-8
Exit.................................................................................... 3-8
Edit ........................................................................................ 3-8
Cut .................................................................................... 3-8
Copy ................................................................................. 3-8
Paste ................................................................................. 3-9
Paste Values..................................................................... 3-9
Clear ................................................................................. 3-9
Insert............................................................................... 3-10
Remove .......................................................................... 3-10
Cell Names ..................................................................... 3-11
Find and Replace ........................................................... 3-12
Go To Cell ...................................................................... 3-13
Enable/Disable ............................................................... 3-13
View..................................................................................... 3-14
Desktop Bar.................................................................... 3-14
Status Bar ....................................................................... 3-14
Tool Bar .......................................................................... 3-15
Tabs Bar ......................................................................... 3-16
Hide/Show Sheets... ...................................................... 3-16
Arrange Sheets... ........................................................... 3-17
Zoom In .......................................................................... 3-18
Zoom Out ....................................................................... 3-18
Procedure....................................................................... 3-18
Results............................................................................ 3-18
Print ..................................................................................... 3-19
Add Page Break ............................................................. 3-19
Add Col Page Break ....................................................... 3-19
Add Row Page Break ..................................................... 3-19
Remove Page Break....................................................... 3-19
Page Setup ..................................................................... 3-19
Set Print Area ................................................................. 3-24
Print Area ....................................................................... 3-24
Print Setup ..................................................................... 3-25
Print ................................................................................ 3-26
Format................................................................................. 3-27
Border............................................................................. 3-27
Font................................................................................. 3-28
Number .......................................................................... 3-30
Alignment....................................................................... 3-31
Ascent Software
User’s Guide
vii
3.2.6.5
3.2.7
3.2.7.1
3.2.7.2
3.2.7.3
3.2.7.4
3.2.7.5
3.2.7.6
3.2.7.7
3.2.7.8
3.2.8
3.2.8.1
3.2.8.2
3.2.8.3
3.2.8.3.1
3.2.8.3.2
3.2.8.3.3
3.2.8.4
3.2.8.4.1
3.2.8.4.2
3.2.8.5
3.2.8.6
3.2.8.7
3.2.8.7.1
3.2.8.7.2
3.2.8.8
3.2.8.8.1
3.2.8.8.2
3.2.8.9
3.2.8.9.1
3.2.8.9.2
3.2.8.9.2.1
3.2.8.9.3
3.2.8.9.4
3.2.8.9.5
3.2.8.10
3.2.8.10.1
3.2.8.10.2
3.2.8.10.3
3.2.9
3.2.9.1
3.2.10
viii
Cell References .............................................................. 3-33
Sheet ................................................................................... 3-34
New Sheet... ................................................................... 3-34
Open Sheet..................................................................... 3-35
Save Sheet ..................................................................... 3-36
Save Sheet As... ............................................................. 3-37
Advanced Copy.............................................................. 3-38
Delete Sheet ................................................................... 3-39
Rename Sheet ................................................................ 3-39
Properties... .................................................................... 3-40
Process ................................................................................ 3-41
Function.......................................................................... 3-41
Graph .............................................................................. 3-46
Organize... ...................................................................... 3-47
Source ................................................................................3-48
Source and calculation ......................................................3-49
View....................................................................................3-50
Multipoint... .................................................................... 3-51
Source ................................................................................3-51
Calculation..........................................................................3-52
Blank Subtraction... ........................................................ 3-53
Precalculation................................................................. 3-54
Kinetic Processors.......................................................... 3-55
Source ................................................................................3-56
Calculation..........................................................................3-57
Ratio/Inhibition ............................................................... 3-62
Source ................................................................................3-62
Ratio/Inhibition Properties .................................................3-63
Curve Fit... ...................................................................... 3-64
Source ................................................................................3-65
Curve Fit .............................................................................3-66
Modify fit and graph... ..................................................3-69
Classification ......................................................................3-73
View....................................................................................3-75
Example Curve Fit sheet ....................................................3-76
Cut-Off... ......................................................................... 3-77
Source ................................................................................3-78
Classification ......................................................................3-79
View....................................................................................3-80
Setup ................................................................................... 3-82
Number........................................................................... 3-82
Help ..................................................................................... 3-84
Ascent Software
User’s Guide
4
Reference ................................................................................... 4-1
4.1
Keyboard guide ......................................................................... 4-1
4.1.1
General keys ......................................................................... 4-1
4.1.2
Dialogs and text lines ........................................................... 4-2
4.1.3
Worksheet keys .................................................................... 4-3
4.2
Calculations................................................................................ 4-5
4.2.1
Mathematical operators ....................................................... 4-5
4.2.2
A-Z worksheet function reference ....................................... 4-6
4.2.2.1
ABS................................................................................... 4-7
4.2.2.2
ACOS................................................................................ 4-7
4.1.1.3
ACOSH ............................................................................. 4-8
4.1.1.4
ADDRESS ......................................................................... 4-8
4.1.1.5
AND .................................................................................. 4-9
4.1.1.6
ASIN ............................................................................... 4-10
4.1.1.7
ASINH............................................................................. 4-10
4.1.1.8
ATAN .............................................................................. 4-11
4.1.1.9
ATAN2 ............................................................................ 4-11
4.1.1.10
ATANH ........................................................................... 4-12
4.1.1.11
AVERAGE....................................................................... 4-12
4.1.1.12
CEILING.......................................................................... 4-13
4.1.1.13
CHAR.............................................................................. 4-14
4.1.1.14
CHOOSE......................................................................... 4-14
4.1.1.15
CLEAN ............................................................................ 4-15
4.1.1.16
CODE.............................................................................. 4-16
4.1.1.17
COLUMN ........................................................................ 4-16
4.1.1.18
COLUMNS...................................................................... 4-17
4.1.1.19
COS ................................................................................ 4-17
4.1.1.20
COSH.............................................................................. 4-17
4.1.1.21
COUNT ........................................................................... 4-18
4.1.1.22
COUNTA ........................................................................ 4-18
4.1.1.23
DATE .............................................................................. 4-19
4.1.1.24
DATEVALUE .................................................................. 4-20
4.1.1.25
DAY ................................................................................ 4-20
4.1.1.26
ERROR.TYPE.................................................................. 4-21
4.1.1.27
EVEN .............................................................................. 4-22
4.1.1.28
EXACT............................................................................ 4-22
4.1.1.29
EXP................................................................................. 4-23
4.1.1.30
FACT .............................................................................. 4-23
4.1.1.31
FALSE............................................................................. 4-24
4.1.1.32
FIND ............................................................................... 4-24
4.1.1.33
FIXED ............................................................................. 4-25
Ascent Software
User’s Guide
ix
4.1.1.34
4.1.1.35
4.1.1.36
4.1.1.37
4.1.1.38
4.1.1.39
4.1.1.40
4.1.1.41
4.1.1.42
4.1.1.43
4.1.1.44
4.1.1.45
4.1.1.46
4.1.1.47
4.1.1.48
4.1.1.49
4.1.1.50
4.1.1.51
4.1.1.52
4.1.1.53
4.1.1.54
4.1.1.55
4.1.1.56
4.1.1.57
4.1.1.58
4.1.1.59
4.1.1.60
4.1.1.61
4.1.1.62
4.1.1.63
4.1.1.64
4.1.1.65
4.1.1.66
4.1.1.67
4.1.1.68
4.1.1.69
4.1.1.70
4.1.1.71
4.1.1.72
4.1.1.73
4.1.1.74
x
FLOOR ............................................................................ 4-26
HLOOKUP....................................................................... 4-26
HOUR.............................................................................. 4-28
IF ..................................................................................... 4-28
INDEX ............................................................................. 4-29
INDIRECT........................................................................ 4-30
INT .................................................................................. 4-30
ISBLANK......................................................................... 4-31
ISERR.............................................................................. 4-31
ISERROR......................................................................... 4-32
ISLOGICAL ..................................................................... 4-32
ISNA ............................................................................... 4-33
ISNONTEXT ................................................................... 4-33
ISNUMBER ..................................................................... 4-34
ISREF .............................................................................. 4-34
ISTEXT............................................................................ 4-35
LEFT................................................................................ 4-35
LEN ................................................................................. 4-36
LN ................................................................................... 4-36
LOG................................................................................. 4-37
LOG10............................................................................. 4-37
LOOKUP ......................................................................... 4-38
LOWER ........................................................................... 4-39
MATCH ........................................................................... 4-39
MAX................................................................................ 4-41
MID ................................................................................. 4-41
MIN ................................................................................. 4-42
MINUTE .......................................................................... 4-43
MOD ............................................................................... 4-44
MONTH .......................................................................... 4-44
N ..................................................................................... 4-45
NA................................................................................... 4-45
NOT ................................................................................ 4-46
NOW ............................................................................... 4-46
ODD ................................................................................ 4-47
OFFSET .......................................................................... 4-47
OR................................................................................... 4-49
PI..................................................................................... 4-49
PRODUCT....................................................................... 4-50
PROPER .......................................................................... 4-50
RAND.............................................................................. 4-51
Ascent Software
User’s Guide
4.1.1.75
REPLACE........................................................................ 4-51
4.1.1.76
REPT............................................................................... 4-52
4.1.1.77
RIGHT............................................................................. 4-53
4.1.1.78
ROUND........................................................................... 4-53
4.1.1.79
ROW ............................................................................... 4-54
4.1.1.80
ROWS............................................................................. 4-54
4.1.1.81
SEARCH ......................................................................... 4-55
4.1.1.82
SECOND......................................................................... 4-56
4.1.1.83
SIGN ............................................................................... 4-56
4.1.1.84
SIN.................................................................................. 4-57
4.1.1.85
SINH ............................................................................... 4-57
4.1.1.86
SQRT .............................................................................. 4-58
4.1.1.87
STDEV ............................................................................ 4-58
4.1.1.88
STDEVP.......................................................................... 4-59
4.1.1.89
SUBSTITUTE.................................................................. 4-59
4.1.1.90
SUM ............................................................................... 4-60
4.1.1.91
SUMSQ .......................................................................... 4-61
4.1.1.92
T ..................................................................................... 4-61
4.1.1.93
TAN ................................................................................ 4-62
4.1.1.94
TANH.............................................................................. 4-62
4.1.1.95
TEXT............................................................................... 4-63
4.1.1.96
TIME ............................................................................... 4-63
4.1.1.97
TIMEVALUE ................................................................... 4-64
4.1.1.98
TODAY ........................................................................... 4-64
4.1.1.99
TRIM............................................................................... 4-65
4.1.1.100
TRUE .............................................................................. 4-65
4.1.1.101
TRUNC ........................................................................... 4-65
4.1.1.102
TYPE............................................................................... 4-66
4.1.1.103
UPPER ............................................................................ 4-67
4.1.1.104
VALUE ............................................................................ 4-67
4.1.1.105
VAR ................................................................................ 4-68
4.1.1.106
VARP .............................................................................. 4-68
4.1.1.107
VLOOKUP....................................................................... 4-69
4.1.1.108
WEEKDAY...................................................................... 4-70
4.1.1.109
YEAR .............................................................................. 4-71
4.3
Chart reference ........................................................................ 4-72
4.3.1
Chart terminology............................................................... 4-72
4.3.2
Chart data grid .................................................................... 4-73
4.3.3
Chart types.......................................................................... 4-74
4.3.3.1
Area charts ..................................................................... 4-74
4.3.3.2
Bar charts ....................................................................... 4-74
Ascent Software
User’s Guide
xi
4.3.3.3
Horizontal bar charts...................................................... 4-74
4.3.3.4
Clustered bar charts....................................................... 4-74
4.3.3.5
Line charts ...................................................................... 4-75
4.3.3.6
Step charts ..................................................................... 4-75
4.3.3.7
Combination charts........................................................ 4-75
4.3.3.8
Pie and doughnut charts................................................ 4-75
4.3.3.9
Radar charts ................................................................... 4-75
4.3.3.10
XY charts........................................................................ 4-76
4.3.3.11
Polar charts .................................................................... 4-76
4.3.3.12
Bubble charts ................................................................. 4-76
4.3.3.13
Hi-Lo charts .................................................................... 4-77
4.3.3.14
Gantt charts.................................................................... 4-77
4.3.4
Selecting chart elements .................................................... 4-78
4.3.5
Formatting chart elements ................................................. 4-80
4.3.6
Floating menu ..................................................................... 4-80
4.3.7
Double-clicking chart elements.......................................... 4-83
4.3.8
Using dialog boxes ............................................................. 4-84
4.4
Remote Control Interface ........................................................ 4-85
4.5
Computer control commands ................................................. 4-94
4.5.1
Remote commands of the Ascent Instrument .................. 4-94
4.5.2
Protocol ............................................................................... 4-94
4.5.3
Command format................................................................ 4-94
4.5.4
Response format................................................................. 4-95
4.5.5
Buffering.............................................................................. 4-95
4.6
Warning and error messages .................................................. 4-96
4.6.1
Serial communication......................................................... 4-96
4.6.2
Printer .................................................................................. 4-97
4.6.3
Sheet ................................................................................... 4-97
4.6.4
File input/output.................................................................. 4-99
4.6.5
User input/output.............................................................. 4-100
4.6.6
Steplist............................................................................... 4-100
4.6.7
Miscellaneous ................................................................... 4-101
4.6.8
Reader type related........................................................... 4-102
4.6.9
Multiskan Ascent related .................................................. 4-102
4.6.10
Fluoroskan Ascent (including FL & CF), Luminoskan
Ascent and Nepheloskan Ascent related......................... 4-107
4.6.11
iEMS Reader MF related................................................... 4-115
4.7
File types used in Ascent Software....................................... 4-122
4.7.1
Work file types .................................................................. 4-122
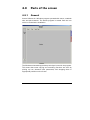
4.8
Parts of the screen ................................................................. 4-123
4.8.1
General .............................................................................. 4-123
xii
Ascent Software
User’s Guide
4.8.2
4.8.3
4.8.4
4.8.5
4.8.6
4.8.7
4.9
Menu Bar........................................................................... 4-124
Tool Bar............................................................................. 4-124
Desktops ........................................................................... 4-127
Status Bar.......................................................................... 4-127
Tab .................................................................................... 4-127
Steplist .............................................................................. 4-128
Glossary and abbreviations................................................... 4-128
Ascent Software
User’s Guide
xiii
Index
2
2-D................................................................................ 4-72, 4-74, 4-75, 4-79
3
3-D.............................................................. 4-73, 4-74, 4-75, 4-79, 4-80, 4-84
base or wall ..........................................................................................4-84
A
Abbreviations .............................................................................4-128, 4-141
Activeness of layout fields ......................................................................2-31
Alarm...............................................................................................1-30, 2-52
All button1-1, 1-23, 1-44, 1-51, 2-2, 2-13, 2-14, 2-58, 2-66, 2-71, 3-9, 3-12,
3-17, 3-22, 3-34, 3-38, 3-58, 3-71, 4-12, 4-45, 4-50, 4-76, 4-88, 4-94, 4-95
Ambient temperature ......................................................... 2-48, 2-77, 4-128
Append ....................................................................................................2-55
Apply button ........... 1-33, 1-35, 2-25, 2-26, 2-28, 2-30, 2-31, 3-2, 3-52, 3-83
Area definition
Horizontal Diagonal .............................................................................2-21
Middle Point ........................................................... 1-30, 1-45, 2-19, 4-125
Point ................................................................ 2-17, 2-18, 2-19, 3-69, 3-71
Vertical Diagonal..................................................................................2-22
Whole Well ..................................................................................1-31, 2-20
ASCII ...........................................1-51, 2-54, 2-55, 4-94, 4-122, 4-129, 4-137
Auto format.....................................................................................3-82, 3-83
Automatic
runtime Curves ...........................................................................1-45, 2-78
session name generation ....................................................................2-78
Autoname .......................................................................................2-55, 4-91
Average rate ............................................................................................3-58
Axis ....................... 4-72, 4-74, 4-75, 4-76, 4-77, 4-79, 4-80, 4-81, 4-82, 4-83
title ............................................................................ 4-79, 4-81, 4-82, 4-83
A-Z Worksheet Function Reference........................................................4-97
B
Backdrop...................................................................... 4-80, 4-81, 4-82, 4-83
legend..........................................................................................4-81, 4-83
xiv
Ascent Software
User’s Guide
Background1-29, 2-35, 2-39, 2-50, 2-71, 2-73, 2-74, 2-75, 3-22, 4-102, 4111, 4-112, 4-114, 4-129, 4-135
mode .................................................................................................... 2-50
shake .................................................................................................... 2-50
Beam.......................................................... 2-10, 2-39, 2-73, 2-74, 2-75, 3-14
Browse......................................................... 1-9, 1-17, 2-55, 2-79, 3-26, 3-85
Buffering .................................................................................................. 4-95
C
Cancel button .............................................................1-49, 3-52, 3-83, 4-133
Chart
backdrop ..................................................................................... 4-80, 4-83
data grid ...................................................................................... 4-73, 4-79
element ........................................................... 4-74, 4-78, 4-80, 4-83, 4-84
file......................................................................................................... 4-82
reference.............................................................................................. 4-72
terminology.......................................................................................... 4-72
title........................................................................................................ 4-78
type ........................................................ 4-72, 4-73, 4-74, 4-77, 4-80, 4-84
Charts
area.............................................................................................. 4-74, 4-75
bar ............................................................................................... 4-74, 4-77
bubble .................................................................................................. 4-76
combination......................................................................................... 4-75
Gantt..................................................................................................... 4-77
hi-lo ...................................................................................................... 4-77
line........................................................................................................ 4-75
pie and doughnut ................................................................................ 4-75
polar ..................................................................................................... 4-76
radar ..................................................................................................... 4-75
step....................................................................................................... 4-75
XY......................................................................................................... 4-76
Clear all button .......................................... 1-33, 1-36, 2-25, 2-28, 2-30, 2-31
Close button ...................1-35, 2-9, 2-13, 2-28, 2-30, 2-31, 3-42, 4-96, 4-118
Command
ABORT.................................................................................................. 4-87
CONTINUE .........................................................................4-87, 4-90, 4-92
flag........................................................................................................ 4-85
format................................................................................................... 4-94
INSTRUMENT STATE .......................................................................... 4-87
KILL.............................................................................................. 4-87, 4-90
Ascent Software
User’s Guide
xv
START ............................................................................... 4-87, 4-90, 4-93
Comment ..................................................................... 1-23, 1-42, 2-15, 3-76
Configuration .................................................................... 1-18, 4-133, 4-140
Continue button.................................................................... 2-52, 2-53, 4-92
Control1-6, 1-32, 1-34, 2-9, 2-24, 2-26, 2-31, 3-78, 4-1, 4-35, 4-36, 4-51, 460, 4-86, 4-133, 4-151
Copy button .................................1-33, 1-45, 2-25, 3-6, 3-8, 3-15, 3-38, 4-82
Cubic polynomial.................................................................. 3-69, 3-70, 3-71
Cubic spline ....................................................................................3-69, 3-71
Curve Fit1-2, 1-41, 3-4, 3-6, 3-13, 3-15, 3-64, 3-66, 3-69, 3-73, 3-74, 3-75,
3-77, 3-82, 4-99, 4-126
Curves ............................................1-2, 1-45, 1-46, 2-42, 2-78, 3-3, 3-4, 3-58
Cut-off1-2, 3-4, 3-6, 3-13, 3-15, 3-53, 3-73, 3-74, 3-76, 3-77, 3-80, 3-81, 382
D
Data point.................................3-58, 4-72, 4-74, 4-77, 4-79, 4-81, 4-82, 4-84
label .......................................................................... 4-79, 4-81, 4-82, 4-84
Diameter .................................................................... 2-50, 2-59, 2-61, 4-108
Directories1-5, 1-9, 1-16, 1-39, 2-5, 2-6, 2-7, 2-8, 2-55, 2-78, 3-35, 3-37, 485, 4-86, 4-88, 4-89, 4-90, 4-96, 4-135, 4-140, 4-144, 4-152
Dispense all and measure........................................... 1-26, 1-29, 2-34, 2-45
Dispenser
position.................................................................................................2-66
settings ........................................................................................1-13, 1-27
setup.....................................................................................................1-18
Drives1-4, 1-7, 1-15, 1-30, 1-51, 2-5, 2-6, 2-8, 2-12, 3-36, 3-38, 4-92, 4-118,
4-119, 4-120, 4-137, 4-138
E
Edit .............................. 3-5, 3-6, 3-8, 3-9, 3-10, 3-11, 3-12, 3-13, 3-46, 4-144
Cell Names ....................................................................................3-6, 3-11
Clear ............................... 1-33, 1-36, 2-25, 2-28, 2-30, 2-31, 3-6, 3-9, 3-47
Copy .........................................1-33, 1-45, 2-25, 3-6, 3-8, 3-15, 3-38, 4-82
Cut ....................................................................... 1-33, 2-25, 3-6, 3-8, 3-15
Enable/Disable .................................................... 3-4, 3-6, 3-13, 3-29, 3-64
Find and Replace ..........................................................................3-6, 3-12
Go To Cell......................................................................................3-6, 3-13
Insert............................................................ 3-6, 3-10, 4-115, 4-116, 4-121
Paste ................................................1-33, 2-25, 3-6, 3-9, 3-15, 4-82, 4-144
Paste Values....................................................................................3-6, 3-9
xvi
Ascent Software
User’s Guide
Remove1-42, 1-43, 2-2, 2-17, 2-22, 2-57, 2-63, 3-6, 3-10, 3-19, 4-100, 4125
Effective Dose ......................................................................................... 3-67
EPROM................................................................................................ 1-3, 1-4
Example Curve Fit sheet ......................................................................... 3-76
Example Instrument Status report ........................ 1-3, 1-13, 2-2, 2-40, 2-73
Example RunStatus printout................................................................... 2-36
Example sessions.................................................................................... 1-16
Examples of setting up time parameters ............................................... 2-50
Execute
by........................1-26, 1-27, 1-29, 1-46, 1-47, 2-32, 2-33, 2-34, 2-35, 2-38
Empty ............................................ 2-2, 2-13, 2-14, 4-18, 4-45, 4-61, 4-130
Plate In .................................................................................2-2, 2-11, 2-12
Plate Out...............................................................................2-2, 2-11, 2-12
Prime ................................................................. 2-2, 2-12, 2-13, 2-45, 2-46
Start..........................................1-6, 1-7, 1-13, 1-15, 1-44, 2-11, 2-67, 4-87
Executing loops of steps ........................................................................ 1-46
Extrapolate ..................................................................................... 3-66, 3-67
F
File types ........................................................................1-50, 2-6, 2-7, 4-122
batch file............................................................................................... 4-92
files produced by each session file .................................................. 4-122
miscellaneous.................................................................................... 4-122
session file .........................1-11, 1-15, 2-25, 4-86, 4-87, 4-92, 4-93, 4-122
text file.....................................................................1-34, 2-27, 2-73, 4-122
work file..........................................................................1-51, 4-122, 4-153
Fill dialog1-33, 1-34, 1-35, 1-42, 2-23, 2-25, 2-26, 2-27, 2-28, 2-29, 2-30, 231, 3-32, 4-84
Filter1-12, 1-13, 1-14, 1-18, 2-37, 2-39, 2-40, 2-41, 2-42, 2-62, 2-63, 2-64, 274, 2-75, 2-76, 3-55, 4-91, 4-103, 4-106, 4-107, 4-108, 4-109, 4-111, 4112, 4-113, 4-115, 4-116, 4-117
Filter pair1-13, 1-14, 2-37, 2-39, 2-40, 2-42, 2-62, 2-63, 2-64, 2-74, 3-55, 491, 4-107, 4-108, 4-109, 4-111, 4-112
validation.............................................................................................. 2-63
Finish button............................................................................................ 3-45
Fluorometric .. 1-2, 1-13, 1-21, 1-28, 2-38, 2-39, 2-40, 2-41, 2-46, 2-62, 2-64
Format
Alignment ..............................................................................3-5, 3-6, 3-31
Border ....................................................................................3-5, 3-6, 3-27
Cell References......................................................................3-5, 3-6, 3-33
Ascent Software
User’s Guide
xvii
Font............................................................................... 3-5, 3-6, 3-28, 4-83
Number1-35, 2-27, 2-29, 2-31, 3-5, 3-6, 3-30, 3-44, 3-73, 3-79, 3-82, 383, 3-84, 4-21, 4-66, 4-89
Four parameter logistic ........................................................ 3-69, 3-71, 4-97
G
Glossary .................................................................................................4-128
Gridline..............................................1-28, 2-36, 2-71, 3-22, 4-79, 4-83, 4-84
H
Help ..........................................1-17, 2-2, 2-79, 3-6, 3-84, 4-98, 4-133, 4-144
HIS/LIMS systems ...................................................................................4-85
I
iEMS Reader MF ....................................................................................4-115
Incubation time..................................................................... 1-46, 2-47, 2-48
Installation of Ascent Software..........................................................1-6, 1-7
Instrument
communication ....................................................................................1-13
setup.....................................................................................................1-12
Integration time ......... 1-27, 2-35, 2-38, 2-39, 2-42, 3-2, 4-107, 4-109, 4-114
Interval ....... 2-37, 2-40, 2-41, 2-42, 2-44, 2-46, 2-50, 2-51, 3-66, 3-71, 4-107
shaking .................................................................................................2-50
K
Keep dispenser syringe full ....................................................................2-78
Keys
dialogs and text lines.............................................................................4-2
general....................................................................................................4-1
worksheet...............................................................................................4-3
L
Label......................... 4-76, 4-77, 4-78, 4-81, 4-82, 4-83, 4-128, 4-131, 4-133
Lag time .......................................................... 2-39, 2-50, 2-51, 4-106, 4-107
Layout
fill by using the fields...........................................................................2-26
fill by using the Fill dialog....................................................................2-28
Legend ..............................................4-76, 4-77, 4-78, 4-80, 4-81, 4-83, 4-84
Linear regression............................................................................3-58, 3-69
Linking sheets............................................................................................3-4
List Files of Type....................................................... 2-5, 2-6, 2-7, 3-35, 3-38
xviii
Ascent Software
User’s Guide
Luminometric1-2, 1-15, 1-21, 1-28, 2-6, 2-38, 2-39, 2-40, 2-41, 2-46, 2-62,
2-76, 4-111, 4-114
M
Mathematical operators............................................................................ 4-5
Maximum of well (Peak) ......................................................................... 3-61
Maximum rate ..............................................................3-57, 3-58, 3-59, 3-60
Measurement
count ................................................................................2-50, 3-47, 4-104
interval ............................................................................................... 4-107
method........................................................ 1-21, 1-28, 2-38, 4-102, 4-114
Measurement type1-28, 2-37, 2-38, 2-40, 2-41, 2-42, 2-43, 2-45, 2-46, 278, 3-3, 3-56
Agglutination ..................................................................................... 4-116
Area scanning...................................................................................... 2-42
Dual ... 1-28, 2-37, 2-40, 2-42, 2-46, 2-47, 2-78, 3-1, 3-3, 3-55, 3-56, 4-113
Dual kinetic ..............................1-28, 2-37, 2-42, 2-47, 2-78, 3-1, 3-3, 3-56
Kinetic1-2, 1-28, 1-46, 2-37, 2-41, 2-42, 2-46, 2-50, 2-78, 3-3, 3-6, 3-55,
3-56, 3-58, 3-59, 3-82
Monitor...................................1-28, 2-37, 2-43, 2-45, 2-47, 2-78, 3-3, 3-56
Single ...................................1-28, 2-37, 2-38, 2-40, 2-41, 2-42, 2-45, 2-46
Menu
floating .......................................................... 1-30, 2-17, 2-23, 4-80, 4-137
layout .............................................................................................. 2-2, 3-6
Moving type ..........................................................................1-26, 2-32, 4-67
N
Navigate arrows ...........................................................1-35, 2-28, 2-30, 2-31
Network .....................................2-5, 2-6, 2-8, 3-26, 3-36, 3-38, 4-128, 4-140
Next button......................................................... 1-10, 3-33, 3-42, 3-43, 3-44
Number of decimals..............................................................3-82, 3-83, 3-84
O
OFF time ................................................................................2-49, 2-50, 2-51
OK button ..................1-7, 1-49, 2-15, 2-16, 2-65, 3-2, 3-45, 3-52, 3-69, 3-83
ON time..................................................................................2-49, 2-50, 2-51
Opening sessions.................................................................................... 1-15
Operation buttons ...................1-33, 1-35, 1-49, 2-60, 3-12, 3-33, 3-52, 3-83
Options ..... 1-3, 1-6, 1-45, 2-2, 2-48, 2-52, 2-53, 2-71, 2-77, 3-22, 3-25, 4-84
Overwrite general step settings1-21, 1-29, 1-43, 1-46, 2-14, 2-39, 2-45, 247
Ascent Software
User’s Guide
xix
P
Parts of the screen
desktops1-1, 1-12, 1-13, 1-14, 1-15, 1-19, 1-23, 1-24, 1-25, 1-28, 1-29, 130, 1-31, 1-36, 1-40, 1-41, 1-43, 1-46, 2-1, 2-2, 2-9, 2-10, 2-11, 2-24, 236, 2-42, 2-51, 2-52, 2-54, 2-55, 2-57, 3-1, 3-3, 3-6, 3-7, 3-14, 3-15, 318, 3-21, 3-64, 3-77, 4-90, 4-127, 4-128
menu bar ......................3-5, 4-1, 4-124, 4-136, 4-141, 4-144, 4-145, 4-147
status bar.......................................2-2, 2-10, 3-6, 3-14, 3-15, 4-127, 4-149
Steplist1-1, 1-2, 1-20, 1-21, 1-23, 1-30, 1-41, 1-43, 1-46, 2-37, 2-44, 2-45,
2-47, 2-49, 2-51, 2-54, 2-56, 2-57, 4-100, 4-124, 4-125, 4-128
tabview1-17, 1-28, 1-40, 1-42, 2-9, 2-14, 2-15, 2-36, 2-48, 2-79, 3-14, 373, 3-75, 3-80, 3-85, 4-83, 4-84, 4-123, 4-127, 4-150
toolbar .......1-43, 2-1, 2-2, 2-9, 2-10, 2-11, 3-4, 3-5, 3-6, 3-14, 3-15, 4-124
Plate acceleration ...........................................................................1-27, 2-34
Plate template1-2, 1-12, 1-16, 1-19, 1-23, 1-30, 1-36, 1-37, 1-42, 1-48, 1-49,
1-50, 2-3, 2-15, 2-59, 4-150, 4-151
Plot ............................................................. 3-46, 4-76, 4-78, 4-80, 4-83, 4-84
PMT voltage..................................2-39, 2-40, 2-74, 2-75, 2-76, 4-111, 4-112
Point to point ..................................................................................3-69, 3-71
Prime tip..........................................................................................2-45, 2-46
Print1-17, 1-22, 1-30, 1-41, 1-45, 2-2, 2-8, 2-11, 2-30, 2-56, 2-57, 2-58, 271, 2-73, 2-79, 3-6, 3-7, 3-15, 3-19, 3-22, 3-24, 3-25, 3-26, 3-85, 4-82, 497, 4-125
Add Col Page Break ......................................................................3-6, 3-19
Add Page Break.............................................................................3-6, 3-19
Add Row Page Break ....................................................................3-6, 3-19
Page Setup ....................................................................................3-6, 3-19
Print1-17, 1-22, 1-30, 1-41, 1-45, 2-2, 2-8, 2-11, 2-30, 2-56, 2-57, 2-58, 271, 2-73, 2-79, 3-6, 3-7, 3-15, 3-19, 3-22, 3-24, 3-25, 3-26, 3-85, 4-82,
4-97, 4-125
Print Area ......................................................................................3-6, 3-24
Print Setup.....................................................................................3-6, 3-25
Remove Page Break......................................................................3-6, 3-19
Set Print Area ...................................................................... 2-57, 3-6, 3-24
Print button1-17, 1-22, 1-30, 1-41, 1-45, 2-2, 2-8, 2-11, 2-30, 2-56, 2-57, 258, 2-71, 2-73, 2-79, 3-6, 3-7, 3-15, 3-19, 3-22, 3-24, 3-25, 3-26, 3-85, 482, 4-97, 4-125
Process
Blank Subtraction............................3-4, 3-6, 3-13, 3-53, 3-77, 3-82, 4-126
xx
Ascent Software
User’s Guide
Curve Fit1-2, 1-41, 3-4, 3-6, 3-13, 3-15, 3-64, 3-66, 3-69, 3-73, 3-74, 3-75,
3-77, 3-82, 4-99, 4-126
Cut-Off......................1-2, 3-4, 3-6, 3-13, 3-15, 3-73, 3-77, 3-80, 3-81, 3-82
Function ..................................................... 1-2, 3-6, 3-41, 3-42, 3-43, 3-44
Graph .................................................................... 1-2, 3-3, 3-6, 3-46, 3-47
Kinetic Processors ...............................................................3-6, 3-55, 3-82
Multipoint....................................................................3-6, 3-51, 3-52, 3-82
Organize .................................................................................3-3, 3-6, 3-47
Precalculation ................................................. 3-6, 3-54, 3-55, 3-82, 4-113
Ratio/Inhibition............................................................3-6, 3-62, 3-63, 3-82
Product support ........................................................................................ 1-3
Prompt on Replace ........................................................................ 3-12, 3-33
Protocol ........................................................................................ 4-94, 4-145
Q
Quadratic polynomial..................................................................... 3-69, 3-70
Quartic polynomial......................................................................... 3-69, 3-70
R
R2 ............................................................................................................. 3-77
Remote
command....................4-85, 4-86, 4-87, 4-88, 4-89, 4-90, 4-92, 4-93, 4-94
control interface.......................................................................... 4-85, 4-87
function ................................................................................................ 4-92
mode .................................................................................................... 4-87
use........................................................................................................ 4-87
Requirements ....................................................... 1-4, 1-5, 1-8, 4-111, 4-136
Response . 4-87, 4-89, 4-90, 4-91, 4-92, 4-93, 4-94, 4-95, 4-96, 4-135, 4-143
file................................................................................................ 4-89, 4-90
format................................................................................................... 4-95
Robotics.................................................................................4-85, 4-89, 4-91
Run plate out ........................................................................................... 2-52
Run program ........................................................................................... 2-53
RunStatus ...... 1-28, 1-40, 1-41, 2-36, 3-3, 3-4, 3-20, 3-24, 3-39, 3-40, 4-127
S
Scale ..................2-62, 2-72, 3-20, 3-23, 3-67, 3-72, 4-81, 4-83, 4-111, 4-152
Scaling ................................................................ 2-63, 2-64, 2-74, 2-75, 2-76
Select reading ......................................................................................... 3-61
Select sheet(s) to print ............................................................................ 2-57
Send string .............................................................................................. 2-53
Ascent Software
User’s Guide
xxi
Serial port .................................................. 1-4, 2-53, 2-77, 4-94, 4-96, 4-148
settings .................................................................................................2-53
Series1-35, 2-24, 2-26, 2-27, 2-29, 2-30, 2-31, 3-46, 3-58, 4-49, 4-72, 4-73,
4-74, 4-75, 4-76, 4-77, 4-78, 4-79, 4-80, 4-81, 4-82, 4-84
label .......................................................................... 4-78, 4-81, 4-82, 4-84
Session
autosave ...............................................................................................2-78
Exit............................................................................. 1-7, 2-2, 2-9, 3-6, 3-8
New1-42, 1-49, 1-50, 2-2, 2-3, 2-11, 2-55, 2-67, 3-4, 3-5, 3-6, 3-7, 3-15, 334, 3-40
Open1-7, 1-15, 1-33, 1-47, 1-48, 2-2, 2-4, 2-5, 2-11, 2-25, 2-26, 3-6, 3-7,
3-15, 3-35, 4-124
Print1-17, 1-22, 1-30, 1-41, 1-45, 2-2, 2-8, 2-11, 2-30, 2-56, 2-57, 2-58, 271, 2-73, 2-79, 3-6, 3-7, 3-15, 3-19, 3-22, 3-24, 3-25, 3-26, 3-85, 4-82,
4-97, 4-125
Save1-22, 1-30, 1-33, 1-46, 1-48, 2-2, 2-6, 2-11, 2-25, 2-54, 2-55, 2-73, 36, 3-7, 3-15, 3-36, 3-37, 4-82, 4-88, 4-91, 4-101, 4-124, 4-125, 4-146
Save As ................. 1-33, 2-2, 2-6, 2-25, 3-6, 3-7, 4-82, 4-88, 4-124, 4-146
Settings1-6, 1-12, 1-13, 1-20, 1-21, 1-26, 1-27, 1-29, 1-46, 2-14, 2-32, 2-33,
2-35, 2-39, 2-45, 2-47, 2-50, 2-53, 2-66, 2-67, 3-83, 4-80, 4-97
Setup
Colors ..............................................1-12, 1-18, 2-2, 2-24, 2-68, 3-64, 3-77
Dispensers ........................................................ 1-12, 1-13, 2-2, 2-66, 2-73
Filters ................................................................. 1-12, 1-13, 1-14, 2-2, 2-62
Instrument Status................................................ 1-3, 1-13, 2-2, 2-40, 2-73
Number1-35, 2-27, 2-29, 2-31, 3-5, 3-6, 3-30, 3-44, 3-73, 3-79, 3-82, 383, 3-84, 4-21, 4-66, 4-89
Password.................................................................... 1-12, 1-14, 2-2, 2-65
Plate Templates ....................................... 1-12, 1-18, 1-42, 1-49, 2-2, 2-59
Printout.............................................................. 1-12, 1-18, 2-2, 2-69, 3-21
Sheet
Advanced Copy................................................... 3-5, 3-6, 3-38, 3-40, 3-50
Delete ....................................................... 1-49, 2-60, 3-6, 3-15, 3-39, 4-98
New1-42, 1-49, 1-50, 2-2, 2-3, 2-11, 2-55, 2-67, 3-4, 3-5, 3-6, 3-7, 3-15, 334, 3-40
Open1-7, 1-15, 1-33, 1-47, 1-48, 2-2, 2-4, 2-5, 2-11, 2-25, 2-26, 3-6, 3-7,
3-15, 3-35, 4-124
Properties1-6, 3-2, 3-4, 3-6, 3-25, 3-40, 3-47, 3-51, 3-53, 3-54, 3-55, 3-63,
3-64, 3-77, 4-85
Rename ................................................................................. 3-3, 3-6, 3-39
xxii
Ascent Software
User’s Guide
Save1-22, 1-30, 1-33, 1-46, 1-48, 2-2, 2-6, 2-11, 2-25, 2-54, 2-55, 2-73, 36, 3-7, 3-15, 3-36, 3-37, 4-82, 4-88, 4-91, 4-101, 4-124, 4-125, 4-146
Save As ..................1-33, 2-2, 2-6, 2-25, 3-6, 3-7, 4-82, 4-88, 4-124, 4-146
Sheets
Blank Subtraction ........................... 3-4, 3-6, 3-13, 3-53, 3-77, 3-82, 4-126
Curve Fit1-2, 1-41, 3-4, 3-6, 3-13, 3-15, 3-64, 3-66, 3-69, 3-73, 3-74, 3-75,
3-77, 3-82, 4-99, 4-126
Cut-Off......................1-2, 3-4, 3-6, 3-13, 3-15, 3-73, 3-77, 3-80, 3-81, 3-82
Measure1-22, 1-28, 1-29, 1-30, 1-40, 1-41, 1-43, 1-44, 1-46, 1-47, 2-2, 211, 2-37, 2-39, 2-42, 2-45, 2-46, 2-50, 2-51, 2-55, 2-64, 2-73, 3-1, 3-2,
3-3, 3-13, 3-36, 3-38, 3-43, 3-52, 3-82, 4-98, 4-100, 4-101, 4-106, 4124, 4-130
Measure1 ...................................1-47, 2-34, 3-1, 3-3, 3-4, 3-20, 3-24, 3-39
Measure1 Curves...............................................................3-20, 3-24, 3-39
Multipoint....................................................................3-6, 3-51, 3-52, 3-82
New1-42, 1-49, 1-50, 2-2, 2-3, 2-11, 2-55, 2-67, 3-4, 3-5, 3-6, 3-7, 3-15, 334, 3-40
Precalculation ................................................. 3-6, 3-54, 3-55, 3-82, 4-113
Ratio/Inhibition............................................................3-6, 3-62, 3-63, 3-82
RunStatus... 1-28, 1-40, 1-41, 2-36, 3-3, 3-4, 3-20, 3-24, 3-39, 3-40, 4-127
Source3-4, 3-26, 3-40, 3-48, 3-49, 3-51, 3-54, 3-56, 3-62, 3-64, 3-65, 375, 3-78, 3-81, 4-98
Steps1-19, 1-20, 1-21, 1-22, 1-23, 1-28, 1-29, 1-30, 1-40, 1-41, 1-43, 146, 2-2, 2-14, 2-30, 2-37, 2-44, 2-45, 2-47, 2-49, 2-51, 2-52, 2-54, 2-55,
2-56, 2-57, 2-58, 3-3, 3-4, 3-20, 3-24, 3-39, 3-40, 4-91
Sigmoid logistic.....................................................................3-69, 3-71, 3-72
Signal2-39, 2-62, 2-74, 2-75, 3-60, 3-61, 3-67, 3-70, 3-71, 4-102, 4-104, 4105, 4-107, 4-111, 4-112, 4-115, 4-117, 4-128, 4-129, 4-132, 4-133, 4137, 4-141, 4-143
Singular Value Decomposition (SVD) ..................................3-69, 3-70, 3-71
Slope......................................................................................2-67, 2-74, 3-58
Speed..........................1-27, 2-34, 2-35, 2-50, 2-66, 2-67, 4-42, 4-108, 4-118
Spreadsheet1-2, 1-40, 1-41, 1-43, 2-56, 3-64, 3-70, 4-9, 4-47, 4-48, 4-73, 4127, 4-131, 4-134, 4-149, 4-153
Startup temperature....................................................................... 2-48, 2-77
Step time ........................................................................................ 2-38, 2-44
Steps
Activate ......................................................................................... 2-2, 2-58
Dispense1-22, 1-26, 1-29, 1-30, 1-46, 1-47, 2-2, 2-11, 2-34, 2-39, 2-44, 245, 2-46, 4-114, 4-125
Dispense And Measure ................ 1-22, 1-29, 2-2, 2-39, 2-45, 2-46, 4-125
Ascent Software
User’s Guide
xxiii
General1-6, 1-13, 1-20, 1-22, 1-23, 1-29, 1-42, 1-43, 1-46, 1-47, 2-1, 2-14,
2-15, 2-39, 2-45, 2-47, 3-1, 3-5, 3-30, 3-31, 4-1, 4-63, 4-80, 4-100, 4123
Inactivate .......................................................................................2-2, 2-57
Incubate................................1-22, 1-29, 1-47, 2-2, 2-11, 2-47, 2-48, 4-125
Measure1-22, 1-28, 1-29, 1-30, 1-40, 1-41, 1-43, 1-44, 1-46, 1-47, 2-2, 211, 2-37, 2-39, 2-42, 2-45, 2-46, 2-50, 2-51, 2-55, 2-64, 2-73, 3-1, 3-2,
3-3, 3-13, 3-36, 3-38, 3-43, 3-52, 3-82, 4-98, 4-100, 4-101, 4-106, 4124, 4-130
Pause ................. 1-22, 1-30, 2-2, 2-11, 2-51, 2-52, 2-53, 4-90, 4-92, 4-125
Print1-17, 1-22, 1-30, 1-41, 1-45, 2-2, 2-8, 2-11, 2-30, 2-56, 2-57, 2-58, 271, 2-73, 2-79, 3-6, 3-7, 3-15, 3-19, 3-22, 3-24, 3-25, 3-26, 3-85, 4-82,
4-97, 4-125
Remove1-42, 1-43, 2-2, 2-17, 2-22, 2-57, 2-63, 3-6, 3-10, 3-19, 4-100, 4125
Save/Load...........................1-22, 1-30, 2-2, 2-11, 2-54, 4-91, 4-101, 4-125
Shake.............................................1-22, 1-29, 2-2, 2-11, 2-49, 2-50, 4-125
T
Template
database .............................................................................. 1-2, 1-41, 1-42
editor .............................................1-2, 1-16, 1-41, 1-42, 1-49, 2-59, 4-151
Ticks ...................................................................................... 4-79, 4-81, 4-83
Time to change...............................................................................3-57, 3-60
Time to maximum (Peak) ........................................................................3-61
Time to maximum rate......................................................... 3-57, 3-59, 3-60
Title4-78, 4-80, 4-81, 4-83, 4-124, 4-128, 4-131, 4-133, 4-135, 4-136, 4-145,
4-151
Total time .............................................................................. 2-49, 2-50, 2-51
Transformation .......................................................... 3-72, 3-77, 4-97, 4-152
U
Unit......................................................... 2-38, 2-60, 3-2, 4-100, 4-130, 4-131
Using tools...............................................................................................1-41
W
Wait program...........................................................................................2-53
Wait string................................................................................................2-53
Waiting time....................................................................................2-52, 2-53
Validate ........................................................... 1-13, 2-62, 2-63, 4-107, 4-108
Validation ....................................1-13, 2-62, 2-74, 2-75, 4-112, 4-113, 4-153
xxiv
Ascent Software
User’s Guide
View
Arrange Sheets............................................................................. 3-6, 3-17
Desktop Bar ....................................................................2-2, 2-9, 3-6, 3-14
Hide/Show Sheets ........................................................................ 3-6, 3-16
Procedure1-1, 1-12, 1-13, 1-14, 1-15, 1-19, 1-24, 1-25, 1-28, 1-29, 1-30,
1-31, 1-36, 1-41, 1-43, 1-44, 2-1, 2-2, 2-11, 2-12, 2-24, 2-36, 3-3, 3-6, 37, 3-18, 3-21, 3-64, 3-77, 4-127, 4-128, 4-142
Results1-1, 1-19, 1-23, 1-28, 1-30, 1-40, 1-41, 1-43, 1-46, 2-2, 2-11, 2-36,
2-42, 2-51, 2-52, 2-54, 2-55, 2-57, 2-68, 3-1, 3-5, 3-6, 3-15, 3-18, 3-77,
4-15, 4-90, 4-101, 4-122, 4-127
Status Bar................................................. 2-2, 2-10, 3-6, 3-14, 3-15, 4-127
Tool Bar........................................... 1-43, 2-2, 2-10, 2-11, 3-6, 3-15, 4-124
Zoom In......................................................................................... 3-6, 3-18
Zoom Out...................................................................................... 3-6, 3-18
Volume .................................................... 1-29, 2-13, 2-44, 2-46, 2-78, 4-120
Word wrap.................................................................................... 3-32, 4-153
X
X-axis ....................................................................................................... 4-11
Y
Y-axis ..........................................................................3-67, 4-74, 4-80, 4-138
Yes button ............................................................................................... 3-39
Ascent Software
User’s Guide
xxv
xxvi
Ascent Software
User’s Guide
1
Overview
1.1
Introduction
Ascent Software is a powerful application which controls the Fluoroskan
Ascent FL, a combined fluorometer and luminometer, and the
Fluoroskan Ascent and Fluoroskan Ascent CF fluorometers. Note that
this User’s Guide describes functions of all these readers. Reader
functions that apply only to the Fluoroskan Ascent FL are marked as “FL
only”.
Note that all the functions for the Fluoroskan Ascent described in this
User’s Guide also apply to the Fluoroskan Ascent CF with the exception
of all information on dispensers and dispensing (marked as “not CF”).
Ascent Software provides features needed to make comprehensive
calculations and reports. You can define and run a variety of plates
easily. A plate information database covers the most common plate
formats. Ascent Software allows you to build your own applications and
to run or modify ready-made applications. Designing an own application
is easy. In the special graphical Procedure Desktop you can simply drag
the assay steps from the toolbox into the Steplist. You can define
measurement, shaking, dispensing and incubation parameters. On the
Results Desktop you can define spreadsheets to perform calculations
and to create impressive reports. All the application data can be
recalled, executed and saved with a click of the mouse.
Ascent Software User's Guide
1-1
Ascent Software provides:
•
Full support for both fluorometric and luminometric measurements
(FL only).
•
A template database for the most common 1- to 384-well plates.
•
A template editor for the user to define plate templates.
•
A variety of options to select measurement points in a well.
•
A drag-and-drop technique to define the procedure steps to the
Steplist.
•
Simultaneous measuring and dispensing.
•
A flexible spreadsheet type environment for calculations and
reports.
•
A session management system.
•
Runtime Screens during execution.
•
Graph functions to generate graphical presentation of data.
•
A Function tool to easily create custom-made formulas.
•
A Curve Fit tool to create calibrator curves and to calculate sample
concentrations.
•
A Cut-Off tool to create various cut-off sheets.
•
Kinetic processors.
1-2
Ascent Software User's Guide
1.2
Product support
For any questions about Ascent Software, contact your local Thermo
Labsystems distributor.
When you contact the distributor, be prepared to give the following
information:
•
Version number and serial number of your Ascent Software
•
Instrument internal software version (EPROM)
•
The type of environment that you are using
o
Windows version number (and language)
o
Computer name and model
o
Processor type
o
Physical RAM in MB
o
Video resolution, colors and card type
•
The exact wording of any messages that appeared on your screen
•
What happened and what you were doing when the problem
occurred
•
How you tried to solve the problem
•
The Instrument Status report
•
Instrument serial number
•
Options installed in your instrument.
Ascent Software User's Guide
1-3
1.3
Getting started
1.3.1
System hardware requirements
The following equipment is required to run the program:
•
IBM PC-compatible computer with Pentium processor
•
SVGA 1024 x 768 display
•
64 MB of free RAM available
•
200 MB of free hard disk space available
•
CD-ROM drive
•
Parallel port for the printer
•
Windows-compatible printer
•
Windows-compatible mouse port (or second serial port) and mouse
•
Free serial port for the instrument, buffered (16550AF).
The printer is a standard printer that can be configured to the Windows
system. The printer is connected to the computer via the Centronics
parallel port (LPT1 or LPT2).
1.3.2
Instrument hardware requirements
Check that the embedded software (EPROM) is compatible with the
Ascent Software version.
Note:
1-4
Problems with the version string will arise if the EPROM in the
instrument is of an older version. The EPROM must then be
replaced. With an older EPROM you might get connected to
the instrument, but the instrument will not necessarily operate
correctly. Use only EPROM version 2.5 with Ascent Software
version 2.6.
Ascent Software User's Guide
1.3.3
Software requirements
One of the following versions of the operating systems is required:
•
Windows 98
•
Windows Me
•
Windows NT 4.0 workstation.
Note:
•
The installation must be carried out through the workstation,
not through the server.
Windows 2000.
Note:
Tool tips must be disabled before installation in Windows 2000.
Note:
•
DO NOT use any directory names more than eight characters
long. Ascent Software does not support long directory names.
•
DO NOT use any nonstandard characters in Ascent Software.
•
DO NOT use a dot character in the directory name. The dot
character is reserved for the extension.
Note:
It is not possible to have two pieces of Ascent Software
operating at the same time, except in Windows NT where “Run
in Separate Memory Space” can be selected.
Ascent Software User's Guide
1-5
1.3.4
Before installation
Please follow the following instructions for carefree installation of the
software.
1.3.4.1
Microsoft Windows language settings
It is recommended that the operating system language is set to English
(United States) or English (United Kingdom) before installation of Ascent
Software as Ascent Software has been only tested in the English (US)
environment.
The language settings can be checked and changed in the Regional
Settings window (Windows 98, Windows Me, and Windows NT) or in
the Regional Options window (Windows 2000):
Language settings in Windows 98, Windows Me, and Windows NT:
Start → Settings → Control Panel → Regional Settings → English
Language settings in Windows 2000:
Start → Settings → Control Panel → Regional Options → General
→ English
1.3.4.2
Letters permitted with Ascent Software
installation
It is only allowed to use the letters a to z and A to Z with Ascent
Software. Scandinavian letters (å, ä, ö, æ, ø, etc.) or any other nonstandard letters should not be used with Ascent Software.
1.3.4.3
Printer settings
Printer default settings should be carried out from the Start → Settings
→ Printers window and then Printer Properties (icon) prior to starting
Ascent Software.
1-6
Ascent Software User's Guide
1.3.5
Installation of Ascent Software
Ascent Software is distributed on CDs.
To install:
1. Exit all open applications and insert the CD into your CD-ROM drive.
If the installation program does not automatically run, perform the
following steps.
2. Click the Start button and select Run.
3. In the Open box, type your CD-ROM drive letter and then type
\setup. For example, E:\setup.
4. Click OK and follow the on-screen prompts to complete the
installation.
The SETUP first copies its setup files to your hard disk. It searches for a
location on the user's hard disk to copy its temporary files. If the SETUP
finds a workable temporary location, it starts running the installation
procedure.
Ascent Software User's Guide
1-7
The installation procedure will prompt the following recommended
computer requirements.
The next dialog allows the selection of the instrument type:
1-8
Ascent Software User's Guide
Then user information is requested:
The serial number can be found on the CD cover.
The destination folder is where you want Ascent Software installed. As
default, this will be installed into C:\Ascent. You can change the path by
using the Browse… button. A new directory can be created by typing in
a new directory name.
Note
•
DO NOT use any directory names more than eight characters
long. Ascent Software does not support long directory names.
•
DO NOT use any nonstandard characters in Ascent Software.
•
DO NOT use a dot character in the directory name. The dot
character is reserved for the extension.
Ascent Software User's Guide
1-9
Next you can select the installation Setup Type:
1-10
Ascent Software User's Guide
Typical:
A complete installation
Compact:
No session files installed. No help files installed.
Custom:
You may choose what components are installed; program files, help
files, and/or session files.
The next dialog allows the selection or the addition of a program folder:
Ascent Software User's Guide
1-11
The installation is completed with the following dialog box:
The icon/shortcut is generated automatically onto the desktop.
1.3.6
Instrument setup
The Instrument Setup allows the user to configure the Ascent Software
settings, Instrument settings and the Startup settings.
The following options are available in the Setup menu on the Procedure
Desktop:
•
Plate Templates. The user can edit plate templates.
•
Filters. The user can modify filter settings.
•
Password. The user can add and change the system password.
•
Dispensers. The user can set the dispenser options.
•
Colors. The user can define the colors for the different well types.
•
Printout. The user can define the printout options.
1-12
Ascent Software User's Guide
•
Instrument Status. The user can retrieve information on the
Instrument Status.
Settings in the General step on the Procedure Desktop include
Instrument and Dispenser settings:
•
Instrument settings. The user can set instrument parameters.
•
Dispenser settings. The user can set dispensing speeds.
For more information, see General step Settings on p. 1-26.
1.3.7
Instrument communication
Ascent Software controls the instrument via the serial interface
(COM1…COM4) RS-232C. The baud rate is 9600. The character format is
1 start bit, 8 data bits, 1 stop bit and no parity with XON/XOFF
handshaking. The above-mentioned communication settings are carried
out automatically.
1.3.8
Dispensers
The dispenser units (from 0 to 3) are connected to the instrument via the
serial interface (not CF).
1.3.9
Filter Pair validation
The validation process is executed in the following main steps:
•
Select Filters from the Setup menu.
•
Add the fluorometric filter pair by entering the filter positions and
wavelengths (Add → Start) or select an existing filter pair and then
press Validate.
Ascent Software User's Guide
1-13
The instrument selects the filters and measures all the reference chips.
After the measurements the instrument selects a suitable reference chip
value and attaches it to the filter pair to be validated. The calculated
correction coefficient is saved within the instrument. In the
autocalibration procedure, the instrument is validated against the
selected reference chip and the correction coefficient is used to
compensate for the degradation of the optical system, if necessary.
Refer to the instrument manual for more information.
If a suitable reference chip is not found, the program displays a message
for the user to accept or to cancel using this filter pair.
Note:
Filter setup is required before using the instrument. Ensure the
filters in Setup → Filters are exactly the same and exactly in
the same positions as in the filter wheel.
1.3.10 Password
The program contains a password system, which can be switched on or
off in Setup → Password. The password is requested once the program
is started:
There is one password for the program, which can be changed by the
user. The given password is cryptic (for more information, see Section
Setup|Password in the Procedure Desktop part of the manual). If the
password is accepted, the program starts.
1-14
Ascent Software User's Guide
1.3.11 Quick start
When the program is started, it is possible to press the Start button
immediately. The Start button starts the measurement of a 96-well plate
(Default session) and gives the results.
1.3.12 Opening Sessions
The Session → Open… command on the Procedure Desktop displays
the Open Session dialog box where you can select and load an existing
session file:
•
File Name. Select or type the name of the Session you want to
open. The fixed extension of the filename is *.sef for the Fluoroskan
Ascent and Fluoroskan Ascent CF, and *.sec for the Fluoroskan
Ascent FL. The Fluoroskan Ascent FL can, however, read *.sec,
*.sef, and *.sel (Luminoskan Ascent luminometric file) files, but only
save them as *.sec files.
•
Drives. Select the drive in which the program stores the Session you
want to open.
Ascent Software User's Guide
1-15
•
Directories. Select the directory in which the program stores the
Session you want to open.
1.3.13 Example Sessions
Some ready-made example sessions are supplied with the program.
When the program is installed, the default session is loaded. It contains
definitions for measuring a 96-well plate.
The session information contains:
•
desktop information
•
procedure information
•
results information.
1.3.14 Creating a new Session
You can create a new application by creating a new Session. The
session is based on a template. The program is supplied with the most
common 1- to 384 (864 with limitations)-well plate templates. You can
always create your own templates by using the Template Editor (for
more information, see Creating your own Session on p. 1-42).
1-16
Ascent Software User's Guide
1.3.15 Using Help
You can launch the Help application by selecting Help → Help Contents
from the main menu.
The following Help window will appear.
The Help main menu buttons are:
•
Hide. Hides the left-hand side navigation window. To display the
navigation window again, click the Show button that appears
instead of the Hide button.
•
Back. Takes you back to the previous view in your view history.
•
Forward. Takes you to the next view in your view history.
•
Print. Prints a single topic or multiple topics.
You can access the help content in three different ways by selecting one
of the following tabs:
•
Contents. Browse the help topics by subject.
•
Index. Type in a keyword or browse all keywords to find a specific
topic.
Ascent Software User's Guide
1-17
•
Search. Find a specific help topic by entering words to search in the
help content.
Note:
Many images in the help application contain links to topics.
When you see an image, move the cursor across the image to
find the links.
1.4
Configuration
The Setup menu is used when the configuration of one of the following
parts of the system is changed:
•
Plate Templates
•
Instrument - filter parameters
•
Passwords - starting the password system and changing passwords
•
Dispenser Setup
•
Colors
•
Printout Setup.
Dispenser Setup
The Execute menu contains tools which are needed when the dispenser
units are primed or emptied.
1-18
Ascent Software User's Guide
1.5
Basic concepts
1.5.1
Session
The program is based on sessions. A session contains a plate template,
a measurement/dispensing area, a plate layout, steps and calculation
information defined by the user. The user can create a new, save the
current and load an old session. Only one session can be loaded at a
time. When a new session is created, the type of plate template is
requested. This template selection defines the dimensions of the plate
and wells. The user can enter the well specification with the plate layout.
Layouts can be saved as files and layouts can be loaded from files to the
sessions. In the Area definition window, the user can select the wells to
be measured.
1.5.2
Desktops
The Desktop is the main window area of the program. There are two
desktops available: Procedure Desktop, and Results Desktop.
1.5.3
Procedure Desktop
With the means of the Procedure Desktop module, the user can define
session steps. Steps is a collection of basic operations, which are
executed for the defined area at a certain time.
When a new Session is created, the user is requested to select a plate
template which is based on predefined well parameters and point
locations. The creation of new areas and steps is based on this template
selection.
Ascent Software User's Guide
1-19
The step parameters are requested in the Parameters entry area. The
area definition, settings and layout of the General step are applied to the
whole session. However, every measurement and dispense step may
have its own area definition, settings and layout. The areas are modified
by using the area definition. The layouts are modified by using the
layout editor.
1.5.4
Steplist
The Steplist is a collection of all the Steps defined for a session. You can
add and delete steps from the Steplist. The Steplist has a vertical scroll
bar for viewing the Steps with the mouse. The scroll bar is displayed
when the steps do not fit completely in the window. The scroll bar is
located to the right of the Steplist. You can also add or remove an active
step from the Steplist by using the right mouse button in the Steplist
area.
1-20
Ascent Software User's Guide
The order of the Steps can be changed by “drag-and-drop”: Select a
Step, keep the mouse button down, move the Step icon to a new
location in the Steplist and release the mouse button.
Steplist:
1.5.5
Steps
Steps is a collection of basic operations that are performed in a certain
sequence. You can/have to designate each step with a specific name.
The step parameters are requested in the Parameters entry area. For
Fluoroskan Ascent FL the measurement method (luminometric or
fluorometric) can be defined for each measurement step. Every
measurement and dispense step may have a specific area definition,
settings and plate layout. In that case you have to click Overwrite
general step settings and define the area, settings and layout.
Ascent Software User's Guide
1-21
The Steps are:
General
Measure
Dispense
Dispense And Measure
Incubate
Shake
Pause
Save/Load
Print
1-22
Ascent Software User's Guide
1.5.5.1
General step
The General step is always the first step in the Steplist. The General step
defines the values for the common parameters of all the steps.
•
Plate template. The selected plate template.
•
User name. The name of the user.
•
Comment. A general comment.
•
Lock. A session-specific password can be added.
All the common parameters are printed in the worksheet named “Steps”
on the Results Desktop.
Ascent Software User's Guide
1-23
1.5.5.1.1
Area definition
You can define the area for the measurement and dispense steps. The
measurement wells can be selected from a variety of options. For more
information, see Area definition on p. 1-30 and in the Procedure
Desktop part of the manual.
1-24
Ascent Software User's Guide
1.5.5.1.2
Layout
You can give a layout for the measurement steps. For more information,
see Layout on p. 1-32 and in the Procedure Desktop part of the manual.
Ascent Software User's Guide
1-25
1.5.5.1.3
Settings
The instrument settings are:
•
Moving type. The program searches for wells to dispense/measure
in the order defined by this input field. If the Moving type has been
selected as above, the columns may not actually be measured in
opposite directions unless adjacent columns are selected.
If a well has several measurement points defined, the points within
the well are measured using the same Moving type as defined for
the wells.
•
Execute by 1...n wells. The Execute by 1...n wells setting defines the
size of a group of wells. As many wells as defined by this field are
dispensed/measured at a time. The default group size is the number
of wells on the plate, which means that all the wells are
dispensed/measured in one pass of the session steps. If the group
size is less than the total number of wells on the plate, the steps of
the session are repeatedly run until all the selected wells are
dispensed/measured. Suppose that you have a 96-well plate and
have selected all the wells. Setting Execute by 1...n wells to 8 means
that the steps are repeated 12 times and 8 wells are measured at
each pass.
•
Dispense all and measure (not CF). If Dispense all and measure is
selected, all the wells defined e.g. by Execute by 1...96 wells will be
1-26
Ascent Software User's Guide
dispensed and after that the defined wells will be measured. If
Dispense all and measure is not ticked, the instrument dispenses
and measures one well at a time before moving on to the next one.
•
Plate acceleration (1...10). Defines the acceleration used for plate
movements. Acceleration can be varied between setting 1
(0.05 m/s2) and setting 10 (0.5 m/s2). The highest acceleration can be
used for small wells, such as on the 96-well plate. Lower
accelerations are used for larger wells as default values. With high
viscosity or solid samples, e.g. agar, higher than default acceleration
speeds can be used. The acceleration setting also affects the
maximum speed of the plate, the lower the acceleration, the lower
the plate speed.
•
Settle delay (0…10000 ms). Defines the time the instrument will wait
at each well after a plate movement before it starts to measure.
•
Blanking time (0…100%) of integration time. Defines the
integration time of blanking. If the value is 0, blanking is not
executed. If the value is between 1–100%, the blanking time is
approximately calculated as: (integration time × value)/100. Round
the result to the nearest 20 ms. The maximum blanking time is
10000 ms before and after the Execute by 1…n wells setting. Only
used in luminometry (FL only).
The Dispenser settings options are (not CF):
With these settings you can adjust the speeds of the optional dispensers
to gain optimal dispensing results. The default setting 18 is suitable for a
viscosity equal to that of water. The dispenser speed setting defines the
speed as % of the maximum possible speed with that dispenser.
•
Dispenser 1 (1...100). Defines the dispensing speed of dispenser
number 1.
•
Dispenser 2 (1...100). Defines the dispensing speed of dispenser
number 2.
•
Dispenser 3 (1...100). Defines the dispensing speed of dispenser
number 3.
Ascent Software User's Guide
1-27
1.5.5.1.4
RunStatus
RunStatus is the Status report of the last run of the session. The
RunStatus tab appears after a run has been executed. The RunStatus
report is generated both on the Procedure Desktop and Results
Desktop. They are exactly identical except for the grid lines in the
RunStatus report generated on the Results Desktop. The RunStatus
report provides summary information on the session and comprises the
session name, program version, instrument type and serial number,
starting time of the run and the actual temperature. The RunStatus
report also includes data about the steps. In addition, the RunStatus
information reports the ending time of the run, number of warnings and
errors and the actual temperature.
For more information, see RunStatus in both the Procedure Desktop
and Results Desktop parts of the manual.
1.5.5.2
Measure step
The Measure step measures the given area well by well according to the
step parameters.
The measurement method can be set in this step, the method can be
either fluorometric or luminometric (FL only).
The Measure step contains the following measurement types with their
own parameters:
•
Single
•
Dual
•
Kinetic
•
Dual kinetic
•
Scanning
•
Monitor
For more information, see Section Steps|Measure in the Procedure
Desktop part of the manual.
1-28
Ascent Software User's Guide
1.5.5.3
Incubate step
The Incubate step sets the time and the temperature for the incubation
in the instrument (for more information, see Section Steps|Incubate in
the Procedure Desktop part of the manual).
1.5.5.4
Shake step
The Shake step shakes the plate using the given parameters. It is also
possible to use shaking as a background task. Shaking is then on when
the reader does not have other tasks to perform (for more information,
see Section Steps|Shake in the Procedure Desktop part of the manual).
1.5.5.5
Dispense step (not CF)
Dispenses with the selected dispenser the defined volume against the
wall of the well when possible (for more information, see Section
Steps|Dispense in the Procedure Desktop part of the manual).
1.5.5.6
Dispense And Measure step (not CF)
This step is a combination of the Dispense and the Measure steps.
Dispensing and measuring can be started at the same time. The
parameters are the same as in the separate Dispense and Measure
steps.
The step has a check box Overwrite general step settings, which breaks
up the dispensing and measuring to work in loops. If the Execute by
1...n wells value is 1, the dispensing and measuring is carried out well
by well through the selected area. If the value is over 1, e.g. 3,
dispensing and measuring is carried out to the next 3 wells. The
selected area is handled in groups of 3 wells (for more information, see
Section Steps|Measure in the Procedure Desktop part of the manual).
The Dispense all and measure check box in General step Settings
affects the Dispense And Measure step (see Section General step
Settings on p. 1-26).
Ascent Software User's Guide
1-29
1.5.5.7
Pause step
The Pause step pauses the run, drives the plate out and gives an alarm,
if desired (for more information, see Section Steps|Pause in the
Procedure Desktop part of the manual).
1.5.5.8
Save/Load step
The Save/Load step can be used to save a Results Desktop sheet in a
file (Save) or to load a sheet from a file to the Results Desktop (Load).
Although they can be placed anywhere in the Steplist, they are not
executed until the run has been completed (for more information, see
Section Steps|Save/Load in the Procedure Desktop part of the manual).
1.5.5.9
Print step
To print sheets automatically the Print step can be used. Sheets are
printed according to the current print area. The Print step is executed
after all the other steps (for more information, see Section Steps|Print
in the Procedure Desktop part of the manual).
1.5.6
Area definition
The area definition is used to select the target areas for the Measure and
Dispense steps. The floating menu appears by pressing the right mouse
button in the Area definition window. The area is selected/deselected by
painting the desired area from the points. Areas are selected from the
points in the selected plate template. There is always one selectable
point in the middle of each well. Selectable points inside the well are in a
1.5 mm grid.
The area definition contains tools to select and deselect :
•
individual points
•
remove undesired points
•
middle point of the wells
1-30
Ascent Software User's Guide
•
all points in the well area
•
horizontal
or vertical
diagonal of the wells
For more information, see Area definition in the Procedure Desktop part
of the manual.
Note:
To properly update the existing results sheets, the area
definition and the plate layout should match. If there is a
mismatch, you might get extra results.
Ascent Software User's Guide
1-31
1.5.7
Layout
The Layout function allows the user to specify the wells. The plate is
displayed in the window.
The data fields are:
•
Type. You can select the type of item from the drop-down list. This
can be either CALIBR., CONTROL, SAMPLE or BLANK.
•
Name. You can edit the name of the item.
•
Concentration/Dilution 1: . The concentration of the calibrator or
the dilution of the sample is displayed in this field. You can edit this
data.
•
Assay. The name of the assay is required when you have several
assays on the same plate.
1-32
Ascent Software User's Guide
The operation buttons are:
•
Apply. You can apply the well specification from the data fields to
the selected well(s).
•
Clear. Clears the well specification from the selected well(s).
•
Open. You can load a layout file to the session.
•
Save As. You can save the modified layout as a layout file.
•
Fill. You can open the Fill dialog. Using the Fill dialog you can
automatically specify as many wells as you want to, and the well
name is automatically numbered to give each well unique names.
•
Clear all. Clears the whole plate layout.
•
Cut. Cuts the selected well specifications into the clipboard.
•
Copy. Copies the selected well specifications into the clipboard.
•
Paste. Pastes the well specifications from the clipboard.
You can open files with *.pla and *.lay extensions and save files with
the *.pla extension.
Ascent Software User's Guide
1-33
1.5.7.1
Fill dialog
The data fields are:
•
Type. You can select the type of item from the drop-down list. This
can be either CALIBR., CONTROL, SAMPLE or BLANK.
•
Name. You can edit the name of the item, and by using max. 50
characters in the beginning the software will automatically number
the wells uniquely.
•
Load ID’s. Loads a list of sample IDs from a text file and uses these
as sample names. (Only with SAMPLE type). The samples must be
separated by a line feed in the text file, i.e. each sample on it’s own
line.
•
Concentration/Dilution 1: . You can enter the concentration of the
calibrator or the dilution of the sample.
•
Assay. You can specify another assay by editing the field or
selecting the assay from the drop-down list.
1-34
Ascent Software User's Guide
•
Filling order. You can select the filling order of the item in the
series.
•
Replicates. You can enter the number of replicates of the item.
•
Specific blanks. You can select the number of specific blanks.
•
Fill replicates and blanks. You can select the filling order of the
replicates and blanks.
•
Number of samples/controls. You can key in the number of
samples or controls when samples and controls are edited. The
names of samples and controls are generated automatically by
adding a running number to the name.
•
Generate concentration/dilution series. You can tick this check
box when you want to generate calibration or dilution series.
•
No. of calibrators/dilutions. You can choose how many dilutions of
each sample are made or how many calibrators are used.
•
Operators: Multiply (*), Divide (/), Add (+), Subtract (-). You can
select the operator used in the calculation of concentrations in
calibration series and in the calculation of dilutions in sample
dilution series.
•
By. You can choose the value used in the calculation of
concentrations in calibration series and in the calculation of
dilutions in sample dilution series.
•
Navigate. You can move on the microplate in different directions
and select a desired well with the Navigate arrows.
The operation buttons are:
•
Apply. Applies the data in the fields to the wells.
•
Close. Closes the Fill box.
Ascent Software User's Guide
1-35
•
Clear. Removes the data from the fields of the selected well and its
replicates and specific blanks.
•
Clear all. Removes the specification of all the wells on the plate.
For more information, see Layout in the Procedure Desktop part of the
manual.
1.5.8
Template
The user can create and modify up to a 100 different plate templates –
select Setup → Plate templates → Modify. The plate template list is
configured by defining the default template and enabling/disabling
templates.
The distance between measurement points in the well area is 1.5 mm
and there is always one point located in the middle of the well area. The
number of additional measurement points inside the well area depends
on the well bottom area.
1-36
Ascent Software User's Guide
The following plate templates are defined in the template list:
•
Thermo Labsystems Microtiter 96 Plate
•
Thermo Labsystems Microtiter 96 Strip Plate
•
Thermo Labsystems Microtiter 384 Plate
•
Thermo Labsystems Microtiter 384 Plate w. adapter
•
Thermo Labsystems Microlite 96 Plate
•
Thermo Labsystems CLINIPLATE
•
Thermo Labsystems COMBIPLATE (in Multiframe)
•
Thermo Labsystems CLINIPLATE 384
•
Thermo Labsystems CLINIPLATE 384 with adapter
•
Dynex 96-well Microlite plates
•
96-Wells GENERIC
•
96-Wells CORNING 25860
Ascent Software User's Guide
1-37
•
96-Wells COSTAR 3596
•
96-Wells NUNC N-167008
•
96-Wells FALCON 3072
•
96-Wells FALCON 3075
•
96-Wells GREINER 655180
•
96-Wells IWAKI 3860-096
•
384-Wells GENETIX
•
384-Wells GENETIX with adapter
•
384-Wells NUNC N-242757, N-242765
•
384-Wells GREINER
•
384-Wells COSTAR 3702
•
48-Wells CORNING 25830
•
48-Wells COSTAR 3548
•
48-Wells NUNC 150687
•
48-Wells SUMILON 80480
•
48-Wells IWAKI 3830-048
•
24-Wells CORNING 25820
•
24-Wells COSTAR 3524
•
24-Wells GREINER 662160
•
24-Wells FALCON 3047
•
24-Wells NUNC Multidish N-143982
•
24-Wells SUMILON 80240
•
24-Wells IWAKI 3820-024
•
12-Wells CORNING 25815
•
12-Wells COSTAR 3512
•
12-Wells NUNC 150628
•
12-Wells SUMILON 80120
1-38
Ascent Software User's Guide
•
12-Wells IWAKI 3815-012
•
6-Wells CORNING 25810
•
6-Wells COSTAR 3516
•
6-Wells NUNC Multidish N-152795
•
6-Wells FALCON 3046
•
6-Wells GREINER 657160
•
6-Wells IWAKI 3810-006
•
Full area
•
Petri dish FALCON with adapter
•
Petri dish COSTAR with adapter
•
Petri dish GREINER with adapter
•
2 x Petri dish COSTAR with adapter
•
6 x Petri dish CORNING with adapter
•
60-Well Terasaki with adapter
•
72-Well Terasaki with adapter
•
864 Generic
•
PCR tubes/plate with adapter
The templates are saved in the TEMPLATE.CNF file in the work
directory.
Ascent Software User's Guide
1-39
1.5.9
Results Desktop
The Results Desktop module is a spreadsheet type calculator and a grid
environment, which is used when basic calculations, graphic views and
reports to the printer, screen, file or to other programs (Clipboard) are
created. It is easy to create new spreadsheets and select them only by
clicking the tabview. The tabview bar allows the user to scroll the
tabviews by using the scroll buttons.
Some sheets are generated automatically, such as Steps, RunStatus
and Measure sheets. The Steps sheet describes parameters that were
used in each procedure step. The RunStatus sheet provides summary
information on the session, such as starting and ending times, and
possible problems during the measurement etc. The “Measure” sheet
name follows the given name of the Measure step, so the sheet name
can be something else than “Measure”. This sheet contains measured
raw data values without any modifications.
1-40
Ascent Software User's Guide
1.6
Printing
You can print selected worksheets or sheet areas (for example, Steps,
Measure, RunStatus and Curve Fit sheets) by defining the ranges, print
formats and other print options. Print commands can be found in both
the Session menu and the Print menu when Results Desktop is
selected.
1.7
Using tools
The main tools of the program:
•
The Procedure Desktop for assay setup and instrument control.
Using the advanced graphical interface, the assay procedure steps
are simply dragged from the toolbox and dropped into the desktop
Steplist. Every step has its own parameters. Wells to be measured
can be selected in a completely visual format. Any combination of
wells can be measured.
•
The Results Desktop for data reduction and results calculation.
When an assay is defined, the calculations and the reports are
configured in a unique spreadsheet environment. The assay may
consist of several worksheets, which are open simultaneously and
allow easy cross-referencing of data from one sheet to another.
Along with the basic spreadsheet functions, a number of other
calculation methods, including curve fittings, qualitative cut-offs and
statistical functions, are also available.
•
The Template Editor to create templates.
The advanced multiwell capability allows the instrument to read a
wide range of plate formats. A template database covers the most
common 1- to 384-well plates. When needed, it can also be
programmed to read nonstandard plate formats. Special sample
vessels (e.g. Petri dishes and Terasaki plates) can also be measured
using suitable adapters provided by Thermo Labsystems.
Ascent Software User's Guide
1-41
1.8
Making applications
You can create your own session or modify ready-made example
sessions, which are supplied with the program.
1.8.1
Creating your own Session
You can make a new application by creating a new Session. The session
is based on a plate template. The program is supplied with a template
database covering the most common plates. You can always create your
own templates using the Template Editor (Plate Templates).
1.8.1.1
Selecting the Template
Select New from the Session menu and choose a plate template from
the template list.
1.8.1.2
General step
The General step covers the general parameters, the area definition and
the plate layout. The Parameters tabview is active and you can type
your name in the User name text box and comments in the Comment
remark box.
1.8.1.3
Selecting the measurement area
By selecting the Area definition tabview you will see the template layout
and you can define wells to be measured. Black dots indicate possible
measurement points. You can select the Area definition tool from the
tabview and mark the measurement wells by painting the area. The
selected wells will turn yellow. You can change the selection as many
times as you wish. With the Remove tool you can erase undesired
points.
1.8.1.4
Defining the plate layout
By selecting the Layout tabview you will see the plate layout. You can
specify the well definition. You can use either the fields in the Layout
window or the Fill dialog.
1-42
Ascent Software User's Guide
1.8.1.5
Selecting Steps to the Procedure
The General step is always the first step in the Steplist. Select the other
steps to the Steplist from the Procedure Tool Bar or from the Steps
menu. You can change the step order in the Steplist by dragging the
step button and dropping it into another place. Any step (except the
General step) can be removed by dragging it into the Remove box.
Every measurement step generates worksheets to the Results Desktop
module. Worksheets are named according to the corresponding Step
name. The naming convention requires a different name for each
measurement step (i.e. if not given 1, 2...). A unique name is created
automatically with the step and when editing this field, you need to keep
the names unique.
1.8.1.6
Defining parameters to Steps
Every step has a default name and a group of default parameters. The
default Step name and parameter values can be changed. To define the
specific area and layout you have to click the Overwrite general step
settings check box.
1.8.1.7
Processing results and reports
You can define calculations and reports in the Results Desktop module.
Calculations comprise data handling and processing of results. Various
reports can be generated on the Results Desktop. There you can create,
save and load worksheets, which are filed together with other session
information.
Each measurement step creates one sheet for the measured raw data to
the Results Desktop. The sheets are named automatically according to
the corresponding measurement step. The name of the raw results
sheet is the same as the name of the measurement step (e.g.
“Measure”).
The reports to the printer are created in the spreadsheet environment.
The user can, for example, define the printout header, page numbering,
fonts and the borders. Reports are created in the same way as in a
general worksheet environment.
Ascent Software User's Guide
1-43
1.8.1.8
Executing the Session
You can run the Session by clicking the Start tool button or by selecting
the Procedure command from the Execute menu. During the procedure
the Running window displays the step execution. All created sheets are
updated from run to run.
Example 1: Running a kinetic Measure step
1-44
Ascent Software User's Guide
•
Curves. Shows the curves during the measurement. The kinetic
curves of all the measurement steps of a session can be monitored
in the same window. If the session has more than one kinetic step,
the steps to monitor can be selected from a list box. The minimum
and maximum Y range values of the curves can be set manually.
Another possibility is to let the program automatically set the
maximum.
Note:
If you select Options → Automatic runtime Curves, the curves
will be displayed automatically.
Note:
If you have a kinetic measurement of a multipoint well, then the
running or online curve displayed is the kinetic curve of the
middle point.
The curves can be printed using the Print button. The curves can also be
copied to the Clipboard using the Copy button.
Ascent Software User's Guide
1-45
Note:
You must print or copy the curves to the Clipboard if you want
to save them manually. They will disappear when the
measurement step is completed and the Well Curves window
is closed. Note that what is seen on the screen is saved to the
Clipboard, so adjust the picture accordingly.
It is also possible to save the runtime curves automatically. If the Create
Kinetic Curves-sheet in the Measure step is chosen, the curves will
automatically be copied and pasted into a new sheet on the Results
Desktop.
1.8.2
Executing loops of steps
The execution order of the Steplist can be modified. Steps may be
executed in several loops (General Step → Settings → Execute by…).
Certain steps are identified as “end loop” steps. These steps are:
•
Steps with Overwrite general step settings checked.
•
An incubate step with an Incubation time of zero.
•
End of the Steplist.
The following rules apply when a session is executed:
•
The execution of a session starts from the step following the
General step until a loop is started. Several steps, such as Dispense
and Measure, can belong to a loop. The execution of the loop
continues until an “end loop” step is encountered. The execution
returns to the first step of the loop without running the “end loop”
step.
•
Not until all the points/wells are dispensed and/or measured, is the
“end loop” step executed. This sequence is repeated until all the
steps of the session are executed.
•
The “end loop” step breaks the loop and a new step with its own
area, method and settings parameters can be added.
•
Sheet Save steps are not executed until all the other steps of the
session have been completed.
1-46
Ascent Software User's Guide
The example below performs an assay where two pairs of dispensing
and measurement have been looped into two separate loops.
General Step
Execute by setting =1
Repeats steps Dispense1 and Measure1
for all wells selected in the Area definition
(Dispense A1, Measure A1, Dispense B1,
Measure B1 etc.)
Loop 1
End Loop
Step
Incubate step with zero time to end the
first loop
Loop 2
Repeats steps Dispense2 and Measure2
for all wells selected in the Area definition
(Dispense A1, Measure A1, Dispense B1,
Measure B1 etc. )
1.8.3
Modifying an existing session
You can modify an existing session in the same way as you created it.
You can open an existing session by selecting the Open session
command from the Session menu.
1.8.4
Example applications
Some applications are supplied with the program and they are readyfor-use after some minor changes. Note that these sessions are only
meant to be read. If these are used in your own applications, you must
save them with your own session name for later use.
Ascent Software User's Guide
1-47
1.8.5
Running an application from the
example applications
The steps for running an application from the example applications:
•
Open the session.
•
Make the changes according to your application.
•
Save the session with a new name.
Now you have a session of your own to run and modify, when needed.
Note:
You cannot change the defined plate template.
Note:
Example files marked with a “d” are demo applications that
cannot be run, for example: exampled.lay. Example files
without the letter “d” in the end can be used with the
instrument, for example: example.lay.
1-48
Ascent Software User's Guide
1.9
Template Editor
The Template Editor in the Setup menu allows the user to create and
modify plate templates.
When Plate Templates is selected, the list box shown contains all the
plate templates found in the TEMPLATE.CNF file. New plate templates
or modifications in the list are saved in the TEMPLATE.CNF file when the
dialog is closed using the OK button. If the dialog is closed using the
Cancel button, no changes are saved.
In the list box, items marked with Enabled are enabled, those marked
with Disabled are disabled and the one that is marked with Default is the
default definition.
The operation buttons are:
•
Modify. You can start to modify the selected template.
•
Duplicate. Makes a copy of a currently selected template. The user
can modify the copy and save it with a new name.
•
Delete. Deletes the currently selected template.
Ascent Software User's Guide
1-49
•
Set as default. Sets the currently selected template as the default
template, which is offered first to the user when a new session is
created.
•
Show plate. Shows the plate layout of the currently selected
template.
When you press the Modify template button, the Template Parameters
dialog appears. This dialog is used when the parameters of the plate
definition are modified.
Note:
Modifications in a plate template valid only from Session →
New…
1.10 Managing files
1.10.1 Opening and saving Sessions
This module allows the user to load an old session from the disk
according to the filename and to save the session using the old or a new
name. If you want to use your application in any other environment,
note that one session consists of four files: *.sef (Fluoroskan Ascent and
Fluoroskan Ascent CF) or *.sec (Fluoroskan Ascent FL), *.vtg, *.vtb, and
*.lay.
Refer to chapter File types used in Ascent Software in the Reference
part of the manual.
Note:
1-50
If you start a program without the command line argument
(session name), the default session name is “DEFAULT.SEF”
(for Fluoroskan Ascent and Fluoroskan Ascent CF)
/”DEFAULT.SEC” (for Fluoroskan Ascent FL). When you create
a new session, the default name (session name) is
“NONAME.SEF” (for Fluoroskan Ascent and Fluoroskan
Ascent CF)/”NONAME.SEC” (for Fluoroskan Ascent FL) until
you save it with a new name.
Ascent Software User's Guide
1.10.2 File structures
All the initial and setup information is in ASCII format. The end
characters of the fields are CR and LF, and they are included in the field
sizes.
1.10.3 Importing and exporting
Connections to other programs are done via the Clipboard. All the
worksheets can be saved and read in the ASCII text or Excel 4.0 format.
1.10.4 Backup
Backup is recommended in order to avoid data loss in case of hard drive
crash or if a computer virus attacks your system. The most important
files are your work files *.sef (Fluoroskan Ascent and Fluoroskan Ascent
CF)/*.sec (Fluoroskan Ascent FL), *.vtg, *.vtb, *.lay, and *.pla.
Note:
If you want to make a backup copy of a session, make sure you
save all four session-specific files: *.sef/*.sec, *.vtg, *.vtb, and
*.lay.
Ascent Software User's Guide
1-51
1-52
Ascent Software User's Guide
2
Procedure Desktop
2.1
Menus (procedure)
2.1.1
General
Commands are grouped in menus. Some commands carry out an action
immediately, others display a dialog box where you can select options.
You can quickly choose the most commonly used commands by using
the mouse to click the button on the tool bar.
Ascent Software
User's Guide
2-1
Menu layout
Session
New...
Open...
Save
Save As...
Print...
Exit
View
Desktop Bar
Status Bar
Tool Bar
Tabs Bar On Top
Procedure
Results
Setup
Plate Templates
Filters
Password
Dispensers
Colors
Printout
Instrument Status
Options
Execute
Procedure
Plate In
Plate Out
Prime
Empty
Steps
Measure
Incubate
Shake
Dispense
Dispense And Measure
Pause
Save/Load
Print
Remove
Inactivate
Activate
Print Current Step
Print All Steps
Help
Help Contents
About
The menu commands are described in the following chapters.
2-2
Ascent Software
User's Guide
2.1.2
Session
2.1.2.1
New...
New... (Session menu) or
You can create a new session with the New command. The program
proposes a default name for the session, “NONAME.SEF” (Fluoroskan
Ascent and Fluoroskan Ascent CF)/”NONAME.SEC” (Fluoroskan Ascent
FL).
The dialog list box contains all the plate template definitions found in the
TEMPLATE.CNF file.
Ascent Software
User's Guide
2-3
If the current session has been modified and has not been saved, an
option to save the changes is given:
2.1.2.2
Open...
Open... (Session menu) or
Use this command to open an existing Session. You can only have one
session open at a time. Change to another session by opening that
session.
2-4
Ascent Software
User's Guide
In an Open Session dialog box, you can:
•
type a full filename in the File Name box.
•
display selected files in the File Name box by selecting a type from
the List Files of Type drop-down list box. You can also choose files
by typing a partial filename with * or ? wildcards in the File Name
box and pressing Enter.
•
view the contents of different directories by selecting a directory
from the Directories list box. You can also change directories by
typing a directory in the File Name box and pressing Enter.
•
view the contents of different drives by selecting one from the
Drives drop-down list box.
•
connect to a network drive by selecting Network... .
Parameters:
•
File Name. The box lets you enter the name of the file to open, or a
file specification to limit the files which are displayed in the list box.
The list box displays the filenames in the current directory that
match the file specifications in the box.
Ascent Software
User's Guide
2-5
•
List Files of Type. Lets you select the file types you want displayed.
With regard to sessions, the fixed file extension is always *.sef for
the Fluoroskan Ascent and Fluoroskan Ascent CF, and *.sec for the
Fluoroskan Ascent FL. The Fluoroskan Ascent FL can also read *.sef
and *.sel (Luminoskan Ascent luminometric file) files in addition to
*.sec files.
•
Directories. Select the directory in which the program stores the
Session you want to open.
•
Drives. Select the drive in which the program stores the Session you
want to open.
•
Network... . Displays a dialog box with available network servers so
you can connect to a different server when your system is running
on the supported network.
2.1.2.3
Save
Save (Session menu) or
Use this command to save the current Session and its name and
location. With regard to sessions, the file extension is always *.sef for
the Fluoroskan Ascent and Fluoroskan Ascent CF, and *.sec for the
Fluoroskan Ascent FL.
If you want to change the name or location of an existing Session before
you save it, choose the Save As command.
2.1.2.4
Save As...
Save As... (Session menu)
Use this command to save the current Session with a new name.
Note:
2-6
To save a Session with its existing name and location, use the
Save command.
Ascent Software
User's Guide
•
File Name. Type a new filename to save a Session with a different
name. Use the current name or select a name from the list to save a
Session with an existing filename.
Note
•
DO NOT use any file or directory names more than eight
characters long. Ascent Software does not support long file or
directory names.
•
DO NOT use any nonstandard characters in Ascent Software.
•
DO NOT use a dot character in the directory name. The dot
character is reserved for the extension.
Note:
A filename can contain up to eight characters and an extension
of up to three characters. The program adds the extension you
specify in the List Files of Type drop-down list box.
•
List Files of Type. Lets you select the file types you want displayed.
With regard to Sessions, files can be saved only with the fixed *.sef
(Fluoroskan Ascent and Fluoroskan Ascent CF) or *.sec (Fluoroskan
Ascent FL) extension.
Ascent Software
User's Guide
2-7
•
Directories. Select the directory in which you want to store the
Session.
•
Drives. Select the drive in which you want to store the Session.
•
Network... . Displays a dialog box of available network servers so
you can connect to a different server when your system is running
on the supported network.
2.1.2.5
Print...
Print... (Session menu)
The Print command displays the Print dialog box where you can select
printout(s) to print.
2.1.2.6
Recently used file list
The Session menu Recently used file list includes the names of five
recent protocols for fast access.
2-8
Ascent Software
User's Guide
2.1.2.7
Exit
Exit (Session menu)
Use this command to exit the program. You can also use the Close
command in the Control menu of the program.
If changes have been made, the program prompts you to save the
Session before exiting.
2.1.3
View
2.1.3.1
Desktop Bar
Desktop Bar (View menu)
The Desktop tabviews are located to the right of the active desktop. The
Desktop tabview selects the active desktop for the program. When the
desktop is changed, the menus and tool bars also change.
Use this command to view the Desktop Bar.
Ascent Software
User's Guide
2-9
2.1.3.2
Status Bar
Status Bar (View menu)
When a command is selected, the left side of the status bar briefly
describes the command. Normally the status bar shows the line state of
the instrument, the beam size, the actual temperature and the current
time.
Instrument status bar:
Note:
The status bar at the bottom of the screen also displays
information about a selected command.
Message status bar:
Use the Status Bar command in the View menu to display or hide the
status bar.
2.1.3.3
Tool Bar
Tool Bar (View menu)
Along the top of the Desktop window, you can see a horizontal strip
containing several tools - this is the tool bar. It offers the most
commonly used functions in the menu as tool buttons. Although these
buttons perform the same functions as their menu counterparts, they
are more convenient to use.
2-10
Ascent Software
User's Guide
Procedure tool bar:
New
Measure
Dispense
Save
Shake Dispense and Measure
Open
Incubate
Pause Print Start run
Save/Load
Plate In
Plate Out
Use the Tool Bar command in the View menu to display or hide the tool
bar.
2.1.3.4
Tabs Bar
Tabs Bar On Top (View menu)
Use this command to display the Tabs Bar either on top of the view or in
the bottom of the view.
2.1.3.5
Procedure
Procedure (View menu)
Use this command to view the Procedure Desktop.
2.1.3.6
Results
Results (View menu)
Use this command to view the Results Desktop.
Ascent Software
User's Guide
2-11
2.1.4
Execute
2.1.4.1
Procedure
Procedure (Execute menu) or
Use this command to run the Session.
2.1.4.2
Plate In
Plate In (Execute menu) or
Use this command to drive the plate into the instrument.
2.1.4.3
Plate Out
Plate Out (Execute menu) or
Use this command to drive the plate out of the instrument.
2.1.4.4
Prime (not CF)
Prime (Execute menu)
Use this command to prime the dispensers.
Note:
2-12
Before priming the plate is retracted. If the dispensers are in
the X, Y or M positions, priming will be done straight to the
center of the plate. If priming to the plate is not desired, the
tips should be moved into the container(s) or a suitable waste
vessel.
Ascent Software
User's Guide
•
Prime dispenser. Primes the selected dispenser (1, 2, 3 or All). Only
the buttons of the installed dispensers are enabled. When the All
button is pressed, the priming command of every dispenser in use is
sent to the instrument one after another.
•
Volume (µl). Volume 100...9900 µl, in steps of 100 µl increments.
When the Close button is pressed, no priming commands are sent.
2.1.4.5
Empty (not CF)
Empty (Execute menu)
Use this command to empty the dispenser.
Ascent Software
User's Guide
2-13
•
Empty dispenser. Empties the selected dispenser. Only the buttons
of the installed dispensers are enabled.
•
All. Empties all dispensers.
2.1.5
Steps
The selections of the Area definition, Layout and Settings tabviews
apply as default throughout all selected steps unless the steps have
them defined with the Overwrite general step settings check box.
2.1.5.1
General
The General step is the first step of every session. The user cannot add
or remove the General step. There is no shortcut button for the General
step.
2-14
Ascent Software
User's Guide
The following parameters for the General step are:
•
Plate template. The name of the selected microplate, e.g.
Labsystems Cliniplate.
•
User name. The user name is given by the user.
•
Comment. Further details or specifications about the session given
by the user.
•
Lock. A session-specific password can be added.
2.1.5.1.1
Session lock
To add a session-specific password:
1. Click the Lock button in the General → Parameters tab.
2. Make sure that the Session lock enabled checkbox is ticked.
3. Enter a password. Click OK, then retype password and click
OK again. The session is now locked – the Lock button has
now changed to Unlock.
Note:
The password remains even if the session is saved under a
different name.
To unlock the session for editing:
1. Click Unlock.
Ascent Software
User's Guide
2-15
2. Type the password and click OK. You may now edit the
session.
Note:
DO NOT untick the Session lock enabled checkbox. If yo do,
then the session lock is removed.
To remove lock:
1. Click Unlock.
2. Type the session password AND untick the Session lock
enabled checkbox.
3. Click OK, the lock has now been removed.
2-16
Ascent Software
User's Guide
2.1.5.2
Area definition
The Area functions allow the user to Point (select) or Remove (deselect)
areas to be measured. The area is a collection of measurement points
on the plate. The maximum number of points in the X direction is 75 and
in the Y direction 49. The minimum distance between two single
measurement points is 1.5 mm.
The floating menu appears by pressing the right mouse button in the
Area definition window. The command buttons are situated top left of
the Area definition window.
After defining the tool, select the area by painting the desired area. Wells
are added to or removed from the measurement area depending on the
tool. The points marked yellow are selected, black ones are not.
Note:
To properly update the existing results sheets, the area
definition and the plate layout should match. If there is a
mismatch, you might get extra results.
Ascent Software
User's Guide
2-17
2.1.5.2.1
Point
Point (Area menu) or
Use this command to define any single points of the wells to be
measured.
2-18
Ascent Software
User's Guide
2.1.5.2.2
Middle Point
Middle Point (Area menu) or
Use this command to define that the middle point of the well is to be
measured.
Ascent Software
User's Guide
2-19
2.1.5.2.3
Whole Well
Whole Well (Area menu) or
Use this command to define that all the points of the well are to be
measured.
2-20
Ascent Software
User's Guide
2.1.5.2.4
Horizontal Diagonal
Horizontal Diagonal (Area menu) or
Use this command to define that the horizontal diagonal of the well is to
be measured.
Ascent Software
User's Guide
2-21
2.1.5.2.5
Vertical Diagonal
Vertical Diagonal (Area menu) or
Use this command to define that the vertical diagonal of the well is to be
measured.
2.1.5.2.6
Remove
Remove (Area menu) or
Use this button to define the tool to “Remove wells from the
measurement area”.
2-22
Ascent Software
User's Guide
2.1.5.3
Layout
The Layout function allows the user to specify the data of the wells on
the microplate. The plate is displayed in the window. The floating menu
appears by pressing the right mouse button in the Layout window.
The Layout Editor is used to enter and change the well data. The well
data can be filled using two different approaches. By using the fields and
buttons in the Layout Editor the wells are filled manually (A). For a more
enhanced filling the Fill dialog should be used (B). You can change the
well type color by selecting Setup → Color.
Note:
To properly update the existing results sheets, the area
definition and the plate layout should match. If there is a
mismatch, you might get extra results.
Note:
Creating a plate
measurements.
layout
is
not
necessary
for
basic
To select the well(s) click one of the wells in the window or keep the left
mouse button down and drag it over the wells you want to select.
Ascent Software
User's Guide
2-23
The well data contains the type and name of the item in the well. The
calibrator well data also contains the concentration of the item. The
sample well data contains the dilution of the sample.
A. The Layout Editor contains the following buttons and fields:
•
Type.The type of well is either CALIBR., CONTROL, SAMPLE or
BLANK. The type can be changed only when the selected well is
empty.
The colors of the well borders are the same as the defined colors
for the different well types (i.e. calibrators, controls, samples and
blanks). The borders of empty wells are black. The colors of the
different well types can be defined on the Procedure Desktop
through Setup → Colors.
•
Name. The name of the item. The name “Blank” is allowed only
with the type BLANK.
The maximum length of the name is generally 50 characters, with
the exception of the type BLANK. Ascent Software automatically
numbers different items, concentrations and dilutions in series. This
number is added as an extension to the name given by the user.
The numbering of the samples in the dilution series has a space, a
running number, a slash, and a running dilution number.
The user can give a name maximum 50 characters for the type
SAMPLE.
Depending on the characters used, the whole name should be
visible in the well data if the length of the name is 9 to 10 characters
or less in layout and 9 characters in cell (including running number
and dilution). Otherwise the whole name is only displayed in the
Name field, and the first 9 to 10 characters are displayed in the well.
•
2-24
Concentration/Dilution 1: The concentration of the calibrator or the
dilution of the sample. This data can only be edited when the type
is CALIBR. or SAMPLE.
Ascent Software
User's Guide
•
Assay. The name of the assay. You can enter an assay name by
editing the field or selecting the assay from the drop-down list. The
name of the assay is required when you have several assays on the
same plate. The maximum length of the name is 20 characters.
Only 10 characters can be displayed in the Assay list.
•
Apply. Applies the data from the fields to the well.
•
Clear. Removes the data from the fields of the selected well(s) and
their replicates and specific blanks.
•
Open
. Opens the list of layout files. The layout can be selected
to the editor from the list. You can open files with the *.lay and
*.pla extensions. The *.lay file is a layout file that is automatically
generated by Ascent Software whenever a whole session is saved.
The *.lay file always has the same name as the corresponding
session file. The *.pla file is a user-generated layout file that is
named manually with the Save As function.
•
Save As
. Opens the list of layout files. The name of the file to
be saved can be typed or selected from the list of existing *.pla
files. You can save files only with the *.pla extension.
•
Fill. Opens the Fill dialog to enable a more automated filling of the
wells with user-defined parameters.
•
Clear all. Clears the whole plate layout.
•
Cut. Cuts the selected well specifications into the clipboard.
•
Copy. Copies the selected well specifications into the clipboard.
•
Paste. Pastes the well specifications from the clipboard.
Ascent Software
User's Guide
2-25
Fill by using the fields
Select the type of the well from the drop-down list and enter the name
of the item. You can also key in a concentration for the calibrator or
enter a dilution (1:n) for the sample. You can specify Assay for all types
of wells. Press the Apply button to apply the data to the well(s).
The data of all replicates is changed at the same time (except for the
SAMPLE type). The names of the specific blanks are also changed if the
name of the original sample is changed.
The editability of the fields depends on the selection in the Type field. If
several wells of different types are selected with the mouse drag, only
Assay can be edited. If all the selected wells have the same type and
name, Name can also be edited. Concentration/Dilution 1: can be
edited when all the selected wells have the same type of CALIBR. or
SAMPLE, the same name and the same concentration or dilution.
B. Open the Fill dialog by pressing the Fill button. The Fill dialog
contains the following buttons and fields:
•
Type. The type of well is either CALIBR., CONTROL, SAMPLE or
BLANK.
•
Name. The name of the item corresponds to that in the Layout
Editor. The name “Blank” is allowed only with the type BLANK.
The maximum length of the name is generally 50 characters, with
the exception of the type BLANK. Ascent Software automatically
numbers different items, concentrations and dilutions in series. This
number is added as an extension to the name given by the user. The
numbering of the samples in the dilution series has a space, a
running number, a slash, and a running dilution number.
The user can give a name maximum 50 characters for the type
SAMPLE.
Depending on the characters used, the whole name should be
visible in the well data if the length of the name is 9 to 10 characters
or less in layout and 9 characters in cell (including running number
and dilution). Otherwise the whole name is only displayed in the
Name field, and the first 9 to 10 characters are displayed in the well.
2-26
Ascent Software
User's Guide
•
Load IDs (only with SAMPLE type): Loads a list of names from a text
file where names are separated by an enter (↵), i.e. all the names are
on their own lines:
Name1↵
Name2↵
Name3↵
…etc
•
Concentration/Dilution 1: The concentration of the calibrator or the
dilution of the sample.
•
Assay. The name of the assay. The name of the assay is required
when you have several assays on the same plate.
•
Filling order. Select the filling order of the item and the
calibration/dilution series.
•
Replicates. The number of replicates of the item.
•
Specific blanks. The calibrator, control or sample can have none,
one, or two specific blank(s).
•
Fill replicates and blanks. The filling order of the replicates and
blanks.
•
Number of samples/controls. Key in the number of samples or
controls when samples and controls are edited. The names of
samples and controls are generated automatically by adding a
number to the name.
•
Generate concentration/dilution series. Tick this check box when
you want to generate calibration or dilution series.
•
No. of calibrators/dilutions. Key in the number of calibrators or
sample dilutions in the series. The names of the calibrators are
generated automatically by adding a running number to the name.
Calibrators and sample dilutions are generated automatically.
•
Operators: Multiply (*), Divide (/), Add (+), Subtract (-). The
operators used in the calculation of concentrations in calibration
series and in the calculation of dilutions in sample dilution series.
•
By. The value used in the calculation of concentrations in calibration
series and in the calculation of dilutions in sample dilution series.
Ascent Software
User's Guide
2-27
•
Navigate. You can move on the microplate in different directions
and select a desired well with the Navigate arrows.
•
Apply. Applies the data to the wells according to the field entries.
•
Close. Closes the Fill dialog.
•
Clear. Removes the data from the fields of the selected well and its
replicates and specific blanks.
•
Clear all. Removes the data from all the wells.
Fill by using the Fill dialog
Only empty wells can be filled with the Fill dialog.
Select the type of well from the drop-down list and enter the name of
the item.
The additional parameters depend on the type of item.
2-28
Ascent Software
User's Guide
You can enter the concentration for calibrators. You can enter the
dilution (1:n) for samples. The name of the field is automatically
Concentration for calibrators and Dilution 1: for samples.
Enter the name of the assay with the Assay field. The maximum length
of the assay name is 20 characters.
The filling order of the items can be selected with the Filling order
buttons either down or across.
Key in the number of replicates. The maximum number of replicates is
30.
Calibrators, controls and samples have no specific blank as default. Then
the value in the Specific blanks field is “None”. Select “One” if the item
has one specific blank. Select “Two” if the item has two specific blanks.
The filling order of replicates and blanks can be selected by using the Fill
replicates and blanks buttons either down or across.
The Number of samples/controls field is activated when samples and
controls are edited. The names of samples and controls are generated
automatically by adding numbers to the name. The maximum number
of controls/samples equals the size of the plate.
When you want to generate calibration or dilution series, tick the
Generate concentration/dilution series check box. The Generate
concentration/ dilution series check box activates the other fields, e.g.
No. of calibrators/dilutions.
When the type of well is “CALIBR.”, you can enter the number of
calibrators used in the calibration series in the No. of
calibrators/dilutions field. The names of the calibrators are generated
automatically by adding numbers to the item name. Alternatively, when
the type of well is “SAMPLE”, you can enter the number of dilutions
used in the dilution series. The names are not generated but the dilution
series is made for the same item.
In the calibration series the concentrations are calculated according to
the operators Multiply (*), Divide (/), Add (+) or Subtract (-). The
Ascent Software
User's Guide
2-29
calculation is made by using the basic value
Concentration/Dilution 1: field and the value in the By field.
in
the
In the dilution series the dilutions are calculated according to the
operators Multiply (*), Divide (/), Add (+) or Subtract (-). The
calculation is made by using the basic value in the
Concentration/Dilution 1: field and the value in the By field.
The filling order of the item in the series can be selected with the Filling
order buttons either down or across.
Navigate enables the user to move on the microplate in different
directions and select a desired well with the Navigate arrows.
Press the Apply button to apply the data to the well(s). Only empty wells
are filled; reserved wells are not overwritten.
Press the Close button when you want to close the Fill dialog.
Press the Clear button to remove data from the fields of the selected
well and its replicates and specific blanks.
Press the Clear all button when you want to empty all the data of the
wells on the plate.
Note:
2-30
The user can get a printout of the plate layout in Steps → Print
Current Step.
Ascent Software
User's Guide
Activeness of fields
The Type field can be selected when the plate contains at least one
empty well.
The editability of fields depends on the selection in the Type field.
The Name field can be edited when the type is not BLANK.
The Load IDs button is active when type is SAMPLE.
The Concentration field can be edited when the type is CALIBR..
The Dilution 1: field can be edited when the type is SAMPLE.
The Assay, Filling order and Replicates fields can always be changed.
The Specific blanks field can be selected when the type is not BLANK.
The Fill replicates and blanks buttons can be selected when there is
more than one replicate or specific blank.
The Number of samples/controls field can be edited when the type is
SAMPLE or CONTROL.
The Generate concentration/dilution series check box can be selected
when the type is CALIBR. or SAMPLE.
The fields belonging to series can be edited when the Generate
concentration/dilution series check box is selected.
In other words, the No. of calibrators/dilutions, Operators and By fields
are active when Generate concentration/dilution series is checked.
The Navigate arrows are constantly active.
The Apply and Close buttons are active on every occasion and the Clear
all button is inactive only when the plate is empty. Apply is inactive
when all wells have been specified.
The Clear button is active when the selected well contains data.
Ascent Software
User's Guide
2-31
2.1.5.4
Settings
The instrument settings are:
•
Moving type. The program searches for wells to dispense/measure
in the order defined by this input field. If the Moving type has been
selected as above, the columns may not actually be measured in
opposite directions unless adjacent columns are selected.
If a well has several measurement points defined, the points within
the well are measured using the same Moving type as defined for
the wells.
•
2-32
Execute by 1...n wells. The Execute by 1...n wells setting defines the
size of a group of wells. As many wells as defined by this field are
measured/dispensed at a time. The default group size is the number
of wells on the plate, which means that all the wells are
measured/dispensed in one pass of the session steps. If the group
size is less than the total number of wells on the plate, the steps of
the session are repeatedly run until all the selected wells are
measured/dispensed. Suppose that you have a 96-well plate and
have selected all the wells. Setting Execute by 1...n wells to 8 means
that the steps are repeated 12 times and 8 wells are measured in
each pass.
Ascent Software
User's Guide
For example, when the user has defined the following session using
moving type 5:
The instrument will perform the following actions with different
Execute by 1…n wells settings:
Ascent Software
User's Guide
2-33
1 well
Dispense1 for well A1
⇓
Measure1 for well A1
⇓
Dispense2 for well A1
⇓
Measure2 for well A1
⇓
Dispense1 for well B1
⇓
Measure1 for well B1
⇓
Dispense2 for well B1
⇓
Measure2 for well B1
⇓
Dispense1 for well C1
⇓
Measure1 for well C1
⇓
Dispense2 for well C1
⇓
Measure2 for well C1
⇓
etc until well H12
Execute by 1...n wells setting
8 wells
Dispense1 for wells A1 – H1
⇓
Measure1 for wells A1 – H1
⇓
Dispense2 for wells A1 – H1
⇓
Measure2 for wells A1 – H1
⇓
Dispense1 for wells A2 – H2
⇓
Measure1 for wells A2 – H2
⇓
Dispense2 for wells A2 – H2
⇓
Measure2 for wells A2 – H2
⇓
Dispense1 for wells A3 – H3
⇓
Measure1 for wells A3 – H3
⇓
Dispense2 for wells A3 – H3
⇓
Measure2 for wells A3 – H3
⇓
etc until well H12
96 wells
Dispense1 for wells A1 – H12
⇓
Measure1 for wells A1 – H12
⇓
Dispense2 for wells A1 – H12
⇓
Measure2 for wells A1 – H12
•
Dispense all and measure. If Dispense all and measure is selected,
all the wells defined e.g. by Execute by 1...96 wells will be
dispensed and after that the defined wells will be measured. If
Dispense all and measure is not ticked, the instrument dispenses
and measures one well at a time before moving on to the next one.
•
Plate acceleration (1...10). Defines the acceleration used for plate
movements. Acceleration can be varied between setting 1
(0.05 m/s2) and setting 10 (0.5 m/s2). The highest acceleration can be
used for small wells, such as on the 96-well plate. Lower
accelerations are used for larger wells as default values. With high
viscosity or solid samples, e.g. agar, higher than default acceleration
speeds can be used. The acceleration setting also affects the
maximum speed of the plate, the lower the acceleration, the lower
the plate speed.
2-34
Ascent Software
User's Guide
•
Settle delay (0…10000 ms). Defines the time the instrument will wait
at each well after a plate movement before it starts to measure.
•
Blanking time (0…100%) of integration time (Fluoroskan Ascent FL
only). Defines the integration time used in automatic blanking of the
instrument background. The instrument performs automatic
blanking before and after each execution group (the Execute by 1...n
wells setting). As a default, this blanking uses the same integration
time as the actual measurement step so that 50% of the integration
is performed before and 50% after the execution group. With this
setting, the user can reduce the time spent for automatic blanking.
For example, if the Execute by 1…n wells setting is one and the user
has defined a 10 s integration time, the instrument will perform a 5 s
blanking before and after each well. If one defines here a blanking
time setting of 20%, the instrument will perform only a 1 s blanking
before and after each well. If the setting is zero, then automatic
instrument blanking is totally prevented.
The Dispenser speed settings options are:
With these settings you can adjust the speeds of the optional dispensers
to gain optimal dispensing results. The default setting 18 is suitable for a
viscosity equal to that of water. The dispenser speed setting defines the
speed as % of the maximum possible speed with that dispenser.
•
Dispenser 1 (1...100). Defines the dispensing speed of dispenser
number 1.
•
Dispenser 2 (1...100). Defines the dispensing speed of dispenser
number 2.
•
Dispenser 3 (1...100). Defines the dispensing speed of dispenser
number 3.
Ascent Software
User's Guide
2-35
2.1.5.5
RunStatus
RunStatus is the Status report of the last run of the Session. If the
session has not been run, the RunStatus tab is not visible on the
Procedure Desktop. RunStatus is generated both in Procedure Desktop
and Results Desktop. They are exactly identical except for the grid lines
in the RunStatus sheet generated on the Results Desktop. The
RunStatus sheet provides summary information on the session and
comprises the session name, program version, instrument type and
serial number, starting time of the run and the actual temperature. The
RunStatus report also includes data about the steps. In addition, the
RunStatus sheet reports the ending time of the run, number of warnings
and errors and the actual temperature.
Example printout
2-36
Ascent Software
User's Guide
2.1.5.6
Measure
Measure (Steps menu) or
Use this command to add a Measure (measurement) step to the Steplist.
The following measurement types are available:
•
Single
•
Dual
•
Kinetic
•
Dual kinetic
•
Scanning
•
Monitor
Single measures each well once with the defined integral time. This
measurement type equals a basic end point measurement.
The Dual measurement type performs a double end point measurement
with a defined interval time between the two measurements. Each well
is measured twice and the measurement can be performed with two
different filter pairs/filters.
In the Kinetic measurement type several measurements are taken from
the selected wells using the defined interval time. The Kinetic
measurement type is used for the detection of kinetic reactions. In the
Kinetic measurement type any number of wells from 1 to 384 are
measured continuously for a defined number of measurement points.
The Dual kinetic measurement type is a combination of the Dual and the
Kinetic measurement types. Two readings are taken several times from
each measurement point using the defined interval time.
The Scanning measurement type is similar to Single except that the
plates are read without stopping the plate movement.
The Monitor measurement type measures the point a defined number
of times. Monitor is intended for the detection of very fast kinetic signals
where the total reaction time is less than about 20 s.
Ascent Software
User's Guide
2-37
2.1.5.6.1
Single
In the Single measurement type the selected wells are measured once.
A single measurement result is taken from each measurement point.
The general parameters for all the measurement types are:
•
Step name. The name of the step. The name is generated
automatically or given by the user and must be unique.
•
Unit. The measurement unit for the reading. You can enter a ninecharacter long string as the name of the unit.
•
Step time (hh:mm:ss.s). The time spent before advancing to the
next step. The time is expressed as hh:mm:ss.s, where hh stands
for hours, mm for minutes, ss for seconds and s for milliseconds.
•
Measurement method (FL only). Selection of the measurement
method, either fluorometric or luminometric.
•
Measurement type. The measurement type is selected (e.g. Single).
•
Integration time (from 20 ms to 1000 ms in the fluorometric
method, and from 20 ms to 1 h in the luminometric method with the
measurement type Single/Execute by 1...n wells and from 20 ms to
2-38
Ascent Software
User's Guide
10 s with other parameters in the luminometric method). Defines the
length of time used to obtain one measurement result from a
measurement point. The minimum time is 20 ms during which time
the instrument sums 150 readings from the A/D converter. If the
integration time is longer, the result is the mean value of the number
of 20 ms readings during the total integration time. For example, if a
100 ms integration is used, the result is:
(150 readings + 150 readings + 150 readings + 150 readings + 150
readings) / 5
Longer than 20 ms integration times can be used to reduce
background noise if the signal level of the sample is very low.
•
Lag time (hh:mm:ss.s). The time before the measurement is started.
•
Overwrite general step settings. By checking this check box you
can define the area and the plate layout for this step different from
those defined in the General step. When Overwrite general step
settings is selected, the area definition, layout and the settings of the
General step are used as default for the current step. These
parameters can, however, be edited suitable for the step in question.
The fluorometric parameters are:
•
Filter pair. The wavelength for the filter pair expressed in
nanometers. Select the appropriate wavelength from the drop-down
list.
•
Beam. Normal or Small beam selection. If the beam of the
instrument is changed, the beam state is updated. If the beam in any
Measure or Dispense And Measure step does not match the current
beam when the session is started, an error is reported.
The luminometric parameters are (FL only):
•
Filter. The wavelength for the filter expressed in nanometers. Select
the appropriate wavelength from the drop-down list. The default
filter is “None” in luminometric measurements.
•
Use default PMT voltage. By selecting this check box, the standard
factory calibration PMT (photomultiplier tube) voltage is used in the
measurements. This is selected as default and it gives the best
Ascent Software
User's Guide
2-39
possible performance for luminometric measurements. The software
obtains the actual voltage from the instrument and it can be viewed
in the Instrument Status sheet.
•
PMT voltage. If the Use default PMT voltage check box is
deselected, you can change the PMT voltage value from 300 to
1000. The initial value is factory-calibrated. Changing this value may
become necessary if very high signals are measured.
2.1.5.6.2
Dual
In the Dual measurement type each point is measured twice using two
different filters (luminometric)/filter pairs (fluorometric), at first with one
filter/filter pair and then with another. Meas. interval defines the interval
time between the two measurements.
For more details on general parameters, see section Single on p. 2-38.
The specific parameters in the Dual measurement type are:
•
2-40
Meas. interval (hh:mm:ss.s). The time interval between the
measurements.
Ascent Software
User's Guide
The fluorometric parameters are:
•
Excitation. The wavelength of the first excitation filter.
•
Emission. The wavelength of the first emission filter.
•
Excitation 2. The wavelength of the second excitation filter.
•
Emission 2. The wavelength of the second emission filter.
The luminometric parameters are (FL only):
•
Filter 1 & 2. The wavelengths for the first and second measurement
filters.
For other parameters, see section Single on p. 2-38.
2.1.5.6.3
Kinetic
In the Kinetic measurement type several measurements are taken from
the selected wells using the defined interval time. The number of
readings is defined in the Meas. count field.
Ascent Software
User's Guide
2-41
The general parameters for all the measurement types are described in
the Single section. The specific parameters for the Kinetic measurement
type are:
•
Interval (hh:mm:ss.s). The time between the successive readings.
•
Meas. count (1...1000). The number of consecutive measurements.
•
Create Kinetic Curve-sheet. Automatically copies kinetic curves and
pastes them on a new sheet named [Measure] Curves on the
Results Desktop.
2.1.5.6.4
Dual kinetic
The Dual kinetic measurement type is a combination of the Dual
measurement type and the Kinetic measurement type. Two readings are
taken several times from each measurement point using the defined
interval time and the two selected filters/filter pairs.
The parameters for the Dual Kinetic measurement type are the same as
for those in the Kinetic measurement type except that two filters/filter
pairs are used instead of one filter/filter pair. For more information about
parameters, see the Kinetic, Dual and Single (on p. 2-38) measurement
types.
2.1.5.6.5
Scanning
Scans over the given area.
The Scanning measurement type is similar to Single except that the
points are read while the plate is moving. This mode is useful for large
wells with a lot of measurement points. Use low acceleration if the well
contains a liquid of low viscosity.
The parameters for the Area scanning measurement type are the same
as for the measurement type Single.
Note:
2-42
In Scanning mode, the maximum Integration time is 860 ms
(FL only).
Ascent Software
User's Guide
2.1.5.6.6
Monitor
The Monitor measurement type is a special measurement type for fast
kinetic reactions (total reaction time ca. < 20 s) that measures the well a
defined number of times.
In the Monitor measurement type one well at a time is measured. When
you dispense into a well and want to follow fast reactions, Monitor is the
correct choice. After the well has been measured, the instrument
continues to the next well.
A specific parameter for this measurement type is:
•
Meas. count (1...1000). Total number of readings taken from the
points.
Ascent Software
User's Guide
2-43
2.1.5.7
Dispense (not CF)
Dispense (Steps menu) or
Use this command to add a Dispense step to the Steplist.
The parameters for the Dispense step are:
•
Step name. The name of the step. The name is generated
automatically or given by the user and must be unique.
•
Step time (hh:mm:ss.s). The time spent before continuing to the
next step.
•
Volume (1, 2…1000 µl). Defines the dispensing volume in steps of 1
µl increments.
Note:
•
2-44
The resolution of the dispensing volume is 1 µl, but the
accuracy of the dispensers is not as precise. Refer to the
instrument manual for deatails on dispenser specificatios.
Interval (hh:mm:ss.s). Defines the dispensing time interval between
the wells.
Ascent Software
User's Guide
•
Prime tip (5 µl). Primes 5 µl to the waste wells after each aspiration.
With small dispensing volumes this improves the dispensing
precision of the first dispensing after aspiration.
•
Dispenser (from 1 to 3). The number of the dispenser used.
•
Overwrite general step settings. By checking this check box you
can define the area and the plate layout for this step different from
those defined in the General step. When Overwrite general step
settings is selected, the area definition, layout and the settings of the
General step are used as default for the current step. These
parameters can, however, be edited suitable for the step in question.
2.1.5.8
Dispense And Measure (not CF)
Dispense And Measure (Steps menu) or
Use this command to add a Dispense And Measure step to the Steplist.
With this step dispensing and measuring can be accurately timed, as
with separate Dispense/Measure steps timing is less accurate.
It is possible to measure simultaneously while dispensing using this
step. Simultaneous measuring and dispensing is possible when the
dispenser is in the M position, in addition to the measurement type
being either Single or Monitor. To avoid splashing in larger wells, the
dispensing is always carried out in such a manner that the injected
squirt hits the side wall of the well when possible. This requires moving
the plate between dispensing and measuring if the measuring point is
not in the correct position during dispensing. In this case the plate must
be moved to the measuring position, which causes a delay of about 0.15
s between the dispensing and measurement. For standard 96-well
plates, moving the plate is not required and simultaneous measurement
and dispensing is possible.
Note:
The check box Dispense all and measure in General step
Settings affects the Dispense And Measure step (see General
step Instrument Settings in the Overview part of the manual).
Ascent Software
User's Guide
2-45
The step is a combination of a Dispense step and a Measure step.
The parameters for the Dispense And Measure step are:
•
Volume (1, 2...1000 µl). Defines the dispensing volume in steps of 1
µl increments.
•
Interval (hh:mm:ss.s). Defines the dispensing interval between the
wells.
•
Prime tip (5 µl). Primes 5 µl to the waste wells after each aspiration.
With small dispensing volumes this improves the dispensing
precision of the first dispensing after aspiration.
•
Dispenser (from 1 to 3). The number of the dispenser you are using.
•
Measure. The Measure part is the same as that of a Measure step. It
contains the selection of either the fluorometric or luminometric
method (FL only). The following measurement types with their own
parameters are:
2-46
!
Single
!
Dual
!
Kinetic
Ascent Software
User's Guide
•
!
Dual kinetic
!
Scanning
!
Monitor
Overwrite general step settings. By checking this check box you
can define the area and the plate layout for this step different from
those defined in the General step. When Overwrite general step
settings is selected, the area definition, layout and the settings of the
General step are used as default for the current step. These
parameters can, however, be edited suitable for the step in question.
2.1.5.9
Incubate
Incubate (Steps menu) or
Use this command to add an Incubate step to the Steplist.
The parameters of the Incubate step are:
•
Step name. The name of the step. The name is generated
automatically and must be unique.
•
Incubation time (hh:mm:ss). Defines the time before the next step
is executed. If the value is zero, the incubation is switched on and
the execution of the next step starts immediately.
Ascent Software
User's Guide
2-47
Note:
•
To switch the incubation off, add an Incubate step and set the
Temperature to Ambient temperature (amb.temp.).
Temperature. You can set the incubation temperature by sliding the
temperature regulator (from ambient temperature to +45°C).
Note:
•
The temperature inside the instrument is approx. +3°C above
the ambient temperature.
•
The following exception for Incubate steps applies: Incubate
steps with an Incubation time of zero are executed only once.
These are only used in order to break a loop.
•
Use the mouse or keyboard keys to set the temperature. First
choose the temperature selector by using the mouse or tab
key.
Keys
Step °C
Direction
Arrow key left
0.1
Down
Arrow key right
0.1
Up
Page Up
1
Down
Page Down
1
Up
Home
Amb.temp.
Down
End
45
Up
If the instrument is always used at a
temperature, it is convenient to select
Options (on p. 2-77) menu, and no
required. Use Options → Startup
instrument.
2-48
higher temperature than ambient
set Startup temperature from the
separate incubation step is then
temperature to warm up the
Ascent Software
User's Guide
Note:
The incubation will be turned on until Ascent Software is
switched off.
2.1.5.10 Shake
Shake (Steps menu) or
Use this command to add a Shake step to the Steplist.
The parameters of the Shake step are:
•
Step name. The name of the step. The name is generated
automatically and must be unique.
•
Total time (hh:mm:ss). The duration time of the total Shake step.
•
ON time (hh:mm:ss). The ON time of the shaking period. The ON
time must always be given so that the instrument will shake. The
other shake parameters mentioned are just for the fine-tuning of the
instrument.
•
OFF time (hh:mm:ss). The OFF time of the shaking period. The
Shake step is broken up into intermittent ON and OFF times.
Ascent Software
User's Guide
2-49
•
Diameter (1...50 mm). Defines the shaking amplitude.
•
Speed (60...1200 rpm). Defines the shaking speed.
•
Background mode. The shaking is carried out when the instrument
does not have any other tasks to perform, e.g. during lag times.
Note:
Different time settings will affect the way the program performs
tasks.
Examples of setting up time parameters
1. Interval shaking
If, for example, the Total time equals 30 s, the ON time 10 s and the OFF
time 5 s, then the instrument:
shakes 10 s ⇒
is idle 5 s ⇒
is idle 5 s =
shakes 10 s ⇒
total 30 s
2. Background shake in a kinetic measurement
a) Shaking would normally start as soon as the instrument is idle, i.e.
right after the measurement if the OFF time equals zero. If you want
the shaking to commence at a set time before the measurement, and
wait the remaining interval time before the next kinetic measurement,
then setting the Total time is not necessary. The ON time equals the
length of time the instrument shakes before the measurement. The
OFF time has to be set greater than the lag time or interval times of
the Measure steps.
b) Kinetic measurement, shake before each count: setting up a session
with having the instrument shake right before each measurement
count:
interval
time
background
shake
Measure
interval
time
background
shake
Measure
A Shake step with Background mode and the following time settings:
2-50
Ascent Software
User's Guide
Total time not needed;
ON time = How long you want the instrument to shake, here 30
seconds, and
OFF time = If zero, will start shaking as soon as the instrument is idle,
which means that the shaking starts at the beginning of the Measure
step’s lag or interval time. If the OFF time is greater than the lag time or
the interval time, then the shaking will commence at the time set for the
ON time right before the measurement.
2.1.5.11 Pause
Pause (Steps menu) or
Use this command to add a Pause step to the Steplist.
The parameters of the Pause step are:
•
Step name. The name of the step. The name is generated
automatically or given by the user and must be unique.
•
Plate ID. A plate ID can be added. It will be written in the Steps sheet
on the Results Desktop.
Ascent Software
User's Guide
2-51
Note:
The plate ID can be referenced in the custom-made report
sheets or in the comment fields on the Results Desktop by
typing =Steps!Pause1_Plate_ID into a cell.
•
Message. The message displayed to the user when the Pause step is
executed.
•
Waiting time (hh:mm:ss). The Waiting time allows the user to
perform tasks while the plate is out between measurements. After
the given time the execution of the session continues. The execution
of the steps continues automatically after a given Waiting time.
•
Run plate out. Runs the plate out if this check box is selected when
the Pause step is executed. This check box option is useful, e.g.
when manual addition of liquids is required. First tick the check box
to enable to send out the microplate between the two
measurements. Then set the time between the measurements in the
Waiting time field.
Note:
Especially in some instances where it might be difficult to
estimate the Waiting time correctly, set the Waiting time to
zero and manually control the Pause step execution by
pressing the Continue button (see next page), when desired.
•
Alarm. Issues an alarm if this check box is selected when the Pause
step is executed.
•
Options. This window is used e.g. when communication between
two programs or systems is necessary, or waiting for a string from a
barcode reader.
When the Options button is pressed:
2-52
Ascent Software
User's Guide
The following Pause Options are available:
•
Send string. Sends a string to the serial port when the Pause
step starts.
•
Wait string. Waits for a string from the serial port and
continues the execution after it has been received.
•
Wait Plate ID string. Waits for a string from a barcode reader.
•
Run program. Starts a program when the Pause step
commences. In the Run program option, you have to type the
name of the program you want to run in the field. The name
may include path and command line arguments.
•
Wait program. Waits for the started program to terminate and
then continues the execution. The option Wait program is
available only if you have selected the option Run program.
Even if one or more of the wait options you have selected are not
yet completely executed, you can continue manually by clicking the
Continue button when the Pause dialog appears. A “Waiting...”
message is displayed if the Pause step is waiting for a string,
program or a waiting time. If you have selected two or three of the
waiting options, the execution continues at the first wait-end
condition.
•
Serial port settings. From Serial port settings the user can
select the correct communication parameters. For Send string
and Wait string you have to select the proper serial port
Ascent Software
User's Guide
2-53
settings in the dialog. You cannot send to or receive from the
instrument that Ascent Software is controlling. You can insert
control characters into the Send string and Wait string input
fields by first entering ^ (= Ctrl) and then a character with the
ASCII value 64 + the ASCII value of the control character you
want. For example, ^M is the carriage return (CR) and ^J is
the line feed (LF). The last character in the Wait string input
field should be unique for Wait string or the string will not be
detected even if it has been received.
2.1.5.12 Save/Load
Save/Load (Steps menu) or
Use this command to add a Save/Load step to the Steplist.
The parameters of the Save/Load step are:
•
Step name. The name of the step. Different Save/Load steps do not
require unique step names.
•
Load. Loads data from a file. When the data is loaded, it is created in
a sheet on the Results Desktop.
2-54
Ascent Software
User's Guide
•
Save. Saves a sheet as a file. When the sheet is saved, it must exist
on the Results Desktop. The Steps sheet shows the filename of the
saved sheet.
Note:
When the Measure sheet is saved in *.txt and *.xls (worksheet)
file formats, it will contain hidden measurement times and
plate layout information.
•
Sheet name. Optional if loading data. A sheet with the given name
will be created on the Results Desktop that contains data from the
loaded file. Case-sensitive if saving data. The Sheet name must be
written exactly as it was on the Results Desktop.
•
Append. If the Append check box is selected, the sheet will be saved
to the end of the file after all the previous data. In this way many
sheets can be saved in the same file. The extension *.txt is the only
extension allowed for the Append file format.
Note:
•
In many cases it is advisable to create a new sheet (Results →
Sheet → New) to obtain the Append file in the desired format.
Autoname file. This check box is only enabled when the Save sheet
is selected. The directory path is given and the name of the file is
generated from the current date and time. The name format is
MMddhhmm, where MM is the month, dd the day, hh the hours,
and mm the minutes.
Note:
Append and Autoname file cannot be on at the same time.
•
File name/Directory path. The name of the file that the sheet is
loaded from or saved in. An extension is not required, but if given, it
must match the selected file format. The filename should be written
here exactly the same as the actual filename on the disk. The
directory path is given when Autoname file is ticked.
•
Browse... . The file or the directory path can be selected from the file
or directory list.
•
File format. You can select the File format from three alternative
choices: Default; Excel 4.0, and ASCII text. Default is the natural
format for the Ascent sheets. The filename extension is .VTS. Excel
4.0 can be used to transfer data between Ascent Software and
Microsoft Excel. The filename extension is .XLS. The tabbed text is
an ASCII format where the rows are represented by a line of text
Ascent Software
User's Guide
2-55
ending with LF. The columns in each row are separated by a TAB
character and the extension is .TXT. Most spreadsheet programs
can import this kind of file, and the file can also be edited with text
editors like MS Notepad or word processors such as MS Word.
Remember to keep the file extension as *.txt.
2.1.5.13 Print
Print (Steps menu) or
Use this command to add a Print step to the Steplist.
The parameters of the Print step are:
•
2-56
Step name. The name of the step. Different Print steps do not
require unique step names.
Ascent Software
User's Guide
•
Select sheet(s) to print. The sheets to print can be selected from the
list.
•
Select all. With the Select all button, all the sheets are selected to be
printed.
The Print step is executed after all the other steps. The sheets are
printed using the system printer. See Section Before Installation in the
Overview part of the manual.
Note:
Sheets are printed according to the current print area. It is
recommended to check and/or modify the print area (Results
Desktop: Print → Set Print Area) before running the session.
2.1.5.14 Remove
Remove (Steps menu)
Use the Remove command to remove a step from the Steplist or simply
drag it into the Remove box at the bottom of the Steplist.
2.1.5.15 Inactivate
Inactivate (Steps menu)
The Inactivate command is used if the user chooses not to carry out the
step. If the step is inactivated, it will be crossed over with an X mark in
the Steplist. Otherwise the step is executed. The Inactivate command
can be used when you want to use an old calibration curve with plates
that only have samples on. For example, you create two steps, one for
calibrators and the other for samples, both with different layouts. Then
you run a calibration curve with the first step active and the second
inactive. In the following run you inactivate the first step and measure
the samples with the second step active.
Ascent Software
User's Guide
2-57
2.1.5.16 Activate
Activate (Steps menu)
The user can choose whether or not to carry out a certain step. The
Activate command is used if the user chooses to carry out the step. The
Activate command cannot be distinguished by any specific mark(s)
(compare above). The default is that the step is carried out. Only
inactivated steps can be activated.
2.1.5.17 Print Current Step
Print Current Step (Steps menu)
Use the Print current step command to print the current step.
Displays the Print dialog box where you can select the print options and
print the step.
Note:
The appearance of the Print dialog box depends on the
operating system used and the printer used.
2.1.5.18 Print All Steps
Print All Steps (Steps menu)
Automatically prints all steps. Displays the Print dialog box where you
can select the print options and print the steps.
Note:
2-58
The appearance of the Print dialog box depends on the
operating system used and the printer used.
Ascent Software
User's Guide
2.1.6
Setup
2.1.6.1
Plate Templates
Plate Templates (Setup menu)
Use this command to edit Plate Templates.
The Template Editor allows the user to create, delete or modify existing
plate templates.
In the list box, the items marked with Enabled are enabled, those
marked with Disabled are disabled and the one that is marked with
Default is the default definition.
Note:
If the well diameter is < 3 mm (e.g. 864-well plates), then
dispensing cannot be performed since the precision of the
instrument is not sufficient.
Note:
Dispensing into Terasaki plates cannot be performed due to
the shape of the well.
Ascent Software
User's Guide
2-59
The operation buttons are:
•
Modify. You can start to modify the selected template.
•
Duplicate. Makes a copy of a currently selected template. You can
create a new template by copying the currently selected one,
modifying the template parameters and by saving it with a new
name.
•
Delete. Deletes the currently selected template after verifying that
you actually want to delete the template.
•
Set as default. Sets the currently selected template to the default
template which is offered first to the user when a new Session is
created.
•
Show plate. Shows the plate layout of the currently selected
template.
When you press the Modify template button:
Note:
2-60
The size unit is 1/10 mm.
Ascent Software
User's Guide
The following parameters are entered for the templates:
•
Name. Define the name of the template. The name is added to the
template list.
•
Enabled. You can enable/disable templates in the template list by
clicking the Enabled check box.
•
Plate size X (1...1340). Defines the plate length in the X direction.
•
Plate size Y (1...900). Defines the plate length in the Y direction.
•
Plate height (1...240). Defines the plate height.
•
Well count X (1...36). Defines the number of wells in the X direction.
•
Well count Y (1...24). Defines the number of wells in the Y direction.
•
Well diameter X (1...1290). Defines the well diameter in the X
direction.
•
Well diameter Y (1...900). Defines the well diameter in the Y
direction.
•
Well start X (80...670). Defines the position of the first well
measured from the edge of the plate. Enter the center point of the
first well in the X direction.
•
Well start Y (40...450). Defines the position of the first well
measured from the edge of the plate. Enter the center point of the
first well in the Y direction.
•
Corner well distance X (0...1340). Defines the distance between the
corner wells. Enter the distance in the X direction.
•
Corner well distance Y (0...900). Defines the distance between the
corner wells. Enter the distance in the Y direction.
•
Well type. Circle sets the shape of the wells to be circular. Rectangle
sets the shape of the wells to be rectangular.
Ascent Software
User's Guide
2-61
2.1.6.2
Filters
Filters (Setup menu)
In the Filters setup menu the filter and filter pair information is modified.
You can add, remove, validate, and scale filters/filter pairs. To modify
luminometric filter parameters, place the cursor in the luminometric list
before pressing any push buttons (Fluoroskan Ascent FL only).
In the validation procedure a new filter pair is introduced into the
autocalibration system. The instrument selects the reference chip giving
a suitable signal and saves the value in the memory for the
autocalibration procedure. If the validation procedure does not find a
suitable reference chip, the program requests if the user still wants to
use this filter pair. If the answer is "Yes", the pair can be used in
measurements. The instrument selects the reference channel for
excitation intensity compensation in the autocalibration system. For
further information, see the User Manual of the instrument used.
The following commands are available:
• Add. Defines a new fluorometric filter pair (positions and wavelengths)
to be validated or a new luminometric filter (Fluoroskan Ascent FL
only).
2-62
Ascent Software
User's Guide
• Remove. The action is confirmed (Yes/No dialog) and if the user
selects “Yes”, an existing filter/filter pair is removed.
• Validate. Validates an existing filter pair (for more information, see
Filter Pair Validation).
• Scaling. Sets a scaling factor.
Ascent Software
User's Guide
2-63
.
Sets a user-defined scaling factor to the indicated filter pair (the default
value is 1). The measured values are multiplied by this factor. In the
fluorometric method, the scaling values can be set separately for normal
and small beams.
Values of the scaling factors used in the measurement are automatically
copied to the Measure sheet.
2-64
Ascent Software
User's Guide
2.1.6.3
Password
Password (Setup menu)
Use this command to specify a system password. If a system password
has been specfied, Ascent Software cannot be started without entering
the password. The password length must be 5 - 10 characters long.
To set a password:
1. Select Setup → Password.
2. Enter a password.
3. Tick Password in use.
4. Click OK.
5. Retype password and click OK.
To remove a password:
1. Select Setup → Password.
2. Enter the password.
3. Untick Password in use.
4. Click OK.
Ascent Software
User's Guide
2-65
2.1.6.4
Dispensers (not CF)
Dispensers (Setup menu)
Use this command to set the parameters for the dispensers.
•
Dispenser. Defines the dispenser (1 to 3) to set the parameters for.
•
Dispenser position. Defines the position of the dispenser.
2.1.6.4.1
Default settings
All values are a percentage of the maximum. The maximum values
represent different speeds. The speeds of the dispenser pump(s) are set
according e.g. to the viscosity and other properties of the liquids used.
•
2-66
Default speed. The maximum speed of the dispenser pump syringe
during the dispensing (see the following figure). The changed
Ascent Software
User's Guide
Default speed is effective in the following session (Session → New).
In certain cases, e.g. with small dispensing volumes, the Default
speed may not be reached.
•
Start speed. The speed with which the dispenser pump starts when
the dispensing starts. The Start speed is effective immediately.
•
Cutoff speed. The speed at which the dispenser pump stops
completely after the dispenser pump syringe has moved the
required dimension. The Cutoff speed is effective immediately.
•
Slope. Both the acceleration speed when the pump accelerates from
the Start speed to the Default speed and the deceleration speed
when the pump decelerates from the Default speed to the Cutoff
speed. The Slope is effective immediately. The Slope value can at
times be slightly changed.
•
Defaults. Reads the parameters from the initialization file and sets
the factory pre-set values.
The default settings (Default speed 18, Start speed 100, Cutoff speed
100, and Slope 70) are for water-type liquids.
Ascent Software
User's Guide
2-67
2.1.6.5
Colors
Colors (Setup menu)
Use this command to define the colors for the different well types (i.e.
calibrators, controls, samples and blanks). The type is selected from the
drop-down list and the color is selected from the palette. The selected
color is displayed in the field in front of the Type option menu and in the
list beside the name of the type.
The default color for all well types is black.
The colors are used in the Layout Editor and in Results sheets. If the
Layout Editor is visible when colors are changed, the previously filled
wells will keep their original colors until the layout is totally updated.
Note:
2-68
Light colors may not be visible in printouts
Ascent Software
User's Guide
2.1.6.6
Printout
Printout (Setup menu)
The Printout command controls the headers, footers, margins and many
other printout options. Headers and footers are descriptive texts, which
are printed at the top and bottom of every page in your step. You can
add, delete, edit, format and position headers and footers, and view
them as they will be printed.
•
Header. The area in the Header box shows you the contents of the
header.
Ascent Software
User's Guide
2-69
•
Footer. The area in the Footer box shows you the contents of the
footer.
The following control characters have a special meaning:
•
&L
Left alignment
&C
Center
&R
Right
&D
Date
&T
Time
&F
Sheet name
&P
Page number
&N
Total number of pages
Margins
Top
Select the distance between your data and the top edge of the
printed page. The default value is 1.0 cm.
Bottom
Select the distance between your data and the bottom edge of the
printed page. If your data is less than a page long, it will not expand
to extend to the bottom margin. The default value is 1.0 cm.
Left
Select the distance between your data and the left edge of the
printed page. The default value is 0.75 cm.
Right
Select the distance between your data and the right edge of the
printed page. If your data is less than a page wide, it will not
expand to extend to the right margin. The default value is 0.75 cm.
2-70
Ascent Software
User's Guide
Note:
•
All the margins are usually slightly over the set values due to
printer properties.
Page Order. Controls the order in which your data is numbered and
printed when it does not fit onto one page.
Top To Bottom
Numbering and printing proceed from the first page to the pages
below and then move to the right and continue printing down.
Left To Right
Numbering and printing proceed from the first page to the pages to
the right and then move down and continue printing across the
page.
•
Center. Centers the data on the page within the margins vertically,
horizontally or both.
•
Print Options
Grid Lines
If selected, prints horizontal and vertical cell grid lines in
worksheets.
Black & White
Prints drawing objects in black and white. Anything in the
foreground that is not entirely white is printed as black. Anything in
the background that is not entirely black is printed as white. If you
formatted your data with colors but print on a black and white
printer, select this option. If you use a color printer but want faster
printing, selecting this option may reduce the printing time.
Row and Column Headings
Prints row numbers and column letters in the A1 reference style or
numbered rows and columns in the R1C1 reference style.
Ascent Software
User's Guide
2-71
•
Scale. Reduces the step or selection during printing to fit the
specified number of pages.
Fit To Pages
In most cases it is worthwhile to select this option to save paper.
Pages Wide
You can change the figure of pages wide. This figure does not
normally have to be changed. The default figure is 19. Pages wide
can range from 1 to 100.
Pages High
You can change the figure of pages high. This figure does not
normally have to be changed. The default figure is 1. Pages high
can range from 1 to 100.
Note:
Pages Wide and Pages High are used together with Fit To
Pages to define how many papers can maximum be used
when you scale the data to the page(s). If the data requires
width but not height, then Pages Wide = 19 and Pages High =
1. On the other hand, if the data requires height but not width,
then Pages Wide = 1 and Pages High = 19.
Scale
Reduces or enlarges the selection to be printed. You can reduce
the selection to be printed to 10% of its normal size or enlarge it up
to 400%. The default value is 100%.
2-72
Ascent Software
User's Guide
2.1.6.7
Instrument Status
Instrument Status (Setup menu)
Retrieves the Instrument Status report including the version, serial
number and a list of instrument data. This function is enabled when the
instrument is connected and is online. The user can obtain valuable
information from the Instrument Status report, e.g. in problem
situations. By pressing the Save button you can store the Instrument
Status report as a text file. By pressing the Print button you can print the
Instrument Status report. The Print dialog is the same as the dialog in
other print functions.
Example Instrument Status report
Report created:
Instrument:
Serial number:
26.2.2002 14:09:05
Fluoroskan Ascent FL 2.5
374033609C
Instrument capabilities:
Shaking:
Incubating:
Dispensers:
Yes
Yes
1
Current beam:
Plate X offset correction [steps]:
Plate Y offset correction [steps]:
Excitation stepper offset correction [steps]:
Emission stepper offset correction [steps]:
Temperature A/D offset correction 10 to 24°C:
Temperature A/D offset correction 24 to 45°C:
Measure A/D offset correction:
Background noise standard deviation:
PMT gain factor:
Gain adjust factor for gain 1:
Gain adjust factor for gain 10:
Gain adjust factor for gain 100:
Gain adjust factor for gain 1000:
Normal
2
1
0
0
-2
-1
-3
5.45
0.714
1039.28
102.518
10.1323
1
Lamp set voltage:
10.0 V
Ascent Software
User's Guide
2-73
Heating elements:
Ceiling temperature °C:
Ceiling offset °C:
Ceiling slope C/°C:
Ceiling slope start °C:
Bottom temperature °C:
Bottom offset °C:
Bottom slope C/°C:
Bottom slope start °C:
23.8
1.20
0.10
37.00
23.6
0.00
0.00
0.00
Filter pair data:
Excitation filter position:
1
Excitation filter wavelength:
355
Emission filter position:
1
Emission filter wavelength:
460
Calibration chip:
3
Validation signal [% of max.]:
2.24
Validation background [% of max.]:
0.01
Calibration factor:
1.00227
Normal beam scaling factor:
1
Small beam scaling factor:
1
Date and time of validation:
13.2.2002 16:08:44
Reference channel gain:
47.63
PMT voltage:
550
Excitation filter position:
2
Excitation filter wavelength:
485
Emission filter position:
2
Emission filter wavelength:
518
Calibration chip:
3
Validation signal [% of max.]:
33.90
Validation background [% of max.]:
0.00
Calibration factor:
1.02704
Normal beam scaling factor:
1
Small beam scaling factor:
1
Date and time of validation:
13.2.2002 16:09:21
Reference channel gain:
7.66
PMT voltage:
423
Excitation filter position:
2-74
2
Ascent Software
User's Guide
Excitation filter wavelength:
485
Emission filter position:
3
Emission filter wavelength:
538
Calibration chip:
4
Validation signal [% of max.]:
35.64
Validation background [% of max.]:
0.00
Calibration factor:
1.02316
Normal beam scaling factor:
0.338
Small beam scaling factor:
0.372
Date and time of validation:
13.2.2002 16:09:38
Reference channel gain:
7.66
PMT voltage:
433
Excitation filter position:
3
Excitation filter wavelength:
544
Emission filter position:
4
Emission filter wavelength:
590
Calibration chip:
4
Validation signal [% of max.]:
48.69
Validation background [% of max.]:
0.00
Calibration factor:
1.01719
Normal beam scaling factor:
1
Small beam scaling factor:
1
Date and time of validation:
13.2.2002 16:09:57
Reference channel gain:
4.04
PMT voltage:
442
Excitation filter position:
4
Excitation filter wavelength:
584
Emission filter position:
5
Emission filter wavelength:
612
Calibration chip:
4
Validation signal [% of max.]:
12.84
Validation background [% of max.]:
0.00
Calibration factor:
1.02343
Normal beam scaling factor:
1
Small beam scaling factor:
1
Date and time of validation:
13.2.2002 16:10:16
Reference channel gain:
3.89
PMT voltage:
456
Ascent Software
User's Guide
2-75
Luminometric status:
Default PMT voltage:
850
Filter data:
Filter position:
Filter wavelength:
Scaling factor:
Date and time of adding:
2-76
7
0
100.988998
26.2.2002 14:09:06
Ascent Software
User's Guide
2.1.7
Options
The Options dialog allows the user to set the startup parameters: the
serial port selection; startup temperature for incubation; session
autosave parameters, and the dispenser control.
•
Serial port. Searches for the instrument in the selected port
(COM1...COM4) or automatically (Auto) in every port. If autosearch
fails, use the port selection.
•
Startup temperature. When the program is started, the incubation
goes on.
Note:
To switch the incubation off, set the temperature to ambient
temperature. The temperature inside the instrument is approx.
+3°C above the ambient temperature.
Ascent Software
User's Guide
2-77
•
Session autosave. If the session data is changed, the current
session is saved automatically.
Note:
•
The session is overwritten over the existing session.
Automatic session name generation. Saves the whole, sessionrelated data (*.sef (Fluoroskan Ascent and Fluoroskan Ascent
CF)/*.sec (Fluoroskan Ascent FL), *.vtb, *.vtg, and *.lay files)
automatically when a new run is executed. The name format is:
MMddhhmm.ext, where MM is the month, dd the day, hh the hours,
and mm the minutes. The extension corresponds to the data file
extension (*.sef (Fluoroskan Ascent and Fluoroskan Ascent CF)/*.sec
(Fluoroskan Ascent FL), *.vtb, *.vtg, or *.lay).
Note:
Automatic session name generation is enabled only when
Session autosave is ticked.
Note:
It is useful to create and use a directory for each respective
Session that uses the Automatic session name generation.
•
Automatic runtime Curves. The runtime Curves dialog appears
automatically when this check box is checked with the measurement
types Kinetic, Dual kinetic and Monitor. The curves also disappear
automatically after the run.
•
Leave plate in. Leaves the plate in the instrument after a run.
•
Keep dispenser syringe full. Aspirates the dispenser syringe full
after priming and whenever the syringe needs filling always to full
volume. Without this check box selected, only the volume needed
for the completion of the assay will be aspirated.
2-78
Ascent Software
User's Guide
2.1.8
Help
You can launch the Help application by selecting Help → Help Contents
from the main menu.
The following Help window will appear.
The Help main menu buttons are:
•
Hide. Hides the left-hand side navigation window. To display the
navigation window again, click the Show button that appears
instead of the Hide button.
•
Back. Takes you back to the previous view in your view history.
•
Forward. Takes you to the next view in your view history.
•
Print. Prints a single topic or multiple topics.
You can access the help content in three different ways by selecting one
of the following tabs:
•
Contents. Browse the help topics by subject.
•
Index. Type in a keyword or browse all keywords to find a specific
topic.
Ascent Software
User's Guide
2-79
•
Search. Find a specific help topic by entering words to search in the
help content.
Note:
2-80
Many images in the help application contain links to topics.
When you see an image, move the cursor across the image to
find the links.
Ascent Software
User's Guide
3
Results Desktop
3.1
General (results)
3.1.1
Standard Sheets
3.1.1.1
Measurements
Every measurement step generates a measurement sheet automatically.
The name of the sheet is the same as the measurement step name and
the default measurement step name is “Measure1”. In Dual and Dual
kinetic measurements two measurement sheets are generated. The
name of the first sheet is the same as the step name “Measure1”. The
other sheet name is generated from the step name by adding the ending
“_f2”. The values within this sheet are raw data values.
Note:
Measure sheets containing raw data values are locked. In other
words, they contain a locking mechanism so that the
measurement results cannot be tampered with.
Ascent Software User's Guide
3-1
In the Measure sheet properties dialog (
or Sheet → Properties…)
the Show times check box can be selected. The default setting is that
the check box is not ticked, i.e. the measurement times are hidden.
When the Show times check box is ticked, however, and the OK button
or the Apply button is pressed, the measurement times will be shown to
the right of the raw measurement data in the same Measure sheet in the
same format. The measurement times are expressed in seconds.
The Measure sheet properties dialog also contains a selection for the
raw data result unit. Average (default setting) sets the result unit to be
either RFU/s (fluorometry) or RLU/s (luminometry).
When Average is selected, all results are calculated per second and the
result value is independent of the integration time. Therefore, the same
sample will give the same numerical value with all possible integration
times.
When Integral is selected, the calculated value is an integral over the
defined integration time. This numerical value is dependent of the
integration time, so that when the integration time increases, the value
will increase correspondingly.
3-2
Ascent Software User's Guide
3.1.1.2
Curves
Measure1 runtime Curves are automatically created if Create Kinetic
Curves-sheet is selected in the Measure step with the measurement
types Kinetic, Dual kinetic and Monitor. See the Procedure Desktop part
of the manual for more details.
The Curves sheet contains a constant picture of the runtime kinetic
curves and the picture cannot be edited afterwards. More flexible
pictures can, however, be created with Process → Organize… and
Process → Graph features, see pp. 3-47 and 3-46 .
3.1.1.3
Steps
This sheet is updated automatically when a measurement is carried out.
This sheet has all the step parameters defined on the Procedure
Desktop. The summary of the plate layout can also be found here.
3.1.1.4
RunStatus
This sheet is updated automatically when a measurement is carried out.
This sheet provides general information about the last run, such as the
session name, program versions and information about possible
warnings and errors during the measurement. See the Procedure
Desktop part of the manual for more details.
3.1.2
Basic operations
3.1.2.1
Sheet names
Sheets created with the Process menu are named automatically.
However, sheet names can be changed using the Sheet → Rename
selection.
3.1.2.2
Sheet types and properties
There are several types of sheets that have different kinds of functions.
The standard sheet types are: general, measurement, multipoint, blank
subtraction, precalculation, organize, kinetic processors, ratio/inhibition,
Ascent Software User's Guide
3-3
curve fit, and cut-off. The general sheets are created by the user (Sheet
→ New). Other sheet types are described in the Process menu section.
Every sheet (except Steps, RunStatus, Curves and general) has
properties which can be changed in the Properties dialog. Each sheet
type has its own type of properties.
Note:
Many sheet properties utilize the area definition and plate
layout. To properly update the existing results sheets, the area
definition and the plate layout should match. If there is a
mismatch, you might get extra results.
3.1.2.3
Linking sheets
Sheets are linked together automatically in different ways depending on
the sessions. New sheets are progressively generated and linked, for
example, in the following manner:
Measure1 sheet ⇒
Blank Subtraction sheet ⇒ ⇒
Curve Fit sheet
As Source Sheet 1
If blank wells are used and the
Measure1 sheet acts as the
source sheet.
Finally
produced using
the Blank
Subtraction
sheet as the
source sheet.
3.1.2.4
Enable/Disable values
In case of erroneous measurements, values can be disabled. With
regard to replicates, as well as blanks, standards and samples, it is
possible to disable e.g. one value out of five different measurement
values and calculate the results based on these four remaining
measurement values. On the other hand, when a value is enabled, it is
used in calculations.
Note:
3-4
The E/D (Enable/Disable) icon is present on the results tool bar
and specifies a general property employed in, for example,
Cut-Off and Curve Fit sheets.
Ascent Software User's Guide
3.2
Menus (results)
3.2.1
General
Results menu and tool bar
Commands are grouped in menus. Some commands carry out an action
immediately, others display a dialog box for selecting options.
You can quickly select the most commonly used commands by clicking
the tool bar button with the mouse.
Some menus cannot be used in all situations.
Format menu items; Border, Font, Number, Alignment, and Cell
References are active in user-defined sheets, which can be generated
after Sheet → New and Advanced Copy sheet operations.
Format and Edit are active in the above-mentioned sheets.
Ascent Software User's Guide
3-5
Menu layout
Session
New...
Open...
Save
Save As...
Print...
Exit
Edit
Cut
Copy
Paste
Paste Values
Clear
Insert
Remove
Cell Names
Find and Replace
Go To Cell
Enable/Disable
Print
Add Page Break
Add Col Page Break
Add Row Page Break Ctrl+Enter
Remove Page Break Ctrl+M
Page Setup
Set Print Area
Print Area
Print Setup
Print
Process
Function…
Graph
Organize…
Multipoint…
Blank Subtraction…
Precalculation…
Kinetic Processors…
Ratio/Inhibition…
Curve Fit…
Cut-Off…
3-6
Ctrl+X
Ctrl+C
Ctrl+V
Del
Ctrl+I
Ctrl+R
Ctrl+E
Ctrl+H
View
Desktop Bar
Status Bar
Tool Bar
Tabs Bar On Top
Hide/Show Sheets...
Arrange Sheets...
Zoom In
Zoom Out
Procedure
Results
Format
Border
Font
Number
Alignment
Cell References
Setup
Number…
Sheet
New Sheet...
Open Sheet...
Save Sheet
Save Sheet As...
Advanced Copy
Delete Sheet
Rename Sheet
Properties...
Help
Help Contents
About
Ascent Software User's Guide
3.2.2
Session
See the Procedure Desktop for more details.
3.2.2.1
New...
New... (Session menu) or
Use this command to create a new session and specify the name of the
session.
3.2.2.2
Open ...
Open ... (Session menu) or
Use this command to open an existing session.
3.2.2.3
Save
Save (Session menu) or
Use this command to save the session.
3.2.2.4
Save As ...
Save As ... (Session menu)
Use this command to save the session with a new name.
3.2.2.5
Print ...
Print ... (Session menu) or
Use this command to get a printout of the session.
Ascent Software User's Guide
3-7
3.2.2.6
Last five sessions
The last five sessions can be quickly opened from the list.
3.2.2.7
Exit
Exit (Session menu)
Use this command to exit the program.
3.2.3
Edit
3.2.3.1
Cut
Cut (Edit menu) or
Removes the selection from the sheet and places it on the Clipboard.
The selection can be a cell or a cell range.
When you cut characters in a cell, the characters are removed to the
Clipboard. The cut characters are then available for pasting into a new
location.
Shortcut:
3.2.3.2
Ctrl+X
Copy
Copy (Edit menu) or
Copies the selection to the Clipboard. The selection can be a cell or a
cell range.
When you copy characters in a cell, the characters are placed on the
Clipboard. The copied characters are then available for pasting into a
new location.
Shortcut:
3-8
Ctrl+C
Ascent Software User's Guide
3.2.3.3
Paste
Paste (Edit menu) or
Pastes the contents of the Clipboard into the selected location.
Shortcut:
3.2.3.4
Ctrl+V
Paste Values
Paste Values (Edit menu)
Pastes values only from the Clipboard into the selected location.
Shortcut:
3.2.3.5
none
Clear
Clear (Edit menu)
Clears the selected area (All, Formats or Values). Formats clears the
calculation formula, Values clears the numerical values, and All clears
both the calculation formula and the numerical values.
Shortcut:
Ascent Software User's Guide
Del
3-9
3.2.3.6
Insert
Insert (Edit menu)
Inserts a row or range of blank cells equivalent in size and shape into the
selected cell range. The selected rows or cells are shifted to
accommodate the insertion.
Shortcut:
3.2.3.7
Ctrl+I
Remove
Remove (Edit menu)
The Remove command completely removes selected cells, rows or
columns from a worksheet. The surrounding cells shift to fill the space.
Shortcut:
Note:
3-10
Ctrl+R
The Insert and Remove commands should be used with care
since their use might interfere with formulas or graphs.
Ascent Software User's Guide
3.2.3.8
Cell Names
Cell Names (Edit menu)
Use this command to edit names.
•
Name. Creates a name for a cell, range, constant or computed value.
You can then use this name to refer to the cell, range or value.
Names make formulas easier to read, understand and maintain. You
can add or delete names that have been defined previously.
•
Formula. You can define constant or computed values you intend to
use later.
Shortcut:
Ascent Software User's Guide
Ctrl+E
3-11
3.2.3.9
Find and Replace
Find and Replace (Edit menu)
Searches a selected area or the entire (whole) worksheet for specified
characters, selects the first cell containing these characters and replaces
them.
The operation buttons are:
•
Find What. Specifies what to search for.
•
Replace. Identifies the characters that will replace the characters
searched for.
•
Current Cell Data. Displays the searched data and cell position.
•
Replace. Replaces the searched characters in the active cell with the
new characters.
•
Replace All. Finds and Replaces every occurrence of the characters
in the Find What text box with the characters in the Replace text
box.
•
Selected Area. Finds and Replaces in the selected area.
•
Whole Sheet. Finds and Replaces in the whole sheet.
•
Prompt on Replace. Asks to confirm the replacement.
Shortcut:
3-12
Ctrl+H
Ascent Software User's Guide
3.2.3.10 Go To Cell
Go To Cell (Edit menu)
Use this command to go to a given worksheet address. The Go To
command can occasionally be seen in the Goto (GOTO) format.
Goes to the specified cell.
3.2.3.11 Enable/Disable
Enable/Disable (Edit menu) or
Enables or disables the value in a selected cell. Enable/Disable (E/D) only
affects the current sheet and the property is not inherited to other
processed sheets (exception: disabling of Blank in blank subtraction
sheet and measurement values in Measure sheets containing more than
one measurement point per well). In case of erroneous measurements,
values can be disabled. With regard to replicates, as well as blanks,
standards and samples, it is possible to disable e.g. one value out of five
measurement values and calculate the results based on these four
remaining values. On the other hand, when a value is enabled, it is used
in calculations. Enable/Disable specifies a general property employed in,
for example, Cut-Off and Curve Fit sheets.
In a Blank Subtraction sheet you can Enable/Disable “BLANK” well
values. It is effective in Blank Subtraction calculations. In a Curve Fit
sheet you can Enable/Disable calibrator values and values in the Result
list. In the Cut-Off sheet you can Enable/Disable control values and
calculated values in the Result list.
The Enable/Disable command is not active in Measure sheets containing
only one measurement point per well.
Ascent Software User's Guide
3-13
3.2.4
View
3.2.4.1
Desktop Bar
Desktop Bar (View menu)
The Desktop tabviews are located to the right of the active desktop. The
Desktop tabview selects the active desktop for the program. When the
desktop is changed, the menus and tool bars also change.
Use this command to view the Desktop Bar.
3.2.4.2
Status Bar
Status Bar (View menu)
When a command is selected, the left side of the status bar briefly
describes the command. Normally the status bar shows the line state of
the instrument, the beam size, selected temperature and the current
time.
3-14
Ascent Software User's Guide
Instrument status bar:
Note:
The status bar at the bottom of the screen also displays
information about a selected command.
Message status bar:
Use the Status Bar command in the View menu to display or hide the
status bar.
3.2.4.3
Tool Bar
Tool Bar (View menu)
Along the top of the Desktop window, you can see a horizontal strip
containing several tools - this is the tool bar. It offers the most
commonly used functions from the menu as tool buttons. Although
these buttons perform the same functions as their menu counterparts,
they are more convenient to use.
Results tool bar:
New
Save
(Session)
Open
(Session)
Open
Sheet
Print
Save
Sheet
New
Sheet
Print
(Area)
Delete
Sheet
Cut
to
CB
Paste
from
CB
Zoom
Cut-Off
Out Blank
Subtraction
Copy
Zoom
to CB
In
CB = Clipboard
Properties
Curve Fit Enable/
Disable
Use the Tool Bar command in the View menu to display or to hide the
tool bar.
Ascent Software User's Guide
3-15
3.2.4.4
Tabs Bar
Tabs Bar On Top (View menu)
Use this command to display the Tabs Bar either on top of the view or at
the bottom of the view.
3.2.4.5
Hide/Show Sheets...
Hide/Show Sheets... (View menu)
Use this command to select visible sheets. The sheets vary according to
the application employed.
•
Sheet. Contains the list of existing sheets.
3-16
Ascent Software User's Guide
•
All Visible. Select if you want all sheets to be visible.
•
All Hide. Select if you want all sheets to be hidden.
Note:
Only selected sheets are visible.
3.2.4.6
Arrange Sheets...
Arrange Sheets... (View menu)
Use this command to arrange active sheets. You can change the order
of the sheets by pressing the left mouse button and dragging the list
item into a suitable position. You can also change the order of the
sheets with the Up and Down buttons.
•
Sheet. Contains the list of existing sheets.
•
Up. Moves the selected sheet one step up.
•
Down. Moves the selected sheet one step down.
Ascent Software User's Guide
3-17
3.2.4.7
Zoom In
Zoom In (Format menu) or
Zooms in the display at 10% intervals.
3.2.4.8
Zoom Out
Zoom Out (Format menu) or
Zooms out the display at 10% intervals.
3.2.4.9
Procedure
Procedure (View menu)
Use this command to view the Procedure Desktop. Return to the
Results Desktop through the Results → View command or by pressing
the Results Desktop bar.
3.2.4.10 Results
Results (View menu)
Use this command to view the Results Desktop. Return to the
Procedure Desktop through the Procedure → View command or by
pressing the Procedure Desktop bar.
3-18
Ascent Software User's Guide
3.2.5
Print
3.2.5.1
Add Page Break
Add Page Break (Print menu)
Adds vertical and horizontal page breaks adjacent to the current cell.
3.2.5.2
Add Col Page Break
Add Col Page Break (Print menu)
Adds a vertical page break adjacent to the current cell.
3.2.5.3
Add Row Page Break
Add Row Page Break (Print menu)
Adds a horizontal page break adjacent to the current cell.
Shortcut:
3.2.5.4
Ctrl+Enter
Remove Page Break
Remove Page Break (Print menu)
Removes vertical and horizontal page breaks adjacent to the current cell.
Shortcut:
3.2.5.5
Ctrl+M
Page Setup
Page Setup (Print menu)
Use this command to set the page setup.
Ascent Software User's Guide
3-19
Controls the headers, footers, margins and many other options for the
selected worksheet. Headers and footers are descriptive texts, which are
printed at the top and bottom of every page in your sheet. You can add,
delete, edit, format and position headers and footers, and view them as
they will be printed.
The values given separately for every sheet (including the Measure1,
Steps, RunStatus and Measure1 Curves sheets) are stored from run to
run. The scale does not keep its value, but is always changed to 100 in a
run. When the order of the steps is changed and the session has been
3-20
Ascent Software User's Guide
stored and opened, the values for the aforementioned sheets are
initialized to the values set by Procedure Desktop: Setup → Printout.
•
Header. The area in the Header box shows you the contents of the
header.
•
Footer. The area in the Footer box shows you the contents of the
footer.
The following control characters have a special meaning:
•
&L
Left alignment
&C
Center
&R
Right
&D
Date
&T
Time
&F
Sheet name
&P
Page number
&N
Total number of pages
Margins
Top
Select the distance you want between your data and the top edge
of the printed page. The default value is 1 cm.
Bottom
Select the distance you want between your data and the bottom
edge of the printed page. If your data is less than a page long, it will
not expand to extend to the bottom margin. The default value is 1
cm.
Left
Select the distance you want between your data and the left edge
of the printed page. The default value is 0.75 cm.
Ascent Software User's Guide
3-21
Right
Select the distance you want between your data and the right edge
of the printed page. If your data is less than a page wide, it will not
expand to extend to the right margin. The default value is 0.75 cm.
Note:
•
All the margins are usually slightly over the set values due to
printer properties.
Page Order. Controls the order in which your data is numbered and
printed when it does not fit onto one page.
Top To Bottom
Numbering and printing proceed from the first page to the pages
below and then move to the right and continue printing down the
sheet.
Left To Right
Numbering and printing proceed from the first page to the pages to
the right and then move down and continue printing across the
sheet.
•
Center. Centers the data on the page within the margins vertically,
horizontally or both.
•
Print Options
Grid Lines
If selected, prints horizontal and vertical cell grid lines in
worksheets.
Black & White
Prints cells and drawing objects in black and white. Anything in the
foreground that is not entirely white is printed black. Anything in
the background that is not entirely black is printed white. If you
formatted your data with colors but print on a black and white
printer, select this option. If you use a color printer but want faster
printing, selecting this option may reduce the printing time.
3-22
Ascent Software User's Guide
Row and Column Headings
Prints row numbers and column letters in the A1 reference style or
numbered rows and columns in the R1C1 reference style.
•
Scale. Reduces the sheet or selection during printing to fit onto the
specified number of pages.
Fit To Page(s)
In most cases it is worthwhile to select this option to save paper.
Pages Wide
You can change the figure of pages wide. This figure does not
normally have to be changed. The default figure is 1. Pages wide
can range from 1 to 100.
Pages High
You can change the figure of pages high. This figure does not
normally have to be changed. The default figure is 19. Pages high
can range from 1 to 100.
Note:
Pages Wide and Pages High are used together with Fit To
Pages to define how many papers can maximum be used
when you scale the data to the page(s). If the data requires
width but not height, then Pages Wide = 19 and Pages High =
1. On the other hand, if the data requires height but not width,
then Pages Wide = 1 and Pages High = 19.
Scale
Reduces or enlarges the printed sheet. You can reduce the printed
sheet to 10% of its normal size or enlarge it up to 400%. The
default value is 100%.
Ascent Software User's Guide
3-23
3.2.5.6
Set Print Area
Set Print Area (Print menu)
Use this command to set the print area.
Defines the selected cells as the portion of the worksheet that you want
to print.
The print area given separately for every sheet (including the Measure1,
Steps, RunStatus and Measure1 Curves sheets) is stored from run to
run.
3.2.5.7
Print Area
Print Area (Print menu) or
Use this command to print the currently selected area. Select the area
by using the mouse.
3-24
Ascent Software User's Guide
3.2.5.8
Print Setup
Print Setup (Print menu)
Use this command to set the print setup.
Note:
The layout of this dialog depends on the Windows version.
Controls the printer selection, page orientation and the paper size and
source.
•
Options/Properties. The contents of this dialog box depends on the
Windows version and the printer employed. Use this dialog box to
specify the option properties, e.g. the darkness and fineness of the
graphics and text, and whether or not to convert TrueType fonts to
graphics when printing.
•
Paper
Ascent Software User's Guide
3-25
Size
Select A4, letter, legal or some other paper size option.
Source
You can specify which paper feeder to use.
•
Orientation. Specify the orientation for the printed image.
Portrait
Prints with the short edge of the paper horizontal.
Landscape
Prints with the long edge of the paper horizontal.
•
Network... . The contents of this dialog box depends on the
Windows version and the printer employed. Use this dialog box to
browse through and connect to a network printer. To connect to a
network printer (Capture Printer Port), you assign a port (virtual port)
to the printer (device) and you specify the path (computer name and
share name). The share name equals the network name and is e.g.
the name under the icon of a shared printer. You can also choose
whether or not to reconnect at logon.
3.2.5.9
Print
Print (Print menu) or
Use this command to print the current sheet.
Note:
3-26
The layout of this dialog depends on the printer used.
Ascent Software User's Guide
3.2.6
Format
3.2.6.1
Border
Border (Format menu)
Use the Format/Border command to add or remove border lines in the
selected cells.
•
Borders. Click the check box(es) to select or deselect.
Outline
Puts a border around the outer edges of the selection.
Top, Left, Right, Bottom
Puts a border along the specified edges of each cell in the
selection.
•
Border. Sets the line style to apply to a border.
•
Color. Sets the border color.
Ascent Software User's Guide
3-27
3.2.6.2
Font
Font (Format menu)
Use this command to change the font, style, size, color and effects
(strikeout, underline) of the text in the selected cells.
•
Font. Lists all available font types. Select the font you want or enter
the name of the font in the box above the list of font types.
•
Font style. Lists the available font styles. Select the font style you
want or enter the font style in the box above the list of font styles.
•
Size. Lists the available sizes for the font selected in the Font box.
Select a font size or enter the size you want in the box above the list
of sizes.
3-28
Ascent Software User's Guide
•
Effects
Strikeout
Formats selected characters with a line through the middle.
Note:
E/D (Enable/Disable) visibly looks about the same as strikeout.
Underline
Underlines the selected characters.
•
Color. Lists the available colors. Select a color for the text from the
drop-down list.
•
Sample. Shows a sample of the text with the current font formatting
choices applied.
•
Script. Lists the available scripts (set of letters). Select a script from
the drop-down list.
Ascent Software User's Guide
3-29
3.2.6.3
Number
Number (Format menu)
Use this command to determine how the information is displayed in the
selected cells. You can use one of the built-in number formats or you
can create your own custom formats.
•
Format. Lists all available formats for a selected category. In a new
worksheet, the default number format for all cells is the General
format. The selected format is displayed below the Format list box.
•
Category. Lists the categories into which the number formats are
grouped into. When you select a category, the built-in and custom
formats for that category are displayed in the Format list box.
3-30
Ascent Software User's Guide
3.2.6.4
Alignment
Alignment (Format menu)
Aligns the contents of the selected cells.
•
Horizontal
General
Aligns text to the left, numbers to the right and centers logical and
error values. This is the default alignment.
Left
Aligns the cell contents to the left.
Center
Centers the cell contents.
Ascent Software User's Guide
3-31
Right
Aligns the cell contents to the right.
Fill
Repeats the contents of the selected cell until the cell is full. If the
blank cells to the right also have the Fill alignment, they are filled as
well.
Justify
Aligns wrapped text (see the Word Wrap paragraph below) within a
cell to the right and left. You must have more than one line of
wrapped text to see the justification.
Center Across Cells
Centers a cell entry across the selected cells.
•
Vertical
Top
Aligns the cell contents along the top of the cell.
Center
Centers the cell contents to the middle of the cell.
Bottom
Aligns the cell contents along the bottom of the cell.
•
Word Wrap. Also known as wraparound. Displays long strings of
text on multiple lines within a cell. Wrapped text may be left-aligned,
right-aligned, centered or justified in a cell.
3-32
Ascent Software User's Guide
3.2.6.5
Cell References
Cell References (Format menu)
Searches the selected area or the entire worksheet for a specified (Find)
reference address and replaces it with the Replace with Reference
Address type.
The operation buttons are:
•
Find Reference Address. Specifies what kind of reference address to
search for.
•
Replace with Reference Address. Identifies the address type that
will replace the address searched for.
•
Current Cell Data. Specifies the contents of the active cell.
•
Whole Sheet. Finds and Replaces in the whole sheet.
•
Selected Area. Finds and Replaces in the selected area.
•
Prompt on Replace. Asks to confirm the replacement.
•
Find Next. Finds the next reference address to be replaced.
Ascent Software User's Guide
3-33
•
Replace. Replaces the searched address type in the active cell with
the new address type.
•
Replace All. Finds and Replaces every occurrence.
3.2.7
Sheet
3.2.7.1
New Sheet...
New Sheet... (Sheet menu) or
Use this command to create a new worksheet and specify the name of
the sheet.
3-34
Ascent Software User's Guide
3.2.7.2
Open Sheet...
Open Sheet... (Sheet menu) or
Use this command to open an existing sheet.
Displays the Open dialog box where you can open an existing file. You
can have several worksheets open simultaneously, but you view them
individually.
•
File Name. Displays the default file specification *.VTS and a list of
the *.VTS files in the current directory. Type or select the filename
you want to open. This list box lists the files with the extension you
select from the List Files of Type list box.
•
Directories. Lists the current directory and any subdirectories which
contain files. Double-click the directories and subdirectories to move
through the list.
•
List Files of Type. Lists the available file formats. Select the file
format you want to open.
Ascent Software User's Guide
3-35
•
Drives. Lists the available drives. Select the drive that contains the
worksheet you want to open.
•
Network... . Displays a dialog box of available network servers so
you can connect to a different server when your system is running
on the supported network.
3.2.7.3
Save Sheet
Save Sheet (Sheet menu) or
Use this command to save the sheet.
Saves the active sheet. This command replaces the previous version of
the sheet with the current version. The sheet is still displayed in the
window.
Note:
3-36
When the Measure sheet is saved in *.txt and *.xls file formats,
it will contain hidden measurement times and plate layout
information.
Ascent Software User's Guide
3.2.7.4
Save Sheet As...
Save Sheet As... (Sheet menu)
Use this command to save the sheet with a new name.
The sheet remains open. You can also use this command to save files so
they can be read in other applications.
•
File Name. Saves the worksheet in the current directory unless you
type a full path for the worksheet or select a different directory from
the directory listing. Type a name for the worksheet or accept the
proposed name.
Note:
•
DO NOT use any names more than 8 characters long. Ascent
Software does not support long names.
Directories. Lists the current directory and any subdirectories.
Double-click the directories and subdirectories to move through the
list.
Ascent Software User's Guide
3-37
•
List Files of Type. Lists the available file formats that allow you to
save a worksheet for use in another application. The formats
available vary according to the active worksheet.
•
Drives. Lists the available drives. Select the drive to which you want
to save the worksheet.
•
Network... . Displays a dialog box of available network servers so
you can connect to a different server when your system is running
on the supported network.
3.2.7.5
Advanced Copy
Advanced Copy (Sheet menu)
Use this command to make an almost exact copy of a sheet.
Note:
The Advanced Copy is, however, not locked, as opposed to the
Measure sheet where the values in the sheet cannot be
tampered with.
All values, colors and cell names are copied to the new sheet. The
currently active sheet is always the source sheet of the Advanced Copy
command and the name of the target sheet is requested in the dialog.
Note:
3-38
The Advanced Copy sheet can be made active by linking the
source data to the Advanced Copy. The Advanced Copy sheet
is not updated automatically when changes regarding plate
layout, area definition etc are carried out.
Ascent Software User's Guide
3.2.7.6
Delete Sheet
Delete Sheet (Sheet menu) or
Use this command to delete the current worksheet.
Warning!
If you press the YES button, you cannot undo this command.
3.2.7.7
Rename Sheet
Rename Sheet (Sheet menu)
Use this command to rename the active sheet.
Note:
Automatically generated sheets (Measure1, Steps, RunStatus,
Measure1 Curves) cannot be renamed. The renaming of a
sheet can cause the references to be lost.
Ascent Software User's Guide
3-39
3.2.7.8
Properties...
Properties... (Sheet menu) or
Use this command to change the sheet properties.
Most sheets (except e.g. Advanced Copy, New, RunStatus and Steps)
have properties which can be changed in the Properties dialog. Each
sheet type has its own type of properties (see example below).
Most sheet types include the Source sheet information and the
possibility to change the View of the sheet.
3-40
Ascent Software User's Guide
3.2.8
Process
3.2.8.1
Function...
Function... (Process menu)
Use this command to run the Function dialog.
The Function dialog allows you to create formulas easily. By using the
Function dialog the formatting is made exact and the possibilities of
typing errors occurring is eliminated. Just select the function group and
Ascent Software User's Guide
3-41
function from a list and enter the function arguments. When you select a
function from the list box, the definition of the function and of its
arguments will automatically appear, as well as the correct placement of
commas and parentheses. When an argument is followed by an
extension_list, you can have more than one argument of that data type.
You can have up to 30 arguments for some functions, as long as the
total number of characters in the formula does not exceed 1024. In
addition, no individual string can be longer than 255 characters.
The user can, if accustomed to it, key in the equations into the cell
without using the Function dialog.
Example STDEV (Standard deviation)
•
Function Groups. Displays the names of the function groups.
•
Functions. Displays all the functions in a current function group.
•
Selected Function. Displays the function syntax.
•
Close. Closes the Function dialog.
•
Next. Allows you to enter values for the arguments.
3-42
Ascent Software User's Guide
Note:
When the Function dialog is displayed, you can select the
target cell where you want to insert the function. The default
target is the selection made before the Function dialog was
started.
When the Next button is pressed:
Select cells from the Measure sheet by using the mouse (number 1,
number 2 and number 3). Place the cursor in the argument field where
you want to enter the selection. Type the argument or select the area by
using the mouse. By clicking the Function Definition dialog the selected
area is updated (number 1 etc fields).
Ascent Software User's Guide
3-43
Number 4 is defined by using the AVERAGE (number_list) function.
Note:
Place the cursor in field number 4. Then select the function
(at the end of line number 4) from the Function
button
Definition dialog. Select Statistical/AVERAGE and press the
Next button.
3-44
Ascent Software User's Guide
The Nested dialog is displayed. Select or key in the arguments. Typing
errors can easily occur when you key in the arguments yourself instead
of using the selection. When you press the OK button, the AVERAGE
function appears in field number 4 (or in the location where the cursor
is).
When the Finish button is pressed, the entered formula is inserted into
the Target location.
Ascent Software User's Guide
3-45
3.2.8.2
Graph
Graph (Process menu)
Use this command to run the Graph tool.
Note:
In the worksheet, first select the data you want to plot,
including the cells containing any category or series of names
that you want to use on the chart and select Graph from the
menu.
Note:
It is highly recommendable to collect the source data into a
custom-made sheet and to create the graphs in the new sheet.
You can edit the metafile object (e.g. cut, copy, paste, clear, insert,
remove).
Double-click the metafile object (graph) to generate an Edit window. In
the Edit (Format Plot) window you can customize your chart by clicking
3-46
Ascent Software User's Guide
the right mouse button (see the Reference part of the manual for more
details).
When the data is updated, the metafile object updates itself.
You can e.g. copy and paste the metafile object by using the right
mouse button and selecting the operation outside the Graph. Clicking
the right mouse button inside the Graph borders produces a different
pop-up menu.
If you want to delete the metafile object, first exit the Graph, activate the
metafile object and then select Clear from the pop-up menu that
appears after clicking the right mouse button. Otherwise relevant values
are cleared.
3.2.8.3
Organize...
Organize... (Process menu)
Organizes the measurement results. This allows the user to create charts
and handle data more easily.
The Organize… command creates a new sheet and reorganizes the
kinetic data (rows by measurement count and columns by well address)
by using relative addressing. It is not recommended to write your own
data in the unused cells in the Organize sheet since the data is
destroyed when the session is rerun.
In the Properties dialog you can give the parameters for the sheet.
Ascent Software User's Guide
3-47
3.2.8.3.1
•
Source
Source sheet name. Select the sheet containing the data you want
to organize.
3-48
Ascent Software User's Guide
3.2.8.3.2
Source and calculation
•
Source data. Measurement data is organized.
•
Source data with times. Both measurement data and measurement
times are organized.
Arrange direction
•
By column. Data is organized by column.
•
By row. Data is organized by row.
Ascent Software User's Guide
3-49
3.2.8.3.3
View
See display figure below. A result matrix for further calculations can be
selected.
If matrix is used, formulas need to be entered into the cells of the matrix,
e.g. AVERAGE (B16:B100).
Note:
3-50
The user’s own formulas might disappear from the sheets
created automatically by the software when the session is
rerun. If you want to maintain the formulas, it is recommended
that you use the Sheet → Advanced Copy function.
Ascent Software User's Guide
3.2.8.4
Multipoint...
Multipoint... (Process menu)
The Multipoint feature is designed for large wells, i.e. microplates with
less than 96 wells, whereby more than one measurement point per well
can be measured.
Multipoint feature reduces the data to one value per well. This is
necessary since further data reduction cannot be performed if there is
more than one measurement value per well.
In the Properties dialog you can give the parameters for the sheet.
3.2.8.4.1
•
Source
Source sheet name. Select the sheet containing your measurement
data.
Ascent Software User's Guide
3-51
3.2.8.4.2
Calculation
Only one result per well is calculated from all the measurement points of
the well. The user can select how the measurement points will be
calculated. The different calculation types comprise: Average, Minimum,
Maximum, Maximum - Minimum, and Standard deviation.
The operation buttons are:
•
OK. Applies the selected calculation type used in the Multipoint
calculations to the well(s) and closes the dialog.
•
Cancel. Cancels the dialog.
•
Apply. Applies the selected calculation type used in the Multipoint
calculations to the well(s).
The results from Multipoint calculations can be used in further
calculations, i.e. curve fits, cut-offs, precalculations and various sheets
can be combined.
Note:
3-52
Disabled values in Measure sheets affect the calculation results
in Multipoint calculations.
Ascent Software User's Guide
3.2.8.5
Blank Subtraction...
Blank Subtraction... (Process menu)
The blank well(s) is (are) subtracted automatically from the source sheet
and the result is displayed in this sheet. If a blank has been defined in
the plate layout, the blank is automatically subtracted in this sheet. If
several blanks are involved, the mean of the blanks is subtracted.
The calculated mean blank value used in the blank subtraction
calculation will be displayed in well D2 in the blank subtraction sheet.
The mean blank value will also be displayed in Curve-Fit and Cut-off
sheets. If no blank value is available, the text N/A will be displayed
instead of the mean blank value.
The mean blank value is calculated as the average of all non-specific
blanks in the layout. If no non-specific blanks are defined, the text N/A
will be displayed in well D2.
In the Properties dialog you can give the parameters for the sheet.
Ascent Software User's Guide
3-53
•
Source sheet name. Select the sheet containing your measurement
data.
•
Assay name. Specifies the assay name for the source.
3.2.8.6
Precalculation...
Precalculation... (Process menu)
This menu item creates a precalculation sheet, which offers a possibility
to carry out simple calculations, such as subtractions and ratios, with
measurement data. This sheet does not need a plate layout.
In the Properties dialog you can give the parameters for the sheet.
•
Source sheet 1. Defines the name of the first source sheet.
•
Source sheet 2. Defines the name of the second source sheet.
•
Sheet 1 - Sheet 2. The measurement data of the second sheet is
subtracted from the measurement data of the first sheet.
•
Sheet 2 - Sheet 1. The measurement data of the first sheet is
subtracted from the measurement data of the second sheet.
•
Sheet 1 / Sheet 2. The measurement data of the first sheet is
divided by the measurement data of the second sheet.
3-54
Ascent Software User's Guide
•
Sheet 2 / Sheet 1. The measurement data of the second sheet is
divided by the measurement data of the first sheet.
Note:
The Precalculation submenu is typically used e.g. in dual
(using two filters/filter pairs) measurements.
3.2.8.7
Kinetic Processors...
Kinetic Processors... (Process menu)
This menu item creates a processor sheet, which offers a possibility to
perform kinetic calculations. This sheet does not require a plate layout.
In the Properties dialog you can give the parameters for the sheet.
Ascent Software User's Guide
3-55
3.2.8.7.1
•
Source
Source sheet name. Select the sheet containing your kinetic
measurement data.
The measurement type has to be Kinetic, Dual Kinetic, or Monitor.
3-56
Ascent Software User's Guide
3.2.8.7.2
Calculation
Different calculation types (left column) have different options (right
column) available. The options are listed under each calculation type.
The processing results of Maximum rate, Time to maximum rate, Time
to maximum rate/2 and Time to change are based on the chosen
kinetic reaction course (Undefined, Increasing, or Decreasing).
Ascent Software User's Guide
3-57
Calculation type
•
•
Average rate. Also known as normal rate. The slope of the reaction
will be calculated from the raw data and time stamps for each well
using the linear least squares method (LLS) of all n
fluorescence/luminescence readings. The average kinetic rate (slope
of the A (= fluorescence/luminescence) vs. time curve) will be
calculated by linear regression using all the data points within the
selected raw data and time range.
!
Kinetic rate / s or Kinetic rate / min. The Kinetic rate is
calculated per second or per minute.
!
Ignore first (n) readings. Ignores a defined number of
readings. Starts from the first reading.
!
Ignore last (n) readings. Ignores a defined number of
readings. Starts from the last reading.
Maximum rate. If the maximum rate is selected, the program
searches the data for the maximum rate found in each well. To
obtain the maximum rate a series of linear curve fits will be
performed for different segments of the fluorescence/luminescence
vs. time curve. The first segment starts at the first data point within
the selected time and fluorescence/luminescence range, the second
segment starts at the second data point etc until all the data points
have been analyzed. All the rate calculations are evaluated to
determine the maximum rate. In other words, the LLS fit of m span
points are sequentially fitted through each of the n data points.
There will be n-m+1 curves produced from this. The number of data
points in a segment is specified by the user. The maximum rate
option is useful, if you are not able to select the linear part of the
curve using fluorescence/luminescence and time limits.
3-58
!
Undefined. Searches for the absolute maximum rate. If the
highest absolute rate value is increasing it will be presented
with the prefix “+”. If the maximum rate is decreasing it will
be presented with the prefix “-“.
!
Increasing. Searches for the maximum increasing rate. The
rate is presented with the prefix “+”. If no increasing rate is
found the result is “0” (zero).
Ascent Software User's Guide
•
!
Decreasing. Searches for the maximum decreasing rate. The
rate is presented with the prefix “+”. If no decreasing rate is
found the result is “0” (zero).
!
Kinetic rate / s or Kinetic rate / min. The Kinetic rate is
calculated per second or per minute.
!
Ignore first (n) readings. Ignores a defined number of
readings. Starts from the first reading.
!
Ignore last (n) readings. Ignores a defined number of
readings. Starts from the last reading.
!
Window (2...1000). The number of consecutive readings to
use for evaluation. The highest reaction rate for each well is
calculated using a sliding window. A window defines how
many measurement points are included in the calculations.
When the measurement results are calculated, the means
are used. The size of this window is given in the Window
parameter box. For example, if the number of
measurements is ten and the Window parameter is three,
the system will calculate the first rate using the
measurements 1 to 3, the second rate using the
measurements 2 to 4, and so on until all the measurement
points have been handled. The system will give the
maximum value of the calculated rates.
Time to maximum rate. The time to maximum rate is calculated
similarly to the maximum rate, but the result is reported as the time
in seconds from the first reading to the endpoint of the sliding
window in seconds instead of the rate itself.
!
Undefined. Searches for the absolute maximum rate (see
Maximum rate above) and returns the corresponding time
as a positive number.
!
Increasing. Searches for the maximum increasing rate (see
Maximum rate above) and returns the corresponding time
as a positive number. If no increasing rate is found, the
result is “0” (zero).
!
Decreasing. Searches for the maximum decreasing rate (see
Maximum rate above) and returns the corresponding time
as a positive number. If no decreasing rate is found, the
result is “0” (zero).
Ascent Software User's Guide
3-59
!
•
•
Window (2...1000). The number of consecutive readings to
use for evaluation.
Time to maximum rate/2. The time to maximum rate/2 is the time
taken to reach half of the maximum rate. The maximum rate is
determined as above. This rate is halved and the data is scanned to
determine the first rate, which exceeds this rate.
!
Undefined. Searches for the absolute maximum rate (see
Maximum rate above), calculates the half of the maximum
rate, and returns the corresponding time as a positive
number.
!
Increasing. Searches for the maximum increasing rate (see
Maximum rate above), calculates the half of the maximum
rate, and returns the corresponding time as a positive
number. If no increasing rate is found the result is “0” (zero).
!
Decreasing. Searches for the maximum decreasing rate (see
Maximum rate above), calculates the half of the maximum
rate, and returns the corresponding time as a positive
number. If no decreasing rate is found the result is “0” (zero).
!
Window (2...1000). The number of consecutive readings to
use for evaluation.
Time to change. The time to change is used for calculating the time
required to reach a defined change in the signal (in each well). The
time is given in seconds from the first reading to the endpoint of the
sliding window in seconds.
3-60
!
Undefined. Searches for the defined change in signal,
regardless of the rate polarity (positive or negative), and
returns the corresponding time as a positive number.
!
Increasing. Searches for the increasing defined change in
signal and returns the corresponding time as a positive
number. If no increasing rate is found the result is “0” (zero).
!
Decreasing. Searches for the decreasing defined change in
signal and returns the corresponding time as a positive
number. If no decreasing rate is found the result is “0” (zero).
!
Base line (1...1000). The Base line parameter is the number
of initial readings used for the base line calculation. The base
line can also be zero, which means that the comparison will
Ascent Software User's Guide
be made against zero. In Base line the program chooses as
many measurement points as exist in the base line and
calculates the mean thereof. The mean equals the base line
value.
!
Change (Relative % or Absolute). The relative change from
the base line in percent or then the absolute change. The
change in signal is specified in the Change parameter and is
compared to the base line. The Window parameter here
means the number of consecutive measurements which
should reach the change before the result is accepted.
•
Maximum of well (Peak). The maximum of well is used to search
the maximum value of the well.
•
Maximum - Minimum (Change). The minimum measured value of
the well is subtracted from the maximum measured value of the
well.
•
Time to maximum (Peak). The time to maximum is used to calculate
the time elapsed before the peak is reached. The time is given in
seconds.
•
Time to maximum (Peak)/2. The time to maximum/2 equals the
time to reach half of the maximum value.
•
Select Reading. Select reading is used to select the measurement.
!
•
Reading Index (1...1000). The index of the kinetic
measurement. Enables the user to select the kinetic
measurement that is wanted in further calculations.
Integral. Estimates the area under the curve. The starting point can
be moved (Ignore first (n) readings).
!
Ignore last (n) readings. Ignores a defined number of
readings. Starts from the last reading.
Ascent Software User's Guide
3-61
3.2.8.8
Ratio/Inhibition
Ratio/Inhibition (Process menu)
3.2.8.8.1
Source
•
Source sheet name. Select the sheet that contains the measurement
data.
•
Assay name. Specifies the assay that contains the desired data.
3-62
Ascent Software User's Guide
3.2.8.8.2
Ratio/Inhibition Properties
Creates a Ratio/Inhibition sheet. The user can select either Ratio (i.e.
B/B0%) or Inhibition (i.e. 100% - B/B0%). The user selects the source for
B0 from the layout well types and names. The mean value of the sample
selected (if replicates do exist), will be used in further calculations. The
user can also select the maximum value of the specified type through
the Use maximum value selection.
Ascent Software User's Guide
3-63
3.2.8.9
Curve Fit...
Curve Fit... (Process menu)
Creates a Curve Fit sheet, calculates the curve fitting and the
concentration of the samples.
Note:
•
The Curve Fit requires that calibrators have either been defined
in the plate layout or that calibrators have been loaded from a
file.
•
Any modification in the sheet properties will erase user
modifications, Enable/Disable information or any other added
information. However, added information stays in the two
comment columns in the concentration list, as well as the
comment wells (wells H4 – H7) at the top of the Curve Fit
spreadsheet.
The colors of the names of the specimen in the Curve Fit sheet (Layout
map matrix, Source data matrix, and Calculated concentrations matrix)
are the same as the defined colors of the different well types, i.e.
calibrators, controls, blanks, and samples (see Section Setup|Colors in
the Procedure Desktop part of the manual).
Note:
There are no colors in the Concentration list.
In the Properties dialog you can give the parameters for the sheet.
3-64
Ascent Software User's Guide
3.2.8.9.1
Source
Calibrator source. Specifies the source sheet for the calibrators and the
assay name of the specific, selected Assay in that sheet.
•
Sheet name. Specifies the name of the source sheet for the
calibrators.
•
Assay name. Specifies the assay name for the calibrator source.
Sample source. Specifies the source sheet for the samples and the
assay name.
Ascent Software User's Guide
3-65
•
Sheet name. Specifies the name of the source sheet for the
samples.
•
Assay name. Specifies the assay name for the sample source.
3.2.8.9.2
•
Curve Fit
Extrapolate. Automatic extrapolation can be selected. Extrapolation
generally means the estimation of the value of a function (given
other values of the function) at a point beyond the interval in which
the calibrator data lies. When Extrapolate is not selected, the
concentrations of the sample values which are smaller than the
3-66
Ascent Software User's Guide
lowest value of the calibrators or greater than the highest value of
the calibrators are not calculated. If Extrapolate is selected, the
concentrations are calculated for those measurement values outside
the interval in which the measured calibrator values lie.
Note:
If Extrapolate is not selected and the calibrators have
replicates, then the value(s) of the lowest calibrator under the
calculated average for the replicates will be listed “<min”.
Correspondingly, the value(s) of the highest calibrator over the
calculated average for the replicates will be listed “>max”.
Note:
Extrapolated values are in bold facetype.
•
Effective Dose. The Effective Dose or ED calculation scales the
calibration curve. A percent scale is plotted on the Y-axis instead of
the measured value. A selected signal specified by the selected well
type and typed well name is set to 100%. The user can also select
the maximum value of the specified type through the Use maximum
value selection. The signal of all other measurements is calculated
as the percentage of the maximum signal. It is possible to define
three different ED values (ED1%, ED2% and ED3%) and obtain the
corresponding concentrations automatically calculated for these
(see figure below).
Ascent Software User's Guide
3-67
Example
3-68
Ascent Software User's Guide
3.2.8.9.2.1 Modify fit and graph...
Note:
In some cases the warning message “Not enough data” can be
seen in the Modify fit and graph dialog. The user can,
however, create the Curve Fit sheet by pressing the OK button.
File
The Curve Fit → Modify fit and graph window can be closed here.
Fit type
Select the type of curve fit algorithm (Linear regression (LLS), Linear
regression (SVD), Quadratic polynomial, Cubic polynomial, Quartic
polynomial, Point to point, Cubic spline, Log-Logit, Four parameter
logistic, Sigmoid logistic).
Ascent Software User's Guide
3-69
Polynomial fit
Generally the polynomial fit function is determined as:
y= x+ ax + bx2 …mxn, where n= 1, 2, 3 or 4.
Derived from the above equation:
•
•
•
•
y = a + bx for Linear Regression (SVD) and the minimum number
of calibrators is 2.
y = a + bx + cx2 for Quadratic polynomial and the minimum
number of calibrators is 3.
y = a + bx + cx2 + dx3 for Cubic polynomial and the minimum
number of calibrators is 4.
y = a + bx + cx2 + dx3 + ex4 for Quartic polynomial and the
minimum number of calibrators is 5.
In the equations above y equals the measured signal and x equals the
concentration. a, b, c, d, and e are the coefficients specific to each
degree of the fit function.
Coefficients of the functions are solved with the least squares algorithm
using singular value decomposition (SVD).
Roots of the polynomial, i.e. “the results”, are calculated with an iterative
Laquerre’s method. If more than one root is found in the calibration
area, the method returns a warning.
You can also select a method that is commonly used by spreadsheet
programs; a straight forward linear least squares (LLS) method. This
method might produce slightly different values for the coefficients a and
b, but neither of these two methods (SVD or LLS) can be considered
absolutely better than the other.
•
y = a + bx for Linear Regression (LLS) and the minimum number of
calibrators is 2.
3-70
Ascent Software User's Guide
Point to point
The point to point method connects the adjacent responseconcentrations coordinates, i.e. the calibration points, together using a
straight line (yi = ai + bixi) different for each of the intervals. The results
are calculated by searching first the correct interval and then using the
corresponding equation. The minimum number of calibrators for this fit
type is 2.
Cubic spline
This method is a smoothed point to point method where the adjacent
calibration points are connected together using cubic polynomials
(yi = ai + bixi + cixi2 + dixi3) and optimizing the connecting points as
smoothly as possible to avoid sharp angles. The results are calculated
by searching first the correct interval and then using a bi-section method
to find the answer from the corresponding equation. The minimum
number of calibrators for this fit type is 2.
Sigmoid logistic, Log-Logit and Four parameter logistic functions
All the three fit function methods use the same fit model:
y=b+
(a - b)
(1 + xc)d
In the equation above y is the signal, x the concentration, a the
maximum signal (asymptote above), b the minimum signal (asymptote
below), c the concentration at inflection point and d a slope-related term
at the inflection point.
The difference between these three models is that they solve
coefficients of the equation above differently. The minimum number of
calibrators for these fit types is 4.
•
•
Sigmoid logistic. The coefficients of the function are solved using
the Levenberg-Marguardt method.
Four parameter logistic. The coefficients of the function are solved
with the least squares algorithm using singular value decomposition
(SVD).
Ascent Software User's Guide
3-71
•
Log-Logit. The a and b coefficients are treated as known otherwise it
is the same as the sigmoid logistic fit.
Transformation
Data Transformation trailing occurs prior to fit calculation.
Transformation of statistical data means in brief a change of scale used
to improve the validity of statistical analyses. The default is Linear-Linear
for concentration and measurement linear. The type of Data
Transformation can represent either concentration linear, concentration
logarithm (LOG 10), measurement linear or measurement logarithm.
Logarithmic transformation is employed when data dynamics is
considerable. This facilitates mathematical adaptions, i.e. curve fitting.
Note:
If the concentration range of the calibrators is more than four
decades, logarithmic transformation should be used to obtain
more precise curve fitting.
Markers
Either the means of the measurements or individual measurements
(replicates) are displayed in the graph.
3-72
Ascent Software User's Guide
3.2.8.9.3
Classification
With the classification option it is possible to add cut-off interpretations
to the Curve Fit sheet. The cut-off interpretations will be added to the
Comment1 column in the concentration list.
Note:
•
The Classification tab is filled in the same way in the Curve Fit
and the Cut-Off functions.
Number of limits. This indicates the number of limits used. The
default is no limits.
Ascent Software User's Guide
3-73
Limit values or formulas. Contains defined limit values or formulas
to calculate the cut-off. Controls and calibrators defined in the plate
layout can be used in the limit formulas. The name must be written
exactly as in the layout. In case of replicates, the mean of the
replicates is used in the calculations.
•
Note:
It is important to update formulas if the controls used in the
respective formulas are removed, deleted or all replicates
disabled to obtain the correct limit values.
Interpretation
•
3-74
Categories. Add text strings that will be displayed for the Curve Fit
result categories in the Comment1 column in the concentration list
in the Curve Fit sheet.
Ascent Software User's Guide
3.2.8.9.4
View
The user can select the items shown on the screen and printout with the
View tab. The report consists of everything that has been carried out.
The Curve Fit sheet can be used as a report sheet and through the View
tab different layout options can be selected.
•
Plate layout matrix. Adds a layout map with defined names.
•
Source data matrix. Adds a source data matrix to the Curve Fit
sheet.
•
Concentration matrix. Calculated concentrations in plate format
(e.g. 8 x 12 grid).
Ascent Software User's Guide
3-75
•
Concentration list. A list of measurements, including the well name,
raw data, calculated concentration, dilution factor, calculated
concentration with the dilution accounted for, average of the raw
data, SD, CV% and the two comment columns – Comment 1 and
Comment 2, which can be used for various purposes, such as QC
calculations, text and formulas or for displaying cut-off
interpretations.
3.2.8.9.5
Example Curve Fit sheet
•
Calibrators (= Standards). A table of calibrator data, calculated
responses and residual concentrations (DO NOT edit this table).
Residuals describe how good the fitting is. Residuals are the
calculated differences between the actual and the computed values.
If the mean of the measured calibrators becomes negative, it is
automatically disabled and shown in red.
•
Calibrator chart. Calibrator data presented on a chart. Calibrators
can be enabled or disabled, either as replicates or whole calibrators.
Disabled calibrator points are shown in the graph (if replicates are
chosen, markers become replicates).
3-76
Ascent Software User's Guide
•
Mean Blank. The user sees the Mean Blank value given in the Blank
Subtraction sheet, i.e. the mean of all the blank wells in a specified
assay. Otherwise if nonspecific plate blanks do not exist, the text
N/A (short for not available) appears.
•
Status. Shows the status of the fitting.
•
Fit type. Shows the used fit type and fit formula.
•
Transformation. The used type of Data Transformation.
•
Parameters. Shows the fit parameters.
•
R2. The index of determination, R2, is the correlation coefficient R to
the power 2 and shows the goodness of the curve fit; the greater the
R2, the better the goodness of the fit is.
3.2.8.10 Cut-Off...
Cut-Off... (Process menu)
In the Properties dialog you can give the parameters for the sheet.
The colors of the names of the specimen in the Cut-Off sheets are the
same as the defined colors of the different well types, i.e. calibrators,
controls, blanks and samples (see Section Setup|Colors in the
Procedure Desktop part of the manual).
Note:
Any modification in the sheet properties will erase user
modifications and any added information. However, added
information stays in the two comment columns in the list and
the comment wells at the top of the page, wells H3 – H6. Refer
to Section Curve Fit|View, item Concentration list, in the
Results Desktop part of the manual for example.
Ascent Software User's Guide
3-77
3.2.8.10.1 Source
Displays the available data sheets from which the source sheet can be
selected.
Control source. Specifies the source sheet and the assay name for the
control source.
•
Sheet name. Specifies the name of the source sheet for the controls.
•
Assay name. Specifies the assay name for the control source.
3-78
Ascent Software User's Guide
Sample source. Specifies the source sheet and the assay name for the
sample source.
•
Sheet name. Specifies the name of the source sheet for the sample
source.
•
Assay name. Specifies the assay name for the sample source.
3.2.8.10.2 Classification
•
Number of limits. This tells the number of limits used.
Ascent Software User's Guide
3-79
Limit values or formulas. Contains defined limit values or formulas
to calculate the cut-off. Controls and calibrators defined in the plate
layout can be used in the limit formulas. The name must be written
exactly as in the layout. In case of replicates, the mean of the
replicates is used in the calculations.
•
Note:
It is important to update formulas if the controls used in the
respective formulas are removed, deleted or all replicates
disabled to obtain the correct limit values.
Interpretation
•
Categories. Add text strings that will be displayed for the Cut-Off
result categories in the interpretation matrix and interpretation list.
3.2.8.10.3 View
The user can select the items shown on the screen and printout in the
View tab. The report consists of everything that has been carried out.
The Cut-Off sheet can be used as a report sheet and in the View tab
different layout options can be selected.
3-80
Ascent Software User's Guide
•
Plate layout matrix. Adds a layout map with defined names.
•
Source data matrix. Adds a source data matrix to the Cut-Off sheet.
•
Interpretation matrix. Adds an interpretation matrix to the Cut-Off
sheet.
•
Interpretation list. Adds an interpretation list to the Cut-Off sheet.
Ascent Software User's Guide
3-81
3.2.9
Setup
3.2.9.1
Number...
Number... (Setup menu)
Use this command to change the number of decimals in the different
sheets.
•
Sheets. The number of decimals in the Measure, Kinetic Processors
and Multipoint sheets can be changed either through the Auto
format check box or the Number of decimals edit field on the left.
The number of decimals in the Blank Subtraction, Precalculation,
Ratio/Inhibition, Curve Fit and Cut-Off sheets can only be changed
in the Number of decimals edit field on the right.
3-82
Ascent Software User's Guide
•
Auto format. The settings for the automatic formatting of decimals
affect only measurement data, i.e. RFU or RLU. They do not,
however, affect any other number formats. If the Auto format is
ticked, the following rules apply:
Auto
- Result
<1
4 decimals
- Result
< 10
3 decimals
- Result
< 100
2 decimals
- Result
< 1000
1 decimal
- Result
≥ 1000
0 decimals
•
Number of decimals. The Number of decimals can range from 1 to
8. There are two Number of decimals edit fields belonging to
different sheet types in the dialog.
•
Use scientific format (0.00E+00) if absolute value is: Numbers
outside the defined range will be shown using exponential
presentation in the sheets.
The operation buttons are:
•
OK. Applies the selected decimal format(s) to the sheets, updates
the default decimal format(s) and then closes the dialog.
•
Cancel. Cancels the dialog.
•
Apply. Applies the selected decimal format(s) to the sheets and
updates the default decimal format(s).
The default decimal format is pre-set in Ascent Software and varies
according to the instrument used (see following table).
Ascent Software User's Guide
3-83
Instrument
Number of decimals
(left edit field)
Number of decimals
(right edit field)
Fluoroskan Ascent
Auto
3
Fluoroskan Ascent FL
Auto
3
Fluoroskan Ascent CF
Auto
3
Luminoskan Ascent
Auto
3
3.2.10 Help
You can launch the Help application by selecting Help → Help Contents
from the main menu.
The following Help window will appear.
The Help main menu buttons are:
•
Hide. Hides the left-hand side navigation window. To display the
navigation window again, click the Show button that appears
instead of the Hide button.
•
Back. Takes you back to the previous view in your view history.
3-84
Ascent Software User's Guide
•
Forward. Takes you to the next view in your view history.
•
Print. Prints a single topic or multiple topics.
You can access the help content in three different ways by selecting one
of the following tabs:
•
Contents. Browse the help topics by subject.
•
Index. Type in a keyword or browse all keywords to find a specific
topic.
•
Search. Find a specific help topic by entering words to search in the
help content.
Note:
Many images in the help application contain links to topics.
When you see an image, move the cursor across the image to
find the links.
Ascent Software User's Guide
3-85
3-86
Ascent Software User's Guide
4
Reference
4.1
Keyboard guide
4.1.1
General keys
The tables in this section list the keyboard commands you can use when
working in a desktop environment. The following table lists action keys
which allow you to use menus, select items, enter and delete data.
Menus
Key
Description
ALT/ F10
Activates the menu bar.
ALT+underlined character in the menu name
Selects a menu.
An arrow key+ENTER
Selects a menu command.
ALT+SPACEBAR
Opens the Control menu.
Underlined character in menu
Executes the menu command.
Ascent Software
User's Guide
4-1
4.1.2
Dialogs and text lines
Key
Description
ENTER
Carries out a command.
ALT+up/down arrow
Opens or closes a selected list.
Escape/ALT+F4
Cancels a dialog.
An arrow key
Moves between menu commands, characters in
a text box or items in a list.
TAB/SHIFT+TAB
Moves to the next or previous dialog box item.
CTRL+an arrow key
Moves one word right or left in a text box.
HOME / END
Moves to the beginning or end of a line or list.
BACKSPACE / DEL
Deletes the character to the left or right or
deletes a selected text.
CTRL+C
Copies a selected text to the Clipboard.
CTRL+X
Moves a selected text to the Clipboard.
CTRL+V
Pastes a text from the Clipboard.
CTRL+Z / ALT+BACKSPACE
Undoes the last editing action.
4-2
Ascent Software
User's Guide
4.1.3
Worksheet keys
The tables in this section list the keyboard commands you can use when
working in a worksheet at run time. The following table lists the action
keys that allow you to enter data, move the active cell within a selected
range and recalculate the worksheet.
Key
Description
ENTER
When in the edit mode, it accepts the current entry. When a
range is selected, it accepts the current entry and moves
the active cell vertically to the next cell in the selection.
SHIFT+ENTER
When in the edit mode, it accepts the current entry. When a
range is selected, it accepts the current entry and moves
the active cell vertically to the previous cell in the selection.
TAB
When in the edit mode, it accepts the current entry. When a
range is selected, it accepts the current entry and moves
the active cell horizontally to the next cell in the selection.
SHIFT+TAB
When in the edit mode, it accepts the current entry. When a
range is selected, it accepts the current entry and moves
the active cell horizontally to the previous cell in the
selection.
F2
Enters the edit mode. While in the editing mode, F2 displays
the Cell Text dialog box, in which you can key in data and
wrap it onto several lines.
F9
Recalculates a worksheet.
DEL
Clears the current selection or deletes the current record.
Escape
Cancels the current data entry or editing operation. If you
are not editing and are currently in a database row, it
refreshes the current database row.
The following table lists the movement keys that allow you to move the
active cell within a worksheet and display different sections of the
worksheet.
Ascent Software
User's Guide
4-3
Key
Description
Up Arrow
Moves the active cell one row up.
Down Arrow
Moves the active cell one row down.
Left Arrow
Moves the active cell one column left.
Right Arrow
Moves the active cell one column right.
CTRL Up/Down/Left/
Right
Moves to the next range of cells containing data. If
there is no additional data in the direction in which
you are moving, it moves to the edge of the
worksheet.
Page Up
Moves one screen up.
Page Down
Moves one screen down.
CTRL Page Up
Moves one screen left.
CTRL Page Down
Moves one screen right.
Home
Goes to the first column of the current row.
End
Goes to the last column of the current row that
contains data.
CTRL Home
Goes to row 1 column 1.
CTRL End
Goes to the last row and column that contains data.
4-4
Ascent Software
User's Guide
The following table lists the keys that modify the action of the
movement keys.
Key
Description
Scroll lock
Causes the worksheet window to scroll without
changing the current selection with all the
movement keys except Home, End, CTRL Home
and CTRL End.
SHIFT plus any
movement key
Extends the current selection.
4.2
Calculations
4.2.1
Mathematical operators
The following table shows typical mathematical operators used.
+ or - (unary)
* or /
+ or = < > <= >= <>
#not#(unary)
#and# #or#
Ascent Software
User's Guide
4-5
4.2.2
A-Z worksheet function reference
This chapter provides a complete alphabetical reference to the
worksheet functions. Refer to Built-In Worksheet Functions for additional
information on how to use the worksheet functions.
ABS
ACOS
ACOSH
ADDRESS
AND
ASIN
ASINH
ATAN
ATAN2
ATANH
AVERAGE
CEILING
CHAR
CHOOSE
CLEAN
CODE
COLUMN
COLUMNS
COS
COSH
COUNT
COUNTA
DATE
DATEVALUE
DAY
ERROR.TYPE
EVEN
EXACT
EXP
FACT
FALSE
FIND
FIXED
FLOOR
HLOOKUP
HOUR
IF
4-6
INDEX
INDIRECT
INT
ISBLANK
ISERR
ISERROR
ISLOGICAL
ISNA
ISNONTEXT
ISNUMBER
ISREF
ISTEXT
LEFT
LEN
LN
LOG
LOG10
LOOKUP
LOWER
MATCH
MAX
MIDX
MIN
MINUTE
MOD
MONTH
N
NA
NOT
NOW
ODD
OFFSET
OR
PI
PRODUCT
PROPER
RAND
REPLACE
REPT
RIGHT
ROUND
ROW
ROWS
SEARCH
SECOND
SIGN
SIN
SINH
SQRTX
STDEV
STDEVP
SUBSTITUTE
SUM
SUMSQ
T
TAN
TANH
TEXT
TIME
TIMEVALUE
TODAY
TRIM
TRUE
TRUNC
TYPE
UPPER
VALUE
VAR
VARP
VLOOKUP
WEEKDAY
YEAR
Ascent Software
User's Guide
4.2.2.1
ABS
Description
Returns the absolute value of a number.
Syntax
ABS(number)
The number is any integer.
Remarks
An absolute value does not display a
positive or negative sign.
See Also
SIGN function
Examples
ABS(-1) returns 1
ABS(1) returns 1
4.2.2.2
ACOS
Description
Returns the arccosine of a number.
Syntax
ACOS(number)
The number is the cosine of the angle. The
cosine can range from 1 to -1.
Remarks
The resulting angle is returned in radians
(from 0 to π).
See Also
COS and PI functions
Examples
ACOS(.5) returns 1.05
ACOS(-.2) returns 1.77
Ascent Software
User's Guide
4-7
4.2.2.3
ACOSH
Description
Returns the inverse hyperbolic cosine of a
number.
Syntax
ACOSH(number)
The number is any number equal to or greater
than 1.
See Also
ASINH, ATANH and COSH functions
Examples
ACOSH(1.2) returns .62
ACOSH(3) returns 1.76
4.2.2.4
ADDRESS
Description
Creates a cell address as text.
Syntax
ADDRESS(row, column,
[, sheet])
ref_type
[,
a1]
The row is the row number for the cell. The
addresscolumn is the column number for the
cell address.
The ref_type is the cell reference type. The
following table lists the values for this
argument.
Argument
Reference type
1
Absolute
2
Absolute row, relative column
3
Relative row, absolute column
4
Relative
The a1 is the reference format. This argument
must be TRUE() to represent an A1 reference
format. Formula One does not support the
4-8
Ascent Software
User's Guide
R1C1 reference format.
The sheet is the name of an external
spreadsheet. Omitting this argument assumes
that the reference exists on the current
spreadsheet.
See Also
COLUMN, OFFSET and ROW functions
Examples
ADDRESS(5, 6, 1) returns “$F$5”
ADDRESS(5,
6,
4,
TRUE(),
“STEPS.VTS”) returns “STEPS.VTS!F5”
4.2.2.5
AND
Description
Returns True if all arguments are true. Returns
False if at least one argument is false.
Syntax
AND(logical_list)
The logical_list is a list of conditions separated
by commas. You can include as many as 30
conditions in the list. The list can contain
logical values or a reference to a range
containing logical values. Text and empty cells
are ignored. If there are no logical values on
the list, the #VALUE! is returned.
See Also
IF , NOT and OR functions
Examples
AND(1+1=2, 5+5=10) returns True, because
both arguments are true.
AND(TRUE(), FALSE()) returns False
Ascent Software
User's Guide
4-9
4.2.2.6
ASIN
Description
Returns the arcsine of a number.
Syntax
ASIN(number)
The number is the sine of the resulting angle
ranging from -1 to 1.
Remarks
The resulting angle is returned in radians
(ranging from -π/2 to π/2).
See Also
ASINH, PI and SIN functions
Examples
ASIN(-1) returns -1.57
ASIN(.4) returns .41
4.2.2.7
ASINH
Description
Returns the inverse hyperbolic sine of a
number.
Syntax
ASINH(number)
The number is any number.
See Also
ACOSH, ASIN, ATANH and SINH functions
Examples
ASINH(5.3) returns 2.37
ASINH(-4) returns -2.09
4-10
Ascent Software
User's Guide
4.2.2.8
ATAN
Description
Returns the arctangent of a number.
Syntax
ATAN(number)
The number is the tangent of the angle.
Remarks
The resulting angle is returned in radians
ranging from -π/2 το π/2. To find the result in
degrees, multiply the result by 180/PI().
See Also
ATAN2, ATANH, PI and TAN functions
Examples
ATAN(3.5) returns 1.29
ATAN(-4) returns -1.33
4.2.2.9
ATAN2
Description
Returns the
coordinates.
Syntax
ATAN2(x, y)
arctangent
of
the
specified
x is the x coordinate.
y is the y coordinate.
Remarks
The arctangent is the angle from the x-axis to
a line with endpoints at the origin (0, 0) and a
point with the given coordinates (x, y). The
angle is returned in radians ranging from π το π, excluding -π.
See Also
ATAN, ATANH, PI and TAN functions
Examples
ATAN2(3, 6) returns 1.11
ATAN2(-1, .1) returns 3.04
Ascent Software
User's Guide
4-11
4.2.2.10 ATANH
Description
Returns the inverse hyperbolic tangent of a
number.
Syntax
ATANH(number)
The number is a number between -1 and 1,
excluding -1 and 1.
See Also
ACOS, ASINH and TANH functions
Examples
ATANH(.5) returns .55
ATANH(-.25) returns -.26
4.2.2.11 AVERAGE
Description
Returns the average of the supplied numbers.
The result of AVERAGE is also known as the
arithmetic mean.
Syntax
AVERAGE(number_list)
The number_list is a list of numbers separated
by commas. As many as 30 numbers can be
included in the list and the list can contain
numbers or a reference to a range that
contains numbers. Text, logical expressions
or empty cells in a referenced range are
ignored. All numerical values (incl. 0) are
used.
See Also
MIN and MAX functions
Examples
AVERAGE(5, 6, 8, 14) returns 8.25
AVERAGE(C15:C17) returns 134; C15:C17
contains 24,144, and 234
4-12
Ascent Software
User's Guide
4.2.2.12 CEILING
Description
Rounds up a number to the nearest multiple of
a specified significance.
Syntax
CEILING(number, significance)
The number is the value to round.
The significance is the multiple to which to
round.
Remarks
Regardless of the sign of the number, the
value is rounded up away from zero. If the
number is an exact multiple of the
significance, no rounding occurs.
If the number or significance is non-numerical,
the #VALUE! is returned. When the
arguments have opposite signs, the #NUM! is
returned.
See Also
EVEN, FLOOR, INT, ODD, ROUND and TRUNC
functions
Examples
CEILING(1.23459, .05) returns 1.25
CEILING(-148.24, -2) returns -150
Ascent Software
User's Guide
4-13
4.2.2.13 CHAR
Description
Returns a character that corresponds to the
supplied ANSI code.
Syntax
CHAR(number)
The number is a value between 1 and 255 that
specifies an ANSI character.
Remarks
The character and associated numeric code
are defined by Windows in the ANSI
character set.
See Also
CODE function
Examples
CHAR(70) returns F
CHAR(35) returns #
4.2.2.14 CHOOSE
Description
Returns a value from a list of numbers based
on the index number supplied.
Syntax
CHOOSE(index, item_list)
The index is a number that refers to an item
on the item_list.
The index can be a cell reference. The index
can also be a formula that returns any value
from 1 to 29.
If index is less than 1 or greater than the
number of items on the item_list, the
#VALUE! is returned.
If the index is a fractional number, it is
truncated to an integer.
The item_list is a list of numbers, formulas or
text separated by commas. This argument can
also be a range reference. You can specify as
4-14
Ascent Software
User's Guide
many as 29 items on the list.
See Also
INDEX function
Examples
CHOOSE(2,”Q1”,
returns “Q2”
“Q2”,
“Q3”,
“Q4”)
AVERAGE(CHOOSE(1, A1:A10, B1:B10,
C1:C10)) returns the average of the
contents of the range A1:A10.
4.2.2.15 CLEAN
Description
Removes all non-printable characters from the
supplied text.
Syntax
CLEAN(text)
The text is any worksheet information.
Remarks
Text that is imported from another
environment may require this function.
See Also
CHAR and TRIM functions
Examples
CLEAN(“Results “ & CHAR(8) & “RFU”)
returns the Results RFU, because the character
returned by CHAR(8) is non-printable.
Ascent Software
User's Guide
4-15
4.2.2.16 CODE
Description
Returns a numeric code representing the first
character of the supplied string.
Syntax
CODE(text)
The text is any string.
Remarks
The numeric code and associated string are
defined in your computer’s character set. The
character set used by Windows is the ANSI
character set.
See Also
CHAR function
Examples
CODE(“A”) returns 65
CODE(“b”) returns 98
4.2.2.17 COLUMN
Description
Returns the column number of the supplied
reference.
Syntax
COLUMN(reference)
The reference is a reference to a cell or range.
Omitting the argument returns the number of
the column in which the COLUMN is placed.
See Also
COLUMNS and ROW functions
Examples
COLUMN(B3) returns 2
COLUMN() returns 4 if the function is entered
in cell D2.
4-16
Ascent Software
User's Guide
4.2.2.18 COLUMNS
Description
Returns the number of columns in a range
reference.
Syntax
COLUMNS(range)
The range is a reference to a range of cells.
See Also
COLUMN and ROWS functions
Examples
COLUMNS(A1:D5) returns 4
4.2.2.19 COS
Description
Returns the cosine of a number.
Syntax
COS(number)
The number is any number.
See Also
ACOS, ASINH,
functions
ATANH,
Examples
COS(1.444) returns .126
COSH
and
PI
COS(5) returns .28
4.2.2.20 COSH
Description
Returns the hyperbolic cosine of a number.
Syntax
COSH(number)
The number is any number.
See Also
ASINH, ATANH and COS functions
Examples
COSH(2.10) returns 4.14
COSH(.24) returns 1.03
Ascent Software
User's Guide
4-17
4.2.2.21 COUNT
Description
Returns the number of values on the supplied
list.
Syntax
COUNT(value_list)
The value_list is a list of values. The list can
contain as many as 30 values.
Remarks
The COUNT only numerates numbers or
numerical values (e.g. logical values, dates or
text representations of dates). If you supply a
range, only numbers and numerical values in
the range are counted. Empty cells, logical
values, text and error values in the range are
ignored.
See Also
AVERAGE, COUNTA and SUM functions
Examples
COUNT(5, 6, “Q2”) returns 2
COUNT(“03/06/94”,
“06/21/94”,
“10/19/94”) returns 3
4.2.2.22 COUNTA
Description
Returns the number of nonblank values on the
supplied list.
Syntax
COUNTA(expression_list)
The expression_list is a list of expressions. As
many as 30 expressions can be included in the
list.
4-18
Remarks
The COUNTA returns the number of cells that
contain data in a range. Null values ("") are
counted, but references to empty cells are
ignored.
See Also
AVERAGE, COUNT, PRODUCT and SUM
functions
Ascent Software
User's Guide
Examples
COUNTA(32,45,“Average”, "") returns 4
COUNTA(C38:C40) returns 0, when
specified range contains empty cells.
the
4.2.2.23 DATE
Description
Returns the serial number of the supplied date.
Syntax
DATE(year, month, day)
The year is a number ranging from 1900 to
2078. If the year is between 1920 and 2019,
you can specify two digits to represent the
year. Otherwise specify all four digits.
The month is a number representing the
month (e.g. 12 represents December). If a
number greater than 12 is supplied, the
number is added to the first month of the
specified year.
The day is a number representing the day of
the month. If the number you specify for the
day exceeds the number of days in that
particular month, the number is added to the
first day of the specified month.
See Also
DATEVALUE,
DAY,
MONTH,
NOW,
TIMEVALUE, TODAY and YEAR functions
Examples
DATE(94, 6, 21) returns 34506
DATE(99, 3, 6) returns 36225
Ascent Software
User's Guide
4-19
4.2.2.24 DATEVALUE
Description
Returns the serial number of a date supplied
as a text string.
Syntax
DATEVALUE(text)
The text is a date in text format between
January 1, 1900 and December 31, 2078. If
you omit the year, the current year is used.
See Also
NOW, TIMEVALUE and TODAY functions
Examples
DATEVALUE(“3/6/94”) returns 34399
DATEVALUE(“12/25/95”) returns 35058
4.2.2.25 DAY
Description
Returns the day of the month that corresponds
to the date represented by the supplied
number.
Syntax
DAY(serial_number)
The serial_number is a date represented as a
serial number or as text (e.g. “06-21-94” or
“21-Jun-94”).
See Also
HOUR, MINUTE, MONTH, NOW, SECOND,
TODAY, WEEKDAY and YEAR functions
Examples
DAY(34399) returns 6
DAY(“06-21-94”) returns 21
4-20
Ascent Software
User's Guide
4.2.2.26 ERROR.TYPE
Description
Returns a number corresponding to an error.
Syntax
ERROR.TYPE(error_ref)
The error_ref is a cell reference.
Remarks
The following table lists the error text and
associated error numbers returned by this
function.
Number
Error text
1
#NULL!
2
#DIV/0!
3
#VALUE!
4
#REF!
5
#NAME?
6
#NUM!
7
#N/A
#N/A
Other
See Also
ISERR and ISERROR functions
Examples
ERROR.TYPE(A1) returns 2 if the formula in
cell A1 attempts to divide by zero.
Ascent Software
User's Guide
4-21
4.2.2.27 EVEN
Description
Rounds the specified number up to the
nearest even integer.
Syntax
EVEN(number)
The number is any number, a formula that
evaluates to a number or a reference to a cell
that contains a number.
See Also
CEILING, FLOOR, INT, ODD, ROUND and
TRUNC functions
Examples
EVEN(2.5) returns 4
EVEN(2030.45) returns 2032
4.2.2.28 EXACT
Description
Compares two expressions for identical, casesensitive matches. True is returned if the
expressions are identical. False is returned if
they are not identical.
Syntax
EXACT(expression1, expression2)
The expression1 is any text.
The expression2 is any text.
See Also
LEN and SEARCH functions
Examples
EXACT(“Match”, “Match”) returns True
EXACT(“Match”, “match”) returns False
4-22
Ascent Software
User's Guide
4.2.2.29 EXP
Description
Returns e raised to the specified power. The
constant e is 2.71828182845904 (the base of
the natural logarithm).
Syntax
EXP(number)
The number is any number expressed as the
exponent.
See Also
LN and LOG functions
Examples
EXP(2.5) returns 12.18
EXP(3) returns 20.09
4.2.2.30 FACT
Description
Returns the factorial of a specified number.
Syntax
FACT(number)
The number is any non-negative integer. If you
supply a real number, the FACT truncates the
number to an integer before calculation.
See Also
PRODUCT function
Examples
FACT(2.5) returns 2
FACT(6) returns 720
Ascent Software
User's Guide
4-23
4.2.2.31 FALSE
Description
Returns the logical value False. This function
always requires the trailing parentheses.
Syntax
FALSE()
See Also
TRUE function
4.2.2.32 FIND
Description
Searches for a string of text within another
text string and returns the character position at
which the search string first occurs.
Syntax
FIND(search_text, text [, start_position])
The search_text is the text to find. If you
specify an empty string (""), the FIND matches
the first character in the text.
The text is the text to be searched.
The start_position is the character position in
the text, where the search begins. The first
character in the text is character number 1.
When you omit this argument, the default
starting position is character number 1.
Remarks
The FIND is case-sensitive. You cannot use
wild card characters in the search_text.
See Also
EXACT, LEN, MID and SEARCH functions
Examples
FIND(“Em”, “Ex=320 Em=405”) returns 8
FIND(“=”,
10
4-24
“Ex=320
Em=405”,4) returns
Ascent Software
User's Guide
4.2.2.33 FIXED
Description
Rounds a number to the supplied precision,
formats the number into decimal format and
returns the result as text.
Syntax
FIXED(number [, precision][, no_commas])
number is any number.
The precision is the number of digits that
appear to the right of the decimal place. When
this argument is omitted, a default precision of
2 is used. If you specify a negative precision,
the number is rounded to the left of the
decimal point. You can specify a precision
with as many as 127 digits.
The no_commas determines if thousands
separators (commas) are used in the result.
Use 1 to exclude commas in the result. If the
no_commas is 0 or the argument is omitted,
the thousands separators are included (e.g.
1,000.00).
See Also
ROUND, TEXT and VALUE functions
Examples
FIXED(2000.5, 3) returns “2,000.500”
FIXED(2009.5, -1, 1) returns “2010”
Ascent Software
User's Guide
4-25
4.2.2.34 FLOOR
Description
Rounds a number down to the nearest
multiple of a specified significance.
Syntax
FLOOR(number, significance)
The number is the value to round.
The significance is the multiple to which to
round.
Remarks
Regardless of the sign of the number, the
value is rounded down towards zero. If the
number is an exact multiple of the
significance, no rounding occurs.
If the number or significance is non-numerical,
the #NAME? is returned. When the arguments
have opposite signs, the #NUM! is returned.
See Also
CEILING, EVEN, INT, ODD, ROUND and
TRUNC functions
Examples
FLOOR(1.23459, .05) returns 1.2
FLOOR(-148.24, -2) returns -148
4.2.2.35 HLOOKUP
Description
Searches the top row of a table for a value and
returns the contents of a cell in the table that
corresponds to the location of the search
value.
Syntax
HLOOKUP(search_item, search_range,
row_index)
The search_item is a value, text string or
reference to a cell containing a value that is
matched against data in the top row of the
4-26
Ascent Software
User's Guide
search_range.
The search_range is a reference to the range
(table) to be searched. The cells in the first
row of the search_range can contain
numbers, text or logical values. The contents
of the first row must be in ascending order
(e.g. -2, -1, 0, 2...A through Z, False, True).
Text searches are not case-sensitive.
The row_index is the row in the search_range
from which the matching value is returned.
The row_index can be a number from 1 to the
number of rows in the search_range.
If the row_index is less than 1, the #VALUE! is
returned.
When the row_index is greater than the
number of rows in the table, the #REF! is
returned.
Remarks
The HLOOKUP compares the information in
the top row of the search_range to the
supplied search_item. When a match is found,
information located in the same column and
supplied row (row_index) is returned.
If the search_item cannot be found in the top
row of the search_range, the largest value that
is less than the search_item is used. When the
search_item is less than the smallest value in
the first row of the search_range, the #REF! is
returned.
See Also
INDEX, LOOKUP, MATCH and VLOOKUP
functions
Ascent Software
User's Guide
4-27
4.2.2.36 HOUR
Description
Returns the hour component of the specified
time in a 24-hour format.
Syntax
HOUR(serial_number)
The serial_number is the time expressed as a
serial number. The decimal portion of the
number represents the time as a fraction of the
day.
Remarks
The result is an integer ranging from 0 (12:00
AM) to 23 (11:00 PM).
See Also
DAY, MINUTE, MONTH, NOW, SECOND,
WEEKDAY and YEAR functions
Examples
HOUR(34259.4) returns 9
HOUR(34619.976) returns 23
4.2.2.37 IF
Description
Tests the condition and returns the specified
value.
Syntax
IF(condition, true_value, false_value)
The condition is any logical expression.
The true_value is the value to be returned if
the condition evaluates to True.
The false_value is the value to be returned if
the condition evaluates to False.
4-28
See Also
AND, FALSE, NOT, OR and TRUE functions
Examples
IF(A1>10, “Greater”, “Less”) returns
Greater if the contents of A1 is greater than 10
and Less if the contents of A1 is less than 10.
Ascent Software
User's Guide
4.2.2.38 INDEX
Description
Returns the contents of a cell from a specified
range.
Syntax
INDEX(reference [, row] [, column]
[, range_number])
The reference is a reference to one or more
ranges.
If the reference specifies more than one
range, separate each reference with a comma
and enclose the reference in parentheses (e.g.
(A1:C6, B7:E14, F4)).
If each range in the reference contains only
one row or column, you can omit the row or
column argument. For example, if the
reference is A1:A15, you can omit the column
argument (e.g. INDEX(A1:A15, 3,, 1)).
The row is the row number in the reference
from which to return data.
The column is the column number in the
reference from which to return data.
The range_number specifies the range from
which the data is returned if the reference
contains more than one range. For example, if
the reference is (A1:A10, B1:B5, D14:E23),
then A1:A10 is the range_number 1, B1:B5
the range_number 2 and D14:E23 the
range_number 3.
Remarks
If the row, column and range_number do not
point to a cell within the reference, the #REF!
is returned. If the row and column are omitted,
the INDEX returns the range in the reference
specified by the range_number.
See Also
CHOOSE, HLOOKUP, LOOKUP, MATCH and
VLOOKUP functions
Ascent Software
User's Guide
4-29
4.2.2.39 INDIRECT
Description
Returns the contents of the cell referenced by
the specified cell.
Syntax
INDIRECT(ref_text [, a1])
The ref_text is a reference to a cell that
references a third cell. If the ref_text is not a
valid reference, the #REF! is returned.
The a1 is the reference format. This argument
must be TRUE() to represent an A1 reference
format. Formula One does not support the
R1C1 reference format.
See Also
OFFSET function
Examples
INDIRECT(C1) returns the contents of the cell
that C1 references. If C1 contains “D1”, the
contents of D1 is returned by INDIRECT.
4.2.2.40 INT
Description
Rounds the supplied number down to the
nearest integer.
Syntax
INT(number)
The number is any real number.
See Also
CEILING, FLOOR, MOD, ROUND and TRUNC
functions
Examples
INT(10.99) returns 10
INT(-10.99) returns -11
4-30
Ascent Software
User's Guide
4.2.2.41 ISBLANK
Description
Determines if the specified cell is blank.
Syntax
ISBLANK(reference)
The reference is a reference to any cell.
Remarks
If the referenced cell is blank, True is returned.
False is returned if the cell is not blank.
See Also
ISERR,
ISERROR,
ISLOGICAL,
ISNA,
ISNONTEXT, ISNUMBER, ISREF and ISTEXT
functions
Examples
ISBLANK(A1) returns True if A1 is a blank
cell.
4.2.2.42 ISERR
Description
Determines if the specified expression returns
an error value.
Syntax
ISERR(expression)
The expression is any expression.
Remarks
If the expression returns any error except the
#N/A!, True is returned. Otherwise False is
returned.
See Also
ISBLANK, ISERROR, ISLOGICAL, ISNA,
ISNONTEXT, ISNUMBER, ISREF and ISTEXT
functions
Examples
ISERR(A1) returns True if A1 contains a
formula that returns an error (e.g. #NUM!).
Ascent Software
User's Guide
4-31
4.2.2.43 ISERROR
Description
Determines if the specified expression returns
an error value.
Syntax
ISERROR(expression)
The expression is any expression.
Remarks
If the expression returns any error value (e.g.
#N/A!, #VALUE!, #REF!, #DIV/0!, #NUM!,
#NAME? or #NULL!), True is returned.
Otherwise False is returned.
See Also
ISBLANK,
ISERR,
ISLOGICAL,
ISNA,
ISNONTEXT, ISNUMBER, ISREF and ISTEXT
functions
Examples
ISERROR(4/0) returns True
ISERROR(A1) returns False if A1 contains a
formula that does not return an error.
4.2.2.44 ISLOGICAL
Description
Determines if the specified expression returns
a logical value.
Syntax
ISLOGICAL(expression)
The expression is any expression.
4-32
Remarks
If the expression returns a logical value, True
is returned. Otherwise False is returned.
See Also
ISBLANK,
ISERR,
ISERROR,
ISNA,
ISNONTEXT, ISNUMBER, ISREF and ISTEXT
functions
Examples
ISLOGICAL(ISBLANK(A1)) returns True,
because ISBLANK returns a logical value.
Ascent Software
User's Guide
4.2.2.45 ISNA
Description
Determines if the specified expression returns
the value “not available” error.
Syntax
ISNA(expression)
The expression is any expression.
Remarks
If the expression returns the #N/A! error, True
is returned. Otherwise False is returned.
See Also
ISBLANK, ISERR, ISERROR, ISLOGICAL,
ISNONTEXT, ISNUMBER, ISREF and ISTEXT
functions
Examples
ISNA(A1) returns True if cell A1 contains the
NA() function or returns the error value #N/A!.
4.2.2.46 ISNONTEXT
Description
Determines if the specified expression is not a
text.
Syntax
ISNONTEXT(expression)
The expression is any expression.
Remarks
If the expression returns any value that is not a
text, True is returned. Otherwise False is
returned.
See Also
ISBLANK, ISERR, ISERROR, ISLOGICAL,
ISNA, ISNUMBER, ISREF and ISTEXT
functions
Examples
ISNONTEXT(F3) returns True if
contains a number or is a blank cell.
cell
F3
ISNONTEXT(“text”) returns False.
Ascent Software
User's Guide
4-33
4.2.2.47 ISNUMBER
Description
Determines if the specified expression is a
number.
Syntax
ISNUMBER(expression)
The expression is any expression.
Remarks
If the expression returns a number, True is
returned. Otherwise False is returned. If the
expression returns a number represented as
text (e.g. “12”), False is returned.
See Also
ISBLANK, ISERR, ISERROR, ISLOGICAL,
ISNA, ISNONTEXT, ISREF and ISTEXT
functions
Examples
ISNUMBER(123.45) returns True
ISNUMBER(“123”) returns False
4.2.2.48 ISREF
Description
Determines if the specified expression is a
range reference.
Syntax
ISREF(expression)
The expression is any expression.
4-34
Remarks
If the expression returns a range reference,
True is returned. Otherwise False is returned.
See Also
ISBLANK, ISERR, ISERROR, ISLOGICAL,
ISNA, ISNONTEXT, ISNUMBER and ISTEXT
functions
Examples
ISREF(A3) returns True
Ascent Software
User's Guide
4.2.2.49 ISTEXT
Description
Determines if the specified expression is text.
Syntax
ISTEXT(expression)
The expression is any expression.
Remarks
If the expression returns text, True is returned.
Otherwise False is returned.
See Also
ISBLANK, ISERR, ISERROR, ISLOGICAL,
ISNA, ISNONTEXT, ISNUMBER and ISREF
functions
Examples
ISTEXT(“2nd Blank”) returns True
4.2.2.50 LEFT
Description
Returns the characters furthest left from the
specified text string.
Syntax
LEFT(text [, num_chars])
The text is any text string.
The num_chars is the number of characters to
return. This value must be greater than or
equal to zero. If the num_chars is greater than
the number of characters in the text, the entire
string is returned. Omitting this argument
assumes a value of 1.
See Also
MID and RIGHT functions
Examples
LEFT(“2nd Sample”) returns “2”
LEFT(“2nd Control”, 3) returns “2nd”
Ascent Software
User's Guide
4-35
4.2.2.51 LEN
Description
Returns the number of characters in the
supplied text string.
Syntax
LEN(text)
The text in any text string. The spaces in the
string are counted as characters.
See Also
EXACT and SEARCH functions
Examples
LEN(“3rd Control”) returns 11
LEN(“1-3”) returns 3
4.2.2.52 LN
Description
Returns the natural logarithm (based on the
constant e) of a number.
Syntax
LN(number)
The number is any positive real number.
Remarks
The LN is the inverse of the EXP function.
See Also
EXP, LOG and LOG10 functions
Examples
LN(12.18) returns 2.50
LN(20.09) returns 3.00
4-36
Ascent Software
User's Guide
4.2.2.53 LOG
Description
Returns the logarithm of a number to the
specified base.
Syntax
LOG(number [, base])
The text is any positive real number.
The base is the base of the logarithm.
Omitting this argument assumes a base of 10.
See Also
EXP, LN and LOG10 functions
Examples
LOG(1) returns 0
LOG(10) returns 1
4.2.2.54 LOG10
Description
Returns the base 10 logarithm of a number.
Syntax
LOG10(number)
The number is any positive real number.
See Also
EXP, LN and LOG functions
Examples
LOG10(260) returns 2.41
LOG10(100) returns 2
Ascent Software
User's Guide
4-37
4.2.2.55 LOOKUP
Description
Searches for a value in one range and returns
the contents of the corresponding position to
a second range.
Syntax
LOOKUP(lookup_value, lookup_range,
result_range)
The lookup_value is the value for which to
search in the first range.
The lookup_range is the first range to search
and contains only one row or one column.
The range can contain numbers, text or logical
values.
To search for the lookup_range correctly, the
expressions in the range have to be placed in
ascending order (e.g. -2, -1, 0, 1, 2...A through
Z, False, True). The search is not casesensitive.
The result_range is a range consisting of one
row or one column that is of the same size as
the lookup_range.
4-38
Remarks
If the lookup_value does not have an exact
match in the lookup_range, the largest value
that is less than or equal to the lookup_value is
found and the corresponding position in the
result_range
is
returned.
When
the
lookup_value is smaller than the data in the
lookup_range, the #N/A is returned.
See Also
HLOOKUP, INDEX and VLOOKUP functions
Ascent Software
User's Guide
4.2.2.56 LOWER
Description
Changes the characters in the specified string
to lowercase characters. Numerical characters
in the string are not changed.
Syntax
LOWER(text)
The text is any string.
See Also
PROPER and UPPER functions
Examples
LOWER(“3rd Sample”) returns “3rd sample”
LOWER(“JOHN DOE”) returns “john doe”
4.2.2.57 MATCH
Description
A specified value is compared to values in a
range. The position of the matching value in
the search range is returned.
Syntax
MATCH(lookup_value, lookup_range,
comparison)
The lookup_value is the value to compare to.
It can be a number, text or logical value or a
reference to a cell that contains one of those
values.
The lookup_range is the range to search and
contains only one row or one column. The
range can contain numbers, text or logical
values.
The comparison is a number that represents
the type of comparison to be made between
the lookup_value and the values in the
lookup_range. When you omit this argument,
the comparison method 1 is assumed.
When the comparison is 1, the largest value
that is less than or equal to the lookup_value
Ascent Software
User's Guide
4-39
is matched. When using this comparison
method, the values in the lookup_range have
to be in ascending order (e.g. ...-2, -1, 0, 1, 2...,
A through Z, False, True).
When the comparison is 0, the first value that
is equal to the lookup_value is matched. When
using this comparison method, the values in
the lookup_range can be in any order.
When the comparison is -1, the smallest value
that is greater than or equal to the
lookup_value is matched. When using this
comparison method, the values in the
lookup_range have to be in descending order
(e.g. True, False, Z through A, ...2, 1, 0, -1, 2...).
Remarks
When the comparison method 0 is used and
the lookup_value is text, the lookup_value can
contain wild card characters. The wild card
characters are * (an asterisk), which matches
any sequence of characters and ? (a question
mark), which matches any single character.
When no match is found for the lookup_value,
the #N/A is returned.
See Also
4-40
HLOOKUP, INDEX, LOOKUP and VLOOKUP
functions
Ascent Software
User's Guide
4.2.2.58 MAX
Description
Returns the largest value on the specified list
of numbers.
Syntax
MAX(number_list)
The number_list is a list of as many as 30
numbers separated by commas.
The list can contain numbers, logical values,
text representations of numbers or a
reference to a range containing those values.
Error values or text that cannot be translated
into numbers return errors.
If a range reference is included in the list, text,
logical expressions and empty cells in the
range are ignored.
If there are no numbers on the list, 0 is
returned.
See Also
AVERAGE and MIN functions
Examples
MAX(50, 100, 150, 500, 200) returns
500
MAX(A1:F12) returns the largest value in the
range.
4.2.2.59 MID
Description
Returns the specified number of characters
from a text string, beginning with the specified
starting position.
Syntax
MID(text, start_position, num_chars)
The text is the string from which to return
characters.
The start_position is the position of the first
Ascent Software
User's Guide
4-41
character to return from the text.
If the start_position is 1, the first character in
the text is returned.
If the start_position is greater than the number
of characters in the text, an empty string ("") is
returned.
If the start_position is less than 1, the
#VALUE! is returned.
The num_chars is the number of characters to
return. If the num_chars is negative, the
#VALUE! is returned.
Remarks
If the start_position plus the number of
characters in the num_chars exceed the length
of the text, the characters from the
start_position to the end of the text are
returned.
See Also
CODE, FIND, LEFT, RIGHT and SEARCH
functions
Examples
MID(“Labsystems COMBIPLATE ”, 12, 10)
returns “COMBIPLATE”
MID(“Dispenser 2 speed (1..100%):”, 11,
1) returns 2
4.2.2.60 MIN
Description
Returns the smallest value on the specified list
of numbers.
Syntax
MIN(number_list)
The number_list is a list of as many as 30
numbers separated by commas.
The list can contain numbers, logical values,
text representations of numbers or a
reference to a range containing those values.
4-42
Ascent Software
User's Guide
Error values or text that cannot be translated
into numbers return errors.
If a range reference is included in the list, text,
logical expressions and empty cells in the
range are ignored.
If there are no numbers on the list, 0 is
returned.
See Also
Examples
AVERAGE and MAX functions
MIN(50, 100, 150, 500, 200) returns 50
MIN(A1:F12) returns the smallest value in the
range.
4.2.2.61 MINUTE
Description
Returns the minute that corresponds to the
supplied date.
Syntax
MINUTE(serial_number)
The serial_number is the time expressed as a
serial number. The decimal portion of the
number represents the time as a fraction of the
day.
Remarks
The result is an integer ranging from 0 to 59.
See Also
DAY, HOUR, MONTH, NOW,
WEEKDAY and YEAR functions
Examples
MINUTE(34506.4) returns 36
SECOND,
MINUTE(34399.825) returns 48
Ascent Software
User's Guide
4-43
4.2.2.62 MOD
Description
Returns the remainder after dividing a number
with a specified divisor.
Syntax
MOD(number, divisor)
The number is any number.
The divisor is any non-zero number. If the
divisor is 0, the #DIV/0! is returned.
See Also
INT, ROUND and TRUNC functions
Examples
MOD(-23, 3) returns 1
MOD(-23, -3) returns -2
4.2.2.63 MONTH
Description
Returns the month that corresponds to the
supplied date.
Syntax
MONTH(serial_number)
The serial_number is the date expressed as a
serial number or as text (e.g. “06-21-94” or
“21-Jun-94”).
Remarks
The MONTH returns a number ranging from 1
(January) to 12 (December).
See Also
DAY, HOUR, MINUTE, NOW, SECOND,
TODAY, WEEKDAY and YEAR functions
Examples
MONTH(“06-21-94”) returns 6
MONTH(34626) returns 10
4-44
Ascent Software
User's Guide
4.2.2.64 N
Description
Tests the supplied value and returns the value
if it is a number.
Syntax
N(value)
The value is a value or a reference to a cell
containing a value to test.
Remarks
Numbers are returned as numbers, serial
numbers formatted as dates are returned as
serial numbers and the logical function TRUE()
is returned as 1. All other expressions return 0.
See Also
T and VALUE functions
Examples
N(32467) returns 32467
N(A4) returns 1 if A4 contains the logical
function True.
4.2.2.65 NA
Description
Returns the error value
represents “not available”.
#N/A,
which
Syntax
NA()
Remarks
Use the NA to mark cells that lack data
without leaving them empty. Empty cells may
not be correctly represented in certain
calculations.
Although the NA does not use any arguments,
you must supply the empty parentheses to
correctly reference the function.
See Also
ISNA function
Ascent Software
User's Guide
4-45
4.2.2.66 NOT
Description
Returns a logical value that is the opposite of
its value.
Syntax
NOT(logical)
The logical is an expression that returns a
logical value (e.g. True or False).
Remarks
If the logical is false, the NOT returns True.
Conversely, if the logical is true, the NOT
returns False.
See Also
AND, IF and OR functions
Examples
NOT(TRUE()) returns False
NOT(MONTH(“12/25/94”)
False
=
12) returns
4.2.2.67 NOW
4-46
Description
Returns the current date and time as a serial
number.
Syntax
NOW()
Remarks
In a serial number, the numbers to the left of
the decimal point represent the date. The
numbers to the right of the decimal point
represent the time. The result of this function
changes only when a recalculation of the
worksheet occurs.
See Also
DATE, DAY, HOUR, MINUTE, MONTH,
SECOND, TODAY, WEEKDAY and YEAR
functions
Ascent Software
User's Guide
4.2.2.68 ODD
Description
Rounds the specified number up to the
nearest odd integer.
Syntax
ODD(number)
The number is any number, a formula that
evaluates to a number or a reference to a cell
that contains a number.
See Also
CEILING, EVEN, FLOOR, INT, ROUND and
TRUNC functions
Examples
ODD(3.5) returns 5
ODD(6) returns 7
4.2.2.69 OFFSET
Description
Returns the contents of a range that is offset
from a starting point on the spreadsheet.
Syntax
OFFSET(reference, rows, columns [, height] [,
width])
The reference is a reference to a cell on which
the offset reference is based. If you specify a
range reference, the #VALUE! is returned.
The rows is the number of rows of the
reference that represents the upper left cell of
the offset range. A positive number represents
rows below the starting cell. A negative
number represents rows above the starting
cell. If the rows places the upper left cell of the
offset range outside the spreadsheet
boundary, the #REF! is returned.
The columns is the number of columns of the
reference that represents the upper left cell of
the offset range. A positive number represents
the columns to the right of the starting cell. A
Ascent Software
User's Guide
4-47
negative number represents the columns to
the left of the starting cell. If the columns
places the upper left cell of the offset range
outside the spreadsheet boundary, the #REF!
is returned.
The height is a positive number representing
the number of rows to include in the offset
range. Omitting this argument assumes a
single row .
The width is a positive number representing
the number of columns to include in the offset
range. Omitting this argument assumes a
single column.
Remarks
The OFFSET does not change the current
selection on the worksheet. Because it returns
a reference, the OFFSET can be used in any
function that requires or uses a cell or range
reference as an argument.
See Also
COLUMN, INDIRECT and ROW functions
Examples
OFFSET(B1, 3, 2,
contents of cell D4.
1,
1) returns the
SUM(OFFSET(A1, 2, 4, 3, 2)) equals the
sum of the range E3:F5.
4-48
Ascent Software
User's Guide
4.2.2.70 OR
Description
Returns True if at least one of a series of
logical arguments is true.
Syntax
OR(logical_list)
The logical_list is a list of conditions separated
by commas. You can include as many as 30
conditions in the list. The list can contain
logical values or a reference to a range
containing logical values. Text and empty cells
are ignored. If there are no logical values on
the list, the error value #VALUE! is returned.
See Also
AND, IF and NOT functions
Examples
OR(1 + 1 = 1, 5 + 5 = 10) returns True
because one of the arguments is true.
4.2.2.71 PI
Description
Returns the value of pi (π), which is
approximately
3.14159265358979,
when
calculated to 15 significant digits.
Syntax
PI()
Remarks
Although the PI does not use arguments, you
must supply the empty parentheses to
correctly reference the function.
See Also
COS, SIN and TAN functions
Ascent Software
User's Guide
4-49
4.2.2.72 PRODUCT
Description
Multiplies a list of numbers and returns the
result.
Syntax
PRODUCT(number_list)
The number_list is a list of as many as 30
numbers separated by commas.
The list can contain numbers, logical values,
text representations of numbers or a
reference to a range containing those values.
Error values or text that cannot be translated
into numbers return errors.
If a range reference is included in the list, text,
logical expressions and empty cells in the
range are ignored.
All numerical values incl. 0 are used in the
calculation.
See Also
FACT and SUM functions
Examples
PRODUCT(1, 2, 3, 4) returns 24
4.2.2.73 PROPER
Description
Returns the specified string in a proper case
format.
Syntax
PROPER(text)
The text is any string.
Remarks
4-50
In the proper case format, the first alphabetic
character in a word is capitalized. If an
alphabetic character follows a number,
punctuation mark or a space, it is capitalized.
All other alphabetic characters are lowercase.
Numbers are not changed by the PROPER.
Ascent Software
User's Guide
See Also
LOWER and UPPER functions
Examples
PROPER(“3rd Control”) returns “3Rd Control”
PROPER(“PROLIFERATION INDEX”) returns
“Proliferation Index”
4.2.2.74 RAND
Description
Returns a number selected randomly from a
uniform distribution greater than or equal to 0
and less than 1.
Syntax
RAND()
Remarks
Although the RAND does not use arguments,
you must supply the empty parentheses to
correctly reference the function.
Examples
RAND()*10 returns a random number greater
than or equal to 0 and less than 10.
4.2.2.75 REPLACE
Description
Replaces part of a text string with another text
string.
Syntax
REPLACE(orig_text, start_position,
num_chars, repl_text)
The orig_text is the original text string.
The start_position is the character position
where the replacement begins.
If the start_position is greater than the number
of characters in the orig_text, the repl_text is
appended to the end of the orig_text.
If the start_position is less than 1, the
#VALUE! is returned.
Ascent Software
User's Guide
4-51
The num_chars is the number of characters
one wishes to replace. If this argument is
negative, the #VALUE! is returned.
The repl_text is the replacement text string.
See Also
MID, SEARCH and TRIM functions
Examples
REPLACE(“For the year: 1993”,
1, “4”) returns “For the year: 1994”
18,
4.2.2.76 REPT
Description
Repeats a text string a specified number of
times.
Syntax
REPT(text, number)
The text is any text string.
The number is the number of times that you
want the text to be repeated. If the number is
0, empty text ("") is returned.
4-52
Remarks
The result of the REPT cannot exceed 255
characters.
Examples
REPT(“error-”, 3)returns “error-error-error-”
Ascent Software
User's Guide
4.2.2.77 RIGHT
Description
Returns the characters furthest right from the
given text string.
Syntax
RIGHT(text [, num_chars])
The text is any text string.
The num_chars is the number of characters
one wishes to return. The value must be
greater than or equal to zero. If the num_chars
is greater than the number of characters in the
text, the entire string is returned. Omitting this
argument assumes a value of 1.
See Also
LEFT and MID functions
Examples
RIGHT(“2nd Quarter”) returns “r”
RIGHT(“2nd
“Quarter”
Quarter”,
7)
returns
4.2.2.78 ROUND
Description
Rounds the given number to the supplied
number of decimal places.
Syntax
ROUND(number, precision)
The number is any value.
The precision is the number of decimal places
to which the number is rounded.
When a negative precision is used, the digits
to the right of the decimal point are dropped
and the absolute number of the significant
digits specified by the precision are replaced
with zeros.
If the precision is 0, the number is rounded to
the nearest integer.
Ascent Software
User's Guide
4-53
See Also
CEILING, FLOOR, INT, MOD and TRUNC
functions
Examples
ROUND(123.456, 2) returns 123.46
ROUND(9899.435, -2) returns 9900
4.2.2.79 ROW
Description
Returns the row number of the supplied
reference.
Syntax
ROW(reference)
The reference is a cell or a range reference.
Omitting this argument returns the row
number of the cell in which the ROW is
entered.
See Also
COLUMN and ROWS function
Examples
ROW(B3) returns 3
4.2.2.80 ROWS
Description
Returns the number of rows in a range
reference.
Syntax
ROWS(range)
The range is a reference to a range of cells.
See Also
COLUMNS and ROW functions
Examples
ROWS(A1:D5) returns 5
ROWS(C30:F35) returns 6
4-54
Ascent Software
User's Guide
4.2.2.81 SEARCH
Description
Locates the position of the first character of a
specified text string within another text string.
Syntax
SEARCH(search_text, text [, start_position])
The search_text is the text one wishes to find.
The search string can contain wild card
characters. The available wild card characters
are * (an asterisk), which matches any
sequence of characters and ? (a question
mark), which matches any single character.
To search for an asterisk or a question mark,
include a tilde (~) before the character.
The text is the text to be searched.
The start_position is the character position
where the search begins. If the number you
specify is less than 0 or greater than the
number of characters in the text, the #VALUE!
is returned. Omitting this argument assumes a
starting position of 1.
Remarks
The text is searched from left to right, starting
from the position specified. The search is not
case-sensitive. If the text does not contain the
search string, the #VALUE! is returned.
See Also
FIND, MID,
functions
Examples
SEARCH(“?5”, “Bin b45”) returns 6
REPLACE
and
SUBSTITUTE
SEARCH(“b”, “Bin b45”, 4) returns 5
Ascent Software
User's Guide
4-55
4.2.2.82 SECOND
Description
Returns the second that corresponds to the
supplied date.
Syntax
SECOND(serial_number)
The serial_number is the time expressed as a
serial number. The decimal portion of the
number represents the time as a fraction of the
day.
See Also
DAY, HOUR, MINUTE, MONTH,
WEEKDAY and YEAR functions
Examples
SECOND(.259) returns 58
NOW,
SECOND(34657.904) returns 46
4.2.2.83 SIGN
Description
Determines the sign of the specified number.
Syntax
SIGN(number)
The number is any number.
Remarks
The SIGN returns 1 if the specified number is
positive, -1 if it is negative and 0 if it is 0.
See Also
ABS function
Examples
SIGN(-123) returns -1
SIGN(123) returns 1
4-56
Ascent Software
User's Guide
4.2.2.84 SIN
Description
Returns the sine of the supplied angle.
Syntax
SIN(number)
The number is the angle expressed in radians.
If the angle is expressed in degrees, convert
the angle to radians by multiplying the angle
by PI()/180.
See Also
ASIN and PI functions
Examples
SIN(45) returns .85
SIN(90) returns .89
4.2.2.85 SINH
Description
Returns the hyperbolic sine of the specified
number.
Syntax
SINH(number)
The number is any number.
See Also
ASINH and PI functions
Examples
SINH(1) returns 1.18
SINH(3) returns 10.02
Ascent Software
User's Guide
4-57
4.2.2.86 SQRT
Description
Returns the square root of the specified
number.
Syntax
SQRT(number)
The number is any positive number. If you
specify a negative number, the #NUM! is
returned.
See Also
SUMSQ function
Examples
SQRT(9) returns 3
SQRT(2.5) returns 1.58
4.2.2.87 STDEV
Description
Returns the standard deviation of a population
based on a sample of supplied values. The
standard deviation of a population represents
an average of deviations from the population
mean within a list of values.
Syntax
STDEV(number_list)
The number_list is a list of as many as 30
numbers separated by commas. The list can
contain numbers or a reference to a range that
contains numbers.
4-58
See Also
STDEVP, VAR and VARP functions
Examples
STDEV(4.0, 3.0, 3.0, 3.5, 2.5, 4.0,
3.5) returns .56
Ascent Software
User's Guide
4.2.2.88 STDEVP
Description
Returns the standard deviation of a population
based on an entire population of values. The
standard deviation of a population represents
an average of deviations from the population
mean within a list of values.
Syntax
STDEVP(number_list)
The number_list is a list of as many as 30
numbers separated by commas. The list can
contain numbers or a reference to a range that
contains numbers.
See Also
STDEV, VAR and VARP functions
Examples
STDEVP(4.0, 3.0,
4.0, 3.5) returns .52
3.0,
3.5,
2.5,
4.2.2.89 SUBSTITUTE
Description
Replaces a specified part of a text string with
another text string.
Syntax
SUBSTITUTE(text, old_text, new_text
[, instance])
The text is a text string that contains the text
one wishes to replace. You can also specify a
reference to a cell that contains text.
The old_text is the text string to be replaced.
The new_text is the replacement text.
The instance specifies the occurrence of the
old_text one wishes to replace. If this
argument is omitted, every instance of the
old_text is replaced.
See Also
REPLACE and TRIM functions
Ascent Software
User's Guide
4-59
Examples
SUBSTITUTE(“User Name: Customer”,
“Customer”, “John Doe”) returns “User
Name: John Doe”
SUBSTITUTE(“Blank 1, Control 1”,
“1”, “2”, 2) returns “Blank 1, Control 2”
4.2.2.90 SUM
Description
Returns the sum of the supplied numbers.
Syntax
SUM(number_list)
The number_list is a list of as many as 30
numbers separated by commas.
The list can contain numbers, logical values,
text representations of numbers or a
reference to a range containing those values.
Error values or text that cannot be translated
into numbers return errors.
If a range reference is included in the list, text,
logical expressions and empty cells in the
range are ignored.
See Also
AVERAGE, COUNT, COUNTA and SUMSQ
functions
Examples
SUM(1000, 2000, 3000) returns 6000
SUM(A10:D10) returns 4000 when each cell in
the range contains 1000.
4-60
Ascent Software
User's Guide
4.2.2.91 SUMSQ
Description
Squares each of the supplied numbers and
returns the sum of the squares.
Syntax
SUMSQ(number_list)
The number_list is a list of as many as 30
numbers separated by commas.
The list can contain numbers, logical values,
text representations of numbers or a
reference to a range containing those values.
Error values or text that cannot be translated
into numbers return errors.
If a range reference is included in the list, text,
logical expressions and empty cells in the
range are ignored.
See Also
SUM function
Examples
SUMSQ(9, 10, 11) returns 302
4.2.2.92 T
Description
Tests the supplied value and returns the value
if it is text.
Syntax
T(value)
The value is the value one wishes to test.
Remarks
Empty text ("") is returned for any value that is
not text.
See Also
N and VALUE functions
Examples
T(“Report”) returns “Report”
T(A4) returns empty text ("") if A4 contains a
number.
Ascent Software
User's Guide
4-61
4.2.2.93 TAN
Description
Returns the tangent of the specified angle.
Syntax
TAN(number)
The number is the angle expressed in radians.
To convert a number expressed as degrees to
radians, multiply the degrees by 180/PI().
See Also
ATAN, ATAN2, PI and TANH functions
Examples
TAN(45) returns 1.62
TAN(90) returns -2.00
4.2.2.94 TANH
Description
Returns the hyperbolic tangent of a number.
Syntax
TANH(number)
The number is any number.
See Also
ATANH, COSH, SINH and TAN functions
Examples
TANH(-2) returns -.96
TANH(1.2) returns .83
4-62
Ascent Software
User's Guide
4.2.2.95 TEXT
Description
Returns the given number as text using the
specified formatting.
Syntax
TEXT(number, format)
The number is any value, a formula that
evaluates to a number or a reference to a cell
that contains a value.
The format is a string representing a number
format. The string can be any valid format
string including “General”, “M/DD/YY” or
“H:MM AM/PM”. The format must be
surrounded by a set of double quotation
marks. Asterisks cannot be included in the
format.
See Also
FIXED, T and VALUE functions
Examples
TEXT(123.62, “0.000”) returns 123.620
TEXT(34626.2,
10/19/94
“MM/DD/YY”)
returns
4.2.2.96 TIME
Description
Returns a serial number for the supplied time.
Syntax
TIME(hour, minute, second)
The hour is a number from 0 to 23.
The minute is a number from 0 to 59.
The second is a number from 0 to 59.
See Also
HOUR, MINUTE, NOW,
TIMEVALUE functions
SECOND
Examples
TIME(12, 26, 24) returns .52
and
TIME(1, 43, 34) returns .07
Ascent Software
User's Guide
4-63
4.2.2.97 TIMEVALUE
Description
Returns a serial number for the supplied text
representation of time.
Syntax
TIMEVALUE(text)
The text is a time in text format.
See Also
HOUR, MINUTE, NOW, SECOND and TIME
functions
Examples
TIMEVALUE(“1:43:43 am”) returns .07
TIMEVALUE(“14:10:07”) returns .59
4.2.2.98 TODAY
4-64
Description
Returns the current date as a serial number.
Syntax
TODAY()
Remarks
This function is updated only when the
worksheet is recalculated.
See Also
DATE, DAY and NOW functions
Ascent Software
User's Guide
4.2.2.99 TRIM
Description
Removes all the spaces from the text except
single spaces between words.
Syntax
TRIM(text)
The text is any text string or a reference to a
cell that contains a text string.
Remarks
Text that is imported from another
environment may require this function.
See Also
CLEAN, MID, REPLACE and SUBSTITUTE
functions
Examples
TRIM(“ Sample 1, Sample 2 ”) returns
“Sample 1, Sample 2”
4.2.2.100
TRUE
Description
Returns the logical value True. This function
always requires the trailing parentheses.
Syntax
TRUE()
See Also
FALSE function
4.2.2.101
TRUNC
Description
Truncates the given number to an integer.
Syntax
TRUNC(number [, precision])
The number is any value.
The precision is the number of decimal places
allowed in the truncated number. Omitting
this argument assumes a precision of 0.
Ascent Software
User's Guide
4-65
Remarks
The TRUNC removes the fractional part of a
number to the specified precision without
rounding the number.
See Also
CEILING, FLOOR, INT, MOD and ROUND
functions
Examples
TRUNC(123.456, 2) returns 123.45
TRUNC(9899.435, -2) returns 9800
4.2.2.102
TYPE
Description
Returns the argument type of the given
expression.
Syntax
TYPE(expression)
The expression is any expression.
Remarks
The following table lists the expression types
and numbers.
Expression type
Number
Number
1
Text string
2
Logical value
4
Error value
16
See Also
ISBLANK, ISERR, ISERROR, ISLOGICAL,
ISNA, ISNONTEXT, ISNUMBER, ISREF and
ISTEXT functions
Examples
TYPE(A1) returns 1 if cell A1 contains a
number.
TYPE(“Customer”) returns 2
4-66
Ascent Software
User's Guide
4.2.2.103
UPPER
Description
Changes the characters in the specified string
to uppercase characters.
Syntax
UPPER(text)
The text is any string.
Remarks
The numerical characters in the string are not
changed.
See Also
LOWER and PROPER functions
Examples
UPPER(“Moving type:7”) returns “MOVING
TYPE:7”
UPPER(“My Name”) returns “MY NAME”
4.2.2.104
VALUE
Description
Returns the specified text as a number.
Syntax
VALUE(text)
The text is any text string, a formula that
changes to a text string or a cell reference that
contains a text string. You can also specify a
date or time in a recognizable format (e.g.
M/DD/YY for dates or H:MM AM/PM for time).
If the format is not recognized, the #VALUE! is
returned.
See Also
FIXED and TEXT functions
Examples
VALUE(9800) returns 9800
VALUE(“123”) returns 123
Ascent Software
User's Guide
4-67
4.2.2.105
VAR
Description
Returns the variance of a population based on
a sample of values.
Syntax
VAR(number_list)
The number_list is a list of as many as 30
numbers separated by commas. The list can
contain numbers or a reference to a range that
contains numbers.
See Also
STDEV, STDEVP and VARP functions
Examples
VAR(4.0, 3.0, 3.0, 3.5, 2.5, 4.0,
3.5) returns .31
4.2.2.106
VARP
Description
Returns the variance of a population based on
an entire population of values.
Syntax
VARP(number_list)
The number_list is a list of as many as 30
numbers separated by commas. The list can
contain numbers or a reference to a range that
contains numbers.
4-68
See Also
STDEV, STDEVP and VAR functions
Examples
VARP(4.0, 3.0, 3.0, 3.5, 2.5, 4.0,
3.5) returns .27
Ascent Software
User's Guide
4.2.2.107
VLOOKUP
Description
Searches the first column of a table for a value
and returns the contents of a cell in the table
that corresponds to the location of the search
value.
Syntax
VLOOKUP(search_item, search_range,
column_index)
The search_item is a value, text string or
reference to a cell containing a value that is
matched against data in the top row of the
search_range.
The search_range is the reference of the
range (table) to be searched. The cells in the
first column of the search_range can contain
numbers, text or logical values. The contents
of the first column must be in ascending order
(e.g. -2, -1, 0, 2...A through Z, False, True).
Text searches are not case-sensitive.
The column_index is the column in the search
range from which the matching value is
returned.
The column_index can be a number from 1 to
the number of rows in the search range.
If the column_index is less than 1, the
#VALUE! is returned.
When the column_index is greater than the
number of rows in the table, the #REF! is
returned.
Remarks
VLOOKUP compares the information in the
first column of the search_range to the
supplied search_item. When a match is found,
information located in the same row and
supplied column (column_index) is returned.
If the search_item cannot be found in the first
Ascent Software
User's Guide
4-69
column of the search_range, the largest value
that is less than the search_item is used.
When the search_item is less than the
smallest value in the first column of the
search_range, the #REF! is returned.
HLOOKUP, INDEX, LOOKUP and MATCH
functions
See Also
4.2.2.108
WEEKDAY
Description
Returns the day of the week that corresponds
to the supplied date.
Syntax
WEEKDAY(serial_number)
The serial_number is the date expressed as a
serial number or as text (e.g. “06-21-94” or
“21-Jun-94”).
Remarks
WEEKDAY returns a number ranging from 1
(Sunday) to 7 (Saturday).
See Also
DAY, NOW, TEXT and TODAY functions
Examples
WEEKDAY(34399.92) returns 1, indicating
Sunday
WEEKDAY(“06/21/94”) returns 3, indicating
Tuesday
4-70
Ascent Software
User's Guide
4.2.2.109
YEAR
Description
Returns the year that corresponds to the
supplied date.
Syntax
YEAR(serial_number)
The serial_number is the date expressed as a
serial number or as text (e.g. “06-21-94” or
“21-Jun-94”).
See Also
DAY, HOUR, MINUTE, MONTH, NOW,
SECOND, TODAY and WEEKDAY functions
Examples
YEAR(34328) returns 1993
YEAR(“06/21/94”) returns 1994
Ascent Software
User's Guide
4-71
4.3
Chart reference
4.3.1
Chart terminology
Charts provide a graphical presentation of data. Values or data points
are displayed in formats such as: bars, lines, markers, filled areas,
bubbles, or pie slices. These data points are grouped into series that are
identified with unique colors or patterns. In many chart types, one data
point from each series is grouped together by category along an axis.
Charts can also have titles, backdrops, legends, plots and footnotes.
The following illustration identifies the elements on a typical two
dimensional (2-D) chart.
4-72
Ascent Software
User's Guide
The following illustration identifies the elements on a typical three
dimensional (3-D) chart.
4.3.2
Chart data grid
Each chart is associated with a data grid. This data grid is a table that
holds the data that is being charted. The data grid can also include
labels used to identify series and categories on the chart. The user, who
designs a chart application, fills the data grid with information by
inserting data or by importing data from a spreadsheet or array.
In most cases, each column in the data grid translates into one series on
the chart. However, the Program supports a number of chart types that
require two or more columns of data to chart a series. These chart types
include XY, polar, bubble, hi-lo and gantt charts.
Ascent Software
User's Guide
4-73
4.3.3
Chart types
4.3.3.1
Area charts
Use area charts to emphasize the relative importance of values over a
period of time. An area chart focuses on the magnitude of change rather
than the rate of change. Each filled area on the chart represents a series
and is identified by a different color or pattern. Values are plotted on the
vertical (Y) axis and categories are plotted on the horizontal (X) axis. You
can also chart one or more series against the secondary Y axis instead
of against the primary axis.
4.3.3.2
Bar charts
Use bar charts to compare one item to another or to compare a number
of items over a period of time. These charts are particularly effective at
showing large changes from one category to another. Each 2-D or 3-D
bar represents a value in the data grid. Bars representing a series are
located at the same position in each category and have the same color
and pattern.
In 2-D charts values are grouped on the vertical (Y) axis and bars are
grouped by category along the horizontal (X) axis. On 3-D charts the
values are plotted on the vertical (Y) axis, the categories are grouped
along the horizontal (X) axis and the depth (Z) axis shows the series.
4.3.3.3
Horizontal bar charts
Horizontal bars are similar to standard bar charts except that the
categories are organized on a vertical (X) axis and the values are plotted
on a horizontal (Y) axis.
4.3.3.4
Clustered bar charts
Series and data points on a clustered bar chart are displayed as they are
on a 2-D bar chart, however, the chart and all the chart elements are
displayed on a 3-D chart.
4-74
Ascent Software
User's Guide
4.3.3.5
Line charts
Use line charts to show trends or changes in data over a period of time.
These charts emphasize the time flow and rate of change, rather than
the amount of change.
On 2-D line charts the values are plotted along the vertical (Y) axis and
the categories are displayed on the horizontal (X) axis. On 3-D charts the
values are plotted on the vertical (Y) axis, the categories are grouped
along the horizontal (X) axis and the depth (Z) axis shows the series.
4.3.3.6
Step charts
Use step charts to compare items that do not show trends. Step charts
display distinct points along the value (Y) axis with vertical lines showing
the difference between each point. The horizontal (X) axis shows the
categories.
4.3.3.7
Combination charts
Use combination charts to visually highlight the differences between
multiple series of data. A different method can be used to draw each
data series.
4.3.3.8
Pie and doughnut charts
Use pie or doughnut charts to show the relationship of parts to the
whole. Each pie or doughnut represents a category. Each slice of the pie
or doughnut represents a value in that category. You can separate or
“explode” slices on a chart by clicking a slice and dragging it away from
the rest of the pie or doughnut.
4.3.3.9
Radar charts
Use radar charts to show changes or frequencies of each series relative
to a center point and to one another. Lines connect all the data markers
in the same series. You can choose to fill the lines, thereby creating a
radar area chart.
Ascent Software
User's Guide
4-75
4.3.3.10 XY charts
Use XY charts to plot two groups of numbers as one series of XY
coordinates. Each series on the chart requires two columns of data in
the data grid. The first column holds the X coordinate and the second
column the Y coordinate. The column label in the first column in each
series is used to identify the series in the legend. Additionally, any
formatting applied to the first column is used to display the series on the
chart. Any formatting applied to the second column is ignored. You can
use markers or lines or both to draw the XY points.
4.3.3.11 Polar charts
Use polar charts to show cyclical trends. The polar chart requires two
columns in the data grid for each chart series: the first column holds the
distance from the center of the chart (the radius), and the second
column contains the angle on the perimeter of the chart. The column
label in the first column in each series identifies the series in the legend.
Additionally, any formatting applied to the first column is used to display
the series on the chart. Any formatting applied to the second column is
ignored.
4.3.3.12 Bubble charts
Use bubble charts to show a visual comparison using three coordinates.
Each bubble requires three columns of data in the data grid. The first
column holds the X coordinate, the second the Y coordinate and the
third the bubble size. All the coordinates on a bubble chart measure
values. Therefore, the vertical (Y) axis and the horizontal (X) axis both
show values. The column label in the first column in each series
identifies the series in the legend. Additionally, any formatting applied to
the first column is used to display the series on the chart. Any formatting
applied to the second and third columns is ignored.
4-76
Ascent Software
User's Guide
4.3.3.13 Hi-Lo charts
Hi-lo charts are most commonly used to show stock market information.
However, these chart types can also be applied to scientific data such as
indicating changes in readings over a period of time. The vertical (Y) axis
shows the values and the horizontal (X) axis shows the categories or
dates.
The Program supports a number of variations of the hi-lo charts. These
include: hi-lo-close with the close marker crossing the data point or
extending to the right of the data point, open-hi-lo-close, and open-hi-loclose bar.
The data in the data grid must be organized appropriately for each
variation of the hi-lo chart.
A hi-lo chart requires two columns for each data series: the first column
is used for the high point and the second is used for the low point.
A hi-lo-close chart requires three columns for each data series: the first
column is used for the high point, the second for the low point, and the
third for the closing point.
An open-hi-lo-close or an open-hi-lo-close bar chart (sometimes called
candlestick charts) requires four columns of data for each data series:
the first column is used for the opening point, the second for the high
point, the third for the low point, and the fourth for the closing point.
The column label in the first column in each series identifies the series in
the legend. Additionally, any formatting applied to the first column is
used to display the series on the chart. Any formatting applied to the
remaining columns that make up the series is ignored.
4.3.3.14 Gantt charts
Use gantt charts to display a range of bars that indicate the relative time
required for various activities within a project. The horizontal axis (Y)
shows the dates and the vertical axis (X) shows the categories. This
chart type requires two columns of data for each series. The first column
holds the starting date and the second column holds the duration.
Ascent Software
User's Guide
4-77
4.3.4
Selecting chart elements
You can click the left mouse button once on a chart element in order to
select it. The following table provides information on how to select each
chart element.
To select...
Click...
Effect
Chart
On the chart, but not
on a specific chart
element.
Selection handles appear
around the chart.
Chart title
Anywhere in the title
area.
Selection handles appear
around the title. You can
resize or reposition it.
Footnote
Anywhere in the
footnote area.
Selection handles appear
around the footnote. You
can resize or reposition it.
Legend
In the legend, but not
the legend keys.
Selection handles appear
around the legend. You can
resize or reposition it.
Series
On an element in an
unselected series or
on the legend key
identifying the series.
Selection handles appear
on all elements of the chart
series. A handle also
appears on the legend key.
Series label
Anywhere on the
series label.
Selection handles appear
around the label. You can
reposition it.
Plot
In the plot, but not on
a specific chart
element.
Selection handles appear
around the chart plot. You
can resize or reposition it.
Continued
4-78
Ascent Software
User's Guide
To select...
Click...
Effect
Axis
On the axis text, axis
line or axis ticks.
Selection handles appear
on the axis. You cannot
manually resize the axis.
Axis title
Anywhere in the axis
title area.
Selection handles appear
around the axis title.
Chart grid
On any grid line.
Selection handles appear
around the grid.
2-D wall and 3-D
wall or base
Any part of the base
or wall other than a
grid line.
Selection handles appear
around the wall on a 2-D
chart, and the base and wall
on a 3-D chart.
Data point
Click a data point in a
selected series or a
data point in the same
series as another
selected data point.
Selection handles appear
on the single data point
only.
Data point label
Anywhere on the data
point label.
Selection handles appear
around the data point label.
You can reposition it.
Ascent Software
User's Guide
4-79
4.3.5
Formatting chart elements
You can format any element of a chart by changing the settings in a
dialog box. Dialog boxes can be displayed by making a selection from a
menu or by double-clicking the appropriate chart element.
4.3.6
Floating menu
Click the right mouse button anywhere within a chart to display the
floating menu. Once the menu appears, use the left mouse button to
select a menu item. Clicking menu items followed by an arrow character
displays a submenu.
The following table describes the purpose of each item in the floating
menu.
Item
Dialog box
displayed
Purpose
General
Format Chart
Formats the fill, frame and shadow
displayed on the chart backdrop and
provides a convenient place to toggle on
and off the display of the title, legend,
footnote or the 2nd Y axis.
Plot
Format Plot
Changes the chart type, stacks or unstacks
chart series, turns lines and markers on or
off, controls the location of the plot,
formats the plot backdrop, reorders series,
sets chart type specific options and
controls the 3-D chart formatting and
lighting.
Series/Series
Format Series
Controls the display of series, plots a
series on a secondary axis, formats series
appearance such as bar shape, line style,
markers, and fill colors, sets series
smoothing and formats statistics lines and
guidelines.
Continued
4-80
Ascent Software
User's Guide
Item
Dialog box
displayed
Purpose
Series/Label
Format Series
Label
Controls the series label location and
line style, edits the label text,
formats the label text and position
and formats the label backdrop.
Series/Data Point
Format Data
Point
Formats the fill and marker of an
individual data point.
Series/Data Point
Label
Format Data
Point Label
Controls the type and location of the
label on an individual data point,
formats the font and layout of the
label text and formats the label
backdrop.
Axis/Axis
Format Axis
Formats the width and color of the
axis, axis grid, and axis ticks and
changes the axis scale.
Axis/Label
Format Axis
Label
Formats the axis label backdrop and
font, and controls the positioning
and alignment of the axis labels.
Axis/Title
Format Axis
Title
Formats the axis title backdrop and
font, edits the axis title text, and
controls the display of the axis title
and its location.
Legend
Format Legend
Formats the legend backdrop,
changes the font used to display the
legend text and controls the legend
location.
Title
Format Title
Formats the title backdrop and font,
edits the title text and controls the
display of the title and its location.
Continued
Ascent Software
User's Guide
4-81
Item
Dialog box
displayed
Purpose
Footnote
Format Footnote
Formats the footnote backdrop and font,
edits the footnote text, controls the display of
the footnote and its location.
Copy
None
Places a copy of the current chart on the
clipboard in Windows Metafile (.wmf) format.
Paste
None
Takes a graphic in Windows Bitmap (.bmp) or
Windows Metafile (.wmf) format from the
clipboard and places it on the selected
element’s backdrop or fill.
Print
Print
Displays the Print dialog box.
Save As
Save As
Saves the current file as a chart file (.vtc), a
bitmap (.bmp) or a metafile (.wmf).
Load
Load Chart
Loads an existing chart file into the current
chart control. The chart that you load
replaces the chart already in the control.
If you use the menu to display the Format Axis, Format Axis Title,
Format Axis Label, Format Series, Format Series Label, Format Data
Point or Format Data Point Label dialog boxes, you are prompted to
identify the specific axis, series or data point that you want to modify.
4-82
Ascent Software
User's Guide
4.3.7
Double-clicking chart elements
You can also display dialog boxes by double-clicking chart elements.
The following table lists the dialog box displayed, when you double-click
various chart elements.
To format
Double-click
Dialog box
Tab
Chart Backdrop
The chart, but not on a
specific chart element.
Format Chart
Backdrop
Footnote
Any part of the footnote.
Format
Footnote
Text
Title
Any part of the title.
Format Title
Text
Legend Backdrop
Anywhere in the legend
area other than the text
or keys.
Format
Legend
Backdrop
Legend Text
The legend text.
Format
Legend
Font
Plot
Anywhere in the plot
area, but not on a
specific chart element.
Format Plot
Type
Axis Label
An axis label.
Format
Label
Font
Axis Line or Ticks
The line or ticks on an
axis.
Format Axis
Scale
Axis Title
The axis title text.
Format
Title
Text
Grid
Any grid line.
Format Axis
Axis
Axis
Grid
Continued
Ascent Software
User's Guide
4-83
To format
Double-click
Dialog box
Tab
3-D Base or Wall
Anywhere on the base
or wall other than a
grid line.
Format Plot
Base & Walls
Series
A chart element in an
unselected series or
the legend key
identifying the series.
Format
Series
Line for line type
series
Data Point
A selected data point
or a point in the same
series as a selected
data point.
Format Data
Point
Options or Fill if
series defaults
have been
overridden.
Series Label
The series label.
Format
Series Label
Options or Text if
series defaults
have been
overridden.
Data Point Label
The data point label.
Format Data
Point Label
Options or Text if
series defaults
have been
overridden.
4.3.8
Fill for all others
Using dialog boxes
Most dialog boxes provide sets of options grouped on separate tabs. As
you click each tab, the controls in the dialog box change to allow you to
edit a different set of options. Any options that are not appropriate for
the current chart type or situation are applied with gray shading.
4-84
Ascent Software
User's Guide
4.4
Remote Control Interface
Ascent Software enables integration with robotics and HIS/LIMS
systems by using the Remote Control Interface. The execution of
predefined assays can be controlled remotely by changing files between
Ascent Software and the host system.
Ascent Software is started with an additional /R command flag which
indicates to Ascent Software that it needs to start monitoring a file
named “REMOTE.CMD” in its own working directory.
Click on your Ascent Software icon with the right mouse button, select
Properties → Shortcut and add the /R command flag as illustrated
below, e.g. C:\Ascento\APPFWG1.EXE /DC /R.
Ascent Software
User's Guide
4-85
When you start Ascent Software, you will see on top of the Ascent
window a text similar to the following:
Ascent Software Version 2.5 - DEFAULT.SEC In Remote Control
which now indicates that the software is monitoring the REMOTE.CMD
file to exist in its directory (in this example the C:\ASCENTO - directory).
Create a (simple) session and give it the name “remote.sec”.
Note:
4-86
Use the correct session filename extensions. In the example
below *.sec has been used for the Fluoroskan Ascent FL
session files.
Ascent Software
User's Guide
Use *.sed for the Multiskan Ascent session files, *.see for the iEMS
Ascent session files, *.sef for the Fluoroskan Ascent session files, and
*.sel for the Luminoskan Ascent session files, respectively.
Note:
You should not run Ascent Software in REMOTE mode and
manually at the same time, since this may cause some
unexpected situations and a possible crash. To avoid this you
should have at least two icons, one for normal use and one for
remote use.
REMOTE.CMD file
The command set is described in the Ascent Software Remote Control
Interface (Interface based on files) document.
This document describes the syntax of the commands which are:
• START
• ABORT
• INSTRUMENT STATE
• KILL
• CONTINUE
This file can be created using e.g. MS Notepad (Start → Programs →
Accessories → Notepad).
START
c:\ascento\remote.sec
c:\ascento\response.txt
Ascent Software
User's Guide
4-87
DO NOT forget to type the .extensions.
Save the file in another directory (c:\remote) with the name
“REMOTE.CMD”. Note that you have to select “All Files (*.*)” as the
Save As type:
Using Explorer locate your (c:\remote\) remote.cmd file and copy (select
the file and while pressing the Ctrl key drag and drop ) this file into your
Ascent (c:\ascento) directory.
4-88
Ascent Software
User's Guide
Note for real robot systems: It is recommended to create/edit a file with
another name than “remote.cmd” (e.g. “remote.cm_”) in the Ascent
directory. When the file is ready, it should be renamed “remote.cmd” by
using the rename command (rename remote.cm_ remote.cmd). In this
way the file is ready and free (not half-ready or used by another
program) when Ascent Software detects it.
As soon as you have copied the file, Ascent Software recognizes the file,
opens the file and starts to run the defined session (remote.sec).
Once the run is completed in this example, a response file named
“response.txt” is generated in the defined directory (c:\ascento). The file
can look like this:
[HEADER]
Instrument_Type=Fluoroskan Ascent FL 1.8
Instrument_Serial_Number=374000-007-0C
COM_port=0
Date_Time_Started=30.12.1997 13:6:20
Date_Time_Ended=30.12.1997 13:6:45
Input_Filename=c:\ascento\remote.sec
Output_Filename=c:\ascento\response.txt
[RESULT_FORMAT]
Plate_Type=96
Number_of_Plate_Data=1
Number_Columns=12
Number_Rows=8
Column_Dimension=1
Row_Dimension=1
[DATA01]
ROW1=
ROW2=
ROW3=
ROW4=
ROW5=
ROW6=
ROW7=
ROW8=
1.365290
1.247860
1.314892
1.214340
1.509920
1.556931
1.629191
1.763220
1239231
1239470
1239577
1239816
1239924
1240163
1240270
1240509
2.390992
2.038040
3.107760
1.801290
4.712982
6.065250
6.431550
6.358040
1239237
1239464
1239583
1239810
1239930
1240157
1240276
1240503
12.775000
10.887500
11.355630
10.971920
19.167600
23.241800
23.153000
22.923640
(The data extends up to 12 columns ->)
Ascent Software
User's Guide
4-89
When the remote.cmd file has been detected and read by Ascent
Software, the file is deleted from the directory. Now it is possible to
write (copy) another file in this directory inquiring e.g. for the state of
Ascent Software (STATE), continue after a Pause step (CONTINUE),
launch a new plate with the same (or different) session (START) etc.
Finally you can exit Ascent Software by sending a KILL command file.
Note:
By default if the response file already exists, the file is
overwritten.
The START command can have optional parameters, such as APPEND.
That means that the output file is appended and not overwritten.
Another option is a PLATEID = followed with a plate identification code. If
this option is used, the plate identification code is added to the response
file.
You can also save individual sheets from the Results Desktop. This is
handy when you have predefined report sheets. Then the command file
can look like this:
START PLATEID=12345 APPEND
c:\ascento\remote.sec
c:\ascento\response.txt
results
c:\ascento\results.txt,
where the Results sheet is your report sheet.
4-90
Ascent Software
User's Guide
Note:
Be sure to write the sheet name exactly in the same way as in
your session, since the sheet names are case-sensitive.
Otherwise there will be an Application error.
The results.txt file can look like this in Excel:
Session:
c:\ascento\remote.sec
Started at: 30.12.1997 14:19
Filter
pair Ex=485 Em=538
(nm):
A
B
C
D
E
F
G
H
1
1.309
1.28
1.322
1.218
1.515
1.554
1.668
1.749
2
2.373
2.017
3.137
1.791
4.7
6.124
6.495
6.242
3
12.881
10.864
11.272
11.02
19.24
23.027
23.194
22.933
4
48.405
45.796
43.611
43.365
75.308
82.877
78.094
79.244
5
150.513
143.511
139.964
141.633
223.062
231.391
230.964
230.82
6
25.494
24.079
22.321
21.709
107.191
116.059
20.708
21.16
AVG
MIN
MAX
STD
1.452
1.218
1.749
0.184
4.11
1.791
6.495
1.883
16.804
10.864
23.194
5.452
62.088
43.365
82.877
16.964
186.482
139.964
231.391
42.742
44.84
20.708
116.059
38.65
(Data extends to 12 columns ->)
Note:
Another way of saving sheets is to have a Save/Load step
(Sheet → Steps) in your session and check the Autoname file
function.
Note for real robot systems: Even when Ascent Software writes the
results as a separate file, the system control software should monitor the
response.txt file, not the other result file. That is because Ascent
Software can still write the rest of the results in the file when this result
file is seen by the system control software. When the response.txt file is
made, Ascent Software has performed all the actions and the results file
can be used. It is also recommended to verify that there are no error
messages in the response.txt file before using the result files.
Ascent Software
User's Guide
4-91
Pause step
If you need to drive the plate out during a session and access the plate
through some other automated process, use the Pause step. During the
Pause step the plate is driven out and it can be manipulated. When the
system is ready to continue the session, write a REMOTE.CMD file with
the CONTINUE command.
Example on how to demonstrate/test remote functions
Assuming that there are two sessions, namely session1.sec and
session2.sec, it is possible to run Ascent Software continuously with the
following batch file:
Contents of the remote.bat file
@echo off
if exist response.txt del response.txt
:start
echo
choice /C:yn /Ty,5 Continue ?
if errorlevel 2 goto end
copy session.1 remote.cm_
rename remote.cm_ remote.cmd
:wait1
choice /C:yn /Ty,5 Continue ?
if errorlevel 2 goto end
if not exist response.txt goto wait1
find /C "[ERROR]" response.txt
if not errorlevel 1 goto error
del response.txt
copy session.2 remote.cm_
rename remote.cm_ remote.cmd
:wait2
choice /C:yn /Ty,5 Continue ?
if errorlevel 2 goto end
if not exist response.txt goto wait2
find /C "[ERROR]" response.txt
if not errorlevel 1 goto error
del response.txt
goto start
:error
echo Error in response.txt file
:end
4-92
Ascent Software
User's Guide
Contents of the session.1 file
START
session1.sec
response.txt
Contents of the session.2 file
START
session2.sec
response.txt
To demonstrate and test different remote commands, it is
recommended to have remote.cmd files, which have different
commands, in folders of their own. By copying files in the right order, it
is possible to show the effect of different commands.
Ascent Software
User's Guide
4-93
4.5
Computer control commands
4.5.1
Remote commands of the Ascent
Instrument
The Ascent Instrument connected to a PC uses the serial port (1...4). The
baud rate is 9600 with 1 start bit, 8 data bits, 1 stop bit and no parity.
XON/XOFF software handshaking is used.
4.5.2
Protocol
All data is transferred in case-sensitive ASCII lines. The end character of
the command and response lines is <CR> and <LF> or all possible
combinations thereof (CR, LF, CR LF, LF CR). The maximum length of the
command or response line is 200 characters.
4.5.3
Command format
The command line contains 3 unique header characters, parameters and
end character(s). The header characters are used to separate different
commands. Parameters are separated using the <SPACE> character.
The end characters of lines are <CR><LF>.
Example: ‘TEM 370 0’<CR><LF>
4-94
Ascent Software
User's Guide
4.5.4
Response format
Response lines consist of the header part of the command (3 character),
response information line(s), the response end field and the status and
end character of lines.
All commands are responded by sending a line, which contains the
header part of the command (3 character) immediately when the
execution of the command is started.
It is possible to send response information in more than one line. Every
line starts with the header part of the original command and ends with
<CR>< LF>. The fields of the response information string are
separated using the <SPACE> character.
The last line of the response contains the header part of the original
command, end field characters “END”, status characters and the end
characters <CR><LF>. Some of the commands have wait features,
which define if the last response line is acquired after the command is
executed or after the execution is started.
Example 1: Response to the TEM command with “no errors” status.
‘TEM’<CR><LF>
‘TEM END 0’<CR><LF>
4.5.5
Buffering
The PC and the instrument are able to receive more than one command
line at a time. Receiver buffer overflows are handled using XON/XOFF
handshaking. The maximum number of received characters is 2 Kbytes.
Note:
The abort command is always executed immediately.
Ascent Software
User's Guide
4-95
4.6
Warning and error messages
Usually the meaning of warning and error messages are self-explanatory
and any required correction is obvious. However, if the meaning of the
message is unclear, we recommend you to repeat the past action. If the
same message is generated once more, study the service manual or
contact your local dealer.
This chapter lists warning and error messages that the instrument or
Ascent Software generates.
4.6.1
Serial communication
Message
•
Could not open serial
port COM”NUMBER”.
Reason
The serial port is
maybe used by
another application.
•
Failed to open serial
port COM”NUMBER”.
The serial port is
maybe used by
another application.
•
No response from
the instrument.
The instrument and
Ascent Software are
not connected.
•
Serial port framing
error.
Serial port parity
error.
Serial port receiver
buffer overflow.
The serial cable may
be damaged.
The serial cable may
be damaged.
The computer did not
get all the data from
the serial port.
The computer did not
get all the data from
the serial port.
•
•
•
4-96
Serial port receiver
overrun error.
Actions
1. Close other
applications.
2. Reset the computer.
3. Contact PC support.
1. Close other
applications.
2. Reset the computer.
3. Contact PC support.
1. Ensure that the cable is
connected in both ends.
2. Reset the computer
and the instrument.
Ensure that the cable is
undamaged.
Ensure that the cable is
undamaged.
See readme.txt file in the
Ascent directory.
See readme.txt file in the
Ascent directory.
Ascent Software
User's Guide
4.6.2
Printer
Message
•
Error encountered
during printing.
•
Printer error.
•
Printing error.
•
Printing aborted in
the Print Manager.
4.6.3
There is a problem in
the printer.
There may be a
problem in the printer
settings.
Print jobs were
canceled in the Print
Manager.
Actions
Ensure that the printer
and printer settings are
correct.
Ensure that the printer
power is on and is online.
Ensure that the printer
settings are correct.
Try again.
Sheet
Message
•
Invalid formula
syntax.
•
Zero concentration
not allowed. Try
0.0001 instead.
•
The same
concentration is not
allowed in different
calibrators.
Curve fit variable
missing.
•
Reason
An error did occur
during printing.
Reason
The command you
have entered is
incorrect.
The fit type is 4PL or
the conc.
transformation is log
and the concentration
zero.
Different calibrators
have the same
concentration.
The hidden sheet
specific data is
corrupted or missing.
Actions
Check the list separator in
the Windows
environment. Refer to A-Z
Worksheet Function
Reference in the
Reference part of the
manual. Refer to Section
Before Installation in the
Overview part of the
manual.
Change the fit type,
transformation or the
concentration.
Change the calibrator
concentration.
Create a new curve fit
sheet.
Continued
Ascent Software
User's Guide
4-97
Message
•
Delete sheet: Cannot
delete.
•
•
•
Error in sheet
generation.
No layout found from
the source sheet
chain.
No source sheet
available.
•
No source sheet
name available.
•
No space for a new
sheet.
•
Not a valid filename.
•
Plate dimensions
missing.
•
Plate layout start
coordinate missing.
•
Sheet already exists.
•
Sheet variable
missing.
•
Source sheet sizes
are not the same.
•
The selected well
type not found.
•
The typed well name
not found.
Reason
The Measure sheet is
locked and cannot be
deleted.
Sheet creation did not
succeed.
The layout cannot be
found in the source
sheet.
The sheet given in the
properties does not
exist.
The sheet properties
do not contain the
source sheet name at
all.
1. Out of memory.
2. The sheet cannot be
created.
The name is not a
valid name.
The hidden sheet
specific data is
corrupted or missing.
The hidden sheet
specific data is
corrupted or missing.
A sheet with the given
name exists.
The hidden sheet
specific data is
corrupted or missing.
The plate size in
source sheets one and
two are different.
The selected well type
is not found from the
plate layout.
The typed well name
is not found from the
plate layout.
Actions
Change the sheet
properties.
Create a layout in the
layout editor.
Run the session.
Set the existing sheet to
the source sheet.
Set the source sheet
name in the sheet
properties.
Refer to Windows Help.
Try changing the name of
the sheet.
Change the name.
Create a new source
sheet.
Create a new source
sheet.
Try different sheet names.
Give the sheet an unique
name.
Modify the sheet
properties.
Create new source sheets.
Check the well type.
Double check the typing.
Continued
4-98
Ascent Software
User's Guide
Message
•
At least two enabled
calibrators required.
•
•
Calibrators
measurement values
are identical or
missing.
There is something
else than a number in
the source table.
4.6.4
Reason
There are less than 2
calibrators in the
layout of the source
sheet.
The Curve Fit sheet is
created before the
measurements are
done.
The Curve Fit sheet
failed to perform the
calculation.
Actions
Add the number of
calibrators in the layout.
Executing the session will
correct this automatically.
Check that the source
data is numbers.
File input/output
Message
•
Cannot find the
“FILENAME”.
•
Out of disk space.
Reason
The specified filename
is not found.
The disk is full.
•
Unable to read the
file “FILENAME” from
the disk.
The specified file is not
found or the disk is
damaged.
•
Unable to write the
file “FILENAME” on
the disk.
The disk may be
damaged.
Ascent Software
User's Guide
Actions
Ensure that the filename
and path are correct.
Some unused files should
be deleted or the Recycle
Bin should be emptied.
Ensure that the filename
and path are correct. Try
to read the floppy disk
from another computer.
Try to write on another
(floppy) disk.
4-99
4.6.5
User input/output
Message
•
Input not in the valid
list.
Reason
The user input is not
recognized by the
program.
•
Invalid characters in
the input.
The user input is not
recognized by the
program.
•
The password length
must be 5 to 10
characters.
Passwords not
identical.
The value should be
in the range
“NUMBER”,
“NUMBER”, ...
“NUMBER”.
The value should be
in the range
“NUMBER” to
“NUMBER”.
The password has less
than 5 or more than 10
characters.
The passwords were
not typed identically.
The user input is not
recognized by the
program.
•
•
•
4.6.6
Executable steps not
found.
4-100
Try again.
Try to rewrite the input
correctly. Usually the
cursor is flashing in an
unsatisfactory field.
The user input is not
recognized by the
program.
Try to rewrite the input
correctly. Usually the
cursor is flashing in an
unsatisfactory field.
Reason
The reader does not
have the heater
installed.
Actions
Remove the Step or
change the target
temperature.
There are two steps
that have identical
names.
There is only a General
step within the
Steplist.
Change the name of
either step.
Steplist
Message
•
Wrong temperature
in step:
“STEPNAME”. The
heater unit is not
connected.
•
Duplicate step name:
“STEPNAME”.
•
Actions
Try to rewrite the input
correctly. Usually the
cursor is flashing in an
unsatisfactory field.
Try to rewrite the input
correctly. Usually the
cursor is flashing in an
unsatisfactory field.
Try to use another
password.
Add steps (for example, a
Measure step) to the
Steplist.
Continued
Ascent Software
User's Guide
Message
•
Invalid sheet name.
Check that the
lowercase and
uppercase characters
are correct.
•
The Load step failed.
Check that the
filename and path are
correct.
•
No area definition in
step: “STEPNAME”.
•
The Save step failed.
Check that the sheet
name is correct.
•
Step name:
“STEPNAME” already
used in Results.
4.6.7
•
•
Actions
Ensure that the name of
the sheet is typed
correctly.
The filename
described in the
Save/Load step was
not found.
The measurement
area is not defined.
Ensure that the name of
the file and path are
correct.
The sheet name
described in the
Save/Load step was
not found.
An identical name was
found.
Define the measurement
area in the area definition
window.
Ensure that the name of
the sheet is typed
correctly.
Change the name of the
Measure step.
Miscellaneous
Message
•
The input does not
conform to a picture.
•
Reason
The sheet name
described in the
Save/Load step was
not found.
The instrument
operation was
aborted.
Unlisted error:
“NUMBER”.
Unlisted warning:
“NUMBER”.
Ascent Software
User's Guide
Reason
The user input is not
correct for this field.
Actions
Try to type the input value
according to the default
value by using the same
type of characters.
The user has pressed
the Abort button.
An unusual error has
occurred in the
instrument.
An unusual problem
has occurred in the
instrument.
Contact your local
Labsystems
representative.
Contact your local
Labsystems
representative.
4-101
4.6.8
Reader type related
Message
•
Wrong measurement
method.
•
Cannot load a
“SESSIONNAME”
session.
4.6.9
Reason
The Reader is not able
to carry out this
method, i.e. the
Reader is not correctly
configured.
There is a version
conflict between
Ascent Software and
the stored Session.
Actions
Use only measurement
methods that can be
performed by the Reader.
Use only sessions that are
made with the current
Reader and the current
software version.
Multiskan Ascent related
Message
•
The instrument
received an unknown
command.
•
Too high instrument
background signal.
•
Automatic stepper
offset adjustment
failed.
•
Cannot shake with
the given shake
parameters.
Reason
The command is not
recognized or has an
invalid parameter.
During measurement
the signal level is
checked when the
light path is blocked.
If the level is too high,
this error is reported.
The instrument was
unable to detect the
edges of the air blank
hole, and thus could
not adjust the offsets.
One of the parameters
in a shake command is
not within the allowed
limits.
Actions
Check that the serial cable
is properly connected.
This error may be
reported if the serial cable
is connected while the
instrument is on.
Check that the instrument
cover is properly closed.
Check that the measuring
chamber lid is closed.
Contact service if the
error persists.
This error may be
reported after the OFF
command which is not
used during normal
operation. Leave the use
of the OFF command to a
service person.
This error should never
appear if the instrument is
used in the standalone
mode or through the
Ascent PC software.
Continued
4-102
Ascent Software
User's Guide
Message
•
The required
measuring head
position is out of
range.
•
Plate X stepper out of
position tolerance.
•
Plate X stepper
timeout.
•
Measuring head Y
stepper out of
position tolerance.
•
Measuring head Y
stepper timeout.
•
Filter wheel position
error.
•
Filter wheel timeout.
•
Measuring head XP
stepper out of
position tolerance.
•
Measuring head XP
stepper timeout.
Reason
This may occur if all
the points of the array
to be measured are
not within the allowed
moving area of the
measuring head.
There was too high a
position error when
the stepper passed the
home sensor.
The stepper home
sensor was not
detected within the
allowed time.
There was too high a
position error when
the stepper passed the
home sensor.
The stepper home
sensor was not
detected within the
allowed time.
There was too high a
position error when
the stepper passed the
home sensor.
The stepper home
sensor was not
detected within the
allowed time.
There was too high a
position error when
the stepper passed the
home sensor.
The stepper home
sensor was not
detected within the
allowed time.
Actions
This error should never
appear if the instrument is
used in the standalone
mode or through the
Ascent PC software.
Check that the plate is
properly installed in the
plate holder. Contact
service if the error
persists.
Contact service if the
error persists.
Contact service if the
error persists.
Contact service if the
error persists.
Contact service if the
error persists.
Check that the filter wheel
is in place. Contact
service if the error
persists.
Contact service if the
error persists.
Contact service if the
error persists.
Continued
Ascent Software
User's Guide
4-103
Message
•
Cannot measure in
continuous mode.
Reason
The acceleration ramp
starts or the
deceleration ramp
ends outside the Y
position limits.
The RAM memory
failed the startup test.
The number of
columns or rows to
measure is not within
the allowed limits.
•
RAM error.
•
XP/Y measurement
count error.
•
Too high ground
signal noise level.
During startup the A/D
converter is tested by
connecting the input
to signal ground. This
should produce a
near-zero signal with
little noise. If the noise
is too high, this error is
reported.
•
Gain steps 1, 10
not within
tolerance.
•
EEPROM
checksum error.
During startup the
two gain steps of
the A/D converter
are fitted together
by applying a
correction factor for
the x10 gain. If this
factor is not within
the limits, this error
is reported.
The checksum byte
of the EEPROM is
incorrect.
Parameters are lost.
Actions
This error should never
appear if the instrument is
used in the standalone
mode or through the
Ascent PC software.
Contact service if the
error persists.
This error should never
appear if the instrument is
used in the standalone
mode or through the
Ascent PC software.
Contact service if the
error persists.
Contact service if the
error persists.
Contact service if the
error persists.
Continued
4-104
Ascent Software
User's Guide
Message
•
Too high stepper
offset.
•
Temperature error.
•
Too high A/D
converter ground
offset.
•
Lamp failure.
•
Invalid serial number.
Reason
When adjusting the
stepper offsets, either
manually or
automatically, one or
more of the resulting
offsets would be
outside the limits. That
offset is not changed.
Invalid set value in the
TEM command or the
option not installed.
During startup the A/D
converter is tested by
connecting the input
to the signal ground.
This should produce a
near-zero signal with
both gains x1 and x10.
If the signal is not
within the limits, this
error is reported.
During autocalibration
or measurement the
signal measured
through the air blank
hole is too low. This
may have several
reasons, but the most
likely one is that the
lamp has failed.
The serial number
must be 1 to 20
characters long.
Actions
This error may be
reported after the OFF
command which is not
used during normal
operation. Leave the use
of the OFF command to a
service person.
This error should never
appear if the instrument is
used in the standalone
mode or through the
Ascent PC software.
Contact service if the
error persists.
Check/replace the lamp.
Contact service if the
error persists.
This error should never
appear if the instrument is
used in the standalone
mode or through the
Ascent PC software.
Continued
Ascent Software
User's Guide
4-105
Message
•
Missing filter/optics
error.
•
Lamp not ready.
•
Invalid filter(s) in
step: “STEPNAME”.
The plate is too high
for the Multiskan
Ascent. The
maximum height is
15 mm.
•
Reason
During autocalibration
a suitable lamp
voltage for each filter
is adjusted. If the
resulting voltage is
very low, it is very
likely that the filter is
missing. This error is
reported if this missing
filter is selected.
After the lag time has
expired, the lamp is
not yet ready for
measurement. This
may occur if the lamp
was off and a Measure
command is executed
before the lamp has
been on for 5 seconds.
The lag time must also
be nonzero, but less or
equal to 5 seconds for
this warning to appear.
The measurement will
not start until the lamp
has been on for 5
seconds.
The selected / typed
filter is not available.
The type of plate is too
high for this
instrument.
Actions
If the filter is not missing
and the error persists,
contact service.
Increase the lag time. This
error should never appear
in the standalone mode.
Try another filter.
Change the type of plate.
Continued
4-106
Ascent Software
User's Guide
Message
•
Timer already
expired.
Reason
If a command to wait
for a timer to expire
(WAI) is executed and
the timer has already
expired, this warning
is returned. This error
may also be reported
if the lag time is too
short for the
measuring head to
move to the first
measuring position.
Actions
Use a longer lag or
interval time.
4.6.10 Fluoroskan Ascent (including FL &
CF), Luminoskan Ascent and
Nepheloskan Ascent related
Message
•
Did not find a
suitable reference
chip. Validate without
a reference?
•
•
•
The instrument
received an unknown
command.
The measurement
interval is shorter
than the integration
time.
More than 65535
measurements per
point requested.
Reason
When validating a filter
pair, none of the
reference chips on the
plate carrier gave an
acceptable signal
level.
The command was not
recognized by the
instrument.
The time needed for
doing a single
measurement is longer
than the requested
interval time between
measurements.
The measurement
parameters of the
instrument would
result in more than
65535 results per
measurement point.
Actions
If a slight decrease in the
precision of the results is
acceptable, you can
validate the pair without a
reference chip.
If this error is reported
repeatedly, contact
service.
Increase the interval time
or decrease the
integration time so that
the interval time is longer
than the integration time.
Contact service.
Continued
Ascent Software
User's Guide
4-107
Message
•
Cannot shake with
the given shake
parameters.
•
Plate position
undefined.
•
Plate X/Y stepper out
of position tolerance.
•
Plate X/Y stepper
timeout.
•
Emission filter out of
position tolerance.
•
Emission filter
timeout.
•
Excitation filter out of
position tolerance.
•
Excitation filter
timeout.
•
Filter pair not
validated.
Reason
The combination of
the shaking
parameters results in
too high a radial
acceleration.
Attempt to shake the
plate when the plate is
out.
The actual and the
expected plate
positions differ too
much at the home
sensor of the stepper.
The plate did not
arrive at the home
sensor within the
expected time.
The actual and the
expected filter wheel
positions differ too
much at the home
sensor.
The filter wheel did not
arrive at the home
sensor within the
expected time.
The actual and the
expected filter wheel
positions differ too
much at the home
sensor.
The filter wheel did not
arrive at the home
sensor within the
expected time.
An attempt to measure
with a filter pair that
has not been
validated.
Actions
Decrease the shaking
speed or the shaking
diameter.
Only shake when the plate
is in.
If the error persists,
contact service.
If the error persists,
contact service.
If the error persists,
contact service.
If the error persists,
contact service.
If the error persists,
contact service.
If the error persists,
contact service.
Validate the filter pair
before using it.
Continued
4-108
Ascent Software
User's Guide
Message
•
Too long ramp for a
scan. Change the
scanning direction or
decrease the
integration time.
•
Autocalibration not
carried out.
•
Too long integration
time for a scan
measurement.
•
Instrument gain
levels not within
tolerance.
•
Too high factor drift.
Reason
The start of the
acceleration ramp or
the end of the
deceleration ramp for
scanning is outside the
moving area of the
plate.
Cannot measure if
autocalibration is not
carried out.
The instrument is not
able to move the plate
as slowly as the
integration time
requires.
The instrument
automatically selects
between the gains 1,
10, 100 and 1000
when measuring.
During startup these
gains are checked and
fitted together. If any
of the gains differ too
much from the
nominal value, this
error is reported.
Autocalibration
measures a reference
chip and calculates a
correction factor for
the measurement
results. If it differs too
much from the
nominal value of 1.0,
this error is reported.
Actions
Change the scanning
direction or decrease the
integration time or do not
scan points near the edge
of the plate.
Autocalibrate.
Shorten the integration
time.
Contact service.
First try validating the
filter pair again. If this
does not help or
revalidation is required
frequently, contact
service.
Continued
Ascent Software
User's Guide
4-109
Message
•
Too high offset in
temperature
measurement.
•
Too high stepper
offset.
•
Temperature set
value out of range.
•
Instrument gain
levels adjustment
failed.
•
Dispenser init failed.
•
Invalid dispenser
command.
•
Invalid dispenser
command operand.
Invalid dispenser
command sequence.
•
•
Dispenser EEPROM
failure.
•
Dispenser not
initialized.
Reason
The A/D converter
offset of the
temperature
measuring electronics
is too high to
guarantee the
specified temperature
range.
Attempt to set a too
high stepper offset.
Attempt to set an
incubation
temperature that is out
of range.
During startup the
gains 1, 10, 100 and
1000 are fitted
together. If this
process fails, the error
is reported.
The dispenser failed to
carry out the
initialization.
The dispenser
received an unknown
command.
An invalid dispenser
command parameter.
The order of the
commands to the
dispenser is invalid.
The dispenser
firmware checksum
does not match the
calculated checksum.
The dispenser cannot
execute commands
before it is initialized.
Actions
Contact service.
If the allowed stepper
offset range is not large
enough, there is a
mechanical error. Contact
service.
Use temperature set
values within the allowed
range.
Contact service.
If the error persists,
contact service.
If the error persists,
contact service.
If the error persists,
contact service.
If the error persists,
contact service.
If the error persists,
contact service.
If the error persists,
contact service.
Continued
4-110
Ascent Software
User's Guide
Message
•
Dispenser plunger
overload.
•
Dispenser valve
overload.
•
Dispenser plunger
move not allowed.
Too many dispenser
commands.
•
•
Dispenser timeout.
•
Autocalibration
validity expired.
•
Unable to keep up
with the requested
timing.
•
Too high signal, the
measurement
channel is saturated.
•
Instrument
measurement result
range overflow.
•
Too high instrument
background signal.
Reason
The dispenser plunger
did not reach the
target position.
The dispenser valve
did not reach the
target position.
The dispenser valve is
in bypass position.
More commands were
sent to the dispenser
than it could buffer.
The dispenser is not
responding.
Too much time has
passed from the last
autocalibration. The
precision of the results
may suffer.
The timing
requirements of the
session are too tight
and cannot be fulfilled.
The measured signal
gives a full scale
reading.
The calculated result
exceeds the numeric
range of the
instrument.
During startup the
background signal is
checked. If it is too
high, this error is
reported.
Actions
If the error persists,
contact service.
If the error persists,
contact service.
If the error persists,
contact service.
If the error persists,
contact service.
If the error persists,
contact service.
The timing requirements
of the session are too
tight, there is no time to
carry out the
autocalibration. Modify
the session so that there
is time to autocalibrate.
Relax the timing
requirements.
Ensure that the filter pair
is suitable for this
measurement. Dilute the
samples. In luminometric
mode decrease the PMT
voltage.
Decrease the user factor
value.
If the error persists,
contact service.
Continued
Ascent Software
User's Guide
4-111
Message
•
Instrument
background signal
noise level too high.
•
Lamp failure.
•
Too high reference
channel drift.
•
Too high PMT drift.
Reason
During startup the
background signal is
checked. If there is too
much noise in it, this
error is reported.
There is no signal
through the reference
channel. This is
detected during
autocalibration.
The reference channel
gain is adjusted during
validation and
autocalibration. The
validation gain is
saved and if the
resulting gain during
autocalibration differs
too much from the
saved gain, this error
is reported.
The first
autocalibration of a
filter pair adjusts the
PMT voltage to obtain
the same reading from
the reference chip as
was measured during
validation. If the
resulting voltage
differs too much from
the one used in
validation, this error is
reported.
Actions
If the error persists,
contact service.
Change the lamp.
Revalidate the filter pair.
If the error persists,
contact service.
Revalidate the filter pair.
If the error persists,
contact service.
Continued
4-112
Ascent Software
User's Guide
Message
•
Nonvolatile
parameters lost.
•
Invalid filter position.
•
If there is only one
source sheet, it must
be either dual or dual
kinetic.
Reason
The calculated
checksum of
nonvolatile parameters
does not match the
saved checksum.
Some or all of the
nonvolatile parameters
(validation data,
stepper offsets, serial
number, user factors)
are lost.
The lifetime of the
backup battery for the
memory is at an end.
The filter command
requested a filter that
was not on the filter
wheel.
The Precalculation
sheet needs two
source sheets if the
first source sheet is
not dual or dual
kinetic. The
Precalculation sheet
can only be created
from two separate
measurement steps or
from a dual
measurement
containing two
measurement
parameters.
Actions
Contact service.
Contact service.
Set the second source
sheet in the sheet
properties.
Continued
Ascent Software
User's Guide
4-113
Message
•
Cannot dispense into
a plate over 21 mm
high.
•
Dispensing is not
allowed with plates
less than 13.5 mm
high.
•
The integration time
is too long in step
“STEPNAME”.
Longer than 10000
ms is allowed only in
SINGLE
measurements and
when executed by
one well.
•
The instrument does
not support
luminometric
methods.
•
Please confirm that
the light guard is
installed.
•
Please confirm that
the light guard has
been removed.
•
The instrument cover
is open.
4-114
Reason
The type of plate is too
high for dispensing.
The type of plate is too
low for dispensing.
Actions
Change the plate type or
remove all the Dispense
steps from the Session.
Change the plate type or
remove all the Dispense
steps from the Session.
The reader cannot
have that long an
integration time with
the current
parameters.
Change the integration
time or some other
parameters.
The reader is not able
to carry out
luminometric
measurements.
Luminometric
measurements need a
light guard to avoid
high background
noise.
The type of plate is so
high that the light
guard cannot be used.
Use only measurement
methods that can be
measured by the reader.
The cover of the
instrument is open
during measurement.
Reported in
luminometric
measurements only.
Ensure that the light
guard is installed.
Ensure that the light
guard is removed before
any measurements are
carried out.
If carrying out a
luminometric
measurement, ensure that
the instrument cover is
closed.
Ascent Software
User's Guide
4.6.11 iEMS Reader MF related
Message
•
Air blank failed.
•
The plate holder is
not inserted.
•
Measurement
channel gains not
within limits.
•
Chopper timeout.
Reason
Either the signal level
on one or more
channels was too high
when measuring with
the light path blocked
or there was too high
a signal level deviation
between the channels
when measuring air.
The plate holder is
checked to be inserted
in the carriage before
driving the carriage
into the reader. If the
holder is not inserted,
this error is reported.
The measuring
channel signal levels
with one or more
filters are not within
limits after channel
gains adjust. The
measurement results
may be incorrect if this
error is reported.
The chopper drum
home position was not
detected within the
allowed time. Either
the drum is not
rotating or the position
sensor is faulty.
Actions
Check that the optics is
not soiled and clean it, if
necessary. Check that
there is no leakage of light
from outside the
instrument into the
measuring chamber.
If the error persists,
contact service.
Insert a plate holder in the
carriage.
Try another holder.
Contact service.
Check that the optics is
not soiled and clean it, if
necessary.
Check that there is no
leakage of light from
outside the instrument
into the measuring
chamber.
Try with another filter
wheel.
If the error persists,
contact service.
Check that connector X6
on the reader PCB is
properly inserted.
Check that the chopper
wheel rotates freely when
the instrument power is
off.
If the error persists,
contact service.
Continued
Ascent Software
User's Guide
4-115
Message
•
Chopper position
error.
•
•
Filter wheel not in
position.
Filter wheel timeout.
•
Filter wheel position
error.
•
Too high gain
deviation between
measurement
channels.
•
Invalid profile point
number.
Reason
The detected chopper
drum home position
did not match the
calculated chopper
position. The chopper
drum is not rotating
properly.
The filter wheel has
been removed.
The filter wheel home
position was not
detected within the
allowed time. Either
the wheel is not
rotating or the position
sensor is faulty.
The detected filter
wheel home position
did not match the
calculated filter
position. The filter
wheel is not rotating
properly.
The gain difference of
adjusted gains
between the
measuring channels is
too high. The reader
may still seem to
operate correctly but
there is a risk of
incorrect
measurement results.
Well agglutination data
of a profile point
outside the range
1...26 was requested.
Actions
Check that connector X6
on the reader PCB is
properly inserted.
Check that the chopper
wheel rotates freely when
the instrument power is
off.
If the error persists,
contact service.
Insert the filter wheel.
Check that the filter wheel
rotates freely when the
instrument power is off.
If the error persists,
contact service.
Check that the filter wheel
rotates freely when the
instrument power is off.
If the error persists,
contact service.
Check that the optics is
not soiled and clean it, if
necessary.
Check that there is no
leakage of light from
outside the instrument
into the measuring
chamber.
Try with another filter
wheel.
If the error persists,
contact service.
Contact service.
Continued
4-116
Ascent Software
User's Guide
Message
•
Invalid filter number.
•
Lamp failure.
•
The lamp is off.
•
Shaker timeout.
•
Shaker position error.
•
Reference channel
gain not within limits.
Reason
The reader was
requested to select a
filter number not in the
range of 1...8.
The measured lamp
intensity after
switching the lamp on
is too low.
A measure or blank
command is received,
but the lamp is off.
The shaker home
position was not
detected within the
allowed time. Either
the shaker is not
rotating or the position
sensor is faulty.
The detected shaker
home position did not
match the calculated
position. The shaker is
not rotating properly.
The reference channel
signal level with one
or more filters is not
within limits after
reference channel
gains adjust.
The measurement
results may be
incorrect if this error is
reported.
Actions
Contact service.
Check and replace the
lamp, if necessary. If the
error persists, contact
service.
Contact service.
Check that the shaker
stepper motor rotates
freely when the
instrument power is off.
If the error persists,
contact service.
Check that the shaker
stepper motor rotates
freely when the
instrument power is off.
If the error persists,
contact service.
Check the reference
channel optics (the lenses
to the far left) for spills or
any other stains and clean
it, if necessary.
Check the filters.
If the error persists,
contact service.
Continued
Ascent Software
User's Guide
4-117
Message
•
Track timeout.
•
Track position error.
•
Invalid strip number.
•
Invalid shake mode.
•
Invalid shake speed.
•
Invalid well number.
•
Invalid temperature
set value.
•
The reader cover is
open.
4-118
Reason
The track stepper
home position was not
detected within the
allowed time. Either
the track stepper is not
rotating or the position
sensor is faulty.
The detected track
stepper home position
did not match the
calculated position.
The track stepper is
not rotating properly
or the drive belt slips.
A command was
received which
referenced a strip
outside the range
1...12.
Onset of shake in a
mode not supported
was requested.
A shake speed outside
the range 300...1500
rpm was requested.
The well reference in a
command was outside
the range 1...96.
A temperature outside
the range 14...40°C
was requested.
The reader cover is
not closed during
measurement.
Actions
Check that the plate
carriage moves freely
when the instrument
power is off.
If the error persists,
contact service.
Check that the plate
carriage moves freely
when the instrument
power is off.
If the error persists,
contact service.
Contact service.
Contact service.
Contact service.
Contact service.
Contact service.
Close the green
instrument cover. A faint
click from a microswitch
should be audible when
the cover is closed. If the
error persists, contact
service.
Continued
Ascent Software
User's Guide
Message
•
Too much lag in
track.
•
Chopper drum not
properly aligned.
•
Too high
temperature
measurement
electronics offset.
•
Dispenser pump
position error.
Ascent Software
User's Guide
Reason
The position difference
between detecting the
home position of track
when traveling in
opposite directions is
too high. There is
probably a slack in the
track drive belt. The
positioning of the
microplate is not
accurate enough to
guarantee correct
measurement results.
The chopper drum is
not adequately aligned
with the optics
assembly.
The measurement
results may be
incorrect if this error is
reported.
The temperature
measuring system is
calibrated at startup. If
the calibration
correction is too big,
this error is reported.
The detected
dispenser pump home
position did not match
the calculated
position. The pump is
not rotating properly.
Actions
Check that the plate
carriage is securely
clamped to the drive belt.
Tighten the track belt by
moving the drive wheel
closest to the front of the
instrument towards the
front. But not too tight!
If the error persists,
contact service.
Contact service.
Contact service.
Check that the pump rotor
rotates freely when the
instrument power is off
and the tubing is in rest
position.
If the error persists,
contact service.
Continued
4-119
Message
•
Dispenser pump
timeout.
•
Position error of
dispenser tips.
•
Timeout of dispenser
tips.
•
Invalid dispensing
volume.
•
Invalid strip number
for dispensing.
•
Invalid dispenser
temperature value.
•
Internal timeout of
reader while
dispensing.
•
The reader reported
an error while
dispensing.
4-120
Reason
The dispenser pump
home position was not
detected within the
allowed time. Either
the pump is not
rotating or the position
sensor is faulty.
The detected
dispenser tips home
position did not match
the calculated
position. The tips drive
motor is not rotating
properly.
The dispenser tips
home position was not
detected within the
allowed time. Either
the tips motor is not
rotating or the position
sensor is faulty.
The dispenser cannot
dispense the required
volume.
A command was
received which
referenced a strip
outside the range
1...12.
A temperature outside
the range 14...40°C
was requested.
The reader did not
respond to a
command from the
dispenser.
The reader reported
an error in the
dispenser during
dispensing.
Actions
Check that the pump rotor
rotates freely when the
instrument power is off
and the tubing is in rest
position.
If the error persists,
contact service.
Check that the tips
stepper motor rotates
freely when the
instrument power is off.
If the error persists,
contact service.
Check that the tips
stepper motor rotates
freely when the
instrument power is off.
If the error persists,
contact service.
Contact service.
Contact service.
Contact service.
If the error persists,
contact service.
Contact service.
Continued
Ascent Software
User's Guide
Message
•
Unknown dispenser
command.
•
Too high
temperature
measurement
electronics offset in
dispenser.
•
Dispenser pump not
primed.
Dispenser tubing not
in operating position.
•
•
Wells must be
present for
dispensing.
•
Dispenser not
responding.
Ascent Software
User's Guide
Reason
The dispenser did not
recognize the
command it received.
The temperature
measuring system is
calibrated at startup. If
the calibration
correction is too big,
this error is reported.
The dispenser pump is
not primed.
The dispenser pump
tubing is not in
operating position
around the pump
rotor.
The reader ensures
before dispensing that
the wells are present
for all the columns to
be dispensed into.
This error is reported if
the check fails.
The dispenser did not
report that the
dispensing was
completed within the
allowed time.
Actions
Contact service.
Contact service.
Contact service.
Move the tubing cassette
from rest position into
operating position. A faint
click from a microswitch
should be audible when
the cassette is inserted in
the operating position
slot.
If the error persists,
contact service.
Insert strips in all the
dispense columns.
If the error persists,
contact service.
4-121
4.7
File types used in Ascent
Software
4.7.1
Work file types
Session files
*.sec
Fluoroskan Ascent FL session file
*.sed
Multiskan Ascent session file
*.see
iEMS Ascent session file
*.sef
Fluoroskan Ascent or Fluoroskan Ascent CF session file
*.sel
Luminoskan Ascent session file
*.ses
session file of earlier Ascent Software versions
Files produced by
each session file
*.lay
file that contains all session layouts
*.pla
separate, editable layout file
*.vtb
file that contains all session sheets
*.vtg
file that contains all session graphs
Miscellaneous files
*.txt
text file in ASCII format
*.vts
file of the Results sheets
*.xls
Microsoft Excel 4.0 file
4-122
Ascent Software
User's Guide
4.8
Parts of the screen
4.8.1
General
Ascent Software is a Windows program operated with menus, notebook
tabs and quick buttons. The Ascent program is started from the icon
which is created at the installation.
The Windows-oriented drag-and-drop technique is used in the program.
This means that some copying and controlling functions are done by
picking up icon elements (with parameters) and dropping them in
appropriate positions on the screen.
Ascent Software
User's Guide
4-123
4.8.2
Menu Bar
The Menu Bar, which is located below the title bar along the top of the
desktop window, contains textual selections to the functions of the user
interface.
To view all the commands in a menu, do one of the following:
•
Click the menu name, or
•
Press ALT+n, where n is the underlined letter in the menu name. For
example, press ALT+S to open the Session menu.
4.8.3
Tool Bar
The Tool Bar is displayed across the top of the desktop window below
the menu bar. It contains quick buttons to the main functions of the
active desktop.
To hide or display the Tool Bar, choose Tool Bar from the View menu
(ALT, V, T).
The most used tool bar buttons are:
Click
Action
Opens a new Session.
Opens an existing Session. The program
displays the Open dialog box in which you
can locate and open the Session you want.
Saves the active Session with its current
name. If you have not named the Session, the
program displays the Save As dialog box. The
default exists.
Selects the Measure step to the Steplist.
Continued
4-124
Ascent Software
User's Guide
Click
Action
Selects the Dispense step to the Steplist (does
not apply to Multiskan).
Selects the Dispense And Measure step to the
Steplist (does not apply to Multiskan).
Selects the Incubate step to the Steplist.
Selects the Shake step to the Steplist.
Selects the Pause step to the Steplist.
Selects the Save/Load sheet step to the
Steplist.
Selects the Print step to the Steplist.
Defines the tool to “Add wells to the
measurement area”.
Defines the tool to “Remove wells from the
measurement area”.
Defines the middle point of the well to be
measured (does not apply to Multiskan,
Nepheloskan or iEMS).
Defines all the points in the well to be
measured (does not apply to Multiskan,
Nepheloskan or iEMS).
Defines the horizontal diagonal of the well to
be measured (does not apply to Multiskan,
Nepheloskan or iEMS).
Continued
Ascent Software
User's Guide
4-125
Click
Action
Defines the vertical diagonal of the well to be
measured (does not apply to Multiskan,
Nepheloskan or iEMS).
Prints the current worksheet.
Prints the currently selected area.
Creates a new worksheet.
Deletes the current worksheet.
Cuts the selected area to the Clipboard.
Copies the selected area to the Clipboard.
Pastes the contents of the Clipboard into
the selected location.
Zooms in the display at 10% intervals.
Zooms out the display at 10% intervals.
Creates a Blank Subtraction sheet.
Creates a Curve Fit sheet
Creates a Cutoff sheet.
Enables/Disables the values in the cells.
Opens the properties dialog of the sheet.
4-126
Ascent Software
User's Guide
4.8.4
Desktops
The Desktop is the main window area of the program.
4.8.5
Status Bar
Displayed at the bottom of the Program window. The status bar shows
the buttons and menu selection information, when the cursor moves
over the selections. The status bar also contains fixed types of
information, like the current time and the line state of the instrument.
To hide or display the status bar, choose Status Bar from the View
menu (ALT, V, S).
Status information
Example
Description
Searching for...
The Reader is not connected to the
Program.
Connected to...
The Reader is connected to the Program.
4.8.6
Tab
Desktop tabs are located to the right of the active desktop. The desktop
tab selects the active desktop of the program. When the desktop is
changed, the menu and status bars are also changed.
At the top or bottom of the Procedure Desktop you will find the
Parameters, Area definition, Layout and the RunStatus tabviews. With
these tabs you can change the page of the desktop. (View → Tabs Bar
On Top)
At the bottom of the Results Desktop the spreadsheet tabviews are
located. With these tabs you can change the current spreadsheet of the
desktop.
Ascent Software
User's Guide
4-127
4.8.7
Steplist
Located to the left of the Procedure Desktop. Shows the steps selected
to the Steplist. The right mouse button also allows the selection of steps
from the Steplist, when the mouse pointer is on the Steplist area.
4.9
Glossary and abbreviations
active
The window or icon that you are currently using or
that is currently selected. Only one window or icon
can be activated at a time. Keystrokes and commands
and mouse operations affect the active window or
icon. If a window is active, its title bar changes color
to differentiate it from other windows. If an icon is
active, its label changes color. Windows or icons on
the desktop that are not selected are inactive.
A/D
(or A to D)
ANALOG TO DIGITAL. Changing a signal from an
analog form to a digitally coded form; A/D converter
(or A-D converter, analog-to-digital converter); (analog
to digital converter) device used to convert an analog
input to a digital output form which can be
understood by a computer.
address
1. The term most generally used to refer (in some
way) to a location within the computer memory; the
word location is actually used as a synonym. 2. In
communications, see addressing.
addressing
The method used to identify the location of a
participant in a network. Addressing specifies where
the participant is located rather than who they are or
how to get there.
amb.temp.
ambient temperature
4-128
Ascent Software
User's Guide
application
A role or task for which a computer system can be
used or, more usually, the software used for such a
purpose.
area filling
Painting a defined area with a specific color or pattern.
arrow keys
(or direction
keys, cursor
keys)
Four keys on a computer keyboard with arrows
engraved on the keycaps pointing up, down, left and
right. They can be separate keys, usually found to the
right of the typewriter keys or combined with other
keys. The action performed by arrow keys is under
program control, but usually involves moving the
cursor or some part of the display in the indicated
direction.
ASCII
(or Ascii)
Acronym for American Standard Code for Information
Interchange. A standard character encoding scheme
introduced in 1963 and used widely on many
machines.
attributes
Information about a file that indicates whether the file
is read-only, hidden or system and whether it has
been changed since it was backed up.
background
application
An application that is running but is not active. The
application cannot receive user input.
background
noise
The noise inherent in a line or circuit, independent of
the presence of a signal.
backup
A resource that is, or can be used as, a substitute
when a primary resource fails or when a file has been
corrupted. The word is also used as a verb, to back
up, i.e. to make a copy in anticipation of future failure
or corruption.
Ascent Software
User's Guide
4-129
bandwidth
1. For bandpass filters, it is the full width of the pass
band measured at one-half the peak transmittance,
expressed in nanometers and microns. 2. Range of
frequencies. 3. Measure of the amount of data that
can be transmitted along a cable or channel or other
medium. 4. Measure of the range of frequencies that a
monitor or CRT will accept and display.
baud rate
The number of times per second that a system,
especially a data transmission channel, changes state.
In the particular case of a binary channel, the baud
rate is equal to the bit rate, i.e. 1 baud is 1 bit per
second. For a general channel, 1 baud is 1 digit per
second, 1 baud is 1 symbol per second or whatever
the states of the system represent.
bit
(binary digit)
1. Either of the two digits 0 and 1 in the binary number
system. 2. The fundamental unit of information used
in information theory. It is the quantity of information
required to distinguish between a pair of equiprobable
events.
blank
1. Empty, i.e. not containing meaningful data. In a
memory, blank cells may contain a particular bit
pattern that has no assigned value. 2. Blanks in the
assays: reagent blank; reagent blank without any
sample, specific blank; each calibrator, control, or
sample has its own blank, and both blanks; both
reagent blank and specific blank.
button
An area on a screen that when activated by means of
a pointing device or predetermined key sequence
causes an action to be initiated. When the button is
activated or “pressed”, its appearance will normally
change so that it appears recessed. A horizontal or
vertical row of buttons is called a button bar. See
command button.
4-130
Ascent Software
User's Guide
byte
A fixed number of bits that can be treated as a unit by
the computer hardware. It is a subdivision of a word
and typically comprises 8 bits, although 6, 7 or 9 bits
are occasionally encountered. The letters B and b are
used as symbols for byte, as in MB (megabyte) and
GB (gigabyte), although the word is often written in
full in such cases, as in Mbyte.
cascade
A way of arranging open windows on the desktop so
that they overlap each other, with the title bar of each
window remaining visible.
cascading
menu
A hierarchical graphical menu system in which a side
menu of subcategories is displayed when the pointer
is placed on the main category.
case-sensitive
Requiring or making a distinction between upper and
lower case letters.
cell
1. An address, a location in memory or a register,
usually one capable of holding one bit. 2. The basic
unit of a spreadsheet or some other table of text,
formed by the intersection of a row and column. It
contains a label, value or formula with attributes such
as size, font and color. 3. The name given to a packet
in one version of a packet switching system. Packet
switching systems subdivide the data to be
transmitted into a number of packets.
Centronics
interface
A standard plug-compatible parallel interface for
printers, first used in printers manufactured by
Centronics Corp.
check box
A small square in a dialog box with an option
alongside, allowing the option to be selected or
cleared. Multiple check boxes allow as many options
as needed to be selected.
Ascent Software
User's Guide
4-131
checksum
(or check total)
Program which checks that data (retrieved from
memory) is correct, summing it and comparing the
sum with a stored value.
chopper
1. Light interrupter used to produce a.c. output from a
photocell. 2. Mechanical or semiconductor switch
used to modulate a d.c. signal so that it can be
amplified by an a.c. amplifier. An output chopper may
be operated in synchronism with the input chopper in
order to rectify the amplified signal.
clear
An instruction that causes a designated variable,
register or counter to be set to the all-zero state (i.e.
cleared).
click
To press and release a button on a mouse or similar
device or (as a noun) the action of pressing and
releasing a button. Most mice have one, two or three
buttons, so the prefixed forms left click, right click,
middle click are often used.
click and drag
To click and drag involves holding a button down
while moving the mouse; this technique is often used
first to select (click) and then to move (drag) an object
on the screen.
clipboard
A temporary storage location where a section cut or
copied from displayed textual or graphical information
is held until it can be pasted into another location.
close
To remove a window or dialog box or quit an
application.
command file
(script)
A file containing commands or other actions that
could have been entered from the keyboard.
4-132
Ascent Software
User's Guide
command
button
In a dialog box, a control shaped like a pushbutton
that carries out an action. A command button often
has a label that describes the action it carries out (for
example, Cancel, Help or Install).
comms
(or coms, com)
Short for communications, as in datacomms,
telecomms, comms equipment and comms link.
communicatio
n port
(or com port,
comms port)
Any external socket on a computer that can be
connected to a communication line and used to
exchange information with other computers or
electronic systems. Each type of port has strictly
defined connector types and pin assignments as well
as electronic and logical signal protocols.
configuration
1. The particular hardware elements and their
interconnection in a computer system for a particular
period of operation. 2. In configuration management,
the functional and physical characteristics of hardware
or software as set out in documentation or achieved in
a product.
Control menu
A menu that contains commands you can use to
manipulate the window. Application icons and some
dialog boxes also have a Control menu. To open the
Control menu, you use the Control menu box at the
left of the title bar in a window or you select an
application icon.
copy
To produce a replica of some stored information in a
different part of the store or on a different storage
device.
CR
carriage return
crosstalk
A signal that has leaked or “crossed” from one
communication channel to an adjacent channel. This
interferes with (causes errors on) the second channel.
In brief, interference between two communication
cables or channels.
Ascent Software
User's Guide
4-133
cut
To mark a piece of text or graphical information in
some way, read it into a temporary storage location
and delete it from the original document. The
information may then be inserted into a new location.
It is often called a move or cut and paste by analogy
with scissors and glue techniques.
database
1. Normally and strictly, a body of information held
within a computer system using the facilities of a
database management system. 2. Colloquially, a
collection of data on a subject however defined,
accessed and stored within a computer system.
data chaining
Organizing a data file so that records are linked. A
record may belong to more than one chain. Chaining
allows access to records in a number of different
sequences.
data entry
The process in which an operator uses a keyboard or
other device to input data directly into a system.
data file
A file containing data, such as a file created within an
applications program; for example, it may be a wordprocessing document, a spreadsheet, a database file
or a chart.
default
A value that is used when no other value has been
supplied. Nearly every application has defaults for
something.
delete
1. To remove or obliterate a record or item of data,
such as by overwriting data on disk or tape with new
data or null characters. 2. To remove permanently an
object, such as a character, word, paragraph or
graphic, from a document or to remove an entire
document file from permanent storage.
deselect
To reverse the action of selecting an option, a range of
text, a collection of graphical objects, and so on.
4-134
Ascent Software
User's Guide
desktop
The screen background for Windows on which
windows, icons and dialog boxes appear. In other
words, an on-screen work area that uses icons and
menus to simulate the top of a desk.
dialog box
(or dialogue
box, dialog,
dialogue)
A simple window containing a title bar, a message and
one or more response buttons. This kind of window
will normally allow no other actions to take place until
a button has been pressed. Dialog boxes may also
contain more complex objects such as radio buttons,
pull-down menus or scroll bars.
directory
A means of locating data items, usually files. A
directory can be regarded as establishing a set of links
between named data items and their locations in a
direct-access storage device. A directory may contain
the names of files and of other directories.
disable
1. To make a device inactive. 2. To suppress the
action of an interrupt.
DOS
Short for MS-DOS (Microsoft Disk Operating System).
double-click
(or double
click)
The double click consists of two clicks of the same
button - typically the mouse - in quick succession;
when performed too quickly or too slowly then the
user’s intention is misunderstood. Double-clicking
carries out an action, such as starting an application.
dpi (d.p.i.)
dots per inch. Standard method used to describe the
resolution capabilities of a dot-matrix or laser printer
or scanner that is expressed as the number of dots
that a device can print or display per linear inch.
drag
To move an item on the screen by selecting the item
and then pressing and holding down the mouse
button while moving the mouse.
Ascent Software
User's Guide
4-135
drop-down list
box
List of options for an entry that appears when you
move the cursor to the entry field.
drop-down
menu
(pull-down
menu)
A menu that appears on a computer screen when its
title, often occurring in a menu bar, is selected by
means of a mouse or other pointing device or an
appropriate sequence of keystrokes. One or more of
the menu options may then be selected in the same
way, after which the menu will normally vanish.
edit
To create, modify or add to a document. Editing
includes delete, insert, move, copy, search, replace,
include another file, justify and paginate.
enable
To selectively activate a device, function or a value.
error
1. The difference between a computed, observed or
measured value or condition and the true, specified or
theoretically correct value or condition. 2. An incorrect
result resulting from some failure in the hardware of a
system. 3. An incorrect step, process or data
definition in, for example, a program.
error message
A message that reports the occurrence of an error.
error routine
Any routine within a program that is entered as a
result of some error condition having been detected.
The actions taken by such a routine will be dependent
upon the reliability requirements that the program is
expected to meet and upon the strategy for error
analysis and recovery.
execute
To carry out an instruction or program. This includes
interpreting
machine
instructions,
performing
subroutines and applying functions to sets of
parameters.
4-136
Ascent Software
User's Guide
export
To introduce information to another location or to a
different software program. Files that consist only of
text can be exported in ASCII (plain text format). For
files with graphics, however, the receiving system or
program must offer some support for the exported
file’s format.
extension
The period and up to three characters at the end of a
filename. An extension usually identifies the kind of
information a file contains.
file
Information held on backing store (i.e. usually on
magnetic disk or magnetic tape) in order (a) to enable
it to persist beyond the time of execution of a single
job and/or (b) to overcome space limitations in main
memory. Files may hold data, programs, documents,
pictures or any other information. They are referred to
by filename.
file manager
A program for organizing a set of files.
file name
(or filename)
An identifying character string used to refer to a file.
The name can be generated by software or created by
the user.
floating menu
The menu that appears when you press the right
mouse button. The position of the menu is the current
cursor position.
floppy disk
drive (diskette
drive, FDD)
A device that accepts flexible magnetic disks, i.e.
floppy disks and reads or writes magnetic patterns
that correspond to the data to be retrieved or stored.
gain
The increase in the amplitude of a signal, as of
voltage, current, or power, that is produced by a
circuit. Gain can be expressed as a factor or in
decibels.
Ascent Software
User's Guide
4-137
grid (mesh)
The result of subdividing a region in time and/or space
into smaller subregions. A rectangular region in the
x,y-plane can thus be divided into smaller rectangles
by lines parallel to the x- and y-axes. The points of
intersection of the lines are called the grid (or mesh)
points. A discretization method replaces differential
equations defined in a region by a finite set of
equations, which define approximations to the exact
solution at the grid points. The finite-difference and
finite-element methods are important methods of this
general type.
handshake
(or
handshaking)
An
exchange
of
signals
that
establishes
communications between two or more devices. The
handshake synchronizes the devices and allows data
to be transferred successfully. XON/XOFF is also
called software handshake.
hard copy
A printed or otherwise permanent copy of data from a
processing system.
hard disk
1. A magnetic disk consisting of a rigid aluminum
substrate coated or plated - usually on both sides with a magnetic material. 2. A disk permanently
mounted in its drive.
highlighting
A way of making a portion of a document stand out.
HIS
Acronym for Hospital Information System.
hot key
A keystroke or combination of keystrokes that
switches the user to a different program, often a
terminate-and-stay-resident (TSR) program or the
operating system user interface.
icon
A small picture used in place of another entity.
Window managers often use icons to represent
devices, wastebaskets etc.
4-138
Ascent Software
User's Guide
idle
1. Operational but not in use. 2. Waiting for a
command.
import
The opposite to export. To bring something in from
outside a system; to convert a file stored in one
format to the default format used by a program.
initialization
The act of assigning initial values to variables before
the start of a computation.
insert
1. One of the basic actions performed on sets. 2. One
of the basic actions performed on lists that places a
new element into a list, not necessarily at one end or
the other. 3. An editing operation.
integer
A whole number, as opposed to a rational or real
number. The concept of integer type is used for
computer representation of a finite subset of the
integers.
invalid
Not valid.
inverse video
(or reverse
video)
A display attribute in which one or more characters
are displayed in the opposite contrast to the
surrounding information.
justify
To achieve uniform vertical edges or columns of
material printed or displayed on a screen. Information
can be aligned along the left or right margin or
centered between the margins. In the latter case, the
space between words and/or letters is increased until
the line fills the distance between the margins. If the
spacing is excessive, it can be reduced by rewriting or
by hyphenating words at the ends of lines.
LCD
(or LC display)
liquid crystal display
LF
line feed
Ascent Software
User's Guide
4-139
library
There are various different libraries, i.e. program
library, link library, DLL, optical disk library, tape
library and session library. A program or software
library is a collection of programs and packages that
are made available for common use within some
environment; individual items need not be related. A
typical library might contain compilers, utility
programs, packages for mathematical operations etc.
Usually it is only necessary to reference the library
program to cause it to be automatically incorporated
in a user’s program.
LIMS
Acronym for Laboratory Information Management
System.
list
A set of words, numbers etc written one below the
other. One distinguishes between the head and tail of
a list as well as a null list (or empty list). The items in a
list can be arbitrary in nature, unless stated otherwise.
In particular it is possible for an item to be in another
list, in which case it is known as a sublist. If a list has
one or more sublists it is called a list structure. If it has
no sublists it is called a linear list. The two basic
representation forms for lists are sequentially
allocated lists and linked lists, the latter being more
flexible.
list box
Within an application window or dialog box, a type of
box that lists available choices - for example, a list of
all files in a directory. If all the choices do not fit in the
list box, there is a scroll bar.
loop
1. A sequence of instructions that is repeated until a
prescribed condition, such as agreement with a data
element or completion of a count, is satisfied. 2. A
configuration of a local area network that consists of
nodes connected serially in a ring topology. 3. (local
loop) The (twisted pair) connection from a switching
exchange to the subscriber terminal.
4-140
Ascent Software
User's Guide
MB
(or Mb, Mbyte)
Symbols or abbreviations for megabyte. Usually
1,048,576 bytes (220); sometimes interpreted as 1
million bytes.
menu
A list of options that may be displayed either vertically
or horizontally on a screen and from which one or
more items may be selected using an input device.
menu bar
In either a text- or graphics-based user interface, a
row, usually horizontal, of words or abbreviations that
when activated by a pointing device or a sequence of
key depressions cause some appropriate action. This
may involve the display of menus.
menu bypass
A technique whereby expert users of a menu-driven
program may avoid the process of stepping through a
number of menus. This usually involves pre-empting
the menus by typing in the selections before they
appear.
menu-driven
program
A program that obtains input from a user by
displaying a list of options - the menu - from which the
user indicates his/her choice.
metafile
A mechanism for storing and transmitting graphical
information in a device-independent way.
mode
1. A term used in many contexts concerning the
operation and use of a computer system. For
example, conversational mode refers to interactive
computer use; interpretive mode refers to a way of
executing a language; there are addressing modes in
instruction descriptions. 2. A measure of location
(compare mean, median and mode).
noise
Any signal that occurs in an electronic or
communication system and is considered extraneous
to the desired signal.
Ascent Software
User's Guide
4-141
notebook
(computer)
A computer about the size of a piece of A4 paper
(about 20 by 30 cm) and a few cm thick with a hinge
along the long side. Notebooks can have all the
processing power and features of desktop computers.
To increase their flexibility the pointing device is often
a trackerball embedded in the keyboard rather than a
mouse, which requires a hard flat surface to operate
successfully.
off-line
(or offline, OffLine)
Of peripheral devices or files: not connected to the
system or not usable. A device may be physically
connected but off-line if the system has been
instructed not to use it.
offset
Sustained deviation of the control point from the
index (or desired) value.
online
(or on-line, OnLine)
1. Connected to the system and usable. 2. Online
operation; Procedure such that results are available
immediately, e.g. online help.
open
To instruct an application that a particular file is
required for reading, writing or both. When a file is
opened, its name is passed to the operating system,
which locates it and checks that it exists and is
available - creating it if necessary - before giving to
the application status information and the location of
the first record. Once a file has been opened for
writing it is normally unavailable to other applications
until it has been closed.
operator
1. A person responsible for the immediate supervision
of the hardware of a computer system. 2. A function
that can be applied to one or more operands so as to
yield a result. It is a symbol representing an operation
to be carried out, as opposed to a variable, which
represents a data value. Arithmetic operator is a type
of operator appearing in an expression denoting one
of the operations of arithmetic, e.g. +, -, *
(multiplication), / (divide).
4-142
Ascent Software
User's Guide
option button
A small, round button that appears in a dialog box.
Within a group of related option buttons, you can
select only one.
output
1. The result of data processing presented external to
the system or the process of presenting the data
externally. The output from a computer can be in a
form for use by people, e.g. printed or displayed or it
may be ready for input to another system or process,
when it may be encoded magnetically or optically on
a tape or disk. 2. A signal that is obtained from an
electrical circuit, such as a logic circuit. 3. To produce
a result or signal.
override
To prevent something from happening in a program
or in an operating system or to initiate another
response. For example, a user can often override and
thus abort a lengthy sorting procedure in a database
program by pressing the Escape key.
overwrite
To write data to a location (memory or tape or disk)
and, in doing so, to destroy any data already
contained in that location.
parallel
interface
see also Centronics interface and parallel printer. A
connection point that comprises a set of individual
electric connections, each having a specified function,
usually either data or control.
parallel port
An input/output socket on a computer or other device
for a parallel interface. A parallel port on a computer is
often used for a parallel printer.
parallel printer
A printer with a parallel interface that connects to a
computer by means of a parallel port. The original
parallel
printer
interface
(Centronics)
was
unidirectional. Most parallel ports on current
computers will support data transfers in either
direction.
Ascent Software
User's Guide
4-143
parity
In brief, parity is an error-checking procedure in which
the number of 1’s must always be the same - either
even or odd - for each group of bits transmitted
without error.
password
A secret group of letters or numbers that must be put
into a computer before you can use a system or
program.
paste
To insert the contents of the clipboard or the paste
buffer into a text or graphics object at a desired point.
Many applications have a Paste command on the Edit
menu that performs this task.
PIF
(program
information
file)
A file that provides information about how Windows
should run a non-Windows application. For example,
you use a PIF to direct Windows to run a nonWindows application in a full screen rather than in a
window or to specify a startup directory.
pop-up menu
A menu that appears on the display when the user
changes the state of a button or makes a selection
from a menu bar. The menu item is selected by
pointing to the desired entry before changing the
button state back to the original state.
pop-up
messages
The messages that appear when pop-up Help is used.
pop-up
program
A program that is permanently resident in memory
and “pops up” onto the screen at the touch of a key.
print quality
The characteristics of the printed characters on a
printout (of a printer), e.g. characters per inch (CPI). In
general, slower impact printers produce higher-quality
print but the highest quality is available from laser
printers.
4-144
Ascent Software
User's Guide
program file
A file containing one or more programs or program
fragments in source code or object code form.
prompt
A change to the contents of a computer display to
indicate that input is required from the operator.
protocol
An agreement that governs the procedures used to
exchange information between cooperating entities.
More specifically, a protocol is such an agreement
operating between entities that have no direct means
of exchanging information, but that do so by passing
information across a local interface to so-called lowerlevel protocols, until the lowest, physical level is
reached. In general, a protocol will govern the format
of messages, the generation of checking information
and the flow control, as well as actions to be taken in
the event of errors.
pull-down
menu
A menu that is pulled down from the menu bar and
that remains available as long as the user holds it
open. Compare drop-down menu.
push button
A general term for the buttons on the menu bar, the
scroll bars, the toolbars, in the dialog boxes etc (e.g.
Option buttons, Command buttons) that are normally
equipped with a title or picture and cause an action
when pressed.
RAM
Acronym for Random-Access Memory, usually the
main, impermanent memory of a computer.
raw data
Data in the form in which it reaches a computer
system from the outside world: data that has not been
processed.
read
To sense and retrieve (or interpret) data from a form
of storage or input medium. The word is often used to
qualify the meaning of a noun, as in read head.
Ascent Software
User's Guide
4-145
read-only file
A file that can be read or copied, but not erased or
modified. The protection is maintained by the
operating system and in multiuser systems can be
made to depend upon the category of the user. A file
might be writeable by its owner, read-only to the
owner’s colleagues and inaccessible to everyone else.
relative
addressing
Usually either of two ways to expand a short specified
address. The first is self-relative addressing where the
specified address is added to the address of the
instruction (generally the current contents of the
program counter) that contains the self-relative
reference to produce a direct address. The second is
base addressing in which the specified address is
added to the contents of a base register containing a
base address to produce a direct address.
remove
Data information can be taken away from the place
where it is by e.g. replacing, erasing, deleting, cutting
or rewriting.
run time
The time at which a program begins to execute, in
contrast to the time at which it may have been
submitted, loaded, compiled or assembled. The
amount of time - elapsed time or processor time used in executing a program is called the execution
time or sometimes the run time.
save
In many applications the File menu contains two
commands for saving files: Save and Save As. You
use the Save command to save changes to an existing
file. You use the Save As command to name and save
a new file or to save an existing file under a new
name. In brief, to write data (typically a file) to a
storage medium, such as a disk or tape.
4-146
Ascent Software
User's Guide
scroll
To move the information displayed on a screen in a
vertical or horizontal direction: as information
disappears at one edge new information becomes
visible at the other edge or alternatively space is
provided for the entry of new data. The scrolling
action is perceived as a smooth movement. In some
displays the movement is in discrete increments of
one line pitch and this is referred to as racking.
Scrolling is technically more difficult to achieve but
eases simultaneous reading.
scroll box
In a scroll bar, the small box that shows the position
of information currently in the window or list box
relative to the contents of the entire window.
select
1. To initiate an action or enable a data path. 2. To
mark out a section of a document before performing
an operation on it, such as copy, move or cut or
before changing its attributes, such as font, color,
margins or line spacing. The selection process can be
done using the keyboard or dragging the cursor with a
pointing device such as a mouse. The marked text is
known as the selection. 3. To indicate an item in a
menu, menu bar, button bar etc with the selection
cursor before initiating an action.
serial interface
A connection point through which information is
transferred one digital bit at a time. The rate may be
high, e.g. 10 megabits per second as in Ethernet or as
slow as 110 bits per second via an RS232C interface.
The term is sometimes applied to interfaces such as
the RS232C and RS422 in which the data is transferred
serially via one path, but some control signals can be
transferred simultaneously via parallel paths.
Ascent Software
User's Guide
4-147
serial port
An input/output socket on a computer or other device
that is used for serial input/output, often making use
of the RS232C standard. The physical port may have a
25- or 9-pin subminiature D connector or an RJ45
connector (which looks like a telephone connector).
From the software, a serial port is usually treated as a
device rather than a file.
session
The software program is based on sessions. The
session contains the measurement parameters, the
instructions for the instrument and the measurement
data processing defined by the user. The user can
create a new, save the current and edit an old session.
Only one session can be edited at a time.
setup
The preparation of a machine for a specific work
method, activity or process.
specimen
1. A small amount or piece of something that is taken
from a plant, animal or human being, so that it can be
tested or examined. 2. A single example of something.
4-148
Ascent Software
User's Guide
spreadsheet
A program that manipulates tables consisting of rows
and columns of cells and displays them on the screen;
the cells contain numerical information and formulas
or text. Each cell has a unique row and column
identifier, but different spreadsheets use different
conventions so the top left-hand cell may be A1, 1A or
1,1. The value in a numerical cell is either typed in or
is calculated from a formula in the cell; this formula
can involve other cells. The ability of the cells to store
text is used to annotate the table with column
headings, titles etc.
The common characteristics of all spreadsheets is the
way the screen of a computer acts as a window onto
the matrix of cells; if there are more rows and
columns than will fit on the screen, then the
spreadsheet can be scrolled horizontally or vertically
to bring into view previously hidden rows or columns.
To change a value it is only necessary to move the
cursor into the required cell displayed on the screen
and type in the new value.
status bar
(status line)
In many kinds of display, including text and graphical
user interfaces, a line of usually textual information
about current status. A word processor status bar may
tell the user what line and page is currently in use, if
typeover or insert mode is in force and which font is
currently selected, while a database status bar might
have the current record number and field name and
whether the display may be edited.
strikeout
Strikeout is a method of leaving a deleted section of
printed or displayed text visible but clearly marked
with a horizontal line through it.
Ascent Software
User's Guide
4-149
string
1. A flexible one-dimensional array, i.e. a flexible
vector, of symbols where the lower bound of the
vector is fixed at unity but the upper bound, i.e. the
string length, may vary. 2. A type of input to a
graphics system consisting of a sequence of
characters. The usual input device is a keyboard.
submenu
A menu that appears as a result of the selection of a
menu item. Menu items that cause further menus to
appear rather than cause an immediate action to be
performed are often indicated by ellipsis, by a rightpointing arrow or some other device, as in SAVE ... or
SEARCH!.
Syntax
(syntax rules)
The rules defining the legal sequences of symbolic
elements in a language. The syntax rules define the
form of the various constructs in the language, but say
nothing about the meaning of these constructs.
Examples of constructs are: expressions, procedures
and programs (in the case of programming languages)
and terms, well-formed formulas and sentences (in
the case of logical languages).
tab
Short for tabulate, i.e. to lay out data and for
tabulation character, a control character used when
laying out data to control the movement of a print or
display mechanism. The tab key may initiate the
tabulation function or may be used for other control
purposes.
template
1. The dimensions of the used microplate. The plate
templates are expressed in units of 1/10 mm. 2. A
pattern that specifies a structure - i.e. a relationship
between parts of a compound data object - from
which instances may be made. The term is a
convenient means of differentiating the structure
specification from the declaration of individual
instances of the structure.
4-150
Ascent Software
User's Guide
template
editor
The template editor in the Setup menu allows the user
to create and modify plate templates.
text box
In a dialog box, a box in which you type information
needed to carry out a command. The text box may be
blank or may contain text when the dialog box opens.
timeout
(or time out,
time-out)
1. logoff procedure carried out if no data is entered on
an online terminal; 2. period of time reserved for an
operation.
title bar
The horizontal bar (at the top of a window) that
contains the title of the window or dialog box. On
many windows, the title bar also contains the Control
menu box and Maximize and Minimize buttons.
toggle
1. An electronic device with two states or a program
option that can be turned on or off using the same
action, such as a mouse click. 2. To switch back and
forth between two states. For example, the Num Lock
key on an IBM-style keyboard toggles the numeric
keypad between numbers and cursor movement.
toolbox
A set of software tools, probably from several
vendors, not necessarily as closely related or
providing as full coverage of the software life cycle as
the toolkit. The set of tools in a toolkit is usually from a
single vendor.
Ascent Software
User's Guide
4-151
transformation
Transformation of statistics data means a change of
scale used to improve the validity of statistical
analyses. For data in which small values have smaller
variance than large values a logarithmic or square root
transformation is often recommended. For data in the
form of proportions, a transformation from the scale
(0,1) to an infinite scale is advisable before performing
analysis of variance or regression analysis. Several
transformations exist for proportions, such as the
logistic or log-odds-ratio that is used in the analysis of
generalized
linear
models.
Appropriate
transformations may be suggested by studying
residuals in a regression analysis.
troubleshootin
g (or trouble
shooting,
troubleshooting)
Solving a particular problem related to a project or
system.
truncation
The decimals in a calculation are chopped - not
rounded - in other words, removal of digits from a
number so that it is a certain length. Truncate; 1. To
cut short. 2. To give an approximate value to a
number by reducing it to a certain number of digits.
user interface
(UI)
The means of communication between a human user
and a computer system, referring in particular to the
use of input/output devices with supporting software.
Examples include the graphical user interface (GUI)
and command-line interface (CLI).
utility
programs
(utilities)
The collection of programs that forms part of every
computer system and provides a variety of generally
useful functions, including file searching, file copying
and deleting, file directories, sorting and debugging,
text preparation, program cross-referencing and
various mathematical functions.
4-152
Ascent Software
User's Guide
verification
and validation
(V&V)
A generic term for the complete range of checks that
are performed on a system in order to increase
confidence that the system is suitable for its intended
purpose. This range might include a rigorous set of
functional tests, performance testing, reliability testing
and so on, in which case the term verification,
validation and testing (VV&T) is more appropriate.
viewing
The mapping of scenes defined in a world-coordinate
system to pictures seen from a particular view point,
possibly with culling of the original scene and clipping
of the area viewed.
warping
Distorting an image or texture to achieve some
desired effect.
wildcard
A character that represents one or more other
characters. Wildcards are widely used in commands
and text searches. In filenames, you can use the
question mark (?) to represent any single character
and the asterisk (*) to represent any character or
group of characters that might match that position in
other filenames. For example, *.EXE represents all
files that end with the .EXE filename extension.
wordwrap
(or word wrap)
The ability of a word processing program or a textediting program to break lines of text automatically to
stay within the page margins or window boundaries of
a document without the user having to do so with
carriage returns, as is typically necessary on a
typewriter.
workfile
Files with a very brief existence or where they simply
carry information between one job and the next in
sequence are called work files.
worksheet
In a spreadsheet program, a two-dimensional matrix
of rows and columns that contains cells which can,
themselves, contain equations.
Ascent Software
User's Guide
4-153
zoom in / out
4-154
A possibility to see information either more closely
and detailed (zoom in) by enlarging it or more remote
and less accurately (zoom out) by diminishing it.
Ascent Software
User's Guide
Ascent Software
User's Guide
4-155
Manufactured by:
Distributed by:
P.O.Box 208, FIN-00811 Helsinki, Finland
Tel. +358-9-329 100, Fax +358-9-3291 415
www.thermolabsystems.fi
A Thermo Electron Business
4-156
Ascent Software
User's Guide