1
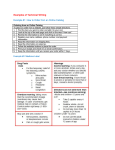
Wo rdpress 3.0+ User Manu al
1
© Cop y r i g h t 2 0 0 8
0800 54 50 50
|
M y t h Li m i t e d
[email protected]
|
All R i g h t s Re s e r v e d
3 A r t h u r S t , D u n e d i n , N e w Z e al a n d
Table Of Contents
WORDP RESS 3.0+ U SER MANU AL ............................... 1
Table Of Contents.................................................................................2
Creating Pages ......................................................................................3
Creating Posts .....................................................................................11
Worpdress Menus (3.0 +) ....................................................................20
Wordpress Gallery (Nextgen) .............................................................23
Featured Slider ....................................................................................27
Create PDF for download ....................................................................30
2
© Cop y r i g h t 2 0 0 8
0800 54 50 50
|
M y t h Li m i t e d
[email protected]
|
All R i g h t s Re s e r v e d
3 A r t h u r S t , D u n e d i n , N e w Z e al a n d
Creating Pages
1. Create/Edit Page.
Pages > Add New
2. Add a title for the new page.
3. Now write the body of the page.
If you make sure the “Visual” tab is selected (top right of the editor), rather than
“HTML,” you’ll be able to use a familiar set of Word Processor-like tools for bolding,
italicising and otherwise formatting your content.
3
© Cop y r i g h t 2 0 0 8
0800 54 50 50
|
M y t h Li m i t e d
[email protected]
|
All R i g h t s Re s e r v e d
3 A r t h u r S t , D u n e d i n , N e w Z e al a n d
4. Saving the page
You can save the page at any time (without sharing it with the world) by hitting the
“Save Draft” button. When you’re ready to share your content with the world, it’s as
simple as hitting “Publish.”
5. View the page
Once you’ve done that, click on “View Pag e” and you can check out exactly how your
content looks to the rest of the world.
6. Add link to page
Highlight the text you’d like to turn into a link by left-clicking and dragging over it
Click the button that looks like a chain
4
© Cop y r i g h t 2 0 0 8
0800 54 50 50
|
M y t h Li m i t e d
[email protected]
|
All R i g h t s Re s e r v e d
3 A r t h u r S t , D u n e d i n , N e w Z e al a n d
7. Add the URL (web address) that you’d like your text to link to
Make sure to click insert.
If you decide to unlink your text, reselect it and use the second, broken chain –
your link vanishes.
8. Add Images to a page
Click the “image” icon on the toolbar of your visual editor while you’re writing a
page:
5
© Cop y r i g h t 2 0 0 8
0800 54 50 50
|
M y t h Li m i t e d
[email protected]
|
All R i g h t s Re s e r v e d
3 A r t h u r S t , D u n e d i n , N e w Z e al a n d
9. Upload/Choose Image
You can then select a picture from your computer to upload. Or from the same pop
up screen you can select an image from your media library, which is where
previously uploaded photos (or videos) are stored. The icons to the right of the photo
icon are for similar actions — adding video, audio, media and polls.
You can add as many images as you like this way, or you can leave them in your media
library for later use.
10. Image Options
Once the image is uplo aded, you’ll get a special screen to plug in lots of details for
the image.
6
© Cop y r i g h t 2 0 0 8
0800 54 50 50
|
M y t h Li m i t e d
[email protected]
|
All R i g h t s Re s e r v e d
3 A r t h u r S t , D u n e d i n , N e w Z e al a n d
Title - Text displayed as a tooltip (when a mouse is hovered over the image)
Caption - Image caption displayed directly underneath the image (will also serve as
the alternate text.)
Description - Text displayed with the image in your dashboard and attachment
pages on your blog.
Link URL / Link Image to: – The URL/web address to which the image will be linked.
Click the File URL button to link the image to its original, full-size version. Click the
Post URL button to have the image linked to its attachment page.
Alignment – The position of the image within your post or page.
Size – The size of the image. You can change this later under Settings -> Media.
11. Insert Image
When finished choosing your image settings, click on the Insert into Post button.
12. Advanced Image Editing
Click the edit image button located on top of the image in your pag e.
7
© Cop y r i g h t 2 0 0 8
0800 54 50 50
|
M y t h Li m i t e d
[email protected]
|
All R i g h t s Re s e r v e d
3 A r t h u r S t , D u n e d i n , N e w Z e al a n d
13. Choose Options to edit image
Here you can alter the size of your image or alignment on the page. You can also
attach a URL link to the image.
8
© Cop y r i g h t 2 0 0 8
0800 54 50 50
|
M y t h Li m i t e d
[email protected]
|
All R i g h t s Re s e r v e d
3 A r t h u r S t , D u n e d i n , N e w Z e al a n d
15. Advanced Options for editing images
Here you can add advanced editing o ptions to your imag es.
Add Vertical or Horizo ntal spacing to create spacing between the image and
text content.
9
© Cop y r i g h t 2 0 0 8
0800 54 50 50
|
M y t h Li m i t e d
[email protected]
|
All R i g h t s Re s e r v e d
3 A r t h u r S t , D u n e d i n , N e w Z e al a n d
10
© Cop y r i g h t 2 0 0 8
0800 54 50 50
|
M y t h Li m i t e d
[email protected]
|
All R i g h t s Re s e r v e d
3 A r t h u r S t , D u n e d i n , N e w Z e al a n d
Creating Posts
1. Create/Edit Post
Posts > Add New
2. Add a title for the new post
3. Now write the body of the post.
If you make sure the “Visual” tab is selected (top right of the editor), rather than
“HTML,” you’ll be able to use a familiar set of Word Processor-like tools for bolding,
italicising and otherwise formatting your content
11
© Cop y r i g h t 2 0 0 8
0800 54 50 50
|
M y t h Li m i t e d
[email protected]
|
All R i g h t s Re s e r v e d
3 A r t h u r S t , D u n e d i n , N e w Z e al a n d
4. Choose a Category
You can choose from a category already located in your site, or create a new one.
You can choose 1 or many categories.
Categories provide a helpful way to gro up r elat ed posts together, and to quickly
tell readers what a post is about. Categories also make it easier for people to find
your content.
5. Saving the post
You can save the page at any time (without sharing it with the world) by hitting the
“Save Draft” button. When you’re ready to share your content with the world, it’s as
simple as hitting “Publish.”
12
© Cop y r i g h t 2 0 0 8
0800 54 50 50
|
M y t h Li m i t e d
[email protected]
|
All R i g h t s Re s e r v e d
3 A r t h u r S t , D u n e d i n , N e w Z e al a n d
6. View the post
Once you’ve done that, click on “View Post” and you can check out exactly how your
content looks to the rest of the world.
7. Add link to post
Highlight the text you’d like to turn into a link by left-clicking and dragging over it
Click the button that looks like a chain
8. Add the URL (web address) that you’d like your text to link to
Make sure to click insert.
If you decide to unlink your text, reselect it and use the second, broken chain –
your link vanishes.
13
© Cop y r i g h t 2 0 0 8
0800 54 50 50
|
M y t h Li m i t e d
[email protected]
|
All R i g h t s Re s e r v e d
3 A r t h u r S t , D u n e d i n , N e w Z e al a n d
9. Add Images to a post
Click the “image” icon on the toolbar of your visual editor while you’re writing a post:
10. Upload/Choose Image
You can then select a picture from your computer to upload. Or from the same pop
up screen you can select an image from your media library, which is where
previously uploaded photos (or videos) are stored. The icons to the right of the photo
icon are for similar actions — adding video, audio, and media.
You can add as many images as you like this way, or you can leave them in your media
library for later use.
14
© Cop y r i g h t 2 0 0 8
0800 54 50 50
|
M y t h Li m i t e d
[email protected]
|
All R i g h t s Re s e r v e d
3 A r t h u r S t , D u n e d i n , N e w Z e al a n d
11. Image Options
Once the image is uploaded, you’ll get a special screen to plug in lots of details for the
image.
Title - Text displayed as a tooltip (when a mouse is hovered over the image)
Caption - Image caption displayed directly underneath the image (will also serve as
the alternate text.)
Description - Text displayed with the image in your dashboard and attachment
pages on your blog.
Link URL / Link Image to: – The URL/web address to which the image will be linked.
Click the File URL button to link the image to its original, full-size version. Click the
Post URL button to have the image linked to its attachment page.
Alignment – The position of the image within your post or page.
Size – The size of the image. You can change this later under Settings -> Media.
15
© Cop y r i g h t 2 0 0 8
0800 54 50 50
|
M y t h Li m i t e d
[email protected]
|
All R i g h t s Re s e r v e d
3 A r t h u r S t , D u n e d i n , N e w Z e al a n d
12. Insert Image
When finished choosing your image settings, click on the Insert into Post button.
13. Advanced Image Editing
Click the edit image button located on top of the image in your post.
16
© Cop y r i g h t 2 0 0 8
0800 54 50 50
|
M y t h Li m i t e d
[email protected]
|
All R i g h t s Re s e r v e d
3 A r t h u r S t , D u n e d i n , N e w Z e al a n d
14. Choose Options to edit image
Here you can alter the size of your imag e or alig nment on the post. You can also
attach a URL link to the image.
17
© Cop y r i g h t 2 0 0 8
0800 54 50 50
|
M y t h Li m i t e d
[email protected]
|
All R i g h t s Re s e r v e d
3 A r t h u r S t , D u n e d i n , N e w Z e al a n d
15. Advanced Options for editing images
Here you can add advanced editing options to your images.
Add Vertical or Horizo ntal spacing to create spacing between the image and
text content.
18
© Cop y r i g h t 2 0 0 8
0800 54 50 50
|
M y t h Li m i t e d
[email protected]
|
All R i g h t s Re s e r v e d
3 A r t h u r S t , D u n e d i n , N e w Z e al a n d
19
© Cop y r i g h t 2 0 0 8
0800 54 50 50
|
M y t h Li m i t e d
[email protected]
|
All R i g h t s Re s e r v e d
3 A r t h u r S t , D u n e d i n , N e w Z e al a n d
Worpdress Menus (3.0 +)
1. Add/Edit Menu
Appearances > Menus
2. Menu Screen
20
© Cop y r i g h t 2 0 0 8
0800 54 50 50
|
M y t h Li m i t e d
[email protected]
|
All R i g h t s Re s e r v e d
3 A r t h u r S t , D u n e d i n , N e w Z e al a n d
The left column allows you to choose the type of link you want to add to your menu.
There are three types of menu items you can add:
Custom Links allow you to add menu items that link to external web pages. Enter
the page’s address in the URL box and the name you want to use in the label box.
Pages is where you add menu items that link to the WordPress pages you have
created.
Categories is the final option, and if you have created categories of blog posts,
pages that list all posts in that category appear here.
3. Select Item For Menu
Select the check boxes next to the pages you want and click add to your menu.
4. Order the menu Items
Now click and drag the items in the right column – you will notice that you can
arrange them and adjust them left and right. The o rder you arrange them in is the
order in which they appear. The adjustments you make left and right determine their
hierarchy in the site. The leftmost items are your primar y navigation. Items
nested one notch to the right are the s econdar y navigation of their par ent, and so
on.
5. Save Menu
View site to make sure the menu is working and ordered correctly.
21
© Cop y r i g h t 2 0 0 8
0800 54 50 50
|
M y t h Li m i t e d
[email protected]
|
All R i g h t s Re s e r v e d
3 A r t h u r S t , D u n e d i n , N e w Z e al a n d
22
© Cop y r i g h t 2 0 0 8
0800 54 50 50
|
M y t h Li m i t e d
[email protected]
|
All R i g h t s Re s e r v e d
3 A r t h u r S t , D u n e d i n , N e w Z e al a n d
Wordpress Gallery (Nextgen)
1. Gallery
2. Add Gallery / Images
Gallery > Add Gallery/Images
3. Add name of new gallery
23
© Cop y r i g h t 2 0 0 8
0800 54 50 50
|
M y t h Li m i t e d
[email protected]
|
All R i g h t s Re s e r v e d
3 A r t h u r S t , D u n e d i n , N e w Z e al a n d
4. Upload Images to new gallery.
Browse your computer for the imag es and make sure to select the gallery to put
images into!
5. Adding gallery to your post or page
Post > Edit/Add New
Or
Page > Edit/Add New
Use the button “add NextGEN Gallery”. Located amongst the tools when writing
content into your post or page.
Select the galler y name, choose a dis play option (3 examples listed below) and
click Insert. There will be a piece of code inserted in the post and when you preview
the post you will see the gallery appear.
24
© Cop y r i g h t 2 0 0 8
0800 54 50 50
|
M y t h Li m i t e d
[email protected]
|
All R i g h t s Re s e r v e d
3 A r t h u r S t , D u n e d i n , N e w Z e al a n d
6. Preview the page/post
Click on “Preview” and you can check out exactly how your gallery looks.
25
© Cop y r i g h t 2 0 0 8
0800 54 50 50
|
M y t h Li m i t e d
[email protected]
|
All R i g h t s Re s e r v e d
3 A r t h u r S t , D u n e d i n , N e w Z e al a n d
26
© Cop y r i g h t 2 0 0 8
0800 54 50 50
|
M y t h Li m i t e d
[email protected]
|
All R i g h t s Re s e r v e d
3 A r t h u r S t , D u n e d i n , N e w Z e al a n d
Featured Slider
Featured slider content is almost always populated with Posts.
1. Add post to featured slider
Posts > Add New
Or
Posts > Edit
2. Add Featured Image
Click s et featured image
3. Image Options
Browse your media library or upload a new image.
Once the image is uploaded, you’ll get a special screen to plug in lots of details for the
image.
Make sure to click “Use as featured imag e” when done.
27
© Cop y r i g h t 2 0 0 8
0800 54 50 50
|
M y t h Li m i t e d
[email protected]
|
All R i g h t s Re s e r v e d
3 A r t h u r S t , D u n e d i n , N e w Z e al a n d
4. Choose a Category
Choose the category from categories that displays the featured slider co ntent.
We usually set up a certain category called “Featured” for you to select from.
5. View the post
Click on “View Post” and you can check out exactly how your post looks. Make sure
to check the featured slider page, usually the home page, to make sure the post is
showing up in the slider.
28
© Cop y r i g h t 2 0 0 8
0800 54 50 50
|
M y t h Li m i t e d
[email protected]
|
All R i g h t s Re s e r v e d
3 A r t h u r S t , D u n e d i n , N e w Z e al a n d
29
© Cop y r i g h t 2 0 0 8
0800 54 50 50
|
M y t h Li m i t e d
[email protected]
|
All R i g h t s Re s e r v e d
3 A r t h u r S t , D u n e d i n , N e w Z e al a n d
Create PDF for download
This can be performed both in a Post or Page.
1. Upload PDF
Use the upload media b utton to upload the PDF. The media button is the star
shaped button.
2. Choose PDF to upload
Click the “Select Files” button and browse your computer to find the PDF
30
© Cop y r i g h t 2 0 0 8
0800 54 50 50
|
M y t h Li m i t e d
[email protected]
|
All R i g h t s Re s e r v e d
3 A r t h u r S t , D u n e d i n , N e w Z e al a n d
3. Insert PDF into Post/Page
Add any extra details to the PDF and Insert into Post/Page. The result will be a link
that anyone can click on to download or view the PDF.
31
© Cop y r i g h t 2 0 0 8
0800 54 50 50
|
M y t h Li m i t e d
[email protected]
|
All R i g h t s Re s e r v e d
3 A r t h u r S t , D u n e d i n , N e w Z e al a n d