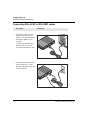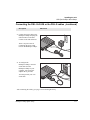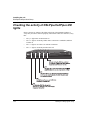
1
DSLPipe/CellPipe Quick Setup
Part Number: 7820-0597-003
For software version 8.0
October 1999
Copyright© 1999 Lucent Technologies. All Rights Reserved.
This material is protected by the copyright laws of the United States and other countries. It may not be reproduced, distributed, or
altered in any fashion by any entity (either internal or external to Lucent Technologies), except in accordance with applicable
agreements, contracts, or licensing, without the express written consent of Lucent Technologies.
Notice
Every effort was made to ensure that the information in this document was complete and accurate at the time of printing.
However, information is subject to change.
Trademarks
DSLPipe, DSLTNT, and CellPipe are trademarks of Lucent Technologies. Other trademarks and trade names mentioned in this
publication belong to their respective owners.
Ordering Information
To order copies of this document, contact your Lucent Technologies representative or reseller.
Support Telephone Numbers
For a menu of support and other services, call (800) 272-3634. Or call (510) 769-6001 for an operator.
Lucent Technologies
Customer Service
Customer Service
Customer Service provides a variety of options for obtaining information about
Lucent products and services, software upgrades, and technical assistance.
Finding information and software on the Internet
Visit the Web site at http://www.ascend.com for technical information,
product information, and descriptions of available services.
Visit the FTP site at ftp.ascend.com for software upgrades, release notes, and
addenda to this manual.
Obtaining technical assistance
You can obtain technical assistance by telephone, email, fax, modem, or regular mail,
as well as over the Internet.
Enabling Lucent to assist you
If you need to contact Lucent for help with a problem, make sure that you have the
following information when you call or that you include it in your correspondence:
•
Product name and model.
•
Software and hardware options.
•
Software version.
•
Whether you are routing or bridging with your Lucent product.
•
Type of computer you are using.
•
Description of the problem.
Calling Lucent from within the United States
In the U.S., you can take advantage of Priority Technical Assistance or you can call to
request assistance.
DSLPipe/CellPipe Quick Setup
iii
Customer Service
Priority Technical Assistance
If you need to talk to an engineer right away, call (900) 555-2763 to reach the Priority
Call queue. The charge of $2.95 per minute does not begin to accrue until you are
connected to an engineer. Average wait times are less than three minutes.
Other telephone numbers
For a menu of Lucent’s services, call (800) 272-363). Or call (510) 769-6001 for an
operator.
Calling Lucent from outside the United States
You can contact Lucent by telephone from outside the United States at one of the
following numbers:
Telephone outside the United States
(510) 769-8027
Austria/Germany/Switzerland
(+33) 492 96 5672
Benelux
(+33) 492 96 5674
France
(+33) 492 96 5673
Italy
(+33) 492 96 5676
Japan
(+81) 3 5325 7397
Middle East/Africa
(+33) 492 96 5679
Scandinavia
(+33) 492 96 5677
Spain/Portugal
(+33) 492 96 5675
UK
(+33) 492 96 5671
For the Asia Pacific Region, you can find additional support resources at
http://apac.ascend.com
Obtaining assistance through correspondence
Lucent maintains two email addresses for technical support questions. One is for
customers in the United States, and the other is for customers in Europe, the Middle
East, and Asia. If you prefer to correspond by fax, BBS, or regular mail, please direct
iv
DSLPipe/CellPipe Quick Setup
Important safety instructions
your inquiry to Lucent’s U.S. offices. Following are the ways in which you can reach
Customer Service:
•
Email from within the U.S.—[email protected]
•
Email from Europe, the Middle East, or Asia—[email protected]
•
Fax—(510) 814-2312
•
Customer Support BBS (by modem)—(510) 814-2302
Write to Lucent at the following address:
Attn: Customer Service
Lucent Technologies
1701 Harbor Bay Parkway
Alameda, CA 94502-3002
Important safety instructions
A. GENERAL
1
Read and follow all warning notices and instructions marked on the product or
included in the manual.
2
There are no operator serviceable parts within the unit. Refer all servicing to
trained service personnel.
3
Product installation should be performed by trained service personnel only.
4
Install only in restricted-access areas in accordance with UL1950, C22.2 No. 950,
and IEC60950
5
The maximum recommended operating ambient is 104° F (40° C). Allow
sufficient air circulation or space between units when installed in a closed or
multiple-rack assembly.
6
Slots and openings in the cabinet are provided for ventilation. To ensure reliable
operation of the product and to protect it from overheating, these slots and
openings must not be blocked or covered. Installation without sufficient airflow
can be unsafe.
7
Equipment mounted in a rack should be distributed to prevent a possible
hazardous condition due to uneven loading. The rack should safely support the
combined weight of all equipment. This product weighs about 2 lbs.
DSLPipe/CellPipe Quick Setup
v
Important safety instructions
8
The power source has to be adequately rated to assure safe operation of the
equipment. The building installation and/or power source must provide overload
protection.
9
Protective earth (PE) connection is essential to ensure safe operation before
connecting to the power supply and telecommunication network. Do not defeat
the purpose of the grounding-type plug by modifying the plug or using an
adapter. Use an outlet tester or a voltmeter to check the ac receptacle for the
presence of earth ground. If the receptacle is not properly grounded, the
installation must not procede until a qualified electrician has corrected the
problem.
If the power supply is fed from a power source with no protective-earthing path
(such as in certain Nordic countries), connect an earth-grounded copper wire to
the dedicated wiring terminal marked with
(PE symbol) on the chassis. The
minimum size of the wire for a Pipeline unit with rated input current not
exceeding 6A is AWG 18 and cross-sectional area 0.75 mm2.
Models with ac power inputs are intended for use with a single-phase three-wire
power cord (which includes earthing conductor).
For models with dc power inputs, the protective earth connection must be
established by using the dedicated earthing terminal marked with the PE symbol
or, if provided, the earthing pin of the input terminal block.
10 Models with dc power inputs must be connected to a -48V dc supply source that
is electrically isolated from the ac source in accordance with UL1950, C22.2 No.
950, and IEC60950.
11 For products installed in Nordic countries (except Central Office equipment), a
type B plug or permanent connection must be used for connections to the main
power supply.
12 Before installing wires to the dc power terminal block, verify that these wires are
not connected to any power source. Installing live wires (that is, wires connected
to a power source) is hazardous.
13 Do not allow anything to rest on the power cord, and do not locate the product
where people will walk on the power cord.
14 Do not attempt to service this product yourself. Opening or removing covers can
expose you to dangerous high voltage points or other risks. Refer all servicing to
qualified service personnel.
15 General purpose cables are provided with this product. Special cables, which
might be required by the regulatory inspection authority for the installation site,
are the responsibility of the customer.
vi
DSLPipe/CellPipe Quick Setup
Important safety instructions
16 When installed in the final configuration, the product must comply with the
applicable safety standards and regulatory requirements of the country in which it
is installed. If necessary, consult with the appropriate regulatory agencies and
inspection authorities to ensure compliance.
17 A rare phenomenon can create a voltage potential between the earth grounds of
two or more buildings. If products installed in separate buildings are
interconnected, the voltage potential might cause a hazardous condition. Consult
a qualified electrical consultant to determine whether or not this phenomenon
exists.
In addition, if the equipment is to be used with telecommunications circuits, take the
following precautions:
•
Never install telephone wiring during a lightning storm.
•
Never install telephone jacks in wet locations unless the jack is specifically
designed for wet locations.
•
Never touch uninsulated telephone wires or terminals unless the telephone line
has been disconnected at the network interface.
•
Use caution when installing or modifying telephone lines.
•
Avoid using equipment connected to telephone lines (other than a cordless
telephone) during an electrical storm. There is a remote risk of electric shock
from lightning.
•
Do not use a telephone or other equipment connected to telephone lines to report
a gas leak in the vicinity of the leak.
!
Warning: To reduce the risk of fire, communication cable conductors must be 26
AWG (0.13 mm2) or larger.
!
Avertissement: Afin de réduire les risques d'incendie, les fils conducteurs du câble
de communication doivent être d'un calibre minimum de 26 AWG (American Wire
Gauge), c'est-à-dire d'un minimum de 0,13 mm².
!
Warnung:
Um Feuer-Risiko zu reduzieren, müsssen die Querschnitte der Kommunikationskabel-Leiter 0,13 mm² oder größer sein.
B. SPECIAL REQUIREMENTS
18 Lithium batteries:
DSLPipe/CellPipe Quick Setup
vii
Important safety instructions
!
!
!
Warning: The battery can explode if incorrectly replaced. Replace the battery
only with the same or equivalent type recommended by the manufacturer.
Dispose of used batteries according to the manufacturer’s instructions.
Avertissement: Il y a danger d'explosion si la batterie n'est pas remplacée
correctement. Remplacer uniquement avec une batterie du même type ou d'un
type recommandé par le fabricant. Mettre au rebut les batteries usagées
conformément aux instructions du fabricant.
Warnung: Die Batterie kann eventuell explodieren, wenn sie nicht
ordnungsgemäß ausgetauscht wird. Ersetzen Sie die Batterie nur mit einer
Batterie des gleichen oder eines ähnlichen vom Hersteller empfohlenen Typs.
Entsorgen Sie gebrauchte Batterien gemäß den Anweisungen des Herstellers.
19 Mains Disconnect (no power switch):
viii
!
Caution: The power supply cord is used as the main disconnect device. Make
sure that the outlet socket is located/installed near the equipment and is easily
accessible.
!
Attention: Le cordon d'alimentation est utilisé comme interrupteur général. La
prise de courant doit être située ou installée à proximité du matériel et être facile
d'accès.
!
Vorsicht: Zur sicheren Trennung des Gerätes vom Netz muß der Netzstecker
gezogen werden. Stellen Sie sicher, daß sich die Steckdose in der Nähe des
Gerätes befindet und leicht zugänglich ist.
DSLPipe/CellPipe Quick Setup
Contents
Customer Service ..................................................................................................... iii
Important safety instructions ..................................................................................... v
Installing the unit ................................................................. 1-1
What is the DSLPipe/CellPipe? ............................................................................. 1-1
Checking box contents .......................................................................................... 1-2
Other items you need for installation .................................................................... 1-4
Steps to setting up your DSLPipe/CellPipe unit .................................................... 1-7
Checking DSLPipe/CellPipe model name ............................................................. 1-8
Connecting DSL-Cell-50A or DSL-Cell-20A cables ................................... 1-10
Connecting DSL-HST or DSL-HS cables .................................................... 1-12
Connecting DSL-ACAP or DSL-DMT cables ............................................. 1-14
Connecting the DSL-Cell-50S or the DSL-S cables .................................... 1-16
Connecting DSL-2S cables .......................................................................... 1-18
Connecting DSL-HSTB cables .................................................................... 1-20
Checking the activity of DSLPipe/CellPipe LED lights ..................................... 1-22
Getting ready to configure .................................................. 2-1
Getting ready to configure the DSLPipe or CellPipe unit .....................................
Items you need .........................................................................................
Connecting serial cable and setting up communications software ..........
What’s next? ............................................................................................
The DSLPipe/CellPipe main window ...................................................................
Status windows ........................................................................................
Navigating within the DSLPipe/CellPipe window ................................................
Opening a menu .......................................................................................
DSLPipe/CellPipe Quick Setup
2-1
2-1
2-2
2-3
2-3
2-4
2-4
2-5
ix
Contents
Changing parameters with text entries ..................................................... 2-6
Setting parameters with predefined values ............................................... 2-6
Saving or discarding your changes ........................................................... 2-6
Configuring the unit ............................................................ 3-1
Configuring the DSLPipe units ............................................................................. 3-2
Plug and Play capability ........................................................................... 3-3
Changing default configuration of DSLPipe units ......................................... 3-3
Creating a connection profile for a Frame Relay connection ................... 3-3
Creating a connection profile for a PPP connection ................................ 3-4
Configuring the DSL-Cell-50A and the DSL-Cell-50S units ................................ 3-6
Traffic shaping options for the CellPipes ....................................................... 3-7
Configuring the DSL-Cell-20A ............................................................................. 3-8
DSL-Cell-20A command-line interface ......................................................... 3-8
Displaying status ............................................................................................ 3-8
Displaying ATM status ............................................................................ 3-9
Displaying ADSL status ......................................................................... 3-10
Changing configuration information ............................................................ 3-11
Changing the console baud rate ............................................................. 3-11
Changing the VPI and VCI .................................................................... 3-12
Changing the MUX type ........................................................................ 3-12
Exiting the command-line interface ............................................................. 3-12
Configuring the DSL-HSTB unit ........................................................................ 3-13
DSL-HSTB command-line interface ............................................................ 3-13
Displaying status .......................................................................................... 3-13
Displaying Frame Relay status ............................................................... 3-14
Displaying the Frame Relay DLCI ......................................................... 3-15
Displaying SDSL rate ............................................................................. 3-16
Changing configuration information ............................................................ 3-16
Changing the console baud rate ............................................................. 3-16
Changing the Frame Relay DLCI ........................................................... 3-16
Changing the SDSL rate ......................................................................... 3-17
Exiting the command-line interface ............................................................. 3-17
Example configurations ....................................................................................... 3-18
DSL-HST as CPE ......................................................................................... 3-19
DSL-HST as COE ........................................................................................ 3-21
DSL-ACAP as CPE ...................................................................................... 3-23
DSL-ACAP as COE ..................................................................................... 3-24
DSL-Cell-50A as CPE .................................................................................. 3-25
x
DSLPipe/CellPipe Quick Setup
Contents
DSL-Cell-50S as CPE .................................................................................. 3-29
DSLPipe/CellPipe Quick Setup
xi
Contents
xii
DSLPipe/CellPipe Quick Setup
Installing the unit
1
What is the DSLPipe/CellPipe? . . . . . . . . . . . . . . . . . . . . . . . . . . . . . . . . . . . . . . . . . . . . . . . . . . . . 1-1
Checking box contents . . . . . . . . . . . . . . . . . . . . . . . . . . . . . . . . . . . . . . . . . . . . . . . . . . . . . . . . . . . 1-2
Other items you need for installation . . . . . . . . . . . . . . . . . . . . . . . . . . . . . . . . . . . . . . . . . . . . . . . . 1-4
Steps to setting up your DSLPipe/CellPipe unit . . . . . . . . . . . . . . . . . . . . . . . . . . . . . . . . . . . . . . . . 1-7
Checking DSLPipe/CellPipe model name . . . . . . . . . . . . . . . . . . . . . . . . . . . . . . . . . . . . . . . . . . . . 1-8
Connecting DSL-Cell-50A or DSL-Cell-20A cables . . . . . . . . . . . . . . . . . . . . . . . . . . . . . . . . . . . 1-10
Connecting DSL-HST or DSL-HS cables. . . . . . . . . . . . . . . . . . . . . . . . . . . . . . . . . . . . . . . . . . . . 1-12
Connecting DSL-ACAP or DSL-DMT cables . . . . . . . . . . . . . . . . . . . . . . . . . . . . . . . . . . . . . . . . 1-14
Connecting the DSL-Cell-50S or the DSL-S cables . . . . . . . . . . . . . . . . . . . . . . . . . . . . . . . . . . . . 1-16
Connecting DSL-2S cables . . . . . . . . . . . . . . . . . . . . . . . . . . . . . . . . . . . . . . . . . . . . . . . . . . . . . . . 1-18
Connecting DSL-HSTB cables . . . . . . . . . . . . . . . . . . . . . . . . . . . . . . . . . . . . . . . . . . . . . . . . . . . . 1-20
Checking the activity of DSLPipe/CellPipe LED lights . . . . . . . . . . . . . . . . . . . . . . . . . . . . . . . . . 1-22
What is the DSLPipe/CellPipe?
The DSLPipe/CellPipe unit is a high-speed bridging and/or routing device. You can
use a DSLPipe/CellPipe unit to create a dedicated, physical connection to Digital
Subscriber Line (DSL) equipment at the phone company. You first attach your
computer or Ethernet hub to a DSLPipe/CellPipe unit. Then, you connect one end of a
DSLPipe/CellPipe Quick Setup
1-1
Installing the unit
DSLPipe/CellPipe Quick Setup
standard telephone line to the unit. The other end connects to DSL equipment at the
phone company. Your DSL circuit is dedicated to your DSLPipe/CellPipe unit.
With DSL, you have the capacity to transfer data at very high rates. The actual rate
can vary according to the type of DSLPipe/CellPipe you use, the distance between the
DSLPipe/CellPipe and the DSL equipment, and the line quality of the connection.
You can use DSL technology for Internet access, telecommuting, remote office
connectivity, multimedia, and videoconferencing.
ISP/ Corp Site
DSLPipe/Cell
Pipe
Central Office
IP, ATM
Frame
Relay, etc.
Satellite Office
DSLPipe/Cell
Pipe
Figure 1-1. Example of DSLPipe/CellPipe setup
This Quick Setup shows you how to connect the DSLPipe/CellPipe to your
workstation or Ethernet hub. If you are using a DSLTNT at the central office, refer to
the DSLTNT documentation for details on setting it up.
Checking box contents
The box in which you received your DSLPipe/CellPipe should contain the items
shown in Table 1-1.
1-2
DSLPipe/CellPipe Quick Setup
Installing the unit
DSLPipe/CellPipe Quick Setup
If you want to set up a DSL-ACAP or DSL-DMT for voice traffic, you must obtain a
separate voice splitter package. For details on setting up the voice splitter with your
DSLPipe, see the DSLPipe/CellPipe User’s Guide.
Table 1-1. Box contents
1
DSLPipe/CellPipe
unit
2
10Base-T Ethernet
crossover cable
(yellow). The
DSL-HST and the
DSL-HS units ship
with one
straight-through
cable.
3
DSL WAN cable
with RJ11 modular
plug connectors
(blue)
Note: If you have a
DSL-2S, you may
need to supply a
second WAN cable.
4
DB-25 to DB-9
serial adapter
5
Power supply
6
DSLPipe/CellPipe
manuals, including
Quick Setup, User’s
Guide, and
Reference Guide.
DSLPipe/CellPipe Quick Setup
1
2
3
4
5
6
1-3
Installing the unit
DSLPipe/CellPipe Quick Setup
Other items you need for installation
In addition to the items provided with the DSLPipe/CellPipe unit, you will also need
the following:
An Ethernet interface
For the DSLPipe to transmit data to and receive data from your computer, you need a
properly configured Ethernet interface for your computer. The interface can be built
into the computer, as it is on many recent Dell, Apple Macintosh, and
Macintosh-compatible personal computers, or it can be an add-on circuit board or
PCMCIA card (PC card). Follow the instructions for installing and configuring the
interface that are included with your computer.
TCP/IP or IPX software
To communicate with a remote network, your computer must have the necessary
networking software, often known as a “stack.”
A TCP/IP stack lets you connect to the Internet and to other networks that use the
same networking standards as the Internet. Many operating systems include software
for TCP/IP. If TCP/IP software is not included in your operating system, you need to
obtain a separate TCP/IP software package. For information on configuring the
TCP/IP software, see the documentation for your operating system or TCP/IP
software package.
An IPX stack lets you connect to Novell NetWare networks.
A WAN cable
If you have a DSL-2S (the model number is printed in the bottom of the box) and you
want to use both WAN ports to connect to two separate jacks, you will need another
WAN cable with RJ11 modular plug connectors.
1-4
DSLPipe/CellPipe Quick Setup
Installing the unit
DSLPipe/CellPipe Quick Setup
Straight-through Ethernet cables
With the exception of the DSL-HST and the DSL-HS, all DSLPipes/CellPipes ship
with one crossover Ethernet cable. The DSL-HST and the DSL-HS ship with one
straight-through cable.
Note: If you’re connecting a single computer to the DSLPipe/CellPipe and the
computer has a 10Base-T (twisted-pair) Ethernet interface, you don’t need any
additional Ethernet cabling. In this case, you can use the special “crossover” cable
included with the DSLPipe/CellPipe.
If you’re connecting a 10Base-T Ethernet network that includes a hub, you need a
standard 10Base-T cable to connect the DSLPipe/CellPipe to the 10Base-T hub for
the network and another standard 10Base-T cable for connecting the computer to the
hub. Note that you cannot use the 10Base-T “crossover” cable included with the
DSLPipe/CellPipe for these connections. You can use the crossover cable only for a
direct connection between a computer and the DSLPipe, not for a connection to a
10Base-T hub.
For Thicknet (10Base-5) or Thinnet (10Base-2) Ethernet networks, consult the
documentation for your network for information about proper cables and termination.
Items needed for establishing a serial connection
If you are not using one of the CellPipes and you want to keep the DSLPipe’s default
configuration (see page page 3-2), you do not have to establish a serial connection.
After connecting the Ethernet, WAN, and power cables, you are ready to start using
your DSLPipe.
If you are changing the DSLPipe’s default configuration, you must establish a serial
connection. You will need the following:
A computer with a serial port
To change the default configuration or monitor the DSLPipe, you need a computer
with a serial communication port capable of transmitting data at 9600 bits per second.
The serial communication port is normally one you could use to connect an external
modem. If you are not already familiar with your computer’s serial ports, refer to your
computer’s user guide for more information.
DSLPipe/CellPipe Quick Setup
1-5
Installing the unit
DSLPipe/CellPipe Quick Setup
If possible, you should set aside a serial port for a permanent connection to the
DSLPipe/CellPipe. If there are not enough serial ports for all the devices that need
serial connections, consider adding another serial port if you can. With a permanent
serial connection, you can monitor the DSLPipe at any time, manually connect to and
disconnect from remote networks, and make configuration changes whenever
necessary.
If no serial port is currently free and you cannot add a serial port to your computer,
disconnect from one of the serial ports a device that you can temporarily do without,
such as an external modem.
A serial cable
To connect the DSLPipe to your computer’s serial port, you need a serial cable (a
serial communication cable designed for connecting an external device). The cable
must be a “high-speed” cable, that is, one that supports the “hardware handshaking”
technique used by almost all recently manufactured modems. This cable must have
the appropriate plug for connecting to a serial communication port on your computer
and either a 9- or 25-pin male “D” connector at the other end.
Communications software
To configure and monitor the DSLPipe, you need communications software for your
computer. This software must be able to:
•
Emulate a VT100 terminal
•
Make a direct connection to the DSLPipe (through the serial port to which the
DSLPipe is connected).
Most communications software that you purchase separately, such as the PROCOMM
PLUS program for Microsoft Windows, work reliably. For Macintosh computers, a
shareware communications program, ZTerm, works well. You can also use the
Terminal program included with Microsoft Windows 3.1 and the HyperTerm program
included with Microsoft Windows 95.
1-6
DSLPipe/CellPipe Quick Setup
Installing the unit
DSLPipe/CellPipe Quick Setup
Steps to setting up your DSLPipe/CellPipe unit
To set up your DSLPipe/CellPipe, perform the following steps:
Step
Description
Go to page
1
Check DSLPipe/CellPipe model. The model name
is printed on the bottom of the DSLPipe/CellPipe
box.
page 1-8
2
Connect the cables as required for your
DSLPipe/CellPipe model.
page 1-10, page 1-12,
page 1-14, page 1-16,
page 1-18
page 1-20
•
If you are connecting to an Ethernet hub and
you are not using the DSL-HS or the
DSL-HST model, you must supply your own
straight-through cable.
•
To configure the DSLPipe/CellPipe, you must
supply your own serial cable.
3
Check the activity of DSLPipe/CellPipe LED
lights.
4
If you are configuring:
5
•
a DSLPipe unit, read the description of the
default configuration.
•
the CellPipe 50A or the CellPipe 50S, read the
information on configuring these pipes.
•
the CellPipe 20A, read the desciption of the
default configuration.
To change the default configuration, see the
sample scenarios.
Before you can change the configuration, you must
establish a serial connection between your
workstation and the DSLPipe/CellPipe unit. You
must also have software for vt100 emulation.
DSLPipe/CellPipe Quick Setup
page 1-22
page 3-2/ page 3-13
page 3-6
page 3-8
page 3-18 (Also see
page 3-8 and
page 3-13)
1-7
Installing the unit
DSLPipe/CellPipe Quick Setup
Step
Description
Go to page
For additional information, refer to the DSLPipe/CellPipe User’s Guide and the
DSLPipe/CellPipe Reference Guide
Checking DSLPipe/CellPipe model name
Before setting up the DSLPipe/CellPipe, check which DSLPipe/CellPipe model you
have. The model number is printed on the back of the DSLPipe/CellPipe. Your setup
procedure will vary slightly according to the model.
Table 1-2. Checking DSLPipe/CellPipe model
DSLPipe/CellPipe
model
Description
Voice?
DSL-Cell-20A
ADSL CellPipe that only
supports bridging. Supports
RFC1483 Multiprotcol over
AAL5.
No
DSL-Cell-50A
Go to page 1-10
ADSL CellPipe that supports
ATM over ADSL. Supports
RFC1483 Multiprotcol over
AAL5.
No
DSL-Cell-50S
Go to page 1-16
SDSL CellPipe that supports
ATM over SDSL. Supports
RFC1483 Multiprotcol over
AAL5.
No
DSL-HSTB
SDSL 2.3MB DSLPipe that only
supports bridging
No
SDSL High Performance 2.3
MB Multi-rate DSLPipe
No
Go to page 1-10
Go to page 1-20
DSL-HST
Go to page 1-12
1-8
DSLPipe/CellPipe Quick Setup
Installing the unit
DSLPipe/CellPipe Quick Setup
Table 1-2. Checking DSLPipe/CellPipe model (continued)
DSLPipe/CellPipe
model
Description
Voice?
DSL-HS
Go to page 1-12
SDSL High Performance1.5 MB
Multi-rate DSLPipe
No
DSL-S
Go to page 1-16
SDSL DSLPipe,
1-port
No
DSL-2S
Go to page 1-18
SDSL DSLPipe,
2-port
No
DSL-ACAP
Go to page 1-14
RADSL-CAP DSLPipe
Yes, with voice
splitter*
DSL-DMT
Go to page 1-14
RADSL-DMT DSLPipe
No
*For details on setting up the voice splitter, see the DSLPipe/CellPipe User’s
Guide.
DSLPipe/CellPipe Quick Setup
1-9
Installing the unit
DSLPipe/CellPipe Quick Setup
Connecting DSL-Cell-50A or DSL-Cell-20A cables
Description
Illustration
1 Connect the yellow crossover
Ethernet cable from the port
labeled 10BT or LAN on the
CellPipe to the Ethernet adapter
in your computer.
To connect the CellPipe to an
Ethernet hub, use your own
straight-through Ethernet cable.
WAN
10
BT
INAL
RM
TE
R
PW
2 Connect the blue WAN cable to
the port labeled WAN on the
CellPipe and plug the other end
into the wall jack.
WAN
10
BT
INAL
RM
TE
R
PW
1-10
DSLPipe/CellPipe Quick Setup
Installing the unit
DSLPipe/CellPipe Quick Setup
Connecting DSL-Cell-50A or DSL-Cell-20A cables (continued)
Description
Illustration
3 Connect the power cable to the
CellPipe and plug the other end
into a wall outlet. Connect to the
wall outlet last.
There is no power switch.
Connecting the power cable
turns on the CellPipe.
WAN
10
BT
INAL
RM
TE
R
PW
4 To configure the CellPipe,
connect a serial cable from the
CellPipe to your computer. You
can use the adapter that is
provided.
You must provide your own
serial cable.
WAN
10
BT
INAL
RM
TE
R
PW
After connecting the cables, go to page 1-22 to check light activity.
DSLPipe/CellPipe Quick Setup
1-11
Installing the unit
DSLPipe/CellPipe Quick Setup
Connecting DSL-HST or DSL-HS cables
Description
Illustration
1 Connect the yellow
straight-through Ethernet cable
to one of the Ethernet ports on
the DSLPipe and plug the other
end to an Ethernet hub.
WAN
Only one straight-through cable
is provided with this unit.
INAL
RM
TE
2 Connect the blue WAN cable to
the port labeled WAN on the
DSLPipe and plug the other end
into the wall jack.
WAN
INAL
RM
TE
1-12
DSLPipe/CellPipe Quick Setup
Installing the unit
DSLPipe/CellPipe Quick Setup
Connecting DSL-HST or DSL-HS cables (continued)
Description
Illustration
3 Connect the power cable to the
DSLPipe and plug the other end
into a wall outlet. Connect to the
wall outlet last.
There is no power switch.
Connecting the power cable
turns on the DSLPipe.
WAN
INAL
RM
TE
4 (Optional)To change the
DSLPipe default configuration,
connect a serial cable from the
DSLPipe to your computer. You
can use the adapter that is
provided.
WAN
WAN
ER
LITT
SP
You must provide your own
serial cable.
INAL
RM
TE
After connecting the cables, go to page 1-22 to check light activity.
DSLPipe/CellPipe Quick Setup
1-13
Installing the unit
DSLPipe/CellPipe Quick Setup
Connecting DSL-ACAP or DSL-DMT cables
Description
Illustration
1 Connect the yellow crossover
Ethernet cable from the port
labeled 10BT on the DSLPipe to
the Ethernet adapter in your
computer.
To connect the DSLPipe to an
Ethernet hub, use your own
straight-through Ethernet cable.
ER
LITT
SP
10
WAN
BT
INAL
RM
TE
R
PW
2 Connect the blue WAN cable to
the port labeled WAN on the
DSLPipe and plug the other end
into the wall jack.
ER
LITT
SP
10
WAN
BT
INAL
RM
TE
R
PW
1-14
DSLPipe/CellPipe Quick Setup
Installing the unit
DSLPipe/CellPipe Quick Setup
Connecting DSL-ACAP or DSL-DMT cables (continued)
Description
Illustration
3 Connect the power cable to the
DSLPipe and plug the other end
into a wall outlet. Connect to the
wall outlet last.
There is no power switch.
Connecting the power cable
turns on the DSLPipe.
ER
LITT
SP
10
WAN
BT
INAL
RM
TE
R
PW
4 (Optional)To change the
DSLPipe default configuration,
connect a serial cable from the
DSLPipe to your computer. You
can use the adapter that is
provided.
ER
LITT
SP
You must provide your own
serial cable.
10
WAN
BT
INAL
RM
TE
R
PW
After connecting the cables, go to page 1-22 to check DSLPipe light activity.
DSLPipe/CellPipe Quick Setup
1-15
Installing the unit
DSLPipe/CellPipe Quick Setup
Connecting the DSL-Cell-50S or the DSL-S cables
Description
Illustration
1 Connect the yellow crossover
Ethernet cable from the port
labeled 10BT on the
DSLPipe/CellPipe to the
Ethernet adapter in your
computer.
WAN
To connect the
DSLPipe/CellPipe to an Ethernet
hub, use your own
straight-through Ethernet cable.
10
BT
INAL
RM
TE
R
PW
2 Connect the blue WAN cable to
the port labeled WAN on the
DSLPipe/CellPipe and plug the
other end into the wall jack.
WAN
10
BT
INAL
RM
TE
R
PW
1-16
DSLPipe/CellPipe Quick Setup
Installing the unit
DSLPipe/CellPipe Quick Setup
Connecting the DSL-Cell-50S or the DSL-S cables (continued)
Description
Illustration
3 Connect the power cable to the
DSLPipe/CellPipe and plug the
other end into a wall outlet.
Connect to the wall outlet last.
There is no power switch.
Connecting the power cable
turns on the DSLPipe/CellPipe.
WAN
10
BT
INAL
RM
TE
R
PW
4 To configure the
DSLPipe/CellPipe, connect a
serial cable from the
DSLPipe/CellPipe to your
computer. You can use the
adapter that is provided.
WAN
You must provide your own
serial cable.
10
BT
INAL
RM
TE
R
PW
After connecting the cables, go to page 1-22 to check light activity.
DSLPipe/CellPipe Quick Setup
1-17
Installing the unit
DSLPipe/CellPipe Quick Setup
Connecting DSL-2S cables
Description
Illustration
1 Connect the yellow crossover
Ethernet cable from the port
labeled 10BT on the DSLPipe to
the Ethernet adapter in your
computer.
WAN
To connect the DSLPipe to an
Ethernet hub, use your own
straight-through Ethernet cable.
2 Connect the WAN cables from
the DSLPipe to wall jacks. Only
one WAN cable (blue) is
supplied.
If your jack supports two lines,
you can use a single cable for
both connections. Connect from
the port labeled WAN 1-2 to the
jack.
1-18
WAN
10
1
2
BT
INAL
RM
TE
R
PW
WAN
WAN
10
1
2
BT
INAL
RM
TE
R
PW
DSLPipe/CellPipe Quick Setup
Installing the unit
DSLPipe/CellPipe Quick Setup
Connecting DSL-2S cables (continued)
Description
Illustration
3 Connect the power cable to the
DSLPipe and plug the other end
into a wall outlet. Connect to the
wall outlet last.
There is no power switch.
Connecting the power cable
turns on the DSLPipe.
WAN
WAN
10
1
2
BT
INAL
RM
TE
R
PW
4 (Optional)To change the
DSLPipe default configuration,
connect a serial cable from the
DSLPipe to your computer. You
can use the adapter that is
provided.
WAN
WAN
You must provide your own
serial cable.
10
1
2
BT
INAL
RM
TE
R
PW
After connecting the cables, go to page 1-22 to check light activity.
DSLPipe/CellPipe Quick Setup
1-19
Installing the unit
DSLPipe/CellPipe Quick Setup
Connecting DSL-HSTB cables
Description
Illustration
1 Connect the yellow crossover
Ethernet cable from the port
labeled LAN on the DSLPipe to
the Ethernet adapter in your
computer.
WAN
OLE
NS
Note: To connect the DSLPipe
to an Ethernet hub, use your own
straight-through Ethernet cable.
CO
10
BT
R
PW
2 Connect the blue WAN cable to
the port labeled WAN on the
DSLPipe and plug the other end
into the wall jack.
WAN
OLE
NS
CO
10
BT
R
PW
1-20
DSLPipe/CellPipe Quick Setup
Installing the unit
DSLPipe/CellPipe Quick Setup
Connecting DSL-HSTB cables
Description
Illustration
3 Connect the power cable to the
DSLPipe and plug the other end
into a wall outlet. Connect to the
wall outlet last.
There is no power switch.
Connecting the power cable
turns on the DSLPipe.
WAN
OLE
NS
CO
10
BT
R
PW
4 (Optional)To change the
DSLPipe default configuration,
connect a serial cable from the
DSLPipe to your computer. You
can use the adapter that is
provided.
You must provide your own
serial cable.
WAN
OLE
NS
CO
10
BT
R
PW
After connecting the cables, go to page 1-22 to check light activity.
DSLPipe/CellPipe Quick Setup
1-21
Installing the unit
DSLPipe/CellPipe Quick Setup
Checking the activity of DSLPipe/CellPipe LED
lights
Observe the activity pattern of the lights at the front of the DSLPipe/CellPipe to
verify that your unit is connected properly. When all the cables are connected, verify
that:
1-22
•
The pwr light turns on and remains on.
•
The wan light is on initially, blinks until a connection is established, and then
remains on.
•
The lnk light is on if there is an ethernet connection.
•
The con light is on initially and then turns off.
DSLPipe/CellPipe Quick Setup
Getting ready to configure
2
Getting ready to configure the DSLPipe or CellPipe unit. . . . . . . . . . . . . . . . . . . . . . . . . . . . . . . . . 2-1
The DSLPipe/CellPipe main window . . . . . . . . . . . . . . . . . . . . . . . . . . . . . . . . . . . . . . . . . . . . . . . . 2-3
Navigating within the DSLPipe/CellPipe window . . . . . . . . . . . . . . . . . . . . . . . . . . . . . . . . . . . . . . 2-4
Most of the DSLPipe/CellPipe units share the same user interface window and are
configured in a similar way. The DSL-Cell-20A and the DSL-HSTB units, however,
are bridging-only units and allow for very limited software configuration.These two
units display a different command-line interface. To view or change the configuration
for these two units, see “Configuring the DSL-Cell-20A” on page 3-8 and
“Configuring the DSL-HSTB unit” on page 3-13
Getting ready to configure the DSLPipe or
CellPipe unit
Before you can configure your DSLPipe/CellPipe unit, you must establish a serial
connection to the unit.
Items you need
•
You need a serial cable that can plug into an available, enabled serial port on your
computer. The other end of the cable must have a male DB-9 connector to fit the
serial port connector on the back of the DSLPipe/CellPipe, or it must fit into the
supplied DB-25 to DB-9 adapter. If your computer is a Macintosh, the cable must
fit the modem port’s nine-pin mini DIN connector.
•
You also need communications software that supports VT100 emulation.
DSLPipe/CellPipe Quick Setup
2-1
Getting ready to configure
DSLPipe/CellPipe Quick Setup
Connecting serial cable and setting up communications software
To establish a serial connection, proceed as follows:
1
Use a serial cable to connect your computer’s serial (or modem) port to the
terminal port on the back of the DSLPipe/CellPipe.
2
Use a communications program (such as HyperTerm, PROCOMM PLUS, Zterm,
or any other program that supports VT100 terminal emulation) to open a session
directly with the port to which the DSLPipe/CellPipe is connected. Since the
DSLPipe/CellPipe connects directly to DSL equipment in the telephone
company’s central office, you do not need to dial a telephone number.
3
Set your communications software to connect with the following settings:
Note: If you are not already familiar with the settings listed, see the
documentation for your communications software. If you’re using the software
for the first time, going through an online or printed tutorial (if the software
includes one) is a good way to get started.
2-2
–
Direct connection: Tell the software that there is a serial cable connecting
the DSLPipe/CellPipe directly to the computer.
–
Serial port: Specify which of the computer’s serial ports the software uses.
If the only serial port available is currently used by an internal modem, you
may need to use your computer’s setup software to specify an external
connector for the port that will be used in place of the internal modem. In
some cases, you also may need to remove the modem. See the manual for the
modem and your computer’s user manual for details.
–
Flow control: Turn off software flow control (XON/XOFF) and, if possible,
hardware flow control (RTS/CTS). Specify None.
–
Terminal type: Specify VT100.
–
Duplex: If the software lets you choose, specify Full. Because this is by far
the most common choice, most communications software sets this by
default.
–
Bits per second: Specify 9600
–
Data bits: Specify 8.
–
Stop bits: Specify 1.
–
Parity: Specify None.
DSLPipe/CellPipe Quick Setup
Getting ready to configure
DSLPipe/CellPipe Quick Setup
4
Your communications program should now display the DSLPipe/CellPipe main
window (see page page 2-3). If it does not, press Ctrl-L to reload or refresh the
screen. The part of the screen you use to configure the DSLPipe/CellPipe is on
the left and looks like this:
Configure...
Chan Usage= Leased/Unused
My Num A= N/A
My Num B= N/A
My Name=
My Addr=
Rem Name=
Rem Addr=
Note: The DSL-Cell-20A and the DSL-HSTB units don’t display the same software
as the other DSLPipe/CellPipe units.
What’s next?
To learn how to navigate within the DSLPipe/CellPipe menu system, see page
page 2-4. To see example configurations, turn to page page 3-18.
The DSLPipe/CellPipe main window
Note: The DSL-Cell-20A and the DSL-HSTB units don’t display the same user
interface as the other DSLPipe/CellPipe units. See “Configuring the DSL-Cell-20A”
on page 3-8 and “Configuring the DSL-HSTB unit” on page 3-13 for details.
DSLPipe/CellPipe Quick Setup
2-3
Getting ready to configure
DSLPipe/CellPipe Quick Setup
The DSLPipe/CellPipe main window allows you to monitor the status of your
DSLPipe/CellPipe as well as configure all the connection profiles.
Note: To learn how to configure your DSLPipe/CellPipe, see the examples on the
next few pages. To change parameters not shown in the examples, see the
DSLPipe/CellPipe User’s Guide and the DSLPipe/CellPipe Reference Guide.
Edit
Main Edit Menu
Configure...
>00-000 System
20-000 Ethernet
10-100 Line Status
>Unit Type:CPE
State: UP
Up Rate:784000
00-200 06:39:10
M31 Line
Ch
Outgoing Call
20-100 Sessions
> 1 Active
20-500 Dyn Stat
Link Up: 12:1:32
RX Signal: present
>Line Q:
15db Good
20-300 WAN Stat
>Rx Pkt: 404
Tx Pkt: 421
CRC: 5
20-400 Ether Stat
>Rx Pkt: 8
Tx Pkt: 95
Col: 0
00-100 Sys Option
>Security Prof: 1
Software: +6.10
S/N: 7475332
^
00-400 HW Config
RADSL Interface
>Adrs: 00c07b722bdc
Enet I/F: UTP
Press Ctrl-n to move cursor to the next menu item. Press return to select it.
Press Tab to move to another window--thick border indicates active window.
Status windows
The eight windows on the right are the status windows. Use the Tab key to make any
status window active. If a plus sign (+) appears at the end of a line in a status window,
you can see more text by selecting the line and scrolling to the end of it. If a “^” and
“v” appear at the end of the top or bottom lines in a status window, you can press
Ctrl-N or the down-arrow key, or Ctrl-P or the up arrow to display additional lines of
text. See the DSLPipe/CellPipe Reference Guide and the DSLPipe/CellPipe User’s
Guide for more information.
Navigating within the DSLPipe/CellPipe window
Note: This section does not apply to the DSL-Cell-20A and the DSL-HSTB units.
2-4
DSLPipe/CellPipe Quick Setup
Getting ready to configure
DSLPipe/CellPipe Quick Setup
Follow these guidelines to navigate the DSLPipe/CellPipe menu system.
Use the Up and Down arrow keys to
navigate up and down through the
menus. A v at the end of the bottom line
of a menu or status window listing
indicates that more lines follow. A ^ at
the end of the top line indicates
additional lines above.
You can also use Ctrl-N and Ctrl-P.
Use Enter to do any of the following:
•
Cycle through available values for a
parameter.
•
Open an input field for a parameter
that doesn’t have preset values.
•
Move to the next field to make a
selection or keep an entry.
Use the Esc key to exit a menu. You
always have the choice of saving or
discarding your changes before exiting.
Opening a menu
To open a menu, select it by placing the cursor (>) in front of the item and pressing
Enter.
Main Edit Menu
>Configure...
00-000 System
20-000 Ethernet
To move the cursor down, press Ctrl-N (next) or the Down-Arrow key. To move it up,
press Ctrl-P (previous) or the Up-Arrow key.
DSLPipe/CellPipe Quick Setup
2-5
Getting ready to configure
DSLPipe/CellPipe Quick Setup
With the exception of parameters designated N/A (not applicable), you can edit all
parameters in any menu. N/A indicates that a parameter does not apply, based on the
value of parameter it is subordinate to; or based on a service not currently available on
your system.
Changing parameters with text entries
To edit text (such as a password), move the cursor to the parameter and press Enter.
An edit field opens, delimited by brackets. A blinking text cursor appears in the
brackets, indicating that you can type in text. If the field already contains text, it is
cleared when you type a character. To modify only a few characters of existing text,
use the arrow keys to position the cursor, then delete or overtype the characters. To
close the edit field and accept the new text, press Enter.
Setting parameters with predefined values
You can change the value of a parameter with predefined values by placing the cursor
beside the parameter and pressing Enter until the correct value appears. To select a
value, move to the next field or exit the menu.
Saving or discarding your changes
When you have finished editing, press the Esc key. If you have entered or changed
any parameters, the Exit menu appears:
EXIT
>0=ESC (Don’t exit)
1=Exit and discard
2=Exit and save
You can save your changes by choosing the Exit and Save option and pressing Enter,
or by pressing 2.
2-6
DSLPipe/CellPipe Quick Setup
Configuring the unit
3
Configuring the DSLPipe units . . . . . . . . . . . . . . . . . . . . . . . . . . . . . . . . . . . . . . . . . . . . . . . . . . . . . 3-2
Configuring the DSL-Cell-50A and the DSL-Cell-50S units . . . . . . . . . . . . . . . . . . . . . . . . . . . . . . 3-6
Configuring the DSL-Cell-20A. . . . . . . . . . . . . . . . . . . . . . . . . . . . . . . . . . . . . . . . . . . . . . . . . . . . . 3-8
Configuring the DSL-HSTB unit . . . . . . . . . . . . . . . . . . . . . . . . . . . . . . . . . . . . . . . . . . . . . . . . . . 3-13
Example configurations. . . . . . . . . . . . . . . . . . . . . . . . . . . . . . . . . . . . . . . . . . . . . . . . . . . . . . . . . . 3-18
Many of the DSLPipe and CellPipe units share a similar user interface. The main
configuration window is described in “The DSLPipe/CellPipe main window” on
page 2-3. The DSL-HSTB and the DSL-Cell-20A units, however, use a
command-line interface for displaying status and changing configuration. For more
details on using this interface, see the sections on “Configuring the DSL-Cell-20A”
on page 3-8 and “Configuring the DSL-HSTB unit” on page 3-13.
All DSLPipe units ship with a default Frame Relay configuration. See “Configuring
the DSLPipe units” on page 3-2 for details. If you do not need to change the default
configuration, just plug in the cables and your DSLPipe unit is ready for use. If you
need to change the configuration, see “Changing default configuration of DSLPipe
units” on page 3-3. Since the DSL-HSTB unit uses a command-line interface instead
of menus, the procedure for changing the default configuration of this unit is not the
same as the procedure for changing the default configuration of the other units. See
“Configuring the DSL-HSTB unit” on page 3-13.
The DSL-Cell-50S and the DSL-Cell-50A units do not ship with a default
configuration. See “Configuring the DSL-Cell-50A and the DSL-Cell-50S units” on
page 3-6 for details.
DSLPipe/CellPipe Quick Setup
3-1
Configuring the unit
DSLPipe/CellPipe Quick Setup
The DSL-Cell-20A ships with a default configuration. The unit is set up to bridge
with ATM-LLC encapsulation. The VPI is set to 8 and the VCI is set to 35. If you
want to change these defaults, see “Configuring the DSL-Cell-20A” on page 3-8.
Configuring the DSLPipe units
All DSLPipe units ship with a default configuration. If you are setting up the
DSLPipe to bridge and use Frame Relay, you may not have to change the
configuration.You may be able to start using the DSLPipe after plugging in the cables.
See “Plug and Play capability” on page 3-3. Check with your service provider to see
if you need to change the configuration.
Note: The CellPipes do not ship with a default configuration.
The default configuration uses the following settings:
Table 3-1. Default DSLPipe configuration
Menu
Defaults
Configure
Route=None
Bridge=Yes
Ethernet > Connections
Station=DSLPipe
Active=Yes
Encaps=FR
Ethernet > Connections >
Encaps Options
FR Prof = DSLframe
DLCI=16
Ethernet > Frame Relay
Name=DSLframe
Active=Yes
FR Type=DTE
Link Mgmt=T1.617D
The default configuration is an example of a connection profile. A DSLPipe
connection profile contains all the settings required to talk to a remote machine.
3-2
DSLPipe/CellPipe Quick Setup
Configuring the unit
DSLPipe/CellPipe Quick Setup
Plug and Play capability
The Ascend Plug and Play is a set of features that allows you to set up your DSLPipe
quickly and easily. The Plug and Play feature is automatically enabled in your
DSLPipe. The Plug and Play capability is based on a default Frame Relay
configuration and a DHCP client. The DHCP client in a DSLPipe automatically
performs the appropriate DHCP protocol procedure to get its configuration
information. The DSLPipe automatically receives its IP address, netmask, default
gateway, and TFTP server address from the remote device.
Note: To see if you can use the DSLPipe plug and play capability, check with your
service provider.
Changing default configuration of DSLPipe units
If you cannot use the plug and play capability, you must modify the predefined
settings to create your own connection profile(s).
Note: This section does not apply to the DSL-HSTB unit. For details on changing
the configuration of the DSL-HSTB unit, see “Configuring the DSL-HSTB unit” on
page 3-13.
Creating a connection profile for a Frame Relay connection
To create a connection profile for Frame Relay, you must, at a minimum, do the
following:
1
Assign values to the following in the Configure menu:
My Name =
My Addr =
Rem Name =
Rem Addr =
Route =
Bridge =
2
Choose Configure > Ethernet > Connections and verify that Encaps = FR.
3
Choose Configure > Ethernet > Encaps options... and assign values for the
following:
DSLPipe/CellPipe Quick Setup
3-3
Configuring the unit
DSLPipe/CellPipe Quick Setup
FR Prof = [name of the Frame Relay Profile]
DLCI = [DLCI number for this profile]
Note: You can set up multiple Frame Relay profiles or use the same Frame Relay
profile in multiple connection profiles.
4
Choose Ethernet > Frame Relay > connection (the “connection” is the FR Prof
name you assigned in the previous step) and assign values to all the parameters in
the menu.
20-501 DSLFrame
Name = DSLFrame
Active = Yes
Call Type = Nailed
FR Type = DTE
Nailed Grp = 1
5
(Optional) You may need to choose Ethernet > Mod Config > Ether Options and
turn Proxy Mode to Off. Check with your service provider.
6
Save all your settings before you exit the DSLPipe main menu.
Creating a connection profile for a PPP connection
Unless you are setting up the DSLPipe-2S (which has two WAN ports), you can only
create one connection profile for a PPP connection.
To create a connection profile for PPP, you must, at a minimum, do the following:
3-4
1
Assign values to the following in the Configure menu:
My Name =
My Addr =
Rem Name =
Rem Addr =
Route =
Bridge =
Send Auth =
Send PW =
Recv Auth =
Recv PW =
2
Choose Configure > Ethernet > Connections. Set Encaps = PPP.
3
Choose Ethernet > Frame Relay > connection. Set Active = No.
DSLPipe/CellPipe Quick Setup
Configuring the unit
DSLPipe/CellPipe Quick Setup
4
(Optional) You may need to choose Ethernet > Mod Config > Ether Options and
turn Proxy Mode to Off. Check with your service provider.
5
Save all your settings before you exit the DSLPipe main menu.
DSLPipe/CellPipe Quick Setup
3-5
Configuring the unit
DSLPipe/CellPipe Quick Setup
Configuring the DSL-Cell-50A and the
DSL-Cell-50S units
The CellPipes do not ship with a default configuration. You must set up the CellPipes
by choosing parameters available in the Configure menu. When you choose values in
the Configure menu, you are choosing values that apply to the first connection profile.
Note: A DSLPipe/CellPipe connection profile contains all the settings required to
talk to a remote machine. For additional CellPipe connection profiles, see the
example scenarios (page 3-25).
The following shows possible values for the parameters in the Configure menu:
Configure...
Chan Usage = Leased/Unused
My Name = CellPipe1
My Addr = 204.204.215.342
Rem Name = COE1
Rem Addr = 198.902.101.001
Encaps = ATM (You can choose ATM or PPP)
Mux Type = ATM-LLC (You can choose ATM-LLC or ATM-VC)*
Vpi = (You must specify a number.)
Vci = (You must specify a number.)
Route = No
Bridge = Yes
Send Auth = N/A
Send PW = N/A
Recv Auth = N/A
Rev PW = N/A
Save=
* The CellPipes can be set up for one of the following encapsulations:
•
RFC 1483 LLC (Logical Link Control) encapsulation or VC (Virtual Circuit)
multiplexing for ATM AAL5. The default is ATM-LLC.
•
PPP over ATM AAL5, using LLC encapsulation or VC multiplexing
In VC multiplexing, only one protocol is allowed per session. Up to eight sessions can
be set up, each with a unique VPI (Virtual Path Identifier) and VCI (Virtual Circuit
3-6
DSLPipe/CellPipe Quick Setup
Configuring the unit
DSLPipe/CellPipe Quick Setup
Identifier). In LLC encapsulation, the LLC header specifies the protocol being
transmitted.
Traffic shaping options for the CellPipes
The traffic shaping feature in the CellPipes allows you to specify the transmit rate and
priority for each VC you define. You specify traffic shaping by choosing a Service
Type and Service Rate for each connection profile. The Service Rate is the number of
cells/per second. The Service Type can be either “Unspecified” or “Constant.”
Specifying “Constant” means that the traffic will transmit at a pre-defined constant bit
rate. The default Service Type is “Unspecified” and the default Service Rate is “0.”
With this default, transmission will be based on a best effort method.
For example, you can set up a connection profile where the Service Type is
“Constant” and the Service Rate is 1000 cells/per second. You can set up a second
profile where the Service Type is also “Unspecified” but the service rate is set to 500
cells/per second.
Depending on the Encaps options you chose (ATM or PPP), you can specify the
Service Type and Service Rate from the Configure > Ethernet > Encaps options...
menu option or the Configure > Ethernet > Interface options... menu option.
Note: If you are setting up multiple connection profiles and you specify the Service
Type as “Constant” for each profile, make sure the total Service Rate for the profiles
is less than or equal to the maximum upstream rate.
DSLPipe/CellPipe Quick Setup
3-7
Configuring the unit
DSLPipe/CellPipe Quick Setup
Configuring the DSL-Cell-20A
The DSL-Cell-20A unit performs bridging over ATM with LLC encapsulation. It
ships with a default VPI of 8 and a default VCI of 35. If you do not need to change
these default settings, just plug in the cables and you are ready to use the
DSL-Cell-20A unit.
DSL-Cell-20A command-line interface
After you connect the cables, and set up the communications software (see “Getting
ready to configure the DSLPipe or CellPipe unit” on page 2-1), the following appears
on your VT100 terminal:
Boobase Version: <Version Number> <Date and Time>
RAM Size = 4096 bytes
DRAM POST: Testing: 4096 OK
FLASH: Intel 8M*1
ZYNOS Version: <Version Number> <Date and Time>
Press any key to enter debug mode within 3 seconds...
Version: <Version Number>, start: <hex address>
Length: <hex number>, Checksum: <hex number>
Compressed Length: <hex number>, Checksum: <hex number>
Initialize ch=0, Ethernet address: <MAC addresss>
Loading AADSL modem F/W
..................................................
WAN Channel init...done
Press ENTER to continue...
From the VT100 emulation screen, press the Enter key to see the lucent prompt.
The lucent% prompt appears.
Displaying status
To see the list of all the status commands available, type the following:
lucent% show atm ?
3-8
DSLPipe/CellPipe Quick Setup
Configuring the unit
DSLPipe/CellPipe Quick Setup
The following list appears:
show atm ?
Display help information
show atm help
Display help information
show atm stats
Display ATM information
Displaying ATM status
To see statistics on the ATM connection, type the following:
lucent% show atm stats
The following list displays:
VPI=8 VCI=35
input pkts
0
input OK pkts
0
output pkts
0
output OK pkts
0
input cells
0
input OK cells
0
output cells
0
output OK cells
0
pad error
0
CRC error
0
cpi error
0
length error
0
f4_ais_rx
0
f4_rdi_tx
0
f4_lpb_rx
0
f4_lpb_tx
0
f5_ais_rx
0
f5_rdi_tx
0
f5_lpb_rx
0
f5_lpb_tx
0
Table 3-2 describes each field in the list that displays.
Table 3-2. Fields in the ATM status screen
Fields
Description
VPI
Virtual Path Identifier. The default is 8.
DSLPipe/CellPipe Quick Setup
3-9
Configuring the unit
DSLPipe/CellPipe Quick Setup
Table 3-2. Fields in the ATM status screen
Fields
Description
VCI
Virtual Circuit Identifier. The default is 35.
input pkts/
input OK pkts
Number of packets received by the unit since the
connection became active. The input pkts value
should match the input OK pkts value.
output
pkts/output OK
pkts
Number of packets sent by the unit since the connection
became active. The output pkts value should match
the output OK pkts value.
input cells/
input OK cells
Number of cells received by the unit since the connection
became active. The input cells value should match
the input OK cells value.
output
cells/output OK
cells
Number of packets sent by the unit since the connection
became active.
f4...rx -f5...tx
If these numbers increment quickly in a short period of
time, it means that the CO site is sending signals about
problems in the ATM backbone. You may find that the
Internet connection is not stable.
The output cells value should match the output
OK cells value.
Displaying ADSL status
To see statistics on the ATM connection, type the following:
lucent% show adsl stats
The following screen of information displays:
ADSL Chipset Version: <Version>
ANSI Version: <Version>
Line Status: Up
Upstream Speed: <Kbps>
3-10
DSLPipe/CellPipe Quick Setup
Configuring the unit
DSLPipe/CellPipe Quick Setup
Downstream Speed: < Kbps>
Table 3-3. Fields in the ADSL Status screen
Fields
Description
ADSL Chipset
Version
Version number of the chipset.
ANSI Version
ANSI version number.
Line Status
Up or Down. Up if the connection is active. Down if the
connection is inactive.
Upstream Speed
Speed from the DSL-Cell-20A unit to the CO site.
Downstream
Speed
Speed from the CO site to the DSL-Cell-20A unit.
Changing configuration information
Using the command-line interface of the DSL-Cell-20A, you can change the console
baud rate, and the VPI or VCI values. You can also change the ATM encapsulation
from LLC to VC multiplexing.
Changing the console baud rate
The default value at which you connect to the DSL-Cell-20A is 9600 bps. To change
this value, type the following:
lucent% set baudrate <bps> (Press the Enter key)
The baudrate can be any of the following: 9600 bps, 19200 bps, 38400 bps, 57600
bps, or 115200 bps.
Changing the VPI and VCI
The DSL-Cell-20A ships with the default VPI of 8 and the default VCI of 35. To
change the VPI or VCI, enter the following:
DSLPipe/CellPipe Quick Setup
3-11
Configuring the unit
DSLPipe/CellPipe Quick Setup
lucent% set atm vpi <number> (Press the Enter key)
or
lucent% set atm vci <number> (Press the Enter key)
This changes the VPI or VCI number.
Changing the MUX type
The DSL-Cell-20A ships with the LLC encapsulation as the default. To change the
LLC encapsulation (default) to VC multiplexing, type the following:
lucent% set atm mux vc (Press the Enter key)
To return to LLC, type the following:
lucent% set atm mux llc (Press the Enter key)
In VC multiplexing, the bridged packets will not be encapsulated in the LLC header.
In LLC encapsulation, the LLC header specifies the protocol being transmitted.
Exiting the command-line interface
To exit the command line interface, type exit at the prompt:
lucent% exit
3-12
DSLPipe/CellPipe Quick Setup
Configuring the unit
DSLPipe/CellPipe Quick Setup
Configuring the DSL-HSTB unit
The DSL-HSTB unit performs bridging over a Frame Relay connection. It supports
symmetrical transmission of 2.3 Mbps. It ships with the DLCI set to 16. If you do not
need to change these default settings, just plug in the cables and you are ready to use
the DSL-HSTB unit
DSL-HSTB command-line interface
After you connect the cables, and set up the communications software (see “Getting
ready to configure the DSLPipe or CellPipe unit” on page 2-1), the following appears
on your VT100 terminal:
Boobase Version: <Version Number> <Date and Time>
RAM Size = 4096 bytes
DRAM POST: Testing: 4096 OK
FLASH: Intel 8M*1
ZYNOS Version: <Version Number> <Date and Time>
Press any key to enter debug mode within 3 seconds...
Version: <Version Number>, start: <hex address>
Length: <hex number>, Checksum: <hex number>
Compressed Length: <hex number>, Checksum: <hex number>
Initialize ch=0, Ethernet address: <MAC addresss>
Start to initialize SDSL...
..................................................
Start to configure SDSL...
SDSL Channel Configuration
Press ENTER to continue...
From the VT100 emulation screen, press the Enter key to see the lucent prompt.
The lucent% prompt appears.
Displaying status
To see the list of all the Frame Relay commands available, type the following:
lucent% show fr ?
DSLPipe/CellPipe Quick Setup
3-13
Configuring the unit
DSLPipe/CellPipe Quick Setup
The following list appears:
show fr ?
Display help information
show fr help
Display help information
show fr stats
Display Frame Relay information
show fr dlci
Display all DLCI information
Displaying Frame Relay status
To see statistics on the Frame Relay connection, type the following:
lucent% show fr stats
The following list displays:
Name
Type
Status
MTU
InFrame
OutFrame
DSLFrame
DTE
Up
1532
275
219
Table 3-4 provides a description of each field.
Table 3-4. Frame Relay status screen
3-14
Fields
Description
Name
Name of the DSL-HSTB unit. The default is
DSLFrame.
Type
DTE or DCE. The unit is always configured as DTE.
Status
Either Up or Down. Up means the Frame Relay link
is up. Down means the Frame Relay link is down.
MTU
Maximum Transmission Unit size.
InFrame
The number of received packets sent by the unit since
the connection came up.
DSLPipe/CellPipe Quick Setup
Configuring the unit
DSLPipe/CellPipe Quick Setup
Table 3-4. Frame Relay status screen
Fields
Description
OutFrame
The number of packets sent by the unit since the
connection came up.
Displaying the Frame Relay DLCI
To display the Frame Relay DLCI, type the following:
lucent% show fr dlci
The following list displays:
DLCI = 16
Status = Active
input pkts
293723
input octets 223406698
output pkts
496500
output octets
249929584
Table 3-5 provides a description of each field.
Table 3-5. Frame Relay DLCI status screen
Fields
Description
DLCI
DLCI number of the PVC. The default is 16.
Status
Active or Inactive. Active if the Frame Relay
connection is up. Inactive if the Frame Relay
connection is down.
input pkts
Number of packets received by the unit since the
connection became active.
output pkts
Number of packets sent by the unit since the
connection became active.
input octets
Number of bytes received by the unit since the
connection became active.
DSLPipe/CellPipe Quick Setup
3-15
Configuring the unit
DSLPipe/CellPipe Quick Setup
Table 3-5. Frame Relay DLCI status screen
Fields
Description
output octets
Number of bytes sent by the unit since the connection
became active.
Displaying SDSL rate
To display the SDSL line rate, type the following:
lucent% show sdsl stats
The current SDSL rate displays in the screen. The default is 2320 Kbps.
Changing configuration information
Using the command-line interface of the DSL-HSTB, you can change the console
baud rate, the Frame Relay DLCI, and the SDSL line rate. You can also choose to turn
off the SDSL rate Autohunt option.
Changing the console baud rate
The default value at which you connect to the DSL-HSTB unit is 9600 bps. To change
this value, type the following:
lucent% set baudrate <bps> (Press the Enter key)
The baudrate can be any of the following: 9600 bps, 19200 bps, 38400 bps, 57600
bps, or 115200 bps.
Changing the Frame Relay DLCI
The DSL-HSTB unit ships with the default DLCI of 16. To change the DLCI, enter
the following:
lucent% set fr dlci <number> (Press the Enter key)
The DLCI can be any number between 16 and 991. This command changes the DLCI
of the Frame Relay connection.
3-16
DSLPipe/CellPipe Quick Setup
Configuring the unit
DSLPipe/CellPipe Quick Setup
Changing the SDSL rate
The DSL-HSTB unit ships with the default SDSL rate of 2320 Kbps. You can use any
one of the following rates:
•
144 Kbps
•
272 Kbps
•
400 Kbps
•
528 Kbps
•
784 Kbps
•
1168 Kbps
•
1552 Kbps
•
2320 Kbps
. To change the SDSL line rate, enter the following:
lucent% set sdsl rate <Kbps> (Press the Enter key)
Autohunt option
The DSL-HSTB unit is automatically set to hunt for the line rate. The unit tries
different rates to sync up with the COE site. Depending on the rate set at the COE
side, this might take a few minutes.
To force the DSL-HSTB unit to connect at only a specified speed, you can set the
autohunt option to off. Type the following:
lucent% set autohunt off (Press the Enter key)
Exiting the command-line interface
To exit the command line interface, type exit at the prompt:
lucent% exit
DSLPipe/CellPipe Quick Setup
3-17
Configuring the unit
DSLPipe/CellPipe Quick Setup
Example configurations
Since only parameters that you are changing are shown in these examples, the display
you see on the screen will not match the parameters shown in the examples. The
values shown are examples. Obtain the actual values from the telephone company
providing you with DSL access.
Note: The options you choose from the Configure menu only apply to the first
connection profile.
3-18
DSLPipe/CellPipe Quick Setup
Configuring the unit
DSLPipe/CellPipe Quick Setup
DSL-HST as CPE
Table 3-6. Configuring the DSL-HST as CPE
Example Scenarios, as CPE
DSL-HST Configuration
1. Assume you are setting up a
DSL-HST for Frame Relay with
only IP routing enabled.
Configure >
Chan Usage = Leased/Unused
My Name = CPE
My Addr = 204.215.204.215
Note: When you set up a
DSLPipe for Frame Relay, you
must create a Connection profile
and a Frame Relay profile.
Rem Name = COE
Rem Addr = 192.168.200.1/24
Route = IP
Bridge = No
SDSL Line Rate = 784000
Unit Type = CPE
Ethernet > Connections > COE
Active = Yes
Encaps = FR
Encaps options...
FR Prof = frame-relay
DLCI = 16
Ethernet > Frame Relay >COE
Name=frame-relay
Active=Yes
FR Type=DTE
Link Mgmt=T1.617D
DSLPipe/CellPipe Quick Setup
3-19
Configuring the unit
DSLPipe/CellPipe Quick Setup
Table 3-6. Configuring the DSL-HST as CPE (continued)
Example Scenarios, as CPE
DSL-HST Configuration
2. Assume you are setting up a
DSL-HST for a bridged Frame
Relay connection.
Configure >
Chan Usage = Leased/Unused
My Name = CPE
My Addr = 204.215.204.215
Note: When you set up a
DSLPipe for Frame Relay, you
must create a Connection profile
and a Frame Relay profile.
Rem Name = COE
Rem Addr = 192.168.200.1/24
Route = None
Bridge = Yes
SDSL Line Rate = 1552000
Unit Type = CPE
Ethernet > Connections > COE
Active = Yes
Encaps = FR
Encaps options...
FR Prof = frame-relay
DLCI = 16
Ethernet > Frame Relay > COE
Name=frame-relay
Active=Yes
FR Type=DTE
Link Mgmt=T1.617D
3-20
DSLPipe/CellPipe Quick Setup
Configuring the unit
DSLPipe/CellPipe Quick Setup
DSL-HST as COE
Table 3-7. Configuring the DSL-HST as COE
Example Scenarios, as COE
DSL-HST Configuration
1. Assume you are setting up a
DSL-HST for Frame Relay with
only IP routing enabled.
Configure >
Chan Usage = Leased/Unused
My Name = COE
My Addr = 192.168.200.1/24
Note: When you set up a
DSLPipe for Frame Relay, you
must create a Connection profile
and a Frame Relay profile.
Rem Name = CPE
Rem Addr = 204.215.204.215
Route = IP
Bridge = No
SDSL Line Rate = 1552000
Unit Type = COE
Ethernet > Connections > CPE
Active = Yes
Encaps = FR
Encaps options...
FR Prof = frame-relay
DLCI = 16
Ethernet > Frame Relay > CPE
Name=frame-relay
Active=Yes
FR Type=DCE
Link Mgmt=T1.617D
DSLPipe/CellPipe Quick Setup
3-21
Configuring the unit
DSLPipe/CellPipe Quick Setup
Table 3-7. Configuring the DSL-HST as COE (continued)
Example Scenarios, as COE
DSL-HST Configuration
2. Assume you are setting up a
DSL-HST for bridged Frame
Relay connection.
Configure >
Chan Usage = Leased/Unused
My Name = COE
My Addr = 192.168.200.1/24
Note: When you set up a
DSLPipe for Frame Relay, you
must create a Connection profile
and a Frame Relay profile.
Rem Name = CPE
Rem Addr = 204.215.204.215
Route = None
Bridge = Yes
SDSL Line Rate = 1552000
Unit Type = COE
Ethernet > Connections > CPE
Active = Yes
Encaps = FR
Encaps options...
FR Prof = frame-relay
DLCI = 16
Ethernet > Frame Relay > CPE
Name=frame-relay
Active=Yes
FR Type=DCE
Link Mgmt=T1.617D
3-22
DSLPipe/CellPipe Quick Setup
Configuring the unit
DSLPipe/CellPipe Quick Setup
DSL-ACAP as CPE
Table 3-8. Configuring the DSL-ACAP as CPE
Example Scenario, as CPE
DSL-ACAP Configuration
Assume you are setting up the
RADSL-CAP DSLPipe for a
bridged Frame Relay
connection.
Configure >
Chan Usage = Leased/Unused
My Name = CPE
My Addr = 192.168.200.1/
Note: When you set up a
DSLPipe for Frame Relay, you
must create a Connection profile
and a Frame Relay profile.
Rem Name = COE
Rem Addr = 204.215.204.215
Route = None
Bridge = Yes
Ethernet > Connections > COE
Active = Yes
Encaps = FR
Encaps options...
FR Prof = frame-relay
DLCI = 16
Ethernet > Frame Relay > COE
Name=frame-relay
Active=Yes
FR Type= DTE
Link Mgmt=T1.617D
DSLPipe/CellPipe Quick Setup
3-23
Configuring the unit
DSLPipe/CellPipe Quick Setup
DSL-ACAP as COE
Table 3-9. Configuring the DSL-ACAP as COE
Example Scenario, as COE
DSL-ACAP Configuration
Assume you are setting up the
RADSL-CAP DSLPipe for a
bridged Frame Relay
connection.
Configure >
Chan Usage = Leased/Unused
My Name = COE
My Addr = 204.215.204.215
Note: When you set up a
DSLPipe for Frame Relay, you
must create a Connection profile
and a Frame Relay profile.
Rem Name = CPE
Rem Addr = 192.168.200.1/24
Route = None
Bridge = Yes
Ethernet > Connections > CPE
Active = Yes
Encaps = FR
Encaps options...
FR Prof = frame-relay
DLCI = 16
Ethernet > Frame Relay > CPE
Name=frame-relay
Active=Yes
FR Type=DCE
Link Mgmt=T1.617D
3-24
DSLPipe/CellPipe Quick Setup
Configuring the unit
DSLPipe/CellPipe Quick Setup
DSL-Cell-50A as CPE
Table 3-10.Confiuging the CellPipe 50A as CPE
Example Scenarios
CellPipe Configuration
1. Assume you are setting up ATM
over ADSL with VPI = 1, VCI = 10.
Assume you will be using a VC
connection with IP routing.
Configure >
Chan Usage = Leased/Unused
My Addr = 204.215.204.215
Encaps = ATM
Mux Type = ATM-VC
Vpi = 1
Vci = 10
Configure > Ethernet > Connections >
Station = ex1
Active = Yes
Encaps = ATM
Dial # = N/A
Route IP = Yes
Bridge = No
Dial brdcast = N/A
Ip options...
LAN Adrs = 10.10.10.10
Telco options...
Call Type = Nailed
Group = 1
DSLPipe/CellPipe Quick Setup
3-25
Configuring the unit
DSLPipe/CellPipe Quick Setup
Table 3-10.Confiuging the CellPipe 50A as CPE
Example Scenarios
CellPipe Configuration
2. Assume you are setting up ATM
over ADSL with VPI = 5, VCI = 20.
Assume you will be using a LLC
connection with bridging. Also
assume that you want to specify a
constant rate of 1000 cells/second.
Configure >
Chan Usage = Leased/Unused
My Addr = 204.215.204.215
Encaps = ATM
Mux Type = ATM-LLC
Vpi = 5
Vci = 20
Ethernet > Connections >
Station = ex1
Active = Yes
Encaps = ATM
Dial # = N/A
Route IP = No
Bridge = Yes
Dial brdcast = Yes
Encaps options...
MUX Type = ATM-LLC
vpi = 5
vci = 20
Service Type = Constant
Service Rate = 1000
Telco options...
Call Type = Nailed
Group = 1
3-26
DSLPipe/CellPipe Quick Setup
Configuring the unit
DSLPipe/CellPipe Quick Setup
Table 3-10.Confiuging the CellPipe 50A as CPE
Example Scenarios
CellPipe Configuration
3. Assume you are setting up nailed
PPP over ATM with VPI = 5, VCI =
20. Assume you will be using a LLC
connection with IP routing. Assume
you are using PAP authentication
with password lala.
Configure >
Chan Usage = Leased/Unused
My Addr = 204.215.204.215
Encaps = PPP
Mux Type = ATM-LLC
Vpi = 5
Vci = 20
Configure > Ethernet > Connections >
Station = ex1
Active = Yes
Encaps = PPP
Dial # = N/A
Route IP = Yes
Bridge = No
Dial brdcast = No
Encaps options...
Send Auth = PAP
Send PW = lala
Interface Type = AAL5
Ip options...
LAN Adrs = 10.10.10.10
Telco options...
Call Type = Nailed
Group = 1
Interface options...
MUX Type = ATM-LLC
vpi = 5
vci = 20
Service Type = Unspecified
Service Rate = 0
DSLPipe/CellPipe Quick Setup
3-27
Configuring the unit
DSLPipe/CellPipe Quick Setup
Table 3-10.Confiuging the CellPipe 50A as CPE
Example Scenarios
CellPipe Configuration
4. Assume you are setting up
on-demand PPP over ATM with VPI
= 5, VCI = 20. Assume you will be
using a LLC connection with IP
routing. Assume you are using PAP
authentication with password lala.
Configure >
Chan Usage = Switch/Unused
My Addr = 204.215.204.215
Encaps = PPP
Mux Type = ATM-LLC
Vpi = 5
Vci = 20
Configure > Ethernet > Connections>
Station = ex1
Active = Yes
Encaps = PPP
Dial # = N/A
Route IP = Yes
Bridge = No
Dial brdcast = No
Encaps options...
Send Auth = PAP
Send PW = lala
Interface Type = AAL5
Ip options...
LAN Adrs = 10.10.10.10
Telco options...
Call Type = Switched
Group = N/A
Interface options...
MUX Type = ATM-LLC
vpi = 5
vci = 20
Service Type = Unspecified
Service Rate = 0
3-28
DSLPipe/CellPipe Quick Setup
Configuring the unit
DSLPipe/CellPipe Quick Setup
DSL-Cell-50S as CPE
Table 3-11.Configuring the DSLPipe 50S as CPE
Scenario
DSL-Cell-50S configuration
1. Assume you are setting up only
one Connection profile with the Data
Rate parameter set to 144 Kbps. The
unit is functioning as CPE. You are
setting up ATM over SDSL with Vpi
set to 1 and Vci set to 15. Assume
you will be using a VC connection
with bridging.
Configure >
Chan Usage =
Leased/Unused
My Name=
My Addr =
* Rem Name = ex1
Rem Addr=
* Encaps = ATM
* Mux Type = ATM-VC
* Vpi = 1
* Vci = 15
Route = None
* Bridge = Yes
Send Auth= N/A
Send PW = N/A
Recv Auth = N/A
Recv PW = N/A
Rate Mode = singlebaud
* SDSL Line Rate = 144000
* Unit Type = CPE
Note: The * to the left of a field
indicates that it is a required field.
You must fill in a value for the field.
DSLPipe/CellPipe Quick Setup
3-29
Configuring the unit
DSLPipe/CellPipe Quick Setup
Table 3-11.Configuring the DSLPipe 50S as CPE
Scenario
DSL-Cell-50S configuration
2. Assume you are setting up ATM
over SDSL with Vpi set to 1 and Vci
set to 10. The Data Rate parameter is
set to 528 Kbps and you are using the
unit as CPE. Assume you will be
using a VC connection with IP routing.
Configure >
Chan Usage =
Leased/Unused
My Name=
* My Addr =
204.215.204.215
* Rem Name = ex2
* Rem Addr = 10.10.10.10
* Encaps = ATM
* Mux Type = ATM-VC
* Vpi = 1
* Vci = 10
* Route = IP
Bridge = No
Send Auth = N/A
Send PW = N/A
Recv Auth = N/A
Recv PW = N/A
Rate Mode = singlebaud
* SDSL Line Rate = 528000
* Unit Type = CPE
Note: The * to the left of a field
indicates that it is a required field.
You must fill in a value for the field.
3-30
DSLPipe/CellPipe Quick Setup
Configuring the unit
DSLPipe/CellPipe Quick Setup
Table 3-11.Configuring the DSLPipe 50S as CPE
Scenario
DSL-Cell-50S configuration
3. Assume you are setting up ATM
over SDSL with VPI = 5, VCI = 20.
The data rate is set to 144 Kbps and
you are using the unit as CPE.
Assume you will be using a LLC
connection with bridging. Also
assume that you want to specify a
constant rate of 1000 cells/second.
Configure >
Chan Usage =
Leased/Unused
My Name =
My Addr =
* Rem Name = ex3
Rem Addr =
* Encaps = ATM
* Mux Type = ATM-LLC
* Vpi = 5
* Vci = 20
Route = None
Bridge = Yes
Send Auth = N/A
Send PW = N/A
Recv Auth = N/A
Recv PW = N/A
Rate Mode = singlebaud
* SDSL Line Rate - 144000
* Unit Type = CPE
Note: The * to the left of a field
indicates that it is a required field.
You must fill in a value for the field.
(continued on the next page)
DSLPipe/CellPipe Quick Setup
3-31
Configuring the unit
DSLPipe/CellPipe Quick Setup
Table 3-11.Configuring the DSLPipe 50S as CPE
Scenario
DSL-Cell-50S configuration
3. (Continued)
Ethernet > Connections >
ex3
Station = ex3 (already
assigned in the Configure
menu)
Active = Yes (set to Yes
when saved in the Configure menu)
Encaps = ATM (already
assigned in the Configure
menu)
Route IP = No
Route IPX = No
Bridge = Yes (already
assigned in the Configure
menu)
Dial brdcast = Yes
Encaps options...
MUX Type = ATM-LLC
(already assigned in
the Configure menu)
vpi = 5 (already
assigned in the
Configure menu)
vci = 20 (already
assigned in the
Configure menu)
* Service Type =
Constant
* Service Rate = 1000
Inverse ARP = N/A
3-32
DSLPipe/CellPipe Quick Setup
Configuring the unit
DSLPipe/CellPipe Quick Setup
Table 3-11.Configuring the DSLPipe 50S as CPE
Scenario
DSL-Cell-50S configuration
4. Assume you are setting up nailed
PPP over ATM with Vpi set to 5 and
VCI set to 20. The Data Rate parameter is set to 784 Kbps and you are
using the unit as CPE. Assume you
will be using a LLC connection with
IP routing. Assume you are using
PAP authentication with the password lala.
Configure >
* Chan Usage =
Leased/Unused
* My Name = Bob
* My Addr =
204.215.204.215 (if not
assigned, the COE can
assign an address)
* Rem Name = ex4
* Rem Addr = 10.10.10.10
* Encaps = PPP
* Mux Type = ATM-LLC
* Vpi = 5
* Vci = 20
* Route = IP
Bridge = No
Send Auth = PAP
Send PW = lala
Recv Auth = N/A
Recv PW = N/A
Rate Mode = singlebaud
* SDSL Line Rate = 784000
* Unit Type = CPE
Note: The * to the left of a field
indicates that it is a required field.
You must fill in a value for the field.
DSLPipe/CellPipe Quick Setup
3-33
Configuring the unit
DSLPipe/CellPipe Quick Setup
Table 3-11.Configuring the DSLPipe 50S as CPE
Scenario
DSL-Cell-50S configuration
5. Assume you are setting up
on-demand PPP over ATM with Vpi
set to 5 and Vci set to 20. The Data
Rate parameter is set to 2320 Kbps
and you are using the unit as CPE.
Assume you will be using a LLC
connection with IP routing. Assume
you are using PAP authentication
with the password lala.
Configure >
* Chan Usage =
Switch/Unused
* My Name = Bob
* My Addr =
204.215.204.215 (if not
assigned, the COE can
assign an address)
* Rem Name = ex5
* Rem Addr = 10.10.10.10
* Encaps = PPP
* Mux Type = ATM-LLC
* Vpi = 5
* Vci = 20
* Route = IP
Bridge = No
Send Auth = PAP
Send PW = lala
Recv Auth = N/A
Recv PW = N/A
Rate Mode = singlebaud
* SDSL Line Rate = 2320000
* Unit Type = CPE
Note: The * to the left of a field
indicates that it is a required field.
You must fill in a value for the field.
3-34
DSLPipe/CellPipe Quick Setup
Configuring the unit
DSLPipe/CellPipe Quick Setup
Table 3-11.Configuring the DSLPipe 50S as CPE
Scenario
DSL-Cell-50S configuration
6. Assume you are using NAT.
10.10.10.10 is the gateway address.
You are setting up ATM over SDSL
with Vpi set to and Vci set to 10. The
Data Rate parameter is set to 528
Kbps and you are using the unit as
CPE. Assume you will be using a VC
connection with IP routing.
Configure >
Chan Usage =
Leased/Unused
My Name=
* My Addr =
204.215.204.215 (address
belongs to the local subnet)
* Rem Name = ex6
* Rem Addr = 10.10.10.10
* Encaps = ATM
* Mux Type = ATM-VC
* Vpi = 1
* Vci = 10
* Route = IP
Bridge = No
Send Auth = N/A
Send PW = N/A
Recv Auth = N/A
Recv PW = N/A
Rate Mode = singlebaud
* SDSL Line Rate = 528000
* Unit Type = CPE
Note: The * to the left of a field
indicates that it is a required field.
You must fill in a value for the field.
(continued on the next page)
DSLPipe/CellPipe Quick Setup
3-35
Configuring the unit
DSLPipe/CellPipe Quick Setup
Table 3-11.Configuring the DSLPipe 50S as CPE
Scenario
DSL-Cell-50S configuration
6. (Continued)
Ethernet > NAT
* Routing = Yes
* Profile = ex6
* VC address =
10.10.10.100 (use the
static address assigned
by your service provider)
LAN = N/A
Static Mappings...
Def Server = N/A
Reuse last addr = N/A
Reuse addr timeout = N/A
3-36
DSLPipe/CellPipe Quick Setup