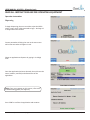
1
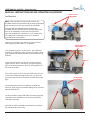
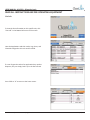
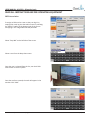
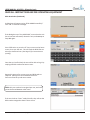
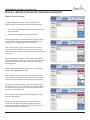
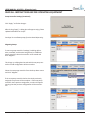
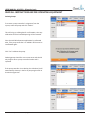
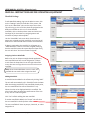
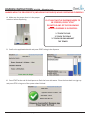
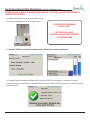
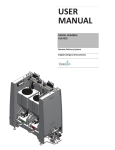
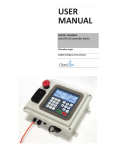
USER
MANUAL
MODEL NUMBER:
ALX-PRO
Allocation Logix
English (Original Instructions)
USER MANUAL: ALX-PRO - Allocation Logix
READ ALL INSTRUCTIONS BEFORE OPERATING EQUIPMENT
Table of Contents
Installation Instructions.............................................................................4
Control Box..................................................................................................... 4
Tower.............................................................................................................. 4
Pump Controller Boards................................................................................. 5
Air and Water Supply...................................................................................... 6
Manifolds........................................................................................................ 7
Setup Instructions.....................................................................................8
General Settings.............................................................................................. 8
Sleep Function................................................................................................ 10
Site Info........................................................................................................... 11
RFID Association............................................................................................ 12
Pump Controller Settings................................................................................ 14
Manifold Settings............................................................................................ 17
Priming Pumps................................................................................................ 19
Calibrating the Scale....................................................................................... 20
Pump Calibration............................................................................................ 21
Post-Dispense Water Flush............................................................................. 23
Operation Instructions...............................................................................24
Dispensing...................................................................................................... 24
Syncing........................................................................................................... 27
Manual Water Flush........................................................................................ 28
Standard & Event Logs................................................................................... 29
Dispensing Errors.......................................................................................30
Printable Instructions................................................................................33
Dispensing Instructions (English)................................................................... 33
Dispensing Instructions (Spanish).................................................................. 35
USER MANUAL (MODEL: ALX-PRO) Page 2 of 32
6/8/2015
USER MANUAL: ALX-PRO - Allocation Logix
READ ALL INSTRUCTIONS BEFORE OPERATING EQUIPMENT
WARNING
Avoid Personal Injury
1. Avoid contact of cleaning agent with skin and
eyes. If contact occurs, see MSDS sheet for
further first aid measures.
2. Follow safety instructions of chemical
manufacturer (MSDS).
3. Always follow plant and OSHA guidelines
about the use of hygiene equipment.
4. Disconnect power before servicing unit.
Specifications
Control Box:
Width..............14”
Depth..............8”
Height.............16”
Tower:
Width..............30”
Depth..............22.5”
Height.............68”
Water Connection Requirements
Cold Potable Water
35 PSI Minimum Pressure
60 PSI Maximum Pressure
5 GPM Connection
Electrical Connection Requirements
110 Volts AC
Single Phase
60 Hz
5 Amps
24 VDC - Control Voltage (Unit has internal power supply)
Acceptable Chemical Products
Acids
Caustics
Sanitizers
Chlorine
USER MANUAL (MODEL: ALX-PRO) Page 3 of 32
6/8/2015
USER MANUAL: ALX-PRO - Allocation Logix
READ ALL INSTRUCTIONS BEFORE OPERATING EQUIPMENT
Installation Instructions
Control Box
Aspects to consider when deciding on placement:
• Room for entering and exiting.
• Emergency exit paths.
• Distance to electrical connection.
• Space to access control box.
• Cell signal strength (for the 3G router inside box).
• Distance from pumps and pump controllers.
Attach the included mounting feet to the back of the
control box with a phillips screwdriver.
Securely mount the control box to the wall, then plug into
115 volt wall outlet. Turn the unit on by pulling out on the
red E-stop located on the right side of the box.
Open the box and look for 3 green lights on the router to
turn on - signaling there is full cell service.
If there are only 2 green lights and 1 orange light, the
router has low signal in the building, but still has internet
access. Red lights show that the router has no service.
Move the box until an area with decent cellular service is
found.
Tower
If the ALX-PRO was purchased with a tower assembly, set
the unit in desired location.
Aspects to consider when deciding on placement:
• Room for entering and exiting.
• Emergency exit paths.
• Space to access control box.
• Cell signal strength (for the 3G router inside box).
• Distance from pumps and pump controllers.
• Connections for water, air, and chemical lines.
Once the unit has been positioned correctly, level it using
the adjustable feet.
USER MANUAL (MODEL: ALX-PRO) Page 4 of 32
6/8/2015
USER MANUAL: ALX-PRO - Allocation Logix
READ ALL INSTRUCTIONS BEFORE OPERATING EQUIPMENT Air In from
Pump Controller Boards
Air Supply
Air Out to
AODD Pumps
The pump controllers are comprised of a circuit board and
solenoid to control air flow to each air operated double
diaphragm pump.
When a pump controller is turned on, the solenoid will
open and send air out to its corresponding AODD pump,
which will send chemical through the lines into the
manifolds and out to the dispense hoses.
Place pump controller board(s) in desired location.
Aspects to consider when deciding on placement:
• Number of pump controllers.
• Distance between the pumps and their pump
controllers.
• Quantity of hose, tubing, and CAN lines available to
make connections.
Securely mount the board(s) to wall.
The pump controllers come pre-daisychained with their
CAN lines & 3/8” air lines. Use the 5m CAN cable provided
with each board to connect multiple pump controller
boards together if the system comes with more than one
board.
Connect the open end of the CAN line on the pump
controller board to the CAN cable on the control box.
String 3/8” airlines from the “Air Out” connection on the
pump controllers to each corresponding pump to finish
installation.
Make sure the control box is turned on, then check for a
green light on each pump controller, signaling power.
NOTE: The pumps require clean, dry air for proper
operation. The customer is responsible for installing an air
regulator before the pump controllers to ensure
correct operation of the solenoids. Do not use lubricated
air with this system.
USER MANUAL (MODEL: ALX-PRO) Page 5 of 32
6/8/2015
USER MANUAL: ALX-PRO - Allocation Logix
READ ALL INSTRUCTIONS BEFORE OPERATING EQUIPMENT
Air/Water Kit
Water Out to
Manifolds
NOTE: If the ALX-400 was ordered with a tower, the
Air/Water Kit will be mounted inside the tower and already
have the water lines pre-connected to the manifolds.
If the ALX-PRO was ordered without a tower, the
Air/Water Kit will be mounted on a separate HDPE plate
that can be mounted to a wall near the control box.
Once the Air/Water Kit is installed, run 1/2” tubing from
the “Water Out” connections to the 1/2” “Water In”
connections on the manifolds.
Connect 1/2” tubing for the water line from the plant’s
water supply into the “Water In” connection.
Water Regulator
Adjustment
Turn the water supply on to the system. Use a flathead
screwdriver to adjust the water pressure if needed. Clean
Logix recommends setting the water pressure between 40
& 60 PSI.
Water In
Connect 3/8” tubing for the air line from the plant’s air
supply into the “Air In” connection. String the outgoing
3/8” air connection from the “Air Out” connection out to
the pump controllers.
Turn the air supply on, then turn the master shut-off valve
to the left to send air through all the lines. To relieve air
pressure at any time, turn the master shut-off valve to the
right.
Air Regulator
Adjustment
Use the knob on top of the air regulator to adjust the
pressure. Clean Logix recommends setting the air pressure
between 60 & 80 PSI.
Use the provided 5 meter CAN cable to connect the pump
controllers in the Air/Water kit to the pump controllers
mounted on the wall.
Once the air, water, and CAN lines have been connected,
the Air/Water Kit is fully setup.
USER MANUAL (MODEL: ALX-PRO) Page 6 of 32
Air Out
Air In
6/8/2015
USER MANUAL: ALX-PRO - Allocation Logix
READ ALL INSTRUCTIONS BEFORE OPERATING EQUIPMENT
Manifolds
NOTE: If the ALX-PRO was ordered with a tower, the
manifolds will be mounted inside the tower and already
have the water lines pre-connected from the Air/Water kit,
as well as the 3/4” hose for the dispense line.
If the ALX-PRO was ordered without a tower, the manifolds
will have to be separately mounted to a wall. Once the
manifolds are mounted, run 1/2” tubing from the “Water
Out” connections on the Air/Water kit to the 1/2” “Water
In” connections on the manifolds, and connect a 3/4” hose
to the bottom hosebarb for the dispense hose.
Water In
Connect the outgoing hose from the pump output onto
the check valves on the manifolds, using a hose clamp on
each hose.
Make sure the hose is all the way on the hosebarb before
tightening the hose clamp.
Chemical In
Make sure acids run into one manifold and caustics run
into the opposite one.
Dispense Hose
Once all of the chemical lines have been run, installation
is complete and the unit is ready to be configured in the
software.
USER MANUAL (MODEL: ALX-PRO) Page 7 of 32
6/8/2015
USER MANUAL: ALX-PRO - Allocation Logix
READ ALL INSTRUCTIONS BEFORE OPERATING EQUIPMENT
Setup Instructions
General Settings
To edit the General Settings, log into the Admin screen
by selecting the “Admin” button on the bottom right of
the screen and typing in the 4-digit administrator
passcode.
The Admin screen will automatically time out and bring
the user back to the home screen after 10 minutes of
inactivity for security purposes.
Click the “Settings” tab on the left side of the screen.
Under the “General Settings” tab, the software version,
model, and serial number can be viewed.
To change the Jug Selection type, select an option from
the drop-down menu. See Page 25 for examples of what
Jug Selections do before performing a dispense.
• Disabled: This option does not require anything
before a dispense.
• RFID: This option requires an RFID card for the
jug to be scanned before a dispense.
• Keypad: This option requires a user to type in a 4
digit code for the jug before a dispense.
Dispense Applications (Dispense Recipes) are assigned
permissions on Cleanintel.com. To tell the unit to
reference those permissions (how many times the
application can be dispensed by a user within a 24 hour
period) select “Use Permissions.”
If permissions do not matter and anyone is allowed to
dispense any application freely, select “Access All Apps.”
When users dispense applications then, their
permissions will appear as “9999 Uses Left.”
USER MANUAL (MODEL: ALX-PRO) Page 8 of 32
6/8/2015
USER MANUAL: ALX-PRO - Allocation Logix
READ ALL INSTRUCTIONS BEFORE OPERATING EQUIPMENT
General Settings (Continued)
The Max Dispense Time sets a time limit for weightbased applications to dispense within. This safety
feature provides partial protection against accidental
overflows when dispensing. To change the time limit,
select an option from the drop-down menu.
Example: A user starts to dispense a 1 gallon application,
but forgets to place the jug on the scale. If the Max Dispense Time is not set, the unit will continue to dispense
for forever since the scale is not reading any increases in
weight.
If the Max Dispense Time is set at 5 minutes, the dispense will automatically terminate after 5 minutes,
therefore preventing chemical being dispensed all over
for an unlimited amount of time.
If large amounts of chemical are being dispensed, the
Max Dispense Time must be set in a way that will not
end the dispense before it is done.
NOTE: Since the ALX-PRO is a time-based dispensing
system and does not use a scale, the “Max Dispense
Time” feature is invalid and does not need to be used.
To change the timezone on the unit, select a new one
from the drop-down menu.
Click “Apply” to save any changes made on this page.
Every time the unit dispenses, it records the weight and
time, creating a learning algorithm to help it dispense
accurately every time. Clicking “Clear All Learned
Calibrations” will erase the logs of the dispenses, making
the unit have to “relearn” how to dispense applications
again.
Clicking this will not stop the unit from being able to perform, but it may take 4 to 5 dispenses again before the
unit’s calibrations are exact again.
USER MANUAL (MODEL: ALX-PRO) Page 9 of 32
6/8/2015
USER MANUAL: ALX-PRO - Allocation Logix
READ ALL INSTRUCTIONS BEFORE OPERATING EQUIPMENT
Sleep Function
To prevent the computer from building up too much heat
inside the control box, the unit will begin a
“Sleep Function” after 90 minutes of inactivity.
After 80 minutes of inactivity, the unit will load a screen
that says “Preparing to Sleep.” This screen will appear
for 10 minutes before turning the screen off. Press any
number key on the keypad to remove this screen and go
back to the home page.
When the unit goes to sleep, the screen will turn off, but
the blue light on the monitor, the red light on the RFID
reader, and the green lights on the pump controllers will
all stay on.
To wake up the unit, simply move or click the mouse
on the control box. This will bring up a loading screen
where the unit will “wake up,” which will take between
30 and 60 seconds.
Once the home screen appears, the unit can be used
again.
USER MANUAL (MODEL: ALX-PRO) Page 10 of 32
6/8/2015
USER MANUAL: ALX-PRO - Allocation Logix
READ ALL INSTRUCTIONS BEFORE OPERATING EQUIPMENT
Site Info
To view the Site Information on this specific unit, click
“Site Info” in the bottom left corner of the screen.
Here the Applications and their codes, Jugs, Users, and
Chemicals assigned to this unit can be viewed.
If a user forgets the code of an application they need to
dispense, they can simply look it up in the Site Info tab.
Press STOP or “A” to return to the home screen.
USER MANUAL (MODEL: ALX-PRO) Page 11 of 32
6/8/2015
USER MANUAL: ALX-PRO - Allocation Logix
READ ALL INSTRUCTIONS BEFORE OPERATING EQUIPMENT
RFID Association
To assign an RFID card to a user so they can log in by
swiping their card, log into the Admin screen by selecting
the “Admin” button on the bottom right of the screen
and typing in the 4-digit administrator passcode.
Select “Easy Add” on the left side of the screen.
Select a user from the drop-down menu.
Once the user is selected from the list, scan their RFID
card to enter it into the system.
Once the card has scanned, the code will appear in the
text box. Click “Add.”
USER MANUAL (MODEL: ALX-PRO) Page 12 of 32
6/8/2015
USER MANUAL: ALX-PRO - Allocation Logix
READ ALL INSTRUCTIONS BEFORE OPERATING EQUIPMENT
RFID Association (Continued)
A dialog box will appear saying “RFID Added Successfully.”
Click “OK” to clear this message.
If the dialog box says “Easy Add Failed,” ensure that the unit
has an internet connection, reboot the unit, and attempt to
Easy Add again.
Press STOP twice or press the “A” key to return to the home
screen, then sync the unit. This will send the RFID information up to cleanintel.com. (See Page 27 for instructions on
syncing).
Once the sync has finished, the user will be able to log in by
swiping that RFID card at the home screen.
Repeat this process for as many users and RFID cards as
required. Syncing must occur between each user.
Each user must be synced one at a time.
NOTE: Only one card can be assigned per user, and cards
cannot be shared between other users.
If the user looks at “Users” under Site Info, they will see the
RFID number assigned to them if there is one.
USER MANUAL (MODEL: ALX-PRO) Page 13 of 32
6/8/2015
USER MANUAL: ALX-PRO - Allocation Logix
READ ALL INSTRUCTIONS BEFORE OPERATING EQUIPMENT
Pump Controller Settings
In order to dispense chemical with the ALX-PRO, the
following items must be setup under the Pump settings:
• Each chemical being dispensed must be be assigned to a
pump controller.
• Water must be assigned to a pump controller.
To edit Pump settings, log into the Admin screen by selecting the “Admin” button on the bottom right of the screen
and typing in the 4-digit administrator passcode.
Click on the “Settings” tab on the left side of the screen,
then click on the “Pumps” tab near the top of the screen.
This will bring up a list of all the pump controllers connected
to this unit.
Connected pumps will appear as “Ok” while disconnected
pumps will appear as “Missing.” If a pump is missing, check
its connections to the unit and see if it has a green light,
signaling power.
Select a pump from the list by clicking on it. The selected
pump will be highlighted in orange.
Click “Identify” to make the pump controller blink red for
a few seconds. This allows a user to ensure that the pump
controller they are editing is connected to the right pump.
To assign a chemical to a pump, select the pump and click
the “Assignments” tab. This brings up a list of all the chemicals that are set up on this unit. Select the chemical that
this pump will be dispensing.
Next, click the button underneath the “Assignments” tab
that says “Manifold A.”
Select from the drop-down menu which manifold this
chemical will be dispensing through (acids or caustics).
If there needs to be more than 2 manifolds, see Page 17 to
add more manifolds in the software.
USER MANUAL (MODEL: ALX-PRO) Page 14 of 32
6/8/2015
USER MANUAL: ALX-PRO - Allocation Logix
READ ALL INSTRUCTIONS BEFORE OPERATING EQUIPMENT
Pump Controller Settings (Continued)
Click “Apply” to finalize changes.
After clicking “Apply,” a dialog box will appear saying “Must
Update Calibrations for Pump!”
See Page 21 to calibrate pumps for time-based dispensing.
Migrating Pumps
To move a pump controller’s settings (including calibrations, manifold, and chemical assignment) to a different
pump controller, select the controller to be moved and
click “Migrate.”
This brings up a dialog box that asks which new pump controller the old configuration will be moved to.
Select the new pump controller from the drop-down menu
and click “Migrate.”
If the new pump controller had no chemicals previously
assigned, the process will be complete. If the new pump
controller had a previous assignment, an alert will appear
warning that the previous configuration will be overwritten.
USER MANUAL (MODEL: ALX-PRO) Page 15 of 32
6/8/2015
USER MANUAL: ALX-PRO - Allocation Logix
READ ALL INSTRUCTIONS BEFORE OPERATING EQUIPMENT
Deleting Pumps
To remove a pump controller’s assignment from the
system, select the pump and click “Delete.”
This will bring up a dialog box for confirmation, since any
calibrations for time-based dispensing will be removed.
Since the ALX-PRO dispenses applications by calibrated
time, if the pump controller is re-added it will have to be
recalibrated again.
Click “Yes” to delete the pump.
Deleting pumps should be a rare occurrence and should
only happen when a pump controller breaks and is
replaced.
If the pump controller is not broken, but is deleted, it will
automatically show up in the list of pumps again with no
chemical assignments.
USER MANUAL (MODEL: ALX-PRO) Page 16 of 32
6/8/2015
USER MANUAL: ALX-PRO - Allocation Logix
READ ALL INSTRUCTIONS BEFORE OPERATING EQUIPMENT
Manifold Settings
To edit Manifold settings, log into the Admin screen, click
on the “Settings” tab on the left side of the screen, and
click on the “Manifolds” tab near the top of the screen.
This will bring up a list of all the chemicals assigned to the
different manifolds on this unit. To view different
manifolds, click on the drop-down menu and select one.
See Page 14 for instructions on assigning water and
chemicals to pumps and manifolds.”
Use the “Manifolds” tab to see which chemicals and
pumps are assigned to which manifolds; ensuring that all
acids are on one manifold and all caustics are on another.
If Water is assigned to the manifold, it will appear as a
“Valid Manifold.” If there is no water assigned (meaning
that the manifold cannot do a post-dispense water flush),
the unit will show “You have no water assigned.”
Assigning Scales to Manifolds
Before the unit can dispense weight-based applications,
each manifold must have a scale assigned to it. Select
a scale from the drop-down list on the right side of the
screen. Be sure to assign the correct scale to the correct
manifold.
NOTE: Since the ALX-PRO does not use a scale, the
manifolds do not need scales assigned to them.
Adding Manifolds
A manifold can be added in the software by clicking “Add.”
The unit will automatically call it “Manifold” with the letter
after the existing manifolds (if two manifolds already exist,
the new manifold will be named “Manifold C” etc).
Select the color to be displayed with this manifold. The
color chosen does not affect the performance of the unit.
It only acts as a reference guide.
Click “Yes” to finish adding the new manifold.
If another manifold is added, the “Pumps” tab will show
the new manifold in the drop-down menu.
The new manifold will have no pumps, chemicals, or scales
assigned to it.
USER MANUAL (MODEL: ALX-PRO) Page 17 of 32
6/8/2015
USER MANUAL: ALX-PRO - Allocation Logix
READ ALL INSTRUCTIONS BEFORE OPERATING EQUIPMENT
Deleting Manifolds
To remove a manifold from the software, go to the
Manifolds tab, select the manifold, and click “Delete.”
If the manifold has chemicals assigned to it, the pump
controllers must be moved to a different manifold in the
software before the old manifold can be removed. Otherwise a screen will appear with a warning that a manifold
with assigned chemicals can’t be deleted.
If no chemicals are setup on that manifold, a confirmation
screen will appear.
Click “Yes” to delete the manifold.
USER MANUAL (MODEL: ALX-PRO) Page 18 of 32
6/8/2015
USER MANUAL: ALX-PRO - Allocation Logix
READ ALL INSTRUCTIONS BEFORE OPERATING EQUIPMENT
Priming Pumps
Before the unit can dispense chemical, each pump must be
primed so the chemical fills up the hose to the manifold.
Before the pumps start to prime, make sure that a pump
controller is assigned to water for that manifold so a manual
water flush can be performed between priming pumps. See
Page 14 for instructions on assigning water and chemical to
pump controllers.
Select the pump to be primed from the Pumps list, then click
“Prime Pump.”
This will bring up a screen where the user can prime the
pump and bring chemical through the hoses.
Press START to turn the pump on. Once chemical is through
the entire hose and is dispensing through the manifold, press
STOP to turn the pump off.
Click “Close” when priming has been completed.
Perform a manual water flush between priming pumps to
cleanse the chemical out of the line before dispensing another chemical. See page 28 for instructions on manual water
flushing.
Repeat this process for each pump.
USER MANUAL (MODEL: ALX-PRO) Page 19 of 32
6/8/2015
USER MANUAL: ALX-PRO - Allocation Logix
READ ALL INSTRUCTIONS BEFORE OPERATING EQUIPMENT
Calibrating the Scale
NOTE: Since the ALX-PRO does not use a scale for
dispensing, disregard the following instructions.
To calibrate the scales to ensure the best accuracy when
dispensing, log into the Admin screen by selecting the
“Admin” button on the bottom right of the screen and typing in the 4-digit admin passcode.
Select “Calibrate” on the left side of the screen, then click
“Scale” on the top of the screen.
Select a scale from the drop-down menu.
If this is the first time calibrating the scale, both sides will
appear red with an exclamation point.
Make sure there is nothing on the scale, then click “Tare
Scale.”
Next, place a dumbbell, or a weight on the scale.
The specific weight of this object must be known to ensure
accuracy.
Using the numbers on the keypad, type in the weight of
the dumbbell and click “Calibrate Scale.”
Both sides will appear green with check marks, signaling
that the scale is fully calibrated.
If the scale must be recalibrated, click “Tare Scale” and
start over. This will wipe all previous calibration values
and will require the user to recalibrate the scale before
dispensing again.
Clean Logix recommends recalibrating the scale every 2-3
months to ensure the best accuracy.
USER MANUAL (MODEL: ALX-PRO) Page 20 of 32
6/8/2015
USER MANUAL: ALX-PRO - Allocation Logix
READ ALL INSTRUCTIONS BEFORE OPERATING EQUIPMENT
Pump Calibration
To calibrate the pumps for time-based dispenses, log into
the Admin screen by selecting the “Admin” button on the
bottom right of the screen and typing in the 4-digit admin
passcode.
Select “Calibrate” on the left side of the screen, then click
“Pump” on the top of the screen.
Select a pump from the drop-down menu. Only pumps
that have been assigned to a chemical will appear in this
list. See Page 14 for instructions on assigning water and
chemicals to pump controllers.
The unit needs to know how much chemical it pumps out
for a set amount of time, so to calibrate it for timed
dispenses it must have calibration points setup close to
the regular amounts of chemical that will be dispensed.
The unit’s text will read:
“Calibrate Pump - Without a few calibration points close
to your regular dispense amounts, the unit will not
perform up to its capability.
To add a calibration, click the button below.”
Click “Add Calibration Point.”
The onscreen instructions will read:
“Run the Pump - Dispense a measure that is close to what
would normally be used.
Be sure that you dispense into a jug that will let you
accurately measure how much was dispensed.
You’ll stop the pump by pressing STOP.
To proceed, press the START button.”
Press START and dispense an amount close to what will
be normally dispensed (e.g. if users will be dispensing
one gallon of chemical, dispense one gallon of chemical
for a calibration point).
Press STOP when the desired amount of chemical is
reached.
USER MANUAL (MODEL: ALX-PRO) Page 21 of 32
6/8/2015
USER MANUAL: ALX-PRO - Allocation Logix
READ ALL INSTRUCTIONS BEFORE OPERATING EQUIPMENT
Pump Calibration (Continued)
Enter the amount of chemical that was dispensed and
select the correct value from the drop-down menu (fluid
ounces, mililiters, liters, or gallons).
Click “Confirm” to save the calibration value. If the
measurement was inaccurate (spilled chemical, etc), click
“Cancel” and try again.
The saved calibration values will appear in a table on the
right hand side of the screen. Clean Logix recommends
having 2 calibration points per pump.
Repeat this process with all of the pump controllers that
will be dispensing chemical via time. Once they are all
calibrated, the unit can dispense time-based applications.
Clearing Calibrations
To clear calibration points on pumps, select the pump from
the drop-down menu and click “Clear all Calibrations.”
The unit will bring up a confirmation message. Click “Clear
all Calibrations” again to erase all the timed calibration
points on this pump.
Clearing calibrations should be a rare occurance, but may
be required when changes in the plant environment (e.g.
change in air pressure, water pressure, length of hose, type
of pump, etc) affect the speed at which chemical is
dispensed.
USER MANUAL (MODEL: ALX-PRO) Page 22 of 32
6/8/2015
USER MANUAL: ALX-PRO - Allocation Logix
READ ALL INSTRUCTIONS BEFORE OPERATING EQUIPMENT
Post-Dispense Water Flush
To change the length of time that water flushes after a
dispense, log into the Admin screen by selecting the
“Admin” button on the bottom right of the screen and
typing in the 4-digit administrator passcode.
Click on the “Settings” tab on the left side of the screen,
then click on the “Flush Time” tab near the top of the
screen.
Use the buttons to increase or decrease the time by
1.0 seconds or 0.1 seconds.
The scroll bar can also be manually moved by clicking it.
The maximum time that water will flush after a dispense is
10 seconds.
Click the checkbox on the bottom to require a water flush
after every dispense. If this is not checked, users can skip
the post-dispense water flush by pressing STOP.
Any changes made on this page will automatically be saved.
Press STOP, “A” or click “Exit,” to return to the home screen.
USER MANUAL (MODEL: ALX-PRO) Page 23 of 32
6/8/2015
USER MANUAL: ALX-PRO - Allocation Logix
READ ALL INSTRUCTIONS BEFORE OPERATING EQUIPMENT
Operation Instructions
Dispensing
To begin dispensing, the user can either swipe their RFID
card or type in their 4-digit passcode to login. See Page 12
to assign RFID cards to users.
Correct passcodes will bring the user to the next screen
while incorrect codes will appear in red.
Select an application to dispense by typing in its 4-digit
code.
Once the application has been selected, the unit shows the
name, location, manifold, and allowed uses of the
application.
NOTE: If any errors appear on this screen, refer to the
Troubleshooting guide. (See Page 30).
Press START to confirm the application and continue.
USER MANUAL (MODEL: ALX-PRO) Page 24 of 32
6/8/2015
USER MANUAL: ALX-PRO - Allocation Logix
READ ALL INSTRUCTIONS BEFORE OPERATING EQUIPMENT
Dispensing - Jug Selection
If the Jug Selection is set to “RFID,” a screen will come up
requesting the RFID card for the jug be scanned. This is to
ensure that acids dispense into jugs designed for acids, and
caustics dispense into jugs designed for caustics.
See Page 8 to change the Jug Selection.
If the Jug Selection is set to “Keypad,” a message will come
up requesting the 4-digit code for the jug. This is to ensure
that acids dispense into jugs designed for acids, and caustics
dispense into jugs designed for caustics.
Once the jug selection requirements have been fulfilled, or
if the Jug Selection is set to “Disabled,” the unit will
automatically go to the pre-dispense screen.
Make sure the dispensing hose from the manifold is securely
in the jug that the chemical will dispense into.
Press START to begin the dispense.
USER MANUAL (MODEL: ALX-PRO) Page 25 of 32
6/8/2015
USER MANUAL: ALX-PRO - Allocation Logix
READ ALL INSTRUCTIONS BEFORE OPERATING EQUIPMENT
Dispensing (Continued)
The bar on the left of the screen shows the current volume
of chemical being dispensed.
The bar on the right shows the total amount of chemical in
the application. If there is more than one chemical being
dispensed, these bars will be different. If there is only one
chemical being dispensed, the bars will be the same.
Once the dispense has been completed, press START to flush
the hose and manifold with water. See Page 23 to change
the length of time the post-dispense water flush runs.
If another dispense is required, press START. This will bring
up the pre-dispense screen. If the same application needs
to be dispensed again, press START to begin the dispensing
process again.
If a different application is required, press CE/E on the
keypad to remove the current code and type in the new
code for the different application.
When dispensing is finished, press STOP to log out.
USER MANUAL (MODEL: ALX-PRO) Page 26 of 32
6/8/2015
USER MANUAL: ALX-PRO - Allocation Logix
READ ALL INSTRUCTIONS BEFORE OPERATING EQUIPMENT
Syncing
To sync information to and from cleanintel.com, press
the “Sync” button in the bottom right corner of the home
screen.
This will automatically initiate a data transfer from the
unit to the website and back again through the cellular
router.
The unit will sync up all the data logs of dispenses including which users have logged in, how much chemical has
been dispensed, which applications have been used, and
the times and durations for all dispenses.
If a manager has created a new user, updated the list of
chemicals or applications, or added new user permissions
on cleanintel.com, the syncing process will update the unit
with this new data.
The unit is configured to sync to cleanintel.com hourly, so
a user will rarely need to manually sync.
If the syncing fails, ensure the unit has internet
connection by checking the router for 3 green lights on
the right (meaning full signal) and that all connections are
securely in place.
If there are only 2 green lights and 1 orange light, the
router has low signal in the building, but still has internet
access. Red lights show that the router has no service.
USER MANUAL (MODEL: ALX-PRO) Page 27 of 32
6/8/2015
USER MANUAL: ALX-PRO - Allocation Logix
READ ALL INSTRUCTIONS BEFORE OPERATING EQUIPMENT
Manual Water Flush
To manually flush out the dispense hoses with water,
select “Water Flush” from the home screen.
The screen will say “Press Key That Corresponds to
Manifold for Flush.”
Press “1” on the keypad to select the Red manifold.
Press “2” on the keypad to select the Blue manifold.
If there are more than 2 manifolds setup on the unit, press
the corresponding numbers to select the correct manifold
(e.g. pressing “3” would select the next manfold, etc).
Once the manifold has been selected, press START to
manually rinse with water.
The water will continue to dispense until STOP is pressed.
Once STOP is pressed, the unit will return to the home
screen.
If water is not assigned to a manifold, an error message
will appear. See Page 14 for instructions on assigning
water and chemicals to pumps and manifolds.
USER MANUAL (MODEL: ALX-PRO) Page 28 of 32
6/8/2015
USER MANUAL: ALX-PRO - Allocation Logix
READ ALL INSTRUCTIONS BEFORE OPERATING EQUIPMENT
Standard & Event Logs
The data logs on the ALX-PRO can be used to see what has
been happening on the unit.
To access the data logs, log into the Admin screen by
selecting the “Admin” button on the bottom right of the
screen and typing in the 4-digit admin passcode.
Select “Logs” from the left side of the screen.
The Standard Logs show which applications were dispensed
when, by which user.
If there is more than one page of logs, navigate through the
pages by clicking “Next Page” or “Previous Page.”
The Event Logs show each individual action that took place
on the unit, including all button presses and pointer clicks.
USER MANUAL (MODEL: ALX-PRO) Page 29 of 32
6/8/2015
USER MANUAL: ALX-PRO - Allocation Logix
READ ALL INSTRUCTIONS BEFORE OPERATING EQUIPMENT
Dispensing Errors
Use the following guides to help troubleshoot if errors
appear on the unit.
Message
Cause
Solution
Message
Cause
Invalid App Code
The code typed in does not reference any
existing application setup on cleanintel.
com.
Check the Site Info tab to see the
existing applications setup on the unit,
then type in a correct code to dispense an
existing application.
Not all Chemicals Have a Pump
A chemical in the application is not
assigned to a pump.
Solution
Ensure all pump controllers have power.
On unit, go into the Admin screen, then
under “Pumps” tab. Assign the chemical
to a pump. (See Page 14).
Message
Not All Chemicals on Same Manifold
Cause
Solution
Message
Cause
Solution
The application trying to dispense has
multiple chemicals, but not all are
assigned to the same manifold.
On unit, go into the Admin screen, then
under “Pumps” tab. Assign the chemicals
in the application to the same manifold.
(See Page 14).
No Water Pump (Water Flush Required)
Water is not assigned to the manifold that
has an application that is trying to
dispense, but a post-dispense water flush
is required.
On unit, go into the Admin screen, then
under “Pumps” tab and assign water to
the correct manifold, or go under the
“Flush Time” tab and deselect “Require a
flush after each dispense.” (See Page 23).
USER MANUAL (MODEL: ALX-PRO) Page 30 of 32
6/8/2015
USER MANUAL: ALX-PRO - Allocation Logix
READ ALL INSTRUCTIONS BEFORE OPERATING EQUIPMENT
Troubleshooting (Continued)
Message
Cause
Solution
Message
Cause
Solution
Message
Cause
Solution
Message
Cause
Solution
No App Permissions Set Up
No permissions to dispense this
application have been setup for this user
on cleanintel.com.
On website, edit the user’s permissions to
be able to dispense that application, then
sync the unit. Alternative: under General
Settings select “Don’t Use Permissions”
(See Page 8).
Too Many Uses
The application has been dispensed by
that particular user to their max permission level within a 24-hour period.
On website, edit the user’s permissions to
be able to dispense that application more
times within a 24-hour period, then sync
the unit. Alternative: under General
Settings select “Don’t Use Permissions”
(See Page 8).
Warning: No Calibrations Near Dispense
Size
There are no calibrations close to the
amount of chemical that is attempting to
be dispensed.
On unit, go into the Admin screen, then
under “Calibrate” tab. Select which pump
to calibrate, then calibrate a value close to
the dispense amount. (See Page 21).
Pump Needs Calibration
The application trying to dispense is
time-based and needs the pump to be
time-calibrated, but the pump is not.
On unit, go into the Admin screen, then
under “Calibrate” tab. Select which pump
to calibrate. (See Page 21).
USER MANUAL (MODEL: ALX-PRO) Page 31 of 32
6/8/2015
USER MANUAL: ALX-PRO - Allocation Logix
READ ALL INSTRUCTIONS BEFORE OPERATING EQUIPMENT
Troubleshooting (Continued)
Message
Cause
No Scale Assigned to this Manifold
The scale has not been assigned to a
manifold in the Admin screen.
Solution
On unit, go into the Admin screen and
assign the scale to a manifold under the
“Manifolds” tab. (See Page 17).
Message
The Scale is not Connected
Cause
Solution
Message
Cause
The scale assigned to the manifold of the
application is not connected to the CAN
network.
Check for a red light on the scale conditioner signaling power, then check the
connection from the scale conditioner to
the scale.
The Scale is not Calibrated
The scale has not been calibrated.
Solution
On unit, go into the Admin screen, then
under “Calibrate” tab. Tare the scale, then
follow on-screen instructions to calibrate.
(See Page 20).
Message
Dispense Cancelled
Cause
Solution
User pressed STOP before the dispense
finished.
During a dispense, do not press any
buttons until the screen shows a green
check mark signaling the end of the
dispense. If this error appears, press STOP
to return to the home screen.
USER MANUAL (MODEL: ALX-PRO) Page 32 of 32
6/8/2015
DISPENSE INSTRUCTIONS: ALX-PRO - Allocation Logix
ALWAYS WEAR THE PROPER PPE’S (INCLUDING FACESHIELD) WHILE DISPENSING CHEMICALS
Leave Main Power switch ON at all times
1. Type in your 4 digit user passcode to log in. If your code is entered correctly, you will be brought to the
next screen. If your code is entered incorrectly, the asterisks will turn RED. If your code is entered incorrectly, press CLR/DEL button to delete the wrong numbers, and try again.
Passcode Entered Incorrectly
Passcode Entered Correctly
2. Select an application by typing in the 4 digit code for the formula you want to dispense. A description
will come up to confirm the formula.
3. If you have selected the correct application, press ENTER or START to continue.
DISPENSE INSTRUCTIONS (MODEL: ALX-PRO) Page 33 of 34
6/8/2015
DISPENSE INSTRUCTIONS: ALX-PRO - Allocation Logix
ALWAYS WEAR THE PROPER PPE’S (INCLUDING FACESHIELD) WHILE DISPENSING CHEMICALS
4. Make sure the proper hose is in the proper
container before dispensing.
IF AT ANY TIME THE DISPENSE NEEDS TO
BE STOPPED, PRESS “STOP.”
DO NOT DO ANY OF THE FOLLOWING
WHILE A DISPENSE IS IN PROCESS:
1. TOUCH THE JUG
2. TOUCH THE SCALE
3. TOUCH OR LEAN AGAINST
THE TOWER
5. Confirm the application details and press START to begin the dispense.
6. Press START at the end of the dispense to flush the hose with water. Place the hose back into jug tray
and press STOP to log out of the system when finished.
DISPENSE INSTRUCTIONS (MODEL: ALX-PRO) Page 34 of 34
6/8/2015
Las Instrucciones Para Dispensan: ALX-PRO - Allocation Logix
SIEMPRE USAR LA ROPA ADECUADA (INCLUYENDO LA CARETA) CUANDO SE DISTRIBUYE
PRODUCTOS QUÍMICOS
Deje el Interruptor de Alimentación Principal en Todo Momento
1. Escriba su código de usuario de 4 dígitos que entrar. Si se ha introducido correctamente el código, se le
llevará a la siguiente pantalla. Si se introduce el código de forma incorrecta, el asteriscos se volverá ROJO.
Si se introduce el código de forma incorrecta, pulse la tecla CLR / DEL para borrar los números erróneos, y
vuelva a intentarlo.
Código de Acceso Introducido Incorrectamente
Código de Acceso Introducido Correctamente
2. Seleccione una aplicación escribiendo el código de 4 dígitos para la fórmula que quiere dispensar. Una
descripción se van a plantear para confirmar la fórmula.
3. Si ha seleccionado la aplicación correcta, Pulse ENTER o START para continuar.
DISPENSE INSTRUCTIONS (MODEL: ALX-PRO) Page 35 of 36
6/8/2015
Las Instrucciones Para Dispensan: ALX-PRO - Allocation Logix
SIEMPRE USAR LA ROPA ADECUADA (INCLUYENDO LA CARETA) CUANDO SE DISTRIBUYE
PRODUCTOS QUÍMICOS
4. Asegúrese de que la manguera adecuada está en
el recipiente adecuado antes de la dispensación.
SI SE NECESITA TERMINAR,
PULSE “STOP”
NO TOQUE EL JARRA,
LA ESCALA, O LA TORRE, DURANTE
LA DISPENSACIÓN
5. Presione START para confirmar la dispensación. Aplicación comenzará a dispensar.
6. Cuando haya terminado de la dispensación, presione START para enjuagar el manguera con agua.
Coloque la manguera de nuevo en la bandeja de jarra y pulse STOP para cerrar sesión en el sistema cuando
haya terminado.
DISPENSE INSTRUCTIONS (MODEL: ALX-PRO) Page 36 of 36
6/8/2015