1
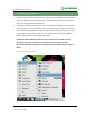
Raspberry Pi LCD User Manual 4. share awesome hardware How to work with a camera RPi LCD can also work with an external camera to take photos. In this operation, a Raspberry Pi camera is required, which should be purchased separately. To work with a camera, you should enter the terminal, and input: cd /home/pi/camera/ Camera Then, waiting several seconds, the camera application will be started automatically. Now, you can capture pictures by double clicking the screen. 5. 5.1. 1) FAQ How to use LCD with custom ized image? Make sure that desktop log in as user ‘pi’ at the graphical desktop, execute: sudo raspi-config Choose: Enable Boot to Desktop/Scratch -> Desktop Log in as user ‘pi’ at the graphical desktop 2) Copy the file LCD-show.tar.gz to the customized OS via Ethernet or flash disk. Then execute: tar xvf LCD-show.tar.gz cd LCD-show/ #3.2inch RPi LCD (B) run: sudo ./LCD32-show #3.5inch RPi LCD (A) run: sudo ./LCD35-show #4inch RPi LCD (A) run: sudo ./LCD4-show #5inch HDMI LCD run: sudo ./LCD5-show 3) 5.2. Reboot and wait a minute, until LCD shows. Why the image cannot be used after upda ted? For avoiding unusable, image should be updated with the following methods: sudo apt-mark hold raspberrypi-bootloader sudo apt-get update sudo apt-get upgrade 5 th Rev 2.3, April 29 2015