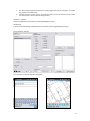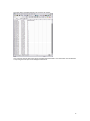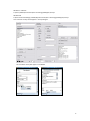
1
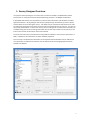
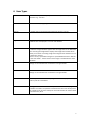
Survey ™ Designer USER MANUAL Version 1.2 © Pear Technology Services Ltd. 2012 Unit 31 Broadmarsh Business Centre, Harts Farm Way, Havant. Hants. UK. PO9 1HS Tel: 023 9249 9689 [email protected] - www.peartechnology.co.uk Contents 1. Survey Designer Overview .............................................................................................................. 3 2. Installing Survey Designer ............................................................................................................... 4 3. Tips .................................................................................................................................................. 4 4. Creating, Opening and Saving Surveys ............................................................................................ 4 4.1 4.2 4.3 5 Creating a New Survey File ..................................................................................................... 4 Opening Survey Files ............................................................................................................... 4 Saving Survey Files .................................................................................................................. 5 Adding, Modifying and Removing a Survey Items .......................................................................... 5 6 Item Types....................................................................................................................................... 6 7 Item Properties ............................................................................................................................... 7 8 Auto-Set .......................................................................................................................................... 7 9 Data Field Size ................................................................................................................................. 8 10 Tables .............................................................................................................................................. 8 10.1 Adding, Modifying and Removing Tables ................................................................................ 8 10.1.1 Simple Tables ......................................................................................................................... 8 10.1.2 Category Tables ..................................................................................................................... 9 10.2 Table Options ........................................................................................................................ 10 10.3 Linking a Table to an Item ..................................................................................................... 10 10.4 Checklists .............................................................................................................................. 11 11 Display Settings ............................................................................................................................. 12 11.1 Point Features ....................................................................................................................... 12 11.2 Line Features ......................................................................................................................... 12 11.3 Area Features ........................................................................................................................ 13 12 Importing PocketGIS Connection Schemes ................................................................................... 13 13 Worked Examples ......................................................................................................................... 13 13.1 13.2 Simple Example ..................................................................................................................... 13 Advanced Example ................................................................................................................ 16 2 1. Survey Designer Overview The purpose of Survey Designer is to allow users to create and modify a PocketGIS data capture scheme that can easily be transferred to PocketGIS using the tools in PT-Mapper Professional. In PocketGIS new features can be plotted on a map and then information and attributes recorded against that feature. Survey Designer lets the user specify the type of feature they wish to capture and the details to record during the survey. The details may be entered into text boxes and in order to reduce time during the survey items can be chosen from drop down lists or pick lists. The user can also specify properties for an item in the survey, such as making some necessary items mandatory to complete during the survey or limiting a particular item so that only numbers can be entered, or set limits on the amount of information that can be entered. For those users who have some experience using database software a survey item is equivalent to a field in a database, each field then has similar database properties. Once a survey is completed the information can be exported from PocketGIS in CSV or SHP format. The information recorded for each feature can be viewed in Excel and the geographical features plotted in PT-Mapper. 3 2. Installing Survey Designer Insert the Survey Designer CD into your CD/DVD drive. A splash screen will appear, click on the install button and follow the instructions. Survey Designer is compatible with Windows 7, Vista and XP. 3. Tips Survey Designer includes a hints panel in the lower section of the user interface. Survey Designer will alert the user to any settings or items that may have been missed whilst creating a survey file. 4. Creating, Opening and Saving Surveys 4.1 Creating a New Survey File To start creating a new survey go to the File menu and select New Survey. A couple of worked examples are included further on in the manual. 4.2 Opening Survey Files To open an existing survey go to the File menu and select Open Survey. All survey files that are used with PT-Mapper Professional will be found in the following location: Windows 7 and Vista C:\Users\<USER>\Documents\Pear Technology\PTMapper\Surveys Windows XP C:\Documents and Settings\<USER>\My Documents\Pear Technology\PTMapper\Surveys 4 4.3 Saving Survey Files A survey file may be saved by going to the File menu and selecting Save. Alternatively it is also possible to use the Save As command so that changes can be made to a survey file without modifying the original copy. All survey files that are to be used with PT-Mapper Professional must be saved in the following location: Windows 7 and Vista C:\Users\<USER>\Documents\Pear Technology\PTMapper\Surveys Windows XP C:\Documents and Settings\<USER>\My Documents\Pear Technology\PTMapper\Surveys 5 Adding, Modifying and Removing a Survey Items An item can be added to the survey by clicking on the Add Item button. Survey Designer will then ask for a name to be entered for that item. Selecting Add Item will add a new item to the bottom of the list of survey items. Alternatively the Insert Item button can be used, this will add a new survey item above the item that is currently selected. An items properties and settings can be modified by first selecting the item in the Survey Items list. That item can then be modified using the centre panel. To rename an item double click on the item name in the Survey Items list. To remove an item, select it in the Survey Items list then click on the Remove Item button. 5 6 Item Types Text A value that may contain any sequence of numbers, letters and punctuation characters e.g. Tree-123 Number A whole number (integer) e.g. 147 Decimal A number that can be expressed to 2 decimal places e.g. 147.25 Logical A logical data type can have one of two values, e.g. yes or no. In PocketGIS a Boolean item is displayed as a row of radio buttons. Image Image attributes allow you to attach an image such as a digital photograph to a feature. Image attributes appear with an Image button in the Attributes Form. Pressing the Image button displays the Image Select window which allows you to select an existing image to be assigned to the attribute or link to the built in camera. When a survey is uploaded all images are uploaded with the CSV or SHP file to the same folder. The file name of each image is included with the other attributes. The current date can be recorded. This is obtained from the Windows settings on the mobile device or tablet PC running PocketGIS. Date Time The current time can be recorded. This is obtained from the Windows settings on the mobile device or tablet PC running PocketGIS. Table Allows any items listed in a Survey Designer table to be displayed as a drop down or pick list in PocketGIS. Header Setting up headers allows the data entry form in PocketGIS to be paginated. If headers are used it is important to make the first item in the Survey Items list a header since any items listed prior to the first header will not be visible in the data entry form. 6 7 Item Properties Visible Sets an item to be visible in the data entry form in PocketGIS. The default value is visible. Read Only Sets an item to be read only. Any items set to read only cannot be modified. Mandatory Any item set to mandatory must contain a value before the data entry in PocketGIS can be completed. Remember If an item is set to remember a list of recently entered items will be displayed. Annotation When a feature is plotted the value of the item set with annotation on will be displayed next to the point. Note, that this property is only available with point features and that only one item can be used to annotate the point. E.g. if annotation is set on for the item Tree ID, the Tree ID number will be displayed next to the marker showing the tree’s position. 8 Auto-Set The Auto-set menu is available for the following item types: Text Number Date Time For text and number items an automatically incremented value can be entered. A start value must be given and if necessary a prefix can also be specified (a prefix is only available if the item is set to text). The example below will begin numbering at T1 and then continue upwards T2, T3…etc. 7 Date and time details can be entered manually during a survey. They may also be input automatically if the following settings are specified. 9 Data Field Size The size of data entered for an item can be controlled in two ways: Width – Specifying a width of 10 for example will limit the maximum number of characters that can be entered for that item to 10. Number of Lines – The number of lines can only be specified for text items and checklist tables. This is useful for items when long descriptions maybe necessary. The default value is 1 line. 10 Tables Survey Designer lookup tables are used to hold and modify lists of items that are used to populate drop down lists and checklists in PocketGIS. Setting up these lists can greatly reduce the time taken to input data during a survey. There are two types of look-up tables: Plain Tables – Are used to populate drop down lists and checklists. Categorised Tables – Generally used for long lists of information. Instead of having one long list of items to scroll through in PocketGIS, the user will be presented with two drop down boxes, the first being the category e.g. Beech and the second containing all of the items in the category e.g. different varieties of Beech tree. The output from a category list selection is always the item, categories are not uploaded. 10.1 Adding, Modifying and Removing Tables 10.1.1 Simple Tables A simple look-up table can be added by clicking on the Add Table button, a name must then be specified for the table e.g. Condition. Once a table has been added the contents can then be 8 populated in the Table Contents box. Each line represents a single item in PocketGIS, items can be typed into the contents box or copied and pasted from an existing list in an Excel spreadsheet or Text file. To modify a table name, double click on the name in the tables list. To modify the contents of the table, first select the appropriate table, items can be added, removed or modified in the contents box. To delete a table first select the appropriate table from the Tables list then click on the Remove Table button. 10.1.2 Category Tables A category lookup table is added by clicking on the Add Categorised Table button. A name for the table must be entered along with the titles of the first two categories. Subsequent categories can be added by clicking on the Add Category button. Once all of the categories are added, the items for each category can be entered by typing into the Content box or copied from an external source. 9 To modify a categorised table first select the appropriate entry from the Tables list. To add categories click on the Add Category button, to modify the name of an existing category double click on the name. To modify the contents of a category, select the appropriate table and category and then add, remove or modify items in the contents box. To delete a category table first select the appropriate table from the Tables list then click on the Remove Table button. 10.2 Table Options Dependant lookup – The values displayed in a drop down list may be filtered according to a value selected for a previous item. Selecting an item from the “Depends On” list activates this option and can be used for tables and categorised tables. This option is often useful because a category can be output with a look-up value. For example a table containing a list of Latin names of trees could be dependant on the value selected for the common name. Allowing table attributes to be added in PocketGIS – It’s not always possible to predict in advance the values that might be entered during a survey e.g. the target a tree may hit if it were to fall. Therefore in PocketGIS there is an option to add new items to a drop down list for the duration of that survey. To activate this option tick the box to “Allow table values to added in PocketGIS”. 10.3 Linking a Table to an Item The previous section of the manual explained how to add and modify tables, the table must now be associated with a Survey Item. First create a new item e.g. Condition, then set the Item Type to Table. From the Lookup Table section choose the appropriate table. 10 These options will create a PocketGIS survey item called Condition that will enable the user to select one of the four options in the Table Contents box. 10.4 Checklists It is sometimes possible that two or more options from a list will apply. To set up a checklist tick the checklist box. Then increase the number of lines in the Data Field Size section to fit the table contents. On most mobile devices a maximum of 12 is sufficient. If the number of lines is not increased then browsing through the contents can be awkward. 11 11 Display Settings 11.1 Point Features A choice of symbols are available in Survey Designer. The symbol size can be altered and if necessary an annotation label can be placed above the point. The default colour is black, no other choice is available. 11.2 Line Features Line colour and width can be specified. 12 11.3 Area Features Line colour and width for area features can be selected in the same way as line features. There are no fill colour options available. 12 Importing PocketGIS Connection Schemes For users of PocketGIS Connection, Survey Designer includes a facility for importing PocketGIS Connection translation schemes (TSP files). A TSP file can be imported into Survey Designer from the File menu, Import TSP. Survey Designer will import all of the features and settings as shown in the left and centre panel. It is important to note that attribute codes and lookup table codes are not available and not imported into Survey Designer. This feature is designed to import a single PocketGIS feature and its associated attributes, settings and tables. Translation schemes created for existing geographical data cannot be imported into Survey Designer. PocketGIS Maps created by PocketGIS Connection or Survey Designer/PT-Mapper can both be used on the same PocketGIS device simultaneously as long as they have unique names and matching PocketGIS units. To import a PocketGIS Survey: 1. 2. 3. 4. 5. Open a new survey. File menu, New survey. Import the PocketGIS scheme TSP file. File menu, Import TSP. Select the PocketGIS Connection scheme file and click on Open. Check the settings in Survey Designer. Save the Survey. Next time PT-Mapper Pro is opened the new survey will appear in the list in the PocketGIS panel. 13 Worked Examples 13.1 Simple Example In many cases of data capture it will only be necessary to record the location and a unique reference number of a feature. This example explains how a series of lamp posts can be plotted: 1. 2. 3. 4. 5. 6. Open Survey Designer, a new blank survey will appear. In the Survey Title box enter the name “Lamp Post Survey”. A lamp post will be plotted as a point feature. Check that the capture type is set to point. Select a symbol that you want to represent the lamp post when it is plotted in PocketGIS. The only item that will be recorded against a lamp post is a reference number. Click on the Add Item button and enter the name “Reference Number”. The Item type will automatically be set to Text and the item will have no properties set other than being visible. In PocketGIS this will create a one line text box where a string of numbers or letters can be entered. 13 7. 8. It is often useful to display the reference number against the point in PocketGIS. To enable this check the Annotation box. The final step is to save the survey. Go to the file menu and click on the Save survey. Make sure that the file is saved in the following location: Windows 7 and Vista C:\Users\<USER>\Documents\Pear Technology\PTMapper\Surveys Windows XP C:\Documents and Settings\<USER>\My Documents\Pear Technology\PTMapper\Surveys Survey Designer settings: This is how the survey will appear in PocketGIS: 14 Once the data is uploaded to Excel, this is how it will appear This is how the CSV file will appear when uploaded from PocketGIS. This information can be added to a map using the CSV import in PT-Mapper Professional. 15 13.2 Advanced Example The purpose of this example is to demonstrate a wider range of features available in Survey Designer. In this example a basic tree survey will be created, the following items will be included: Survey Item Name Item Type Page 1 – Tree Survey Tree ID Tree Type Height Stake Present Page 2 – Recommendations/Comments Recommendations Section Header Text Table Decimal Logical Section Header Comments Date Text Date 1. 2. 3. 4. 5. 6. 7. 8. 9. 10. 11. 12. 13. 14. Table Item Settings, Properties and Tables Mandatory, annotation Category lookup table Checklist (multi-select) 5 lines 5 lines Auto-set On Open Survey Designer, a new blank survey will appear. In the Survey Title box enter the name “Tree Survey”. A tree will be plotted as a point feature. Check that the capture type is set to point. Select a symbol that you want to represent the tree when it is plotted in PocketGIS. Add the first survey item, in this case will be a header. Click on the Add Item button, enter the name “Tree Survey” and set the item type to Header. Add the tree ID. Add a new item, call it “Tree ID”, set the item type to Text. Check the mandatory and annotation items in the item properties box. Add a new item called “Tree Type” and set it to be a table. There are so many types of tree that it is not advisable to create a single list. It is far better to categorise the trees by type/genera. Create a new categorised table, call it “Tree Type” and begin by entering the categories (e.g. Alder, Apple, Beech, Birch, Cedar…). Now click on each category and enter the common name for each tree (e.g. Common Alder, Green Alder, Grey Alder…). Se the lookup table to tree type. Add a new item called “Height” and set the item type to decimal. This will allow numbers to be recorded (e.g. 8.10) but now allow any other characters to be entered. Add a new item called “Stake present” and set the item type to logical. A text box could be used for this although it is far simpler to add a row of radio buttons that requires one tap to enter a value. It’s time to create a second page for the data capture. Add a new survey item called “Recommendations/Comments” and set the item type to Section Header. During a tree survey it might be necessary to recommend works that need to be carried out to the tree. Add a new item, call it “Recommendations” and set the type to table. Add a table and call it “Recommendations”. Create a list of work items (e.g. Cable brace, Coppice, End weight reduction…). Set the lookup table for this item to recommendations. Because it may be necessary to specify 2 or more items check the checklist box as well. So that more of the options appear on screen set the number of lines to 5. Create a comments box. Add a new item and call it “Comments”, set the item type to text and set the number of lines to 5. It’s always useful to include the date a survey is carried out, this can be done automatically. Add a new item and call it “Date”, set the item type to date. In the Auto-set section check the box for automatically enter a value for new features. The final step is to save the survey. Go to the file menu and click on the Save survey. Make sure that the file is saved in the following location: 16 Windows 7 and Vista C:\Users\<USER>\Documents\Pear Technology\PTMapper\Surveys Windows XP C:\Documents and Settings\<USER>\My Documents\Pear Technology\PTMapper\Surveys This is how the survey should appear in Survey Designer: This is how the survey will appear in PocketGIS: 17 This is how the survey will appear in Excel: 18