1
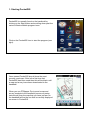
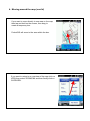
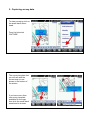
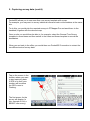
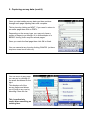
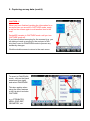
POCKETGIS USER GUIDE
1.Starting PocketGIS
2. Viewing and changing the survey map
3. Starting and stopping the GPS
4. Moving around the map
5. Capturing survey data
6. Modifying survey data
7. Moving surveyed items
8. Deleting surveyed items
9. Finding surveyed items on the map
10. Adding or modifying multiple survey items
11. Measuring distances
12. Finding a Grid Reference
13. Identifying map detail
14. Resurveys
15. Where’s my survey?
1. Starting PocketGIS
PocketGIS is normally found on the handheld by
clicking on the Start button and scrolling down past the
various Window Mobile program icons.
Click on the PocketGIS icon to start the program (see
right).
Once started PocketGIS should show the most
recently used map. If this is the first time that
PocketGIS has been used then this will be blank until
a map and survey have been downloaded to the
handheld.
When you use PTMapper Pro to send a map and
survey template to the handheld (see survey setup
instructions) then the map that you have just sent to
the handheld will be the one that is currently displayed
on screen in PocketGIS.
2. Viewing and changing the survey map
PocketGIS maintains a list
of previous maps that have
been downloaded to the
handheld.
These can be found by
clicking on VIEW, then
SELECT and clicking on
the required survey map.
The dot next to one of the
maps indicates the
current map on screen.
3. Starting and stopping the GPS
To use GPS to accurately
survey you must first
connect PocketGIS to the
handheld’s GPS hardware.
To do this click on TOOLS
then GPS RECEIVER.
NOTE: To survey a site
using GPS your map must
be geo-referenced (i.e. it
has real world location
and scaling).
3. Starting and stopping the GPS (cont’d)
Click on CONNECT.
NOTE: If your device was supplied by Pear Technology
then the OPTIONS section has been preconfigured
by us and should not normally require any changes.
The details shown in the CONNECT VIA box vary
depending on setup and may be different for your handheld.
If your map is not geo-referenced then you can still
do the survey but do not connect to the GPS
Receiver.
“No GPS Input” will appear briefly and then it will
immediately change to “No GPS Position”.
If it remains on “No GPS Input” then PocketGIS is not
connecting to the handheld’s GPS hardware.
This usually indicates that either another program is
already using the GPS or there is an incorrect setting in
PocketGIS.
If powering off the device and restarting doesn’t
correct this then call the Pear Technology technical
support line.
3. Starting and stopping the GPS (cont’d)
After a few minutes the GPS will start to receive satellite
signals and this will be displayed on screen in a box in the
bottom left hand corner - see right.
(For a full explanation of these figures see the box below).
PocketGIS will also display a constantly flashing GPS
cursor on the map. This is your position based on the
number and accuracy of the satellite signals received.
Initially the cursor may move around the screen but it
should soon settle in one position and you are then ready
to start surveying.
Once the GPS is connected and satellite signals are being received, there are three bits
of information displayed on screen:
1. The grid co-ordinates of the GPS cursor - these are the Ordnance Survey Eastings
(1st line) and Northings (2nd line).
2. The number of Satellites in view (3rd line) – generally speaking, the more satellites
available the better the accuracy. 8+ is ideal, 5-8 is good, under 4 is poor (but see
HDOP below).
3. HDOP (4th line) - This is the overall level of expected accuracy based on the geometry
of the satellites in view (i.e. their positions relative to you) - the lower the HDOP figure
the better. 1 or under is ideal, 1-2 is good, 2-3 is OK, 3+ poor.
Example 1: You have 9 satellites in view but your HDOP is 5 - it is likely that all or most of
the satellites are in one section of the sky (e.g. to your north).
Example 2: You have 5 satellites in view and your HDOP is 1.5 - it is likely that all or most
of your satellites are evenly spread around you.
If nothing changes then Example 2’s survey data should be more accurate.
3. Starting and stopping the GPS (cont’d)
Normally, if you are surveying all day then it’s better to
leave the GPS connected but if you are finished for
the day, or if the battery is getting low, then it’s best to
disconnect.
To disconnect from the GPS click on TOOLS then
GPS RECEIVER and then DISCONNECT.
NOTE: Powering off the handheld will also disconnect
the GPS but putting it into Sleep mode will leave it
connected and so will continue to drain the battery.
4. Moving around the map
PocketGIS has six buttons on the bottom tool bar
which allow you to move around the map:
Zoom into the map
Pan in one of four directions using the 4 arrows
Zoom out of the map
If you tap on any part of the map then PocketGIS
will centre the view on that point.
If you want to pan the map view slightly in any
direction then tap on the screen half way between
the centre of the screen and the edge of the
screen, in the direction required.
4. Moving around the map (cont’d)
If you want to zoom directly to one area on the map
then tap and hold on the screen, then drag to
create a temporary box.
PocketGIS will zoom to the area within the box.
If you want to return to an overview of the map click on
VIEW then select ZOOM/PAN and then finally click on
OVERVIEW.
5. Capturing survey data
To start surveying click on
the small black arrowhead.
From the list select
CAPTURE.
The survey template that
you will use with the
current map is now
shown at the bottom of
the screen.
If you have more than
one survey template
available for the map
then click the small black
arrowhead to choose.
5. Capturing survey data (cont’d)
PocketGIS allows you to use more than one survey template with a map.
For example, you may want to survey individual trees and mark out boundaries at the same
site.
To do this, you would pick the required surveys in PTMapper Pro and send them to the
handheld, together with the relevant map.
Once on site you would then be able to, for example, select the General Tree Survey
template to record trees and then switch to the Lines and Areas template to record the
boundaries.
When you are back in the office you would then use PocketGIS Connection to extract the
two different sets of survey data.
Tap on the screen in the
location where you want
to start capturing data.
If GPS is on then your
location will be where
the GPS cursor is
Flashing.
The first screen for the
survey will display (in
this example it’s for a
BS5837 tree survey).
5. Capturing survey data (cont’d)
Once you start adding survey data you then continue
through each page inputting data until complete.
This is done by clicking on NEXT. If you need to return to
an earlier page then click on PREV.
Depending on the survey type, you may only have a
couple of pages to go through or (in this example of a
BS5837 survey) there may be several pages.
Once you reach the final page then click OK to finish.
You can cancel at any time by clicking CANCEL (or there
may be a cross box to click on).
You can move to any page
on a survey by clicking on
the small arrowhead on the
right.
This displays all of the
survey pages and allows
you to jump to any one by
selecting it from the list.
This is particularly
useful when amending an
existing item.
5. Capturing survey data (cont’d)
CAUTION..!!
When you have finished inputting the information for a
surveyed item you are still in CAPTURE mode, ready
to tap on the screen again to add another item to the
map.
PocketGIS remains in CAPTURE mode until you turn
CAPTURE mode off.
If you have finished surveying for the moment (e.g. you
are taking a break or moving to the next part of the
site) then revert to PAN/ZOOM mode to prevent any
accidently changes.
Click the double arrows to return to the main menu.
To revert to PAN/ZOOM
mode - click on the black
arrowhead (see right)
and select PAN/ZOOM.
This also applies when
using the other features
in the list which includes
CAPTURE:
e.g. ATTRIBUTES,
AREA, GRID REF,
GEOMETRY, etc.
6. Modifying survey data
To amend existing survey
data (e.g. If you have made
a mistake or if you are resurveying a site) then click
on ATTRIBUTES then click
on the item on the map to
be amended.
Use the option to go directly
to the relevant pages in the
survey to make your
amendments.
Don’t forget to revert to
PAN/ZOOM once finished.
7. Moving surveyed items
To move a surveyed item
select GEOMETRY.
Click on the item to be moved
and click on it’s new location
on the map.
Click on the “Sergeants
Stripes” button to complete
the relocation.
When you have finished
moving the item remember
to revert to PAN/ZOOM in
the main menu.
If you didn’t click on the
“Sergeants Stripes” button
to finish the move then
reverting to PAN/ZOOM
Will display the prompt on
the right.
This also gives you the
option to cancel the item
move.
8. Deleting surveyed items
To delete a survey item
select GEOMETRY.
Click on the item to delete
and then click on the black
arrowhead (see right).
From the list click on
DELETE FEATURE.
Remember to revert back
to PAN/ZOOM.
9. Finding surveyed items on the map
To search for an item on
the map that has been
previously surveyed first
click on the black arrowhead on the right.
From the list click on
FIND BY ATTRIBUTE.
9. Finding surveyed items on the map (cont’d)
Click on the ATTRIBUTE
dropdown for a list of all
the recorded attributes of
ALL the surveyed items.
The example shown is to
search for Tree ID - T3.
Type the specific value to
search (e.g. the Tree ID
number) in the VALUE
field, or leave blank to
see all Tree ID numbers.
Click FIND.
The example above was to
find Tree ID T3 and this was
found and is now shown.
If you left the VALUE field
blank then all available
Tree ID’s are listed (see far
right).
9. Finding surveyed items on the map (cont’d)
Either click on the single item that you searched for (e.g.
T3) or, if you left the VALUE field blank, click on an item
from the available list.
The options now available are:
ATTRIBUTES - edit the attributes for the selected item
GEOM & GO - takes you to the location of the item to then
relocate it.
GEOMETRY - move the selected item to the area of the
map currently on screen (unlike GEOM & GO this option
does not take you to the location of the item).
GO TO - just takes you to the item’s location and then
IDENTIFIES it. This will display text indicating the survey
that it belongs to.
10. Adding or modifying multiple survey items
If you have a number of items to survey which have identical or mostly similar features
then PocketGIS has an option to make this a bit easier.
Initially you must create the items individually on the map using CAPTURE. For each item
created only enter the bare minimum e.g. Tree ID. For the example on the next page
three trees have been created - T3, T4 and T5.
Once you have created the required items then switch to PAN/ZOOM to deselect the final
newly created item. Make sure that all of the newly created items are showing on screen
and then select ATTRIBUTES mode.
10. Adding or modifying multiple survey items (cont’d)
Click on ATTRIBUTES
and the bottom menu will
change to allow multi
editing.
NOTE: Multi edit is only
available if you don’t
have anything selected,
so make sure that you
switch to PAN/ZOOM
mode before doing this.
Click on the multi select
button (right) and then
click on the first item.
Continue to click on further items to add to the
selection.
Once you have selected
all of the items to be edited click on the Proceed
button shown on the far
right.
In the example shown
T3, T4 and T5 have all
been selected.
10. Adding or modifying multiple survey items (cont’d).
Before you click to proceed,
if you have selected too
many items then clicking on
the second button (shown
right) will cancel each item
in reverse order.
Once you click to proceed
the normal survey data input pages will be displayed.
Each page of the survey
that you edit is now being
done for ALL of the items
previously selected.
Once you have clicked
OK to complete your input of survey data click
on the third button (right)
to finish the multiple edit.
NOTE: also remember to
click on the Multi Select
button again (first button)
to switch off Multi Edit.
NOTE:
Multi edit can also be
used with previously
surveyed items.
11. Measuring distances
PocketGIS has an option
to measuring a distance
between two points on a
map.
Select DISTANCE, then
click on a point on screen.
Click on a second point
and the distance is shown.
The units displayed can be
changed under POCKETGIS, OPTIONS and then
DISPLAY UNITS.
12. Finding a Grid Reference
If you need to find the
Ordnance Survey grid
reference for a point on a
map then select GRID
REFERENCE.
Where ever you tap on the
map the grid reference
(shown as Eastings and
Northings) will be displayed.
NOTE:
Your map must be georeferenced.
13. Identifying map detail
The IDENTIFY option lets
you identify details of any
background map items.
Select IDENTIFY and click
on the relevant map detail.
The AREA function lets you
find out the area of any
background map detail.
Both of these functions
work best if your background map is made up of
layers of map detail.
14. Resurveys
To conduct a resurvey of a site you must have the previous survey data available in
PocketGIS. This may be found by selecting VIEW, SELECT and then scrolling through
the list of surveys.
If the survey is not shown in the list then check to see if the data is still listed under
TOOLS and then MAP MANAGER. If the data is listed there then you may need to
re-create the VIEW so that the map and survey data can be displayed again on screen.
If this is the case then read the section “Where’s my survey?” to recreate the map
and survey data.
Alternatively, it may be stored on a micro SD card previously installed in the handheld
and used when creating surveys with PocketGIS. If this is the case then inserting it into
the handheld will allow you to re-use the survey data.
All surveys created in PocketGIS are saved in a folder called PocketGIS Database,
which is normally saved on a micro SD card installed in the handheld.
We recommend buying additional Micro SD cards (we normally fit 4 GB cards) and
periodically replacing the cards. Keep the removed cards in a safe place so that you can
replace them in the handheld and return to any previously conducted surveys.
Keeping copies of each removed cards PocketGIS Database folder on your PC is also
recommended.as an additional backup method.
15. Where’s my survey?
PocketGIS has a limit on the number of VIEW’s that it can display. Each VIEW is the
combination of the survey template(s) and the background map. Once it passes 50
VIEWS then PocketGIS will remove the most recent VIEW from the list to make room for
the latest one added.
The survey data and background map from the previous surveys which have been removed from the VIEW’s list will still exist and can be found by clicking on TOOLS and
then MAP MANAGER.
If you wish to return to a previous survey (e.g. To resurvey the site or to re-import the
data into PTMapper Pro or Treeminder) then you will need to recreate the VIEW.
To recreate a VIEW, first
go into MAP MANAGER
and take note of the
name of the old survey.
In this example we will
recreate the BS5837
survey previously
conducted on the
“Broadmarsh” map.
15. Where’s my survey? (cont’d)
Click on VIEW and NEW.
On the NEW VIEW screen
(shown right) type in the
name of the old survey.
Click on LOCATION and
select SD CARD. Then click
on the ADD button.
On the ADD VIEW LAYER
screen (shown far right) click
on MAP and select the map
layer (shorter name).
Click ADD LAYER.
Again click on MAP and
select the survey layer
(longer name).
Click ADD LAYER.
Repeat the above if there
was more than one type of
survey done on the map.
Once you have added all
layers click OK. You will be
returned to the map
window, now displaying the
recreated map and survey.