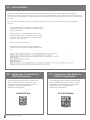
1
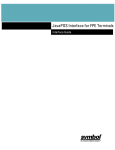
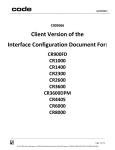
USER MANUAL
NORTH AMERICA, EMEA, APAC
Products Supported: CR900FD, CR1000,
CR1400, CR5000, CR6000, CR8000 (Limited
Support for CR2300, CR2600, and CR3600)
CORTEXJPOS
MANUAL VERSION 01
RELEASE DATE: SEPTEMBER 2015
www.codecorp.com
YouTube.com/codecorporation
®
™
CortexJPOS™ User Manual
Copyright © 2015 Code Corporation.
All Rights Reserved.
The software described in this manual may only be used in accordance with the terms of its license agreement.
No part of this publication may be reproduced in any form or by any means without written permission from Code Corporation. This includes
electronic or mechanical means such as photocopying or recording in information storage and retrieval systems.
NO WARRANTY. This technical documentation is provided AS-IS. Further, the documentation does not represent a commitment on the part
of Code Corporation. Code Corporation does not warrant that it is accurate, complete or error free. Any use of the technical documentation
is at the risk of the user. Code Corporation reserves the right to make changes in specifications and other information contained in this
document without prior notice, and the reader should in all cases consult Code Corporation to determine whether any such changes
have been made. Code Corporation shall not be liable for technical or editorial errors or omissions contained herein; nor for incidental or
consequential damages resulting from the furnishing, performance, or use of this material. Code Corporation does not assume any product
liability arising out of or in connection with the application or use of any product or application described herein.
NO LICENSE. No license is granted, either by implication, estoppel, or otherwise under any intellectual property rights of Code Corporation.
Any use of hardware, software and/or technology of Code Corporation is governed by its own agreement.
The following are trademarks or registered trademarks of Code Corporation:
CodeXML®, Maker, QuickMaker, CodeXML® Maker, CodeXML® Maker Pro, CodeXML® Router, CodeXML® Client SDK, CodeXML® Filter,
HyperPage, CodeTrack, GoCard, GoWeb, ShortCode, GoCode®, Code Router, QuickConnect Codes, Rule Runner®, Cortex®, CortexRM,
CortexMobile, Code®, Code Reader, CortexAG, CortexStudio, CortexTools®, Affinity®, and CortexDecoder®.
All other product names mentioned in this manual may be trademarks of their respective companies and are hereby acknowledged.
The software and/or products of Code Corporation include inventions that are patented or that are the subject of patents pending. A complete
list of pantents are available at www.codecorp.com/legal/patents.php.
The Code Reader software uses the Mozilla SpiderMonkey JavaScript engine, which is distributed under the terms of the Mozilla Public
Code
5000 User Manual
LicenseReader™
Version 1.1.
The Code Reader software is based in part on the work of the Independent JPEG Group.
Code Corporation, 12393 S. Gateway Park Place, Ste. 600, Draper, Utah 84020 USA
www.codecorp.com
D008733_01 CortexJPOS User Manual
2
Table of Contents
1.0 - Introduction.......................................................................................................4
2.0 - Hardware Requirements......................................................................................4
3.0 - Software Requirements.......................................................................................4
4.0 - Windows Installation...........................................................................................5
5.0 - Linux Installation................................................................................................6
6.0 - Configuring a Code Reader for USB Communication...............................................6
7.0 - Configuring a Code Reader for RS232 Communication...........................................6
8.0 - JPOS XML File for USB Devices on Windows or Linux.............................................7
9.0 - JPOS XML File for USB Devices on Windows or Linux.............................................8
10.0 - JPOS XML File for RS232 Devices on Windows....................................................9
11.0 - JPOS XML File for RS232 Devices on Linux........................................................9
12.0 - POSTest for Windowss.....................................................................................10
13.0 - POSTest for Linux...........................................................................................11
D008733_01 CortexJPOS User Manual
3
1.0 - Introduction
The CortexJPOS™ driver allows Code barcode readers to communicate with Windows and Linux PC applications that use the JPOS standard to
communicate to peripherals.
The CortexJPOS™ driver supports USB and RS232 connections between the reader and the host computer.
This manual will cover the steps necessary to configure the Code reader for JPOS operation and to install the CortexJPOS™ service object. It
will also provide guidelines for configuring your JPOS application to use the CortexJPOS™ service object and Code readers, using POSTest as an
example.
2.0 - Hardware Requirements
Component
Requirements
Computer
PC/AT compatible.
Hard Disk
In addition to the capacity recommended for the OS, the hard disk must have at least 10 MB space available.
Memory
A minimum of 94 MB of memory is required, and an additional 256 MB is recommended.
3.0 - Software Requirements
Component
Requirements
Operating System
Windows XP (SP2), Windows 7, Windows 8, Windows 10, or Linux
Java Runtime Engine
JRE 1.6 or above
D008733_01 CortexJPOS User Manual
4
4.0 - Windows Installation
There are two installers depending on the Java Runtime Environment (JRE) being used: one for 32-bit environments, and one for 64-bit
environments. The “x86” installer should be used if the JRE is the 32-bit runtime environment, and the “x86-64” installer should be used if the
JRE is the 64-bit runtime environment. If using a 64-bit version of the operating system, but a 32-bit version of the JRE, use the “x86” version of
the installer.
1.
Download the appropriate installer for your JRE from www.
codecorp.com/downloads.php.
2.
Run the executable (e.g. CortexJPOSSetup-05.00.00-Windows_
x86.exe) and press “Next” when the screen below opens.
3.
4.
Choose the “Typical” option and select “Next”.
5.
Select “Install”, then “Finish” to complete installation.
Accept the Terms & Conditions and select Next.
D008733_01 CortexJPOS User Manual
5
5.0 - Linux Installation
There are two installers depending on the Java Runtime Environment (JRE) being used: one for 32-bit environments, and one for 64-bit
environments. The “x86” installer should be used if the JRE is the 32-bit runtime environment, and the “x86-64” installer should be used if the
JRE is the 64-bit runtime environment. If using a 64-bit version of the operating system, but a 32-bit version of the JRE, use the “x86” version of
the installer.
The Linux version of the CortexJPOS™ installer is provided as a gzipped tar file. To unzip and install CortexJPOS™, perform the following
commands:
1.
Enter the command “tar xzf <INSTALLER_FILENAME>” where
<INSTALLER_FILENAME> is the name of the .tar.gz file that you
received or downloaded.
2.
Enter the command “cd <INSTALLER_DIRECTORY>” where
<INSTALLER_DIRECTORY> is the directory that was created by
the previous step, and has the same name as the installer, but
without the “.tar.gz” at the end.
3.
Enter the command “sudo ./install.sh”
4.
CortexJPOS™ will be installed in the /usr/local/CortexJPOS
directory, with the binary library (libCodeUtil.so) stored in /usr/
lib/
6.0 - Configuring a Code Reader for
USB Communication
7.0 - Configuring a Code Reader for
RS232 Communication
Scan the following barcode to configure the reader for JPOS
mode using USB communication. To restore the original
configuration, scan the “Reset to USB Factory Defaults”
barcode from the online configuration guide at
www.codecorp.com/ConfigGuide/.
Scan the following barcode to configure the reader for JPOS
mode using RS232 communication. To restore the original
configuration, scan the “Reset to RS232 Factory Defaults”
barcode from the online configuration guide at
www.codecorp.com/ConfigGuide/.
USB OPOS/JPOS Mode
D008733_01 CortexJPOS User Manual
RS232 OPOS/JPOS Mode
6
8.0 - Integrating CortexJPOS into the JPOS environment using POSTest as an example
POSTest is an open-source Java application that may be used to test the basic functionality of the CortexJPOS driver. The following sections will
use POSTest as an example JPOS application, and show how to configure the application to use the CortexJPOS service object and Code barcode
readers.
First, download the POSTest binary application from http://postest.sourceforge.net/. Unzip the downloaded zip file.
The next step is to modify the jpos.xml file, to add an entry for Code barcode readers. The entry to add depends on the interface of the reader
(USB or RS232) and, in the case of RS232, the operating system. The appropriate entries can be found in the sections below:
Section 9 – JPOS XML File for USB Devices on Windows or Linux
Section 10 – JPOS XML File for RS232 Devices on Windows
Section 11 – JPOS XML File for RS232 Devices on Linux
Copy and paste these entries in to the jpos.xml file in the POSTest directory.
9.0 - JPOS XML File for USB Devices on Windows or Linux
The entry below should be placed in the JPOS XML file for your particular application. This entry will pick up any USB-JPOS-configured Code
reader.
<JposEntry logicalName="Code Barcode Reader">
<creation
factoryClass="com.codecorp.pos.jpos.service.CCJposServiceInstanceFactory"
serviceClass="com.codecorp.pos.jpos.service.DeviceService"/>
<vendor name="Code Corporation" url="http://www.codecorp.com"/>
<jpos category="Scanner" version="1.13"/>
<product description="Barcode Reader JavaPOS Service" name="Barcode
Reader JavaPOS Service" url="http://www.codecorp.com"/>
<!--Other non JavaPOS required property (mostly vendor properties and
bus specific properties)-->
<prop name="Type" type="String" value="Hid_Native"/>
<prop name="deviceBus" type="String" value="USB"/>
<prop name="Maxpacket" type="String" value="21"/>
<prop name="DeviceModal" type="String" value=""/>
<prop name="Path" type="String" value="None"/>
</JposEntry>
D008733_01 CortexJPOS User Manual
7
10.0 - JPOS XML File for RS232 Devices on Windows
The entry below should be placed in the JPOS XML file for your particular application. This particular entry will pick up any RS-232-JPOSconfigured Code reader on COM1. If you are connected to a different serial port, change the value of the “Path” property to match the serial port
that the device is connected on.
<JposEntry logicalName="Code Serial Barcode Reader">
<creation
factoryClass="com.codecorp.pos.jpos.service.CCJposServiceInstanceFactory"
serviceClass="com.codecorp.pos.jpos.service.DeviceService"/>
<vendor name="Code Corporation" url="http://www.codecorp.com"/>
<jpos category="Scanner" version="1.13"/>
<product description="Barcode Reader JavaPOS Service" name="Barcode
Reader JavaPOS Service" url="http://www.codecorp.com"/>
<!--Other non JavaPOS required property (mostly vendor properties and
bus specific properties)-->
<prop name="Type" type="String" value="Serial_Port"/>
<prop name="deviceBus" type="String" value="Serial"/>
<prop name="Maxpacket" type="String" value="null"/>
<prop name="DeviceModal" type="String" value=""/>
<prop name="Path" type="String" value="COM1"/>
<prop name="BitsPerSecond" type="String" value="115200"/>
</JposEntry>
D008733_01 CortexJPOS User Manual
8
11.0 - JPOS XML File for RS232 Devices on Linux
The entry below should be placed in the JPOS XML file for your particular application. This particular entry will pick up any RS232-JPOSconfigured Code reader on /dev/ttyS0. If you are connected to a different serial port, change the value of the “Path” property to match the serial
port that the device is connected on.
Note: Make sure that the serial port that you are using (such as /dev/ttyS0) has adequate file permissions, so that the JPOS application can open
it. If the JPOS application fails to claim the device, confirm that you have specified the correct port in the “Path” property of the JPOS XML
entry, and that the serial port has read and write permissions enabled for non-root users.
<JposEntry logicalName="Code Serial Barcode Reader">
<creation
factoryClass="com.codecorp.pos.jpos.service.CCJposServiceInstanceFactory"
serviceClass="com.codecorp.pos.jpos.service.DeviceService"/>
<vendor name="Code Corporation" url="http://www.codecorp.com"/>
<jpos category="Scanner" version="1.13"/>
<product description="Barcode Reader JavaPOS Service" name="Barcode
Reader JavaPOS Service" url="http://www.codecorp.com"/>
<!--Other non JavaPOS required property (mostly vendor properties and
bus specific properties)-->
<prop name="Type" type="String" value="Serial_Port"/>
<prop name="deviceBus" type="String" value="Serial"/>
<prop name="Maxpacket" type="String" value="null"/>
<prop name="DeviceModal" type="String" value=""/>
<prop name="Path" type="String" value="/dev/ttyS0"/>
<prop name="BitsPerSecond" type="String" value="115200"/>
</JposEntry>
D008733_01 CortexJPOS User Manual
9
12.0 - POSTest for Windows
After following the common steps above, perform the steps below to set up POSTest on Windows.
•
Copy the following files from the CortexJPOS™ installation directory (such as C:\Program Files (x86)\CortexJPOS) to the POSTest directory:
- CortexJPOSApplications.jar
- CodeUtil.dll
- hidapi.dll
• In the POSTest directory, add the following line to the POSTest.bat batch file:
- set classpath=%classpath%;CortexJPOSApplications.jar
•
Open the POSTest program by double clicking “POSTest.bat”.
•
Click the “Configured Devices” tab to see the devices that have been setup to work with the program. The Code reader (“Code
Barcode Reader” by default) should appear on the list.
•
Click the “Scanner” tab. In the “Logical name” box, type the name of your configured reader (“Code Barcode Reader” by default).
•
Press “Open”. The state to the right of the “Logical name” box will change to JPOS_S_IDLE.
•
Press “Claim”.
•
Check the “Device enabled” and “Data event enabled” boxes.
•
Read a barcode with your connected reader. It should appear in the “Scan Data” box. Check the “Decode data” box to see the
parsed data from the barcode reader.
Note: after each decode, the “Data event enabled” box must be rechecked to enable data to appear.
D008733_01 CortexJPOS User Manual
10
13.0 - POSTest for Linux
After following the common steps above, perform the steps below to set up POSTest on Linux.
• Copy the file “CortexJPOSApplications.jar” from the CortexJPOS™ installation directory
(/usr/local/CortexJPOS) to the POSTest directory.
• In the POSTest directory, add the following line to the POSTest.sh batch file:
- CLASSPATH=$CLASSPATH:CortexJPOSApplications.jar
•
Open the POSTest program by running the POSTest.sh file from its directory using a terminal program.
•
Click the “Configured Devices” tab to see the devices that have been setup to work with the program. The Code
reader (“Code Barcode Reader” by default) should appear on the list.
•
Click the “Scanner” tab. In the “Logical name” box, type the name of your configured reader (“Code Barcode
Reader” by default).
•
Press “Open”. The state to the right of the “Logical name” box will change to JPOS_S_IDLE.
•
Press “Claim”.
•
Check the “Device enabled” and “Data event enabled” boxes.
•
Read a barcode with your connected reader. It should appear in the “Scan Data” box. Check the “Decode data” box
to see the parsed data from the barcode reader.
Note: after each decode, the “Data event enabled” boxke must be rechecked to enable data to appear.
D008733_01 CortexJPOS User Manual
11