1
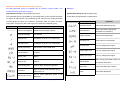
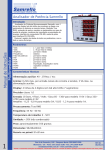
SANUP ELECTRIC CO., LTD.
Vol. 04E
Universal Process Controller
SDM Series User Manual
Thank you very much for selecting Sanup temperature controller.
For your safety, please read the following before using.
Address
Factory
&
Head
Office: 240-42,
Euijeongbu
Euijeongbu si, Kyoungkido, Korea
Tel: +82-31-876-4641~3 & / Fax: +82-31-876-4640
http://www.sanup.com
2-dong,
SDM Universal Temperature & Process Controller
CONTENTS
5. Operation
[1] Operation Procedure
[2] Auto-Tuning
1. Feature
[3] ON-OFF Control
[4] Fuzzy Control
2. Installation
[5] Alarm Operation
[1] Installation Guidelines
[6] Heating – Refrigeration Control
[2] Installation Procedure
[7] Ramp Output Heating
[8] Loop Break Alarm
3. Wiring Diagram
[1] Power
[9] Using the Second Set Value
[10] Miscellaneous
[2] Input Connection
[3] Output Connection
6. Set Value Program Control
[4] Alarm Output
[1] Set Value Program Procedure
[5] Retransmission Output
[2] The End of the Operation
[6] Digital Input
[3] Temporary Hold of the Set Value During Operation(Hold)
[4] Process Value Wait Function
4. Controller
[5] Repeat After a Power Failure
[1] Front Description
[2] Changing Parameters
7. Specification
[3] Parameter Groups
[1] Input
[4] Parameter Group 1 (Tuning Parameter Group)
[2] Output
[5] Parameter Group 2 (Input/Output Group)
[3] Control Mode
[6] Parameter Group 3 (Alarm and Retransmission Output Parameter Group)
[4] Optional and Others
[7] Parameter Group 4 (Control Parameter Group)
[8] Parameter Group 5 (Setting Value Program Control Group)
[9] Parameter Group 6 (Communication Group)
SDM Universal Temperature & Process Controller
• It may cause fire or trouble.
CAUTION FOR YOUR SAFETY
4. Do not turn on the power until the wiring completed.
• It may cause electric shock.
5. Do not repair, wiring or checkup when electric power on.
z
controller.
z
• It may cause electric shock.
Please keep these instructions and review before using this
6. Installation the controller where there is no dust, corrosive or explosive gas,
direct ray of the sun, mechanical vibration or shock present.
This instruction manual uses WARNING and CAUTION as signal
• It may cause fire or explosive.
words for safety.
7. This controller must be mounted on panel.
• It may cause electric shock.
WARNING
WARNING indicates a potentially hazardous situation which,
8. Do not repair beyond of authorized technician.
• It may cause trouble.
if not avoided, will result in death or serious injury.
CAUTION
CAUTION indicates a potentially hazardous situation which, if not
CAUTION indicates a potentially hazardous situation which, if not avoided, will
avoided, will
result in minor or moderate injury and at other times will result in death or serious
result in minor or moderate injury and at other times will result in death
injury. I may also be used to alert against unsafe practice.
or serious injury. I may also be used to alert against unsafe practice.
Installation Guidelines
WARNING indicates a potentially hazardous situation which, if not avoided,
1.
will result in death or serious injury.
Ensure the surrounding ambient operating temperature is between
0~50°C (32~122°F)
• It may cause fire or wrong operation.
1. In case of using this unit with machineries (warehouse, medical equipments,
2.
Altitude over 0~2000m use.
vehicle, train, airplane, nuclear power or safety device etc.), it requires
3.
Ensure the power supply for the controller does not fluctuate greatly. Main
supply voltage fluctuations not exceed ±10% of the normal voltage.
installing fail-safe device.
• It may cause fire.
• It may result in serious damage, fire or human injury.
2. Use a rated voltage to prevent damage or trouble.
• It may result in fire.
3. Check the number of terminal when connect each line and signal input.
4.
Install the controller where there is no dust, corrosive or explosive gas
present.
• It may cause fire.
SDM Universal Temperature & Process Controller
5. Install the controller where there is no risk of mechanical vibration or shock.
1. Feature
• It might shorten the life cycle of the product or give an electric
shock.
6.
This controller shall not be used outdoors.
▷Programmable Ramp Sock Control
• It might shorten the life cycle of the product or give an electric
▷Universal Input
shock.
7.
When control signal wire connection, #20AWG (0.5mm2) should be used
and screw blot on terminal block with 0.74N.m strength.
8.
▷2 Point Alarm Contact
controller and connection wires (esp. compensation conductors and RTD
▷Control Output Limit
lead wires) should be kept approximately 30cm(12”) away from high
▷Delay Timer
current or voltage circuits to limit the possible affect of noise.
▷RS 485 Communication MODBUS ASCII Protocol.
Do not use a place where temperature fluctuates or icing occurs.
In cleaning the controller, do not use water or an oil-based detergent.
the product.
Do not inflow dust or dregs into inside of this controller.
• It may cause fire or trouble.
12.
▷Heating/Cooling Control
Keep the controller away from high current and voltage circuits. The
• It might cause an electric shock or fire that will result in damage to
11.
▷Universal Power (100~240V ac, 50/60Hz)
▷Retransmission Output 4~20mA dc
• It may cause fire, explosive or error.
10.
▷Universal Control Output
• It may result in malfunction or error.
• It may cause display fluctuation or error.
9.
▷Fuzzy Logic
Check the number of terminal when connect signal input line.
• It may cause fire or trouble.
13.
Installation category II
14.
Pollution degree 2
SDM Universal Temperature & Process Controller
3. Wiring Diagram
2. Installation
a. Make a 91X91mm (or each size according to panel cut size) panel cutout.
When installing more than two controllers parallel to each other, keep distance
between the panel cuts to allow room for the bezel of the controller (refer to
drawing).
b. Insert the controller into the panel cut.
c. Insert a mounting clip into both sides of the controller and tighten the screws.
(around 14.7N.m)
SDM 9000 (9100) / SDM 9400 / SDM 4900
SDM series panel cut size
SDM 7000 (7100)
SDM Universal Temperature & Process Controller
[1] Power
Prior to applying power, ensure the supply voltage is connected to the correct
※In case of SDM7000, terminal no. is 2(-) and 3(+).
[3] Output Connections
terminals as marked on the electrical connection diagram. Connect the power
supply voltage to power terminals. If controlling a heater, prevent input surge
a. Relay Output
voltage by making sure the power supply voltage and the heater magnetic switch
drive voltage are isolated.
Note: Connect the power supply ground to terminal 11(15). If this connection is
SDM9000/4900/9400
not made, the controller could be affected by noises, causing malfunction.
※In case of SDM7000, terminal no. is 19(Com) and 18(N.O).
[2] Input Connection
a. Thermocouple Input: Connect the positive lead of the thermocouple sensor to
terminal 3 and the negative lead of the thermocouple to terminal 2.
b. 4~20mA or SSR Output
b. RTD Input: Connect lead A of the RTD sensor to terminal 4(A), and the other
two leads to terminal 3(B) and terminal 2(b).
If you require SSR output, set the header pin switch located inside the controller
on the circuit board to the SSR position.
Note: The maximum allowable resistance of the lead wire connected to the RTD
is 15Ω. Each lead wire should be the same thickness.
c. DC Voltage Input: Connect the input signal positive lead to terminal + and the
negative input signal lead to terminal -.
SDM9000/4900/9400
SDM Universal Temperature & Process Controller
4. Controller
[2] Changing Parameters
[1] Front Description
(1) Pressing the MODE key when the process value is displayed allows
various parameter groups to be seen in the process value display.
PV DISPLAY
(2)The indicated parameters can be changed by using the increase and
SV DISPLAY
Displays
Displays set value and
processing value
Parameters set.
INDICATOR LAMP
OPERATION KEYS
Data
increase
decrease,
Indicates
or
alarms,
manual control
parameter
decrease keys. Holding down these keys for more than 1.5 seconds will
change the value rapidly.
(3) After changing the value of a parameter, the right decimal point blinks,
indicating the parameter has not been accepted. By pressing Enter this
value is accepted and entered into EEPROM(nonvolatile memory). When
selection, auto-manual
the value is accepted the decimal point disappears.
and data enter
(4) Once finished changing parameter values, pressing
for more than 2
seconds returns the controller to normal operation and the process value
will be displayed. Waiting approximately 80 seconds without pressing the
Key
1
2
Operation
key will return the meter to normal operation as well.
1. parameters description
2. starting of program control
Selection of parameter
Note: Parameter groups other than group 1 have a major affect on the
operation of the controller. If possible, no changes in these parameter groups
should be made during controller operation. All changes should be made by
3
Decrement of parameter data
4
Increment of parameter data
experienced personnel.
[3] Parameter Groups
The parameters are divided into six groups. This includes group 1, the tuning
5
1. selection auto/manual control
parameter group, which is used frequently and the 5 other groups.
2. end auto-tuning
Note: Group 1(Tuning parameter group) is accessible without any restrictions,
SDM Universal Temperature & Process Controller
but other parameter group is accessible only by entering a pass number. This
displayed.
number is entered at the end of group 1.
[4] Parameter Group 1 (Tuning parameter group)
[5] Parameter Group 2 (Input/Output group)
This parameter group is accessible by connecting power to the controller and does
These define an input/output or high/low limit.
not require a pass number. This parameter group controls every tuning parameter
including target set value, PID coefficient, hysteresis, alarm set value, and auto-
Symbol
Setting Data
Operation
tuning start. This group is also used to get to the extension parameter group.
Symbol
Setting Data
Control Out Capacity
Operation
Displays control output capacity.
Proportional Band
0.5~999.8%
Integral Time
0~9998sec. If set to 0, “P” control only.
Derivative Time
Parameter Group
Input Selection
Select other parameter group
Select input sensor signal type.
(See table “Input Sensor”)
Output Selection
Select control output type.
Indicating Unit
Select Celcius or Fahrenheit.
Decimal Point
Use only voltage input signal.
Display High-Limit
Use only voltage input signal.
Display Low-Limit
Use only voltage input signal.
0~2500sec. If set to 0, “PI” control only.
On/Off Hysteresys
Set ON/OFF control dead band.
Control Period
1~60sec.
Alarm 1 Set
Alarm 1
Alarm 2 Set
Alarm 2
Manual Reset
Auto-Tuning Start
If set to “StAt”, auto-tuning will start.
Input Filter
Select input filter time 0~60sec.
Insert
Input offset adjustment.
Password
Select Para. Group
When using proportional control use to
set manual reset value.
Enter to access other parameter group.
Parameter is ‘5’.
Use to select parameter group to be
displayed.
Note: If the correct password is not entered other parameter groups will not be
SDM Universal Temperature & Process Controller
[6] Parameter Group 3 (Alarm and retransmission output parameter group)
These define alarms and a retransmission output.
<Input Sensor>
Symbol
Sensor
Set Range
℃
℉
Symbol
Setting Data
Operation
K Thermocouple
-70~1370℃
-94~2498℉
Parameter Group
Select other parameter groups.
J Thermocouple
-70~950℃
-94~1742℉
Alarm 1 Action
Select type of alarm that alarm 1 will be.
E Thermocouple
-70~750℃
-94~1382℉
Alarm 1 Hysteresys
Set alarm 1 dead band
N Thermocouple
-100~1300℃
-148~2372℉
Alarm 2 Action
Select type of alarm that alarm 2 will be.
Same as AL1 except LBA and P.END.
C Thermocouple
0~2300℃
32~4172℉
T Thermocouple
-130~400℃
-202~752℉
R Thermocouple
0~1760℃
32~3200℉
S Thermocouple
0~1760℃
32~3200℉
Retransmission Out
B Thermocouple
0~1800℃
32~3200℉
Ret-Out High Limit
Set Ret-out high limit.
Jis Pt 100Ω
-200~600℃
-328~1112℉
Ret-Out Low Limit
Set Ret-out low limit.
Din Pt 100Ω
-200~600℃
-328~1112℉
Alarm 2 Hysteresys
Set alarm 2 dead band
Loop Break Alarm
0~9998sec.
Ramp Control Output
1~5 V dc (4~20mA)
Select type of Ret-Out.
PV, SV or MV.
0~30min. 1~5V (4~20mA) control out
only.
By set limit high and low parameters.
[7] Parameter Group 4 (Control parameter group)
※In case of set to JPt1 or dPt1, can be setting and display with decimal point.
These assign a control operation.
SDM Universal Temperature & Process Controller
Symbol
Setting Data
Operation
Parameter Group
Select other parameter groups.
2nd set point
Set 2nd target set point value.
[8] Parameter Group 5 (Setting value program control group)
These affect the set value program control.
Symbol
Setting Data
Operation
Parameter Group
Select other parameter groups.
Hold can be selected.
Enable
Control
YES: Enable program control
NO: Disable program control
Auto-Tuning
OFF/ON
Pattern End Mode
Select Hold, Reset, Repeat or End.
Wait Time
Set wait time
Fuzzy Logic
OFF/ON
Restart Mode.
Restart mode setting after power failure.
Number of Segment.
Set segment quantity.
Start Value
Set first segment value.
Start Mode
SV: first seg. Start by “SORG”.
PV: first seg. Start by processing value.
Set Point 1
Segment 1 set value
under 99.0%, AT disable.
Time 1
Segment 1 time
Heat/Cool Dead Band
Set heat/cool out dead band. (Unit=%)
Set Point 2
Segment 1 set value
Cooling Gain
Set cooling output gain. (0.1~10.0%)
Time 2
Segment 2 time
Set Point 10
Segment 10 set value
Time 10
Segment 10 time
Select Digital Input
SP2 or Auto/Manual or program control
Burn Out
Set output % in case of burn-out.
Control Action
Select output control action.
Control Out High Limit
Set high control out limit.
Control Out Low Limit
Cooling Output Type
Control Period
Set low control out limit. In case of
Program
Select cooling output type.
If cooling output is relay, set control
period. (1~60sec.)
※Time description: XX.YY (XX: Hour, YY: Minute)
※If program control hold is required press the
※If hold cancellation is required press the
Key.
key for approximately 2 sec.
SDM Universal Temperature & Process Controller
[9] Parameter Group 6
key on the front or by using the digital input. The MAN indicator is
on during manual operation and off during automatic operation.
These affect RS-485 communication options.
When parameter dI is set to auto/manual operation is accomplished by using
Symbol
Setting Data
the digital input only. Using the front key to change to manual operation is
Operation
Communication
(0~31) Set of communication address
disabled.
Address
for RS485
When set to manual operation, the control output is indicated on the display by
Communication Speed
Set speed 2400, 4800 or 9600 BPS.
/ symbol. The control output can be changed by using
Reply Delay Time
,
and
key.
1: 4~54 msec. 2: 54~104 msec.
3: 104~154 msec.
※See RS485 manual for additional information.
Control output indication during manual operation.
5. Operation
[1] Operation Procedure
Note: In the following cases, manual operation is disabled or restricted.
(1) Automatic operation
Upon connecting power the controller is in a state of automatic operation
and the process value is indicated on the upper display (process value
1. When the ON/OFF control operation is selected manual operation is
disabled.
display) and the set value is indicated on the lower display (the set value /
2. When the process/heating function is operating manual operation is disabled.
parameter display).
3. When heating/refrigerating function is operating, more than 50% of the
The set value can be changed by using
,
and
key.
Operation of the controller depends on the initial settings and alarm
output is heating output and less than 50% is refrigeration output. (See
heating/refrigeration operation in chapter 6)
assignments. The controller will indicate a control output, an alarm state
and an operation.
[2] Auto-Tuning
The controller can be tuned for the process being monitored by changing
Auto-tuning, using PID, automatically tunes the controller for the process being
parameter group 1 (tuning parameter group) as outlined in chapter 4.
monitored so it will operate optimally. This saves time over tuning the controller
(2) Automatic and Manual operation
Changing between automatic/manual operation is performed by using the
manually.
SDM Universal Temperature & Process Controller
(1) Auto-tuning procedure
z
Auto-tuning function does not operate when the high limit of the
control output is set below 99.9% or the low limit is above 0.1 %.
a. Find the A.T parameterfrom parameter group 4 and enable auto-tuning by
entering YES.
b. Find the tuning start parameter from parameter group 1 and enter StAt.
This will start the auto-tuning process.
c. When auto-tuning begins the controller is in ON-OFF control operation
[3] ON-OFF Control
When the control operation is set to ON-OFF mode the controller performs the ONOFF control operation and “hysteresis” can be adjusted.
and the manual operation indicator (AT indicator) will be blink. (Figure 5)
d. To cancel autotuning press the AT key. The AT indicator will turn off and
(1) Programming procedure
z
autotuning will stop.
from parameter group 4.
e. When auto-tuning is stopps the controller calculates the optimum PID
constant and applies it to the control function, the loop break alarm time
Find the control operation parameter (parameter symbol : CACt)
z
Enter “d.o.n.F” for positive (cooling operation) of the ON-OFF
control.
LbA is set to twice yhe integral time.
z
Enter “On.OF” for negative (heating operation) operation of the ONOFF control.
z
Find the hysteresis parameter (parameter symbol : HYS) from the
tuning parameter group and set the hysteresis as required.
(2) Negative and Positive operation ON-OFF control
Dead Band
Auto-Tuning Cycle
Set
(2) Auto-tuning considerations
z
Auto-tuning does not affect the output when the controller is in ON-
Dead Band
OFF control mode.
z
Auto-tuning does not affect the output when the controller is in
heating-cooling control mode.
Set
SDM Universal Temperature & Process Controller
[4] Fuzzy control
Overshoot generated when the set value is changed and operation begins can be
reduced by enabling the fuzzy control function.
This function can be enabled by finding the fuzzy control function parameter from
parameter group 3 and set the hysteresis.
c. Set the alarm activation point with the alarm parameter (parameter symbol :
AL-1,AL-2) from parameter group 1.
<Assignment symbol and alarm operation>
parameter group 4 and setting it to On.
Symbol
Setting Data
Operation
Note: Fuzzy function is enabled when the PID constant is not zero and the
controller is in automatic operation mode.
Alarm Off
High alarm
Standby high alarm
Low alarm
Standby low alarm
Deviation high alarm
Response characteristic in restricting overshooting
Deviation low ararm
[5] Alarm operation
Deviation alarm
The alarms can be used as an output for two types of information. Alarm function
based on the process value is disabled automatically when alarm 2 is used as a
Loop break alarm
refrigeration output in the heating/refregeration control.
Program control
(1) Alarm operation programming procedure
pattern end output
Alarm 1 application
a. Find the alarm operation parameter (parameter symbol : ALS1, ALS2) from
parameter group 3 and assign alarm operation.
b. Find the hysteresis parameter (parameter symbol HYS1, HYS2) from
Note: The deviation alarm is 0 when the alarm set value is below 0.
Note: The deviation alarm hysteresys is 1/2 of the alarm set value when it is below
SDM Universal Temperature & Process Controller
1/2 of the alarm set value.
(2) Heating/refrigeration output
[6] Heating/refrigeration control
a. Heating output is enabled through the control output in parameter group
The heating/refrigeration control output is 50% of the control output obtained by PID
2.
calculation.
b. Auto-tuning is disabled during the heating/refrigeration control operation.
Manual tuning is still possible.
z
Heating output=(calculated output – 50% - hysteresys/2) X 2
c. The second alarm output is disabled automatically when the refrigeration
output is assigned as a relay, and the transmission output is disabled
z
Refrigeration output=(50% - calculated output – hysteresys/2) X 2 X
automatically when the refrigeration output is assigned as a 4~20mA current
refrigeration gain
output. Use these outputs as the refrigeration output.
d. Any output value set during manual operation is divided by the
(1) Programming procedure
Find the control operation parameter from parameter group 4 and enter
heating/refrigeration output and contains 50% center hysteresys.
e. Except in special cases set the control output to 50%.
heating/refrigeration operation. Set the heating/refrigeration hysteresys. The
heating/refrigeration output is set to OFF while within the hysteresys dead
[7] Ramp output heating
band.
Some heaters can be damaged if power is not supplied gradually. In this case the
Set refrigeration gain. Refrigeration gain is used for controlling refrigeration
heater should be protected by using the ramp control function.
speed. Enter the type of refrigeration output. Choose from relay and current.
Set the refrigeration control output period when the refrigeration output is
(1) Programming procedure
assigned as a relay.
a. Find the ramp control output parameter (parameter symbol : d-tm) from
parameter group 3 and set the required ramp control output time in minutes.
The control output increases slowly after the power is on and resets to the
original control output after the time set for the ramp control parameter d-tm
has been reached.
If set to “0” stop ramp output.
b. The control output indicator blinks during the ramp control output function.
※Control output indication
heating/refrigeration operation output characteristic
during ramp control output
SDM Universal Temperature & Process Controller
(2) Ramp control output
a. Ramp control output is a 4-20 mA current control output.
control loop break alarm occurs.
[9] Using the second set value
b. Ramp control output is disabled during ON/OFF control operation.
c. Auto-tuning is disabled when ramp control output is enabled.
The first set value which is the controller set value can be changed to the second
d. Manual operation is disabled when ramp control output is enabled.
set value by using the exterior contact. (dl)
[8] Loop break alarm
(1) Programming procedure
Find the contact point input selection parameter from parameter group 4
If the control output lasts longer than the time set for operation, the controller treats
and assign this as the second set value.
this as a control loop error and an alarm is activated.
Find
(2) Second set value operation
(1) Programming procedure
When the contact input is set to automatic/manual operation changing the
a. Find the first alarm operation parameter in parameter group 3.
second set value is impossible.
Assign the control loop break alarm.
Adjustability of the second target set value is automatically restricted
b. Find the alarm time set parameter and set the alarm time. Usually
according to the input sensor and scale setting being used.
twice the integral is used. Alarm function stops when set to “0”.
(Information output does not occur.)
6. Set value program control (Ramp-Sock Control)
c. When auto-tuning is enabled, twice the time of the integral time is
automatically set as the alarm time based on the PID constant
This describes the procedure necessary to use the set value program located in
calculation procedure.
parameter group 5. This will setup the set value program operation which is 10
(2) Cause for alarm generation
segments in length.
a. Power interruption
b. Heating element problem
The parameters relate to the set value program operation control and the
c. Exterior relay or magnetic switch malfunction
parameters set each segment value and time.
Note: When the control output high limit set value is below 99.9%, the control loop
This procedure sets the parameters related to operation control and enables the set
break alarm does not function.
value program operation, which determines the control operation after the end of
Note: When manual control output is set to a time that is more than 100%, the
the program operation, and assigns the operation procedure after a power failure.
SDM Universal Temperature & Process Controller
This is accomplished by setting the wait value that the process value reaches when
(3) Automatic/manual operation selection is possible only during a set
value hold state.
the last segment ends each segment starts.
(4) To cancel the hold functions press the
[1] Set value program procedure
key for 2 seconds
during a hold state. The hold function ends automatically during autotuning.
(1) Set related parameter suitable for the process.
(2) Enable the set value program operation. (Parameter symbol: rSEn)
(3) The operation begins by pressing the
key for 2 seconds.
When the operation begins, the operation indicator blinks.
(4) To cancel during operation, press the
key for two seconds. This
resets to the initial fixed set value operation state. (Reset)
[4] Process value “WAIT” function
When each segment begins, if the difference between the process value and the
set value is larger than wait value, the change in set value stops and the set value
is changed so it will be within the wait value. If the wait function is not necessary set
the wait set value to 0.
[2] The end of the operation
(1) When operation end mode is set to hold mode it is enabled on the last
set value of the program operation.
a. The operation indicator turns ON.
b. The relay of the first alarm output indicator turns ON when the first
alarm output is assigned to pattern end indication output.
c. When the
[5] Repeat after a power failure
(1) Reset to the initial fixed set value operation state and operate when repeat
mode is set to reset.
(2) Restart from the initial segment (segment 1) when repeat mode is set to
restart.
key is pressed for two seconds while the controller
is in the hold state, the hold state is cancelled and the controller resets
to the initial fixed set value operation state. (Reset)
7. Specification
(2) When operation end mode is set to repeat mode.
a. The set value program operation will restart from the initial segment.
b. The first alarm output relay turns ON for 3 seconds and resets when
the first alarm output is assigned to pattern end indication output.
[1] Input
(1) Accuracy
T.C Input: ±0.3% of F.S + 1 digit or 3℃
(R,S,B,C exclusion under 450℃)
[3] Temporary hold of the set value during operation (hold)
(1) Press the
key when set value hold is required during operation.
(2) Auto-tuning is possible only during a set value hold state.
RTD Input: ±0.2% of F.S 1 digit
DC Volt (Current 4~20mA) Input: ±0.2% of F.S
SDM Universal Temperature & Process Controller
(2) Input
(6) ARW: Auto operating
T.C : K,J,E,N,C,T,R,S,B
(7) Control Output Period: 1~60 sec. (*Contact. SSR control only)
RTD : Pt100 ohm, JPt100 ohm
(8) Manual Reset: 0~100% (*P. PD control only)
Volt : 1~5Vdc (4~20mA)
(Universal Input)
Digital input: 1 point dry contact. Operating impedance 100 Ω max.
[4] Option and Others
(1) Scan Time: 0.16 sec.
(2) Power
[2] Output
(1) Control Output
Relay Contact (250V 2A, R load)
4~20mA (max. 600 Ω)
SSR (20Vdc, 21mA)
(Universal Output)
AC 100~240V, 50/60Hz, 0.1A max.
(3) Communication
RS 485, 2-wire type. MODBUS® protocol: optional
(4) Operating Environment
Temperature 0~50℃ Humidity 35~85%RH
(5) Demension
SDM 9000: 96 X 96 X 100(mm)
(2) Retransmission Output: programmable scale
SDM 4900: 48 X 96 X 100(mm)
600 Ω max.
SDM 9400: 96 X 48 X 100(mm)
Accuracy: ±0.2%
SDM 7000: 72 X 72 X 100(mm)
(3) Alarm output
2-point 250Vac. 1A (R load)
*Caution should be used when installing this device. Misuse or incorrect
installation may result in serious injury or damage to the controller.
*This manual is subject to change without notice.
[3] Control Mode
(1) PID, PI, PD, P, ON-OFF
Each direct/reverse mode. Heating/Cooling mode
(2) Auto-Manual Control
(3) Fuzzy Logic
(4) Program Control: 1 Pattern 10 Segment
(5) 2nd Set Value: by digital input