1
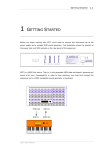
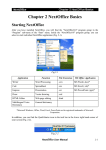
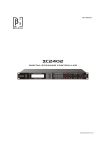
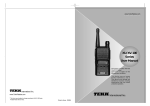
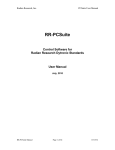
GETTING STARTED
1
1.1
GETTING STARTED
Before you begin working with ZEIT, you’ll need to connect the instrument up to the
power supply and a suitable MIDI sound generator. This illustration shows location of the
power inlet and MIDI sockets on the rear panel of the sequencer.
ZEIT is a MIDI Only device. That is, it only generates MIDI data and doesn’t generate any
sound of its own. Consequently, in order to hear anything, you must first connect the
sequencer up to a MIDI compatible sound generator or keyboard.
To connect ZEIT to your MIDI device, take a standard MIDI cable (5 pin DIN, 180
degrees) and plug the MIDI In on your keyboard or module to the MIDI Out port on ZEIT.
If you are using a keyboard then you can use a second cable to connect the MIDI Out on
your keyboard to the MIDI In port on ZEIT.
ZEIT USER MANUAL
1.2
GETTING STARTED
MIDI In
MIDI Out
MIDI Out
MIDI In
When you have connected your MIDI device to ZEIT as shown in the above diagram, set
the MIDI receive channel on your keyboard to Channel 1. If you don’t know how to do
this then consult the User Guide that came with your module.
Locate the Playback strip on ZEIT’s front panel and press the button marked MIDI. The
display will show the following screen:
The cursor points to the Chan field. Turn the Data Wheel until the MIDI Transmit channel
for the current sequence is set to Channel 1.
ZEIT USER MANUAL
GETTING STARTED
1.3
Next, check that you have either headphones or an amplifier connected to the audio
output on your MIDI device and the volume control on your device is set to the lowest
volume.
Now press Play/Stop in the Transport Control strip and slowly increase the volume on
your amplifier. If the instruments are connected up properly, you should be able to hear
one of the factory preset sequences playing on your sound generator. If you don’t hear
anything then check your connections to make sure that you haven’t made a mistake.
In the next section, we’ll talk about some of the terms we use to describe how ZEIT
works. This will make it easier to understand the following sections.
Terminology
The following is a short introduction to the terms we’ll use frequently in the next couple of
chapters. Even if you’re familiar with step sequencers in general, we still recommend that
you read this section to make sure we’re all talking about the same thing.
ZEIT is an 8-track step sequencer. By this, we mean that the instrument can play 8
sequences at once on any of the 16 MIDI channels.
A sequence is made up of 3 data streams each consisting of 16 individual steps. The
data streams are hard wired as one note channel and two MIDI controller channels. The
note channel provides the raw MIDI notes and the controller channels provide articulation
and expression to the sequence.
A step can be either normal or skipped. If a step is normal, then it can be either active,
(i.e. the sequencer plays a note) or it can be muted (the sequencer plays a rest). If a step
is skipped, then the sequencer “skips” over it.
Finally, a Patch record groups together 8 sequences along with their associated settings
for the MIDI effects unit, the playback tempo, the MIDI channel, which sequences are
enabled and which are muted, etc. You can group together all of the sequences and their
associated settings that make up a piece of music under one Patch record and save and
quickly recall complex patches at a later date.
Next, we’ll look at ZEIT’s front panel.
ZEIT USER MANUAL
1.4
GETTING STARTED
The Front Panel
At first glance, many users find ZEIT a little intimidating. However, if we look at the
individual sections that make up the instrument you should be able to start finding your
way around the sequencer very quickly.
Let’s begin with the Transport Control strip. This is at the bottom right of the front
panel, beneath the main display and the Data Wheel.
The Transport strip features four push buttons. From left to right these are the Reset
button, Step Backwards button, Play/Stop button and the Step Forwards button.
The push buttons operate in exactly the same way as a traditional tape recorder transport
mechanism. Step backwards rewinds the sequencer by one step, Play/Stop makes the
sequencer stop and start, Step Forward advances the transport by one step and Reset
forces all of the sequences back to their individual start steps.
To the right of the Transport Control strip are the Data Entry push buttons. These are
used for saving and loading records and for moving between individual fields in the editor
screens. We’ll talk in greater detail about these buttons in the Menus and Data Entry
section later on in this chapter. For the moment, the most important push button in this
ZEIT USER MANUAL
GETTING STARTED
1.5
section is the Shift push button because this button changes the function of many of the
front panel controls. When the Shift button has been pressed, we say that the front panel
is in shift mode. The LED above the button will flash approximately once per second when
you’re in shift mode. When you’re in normal mode the LED is always Off.
Above the Transport Control strip is the System Display and, to the right of the System
Display is the Data Entry Wheel, which is usually referred to more simply as the Data
Wheel. We use this for changing parameters, moving between editor pages and adjusting
the playback speed.
To the left of the Transport Control strip is the Sequence Select strip. ZEIT can have 8
sequences playing at once and we use this strip to select the sequence we want to edit
next. This sequence is often referred to as the “current sequence”. Try pressing these
buttons. You should see how the display and front panel LEDs change every time you
select a new sequence.
Above the Sequence Select Strip is the Sequence Enable strip. These push buttons are
very important because they let you enable and mute any number of sequences very
quickly.
Now let’s jump to the very top of the instrument. The first bank of knobs are the Note
Pitch knobs. We use these for changing the pitch of each individual step.
ZEIT USER MANUAL
1.6
GETTING STARTED
Below the Note Pitch knobs are two banks of Controller knobs. We use these for
changing the MIDI Continuous Controller values.
Moving down to the first bank of push buttons, we come to the Step Active switches. If a
step is active then the LED above the step is switched on. When the step is muted (a
rest) then the LED is switched off.
Next, we come to the Skipped Step push buttons. If the associated LED is switched on
then this step is said to be normal. When the LED is switched off, then this step is said to
be skipped and is ignored by the sequencer.
Now we come to the Playback push buttons. This bank of push buttons does one of two
things. Some buttons will set a specific playback parameter such as the clock speed or the
sequence direction but others will take you directly to a page within one of the edit
menus.
For instance, pressing the MIDI push button will take you directly to the MIDI Channel
parameter in the Sequence Menu whilst pressing the FX Send push button will set the
ZEIT USER MANUAL
GETTING STARTED
1.7
state of the Effects Send routing for the current sequence. This set up has been chosen
to provide what we believe is the optimum playback environment.
Wherever possible, we’ve tried to stick to the rule that one button has only one function.
However, the Clock Speed and Direction push buttons have different, though related,
functions in normal mode and in shift mode – they simply extend the number of available
clock and direction options. In normal mode, when you press one of the Clock Speed or
Direction push buttons, then the associated LED will remain on all the time. When you’re
in shift mode then the associated LED will flash roughly twice a second.
Moving on, we come to the Modifier strip. On the left-hand side we have the Low
Frequency Oscillator (LFO) controls. Each sequence has a LFO permanently wired into it
and the output from the LFO can be routed to the Note Pitch, Note Velocity and both of
the MIDI Continuous Controller signals to slowly modify the sequences generated in real
time.
A Sweep Generator is also hard wired into the sequence control set up. We’ll talk more
about the Sweep Generator at a later stage.
On the right-hand side of the Modifier strip, we have the Effects Processor strip. This
bank of push buttons will take you directly to the relevant page in the Effects Processor
Edit Menu.
Finally, we come to the Quick Select strip. Straight out of the box, these buttons call up
the first page of the various edit menus and are used mostly for inspecting values,
loading and saving records etc. We recommend that you go through these menus with the
manual open at the section called “The Menus in Detail”.
ZEIT USER MANUAL
1.8
GETTING STARTED
The Patch/Tempo Screen
The Patch/Tempo screen is the first screen you see once the sequencer has finished
starting up. It’s also the screen you return to when you exit from the edit menus.
Patch
Number
Patch
Name
Sequencer
Mode
Current
Tempo
The top line of this page refers to the current Patch. The first parameter is the Patch
Record Number. The next parameter is the Patch Name, which in the above example is
“DarkSideMoon”. To change the Patch Name you would go to the Patch Edit Menu.
The third parameter is the Sequencer Mode, which is usually “Play” but can be “Comp”
when you’re using the composer plug-in or ‘Morf” when you’re using the sequence Morph
facility.
The fourth and final parameter on the top line is the Tempo setting. When you’re in this
page you can use the Data Wheel to increase and decrease this value. You can increase
the Tempo up to a maximum of 250 BPM and decease down to a minimum of 30 BPM.
Note that when synchronised to external MIDI equipment, this value is approximate only.
The second line tells you about the current sequence, which is selected using the
Sequence Select push buttons at the bottom left of the front panel. There are 8 of these
- one for every sequence.
In the above diagram, Sequence 1 is shown as the currently selected sequence. When
selected, the LED above the relevant Sequence Select push button lights up and remains
illuminated until you press another Sequence Select push button. Note that ZEIT has 8
sequences available at once. The above diagram shows only the first 4!
ZEIT USER MANUAL
GETTING STARTED
Sequence
Number
Sequence
Name
Sequence
State
1.9
Current
Step
The first parameter on the second line is the Sequence Number for the current
sequence and the second parameter is the Sequence Name. The third parameter is the
Sequence State and this parameter is either ‘On’, i.e. the sequence is playing, or ‘Off’,
i.e. the sequence is silent.
You can change the Sequence State using the Sequence Enable push buttons on the
front panel. These are immediately above the Sequence Select push buttons.
If a sequence is active (i.e. playing) then the LED above the relevant Sequence Enable
push button will illuminate. If not then the LED will remain off. In the above example,
Sequence 2 is active whilst sequences 1, 3 and 4 are not (i.e. they are muted).
If you press one of the Sequence Enable push buttons while you’re in the Patch/Tempo
page, the Sequence State will show either ‘On’ or ‘Off’. If you’re in any of the other edit
pages then the instrument will jump to the Sequence State field in the Sequence Play
Menu.
The fourth and final parameter on the second line is the Current Step for the current
sequence. This two digit number is updated constantly whilst the sequencer is playing.
Next, we’ll look at how you change data values to alter the way a sequence sounds.
ZEIT USER MANUAL
1.10
GETTING STARTED
The Menus and Data Entry
We have tried to make the menu system as simple and as intuitive to use as possible.
Each menu consists of one or more pages and every menu page provides access to one
or more data fields, each representing a sequencer parameter.
When you change a sequencer parameter from the front panel you are automatically
dropped into the relevant page within the edit menu for that parameter and the cursor, a
right chevron (‘>’) character, will point to the data field that you have just changed.
If you just want to check on a particular value, you can press one of the Menu Quick
Select buttons and then use the navigation features to work your way through the menu.
Edit Page
Reference
The menu pages themselves can be divided roughly into three groups:
1) those that affect sequences;
2) those that affect the current patch;
3) and those that govern the system setup and MIDI facilities.
Certain positions on the screen are important. The top left-hand corner of every menu
page is the Edit Page Reference. In the above diagram, this reference is 26. You don't
need to remember anything about the edit page number - it's there mainly to assist you
when talking to our technical support staff.
Let’s look at a typical menu page. Below is the Effects Repeat/Note Adjust page within the
MIDI Effects Processor Menu.
Page
Cursor
Number Home
Page
Title
Sub-Page
Number
To the right of the page number is the Cursor Home position. When the cursor is in this
position you can use the Data Wheel to navigate between the menu pages. Turning the
ZEIT USER MANUAL
GETTING STARTED
1.11
wheel clockwise increments the page number and turning the wheel anti-clockwise
decrements the page number. When you reach the end of the available menu pages,
turning the Data Wheel has no effect.
To the right of the Home position is the Page Title and, in the majority of cases, this is
followed by a Sub-Page Number.
In menu pages that refer to sequence parameters, you’ll see the Sequence Number in
the top right-hand corner of the display.
Let’s look at the Sequence Direction/Clock page.
Sequence
Name
Direction
Sequence
Number
Clock
Speed
Sequence
Status
In this example, the page title is actually the sequence name – this makes it easier to
figure out which sequence you’re working with. We felt that it was OK to break our fairly
strict presentation rules in this instance because it’s easy to get lost when you’re
navigating around menus. We’re not fond of menus: that’s why ZEIT has so many buttons
and knobs!
This page also has three data fields, a Direction parameter, the Clock Rate and the
Sequence Active Status.
To navigate between data fields you press the Enter button which is located at the bottom
right of the front panel, beneath the Data Wheel.
ZEIT USER MANUAL
1.12
GETTING STARTED
Every time you press the Enter button the LED flashes once and the cursor moves to the
next field. The cursor always moves around the screen in a counter-clockwise direction.
When you reach the last data field on the screen the cursor returns to the Home position.
If there’s only one parameter on the screen then the cursor will return to the Home
position immediately.
In certain pages you have to press the Select button before something will happen. The
Select button is located near the Enter button at the bottom right-hand side of the front
panel.
The diagram below shows the Load Sequence page in the Sequence Play menu.
To load a sequence, press the Enter button so that the cursor is sitting after the Sequence
Record Number and before the Sequence Name. You can scroll through the available
records until you find the one that you want. When you’ve found it, press the Select
button to load the record. A confirmation message (‘OK’) will appear to let you know that
the sequence has been loaded.
Sequence
Number
Sequence
Name
Confirmation
Message
ZEIT has two operating modes, Normal and Shift and the function of many of the push
buttons on the front panel will change depending upon the current operating mode. We’ve
tried to keep this dual functionality to an absolute minimum because it’s a feature that
ZEIT USER MANUAL
GETTING STARTED
1.13
the majority of users, including us, don’t like! However, without Shift mode, ZEIT would
have been double the size and we think you’ll agree it’s already big enough!
To make it easier to keep track of which mode you’re in, the Shift LED flashes once a
second when you’re in Shift mode. When you’re in Normal mode, the LED stays off.
One final function that is a bit of an odd-ball and doesn’t really fit in anywhere else is Edit
Hold.
Edit Hold is a performance feature that, when enabled, lets you make a series of
changes to the current sequence without those changes being passed to the output
driver. When you switch off Edit Hold those changes are then copied up to the output
driver all at once so your audience will hear a sudden change in the sequence. Of course,
if your edits are not passed to the output driver then you can’t hear them either. Hence,
it’s a useful tool – once you know what you’re doing!
ZEIT USER MANUAL
1.14
GETTING STARTED
This page intentionally left blank.
ZEIT USER MANUAL