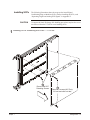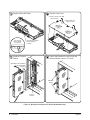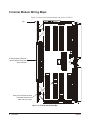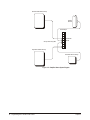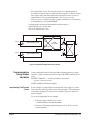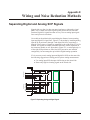
1
bus VT1415A Algorithmic Closed Loop Controller User’s Manual APPLICABILITY This manual edition is intended for use with the following instrument drivers: · Downloaded driver revision A.01.02 or later for Agilent/HP Command Modules · C-SCPI driver revision D.01.02 or later Call your local VXI Technology Sales Office for information on other drivers. Copyright © VXI Technology, Inc. 2005 P/N: 82-0074-000 Rev. August 15, 2005 Printed in U.S.A. Certification VXI Technology, Inc. certifies that this product met its published specifications at the time of shipment from the factory. VXI Technology further certifies that its calibration measurements are traceable to the United States National Institute of Standards and Technology (formerly National Bureau of Standards), to the extent allowed by that organization’s calibration facility and to the calibration facilities of other International Standards Organization members. Warranty This VXI Technology product is warranted against defects in materials and workmanship for a period of three years from date of shipment. Duration and conditions of warranty for this product may be superseded when the product is integrated into (becomes a part of) other VXI Technology products. During the warranty period, VXI Technology will, at its option, either repair or replace products which prove to be defective. For warranty service or repair, this product must be returned to a service facility designated by VXI Technology. Buyer shall prepay shipping charges to VXI Technology and VXI Technology shall pay shipping charges to return the product to Buyer. However, Buyer shall pay all shipping charges, duties and taxes for products returned to VXI Technology from another country. VXI Technology warrants that its software and firmware designated by VXI Technology for use with a product will execute its programming instructions when properly installed on that product. VXI Technology does not warrant that the operation of the product or software or firmware will be uninterrupted or error free. Limitation Of Warranty The foregoing warranty shall not apply to defects resulting from improper or inadequate maintenance by Buyer, Buyer-supplied products or interfacing, unauthorized modification or misuse, operation outside of the environmental specifications for the product or improper site preparation or maintenance. The design and implementation of any circuit on this product is the sole responsibility of the Buyer. VXI Technology does not warrant the Buyer’s circuitry or malfunctions of VXI Technology products that result from the Buyer’s circuitry. In addition, VXI Technology does not warrant any damage that occurs as a result of the Buyer’s circuit or any defects that result from Buyer-supplied products. NO OTHER WARRANTY IS EXPRESSED OR IMPLIED. VXI TECHNOLOGY SPECIFICALLY DISCLAIMS THE IMPLIED WARRANTIES OF MERCHANTABILITY AND FITNESS FOR A PARTICULAR PURPOSE. Exclusive Remedies THE REMEDIES PROVIDED HEREIN ARE BUYER’S SOLE AND EXCLUSIVE REMEDIES. VXI TECHNOLOGY SHALL NOT BE LIABLE FOR ANY DIRECT, INDIRECT, SPECIAL, INCIDENTAL or CONSEQUENTIAL DAMAGES, WHETHER BASED ON CONTRACT, TORT, or ANY OTHER LEGAL THEORY. Notice The information contained in this document is subject to change without notice. VXI TECHNOLOGY MAKES NO WARRANTY OF ANY KIND WITH REGARD TO THIS MATERIAL, INCLUDING, BUT NOT LIMITED TO, THE IMPLIED WARRANTIES OF MERCHANTABILITY AND FITNESS FOR A PARTICULAR PURPOSE. VXI Technology shall not be liable for errors contained herein or for incidental or consequential damages in connection with the furnishing, performance, or use of this material. This document contains proprietary information which is protected by copyright. All rights are reserved. No part of this document may be photocopied, reproduced, or translated to another language without the prior written consent of VXI Technology. VXI Technology assumes no responsibility for the use or reliability of its software on equipment that is not furnished by VXI Technology. Restricted Rights Legend U.S. Government Restricted Rights. The Software and Documentation have been developed entirely at private expense. They are delivered and licensed as “commercial computer software” as defined in DFARS 252.227- 7013 (Oct 1988), DFARS 252.211-7015 (May 1991) or DFARS 252.227-7014 (Jun 1995), as a “commercial item” as defined in FAR 2.101(a) or as “Restricted computer software” as defined in FAR 52.227-19 (Jun 1987)(or any equivalent agency regulation or contract clause), whichever is applicable. You have only those rights provided for such Software and Documentation by the applicable FAR or DFARS clause or the VXI Technology standard software agreement for the product involved. iii Safety Symbols Instruction manual symbol affixed to product. Indicates that the user must refer to the manual for specific WARNING or CAUTION information to avoid personal injury or damage to the product. Alternating current (ac). Direct current (dc). Indicates hazardous voltages. Indicates the field wiring terminal that must be connected to earth ground before operating the equipment—protects against electrical shock in case of fault. or Frame or chassis ground terminal—typically connects to the equipment’s metal frame. WARNING Calls attention to a procedure, practice, or condition that could cause bodily injury or death. CAUTION Calls attention to a procedure, practice, or condition that could possibly cause damage to equipment or permanent loss of data. Warnings The following general safety precautions must be observed during all phases of operation, service, and repair of this product. Failure to comply with these precautions or with specific warnings elsewhere in this manual violates safety standards of design, manufacture, and intended use of the product. VXI Technology assumes no liability for the customer’s failure to comply with these requirements. Ground the equipment: For Safety Class 1 equipment (equipment having a protective earth terminal), an uninterruptible safety earth ground must be provided from the mains power source to the product input wiring terminals or supplied power cable. DO NOT operate the product in an explosive atmosphere or in the presence of flammable gases or fumes. For continued protection against fire, replace the line fuse(s) only with fuse(s) of the same voltage and current rating and type. DO NOT use repaired fuses or short-circuited fuse holders. Keep away from live circuits: Operating personnel must not remove equipment covers or shields. Procedures involving the removal of covers or shields are for use by service-trained personnel only. Under certain conditions, dangerous voltages may exist even with the equipment switched off. To avoid dangerous electrical shock, DO NOT perform procedures involving cover or shield removal unless you are qualified to do so. DO NOT operate damaged equipment: Whenever it is possible that the safety protection features built into this product have been impaired, either through physical damage, excessive moisture or any other reason, REMOVE POWER and do not use the product until safe operation can be verified by service-trained personnel. If necessary, return the product to a VXI Technology Sales and Service Office for service and repair to ensure that safety features are maintained. DO NOT service or adjust alone: Do not attempt internal service or adjustment unless another person, capable of rendering first aid and resuscitation, is present. DO NOT substitute parts or modify equipment: Because of the danger of introducing additional hazards, do not install substitute parts or perform any unauthorized modification to the product. Return the product to a VXI Technology Sales and Service Office for service and repair to ensure that safety features are maintained. Note for European Customers If this symbol appears on your product, it indicates that it was manufactured after August 13, 2005. This mark is placed in accordance with EN 50419, Marking of electrical and electronic equipment in accordance with Article 11(2) of directive 2002/96/EC (WEEE). End-of-life product can be returned to VTI by obtaining an RMA number. Fees for recycling will apply if not prohibited by national law. SCP cards for use with the VT1415A have this mark placed on their packaging due to the densely populated nature of these cards. iv Table of Contents Warranty . . . . . . . . . . . . . . . . . . . . . . . . . . . . . . . . . . . . . . . . . . . . . . . . . . . iii Safety Symbols. . . . . . . . . . . . . . . . . . . . . . . . . . . . . . . . . . . . . . . . . . . . . . . iv Note for European Customers . . . . . . . . . . . . . . . . . . . . . . . . . . . . . . . . . . . iv Support Resources. . . . . . . . . . . . . . . . . . . . . . . . . . . . . . . . . . . . . . . . . . . . xv Chapter 1. Getting Started . . . . . . . . . . . . . . . . . . . . . . . . . . . . . . . . . . . . . . 17 About This Chapter . . . . . . . . . . . . . . . . . . . . . . . . . . . . . . . . . . . . . . . . . . . 17 Configuring the VT1415A . . . . . . . . . . . . . . . . . . . . . . . . . . . . . . . . . . . . . 17 Setting the Logical Address Switch . . . . . . . . . . . . . . . . . . . . . . . . . . 18 Installing SCPs . . . . . . . . . . . . . . . . . . . . . . . . . . . . . . . . . . . . . . . . . . 19 Disabling the Input Protect Feature (Optional) . . . . . . . . . . . . . . . . . . 23 Disabling Flash Memory Access (Optional) . . . . . . . . . . . . . . . . . . . . 23 Instrument Drivers. . . . . . . . . . . . . . . . . . . . . . . . . . . . . . . . . . . . . . . . . . . . 25 About Example Programs . . . . . . . . . . . . . . . . . . . . . . . . . . . . . . . . . . . . . . 25 Verifying a Successful Configuration . . . . . . . . . . . . . . . . . . . . . . . . . . . . . 25 Chapter 2. Field Wiring . . . . . . . . . . . . . . . . . . . . . . . . . . . . . . . . . . . . . . . . . 29 About This Chapter . . . . . . . . . . . . . . . . . . . . . . . . . . . . . . . . . . . . . . . . . . . 29 Planning the Wiring Layout . . . . . . . . . . . . . . . . . . . . . . . . . . . . . . . . . . . . 29 SCP Positions and Channel Numbers . . . . . . . . . . . . . . . . . . . . . . . . . 29 Sense SCPs and Output SCPs . . . . . . . . . . . . . . . . . . . . . . . . . . . . . . . 31 Planning for Thermocouple Measurements. . . . . . . . . . . . . . . . . . . . . 32 Terminal Modules . . . . . . . . . . . . . . . . . . . . . . . . . . . . . . . . . . . . . . . . . . . . 33 The SCPs and Terminal Module . . . . . . . . . . . . . . . . . . . . . . . . . . . . . 33 Terminal Module Layout. . . . . . . . . . . . . . . . . . . . . . . . . . . . . . . . . . . 33 Reference Temperature Sensing with the VT1415A. . . . . . . . . . . . . . . . . . 35 Preferred Measurement Connections. . . . . . . . . . . . . . . . . . . . . . . . . . . . . . 37 Connecting the On-Board Thermistor . . . . . . . . . . . . . . . . . . . . . . . . . . . . . 40 Wiring and Attaching the Terminal Module . . . . . . . . . . . . . . . . . . . . . . . . 41 Attaching/Removing the VT1415A Terminal Module . . . . . . . . . . . . . . . . 43 Adding Components to the Terminal Module. . . . . . . . . . . . . . . . . . . . . . . 45 Terminal Module Wiring Maps. . . . . . . . . . . . . . . . . . . . . . . . . . . . . . . . . . 46 Terminal Module Option. . . . . . . . . . . . . . . . . . . . . . . . . . . . . . . . . . . . . . . 47 Option A3F . . . . . . . . . . . . . . . . . . . . . . . . . . . . . . . . . . . . . . . . . . . . . 47 Faceplate Connector Pin-Signal Lists . . . . . . . . . . . . . . . . . . . . . . . . . . . . . 49 Chapter 3. Programming the VT1415A for PID Control . . . . . . . . . . . . . . 51 About This Chapter . . . . . . . . . . . . . . . . . . . . . . . . . . . . . . . . . . . . . . . 51 Overview of the VT1415A Algorithmic Loop Controller. . . . . . . . . . . . . . 52 Operational Overview . . . . . . . . . . . . . . . . . . . . . . . . . . . . . . . . . . . . . 52 Programming Model . . . . . . . . . . . . . . . . . . . . . . . . . . . . . . . . . . . . . . . . . . 53 Executing the Programming Model. . . . . . . . . . . . . . . . . . . . . . . . . . . . . . . 55 Power-On and *RST Default Settings. . . . . . . . . . . . . . . . . . . . . . . . . 55 Table of Contents v Setting Up Analog Input and Output Channels. . . . . . . . . . . . . . . . . . . . . . 58 Configuring Programmable Analog SCP Parameters . . . . . . . . . . . . . 58 Linking Channels to EU Conversion. . . . . . . . . . . . . . . . . . . . . . . . . . 60 Linking Output Channels to Functions . . . . . . . . . . . . . . . . . . . . . . . . 67 Setting Up Digital Input and Output Channels . . . . . . . . . . . . . . . . . . . . . . 68 Setting Up Digital Inputs. . . . . . . . . . . . . . . . . . . . . . . . . . . . . . . . . . . 68 Setting Up Digital Outputs . . . . . . . . . . . . . . . . . . . . . . . . . . . . . . . . . 69 Performing Channel Calibration (Important!). . . . . . . . . . . . . . . . . . . . . . . 72 Defining Standard PID Algorithms . . . . . . . . . . . . . . . . . . . . . . . . . . . . . . . 73 The Pre-Defined PIDA Algorithm . . . . . . . . . . . . . . . . . . . . . . . . . . . 73 The Pre-Defined PIDB Algorithm. . . . . . . . . . . . . . . . . . . . . . . . . . . . 74 Defining a PID with ALG:DEFINE . . . . . . . . . . . . . . . . . . . . . . . . . . 76 Pre-Setting PID Variables and Coefficients . . . . . . . . . . . . . . . . . . . . . . . . 77 Pre-Setting PID Variables . . . . . . . . . . . . . . . . . . . . . . . . . . . . . . . . . . 77 Defining Data Storage . . . . . . . . . . . . . . . . . . . . . . . . . . . . . . . . . . . . . . . . . 77 Specifying the Data Format. . . . . . . . . . . . . . . . . . . . . . . . . . . . . . . . . 77 Selecting the FIFO Mode . . . . . . . . . . . . . . . . . . . . . . . . . . . . . . . . . . 78 Setting up the Trigger System . . . . . . . . . . . . . . . . . . . . . . . . . . . . . . . . . . . 78 Arm and Trigger Sources . . . . . . . . . . . . . . . . . . . . . . . . . . . . . . . . . . 78 Programming the Trigger Timer . . . . . . . . . . . . . . . . . . . . . . . . . . . . . 80 Setting the Trigger Counter. . . . . . . . . . . . . . . . . . . . . . . . . . . . . . . . . 81 Outputting Trigger Signals . . . . . . . . . . . . . . . . . . . . . . . . . . . . . . . . . 81 INITiating/Running Algorithms . . . . . . . . . . . . . . . . . . . . . . . . . . . . . . . . . 81 Starting the PID Algorithm . . . . . . . . . . . . . . . . . . . . . . . . . . . . . . . . . 81 The Operating Sequence . . . . . . . . . . . . . . . . . . . . . . . . . . . . . . . . . . . 82 Reading Running Algorithm Values . . . . . . . . . . . . . . . . . . . . . . . . . . . . . . 83 Reading Algorithm Variables . . . . . . . . . . . . . . . . . . . . . . . . . . . . . . . 83 Reading Algorithm Values From the CVT . . . . . . . . . . . . . . . . . . . . . 83 Reading History Mode Values From the FIFO . . . . . . . . . . . . . . . . . . 84 Modifying Running Algorithm Variables . . . . . . . . . . . . . . . . . . . . . . . . . . 87 Updating the Algorithm Variables and Coefficients . . . . . . . . . . . . . . 87 Enabling and Disabling Algorithms . . . . . . . . . . . . . . . . . . . . . . . . . . 87 Setting Algorithm Execution Frequency. . . . . . . . . . . . . . . . . . . . . . . 88 Example Command Sequence . . . . . . . . . . . . . . . . . . . . . . . . . . . . . . . . . . . 88 A Quick-Start PID Algorithm Example . . . . . . . . . . . . . . . . . . . . . . . . . . . 89 PID Algorithm Tuning . . . . . . . . . . . . . . . . . . . . . . . . . . . . . . . . . . . . . . . . 91 Using the Status System . . . . . . . . . . . . . . . . . . . . . . . . . . . . . . . . . . . . . . . 91 Enabling Events to be Reported in the Status Byte. . . . . . . . . . . . . . . 94 Reading the Status Byte . . . . . . . . . . . . . . . . . . . . . . . . . . . . . . . . . . . 96 Clearing the Enable Registers . . . . . . . . . . . . . . . . . . . . . . . . . . . . . . 97 The Status Byte Group’s Enable Register . . . . . . . . . . . . . . . . . . . . . . 97 Reading Status Groups Directly . . . . . . . . . . . . . . . . . . . . . . . . . . . . . 97 VT1415A Background Operation . . . . . . . . . . . . . . . . . . . . . . . . . . . . . . . . 98 Updating the Status System and VXIbus Interrupts . . . . . . . . . . . . . . . . . . 98 Creating and Loading Custom EU Conversion Tables . . . . . . . . . . . . . . . . 99 Compensating for System Offsets . . . . . . . . . . . . . . . . . . . . . . . . . . . . . . . 102 Special Considerations . . . . . . . . . . . . . . . . . . . . . . . . . . . . . . . . . . . 104 vi Table of Contents Detecting Open Transducers . . . . . . . . . . . . . . . . . . . . . . . . . . . . . . . . . . . 104 More On Auto Ranging. . . . . . . . . . . . . . . . . . . . . . . . . . . . . . . . . . . . . . . 106 Settling Characteristics . . . . . . . . . . . . . . . . . . . . . . . . . . . . . . . . . . . . . . . 106 Background . . . . . . . . . . . . . . . . . . . . . . . . . . . . . . . . . . . . . . . . . . . . 106 Checking for Problems . . . . . . . . . . . . . . . . . . . . . . . . . . . . . . . . . . . 107 Fixing the Problem . . . . . . . . . . . . . . . . . . . . . . . . . . . . . . . . . . . . . . 107 Chapter 4. Creating and Running Custom Algorithms . . . . . . . . . . . . . . 109 About This Chapter . . . . . . . . . . . . . . . . . . . . . . . . . . . . . . . . . . . . . . . . . . 109 Describing the VT1415A Closed Loop Controller . . . . . . . . . . . . . . . . . . 110 What is a Custom Algorithm? . . . . . . . . . . . . . . . . . . . . . . . . . . . . . . . . . . 110 Overview of the Algorithm Language. . . . . . . . . . . . . . . . . . . . . . . . . . . . 110 Example Language Usage . . . . . . . . . . . . . . . . . . . . . . . . . . . . . . . . . 111 The Algorithm Execution Environment . . . . . . . . . . . . . . . . . . . . . . . . . . 111 The Main Function . . . . . . . . . . . . . . . . . . . . . . . . . . . . . . . . . . . . . . 112 How the Algorithms Fit In . . . . . . . . . . . . . . . . . . . . . . . . . . . . . . . . 112 Accessing the VT1415A’s Resources . . . . . . . . . . . . . . . . . . . . . . . . . . . . 113 Accessing I/O Channels . . . . . . . . . . . . . . . . . . . . . . . . . . . . . . . . . . 114 Defining and Accessing Global Variables . . . . . . . . . . . . . . . . . . . . 115 Determining First Execution (First_loop) . . . . . . . . . . . . . . . . . . . . . 115 Initializing Variables . . . . . . . . . . . . . . . . . . . . . . . . . . . . . . . . . . . . . 116 Sending Data to the CVT and FIFO . . . . . . . . . . . . . . . . . . . . . . . . . 116 Setting a VXIbus Interrupt . . . . . . . . . . . . . . . . . . . . . . . . . . . . . . . . 117 Determining an Algorithm’s Identity (ALG_NUM). . . . . . . . . . . . . 117 Calling User Defined Functions . . . . . . . . . . . . . . . . . . . . . . . . . . . . 118 Operating Sequence. . . . . . . . . . . . . . . . . . . . . . . . . . . . . . . . . . . . . . . . . . 118 Overall Sequence. . . . . . . . . . . . . . . . . . . . . . . . . . . . . . . . . . . . . . . . 119 Algorithm Execution Order. . . . . . . . . . . . . . . . . . . . . . . . . . . . . . . . 119 Defining Custom Algorithms (ALG:DEF) . . . . . . . . . . . . . . . . . . . . . . . . 121 ALG:DEFINE in the Programming Sequence . . . . . . . . . . . . . . . . . 121 ALG:DEFINE’s Three Data Formats . . . . . . . . . . . . . . . . . . . . . . . . 121 Changing a Running Algorithm . . . . . . . . . . . . . . . . . . . . . . . . . . . . 122 A Very Simple First Algorithm. . . . . . . . . . . . . . . . . . . . . . . . . . . . . . . . . 124 Writing the Algorithm . . . . . . . . . . . . . . . . . . . . . . . . . . . . . . . . . . . . 125 Running the Algorithm . . . . . . . . . . . . . . . . . . . . . . . . . . . . . . . . . . . 125 Modifying a Standard PID Algorithm. . . . . . . . . . . . . . . . . . . . . . . . . . . . 125 PIDA with Digital On-Off Control . . . . . . . . . . . . . . . . . . . . . . . . . . 125 Algorithm to Algorithm Communication . . . . . . . . . . . . . . . . . . . . . . . . . 126 Communication Using Channel Identifiers . . . . . . . . . . . . . . . . . . . . 126 Communication Using Global Variables. . . . . . . . . . . . . . . . . . . . . . 127 Non-Control Algorithms . . . . . . . . . . . . . . . . . . . . . . . . . . . . . . . . . . . . . . 129 Data Acquisition Algorithm . . . . . . . . . . . . . . . . . . . . . . . . . . . . . . . 129 Process Monitoring Algorithm . . . . . . . . . . . . . . . . . . . . . . . . . . . . . 129 Implementing Setpoint Profiles. . . . . . . . . . . . . . . . . . . . . . . . . . . . . . . . . 130 Table of Contents vii Chapter 5. Algorithm Language Reference . . . . . . . . . . . . . . . . . . . . . . . . 133 Language Reference . . . . . . . . . . . . . . . . . . . . . . . . . . . . . . . . . . . . . . . . . 133 Standard Reserved Keywords . . . . . . . . . . . . . . . . . . . . . . . . . . . . . . 134 Special VT1415A Reserved Keywords. . . . . . . . . . . . . . . . . . . . . . . 134 Identifiers . . . . . . . . . . . . . . . . . . . . . . . . . . . . . . . . . . . . . . . . . . . . . 134 Special Identifiers for Channels . . . . . . . . . . . . . . . . . . . . . . . . . . . . 135 Operators . . . . . . . . . . . . . . . . . . . . . . . . . . . . . . . . . . . . . . . . . . . . . . 135 Intrinsic Functions and Statements . . . . . . . . . . . . . . . . . . . . . . . . . . 135 Program Flow Control. . . . . . . . . . . . . . . . . . . . . . . . . . . . . . . . . . . . 136 Data Types. . . . . . . . . . . . . . . . . . . . . . . . . . . . . . . . . . . . . . . . . . . . . 136 Data Structures . . . . . . . . . . . . . . . . . . . . . . . . . . . . . . . . . . . . . . . . . 137 Bitfield Access . . . . . . . . . . . . . . . . . . . . . . . . . . . . . . . . . . . . . . . . . 138 Language Syntax Summary. . . . . . . . . . . . . . . . . . . . . . . . . . . . . . . . . . . . 139 Program Structure and Syntax. . . . . . . . . . . . . . . . . . . . . . . . . . . . . . . . . . 143 Declaring Variables. . . . . . . . . . . . . . . . . . . . . . . . . . . . . . . . . . . . . . 143 Assigning Values. . . . . . . . . . . . . . . . . . . . . . . . . . . . . . . . . . . . . . . . 143 The Operations Symbols . . . . . . . . . . . . . . . . . . . . . . . . . . . . . . . . . . 144 Conditional Execution. . . . . . . . . . . . . . . . . . . . . . . . . . . . . . . . . . . . 144 Comment Lines . . . . . . . . . . . . . . . . . . . . . . . . . . . . . . . . . . . . . . . . . 146 Overall Program Structure. . . . . . . . . . . . . . . . . . . . . . . . . . . . . . . . . 146 Where To Go Next . . . . . . . . . . . . . . . . . . . . . . . . . . . . . . . . . . . . . . 147 Chapter 6. VT1415A Command Reference . . . . . . . . . . . . . . . . . . . . . . . 149 ABORt. . . . . . . . . . . . . . . . . . . . . . . . . . . . . . . . . . . . . . . . . . . . . . . . . . . . 160 ALGorithm . . . . . . . . . . . . . . . . . . . . . . . . . . . . . . . . . . . . . . . . . . . . . . . . 161 ALGorithm[:EXPLicit]:ARRay . . . . . . . . . . . . . . . . . . . . . . . . . . . . 162 ALGorithm[:EXPLicit]:ARRay? . . . . . . . . . . . . . . . . . . . . . . . . . . . 163 ALGorithm[:EXPLicit]:DEFine . . . . . . . . . . . . . . . . . . . . . . . . . . . . 163 ALGorithm[:EXPLicit]:SCALar . . . . . . . . . . . . . . . . . . . . . . . . . . . 167 ALGorithm[:EXPLicit]:SCALar? . . . . . . . . . . . . . . . . . . . . . . . . . . 168 ALGorithm[:EXPLicit]:SCAN:RATio . . . . . . . . . . . . . . . . . . . . . . 168 ALGorithm[:EXPLicit]:SCAN:RATio? . . . . . . . . . . . . . . . . . . . . . . 169 ALGorithm[:EXPLicit]:SIZe? . . . . . . . . . . . . . . . . . . . . . . . . . . . . . 169 ALGorithm[:EXPLicit][:STATe] . . . . . . . . . . . . . . . . . . . . . . . . . . . 170 ALGorithm[:EXPLicit][:STATe]? . . . . . . . . . . . . . . . . . . . . . . . . . . 171 ALGorithm[:EXPLicit]:TIMe? . . . . . . . . . . . . . . . . . . . . . . . . . . . . 171 ALGorithm:FUNCtion:DEFine . . . . . . . . . . . . . . . . . . . . . . . . . . . . 172 ALGorithm:OUTPut:DELay . . . . . . . . . . . . . . . . . . . . . . . . . . . . . . 173 ALGorithm:OUTPut:DELay? . . . . . . . . . . . . . . . . . . . . . . . . . . . . . 174 ALGorithm:UPDate[:IMMediate] . . . . . . . . . . . . . . . . . . . . . . . . . . 174 ALGorithm:UPDate:CHANnel . . . . . . . . . . . . . . . . . . . . . . . . . . . . . 175 ALGorithm:UPDate:WINDow . . . . . . . . . . . . . . . . . . . . . . . . . . . . . 176 ALGOrithm:UPDate:WINDow? . . . . . . . . . . . . . . . . . . . . . . . . . . . 177 ARM . . . . . . . . . . . . . . . . . . . . . . . . . . . . . . . . . . . . . . . . . . . . . . . . . . . . . 178 ARM[:IMMediate] . . . . . . . . . . . . . . . . . . . . . . . . . . . . . . . . . . . . . . 179 ARM:SOURce . . . . . . . . . . . . . . . . . . . . . . . . . . . . . . . . . . . . . . . . . 179 ARM:SOURce?. . . . . . . . . . . . . . . . . . . . . . . . . . . . . . . . . . . . . . . . . 180 viii Table of Contents CALibration. . . . . . . . . . . . . . . . . . . . . . . . . . . . . . . . . . . . . . . . . . . . . . . . 181 CALibration:CONFigure:RESistance . . . . . . . . . . . . . . . . . . . . . . . 182 CALibration:CONFigure:VOLTage . . . . . . . . . . . . . . . . . . . . . . . . 183 CALibration:SETup . . . . . . . . . . . . . . . . . . . . . . . . . . . . . . . . . . . . . 184 CALibration:SETup? . . . . . . . . . . . . . . . . . . . . . . . . . . . . . . . . . . . . 184 CALibration:STORe . . . . . . . . . . . . . . . . . . . . . . . . . . . . . . . . . . . . . 185 CALibration:TARE . . . . . . . . . . . . . . . . . . . . . . . . . . . . . . . . . . . . . 186 CALibration:TARE:RESet . . . . . . . . . . . . . . . . . . . . . . . . . . . . . . . . 187 CALibration:TARE? . . . . . . . . . . . . . . . . . . . . . . . . . . . . . . . . . . . . . 188 CALibration:VALue:RESistance . . . . . . . . . . . . . . . . . . . . . . . . . . 188 CALibration:VALue:VOLTage . . . . . . . . . . . . . . . . . . . . . . . . . . . . 189 CALibration:ZERO? . . . . . . . . . . . . . . . . . . . . . . . . . . . . . . . . . . . . . 190 DIAGnostic . . . . . . . . . . . . . . . . . . . . . . . . . . . . . . . . . . . . . . . . . . . . . . . . 191 DIAGnostic:CALibration:SETup[:MODE] . . . . . . . . . . . . . . . . . . . 191 DIAGnostic:CALibration:SETup[:MODE]? . . . . . . . . . . . . . . . . . . 192 DIAGnostic:CALibration:TARE[:OTDetect]:MODE . . . . . . . . . . . 192 DIAGnostic:CALibration:TARE[:OTDetect]:MODE? . . . . . . . . . . 193 DIAGnostic:CHECksum? . . . . . . . . . . . . . . . . . . . . . . . . . . . . . . . . . 193 DIAGnostic:CUSTom:LINear . . . . . . . . . . . . . . . . . . . . . . . . . . . . . 193 DIAGnostic:CUSTom:PIECewise . . . . . . . . . . . . . . . . . . . . . . . . . . 194 DIAGnostic:CUSTom:REFerence:TEMPerature . . . . . . . . . . . . . . . 195 DIAGnostic:IEEE . . . . . . . . . . . . . . . . . . . . . . . . . . . . . . . . . . . . . . . 195 DIAGnostic:IEEE? . . . . . . . . . . . . . . . . . . . . . . . . . . . . . . . . . . . . . . 196 DIAGnostic:INTerrupt[:LINe] . . . . . . . . . . . . . . . . . . . . . . . . . . . . . 196 DIAGnostic:INTerrupt[:LINe]? . . . . . . . . . . . . . . . . . . . . . . . . . . . . 196 FORMat. . . . . . . . . . . . . . . . . . . . . . . . . . . . . . . . . . . . . . . . . . . . . . . . . . . 199 FORMat[:DATA] . . . . . . . . . . . . . . . . . . . . . . . . . . . . . . . . . . . . . . . 199 FORMat[:DATA]? . . . . . . . . . . . . . . . . . . . . . . . . . . . . . . . . . . . . . . 201 INITiate . . . . . . . . . . . . . . . . . . . . . . . . . . . . . . . . . . . . . . . . . . . . . . . . . . . 202 INITiate[:IMMediate] . . . . . . . . . . . . . . . . . . . . . . . . . . . . . . . . . . . . 202 INPut . . . . . . . . . . . . . . . . . . . . . . . . . . . . . . . . . . . . . . . . . . . . . . . . . . . . 203 INPut:FILTer[:LPASs]:FREQuency. . . . . . . . . . . . . . . . . . . . . . . . . 203 INPut:FILTer[:LPASs]:FREQuency? . . . . . . . . . . . . . . . . . . . . . . . . 204 INPut:FILTer[:LPASs][:STATe] . . . . . . . . . . . . . . . . . . . . . . . . . . . 204 INPut:FILTer[:LPASs][:STATe]?. . . . . . . . . . . . . . . . . . . . . . . . . . . 205 INPut:GAIN . . . . . . . . . . . . . . . . . . . . . . . . . . . . . . . . . . . . . . . . . . . 205 INPut:GAIN? . . . . . . . . . . . . . . . . . . . . . . . . . . . . . . . . . . . . . . . . . . 206 INPut:LOW . . . . . . . . . . . . . . . . . . . . . . . . . . . . . . . . . . . . . . . . . . . . 206 INPut:LOW? . . . . . . . . . . . . . . . . . . . . . . . . . . . . . . . . . . . . . . . . . . . 207 INPut:POLarity . . . . . . . . . . . . . . . . . . . . . . . . . . . . . . . . . . . . . . . . . 207 INPut:POLarity? . . . . . . . . . . . . . . . . . . . . . . . . . . . . . . . . . . . . . . . . 208 MEMory . . . . . . . . . . . . . . . . . . . . . . . . . . . . . . . . . . . . . . . . . . . . . . . . . . 209 MEMory:VME:ADDRess. . . . . . . . . . . . . . . . . . . . . . . . . . . . . . . . . 210 MEMory:VME:ADDRess? . . . . . . . . . . . . . . . . . . . . . . . . . . . . . . . . 210 MEMory:VME:SIZE . . . . . . . . . . . . . . . . . . . . . . . . . . . . . . . . . . . . 210 MEMory:VME:SIZE?. . . . . . . . . . . . . . . . . . . . . . . . . . . . . . . . . . . . 211 MEMory:VME:STATe . . . . . . . . . . . . . . . . . . . . . . . . . . . . . . . . . . . 211 MEMory:VME:STATe? . . . . . . . . . . . . . . . . . . . . . . . . . . . . . . . . . . 212 Table of Contents ix OUTPut . . . . . . . . . . . . . . . . . . . . . . . . . . . . . . . . . . . . . . . . . . . . . . . . . . . 213 OUTPut:CURRent:AMPLitude . . . . . . . . . . . . . . . . . . . . . . . . . . . . 213 OUTPut:CURRent:AMPLitude?. . . . . . . . . . . . . . . . . . . . . . . . . . . . 214 OUTPut:CURRent[:STATe] . . . . . . . . . . . . . . . . . . . . . . . . . . . . . . . 215 OUTPut:CURRent[:STATe]? . . . . . . . . . . . . . . . . . . . . . . . . . . . . . . 215 OUTPut:POLarity . . . . . . . . . . . . . . . . . . . . . . . . . . . . . . . . . . . . . . . 216 OUTPut:POLarity? . . . . . . . . . . . . . . . . . . . . . . . . . . . . . . . . . . . . . . 216 OUTPut:SHUNt . . . . . . . . . . . . . . . . . . . . . . . . . . . . . . . . . . . . . . . . 216 OUTPut:SHUNt? . . . . . . . . . . . . . . . . . . . . . . . . . . . . . . . . . . . . . . . 217 OUTPut:TTLTrg:SOURce . . . . . . . . . . . . . . . . . . . . . . . . . . . . . . . . 217 OUTPut:TTLTrg:SOURce? . . . . . . . . . . . . . . . . . . . . . . . . . . . . . . . 218 OUTPut:TTLTrg<n>[:STATe] . . . . . . . . . . . . . . . . . . . . . . . . . . . . 218 OUTPut:TTLTrg<n>[:STATe]? . . . . . . . . . . . . . . . . . . . . . . . . . . . 219 OUTPut:TYPE . . . . . . . . . . . . . . . . . . . . . . . . . . . . . . . . . . . . . . . . . 219 OUTPut:TYPE? . . . . . . . . . . . . . . . . . . . . . . . . . . . . . . . . . . . . . . . . 220 OUTPut:VOLTage:AMPLitude . . . . . . . . . . . . . . . . . . . . . . . . . . . . 220 OUTPut:VOLTage:AMPLitude? . . . . . . . . . . . . . . . . . . . . . . . . . . . 221 ROUTe . . . . . . . . . . . . . . . . . . . . . . . . . . . . . . . . . . . . . . . . . . . . . . . . . . . 222 ROUTe:SEQuence:DEFine? . . . . . . . . . . . . . . . . . . . . . . . . . . . . . . 222 ROUTe:SEQuence:POINts? . . . . . . . . . . . . . . . . . . . . . . . . . . . . . . 223 SAMPle . . . . . . . . . . . . . . . . . . . . . . . . . . . . . . . . . . . . . . . . . . . . . . . . . . . 224 SAMPle:TIMer . . . . . . . . . . . . . . . . . . . . . . . . . . . . . . . . . . . . . . . . . 224 SAMPle:TIMer? . . . . . . . . . . . . . . . . . . . . . . . . . . . . . . . . . . . . . . . . 225 [SENSe]. . . . . . . . . . . . . . . . . . . . . . . . . . . . . . . . . . . . . . . . . . . . . . . . . . . 226 [SENSe:]CHANnel:SETTling. . . . . . . . . . . . . . . . . . . . . . . . . . . . . . 227 [SENSe:]CHANnel:SETTling?. . . . . . . . . . . . . . . . . . . . . . . . . . . . . 227 [SENSe:]DATA:CVTable? . . . . . . . . . . . . . . . . . . . . . . . . . . . . . . . 228 [SENSe:]DATA:CVTable:RESet . . . . . . . . . . . . . . . . . . . . . . . . . . . 229 [SENSe:]DATA:FIFO[:ALL]? . . . . . . . . . . . . . . . . . . . . . . . . . . . . . 229 [SENSe:]DATA:FIFO:COUNt? . . . . . . . . . . . . . . . . . . . . . . . . . . . . 230 [SENSe:]DATA:FIFO:COUNt:HALF? . . . . . . . . . . . . . . . . . . . . . . 231 [SENSe:]DATA:FIFO:HALF? . . . . . . . . . . . . . . . . . . . . . . . . . . . . . 231 [SENSe:]DATA:FIFO:MODE . . . . . . . . . . . . . . . . . . . . . . . . . . . . . 232 [SENSe:]DATA:FIFO:MODE? . . . . . . . . . . . . . . . . . . . . . . . . . . . . 233 [SENSe:]DATA:FIFO:PART? . . . . . . . . . . . . . . . . . . . . . . . . . . . . . 233 [SENSe:]DATA:FIFO:RESet . . . . . . . . . . . . . . . . . . . . . . . . . . . . . . 234 [SENSe:]FREQuency:APERture . . . . . . . . . . . . . . . . . . . . . . . . . . . 234 [SENSe:]FREQuency:APERture?. . . . . . . . . . . . . . . . . . . . . . . . . . . 234 [SENSe:]FUNCtion:CONDition . . . . . . . . . . . . . . . . . . . . . . . . . . . . 235 [SENSe:]FUNCtion:CUSTom . . . . . . . . . . . . . . . . . . . . . . . . . . . . . 235 [SENSe:]FUNCtion:CUSTom:REFerence . . . . . . . . . . . . . . . . . . . . 236 [SENSe:]FUNCtion:CUSTom:TCouple . . . . . . . . . . . . . . . . . . . . . 237 [SENSe:]FUNCtion:FREQuency . . . . . . . . . . . . . . . . . . . . . . . . . . . 238 [SENSe:]FUNCtion:RESistance . . . . . . . . . . . . . . . . . . . . . . . . . . . 239 [SENSe:]FUNCtion:STRain: . . . . . . . . . . . . . . . . . . . . . . . . . . . . . . 240 [SENSe:]FUNCtion:TEMPerature . . . . . . . . . . . . . . . . . . . . . . . . . . 241 [SENSe:]FUNCtion:TOTalize . . . . . . . . . . . . . . . . . . . . . . . . . . . . . 243 [SENSe:]FUNCtion:VOLTage[:DC] . . . . . . . . . . . . . . . . . . . . . . . . 243 x Table of Contents [SENSe:]REFerence . . . . . . . . . . . . . . . . . . . . . . . . . . . . . . . . . . . . . 244 [SENSe:]REFerence:CHANnels . . . . . . . . . . . . . . . . . . . . . . . . . . . 246 [SENSe:]REFerence:TEMPerature . . . . . . . . . . . . . . . . . . . . . . . . . 246 [SENSe:]STRain:EXCitation . . . . . . . . . . . . . . . . . . . . . . . . . . . . . . 247 [SENSe:]STRain:EXCitation? . . . . . . . . . . . . . . . . . . . . . . . . . . . . . 247 [SENSe:]STRain:GFACtor . . . . . . . . . . . . . . . . . . . . . . . . . . . . . . . . 248 [SENSe:]STRain:GFACtor? . . . . . . . . . . . . . . . . . . . . . . . . . . . . . . . 248 [SENSe:]STRain:POISson . . . . . . . . . . . . . . . . . . . . . . . . . . . . . . . . 249 [SENSe:]STRain:POISson? . . . . . . . . . . . . . . . . . . . . . . . . . . . . . . . 249 [SENSe:]STRain:UNSTrained . . . . . . . . . . . . . . . . . . . . . . . . . . . . . 249 [SENSe:]STRain:UNSTrained? . . . . . . . . . . . . . . . . . . . . . . . . . . . . 250 [SENSe:]TOTalize:RESet:MODE . . . . . . . . . . . . . . . . . . . . . . . . . . 250 [SENSe:]TOTalize:RESet:MODE? . . . . . . . . . . . . . . . . . . . . . . . . . 252 SOURce. . . . . . . . . . . . . . . . . . . . . . . . . . . . . . . . . . . . . . . . . . . . . . . . . . . 253 SOURce:FM[:STATe] . . . . . . . . . . . . . . . . . . . . . . . . . . . . . . . . . . . 253 SOURce:FM:STATe? . . . . . . . . . . . . . . . . . . . . . . . . . . . . . . . . . . . . 254 SOURce:FUNCtion[:SHAPe]:CONDition . . . . . . . . . . . . . . . . . . . . 254 SOURce:FUNCtion[:SHAPe]:PULSe. . . . . . . . . . . . . . . . . . . . . . . . 254 SOURce:FUNCtion[:SHAPe]:SQUare . . . . . . . . . . . . . . . . . . . . . . . 255 SOURce:PULM[:STATe] . . . . . . . . . . . . . . . . . . . . . . . . . . . . . . . . . 255 SOURce:PULM:STATe? . . . . . . . . . . . . . . . . . . . . . . . . . . . . . . . . . 255 SOURce:PULSe:PERiod. . . . . . . . . . . . . . . . . . . . . . . . . . . . . . . . . . 256 SOURce:PULSe:PERiod?. . . . . . . . . . . . . . . . . . . . . . . . . . . . . . . . . 256 SOURce:PULSe:WIDTh. . . . . . . . . . . . . . . . . . . . . . . . . . . . . . . . . . 257 SOURce:PULSe:WIDTh?. . . . . . . . . . . . . . . . . . . . . . . . . . . . . . . . . 257 STATus . . . . . . . . . . . . . . . . . . . . . . . . . . . . . . . . . . . . . . . . . . . . . . . . . . . 258 STATus:OPERation:CONDition?. . . . . . . . . . . . . . . . . . . . . . . . . . . 260 STATus:OPERation:ENABle . . . . . . . . . . . . . . . . . . . . . . . . . . . . . . 261 STATus:OPERation:ENABle? . . . . . . . . . . . . . . . . . . . . . . . . . . . . . 261 STATus:OPERation[:EVENt]?. . . . . . . . . . . . . . . . . . . . . . . . . . . . . 262 STATus:OPERation:NTRansition . . . . . . . . . . . . . . . . . . . . . . . . . . 262 STATus:OPERation:NTRansition?. . . . . . . . . . . . . . . . . . . . . . . . . . 263 STATus:OPERation:PTRansition . . . . . . . . . . . . . . . . . . . . . . . . . . . 263 STATus:OPERation:PTRansition? . . . . . . . . . . . . . . . . . . . . . . . . . . 264 STATus:PRESet . . . . . . . . . . . . . . . . . . . . . . . . . . . . . . . . . . . . . . . . 264 STATus:QUEStionable:CONDition? . . . . . . . . . . . . . . . . . . . . . . . . 265 STATus:QUEStionable:ENABle . . . . . . . . . . . . . . . . . . . . . . . . . . . 265 STATus:QUEStionable:ENABle? . . . . . . . . . . . . . . . . . . . . . . . . . . 266 STATus:QUEStionable[:EVENt]? . . . . . . . . . . . . . . . . . . . . . . . . . . 266 STATus:QUEStionable:NTRansition . . . . . . . . . . . . . . . . . . . . . . . . 267 STATus:QUEStionable:NTRansition? . . . . . . . . . . . . . . . . . . . . . . . 267 STATus:QUEStionable:PTRansition . . . . . . . . . . . . . . . . . . . . . . . . 268 STATus:QUEStionable:PTRansition? . . . . . . . . . . . . . . . . . . . . . . . 268 SYSTem . . . . . . . . . . . . . . . . . . . . . . . . . . . . . . . . . . . . . . . . . . . . . . . . . . 269 SYSTem:CTYPe? . . . . . . . . . . . . . . . . . . . . . . . . . . . . . . . . . . . . . . 269 SYSTem:ERRor? . . . . . . . . . . . . . . . . . . . . . . . . . . . . . . . . . . . . . . . 269 SYSTem:VERSion? . . . . . . . . . . . . . . . . . . . . . . . . . . . . . . . . . . . . . 270 Table of Contents xi TRIGger. . . . . . . . . . . . . . . . . . . . . . . . . . . . . . . . . . . . . . . . . . . . . . . . . . . 271 TRIGger:COUNt . . . . . . . . . . . . . . . . . . . . . . . . . . . . . . . . . . . . . . . 273 TRIGger:COUNt? . . . . . . . . . . . . . . . . . . . . . . . . . . . . . . . . . . . . . . 273 TRIGger[:IMMediate] . . . . . . . . . . . . . . . . . . . . . . . . . . . . . . . . . . . 273 TRIGger:SOURce . . . . . . . . . . . . . . . . . . . . . . . . . . . . . . . . . . . . . . . 274 TRIGger:SOURce? . . . . . . . . . . . . . . . . . . . . . . . . . . . . . . . . . . . . . 275 TRIGger:TIMer[:PERiod] . . . . . . . . . . . . . . . . . . . . . . . . . . . . . . . . 275 TRIGger:TIMer[:PERiod]? . . . . . . . . . . . . . . . . . . . . . . . . . . . . . . . 275 Common Command Reference . . . . . . . . . . . . . . . . . . . . . . . . . . . . . . . . 276 *CAL? . . . . . . . . . . . . . . . . . . . . . . . . . . . . . . . . . . . . . . . . . . . . . . . 276 *CLS . . . . . . . . . . . . . . . . . . . . . . . . . . . . . . . . . . . . . . . . . . . . . . . . . 277 *DMC <name>,<cmd_data> . . . . . . . . . . . . . . . . . . . . . . . . . . . . . . 277 *EMC . . . . . . . . . . . . . . . . . . . . . . . . . . . . . . . . . . . . . . . . . . . . . . . . 277 *EMC? . . . . . . . . . . . . . . . . . . . . . . . . . . . . . . . . . . . . . . . . . . . . . . . 277 *ESE <mask> . . . . . . . . . . . . . . . . . . . . . . . . . . . . . . . . . . . . . . . . . . 277 *ESE? . . . . . . . . . . . . . . . . . . . . . . . . . . . . . . . . . . . . . . . . . . . . . . . . 278 *ESR? . . . . . . . . . . . . . . . . . . . . . . . . . . . . . . . . . . . . . . . . . . . . . . . . 278 *GMC? <name> . . . . . . . . . . . . . . . . . . . . . . . . . . . . . . . . . . . . . . . . 278 *IDN? . . . . . . . . . . . . . . . . . . . . . . . . . . . . . . . . . . . . . . . . . . . . . . . . 278 *LMC? . . . . . . . . . . . . . . . . . . . . . . . . . . . . . . . . . . . . . . . . . . . . . . . 279 *OPC . . . . . . . . . . . . . . . . . . . . . . . . . . . . . . . . . . . . . . . . . . . . . . . . . 279 *OPC? . . . . . . . . . . . . . . . . . . . . . . . . . . . . . . . . . . . . . . . . . . . . . . . . 279 *PMC . . . . . . . . . . . . . . . . . . . . . . . . . . . . . . . . . . . . . . . . . . . . . . . . 279 *RMC <name> . . . . . . . . . . . . . . . . . . . . . . . . . . . . . . . . . . . . . . . . . 279 *RST . . . . . . . . . . . . . . . . . . . . . . . . . . . . . . . . . . . . . . . . . . . . . . . . . 280 *SRE <mask>. . . . . . . . . . . . . . . . . . . . . . . . . . . . . . . . . . . . . . . . . . 281 *SRE? . . . . . . . . . . . . . . . . . . . . . . . . . . . . . . . . . . . . . . . . . . . . . . . . 281 *STB? . . . . . . . . . . . . . . . . . . . . . . . . . . . . . . . . . . . . . . . . . . . . . . . . 281 *TRG. . . . . . . . . . . . . . . . . . . . . . . . . . . . . . . . . . . . . . . . . . . . . . . . . 281 *TST? . . . . . . . . . . . . . . . . . . . . . . . . . . . . . . . . . . . . . . . . . . . . . . . . 281 *WAI. . . . . . . . . . . . . . . . . . . . . . . . . . . . . . . . . . . . . . . . . . . . . . . . . 285 Command Quick Reference . . . . . . . . . . . . . . . . . . . . . . . . . . . . . . . . . . . 286 APPENDIX A. Specifications . . . . . . . . . . . . . . . . . . . . . . . . . . . . . . . . . . . 295 APPENDIX B. Error Messages. . . . . . . . . . . . . . . . . . . . . . . . . . . . . . . . . . 325 APPENDIX C. Glossary . . . . . . . . . . . . . . . . . . . . . . . . . . . . . . . . . . . . . . . 333 APPENDIX D. PID Algorithm Listings . . . . . . . . . . . . . . . . . . . . . . . . . . . 337 PIDA . . . . . . . . . . . . . . . . . . . . . . . . . . . . . . . . . . . . . . . . . . . . . . . . . . . . . 337 PIDB . . . . . . . . . . . . . . . . . . . . . . . . . . . . . . . . . . . . . . . . . . . . . . . . . . . . . 339 PIDC . . . . . . . . . . . . . . . . . . . . . . . . . . . . . . . . . . . . . . . . . . . . . . . . . . . . . 344 APPENDIX E. Wiring and Noise Reduction Methods . . . . . . . . . . . . . . . 351 Separating Digital and Analog SCP Signals . . . . . . . . . . . . . . . . . . . . . . . 351 Recommended Wiring and Noise Reduction Techniques . . . . . . . . . . . . . 352 Wiring Checklist . . . . . . . . . . . . . . . . . . . . . . . . . . . . . . . . . . . . . . . . 352 xii Table of Contents VT1415A Guard Connections. . . . . . . . . . . . . . . . . . . . . . . . . . . . . . 353 Common Mode Voltage Limits. . . . . . . . . . . . . . . . . . . . . . . . . . . . . 353 When to Make Shield Connections . . . . . . . . . . . . . . . . . . . . . . . . . . 353 Noise Due to Inadequate Card Grounding . . . . . . . . . . . . . . . . . . . . . . . . 353 VT1415A Noise Rejection . . . . . . . . . . . . . . . . . . . . . . . . . . . . . . . . . . . . 354 Normal Mode Noise (Enm) . . . . . . . . . . . . . . . . . . . . . . . . . . . . . . . . 354 Common Mode Noise (Ecm). . . . . . . . . . . . . . . . . . . . . . . . . . . . . . . 354 Keeping Common Mode Noise out of the Amplifier . . . . . . . . . . . . 354 Reducing Common Mode Rejection Using Tri-Filar Transformers . 355 APPENDIX F. Generating User Defined Functions . . . . . . . . . . . . . . . . . 357 Introduction . . . . . . . . . . . . . . . . . . . . . . . . . . . . . . . . . . . . . . . . . . . . . . . . 357 Haversine Example . . . . . . . . . . . . . . . . . . . . . . . . . . . . . . . . . . . . . . . . . . 358 Limitations. . . . . . . . . . . . . . . . . . . . . . . . . . . . . . . . . . . . . . . . . . . . . . . . . 360 Program Listings . . . . . . . . . . . . . . . . . . . . . . . . . . . . . . . . . . . . . . . . . . . . 361 APPENDIX G. Example Program Listings . . . . . . . . . . . . . . . . . . . . . . . . 377 simp_pid.cs . . . . . . . . . . . . . . . . . . . . . . . . . . . . . . . . . . . . . . . . . . . . . . . . 377 file_alg.cs . . . . . . . . . . . . . . . . . . . . . . . . . . . . . . . . . . . . . . . . . . . . . . . . . 383 swap.cs . . . . . . . . . . . . . . . . . . . . . . . . . . . . . . . . . . . . . . . . . . . . . . . . . . . 389 tri_sine.cs. . . . . . . . . . . . . . . . . . . . . . . . . . . . . . . . . . . . . . . . . . . . . . . . . . 396 Index . . . . . . . . . . . . . . . . . . . . . . . . . . . . . . . . . . . . . . . . . . . . . . . . . . . . . . . . 409 Table of Contents xiii xiv Table of Contents Support Resources Support resources for this product are available on the Internet and at VXI Technology customer support centers. VXI Technology World Headquarters VXI Technology, Inc. 2031 Main Street Irvine, CA 92614-6509 Phone: (949) 955-1894 Fax: (949) 955-3041 VXI Technology Cleveland Instrument Division VXI Technology, Inc. 7525 Granger Road, Unit 7 Valley View, OH 44125 Phone: (216) 447-8950 Fax: (216) 447-8951 VXI Technology Lake Stevens Instrument Division VXI Technology, Inc. 1924 - 203 Bickford Snohomish, WA 98290 Phone: (425) 212-2285 Fax: (425) 212-2289 Technical Support Phone: (949) 955-1894 Fax: (949) 955-3041 E-mail: [email protected] Visit http://www.vxitech.com for worldwide support sites and service plan information. Support xv Support xvi Chapter 1 Getting Started About This Chapter This chapter will explain hardware configuration before installation in a VXIbus mainframe. By attending to each of these configuration items, the VT1415A won’t have to be removed from its mainframe later. Chapter contents include: · · · · Configuring the VT1415A . . . . . . . . . . . . . . . . . . . . . . . . . . . . . page 17 Instrument Drivers . . . . . . . . . . . . . . . . . . . . . . . . . . . . . . . . . . . page 25 About Example Programs . . . . . . . . . . . . . . . . . . . . . . . . . . . . . page 25 Verifying a Successful Configuration . . . . . . . . . . . . . . . . . . . . page 25 Configuring the VT1415A There are several aspects to configuring the module before installing it in a VXIbus mainframe. They are: · · · · Setting the Logical Address Switch . . . . . . . . . . . . . . . . . . . . . . page 18 Installing Signal Conditioning Plug-Ons . . . . . . . . . . . . . . . . . . page 18 Disabling the Input Protect Feature . . . . . . . . . . . . . . . . . . . . . . page 23 Disabling Flash Memory Access . . . . . . . . . . . . . . . . . . . . . . . . page 23 For most applications, only the Logical Address switch needs to be changed prior to installation. The other settings can be used as delivered. Switch/Jumper Logical Address Switch Input Protect Jumper Flash Memory Protect Jumper NOTE Chapter 1 Setting 208 Protected PROG Setting the VXIbus Interrupt Level: The VT1415A uses a default VXIbus interrupt level of 1. The default setting is made at power-on and after *RST command. The interrupt level can be changed by executing the DIAGnostic:INTerrupt[:LINe] command in the application program. Getting Started 17 Setting the Logical Address Switch Follow the next figure and ignore any switch numbering printed on the Logical Address switch. When installing more than one VT1415A in a single VXIbus Mainframe, set each instrument to a different Logical Address. Setting Logical Address Switch VT1415A Set Switch As Shown LOGICAL ADDRESS = 208 OPEN = SWITCH SET TO 0 (OFF) CLOSED = SWITCH SET TO 1 (ON) 18 Getting Started Chapter 1 Installing SCPs CAUTION The following illustrations show the steps used to install Signal Conditioning Plug-on Modules (SCPs). Before installing the SCPs, read “Separating Digital and Analog SCP Signals” in Appendix E. Use approved Static Discharge Safe handling procedures anytime the covers are removed from the VT1415A or are handling SCPs. 1 Installing SCPs: Removing the Cover – VT1415A 2 Remove the SCP Retaining Screws Chapter 1 1 Remove 2 screws (#10 Torx); lift front and slide out tabs Getting Started 19 2 Installing SCPs – VT1415A CAUTION Use approved Static Discharge handling procedures when handling the VT1415A Scanning A/D Module and the SCPs. SCP 2 1 Tighten the SCP Retaining Screws Align the SCP Connectors with the Module Connectors and then Push in 20 Getting Started Chapter 1 3 Installing SCPs: Reinstalling the Cover – VT1415A 1 Line up the 3 Tabs with the 3 Slots; then lower cover onto the Module 2 Tighten 2 Screws Chapter 1 Getting Started 21 4 Installing SCPs: Labeling – VT1415A Peel off correct Label from Card and Stick on the appropriate place on the Cover 1 Terminal Module (Connect to A/D Module Later) Stick-on Label furnished with the SCP (VXI Technology part number: VT15xx) 2 Peel off Label from Card and Stick on the Terminal Module to be Connected to the A/D Module 22 Getting Started Chapter 1 Disabling the Input Protect Feature (Optional) VOIDS WARRANTY Disabling the Input Protect feature voids the VT1415A’s warranty. The Input Protect feature allows the VT1415A to open all channel input relays if any input’s voltage exceeds ±19 volts (±6 volts for digital I/O SCPs). This feature will help to protect the card’s Signal Conditioning Plug-ons, input multiplexer, ranging amplifier, and A/D from destructive voltage levels. The level that trips the protection function has been set to provide a high probability of protection. The voltage level that is certain to cause damage is somewhat higher. If, in an application, the importance of completing a measurement run outweighs the added risk of damage to the VT1415A, the input protect feature may be disabled. Disabling the Input Protection Feature voids the VT1415A’s warranty. To disable the Input Protection feature, locate and cut JM2202. Make a single cut in the jumper and bend the adjacent ends apart. See following illustration for location of JM2202. Disabling Flash Memory Access (Optional) The Flash Memory Protect Jumper (JM2201) is shipped in the “PROG” position. It is recommended that the jumper be left in this position so that all of the calibration commands can function. Changing the jumper to the protect position prevents the following from being executed: · The SCPI calibration command CAL:STORE ADC | TARE · The register-based calibration commands STORECAL and STORETAR · Any application that installs firmware-updates or makes any other modification to Flash Memory through the A24 window. With the jumper in the “PROG” position, one or more VT1415As can be completely calibrated without removing them from the application system. A VT1415A calibrated in its working environment will in general be better calibrated than if it were calibrated separate from its application system. The multimeter used during the periodic calibration cycle should be considered the calibration transfer standard. Provide Calibration Organization control unauthorized access to its calibration constants. See the VT1415A/VT1419A Service Manual for complete information on VT1415A periodic calibration. If access to the VT1415A’s calibration constants must be limited, place JM2201 in the protected position and cover the shield retaining screws with calibration stickers. See following illustration for location of JM2201. Chapter 1 Getting Started 23 Accessing and Locating JM2201 and JM2202 – VT1415A Flash Memory Protect Jumper Default = PROG (recommended) JM2201 JM2202 1 Locate 2 Cut 3 Bend Input Protect Jumper Warning: Cutting this Jumper Voids Your Warranty! 24 Getting Started Chapter 1 Instrument Drivers If using the VT1415A with C-SCPI (compiled-SCPI), the driver needed is supplied as an option to the C-SCPI product. Follow the C-SCPI documentation for use. The Agilent/HP E1405B/06A downloadable driver is supplied with the VT1415A. See the manual for the Agilent/HP Command Module/ Mainframe for down-loading procedures. About Example Programs Examples on Disc Example Command Sequences Typical C-SCPI Example Program All example programs mentioned by file name in this manual are available on the “VXIplug&play Drivers & Product Manuals” CD supplied with the VT1415A. Where programming concepts are discussed in this manual, the commands to send to the VT1415A are shown in the form of command sequences. These are not example programs because they are not written in any computer language. They are meant to show the VT1415A SCPI commands in the sequence they should be sent. Where necessary these sequences include comments to describe program flow and control such as loop - end loop and if - end if. See the code sequence on page 86 for an example. The Verify program (file name verif.cs) is printed below to show a typical C-SCPI program for the VT1415A. Verifying a Successful Configuration An example C-SCPI program source is shown on the following pages. This program is included with the VXIplug&play Drivers and Product Manuals CD (file name verif.cs). The program uses the *IDN? query command to verify the VT1415A is operational and responding to commands. The program also has an error checking function (check_error()). It is important to include an instrument error checking routine in programs, particularly the first trial programs so that instant feedback can be provided while learning about the VT1415A. After the C-SCPI preprocessor is run and the program is compiled and loaded, type verif to run the example. Chapter 1 Getting Started 25 /* verif.cs 1.) Prints the Module’s identification, manufacturer, and revision number 2.) Prints the Signal Conditioning Plug-ons (SCPs) identification (if any) at each of the SCP positions. */ #include <stdio.h> #include <cscpi.h> /* Defines module’s logical address */ #define LADD “208" /* Declares module as a register device */ INST_DECL(e1415, “E1415A”, REGISTER); /* Prototypes of functions declared later */ void rst_clr( void ); void id_scps( void ); int32 check_error( char * ); /************************************************************************/ void main() /* Main function */ { char read_id[80]; /* Clear screen and announce program */ printf(“\033H\033J\n\n Installation Verification Program\n\n”); printf(“\n\n Please Wait...”); /* Start the register-based operating system for the module */ INST_STARTUP(); /* Enable communications to the module; check if successful */ INST_OPEN(e1415, “vxi,” LADD); if ( !e1415 ) { printf(“INST_OPEN failed (ladd = %s).Failure code is: %d\n”, LADD,cscpi_open_error); exit(1); } /* Read and print the module’s identification */ INST_QUERY(e1415, “*idn?”, “”, read_id); printf(“\n\nInstrument ID: %s\n\n”, read_id); rst_clr(); /* Function resets the module */ id_scps(); /* Function checks for installed SCPs */ exit(0); } /************************************************************************/ void rst_clr() /* Reset the A/D module to its power-on state */ 26 Getting Started Chapter 1 { int16 opc_wait; /* Reset the module and wait until it resets */ INST_QUERY(e1415, “*RST;*OPC?”, “”, &opc_wait); /* Check for module generated errors; exit if errors read */ if (check_error(“rst_clr”)) exit(1); } /*************************************************************************/ void id_scps() /* Check ID of all installed SCPs */ { int16 scp_addr; char scp_id[100]; /* Get SCP identifications of all SCPs */ printf(“\nSCP Identifications:\n\n”); for (scp_addr = 100; scp_addr <= 156; scp_addr += 8) { INST_QUERY(e1415, “SYST:CTYP? (@%d)”, “%s”, scp_addr, scp_id); printf(“ID for SCP %d is %s\n”, (scp_addr - 100) / 8, scp_id); } } /************************************************************************/ int32 check_error( char *message ) /* Check for module generated errors */ { int16 error; char err_out[256]; /* Check for any errors */ INST_QUERY(e1415, “SYST:ERR?”, “”, &error, err_out); /* If error is found, print out the error(s) */ if (error) { while(error) { printf(“Error %d,%s (in function %s)\n”, error, err_out, message); INST_QUERY(e1415, “SYST:ERR?”, “”, &error, err_out); } return 1; } return 0; } Chapter 1 Getting Started 27 Notes 28 Getting Started Chapter 1 Chapter 2 Field Wiring About This Chapter This chapter shows how to plan and connect field wiring to the VT1415A’s Terminal Module. The chapter explains proper connection of analog signals to the VT1415A, both two-wire voltage type and four-wire resistance type measurements. Connections for other measurement types (e.g., strain using the Bridge Completion SCPs) refer to specific SCP manual in the “SCP Manuals” section. Chapter contents include: · · · · · · · · · · · Planning Wiring Layout for the VT1415A . . . . . . . . . . . . . . . . . page 29 Terminal Module. . . . . . . . . . . . . . . . . . . . . . . . . . . . . . . . . . . . . page 33 Reference Temperature Sensing with the VT1415A . . . . . . . . . page 35 Preferred Measurement Connections . . . . . . . . . . . . . . . . . . . . . page 38 Connecting the On-Board Thermistor. . . . . . . . . . . . . . . . . . . . . page 40 Wiring and Attaching the Terminal Module . . . . . . . . . . . . . . . . page 41 Attaching/Removing the VT1415A Terminal Module . . . . . . . . page 43 Adding Components to the Terminal Module . . . . . . . . . . . . . . page 45 Terminal Module Wiring Maps . . . . . . . . . . . . . . . . . . . . . . . . . page 46 Terminal Module Options . . . . . . . . . . . . . . . . . . . . . . . . . . . . . . page 47 Faceplate Connector Pin-Signal List. . . . . . . . . . . . . . . . . . . . . . page 49 Planning the Wiring Layout The first point to understand is that the VT1415A makes no assumptions about the relationship between Signal Conditioning Plug-on (SCP) function and the position in the VT1415A that it can occupy. Any type of SCP can be placed into any SCP position. There are, however, some factors that should be considered when planning what mix of SCPs should be installed in each of the VT1415As. The following discussion is intended to clarify these factors. SCP Positions and Channel Numbers Chapter 2 The VT1415A has a fixed relationship between Signal Conditioning Plug-on positions and the channels they connect to. Each of the eight SCP positions can connect to eight channels. Figure 2-1 shows the channel number to SCP relationship. Field Wiring 29 Ch 00 SCP 0 Ch 07 Ch 08 SCP 1 Ch 15 Ch 16 Note Each channel line represents both a Hi and Lo input. SCP 2 Ch 23 Ch 24 SCP 3 Ch 31 A/D System Ch 32 SCP 4 Ch 39 Ch 40 SCP 5 Ch 47 Ch 48 SCP 6 Ch 55 Ch 56 SCP 7 Ch 63 Figure 2-1: Channel Numbers at SCP Positions 30 Field Wiring Chapter 2 Sense SCPs and Output SCPs Some SCPs provide input signal conditioning (sense SCPs such as filters and amplifiers) while others provide stimulus to the measurement circuit (output SCPs such as current sources and strain bridge completion). In general, channels at output SCP positions are not used for external signal sensing but are paired with channels of a sense SCP. Two points to remember about mixing output and sense SCPs: 1. Paired SCPs (an output and a sense SCP) may reside in separate VT1415As. SCP outputs are adjusted by *CAL? to be within a specific limit. The Engineering Unit (EU) conversion used for a sense channel will assume the calibrated value for the output channel. 2. Output SCPs while providing stimulus to the measurement circuit reduce the number of external sense channels available to the VT1415A. Figure 2-2 illustrates an example of “pairing” output SCP channels with sense SCP channels (in this example, four-wire resistance measurements). sense Hi Note Each channel line represents both a Hi and Lo input. sense Lo Ch 24 SCP 3 (sense) Ch 31 Ch 32 SCP 4 (output) Ch 39 Terminal Module Figure 2-2: Pairing Output and Sense SCP Channels Chapter 2 Field Wiring 31 Planning for Thermocouple Measurements Thermocouples and thermocouple reference temperature sensors can be wired to any of the VT1415A’s channels. When the scan list is executed, make sure that the reference temperature sensor is specified in the channel sequence before any of the associated thermocouple channels. External wiring and connections to the VT1415A are made using the Terminal Module (see page 41). NOTE IMPORTANT! 32 Field Wiring The isothermal reference temperature measurement made by a VT1415A applies only to thermocouple measurements made by that instrument. In systems with multiple VT1415As, each instrument must make its own reference measurements. The reference measurement made by one VT1415A can not be used to compensate thermocouple measurements made by another VT1415A. To make good low-noise measurements, shielded wiring must be used from the device under test to the Terminal Module at the VT1415A. The shield must be continuous through any wiring panels or isothermal reference connector blocks and must be grounded at a single point to prevent ground loops. See “Preferred Measurement Connections” later in this section and “Wiring and Noise Reduction Methods” in Appendix E. Chapter 2 Terminal Modules The VT1415A is comprised of an A/D module and a spring clamp type Terminal Module. The terminals utilize a spring clamp terminal for connecting solid or stranded wire. Connection is made with a simple push of a three-pronged insertion tool (P/N: 8710-2127), which is shipped with the VT1415A. If the spring clamp terminal module is not desired, an interface to a rack mount terminal panel (Option A3F) is available (see page 47). The Terminal Module provides the following: · Terminal connections to field wiring. · Strain relief for the wiring bundle. · Reference junction temperature sensing for thermocouple measurements. · Ground-to-Guard connections for each channel. The SCPs and Terminal Module The same Terminal is used for all field wiring regardless of which Signal Conditioning Plug-On (SCP) is used. Each SCP includes a set of labels to map that SCP’s channels to the Terminal Module’s terminal blocks. See step 4 in “Installing Signal Conditioning Plug-Ons” in Chapter 1 page 22 for VT1415A Terminal Modules. Terminal Module Layout Figure 2-3 shows a Terminal Module for the VT1415A. Chapter 2 Field Wiring 33 Sockets for Guard to Ground Connections Terminal Block for Input Connections Jumper to select for On-board or Remote Temperature Sensing On-board Thermistor for Temperature Sensing Terminal Block with Remote Temperature Sensing, Trigger, and other Connections Figure 2-3: VT1415A Terminal Module 34 Field Wiring Chapter 2 Reference Temperature Sensing with the VT1415A The Terminal Module provides an on-board thermistor for sensing isothermal reference temperature of the terminal blocks. Also provided is a jumper set (J1 in Figure 2-3) to route the VT1415A’s on-board current source to a thermistor or RTD on a remote isothermal reference block. Figures 2-5 and 2-4 show connections for both local and remote sensing. VT1415A Field Wiring Terminal Module HTI ON REM BOARD LTI HTS On-Board Current Source LTS J1 Any Sense Channel Hnn Lnn Figure 2-4: On-Board Thermistor Connections VT1415A Field Wiring Terminal Module HTI ON REM BOARD LTI HTS On-Board Current Source LTS J1 Any Sense Channel Hnn Lnn Figure 2-5: Remote Thermistor or RTD Connections Chapter 2 Field Wiring 35 Terminal Module Considerations for TC Measurements 36 Field Wiring The isothermal characteristics of the VT1415A Terminal Module are crucial for good TC readings and can be affected by any of the following factors: 1. The clear plastic cover must be on the Terminal Module. 2. The thin white mylar thermal barrier must be inserted over the Terminal Module connector (VT1415A only). This prevents airflow from the VT1415A A/D Module into the Terminal Module. 3. The Terminal Module must also be in a fairly stable temperature environment and it is best to minimize the temperature gradient between the VT1415A module and the Terminal Module. 4. The VXI mainframe cooling fan filters must be clean and there should be as much clear space in front of the fan intakes as possible. 5. Recirculating warm air inside a closed rack cabinet can cause a problem if the Terminal Module is suspended into ambient air that is significantly warmer or cooler. If the mainframe recess is mounted in a rack with both front and rear doors, closing both doors helps keep the entire VT1415A at a uniform temperature. If there is no front door, try opening the back door. 6. VXI Technology recommends that the cooling fan switch on the back of the of an Agilent/HP E1401 Mainframe be in the “High” position. The normal variable speed cooling fan control can make the internal VT1415A module temperature cycle up and down, which affects the amplifiers with these microvolt-level signals. Chapter 2 Preferred Measurement Connections For any A/D Module to scan channels at high speeds, it must use a very short sample period (< 10 µs for the VT1415A). If significant normal mode noise is presented to its inputs, that noise will be part of the measurement. To make quiet, accurate measurements in electrically noisy environments, use properly connected shielded wiring between the A/D and the device under test. Figure 2-6 shows recommended connections for powered transducers, thermocouples, and resistance transducers. (See Appendix E for more information on Wiring Techniques). IMPORTANT! HINTS Chapter 2 1. Try to install Analog SCPs relative to Digital I/O as shown in “Separating Digital and Analog Signals” in Appendix E. 2. Use individually shielded, twisted-pair wiring for each channel. 3. Connect the shield of each wiring pair to the corresponding Guard (G) terminal on the Terminal Module (see Figure 2-7 for schematic of Guard-to-Ground circuitry on the Terminal Module). 4. The Terminal Module is shipped with the Ground-to-Guard (GND-GRD) shorting jumper installed for each channel. These may be left installed or removed (see Figure 2-8 to remove the jumper), dependent on the following conditions: a.Grounded Transducer with shield connected to ground at the transducer: Low frequency ground loops (dc and/or 50/60 Hz) can result if the shield is also grounded at the Terminal Module end. To prevent this, remove the GND-GRD jumper for that channel (Figure 2-6 A/C). b.Floating Transducer with shield connected to the transducer at the source: In this case, the best performance will most likely be achieved by leaving the GND-GRD jumper in place (Figure 2-6 B/D). 5. In general, the GND-GRD jumper can be left in place unless it is necessary to remove to break low frequency (below 1 kHz) ground loops. 6. Use good quality foil or braided shield signal cable. 7. Route signal leads as far as possible from the sources of greatest noise. 8. In general, don’t connect Hi or Lo to Guard or Ground at the VT1415A. 9. It is best if there is a dc path somewhere in the system from Hi or Lo to Guard/Ground. 10. The impedance from Hi to Guard/Ground should be the same as from Lo to Guard/Ground (balanced). 11. Since each system is different, don’t be afraid to experiment using the suggestions presented here until an acceptable noise level is found. Field Wiring 37 power Device Under Test pressure Shield Lo Guard A Example for Powered Transducers Shield power power Device Under Test pressure Hi P to V Remove Jumper to break Ground Loop (shield connected to ground at transducer) Hi P to V Lo Guard B power Shield Leave Jumper in Place (transducer floating) Hi Device Under Test Lo Example for Thermocouples C Shield Guard Hi Device Under Test Remove Jumper to break Ground Loop (shield connected to ground at transducer) Lo D Guard Leave Jumper in Place (transducer floating) Shield Hi Lo Example for Resistive Transducers E Guard Jumper may be left in place, since Current Lo( + ) is at VT1415A GND Potential Current Hi ( - ) Current Lo ( + ) Figure 2-6: Preferred Signal Connections 38 Field Wiring Chapter 2 SCP Terminal Module External Connections 1 kW G0 0.1 µF GND to GRD Jumper (removable) 10 kW For each SCP Position 1 kW G7 0.1 µF GND to GRD Jumper (removable) 10 kW Figure 2-7: GRD/GND Circuitry on Terminal Module Removing Guard to Ground on Channel 00 Figure 2-8: Grounding the Guard Terminal Chapter 2 Field Wiring 39 Connecting the On-Board Thermistor The following figures show how to use the A/D module to make temperature measurements with or without using the on-board Thermistor. The Thermistor is used for reference junction temperature sensing in thermocouple measurements. Figure 2-9 shows the configuration for the VT1415A Terminal Module. Under Cover ON BOARD Place both J1 jumpers here to connect current source to on-board thermistor RT1. Sense RT1 by connecting any sense channels to terminals HTS and LTS. REMote Place both J1 jumpers here to route current source to terminals HTI and LTI. Connect these terminals to remote thermistor or RTD. Sense with any sense channel. See figure on page 41 to remove the cover Figure 2-9: Temperature Sensing for VT1415A Terminal Module 40 Field Wiring Chapter 2 Wiring and Attaching the Terminal Module Figures 2-10 and 2-11 show how to open, wire, and attach the terminal module to a VT1415A. 2 Remove and Retain Wiring Exit Penal 1 Remove Clear Cover A. Release Screws Remove 1 of the 3 wire exit panels B. Press Tab Forward and Release Tab 3 Make Connections Special tool P/N 8710-2127 (shipped with Terminal Module) Use wire Size 20-26 AEG 5mm 0.2" 4 Route Wiring Tighten wraps to secure wires VW1 Flammability Rating Push down on lever, insert wire into terminal and release. Figure 2-10: Wiring and Connecting the VT1415A Terminal Module Chapter 2 Field Wiring 41 Replace Wiring Exit Panel Replace Clear Cover A. Hook in the top cover tabs onto the fixture B. Press down and tighten screws Cut required holes in panels for wire exit Keep wiring exit panel hole as small as possible Install the Terminal Module Push in the Extraction Levers to Lock the Terminal Module onto the VT1415A Install Mylar Thermal Barrier on Terminal Module connectors Extraction Levers VT1415A Module Figure 2-11: Wiring and Connecting the VT1415A Terminal Module (Cont.) 42 Field Wiring Chapter 2 Attaching/Removing the VT1415A Terminal Module Figure 2-12 shows how to attach the terminal module to the VT1415A and Figure 2-13 shows how to remove it. Extend the extraction levers on the Terminal Module Install Mylar Thermal Barrier on Terminal Module connectors Extraction Lever Use a small screwdriver to pry and release the two extraction levers VT1415A Align the Terminal Module connectors to the VT1415A module connectors Apply gentle pressure to attach the Terminal Module to the VT1415A Module Extraction Levers Push in the extraction levers to lock the Terminal Module onto the VT1415A Module Figure 2-12: Attaching the VT1415A Terminal Module Chapter 2 Field Wiring 43 Release the two extraction levers and push both levers out simultaneously Extraction Lever Use a small screwdriver to pry and release the two extraction levers Free and remove the Terminal Module from the A/D Module Extraction Lever VT1415A Extraction Lever Figure 2-13: Removing the VT1415A Terminal Module 44 Field Wiring Chapter 2 Adding Components to the Terminal Module The back of the terminal module printed circuit board (PCB) provides surface mount pads which can be used to add serial and parallel components to any channel’s signal path. Figure 2-14 shows additional component locator information (see the schematic and pad layout information on the back of the terminal module PCB). Figure 2-15 shows some usage example schematics. Figure 2-14: Additional Component Location Information HI SH HI TO USER WIRING LO HI TO VT1413A/VT1415A LO 0 Ohms PL PH PL PH Normal Mode Low-Pass Filter Circuit SH PHL TO USER WIRING SL 200 Ohms or 250 Ohms 0 Ohms LO TO VT1413A/VT1415A LO SL 10 kOhms Default Circuit HI TO USER WIRING LO SL HI 10 kOhms PHL PHL 0 Ohms TO VT1413A/VT1415A 0 Ohms PL PH 4 - 20 mA NOTE: Input must not exceed common mode limits (usually ±16 Volts unless attenuated with a VT1513A) 4 to 20 mA Sense 5 V Full Scale with 250 Ohm (must use 16 Volt range) 4 V Full Scale with 200 Ohm (can use 4 Volt range for better resolution) Figure 2-15: Series & Parallel Component Examples Chapter 2 Field Wiring 45 Terminal Module Wiring Maps Figure 2-16 shows the Terminal Module map for the VT1415A. Top H24 L24 G24 H25 L25 G25 H26 L26 G26 H27 L27 G27 H28 L28 G28 H29 L29 G29 H30 L30 G30 H31 L31 G31 H16 L16 G16 H17 L17 G17 H18 L18 G18 H19 L19 G19 H20 L20 G20 H21 L21 G21 H22 L22 G22 H23 L23 G23 H08 L08 G08 H09 L09 G09 H10 L10 G10 H11 L11 G11 H12 L12 G12 H13 L13 G13 H14 L14 G14 H15 L15 G15 GND GND GND GND LTS HTS LTI HTI GND TRIG GND LCAL HCAL LOHM HOHM GND GND GND All wiring entering Terminal Module passes under this strain relief bar Heavy line indicates the side of the terminal block on which the wire enters H00 L00 G00 H01 L01 G01 H02 L02 G02 H03 L03 G03 H04 L04 G04 H05 L05 G05 H06 L06 G06 H07 L07 G07 G32 L32 H32 G33 L33 H33 G34 L34 H34 G35 L35 H35 G36 L36 H36 G37 L37 H37 G38 L38 H38 G39 L39 H39 G40 L40 H40 G41 L41 H41 G42 L42 H42 G43 L43 H43 G44 L44 H44 G45 L45 H45 G46 L46 H46 G47 L47 H47 G48 L48 H48 G49 L49 H49 G50 L50 H50 G51 L51 H51 G52 L52 H52 G53 L53 H53 G54 L54 H54 G55 L55 H55 G56 L56 H56 G57 L57 H57 G58 L58 H58 G59 L59 H59 G60 L60 H60 G61 L61 H61 G62 L62 H62 G63 L63 H63 Figure 2-16: VT1415A Terminal Module Map 46 Field Wiring Chapter 2 Terminal Module Option Option A3F Option A3F allows a VT1415A to be connected to a VT1586A Rack Mount Terminal Panel. The option provides four SCSI plugs on a Terminal Module to make connections to the Rack Mount Terminal Panel using four separately ordered SCSI cables. Option A3F Is shown in Figure 2-17. Figure 2-17: Option A3F Rack Mount Terminal Panel Accessories Chapter 2 There are two different cables available for connecting the VT1586A Rack Mount Terminal Panel to the VT1415A Option A3F. In both cases, four cables are required if all 64-channels are needed. These cables do not come with the VT1415A Option A3F and must be ordered separately. Field Wiring 47 Standard Cable This cable (VT1588A) is a 16-channel twisted pair cable with an outer shield. This cable is suitable for relatively short cable runs. Custom Length Cable This cable is available in custom lengths. It is a 16-channel twisted pair cable with each twisted pair individually shielded to provide better quality shielding for longer cable runs. Contact a VXI Technology Sales Representative for more information. HF Common Mode Filters Optional High Frequency (HF) Common Mode Filters are on the VT1586A Rack Mount Terminal Panel’s input channels (VT1586A-001, RF Filters). They filter out ac common mode signals present in the cable that connects between the terminal panel and the device under test. The filters are useful for filtering out small common mode signals below 5 VP-P. To order these filters, order P/N: 73-0027-001 (Final Assy, VT1586A-001, Rf Filters Large Common Mode Signals). 48 Field Wiring Chapter 2 Faceplate Connector Pin-Signal Lists Figure 2-18 shows the Faceplate Connector Pin Signal List for the VT1415A. Count From Top Closed Loop Controller Count From Bottom 1 2 3 4 5 6 7 8 9 10 11 12 13 14 15 16 17 18 19 20 21 22 23 24 25 26 27 28 29 30 31 32 GND GND GND GND GND G0 G1 H08 L08 H11 L11 H14 L14 H17 L17 H20 L20 H23 L23 G2 H27 L27 H30 L30 G3 G3 GND GND GND GND GND GND 1 2 3 4 5 6 VT1415A bus 1 2 3 4 5 6 7 8 9 10 11 12 13 14 15 16 17 18 19 20 21 22 23 24 25 26 27 28 29 30 31 32 H00 H01 H02 H03 H04 H05 H06 H07 H08 H10 H12 H13 L15 H16 H18 H19 H21 H22 L24 H25 H26 H28 H29 L31 G3 G3 GND HOHM HCAL GND H_I GND HCAL LCAL GND HOHM LOHM GND GND GND GND TST-A GND G4 G4 G4 L33 H33 L36 H36 G5 L40 H40 L43 H43 L46 H46 L49 H49 L52 H52 L55 H55 G6 G7 GND GND GND GND GND L00 L01 L02 L03 L04 L05 L06 L07 L09 L00 L02 H03 L05 H06 L08 H09 L10 H22 L24 L25 L26 L28 H29 L31 G3 G3 GND LOHM LCAL GND L_I GND HCAL LCAL GND HOHM LOHM GND GND TRG GND SYSF GND G4 G4 G4 H32 H34 H35 H37 L38 L39 L41 L42 H44 L45 H47 H48 H50 H51 H53 H54 H56 H57 H58 H59 H60 H61 H62 H63 32 31 30 29 28 27 26 25 24 23 22 21 20 19 18 17 16 15 14 13 12 11 10 9 8 7 6 5 4 3 2 1 6 5 4 3 2 1 GND GND GND GND GND G4 G4 G4 L32 L34 L35 L37 L38 L39 L41 L42 L44 L45 L47 L48 L50 L51 L53 L54 L56 L57 L58 L59 L60 L61 L62 L63 32 31 30 29 28 27 26 25 24 23 22 21 20 19 18 17 16 15 14 13 12 11 10 9 8 7 6 5 4 3 2 1 Figure 2-18: VT1415A Connector Pin-Signal List Chapter 2 Field Wiring 49 Notes 50 Field Wiring Chapter 2 Chapter 3 Programming the VT1415A for PID Control About This Chapter The focus in this chapter is to show the VT415A’s programming model. The programming model is basically a sequence of SCPI commands an application program sends to a VT1415A to configure it to execute defined PID (proportional integral derivative) algorithms. This programming model is virtually the same for the pre-defined PID algorithms and user-defined custom algorithms. This chapter contains: · Overview of the VT1415A Loop Controller . . . . . . . . . . . . . . . page 52 Programming Model . . . . . . . . . . . . . . . . . . . . . . . . . . . . . page 53 · Executing the Programming Model . . . . . . . . . . . . . . . . . . . . . page 55 · · · · · · · Chapter 3 Programming Overview Diagram . . . . . . . . . . . . . . . . . . . page 57 - Setting up Analog Input and Output Channels . . . . . . . . . page 58 Configuring Programmable SCP Parameters . . . . . . . . page 58 Linking Input Channels to EU Conversion . . . . . . . . . . page 60 Linking Output Channels to Functions . . . . . . . . . . . . . page 67 - Setting up Digital Input and Output Channels . . . . . . . . . page 68 Digital Input Channels . . . . . . . . . . . . . . . . . . . . . . . . . page 68 Digital Output Channels . . . . . . . . . . . . . . . . . . . . . . . . page 69 - Performing Channel Calibration (Important!) . . . . . . . . . . page 72 - Defining PID algorithms . . . . . . . . . . . . . . . . . . . . . . . . . . page 73 The VT1415A’s Standard PID algorithms . . . . . . . . . . page 73 Pre-setting PID variables and coefficients . . . . . . . . . . page 77 - Defining Data Storage . . . . . . . . . . . . . . . . . . . . . . . . . . . . page 77 Specifying the Data Format . . . . . . . . . . . . . . . . . . . . . . page 77 Selecting the FIFO Mode . . . . . . . . . . . . . . . . . . . . . . . page 78 - Setting up the Trigger System . . . . . . . . . . . . . . . . . . . . . . page 78 Arm and Trigger Sources . . . . . . . . . . . . . . . . . . . . . . . page 78 Programming the Trigger Timer . . . . . . . . . . . . . . . . . . page 80 - INITiating/Running Algorithms . . . . . . . . . . . . . . . . . . . . page 81 The Operating Sequence . . . . . . . . . . . . . . . . . . . . . . . . page 82 - Reading Running Algorithm Values . . . . . . . . . . . . . . . . . page 83 Reading History Mode Values From the FIFO . . . . . . page 84 Reading Algorithm Values From the CVT . . . . . . . . . . page 83 Reading Algorithm Variables . . . . . . . . . . . . . . . . . . . . page 83 - Modifying Algorithm Variables . . . . . . . . . . . . . . . . . . . . page 87 Updating Algorithm Variables . . . . . . . . . . . . . . . . . . . page 87 Enabling/Disabling Algorithms . . . . . . . . . . . . . . . . . . . page 87 Setting Algorithm Execution Frequency . . . . . . . . . . . . page 88 A Quick-Start PID Algorithm Example . . . . . . . . . . . . . . . . . . . page 89 Algorithm Tuning . . . . . . . . . . . . . . . . . . . . . . . . . . . . . . . . . . . page 91 Using the Status System . . . . . . . . . . . . . . . . . . . . . . . . . . . . . . . page 91 VT1415A Background Operation . . . . . . . . . . . . . . . . . . . . . . . . page 98 Updating the Status System and VXI Interrupts . . . . . . . . . . . . . page 98 Creating and Loading Custom EU Tables . . . . . . . . . . . . . . . . . page 99 Compensating for System Offsets . . . . . . . . . . . . . . . . . . . . . . page 102 Programming the VT1415A for PID Control 51 · Detecting Open Transducers . . . . . . . . . . . . . . . . . . . . . . . . . . page 104 · More on Auto Ranging . . . . . . . . . . . . . . . . . . . . . . . . . . . . . . page 106 · Settling Characteristics . . . . . . . . . . . . . . . . . . . . . . . . . . . . . . . page 106 Overview of the VT1415A Algorithmic Loop Controller The first part of this chapter will provide an overview of the VT1415A’s operating model and programming. This is intended to facilitate understanding the affects of programming commands that are seen in later examples and detailed discussions. Operational Overview This section describes how the VT1415A gathers input data, executes an algorithm and outputs control signals. Figure 3-1 shows a simplified functional block diagram. Trigger Timer Digital Signal Processor (DSP) Trigger System A/D Strain Sample/Hold alg2() { static float input_val, val_out; input_val = I101; ....pid algorithm.... O109 = val_out; } Digital Input SCPs Totalize Algorithm Program Memory Input Buffer O100 to O163 alg1() { static float input_val, val_out; input_val = I100; ....pid algorithm.... O108 = val_out; } Digital State Frequency Output System alg3() { static float input_val, val_out; input_val = I102; ....pid algorithm.... O116 = val_out; } Current Digital Output SCPs Resistance Analog Multiplexer Temperature EU Conversion(EU) Analog Output SCPs Voltage Input Buffer I100 to I163 Static States Voltage Pulse per Trigger Pulse Width Modulation Frequency Modulation Figure 3-1: Simplified Functional Block Diagram Algorithmic? The VT1415A is an algorithmic process loop controller. It can provide as many as 32 single-input/single-output control loops in a single VXIbus module. The term "algorithmic" indicates that the VT1415A is a digital loop controller. An internal Digital Signal Processor (DSP) executes program code that implements a control algorithm. The algorithm is defined for a control loop by selecting one of the VT1415A’s two standard PID algorithms or by downloading a custom algorithm created in the VT1415A’s Algorithm Programming Language (a ‘C’-like language). Once defined, the control loop algorithm becomes a subprogram function that is executed each time the module receives a trigger signal and after all input signal channels have been scanned. 52 Programming the VT1415A for PID Control Chapter 3 Process Data In Process Control Out The VT1415A provides advanced data acquisition capability which includes on-board signal conditioning and Engineering Unit (EU) conversion. Signal conditioning creates accurate signal values from a wide range of process sensors. The EU conversion means that signal values measured at process sensors will be returned in standard engineering units such as volts, ohms, degrees Celsius, or microstrain. Further, custom EU conversions can be defined to convert signal values from standard sensors, to values more closely related to the process variables being measured. For instance, voltage from a pressure sensor can be converted to PSI. The input data appear to the control algorithm as program constants. They are constants only in that the algorithmic program cannot change their values. These values are updated each time a trigger causes the input channels to be scanned. After all input channels are scanned, each of the defined and enabled control algorithms are executed. Control output to the process is determined by the executing algorithms. In general the algorithm assigns a value to one of 64 special “output channel” identifiers. If the algorithm executes the statement: 0107 = control_out_var; the value of the variable “control_out_var” is placed in the Output Channel Buffer entry for channel 7. After all active algorithms have been executed, the buffer values (one for each assigned channel) are sent to the output Signal Conditioning Plug-Ons (SCP) at those channel positions. The characteristic of the actual output quantity is determined by the type of output SCP that is installed at the specified channel. For instance, if a VT1532A Current Output SCP were installed at the specified channel, the parameter value could range from -0.01 to +0.01 amps (±10 mA). A Voltage Output SCP at the channel would allow a parameter value of -16 to +16 volts. Programming Model The SCPI command set is used to configure, start, stop, and communicate with the VT1415A. The module can be in one of two states: the “idle” state or the “running” state. The INITiate[:IMMediate] command moves the module from the “idle” state to the “running” state. These two states will be called “before INIT”and “after INIT.” See Figure 3-2 for the following discussion. Before INIT, the module is in the Trigger Idle State and its DSP chip (the on-board control processor) is ready to accept virtually any of its SCPI or Common commands. At this point, send it commands that configure SCPs, link input channels to EU conversions, configure digital input and output channels, configure the trigger system, and define control algorithms. Chapter 3 Programming the VT1415A for PID Control 53 After INIT (and with trigger events occurring), the DSP is busy measuring input channels, executing algorithm code, sending internal algorithm values to the CVT and updating control outputs. To insulate the DSP from commands that would interrupt its algorithm execution, the VT1415A’s driver disallows execution of most SCPI commands after INIT. The driver does allow certain commands that make sense while the module is running algorithms. These are the commands that read and update algorithm variables, retrieve CVT and FIFO data and return Status System values. The Command Reference Section (Chapter 6) specifies whether a command is accepted before or after INIT. The next section in this chapter (“Executing the Programming Model”) shows the programming sequence that should be followed when setting up the VT1415A to run algorithms. Power-On Trigger Idle State Before INIT Commands Accepted: INITiate[:IMM] All commands except: *TRG, TRIGGER and ALG:UPD:CHAN yes After INIT Waiting for Trigger State no Trig Count Exhausted? Commands Accepted: TIMer or other All commands except: trigger event *RST ABORT Most ALG subsystem ARM[:IMM] Input, FETCH? Execute Algs, FORMAT Output SOURce:DATA:... STATus... SYSTem... *TRG & Trigger[:IMMediate] (if TRIG:SOUR is HOLD) no yes *RST or ABORt Figure 3-2: Module States 54 Programming the VT1415A for PID Control Chapter 3 Executing the Programming Model This section shows the sequence of programming steps that should be used for the VT1415A. Within each step, most of the available choices are shown using command sequence examples, with further details available in the Command Reference Chapter 6. IMPORTANT! Power-On and *RST Default Settings It is very important while developing an application to execute the SYSTem:ERRor? command after each programming command. This is the only way to know if there is a programming error. SYST:ERR? returns an error number and description (or +0, “No Error”). Some of the programming operations that follow may already be set after Power-on or after a *RST command. Where these default settings coincide with the configuration settings required, it is unnecessary to execute a command to set them. These are the default settings: · No algorithms defined · No channels defined in channel lists · Programmable SCPs configured to their Power-on defaults (see individual SCP User’s Manuals) · All analog input channels linked to EU conversion for voltage · All analog output channels ready to take values from an algorithm · All digital I/O channels set to input static digital state · ARM:SOURce IMMediate · TRIGger:SOURce TIMer · TRIGger:COUNt INF (0) · TRIGer:TIMer .010 (10 ms) · FORMat ASC,7 (ASCII) · SENSe:DATA:FIFO:MODE BLOCking Figure 3-3 provides a quick reference to the Programming model. Refer to this, together with the Programming Model Block Diagram to keep an overview of the VT1415A SCPI programming sequence. Again, where default settings match the desired settings, that configuration step can be skipped. Chapter 3 Programming the VT1415A for PID Control 55 Step 1 Power On or *RST Set up SCP Amps, Filters and Measurement Excitation Sources INP: ..., OUTP: ..., Commands Step 2 Link Engineering Units (Functions) to Analog Input Channels [SENSe:]FUNC: ¼ Commands Step 3 Set up Digital I/O Channels Step 4 Calibrate Channel Set-up (after 1 hour warm-up) Step 5 Setup Trigger System Step 6 Select Data Format Step 7 Select FIFO Mode (if using History Mode) [SENS:]DATA:FIFO:MODE Command Step 8 Define Global Variables (optional) ALGorithm:DEFine “GLOBALS”,... Command Step 9 Setup Algorithm(s) and Preset Algorithm Variables Step 10 Initiate Trigger System INP: ..., OUTP: ...,[SENSe:]..., SOURce: ... *CAL? or CAL:SETup Command ARM:SOUR, TRIG:SOUR , TRIG:COUNt, TRIG:TIMer Command FORMAT Command ALG:DEF, ALG:ARRay, ALG:SCALar, ALG:SCAN:RATio, ALG:UPDate INITiate command Trigger events execute algs Step 11 Retrieve Data Step 12 Modify Algorithm Variables SENS:DATA:FIFO: ..., SENS:CVT: ..., ALG:SCAL?and ALG:ARR? commands ALG:ARRay, ALG:SCALar, ALG:STAT, ALG:SCAN:RATio, ALG:UPD Figure 3-3: Programming Sequence 56 Programming the VT1415A for PID Control Chapter 3 Programming Model Block Diagram STATus: . . . SYSTem:ERRor? FORMat[:DATA] 6 8 9 12 [SENSe:]DATA:CVTable? :RESet 5 ALG:DEF ‘GLOBALS’,... ALG:DEF ‘ALGn’,... ALG:ARRay ALG:SCALar ALG:SCAN:RATio writecvt ( ) writefifo ( ) writeboth ( ) ALG:UPDate 7 [SENSe:]DATA:FIFO[:ALL]? :COUNt? :HALF? :PART? :HALF? :RESet [SENSe:]DATA:FIFO:MODE 11 ARM:SOURce TRIGger:TIMer 1 INPut:FILTer INPut:GAIN OUTPut:CURRent:AMPLitude OUTPut:CURRent:STATe OUTPut:SHUNt OUTPut:VOLTage:AMPlitude 2 [SENSe:]FUNCtion:RESistance [SENSe:]FUNCtion:STRAIN: ... [SENSe:]FUNCtion:TEMPerature [SENSe:]FUNCtion:VOLTage 4 CALibration:CONFiguration:RESistance :VOLTage :VALue:RESistance :VOLTage :STORe :ZERO? 10 INPut:POLarity SENSe:FREQuency:APERture SENSe:FUNCtion::CONDition SENSe:FUNCtion:FREQuency SENSe:FUNCtion:TOTalize SENSe:FREQuency SENSe:TOTtalize:RESet:MODE INITiate[:IMMediate] OUTPut:TRIGger:SOURce OUTPut:TTLTrg< n> 3 OUTPut:POLarity OUTPut:TYPE SOURce:FM:STATe SOURce:FUNCtion:CONDition SOURce:FUNCtion:PULSe SOURce:FUNCtion:SQUare SOURce:PULM:STATe SOURce:PULSe:PERiod SOURce:PULSe:WIDTh * CAL? CALibration:SETup :SETup? Programming the VT1415A for PID Control 57 Chapter 3 TRIGger:SOURce TRIGger:COUNt CALibration:TARE :TARE? Setting Up Analog Input and Output Channels This section covers configuring input and output channels to provide the measurement values and output characteristics that algorithms need to operate. Configuring Programmable Analog SCP Parameters This step applies only to programmable Signal Conditioning Plug-Ons such as the VT1503A Programmable Amplifier/Filter SCP, the VT1505A Current Source SCP, the VT1510A Sample and Hold SCP and the VT1511A Transient Strain SCP. Refer to the individual SCP’s user’s manual to determine the gain, filter cutoff frequency, or excitation amplitude selections that it may provide. Setting SCP Gains An important concept to understand about input amplifier SCPs is that, given a fixed input value at a channel, changes in channel gain do not change the value an algorithm will receive from that channel. The DSP chip (Digital Signal Processor) keeps track of SCP gain and Range Amplifier settings and “calculates” a value that reflects the signal level at the input terminal. The only time this in not true is when the SCP gain chosen would cause the output of the SCP amplifier to be too great for the selected A/D range. An example: with SCP gain set to 64, an input signal greater than ±0.25 volts would cause an overrange reading even with the A/D set to its 16 volt range. The gain command for SCPs with programmable amplifiers is: INPut:GAIN <gain>,(@<ch_list>) to select SCP channel gain. The gain selections provided by the SCP can be assigned to any channel individually or in groups. Send a separate command for each gain selection. An example for the VT1503A programmable Amp & Filter SCP: To set the SCP gain to 8 for channels 0, 4, 6, and 10 through 19 send: INP:GAIN 8,(@100,104,106,110:119) To set the SCP gain to 16 for channels 0 through 15 and to 64 for channels 16 through 23 send: INP:GAIN 16,(@100:115) INP:GAIN 64,(@116:123) or to combine into a single command message: INP:GAIN 16,(@100:115);GAIN 64,(@116:123) Setting Filter Cutoff Frequency The commands for programmable filters are: INPut:FILTer[:LPASs]:FREQuency <cutoff_freq>,(@<ch_list>) to select cutoff frequency INPut:FILTer[:LPASs][:STATe] ON | OFF,(@<ch_list> to enable or disable input filtering 58 Programming the VT1415A for PID Control Chapter 3 The cutoff frequency selections provided by the SCP can be assigned to any channel individually or in groups. Send a separate command for each frequency selection. For example: To set 10 Hz cutoff for channels 0, 4, 6, and 10 through 19 send: INP:FILT:FREQ 10,(@100,104,106,110:119) To set 10 Hz cutoff for channels 0 through 15 and 100 Hz cutoff for channels 16 through 23 send: INP:FILT:FREQ 10,(@100:115) INP:FILT:FREQ 100,(@116:123) or to combine into a single command message INP:FILT:FREQ 10,(@100:115);FREQ 100,(@116:123) By default (after *RST or at power-on) the filters are enabled. To disable or re-enable individual (or all) channels, use the INP:FILT ON | OFF, (@<ch_list>) command. For example, to program all but a few filters on, send: INP:FILT:STAT ON,(@100:163) INP:FILT:STAT OFF,(@100, 123,146,163) Setting the VT1505A Current Source SCP all channel’s filters on (same as at *RST) only channels 0, 23, 46, and 63 OFF The Current Source SCP supplies excitation current for resistance type measurements. These include resistance and temperature measurements using resistance temperature sensors. The commands to control Current Source SCPs are: OUTPut:CURRent:AMPLitude <amplitude>,(@<ch_list>) and OUTPut:CURRent[:STATe] <enable>. · The <amplitude> parameter sets the current output level. It is specified in units of amps dc and for the VT1505A SCP can take on the values 30e-6 (or MIN) and 488e-6 (or MAX). Select 488 µA for measuring resistances of less than 8,000 W. Select 30 µA for resistances of 8,000 W and above. · The <ch_list> parameter specifies the Current Source SCP channels that will be set. To set channels 0 through 9 to output 30 µA and channels 10 through 19 to output 488 µA: OUTP:CURR 30e-6,(@100:109) OUTP:CURR 488e-6,(@110:119) separate command per output level or to combine into a single command message: OUTP:CURR 30e-6,(@100:109);CURR 488e-6,(@110:119) Chapter 3 Programming the VT1415A for PID Control 59 NOTE Setting the VT1511A Strain Bridge SCP Excitation Voltage The OUTPut:CURRent:AMPLitude command is only for programming excitation current used in resistance measurement configurations. It is does not program output DAC SCPs like the VT1532A. The VT1511A Strain Bridge Completion SCP has a programmable bridge excitation voltage source. The command to control the excitation supply is OUTPut:VOLTage:AMPLitude <amplitude>,(@<ch_list>) · The <amplitude> parameter can specify 0, 1, 2, 5, or 10 volts for the VT1511A’s excitation voltage. · The <ch_list> parameter specifies the SCP and bridge channel excitation supply that will be programmed. There are four excitation supplies in each VT1511A. To set the excitation supplies for channels 0 through 3 to output 2 volts: OUTP:VOLT:AMPL 2,(@100:103) NOTE Linking Channels to EU Conversion The OUTPut:VOLTage:AMPLitude command is only for programming excitation voltage used measurement configurations. It is does not program output DAC SCPs like the VT1531A. This step links each of the module’s channels to a specific measurement type. For analog input channels, this “tells” the on-board control processor which EU conversion to apply to the value read on any channel. The processor is creating a list of conversion types vs. channel numbers. The commands for linking EU conversion to channels are: [SENSe:]FUNCtion:RESistance <excite_current>,[<range>,](@<ch_list>) for resistance measurements [SENSe:]FUNCtion:STRain:... <excite_current>,[<range>,](@<ch_list>) for strain bridge measurements [SENSe:]FUNCtion:TEMPerature <type>,<sub_type>,[<range>,](@<ch_list>) for temperature measurements with thermocouples, thermistors, or RTDs [SENSe:]FUNCtion:VOLTage <range>,(@<ch_list>) for voltage measurements [SENSe:]FUNCtion:CUSTom <range>,(@<ch_list>) for custom EU conversions. NOTE At Power-on and after *RST, the default EU Conversion is autorange voltage for all 64 channels. 60 Programming the VT1415A for PID Control Chapter 3 Linking Voltage Measurements To link channels to the voltage conversion send the [SENSe:]FUNCtion:VOLTage [<range>,] (@<ch_list>) command. · The <ch_list> parameter specifies which channels to link to the voltage EU conversion. · The optional <range> parameter can be used to choose a fixed A/D range. Valid values are: 0.0625, 0.25, 1, 4, 16, or AUTO. When not specified, the module uses auto-range (AUTO). To set channels 0 through 15 to measure voltage using auto-range: SENS:FUNC:VOLT AUTO,(@100:115) To set channels 16 and 24 to the 16 volt range and 32 through 47 to the 0.0625 volt range: SENS:FUNC:VOLT 16,(@116,124) SENS:FUNC:VOLT .625,(@132:147) must send a command per range or to send both commands in a single command message: SENS:FUNC:VOLT 16,(@116,124);VOLT .0625,(@123:147) NOTE Linking Resistance Measurements When using manual range in combination with amplifier SCPs, the EU conversion will try to return readings which reflect the value of the input signal. However, the user must choose range values that will provide good measurement performance (avoiding over-ranges and selecting ranges that provide good resolution based on the input signal). In general, measurements can be made at full speed using auto-range. Auto-range will choose the optimum A/D range for the amplified signal level. To link channels to the resistance EU conversion, send the [SENSe:]FUNCtion:RESistance <excite_current>,[<range>,](@<ch_list>) command. Resistance measurements assume that there is at least one Current Source SCP installed (eight current sources per SCP). See Figure 3-4. Chapter 3 Programming the VT1415A for PID Control 61 Four-Wire Measurement Two-Wire Measurement (not recommended**) Current Source SCP Current Source SCP Field Wiring HI Field Wiring HI *150 Ohm 5% LO LO *150 Ohm 5% * Because of the 150 Ohm resistor in series with each of the current source outputs, Two-Wire resistance and temperature measurements will have a 300 Ohm offset. Any Sense SCP HI ** The current source HI terminal is the negative voltage node. The current source LO terminal is the positive voltage node. Figure 3-4: Resistance Measurement Sensing The <excite_current> parameter is used only to tell the EU conversion what the Current Source SCP channel is now set to. <excite_current> is specified in amps dc and the choices for the VT1505A SCP are 30e-6 (or MIN) and 488e-6 (or MAX). Select 488 µA for measuring resistances of less than 8,000 W. Select 30 µA for resistances of 8,000 W and above. · The optional <range> parameter can be used to choose a fixed A/D range. When not specified (defaulted), the module uses auto-range. · The <ch_list> parameter specifies which channel(s) to link to the resistance EU conversion. These channels will sense the voltage across the unknown resistance. Each can be a Current Source SCP channel (a two-wire resistance measurement) or a sense channel separate from the Current Source SCP channel (a four-wire resistance measurement). See Figure 3-4 for diagrams of these measurement connections. To set channels 0 through 15 to measure resistances greater than 8,000 W and set channels 16, 20, and 24 through 31 to measure resistances less than 8k (in this case paired to current source SCP channels 32 through 57): OUTP:CURR:AMPL 30e-6, (@132:147) set 16 channels to output 30 µA for 8 kW or greater resistances SENS:FUNC:RES 30e-6, (@100:115) link channels 0 through 15 to resistance EU conversion (8 kW or greater) OUTP:CURR:AMPL 488e-6, (@148,149,150:157) set 10 channels to output 488 µA for less than 8 kW resistances SENS:FUNC:RES 488e-6, (@116,120,124:132) link channels 16, 20, and 24 through 32 to resistance EU conversion (less than 8 kW) 62 Programming the VT1415A for PID Control Chapter 3 Linking Temperature Measurements To link channels to temperature EU conversion, send the [SENSe:]FUNCtion:TEMPerature <type>, <sub_type>, [<range>,](@<ch_list>) command. · The <ch_list> parameter specifies which channel(s) to link to the temperature EU conversion. · The <type> parameter specifies RTD, THERmistor, or TC (for ThermoCouple) · The optional <range> parameter can be used to choose a fixed A/D range. When not specified (defaulted), the module uses auto-range. RTD and Thermistor Measurements Temperature measurements using resistance type sensors involve all the same considerations as resistance measurements discussed in the previous section. See the discussion of Figure 3-4 in “Linking Resistance Measurements.” For resistance temperature measurements, the <sub_type> parameter specifies: · For RTDs; “85" or ”92" (for 100 W RTDs with 0.00385 or 0.00392 ohms/ohm/ºC temperature coefficients respectively) · For Thermistors; 2250, 5000, or 10000 (the nominal value of these devices at 25 ºC) NOTES 1. Resistance temperature measurements (RTDs and THERmistors) require the use of Current Source Signal Conditioning Plug-Ons. The following table shows the Current Source setting that must be used for the following RTDs and Thermistors: Required Current Amplitude MAX (488 µA) MIN (30 µA) Temperature Sensor Types and Subtypes RTD,85 | 92 and THER,2250 THER,5000 | 10000 2. The <sub_type> parameter values of 2250, 5000, and 10000 refer to thermistors that match the Omega 44000 series temperature response curve. These 44000 series thermistors have been selected to match the curve within 0.1 or 0.2 °C. To set channels 0 through 15 to measure temperature using 2,250 W thermistors (in this case paired to current source SCP channels 16 through 31): OUTP:CURR:AMPL 488e-6,(@116:131) set excite current to 488 µA on current SCP channels 16 through 31 Chapter 3 Programming the VT1415A for PID Control 63 SENS:FUNC:TEMP THER, 2250, (@100:115) link channels 0 through 15 to temperature EU conversion for 2,250 W thermistor To set channels 32 through 47 to measure temperature using 10,000 W thermistors (in this case paired to current source SCP channels 48 through 63): OUTP:CURR:AMPL 30e-6,(@148:163) set excite current to 30 µA on current SCP channels 48 through 63 SENS:FUNC:TEMP THER, 10000, (@132:147) link channels 32 through 47 to temperature EU conversion for 10,000 W thermistor To set channels 48 through 63 to measure temperature using 100 W RTDs with a TC of 0.00385 ohm/ohm/°C (in this case paired to current source SCP channels 32 through 47): OUTP:CURR:AMPL 488e-6,(@132:147) set excite current to 488 µA on current SCP channels 32 through 47 SENS:FUNC:TEMP RTD, 85, (@148:163) link channels 48 through 63 to temperature EU conversion for 100 W RTDs with 0.00385 TC. Thermocouple Measurements Thermocouple measurements are voltage measurements that the EU conversion changes into temperature values based on the <sub_type> parameter and latest reference temperature value. · For Thermocouples the <sub_type> parameter can specify CUSTom, E, EEXT, J, K, N, R, S, T (CUSTom is pre-defined as Type K, no reference junction compensation. EEXT is the type E for extended temperatures of 800 °C or above). To set channels 32 through 40 to measure temperature using type E thermocouples: SENS:FUNC:TEMP TC, E, (@132:140) (see following section to configure a TC reference measurement) Thermocouple Reference Temperature Compensation The isothermal reference temperature is required for thermocouple temperature EU conversions. The Reference Temperature Register must be loaded with the current reference temperature before thermocouple channels are scanned. The Reference Temperature Register can be loaded two ways: 1. By measuring the temperature of an isothermal reference junction during an input scan. 2. By supplying a constant temperature value (that of a controlled temperature reference junction) before a scan is started. 64 Programming the VT1415A for PID Control Chapter 3 Setting Up a Reference Temperature Measurement This operation requires two commands, the [SENSe:]REFerence command and the [SENSe:]REFerence:CHANnels command. The [SENSe:]REFerence <type>,<sub_type>,[<range>,](@<ch_list>) command links channels to the reference temperature EU conversion. · The <ch_list> parameter specifies the sense channel that is connected to the reference temperature sensor. · The <type> parameter can specify THERmistor, RTD, or CUSTom. THER and RTD are resistance temperature measurements and use the on-board 122 µA current source for excitation. CUSTom is pre-defined as a Type E thermocouple which has a thermally controlled ice point reference junction. · The <sub_type> parameter must specify: – For RTDs, “85" or ”92" (for 100 W RTDs with 0.00385 or 0.00392 ohms/ohm/ºC temperature coefficients respectively) – For Thermistors, only “5000" (See previous note on page 63) – For CUSTom, only “1" · The optional <range> parameter can be used to choose a fixed A/D range. When not specified (defaulted) or set to AUTO, the module uses auto-range. Reference Measurement Before Thermocouple Measurements At this point, the concept of the Scan List will be introduced. As each algorithm is defined, the VT1415A places any reference to an analog input channel into the Scan List. When the algorithms are run, the scan list tells the VT1415A which analog channels to scan during the Input Phase. The [SENSe:]REFerence:CHANnels (@<ref_chan>),(@<meas_ch_list>) is used to place the <ref_chan> channel in the scan list before the related thermocouple measuring channels in <meas_chan>. Now, when analog channels are scanned, the VT1415A will include the reference channel in the scan list and will scan it before the specified thermocouples are scanned. The reference measurement will be stored in the Reference Temperature Register. The reference temperature value is applied to the thermocouple EU conversions for thermocouple channel measurements that follow. Chapter 3 Programming the VT1415A for PID Control 65 A Complete Thermocouple Measurement Command Sequence The command sequence performs these functions: · Configures reference temperature measurement on channel 15. · Configures thermocouple measurements on channels 16 through 23. · Instructs the VT1415A to add channel 15 to the Scan List and order channels so channel 15 will be scanned before channels 16 through 23. SENS:REF THER, 5000, (@115) SENS:FUNC TC,J,(@116:123) SENS:REF:CHAN (@115),(@116:123) 5k thermistor temperature for channel 15 Type J thermocouple temperature for channels 16 through 23 reference channel scanned before channels 16 - 23 Supplying a Fixed Reference Temperature The [SENse:]REFerence:TEMPerature <degrees_c> command immediately stores the temperature of a controlled temperature reference junction panel in the Reference Temperature Register. The value is applied to all subsequent thermocouple channel measurements until another reference temperature value is specified or measured. There is no need to use SENS:REF:CHANNELS. To specify the temperature of a controlled temperature reference panel: SENS:REF:TEMP 50 reference temp = 50 °C Now begin scan to measure thermocouples Linking Strain Measurements Strain measurements usually employ a Strain Completion and Excitation SCP (VT1506A/07A/11A). To link channels to strain EU conversions send the [SENSe:]FUNCtion:STRain:<bridge_type> [<range>,](@<ch_list>) · The <bridge_type> parameter is not a parameter but is part of the command syntax. The following table relates the command syntax to bridge type. See the VT1506A, VT1507A, and VT1511A SCP User’s Manuals for bridge schematics and field wiring information. Command Bridge Type :FBENding Full Bending Bridge :FBPoisson Full Bending Poisson Bridge :FPOisson Full Poisson Bridge :HBENding Half Bending Bridge :HPOisson Half Poisson Bridge [:QUARter] Quarter Bridge (default) · The <ch_list> parameter specifies which sense SCP channel(s) to link to the strain EU conversion. <ch_list> does not specify channels on the VT1506A/07A Strain Bridge Completion SCPs but does specify one of the lower four channels of a VT1511A SCP. 66 Programming the VT1415A for PID Control Chapter 3 · The optional <range> parameter can be used to choose a fixed A/D range. When not specified (defaulted), the module uses auto-range. To link channels 23 through 30 to the quarter bridge strain EU conversion: SENS:FUNC:STR:QUAR (@123:130) uses autorange Other commands used to set up strain measurements are: [SENSe:]STRain:POISson [SENSe:]STRain:EXCitation [SENSe:]STRain:GFACtor [SENSe:]STRain:UNSTrained See the Command Reference Chapter 6 and the VT1506A/07A and VT1511A User’s Manuals for more information on strain measurements. Custom EU Conversions Linking Output Channels to Functions Chapter 3 See “Creating and Loading Custom EU Conversion Tables” on page 99. Analog outputs are implemented either by a VT1531A Voltage Output SCP or a VT1532A Current Output SCP. Channels where these SCPs are installed are automatically considered outputs. No SOURce:FUNCtion command is required since the VT1531A can only output voltage, while the VT1532A can only output current. The only way to control the output amplitude of these SCPs is through the VT1415A’s Algorithm Language. Programming the VT1415A for PID Control 67 Setting Up Digital Input and Output Channels Setting Up Digital Inputs Setting Input Polarity Digital inputs can be configured for polarity and depending on the SCP model, a selection of input functions as well. The following discussion will explain which functions are available with a particular Digital I/O SCP model. Setting a digital channel’s input function is what defines it as an input channel. To specify the input polarity (logical sense) for digital channels use the command INPut:POLarity <mode>,(@<ch_list>). This capability is available on all digital SCP models. This setting is valid even while the specified channel in not an input channel. If and when the channel is configured for input (an input FUNCtion command), the setting will be in effect. · The <mode> parameter can be either NORMal or INVerted. When set to NORM, an input channel with 3 V applied will return a logical 1. When set to INV, a channel with 3 V applied will return a logic 0. · The <ch_list> parameter specifies the channels to configure. The VT1533A has 2 channels of 8 bits each. All 8 bits in a channel take on the configuration specified for the channel. The VT1534A has 8 I/O bits that are individually configured as channels. To configure the lower 8-bit channel of a VT1533A for inverted polarity: INP:POLARITY INV,(@108) SCP in SCP position 1 To configure the lower 4 bits of a VT1534A for inverted polarity: INP:POL INV,(@132:135) Setting Input Function SCP in SCP position 4 The VT1533A Digital I/O SCP and the VT1534A Frequency/Totalizer SCP can both input static digital states. The VT1534A Frequency/Totalizer SCP can also input Frequency measurements and Totalize the occurrence of positive or negative edges. Static State (CONDition) Function To configure digital channels to input static states, use the [SENSe:]FUNCtion:CONDition (@<ch_list>) command. Examples: To set the lower 8-bit channel of n VT1533A in SCP position 4 to input SENS:FUNC:COND (@132) To set the upper 4 channels (bits) of a VT1534A in SCP pos 2 to input states SENS:FUNC:COND (@120:123) Frequency Function The frequency function uses two commands. For more on this VT1534A capability, see the SCP’s User’s Manual. 68 Programming the VT1415A for PID Control Chapter 3 To set the frequency counting gate time execute: [SENSe:]FREQuency:APERature <gate_time>,(@<ch_list>) Sets the digital channel function to frequency [SENSe:]FUNCtion:FREQuency (@<ch_list>) Totalizer Function The totalizer function uses two commands also. One sets the channel function and the other sets the condition that will reset the totalizer count to zero. For more on this VT1534A capability, see the SCP’s User’s Manual. To set the VT1534A’s totalize reset mode [SENSe:]TOTalize:RESet:MODE INIT | TRIG,(@<ch_list>) To configure VT1534A channels to the totalizer function [SENSe:]FUNCtion:TOTalize (@<ch_list>) Setting Up Digital Outputs Setting Output Polarity Digital outputs can be configured for polarity, output drive type and depending on the SCP model, a selection of output functions as well. The following discussion will explain which functions are available with a particular Digital I/O SCP model. Setting a digital channel’s output function is what defines it as an output channel. To specify the output polarity (logical sense) for digital channels, use the command OUTPut:POLarity <mode>,(@<ch_list>). This capability is available on all digital SCP models. This setting is valid even while the specified channel in not an output channel. If and when the channel is configured for output (an output FUNCtion command), the setting will be in effect. · The <mode> parameter can be either NORMal or INVerted. When set to NORM, an output channel set to logic 0 will output a TTL compatible low. When set to INV, an output channel set to logic 0 will output a TTL compatible high. · The <ch_list> parameter specifies the channels to configure. The VT1533A has 2 channels of 8 bits each. All 8 bits in a channel take on the configuration specified for the channel. The VT1534A has 8 I/O bits that are individually configured as channels. To configure the higher 8-bit channel of a VT1533A for inverted polarity: OUTP:POLARITY INV,(@109) SCP in SCP position 1 To configure the upper 4 bits of a VT1534 for inverted polarity: OUTP:POL INV,(@132:135) Setting Output Drive Type Chapter 3 SCP in SCP position 4 The VT1533A and VT1534A use output drivers that can be configured as either active or passive pull-up. To configure this, use the command OUTPut:TYPE <mode>,(@<ch_list>). This setting is valid even while the specified channel in not an output channel. If and when the channel is configured for output (an output FUNCtion command), the setting will be in effect. Programming the VT1415A for PID Control 69 · The <mode> parameter can be either ACTive or PASSive. When set to ACT (the default), the output provides active pull-up. When set to PASS, the output is pulled up by a resistor. · The <ch_list> parameter specifies the channels to configure. The VT1533A has 2 channels of 8 bits each. All 8 bits in a channel take on the configuration specified for the channel. The VT1534A has 8 I/O bits that are individually configured as channels. To configure the higher 8-bit channel of a VT1533A for passive pull-up: OUTP:TYPE PASS,(@109) SCP in SCP position 1 To configure the upper 4 bits of a VT1534A for active pull-up: OUTP:TYPE ACT,(@132:135) Setting Output Functions SCP in SCP position 4 Both the VT1533A Digital I/O SCP and VT1534A Frequency/Totalizer SCP can output static digital states. The VT1534A Frequency/Totalizer SCP can also output single pulses per trigger, continuous pluses that are width modulated (PWM and continuous pulses that are frequency modulated (FM)). Static State (CONDition) Function To configure digital channels to output static states, use the SOURce:FUNCtion:CONDition (@<ch_list>) command. Examples: To set the upper 8-bit channel of a VT1533A in SCP position 4 to output SOUR:FUNC:COND (@133) To set the lower 4 channels (bits) of a VT1534A in SCP pos 2 to output states SOUR:FUNC:COND (@116:119) To configure digital channels to output static states: Variable Width Pulse Per Trigger This function sets up one or more VT1534A channels to output a single pulse per trigger (per algorithm execution). The width of the pulse from these channels is controlled by Algorithm Language statements. Use the command SOURce:FUNCtion[:SHAPe]:PULSe (@<ch_list>). Example command sequence: To set VT1534A channel 2 at SCP position 4 to output a pulse per trigger SOUR:FUNC:PULSE (@134) Example algorithm statement to control pulse width to 1 ms O134 = 0.001 Variable Width Pulses at Fixed Frequency (PWM) This function sets up one or more VT1534A channels to output a train of pulses. A companion command sets the period for the complete pulse ( edge to edge). This, of course, fixes the frequency of the pulse train. The width of the pulses from these channels is controlled by Algorithm Language statements. 70 Programming the VT1415A for PID Control Chapter 3 Use the command SOURce:FUNCtion[:SHAPe]:PULSe (@<ch_list>). Example command sequence: To enable pulse width modulation for VT1534’s first channel at SCP position 4 SOUR:PULM:STATE ON,(@132) To set pulse period to 0.5 ms (which sets the signal frequency 2 kHz) SOUR:PULSE:PERIOD 0.5e-3,(@132) To set function of VT1534A’s first channel in SCP position 4 to PULSE SOUR:FUNCTION:PULSE (@132) Example algorithm statement to control pulse width to 0.1 ms (20% duty-cycle) O132 = 0.1e-3; Fixed Width Pulses at Variable Frequency (FM) This function sets up one or more VT1534A channels to output a train of pulses. A companion command sets the width ( edge to ¯ edge) of the pulses. The frequency of the pulse train from these channels is controlled by Algorithm Language statements. Use the command SOURce:FUNCtion[:SHAPe]:PULSe (@<ch_list>). Example command sequence: To enable FM for VT1534A’s second channel at SCP position 4 SOUR:FM:STATE ON,(@133) To set pulse width to 0.3333 ms SOUR:PULSE:WIDTH 0.3333e-3,(@133) To set function of VT1534A’s second channel in SCP position 4 to PULSE SOUR:FUNCTION:PULSE (@133) Example algorithm statement to control frequency to 1000 Hz O133 = 1000; Variable Frequency Square-Wave Output (FM) To set function of VT1534A’s third channel in SCP position 4 to output a variable frequency square-wave. SOUR:FUNCTION:SQUare (@134) Example Algorithm Language statement to set output to 20 kHz O134 = 20e3; For complete VT1534A capabilities, see the SCP’s User’s Manual. Chapter 3 Programming the VT1415A for PID Control 71 Performing Channel Calibration (Important!) The *CAL? (also performed using CAL:SETup then CAL:SETup?) is a very important step. *CAL? generates calibration correction constants for all analog input and output channels. *CAL? must be performed in order for the VT1415A to deliver its specified accuracy. Operation and Restrictions *CAL? generates calibration correction constants for each analog input channel for offset and gain at all five A/D range settings. For programmable input SCPs, these calibration constants are only valid for the current configuration (gain and filter cut-off frequency). This means that *CAL? calibration is no longer valid if channel gain or filter settings (INP:FILT or INP:GAIN) are changed, but are still valid for changes of channel function or range (using SENS:FUNC...). Calibration becomes invalid if the SCPs are moved to different SCP locations. For analog output channels (both measurement excitation SCPs as well as control output SCPs), *CAL? also generates calibration correction constants. These calibration constants are valid only for the specific SCPs in the positions they are currently in. Calibration becomes invalid if the SCPs are moved to different SCP locations. How to Use *CAL? When power is turned on to the VT1415A after the SCPs are first installed (or after an SCP has been moved), the module will use approximate values for calibration constants. This means that input and output channels will function although the values will not be very accurate relative to the VT1415A’s specified capability. At this point, make sure the module is firmly anchored to the mainframe (front panel screws are tight) and let it warm up for a full hour. After it has warmed up, execute *CAL?. What *CAL? Does The *CAL? command causes the module to calibrate A/D offset and gain and all channel offsets. This may take many minutes to complete. The actual time it will take the VT1415A to complete *CAL? depends on the mix of SCPs installed. *CAL? literally performs hundreds of measurements of the internal calibration sources for each channel and must allow seventeen time constants of settling wait each time a filtered channel’s calibration source changes value. The *CAL? procedure is internally very sophisticated and results in an extremely well calibrated module. When *CAL? finishes, it returns a +0 value to indicate success. The generated calibration constants are now in volatile memory as they always are when ready to use. If the configuration just calibrated is to be fairly long-term, execute the CAL:STORE ADC command to store these constants in non-volatile memory. That way the module can restore calibration constants for this configuration in case of a power failure. After power returns and after the module warms up, these constants will be relatively accurate. 72 Programming the VT1415A for PID Control Chapter 3 When to Re-Execute *CAL? · When the channel gain and/or filter cut-off frequency is changed on programmable SCPs (using INPut:GAIN or INPut:FILTer... ) · When SCPs are reconfigured to different locations. This is true even if the SCP is replaced with an identical SCP model because the calibration constants are specific to each SCP channel’s individual performance. · When the ambient temperature within the mainframe changes significantly. Temperature changes affect accuracy much more than long-term component drift. See temperature coefficients in Appendix A “Specifications.” NOTE To save time when performing channel calibration on multiple VT1415As in the same mainframe, use the CAL:SETup and CAL:SETup? commands (see Chapter 6 for details). Defining Standard PID Algorithms The VT1415A provides two different pre-defined PID algorithms that are widely used in process control. The Pre-Defined PIDA Algorithm Figure 3-5 shows the block diagram of the PID algorithm that is defined when ALG:DEFINE is executed ‘ALGn’,’PIDA(<inp_channel>,<outp_channel>)’ P_factor variable Setpoint variable + + S Error variable I_factor variable - I_out variable + S <outp_chan> channel process + D_factor variable <inp_chan> channel Figure 3-6: The Simple PID Algorithm "PIDA" PIDA algorithm implements the classic PID controller. This implementation was designed to be fast. In order to be fast, this algorithm provides no clipping limit, alarm limits, status management or CVT/FIFO communication (History Modes). The algorithm performs the following calculations each time it is executed: Chapter 3 Programming the VT1415A for PID Control 73 Error = Setpoint - <inp_chan> I_out = I_out + I_factor * Error <outp_chan> = P_factor * Error + I_out + D_factor * (Error - Error_old) Error_old = Error See the program listing for PIDA in Appendix D. The Pre-Defined PIDB Algorithm Figure 3-6 shows the block diagram of a more advanced algorithm that is favored in process control because of the flexibility allowed by its two differential terms. The “D” differential term is driven by changes in the process input measurement. The “SD” differential term is driven by changes in the setpoint variable value. This algorithm can be defined by executing ALG:DEFINE ‘ALGn’,’PIDB(<inp_channel>,<outp_channel>,<alarm_chan>).’ SD_factor variable clip limits Status.B3 SD_out variable alarm limits Status.B5 P_factor variable Error variable Setpoint variable + clip limits Status.B1 I_factor variable S man_out variable + I_out variable clip limits Status.B2 + + manual <outp_chan> channel S + D_out variable D_factor variable alarm limits Status.B6 slew rate limited by Man_inc variable process auto Man_state variable clip limits Status.B0 Status.B4 <inp_chan> channel Figure 3-6: The Advanced Algorithm "PIDB" Clipping Limits The PIDB algorithm provides clipping limits for its I, D, SD terms and the value sent to <outp_chan>. Values for these terms are not allowed to range outside of the set limits. The variables that control clipping are: I term limits; D term limits; SD term limits; <outp_chan> limits; 74 Programming the VT1415A for PID Control I_maxand I_min D_maxand D_min SD_maxand SD_min Out_maxand Out_min Chapter 3 Alarm Limits The PIDB algorithm provides Alarm Limits for the process variable PV and the Error term variable Error. If these limits are reached, the algorithm sets the value of <alarm_chan> true and generates a VXIbus interrupt. The variables that control alarm limits are: Process Variable (from <inp_chan>); Error term alarm limits; PV_maxand PV_min Error_maxand Error_min The max and min limits for clipping and alarms are set to 9.9E+37 and -9.9E+37 respectively when the algorithm is defined. This effectively turns the limits off until the values are changed with the ALG:SCALAR and ALG:UPDATE commands as described in “Pre-setting PID Variables and Coefficients” later in this section. Manual Control The PIDB algorithm provides for manual control with “bumpless” transfer between manual and automatic control. The variables that control the manual mode are: Auto/Manual control; Manual output control; Manual control slew rate; Man_state (0=automatic (default), 1=manual) Man_out (defaults to current auto value) Man_inc (defaults to 9.99E+37 (fast change)) Use the ALG:SCALAR and ALG:UPDATE commands to change the manual control variables before or after the algorithm is running. Status Variable The PIDB algorithm uses 7 bits in a status variable (Status) to record the state of clipping and alarm limits and the automatic/manual mode. When a limit is reached or the manual mode is set, the algorithm sets a status bit to 1. Output (<outp_chan>) at clipping limit; I term (I_out) at clipping limit; D term (D_out) reached at limit; SD term (SD_out) at clipping limit; Control mode (Man_state) is manual; Error term (Error) out of limits; Process Variable (<inp_chan>) out of limits; History Mode Status.B0 Status.B1 Status.B2 Status.B3 Status.B4 Status.B5 Status.B6 The PIDB algorithm provides two modes of reporting the values of its operating variables. A variable <History_mode> controls the two modes. The default history mode (<History_mode> = 0) places the following algorithm values into elements of the Current Value Table (the CVT): Process Variable (<inp_chan>) value to CVT element (10 * n) + 0 Error Term variable (Error) value to CVT element (10 * n) + 1 Output (<outp_chan>) value to CVT element (10 * n) + 2 Status word bits 0 through 6 (Status) to CVT element (10 * n) + 3 Where n is the number of the algorithm from ‘ALGn’ So ALG1 places values into CVT elements 10 through 13, ALG2 places values in CVT elements 20 through 23 ... ALG32 places values into CVT elements 320 through 323. Chapter 3 Programming the VT1415A for PID Control 75 When <History_mode> is set to 1, the operating values are sent to the CVT as above and they are sent to the FIFO buffer as well. The algorithm writes a header entry first. The header value is (n * 256) + 4, where n is the algorithm number from ‘ALGn’ and the number 4 indicates the number of FIFO entries that follow for this algorithm. This identifies which PIDB algorithm the 5 element FIFO entry is from. See the program listing for PIDB in Appendix D. Defining a PID with ALG:DEFINE Select the PID algorithm that will be used (PIDA or PIDB). Determine which channels to specify for the PID input, PID output and optionally the digital channel to use as an alarm channel. Execute the command ALGorithm[:EXPLicit]:DEFine‘<alg_name>’,’<alg_def_string>.’ · <alg_name> is ALG1 for the first defined algorithm, ALG2 for the second etc. up to the maximum of ALG32. The “ALG” is not case sensitive. That is, ALG1, alg1, aLg1 are all equivalent. · <alg_def_string> contains a string that selects the PID algorithm (PIDA... or PIDB... ) and specifies the input and output “channels.” PIDB also takes an alarm “channel.” The general form of the string is: ‘PIDx(<inp_channel>,<outp_channel>,<alarm_channel>)’ Where x is A or B. Note that <alarm_channel> is only supported for PIDB. Enclose <alg_def_string> within single quotes (apostrophe character) or double quotes. The <alg_def_string> commands the driver’s translator function to download the program code for the selected PID algorithm into the VT1415A’s algorithm memory space where is can be executed. The source code listings for the available PIDs can be seen in Appendix D. To select PID algorithm PIDB and use channel 0 for its input, channel 8 for its output and channel 24, bit 0 as the alarm channel, execute: ALG:DEF ‘ALG1’,’PIDB(I100,O108,O124.B0)’ NOTES 1. If error messages are received when a PID algorithm is defined, the most common causes are: 1) Trying to re-define an algorithm by the same name or 2) Using a “channel” identifier that is not defined (make sure the first letter in channel specifier is uppercase and that bit identifiers start with the uppercase B). 76 Programming the VT1415A for PID Control Chapter 3 2. The “channels” specified in the PID definition can be any GLOBAL variable identifier defined prior to the algorithm definition. Use ALG:DEF ‘GLOBALS’,’<var_declaration_source>.’ ALG:DEF ‘GLOBALS’,’static float pid1_outp, pid2_inp;’ ALG:DEF ‘ALG1’,’PIDB(I114,pid1_outp,O124) ALG:DEF ‘ALG2’,’PIDB(pid2_inp,O132,O124) Use global for PIDB output Use global for PIDB input Use ALG:SCALAR ‘GLOBALS’,’<var_name>’,<value> to assign a value. Use ALG:SCALAR? ‘GLOBALS’,’<var_name>’ to read the value. Pre-Setting PID Variables and Coefficients Pre-Setting PID Variables To send values to variables in standard PID algorithms, use the command ALGorithm[:EXPLicit]:SCALar <alg_name>, <variable_name>,<value> . To set PID ALG1’s gain to 5 and “turn off” the I and D term send: ALG:SCALAR ‘ALG1’,’P_factor’,5 set gain to 5 ALG:SCALAR ‘ALG1’,’I_factor’,0 turn off I term ALG:SCALAR ‘ALG1’,’D_factor’,0 turn off D term ALG:SCALAR ‘ALG1’,’Setpoint’,8 adjust Setpoint to 8 volts ALG:UPDATE cause all variables to be updated immediately Defining Data Storage Specifying the Data Format The format of the values stored in the FIFO buffer and CVT never changes. They are always stored as IEEE 32-bit Floating point numbers. The FORMat <format>[,<length>] command merely specifies whether and how the values will be converted as they are transferred from the CVT and FIFO to the host computer. · The <format>[,<length>] parameters can specify: PACKED REAL,32 REAL REAL,64 ASCii,7 ASCii Same as REAL,64 except for the values of IEEE -INF, IEEE +INF and Not-a-Number (NaN). See FORMat command in Chapter 5 for details. means real 32-bit (no conversion, fastest) same as above means real 64-bit (values converted) means 7-bit ASCII (values converted) same as above (the *RST condition) To specify that values are to remain in IEEE 32-bit Floating Point format for fastest transfer rate: FORMAT REAL,32 Chapter 3 Programming the VT1415A for PID Control 77 To specify that values are to be converted to 7-bit ASCII and returned as a 15 character per value comma separated list: FORMAT ASC,7 or FORM ASC Selecting the FIFO Mode The *RST, *TST?, and power-on default format same operation as above The VT1415A’s FIFO can operate in two modes. One mode is for reading FIFO values while algorithms are executing, the other mode is for reading FIFO values after algorithms have been halted (ABORT sent). · BLOCking: The BLOCking mode is the default and is used to read the FIFO while algorithms are executing. The application program must read FIFO values often enough to keep it from overflowing (see “Continuously Reading the FIFO” on page 85). The FIFO stops accepting values when it becomes full (65,024 values). Values sent by algorithms after the FIFO is full are discarded. The first value to exceed 65,024 sets the STAT:QUES:COND? bit 10 (FIFO Overflowed) and an error message is put in the Error Queue (read with SYS:ERR? command). · Overwrite: When the FIFO fills, the oldest values in the FIFO are overwritten by the newest values. Only the latest 65,024 values are available. In OVERwrite mode, the module must be halted (ABORT sent) before reading the FIFO (see “Reading the Latest FIFO Values” on page 86). This mode is very useful when viewing an algorithm’s response to a disturbance is desired. Run the algorithm with <History_mode> set to 1. Disturb the loop with a step change. Stop the algorithm with the ABORT command. The FIFO records the latest 13,004 5-value entries from a PIDB. To set the FIFO mode (blocking is the *RST/Power-on condition): [SENSe:]DATA:FIFO:MODE OVERWRITE [SENSe:]DATA:FIFO:MODE BLOCK select overwrite mode select blocking mode Setting up the Trigger System Arm and Trigger Sources Figure 3-7 shows the trigger and arm model for the VT1415A. Note that when the Trigger Source selected is TIMer (the default), the remaining sources become Arm Sources. Using ARM:SOUR allows an event to be specified that must occur in order to start the Trigger Timer. The default Arm source is IMMediate (always armed). 78 Programming the VT1415A for PID Control Chapter 3 ARM:SOURce <source> ARM Source Selector TRIGger:TIMer <interval> Trigger Timer TRIGger:SOURce <source> TIMer BUS Trigger Source Selector ARM/TRIGger Sources EXTernal HOLD IMMediate TTLTrg<n> SCP Trig Internal Trigger Signal Trigger Enable Trigger Counter TRIGger:COUNt <count> Figure 3-7: Logical Arm and Trigger Model Selecting the Trigger Source In order to start an algorithm execution cycle, a trigger event must occur. The source of this event is selected with the TRIGger:SOURce <source> command. The following table explains the possible choices for <source>. Parameter Value NOTES Source of Trigger (after INITiate:¼ command) BUS TRIGger[:IMMediate], *TRG, GET (for GPIB) EXTernal “TRG” signal input on terminal module HOLD TRIGger[:IMMediate] IMMediate The trigger signal is always true (scan starts when an INITiate:¼ command is received). SCP SCP Trigger Bus (future SCP Breadboard) TIMer The internal trigger interval timer (must set Arm source) TTLTrg<n> The VXIbus TTLTRG lines (n = 0 through 7) 1. When TRIGger:SOURce is not TIMer, ARM:SOURce must be set to IMMediate (the *RST condition). If not, the INIT command will generate an error -221,"Settings conflict." 2. When TRIGger:SOURce is TIMer, the trigger timer interval (TRIG:TIM <interval>) must allow enough time to scan all channels, execute all algorithms, and update all outputs or a +3012, “Trigger Too Fast” error will be generated during the algorithm cycle. See the TRIG:TIM command on page 275 for details. To set the trigger source to the internal Trigger Timer (the default): TRIG:SOUR TIMER Chapter 3 now select ARM:SOUR Programming the VT1415A for PID Control 79 To set the trigger source to the External Trigger input connection: TRIG:SOUR EXT an external trigger signal To set the trigger source to a VXIbus TTLTRG line: TRIG:SOUR TTLTRG1 Selecting Trigger Timer Arm Source the TTLTRG1 trigger line Figure 3-7 shows that when the TRIG:SOUR is TIMer, the other trigger sources become Arm sources that control when the timer will start. The command to select the arm source is ARM:SOURce <source>. · The <source> parameter choices are explained in the following table Parameter Value NOTE Source of Arm (after INITiate:¼ command) BUS ARM[:IMMediate] EXTernal “TRG” signal input on terminal module HOLD ARM[:IMMediate] IMMediate The arm signal is always true (scan starts when an INITiate:¼ command is received). SCP SCP Trigger Bus (future SCP Breadboard) TTLTrg<n> The VXIbus TTLTRG lines (n=0 through 7) When TRIGger:SOURce is not TIMer, ARM:SOURce must be set to IMMediate (the *RST condition). If not, the INIT command will generate an error -221,"Settings conflict." To set the external trigger signal as the arm source: ARM:SOUR EXT Programming the Trigger Timer trigger input on connector module When the VT1415A is triggered, it begins its algorithm execution cycle. The time it takes to complete a cycle is the minimum interval setting for the Trigger Timer. If programmed to a shorter time, the module will generate a “Trigger too fast” error. How is the minimum time determined? After all algorithms are defined, send the ALG:TIME? command with its <alg_name> parameter set to ‘MAIN.’ This causes the VT1415A’s driver to analyze the time required for all four phases of the execution cycle: Input, Update, Calculate, and Output. The value returned from ALG:TIME? ‘MAIN’ is the minimum allowable Trigger Timer interval. With this information, execute the command TRIGger:TIMer <interval> and set <interval> to a time that is equal to or greater than the minimum. See “Starting the PID Algorithm” in a later section in this chapter for more on phases of the execution cycle. 80 Programming the VT1415A for PID Control Chapter 3 Setting the Trigger Counter The Trigger Counter controls how many trigger events will be allowed to start an input-calculate-output cycle. When the number of trigger events set with the TRIGger:COUNt command is reached, the module returns to the Trigger Idle State (needs to be INITiated again). The default Trigger Count is 0 which is the same as INF (can be triggered an unlimited number of times). This setting will be used most often because it allows un-interrupted execution of control algorithms. To set the trigger count to 50 (perhaps to help debug an algorithm): TRIG:COUNT 50 Outputting Trigger Signals execute algorithms 50 times then return to Trig Idle State. The VT1415A can output trigger signals on any of the VXIbus TTLTRG lines. Use the OUTPut:TTLTrg<n>[:STATe] ON | OFF command to select one of the TTLTRG lines and then choose the source that will drive the TTLTRG line with the command OUTPut:TTLTrg:SOURce command. For details, see OUTP:TTLTRG commands starting on page 217. To output a signal on the TTLTRG1 line each time the Trigger Timer cycles execute the commands: TRIG:SOUR TIMER OUTP:TTLTRG1 ON OUTP:TTLTRG:SOUR TRIG select trig timer as trig source select and enable TTLTRG1 line each trigger output on TTLTRG1 INITiating/Running Algorithms When the INITiate[:IMMediate] command is sent, the VT1415A builds the input Scan List from the input channels referenced when the algorithm was defined with the ALG:DEF command above. The module also enters the "Waiting For Trigger" state. In this state, all that is required to run the algorithm is a trigger event for each pass through the input-calculate-output cycle. To initiate the module, send the command: INIT module to Waiting for Trigger State When an INIT command is executed, the driver checks several interrelated settings programmed in the previous steps. If there are conflicts in these settings an error message is placed in the Error Queue (read with the SYST:ERR? command). Some examples: · If TRIG:SOUR is not TIMer then ARM:SOUR must be IMMediate. · The time it would take to execute all algorithms is longer than the TRIG:TIMER interval currently set. Starting the PID Algorithm Chapter 3 Once the module is INITiated it can accept triggers from any source specified in TRIG:SOUR. Programming the VT1415A for PID Control 81 TRIG:SOUR ARM:SOUR INIT or TRIG:SOUR ARM:SOUR INIT ARM TIMER IMM (*RST default) (*RST default) INIT starts Timer triggers TIMER HOLD INIT readies module ARM starts Timer triggers. ... and the algorithms start to execute. The Operating Sequence The VT1415 has four major operating phases. Figure 3-8 shows these phases. A trigger event starts the sequence: 4 PUT ut table to SCP nels) 1 INPUT 2 UPDATE 3 CALCULATE (from SCP channels, analog & digital) (variables & algorithms) (execute all enabled algorithms) 4 OUTPUT ··· (output table sent to SCP channels) 1 INP (from chan anal digi Set by ALG:OUTPut:DELay (if any) Trigger Event Trigger Event Figure 3-8: Sequence of Loop Operations 1. (INPUT): the state of all digital inputs are captured and each analog input channel that is linked to an algorithm variable is scanned. 2. (UPDATE): The update phase is a window of time made large enough to process all variables and algorithm changes made after INIT. Its width is specified by ALG:UPDATE:WINDOW. This window is the only time variables and algorithms can be changed. Variable and algorithm changes can actually be accepted during other phases, but the changes don’t take place until an ALG:UPDATE command is received and the update phase begins. If no ALG:UPDATE command is pending, the update phase is simply used to accept variable and algorithm changes from the application program (using ALG:SCAL, ALG:ARR, ALG:DEF). Data acquired by external specialized measurement instruments can be sent to the algorithms at this time. 3. (CALCULATE): all INPUT and UPDATE values have been made available to the algorithm variables and each enabled algorithm is executed. The results to be output from algorithms are stored in the Output Channel Buffer. 4. (OUTPUT): each Output Channel Buffer value stored during (CALCULATE) is sent to its assigned SCP channel. The start of the OUTPUT phase relative to the Scan Trigger can be set with the SCPI command ALG:OUTP:DELay. 82 Programming the VT1415A for PID Control Chapter 3 Reading Running Algorithm Values The PIDB algorithm stores its most important working values into the Current Value Table (CVT) each time it executes. Further, by changing the variable named “<History_mode>” from 0 to 1, PIDB will also send these value to the FIFO buffer. In addition, any PID algorithm variable can be read directly from the running algorithm. Reading Algorithm Variables Use this method to read a variable that isn’t available from the CVT or FIFO. To directly read algorithm variables, the names of the variables must be known. The working variables for PIDA and PIDB are listed in the section “Defining Standard PID Algorithms,” starting on page 73. To read the values of these variable, use the command ALGorithm:SCALar? ‘<alg_name>’,’<var_name>.’ The command returns the current value of the variable <var_name> from the algorithm <alg_name>. With this command, it is possible to look at PIDB variables that are not automatically placed in the CVT. Since the PIDA algorithm doesn’t send values to the CVT, ALG:SCALAR? is the only way to view the contents of its working variables. Example for PIDA: To return the value of the error term variable from the PIDA ‘ALG3’ ALG:SCALAR? ‘ALG3’,’Error’ now input the value program executes “enter” statement Reading Algorithm Values From the CVT Organization of the CVT The Current Value Table (CVT) contains the latest operating parameter values from executing PIDB algorithms. The algorithms copy these values to specific elements of the CVT each time they execute. The CVT is fast because it is a hardware state machine that does not require the DSP to be involved in the data transaction. Further, a single SCPI command can return some or all of the CVT’s values, thus reducing the I/O load on an application program. There is a pre-defined organization for the CVT. Standard PID algorithms are allocated 10 CVT elements. With up to 32 PIDs possible, 320 elements are allocated for Standard PIDs. ALG1 can use elements 10-19, ALG2 can use elements 20-29, ALG3 can use elements 30-39, etc. through ALG32 which can use elements 320-329. Each of these 10 element areas are called a segment. Note that PIDA does not record its operating values and PIDB records four values. For PIDB the values stored in each segment are: Element xx0 xx1 xx2 xx3 xx4 xx5 xx6 xx7 xx8 xx9 Chapter 3 Variable Sense Error Output Status not used not used not used not used not used not used Description Process value monitored Setpoint value minus Sense value Process control drive value Sum of bit values for Clips/Alarms exceeded Programming the VT1415A for PID Control 83 The CVT has a total size of 512 elements. Elements 10 through 511 are available to algorithms. Elements 0 through 9 are reserved for internal use. NOTE After *RST/Power-on, each element in the CVT contains the IEEE-754 value “Not-a Number” (NaN). Channel values which are a positive over-voltage return IEEE +INF and negative over-voltage return IEEE -INF. Refer to the FORMat command in on page 199 for the NaN, +INF, and -INF values for each data format. The command used to return values from CVT elements is the [SENSe:]DATA:CVT? (@<element_list>). The <element_list> parameter has the same form as a <ch_list> parameter. The format of returned data is dependent on the current setting from the FORMat command. To access the latest values from PIDB algorithms ALG1: SENS:DATA:CVT? (@10:13) returns Sense, Error, Output and execute program input statement here Status values from ALG1 must input 4 values To return the latest values from PIDB Alg1 and PIDB ALG2: SENS:DATA:CVT? (@10:13,20:23) execute program input statement here returns Sense, Error, Output and Status values from ALGs 1 and 2 must input 8 values To reset the CVT (and set all values to NaN), send the command [SENSe:]DATA:CVTable:RESet. Reading History Mode Values From the FIFO The algorithm history mode enables PIDB algorithms to send their operating values to the FIFO buffer. To enable the PIDB algorithm to send its operating values to the FIFO, set the <History_mode> variable to 1. If it is necessary to retrieve the value of the working variables from every execution of an algorithm, the FIFO is the best choice. Since it is a buffer that can store up to 65,024 values, the application program can read the FIFO values intermittently and still keep up with the data rate from the algorithm. The commands provided for reading the FIFO are: FIFO Transfer Commands [SENSe:]DATA:FIFO[:ALL]? returns all values remaining in the FIFO. This command should be used only when no more values are being placed in the FIFO (algorithms stopped). [SENSe:]DATA:FIFO:HALF? returns 32,768 values (approximately half of the FIFO capacity) when they become available. This command completes only after the 32,768 values are transferred. [SENSe:]DATA:FIFO:PART? <n_values> returns the number of values specified by <n_values> (2,147,483,647 maximum). This command completes only after <n_values> have been transferred. 84 Programming the VT1415A for PID Control Chapter 3 FIFO Status Commands [SENSe:]DATA:FIFO:COUNt? returns a count of the values in the FIFO buffer. Use with the DATA:FIFO:PART? or DATA:FIFO:ALL? commands [SENSe:]DATA:FIFO:COUNt:HALF? returns a 1 if the FIFO is at least half full (32,768 values) or a 0 if not. Use with the DATA:FIFO:HALF? command. All of the FIFO commands except SENS:DATA:FIFO:ALL? can execute while the module continues to run algorithms. Once a FIFO Transfer command is executed, the instrument cannot accept other commands until the transfer is complete as specified for each command above. The FIFO Status commands allow the instrument to be polled for availability of values before executing a transfer command. Which FIFO Mode? The way the FIFO is read depends on how the FIFO mode is set in the programming step “Setting the FIFO Mode” on page 78. Continuously Reading the FIFO (FIFO mode BLOCK) If reading the FIFO while algorithms are running, the FIFO mode must be set to SENS:DATA:FIFO:MODE BLOCK. In this mode, if the FIFO fills up, it stops accepting values from algorithms. The algorithms continue to execute, but the latest data is lost. To avoid losing any FIFO data, an application needs to read the FIFO often enough to prevent overflow. The flow diagram below shows where and when to use the FIFO commands. Begin Data Retrieval STAT:OPER:COND? (bit 4 “Measuring”) No No Enough Values In FIFO? Algorithms Stopped? Yes No DATA:FIFO:COUNT? Any Values In FIFO? Yes Execute Bulk Transfer command Yes DATA:FIFO:PART? <n_values> Execute Final Transfer command Exit Data Retrieval Figure 3-9: Controlling Reading Count Chapter 3 Programming the VT1415A for PID Control 85 An example command sequence for Figure 3-9 is provided below. It assumes that the FIFO mode was set to BLOCK and that at least one algorithm is sending values to the FIFO (a PIDB with <History_mode> set to 1). following loop reads number of values in FIFO while algorithms executing see STAT:OPER:COND bit 4 query for count of values in FIFO loop while “measuring” bit is true SENS:DATA:FIFO:COUNT? input n_values here if n_values >= 16384 SENS:DATA:FIFO:PART? n_values input read_data here end if end while loop Set the minimum block size to transfer ask for n_values Format depends on FORMat cmd following checks for values remaining in FIFO after “measuring” false SENS:DATA:FIFO:COUNT? query for values still in FIFO input n_values here if n_values SENS:DATA:FIFO:PART? n_values input read_data here end if if any values... get remaining values from FIFO Reading the Latest FIFO Values (FIFO mode OVER) In this mode, the FIFO always contains the latest values (up to the FIFO’s capacity of 65,024 values) from running algorithms. In order to read these values, the algorithms must be stopped (use ABORT). This forms a record of the algorithm’s latest performance. In the OVERwrite mode, the FIFO cannot be read while it is accepting readings from algorithms. Algorithm execution must be stopped before the application program reads the FIFO. Here is an example command sequence that can be used to read values from the FIFO after algorithms are stopped (ABORT sent). SENS:DATA:FIFO:COUNT? input n_values here if n_values SENS:DATA:FIFO:PART? n_values input read_data here end of if 86 Programming the VT1415A for PID Control query count of values in FIFO if any values... Format of values set by FORMat get remaining values from FIFO Chapter 3 Modifying Running Algorithm Variables Updating the Algorithm Variables and Coefficients The values sent with the ALG:SCALAR command are kept in the Update Queue until an ALGorithm:UPDate command is received. ALG:UPD cause changes to take place Updates are performed during phase 2 (see Figure 3-8 on page 82) of the algorithm execution cycle. The UPDate:WINDow <num_updates> command can be used to specify how many updates will need to be performed during phase 2 (UPDATE phase) and assigns a constant window of time to accomplish all of the updates that will be made. The default value for <num_updates> is 20. Fewer updates (shorter window) means slightly faster loop execution times. Each update takes approximately 1.4 µs. To set the Update Window to allow 10 updates in phase 2: ALG:UPD:WIND 10 allows slightly faster execution than default of 20 updates A way to synchronize variable updates with an external event is to send the ALGorithm:UPDate:CHANnel ‘<dig_chan/bit>’ command. · The <dig_chan/bit> parameter specifies the digital channel/bit that controls execution of the update operation. When the ALG:UPD:CHAN command is received, the module checks the current state of the digital bit. When the bit next changes state, pending updates are made in the next UPDATE Phase. ALG:UPD:CHAN ‘I133.B0’ Enabling and Disabling Algorithms NOTE perform updates when bit zero of VT1533A at channel 133 changes state An algorithm is enabled by default when it is defined. However, the ALG:STATe <alg_name>, ON | OFF command is provided to enable or disable algorithms. When an individual algorithm is enabled, it will execute when the module is triggered. When disabled, the algorithm will not execute. The command ALG:STATE <alg_name>, ON | OFF does not take effect until an ALG:UPDATE command is received. This allows multiple ALG:STATE commands to be sent with their their effects synchronized. To enable ALG1 and ALG2and disable ALG3 and ALG4: ALG:STATE ‘ALG1’,ON ALG:STATE ‘ALG2’,ON ALG:STATE ‘ALG3’,OFF ALG:STATE ‘ALG4’,OFF ALG:UPDATE Chapter 3 enable algorithm ALG1 enable algorithm ALG2 disable algorithm ALG3 disable algorithm ALG4 changes take effect at next update phase Programming the VT1415A for PID Control 87 Setting Algorithm Execution Frequency The ALGorithm:SCAN:RATio ‘<alg_name>’,<num_trigs> command sets the number of trigger events that must occur before the next execution of algorithm <alg_name>. For PID ‘ALG3’ to execute once every twenty triggers, send ALG:SCAN:RATIO ‘ALG3’,20, followed by an ALG:UPDATE command. ‘ALG3’ would then execute on the first trigger after INIT, then the 21st, then the 41st, etc. This can be useful to adjust the response time of a control algorithm relative to others. The *RST default for all algorithms is to execute on every trigger event. Example Command Sequence This example command sequence puts together all of the steps discussed so far in this chapter. *RST Reset the module Setting up Signal Conditioning (only for programmable SCPs) INPUT:FILTER:FREQUENCY 2,(@116:119) INPUT:GAIN 64,(@116:119) INPUT:GAIN 8,(@120:123) set up digital channel characteristics INPUT:POLARITY NORM,(@125) OUTPUT:POLARITY NORM,(@124) (*RST default) (*RST default) OUTPUT:TYPE ACTIVE,(@124) link channels to EU conversions (measurement functions) SENSE:FUNCTION:VOLTAGE AUTO,(@100:107) (*RST default) SENSE:REFERENCE THER,5000,AUTO,(@108) SENSE:FUNCTION:TEMPERATURE TC,T,AUTO,(@109:123) SENSE:REFERENCE:CHANNELS (@108),(@109:123) configure digital output channel for “alarm channel” SOURCE:FUNCTION:CONDITION (@132) execute channel calibration *CAL? can take several minutes Configure the Trigger System ARM:SOURCE IMMEDIATE (*RST default) TRIGGER:COUNT INF (*RST default) TRIGGER:TIMER .010 (*RST default) TRIGGER:SOURCE TIMER (*RST default) specify data format FORMAT ASC,7 (*RST default) select FIFO mode SENSE:DATA:FIFO:MODE BLOCK may read FIFO while running Define PID algorithm ALG:DEFINE ‘ALG1’,’PIDB(I100,O124,O132.B0)’ Pre-set PID coefficients ALG:SCAL ‘ALG1’,’P_factor’,5 ALG:SCAL ‘ALG1’,’I_factor’,0 ALG:SCAL ‘ALG1’,’D_factor’,0 88 Programming the VT1415A for PID Control Chapter 3 initiate trigger system (start algorithm) INITIATE retrieve PID data SENSE:DATA:CVT? (@<element_list>) A Quick-Start PID Algorithm Example This example uses the “PIDB” algorithm to control a simulated process provided by a capacitor, two resistors, and a diode. The object is to control the voltage level in the capacitor. The example program is written in C-SCPI. To save space, the program shown here does not include any error trapping. The source file for this example does implement error trapping. The source file is named “simp_pid.cs” and can be found in the VXIplug&play Drivers and Product Manuals CD. See Appendix G for program listings. Chn 0 HI Chn 8 HI Chn 0 LO Chn 8 LO VT1501A Direct Input SCP R2 10 kW PIDA Algorithm - VT1532A Current Output SCP C1 100mF Load + R1 2 kW CR1 Current Limit Figure 3-10: Quick Start Example PID /* C-SCPI Example program for the E1415A Algorithmic Closed Loop Controller * file name “simp_pid.cs” * * This program example shows the use of the intrinsic function PIDB. */ /* Standard include files */ #include <stdlib.h> #include <stdio.h> #include <stddef.h> #include <math.h> /* Instrument control include files */ #include <cscpi.h> /* C-SCPI include file */ /* Declare constants */ #define E1415_ADDR “vxi,208" /* The C-SCPI address of your E1415 */ INST_DECL(e1415, “E1415A”, REGISTER); /* E1415 */ /* Main program */ void main() Chapter 3 Programming the VT1415A for PID Control 89 { /* Main program local variable declarations */ char *algorithm; /* Algorithm string */ int alg_num; /* Algorithm number being loaded */ char string[333]; /* Holds error information */ int32 error; /* Holds error number */ INST_STARTUP(); /* Initialize the C-SCPI routines */ /* Open the E1415 device session with error checking */ INST_OPEN(e1415, E1415_ADDR); /* Open the E1415 */ if (! e1415) { /* Did it open? */ (void) fprintf(stderr, “Failed to open the E1415 at address %s\n”, E1415_ADDR); (void) fprintf(stderr, “C-SCPI open error was %d\n”, cscpi_open_error); exit(1); } /* Check for startup errors */ INST_QUERY(e1415,"syst:err?\n", “%d,%S”, &error, string); if (error) { (void) printf(“syst:err %d,%s\n”, error, string); exit(1); } /* Start from a known instrument INST_CLEAR(e1415); INST_SEND(e1415, “*RST;*CLS\n”); */ /* Selected device clear */ /* Setup SCP functions */ INST_SEND(e1415, “sens:func:volt (@116)\n”); /* Analog in volts INST_SEND(e1415, “sour:func:cond (@141)\n”); /* Digital output */ */ /* Configure Trigger Subsystem and Data Format */ INST_SEND(e1415, “trig:sour timer;:trig:timer .001\n”); INST_SEND(e1415, “samp:timer 10e-6\n”); /* default */ INST_SEND(e1415, “form real,32\n”); /* Download algorithm with in-line code */ INST_SEND(e1415,"alg:def ‘alg1’,’PIDB(I116,O100,O141.B0)’\n"); /* Preset Algorithm variables */ INST_SEND(e1415,"alg:scal ‘alg1’,’Setpoint’,%f\n", 3.0); INST_SEND(e1415,"alg:scal ‘alg1’,’P_factor’,%f\n", 0.0001); INST_SEND(e1415,"alg:scal ‘alg1’,’I_factor’,%f\n", 0.00025); INST_SEND(e1415,"alg:upd\n"); /* Initiate Trigger System - start scanning and running algorithms INST_SEND(e1415,"init\n"); */ /* Alter run-time variables and Retrieve Data */ while( 1 ) { float32 setpoint = 0, process_info[4]; int i; /* type in -100 to exit */ printf(“Enter desired setpoint: ”); scanf( “%f”,&setpoint ); if ( setpoint == -100.00 ) break; INST_SEND(e1415,"alg:scal ‘alg1’,’Setpoint’,%f\n", setpoint ); INST_SEND(e1415,"alg:upd\n"); for ( i = 0; i < 10 ; i++ ) { /* read CVT 10 times */ /* ALG1 has elements 10-13 in CVT */ INST_QUERY( e1415, “data:cvt? (@10:13)”,"%f",&process_info ); 90 Programming the VT1415A for PID Control Chapter 3 printf(“Process variable: %f, %f, %f, %f\n”,process_info[0], process_info[1],process_info[2],process_info[3]); } } } PID Algorithm Tuning Tuning control loops is an extensive subject in itself. A proper discussion of loop tuning must be undertaken within the context of process and control loop theory. With this in mind, reading a book that covers the subject well is also recommended: Fundamentals Of Process Control Theory, by Paul W. Murrill, Instrument Society of America, Research Triangle Park, NC, 1981, Second Edition 1991, ISBN 1-55617-297-4. The VT1415A Algorithmic Closed Loop Controller provides tuning assistance in the form of the following loop control and monitoring features: · · · · Manual control mode Direct manipulation of variable values in both PIDA and PIDB PIDB operating values available from CVT PIDB History Mode puts continuous sequence of operating values into FIFO Using the Status System The VT1415A’s Status System allows a single register (the Status Byte) to be polled quickly to see if any internal condition requires attention. Figure 3-11 shows that the three Status Groups (Operation Status, Questionable Data, and the Standard Event Groups) and the Output Queue all send summary information to the Status Byte. By this method, the Status Byte can report many more events than its eight bits would otherwise allow. Figure 3-12 shows the Status System in detail. Chapter 3 Programming the VT1415A for PID Control 91 Questionable Data Group Output Queue Status Byte Group Summary Bits Read with *STB Operation Status Group Standard Event Group Figure 3-11: Simplified Status System Diagram 92 Programming the VT1415A for PID Control Chapter 3 QUESTIONABLE DATA GROUP STATus:QUEStionable:CONDition? (reads register) STATus:QUEStionable:NTR and STATus:QUEStionable:PTR (set filters) STATus:QUEStionable:EVENt? (reads/clears register) STATus:QUEStionable:ENABle (sets mask) 0 1 2 3 Output Queue Not Empty 4 5 6 Logical OR 7 Lost Calibration Trigger Too Fast FIFO Overflowed 8 9 Over-voltage 10 VME Memory Overflow 11 Setup Changed 12 13 14 15 STATUS BYTE GROUP Condition (real time) Filter Summary (real-time) 0 Event Enable (latched (1=enable Enable (1=enable) 1 2 Logical OR Summary Bit QUE MAV ESB OPERATION STATUS GROUP STATus:OPERation:CONDition? RQS (SRQ) OPR Summary Bit *STB? *SRE <mask_value> (reads register) STATus:OPERation:NTR and STATus:QUEStionable:PTR (set filters) STATus:OPERation:EVENt? STATus:OPERation:ENABle Calibrating Summary Bit (reads/clears QUE - Questionable Data MAV - Message Available ESB - Standard Event RQS - Request Service OPR - Operation Status (sets mask) 0 1 Summary Bit 2 Measuring 3 STANDARD EVENT GROUP 4 Event (latched) 5 Operation Complete 6 Request Control 0 SCP Trigger 7 FIFO Half Full 8 Algorithm Interrupt 9 Execution Error 3 10 Command Error 4 11 User Request 5 Query Error Device Dependent Error Power-On 12 13 2 6 7 14 *ESR? 15 Condition (real time) 1 Logical OR Logical OR Scan Complete Enable (1=enable) Filter *ESE <mask_value> *ESE? Event Enable (latched (1=enable Figure 3-12: VT1415A Status System Chapter 3 Programming the VT1415A for PID Control 93 Status Bit Descriptions Questionable Data Group Bit Bit Value Event Name 8 256 Lost Calibration At *RST or Power-on, Control Processor has found a checksum error in the Calibration Constants. Read error(s) with SYST:ERR? command and re-calibrate areas that lost constants. Description 9 512 Trigger Too Fast Scan not complete when another trigger event received. 10 1024 FIFO Overflowed Attempt to store more than 65,024 values in FIFO. 11 2048 Over-voltage (Detected on Input) 12 4096 VME Memory Overflow 13 8192 Setup Changed If the input protection jumper has not been cut, the input relays have been opened and *RST is required to reset the module. Over-voltage will also generate an error. The number of values taken exceeds VME memory space. Channel Calibration in doubt because SCP setup may have changed since last *CAL? or CAL:SETup command. (*RST always sets this bit.) Operation Status Group Bit Bit Value Event Name 0 1 Calibrating Set by CAL:TARE and CAL:SETup. Cleared by CAL:TARE? and CAL:SETup?. Set while *CAL? executing, then cleared. Description 4 16 Measuring Set when instrument INITiated. Cleared when instrument returns to Trigger Idle State. 8 256 Scan Complete 9 512 SCP Trigger Reserved for future SCPs 10 1024 FIFO Half Full FIFO contains at least 32,768 values 11 2048 Algorithm Interrupt Bit Bit Value Event Name Description 0 1 Operation Complete *OPC command executed and instrument has completed all pending operations. 1 2 Request Control 2 4 Query Error 3 8 Device Dependent Error 4 16 Execution Error Parameter out of range or instrument cannot execute a proper command because it would conflict with another instrument setting. 5 32 Command Error Unrecognized command or improper parameter count or type. 6 64 User Request 7 128 Power-On Set when each pass through a Scan List is completed The interrupt() function was called in an executing algorithm Standard Event Group Enabling Events to be Reported in the Status Byte Configuring the Transition Filters Not used by VT1415A Attempting to read empty output queue or output data lost. A device dependent error occurred. See Appendix B. Not used by VT1415A Power has been applied to the instrument There are two sets of registers that individual status conditions must pass through before that condition can be recorded in a group’s Event Register. These are the Transition Filter Registers and the Enable registers. They provide selectivity in recording and reporting module status conditions. Figure 3-12 shows that the Condition Register outputs are routed to the input of the Negative Transition and Positive Transition Filter Registers. For space reasons, they are shown together but are controlled by individual SCPI commands. Here is the truth table for the Transition Filter Registers: 94 Programming the VT1415A for PID Control Chapter 3 Condition Reg Bit PTRansition Reg Bit NTRansition Reg Bit Event Reg Input 0®1 0 0 0 1®0 0 0 0 0®1 1 0 1 1®0 1 0 0 0®1 0 1 0 1®0 0 1 1 0®1 1 1 1 1®0 1 1 1 The Power-on default condition is: All Positive Transition Filter Register bits set to one and all Negative Transition Filter Register bits set to 0. This applies to both the Operation and Questionable Data Groups. An Example Using the Operation Group Suppose it is necessary to have the module report via the Status System after executing a complicated *CAL? command. The “Calibrating” bit (bit 0) in the Operation Condition Register goes to 1 when *CAL? is executing and returns to 0 when *CAL? is complete. In order to record only the negative transition of this bit in the STAT:OPER:EVEN register, send: STAT:OPER:PTR 32766 All ones in Pos Trans Filter register except bit 0=0 All zeros in Neg Trans Filter register except bit 0=1 STAT:OPER:NTR 1 Now when *CAL? completes and Operation Condition Register bit zero goes from 1 to 0, Operation Event Register bit zero will become a 1. Configuring the Enable Registers Note that in Figure 3-12, each Status Group has an Enable Register. These control whether or not the occurrence of an individual status condition will be reported by the group’s summary bit in the Status Byte. Questionable Data Group Examples For only the “FIFO Overflowed” condition to be reported by the QUE bit (bit 3) of the Status Byte, execute: STAT:QUES:ENAB 1024 1024=decimal value for bit 10 For the “FIFO Overflowed” and “Setup Changed” conditions to be reported, execute: STAT:QUES:ENAB 9216 9216=decimal sum of values for bits 10 and 13 Operation Status Group Examples For only the “FIFO Half Full” condition to be reported by the OPR bit (bit 7) of the Status Byte, execute: STAT:OPER:ENAB 1024 Chapter 3 1024=decimal value for bit 10 Programming the VT1415A for PID Control 95 For only the “FIFO Half Full” and “Scan Complete” conditions to be reported, execute: STAT:OPER:ENAB 1280 1280=decimal sum of values for bits 10 and 8 Standard Event Group Examples For the “Query Error,” “Execution Error,” and “Command Error” conditions to be reported by the ESB bit (bit 5) of the Status Byte, execute: *ESE 52 Reading the Status Byte 52=decimal sum of values for bits 2, 4, and 5 To check if any enabled events have occurred in the status system, first read the Status Byte using the *STB? command. If the Status Byte is all zeros, there is no summary information being sent from any of the status groups. If the Status Byte is other than zero, one or more enabled events have occurred. Interpret the Status Byte bit values and take further action as follows: Bit 3 (QUE) bit value 810 Read the Questionable Data Group’s Event Register using the STAT:QUES:EVENT? command. This will return bit values for events which have occurred in this group. After reading, the Event Register is cleared. Note that bits in this group indicate error conditions. If bit 8, 9, or 10 is set, error messages will be found in the Error Queue. If bit 7 is set, error messages will be in the error queue following the next *RST or cycling of power. Use the SYST:ERR? command to read the error(s). Bit 4 (MAV) bit value 1610 There is a message available in the Output Queue. Execute the appropriate query command. Bit 5 (ESB) bit value 3210 Read the Standard Event Group’s Event Register using the *ESR? command. This will return bit values for events which have occurred in this group. After reading, this status register is cleared. Note that bits 2 through 5 in this group indicate error conditions. If any of these bits are set, error messages will be found in the Error Queue. Use the SYST:ERR? command to read these. Bit 7 (OPR) bit value 12810 96 Programming the VT1415A for PID Control Read the Operation Status Group’s Event Register using the STAT:OPER:EVENT? command. This will return bit values for events which have occurred in this group. After reading, the Event Register is cleared. Chapter 3 Clearing the Enable Registers To clear the Enable Registers execute: STAT:PRESET *ESE 0 *SRE 0 for Operation Status and Questionable Data Groups for the Standard Event Group for the Status Byte Group The Status Byte Group’s Enable Register The Enable Register for the Status Byte Group has a special purpose. Notice in Figure 3-12 how the Status Byte Summary bit wraps back around to the Status Byte. The summary bit sets the RQS (request service) bit in the Status Byte. Using this Summary bit (and those from the other status groups) the Status Byte can be polled and the RQS bit checked to determine if there are any status conditions which need attention. In this way the RQS bit is like the GPIB’s SRQ (Service Request) line. The difference is that, while executing a GPIB serial poll (SPOLL) releases the SRQ line, executing the *STB? command does not clear the RQS bit in the Status Byte. The Event Register must be read of the group whose summary bit is causing the RQS. Reading Status Groups Directly Status groups can be directly polled for instrument status rather than via polling the Status Byte for summary information. Reading Event Registers The Questionable Data, Operation Status, and Standard Event Groups all have Event Registers. These Registers log the occurrence of even temporary status conditions. When read, these registers return the sum of the decimal values for the condition bits set, then are cleared to make them ready to log further events. The commands to read these Event Registers are: STAT:QUES:EVENT? STAT:OPER:EVENT? *ESR? Clearing Event Registers To clear the Event Registers without reading them execute: *CLS Reading Condition Registers clears all group’s Event Registers The Questionable Data and Operation Status Groups each have a Condition Register. The Condition Register reflects the group’s status condition in “real-time.” These registers are not latched so transient events may be missed when the register is read. The commands to read these registers are: STAT:QUES:COND? STAT:OPER:COND? Chapter 3 Questionable Data Group Event Register Operation Status Group Event Register Standard Event Group Event Register Questionable Data Group Condition Register Operation Status Group Condition Register Programming the VT1415A for PID Control 97 VT1415A Background Operation The VT1415A inherently runs its algorithms and calibrations in the background mode with no interaction required from the driver. All resources needed to run the measurements are controlled by the on-board Control Processor (DSP). The driver is required to setup the type of measurement to be run, modify algorithm variables, and to unload data from the card after it appears in the CVT or FIFO. Once the INIT[:IMM] command is given, the VT1415A is initiated and all functions of the trigger system and algorithm execution are controlled by its on-board control processor. The driver returns to waiting for user commands. No interrupts are required for the VT1415A to complete its measurement. While the module is running algorithms, the driver can be queried for its status and data can be read from the FIFO and CVT. The ABORT command may be given to force continuous execution to complete. Any changes to the measurement setup will not be allowed until the TRIG:COUNT is reached or an ABORT command is given. Of course, any commands or queries can be given to other instruments while the VT1415A is running algorithms. Updating the Status System and VXIbus Interrupts The driver needs to update the status system’s information whenever the status of the VT1415A changes. This update is always done when the status system is accessed or when CALibrate, INITiate, or ABORt commands are executed. Most of the bits in the OPER and QUES registers represent conditions which can change while the VT1415A is measuring (initiated). In many circumstances, it is sufficient to have the status system bits updated the next time the status system is accessed or the INIT or ABORt commands are given. When it is desired to have the status system bits updated closer in time to when the condition changes on the VT1415A, the VT1415A interrupts can be used. The VT1415A can send VXI interrupts upon the following conditions: · Trigger too Fast condition is detected. Trigger comes prior to trigger system being ready to receive trigger. · FIFO overflowed. In either FIFO mode, data was received after the · · · · · · FIFO was full. Over-voltage detection on input. If the input protection jumper has not been cut, the input relays have all been opened and an *RST is required to reset the VT1415A. Scan complete. The VT1415A has finished a scan list. SCP trigger. A trigger was received from an SCP. FIFO half full. The FIFO contains at least 32,768 values. Measurement complete. The trigger system exited the “Wait-For-Arm.” This clears the Measuring bit in the OPER register. Algorithm executes an “interrupt()” statement. 98 Programming the VT1415A for PID Control Chapter 3 These VT1415A interrupts are not always enabled since, under some circumstances, this could be detrimental to system operation. For example, the Scan Complete, SCP triggers, FIFO half full, and Measurement complete interrupts could come repetitively, at rates that would cause the operating system to be swamped processing interrupts. These conditions are dependent upon the user’s overall system design, therefore the driver allows the user to decide which, if any, interrupts will be enabled. The way the user controls which interrupts will be enabled is via the *OPC, STATUS:OPER/QUES:ENABLE, and STAT:PRESET commands. Each of the interrupting conditions listed above has a corresponding bit in the QUES or OPER registers. If that bit is enabled via the STATus:OPER/QUES:ENABle command to be a part of the group summary bit, it will also enable the VT1415A interrupt for that condition. If that bit is not enabled, the corresponding interrupt will be disabled. Sending STAT:PRESET will disable all the interrupts from the VT1415A. Sending the *OPC command will enable the measurement complete interrupt. Once this interrupt is received and the OPC condition sent to the status system, this interrupt will be disabled if it was not previously enabled via the STATUS:OPER/QUES:ENABLE command. The above description is always true for a downloaded driver. In the C-SCPI driver, however, the interrupts will only be enabled if cscpi_overlap mode is ON when the enable command is given. If cscpi_overlap is OFF, the user is indicating they do not want interrupts to be enabled. Any subsequent changes to cscpi_overlap will not change which interrupts are enabled. Only sending *OPC or STAT:OPER/QUES:ENAB with cscpi_overlap ON will enable interrupts. In addition, the user can enable or disable all interrupts via the SICL calls, iintron() and iintroff(). Creating and Loading Custom EU Conversion Tables The VT1415A provides for loading custom EU conversion tables. This allows for the on-board conversion of transducers not otherwise supported by the VT1415A. Standard EU Operation Chapter 3 The EU conversion tables built into the VT1415A are stored in a “library” in the module’s non-volatile Flash Memory. When a specific channel is linked to a standard EU conversion using the [SENSe:]FUNC:… command, the module copies that table from the library to a segment of RAM allocated to the specified channel. When a single EU conversion is specified for multiple channels, multiple copies of that conversion table are put in RAM, one copy into each channel’s Table RAM Segment. The conversion table-per-channel arrangement allows higher speed scanning since the table is already loaded and ready to use when the channel is scanned. Programming the VT1415A for PID Control 99 Custom EU Operation NOTE Custom EU Tables Custom Thermocouple EU Conversions Custom EU conversion tables are loaded directly into a channel’s Table RAM Segment using the DIAG:CUST:LIN and DIAG:CUST:PIEC commands. The DIAG:CUST:... commands can specify multiple channels. To “link” custom conversions to their tables, execute the [SENSe:]FUNC:CUST <range>,(@<ch_list>) command. Unlike standard EU conversions, the custom EU conversions are already linked to their channels (tables loaded) before the [SENSe:]FUNC:CUST command is executed, but the command allows the A/D range for these channels to be specified. The *RST command clears all channel Table RAM segments. Custom EU conversion tables must be re-loaded using the DIAG:CUST:... commands. The VT1415A uses two types of EU conversion tables: linear and piecewise. The linear table describes the transducer’s response slope and offset (y=mx+b). The piecewise conversion table gets its name because it is actually an approximation of the transducer’s response curve in the form of 512 linear segments whose end-points fall on the curve. Data points that fall between the end-points are linearly interpolated. The built-in EU conversions for thermistors, thermocouples, and RTDs use this type of table. The VT1415A can measure temperature using custom characterized thermocouple wire of types E, J, K, N, R, S, and T. The custom EU table generated for the individual batch of thermocouple wire is loaded to the appropriate channels using the DIAG:CUST:PIEC command. Since thermocouple EU conversion requires a “reference junction compensation” of the raw thermocouple voltage, the custom EU table is linked to the channel(s) using the command [SENSe:]FUNCtion:CUSTom:TCouple <type>[,<range>], (@<ch_list>). The <type> parameter specifies the type of thermocouple wire so that the correct built-in table will be used for reference junction compensation. Reference junction compensation is based on the reference junction temperature at the time the custom channel is measured. For more information, see “Thermocouple Reference Temperature Compensation” on page 64. Custom Reference Temperature EU Conversions The VT1415A can measure reference junction temperatures using custom characterized RTDs and thermistors. The custom EU table generated for the individually characterized transducer is loaded to the appropriate channel(s) using the DIAG:CUST:PIEC command. Since the EU conversion from this custom EU table is to be considered the “reference junction temperature,” the channel is linked to this EU table using the command [SENSe:]FUNCtion:CUSTom:REFerence [<range>,](@<ch_list>). This command uses the custom EU conversion to generate the reference junction temperature as explained in the “Thermocouple Reference Temperature Compensation” section on page 64. 100 Programming the VT1415A for PID Control Chapter 3 Creating Conversion Tables Contact a VXI Technology System Engineer for more information on Custom Engineering Unit Conversion for specific applications. Loading Custom EU Tables There is a specific location in the VT1415A’s memory for each channel’s EU Conversion table. When standard EU conversions are specified, the VT1415A loads these locations with EU conversion tables copied from its non-volatile FLASH Memory. For Custom EU conversions, these table values must be loaded using either of two SCPI commands. Loading Tables for Linear Conversions The DIAGnostic:CUSTom:LINear <table_range>,<table_block>, (@<ch_list>) command downloads a custom linear Engineering Unit Conversion table to the VT1415A for each channel specified. · The <table_block> parameter is a block of 8 bytes that define 4, 16-bit values. SCPI requires that <table_block> include the definite length block data header. C-SCPI adds the header automatically. · The <table_range> parameter specifies the range of input voltage that the table covers (from -<table_range> to +<table_range>). The value specified must be within 5% of: 0.015625 | 0.03125 | 0.0625 | 0.125 | 0.25 | 0.5 | 1 | 2 | 4 | 8 | 16 | 32 | 64. · The <ch_list> parameter specifies which channels will have this custom EU table loaded. Usage Example The program puts table constants into array <table_block>: DIAG:CUST:PIEC table_block,1,(@132:163) SENS:FUNC:CUST:PIEC 1,1,(@132:163) send table for channels 32-63 to VT1415A link custom EU with channels 32-63 and set the 1 V A/D range INITiate then TRIGger module Loading Tables for Non Linear Conversions The DIAGnostic:CUSTom:PIECewise <table_range>,<table_block>, (@<ch_list>) command downloads a custom piecewise Engineering Unit Conversion table to the VT1415A for each channel specified. · The <table_block> parameter is a block of 1,024 bytes that define 512 16-bit values. SCPI requires that <table_block> include the definite length block data header. C-SCPI adds the header automatically. · The <table_range> parameter specifies the range of input voltage that the table covers (from -<table_range> to +<table_range>). The value specified must be within 5% of: 0.015625 | 0.03125 | 0.0625 | 0.125 | 0.25 | 0.5 | 1 | 2 | 4 | 8 | 16 | 32 | 64. · The <ch_list> parameter specifies which channels will have this custom EU table loaded. Chapter 3 Programming the VT1415A for PID Control 101 Usage Example The program puts table constants into array <table_block>. DIAG:CUST:PIEC table_block,1,(@124:131) SENS:FUNC:CUST:PIEC 1,1,(@124:131) send table for chs 24-31 to VT1415A link custom EU with chs 24-31 and set the 1 V A/D range INITiate then TRIGger module Summary The following points describe the capabilities of custom EU conversion: · A given channel has only one active EU conversion table assigned to it. Changing tables requires loading it with a DIAG:CUST:… command. · The limit on the number of different custom EU tables that can be loaded in a VT1415A is the same as the number of channels. · Custom tables can provide the same level of accuracy as the built-in tables. In fact, the built-in resistance function uses a linear conversion table and the built-in temperature functions use the piecewise conversion table. Compensating for System Offsets System Wiring Offsets Important Note for Thermocouples The VT1415A can compensate for offsets in a system’s field wiring. Apply shorts to channels at the Unit-Under-Test (UUT) end of the field wiring and then execute the CAL:TARE (@<ch_list>) command. The instrument will measure the voltage at each channel in <ch_list> and save those values in RAM as channel Tare constants. · CAL:TARE cannot be used on field wiring that is made up of thermocouple wire. The voltage that a thermocouple wire pair generates cannot be removed by introducing a short anywhere between its junction and its connection to an isothermal panel (either the VT1415A’s Terminal Module or a remote isothermal reference block). Thermal voltage is generated along the entire length of a thermocouple pair where there is any temperature gradient along that length. To CAL:TARE thermocouple wire this way would introduce an unwanted offset in the voltage/temperature relationship for that thermocouple. If a thermocouple wire pair is inadvertently “CAL:TARE'd,” see “Resetting CAL:TARE” on page 103. · CAL:TARE should be used to compensate wiring offsets (copper wire, not thermocouple wire) between the VT1415A and a remote thermocouple reference block. Disconnect the thermocouples and introduce copper shorting wires between each channel’s HI and LO, then execute CAL:TARE for these channels. 102 Programming the VT1415A for PID Control Chapter 3 Residual Sensor Offsets Operation To remove residual sensor offsets in an unstrained strain gage bridge, execute the CAL:TARE command on those channels. The module will then measure the offsets and, as in the wiring case above, remove these offsets from future measurements. In the strain gage case, this “balances the bridge” so all measurements have the initial unstrained offset removed to allow the most accurate high speed measurements possible. After CAL:TARE <ch_list> measures and stores the offset voltages, it then performs the equivalent of a *CAL? operation. This operation uses the Tare constants to set a DAC which will remove each channel offset as “seen” by the module’s A/D converter. The absolute voltage level that CAL:TARE can remove is dependent on the A/D range. CAL:TARE will choose the lowest range that can handle the existing offset voltage. The range that CAL:TARE chooses will become the lowest usable range (range floor) for that channel. For any channel that has been “CAL:TARE'd,” Autorange will not go below that range floor and selecting a manual range below the range floor will return an Overload value (see table on page 200). As an example, assume that the system wiring to channel 0 generates a +0.1 volt offset with 0 volts (a short) applied at the UUT. Before CAL:TARE, the module would return a reading of 0.1 volt for channel 0. After CAL:TARE (@100), the module will return a reading of 0 volts with a short applied at the UUT and the system wiring offset will be removed from all measurements of the signal to channel 0. Think of the signal applied to the instrument’s channel input as the gross signal value. CAL:TARE removes the tare portion leaving only the net signal value. Because of settling times, especially on filtered channels, CAL:TARE can take a number of minutes to execute. The tare calibration constants created during CAL:TARE are stored in and are usable from the instrument’s RAM. To store the Tare constants in non-volatile Flash Memory, execute the CAL:STORE TARE command. NOTE Resetting CAL:TARE Chapter 3 The VT1415A’s Flash Memory has a finite lifetime of approximately 10,000 write cycles (unlimited read cycles). While executing CAL:STOR once every day would not exceed the lifetime of the Flash Memory for approximately 27 years, an application that stored constants many times each day would unnecessarily shorten the Flash Memory’s lifetime. To “undo” the CAL:TARE operation, execute CAL:TARE:RESet then *CAL?/CAL:SET. If current Tare calibration constants have been stored in Flash Memory, execute CAL:TARE:RESET, then CAL:STORE TARE. Programming the VT1415A for PID Control 103 Special Considerations Maximum Tare Capability Here are some things to keep in mind when using CAL:TARE. The tare value that can be compensated for is dependent on the instrument range and SCP channel gain settings. The following table lists these limits Maximum CAL:TARE Offsets A/D range ±V F.Scale Offset V Gain x1 Offset V Gain x8 Offset V Gain x16 Offset V Gain x64 16 4 1 0.25 0.0625 3.2213 0.82101 0.23061 0.07581 0.03792 0.40104 0.10101 0.02721 0.00786 0.00312 0.20009 0.05007 0.01317 0.00349 0.00112 0.04970 0.01220 0.00297 0.00055 N/A Changing Gains or Filters To change a channel’s SCP setup after a CAL:TARE operation, a *CAL? operation must be performed to generate new DAC constants and reset the “range floor” for the stored Tare value. The tare capability of the range/gain setup must also be considered that is going to be used. For instance, if the actual offset present is 0.6 volts and was “Tared” for a 4 volt range/Gain x1 setup, moving to a 1 volt range/Gain x1 setup will return Overload values for that channel since the 1 volt range is below the range floor as set by CAL:TARE. See table on page 200 for more on values returned for Overload readings. Unexpected Channel Offsets or Overloads This can occur when the VT1415A’s Flash Memory contains CAL:TARE offset constants that are no longer appropriate for its current application. Execute CAL:TARE:RESET then *CAL? to reset the tare constants in RAM. Measure the affected channels again. If the problems go away, the tare constants in Flash memory can now be reset by executing CAL:STORE TARE. Detecting Open Transducers Most of the VT1415A’s analog input SCPs provide a method to detect open transducers. When Open Transducer Detect (OTD) is enabled, the SCP injects a small current into the HIGH and LOW input of each channel. The polarity of the current pulls the HIGH inputs toward +17 volts and the LOW inputs towards -17 volts. If a transducer is open, measuring that channel will return an over-voltage reading. OTD is available on a per SCP basis. All eight channels of an SCP are enabled or disabled together. See Figure 3-13 for a simplified schematic diagram of the OTD circuit. 104 Programming the VT1415A for PID Control Chapter 3 Figure 3-13: Simplified Open Transducer Detect Circuit NOTES 1) When OTD is enabled, the inputs have up to 0.2 µA injected into them. If this current will adversely affect the measurement, but checking for open transducers is still desired, enable OTD, run the algorithms, check analog input variables for measurement values that indicate an open transducer, then disable OTD, and run the algorithms without it. The VT1415A’s accuracy specifications apply only when OTD is off. 2) When a channel’s SCP filtering is enabled, allow 15 seconds after turning on OTD for the filters capacitors to charge before checking for open transducers. To enable or disable Open Transducer Detection, use the DIAGnostic:OTDetect <enable>, (@<ch_list>) command. · The <enable> parameter can specify ON or OFF · An SCP is addressed when the <ch_list> parameter specifies a channel number contained on the SCP. The first channel on each SCP is: 0, 8, 16, 24, 32, 40, 48, and 56 To enable Open Transducer Detection on all channels on SCPs 1 and 3: DIAG:OTD ON, (@100,116) 0 is on SCP 1 and 16 is on SCP3 To disable Open Transducer Detection on all channels on SCPs 1 and 3: DIAG:OTD OFF, (@100,116) Chapter 3 Programming the VT1415A for PID Control 105 More On Auto Ranging There are rare circumstances where an input signal can be difficult for the VT1419A to auto range correctly. The module completes the range selection based on the input signal about 6 µs before the actual measurement is made on that channel. If during that period the signal becomes greater than the selected range can handle, the module will return an overflow reading (±INFinity). The only solution to this problem is to use manual range on channels that display this behavior. Settling Characteristics Some sequences of input signals, as determined by their order of appearance in a scan list, can be a challenge to measure accurately. This section is intended to help determine if a system presents any of these problems and how best to eliminate them or reduce their effect. Background While the VT1415 can auto-range, measure, and convert a reading to engineering units as fast as once every 10 µs, measuring a high-level signal followed by a very-low level signal may require some extra settling time. As seen from the point of view of the VT1415A’s Analog-to-Digital converter and its Range Amplifier, this situation is the most difficult to measure. For example, look at two consecutive channels. The first measures a power supply at 15.5 volts, the next measures a thermocouple temperature. First, the input to the Range Amplifier is at 15.5 volts (near its maximum) with any stray capacitances charged accordingly, then it immediately is switched to a thermocouple channel and down-ranged to its 0.0625 volt range. On this range, the resolution is now 1.91 µV per Least Significant Bit (LSB). Because of this sensitivity, the time to discharge these stray capacitances may have to be considered. Thus far in the discussion, it has been assumed that the low-level channel measured after a high-level channel has presented a low impedance path to discharge the A/D’s stray capacitances (path was the thermocouple wire). The combination of a resistance measurement through a VT1501A Direct Input SCP presents a much higher impedance path. A very common measurement like this would be the temperature of a thermistor. If measured through a Direct Input SCP, the source impedance of the measurement is essentially the value of the thermistor (the output impedance of the current source is in the gigaohm region). Even though this is a higher level measurement than the previous example, the settling time can be even longer due to the slower discharge of the stray capacitances. The simple answer here is to always use an SCP that presents a low impedance buffered output to the VT1415A’s Range Amp and A/D. The VT1503A/08A/09A/ 10A/12A and 14A through 17A SCPs all provide this capability. 106 Programming the VT1415A for PID Control Chapter 3 Checking for Problems The method used to quickly determine if any of the channels in a system need more settling time is to simply apply some settling time to every channel. Use this procedure: 1. First run the system to make a record of its current measurement performance. 2. Then use the SAMPle:TIMer command to add a significant settling delay to every measurement in the scan list. Take care that the sample time multiplied by the number of channels in the scan list doesn’t exceed the time between triggers. 3. Now run the system and look primarily for low level channel measurements (like thermocouples) with dc values that change somewhat. If channels are found that respond to this increase in sample period, it may also be noticed that these channels return slightly quieter measurements as well. The extra sample period reduces or removes the affected channels coupling to the value of the channel measured just before it. 4. If some improvement is seen, increase the sample period again and perform another test. When the sample period is increased and no improvement is seen, the maximum settling delay that any single channel requires has been found. 5. If the quality of the measurements does not respond to this increase in sample period, then inadequate settling time is not likely to be causing measurement problems. Fixing the Problem If the system scans fast enough with the increased sample period, the problem is solved. The system is only running as fast as the slowest channel allows, but, if it's fast enough, that’s OK. If, on the other hand, getting quality readings has slowed the scan rate too much, there are two other methods that can, either separately or in combination, have the system making good measurements as fast as possible. Use Amplifier SCPs Amplifier SCPs can remove the need to increase settling delays. How? Each gain factor of 4 provided by the SCP amplifier allows the Range Amplifier to be set one range higher and still provide the same measurement resolution. Amplifier SCPs for the VT1415A are available with gains of 0.5, 8, 16, 64, and 512. Now, return to the earlier example of a difficult measurement where one channel is measuring 15.5 volts on the 16 volt range and the next a thermocouple on the 0.0625 range. If the thermocouple channel is amplified through an SCP with a gain of 16, the Range Amplifier can be set to the 1 volt range. On this range, the A/D resolution drops to around 31 µV per LSB so the stray capacitances discharging after the 15.5 volt measurement are now only one sixteenth as significant and thus reduce any required settling delay. Of course, for most thermocouple measurements a gain of 64 can be used with the Range Amplifier set to the 4 volt range. At this setting, the A/D resolution for one LSB drops to about 122 µV and further reduces or removes any need for additional settling Chapter 3 Programming the VT1415A for PID Control 107 delay. This improvement is accomplished without any reduction of the overall measurement resolution. NOTE Adding Settling Delay for Specific Channels Filter-amplifier SCPs can provide improvements in low-level signal measurements that go beyond just settling delay reduction. Amplifying the input signal at the SCP allows using less gain at the Range Amplifier (higher range) for the same measurement resolution. Since the Range Amplifier has to track signal level changes (from the multiplexer) at up to 100 kHz, its bandwidth must be much higher than the bandwidth of individual filter-amplifier SCP channels. Using higher SCP gain along with lower Range Amplifier gain can significantly increase normal-mode noise rejection. This method adds settling time only to individual problem measurements as opposed to the SAMPle:TIMer command that introduces extra time for all analog input channels. If problems are seen on only a few channels, use the SENS:CHAN:SETTLING <num_samples>,(@<ch_list>) command to add extra settling time for just these problem channels. What SENS:CHAN:SETTLING does is instructs the VT1415A to replace single instances of a channel in the Scan List with multiple repeat instances of the channel specified in (@<ch_list>). The number of repeats is set by <num_samples>. Example: Normal Scan List: 100, 101, 102, 103, 104 Scan List after SENS:CHAN:SETT 3,(@100,103) 100, 100, 100, 101, 102, 103, 103, 103, 104 When the algorithms are run, channels 0 and 3 will be sampled three times and the final value from each will be sent to the Channel Input Buffer. This provides extra settling time while channels 1, 2, and 4 are measured in a single sample period and their values also sent to the Channel Input Buffer. 108 Programming the VT1415A for PID Control Chapter 3 Chapter 4 Creating and Running Custom Algorithms Learning Hint This chapter builds upon the “VT1415A Programming Model” information presented in Chapter 3. That information is common to PIDs and to custom algorithms. Read that section before continuing on to this one. About This Chapter This chapter describes how to write custom algorithms that apply the VT1415A’s measurement, calculation, and control resources. It describes these resources and how they can be accessed with the VT1415A’s Algorithm Language. This manual assumes that the user has some programming experience already, ideally in the ‘C’ language, as the VT1415A’s Algorithm Language is based on ‘C.’ See Chapter 5 for a description of the Algorithm Language. The contents of this chapter are: · · · · · Describing the VT1415A . . . . . . . . . . . . . . . . . . . . . . . . . . . . . page 110 What is a Custom Algorithm . . . . . . . . . . . . . . . . . . . . . . . . . . page 110 Overview of the Algorithm Language . . . . . . . . . . . . . . . . . . . page 110 The Algorithm Execution Environment . . . . . . . . . . . . . . . . . . page 111 Accessing the VT1415A’s Resources . . . . . . . . . . . . . . . . . . . page 113 - Accessing I/O Channels . . . . . . . . . . . . . . . . . . . . . . . . . . . . page 114 - Defining and Accessing Global Variables . . . . . . . . . . . . . . . page 115 - Determining First Execution . . . . . . . . . . . . . . . . . . . . . . . . . page 115 - Initializing Variables . . . . . . . . . . . . . . . . . . . . . . . . . . . . . . . page 116 - Sending Data to the CVT and FIFO . . . . . . . . . . . . . . . . . . . page 116 - Setting a VXIbus Interrupt . . . . . . . . . . . . . . . . . . . . . . . . . . page 117 - Determining an Algorithms ID (ALG_NUM) . . . . . . . . . . . . page 117 - Calling User Defined Functions . . . . . . . . . . . . . . . . . . . . . . page 118 · Operating Sequence . . . . . . . . . . . . . . . . . . . . . . . . . . . . . . . . . page 118 · Defining Custom Algorithms (ALG:DEF) . . . . . . . . . . . . . . . page 121 · A Very Simple First Algorithm . . . . . . . . . . . . . . . . . . . . . . . . page 124 · Modifying a Standard PID Algorithm . . . . . . . . . . . . . . . . . . . page 125 · Algorithm to Algorithm Communication . . . . . . . . . . . . . . . . . page 126 Communication Using Channel Identifiers . . . . . . . . . . . . . page 126 Communication Using Global Variables . . . . . . . . . . . . . . . page 127 · Non Control Algorithms . . . . . . . . . . . . . . . . . . . . . . . . . . . . . page 129 Data Acquisition Algorithm . . . . . . . . . . . . . . . . . . . . . . . . . page 129 Process Monitoring Algorithm . . . . . . . . . . . . . . . . . . . . . . . page 129 · Implementing Setpoint Profiles . . . . . . . . . . . . . . . . . . . . . . . . page 130 Chapter 4 Creating and Running Custom Algorithms 109 Describing the VT1415A Closed Loop Controller The VT1415A is a self contained data acquisition and control platform in a single C-size VXIbus module. Once configured for operation and initiated with its SCPI command set, the module is controlled by the algorithm(s) it is executing. It is the algorithms that have exclusive access to acquired data from input channels and it is the algorithms that generate values that control the analog and digital output channels. It is the calculation and decision making capability provided by its Algorithm Language that makes the VT1415A a closed loop controller. By placing the control “computer” (the algorithm) inside the data acquisition and control instrument, the data acquisition, the control decision making, and the data output phases are as tightly coupled as they can be. The time required for the system to respond to changing input values is at most one execution of the control algorithm. No data exchange to or from an external computer is required in this cycle. What is a Custom Algorithm? The only thing that separates the VT1415A’s standard PID algorithms from custom algorithms is that the standard PIDs are “built-in.” That is, they are in the VT1415A’s driver and the driver can automatically insert channel references into the code as it is loading it. Otherwise, there is no difference, in fact, the standard PIDs are written in the same Algorithm Language used to create custom algorithms. The source code for PIDA, PIDB, as well a third algorithm, “PIDC,” are supplied with the VT1415A which can be used as the basis for custom PID algorithms. Overview of the Algorithm Language As mentioned in the Introduction, the VT1415A’s Algorithm Language is based on the ANSI ‘C’ programming language. This section will present a quick look at the Algorithm Language. The complete language reference is provided in Chapter 5. Arithmetic Operators: add +, subtract -, multiply *, divide / NOTE: Also see “Calling User Defined Functions” on page 118. Assignment Operator: = Comparison Functions: less than <, less than or equal <=, greater than >, greater than or equal >=, equal to ==, not equal to != Boolean Functions: and && or ||, not ! Variables: scalars of type static float and single dimensioned arrays of type static float limited to 1,024 elements. Constants: 32-bit decimal integer; Dddd... where D and d are decimal digits but D is 110 Creating and Running Custom Algorithms Chapter 4 not zero. No decimal point or exponent specified. 32-bit octal integer: 0oo... where 0 is a leading zero and o is an octal digit. No decimal point or exponent specified. 32-bit hexadecimal integer: 0Xhhh... or 0xhhh... where h is a hex digit. 32-bit floating point: ddd., ddd.ddd, ddde±dd, dddE±dd, ddd.dddedd or ddd.dddEdd where d is a decimal digit. Flow Control: conditional construct if(){ } else { } Intrinsic Functions: Return minimum: min(<expr1>,<expr2>) Return maximum: max(<expr1>,<expr2>) User defined function: <user_name>(<expr>) Write value to CVT element: writecvt(<expr>,<expr>) Write value to FIFO buffer: writefifo(<expr>) Write value to both CVT and FIFO: writeboth(<expr>,<expr>) Example Language Usage Here are examples of some Algorithm Language elements assembled to show them used in context. Later sections will explain any unfamiliar elements seen here: Example 1; /*** get input from channel 8, calculate output, check limits, output to ch 16 & 17 ***/ static float output_max = .020; /* 20 mA max output */ static float output_min = .004; /* 4 mA min output */ static float input_val, output_val; /* intermediate I/O vars */ input val_ = I108; output_val = 12.5 * input_val; if ( output_val > output_max ) output_val = output_max; else if( output_val < output_min) output_val = output_min; O116 = output_val / 2; O117 = output_val / 2; /* get value from input buffer channel 8*/ /* calculate desired output */ /* check output greater than limit */ /* if so, output max limit */ /* check output less than limit */ /* if so, output min limit */ /* split output_val between two SCP */ /* channels to get up to 20 mA max */ Example 2; /*** same function as example 1 above but shows a different approach ***/ static float max_output = .020; /* 20 mA max output */ static float min_output = .004; /* 4 mA min output */ /* following lines input, limit output between min and max_output and outputs . */ /* output is split to two current output channels wired in parallel to provide 20 mA */ O116 = max( min_output, min( max_output, (12.5 * I108) / 2 ) ); O117 = max( min_output, min( max_output, (12.5 * I108) / 2 ) ); The Algorithm Execution Environment This section describes the execution environment that the VT1415A provides for algorithms. Here, the relationship of an algorithm to the main() function that calls it is described. Chapter 4 Creating and Running Custom Algorithms 111 The Main Function All ‘C’ language programs consist of one or more functions. A ‘C’ program must have a function called main(). In the VT1415A, the main() function is usually generated automatically by the driver when the INIT command is executed. The main() function executes each time the module is triggered and controls execution of algorithm functions. See Figure 4-1 for a partial listing of main(). How the Algorithms Fit In When the module is INITiated, a set of control variables and a function calling sequence is created for all algorithms defined. The value of variable “State_n” is set with the ALGorithm:STATe command and determines whether the algorithm will be called. The value of “Ratio_n” is set with the ALGorithm:SCAN:RATio command and determines how often the algorithm will be called (relative to trigger events). Since the function-calling interface to an algorithm is fixed in the main() function, the “header” of an algorithm function is also pre-defined. This means that, unlike standard ‘C’ language programming, an algorithm program (a function) need not (must not) include the function declaration header, opening brace “{” and closing brace “}.” Only the “body” of the function is supplied; the VT1415A’s driver supplies the rest. Think of the program space in the VT1415A in the form of a source file with any global variables first, then the main() function followed by as many algorithms as are defined. Of course, what is really contained in the VT1415A’s algorithm memory are executable codes that have been translated from the downloaded source code. While not an exact representation of the algorithm execution environment, Figure 4-1 shows the relationship between a normal ‘C’ program and two VT1415 algorithms. 112 Creating and Running Custom Algorithms Chapter 4 /* GLOBALS you define with ALG:DEF GLOBALS... go here */ Global variables area First_loop declared by VT1415A’s driver Begin main() function (built by VT1415A’s driver) /* global variable First_loop equals 1 until all algorithms called */ static float First_loop; /* global value set to 1 at each INIT */ /**************************** function main() ****************************/ /*The VT1415 driver creates main() at INIT time. This example shows a main created after 2 algorithms have been defined. */ main() { /********* declaration of variables local to main() ********/ static float State_1, Ratio_1, Count_1; /* created if alg1 defined */ static float State_2, Ratio_2, Count_2; /* created if alg2 defined */ /********* this section created if ALG1 is defined ********/ Count_1 = Count_1 - 1; /* Count_1 used for ALG:SCAN:RATIO */ if (Count_1 <= 0) { /* test for ratio met (<=0 means execute)*/ Count_1 = Ratio_1; /* Count_1 = ALG:SCAN:RATIO setting */ if (State_1) alg1(); /* if ALG:STATE ALG1,ON, call alg1 */ } End main() function Begin algorithm “shells” (built by VT1415A’s driver) Your algorithms go here /********* this section created if ALG2 is defined ********/ Count_2 = Count_2 - 1; /* Count_2 used for ALG:SCAN:RATIO */ if (Count_2 <= 0) { /* test for ratio met (<=0 means execute)*/ Count_2 = Ratio_2; /* Count_2 = ALG:SCAN:RATIO setting */ if (State_2) alg2(); /* if ALG:STATE ALG2,ON, call alg2 */ } First_loop = 0; /* reset First_loop after last alg has been called */ } /* ************************ end function main() *************************/ Figure 4-1: Source Listing of Function main() Accessing the VT1415A’s Resources This section describes how an algorithm accesses hardware and software resources provided by the VT1415A. The following is a list of these resources: · I/O channels. · Global variables defined before an algorithm is defined. · The constant ALG_NUM which the VT1415A makes available to an algorithm. ALG_NUM = 1 for ALG1, 2 for ALG2, etc. · User defined functions defined with the ALG:FUNC:DEF command. · The Current Value Table (CVT) and the data FIFO buffer (FIFO) to output algorithm data to the application program. · VXIbus Interrupts. Chapter 4 Creating and Running Custom Algorithms 113 Accessing I/O Channels In the Algorithm Language, channels are referenced as pre-defined variable identifiers. The general channel identifier syntax is “Iccc” for input channels and “Occc” for output channels; where ccc is a channel number from 100 (channel 0) through 163 (channel 63). Like all VT1415A variables, channel identifier variables always contain 32-bit floating point values even when the channel is part of a digital I/O SCP. If the digital I/O SCP has 8-bit channels (like the VT1533A), the channel’s identifiers (Occc and Iccc) can take on the values 0 through 255. To access individual bit values, append “.Bn” to the normal channel syntax, where n is the bit number (0 through 7). If the Digital I/O SCP has single-bit channels (like the VT1534A), its channel identifiers can only take on the values 0 and 1. Examples: O100 = 1; Inp_val = I108; Bit_4 = I109.B4; assign value to output chan 0 on VT1534A. from 8-bit channel on VT1533A Inp_val will be 0 to 255. assign VT1533A chan 9 bit 4 to variable Bit_4 Output Channels Output channels can appear on either or both sides of an assignment operator. They can appear anywhere other variables can appear. Examples: O100 = 12.5; O108.B4 = ! O108.B4; writecvt(O116,350); send value to output channel buffer element 0 compliment value found in output channel buffer element 8, bit 4 each time algorithm is executed. send value of output channel 16 to CVT element 350 Input Channels Input channel identifiers can only appear on the right side of assignment operators. It doesn’t make sense to output values to an input channel. Other than that, they can appear anywhere other variables can appear. Examples: dig_bit_value = I108.B0; inp_value = I124; O156 = 4 * I124; writefifo(I124); Defined Input and Output Channels retrieve value from Input Channel Buffer element 8, bit 0 retrieve value from Input Channel Buffer element 24 retrieve value from Input Channel Buffer element 24, multiply by 4 and send result to Output Channel Buffer element 56 send value of input channel 24 to FIFO buffer An algorithm “references” channels. It can reference input or output channels, but, in order for these channels to be available to an algorithm, they must be “defined.” To be “defined,” an SCP must be installed and an appropriate SOURce or SENSe:FUNCtion must explicitly (or implicitly, in the case of VT1531A & 32A SCPs) be tied to the channels. If an algorithm references an input channel identifier that is not configured as an input 114 Creating and Running Custom Algorithms Chapter 4 channel or an output channel identifier that is not configured as an output channel, the driver will generate an error when the algorithm is defined with ALG:DEF. Defining and Accessing Global Variables Global variables are those declared outside of the main() function and any algorithms (see Figure 4-1). A global variable can be read or changed by any algorithm. To declare global variables, use the command: ALG:DEF ‘GLOBALS’,’<source_code>’ where <source_code> is Algorithm Language source limited to constructs for declaring variables. It must not contain executable statements. Examples: declare single variable without assignment; ALG:DEF ‘GLOBALS’,’static float glob_scal_var;’ declare single variable with assignment; ALG:DEF ‘GLOBALS’,’static float glob_scal_var = 22.53;’ declare one scalar variable and one array variable; ALG:DEF ‘GLOBALS’,’static float glob_scal_var, glob_array_var[12];’ Access global variables within an algorithm like any other variable. glob_scal_var = P_factor * I108 NOTES Determining First Execution (First_loop) 1. All variables must be declared static float. 2. Array variables cannot be assigned a value when declared. 3. All variables declared within an algorithm are local to that algorithm. If a variable is declared locally with the same identifier as an existing global variable, the algorithm will only access the local variable. The VT1415A always declares the global variable First_loop. First_loop is set to 1 each time INIT is executed. After main() calls all enabled algorithms, it sets First_loop to 0. By testing First_loop, an algorithm can determine if it is being called for the first time since an INITiate command was received. Example: static float scalar_var; static float array_var [ 4 ]; /* assign constants to variables on first pass only */ if ( First_loop ) { scalar_var = 22.3; array_var[0] = 0; array_var[1] = 0; array_var[2] = 1.2; array_var[3] = 4; } Chapter 4 Creating and Running Custom Algorithms 115 Initializing Variables Variable initialization can be performed during three distinct VT1415A operations: 1. When algorithms are defined with the ALG:DEFINE command. A declaration initialization statement is a command to the driver’s translator function and doesn’t create an executable statement. The value assigned during algorithm definition is not re-assigned when the algorithm is run with the INIT command. Example statement: static float my_variable = 22.95;/* tells translator to allocate space for this */ /* variable and initialize it to 22.95 */ 2. Each time the algorithm executes. By placing an assignment statement within the algorithm. This will be executed each time the algorithm is executed. Example statement. my_variable = 22.95; /* reset variable to 22.95 every pass */ 3. When the algorithm first executes after an INIT command. By using the global variable First_loop, the algorithm can distinguish the first execution since an INIT command was sent. Example statement: if( First_loop ) my_variable = 22.95 /* reset variable only when INIT starts alg */ Sending Data to the CVT and FIFO The Current Value Table (CVT) and FIFO data buffer provides communication from an algorithm to the application program (running in the VXIbus controller). Writing a CVT element The CVT provides 502 addressable elements where algorithm values can be stored. To send a value to a CVT element, execute the intrinsic Algorithm Language statement writecvt(<expression>,<cvt_element>), where <cvt_element> can take the value 10 through 511. Note that the default PIDB algorithm will use certain CVT elements (see “History Mode” on page 75). The following is an example algorithm statement: writecvt(O124, 330); /* send output channel 24’s value to CVT element 330 */ Each time the algorithm writes a value to a CVT element, the previous value in that element is overwritten. Reading CVT elements An application program reads one or more CVT elements by executing the SCPI command [SENSe:]DATA:CVT? (@<element_list>), where <element_list> specifies one or more individual elements and/or a range of contiguous elements. The following example command will help to explain the <element_list> syntax. DATA:CVT? (@10,20,30:33,40:43,330) 116 Creating and Running Custom Algorithms Return elements 10, 20, 30-33, 40-43, and element 330. Chapter 4 Individual element numbers are isolated by commas. A contiguous range of elements is specified by: <starting element>colon<ending element>. Writing values to the FIFO The FIFO, as the name implies is a First-In-First-Out buffer. It can buffer up to 65,024 values. This capability allows an algorithm to send a continuous stream of data values related in time by their position in the buffer. It can be thought of as an electronic strip-chart recorder. Each value is sent to the FIFO by executing the Algorithm Language intrinsic statement writefifo(<expression>). The following in an example algorithm statement: writecvt(O124); /* send output channel 24’s value to the FIFO */ Since the actual algorithm execution rate can be determined (see “Programming the Trigger Timer” on page 80), the time relationship of readings in the FIFO is very deterministic. Reading values from the FIFO For a discussion on reading values from the FIFO, see “Reading History Mode Values from the FIFO” on page 84. Writing values to the FIFO and CVT The writeboth(<expression>,<cvt_element>) statement sends the value of <expression> both to the FIFO and to a <cvt_element>. Reading these values is done the same way as mentioned for writefifo() and writecvt(). Setting a VXIbus Interrupt The algorithm language provides the function interrupt() to force a VXIbus interrupt. When interrupt() is executed in an algorithm, a VXIbus interrupt line (selected by the the SCPI command DIAG:INTR[:LINe]) is asserted. The following example algorithm code tests an input channel value and sets an interrupt if it is higher or lower than set limits. static float upper_limit = 1.2, lower_limit = 0.2; if( I124 > upper_limit || I124 < lower_limit ) interrupt(); Determining an Algorithm’s Identity (ALG_NUM) When an algorithm is defined with the ALG:DEF ‘ALGn’,… command, the VT1415A’s driver makes available to the algorithm the constant ALG_NUM. ALG_NUM has the value n from “ALGn.” For instance, if an algorithm is defined with <alg_name> equal to “ALG3", then ALG_NUM within that algorithm would have the value 3. What can be done with this value? The standard PID algorithm, PIDB, uses ALG_NUM to determine which CVT elements it should use to store values. Here’s a short example of the code used: writecvt ( inp_channel, (ALG_NUM * 10) + 0 ); writecvt ( Error, (ALG_NUM * 10) + 1 ); writecvt ( outp_channel, (ALG_NUM * 10) + 2 ); writecvt ( Status, (ALG_NUM * 10) + 3 ); Chapter 4 Creating and Running Custom Algorithms 117 This code writes PID values into CVT elements 10 through 13 for ALG1, CVT elements 20 through 23 for ALG2, CVT elements 30 through 33 for ALG3, etc. Using ALG_NUM allows identical code to be written that can take different actions depending on the name it was given when defined. Calling User Defined Functions Access to user defined functions is provided to avoid complex equation calculation within an algorithm. Essentially, what is provided with the VT1415A is a method to pre-compute user function values outside of algorithm execution and place these values in tables, one for each user function. Each function table element contains a slope and offset to calculate an mx+b over the interval (x is the value the function is provided). This allows the DSP to linearly interpolate the table for a given input value and return the function’s value much faster than if a transcendental function’s equation were arithmetically evaluated using a power series expansion. User functions are defined by downloading function table values with the ALG:FUNC:DEF command and can take any name that is a valid ‘C’ identifier like ‘haversine,’ ‘sqr,’ ‘log10,’ etc. To find out how to generate table values from function equation, see “Generating User Defined Functions” in Appendix F. For details on the ALG:FUNC:DEF command, see page 172 in the Command Reference. User defined functions are global in scope. A user function defined with ALG:FUNC:DEF is available to all defined algorithms. Up to 32 functions can be defined in the VT1415A. Call the function using the syntax <func_name>(<expression>). Example: for user function pre-defined as square root with name ‘sqrt’ O108 = sqrt( I100); /* channel 8 outputs square root of input channel 0’s value */ NOTE A user function must be defined (ALG:FUNC:DEF) before any algorithm is defined (ALG:DEF) that references it. A C-SCPI program that shows the use of a user defined function is supplied on the VXIplug&play Drivers and Product Manuals CD (tri_sine.cs). See Appendix G for example program listings. Operating Sequence This section explains another important factor in an algorithm’s execution environment. Figure 4-2 shows the same overall sequence of operations seen in Chapter 3, but also includes a block diagram to show which parts of the VT1415A are involved in each phase of the control sequence. 118 Creating and Running Custom Algorithms Chapter 4 Overall Sequence Here, the important things to note about this diagram are: · All algorithm referenced input channel values are stored in the Channel Input Buffer (Input Phase) BEFORE algorithms are executed during the Calculate Phase. · The execution of all defined algorithms (Calculate Phase) is complete BEFORE output values from algorithms, stored in the Channel Output Buffer, are used to update the output channel hardware during the Output Phase. In other words, algorithms don’t actually read inputs at the time they reference input channels and they don’t send values to outputs at the time they reference output channels. Algorithms read channel values from an input buffer and write (and can read) output values to/from an output buffer. Here are example algorithm statements to describe operation: inp_val = I108; O116 = 22.3; O125 = O124; A Common Error to Avoid /* inp_val is assigned a value from input buffer element 8 */ /* output buffer element 16 assigned the value 22.3 */ /* output buffer [24] is read and assigned to output buffer [25] */ Since the "buffered input, algorithm execution, buffered output" sequence is probably unfamiliar to many, a programming mistake associated with it is easy to make. A common error is shown below and, it is hoped, that seeing this error will prevent its occurrence. O124.B0 = 1; /* digital output bit on VT1533A in SCP position 3 */ O124.B0 = 0; Traditionally, the first of these two statements is expected to set output channel 24, bit 0 to a digital 1, then, after the time it takes to execute the second statement, the bit would return to a digital 0. Because both of these statements are executed BEFORE any values are sent to the output hardware, only the last statement has any effect. Even if these two statements were in separate algorithms, the last one executed would determine the output value. In this example, the bit would never change. The same applies to analog outputs. Algorithm Execution Order Chapter 4 The buffered I/O sequence explained previously can be used advantageously. Multiple algorithms can access the very same buffered channel input value without having to pass the value in a parameter. Any algorithm can read and used as its input the value that any other algorithm has sent to the output buffer. In order for these features to be of use, the order in which the algorithms will be executed must be known. When algorithms are defined, they are given one of 32 pre-defined algorithm names. These range from ‘ALG1’ to ALG32.’ The algorithms will execute in order of its name. For instance, if ‘ALG5’ is defined, then ‘ALG2,’ then ‘ALG8,’ and finally ‘ALG1,’ when run, they will execute in the order ‘ALG1,’ ‘ALG2,’ ‘ALG5,’ and ‘ALG8.’ For more on input and output value sharing, see “Algorithm to Algorithm Communication” on page 126. Creating and Running Custom Algorithms 119 State Frequency Totalize Voltage Resistance Temp. Strain 8 16 8 Digital I/O SCPs Analog Input SCP 8 Analog Input SCP Analog Input SCP 8 Analog Output SCP 8 8 Digital I/O SCPs Voltage Pulses 16 State 8 8 8 Output 4 PHASE 1 INPUT A/D EU Conversion 64 Channel Scan List PHASE 4 OUTPUT Trigger Input Channel Buffer (I100 - I163) Output Channel Buffer (OI100 - O163) PHASE 3 CALCULATE Global Variables main() function (driver generated) ALG1 Local Variables Local Variables Local Variables Local Variables Local Variables Algorithm Code main() main() main() main() FIFO/CVT Buffer PHASE 3 CALCULATE PHASE 2 UPDATE PHASE 2 UPDATE Update Queue For Variables and Algorithms Local and Global Query Current Value Table (elements 10 - 511) FIFO (64 K values) Chapter 4 120 Creating and Running Custom Algorithms Current PWM FM 64 Channel Analog Multiplexer TRIG:TIMER Execution Phases Trigger Calculate 2 3 ALG:OUTP:DELAY Input 1 Update VXIbus Figure 4-2: Algorithm Operating Sequence Diagram Defining Custom Algorithms (ALG:DEF) This section discusses how to use the ALG:DEFINE command to define custom algorithms. Later sections will discuss “what to define.” ALG:DEFINE in the Programming Sequence *RST erases all previously defined algorithms. All algorithms must be erased before beginning to re-define them (except in the special case described in “Changing an Algorithm While it’s Running” later in this section). ALG:DEFINE’s Three Data Formats For custom algorithms, the ALG:DEFINE ‘<alg_name>’,’<source_code>’ command sends the algorithm’s source code to the VT1415A’s driver for translation to executable code. The <source_code> parameter can be sent in one of three forms: 1. SCPI Quoted String: For short segments (single lines) of code, enclose the code string within single (apostrophes) or double quotes. Because of string length limitations within SCPI and some programming platforms, it is recommended that the quoted string length not exceed a single program line. Example: ALG:DEF ‘ALG1’,’if(First_loop) O108=0; O108=O108+.01;’ 2. SCPI Indefinite Length Block Program Data: This form terminates the data transfer when it received an End Identifier with the last data byte. Use this form only when it is certain that the controller platform will include the End Identifier. If it is not included, the ALG:DEF command will “swallow” whatever data follows the algorithm code. The syntax for this parameter type is: #0<data byte(s)><null byte with End Identifier> Example from “Quoted String” above: ALG:DEF ‘ALG1’,#0O108=I100;Æ (where “Æ” is a null byte) 3. SCPI Definite Length Block Program Data: For longer code segments (like complete custom algorithms) this parameter works well because it specifies the exact length of the data block that will be transferred. The syntax for this parameter type is: #<non-zero digit><digit(s)><data byte(s)> Where the value of <non-zero digit> is 1-9 and represents the number of <digit(s)>. The value of <digit(s)> taken as a decimal integer indicates the number of <data byte(s)> in the block. Example from “Quoted String” above: ALG:DEF ‘ALG1’,#211O108=I100;Æ (where “Æ” is a null byte) Chapter 4 Creating and Running Custom Algorithms 121 NOTE For Block Program Data, the Algorithm Parser requires that the <source_code> data end with a null (0) byte. The null byte must be appended to the end of the block’s <data byte(s)>. For Definite Length Block Data, the null byte must be accounted for in the byte count <digit(s)>. If the null byte is not included within the block, the error “Algorithm Block must contain termination ‘\0’” will be generated. Indefinite Length Block Data Example Retrieve algorithm source code from file and send to VT1415A in indefinite length format using VISA instrument I/O libraries: int byte_count, file_handle; char source_buffer[8096], null = 0; file_handle = open( “<filename>”, O_RDONLY + O_BINARY); byte_count = read( file_handle, source_buffer, sizeof( source_buffer ) ); close( file_handle ); source_buffer[ byte_count ] = 0; /* null to terminate source buffer string */ viPrintf( e1415, “ALG:DEF ‘ALG8’,#0%s%c\n”, source_buffer, null ); Definite Length Block Data Example Retrieve source code from text file, determine length of file, create a Definite Length Block header and send algorithm to VT1415A using VISA instrument I/O Libraries: int byte_count, file_handle; char header_string[12], source_buffer[8096], null = 0; file_handle = open( “<filename>” O_RDONLY+O_BINARY); byte_count = read( file_handle, source_buffer, sizeof( source_buffer ) ); close( file_handle ); source_buffer[ byte_count ] = 0; /* null to terminate source buffer string */ sprintf( header_string, “%d”, byte_count + 1 ); /* note byte_count+1for null byte */ sprintf( header_string, “%d%d”, strlen( header_string ), byte_count); viPrintf( e1415, “ALG:DEF ‘ALG4’,#%s%s%c\n”, header_string, source_buffer, null ); See the section “Running the Algorithm” later in this chapter for more on loading algorithms from files. Changing a Running Algorithm Defining an Algorithm for Swapping The VT1415A has a feature that allows a specified algorithm to be swapped with another even while it is executing. This is useful if, for instance, it is necessary to alter the function of an algorithm that is currently controlling a process and it is undesirable to have this process uncontrolled. In this case, when original algorithm is defined, enable it to be swapped. The ALG:DEF command has an optional parameter that is used to enable algorithm swapping. The command’s general form is: ALG:DEF ‘<alg_name>’[,<swap_size>],’<source_code>’ 122 Creating and Running Custom Algorithms Chapter 4 Note the parameter <swap_size>. It specifies the amount of memory that will be allocated to algorithm <alg_name>. Make sure to allocate enough space for the largest algorithm expected to be defined for <alg_name>. Here is an example of defining an algorithm for swapping: define ALG3 so it can be swapped with an algorithm as large as 1000 words ALG:DEF ‘ALG3’,1000,#41698<1698char_alg_source> NOTE How Does it Work? The number of characters (bytes) in an algorithm’s <source_code> parameter is not well related to the amount of memory space the algorithm requires. Remember, this parameter contains the algorithm’s source code, not the executable code it will be translated into by the ALG:DEF command. The algorithm’s source might contain extensive comments, none of which will be in the executable algorithm code after it is translated. The example algorithm definition above will be used for this discussion. When a value for <swap_size> is specified at algorithm definition, the VT1415A allocates two identical algorithm spaces for ALG3, each the size specified by <swap_size> (in this example 1000 words). This is called a “double buffer.” They will be arbitrarily called "space A" and "space B." The algorithm is loaded into ALG3’s space A at first definition. Later, while algorithms are running, “replace” ALG3 by again executing: ALG:DEF ALG3,#42435<2435char_alg_source> Notice that <swap_size> is not (must not be) included this time. This ALG:DEF works like an Update Request. The VT1415A translates and downloads the new algorithm into ALG3’s space B while the old ALG3 is still running from space A. When the new algorithm has been completely loaded into space B and an ALG:UPDATE command has been sent, the VT1415A simply switches to executing ALG3’s new algorithm from space B at the next Update Phase (see Figure 4-2). If yet another ALG3 were sent, it would be loaded and executed from ALG3’s space A. Determining an Algorithm’s Size In order to define an algorithm for swapping, it is necessary to know how much algorithm memory to allocate for it or any of its replacements. This information can be queried from the VT1415A. Use the following sequence: 1. Define the algorithm without swapping enabled. This will cause the VT1415A to allocate only the memory actually required by the algorithm. 2. Execute the ALG:SIZE? <alg_name> command to query the amount of memory allocated. The minimum amount of memory required for the algorithm is now known. 3. Repeat 1 and 2 for each of the algorithms that can be swapped with the original. From this, the minimum amount of memory required for the largest is known. Chapter 4 Creating and Running Custom Algorithms 123 4. Execute *RST to erase all algorithms. 5. Re-define one of the algorithms with swapping enabled and specify <swap_size> at least as large as the value from step 3 above (and probably somewhat larger because as alternate algorithms declare different variables, space is allocated for total of all variables declared). 6. Swap each of the alternate algorithms for the one defined in step 5, ending with the one to run now. Remember, the <swap_size> parameter is not sent with these. If an “Algorithm too big” error is not received, then the value for <swap_size> in step 5 was large enough. 7. Define any other algorithms in the normal manner. NOTES 1. Channels referenced by algorithms when they are defined are only placed in the channel list before INIT. The channel list cannot be changed after INIT. If an algorithm is re-defined (by swapping), after INIT and it references channels not already in the channel list, it will not be able to access the newly referenced channels. No error message will be generated. To make sure all required channels will be included in the channel list, define <alg_name> and re-define all algorithms that will replace <alg_name> by swapping them before INIT is sent. This insures that all channels referenced in these algorithms will be available after INIT. 2. The driver only calculates overall execution time for algorithms defined before INIT. This calculation is used to set the default output delay (same as executing ALG:OUTP:DELAY AUTO). If an algorithm is swapped after INIT that takes longer to execute than the original, the output delay will behave as if set by ALG:OUTP:DEL 0 rather than AUTO (see ALG:OUTP:DEL command). Use the same procedure from note 1 to make sure the longest algorithm execution time is used to set ALG:OUTP:DEL AUTO before INIT. An example program file named “swap.cs” on the VXIplug&play Drivers and Product Manuals CD shows how to swap algorithms while the module is running. See Appendix G for program listings. A Very Simple First Algorithm This section will demonstrates how to create and download an algorithm that simply sends the value of an input channel to a CVT element. It includes an example application program that configures the VT1415A, downloads (defines) the algorithm, starts, and then communicates with the running algorithm. 124 Creating and Running Custom Algorithms Chapter 4 Writing the Algorithm The most convenient method of creating a custom algorithm is to use a text editor or word processor to input the source code. The following algorithm source code is on the examples disc in a file called “mxplusb.” /* Example algorithm that calculates 4 Mx+B values upon * signal that sync == 1. M and B terms set by application * program. */ static float M, B, x, sync; if ( First_loop ) sync = 0; if ( sync == 1 ) { writecvt( M*x+B, 10 ); writecvt(-(M*x+B), 11 ); writecvt( (M*x+B)/2,12 ); writecvt( 2*(M*x+B),13 ); sync = 2; } Running the Algorithm A C-SCPI example program “file_alg.cs” shows how to retrieve the algorithm source file “mxplusb” and use it to define and execute an algorithm. When “file_alg.cs” has been compiled, type file_alg mxplusb to run the example and load the algorithm. The aforementioned files can be found on the VXIplug&play Drivers and Product Manuals CD. Modifying a Standard PID Algorithm While the standard PID algorithms can provide excellent general closed loop process control, there will be times when a process has specialized requirements that are not addressed by the default form of the VT1415A’s PID algorithms. This section shows how to copy and modify a standard PID algorithm. Both of the VT1415A’s standard PID algorithms, PIDA and PIDB, are also available as source files supplied with the VT1415A. Also included is a source file for a PIDC algorithm. PIDC has more features than PIDB but is not pre-defined in the VT1415A’s driver like PIDA and PIDB. It is only available as a source file. PIDA with Digital On-Off Control The VT1415A’s PID algorithms are written to supply control outputs through analog output SCPs. While it would not be an error to specify a digital channel as the PID control output, the PID algorithm as written would not operate the digital channel as desired. The value written to a digital output bit is evaluated as if it were a boolean value. That is, if the value represents a boolean true, the digital output is set to a binary 1. If the value represents a boolean false, the digital output is set to a binary 0. The VT1415A’s Algorithm Language (like ‘C’) specifies that a value of 0 is a boolean false (0), any other value is considered true (1). With that in mind, the operation of a standard PIDA will be analyzed with a digital output as its control output. Chapter 4 Creating and Running Custom Algorithms 125 How the Standard PIDA Operates Modifying the Standard PIDA A PID is to control a bath temperature at 140 °C. With the Setpoint at 140 and the process variable (PV) reading 130, the value sent to the output is a positive value which drives the digital output to 1 (heater on). When the process value reading reaches 140 the “error term” would equal zero so the value sent to the digital output would be 0 (heater off). Fine so far, but, as the bath temperature coasts even minutely above the setpoint, a small negative value will be sent to the digital output which represents a boolean true value. At this point the output will again be 1 (heater on) and the bath temperature will continue go up rather than down. This process is now out of control! This behavior is easy to fix. Simply modify the standard PIDA algorithm source code (supplied with the VT1415A in the file PIDA.C) and then define it as a custom algorithm. Use the following steps: 1. Load the source file for the standard PIDA algorithm into a text editor. 2. Find the line of code near the end of PIDA that reads: outchan = Error * P_factor + I_out + D_factor * (Error - Error_old) and insert this line below it: if ( outchan <= 0 ) outchan = 0; /* all value not positive are now zero */ 3. Going back to the beginning of the file, change all occurrences of “inchan” to the input channel specifier of choice (e.g. I100). 4. As in step 3, change all occurrences of “outchan” to the digital output channel/bit identifier of choice (e.g. O108.B0). 5. Now, save this algorithm source file as “ONOFFPID.C.” Algorithm to Algorithm Communication The ability for one algorithm to have access to values from another can be very important, particularly in more complex control situations. One of the important features of the VT1415A is that this communication can take place entirely within the algorithms’ environment. The application program is freed from having to retrieve values from one algorithm and then send those values to another algorithm. Communication Using Channel Identifiers Implementing Multivariable Control The value of all defined input and output channels can be read by any algorithm. Here is an example of inter-algorithm channel communication. In this example, two PID algorithms each control part of a process and, due to the process dynamics, are interactive. This situation can call for what is known as a “decoupler.” The job of the decoupler is to correct for the “coupling” between these two process controllers. Figure 4-3 shows the two PID controllers and how the decoupler algorithm fits into the control loops. As mentioned before, algorithm output statements don’t write to the output SCP channels but are instead buffered in the Output Channel Buffer until 126 Creating and Running Custom Algorithms Chapter 4 the Output Phase occurs. This situation allows easy implementation of decouplers because it allows an algorithm following the two PIDs to inspect their output values and make adjustments to them before they are sent to output channels. The decoupler algorithm’s Decoupl_factor1 and Decouple_factor2 variables (assumes a simple interaction) are local and can be independently set using ALG:SCALAR: /* decoupler algorithm. (must follow the coupled algorithms in execution sequence) */ static float Decouple_factor1, Decouple_factor2; O124 = O124 + Decouple_factor2 * O125; O125 = O125 + Decouple_factor1 * O124; O124 + Decoupl_factor1 Setpoint O124 + _ + ALG3 De-coupler PID Controller ALG1 O125 + Decoupl_factor2 O125 + Setpoint + PID Controller ALG2 _ Process Interaction Figure 4-3: Algorithm Communication with Channels Communication Using Global Variables A more traditional method of inter-algorithm communication uses global variables. Global variables are defined using the ALG:DEF command in the form: ALG:DEF ‘GLOBALS’,’<variable_declaration_statements>’ Example of global declaration ALG:DEF ‘GLOBALS’,’static float cold_setpoint;’ Implementing Feed Forward Control In this example, two algorithms mix hot and cold water supplies in a ratio that results in a tank being filled to a desired temperature. The temperature of the make-up supplies is assumed to be constant. Figure 4-4 shows the process diagram. To set up the algorithms for this example: 1. Define the global variable cold_setpoint ALG:DEF ‘GLOBALS’,’static float cold_setpoint;’ 2. Define the following algorithm language code as ALG1, the ratio station algorithm. Chapter 4 Creating and Running Custom Algorithms 127 static float hot_flow, cold_hot_ratio; static float cold_temp = 55, hot_temp = 180, product_temp = 120; hot_flow = I108; /* get flow rate of cold supply */ /* following line calculates cold to hot ratio from supply and product temps */ cold_hot_ratio = (hot_temp - product_temp) / (cold_temp - product_temp); cold_setpoint = hot_flow * cold_hot_ratio; /* output flow setpoint for ALG2 */ GLOBAL cold_setpoint ALG2 Flow Controller FC I109 55° Cold Supply 120° Product O116 FT flow transmitter ALG1 Ratio Station I108 180° Hot Supply RS FT flow transmitter Figure 4-4: Inter-algorithm Communication with Globals 3. Modify a PIDA algorithm so its setpoint variable is the global variable cold_setpoint, its input channel is I109 and its output channel is O116 and Define as ALG2, the cold supply flow controller: /* Modified PIDA Algorithm; comments stripped out, setpoint from global, inchan = I109, outchan = O116 */ /* the setpoint is not declared so it will be global */ static float P_factor = 1; static float I_factor = 0; static float D_factor = 0; static float I_out; static float Error; static float Error_old; /* following line includes global setpoint var and hard coded input chan */ Error = Cold_setpoint - I109; if (First_loop) { I_out = Error * I_factor; Error_old = Error; } else /* not First trigger */ { I_out = Error * I_factor + I_out; /* output channel hard coded here */ } O116 = Error * P_factor + I_out + D_factor * (Error - Error_old); Error_old = Error; 128 Creating and Running Custom Algorithms Chapter 4 Non-Control Algorithms Data Acquisition Algorithm The VT1415A’s Algorithm Language includes intrinsic functions to write values to the CVT, the FIFO, or both. Using these functions, it is possible to create algorithms that simply perform a data acquisition function. The following example shows the acquisition of eight channels of analog input from SCP position 0 and one channel (8 bits) of digital input from a VT1533A in SCP position 2. The results of the acquisition are placed in the CVT and FIFO. /* Data acquisition to CVT and FIFO */ writeboth( I100, 330 ); /* channel 0 to FIFO and CVT element 330 */ writeboth( I101, 331 ); /* channel 1 to FIFO and CVT element 331 */ writeboth( I102, 332 ); /* channel 2 to FIFO and CVT element 332 */ writeboth( I103, 333 ); /* channel 3 to FIFO and CVT element 333 */ writeboth( I104, 334 ); /* channel 4 to FIFO and CVT element 334 */ writeboth( I105, 335 ); /* channel 5 to FIFO and CVT element 335 */ writeboth( I106, 336 ); /* channel 6 to FIFO and CVT element 336 */ writeboth( I107, 337 ); /* channel 7 to FIFO and CVT element 337 */ writeboth( I116, 338 ); /* channel 16 to FIFO and CVT element 338 */ Using SENS:DATA:FIFO:… and the SENS:DATA:CVT commands, the application program can access the data. Process Monitoring Algorithm Another function the VT1415A performs well is monitoring input values and testing them against pre-set limits. If an input value exceeds its limit, the algorithm can be written to supply an indication of this condition by changing a CVT value or even forcing a VXIbus interrupt. The following example shows acquiring one analog input value from channel 0 and one VT1533A digital channel from channel 16 and limit testing them. /* Limit test inputs , send values to CVT and force interrupt when exceeded */ static float Exceeded; static float Max_chan0, Min_chan0, Max_chan1, Min_chan1; static float Max_chan2, Min_chan2, Max_chan3, Min_chan3; static float Mask_chan16; if ( First_loop ) Exceeded = 0; /* initialize Exceeded on each INIT */ writecvt( I100, 330); /* write analog value to CVT */ Exceeded = ( ( I100 > Max_chan0 ) || ( I100 < Min_chan0 ) ); /* limit test analog */ writecvt( I101, 331); /* write analog value to CVT */ Exceeded = Exceeded + ( ( I101 > Max_chan1 ) || ( I101 < Min_chan1 ) ); writecvt( I102, 332); /* write analog value to CVT */ Exceeded = Exceeded + ( ( I102 > Max_chan2 ) || ( I102 < Min_chan2 ) ); writecvt( I103, 333); /* write analog value to CVT */ Exceeded = Exceeded + ( ( I103 > Max_chan3 ) || ( I103 < Min_chan3 ) ); writecvt( I116, 334); /* write 8-bit value to CVT */ Exceeded = Exceeded + ( I116 != Mask_chan16); /* limit test digital */ If ( Exceeded ) interrupt( ); Chapter 4 Creating and Running Custom Algorithms 129 Implementing Setpoint Profiles A setpoint profile is a sequence of set-points inputted to a control algorithm. A normal setpoint is either static or modified by operator input to some desired value where it will then become static again. A setpoint profile is used to cycle a device under test through some operating range and the setpoint remains for some period of time before changing. The automotive industry uses setpoint profiles to test their engines and drive trains. That is, each new setpoint is a simulation of an operator sequence that might normally be encountered. A setpoint profile can either be calculated for each interval or pre-calculated and placed into an array. If calculated, the algorithm is given a starting setpoint and an ending setpoint. A function based upon time then calculates each new desired setpoint until traversing the range to the end point. Some might refer to this technique as setpoint ramping. Most setpoint profiles are usually pre-calculated by the application program and downloaded into the instrument performing the sequencing. In that case, an array affords the best alternative for several reasons: · Arrays can hold up to 1,024 points. · Arrays can be downloaded quickly while the algorithm is running. · Time intervals can be tied to trigger events and each n trigger events can simply access the next element in the array. · Real-time calculations of setpoint profiles by the algorithm itself complicates the algorithm. · The application program has better control over time spacing and the complexity and range of the data. For example, successive points in the array could be the same value just to keep the setpoint at that position for extra time periods. The following is an example program that sequences data from an array to an Analog Output. There are some unique features illustrated here that can be used: · The application program can download new profiles while the application program is running. The algorithm will continue to sequence through the array until it reaches the end of the array. At this time, it will set its index back to 0 and toggle a Digital Output bit to create an update channel condition on a Digital Input. Then, at the next trigger event, the new array values will take effect before the algorithm executes. As long as the new array is download into memory before the index reaches 1,023, the switch to the new array elements will take place. If the array is downloaded AFTER the index reaches 1,023, the same setpoint profile will be executed until index reaches 1,023 again. · The application program can monitor the index value with ALG:SCAL? “alg1",”index" so it can keep track of where the profile sequence is currently running. The interval can also be made shorter or longer by changing the num_events variable. 130 Creating and Running Custom Algorithms Chapter 4 SOUR:FUNC:COND (@141) make Digital I/O channel 141 a digital output. The default condition for 140 is digital input. define algorithm ALG:DEF ‘alg1’,’ static float setpoints[ 1024 ], index, num_events, n; if ( First_loop ) { index = 0; /* array start point */ n = num_events; /* preset interval */ } n = n - 1; /* count trigger events */ if ( n <= 0 ) { O100 = setpoints[ index ]; /* output new value */ index = index + 1; /* increment index */ if ( index > 1023 ) { /* look for endpoint */ index = 0; O140.B0 = !O140.B0; /* toggle update bit */ } n = num_events; /* reset interval count */ } ALG:SCAL “alg1",”num_events", 10 ALG:ARRAY “alg1",”setpoints",<block_data> ALG:UPD TRIG:TIMER .001 TRIG:SOUR TIMER INIT output change every 10 ms set first profile force change trigger event at 1 ms trigger source timer start algorithm Download new setpoint profile and new timer interval: ALG:SCAL “alg1",”num_events", 20 ALG:ARRAY “alg1",”setpoints",<block data> ALG:UPD:CHAN “I140.B0" output change every 20 ms set first profile change takes place with change in bit 0 of O140. This example program was configured using Digital Output and Digital Inputs for the express reason that multiple VT1415A’s may be used in a system. In this case, the VT1415A toggling the digital bit would be the master for the other VT1415A’s in the system. They all would be monitoring one of their digital input channels to signal a change in setpoint profiles. Chapter 4 Creating and Running Custom Algorithms 131 Notes 132 Creating and Running Custom Algorithms Chapter 4 Chapter 5 Algorithm Language Reference The VT1415A’s Algorithm Language is a limited version of the ‘C’ programming language. It is designed to provide the necessary control constructs and algebraic operations to support standard PID as well as custom control algorithms. There are no loop constructs, multi-dimensional arrays, or transcendental functions. Further, an algorithm must be completely contained within a single function subprogram ‘ALGn.’ The algorithm cannot call another user-written function subprogram. It is important to note that, while the VT1415A’s Algorithm Language has a limited set of intrinsic arithmetic operators, it also provides the capability to call special user defined functions “f(x).” An off-line program included with the VT1415A converts the functions supplied into piece-wise linear interpolated tables and gives them user defined names. The VT1415A can extract function values from these tables in under 18 µs, regardless of the function’s original complexity. This method provides faster algorithm execution by moving the complex math operations off-board. See Appendix F, “Generating User Defined Functions” This section assumes that the user already programs in some language. If the user is a ‘C’ language programmer, the reference section here, as well as Chapter 4 “Customizing Algorithms,” is all that will likely be needed to create an algorithm. If unfamiliar with the C programming language, study the “Program Structure and Syntax” section before attempting to to write custom algorithms. · Language reference . . . . . . . . . . . . . . . . . . . . . . . . . . . . . . . . . page 133 - Standard Reserved Keywords . . . . . . . . . . . . . . . . . . . . . . . . page 134 - Special VT1415A Reserved Keywords . . . . . . . . . . . . . . . . . page 134 - Identifiers . . . . . . . . . . . . . . . . . . . . . . . . . . . . . . . . . . . . . . . . page 134 - Special Identifiers for Channels . . . . . . . . . . . . . . . . . . . . . . page 135 - Operators . . . . . . . . . . . . . . . . . . . . . . . . . . . . . . . . . . . . . . . . page 135 - Intrinsic Functions and Statements . . . . . . . . . . . . . . . . . . . . page 135 - Program Flow Control . . . . . . . . . . . . . . . . . . . . . . . . . . . . . . page 136 - Data Types . . . . . . . . . . . . . . . . . . . . . . . . . . . . . . . . . . . . . . . page 136 - Data Structures . . . . . . . . . . . . . . . . . . . . . . . . . . . . . . . . . . . page 137 - Bitfield Access . . . . . . . . . . . . . . . . . . . . . . . . . . . . . . . . . . . . page 138 · Language Syntax Summary . . . . . . . . . . . . . . . . . . . . . . . . . . . page 139 · Program Structure and Syntax . . . . . . . . . . . . . . . . . . . . . . . . . page 143 Language Reference This section provides a summary of reserved keywords, operators, data types, constructs, intrinsic functions, and statements. Chapter 5 Algorithm Language Reference 133 Standard Reserved Keywords NOTE Special VT1415A Reserved Keywords Identifiers The list of reserved keywords is the same as ANSI ‘C.’ Custom variables cannot be created using these names. Note that the keywords that are shown underlined and bold are the only ANSI ‘C’ keywords that are implemented in the VT1415A. auto double int struc break else long switch case enum register typeof char extern return union const float short unsigned continue for signed void default goto sizeof volatile do if static while While all of the ANSI ‘C’ keywords are reserved, only those keywords that are shown in bold are actually implemented in the VT1415A. The VT1415A implements some additional reserved keywords. Variables cannot be created using these names: abs interrupt writeboth Bn (n=0 through 9) max writecvt Bnn (nn=10 through 15) min writefifo Identifiers (variable names) are significant to 31 characters. They can include alpha, numeric, and the underscore character “_.” Names must begin with an alpha character or the underscore character. Alpha: a b c d e f g h i j k l m n o p q r s t u v w x y z ABCDEFGHIJKLMNOPQRSTUVWXYZ Numeric: 0 1 2 3 4 5 6 7 8 9 Other: _ NOTE 134 Algorithm Language Reference Identifiers are case sensitive. The names "My_array" and "my_array" reference different identifiers. Chapter 5 Special Identifiers for Channels NOTE Operators Channel identifiers appear as variable identifiers within the algorithm and have a fixed, reserved syntax. The identifiers I100 to I163 specify input channel numbers. The “I” must be uppercase. They may only appear on the right side of an assignment operator. The identifiers O100 to O163 specify output channel numbers. The “O” must be uppercase. They can appear on either or both sides of the assignment operator. Trying to declare a variable with a channel identifier will generate an error. The VT1415A’s Algorithm Language supports the following operators: Assignment Operator = (assignment) example: c = 1.2345 Arithmetic Operators + * / (addition) (subtraction) (multiplication) (division) examples: c=a+b c=a-b c= a*b c=a/b Unary Operators + (unary minus) (unary plus) c = a + (-b) c = a + (+b) == != < > <= >= (is equal to) examples: (is not equal to) (is less than) (is greater than) (is less than or equal to) (is greater than or equal to) a == b a != b a<b a>b a <= b a >= b || && (or) (and) examples: (a == b) || (a == c) (a == b) && (a == c) ! (not) example: !b Comparison Operators Logical Operators Unary Logical Operator The result of a comparison operation is a boolean value. It is still a type float, but its value is either 0 (zero) if false or 1 (one) if true. Any variable can be tested with the if statement. A value of zero tests false; if any other value, it tests true. For example: /* if my_var is other than 0, increment count_var */ if(my_var) count_var=count_var+1; Intrinsic Functions and Statements Chapter 5 The following functions and statements are provided in the VT1415A’s Algorithm Language: Algorithm Language Reference 135 Functions: abs(expression) return absolute value of expression max(expression1,expression2) return largest of the two expressions min(expression1,expression2) return smallest of the two expressions Statements: interrupt() sets VXI interrupt writeboth(expression,cvt_loc) write expression result to FIFO and CVT element specified. writecvt(expression,cvt_loc) write expression result to CVT element specified. writefifo(expression) write expression result to FIFO. Program Flow Control Program flow control is limited to the conditional execution construct using if and else and return. Looping inside an algorithm function is not supported. The only “loop” is provided by repeatedly triggering the VT1415A. Each trigger event (either external or internal Trigger Timer) executes the main() function which calls each defined and enabled algorithm function. There is no goto statement. Conditional Constructs The VT1415A Algorithm Language provides the if-else construct in the following general form: if (expression) statement1 else statement2 If expression evaluates to non-zero statement1 is executed. If expression evaluates to zero, statement2 is executed. The else clause with its associated statement2 is optional. Statement1 and/or statement2 can be compound statement. That is { statement; statement; statement; ... }. Exiting the Algorithm The return statement allows terminating algorithm execution before reaching the end by returning control to the main() function. The return statement can appear anywhere in an algorithm. It is not required to include a return statement to end an algorithm. The translator treats the end of an algorithm as an implied return. Data Types The data type for variables is always static float. However, decimal constant values without a decimal point or exponent character (“.”, “E” or “e”), as well as Hex and Octal constants are treated as 32-bit integer values. This treatment of constants is consistent with ANSI ‘C.’ To understand what this can mean, it is necessary to understand that not all arithmetic statements in an algorithm are actually performed within the VT1415A’s DSP chip at algorithm run-time. Where expressions can be simplified, the VT1415A’s translator (a function of the driver invoked by ALG:DEF) performs the arithmetic operations before downloading the executable code to the algorithm memory in the VT1415A. For example, look at the statement: a = 5 + 8; 136 Algorithm Language Reference Chapter 5 When the VT1415A’s translator receives this statement, it simplifies it by adding the two integer constants (5 and 8) and storing the sum of these as the float constant 13. At algorithm run-time, the float constant 13 is assigned to the variable “a.” No surprises so far. Now, analyze this statement: a = ( 3 / 4 ) * 12; Again, the translator simplifies the expression by performing the integer divide for 3/4. This results in the integer value 0 being multiplied by 12 which results in the float constant 0.0 being assigned to the variable “a” at run-time. This is obviously not what was desired, but is exactly what the algorithm instructed. These subtle problems can be avoided by specifically including a decimal point in decimal constants where an integer operation is not desired. For example, if either of the constants in the division above were made a float constant by including a decimal point, the translator would have promoted the other constant to a float value and performed a float divide operation resulting in the expected 0.75 * 12 or the value 8.0. So, the statement: a = ( 3. / 4 ) * 12; will result in the value float 8.0 being assigned to the variable “a.” The Static Modifier All VT1415A variables, local or global, must be declared as static. An example: static float gain_var, integer_var, deriv_var; /* three vars declared */ In ‘C’, local variables that are not declared as static lose their values once the function completes. The value of a local static variable remains unchanged between calls to an algorithm. Treating all variables this way allows an algorithm to “remember” its previous state. The static variable is local in scope, but otherwise behaves as a global variable. Also note that variables may not be declared within a compound statement. Data Structures The VT1415A Algorithm Language allows the following data structures: · Simple variables of type float: Declaration static float simp_var, any_var; Use simp_var = 123.456; any_var = -23.45; Another_var = 1.23e-6; Storage Each simple variable requires four 16-bit words of memory. Chapter 5 Algorithm Language Reference 137 · Single-dimensioned arrays of type float with a maximum of 1,024 elements: Declaration static float array_var [3]; Use array_var [0] = 0.1; array_var [1] = 1.2; array_var [2] = 2.34; array_var [3] = 5; Storage Arrays are “double buffered.” This means that when an array is declared, twice the space required for the array is allocated, plus one more word as a buffer pointer. The memory required is: words of memory = (8 * num_ elements ) + 1 This double buffered arrangement allows the ALG:ARRAY command to download all elements of the array into the “B” buffer while an algorithm is accessing values from the “A” buffer. Then an ALG:UPDATE command will cause the buffer pointer word to point to the newly loaded buffer between algorithm executions. Bitfield Access The VT1415A implements bitfield syntax that allows individual bit values to be manipulated within a variable. This syntax is similar to what would be done in ‘C’, but doesn’t require a structure declaration. Bitfield syntax is supported only for the lower 16 bits (bits 0-15) of simple (scalar) variables and channel identifiers. Use if(word_var.B0 || word_var.B3) word_var.B15 = 1; NOTES /* if either bit 0 or bit 3 true ... */ /* set bit 15 */ 1. A bitfield structure does not have to be declared in order to use it. In the Algorithm Language, the bitfield structure is assumed to be applicable to any simple variable including channel identifiers. 2. Unlike ‘C’, the Algorithm Language allows for both bit access and “whole” access to the same variable. Example: static float my_word_var; my_word_var = 255 /* set bits 0 through 7 */ my_word_var.B3 = 0 /* clear bit 3 */ 138 Algorithm Language Reference Chapter 5 Declaration Initialization NOTE! Global Variables Only simple variables (not array members) may be initialized in the declaration statement: static float my_var = 2; The initialization of the variable only occurs when the algorithm is first defined with the ALG:DEF command. The first time the algorithm is executed (module INITed and triggered), the value will be as initialized. But when the module is stopped (ABORT command) and then re-INITiated, the variable will not be re-initialized but will contain the value last assigned during program execution. In order to initialize variables each time the module is re-INITialized, see “Determining First Execution” on page 115. To declare global variables, execute the SCPI command ALG:DEF ‘GLOBALS’,<program_string>. The <program_string> can contain simple variable and array variable declaration/initialization statements. The string must not contain any executable source code. Language Syntax Summary This section documents the VT1415A’s Algorithm Language elements. Identifier: first character is A-Z, a-z or “_”, optionally followed by characters; A-Z, a-z, 0-9 or “_.” Only the first 31 characters are significant. For example: a, abc, a1, a12, a_12, now_is_the_time, gain1. Decimal Constant: first character is 0-9 or “.”(decimal point). Remaining characters if present are 0-9, a “.”(one only), a single “E”or"e", optional “+” or “-”, 0-9. For example: 0.32, 2, 123, 123.456, 1.23456e-2, 12.34E3. NOTE Decimal constants without a decimal point character are treated by the translator as 32-bit integer values. See Data Types on page 136. Hexadecimal Constant: first characters are 0x or 0X. Remaining characters are 0-9 and A-F or a-f. No “.” allowed. Octal Constant: first character is 0. Remaining characters are 0-7. If “.”, “e” or “E” is found, the number is assumed to be a Decimal Constant as above. Chapter 5 Algorithm Language Reference 139 Primary-Expression: constant (expression) scalar-identifier scalar-identifier.bitnumber array-identifier[expression] abs(expression) max(expression,expression) min(expression,expression) Bit-Number: Bn Bnn where n=0-9 where nn=10-15 Unary-Expression: primary-expression unary-operator unary-expression Unary-Operator: + ! Multiplicative-Expression: unary-expression multiplicative-expression multiplicative-operator unary-expression Multiplicative-Operator: * / Additive-Expression: multiplicative-expression additive-expression additive-operator multiplicative-expression Additive-Operator: + Relational-Expression: additive-expression relational-expression relational-operator additive-expression 140 Algorithm Language Reference Chapter 5 Relational-Operator: < > <= >= Equality-Expression: relational-expression equality-expression equality-operator relational-expression Equality-Operator: == != Logical-AND-Expression: equality-expression logical-AND-expression && equality-expression Expression: logical-AND-expression expression || logical-AND-expression Declarator: identifier identifier [ integer-constant-expression ] NOTE: Integer-constant expression in array identifier above must not exceed 1,023. Init-Declarator: declarator declarator = constant-expression NOTES: 1. May not initialize array declarator. 2. Arrays limited to single dimension of 1024 maximum. Init-Declarator-List: init-declarator init-declarator-list , init-declarator Declaration: static float init-declarator-list; Chapter 5 Algorithm Language Reference 141 Declarations: declaration declarations declaration Intrinsic-Statement: interrupt ( ) writefifo ( expression ) writecvt ( expression , constant-expression ) writeboth( expression , constant-expression ) exit ( expression ) Expression-Statement: scalar-identifier = expression ; scalar-identifier . bit-number = expression ; array-identifier [ integer-constant expression ] = expression ; intrinsic-statement ; Selection-Statement: if ( expression ) statement if ( expression ) statement else statement Compound-Statement: { statement-list } { } NOTE: Variable declaration not allowed in compound statement. Statement: expression-statement compound-statement selection-statement Statement-List: statement statement-list statement Algorithm-Definition: declarations statement-list statement-list 142 Algorithm Language Reference Chapter 5 Program Structure and Syntax In this section, the portion of the ‘C’ programming language that is directly applicable to the VT1415A’s Algorithm Language will be discussed. To do this, ‘C’ Algorithm Language elements will be compared with equivalent BASIC language elements. Declaring Variables In BASIC, the DIM statement is typically used to name variables and allocate space in memory for them. In the Algorithm Language, the variable type and a list of variables is specified: BASIC DIM a, var, array(3) ‘C’ static float a, var, array[ 3 ]; Here, three variables are declared. Two simple variables: a and var and a single dimensioned array, array. Comments: · Note that the ‘C’ language statement must be terminated with the semicolon “;”. · Although all variables in the Algorithm Language are of type float, they must be explicitly declared as such. · All variables in an algorithm are static. This means that each time an algorithm is executed, the variables “remember” their values from the previous execution. The static modifier must appear in the declaration. · Array variables must have a single dimension. The array dimension specifies the number of elements. The lower bound is always zero (0) in the Algorithm Language. Therefore, the variable My_array from above has three elements: My_array [0] through My_array[2]. Assigning Values BASIC and ‘C’ are the same here. Both languages use the symbol “=” to assign a value to a simple variable or an element of an array. The value can come from a constant, another variable, or an expression. Examples: a = 12.345; a = My_var; a = My_array[ 2 ]; a = (My_array[ 1 ] + 6.2) / My_var; NOTE Chapter 5 In BASIC, the assignment symbol “=” is also used as the comparison operator “is equal to.” For example; IF a=b THEN ... . As is discussed later in this chapter, ‘C’ uses a different symbol for this comparison. Algorithm Language Reference 143 The Operations Symbols The Arithmetic Operators Unary Arithmetic Operator The Comparison Operators Many of the operation symbols are the same and are used the same way as those in BASIC. However, there are differences and they can cause programming errors until they are recognized. The arithmetic operators available to the VT1415A are the same as those equivalents in BASIC: + (addition) (subtraction) * (multiplication) / (division) Again same as BASIC: (unary minus) + (unary plus) Examples: a = b + (-c) a = c + (+b) Here there are some differences. BASIC = (is equal to) <> or # (is not equal to) > (is greater than) < (is less than) >= (is greater than or equal to) <= (is less than or equal to) ‘C’ == != > > >= <= Notes Different (hard to remember) Different but obvious Same Same Same Same A common ‘C’ programming error for BASIC programmers is to inadvertently use the assignment operator “=” instead of the comparison operator “==” in an if statement. Fortunately, the VT1415A will flag this as a Syntax Error when the algorithm is loaded. The Logical Operators There are three operators. They are very different from those in BASIC. BASIC Examples ‘C’ Examples AND OR NOT IF A=B AND B=C IF A=B OR A=C IF NOT B && || ! if( ( a == b )&&( b == c ) ) if( ( a == b ) || ( a == c ) ) if ( ! b ) Conditional Execution The VT1415A Algorithm Language provides the if - else construct for conditional execution. The following figure compares the elements of the ‘C’ if - else construct with the BASIC if - then - else - end if construct. The general form of the if - else construct is: if(expression) statement1 else statement2 where statement1 is executed if expression evaluates to non-zero (true) and statement2 is executed if expression evaluates to zero (false). Statement1 and/or statement2 can be compound statements. That is, multiple simple statements within curly braces. See Figure 5-1. 144 Algorithm Language Reference Chapter 5 BASIC Syntax Comments ‘C’ Syntax IF boolean_expression THEN statement Simplest form (used often) if(boolean_expression) statement; IF boolean_expression THEN statement END IF Two-line form (not recommended; use multiple line form instead) if(boolean_expression) statement; IF boolean_expression THEN statement statement statement END IF if(boolean_expression) { statement; statement; statement; } Multiple line form (used often) IF boolean_expression THEN statement statement ELSE statement END IF if(boolean_expression) { statement; statement; } else { statement; } Multiple line form with else (used often) Figure 5-1: The if Statement 'C' versus BASIC Note that in BASIC, the <boolean_expression> is delimited by the IF and the THEN keywords. In ‘C’, the parentheses delimit the expression. In ‘C’ , the “)” is the implied THEN. In BASIC, the END IF keyword terminates a multi-line IF. In ‘C’, the if is terminated at the end of the following statement when no else clause is present or at the end of the statement following the else clause. Figure 5-2 shows examples of these forms: BASIC Syntax Examples ‘C’ Syntax IF A<=0 THEN C=ABS(A) if(a <= 0) c=abs(a); IF A<>0 THEN C=B/A END IF if(a != 0) c = b / a; IF A<>B AND A<>C THEN A=A*B B=B+1 C=0 END IF if((a != b) && (a != c)) { a = a * b; b = b + 1; c = 0; } IF A=5 OR B=-5 THEN C=ABS(C) C= 2/C ELSE C= A*B END IF if((a == 5) || (b == -5)) { c = abs(c); c = 2 / c; } else { c = a * b; } Figure 5-2: Examples of 'C' and BASIC if Statements Chapter 5 Algorithm Language Reference 145 Note that in ‘C’ “else” is part of the closest previous “if”statement. So the example: if( x ) if( y ) z = 1; else z = 2; executes like: if( x ){ if( y ){ z = 1; } else{ z = 2; } } Comment Lines not like: if( x ){ if ( y ){ z = 1; } } else{ z = 2; } Probably the most important element of programming is the comment. In older BASIC interpreters the comment line began with “REM” and ended at the end-of-line character(s) (probably carriage return then linefeed). Later BASICs allowed comments to also begin with various “shorthand” characters such as “!” or “’.” In all cases a comment ended when the end-of-line is encountered. In ‘C’ and the Algorithm Language, comments begin with the the two characters “/*” and continue until the two characters “*/” are encountered. Examples: /* this line is solely a comment line */ if ( a != b) c = d + 1; /* comment within a code line */ /* This comment is composed of more than one line. The comment can be any number of lines long and terminates when the following two characters appear */ About the only character combination that is not allowed within a comment is “*/”, since this will terminate the comment. Overall Program Structure The preceding discussion showed the differences between individual statements in BASIC and ‘C.’ Shown here is the way the VT1415A’s Algorithm Language elements are arranged into a program. Here is a simple example algorithm that shows most of the elements discussed so far. /* Example Algorithm to show language elements in the context of a complete custom algorithm. Program variables: user_flag user_value 146 Algorithm Language Reference Set this value with the SCPI command ALG:SCALAR. Set this value with the SCPI command ALG:SCALAR. Chapter 5 Program Function: Algorithm returns user_flag in CVT element 330 and another value in CVT element 331 each time the algorithm is executed. When user_flag = 0, returns zero in CVT 331. When user_flag is positive, returns user_value * 2 in CVT 331 When user_flag is negative, returns user_value / 2 in CVT 331 and in FIFO Use the SCPI command ALGorithm:SCALar followed by ALGorithm:UPDate to set user_flag and user_value. */ static float user_flag; static float user_value; /* Declaration statements (end with ; ) */ writecvt (user_flag,330); /* Always write user_flag in CVT (statement ends with ; ) */ if (user_flag ) { if (user_flag > 0) writecvt (user_value * 2,331); else { writecvt (user_value / 2,331); writefifo (user_value); } } else writecvt (0,331); Where To Go Next Chapter 5 /* if statement (note no ; ) */ /* brace opens compound statement */ /* one-line if statement (writecvt ends with ; ) */ /* else immediately follows complete if-statement construct */ /* open compound statement for else clause */ /* each simple statement ends in ; (even within compound ) */ /* these two statements could combine with writeboth () */ /* close compound statement for else clause */ /* close compound statement for first if */ /* else clause goes with first if statement. Note single line else */ If one has already read Chapter 3 “Programming the VT1415A for PIDs”, read Chapter 4 “Creating and Running Custom Algorithms.” It is very important to read Chapter 3 first since almost all of the programming steps for PIDs apply to programming the VT1415A to run custom algorithms. Algorithm Language Reference 147 Notes 148 Algorithm Language Reference Chapter 5 Chapter 6 VT1415A Command Reference Using This Chapter This chapter describes the Standard Commands for Programmable Instruments (SCPI) command set and the IEEE-488.2 Common Commands for the VT1415A. · · · · · Overall Command Index . . . . Command Fundamentals . . . . SCPI Command Reference . . . Common Command Reference . Command Quick Reference. . . . . . . . . . . . . . . . . . . . . . . . . . . . . . . . . . . . . . . . . . . . . . . . . . . . . . . . . . . . . . . . . . . . . . . . . . . . . . . . . . . . . . . . . . . . . . . . . . page 149 page 153 page 159 page 276 page 286 Overall Command Index SCPI Commands ABORt . . . . . . . . . . . . . . . . . . . . . . . . . . . . . . . . . . . . . . . . . . . . . . . . . . . . page 160 ALGorithm[:EXPLicit]:ARRay <alg_name>,<array_name>,<block_data> . . . . . . ALGorithm[:EXPLicit]:ARRay? <alg_name>,<array_name> . . . . . . . . . . . . . ALGorithm[:EXPLicit]:DEFine <alg_name>,[<swap_enable>,<size>,]<source_code> ALGorithm[:EXPLicit]:SCALar <alg_name>,<var_name>,<value> . . . . . . . . . . ALGorithm[:EXPLicit]:SCALar? <alg_name>,<var_name> . . . . . . . . . . . . . . ALGorithm[:EXPLicit]:SCAN:RATio <alg_name>,<value> . . . . . . . . . . . . . . ALGorithm[:EXPLicit]:SCAN:RATio? <alg_name> . . . . . . . . . . . . . . . . . . ALGorithm[:EXPLicit]:SIZe? <alg_name> . . . . . . . . . . . . . . . . . . . . . . . ALGorithm[:EXPLicit][:STATe] <alg_name>,1 | 0 | ON | OFF . . . . . . . . . . . . . ALGorithm[:EXPLicit][:STATe]? <alg_name> . . . . . . . . . . . . . . . . . . . . . ALGorithm[:EXPLicit]:TIMe? <alg_name> . . . . . . . . . . . . . . . . . . . . . . . ALGorithm:FUNCtion:DEFine <func_name>,<range>,<offset>,<func_data> . . . . . ALGorithm:OUTPut:DELay <delay> | AUTO . . . . . . . . . . . . . . . . . . . . . ALGorithm:OUTPut:DELay? . . . . . . . . . . . . . . . . . . . . . . . . . . . . . . ALGorithm:UPDate[:IMMediate] . . . . . . . . . . . . . . . . . . . . . . . . . . . . ALGorithm:UPDate:CHANnel (@<channel>) . . . . . . . . . . . . . . . . . . . . . ALGorithm:UPDate:WINDow <num_updates> . . . . . . . . . . . . . . . . . . . . . ALGorithm:UPDate:WINDow? . . . . . . . . . . . . . . . . . . . . . . . . . . . . . . . . . . . . . . . . . . . . . . . . . . . . . . . . . . . . . . . . . . . . . . . . . . . . . . . . . . . . . . . . . . . . . . . . . . . . . . . . . . . . . . . . . . . . . . . . . . . . . . . . . . . . . . . . . . . . . . . . . . . . . . . . . . . . . . . . . . . . . . . . . . . . . . . . . . . . . . . . . . . . . . . page 162 page 163 page 163 page 167 page 168 page 168 page 169 page 169 page 170 page 171 page 171 page 172 page 173 page 174 page 174 page 175 page 176 page 177 ARM[:IMMediate] . . . . . . . . . . . . . . . . . . . . . . . . . . . . . . . . . . . . . . . . . . . . . page 179 ARM:SOURce BUS | EXT | HOLD | IMM | SCP | TTLTrg<n> . . . . . . . . . . . . . . . . . . . . . . page 179 ARM:SOURce? . . . . . . . . . . . . . . . . . . . . . . . . . . . . . . . . . . . . . . . . . . . . . . . page 180 CALibration:CONFigure:RESistance . . . . . . . . . . . . . . . . . . . . . . . . . . . . . . . . . . . . page 182 CALibration:CONFigure:VOLTage <range> . . . . . . . . . . . . . . . . . . . . . . . . . . . . . . . page 183 CALibration:SETup . . . . . . . . . . . . . . . . . . . . . . . . . . . . . . . . . . . . . . . . . . . . . page 184 Chapter 6 VT1415A Command Reference 149 CALibration:SETup? . . . . . . . . . . . . . CALibration:STORe ADC | TARE . . . . . CALibration:TARE (@<ch_list>) . . . . . . CALibration:TARE:RESet . . . . . . . . . . CALibration:TARE? . . . . . . . . . . . . . CALibration:VALue:RESistance <ref_ohms> CALibration:VALue:VOLTage <ref_volts> . CALibration:ZERO? . . . . . . . . . . . . . . . . . . . . . . . . . . . . . . . . . . . . . . . . . . . . . . . . . . . . . . . . . . . . . . . . . . . . . . . . . . . . . . . . . . . . . . . . . . . . . . . . . . . . . . . . . . . . . . . . . . . . . . . . . . . . . . . . . . . . . . . . . . . . . . . . . . . . . . . . . . . . . . . . . . . . . . . . . . . . . . . . . . . . . . . . . . . . . . . . . . . . . . . . . . . . . . . . . . . . . . . . . . . . . . . . . . . . . . . . . . . . . . . . . . . . . . . . . . . . . . . . . . . . . page 184 page 185 page 186 page 187 page 188 page 188 page 189 page 190 DIAGnostic:CALibration:SETup[:MODE] 0 | 1 . . . . . . . . . . . . . . . . DIAGnostic:CALibration:SETup[:MODE]? . . . . . . . . . . . . . . . . . . DIAGnostic:CALibration:TARE[:OTDetect][:MODE] 0 | 1 . . . . . . . . . DIAGnostic:CALibration:TARE[:OTDetect][:MODE]? . . . . . . . . . . . . DIAGnostic:CHECksum? . . . . . . . . . . . . . . . . . . . . . . . . . . . . DIAGnostic:CUStom:LINear <table_range>,<table_block>,(@<ch_list>) . . DIAGnostic:CUStom:PIECewise <table_range>,<table_block>,(@<ch_list>) DIAGnostic:CUSTom:REFerence:TEMPerature . . . . . . . . . . . . . . . . DIAGnostic:IEEE 0 | 1 . . . . . . . . . . . . . . . . . . . . . . . . . . . . . DIAGnostic:IEEE? . . . . . . . . . . . . . . . . . . . . . . . . . . . . . . . DIAGnostic:INTerrupt[:LINe] <int_line> . . . . . . . . . . . . . . . . . . . DIAGnostic:INTerrupt[:LINe]? . . . . . . . . . . . . . . . . . . . . . . . . . DIAGnostic:OTDetect[:STATe] 1 | 0 | ON | OFF,(@<ch_list>) . . . . . . . . DIAGnostic:OTDetect[:STATe]? (@<channel>) . . . . . . . . . . . . . . . DIAGnostic:QUERy:SCPREAD? <reg_addr> . . . . . . . . . . . . . . . . DIAGnostic:VERSion? . . . . . . . . . . . . . . . . . . . . . . . . . . . . . . . . . . . . . . . . . . . . . . . . . . . . . . . . . . . . . . . . . . . . . . . . . . . . . . . . . . . . . . . . . . . . . . . . . . . . . . . . . . . . . . . . . . . . . . . . . . . . . . . . . . . . . . . . . . . . . . . . . . . . . . . . . . . . . . . . . . . . . . . . . . . . . . . . . . . . . . . . . . . . . . . . . . . . . . . . . . . . . . . . . . . . . . . . . . . . . . . . . . . . . . . . . . . . . . . . . . . . . . . . . . . . . page 191 page 192 page 192 page 193 page 193 page 193 page 194 page 195 page 195 page 196 page 196 page 196 page 198 page 198 page 199 page 199 FETCh? . . . . . . . . . . . . . . . . . . . . . . . . . . . . . . . . . . . . . . . . . . . . . . . . . . . page 200 FORMat[:DATA] <format>[,<size>] . . . . . . . . . . . . . . . . . . . . . . . . . . . . . . . . . . . page 199 FORMat[:DATA]? . . . . . . . . . . . . . . . . . . . . . . . . . . . . . . . . . . . . . . . . . . . . . page 201 INITiate[:IMMediate] . . . . . . . . . . . . . . . . . . . . . . . . . . . . . . . . . . . . . . . . . . . . page 202 150 INPut:FILTer[:LPASs]:FREQuency <cutoff_freq>,(@<ch_list>) INPut:FILTer[:LPASs]:FREQuency? (@<channel>) . . . . . . INPut:FILTer[:LPASs][:STATe] 1 | 0 | ON | OFF,(@<ch_list>) INPut:FILTer[:LPASs][:STATe]? (@<channel>) . . . . . . . . INPut:GAIN <chan_gain>,(@<ch_list>) . . . . . . . . . . . . INPut:GAIN? (@<channel>) . . . . . . . . . . . . . . . . . . INPut:LOW <wvolt_type>,(@<ch_list>) . . . . . . . . . . . . INPut:LOW? (@<channel>) . . . . . . . . . . . . . . . . . . . INPut:POLarity NORMal | INverted,(@<ch_list>) . . . . . . . INPut:POLarity? (@<channel>) . . . . . . . . . . . . . . . . . . . . . . . . . . . . . . . . . . . . . . . . . . . . . . . . . . . . . . . . . . . . . . . . . . . . . . . . . . . . . . . . . . . . . . . . . . . . . . . . . . . . . . . . . . . . . . . . . . . . . . . . . . . . . . . . . . . . . . . . . . . . . . . . . . . . . . . . . . . . . . . . . . . . . . . . . . . . . . . . . . . . . . . . . . . . . . . . . . . . . . . . . . . . . . . . . . . . . . . . . . . . . . . . . . . page 203 page 204 page 204 page 205 page 205 page 206 page 206 page 207 page 207 page 208 MEMory:VME:ADDRess <A24_address> MEMory:VME:ADDRess? . . . . . . . . . MEMory:VME:SIZE <mem_size> . . . . . MEMory:VME:SIZE? . . . . . . . . . . . MEMory:VME:STATe 1 | 0 | ON | OFF . . MEMory:VME:STATe? . . . . . . . . . . . . . . . . . . . . . . . . . . . . . . . . . . . . . . . . . . . . . . . . . . . . . . . . . . . . . . . . . . . . . . . . . . . . . . . . . . . . . . . . . . . . . . . . . . . . . . . . . . . . . . . . . . . . . . . . . . . . . . . . . . . . . . . . page 210 page 210 page 210 page 211 page 211 page 212 VT1415A Command Reference . . . . . . . . . . . . . . . . . . . . . . . . . . . . . . . . . . . . . . . . . . . . . . . . . . . . . . . . . . . . . . . . . . Chapter 6 OUTPut:CURRent:AMPLitude <amplitude>,(@<ch_list>) . . . . . . . . OUTPut:CURRent:AMPLitude? (@<channel>) . . . . . . . . . . . . . . OUTPut:CURRent[:STATe] 1 | 0 | ON | OFF,(@<ch_list>) . . . . . . . . OUTPut:CURRent[:STATe]? (@<channel>) . . . . . . . . . . . . . . . OUTPut:POLarity NORMal | INVerted,(@<ch_list>) . . . . . . . . . . . OUTPut:POLarity? (@<channel>) . . . . . . . . . . . . . . . . . . . . . OUTPut:SHUNt 1 | 0,(@<ch_list>) . . . . . . . . . . . . . . . . . . . . OUTPut:SHUNt? (@<channel>) . . . . . . . . . . . . . . . . . . . . . OUTPut:TTLTrg:SOURce ALGorithm | FTRigger | SCPlugon | TRIGger OUTPut:TTLTrg:SOURce? . . . . . . . . . . . . . . . . . . . . . . . . OUTPut:TTLTrg<n>[:STATe] 1 | 0 | ON | OFF . . . . . . . . . . . . . . OUTPut:TTLTrg<n>[:STATe]? . . . . . . . . . . . . . . . . . . . . . . OUTPut:TYPE PASSive | ACTive,(@<ch_list>) . . . . . . . . . . . . . OUTPut:TYPE? (@<channel>) . . . . . . . . . . . . . . . . . . . . . . OUTPut:VOLTage:AMPLitude <amplitude>,(@<ch_list>) . . . . . . . . OUTPut:VOLTage:AMPLitude? (@<channel>) . . . . . . . . . . . . . . . . . . . . . . . . . . . . . . . . . . . . . . . . . . . . . . . . . . . . . . . . . . . . . . . . . . . . . . . . . . . . . . . . . . . . . . . . . . . . . . . . . . . . . . . . . . . . . . . . . . . . . . . . . . . . . . . . . . . . . . . . . . . . . . . . . . . . . . . . . . . . . . . . . . . . . . . . . . . . . . . . . . . . . . . . . . . . . . . . . . . . . . . . . . . . . . . . . . . . . . . . . . . . . . . . . . . . . . . . . . . . . . . . . . . . . . . . . . . . . . . . . . . . . . . . . . . . . page 213 page 214 page 215 page 215 page 216 page 216 page 216 page 217 page 217 page 218 page 218 page 219 page 219 page 220 page 220 page 221 ROUTe:SEQuence:DEFine? AIN | AOUT | DIN | DOUT . . . . . . . . . . . . . . . . . . . . . . . . . page 222 ROUTe:SEQuence:POINts? AIN | AOUT | DIN | DOUT . . . . . . . . . . . . . . . . . . . . . . . . . page 223 SAMPle:TIMer <interval> . . . . . . . . . . . . . . . . . . . . . . . . . . . . . . . . . . . . . . . . . page 224 SAMPle:TIMer? . . . . . . . . . . . . . . . . . . . . . . . . . . . . . . . . . . . . . . . . . . . . . . page 225 [SENSe:]CHANnel:SETTling <settle_time>,(@<ch_list>) . . . . . . . . . [SENSe:]CHANnel:SETTling? (@<channel>) . . . . . . . . . . . . . . . [SENSe:]DATA:CVTable? (@<element_list>) . . . . . . . . . . . . . . . [SENSe:]DATA:CVTable:RESet . . . . . . . . . . . . . . . . . . . . . . . [SENSe:]DATA:FIFO[:ALL]? . . . . . . . . . . . . . . . . . . . . . . . . [SENSe:]DATA:FIFO:COUNT? . . . . . . . . . . . . . . . . . . . . . . . [SENSe:]DATA:FIFO:COUNT:HALF? . . . . . . . . . . . . . . . . . . . [SENSe:]DATA:FIFO:HALF? . . . . . . . . . . . . . . . . . . . . . . . . [SENSe:]DATA:FIFO:MODE BLOCk | OVERwrite . . . . . . . . . . . . [SENSe:]DATA:FIFO:MODE? . . . . . . . . . . . . . . . . . . . . . . . . [SENSe:]DATA:FIFO:PART? <n_readings> . . . . . . . . . . . . . . . . [SENSe:]DATA:FIFO:RESet . . . . . . . . . . . . . . . . . . . . . . . . . [SENSe:]FREQuency:APERture <gate_time>,(@<ch_list>) . . . . . . . . [SENSe:]FREQuency:APERture? (@<channel>) . . . . . . . . . . . . . . [SENSe:]FUNCtion:CONDition (@<ch_list>) . . . . . . . . . . . . . . . [SENSe:]FUNCtion:CUSTom [<range>,](@<ch_list>) . . . . . . . . . . . [SENSe:]FUNCtion:CUSTom:REFerence [<range>,](@<ch_list>) . . . . [SENSe:]FUNCtion:CUSTom:TCouple <type>,[<range>,](@<ch_list>) . . [SENSe:]FUNCtion:FREQuency (@<ch_list>) . . . . . . . . . . . . . . . [SENSe:]FUNCtion:RESistance <excite_current>,[<range>,] @<ch_list>) [SENSe:]FUNCtion:STRain:FBENding [<range>,](@<ch_list>) . . . . . . [SENSe:]FUNCtion:STRain:FBPoisson [<range>,](@<ch_list>) . . . . . . [SENSe:]FUNCtion:STRain:FPOisson [<range>,](@<ch_list>) . . . . . . [SENSe:]FUNCtion:STRain:HBENding [<range>,](@<ch_list>) . . . . . [SENSe:]FUNCtion:STRain:HPOisson [<range>,](@<ch_list>) . . . . . . [SENSe:]FUNCtion:STRain[:QUARter] [<range>,](@<ch_list>) . . . . . Chapter 6 . . . . . . . . . . . . . . . . . . . . . . . . . . . . . . . . . . . . . . . . . . . . . . . . . . . . . . . . . . . . . . . . . . . . . . . . . . . . . . . . . . . . . . . . . . . . . . . . . . . . . . . . . . . . . . . . . . . . . . . . . . . . . . . . . . . . . . . . . . . . . . . . . . . . . . . . . . . . . . . . . . . . . . . . . . . . . . . . . . . . . . . . . . . . . . . . . . . . . . . . . . . . . . . . . . . . . . . . . . . . . . . . . . . . . . . . . . . . . . . . . . . . . . . . . . . . . . . . . . . . . . . . . . . . . . . . . . . . . . . . . . . . . . . . . . . . . . . . . . . . . . . . . . . . . . . . . . . . . . . . . . . . . . . . . . . . . . . . . . . . . . . . . . . . . . . . . . . . . . . . . . . . . . . . . . . . . . . . . . . . . . . . . . . . . . page 227 page 227 page 228 page 229 page 229 page 230 page 231 page 231 page 232 page 233 page 233 page 234 page 234 page 234 page 235 page 235 page 236 page 237 page 238 page 239 page 240 page 240 page 240 page 240 page 240 page 240 VT1415A Command Reference 151 [SENSe:]FUNCtion:TEMPerature <sensor_type>,<sub_type>,[<range>,] (@<ch_list>) [SENSe:]FUNCtion:TOTalize (@<ch_list>) . . . . . . . . . . . . . . . . . . . . . . . [SENSe:]FUNCtion:VOLTage[:DC] [<range>,](@<ch_list>) . . . . . . . . . . . . . . [SENSe:]REFerence <sensor_type>,[<sub_type>,][<range>,] (@<ch_list>) . . . . . . . [SENSe:]REFerence:CHANnels (@<ref_channel>),(@<tc_channels>) . . . . . . . . . [SENSe:]REFerence:TEMPerature <degrees_c> . . . . . . . . . . . . . . . . . . . . . [SENSe:]STRain:EXCitation <excite_v>,(@<ch_list>) . . . . . . . . . . . . . . . . . . [SENSe:]STRain:EXCitation? (@<channel>) . . . . . . . . . . . . . . . . . . . . . . . [SENSe:]STRain:GFACtor <gage_factor>,(@<ch_list>) . . . . . . . . . . . . . . . . . [SENSe:]STRain:GFACtor? (@<channel>) . . . . . . . . . . . . . . . . . . . . . . . . [SENSe:]STRain:POISson <poisson_ratio>,(@<ch_list>) . . . . . . . . . . . . . . . . [SENSe:]STRain:POISson? (@<channel>) . . . . . . . . . . . . . . . . . . . . . . . . [SENSe:]STRain:UNSTrained <unstrained_v>,(@<ch_list>) . . . . . . . . . . . . . . . [SENSe:]STRain:UNSTrained? (@<channel>) . . . . . . . . . . . . . . . . . . . . . . [SENSe:]TOTalize:RESet:MODE INIT | TRIGger,(@<ch_list>) . . . . . . . . . . . . . [SENSe:]TOTalize:RESet:MODE? (@<channel>) . . . . . . . . . . . . . . . . . . . . . . . . . . . . . . . . . . . . . . . . . . . . . . . . . . . . . . . . . . . . . . . . . . . . . . . . . . . . . . . . . . . . . . . . . . . . . . . . . . . . . . . . . . . . . . . . . . . . . . . . . . . . . . . . . . . . . . . . . . . . . . . . . . . . page 241 page 243 page 243 page 244 page 246 page 246 page 247 page 247 page 248 page 248 page 249 page 249 page 249 page 250 page 250 page 252 SOURce:FM[:STATe] 1 | 0 | O | OFF,(@<ch_list>) . . . SOURce:FM[:STATe]? (@<channel>) . . . . . . . . . SOURce:FUNCtion:[SHAPe:]CONDition (@<ch_list>) SOURce:FUNCtion:[SHAPe:]PULSe (@<ch_list>) . . SOURce:FUNCtion:[SHAPe:]SQUare (@<ch_list>) . . SOURce:PULM[:STATe] 1 | 0 | ON | OFF,(@<ch_list>) SOURce:PULM[:STATe]? (@<channel>) . . . . . . . SOURce:PULSe:PERiod <period>,(@<ch_list>) . . . . SOURce:PULSe:PERiod? (@<channel>) . . . . . . . . SOURce:PULSe:WIDth <width>,(@<ch_list>) . . . . . SOURce:PULSe:WIDth? (@<channel>) . . . . . . . . . . . . . . . . . . . . . . . . . . . . . . . . . . . . . . . . . . . . . . . . . . . . . . . . . . . . . . . . . . . . . . . . . . . . . . . . . . . . . . . . . . . . . . . . . . . . . . . . . . . . . . . . . . . . . . . . . . . . . . . . . . . . . . . . . . . . . . . . . . . . . . . . . . . . . . . . . . . . . . . . . . . . . . . . . . . . . . . . . . . . . . . . . . . . . . . . . . . . . . . . . . . . . . . . . . . . . . . . . . . . . . . . . . . . . . . . . . . . . . . . . . . . . . . . . . . . . . . . . . . . . . . . . . . . . . . . . . . page 253 page 254 page 254 page 254 page 255 page 255 page 255 page 256 page 256 page 257 page 257 STATus:OPERation:CONDition? . . . . . . . . . . . . STATus:OPERation:ENABle <enable_mask> . . . . . STATus:OPERation:ENABle? . . . . . . . . . . . . . . STATus:OPERation[:EVENt]? . . . . . . . . . . . . . . STATus:OPERation:NTRansition <transition_mask> . . STATus:OPERation:NTRansition? . . . . . . . . . . . . STATus:OPERation:PTRansition <transition_mask> . . STATus:OPERation:PTRansition? . . . . . . . . . . . . STATus:PRESet . . . . . . . . . . . . . . . . . . . . . STATus:QUEStionable:CONDition? . . . . . . . . . . . STATus:QUEStionable:ENABle <enable_mask> . . . . STATus:QUEStionable:ENABle? . . . . . . . . . . . . STATus:QUEStionable[:EVENt]? . . . . . . . . . . . . STATus:QUEStionable:NTRansition <transition_mask> STATus:QUEStionable:NTRansition? . . . . . . . . . . STATus:QUEStionable:PTRansition <transition_mask> STATus:QUEStionable:PTRansition? . . . . . . . . . . . . . . . . . . . . . . . . . . . . . . . . . . . . . . . . . . . . . . . . . . . . . . . . . . . . . . . . . . . . . . . . . . . . . . . . . . . . . . . . . . . . . . . . . . . . . . . . . . . . . . . . . . . . . . . . . . . . . . . . . . . . . . . . . . . . . . . . . . . . . . . . . . . . . . . . . . . . . . . . . . . . . . . . . . . . . . . . . . . . . . . . . . . . . . . . . . . . . . . . . . . . . . . . . . . . . . . . . . . . . . . . . . . . . . . . . . . . . . . . . . . . . . . . . . . . . . . . . . . . . . . . . . . . . . . . . . . . . . . . . . . . . . . . . . . . . . . . . . . . . . . . . . . . . . . . . . . . . . . . . . . . . . . . . . . . . . . . . . . . . . . . . . . . . . . . . . . . . . . . . . . . . . . . . . . . . . . . . . . . . . . . . . . . . . . . . . . . . . . . . . . . . . . . . . . . . . . . . . . . . . . . . . . page 260 page 261 page 261 page 262 page 262 page 263 page 263 page 264 page 264 page 265 page 265 page 266 page 266 page 267 page 267 page 268 page 268 SYSTem:CTYPe? (@<channel>) . . . . . . . . . . . . . . . . . . . . . . . . . . . . . . . . . . . . . page 269 SYSTem:ERRor? . . . . . . . . . . . . . . . . . . . . . . . . . . . . . . . . . . . . . . . . . . . . . . page 269 SYSTem:VERSion? . . . . . . . . . . . . . . . . . . . . . . . . . . . . . . . . . . . . . . . . . . . . page 270 152 VT1415A Command Reference Chapter 6 TRIGger:COUNt <trig_count> . . . . . . . . . . . . . . . . . . . . . . . TRIGger:COUNt? . . . . . . . . . . . . . . . . . . . . . . . . . . . . . . . TRIGger[:IMMediate] . . . . . . . . . . . . . . . . . . . . . . . . . . . . TRIGger:SOURce BUS | EXT | HOLD | IMM | SCP | TIMer | TTLTrg<n> TRIGger:SOURce? . . . . . . . . . . . . . . . . . . . . . . . . . . . . . . TRIGger:TIMer[:PERiod] <trig_interval> . . . . . . . . . . . . . . . . . . TRIGger:TIMer[:PERiod]? . . . . . . . . . . . . . . . . . . . . . . . . . . . . . . . . . . . . . . . . . . . . . . . . . . . . . . . . . . . . . . . . . . . . . . . . . . . . . . . . . . . . . . . . . . . . . . . . . . . . . . . . . . . . . . . . . . . . . . . . . . . . . . . . . . . page 273 page 273 page 273 page 274 page 275 page 275 page 275 Common Commands *CAL? . . . . . . . . . . . *CLS . . . . . . . . . . . . *DMC <name>,<cmd_data> *EMC <enable> . . . . . . . *EMC? . . . . . . . . . . . *ESE . . . . . . . . . . . . *ESE? . . . . . . . . . . . . *ESR? . . . . . . . . . . . . *GMC? <name> . . . . . . *IDN? . . . . . . . . . . . . *LMC? . . . . . . . . . . . *OPC . . . . . . . . . . . . *OPC? . . . . . . . . . . . . *PMC . . . . . . . . . . . . *RMC <name> . . . . . . . *RST . . . . . . . . . . . . *SRE . . . . . . . . . . . . *SRE? . . . . . . . . . . . . *STB? . . . . . . . . . . . . *TRG . . . . . . . . . . . . *TST? . . . . . . . . . . . . *WAI . . . . . . . . . . . . . . . . . . . . . . . . . . . . . . . . . . . . . . . . . . . . . . . . . . . . . . . . . . . . . . . . . . . . . . . . . . . . . . . . . . . . . . . . . . . . . . . . . . . . . . . . . . . . . . . . . . . . . . . . . . . . . . . . . . . . . . . . . . . . . . . . . . . . . . . . . . . . . . . . . . . . . . . . . . . . . . . . . . . . . . . . . . . . . . . . . . . . . . . . . . . . . . . . . . . . . . . . . . . . . . . . . . . . . . . . . . . . . . . . . . . . . . . . . . . . . . . . . . . . . . . . . . . . . . . . . . . . . . . . . . . . . . . . . . . . . . . . . . . . . . . . . . . . . . . . . . . . . . . . . . . . . . . . . . . . . . . . . . . . . . . . . . . . . . . . . . . . . . . . . . . . . . . . . . . . . . . . . . . . . . . . . . . . . . . . . . . . . . . . . . . . . . . . . . . . . . . . . . . . . . . . . . . . . . . . . . . . . . . . . . . . . . . . . . . . . . . . . . . . . . . . . . . . . . . . . . . . . . . . . . . . . . . . . . . . . . . . . . . . . . . . . . . . . . . . . . . . . . . . . . . . . . . . . . . . . . . . . . . . . . . . . . . . . . . . . . . . . . . . . . . . . . . . . . . . . . . . . . . . . . . . . . . . . . . . . . . . . . . . . . . . . . . . . . . . . . . . . . . . . . . . . . . . . . . . . . . . . . . . . . . . . . . . . . . . . . . . . . . . . . . . . . . . . . . . . . . . . . . . . . . . . . . . . . . . . . . . . . . . . . . . . . . . . . . . . . . . . . . . . . . . . . . . . . . . . . . . . . . . . . . . . . . . . . . . . . . . . . . . . . . . . . . . . . . . . . . . . . . . . . . . . . . . . . . . . . . . . . . . . . . . . . . . . . . . . . . . . . . . . . . . . . . . . . . . . . . . . . . . . . . . . . . . . . . . . . . . . . . . . . . . . . . . . . . . . . . . . . . . . . . . . . . . . . . . page 276 page 277 page 277 page 277 page 277 page 277 page 278 page 278 page 278 page 278 page 279 page 279 page 279 page 279 page 279 page 280 page 281 page 281 page 281 page 281 page 281 page 285 Command Fundamentals Commands are separated into two types: IEEE-488.2 Common Commands and SCPI Commands. The SCPI command set for the VT1415A is 1990 compatible. Common Command Format The IEEE-488.2 standard defines the Common commands that perform functions like reset, self-test, status byte query, etc. Common commands are four or five characters in length, always begin with the asterisk character (*), and may include one or more parameters. The command keyword is separated from the first parameter by a space character. Some examples of Common commands are: *RST *ESR 32 *STB? Chapter 6 VT1415A Command Reference 153 SCPI Command Format The SCPI commands perform functions like configuring channels, setting up the trigger system and querying instrument states or retrieving data. A subsystem command structure is a hierarchical structure that usually consists of a top level (or root) command, one or more lower level commands and their parameters. The following example shows part of a typical subsystem: MEMory :VME :ADDRess <A24_address> :ADDRess? :SIZE <mem_size> :SIZE? MEMory is the root command, :VME is the second level command and :ADDRess and SIZE are third level commands. Command Separator A colon (:) always separates one command from the next lower level command as shown below: ROUTE:SEQUENCE:DEFINE? Colons separate the root command from the second level command (ROUTE:SEQUENCE) and the second level from the third level (SEQUENCE:DEFINE?). If parameters are present, the first is separated from the command by a space character. Additional parameters are separated from each other by commas. Abbreviated The command syntax shows most commands as a mixture of upper and lowercase Commands letters. The uppercase letters indicate the abbreviated spelling for the command. For shorter program lines, send the abbreviated form. For better program readability, send the entire command. The instrument will accept either the abbreviated form or the entire command. For example, if the command syntax shows SEQuence, then SEQ and SEQUENCE are both acceptable forms. Other forms of SEQuence, such as SEQUEN or SEQU will generate an error. Upper or lowercase letters may be used. Therefore, SEQUENCE, sequence, and SeQuEnCe are all acceptable. Implied Commands Implied commands are those which appear in square brackets ([ ]) in the command syntax. (Note that the brackets are not part of the command and are not sent to the instrument.) Suppose a second level command is sent but the preceding implied command is not sent. In this case, the instrument assumes the implied command is intended and it responds as if were sent. Examine the INITiate subsystem shown below: INITiate [:IMMediate] The second level command :IMMediate is an implied command. To set the instrument’s trigger system to INIT:IMM, send either of the following command statements: INIT:IMM or INIT. 154 VT1415A Command Reference Chapter 6 Variable Command Some commands will have what appears to be a variable syntax. As an example: Syntax OUTPut:TTLTrg<n>:STATe ON In these commands, the “<n>” is replaced by a number. No space is left between the command and the number because the number is not a parameter. The number is part of the command syntax. The purpose of this notation is to save a great deal of space in the Command Reference. In the case of …TTLTrg<n>…, n can be from 0 through 7. An example command statement: OUTPUT:TTLTRG2:STATE ON Parameters Parameter Types. The following section contains explanations and examples of parameter types that are seen later in this chapter. Parameter Types Explanations and Examples Numeric Accepts all commonly used decimal representations of numbers including optional signs, decimal points and scientific notation: 123, 123E2, -123, -1.23E2, .123, 1.23E-2, 1.23000E-01. Special cases include MIN, MAX, and INFinity. A parameter that represents units may also include a units suffix. These are: -3 -6 Volts; V, mv=10 , uv=10 3 6 Ohms; ohm, kohm=10 , mohm=10 -3 -6 Seconds; s, msec=10 , usec=10 3 6 9 Hertz; hz, khz=10 , mhz=10 , ghz=10 The Comments section within the Command Reference will state whether a numeric parameter can also be specified in hex, octal, and/or binary. #H7B, #Q173, #B1111011 Boolean Represents a single binary condition that is either true or false. ON, OFF, 1, 0. Discrete Selects from a finite number of values. These parameters use mnemonics to represent each valid setting. An example is the TRIGger:SOURce <source> command where <source> can be: BUS, EXT, HOLD, IMM, SCP, TIMer or TTLTrg<n>. Channel List Chapter 6 The general form of a single channel specification is: ccnn where cc represents the card number and nn represents the channel number. VT1415A Command Reference 155 Since the VT1415A has an on-board 64 channel multiplexer,the card number will be 1 and the channel number can range from 00 to 63. Some example channel specifications: channel 0=100, channel 5=105, channel 54=154 The General form of a channel range specification is: ccnn:ccnn (colon separator) (the second channel must be greater than the first) Example: channels 0 through 15=100:115 By using commas to separate them, individual and range specifications can be combined into a single channel list: 0, 5, 6 through 32, and 45=(@100,105,106:132,145) Note that a channel list is always contained within “(@”and “).” The Command Reference always shows the “(@” and “)” punctuation: (@<ch_list>) Arbitrary Block Program and Response Data l This parameter or data type is used to transfer a block of data in the form of bytes. The block of data bytes is preceded by a preamble which indicates either 1) the number of data bytes which follow (definite length) or 2) that the following data block will be terminated upon receipt of a New Line message, and for GPIB operation, with the EOI signal true (indefinite length). The syntax for this parameter is: Definite Length: #<non-zero digit><digit(s)><data byte(s)> Where the value of <non-zero digit> is 1-9 and represents the number of <digit(s)>. The value of <digit(s)> taken as a decimal integer indicates the number of <data byte(s)> in the block. Example of sending or receiving 1024 data bytes: #41024<byte><byte1><byte2><byte3><byte4>¼ ¼<byte1021><byte1022><byte1023><byte1024> OR Indefinite Length: #0<data byte(s)><NL^END> Examples of sending or receiving 4 data bytes: #0<byte><byte><byte><byte><NL^END> 156 VT1415A Command Reference Chapter 6 Optional Parameters Parameters shown within square brackets ([ ]) are optional parameters. (Note that the brackets are not part of the command and should not be sent to the instrument.) If a value for an optional parameter is not specified, the instrument chooses a default value. For example, consider the FORMAT:DATA <type>[,<length>] command. If the command is sent without specifying <length>, a default value for <length> will be selected depending on the <type> of format specified. For example: FORMAT:DATA ASC will set [,<length>] to the default for ASC of 7 FORMAT:DATA REAL will set [,<length>] to the default for REAL of 32 FORMAT:DATA REAL, 64 will set [,<length>] to 64 Be sure to place a space between the command and the first parameter. Linking Commands Linking commands provides a way to send more than one complete command in a single command statement. Linking IEEE-488.2 Common Commands with SCPI Commands. Use a semicolon between the commands. For example: *RST;OUTP:TTLT3 ON or TRIG:SOUR IMM;*TRG Linking Multiple complete SCPI Commands. Use both a semicolon and a colon between the commands. For example: OUTP:TTLT2 ON;:TRIG:SOUR EXT The semicolon as well as separating commands tells the SCPI parser to expect the command keyword following the semicolon to be at the same hierarchical level (and part of the same command branch) as the keyword preceding the semicolon. The colon immediately following the semicolon tells the SCPI parser to reset the expected hierarchical level to Root. Linking a complete SCPI Command with other keywords from the same branch and level. Separate the first complete SCPI command from next partial command with the semicolon only. For example take the following portion of the [SENSE] subsystem command tree (the FUNCtion branch): [SENSe:] FUNCtion :RESistance <range>,(@<ch_list>) :TEMPerature <sensor>[,<range>,](@<ch_list>) :VOLTage[:DC] [<range>,](@<ch_list>) Rather than sending a complete SCPI command to set each function, send: FUNC:RES 10000,(@100:107);TEMP RTD, 92,(@108:115);VOLT (@116,123) This sets the first eight channels to measure resistance, the next eight channels to measure temperature and the next eight channels to measure voltage. Chapter 6 VT1415A Command Reference 157 NOTE C-SCPI Data Types 158 The command keywords following the semicolon must be from the same command branch and level as the complete command preceding the semicolon or a -113,"Undefined header" error will be generated. The following table shows the allowable type and sizes of the C-SCPI parameter data sent to the module and query data returned by the module. The parameter and returned value type is necessary for programming and is documented in each command in this chapter. VT1415A Command Reference Data Types Description int16 Signed 16-bit integer number. int32 Signed 32-bit integer number. uint16 Unsigned 16-bit integer number. uint32 Unsigned 32-bit integer number. float32 32-bit floating point number. float64 64-bit floating point number. string String of characters (null terminated). Chapter 6 SCPI Command Reference The following section describes the SCPI commands for the VT1415A. Commands are listed alphabetically by subsystem and also within each subsystem. A command guide is printed in the top margin of each page. The guide indicates the current subsystem on that page. Chapter 6 VT1415A Command Reference 159 ABORt The ABORt subsystem is a part of the VT1415A’s trigger system. ABORt resets the trigger system from its Wait For Trigger state to its Trigger Idle state. Subsystem Syntax ABORt CAUTION! Comments ABORt stops execution of a running algorithm. The control output is left at the last value set by the algorithm. Depending on the process, this uncontrolled situation can be dangerous. Make certain that the process is in a safe state before halting the execution of a controlling algorithm. · ABORt does not affect any other settings of the trigger system. When the INITiate command is sent, the trigger system will respond just as it did before the ABORt command was sent. · Related Commands: INITiate[:IMMediate], TRIGger… · *RST Condition: TRIG:SOUR HOLD Usage ABORT 160 VT1415A Command Reference If INITed, goes to "Trigger Idle" state. If running algorithms, stops and goes to "Trigger Idle" state. Chapter 6 ALGorithm The ALGorithm command subsystem provides: · Definition of standard and custom control loop algorithms · Communication with algorithm array and scalar variables · Controls to enable or disable individual loop algorithms · Control of ratio of number of scan triggers per algorithm execution · Control of loop algorithm execution speed · Easy definition of algorithm data conversion functions Subsystem Syntax ALGorithm [:EXPLicit] :ARRay <alg_name>,<array_name>,<block_data> :ARRay? <alg_name>,<array_name> :DEFine <alg_name>[,<swap_size>],<program_block> :SCALar <alg_name>,<var_name>,<value> :SCALar? <alg_name>,<var_name> :SCAN:RATio <alg_name>,<value> :SCAN:RATio? <alg_name> :SIZe? <alg_name> [:STATe] <alg_name>,ON | OFF [:STATe]? <alg_name> :TIMe? <alg_name> :FUNCtion:DEFine <func_name>,<range>,<offset>,<block_data> :OUTPut:DELay <usec> | AUTO :OUTPut:DELay? :UPDate [:IMMediate] :CHANnel <channel_item> :WINDow <num_updates> :WINDow? Chapter 6 VT1415A Command Reference 161 ALGorithm[:EXPLicit]:ARRay ALGorithm[:EXPLicit]:ARRay <alg_name>,<array_name>,<array_block> places values of <array_name> for algorithm <alg_name> into the Update Queue. This update is then pending until ALG:UPD is sent or an update event (as set by ALG:UPD:CHANNEL) occurs. NOTE ALG:ARRAY places a variable update request in the Update Queue. Do not place more update requests in the Update Queue than are allowed by the current setting of ALG:UPD:WINDOW or a “Too many updates — send ALG:UPDATE command’ error message will be generated. Parameters Comments Parameter Name Parameter Type Range of Values Default Units alg_name string ALG1 - ALG32 | GLOBALS none array_name string Valid ‘C’ variable name. none array_block block data Block of IEEE-754 64-bit floating point numbers. none · To send values to a Global array, set the <alg_name> parameter to “GLOBALS.” To define a global array, see the ALGorithm:DEFine command. · An error is generated if <alg_name> or <array_name> is not defined. · When an array is defined (in an algorithm or in ‘GLOBALS’), the VT1415A allocates twice the memory required to store the array. When the ALG:ARRAY command is sent, the new values for the array are loaded into the second space for this array. When ALG:UPDATE or ALG:UPDATE:CHANNEL commands are sent, the VT1415A switches a pointer to the space containing the new array values. This is how even large arrays can be “updated” as if they were a single update request. If the array is again updated, the new values are loaded into the original space and the pointer is again switched. · <progname> is not case sensitive. However, <array_name> is case sensitive. · Related Commands: ALG:DEFINE, ALG:ARRAY? · *RST Condition: No algorithms or variables are defined. Usage send array values to my_array in ALG4 ALG:ARR ‘ALG4’,’my_array’,<block_array_data> send array values to the global array glob_array ALG:ARR ‘GLOBALS’,’glob_array’,<block_array_data> ALG:UPD force update of variables 162 VT1415A Command Reference Chapter 6 ALGorithm ALGorithm[:EXPLicit]:ARRay? ALGorithm[:EXPLicit]:ARRay? <alg_name>,<array_name> returns the contents of <array_name> from algorithm <alg_name>. ALG:ARR? can return contents of global arrays when <alg_name> specifies ‘GLOBALS.’ Parameters Comments Parameter Name Parameter Type Range of Values Default Units alg_name string ALG1 - ALG32 | GLOBALS none array_name string Valid ‘C’ variable name. none · An error is generated if <alg_name> or <array_name> is not defined. · Returned Value: Definite length block data of IEEE-754 64-bit float. ALGorithm[:EXPLicit]:DEFine ALGorithm[:EXPLicit]:DEFine ‘<alg_name>’,[<swap_size>,] ‘<source_code>’ is used to define control algorithms and global variables. Parameters Comments Parameter Name Parameter Type Range of Values Default Units alg_name string ALG1 - ALG32 | GLOBALS none swap_size numeric (uint16) 0 - Max Available Algorithm Memory words source_code string or block data see Comments PIDA... | PIDB... | algorithm source none · The <alg_name> must be one of ALG1, ALG2, ALG3, etc. through ALG32 or GLOBALS. The parameter is not case sensitive. ‘ALG1’ and ‘alg1’ are equivalent as are ‘GLOBALS’ and ‘globals.’ · The <swap_size> parameter is optional. Include this parameter with the first definition of <alg_name> to make it possible to change <alg_name> later while it is running. The value can range up to about 23k words (ALG:DEF will then allocate 46k words as it creates two spaces for this algorithm). – If included, <swap_size> specifies the number of words of memory to allocate for the algorithm specified by <alg_name>. The VT1415A will then allocate this much memory again, as an update buffer for this algorithm. Note that this doubles the amount of memory space requested. Think of this as “space1” and “space2” for algorithm <alg_name>. When a replacement algorithm is sent later (must be sent without the <swap_size> parameter), it will be placed in “space2.” An ALG:UPDATE command must be sent for execution to switch Chapter 6 VT1415A Command Reference 163 ALGorithm from the original to the replacement algorithm. If the algorithm for <alg_name> is again changed, it will be executed from “space1” and so on. Note that <swap_size> must be large enough to contain the original executable code derived from <source_code> and any subsequent replacement for it or an error 3085 “Algorithm too big” will be generated. – If <swap_size> is not included, the VT1415A will allocate just enough memory for algorithm <alg_name>. Since there is no swapping buffer allocated, this algorithm cannot be changed until a *RST command is sent to clear all algorithms. See “When Accepted and Usage.” · The <source_code> parameter contents can be: – When <alg_name> is ‘ALG1’ through ‘ALG32’: ‘PIDA(<inp_channel>,<outp_channel>)’ or ‘PIDB(<inp_channel>,<outp_channel>,<alarm_channel>)’ < _channel> parameters can specify actual input and output channels or they can specify global variables. This can be useful for inter-algorithm communication. Any global variable name used in this manner must have already been defined before this algorithm. ALG:DEF ‘ALG3’,’PIDB(I100,O124,O132.B2)’ Algorithm Language source code representing a custom algorithm. ALG:DEF ‘ALG5’,’if( First_loop ) O116=0; O116=O116+0.01;, – When <alg_name> is ‘GLOBALS’, Algorithm Language variable declarations. A variable name must not be the same as an already define user function. ALG:DEF ‘GLOBALS’,’static float my_glob_scalar, my_glob_array[24];’ The Algorithm Language source code is translated by the VT1415A’s driver into an executable form and sent to the module. For ‘PIDA’ and ‘PIDB’ the driver sends the stored executable form of these PID algorithms. · The <source_code> parameter can be one of three different SCPI types: – Quoted String: For short segments (single lines) of code, enclose the code string within single (apostrophes) or double quotes. Because of string length limitations within SCPI and some programming platforms, it is recommended that the quoted string length not exceed a single program line. Examples: ALG:DEF ‘ALG1’,’O108=I100;’ or ALG:DEF ‘ALG3’,’PIDA(I100,O124)’ – Definite Length Block Program Data: for longer code segments (like complete custom algorithms) this parameter works well because it specifies the exact length of the data block that will be transferred. The syntax for this parameter type is: #<non-zero digit><digit(s)><data byte(s)> 164 VT1415A Command Reference Chapter 6 ALGorithm Where the value of <non-zero digit> is 1-9 and represents the number of <digit(s)>. The value of <digit(s)> taken as a decimal integer indicates the number of <data byte(s)> in the block. Example from “Quoted String” above: ALG:DEF ‘ALG1’,#211O108=I100;Ø NOTE (where “Ø” is a null byte) For Block Program Data, the Algorithm Parser requires that the <source_code> data end with a null (0) byte. The null byte must be appended to the end of the block’s <data byte(s)> and account for it in the byte count <digit(s)> from above. If the null byte is not included or <digit(s)> doesn’t include it, the error “Algorithm Block must contain termination ‘\0’” will be generated. – Indefinite Length Block Program Data: this form terminates the data transfer when it receives an End Identifier with the last data byte. Use this form only when it is certain that the controller platform will include the End Identifier. If it is not included, the ALG:DEF command will “swallow” whatever data follows the algorithm code. The syntax for this parameter type is: #0<data byte(s)><null byte with End Identifier> Example from “Quoted String” above: ALG:DEF ‘ALG1’,#0O108=I100;Ø NOTE (where “Ø” is a null byte) For Block Program Data, the Algorithm Parser requires that the <source_code> data end with a null (0) byte. The null byte must be appended to the end of the block’s <data byte(s)>. The null byte is sent with the End Identifier. If the null byte is not included, the error “Algorithm Block must contain termination ‘\0’” will be generated. When accepted If <alg_name> is not enabled to swap (not originally defined with the <swap_size> and Usage parameter included) then both of the following conditions must be true: a. Module is in Trigger Idle State (after *RST or ABORT and before INIT). OK *RST ALG:DEF ‘GLOBALS’,’static float My_global;’ ALG:DEF ‘ALG2’,’PIDA(I100,O108)’ ALG:DEF ‘ALG3’,’My_global = My_global + 1;’ Error INIT ALG:DEF ‘ALG5’,’PIDB(I101,O109,O124.B0)’ “Can’t define new algorithm while running” Chapter 6 VT1415A Command Reference 165 ALGorithm b. The <alg_name> has not already been defined since a *RST command. Here, <alg_name> specifies either an algorithm name or ‘GLOBALS.’ OK *RST ALG:DEF ‘GLOBALS’,’static float My_global;’ Error *RST ALG:DEF ‘GLOBALS’,’static float My_global;’ “No error” ALG:DEF ‘GLOBALS’,’static float A_different_global’ “Algorithm already defined” Because ‘GLOBALS’ already defined Error *RST ALG:DEF ‘ALG3’,’PIDA(I100,O108)’ “No error” ALG:DEF ‘ALG3’,’PIDB(I100,O108,O124.B0)’ “Algorithm already defined” Because ‘ALG3’ already defined If <alg_name> has been enabled to swap (originally defined with the <swap_size> parameter included) then the <alg_name> can be re-defined (do not include <swap_size> now) either while the module is in the Trigger Idle State or while in Waiting For Trigger State (INITed). Here, <alg_name> is an algorithm name only, not ‘GLOBALS.’ OK *RST ALG:DEF ‘ALG3’,200,’if(O108<15.0) O108=O108 + 0.1; else O108 = -15.0;’ INIT starts algorithm ALG:DEF ‘ALG3’,’if(O108<12.0) O108=O108 + 0.2; else O108 = -12.0;’ ALG:UPDATE Required to cause new code to run “No error” Error *RST ALG:DEF ‘ALG3’,200,’if(O108<15.0) O108=O108 + 0.1; else O108 = -15.0;’ INIT starts algorithm ALG:DEF ‘ALG3’,200,’if(O108<12.0) O108=O108 + 0.2; else O108 = -12.0;’ “Algorithm swapping already enabled; Can’t change size” Because <swap_size> included at re-definition NOTES 166 1. Channels referenced by algorithms when they are defined are only placed in the channel list before INIT. The list cannot be changed after INIT. If an algorithm is re-defined (by swapping) after INIT and it references channels not already in the channel list, it will not be able to access the newly referenced channels. No error message will be generated. To make sure all required channels will be VT1415A Command Reference Chapter 6 ALGorithm included in the channel list, define <alg_name> and re-define all algorithms that will replace <alg_name> by swapping them before sending INIT. This insures that all channels referenced in these algorithms will be available after INIT. 2. If an algorithm is re-defined (by swapping) after INIT and it declares an existing variable, the declaration-initialization statement (e.g. static float my_var = 3.5) will not change the current value of that variable. 3. The driver only calculates overall execution time for algorithms defined before INIT. This calculation is used to set the default output delay (same as executing ALG:OUTP:DELAY AUTO). If an algorithm is swapped after INIT that takes longer to execute than the original, the output delay will behave as if set by ALG:OUTP:DEL 0, rather than AUTO (see ALG:OUTP:DEL command). Use the same procedure from note 1 to make sure the longest algorithm execution time is used to set ALG:OUTP:DEL AUTO before INIT. ALGorithm[:EXPLicit]:SCALar ALGorithm[:EXPLicit]:SCALar <alg_name>,<var_name>,<value> sets the value of the scalar variable <var_name> for algorithm <alg_name> into the Update Queue. This update is then pending until ALG:UPD is sent or an update event (as set by ALG:UPD:CHANNEL) occurs. NOTE ALG:SCALAR places a variable update request in the Update Queue. Do not place more update requests in the Update Queue than are allowed by the current setting of ALG:UPD:WINDOW or a “Too many updates — send ALG:UPDATE command” error message will be generated. Parameters Comments Parameter Name Parameter Type Range of Values Default Units alg_name string ALG1 - ALG32 or GLOBALS none var_name string Valid ‘C’ variable name. none value numeric (float32) IEEE-754 32-bit floating point number none · To send values to a global scalar variable, set the <alg_name> parameter to ‘GLOBALS.’ To define a scalar global variable, see the ALGorithm:DEFine command. · An error is generated if <alg_name> or <var_name> is not defined. · Related Commands: ALG:DEFINE, ALG:SCAL? · *RST Condition: No algorithms or variables are defined. Chapter 6 VT1415A Command Reference 167 ALGorithm Usage ALG:SCAL ‘ALG1’,’my_var’,1.2345 ALG:SCAL ‘ALG1’,’another’,5.4321 ALG:SCAL ‘ALG3’,’my_global_var’,1.001 ALG:UPD 1.2345 to variable my_var in ALG1 5.4321 to variable another also in ALG1 1.001 to global variable update variables from update queue ALGorithm[:EXPLicit]:SCALar? ALGorithm[:EXPLicit]:SCALar? <alg_name>,<var_name> returns the value of the scalar variable <var_name> in algorithm <alg_name>. Parameters Comments Parameter Name Parameter Type Range of Values Default Units alg_name string ALG1 - ALG32 none var_name string Valid ‘C’ variable name. none · An error is generated if <alg_name> or <var_name> is not defined. · Returned Value: numeric value. The type is float32. ALGorithm[:EXPLicit]:SCAN:RATio ALGorithm[:EXPLicit]:SCAN:RATio <alg_name>,<num_trigs> specifies the number of scan triggers that must occur for each execution of algorithm <alg_name>. This allows the specified algorithm to be executed less often than other algorithms. This can be useful for algorithm tuning. NOTES 1. The command ALG:SCAN:RATio <alg_name>,<num_trigs> does not take effect until an ALG:UPDATE or ALG:UPD:CHAN command is received. This allows multiple ALG:SCAN:RATIO commands to be sent with their effect synchronized with ALG:UPDATE. 2. ALG:SCAN:RATio places a variable update request in the Update Queue. Do not place more update requests in the Update Queue than are allowed by the current setting of ALG:UPD:WINDOW or a “Too many updates — send ALG:UPDATE command” error message will be generated. Parameters Parameter Name 168 Parameter Type Range of Values Default Units alg_name string ALG1 - ALG32 none num_trigs numeric (int16) 1 to 32,767 none VT1415A Command Reference Chapter 6 ALGorithm Comments Specifying a value of 1 (the default) causes the named algorithm to be executed each time a trigger is received. Specifying a value of n will cause the algorithm to be executed once every n triggers. All enabled algorithms execute on the first trigger after INIT. · The algorithm specified by <alg_name> may or may not be currently defined. The specified setting will be used when the algorithm is defined. · Related Commands: ALG:UPDATE, ALG:SCAN:RATIO? · When Accepted: Both before and after INIT. Also accepted before and after the algorithm referenced is defined. · *RST Condition: ALG:SCAN:RATIO = 1 for all algorithms Usage ALG:SCAN:RATIO ‘ALG4’,16 ALG4 executes once every 16 triggers. ALGorithm[:EXPLicit]:SCAN:RATio? ALGorithm[:EXPLicit]:SCAN:RATio? <alg_name> returns the number of triggers that must occur for each execution of <alg_name>. Comments · Since ALG:SCAN:RATIO is valid for an undefined algorithm, ALG:SCAN:RATIO? will return the current ratio setting for <alg_name> even if it is not currently defined. · Returned Value: numeric, 1 to 32,768. The type is int16. ALGorithm[:EXPLicit]:SIZe? ALGorithm[:EXPLicit]:SIZe? <alg_name> returns the number of words of memory allocated for algorithm <alg_name>. Parameters Comments Parameter Name Parameter Type Range of Values Default Units alg_name string ALG1 - ALG32 none · Since the returned value is the memory allocated to the algorithm, it will only equal the actual size of the algorithm if it was defined by ALG:DEF without its [<swap_size>] parameter. If enabled for swapping (if <swap_size> included at original definition), the returned value will be equal to (<swap_size>)*2. NOTE Chapter 6 If <alg_name> specifies an undefined algorithm, ALG:SIZ? returns 0. This can be used to determine whether algorithm <alg_name> is defined. VT1415A Command Reference 169 ALGorithm · Returned Value: numeric value up to the maximum available algorithm memory (this approximately 46k words). The type is int32. · *RST Condition: returned value is 0. ALGorithm[:EXPLicit][:STATe] ALGorithm[:EXPLicit][:STATe] <alg_name>,<enable> specifies that algorithm <alg_name>, when defined, should be executed (ON) or not executed (OFF) during run-time. NOTES 1. The command ALG:STATE <alg_name>, ON | OFF does not take effect until an ALG:UPDATE or ALG:UPD:CHAN command is received. This allows multiple ALG:STATE commands to be sent with a synchronized effect. 2. ALG:STATE places a variable update request in the Update Queue. Do not place more update requests in the Update Queue than are allowed by the current setting of ALG:UPD:WINDOW or a “Too many updates — send ALG:UPDATE command” error message will be generated. CAUTION! When ALG:STATE OFF disables an algorithm, its control output is left at the last value set by the algorithm. Depending on the process, this uncontrolled situation can be dangerous. Make certain that the process is in a safe state before halting the execution of a controlling algorithm. The Agilent/HP E1535 Watchdog Timer SCP was specifically developed to automatically signal that an algorithm has stopped controlling a process. Use of the Watchdog Timer is recommended for critical processes. Parameters Comments Parameter Name Parameter Type Range of Values Default Units alg_name string ALG1 - ALG32 none enable boolean (uint16) 0 | 1 | ON | OFF none · The algorithm specified by <alg_name> may or may not be currently defined. The setting specified will be used when the algorithm is defined. · *RST Condition: ALG:STATE ON · When Accepted: Both before and after INIT. Also accepted before and after the algorithm referenced is defined. · Related Commands: ALG:UPDATE, ALG:STATE?, ALG:DEFINE 170 VT1415A Command Reference Chapter 6 ALGorithm Usage ALG:STATE ‘ALG2’,OFF disable ALG2 ALGorithm[:EXPLicit][:STATe]? ALGorithm[:EXPLicit][:STATe]? <alg_name> returns the state (enabled or disabled) of algorithm <alg_name>. Parameters Comments Parameter Name Parameter Type Range of Values Default Units alg_name string ALG1 - ALG32 none · Since ALG:STATE is valid for an undefined algorithm, ALG:STATE? will return the current state for <alg_name> even if it is not currently defined. · Returned Value: Numeric, 0 or 1. Type is uint16. · *RST Condition: ALG:STATE 1 ALGorithm[:EXPLicit]:TIMe? ALGorithm[:EXPLicit]:TIMe? <alg_name> computes and returns a worst-case execution time estimate in seconds. Parameters Comments Parameter Name Parameter Type Range of Values Default Units alg_name string ALG1 - ALG32 or MAIN none · When <alg_name> is ALG1 through ALG32, ALG:TIME? returns only the time required to execute the algorithm’s code. · When <alg_name> is ‘MAIN’, ALG:TIME? returns the worst-case execution time for an entire measurement & control cycle (sum of MAIN, all enabled algorithms, analog and digital inputs, and control outputs). · If triggered more rapidly than the value returned by ALG:TIM? ‘MAIN’, the VT1415A will generate a “Trigger too fast” error. NOTE If <alg_name> specifies an undefined algorithm, ALG:TIM? returns 0. This can be used to determine whether algorithm <alg_name> is defined. · When Accepted: Before INIT only. · Returned Value: numeric value. The type is float32 Chapter 6 VT1415A Command Reference 171 ALGorithm ALGorithm:FUNCtion:DEFine ALGorithm:FUNCtion:DEFine <function_name>,<range>,<offset>, <func_data> defines a custom function that can be called from within a custom algorithm. See Appendix F, “Generating User Defined Functions,” for full information. Parameters Comments Parameter Name Parameter Type Range of Values Default Units function_name string Valid ‘C’ identifier. (If not already defined in ‘GLOBALS’) none range numeric (float32) See comments. none offset numeric (float32) See comments. none func_data 512 element array of uint16 See comments. none · By providing this custom function capability, the VT1415A’s algorithm language can be kept simple in terms of mathematical capability. This increases speed. Rather than having to calculate high-order polynomial approximations of non-linear functions, this custom function scheme loads a pre-computed look-up table of values into memory. This method allows computing virtually any transcendental or non-linear function in only 17 µs. Resolution is 16 bits. · The <function_name> parameter is a global identifier and cannot be the same as a previously define global variable. A user function is globally available to all defined algorithms. · Values for <range>, <offset>, and <func_data> are generated by a program supplied with the VT1415A. It is provided in C-SCPI and Agilent BASIC forms. See Appendix F, “Generating User Defined Functions,” for full information. · The <range> and <offset> parameters define the allowable input values to the function (domain). If values input to the function are equal to or outside of (±<range>+<offset>), the function may return ±INF in IEEE-754 format. For example, <range> = 8 (-8 to 8), <offset> = 12. The allowable input values must be greater than 4 and less than 20. · The <func_data> parameter is a 512 element array of type uint16. · The algorithm syntax for calling is: <function_name> ( <expression> ). for example: O116 = squareroot( 2 * Input_val ); · Functions must be defined before defining algorithms that reference them. · When Accepted: Before INIT only. Usage ALG:FUNC:DEF ‘F1’,8,12,<block_data> 172 VT1415A Command Reference send range, offset and table values for function F1 Chapter 6 ALGorithm ALGorithm:OUTPut:DELay ALGorithm:OUTPut:DELay <delay> sets the delay from Scan Trigger to start of output phase. Parameters Comments Parameter Name Parameter Type Range of Values Default Units delay numeric (float32) 0 - 0.081 | AUTO (2.5 µs resolution) seconds · The algorithm output statements (e.g. O115 = Out_val) DO NOT program outputs when they are executed. Instead, these statements write to an intermediate Output Channel Buffer which is read and used for output AFTER all algorithms have executed AND the algorithm output delay has expired (see Figure 6-1). Also, note that not all outputs will occur at the same time but will take approximately 10 µs per channel to write. · When <delay> is 0, the Output phase begins immediately after the Calculate phase. This provides the fastest possible execution speed while potentially introducing variations in the time between trigger and beginning of the Output phase. The variation can be caused by conditional execution constructs in algorithms or other execution time variations. · If <delay> is set to less than the time required for the Input + Update + Calculate, ALG:OUTP:DELAY? will report the time set, but the effect will revert to the same that is set by ALG:OUTP:DELAY 0 (Output begins immediately after Calculate). · When <delay> is AUTO, the delay is set to the worst-case time required to execute phases 1 through 3. This provides the fastest execution speed while maintaining a fixed time between trigger and the OUTPUT phase. · To set the time from trigger to the beginning of OUTPUT, use the following procedure. After defining all algorithms, execute: ALG:OUTP:DEL AUTO ALG:OUTP:DEL? ALG:OUTP:DEL <minimum+additional> sets minimum stable delay returns this minimum delay additional = desired - minimum Note that the delay value returned by ALG:OUTP:DEL? is valid only until another algorithm is loaded. After that, re-issue the ALG:OUTP:DEL AUTO and ALG:OUTP:DEL? commands to determine the new delay that includes the added algorithm. · When Accepted: Before INIT only. · *RST Condition: ALG:OUTP:DELAY AUTO Chapter 6 VT1415A Command Reference 173 ALGorithm ALGorithm:OUTPut:DELay? ALGorithm:OUTPut:DELay? returns the delay setting from ALG:OUTP:DEL. Comments · The value returned will be either the value set by ALG:OUTP:DEL <delay> or the value determined by ALG:OUTP:DEL AUTO. · When Accepted: Before INIT only. · *RST Condition: ALG:OUTP:DEL AUTO, returns delay setting determined by AUTO mode. · Returned Value: number of seconds of delay. The type is float32. ALGorithm:UPDate[:IMMediate] ALGorithm:UPDate[:IMMediate] requests an immediate update of any scalar, array, algorithm code, ALG:STATE, or ALG:SCAN:RATIO changes that are pending. Comments · Variables and algorithms can be accepted during Phase 1-INPUT or Phase 2-UPDATE in Figure 6-1 when INIT is active. All writes to variables and algorithms occur to their buffered elements upon receipt. However, these changes do not take effect until the ALG:UPD:IMM command is processed at the beginning of the UPDATE phase. The update command can be received at any time prior to the UPDATE phase and will be the last command accepted. Note that the ALG:UPD:WINDow command specifies the maximum number of updates to do. If no update command is pending when entering the UPDATE phase, then this time is dedicated to receiving more changes from the system. · As soon as the ALG:UPD:IMM command is received, no further changes are accepted until all updates are complete. A query of an algorithm value following an UPDate command will not be executed until the UPDate completes; this may be a useful synchronizing method. 4 OUTPUT 1 INPUT (output table sent to SCP channels) (from SCP channels, analog & digital) 2 UPDATE 3 CALCULATE (variables & algorithms) (execute all enabled algorithms) 4 OUTPUT ••• 1 INPUT (output table sent to SCP channels) (from SCP channels, analog & digital) Set by ALG:OUTPut:DELay (if any) Scan Trigger Scan Trigger Figure 6-1: Updating Variables and Algorithms 174 VT1415A Command Reference Chapter 6 ALGorithm · When Accepted: Before or after INIT. · Related Commands: ALG:UPDATE:WINDOW, ALG:SCALAR, ALG:ARRAY, ALG:STATE, and ALG:SCAN:RATIO, ALG:DEF (with swapping enabled) Command Sequence The following example shows three scalars being written with the associated update command following. See ALG:UPD:WINDOW. ALG:SCAL ALG1’,’Setpoint’,25 ALG:SCAL ‘ALG1’,’P_factor’,1.3 ALG:SCAL ‘ALG2’,’P_factor’,1.7 ALG:UPD ALG:SCAL? ‘ALG2’,’Setpoint’ ALGorithm:UPDate:CHANnel ALGorithm:UPDate:CHANnel <dig_chan> This command is used to update variables, algorithms, ALG:SCAN:RATIO, and ALG:STATE changes when the specified digital input level changes state. When the ALG:UPD:CHAN command is executed, the current state of the digital input specified is saved. The update will be performed at the next update phase (UPDATE in Figure 6-1), following the channel’s change of digital state. This command allows multiple VT1415As to be synchronized so that all variable updates can be processed simultaneously. Parameters Comments Parameter Name Parameter Type Range of Values Default Units dig_chan Algorithm Language channel specifier (string) Input channel for VT1533A: Iccc.Bb for VT1534A: Iccc. Where ccc=normal channel number and b=bit number (include “.B”). none · The duration of the level change to the designated bit or channel MUST be at least the length of time between scan triggers. Variable and algorithm changes can be accepted during the INPUT or UPDATE phases (Figure 6-1) when INIT is active. All writes to variables and algorithms occur to their buffered elements upon receipt. However, these changes do not take effect until the ALG:UPD:CHAN command is processed at the beginning of the UPDATE phase. Note that the ALG:UPD:WINDow command specifies the maximum number of updates to do. If no update command is pending when entering the UPDATE phase, then this time is dedicated to receiving more changes from the system. NOTE Chapter 6 As soon as the ALG:UPD:CHAN command is received, the VT1415A begins to closely monitor the state of the update channel and can not execute other commands until the update channel changes state to complete the update VT1415A Command Reference 175 ALGorithm · Note that an update command issued after the start of the UPDATE phase will be buffered but not executed until the beginning of the next INPUT phase. At that time, the current stored state of the specified digital channel is saved and used as the basis for comparison for state change. If at the beginning of the scan trigger the digital input state had changed, then at the beginning of the UPDATE phase the update command would detect a change from the previous scan trigger and the update process would begin. · When Accepted: Before and After INIT. Command Sequence The following example shows three scalars being written with the associated update command following. When the ALG:UPD:CHAN command is received, it will read the current state of channel 108, bit 0. At the beginning of the UPDATE phase, a check will be made to determine if the stored state of channel 108 bit 0 is different from the current state. If so, the update of all three scalars take effect next Phase 2. INIT ALG:SCAL ‘ALG1’,’Setpoint’,25 ALG:SCAL ‘ALG1’,’P_factor’,1.3 ALG:SCAL ‘ALG2’,’P_factor’,1.7 ALG:UPD:CHAN ‘I108.B0’ update on state change at bit zero of 8-bit channel 8 ALGorithm:UPDate:WINDow ALGorithm:UPDate:WINDow <num_updates> specifies how many updates may need to be performed during phase 2 (UPDATE). The DSP will process this command and assign a constant window of time for UPDATE. Parameters Comments Parameter Name Parameter Type Range of Values Default Units num_updates numeric (int16) 1 - 512 none · The default value for <num_updates> is 20. If it is known that fewer updates are needed, specifying a smaller number will result in slightly faster loop execution speeds. · This command creates a time interval in which to perform all pending algorithm and variable updates. To keep the loop times predictable and stable, the time interval for UPDATE is constant. That is, it exists for all active algorithms each time they are executed whether or not an update is pending. · *RST Condition: ALG:UPD:WIND 20 · When Accepted: Before INIT only. Usage It is decided that a maximum of eight variables updates will be needed during run-time. ALG:UPD:WIND 8 176 VT1415A Command Reference Chapter 6 ALGorithm NOTES 1. When the number of update requests exceeds the Update Queue size set with ALG:UPD:WINDOW by one, the module will refuse the request and will issue the error message “Too many updates in queue. Must send UPDATE command.” Send ALG:UPDATE, then re-send the update request that caused the error. 2. The “Too many updates in queue…” error can occur before the module is INITialized. It’s not uncommon with several algorithms defined to have more variables that need to be pre-set before INIT than will be changed in one update after the algorithms are running. INIT can be sent with updates pending. The INIT command automatically performs the updates before starting the algorithms. ALGOrithm:UPDate:WINDow? ALGOrithm:UPDate:WINDow? returns the number of variable and algorithm updates allowed within the UPDATE window. · Returned Value: number of updates in the UPDATEwindow. The type is int16. Chapter 6 VT1415A Command Reference 177 ARM ARM With the VT1415A, when the TRIG:SOURCE is set to TIMer, an ARM event must occur to start the timer. This can be something as simple as executing the ARM[:IMMediate] command or it could be another event selected by ARM:SOURCE. NOTE The ARM subsystem may only be used when the TRIGger:SOURce is TIMer. If the TRIGger:SOURce is not TIMer and ARM:SOURce is set to anything other than IMMediate, an Error -221,"Settings conflict" will be generated. The ARM command subsystem provides: · An immediate software ARM (ARM:IMM). · Selection of the ARM source (ARM:SOUR BUS | EXT | HOLD | IMM | SCP | TTLTRG<n>) when TRIG:SOUR is TIMer. Figure 6-2 shows the overall logical model of the Trigger System. ARM:SOURce <source> ARM Source Selector TRIGger:TIMer <interval> Trigger Timer TRIGger:SOURce <source> TIMer BUS Trigger Source Selector ARM/TRIGger Sources EXTernal HOLD IMMediate TTLTrg<n> SCP Trig Trigger Enable Internal Trigger Signal Trigger Counter TRIGger:COUNt <count> Figure 6-2: Logical Trigger Model 178 VT1415A Command Reference Chapter 6 ARM Subsystem Syntax ARM [:IMMediate] :SOURce BUS | EXTernal | HOLD | IMMediate | SCP | TTLTrg<n> :SOURce? ARM[:IMMediate] ARM[:IMMediate] arms the trigger system when the module is set to the ARM:SOUR BUS or ARM:SOUR HOLD mode. Comments · Related Commands: ARM:SOURCE, TRIG:SOUR · *RST Condition: ARM:SOUR IMM Usage ARM:IMM After INIT, system is ready for trigger event ARM Same as above (:IMM is optional) ARM:SOURce ARM:SOURce <arm_source> configures the ARM system to respond to the specified source. Parameters Comments Parameter Name Parameter Type Range of Values Default Units arm_source discrete (string) BUS | EXT | HOLD | IMM | SCP | TTLTrg<n> none · The following table explains the possible choices. Parameter Value Source of Arm BUS ARM[:IMMediate] EXTernal “TRG” signal on terminal module HOLD ARM[:IMMediate] IMMediate The arm signal is always true (continuous arming) SCP SCP Trigger Bus (future SCP Breadboard) TTLTrg<n> The VXIbus TTLTRG lines (n=0 through 7) · See note about ARM subsystem on page 178. · When TRIG:SOURCE is TIMER, an ARM event is required only to trigger the first scan. After that the timer continues to run and the module goes to the "Waiting For Trigger" state ready for the next Timer trigger. An ABORT command will return the module to the "Trigger Idle" state after the current scan is completed. See TRIG:SOURce for more detail. While ARM:SOUR is IMM, simply INITiate the trigger system to start a measurement scan. Chapter 6 VT1415A Command Reference 179 · When Accepted: Before INIT only. · Related Commands: ARM:IMM, ARM:SOURCE?, INIT[:IMM], TRIG:SOUR · *RST Condition: ARM:SOUR IMM Usage ARM:SOUR BUS ARM:SOUR TTLTRG3 Arm with ARM command Arm with VXIbus TTLTRG3 line ARM:SOURce? ARM:SOURce? returns the current arm source configuration. See the ARM:SOUR command for more response data information. · Returned Value: Discrete, one of BUS, HOLD, IMM, SCP, or TTLT0 through TTLT7. The C-SCPI type is string. Usage ARM:SOUR? 180 VT1415A Command Reference An enter statement return arm source configuration Chapter 6 CALibration CALibration The Calibration subsystem provides for two major categories of calibration: 1. “A/D Calibration”: In these procedures, an external multimeter is used to calibrate the A/D gain on all 5 of its ranges. The multimeter also determines the value of the VT1415A’s internal calibration resistor. The values generated from this calibration are then stored in nonvolatile memory and become the basis for “Working Calibrations. These procedures each require a sequence of several commands from the CALibration subsystem (CAL:CONFIG…, CAL:VALUE:… and CAL:STORE ADC). Always execute *CAL? or a CAL:TARE operation after A/D Calibration. 2. “Working Calibration”: This category consists of three levels (see Figure 6-3): – “A/D Zero”: This function quickly compensates for any short term A/D converter offset drift. This would be called the auto-zero function in a conventional voltmeter. In the VT1415A where channel scanning speed is of primary importance, this function is performed only when the CAL:ZERO? command is executed. Execute CAL:ZERO? as often as the control setup will allow. – “Channel Calibration”: This function corrects for offset and gain errors for each module channel. The internal current sources are also calibrated. This calibration function corrects for thermal offsets and component drift for each channel out to the input side of the Signal Conditioning Plug-On (SCP). All calibration sources are on-board and this function is invoked using either the *CAL? or CAL:SETup command. – “Channel Tare”: This function (CAL:TARE) corrects for voltage offsets in external system wiring. Here, the user places a short across transducer wiring and the voltage that the module measures is now considered the new “zero” value for that channel. The new offset value can be stored in non-volatile calibration memory (CAL:STORE TARE) but is in effect whether stored or not. System offset constants which are considered long-term should be stored. Offset constants which are measured relatively often would not require non-volatile storage. CAL:TARE automatically executes a *CAL?. Chapter 6 VT1415A Command Reference 181 CALibration SCP SCP Multiplexer SCP CAL:TARE SCP SCP SCP CAL:ZERO? SCP SCP 8 8 8 8 8 8 8 User’s System Wiring *CAL? or CAL:SETup 8 Figure 6-3: Levels of Working Calibration Subsystem Syntax CALibration :CONFigure :RESistance :VOLTage <range>, ZERO | FS :SETup :SETup? :STORe ADC | TARE :TARE (@<ch_list>) :RESet :TARE? :VALue :RESistance <ref_ohms> :VOLTage <ref_volts> :ZERO? CALibration:CONFigure:RESistance CALibration:CONFigure:RESistance connects the on-board reference resistor to the Calibration Bus. A four-wire measurement of the resistor can be made with an external multimeter connected to the H Cal, L Cal, H ohm, and L ohm terminals on the Terminal Module or the V H, V L, W H, and W L terminals on the Cal Bus connector. Comments · Related Commands: CAL:VAL:RES, CAL:STOR ADC · When Accepted: Not while INITiated 182 VT1415A Command Reference Chapter 6 Command Sequence CAL:CONF:RES *OPC? or SYST:ERR? (now measure ref resistor with external DMM) CAL:VAL:RES <measured value> CAL:STORE ADC Connect reference resistor to Calibration Bus must wait for CAL:CONF:RES to complete Send measured value to module Store cal constants in non-volatile memory (used only at end of complete cal sequence) CALibration:CONFigure:VOLTage CALibration:CONFigure:VOLTage <range>,<zero_fs> connects the on-board voltage reference to the Calibration Bus. A measurement of the source voltage can be made with an external multimeter connected to the H Cal and L Cal terminals on the Terminal Module or the V H and V L terminals on the Cal Bus connector. The <range> parameter controls the voltage level available when the <zero_fs> parameter is set to FSCale (full scale). Parameters Comments Parameter Name Parameter Type Range of Values Default Units range numeric (float32) See comments. volts zero_fs discrete (string) ZERO | FSCale none · The <range> parameter must be within ±5% of one of the five following values: 0.0625 V dc, 0.25 V dc, 1 V dc, 4 V dc, 16 V dc <range> may be specified in millivolts (mv). · The FSCALE output voltage of the calibration source will be greater than 90% of the nominal value for each range, except the 16 V range where the output is 10 V. · When Accepted: Not while INITiated · Related Commands: CAL:VAL:VOLT, STOR ADC Command Sequence CAL:CONF:VOLTAGE .0625, ZERO *OPC? or SYST:ERR? connect voltage reference to Calibration Bus must wait for CAL:CONF:VOLT to complete (now measure voltage with external DMM) CAL:VAL:VOLT <measured value> Send measured value to module repeat above sequence for full-scale repeat zero and full-scale for remaining ranges (0.25, 1, 4, 16) CAL:STORE ADC Store cal constants in non-volatile memory (used only at end of complete cal sequence) Chapter 6 VT1415A Command Reference 183 CALibration CALibration:SETup CALibration:SETup causes the Channel Calibration function to be performed for every module channel with an analog SCP installed (input or output). The Channel Calibration function calibrates the A/D Offset and the Gain/Offset for these analog channels. This calibration is accomplished using internal calibration references. For more information see *CAL? on page 276. Comments · CAL:SET performs the same operation as the *CAL? command except that, since it is not a query command, it doesn’t tie-up the C-SCPI driver waiting for response data from the instrument. If there are multiple VT1415As in a system, start a CAL:SET operation on each and then execute a CAL:SET? command to complete the operation on each instrument. · Related Commands: CAL:SETup?, *CAL? · When Accepted: Not while INITiated Usage CAL:SET start SCP Calibration on 1st VT1415A : CAL:SET CAL:SET? : CAL:SET? start SCP Calibration on more VT1415As start SCP Calibration on last VT1415A query for results from 1st VT1415A query for results from more VT1415As query for results from last VT1415A CALibration:SETup? CALibration:SETup? Returns a value to indicate the success of the last CAL:SETup or *CAL? operation. CAL:SETup? returns the value only after the CAL:SETup operation is complete. Comments · Returned Value: Value Meaning Further Action 0 Cal OK None -1 Cal Error Query the Error Queue (SYST:ERR?) See Error Messages in Appendix B. Also run *TST? -2 No results available No *CAL? or CAL:SETUP done. The C-SCPI type for this returned value is int16. · Related Commands: CAL:SETup, *CAL? Usage see CAL:SETup 184 VT1415A Command Reference Chapter 6 CALibration CALibration:STORe CALibration:STORe <type> stores the most recently measured calibration constants into Flash Memory (Electrically Erasable Programmable Read Only Memory). When <type> = ADC, the module stores its A/D calibration constants as well as constants generated from *CAL?/CAL:SETup into Flash Memory. When <type> = TARE, the module stores the most recently measured CAL:TARE channel offsets into Flash Memory. NOTE The VT1415A’s Flash Memory has a finite lifetime of approximately ten thousand write cycles (unlimited read cycles). While executing CAL:STOR once every day would not exceed the lifetime of the Flash Memory for approximately 27 years, an application that stored constants many times each day would unnecessarily shorten the Flash Memory’s lifetime. See Comments below. Parameters Comments Parameter Name Parameter Type Range of Values Default Units type discrete (string) ADC | TARE none · The Flash Memory Protect jumper (JM2201) must be set to the enable position before executing this command (see Chapter 1). · Channel offsets are compensated by the CAL:TARE command even when not stored in the Flash Memory. There is no need to use the CAL:STORE TARE command for channels which are re-calibrated frequently. · When Accepted: Not while INITiated. · Related Commands: CAL:VAL:RES, CAL:VAL:VOLT. · *RST Condition: Stored calibration constants are unchanged. Usage CAL:STORE ADC CAL:STORE TARE Store cal constants in non-volatile memory after A/D calibration Store channel offsets in non-volatile memory after channel tare Command Sequence Storing A/D cal constants perform complete A/D calibration, then... CAL:STORE ADC Storing channel tare (offset) values CAL:TARE <ch_list> CAL:STORE TARE Chapter 6 To correct channel offsets Optional depending on necessity of long term storage VT1415A Command Reference 185 CALibration CALibration:TARE CALibration:TARE (@<ch_list>) measures offset (or tare) voltage present on the channels specified and stores the value in on-board RAM as a calibration constant for those channels. Future measurements made with these channels will be compensated by the amount of the tare value. Use CAL:TARE to compensate for voltage offsets in system wiring and residual sensor offsets. Where tare values need to be retained for long periods, they can be stored in the module’s Flash Memory (Electrically Erasable Programmable Read Only Memory) by executing the CAL:STORe TARE command. For more information see Compensating for System Offsets on page 102. Note for Thermocouples · Do not use CAL:TARE on field wiring that is made up of thermocouple wire. The voltage a thermocouple wire pair generates cannot be removed by introducing a short anywhere between its junction and its connection to an isothermal panel (either the VT1415A’s Terminal Module or a remote isothermal reference block). Thermal voltage is generated along the entire length of a thermocouple pair where there is any temperature gradient along that length. To CAL:TARE thermocouple wire this way would introduce an unwanted offset in the voltage/temperature relationship for that channel. If a thermocouple wire pair is inadvertently "CAL:TARE'd," use CAL:TARE:RESET to reset all tare constants to zero. · Do use CAL:TARE to compensate wiring offsets (copper wire, not thermocouple wire) between the VT1415A and a remote thermocouple reference block. Disconnect the thermocouples and introduce copper shorting wires between each channel’s HI and LO, then execute CAL:TARE for these channels. Parameters Comments Parameter Name Parameter Type Range of Values Default Units ch_list channel list (string) 100 - 163 none · CAL:TARE also performs the equivalent of a *CAL? operation. This operation uses the Tare constants to set a DAC which will remove each channel offset as “seen” by the module’s A/D converter. As an example, assume that the system wiring to channel 0 generates a +0.1 volt offset with 0 volts (a short) applied at the Unit Under Test (UUT). Before CAL:TARE the module would return a reading of 0.1 volts for channel 0. After CAL:TARE (@100), the module will return a reading of 0 volts with a short applied at the UUT and the system wiring offset will be removed from all measurements of the signal to channel 0. · Set Amplifier/Filter SCP gain before CAL:TARE. For best accuracy, choose the gain that will be used during measurements. If the range or gain setup later is changed later, be sure to perform another *CAL?. 186 VT1415A Command Reference Chapter 6 CALibration · If Open TransducerDetect (OTD) is enabled when CAL:TARE is executed, the module will disable OTD, wait 1 minute to allow channels to settle, perform the calibration, and then re-enable OTD. If a program turns off OTD before executing CAL:TARE, it should also wait 1 minute for settling. · The maximum voltage that CAL:TARE can compensate for is dependent on the range chosen and SCP gain setting. The following table lists these values. Maximum CAL:TARE Offsets A/D range ±V( F.Scale) Offset V Gain x1 Offset V Gain x8 Offset V Gain x16 Offset V Gain x64 16 4 1 0.25 0.0625 3.2213 0.82101 0.23061 0.07581 0.03792 0.40104 0.10101 0.02721 0.00786 0.00312 0.20009 0.05007 0.01317 0.00349 0.00112 0.04970 0.01220 0.00297 0.00055 n/a · Channel offsets are compensated by the CAL:TARE command even when not stored in the Flash Memory. There is no need to use the CAL:STORE TARE command for channels which are re-calibrated frequently. · The VT1415A’s Flash Memory has a finite lifetime of approximately ten thousand write cycles (unlimited read cycles). While executing CAL:STOR once every day would not exceed the lifetime of the Flash Memory for approximately 27 years, an application that stored constants many times each day would unnecessarily shorten the Flash Memory’s lifetime. See Comments below. · Executing CAL:TARE sets the Calibrating bit (bit 0) in Operation Status Group. Executing CAL:TARE? resets the bit. · When Accepted: Not while INITiated · Related Commands: CAL:TARE?, CAL:STOR TARE · *RST Condition: Channel offsets are not affected by *RST. Command Sequence CAL:TARE <ch_list> CAL:TARE? CAL:STORE TARE To correct channel offsets To return the success flag from the CAL:TARE operation Optional depending on necessity of long term storage CALibration:TARE:RESet CALibration:TARE:RESet resets the tare calibration constants to zero for all 64 channels. Executing CAL:TARE:RES affects the tare cal constants in RAM only. To reset the tare cal constants in Flash Memory, execute CAL:TARE:RES and then execute CAL:STORE TARE. Command Sequence CAL:TARE:RESET CAL:STORE TARE Chapter 6 to reset channel offsets Optional if necessary to reset tare cal constants in Flash Memory. VT1415A Command Reference 187 CALibration CALibration:TARE? CALibration:TARE? Returns a value to indicate the success of the last CAL:TARE operation. CAL:TARE? returns the value only after the CAL:TARE operation is complete. · Returned Value: Value Meaning Further Action 0 Cal OK None -1 Cal Error Query the Error Queue (SYST:ERR?) See Error Messages in Appendix B. Also run *TST? -2 No results available Perform CAL:TARE before CAL:TARE? The C-SCPI type for this returned value is int16. · Executing CAL:TARE sets the Calibrating bit (bit 0) in Operation Status Group. Executing CAL:TARE? resets the bit. · Related Commands: CAL:STOR TARE Command Sequence CAL:TARE <ch_list> to correct channel offsets CAL:TARE? to return the success flag from the CAL:TARE operation Optional depending on necessity of long term storage CAL:STORE TARE CALibration:VALue:RESistance CALibration:VALue:RESistance <ref_ohms> sends the just-measured value of the on-board reference resistor to the module for A/D calibration. Parameters Comments Parameter Name Parameter Type Range of Value Default Units ref_ohms numeric (float32) 7,500 ± 5% ohms · The <ref_ohms> parameter must be within 5% of the nominal reference resistor value (7,500 W) and may be specified in W (kohm). · A four-wire measurement of the resistor can be made with an external multimeter connected to the H Cal, L Cal, H ohm, and L ohm terminals on the Terminal Module or the V H, V L, W H, and W L terminals on the Cal Bus connector. · Use the CAL:CONF:RES command to configure the reference resistor for measurement at the Calibration Bus connector. 188 VT1415A Command Reference Chapter 6 CALibration · When Accepted: Not while INITiated. · Related Commands: CAL:CONF:RES, CAL:STORE ADC. Command Sequence CAL:CONF:RES (now measure ref resistor with external DMM) CAL:VAL:RES <measured value> Send measured value to module CALibration:VALue:VOLTage CALibration:VALue:VOLTage <ref_volts> sends the value of the last-measured dc reference source to the module for A/D calibration. Parameters Comments Parameter Name Parameter Type Range of Values Default Units ref_volts numeric (float32) Must be within 10% of range nominal. volts · The value sent must be for the currently configured range and output (zero or full scale) as set by the previous CAL:CONF:VOLT <range>, ZERO | FSCale command. Full scale values must be within 10% of 0.0625, 0.25, 1, 4, or 10 (the voltage reference provides 10 V dc on the 16 V range). · The <ref_volts> parameter may be specified in millivolts (mv). · A measurement of the source voltage can be made with an external multimeter connected to the H Cal and L Cal terminals on the Terminal Module or the V H and V L terminals on the Cal Bus connector. · Use the CAL:CONF:VOLT command to configure the on-board voltage source for measurement at the Calibration Bus connector. · When Accepted: Not while INITiated. · Related Commands: CAL:CONF:VOLT, CAL:STORE ADC. Command Sequence CAL:CONF:VOLTAGE 4,FSCALE *OPC? Wait for operation to complete enter statement (now measure voltage with external DMM) CAL:VAL:VOLT <measured value> Chapter 6 Send measured value to module VT1415A Command Reference 189 CALibration CALibration:ZERO? CALibration:ZERO? corrects Analog to Digital converter offset for any drift since the last *CAL? or CAL:ZERO? command was executed. The offset calibration takes about 5 seconds and should be done as often as the control set up allows. Comments · The CAL:ZERO? command only corrects for A/D offset drift (zero). Use the *CAL? common command to perform on-line calibration of channels as well as A/D offset. *CAL? performs gain and offset correction of the A/D and each channel with an analog SCP installed (both input and output). · Returned Value: Value Meaning Further Action 0 Cal OK None -1 Cal Error Query the Error Queue (SYST:ERR?). See Error Messages in Appendix B. The C-SCPI type for this returned value is int16. · Executing this command does not alter the module’s programmed state (function, range etc.). · Related Commands: *CAL? · *RST Condition: A/D offset performed Usage CAL:ZERO? enter statement here 190 VT1415A Command Reference returns 0 or -1 Chapter 6 DIAGnostic DIAGnostic The DIAGnostic subsystem allows for special operations to be performed that are not standard in the SCPI language. This includes checking the current revision of the Control Processor’s firmware and that it has been properly loaded into Flash Memory. Subsystem Syntax DIAGnostic :CALibration :SETup :MODE 0 | 1 :MODE? :TARe [:OTD] :MODE 0 | 1 :MODE? :CHECksum? :CUSTom :LINear <table_range>,<table_block>,(@<ch_list>) :PIECewise <table_range>,<table_block>,(@<ch_list>) :REFerence :TEMPerature :IEEE 1 | 0 :IEEE? :INTerrupt [:LINe] <intr_line> [:LINe]? :OTDetect [:STATe] 1 | 0 | ON | OFF,(@<ch_list>) [:STATe]? (@<channel>) :QUERy :SCPREAD? <reg_addr> :VERSion? DIAGnostic:CALibration:SETup[:MODE] DIAGnostic:CALibration:SETup[:MODE] <mode> sets the type of calibration to use for analog output SCPs like the VT1531A and VT1532A when *CAL? or CAL:SET are executed. Parameters Parameter Name Parameter Type Range of Values Default Units mode boolean (uint 16) 0|1 volts Comments Chapter 6 VT1415A Command Reference 191 DIAGnostic · When <mode> is set to 1 (the *RST Default), channels are calibrated using the Least Squares Fit method to provide the minimum error overall (over the entire output range). When <mode> is 0, channels are calibrated to provide the minimum error at their zero point. See the SCPs User’s Manual for its accuracy specifications using each mode. · Related Commands: *CAL?, CAL:SET, DIAG:CAL:SET:MODE? · *RST Condition: DIAG:CAL:SET:MODE 1 Usage set analog DAC SCP cal mode for best zero accuracy DIAG:CAL:SET:MODE 0 *CAL? Set mode for best zero cal. Start channel calibration. DIAGnostic:CALibration:SETup[:MODE]? DIAGnostic:CALibration:SETup[:MODE]? returns the currently set calibration mode for analog output DAC SCPs. Comments · Returns a 1 when channels are calibrated using the Least Squares Fit method to provide the minimum error overall (over the entire output range). Returns a 0 when channels are calibrated to provide the minimum error at their zero point. See the SCPs User’s Manual for its accuracy specifications using each mode. The C-SCPI type is int16. · Related Commands: DIAG:CAL:SET:MOD, *CAL?, CAL:SET. · *RST Condition: DIAG:CAL:SET:MODE 1. DIAGnostic:CALibration:TARE[:OTDetect]:MODE DIAGnostic:CALibration:TARE[:OTDetect]:MODE <mode> sets whether Open Transducer Detect current will be turned off or left on (the default mode) during the CAL:TARE operation. Parameters Comments Parameter Name Parameter Type Range of Values Default Units mode boolean (uint 16) 0|1 volts · When <mode> is set to 0 (the *RST Default), channels are tare calibrated with their OTD current off. When <mode> is 1, channels that have their OTD current on (DIAGnostic:OTDetect ON,(@<ch_list>)) are tare calibrated with their OTD current left on. · By default (*RST), the CALibration:TARE? command will calibrate all channels with the OTD circuitry disabled. This is done for two reasons: first, most users do not leave OTD enabled while taking readings and second, the CALibration:TARE? operation takes much longer with OTD enabled. 192 VT1415A Command Reference Chapter 6 DIAGnostic However, for users who intend to take readings with OTD enabled, setting DIAG:CAL:TARE:OTD:MODE to 1, will force the CAL:TARE? command to perform calibration with OTD enabled on channels so specified by the user with the DIAG:OTD command. · Related Commands: *CAL?, CAL:SET, DIAG:CAL:SET:MODE? · *RST Condition: DIAG:CAL:TARE:MODE 0. Usage configure OTD on during CAL:TARE DIAG:CAL:TARE:MODE 1 CAL:TARE? Set mode for OTD to stay on. Start channel tare cal. DIAGnostic:CALibration:TARE[:OTDetect]:MODE? DIAGnostic:CALibration:TARE[:OTDetect]:MODE? returns the currently set mode for controlling Open Transducer Detect current while performing CAL:TARE? operation. Comments · Returns a 0 when OTD current will be turned off during CAL:TARE?. Returns 1 when OTD current will be left on during CAL:TARE? operation. The C-SCPI type is int16. · Related Commands: DIAG:CAL:TARE:MOD, DIAG:OTD, CAL:TARE? · *RST Condition: DIAG:CAL:TARE:MODE 0. DIAGnostic:CHECksum? DIAGnostic:CHECksum? performs a checksum operation on Flash Memory. A returned value of 1 indicates that Flash memory contents are correct. A returned value of 0 indicates that the Flash Memory is corrupted or has been erased. Comments · Returned Value: Returns 1 or 0. The C-SCPI type is int16. Usage DIAG:CHEC? Checksum Flash Memory, return 1 for OK, 0 for corrupted. DIAGnostic:CUSTom:LINear DIAGnostic:CUSTom:LINear <table_range>,<table_block>, (@<ch_list>) downloads a custom linear Engineering Unit Conversion table (in <table_block>) to the VT1415A. Contact a VXI Technology System Engineer for more information on Custom Engineering Unit Conversion for specific applications. Chapter 6 VT1415A Command Reference 193 Parameters Comments Parameter Name Parameter Type Range of Values Default Units table_range numeric (float32) 0.015625 | 0.03125 | 0.0625 | 0.125 | 0.25 | 0.5 | 1 | 2 | 4 | 8 | 16 | 32 | 64 volts table_block definite length block data See comments. none ch_list channel list (string) 100 - 163 none · The <table_block> parameter is a block of 8 bytes that define 4, 16-bit values. SCPI requires that <table_block> include the definite length block data header. C-SCPI adds the header automatically. · The <table_range> parameter specifies the range of voltage that the table covers (from -<table_range> to +<table_range>). The value specified must be within 5% of one of the nominal values from the table above. · The <ch_list> parameter specifies which channels may use this custom EU table. · Related Commands: [SENSe:]FUNCtion:CUSTom. · *RST Condition: All custom EU tables erased. Usage program puts table constants into array table_block DIAG:CUST:LIN table_block,(@116:123) SENS:FUNC:CUST:LIN 1,1,(@116:123) INITiate then TRIGger module send table to VT1415A for chs 16-23 link custom EU with chs 16-23 DIAGnostic:CUSTom:PIECewise DIAGnostic:CUSTom:PIECewise <table_range>,<table_block>, (@<ch_list>) downloads a custom piece-wise Engineering Unit Conversion table (in <table_block>) to the VT1415A. Contact a VXI Technology System Engineer for more information on Custom Engineering Unit Conversion for specific applications. Parameters Comments Parameter Name Parameter Type Range of Values Default Units table_range numeric (float32) 0.015625 | 0.03125 | 0.0625 | 0.125 | 0.25 | 0.5 | 1 | 2 | 4 | 8 | 16 | 32 | 64 volts table_block definite length block data See comments. none ch_list channel list (string) 100 - 163 none · The <table_block> parameter is a block of 1,024 bytes that define 512 16-bit values. SCPI requires that <table_block> include the definite length block data header. C-SCPI adds the header automatically. 194 VT1415A Command Reference Chapter 6 DIAGnostic · The <table_range> parameter specifies the range of voltage that the table covers (from -<table_range> to +<table_range>). · The <ch_list> parameter specifies which channels may use this custom EU table. · Related Commands: [SENSe:]FUNCtion:CUSTom · *RST Condition: All custom EU tables erased. Usage program puts table constants into array table_block DIAG:CUST:PIEC table_block,(@124:131) SENS:FUNC:CUST:PIEC 1,1,(@124:131) INITiate then TRIGger module Send table for chs 24-31 to VT1415A. Link custom EU with chs 24-31. DIAGnostic:CUSTom:REFerence:TEMPerature DIAGnostic:CUSTom:REFerence:TEMPerature extracts the current Reference Temperature Register Contents, converts it to 32-bit floating point format and sends it to the FIFO. This command is used to verify that the reference temperature is as expected after measuring it using a custom reference temperature EU conversion table. Usage The program must have EU table values stored in <table_block>. download the new reference EU table DIAG:CUST:PIECEWISE <table_range>,<table_block>,(@<ch_list>) designate channel as reference SENS:FUNC:CUST:REF <range>,(@<ch_list>) set up scan list sequence (ch 0 in this case) Now run the algorithm that uses the custom reference conversion table dump reference temp register to FIFO DIAG:CUST:REF:TEMP read the diagnostic reference temperature value SENS:DATA:FIFO? DIAGnostic:IEEE DIAGnostic:IEEE <mode> enables (1) or disables (0) IEEE-754 NAN (Not A Number) and ±INF value outputs. This command was created for the Agilent VEE platform. Parameters Chapter 6 Parameter Name Parameter Type Range of Values Default Units mode boolean (uint 16) 0|1 volts VT1415A Command Reference 195 DIAGnostic Comments · When <mode> is set to 1, the module can return ±INF and NAN values according to the IEEE-754 standard. When <mode> is set to 0, the module returns values as ±9.9E37 for INF and 9.91E37 for NAN. · Related Commands: DIAG:IEEE? · *RST Condition: DIAG:IEEE 1 Usage Set IEEE mode DIAG:IEEE 1 INF values returned in IEEE standard DIAGnostic:IEEE? DIAGnostic:IEEE? returns the currently set IEEE mode. Comments · The C-SCPI type is int16. · Related Commands: DIAG:IEEE · *RST Condition: DIAG:IEEE 1 DIAGnostic:INTerrupt[:LINe] DIAGnostic:INTerrupt[:LINe] <intr_line> sets the VXIbus interrupt line the module will use. Parameters Comments Parameter Name Parameter Type Range of Values Default Units intr_line numeric (int16) 0 through 7 none · Related Commands: DIAG:INT:LINE? · Power-on and *RST Condition: DIAG:INT:LINE 1 Usage DIAG:INT:LINE 5 Module will interrupt on VXIbus interrupt line 5. DIAGnostic:INTerrupt[:LINe]? · PACKed,64 returns the same values as REAL,64 except for Not-a-Number (NaN), IEEE +INF, and IEEE -INF. The NaN, IEEE +INF, and IEEE -INF values returned by PACKed,64 are in a form compatible with HP Workstation BASIC and HP BASIC/UX. Refer to the FORMat command for the actual values for NaN, +INF, and -INF. · ASCii is the default format. 196 VT1415A Command Reference Chapter 6 DIAGnostic · ASCII readings are returned in the form ±1.234567E±123. For example 13.325 volts would be +1.3325000E+001. Each reading is followed by a comma (,). A line feed (LF) and End-Or-Identify (EOI) follow the last reading. · Related Commands: MEMory Subsystem, FORMat[:DATA] · *RST Condition: MEMORY:VME:ADDRESS 240000; MEMORY:VME:STATE OFF; MEMORY:VME:SIZE 0 Chapter 6 VT1415A Command Reference 197 DIAGnostic Use Sequence MEM:VME:ADDR #H300000 MEM:VME:SIZE #H100000 1 megabyte (MB) or 262,144 readings. MEM:VME:STAT ON * * (set up VT1415A for scanning) * TRIG:SOUR IMM Let unit trigger on INIT. INIT Program execution remains here until VME memory is full or the VT1415A has stopped taking readings. FORM REAL,64 Affects only the return of data. FETCH? NOTE 198 When using the MEM subsystem, the module must be triggered before executing the INIT command (as shown above) unless an external trigger (EXT trigger) is being used. When using EXT trigger, the trigger can occur at any time. VT1415A Command Reference Chapter 6 FORMat FORMat The FORMat subsystem provides commands to set and query the response data format of readings returned using the [SENSe:]DATA:FIFO:…? commands. Subsystem Syntax FORMat [:DATA] <format>[,<size>] [:DATA]? FORMat[:DATA] FORMat[:DATA] <format>[,<size>] sets the format for data returned using the [SENSe:]DATA:FIFO:¼?, [SENSe:]DATA:CVTable and FETCh? commands. Parameters Comments Parameter Name Parameter Type Range of Values Default Units format discrete (string) REAL | ASCii | PACKed none size numeric for ASCii, 7 for REAL, 32 | 64 for PACKed, 64 none · The REAL format is IEEE-754 Floating Point representation. · REAL, 32 provides the highest data transfer performance since no format conversion step is placed between reading and returning the data. The default <size> for the REAL format is 32 bits. Also see DIAG:IEEE command. · PACKed, 64 returns the same values as REAL, 64 except for Not-a-Number (NaN), IEEE +INF, and IEEE -INF. The NaN, IEEE +INF, and IEEE -INF values returned by PACKed,64 are in a form compatible with HP Workstation BASIC and HP BASIC/UX (see table on following page). · REAL 32, REAL 64, and PACK 64, readings are returned in the IEEE-488.2-1987 Arbitrary Block Data format. The Block Data may be either Definite Length or Indefinite Length depending on the data query command executed. These data return formats are explained in “Arbitrary Block Program Data” on page 156 of this chapter. For REAL 32, readings are 4 bytes in length (C-SCPI type is float32 array). For REAL 64 and PACK, 64, readings are 8 bytes in length (C-SCPI type is float64 array). · ASCii is the default format. ASCII readings are returned in the form ±1.234567E±123. For example 13.325 volts would be +1.3325000E+001. Each reading is followed by a comma (,). A line feed (LF) and End-Or-Identify (EOI) follow the last reading (C-SCPI type is string array). Chapter 6 VT1415A Command Reference 199 FORMat NOTE *TST? leaves the instrument in its power-on, reset state. This means that the ASC,7 data format is set even if something else was set before executing *TST?. If the FIFO must be read for test information, set the format after *TST? and before reading the FIFO. · Related Commands: [SENSe:]DATA:FIFO:¼?, [SENSe:]DATA:CVTable?, MEMory subsystem and FETCh? Also, see how DIAG:IEEE can modify REAL,32 returned values. · *RST Condition: ASCII, 7 · After *RST/Power-on, each channel location in the CVT contains the IEEE-754 value “Not-a-number” (NaN). Channel readings which are a positive over-voltage return IEEE +INF and a negative over-voltage return IEEE -INF. The NaN, +INF, and -INF values for each format are shown in the following table. Format IEEE Term Value Meaning ASCii +INF +9.9E37 Positive Overload -INF -9.9E37 Negative Overload NaN +9.91E37 No Reading +INF 7F80000016 Positive Overload -INF FF80000016 Negative Overload NaN 7FFFFFFF16 No Reading +INF 7FF000...0016 Positive Overload -INF FFF000...0016 Negative Overload NaN 7FFF...FF16 No Reading +INF 47D2 9EAD 3677 AF6F16 (+9.0E3710) Positive Overload -INF C7D2 9EAD 3677 AF6F16 (-9.0E3710) Negative Overload NaN 47D2 A37D CED4 614316 (+9.91E3710) No Reading REAL,32 REAL,64 PACKed,64 Usage FORMAT REAL FORM REAL, 64 FORMAT ASCII, 7 200 VT1415A Command Reference Set format to IEEE 32-bit Floating Point. Set format to IEEE 64-bit Floating Point. Set format to 7-bit ASCII. Chapter 6 FORMat FORMat[:DATA]? FORMat[:DATA]? returns the currently set response data format for readings. Comments · Returned Value: Returns REAL, +32 | REAL, +64 | PACK, +64 | ASC, +7. The C-SCPI type is string, int16. · Related Commands: FORMAT · *RST Condition: ASCII, 7 Usage FORMAT? Chapter 6 Returns REAL, +32 | REAL, +64 | PACK, +64 | ASC, +7 VT1415A Command Reference 201 INITiate INITiate The INITiate command subsystem moves the VT1415A from the "Trigger Idle" state to the "Waiting For Trigger" state. When initiated, the instrument is ready to receive one (:IMMediate) or more (depending on TRIG:COUNT) trigger events. On each trigger, the module will perform one control cycle which includes reading analog and digital input channels (Input Phase), executing all defined algorithms (Calculate Phase), and updating output channels (Output Phase). See the TRIGger subsystem to specify the trigger source and count. Subsystem Syntax INITiate [:IMMediate] INITiate[:IMMediate] INITiate[:IMMediate] changes the trigger system from the "Idle" state to the "Wait For Trigger" state. When triggered, one or more (depending on TRIGger:COUNt) trigger cycles occur and the instrument returns to the "Trigger Idle" state. Comments · INIT:IMM clears the FIFO and Current Value Table. · If a trigger event is received before the instrument is Initiated, a -211 “Trigger ignored” error is generated. · If another trigger event is received before the instrument has completed the current trigger cycle (measurement scan), the Questionable Data Status bit 9 is set and a +3012 “Trigger too fast” error is generated. · Sending INIT while the system is still in the Wait for Trigger state (already INITiated) will cause an error -213,"Init ignored." · Sending the ABORt command send the trigger system to the Trigger Idle state when the current input-calculate-output cycle is completed. · If updates are pending, they are made prior to beginning the Input phase. · When Accepted: Not while INITiated. · Related Commands: ABORt, CONFigure, TRIGger. · *RST Condition: Trigger system is in the Idle state. Usage INIT Both versions same function. INITIATE:IMMEDIATE 202 VT1415A Command Reference Chapter 6 INPut INPut The INPut subsystem controls configuration of programmable input Signal Conditioning Plug-Ons (SCPs). Subsystem Syntax INPut :FILTer [:LPASs] :FREQuency <cutoff_freq>,(@<ch_list>) :FREQuency? (@<channel>) [:STATe] 1 | 0 | ON | OFF,(@<channel>) [:STATe]? (@<channel>) :GAIN <chan_gain>,(@<ch_list>) :GAIN? (@<channel>) :LOW <wvolt_type>,(@<ch_list>) :LOW? (@<channel>) :POLarity NORMal | INVerted,(@<ch_list>) :POLarity? (@<channel>) INPut:FILTer[:LPASs]:FREQuency INPut:FILTer[:LPASs]:FREQuency <cutoff_freq>,(@<ch_list>) sets the cutoff frequency of the filter on the specified channels. Parameters Comments Parameter Name Parameter Type Range of Values Default Units cutoff_freq numeric (float32) (string) see comment | MIN | MAX Hz ch_list channel list (string) 100 - 163 none · <cutoff_freq> may be specified in kilohertz (khz). A programmable Filter SCP has a choice of several discrete cutoff frequencies. The cutoff frequency set will be the one closest to the value specified by <cutoff_freq>. Refer to Chapter 6 for specific information on the SCP being programmed. · Sending MAX for the <cutoff_freq> selects the SCP’s highest cutoff frequency. Sending MIN for the <cutoff_freq> selects the SCP’s lowest cutoff frequency. To disable filtering (the “pass through” mode), execute the INP:FILT:STATE OFF command. · Sending a value greater than the SCP’s highest cutoff frequency or less than the SCP’s lowest cutoff frequency generates a -222 “Data out of range” error. · When Accepted: Not while INITiated · Related Commands: INP:FILT:FREQ?, INP:FILT:STAT ON | OFF · *RST Condition: set to MIN Chapter 6 VT1415A Command Reference 203 Usage INP:FILT:FREQ 100,(@100:119) INPUT:FILTER:FREQ 2,(@155) Set cutoff frequency of 100 Hz for first 20 channels Set cutoff frequency of 2 Hz for channel 55 INPut:FILTer[:LPASs]:FREQuency? INPut:FILTer[:LPASs]:FREQuency? (@<channel>) returns the cutoff frequency currently set for <channel>. Non-programmable SCP channels may be queried to determine their fixed cutoff frequency. If the channel is not on an input SCP, the query will return zero. Parameters Comments Parameter Name Parameter Type Range of Values Default Units channel channel list (string) 100 - 163 none · <channel> must specify a single channel only. · This command is for programmable filter SCPs only. · Returned Value: Numeric value of Hz as set by the INP:FILT:FREQ command. The C-SCPI type is float32. · When Accepted: Not while INITiated · Related Commands: INP:FILT:LPAS:FREQ, INP:FILT:STATE · *RST Condition: MIN Usage INPUT:FILTER:LPASS:FREQUENCY? (@155) INP:FILT:FREQ? (@100) Check cutoff freq on channel 55 Check cutoff freq on channel 0 INPut:FILTer[:LPASs][:STATe] INPut:FILTer[:LPASs][:STATe] <enable>,(@<ch_list>) enables or disables a programmable filter SCP channel. When disabled (enable=OFF), these channels are in their “pass through” mode and provide no filtering. When re-enabled (enable=ON), the SCP channel reverts to its previously programmed setting. Parameters Comments Parameter Name Parameter Type Range of Values Default Units enable boolean (uint16) 1 | 0 | ON | OFF none ch_list channel list (string) 100 - 163 none · If the SCP has not yet been programmed, ON enables the SCP’s default cutoff frequency. 204 VT1415A Command Reference Chapter 6 INPut · When Accepted: Not while INITiated · *RST Condition: ON Usage INPUT:FILTER:STATE ON,(@115,117) INP:FILT OFF,(@100:115) Channels 115 and 117 return to previously set (or default) cutoff frequency Set channels 0 - 15 to “pass-through” state INPut:FILTer[:LPASs][:STATe]? INPut:FILTer[LPASs][:STATe]? (@<channel>) returns the currently set state of filtering for the specified channel. If the channel is not on an input SCP, the query will return zero. Parameters Comments Parameter Name Parameter Type Range of Values Default Units channel channel list (string) 100 - 163 none · Returned Value: Numeric value either 0 (off or “pass-through”) or 1 (on). The C-SCPI type is int16. · <channel> must specify a single channel only. Usage INPUT:FILTER:LPASS:STATE? (@115) INP:FILT? (@115) Enter statement returns either 0 or 1 Same as above INPut:GAIN INPut:GAIN <gain>,(@<ch_list>) sets the channel gain on programmable amplifier Signal Conditioning Plug-Ons. Parameters Comments Parameter Name Parameter Type Range of Values Default Units gain numeric (float32) discrete (string) see comment | MIN | MAX none ch_list channel list (string) 100 - 163 none · A programmable amplifier SCP has a choice of several discrete gain settings. The gain set will be the one closest to the value specified by <gain>. Refer to the SCP manual for specific information on the SCP being programmed. Sending MAX will program the highest gain available with the SCP installed. Sending MIN will program the lowest gain. · Sending a value for <gain> that is greater than the highest or less than the lowest setting allowable for the SCP will generate a -222 “Data out of range” error. Chapter 6 VT1415A Command Reference 205 · When Accepted: Not while INITiated · Related Commands: INP:GAIN? · *RST Condition: gain set to MIN Usage INP:GAIN 8,(@100:119) Set gain of 8 for first 20 channels INPUT:GAIN 64,(@155) Set gain of 64 for channel 55 INPut:GAIN? INPut:GAIN? (@<channel>) returns the gain currently set for <channel>. If the channel is not on an input SCP, the query will return zero. Parameters Comments Parameter Name Parameter Type Range of Values Default Units channel channel list (string) 100 - 163 none · <channel> must specify a single channel only. · If the channel specified does not have a programmable amplifier, INP:GAIN? will return the nominal as-designed gain for that channel. · Returned Value: Numeric value as set by the INP:GAIN command. The C-SCPI type is float32. · When Accepted: Not while INITiated · Related Commands: INP:GAIN · *RST Condition: gain set to 1 Usage INPUT:GAIN? (@105) Check gain on channel 5 INP:GAIN? (@100) Check gain on channel 0 INPut:LOW INPut:LOW <wvolt_type>,(@<ch_list>) controls the connection of input LO at a Strain Bridge SCP channel specified by <ch_list>. LO can be connected to the Wagner Voltage ground or left floating. Parameters 206 Parameter Name Parameter Type Range of Values Default Units wvolt_type discrete (string) FLOat | WVOLtage none ch_list channel list (string) 100 - 163 none VT1415A Command Reference Chapter 6 INPut Comments · Related Commands: INP:LOW? · *RST Condition: INP:LOW FLOAT (all Option 21 channels) Usage INP:LOW WVOL (@100:103,116:119) connect LO of channels 0 through 3 and 16 through 19 to Wagner Ground. INPut:LOW? INPut:LOW? (@<channel>) returns the LO input configuration for the channel specified by <channel>. Parameters Comments Parameter Name Parameter Type Range of Values Default Units channel channel list (string) 100 - 163 none · The <channel> parameter must specify a single channel only. · Returned Value: Returns FLO or WV. The C-SCPI type is string. · Related Commands: INP:LOW Usage INP:LOW? (@103) enter statement will return either FLO or WV for channel 3 INPut:POLarity INPut:POLarity <mode>,<ch_list> sets logical input polarity on a digital SCP channel. Parameters Comments Parameter Name Parameter Type Range of Values Default Units mode discrete (string) NORMal | INVerted none ch_list string 100 - 163 none · If the channels specified are on an SCP that doesn’t support this function, an error will be generated. See the SCP’s User’s Manual to determine its capabilities. · Related Commands: for output sense; SOURce:PULSe:POLarity · *RST Condition: INP:POL NORM for all digital SCP channels. Usage INP:POL INV,(@140:143) Chapter 6 invert first 4 channels on SCP at SCP position 5. Channels 40 through 43 VT1415A Command Reference 207 INPut INPut:POLarity? INPut:POLarity? <channel> returns the logical input polarity on a digital SCP channel. Parameters Comments Parameter Name Parameter Type Range of Values Default Units channel string 100 - 163 none · <channel> must specify a single channel. · If the channel specified is on an SCP that doesn’t support this function, an error will be generated. See the SCP’s User’s Manual to determine its capabilities. · Returned Value: returns “NORM” or “INV.” The type is string. 208 VT1415A Command Reference Chapter 6 MEMory The MEMory subsystem allows using VME memory as an additional reading storage buffer. Subsystem Syntax MEMory :VME :ADDRess <A24_address> :ADDRess? :SIZE <mem_size> :SIZE? :STATe 1 | 0 | ON | OFF :STATe? NOTE This subsystem is only available in systems using an Agilent/HP E1405B/06A command module. Use Sequence *RST MEM:VME:ADDR #H300000 MEM:VME:SIZE #H100000 1 MB or 262,144 readings MEM:VME:STAT ON * * (set up VT1415A for scanning) * TRIG:SOUR IMM let unit trigger on INIT INIT *OPC? program execution remains here until VME memory is full or the VT1415A has stopped taking readings FORM REAL,64 affects only the return of data FETCH? return data from VME memory NOTE Chapter 6 When using the MEM subsystem, the module must be triggered before executing the INIT command (as shown above) unless an external trigger (EXT trigger) is being used. When using EXT trigger, the trigger can occur at any time. VT1415A Command Reference 209 MEMory:VME:ADDRess MEMory:VME:ADDRess <A24_address> sets the A24 address of the VME memory card to be used as additional reading storage. Parameters Comments Parameter Name Parameter Type Range of Values Default Units A24_address numeric valid A24 address none · This command is only available in systems using an Agilent/HP E1405B/06A command module. · The default (if MEM:VME:ADDR not executed) is 24000016. · <A24_address> may be specified in decimal, hex (#H), octal (#Q) or binary (#B). · Related Commands: MEMory subsystem, FORMat and FETCH? · *RST Condition: VME memory address starts at 20000016. When using an Agilent/HP E1405B/06A command module, the first VT1415A occupies 20000016 - 23FFFF16. Usage MEM:VME:ADDR #H400000 Set the address for the VME memory card to be used as reading storage MEMory:VME:ADDRess? MEMory:VME:ADDRess? returns the address specified for the VME memory card used for reading storage. Comments · Returned Value: numeric. · This command is only available in systems using an Agilent/HP E1405B/06A command module. · Related Commands: MEMory subsystem, , FORMat, and FETCH? Usage MEM:VME:ADDR? Returns the address of the VME memory card. MEMory:VME:SIZE MEMory:VME:SIZE <mem_size> Specifies the number of bytes of VME memory to allocate for additional reading storage. 210 VT1415A Command Reference Chapter 6 MEMory Parameters Comments Parameter Name Parameter Type Range of Values Default Units mem_size numeric to limit of available VME memory none · This command is only available in systems using an Agilent/HP E1405B/06A command module. · <mem_size> may be specified in decimal, hex (#H), octal (#Q), or binary(#B). · <mem_size> should be a multiple of four (4) to accommodate 32-bit readings. · Related Commands: MEMory subsystem, FORMAT, and FETCH? · *RST Condition: MEM:VME:SIZE 0 Usage MEM:VME:SIZE 32768 Allocate 32 kilobytes (kB) of VME memory to reading storage (8,192 readings) MEMory:VME:SIZE? MEMory:VME:SIZE? returns the amount (in bytes) of VME memory allocated to reading storage. Comments · This command is only available in systems using an Agilent/HP E1405B or E1406A command module. · Returned Value: Numeric. · Related Commands: MEMory subsystem and FETCH? Usage MEM:VME:SIZE? Returns the number of bytes allocated to reading storage. MEMory:VME:STATe MEMory:VME:STATe <enable> enables or disables use of the VME memory card as additional reading storage. Parameters Comments Parameter Name Parameter Type Range of Values Default Units enable boolean (uint16) 1 | 0 | ON | OFF none · This command is only available in systems using an Agilent/HP E1405B/06A command module. · When the VME memory card is enabled, the INIT command does not terminate until data acquisition stops or VME memory is full. · Related Commands: Memory subsystem and FETCH? Chapter 6 VT1415A Command Reference 211 MEMory · *RST Condition: MEM:VME:STAT OFF Usage MEMORY:VME:STATE ON MEM:VME:STAT 0 enable VME card as reading storage Disable VME card as reading storage MEMory:VME:STATe? MEMory:VME:STATe? returned value of 0 indicates that VME reading storage is disabled. Returned value of 1 indicates VME memory is enabled. Comments · This command is only available in systems using an Agilent/HP E1405B/06A command module. · Returned Value: Numeric 1 or 0. C-SCPI type uint16. · Related Commands: MEMory subsystem and FETCH? Usage MEM:VME:STAT? 212 VT1415A Command Reference Returns 1 for enabled, 0 for disabled Chapter 6 OUTPut OUTPut The OUTPut subsystem is involved in programming source SCPs as well as controlling the state of VXIbus TTLTRG lines 0 through 7. Subsystem Syntax OUTPut :CURRent :AMPLitude <amplitude>,(@<ch_list>) :AMPLitude? (@<channel>) [:STATe] 1 | 0 | ON | OFF,(@<ch_list>) [:STATe]? (@<channel>) :POLarity NORMal | INVerted,(@<ch_list>) :POLarity? (@<channel>) :SHUNt 1 | 0 | ON | OFF,(@<ch_list>) :SHUNt? (@<channel>) :TTLTrg :SOURce TRIGger | FTRigger | SCPlugon | LIMit :SOURce? :TTLTrg<n> [:STATe] 1 | 0 | ON | OFF [:STATe]? :TYPE PASSive | ACTive,(@<ch_list>) :TYPE? (@<channel>) :VOLTage :AMPLitude <amplitude>,(@<ch_list>) :AMPLitude? (@<channel>) OUTPut:CURRent:AMPLitude OUTPut:CURRent:AMPLitude <amplitude>,(@<ch_list>) sets the VT1505A Current Source SCP channels specified by <ch_list> to either 488 µA or 30 µA. This current is typically used for four-wire resistance and resistance temperature measurements. NOTE This command does not set current amplitude on SCPs like the VT1532A Current Output SCP. Parameters Parameter Name Chapter 6 Parameter Type Range of Values Default Units amplitude numeric (float32) MIN | 30E-6 | MAX | 488E-6 ADC ch_list channel list (string) 100 - 163 none VT1415A Command Reference 213 OUTPut Comments · Select 488E-6 (or MAX) for measuring resistances of less than 8000 W. Select 30E-6 (or MIN) for resistances of 8000 W and above. The <amplitude> may be specified in µA (ua). · For resistance temperature measurements ([SENSe:]FUNCtion:TEMPerature) the Current Source SCP must be set as follows: Required Current Amplitude MAX (488 µA) MIN (30 µA) Temperature Sensor Types and Subtypes RTD,85 | 92 and THER,2250 THER,5000 | 10000 · When *CAL? is executed, the current sources are calibrated on the range selected at that time. · When Accepted: Not while INITiated · Related Commands: *CAL?, OUTP:CURR:AMPL? · *RST Condition: MIN Usage OUTP:CURR:AMPL 488ua,(@116:123) OUTP:CURR:AMPL 30E-6,(@105) Set Current Source SCP at channels 16 through 23 to 488 µA Set Current Source SCP at channel 5 to 30 µA OUTPut:CURRent:AMPLitude? OUTPut:CURRent:AMPLitude? (@<channel>) returns the range setting of the Current Source SCP channel specified by <channel>. Parameters Comments Parameter Name Parameter Type Range of Values Default Units channel channel list (string) 100 - 163 none · <channel> must specify a single channel only. · If <channel> specifies an SCP which is not a Current Source, a +3007, “Invalid signal conditioning plug-on” error is generated. · Returned Value: Numeric value of amplitude set. The C-SCPI type is float32. · Related Commands: OUTP:CURR:AMPL Usage OUTP:CURR:AMPLITUDE? (@163) 214 VT1415A Command Reference Check SCP current set for channel 63 (returns +3.0E-5 or +4.88E-4) Chapter 6 OUTPut OUTPut:CURRent[:STATe] OUTPut:CURRent[:STATe] <enable>,(@<ch_list>) enables or disables current source on channels specified in <ch_list>. Parameters Comments Parameter Name Parameter Type Range of Values Default Units enable boolean (uint16) 1 | 0 | ON | OFF none ch_list channel list (string) 100 - 163 none · OUTP:CURR:STAT does not affect a channel’s amplitude setting. A channel that has been disabled, when re-enabled sources the same current set by the previous OUTP:CURR:AMPL command. · OUTP:CURR:STAT is most commonly used to turn off excitation current to four-wire resistance (and resistance temperature device) circuits during execution of CAL:TARE for those channels. · When Accepted: Not while INITiated · Related Commands: OUTP:CURR:AMPL, CAL:TARE · *RST Condition: OUTP:CURR OFF (all channels) Usage OUTP:CURR OFF,(@100,108) turn off current source channels 0 and 8 OUTPut:CURRent[:STATe]? OUTPut:CURRent[:STATe]? (@<channel>) returns the state of the Current Source SCP channel specified by <channel>. If the channel is not on a VT1505A Current Source SCP, the query will return zero. Parameters Comments Parameter Name Parameter Type Range of Values Default Units channel channel list (string) 100 - 163 none · <channel> must specify a single channel only. · Returned Value: returns 1 for enabled, 0 for disabled. C-SCPI type is uint16. · Related Commands: OUTP:CURR:STATE, OUTP:CURR:AMPL Usage OUTP:CURR? (@108) execute enter statement here Chapter 6 query for state of Current SCP channel 8 enter query value, either 1 or 0 VT1415A Command Reference 215 OUTPut:POLarity OUTPut:POLarity <select>,(@<ch_list>) sets the polarity on digital output channels in <ch_list>. Parameters Comments Parameter Name Parameter Type Range of Values Default Units select discrete (string) NORMal | INVerted none ch_list string 100 - 163 none · If the channels specified do not support this function, an error will be generated. · Related Commands: INPut:POLarity, OUTPut:POLarity? · *RST Condition: OUTP:POL NORM for all digital channels Usage OUTP:POL INV,(@144) invert output logic sense on channel 44 OUTPut:POLarity? OUTPut:POLarity? (@<channel>) returns the polarity on the digital output channel in <channel>. Parameters Comments Parameter Name Parameter Type Range of Values Default Units channel string 100 - 163 none · <channel> must specify a single channel · Returned Value: returns one of NORM or INV. The type is string. OUTPut:SHUNt OUTPut:SHUNt <enable>,(@<ch_list>) adds shunt resistance to one leg of bridge on Strain Bridge Completion SCPs. This can be used for diagnostic purposes and characterization of bridge response. Parameters 216 Parameter Name Parameter Type Range of Values Default Units enable boolean (uint16) 0 | 1 | ON | OFF none ch_list channel list (string) 100 - 163 none VT1415A Command Reference Chapter 6 OUTPut Comments · If <ch_list> specifies a non strain SCP, a 3007 “Invalid signal conditioning plug-on” error is generated. · When Accepted: Not while INITiated · Related Commands: [SENSe:]FUNCtion:STRain¼, [SENSe:]STRain¼ · *RST Condition: OUTP:SHUNT 0 on all Strain SCP channels Usage OUTP:SHUNT 1,(@116:119) add shunt resistance at channels 16 through 19 OUTPut:SHUNt? OUTPut:SHUNt? (@<channel>) returns the status of the shunt resistance on the specified Strain SCP channel. Parameters Comments Parameter Name Parameter Type Range of Values Default Units channel channel list (string) 100 - 163 none · <channel> must specify a single channel only. · If <channel> specifies a non strain SCP, a 3007 “Invalid signal conditioning plug-on” error is generated. · Returned Value: Returns 1 or 0. The C-SCPI type is uint16. · Related Commands: OUTP:SHUNT Usage OUTPUT:SHUNt? (@116) Check status of shunt resistance on channel 16 OUTPut:TTLTrg:SOURce OUTPut:TTLTrg:SOURce <trig_source> selects the internal source of the trigger event that will operate the VXIbus TTLTRG lines. Parameters Chapter 6 Parameter Name Parameter Type Range of Values Default Units trig_source discrete (string) ALGorithm | TRIGger | FTRigger | SCPlugon none VT1415A Command Reference 217 OUTPut Comments · The following table explains the possible choices. Parameter Value Source of Trigger ALGorithm Generated by the Algorithm Language function “interrupt()” FTRigger Generated on the First Trigger of a multiple “counted scan” (set by TRIG:COUNT <trig_count>) SCPlugon Generated by a Signal Conditioning Plug-On (SCP). Do not use this when Sample-and-Hold SCPs are installed. TRIGger Generated every time a scan is triggered (see TRIG:SOUR <trig_source>) · FTRigger (First TRigger) is used to generate a single TTLTRG output when repeated triggers are being used to make multiple executions of the enabled algorithms. The TTLTRG line will go low (asserted) at the first trigger event and stay low through subsequent triggers until the trigger count (as set by TRIG:COUNT) is exhausted. At this point the TTLTRG line will return to its high state (de-asserted). This feature can be used to signal when the VT1415A has started running its control algorithms. · Related Commands: OUTP:TTLT<n>[:STATE], OUTP:TTLT:SOUR?, TRIG:SOUR, TRIG:COUNT · *RST Condition: OUTP:TTLT:SOUR TRIG Usage OUTP:TTLT:SOUR TRIG toggle TTLTRG line every time module is triggered (use to trigger other VT1415As) OUTPut:TTLTrg:SOURce? OUTPut:TTLTrg:SOURce? returns the current setting for the TTLTRG line source. Comments · Returned Value: Discrete, one of; TRIG, FTR, or SCP. C-SCPI type is string. · Related Commands: OUTP:TTLT:SOUR Usage OUTP:TTLT:SOUR? enter statement will return on of FTR, SCP or TRIG OUTPut:TTLTrg<n>[:STATe] OUTPut:TTLTrg<n>:STATe <ttltrg_cntrl> specifies which VXIbus TTLTRG line is enabled to source a trigger signal when the module is triggered. TTLTrg<n> can specify line 0 through 7. For example, …:TTLTRG4 or TTLT4 for VXIbus TTLTRG line 4. 218 VT1415A Command Reference Chapter 6 OUTPut Parameters Comments Parameter Name Parameter Type Range of Values Default Units ttltrg_cntrl boolean (uint16) 1 | 0 | ON | OFF none · Only one VXIbus TTLTRG line can be enabled simultaneously. · When Accepted: Not while INITiated · Related Commands: ABORT, INIT…, TRIG… · *RST Condition: OUTPut:TTLTrg<0 through 7> OFF Usage OUTP:TTLT2 ON Enable TTLTRG2 line to source a trigger OUTPUT:TTLTRG7:STATE ON Enable TTLTRG7 line to source a trigger OUTPut:TTLTrg<n>[:STATe]? OUTPut:TTLTrg<n>[:STATe]? returns the current state for TTLTRG line <n>. Comments · Returned Value: Returns 1 or 0. The C-SCPI type is int16. · Related Commands: OUTP:TTLT<n> Usage OUTP:TTLT2? OUTPUT:TTLTRG7:STATE? See if TTLTRG2 line is enabled (returns 1 or 0) See if TTLTRG7 line is enabled OUTPut:TYPE OUTPut:TYPE <select>,(@<ch_list>) sets the output drive characteristic for digital SCP channels. Parameters Comments Parameter Name Parameter Type Range of Values Default Units select discrete (string) PASSive | ACTive seconds ch_list string 100 - 163 none · If the channels specified are on an SCP that doesn’t support this function an error will be generated. See the SCP’s User’s Manual to determine its capabilities. · PASSive configures the digital channel/bit to be passive (resistor) pull-up allowing one to wire-or more than one output together. · ACTive configures the digital channel/bit to both source and sink current. · Related Commands: SOURce:PULSe:POLarity, OUTPut:TYPE? Chapter 6 VT1415A Command Reference 219 · *RST Condition: OUTP:TYPE ACTIVE (for TTL compatibility) Usage OUTP:TYPE PASS,(@140:143) make channels 40 to 43 passive pull-up OUTPut:TYPE? OUTPut:TYPE? <channel> returns the output drive characteristic for a digital channel. Parameters Comments Parameter Name Parameter Type Range of Values Default Units channel string 100 - 163 none · <channel> must specify a single channel. · If the channel specified is not on a digital SCP, an error will be generated. · Returned Value: returns PASS or ACT. The type is string. · *RST Condition: returns ACT OUTPut:VOLTage:AMPLitude OUTPut:VOLTage:AMPLitude <amplitude>,(@<ch_list>) sets the excitation voltage on programmable Strain Bridge Completion SCPs pointed to by <ch_list> (the VT1511A for example). This command is not used to set output voltage on SCPs like the VT1531A Voltage Output SCP. Parameters Comments Parameter Name Parameter Type Range of Values Default Units amplitude numeric (float32) MIN | 0 |1 | 2 | 5 | 10 | MAX none ch_list channel list (string) 100 - 163 none · To turn off excitation voltage (when using external voltage source) program <amplitude> to 0. · Related Commands: OUTP:VOLT:AMPL? · *RST Condition: MIN (0) Usage OUTP:VOLT:AMPL 5,(@116:119) 220 VT1415A Command Reference set excitation voltage for channels 16 through 19 Chapter 6 OUTPut OUTPut:VOLTage:AMPLitude? OUTPut:VOLTage:AMPLitude? (@<channel>) returns the current setting of excitation voltage for the channel specified by <channel>. If the channel is not on a VT1511A SCP, the query will return zero. Comments · channel must specify a single channel only. · Returned Value: Numeric, one of 0, 1, 2 , 5, or 10. C-SCPI type is float32. · Related Commands: OUTP:VOLT:AMPL Usage OUTP:VOLT:AMPL? (@103) Chapter 6 returns current setting of excitation voltage for channel 3 VT1415A Command Reference 221 ROUTe ROUTe The ROUTe subsystem provides a method to query the overall channel list definition for its sequence of channels. Subsystem Syntax ROUTe :SEQuence :DEFine? :POINts? ROUTe:SEQuence:DEFine? ROUTe:SEQuence:DEFine? <type> returns the sequence of channels defined in the scan list. Parameters Comments Parameter Name Parameter Type Range of Values Default Units type (string) AIN | AOUT | DIN | DOUT none · The channel list contents and sequence are determined primarily by channel references in the algorithms currently defined. The SENS:REF:CHANNELS and SENS:CHAN:SETTLING commands also effect the scan list contents. · The <type> parameter selects which channel list will be queried: “AIN” “AOUT” “DIN” “DOUT” selects the Analog Input channel list (this is the Scan List). selects the Analog Output channel list. selects the Digital Input channel list. selects the Digital Output channel list. · Returned Value: Definite Length Arbitrary Block Data format. This data return format is explained in “Arbitrary Block Program Data” on page 156 of this chapter. Each value is 2 bytes in length (the C-SCPI data type is an int16 array). · *RST Condition: To supply the necessary time delay before Digital inputs are read, the analog input (AIN) scan list contains eight entries for channel 0 (100).This minimum delay is maintained by replacing these default channels as others are defined in algorithms. After algorithm definition, if some delay is still required, there will be repeat entries of the last channel referenced by an algorithm. The three other lists contain no channels. Usage ROUT:SEQ:DEF? AIN 222 VT1415A Command Reference query for analog input (Scan List) sequence Chapter 6 ROUTe ROUTe:SEQuence:POINts? ROUTe:SEQuence:POINts? <type> returns the number of channels defined in each of the four channel list types. Parameters Comments Parameter Name Parameter Type Range of Values Default Units type (string) AIN | AOUT | DIN | DOUT none · The channel list contents and sequence are determined by channel references in the algorithms currently defined. · The <type> parameter selects which channel list will be queried: “AIN” “AOUT” “DIN” “DOUT” selects the Analog Input list. selects the Analog Output list. selects the Digital Input list. selects the Digital Output list. · Returned Value: Numeric. The C_SCPI type is int16. · *RST Condition: The Analog Input list returns +8, the others return +0. Usage ROUT:SEQ:POINTS? AIN Chapter 6 query for analog input channel count VT1415A Command Reference 223 SAMPle SAMPle The SAMPle subsystem provides commands to set and query the interval between channel measurements (pacing). Subsystem Syntax SAMPle :TIMer <interval> :TIMer? SAMPle:TIMer SAMPle:TIMer <interval> sets the time interval between channel measurements. It is used to provide additional channel settling time. See “Settling Characteristics” discussion on page 106. Parameters Comments Parameter Name Parameter Type Range of Values Default Units interval numeric (float32) (string) 1.0E-5 to 16.3825E-3 | MIN | MAX seconds · The minimum <interval> is 10 µs. The resolution for <interval> is 2.5 µs. · If the Sample Timer interval multiplied by the number of channels in the specified Scan List is longer than the Trigger Timer interval, at run time a “Trigger too fast” error will be generated. · the SAMP:TIMER interval can change the effect of the SENS:CHAN:SETTLING command. ALG:CHAN:SETT specifies the number of times a channel measurement should be repeated. The total settling time per channel then is (SAMP:TIMER <interval>) X (<chan_repeats> from SENS:CHAN:SETT) · When Accepted: Not while INITiated · Related Commands: SENSE:CHAN:SETTLING, SAMP:TIMER? · *RST Condition: Sample Timer for all Channel Lists set to 1.0E-5 seconds. Usage SAMPLE:TIMER 50E-6 224 VT1415A Command Reference Pace measurements at 50 µs intervals Chapter 6 SAMPle SAMPle:TIMer? SAMPle:TIMer? returns the sample timer interval. Comments · Returned Value: Numeric. The C-SCPI type is float32. · Related Commands: SAMP:TIMER · *RST Condition: Sample Timer set to 1.0E-5 seconds. Usage SAMPLE:TIMER? Chapter 6 Check the interval between channel measurements VT1415A Command Reference 225 [SENSe] [SENSe] Subsystem Syntax [SENSe:] :CHANnel :SETTling <settle_time>,(@<ch_list>) :SETTling? (@<channel>) DATA :CVTable? (@<element_list>) :RESet :FIFO [:ALL]? :COUNt? :HALF? :HALF? :MODE BLOCk | OVERwrite :MODE? :PART? <n_values> :RESet FREQuency:APERture <gate time>,<ch_list> FREQuency:APERture? <channel> FUNCtion :CONDition (@<ch_list>) :CUSTom [<range>,](@<ch_list>) :REFerence [<range>,](@<ch_list>) :TC <type>,[<range>,](@<ch_list>) :FREQuency (@<ch_list>) :RESistance <excite_current>,[<range>,](@<ch_list>) :STRain :FBENding [<range>,](@<ch_list>) :FBPoisson [<range>,](@<ch_list>) :FPOisson [<range>,](@<ch_list>) :HBENding [<range>,](@<ch_list>) :HPOisson [<range>,](@<ch_list>) [:QUARter] [<range>,](@<ch_list>) :TEMPerature <sensor_type>,<sub_type>,[<range>,](@<ch_list>) :TOTalize (@<ch_list>) :VOLTage[:DC] [<range>,](@<ch_list>) REFerence <sensor_type>, [<sub_type>,](@<ch_list>) :CHANnels (@<ref_channel>),(@<ch_list>) :TEMPerature <degrees_celsius> STRain :EXCitation <excite_v>,(@<ch_list>) :EXCitation? (@<channel>) :GFACtor <gage_factor>,(@<ch_list>) :GFACtor? (@<channel>) :POISson <poisson_ratio>,(@<ch_list>) :POISson? (@<channel>) :UNSTrained <unstrained_v>,(@<ch_list>) :UNSTrained? (@<channel>) TOTalize:RESet:MODE INIT | TRIGger,(@<ch_list>) TOTalize:RESet:MODE? (@<channel>) 226 VT1415A Command Reference Chapter 6 [SENSe] [SENSe:]CHANnel:SETTling [SENSe:]CHANnel:SETTling <num_samples>,<ch_list> specifies the number of measurement samples to make on channels in <ch_list>. SENS:CHAN:SETTLING is used to provide additional settling time only to selected channels that might need it. See the “Settling Characteristics” discussion on page 106. Parameters Comments Parameter Name Parameter Type Range of Values Default Units settle_time numeric (int16) 1 to 64 none ch_list string 100 - 163 none · SENS:CHAN:SETTLING causes each channel specified in <ch_list> that is also referenced in an algorithm to appear <num_samples> times in the analog input Scan List. Channels that do not appear in any SENS:CHAN:SETT command will be entered into the scan list only once when referenced in an algorithm. · Since the scan list is limited to 64 entries, an error will be generated if the number of channels referenced in algorithms plus the additional entries from any SENS:CHAN:SETTLING commands that coincide with algorithm referenced channels exceeds 64. · The SAMPLE:TIMER command can change the effect of the SENS:CHAN:SETTLING command since SAMPLE:TIMER changes the amount of time for each measurement sample. · When Accepted: Not while INITiated · Related Commands: [SENSe:]CHANnel:SETTling?, SAMPLE:TIMER · *RST Condition: SENS:CHAN:SETTLING 1,(@100:163) Usage SENS:CHAN:SETT 4,(@144,156) settle channels 44 and 56 for 4 measurement periods [SENSe:]CHANnel:SETTling? [SENSe:]CHANnel:SETTling? <channel> returns the current number of samples to make on <channel>. Parameters Comments Parameter Name Parameter Type Range of Values Default Units channel string 100 - 163 none · <channel> must specify a single channel. · Related Commands: SENS:CHAN:SETT, SAMP:TIMER? Chapter 6 VT1415A Command Reference 227 [SENSe] · *RST Condition: will return 1 for all channels. · Returned Value: returns numeric number of samples, The type is int16. [SENSe:]DATA:CVTable? [SENSe:]DATA:CVTable? (@<element_list>) returns from the Current Value Table the most recent values stored by algorithms. Parameters Comments Parameter Name Parameter Type Range of Values Default Units element_list channel list 10 - 511 none · [SENSe:]DATA:CVTable? (@<element_list>) allows the latest values of internal algorithm variables to be "viewed" while algorithms are executing. · The Current Value Table is an area in memory that can contain as many as 502 32-bit floating point values. Algorithms can copy any of their variable values into these CVT elements while they execute. · There is a pre-defined organization for the first part of the CVT. It is divided into 32, 10 element segments. This allows up to 32 PID algorithms to place up to 10 variable values each into the CVT. The pre-defined PIDB algorithm can return 4 variable values. The PIDC algorithm (defined as a custom algorithm) can return up to 9. With up to 32 PIDs possible, 320 elements are allocated for “standard” PIDs. ALG1 can use elements 10-19, ALG2 can use elements 20-29, ALG3 can use elements 30-39, etc. through ALG32 which can use elements 320-329. The values stored in each segment are: Element xx0 xx1 xx2 xx3 xx4 xx5 xx6 xx7 xx8 xx9 Variable Description Sense Process value monitored Error Setpoint value minus Sense value Output Process control drive value Status Bit values indicate Clips/Alarms limited Setpoint Setpoint value Setpoint_D Value of Differential term from setpoint P Value of Proportional term I Value of Integral term D Value of Differential term reserved for future use (PIDB & C) (PIDB & C) (PIDB & C) (PIDB & C) (PIDC only) (PIDC only) (PIDC only) (PIDC only) (PIDC only) · Elements 0 through 9 are not accessible. · Custom written algorithms can use CVT elements 330-511. The user defines how a custom algorithm will use this area. · The format of values returned is set using the FORMat[:DATA] command · Returned Value: ASCII values are returned in the form ±1.234567E ±123. For example 13.325 volts would be +1.3325000E+001. Each value is followed by a comma (,). A line feed (LF) and End-Or-Identify (EOI) follow the last value. The C-SCPI data type is a string array. 228 VT1415A Command Reference Chapter 6 REAL 32, REAL 64, and PACK 64, values are returned in the IEEE-488.2-1987 Definite Length Arbitrary Block Data format. This data return format is explained in “Arbitrary Block Program Data” on page 156 of this chapter. For REAL 32, each value is 4 bytes in length (the C-SCPI data type is a float32 array). For REAL 64 and PACK 64, each value is 8 bytes in length (the C-SCPI data type is a float64 array). NOTE After *RST/Power-on, each element in the CVT contains the IEEE-754 value “Not-a-number” (NaN). Elements specified in the DATA:CVT? command that have not been written to be an algorithm will return the value 9.91E37. · *RST Condition: All elements of CVT contains IEEE-754 “Not a Number.” Usage SENS:DATA:CVT? (@10:13) DATA:CVT? (@30:38) DATA:CVT? (@10,13) DATA:CVT? (@330:337,350,360) Return all variables from Std PIDB ALG1 Return all nine variables from PIDC ALG3 Return only element 0 (Sense) and element 3 (Status) from PID ALG1 Return custom algorithm values from elements 330-337, 350, and 360 [SENSe:]DATA:CVTable:RESet [SENSe:]DATA:CVTable:RESet sets all 64 Current Value Table entries to the IEEE-754 “Not-a-number.” Comments · The value of NaN is +9.910000E+037 (ASCII). · Executing DATA:CVT:RES while the module is INITiated will generate an error 3000, “Illegal while initiated.” · When Accepted: Not while INITiated · Related Commands: SENSE:DATA:CVT? · *RST Condition: SENSE:DATA:CVT:RESET Usage SENSE:DATA:CVT:RESET Clear the Current Value Table [SENSe:]DATA:FIFO[:ALL]? [SENSe:]DATA:FIFO[:ALL]? returns all values remaining in the FIFO buffer until all measurements are complete or until the number of values returned exceeds FIFO buffer size (65,024). Comments · DATA:FIFO? may be used to acquire all values (even while they are being made) into a single large buffer or can be used after one or more DATA:FIFO:HALF? commands to return the remaining values from the FIFO. Chapter 6 VT1415A Command Reference 229 [SENSe] · The format of values returned is set using the FORMat[:DATA] command. · Returned Value: ASCII values are returned in the form ±1.234567E±123. For example 13.325 volts would be +1.3325000E+001. Each value is followed by a comma (,). A line feed (LF) and End-Or-Identify (EOI) follow the last value. The C-SCPI data type is a string array. REAL 32, REAL 64, and PACK 64, values are returned in the IEEE-488.2-1987 Indefinite Length Arbitrary Block Data format. This data return format is explained in “Arbitrary Block Program Data” on page 156 of this chapter. For REAL 32, each value is 4 bytes in length (the C-SCPI data type is a float32 array). For REAL 64 and PACK 64, each value is 8 bytes in length (the C-SCPI data type is a float64 array). NOTE Algorithm values which are a positive over-voltage return IEEE +INF and a negative over-voltage return IEEE -INF (see table on page 200 for actual values for each data format). · Related Commands: SENSE:DATA:FIFO:HALF? · *RST Condition: FIFO is empty Usage DATA:FIFO? return all FIFO values until measurements complete and FIFO empty Command Sequence set up scan lists and trigger SENSE:DATA:FIFO:ALL? now execute read statement read statement does not complete until triggered measurements are complete and FIFO is empty [SENSe:]DATA:FIFO:COUNt? [SENSe:]DATA:FIFO:COUNt? returns the number of values currently in the FIFO buffer. Comments · DATA:FIFO:COUNT? is used to determine the number of values to acquire with the DATA:FIFO:PART? command. · Returned Value: Numeric 0 through 65,024. The C-SCPI type is int32. · Related Commands: DATA:FIFO:PART? · *RST Condition: FIFO empty Usage DATA:FIFO:COUNT? 230 VT1415A Command Reference Check the number of values in the FIFO buffer Chapter 6 [SENSe:]DATA:FIFO:COUNt:HALF? [SENSe:]DATA:FIFO:COUNt:HALF? returns a 1 if the FIFO is at least half full (contains at least 32,768 values) or 0 if FIFO is less than half-full. Comments · DATA:FIFO:COUNT:HALF? is used as a fast method to poll the FIFO for the half-full condition. · Returned Value: Numeric 1 or 0. The C-SCPI type is int16. · Related Commands: DATA:FIFO:HALF? · *RST Condition: FIFO empty Command Sequence DATA:FIFO:COUNT:HALF? DATA:FIFO:HALF? poll FIFO for half-full status returns 32,768 values [SENSe:]DATA:FIFO:HALF? [SENSe:]DATA:FIFO:HALF? returns 32,768 values if the FIFO buffer is at least half-full. This command provides a fast means of acquiring blocks of values from the buffer. Comments · For acquiring data from continuous algorithm executions, an application needs to execute a DATA:FIFO:HALF? command and a read statement often enough to keep up with the rate that values are being sent to the FIFO. · Use the DATA:FIFO:ALL? command to acquire the values remaining in the FIFO buffer after the ABORT command has stopped execution. · The format of values returned is set using the FORMat[:DATA] command. · Returned Value: ASCII values are returned in the form ±1.234567E±123. For example 13.325 volts would be +1.3325000E+001. Each value is followed by a comma (,). A line feed (LF) and End-Or-Identify (EOI) follow the last value. The C-SCPI data type is a string array. REAL 32, REAL 64, and PACK 64, values are returned in the IEEE-488.2-1987 Definite Length Arbitrary Block Data format. This data return format is explained in “Arbitrary Block Program Data” on page 156 of this chapter. For REAL 32, each value is 4 bytes in length (the C-SCPI data type is a float32 array). For REAL 64 and PACK 64, each value is 8 bytes in length (the C-SCPI data type is a float64 array). NOTE Chapter 6 Algorithm values which are a positive over-voltage return IEEE +INF and a negative over-voltage return IEEE -INF (see table on page 200 for actual values for each data format). VT1415A Command Reference 231 [SENSe] · Related Commands: DATA:FIFO:COUNT:HALF? · *RST Condition: FIFO buffer is empty Command Sequence DATA:FIFO:COUNT:HALF? DATA:FIFO:HALF? poll FIFO for half-full status returns 32768 values [SENSe:]DATA:FIFO:MODE [SENSe:]DATA:FIFO:MODE <mode> sets the mode of operation for the FIFO buffer. Parameters Comments Parameter Name Parameter Type Range of Values Default Units mode discrete (string) BLOCk | OVERwrite none · In BLOCk(ing) mode, if the FIFO becomes full and measurements are still being made, the new values are discarded. · OVERwrite mode is used record the latest 65,024 values. The module must be halted (ABORT sent) before attempting to read the FIFO. In OVERwrite Mode, if the FIFO becomes full and measurements are still being made, new values overwrite the oldest values. · In both modes, Error 3021, “FIFO Overflow,” is generated to indicate that measurements have been lost. · When Accepted: Not while INITiated · Related Commands: SENSE:DATA:FIFO:MODE?, SENSE:DATA:FIFO:ALL?, SENSE:DATA:FIFO:HALF?, SENSE:DATA:FIFO:PART?, SENSE:DATA:FIFO:COUNT? · *RST Condition: SENSE:DATA:FIFO:MODE BLOCk Usage SENSE:DATA:FIFO:MODE OVERWRITE DATA:FIFO:MODE BLOCK 232 VT1415A Command Reference Set FIFO to overwrite mode Set FIFO to block mode Chapter 6 [SENSe:]DATA:FIFO:MODE? [SENSe:]DATA:FIFO:MODE? returns the currently set FIFO mode. Comments · Returned Value: String value either BLOCK or OVERWRITE. The C-SCPI type is string. · Related Commands: SENSE:DATA:FIFO:MODE Usage DATA:FIFO:MODE? Enter statement returns either BLOCK or OVERWRITE [SENSe:]DATA:FIFO:PART? [SENSe:]DATA:FIFO:PART? <n_values> returns n_values from the FIFO buffer. Parameters Comments Parameter Name Parameter Type Range of Values Default Units n_values numeric (int32) 1 - 2,147,483,647 none · Use the DATA:FIFO:COUNT? command to determine the number of values in the FIFO buffer. · The format of values returned is set using the FORMat[:DATA] command. · Returned Value: ASCII values are returned in the form ±1.234567E±123. For example 13.325 volts would be +1.3325000E+001. Each value is followed by a comma (,). A line feed (LF) and End-Or-Identify (EOI) follow the last value. The C-SCPI data type is a string array. REAL 32, REAL 64, and PACK 64, values are returned in the IEEE-488.2-1987 Definite Length Arbitrary Block Data format. This data return format is explained in “Arbitrary Block Program Data” on page 156 of this chapter. For REAL 32, each value is 4 bytes in length (the C-SCPI data type is a float32 array). For REAL 64 and PACK 64, each value is 8 bytes in length (the C-SCPI data type is a float64 array). NOTE Algorithm values which are a positive over-voltage return IEEE +INF and a negative over-voltage return IEEE -INF (see table on page 200 for actual values for each data format). · Related Commands: DATA:FIFO:COUNT? · *RST Condition: FIFO buffer empty Usage DATA:FIFO:PART? 256 Chapter 6 return 256 values from FIFO VT1415A Command Reference 233 [SENSe] [SENSe:]DATA:FIFO:RESet [SENSe:]DATA:FIFO:RESet clears the FIFO of values. The FIFO counter is reset to 0. Comments · When Accepted: Not while INITiated · Related Commands: SENSE:DATA:FIFO¼ · *RST Condition: SENSE:DATA:FIFO:RESET Usage SENSE:DATA:FIFO:RESET Clear the FIFO [SENSe:]FREQuency:APERture [SENSe:]FREQuency:APERture <gate_time>,<ch_list> sets the gate time for frequency measurement. The gate time is the time period that the SCP will allow for counting signal transitions in order to calculate frequency. Parameters Comments Parameter Name Parameter Type Range of Values Default Units gate_time numeric (float32) 0.001 to 1 (0.001 resolution) seconds ch_list string 100 - 163 none · If the channels specified are on an SCP that doesn’t support this function, an error will be generated. See the SCP’s User’s Manual for its capabilities. · Related Commands: SENSe:FUNCtion:FREQuency · *RST Condition: 0.001 s Usage SENS:FREQ:APER .01,(@144) set channel 44 aperture to 10 ms [SENSe:]FREQuency:APERture? [SENSe:]FREQuency:APERture? <ch_list> returns the frequency counting gate time. Parameters 234 Parameter Name Parameter Type Range of Values Default Units channel string 100 - 163 none VT1415A Command Reference Chapter 6 [SENSe] Comments · If the channels specified are on an SCP that doesn’t support this function, an error will be generated. See the SCP’s User’s Manual for its capabilities. · Related Commands: SENSe:FREQuency:APERture · Returned Value: returns numeric gate time in seconds, The type is float32. [SENSe:]FUNCtion:CONDition [SENSe:]FUNCtion:CONDition <ch_list> sets the SENSe function to input the digital state for channels in <ch_list>. Also configures digital SCP channels as inputs (this is the *RST condition for all digital I/O channels). Parameters Comments Parameter Name Parameter Type Range of Values Default Units ch_list string 100 - 163 none · The VT1533A SCP senses 8 digital bits on each channel specified by this command. The VT1534A SCP senses 1 digital bit on each channel specified by this command. · If the channels specified are not on a digital SCP, an error will be generated. · Use the INPut:POLarity command to set input logical sense. · Related Commands: INPut:POLarity · *RST Condition: SENS:FUNC:COND and INP:POL NORM for all digital SCP channels. Usage To set second 8-bits of VT1533A at SCP position 4 and upper 4-bits of VT1534A at SCP position 5 to digital inputs send: SENS:FUNC:COND (@133,144:147) [SENSe:]FUNCtion:CUSTom [SENSe:]FUNCtion:CUSTom [<range>,](@<ch_list>) links channels with the custom Engineering Unit Conversion table loaded with the DIAG:CUST:LINEAR or DIAG:CUST:PIECE commands. Contact a VXI Technology System Engineer for more information on Custom Engineering Unit Conversion for specific applications. Parameters Parameter Name Chapter 6 Parameter Type Range of Values Default Units range numeric (float32) see first comment V dc ch_list channel list (string) 100 - 163 none VT1415A Command Reference 235 [SENSe] Comments · <range> parameter: The VT1415A has five ranges: 0.0625 V dc, 0.25 V dc, 1 V dc, 4 V dc, and 16 V dc. To select a range, simply specify the range value (for example, 4 selects the 4 V dc range). If a value larger than one of the first four ranges is specified, the VT1415A selects the next higher range (for example, 4.1 selects the 16 V dc range). Specifying a value larger than 16 causes an error -222 “Data out of range.” Specifying 0 selects the lowest range (0.0625 V dc). Specifying AUTO selects auto range. The default range (no range parameter specified) is auto range. · If using amplifier SCPs, set them first and keep their settings in mind when specifying a range setting. For instance, if the expected signal voltage is to be approximately 0.1 V dc and the amplifier SCP for that channel has a gain of 8, <range> must be set no lower than 1 V dc or an input out-of-range condition will exist. · If an A/D reading is greater than the <table_range> specified with DIAG:CUSTOM:PIEC, an overrange condition will occur. · If no custom table has been loaded for the channels specified with SENS:FUNC:CUST, an error will be generated when an INIT command is given. · When Accepted: Not while INITiated · Related Commands: DIAG:CUST:¼ · *RST Condition: all custom EU tables erased Usage program must put table constants into array table_block DIAG:CUST:LIN 1,table_block,(@116:123) SENS:FUNC:CUST 1,(@116:123) INITiate then TRIGger module send table to VT1415A for chs 16-23 link custom EU with chs 16-23 [SENSe:]FUNCtion:CUSTom:REFerence [SENSe:]FUNCtion:CUSTom:REFerence [<range>,](@<ch_list>) links channels with the custom Engineering Unit Conversion table loaded with the DIAG:CUST:PIECE command. Measurements from a channel linked with SENS:FUNC:CUST:REF will result in a temperature that is sent to the Reference Temperature Register. This command is used to measure the temperature of an isothermal reference panel using custom characterized RTDs or thermistors. Contact a VXI Technology System Engineer for more information on Custom Engineering Unit Conversion for specific applications. Parameters Comments Parameter Name Parameter Type Range of Values Default Units range numeric (float32) see comments V dc ch_list channel list (string) 100 - 163 none · See “Linking Input Channels to EU Conversion” on page 60 for more information. 236 VT1415A Command Reference Chapter 6 [SENSe] · The <range> parameter: The VT1415A has five ranges: 0.0625 V dc, 0.25 V dc, 1 V dc, 4 V dc, and 16 V dc. To select a range, simply specify the range value (for example, 4 selects the 4 V dc range). If a value larger than one of the first four ranges is specified, the VT1415A selects the next higher range (for example, 4.1 selects the 16 V dc range). Specifying a value larger than 16 generates an error. Specifying 0 selects the lowest range (0.0625 V dc). Specifying AUTO selects auto range. The default range (no range parameter specified) is auto range. · If using amplifier SCPs, set them first and keep their settings in mind when specifying a range setting. For instance, if the expected signal voltage is to be approximately 0.1 V dc and the amplifier SCP for that channel has a gain of 8, <range> must be set no lower than 1 V dc or an input out-of-range condition will exist. · The *CAL? command calibrates temperature channels based on Sense Amplifier SCP setup at the time of execution. If SCP settings are changed, those channels are no longer calibrated. *CAL? must be executed again. · Related Commands: DIAG:CUST:PIEC, SENS:FUNC:TEMP, SENS:FUNC:CUST:TC, *CAL? · *RST Condition: all custom EU tables erased Usage program must put table constants into array table_block DIAG:CUST:PIEC 1,table_block,(@108) send characterized reference transducer table for use by channel 8 SENS:FUNC:CUST:REF .25,(@108) link custom ref temp EU with ch 8 include this channel in a scan list with thermocouple channels (REF channel first) INITiate then TRIGger module [SENSe:]FUNCtion:CUSTom:TCouple [SENSe:]FUNCtion:CUSTom:TCouple <type>,[<range>,](@<ch_list>) links channels with the custom Engineering Unit Conversion table loaded with the DIAG:CUST:PIECE command. The table is assumed to be for a thermocouple and the <type> parameter will specify the built-in compensation voltage table to be used for reference junction temperature compensation. SENS:FUNC:CUST:TC allows an EU table to be used that is custom matched to thermocouple wire characterized. Contact a VXI Technology System Engineer for more information on Custom Engineering Unit Conversion for specific applications. Parameters Comments Parameter Name Parameter Type Range of Values Default Units type discrete (string) E | EEXT | J | K | N | R | S | T none range numeric (float32) see comments V dc ch_list channel list (string) 100 - 163 none · See “Linking Input Channels to EU Conversion” on page 60 for more information. Chapter 6 VT1415A Command Reference 237 [SENSe] · The <range> parameter: The VT1415A has five ranges: 0.0625 V dc, 0.25 V dc, 1 V dc, 4 V dc, and 16 V dc. To select a range, simply specify the range value (for example, 4 selects the 4 V dc range). If a value larger than one of the first four ranges is specified, the VT1415A selects the next higher range (for example, 4.1 selects the 16 V dc range). Specifying a value larger than 16 generates an error. Specifying 0 selects the lowest range (0.0625 V dc). Specifying AUTO selects auto range. The default range (no range parameter specified) is auto range. · If using amplifier SCPs, set them first and keep their settings in mind when specifying a range setting. For instance, if the expected signal voltage is to be approximately 0.1 V dc and the amplifier SCP for that channel has a gain of 8, <range> must be set no lower than 1 V dc or an input out-of-range condition will exist. · The <sub_type> EEXTended applies to E type thermocouples at 800 °C and above. · The *CAL? command calibrates temperature channels based on Sense Amplifier SCP setup at the time of execution. If SCP settings are changed, those channels are no longer calibrated. *CAL? must be executed again. · Related Commands: DIAG:CUST:PIEC, *CAL?,SENS:REF, and SENS:REF:TEMP · *RST Condition: all custom EU tables erased Usage program must put table constants into array table_block DIAG:CUST:PIEC 1,table_block,(@100:107) send characterized thermocouple table for use by channels 0-7 SENS:FUNC:CUST:TC N,.25,(@100:107) link custom thermocouple EU with chs 0-7, use reference temperature compensation for N type wire. SENSE:REF RTD,92,(@120) designate a channel to measure the reference junction temperature include these channels in a scan list (REF channel first) INITiate then TRIGger module [SENSe:]FUNCtion:FREQuency [SENSe:]FUNCtion:FREQuency <ch_list> sets the SENSe function to frequency for channels in <ch_list>. Also configures the channels specified as digital inputs. Parameters Comments Parameter Name Parameter Type Range of Values Default Units ch_list string 100 - 163 none · If the channels specified are on an SCP that doesn’t support this function, an error will be generated. See the SCP’s User’s Manual for its capabilities. 238 VT1415A Command Reference Chapter 6 [SENSe] · Use the SENSe:FREQuency:APERture command to set the gate time for the frequency measurement. · Related commands: SENS:FREQ:APER · *RST Condition: SENS:FUNC:COND and INP:POL NORM for all digital SCP channels. Usage SENS:FUNC:FREQ (@144) set channel 44’s sense function to frequency [SENSe:]FUNCtion:RESistance [SENSe:]FUNCtion:RESistance <excite_current>,[<range>,](@<ch_list>) links the EU conversion type for resistance and range with the channels specified by <ch_list>. Parameters Comments Parameter Name Parameter Type Range of Values Default Units excite_current discrete(string) 30E-6 | 488E-6 | MIN | MAX amps range numeric (float32) see first comment V dc ch_list channel list (string) 100 - 163 none · The <range> parameter: The VT1415A has five ranges: 0.0625 V dc, 0.25 V dc, 1 V dc, 4 V dc, and 16 V dc. To select a range, simply specify the range value (for example, 4 selects the 4 V dc range). If a value larger than one of the first four ranges is specified, the VT1415A selects the next higher range (for example, 4.1 selects the 16 V dc range). Specifying a value larger than 16 causes an error. Specifying 0 selects the lowest range (0.0625 V dc). Specifying AUTO selects auto range. The default range (no range parameter specified) is auto range. · If amplifier SCPs, set them first and keep their settings in mind when specifying a range setting. For instance, if the expected signal voltage is to be approximately 0.1 V dc and the amplifier SCP for that channel has a gain of 8, <range> must be set no lower than 1 V dc or an input out-of-range condition will exist. · Resistance measurements require the use of Current Source Signal Conditioning Plug-Ons. · The <excite_current> parameter (excitation current) does not control the current applied to the channel to be measured. The <excite_current> parameter only passes the setting of the SCP supplying current to channel to be measured. The current must have already been set using the OUTPUT:CURRENT:AMPL command. The choices for <excite_current> are 30E-6 (or MIN) and 488E-6 (or MAX). <excite_current> may be specified in milliamps (ma) and microamps (ua). Chapter 6 VT1415A Command Reference 239 [SENSe] · The *CAL? command calibrates resistance channels based on Current Source SCP and Sense Amplifier SCP setup at the time of execution. If SCP settings are changed, those channels are no longer calibrated. *CAL? must be executed again. · See “Linking Input Channels to EU Conversion” on page 60 for more information. · When Accepted: Not while INITiated · Related Commands: OUTP:CURR, *CAL? · *RST Condition: SENSE:FUNC:VOLT (@100:163) Usage FUNC:RES 30ua,(@100,105,107) Set channels 0, 5, and 7 to convert voltage to resistance assuming current source set to 30 mA use auto-range (default) [SENSe:]FUNCtion:STRain:FBENding :FBPoisson :FPOisson :HBENding :HPOisson [:QUARter] Note on Syntax: Although the strain function is comprised of six separate SCPI commands, the only difference between them is the bridge type they specify to the strain EU conversion algorithm. · [SENSe:]FUNCtion:STRain:<bridge_type> [<range>,](@<ch_list>) links the strain EU conversion with the channels specified by <ch_list> to measure the bridge voltage. See “Linking Input Channels to EU Conversion” on page 60 for more information. <bridge_type> is not a parameter but is part of the command syntax. The following table relates the command syntax to bridge type. See the user’s manual for the optional Strain SCP for bridge schematics and field wiring information. Command 240 VT1415A Command Reference Bridge Type :FBENding Full Bending Bridge :FBPoisson Full Bending Poisson Bridge :FPOisson Full Poisson Bridge :HBENding Half Bending Bridge :HPOisson Half Poisson Bridge [:QUARter] Quarter Bridge (default) Chapter 6 [SENSe] Parameters Comments Parameter Name Parameter Type Range of Values Default Units range numeric (flt32) see comments V dc ch_list channel list (string) 100 - 163 none · Strain measurements require the use of Bridge Completion Signal Conditioning Plug-Ons. · Bridge Completion SCPs provide the strain measurement bridges and their excitation voltage sources. <ch_list> specifies the voltage sensing channels that are to measure the bridge outputs. Measuring channels on a Bridge Completion SCP only returns that SCP’s excitation source voltage. · The <range> parameter: The VT1415A has five ranges: 0.0625 V dc, 0.25 V dc, 1 V dc, 4 V dc, and 16 V dc. To select a range, simply specify the range value (for example, 4 selects the 4 V dc range). If a value larger than one of the first four ranges is specified, the VT1415A selects the next higher range (for example, 4.1 selects the 16 V dc range). Specifying a value larger than 16 generates an error. Specifying 0 selects the lowest range (0.0625 V dc). Specifying AUTO selects auto range. The default range (no range parameter specified) is auto range. · If using amplifier SCPs, set them first and keep their settings in mind when specifying a range setting. For instance, if the expected signal voltage is to be approximately 0.1 V dc and the amplifier SCP for that channel has a gain of 8, <range> must be set no lower than 1 V dc or an input out-of-range condition will exist. · The channel calibration command (*CAL?) calibrates the excitation voltage source on each Bridge Completion SCP. · When Accepted: Not while INITiated · Related Commands: *CAL?, [SENSE:]STRAIN¼ · *RST Condition: SENSE:FUNC:VOLT 0,(@100:163) Usage FUNC:STRAIN 1,(@100:,105,107) quarter bridge sensed at channels 0, 5, and 7 [SENSe:]FUNCtion:TEMPerature [SENSe:]FUNCtion:TEMPerature <type>,<sub_type>,[<range>,](@<ch_list>) links channels to an EU conversion for temperature based on the sensor specified in <type> and <sub_type>. Not for sensing thermocouple reference temperature (for that, use the SENS:REF <type>,<sub_type>,(@<channel>) command). Chapter 6 VT1415A Command Reference 241 [SENSe] Parameters Comments Parameter Name Parameter Type Range of Values Default Units type discrete (string) RTD | THERmistor | TCouple none sub_type numeric (float32) numeric (float32) discrete (string) for RTD use 85 | 92 for THER use 2250 | 5000 | 10000 for TC use CUSTom | E | EEXT | J|K|N|R|S|T none ohms none range numeric (float32) see comments V dc ch_list channel list (string) 100 - 163 none · Resistance temperature measurements (RTDs and THERmistors) require the use of Current Source Signal Conditioning Plug-Ons. The following table shows the Current Source setting that must be used for the following RTDs and Thermistors: Required Current Amplitude Temperature Sensor Types and Subtypes MAX (488 µA) MIN (30 µA) for RTD and THER,2250 for THER,5000 and THER,10000 · The <range> parameter: The VT1415A has five ranges: 0.0625V dc, 0.25V dc, 1 V dc, 4 V dc, and 16 V dc. To select a range, simply specify the range value (for example, 4 selects the 4 V dc range). If a value larger than one of the first four ranges is specified, the VT1415A selects the next higher range (for example, 4.1 selects the 16 V dc range). Specifying a value larger than 16 generates an error. Specifying 0 selects the lowest range (0.0625 V dc). Specifying AUTO selects auto range. The default range (no range parameter specified) is auto range. · If amplifier SCPs, set them first and keep their settings in mind when specifying a range setting. For instance, if the expected signal voltage is to be approximately 0.1 V dc and the amplifier SCP for that channel has a gain of 8, <range> must be set no lower than 1 V dc or an input out-of-range condition will exist. · The <sub_type> parameter: values of 85 and 92 differentiate between 100 W (@ 0 °C) RTDs with temperature coefficients of 0.00385 and and 0.00392 ohm/ohm/°C respectively. The <sub_type> values of 2250, 5000, and 10000 refer to thermistors that match the Omega 44000 series temperature response curve. These 44000 series thermistors are selected to match the curve within 0.1 or 0.2 °C. For thermistors, <sub_type> may be specified in kW (kohm). The <sub_type> EEXTended applies to E type thermocouples at 800 °C and above. CUSTom is pre-defined as Type K, with no reference junction compensation (reference junction assumed to be at 0 °C). · The *CAL? command calibrates temperature channels based on Current Source SCP and Sense Amplifier SCP setup at the time of execution. If SCP settings are 242 VT1415A Command Reference Chapter 6 [SENSe] changed, those channels are no longer calibrated. *CAL? must be executed again. · See “Linking Input Channels to EU Conversion” on page 60 for more information. · When Accepted: Not while INITiated · Related Commands: *CAL?, OUTP:CURR (for RTDs and Thermistors), SENS:REF and SENS:REF:TEMP (for Thermocouples) · *RST Condition: SENSE:FUNC:VOLT AUTO,(@100:163) Usage Link two channels to the K type thermocouple temperature conversion SENS:FUNC:TEMP TCOUPLE,K,(@101,102) Link channel 0 to measure reference temperature using 5 k thermistor SENS:REF THER,5000,(@100) [SENSe:]FUNCtion:TOTalize [SENSe:]FUNCtion:TOTalize <ch_list> sets the SENSe function to TOTalize for channels in <ch_list>. Parameters Comments Parameter Name Parameter Type Range of Values Default Units ch_list string 100 - 163 none · The totalize function counts rising edges of digital transitions at Frequency/Totalize SCP channels. The counter is 24 bits wide and can count up to 16,777,215. · The SENS:TOT:RESET:MODE command controls which events will reset the counter. · If the channels specified are not on a Frequency/Totalize SCP, an error will be generated. · Related Commands: SENS:TOT:RESET:MODE, INPUT:POLARITY · *RST Condition: SENS:FUNC:COND and INP:POL NORM for all digital SCP channels. Usage SENS:FUNC:TOT (@134) channel 34 is a totalizer [SENSe:]FUNCtion:VOLTage[:DC] [SENSe:]FUNCtion:VOLTage[:DC] [<range>,](@<ch_list>) links the specified channels to return dc voltage. Chapter 6 VT1415A Command Reference 243 [SENSe] Parameters Comments Parameter Name Parameter Type Range of Values Default Units range numeric (float32) see comments V dc ch_list channel list (string) 100 - 163 none · The <range> parameter: The VT1415A has five ranges: 0.0625 V dc, 0.25 V dc, 1 V dc, 4 V dc, and 16 V dc. To select a range, simply specify the range value (for example, 4 selects the 4 V dc range). If a value larger than one of the first four ranges is specified, the VT1415A selects the next higher range (for example, 4.1 selects the 16 V dc range). Specifying a value larger than 16 causes an error. Specifying 0 selects the lowest range (0.0625 V dc). Specifying AUTO selects auto range. The default range (no range parameter specified) is auto range. · If using amplifier SCPs, set them first and keep their settings in mind when specifying a range setting. For instance, if the expected signal voltage is to be approximately 0.1 V dc and the amplifier SCP for that channel has a gain of 8, <range> must be set no lower than 1 V dc or an input out-of-range condition will exist. · The *CAL? command calibrates channels based on Sense Amplifier SCP setup at the time of execution. If SCP settings are changed, those channels are no longer calibrated. *CAL? must be executed again. · See “Linking Input Channels to EU Conversion” on page 60 for more information. · When Accepted: Not while INITiated · Related Commands: *CAL?, INPUT:GAIN¼ · *RST Condition: SENSE:FUNC:VOLT AUTO,(@100:163) Usage FUNC:VOLT (@140:163) Channels 40 - 63 measure voltage in auto-range (defaulted) [SENSe:]REFerence [SENSe:]REFerence <type>,<sub_type>,[<range>,](@<ch_list>) links channel in <ch_list> to the reference junction temperature EU conversion based on <type> and <sub_type>. When scanned, the resultant value is stored in the Reference Temperature Register and by default the FIFO and CVT. This is a resistance temperature measurement and uses the on-board 122 µA current source. NOTE 244 The reference junction temperature value generated by scanning the reference channel is stored in the Reference Temperature Register. This reference temperature is used to compensate all subsequent thermocouple measurements until the register is overwritten by another reference measurement or by specifying a constant reference temperature with the SENSE:REF:TEMP command. If used, the reference VT1415A Command Reference Chapter 6 [SENSe] junction channel must be scanned before any thermocouple channels. Use the SENSE:REF:CHANNELS command to place the reference measuring channel into the scan list ahead of the thermocouple measuring channels. Parameters Comments Parameter Name Parameter Type Range of Values Default Units type discrete (string) THERmistor | RTD | CUSTom none sub_type numeric (float32) numeric (float32) for THER use 5000 for RTD use 85 | 92 for CUSTom use 1 ohm none none range numeric (float32) see comments V dc ch_list channel list (string) 100 - 163 none · See “Linking Input Channels to EU Conversion” on page 60 for more information. · The <range> parameter: The VT1415A has five ranges: 0.0625 V dc, 0.25 V dc, 1 V dc, 4 V dc, and 16 V dc. To select a range, simply specify the range value (for example, 4 selects the 4 V dc range). If a value larger than one of the first four ranges is specified, the VT1415 selects the next higher range (for example, 4.1 selects the 16 V dc range). Specifying a value larger than 16 causes an error. Specifying 0 selects the lowest range (0.0625 V dc). Specifying AUTO selects auto range. The default range (no range parameter specified) is auto range. · If using amplifier SCPs, set them first and keep their settings in mind when specifying a range setting. For instance, if the expected signal voltage is to be approximately 0.1 V dc and the amplifier SCP for that channel has a gain of 8, <range> must be set no lower than 1 V dc or an input out-of-range condition will exist. · The <type> parameter specifies the sensor type that will be used to determine the temperature of the isothermal reference panel. <type> CUSTom is pre-defined as Type E with 0 °C reference junction temp and is not re-defineable. · For <type> THERmistor, the <sub_type> parameter may be specified in ohms or kohm. · The *CAL? command calibrates resistance channels based on Current Source SCP and Sense Amplifier SCP setup at the time of execution. If SCP settings are changed, those channels are no longer calibrated. *CAL? must be executed again. · Related Commands: SENSE:FUNC:TEMP · *RST Condition: Reference temperature is 0 °C Chapter 6 VT1415A Command Reference 245 [SENSe] Usage sense the reference temperature on channel 20 using an RTD SENSE:REF RTD,92,(@120) [SENSe:]REFerence:CHANnels [SENSe:]REFerence:CHANnels (@<ref_channel>),(@<ch_list>) causes channel specified by <ref_channel> to appear in the scan list just before the channel(s) specified by <ch_list>. This command is used to include the thermocouple reference temperature channel in the scan list before other thermocouple channels are measured. Parameters Comments Parameter Name Parameter Type Range of Values Default Units ref_channel channel list (string) 100 - 163 none ch_list channel list (string) 100 - 163 none · Use SENS:FUNC:TEMP to configure channels to measure thermocouples. Then use SENS:REF to configure one or more channels to measure an isothermal reference temperature. Now use SENS:REF:CHAN to group the reference channel with its thermocouple measurement channels in the scan list. · If thermocouple measurements are made through more than one isothermal reference panel, set up a reference channel for each. Execute the SENS:REF:CHAN command for each reference/measurement channel group. · Related commands: SENS:FUNC:TEMP, SENS:REF · *RST Condition: Scan List contains no channel references. Usage SENS:FUNC:TEMP TC,E,.0625,(@108:115) SENS:REF THER,5000,1,(@106) SENS:REF RTD,85,.25,(@107) SENS:REF:CHAN (@106),(@108:111) SENS:REF:CHAN (@107),(@112:115) E type TCs on channels 8 through 15 Reference ch is thermistor at channel 6 Reference ch is RTD at channel 7 Thermistor measured before chs 8 - 11 RTD measured before chs 12 - 15 [SENSe:]REFerence:TEMPerature [SENSe:]REFerence:TEMPerature <degrees_c> stores a fixed reference junction temperature in the Reference Temperature Register. Use when the thermocouple reference junction is kept at a controlled temperature. NOTE 246 This reference temperature is used to compensate all subsequent thermocouple measurements until the register is overwritten by another SENSE:REF:TEMP value or by scanning a channel linked with the SENSE:REFERENCE command. If used, SENS:REF:TEMP must be executed before scanning any thermocouple channels. VT1415A Command Reference Chapter 6 [SENSe] Parameters Comments Parameter Name Parameter Type Range of Values Default Units degrees_c numeric (float32) -126 to +126 none · This command is used to specify to the VT1415A the temperature of a controlled temperature thermocouple reference junction. · When Accepted: Not while INITiated · Related Commands: FUNC:TEMP TC… · *RST Condition: Reference temperature is 0 °C Usage SENSE:REF:TEMP 40 subsequent thermocouple conversion will assume compensation junction at 40 °C [SENSe:]STRain:EXCitation [SENSe:]STRain:EXCitation <excite_v>,(@<ch_list>) specifies the excitation voltage value to be used to convert strain bridge readings for the channels specified by <ch_list>. This command does not control the output voltage of any source. Parameters Parameter Name Comments Parameter Type Range of Values Default Units excite_v numeric (flt32) 0.01 - 99 volts ch_list channel list (string) 100 - 163 none · <ch_list> must specify the channel used to sense the bridge voltage, not the channel position on a Bridge Completion SCP. · Related Commands: SENSE:STRAIN:¼, SENSE:FUNC:STRAIN¼ · *RST Condition: 3.9V Usage STRAIN:EXC 4,(@100:107) set excitation voltage for channels 0 through 7 [SENSe:]STRain:EXCitation? [SENSe:]STRain:EXCitation? (@<channel>) returns the excitation voltage value currently set for the sense channel specified by <channel>. Parameters Chapter 6 Parameter Name Parameter Type Range of Values Default Units channel channel list (string) 100 - 163 none VT1415A Command Reference 247 [SENSe] Comments · Returned Value: Numeric value of excitation voltage. The C-SCPI type is flt32. · <channel> must specify a single channel only. · Related Commands: STRAIN:EXCitation Usage STRAIN:EXC? (@107) query excitation voltage for channel 7 enter statement here returns the excitation voltage set by STR:EXC [SENSe:]STRain:GFACtor [SENSe:]STRain:GFACtor <gage_factor>,(@<ch_list>) specifies the gage factor to be used to convert strain bridge readings for the channels specified by <ch_list>. Parameters Comments Parameter Name Parameter Type Range of Values Default Units gage_factor numeric (flt32) 1-5 none ch_list channel list (string) 100 - 163 none · <ch_list> must specify the channel used to sense the bridge voltage, not the channel position on a Bridge Completion SCP. · Related Commands: SENSE:STRAIN:GFAC?, SENSE:FUNC:STRAIN¼ · *RST Condition: Gage factor is 2 Usage STRAIN:GFAC 3,(@100:107) set gage factor for channels 0 through 7 [SENSe:]STRain:GFACtor? [SENSe:]STRain:GFACtor? (@<channel>) returns the gage factor currently set for the sense channel specified by <channel>. Parameters Comments Parameter Name Parameter Type Range of Values Default Units channel channel list (string) 100 - 163 none · Returned Value: Numeric value of gage factor. The C-SCPI type is flt32. · <channel> must specify a single channel only. · Related Commands: STRAIN:GFACTOR Usage STRAIN:GFAC? (@107) enter statement here 248 VT1415A Command Reference query gage factor for channel 7 returns the gage factor set by STR:GFAC Chapter 6 [SENSe] [SENSe:]STRain:POISson [SENSe:]STRain:POISson <poisson_ratio>,(@<ch_list>) sets the Poisson ratio to be used for EU conversion of values measured on sense channels specified by <ch_list>. Parameters Parameter Name Comments Parameter Type Range of Values Default Units poisson_ratio numeric (flt32) 0.1 - 0.5 none ch_list channel list (string) 100 - 163 none · <ch_list> must specify channels used to sense strain bridge output, not channel positions on a Bridge Completion SCP. · Related Commands: FUNC:STRAIN¼, STRAIN:POISson? · *RST Condition: Poisson ratio is 0.3 Usage STRAIN:POISSON .5,(@124:131) set Poisson ratio for sense channels 24 through 31 [SENSe:]STRain:POISson? [SENSe:]STRain:POISson? (@<channel>) returns the Poisson ratio currently set for the sense channel specified by <channel>. Parameters Comments Parameter Name Parameter Type Range of Values Default Units channel channel list (string) 100 - 163 none · Returned Value: numeric value of the Poisson ratio. C-SCPI type is flt32. · <channel> must specify a single channel only. · Related Commands: FUNC:STRAIN¼, STRAIN:POISSON Usage STRAIN:POISSON? (@131) enter statement here query for the Poisson ratio specified for sense channel 31 enter the Poisson ratio value [SENSe:]STRain:UNSTrained [SENSe:]STRain:UNSTrained <unstrained_v>,(@<ch_list>) specifies the unstrained voltage value to be used to convert strain bridge readings for the channels specified by <ch_list>. This command does not control the output voltage of any source. Chapter 6 VT1415A Command Reference 249 [SENSe] Parameters Comments Parameter Name Parameter Type Range of Values Default Units unstrained_v numeric (flt32) -16 through +16 volts ch_list channel list (string) 100 - 163 none · Use a voltage measurement of the unstrained bridge sense channel to determine the correct value for <unstrained_v>. · <ch_list> must specify the channel used to sense the bridge voltage, not the channel position on a Bridge Completion SCP. · Related Commands: SENSE:STRAIN:UNST?, SENSE:FUNC:STRAIN¼ · *RST Condition: Unstrained voltage is zero Usage STRAIN:UNST .024,(@100) set unstrained voltage for channel 0 [SENSe:]STRain:UNSTrained? [SENSe:]STRain:UNSTrained? (@<channel>) returns the unstrained voltage value currently set for the sense channel specified by <channel>. This command does not make a measurement. Parameters Comments Parameter Name Parameter Type Range of Values Default Units channel channel list (string) 100 - 163 none · Returned Value: Numeric value of unstrained voltage. The C-SCPI type is flt32. · <channel> must specify a single channel only. · Related Commands: STRAIN:UNST Usage STRAIN:UNST? (@107) enter statement here query unstrained voltage for channel 7 returns the unstrained voltage set by STR:UNST [SENSe:]TOTalize:RESet:MODE [SENSe:]TOTalize:RESet:MODE <select>,<ch_list> sets the mode for resetting totalizer channels in <ch_list>. 250 VT1415A Command Reference Chapter 6 [SENSe] Parameters Comments Parameter Name Parameter Type Range of Values Default Units select discrete (string) INIT | TRIGger seconds ch_list string 100 - 163 none · In the INIT mode the total is reset only when the INITiate command is executed. In the TRIGger mode the total is reset every time a new scan is triggered. · If the channels specified are not on a Frequency/Totalize SCP, an error will be generated. · Related Commands: SENS:FUNC:TOT, INPUT:POLARITY · *RST Condition: SENS:TOT:RESET:MODE INIT Usage SENS:TOT:RESET:MODE TRIG,(@134) Chapter 6 totalizer at channel 34 resets at each trigger event VT1415A Command Reference 251 [SENSe] [SENSe:]TOTalize:RESet:MODE? [SENSe:]TOTalize:RESet:MODE? <channel> returns the reset mode for the totalizer channel in <channel>. Parameters Comments Parameter Name Parameter Type Range of Values Default Units channel string 100 - 163 none · <channel> must specify a single channel. · If the channel specified is not on a frequency/totalize SCP, an error will be generated. · Returned Value: returns INIT or TRIG. The type is string. 252 VT1415A Command Reference Chapter 6 SOURce SOURce The SOURce command subsystem allows configuring output SCPs as well as linking channels to output functions. Subsystem Syntax SOURce :FM :STATe 1 | 0 | ON | OFF,(@<ch_list>) :STATe? (@<channel>) :FUNCtion [:SHAPe] :CONDition (@<ch_list>) :PULSe (@<ch_list>) :SQUare (@<ch_list>) :PULM :STATe 1 | 0 | ON | OFF,(@<ch_list>) :STATe? (@<channel>) :PULSe :PERiod <period>,(@<ch_list>) :PERiod? (@<channel>) :WIDTh <pulse_width>,(@<ch_list>) :WIDTh? (@<channel>) SOURce:FM[:STATe] SOURce:FM[:STATe] <enable>,(@<ch_list>) enables the Frequency Modulated mode for a PULSe channel. Parameters Comments Parameter Name Parameter Type Range of Values Default Units enable boolean (uint16) 1 | 0 | ON | OFF none ch_list string 100 - 163 none · This command is coupled with the SOURce:PULM:STATE command. If the FM state is ON then the PULM state is OFF. If the PULM state is ON then the FM state is OFF. If both the FM and the PULM states are OFF then the PULSe channel is in the single pulse mode. · If the channels specified are not on a Frequency/Totalize SCP, an error will be generated. · Use SOURce:FUNCtion[:SHAPe]:SQUare to set FM pulse train to 50% duty cycle. Use SOURce:PULSe:PERiod to set the period. · *RST Condition: SOUR:FM:STATE OFF, SOUR:PULM:STATE OFF, SENS:FUNC:COND, and INP:POL for all digital SCP channels Chapter 6 VT1415A Command Reference 253 SOURce · Related Commands: SOUR:PULM[:STATe], SOUR:PULS:POLarity, SOUR:PULS:PERiod, SOUR:FUNC[:SHAPe]:SQUare · The variable frequency control for this channel is provided by the algorithm language. When the algorithm executes an assignment statement to this channel, the value assigned will be the frequency setting. For example: O143 = 2000 /* set channel 43 to 2 kHz */ SOURce:FM:STATe? SOURce:FM:STATe? (@<channel>) returns the frequency modulated mode state for a PULSe channel. Parameters Comments Parameter Name Parameter Type Range of Values Default Units channel string 100 - 163 none · <channel> must specify a single channel. · If the channel specified is not on a Frequency/Totalize SCP, an error will be generated. · Returned Value: returns 1 (ON) or 0 (OFF). The type is uint16. SOURce:FUNCtion[:SHAPe]:CONDition SOURce:FUNCtion[:SHAPe]:CONDition (@<ch_list>) sets the SOURce function to output digital patterns to bits in <ch_list>. Parameters Comments Parameter Name Parameter Type Range of Values Default Units ch_list string 100 - 163 none · The VT1533A SCP sources 8 digital bits on the channel specified by this command. The VT1534A SCP can source 1 digital bit on each of the the channels specified by this command. SOURce:FUNCtion[:SHAPe]:PULSe SOURce:FUNCtion[:SHAPe]:PULSe (@<ch_list>) sets the SOURce function to PULSe for the channels in <ch_list>. Parameters 254 Parameter Name Parameter Type Range of Values Default Units ch_list string 100 - 163 none VT1415A Command Reference Chapter 6 SOURce Comments · This PULSe channel function is further defined by the SOURce:FM:STATe and SOURce:PULM:STATe commands. If the FM state is enabled then the frequency modulated mode is active. If the PULM state is enabled then the pulse width modulated mode is active. If both the FM and the PULM states are disabled then the PULSe channel is in the single pulse mode. SOURce:FUNCtion[:SHAPe]:SQUare SOURce:FUNCtion[:SHAPe]:SQUare (@<ch_list>) sets the SOURce function to output a square wave (50% duty cycle) on the channels in <ch_list>. Parameters Comments Parameter Name Parameter Type Range of Values Default Units ch_list string 100 - 163 none · The frequency control for these channels is provided by the algorithm language function: O143 = 2000 /* set channel 43 to 2 kHz */ SOURce:PULM[:STATe] SOURce:PULM[:STATe] <enable>,(@<ch_list>) enable the pulse width modulated mode for the PULSe channels in <ch_list>. Parameters Comments Parameter Name Parameter Type Range of Values Default Units enable boolean (uint16) 1 | 0 | ON | OFF none ch_list string 100 - 163 none · This command is coupled with the SOURce:FM command. If the FM state is enabled then the PULM state is disabled. If the PULM state is enabled then the FM state is disabled. If both the FM and the PULM states are disabled then the PULSe channel is in the single pulse mode. · If the channels specified are not on a Frequency/Totalize SCP, an error will be generated. · *RST Condition: SOUR:PULM:STATE OFF SOURce:PULM:STATe? SOURce:PULM[:STATe]? (@<channel>) returns the pulse width modulated mode state for the PULSe channel in <channel>. Chapter 6 VT1415A Command Reference 255 SOURce Parameters Parameter Name Parameter Type Range of Values Default Units channel string 100 - 163 none Comments <channel> must specify a single channel. · Returned Value: returns ON or OFF. The type is string. SOURce:PULSe:PERiod SOURce:PULSe:PERiod <period>,(@<ch_list>) sets the fixed pulse period value on a pulse width modulated pulse channel. This sets the frequency (1/period) of the pulse-width-modulated pulse train. Parameters Comments Parameter Name Parameter Type Range of Values Default Units period numeric (float32) 25E-6 to 7.8125E-3 (resolution 0.238 µs) seconds ch_list string 100 - 163 none · If the channels specified are not on a Frequency/Totalize SCP, an error will be generated. · *RST Condition: SOUR:FM:STATE OFF and SOUR:PULM:STATE OFF · Related Commands: SOUR:PULM:STATE, SOUR:PULS:POLarity · The variable pulse-width control for this channel is provided by the algorithm language. When the algorithm executes an assignment statement to this channel, the value assigned will be the pulse-width setting. For example: O140 = .0025 /* set channel 43 pulse-width to 2.5 ms */ Usage SOUR:PULS:PER .005,(@140) set PWM pulse train to 200 Hz on channel 40 SOURce:PULSe:PERiod? SOURce:PULSe:PERiod? (@<channel>) returns the fixed pulse period value on the pulse width modulated pulse channel in <channel>. Parameters Comments Parameter Name Parameter Type Range of Values Default Units channel string 100 - 163 none · If the channels specified are not on a Frequency/Totalize SCP, an error will be generated. 256 VT1415A Command Reference Chapter 6 SOURce · Returned Value: numeric period. The type is float32. SOURce:PULSe:WIDTh SOURce:PULSe:WIDTh <pulse_width>,(@<ch_list>) sets the fixed pulse width value on the frequency modulated pulse channels in <ch_list>. Parameters Comments Parameter Name Parameter Type Range of Values Default Units pulse_width numeric (float32) 7.87E-6 to 7.8125E-3 (238.4E-9 resolution) seconds ch_list string 100 - 163 none · If the channels specified are not on a Frequency/Totalize SCP, an error will be generated. · *RST Condition: SOUR:FM:STATE OFF and SOUR:PULM:STATE OFF · Related Commands: SOUR:PULM:STATE, SOUR:PULS:POLarity · The variable frequency control for this channel is provided by the algorithm language. When the algorithm executes an assignment statement to this channel, the value assigned will be the frequency setting. For example: O143 = 2000 /* set channel 43 to 2 kHz */ Usage SOUR:PULS:WIDTH 2.50E-3,(@143) set fixed pulse width of 2.5 ms on channel 43 SOURce:PULSe:WIDTh? SOURce:PULSe:WIDTh? (@<ch_list>) returns the fixed pulse width value on a frequency modulated pulse channel. Parameters Comments Parameter Name Parameter Type Range of Values Default Units channel string 100 - 163 none · <channel> must specify a single channel. · If the channels specified are not on a Frequency/Totalize SCP, an error will be generated. · Returned Value: returns the numeric pulse width. The type is float32. Chapter 6 VT1415A Command Reference 257 STATus STATus The STATus subsystem communicates with the SCPI defined Operation and Questionable Data status register sets. Each is comprised of a Condition register, a set of Positive and Negative Transition Filter registers, an Event register, and an Enable register. Condition registers allow the current real-time states of their status signal inputs (signal states are not latched) to be viewed. The Positive and Negative Transition Filter registers allow the polarity of change from the Condition registers to be controlled that will set Event register bits. Event registers contain latched representations of signal transition events from their Condition register. Querying an Event register reads and then clears its contents, making it ready to record further event transitions from its Condition register. Enable registers are used to select which signals from an Event register will be logically OR'ed together to form a summary bit in the Status Byte Summary register. Setting a bit to one in an Enable register enables the corresponding bit from its Event register. NOTE For a complete discussion see “Using the Status System” on page 91. Condition P/N Transition Event Enable =1 Bit 0 latch =1 =1 Bit 1 latch =1 Logical OR Summary Bit to Status Byte =1 Bit 14 latch =1 =1 Bit 15 latch =1 Figure 6-4: General Status Register Organization 258 VT1415A Command Reference Chapter 6 STATus Initializing the Status The following table shows the effect of Power-on, *RST, *CLS, and System STATus:PRESet on the status system register settings. SCPI Transition Filters SCPI Enable Registers SCPI Event Registers IEEE 488.2 Registers ESE and SRE IEEE 488.2 Registers SESR and STB Power-On preset preset clear clear clear *RST none none none none none *CLS none none clear none clear STAT:PRESET preset preset none none none Subsystem Syntax STATus :OPERation :CONDition? :ENABle <enable_mask> :ENABle? [:EVENt]? :NTRansition <transition_mask> :NTRansition? :PTRansition <transition_mask> :PTRansition? :PRESet :QUEStionable :CONDition? :ENABle <enable_mask> :ENABle? [:EVENt]? :NTRansition <transition_mask> :NTRansition? :PTRansition <transition_mask> :PTRansition? The Status system contains four status groups · · · · Operation Status Group Questionable Data Group Standard Event Group Status Byte Group This SCPI STATus subsystem communicates with the first two groups while IEEE-488.2 Common Commands (documented later in this chapter) communicate with Standard Event and Status Byte Groups. Chapter 6 VT1415A Command Reference 259 STATus Weighted Bit Values Register queries are returned using decimal weighted bit values. Enable registers can be set using decimal, hex, octal, or binary. The following table can be used to help set Enable registers using decimal and decode register queries. Status System Decimal Weighted Bit Values bit# 15 14 13 12 11 10 9 8 7 6 5 4 3 2 1 0 value always 0 16,384 8,192 4,096 2,048 1,024 512 256 128 64 32 16 8 4 2 1 The Operation Status Group The Operation Status Group indicates the current operating state of the VT1415A. The bit assignments are: Bit # dec value hex value 0 1 000116 Bit Name Calibrating 1-3 4 Description Set by CAL:TARE and CAL:SETup. Cleared by CAL:TARE? and CAL:SETup?. Set while *CAL? executes and reset when *CAL? completes. Set by CAL:CONFIG:VOLT or CAL:CONFIG:RES, cleared by CAL:VAL:VOLT or CAL:VAL:RES. Not used 16 001016 Measuring 5-7 Set when instrument INITiated. Cleared when instrument returns to Trigger Idle State. Not used 8 256 010016 Scan Complete Set when each pass through a Scan List completed (may not indicate all measurements have been taken when TRIG:COUNT >1). 9 512 020016 SCP Trigger An SCP has sourced a trigger event (future VT1415A SCPs) 10 1024 040016 FIFO Half Full The FIFO contains at least 32,768 readings 11 2048 080016 Algorithm Interrupted The interrupt() function was called in an algorithm 12-15 Not used STATus:OPERation:CONDition? STATus:OPERation:CONDition? returns the decimal weighted value of the bits set in the Condition register. Comments · The Condition register reflects the real-time state of the status signals. The signals are not latched; therefore past events are not retained in this register (see STAT:OPER:EVENT?). 260 VT1415A Command Reference Chapter 6 · Returned Value: Decimal weighted sum of all set bits. The C-SCPI type is uint16. · Related Commands: *CAL?, CAL:ZERO, INITiate[:IMMediate], STAT:OPER:EVENT?, STAT:OPER:ENABLE, STAT:OPER:ENABLE? · *RST Condition: No Change Usage STATUS:OPERATION:CONDITION? Enter statement will return value from condition register STATus:OPERation:ENABle STATus:OPERation:ENABle <enable_mask> sets bits in the Enable register that will enable corresponding bits from the Event register to set the Operation summary bit. Parameters Comments Parameter Name Parameter Type Range of Values Default Units enable_mask numeric (uint16) 0-32767 none · <enable_mask> may be sent as decimal, hex (#H), octal (#Q), or binary (#B). · VXI Interrupts: When Operation Status Group bits 4, 8, 9, 10, or 11 are enabled, VXI card interrupts will occur as follows: When the event corresponding to bit 4 occurs and then is cleared, the card will generate a VXI interrupt. When the event corresponding to bit 8, 9, 10, or 11 occurs, the card will generate a VXI interrupt. NOTE: In C-SCPI, the C-SCPI overlap mode must be on for VXIbus interrupts to occur. · Related Commands: *STB?, SPOLL, STAT:OPER:COND?, STAT:OPER:EVENT?, STAT:OPER:ENABLE? · Cleared By: STAT:PRESet and power-on. · *RST Condition: No change Usage STAT:OPER:ENABLE 1 Set bit 0 in the Operation Enable register STATus:OPERation:ENABle? STATus:OPERation:ENABle? returns the value of bits set in the Operation Enable register. Comments · Returned Value: Decimal weighted sum of all set bits. The C-SCPI type is uint16. Chapter 6 VT1415A Command Reference 261 STATus · Related Commands: *STB?, SPOLL, STAT:OPER:COND?, STAT:OPER:EVENT?, STAT:OPER:ENABLE · *RST Condition: No change Usage STAT:OPER:ENABLE? Enter statement returns current value of bits set in the Operation Enable register STATus:OPERation[:EVENt]? STATus:OPERation[:EVENt]? returns the decimal weighted value of the bits set in the Event register. Comments · When using the Operation Event register to cause SRQ interrupts, STAT:OPER:EVENT? must be executed after an SRQ to re-enable future interrupts. · Returned Value: Decimal weighted sum of all set bits. The C-SCPI type is uint16. · Related Commands: *STB?, SPOLL, STAT:OPER:COND?, STAT:OPER:ENABLE, STAT:OPER:ENABLE? · Cleared By: *CLS, power-on and by reading the register. · *RST Condition: No change Usage STAT:OPER:EVENT? Enter statement will return the value of bits set in the Operation Event register Same as above STAT:OPER? STATus:OPERation:NTRansition STATus:OPERation:NTRansition <transition_mask> sets bits in the Negative Transition Filter (NTF) register. When a bit in the NTF register is set to one, the corresponding bit in the Condition register must change from a one to a zero in order to set the corresponding bit in the Event register. When a bit in the NTF register is zero, a negative transition of the Condition register bit will not change the Event register bit. Parameters Comments Parameter Name Parameter Type Range of Values Default Units transition_mask numeric (uint16) 0-32767 none · The <transition_mask> parameter may be sent as decimal, hex (#H), octal (#Q), or binary (#B). · If both the STAT:OPER:PTR and STAT:OPER:NTR registers have a corresponding bit set to one, any transition, positive or negative, will set the corresponding bit in the Event register. 262 VT1415A Command Reference Chapter 6 STATus · If neither the STAT:OPER:PTR or STAT:OPER:NTR registers have a corresponding bit set to one, transitions from the Condition register will have no effect on the Event register. · Related Commands: STAT:OPER:NTR?, STAT:OPER:PTR · Cleared By: STAT:PRESet and power-on. · *RST Condition: No change Usage STAT:OPER:NTR 16 When “Measuring” bit goes false, set bit 4 in Status Operation Event register. STATus:OPERation:NTRansition? STATus:OPERation:NTRansition? returns the value of bits set in the Negative Transition Filter (NTF) register. Comments · Returned Value: Decimal weighted sum of all set bits. The C-SCPI type is uint16. · Related Commands: STAT:OPER:NTR · *RST Condition: No change Usage STAT:OPER:NTR? Enter statement returns current value of bits set in the NTF register STATus:OPERation:PTRansition STATus:OPERation:PTRansition <transition_mask> sets bits in the Positive Transition Filter (PTF) register. When a bit in the PTF register is set to one, the corresponding bit in the Condition register must change from a zero to a one in order to set the corresponding bit in the Event register. When a bit in the PTF register is zero, a positive transition of the Condition register bit will not change the Event register bit. Parameters Comments Parameter Name Parameter Type Range of Values Default Units transition_mask numeric (uint16) 0-32767 none · <transition_mask> may be sent as decimal, hex (#H), octal (#Q), or binary (#B). · If both the STAT:OPER:PTR and STAT:OPER:NTR registers have a corresponding bit set to one, any transition, positive or negative, will set the corresponding bit in the Event register. · If neither the STAT:OPER:PTR or STAT:OPER:NTR registers have a corresponding bit set to one, transitions from the Condition register will have no effect on the Event register. Chapter 6 VT1415A Command Reference 263 STATus · Related Commands: STAT:OPER:PTR?, STAT:OPER:NTR · Set to all ones by: STAT:PRESet and power-on. · *RST Condition: No change Usage STAT:OPER:PTR 16 When “Measuring” bit goes true, set bit 4 in Status Operation Event register. STATus:OPERation:PTRansition? STATus:OPERation:PTRansition? returns the value of bits set in the Positive Transition Filter (PTF) register. Comments · Returned Value: Decimal weighted sum of all set bits. The C-SCPI type is uint16. · Related Commands: STAT:OPER:PTR · *RST Condition: No change Usage STAT:OPER:PTR? Enter statement returns current value of bits set in the PTF register STATus:PRESet STATus:PRESet sets the Operation Status Enable and Questionable Data Enable registers to 0. After executing this command, none of the events in the Operation Event or Questionable Event registers will be reported as a summary bit in either the Status Byte Group or Standard Event Status Group. STATus:PRESet does not clear either of the Event registers. Comments · Related Commands: *STB?, SPOLL, STAT:OPER:ENABLE, STAT:OPER:ENABLE?, STAT:QUES:ENABLE, STAT:QUES:ENABLE? · *RST Condition: No change Usage STAT:PRESET Clear both of the Enable registers The Questionable Data Group The Questionable Data Group indicates when errors are causing lost or questionable data. The bit assignments are: 264 VT1415A Command Reference Chapter 6 STATus Bit # dec value hex value Bit Name 0-7 Description Not used 8 256 010016 Calibration Lost At *RST or Power-on Control Processor has found a checksum error in the Calibration Constants. Read error(s) with SYST:ERR? and re-calibrate area(s) that lost constants. 9 512 020016 Trigger Too Fast Scan not complete when another trigger event received. 10 1024 040016 FIFO Overflowed Attempt to store more than 65,024 readings in FIFO. 11 2048 080016 Over voltage Detected on Input If the input protection jumper has not been cut, the input relays have been opened and *RST is required to reset the module. Over-voltage will also generate an error. 12 4096 100016 VME Memory Overflow The number of readings taken exceeds VME memory space. 13 8192 200016 Setup Changed Channel Calibration in doubt because SCP setup may have changed since last *CAL? or CAL:SETup command. (*RST always sets this bit.) 14-15 Not used STATus:QUEStionable:CONDition? STATus:QUEStionable:CONDition? returns the decimal weighted value of the bits set in the Condition register. Comments · The Condition register reflects the real-time state of the status signals. The signals are not latched; therefore past events are not retained in this register (see STAT:QUES:EVENT?). · Returned Value: Decimal weighted sum of all set bits. The C-SCPI type is uint16. · Related Commands: CAL:VALUE:RESISTANCE, CAL:VALUE:VOLTAGE, STAT:QUES:EVENT?, STAT:QUES:ENABLE, STAT:QUES:ENABLE? · *RST Condition: No change Usage STATUS:QUESTIONABLE:CONDITION? Enter statement will return value from condition register STATus:QUEStionable:ENABle STATus:QUEStionable:ENABle <enable_mask> sets bits in the Enable register that will enable corresponding bits from the Event register to set the Questionable summary bit. Chapter 6 VT1415A Command Reference 265 STATus Parameters Comments Parameter Name Parameter Type Range of Values Default Units enable_mask numeric (uint16) 0-32767 none · <enable_mask> may be sent as decimal, hex (#H), octal (#Q), or binary (#B). · VXI Interrupts: When bits 9, 10, or 11 are enabled and C-SCPI overlap mode is on (or if using non-compiled SCPI), VXI card interrupts will be enabled. When the event corresponding to bit 9, 10, or 11 occurs, the card will generate a VXI interrupt. · Related Commands: *STB?, SPOLL, STAT:QUES:COND?, STAT:QUES:EVENT?, STAT:QUES:ENABLE? · Cleared By: STAT:PRESet and power-on. · *RST Condition: No change Usage STAT:QUES:ENABLE 128 Set bit 7 in the Questionable Enable register STATus:QUEStionable:ENABle? STATus:QUEStionable:ENABle? returns the value of bits set in the Questionable Enable register. Comments · Returned Value: Decimal weighted sum of all set bits. The C-SCPI type is uint16. · Related Commands: *STB?, SPOLL, STAT:QUES:COND?, STAT:QUES:EVENT?, STAT:QUES:ENABLE · *RST Condition: No change Usage STAT:QUES:ENABLE? Enter statement returns current value of bits set in the Questionable Enable register STATus:QUEStionable[:EVENt]? STATus:QUEStionable[:EVENt]? returns the decimal weighted value of the bits set in the Event register. Comments · When using the Questionable Event register to cause SRQ interrupts, STAT:QUES:EVENT? must be executed after an SRQ to re-enable future interrupts. · Returned Value: Decimal weighted sum of all set bits. The C-SCPI type is uint16. · Cleared By: *CLS, power-on and by reading the register. 266 VT1415A Command Reference Chapter 6 · Related Commands: *STB?, SPOLL, STAT:QUES:COND?, STAT:QUES:ENABLE, STAT:QUES:ENABLE? Usage STAT:QUES:EVENT? Enter statement will return the value of bits set in the Questionable Event register Same as above STAT:QUES? STATus:QUEStionable:NTRansition STATus:QUEStionable:NTRansition <transition_mask> sets bits in the Negative Transition Filter (NTF) register. When a bit in the NTF register is set to one, the corresponding bit in the Condition register must change from a one to a zero in order to set the corresponding bit in the Event register. When a bit in the NTF register is zero, a negative transition of the Condition register bit will not change the Event register bit. Parameters Comments Parameter Name Parameter Type Range of Values Default Units transition_mask numeric (uint16) 0-32767 none · <transition_mask> may be sent as decimal, hex (#H), octal (#Q), or binary (#B). · If both the STAT:QUES:PTR and STAT:QUES:NTR registers have a corresponding bit set to one, any transition, positive or negative, will set the corresponding bit in the Event register. · If neither the STAT:QUES:PTR or STAT:QUES:NTR registers have a corresponding bit set to one, transitions from the Condition register will have no effect on the Event register. · Related Commands: STAT:QUES:NTR?, STAT:QUES:PTR · Cleared By: STAT:PRESet and power-on. · *RST Condition: No change Usage STAT:QUES:NTR 1024 When “FIFO Overflowed” bit goes false, set bit 10 in Status Questionable Event register. STATus:QUEStionable:NTRansition? STATus:QUEStionable:NTRansition? returns the value of bits set in the Negative Transition Filter (NTF) register. Comments · Returned Value: Decimal weighted sum of all set bits. The C-SCPI type is uint16. · Related Commands: STAT:QUES:NTR · *RST Condition: No change Chapter 6 VT1415A Command Reference 267 STATus Usage STAT:QUES:NTR? Enter statement returns current value of bits set in the NTF register STATus:QUEStionable:PTRansition STATus:QUEStionable:PTRansition <transition_mask> sets bits in the Positive Transition Filter (PTF) register. When a bit in the PTF register is set to one, the corresponding bit in the Condition register must change from a zero to a one in order to set the corresponding bit in the Event register. When a bit in the PTF register is zero, a positive transition of the Condition register bit will not change the Event register bit. Parameters Comments Parameter Name Parameter Type Range of Values Default Units transition_mask numeric (uint16) 0-32767 none · <transition_mask> may be sent as decimal, hex (#H), octal (#Q), or binary (#B). · If both the STAT:QUES:PTR and STAT:QUES:NTR registers have a corresponding bit set to one, any transition, positive or negative, will set the corresponding bit in the Event register. · If neither the STAT:QUES:PTR or STAT:QUES:NTR registers have a corresponding bit set to one, transitions from the Condition register will have no effect on the Event register. · Related Commands: STAT:QUES:PTR?, STAT:QUES:NTR · Set to all ones by: STAT:PRESet and power-on. · *RST Condition: No change Usage STAT:QUES:PTR 1024 When “FIFO Overflowed” bit goes true, set bit 10 in Status Operation Event register. STATus:QUEStionable:PTRansition? STATus:QUEStionable:PTRansition? returns the value of bits set in the Positive Transition Filter (PTF) register. Comments · Returned Value: Decimal weighted sum of all set bits. The C-SCPI type is uint16. · Related Commands: STAT:QUES:PTR · *RST Condition: No change Usage STAT:OPER:PTR? 268 VT1415A Command Reference Enter statement returns current value of bits set in the PTF register Chapter 6 SYSTem SYSTem The SYSTem subsystem is used to query for error messages, types of Signal Conditioning Plug-Ons (SCPs) and the SCPI version currently implemented. Subsystem Syntax SYSTem :CTYPe? (@<channel>) :ERRor? :VERSion? SYSTem:CTYPe? SYSTem:CTYPe? (@<channel>) returns the identification of the Signal Conditioning Plug-On installed at the specified channel. Parameters Comments Parameter Name Parameter Type Range of Values Default Units channel channel list (string) 100 - 163 none · The <channel> parameter must specify a single channel only. · Returned Value: An example of the response string format is: Agilent,E1415 Option <option number and description> SCP,0,0 The C-SCPI type is string. For specific response string, refer to the appropriate SCP manual. If <channel> specifies a position where no SCP is installed, the module returns the response string: 0,No SCP at this Address,0,0 Usage SYST:CTYPE? (@100) return SCP type install at channel 0 SYSTem:ERRor? SYSTem:ERRor? returns the latest error entered into the Error Queue. Comments · SYST:ERR? returns one error message from the Error Queue (returned error is removed from queue). To return all errors in the queue, repeatedly execute SYST:ERR? until the error message string = +0, “No error” · Returned Value: Errors are returned in the form: ±<error number>, “<error message string>” · RST Condition: Error Queue is empty. Usage SYST:ERR? Chapter 6 returns the next error message from the Error Queue VT1415A Command Reference 269 SYSTem SYSTem:VERSion? SYSTem:VERSion? returns the version of SCPI this instrument complies with. Comments · Returned Value: String “1990." The C-SCPI type is string. Usage SYST:VER? 270 VT1415A Command Reference Returns “1990" Chapter 6 TRIGger TRIGger The TRIGger command subsystem controls the behavior of the trigger system once it is initiated (see INITiate command subsystem). Figure 6-5 shows the overall Trigger System model. The shaded area shows the ARM subsystem portion. ARM:SOURce <source> ARM Source Selector TRIGger:TIMer <interval> Trigger Timer TRIGger:SOURce <source> TIMer BUS Trigger Source Selector ARM/TRIGger Sources EXTernal HOLD IMMediate TTLTrg<n> SCP Trig Trigger Enable Internal Trigger Signal Trigger Counter TRIGger:COUNt <count> Figure 6-5: Logical Trigger Model CAUTION! Algorithms execute at most once per trigger event. Should trigger events cease (external trigger source stops) or are ignored (TRIGger:COUNt reached), algorithms execution will stop. In this case control outputs are left at the last value set by the algorithms. Depending on the process, this uncontrolled situation could even be dangerous. Make certain that the process is in a safe state before halting (stop triggering) execution of a controlling algorithm. The Agilent/HP E1535 Watchdog Timer SCP was specifically developed to automatically signal that an algorithm has stopped controlling a process. Use of the Watchdog Timer is recommended for critical processes. Chapter 6 VT1415A Command Reference 271 TRIGger Event Sequence Figure 6-6 shows how the module responds to various trigger/arm configurations. Trigger Idle State INITiate[:IMMediate] Execute Control Loop Algorithm yes Execute Control Loop Algorithm TRIG:SOUR TIMer? no yes ARM Event Execute Control Loop Algorithm no Trig. Counter= TRIG:COUNT? Waiting For Trigger no Trigger Events Scan Inputs and Increment Trig Counter yes ABORt Execute Control Loop Algorithm Update Control Outputs Figure 6-6: Trigger/Scan Sequence Diagram Subsystem Syntax 272 TRIGger :COUNt <trig_count> :COUNt? [:IMMediate] :SOURce BUS | EXTernal | HOLD | SCP | IMMediate | TIMer | TTLTrg<n> :SOURce? :TIMer [:PERiod] <trig_interval> [:PERiod]? VT1415A Command Reference Chapter 6 TRIGger TRIGger:COUNt TRIGger:COUNt <trig_count> sets the number of times the module can be triggered before it returns to the Trigger Idle State. The default count is 0 (same as INF) so accepts continuous triggers. See Figure 6-6. Parameters Comments Parameter Name Parameter Type Range of Values Default Units trig_count numeric (uint16) (string) 0 to 65535 | INF none · When <trig_count> is set to 0 or INF, the trigger counter is disabled. Once INITiated the module will return to the Waiting For Trigger State after each trigger event. The ABORT (preferred) and *RST commands will return the module to the Trigger Idle State. ABORT is preferred since *RST also returns other module configurations to their default settings. · The default count is 0 · Related Commands: TRIG:COUNT? · *RST Condition: TRIG:COUNT 0 Usage TRIG:COUNT 10 TRIG:COUNT 0 Set the module to make 10 passes all enabled algorithms. Set the module to accept unlimited triggers (the default). TRIGger:COUNt? TRIGger:COUNt? returns the currently set trigger count. Comments · If TRIG:COUNT? returns 0, the trigger counter is disabled and the module will accept an unlimited number of trigger events. · Returned Value: Numeric 0 through 65,535. The C-SCPI type is int32. · Related Commands: TRIG:COUNT · *RST Condition: TRIG:COUNT? returns 0 Usage TRIG:COUNT? enter statement Query for trigger count setting. Returns the TRIG:COUNT setting. TRIGger[:IMMediate] TRIGger[:IMMediate] causes one trigger when the module is set to the TRIG:SOUR BUS or TRIG:SOUR HOLD mode. Chapter 6 VT1415A Command Reference 273 TRIGger Comments · This command is equivalent to the *TRG common command or the IEEE-488.2 “GET” bus command. · Related Commands: TRIG:SOURCE Usage TRIG:IMM Use TRIGGER to start a measurement scan. TRIGger:SOURce TRIGger:SOURce <trig_source> configures the trigger system to respond to the trigger event. Parameters Comments Parameter Name Parameter Type Range of Values Default Units trig_source discrete (string) BUS | EXT | HOLD | IMM | SCP | TIM | TTLTrg<n> none · The following table explains the possible choices. Parameter Value NOTE Source of Trigger BUS TRIGger[:IMMediate], *TRG, GET (for GPIB) EXTernal “TRG” signal on terminal module HOLD TRIGger[:IMMediate] IMMediate The trigger event is always satisfied. SCP SCP Trigger Bus (future SCP Breadboard) TIMer The internal trigger timer TTLTrg<n> The VXIbus TTLTRG lines (n=0 through 7) The ARM system only exists while TRIG:SOUR is TIMer. When TRIG:SOUR is not TIMer, SCPI compatibility requires that ARM:SOUR be IMM or an Error -221,"Settings conflict" will be generated. · While TRIG:SOUR is IMM, simply INITiate the trigger system to start a measurement scan. · When Accepted: Before INIT only. · Related Commands: ABORt, INITiate, *TRG · *RST Condition: TRIG:SOUR TIMER Usage TRIG:SOUR EXT 274 VT1415A Command Reference Hardware trigger input at Connector Module. Chapter 6 TRIGger TRIGger:SOURce? TRIGger:SOURce? returns the current trigger source configuration. · Returned Value: Discrete; one of BUS, EXT, HOLD, IMM, SCP, TIM, or TTLT0 through TTLT7. The C-SCPI type is string. See the TRIG:SOUR command for more response data information. Usage TRIG:SOUR? ask VT1415A to return trigger source configuration. TRIGger:TIMer[:PERiod] TRIGger:TIMer[:PERiod] <trig_interval> sets the interval between scan triggers. Used with the TRIG:SOUR TIMER trigger mode. Parameters Comments Parameter Name Parameter Type Range of Values Default Units trig_interval numeric (float32) (string) 100E-6 to 6.5536 | MIN | MAX seconds · In order for the TRIG:TIMER to start it must be Armed. For information on timer arming see the ARM subsystem in this command reference. · The default interval is 10E-3 seconds. <trig_interval> may be specified in seconds, milliseconds (ms), or microseconds (us). For example; 0.0016, 1.6 ms or 1600 us. The resolution for <trig_interval> is 100 µs. · When Accepted: Before INIT only. · Related Commands: TRIG:SOUR TIMER, ARM:SOUR, ARM:IMM, INIT, TRIG:SOUR?, ALG:EXPL:TIMe? · *RST Condition: TRIG:TIM 1.0E-3 Usage TRIG:TIMER 1.0E-1 TRIG:TIMER 1 Set the module to scan inputs and execute all algorithms every 100 ms. Set the module to scan inputs and execute all algorithms every second. TRIGger:TIMer[:PERiod]? TRIGger:TIMer[:PERiod]? returns the currently set Trigger Timer interval. Comments · Returned Value: Numeric 1 through 6.5536. The C-SCPI type is float32. · Related Commands: TRIG:TIMER · *RST Condition: 1.0E-4 Usage TRIG:TIMER? enter statement Chapter 6 Query trig timer. Returns the timer setting. VT1415A Command Reference 275 Common Command Reference Common Command Reference The following reference discusses the VT1415A IEEE-488.2 Common commands. *CAL? Calibration command. The calibration command causes the Channel Calibration function to be performed for every module channel. The Channel Calibration function includes calibration of A/D Offset and Gain and Offset for all 64 channels. This calibration is accomplished using internal calibration references. The *CAL? command causes the module to calibrate A/D offset and gain and all channel offsets. This may take many minutes to complete. The actual time it will take the VT1415A to complete *CAL? depends on the mix of SCPs installed. *CAL performs literally hundreds of measurements of the internal calibration sources for each channel and must allow seventeen time constants of settling wait each time a filtered channel’s calibrations source value is changed. The *CAL procedure is internally very sophisticated and results in an extremely well calibrated module. To perform Channel Calibration on multiple VT1415As, use CAL:SETup. · Returned Value: Value Meaning Further Action 0 Cal OK None -1 Cal Error Query the Error Queue (SYST:ERR?) See Error Messages in Appendix B The C-SCPI type for this returned value is int16. · When Accepted: Not while INITiated · Related Commands: CALibration:SETup, CALibration:SETup?, CALibration:STORe ADC · CAL:STOR ADC stores the calibration constants for *CAL? and CAL:SETup into non-volatile memory. · Executing this command does not alter the module’s programmed state (function, range, etc.). It does however clear STAT:QUES:COND? register bit 13. NOTE 276 If Open Transducer Detect (OTD) is enabled when *CAL? is executed, the module will disable OTD, wait 1 minute to allow channels to settle, perform the calibration and then re-enable OTD. If a program turns off OTD before executing *CAL?, it should also wait 1 minute for settling. VT1415A Command Reference Chapter 6 Common Command Reference *CLS Clear Status Command. The *CLS command clears all status event registers (Standard Event Status Event Register, Standard Operation Status Event Register, Questionable Data Event Register) and the instrument’s error queue. This clears the corresponding summary bits (bits 3, 5, and 7) in the Status Byte Register. *CLS does not affect the enable bits in any of the status register groups. (The SCPI command STATus:PRESet does clear the Operation Status Enable and Questionable Data Enable registers.) *CLS disables the Operation Complete function (*OPC command) and the Operation Complete Query function (*OPC? command). *DMC <name>,<cmd_data> Define Macro Command. Assigns one or a sequence of commands to a named macro. The command sequence may be composed of SCPI and/or Common commands. <name> may be the same as a SCPI command, but may not be the same as a Common command. When a SCPI named macro is executed, the macro rather than the SCPI command is executed. To regain the function of the SCPI command, execute *EMC 0 command. <cmd_data> is sent as arbitrary block program data (see page 156). *EMC Enable Macro Command. When <enable> is non-zero, macros are enabled. When <enable> is zero, macros are disabled. *EMC? Enable Macro query. Returns either 1 (macros are enabled) or 0 (macros are disabled). *ESE <mask> Standard Event Status Enable Register Command. Enables one or more events in the Standard Event Status Register to be reported in bit 5 (the Standard Event Status Summary Bit) of the Status Byte Register. An event is enabled by specifying its decimal weight for <mask>. To enable more than one event (bit), specify the sum of the decimal weights. The C-SCPI type for <mask> is int16. Bit # 7 6 5 4 3 2 1 0 Weighted Value 128 64 32 16 8 4 2 1 Event Power-On User Request Command Error Execution Error Device Dependent Error Query Error Request Control Operation Complete Chapter 6 VT1415A Command Reference 277 Common Command Reference *ESE? Standard Event Status Enable Query. Returns the weighted sum of all enabled (unmasked) bits in the Standard Event Status Register. The C-SCPI type for this returned value is int16. *ESR? Standard Event Status Register Query. Returns the weighted sum of all set bits in the Standard Event Status Register. After reading the register, *ESR? clears the register. The events recorded in the Standard Event Status Register are independent of whether or not those events are enabled with the *ESE command to set the Standard Event Summary Bit in the Status Byte Register. The Standard Event bits are described in the *ESE command. The C-SCPI type for this returned value is int16. *GMC? <name> Get Macro query. Returns arbitrary block response data which contains the command or command sequence defined for <name>. For more information on arbitrary block response data see page 156. *IDN? Identity. Returns the device identity. The response consists of the following four fields (fields are separated by commas): · · · · Manufacturer Model Number Serial Number (returns 0 if not available) Driver Revision (returns 0 if not available) *IDN? returns the following response strings depending on model and options: Agilent,E1415B,<serial number>,<revision number> · The C-SCPI type for this returned value is string. NOTE 278 The revision will vary with the revision of the driver software installed in the system. This is the only indication of which version of the driver is installed. VT1415A Command Reference Chapter 6 *LMC? Learn Macros query. Returns a quoted string name for each currently defined macro. If more than one macro is defined, the strings are separated by commas (,). If no macro is defined, *LMC? returns a null string. *OPC Operation Complete. Causes an instrument to set bit 0 (Operation Complete Message) in the Standard Event Status Register when all pending operations invoked by SCPI commands have been completed. By enabling this bit to be reflected in the Status Byte Register (*ESE 1 command), synchronization can be ensured between the instrument and an external computer or between multiple instruments. NOTE Do not use *OPC to determine when the CAL:SETUP or CAL:TARE commands have completed. Instead, use their query forms CAL:SETUP? or CAL:TARE?. *OPC? Operation Complete Query. Causes an instrument to place a 1 into the instrument’s output queue when all pending instrument operations invoked by SCPI commands are finished. By requiring the computer to read this response before continuing program execution, synchronization can be ensured between one or more instruments and the computer. The C-SCPI type for this returned value is int16. NOTE Do not use *OPC? to determine when the CAL:SETUP or CAL:TARE commands have completed. Instead, use their query forms CAL:SETUP? or CAL:TARE?. *PMC Purge Macros Command. Purges all currently defined macros. *RMC <name> Remove individual Macro Command. Removes the named macro command. Chapter 6 VT1415A Command Reference 279 Common Command Reference *RST Reset Command. Resets the VT1415A as follows: · · · · · · · WARNING Erases all algorithms All elements in the Input Channel Buffer (I100 - I163) set to zero. All elements in the Output Channel Buffer (O100-O163) set to zero Defines all Analog Input channels to measure voltage Configures all Digital I/O channels as inputs Resets VT1531A and VT1532A Analog Output SCP channels to zero When Accepted: Not while INITiated Note the change in character of output channels when *RST is received. Digital outputs change to inputs (appearing now is 1 kW to +3 V, a TTL one) and analog control outputs change to zero (current or voltage). Keep these changes in mind when applying the VT1415A to a system or engineering a system for operation with the VT1415A. Also, note that each analog output channels disconnects for 5-6 milliseconds to discharge to zero at each *RST. It isn’t difficult to have the VT1415A signal a system when *RST is executed. A solution that can provide signals for several types of failures as well as signaling when *RST is executed is the Agilent/HP E1535 Watchdog Timer SCP. The Watchdog SCP even has an input through which all of the VT1415A’s channels can be commanded to disconnect from the system. · Sets the trigger system as follows: – TRIGGER:SOURCE TIMER – TRIGGER:TIMER 10E-3 – TRIGGER:COUNT 0 (infinite) – ARM:SOURCE IMMEDIATE · SAMPLE:TIMER 10E-6 · Aborts all pending operations, returns to Trigger Idle state · Disables the *OPC and *OPC? modes · MEMORY:VME:ADDRESS 240000; MEMORY:VME:STATE OFF; MEMORY:VME:SIZE 0 · Sets STAT:QUES:COND? bit 13 *RST does not affect: · · · · 280 Calibration data The output queue The Service Request Enable (SRE) register The Event Status Enable (ESE) register VT1415A Command Reference Chapter 6 *SRE <mask> Service Request Enable. When a service request event occurs, it sets a corresponding bit in the Status Byte Register (this happens whether or not the event has been enabled (unmasked) by *SRE). The *SRE command allows events to be identified which will assert a GPIB service request (SRQ). When an event is enabled by *SRE and that event occurs, it sets a bit in the Status Byte Register and issues an SRQ to the computer (sets the GPIB SRQ line true). An event is enabled by specifying its decimal weight for <mask>. To enable more than one event, specify the sum of the decimal weights. Refer to “The Status Byte Register” for a table showing the contents of the Status Byte Register. The C-SCPI type for <mask> is int16. Bit # 7 6 5 4 3 2 1 0 Weighted Value 128 64 32 16 8 4 2 1 Event Operation Status Request Service Standard Event Message Available Questionable Status not used not used not used *SRE? Status Register Enable Query. Returns the weighted sum of all enabled (unmasked) events (those enabled to assert SRQ) in the Status Byte Register. The C-SCPI type for this returned value is int16. *STB? Status Byte Register Query. Returns the weighted sum of all set bits in the Status Byte Register. Refer to the *ESE command earlier in this chapter for a table showing the contents of the Status Byte Register. *STB? does not clear bit 6 (Service Request). The Message Available bit (bit 4) may be cleared as a result of reading the response to *STB?. The C-SCPI type for this returned value is int16. *TRG Trigger. Triggers an instrument when the trigger source is set to bus (TRIG:SOUR BUS command) and the instrument is in the Wait for Trigger state. *TST? Self-Test. Causes an instrument to execute extensive internal self-tests and returns a response showing the results of the self-test. NOTES Chapter 6 1. During the first 5 minutes after power is applied, *TST? may fail. Allow the module to warm-up before executing *TST?. VT1415A Command Reference 281 Common Command Reference 2. Module must be screwed securely to mainframe. 3. The VT1415A C-SCPI driver for MS-DOS® implements two versions of *TST. The default version is an abbreviated self test that executes only the Digital Tests. By loading an additional object file, the full self test can be executed as described below. See the documentation that comes with the VT1415A C-SCPI driver for MS-DOS®. Comments · Returned Value: Value Meaning Further Action 0 *TST? OK None -1 *TST? Error Query the Error Queue (SYST:ERR?) for error 3052. See explanation below. · IF error 3052 ‘Self test failed. Test info in FIFO’ is returned. A FIFO value of 1 through 99 or ³ 300 is a failed test number. A value of 100 through 163 is a channel number for the failed test. A value of 200 through 204 is an A/D range number for the failed test where 200 = 0.0625, 201 = 0.25 V, 202 = 1 V, 203 = 4 V and 204 = 16 V ranges. For example DATA:FIFO? returns the values 72 and 108. This indicates that test number 72 failed on channel 8. Test numbers 20, 30-37, 72, 74-76, and 80-93 may indicate a problem with a Signal Conditioning Plug-On. For tests 20 and 30-37, remove all SCPs and see if *TST? passes. If so, replace SCPs one at a time until the one causing the problem is found. For tests 72, 74-76, and 80-93, try to re-seat the SCP that the channel number(s) points to or move the SCP and see if the failure(s) follow the SCP. If the problems move with the SCP, replace the SCP. These are the only tests where the user should troubleshoot a problem. Other tests which fail should be referred to qualified repair personnel. NOTE Executing *TST? returns the module to its *RST state. *RST causes the FIFO data format to return to its default of ASC,7. To read the FIFO for *TST? diagnostic information and have data in a format other than ASCII,7, make certain that the data FIFO format is set to the desired format (FORMAT command) after completion of *TST? but before executing a SENSE:DATA:FIFO? query command. · The C-SCPI type for this returned value is int16. · Following *TST?, the module is placed in the *RST state. This returns many of the module’s programmed states to their defaults. See page 55 for a list of the module’s default states. 282 VT1415A Command Reference Chapter 6 Common Command Reference · *TST? performs the following tests on the VT1415A and installed Signal Conditioning Plug-Ons: DIGITAL TESTS: Test# 1-3: 4-5: 6: 7: 8-9: Description Writes and reads patterns to registers via A16 & A24 Checks FIFO and CVT Checks measurement complete (Measuring) status bit Checks operation of FIFO half and FIFO full IRQ generation Checks trigger operation ANALOG FRONT END DIGITAL TESTS: Test# 20: 30-32: 33,71: 34-37: Description Checks that SCP ID makes sense Checks relay driver and fet mux interface with EU CPU Checks opening of all relays on power down or input over-voltage Check fet mux interface with A/D digital ANALOG TESTS: Test# 40-42: 43-44: 45-46: 47-48: 49: 50-53: 54-55: 56-57: 58-59: 60-63: 64: 65-70: 71: 72-73: 74: 75: 76: 80: 81: 82: 83: 84: 86: 87: 88: Chapter 6 Description Checks internal voltage reference Checks zero of A/D, internal cal source and relay drives Checks fine offset calibration DAC Checks coarse offset calibration DAC Checks internal + and -15V supplies Checks internal calibration source Checks gain calibration DAC Checks that autorange works Checks internal current source Checks front end and A/D noise and A/D filter Checks zeroing of coarse and fine offset calibration DACs Checks current source and CAL BUS relay and relay drives and OHM relay drive See 33 Checks continuity through SCPs, bank relays and relay drivers Checks open transducer detect Checks current leakage of the SCPs Checks voltage offset of the SCPs Checks mid-scale strain dac output. Only reports first channel of SCP. Checks range of strain dac. Only reports first channel of SCP. Checks noise of strain dac. Only reports first channel of SCP. Checks bridge completion leg resistance each channel. Checks combined leg resistance each channel. Checks current source SCP’s OFF current. Checks current source SCP’s current dac mid-scale. Checks current source SCP’s current dac range on HI and LO ranges. VT1415A Command Reference 283 Common Command Reference 89: 90: 91: Checks current source compliance Checks strain SCP’s Wagner Voltage control. Checks autobalance dac range with input shorted. ANALOG TESTS: (continued) 92: 93: Sample and Hold channel holds value even when input value changed. Sample and Hold channel held value test for droop rate. ANALOG OUTPUT AND DIGITAL I/O TESTS 284 301: 302: Current and Voltage Output SCPs Current and Voltage Output SCPs 303: 304: 305: 306: 307: 308: Current Output SCP Current Output SCP Current Output SCP Current Output SCP Current Output SCP Current Output SCP offset gain shift offset linearity linearity turn over 313: 315: 316: 317: 318: Voltage Output SCP Voltage Output SCP Voltage Output SCP Voltage Output SCP Voltage Output SCP offset offset linearity linearity turn over 331: 332: 333: 334: 335: 336: 337: Digital I/O SCP Digital I/O SCP Digital I/O SCP Digital I/O SCP Digital I/O SCP Digital I/O SCP Digital I/O SCP internal digital interface user input user input user output user output output current output current 341: 342: 343: 344: 345: 346: 347: 348: 349: Freq/PWM/FM SCP Freq/PWM/FM SCP Freq/PWM/FM SCP Freq/PWM/FM SCP Freq/PWM/FM SCP Freq/PWM/FM SCP Freq/PWM/FM SCP Freq/PWM/FM SCP Freq/PWM/FM SCP internal data0 register internal data1 register internal parameter register on-board processor self-test on-board processor self-test user inputs user outputs outputs ACTive/PASSive output interrupts 350: 351: 352: 353: Watchdog SCP Watchdog SCP Watchdog SCP Watchdog SCP enable/disable timer relay drive and coil closed relay drive and coil open I/O Disconnect line VT1415A Command Reference digital DAC control. DAC noise. Chapter 6 Common Command Reference 354: Watchdog SCP I/O Disconnect supply *WAI Wait-to-continue. Prevents an instrument from executing another command until the operation begun by the previous command is finished (sequential operation). NOTE Chapter 6 Do not use *WAI to determine when the CAL:SETUP or CAL:TARE commands have completed. Instead, use their query forms CAL:SETUP? or CAL:TARE?. CAL:SETUP? and CAL:TARE? return a value only after the CAL:SETUP or CAL:TARE operations are complete. VT1415A Command Reference 285 Command Quick Reference Command Quick Reference The following tables summarize SCPI and IEEE-488.2 Common (*) commands for the VT1415A Algorithmic Loop Controller. SCPI Command Quick Reference Command ABORt ALGorithm [:EXPLicit] :ARRay <alg_name>,<array_name>,<block_data> :ARRay? <alg_name>,<array_name> :DEFine <alg_name>[,<swap_size>],<program_data> :SCALar <alg_name>,<var_name>,<value> :SCALar? <alg_name>,<var_name> :SCAN :RATio <alg_name>,<ratio> :RATio? <alg_name> :SIZe? <alg_name> :STATe <alg_name>,ON | OFF :STATe? <alg_name> :TIMe? <alg_name> | MAIN :FUNCtion :DEFine <function_name>,<range>,<offset>,<func_data> :OUTPut :DELay <delay> | AUTO :DELay? :UPDate [:IMMediate] :CHANnel (@<channel> :WINDow <num_updates> :WINDow? ARM [:IMMediate] :SOURce BUS | EXT | HOLD | IMM | SCP | TTLTrg<n> :SOURce? CALibration :CONFigure :RESistance :VOLTage <range>, ZERO | FSCale :SETup :SETup? :STORe ADC | TARE 286 VT1415A Command Reference Description Stops scanning immediately and sets trigger system to idle state (scan lists are unaffected) Subsystem to define, configure and enable loop control algorithms Defines contents of array <array_name> in algorithm <alg_name> or if <alg_name> is “GLOBALS”, defines values global to all algorithms. Returns block data from <array_name> in algorithm <alg_name> or if <alg_name> is “GLOBALS”, returns values from a global array. Defines algorithms or global variables. <program_data> is ‘C’ source of algorithm or global declaration. Defines value of variable <var_name> in algorithm <alg_name> or if <alg_name> is “GLOBALS”, defines a value global to all algorithms. Returns value from <var_name> in algorithm <alg_name> or if <alg_name> is “GLOBALS”, returns a value from global variable. Sets scan triggers per execution of <alg_name> (send also ALG:UPD) Returns scan triggers per execution of <alg_name> Returns size in words of named algorithm Enables/disables named algorithm after ALG:UPDATE sent Returns state of named algorithm Returns worst case alg execution time. Use “MAIN” for overall time. Defines a custom conversion function Sets the delay from scan trigger to start of outputs Returns the delay from scan trigger to start of outputs Requests immediate update of algorithm code, variable, or array Sets dig channel to synch algorithm updates Sets a window for num_updates to occur. *RST default is 20 Returns setting for allowable number variable and algorithm updates. Arm if ARM:SOUR is BUS or HOLD (software ARM) Specify the source of Trigger Timer ARM Return current ARM source Prepare to measure on-board references with an external multimeter Configure to measure reference resistor Configure to measure reference voltage range at zero or full scale Performs Channel Calibration procedure Returns state of CAL:SETup operation (returns error codes or 0 for OK) Store cal constants to Flash RAM for either A/D calibration or those generated by the CAL:TARE command Chapter 6 SCPI Command Quick Reference Command CALibration (cont.) :TARE (@<ch_list>) :RESet :TARE? :VALue :RESistance <ref_ohms> :VOLTage <ref_volts> :ZERO? DIAGnostic :CALibration :SETup [:MODE] 0 | 1 [:MODE]? :TARe [:OTD] [:MODE] 0 | 1 [:MODE]? :CHECksum? :COMMand :SCPWRITE <reg_addr>,<reg_data> :CUSTom :LINear <table_ad_range>,<table_block>,(@<ch_list>) :PIECewise <table_ad_range>,<table_block>,(@<ch_list>) :REFerence:TEMPerature :INTerrupt[:LINe] <intr_line> :INTerrupt[:LINe]? :OTDetect[:STATe] ON | OFF, (@<ch_list>) :OTDetect[:STATe]? (@<channel>) :QUERy :SCPREAD? <reg_addr> :VERSion? FETCh? FORMat [:DATA] <format>[, <size>] ASCii[, 7] PACKed[, 64] REAL[, 32] REAL, 64 [:DATA]? INITiate [:IMMediate] INPut :FILTer [:LPASs] :FREQuency <cutoff_freq>,(@<ch_list>) :FREQuency? (@<channel>) Chapter 6 Description Calibrate out system field wiring offsets Resets cal constants from CAL:TARE back to zero for all channels Returns state of CAL:TARE operation (returns error codes or 0 for OK) Send to instrument the value of just measured reference resistor Send to instrument the value of just measured voltage reference Correct A/D for short term offset drift (returns error codes or 0 for OK) Set analog DAC output SCP calibration mode Return current setting of DAC calibration mode Set mode to control OTD current during tare calibration Return current setting of OTD control during tare calibration Perform checksum on Flash RAM and return a ‘1’ for OK, a ‘0’ for corrupted or deleted memory contents Writes values to SCP registers Loads linear custom EU table Loads piecewise custom EU table Puts the contents of the Reference Temperature Register into the FIFO Sets the VXIbus interrupt line the module will use Returns the VXIbus interrupt line the module is using Controls “Open Transducer Detect” on SCPs contained in <ch_list> Returns current state of OTD on SCP containing <channel> Returns value from an SCP register Returns manufacturer, model, serial#, flash revision # and date e.g. Agilent,E1415B,US34000478,A.04.00, Wed Jul 08 11:06:22 MDT 1994 Return readings stored in VME Memory (format set by FORM cmd) Set format for response data from [SENSe:]DATA? Seven bit ASCII format (not as fast as 32-bit because of conversion) Same as REAL, 64 except NaN, +INF and -INF format compatible with Agilent BASIC IEEE 32-bit floating point (requires no conversion so is fastest) IEEE 64-bit floating point (not as fast as 32-bit because of conversion) Returns format: REAL Put module in Waiting for Trigger state (ready to make one scan) Control filter Signal Conditioning Plug-Ons Sets the cutoff frequency for active filter SCPs Returns the cutoff frequency for the channel specified VT1415A Command Reference 287 Command Quick Reference SCPI Command Quick Reference Command [:STATe] ON | OFF, (@<channel>) [:STATe]? (@<channel>) :GAIN <chan_gain>,(@<ch_list>) :GAIN? (@<channel>) :LOW <wvolt_type>,(@<ch_list>) :LOW? (@<channel>) :POLarity NORmal | INVerted,(@<ch_list>) :POLarity? (@<channel>) MEMory :VME :ADDRess <mem_address> :ADDRess? :SIZE <mem_size> :SIZE? :STATe 1 | 0 | ON | OFF :STATe? OUTPut :CURRent :AMPLitude <amplitude>,(@<ch_list>) :AMPLitude? (@<channel>) :STATe ON | OFF,(@<ch_list>) :STATe? (@<channel>) :POLarity NORmal | INVerted,(@<ch_list>) :POLarity? (@<channel>) :SHUNt ON | OFF,(@<ch_list>) :SHUNt? (@<channel>) :TTLTrg :SOURce FTRigger | LIMit | SCPlugon | TRIGger :SOURce? :TTLTrg<n> [:STATe] ON | OFF [:STATe]? :TYPE PASSive | ACTive,(@<ch_list>) :TYPE? (@<channel>) :VOLTage :AMPLitude <amplitude>,(@<ch_list>) :AMPLitude? (@<channel>) ROUTe :SEQuence :DEFine? AIN | AOUT | DIN | DOUT :POINts? AIN | AOUT | DIN | DOUT SAMPle :TIMer <num_samples>,(@<ch_list>) :TIMer? (@<channel>) [SENSe:] CHANnel :SETTling <settle_time>,(@<ch_list>) :SETTling? (@<channel>) DATA :CVTable? (@<ch_list>) :RESet :FIFO 288 VT1415A Command Reference Description Turn filtering OFF (pass through) or ON (filter) Return state of SCP filters Set gain for amplifier-per-channel SCP Returns the channel’s gain setting Controls the connection of input LO on a Strain Bridge (Opt. 21 SCP) Returns the LO connection for the Strain Bridge at channel Sets input polarity on a digital SCP channel Returns digital polarity currently set for <channel Specify address of VME memory card to be used as reading storage Returns address of VME memory card Specify number of bytes of VME memory to be used to store readings Returns number of VME memory bytes allocate to reading storage Enable or disable reading storage in VME memory at INIT Returns state of VME memory, 1=enabled, 0=disabled Set amplitude of Current Source SCP channels Returns the setting of the Current Source SCP channel Enable or disable the Current Source SCP channels Returns the state of the Current Source SCP channel Sets output polarity on a digital SCP channel Returns digital polarity currently set for <channel> Adds shunt resistance to leg of Bridge Completion SCP channels Returns the state of the shunt resistor on Bridge Completion SCP channel Sets the internal trigger source that can drive the VXIbus TTLTrg lines Returns the source of TTLTrg drive. When module triggered, source a VXIbus trigger on TTLTrg<n> Returns whether the TTL trigger line specified by n is enabled sets the output drive type for a digital channel Returns the output drive type for <channel> Sets the voltage amplitude on Voltage Output and Strain SCPs Returns the voltage amplitude setting Returns comma separated list of channels in analog I, O, dig I, O ch lists Returns number of channels defined in above lists. Sets number of samples that will be made on channels in <ch_list> Returns number of samples that will be made on channels in <ch_list> Sets the channel settling time for channels in ch_list Returns the channel settling time for channel Returns elements of Current Value Table specified by ch_list Resets all entries in the Current Value Table to IEEE “Not-a-number” Chapter 6 Command Quick Reference SCPI Command Quick Reference Command [:ALL]? :COUNt? :HALF? :HALF? :MODE BLOCK | OVERwrite :MODE? :PART? <n_readings> :RESet FREQuency :APERture <gate_time>,(@<ch_list>) :APERture? (@<channel>) FUNCtion :CONDition (@<ch_list>) :CUSTom [<range>,](@<ch_list>) :REFerence [<range>,](@<ch_list>) :TC <type>,[<range>,](@<ch_list>) :FREQuency (@<ch_list>) :RESistance <excite_current>,[<range>,](@<ch_list>) :STRain :FBENding [<range>,](@<ch_list>) :FBPoisson [<range>,](@<ch_list>) :FPOisson [<range>,](@<ch_list>) :HBENding [<range>,](@<ch_list>) :HPOisson [<range>,](@<ch_list>) [:QUARter] [<range>,](@<ch_list>) RTD TCouple, CUST | E | EEXT | J | K | N | S | T THERmistor Sets the gate time for frequency counting Returns the gate time set for frequency counting Equate a function and range with groups of channels Sets function to sense digital state Links channels to custom EU conversion table loaded by DIAG:CUST:LIN or DIAG:CUST:PIEC commands Links channels to custom reference temperature EU conversion table loaded by DIAG:CUST:PIEC commands Links channels to custom temperature EU conversion table loaded by DIAG:CUST:PIEC and performs ref temp compensation for <type> Configure channels to measure frequency Configure channels to sense resistance measurements Links measurement channels as having read bridge voltage from: Full BENding Full Bending Poisson Full POisson Half BENding Half Poisson QUARter 85 | 92 thermocouples 2250 | 5000 | 10000 :TEMPerature <sensor_type>,<sub_type>, [<range>,](@<ch_list>) Configure channels for temperature measurement types above: excitation current comes from Current Output SCP. :TOTalize (@<ch_list>) :VOLTage[:DC] [<range>,](@<ch_list>) Configure channels to count digital state transitions Configure channels for dc voltage measurement RTD, 85 | 92 THERmistor,5000 :REFerence <sensor_type>,<sub_type>,[<range>,](@<ch_list>) :CHANnels (@<ref_channel>),(@<ch_list>) :TEMPerature <degrees_c> :STRain :EXCitation <excite_v>,(@<ch_list>) :STRain :EXCitation <excite_v>,(@<ch_list>) :EXCitation? (@<channel>) :GFACtor <gage_factor>,(@<ch_list>) :GFACtor? (@<channel>) :POISson <poisson_ratio>,(@<ch_list>) Chapter 6 Description Fetch all readings until instrument returns to trigger idle state Returns the number of measurements in the FIFO buffer Returns 1 if at least 32,768 readings are in FIFO, else returns 0 Fetch 32,768 readings (half the FIFO) when available Set FIFO mode. Return the currently set FIFO mode Fetch n_readings from FIFO reading buffer when available Reset the FIFO counter to 0 RTDs thermistors Configure channel for reference temperature measurements above: Groups reference temperature channel with TC measurement channels Specifies the temperature of a controlled temperature reference junction Specifies the Excitation Voltage by channel to the strain EU conversion Specifies the Excitation Voltage by channel to the strain EU conversion Returns the Excitation Voltage set for <channel> Specifies the Gage Factor by channel to the strain EU conversion Returns the Gage Factor set for <channel> Specifies the Poisson Ratio by channel to the strain EU conversion VT1415A Command Reference 289 Command Quick Reference SCPI Command Quick Reference Command [SENSe:]STRAin (continued) :POISson? (@<channel>) :UNSTrained <unstrained_v>,(@<ch_list>) :UNSTrained? (@<channel>) Description Returns the Poisson Ratio set for <channel> Specifies the Unstrained Voltage by channel to the strain EU conversion Returns the Unstrained Voltage set for <channel> SOURce :FM [:STATe] 1 | 0 | ON | OFF,(@<ch_list>) [:STATe]? (@<channel>) :FUNCtion [:SHAPe] :CONDition (@<ch_list>) :PULSe (@<ch_list>) :SQUare (@<ch_list>) :PULM :STATe 1 | 0 | ON | OFF,(@<ch_list>) :STATe? (@<channel>) :PERiod <period>,(@<ch_list>) :PERiod? ,(@<channel>) :WIDTh <width>,(@<ch_list>) :WIDTh? (@<channel>) STATus :OPERation :CONDition? :ENABle <enable_mask> :ENABle? [:EVENt]? :NTRansition <transition_mask> :NTRansition? :PTRansition <transition_mask> :PTRansition? :PRESet :QUEStionable :CONDition? :ENABle <enable_mask> :ENABle? [:EVENt]? :NTRansition <transition_mask> :NTRansition? :PTRansition <transition_mask> :PTRansition? SYSTem :CTYPe? (@<channel>) :ERRor? 290 VT1415A Command Reference Configure digital channels to output frequency modulated signal Returns state of channels for FM output Configures channels to output static digital levels Configures channels to output digital pulse(s) Configures channels to output 50/50 duty cycle digital pulse train Configure digital channels to output pulse width modulated signal Returns state of channels for PW modulated output Sets pulse period for PW modulated signals Returns pulse period for PW modulated signals Sets pulse width for FM modulated signals Returns pulse width setting for FM modulated signals Operation Status Group: Bit assignments; 0=Calibrating, 4=Measuring, 8=Scan Complete, 10=FIFO Half Full, 11=algorithm interrupt Returns state of Operation Status signals Bits set to 1 enable status events to be summarized into Status Byte Returns the decimal weighted sum of bits set in the Enable register Returns weighted sum of bits that represent Operation status events Sets mask bits to enable pos. Condition Reg. transitions to Event reg Returns positive transition mask value Sets mask bits to enable neg. Condition Reg. transitions to Event reg Returns negative transition mask value Presets both the Operation and Questionable Enable registers to 0 Questionable Data Status Group: Bit assignments; 8=Calibration Lost, 9=Trigger Too Fast, 10=FIFO Overflowed, 11=Over voltage, 12=VME Memory Overflow, 13=Setup Changed. Returns state of Questionable Status signals Bits set to 1 enable status events to be summarized into Status Byte Returns the decimal weighted sum of bits set in the Enable register Returns weighted sum of bits that represent Questionable Data events Sets mask bits to enable pos. Condition Reg. transitions to Event reg Returns positive transition mask value Sets mask bits to enable neg. Condition Reg. transitions to Event reg Returns negative transition mask value Returns the identification of the SCP at channel Returns one element of the error queue “0" if no errors Chapter 6 Command Quick Reference SCPI Command Quick Reference Command :VERSion? TRIGger :COUNt <trig_count> :COUNt? [:IMMediate] :SOURce BUS | EXT | HOLD | IMM | SCP | TIMer | TTLTrg<n> :SOURce? :TIMer [:PERiod] <trig_interval> [:PERiod]? Chapter 6 Description Returns the version of SCPI this instrument complies with Specify the number of trigger events that will be accepted Returns the current trigger count setting Triggers instrument when TRIG:SOUR is TIMer or HOLD (same as *TRG and IEEE 488.1 GET commands. Specify the source of instrument triggers Returns the current trigger source Sets the interval between scan triggers when TRIG:SOUR is TIMer Sets the interval between scan triggers when TRIG:SOUR is TIMer Returns setting of trigger timer VT1415A Command Reference 291 Command Quick Reference IEEE-488.2 Common Command Quick Reference Category Command Title Description Calibration *CAL? Calibrate Performs internal calibration on all 64 channels out to the terminal module connector. Returns error codes or 0 for OK Internal Operation *IDN? Identification Returns the response: Agilent,E1415B,<serial#>,<driver rev#> *RST Reset Resets all scan lists to zero length and stops scan triggering. Status registers and output queue are unchanged. *TST? Self Test Performs self test. Returns 0 to indicate test passed. *CLS Clear Status Clears all status event registers and so their status summary bits (except the MAV bit). *ESE <mask> Event Status Enable Set Standard Event Status Enable register bits mask. *ESE? Event Status Enable query Return current setting of Standard Event Status Enable register. *ESR? Event Status Register query Return Standard Event Status Register contents. *SRE <mask> Service Request Enable Set Service Request Enable register bit mask. *SRE? Service Request Enable query Return current setting of the Service Request Enable register. *STB? Read Status Byte query Return current Status Byte value. *DMC <name>,<cmd_data> Define Macro Command Assigns one or a sequence of commands to a macro. *EMC 1 | 0 Enable Macro Command Enable/Disable defined macro commands. *EMC? Enable Macros query Returns 1 for macros enabled, 0 for disabled. *GMC? <name> Get Macro query Returns command sequence for named macro. *LMC? Learn Macro query Returns comma-separated list of defined macro names *PMC Purge Macro Commands Purges all macro commands *RMC <name> Remove Individual Macro Removes named macro command. *OPC Operation Complete Standard Event register’s Operation Complete bit will be 1 when all pending device operations have been finished. *OPC? Operation Complete query Places an ASCII 1 in the output queue when all pending operations have finished. *TRG Trigger Trigger s module when TRIG:SOUR is HOLD. *WAI Wait to Complete Status Reporting Macros Synchronization 292 VT1415A Command Reference Chapter 6 Command Quick Reference Notes Chapter 6 VT1415A Command Reference 293 Appendix A Specifications Power Requirements (with no SCPs installed) +5 V +12 V IPm=Peak Module Current IPm IDm IDm=Dynamic Module Current 1.0 0.02 Cooling Requirements Power Available for SCPs (See VXI Catalog or SCP manuals for SCP current) IPm -12 V +24 V -24 V -5.2 V IDm IPm IDm IPm IDm IPm IDm IPm IDm 0.06 0.01 0.01 0.01 0.1 0.01 0.1 0.01 0.15 0.01 Average (watts/slot) D Pressure (mm H2O) Air Flow (liters/s) 14 0.08 0.08 1.0 A ± 24 V, 3.5 A 5 V Measurement Ranges dc volts (VT1501A or VT1502A) ±62.5 mV to ±16 V Full Scale Temperature Thermocouples - -200 to +1700 °C Thermistors - (Opt 15 required) -80 to +160 °C RTD’s - (Opt 15 required) -200 to +850 °C Resistance (VT1505A with VT1501A) 512 W to 131 kW FS) Strain 25,000 µe or limit of linear range of strain gage Measurement Resolution Maximum Update Rate (running PIDA algorithms) Trigger Timer and Sample Timer Accuracy Appendix A 16 bits (including sign) 1 Loop 8 Loops 32 Loops 2.5 kHz 1 kHz 250 Hz 100 ppm (0.01%) from -10 °C to +70 °C Specifications 295 External Trigger Input TTL compatible input. Negative true edge triggered except first trigger will occur if external trigger input is held low when module is INITiated. Minimum pulse width 100 ns. Since each trigger starts a complete scan of 2 or more channel readings, maximum trigger rate depends on module configuration. With Direct Input, Passive Filter or Amplifier SCPs: Operating: < ± 16 V peak Damage level: > ± 42 V peak With VT1513A, Divide by 16 Attenuator SCP: Operating: < ± 60 V dc, < ± 42 V peak Maximum Input Voltage (Normal mode plus common mode) Maximum Common Mode Voltage With Direct Input, Passive Filter or Amplifier SCPs: Operating: < ±16 V peak Damage level: > ±42 V peak With VT1513A Divide by 16 Attenuator SCP: Operating: < ± 60 V dc, < ± 42 V peak Common Mode Rejection 0 to 60 Hz -105 dB Input Impedance greater than 90 MW differential (1 MW with VT1513A Attenuator) On-Board Current Source 122 µA ± 0.02%, with ± 17 volts Compliance Maximum Tare Cal Offset SCP Gain = 1 (Maximum tare offset depends on A/D range and SCP gain) A/D range ± V F.Scale 16 4 1 0.25 0.0625 Max Offset 3.2213 0.82101 0.23061 0.07581 0.03792 The following specifications reflect the performance of the VT1415A with the VT1501A Direct Input Signal Conditioning Plug-On. The performance of the VT1415A with other SCPs is found in the Specifications section of that SCP’s manual. Measurement Accuracy dc volts (90 days) 20 °C ± 1 °C (with *CAL? done after 1 hr warm up and CAL:ZERO? within 5 min) Note: If autoranging is ON for readings < 3.8 V, add ±0.02% to linearity specifications for readings > 3.8 V, add ±0.05% to linearity specifications. A/D range ± V F.Scale Linearity % of reading Offset Error Noise 3 sigma Noise* 3 sigma 0.0625 0.25 1 4 16 0.01% 0.01% 0.01% 0.01% 0.01% 5.3 µV 10.3 µV 31 µV 122 µV 488 µV 18 µV 45 µV 110 µV 450 µV 1.8 mV 8 µV 24 µV 90 µV 366 µV 1.5 mV Temperature Coefficients: Gain - 10 ppm/°C. 296 Specifications Offset - (0 - 40 °C) 0.14 µV/°C, (40 - 55 °C) 0.8 µV+0.38 µV/°C Appendix A Temperature Accuracy The following pages have temperature accuracy graphs that include instrument and firmware linearization errors. The linearization algorithm used is based on the IPTS-68(78) standard transducer curves. Add the custom transducer's accuracy to determine total measurement error. The thermocouple graphs on the following pages include only the errors due to measuring the voltage output of the thermocouple, as well as the algorithm errors due to converting the thermocouple voltage to temperature. To this error must be added the error due to measuring the reference junction temperature with an RTD or a 5k thermistor. See the graphs for the RTD or the 5k thermistor to determine this additional error. Also, the errors due to gradients across the isothermal reference must be added. If an external isothermal reference panel is used, consult the manufacturer’s specifications. If VXI Technology termination blocks are used as the isothermal reference, see the notes below. NOTE 1) When using the Terminal Module as the isothermal reference, add ±0.6 °C to the thermocouple accuracy specs to account for temperature gradients across the Terminal Module. The ambient temperature of the air surrounding the Terminal Module must be within ±2 °C of the temperature of the inlet cooling air to the VXI mainframe. 2) When using the VT1586A Rack-Mount Terminal Panel as the isothermal reference, add ±0.2 °C to the thermocouple accuracy specs to account for temperature gradients across the VT1586A. The VT1586A should be mounted in the bottom part of the rack, below, and away from other heat sources for best performance. The temperature graphs are found on the following pages: · · · · · · · · · · · · · · Appendix A Thermocouple Type E (-200 to 800 °C) . . . . . . . . . . . . . . . . . . . . . 298,299 Thermocouple Type E (0 to 800 °C) . . . . . . . . . . . . . . . . . . . . . . . . 300,301 Thermocouple Type EEXtended . . . . . . . . . . . . . . . . . . . . . . . . . . . 302,303 Thermocouple Type J . . . . . . . . . . . . . . . . . . . . . . . . . . . . . . . . . . . 304,305 Thermocouple Type K . . . . . . . . . . . . . . . . . . . . . . . . . . . . . . . . . . . . . . 306 Thermocouple Type R . . . . . . . . . . . . . . . . . . . . . . . . . . . . . . . . . . . 307,308 Thermocouple Type S . . . . . . . . . . . . . . . . . . . . . . . . . . . . . . . . . . . 309,262 Thermocouple Type T . . . . . . . . . . . . . . . . . . . . . . . . . . . . . . . . . . . 311,312 Reference Thermistor 5k . . . . . . . . . . . . . . . . . . . . . . . . . . . . . . . . . 313,314 Reference RTD 100 W . . . . . . . . . . . . . . . . . . . . . . . . . . . . . . . . . . . . . . . 315 RTD 100 W . . . . . . . . . . . . . . . . . . . . . . . . . . . . . . . . . . . . . . . . . . . . 316,317 Thermistor 2250 W . . . . . . . . . . . . . . . . . . . . . . . . . . . . . . . . . . . . . . 318,319 Thermistor 5 kW . . . . . . . . . . . . . . . . . . . . . . . . . . . . . . . . . . . . . . . . 320,321 Thermistor 10 kW . . . . . . . . . . . . . . . . . . . . . . . . . . . . . . . . . . . . . . . 322,323 Specifications 297 Type E -200 to 800 °C filter off 298 Specifications Appendix A Type E -200 to 800 °C filter off (E1508/09) Appendix A Specifications 299 Type E 0 to 800 °C filter off 300 Specifications Appendix A Type E 0 to 800 °C filter off (VT1508A/09A) Appendix A Specifications 301 Type EEXtended filter off 302 Specifications Appendix A Type EEXtended filter off (VT1508A/09A) Appendix A Specifications 303 Type J filter off 304 Specifications Appendix A Type J filter off (VT1508A/09A) Appendix A Specifications 305 Type K filter off 306 Specifications Appendix A Type R filter off Appendix A Specifications 307 Type R filter off (VT1508A/09A) 308 Specifications Appendix A Type S filter off Appendix A Specifications 309 Type S filter off (VT1508A/09A) 310 Specifications Appendix A Type T filter off Appendix A Specifications 311 Type T filter off (VT1508A/09A) 312 Specifications Appendix A Reference Thermistor 5 kW filter off Appendix A Specifications 313 Reference Thermistor 5 kW filter off (VT1508A/09A) 314 Specifications Appendix A Reference RTD filter off Appendix A Specifications 315 RTD filter off 316 Specifications Appendix A RTD filter off (VT1508A/09A) Appendix A Specifications 317 Thermistor 2250 W filter off 318 Specifications Appendix A Thermistor 2250 W filter off (VT1508A/09A) Appendix A Specifications 319 Thermistor 5 kW filter off 320 Specifications Appendix A Thermistor 5 kW filter off (VT1508A/09A) Appendix A Specifications 321 Thermistor 10 kW filter off 322 Specifications Appendix A Thermistor 10 kW filter off (VT1508A/09A) Appendix A Specifications 323 324 Specifications Appendix A Appendix B Error Messages Possible Error Messages: Appendix B -108 ‘Parameter not allowed.’ -109 ‘Missing parameter.’ -160 ‘Block data error.’ -211 ‘Trigger ignored.’ -212 ‘Arm ignored.’ -213 ‘Init ignored.’ -221 ‘Settings conflict.’ -222 ‘Data out of range.’ -224 ‘Illegal parameter value.’ -240 ‘Hardware error.’ Execute *TST?. -253 ‘Corrupt media.’ -281 ‘Cannot create program.’ -282 ‘Illegal program name.’ -310 ‘System error.’ -410 ‘Query INTERRUPTED.’ 1000 ‘Out of memory.’ 2001 ‘Invalid channel number.’ 2003 ‘Invalid word address.’ 2007 ‘Bus error.’ 2008 ‘Scan list not initialized.’ 2009 ‘Too many channels in channel list.’ 2016 ‘Byte count is not a multiple of two.’ 3000 ‘Illegal while initiated.’ Operation must be performed before INIT or INIT:CONT ON. Error Messages 325 326 Error Messages 3004 ‘Illegal command. CAL:CONF not sent.’ Incorrect sequence of calibration commands. Send CAL:CONF:VOLT command before CAL:VAL:VOLT and send CAL:CONF:RES command before CAL:VAL:RES. 3005 ‘Illegal command. Send CAL:VAL:RES.’ The only command accepted after a CAL:CONF:RES is a CAL:VAL:RES command. 3006 ‘Illegal command. Send CAL:VAL:VOLT.’ The only command accepted after a CAL:CONF:VOLT is a CAL:VAL:VOLT command. 3007 ‘Invalid signal conditioning module.’ The command sent to an SCP was illegal for its type. 3008 ‘Too few channels in scan list.’ A Scan List must contain at least two channels. 3012 ‘Trigger too fast.’ Scan list not completed before another trigger event occurs. 3015 ‘Channel modifier not permitted here.’ 3019 ‘TRIG:TIM interval too small for SAMP:TIM interval and scan list size.’ TRIG:TIM interval must allow for completion of entire scan list at currently set SAMP:TIM interval. See TRIG:TIM in Chapter 6, the Command Reference. 3020 ‘Input over-voltage.’ Calibration relays opened (if JM2202 not cut) to protect module inputs and Questionable Data Status bit 11 set. Execute *RST to close relays and/or reset status bit. 3021 ‘FIFO overflow.’ Indicates that the FIFO buffer has filled and that one or more readings have been lost. Usually caused by algorithm values stored in FIFO faster than FIFO was read. 3026 ‘Calibration failed.’ 3027 ‘Unable to map A24 VXI memory.’ 3028 ‘Incorrect range value.’ Range value sent is not supported by instrument. 3030 ‘Command not yet implemented!!’ 3032 ‘0x1: DSP-Unrecognized command code.’ 3033 ‘0x2: DSP-Parameter out of range.’ Appendix B 3034 ‘0x4: DSP-Flash rom erase failure.’ 3035 ‘0x8: DSP-Programming voltage not present.’ 3036 ‘0x10: DSP-Invalid SCP gain value.’ Check that SCP is seated or replace SCP. Channel numbers are in FIFO. 3037 ‘0x20: DSP-Invalid *CAL? constant or checksum. *CAL? required.’ 3038 ‘0x40: DSP-Couldn’t cal some channels.’ Check that SCP is seated or replace SCP. Channel numbers are in FIFO. 3039 ‘0x80: DSP-Re-Zero of ADC failed.’ 3040 ‘0x100: DSP-Invalid Tare CAL constant or checksum.’ Perform CAL:TARE - CAL:TARE? procedure. 3041 ‘0x200: DSP-Invalid Factory CAL constant or checksum.’ Perform A/D Cal procedure. 3042 ‘0x400: DSP-DAC adjustment went to limit.’ Execute *TST? 3043 ‘0x800: DSP Status—Do *CAL?’ 3044 ‘0x1000: DSP-over-voltage on input.’ 3045 ‘0x2000: DSP-reserved error condition.’ 3046 ‘0x4000: DSP-ADC hardware failure.’ 3047 ‘0x8000: DSP-reserved error condition.’ 3048 ‘Calibration or Test in Process.’ 3049 ‘Calibration not in Process.’ 3050 ‘ZERO must be sent before FSCale.’ Perform A/D Cal sequence as shown in Command Reference under CAL:CONF:VOLT 3051 ‘Memory size must be multiple of 4.’ From MEM:VME:SIZE. Each VT1415A reading requires 4 bytes. 3052 ‘Self test failed. Test info in FIFO.’ Use SENS:DATA:FIFO:ALL? to retrieve data from FIFO. NOTE: *TST? always sets the FIFO data FORMat to ASCII,7. Read FIFO data into string variables. Appendix B Error Messages 327 Meaning of *TST? FIFO data by Value FIIFO Value Definition 1 - 99 ID number of failed test (see following table for possible corrective actions). 100 - 163 channel number(s) associated with test (ch 0-63). 164 special “channel” used for A/D tests only. 200 A/D range 0.0625 V associated with failed test. 201 A/D range 0.25 V associated with failed test. 202 A/D range 1 V associated with failed test. 203 A/D range 4 V associated with failed test. 204 A/D range 16 V associated with failed test. Possible Corrective Action by Failed Test ID Number Test ID Corrective Actions 1 - 19, 21 - 29 20, 30 -37 38 - 71 (VXI Technology Service)* Remove all SCPs and see if *TST? passes. If so, replace SCPs one at a time until the one causing the problem is found. (VXI Technology Service)* 72,74 - 76, 80 - 93, 301 - 354 re-seat the SCP that the channel number(s) points to or move the SCP and see if the failure(s) follow the SCP. If the problems move with the SCP, replace the SCP. 73, 77 - 79, 94 - 99 (VXI Technology Service)* *Must send module to a VXI Technology Service Center for repair. Record information found in FIFO to assist the VXI Technology Service Center in repairing the problem. Refer to the Command Reference under *TST? for a list of module functions tested. NOTE 328 Error Messages During the first 5 minutes after power is applied, *TST? may fail. Allow the module to warm-up before executing *TST? 3053 ‘Corrupt on board Flash memory.’ 3056 ‘Custom EU not loaded.’ May have erased custom EU conversion table with *RST. May have linked channel with standard EU after loading custom EU, this erases the custom EU for this channel. Reload custom EU table using DIAG:CUST:LIN or DIAG:CUST:PIEC. Appendix B Appendix B 3057 ‘Invalid ARM or TRIG source when S/H SCP’s enabled.’ Don’t set TRIG:SOUR or ARM:SOUR to SCP with VT1510A or VT1511A installed. 3058 ‘Hardware does not have D32, S/H or new trigger capabilities.’ Module’s serial number is earlier than 3313A00530. 3067 ‘Multiple attempts to erase Flash Memory failed.’ 3068 ‘Multiple attempts to program Flash Memory failed.’ 3069 ‘Programming voltage jumper not set properly.’ See Disabling Flash Memory Access in Chapter 1 (JM2201) 3070 ‘Identification of Flash ROM incorrect.’ 3071 ‘Checksum error on Flash Memory.’ 3074 ‘WARNING! Old Opt 16 or Opt 17 card can damage SCP modules.’ must use VT1506A/07A. 3075 ‘Too many entries in CVT list.’ 3076 ‘Invalid entry in CVT list.’ Can only be 10 to 511. 3077 ‘Too many updates in queue. Must send UPDATE command’ To allow more updates per ALG:UPD, increase ALG:UPD:WINDOW. 3078 ‘Invalid Algorithm name.’ Can only be ‘ALG1’ through ‘ALG32’ or ‘GLOBALS’ or ‘MAIN.’ 3079 ‘Algorithm is undefined.’ In ALG:SCAL, ALG:SCAL?, ALG:ARR or ALG:ARR? 3080 ‘Algorithm already defined.’ Trying to repeat ALG:DEF with same <alg_name> (and is not enabled to swap) or trying to define ‘GLOBALS’ again since last *RST. 3081 ‘Variable is undefined.’ Algorithm exists but has no local variable by that name. 3082 ‘Invalid Variable name.’ Must be valid ‘C’ identifier, see Chapter 5. 3083 ‘Global symbol (variable or custom function) already defined.’ Trying to define a global variable with same name as a user defined function or vice versa. User functions are also global. 3084 ‘Algorithmic error queue full.’ ALG:DEF has generated too many errors from the algorithm source code. Error Messages 329 3084 “Error 1: “Error 2: “Error 3: “Error 4: “Error 5: “Error 6: “Error 7: “Error 8: “Error 9: “Error 10: “Error 11: “Error 12: “Error 13: “Error 14: “Error 15: “Error 16: “Error 17: “Error 18: “Error 19: “Error 20: “Error 21: “Error 22: “Error 23: “Error 24: “Error 25: “Error 26: “Error 27: “Error 28: “Error 29: “Error 30: “Error 31: ”Error 32: from Number too big for a 32 bit float” Number too big for a 32 bit integer” ‘8’ or ‘9’ not allowed in an octal number” Syntax error” Expecting ‘(‘” Expecting ‘)’” Expecting an expression” Out of driver memory” Expecting a bit number (Bn or Bnn)” Expecting ‘]’” Expecting an identifier” Arrays can’t be initialized” Expecting ‘static’” Expecting ‘float’” Expecting ‘;’” Expecting ‘,’” Expecting ‘=’” Expecting ‘{‘” Expecting ‘}’” Expecting a statement” Expecting ‘if’” Can’t write to input channels” Expecting a constant expression” Expecting an integer constant expression” Reference to an undefined variable” Array name used in a scalar context” Scalar name used in an array context” Variable name used in a custom function context” Reference to an undefined custom function” Can’t have executable code in GLOBALS definition” CVT address range is 10 - 511" Numbered algorithms can only be called MAIN" “Error 33: Reference to an undefined algorithm” “Error 34: Attempt to redefine an existing symbol (var or fn)” “Error 35: Array size is 1 - 1024" ”Error 36: Expecting a default PID parameter" “Error 37: Too many FIFO or CVT writes per scan trigger” “Error 38: Statement is too complex” “Error 39: Unterminated comment” 3085 330 Error Messages ‘Algorithm too big.’ Algorithm exceeded 46k words (23k if enabled to swap) or exceeded size specified in <swap_size>. Appendix B Appendix B 3086 ‘Not enough memory to compile Algorithm.’ The algorithm’s constructs are using too much translator memory. Need more memory in the Agilent/HP E1406. Try breaking the algorithm into smaller algorithms. 3088 ‘Too many functions.’ Limit is 32 user defined functions 3089 ‘Bad Algorithm array index.’ Must be from 0 to (declared size)-1. 3090 ‘Algorithm Compiler Internal Error.’ Call VXI Technology with details of operation. 3091 ‘Illegal while not initiated.’ Send INIT before this command. 3092 ‘No updates in queue.’ 3093 ‘Illegal Variable Type.’ Sent ALG:SCAL with identifier of array, ALG:ARR with scalar identifier, ALG:UPD:CHAN with identifier that is not a channel, etc. 3094 ‘Invalid Array Size.’ Must be 1 to 1024. 3095 ‘Invalid Algorithm Number.’ Must be ‘ALG1’ to ‘ALG32.’ 3096 ‘Algorithm Block must contain termination.’ Must append a null byte to end of algorithm string within the Block Data. 3097 ‘Unknown SCP. Not Tested.’ May be received if using a breadboard SCP. 3099 ‘Invalid SCP for this product.’ 3100 ‘Analog Scan time to big. Too much settling time.’ Count of channels referenced by algorithms combined with use of SENS:CHAN:SETTLING has attempted to build an analog Scan List greater than 64 channels. 3101 ‘Can’t define new algorithm while running.’ Execute ABORT, then define algorithm. 3102 ‘Need ALG:UPD before redefining this algorithm again.’ Already have an algorithm swap pending for this algorithm. 3103 ‘Algorithm swapping already enabled; Can’t change size.’ Only send <swap_size> parameter on initial definition. Error Messages 331 3104 332 Error Messages ‘GLOBALS can’t be enabled for swapping.’ Don’t send <swap_size> parameter for ALG:DEF ‘GLOBALS.’ Appendix B Appendix C Glossary The following terms have special meaning when related to the VT1415A. Algorithm In general, an algorithm is a tightly defined procedure that performs a task. This manual, uses the term to indicate a program executed within the VT1415A that implements a data acquisition and control algorithm. Algorithm Language The algorithm programming language specific to the VT1415A. This programming language is a subset of the ANSI ‘C’ language. Application Program The program that runs in the VXIbus controller, either embedded within the VXIbus mainframe or external and interfaced to the mainframe. The application program typically sends SCPI commands to configure the VT1415A, define its algorithms, then start the algorithms running. Typically, once the VT1415A is running algorithms, the application need only “oversee” the control application by monitoring the algorithms’ status. During algorithm writing, debugging and tuning, the application program can retrieve comprehensive data from running algorithms. Buffer In this manual, a buffer is an area in RAM memory that is allocated to temporarily hold: Data input values that an algorithm will later access. This is the Input Channel Buffer. Data output values from an algorithm until these values are sent to hardware output channels. This is the Output Channel Buffer. Data output values from an algorithm until these values are read by the application program. This is the First-In-First-Out or FIFO buffer. A second copy of an array variable containing updated values until it is “activated” by an update. This is “double buffering.” A second version of a running algorithm until it is “activated” by an update. This is only for algorithms that are enabled for swapping. This is also “double buffering.” Appendix C Glossary 333 Control Processor The Digital Signal Processor (DSP) chip that performs all of the VT1415A’s internal hardware control functions as well as performing the EU Conversion process. DSP Same as Control Processor EU Engineering Units EU Conversion Engineering Unit Conversion: Converting binary A/D readings (in units of A/D counts) into engineering units of voltage, resistance, temperature, strain. These are the “built in” conversions (see SENS:FUNC: ...). The VT1415A also provides access to custom EU conversions (see SENS:FUNC:CUST in command reference and “Creating and Loading Custom EU Tables” in Chapter 3). 334 Glossary FIFO The First-In-First-OUT buffer that provides output buffering for data sent from an algorithm to an application program. Flash or Flash Memory Non-volatile semiconductor memory used by the VT1415A to store its control firmware and calibration constants Scan List A list of up to 64 channels that is built by the VT1415A. Channels referenced in algorithms are placed in the Scan List as the algorithm is defined. This list will be scanned each time the module is triggered. SCP Signal Conditioning Plug-On: Small circuit boards that plug onto the VT1415A’s main circuit board. Available analog input SCPs can provide noise canceling filters, signal amplifiers, signal attenuators and strain bridge completion. Analog output SCPs are available to provide measurement excitation current, controlling voltage and controlling current. Digital SCPs are available to both read and write digital states, read frequency and counts and output modulated pulse signals (FM and PWM). Swapping This term applies to algorithms that are enabled to swap. These algorithms can be exchanged with another of the same name while the original is running. The “new” algorithm becomes active after an update command is sent. This “new” algorithm may again be swapped with another and so on. This capability allows changing algorithm operation without stopping and leaving this and perhaps other processes without control. Terminal Blocks The screw-terminal blocks the system field wiring is connected to. The terminal blocks are inside the Terminal Module. Appendix C Appendix C Terminal Module The plastic encased module which contains the terminal blocks the field wiring is connected to. The Terminal Module then is plugged into the VT1415A’s front panel. Update This is an intended change to an algorithm, algorithm variable or global variable that is initiated by one of the commands ALG:SCALAR, ALG:ARRAY, ALG:DEFINE, ALG:SCAN:RATIO or ALG:STATE. This change or “update” is considered to be pending until an update command is received. Several updates can be sent to the Update Queue, waiting for an update command to cause them to take effect synchronously. The update commands are ALG:UPDATE and ALG:UPD:CHANNEL. Update Queue A list of scalar variable values and/or buffer pointer values (for arrays and swapping algorithms) that is built in response to updates (see Update). When an update command is sent, scalar values and pointer values are sent to their working locations. User Function A function callable from the Algorithm Language in the general form <function_name>( <expression> ). These user defined functions provide advanced mathematical capability to the Algorithm Language Glossary 335 Notes 336 Glossary Appendix C Appendix D PID Algorithm Listings The following source listings show the actual code for the VT1415A’s default PID algorithms: PIDA, PIDB, and PIDC. PIDC is an advanced algorithm that is not "built into" the VT1415A, like PIDA and PIDB, but is included here so that it can be downloaded using the ALG:DEF command. Contents · PIDA Listing . . . . . . . . . . . . . . . . . . . . . . . . . . . . . . . . . . . . . . page 337 · PIDB Listing . . . . . . . . . . . . . . . . . . . . . . . . . . . . . . . . . . . . . . page 339 · PIDC Listing . . . . . . . . . . . . . . . . . . . . . . . . . . . . . . . . . . . . . . page 344 PIDA /*****************************************************************************/ /* I/O Channels */ /* Must be defined by the user */ /* */ /* inchan - Input channel name */ /* outchan - Output channel name */ /* */ /*****************************************************************************/ /* */ /*****************************************************************************/ /* PID algorithm for E1415A controller module. This algorithm is called */ /* once per scan trigger by main(). It performs Proportional, Integral */ /* and Derivative control. */ /* */ /* */ /* The output is derived from the following equations: */ /* */ /* PID_out = P_out + I_out + D_out */ /* P_out = Error * P_factor */ /* I_out = I_out + (Error * I_factor) */ /* D_out = ((Error - Error_old) * D_factor) */ /* Error = Setpoint - PV */ /* */ /* where: */ /* Setpoint is the desired value of the process variable (user supplied) */ /* PV is the process variable measured on the input channel */ /* PID_out is the algorithm result sent to the output channel */ /* P_factor, I_factor and D_factor are the PID constants */ /* (user supplied) */ /* */ /* */ /* At startup, the output will abruptly change to P_factor * Error. */ /* */ /* */ /*****************************************************************************/ /* */ /* User determined control parameters */ Appendix D PID Algorithm Listings 337 static static static static /* /* float float float float Setpoint P_factor I_factor D_factor = = = = Other Variables static float I_out; static float Error; static float Error_old; 0; 1; 0; 0; /* /* /* /* The setpoint Proportional control constant Integral control constant Derivative control constant /* Integral term /* Error term /* Last Error - for derivative /* /*PID algorithm code: /* Begin PID calculations */ /* First, find the Process Variable “error” */ /* This calculation has gain of minus one (-1) */ Error = Setpoint - inchan; /* On the first trigger after INIT, initialize the I and D terms */ if (First_loop) { /* Zero the I term and start integrating */ I_out = Error * I_factor; /* Zero the derivative term */ Error_old = Error; } /* On subsequent triggers, continue integrating */ else /* not First trigger */ { I_out = Error * I_factor + I_out; } /* Sum PID terms */ outchan = Error * P_factor + I_out + D_factor * (Error - Error_old); /* Save values for next pass */ Error_old = Error; 338 PID Algorithm Listings */ */ */ */ */ */ */ */ */ */ */ Appendix D PIDB /*****************************************************************************/ /* PID_B */ /*****************************************************************************/ /* I/O Channels */ /* Must be defined by the user */ /* */ /* inchan - Input channel name */ /* outchan - Output channel name */ /* alarmchan - Alarm channel name */ /* */ /*****************************************************************************/ /* */ /*****************************************************************************/ /* PID algorithm for E1415A controller module. This algorithm is called */ /* once per scan trigger by main(). It performs Proportional, Integral */ /* and Derivative control. */ /* */ /* */ /* The output is derived from the following equations: */ /* */ /* PID_out = P_out + I_out + D_out + SD_out */ /* P_out = Error * P_factor */ /* I_out = I_out + (Error * I_factor) */ /* D_out = ((PV_old - PV) * D_factor) */ /* SD_out = (Setpoint - Setpoint_old) * SD_factor */ /* Error = Setpoint - PV */ /* */ /* where: */ /* Setpoint is the desired value of the process variable (user supplied) */ /* PV is the process variable measured on the input channel */ /* PID_out is the algorithm result sent to the output channel */ /* P_factor, I_factor, D_factor and SD_factor are the PID constants */ /* (user supplied) */ /* */ /* Alarms may be generated when either the Process Variable or the */ /* error exceeds user supplied limits. The alarm condition will cause */ /* an interrupt to the host computer, set the (user-specified) alarm */ /* channel output to one (1) and set a bit in the Status variable to */ /* one (1). The interrupt is edge-sensitive. ( It will be asserted only */ /* on the transition into the alarm state.) The alarm channel digital */ /* output will persist for the duration of all alarm conditions. The */ /* Status word bits will also persist for the alarm duration. No user */ /* intervention is required to clear the alarm outputs. */ /* */ /* This version provides for limiting (or clipping) of the Integral, */ /* Derivative, Setpoint Derivative and output to user specified limits. */ /* The Status Variable indicates when terms are being clipped. */ /* */ /* Manual control is activated when the user sets the Man_state variable */ /* to a non-zero value. The output will be held at its last value. The */ /* user can change the output by changing the Man_out variable. User */ /* initiated changes in Man_out will cause the output to slew to the */ /* Man_out value at a rate of Man_inc per scan trigger. */ /* */ /* Manual control causes the Setpoint to continually change to match */ /* the Process Variable and the Integral term to be constantly updated */ /* to the output value such that a return to automatic control will */ /* be bumpless and will use the current Process Variable value as the */ /* new setpoint. */ /* The Status variable indicates when the Manual control mode is active. */ Appendix D PID Algorithm Listings 339 /* */ /* At startup in the Manual control mode, the output will slew to Man_out */ /* at a rate of Man_inc per scan trigger. */ /* */ /* At startup, in the Automatic control mode, the output will abruptly */ /* change to P_factor * Error. */ /* */ /* For process monitoring, data may be sent to the FIFO and current */ /* value table (CVT). There are two levels of data logging, controlled */ /* by the History_mode variable. The location in the CVT is based */ /* on ‘n’, where n is the algorithm number (as returned by ALG_NUM, for */ /* example). The first value is placed in the (10 * n)th 32-bit word of */ /* the CVT. The other values are written in subsequent locations. */ /* */ /* History_mode = 0: Summary to CVT only. In this mode, four values */ /* are output to the CVT. */ /* */ /* Location Value */ /* 0 Input */ /* 1 Error */ /* 2 Output */ /* 3 Status */ /* */ /* History_mode = 1: Summary to CVT and FIFO. In this mode, the four */ /* summary values are written to both the CVT and FIFO. A header */ /* tag (256 * n + 4) is sent to the FIFO first, where n is the Algorithm */ /* number (1 - 32). */ /* */ /*****************************************************************************/ /* */ /* User determined control parameters */ static float Setpoint = 0; /* The setpoint */ static float P_factor = 1; /* Proportional control constant */ static float I_factor = 0; /* Integral control constant */ static float D_factor = 0; /* Derivative control constant */ static float Error_max = 9.9e+37; /* Error alarm limits */ static float Error_min = -9.9e+37; static float PV_max = 9.9e+37; /* Process Variable alarm limits */ static float PV_min = -9.9e+37; static float Out_max = 9.9e+37; /* Output clip limits */ static float Out_min = -9.9e+37; static float D_max = 9.9e+37; /* Derivative clip limits */ static float D_min = 9.9e+37; static float I_max = 9.9e+37; /* Integral clip limits */ static float I_min = -9.9e+37; static float Man_state = 0; /* Activates manual control */ static float Man_out = 0; /* Target Manual output value */ static float Man_inc = 9.9e+37; /* Manual outout change increment */ static float SD_factor = 0; /* Setpoint Derivative constant */ static float SD_max = 9.9e+37; /* Setpoint Derivative clip limits */ static float SD_min = 9.9e+37; static float History_mode = 0; /* Activates fifo data logging */ /* */ /* Other Variables */ static float I_out; /* Integral term */ static float D_out; /* Derivative term */ static float Error; /* Error term */ static float PV_old; /* Last process variable */ static float Setpoint_old; /* Last setpoint - for derivative */ static float SD_out; /* Setpoint derivative term */ static float Status = 0; /* Algorithm status word */ /* */ 340 PID Algorithm Listings Appendix D /* /* /* /* /* /* /* /* /* B0 - PID_out at clip limit B1 - I_out at clip limit B2 - D_out at clip limit B3 - SD_out at clip limit B4 - in Manual control mode B5 - Error out of limits B6 - PV out of limits others - unused */ */ */ */ */ */ */ */ */ */ /* /*PID algorithm code: */ /* Test for Process Variable out of limits */ if ( (inchan > PV_max) || ( PV_min > inchan ) ) /* PV alarm test */ { if ( !Status.B6 ) { Status.B6 = 1; alarmchan = 1; interrupt(); } } else { Status.B6 = 0; } /* Do this when in the Manual control mode */ if ( Man_state ) { /* Slew output towards Man_out */ if (Man_out > outchan + abs(Man_inc)) { outchan = outchan + abs(Man_inc); } else if (outchan > Man_out + abs(Man_inc)) { outchan = outchan - abs(Man_inc); } else { outchan = Man_out; } /* Set manual mode bit in status word */ Status.B4 = 1; /* No error alarms while in Manual mode */ Status.B5 = 0; /* In case we exit manual mode on the next trigger */ /* Set up for bumpless transfer */ I_out = outchan; Setpoint = inchan; PV_old = inchan; Setpoint_old = inchan; } /* Do PID calculations when not in Manual mode */ else /* if ( Man_state ) */ { Status.B4 = 0; /* First, find the Process Variable “error” */ /* This calculation has gain of minus one (-1) */ Error = Setpoint - inchan; /* Test for error out of limits */ if ( (Error > Error_max) || (Error_min > Error) ) { Appendix D PID Algorithm Listings 341 if ( !Status.B5 ) { Status.B5 = 1; alarmchan = 1; interrupt(); } /* /* /* /* /* /* /* /* /* } else { Status.B5 = 0; } On the first trigger after INIT, initialize the I and D terms */ if (First_loop) { Zero the I term and start integrating */ I_out = Error * I_factor; Zero the derivative terms */ PV_old = inchan; Setpoint_old = Setpoint; } On subsequent triggers, continue integrating */ else /* not First trigger */ { I_out = Error * I_factor + I_out; } Clip the Integral term to specified limits */ if ( I_out > I_max ) { I_out = I_max; Status.B1=1; } else if ( I_min > I_out ) { I_out = I_min; Status.B1=1; } else { Status.B1 = 0; } Calculate the Setpoint Derivative term */ SD_out = SD_factor * ( Setpoint - Setpoint_old ); Clip to specified limits */ if ( SD_out > SD_max ) /* Clip Setpoint derivative */ { SD_out = SD_max; Status.B3=1; } else if ( SD_min > SD_out ) { SD_out = SD_min; Status.B3=1; } else { Status.B3 = 0; } Calculate the Error Derivative term */ D_out = D_factor *( PV_old - inchan ); Clip to specified limits */ if ( D_out > D_max ) /* Clip derivative */ { 342 PID Algorithm Listings Appendix D D_out = D_max; Status.B2=1; } else if ( D_min > D_out ) { D_out = D_min; Status.B2=1; } else { Status.B2 = 0; } /* Sum PID&SD terms */ outchan = Error * P_factor + I_out + D_out + SD_out; /* Save values for next pass */ PV_old = inchan; Setpoint_old = Setpoint; /* In case we switch to manual on the next pass */ /* prepare to hold output at latest value */ Man_out = outchan; } /* if ( Man_state ) */ /* Clip output to specified limits */ if ( outchan > Out_max ) { outchan = Out_max; Status.B0=1; } else if ( Out_min > outchan ) { outchan = Out_min; Status.B0=1; } else { Status.B0 = 0; } /* Clear alarm output if no alarms */ if (!(Status.B6 || Status.B5) ) alarmchan = 0; /* Log appropriate data */ if ( History_mode ) { /* Output summary to FIFO & CVT */ writefifo( (ALG_NUM*256)+4 ); writeboth( inchan, (ALG_NUM*10)+0 ); writeboth( Error, (ALG_NUM*10)+1); writeboth( outchan, (ALG_NUM*10)+2); writeboth( Status, (ALG_NUM*10)+3 ); } else { /* Output summary to CVT only */ writecvt( inchan, (ALG_NUM*10)+0 ); writecvt( Error, (ALG_NUM*10)+1); writecvt( outchan, (ALG_NUM*10)+2); writecvt( Status, (ALG_NUM*10)+3 ); } Appendix D PID Algorithm Listings 343 PIDC /*****************************************************************************/ /* PID_C */ /*****************************************************************************/ /* I/O Channels */ /* Must be defined by the user */ /* */ /* inchan - Input channel name */ /* outchan - Output channel name */ /* alarmchan - Alarm channel name */ /* */ /*****************************************************************************/ /* */ /*****************************************************************************/ /* PID algorithm for E1415A controller module. This algorithm is called */ /* once per scan trigger by main(). It performs Proportional, Integral */ /* and Derivative control. */ /* */ /* */ /* The output is derived from the following equations: */ /* */ /* PID_out = P_out + I_out + D_out + SD_out */ /* P_out = Error * P_factor */ /* I_out = I_out + (Error * I_factor) */ /* D_out = ((PV_old - PV) * D_factor) */ /* SD_out = (Setpoint - Setpoint_old) * SD_factor */ /* Error = Setpoint - PV */ /* */ /* where: */ /* Setpoint is the desired value of the process variable (user supplied) */ /* PV is the process variable measured on the input channel */ /* PID_out is the algorithm result sent to the output channel */ /* P_factor, I_factor, D_factor and SD_factor are the PID constants */ /* (user supplied) */ /* */ /* Alarms may be generated when either the Process Variable or the */ /* error exceeds user supplied limits. The alarm condition will cause */ /* an interrupt to the host computer, set the (user-specified) alarm */ /* channel output to one (1) and set a bit in the Status variable to */ /* one (1). The interrupt is edge-sensitive. ( It will be asserted only */ /* on the transition into the alarm state.) The alarm channel digital */ /* output will persist for the duration of all alarm conditions. The */ /* Status word bits will also persist for the alarm duration. No user */ /* intervention is required to clear the alarm outputs. */ /* */ /* This version provides for limiting (or clipping) of the Integral, */ /* Derivative, Setpoint Derivative and output to user specified limits. */ /* The Status Variable indicates when terms are being clipped. */ /* */ /* Manual control is activated when the user sets the Man_state variable */ /* to a non-zero value. The output will be held at its last value. The */ /* user can change the output by changing the Man_out variable. User */ /* initiated changes in Man_out will cause the output to slew to the */ /* Man_out value at a rate of Man_inc per scan trigger. */ /* */ /* Manual control causes the Setpoint to continually change to match */ /* the Process Variable and the Integral term to be constantly updated */ /* to the output value such that a return to automatic control will */ /* be bumpless and will use the current Process Variable value as the */ /* new setpoint. */ /* The Status variable indicates when the Manual control mode is active. */ 344 PID Algorithm Listings Appendix D /* */ /* At startup in the Manual control mode, the output will be held at */ /* its current value. */ /* */ /* At startup, in the Automatic control mode, the output will slew */ /* from its initial value towards P_factor * Error at a rate determined */ /* by the Integral control constant (I_out is initialized to cancel P_out). */ /* */ /* For process monitoring, data may be sent to the FIFO and current */ /* value table (CVT). There are three levels of data logging, controlled */ /* by the History_mode variable. The location in the CVT is based */ /* on ‘n’, where n is the algorithm number (as returned by ALG_NUM, for */ /* example). The first value is placed in the (10 * n)th 32-bit word of */ /* the CVT. The other values are written in subsequent locations. */ /* */ /* History_mode = 0: Summary to CVT only. In this mode, four values */ /* are output to the CVT. */ /* */ /* Location Value */ /* 0 Input */ /* 1 Error */ /* 2 Output */ /* 3 Status */ /* */ /* History_mode = 1: Summary to CVT and FIFO. In this mode, the four */ /* summary values are written to both the CVT and FIFO. A header */ /* tag (256 * n + 4) is sent to the FIFO first. */ /* */ /* History_mode = 2: All to FIFO and CVT. In this mode, nine values */ /* are output to both the CVT and FIFO. A header tag (256 * n + 9) */ /* is sent to the FIFO first. */ /* */ /* Location Value */ /* 0 Input */ /* 1 Error */ /* 2 Output */ /* 3 Status */ /* 4 Setpoint */ /* 5 Proportional term */ /* 6 Integral term */ /* 7 Derivative term */ /* 8 Setpoint Derivative term */ /* */ /*****************************************************************************/ /* */ /* User determined control parameters */ static float Setpoint = 0; /* The setpoint */ static float P_factor = 1; /* Proportional control constant */ static float I_factor = 0; /* Integral control constant */ static float D_factor = 0; /* Derivative control constant */ static float Error_max = 9.9e+37; /* Error alarm limits */ static float Error_min = -9.9e+37; static float PV_max = 9.9e+37; /* Process Variable alarm limits */ static float PV_min = -9.9e+37; static float Out_max = 9.9e+37; /* Output clip limits */ static float Out_min = -9.9e+37; static float D_max = 9.9e+37; /* Derivative clip limits */ static float D_min = 9.9e+37; static float I_max = 9.9e+37; /* Integral clip limits */ static float I_min = -9.9e+37; static float Man_state = 0; /* Activates manual control */ static float Man_out = 0; /* Target Manual output value */ Appendix D PID Algorithm Listings 345 static static static static static /* /* float float float float float Man_inc = 0; SD_factor = 0; SD_max = 9.9e+37; SD_min = 9.9e+37; History_mode = 0; /* Manual outout change increment /* Setpoint Derivative constant /* Setpoint Derivative clip limits */ */ */ /* Activates fifo data logging */ */ */ */ */ */ */ */ */ */ */ Other Variables static float I_out; /* Integral term static float P_out; /* Proportional term static float D_out; /* Derivative term static float Error; /* Error term static float PV_old; /* Last process variable static float Setpoint_old; /* Last setpoint - for derivative static float SD_out; /* Setpoint derivative term static float Status = 0; /* Algorithm status word /* */ /* B0 - PID_out at clip limit /* B1 - I_out at clip limit /* B2 - D_out at clip limit /* B3 - SD_out at clip limit /* B4 - in Manual control mode /* B5 - Error out of limits /* B6 - PV out of limits /* others - unused /* */ */ */ */ */ */ */ */ */ */ */ /* /*PID algorithm code: /* Test for Process Variable out of limits */ if ( (inchan > PV_max) || ( PV_min > inchan ) ) /* PV alarm test */ { if ( !Status.B6 ) { Status.B6 = 1; alarmchan = 1; interrupt(); } } else { Status.B6 = 0; } /* Do this when in the Manual control mode */ if ( Man_state ) { /* On the first trigger after INIT only */ if (First_loop) { Man_out= outchan; /* Maintain output at manual smooth start */ } /* On subsequent triggers, slew output towards Man_out */ else if (Man_out > outchan + abs(Man_inc)) { outchan = outchan + abs(Man_inc); } else if (outchan > Man_out + abs(Man_inc)) { outchan = outchan - abs(Man_inc); } else { outchan = Man_out; } 346 PID Algorithm Listings Appendix D /* Set manual mode bit in status word */ Status.B4 = 1; /* No error alarms while in Manual mode */ Status.B5 = 0; /* In case we exit manual mode on the next trigger */ /* Set up for bumpless transfer */ I_out = outchan; Setpoint = inchan; PV_old = inchan; Setpoint_old = inchan; } /* Do PID calculations when not in Manual mode */ else /* if ( Man_state ) */ { Status.B4 = 0; /* First, find the Process Variable “error” */ /* This calculation has gain of minus one (-1) */ Error = Setpoint - inchan; /* Test for error out of limits */ if ( (Error > Error_max) || (Error_min > Error) ) { if ( !Status.B5 ) { Status.B5 = 1; alarmchan = 1; interrupt(); } } else { Status.B5 = 0; } /* On the first trigger after INIT, initialize the I and D terms */ if (First_loop) { /* For no abrupt output change at startup make the I term cancel the P term */ I_out = outchan + Error * ( I_factor - P_factor ); /* Zero the derivative terms */ PV_old = inchan; Setpoint_old = Setpoint; } /* On subsequent triggers, continue integrating */ else /* not First trigger */ { I_out = Error * I_factor + I_out; } /* Clip the Integral term to specified limits */ if ( I_out > I_max ) { I_out = I_max; Status.B1=1; } else if ( I_min > I_out ) { I_out = I_min; Status.B1=1; } else { Status.B1 = 0; } /* Calculate the Setpoint Derivative term */ Appendix D PID Algorithm Listings 347 SD_out = SD_factor * ( Setpoint - Setpoint_old ); /* Clip to specified limits */ if ( SD_out > SD_max ) /* Clip Setpoint derivative */ { SD_out = SD_max; Status.B3=1; } else if ( SD_min > SD_out ) { SD_out = SD_min; Status.B3=1; } else { Status.B3 = 0; } /* Calculate the Error Derivative term */ D_out = D_factor *( PV_old - inchan ); /* Clip to specified limits */ if ( D_out > D_max ) /* Clip derivative */ { D_out = D_max; Status.B2=1; } else if ( D_min > D_out ) { D_out = D_min; Status.B2=1; } else { Status.B2 = 0; } /* Calculate Proportional term */ P_out = Error * P_factor; /* Sum PID&SD terms */ outchan = P_out + I_out + D_out + SD_out; /* Save values for next pass */ PV_old = inchan; Setpoint_old = Setpoint; /* In case we switch to manual on the next pass */ /* prepare to hold output at latest value */ Man_out = outchan; } /* if ( Man_state ) */ /* Clip output to specified limits */ if ( outchan > Out_max ) { outchan = Out_max; Status.B0=1; } else if ( Out_min > outchan ) { outchan = Out_min; Status.B0=1; } else { Status.B0 = 0; } /* Clear alarm output if no alarms */ if (!(Status.B6 || Status.B5) ) alarmchan = 0; /* Log appropriate data */ 348 PID Algorithm Listings Appendix D if ( History_mode > 1 ) { /* Output everything to FIFO & CVT */ writefifo( (ALG_NUM*256)+9 ); writeboth( inchan, (ALG_NUM*10)+0 ); writeboth( Error, (ALG_NUM*10)+1); writeboth( outchan, (ALG_NUM*10)+2); writeboth( Status, (ALG_NUM*10)+3 ); writeboth( Setpoint, (ALG_NUM*10)+4 ); writeboth( P_out, (ALG_NUM*10)+5 ); writeboth( I_out, (ALG_NUM*10)+6 ); writeboth( D_out, (ALG_NUM*10)+7 ); writeboth( SD_out, (ALG_NUM*10)+8 ); } else if ( History_mode ) { /* Output summary to FIFO & CVT */ writefifo( (ALG_NUM*256)+4 ); writeboth( inchan, (ALG_NUM*10)+0 ); writeboth( Error, (ALG_NUM*10)+1); writeboth( outchan, (ALG_NUM*10)+2); writeboth( Status, (ALG_NUM*10)+3 ); } else { /* Output summary to CVT only */ writecvt( inchan, (ALG_NUM*10)+0 ); writecvt( Error, (ALG_NUM*10)+1); writecvt( outchan, (ALG_NUM*10)+2); writecvt( Status, (ALG_NUM*10)+3 ); } Appendix D PID Algorithm Listings 349 350 PID Algorithm Listings Appendix D Appendix E Wiring and Noise Reduction Methods Separating Digital and Analog SCP Signals Signals with very fast rise time can cause interference with nearby signal paths. This is called cross-talk. Digital signals present this fast rise-time situation. Digital I/O signal lines that are very close to analog input signal lines can inject noise into them. Cross-talk can be minimized by maximizing the distance between analog input and digital I/O signal lines. Figure E-1 shows that by installing analog input SCPs in positions 0 through 3 and digital I/O SCPs in positions 4 through 7, these types of signals are separated by the width of the VT1415A module. The signals are further isolated because they remain separated on the connector module as well. Note that in Figure E-1, even though only six of the eight SCP positions are filled, the SCPs present are not installed contiguously, but are arranged to provide this digital/analog separation. If it is necessary to mix analog input and digital I/O SCPs on the same side, the following suggestions will help provide quieter analog measurements. · Use analog input SCPs that provide filtering on the mixed side. · Route only high level analog signals to the mixed side. SCP Pos 1 SCP Pos 2 SCP Pos 3 SCP Pos 7 SCP Pos 6 SCP Pos 5 SCP Pos 4 Digital I/O Analog Input SCP Pos 0 Figure E-1: Separating Analog and Digital Signals Appendix E Wiring and Noise Reduction Methods 351 Recommended Wiring and Noise Reduction Techniques Unshielded signal wiring is very common in Data Acquisition applications. While this worked well for low speed integrating A/D measurements and/or for measuring high level signals, it does not work for high speed sampling A/Ds, particularly when measuring low level signals like thermocouples or strain gage bridge outputs. Unshielded wiring will pick up environmental noise, causing measurement errors. Shielded, twisted pair signal wiring, although it is expensive, is required for these measurements unless an even more expensive amplifier-at-the-signal-source or individual A/D at the source is used. Generally, the shield should be connected to ground at the DUT and left open at the VT1415A. Floating DUTs or transducers are an exception. Connect the shield to VT1415A GND or GRD terminals for this case, whichever gives the best performance. This will usually be the GND terminal. A single point shield to ground connection is required to prevent ground loops. This point should be as near to the noise source as possible and this is usually at the DUT. Wiring Checklist The following lists some recommended wiring techniques. 1. Use individually shielded, twisted-pair wiring for each channel. 2. Connect the shield of each wiring pair to the corresponding Guard (G) terminal on the Terminal Module . 3. The Terminal Module is shipped with the Ground-Guard (GND-GRD) shorting jumper installed for each channel. These may be left installed or removed, dependent on the following conditions: a.Grounded Transducer with shield connected to ground at the transducer: Low frequency ground loops (dc and/or 50/60 Hz) can result if the shield is also grounded at the Terminal Module end. To prevent this, remove the GND-GRD jumper for that channel. b.Floating Transducer with shield connected to the transducer at the source: In this case, the best performance will most likely be achieved by leaving the GND-GRD jumper in place. 4. In general, the GND-GRD jumper can be left in place unless it is necessary to break low frequency (below 1 kHz) ground loops. 352 Wiring and Noise Reduction Methods Appendix E VT1415A Guard Connections The VT1415A guard connection provides a 10 kW current limiting resistor between the guard terminals (G) and VT1415A chassis ground for each 8 channel SCP bank. This is a safety device for the case where the Device Under Test (DUT) isn’t actually floating, the shield is connected to the DUT and also connected to the VT1415A guard terminal (G). The 10 kW resistor limits the ground loop current, which has been known to burn out shields. This also provides 20 kW isolation between shields between SCP banks which helps isolate the noise source. Common Mode Voltage Limits Be very careful not to exceed the maximum common mode voltage referenced to the card chassis ground of ±16 volts (±60 volts with the VT1513A Attenuator SCP). There is an exception to this when high frequency (1 kHz - 20 kHz) common mode noise is present (see “VT1415A Noise Rejection” below). Also, if the DUT is not grounded, then the shield should be connected to the VT1415A chassis ground. When to Make Shield Connections It is not always possible to state positively the best shield connection for all cases. Shield performance depends on the noise coupling mechanism which is very difficult to determine. The above recommendations are usually the best wiring method, but if feasible, experiment with shield connections to determine which provides the best performance for an installation and environment. NOTE For a thorough, rigorous discussion of measurement noise, shielding and filtering, see “Noise Reduction Techniques in Electronic Systems” by Henry W. Ott of Bell Laboratories, published by Wiley & Sons, ISBN 0-471-85068-3. Noise Due to Inadequate Card Grounding If either or both of the VT1415A and Agilent/HP E1482 (MXI Extender Modules) are not securely screwed into the VXIbus Mainframe, noise can be generated. Make sure that both screws (top and bottom) are screwed in tight. If not, it is possible that CVT data could be more noisy than FIFO data because the CVT is located in A24 space, the FIFO in A16 space; more lines moving could cause noisier readings. Appendix E Wiring and Noise Reduction Methods 353 VT1415A Noise Rejection See Figure E-2 for the following discussion. Normal Mode Noise (Enm) This noise is actually present at the signal source and is a differential noise (Hi to Lo). It is what is filtered out by the buffered filters on the VT1502A, VT1503A, VT1508A, and VT1509A SCPs. Common Mode Noise (Ecm) This noise is common to both the Hi and Lo differential signal inputs. Low frequency Ecm is very effectively rejected by a good differential instrumentation amplifier and it can be averaged out when measured through the Direct Input SCP (VT1501A). However, high frequency Ecm is rectified and generates an offset with the amplifier and filter SCPs (such as VT1502A, VT1503A, VT1508A, and VT1509A). This is since these SCPs have buffer-amplifiers on-board and is a characteristic of amplifiers. The best way to deal with this is to prevent the noise from getting into the amplifier. Keeping Common Mode Noise out of the Amplifier Most common mode noise is about 60 Hz, so the differential amplifier rejection is very good. The amplifier Common Mode Noise characteristics are: 120 dB flat to 300 Hz, then 20 dB/octave rolloff The VT1415A amplifiers are selected for low gain error, offset, temperature drift and low power. These characteristics are generally incompatible with good high frequency CMR performance. More expensive, high performance amplifiers can solve this problem, but since they aren’t required for many systems, VXI Technology elected to handle this with the High Frequency Common Mode Filter option to the VT1586A Remote Rack Panel (VT1586A-001, RF Filter) discussed below. Shielded, twisted pair lead wire generally does a good job of keeping high frequency common mode noise out of the amplifier, provided the shield is connected to the VT1415A chassis ground through a very low impedance. (Not via the guard terminal - The VT1415A guard terminal connection shown in the VT1415A User’s manual does not consider the high frequency Ecm problem and is there to limit the shield current and to allow the DUT to float up to some dc common mode voltage subject to the maximum ±16 volt input specification limit. This conflicts with the often recommended good practice of grounding the shield at the signal source and only at that point to eliminate line frequency ground loops, which can be high enough to burn up a shield. It is recommended that this practice be followed and if high frequency common mode noise is seen (or suspected), tie the shield to the VT1415A ground through a 0.1 µF capacitor. At high frequencies, this drives the shield voltage to 0 volts at the VT1415A input. Due to inductive coupling to the signal leads, the Ecm voltage on the signal leads is also driven to zero. 354 Wiring and Noise Reduction Methods Appendix E thermocouple VT1586A with Filter Option 001 110 dB CMR to 10 MHz Normal Mode (differential) Noise Source VT1415A SCSI cable Hi RC filter ENM Lo RC filter G shielded twisted pair cable 5 µF jumper configured removable jumper Common Mode Noise Source Note: RC filter is a series 5.11 kOhm resistor with a 220 pF capacitor to GND ECM VT1415A Ground DUT Ground Figure E-2: HF Common Mode Filters Reducing Common Mode Rejection Using Tri-Filar Transformers One VT1413C customer determined that greater than 100 dB CMR to 10 MHz was required to get good thermocouple (TC) measurements in his test environment. To accomplish this requires the use of tri-filar transformers which are an option to the VT1586A Remote Rack Terminal Panel. (This also provides superior isothermal reference block performance for thermocouple measurements.) This works by virtue of the inductance in the shield connected winding presenting a significant impedance to high frequency common mode noise and forcing all the noise voltage to be dropped across the winding. The common mode noise at the input amplifier side of the winding is forced to 0 volts by virtue of the low impedance connection to the VT1415A ground via the selectable short or parallel combination of 1 kW and 0.1 µF. The short cannot be used in situations where there is a very high common mode voltage, (dc and/or ac) that could generate very large shield currents. The tight coupling through the transformer windings into the signal Hi and Low leads, forces the common mode noise at the input amplifier side of those windings to 0 volts. This achieves the 110 dB to 10 MHz desired, keeping the high frequency common mode noise out of the amplifier, thus preventing the amplifier from rectifying this into an offset error. This effectively does the same thing that shielded, twisted pair cable does, only better. It is especially effective if the shield connection to the VT1415A ground can’t be a very low impedance due to large dc and/or low frequency common mode voltages. Appendix E Wiring and Noise Reduction Methods 355 The tri-filar transformers don’t limit the differential (normal mode) signal bandwidth. Thus, removing the requirement for “slowly varying signal voltages.” The nature of the tri-filar transformer or, more accurately, common-mode inductor, is that it provides a fairly high impedance to common mode signals and a quite low impedance to differential mode signals. The ratio of common-mode impedance to differential-mode impedance for the transformer used is ~ 3500:1. Thus, there is NO differential mode bandwidth penalty incurred by using the tri-filar transformers. 356 Wiring and Noise Reduction Methods Appendix E Appendix F Generating User Defined Functions Introduction The VT1415A Algorithmic Closed Loop Control Card has a limited set of mathematical operations such as add, subtract, multiply, and divide. Many control applications require functions such a square root for calculating flow rate or a trigonometric function to correctly transition motion of moving object from a start to ending position. In order to represent a sine wave or other transcendental functions, one could use a power series expansion to approximate the function using a finite number of algebraic expressions. Since the above mentioned operations can take from 1.5 µs to 4 µs for each floating point calculation, a complex waveform such as sine(x) could take more than 100 µs to get the desired result. A faster solution is desirable and available. The VT1415A provides a solution to approximating such complex waveforms by using a piece-wise linearization of virtually any complex waveform. The technique is simple. The DOS disc supplied with the VT1415A contains both a ‘C’ and Rocky Mountain BASIC program which calculates 128 Mx+B segments over a specified range of values for the desired function. The user supplies the function; the program generates the segments in a table. The resulting table can be downloaded into the VT1415A’s RAM with the ALG:FUNC:DEF command where any desired name of the function (i.e. sin(x), tan(x), etc.) can be selected. Up to 32 functions can be created for use in algorithms. At runtime where the function is passed an ‘x’ value, the time to calculate the Mx+B function is approximately 17 µs. The VT1415A actually uses this technique to convert volts to temperature, strain, etc. The accuracy of the approximation is really based upon how well the range is selected over which the table is built. For thermocouple temperature conversion, the VT1415A fixes the range to the lowest A/D range (±64 millivolts) so that small, microvolt measurements yield the proper resolution of the actual temperature for a non-linear transducer. In addition, the VT1415A permits Custom Engineering Unit conversions to be created for custom transducers so that when the voltage measurement is actually made the EU conversion takes place (see SENS:FUNC:CUST ). Algorithms deal with the resulting floating point numbers generated during the measurement phase and may require further complex mathematical operations to achieve the desired result. With some complex waveforms, it may be beneficial to break up the waveform into several functions in order to get the desired accuracy. For example, suppose it is necessary to generate a square root function for both voltage and strain calculations. The voltages are only going to range from 0 to ±16 volts, worst case. The strain measurements return numbers in Appendix F Generating User Defined Functions 357 microstrain will be in the 1000’s range. Trying to represent the square root function over the entire range would severely impact the accuracy of the approximation. Remember, the entire range is broken up into only 128 segments of Mx+B operations. If accuracy is desired, the range over which calculations are made MUST be limited. Many transcendental functions are simply used as a scaling multiplier. For example, a sine wave function is typically created over a range of 360 degrees or 2*PI (or 2p) radians. After which, the function repeats itself. It’s a simple matter to make sure the ‘x’ term is scaled to this range before calculating the result. This concept should be used almost exclusively to obtain the best results. Haversine Example The following is an example of creating a haversine function (a sine wave over the range of - p 2 to p 2). The resulting function represents a fairly accurate approximation of this non-linear waveform when the range is limited as indicated. Since the tables must be built upon binary boundaries (i.e. 0.125, 0.25, 0.5, 1, 2, 4, etc.) and since p/2 is a number greater than 1 but less than 2, the next binary interval to include this range will be 2. Another requirement for building the table is that the waveform range MUST be centered around 0 (i.e. symmetrical about the X-axis). If the desired function is not defined on one side or the other of the Y-axis, then the table is right or left shifted by the offset from X = 0 and the table values are calculated correctly, but the table is built as though it were centered about the X-axis. For the most part, the last couple of sentences can be ignored if they do not make sense. The only reason its brought up here is that accuracy may suffer the farther away the waveform gets from the X = 0 point unless it is understood what resolution is available and how much non-linearity is present in the waveform. This will be discussed later in the “Limitations” section. Figure F-1 shows the haversine function as stated above. This type of waveform is typical of the kind of acceleration and deceleration one wants when moving an object from one point to another. The desired beginning point would be the location at - p 2 and the ending point would be at p 2. With the desired range spread over ± p 2, the 128 segments are actually divided over the range of ±2. Therefore, the 128 Mx+B line segments are divided equally on both sides of X=0: 64 segments for 0..2 and 64 segments for -2..0. 358 Generating User Defined Functions Appendix F Figure F-1: A Haversine Function A typical use of this function would be to output an analog voltage or current at each Scan Trigger of the VT1415A and over the range of the haversine. For example, suppose a new position of an analog output is needed to move from 1 mA to 3 mA over a period of 100 ms. If the TRIG:TIMER setting or the EXTernal trigger was set to 2 ms, then force 50 intervals over the range of the haversine. This can be easily done by using a scalar variable to count the number of times the algorithm has executed and to scale the variable value to the -p/2 to p/2 range. 3 mA is multiplied times the custom function result over each interval which will yield the shape of the haversine (0.003*sin(x)+0.001). This is illustrated in the example shown in Figure F-1. The program listings on the disc(and printed later in this appendix) illustrate the actual program used to generate this haversine function. Simply supply the algebraic expression in my_function(), the desired range over which to evaluate the function (which determines the table range) and the name of the function. The Build_table() routine (see example file sine_fn.cs) creates the table for the function and the ALG:FUNC:DEF writes that table into VT1415A memory. The table MUST be built and downloaded BEFORE trying to use the function. The following is a summary of what commands and parameters are used in the program examples. Table F-1 shows some examples of the accuracy of custom function with various input values compared to an evaluation of the actual transcendental function found in ‘C’ or RMB. Please note that the Mx+B segments are located on boundaries specified by 2/64 on each side of X=0. This means that if the exact input value is selected that is used for the beginning of each segment, the exact calculated value of the function at that point will be provided. Any point between segments will be an approximation dependent upon the linearity of that segment. Also note that values of X = 2 and X = -2 will result in Y=infinity. Appendix F Generating User Defined Functions 359 ‘C’ sin(-1.570798) -1.000000 ‘VT1415A’ sin(-1.570798) -0.999905 ‘C’ sin(-1.256639) -0.951057 ‘VT1415A’ sin(-1.256639) -0.950965 ‘C’ sin(-0.942479) -0.809018 ‘VT1415A’ sin(-0.942479) -0.808944 ‘C’ sin(-0.628319) -0.587786 ‘VT1415A’ sin(-0.628319) -0.587740 ‘C’ sin(-0.314160) -0.309017 ‘VT1415A’ sin(-0.314160) -0.308998 ‘C’ sin(0.000000) 0.000000 ‘VT1415A’ sin(0.000000) 0.000000 ‘C’ sin(0.314160) 0.309017 ‘VT1415A’ sin(0.314160) 0.308998 ‘C’ sin(0.628319) 0.587786 ‘VT1415A’ sin(0.628319) 0.587740 ‘C’ sin(0.942479) 0.809018 ‘VT1415A’ sin(0.942479) 0.808944 ‘C’ sin(1.256639) 0.951057 ‘VT1415A’ sin(1.256639) 0.950965 ‘C’ sin(1.570798) 1.000000 ‘VT1415A’ sin(1.570798) 0.999905 Table F-1. ‘C’ Sin(x) Vs. VT1415A Haversine Function for Selected Points. Limitations As stated earlier, there are limitations to using this custom function technique. These limitations are directly proportional to the non-linearity of the desired waveform. For example, suppose that the function X*X*X (or X3) is to be represented over a range of ±1000. The resulting binary range would be ±1024 and the segments would be partitioned at 1024/64 intervals. This means that every 16 units would yield an Mx+B calculation over that segment. As long as numbers are inputted that are VERY close to those cardinal points, good results are yielded. Strictly speaking, perfect results can be received only if calculations are performed at the cardinal points, which may be reasonable for an application if the input values are limited to exactly those 128 points. The waveform may also be shifted anywhere along the X-axis and Build_table() will provide the necessary offset calculations to generate the proper table. Be aware, too, that shifting the table out to greater magnitudes of X may also impact the precision of the results dependent upon the linearity of the waveform. Suffice it to say that the best results will be attained and it will be easiest to understand what is being done if the waveforms stay near the X=0 point since most of the measurement results will have 1e-6..16 values for volts. One final note. Truncation errors may be seen in the fourth digit of the results. This is because only 15 bits of the input value is sent to the function. This occurs because the same technique used for Custom EU conversion is used here and the method assumes input values are from the 16-bit A/D (15 bits = sign bit). This is evident in Table F-1, where the first and last entries return ±0.9999 rather than ±1. For most applications, this accuracy should be more than adequate. 360 Generating User Defined Functions Appendix F Program Listings ‘C’ Version /* $Header: $ * * C-SCPI Example program for the E1415A Algorithmic Closed Loop Controller * * sine_fn.cs * * This is a general purpose example of using Custom Functions to generate * a haversine function. * * This is a template for building E1415A C programs that may use C-SCPI * or SICL to control instruments. */ /* Standard include files #include <stdlib.h> #include <stdio.h> #include <stddef.h> #include <math.h> */ /* Most programs use one or more * functions from the C standard * library. */ /* Most programs will also use standard * I/O functions. */ /* This file is also often useful */ /* Needed for any floating point fn’s */ /* Other system include files */ /* Whenever using system or library calls, check the call description to see * which include files should be included. */ /* Instrument control include files */ #include <cscpi.h> /* C-SCPI include file */ /* Declare any constants that will be useful to the program. In particular, * it is usually best to put instrument addresses in this area to make the code * more maintainable. */ #define E1415_ADDR “vxi,208" /* The SICL address of your E1415 */ INST_DECL(e1415, “E1415A”, REGISTER); /* E1415 */ /* Use something like this for GPIB and Agilent E1405/6 Command Module */ /* #define E1415_ADDR “gpib,22,26" /* The SICL address of your E1415 */ /*INST_DECL(e1415, “E1415A”, MESSAGE); /* E1415 */ /* Declare instruments that will be accessed with SICL. * can also be moved into local contexts. */ INST vxi; /* VXI interface session */ /* * * * Appendix F Trap instrument errors. If this function time a C-SCPI instrument puts an error in function will figure out which instrument error, print a message and exit. You may These declarations is used, it will be called every the error queue. As written, the generated the error, retrieve the want to modify the way the error Generating User Defined Functions 361 * is printed or comment out the exit if you want the program to continue. * * Note that this works only on REGISTER based instruments, because it was * a C-SCPI register-based feature, not a general programming improvement. * If you’re using MESSAGE instruments, you’ll still have to do SYST:ERR?: * * If your test program generates errors on purpose, you probably don’t want * this error function. If so, set the following “#if 1" to ”#if 0." This * function is most useful when you’re trying to get your program running. */ #if 1 /* Set to 0 to skip trapping errors */ /*ARGSUSED*/ /* Keeps lint happy */ void cscpi_error(INST id, int err) { char errorbuf[255]; /* Holds instrument error message */ char idbuf[255]; /* Holds instrument response to *IDN? */ cscpi_exe(id, “*IDN?\n”, 6, idbuf, 255); cscpi_exe(id, “SYST:ERR?\n”, 10, errorbuf, 255); (void) fprintf(stderr, “Instrument error %s from %s\n”, errorbuf, idbuf); } #endif /* The following routine allows you to type SCPI commands and see the results. * If you don’t call this from your program, set the following “#if 1" to * “#if 0." */ #if 1 /* Set to 0 to skip this routine */ void do_interactive(void) { char command[5000]; char result[5000]; int32 error; char string[256]; for(;;) { (void) printf(“SCPI command: ”); (void) fflush(stdout); /* repeat until it actually gets something*/ while (!gets(command)); if (!*command) { break; } result[0] = 0; cscpi_exe(e1415, command, strlen(command), result, sizeof(result)); INST_QUERY(e1415, “syst:err?”, “%d,%s”, &error, string); while ( error ) { (void) printf(“syst:err %d,’%s’\n”, error, string); INST_QUERY(e1415,"syst:err?", “%d,%s”, &error, string); } if (result[0]) { (void) printf(“result: %s\n”, result); } } } #endif /* Print usage information */ void usage(char *prog_name) { 362 Generating User Defined Functions Appendix F (void) fprintf(stderr, “usage: %s algorithm_file...\n”, prog_name); } /* Get an algorithm from a filename */ static char *get_algorithm(char *file_name) { FILE *f; /* Algorithm int32 a_size; /* Algorithm int c; /* Character char *algorithm; /* Points to file pointer */ size */ read from input */ algorithm string */ f = fopen(file_name, “r”); if (! f) { (void) fprintf(stderr, “Error: can’t open algorithm file ‘%s’\n”, file_name); exit(1); } a_size = 0; while (getc(f) != EOF) { a_size++; } rewind(f); algorithm = malloc(a_size + 1); a_size = 0; while ((c = getc(f)) != EOF) { algorithm[a_size] = c; a_size++; } algorithm[a_size] = 0; (void) fclose(f); return algorithm; /* Count length of algorithm */ /* Storage for algorithm */ /* Use as array index */ /* Read the algorithm */ /* Null terminate */ /* Return algorithm string */ } /*F****************************************************************** * NAME: static float64 two_to_the_N() * * TASK: Calculates 2^n */ static float64 { /* compute 2^n */ float64 r = 1; int32 i; for ( i = r return ( } two_to_the_N( int32 n ) 0; i < n; i++ ) *= 2; r ); /*F****************************************************************** * NAME: static int32 round32f() * * TASK: Rounds a 32-bit floating point number. */ static int32 round32f( float64 number ) { /* add or subtract 0.5 to round based on sign of number */ float64 half = (number > 0.0 )? 0.5 : -0.5 ; Appendix F Generating User Defined Functions 363 return( (int32)( number + half ) ); } /*F****************************************************************** * NAME: static float64 my_function() * * TASK: User-supplied function for calculating desired results of f(x). * * HAVERSINE */ float64 my_function( float64 input ) { float64 returnValue; returnValue = sin(input); return( returnValue ); } /*F****************************************************************** * NAME: void Build_table() * * TASK: Generates tables of mx+b values used for Custom Functions * in the E1415A. * * Generate the three coefficients for the CUSTOM FUNCTION algorithm: * a. The “exponent” value * b. The “slope” or “M” value * c. The “intercept” or “B” value. * * INPUT PARAMETERS: * float64 max_input - maximum input expected * float64 min_input - minimum input expected * float64 (*custom_function)( float64 input ) * - pointer to user function * OUTPUT PARAMETERS * float64 *range - returned table range * float64 *offset - returned table offset * uint16 *conv_array - returned coefficient array: * (512 values for piecewise) * *F*/ void Build_table(float64 max_input, float64 min_input, float64 (*custom_function)( float64 input ), float64 *range, float64 *offset, uint16 *conv_array ) { uint16 M[128]; uint16 EX[128]; uint16 Bhigh[128]; uint16 Blow[128]; int32 B; int16 ii; int16 jj; int32 Mfactor; int32 Xfactor; int32 Xofst; float64 float64 float64 float64 test_range; tbl_range; center; temp_range; 364 Generating User Defined Functions Appendix F float64 float64 float64 float64 float64 float64 float64 t; slope; absslope; exponent; exponent2; input[129]; result[129]; /* * First calculate the mid point of the range of values from the min and max * input values. The offset is the center of the range of min and max * inputs. The purpose of the offset is to permit calculating the tables * based upon a relative centering about the X axis. The offset simply * permits the run-time code to send the corrected X values assuming * the tables were built symetrically around X=0. */ center = min_input + (max_input - min_input) / 2.0F; *offset = center; temp_range = max_input - center; test_range = (temp_range < 0.0 )? -temp_range : temp_range; /* * Now calculate the closest binary representation of the test_range such * that the new binary value is equal to or greater than the calculated * test_range. Start with the lowest range(1/2^128) and step up until the * new binary range is equal or greater than the test_range. */ tbl_range = two_to_the_N(128); /* 2^28 */ tbl_range = 1.0/tbl_range; while ( test_range > tbl_range ) { tbl_range *= 2; } *range = tbl_range; Xofst = 157; /* exponent bias for DSP calculations */ /* * Now divide the full range of the table into 128 segments (129 points) * scanning first the positive side of the X-axis and then the negative * side of the X-axis. * * Note that 129 points are calculated in order to generate a line segment * for calculating slope. * * Also note that the entire binary range is built to include the min * and max values entered as min_input and max_input. */ for ( ii=0 ; ii<=64 ; ii++ ) /* 0 to +FS */ { input[ii] = center + ( (tbl_range/64.0)*(float64)ii); result[ii] = (*custom_function)( input[ii] ); if ( ii == 0 ) continue; /* This is the first point - skip slope */ jj = 64 + ii - 1; /* generate numbers for prev segment */ /* for second and subsequent points */ t = result[ii-1]; /* using prev seg base */ if (t< 0.0) t *= -1.0; /* use abs value (magnitude) of t */ /* compute the exponent of the offset (B is 31 bits) */ Appendix F Generating User Defined Functions 365 if (t!=0.0) { /* don’t take log of zero */ exponent = 31.0 - (log10(t)/log10(2.0));/* take log base 2 */ } else { exponent = 100.0; } /* compute slope in bits (each table entry represents 512 bits) */ slope = ( result[ii] - result[ii-1] ) / 512.0; /* don’t take the log of a negative slope */ absslope = (slope < 0 )? -slope : slope; /* compute the exponent of the slope (M is 16 bits) */ if ( absslope != 0 ) { exponent2 = 15.0 -(log10(absslope)/log10(2.0)); } else { exponent2 = 100.0; } /* Choose the smallest exponent — maximize resolution */ if (exponent2 < exponent) exponent = exponent2; Xfactor = (int32)(exponent); if ( t != 0 ) { int32 ltemp = round32f( log10( t ) / log10( 2.0 ) ); if ( (Xfactor + ltemp) > 30 ) { Xfactor = 30 - ltemp; } } Mfactor = round32f( two_to_the_N(Xfactor)*slope ); if ( Mfactor == 32768 ) { /* There is an endpoint problem. Re-compute if on endpoint */ Xfactor—; Mfactor =round32f( two_to_the_N(Xfactor)*slope ); } if ((Mfactor<=32767) && (Mfactor>= -32768) ) { /* only save if M is within limits */ /* Adjust EX to match runtime.asm */ EX[jj] = (uint16)(Xofst - Xfactor ); M[jj] = (uint16)(Mfactor & 0xFFFF); /* remove leading 1’s*/ B = round32f( two_to_the_N(Xfactor )*result[ii-1] ); Bhigh[jj] = (uint16)((B >> 16) & 0x0000FFFF); Blow[jj] = (uint16)(B & 0x0000FFFF); } } /* end for */ for ( ii=0 ; ii<=64 ; ii++ ) /* 0 to -FS */ { input[ii] = center - ( (tbl_range/64.0)*(float64)(ii)); result[ii] = (*custom_function)( input[ii] ); 366 Generating User Defined Functions Appendix F if ( ii == 0 ) continue; /* This is the first point - skip slope */ jj = ii - 1; /* generate numbers for prev segment */ /* for second and subsequent points */ t = result[ii-1]; /* using prev seg base */ if (t< 0.0) t *= -1.0; /* use abs value (magnitude) of t */ /* compute the exponent of the offset (B is 31 bits) */ if (t!=0.0) { /* don’t take log of zero */ exponent = 31.0 - (log10(t)/log10(2.0));/* take log base 2 */ } else { exponent = 100.0; } /* compute slope in bits (each table entry represents 512 bits) */ slope = ( result[ii] - result[ii-1] ) / 512.0; /* don’t take the log of a negative slope */ absslope = (slope < 0 )? -slope : slope; /* compute the exponent of the slope (M is 16 bits) */ if ( absslope != 0 ) { exponent2 = 15.0 -(log10(absslope)/log10(2.0)); } else { exponent2 = 100.0; } /* Choose the smallest exponent — maximize resolution */ if (exponent2 < exponent) exponent = exponent2; Xfactor = (int32)(exponent); if ( t != 0 ) { int32 ltemp = round32f( log10( t ) / log10( 2.0 ) ); if ( (Xfactor + ltemp) > 30 ) { Xfactor = 30 - ltemp; } } Mfactor = round32f( two_to_the_N(Xfactor)*slope ); if ( Mfactor == 32768 ) { /* There is an endpoint problem. Re-compute if on endpoint */ Xfactor—; Mfactor =round32f( two_to_the_N(Xfactor)*slope ); } if ((Mfactor<=32767) && (Mfactor>= -32768) ) { /* only save if M is within limits */ /* Adjust EX to match runtime.asm */ EX[jj] = (uint16)(Xofst - Xfactor ); M[jj] = (uint16)(Mfactor & 0xFFFF); /* remove leading 1’s*/ B = round32f( two_to_the_N(Xfactor )*result[ii-1] ); Appendix F Generating User Defined Functions 367 Bhigh[jj] = (uint16)((B >> 16) & 0x0000FFFF); Blow[jj] = (uint16)(B & 0x0000FFFF); } } /* end for */ /* * Build actual tables for downloading into the E1415 memory. */ for ( ii=0 ; ii<128 ; ii++ ) { /* copy 64 sets of coefficents */ conv_array[ii*4] = M[ii]; conv_array[ii*4+1] = EX[ii]; conv_array[ii*4+2] = Bhigh[ii]; conv_array[ii*4+3] = Blow[ii]; /* printf(“%d %d %d %d %d\n”,ii,M[ii],EX[ii],Bhigh[ii],Blow[ii]); */ } return; } /* Main program */ /*ARGSUSED*/ /* Keeps lint happy */ int main(int argc, char *argv[]) { /* Main program local variable declarations */ char *algorithm; /* Algorithm string */ int alg_num; /* Algorithm number being loaded */ char string[333]; /* Holds error information */ int32 error; /* Holds error number */ #if 0 /* Set to 1 if reading algorithm files */ /* Check pass parameters */ if ((argc < 2) || (argc > 33)) { /* Must have 1 to 32 algorithms */ usage(argv[0]); exit(1); } #endif INST_STARTUP(); /* Initialize the C-SCPI routines */ #if 0 /* Set to 1 to open interface session */ /* If you need to open a VXI device session, here’s how to do it. You need * a VXI device session if the V382 is to source or respond to VXI * backplane triggers (SICL ixtrig or ionintr calls). */ if (! (vxi = iopen(“vxi”))) { (void) fprintf(stderr, “SICL error: failed to open vxi interface.\n”); (void) fprintf(stderr, “SICL error %d: %s\n”, igeterrno(), igeterrstr(igeterrno())); exit(1); } #endif /* Open the E1415 device session with error checking. Copy and modify * these lines if you need to open other instruments. */ INST_OPEN(e1415, E1415_ADDR); /* Open the E1415 */ if (! e1415) { /* Did it open? */ (void) fprintf(stderr, “Failed to open the E1415 at address %s\n”, E1415_ADDR); 368 Generating User Defined Functions Appendix F (void) fprintf(stderr, “C-SCPI open error was %d\n”, cscpi_open_error); (void) fprintf(stderr, “SICL error was %d: %s\n”, igeterrno(), igeterrstr(igeterrno())); exit(1); } /* Check for startup errors */ INST_QUERY(e1415,"syst:err?\n", “%d,%S”, &error, string); if (error) { (void) printf(“syst:err %d,%s\n”, error, string); exit(1); } /* Usually, you’ll want to start from a known instrument state. * following provides this. */ INST_CLEAR(e1415); /* Selected device clear */ INST_SEND(e1415, “*RST;*CLS\n”); The #if 0 /* Set to 1 to do self test */ /* Does the E1415 pass self-test? */ { int test_result; /* Result of E1415 self-test */ test_result = -1; /* Make sure it gets assigned */ INST_QUERY(e1415, “*TST?\n”, “%d”, &test_result); if (test_result) { (void) fprintf(stderr, “E1415A failed self-test\n”); exit(1); } } #endif /* Setup SCP functions */ INST_SEND(e1415, “sens:func:volt (@116)\n”); /* Analog in volts INST_SEND(e1415, “sour:func:cond (@141)\n”); /* Digital output */ */ #if 0 /* Set to 1 to do calibration */ /* Perform Calibrate, if necessary */ { int cal_result; /* Result of E1415 self-test */ cal_result = -1; /* Make sure it gets assigned */ INST_QUERY(e1415, “*CAL?\n”, “%d”, &cal_result); if (cal_result) { (void) fprintf(stderr, “E1415A failed calibration\n”); (void) fprintf(stderr, “Check FIFO for channel errors\n”); exit(1); } } #endif /* Configure Trigger Subsystem and Data Format */ INST_SEND(e1415, “trig:sour timer;:trig:timer .001\n”); INST_SEND(e1415, “samp:timer 10e-6\n”); /* default */ INST_SEND(e1415, “form real,32\n”); /* Download Globals */ /* INST_SEND(e1415, “alg:def ‘globals’,’static float x;’\n”); */ /* Download Custom Function */ Appendix F Generating User Defined Functions 369 { float64 float64 float64 uint16 float64 maxInput; minInput; tableOffset; coef_array[512]; tableRange; /* /* /* /* /* set to maximum expected input*/ set to minimum expected input*/ offset used in building table*/ 512 elements */ Range on which table was built*/ maxInput = 2; minInput = -2; Build_table( maxInput, minInput, my_function, &tableRange, &tableOffset, coef_array ); /* Download the table range and the table array to the card /* Piecewise requires 128 sets of table values */ */ INST_SEND(e1415,"ALGorithm:FUNCtion:DEFine ‘sin’,%f,%f,%1024b", tableRange, tableOffset, coef_array); } /* Download algorithms */ #if 0 /* Set to 1 if algorithms passed in as files */ /* Get an algorithm(s) from the passed filename(s). We assign sequential * algorithm numbers to each successive file name: ALG1, ALG2, etc. when * you execute this program as “<progname> lang1 lang2 lang3 ...” */ alg_num = 1; /* Starting algorithm number */ while (argc > alg_num) { algorithm = get_algorithm(argv[alg_num]); /* Read the algorithm */ /* Define the algorithm */ { char alg[6]; /* Temporary algorithm name */ (void) sprintf(alg, “ALG%d”, alg_num); INST_SEND(e1415, “alg:def %S,%*B\n”, alg, strlen(algorithm) + 1, algorithm); /* Check for algorithm errors */ INST_QUERY(e1415,"syst:err?\n", “%d,%S”, &error, string); if (error) { (void) printf(“While loading file %s, syst:err %d,%s\n”, argv[alg_num], error, string); exit(1); } } /* Free the malloc’ed memory */ free(algorithm); alg_num++; /* Next algorithm */ } (void) printf(“All %d algorithm(s) loaded without errors\n\n”, alg_num-1); #else /* Download algorithm with in-line code */ algorithm = “ \n” “/* Example algorithm uses Custom Function.\n” “ * This algorithms builds a haversine.\n” “ */\n” “\n” 370 Generating User Defined Functions Appendix F “ static float radians = 0, y;\n” “ y = sin( radians );\n” “ \n”; INST_SEND(e1415, “alg:def ‘ALG1’,%*B\n”, strlen(algorithm) + 1, algorithm); #endif /* Preset Algorithm variables */ /* Initiate Trigger System - start scanning and running algorithms */ INST_SEND(e1415,"init\n"); /* Print out results */ { float32 pi = 3.14159654; float32 radians; float32 y; /* Note that alg:scal? won’t execute until alg:upd is done */ for ( radians = -pi/2.0; radians < pi/2.0; radians += pi / 10.0 ) { INST_SEND(e1415, “alg:scal ‘alg1’,’radians’,%f\n”, radians); INST_SEND(e1415, “alg:upd\n”); INST_QUERY(e1415, “alg:scal? ‘alg1’,’y’\n”, “%f”, &y); printf( “’C’ sin(%f): %f, ‘E1415A’ sin(%f): %f\n”,radians, (float32)sin((float64)radians), radians, y); } } #if 1 /* Set to 1 if using User interactive commands to E1415 */ /* Call this function if you want to be able to type SCPI commands and * see their responses. NOTE: switch to FORM,ASC to retrieve * ASCII numbers during interactive mode. */ INST_SEND(e1415,"form asc\n"); do_interactive(); /* Calls cscpi_exe() in a loop */ #endif #if 0 /* C-CSPI way to check for errors */ INST_QUERY(e1415,"syst:err?\n", “%d,%S”, &error, string); if (error) { (void) printf(“syst:err %d,%s\n”, error, string); exit(1); } #endif return 0; /* Normal end of program */ } #if 0 Example of results from program: ‘C’ ‘C’ ‘C’ ‘C’ ‘C’ ‘C’ ‘C’ ‘C’ ‘C’ ‘C’ Appendix F sin(-1.570798): -1.000000, ‘E1415A’ sin(-1.570798): -0.999905 sin(-1.256639): -0.951057, ‘E1415A’ sin(-1.256639): -0.950965 sin(-0.942479): -0.809018, ‘E1415A’ sin(-0.942479): -0.808944 sin(-0.628319): -0.587786, ‘E1415A’ sin(-0.628319): -0.587740 sin(-0.314160): -0.309017, ‘E1415A’ sin(-0.314160): -0.308998 sin(0.000000): 0.000000, ‘E1415A’ sin(0.000000): 0.000000 sin(0.314160): 0.309017, ‘E1415A’ sin(0.314160): 0.308998 sin(0.628319): 0.587786, ‘E1415A’ sin(0.628319): 0.587740 sin(0.942479): 0.809018, ‘E1415A’ sin(0.942479): 0.808944 sin(1.256639): 0.951057, ‘E1415A’ sin(1.256639): 0.950965 Generating User Defined Functions 371 ‘C’ sin(1.570798): 1.000000, ‘E1415A’ sin(1.570798): 0.999905 #endif RMB Version 10 ! RE-SAVE “SINE_FN.ASC” 20 ! 30 ! DESCRIPTION: Example program to illustrate the use of Custom Functions 40 ! in the E1415A. This example shows the use of RMB. 50 ! This example shows the creation of a Haversine function. 60 ! 70 ! The Build_table subprogram receives the minimum and maximum ranges 80 ! over which the function it to be built. You supply the algebraic 90 ! expression for FNMy_function(). 100 ! 110 ! ****************************************************************** 120 INTEGER Coef_array(0:511),Error 130 REAL Hpibintfc,Cmdmodule,E1413_ladd,E1413addr 140 INTEGER Lin_piecewise,Ilin(0:3),Ipiec(0:514) 150 REAL Min_input,Max_input 160 DIM String$[333] 170 ASSIGN @Err TO 1 180 ! 190 ! ******************************************************************** 200 ! The following three lines should be customized for each installation 210 Hpibintfc=7 ! Hpib interface number for E1415 220 Cmdmodule=9 ! Hpib address for command module for E1415 230 E1415_ladd=208 ! Logical address for E1415 card 240 ! ******************************************************************** 250 ON TIMEOUT Hpibintfc,12 GOTO End_ 260 E1415addr=Hpibintfc*10000+Cmdmodule*100+E1415_ladd/8 270 ASSIGN @E1415 TO E1415addr 280 ASSIGN @Bus TO Hpibintfc;FORMAT OFF 290 ! 300 OUTPUT @E1415;"*RST;*CLS" 310 OUTPUT @E1415;"*IDN?" 320 ENTER @E1415;String$ 330 PRINT String$ 340 ! 350 ! Select the Domain values for the function. 360 ! 370 Min_input=-2 380 Max_input=2 390 CALL Build_table(Max_input,Min_input,Table_range,Table_offset,Coef_array(*)) 400 ! 410 ! Download the function table and define the function 420 ! 430 Ipiec(0)=256*NUM(“#”)+NUM(“4") !build block 440 Ipiec(1)=256*NUM(“1")+NUM(”0") !1024 bytes 450 Ipiec(2)=256*NUM(“2")+NUM(”4") !512 Integers 460 FOR Ii=0 TO 511 470 Ipiec(Ii+3)=Coef_array(Ii) 480 NEXT Ii 490 GOSUB Err_check 500 OUTPUT @E1415;"ALG:FUNC:DEF ‘sin’,";Table_range;",";Table_offset;","; 510 OUTPUT @Bus;Ipiec(*) !add block 520 OUTPUT @Bus;CHR$(10);END !terminate 530 ! 372 Generating User Defined Functions Appendix F 540 GOSUB Err_check 550 ! 560 ! Now define an algorithm to use sin(x) and tests its functionality. 570 ! 580 OUTPUT @E1415;"alg:def ‘alg1’,’static float y,radians=0;y=sin(radians);’" 590 OUTPUT @E1415;"form ascii;:trig:timer .001;:init" 600 RAD ! use radians 610 GOSUB Err_check 620 FOR Radians=-PI/2 TO PI/2 STEP PI/10 630 OUTPUT @E1415;"alg:scal ‘alg1’,’radians’,";Radians;";upd" 640 OUTPUT @E1415;"alg:scal? ‘alg1’,’y’" 650 ENTER @E1415;Y 660 PRINT USING This;"’RMB’ sin(radians): “;SIN(Radians);” ‘E1415A’ sin(Radians): “;Y 670 This:IMAGE K,SD.DDDD,K,SD.DDDD 680 NEXT Radians 690 STOP 700 End_: ! 710 PRINT “HPIB TIMEOUT” 720 STOP 730 Err_check:REPEAT ! Check for any errors 740 OUTPUT @E1415;"SYST:ERR?" 750 ENTER @E1415;Error,String$ 760 IF Error THEN 770 OUTPUT @Err;"Error returned: “&VAL$(Error)&.” “&String$ 780 END IF 790 UNTIL Error=0 800 RETURN 810 END 820 ! ############################################################## 830 ! 840 ! Subprogram Build_eu_table 850 ! TASK: Generates tables of mx+b values for downloading to E1415 DSP 860 ! 870 ! Generate the three coefficients for the EU algorithm: 880 ! a. The “exponent” value 890 ! b. The “slope” or “M” value 900 ! c. The “intercept” or “B” value. 910 ! 920 ! INPUT PARAMETERS: 930 ! REAL Min_input - lowest expected value 940 ! REAL Max_input - largest expected value 950 ! zero generates piecewise table 960 ! OUTPUT PARAMETERS 970 ! REAL Table_range - returned table range 980 ! REAL Table_offset - how much to adjust X for shifted function 990 ! INTEGER Coef_array - returned coeficient array: 1000 ! (512 values) 1010 ! 1020 Build_eu_table:SUB Build_table(REAL Min_input,Max_input,Table_range,Table_offset,INTEGER Coef_array(*)) 1030 INTEGER M(128),Ex(128),Bhigh(128),Blow(128),Xofst,Shift,Ii,Jj 1040 INTEGER Xfactor,Ltemp 1050 REAL Input(129),Result(129),Test_range,T,Exponent,Exponent2 1060 REAL Slope,Absslope,Mfactor,B,Bl 1070 ! 1080 ! Calculate the mid point of the range. 1090 ! 1100 Center=Min_input+(Max_input-Min_input)/2 1110 Table_offset=Center 1120 Temp_range=Max_input-Center 1130 Test_range=ABS(Temp_range) Appendix F Generating User Defined Functions 373 1140 1150 1160 1170 1180 1190 1200 1210 1220 1230 1240 1250 1260 1270 1280 1290 1300 1310 1320 1330 1340 1350 1360 1370 1380 1390 1400 1410 1420 1430 1440 1450 1460 1470 1480 1490 1500 1510 1520 1530 1540 1550 1560 1570 1580 1590 1600 1610 1620 1630 1640 1650 1660 1670 1680 1690 1700 1710 1720 1730 1740 1750 ! ! Now calculate the closest binary representation of the test_range ! Tbl_range=1/2^128 WHILE Test_range>Tbl_range Tbl_range=Tbl_range*2 END WHILE Table_range=Tbl_range Xofst=157 ! exponent bias for DSP calculations ! ! ! ! ! ! ! ! ! Now divide the full range of the table into 128 segments (129 points) from -Rnge to +Rnge using the Custom() function function. We then generate the M, B and Ex values for the table to be downloaded. Note that we actually calculate 129 points but generate 128 sets of M, B and Ex values. FOR Ii=0 TO 64 STEP 1 Input(Ii)=Center+((Tbl_range/64.0)*Ii) Result(Ii)=FNMy_function(Input(Ii)) IF Ii=0 THEN GOTO Loopend1! This is the first point ! ! for second and subsequent points Jj=64+Ii-1 ! generate numbers for prev segment T=ABS(Result(Ii-1)) ! using abs value of prev seg base ! ! compute the exponent of the offset (B is 31 bits) IF T<>0. THEN ! don’t take log of zero Exponent=31.0-(LGT(T)/LGT(2.0)) ! take log base 2 ELSE Exponent=100.0 END IF ! ! compute slope in bits (each table entry represents 512 bits) Slope=(Result(Ii)-Result(Ii-1))/512.0 ! ! don’t take the log of a negative slope Absslope=ABS(Slope) ! ! compute the exponent of the slope (M is 16 bits) IF Absslope<>0. THEN Exponent2=15.0-(LGT(Absslope)/LGT(2.0)) ELSE Exponent2=100.0 END IF ! Choose the smallest exponent — maximize resolution IF Exponent2<Exponent THEN Exponent=Exponent2 Xfactor=INT(Exponent) !convert to integer IF T<>0. THEN Ltemp=PROUND(LGT(T)/LGT(2.0),0) IF (Xfactor+Ltemp)>30 THEN Xfactor=30-Ltemp END IF Mfactor=PROUND(2^Xfactor*Slope,0) IF Mfactor=32768.0 THEN ! There is an endpoint problem. Re-compute if on endpoint Xfactor=Xfactor-1 Mfactor=PROUND(2^Xfactor*Slope,0) END IF IF (Mfactor<=32767.0 AND Mfactor>=-32768.0) THEN ! only save if M is in limits Ex(Jj)=Xofst-Xfactor 374 Generating User Defined Functions Appendix F 1760 1770 1780 1790 1800 1810 1820 1830 1840 1850 1860 1870 1880 1890 1900 1910 1920 1930 1940 1950 1960 1970 1980 1990 2000 2010 2020 2030 2040 2050 2060 2070 2080 2090 2100 2110 2120 2130 2140 2150 2160 2170 2180 2190 2200 2210 2220 2230 2240 2250 2260 2270 2280 2290 2300 2310 2320 2330 2340 2350 2360 2370 Appendix F M(Jj)=Mfactor ! remove leading 1’s B=PROUND(2^Xfactor*Result(Ii-1),0) Bhigh(Jj)=INT(B/65536.0) ! truncates Bl=B-(Bhigh(Jj)*65536.0) IF Bl>32767 THEN Bl=Bl-65536 Blow(Jj)=Bl END IF Loopend1:NEXT Ii FOR Ii=0 TO 64 STEP 1 Input(Ii)=Center-((Tbl_range/64.0)*Ii) Result(Ii)=FNMy_function(Input(Ii)) IF Ii=0 THEN GOTO Loopend2! This is the first point ! ! for second and subsequent points Jj=Ii-1 ! generate numbers for prev segment T=ABS(Result(Ii-1)) ! using abs value of prev seg base ! ! compute the exponent of the offset (B is 31 bits) IF T<>0. THEN ! don’t take log of zero Exponent=31.0-(LGT(T)/LGT(2.0)) ! take log base 2 ELSE Exponent=100.0 END IF ! ! compute slope in bits (each table entry represents 512 bits) Slope=(Result(Ii)-Result(Ii-1))/512.0 ! ! don’t take the log of a negative slope Absslope=ABS(Slope) ! ! compute the exponent of the slope (M is 16 bits) IF Absslope<>0. THEN Exponent2=15.0-(LGT(Absslope)/LGT(2.0)) ELSE Exponent2=100.0 END IF ! Choose the smallest exponent — maximize resolution IF Exponent2<Exponent THEN Exponent=Exponent2 Xfactor=INT(Exponent) !convert to integer IF T<>0. THEN Ltemp=PROUND(LGT(T)/LGT(2.0),0) IF (Xfactor+Ltemp)>30 THEN Xfactor=30-Ltemp END IF Mfactor=PROUND(2^Xfactor*Slope,0) IF Mfactor=32768.0 THEN ! There is an endpoint problem. Re-compute if on endpoint Xfactor=Xfactor-1 Mfactor=PROUND(2^Xfactor*Slope,0) END IF IF (Mfactor<=32767.0 AND Mfactor>=-32768.0) THEN ! only save if M is in limits Ex(Jj)=Xofst-Xfactor M(Jj)=Mfactor ! remove leading 1’s B=PROUND(2^Xfactor*Result(Ii-1),0) Bhigh(Jj)=INT(B/65536.0) ! truncates Bl=B-(Bhigh(Jj)*65536.0) IF Bl>32767 THEN Bl=Bl-65536 Blow(Jj)=Bl END IF Loopend2:NEXT Ii ! ! Copy the calculated table values to the output array Generating User Defined Functions 375 2380 2390 2400 2410 2420 2430 2440 2450 2460 2470 2480 2490 2500 2510 2520 2530 2540 2550 2560 2570 ! ! ! Store M, E and B terms in array ! FOR Ii=0 TO 127 ! copy 128 sets of coefficents Coef_array(Ii*4)=M(Ii) Coef_array(Ii*4+1)=Ex(Ii) Coef_array(Ii*4+2)=Bhigh(Ii) Coef_array(Ii*4+3)=Blow(Ii) ! PRINT Ii,M(Ii),Ex(Ii),Bhigh(Ii),Blow(Ii) NEXT Ii SUBEND ! ! ************************************************************ ! Insert your desired function here ! DEF FNMy_function(REAL In_val) RETURN SIN(In_val) FNEND 376 Generating User Defined Functions Appendix F Appendix G Example Program Listings This appendix includes listings of example programs that are not printed in other parts of the manual. The example “simp_pid.cs” is shown here because the listing in Chapter 3 is a shortened version. · · · · simp_pid.cs . . . . . . . . . . . . . . . . . . . . . . . . . . . . . . . . . . . . . . . . . . page 377 file_alg.cs . . . . . . . . . . . . . . . . . . . . . . . . . . . . . . . . . . . . . . . . . . . . page 383 swap.cs . . . . . . . . . . . . . . . . . . . . . . . . . . . . . . . . . . . . . . . . . . . . . . page 389 tri_sine.cs . . . . . . . . . . . . . . . . . . . . . . . . . . . . . . . . . . . . . . . . . . . . page 396 simp_pid.cs /* $Header: $ * * C-SCPI Example program for the E1415A Algorithmic Closed Loop Controller * * simp_pid.cs * * This program example shows the use of the intrinsic function PIDB. * * This is a template for building E1415A C programs that may use C-SCPI * or SICL to control instruments. */ /* Standard include files */ #include <stdlib.h> /* Most programs use one or more * functions from the C standard * library. */ #include <stdio.h> /* Most programs will also use standard * I/O functions. */ #include <stddef.h> /* This file is also often useful */ #include <math.h> /* Needed for any floating point fn’s */ /* Other system include files */ /* Whenever using system or library calls, check the call description to see * which include files should be included. */ /* Instrument control include files */ #include <cscpi.h> /* C-SCPI include file */ /* Declare any constants that will be useful to the program. In particular, * it is usually best to put instrument addresses in this area to make the code * more maintainable. */ #define E1415_ADDR “vxi,208" /* The SICL address of your E1415 */ INST_DECL(e1415, “E1415A”, REGISTER); /* E1415 */ /* Use something like this for GPIB and Agilent E1405/6 Command Module */ Appendix G Example Program Listings 377 /* #define E1415_ADDR “hpib,22,26" /*INST_DECL(e1415, “E1415A”, MESSAGE); /* The SICL address of your E1415 */ /* E1415 */ /* Declare instruments that will be accessed with SICL. * can also be moved into local contexts. */ INST vxi; /* VXI interface session */ These declarations /* Trap instrument errors. If this function is used, it will be called every * time a C-SCPI instrument puts an error in the error queue. As written, the * function will figure out which instrument generated the error, retrieve the * error, print a message and exit. You may want to modify the way the error * is printed or comment out the exit if you want the program to continue. * * Note that this works only on REGISTER based instruments, because it was * a C-SCPI register-based feature, not a general programming improvement. * If you’re using MESSAGE instruments, you’ll still have to do SYST:ERR?: * * If your test program generates errors on purpose, you probably don’t want * this error function. If so, set the following “#if 1" to ”#if 0." This * function is most useful when you’re trying to get your program running. */ #if 1 /* Set to 0 to skip trapping errors */ /*ARGSUSED*/ /* Keeps lint happy */ void cscpi_error(INST id, int err) { char errorbuf[255]; /* Holds instrument error message */ char idbuf[255]; /* Holds instrument response to *IDN? */ cscpi_exe(id, “*IDN?\n”, 6, idbuf, 255); cscpi_exe(id, “SYST:ERR?\n”, 10, errorbuf, 255); (void) fprintf(stderr, “Instrument error %s from %s\n”, errorbuf, idbuf); } #endif /* The following routine allows you to type SCPI commands and see the results. * If you don’t call this from your program, set the following “#if 1" to * “#if 0." */ #if 1 /* Set to 0 to skip this routine */ void do_interactive(void) { char command[5000]; char result[5000]; int32 error; char string[256]; for(;;) { (void) printf(“SCPI command: ”); (void) fflush(stdout); /* repeat until it actually gets something*/ while (!gets(command)); if (!*command) { break; } result[0] = 0; cscpi_exe(e1415, command, strlen(command), result, sizeof(result)); INST_QUERY(e1415, “syst:err?”, “%d,%s”, &error, string); while ( error ) { 378 Example Program Listings Appendix G (void) printf(“syst:err %d,’%s’\n”, error, string); INST_QUERY(e1415,"syst:err?", “%d,%s”, &error, string); } if (result[0]) { (void) printf(“result: %s\n”, result); } } } #endif /* Print usage information */ void usage(char *prog_name) { (void) fprintf(stderr, “usage: %s algorithm_file...\n”, prog_name); } /* Get an algorithm from a filename */ static char *get_algorithm(char *file_name) { FILE *f; /* Algorithm int32 a_size; /* Algorithm int c; /* Character char *algorithm; /* Points to file pointer */ size */ read from input */ algorithm string */ f = fopen(file_name, “r”); if (! f) { (void) fprintf(stderr, “Error: can’t open algorithm file ‘%s’\n”, file_name); exit(1); } a_size = 0; while (getc(f) != EOF) { a_size++; } rewind(f); algorithm = malloc(a_size + 1); a_size = 0; while ((c = getc(f)) != EOF) { algorithm[a_size] = c; a_size++; } algorithm[a_size] = 0; (void) fclose(f); return algorithm; /* Count length of algorithm */ /* Storage for algorithm */ /* Use as array index */ /* Read the algorithm */ /* Null terminate */ /* Return algorithm string */ } /* Main program */ /*ARGSUSED*/ /* Keeps lint happy */ int main(int argc, char *argv[]) { /* Main program local variable declarations */ char *algorithm; /* Algorithm string */ int alg_num; /* Algorithm number being loaded */ char string[333]; /* Holds error information */ int32 error; /* Holds error number */ #if 0 Appendix G /* Set to 1 if reading algorithm files */ Example Program Listings 379 /* Check pass parameters */ if ((argc < 2) || (argc > 33)) { usage(argv[0]); exit(1); } #endif INST_STARTUP(); /* Must have 1 to 32 algorithms */ /* Initialize the C-SCPI routines */ #if 0 /* Set to 1 to open interface session */ /* If you need to open a VXI device session, here’s how to do it. You need * a VXI device session if the V382 is to source or respond to VXI * backplane triggers (SICL ixtrig or ionintr calls). */ if (! (vxi = iopen(“vxi”))) { (void) fprintf(stderr, “SICL error: failed to open vxi interface.\n”); (void) fprintf(stderr, “SICL error %d: %s\n”, igeterrno(), igeterrstr(igeterrno())); exit(1); } #endif /* Open the E1415 device session with error checking. Copy and modify * these lines if you need to open other instruments. */ INST_OPEN(e1415, E1415_ADDR); /* Open the E1415 */ if (! e1415) { /* Did it open? */ (void) fprintf(stderr, “Failed to open the E1415 at address %s\n”, E1415_ADDR); (void) fprintf(stderr, “C-SCPI open error was %d\n”, cscpi_open_error); (void) fprintf(stderr, “SICL error was %d: %s\n”, igeterrno(), igeterrstr(igeterrno())); exit(1); } /* Check for startup errors */ INST_QUERY(e1415,"syst:err?\n", “%d,%S”, &error, string); if (error) { (void) printf(“syst:err %d,%s\n”, error, string); exit(1); } /* Usually, you’ll want to start from a known instrument state. * following provides this. */ INST_CLEAR(e1415); /* Selected device clear */ INST_SEND(e1415, “*RST;*CLS\n”); The #if 0 /* Set to 1 to do self test */ /* Does the E1415 pass self-test? */ { int test_result; /* Result of E1415 self-test */ test_result = -1; /* Make sure it gets assigned */ INST_QUERY(e1415, “*TST?\n”, “%d”, &test_result); if (test_result) { (void) fprintf(stderr, “E1415A failed self-test\n”); exit(1); } } 380 Example Program Listings Appendix G #endif /* Setup SCP functions */ INST_SEND(e1415, “sens:func:volt (@116)\n”); /* Analog in volts INST_SEND(e1415, “sour:func:cond (@141)\n”); /* Digital output */ */ #if 0 /* Set to 1 to do calibration */ /* Perform Calibrate, if necessary */ { int cal_result; /* Result of E1415 self-test */ cal_result = -1; /* Make sure it gets assigned */ INST_QUERY(e1415, “*CAL?\n”, “%d”, &cal_result); if (cal_result) { (void) fprintf(stderr, “E1415A failed calibration\n”); (void) fprintf(stderr, “Check FIFO for channel errors\n”); exit(1); } } #endif /* Configure Trigger Subsystem and Data Format */ INST_SEND(e1415, “trig:sour timer;:trig:timer .001\n”); INST_SEND(e1415, “samp:timer 10e-6\n”); /* default */ INST_SEND(e1415, “form real,32\n”); /* Download Globals */ /* INST_SEND(e1415, “alg:def ‘globals’,’static float x;’\n”); */ /* Download algorithms */ #if 0 /* Set to 1 if algorithms passed in as files */ /* Get an algorithm(s) from the passed filename(s). We assign sequential * algorithm numbers to each successive file name: ALG1, ALG2, etc. when * you execute this program as “<progname> lang1 lang2 lang3 ...” */ alg_num = 1; /* Starting algorithm number */ while (argc > alg_num) { algorithm = get_algorithm(argv[alg_num]); /* Read the algorithm */ /* Define the algorithm */ { char alg[6]; /* Temporary algorithm name */ (void) sprintf(alg, “ALG%d”, alg_num); INST_SEND(e1415, “alg:def %S, %*B\n”, alg, strlen(algorithm) + 1, algorithm); /* Check for algorithm errors */ INST_QUERY(e1415,"syst:err?\n", “%d,%S”, &error, string); if (error) { (void) printf(“While loading file %s, syst:err %d,%s\n”, argv[alg_num], error, string); exit(1); } } /* Free the malloc’ed memory */ free(algorithm); alg_num++; Appendix G /* Next algorithm */ Example Program Listings 381 } (void) printf(“All %d algorithm(s) loaded without errors\n\n”, alg_num-1); #else /* Download algorithms with in-line code */ INST_SEND(e1415,"alg:def ‘alg1’,’PIDB(I116,O100,O141.B0)’\n"); #endif /* Preset Algorithm variables */ INST_SEND(e1415,"alg:scal ‘alg1’,’Setpoint’,%f\n", 3.0); INST_SEND(e1415,"alg:scal ‘alg1’,’P_factor’,%f\n", 0.0001); INST_SEND(e1415,"alg:scal ‘alg1’,’I_factor’,%f\n", 0.00025); INST_SEND(e1415,"alg:upd\n"); /* Initiate Trigger System - start scanning and running algorithms */ INST_SEND(e1415,"init\n"); /* Alter run-time variables and Retrieve Data */ while( 1 ) { float32 setpoint = 0, process_info[4]; int i; /* type in -100 to exit */ printf(“Enter desired setpoint: ”); scanf( “%f”,&setpoint ); if ( setpoint == -100.00 ) break; INST_SEND(e1415,"alg:scal ‘alg1’,’Setpoint’,%f\n", setpoint ); INST_SEND(e1415,"alg:upd\n"); for ( i = 0; i < 10 ; i++ ) { /* read CVT 10 times */ /* ALG1 has elments 10-13 in CVT */ INST_QUERY( e1415, “data:cvt? (@10:13)”,"%f",&process_info ); printf(“Process variable: %f, %f, %f, %f\n”,process_info[0], process_info[1],process_info[2],process_info[3]); } #if 0 /* Set to 1 if using User interactive commands to E1415 */ /* Call this function if you want to be able to type SCPI commands and * see their responses. NOTE: switch to FORM,ASC to retrieve * ASCII numbers during interactive mode. */ do_interactive(); /* Calls cscpi_exe() in a loop */ #endif #if 0 /* C-CSPI way to check for errors */ INST_QUERY(e1415,"syst:err?\n", “%d,%S”, &error, string); if (error) { (void) printf(“syst:err %d,%s\n”, error, string); exit(1); } #endif } return 0; /* Normal end of program */ } #if 0 C-CSPI program. Example of changing from Setpoint=3 to Setpoint=9 over a trigger event period of 1msec using PIDB. Setpoint, error, output and status are shown: 382 Example Program Listings Appendix G Enter desired setpoint: 9 Process Process Process Process Process Process Process Process Process Process variable: variable: variable: variable: variable: variable: variable: variable: variable: variable: 3.000122, 2.998657, 5.744141, 7.165039, 8.086914, 9.018555, 9.056152, 9.054688, 9.046387, 9.010254, -0.000122, 0.001538, 0.000000 6.001343, 0.003638, 0.000000 3.255859, 0.004178, 0.000000 1.834961, 0.004494, 0.000000 0.383301, 0.004673, 0.000000 -0.018555, 0.004655, 0.000000 -0.056152, 0.004637, 0.000000 -0.054688, 0.004623, 0.000000 -0.046387, 0.004612, 0.000000 -0.010254, 0.004601, 0.000000 #endif file_alg.cs /* $Header: $ * * C-SCPI Example program for the E1415A Algorithmic Closed Loop Controller * * file_alg.cs * * This example shows how to load algorithms from files. This example * works properly with the file “mxplusb”, which contains the E1415A * algorithm for calculating various combinations of Mx+B. * * This is a template for building E1415A C programs that may use C-SCPI * or SICL to control instruments. */ /* Standard include files */ #include <stdlib.h> /* Most programs use one or more * functions from the C standard * library. */ #include <stdio.h> /* Most programs will also use standard * I/O functions. */ #include <stddef.h> /* This file is also often useful */ #include <math.h> /* Needed for any floating point fn’s */ /* Other system include files */ /* Whenever using system or library calls, check the call description to see * which include files should be included. */ /* Instrument control include files */ #include <cscpi.h> /* C-SCPI include file */ /* Declare any constants that will be useful to the program. In particular, * it is usually best to put instrument addresses in this area to make the code * more maintainable. */ #define E1415_ADDR “vxi,208" /* The SICL address of your E1415 */ INST_DECL(e1415, “E1415A”, REGISTER); /* E1415 */ /* Use something like this for GPIB and Agilent E1405/6 Command Module */ Appendix G Example Program Listings 383 /* #define E1415_ADDR “hpib,22,26" /*INST_DECL(e1415, “E1415A”, MESSAGE); /* The SICL address of your E1415 */ /* E1415 */ /* Declare instruments that will be accessed with SICL. * can also be moved into local contexts. */ INST vxi; /* VXI interface session */ These declarations /* Trap instrument errors. If this function is used, it will be called every * time a C-SCPI instrument puts an error in the error queue. As written, the * function will figure out which instrument generated the error, retrieve the * error, print a message and exit. You may want to modify the way the error * is printed or comment out the exit if you want the program to continue. * * Note that this works only on REGISTER based instruments, because it was * a C-SCPI register-based feature, not a general programming improvement. * If you’re using MESSAGE instruments, you’ll still have to do SYST:ERR?: * * If your test program generates errors on purpose, you probably don’t want * this error function. If so, set the following “#if 1" to ”#if 0." This * function is most useful when you’re trying to get your program running. */ #if 1 /* Set to 0 to skip trapping errors */ /*ARGSUSED*/ /* Keeps lint happy */ void cscpi_error(INST id, int err) { char errorbuf[255]; /* Holds instrument error message */ char idbuf[255]; /* Holds instrument response to *IDN? */ cscpi_exe(id, “*IDN?\n”, 6, idbuf, 255); cscpi_exe(id, “SYST:ERR?\n”, 10, errorbuf, 255); (void) fprintf(stderr, “Instrument error %s from %s\n”, errorbuf, idbuf); } #endif /* The following routine allows you to type SCPI commands and see the results. * If you don’t call this from your program, set the following “#if 1" to * “#if 0." */ #if 1 /* Set to 0 to skip this routine */ void do_interactive(void) { char command[5000]; char result[5000]; int32 error; char string[256]; for(;;) { (void) printf(“SCPI command: ”); (void) fflush(stdout); /* repeat until it actually gets something*/ while (!gets(command)); if (!*command) { break; } result[0] = 0; cscpi_exe(e1415, command, strlen(command), result, sizeof(result)); INST_QUERY(e1415, “syst:err?”, “%d,%s”, &error, string); while ( error ) { 384 Example Program Listings Appendix G (void) printf(“syst:err %d,’%s’\n”, error, string); INST_QUERY(e1415,"syst:err?", “%d,%s”, &error, string); } if (result[0]) { (void) printf(“result: %s\n”, result); } } } #endif /* Print usage information */ void usage(char *prog_name) { (void) fprintf(stderr, “usage: %s algorithm_file...\n”, prog_name); } /* Get an algorithm from a filename */ static char *get_algorithm(char *file_name) { FILE *f; /* Algorithm int32 a_size; /* Algorithm int c; /* Character char *algorithm; /* Points to file pointer */ size */ read from input */ algorithm string */ f = fopen(file_name, “r”); if (! f) { (void) fprintf(stderr, “Error: can’t open algorithm file ‘%s’\n”, file_name); exit(1); } a_size = 0; while (getc(f) != EOF) { a_size++; } rewind(f); algorithm = malloc(a_size + 1); a_size = 0; while ((c = getc(f)) != EOF) { algorithm[a_size] = c; a_size++; } algorithm[a_size] = 0; (void) fclose(f); return algorithm; /* Count length of algorithm */ /* Storage for algorithm */ /* Use as array index */ /* Read the algorithm */ /* Null terminate */ /* Return algorithm string */ } /* Main program */ /*ARGSUSED*/ /* Keeps lint happy */ int main(int argc, char *argv[]) { /* Main program local variable declarations */ char *algorithm; /* Algorithm string */ int alg_num; /* Algorithm number being loaded */ char string[333]; /* Holds error information */ int32 error; /* Holds error number */ #if 1 Appendix G /* Set to 1 if reading algorithm files */ Example Program Listings 385 /* Check pass parameters */ if ((argc < 2) || (argc > 33)) { usage(argv[0]); exit(1); } #endif INST_STARTUP(); /* Must have 1 to 32 algorithms */ /* Initialize the C-SCPI routines */ #if 0 /* Set to 1 to open interface session */ /* If you need to open a VXI device session, here’s how to do it. You need * a VXI device session if the V382 is to source or respond to VXI * backplane triggers (SICL ixtrig or ionintr calls). */ if (! (vxi = iopen(“vxi”))) { (void) fprintf(stderr, “SICL error: failed to open vxi interface.\n”); (void) fprintf(stderr, “SICL error %d: %s\n”, igeterrno(), igeterrstr(igeterrno())); exit(1); } #endif /* Open the E1415 device session with error checking. Copy and modify * these lines if you need to open other instruments. */ INST_OPEN(e1415, E1415_ADDR); /* Open the E1415 */ if (! e1415) { /* Did it open? */ (void) fprintf(stderr, “Failed to open the E1415 at address %s\n”, E1415_ADDR); (void) fprintf(stderr, “C-SCPI open error was %d\n”, cscpi_open_error); (void) fprintf(stderr, “SICL error was %d: %s\n”, igeterrno(), igeterrstr(igeterrno())); exit(1); } /* Check for startup errors */ INST_QUERY(e1415,"syst:err?\n", “%d,%S”, &error, string); if (error) { (void) printf(“syst:err %d,%s\n”, error, string); exit(1); } /* Usually, you’ll want to start from a known instrument state. * following provides this. */ INST_CLEAR(e1415); /* Selected device clear */ INST_SEND(e1415, “*RST;*CLS\n”); The #if 0 /* Set to 1 to do self test */ /* Does the E1415 pass self-test? */ { int test_result; /* Result of E1415 self-test */ test_result = -1; /* Make sure it gets assigned */ INST_QUERY(e1415, “*TST?\n”, “%d”, &test_result); if (test_result) { (void) fprintf(stderr, “E1415A failed self-test\n”); exit(1); } } 386 Example Program Listings Appendix G #endif /* Setup SCP functions */ INST_SEND(e1415, “sens:func:volt (@116)\n”); /* Analog in volts INST_SEND(e1415, “sour:func:cond (@141)\n”); /* Digital output */ */ #if 0 /* Set to 1 to do calibration */ /* Perform Calibrate, if necessary */ { int cal_result; /* Result of E1415 self-test */ cal_result = -1; /* Make sure it gets assigned */ INST_QUERY(e1415, “*CAL?\n”, “%d”, &cal_result); if (cal_result) { (void) fprintf(stderr, “E1415A failed calibration\n”); (void) fprintf(stderr, “Check FIFO for channel errors\n”); exit(1); } } #endif /* Configure Trigger Subsystem and Data Format */ INST_SEND(e1415, “trig:sour timer;:trig:timer .001\n”); INST_SEND(e1415, “samp:timer 10e-6\n”); /* default */ INST_SEND(e1415, “form real,32\n”); /* Download Globals */ /* INST_SEND(e1415, “alg:def ‘globals’,’static float x;’\n”); */ /* Download algorithms */ #if 1 /* Set to 1 if algorithms passed in as files */ /* Get an algorithm(s) from the passed filename(s). We assign sequential * algorithm numbers to each successive file name: ALG1, ALG2, etc. when * you execute this program as “<progname> lang1 lang2 lang3 ...” */ alg_num = 1; /* Starting algorithm number */ while (argc > alg_num) { algorithm = get_algorithm(argv[alg_num]); /* Read the algorithm */ /* Define the algorithm */ { char alg[6]; /* Temporary algorithm name */ (void) sprintf(alg, “ALG%d”, alg_num); INST_SEND(e1415, “alg:def %S, %*B\n”, alg, strlen(algorithm) + 1, algorithm); /* Check for algorithm errors */ INST_QUERY(e1415,"syst:err?\n", “%d,%S”, &error, string); if (error) { (void) printf(“While loading file %s, syst:err %d,%s\n”, argv[alg_num], error, string); exit(1); } } /* Free the malloc’ed memory */ free(algorithm); alg_num++; Appendix G /* Next algorithm */ Example Program Listings 387 } (void) printf(“All %d algorithm(s) loaded without errors\n\n”, alg_num-1); #else /* Download algorithms with in-line code */ INST_SEND(e1415,"alg:def ‘alg1’,’PIDB(I116,O100,O141.B0)’\n"); #endif /* Preset Algorithm variables */ INST_SEND(e1415,"alg:scal ‘alg1’,’M’,%f\n", 1.234); INST_SEND(e1415,"alg:scal ‘alg1’,’B’,%f\n", 5.678); INST_SEND(e1415,"alg:upd\n"); /* Initiate Trigger System - start scanning and running algorithms */ INST_SEND(e1415,"init\n"); /* Alter run-time variables and Retrieve Data */ { float32 sync, array[4]; int i; for ( i = 0; i < 10 ; i++ ) { /* make 10 changes to ‘x’ */ INST_SEND(e1415,"alg:scal ‘alg1’,’x’,%f\n", (float32) i ); INST_SEND(e1415,"alg:scal ‘alg1’,’sync’,%f\n", 1 ); /* set sync */ INST_SEND(e1415,"alg:upd\n"); /* The following alg:scal? command will not complete if the * update has not occured. Then, it’s a matter of waiting for * the algorithm to complete and set sync = 2. This should * happen almost instantly since the algorithm is executing * every 1msec based upon trig:timer .001 above. */ sync = 0; while ( sync != 2.0 ) /* wait until algorithm sets sync to 2 */ INST_QUERY( e1415, “alg:scal? ‘alg1’,’sync’”,"%f",&sync ); /* read results of Mx+B calculations */ INST_QUERY( e1415, “data:cvt? (@10:13)”,"%f",&array ); printf(“Array contents: %f, %f, %f, %f\n”,array[0], array[1],array[2],array[3]); } #if 0 /* Set to 1 if using User interactive commands to E1415 */ /* Call this function if you want to be able to type SCPI commands and * see their responses. NOTE: switch to FORM,ASC to retrieve * ASCII numbers during interactive mode. */ do_interactive(); /* Calls cscpi_exe() in a loop */ #endif #if 0 /* C-CSPI way to check for errors */ INST_QUERY(e1415,"syst:err?\n", “%d,%S”, &error, string); if (error) { (void) printf(“syst:err %d,%s\n”, error, string); exit(1); } #endif } return 0; /* Normal end of program */ } #if 0 388 Example Program Listings Appendix G /* Example algorithm that calculates 4 Mx+B values upon * signal that sync == 1. M and B terms set by application * program. * * filename: mxplusb */ static float M, B, x, sync; if ( First_loop ) sync = 0; if ( sync == 1 ) { writecvt( M*x+B, 10 ); writecvt(-(M*x+B), 11 ); writecvt( (M*x+B)/2,12 ); writecvt( 2*(M*x+B),13 ); sync = 2; } Results from running this program with the following syntax: <progname> mxplusb Array Array Array Array Array Array Array Array Array Array contents: contents: contents: contents: contents: contents: contents: contents: contents: contents: 5.678000, -5.678000, 2.839000, 11.356000 6.912000, -6.912000, 3.456000, 13.823999 8.146000, -8.146000, 4.073000, 16.292000 9.379999, -9.379999, 4.690000, 18.759998 10.613999, -10.613999, 5.307000, 21.227999 11.848000, -11.848000, 5.924000, 23.695999 13.082000, -13.082000, 6.541000, 26.164000 14.315999, -14.315999, 7.158000, 28.631998 15.549999, -15.549999, 7.775000, 31.099998 16.783998, -16.783998, 8.391999, 33.567997 #endif swap.cs /* $Header: $ * * C-SCPI Example program for the E1415A Algorithmic Closed Loop Controller * * swap.cs * * This example shows how to perform algorithm swapping. This is an * extension of the example file file_alg.cs * * This is a template for building E1415A C programs that may use C-SCPI * or SICL to control instruments. */ /* Standard include files */ #include <stdlib.h> /* Most programs use one or more * functions from the C standard * library. */ #include <stdio.h> /* Most programs will also use standard * I/O functions. */ #include <stddef.h> /* This file is also often useful */ #include <math.h> /* Needed for any floating point fn’s */ /* Other system include files */ Appendix G Example Program Listings 389 /* Whenever using system or library calls, check the call description to see * which include files should be included. */ /* Instrument control include files */ #include <cscpi.h> /* C-SCPI include file */ /* Declare any constants that will be useful to the program. In particular, * it is usually best to put instrument addresses in this area to make the code * more maintainable. */ #define E1415_ADDR “vxi,208" /* The SICL address of your E1415 */ INST_DECL(e1415, “E1415A”, REGISTER); /* E1415 */ /* Use something like this for GPIB and Agilent E1405/6 Command Module */ /* #define E1415_ADDR “hpib,22,26" /* The SICL address of your E1415 */ /*INST_DECL(e1415, “E1415A”, MESSAGE); /* E1415 */ /* Declare instruments that will be accessed with SICL. * can also be moved into local contexts. */ INST vxi; /* VXI interface session */ These declarations /* Trap instrument errors. If this function is used, it will be called every * time a C-SCPI instrument puts an error in the error queue. As written, the * function will figure out which instrument generated the error, retrieve the * error, print a message and exit. You may want to modify the way the error * is printed or comment out the exit if you want the program to continue. * * Note that this works only on REGISTER based instruments, because it was * a C-SCPI register-based feature, not a general programming improvement. * If you’re using MESSAGE instruments, you’ll still have to do SYST:ERR?: * * If your test program generates errors on purpose, you probably don’t want * this error function. If so, set the following “#if 1" to ”#if 0." This * function is most useful when you’re trying to get your program running. */ #if 1 /* Set to 0 to skip trapping errors */ /*ARGSUSED*/ /* Keeps lint happy */ void cscpi_error(INST id, int err) { char errorbuf[255]; /* Holds instrument error message */ char idbuf[255]; /* Holds instrument response to *IDN? */ cscpi_exe(id, “*IDN?\n”, 6, idbuf, 255); cscpi_exe(id, “SYST:ERR?\n”, 10, errorbuf, 255); (void) fprintf(stderr, “Instrument error %s from %s\n”, errorbuf, idbuf); } #endif /* The following routine allows you to type SCPI commands and see the results. * If you don’t call this from your program, set the following “#if 1" to * “#if 0." */ #if 1 /* Set to 0 to skip this routine */ void do_interactive(void) { char command[5000]; 390 Example Program Listings Appendix G char result[5000]; int32 error; char string[256]; for(;;) { (void) printf(“SCPI command: ”); (void) fflush(stdout); /* repeat until it actually gets something*/ while (!gets(command)); if (!*command) { break; } result[0] = 0; cscpi_exe(e1415, command, strlen(command), result, sizeof(result)); INST_QUERY(e1415, “syst:err?”, “%d,%s”, &error, string); while ( error ) { (void) printf(“syst:err %d,’%s’\n”, error, string); INST_QUERY(e1415,"syst:err?", “%d,%s”, &error, string); } if (result[0]) { (void) printf(“result: %s\n”, result); } } } #endif /* Print usage information */ void usage(char *prog_name) { (void) fprintf(stderr, “usage: %s algorithm_file...\n”, prog_name); } /* Get an algorithm from a filename */ static char *get_algorithm(char *file_name) { FILE *f; /* Algorithm int32 a_size; /* Algorithm int c; /* Character char *algorithm; /* Points to file pointer */ size */ read from input */ algorithm string */ f = fopen(file_name, “r”); if (! f) { (void) fprintf(stderr, “Error: can’t open algorithm file ‘%s’\n”, file_name); exit(1); } a_size = 0; while (getc(f) != EOF) { a_size++; } rewind(f); algorithm = malloc(a_size + 1); a_size = 0; while ((c = getc(f)) != EOF) { algorithm[a_size] = c; a_size++; } algorithm[a_size] = 0; (void) fclose(f); Appendix G /* Count length of algorithm */ /* Storage for algorithm */ /* Use as array index */ /* Read the algorithm */ /* Null terminate */ Example Program Listings 391 return algorithm; /* Return algorithm string */ } /* Main program */ /*ARGSUSED*/ /* Keeps lint happy */ int main(int argc, char *argv[]) { /* Main program local variable declarations */ char *algorithm; /* Algorithm string */ int alg_num; /* Algorithm number being loaded */ char string[333]; /* Holds error information */ int32 error; /* Holds error number */ #if 0 /* Set to 1 if reading algorithm files */ /* Check pass parameters */ if ((argc < 2) || (argc > 33)) { /* Must have 1 to 32 algorithms */ usage(argv[0]); exit(1); } #endif INST_STARTUP(); /* Initialize the C-SCPI routines */ #if 0 /* Set to 1 to open interface session */ /* If you need to open a VXI device session, here’s how to do it. You need * a VXI device session if the V382 is to source or respond to VXI * backplane triggers (SICL ixtrig or ionintr calls). */ if (! (vxi = iopen(“vxi”))) { (void) fprintf(stderr, “SICL error: failed to open vxi interface.\n”); (void) fprintf(stderr, “SICL error %d: %s\n”, igeterrno(), igeterrstr(igeterrno())); exit(1); } #endif /* Open the E1415 device session with error checking. Copy and modify * these lines if you need to open other instruments. */ INST_OPEN(e1415, E1415_ADDR); /* Open the E1415 */ if (! e1415) { /* Did it open? */ (void) fprintf(stderr, “Failed to open the E1415 at address %s\n”, E1415_ADDR); (void) fprintf(stderr, “C-SCPI open error was %d\n”, cscpi_open_error); (void) fprintf(stderr, “SICL error was %d: %s\n”, igeterrno(), igeterrstr(igeterrno())); exit(1); } /* Check for startup errors */ INST_QUERY(e1415,"syst:err?\n", “%d,%S”, &error, string); if (error) { (void) printf(“syst:err %d,%s\n”, error, string); exit(1); } /* Usually, you’ll want to start from a known instrument state. * following provides this. */ 392 Example Program Listings The Appendix G INST_CLEAR(e1415); INST_SEND(e1415, “*RST;*CLS\n”); /* Selected device clear */ #if 0 /* Set to 1 to do self test */ /* Does the E1415 pass self-test? */ { int test_result; /* Result of E1415 self-test */ test_result = -1; /* Make sure it gets assigned */ INST_QUERY(e1415, “*TST?\n”, “%d”, &test_result); if (test_result) { (void) fprintf(stderr, “E1415A failed self-test\n”); exit(1); } } #endif /* Setup SCP functions */ INST_SEND(e1415, “sens:func:volt (@116)\n”); /* Analog in volts INST_SEND(e1415, “sour:func:cond (@141)\n”); /* Digital output */ */ #if 0 /* Set to 1 to do calibration */ /* Perform Calibrate, if necessary */ { int cal_result; /* Result of E1415 self-test */ cal_result = -1; /* Make sure it gets assigned */ INST_QUERY(e1415, “*CAL?\n”, “%d”, &cal_result); if (cal_result) { (void) fprintf(stderr, “E1415A failed calibration\n”); (void) fprintf(stderr, “Check FIFO for channel errors\n”); exit(1); } } #endif /* Configure Trigger Subsystem and Data Format */ INST_SEND(e1415, “trig:sour timer;:trig:timer .001\n”); INST_SEND(e1415, “samp:timer 10e-6\n”); /* default */ INST_SEND(e1415, “form real,32\n”); /* Download Globals */ /* INST_SEND(e1415, “alg:def ‘globals’,’static float x;’\n”); */ /* Download algorithms */ #if 0 /* Set to 1 if algorithms passed in as files */ /* Get an algorithm(s) from the passed filename(s). We assign sequential * algorithm numbers to each successive file name: ALG1, ALG2, etc. when * you execute this program as “<progname> lang1 lang2 lang3 ...” */ alg_num = 1; /* Starting algorithm number */ while (argc > alg_num) { algorithm = get_algorithm(argv[alg_num]); /* Read the algorithm */ /* Define the algorithm */ { char alg[6]; /* Temporary algorithm name */ (void) sprintf(alg, “ALG%d”, alg_num); INST_SEND(e1415, “alg:def %S,%*B\n”, alg, Appendix G Example Program Listings 393 strlen(algorithm) + 1, algorithm); /* Check for algorithm errors */ INST_QUERY(e1415,"syst:err?\n", “%d,%S”, &error, string); if (error) { (void) printf(“While loading file %s, syst:err %d,%s\n”, argv[alg_num], error, string); exit(1); } } /* Free the malloc’ed memory */ free(algorithm); alg_num++; /* Next algorithm */ } (void) printf(“All %d algorithm(s) loaded without errors\n\n”, alg_num-1); #else /* Download algorithms with in-line code */ algorithm = “ \n”\ “/* Example algorithm that calculates 4 Mx+B values upon\n” “ * signal that sync == 1. M and B terms set by application\n” “ * program. \n” “ */\n” “ static float M, B, x, sync;\n” “ if ( First_loop ) sync = 0;\n” “ if ( sync == 1 ) {\n” “ writecvt( M*x+B, 10 );\n” “ writecvt(-(M*x+B), 11 );\n” “ writecvt( (M*x+B)/2,12 );\n” “ writecvt( 2*(M*x+B),13 );\n” “ sync = 2;\n” “ } \n”; INST_SEND(e1415, “alg:def ‘ALG1’,500,%*B\n”, strlen(algorithm) + 1, algorithm); #endif algorithm = “ \n”\ “/* Example algorithm that calculates 4 Mx+B values upon\n” “ * signal that sync == 1. M and B terms set by application\n” “ * program. Calculations are different than above.\n” “ */\n” “ static float M, B, x, sync;\n” “ if ( First_loop ) sync = 0;\n” “ if ( sync == 1 ) {\n” “ writecvt( -(M*x+B), 10 );\n” “ writecvt( M*x+B, 11 );\n” “ writecvt( 2*(M*x+B),12 );\n” “ writecvt( (M*x+B)/2,13 );\n” “ sync = 2;\n” “ } \n”; /* Preset Algorithm variables */ INST_SEND(e1415,"alg:scal ‘alg1’,’M’,%f\n", 1.234); INST_SEND(e1415,"alg:scal ‘alg1’,’B’,%f\n", 5.678); INST_SEND(e1415,"alg:upd\n"); /* Initiate Trigger System - start scanning and running algorithms */ INST_SEND(e1415,"init\n"); /* Alter run-time variables and Retrieve Data */ 394 Example Program Listings Appendix G { float32 int i; sync, array[4]; for ( i = 0; i < 10 ; i++ ) { /* make 10 changes to ‘x’ */ INST_SEND(e1415,"alg:scal ‘alg1’,’x’,%f\n", (float32) i ); INST_SEND(e1415,"alg:scal ‘alg1’,’sync’,%f\n", 1 ); /* set sync */ INST_SEND(e1415,"alg:upd\n"); /* The following alg:scal? command will not complete if the * update has not occured. Then, it’s a matter of waiting for * the algorithm to complete and set sync = 2. This should * happen almost instantly since the algorithm is executing * every 1msec based upon trig:timer .001 above. */ sync = 0; while ( sync != 2.0 ) /* wait until algorithm sets sync to 2 */ INST_QUERY( e1415, “alg:scal? ‘alg1’,’sync’”,"%f",&sync ); /* read results of Mx+B calculations */ INST_QUERY( e1415, “data:cvt? (@10:13)”,"%f",&array ); printf(“Array contents: %f, %f, %f, %f\n”,array[0], array[1],array[2],array[3]); } INST_SEND(e1415, “alg:def ‘ALG1’, %*B\n”,strlen(algorithm) + 1, algorithm); INST_SEND(e1415, “alg:upd\n”); printf(“\nExecuting now with different algorithm\n\n”); /* Repeat with different algorithm running. */ for ( i = 0; i < 10 ; i++ ) { /* make 10 changes to ‘x’ */ INST_SEND(e1415,"alg:scal ‘alg1’,’x’,%f\n", (float32) i ); INST_SEND(e1415,"alg:scal ‘alg1’,’sync’,%f\n", 1 ); /* set sync */ INST_SEND(e1415,"alg:upd\n"); /* The following alg:scal? command will not complete if the * update has not occured. Then, it’s a matter of waiting for * the algorithm to complete and set sync = 2. This should * happen almost instantly since the algorithm is executing * every 1msec based upon trig:timer .001 above. */ sync = 0; while ( sync != 2.0 ) /* wait until algorithm sets sync to 2 */ INST_QUERY( e1415, “alg:scal? ‘alg1’,’sync’”,"%f",&sync ); /* read results of Mx+B calculations */ INST_QUERY( e1415, “data:cvt? (@10:13)”,"%f",&array ); printf(“Array contents: %f, %f, %f, %f\n”,array[0], array[1],array[2],array[3]); } #if 1 /* Set to 1 if using User interactive commands to E1415 */ /* Call this function if you want to be able to type SCPI commands and * see their responses. NOTE: switch to FORM,ASC to retrieve * ASCII numbers during interactive mode. */ do_interactive(); /* Calls cscpi_exe() in a loop */ #endif #if 0 /* C-CSPI way to check for errors */ INST_QUERY(e1415,"syst:err?\n", “%d,%S”, &error, string); if (error) { (void) printf(“syst:err %d,%s\n”, error, string); exit(1); } #endif } Appendix G Example Program Listings 395 return 0; /* Normal end of program */ } #if 0 /* Example algorithm that calculates 4 Mx+B values upon * signal that sync == 1. M and B terms set by application * program. * * filename: mxplusb */ static float M, B, x, sync; if ( First_loop ) sync = 0; if ( sync == 1 ) { writecvt( M*x+B, 10 ); writecvt(-(M*x+B), 11 ); writecvt( (M*x+B)/2,12 ); writecvt( 2*(M*x+B),13 ); sync = 2; } Results from running this program with the following syntax: <progname> mxplusb Array Array Array Array Array Array Array Array Array Array contents: contents: contents: contents: contents: contents: contents: contents: contents: contents: 5.678000, -5.678000, 2.839000, 11.356000 6.912000, -6.912000, 3.456000, 13.823999 8.146000, -8.146000, 4.073000, 16.292000 9.379999, -9.379999, 4.690000, 18.759998 10.613999, -10.613999, 5.307000, 21.227999 11.848000, -11.848000, 5.924000, 23.695999 13.082000, -13.082000, 6.541000, 26.164000 14.315999, -14.315999, 7.158000, 28.631998 15.549999, -15.549999, 7.775000, 31.099998 16.783998, -16.783998, 8.391999, 33.567997 #endif tri_sine.cs /* $Header: $ * * C-SCPI Example program for the E1415A Algorithmic * * tri_sine.cs * * This example shows how to use Custom Functions in * both a triangle and sine wave to a current output * * This is a template for building E1415A C programs * or SICL to control instruments. */ Closed Loop Controller the E1415A by generating DAC. that may use C-SCPI /* Standard include files */ #include <stdlib.h> /* Most programs use one or more * functions from the C standard * library. */ #include <stdio.h> /* Most programs will also use standard * I/O functions. 396 Example Program Listings Appendix G */ #include <stddef.h> #include <math.h> /* This file is also often useful */ /* Needed for any floating point fn’s */ /* Other system include files */ /* Whenever using system or library calls, check the call description to see * which include files should be included. */ /* Instrument control include files */ #include <cscpi.h> /* C-SCPI include file */ /* Declare any constants that will be useful to the program. In particular, * it is usually best to put instrument addresses in this area to make the code * more maintainable. */ #define E1415_ADDR “vxi,208" /* The SICL address of your E1415 */ INST_DECL(e1415, “E1415A”, REGISTER); /* E1415 */ /* Use something like this for GPIB and Agilent E1405/6 Command Module */ /* #define E1415_ADDR “hpib,22,26" /* The SICL address of your E1415 */ /*INST_DECL(e1415, “E1415A”, MESSAGE); /* E1415 */ /* Declare instruments that will be accessed with SICL. * can also be moved into local contexts. */ INST vxi; /* VXI interface session */ These declarations /* Trap instrument errors. If this function is used, it will be called every * time a C-SCPI instrument puts an error in the error queue. As written, the * function will figure out which instrument generated the error, retrieve the * error, print a message and exit. You may want to modify the way the error * is printed or comment out the exit if you want the program to continue. * * Note that this works only on REGISTER based instruments, because it was * a C-SCPI register-based feature, not a general programming improvement. * If you’re using MESSAGE instruments, you’ll still have to do SYST:ERR?: * * If your test program generates errors on purpose, you probably don’t want * this error function. If so, set the following “#if 1" to ”#if 0." This * function is most useful when you’re trying to get your program running. */ #if 1 /* Set to 0 to skip trapping errors */ /*ARGSUSED*/ /* Keeps lint happy */ void cscpi_error(INST id, int err) { char errorbuf[255]; /* Holds instrument error message */ char idbuf[255]; /* Holds instrument response to *IDN? */ cscpi_exe(id, “*IDN?\n”, 6, idbuf, 255); cscpi_exe(id, “SYST:ERR?\n”, 10, errorbuf, 255); (void) fprintf(stderr, “Instrument error %s from %s\n”, errorbuf, idbuf); } #endif /* The following routine allows you to type SCPI commands and see the results. * If you don’t call this from your program, set the following “#if 1" to * “#if 0." Appendix G Example Program Listings 397 */ #if 1 /* Set to 0 to skip this routine */ void do_interactive(void) { char command[5000]; char result[5000]; int32 error; char string[256]; for(;;) { (void) printf(“SCPI command: ”); (void) fflush(stdout); /* repeat until it actually gets something*/ while (!gets(command)); if (!*command) { break; } result[0] = 0; cscpi_exe(e1415, command, strlen(command), result, sizeof(result)); INST_QUERY(e1415, “syst:err?”, “%d,%s”, &error, string); while ( error ) { (void) printf(“syst:err %d,’%s’\n”, error, string); INST_QUERY(e1415,"syst:err?", “%d,%s”, &error, string); } if (result[0]) { (void) printf(“result: %s\n”, result); } } } #endif /* Print usage information */ void usage(char *prog_name) { (void) fprintf(stderr, “usage: %s algorithm_file...\n”, prog_name); } /* Get an algorithm from a filename */ static char *get_algorithm(char *file_name) { FILE *f; /* Algorithm int32 a_size; /* Algorithm int c; /* Character char *algorithm; /* Points to file pointer */ size */ read from input */ algorithm string */ f = fopen(file_name, “r”); if (! f) { (void) fprintf(stderr, “Error: can’t open algorithm file ‘%s’\n”, file_name); exit(1); } a_size = 0; while (getc(f) != EOF) { a_size++; } rewind(f); algorithm = malloc(a_size + 1); a_size = 0; while ((c = getc(f)) != EOF) { 398 Example Program Listings /* Count length of algorithm */ /* Storage for algorithm */ /* Use as array index */ /* Read the algorithm */ Appendix G algorithm[a_size] = c; a_size++; } algorithm[a_size] = 0; (void) fclose(f); /* Null terminate */ return algorithm; /* Return algorithm string */ } /*F****************************************************************** * NAME: static float64 two_to_the_N() * * TASK: Calculates 2^n */ static float64 { /* compute 2^n */ float64 r = 1; int32 i; for ( i = r return ( } two_to_the_N( int32 n ) 0; i < n; i++ ) *= 2; r ); /*F****************************************************************** * NAME: static int32 round32f() * * TASK: Rounds a 32-bit floating point number. */ static int32 round32f( float64 number ) { /* add or subtract 0.5 to round based on sign of number */ float64 half = (number > 0.0 )? 0.5 : -0.5 ; return( (int32)( number + half ) ); } /*F****************************************************************** * NAME: static float64 my_function() * * TASK: User-supplied function for calculating desired results of f(x). * * HAVERSINE */ float64 my_function( float64 input ) { float64 returnValue; returnValue = sin(input); return( returnValue ); } /*F****************************************************************** * NAME: void Build_table() * * TASK: Generates tables of mx+b values used for Custom Functions * in the E1415A. * * Generate the three coefficients for the CUSTOM FUNCTION algorithm: * a. The “exponent” value * b. The “slope” or “M” value Appendix G Example Program Listings 399 * c. The “intercept” or “B” value. * * INPUT PARAMETERS: * float64 max_input - maximum input expected * float64 min_input - minimum input expected * float64 (*custom_function)( float64 input ) * - pointer to user function * OUTPUT PARAMETERS * float64 *range - returned table range * float64 *offset - returned table offset * uint16 *conv_array - returned coeficient array: * (512 values for piecewise) * *F*/ void Build_table(float64 max_input, float64 min_input, float64 (*custom_function)( float64 input ), float64 *range, float64 *offset, uint16 *conv_array ) { uint16 M[128]; uint16 EX[128]; uint16 Bhigh[128]; uint16 Blow[128]; int32 B; int16 ii; int16 jj; int32 Mfactor; int32 Xfactor; int32 Xofst; float64 float64 float64 float64 float64 float64 float64 float64 float64 float64 float64 test_range; tbl_range; center; temp_range; t; slope; absslope; exponent; exponent2; input[129]; result[129]; /* * First calculate the mid point of the range of values from the min and max * input values. The offset is the center of the range of min and max * inputs. The purpose of the offset is to permit calculating the tables * based upon a relative centering about the X axis. The offset simply * permits the run-time code to send the corrected X values assuming * the tables were built symetrically around X=0. */ center = min_input + (max_input - min_input) / 2.0F; *offset = center; temp_range = max_input - center; test_range = (temp_range < 0.0 )? -temp_range : temp_range; /* * Now calculate the closest binary representation of the test_range such * that the new binary value is equal to or greater than the calculated * test_range. Start with the lowest range(1/2^128) and step up until the * new binary range is equal or greater than the test_range. */ tbl_range = two_to_the_N(128); /* 2^28 */ 400 Example Program Listings Appendix G tbl_range = 1.0/tbl_range; while ( test_range > tbl_range ) { tbl_range *= 2; } *range = tbl_range; Xofst = 157; /* exponent bias for DSP calculations */ /* * Now divide the full range of the table into 128 segments (129 points) * scanning first the positive side of the X-axis and then the negative * side of the X-axis. * * Note that 129 points are calculated in order to generate a line segment * for calculating slope. * * Also note that the entire binary range is built to include the min * and max values entered as min_input and max_input. */ for ( ii=0 ; ii<=64 ; ii++ ) /* 0 to +FS */ { input[ii] = center + ( (tbl_range/64.0)*(float64)ii); result[ii] = (*custom_function)( input[ii] ); if ( ii == 0 ) continue; /* This is the first point - skip slope */ jj = 64 + ii - 1; /* generate numbers for prev segment */ /* for second and subsequent points */ t = result[ii-1]; /* using prev seg base */ if (t< 0.0) t *= -1.0; /* use abs value (magnitude) of t */ /* compute the exponent of the offset (B is 31 bits) */ if (t!=0.0) { /* don’t take log of zero */ exponent = 31.0 - (log10(t)/log10(2.0));/* take log base 2 */ } else { exponent = 100.0; } /* compute slope in bits (each table entry represents 512 bits) */ slope = ( result[ii] - result[ii-1] ) / 512.0; /* don’t take the log of a negative slope */ absslope = (slope < 0 )? -slope : slope; /* compute the exponent of the slope (M is 16 bits) */ if ( absslope != 0 ) { exponent2 = 15.0 -(log10(absslope)/log10(2.0)); } else { exponent2 = 100.0; } /* Choose the smallest exponent — maximize resolution */ if (exponent2 < exponent) exponent = exponent2; Appendix G Example Program Listings 401 Xfactor = (int32)(exponent); if ( t != 0 ) { int32 ltemp = round32f( log10( t ) / log10( 2.0 ) ); if ( (Xfactor + ltemp) > 30 ) { Xfactor = 30 - ltemp; } } Mfactor = round32f( two_to_the_N(Xfactor)*slope ); if ( Mfactor == 32768 ) { /* There is an endpoint problem. Re-compute if on endpoint */ Xfactor—; Mfactor =round32f( two_to_the_N(Xfactor)*slope ); } if ((Mfactor<=32767) && (Mfactor>= -32768) ) { /* only save if M is within limits */ /* Adjust EX to match runtime.asm */ EX[jj] = (uint16)(Xofst - Xfactor ); M[jj] = (uint16)(Mfactor & 0xFFFF); /* remove leading 1’s*/ B = round32f( two_to_the_N(Xfactor )*result[ii-1] ); Bhigh[jj] = (uint16)((B >> 16) & 0x0000FFFF); Blow[jj] = (uint16)(B & 0x0000FFFF); } } /* end for */ for ( ii=0 ; ii<=64 ; ii++ ) /* 0 to -FS */ { input[ii] = center - ( (tbl_range/64.0)*(float64)(ii)); result[ii] = (*custom_function)( input[ii] ); if ( ii == 0 ) continue; /* This is the first point - skip slope */ jj = ii - 1; /* generate numbers for prev segment */ /* for second and subsequent points */ t = result[ii-1]; /* using prev seg base */ if (t< 0.0) t *= -1.0; /* use abs value (magnitude) of t */ /* compute the exponent of the offset (B is 31 bits) */ if (t!=0.0) { /* don’t take log of zero */ exponent = 31.0 - (log10(t)/log10(2.0));/* take log base 2 */ } else { exponent = 100.0; } /* compute slope in bits (each table entry represents 512 bits) */ slope = ( result[ii] - result[ii-1] ) / 512.0; /* don’t take the log of a negative slope */ absslope = (slope < 0 )? -slope : slope; /* compute the exponent of the slope (M is 16 bits) */ if ( absslope != 0 ) { 402 Example Program Listings Appendix G exponent2 = 15.0 -(log10(absslope)/log10(2.0)); } else { exponent2 = 100.0; } /* Choose the smallest exponent — maximize resolution */ if (exponent2 < exponent) exponent = exponent2; Xfactor = (int32)(exponent); if ( t != 0 ) { int32 ltemp = round32f( log10( t ) / log10( 2.0 ) ); if ( (Xfactor + ltemp) > 30 ) { Xfactor = 30 - ltemp; } } Mfactor = round32f( two_to_the_N(Xfactor)*slope ); if ( Mfactor == 32768 ) { /* There is an endpoint problem. Re-compute if on endpoint */ Xfactor—; Mfactor =round32f( two_to_the_N(Xfactor)*slope ); } if ((Mfactor<=32767) && (Mfactor>= -32768) ) { /* only save if M is within limits */ /* Adjust EX to match runtime.asm */ EX[jj] = (uint16)(Xofst - Xfactor ); M[jj] = (uint16)(Mfactor & 0xFFFF); /* remove leading 1’s*/ B = round32f( two_to_the_N(Xfactor )*result[ii-1] ); Bhigh[jj] = (uint16)((B >> 16) & 0x0000FFFF); Blow[jj] = (uint16)(B & 0x0000FFFF); } } /* end for */ /* * Build actual tables for downloading into the E1415 memory. */ for ( ii=0 ; ii<128 ; ii++ ) { /* copy 64 sets of coefficients */ conv_array[ii*4] = M[ii]; conv_array[ii*4+1] = EX[ii]; conv_array[ii*4+2] = Bhigh[ii]; conv_array[ii*4+3] = Blow[ii]; /* printf(“%d %d %d %d %d\n”,ii,M[ii],EX[ii],Bhigh[ii],Blow[ii]); */ } return; } /* Main program */ /*ARGSUSED*/ /* Keeps lint happy */ int main(int argc, char *argv[]) { /* Main program local variable declarations */ char *algorithm; /* Algorithm string */ int alg_num; /* Algorithm number being loaded */ Appendix G Example Program Listings 403 char int32 string[333]; error; /* Holds error information */ /* Holds error number */ #if 0 /* Set to 1 if reading algorithm files */ /* Check pass parameters */ if ((argc < 2) || (argc > 33)) { /* Must have 1 to 32 algorithms */ usage(argv[0]); exit(1); } #endif INST_STARTUP(); /* Initialize the C-SCPI routines */ #if 0 /* Set to 1 to open interface session */ /* If you need to open a VXI device session, here’s how to do it. You need * a VXI device session if the V382 is to source or respond to VXI * backplane triggers (SICL ixtrig or ionintr calls). */ if (! (vxi = iopen(“vxi”))) { (void) fprintf(stderr, “SICL error: failed to open vxi interface.\n”); (void) fprintf(stderr, “SICL error %d: %s\n”, igeterrno(), igeterrstr(igeterrno())); exit(1); } #endif /* Open the E1415 device session with error checking. Copy and modify * these lines if you need to open other instruments. */ INST_OPEN(e1415, E1415_ADDR); /* Open the E1415 */ if (! e1415) { /* Did it open? */ (void) fprintf(stderr, “Failed to open the E1415 at address %s\n”, E1415_ADDR); (void) fprintf(stderr, “C-SCPI open error was %d\n”, cscpi_open_error); (void) fprintf(stderr, “SICL error was %d: %s\n”, igeterrno(), igeterrstr(igeterrno())); exit(1); } /* Check for startup errors */ INST_QUERY(e1415,"syst:err?\n", “%d,%S”, &error, string); if (error) { (void) printf(“syst:err %d,%s\n”, error, string); exit(1); } /* Usually, you’ll want to start from a known instrument state. * following provides this. */ INST_CLEAR(e1415); /* Selected device clear */ INST_SEND(e1415, “*RST;*CLS\n”); The #if 0 /* Set to 1 to do self test */ /* Does the E1415 pass self-test? */ { int test_result; /* Result of E1415 self-test */ test_result = -1; /* Make sure it gets assigned */ INST_QUERY(e1415, “*TST?\n”, “%d”, &test_result); if (test_result) { 404 Example Program Listings Appendix G (void) fprintf(stderr, “E1415A failed self-test\n”); exit(1); } } #endif /* Setup SCP functions */ INST_SEND(e1415, “sens:func:volt (@116)\n”); /* Analog in volts INST_SEND(e1415, “sour:func:cond (@141)\n”); /* Digital output */ */ #if 0 /* Set to 1 to do calibration */ /* Perform Calibrate, if necessary */ { int cal_result; /* Result of E1415 self-test */ cal_result = -1; /* Make sure it gets assigned */ INST_QUERY(e1415, “*CAL?\n”, “%d”, &cal_result); if (cal_result) { (void) fprintf(stderr, “E1415A failed calibration\n”); (void) fprintf(stderr, “Check FIFO for channel errors\n”); exit(1); } } #endif /* Configure Trigger Subsystem and Data Format */ INST_SEND(e1415, “trig:sour timer;:trig:timer .001\n”); INST_SEND(e1415, “samp:timer 10e-6\n”); /* default */ INST_SEND(e1415, “form real,32\n”); /* Download Globals */ /* INST_SEND(e1415, “alg:def ‘globals’,’static float x;’\n”); */ /* Download { float64 float64 float64 uint16 float64 Custom Function */ maxInput; minInput; tableOffset; coef_array[512]; tableRange; /* /* /* /* /* set to maximum expected input*/ set to minimum expected input*/ offset used in building table*/ 512 elements */ Range on which table was built*/ maxInput = 2; minInput = -2; Build_table( maxInput, minInput, my_function, &tableRange, &tableOffset, coef_array ); /* Download the table range and the table array to the card /* Piecewise requires 128 sets of table values */ */ INST_SEND(e1415,"ALGorithm:FUNCtion:DEFine ‘sin’,%f,%f,%1024b", tableRange, tableOffset, coef_array); } /* #if 0 /* * * Appendix G Download algorithms */ /* Set to 1 if algorithms passed in as files */ Get an algorithm(s) from the passed filename(s). We assign sequential algorithm numbers to each successive file name: ALG1, ALG2, etc. when you execute this program as “<progname> lang1 lang2 lang3 ...” Example Program Listings 405 */ alg_num = 1; while (argc > alg_num) { /* Starting algorithm number */ algorithm = get_algorithm(argv[alg_num]); /* Read the algorithm */ /* Define the algorithm */ { char alg[6]; /* Temporary algorithm name */ (void) sprintf(alg, “ALG%d”, alg_num); INST_SEND(e1415, “alg:def %S,%*B\n”, alg, strlen(algorithm) + 1, algorithm); /* Check for algorithm errors */ INST_QUERY(e1415,"syst:err?\n", “%d,%S”, &error, string); if (error) { (void) printf(“While loading file %s, syst:err %d,%s\n”, argv[alg_num], error, string); exit(1); } } /* Free the malloc’ed memory */ free(algorithm); alg_num++; /* Next algorithm */ } (void) printf(“All %d algorithm(s) loaded without errors\n\n”, alg_num-1); #else /* Download algorithm with in-line code */ algorithm = “ \n” “/* Example algorithm uses Custom Functions.\n” “ * This algorithms generates a triangle and\n” “ * sine wave signal to separate current outputs.\n” “ */\n” “\n” “ static float inc = .1, x=0, gain=2*1.57;\n” “ if ( x > 1.57 ) inc = -inc;\n” “ if ( x < -1.57 ) inc = abs(inc);\n” “ x = x + inc;\n” “ O100 = x * ( .001 ); \n” “ O101 = gain * sin( x ) * ( .001 );\n” “ \n”; INST_SEND(e1415, “alg:def ‘ALG1’,%*B\n”, strlen(algorithm) + 1, algorithm); #endif /* Preset Algorithm variables */ /* Initiate Trigger System - start scanning and running algorithms */ INST_SEND(e1415,"init\n"); /* This example shows no data retrieval. */ #if 1 /* Set to 1 if using User interactive commands to E1415 */ /* Call this function if you want to be able to type SCPI commands and * see their responses. NOTE: switch to FORM,ASC to retrieve * ASCII numbers during interactive mode. */ INST_SEND(e1415,"form asc\n"); do_interactive(); /* Calls cscpi_exe() in a loop */ #endif 406 Example Program Listings Appendix G #if 0 /* C-CSPI way to check for errors */ INST_QUERY(e1415,"syst:err?\n", “%d,%S”, &error, string); if (error) { (void) printf(“syst:err %d,%s\n”, error, string); exit(1); } #endif return 0; /* Normal end of program */ } Appendix G Example Program Listings 407 Notes 408 Example Program Listings Appendix G Index ! (ALG_NUM), determining an algorithms identity, 117 (First_loop), determining first execution, 115 (FM), fixed width pulses at variable frequency, 71 (FM), variable frequency square-wave output, 71 (Important!), performing channel calibration, 72 (PWM), variable width pulses at fixed frequency, 70 *CAL?, how to use, 72 *RST, default settings, 55 4-20 mA, adding sense circuits for, 45 A A common error to avoid, 119 A complete thermocouple measurement command sequence, 66 A quick-start PID algorithm example, 89 A very simple first algorithm, 124 Abbreviated Commands, 154 ABORt subsystem, 160 abs(expression), 136 Access, bitfield, 138 Accessing I/O channels, 114 Accessing the VT1415A’s resources, 113 Accessories Rack Mount Terminal Panel, 47 Accuracy 10k ohm Thermistor, 322, 323 2250 ohm Thermistor, 318, 319 5k ohm Thermistor, 320, 321 dc volts, 296 E Type Thermocouple, 298, 299, 300, 301 E Type Thermocouple (extended), 302, 303 J Type Thermocouple, 304, 305 K Type Thermocouple, 306 R Type Thermocouple, 307, 308 Reference RTD, 315 Reference Thermistor, 313, 314 RTD, 316, 317 S Type Thermocouple, 309, 310 Sample timer, 295 T Type Thermocouple, 311, 312 Temperature, 297 Adding settling delay for specific channels, 108 Adding terminal module components, 45 Additive-expression:, 140 Additive-operator:, 140 ADDRess MEM:VME:ADDR, 210 ADDRess? MEM:VME:ADDR?, 210 Alarm limits, 75 ALG:DEFINE in the programming sequence, 121 ALG:DEFINE, defining a PID with, 76 ALG:DEFINE’s three data formats, 121 ALGorithm :EXPLicit :STATe , 170, 171 ALGorithm :EXPLicit :ARRay, 162 ALGorithm :EXPLicit :ARRay?, 163 ALGorithm :EXPLicit :DEFine, 163 ALGorithm :EXPLicit :SCALar, 167 ALGorithm :EXPLicit :SCALar?, 168 ALGorithm :EXPLicit :SCAN:RATio, 168 ALGorithm :EXPLicit :SCAN:RATio?, 169 ALGorithm :EXPLicit :SIZe?, 169 ALGorithm :EXPLicit :TIMe?, 171 Algorithm execution order, 119 Algorithm Language reference, 133 Algorithm language statement writecvt(), 116 writefifo(), 117 Algorithm to algorithm communication, 126 Algorithm, A very simple first, 124 Algorithm, data acquisition, 129 Algorithm, exiting the, 136 Algorithm, modifying a standard PID, 125 Algorithm, process monitoring, 129 Algorithm, running the, 125 Algorithm, starting the PID, 81 Algorithm, the pre-defined PIDA, 73 Algorithm, the pre-defined PIDB, 74 Algorithm, What is a custom ?, 110 Algorithm, writing the, 125 ALGorithm:FUNCtion:DEFine, 172 ALGorithm:OUTPut:DELay, 173 ALGorithm:OUTPut:DELay?, 174 ALGorithm:UPDate :IMMediate , 174 ALGorithm:UPDate:CHANnel, 175 ALGorithm:UPDate:WINDow, 176 ALGorithm:UPDate:WINDow?, 177 Algorithm-definition:, 142 Algorithms disabling, 87 enabling, 87 Algorithms, defining custom, 121 Algorithms, defining standard PID, 73 Index 409 Algorithms, INITiating/Running, 81 Algorithms, non-control, 129 ALL? DATA:FIFO:ALL?, 229 AMPLitude OUTP:CURRent:AMPLitude, 213 OUTPut:CURRent:AMPLitude?, 214 An example using the operation group, 95 APERture SENSe:FREQuency:APERture, 234 APERture? SENSe:FREQuency:APERture?, 234 Arithmetic operators, 135 Arm and trigger sources, 78 ARM subsystem, 178, 179 ARM:SOURce, 179 ARM:SOURce?, 180 ARRay ALGorithm :EXPLicit :ARRay, 162 ARRay? ALGorithm :EXPlicit :EXPLicit:ARRay?, 163 Assigning values, 143 Assignment operator, 135 Attaching and removing the terminal module, 43 Attaching the terminal module, 41 Attaching the VT1415A terminal module, 43 Autoranging, more on, 106 Available Power for SCPs, 295 B Bitfield access, 138 Bit-number:, 140 BLOCK), continuously reading the FIFO (FIFO mode, 85 Byte, enabling events to be reported in the status, 94 Byte, reading the status, 96 C CAL:CONF:RES, 182 CAL:CONF:VOLT, 183 CAL:SETup, 184 CAL:SETup?, 184 CAL:STORe, 185 CAL:TARE, 186 CAL:TARE and thermocouples, 102 CAL:TARE, resetting, 103 CAL:TARE:RESet, 187 CAL:TARE?, 188 CAL:VAL:RESistance, 188 CAL:VAL:VOLTage, 189 CAL:ZERO?, 190 CALibration subsystem, 181, 182, 184, 185, 186, 187, 188, 189, 190 410 Index Calibration, channel *CAL?, 276 Calibration, control of, 23 Calling user defined functions, 118 Capability, maximum tare, 104 CAUTIONS Loss of process control by algorithm, 160, 170, 271 Safe handling procedures, 19 Certification, iii Changing an algorithm while it’s running, 122 Changing gains, 104 Changing gains or filters, 104 Changing timer interval while scanning, 274 CHANnel ALGorithm:UPDate:CHANnel, 175 Channel calibration *CAL?, 276 Channel identifiers, communication using, 126 Channels defined input, 114 output, 58, 68, 114 setting up analog input, 58 setting up digital input, 68 CHANnels SENSe:REFerence:CHANnels, 246 Channels, accessing I/O, 114 Channels, adding settling delay for specific, 108 Channels, input, 114 Channels, output, 114 Channels, special identifiers for, 135 Characteristics, settling, 106 Checking for problems, 107 CHECksum? DIAG:CHECK?, 193 Clearing event registers, 97 Clearing the enable registers, 97 Clipping limits, 74 Coefficients, 87 Command Abbreviated, 154 Implied, 154 Linking, 157 Separator, 154 Command Quick Reference, 286, 288, 289, 290, 291, 292, 293 Command Reference, Common *CAL?, 276 *CLS, 277 *DMC, 277 *EMC, 277 *EMC?, 277 *ESE, 277 *ESE?, 278 *ESR?, 278 *GMC?, 278 *IDN?, 278 *LMC?, 279 *OPC, 279 *OPC?, 279 *PMC, 279 *RMC, 279 *RST, 280 *SRE, 281 *SRE?, 281 *STB?, 281 *TRG, 281 *TST?, 281 *WAI, 285 Command Reference, SCPI, 159 ABORt subsystem, 160 ALGorithm :EXPLicit :STATe , 170, 171 ALGorithm :EXPLicit :ARRay, 162 ALGorithm :EXPLicit :ARRay?, 163 ALGorithm :EXPLicit :DEFine, 163 ALGorithm :EXPLicit :SCALar, 167 ALGorithm :EXPLicit :SCALar?, 168 ALGorithm :EXPLicit :SCAN:RATio?, 169 ALGorithm :EXPLicit :SIZe?, 169 ALGorithm :EXPLicit :TIMe?, 171 ALGorithm :EXPLicit SCAN:RATio, 168 ALGorithm:FUNCtion:DEFine, 172 ALGorithm:OUTPut:DELay, 173 ALGorithm:OUTPut:DELay?, 174 ALGorithm:UPDate :IMMediate , 174 ALGorithm:UPDate:CHANnel, 175 ALGorithm:UPDate:WINDow, 176 ALGorithm:UPDate:WINDow?, 177 ARM subsystem, 178, 179 ARM:IMMediate, 179 ARM:SOURce, 179 ARM:SOURce?, 180 CALibration subsystem, 181, 182, 184, 185, 186, 187, 188, 189, 190 CALibration:CONFigure:RESistance, 182 CALibration:CONFigure:VOLTage, 183 CALibration:SETup, 184 CALibration:SETup?, 184 CALibration:STORe, 185 CALibration:TARE, 186 CALibration:TARE:RESet, 187 CALibration:TARE?, 188 CALibration:VALue:RESistance, 188 CALibration:VALue:VOLTage, 189 CALibration:ZERO?, 190 DIAGnostic subsystem, 191, 192, 193, 195, 196, 197, 198 DIAGnostic:CALibration:SETup :MODE , 191 DIAGnostic:CALibration:SETup :MODE ?, 192 DIAGnostic:CALibration:TARe:MODE, 192 DIAGnostic:CALibration:TARe:MODE?, 193 DIAGnostic:CHECksum?, 193 DIAGnostic:CUSTom:LINear, 193 DIAGnostic:CUSTom:PIECewise, 194 DIAGnostic:CUSTom:REFerence:TEMPerature, 195 DIAGnostic:IEEE, 195 DIAGnostic:IEEE?, 196 DIAGnostic:INTerrupt:LINe, 196 DIAGnostic:INTerrupt:LINe?, 196 FORMat subsystem, 199, 200, 201 FORMat:DATA, 199 FORMat:DATA?, 201 INITiate subsystem, 202 INITiate:IMMediate, 202 INPut subsystem, 203, 205, 207, 208 INPut:FILTer:LPASs:FREQuency?, 204 INPut:FILTer:LPASs:STATe, 204 INPut:FILTer:LPASs:STATe?, 205 INPut:GAIN, 205 INPut:GAIN?, 206 INPut:LOW, 206 INPut:LOW?, 207 INPut:LPASs:FILTer:FREQuency, 203 INPut:POLarity, 207 INPut:POLarity?, 208 MEMory subsystem, 209, 211, 212 MEMory:VME:ADDRess, 210 MEMory:VME:ADDRess?, 210 MEMory:VME:SIZE, 210 MEMory:VME:SIZE?, 211 MEMory:VME:STATe, 211 MEMory:VME:STATe?, 212 OUTPut subsystem, 213, 214, 215, 217, 218, 219, 221 OUTPut:CURRent:AMPLitude, 213 OUTPut:CURRent:AMPLitude?, 214 OUTPut:CURRent:STATe, 215 OUTPut:CURRent:STATe?, 215 OUTPut:POLarity, 216 OUTPut:POLarity?, 216 OUTPut:SHUNt, 216 OUTPut:SHUNt?, 217 OUTPut:TTLTrg:SOURce, 217 OUTPut:TTLTrg:SOURce?, 218 OUTPut:TTLTrg<n>:STATe, 218 OUTPut:TTLTrg<n>:STATe?, 219 OUTPut:TYPE, 219 OUTPut:TYPE?, 220 OUTPut:VOLTage:AMPLitude, 220 OUTPut:VOLTage:AMPLitude?, 221 ROUTe subsystem, 222, 223 ROUTe:SEQuence:DEFine?, 222 ROUTe:SEQuence:POINts?, 223 SAMPle subsystem, 224, 225 SAMPle:TIMer, 224 SAMPle:TIMer?, 225 SENSe subsystem, 226, 227, 228, 230, 232, 234, 235, 236, 237, 238, 239, 240, 241, 242, 243, 244, 245, 246, 247, 248, 249, 250, 251, 252 SENSe:CHANnel:SETTling, 227 SENSe:CHANnel:SETTling?, 227 SENSe:DATA:COUN:HALF?, 231 SENSe:DATA:CVTable:RESet, 229 SENSe:DATA:CVTable?, 228 SENSe:DATA:FIFO:ALL?, 229 SENSe:DATA:FIFO:COUNt?, 230 SENSe:DATA:FIFO:HALF?, 231 SENSe:DATA:FIFO:MODE, 232 SENSe:DATA:FIFO:MODE?, 233 SENSe:DATA:FIFO:PART?, 233 SENSe:DATA:FIFO:RESet, 234 SENSe:FREQuency:APERture, 234 SENSe:FREQuency:APERture?, 234 SENSe:FUNC:CONDition, 235 SENSe:FUNCtion:CUSTom, 235 Index 411 SENSe:FUNCtion:CUSTom:REFerence, 236 SENSe:FUNCtion:CUSTom:TCouple, 237 SENSe:FUNCtion:FREQuency, 238 SENSe:FUNCtion:RESistance, 239 SENSe:FUNCtion:STRain:FBEN, 240 SENSe:FUNCtion:STRain:FBP, 240 SENSe:FUNCtion:STRain:FPO, 240 SENSe:FUNCtion:STRain:HBEN, 240 SENSe:FUNCtion:STRain:QUAR, 240 SENSe:FUNCtion:STRainHPO:, 240 SENSe:FUNCtion:TEMPerature, 241 SENSe:FUNCtion:TOTalize, 243 SENSe:FUNCtion:VOLTage, 243 SENSe:REFerence, 244 SENSe:REFerence:CHANnels, 246 SENSe:REFerence:TEMPerature, 246 SENSe:STRain:EXCitation, 247 SENSe:STRain:EXCitation?, 247 SENSe:STRain:GFACtor, 248 SENSe:STRain:GFACtor?, 248 SENSe:STRain:POISson, 249 SENSe:STRain:POISson?, 249 SENSe:STRain:UNSTrained, 249 SENSe:STRain:UNSTrained?, 250 SENSe:TOTalize:RESet:MODE, 250 SENSe:TOTalize:RESet:MODE?, 252 SOURce subsystem, 253, 254, 255, 256, 257 SOURce:FM:STATe, 253 SOURce:FM:STATe?, 254 SOURce:FUNC :SHAPe , 255 SOURce:FUNC :SHAPe :CONDition, 254 SOURce:FUNC :SHAPe :PULSe, 254 SOURce:PULM:STATe, 255 SOURce:PULM:STATe?, 255 SOURce:PULSe:PERiod, 256 SOURce:PULSe:PERiod?, 256 SOURce:PULSe:WIDTh, 257 SOURce:PULSe:WIDTh?, 257 STATus subsystem, 258, 259, 260, 262, 263, 264, 265, 266, 268 STATus:OPERation:CONDition?, 260 STATus:OPERation:ENABle, 261 STATus:OPERation:ENABle?, 261 STATus:OPERation:EVENt?, 262 STATus:OPERation:NTRansition, 262 STATus:OPERation:NTRansition?, 263 STATus:OPERation:PTRansition, 263 STATus:OPERation:PTRansition?, 264 STATus:PRESet, 264 STATus:QUEStionable:CONDition?, 265 STATus:QUEStionable:ENABle, 265 STATus:QUEStionable:ENABle?, 266 STATus:QUEStionable:EVENt?, 266 STATus:QUEStionable:NTRansition, 267 STATus:QUEStionable:NTRansition?, 267 STATus:QUEStionable:PTRansition, 268 STATus:QUEStionable:PTRansition?, 268 SYSTem subsystem, 269, 270 SYSTem:CTYPe?, 269 SYSTem:ERRor?, 269 SYSTem:VERSion?, 270 TRIGger subsystem, 271, 272, 273, 274, 275 TRIGger:COUNt, 273 412 Index TRIGger:COUNt?, 273 TRIGger:IMMediate, 273 TRIGger:SOURce, 274 TRIGger:SOURce?, 275 TRIGger:TIMer, 275 TRIGger:TIMer?, 275 Command sequences, defined, 25 Commands, FIFO status, 85 Commands, FIFO transfer, 84 Comment lines, 146 Comments:, 143 Common Command Format, 153 Common mode noise, 354 Common mode rejection, 296 Common mode voltage Maximum, 296 Common mode voltage limits, 353 Communication using channel identifiers, 126 Communication using global variables, 127 Communication, algorithm to algorithm, 126 Comparison operators, 135 Compensating for system offsets, 102 Compensation, thermocouple reference temperature, 64 Components, adding terminal module, 45 Compound-statement:, 142 CONDition SENSe:FUNC:CONDition, 235 SOURce:FUNC :SHAPe , 254 STAT:OPER:CONDition?, 260 CONDition? STAT:QUES:CONDition?, 265 Conditional constructs, 136 Conditional execution, 144 Configuring programmable analog SCP parameters, 58 Configuring the enable registers, 95 Configuring the transition filters, 94 Configuring the VT1415A, 17 Connecting the on-board thermistor, 40 Connection recommended, 37 signals to channels, 37 Connections Guard, 353 Considerations, special, 104 Constant:, decimal, 139 Constant:, hexadecimal, 139 Constant:, octal, 139 Constructs, conditional, 136 Continuous Mode, 274 Continuously reading the FIFO (FIFO mode BLOCK), 85 Control, implementing feed forward, 127 Control, implementing multivariable, 126 Control, manual, 75 Control, PIDA with digital on-off, 125 Control, program flow, 136 Controller, describing the VT1415A closed loop, 110 Controller, overview of the VT1415A algorithmic loop, 52 Conversion, EU, 334 Conversion, linking channels to EU, 60 Conversions, custom EU, 67 Conversions, custom reference temperature EU, 100 Conversions, custom thermocouple EU, 100 Conversions, loading tables for linear, 101 Conversions, loading tables for non linear, 101 COUNt? SENS:DATA:FIFO:COUNt?, 230 Counter, setting the trigger, 81 Creating and loading custom EU conversion tables, 99 Creating conversion tables, 101 CTYPe? SYST:CTYPe?, 269 Current Value Table SENSe:DATA:CVTable?, 228 CUSTom SENS:FUNC:CUSTom, 235 Custom Algorithm, what is a ?, 110 Custom EU conversion tables creating, 99 loading, 99 Custom EU conversions, 67 Custom EU operation, 100 Custom EU tables, 100 Custom reference temperature EU conversions, 100 Custom thermocouple EU conversions, 100 CVT Resetting the CVT, 84 SENSe:DATA:CVTable?, 228 CVT elements, reading, 116 CVT elements, writing value to, 116 CVT, organization of the, 83 CVT, reading algorithm values from the, 83 CVT, sending data to, 116 D DATA FORMat:DATA, 199 FORMat:DATA?, 201 Data acquisition algorithm, 129 Data structures, 137 Data types, 136 DATA:FIFO:ALL?, 229 Decimal constant:, 139 Declaration initialization, 139 Declaration:, 141 Declarations:, 142 Declarator:, 141 Declaring variables, 143 Default settings, power-on, 55 DEFine ALGorithm :EXPLicit :DEFine, 163 ALGorithm:FUNCtion:DEFine, 172 ROUT:SEQ:DEF?, 222 Defined input and output channels, 114 Defining a PID with ALG:DEFINE, 76 Defining an algorithm for swapping, 122 Defining and accessing global variables, 115 Defining custom algorithms, 121 Defining data storage, 77 Defining standard PID algorithms, 73 Definite length block data example, 122 DELay ALGorithm:OUTPut:DELay, 173 DELay? ALGorithm:OUTPut, 174 Describing the VT1415A closed loop controller, 110 Detecting open transducers, 104 Determining an algorithm’s size, 123 Determining an algorithms identity (ALG_NUM), 117 Determining first execution (First_loop), 115 Determining model SCPI programming, 278 DIAG:CHECK?, 193 DIAG:CUST:REF:TEMP, 195 DIAG:INT:LINe, 196 DIAG:INT:LINe?, 196 DIAGnostic DIAGnostic:CALibration:SETup :MODE , 191 DIAGnostic:CALibration:SETup :MODe ?, 192 DIAGnostic:CALibration:TARe:MODE, 192 DIAGnostic:CALibration:TARe:MODE?, 193 DIAGnostic:CUSTom:LINear, 193 DIAGnostic:CUSTom:PIECewise, 194 DIAGnostic:IEEE, 195 DIAGnostic:IEEE?, 196 DIAGnostic:CALibration:SETup :MODE ?, 192 DIAGnostic:CALibration:SETup: MODE , 191 DIAGnostic:CALibration:TARe:MODE, 192 DIAGnostic:CALibration:TARe:MODE?, 193 DIAGnostic:CUSTom:LINear, 193 DIAGnostic:CUSTom:PIECewise, 194 DIAGnostic:IEEE, 195 DIAGnostic:IEEE?, 196 DIAGnostic:OTDetect, 105 Directly, reading status groups, 97 Disabling flash memory access (optional), 23 Disabling the input protect feature (optional), 23 Does, what *CAL?, 72 Drivers, 25 DSP, 334 E ENABle Index 413 STAT:OPER:ENABle, 261 STAT:QUES:ENABle, 265 ENABle? STAT:OPER:ENABle?, 261 STAT:QUES:ENABle?, 266 Enabling and disabling algorithms, 87 Enabling events to be reported in the status byte, 94 Environment, the algorithm execution, 111 Equality-expression:, 141 Equality-operator:, 141 Error Messages, 325, 326, 327, 328, 329, 330, 331, 332 Self Test, 327 ERRor? SYST:ERRor?, 269 EU, 334 EU Conversion, 334 EVENt? STAT:OPER:EVENt?, 262 STAT:QUES:EVENt?, 266 Example command sequence, 88 Example language usage, 111 Example programs, about, 25 Example, A quick-start PID algorithm, 89 Example, definite length block data, 122 Example, indefinite length block data, 122 Examples, operation status group, 95 Examples, questionable data group, 95 Examples, standard event group, 96 EXCitation SENSe:STRain:EXCitation, 247 SENSe:STRain:EXCitation?, 247 Executing the programming model, 55 Execution, conditional, 144 Exiting the algorithm, 136 Expression:, 141 Expression-statement:, 142 F Faceplate connector pin-signal lists, 49 FIFO status commands, 85 FIFO transfer commands, 84 FIFO, reading history mode values from the, 84 FIFO, reading values from the, 84, 117 FIFO, sending data to, 116 FIFO, time relationship of readings in, 117 FIFO, writing values to, 117 Filters, 104 Filters, adding circuits to terminal module, 45 Filters, configuring the transition, 94 Fixed width pulses at variable frequency (FM), 71 Fixing the problem, 107 Flash Memory, 334 Flash memory access, disabling, 23 414 Index Flash memory limited lifetime, 185 FM:STATe SOURce:FM:STATe, 253 FM:STATe? SOURce:FM:STATe?, 254 Format Common Command, 153 SCPI Command, 154 Format, specifying the data, 77 FORMat:DATA, 199 FORMat:DATA?, 201 Formats, ALG:DEFINE’s three data, 121 FREQuency INPut:FILT:FREQ, 203 SENSe:FUNCtion:FREQuency, 238 Frequency function, 68 Frequency, setting algorithm execution, 88 Frequency, setting filter cutoff, 58 FREQuency? INP:FILT:FREQ?, 204 Function, frequency, 68 Function, setting input, 68 Function, static state (CONDition), 68, 70 Function, the main, 112 Function, totalizer, 69 Functions and statements, intrinsic abs(expression), 135 interrupt(), 117, 135 max(expression1,expression2), 135 min(expression1,expression2), 135 writeboth(expression,cvt_element), 135 writecvt(expression,cvt_element), 116, 135 writefifo(expression), 117, 135 Functions, calling user defined, 118 Functions, linking output channels to, 67 Functions, setting output, 70 Functions:, 136 G Gain channel, 276 GAIN INPut:GAIN, 205 GAIN? INP:GAIN?, 206 Gains, setting SCP, 58 GFACtor SENSe:STRain:GFACtor, 248 SENSe:STRain:GFACtor?, 248 Global variables, 139 accessing, 115 defining, 115 Glossary, 333, 334, 335, 336 Grounding Noise due to inadequate, 353 Group, an example using the operation, 95 Guard connections, 353 H HALF? SENS:DATA:FIFO:COUNt:HALF?, 231 SENS:DATA:FIFO:HALF?, 231 Hexadecimal constant:, 139 HINTS for quiet measurements, 37 Read chapter 3 before chapter 4, 109 History mode, 75 How to use *CAL?, 72 I Identifier:, 139 Identifiers, 134 IEEE +/- INF, 200 IMMediate ALGorithm:UPDate, 174 ARM:IMMediate, 179 INIT:IMM, 202 TRIG:IMMediate, 273 Impedance, input, 296 Implementing feed forward control, 127 Implementing multivariable control, 126 Implementing setpoint profiles, 130 Implied Commands, 154 IMPORTANT! Do use CAL:TARE for copper TC wiring, 102 Don’t use CAL:TARE for thermocouple wiring, 102 Making low-noise measurements, 32 Resolving programming problems, 55 Indefinite length block data example, 122 INF, IEEE, 200 INIT:IMM, 202 Init-declarator:, 141 Init-declarator-list:, 141 Initialization, declaration, 139 Initializing variables, 116 INITiate subsystem, 202 INITiating/Running algorithms, 81 INP:FILT:FREQ?, 204 INP:FILT:LPAS:STAT, 204 INP:FILT:LPAS:STAT?, 205 INP:GAIN?, 206 Input channels, 114 Input impedance, 296 Input protect feature, disabling, 23 INPut subsystem, 203, 205, 207, 208 Input voltage, maximum, 296 INPut:FILT:FREQ, 203 INPut:GAIN, 205 INPut:LOW, 206 INPut:LOW?, 207 INPut:POLarity, 207 INPut:POLarity?, 208 Inputs, setting up digital, 68 Instrument drivers, 25 Interrupt function, 117 Interrupt level, setting NOTE, 17 interrupt(), 117, 136 Interrupts updating the status system, 98 VXI, 98 Intrinsic functions and statements abs(expression), 135 interrupt(), 135 max(expression1,expression2), 135 min(expression1,expression2), 135 writeboth(expression,cvt_element), 135 writecvt(expression,cvt_element), 116, 135 writefifo(expression), 117, 135 Intrinsic Functions and Statements interrupt(), 117 Intrinsic-statement:, 142 Isothermal reference measurement, NOTE, 32 K Keywords, special VT1415A reserved, 134 Keywords, standard reserved, 134 L Language syntax summary, 139 Language, overview of the algorithm, 110 Layout Terminal Module, 33 Lifetime limitation, Flash memory, 185 Limits Common mode voltage, 353 Limits, alarm, 75 Limits, clipping, 74 LINe DIAG:INT:LINe, 196 LINe? DIAG:INT:LINe?, 196 Lines, comment, 146 Linking channels to EU conversion, 60 Linking Commands, 157 Linking output channels to functions, 67 Linking resistance measurements, 61 Linking strain measurements, 66 Linking temperature measurements, 63 Linking voltage measurements, 61 Lists Faceplate connector pin-signal , 49 Index 415 Loading custom EU tables, 101 Loading tables for linear conversions, 101 Loading tables for non linear conversions, 101 Logical operators, 135 Logical-AND-expression:, 141 LOW INPut:LOW, 206 INPut:LOW?, 207 Low-noise measurements, HINTS, 37 Low-noise measurements, IMPORTANT!, 32 M Manual control, 75 max(expression1,expression2), 136 Maximum Common mode voltage, 296 Input voltage, 296 Tare cal offset, 296 Update rate, 295 Maximum tare capability, 104 Measurement accuracy dc volts, 296 Ranges, 295 Resolution, 295 Measurements terminal block considerations for TC, 36 Measurements, linking resistance, 61 Measurements, linking strain, 66 Measurements, linking temperature, 63 Measurements, linking voltage, 61 Measurements, reference measurement before thermocouple, 65 Measurements, thermocouple, 64 Measuring the reference temperature, 65 MEM:VME:ADDR, 210 MEM:VME:ADDR?, 210 MEM:VME:SIZE, 210 MEM:VME:SIZE?, 211 MEM:VME:STATe, 211 MEM:VME:STATe?, 212 Messages, error, 325, 326, 327, 328, 329, 330, 331, 332 min(expression1,expression2), 136 MODE SENS:DATA:FIFO:MODE, 232 SENSe:TOTalize:RESet:MODE, 250 Mode, history, 75 Mode, selecting the FIFO, 78 MODE? SENS:DATA:FIFO:MODE?, 233 SENSe:TOTalize:RESet:MODE?, 252 Mode?, which FIFO, 85 Model, determining SCPI programming, 278 Model, executing the programming, 55 416 Index Model, programming, 53 Modifier, the static, 137 Modifying a standard PID algorithm, 125 Modifying running algorithm variables, 87 Modifying the standard PIDA, 126 Modifying the terminal module circuit, 45 Module SCPs and Terminal, 33 Modules Terminal, 33 More on auto ranging, 106 Multiplicative-expression:, 140 Multiplicative-operator:, 140 N NaN, 200 Next, where to go, 147 Noise Common mode, 354 Normal mode, 354 Noise due to inadequate grounding, 353 Noise reduction with amplifier SCPs, NOTE, 108 Noise reduction, wiring techniques, 352 Noise Rejection, 354 Noisy measurements Quieting, 32, 37 Non-Control algorithms, 129 Normal mode noise, 354 Not-a-Number, 200 NOTES *RST effect on custom EU tables, 100 *TST? sets default ASC,7 data format, 200 + & - overvoltage return format from FIFO, 230, 231, 233 ALG:SCAN:RATIO vs. ALG:UPD, 168 ALG:SIZE? return for undefined algorithm, 169 ALG:STATE effective after ALG:UPDATE, 87 ALG:STATE effective only after ALG:UPD, 170 ALG:TIME? return for undefined algorithm, 171 Algorithm Language case sensitivity, 134 Algorithm Language reserved keywords, 134 Algorithm source string terminated with null, 122 Algorithm source string terminates with null, 165 Algorithm swapping limitations, 166 Algorithm Swapping restrictions, 124 Algorithm variable declaration and assignment, 115 Amplifier SCPs can reduce measurement noise, 108 BASIC’s vs. ‘C’s “is equal to” symbol, 143 Bitfield access ‘C’ vs. Algorithm Language, 138 Cannot declare channel ID as variable, 135 Combining SCPI commands, 158 CVT contents after *RST, 84, 229 Decimal constants can be floating or integer, 139 Default (*RST) Engineering Conversion, 60 Define user function before algorithm calls , 118 Do not CAL:TARE thermocouple wiring, 186 Do use CAL:TARE for copper in TC wiring, 102 Do use CAL:TARE for copper TC wiring, 186 Don’t use CAL:TARE for thermocouple wiring, 102 Flash memory limited lifetime, 103, 185 Isothermal reference measurements, 32 MEM subsystem vs. command module model, 209 MEM subsystem vs. TRIG and INIT sequence, 209 MEM system vs TRIG and INIT sequence, 198 Memory required by an algorithm, 123 Number of updates vs. ALG:UPD:WINDOW, 162, 167, 177 Open transducer detect restrictions, 105 OUTP:CURR:AMPL command, 60 OUTP:CURR:AMPL for resistance measurements, 213 OUTP:VOLT:AMPL command, 60 PID definition errors and channel specifiers, 76 Reference to noise reduction literature, 353 Resistance temperature measurements, 63 Saving time when doing channel calibration, 73 Selecting manual range vs. SCP gains, 61 Setting the interrupt level, 17 Settings conflict, ARM:SOUR vs TRIG:SOUR, 178, 274 Thermocouple reference temperature usage, 244, 246 TRIGger:SOURce vs. ARM:SOURce, 79, 80 Warmup before executing *TST?, 328 When algorithm variables are initialized, 139 NTRansition STAT:OPER:NTRansition, 262 STAT:QUES:NTRansition, 267 NTRansition? STAT:OPER:NTRansition?, 263 STAT:QUES:NTRansition?, 267 O Octal constant:, 139 Offset A/D, 184, 276 channel, 184, 276 Offsets, compensating for system, 102 Offsets, residual sensor, 103 Offsets, system wiring, 102 Operating sequence, 118 Operation, 72, 103 Operation and restrictions, 72 Operation status group examples, 95 Operation, custom EU, 100 Operation, standard EU, 99 Operation, VT1415A background, 98 Operational overview, 52 Operator, assignment, 135 Operator, unary arithmetic, 144 Operator, unary logical, 135 Operators, 135 Operators, arithmetic, 135 Operators, comparison, 135 Operators, logical, 135 Operators, the arithmetic, 144 Operators, the comparison, 144 Operators, the logical, 144 Operators, unary, 135 Option A3F, 47 Options Terminal module, 47 Order, algorithm execution, 119 Organization of the CVT, 83 OTD restrictions, NOTE, 105 OTDetect, DIAGnostic:OTDetect, 105 OUTP:CURRent:AMPLitude, 213 OUTP:CURRent:AMPLitude?, 214 OUTP:SHUNt, 216 OUTP:SHUNt?, 217 OUTP:TTLT<n>:STATe, 218 OUTP:TTLT<n>:STATe?, 219 Output channels, 114 OUTPut subsystem, 213, 214, 215, 217, 218, 219, 221 OUTPut:CURRent:STATe, 215 OUTPut:CURRent:STATe?, 215 OUTPut:POLarity, 216 OUTPut:POLarity?, 216 OUTPut:TTLTrg:SOURce, 217 OUTPut:TTLTrg:SOURce?, 218 OUTPut:TYPE, 219 OUTPut:TYPE?, 220 OUTPut:VOLTage:AMPLitude, 220 OUTPut:VOLTage:AMPLitude?, 221 Outputs, setting up digital, 69 Outputting trigger signals, 81 OVER), reading the latest FIFO values (FIFO mode, 86 Overall program structure, 146 Overloads, unexpected channel, 104 Overview of the algorithm language, 110 Overview of the VT1415A algorithmic loop controller, 52 Overview, operational, 52 P Parameter data and returned value types, 158 Parameters, configuring programmable analog SCP, 58 PART? SENS:DATA:FIFO:PART?, 233 Performing channel calibration (Important!), 72 PERiod SOURce:PULSe:PERiod, 256 PERiod? SOURce:PULSe:PERiod?, 256 PID algorithm tuning, 91 PIDA with digital on-off control, 125 PIDA, modifying the standard, 126 Planning Index 417 grouping channels to signal conditioning, 29 planning wiring layout, 29 sense vs. output SCPs, 31 thermocouple wiring, 32 Points ROUT:SEQ:POINts?, 223 POISson SENSe:STRain:POISson, 249 SENSe:STRain:POISson?, 249 POLarity INPut:POLarity, 207 OUTPut:POLarity, 216 Polarity, setting input, 68 Polarity, setting output, 69 POLarity? INPut:POLarity?, 208 OUTPut:POLarity?, 216 Power Available for SCPs, 295 Power-on and *RST default settings, 55 PRESet STAT:PRESet, 264 Pre-setting PID variables , 77 Pre-setting PID variables and coefficients, 77 Primary-expression:, 140 Problem, fixing the, 107 Problems, checking for, 107 Problems, resolving programming, 55 Process monitoring algorithm, 129 Profiles, implementing setpoint, 130 Program flow control, 136 Program structure and syntax, 143 Programming model, 53 Programming the trigger timer, 80 PTRansition STAT:OPER:PTRansition, 263 STAT:QUES:PTRansition, 268 PTRansition? STAT:OPER:PTRansition?, 264 STAT:QUES:PTRansition?, 268 PULSe SOURce:FUNC :SHAPe , 254 Q Questionable data group examples, 95 Quick Reference, Command, 286, 288, 289, 290, 291, 292, 293 Quiet measurements, HINTS, 37 Quieter readings with amplifier SCPs, NOTE, 108 R Rack Mount Terminal Panel Accessories, 47 Ranges, measurement, 295 RATio ALGorithm :EXPLicit :SCAN:RATio, 168 418 Index RATio? ALGorithm :EXPLicit :SCAN:RATio?, 169 Reading algorithm values from the CVT, 83 Reading algorithm variables, 83 Reading condition registers, 97 Reading CVT elements, 116 Reading event registers, 97 Reading history mode values from the FIFO, 84 Reading running algorithm values, 83 Reading status groups directly, 97 Reading the latest FIFO values (FIFO mode OVER), 86 Reading the status byte, 96 Reading values from the FIFO, 84, 117 Recommended measurement connections, 37 Re-Execute *CAL? when:, 73 REFerence SENS:FUNC:CUST:REF, 236 SENS:REFerence, 244 Reference junction, 40 Reference measurement before thermocouple measurements, 65 Reference temperature measurement, NOTE, 32 Reference temperature sensing, 35 Reference temperature sensing with the VT1415A, 35 Reference, Algorithm language, 133 Register, the status byte group’s enable, 97 Registers, clearing event, 97 Registers, clearing the enable, 97 Registers, configuring the enable, 95 Registers, reading condition, 97 Registers, reading event, 97 Rejection Noise, 354 Rejection, common mode, 296 Relational-expression:, 140 Relational-operator:, 141 Removing the VT1415A terminal module, 43 Reset *RST, 280 Resetting the CVT, 84 RESet SENS:DATA:CVT:RESet, 229 SENS:DATA:FIFO:RESet, 234 Resetting CAL:TARE, 103 Residual sensor offsets, 103 Resistance CAL:VAL:RESistance, 188 RESistance CAL:CONF:RES, 182 SENS:FUNC:RESistance, 239 Resolution, measurement, 295 Resources, accessing the VT1415A’s, 113 Restrictions, 72 ROUT:SEQ:DEF?, 222 ROUT:SEQ:POINts?, 223 ROUTe subsystem, 222, 223 RTD and thermistor measurements, 63 Running the algorithm, 125 Running, changing an algorithm while it’s, 122 S Safe Handling, static discharge CAUTION, 19 SAMP:TIMer, 224 SAMP:TIMer?, 225 SAMPle subsystem, 224, 225 sample timer, accuracy, 295 SCALar ALGorithm :EXPLicit :SCALar, 167 SCALar? ALGorithm :EXPLicit :SCALar?, 168 SCP, 334 grouping channels to signal conditioning, 29 sense vs. output SCPs, 31 SCP, Power Available, 295 SCP, setting the HP E1505 current source, 59 SCPI commands DIAGnostic:OTDetect, 105 SCPI Commands, 149 Format, 154 SCPs and Terminal Module, 33 Selecting the FIFO mode, 78 Selecting the trigger source, 79 Selecting trigger timer arm source, 80 Selection-statement:, 142 Self test and C-SCPI for MS-DOS (R), 282 how to read results, 282 Self Test, error messages, 327 Sending Data to the CVT and FIFO, 116 SENS:DATA:CVT:RESet, 229 SENS:DATA:FIFO:COUNt:HALF?, 231 SENS:DATA:FIFO:COUNt?, 230 SENS:DATA:FIFO:HALF?, 231 SENS:DATA:FIFO:MODE, 232 SENS:DATA:FIFO:MODE?, 233 SENS:DATA:FIFO:PART?, 233 SENS:DATA:FIFO:RESet, 234 SENS:FUNC:CUST:REF, 236 SENS:FUNC:CUST:TC, 237 SENS:FUNC:RESistance, 239 SENS:FUNC:STRain, 240 SENS:FUNC:TEMPerature, 241 SENS:FUNC:VOLTage, 243 SENS:REF:TEMPerature, 246 SENS:REFerence, 244 SENSe subsystem, 226, 227, 228, 230, 232, 234, 235, 236, 237, 238, 239, 240, 241, 242, 243, 244, 245, 246, 247, 248, 249, 250, 251, 252 SENSe:CHANnel:SETTling, 227 SENSe:CHANnel:SETTling?, 227 SENSe:DATA:CVTable?, 228 SENSe:FREQuency:APERture, 234 SENSe:FREQuency:APERture?, 234 SENSe:FUNC:CONDition, 235 SENSe:FUNC:CUSTom, 235 SENSe:FUNCtion:FREQuency, 238 SENSe:FUNCtion:TOTalize, 243 SENSe:REFerence:CHANnels, 246 SENSe:STRain:EXCitation, 247 SENSe:STRain:EXCitation?, 247 SENSe:STRain:GFACtor, 248 SENSe:STRain:GFACtor?, 248 SENSe:STRain:POISson, 249 SENSe:STRain:POISson?, 249 SENSe:STRain:UNSTrained, 249 SENSe:STRain:UNSTrained?, 250 SENSe:TOTalize:RESet:MODE, 250 SENSe:TOTalize:RESet:MODE?, 252 Sensing Reference temperature with the VT1415A, 35 Sensing 4-20 mA, 45 Separator, command, 154 Sequence, A complete thermocouple measurement command, 66 Sequence, ALG:DEFINE in the programming, 121 Sequence, example command, 88 Sequence, operating, 118 Sequence, the operating, 82 Setting algorithm execution frequency, 88 Setting filter cutoff frequency, 58 Setting input function, 68 Setting input polarity, 68 Setting output drive type, 69 Setting output functions, 70 Setting output polarity, 69 Setting SCP gains, 58 Setting the HP E1505 current source SCP, 59 Setting the logical address switch, 18 Setting the trigger counter, 81 Setting the VT1511A strain bridge SCP excitation voltage, 60 Setting up analog input and output channels, 58 Setting up digital input and output channels, 68 Setting up digital inputs, 68 Setting up digital outputs, 69 Setting up the trigger system, 78 Settings conflict ARM:SOUR vs TRIG:SOUR, 178, 274 Index 419 SETTling SENSe:CHANnel:SETTling, 227 Settling characteristics, 106 SETTling? SENSe:CHANnel:SETTling?, 227 SETup CAL:SETup, 184 CAL:SETup?, 184 Shield Connections When to make, 353 Shielded wiring, IMPORTANT!, 32 SHUNt OUTP:SHUNt, 216 OUTPut:SHUNt?, 217 Signal, connection to channels, 37 Signals, outputting trigger, 81 SIZE MEM:VME:SIZE, 210 Size, determining an algorithm’s, 123 SIZe? ALGorithm :EXPLicit :SIZe?, 169 SIZE? MEM:VME:SIZE?, 211 SOURce ARM:SOURce, 179 ARM:SOURce?, 180 OUTPut:TTLTrg:SOURce, 217 TRIG:SOURce, 274 SOURce subsystem, 253, 254, 255, 256, 257 Source, selecting the trigger, 79 Source, selecting trigger timer arm, 80 SOURce:FM:STATe, 253 SOURce:FM:STATe?, 254 SOURce:FUNC :SHAPe , 255 SOURce:FUNC :SHAPe :CONDition, 254 SOURce:FUNC :SHAPe :PULSe, 254 SOURce:PULM:STATe, 255 SOURce:PULM:STATe?, 255 SOURce:PULSe:PERiod, 256 SOURce:PULSe:PERiod?, 256 SOURce:PULSe:WIDTh, 257 SOURce:PULSe:WIDTh?, 257 SOURce? TRIG:SOURce?, 275 Sources arm, 78 trigger, 78 Special considerations, 104 Special identifiers for channels, 135 Special VT1415A reserved keywords, 134 Specifications, 295, 296, 297, 298, 299, 300, 301, 302, 303, 304, 305, 306, 307, 308, 309, 310, 311, 312, 313, 314, 315, 316, 317, 318, 319, 320, 321, 322, 323, 324 Specifying the data format, 77 SQUare 420 Index SOURce:FUNC :SHAPe , 255 Standard Commands for Programmable Instruments, SCPI, 159 Standard EU operation, 99 Standard event group examples, 96 Standard reserved keywords, 134 Starting the PID algorithm, 81 STAT:OPER:CONDition?, 260 STAT:OPER:ENABle, 261 STAT:OPER:ENABle?, 261 STAT:OPER:EVENt?, 262 STAT:OPER:NTRansition, 262 STAT:OPER:NTRansition?, 263 STAT:OPER:PTRansition, 263 STAT:OPER:PTRansition?, 264 STAT:PRESet, 264 STAT:QUES:CONDition?, 265 STAT:QUES:ENABle, 265 STAT:QUES:ENABle?, 266 STAT:QUES:EVENt?, 266 STAT:QUES:NTRansition, 267 STAT:QUES:NTRansition?, 267 STAT:QUES:PTRansition, 268 STAT:QUES:PTRansition?, 268 STATe ALGorithm :EXPLicit , 170 INP:FILT:LPAS:STATe, 204 INP:FILT:LPAS:STATe?, 205 MEM:VME:STATe, 211 MEM:VME:STATe?, 212 OUTPut:CURRent:STATe, 215 OUTPut:CURRent:STATe?, 215 SOURce:PULM:STATe, 255 STATe? ALGorithm :EXPlicit , 171 SOURce:PULM:STATe?, 255 Statement, algorithm language writecvt(), 116 writefifo(), 117 Statement:, 142 Statement-list:, 142 Statements and functions, intrinsic abs(expression), 135 interrupt(), 117, 135 max(expression1,expression2), 135 min(expression1,expression2), 135 writeboth(expression,cvt_element), 135 writecvt(expression,cvt_element), 116, 135 writefifo(expression), 117, 135 Statements:, 136 Static discharge safe handling, CAUTION, 19 Static state (CONDition) function, 68, 70 STATus subsystem, 258, 259, 260, 262, 263, 264, 265, 266, 268 Status variable, 75 Storage, defining data, 77 STORe CAL:STORe, 185 STRain SENS:FUNC:STRain, 240 Structure, overall program, 146 Structures, data, 137 Sub subsystem, 191, 192, 193, 195, 196, 197, 198, 199, 200, 201, 209, 211, 212 Subsystem ABORT, 160 ARM, 178, 179 CALibration, 181, 182, 184, 185, 186, 187, 188, 189, 190 DIAGnostic, 191, 192, 193, 195, 196, 197, 198 FORMat, 199, 200, 201 INITiate, 202 INPut, 203, 205, 207, 208 MEMory, 209, 211, 212 OUTPut, 213, 214, 215, 217, 218, 219, 221 ROUTe, 222, 223 SAMPle, 224, 225 SENSe, 226, 227, 228, 230, 232, 234, 235, 236, 237, 238, 239, 240, 241, 242, 243, 244, 245, 246, 247, 248, 249, 250, 251, 252 SOURce, 253, 254, 255, 256, 257 STATus, 258, 259, 260, 262, 263, 264, 265, 266, 268 SYSTem, 269, 270 TRIGger, 271, 272, 273, 274, 275 Summary, 102 Summary, language syntax, 139 Supplying the reference temperature, 66 support, xv support resources, xv Swapping, defining an algorithm for, 122 Switch, setting the logical address, 18 Symbols, the operations, 144 Syntax, Variable Command, 155 SYST:CTYPe?, 269 SYST:ERRor?, 269 SYST:VERSion?, 270 SYSTem subsystem, 269, 270 System wiring offsets, 102 System, setting up the trigger, 78 System, using the status, 91 T Tables, creating conversion, 101 Tables, custom EU, 100 Tables, loading custom EU, 101 TARE CAL:TARE:RESet, 187 CAL:TARE?, 188 Tare cal offset, maximum, 296 TARE? CAL:TARE, 186 TCouple SENS:FUNC:CUST:TC, 237 technical support, xv Techniques Wiring and noise reduction, 352 TEMPerature DIAG:CUST:REF:TEMP, 195 SENS:FUNC:TEMPerature, 241 SENS:REF:TEMPerature, 246 Temperature accuracy, 297 Temperature, measuring the reference, 65 Temperature, supplying the reference, 66 Terminal block considerations for TC measurements, 36 Terminal Blocks, 334 Terminal Module, 335 Attaching and removing the VT1415A, 43 Attaching the VT1415A, 43 Removing the VT1415A, 43 Wiring and attaching the, 41 Terminal Module Layout, 33 Terminal module options, 47 Terminal module wiring maps, 46 Terminal modules, 33 The algorithm execution environment, 111 The arithmetic operators, 144 The comparison operators, 144 The logical operators, 144 The main function, 112 The operating sequence, 82 The operations symbols, 144 The pre-defined PIDA algorithm, 73 The pre-defined PIDB algorithm, 74 The static modifier, 137 The status byte group’s enable register, 97 Thermistor Connecting the on-board, 40 Thermistor and RTD measurements, 63 Thermocouple measurements, 64 Thermocouple reference temperature compensation, 64 Thermocouples and CAL:TARE, 102 Time relationship of readings in FIFO, 117 TIMe? ALGorithm :EXPLicit , 171 Timer SAMP:TIMer, 224 SAMP:TIMer?, 225 TIMer TRIG:COUNt, 273 TRIG:TIMer, 275 Timer, programming the trigger, 80 TIMer? TRIG:TIMer?, 275 TOTalize SENSe:FUNCtion:TOTalize, 243 Totalizer function, 69 Transducers, detecting open, 104 Index 421 TRIG:COUNt, 273 TRIG:COUNt?, 273 TRIG:IMMediate, 273 TRIG:SOURce, 274 TRIG:SOURce?, 275 TRIG:TIMer, 275 TRIG:TIMer?, 275 TRIGger subsystem, 271, 272, 273, 274, 275 trigger system ABORt subsystem, 160 ARM subsystem, 178, 179 INITiate subsystem, 202 TRIGger subsystem, 271, 272, 273, 274, 275 Trigger, variable width pulse per, 70 TTLTrg:SOURce OUTPut:TTLTrg:SOURce?, 218 TTLTrg<n> OUTP:TTLT<n>:STATe?, 219 OUTP:TTLTrg<n>:STATe, 218 Tuning, PID algorithm, 91 TYPe OUTPut:TYPE, 219 Type, setting output drive, 69 TYPe? OUTPut:TYPE?, 220 Types, data, 136 U Unary arithmetic operator, 144 Unary logical operator, 135 Unary operators, 135 Unary-expression:, 140 Unary-operator:, 140 Unexpected channel offsets or overloads, 104 UNSTrained SENSe:STRain:UNSTrained, 249 SENSe:STRain:UNSTrained?, 250 Update rate, maximum, 295 Updating the algorithm variables, 87 Updating the algorithm variables and coefficients, 87 Updating the status system and VXI interrupts, 98 Usage, example language, 111 Using the status system, 91 V Value types parameter data, 158 returned, 158 Values, assigning, 143 Values, reading running algorithm, 83 Variable Command Syntax, 155 Variable frequency square-wave output (FM), 71 Variable width pulse per trigger, 70 422 Index Variable width pulses at fixed frequency (PWM), 70 Variable, status, 75 Variables, communication using global, 127 Variables, declaring, 143 Variables, global, 139 Variables, initializing, 116 Variables, modifying running algorithm, 87 Variables, reading algorithm, 83 Verifying a successful configuration, 25 VERsion? SYST:VERSion?, 270 Voids Warranty Cutting Input Protect Jumper, 23 Voltage CAL:VALue:VOLTage, 189 VOLTage CAL:CONF:VOLT, 183 SENS:FUNC:VOLTage, 243 Voltage, setting the VT1511A strain bridge SCP excitation, 60 VOLTage:AMPLitude OUTPut:VOLTage:AMPLitude, 220 OUTPut:VOLTage:AMPLitude?, 221 VT1415A background operation, 98 VT1415A, configuring the, 17 W Warranty, iii Voided by cutting Input Protect Jumper, 23 What *CAL? does, 72 What is a custom algorithm?, 110 When to make shield connections, 353 When:, re-execute *CAL?, 73 Where to go next, 147 Which FIFO mode?, 85 WIDTh SOURce:PULSe:WIDTh, 257 WIDTh? SOURce:PULSe:WIDTh?, 257 WINDow ALGorithm:UPDate:WINDow, 176 WINDow? ALGorithm:UPDate:WINDow?, 177 Wiring planning for thermocouple, 32 planning layout, 29 signal connection, 37 Wiring and attaching the terminal module, 41 Wiring maps Terminal Module, 46 Wiring techniques, for noise reduction, 352 Wiring the terminal module, 41 writeboth(expression,cvt_element), 136 writecvt(expression,cvt_element), 116, 136 writefifo(expression), 117, 136 Writing the algorithm, 125 Writing values to CVT elements, 116 Writing values to the FIFO, 117 Z ZERO? CAL:ZERO?, 190 Index 423 VT1415A/1422A VXI Technology™ Algorithmic Closed Loop Controller and Remote Channel Multifunction DAC Overview The VT1415A and VT1422A are C-size, single-slot, VXI modules capable of either multi-function input/output (data acquisition) or powerful control capabilities. They serve as powerful data acquisition modules that handle analog input/output and digital input/output in both static and dynamic modes. The digital capability includes the ability to set or sense static states, to measure input frequency and period, to totalize, and to input or output PWM and FM signals. Refer to the VXI Technology Website for instrument driver availability and downloading instructions, as well as for recent product updates, if applicable. Algorithmic Closed Loop Controller - VT1415A Features Powerful Data Acquisition Capability More powerful than PID controllers and easier to implement than large custom control systems, the VT1415A fills a unique niche in the data acquisition and control field, providing both control and precise data acquisition. Applications include: Powerful Control Capability • PID control of stimulus loops such as hydraulic actuators, levers, rotational devices as in structural test Custom On-board DSP Program Development • PID control of temperature, position, velocity, acceleration and more • Complex control such as cascade loops in thermal cooling jackets, ratio • Comprehensive On-board Signal Conditioning Wide Choice of Input/Output Signal Types Large Channel-count Strain Signal Conditioning and Measurement Independent loops with multi-level alarms. The design of the on-board, DSP firmware assures the user that all inputs, all calculations, and all outputs can be completed between scan triggers. This means there is no drift, or jitter in the critical time intervals that are used to calculate integrals and derivatives in control algorithms. The firmware allows a user to employ pre-written PID control algorithms, modify them for specific application needs, or to write an application from scratch. Low duty-cycle connection to the host computer allows interaction between the host and real-time DSP so the user can update algorithms, change tuning constants, or do envelope control. Limited host computer interaction leads to very high performance (8-loops, update rate 1000/second per loop with simple PID calculation included). Multi-function Data Acquisition & Control Module - VT1422A The VT1422A is a module that is essentially the same as the VT1415A and has all of the same data acquisition and control capabilities as the VT1415A, plus some additional features. Acquisition Online at vxitech.com 949 • 955 • 1VXI 209 VT1415A/1422A VXI Technology™ Algorithmic Closed Loop Controller and Remote Channel Multifunction DAC The VT1422A serves as the controller in this system, managing all the configuration, calibration, triggering of measurements, EU conversion, and calibration processes. The main differences between the VT1415A and VT1422A are: • The VT1422A has 40 kB of memory available for user algorithms; the VT1415A has 48 kB. • If the only thing being done in an application is collection of strain data, the VT1422A user doesn’t have to write an algorithm, as for the VT1415A. • The VT1422A offers the same two Terminal Blocks as does the VT1415A. (Option 011 screw terminals and Option 013 spring clamp) Automated Calibration for Better Measurements The VT1415A and VT1422A offer superior calibration capabilities that provide more accurate measurements. Periodic calibration of the module’s measurement inputs is accomplished by connecting an external voltage measurement standard (such as a highly accurate multimeter) to the inputs of the module. This external standard first calibrates the on-board calibration source. Then built-in calibration routines use the on-board calibration source and on-board switching to calibrate the entire signal path from the closed loop controller’s input, through the signal conditioning plug-ons (SCPs) and FET MUX, to the A/D itself. Subsequent daily or short-term calibrations of this same signal path can be quickly and automatically done using the internal calibration source to eliminate errors introduced by the signal path through the SCPs and FET MUX or by ambient temperature changes. All input channels can be quickly and productively calibrated to assure continued high-accuracy measurements. In addition to the calibration of the signal paths within the modules, the VT1415A and VT1422A allow you to perform a “Tare Cal” to reduce the effects of voltage offsets and IR voltage drops in your signal wiring that is external to the module. The Tare Cal uses an on-board D/A to eliminate these voltage offsets. By placing a short circuit across the signal or transducer being measured, the residual offset can be automatically measured and eliminated by the D/A. Tare Cal should not be used to eliminate the thermoelectric voltage of thermocouple wire on thermocouple channels. 210 Flexibility with Deterministic Control The VT1415A and VT1422A are digital sampling closed loop control systems that are complete in a single VXI module. All signal conditioning, process monitoring, control calculations, and control signals are handled on-board without the need for computer supervision. Once setup is done, the module is essentially free-running. The inputs are updated at the beginning of each cycle and the outputs are updated at a later deterministic time in the cycle so that various paths in the control algorithm do not affect the loop timing. These steps are executed automatically and deterministically without need for intervention from a system computer. Other Features Digital Sampling Closed Loop Control System The VT1415A/VT1422A combine flexibility with deterministic control. Control algorithms for each of the loops can be the default PID calculation or a user-defined, downloaded, custom algorithm. The loop update rate is deterministically controlled by an internal clock so that variations in the algorithm execution times do not affect the loop cycle time. Input Signal Cond. 40 MHz DSP Engr. Unit Conversion Output Signal Cond. Control Algorithm Execution FIFO CVT Buffers VXI Backplane The VT1422A Remote Channel Multi-Function DAC Module supports the VT1539A Remote Channel Signal Conditioning Plug-on and the VT1529B Remote Strain Signal Conditioning Unit to form a high-performance, but economical strain measurement system. A24 Double Buffered Memory Digital Sampling Closed Loop System Powerful Control Capability The control algorithm for each loop is easily developed by the user from a list of algebraic expressions and flow constructs such as IF, THEN, ELSE. Tuning is simplified because all of the constants in the algorithm as well as the algorithm itself can be updated on-the-fly. New values are double-buffered so there is no need to stop scanning the inputs or halt the algorithm execution. Acquisition Online at vxitech.com 949 • 955 • 1VXI VT1415A/1422A VXI Technology™ Algorithmic Closed Loop Controller and Remote Channel Multifunction DAC The on-board 40 MHz pipelined DSP provides highly deterministic execution, making it easy to accurately predict cycle times. Engineering unit conversions for temperature, strain, resistance, and voltage measurements are made automatically without slowing down the algorithm execution speed. Wide Choice of Inputs/outputs The inputs to the loop algorithm can be measured values from multiple channels, operator input values, outputs from other loops, or values from other subsystems. The VT1415A/ VT1422A have a variety of signal conditioning plug-ons for making measurements of: • • • • Temperature, strain Voltage, current, resistance RPM, frequency, totalize Discrete levels, TTL, contact closures In addition, the measured input values and the calculated output values can be stored in a 64,000-sample FIFO buffer and efficiently transferred to the controlling computer in blocks of data. With this feature, it is no longer necessary to waste resources by dedicating a data acquisition channel to monitor each control loop input and output. The result of any algorithm calculation can be an input for use by another loop or subsystem, or it can be a direct output of several different types. Among the choices of output are: • • • • Signal Conditioning Plug-Ons A Signal Conditioning Plug-on (SCP) is a small daughter board that mounts on VXI Technology’s VXI scanning measurement and control modules. These SCPs provide a number of input and output functions. Several include gain and filtered analog inputs for measuring electrical and sensorbased signals, as well as frequency, total event count, pulsewidth modulation, toothed-wheel velocity, and digital state. Output functions include analog voltage and current D/As, 8or 16-bit digital outputs, pulse output with variable frequency and PWM, and stepper motor control. Refer to the information on each individual SCP for more details. Voltage Measurements Use any of the following SCPs with the VT1415A/VT1422A to make voltage measurements: VT1501A, VT1502A, VT1503A, VT1508A, VT1509A, VT1512A, or VT1513A. Temperature Measurements Any of the input SCPs can be used to make temperature measurements with thermocouples, thermistors, or RTDs, but the VT1503A/VT1508A/VT1509A SCPs provide higher accuracy with thermocouples. Resistance Measurements Analog voltage Analog current Discrete levels (TTL) Pulse width modulation (TTL) As an example of output flexibility, the pulse width modulation output has several modes. In the PWM freerun mode, the frequency or pulse width output rate is independent of the loop update rate and can be changed once per loop update cycle. The square wave mode provides a variable frequency, fixed 50% duty cycle output signal. The pulse-per-update mode provides a variable width pulse synchronized to the loop update cycle. Operator Control Manual control can be implemented through a user software interface or external hardware, such as a potentiometer. Seamless transfer from auto to manual mode, or manual to auto is handled automatically by a set-point-tracking routine in the default PID algorithm code. Resistance is measured using either the VT1505A 8-channel Current Source SCP and an input SCP or the VT1518A 4-wire Resistance Measurement SCP. Measurements are made by applying a dc current to the unknown and measuring the voltage drop across the unknown. Static Strain Measurements There are two ways to make static strain measurements. The VT1506A and VT1507A SCPs provide a convenient way to measure a few channels of static strain. When using the VT1506A/VT1507A for bridge completion, a second SCP is required to make the measurement connection. You can use the following SCPs for this type of static strain measurements: • VT1503A 8-channel Programmable Filter/Gain • VT1506A 8-channel 120 Ω Strain Completion & Excitation • VT1507A 8-channel 350 Ω Strain Completion & Excitation Acquisition • VT1508A 8-channel 7 Hz Fixed Filter & x16 Gain • VT1509A 8-channel 7 Hz Fixed Filter & x64 Gain Online at vxitech.com 949 • 955 • 1VXI 211 VT1415A/1422A VXI Technology™ Algorithmic Closed Loop Controller and Remote Channel Multifunction DAC For applications requiring large channel counts of strain measurement, the EX1629 provides a more cost effective approach to static (and dynamic) strain measurements. Dynamic strain measurements are implemented by connecting the EX1629 to high-speed digitizers, such as the VXI Technology VT1432B and VT1433B. Use the VT1533A Digital I/O SCP to provide two 8-bit input/ output words. Frequency/Totalize/PWM Note: SCPs are also available for making dynamic strain measurements (VXI Technology VT1510A, VT1511A, and VT1521). The VT1538A Enhanced Frequency/Totalize/PWM SCP provides eight (8) channels which can be individually configured as a frequency or totalizer input, or as a pulse width modulated output. Transient Measurements Compact Packaging with Signal Conditioning When making higher speed measurements, a vital issue often is the time skew between channels. Ideally, in many applications, the sampled data is needed at essentially the same instant in time. While the intrinsic design of the VT1415A/VT1422A provides scanning of 64 channels, with maximum skew of 640 µs between the first and last channel (far less than most sampled data systems), this still may not be small enough skew for some applications. The VT1415A/VT1422A provide for configurable signal conditioned I/O with up to eight individual plug-ons for analog, digital, and frequency needs. The SCPs are: Transient Voltage Measurements The VT1510A provides basic sample-and-hold capabilities on four channels. Six-pole Bessel filters provide alias and alias-based noise reduction while giving excellent transient response without overshoot or ringing. The VT1510A can be used in strain applications primarily where the bridge is external. 212 Digital I/O • VT1501A 8-channel Direct Input SCP • VT1502A 8-channel 7 Hz Low-pass Filter SCP • VT1503A 8-channel Programmable Filter and Gain SCP • VT1505A 8-channel Current Source SCP • VT1506A 8-channel 120 Ω Strain Completion & Excitation SCP • VT1507A 8-channel 350 Ω Strain Completion & Excitation SCP • VT1508A 8-channel x16 Gain & 7 Hz Fixed Filter SCP • VT1509A 8-channel x64 Gain & 7 Hz Fixed Filter SCP Transient Strain Measurements • VT1510A 4-channel Sample & Hold Input SCP The VT1511A, a double-wide SCP, has all the capabilities of the VT1510A but adds on-board bridge excitation and completion functions. The four direct input channels are used for monitoring the bridge excitation. A maximum of four SCPs (16 channels) can be installed on a VT1415A/VT1422A. • VT1512A 8-channel 25 Hz Fixed Filter SCP Analog Output • VT1521 4-channel High-speed Bridge SCP Use the VT1531A for voltage outputs, and the VT1532A for current outputs. The VT1531A and VT1532A have eight (8) output channels available on each SCP. • VT1532A 8-channel Current Output SCP A maximum of seven (7) VT1532A SCPs can be installed on each VT1415A/VT1422A due to power limitations. There are no power restrictions on the VT1531A. • VT1538A Enhanced Frequency/Totalize/PWM SCP • VT1511A 4-channel Transient Strain SCP • VT1513A 8-channel Divide-by-16 Fixed Attenuator & 7 Hz Low-pass Filter SCP • VT1518A 4-wire Resistance Measurement SCP • VT1531A 8-channel Voltage Output SCP • VT1533A 16-bit Digital I/O SCP • VT1536A 8-bit Isolated Digital I/O SCP • VT1539A Remote Channel SCP (VT1422A only) Product Specifications Acquisition Online at vxitech.com 949 • 955 • 1VXI VT1415A/1422A VXI Technology™ Algorithmic Closed Loop Controller and Remote Channel Multifunction Timing Signals Timing: Scan triggers: Synchronization: Alternate synchronization: Scan-to-scan timing and sample-to-sample timing can be set independently. Can be derived from a software command or a TTL level from other VXI modules, internal timer, or external hardware. Typical latency 17.5 µs. Multiple VT1415A/VT1422A modules can be synchronized at the same rate using the TTL trigger output from one VT1415A/VT1422A to trigger the others. Multiple VT1415A/VT1422A modules can be synchronized at different integer-related rates using the ALG:SCAN:RATIO command and the TTL trigger output from one VT1415A/ VT1422A module to trigger the others. Scan Triggers Maximum reading rate: VT1415A: Up to 56 kSa/s dependent upon configuration VT1422A: Up to 25 kSa/s dependent upon configuration Memory: 64 kSamples Maximum input voltage: Normal mode plus common mode Operating: Damage level: ±16 V peak ±42 V peak Maximum common mode voltage: Operating: Damage level: SCP input impedance: ±16 V peak ±42 V peak 100 MΩ differential Maximum tare cal offset: 62.5 mV range ±75% of full scale, other ranges ±25% of full-scale Jitter: Phase jitter scan-to-scan: 80 ps rms Phase jitter card-to-card: 41 ns peak 12 ns rms Measurement Accuracy Internal: 100 µs to 6.5536 s Resolution: 100 µs Trigger count: 1 to 65535 or infinite Sample Timer Range: VT1415A: 10 µs to 32768 ms VT1422A: 40 µs to 32768 ms Resolution: 0.5 µs Typically ±0.01% of input level; varies with the SCP used. Specifications are 90 days, 23 °C ± 1 °C, with *CAL done after a 1hr warm-up and CAL:ZERO done within 5 minutes. Note: Beyond the 5min. limitation and CAL:ZERO not done, apply the following drift error: Drift = 10 µV/°C ÷ SCP gain, per °C change from CAL:ZERO temperature. Accuracy Data Measurement accuracy is dependent upon the SCP module used. Refer to the accuracy tables and graphs for the individual SCP to determine the overall measurement accuracy. Measurement Specifications The following specifications include the SCP and scanning A/D performance together as a unit. Accuracy is stated for a single sample. Averaging multiple samples will improve accuracy by reducing noise of the signal. The basic VT1415A scanning A/D has a full-scale range of ±16 V and five autoranging gains of x1, x4, x16, x64, and x256. An SCP must be used with each eight channel input block to provide input protection and signal conditioning. Many definitions of accuracy are possible. Here we use singleshot with 3 sigma noise. To calculate accuracy assuming temperature is held constant within ±1 °C of the temperature at calibration, the following formula applies: Single Shot 3σ = ±(√((GainError)2 + (OffsetError)2+ (3σ noise)2)) Correcting for Temperature Acquisition Note: For field wiring, the use of shielded twisted pair wiring is highly recommended. Measurement resolution: 16 bits (including sign) Online at vxitech.com 949 • 955 • 1VXI 213 VT1415A/1422A VXI Technology™ Algorithmic Closed Loop Controller and Remote Channel Multifunction To calculate accuracy over temperature range outside the ±1 °C range, results after *CAL are given by replacing each of the above error terms as follows: Replace with Replace with Intrinsic functions: interrupt( ), writefifo( ), writecvt( ),writeboth( ), min( ), max( ), abs( ). Other functions: Create own custom functions to handle transcendental operations. (GainError)2 (GainError)2 + (GainTempco)2 (OffsetError)2 I/O General (OffsetError)2 + (OffsetTempco)2 Loop Control Specifications Number of loops: 1 to 32 Default control algorithm type: PID Maximum VT1415A loop update rate for default PID algorithm: (Note: VT1422A maximum sample rate is 25 kSamples/s, compared to 56 kSa/s for the VT1415A. The loop speeds of the VT1422A are reduced in same ratio.) 1 loop: 8 loops: 32 loops: 3 kHz 1 kHz 250 Hz Custom algorithm development: Language: Variable types: 214 variables, array local and global variables. Subset of C programming language including ifthen-else, most math and comparison operations. Scalar local and global A total of eight (8) Signal Conditioning Plug-ons (SCPs) can be installed in most combinations of input or output configurations on a single VT1415A/VT1422A. Power Available for SCPs ±24 V: 5 V: 1.0 A 3.5 A General Specifications VXI device type: A16, slave only, Register based Size: C Slots: 1 Connectors: P1/2 Shared memory: n/a VXI buses: TTL Trigger bus Drivers: VXIplug&play with Source Code Instrument Drivers - See the VXI Technology Website www.vxitech.com for driver availability and downloading. VT1415A Algorithmic Closed Loop Controller, Acquisition Online at vxitech.com 949 • 955 • 1VXI VT1415A/1422A VXI Technology™ Algorithmic Closed Loop Controller and Remote Channel Multifunction VT1415A/VT1422A Ordering Information Includes Spring Clamp Terminal Block VT1415A-02 Algorithmic Closed Loop Controller, Includes Screw Connector Terminal Block VT1415A-A3F Interface to rackmount terminal panel VT1422A Remote Channel Multi-function Data Acquisition & Control Module VT1422A-001 16-Port RJ-45 Connector Block (supports VT1415A also) VT1422A-011 Screw Terminal Connector Block (supports VT1415A also) VT1422A-013 Spring Clamp Terminal Connector (supports VT1415A also) VT1501A 8-channel Direct Input SCP VT1502A 8-channel 7 Hz Low-pass Filter SCP VT1503A 8-channel Programmable Filter/Gain SCP VT1505A 8-channel Current Source SCP VT1506A 8-channel 120 Ω Strain Completion & Excitation SCP VT1507A 8-channel 350 Ω Strain Completion & Excitation SCP VT1508A 8-channel x16 Gain & 7 Hz Fixed Filter SCP VT1509A 8-channel x64 Gain & 7 Hz Fixed Filter SCP VT1510A4-channel Sample & Hold Input SCP VT1511A 4-channel Transient Strain SCP VT1512A 8-channel 25 Hz Fixed Filter SCP VT1513A 8-channel ÷ 16 Fixed Attenuator & 7 Hz Low-pass Filter SCP VT1518A 4-wire Resistance Measurement SCP VT1521 4-channel High-Speed Bridge SCP VT1531A 8-channel Voltage Output SCP VT1532A 8-channel Current Output SCP VT1533A 16-bit Digital I/O SCP VT1536A 8-bit Isolated Digital I/O SCP VT1538A Enhanced Frequency/Totalize/PWM SCP VT1539A Remote Channel Signal Conditioning Plug-on (VT1422A only) ACCESSORIES 73-0025-002 Option 011 Screw Terminal Connector Block 73-0025-003 Option 013 Spring Clamp Terminal Connector Block 73-0025-004 Option A3F Interface to Rackmount Terminal Panel Acquisition Online at vxitech.com 949 • 955 • 1VXI 215