1
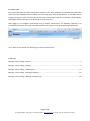
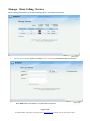
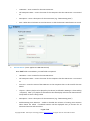
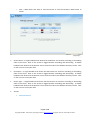
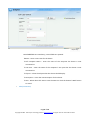
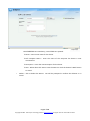
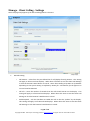
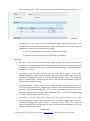
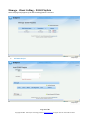
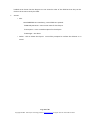
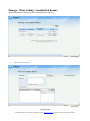
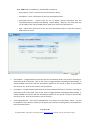
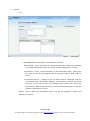
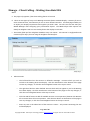
JAYEX HEALTHCARE ENLIGHTEN PROFESSIONAL CLIENT-CALLING USER MANUAL Associated manuals: ENLIGHTEN PROFESSIONAL – TOUCH SCREEN MANUAL ENLIGHTEN PROFESSIONAL – MAIN USER MANUAL Page 1 of 19 Copyright © 2010 - 2011 Jayex Technology Limited. www.jayex.com All rights reserved. Dated 31 Oct 2011 INTRODUCTION This manual describes the Client Calling User Interface to the Jayex Enlighten Professional web-application which optionally manages the client check-in process using Jayex touch screen devices. It should be used in conjunction with the main user manual & Touch Screen manual (where feature purchased). All user guides and update release information can be found on www.jayex.com. After logging in to Enlighten Professional using a desktop web-browser, the following operations are accessible by clicking on the large round blue button in the top left corner of the web-page (see below). Sample image (Ctrl + Click on the relevant line below to go to the required section) CONTENTS Manage - Client Calling - Devices ...................................................................................................................... 3 Manage - Client Calling - Settings ...................................................................................................................... 8 Manage - Client Calling – D300 Playlists.......................................................................................................... 11 Manage - Client Calling - Consultation Rooms ................................................................................................ 15 Manage – Client Calling – Waiting Area Stats URL .......................................................................................... 18 Page 2 of 19 Copyright © 2010 - 2011 Jayex Technology Limited. www.jayex.com All rights reserved. Dated 31 Oct 2011 Manage - Client Calling - Devices Note: this page only appears if the Client Calling feature is purchased and licensed. Sample image Add LCD Device. (note: applies to X-Media or LCD no Media and WebMedia M4 LCD Devices) Note: bold fields are mandatory, normal fields are optional. Sample image Page 3 of 19 Copyright © 2010 - 2011 Jayex Technology Limited. www.jayex.com All rights reserved. Dated 31 Oct 2011 o LCD Name – enter a name for the new LCD Device. o Full Computer Name – enter the name of the computer that the LCD Device is connected to. o Description – enter a description for the LCD Device (e.g. “Main Waiting Area”). o Save - When done click Save to save the Device or click the browser’s Back button to cancel. Sample image Add LED Device. (note: applies to D300 LED Devices) Note: bold fields are mandatory, normal fields are optional. o LED Name – enter a name for the new LED Device. o Full Computer Name – enter the name of the computer that the LED Device is connected to. o Com Port – enter the name of the COM Port on the computer that is to be used for the LED Device. o PlayList – select a playlist to be played by this device (as defined in Manage → Client Calling → PlayLists). Note: if no playlist is selected then the LED display will show the date and time except when a client is being called. o Description – enter a description for the LED Device (e.g. “Main Waiting Area”). o Enable Waiting Area Statistics – enable or disable the inclusion of waiting area statistics when Clients are called. If enabled statistics will be displayed every 5 minutes for all associated Services and Consultors. Page 4 of 19 Copyright © 2010 - 2011 Jayex Technology Limited. www.jayex.com All rights reserved. Dated 31 Oct 2011 o Save – When done click Save to save the Device or click the browser’s Back button to cancel. Sample image Device Name – a single headed arrow shows that the Devices are sorted in ascending or descending order of this field. Click on the arrow to toggle between ascending and descending. A double headed arrow shows that the Devices are not sorted in order of this field but that they can be. Click on the arrow to sort by this field. Description – a single headed arrow shows that the Devices are sorted in ascending or descending order of this field. Click on the arrow to toggle between ascending and descending. A double headed arrow shows that the Devices are not sorted in order of this field but that they can be. Click on the arrow to sort by this field. Device Type – a single headed arrow shows that the Devices are sorted in ascending or descending order of this field. Click on the arrow to toggle between ascending and descending. A double headed arrow shows that the Devices are not sorted in order of this field but that they can be. Click on the arrow to sort by this field. Actions o Edit (LED Device). Page 5 of 19 Copyright © 2010 - 2011 Jayex Technology Limited. www.jayex.com All rights reserved. Dated 31 Oct 2011 Sample image Note: bold fields are mandatory, normal fields are optional. Name – enter a new name for the device. Full Computer Name – enter the name of the computer the device is now connected to. Com Port – enter the name of the computer’s com port that the device is now connected to. PlayList – select the PlayList that this device should display. Description – enter the new Description for the device. Save - When done click Save to save the Device or click the browser’s Back button to cancel. o Edit (LCD Device). Page 6 of 19 Copyright © 2010 - 2011 Jayex Technology Limited. www.jayex.com All rights reserved. Dated 31 Oct 2011 Sample image Note: bold fields are mandatory, normal fields are optional. Name – enter a new name for the device. Full Computer Name – enter the name of the computer the device is now connected to. Description – enter the new Description for the device. Save - When done click Save to save the Device or click the browser’s Back button to cancel. o Delete – click to delete the Device. You will be prompted to confirm the deletion or to cancel. Page 7 of 19 Copyright © 2010 - 2011 Jayex Technology Limited. www.jayex.com All rights reserved. Dated 31 Oct 2011 Manage - Client Calling - Settings Note: this page only appears if the Client Calling feature is licensed. Sample image General Setting. o Call Pattern – select from the pre-defined list of call (display format) patterns. This setting will apply to all LED and LCD displays. When done click Save to save the Client Call Settings or click the browser’s Back button to cancel. Note: Client Calling is by Name or by Number depending on the system setting as defined by JAYEX file. Call Patterns for the type not in use are listed but dimmed. o Call Life – enter the number of seconds that the calls should remain on the display. This setting will apply to all LED and LCD displays. When done click Save to save the Client Call Settings or click the browser’s Back button to cancel. o Enable Speech – tick the checkbox to enable the calls to also be “spoken” by the display. This setting will apply to all LED and LCD displays. When done click Save to save the Client Call Settings or click the browser’s Back button to cancel. Page 8 of 19 Copyright © 2010 - 2011 Jayex Technology Limited. www.jayex.com All rights reserved. Dated 31 Oct 2011 Note: this setting has no effect unless the Number of Calls to be Displayed setting is set to 1. Sample image o Add New Word – click to add a new word and pronunciation to the speech dictionary. This setting will apply to all LED and LCD displays. When done click Save to save the Client Call Settings or click the browser’s Back button to cancel. Word: enter the word as it is spelt (e.g. “Featherstone-Haugh”). Speak As: enter the word as it is pronounced (e.g. “Fanshaw”). LCD Setting. o Call Alert – select from the list of pre-defined alert sounds – the selected sound will be played by the display before the client call is displayed/spoken. This setting will apply to all LCD displays. When done click Save to save the Client Call Settings or click the browser’s Back button to cancel. o Text Colour – click the screen icon to change the Client Call text colour. In the colour palette that appears, drag the slider vertically, adjust the Red/Green/Blue values, adjust the Hue/Saturation/Brightness values or enter a hexadecimal colour value. This setting will apply to all LCD displays. When done click Save to save the Client Call Settings or click the browser’s Back button to cancel. o Background Colour – click the screen icon to change the Client Call background colour. In the colour palette that appears, drag the slider vertically, adjust the Red/Green/Blue values, adjust the Hue/Saturation/Brightness values or enter a hexadecimal colour value. This setting will apply to all LCD displays. When done click Save to save the Client Call Settings or click the browser’s Back button to cancel. o Blink Colour – click the screen icon to change the Client Call blink colour. In the colour palette that appears, drag the slider vertically, adjust the Red/Green/Blue values, adjust the Hue/Saturation/Brightness values or enter a hexadecimal colour value. This setting will apply to all LCD displays. When done click Save to save the Client Call Settings or click the browser’s Back button to cancel. Page 9 of 19 Copyright © 2010 - 2011 Jayex Technology Limited. www.jayex.com All rights reserved. Dated 31 Oct 2011 o Number of Calls to be Displayed – enter the number of Client Calls that can displayed simultaneously on the display. If more than this number of calls coincides then the oldest call will be removed from the display. This setting will apply to all LCD displays. When done click Save to save the Client Call Settings or click the browser’s Back button to cancel. Note: this setting also defines the percentage of the screen height that will be used for client calls. So if the number of calls to be displayed is 1 then the call is full height. If the number of calls to be displayed is 5 then each call is 20% of full height. If there were 3 concurrent calls then 60%of the full height would be used, and any media presentation behind would still be visible. (This is only for users of X-Media – pre April 2011 purchasers, or users of LED calling without Media. M4WebMedia users will have additional calling options over the product lifetime). Page 10 of 19 Copyright © 2010 - 2011 Jayex Technology Limited. www.jayex.com All rights reserved. Dated 31 Oct 2011 Manage - Client Calling – D300 Playlists Note: this page only appears if the Client Calling feature is licensed. Sample image Add D300 Playlist. Sample image Page 11 of 19 Copyright © 2010 - 2011 Jayex Technology Limited. www.jayex.com All rights reserved. Dated 31 Oct 2011 Note: bold fields are mandatory, normal fields are optional. o D300 PlayList Name – enter a name for the new PlayList. Note: a PlayList is a name for a list of defined Messages, each message containing up to two lines of 30 characters each. PlayLists will be displayed continuously but will be interrupted during Client calls. These are only applicable to D300 LED Displays. o Description – enter a description for the PlayList. o Add New Message. Sample image Font – select a font type. In the list of font-types offered, Normal will offer two lines of 30 characters each. A font-type of Tall will double the height of each character – hence you can only have one row of 30 characters. A font type of Wide will double the width of each character – hence you can only have two rows of 15 characters each. A font type of Fat is a combination of Tall and Wide – hence you can only have one row of 15 characters. Line 1/Line 2 – enter the text you wish to see displayed in line 1 and line 2 (as applicable, depending on the font type selected). Effect – select the chosen display effect for the message line(s). ScrollLeft – text will scroll from right to left continuously. ScrollRight – text will scroll from left to right. OpenUp – text will scroll from bottom to top and then stay there. OpenDown – text will scroll from top to bottom and then stay there. OpenIn – text will arrive from left and right ends and meet in the middle and then stay there. OpenOut – text will appear from the centre and move to the left and right ends and then stay there. ScrollUp – text will scroll from bottom to top continuously. Page 12 of 19 Copyright © 2010 - 2011 Jayex Technology Limited. www.jayex.com All rights reserved. Dated 31 Oct 2011 ScrollDown – text will scroll from top to bottom continuously. Appear – text will simply appear and then stay there. Alignment – select the chosen display alignment, e.g. Left, Centre or Right. Add – click Add to add the new message to the PlayList, or click Cancel. Update – click Update to edit the message in the PlayList, or click Cancel. o Actions. Edit – enables you to edit and individual message in the Playlist. Delete – click to delete the Message from the PlayList. You will be prompted to confirm the deletion or to cancel. o Save - When done click Save to save the PlayList or click the browser’s Back button to cancel. Sample image D300 PlayList Name - a single headed arrow shows that the PlayLists are sorted in ascending or descending order of this field. Click on the arrow to toggle between ascending and descending. A double headed arrow shows that the PlayLists are not sorted in order of this field but that they can be. Click on the arrow to sort by this field. Description - a single headed arrow shows that the PlayLists are sorted in ascending or descending order of this field. Click on the arrow to toggle between ascending and descending. A double Page 13 of 19 Copyright © 2010 - 2011 Jayex Technology Limited. www.jayex.com All rights reserved. Dated 31 Oct 2011 headed arrow shows that the PlayLists are not sorted in order of this field but that they can be. Click on the arrow to sort by this field. Actions. o Edit. Note: bold fields are mandatory, normal fields are optional. D300 PlayList Name – enter a new name for the PlayList. Description – enter a new description for the PlayList. Messages – see above. o Delete - click to delete the PlayList. You will be prompted to confirm the deletion or to cancel. Page 14 of 19 Copyright © 2010 - 2011 Jayex Technology Limited. www.jayex.com All rights reserved. Dated 31 Oct 2011 Manage - Client Calling - Consultation Rooms Note: this page only appears if the Client Calling feature is licensed. Sample image Add Consultation Room. Sample image Page 15 of 19 Copyright © 2010 - 2011 Jayex Technology Limited. www.jayex.com All rights reserved. Dated 31 Oct 2011 Note: bold fields are mandatory, normal fields are optional. o Room Name – enter a name for the new Consultation Room. o Description – enter a description for the new Consultation Room. o Associated Devices – choose from the list of display devices associated with the Consultation Room (as defined in Manage → Client Calling → Devices). The white filter box can be used to filter only available device names that contain the specified text. o Save – When done click Save to save the new Consultation Room or click the browser’s Back button to cancel. Sample image Room Name – a single headed arrow shows that the Consultation Rooms are sorted in ascending or descending order of this field. Click on the arrow to toggle between ascending and descending. A double headed arrow shows that the Consultation Rooms are not sorted in order of this field but that they can be. Click on the arrow to sort by this field. Description - a single headed arrow shows that the Consultation Rooms are sorted in ascending or descending order of this field. Click on the arrow to toggle between ascending and descending. A double headed arrow shows that the Consultation Rooms are not sorted in order of this field but that they can be. Click on the arrow to sort by this field. Client Calling Devices – If the list of Calling Devices is too long to fit in the table a “More…” link will be available in this column to enable you to display the entire list of Calling Devices associated with the Consultation Room. Page 16 of 19 Copyright © 2010 - 2011 Jayex Technology Limited. www.jayex.com All rights reserved. Dated 31 Oct 2011 Actions. o Edit. Sample image Note: bold fields are mandatory, normal fields are optional. Room Name – enter a new name for the Consultation Room. When done click Save to save the Consultation Room e or click the browser’s Back button to cancel. Description – enter a new description for the Consultation Room. When done click Save to save the Consultation Room or click the browser’s Back button to cancel. Associated Devices – change the list of display devices associated with the Consultation Room (as defined in Manage → Client Calling → Devices). The white filter box can be used to filter only available device names that contain the specified text. When done click Save to save the Consultation Room or click the browser’s Back button to cancel. o Delete - click to delete the Consultation Room. You will be prompted to confirm the deletion or to cancel. Page 17 of 19 Copyright © 2010 - 2011 Jayex Technology Limited. www.jayex.com All rights reserved. Dated 31 Oct 2011 Manage – Client Calling – Waiting Area Stats URL Notes: a. This page only appears if the Client Calling feature is licensed. b. There are two types of entry in the Waiting Area Stats feed to a Media display – statistics for one or more named Services, and statistics for one or more named Consultors. This web-page enables you to define your display requirement and supplies you with a URL. You then use this URL with your Media Manager when designing your presentation layouts. The Media Player then acquires the data from Enlighten and uses it as a data feed to the display in real-time. c. These data feeds poll the Enlighten database every one minute. This interval is configurable with assistance from Jayex, but not using the Enlighten web interface. Sample image Select Services. o The left-hand box lists the Services as defined in Manage → Services which you wish to include in the Waiting Area Stats display. Click the Save button at the bottom of the page to save any changes, or click the round Enlighten button at the top to cancel. o The right-hand box lists other defined Services which will not appear in you’re the Waiting Area Stats display. Click the Save button at the bottom of the page to save any changes, or click the round Enlighten button at the top to cancel. o Click the Add all button to add all available Services in one operation; likewise click Remove all to remove them all in one operation. Click the Save button at the bottom of the page to save any changes, or click the round Enlighten button at the top to cancel. o Enter any text in the white box to filter Services -names – only names containing the text will be displayed. Page 18 of 19 Copyright © 2010 - 2011 Jayex Technology Limited. www.jayex.com All rights reserved. Dated 31 Oct 2011 Consultors. o The left-hand box lists the Consultors (for all Services) as defined in Manage → Consultors which you wish to see in the Waiting Area Stats display. Click the Save button at the bottom of the page to save any changes, or click the round Enlighten button at the top to cancel. o The right-hand box lists other defined Consultors which will not appear in the Waiting Area Stats display. Click the Save button at the bottom of the page to save any changes, or click the round Enlighten button at the top to cancel. o Click the Add all button to add all available Consultors in one operation; likewise click Remove all to remove them all in one operation. Click the Save button at the bottom of the page to save any changes, or click the round Enlighten button at the top to cancel. o Enter any text in the white box to filter Consultor-names – only names containing the text will be displayed. Enabled Service Average Waiting Time For all Services selected, click to enable/disable the display of Average Waiting time. Enable Service number of Clients waiting For all Services selected, click to enable/disable the display of Number of Clients Waiting. Enable Consultor Average Waiting Time For all Consultors selected, click to enable/disable the display of Average Waiting time. Enable Consultor number of Clients waiting For all Consultors selected, click to enable/disable the display of Number of Clients Waiting. Generate URL Click to generate the URL which you will copy and paste into your Media Manager software. Clear URL Click to clear any existing text in the URL text-box. The “Generate URL” button will pre-wipe the URL text-box anyway. Page 19 of 19 Copyright © 2010 - 2011 Jayex Technology Limited. www.jayex.com All rights reserved. Dated 31 Oct 2011