1
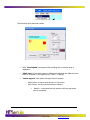
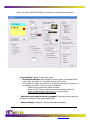
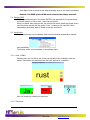
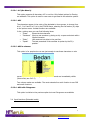
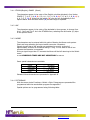
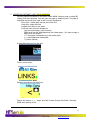
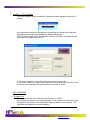
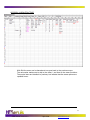
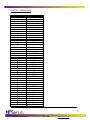
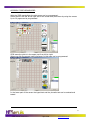
HEServis
Dorshout 7
5406 ND Uden
Tel:
+31 6 41017298
KvKnr: 17147153
Giro:
4647659
SIDE Manual
Single Input Data Entry
SIDE Version 2.0 Manual
Remark:
This manual is preliminary. Adapted for SIDE V2.2 and up.
april 2008
i
CONTENTS
1.
2.
INTRODUCTION
1
INPUT
2.1 Settings
2.2 Starting SIDE
2.3 Input levels
2.3.1 Level 1 YENO
2.3.2 Text input.
2.4 Input functions (Extended mode)
2.4.1 ETAOIN(English), ENARD (Dutch)
2.4.2 ABC
2.4.3 MORSE
2.4.4 PICTOGRAMS
2.5 Wordcompletion
1
1
4
4
4
4
5
6
6
6
6
7
3.
READING FILES
9
4.
MAIL FUNCTIES
10
5.
PRESENTING INTERNET PAGES TO BE MODIFIED
12
6.
MAKING A TEXT AUDIBLE
13
7.
FILE LOCATIONS
7.1 Program files
7.2 Data files
7.2.1 The support directory
13
13
14
14
APPENDIX A MENUSTRUCTURE
15
APPENDIX B MORSE CODES
16
APPENDIX C THE SIDE.INI FILE
18
APPENDIX E SIDE MENUBUILDER
19
2
1. INTRODUCTION
This user manual describes the use and the functioning of the SIDE program. This
program has been developed especially for people with the Locked in syndrome.
Using this program it is possible to enter texts, make them visible on the display and
store them in files, using only one input switch.
This switch can be linked to:
• the space key of the keyboard
• the left mouse switch
• the Joystick A key
• the parallel port.
Other input possibilities are available on request.
By pressing the switch, the character, or menu item in the lower part of the display
is selected. Words partially typed can be finished using a build in word list available
in several languages.
Several selection methods are available:
• ABC method- All characters are displayed one after the other.
• Priority alphabet- The most used characters come first.
• Morse input –
• Pictograms can be used to quickly make long sentences.
For starting users a Yes No selection is available.
A scrolling text in the upper part of the display reproduces the composed text.
By means of speech export it is possible to make the composed text audible through
the PC speakers.
Also it is possible to select the stored texts or E-mails and make them visible in the
scrollbar line by line. At the same time the computer can pronounce the text.
With the E-mail option E-mails can be sent and received using your standard e-mail
program.
The program also has several file managing commands such as stepping through
the directory structure to copy select, delete and merge files.
2. INPUT
Entering data is done by pressing the switch at the correct moment. The character
or function item selected will be presented. Entry can be done by using the
spacebar or with the external switch installed by HEServis or your local reseller.
2.1 Settings
The speeds for refreshing the characters and walking through the menu's and the
scrollbar-speed are established by means of the mouse in the main menu, option
Settings:
1
SIDE manual version 2.0
april 2008
www.heservis.nl
The following menu becomes visible:
•
With "scroll speed" the speed of the scrolling line in the blue area is
regulated.
•
"Wait time" is the waiting time in milliseconds between the different menu
items or character in the yellow area. (1000 = 1 second)
•
"Audio support" text spoken through the pc’s speaker:
o
o
Menu Items: all menu items shown on the screen.
User Choice: only the chosen items are spoken..
Remark : Long sentences are spoken until the new menuitem is presented.
2
SIDE manual version 2.0
april 2008
www.heservis.nl
When the button EXTRA SETTINGS is pressed more items become available:
•
“Input options” setting for the input switch.
• Show input indicator When selected the input switch is visualised at the
main screen by means of a rectangle coloured red or green.
• It is possible to change the moment of selection from pressing the button, or
at releasing the button. There are three possibilities:
o Switch at ON: Select when button pressed.
o Switch at OFF (Timer): Select when button released. When the
switch is pressed longer than time () no action is taken.
o Switch at ON (Timer): Future function.
•
“Minimum word length of words to suggest” Only words longer than this
setting are presented in the word prediction list.
•
‘External Display’ settings for optional external text displays.
3
SIDE manual version 2.0
april 2008
www.heservis.nl
Send Beep. Gives a sound on the external display when a new text is presented.
Remark: The SIDE option READ sends a text to the display selected.
2.2 Starting SIDE
The programme starts up in the menu SWITCH (see appendix A) From that menu
an import function or file or mail - menu can be chosen.
When one wants start with new file, the current file will be saved and closed, and a
new file will be opened with the option "new". A name for the next file is then
immediately generated, what is visible in the blue scroll area.
2.3 Input levels
Several input levels can be selected. Each has its individual presentation method
and possibilities.
The startup mode can be selected in the settings menu.
2.3.1 Level 1 YENO
Starting users can use this to see if they can actually make a selection with the
switch. Care takers can evaluate if the user can respond to a question:
.
User can restart by pressing the input key.
2.3.2 Text input.
4
SIDE manual version 2.0
april 2008
www.heservis.nl
2.3.2.1 A-Z (No Menu’s)
This option presents all characters A-Z in one line. Only limited options for Erasing
are available. This option is used for new users to get used to the selection system.
2.3.2.2 ABC
The characters appear in the order of the alphabet in three groups, to choose from
A to I, J to R and S to Z. As in the ETAOIN menu, selecting the red marker (O) skips
to the options menu. Limited functions are available:
In the options menu you can find following items.
• "Erase"
Erases the last character
• "Sentence” Starts a new sentence y placing a dot, a space and starts with a
Capital character.
•
•
"Enter"
"Speak"
Like sentence but skips to the next line.
The text presented in the scrollbar is spoken by the PC,s
speaker.
2.3.2.3 ABC in columns
This option is for people who can see just enough to see these characters or who
use a big screen. The advantage is that predicted words are immediately visible
(blue words) see Ch 2.5)
Two column modes are available. The most extended has a dir function to use DIR
and email functions.
2.3.2.4 ABC with Pictograms
This option is similar to the previous option but now Pictograms are available:
2.4 Input functions (Extended mode)
5
SIDE manual version 2.0
april 2008
www.heservis.nl
2.4.1 ETAOIN(English), ENARD (Dutch)
The characters appear in the order of the English priorities alphabet in four blocks:
SPACE, E, T, A, O, I, N, O, O, S, R, H, L, D, C, U, M, O, O, F, G, W, P, Y, B, O, O, V,
K, X, J, Q, Z , O, O, Using the red marker (O) one can skip immediately to the
options menu. With the blue marker (O) the last range is repeated.
2.4.2 ABC
The characters appear in the order of the alphabet in three groups, to choose from
A to I, Jto R and S to Z. As in the ETAOIN menu, selecting the red marker (O) skips
to the options menu.
2.4.3 MORSE
The characters can be entered with this option following the Morse-code system.
Short and long activating the import switch can enter a character.
Signals shorter than a half second are considered as a point, a signal of
approximately a second is considered being a ' long ' or line. After a rest of two
seconds the character is composed.
Giving a signal longer than 2.5 seconds the Morse will be left returning to the Switch
menu.
>>> AFORESAID TIMES ARE NOT ADJUSTABLE <<<<<
Some special characters are available:
Space
Backspace
Sentence
Enter
…… (6x short)
---(4x long)
……. (7x short)
……..(8x short)
Standard Morse characters are presented in Appendix B.
2.4.4 PICTOGRAMS
With the menu choice Functions->Switch->Picto. Pictograms are presented like
programmed with the menubuilder program See appendix 7
Special options can be programmed using following table:
6
SIDE manual version 2.0
april 2008
www.heservis.nl
Meaning
Erase last character
Erase last word.
Start new sentence on new
line
Start new sentence on
same line.
Start new line and keep
one empty line.
Start new file.
Speak current line.
Send line to text external
textdisplay
Command (NL)
WIS
WISWRD
ZIN
Command (EN)
DEL
DELWRD
NEWLINE
Example
Cmd:deleteline ,DEL
Cmd:eraseword ,DELWRD
Cmd:newline,NEWWLINE
ENTER
Cmd:enter,ENTER
ENTER2
Cmd:entertwolines,ENTER2
NIEUW
SPREEK
LEES
NEW
TALK
READ
Cmd:newfile,NEW
Cmd:pronounce,SPEAK
Cmd:to display,READ
Table. Commando’s in the pictogram menu.
It is also possible to use characters in stead of pictograms:
Meaning
I like to
Can I have
Can you help me to
Alright
Presented token. Text
!
I like to
Example
txt:!, I like to
?
HELP
OK
txt:?, Can I have a
txt:HELP, Can you help me to
txt:OK, Alright.
Can I have a
Can you help me to
Alright.
Table. Text presented in the pictogram menu.
2.5 Wordcompletion
When one has composed a part of a word, this word can be completed by leaving
the menu with the red marker, and choose '*'.
In the scrollbar successively the words appear from the word list which starts with
the characters until then entered.
The words come in order of ' priority ' of the user. For that purpose the number of
times that becomes a word has been used, is stored in a priority list.
Words, which have been used most, will come in the upper part of the list.
Afterwards the less used words come in alphabetic order. A maximum of 50 words
is presented.
One can go through the list with a short and long click with the input switch like at
reading a file. (See chapter 3)
Short signal (< 0.5 sec): next line.
Long touching (> 1 sec): previous line.
Longer touching (> 2.5 sec): back to the menu selecting the
word.
.
7
SIDE manual version 2.0
april 2008
www.heservis.nl
Example:
One types the word SI, leaves the menu and select * .
After clicks successively the words appear:
(first part many used words) like
since
simple
Single
singles
(Second part with words on alphabet)
Siberian
Siberia
Sicily
sink, etc
The list is always finished with [ empty ]. Also before the first word the option
[empty] is placed. When selecting this one leaves the menu without changing the
characters entered until then.
There are presently three lists with words:
• EN.DIC the standard provided word list in the English language with 45000 words.
This list is not modifiable.
• USER.TXT. The word list in text format,. This list can be modified by the user.
Entered words, which are not in the standard list, are added automatically to this
list. It deserves the recommendation to check this list regularly for wrong spelled
words.
• PRIO.TXT. All used words and the number of times that these are used.
This list is updated automatically. Manually adapting this list is not necessary.
Files can be found at the following locations:
C:\DATA\SIDE\SETUP\DICT\PRIO.TXT
C:\DATA\SIDE\SETUP\DICT\USER.TXT
8
SIDE manual version 2.0
april 2008
www.heservis.nl
3. READING FILES
With the option DIR it possible to select files on the hard disk and present them line
by line in the scrollbar. The programme opens files from the directory
"C:\DATA\SIDE \" the standard directory. All.txt files from these and underlying
directory's can be selected.
With the options ÉND and START is it possible to rapidly go to the beginning or end
of the list of directory to navigate. With PREV and NEXT one goes step by step.
The function "OPEN" has two possibilities:
1. When it concerns a directory it is selected.
2. When it concerns ( ".." = previous directory) the previous directory in the tree is
selected (further back then C:\DATA\SIDE) has been blocked.
3. When it is a filename this file is opened and the lines can be read in the scrollbar
and pronounced by means of the speech option (if installed).
At the reproduction, line for line, following rules apply:
Short signal (< 0.5 sec): next line.
Long touching (> 1 sec): previous line.
Longer touching (> 2.5 sec): back to the menu.
In the Dir menu the option EDIT can be found. Below the menu with the following
options.
• open
• New
• Select
• Copy
• Paste
• Mailto
• Delete
• Append
Possible sequences are the following:
To remove a file:
[ go to directory ]->SELECT->DELETE->ERASE
To copy a file:
[ go to directory ]->SELECT->COPY->PASTE
or
[ go to new directory ]->SELECT->COPY [ go to new directory ] ->PASTE
The copied file gets an extra suffix of _ nnn.txt. Where nnn stand for a number of
three figures starting with 001.
To merge files:
[ go to directory ]->SELECT->SELECT->APPEND->YES [ go to new directory ] - >
SELECT->[ go to new directory ] SELECT->APPEND->YES
To e-mail a file [ go to new directory ]->SELECT->MAILTO (see further)
9
SIDE manual version 2.0
april 2008
www.heservis.nl
4. MAIL FUNCTIES
With the option MAIL from the Switch menu it is possible to send files to the e-mail
program. Outgoing mail is placed in the directory:
C:\Data\SIDE\EMAIL\OUT New received mail is placed in the directory:
C:\Data\SIDE\EMAIL\IN
Sent emails are placed in the directory:
C:\Data\SIDE\EMAIL\SENT
The status of the last Update action is visible in the file:
C:\Data\SIDE\EMAIL\mailinfo.
Receiving and sending mail goes by selecting the Update option in the menu
SWITCH->MAIL->UPDATE
For sending mail the follow next steps:
1. Select file with SELECT option from the DIR menu.
2. Place the file in the OUT directory with the option DIR->EDIT->MAILTO. Select
an address from the list and select the option SEND to confirm this or CANCEL to
cancel the action.
The mail message is ready now to be sent, with the UPDATE option.
PLEASE NOTE: The first 15 signs of the first line of the file becomes if title
of the message used.
Effective sending occurs just when the option SWITCH->MAIL->UPDATE has been
given.
This option places new received messages in the "IN" directory.
These can be read by opening the file from the DIR menu, and selecting the files
from the E-MAIL directory.
The list of addresses has been placed in the directory:
C:\DATA\SIDE\SERVICE\EMAIL\OUT\addressbook.txt
InfoHeservis;[email protected]
Testaddress;[email protected]
Keeping up the list of addresses is not foreseen from SIDE. The list must be edited
with external editor (notepad for example).
This file must be stored in TXT format, the first part until the point comma gives the
name of the person. After the point comma the e-mail address is placed.
In the same directory also an example address book is placed, which can be used
when the address book has lost.
10
SIDE manual version 2.0
april 2008
www.heservis.nl
Please note: It can be that the e-mail program gives the next message: "another
program tries to sent a message with me as sender" When this occurs the following
outlook option must be modified:
Change in Outlook: Extra->Options->security here a checkbox is placed for:
Warn if another application tries to send a message with me
as sender. This option must be unchecked.
11
SIDE manual version 2.0
april 2008
www.heservis.nl
5. PRESENTING INTERNET PAGES TO BE MODIFIED
Internet pages are available in the menu Switch WWW. Select a page by using SEL
(select) from the favourites. You can open the page by selecting open. The page is
magnified and scrolls from right to left. You can navigate by:
Short click : rotate again current part of the line
Long click: rotate next line.
Longest click: Back to the menu.
From the menu you can navigate to:
- Link-list current page ( with pictures)
- PGDN scroll current WebPage down and rotate again. ( for when a page is
bigger than the screen)
- <<< last page ( Backspace-key) and rotate again
- <<< Next page and rotate again.
- ?? (future options)
A magnified page can look like this:
The on screen menu
Stepping through the list with links
Choose the options > ,< , ‘begin’ and ‘end’ to step through the linklist. Choosing
OPEN does opening a link.
12
SIDE manual version 2.0
april 2008
www.heservis.nl
6. MAKING A TEXT AUDIBLE
The SIDE program has the possibility of making the texts audible through the PC
speaker.
Here two desired voices can be selected. By selecting two voices with a different
language one can easily change between different languages.
With the button "tests Voice" the selected voice can be tested. The speed of each
voice can be regulated with the bar..
In the menu "options" it is possible speak the current line entered.
In the menu functions an item "voice" has been incorporated, with which the voice
to use can be established. One chooses there for voice1 or voice2.
7. FILE LOCATIONS
7.1 Program files
The programme files can be found in the directory "C:\SIDE".
Here all files are stored for the implementation of the program. In contrast to other
programs all used library and configuration files are placed in one directory. This
Simplifies the installation and de-installation.
13
SIDE manual version 2.0
april 2008
www.heservis.nl
7.2 Data files
At starting up the programme a file name is generated automatically for the new file
with in this the date and the serial number and as follows:
Directory of C:\Data\SIDE
20020607_001.txt
20020607_002.txt
With the option DIR another directory can be selected. A new file will then be
placed in this directory.
Consult the files in these directories to copy data to for example e-mail or Word
documents.
SIDE is not capable for creating or removing directories.
This must be done with an external program such as the Explorer.
In the current version no data can be added to a file already existing. New the
entered data are linked automatically to the new generated file.
Data can be put at behind of an existing file using the Append command.
7.2.1 The support directory
Contents of C:\Data\SIDE\SETUP\DICT
17-05-2003
17-05-2003
17-05-2003
17-05-2003
17-05-2003
13:47
13:47
13:47
13:04
13:05
582.611
582.611
582.611
20.593
10.921
en.dic
fr.dic
nl.dic
prio.txt
user.txt
The documents PRIO.TXT en USER.TXT are updated continuously when the user
words with the program. It is advisable to backup these files once a month. On USB
stick or CD-RW.
14
SIDE manual version 2.0
april 2008
www.heservis.nl
APPENDIX A MENUSTRUCTURE
With Exit the menu can be leaved and one goes back to the previous menu.
The red marker makes one to skip to the menu * and then to the menu functions.
The purple items are identical to previous, but indicate that the same options are
repeated once..
15
SIDE manual version 2.0
april 2008
www.heservis.nl
APPENDIX B MORSE CODES
SIDE Teken
Space
Backspace
Zin
Enter
!
,
#
$
%
&
'
(
)
*
+
,
.
/
0
1
2
3
4
5
6
7
8
9
:
;
<
=
>
?
@
A
B
C
D
E
F
G
H
I
Morse code
…… (6x)
---……. (7x)
……..(8x)
.----.
-.--..
-.--.-
--..--....._._._
----.---..--...-.........
-....
--...
---..
----.
.-..-.
..--..
.-...
-.-.
-..
.
..-.
--.
....
..
16
SIDE manual version 2.0
april 2008
www.heservis.nl
J
K
L
M
N
O
P
Q
R
S
T
U
V
W
X
Y
Z
[
\
]
^
_
`
.---..-..
--.
--.--.
--..-.
...
......--..-.---..
17
SIDE manual version 2.0
april 2008
www.heservis.nl
APPENDIX C THE SIDE.INI FILE
The side 'ini' file contains the standard settings, which are used to configure the
program. The user does not have to change this file.
Ini file:
Registration. Contains the registration number as can be seen in the about
menu:
[REGISTRATION]
REGNO = BAG12061AEP
System settings tob e changed in the menu:
[SYSTEM]
SCROLLSPEED = 5
DELAY = 1250
VIEWINPUT = 0
NUM_CHARS = 5
Settings for speech
[VOICE]
CURRVOICE = 2
VOICE1 = 0
VOICE2 = 2
VOICESPEED1 = 114
VOICESPEED2 = 180
Input options
[COMMUNICATION]
'JOY 0 = OFF/ PARPORT IS ON THAN 1=ACTIVE AS TRUE 2=ACTIVE AS FALSE
INI_JOY = 1
Parallel port usage:
-1 = no port
Other value = base value.
' PARPORT VALUE WHEN NO KEY PRESSED CAN BE SEEN IN DEMO MODE
INI_PORT_REST = -1
Test option for testing the parallel port. Put this value to
1 for testing. The presented value can be set at option
INI_PORT_REST.
INI_DEMO = 0
INI_PORT_REST.
INI_DEMO = 0
' TIMER OPTIONS:
'
INPUT TIMER ACTS AS FILTER FOR SPASMS IN SECONDS
'
INPUT MODE 0=NORMAL ( ACTS WHEN PRESSING SWITCH)
'
INPUT
1= OFF
( ACTS WHEN RELEASING SWITCH
‘
WITHIN TIMER VALUE)
' FUTURE:
INPUT
2= ON
( ACTS WHEN RELEASING SWITCH FOR VALUE
‘
WHEN THE SWITCH WAS PRESSED
‘
WITHIN TIMER VALUE)
INI_INPUTTIMER = 6
INI_INPUTMODE = 0
'LIMIT USER TO CERTAIN MENU'S:
'
0= LEVEL 5 UNLIMITED (ALL MENU'S)
'
1= LEVEL 3 STANDARD LIMITED: ABC ONLY (NO MENU'S)
'
2= LEVEL 4 STANDARD LIMITED: ABC + PICTO
INI_LIMITEDOPTION = 1
18
SIDE manual version 2.0
april 2008
www.heservis.nl
APPENDIX E SIDE MENUBUILDER
With the SIDE menubuilder the picto menu can be programmed.
Select pictos in the bar at the right side of the screen and place them by using the mouse.
Up to 10 pages can be programmed.
SIDE scans the picto’s in the upper part from left to right.
When you click the second page new items for this page can be programmed.
In the lower part of the screen the typed text and the phonetic text can be entered and
tested.
19
SIDE manual version 2.0
april 2008
www.heservis.nl