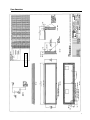
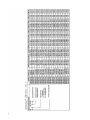
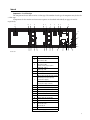
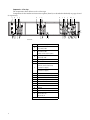
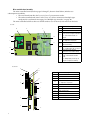
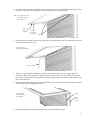
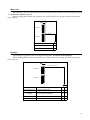
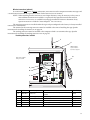
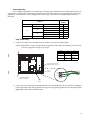
1
AlphaEclipse™ 3500 Sign
Installation Instructions
®
(Go to http://www.adaptivedisplays.com/support/eclipse for the latest information.)
Contents
Introduction . . . . . . . . . . . . . . . . . . 1
Description. . . . . . . . . . . . . . . . . . . 2
External. . . . . . . . . . . . . . . . . . . . . . . . . . . 2
Case dimensions . . . . . . . . . . . . . . . . . . . 3
Internal . . . . . . . . . . . . . . . . . . . . . . . . . . . 5
Technical specifications . . . . . . . . 12
Specifications chart . . . . . . . . . . . . . . . .
Temperature protection . . . . . . . . . . . . . .
EMI compliance . . . . . . . . . . . . . . . . . . .
Power-up information. . . . . . . . . . . . . . .
12
15
15
16
Safety. . . . . . . . . . . . . . . . . . . . . . 17
Electrical protection on signs . . . . . . . . . 17
Heaters . . . . . . . . . . . . . . . . . . . . . . . . . . 18
Backup battery for the sign . . . . . . . . . . . 19
Accessing internal components . . 20
Opening the sign . . . . . . . . . . . . . . . . . . 20
Closing the sign . . . . . . . . . . . . . . . . . . . 22
Introduction
AlphaEclipse™ electronic signs provide highly-visible, exceptionally
bright LED displays of up to four lines for outdoor communications.
There are three options for networking from the computer:
• A standard RS232 or RS485 wired interface
• An optional modem
• An optional wireless transceiver
Full installation includes setting switches, mounting the sign,
connecting power and serial/networking wiring, and setting up messaging
software. All these functions are detailed in this manual.
AlphaEclipse™ signs are designed for message programming using
AlphaNET plus™ for Windows® messaging software, included with the sign.
Basic information for messaging with AlphaNET plus™ is included in this
manual.
Configuring the sign. . . . . . . . . . . 23
Installation . . . . . . . . . . . . . . . . . . 28
Mounting instructions . . . . . . . . . . . . . . 28
AlphaEclipse™ sign . . . . . . . . . . . . . . 28
Temperature probe . . . . . . . . . . . . . . . 30
Modem (optional). . . . . . . . . . . . . . . . 32
Wireless transceivers (optional) . . . . . 33
Electrical connection. . . . . . . . . . . . . . . . 36
Power supply wiring. . . . . . . . . . . . . . 37
Temperature probe wiring . . . . . . . . . . 39
Table 1: Related documentation
Document name
AlphaNET plus™ for Windows®
Part number
Description
9701-0202
Windows® messaging software with ActiveX support
Transceiver user’s manual
9711-6005A
For transceiver installed in wireless models of
AlphaEclipse™ signs
Using an Infrared Message Loader
with an AlphaEclipse™ outdoor
sign
Tech Memo
01-0004
Installing an infrared message loader at an AlphaEclipse™
sign and using it to transfer messages into the sign without a
direct connection to a computer
User Manual
Networking options . . . . . . . . . . . 40
Single-sign networks . . . . . . . . . . . . . . .
RS232 . . . . . . . . . . . . . . . . . . . . . . . .
RS485 . . . . . . . . . . . . . . . . . . . . . . . .
Multiple-sign networks. . . . . . . . . . . . . .
Synchronized messaging . . . . . . . . . .
Non-synchronized messaging . . . . . .
41
41
42
43
44
46
Messaging software setup . . . . . . 48
Basic setup with AlphaNET plus™1.4 . . .
Setting the time and date on the sign . . .
Setting a dimming time for a sign. . . . . .
Setting message timing . . . . . . . . . . . . .
48
52
52
53
Service and troubleshooting . . . . 55
Firmware updates . . . . . . . . . . . . . . . . . . 55
Periodic maintenance . . . . . . . . . . . . . . . 55
Diagnostics. . . . . . . . . . . . . . . . . . . . . . . 56
Appendices . . . . . . . . . . . . . . . . . 57
RS485 EOL termination . . . . . . . . . . . . . 57
Spare parts list . . . . . . . . . . . . . . . . . . . . 60
© Copyright 2001 Adaptive Micro Systems, Inc. All rights reserved.
Adaptive Micro Systems • 7840 North 86th Street • Milwaukee, WI 53224 USA • 414-357-2020 • 414-357-2029 (fax) • http://www.adaptivedisplays.com
The following are trademarks of Adaptive Micro Systems: Adaptive, Alpha, AlphaNet plus, AlphaEclipse, AlphaPremiere, AlphaTicker, AlphaVision, AlphaVision InfoTracker, Automode,
BetaBrite, BetaBrite Director, BetaBrite Messaging Software, Big Dot, PPD, Smart Alec, Solar, TimeNet
The distinctive trade dress of this product is a trademark claimed by Adaptive Micro Systems, Inc.
Due to continuing product innovation, specifications in this manual are subject to change without notice.
1
Revision date: 9/6/2001
9711-6001B
Description
External
B
A
Front View
D
C
Side View
Back View
E
F
F
F
G
G
G
I
H
Item
Notes
A
Door
For 1- and 2-line models of 96 characters or greater and for all 3- and 4-line models, gas cylinders
hold the open door in place and provide assistance in opening/lifting.
B
LED lens cover
Polycarbonate lens cover in the front access cover is a replaceable item.
C
Locking latch
Locks the sign closed. Requires key (included.) Number of latches will vary with the width of the sign.
D
Light-sensing photo cell
Dims the sign’s display at sunset, for night operation. The default is 50% brightness.
E
Transceiver antenna access
opening
Access for antenna for optional wireless transceiver.
F
Signal and temperature probe
opening
Access for communication signals and temperature probe.
Must be sealed with weather-proof conduit during installation.
Holes are factory-sealed using hole plugs which must remain installed in unused holes.
G
Power line opening
Access for electrical power. Must be sealed with weather-proof conduit during installation.
H
Fan covers
Weather-resistant louvers allow air movement through the sign.
Mounting support bars
American Standard 6061-T6 extruded aluminum (ASTM B 308):
1- and 2-line models: 0.25” x 1.5” x 2.0”
3- and 4-line models: 0.375” x 3.0” x 2.0”
I
2
Description
Enlarged view of this table
s shown on next page.
Case dimensions
3
4
Internal
Components – 1- or 2-line sign
The components shown below are for a 2-line sign. The number of each type of component may be less for
a 1-line sign.
Components for the modem and transceiver options are described individually on pages 32 and 33
respectively.
A
B
C
D
B
C
D
E
B
F
C
G
H
I
J
Internal View
B
C
D
O
B
Item
C
D
P
O
N
M
L
K
Description
A
Fan, exhaust, 120V or
Fan, exhaust, 240V
B
Fan, internal, 120V or
Fan, internal, 240V
(Always on when sign has power)
*C
Heater strip, 120V or
Heater strip, 240V
D
Power supply
E
Fan, intake
F
Micro controller board with Turbo-extender
board on top. For master sign only.
(See details on page 8.)
Turbo-extender board. For slave sign only.
(See details on pages 8 and 11.)
G
Transceiver antenna access opening
H
Signal and temperature probe opening
I
Light sensor
J
Power line opening
K
Sign communications terminal block
L
Power terminal block
M
On/Off switch and circuit breaker
N
EMI filter
O
Thermostat, over-temperature
Thermostat, heater
Thermostat, fan
P
Terminal block
* Not all signs are equipped with heaters.
5
Components – 3-line sign
The components shown below are for a 3-line sign.
Components for the modem and transceiver options (Item O) are described individually on pages 32 and
33 respectively.
A
B
C D
B
C D
B
C D
E
B C
F
G
H
A J H
C
D
C
D
J
H
Internal View
Item
Description
A
Fan, exhaust, 120V or
Fan, exhaust, 240V
B
Fan, internal, 120V or
Fan, internal, 240V
(Always on when sign has power)
*C
Heater strip, 120V or
Heater strip, 240V
D
Power supply
E
Fan, intake
F
Master micro controller board
with mini controller board on top
(See details on page 8.)
Slave micro controller board
(See details on page 8.)
G
Transceiver antenna access opening
H
Signal and temperature probe opening
I
Light sensor
J
Power line opening
K
Power terminal block
L
On/Off switch and circuit breaker
M
Sign communications terminal block
N
EMI filter
O
Modem or transceiver (optional)
P
Thermostat, over-temperature
Thermostat, heater
Thermostat, fan
* Not all signs are equipped with heaters.
6
C
D
P O N M L K J I
Components – 4-line sign
The components shown below are for a 4-line sign.
Components for the modem and transceiver options (Item O) are described individually on pages 32 and
33 respectively.
A
B
C D
B
C D
B
C D
E
B
C
F
G
H
A H J B
B
C D
C
D
J
H
B
C
D
P O N M L K J I
Internal View
Item
Description
A
Fan, exhaust, 120V or
Fan, exhaust, 240V
B
Fan, internal, 120V or
Fan, internal, 240V
(Always on when sign has power)
*C
Heater strip, 120V or
Heater strip, 240V
D
Power supply
E
Fan, intake
F
Master micro controller board
with mini controller board on top
(See details on page 8.)
Slave micro controller board
(See details on page 8.)
G
Transceiver antenna access opening
H
Signal and temperature probe opening
I
Light sensor
J
Power line opening
K
Power terminal block
L
On/Off switch and circuit breaker
M
Sign communications terminal block
N
EMI filter
O
Modem or transceiver (optional)
P
Thermostat, over-temperature
Thermostat, heater
Thermostat, fan
* Not all signs are equipped with heaters.
7
Micro controller board assembly
The micro controller board (listed on pages 5 through 7; shown in detail below) includes two
subcomponent assemblies:
• The serial board (item B in the Front view) has a 7-pin connector socket.
• The turbo-extender board (item C in the Front view) allows connection of multiple signs
configured for synchronous messaging. See “Multiple-sign networks” on page 40.
The micro controller board has three sets of DIP switches: two on the end/side and one on the back.
Front view
Item
B
A
A
C
B
C
D
G
D
E
H
E
F
D
G
F
H
Description
Micro controller board
Serial board
Turbo-extender board (semi-transparent
in this view to show parts underneath.)
See “Turbo-extender boards” on
page 11.
Diagnostic LEDs (4)
See “Diagnostics” on page 56.
Serial connector
(RS232 and RS485)
Reset button
See “Configuring the sign” on page 23.
Temperature probe connector
(Located on micro controller board.)
Battery, located on micro controller
board, underneath turbo-extender
board.
See “Backup battery for the sign” on
page 19 for replacement warning.
Left side view
A
F
O1
N
C
2 3 4 5 6 7 8 9 10
O1
N
B
2 3 4 5 6 7 8 9 10
D
D
Item
G
H
I
J
E
K
8
Description
A
Micro controller board
B
DIP switch 2
C
DIP switch 1
D
Diagnostic LEDs (4)
See “Diagnostics” on page 56.
E
Reset button
F
Serial board
G
Serial connector (RS232 and RS485)
H
Turbo-extender board
I
Turbo-out socket
J
Turbo-in socket
K
DIP switch on Turbo-extender board
Back view
Item
A
B
Description
A
Serial connector
(RS232 and RS485)
B
DIP switch 1
C
DIP switch 2
D
DIP switch 3
C
D
DIP Switch 3
DIP Switch 3 is located on the back of the micro controller board. It can only be accessed by removing the
board, which is only necessary in the unlikely event that it needs replacing.
NOTE: DIP switches are factory-set and should not need to be changed. However, should they need to be reset,
follow these steps.
Before resetting DIP switches, remove power by following these steps:
1.
Remove power from the sign at the external circuit breaker.
2.
Open the sign as instructed in “Opening the sign” on page 20.
3.
Remove power from the sign at the internal circuit breaker by turning the ON/OFF switch OFF.
After resetting DIP switches, turn power back on by following these steps:
1.
Turn the ON/OFF switch ON.
2.
Close the sign as in “Closing the sign” on page 22.
3.
Reapply power to the sign at the external circuit breaker.
Set DIP switches as follows.
Size of RAM (memory)
This is set at the factory to correspond to the specific RAM chip installed in the sign. Do not change this
without manufacturer or dealer authorization.
ON
DIP switch 3
1 2 3 4 5 6 7 8 910
ON
Use switch 1
Size of RAM
1
128 K RAM
Off
512 K RAM
On
Type of FLASH chip
DIP switch number 2 is set at the factory to correspond to the specific FLASH chip installed in the sign. Do
not change this without manufacturer or dealer authorization.
9
Channel refresh rate
On all AlphaEclipse™ 3500 series signs, DIP switch number 3 should only be set to OFF.
Sign height
]
ON
DIP switch 3
1 2 3 4 5 6 7 8 910
ON
Use switches 4, 5, and 6
Sign height, in rows of LEDs
4
5
6
8
On
Off
Off
16
Off
Off
Off
24
Off
On
Off
32
On
On
Off
32
All other settings
Sign length
]
ON
DIP switch 3
10
1 2 3 4 5 6 7 8 910
ON
Use switches 7 to 10
Sign length, in columns
7
8
9
10
64 (Default)
Off
Off
Off
Off
80
Off
On
Off
Off
96
Off
Off
On
Off
112
Off
On
On
Off
128
Off
Off
Off
On
144
Off
On
Off
On
Turbo-extender boards
Turbo-extender boards are pre-installed in each sign. There are two uses for turbo-extender boards, with
slightly-different installations:
1.
In slave signs
•
2.
Allows simultaneous display of the same message on multiple signs (“synchronized messages”)
sent from the first (“master”) sign to other (“slave”) signs in a multiple-sign network.
• Is connected to the sign’s internal power supply by separate wire leads.
In all other (non-slave) signs (master, single, or non-synchronized message network)
•
Installed in a master sign (allowing messages to be sent to slave signs) or in other non-slave signs
(sending data to LED driver boards in signs.)
• Connected directly to the micro controller board.
Each turbo-extender board has one set of turbo DIP switches.
Turbo-extender board
P5
P2
P7
P3
Separate wire leads on slave signs
connected to the sign’s internal
power supply
P6
P1
P4 and P6: Turbo extender sockets
Used when receiving data from other (master or slave) signs
or sending data to any slave sign.
12345678
P4
Only one is used if this is the end sign in a multiple-sign
network.
Turbo (DIP) switches
11
Technical specifications
Specifications chart
NOTE: Additional dimensions, for mounting purposes, are shown on page 3.
Input
Current
Model Numbers—AlphaEclipse™ 3500 Series
1.4” Pitch, 4 LEDs per pixel
3500-64 x 8 -R
1.4
30° 64 x 8
3501-64 x 8 -A
1.4
3501-64 x 8 -R
240 V @ 60 Hz (amperes)
120 V @ 60 Hz (amperes)
LED Color
x Height (pixel rows)
Width (pixel columns)
LED Lamp type
(2 digit code)
0 0 = 30 degree lamp
0 1 = 70 degree lamp
L
LED Lamp viewing angle
Red lamp/Amber lamp
Width (Pixel Columns)
x Height (Pixel Rows)
12
LxHxD
Pitch (distance between pixels in inches)
Model Number usage format:
35 00 -64 x 24 R/A
Dimensions
Mounting
Dimensions
MH
Approx.
Weight
H
MD
Red
6.0
3.0
70° 64 x 8 Amber
6.0
3.0
1.4
70° 64 x 8
Red
6.0
3.0
3500-80 x 8 -R
1.4
30° 80 x 8
Red
6.5
3.3
3501-80 x 8 -A
1.4
70° 80 x 8 Amber
6.5
3.3
3501-80 x 8 -R
1.4
70° 80 x 8
Red
6.5
3.3
3500-96 x 8 -R
1.4
30° 96 x 8
Red
7.0
3.5
3501-96 x 8 -A
1.4
70° 96 x 8 Amber
7.0
3.5
3501-96 x 8 -R
1.4
70° 96 x 8
Red
7.0
3.5
3500-112 x 8 -R
1.4
30° 112 x 8
Red
8.5
4.3
3501-112 x 8 -A
1.4
70° 112 x 8 Amber
8.5
4.3
3501-112 x 8 -R
1.4
70° 112 x 8
Red
8.5
4.3
3500-128 x 8 -R
1.4
30° 128 x 8
Red
9.0
4.5
3501-128 x 8 -A
1.4
70° 128 x 8 Amber
9.0
4.5
3501-128 x 8 -R
1.4
70° 128 x 8
Red
9.0
4.5
3500-144 x 8 -R
1.4
30° 144 x 8
Red
9.5
4.8
3501-144 x 8 -A
1.4
70° 144 x 8 Amber
9.5
4.8
3501-144 x 8 -R
1.4
70° 144 x 8
Red
9.5
4.8
3500- 64 x 16 -R
1.4
30° 64 x 16
Red
9.0
4.5
3501- 64 x 16 -A
1.4
70° 64 x 16 Amber
9.0
4.5
D
97.8 x 18.31 x 5.06 (in)
248.8 x 46.5 x 12.9 (cm)
97.8 x 18.31 x 5.06 (in)
248.8 x 46.5 x 12.9 (cm)
97.8 x 18.31 x 5.06 (in)
248.8 x 46.5 x 12.9 (cm)
119.8 x 18.31 x 5.06 (in)
304.3 x 46.5 x 12.9 (cm)
119.8 x 18.31 x 5.06 (in)
304.3 x 46.5 x 12.9 (cm)
119.8 x 18.31 x 5.06 (in)
304.3 x 46.5 x 12.9 (cm)
141.8 x 18.31 x 5.06 (in)
360.2 x 46.5 x 12.9 (cm)
141.8 x 18.31 x 5.06 (in)
360.2 x 46.5 x 12.9 (cm)
141.8 x 18.31 x 5.06 (in)
360.2 x 46.5 x 12.9 (cm)
163.8 x 18.31 x 5.06 (in)
416.1 x 46.5 12.9 (cm)
163.8 x 18.31 x 5.06 (in)
416.1 x 46.5 12.9 (cm)
163.8 x 18.31 x 5.06 (in)
416.1 x 46.5 12.9 (cm)
185.8 x 18.31 x 5.06 (in)
471.9 x 46.5 x 12.9 (cm)
185.8 x 18.31 x 5.06 (in)
471.9 x 46.5 x 12.9 (cm)
185.8 x 18.31 x 5.06 (in)
471.9 x 46.5 x 12.9 (cm)
207.8 x 18.31 x 5.06 (in)
527.8 x 46.5 x 12.9 (cm)
207.8 x 18.31 x 5.06 (in)
527.8 x 46.5 x 12.9 (cm)
207.8 x 18.31 x 5.06 (in)
527.8 x 46.5 x 12.9 (cm)
MH = 15 in (38.1 cm)
MD = 7.5 in (19.1 cm)
MH = 15 in (38.1 cm)
MD = 7.5 in (19.1 cm)
MH = 15 in (38.1 cm)
MD = 7.5 in (19.1 cm)
MH = 15 in (38.1 cm)
MD = 7.5 in (19.1 cm)
MH = 15 in (38.1 cm)
MD = 7.5 in (19.1 cm)
MH = 15 in (38.1 cm)
MD = 7.5 in (19.1 cm)
MH = 15 in (38.1 cm)
MD = 7.5 in (19.1 cm)
MH = 15 in (38.1 cm)
MD = 7.5 in (19.1 cm)
MH = 15 in (38.1 cm)
MD = 7.5 in (19.1 cm)
MH = 15 in (38.1 cm)
MD = 7.5 in (19.1 cm)
MH = 15 in (38.1 cm)
MD = 7.5 in (19.1 cm)
MH = 15 in (38.1 cm)
MD = 7.5 in (19.1 cm)
MH = 15 in (38.1 cm)
MD = 7.5 in (19.1 cm)
MH = 15 in (38.1 cm)
MD = 7.5 in (19.1 cm)
MH = 15 in (38.1 cm)
MD = 7.5 in (19.1 cm)
MH = 15 in (38.1 cm)
MD = 7.5 in (19.1 cm)
MH = 15 in (38.1 cm)
MD = 7.5 in (19.1 cm)
MH = 15 in (38.1 cm)
MD = 7.5 in (19.1 cm)
140 (lbs)
63.5 (kg)
140 (lbs)
63.5 (kg)
140 (lbs)
63.5 (kg)
160 (lbs)
72.6 (kg)
160 (lbs)
72.6 (kg)
160 (lbs)
72.6 (kg)
190 (lbs)
86.2 (kg)
190 (lbs)
86.2 (kg)
190 (lbs)
86.2 (kg)
220 (lbs)
99.8 (kg)
220 (lbs)
99.8 (kg)
220 (lbs)
99.8 (kg)
240 (lbs)
108.9 (kg)
240 (lbs)
108.9 (kg)
240 (lbs)
108.9 (kg)
260 (lbs)
117.9 (kg)
260 (lbs)
117.9 (kg)
260 (lbs)
117.9 (kg)
97.8 x 29.31 x 5.06 (in)
248.8 x 74.4 x 12.9 (cm)
97.8 x 29.31 x 5.06 (in)
248.8 x 74.4 x 12.9 (cm)
MH = 26 in (66.0 cm)
MD = 7.5 in (19.1 cm)
MH = 26 in (66.0 cm)
MD = 7.5 in (19.1 cm)
185 (lbs)
83.9 (kg)
185 (lbs)
83.9 (kg)
Input
Current
Model Numbers—AlphaEclipse™ 3500 Series
LxHxD
1.4” Pitch, 4 LEDs per pixel
Pitch (distance between pixels in inches)
Model Number usage format:
35 00 -64 x 24 R/A
3501- 64 x 16 -R
1.4
70° 64 x 16
Red
9.0
4.5
3500-80 x 16 -R
1.4
30° 80 x 16
Red
11.0
5.5
3501-80 x 16 -A
1.4
70° 80 x 16 Amber 11.0
5.5
3501-80 x 16 -R
1.4
70° 80 x 16
Red
11.0
5.5
3500-96 x 16 -R
1.4
30° 96 x 16
Red
12.0
6.0
3500-96 x 16 -A
1.4
70° 96 x 16 Amber 12.0
6.0
3500-96 x 16 -R
1.4
70° 96 x 16
Red
12.0
6.0
3500-112 x 16 -R
1.4
30° 112 x 16
Red
14.5
7.3
3501-112 x 16 -A
1.4
70° 112 x 16 Amber 14.5
7.3
3501-112 x 16 -R
1.4
70° 112 x 16
Red
14.5
7.3
3500-128 x 16 -R
1.4
30° 128 x 16
Red
16.5
8.3
3501-128 x 16 -A
1.4
70° 128 x 16 Amber 16.5
8.3
3501-128 x 16 -R
1.4
70° 128 x 16
Red
16.5
8.3
3500-144 x 16 -R
1.4
30° 144 x 16
Red
17.5
8.8
3501-144 x 16 -A
1.4
70° 144 x 16 Amber 17.5
8.8
3501-144 x 16 -R
1.4
70° 144 x 16
Red
17.5
8.8
3500-64 x 24 -R
1.4
30° 64 x 24
Red
12.0
6.0
3501-64 x 24 -A
1.4
70° 64 x 24 Amber 12.0
6.0
3501-64 x 24 -R
1.4
70° 64 x 24
Red
12.0
6.0
3500-80 x 24 -R
1.4
30° 80 x 24
Red
13.5
6.8
3501-80 x 24 -A
1.4
70° 80 x 24 Amber 13.5
6.8
3501-80 x 24 -R
1.4
70° 88 x 24
Red
13.5
6.8
3500-96 x 24 -R
1.4
30° 96 x 24
Red
15.0
7.5
3501-96 x 24 -A
1.4
70° 96 x 24 Amber 15.0
7.5
240 V @ 60 Hz (amperes)
120 V @ 60 Hz (amperes)
LED Color
x Height (pixel rows)
Width (pixel columns)
LED Lamp type
(2 digit code)
0 0 = 30 degree lamp
0 1 = 70 degree lamp
L
LED Lamp viewing angle
Red lamp/Amber lamp
Width (Pixel Columns)
x Height (Pixel Rows)
Dimensions
Mounting
Dimensions
MH
Approx.
Weight
H
MD
D
97.8 x 29.31 x 5.06 (in)
248.8 x 74.4 x 12.9 (cm)
119.8 x 29.31 x 5.06 (in)
304.3 x 74.4 x 12.9 (cm)
119.8 x 29.31 x 5.06 (in)
304.3 x 74.4 x 12.9 (cm)
119.8 x 29.31 x 5.06 (in)
304.3 x 74.4 x 12.9 (cm)
141.8 x 29.31 x 5.06 (in)
360.2 x 74.4 x 12.9 (cm)
141.8 x 29.31 x 5.06 (in)
360.2 x 74.4 x 12.9 (cm)
141.8 x 29.31 x 5.06 (in)
360.2 x 74.4 x 12.9 (cm)
163.8 x 29.31 x 5.06 (in)
416.1 x 74.4 x 12.9 (cm)
163.8 x 29.31 x 5.06 (in)
416.1 x 74.4 x 12.9 (cm)
163.8 x 29.31 x 5.06 (in)
416.1 x 74.4 x 12.9 (cm)
185.8 x 29.31 x 5.06 (in)
471.9 x 74.4 x 12.9 (cm)
185.8 x 29.31 x 5.06 (in)
471.9 x 74.4 x 12.9 (cm)
185.8 x 29.31 x 5.06 (in)
471.9 x 74.4 x 12.9 (cm)
207.8 x 29.31 x 5.06 (in)
527.8 x 74.4 x 12.9 (cm)
207.8 x 29.31 x 5.06 (in)
527.8 x 74.4 x 12.9 (cm)
207.8 x 29.31 x 5.06 (in)
527.8 x 74.4 x 12.9 (cm)
MH = 26 in (66.0 cm)
MD = 7.5 in (19.1 cm)
MH = 26 in (66.0 cm)
MD = 7.5 in (19.1 cm)
MH = 26 in (66.0 cm)
MD = 7.5 in (19.1 cm)
MH = 26 in (66.0 cm)
MD = 7.5 in (19.1 cm)
MH = 26 in (66.0 cm)
MD = 7.5 in (19.1 cm)
MH = 26 in (66.0 cm)
MD = 7.5 in (19.1 cm)
MH = 26 in (66.0 cm)
MD = 7.5 in (19.1 cm)
MH = 26 in (66.0 cm)
MD = 7.5 in (19.1 cm)
MH = 26 in (66.0 cm)
MD = 7.5 in (19.1 cm)
MH = 26 in (66.0 cm)
MD = 7.5 in (19.1 cm)
MH = 26 in (66.0 cm)
MD = 7.5 in (19.1 cm)
MH = 26 in (66.0 cm)
MD = 7.5 in (19.1 cm)
MH = 26 in (66.0 cm)
MD = 7.5 in (19.1 cm)
MH = 26 in (66.0 cm)
MD = 7.5 in (19.1 cm)
MH = 26 in (66.0 cm)
MD = 7.5 in (19.1 cm)
MH = 26 in (66.0 cm)
MD = 7.5 in (19.1 cm)
185 (lbs)
83.9 (kg)
220 (lbs)
99.8 (kg)
220 (lbs)
99.8 (kg)
220 (lbs)
99.8 (kg)
250 (lbs)
113.4 (kg)
250 (lbs)
113.4 (kg)
250 (lbs)
113.4 (kg)
285 (lbs)
129.3 (kg)
285 (lbs)
129.3 (kg)
285 (lbs)
129.3 (kg)
320 (lbs)
145.2 (kg)
320 (lbs)
145.2 (kg)
320 (lbs)
145.2 (kg)
355 (lbs)
161.0 (kg)
355 (lbs)
161.0 (kg)
355 (lbs)
161.0 (kg)
98.5 x 40.0 x 5.06 (in)
250.2 x 101.6 x 12.9 (cm)
98.5 x 40.0 x 5.06 (in)
250.2 x 101.6 x 12.9 (cm)
98.5 x 40.0 x 5.06 (in)
250.2 x 101.6 x 12.9 (cm)
120.5 x 40.0 x 5.06 (in)
304.3 x 101.6 x 12.9 (cm)
120.5 x 40.0 x 5.06 (in)
304.3 x 101.6 x 12.9 (cm)
120.5 x 40.0 x 5.06 (in)
304.3 x 101.6 x 12.9 (cm)
142.5 x 40.0 x 5.06 (in)
362.0 x 101.6 x 12.9 (cm)
142.5 x 40.0 x 5.06 (in)
362.0 x 101.6 x 12.9 (cm)
MH = 37 in (94 cm)
MD = 8.5 in (21.6 cm)
MH = 37 in (94 cm)
MD = 8.5 in (21.6 cm)
MH = 37 in (94 cm)
MD = 8.5 in (21.6 cm)
MH = 37 in (94 cm)
MD = 8.5 in (21.6 cm)
MH = 37 in (94 cm)
MD = 8.5 in (21.6 cm)
MH = 37 in (94 cm)
MD = 8.5 in (21.6 cm)
MH = 15 in (38.1 cm)
MD = 8.5 in (21.6 cm)
MH = 37 in (94 cm)
MD = 8.5 in (21.6 cm)
440 (lbs)
199.6 (kg)
440 (lbs)
199.6 (kg)
440 (lbs)
199.6 (kg)
465 (lbs)
210.9 (kg)
465 (lbs)
210.9 (kg)
465 (lbs)
210.9 (kg)
485 (lbs)
220 (kg)
485 (lbs)
220 (kg)
13
Input
Current
Model Numbers—AlphaEclipse™ 3500 Series
1.4” Pitch, 4 LEDs per pixel
3501-96 x 24 -R
1.4
70° 96 x 24
Red
15.0
7.5
3500-112 x 24 -R
1.4
30° 112 x 24
Red
19.0
9.5
3501-112 x 24 -A
1.4
70° 112 x 24 Amber 19.0
9.5
3501-112 x 24 -R
1.4
70° 112 x 24
Red
19.0
9.5
3500-128 x 24 -R
1.4
30° 128 x 24
Red
20.5
10.3
3501-128 x 24 -A
1.4
70° 128 x 24 Amber 20.5
10.3
3501-128 x 24 -R
1.4
70° 128 x 24
Red
20.5
10.3
3500- 64 x 32 -R
1.4
30° 64 x 32
Red
14.0
7.0
3501- 64 x 32 -A
1.4
70° 64 x 32 Amber 14.0
7.0
3501- 64 x 32 -R
1.4
70° 64 x 32
Red
14.0
7.0
3500-80 x 32 -R
1.4
30° 80 x 32
Red
16.0
8.0
3501-80 x 32 -A
1.4
70° 80 x 32 Amber 16.0
8.0
3501-80 x 32 -R
1.4
70° 80 x 32
Red
16.0
8.0
3500-96 x 32 -R
1.4
30° 96 x 32
Red
18.0
9.0
3500-96 x 32 -A
1.4
70° 96 x 32 Amber 18.0
9.0
3500-96 x 32 -R
1.4
70° 96 x 32
Red
18.0
9.0
3500-112 x 32 -R
1.4
30° 112 x 32
Red
22.5
11.3
3501-112 x 32 -A
1.4
70° 112 x 32 Amber 22.5
11.3
3501-112 x 32 -R
1.4
70° 112 x 32
Red
22.5
11.3
3500-128 x 32 -R
1.4
30° 128 x 32
Red
24.0
12.0
3501-128 x 32 -A
1.4
70° 128 x 32 Amber 24.0
12.0
3501-128 x 32 -R
1.4
70° 128 x 32
12.0
240 V @ 60 Hz (amperes)
120 V @ 60 Hz (amperes)
LED Color
x Height (pixel rows)
Width (pixel columns)
LED Lamp type
(2 digit code)
0 0 = 30 degree lamp
0 1 = 70 degree lamp
L
LED Lamp viewing angle
Red lamp/Amber lamp
Width (Pixel Columns)
x Height (Pixel Rows)
14
LxHxD
Pitch (distance between pixels in inches)
Model Number usage format:
35 00 -64 x 24 R/A
Dimensions
Mounting
Dimensions
MH
Approx.
Weight
H
MD
Red
24.0
D
142.5 x 40.0 x 5.06 (in)
362.0 x 101.6 x 12.9 (cm)
164.5 x 40.0 x 5.06 (in)
417.8 x 101.6 x 12.9 (cm)
164.5 x 40.0 x 5.06 (in)
417.8 x 101.6 x 12.9 (cm)
164.5 x 40.0 x 5.06 (in)
417.8 x 101.6 x 12.9 (cm)
186.5 x 40.0 x 5.06 (in)
473.7 x 101.6 x 12.9 (cm)
186.5 x 40.0 x 5.06 (in)
473.7 x 101.6 x 12.9 (cm)
186.5 x 40.0 x 5.06 (in)
473.7 x 101.6 x 12.9 (cm)
MH = 37 in (94 cm)
MD = 8.5 in (21.6 cm)
MH = 37 in (94 cm)
MD = 8.5 in (21.6 cm)
MH = 15 in (38.1 cm)
MD = 8.5 in (21.6 cm)
MH = 37 in (94 cm)
MD = 8.5 in (21.6 cm)
MH = 37 in (94 cm)
MD = 8.5 in (21.6 cm)
MH = 37 in (94 cm)
MD = 8.5 in (21.6 cm)
MH = 37 in (94 cm)
MD = 8.5 in (21.6 cm)
485 (lbs)
220 (kg)
515 (lbs)
233.6 (kg)
515 (lbs)
233.6 (kg)
515 (lbs)
233.6 (kg)
535 (lbs)
242.7 (kg)
535 (lbs)
242.7 (kg)
535 (lbs)
242.7 (kg)
98.5 x 51.0 x 5.06 (in)
250.2 x 129.5 x 12.9 (cm)
98.5 x 51.0 x 5.06 (in)
250.2 x 129.5 x 12.9 (cm)
98.5 x 51.0 x 5.06 (in)
250.2 x 129.5 x 12.9 (cm)
120.5 x 51.0 x 5.06 (in)
306.1 x 129.5 x 12.9 (cm)
120.5 x 51.0 x 5.06 (in)
306.1 x 129.5 x 12.9 (cm)
120.5 x 51.0 x 5.06 (in)
306.1 x 129.5 x 12.9 (cm)
142.5 x 51.0 x 5.06 (in)
362.0 x 129.5 x 12.9 (cm)
142.5 x 51.0 x 5.06 (in)
362.0 x 129.5 x 12.9 (cm)
142.5 x 51.0 x 5.06 (in)
362.0 x 129.5 x 12.9 (cm)
164.5 x 51.0 x 5.06 (in)
417.8 x 129.5 x 12.9 (cm)
164.5 x 51.0 x 5.06 (in)
417.8 x 129.5 x 12.9 (cm)
164.5 x 51.0 x 5.06 (in)
417.8 x 129.5 x 12.9 (cm)
186.5 x 51.0 x 5.06 (in)
473.7 x 129.5 x 12.9 (cm)
186.5 x 51.0 x 5.06 (in)
473.7 x 129.5 x 12.9 (cm)
186.5 x 51.0 x 5.06 (in)
473.7 x 129.5 x 12.9 (cm)
MH = 48 in (121.9 cm)
MD = 8.5 in (21.6 cm)
MH = 48 in (121.9 cm)
MD = 8.5 in (21.6 cm)
MH = 48 in (121.9 cm)
MD = 8.5 in (21.6 cm)
MH = 48 in (121.9 cm)
MD = 8.5 in (21.6 cm)
MH = 48 in (121.9 cm)
MD = 8.5 in (21.6 cm)
MH = 48 in (121.9 cm)
MD = 8.5 in (21.6 cm)
MH = 48 in (121.9 cm)
MD = 8.5 in (21.6 cm)
MH = 48 in (121.9 cm)
MD = 8.5 in (21.6 cm)
MH = 48 in (121.9 cm)
MD = 8.5 in (21.6 cm)
MH = 48 in (121.9 cm)
MD = 8.5 in (21.6 cm)
MH = 48 in (121.9 cm)
MD = 8.5 in (21.6 cm)
MH = 48 in (121.9 cm)
MD = 8.5 in (21.6 cm)
MH = 48 in (121.9 cm)
MD = 8.5 in (21.6 cm)
MH = 48 in (121.9 cm)
MD = 8.5 in (21.6 cm)
MH = 48 in (121.9 cm)
MD = 8.5 in (21.6 cm)
480 (lbs)
217.7 (kg)
480 (lbs)
217.7 (kg)
480 (lbs)
217.7 (kg)
505 (lbs)
229.1 (kg)
505 (lbs)
229.1 (kg)
505 (lbs)
229.1 (kg)
535 (lbs)
242.7 (kg)
535 (lbs)
242.7 (kg)
535 (lbs)
242.7 (kg)
560 (lbs)
254 (kg)
560 (lbs)
254 (kg)
560 (lbs)
254 (kg)
590 (lbs)
267.6 (kg)
590 (lbs)
267.6 (kg)
590 (lbs)
267.6 (kg)
Temperature protection
Cold protection
• At or below 4° C (40° F), internal heater strips are switched on. Air warmed by the heater strips is
blown by the fans throughout the enclosure. If the temperature rises to or above 16° C (60° F), then
the internal heaters and fans turn off.
Heat protection
• At or above 30° C (85° F), cooling fans are switched on by thermostatic controls. If the temperature
drops to 20° C (67° F), then the cooling fans are turned off.
• At or above 70° C (158° F), auto-dimming occurs. This means that the LED output from the sign is
forced into a 50% reduced power mode, effectively dimming the brightness of LED output by
about 50%. If the temperature falls to 65° C (149° F), then auto-dimming stops.
• At or above 80° C (176° F), the sign automatically shuts down to protect against damage. If the
temperature falls to 75° C (167° F) or less, the sign resumes operation in auto-dim mode (i.e., 50%
brightness) as described above.
NOTE: Take into account the effects of ambient temperature when evaluating mounting locations for the
sign. You should always maintain recommended clearance distances around the sign (shown
“Mounting instructions” on page 28) and avoid poorly-ventilated mounting locations that could
be subject to radiation, convection, conduction or other thermal transfer effects.
EMI compliance
This equipment has been tested and found to comply with the limits for a Class A digital device, pursuant
to Part 15 of the FCC Rules. These limits are designed to provide reasonable protection against harmful
interference when the equipment is operated in a commercial environment.
This equipment generates, uses, and can radiate radio frequency energy and, if not installed and used in
accordance with installation guidelines, may cause harmful interference to radio communications. Operation of
this equipment in a residential area is likely to cause harmful interference, in which case the user will be required
to correct the interference at his own expense.
15
Power-up information
When the sign is powered up, it displays this information:
Sequence
Typical display
1
11605001d
Number of the main firmware
2
OUTDOOR
Type of sign
3
064x24
4
SER ADDR
00 HEX
Serial address assigned to the sign
5
SER. DATA
9600, 8n1
Serial data format (baud rate, number of bits, parity,
number of stop bits)
PERF REV
Number and revision of the peripheral firmware
6
Meaning
Size of the sign, in columns and rows
11604001D0108
Number and revision of the custom programmable
logic device
7
FPGA REV
26111601 1.5
8
RAM 1
RAM 128K
9
1:22 AM MON.
10
1/1/01
11
CHK FLASH
FLASH OK
Check for status of “flash” memory
12
LO = 15FF
HI = DD05
Low and high checksums for “flash” memory
Type and size of RAM installed
Time and day of the week set in the sign
Date set in the sign
After displaying all power-up information, the sign displays normal running messages.
16
Safety
Electrical protection on signs
WARNING
Hazardous voltage.
Contact with high voltage may
cause death or serious injury.
Always disconnect power
to sign prior to servicing.
The AlphaEclipse™ sign draws 8 to 15 amps for the most common sign sizes (up to about 24 amps.) See
“Specifications chart” on page 12.
There is an integral 20-amp circuit breaker built into the sign’s internal power on/off switch. If an
overcurrent fault occurs, the switch automatically turns off. To reset the switch/circuit breaker, open the sign (as
described starting on page 20) and manually press the switch “on”.
NOTE: Each sign must also be connected to one or two external, dedicated 20-amp circuit breakers,
depending on the specific sign. See “Power supply wiring” on page 37.
ON
OFF
Internal 20-amp
circuit breaker is
located behind the
ON/OFF switch.
17
Heaters
The AlphaEclipse™ sign includes heater strips that activate in cooler temperatures and therefore can be
hot. In addition, brackets and other metal near the heater strips can get hot.
Each heater strip has a fan for air circulation, and there also are exhaust fans.
Exercise caution when working near these heater strips and fans.
NOTE: Not all units are equipped with heaters.
CAUTION
Keep fingers clear
of strip heaters.
Contact with heaters
may cause injury.
Fans,
internal
2-line AlphaEclipse™
sign is shown here
18
Heater
strip
Fan,
exhaust
Fan,
internal
Heater
strip
Backup battery for the sign
In the event of short-term power loss, backup batteries in the AlphaEclipse™ sign provide temporary
power for the sign to retain information such as messages and the time setting.
Backup batteries are soldered to the main board and should not be replaced by anyone other than a
qualified Adaptive® technician.
WARNING
Danger of explosion if battery is
incorrectly replaced. Replace only
with the same or equivalent type
recommended by the manufacturer.
Dispose of used batteries according
to the manufacturer's instructions.
AVERTISSEMENT
Il y a danger d'explosion s'il y a un
remplacement incorrect de la batterie.
Remplacer uniquement avec une
batterie du meme type recommande
par le fabricant. Mettre au rebut les
batteries usagees conformement
aux instructions du fabricant.
AVVERTENZA
La sostituzione errata della batteria
può comportare il pericolo di esplosione.
Sostituire unicamente con una batteria
identica o di tipo equivalente consigliata
dal fabbricante. Eliminare le batterie
scariche in base alle istruzioni del
fabbricante.
ADVERTENCIA
Existe el peligro de explosión si la batería
se reemplaza incorrectamente.
Reemplácela sólo con el mismo tipo de
batería o uno equivalente recomendado
por el fabricante. Deseche las baterías
usadas de acuerdo con las instrucciones
del fabricante.
WARNUNG
Bei einem nicht vorschriftsgemäßen
Austausch der Batterie besteht
Explosionsgefahr. Nur durch eine Batterie
des gleichen oder eines gleichwertigen,
vom Hersteller empfohlenen Typs
ersetzen. Gebrauchte Batterien gemäß
Herstelleranweisung entsorgen.
19
Accessing internal components
Opening the sign
Cautions when opening and closing the sign
Because of the size and weight of the sign’s door, caution must be used when opening the sign.
Follow these guidelines when opening the sign:
•
•
•
•
•
•
Do not open the sign when winds could cause loss of control.
Use as many people as needed when opening the sign. Two or more people may be needed
depending on the size of the sign and environmental conditions.
Stand away from the front of the sign when opening it, so you are not knocked off balance by the
swing of the door.
Gas shocks, if installed, may open the door more quickly than expected, especially on smaller
signs.
Be sure to use the safety bar as well as the prop rods and the safety lock for each prop rod.
Be careful with the door after disengaging the prop rods when closing the sign, especially in
windy conditions.
WARNING
Possible fall hazard.
Remain clear of access
door when opening.
Install safety bar when
door is open.
Opening the door
1.
Disconnect power to the sign.
2.
Use the locking latch key to unlock and open the latches along the lower edge of the front door.
Front view
of the case
NOTE: The number of locking latches
will vary with the width of the sign.
Locking latches
90°
Locking latch,
closed, with key
inserted
3.
Turn key 90° to
the left to release
initial lock
tension.
180°
Turn key 180° to
the left, to fully
unlock the case
Standing away from the front of the unit, lift the door upward. Gas shocks inside the sign assist the
lifting motion and help to hold the door in the open, self-suspended position.
NOTE 1: With extra-wide signs, you may need one person at each end of the sign to open the sign.
NOTE 2: Gas shocks, if installed, may open the door more quickly than expected, especially on
smaller signs.
20
4.
As soon as the door is self-suspended, unscrew and remove the wing nut holding one of the two safety
bars against the side of the door panel. Save the wing nut for use in a later step.
NOTE: You must unlatch and install
each safety bar immediately
after opening the door.
Wing nut,
shown on
storage bolt
5.
Safety bar in
stored position
inside the door.
Gas shocks
Swing the loose end of the safety bar away from the side of the front of the case and downward to the
outside of the body of the case.
Inside view of the case,
showing safety bar swung down
Safety bar
6.
There is a support bolt for locking the safety bar onto the side of the case. The support bolt has a
protective/safety plastic sleeve on it. Remove the sleeve and save for use after closing the sign. You
may wish to store the sleeve by temporarily sliding it onto the empty storage bolt for the safety bar on
the inside of the door.
7.
Insert the hole of the safety bar over the support bolt in the side of the case. Then thread the wing nut
onto the support bolt and tighten the nut.
Outside view of the
case, showing safety
bar locked down
8.
Safety bar
Wing nut,
shown on
support bolt
Repeat preceding steps for the second safety bar at the other end of the sign.
21
Supporting the LED boards
1.
Unscrew and remove the screws at the bottom of the internal vertical rails. Keep the screws for use
when closing the sign again.
LED boards
Vertical rails
Bottom rail
Rail screws
2.
Carefully lift the LED boards, holding the vertical rails whenever possible. Cable stops and/or Gas
shocks prevent opening the sign too far. In some 3- and 4- line signs, there are gas shocks to help open
the door.
3.
There is at least one prop bar attached to the underside of the LED board rails. Always support the
LED boards with the prop bar(s) by unhooking each prop bar from its storage clamp and inserting the
end into the available hole in the bottom rail.
LED boards
Vertical
rails
Prop bars
4.
Be sure the ON/OFF switch is OFF.
Closing the sign
1.
2.
3.
4.
5.
6.
7.
8.
9.
22
Turn the ON/OFF switch ON.
Holding the LED board rails, fold the prop bars back into the front of the case, hooking them onto the
storage clips. Do not hold the LED boards themselves, to avoid damage.
Lower the LED boards and screw the rail screws back in.
Unscrew the wing nuts locking the safety bars on each side of the case.
Swing the safety bar back up into its storage location within the door.
Replace the protective/safety plastic sleeves onto the support bolts on the side of the case. Thread the
wing nuts onto the storage bolts for the safety bar and tighten the wing nuts.
Carefully lower the door of the sign. With extra-wide signs, you may need one person at each end.
Use the locking latch key to close and lock the locking latches along the lower edge of the door. (See
Step 2 for “Opening the door” for details.) You may need to tighten all the latches almost all the way
and then tighten all the latches completely.
Re-apply power as appropriate.
Configuring the sign
Signs are fully configured at the factory, however, before installing a sign, you may want to change one or
more of the sign’s settings by changing DIP switches inside the sign.
To access and change DIP switches, follow these steps:
DIP switch access
1.
Remove power from the sign at the external circuit breaker.
2.
Open the sign as instructed in “Opening the sign” on page 20.
3.
Remove power from the sign at the internal circuit breaker by turning the ON/OFF switch OFF.
4.
See the applicable section to make changes in the following:
•
Serial address (See page 24.) Default is: zero.
•
Baud rate (See page 25.) Default is: 9600.
•
Data format (See page 26.) Default is: 8N1.
•
EOL termination (See page 26.) Default is: Off.
•
Memory clear (See page 27.) Default is: Off.
•
Diagnostics (See page 27.) Default is: Run normally.
5.
Turn the ON/OFF switch ON.
6.
Close the sign as in “Closing the sign” on page 22.
7.
Reapply power to the sign at the external circuit breaker.
23
Serial address
A serial address is a number from 0 to 127 given to a sign to uniquely identify it on a network so that
messages can be sent to a particular sign. The default is zero.
Before resetting DIP switches, turn off power as in “DIP switch access” on page 23. After resetting, turn
power back on.
NOTE: AlphaEclipse™ signs with the transceiver option are factory-set for point-to-point installation, not
for networking. If you need a point-to-multipoint installation, contact your distributor.
Changing the serial address from zero (default)
1.
Change the DIP switches from zero to a different number, using this table:
ON
ON
DIP switch 1
Serial Address
(The Hex number is
shown on sign.)
2
3
4
5
6
7
(MSB)
Decimal
Hex
0 (default)
00 (default)
Off
Off
Off
Off
Off
Off
Off
1
01
On
Off
Off
Off
Off
Off
Off
2
02
Off
On
Off
Off
Off
Off
Off
3
03
On
On
Off
Off
Off
Off
Off
4
04
Off
Off
On
Off
Off
Off
Off
5
05
On
Off
On
Off
Off
Off
Off
6
06
Off
On
On
Off
Off
Off
Off
7
07
On
On
On
Off
Off
Off
Off
8
08
Off
Off
Off
On
Off
Off
Off
9
09
On
Off
Off
On
Off
Off
Off
10
0A
Off
On
Off
On
Off
Off
Off
11
0B
On
On
Off
On
Off
Off
Off
12
0C
Off
Off
On
On
Off
Off
Off
13
0D
On
Off
On
On
Off
Off
Off
14
0E
Off
On
On
On
Off
Off
Off
.
.
.
.
.
.
.
.
.
.
.
.
.
.
.
.
.
.
.
.
.
.
.
.
24
1
(LSB)
DIP switches 1 through 7 are
used to set the serial address
in binary format. Switch 1 is
the Least Significant Bit
(LSB) and switch 7 is the
Most Significant Bit (MSB).
1 2 3 4 5 6 7 8 910
DIP switch 2
1 2 3 4 5 6 7 8 910
ON
125
7D
On
Off
On
On
On
On
On
126
7E
Off
On
On
On
On
On
On
127
7F
On
On
On
On
On
On
On
2.
Reset the power. After changing DIP switches for a serial address, the change takes effect only after the
power has been reset.
To reset the power, do either of the following:
•
•
Turn the power On/Off switch off and back on.
Press the reset button, labeled SW4 on the lower left end of the micro controller board. The micro
controller board is shown in the diagram on page 8.
Changing the address to another number
After setting the serial address to a value other than zero, you can change that address to a different value
– other than zero – by changing the DIP switches again and resetting power.
Changing the address back to zero
To change the serial address back to zero, you must follow all these steps:
1.
Set the serial address DIP switches all to zero.
2.
Reset the power as in step 2 above.
3.
Send an Alpha® Protocol command to set the address to zero. Refer to the Alpha® Sign
Communications Protocol manual for details.
Baud rate
Baud rate is the speed at which data is sent to and from a sign. The default is 9600.
Before resetting DIP switches, turn off power as in “DIP switch access” on page 23. After resetting, turn
power back on.
ON
ON
DIP switch 1
1 2 3 4 5 6 7 8 910
DIP switch 2
1 2 3 4 5 6 7 8 910
ON
Use switches 3, 4, and 5
Baud rate
3
4
5
9600 (Default)
Off
Off
Off
1200
On
Off
Off
2400
Off
On
Off
4800
On
On
Off
9600
Off
Off
On
19200
On
Off
On
38400
Off
On
On
Not used (Defaults to 9600)
On
On
On
25
Data format
The data format is either:
• 8N1, stands for 8 data bits, no parity, and 1 stop bit. (This is the “EZ95” data format.)
• 7E2, stands for 7 data bits, even parity, and 2 stop bits
The default is 8N1.
Before resetting DIP switches, turn off power as in “DIP switch access” on page 23. After resetting, turn
power back on.
ON
ON
DIP switch 1
Use switch 8
1 2 3 4 5 6 7 8 910
DIP switch 2
1 2 3 4 5 6 7 8 910
ON
Data format
8
8N1 (default)
Off
7E2
On
EOL termination
A sign that is at the end of an RS485 sign network needs its End-of-line (EOL) termination set to ON.
Therefore, even if there is only one sign, EOL termination should be set to ON for the last sign. EOL termination
should be set to OFF for any signs in the middle of the network. The default is OFF.
For an overview of EOL termination, see “Appendices” on page 57. For more information on EOL
termination of an RS485 network, see the Network Configurations manual, PN 9708-8046.
Before resetting DIP switches, turn off power as in “DIP switch access” on page 23. After resetting, turn
power back on.
ON
ON
DIP switch 1
26
1 2 3 4 5 6 7 8 910
DIP switch 2
1 2 3 4 5 6 7 8 910
ON
Use switches 1 and 2
EOL termination
1
2
OFF (default)
Off
Off
ON
On
On
Memory clear
When Memory clear is on, all messages in the sign’s memory will be cleared each time the sign is powered
on. The default is Memory clear off.
Before resetting DIP switches, turn off power as in “DIP switch access” on page 23. After resetting, turn
power back on.
ON
ON
DIP switch 1
1 2 3 4 5 6 7 8 910
DIP switch 2
1 2 3 4 5 6 7 8 910
ON
Use switch 10
Memory clear
10
Memory clear off (default))
Off
Memory clear on
On
Diagnostics
Several diagnostic options can be set using the DIP switches. The default is Run normally.
Before resetting DIP switches, turn off power as in “DIP switch access” on page 23. After resetting, turn
power back on.
ON
ON
DIP switch 1
Diagnostic
Run normally (default)
Use switches 9 and 10
1 2 3 4 5 6 7 8 910
DIP switch 2
1 2 3 4 5 6 7 8 910
ON
Description
9
10
Normal messaging enabled.
Off
Off
Test pattern
Cycles through several test patterns, to test for
unlit LEDs and other irregularities.
On
Off
LED test mode
All LEDs are lit, to test for uniform LED display.
Off
On
Not used
On
On
N/A
27
Installation
Mounting instructions
AlphaEclipse™ sign
WARNING
Possible crush hazard.
Mounting system must be
able to safely support the
unit's weight. Otherwise
the unit may fall, causing
serious injury or death.
Specific guidelines for installing the AlphaEclipse™ sign are listed on page 29.
Sample lifting bolt
(to be used only at
time of installation)
Mounting support bar
(upper)
Fan cover
1.5
inches
Mounting support bar
(lower)
28
There may be more
than one fan/cover.
Allow 1.5 in.
minimum clearance
below each fan cover.
Sample
mounting
structure
Sign mounting guidelines
The design of the mounting structure/system depends on the mounting methods, as well as on the
sign’s size and weight. The design is critical and should be done only by a qualified individual/organization.
The mounting height of the sign and potential wind conditions are also critical factors. It is the customer’s
responsibility to ensure that the structure and mounting system are adequate. Adaptive is not responsible for
the installation or the structural integrity of mounting structures done by others.
It is the responsibility of the installer to ensure that the mounting system and hardware are capable of supporting
the sign and that they comply with all locally-applicable codes and regulations.
Follow these guidelines when installing the sign:
•
Consult with a professional sign installer to determine the proper mounting system and
installation and to comply with all locally-applicable codes and regulations.
•
Only the factory-installed mounting support bars are to be used for mounting. Mounting to any
other parts of the sign will void the warranty.
•
Drill holes as needed only in the mounting support bars for fasteners. Follow these guidelines for
structural integrity:
–
–
–
•
Drill only the minimum number of holes necessary.
Drilling any holes in the sign housing will void the warranty.
The distance from center line of the mounting bolt to the outside edge of the mounting
support bars should not be less than two times the diameter of the bolt.
– To prevent bi-metal corrosion, installation should provide for isolation of dissimilar materials
when mounting to the mounting support bars.
Lifting bolts should be used solely for the purpose of easing the installation process.
–
•
Lifting bolts are not to be used for permanently hanging or mounting the sign. Remove the
lifting bolts after installation.
– Holes are provided for lifting bolts in the upper mounting support bar.
– A spreader bar should be used to maintain a vertical force on each lifting bolt to avoid
dangerous lateral force to the bolts.
Follow these guidelines when fastening the sign to the specific mounting structure:
–
–
•
The unit must be mounted utilizing both upper and lower mounting support bars.
Fasteners are to be supplied by the installer according to the needs of the specific mounting
structure.
Allow 1.5 in. (4 cm) minimum clearance below fan covers to permit adequate circulation of air
flow for cooling and heating. Fans should not be obstructed in any way.
Conduit
Separate 3/4” conduits must be run to the sign for power and for sign communications connections.
1.
Install conduit for power to the power line opening.
2.
Install conduit to the sign communications and Temperature Probe opening if you:
3.
• mount the Control Box outside of the sign’s case for easier access, and/or
• install the Temperature Probe.
If there are two or more signs in a master-slave configuration, install a junction into the conduit for the
sign communications and Temperature Probe at the master sign. Then install conduit from the
junction to the slave sign(s) for the sign communications wiring.
29
Temperature probe
The Temperature Probe is mounted separate from the sign itself.
1.
Connect the cable from the sign to the temperature probe.
Side
view
2.
NOTE: The style of the case for your Temperature
Probe may differ from the one pictured here.
However, its operation and the connector on
the end of the cable will be the same.
Choose a mounting location. To provide the most accurate temperature reading unaffected by
abnormal temperature fluctuations, use these guidelines whenever possible.
Temperature probe mounting guidelines
• A good location is underneath the eaves of a protected overhang. (Roof eaves may be
accessible if the sign is wall-mounted.)
• A location on the north side of a building or other large structure will afford protection from
the afternoon sun.
• Shield the probe from the effect of the direct sun, reflected heat, or any nearby sources of heat,
such as chimneys, vents, or HVAC ducts.
• A light-colored background is preferable to a dark-colored mounting background.
• Choose a location where air movement is not restricted by nearby walls or other obstructions.
• Mount the temperature probe housing so that convection currents, or rising hot air flows, are
not blocked by the mounting plates.
• A location at least 6 feet off the ground is recommended.
• A location above vegetation is preferable to a location above asphalt or blacktop.
• There must not be any strain on the cable. Compare the available cable length (12 feet total)
with the distance from the proposed mounting site to the 6-pin connector on the micro
controller board. (See “Temperature probe wiring” on page 39 for a picture of the connector
and its location on the micro controller board.)
Side
view
Verify cabling length limitations before
mounting the temperature probe housing.
Cable is 12 feet long total.
30
3.
Mount the Temperature Probe vertically, using both feet of the mounting plate. The Temperature Probe
can be mounted on either a flat or a curved surface. Holes are provided in the feet for mounting with
bolts or similar fasteners. You can also use tie wraps. Be sure to place the cable between the feet of the
mounting plate.
Angle
view
Mount vertically, allowing hot air
to flow up, through the bracket.
Mounting plate
Holes for mounting
with bolts, etc.
Temperature
Probe cable
31
Modem (optional)
A modem connection uses one modem at the computer for transmitting messages and a second modem at
the sign for receiving messages.
Installing a transmitting modem at the computer
The transmitting modem (not supplied) must be installed at the computer which is to transmit to the sign.
Install the transmitting modem according to the instructions in the modem’s manual.
NOTE: It is recommended that the telephone line for this connection be a dedicated line, that is, not used
for any other communication.
Installation of the receiving modem in the sign
The receiving modem is installed within the sign and pre-configured at the factory. A factory-installed
modem is shown below.
Yellow
Green (tip)
Red (ring)
Black
A
To telephone
company
service
C
B
Note: Factory-installed
wiring is not shown
Item
A
B
C
Description
Wiring for telephone service
connection
Receiving modem
Power supply adapter
Notes
Connect as shown in exploded diagram
above.
Mounted in support brackets.
Mounted in support brackets.
Installed by
User/installer
Factory
Factory
Creating and sending messages
Basic instructions for configuring the messaging software supplied with the sign, AlphaNET plus™ for
Windows®, are found in “Messaging software setup” on page 48.
32
Wireless transceivers (optional)
In a transceiver (transmitter/receiver) connection, one transceiver at the computer transmits messages and
a second transceiver inside the sign receives them. Each transceiver uses an antenna.
NOTE: When installing wireless transceivers over longer distances, it may be necessary to have one or
more additional transceivers installed as a repeater for the signal between the first and last
transceiver. A site survey is available for testing the installation location to determine if any
repeater transceiver is needed. Contact Adaptive® for a site survey.
The receiving transceiver is installed within the sign and pre-configured at the factory. A factory-installed
transceiver is shown below.
The antenna for the receiving transceiver must be installed at the time of installing the sign. Specific
instructions for installing the antenna are on page 34.
The sending transceiver must be installed at the computer which is to transmit to the sign. Specific
instructions for installing the sending transceiver are on page 35.
Receiving transceiver, installed
F
E
NOTE: Installation
for parts E and F is
described on page 34.
D
Note: Factory-installed
wiring is not shown
A
B
C
Item
Part #
Description
A
1088-9307A
Transceiver
B
N/A
1160-9007
1160-9008A
1160-9009A
1088-9308A
Power supply adapter
15-inch cable
2-foot cable
20-foot cable
Antenna
C
D
E
F
Notes
Mounted with a tie wrap and locking material which can be
separated.
Mounted in support brackets
Serial cable to connect transceiver to the sign’s controller.
Connects to part E.
Shown as grayed-out behind the sign.
Shown not yet mounted.
Installed by
Factory
Factory
Factory
Factory
User/installer
User/installer
33
Receiving transceiver antenna installation
Mount the antenna with the antenna mounting bracket, using any of the holes in the bracket for the
antenna and any other holes for mounting the bracket itself.
Antenna mounting guidelines
Follow these guidelines when mounting the antenna:
•
•
•
•
Install the antenna and bracket on a support structure other than the sign or the sign’s
mounting brackets. Do NOT drill a hole in the sign enclosure.
Install the antenna in a location that will allow optimum line-of-sight transmission and
reception of signals between the sending transceiver and the antenna. Do not install the
antenna so that the sign is between the sending transceiver and the receiving antenna.
Install the antenna in an unobstructed area, keeping adequate clearance from any objects that
could block the signal.
Install the antenna in a more elevated location than the sign, and, if possible, keep it vertical.
Refer to the transceiver user’s manual for additional guidelines.
34
Sending transceiver installation
1.
Attach the antenna onto the sending transceiver.
2.
Connect the RS232 cable to the computer’s COM port and to the transceiver’s RS232 port.
3.
Connect the power supply adapter to the transceiver and then to power.
4.
Turn on the computer and proceed with messaging as described in “Basic setup with AlphaNET
plus™1.4” starting on page 48.
A
C
B
A
Side view
D
F
E
Top view
PWR
LINK
TxD
RxD
C
ANT A
ANT B
End view
Item
A
B
Part #
1088-9308A
1088-9307A
Description
Antenna
Sending transceiver
C
N/A
LED status lights
(on end)
D
N/A
Power supply adapter
E
1088-9309
RS232 cable, 3-wire DB9-to-DB9, black
F
N/A
Computer with AlphaNET plus™ software
Notes
Installed by
User/installer
User/installer
Power – Transceiver is powered on.
Link – There is an active data exchange
link between the two transceivers.
N/A
TXD (Transmit) – Data is being
transmitted.
RXD (Receive) – Data is being
received.
User/installer
This is a specially-configured cable.
User/installer
Do not use an off-the-shelf cable.
User/installer
Configuring the transceiver
Both the transmitting and the receiving transceivers are fully configured at the factory.
If you need to change the configuration, or if another “repeater” transceiver unit is needed between the
sending transceiver and the receiving transceiver, please refer to the user’s manual.
35
Electrical connection
NOTE: The following procedure should only be attempted by a qualified electrician. Installation and
electrical connection must comply with all locally-applicable codes and regulations.
WARNING
Hazardous voltage.
Contact with high voltage may
cause death or serious injury.
Always disconnect power
to sign prior to servicing.
1.
Mount the sign as described in “Mounting instructions” on page 28.
2.
Open the sign as in “Opening the sign” on page 20.
3.
Make sure that the circuit breaker/power switch is in the “0” (OFF) position, as shown in “Electrical
protection on signs” on page 17.
4.
Following the guidelines listed below, run the appropriate electrical wiring as described in:
5.
• “Power supply wiring” on page 37
• “Temperature probe wiring” on page 39
After completing all wiring, turn the circuit breaker/power switch to the ON position, as shown in
“Electrical protection on signs” on page 17.
6.
Close the sign as described in “Closing the sign” on page 22.
7.
Re-apply power to the sign.
Electrical wiring installation guidelines
Follow these guidelines when connecting electrical wiring:
•
•
•
•
•
•
36
All power wiring must be from a switched, fused power source.
A two-pole disconnect device must be installed in the building wiring for each branch circuit
supplying the sign.
Separate conduits must be run to the sign for power and for sign communications
connections.
All electrical connections must be watertight.
Make sure that the electrical power supply to the sign is adequately grounded and in full
compliance with all local codes, statutes, and regulations that may pertain to installation of
outdoor electrical signs.
Use minimum 80° C copper wire only. Torque terminals to 7-10 inch/pounds.
Utiliser uniquement un fil en cuivre pouvant supporter 80° C minimum. Serrer les bornes à
0,79 N/m – 1,13 N/m.
Power supply wiring
Power supply wiring differs for smaller signs and larger signs. All 240-volt and smaller 120-volt signs are
connected to a single breaker, while larger 120-volt signs must be connected to two ganged breakers. Refer to the
table below to determine the correct configuration for your sign. Then choose the corresponding instructions
following.
Number of
breakers
Sign size
Voltage
Height
1- or 2-line
120
3-line
4-line
240
All
Width
1
All
X
96 characters or less
X
More than 96 characters
2
X
80 characters or less
X
More than 80 characters
X
All
X
Single breaker wiring
1.
Connect 12-8 AWG wires through the power conduit to the power terminal block.
NOTE: AlphaEclipse™ signs are individually designed for either 120-volt or 240-volt power. Be sure
to use the appropriate wiring for your sign.
Connection
120V
240V
1
LINE
LINE 1
2
NEUTRAL
LINE 2
3
GROUND
GROUND
Sign communications and
Temperature Probe opening
Power
opening
Note: Factory-installed
wiring is not shown
2.
1
2
3
Power
wiring
Connect power wires from power terminal block to one 20-amp dedicated service breaker according to
locally-applicable codes and regulations. The sign must be properly grounded to prevent damage from
lightning and other electrical disturbances.
37
Dual breaker wiring
1.
Connect 12-8 AWG wires through the power conduit to the power terminal block.
NOTE: AlphaEclipse™ signs are individually designed for either 120-volt or 240-volt power. Be sure
to use the appropriate wiring for your sign.
Connection
Sign communications
and Temperature Probe
opening
Power
opening
Power wiring
can also be
routed through
this opening.
38
Note: Factory-installed
wiring is not shown
Power
wiring
120V
240V
1
#1 LINE
#1 LINE 1
2
#1 NEUTRAL
#1 LINE 2
3
#1 GROUND
#1 GROUND
4
#2 LINE
#2 LINE 1
5
#2 NEUTRAL
#2 LINE 2
6
#2 GROUND
#2 GROUND
1
2
3
4
5
6
2.
In the 3- and 4- line signs, there are two or more potential locations in the sign’s case for openings for
routing service wiring. When using openings other than those closest to the terminal blocks, be sure to
route electrical wiring away from sign components using tie wrap pads at the bottom of the case and
tie wraps. (Route sign communications and temperature probe wiring at the top of the case.) Any
excess wiring length must also be kept away from sign components.
3.
Connect power wires from power terminal block to two 20-amp dedicated service breakers according
to locally-applicable codes and regulations.
4.
The sign must be properly grounded to prevent damage from lightning and other electrical
disturbances.
5.
Plug any unused service openings with waterproof plugs.
Temperature probe wiring
The temperature probe cable is run through the same conduit as any sign communications wiring.
1.
Thread the cable for the temperature probe through conduit to the AlphaEclipse™ sign.
12345678
Sign communications and
Temperature Probe opening
Note: Factory-installed
wiring is not shown
Power line
opening
2.
Connect to the micro controller board.
12345678
Note: Factory-installed
wiring is not shown
Sign communications and
Temperature Probe opening
3.
In the 3- and 4- line signs, there are two or more potential locations in the sign’s case for openings for
routing service wiring. When using openings other than those closest to the terminal blocks, be sure to
route temperature probe wiring away from sign components using tie wrap pads at the top of the case
with tie wraps. (Route electrical wiring at the bottom of the case.) Any excess wiring length must also
be kept away from sign components.
4.
Plug any unused service openings with waterproof plugs.
39
Networking options
Introduction
Single-sign networks
A single-sign network consists of one computer sending messages directly to one sign. A single
AlphaEclipse™ sign can be networked to a computer with any of three options:
1.
Serial RS232 or RS485 cabling
2.
Modem connection
3.
Wireless transceivers
Instructions for networking single-sign networks start on page 41.
Multiple-sign networks
A multiple-sign network consists of one computer sending messages to more than one sign. There are two
ways to display messages on multiple signs. The networking differs between them.
1.
Synchronized messaging allows simultaneous display of identical messages on all signs in the network.
•
2.
The computer sends messages to one sign (“master”) and through the master to any others
(“slaves”).
• Slave signs must be physically the same size (number of lines and characters per line) as the
master sign.
• Networking for the master sign is the same as for single-sign networks. Networking for the slave
sign uses special turbo cabling.
• The slave signs are not fully functional: they can not be disconnected from the sign network and
connected directly to the computer.
Non-synchronized messaging allows display of differing messages on any sign in the network.
•
•
•
The computer can send messages to any sign independently of any others.
Signs can vary in size.
Network options for all signs are the same as for single-sign networks, with the exception of
RS232.
• All signs are master signs and are fully functional independently.
Instructions for networking multiple-sign networks start on page 43.
Notes and cautions for all networking wiring
Consult these notes and cautions when installing any networking for AlphaEclipse™ signs, regardless of
what type of network is used.
1.
2.
3.
4.
5.
6.
40
Separate conduit openings are provided for power and signal connections. In order to minimize signal
interference and for safety reasons, keep the power and signal wiring separate.
Drilling any other holes in the sign housing aside from those openings provided (for signal line and
power line conduits) will void the warranty for the sign. Any existing holes that are not used must be
tightly sealed.
All electrical connections must be watertight.
Serial/sign communications wiring must use minimum 80° C copper wire only. Torque terminals to 7
inch/pounds.
Utiliser uniquement un fil en cuivre pouvant supporter 80° C minimum. Serrer les bornes à 0,79 N/m.
In the 3- and 4- line signs, there are two or more locations in the case of the sign for openings for
routing service wiring. When using openings other than those closest to the terminal blocks, be sure to
route wiring away from sign components using tie wrap pads at the bottom of the case with tie wraps.
Plug any unused service openings with waterproof plugs.
Single-sign networks
A single-sign network consists of one computer sending messages directly to one sign.
RS232 or RS485 serial cabling
- or Modem & phone lines
- or 2 wireless transceivers
Message 1
Standard serial networking, RS232 and RS485 are described below.
For additional information for modems and/or transceivers, refer to your product’s documentation.
NOTE: Standard serial networking is not to be used with optional modem or transceiver communication.
RS232
The option to network a sign to a computer using RS232 communication is normally restricted to shortrange installations, for example, connecting to a sign mounted on the outside wall of a building to a computer
directly on the inside. The maximum distance for using RS232 cabling is 50 feet.
See “Notes and cautions for all networking wiring” on page 40.
1.
Install conduit to the sign for the RS232 serial/sign communications wiring.
2.
Run serial/sign communications wiring from the computer through the conduit and through the
signal wiring opening in the sign.
3.
Connect the RS232 serial/sign communications wiring to the terminal block as shown:
TXD
RXD
Ground
12345678
Note: Factory-installed
wiring is not shown
4.
Power supply
wiring
50 foot maximum
cable length
Host computer must have proper
cabling (not provided) for RS232
configuration.
In the 3- and 4- line signs, there are two or more potential locations in the sign’s case for openings for
routing service wiring. When using openings other than those closest to the terminal blocks, be sure to
route sign communications wiring away from sign components using tie wrap pads at the top of the
case and tie wraps. (Route electrical wiring at the bottom of the case.) Any excess wiring length must
also be kept away from sign components.
41
RS485
See “Notes and cautions for all networking wiring” on page 40.
1.
Install conduit to the sign for the RS485 serial/sign communications wiring.
2.
Run serial/sign communications wiring from the computer through the conduit and through the
signal wiring opening in the sign.
Table 2: Cabling distance limitations
3.
Maximum network length
4,000 feet
8,000 feet
10,000 feet
10,000 feet
Baud rate
9600
4800
2400
1200
Connect the RS485 serial/sign communications wiring to the terminal block as shown:
RS485+
RS485Chassis
12345678
Note: Factory-installed
wiring is not shown
Power supply
wiring
Host computer must have proper
cabling (not provided) for RS485
configuration.
See table below for
cabling limitations
In the 3- and 4- line signs, there are two or more potential locations in the sign’s case for openings for
routing service wiring. When using openings other than those closest to the terminal blocks, be sure to
route sign communications wiring away from sign components using tie wrap pads at the top of the
case and tie wraps. (Route electrical wiring at the bottom of the case.) Any excess wiring length must
also be kept away from sign components.
5.
On the turbo-extender board, set all the DIP switches on, to terminate this sign.
Push all switches away from the edge
of the board to set termination to ON.
12345678
6.
42
P5
P6
12345678
P4
ON
P1
P2
P7
P3
4.
If this sign is part of a non-synchronous multiple-sign network and you want to set unique addresses
for signs, refer to “Changing the serial address from zero (default)” on page 24.
Multiple-sign networks
Introduction
Multiple AlphaEclipse™ signs can be connected to the same computer in one of two ways:
1.
Synchronized
•
•
Signs set up for synchronized messaging always display the same message on all signs in the
network at the same time.
In this type of network all signs are the same size, connected to each other by special turbo cable.
RS232 or RS485 cabling
or
modem & phone lines
or
2 wireless transceivers
Turbo-extender boards are used to relay the
communication signal from the master sign to
the slave signs, using special turbo cabling.
Message 1
Message 1
Master sign
Turbo
cable
Message 1
Receiver signs
can not be
connected to
a computer.
2.
Message 1
Up to 16 slave signs.
Non-synchronized
•
•
All signs can display messages independently; signs may or may not display the same message.
All signs have a serial address.
Message 1
Message 8
RS485
Message 6
RS485
RS485
Message 2
RS485
modem
modem
Message 1
Modem
modem
Message 2
Message 9
modem
Transceiver
Wireless
transceiver
Call the Adaptive® Customer Service
department for information on setting
up a multi-sign, non-synchronous
wireless network.
43
Synchronized messaging
Master signs
In a synchronized sign network, the master sign is the one connected directly to a computer using wired
(RS232 or RS485), modem, or wireless transceiver communication. The turbo-extender board of the master sign is
to be connected to the turbo-extender board of the next sign in the network with special turbo cables, using the
following instructions.
1.
Connect the master sign to the computer using any of the methods described in “Single-sign
networks” on page 41.
2.
Install conduit for cabling between the master sign and the first slave sign.
3.
Run the special turbo cable through the conduit and through the signal line opening of the master
sign.
Part number
4.
Description
Notes
1161-9404
25-foot turbo cable
Standard
1161-9405
50-foot turbo cable
Optional
Connect the end of the cable in the master sign to the P6 turbo-out socket at the right edge of the
turbo-extender board, just above the P4 turbo-in socket.
Master sign
P5
P2
P7
P3
P6 turbo-out
socket
P4
12345678
Note: Factory-installed
wiring not shown.
To slave
sign
P6
P1
12345678
Turbo cable
DIP switches
• RS485
• Modem
or
• Wireless
On the turbo-extender board of the master sign, set all the DIP switches on, to terminate this sign.
12345678
P5
P6
ON
P1
P2
P7
P3
5.
12345678
44
P4
Push all switches away from the edge
of the board to set termination to ON.
Slave signs
In a synchronized sign network, slave signs have a small turbo-extender board which has socket
connections for the special turbo incoming and outgoing communication.
1.
Run the special turbo cable from the previous sign through the signal line opening of this slave sign.
2.
Connect the end of the cable to the P4 turbo-in socket at the bottom right edge of the turbo-extender
board of this slave sign.
3.
If there is another slave sign to be connected, connect another turbo cable to the P6 turbo-out socket.
Slave sign
P3
P7
P2
P6
P5
P7
P3
P6 turbo-out
cable
P6 turbo-out cable to
next sign in network
P5
P2
P1
P4
12345678
P6
P1
P4 turbo-in
cable
Note: Factory-installed
wiring is not shown
4.
P4 turbo-in cable from
preceding sign in network
P4
12345678
DIP switches
On the turbo-extender board of this slave sign, set the DIP switches for termination of the sign:
Sign location
DIP switch settings
All switches OFF
The last sign in the network
All switches ON
P5
12345678
5.
P6
12345678
P4
Push all switches toward the edge of
the board to set termination to OFF.
ON
P1
Push all switches away from the edge
of the board to set termination to ON.
P2
P7
P3
Between the master sign and the last slave
sign in the network
Repeat these steps for all additional slave signs. There can be up to 16 slave signs.
45
Non-synchronized messaging
RS485 (standard)
In a multi-sign RS485 network that does not use synchronized messaging, the RS485 wiring must be
connected between all signs.
1.
Install conduit for the RS485 serial/sign communications wiring from the computer or the previous
sign in the network to this sign.
2.
Run RS485 serial/sign communications wiring through the conduit and through the signal line
opening of this sign.
3.
Connect (incoming) RS485 serial/sign communications wiring to the terminal block of this sign as
shown below.
RS485+
RS485Chassis
12345678
Incoming RS485 wiring
Connects this sign to the
computer or the previous sign.
Note: Factory-installed wiring is not shown
4.
Connect additional (outgoing) RS485 serial/sign communications wiring to the terminal block of this
sign as shown below.
Outgoing RS485 wiring
Connects this sign to the next.
12345678
RS485+
RS485Chassis
Note: Factory-installed wiring is not shown
5.
46
See “Changing the serial address from zero (default)” on page 24 to set a unique address for this sign.
6.
On the turbo-extender board of this sign, set the DIP switches for termination of the sign:
Sign location
DIP switch settings
All switches OFF
The first or last sign in the network
All switches ON
P5
P6
12345678
12345678
7.
Repeat the above steps for each sign in the network.
8.
See “Messaging software setup” on page 48 to configure software.
P4
Push all switches toward the edge of
the board to set termination to OFF.
ON
P1
Push all switches away from the edge
of the board to set termination to ON.
P2
P7
P3
Between the first sign and the last sign in
the network
Modem (optional)
The installation and setup of additional modem-connected signs is identical to the procedure used to
install a single modem-connected sign. Refer to “Modem (optional)” on page 32 for complete information.
Wireless (optional)
Call the Adaptive® Customer Service department for information on setting up a multi-sign, nonsynchronous wireless network.
47
Messaging software setup
Instructions in this section are for use with AlphaNET plus™ for Windows® software, version 1.3 or
higher, which is provided with the AlphaEclipse™ sign for sending messages to the sign. It is assumed that
AlphaNET plus™ software is installed on the computer sending messages.
Basic setup with AlphaNET plus™1.4
Before you can program any message on your sign, AlphaNET plus™ software must be configured with a
new device, using Site Manager. Then you can set up a “site” for the sign and send messages to it. These functions
are described in the steps below.
Create a device
In Site Manager, you must have the specific device needed set up for the specific COM port to which the
AlphaEclipse™ sign is connected. Use this table to determine the type of device needed for the specific type of
connection you have:
Connection
Device
Serial
Local Wired
Wireless transceiver
Local Wired
Modem
Modem
Follow these steps to be sure the device is properly set up:
1.
Open Site Manager and choose Edit > Device.
2.
If the device needed does not already exist, click Install.
3.
Choose the correct device and COM port, as shown in the illustrations on this page and the next.
•
For serial (RS232/RS485), choose Local Wired with the correct COM port.
Choose one
of these.
48
•
For wireless transceiver, also choose Local Wired with the correct COM port.
Choose one
of these.
Do not choose Local Wireless.
•
For modem, choose Modem with the correct COM port.
Choose one
of these.
4.
Click OK for the Install Device window.
49
5.
When the Device Editor window shows the device(s) you need, highlight (click on) the one you want
for this sign and then click on Edit. Be sure the settings are as shown below. Then click OK for the
settings and Close the Device Editor window.
•
Serial or transceiver connection
•
Modem connection
Do not use these.
50
Create a site
A “site” consists of a group of one or more signs to which messages are to be sent.
Choose File > New Site. On the Site Info tab, choose these settings. Then click OK.
•
Serial or transceiver connection
A
B
E
C
D
•
Modem connection
A
B
E
C
F
Refer to the AlphaNET
plus™ User Manual for
additional information for these
settings, or for setting a
specific sign address.
D
Item
Name
Notes
A
Site Name
Specify an appropriate name as desired.
B
Compatibility
Must be “Alpha 2.0”. This allows specific features which are needed for the AlphaEclipse™ sign.
C
Connect Device
Must be a device as appropriate with settings shown in the prior step.
NOTE: Do not choose a “wireless” connect device.
D
Enable error checking
Check this to record any errors in message transmission. Errors are logged in a Comm Manager
error file.
NOTE: Some versions of the AlphaNET plus™ User Manual state that error checking is not valid for
“wireless” connections, but the transceivers available as an option with the AlphaEclipse™ signs do
allow error checking.
E
Use as an Editor
transmit site
When checked, this designates that this site is to be used when sending messages from Message
Editor, described below. For purposes of initial testing, click this on.
F
Phone number
(Modem only) If needed, enter the phone number (provided by the telephone company) to dial,
including any external access number.
51
Create and send a test message
1.
In Message Editor, select File > New.
2.
Type in any text as desired.
3.
Select File > Transmit.
4.
In the Transmit window, choose To Selected Sites and click OK.
5.
The message will be displayed on the sign.
For message formatting and other information, refer to the AlphaNET plus™ for Windows® User
Manual.
Setting the time and date on the sign
Whenever a message is sent to the sign, the clock in the sign is automatically updated to synchronize with
the time on the computer.
However, if the computer is in a different time zone than the sign, there is adjustment available for this
difference. As an example, you could adjust for a computer in the Eastern Time Zone sending to a sign located in
the Central Time Zone. This is done in Site Editor on the Advanced tab.
For specific information, please refer to the AlphaNET plus™ for Windows® User Manual, listed on
page 1.
Setting a dimming time for a sign
The AlphaEclipse™ sign has a light-sensing photo cell which dims the LED display to 50% at dusk (or
darkness) and returns the display to 100% brightness at dawn.
You can set dimming to occur at specific times. If you do so, dimming of the sign will occur at the specified
Dim On Time. Full-power display will resume at the specified Dim Off Time.
You can also use both of these features together. If you do so, dimming of the sign will occur at dusk or at
the specified Dim On Time, whichever comes first. Likewise, full-power display will resume at dawn or at the
specified Dim Off Time, whichever comes first.
For specific information, please refer to the AlphaNET plus™ for Windows® User Manual, listed on
page 1.
52
Setting message timing
Many municipalities and other jurisdictions mandate strict guidelines on the length of time an outdoor
electronic sign may legally display a message, and/or how frequently messages may be updated or altered.
This section details how to schedule messages using AlphaNET plus™ software.
Setting length of time to display a message
1.
In Message Editor, open the message to be displayed.
2.
Choose Edit > Sign Select. Be sure Use Alpha 2.0 protocol compatible features is checked. If not, check it on.
3.
Choose Options > Speed > Custom.
4.
Enter the value for the length of time a message, or page of a message, is to stay on the sign.
NOTE: The actual range is
from 0.1 to 409 seconds.
Seconds-to-minutes Conversion
Seconds
Minutes
60
1
90
1.5
120
2
150
2.5
180
3
210
3.5
240
4
270
4.5
300
5
330
5.5
360
6
390
6.5
Selecting the days and time to display a message
1.
In Site Manager, add the desired message to a site by choosing Message > Add and selecting the
message.
2.
Highlight that message and choose Message > Schedule.
3.
Set the start day or category of days and, if available, the start time. If available, also set the stop day
and time.
53
4.
54
In the example below, a message is programmed to be run only during weekday morning hours.
Service and troubleshooting
Firmware updates
The internal program or firmware (also referred to as “flash EPROM”) that runs an AlphaEclipse™ sign
may need to be updated from time to time.
To find out about the availability of any updates, check this Web page, which will include full instructions,
as well as any available updates:
http://www.adaptivedisplays.com/support/eclipse
Periodic maintenance
Post-installation service guidelines
Observe the following guidelines when inspecting, servicing, or performing maintenance on an
AlphaEclipse™ sign:
• All adaptations to existing mounting structures should be professionally engineered.
• Wind-damaged plexiglas sign faces should be removed as soon as possible after storms.
• If the sign has been installed in a poor drainage area and the foundation of the mounting structure
is regularly in standing water, landscaping may be required to correct the problem.
• Welds, fasteners and base plates in the mounting structure should be protected from water, salt
and other environmental damage.
• Sign structures should be inspected routinely. In areas with particularly severe weather and wind
conditions annual inspections are recommended, before or after the severe weather season.
• To prevent bi-metal corrosion, installation should provide for isolation of dissimilar materials
when mounting to the mounting support bars.
Routine inspection
The sign should be periodically inspected for:
• Insecure mounting
• Damage to the plexiglas window
• Blockage to air flow to the fans
• Blockage of the drain holes at the base of the door and body of the case
• Weather-tight conduits, seals and gaskets
• Loose or corroded fasteners or welds
• Fatigue stress cracks, deflected or bent supports or cross-braces, or other obvious deformations of
the mounting structure
Cleaning of external surface
If cleaning the plastic front window is necessary, use a soft cotton cloth with mild soap and water. Alcohol
and cleaners with alcohol (or any other strong solvent) are not recommended.
Battery information
The AlphaEclipse™ sign uses an internal battery to store and retain message data when the power supply
to the sign is disconnected. If the battery fails while the sign remains connected to a reliable source of power, you
will not become aware of the battery failure until the power supply is lost or interrupted.
NOTE: Backup batteries are soldered to the main micro controller board and should not be replaced by
anyone other than a qualified Adaptive® technician.
If you suspect that your internal backup battery may have failed, please call Adaptive® Customer Support
at 414-357-2020.
55
Diagnostics
On the side of the main micro controller board are two sets of LED lights. These are used for informational
and diagnostic purposes. Their indications are detailed in the table below.
Top set of
diagnostic LEDs
1
2
3
4
Bottom set of
diagnostic LEDs
LED number
56
Color
Indication
5
6
7
8
Meaning
1
Green
RS485 RXD/Receive/in
The sign is receiving a transmission from the computer via RS485.
2
Red
RS485 TXD/Transmit/out
The sign is sending a transmission to the computer via RS485.
3
Green
RS232 RXD/Receive/in
The sign is receiving a transmission from the computer via RS232.
4
Red
RS232 TXD/Transmit/out
The sign is sending a transmission to the computer via RS232.
5
Green
Flash firmware update
The sign is receiving and processing an update for the firmware.
6
Red
Not used.
7
Blue
Steady light: Power-up
Blinking: Normal processing
8
Yellow
Not used.
The sign is powering up. This lasts approximately 2 seconds.
The sign is under normal operation.
Views of LEDs
shown as seen
from the left
side of the
micro controller
board when
mounted on the
sign
Appendices
RS485 EOL termination
When one or more signs are connected to a computer and RS485 cabling is a part of that network of signs,
End-Of-Line (EOL) termination must be set correctly in order for the sign(s) to display messages.
NOTE: EOL termination only applies to AlphaEclipse™ signs that are connected serially using RS485 and
possibly turbo cabling. EOL termination does not apply to signs that communicate with a
computer using modems or wireless transceivers.
EOL termination is set by setting DIP switches on all of these components:
• Converter Box III (See the topic “Converter Box III” in the Network Configurations manual, PN
9708-8046.)
• Micro controller board (See “EOL termination” on page 26 in the section for “Configuring the
sign”.)
• Turbo-extender boards (See “Synchronized messaging” on page 44 for master and slave signs.)
Determining how to set these EOL switches depends on the way the AlphaEclipse™ signs are connected
together. An AlphaEclipse™ sign can be:
• a master sign connected to a computer or another master sign using RS485 cabling
• a slave sign connected to a master sign or to another slave sign using special turbo cabling
Here are some possible network setups and the EOL termination settings.
1.
One single sign
Sign network with standard RS485 cabling.
Termination is set on the micro controller board.
EOL
termination
ON
RS485
Converter
Box III
Micro controller
switches
ON
Master sign
Turbo switches
ON
Since there are no slave signs, there is no
special turbo cabling. However, the turbo
switches on the turbo-extender board must
be set ON.
57
2.
Two signs, non-synchronized
Sign network with standard RS485 cabling.
Termination is set on the micro controller board.
EOL
termination
ON
RS485
Converter
Box III
Micro controller
switches
OFF
Turbo switches
ON
Master sign
Micro controller
switches
ON
Master sign
Turbo switches
ON
Since there are no slave signs, there is no special turbo cabling.
However, the turbo switches on the turbo-extender board must be set ON.
3.
One master sign with one or two slave signs following
Sign network with standard RS485 cabling.
Termination is set on the micro controller board.
EOL
termination
ON
RS485
Converter
Box III
Micro controller
switches
ON
Master sign
Turbo switches
ON
Turbo
Slave-middle
Slave signs do
not have a micro
controller board.
Turbo switches
OFF
Turbo
Slave-end
If there’s only one slave
sign, its turbo switches
should be ON.
Turbo switches
ON
Master/slave sign network with special turbo cabling.
Termination is set on the turbo-extender board.
58
4.
A mixed network of signs
Sign network with standard RS485 cabling
Termination is set on the micro controller board.
EOL
termination
ON
RS485
Converter
Box III
Micro controller
switches
OFF
Turbo switches
ON
Master sign
Micro controller
switches
ON
Turbo
Turbo
Turbo switches
OFF
Slave-middle
Slave signs do
not have a micro
controller board.
Turbo
Turbo switches
ON
Slave-end
Slave signs do
not have a micro
controller board.
Turbo switches
ON
Slave-end
Master/slave sign network with special turbo cabling.
Termination is set on the turbo-extender board.
Master/slave sign network with special turbo cabling.
Termination is set on the turbo-extender board.
5.
Turbo switches
ON
Master sign
One master sign between two slave signs
Sign network with standard RS485 cabling.
Termination is set on the micro controller board.
EOL
termination
ON
Slave-end
Turbo
switches
ON
RS485
Converter
Box III
Micro controller
switches
ON
Master sign
Turbo
switches
OFF
Slave-end
Turbo
Turbo
switches
ON
Turbo
Slave signs do
not have a micro
controller board.
Slave signs do
not have a micro
controller board.
Master/slave sign network with special turbo cabling.
Termination is set on the turbo-extender board.
59
Spare parts list
Category
Part
Part number
30 Degree Red Replacement Driver Board- 8x8x1.4R
1160-9201N
PCB ASY, P1160, 8x8-1.4R BIN N, SPARES
1160-9201P
PCB
ASY,
P1160,
8x8-1.4R
BIN
P,
SPARES
AlphaEclipse
1160-9201Q
PCB ASY, P1160, 8x8-1.4R BIN Q, SPARES
Driver Boards
1160-9201R
PCB ASY, P1160, 8x8-1.4R BIN R, SPARES
1160-9201S
PCB ASY, P1160, 8x8-1.4R BIN S, SPARES
NOTE: Driver boards must 70 Degree Red Replacement Driver Board - 8x8x1.4R WA
be ordered to match the
1160-9203R
PCB ASY, P1160, 8x8-1.4R, WA, BIN R, SPARES
BIN number on your
1160-9203S
PCB ASY, P1160, 8x8-1.4R, WA, BIN S, SPARES
existing sign.
BIN numbers are found on 70 Degree Amber Replacement Driver Board - 8x8x1.4A WA
the back of each driver
1160-9204P2
PCB ASY, P1160, 8x8x1.4A WA, BIN P2, SPARES
board.
1160-9204P4
PCB ASY, P1160, 8x8x1.4A WA, BIN P4, SPARES
1160-9204Q2
PCB ASY, P1160, 8x8x1.4A WA, BIN Q2, SPARES
1160-9204Q4
PCB ASY, P1160, 8x8x1.4A WA, BIN Q4, SPARES
AlphaEclipse
1160-9001SP
MICROBOARD WITH SERIAL ADAPTER
Microboards
NOTE: Specify size and
color of display.
Temperature Probe
Miscellaneous
AlphaEclipse
Spare Parts
Slave Unit
Spare Parts
60
PCB ASY, TURBO EXTENDER
TEMPERATURE PROBE KIT, AEMC, SPARES
SWPS 200W 85-264-5
120V Internal Fan
240V Internal Fan
120V Exhaust Fan
240V Exhaust Fan
Ribbon Cable between Drivers
55cm Ribbon Cable between Micro & Driver
75cm Ribbon cable between Micro & Driver
Line Filter
Surge Suppressor Capacitor (2 per sign)
Latch Key
Exhaust Thermostat
Heater Thermostat
Overtemp Thermostat
Power Switch
Photo Cell
AEMC Modem Kit 120V
AEMC Modem Kit 240V
AE Transceiver Kit - 120V
AE Transceiver Kit - 240V
Slave Turbo Interface Board
25-ft Slave Cable between Master Micro Board and Slave Turbo
Extender Board
1161-9101
1161-9403SP
4065-6110
4600-0009
4600-0012
4600-8028
4600-8029
7226-1403
7226-1404
7226-1405
3073-0014
3035-0012
6811-6061
3067-0758
3067-0755
3067-0002
4810-0002A
1160-9004SP
1161-9401
1161-9402
1088-9312
1088-9313
1161-9102SP
1161-9404