1
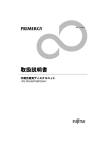
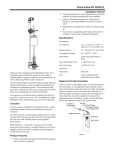
Leica DFC
Cameras
FireCam Application
Symbols
Table of Contents
Table of Contents
3
Symbols
4
Introduction
5
Installation
6
Menu Bar
12
Setup-Panel
15
Acquire Panel
28
Browse Panel
54
Power User Features
57
Warning
This symbol indicates especially important
information that, if not observed, can lead to
malfunctional disturbances or and damage to the
instruments.
Useful Information
This symbol indicates additional information or
explanations that intend to provide clarity
understanding.
Action
4 This symbol within the text indicates that certain
operations actions must be carried out.
Leica FireCam Application – User Manual 3
Leica FireCam Application – User Manual 4
Installation
Introduction
Dear Customer,
We are very pleased that you have chosen to
purchase one of our Leica imaging products. The
Leica FireCam application is a software that runs
on Macintosh computers to operate all Leica
firewire cameras.
The information provided in this Leica DFC
Camera Manual is subject to change without
notification and does not present Leica
Microsystems Ltd. with any binding commitments.
The software described here is a licensed product,
and may be used only in accordance with the
conditions as defined in the license agreement.
The user interface is designed such that the
essential functions for controlling all supported
cameras can be reached through the same user
interface. This design means that you can operate
all the cameras on your system without further
expense after having worked through the user
interface once.
The FireCam application is bundled with all new
camera options purchased..
The FireCam application is the stand alone
software to control the Leica cameras. It contains
all the control and display functions for the camera
and is very easy to use.
The standard procedure for a camera installation is
described below. This normally consists of the
following operations:
Connect Camera 4 Connect your camera to a firewire port on your
computer.
Some computers have a firewire connectors that
do not carry power lines and therefore need a so
called Firewire Repeater to add power to the
firewire bus. Some early blue desktop G3
Macintosh computers need an additional OHCI
firewire board to operate the camera correctly.
See the system requirements at the end of this
manual or in the Readme-Files of the CD.
Install Leica Insert the FireCam CD into the CD-Rom drive of
FireCam your computer. When the Leica FireCam CD
Application appears on your desktop double click the icon to
see the contents of the CD.
The following folder will be displayed:
Leica FireCam Application – User Manual 5
Leica FireCam Application – User Manual 6
Locate the Leica FireCam application and double
click it to start the software. Leica recommends to
create an alias of the application for easier access
and to drag it to the desktop or to install the
application in the dock of Mac OSX:
Locate the file ReadMeFireCam.jpg,
ReadMeOS9.jpg or ReadMeOSX.jpg and double
click it. Follow the installation instruction on the
screen.
To install the FireCam Application, simply drag the
folder “Leica FireCam” to your desktop or into your
applications folder. When you open the copied
folder, you see the following files:
Leica FireCam Application – User Manual 7
Leica FireCam Application – User Manual 8
Install Camera A driver is the communication interface between
Driver the camera and the computer. There are different
camera drivers available for MacOS 9 or MacOSX.
Doubleclick on the LeicaDrivers disk to start the
installation. Two yellow boxes representing the
software packages are displayed.
On MacOS 9, locate the folder “FireCamDrivers
OS9” and open it. Double click on the file
“LeicaDriversOS9 Installer” to install the necessary
files to your harddisk. You need to reboot your Mac
after this installation.
If you are using Mac OSX 10.1 double click on the
package LeicaDriversForOS10.1.pkg.
If you are using Mac OSX 10.2 or later, double
click on the package Leica DriversForOS10.2.pkg.
To start the installation, you have to enter the
administration password to make changes to your
harddisk. Click the lock to allow such changes:
On MacOS X, locate the folder “FireCamDrivers
OSX” and open it. Double click on the file
“LeicaDriversOSX.dmg”. A so called disk image
object called “LeicaDrivers” will be created on your
desktop that contains all the camera drivers for
OSX.
Leica FireCam Application – User Manual 9
Now enter the password and click on OK:
Leica FireCam Application – User Manual 10
After installation of the Leica software you should
reboot the computer. Open the FireCam
application by double clicking the application icon:
The Firecam application starts and displays its user
interface and its corresponding menu bar:
Menu Bar
As all other applications on the Mac OS, the
FireCam application displays a menu bar the the
upper margin of the screen.
The Apple menu contains some general apple
menu items that are not related to the FireCam
application.
The “Leica FireCam” menu contains some general
menu commands for the entire application like
hiding the user interface or quitting the application.
About FireCam: This function displays information
about software used and its copyright holders.
If you restart the FireCam Application anytime
later, the user interface will show up as when you
have quit the application. The size and position of
the window, the active control panel and all the
camera settings are restored from a preferences
file which is stored either in the preferences
directory (with OS9.x) or in the directory
home/Library/Preferences (with OSX). You can
delete the firecam preferences file anytime in case
you want to start the FireCam application with the
factory default values.
Leica FireCam Application – User Manual 11
The “File” menu only contains one single item
called “New”. Calling this menu items will capture
an image.
Leica FireCam Application – User Manual 12
The "Edit" menu is less important, because
FireCam does not offer any options to cut out or
insert parts of an image. It supports however the
delete option in the Browse Panel to delete stored
images.
overall picture impression. Pictures without
sharpening are technically correct, but sharpening
can produce slightly crisper images and the viewer
may find them more striking.
The effects of sharpening are not visible in the live
image but only in a 1:1 scale reproduction of the
image acquired. Each pixel in the image
corresponds exactly to each pixel displayed on the
monitor.
The “Image” menu contains several important
entries concerning image manipulation. Most of
them are also available in the context menu of the
live video. To open the context menu in the live
video hold down the CTRL-key while clicking with
the mouse inside the live video (see section
below).
2:1 representation of an unsharpened image
Flip Horizontally / Vertically
Flips the image horizontally or vertically. Pay
attention that flipping may change the orientation of
the image.
Sharpen
The FireCam application offers a sharpening
feature for the acquired images. The image
sharpening function is a sharpness filter that the
software applies to the raw data to improve the
Leica FireCam Application – User Manual 13
2:1 representation of the same image, with
sharpening
Leica FireCam Application – User Manual 14
Setup-Panel
If the attached camera is not recognized, an error
dialog is displayed:
Once you have installed the camera, you must
configure the camera to the system.
4 Input Options: Select the camera
4 Output Options: Select file options
4 Default Image Info: Select additonal image info
Input Options:
Do a hotplug of the camera (unplug and reconnect
the firewire cable). You may also try to switch to
the VC100 camera for a moment and return to the
Leica camera again. If you are still not able to
connect, quit the application and restart and / or
reboot the computer.
Firmware Update If the FireCam software detects that the firmware
of the camera needs to be updated, a dialog box is
displayed
Choose the camera that is attached to the
computer.
Note: the VC100 is a virtual camera that allows you
to check the firecam application. Although no real
camera is attached, the entire processing, saving
and displaying features of the Firecam application
works as if a real camera is delivering images.
Leica FireCam Application – User Manual 15
Click on the Update button to start the upload of
the firmware or click on cancel to continue without
updating the firmware. Leica however strongly
recommends to do the firmware update in order to
take advantage of corrected or improved firmware
software inside the camera.
Leica FireCam Application – User Manual 16
If the update was successful the following dialog
box is displayed.
Macintosh Powerbook or iBook. In any other case
you should not turn off the active cooling of the
DC500.
Black / White This will be available in the future.
Correction
Calibrate Do some calibration functions for the DC500:
Follow the instruction displayed and restart the
application. The firmware update procedure should
not be displayed any more. You can also detect
the present version of the firmware in the Input
Option Screen of the connected camera.
Input Options If an attached camera is recognized, some camera
DC500 specific setup features are displayed:
1. Black Reference:
A black reference may become very useful if long
exposure times are used. The dark current of a
specific exposure time will be corrected by
applying some algorithms to the captured images if
a black reference is available. Taking a black
reference will take approx. 30 seconds.
Active Cooling you can turn off the active cooling of the DC500 in
case you need to save battery power on a
Leica FireCam Application – User Manual 17
Leica FireCam Application – User Manual 18
2. White Reference:
3. Color Calibration:
The shading correction function allows an
improvement of the overall image quality. This
function is only available with certain Leica
cameras.
The brightness distribution is seldom
homogeneous over the whole picture in practically
all situations because of the lighting conditions,
optics, adapter, etc. To create a perfectly
corrected, homogeneous image, a black image, ie
an image created in zero light conditions, and a
white image, ie an image of the exposure light
only, are taken as references and calculated into
the original image during image acquisition.
Follow the instruction on the screen to produce a
white reference.
In the case of incident illumination and with both
stereomicroscopes and macroscopes it is possible
to precisely calibrate the colors. What you need is
the Leica color calibration tool (Art.No. 10 447
123).
Make sure the color calibration tool can be
displayed completely and the layout is as in picture
above (row of grays in the bottom line). Press start
to enter the color calibration wizard.
A maks of the color calibration tool is displayed.
Leica FireCam Application – User Manual 19
Leica FireCam Application – User Manual 20
Move and adjust the mask until if fits the calibration
tool. The color calibration values are saved in the
preferences file and also when you save a setting
file later in the application. It remains valid until you
delete the preferences file or you load a setting
with different color calibration values.
4. Piezo Calibration:
If the color calibration was successful a dialog box
will be displayed:
Do do a piezo calibration, you need a piezo
calibration pattern (available for stereo- and
compound microscopes). Adjust the pattern in
such a way that you see approx. 5 to 10 grid lines
inside the circle. Press continue…
The calibrated piezo values are saved in the
preferences file and also when you save a setting
file later in the application. It remains valid until you
delete the preferences file or you load a setting
with different piezo calibration values.
Calibrating piezos is hardly ever needed. Make
sure you do the calibration correctly and use it with
care. Wrong piezo calibration values may lead to
spoiled pictures in multishot mode.
Leica FireCam Application – User Manual 21
Leica FireCam Application – User Manual 22
Input Options DFC
cameras
Active Cooling you can turn off the active cooling of the DFC
camera in case you need to save battery power on
a Macintosh Powerbook or iBook. In any other
case you should not turn off the active cooling of
the camera.
Shading Correction This will be available in the future.
Output Options
In the output options panel you can select some
file options. The FireCam application comes with a
so called autoname feature that predefines the
name of an image before you take it. With this
feature you don’t have to care about filenames
during a taking session. Select the name and the
starting number and start acquiring one image after
the other. In the case above they will be called:
Image001.tif
Image002.tif
Image003.tif
etc.
At any time, you can override the selected filename
during Live-Video Preview before taking the the
next image (see also Acquire Panel) :
Leica FireCam Application – User Manual 23
Leica FireCam Application – User Manual 24
Bitdepth:
Depending on the camera type, an image can be
acquired and saved at various color or grayscale
resolutions. Most Leica cameras offer a color depth
of more than 8 bits per color. However, when
saving image data on your computer you must
decide to store a pixel value either in 8 bits (1 Byte)
or in 16 bits per color (2 Bytes).
After saving
In the output selection you can also select what to
do after taking the image:
If you want to continue taking images without
interruption, select the first option (Do nothing).
This is the fastest way to acquire succeeding
images.
If you want to quickly overview the captured image,
select the second option (Switch to Browse).
Only a few image manipulation software
packages, such as Photoshop, are able to handle
color depths greater than 8 bit per color. If an
image is acquired with a color depth greater than
that acceptable to the image handling program, an
error message may appear, the image acquired
may be ignored or the software may even crash. It
is not possible for the FireCam software to detect
whether or not the image manipulation software
can handle higher color depths correctly.
If in doubt, select 8 bits and let the FireCam
application take care about the color depth
reduction. Use the 16bit bitdepth only if you are
going to use an image manipulation software that
is able to handle the 16 bit data format.
Leica FireCam Application – User Manual 25
If you like to immediately view the image in full
resolution select the third option (Open the image).
You have to select a suitable image viewing
application. In OS-9 and OS-X an application is
predefined that is part of the Macintosh operating
system. (QuickTime-Viewer or Preview). Both
applications are very fast and able to do some
basic image manipulations, like turning or saving to
a different location or in another image format.
Of course you can also select some highly
sophisticated image manipulation software like
Photoshop or similar.
Leica FireCam Application – User Manual 26
Default image info
Acquire Panel
Live Image
If you switch to the Acquire Panel, the Live video of
the camera will be displayed:
In the Default image info, you can add some info
tags to your images which are readable by many
different image softwares.
If you save the image in another image
manipulation software that does not support such
image tags, the information gets lost. This is also
the case when you save the image in formats like
jpg or bmp.
All camera and windows parameters are saved
when you quit the FireCam application so that you
do not have to repeat these setup steps in future.
Leica FireCam Application – User Manual 27
The live image from the camera may be seen on
the right-hand side of the window, on the left side
are the image control functions. On the bottom side
are the info section and on the lower right side is
the big exposure button.
The various functions in this panel are described
as follows.
Leica FireCam Application – User Manual 28
Image acquisition
Acquire Panel General Controls
W
The image acquisition module is controlled by
means of an interface designed to be as easy as
possible to use and which shows most frequently
used functions and information. The graphic
control elements laid out in the left part of the
graphical user interface are used to control the
standard functions of your image source.
To acquire an image, simply click on the
"Acquire" button, select the menu enty New in
the File-menu or press the shortcut z-N.
Note how the Acquire button turns red for a
moment and that a release sound of a camera is
played!
Depending on the camera type and the settings
you have selected, this process may take anything
from a few seconds to several minutes. Sometimes
the image will be exposed several times and a high
resolution will be achieved using chip–offset
techniques. These processes can take a long time
to execute, even on fast computers. Two turning
arrows in the Info box indicate the operation
currently being executed.
Note that you can capture several images in a row
without waiting for the image processing. As you
capture the images, the image processing pipline
counts up the remaining images to process. As
soon as the processing is done, the captured
images are displayed in the Browse Panel.
Leica FireCam Application – User Manual 29
Leica FireCam Application – User Manual 30
Live Image Control
Popup menus Many functions or status messages contain further
sub-functions or settings. These sub-functions are
generally hidden and can be accessed by pressing
the CTRL key and clicking with the mouse button.
Note how the cursor changes from an arrow to an
arrow with a small menu when you press the CTRL
key.
The live image shows the image as supplied by the
camera. Depending on the type of camera, the live
image can differ from the target image significantly,
e.g. if the camera supports various different
resolutions. The main task of the live image is a
visual check on the image quality, i.e. focussing,
framing, etc.
The quality of the live image display is heavily
dependent on the camera specification and might
differ for the individual image sources.
Context menu with important functions
The live image window itself also contains control
elements. The function may be selected from a
context menu, which is activated by pressing the
CTRL key and clicking with the mouse button
inside the Live video. Note how the mouse cursor
changes its shape when you press the CTRL-key!
Activated entries will be marked with a checkmark.
Reselect the entry again to turn off a specific
function.
Context menu inside the Live video
− Help: not supported at this moment (greyed out)
− Binning: turns on the Binning mode thus
producing faster live video. Depending on the
Leica FireCam Application – User Manual 31
Leica FireCam Application – User Manual 32
type of camera, different binning modes may be
available. Binning is a special image acquisition
technique in which several pixels are combined
and thus faster data download is possible.
However the color information may get lost and
the quality of the live image may suffer. To avoid
any loss of quality, turn off binning (if possible)
but a slow live video frame rate may result.
range for the image source from the darkest
regions to the brightest. Note that you can
adjust the sections of under and overexposure
by dragging the histogram controls to the left or
to the right! The selection of the histogram is
marked in the image with corresponding colors
showing under- and overexposed regions.
With short exposure times the live image refresh
rate can be almost doubled by activating binning.
With long exposure times, however, the faster read
out of the sensor data allowed by binning does not
affect the live image refresh rate very much.
If binning is activated, the image is acquired at
reduced resolution and may loose the color
information.
− Suppress while acquiring: if activated stops the
live image during image acquisition to speed up
processing. Do not activate this if you want to
capture an image of your sample at a very
precise moment. The live video will then not
turn off during processing.
Deep Red and deep blue pixels show sections of
over- / under-exposure in live image
− Flip Horizontally: flips the live image left to right
and right to left
− Flip Vertically: flips the live image top to down
and down to top
− Show Over/Underexposure: This function helps
to find a perfect output from your image source
by indicating the extent to which a part of the
image is underexposed or overexposed. In
conjunction with the live histogram, this function
assists in adjusting the image source lighting
conditions to values ensuring a perfect dynamic
Leica FireCam Application – User Manual 33
Leica FireCam Application – User Manual 34
Acquire Panel: Toolbox
The toolbox contains the most important tools as
buttons. The active button appears pushed in and
darker (in the illustration below, e.g. the arrow
tool). These tools are also called mouse-tools
because selecting a tool changes the shape of the
cursor.
changes simply click on Auto again to calculate the
best capturing values.
} If there is a need to turn on the automatic
feature all the time, e.g. when switching often
between objectives or when the illumination is
changing, you can make the button always:
simply hold down the z - key and click the auto
button. To unpress the button, click it again.
This will turn off the automatic exposure feature.
} Activate the option dialog box of the automatic
function, by pressing the ALT key and clicking
on the auto button (which turns into an Optionbutton).
Toolbox: Auto-Button
The automatic control functions described in the
paragraphs below essentially help to create the
best conditions for image acquisition.
Any professional user will be pleased to have
these functions available. In most cases, however,
users will prefer to concentrate on the image
content rather than the image acquisition
technique.
Intelligent automated systems help you to do this.
They analyze the current light conditions and
control the image source in such a way that the
resulting image is optimized for you. These
automated systems take into consideration the
following parameters: exposure time, image
amplification, image contrast and gamma value.
} Activate the automatic function, by clicking on
the auto button.
Note how the button turns grey as you press it and
becomes unpressed after a while. This is because
the FireCam software calculates the best capturing
values from the present live video only and then
returns control. The automatic feature is not active
all the time to avoid slower frame rate due to
ongoing calculations. If the lighting conditions
Leica FireCam Application – User Manual 35
Select the options that should be active when you
click on the Auto button. Leica recommends to
check only the first option (Automatic Exposure
Time).
Automatic Exposure Time: calculates the
appropriate exposure time so that the live image is
well balanced (neither under- nor overexposed).
Black Clip / White Clip: sets the black and white
histogram controls (the triangles below the
greybar) to the corresponding values in the
histogram, see example below:
Leica FireCam Application – User Manual 36
Toolbox: Arrow
The arrow tool has no function and is used to turn
off other mouse tools, e.g. if you want to avoid a
change of the neutral setting by clicking with the
neutral tool inside the live video, you should return
to the arrow tool.
White Clip set to 0%, Black Clip set to 0%: all pixel
values are displayed, no clipping occurs:
Toolbox: White Balance
The white balance function performs a color
correction in the image source in order to display
all neutral-colored components of the image (all
gray tones, from black to white) without any color
tone. Thus, the term white balance is not strictly
correct, neutral balance would be more accurate.
However, as the term white balance is used
worldwide, we will continue to use it here.
White and Black Clip set to 2%: live image is more
crisp due to clipping of histogram.
For best results and crisp images, set the clipping
value between 0.5% and 2%.
Automatic Levels: sets the histogram controls in
such a way that black point and white point
matches the histogram values according to the
black and white clip settings.
Automatic Whitebalance: automatically calculates
the white or graybalance of the entire image.
The white balance procedure is one of the most
important settings for the acquisition of a wellbalanced color image. It can be applied either to a
specific detail of the image or to the complete
image.
To do a white balance in an image simply click with
the mouse in live image: As soon as the mouse is
moved inside the live image, the mouse pointer
changes from an arrow to an eyedropper.Click with
the mouse on an area that should be white or gray
balanced. A white balance mark is placed at the
click position for later reference (but will not be
stored in the image!) To avoid such markers select
the color wheel tool (see below).
Make sure the overall live image contains all colors
equally. Do not mark this option if you are working
with monochromatic images as it is the case for
example in fluorescent mode.
Leica FireCam Application – User Manual 37
Leica FireCam Application – User Manual 38
Toolbox: Color-Wheel
Next to the eyedropper for the white balance is the
icon to display the color wheel. Press it to display
the color wheel and click anywhere outside the
color wheel to hide it again.
Live image with single mouse click for white
balance
In order to define the region of interest (ROI) for
the white balance, just draw a rectangle window
using the mouse with the mouse button
depressed. As soon as you release the mouse
button the white balance is calculated for the
selected rectangle and applied to the entire image.
This function is used for fine-tuning the white
balance. Depending on the light conditions and the
camera characteristics, fine correction of the image
may be necessary after a white balance to
compensate for a red color shift, for instance. You
can use the mouse to drag the small circle in the
color wheel displayed towards the color balance
you require.
Live image with ROI for white balance
As mentioned before, the white balance may also
be applied to the complete image. In this case, you
do not need to draw a window, but only to click on
Auto-button. You need however have selected the
Automatic Whitebalance option in the AutoOptions.
Leica FireCam Application – User Manual 39
Use the color circle also to avoid any white balance
markers inside the live video which are set when
you use the neutral eye dropper.
Toolbox : Crop
This function allows you to acquire only part of the
image. When corp is activated, a rectangle is
shown in the image. The position and size of the
crop rectangle can be changed at any time by
moving the mouse on one of the square dots
around the window frame and dragging the mouse
with the button depressed. Note how the mouse
pointer changes its shape to an arrow as soon as
you touch one of the square dots of the rectangle.
Leica FireCam Application – User Manual 40
Below or above the magnifyer window a focus bar
is displayed which indicates a sharpness measure
inside the magnifying window.
The red square inside the focus bar will stop at the
highest focus value and moves slowly to the left
until it touches the green bar again. Use this focus
indication to find the perfect focus for your image.
To move the crop rectangle to another position,
click inside the rectangle and drag it to the new
position.
To get rid of the crop rectangle, simply click
outside of the crop rectangle.
Toolbox: Magnifyer
With the magnifyer tool you can enlarge a portion
of the live video for better focusing like a
magnifying glass. The magnifyer window always
displays the section under the window in full
resolution (1:1) so some zooming normally occurs
if you display the live video in reduced resolution.
Note that the magnifyer window pops up in its last
position as soon as you select the magnifyer tool.
To reposition the magnifying section move the
mouse cursor inside the magnifyer window. Note
how the cursor turns into a hand tool. Click the
mouse and drag the window to any other location
to display another full resolution section.
If you want to zoom into a corner (where you
normally cannot move the magnifyer window) click
with the mouse cursor into that corner instead of
draging the magnifyer window there.
As long as the magnifyer window is visible, all
image adjustments like exposure time, gamma,
saturation etc. will only be applied to the magnifyer
window.
To turn off the magnifyer tool choose another
mouse tool from the toolbox, e.g. the arrow tool.
Leica FireCam Application – User Manual 41
Leica FireCam Application – User Manual 42
Image Control: Image Type
Image Control: Exposure Time
Some important control features are located in the
following image control box:
The exposure time is shown in micro-, milli or
seconds. You can also type in the exposure time
values and add s for seconds or ms for
milliseconds:
Type: Depending on the image source, there may
be one or many image resolutions available.
Special cameras are capable of achieving true
image sizes that are multiples of the actual chip
size by means of CCD chip movement. Other
cameras are able to combine several pixels to form
a new pixel, thus increasing sensitivity but at a
smaller image size (binning).
You can also use the up and down key to fine
adjust the exposure time but you need to activate
the value box first. This is the case when you click
once inside the value box or when you type a
value. Nothe how the value box gets a blue border
when it is active.
Image Control: Gain
Selection of the target image resolution
Please note that higher image resolutions naturally
mean that more memory is required and recording,
reading and writing times are substantially longer.
Please note that the image size setting does not
affect the live image.
Leica FireCam Application – User Manual 43
A gain control may be used to amplify the camera
signal. With gain it is possible to shorten the
exposure time and increase the frame rate.You
should avoid gain whenever possible because gain
is also amplifying noise which may degrade image
quality.
Set the gain value the same way as the exposure
tim value: move the slider or type in a value.
You can also use the up and down key to fine
adjust the gain value once the gain box is
activated.
Leica FireCam Application – User Manual 44
Image Control: Saturation
The Saturation slider lets you select a desired color
saturation.
For normal color images, move the slider to the
right to 100%.
The gain value is displayed as a factor 1x, 2x, 3x
etc. but you can also type in the values in dB which
is also commonly used with digital cameras and
which is recalculated and displayed as a factor:
For pure grayscale images, move the slider to the
left to 0%.
You can also type in the desired value by
activating the value box and entering a value. Note
that you can type in a value of more than 100%
thus oversaturating the image which may be quite
useful with very faint color images.
If a gain value of more than 0 dB or 1x is selected
a warning message will be displayed:
If you do not want to be reminded about the gain
setting, click the checkbox so the warning
message does not show up again. If you want the
message to reappear delete the preferences file of
the FireCam application.
Leica FireCam Application – User Manual 45
Leica FireCam Application – User Manual 46
Manual exposure
Levels Control
A very important image control element is the live
image histogram which is a graphical
representation of the current light conditions as
seen by the camera. The live image display on the
right-hand side of the window shows the current
image and is mainly used for visualization and as a
preview of the image to be captured.
The histogram shows the light distribution in the
live image, from the darkest components on the
left-hand side to the brightest components on the
right-hand side, as indicated with the grayscale
bar. The histogram indicates the relative
distribution of pixels by tonal value. A peak in the
histogram means that there are many pixels in that
density range. A well-illuminated image should
contain all components from dark to light.
Automatic exposure offers the best possible
combination of the available control parameters for
most acquisition situations, allowing the user to
concentrate on the image content. However, in
situations with difficult light conditions, the
professional user may wish to modify these control
parameters.
At any time you can move the histogram controls
(the triangles below the gray bar) with the mouse
to a new position. The controls remain there until
you move them again or until you press the auto
button again (only if autolevels is checked).
Some stored setting files may also modify the
histogram parameters. See the section about the
setting files.
Live image histogram
The histogram can be used to control brightness
and contrast of an image. Understanding the
histogram is therefore crucial to obtain the best
captured images.
Leica FireCam Application – User Manual 47
At any time you can enter different values in the
value boxes below the histogram controls. Use the
up and down arrow keys to move the triangles to
the desired position.
Leica FireCam Application – User Manual 48
Contrast
To obtain the best image, the contrast indicators
(black and white triangles below the gray bar)
should be lined up with the limits of the brightness
distribution histogram as shown in the example
below. This is also the operation that the automatic
contrast control performs on the live image.
The automatic gamma value function calculates an
optimum gamma value from the composition of the
current brightness distribution.
Managing Settings
Below the tool bar is a very powerful button that is
normally named Custom: It manages the setting
feature of the FireCam application.
You can select from some predefined setting like
color temperatures, gamma or special, or create
new ones.
Gamma
The gamma value helps to brighten or darken
specific light intensities within an image.
Depending on the acquisition situation, dark areas
in images often appear too dark for the human
eye. The gamma value is displayed as a gray
indicator between the two contrast indicators (black
and white triangles). Moving the gamma value
allows selective brightening of these areas.
The gamma value depends on the position of the
contrast indicators. A gamma value of 1.0 for
example is set when the grey indicator is exactly in
the middle of the two contrast indicators,
independent of the position of the contrast
indicators.
Once you have defined the best settings for your
specific environment, you can save them and
retrieve them at any time. This feature is not only
useful for different working and lighting conditions,
but can also be used to create reproducible userspecific working conditions.
Moving the gamma indicator to the left reduces the
gamma value producing a somewhat fainter image,
moving it to the right increases the gamma value
producing a somewhat crisper image.
4 To save a configuration, click the Custom
button and select the "Save…" command from
the menu.
Leica FireCam Application – User Manual 49
4 Choose a suitable name to the current settings
and save it.
Leica FireCam Application – User Manual 50
Info
In the Info box some interesting parameters of the
current image are displayed.
r,g,b values :
When the eyedropper mouse tool is selected and
the cursor is inside the live video window the actual
pixel brightness values under the mouse cursor are
displayed.
Note how the name of the setting appears on the
button: This indicates which setting is active at the
moment.
The brightness values of the three color channels
are displayed after color conversion and image
data processing according to the parameters of the
white balance and levels control.
Frame Rate Value:
As soon as you change any image parameter of
the live video the name of the button is replaced by
the word “Custom” again indicating that some
setting values may have changed and the saved or
restored setting is not valid any more.
Once a setting has been saved it is automatically
entered into the list of directly retrievable settings
where several predefined configuration settings
are available for retrieval.
You can thus easily activate or deactivate setting
combinations such as auto contrast, auto gamma
and auto exposure.
Leica FireCam Application – User Manual 51
The frame rate of the live video is displayed in
number of frames per second. Try to set the image
parameters in such a way that the frame rate is
highest to allow comfortable focussing or arranging
of subject
Pixels:
Size of a captured image in pixels (width x height)
Size:
Size of the next captured image.
Leica FireCam Application – User Manual 52
Free Space:
Number of images with actual size you are able to
capture until the harddisk is full. There is no
limitation concerning numbers of images you can
manage in the FireCam application.
Browse Panel
The Browse Panel offers you an overview of
captured image files and a few corresponding
functions. It does not contain sophisticated image
manipulation function or archiving features. It is a
small and easy to use image browse utility.
Processing:
Displays the number of image processing tasks in
the image pipline.
Filename and Description
If appropriate enter a new filename and a
description for the next image you are going to
capture.
The text you enter in the description box will be
stored inside the captured image and is displayed
in the Browse Panel when you highlight a
thumbnail preview of the image (see section
below).
The captured images are displayed as thumbnails
in a row at the bottom of the window. Browse
through the stored images by clicking on
thumbnails with the mouse or by using the arrow
keys:
Navigation:
Left / Right: Moves one image to the left or to the
right.
PageUp / PageDown: Moves the number of visible
thumbnails to the left or to the right.
Home/End: Jump to the first / last image in the
row.
Leica FireCam Application – User Manual 53
Leica FireCam Application – User Manual 54
Note how fast the images are displayed in the
preview window. This is because only a picture
preview image inside the image data is displayed
that was created during image acquisition.
Therefore previewing a 70Mbyte highres image
does not take longer than a 1shot 3 Mbyte image.
The Pictrue preview inside the captured image
may get deleted if you open a captured image in a
third party image manipulation software and save it
to the same location. Avoid saving captured
images to the same location! Consider the
captured images as your “digital negative” that
should never be changed. As soon as you
manipulate the image, you shall consider it as a
copy of your negative and store it in a different
location.
Delete an Image:
You can not copy or paste images into the row,
but you can delete obsolete single images:
Rename an Image:
To rename an image, simply type another
filename into the File box. If the filename already
exists, the filename is rejected and the original
filename is established.
File-Info Box:
In the File-Info box, some interesting file
properties are displayed like image type, size in
pixels and storage requirements in MB.
Open the File menu and select the meny entry
Delete or select an image and press the shortcut
zç (Apple-Backslash)
Description Box:
In the image description box any corresponding
description values you entered in the acquire panel
are displayed. You can here add additional
information to your captured images.
To delete an image you can also select the image
in the thumbnail row and hold down the CTRL
key. Note how the mouse cursor changes its
shape to indicate that there is a hidden menu.
Click with the mouse to display the menu and
choose delete.
Leica FireCam Application – User Manual 55
Leica FireCam Application – User Manual 56
Power User Features
This chapter introduces you to FireCam features,
which are not necessary for the standard use of
the software. These features might, however, after
a short practice period, highly increase the
efficiency of your work process.
Modify / adjust setting files
Setting files are universal text files which enable
you to save and load any preferences of FireCam
application. Some of the incorporated settings,
such as color temperature settings or gamma
settings demonstrate the various ways of this
feature.
save a file to a folder different from the
recommended one, it will not be displayed in the
matching menu.
Settings files may contain an optional number of
FireCam settings. Setting files include some or all
of the adjustment possibilities in the FireCam
application offered in menus and panels, as well as
the positions of windows on the screen or folder
locations.
If you save own setting files, they usually contain
all the available FireCam parameters. This is not
always desired since loading such a setting file
does not only restores the desired parameter (e.g.
the exposure time) but all other parameters also
(e.g. gain, binning, image mode etc.).
As settings consist of readible text entries,
experienced users can alter them and adjust them
for particular requests.
Modify for example such a setting file so it only
contains the desired parameters and name the
setting file expressivly. See the following sample or
explore some of the setting files in the FireCam
folder:
Setting files located in subfolders
You can save and access settings directly in the
FireCam software without restarting the
application. On the hard drive, setting files are
automatically saved in the setting folder within the
FireCam folder and may be organized in
subfolders. If, with the "Save..." command you
Leica FireCam Application – User Manual 57
The preferences file saved when closing the
application is nothing else but a setting file
containing all of the settings. When starting the
application, the information in the preferences file
guarantees that exactly the same settings and
window positions used in the previous session are
resumed.
Leica FireCam Application – User Manual 58
Leica FireCam Application – User Manual 59
Leica FireCam Application – User Manual 60
©Leica Microsystems Ltd. • CH-9435 Heerbrugg (Switzerland), 2002
Publication no.: M2-398-0en • Printed in Switzerland •
Illustrations, descriptions, technical data are not binding
and may be changed without notice.