1
AN1982
APPLICATION NOTE
FROM ST10 TO Super10
1 - INTRODUCTION
The Super10 core is an evolution of the existing ST10 architecture with highly improved performance.
This evolution has been done with a constant concern for compatibility between the two implementations;
for example, the instruction set is fully compatible. However, the need for improvement requested a
change in the architecture which leads to changes in the application software. The goal of this application
note is to give guidelines to help to convert an ST10 application for Super10.
Most of the differences between the two cores do not imply that the source code has to be changed.
These differences may affect the timing of one instruction, the way the data or program is stored into
memory, or the presence of new registers with reset values making them compatible with ST10 or other
topics related to the new implementation. The first kind of differences will be covered in Chapter 2 - Architectural Differences; these will have to be checked carefully when optimization is needed. However, in
some rare cases, the source code needs to be changed to run on the Super10 core; this is covered in
Chapter 3 - Software Differences.
AN1982/0604
Rev. 1
1/26
AN1982 APPLICATION NOTE
1
INTRODUCTION..........................................................................................................
1
2
ARCHITECTURAL DIFFERENCES ............................................................................
4
2.1
THE FULLY INTERLOCKED PIPELINE ......................................................................
4
2.2
MEMORY ORGANIZATION.........................................................................................
4
2.2.1
Efficiency in Code Fetching .........................................................................................
4
2.2.2
Efficiency in Operands Access ....................................................................................
4
2.3
THE NEW SYSTEM STACK........................................................................................
4
2.4
DPP ADDRESSING IN NON SEGMENTED MODE....................................................
5
2.5
REGISTER IMPROVEMENTS.....................................................................................
5
2.5.1
General Rule for Register Handling ............................................................................
5
2.5.2
New General Purpose Registers (GPRs) Windowing .................................................
5
2.5.3
The Local Banks .........................................................................................................
5
2.5.4
Automatic Fast Bank Switching ...................................................................................
6
2.6
USRX BIT LOOPS .......................................................................................................
6
2.7
THE ENHANCED BRANCH CAPABILITIES ...............................................................
7
2.7.1
Branch Folding ............................................................................................................
7
2.7.2
Branch Detection and Prediction .................................................................................
7
2.7.3
The Enhanced JMPA and CALLA Instructions ...........................................................
7
2.8
MULTIPLICATION AND DIVISION ENHANCEMENT .................................................
7
2.8.1
DIV and MUL Instructions ...........................................................................................
7
2.8.2
Multiplication and Division Management .....................................................................
7
2.9
NEW SOFTWARE BREAK INSTRUCTION.................................................................
8
2.10
ENHANCED WATCHDOG BEHAVIOUR ....................................................................
8
2.11
THE NEW CLOCK TREE.............................................................................................
8
2.12
RESET MECHANISM ..................................................................................................
9
2.13
THE NEW POWER SAVING MODE............................................................................
9
2.14
INTERRUPT JUMP TABLE ADDED FLEXIBILITY......................................................
9
2.14.1
Interrupt Jump Table Relocation .................................................................................
9
2.14.2
Interrupt Jump Table Scaling ......................................................................................
9
2.14.3
Fast Interrupt (Interrupt Jump Table Cache) ...............................................................
10
2.15
PEC IMPROVEMENT ..................................................................................................
10
2.15.1
Source and Destination Segmentation ........................................................................
10
2.15.2
Source and Destination Update ..................................................................................
10
2.15.3
Programmability of the PEC Interrupt Level ................................................................
11
2.15.4
Distinct Interrupt for End of PEC Transfer Event ........................................................
11
3
SOFTWARE DIFFERENCES ......................................................................................
12
3.1
BINARY CODE COMPATIBILITY ................................................................................
12
2/26
AN1982 APPLICATION NOTE
3.2
NEW PIPELINE BEHAVIOUR.....................................................................................
12
3.3
REPEAT CAPABILITY OF THE MULTIPLY AND ACCUMULATE UNIT ....................
13
3.3.1
The Enhanced MRW ..................................................................................................
13
3.3.2
The Modified CoINSTR Instructions ...........................................................................
13
3.3.3
The Software Replacement for Hardware Repeat ......................................................
13
3.4
OTHER MULTIPLY AND ACCUMULATE UNIT DIFFERENCES ...............................
14
3.4.1
MAC V Flag ................................................................................................................
14
3.4.2
MAC Trap ...................................................................................................................
14
3.4.3
Multiplication and Accumulation with Rounding .........................................................
14
3.4.4
Improved Shift Range for CoSHL, CoSHR and CoASHR Instructions .......................
14
3.5
IMPROVED BEHAVIOUR OF BIT FIELD INSTRUCTIONS .......................................
15
3.6
STACK OPERATIONS ................................................................................................
15
4
CONVERTING THE SYSTEM CONFIGURATION ROUTINE ....................................
16
4.1
SYSTEM PROGRAMMING HINTS .............................................................................
16
4.1.1
Register write Protection Via the Security State Machine ..........................................
16
4.1.2
External Access After External Bus Controller Configuration .....................................
17
4.1.3
CPU Performance Increase by Programming the CPUCONx Registers ....................
18
4.2
CONFIGURATION REGISTERS.................................................................................
18
4.2.1
Core Registers ............................................................................................................
18
4.2.2
System Registers .......................................................................................................
19
4.2.3
External Bus Controller Registers ..............................................................................
19
4.3
AN EXAMPLE OF THE SYSTEM CONFIGURATION ROUTINE ...............................
20
5
CONCLUSION ............................................................................................................
21
6
REFERENCES ............................................................................................................
21
7
ANNEXE......................................................................................................................
21
3/26
AN1982 APPLICATION NOTE
2 - ARCHITECTURAL DIFFERENCES
2.1 - The Fully Interlocked Pipeline
The main improvements of the core rely on a new fully interlocked pipeline. This pipeline has enhanced
prefetch and fetch stages feeding its five other stages: decode, address, memory, execute and write
back. This allows a reduction of the number of cycles needed to execute one instruction: while executed
in at least 2 cycles with ST10, most of instructions now need only one cycle with Super10.
In addition, there is no more pipeline hazard. All instructions modifying any GPR, (E)SFR or memory
location can be directly followed by an instruction using the updated value. For instance, an instruction
which modifies a DPP register can be followed by a load instruction which uses the new value of the DPP
register.
2.2 - Memory Organization
The memory organization is quite different between ST10 and Super10, the latter supporting the following
kinds of memories:
– Program memory in segment C0h and above.
– Data memory in the upper part of segment 00h. It is not executable.
– DPRAM for GPR and MAC operand storage. It is no longer executable.
Some external memory can be added, for instance at the beginning of segment 00h to store code and
data. This new organization might force the variables, constants and executable code to be reorganized
within memory using the locator.
2.2.1 - Efficiency in Code Fetching
The fastest way to execute instructions is to place the code in internal program memory. Instructions can
also be located in external memory but the performance will be very similar to the ST10 one; in this case,
no real advantage will be taken from the Super10 architecture.
2.2.2 - Efficiency in Operands Access
Operands should preferably be placed either in DPRAM or data memory. In most cases, no pipeline stalls
occur when using these two memories for data access, leading to one instruction to be executed per
cycle.
Internal program memory or external memory may be used to store operands. This is particularly interesting if non volatile memory is implemented because constants can directly be accessed without copying
them into data memory. In this case though, the pipeline stalls for two cycles when accessing operands in
internal program memory and at least three cycles (depending on the external bus controller configuration) when accessing operands through the external bus controller.
If volatile memory is implemented as internal program memory, at start-up it is recommended to allocate
all operands (variables and constants) into internal data memory, and to place code into internal program
memory.
Note: in case of power supply loss, a non volatile memory preserves its content (code and constants) but
as it is usually read only it cannot store any variable.
2.3 - The New System Stack
To overcome the ST10 system stack size limitation, a circular stack with hardware supported flushing and
filling has been defined. This impacted interrupt latency. For this reason, the maximum stack size has
been significantly increased to 64K Bytes. Since the software extension mechanism is no longer needed,
this feature has been removed (notably STKSIZE in the SYSCON register). This leads to a small incompatibility in the stack initialization which is now limited to the registers listed hereafter.
– A new register is created: SPSEG[7:0] (Stack Pointer SEGment register). This register is used to extend
the stack address from 16-bit to 24-bit. It is cleared at reset.
– SP (Stack Pointer) becomes a 16-bit wide register. At reset it takes the value 0xFC00 for compatibility.
– STKOV and STKUN are now 16-bit wide. They use implicitly SPSEG as segment register (extension to
24-bit).
4/26
AN1982 APPLICATION NOTE
The stack overflow and underflow are no longer detected in the case where the Stack Pointer is greater
than STKOV or lower than STKUN. This may change the software management of the stack as described
in Section 3.6 - Stack Operations.
With this new architecture, the system stack can be placed in any read/write memory but for performance
reasons, it should be placed:
– First in Data SRAM if available
– Second in DPRAM if it is large enough
– Finally in external memory (huge stack), but with a performance penalty. Note that in this case, the stack
cannot cross segment boundaries.
2.4 - DPP Addressing in Non Segmented Mode
On ST10, disabling the segmentation with SYSCON.SGTDIS was done by fixing the CSP value to zero
and moreover, the DPP extension mechanism for data access could not be used any more as only two
bits of these DPP registers were taken into account. Consequently, this meant that the size of both code
and data was smaller than 64K and they were fitting into segment 00h.
On Super10, the data fetch and code fetch have been properly distinguished. Disabling the segmentation
with CPUCON1.SGTDIS fixes the CSP to its current value meaning that up to 64K Bytes of code can be
used. The code can be placed into any segment (for instance segment C0h) independently of data size or
data location. However, special care has to be taken when the fixed CSP value is different from its reset
value (See Section 2.14.1 - Interrupt Jump Table Relocation for more details).
Moreover, the SGTDIS bit has no influence on data addressing: the whole DPP register is still used for the
calculation of the physical 24-bit address. As an example, an application using 60K Bytes of code and
90K Bytes of data can still use the non segmented mode. This is particularly useful when optimization of
the stack usage and low interrupt latency time are needed.
2.5 - Register Improvements
2.5.1 - General Rule for Register Handling
In order to allow a high level of performance within the Super10 core, the (E)SFR and MAC register set
has been moved into the memory area. When converting an application, any access to a register using its
absolute memory address will have to be replaced by an access through its actual name (see examples
below). The register names and new register definition files are provided by the tool chain to keep the full
code compatibility.
Example 1:
MOV R0, #FCE0h ; SRCP0 address on ST10
MOV [R0], R1 ; will NOT work on Super10 (SRCP0 address is now EC40h)
Example 2:
MOV R0, #SRCP0
MOV [R0], R1 ; will work both on ST10 and Super10
2.5.2 - New General Purpose Registers (GPRs) Windowing
A new approach is used for register banks in the Super10: GPRs are not directly accessed from memory
but from a kind of register cache. This change remains invisible from a functional point of view, but it
impacts notably the interrupt latency in case of CP modification (for instance, using a SCXT CP,
#new_bank instruction will take twenty six cycles). To maintain the performance on interrupt latency, several enhancements have been added. They are described in the following paragraphs.
2.5.3 - The Local Banks
In addition to the global register bank, two GPR banks have been added: local bank 1 and local bank 2.
Switching between any of these three banks does not take any cycle. On the other hand, only one out of
these three banks can be seen at a given time, using the short addressing mode (R0 to R15). The global
register bank is always accessible with the long addressing modes.
5/26
AN1982 APPLICATION NOTE
The local banks are not memory mapped so they do not consume any memory location; after reset, their
value is undefined. They cannot be addressed using the long addressing mode; they have to be
accessed by their short address (using the 0xF0-0xFF range of the SFR space or bitoff address space).
By default, a compatible mode not using these local banks is supported meaning all ST10 code will still
work. They are selected using BANK bit field of PSW register. This bit field [9:8] indicates which GPR
bank is in use:
– ‘00’ means compatible mode. The current bank in use is the one pointed at by CP.
– ‘01’ is RESERVED
– ‘10’ means local bank 1 in use.
– ‘11’ means local bank 2 in use.
The selection of the bank in use can directly be done by writing to the PSW register or automatically upon
interrupt entry. This addition has been motivated by the fact that some applications need a very fast context switch.
2.5.4 - Automatic Fast Bank Switching
To improve interrupt latency, at least for a set of selected interrupts, two new control registers has been
created: BNKSEL0 and BNKSEL1. These registers are 16-bit wide.
When an interrupt occurs PSW, CSP and IP are pushed on the stack. Then for interrupts with an interrupt
level greater or equal to 12, the PSW.BANK field, and thus the register bank in use, can be automatically
modified according to the following rule:
if (level15, group3) then PSW[9:8] = BNKSEL1 [15:14]
if (level15, group2) then PSW[9:8] = BNKSEL1 [13:12]
if (level15, group1) then PSW[9:8] = BNKSEL1 [11:10]
if (level15, group0) then PSW[9:8] = BNKSEL1 [9:8]
if (level14, group3) then PSW[9:8] = BNKSEL1 [7:6]
if (level14, group2) then PSW[9:8] = BNKSEL1 [5:4]
if (level14, group1) then PSW[9:8] = BNKSEL1 [3:2]
if (level14, group0) then PSW[9:8] = BNKSEL1 [1:0]
if (level13, group3) then PSW[9:8] = BNKSEL0 [15:14]
if (level13, group2) then PSW[9:8] = BNKSEL0 [13:12]
if (level13, group1) then PSW[9:8] = BNKSEL0 [11:10]
if (level13, group0) then PSW[9:8] = BNKSEL0 [9: 8]
if (level12, group3) then PSW[9:8] = BNKSEL0 [7:6]
if (level12, group2) then PSW[9:8] = BNKSEL0 [5:4]
if (level12, group1) then PSW[9:8] = BNKSEL0 [3:2]
if (level12, group0) then PSW[9:8] = BNKSEL0 [1:0]
Interrupts with priority level below 12 only use the global register bank. When returning from interrupt, the
PSW is automatically restored from the stack thus restoring the previous bank in use.
2.6 - USRx Bit Loops
In addition to USR0, a new user bit called USR1 has been created within PSW (bit number 7). These two
bits now allow loops linked to the MRW register (See Section 3.3.2 - The Modified CoINSTR Instructions
for more details). In accordance with this, four new conditions on JMPA and CALLA branch instructions
are created. These new conditions are selected when the bit [11] of the instruction long word is set. Then
the condition field cc is used to precisely determine which of these new conditions is used:
– Bit 11 set and cc= 0000 -> BRANCHA cc_nusr0, caddr (absolute branch if usr0 is cleared)
– Bit 11 set and cc= 0001 -> BRANCHA cc_nusr1, caddr (absolute branch if usr1 is cleared)
– Bit 11 set and cc= 0010 -> BRANCHA cc_usr0, caddr (absolute branch if usr0 is set)
– Bit 11 set and cc= 0011 -> BRANCHA cc_usr1, caddr (absolute branch if usr1 is set)
– Bit 11 set and cc = x1xx -> Reserved conditions
– Bit 11 set and cc = 10xx -> Reserved conditions
Note that the conditions on USR0 have to be used carefully if the software was already using the USR0
bit. Moreover some C compilers or operating systems may also use the USR0 bit.
6/26
AN1982 APPLICATION NOTE
2.7 - The Enhanced Branch Capabilities
2.7.1 - Branch Folding
A new branch folding unit, sitting within the fetch mechanism, allows the execution of some jump instructions in the same cycle as the preceding instruction. If a branch instruction has been folded and correctly
predicted, it will be executed in parallel with the standard instruction flow i.e. in zero cycle.
2.7.2 - Branch Detection and Prediction
A new branch detection and prediction unit, sitting within the prefetch mechanism, deals efficiently with
non linear code. The prediction is static; it is done by hardware for indirect, intersegment, relative and bit
conditional branches and is user programmable for absolute branches. A correctly predicted instruction
flow is executed like linear code. In case of misprediction, a penalty of 3 to 6 cycles has to be taken.
2.7.3 - The Enhanced JMPA and CALLA Instructions
JMPA and CALLA instructions use a static prediction scheme: if bit 8 of the instruction long word is
cleared then JMPA/CALLA is assumed ‘taken’, if it is set then JMPA/CALLA is assumed ‘not taken’. This
prediction scheme is user programmable:
– ‘JMPA+’ and ‘CALLA+’ instructions are converted into JMPA and CALLA respectively, assumed taken
(prediction bit cleared).
– ‘JMPA-’ and ‘CALLA-’ instructions are converted into JMPA and CALLA respectively assumed not taken
(prediction bit set).
– For regular ‘JMPA’ instructions, the assembler applies the following rule: cc_z is predicted not taken
(prediction bit set), all the other conditions being predicted taken (prediction bit cleared).
– For regular ‘CALLA’ instructions, the assembler assumes them taken (prediction bit cleared).
For the JMPA instruction a prefetch hint bit is used. This bit is the instruction bit 9 and is required by the
fetch unit to deal efficiently with short backward loops. It must be set only if (0 < IP_jmpa - IP_target <=
32) and cleared otherwise (IP_jmpa being the address of the JMPA instruction and IP_target being the
target address of the JMPA instruction). This bit is not user programmable but is set by the assembler
according to the previous rule.
2.8 - Multiplication and Division Enhancement
2.8.1 - DIV and MUL Instructions
The divide and multiply instructions are faster. A 16 by 16 multiplication is now performed in just one cycle
and a 32 by 16 division in 4 cycles. The division is now score boarded; four (4) cycles are executed within
the pipeline and up to seventeen (17) cycles in the background. The flags are available at the end of the
first four cycles so any action depending on the flags resulting from the division can be taken right away.
Alternatively, it is better to delay the reading of the result for at least seventeen cycles to avoid stalling of
the pipeline. To take advantage of this new feature, instruction reordering may be necessary.
2.8.2 - Multiplication and Division Management
Linked to the previous enhancement, the MULIP bit (multiplication/division in progress) in the PSW register has been removed. The management of the division can now use the MDRIU bit (Multiply/Divide Registers In Use) in the Multiply and Divide Control Register (MDC). If an interrupt using the MDH or MDL
registers occurs, the interrupt service routine may check first that those registers were not used by the
main program. If they were used, they must be saved and restored before returning from interrupt:
interrupt:
JNB MDRIU, nosave
PUSH MDL
PUSH MDH
BSET RAMBIT
; Bit location in RAM used as a reminder
nosave:
{remainder of interrupt code using the MD registers}
JNB RAMBIT, norestore
BCLR RAMBIT
; This bit must only be used by this interrupt
POP MDH
POP MDL
norestore:
RETI
7/26
AN1982 APPLICATION NOTE
As this code is quite complex, if the stack use is not an issue it is much better to save and restore those
registers in all interrupts using the multiply and divide registers. Moreover, if a divide instruction is interrupted it will take a maximum of thirteen cycles to be completed. With the following code, the pipeline will
never be stalled:
interrupt:
{beginning of interrupt code not using the MD registers
at least 13 instructions}
PUSH MDL
PUSH MDH
{remainder of interrupt code using the MD registers}
POP MDH
POP MDL
RETI
2.9 - New Software Break Instruction
A new SBRK (software break) instruction has been introduced to ease the debug of an application (the
opcode 8Ch is no longer reserved). It can be used to generate by software a hardware trap (Class A, Vector 8). Otherwise, its behaviour is closely linked to the On Chip Emulation module.
2.10 - Enhanced Watchdog Behaviour
The ENWDT instruction has been created and implemented as a protected instruction (the opcode 85h is
no longer reserved). When this instruction is executed, the watchdog timer unit is enabled (even if this
unit was previously disabled by a DISWDT instruction). Then it is still possible to disable the watchdog
timer again by a DISWDT instruction, and so on.
The WDTCTL bit has been created in CPUCON1. This bit can only be modified until the execution of an
EINIT or a SRWDT (service watchdog instruction). Thereafter its value remains fixed until a reset occurs.
When WDTCTL is cleared (compatible behaviour) then:
– ENWDT instructions are transformed into NOP by hardware.
– After the execution of EINIT or SRWDT, the DISWDT instruction is transformed into NOP.
When WDTCTL is set then:
– ENWDT instructions are normally executed.
– Even after the execution of EINIT or SRWDT, the DISWDT instructions are still executed.
Note: The watchdog timer reset indication flag has been removed from the control register. A new
SYSSTAT register indicates the source of reset.
2.11 - The New Clock Tree
The distribution of the clock signal to the different parts of the chip has been rationalized. From the user
point of view, there is now only one clock and all actions are taken on the rising edge of this clock. This
clock is distributed to the CPU and its maximum value defines the target frequency of the Super10; as an
example, a 100MHz CPU clock can be used to execute instructions in 10ns. It is also distributed to the
external bus controller and all timings are based on this CPU clock. On the emulation chips the CLKOUT
signal represents this clock.
Another clock, called the Peripheral Clock, is derived from the main clock and is distributed to all on chip
peripherals. Its frequency is programmable with the SYSCON1.BCLKCON field. Its maximum frequency
is not dependent on the main clock maximum frequency but is usually lower. A division factor of one (1)
can be used if the CPU clock frequency is lower than the maximum peripheral bus frequency. To ensure
backward compatibility with applications running at a lower frequency, other clock prescalers have also
been added in some peripherals (general purpose timers and watchdog timer).
8/26
AN1982 APPLICATION NOTE
2.12 - Reset Mechanism
From a hardware point of view, the reset mechanism has been simplified. It relies on a reset input
(RSTIN) and two outputs (RSTOUT and RSTOUT2). RSTIN and RSTOUT are similar to the ST10 ones
(only RSTIN in monodirectional asynchronous mode is supported). RSTOUT2 has been added to reset
devices which need to be restarted before the first instruction is fetched by the microcontroller or to emulate the bidirectional reset of the ST10 with external hardware. This RSTOUT2 signal is always activated
on a hardware reset and can be activated on a software or watchdog reset depending on the RSTCON.RSTOUT2DIS bit. The absolute minimum length of the RSTOUT2 pulse is 16 CPU clocks in case of
a hardware reset and then is programmable by the RSTCON.RSTLEN field to up to 2048 CPU clocks.
From a software point of view, the new SYSSTAT register allows to differentiate between the different
sources of reset. For instance, if a long initialization of RAM content for code and data is needed, it can be
performed only on hardware reset where a loss of power supply might have happened, but not on software or watchdog reset where the RAM content is preserved.
2.13 - The New Power Saving Mode
On top of the already existing idle and power down modes, a new sleep mode has been introduced to
offer improved capabilities. The sleep mode is entered upon execution of the IDLE instruction when the
SYSCON1.SLEEPCON field is set to 01b. In this mode, the core and all peripherals including the watchdog timer are stopped which is similar to the power down mode. But, this mode can be exited by any
external interrupt or reset.
This new mode is only one feature offered by the Super10 to efficiently control by software the power consumption. At system level, the peripheral bus clock frequency can be adjusted to reduce the global
peripheral consumption and any peripheral can be individually turned on and off to completely suppress
its power consumption.
2.14 - Interrupt Jump Table Added Flexibility
2.14.1 - Interrupt Jump Table Relocation
A 16-bit wide register VECSEG has been created. When an interrupt, a hardware trap or a software trap
occurs, VECSEG[7:0] indicates in which segment the interrupt table is located. After reset, its value is 00h
if external memory is selected by the EA configuration pin or C0h if internal memory is selected.
VECSEG[15:8] is reserved and read as 0.
This register may be used to move the vector table from a slow non volatile memory where the instructions are fetched from boot, to a fast volatile memory. Special care needs to be taken when modifying this
register if the non segmented mode is used. In this case, the program must jump to the new segment and
update the VECSEG value (to the new CSP value) before disabling the segmentation and enabling any
interrupt.
2.14.2 - Interrupt Jump Table Scaling
The field VECSC has been created within CPUCON1. Depending on its value, the number of word
locations separating two vectors can be two, four, eight or sixteen. Instead of one 32-bit instruction per
interrupt entry, up to eight 32-bit instructions are available for each interrupt entry.
This allows to put the complete interrupt routine in the table if it is really short or to put instructions before
the jump to the actual interrupt routine.
Usually the programmer uses the JMPS instruction in the interrupt jump table. It is usual to have a SCXT
instruction heading the interrupt routine:
...
JMPS interruptXX-1 // entry XX-1
JMPS interruptXX // entry XX
JMPS interruptXX+1 // entry XX+1
...
interruptXX:
SCXT CP, #n
{remainder of interruptXX code}
9/26
AN1982 APPLICATION NOTE
Now with the interrupt jump table scaled by two, we can modify the code in order to have:
...
SCXT
JMPS
SCXT
JMPS
SCXT
JMPS
...
CP, #m // entry XX-1
interruptXX-1
CP, #n // entry XX
interruptXX
CP, #p // entry XX+1
interruptXX+1
interruptXX:
{remainder of interruptXX code}
When using a scaled interrupt table, the execution of the SCXT CP instruction and the execution of the
JMPS instruction are done in parallel, thus saving up to 10 cycles compared to the traditional interrupt
handling where the SCXT CP instruction will be performed after the completion of the JMPS instruction.
2.14.3 - Fast Interrupt (Interrupt Jump Table Cache)
This mechanism allows up to two interrupts not to use the standard jump table. The program directly
jumps to the interrupt service routine saving the execution time of the branch instruction.
To support these fast interrupts, four new registers have been created: FINT1CSP, FINT1ADDR,
FINT0CSP and FINT0ADDR. When an interrupt is entered, before jumping to the corresponding Interrupt
Jump Table location and if the interrupt level is greater or equal than 12 then:
– The 2-lsb of the interrupt level are compared to FINT1CSP[11:10] and the interrupt group number is
compared to FINT1CSP[9:8]. If both fields match and if FINT1CSP.EN is set then the processor go to
the address
{FINT1CSP[7:0], FINT1ADDR[15:0]}.
– Otherwise the 2-lsb of the interrupt level are compared to FINT0CSP[11:10] and the interrupt group
number is compared to FINT0CSP[9:8]. If both fields match and if FINT0CSP.EN is set then the processor goes to the address
{FINT0CSP[7:0], FINT0ADDR[15:0]}.
– Otherwise the processor goes to the corresponding Interrupt Jump Table entry (according to the VECSEG register and the VECSC field value).
On interrupts with an interrupt level strictly less than 12 the processor always goes to the corresponding
Interrupt Jump Table entry (according to the VECSEG register and the VECSC field value).
At reset both FINT1CSP.EN and FINT0CSP.EN (bits 15) are reset, thus disabling the interrupt jump table
cache.
2.15 - PEC Improvement
2.15.1 - Source and Destination Segmentation
For each PECx channel, a 16-bit segment register, PECSEGx, has been created. The 8-msb of PECSEGx are used as the segment for SRCPx (the PECx source pointer) while the 8-lsb are used as the segment for DSTPx (the PECx destination pointer). This allows PEC transfers between any kind of memory
or register, not necessarily in segment zero. After reset all the PECSEGx registers are cleared which
ensures a compatible behaviour.
Reminder: The PEC source and destination pointers have been moved from the internal RAM area on
ST10 (FCE0h-FCFEh) to the internal I/O area on Super10 (EC40h-EC5Eh).
2.15.2 - Source and Destination Update
In the PEC control registers (PECCx), the INC field can now take the value ‘11’. In this case, both the PEC
source and destination pointers are automatically modified. In conjunction with the previous modification,
this change allows the PEC transfers to be used as a kind of software DMA: complete blocks of memories
can be copied by stealing cycles from the CPU.
10/26
AN1982 APPLICATION NOTE
2.15.3 - Programmability of the PEC Interrupt Level
On ST10, PEC transfers always have the highest possible interrupt level (14 or 15). In the PEC control
registers (PECCx), the new PLEV field [13:12] is created to program the PEC interrupt levels between 8
and 15. This allows a greater number of high level interrupts not to be interrupted by PEC transfers. After
reset, all the PECCx registers are cleared which is compatible with ST10 (see Super10 User’s Manual).
2.15.4 - Distinct Interrupt for End of PEC Transfer Event
In some applications, it was tolerated that a few cycles could be stolen from a high level task by a PEC
transfer. But then a problem occurred when an interrupt at the same level was generated to restart the
PEC transfer mechanism with other parameters. This difficulty can be worked around if the “end of PEC
transfer” interrupt is not generated at the same level.
In the PEC control register (PECCx), an end of PEC interrupt selection bit (EOPINT) has been created. If
this bit is cleared, the regular interrupt of the same level is triggered (compatible behaviour). If this bit is
set, a separate interrupt called ‘end of PEC interrupt sub node’ is triggered when at least one EOP event
has occurred.
This new interrupt is controlled by the PEC Interrupt Sub Node Control (PECISNC) register and its level
defined by the classical EOPIC register. The EOP interrupt handler is expected to read the PECISNC register in order to determine which PEC transfer(s) is(are) finished and to initialize it(them) for the next
transfer. It has to be noted that the CxIR bits within the PECISNC register have to be cleared by software
before returning from the interrupt.
11/26
AN1982 APPLICATION NOTE
3 - SOFTWARE DIFFERENCES
Most of the differences leading to a necessary change in the software are due to changes in the “Super10
system” such as the reset configuration, the external bus controller or peripheral management but not to
the core itself. This means that most of the software differences will take place before the EINIT instruction is executed and that a lot of care will have to be taken when converting this system configuration routine (See Chapter 4 - Converting the System Configuration Routine). Nonetheless, the changes needed
to be done in the main part of the software are described in this chapter.
3.1 - Binary Code Compatibility
Linked to the fact that the repeat capability is removed from the Super10 core (See Section 3.3 - Repeat
Capability of the Multiply and Accumulate Unit for more details), the encoding strategy of some instructions especially the MAC instructions has slightly changed.
It means these instructions are no longer binary compatible but still code compatible. A new assembler is
used to generate the Super10 opcodes but no modification of the assembly source code is necessary.
3.2 - New Pipeline Behaviour
Due to the fact that the pipeline is fully interlocked, all software addendum taking care of ST10 particular
pipeline effects can be removed. For instance, a GPR can be used in the instruction following the CP
update and a new DPP or SP value can be used by the following instruction:
ST10 Code
SCXT CP, #0FC00h
NOP
MOV R0, #data
---MOV DPP0, #4
NOP
MOV DPP0:variable, R1
---MOV SP, #0FA40h
NOP
POP R0
Super10 Code
SCXT CP, #0FC00h
MOV R0, #data
---MOV DPP0, #4
MOV DPP0:variable, R1
---MOV SP, #0FA40h
POP R0
When disabling interrupts, the sequence of instructions starting with the one clearing the IEN bit will never
be interrupted.
When initializing port pins, no special care has to be taken anymore:
ST10 Code
BSET DP3.13
NOP; (any instruction not accessing port3)
BSET P3.5
Super10 Code
BSET DP3.13
BSET P3.5
There will also be a difference in execution if a programmer was using a feature of the ST10 non interlocked pipeline. As an example, let’s consider the following code:
MOV
NOP
MOV
MOV
MOV
NOP
MOV
12/26
DPP0, #1
Mem1, R0
Mem2, R0
DPP0, #2
Mem3, R1
; Assume that all variables use DPP0
; Mem1 uses page 1
; Mem2 uses page 1
; Mem3 uses page 2
AN1982 APPLICATION NOTE
For performance reasons, the programmer may have been tempted to write:
MOV
NOP
MOV
MOV
MOV
MOV
DPP0, #1
Mem1,
DPP0,
Mem2,
Mem3,
R0
#2
R0
R1
; Can not be removed on ST10
; Mem1 uses page 1
; Mem2 still uses page 1 (compatibility issue)
; Mem3 uses page 2
This code assumes that no interrupt occurs between the DPP change but the same issue can exist in
interruptible code. For Super10, the code needs to be rewritten:
MOV
MOV
MOV
MOV
MOV
DPP0,
Mem1,
Mem2,
DPP0,
Mem3,
#1
R0
R0
#2
R1
; Mem1 uses page 1
; Mem2 uses page 1
; Mem3 uses page 2
3.3 - Repeat Capability of the Multiply and Accumulate Unit
The hardware repeat capability of the ST10 is no longer supported on Super10. The repeated instructions
are substituted by software 0-cycle loops. As there is potentially more than one instruction contained in
the loop, this is a big enhancement compared to the previous repeat capability.
3.3.1 - The Enhanced MRW
MRW becomes a complete 16-bit register. This is intended to ease the integration of the 0-cycle loops by
a high level language compiler (by using intrinsic functions for example). To have the loop count
expressed on a natural integer size is important. MRW[15] no longer means that a repeatable instruction
has been interrupted. This is a low incompatibility point since this bit was used by the ST10 hardware,
and was not expected to be used by software.
3.3.2 - The Modified CoINSTR Instructions
All CoINSTR repeatable instructions are no longer repeatable but instead it is possible to specify additional capabilities for any CoINSTR instruction.
– USR0 CoINSTR’ performs in addition to the usual CoINSTR behaviour the following actions:
• If MRW is equal to 0x0000 then USR0 is set.
• if MRW is different than 0x0000 then USR0 is cleared and MRW is decremented.
– USR1 CoINSTR’ performs in addition to the usual CoINSTR behaviour the following actions:
• If MRW is equal to 0x0000 then USR1 is set.
• if MRW is different than 0x0000 then USR1 is cleared and MRW is decremented.
3.3.3 - The Software Replacement for Hardware Repeat
Repeatable CoINSTR instructions can be simulated in software. For example, the following code:
repeat #20 times CoMACM [IDX0+], [R0+]
should be replaced by:
mov MRW, #19
loop00:
- USR1 CoMACM [IDX0+], [R0+]
JMPA cc_nusr1, loop00
and the following code:
repeat MRW times CoMACM [IDX0+], [R0+]
should be replaced by:
loop01:
- USR1 CoMACM [IDX0+], [R0+]
JMPA cc_nusr1, loop01
13/26
AN1982 APPLICATION NOTE
Since correctly predicted JMPA are executed in 0-cycle, this new code offers nearly the same performance (on a cycle basis) than the original one using a repeatable CoINSTR instruction. Performance
wise, it has to be noted that for a low number of loops containing only one instruction (approximately less
than five), it is better to write the number of desired instructions than to use the JMPA instruction. Otherwise, the penalty taken during the last mispredicted JMPA (three cycles) would make the performance
worse than on ST10.
Finally, to maintain the maximum compatibility, the USR0 bit should not be used to simulate repeatable
instructions because this bit was already existing and therefore was potentially used by the programmer
or the compiler.
3.4 - Other Multiply and Accumulate Unit Differences
3.4.1 - MAC V Flag
An overflow flag is created in the MSW register. The behaviour of the SV flag is slightly modified according to the following rules:
– CoSHL: V cleared, SV unchanged.
– CoSHR: V cleared, SV unchanged.
– CoASHR:
if rnd is selected then
if rnd generates an overflow then V and SV are set.
else V is cleared and SV unchanged.
else V is cleared and SV unchanged
– CoABS:
if ACC == 0x80_0000_0000 then V and SV are set
else V is cleared and SV unchanged.
– CoCMP: The V flag is set if the ACC is strictly less than the operand. SV is not affected by the CoCMP
instruction.
– CoMIN: V is cleared and SV unchanged.
– CoMAX: V is cleared and SV unchanged.
– CoMOV: V and SV remain unchanged.
– CoSTORE: V and SV remain unchanged.
For all the other CoINSTR instructions, the setting of SV remains identical to ST10. The V flag is set when
an overflow is generated, cleared otherwise.
3.4.2 - MAC Trap
In the ST10 implementation, a class B hardware TRAP is associated to the MAC. A global enable bit
(MCW.MIE) is present to enable or disable MAC traps on specific actions. The TRAPs to be activated are
determined by a set of bits (overflow, limitation, carry, extension). This functionality is not supported on
Super10; as a consequence, MCW bit field [15:11] is now tied to 0. This is a low incompatibility point since
this TRAP was bearly used: in most algorithms, it is less time consuming to leave the complete calculation to complete and look for exceptions at the end than to trigger a top priority TRAP to check and stop
the calculation.
3.4.3 - Multiplication and Accumulation with Rounding
The instructions enabling to perform a multiplication or multiplication accumulation with rounding (extension, rnd) will be supported in 2 cycles in the Super10 core instead of one instruction cycle (two clock
cycles) in ST10. Other instructions using the rounding mechanism are still performed in one cycle.
3.4.4 - Improved Shift Range for CoSHL, CoSHR and CoASHR Instructions
For shift operands specified by an immediate value, the CoSHL, CoSHR and CoASHR instructions now
support the range 0 to 16 included. For instance, the following instruction is now valid:
CoSHL
#16
This is particularly interesting when moving data from the least significant word of the accumulator to its
most significant word and vice versa.
14/26
AN1982 APPLICATION NOTE
For shift operands specified by the content of a GPR, the CoSHL, CoSHR and CoASHR instructions now
support the range 0 to 15 included. The actual shift operand is specified by the 4-lsb of the GPR on
Super10 while it was specified by the 3-lsb on the ST10. This is an incompatibility point since ST10
ignores bit[3] and Super10 does not.
Note: Since the shift field was already 5-bit wide on ST10, the encoding is not affected (but remember
that all the sub-encoding of CoINSTR instruction have been changed due to the new repeat
scheme).
3.5 - Improved Behaviour of Bit Field Instructions
On ST10, the bit field instructions had an unexpected behaviour. This behaviour has been enhanced in
Super 10. For instance, let’s consider the BFLDL bitoff, #AND_mask, #OR_mask instruction:
– On ST10 bits masked with "0" in the AND_mask may be unintentionally altered if the corresponding bit
in the OR_mask contains a "1".
– On Super10, all bits masked with a "0" in the AND_mask will never be altered.
BFLDH R0, #080h, #01h
; clears bit R0.15, set bit R0.8 on ST10,
; Does not alter R0.8 on Super10.
3.6 - Stack Operations
For performance reasons, the TRAPs for stack overflow or underflow will only be activated on system
usage but no more on user arithmetic or a direct move to the stack pointer. The check of SP against
STKOV or STKUN is performed only on the following cases:
–
–
–
–
–
–
–
PUSH / POP
CALLA, CALLI, CALLR, CALLS
PCALL, RETP
RET, RETI, RETS
SCXT
TRAP
Push sequence corresponding to the entering of an interrupt or a hardware trap.
For instance:
SUB SP, #2; May result in a stack overflow but the TRAP will never be triggered. Therefore, it is recommended to implement a user stack with manual checking for underflow or overflow if arithmetic operations
are needed on the stack pointer. This user stack should be used to allocate data dynamically or to pass
parameters to functions as arithmetic operations on the stack pointer may be needed to perform these
operations.
15/26
AN1982 APPLICATION NOTE
4 - CONVERTING THE SYSTEM CONFIGURATION ROUTINE
The modification of the system configuration routine is the main task to be done to convert an application
for Super10. For C programmers, this conversion is transparent as the new programming features are
taken into account by the toolchain. For assembly programmers, the new system registers need to be
programmed according to what was done on ST10 or in a different way if the bits are not existing any
more. After showing some programming hints, this chapter explains what are the equivalences between
the ST10 and the Super10 and finally gives an example of a possible routine.
4.1 - System Programming Hints
This section describes the Super10 specific considerations and gives hints for the software design. Side
effects of the pipeline on the system control unit are detailed.
4.1.1 - Register write Protection Via the Security State Machine
The system control unit of the Super10 supports a special register write protection mechanism via its
security state machine. This state machine selects one of the three security levels:
– Improtected,
– Low protected (the state machine controls the right accesses),
– Protected.
This write protection mechanism is used for several registers within the system control unit (SYSCONx,
RSTCON and WDTCON), for the CPU control registers (CPUCONx) and for all external bus controller
configuration registers. All other registers of the Super10 are not influenced by this mechanism.
After reset the unprotected state is selected by default. The execution of the EINIT instruction changes
the security level to protected mode immediately. However, the security level can be changed all the time
by writing a special command sequence to the security level command register (SCUSLC).
4.1.1.1 - Write Access Immediately Before the EINIT Instruction
A write command to an access controlled register immediately before executing the EINIT instruction will
miss because of the pipeline runtime operation. The write command will be done at the write back stage,
whereas the EINIT condition of the following instruction will be set earlier. Therefore, the security state
machine will be switched to protected level before the write command has taken place.
Wrong programming example:
MOV
EINIT
SYSCON1, #00001H
The initialization software has to read back the content of the last written access controlled register before
executing the EINIT instruction. In case of a pending IO write followed by an IO read at the same address,
the pipeline stalls until the write access is done. Therefore, the write access will be done before the EINIT
instruction takes any action.
Correct programming example:
MOV
MOV
EINIT
SYSCON1, #00001H
Rx, SYSCON1
4.1.1.2 - Write Access Immediately After Selecting Unprotected Level
After executing the last command of the security level changing sequence the security level stays on its
previous level for a certain number of peripheral bus clock cycles. This delay time is caused by the peripheral bus write time and by the switching time of the security level state machine. Therefore, any immediate write access after the last security command to an access controlled register will miss if the former
security level was low protected or protected. Wrong programming example:
MOV
SCUSLC, #0AAAAH
MOV
SCUSLC, #05554H
MOV
SCUSLC, #09600H
MOV
SCUSLC, #00000H
MOV
SYSCON1, #00001H
16/26
AN1982 APPLICATION NOTE
The software has to poll the security level status after the last security command before executing a write
access to any access controlled register.
Correct programming example:
loop:
MOV
MOV
MOV
MOV
CMP
JMP
MOV
SCUSLC, #0AAAAH
SCUSLC, #05554H
SCUSLC, #09600H
SCUSLC, #00000H
SCUSLS, #00000H
cc_Z, loop
SYSCON1, #00001H
4.1.1.3 - Write Access in Low Protected Level
After executing command #4 in low protected security level, an immediate write access to an access controlled register fails because the security state machine needs some cycles to set the supervisor mode
(see Section 4.1.1.2 - Write Access Immediately After Selecting Unprotected Level).
Wrong programming example:
MOV
MOV
SCUSLC, #08EFFH
SYSCON1, #00001H
The software has to poll the security level status after executing command #4 before executing a write
access to any access controlled register.
Correct programming example:
loop:
MOV
CMP
JMP
MOV
SCUSLC, #08EFFH
SCUSLS, #08800H
cc_Z, loop
SYSCON1, #00001H
4.1.2 - External Access After External Bus Controller Configuration
After modifying the EBC configuration, it can take a few cycles before this modification takes place,
because the clock applied to the external bus register is slower than the CPU clock. Therefore, data
accesses as well as code fetches to the modified chip select have to be delayed until the configuration is
valid. After the write access to the configuration register is executed, the next external bus access needs
to be based on this new configuration.
Wrong programming example:
;Data
MOV
MOV
MOV
MOV
access
Ry, #0FE0FH
Rx, #00031H
FCONCS1, Rx
DATA1, Ry
;Code
MOV
MOV
JMP
fetch
Rx, #00031H
FCONCS2, #Rx
SEG Label1, SOF Label1 ; Assumption: Label1 is handled by CS2
; Assumption: Variable DATA1 is handled by CS1
4.1.2.1 - External Data Access
The application software has to read back the content of the last written EBC configuration register before
accessing any data on the modified chip select. The CPU stalls the pipeline in case of a pending IO write
until the write access is done, before the next IO read is executed. Therefore, the write access is done
before the data access takes place.
17/26
AN1982 APPLICATION NOTE
Correct programming example:
;Data access
MOV
Ry, #0FE0FH
MOV
Rx, #00031H
MOV
FCONCS1, Rx
MOV
Rx, FCONCS1
MOV
DATA1, Ry
; Assumption: Variable DATA1 is handled by
; CS1
4.1.2.2 - External Code Fetch
In addition to the measure described for data accesses (see chapter above) the instruction fetch pipeline
has to be cleared, because any prefetched code based on the old chip select configuration is wrong. A
write access to CPU register CPUCON1 cancels the instruction fetch FIFO. Therefore, the origin value of
this register is read first and then written back to the register. This action cancels the pipeline without
modifying any system resources (except the used GPR).
Correct programming example:
;Code
MOV
MOV
MOV
MOV
MOV
JMP
fetch
Rx, #00031H
FCONCS2, #Rx
Rx, FCONCS2
Rx, CPUCON1
CPUCON1, Rx
SEG Label1, SOF Label1
; Assumption: Label1 is handled by CS2
4.1.3 - CPU Performance Increase by Programming the CPUCONx Registers
The CPU control registers CPUCON1 and CPUCON2 should be programmed by the user application initialization routine before executing the EINIT instruction. Note that every reset clears these two registers.
However, the reset default value is not the optimum setting from the performance point of view. Therefore
it is recommended to add the following code to the initialization routine:
MOV
CPUCON1, #00007H
; Other bits may be set by the user
MOV
CPUCON2, #08F3DH
; Fast PEC disabled
4.2 - Configuration Registers
4.2.1 - Core Registers
The SYSCON register has not been implemented on Super10. Some bits have been removed when the
capability is not supported any more. For instance:
– All bits concerning the Xbus and Xperipherals have been removed as the new architecture does not provide such a bus.
– The oscillator watchdog capability is removed.
– Bits configuring alternate functions have been removed where a dedicated pin in now provided.
– The chip select latch capability is removed.
– The internal ROM enable and mapping bits are removed because of the new memory organization (See
Section 2.2 - Memory Organization).
– The power down mode configuration has disappeared because of the new power saving modes (See
Section 2.13 - The New Power Saving Mode).
– The system stack size field is removed because of the new management of the system stack (See Section 2.3 - The New System Stack).
Some bits can be found in other registers:
– SGTDIS (segmentation disabled) can be found in the new CPUCON1 register. Though, its value may
not be copied blindly (See Section 2.4 - DPP Addressing in Non Segmented Mode).
– WRCFG (write configuration) can be found in the new EBCMOD0 register.
18/26
AN1982 APPLICATION NOTE
4.2.2 - System Registers
Most of the special function register names and functions stay identical to the ST10 ones. Some ST10
configuration registers still need to be initialized as DPP0, DPP1, DPP2, DPP3, CP, SP, STKUN, STKOV
and EXICON. The peripheral registers are also identical to the ST10 ones but their function may have
changed slightly. For more information refer to Standard Peripheral User’s Manual, especialy sub-sections "ST10 Upgraders". After reset, the compatible behaviour has been chosen every time it was possible; the concerned peripherals are:
– The input output ports (number and function changed).
– The general purpose timers 1 and 2 (slightly changed).
– The asynchronous synchronous serial interface.
– The synchronous serial channel.
– The pulse width modulation.
The differences are listed below:
– The SYSCON1 register needs to be initialized. It configures the peripheral bus clock and the sleep mode
(See Section 2.11 - The New Clock Tree and Section 2.13 - The New Power Saving Mode).
– The SYSCON2 and SYSCON3 registers can be initialized to determine the port behaviour during power
saving modes and disable unused peripherals.
– The RSTCON register can be initialized. It configures the length of reset and the behaviour of the
RSTOUT2 pin (See Section 2.12 - Reset Mechanism).
– The WDTCON register has slightly changed. The prescaler is more configurable and it is not possible
any more to detect a watchdog reset from this register.
– The SYSSTAT register can be read before the EINIT instruction to determine the source of reset i.e.
whether it is software, hardware or watchdog. After the EINIT instruction, this register is cleared.
– The VECSEG register can be updated with the new vector table segment if it is different from its reset
value.
– The SPSEG register can be initialized with the system stack segment number.
– The BNKSEL0 and BNKSEL1 registers need to be initialized to use the automatic fast bank switch upon
interrupt entry.
– The FINT1CSP, FINT1ADDR, FINT0CSP and FINT0ADDR registers need to be initialized to use the
interrupt jump table cache.
– The PECCx and PECSEGx registers must be initialized to use a PEC transfer.
– The PECISNC and EOPIC registers can be initialized to use a PEC interrupt sub node control.
– The EXISEL register can be initialized to select between different external interrupt sources.
– The fast external interrupt control registers (CCxIC) changed their names to FEIyIC.
4.2.3 - External Bus Controller Registers
The Super10 external bus controller is compatible with the ST10 one but it has been made more configurable. Therefore, the register programming has changed. Moreover, to take advantage of a higher clock
speed, the number of wait states needs to be increased if the external memory latency stays identical.
For these reasons, the ST10 BUSCONx registers are replaced by a set of registers:
– EBCMOD0 programs the general behaviour of the external bus
– FCONCSx (x=0..7) configures the corresponding chip select features
– TCONCSx (x=0..7) configures the corresponding chip select timings
The ADDRSELx (x=1..7) registers stay strictly identical to the ST10 ones; they configure the address windows of the corresponding chip selects.
19/26
AN1982 APPLICATION NOTE
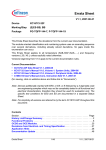
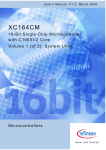
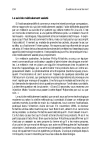
In the Figure 1, an equivalence between the ST10 timings with respect to the BUSCON bit fields and the
Super10 timings in demultiplexed mode is shown. For a precise description of the phases A to F, please
refer to the external bus controller timing description in the Super10 User’s Manual. The A and D phases
have no equivalence in ST10.
Figure 1 : ST10 and Super10 EBC Configuration in Demultiplexed Mode
ST10
ALE CTL
0...1
MCTC
MTTC
0...15
0...1
CPU Clock
ALE
ADDR, CS
R/W
Delay
RD / WR
Super10
CPU Clock
ALE
B
1...2
ADDR, CS
RD / WR
C
0...3
E
1..32
F
0..3
4.3 - An example of the System Configuration Routine
Let’s take the assumption that we need to write the Super10 system configuration routine for the following
application. On power-on, hardware and watchdog resets, the code is fetched from external non volatile
memory. The system configuration routine needs to configure the Super10 external bus controller and
other peripherals, copy the application code to internal program RAM and then jump to the main program.
On a software reset, the system needs to be initialized again and then jump to the main program. For performance reasons, the vector table needs to be in internal program memory. The routine can be found in
the annexe.
20/26
AN1982 APPLICATION NOTE
5 - CONCLUSION
This note has described all the differences between the ST10 and the Super10 architectures. It also
shows the necessary changes in the application software when they are absolutely needed from a functional point of view. In addition, the code can be optimized to take full advantage from the new architecture and use efficiently all implemented features. These hints will be described in a future application note
“Optimizing code for Super10”.
6 - REFERENCES
– Super10 User’s Manual Release 1.3
– Super10 Megacell Specification
– Super10 Standard Peripheral User’s Manual Release 1.2
7 - ANNEXE
THE SOFTWARE INCLUDED IN THIS NOTE IS FOR GUIDANCE ONLY. STMicroelectronics SHALL
NOT BE HELD LIABLE FOR ANY DIRECT, INDIRECT OR CONSEQUENTIAL DAMAGES WITH
RESPECT TO ANY CLAIMS ARISING FROM USE OF THE SOFTWARE.
;/**************** (c) 2000 STMicroelectronics *****************************
;
;PROJECT : Super 10 Evaluation board
;COMPILER : ST10/Super10 Assembler (TASKING)
;
;MODULE : Cstart.asm
;VERSION : V 1.0
;
;CREATION DATE : 03/00
;
;AUTHOR : Stephane MARMEY / DMD Application / STMicroelectronics Grenoble
;
;-*-*-*-*-*-*-*-*-*-*-*-*-*-*-*-*-*-*-*-*-*-*-*-*-*-*-*-*-*-*-*-*-*-*-*-*-*
;
;DESCRIPTION : C start module
;
;-*-*-*-*-*-*-*-*-*-*-*-*-*-*-*-*-*-*-*-*-*-*-*-*-*-*-*-*-*-*-*-*-*-*-*-*-*
;
;MODIFICATIONS :
;
;
;**************************************************************************/
;
;
;/*########################################################################/
;/*
ASSEMBLER SWITCHES
*/
;/*########################################################################/
$DEBUG
$SYMB
$LOCALS
$EXTEND
$NOMOD166
$STDNAMES(REGLONDON.def)
$SEGMENTED
$CASE
ASSUME
DPP3:SYSTEM
21/26
AN1982 APPLICATION NOTE
GPRS
COMREG
R0-R15
;/*########################################################################/
;/*
VARIABLES
*/
;/*########################################################################/
;/*########################################################################/
;/*
EXTERNAL FUNCTIONS
*/
;/*########################################################################/
EXTERN
EXTERN
EXTERN
EXTERN
EXTERN
CopyApplicationCode:FAR
InitializeVariables:FAR
PeripheralInit:FAR
main:FAR
FastIntAddress:WORD
;
;
;
;
;
Copies the application code
Initialize global variables
Peripheral initialization routine
Main program label in internal program RAM
Fast interrupt address
;/*########################################################################/
;/*
FUNCTIONS
*/
;/*########################################################################/
START
StartUp
SECTION
CODE WORD PUBLIC 'PROGRAM'
PUBLIC
StartUp
PROC
TASK
INTNO=0
PowerOnReset:
MOV
CPUCON1, #00007h
MOV
CPUCON2, #08F3Dh
MOV
WDTCON, #00003h
SRVWDT
;
;
;
;
;
; Routine called by reset vector
VECSC = 00 (2 words)
DISWDT executable until EINIT
Segmentation enabled
Switch context interruptible
Maximum performance
; Watchdog divider ratio: 256
; Service watchdog timer
EXTR
MOV
#1
SYSCON1, #00200h
MOV
SYSCON2, ZEROS
MOV
SYSCON3, ZEROS
MOV
EXTR
MOV
R0, #00006h
#1
RSTCON, R0
; Reset length = 1024 CPU cycles
MOV
CP, #0FC00h
; Global register bank address
MOV
MOV
MOV
MOV
DPP0,
DPP1,
DPP2,
DPP3,
;
;
;
;
MOV
MOV
SPSEG, ZEROS
SP, #0C000h
22/26
#00040h
#00080h
#00304h
#00003h
;
;
;
;
;
BUSCLK = CPUCLK / 2
normal IDLE mode
Output drivers independant
from sleep and power down modes
All peripheral enabled
; RSTOUT2 enabled
External SRAM
External I/O memory
Data in Internal Program SRAM
System page and upper 8K of Data SRAM
; System stack in segment zero
AN1982 APPLICATION NOTE
MOV
MOV
STKUN, #0C000h
STKOV, #0800Ch
; Reserve six words for safety
MOV
MOV
EXTR
MOV
P2, #00000h
DP2, #000FFh
#1
ODP2,#000FFh
;
;
;
;
MOV
MOV
EXTR
MOV
P3, #00408h
DP3, #00408h
#1
ODP3, #00000h
; Set Port 3 as input
; Set P3.3 and P3.10 as output to one (AND gate)
MOV
MOV
R0, #00938h
EBCMOD0, R0
;
;
;
;
;
24 address bits
3 chip select lines
Ready pin enabled (active low)
WRLn and WRHn (not WRn and BHEn)
All EBC pins enabled (master mode)
MOV
MOV
MOV
MOV
R0, #21h
FCONCS0, R0
R0, #0240h
TCONCS0, R0
;
;
;
;
;
;
;
;
;
16 Demux
Ready disabled
A = 0 clk No CS switch off time
B = 1 clk ALE length
C = 0 clk No R/W delay
D = 0 clk
E = 10 clks Wait state time
F = 0 clk (R and W) No memory tristate time
110 ns cycles
MOV
MOV
MOV
MOV
R0, #21h
FCONCS1, R0
R0, #00040h
TCONCS1, R0
MOV
MOV
R0, #01008h
ADDRSEL1, R0
;
;
;
;
;
;
;
;
;
;
;
16 Demux
Ready disabled
A = 0 clk No CS switch off time
B = 1 clk ALE length
C = 0 clk No R/W delay
D = 0 clk
E = 2 clks Wait state time
F = 0 clk (R and W)
30ns cycle
1 Mbyte window
Segment 10 to 1F
MOV
MOV
MOV
MOV
R0, #01h
FCONCS2, R0
R0, #00040h
TCONCS2, R0
MOV
MOV
R0, #00807h
ADDRSEL2, R0
;
;
;
;
;
;
;
;
;
;
;
8 Demux
Ready disabled
A = 0 clk No CS switch off time
B = 1 clk ALE length
C = 0 clk No R/W delay
D = 0 clk
E = 2 clks Wait state time
F = 0 clk (R and W)
30ns cycle
512 kBytes window
Segment 8 to F
EXTR
MOV
#2
EXICON, #00008h
Set Port 2[0..7] as output to zero
(XOR gate on P2.0 and P2.1)
Set port 2[8..15] as input (external interrupts)
Set Port 2[0..7] as open drain
; Set P3.3 and P3.10 as push-pull output
; External interrupt number 1
; Falling edge sensitive
23/26
AN1982 APPLICATION NOTE
MOV
EXISEL, #00h
; Input from associated pin only
; i.e. P2.8 to P2.15
; Fast External interrupt programmed to
; Group 2 level 12 and disabled
MOV
FEI1IC, #032h
MOV
MOV
MOV
MOV
MOV
MOV
MOV
R0, #082C0h
FINT0CSP, R0
R0, DPP3:FastIntAddress
FINT0ADDR, R0
R0, #00020h
BNKSEL0, R0
BNKSEL1, ZEROS
;
;
;
;
;
;
;
CALL
PeripheralInit
; Peripheral initialization
; Same as ST10
Interrupt jump table cache
for interrupt Group2 level 12
Fast interrupt routine address in
internal memory
local bank 1 is used
for interrupt Group2 level 12 (GPRSEL2 = 10b)
Other interrupts use global banks
DISWDT
; Disable watchdog
MOV
JB
CALL
R0, SYSSTAT
R0.1, Nocopy
CopyApplicationCode
;
;
;
;
;
Nocopy:
CALL
InitializeVariables
; Initialize global variables and
; possibly constants in internal data memory
VECSEG, #0C0h
; Locate interrupt vector table in internal
; memory
MOV
In case of software reset
do not copy application program
Copies the application code including
vector table
from external Flash to internal program RAM
ENWDT
SRVWDT
; Enable watchdog
; Service watchdog
EINIT
; End of Initialization
BSET
IEN
CALLS main
; Interrupts global enable
; Call main routine in internal program
; memory
IDLE
RETV
StartUp ENDP
START
ENDS
END
;/*** (c) 2000
24/26
STMicroelectronics ************************* END OF FILE ***/
AN1982 APPLICATION NOTE
Table 1. Revision History
Date
Revision
June 2004
1
Description of Changes
First Issue
25/26
AN1982 APPLICATION NOTE
The present note which is for guidance only, aims at providing customers with information regarding their productsin order for them to save
time. As a result, STMicroelectronics shall not be held liable for any direct, indirector consequential damages with respect to any claims arising from the content of such a note and/or the use made by customers of the information contained herein in connection with their products.
Information furnished is believed to be accurate and reliable. However, STMicroelectronics assumes no responsibility for the consequences
of use of such information nor for any infringement of patents or other rights of third parties which may result from its use. No license is granted
by implication or otherwise under any patent or patent rights of STMicroelectronics. Specifications mentioned in this publication are subject
to change without notice. This publication supersedes and replaces all information previously supplied. STMicroelectronics products are not
authorized for use as critical components in life support devices or systems without express written approval of STMicroelectronics.
The ST logo is a registered trademarks of STMicroelectronics
All other names are the property of their respective owners
© 2004 STMicroelectronics - All rights reserved
STMicroelectronics GROUP OF COMPANIES
Australia - Belgium - Brazil - Canada - China - Czech Republic - Finland - France - Germany - Hong Kong - India - Israel - Italy - Japan
- Malaysia - Malta - Morocco - Singapore - Spain - Sweden - Switzerland - United Kingdom - United States
www.st.com
26/26