1
The Weatherization Assistant
Users Manual for Administrative Features
(Version 8)
Michael Gettings
Engineering Science and Technology Division
Oak Ridge National Laboratory
Oak Ridge, Tennessee
ORNL/TM-2005/236
January 2006
"The submitted manuscript has been authored by a
contractor of the U.S. Government under contract
NO. DE-AC05-00OR22725. Accordingly, the U.S.
Government retains a nonexclusive, royalty-free
license to publish or reproduce the published form
of this contribution, or allow others to do so, for
U.S. Government purposes."
Research sponsored by the Office of Weatherization and Intergovernmental Programs,
Weatherization Assistance Program, U.S. Department of Energy, under
Contract DE-AC05-00OR22725 with UT-Battelle, LLC.
Foreword
The Weatherization Assistant is software for personal computers that was
developed for use by local and state agencies of the Department of Energy’s
(DOE’s) Weatherization Assistance Program. It assists states and agencies select
energy efficiency measures that meet government criteria for cost-effectiveness
that can be installed in homes of low-income families enrolled in the program.
The Weatherization Assistant is actually a package of individual measure
selection programs covered by an umbrella of additional features, mostly optional,
which further address common activities of a Program agency. The National
Energy Audit Tool (NEAT) is designed specifically for single family site-built
homes. The Manufactured Home Energy Audit (MHEA) is similarly designed for
manufactured (or mobile) homes. Installation of the Weatherization Assistant
Version 8, provides the user with both measure selection programs as well as the
umbrella functions.
Although the previous version of the Weatherization Assistant included
both the NEAT and MHEA measure selection tools, the umbrella functions were
not introduced until this most recent version, Version 8. This manual addresses
only these added features. Separate users manuals are available for each of the
measure selection tools.
A few of the features now available in Version 8 include: expanded client
data collection capabilities, user-generated surveys, an extensive client status
tracking system, automatically generated work orders which can be modified to
include as much detail as the user desires, an inventory system, tracking of funds
by cost centers, digital photo storage, and a Geographic Information System (GIS)
which maps clients’ locations.
ii
Table of Contents
Foreword . . . . . . . . . . . . . . . . . . . . . . . . . . . . . . . . . . . . . . . . . . . . . . . . . . . . . . . . ii
Table of Contents . . . . . . . . . . . . . . . . . . . . . . . . . . . . . . . . . . . . . . . . . . . . . . . . . iii
List of Abbreviations and Acronyms . . . . . . . . . . . . . . . . . . . . . . . . . . . . . . . . . . vii
Chapter 1 B Quick Start Tutorial B Weatherization Assistant Version 8 . . . . . .
Starting the Weatherization Assistant . . . . . . . . . . . . . . . . . . . . . . .
The Weatherization Assistant Main Menu . . . . . . . . . . . . . . . . . . .
Entering Your Agency Information . . . . . . . . . . . . . . . . . . . . . . . . .
Client Information . . . . . . . . . . . . . . . . . . . . . . . . . . . . . . . . . . . . . .
The Audit . . . . . . . . . . . . . . . . . . . . . . . . . . . . . . . . . . . . . . . . . . . . .
Audit Recommendations . . . . . . . . . . . . . . . . . . . . . . . . . . . . . . . . .
Normal Use . . . . . . . . . . . . . . . . . . . . . . . . . . . . . . . . . . . . . . . . . . .
Setup . . . . . . . . . . . . . . . . . . . . . . . . . . . . . . . . . . . . . . . . . . . . . . . . .
Samples . . . . . . . . . . . . . . . . . . . . . . . . . . . . . . . . . . . . . . . . . . . . . .
1
1
1
2
2
3
4
4
5
6
Chapter 2 B An Overview of the Weatherization Assistant . . . . . . . . . . . . . . . . . 7
2.1 Hardware Requirements . . . . . . . . . . . . . . . . . . . . . . . . . . . . . . . . . 7
2.2 The Expanded Features of Version 8 . . . . . . . . . . . . . . . . . . . . . . . 9
Chapter 3 B Installing and Starting the Weatherization Assistant . . . . . . . . . . .
3.1 Program Installation . . . . . . . . . . . . . . . . . . . . . . . . . . . . . . . . . . . .
3.2 Network Installation . . . . . . . . . . . . . . . . . . . . . . . . . . . . . . . . . . .
3.3 Starting the Weatherization Assistant . . . . . . . . . . . . . . . . . . . . . .
3.4 The User Logon Form . . . . . . . . . . . . . . . . . . . . . . . . . . . . . . . . . .
11
11
14
16
17
Chapter 4 B Navigation . . . . . . . . . . . . . . . . . . . . . . . . . . . . . . . . . . . . . . . . . . . .
4.1 Record Navigation . . . . . . . . . . . . . . . . . . . . . . . . . . . . . . . . . . . . .
4.2 Entering Data into the Weatherization Assistant . . . . . . . . . . . . .
4.3 Navigating Between Controls . . . . . . . . . . . . . . . . . . . . . . . . . . . .
4.4 The Escape Key . . . . . . . . . . . . . . . . . . . . . . . . . . . . . . . . . . . . . . .
4.5 Required Versus Optional Fields . . . . . . . . . . . . . . . . . . . . . . . . . .
4.6 Field Defaults . . . . . . . . . . . . . . . . . . . . . . . . . . . . . . . . . . . . . . . . .
4.7 Field Range Checking . . . . . . . . . . . . . . . . . . . . . . . . . . . . . . . . . .
4.8 Data Sheet and Form Views of Records . . . . . . . . . . . . . . . . . . . .
4.9 Copying and Pasting Data . . . . . . . . . . . . . . . . . . . . . . . . . . . . . . .
19
19
21
22
23
23
24
24
25
27
iii
Table of Contents
4.10
4.11
4.12
4.13
Deleting Data . . . . . . . . . . . . . . . . . . . . . . . . . . . . . . . . . . . . . . . . .
Entry Errors . . . . . . . . . . . . . . . . . . . . . . . . . . . . . . . . . . . . . . . . . .
Getting Help . . . . . . . . . . . . . . . . . . . . . . . . . . . . . . . . . . . . . . . . . .
The Report Block . . . . . . . . . . . . . . . . . . . . . . . . . . . . . . . . . . . . . .
29
30
31
31
Chapter 5 B Agency . . . . . . . . . . . . . . . . . . . . . . . . . . . . . . . . . . . . . . . . . . . . . .
5.1 Agency Information . . . . . . . . . . . . . . . . . . . . . . . . . . . . . . . . . . . .
5.2 Contacts (Agency) . . . . . . . . . . . . . . . . . . . . . . . . . . . . . . . . . . . . .
5.3 Cost Centers . . . . . . . . . . . . . . . . . . . . . . . . . . . . . . . . . . . . . . . . . .
5.4 Surveys (Agency) . . . . . . . . . . . . . . . . . . . . . . . . . . . . . . . . . . . . . .
5.5 Clients . . . . . . . . . . . . . . . . . . . . . . . . . . . . . . . . . . . . . . . . . . . . . .
5.6 Audits (Agency) . . . . . . . . . . . . . . . . . . . . . . . . . . . . . . . . . . . . . . .
5.7 Work Orders (Agency) . . . . . . . . . . . . . . . . . . . . . . . . . . . . . . . . .
5.8 Libraries . . . . . . . . . . . . . . . . . . . . . . . . . . . . . . . . . . . . . . . . . . . . .
5.9 Status History . . . . . . . . . . . . . . . . . . . . . . . . . . . . . . . . . . . . . . . . .
35
35
38
41
45
46
48
49
51
52
Chapter 6 B Clients . . . . . . . . . . . . . . . . . . . . . . . . . . . . . . . . . . . . . . . . . . . . . . .
6.1 Client Information . . . . . . . . . . . . . . . . . . . . . . . . . . . . . . . . . . . . .
6.2 Status (Clients) . . . . . . . . . . . . . . . . . . . . . . . . . . . . . . . . . . . . . . . .
6.3 Energy Index . . . . . . . . . . . . . . . . . . . . . . . . . . . . . . . . . . . . . . . . .
6.4 Contacts (Client) . . . . . . . . . . . . . . . . . . . . . . . . . . . . . . . . . . . . . .
6.5 Audits (Client) . . . . . . . . . . . . . . . . . . . . . . . . . . . . . . . . . . . . . . . .
6.6 Work Orders (Client) . . . . . . . . . . . . . . . . . . . . . . . . . . . . . . . . . . .
6.7 Surveys (Client) . . . . . . . . . . . . . . . . . . . . . . . . . . . . . . . . . . . . . . .
6.8 Photos (Client) . . . . . . . . . . . . . . . . . . . . . . . . . . . . . . . . . . . . . . . .
55
56
61
63
66
68
70
73
74
Chapter 7 B Energy Audits . . . . . . . . . . . . . . . . . . . . . . . . . . . . . . . . . . . . . . . . .
7.1 Audit Information . . . . . . . . . . . . . . . . . . . . . . . . . . . . . . . . . . . . .
7.2 Status (Audit) . . . . . . . . . . . . . . . . . . . . . . . . . . . . . . . . . . . . . . . . .
7.3 Optional Entries under the Heating Form . . . . . . . . . . . . . . . . . . .
7.4 Optional Entries under the Ducts/Infiltration Form . . . . . . . . . . .
Optional Blower Door and Zonal Pressures . . . . . . . . . . . .
Optional Pressure Balance . . . . . . . . . . . . . . . . . . . . . . . . . .
Optional Pressure Pan . . . . . . . . . . . . . . . . . . . . . . . . . . . . .
7.5 Optional Entries under the Baseloads Water Heaters Form . . . . .
7.6 Health and Safety . . . . . . . . . . . . . . . . . . . . . . . . . . . . . . . . . . . . . .
7.7 Itemized Costs . . . . . . . . . . . . . . . . . . . . . . . . . . . . . . . . . . . . . . . .
75
75
80
82
84
85
87
88
89
91
94
iv
Table of Contents
7.8
7.9
Photos (Audit) . . . . . . . . . . . . . . . . . . . . . . . . . . . . . . . . . . . . . . . . 98
Measures (Audit) . . . . . . . . . . . . . . . . . . . . . . . . . . . . . . . . . . . . . . 98
Chapter 8 B Work Orders . . . . . . . . . . . . . . . . . . . . . . . . . . . . . . . . . . . . . . . . .
8.1 Work Order Information . . . . . . . . . . . . . . . . . . . . . . . . . . . . . . .
8.2 Status (Work Order) . . . . . . . . . . . . . . . . . . . . . . . . . . . . . . . . . . .
8.3 Measures (Work Order) . . . . . . . . . . . . . . . . . . . . . . . . . . . . . . . .
The General Task Description . . . . . . . . . . . . . . . . . . . . . .
The Materials/Labor Details Sub-Form . . . . . . . . . . . . . .
8.4 Photos (Work Order) . . . . . . . . . . . . . . . . . . . . . . . . . . . . . . . . . .
103
104
108
109
110
117
121
Chapter 9 B Setup Library . . . . . . . . . . . . . . . . . . . . . . . . . . . . . . . . . . . . . . . .
9.1 Setup Library Information . . . . . . . . . . . . . . . . . . . . . . . . . . . . . .
9.2 Key Parameters . . . . . . . . . . . . . . . . . . . . . . . . . . . . . . . . . . . . . .
9.3 Fuel Costs . . . . . . . . . . . . . . . . . . . . . . . . . . . . . . . . . . . . . . . . . . .
9.4 Fuel Price Indices . . . . . . . . . . . . . . . . . . . . . . . . . . . . . . . . . . . . .
9.5 Library Measures . . . . . . . . . . . . . . . . . . . . . . . . . . . . . . . . . . . . .
9.6 User Defined Measures . . . . . . . . . . . . . . . . . . . . . . . . . . . . . . . .
The General Task Description . . . . . . . . . . . . . . . . . . . . . .
The Materials/Labor Details Sub-Form . . . . . . . . . . . . . .
9.7 User Defined Insulation Types . . . . . . . . . . . . . . . . . . . . . . . . . .
123
123
126
127
128
129
133
136
140
143
Chapter 10 B Supply Library . . . . . . . . . . . . . . . . . . . . . . . . . . . . . . . . . . . . . .
10.1 General Information . . . . . . . . . . . . . . . . . . . . . . . . . . . . . . . . . . .
10.2 Common Entries on Material Forms . . . . . . . . . . . . . . . . . . . . . .
10.3 The Hot Water Equipment and Refrigerator Forms . . . . . . . . . .
10.4 Energy Details . . . . . . . . . . . . . . . . . . . . . . . . . . . . . . . . . . . . . . .
10.5 The Default Supply Library Record . . . . . . . . . . . . . . . . . . . . . .
145
146
148
151
153
157
Chapter 11 B Preferences . . . . . . . . . . . . . . . . . . . . . . . . . . . . . . . . . . . . . . . . .
11.1 The Preferences General Tab . . . . . . . . . . . . . . . . . . . . . . . . . . . .
11.2 Range Check and Default Values . . . . . . . . . . . . . . . . . . . . . . . .
11.3 Report Sections . . . . . . . . . . . . . . . . . . . . . . . . . . . . . . . . . . . . . .
11.4 Features . . . . . . . . . . . . . . . . . . . . . . . . . . . . . . . . . . . . . . . . . . . .
161
161
165
166
166
Chapter 12 B Data Link - Database Linking, Importing and Exporting Data . 173
12.1 Currently Linked Backend Data File . . . . . . . . . . . . . . . . . . . . . . 175
v
Table of Contents
12.2 Currently Linked Reporting File . . . . . . . . . . . . . . . . . . . . . . . . .
12.3 Data Transfer B Import/Export via Database Files . . . . . . . . . . .
Importing Clients (via database files) . . . . . . . . . . . . . . . .
Exporting Clients (via database files) . . . . . . . . . . . . . . . .
Checking Clients In or Out . . . . . . . . . . . . . . . . . . . . . . . .
12.4 Data Transfer B Import/Export via Text Files . . . . . . . . . . . . . . .
Importing Clients (via text files) . . . . . . . . . . . . . . . . . . . .
Exporting Clients (via text files) . . . . . . . . . . . . . . . . . . . .
Selecting Client Records . . . . . . . . . . . . . . . . . . . . . . . . . .
177
177
178
180
181
182
183
186
188
Chapter 13 B Auxiliary Features B Photos, GIS, Status Tracking, E-Mail . . .
13.1 Digital Photos . . . . . . . . . . . . . . . . . . . . . . . . . . . . . . . . . . . . . . .
Pathname Method of Photo Storage . . . . . . . . . . . . . . . . .
Third Party Photo Browser . . . . . . . . . . . . . . . . . . . . . . . .
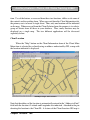
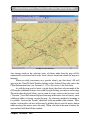
13.2 Geographic Information System (GIS) . . . . . . . . . . . . . . . . . . . .
Client Location . . . . . . . . . . . . . . . . . . . . . . . . . . . . . . . . .
Client Selection . . . . . . . . . . . . . . . . . . . . . . . . . . . . . . . . .
13.3 Status Tracking . . . . . . . . . . . . . . . . . . . . . . . . . . . . . . . . . . . . . .
13.4 E-Mailing from Within Weatherization Assistant . . . . . . . . . . . .
193
193
193
195
197
198
199
201
204
Appendix A B Sample Reports . . . . . . . . . . . . . . . . . . . . . . . . . . . . . . . . . . . . . 207
Appendix B B Customized Reporting Feature . . . . . . . . . . . . . . . . . . . . . . . . . 369
vi
List of Abbreviations and Acronyms
AFUE
AHAM
ASHRAE
Btu
COP
csv
DOE
GIS
GUI
HDD
HSPF
MB
MHEA
MMBtu
NEAT
NFRC
NOAA
RAM
SHGC
SIR
SP2
T&TA
UPW
annual fuel utilization efficiency
Association of Home Appliance Manufacturers
American Society of Heating, Refrigerating, and AirConditioning Engineers
British thermal unit
coefficient of performance
comma separated values (file format)
Department of Energy
Geographic Information System
graphical user interface
heating degree days
heating seasonal performance factor
Megabytes
Manufactured Home Energy Audit
Million British thermal units
National Energy Audit
National Fenestration Rating Council
National Oceanic and Atmospheric Administration
random access memory
solar heat gain coefficient
savings-to-investment ratio
service pack 2 (Microsoft)
training and technical assistance
uniform present worth
vii
List of Abbreviations and Acronyms
viii
Quick Start Tutorial - Weatherization Assistant Version 8
Chapter 1
The following may be used as a tutorial assisting you in becoming acquainted
with Version 8 of the Weatherization Assistant. As such, it would likely benefit you
more if read while having access to the program so that you can actually view the
forms being discussed.
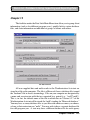
Starting the Weatherization Assistant
After installation and the first time you start the Weatherization Assistant, an
"Installation ID" form will be displayed. This form allows an optional entry
identifying this specific installation of the program. This identification will be useful
if your agency will have several installed copies of the Weatherization Assistant
software and you plan to share data between them.
Following completion of this form, you may be notified that the program will
connect to the databases used to store your data. This is only performed once at this
initial startup, unless you later choose to connect to a different database of
information.
You will then be briefly presented with a form displaying the version, date, and
credits associated with this version of the Weatherization Assistant. The display will
automatically disappear leaving you at the Weatherization Assistant Main Menu.
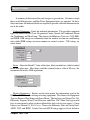
The Weatherization Assistant Main Menu
The Weatherization Assistant Main Menu will be your starting point each time
you initiate the program. It displays buttons accessing the main categories of
information necessary to use the program; for example, Agency, Clients, Site Built
(NEAT), and Setup Library. At any time, the program identifies which of these main
menu items you are accessing by repeatedly displaying horizontally the category
name in the blue banner line at the top of the form you are working with; for example,
"Agency B Agency B Agency..."
Chapter One • 1
Quick Start Tutorial - Weatherization Assistant Version 8
Entering Your Agency Information
To begin using the Weatherization Assistant, select the "Agency" button on the
Main Menu, then replace "Your Agency Name" in the Agency Name field with the
name of your agency and select the correct state in the State field. This is the
minimum information recommended for identifying your agency. You may use the
program with no further entries on this form. However, it is recommended that you
browse through this Agency Information tab and associated tabs to acquaint yourself
with the other information which might be useful for you to supply. The help feature
(F1 key) will provide additional information related to the Agency Main Menu item.
Client Information
To begin your first audit, select the "Clients" tab from the Agency Main Menu
item. Since this is your first use of the program, no clients will be displayed. Create
one by selecting the "Create New Client Record for this Agency" button at the lower
right corner of the form. You will be presented with the Client Information form. A
default Client ID and your agency name will already be filled in for you on this form.
You will likely want to change the Client ID to better describe the client for which
this first audit will be performed, or enter a fictitious client if you are simply learning
to use the program. This is the minimum information necessary to identify a client.
(The Dwelling Type field becomes required if any field other than the Client ID and
Alt. Client ID fields has been accessed.) However, as with the Agency form, it is
recommended that you browse through this Client Information tab and associated tabs
to acquaint yourself with the other information which might be useful for you to
supply. Of possible interest would be using the Contacts tab to define a "Contact"
for this client as a "Primary Applicant." This will allow you to identify this client in
the future by the contact’s name as well as the Client ID, if the Client ID was assigned
something other than a person’s name. Again, the F1 help key will provide you with
information on this and the other tabs under this Client Main Menu item.
If you begin filling in any form and decide against continuing before all of the
required information is entered, strike the "Esc" key twice in succession to return the
form to its condition prior to your entries. This will allow you to go to another form.
Otherwise, you will be asked to fill in the remaining required information on the form
before proceeding.
Chapter One • 2
Quick Start Tutorial - Weatherization Assistant Version 8
It is important to remember that you will always have to enter at least the
minimum client information for a client before proceeding to enter audit information
on the home for the client.
The Audit
Under normal circumstances, describing the client may be as far as you wish
to go at this time with this client if no audit has yet been performed on the client’s
home. You may exit the program at any time without loosing any information. If,
however, you wish to continue by entering audit information, either because an audit
has already been performed for the client (although you should have already set the
program up for your locality before performing an audit for an actual client - see
Setup below) or because you are just learning to use the program, select the "Audits"
tab under this Client Main Menu item. If this is your first use of the program, no
existing audits will be displayed. To create a blank audit for this client, select either
the "Create New Site Built (NEAT) Audit" or "Create New Mobile Home (MHEA)
Audit" buttons at the lower right of the form. You will be presented with the Audit
Information form of the Audit Main Menu item for either National Energy Audit
(NEAT) or the Manufactured Home Energy Audit (MHEA), depending on your
selection. On the form, already filled in for you, will be a default Audit Name, the
Client ID from which the audit was created, and your agency name.
There is considerable required information on this Audit Information form for
both NEAT and MHEA B in fact all editable fields on the forms are required. So
recall the statement above regarding the double "Esc" key sequence returning a form
to its condition prior to your changes, allowing you to exit a form without filling in
all of the required information (though your entries on the form to that point will be
lost). The required entries on all information tabs under the audit need not be filled
in to exit the Audit Main Menu item for a particular audit. Only those of the current
form you are viewing. Required entries always have a lined boarder around the field.
As with former versions of the Weatherization Assistant, most all fields with a down
arrow to the right of the field must be filled in with one of the pre-set selections
available from the list of items accessible by clicking on the down arrow (exceptions
exist on the Water Heaters and Refrigerators forms under Baseloads). All data items
on the tabs under the Audit Main Menu items (NEAT and MHEA) have item-specific
help associated with them. Striking the F1 key while positioned at any data entry
item will display help material specific to that data item.
Chapter One • 3
Quick Start Tutorial - Weatherization Assistant Version 8
See the separate NEAT and MHEA User’s Manuals for more information on
entering the audit information.
Audit Recommendations
Following your describing a home to the Audit portion of the Weatherization
Assistant, the audit can be analyzed (run) to produce recommendations by selecting
the "Run Audit" button visible in the upper right corner on any of the tabs under the
Audit Main Menu items. Following completion of the analysis, the program will
automatically display (though this may be changed in Preferences) the NEAT or
MHEA Recommended Measures report, listing the recommendations from the audit.
This report may be printed directly from the display or simply viewed. Once closed
(or if never opened), this report can be recalled at any time from the Report block on
the Audit Information tab of the Audit Main Menu item.
The recommendations of the audit are included in a second location, the
Measures tab on the Audit Main Menu item. Unlike the Recommended Measures
report described above, this listing has editable entries. If you wish to use some of
Version 8's added optional features, it is from here that you are allowed to accept or
reject each measure, assign it to a specific contractor, or charge its cost to any of your
pre-defined cost centers. Contractors (Contacts) and Cost Centers are optional
definitions you provide under the Agency Main Menu item.
Normal Use
If you have followed along with the above in the sense of a tutorial, you will
have multiple forms opened in the Weatherization Assistant application: the Main
Menu, an Agency form, a Client form, an Audit form, and possibly the Recommended
Measures output report in a totally separate window, if that also has not yet been
closed. Although the Weatherization Assistant will operate with multiple forms and
windows open, there is danger if multiple forms of the same type (i.e., Client, Audit,
etc.) become open at the same time. If you were to exit the main program at this
point, the forms would be closed automatically preparatory to your next
implementation of the program. The Recommended Measures Output report window
needs to be closed separately. Alternately, you may access each form individually,
normally in the reverse order in which they were opened, and close it using the
standard "X" box in the upper right corner of the form, eventually taking you back to
the Main Menu where the standard Weatherization Assistant Exit button exists.
Chapter One • 4
Quick Start Tutorial - Weatherization Assistant Version 8
(Make sure to use the form closure X box, not the application closure X box. The
latter will always be outside the former.) Or, you may close only the Audit form,
taking you back to the Client form where you may define your next client, and then
perhaps the audit for this new client.
On subsequent use of the Weatherization Assistant, you will have little need
to open the Agency Main Menu item. Instead, open the Client Main Menu item
directly from the Main Menu and define a new client. The program will remember
you as the agency and automatically assign the client to you. You may then either use
the Audit tab under the Client Main Menu item to initiate an audit for that client (as
described above), or close the Client Main Menu item and select the NEAT or MHEA
Energy Audit button on the Main Menu and define the audit directly under the Audit
Main Menu item, assigning it to the Client just defined. Just be sure that an audit is
closed before beginning to define a new client and associated audit.
Setup
Before running an audit for an actual client, you must visit the Setup Library
Main Menu item and customize the program to your agency. Upon selecting this
menu option, you will be presented with the Setup Library Information form. If this
is the first time you have visited Setup, the Library Name automatically entered will
be "Setup Library ([Installation ID])," where the Installation ID is that ID you entered
when first starting the Weatherization Assistant (see "Starting the Weatherization
Assistant," above). If you did not enter an Installation ID, a time stamp will take its
place in this library name. You should rename this library to make it easily identified
by you and any others who might receive data from you. Your state may suggest that
the name include an abbreviation of your agency to allow them to identify it. The
Agency to which the library is assigned should already be the name you provided in
first visiting the Agency Main Menu item (see "Entering Your Agency Information,"
above).
If this is not the library automatically presented, see if you can find it in the
Setup Library find box in the lower left corner of the form. As shipped, this find box
will display only setup libraries for the agency last visited on the Agency Main Menu
item. So, if it does not display the desired library, exit Setup and go to the Agency
Main Menu item and call up your agency, then re-visit the Setup Main Menu item and
look for your agency’s Setup Library again in the find box.
The program’s recommendations are based on individual energy efficiency
measures’ savings to investment ratios (SIRs). These SIRs strongly depend on the
Chapter One • 5
Quick Start Tutorial - Weatherization Assistant Version 8
measure implementation costs and fuel prices in your area. Under the Library
Measures tab of your Setup Library, enter estimated measure implementation costs
for those measures that your agency performs by clicking on the Costs button to the
right of each measure. DO NOT ZERO OUT ANY MEASURE COSTS, even if you
do not plan to implement the measures. You may also choose which measures are to
be considered for your program (normally decided upon with assistance from the
State) by checking the "Active." check box for each such measure. The assignments
of measures to a default contractor or default cost center are optional features in the
program of use only if you plan to use the Weatherization Assistant to generate work
orders.
Under the Fuel Costs tab, enter the fuel prices (often time averages) prevalent
in your location. In case you have more than one fuel supplier or electric utility
servicing your area, you may define as many sets of fuel prices as are necessary.
Samples
By selecting the "Sample Agency" using the Agency Record Navigation Block
on the Agency Main Menu item, you may view samples of Client entries and
associated Audits. Default Work Orders have also been created for each client. The
"Sample Setup Library" contains some examples of User-Defined Measures and the
"Sample Supply Library" contains an example inventory of items. The use of an
inventory is an optional feature of the Weatherization Assistant used in conjunction
with work orders. The feature allows you to track use of inventoried items as they are
assigned to various work orders.
Chapter One • 6
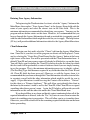
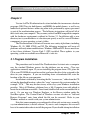
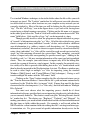
An Overview of the Weatherization Assistant
Chapter 2
The Weatherization Assistant is software for personal computers that was
developed for use by local and state agencies of the Department of Energy’s (DOE’s)
Weatherization Assistance Program. It assists states and agencies select energy
efficiency measures that meet government criteria for cost-effectiveness that can be
installed in homes of low-income families enrolled in the program.
The Weatherization Assistant is actually a package of individual measure
selection programs covered by an umbrella of additional features, mostly optional,
which further address common activities of a Program agency.
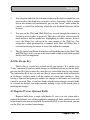
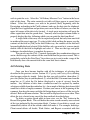
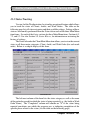
Weatherization Assistant
This Manual
(Member Programs)
NEAT
Site-Built Homes
Separate Manual
MHEA
Manufactured Housing
Separate Manual
The National Energy Audit Tool (NEAT) is designed specifically for single family
site-built homes, although it can also be used with some limitations for small
multifamily residences. The Manufactured Home Energy Audit (MHEA) is similarly
designed for manufactured (or mobile) homes. Installation of the Weatherization
Assistant Version 8, described in Chapter 3 of this manual, Installing and Starting the
Weatherization Assistant, provides you with both measure selection programs as well
as the umbrella functions. This manual, however, addresses only the later. Separate
manuals are available for the NEAT and MHEA measure selection programs.
2.1 Hardware Requirements
The analysis engines (NEAT and MHEA) are written in the programming
language "C" with a user interface and data storage format using Microsoft’s Access.
Chapter Two • 7
An Overview of the Weatherization Assistant
The two are linked by C++ and Visual Basic programs. However, the Weatherization
Assistant requires no software associated with any of these languages or applications
for normal use. The program needs only a Windows operating system (Win95, 98,
NT4.0, Win2000, or XP), which normally comes with the purchase of a computer.
NT4.0 and Win2000 must have at least the service pack 2 (SP2) upgrades, available
through Microsoft, in order to insure proper operation of the program.
The Weatherization Assistant Version 8 runs on any IBM-compatible computer
having at least 64 mega-bytes (MB) of free random-access memory (RAM).
Installation requires at least 35 MB of available hard disk space. Your graphic card
and monitor should be able to produce a display with a minimum resolution of
1024x768 pixels in order to allow windows to be seen without scrolling. All files
necessary to run the program can be stored on a single CD, including weather files
for over 200 cities in the continental United States and bordering provinces of
Canada. Only files necessary for the optional mapping feature of the Weatherization
Assistant are not available on CD. They must be downloaded for each U.S. state
individually.
The Weatherization Assistant uses your existing Windows printer setup to both
display and print results and reports. Thus, even though you may not have a printer
physically attached to your computer, you must have an acceptable printer driver
loaded and selected as default in order to display the results. Output produced by the
program is stored in the audit database and displayed in rich-text format from within
the program. In addition, the program provides a standard ASCII formatted file of
the output for the most recent run, which is readable by any word processor or text
editor and can be viewed in DOS.
Version 8 of the Weatherization Assistant utilizes a commercially produced
database software, Microsoft Access, to store the information you provide and the
results of running the program. Older versions of NEAT and MHEA used separate
files to store the audit inputs and resulting reports associated with each dwelling.
Now, all information for all homes is stored in a single file, the "mdb" database file.
Within this file, information is stored in linked tables, each table composed of as
many "records" as is required to store the information required. When you enter
information on a new client by filling in data on a form, you are adding a new record
to the client table. Information is retrieved simply by requesting to view different
records in the database. Users of other software products based on Microsoft Access
may already be familiar with the concept of tables, records, and forms.
With data stored in Access tables, users experienced in Access can retrieve the
information and import it to other Access applications without having to re-enter data.
Chapter Two • 8
An Overview of the Weatherization Assistant
In addition, new to Version 8, the program will produce and read "comma separate
value" (csv) files containing data, which provides an additional mechanism for data
transfer between computer applications.
2.2 The Expanded Features of Version 8
The expanded features of Version 8 in the Weatherization Assistant were
incorporated into the program in such a way as to allow the measure selection
programs, NEAT and MHEA, to still be used almost as stand-alone programs, if users
are not interested in using the other features. Separate buttons on the Main Menu of
the program take a user directly to either NEAT or MHEA. The expanded features
have also been added mostly independent of one another, allowing the user to pick
and choose which he/she desires to use or to incorporate their use in a phased
approach.
Some of the features added to Version 8 include expanded client data collection
capabilities. Though optional, the added data will likely cover all information
normally collected and stored, perhaps in paper form, for an agency’s clients. In
addition, user-generated surveys can be developed, with the responses from each
individual client stored and retrieved in reports.
A relatively extensive client status tracking system has been incorporated,
allowing an agency to track progress of a client’s application, file, audit, as well as
the work orders, inspection, and payments by the agency related to each client.
Work orders may be automatically generated by the execution of either NEAT
or MHEA, or manually, for example, from a pre-defined priority list, or a
combination of the two. The work orders may contain as much detail as the user
desires and may utilize materials the user has entered in the program’s optional
inventory feature. Use of an item in a work order automatically subtracts the item
from the inventory.
Implementation of measures may be assigned to any cost center (funding
source) the user has defined. If desired, source funding balances will be
automatically updated as work orders including measures funded by a particular
source are completed.
Digital photos taken at any stage of the weatherization process or scans of
additional documents can be stored with data for each client. Also, the new
Geographic Information System (GIS) allows mapping of a single client’s location
Chapter Two • 9
An Overview of the Weatherization Assistant
or any group of clients at once. This could assist in scheduling efforts or in creating
summary reports be geographic location.
These, and other features added, should benefit the agency in performing their
most important task of assisting the nation’s low-income families better afford their
energy costs. The prospect also exists in formalizing the storage of all weatherization
program data into state-wide or nationwide databases which could then be used in
program evaluation or lead to better implementation processes.
Chapter Two • 10
Installing and Starting the Weatherization Assistant
Chapter 3
Version 8 of The Weatherization Assistant includes the two measure selection
programs, NEAT for site-built homes, and MHEA for mobile homes, as well as an
umbrella of optional features addressing other tasks performed by agency personnel
as part of the weatherization process. The following instructions will install all of
these tools onto your computer. They assume you have an IBM-compatible computer
with the hardware requirements outlined in Section 2.1. Installation adds a new
directory tree to your hard drive at a location you specify as well as several Windows
components to your operating system’s folder.
The Weatherization Assistant will execute on a variety of platforms, including
Windows 95, 98, 2000, NT4.0, and XP. The following instructions will cover all
platforms with only minor modifications. Windows 2000 and NT4.0 users must have
at least those platforms’ Service Pack 2 (SP2) installed. These updates to your
operating system are available over Microsoft’s web site.
3.1 Program Installation
The procedure used to install the Weatherization Assistant onto a computer
uses the standard Windows process for the platform you are using. Close any
applications currently open. If you are installing the program from a CD, place the
CD in your CD ROM drive and insure that you know the drive letter assigned to the
drive on your computer. If you are installing from a downloaded file, note the
location of the file on your computer.
Installation is initiated by executing the file "waxxxx.exe," either from the CD
or from the download location, where the "xxxx" represents the version number, for
example "8276." This may be done in any of the ways your Windows installation
provides. Most all Windows platforms have a My Computer icon with which to
locate the installation executable. Once found, double click on the executable file to
run it. Or, you may use Windows Explorer, or the Browse window under the
Start/Run option. The Control Panel of Windows versions also has an "Add and
Remove Programs" entry from which the file can be executed. Refer to your
Windows manual or consult with your system administrator.
Note that some computers are configured to allow only certain users, normally
a system administrator, to install software. If yours is such a computer, this user will
have to be contacted in order to install the program. If you should attempt installation
Chapter Three • 11
Installing and Starting the Weatherization Assistant
under such circumstances without proper authorization, you will receive messages
indicating either the need for "administrative privileges" or that you do not have
"write access" to certain locations on your computer.
The installation procedure will present you with the license agreement. Read
the agreement and click your mouse on the "I Agree" button if you agree with its
contents. Otherwise, click on Cancel to abort the installation process. Any time you
choose to Cancel the installation, you will be asked to confirm this choice. If you
choose to proceed, you will be presented with the "Welcome" screen giving you a
further opportunity to either go to the "Next" screen or "Cancel" the process.
The release version number contains four digits (e.g., "8276"). Any installation
having a version number which differs in any of the first three digits from a
previously installed version is considered a new installation, i.e., a major version
change. However, if the first three digits are the same as an existing version on your
machine, the installation is considered an "upgrade." Thus, if you were installing a
version 8278 and already had installed version 8276, the installation would be an
upgrade. Under such conditions, the installation procedure will present you with the
"Upgrade or Install" form. The form gives details on the former installation as well
as the version you are now asking to have installed. It then indicates, "To upgrade
your existing version, accept the default installation path name on the next dialog.
To perform a new installation, choose a different installation path name on the next
dialog." Normally, if you receive this message, you will be upgrading your software,
unless you have specific reasons for wanting more than one installation of the same
major version. An upgrade will not affect any of your settings or data already
entered. It will only affect the operation of the program. A new installation will
provide you with a completely separate program with a new basically empty data set
and default settings. The new installation, however, will not affect your previous
installation. In this instance, following this new installation, there will be two icons
for this version of the program on your computer, each taking you to the different
installations. This form is only informational, but still gives you an opportunity to
continue with installation by choosing "OK" or exit the process by selecting "Cancel."
The next screen in the installation process allows you to select the location on
your computer to which the program files will be copied, the "Destination Directory."
If you have not previously installed this major version, the default location will be
"c:\Program Files\Weatherization Assistant xxx," where "xxx" stands for the major
version number being installed. If you have installed this major version before, the
location displayed will be where ever you chose to have the program installed on the
previous installation. This is why the instruction was given on the prior form
Chapter Three • 12
Installing and Starting the Weatherization Assistant
(discussed above) to "accept the default installation path name" in order to "upgrade."
If this default location is satisfactory, choose Next. Otherwise click on the "Browse"
button and select the preferred location from the drives (bottom) and folders (middle)
sub-windows presented. The destination field at the top of this window will change
in response to your selections. You may also modify the entry in this destination field
directly to make your selection. If your entry does not correspond to an existing
location, you will later be asked if you wish to have the location created. If it
corresponds to an existing installation, you will be ask to confirm installation into this
existing directory. Click on OK to accept your location specification or Cancel if you
wish to return to using the default or previously accepted location. When you are
satisfied with the selection as displayed in the box containing the Browse button
(which will be the default location if you have not selected to Browse to a new
location), click on the Next button to continue. Note that this screen will also display
the "Free Disk Space" available on the drive selected as well as the expected
remaining "Free Disk Space After Installation."
The next screen summarizes the version being installed, the date of installation,
and your choice of the destination directory. If the summary is correct, choose Next
to continue the installation. Otherwise, choose Back to return to the previous screen
to modify your selections or Cancel to exit the installation process without having
installed the program. Any time you choose to Cancel the installation, you will be
asked to confirm this choice.
If your selection of destination directory does not exist on your computer, a
screen will appear notifying you of this situation. You must click the OK button to
confirm receipt of this notification. You will next see a window with a bar which
meters the progress of installing the necessary files. Concluding this process, you
will be presented with the "Installation Completed" notice from which you are given
the choice of finishing the installation with or without viewing the "User Notes." If
you choose to view these notes, they will be presented in a Notepad window. It may
be helpful to select the File, Print menu item in this window to print the notes for
future reference. It may contain notes available at the time of release of the program
but not contained in this manual. After installation, this file will be available from
the Weatherization Assistant destination directory you have selected (e.g., c:\Program
Files\Weatherization Assistant xxx). Exit the notes when you have finished by
selecting File/Exit or clicking on the Windows close window box [X] in the note pad
window. The installation is now complete. Close any other windows associated with
the install procedure and return to your normal desktop.
Chapter Three • 13
Installing and Starting the Weatherization Assistant
The above described installation process will automatically place the
Weatherization Assistant icon on your desktop, containing the version number in its
name.
The installation process will copy a file into the Weatherization Assistant
destination directory you chose above. This file will eventually contain all data that
you input to the program. The name of the file will reflect the version of the
Weatherization Assistant with which it is to be used, (e.g., "wa827.mdb"). Though
not necessary, it is recommended that your system administrator make a copy of this
file before you begin using the program. See the introduction to Chapter 12, Data
Link - Database Linking, Importing and Exporting Data, for additional details.
3.2 Network Installation
One advantage of using a standard database environment is that standard multiuser features are available. If you are familiar with Microsoft Access, you may be
aware of the strategy where the "front-end" interface (the forms and reports) is
separate from the "backend" database (just data tables). The Weatherization Assistant
uses this design strategy to allow it to be operated on networks. The front-end,
located in the "wa.mde" file, can be installed on each client’s computer while the
backend, located by default in the "wannn.mdb" file (where nnn is the version
number), can be installed in a shared folder on a network.
The front-end can connect (or link) to any backend file located anywhere on the client
computer's file system including shared network drives. Below are some installation
instructions that might be suitable for your situation:
CASE 1) Multiple users on different computers on a local area network need to share
data
(1) Install the Weatherization Assistant using the installation executable file on
each of the client computers (see Section 3.1 above).
(2) Install the Weatherization Assistant using the installation executable file on the
server computer OR copy the "wannn.mdb" file from one of the client
computers to a shared folder on the server. Make sure that shared folder has
no read or write security restrictions.
Chapter Three • 14
Installing and Starting the Weatherization Assistant
(3) Run the Weatherization Assistant on each client computer and use the Data
Link feature (see Section 12.1, Currently Linked Backend Data File) on the
Main Menu to link each client computer to the shared "mdb" file on the server.
(4) (Optional) You may want to erase the "mdb" files on each of the client
computers to avoid any confusion.
CASE 2) Multiple users, some with portable computers used in the field for data
collection
(1) Follow all the steps for CASE #1 above.
(2) Install the Weatherization Assistant using the installation executable on each
portable computer. Do NOT link to the "mdb" file on the server. Each
portable then has an independent "mdb"backend file. Auditors with portable
computers should use the Import/Export feature under the Data Link Main
Menu item to move jobs manually to/from their computer. (See Section 12.3,
Data Transfer B Import/Export via Database Files)
Client records created on different computers linked to a shared backend
database file will not conflict. However, if several client computers linked to the
same backend database file attempt to access the same client record, conflicts could
arise. Microsoft Access handles these conflicts with "record locking." The first
person to open a record ‘wins’, and the second person is locked out of editing (the
computer just beeps whenever attempts to change a locked field are made) until the
first person is finished editing the record. So, if you are sharing a backend, there is
a very important rule to follow: Always finish edits to unlock the record for other
users. Never leave edits in process for extended periods since the record (and
potentially some adjacent records) will remain locked for other users. To finish your
edits, just change tabs, or back out of the form you are working on. This writes the
record to the backend database and unlocks the record for other users. A limitation
of Access is that it may lock more than just the one record you are editing (it may
include some adjacent records as well). Given this limitation of Access record
locking, the rule for sharing backend database files is that much more important.
Chapter Three • 15
Installing and Starting the Weatherization Assistant
If all users install the Weatherization Assistant software and do NOT link to
a shared database, then there will be independent backend database files, each with
their own set of client records and its own Agency record on each machine.
3.3 Starting the Weatherization Assistant
Click on the Weatherization Assistant icon displayed on your desktop to start
the program. Any other means of attempting to open the program will likely fail. The
icon has specific instructions in opening the Weatherization Assistant needed for
successful operation.
The first time you start the Weatherization Assistant, an "Installation ID" form
will be displayed. This form allows an optional entry identifying this specific
installation of the program. This identification will be useful if your agency will have
several installed copies of the Weatherization Assistant software and you plan to
share data between them. The ID is used in the default name given to a new Setup or
Supply Library (see Section 9.1, Setup Library Information and 10.1, General
Information (Supplies)). If left blank, these default naming conventions will use the
record’s time of creation instead.
If during installation you chose to install the Weatherization Assistant into a
location on your computer other than the default location (c:/Program Files/
Weatherization Assistant xxx), the first time you open the program, it will tell you
that it must connect to the back-end database. Click on the OK to continue. You will
then be asked to confirm that the linking was successful. A similar process will be
performed for a reporting module.
Subsequent initiations of the Weatherization Assistant will take you
immediately to an introductory banner indicating that the Weatherization Assistant
has been developed for the Department of Energy and giving a version number and
release date. This screen will automatically disappear once the program has fully
loaded and will be followed by the Main Menu for the Weatherization Assistant. It
is from this form that you will access all of the functions included in the program.
Present on the form are buttons taking you to all of the major functions: your Agency
description, Client data, the Site Built (NEAT) and Mobile Home (MHEA) audits, the
development of detailed Work Orders, as well as tailoring the program to your agency
via the Setup Library, permitting you to enter your inventory in the Supply Library,
and alter Preferences for program operation. The Data Link button takes you to forms
which allow you to link to different databases and share information with other
Chapter Three • 16
Installing and Starting the Weatherization Assistant
program installations. The remaining chapters of this manual each discuss one of
these major functions.
The Weatherization Assistant Main Menu
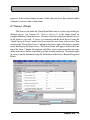
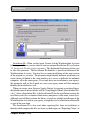
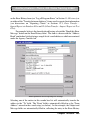
3.4 The User Logon Form
If you have instituted use of the User Logon feature of the program (see "User
logons with user names and passwords from the Agency/ Contacts/ Passwords tab"
in Section 11.4, Features), each time you initiate the program you will be presented
with the Weatherization Assistant Log On form.
Chapter Three • 17
Installing and Starting the Weatherization Assistant
This feature requires users of the program to be registered and have passwords
assigned before they can access the program. These User Names and Passwords are
designated in the Agency Contacts tab of the program (see "Change LogOn Group
and Password" in Section 5.2, Contacts (Agency)). The user name is an abbreviated
(possibly initials) designation for each user. A list of currently registered users is
displayed from the User Name combo box list on the form. Also displayed with each
user in the list are the user’s full name, group (indicating privileges), agency, and
state (of agency). Choose a user from the list and enter the password assigned to that
user as assigned in the above reference. Only after successfully logging on will the
Main Menu become available.
Chapter Three • 18
Navigation
Chapter 4
Versions 7 and 8 of the Weatherization Assistant use the graphic user interface
(GUI) provided by Microsoft’s Access 97. The Weatherization Assistant uses all the
standard Access forms, controls, and the concept of records contained in this
software. Thus, if you are familiar with Access, you are probably already proficient
with the mechanics of entering data into the program. Otherwise, the following
chapter will supply you with the basics needed for this task.
4.1 Record Navigation
Data entry in the Weatherization Assistant uses forms, each form containing
information related to a specific topic, such as Client Information or an Agency
Contact. The term "record" refers to the information contained on a specific form.
Often the terms "record" and "form" may be used interchangeably, keeping this
somewhat subtle difference in definition in mind.
On a given form, there are several different ways to navigate to the record you
are interested in. Described below are some of the most common techniques you can
use.
The Audit Record Navigation Block
Use the controls in the Record Navigation Block located in the lower left
corner of each form to find records of the type indicated in the upper left border of
the block. If applicable, the find combo boxes included in the block may include
listings of these records arranged in alphanumeric order "by" various identifying
fields. For example, to find Audit records, you may search by the Audit Name, Client
Name, etc. Clicking your mouse on any item listed in the combo box list will position
you to that record.
Use the navigation buttons at the bottom of the Record Navigation Block to
move to a particular record number, the first or last record, or , respectively, or
Chapter Four • 19
Navigation
the next or previous record,
or
, respectively. Records are stored in
alphabetical order by one of the identifying fields (the Audit Name for example).
Use the new record button,
,in the navigation block to create a new blank
record, or the "Copy" button to copy the currently accessed record.
The "Del" button deletes the currently accessed record.
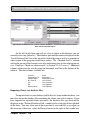
The Client tab under the Agency Main Menu Item
For Clients, Audits, and Work Orders, you can also locate a desired record by
accessing the Navigation Data Sheet View for that type of record (see Section 4.8,
Data Sheet and Form Views of Records). This is done by selecting the Clients,
Audits, Work Orders tab under either the Agency or Client Main Menu items. These
tabs are meant only for navigation and to provide a relatively condensed view of all
records of the type selected. Information under the tabs cannot be altered. You are
reminded of this by the forms having a light blue border.
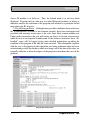
This data sheet view displays the available records in a spread sheet format.
Double click on the record name you desire, and the program will take you there.
This procedure works for any record type whose name in the header for that column
is in angle brackets (< >).
If you have enabled the Bookmarks feature under Preferences (see
"Bookmarks" in Section 11.4, Features), then whenever you select any of the Main
Menu items, the program will automatically return you to the same record you were
last working on when you exited that record type. This applies to Agency, Client,
Audit, Work Order, Setup Library, and Supply Library Main Menu items.
Data for a record are loaded into your computer’s temporary memory (not on
disk) when you start filling in data on a blank form or modify data on an existing
form. When you exit that form or try to navigate to a new record, the record you were
working on gets saved to the database file in your computer’s permanent memory, the
"disk." There are a number of range and completeness checks as well as relational
integrity checks performed by Access when the record is being saved to disk. This is
why you can get warning and error messages when you try to leave a form or navigate
to a new record.
Chapter Four • 20
Navigation
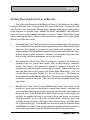
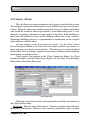
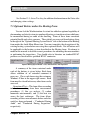
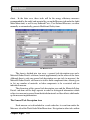
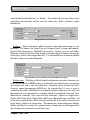
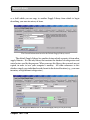
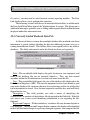
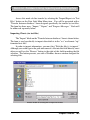
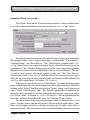
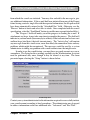
4.2 Entering Data into the Weatherization Assistant
Forms contain three types of controls which
accept input from the user: the field, the combo box,
and the check box.
Fields allow you to type in entries from the
Two fields, one requiring a
keyboard and are not restricted to any pre-selected set
numeric entry
of responses. However, they often must satisfy certain
conditions to be acceptable. For example, a field expecting a
number cannot contain an alphabetic character.
Combo-boxes look like fields except that they have a
square with a downward pointing arrow to the right of the field.
combo-box with
Entries into these controls may be restricted to one of several Aitem
list visible
prescribed responses. The selection may be made in several
ways:
$
Left click the mouse on the box with the arrow, then click on the desired
response from the combo box list which will appear.
$
Having navigated to the control, press the [Alt-Down Arrow] key combination
to display the combo box list, use the [Up Arrow] and [Down Arrow] keys to
highlight the desired response, then press [Enter] or [Tab] to make the
selection.
$
Or, whenever the entire field is selected (in reverse video), you may begin to
type in one of the acceptable responses. As soon as the characters you type
uniquely match one of the acceptable responses, the remainder of the field will
be automatically filled in.
Most combo boxes are restricted to the list of predefined entries and you must
make a selection from that list. The exceptions are the combo boxes for the Existing
Refrigerator and Water Heater Manufacturer and Model under the Audit Baseloads
tab as well as the combo boxes designating the location of zonal pressure and
pressure pan readings under the Ducts and Infiltration tab of the audits. These combo
boxes do not restrict the entry to an item in the list. In these cases, the combo box can
behave as a regular text entry field. However, you will obtain the data from the data
Chapter Four • 21
Navigation
base of refrigerators and water heaters only if your entry matches one that is in the
data base.
A green shaded combo box indicates that the selection is being made from a
library of entries, normally from your Supply Library (see Chapter 10, Supplies). In
such circumstances, your selection includes not only what will appear in the combo
box, but most often additional data associated with the selection.
In all of the cases above, navigating to a new control completes the selection.
You will not be allowed to exit a combo-box control unless an acceptable response
has been provided, or you press the [Esc] key to back out of your changes.
When the characters in a field or combo-box are highlighted (displayed in
reverse video), the control is said to be in ‘overwrite’ mode. Any characters that are
highlighted in a control will be replaced by keystrokes you enter. Any number of
characters can be highlighted by left clicking the mouse while dragging it across
those you wish highlighted. To switch to ‘insert’ mode, position the mouse pointer
to a location within the field and left click. This will allow you to insert characters
between existing ones.
While in insert mode within a field, the [Left Arrow], [Right Arrow], [Home],
[End], [Backspace], and [Delete] keys retain their traditional functions of positioning
the cursor within the field. Single character highlighting (replacing only individual
characters) can be obtained by pressing the [Insert] key on your keyboard.
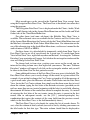
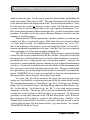
The check box is a small white box in which a check
mark may or may not be visible. If a check is visible, it implies
a yes response to the question associated with the box. You
may change the response in a check box either by left clicking
Two check-boxes,
the mouse on the box or pressing the [Space] key whenever the
the bottom one with
box has been selected (indicated by a dotted rectangle around
a “Yes” response
the control name).
4.3 Navigating Between Controls
You can use either the mouse or keyboard to navigate around the controls on
forms. Typically you will use a mixture of the methods. The mouse is most intuitive
for navigating between forms, menus, and tabs, but you may find the keyboard [Tab]
or other keys to be quite handy as well, especially during lots of data entry where
constantly moving between the mouse and keyboard can be tedious. Experiment and
see what methods are most comfortable for you.
Chapter Four • 22
Navigation
1.
You can point and click the left mouse button on the field or combo box you
want to edit or the check box you want to select. Accessing a field or combo
box in this manner will automatically put you into "insert" mode within the
control, a vertical line indicating where the next keyboard character will be
inserted.
2.
You can use the [Tab] and [Shift-Tab] keys to cycle through the controls in
forward or reverse order, respectively. These keys will place you in overwrite
mode within a field or combo-box, highlighting its entire contents. In most
cases, the [Enter] key will act in the same manner as the [Tab] key. One
exception is when positioned in a comment field. Here, the [Enter] key is
reserved for moving the cursor to a new line within the comment.
3.
The [Up Arrow] and [Down Arrow] keys will work the same as the [Shift-Tab]
and [Tab] keys unless you are in the insert mode within a field, during which
the keys will be inoperative.
4.4 The Escape Key
The Esc key is a useful way to back out of your changes. It is similar to an
"Undo" command. If you have made changes to a field but have not yet left the field,
pressing the [Esc] key restores the value that was in the field prior to your change.
Two consecutive [Esc] keys (or only one [Esc] if you are not in a field) will back out
of all changes you have made to all the controls on a form since entering it. Once
leaving a form and navigating to another, the changes in the former are saved and
cannot be reversed. Thus, if you have doubts whether many changes you will make
to a record are desired, you might consider making a copy of the record prior to
initiating the changes.
4.5 Required Versus Optional Fields
Required fields have a single solid border. If you try to exit a form with a
required field blank, you will be reminded to complete all fields and the cursor will
be positioned to the first missing field. If you decide NOT to save the record, you can
use the [Esc] key to cancel your changes.
Chapter Four • 23
Navigation
Fields without the solid line border are not necessary for the program to
execute or to allow saving the information on the form. However, the data may be
necessary for clarity, record keeping requirements, or simply identification purposes.
4.6 Field Defaults
Although not as numerous outside the Audit portions of the program, most
numeric fields have a user adjustable default value which can be set in Preferences.
This field default value is displayed in the lower left portion of the screen in the status
bar when you enter a field. If you leave a required field by using the Enter or Tab
keys without having supplied a value, the default value will be automatically applied.
You can edit the field default values on the Range Check and Default Value tab
on the Preferences main menu form (see Section 11.2, Range Check and Default
Values).
4.7 Field Range Checking
Numeric fields have range checks applied as soon as you exit the field. There
are two ranges that are checked. The Acceptable range determines which number
values will be acceptable to the analysis engine. All numeric entries must fall within
the acceptable range. When you enter a number outside the field’s acceptable range,
you get an error message and are forced to change the data in that field. Remember
that you can use the [ESC] key to back out of field and record changes.
The Reasonable range can be overridden or changed by the user. The minimum
and maximum values are displayed in the status bar in the lower left corner of the
screen when you enter the field. When you enter a value outside the reasonable range,
you get a warning message that you can override. Be sure to check the accuracy of
the value you entered if you choose to override. Use the Range Check and Default
Values tab on the Preferences main menu form to alter reasonable ranges for
individual fields (see Section 11.2, Range Check and Default Values).
Chapter Four • 24
Navigation
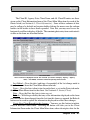
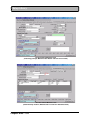
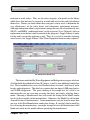
4.8 Data Sheet and Form Views of Records
One of the useful features of the Microsoft Access User Interface is the ability
to display different views of your records. For many of the forms, you can select the
view that best suits your needs. Though more common in the energy audit portions
of the program (see specific users’ manuals for NEAT and MHEA), these alternate
views also exist in the umbrella functions of Agency, Client, Work Order, Setup
Library and Supply Library. There are three basic views supported. You can edit the
data in two of the three views.
$
Standard Form View: The Form View is the most common view, allowing you
to see and edit all of the information for a particular record. The controls on the
form may be arranged or grouped in ways which will contribute to your
understanding of the information requested. Most of the forms allow this view.
In those instances when a form has sub-forms, it is normally only in this view
that all of the sub-form information can also be viewed.
$
Navigation Data Sheet View: This view displays a listing of all records of a
particular type in a spread sheet format. Data in these displays cannot be
altered. The form is used primarily to provide a summary of records of a
particular type and to navigate to the record you choose. Forms of this type are
accessed from tabs on the Agency and Client Main Menu items. (See also
relevant discussion under Section 4.1, Record Navigation.) The forms are
distinguished from the Editable Data Sheet View forms by a light blue border
around the outside of the form. They also do not have Standard Form View
equivalents.
$
Editable Data Sheet View: In the Editable Data Sheet View, ALL of the
records of a given type are displayed in a spread sheet format. All entries for
a given field of data from all records of a given type are in the same column in
the spread sheet. In the Editable Data Sheet View, you can see all records, but
typically, the number of fields is too wide to fit on one screen, so you must
scroll horizontally to view all of the available fields. However, even with
scrolling, in some instances, this display may not allow access to all the fields
for a given record type. You should view records in both the Standard Form
and Editable Data Sheet Views until you become familiar with the contents of
each record type before using the Editable Datasheet View exclusively.
Chapter Four • 25
Navigation
Most record types can be viewed in the Standard Form View, except those
using the Navigation Data Sheet View. The Form View is the default view when first
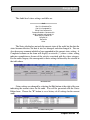
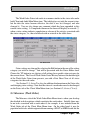
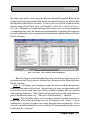
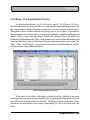
using the program.
The Navigation Data Sheet View is displayed under the Clients, Audits, Work
Orders, and Libraries tabs in the Agency Main Menu item and the Audits and Work
Orders tabs of the Client Main Menu item.
For other forms (and some sub-forms) the Editable Data Sheet View is
available. These alternate views are available for the Contacts and Cost Centers tabs
of the Agency Main Menu item, the Contacts tab for the Clients Main Menu item, and
the Measures tab under the Work Orders Main Menu item. For information on the
use of this alternate view in the Audit Main Menu items, see the users’ manual for the
audit of interest, NEAT or MHEA.
For these forms, it is often helpful to temporarily switch from Form View to
Data Sheet View to see all of your records for a given type. To switch from Form
View to Data Sheet View, right click anywhere on the form. A rectangular "Subform
Datasheet" pop-up window will appear. Left click on the rectangular window and the
view will change to the Data Sheet View.
To change back to form view, position your cursor on the record you are
interested in seeing in form view, then right click your mouse. The same "Subform
Datasheet" window will appear. Left click on the rectangular window and you will
be taken to the Form View for that particular record.
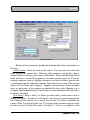
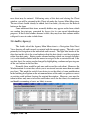
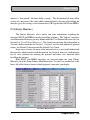
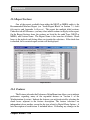
Some additional features of the Data Sheet View may prove to be helpful. The
Data Sheet View allows you to easily change all the entries in a given control. For
example, if you wished to change the Cost Center assigned to all of the measures of
a given work order, place the Measures tab under Work Orders into the Data Sheet
View, locate the Cost Center column, then simply use the down arrow key to travel
down the column, typing the first letter of the desired cost center (provided you do
not have more than one cost center beginning with the letter) in each field, allowing
the automatic fill feature of the combo-box control to complete the entry. Or, instead
of entering the first letter of the cost center, insure the entry is correct in the first
record, then in subsequent records, use the [Ctl-‘] (control-apostrophe) key
combination that copies the contents of the same field from the previous record,
which, in the Data Sheet View, is the field immediately above.)
The Data Sheet View is also handy for sorting the list of records shown. To
sort, select the column of data by which you wish to sort by clicking your mouse on
the title header for that data type. The entire column should then be displayed in
Chapter Four • 26
Navigation
reverse video. Then select either the "A-Z" or "Z-A" buttons on the main application
tool bar at the top of the application’s window. Selecting multiple adjacent columns
in the data sheet (clicking and dragging in the column header) allows the sorting to
operate on multiple key fields (in order of the position of the selected columns, left
to right). The ordering of columns can be changed by highlighting a column(s) then
clicking and dragging the column to a new position. Several of the left most columns
cannot be re-ordered since they are considered as identifying information for the
records. Column widths can be adjusted by dragging the column header borders. All
column width and position settings affect only the current Data Sheet View. When
you close the form, the original column widths and order will be restored.
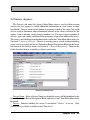
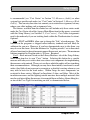
You may also "filter" the records when displayed in Data Sheet View. Filtering
forces the display of only those records which have a specified value for a given data
item. For example, if one of the fields displayed was the city in which the clients
dwelt, you could choose to display only records for clients who lived in one specified
city. To do so, click your mouse on any city entry of the particular city you are
interested in, then click on the filter button at the top of the window, . Your
display will then include only those clients from the city selected. Be careful when
using filtering. If you forget that your display of records is filtered, you may wonder
what happened to some records you would otherwise expect to see in the display. To
cancel filtering, select the remove filter button,
.
4.9 Copying and Pasting Data
Data records are normally copied using the Copy button in the Record
Navigation Blocks (see Section 4.1, Record Navigation). When this technique is
used to create a copy of a record, you will be placed immediately into the Form View
for the new record. Most often, records have a data field that must be unique amongst
all of the records of the specific type, i.e. Agency, Client, etc. Whenever the Copy
button is used to copy such a record, your cursor will be positioned at the field which
must be unique, with the field in reverse video, indicating the expectation that you
will be entering a new unique value.
This mode of copying records has one significant advantage. Even though the
program expects you to enter new values for the data items that must be unique in
each record, this copy process will provide you with default unique entries for these
data items. Thus, if you wished to create three copies of a record, you could do so by
selecting the Copy button in the Record Navigation Block three times in succession.
Chapter Four • 27
Navigation
Three copies would be quickly made. You may then modify the records in any
manner you wish, most likely changing the default unique entries supplied.
The process of copying a record when in the Editable Data Sheet View is
different. In this view, you must first select the record you wish to copy. To select
a record, press the record selection box on the left of the record you wish to copy.
The entire row of data will then be displayed in reverse video, indicating its selection.
Copy the information in this record to a temporary location (referred to as the
"clipboard" in most computer applications) by either (1) entering the [Ctrl-C] key
combination, (2) selecting the Edit / Copy menu items from the menu bar at the top
of the application window, or (3) selecting the Copy button (displayed as two small
overlapping sheets of paper) from the toolbar, also at the top of the application.
The record data copied to the clipboard must next be "pasted" into a blank
record. To do so, select the blank record by pressing the record selection box with
an asterisk in it. This will place the entire blank data row into reverse video. Paste
the data by then (1) entering the [Ctrl-V] key combination, (2) selecting the Edit /
Paste menu items from the menu bar, or (3) selecting the Paste button (displayed as
a clipboard with a small sheet of paper) from the toolbar.
This method of copying records does not provide you with default unique
entries for those fields which must be unique. Therefore, immediately after pasting
the new record of data, you must provide the new unique entry yourself before
proceeding.
Data in the Data Sheet View, or any similar tabular format, in the
Weatherization Assistant can be copied, then pasted, either into an equivalent data
range within the program or into another application. An example of this is seen in
copying the fuel prices from one library to another. To do this, go into the Fuel Costs
tab of the Setup Library you wish to take the fuel costs from, click your mouse on the
Unit Cost column header. The entire column will become displayed in reverse video.
Use one of the techniques described above to copy this data to the clipboard. Then,
go to the Fuel Costs tab in the Setup Library into which you want the costs inserted.
Select the Unit Costs column as before and use one of the techniques for pasting data,
also described above. The fuel costs will be replaced with those you copied. Care
must be taken to always copy and paste the same amount and type of data.
Since the interface is Microsoft Access, data transfer between it and another
Windows application is also possible. An example of this might be used to print out
the entire material cost table from a Setup Library. This is particularly easy if you
have Microsoft’s spread sheet application, Excel, since it and Access are most
compatible. Go to the Library Measures tab in the Setup Library from which you
Chapter Four • 28
Navigation
wish to print the costs. Select the "All Library Measure Costs" button in the lower
right of this form. The entire material cost table will then appear in spread sheet
format. Select the columns you wish to be printed (likely beginning with the
Description and ending in the Unit$ columns) and copy the data into the clipboard.
Open the Excel application and position your cursor in the cell where you want the
upper left corner of the data to be located. A single paste instruction will paste the
entire copied data into the spread sheet. You may need to adjust column widths to
properly display the data, following which you can print the data from Excel.
A single field of data may also be copied and pasted, but only from one field
to another of the exact same type. To select a field, click and drag the mouse over the
contents of the field or [Tab] to the field. Either way, the contents of the field will
become highlighted and selected. If the field has only one word in it, you can simply
double click on the field to highlight and select it. Then use the copy and paste
techniques described above to complete the process.
You can also use the [Ctrl-‘] (control-apostrophe) key combination when you
are in a field to copy the contents of the same field from the previous record. This is
particularly useful in the Data Sheet View when you just want to make a copy of the
field directly above the current field in the same data sheet column.
4.10 Deleting Data
Once you have become familiar with all the techniques of selecting data
described in the previous section, Section 4.9, Copying and Pasting Data, deleting
data becomes relatively simple. Select the data you wish to delete, then either (1)
press the [Delete] key on your keyboard, (2) select the Edit / Cut menu items from the
menu bar, or (3) select the Cut button (displayed as a pair of scissors) from the
toolbar. Any deletion of data from a combo-box must be replaced by another
selection available from the combo box list. An example of deleting data from a field
would be to delete a lengthy comment. Position your cursor at the beginning of the
comment, then drag the mouse with the left button depressed across all the text to be
deleted. Release the mouse button. The text will be displayed in reverse video. Then
delete the text selected using one of the three methods described above.
To delete an entire record while in form view, use the "Del" button in the
Record Navigation Block. This will delete the entire record currently accessed and
of the type indicated by the navigation block. Caution: if you delete a record, you
automatically delete all of the records which fall under it. For example, deleting a
Client record deletes all Audits, Work Orders, and Reports associated with that
Chapter Four • 29
Navigation
Client. Access will prompt you to make sure you really intend to delete the record.
A special case occurs in deleting Setup or Supply Libraries. The program will not
allow you to delete any library that is referenced by any agency, client, or work order.
You would first have to reassign any of these references to another library before
successfully deleting it.
To delete a record while in the Data Sheet View, first press the record selection
box on the left of the record you wish to delete. The entire row of data will be
displayed in reverse video, indicating its selection. Then use one of the three
techniques described above to delete the data.
You can use the Data Sheet View to delete multiple records. Use the sorting
features of this view to make those records you wish to delete appear together. Select
multiple records by moving the cursor to the record selectors on the left side of the
datasheet. The cursor will change to a right arrow. Then click and drag the mouse
across the record selectors until the records you want to delete are all highlighted.
Now press the [Delete] key, or one of the other methods of indicating deletion
described above. The program will ask you if you are sure you want to delete the
number of records selected.
4.11 Entry Errors
Following an entry or when you have selected the run button, the database may
detect an error in the input. These errors may take on several forms. For comboboxes, the most common is "The text you entered isn’t an item in the list," indicating
that you did not select one of the pre-designated items from the combo box list.
Another possible entry error message is "The value you entered isn’t valid for this
field." This would most likely occur if a numeric entry was expected and you,
instead, had an alphabetic character in the entry.
Occasionally even though the entire error message may not be completely
understood, it will contain a reference to a "table" followed by the program’s name
for the entry in question. This name will lie in single quotes and begin with "tbl"
followed by a name which can be recognized as a specific entry. For example,
.tblAgency’ refers to the Agency input field on the General Information form. In such
instances, locate the entry and examine its contents for conformity with the
requirements given in this manual.
Chapter Four • 30
Navigation
4.12 Getting Help
You can get help by pressing the [F1] key anywhere in the program. If you
press [F1] having selected a specific data item (field, combo-box, or, check box), you
will see help material specific to that item. If help material for that specific data item
is not available, the program will display help material for a more general topic, such
as the Client Main Menu item tabs.
The title of the help material is always shown at the top left of the help screen.
Tabs are also available which allow you to "Print" the material in the displayed help
topic and, if you have searched multiple topics, go "Back" to previous topics.
Every help screen also contains a "Contents" tab at the upper left corner. To
view a listing of all topics available in Help, click on the Contents tab. From here,
you can choose topics by browsing through the expandable Contents tree (double
clicking on a topic in the tree will reveal any sub-topics associated with it) or use the
Find feature to search for a particular topic. Type a word in the field supplied and the
program will search for all occurrences of that word in the help material.
Hypertext items are the highlighted help text you see in a different color. If you
move the mouse cursor to the highlighted word(s) and press the left mouse key, you
will see more information on that topic or word.
You can leave the help form and return to the main program at any time by
pressing the [Esc] key, clicking on the close button [X] in the upper right corner, or
choosing File, Exit on the help menu bar.
4.13 The Report Block
The Report Block appears in
the lower right corner on the
Information tabs of most of the Main
Menu items: Agency, Clients, Energy
Audits (NEAT and MHEA), and
Work Orders. It would also appear on The Report Block from the Client Information Form
the Information tabs for the Setup
Library and Supply Library if reports were defined for these program segments. As
of the first release of Version 8 of the Weatherization Assistance, reports for these
two Main Menu items would have to be defined by the user since none exist as
Chapter Four • 31
Navigation
standard reports in the program (see Appendix B, Weatherization Assistant
Customized Reporting Feature Reference Document).
The "Select Report" combo box in each Report Block gives you access to any
reports available for the program segment you are currently accessing. Examples of
all of the standard reports are displayed in Appendix A. Choose the report desired
using the standard mechanics for combo boxes (see Section 4.2, Entering Data into
the Weatherization Assistant).
The "Preview" button in the Report Block displays the selected report as it
would appear if printed. A standard Access toolbar will appear at the top of this
display. Among the buttons on
the toolbar are those which
allow you to display varying
numbers of pages of the report.
Access report toolbar
Each look like a single dark
colored rectangle with light
colored pages in it. A single page indicates viewing one page at a time, two pages
side by side allows you to view two pages at one time, and the button with four small
pages in the button allows you to choose from an additional six predefined layouts.
Depending on the resolution you have chosen for your graphics, many of these
displays will not have large enough text to read. Clicking the mouse while
positioning your cursor at a location on the display will enlarge the view about that
point.
Also on the toolbar is a printer button, normally at the extreme left of the
toolbar. Selecting this button will send a copy of the report to your default printer.
You may also use the [Crtl-P] key combination to display the Windows Print screen
and print the report from there. This form allows you to select other printers you may
have installed, choose which pages to print, as well as other options.
The right-most button on the toolbar is the "Output to Notepad" button.
Selecting this button will export the report to a pure ASCII text file and display it in
Notepad (a Windows application). From there, the file may be saved to any location
on your computer with any file name you wish. It may also be edited as any other text
file or attached to e-mails, etc.
Close the report display using the "Close" button on the toolbar. The standard
Windows closure X box in the upper right of the display may also be used for this
purpose, but care must be taken to select the closure X box associated with the report
display, since other windows may also be open at the same time with their own
closure X boxes.
Chapter Four • 32
Navigation
The "Print" button on the Report Block acts the same as the "Preview" button
except it automatically presents you with the Windows Print screen in addition to
displaying the report.
The "Snapshot File" button also opens the report display, but after creating a
snapshot file and indicating the location where the file was placed on your computer
(e.g., "Snapshot output file created: C:\Program Files\Weatherization Assistant
827\output\NAuOut-01.snp"). The filename is a default name which you may change
using standard Windows procedures. A "Snapshot" file is a file formatted specifically
for the "Snapshot" computer application. If you do not have this software on your
computer, this option may not be of much use to you.
Chapter Four • 33
Navigation
Chapter Four • 34
Agency
Chapter 5
The Agency is the highest level record type within the Weatherization Assistant
program. Thus, all other records (Clients, Audits, Work Orders, etc.) must be
associated with an Agency level record.
Information related to your agency is accessed from the Agency Main Menu
item button. When first installed, the program has two agencies already defined, a
Sample Agency and the "Your Agency Name" agency. You may verify this by
revealing the combo box list in the Agency Record Navigation Block combo-box.
The Sample Agency contains example records of all types to assist you in becoming
familiar with the use of the program. The second is intended to be renamed to be
your agency.
Although the minimum agency information necessary to operate the
Weatherization Assistant program is already supplied at installation, it is highly
recommended that even this information be tailored to your agency and additional
information be supplied before substantial use of the program. Change the "Your
Agency Name" Agency Name to be the name of your agency. Directly below this
information, choose the correct state in which you work. The only other agency level
information required is the name of at least one auditor or crew chief to whom
responsibility for performing audits can be assigned. This data will be discussed in
Section 5.2, Contacts (Agency)).
The remainder of this chapter will contain data item descriptions divided by the
tabs displayed under the Agency Main Menu item: Agency Information, Contacts,
Cost Centers, Surveys, Clients, Audits, Work Orders, Libraries, and Status History.
Note that all but the first and last of these tabs have numbers in parenthesis displayed
on them following the tab name. This indicates the number of entries defined for this
particular record type for your agency.
5.1 Agency Information
The Agency Information form allows you to enter general information about
your agency. This form displays the Agency Record Navigation Block that would
allow you to view and navigate to other agencies (e.g., the Sample Agency) if others
exist in your database. The form also contains the Report Block in the lower right
corner for accessing agency level reports.
Chapter Five • 35
Agency
The Agency Information form
Below are brief comments regarding the individual data items and controls on
this form:
Agency Name B Enter the name of your agency. The entry is one of only two
required data items on the Agency Information Form. The entry may be up to 80
characters in length. Required.
State B Select the state in which your agency resides from the entries in the combo
box list. Required.
Agency Type B Select the entry which best describes the type of your organization.
The choices are: (1) Local Community Action Agency, (2) Tribal Organization, (3)
Unit of Local Government, or (4) Other. Optional.
Federal Grant # B Enter the Federal Grant Number under which you perform your
Weatherization Assistance Program work, as seen on the DOE Program Application
Forms. Optional.
EIN B Enter your Federal Employer Identification Number assigned by the U.S.
Internal Revenue Service, as entered on the Financial Status Reports of the DOE
Program Application. Optional.
Other ID Num B Enter any additional identification descriptor (numbers and/or
letters) which may be of use to you or your state. The entry must be 50 characters or
less. Optional.
Chapter Five • 36
Agency
Comment B Comments may be entered directly in the comment field on the form.
Or, select the Comment button to the left of the field, which will take you to the
Comment Editor. This text editor is similar to Window’s Notepad and may be used
to edit extended comments. The total comment may have up to 65,000 characters.
Text from other sources may be copied and pasted into the Comment Editor’s
window. The Agency Comment is not displayed anywhere else in the program or in
any pre-defined reports. However, you may wish to include the comment in a userdesigned report. Optional.
Address, City, State, Zip Code B Enter the complete mailing address for your
agency. (Note, express mail will normally not deliver to Post Office Boxes.)
Optional.
Phone/Fax Numbers B Enter a phone and fax number through which you would
prefer having others contact your agency. Numbers for individuals in your
organization may be separately recorded under the Contacts tab (see Section 5.2,
Contacts (Agency)). Optional.
E-Mail B Enter an e-mail address through which others may contact your agency.
The Weatherization Assistant has the ability to e-mail client records from within the
program. Setting up this feature will require you to enter this or another agency email address. See Section 13.4, E-Mailing from Within Weatherization Assistant.
Optional.
Web Page URL B If your agency has set up a web site, enter the URL in this field.
Optional.
Default Agency B If selected, this check box indicates that the agency described
on the remainder of the form is to be automatically associated with new Client, Work
Order, Setup Library, and Supply Library records. Only one agency can be selected
as the "Default Agency." Thus, selecting this check box on any Agency Information
Form will automatically un-check it on all other Agency records.
Agency Record Navigation Block B The Agency Record Navigation Block may
be used to find and access existing agency descriptions or create new agencies,
although this would not be a common activity. See Section 4.1, Record Navigation,
for information on using the Weatherization Assistant’s Record Navigation Blocks.
Agency Report Block B The Agency Report Block provides you with access to all
reports available at the Agency level. See Appendix A, Sample Reports, for examples
of these reports and forms. As of the initial release of Version 8, the following
Agency level reports were available: the Unit Production portion of the DOE
Quarterly Report, Scheduled Audits (for NEAT and MHEA), Open Work Orders, and
an Economic Summary by Client. See Section 4.13, The Report Block, for assistance
Chapter Five • 37
Agency
with the mechanics of using the Weatherization Assistant’s Report Blocks. A method
to create reports tailored to your needs and whose selection could be made in the
report blocks has been made available. See Appendix B, Weatherization Assistant
Customized Reporting Feature Reference Document, for more details.
Select Clients B Should reports selected in the Agency Report Block require
defining a specific range of clients to be included in the report, the forms accessed
from the Select Clients button would be used to make this specification. However,
none of the pre-defined reports in the initial release of Version 8 require such a
definition. Should a user-designed report require client selection, the forms accessed
from this button would be used for that purpose. Transfer of client data between
computers requires this same client selection process. See "Selecting Client Records"
in Section 12.4, Data Transfer - Import / Export via Text Files, for use of the Select
Clients feature.
An additional use of the Client Selector form, accessible from the Select Clients
button, is available if the Geographic Information System (GIS) has been
implemented. From this form, you may select a group of clients whose home
locations may be displayed on a map. For additional information on this feature, see
the above reference on "Selecting Client Records" as well as Section 13.2, Graphic
Information System (GIS).
5.2 Contacts (Agency)
This tab allows you to store information on all of the people associated with
your agency, including auditors, contractors, crew members, and suppliers. If you
have enabled the User Logon feature (see "User logons with user names and
passwords from the Agency/ Contacts/ Passwords tab," Section 11.4, Features), then
any contact in this list with a user name and a password can log on the Weatherization
Assistant. If your database is shared over a network (see Section 3.2, Network
Installation), this contact list serves as the central list of all users. If you wish to track
work orders by contractor or add suppliers to your supply libraries, you must enter
these contacts as well. Be sure to use short User Names (initials perhaps) to make
forms and reports more readable.
As many contacts as are required may be entered. Use the Agency Contact
Navigation Block at the lower left of the form to initiate new contacts or locate and
access previously entered contacts. The form may be viewed and edited in Data Sheet
View, providing a summary of all contacts already entered or allowing quick changes
to multiple entries.
Chapter Five • 38
Agency
The Contacts form
Below are brief comments regarding the individual data items and controls on
this form:
Contact Name B Enter the name of the contact. You may enter the name with
either the given or surname first. However, if the surname is entered first, place a
comma between it and any given names which follow. The un-editable Name Detail
fields will show you how the program sees the name you have entered. If you are
entering a company, such as a supplier of materials, you likely still have a person who
is your primary contact within that company. Enter that person’s name. Then provide
entries for User Name and Company. Suppliers and contractors listed in combo
boxes in other parts of the program are identified by these data, allowing you to
recognize them without having a Contact Name associated with them. The entry must
be unique. Required.
User Name B Enter a short User Name, possibly initials, which can be used to
identify the contact. In some lists and reports, space does not permit displaying the
full Contact Name and the list or report will use the User Name to identify the
contact. If the User Logon feature (see "User logons with user names and passwords
from the Agency/ Contacts/ Passwords," Section 11.4, Features) is enabled, a valid
Chapter Five • 39
Agency
User Name and password will be required to use the Weatherization Assistant
software. The entry must be unique. Required.
Company B Enter the company for whom the contact person works. The entry is
optional. However, combo box lists of contractors and suppliers used elsewhere in
the program will identify the contact by the Company entry, as well as User Name
and/or Contact Name. Optional.
Active Check box B Only contacts who are indicated as being "Active" will appear
in lists of appropriate combo boxes through out the program. See also the description
for the Auditor, Contractor, Crew, and Supplier check boxes, below.
Auditor, Contractor, Crew, Supplier Check boxes B Indicate whether the contact
person holds any of the positions indicated. Contacts who are Auditors will be
included in the combo box list for the Assigned To field on the Audit Information tab
under the Audit Main Menu items (NEAT / MHEA) (see Section 7.1, Audit
Information). Contractors and Crews may be assigned to Work Orders (see
"Contractor/Crew" in Section 8.1, Work Order Information) and Suppliers may be
listed as sources of inventoried items in the Supply Library (see "Supplier" in Section
10.2, Common Entries on MaterialsForms). These listings will occur only if a
particular contact is declared as "Active."
EIN B Enter the Federal Employer Identification Number of the company with
whom the contact is associated, as assigned by the U.S. Internal Revenue Service.
Optional.
Title B Enter any title which may help describe the contact, such as "manager,"
"crew chief," or "monitor." This title will not appear in lists of contacts used through
out the program. Optional.
Address, Unit Number, City, State, Zip Code B Enter the complete mailing address
of the contact. Optional
Work, Cell, Pager, Fax, Home Phone B Enter any of the indicated phone numbers
for the contact person. Optional.
E-Mail B Enter an e-mail address for the contact person. The Weatherization
Assistant has the ability to e-mail client records from within the program. Entering
an e-mail address on the Contact tab will automatically enter this contact and his email address in the Address Book of this feature. See Section 13.4, E-Mailing from
Within Weatherization Assistant. Optional.
Web Page URL B If available, enter the URL for this contact’s web site. This
could be particularly useful, for example, if the contact is a supplier and his web site
contains a catalogue of available items. The web site may be accessed directly from
the Contact tab by clicking your mouse on the address. Optional.
Chapter Five • 40
Agency
Change LogOn Group and Password
B If the User Logon feature (see "User
logons with user names and passwords
from the Agency/ Contacts/ Passwords
tab," Section 11.4, Features) has been
enabled in Preferences, only Agency
Contacts who have been assigned
LogOn passwords will be able to open
the Weatherization Assistant software.
Use the form available from selecting
The User Group and Password form
the "Change LogOn Group and
Password" button to provide this information. Assign the Contact a User Group,
either "User" or "Admin." Contacts who are Users will be able to create new records
and edit existing ones, but not be allowed to delete Client, Audit, or Work Orders
records. In addition, the User Group cannot change the settings under the Features tab
of Preferences. Contacts in the Admin group have full capabilities, including deletion
of all records. If the contact has not previously had a password, enter a new password
with confirmation only. Otherwise, enter the existing password before assigning a
new one. Select the "Apply New Password" button to complete the process. Note:
If the User Logon feature is not turned on, there are no restrictions enforced and every
user is considered to be in the "Admin" User Group.
Comments B Comments may be entered directly in the comment field on the form.
Or, select the Comment button to the left of the field, which will take you to the
Comment Editor. This text editor is similar to Window’s Notepad and may be used
to edit extended comments. The total comment may have up to 65,000 characters.
Text from other sources may be copied and pasted into the Comment Editor’s
window. Agency Contact Comments are not displayed anywhere else in the program
or in any pre-defined reports. Optional.
Agency Contact Record Navigation Block B The Agency Contact Record
Navigation Block may be used to find and access existing agency contacts or initiate
new contacts. See Section 4.1, Record Navigation, for information on using the
Weatherization Assistant’s Record Navigation Blocks.
5.3 Cost Centers
Beginning with Version 8 of the Weatherization Assistant, the user has the
option of assigning individual measures to different cost centers (funding sources).
Chapter Five • 41
Agency
Summaries of expenditures by cost center are then available as well as the balance of
funds remaining for each cost center, if the user has also entered the funding
allocations for each.
The Cost Centers form
Below are brief comments regarding the individual data items and controls on
this form:
Cost Center Name B Enter the name of the cost center from which funds are to be
available. Undoubtedly, the DOE Weatherization Program will be one of them. You
may also include LIHEAP, PVE, utility program funds, etc. Required.
Active Check box B Indicate whether the Cost Center is currently available to fund
work. If not Active, a cost center will not appear in the combo-boxes which assign
measures to cost centers, found elsewhere in the program.
Cost Center Type B Indicate the type of funding source: (1) DOE, (2) Other funds
included in grant budget, or (3) Other funds not included in grant budget. Optional.
Program Year - Enter the program year for which the funding is being tracked.
Optional.
Description B Enter any additional description you may need to identify this cost
center. Optional.
Cost Center Financial Summary - Un-editable fields are displayed on the Cost
Center tab which summarize the income and expenditures for each cost center. Two
Chapter Five • 42
Agency
columns of numbers exist, the "Actual" and the "Expected." "Actual" debits or
credits are those which have been declared "Cleared" under the Show Fund
Transactions button (see below) or which are listed as "Actual" from work orders.
"Expected" values include the above "Actual" values but add to them those which
have been entered into the Transactions form but have not yet been "Cleared" and
"Estimated" costs from active work orders which haven’t yet been declared "Actual"
(see "Quantity" and "Unit Cost" "(Actual)" under "Materials/Labor Details SubForm" in Section 8.3, Measures (Work Order)).
The first two rows of entries in this summary list the total income for the funding
source and the total non work order related costs for the funding source, i.e., any costs
that may be considered overhead or administrative (such as T&TA) which will never
be accounted for in work orders of individual audits. The individual entries which
make up these two totals are entered under the Show Fund Transactions button (see
below). The third row of entries is simply the difference between the total income and
the total non work order related costs. The fourth (next to last) row of entries list the
total costs from all un-canceled work orders. The individual entries which make up
this total may be viewed under the Show Work Order Costs button (see below). The
last row of entries displays the Balance for the funding source, having subtracted the
Total Work Order Costs from the Total Available Funds.
Show Fund Transactions B The individual entries which comprise the Total Funds
In and the Total Non Work Order Costs in the cost center financial summary are
displayed and edited under the Show Fund Transactions button.
Fund Transactions table under the Agency / Cost Centers tab
Enter the date of the transaction in the first column and some description of the
transaction in the second. Credits (income) are entered in the third column while
non-work order related debits (costs) are entered in the fourth column. Anticipated
credits and debits may be entered. However, they will only affect totals under the
"Expected" column on the financial summary until the Cleared check box has been
selected. Enter any comments associated with the transaction. Double clicking on the
Comment field will bring up the Comment Editor permitting entry of extended length
comments, if necessary. No standard Form View is available for individual entries
Chapter Five • 43
Agency
of this table. However, entries may be copied and deleted using the conventions
applicable to Data Sheet Views.
Show Work Order Costs B An itemized listing of work order costs which comprise
the Total Work Order Costs in the financial summary are displayed under the Show
Work Order Costs button.
Work Order Costs table under the Agency / Cost Centers tab
Shown in their respective columns of entries are (1) the Client ID of the client for
whom the work is being performed, (2) the specific Work Order under which the cost
was incurred, (3) the measure within the Work Order whose cost is being listed,
preceded by the order number of the measure within the work order, (4) the estimated
cost for the measure, and (5) the actual measure cost, if one has been determined. The
"ActCost" entries on this form are included in both the "Actual" and "Expected"
entries of the financial summary, where as the "EstCost" costs are included in only
the "Expected" totals of the summary.
The form is "READ ONLY." No entries can be edited. Modifications to the
entries can only be made in the respective work orders which generated the costs.
However, note that the headers for Client, Work Order, and Measure are in angle
brackets (<>). This implies that the actual Client, Work Order, or Measure within a
work order may be accessed directly by double clicking on the record’s entry in the
table. If this technique of editing any of these records is used, it is highly
recommended that the form be closed out when you have completed the
modifications. Having too many inter-related forms open at the same time in Access
can confuse the software and result in abnormal behavior and warnings.
Cost Center Record Navigation Block B The Cost Center Record Navigation
Block may be used to find and access existing cost centers or create new cost centers.
See Section 4.1, Record Navigation, for information on using the Weatherization
Assistant’s Record Navigation Blocks.
Chapter Five • 44
Agency
5.4 Surveys (Agency)
The Surveys tab under the Agency Main Menu item is used to define custom
surveys for your agency to collect additional information on your clients or their
households. Surveys need not be limited to questions asked of the client, but could
also be used to document other information related to the clients collected by the
agency, such as income, social security numbers, etc. You can setup any number of
surveys, give each a name, and then define groupings of questions under each survey.
The surveys are filled out for individual clients under the Client Main Menu item (see
Section 6.7, Surveys (Client)). Choose an existing survey to edit or begin defining
a new survey by using the Survey Definition Record Navigation Block in the lower
left corner of the Surveys form (see Section 4.1, Record Navigation). Then use the
fields described below to modify or define your survey.
The Surveys Definition form
Survey Name B Enter a Survey Name by which the survey will be identified in the
Survey Definition Record Navigation Block and later in the Client Main Menu item.
Required.
Active B Indicate whether the survey is considered "Active," or in use. Only
Active surveys will be available at the Client level.
Chapter Five • 45
Agency
Comment B Supply any comment you wish that applies to the entire survey.
Comments may be entered directly in the comment field on the form. Or, select the
Comment button to the left of the field, which will take you to the Comment Editor.
This text editor is similar to Window’s Notepad and may be used to edit extended
comments. The total comment may have up to 65,000 characters. Text from other
sources may be copied and pasted into the Comment Editor’s window. Optional.
Use the items in the Survey Question Definitions sub-form to define the
questions to be included in the survey. A new question may be initiated by either
positioning the cursor at the first blank record or by selecting the new record icon, .
Be careful to distinguish between the new record icon associated with the question
sub-form as opposed to new record button in the Survey Definition Record
Navigation Block. The latter would initiate a whole new survey, not a new question
within the existing survey. The entries in the sub-form are copy/paste friendly from
both the Weatherization Assistant program and other text or word processing
software. The multiple columns of the sub-form may be copied to a spread sheet,
such as Microsoft Excel, for printing, or print a yet empty survey from the Client
Information Form of the Client Main Menu item after associating it with a Client (see
"Client Report Block" in Section 6.1, Client Information).
Group B The assignment of each question to a group is optional. You could use
the Group designation to sort the questions on the sub-form, using standard Data
Sheet View sorting techniques. The entry is limited to 50 characters. Optional
Order # B Select the order the questions will appear on the Survey Report by
assigning order numbers. Optional.
Question B Enter the statement of the question to be asked the client. Each
question may be 255 characters or less.
5.5 Clients
The Clients tab of the Agency Main Menu item is a Navigation Data Sheet
View showing all client records associated with the current agency. The tab is used
primarily for navigation to the individual client records and for creation of new blank
client records. The light blue border of the data sheet on this tab is the visual
indicator that this data sheet is used for navigation rather than data entry. Entries
under column headings which are in angle brackets (<>) can be double clicked with
the mouse to navigate to the associated record. Like any data sheet, the sorting can
be changed by highlighting a column and pressing one of the sort buttons in the tool
bar.
Chapter Five • 46
Agency
The Client ID, Agency State, Client Name, and Alt. Client ID entries are those
given on the Client Information form of the Client Main Menu item for each of the
clients listed (see Section 6.1, Client Information). Some of these columns of data
may be collapse by default and require double clicking the mouse near the column
borders in the header to have them expanded. Note that you may need to use the
horizontal scroll bar to display all fields. The remaining data entry items and controls
visible on the form are described below:
The Clients table
Note: Columns not displayed include “Alt. Client ID” (not used in example),“ Agency,” “Agency
State,” “Last Edited,” and those related to exporting client records.
Last Edited B Gives the date (and time, if expanded) of the last change made to
this client record from the Client Main Menu item tabs.
Status B Gives the latest client status for each client, as set on the Status tab under
the Client Main Menu item for the client. See Section 6.2, Status (Client).
Date B Gives the Date this latest status was set.
Refresh B With the possibility that any of the information displayed on the form
and sub-form has been changed since the last time this form was opened, the Refresh
button can be used to update the information displayed to reflect these changes.
Create New Client Record for this Agency B You may use this button to initiate
entry of data for a new client. Selecting the button will take you to the Client
Information Form under the Client Main Menu item, where descriptive data for the
Chapter Five • 47
Agency
new client may be entered. Following entry of this data and closing the Client
window, you will be returned to this Client tab under the Agency Main Menu item.
The new client should already be added, but if in doubt, you may use the Refresh
button on the form.
Some additional data items, normally hidden, may appear on the form, which
are random long integers generated by Access for its own record identification
purposes. If these data columns become visible, they may have their column widths
collapsed to zero in order to hide them.
5.6 Audits (Agency)
The Audits tab of the Agency Main Menu item is a Navigation Data Sheet
View showing all audit records associated with the current agency. The tab is used
primarily for navigation to the individual audit records. The light blue border of the
data sheet on this tab is the visual indicator that this data sheet is used for navigation
rather than data entry. Entries under column headings which are in angle brackets
(<>) can be double clicked with the mouse to navigate to the associated record. Like
any data sheet, the sorting can be changed by highlighting a column and pressing one
of the sort buttons in the tool bar.
Normally there would be only one audit record for each client. However, the
Weatherization Assistant does allow you to create and execute more than one audit
per client. This might be useful if you desire to see the effect of some modification
in the building description on the recommendations of the audit, or update or correct
an existing audit without loosing the original description. However, care must be
taken to insure only one set of active work orders exists for the client, else confusion
and double accounting of costs are likely to occur.
The Audits table
Chapter Five • 48
Agency
The Client ID, Client Name, Alt. Client ID, Audit Name and Type entries are those
given on the Audit Information form of either Audit Main Menu items (NEAT or
MHEA) for each of the audits listed (see Section 7.1, Audit Information). The
remaining data entry items and controls visible on the form are described below. Note
that you may need to use the horizontal scroll bar to display all fields.
Last Edited B Gives the date (and time, if column is expanded) of the last change
made to this audit record from the Audit Main Menu items tabs.
Status B Gives the latest audit status for each audit, as set on the Status tab under
the Audit Main Menu item for each audit displayed. See Section 7.2, Status (Audit).
Date B Gives the Date this latest status was set.
Refresh B With the possibility that any of the information displayed on the form
and sub-form has been changed since the last time this form was opened, the Refresh
button can be used to update the information displayed to reflect these changes.
Some additional columns of data, normally hidden, may appear on the form,
which are random long integers generated by Access for its own record identification
purposes. If these data columns become visible, they may have their column widths
collapsed to zero in order to hide them.
5.7 Work Orders (Agency)
The Work Orders tab of the Agency Main Menu item is a Navigation Data
Sheet View showing all work order records associated with the current agency. The
tab is used primarily for navigation to the individual work orders. The light blue
border of the data sheet on this tab is the visual indicator that this data sheet is used
for navigation rather than data entry. Entries under column headings which are in
angle brackets (<>) can be double clicked with the mouse to navigate to the
associated record. Like any data sheet, the sorting can be changed by highlighting
a column and pressing one of the sort buttons in the tool bar.
Displayed on this form may be more than one work order per client, if more
than one contractor is assigned work for a client. The work orders may have been
generated from the Measures tab on the Audit form (see "Create Work Orders"in
Section 7.9, Measures (Audit)) or manually, directly under the Work Orders Main
Menu item (see "Work Order Record Navigation Block" under Section 8.1, Work
Order Information).
The Client ID, Work Order, Agency Name, and State entries are those
associated with the work order, as prescribed when generating the work order. The
Agency information columns are collapsed, by default, and may require double
Chapter Five • 49
Agency
clicking on the column border in the header to expand them. The remaining data entry
items and controls visible on the form and sub-form are described below:
The Work Orders table
Note: “Last Edited” column not displayed.
Contractor B The Contractor assigned the work. This entry may be blank if none
has been assigned. Contractors are defined on the Contacts tab under the Agency
Main Menu item (see Section 5.2) and assigned each measure either by default in the
Setup Library (see Section 9.5), at initiation of work orders from the Measure tab
under the Audit Main Menu item (see Section 7.9), or in the Work Order Main Menu
item itself (see section 8.1). See the respective sections of this manual for more
information on defining and assigning contractors.
Last Edited B Gives the date (and time, if the column is expanded) of the last
change made to this work order record from the Work Order Main Menu item tabs or
the date the work order was generated from the Measures tab of the Audit Main Menu
item, if no other modifications have been made.
Status B There are three categories of Status specifications for a Work Order: a
general status, an inspection status, and a payment status. Each status category has
its own column in the Work Orders sub-form, with corresponding dates each status
was changed. The work order status’ are changed under the Work Order Main Menu
item for each individual work order. See Section 8.2, Status (Work Order).
Date B Gives the Date this latest status was set for each work order status category.
Refresh B With the possibility that any of the information displayed on the form
and sub-form has been changed since the last time this form was opened, the Refresh
button can be used to update the information displayed to reflect these changes.
Some additional data items, normally hidden, may appear in the sub-form,
which are random long integers generated by Access for its own record identification
Chapter Five • 50
Agency
purposes. If these data columns become visible, they may have their column widths
collapsed to zero in order to hide them.
5.8 Libraries
The Libraries tab of the Agency Main Menu item is a Navigation Data Sheet
View showing all Library records associated with the current agency. Two separate
listings occur, one for Setup Libraries (see Chapter 9, Setup) and another for Supply
Libraries (see Chapter 10, Supplies). The tab is used for reference and navigation
purposes only. The light blue border of the data sheets on this tab is the visual
indicator that these data sheets are used for navigation rather than data entry.
However, the Setup and Supply Libraries may be directly accessed from the table by
double clicking the mouse on the library name of interest. Like any data sheet, the
sorting can be changed by highlighting a column and pressing one of the sort buttons
in the tool bar.
The Libraries tables
The Library Name, Description, Comment, and Default status entries are those
given to each library under their respective entries from the Setup or Supply Library
Main Menu item.
With the possibility that any of the information displayed on the form and subform has been changed since the last time this form was opened, the Refresh buttons
can be used to update the information displayed to reflect these changes.
Chapter Five • 51
Agency
Some additional columns of data, normally hidden, may appear in the form,
which are random long integers generated by Access for its own record identification
purposes. If these data columns become visible, they may have their column widths
collapsed to zero in order to hide them.
5.9 Status History
The Status History tab of the Agency Main Menu item lists the current status
and the entire history of status changes for all status categories for all clients
belonging to the current agency. The status categories tracked are:
Client Level
General
Application
Audit Level
NEAT
MHEA
Work Order Level
General
Inspection
Payment
This form is used to review the history of status changes, not to edit individual
records in the history. Changes in status should be made under the Status tabs of the
respective Client (see section 6.2), Audit (see Section 7.2), or Work Order (see
Section 8.2) Main Menu items. Section 13.3, Status Tracking, displays all of these
categories and the possible settings for each. Entries in the table under column
headings which are in angle brackets (<>) can be double clicked with the mouse to
navigate to the associated record. Thus, the record whose status listing is being
viewed on this form may be quickly accessed.
The history retains all settings. If you make a mistake in setting a status,
correcting it will still leave the old setting in the history. Even though you cannot edit
status records from the Status History form, entire status records can be deleted using
the form. Thus, the form is a good location to detect mistaken entries and delete
them. Use the same technique you use to delete any records from a Data Sheet View
form (see Section 4.10, Deleting Data).
Combining the use of the filter and sort features in this form can produce a
useful display (see the discussion of filtering and sorting in Section 4.8, Data Sheet
and Form Views of Records). If you first filter the entries by a specific client, then
sort by date, you will receive a chronological listing of all activities associated with
a specific client. A similar display can also be produced by selecting the "Overall
Client Status History"button of the Client Status tab (see section 6.2, Status (Client)),
then sorting on date.
Chapter Five • 52
Agency
The Status History tables
Note: “Comment” field not displayed.
Chapter Five • 53
Agency
Chapter Five • 54
Clients
Chapter 6
Since Audits and Work Orders are organized under clients, the first task in
using the Weatherization Assistant for a new client is to enter identifying information
about the client under the Client Main Menu item. You may wish to enter minimal
information about several clients into this portion of the Weatherization Assistant at
one time, before proceeding further with audit information, recommendations, or
work orders.
You may open a new client record in either of two ways: (1) by selecting the
Client Button on the Main Menu, then selecting the new record button, , from the
Client Record Navigation Block; or (2) enter the Agency Main Menu item, select the
Client tab on the Agency form, then click on the "Create New Client Record for this
Agency" button. Either method will take you to a blank Client Record.
You may also edit any existing clients, accessing the client data in two ways,
analogous to those for new clients above: (1) select the Client Button from the Main
Menu, then use the Client Record Navigation Block combo box list to locate the
client and access the data, or (2) enter the Agency Main Menu item, select the Client
tab on the Agency form, then double click your mouse on the Client ID corresponding
to the client of interest.
In each of the cases above, the first of the methods will likely be the more
common, since it saves having to pass through the Agency form and allows Access
to operate with less open forms.
The minimal information required for a specific Client is a Client ID, the
Agency handling the client (normally automatically entered for you), and the type of
dwelling, all entered on the Client Information tab under the Client Main Menu item.
However, you may store additional client data in case you are using the
Weatherization Assistant as the main repository of client information. The remainder
of this chapter will be divided into descriptions of data entry items on each of the tabs
seen under the Client Main Menu item: Client Information, Status, Energy Index,
Contacts, Audits, Work Orders, Surveys, and Photos (if the pathname method of
photo storage has been activated in Preferences (see Section 11.4, Features)). All but
the first three of the tabs identifying these sub-categories will have a number in
parentheses on the tab following the category name. These numbers indicate the
number of entries which are defined for this particular record type for the client
currently being considered.
Chapter Six • 55
Clients
6.1 Client Information
This form asks for general information relating to a specific client and the
client’s dwelling. All of the data on this form are optional except the Client ID, the
Agency, and the Dwelling Type. However, optional data may still be used elsewhere
in the program or in reports that you may generate. For example, the majority of
information in the Dwelling and Occupants blocks of data are used to generate the
Unit Production portion of the DOE Quarterly Report, accessed from the Report
Block under the Agency Main Menu item (see Section 5.1, Agency Information:
Agency Report Block).
The form displays the Client Record Navigation Block that allows you to view
and navigate to other clients, if others exist in your database. The form also contains
the Client Report Block in the lower right corner for accessing the client level reports.
The Client Information form
Shows all options (including both photo options, normally mutually exclusive)
Below are brief comments regarding the individual data items and controls on this
form:
Client ID B This data item is designed to be the key parameter identifying this
client to you and to the computer. As such, it must be unique. Although the identifier
Chapter Six • 56
Clients
could be a name of an individual, most agencies have alternative designations to
identify their clients and the Weatherization Assistant has other locations in which
to enter the client’s name(s). Examples of possible Client IDs include entries
containing location (county abbreviations), dates (of acceptance into program), or the
number of the client for a particular program year. The Client ID is one of several
fields by which you may search to locate information on an existing client. The entry
must be 50 characters or less. However, report footers can only report the first 20
characters. The Client ID must be unique. Required.
Alt. Client ID B If in your agency you have multiple means of identifying a client,
the Alternate Client ID field allows you to assign a second identifying parameter to
each client. The Client Record Navigation Block can search for a client by this
designation as well as the Client ID. The entry must be 50 characters or less.
However, report footers can only report the first 20 characters. Optional.
Agency B This field displays the agency to which the client has been assigned. A
new client will automatically be assigned the Default agency (see "Default Agency"
in Section 5.1, Agency Information). In order to be assigned a client, an agency must
first be defined under the Agency Main Menu item. Changing the agency a client is
assigned to is not recommended if there are already audits and/or work orders
associated with that client. Information in these program segments would have to be
re-entered to retain consistency with the new agency assignment. Required.
Address, Unit Number, City, County, State, Zip Code B Enter the address of the
dwelling to be weatherized. This address may or may not be the same as any address
you may supply for contacts associated with the client (see Section 6.4, Contacts
(Clients)). However, it is the address which the Geographic Information System
(GIS) will use to plot the location of the dwelling, if you are using this feature (see
Section 13.2, Geographic Information System (GIS)). Optional.
Other Geographic Identifier B Your agency may use an additional geographic
identifier associated with each client, such as the congressional district or plotting
coordinates. Enter this alternate identifier in this field. The entry may be 20
characters or less. Optional.
Dwelling Data Block
The following data items are included in the Dwelling data block on the Client
Information form. The data are primarily used to allow automatic creation of the Unit
Completion portion of the DOE Quarterly Report. Definitions of the items should be
Chapter Six • 57
Clients
consistent with use in this report, and/or as given in the DOE guidance and 10 CFR
Part 440. Entry is optional for all but the Dwelling Type.
Type B Choose from the combo box list the type which best describes the
dwelling: (1) Site Built, (2) Mobile Home, (3) Duplex, (4) Triplex, (5) Fourplex, (6)
Multifamily (5 or more units per building), (7) Shelter,and (8) Other. Required.
Ownership B Indicate whether the occupants own or rent their dwelling. If
"Other" you may wish to specify details in the Comment field. Optional.
Primary Heating Fuel B Choose the fuel that provides the most space heat in the
home: (1) None, (2) Natural Gas, (3) Oil, (4) Electricity, (5) Propane, (6) Wood, (7)
Coal, (8) Kerosene, and (9) Other. If "Other," specify in the Comment field.
Optional.
Secondary Heating Fuel - If more than one fuel is used to provide space heat to the
home, enter the next most used fuel. The selections are the same as for the primary
heating fuel. Optional.
High Energy Use B Select this check box if the dwelling is considered a high
energy user, i.e., "a low income household whose residential energy expenditures
exceed the median level of residential expenditures for all low-income households in
the State." Optional.
High Energy Burden - Select this check box if the energy use of this dwelling is
considered a high burden for the occupants, i.e., "a low-income household whose
residential energy burden (residential [energy] expenditures divided by the annual
income of that household) exceeds the median level of energy burden for all lowincome households in the State." Optional.
Previously Weatherized B Select this check box if the dwelling was previously
weatherized, defined consistent with use in the Unit Completion portion of the DOE
Quarterly Report.
Low Cost/No Cost B Select this check box if the work performed on the dwelling
may be considered Low Cost/No Cost, defined consistent with use in the Unit
Completion portion of the DOE Quarterly Report. Normally this would be a home
in which a maximum of $50 materials were expended.
Year Built B Enter an estimate of the year the dwelling was built.
Occupants Data Block
The following data items are included in the Occupants data block on the
Client Information form. The data are primarily used to allow automatic creation of
the Unit Completion portion of the DOE Quarterly Report. Definitions of the items
Chapter Six • 58
Clients
should be consistent with use in this report, and/or as given in the DOE guidance and
10 CFR Part 440. Entry of all items is optional.
Occupants B Enter the total number of occupants living in the dwelling. Although
optional, this entry is also used in the audit portion of the program to estimate water
usage and modify the minimum leakage rate for a house. A default value is used if
no entry is made. Optional.
Elderly - Enter the number of elderly who live in the dwelling, those 60 years of
age or older. Optional.
Disabled - Enter the number of disabled who live in the dwelling, as defined in 10
CFR Part 40. Optional.
Native American - Enter the number of occupants who are members of an Indian
tribe. Optional.
Children - Enter the number of dependents in the dwelling who do not exceed 19
years of age, unless otherwise defined in your State Plan. Optional.
Primary Language - Select the category which best describes the primary language
spoken by the occupants: (1) English, (2) Spanish, (3) Other European Language, (4)
Other Asian Language, and (5) Other. If "Other," you may specify details in the
Comment field. Optional.
Comment B Comments may be entered directly in the comment field on the form.
Or, select the Comment button to the left of the field, which will take you to the
Comment Editor. This text editor is similar to Window’s Notepad and may be used
to edit extended comments. The total comment may have up to 65,000 characters.
Text from other sources may be copied and pasted into the Comment Editor’s
window. The Client Comment is displayed in a variety of reports and forms including
the Client Information Report and the NEAT/MHEA Data Collection Form (Client
Specific), available from the Client Main Menu item and the Audit Input Report from
the Audit Main Menu item. You may wish to include the comment in a user-designed
report. Optional.
Cumulative Cost and SIR B The Economic Summary Block located below the
Client Comment field contains these two un-editable fields. Entries in the fields are
based on the total Actual Costs and Savings as determined in the Work Orders
associated with the client. See "Quantity (Actual)" and "Unit Cost (Actual)" in "The
Materials/Labor Details Sub-Form" in Section 8.3, Measures (Work Order)).
Client Record Navigation Block B The Client Record Navigation Block may be
used to find and access client descriptions or initiate new clients. See Section 4.1,
Record Navigation, for information on using the Weatherization Assistant’s Record
Chapter Six • 59
Clients
Navigation Blocks. The combo box lists will display only the clients associated with
the Agency currently selected (bookmarked) on the Agency Information tab under the
Agency Main Menu item. Normally the agency selected on this tab is your agency,
so the combo box lists will display only your agency’s clients. If you have more than
one agency defined in your database (e.g., your agency and the Sample Agency) and
you want the combo box lists to display clients from all defined agencies, un-check
the "Use the last bookmarked Agency record to filter find record lists," feature 9 from
the Preferences / Features tab (see the indicated entry in Section 11.4, Features).
Client Report Block B The Client Report Block provides you with access to all
reports available at the Client level. See Appendix A, Sample Reports, for examples
of these reports and forms. As of the initial release of Version 8, the following Client
level reports were available: Client Completion Report, Client Information
Report/Form, NEAT/MHEA Data Collection Forms, and Client Surveys Report.
Reports display information already gathered while Forms are blank forms to be used
to gather the information. The NEAT and MHEA Data Collection forms may be
printed with general client information pre-entered or completely blank. See Section
4.13, The Report Block, for assistance with the mechanics of using the Weatherization
Assistant’s Report Blocks. A method to create additional reports tailored to your
needs and whose selection could be made in the report blocks has been made
available. See Appendix B, Weatherization Assistant Customized Reporting Feature
Reference Document, for more details.
If you have selected the third party photo browser check box, (feature 2) on the
Preferences/ Features tab, a Photo Folder field will appear on your Client Information
form just below the Dwelling data block. Use the Browse button to the right of this
field to locate and select a location on your computer in which you have stored digital
photos for this specific client. Once selected, this location will be displayed in the
Photo Folder field and remain there for all subsequent visits to this client’s data.
Selecting the View button will present you with a photo browser in which you may
view and edit these photos. See Section 13.1, Digital Photos for more information
on viewing and editing photos. Note that the ability to store digital photos also exists
at the Audit and Work Order levels. You should develop a consistent policy
regarding where you store reference to your photos.
If you are utilizing the Graphic Information System (GIS), two un-editable
fields, Latitude and Longitude, and a Map button will appear on the Client
Information form just below the Occupants data block. If the address entered in the
Chapter Six • 60
Clients
address entries on the Client Information form can be recognized by the system as a
location, the fields will display the indicated data and the Map button will take you
to a map showing this location. See Section 13.2, Graphic Information System (GIS)
for more details.
The Checked Out To, Check In, and Check Out data items will appear on the
Client Information form only if you have chosen to use the Check-in / Check-out
feature of the Weatherization Assistant (see "Check-in / Check-out client records" in
Section 11.4, Features as well as "Checking Clients In and Out" in Section 12.3, Data
Transfer - Import / Export via Database Files). If the client you are currently
referencing has been checked out, the User Name (see "User Name" in Section 5.2,
Contacts (Agency)) of the user who checked out the record will appear in the Check
Out To combo box field. If the client has been checked out, you may check the
record back in by selecting the Check In button, regardless of who had previously
checked the record out. Thus, if there are multiple users who may check records in
and out, you will need to coordinate this practice.
You may either initialize the checking out of a record or change the user
assigned to the check-out by using either the combo box list or the Check Out button.
From the combo box list, you may chose any user to be recorded as the user having
checked out the record, or, using the Check Out button, you may check the record out
to the current user who is logged on, presumably yourself.
6.2 Status (Client)
If you use the status tracking feature of the Weatherization Assistant, you may
view all of the current status category settings associated with a given client on the
Status tab under the Client Main Menu item. These include the general and
application client level status settings; the audit status; and the general, inspection,
and payment work order level status settings. Entries will be visible for only those
categories for which a status has been set or for which a setting is possible. Since
each work order has separate status tracking for the overall work, inspections, and
payment, you may need to scroll the form on this tab to see all the status settings if
multiple work orders exist.
The Client level status settings available are:
Chapter Six • 61
Clients
General
Application
Active On
Work Done, File Closed/Locked On*
No Work Done, File Closed/Locked On*
File Locked On
Delayed On
Other
Received On
Eligibility Verified On
Approved On*
Referred On*
Denied On*
Delayed On
Other
See the Status topics for Audit and Work Orders for settings available in these
categories (sections 7.2, Status (Audit), and 8.2, Status (Work Order)) or Section 13.3,
Status Tracking for all possible status settings for all categories.
The Status form
The Status tab displays not only the current status, but the date the status
became effective, the date it was last changed, and who changed it. You are also
shown any comment which has been appended to this current status setting. A
Completed column on the form will display an asterisk (*) when a status setting
indicates completion or closure of the activity associated with the status category.
Status settings are changed by selecting the Edit button in the row of the setting
category you wish to change. You will be presented with the Status Editor form.
Chapter Six • 62
Clients
Choose the "H" button to see a history of all settings for a specific status category for
the current client. Use the Refresh List button on the Status form to insure that any
status changes which may have been made since opening the form are reflected in the
display. The Overall Client Status History button at the bottom right of the Client
Status form presents you with a Data Sheet View of all status categories for the client.
Use of the Sort feature (see Section 4.8, Data Sheet and Form Views of Records)
while viewing this form can insure entries are arranged in a desired order (e.g., by
date). See Section 13.3, Status Tracking for additional information on the Status tabs
and changing status settings.
6.3 Energy Index
The energy index tab is used to compute an overall energy index in units of
BTU per heating degree day per square foot as a measure for determining the
potential to save energy by weatherizing a client’s dwelling. The value can be used
to compare dwellings or possibly rank them in relation to their potential benefit from
weatherization. Use of the form is totally optional. Since the form is based on heating
degree days, it is of most use only in heating climates. The Energy Index calculation
on this tab is independent of the detailed energy audit consumption estimates.
The Energy Index form
Chapter Six • 63
Clients
Below are brief comments related to each individual entry. All entries except
those for the secondary fuel type are required if the program is to obtain an energy
index. However, none are considered required for form completeness. Thus, you
could enter partial data, then return at a later time to complete the data entry.
Setup Library B In order to translate an Annual Cost of energy in dollars into units
of energy consumption, the program requires the fuel prices paid by the client. The
program acquires these prices from the Fuel Cost tables in the Setup Library used for
this client. In the Setup Library field, use the combo box list to choose the Setup
Library which contains the Fuel Cost table appropriate for this client. The selection
here will change the default Setup Library assigned to any new audit which may be
initiated for this client. Of course the setting may be changed when the audit is
performed, but there would then be the possibility that the Energy Index computed
on this tab would no longer be applicable since the fuel prices used may differ from
those used in the audit.
The program uses this selection of Setup Library in other optional features of the
program related to the Client, for instance, in Work Orders. Thus, it is highly
recommended that an entry be made here, whether or not any other entries are to be
made under the Energy Index form.
Fuel Costs B Having selected the Setup Library used for this client in the field
above, the Fuel Costs entry simply designates which fuel cost table within this setup
library contains the fuel prices used by the client. Use the combo box list for this field
to locate and select the entry. If you have only one Setup Library with a single fuel
cost table, this will be a trivial choice. The selection here will change the default Fuel
Costs assigned to any new audit which may be initiated for this client. Of course the
setting may be changed when the audit is performed, but there would then be the
possibility that the Energy Index computed on this tab would no longer be applicable
since the fuel prices used may differ from those used in the audit.
Floor Area (sq ft) B Enter the floor area of the client’s dwelling. This is living
space floor area, not foot print area. Thus, a two story home with 1200 square feet
per story would have a floor area of 2400 square feet. An entry here will
automatically populate the Floor Area field in any future audit building description
initiated for the home. This automatic entry may, however, be replaced when the
audit is actually performed, if necessary.
Heating Degree Days (base 65F) B Enter the number of annual Heating Degree
Days (HDD) at base 65 F for the location of the dwelling. The most accurate
estimates of the energy index would result from using the annual degree days
corresponding to the same period as the annual energy cost entered below. However,
Chapter Six • 64
Clients
if these are not available, values used here for various locations should at least come
from a consistent source. These values do not need to be those used by the
Weatherization Assistant audit analyses. Those listed in the NEAT User’s Manual are
averages over a 30 year span and are actually Heating Degree Hours divided by 24,
so they may differ somewhat from other sources. Other listings may be available
through NOAA (the National Oceanic and Atmospheric Administration) or ASHRAE
(The American Society of Heating, Refrigeration, and Air Conditioning Engineers).
The next three fields exist for both a Primary and a Secondary Heating Fuel.
Enter information into the fields for the Secondary Heating Fuel only if more than one
fuel is used to supply space heat to the dwelling, such as having an electric space
heater in a bedroom when the remainder of the house is heated by a gas furnace.
Fuel Type B Select the fuel type which is being described as providing space heat.
Annual Cost ($) B Enter the dollars spent annually on fuel bills for the fuel
specified. The entry may be taken from utility bills for a year prior to the audit, if
easily obtainable. If you are using the audits’ optional billing data adjustment
features (see the individual NEAT and MHEA User’s Manuals), these bills will have
to be obtained eventually.
Est % Heating - Enter an estimate of the portion of the fuel specified that is used
for space heating, as opposed to water heating, cooking, etc. Default values based on
the fuel type will be automatically entered, but you should modify these if they are
found unrepresentative of the actual conditions in the home.
Following entry of the above data, the program will compute and display the
BTU/HDD/sqft contributions from the primary and secondary fuels and the combined
value for both fuels. This latter value is the energy index for the home, a measure of
the home’s energy efficiency. To be of use, it should be compared to values from
other homes, giving you a comparative feel for its energy use compared to the others.
Note, however, that the energy index may be significantly affected by the life styles
of the occupants, regardless of the home’s construction characteristics, since it is
based on actual energy consumption, .
High Energy Use B This read-only check-box is a reminder of your entry on the
Client Information tab for this same data item (see Section 6.1, Client Information).
Although DOE’s definition of this parameter is not directly linked to the Energy
Index for a home, consistent use of the Energy Index and designation of homes as
high energy users, will likely reveal some correlation.
Chapter Six • 65
Clients
6.4 Contacts (Client)
This tab allows you to enter information on all people associated with a client.
The occupant requesting weatherization assistance will be at least one, if not the only,
contact. However, others may include responsible relatives of elderly individuals
who should be consulted, utility representatives from whom billing data is to be
obtained, or suppliers of materials or work specific to this client. If the dwelling is a
rental unit, the landlord or owner of the building could be one of the contacts.
Multifamily buildings may have a superintendent or maintenance person assigned
who could be a valuable contact.
As many contacts as are desired may be entered. Use the Client Contact
Record Navigation Block at the lower left of the form to initiate new contacts or
locate and access previously entered contacts. The form may be viewed and edited
in Data Sheet View, providing a summary of all contacts already entered or allowing
quick changes to multiple entries.
Client contacts are reported on the Client Completion Report, the Client
Information Report, and the Client Survey Report, all accessible from the Report
Block of the Client Main Menu item.
The Contacts form
Following are brief discussions of the individual entry fields and controls on
the Client Contacts form:
Full Name B Enter the name of the contact. You may enter the name with either
the given or surname first. However, if the surname is entered first, place a comma
Chapter Six • 66
Clients
between it and any given names which follow. The un-editable Name Detail fields
will show you how the program sees the name you have entered. If you are entering
information about a company, you likely still have a person who is your primary
contact within that company. Enter that person’s name. Then provide the company
name in the Company Name field. The name must be unique. Required.
Primary Applicant B Indicate with this check box whether the individual being
entered will be the primary name under which the application will be filed. Others
may be associated with the application, but if paperwork were being filed by a
person’s name, this would be the name used. This is also the "Client Name" which
will appear above the tabs on the Client Main Menu item when this particular client
is accessed. Reports will also display this individual as the Client. Only one contact
can be declared as the Primary Applicant for the client. If the check box is check for
a particular contact, it will automatically be unchecked for whomever had previously
been declared the Primary Applicant. Changing the contact designated as the Primary
Applicant is not recommended when other windows displaying this information are
open.
Contact Type B Select from the combo box list the Contact Type which best
applies to the contact. The choices are: (1) Applicant/Person of Record, (2) NonApplicant/Person of Record, (3) Other Contact for Applicant, (4) Landlord/Owner,
(5) Superintendent, (6) Maintenance Staff, and (7) Other. Unless you wish to place
a different interpretation on the terms, normally the "Primary Applicant," as indicated
in the check box above, will be the "Applicant/Person of Record." The "NonApplicant/Person of Record" is intended for use mainly with the small multifamily
module to the program, to be introduced in a subsequent version of the
Weatherization Assistant. It designates the occupant of a unit in a multifamily
building who can have weatherization work performed on his unit only because the
required fraction of other units in the building qualify. The entry will default to
"Applicant/Person of Record" for a new contact record. Optional.
Company Name B If applicable, enter a Company Name associated with the
contact. Remember, however, that the contacts being entered here are for a specific
client, not for your agency in general. Thus, companies you use as suppliers or
contractors would likely be more appropriately entered on the Contacts from under
your Agency Main Menu item, unless this company supplied a specific need for this
client alone. Optional.
Title B If applicable, enter a title associated with the client. This entry could
alternately be used to enter a position or relation of the contact to a primary applicant.
Optional.
Chapter Six • 67
Clients
Address, Unit Number, City, State, Zip Code B Enter the mailing address of the
contact. If the address is the same as the address of the dwelling (entered on the
Client Information form), use the "Copy Client Addr" button to copy this address
from the Client Information form to this contact form. Optional.
Work, Cell, Pager, Fax, Home Phone B Enter any of the indicated phone numbers
for the contact person. Optional.
E-Mail B Enter an e-mail address for the contact person. Only e-mail addresses
of contacts listed under the Agency Main Menu item will be entered automatically in
the Address Book of the e-mail feature of the Weatherization Assistant. See Section
13.4, E-Mailing from Within Weatherization Assistant. Optional.
Comment B Comments may be entered directly in the comment field on the form.
Or, select the Comment button to the left of the field, which will take you to the
Comment Editor. This text editor is similar to Window’s Notepad and may be used
to edit extended comments. The total comment may have up to 65,000 characters.
Text from other sources may be copied and pasted into the Comment Editor’s
window. Client Contact Comments are displayed on the Client Completion, the
Client Information, and the Client Surveys Reports. If a contact other than the
Primary Applicant is considered the "Primary Contact" this might be entered here in
the Comment block, perhaps in all capital letters to make it stand out on these reports
and forms. Optional.
Client Contact Record Navigation Block B The Client Contact Record Navigation
Block may be used to find and access existing client contacts or initiate new contacts.
See Section 4.1, Record Navigation, for information on using the Weatherization
Assistant’s Record Navigation Blocks.
6.5 Audits (Client)
The Audits tab of the Client Main Menu item is a Navigation Data Sheet View
similar to the Audits tab on the Agency Main Menu item. It displays all audit records
associated with the current client. The tab is used primarily for navigation to the
individual audit records. The light blue border of the data sheet on this tab is the
visual indicator that this data sheet is used for navigation rather than data entry.
Entries under column headings which are in angle brackets (<>) can be double
clicked with the mouse to navigate to the associated record. Like any data sheet, the
sorting can be changed by highlighting a column and pressing one of the sort buttons
in the tool bar.
Chapter Six • 68
Clients
Normally there will be only one audit record for each client. However, the
Weatherization Assistant does allow you to create and execute more than one audit
per client. This might be useful if you desire to see the effect of some modification
in the building description on the recommendations of the audit. Or, you may wish
to update or correct an existing audit without loosing the original description.
However, care must be taken to insure only one set of active work orders existed for
the client, else confusion and double accounting of costs are likely to occur.
The Audits table
The Audit Name and Type entries are those given on the Audit Information
form of either Audit Main Menu items (NEAT or MHEA) for each of the audits listed
(see Section 7.1, Audit Information). The remaining data entry items and controls
visible on the form are described below:
Last Edited B Gives the date (and time, if column in expanded) of the last change
made to this audit record from the Audit Main Menu items tabs.
Status B Gives the latest audit status for each audit, as set on the Status tab under
the Audit Main Menu item for each audit displayed (see Section 7.2, Status (Audit)).
Date B Gives the Date this latest status was set.
Refresh B With the possibility that any of the information displayed on the form
and sub-form has been changed since the last time this form was opened, the Refresh
button can be used to update the information displayed to reflect these changes.
Create New Site Built (NEAT) / Mobile Home (MHEA) Audit B Select these
buttons if you wish to initiate a new NEAT or MHEA audit for this client. The
program will create a new audit and provide an initial default audit name whether or
not an existing audit has been entered for the client. The Client ID and Agency Name
Chapter Six • 69
Clients
and State fields on the new Audit will also be automatically entered, but all other
information will be blank. If no other entries are made on this new Audit form, you
may immediately exit the form without adding any further information. However, the
audit will be recorded for future reference but with blank status. In this manner, you
may enter multiple clients and initiate audits for them without actually having to enter
the audit information at that time.
Following entry of any additional information on the newly created audit form,
the program will begin examining for required data entries and not allow you to exit
the form until you have provided these, or erased the added information by entering
two consecutive [Esc] keys.
Some additional data items, normally hidden, may appear in the sub-form,
which are random long integers generated by Access for its own record identification
purposes. If these data columns become visible, they may have their column widths
collapsed to zero in order to hide them.
6.6 Work Orders (Client)
The Work Orders tab of the Client Main Menu item is a Navigation Data Sheet
View similar to the Work Orders tab under the Agency Main Menu item. It displays
all work order records associated with the current client. The tab is used primarily for
navigation to the individual work orders. The light blue border of the data sheet on
this tab is the visual indicator that this data sheet is used for navigation rather than
data entry. Entries under column headings which are in angle brackets (<>) can be
double clicked with the mouse to navigate to the associated record. Like any data
sheet, the sorting can be changed by highlighting a column and pressing one of the
sort buttons in the tool bar.
Displayed on this form may be more than one work order for the client, if you
have divided the work on a client’s home into more than one work order, normally
because more than one contractor is assigned the work. The work orders may have
been generated either using the Measures tab on the Audit form (see "Create Work
Orders" in Section 7.9, Measures (Audit)) or manually directly under the Work Orders
Main Menu item (see "Work Order Record Navigation Block" under Section 8.1,
Work Order Information).
The Work Order Name is the name associated with the work order, as
prescribed when it was first generated. The remaining data entry items and controls
visible on the form are described below. Note that you may need to use the horizontal
scroll bar to display all fields.
Chapter Six • 70
Clients
The Work Orders table
Note: the table has been displayed wrapped since scrolling would normally be necessary to see all
columns.
Last Edited B Gives the date (and time, if column is expanded) of the last change
made to this work order record from the Work Order Main Menu item tabs or the date
the work order was generated from the Measures tab of the Audit Main Menu item,
if no other modifications have been made.
Status B There are three categories of Status specifications for a Work Order: a
general status, an inspection status, and a payment status. Each status category has
its own column in the Work Orders form, with corresponding dates each status was
changed. The work order status’ are changed under the Work Order Main Menu item
for each individual work order (see Section 8.2, Status (Work Order)).
Date B Gives the Date this latest status was set for each work order status category.
ActCost B If any Actual Costs for the performance of the activities listed on a
work order have been entered (see "Quantity (Actual)" and "Unit Cost (Actual)"
under "The Materials/Labor Details Sub-Form" in Section 8.3, Measures (Work
Order)), the total of these costs will be displayed in this column. This entry may not
be of much significance until the work order status has been declared "Completed"
(see Section 8.2, Status (Work Order)).
ActSave B If energy savings are associated with any of the activities included in
a work order, this field will display the total actual life cycle savings (over the life of
the measures) for all such activities in the work order. The actual savings reflects the
"Actual/Estimated Adjustment Factors" imposed on the savings for the measure (see
discussion of this topic in Section 8.3, Measures (Work Order)). This field may not
be of interest on the work order level and may be "collapsed" by default. If not
Chapter Six • 71
Clients
visible, double click your mouse while positioned just to the right of the line between
the ActCost and ActSir column headers.
ActSIR B If energy savings are associated with any of the activities included in a
work order and Actual Costs for these activities have also been entered, the ActSIR
field will display the corresponding savings-to-investment (SIR) for the work order
as a whole. The value is the ratio of the ActSave to the ActCost entries above. This
entry may not be of much significance until the work order status has been declared
"Completed" and all costs have been declared "Actual." (see Section 8.2, Status
(Work Order)).
Refresh B With the possibility that any of the information displayed on the form
and sub-form has been changed since the last time this form was opened, the Refresh
button can be used to update the information displayed to reflect these changes.
Create New Work Order B Selecting this button will take you directly to the Work
Order Information tab under the Work Order Main Menu item. The program will
initiate a new work order for the client currently being accessed. A default Work
Order name will be supplied together with the Client ID of the current client and the
Agency Name and State of the agency assigned to that client. If an audit has been
entered for the client, the name of the audit will also be automatically entered.
However, this may be altered (if more than one audit has been performed for the
client) or deleted, if the activities to be assigned this work order come from some
source other than either the NEAT or MHEA audits (such as in the case of a priority
list).
Cumulative CLIENT Actual Initial Cost B If Actual Costs (see "ActCost" above)
are associated with any of the work orders for the currently accessed client, this uneditable field will add all of these costs together to give a cumulative cost for all work
orders for the client. If accurately tracked, this entry would eventually equal the total
actual costs of all work performed for a client.
Cumulative CLIENT Actual Initial SIR B This un-editable field will display an
SIR for all work performed for the client from all work orders displayed on the Work
Order tab. Actual Costs must have already been assigned to at least some of the
activities of the work orders for the client (see "Quantity (Actual)" and "Unit Cost
(Actual)" under "The Materials/Labor Details Sub-Form" in Section 8.3, Measures
(Work Order)). The entry may not be of much significance until the work order status
for all work orders associated with the client have been declared "Completed" (see
Section 8.2, Status (Work Order)).
Some additional data items, normally hidden, may appear in the sub-form,
which are random long integers generated by Access for its own record identification
Chapter Six • 72
Clients
purposes. If these data columns become visible, they may have their column widths
collapsed to zero in order to hide them.
6.7 Surveys (Client)
The Surveys tab under the Client Main Menu item is used to copy blank predefined surveys (see Section 5.4, "Surveys (Agency)") to the client record for
completion during a client interview. You may associate as many pre-defined surveys
to the client as you wish. A survey is associated with the client by first using the
"which Survey to Create" combo box list to select the survey you wish to create, then
selecting the "Create New Survey" button on the lower right of the form to actually
create and display the blank survey. The Survey Name will appear in the field at the
top of the form. Caution, the program will allow you to create more than one copy
of the same survey for the same client, possibly creating confusion. Unwanted copies
of surveys may be eliminated using the Del button on the Survey Record Navigation
Block.
The Surveys form
Chapter Six • 73
Clients
Once a survey has been created for a client by copying it from the pre-defined
surveys, it may be altered by adding, deleting, or modifying questions contained in
it. This will not affect the pre-defined blank surveys defined under the Agency Main
Menu item. You are even free to pre-define a blank survey for your agency, then
copy it to any client and make a survey specific to the client by adding what ever
question you like.
Use the abbreviated Record Navigation bar within the Survey Questions table
to navigate to a specific question or create a new question. Delete a question by
selecting the entire entry for the question (by clicking on the record selection box to
the left of the question entry) then pressing your [Del] key. Enter the individual
question replies as text entries in the fields indicated. Number replies are seen as text
and cannot be used in arithmetic operations. Replies are limited to 50 characters or
less. Comments related to each survey question have the same characteristics as those
entered for the survey as a whole (see below). Access the Comment Editor for each
survey question’s comment field by double clicking on the field.
Use the Standard Survey Record Navigation Block to locate or delete entire
existing surveys that are associated with the current client.
Enter any Comment which is applicable to the survey as a whole in the
Comment block at the bottom right of the form. Comments may be entered directly
in the comment field or you may select the Comment button to the left of the field,
which will take you to the Comment Editor. This text editor is similar to Window’s
Notepad and may be used to edit extended comments. The total comment may have
up to 65,000 characters. Text from other sources may be copied and pasted into the
Comment Editor’s window. Client Survey Comments are displayed on the Client
Surveys Report. Optional.
6.8 Photos (Client)
If you have selected the Pathname method of photo storage (Feature 1) on the
Preferences/ Features tab, the Photos tab will appear on the Client form. From this
tab, you may select, view, and edit digital photos for the specific client currently
being referenced. See Section 13.1, Digital Photos, for more information on this
feature. Note that the ability to reference digital photos also exists at the Audit and
Work Order levels. You should develop a consistent policy regarding where you
reference your photos.
Chapter Six • 74
Energy Audits
Chapter 7
The primary purpose of the Weatherization Assistant is to make energy
efficiency measure recommendations applicable to specific homes. This purpose is
fulfilled by gathering audit information on each dwelling and entering the information
into the program. This descriptive data on each dwelling is entered under one of the
Energy Audits buttons from the program Main Menu. For Version 8 of the
Weatherization Assistant, the audits available are NEAT for site built homes and
MHEA for manufactured, or mobile, homes.
You may initiate a new audit for a previously entered client in either of two
ways: (1) by selecting one of the Energy Audit buttons on the Main Menu, then
selecting the new record button, , from the Audit Record Navigation Block (see
Section 4.1, Record Navigation); or (2) selecting the Client button on the Main Menu,
locating the client for which the audit is to be performed, selecting the Audit tab, and
then clicking on either "Create New Site Built (NEAT) Audit" or "Create New
Mobile Home (MHEA) Audit" (see Section 6.5, Audits (Client)), which ever is
appropriate for this specific dwelling. Either method will take you to a Audit
Information form for the respective audit type.
Since descriptive data for a site built home differs from that for a mobile home,
most of the fields under these two Audit Main Menu items also differ. It is not the
purpose of this manual to detail the home descriptive data necessary to describe each
dwelling of these two types. See the existing NEAT and MHEA User’s Manuals for
this information. This manual will only describe the umbrella of features surrounding
the audits themselves, which is common to both audit types. Specifically, common
data entry items on the Audit Information tabs and data on the Status, Health and
Safety, Photos, and Measures tabs will be described. In addition, some optional
entries on the Heating tab and the Water Heaters form under the Baseloads tab will
be briefly addressed. Since the Itemized Costs form for Version 8 is considerably
different from former versions, it will also be covered in this manual.
7.1 Audit Information
This tab on the main NEAT and MHEA Audit forms is used to enter overall
audit information about the house and what libraries to reference for non-house
specific data. Data entry items and controls visible on the form and common to both
NEAT and MHEA Audits are described below:
Chapter Seven • 75
Energy Audits
The Audit Information form (NEAT)
The Audit Information form (MHEA)
Chapter Seven • 76
Energy Audits
Audit Name B Some convention should be adopted to supply each audit with a
unique Audit Name. Most likely, each client will have only one audit associated with
it. However, the possibility of multiple audits for a client should be considered. Since
the Client ID must be unique for each client, the name of the client’s audit might
contain or somehow reference this Client ID. When first initiated, an audit will be
given an Audit Name of the form "Audit (#)," where the "#" is a number forcing the
name to be unique. You should replace this default name with a name of your
choosing. Required.
Client ID B This field will display the Client ID of the client for whom the audit
is being performed. If the audit has been initiated using the "Create New Site Built
(NEAT) Audit" or "Create New Mobile Home (MHEA) Audit" buttons on the Audits
tab of the Client Main Menu item, this field will automatically be filled with that
client’s Client ID. If, the audit is initiated using the new record button, , in the
Audit Record Navigation Block on the form itself, the Client ID will remain the same
as the Client ID on the form prior to requesting the new audit. In this case, you may
have to use the combo box list associated with the Client ID field to choose the
correct client from those already in the database. When you do attempt to change the
client, you will get a warning, since changing the client associated with an existing
audit is not a normal operation. For a new audit, however, it is acceptable. The
program simply does not know that this is a new audit. Required.
Agency Name / State B These un-editable fields display the Name and State of the
Agency to which the Client whose house is being audited is assigned. The fields will
be automatically filled in to correspond to the agency assigned to the Client whose
audit is being performed, as displayed in the Client ID field immediately above.
Changing the Client ID will immediately update the Agency Name and State, if
needed.
Assigned To B Use the combo box list associated with this field to assign the
Auditor in your agency who will be responsible for the dwelling. The list will contain
only those contacts declared as Auditors on the Contacts tab of the Agency Main
Menu item corresponding to the agency responsible for the client. Required.
Selection of Setup and Supply Libraries Data Block
The following four entries tell the program what libraries to reference for nonhouse specific data used by the audit.
Setup Library B Select the Setup Library from which the audit is to take measure
costs, candidate measure information, and other key parameters. See Chapter 9,
Chapter Seven • 77
Energy Audits
Setup, for additional information on the contents of the Setup Library. When you
install the Weatherization Assistant on your computer, the installation routine will
automatically copy the default setup library to a library under the "Your Agency
Name" agency (which should have been renamed to be the name of your agency).
Thus, for this agency, there will be at least one Setup Library to choose from. You
may never have need for more than one Setup Library, making this selection a trivial
one. However, see Chapter 9 for more information on the use of multiple setup
libraries and the need to tailor the Setup Library copied from the default library to
reflect your local conditions. Required.
Fuel Cost Library B Select from the Fuel Cost Library combo box the entry which
contains the fuel costs to be used by the audit in calculating the dollar value of energy
savings. A Fuel Cost Library is a subset of data under the Setup Library. Thus, only
those fuel cost libraries under the chosen Setup Library will be available to choose
from. If you change the Setup Library to be used by the audit, the Fuel Cost Library
field will be automatically deleted, indicating the need to choose another entry, from
the new Setup Library. If you have more than one utility supplying a particular fuel
in your agency’s boundaries, you may need to have more than one fuel cost library
associated with your setup library. See Chapter 9, Setup, for more details. Required.
Supply Library B Although the Supply Library is used primarily in applying the
optional feature of tracking your inventory (applied under Work Orders), the audit
uses entries in the Supply Library for replacement refrigerators and water heaters.
When you install the Weatherization Assistant on your computer, the installation
routine will automatically provide you with an empty supply library. This empty
supply library is sufficient to run the audit, although you will have no replacement
refrigerators or water heaters to choose from unless you populate the supply library
with these items. Unless an unusual situation arises, an agency will probably have
only a single supply library. Multiple libraries would make tracking of inventory
difficult because manual addition of the supplies in each supply library would be
necessary to derive the total items available in the agency’s inventory. See Chapter
10, Supplies, for more information on supply libraries. Required.
Weather File B The audit must be told what climatic data to use in estimating the
energy consumptions for the dwelling. Choose one of the approximately 220 weather
cities listed in the combo box. They are listed in alphabetical order, first by state,
then by city. You may wish to consider not only those cities in your state, but also
cities which lie in another state near a border with your state. Required.
Chapter Seven • 78
Energy Audits
Comment B Audit comments may be entered directly in the comment field on the
form. Or, select the Comment button to the left of the field, which will take you to the
Comment Editor. This text editor is similar to Window’s Notepad and may be used
to edit extended comments. The total comment may have up to 65,000 characters.
Text from other sources may be copied and pasted into the Comment Editor’s
window. The Audit Comment is displayed on the Recommended Measures Report
and the Input Report available from the Audit Report Block. You may also wish to
include the comment in a user-designed report. Optional.
Economics Summary Block B For audits which have already had NEAT or MHEA
produce recommendations, the Economics Summary block of data will display a
summary of these recommendations: the number of Measures Recommended, the
Total Initial Cost of these recommendations (using the audit’s estimated measure
costs prior to any modifications made in work orders to reflect actual costs), and the
Life Cycle Savings to Investment Ratio (SIR) for all the recommended work on the
house. If the audit has not yet been run on the house, the number of Measures
Recommended will be "0" and the other fields will be blank. All of the fields within
the Economics Summary block are un-editable.
Run Audit Button / Block B After completely describing the house to the audit
with data entered under the tabs visible on the main audit forms, use the "Run Audit"
button to have the audit perform its calculations and produce energy efficiency
measure recommendations for the home. Within the same data block as the Run
Audit button are un-editable fields showing the date and time the currently accessed
audit was "Last Run On." If the audit has not yet been run for this specific house
description, the date field will display "Not Run." An audit on a house may be run
any number of times, but the recommendations from any previous runs will be
overwritten. If you wish to run an audit on a house again, but save the
recommendations from a previous audit on the same house, use the "Copy" button in
the Audit Record Navigation Block in the lower left corner of the form to copy the
house description. Then, give the new house description a new Audit Name (possibly
a variant of the original name), make any modifications to the house description
desired, then use the Run Audit button to produce another set of recommendations.
The Run Button is available from all Audit forms and may be activated from any of
these forms once it has been decided that the building description is complete.
Audit Record Navigation Block B The Record Navigation block in the lower left
corner of the form allows you to find, copy, delete, and navigate to existing audits in
your database or to create new audits. See Section 4.1, Record Navigation, for
information on using the Weatherization Assistant’s Record Navigation Blocks. The
Chapter Seven • 79
Energy Audits
combo box lists will display only the audits associated with the Agency currently
selected (bookmarked) on the Agency Information tab under the Agency Main Menu
item. Normally the agency selected on this tab is your agency, so the combo box lists
will display only your agency’s audits. If you have more than one agency defined in
your database (e.g., your agency and the Sample Agency) and you want the combo
box lists to display audits from all defined agencies, un-check the "Use the last
bookmarked Agency record to filter find record lists," feature 9 from the Preferences
/ Features tab (see the indicated top in Section 11.4, Features).
Audit Report Block B The Audit Report Block located in the lower right corner
of the NEAT and MHEA Audit Information forms allows access to the various
reports available in the audit: (1) Recommended Measures, available only after an
audit has been "Run;" (2) Input Report, summarizing all building description data
entered in the audit as well as a summary of the Client data; (3) Heating System
Summary, extracting only the Heating System information supplied to the audit; (4)
Pressure Diagnostics Report / Form; and (5) the Health and Safety Summary,
available if any health and safety issues were identified on any of the audit forms.
Appendix A, Sample Reports, contains examples of these reports and forms. See
Section 4.13, The Report Block, for the mechanics of using the Weatherization
Assistant’s Report Blocks.
If you have selected the third party photo browser check box (Feature 2) on the
Preferences/ Features tab, a Photo Folder field will appear on your Audit Information
form just below the "Selection of Setup and Supply Libraries" data block. Use the
Browse button to the right of this field to locate and select a location on your
computer in which you have stored digital photos for this specific audit. Once
selected, this location will be displayed in the Photo Folder field and remain there for
all subsequent visits to this audit’s data. Selecting the View button will present you
with a photo browser in which you may view and edit these photos. See Section 13.1,
Digital Photos for more information on viewing and editing photos. Note that the
ability to store digital photos also exists at the Client level. You should develop a
consistent policy regarding where you store reference to your photos.
7.2 Status (Audit)
The Status tab under the Audit Main Menu item allows you to view the status
of the audit currently being accessed. The setting and tracking of statuses is an
optional feature in the Weatherization Assistant.
Chapter Seven • 80
Energy Audits
The Audit level status settings available are:
Audit
Site Visit Scheduled For
Site Visit Completed On
Billing Data Collected On
Recommendations Generated On
Audit Complete and Locked On*
Walk Away by Auditor On*
Delayed On
Denied On
Other
The Status tab displays not only the current status of the audit, but the date the
status became effective, the date it was last changed, and who changed it. You are
also shown any comment which has been appended to this current status setting. A
Completed column on the form will display an asterisk (*) when a status setting
indicates completion or closure of the activity associated with the status category.
For the audit category, this corresponds to those settings followed by the asterisk in
the table above.
The Status form
Status settings are changed by selecting the Edit button at the right of the row
indicating the current status for the audit. You will be presented with the Status
Editor form. Choose the "H" button to see a history of all settings for the current
audit.
The Status History table
Chapter Seven • 81
Energy Audits
See Section 13.3, Status Tracking for additional information on the Status tabs
and changing status settings.
7.3 Optional Entries under the Heating Form
Version 8 of the Weatherization Assistant has added an optional capability of
documenting a relatively extensive number of heating system observations which may
be encountered during an audit of the dwelling. Some of these items constitute
potential health and safety concerns. These details are accessed from buttons lying
to the right of the "Optional Heating System Details" title at the bottom of the Heating
form under the Audit Main Menu item. You must complete the description of the
existing heating system before accessing these optional details. Not all buttons will
be applicable to the heating system described on the Heating form. No attempt is
made in this manual to describe correct procedures for obtaining the measurements
or performing the inspections. You should refer to literature on standard HVAC
practices or consult with a qualified HVAC contractor.
Optional Heating System Details - tests, measurements, and inspections
A summary of the items contained under
each of the buttons is given below. Each form
allows addition of an extended comment if
necessary. Close each form using the customary
Windows X box in the upper right corner. Each
form must be closed before any other form can be
accessed.
Operational Tests B This form allows recording
information resulting from three measurement
procedures: (1) flue gas analysis, (2) carbon
monoxide measurements, and (3) the heat rise
across the heat exchanger. The form allows
recording of these measurements before and after
work has been performed B "Conducted During
Audit" and "Conducted During Inspection,"
respectively.
Chapter Seven • 82
Operational Tests form for heating
systems
Energy Audits
Vent Tests form for heating systems
Vent Tests B Information recorded under the
Vent Tests button pertain to the characteristics of
the flue and damper as well as before and after
draft measurements on the flue associated with the
heating system.
Furnace Components B This form allows entry
of characteristics for various furnace components
including the fan limit controls, burner, pilot,
blower, belts, air filter, and accessories
(humidifier, air cleaner, and air-conditioner coil).
Boiler Components B If the heating system is a
boiler, this tab allows description of the boiler
type, its overall condition, and the condition of the
expansion tank and drain valve. Additional
information can be entered describing the
associated controls and convectors. The presence
of asbestos associated with the boiler constitutes a
potential hazard and may also be noted. See the
Furnace Components
Boiler Components
Chapter Seven • 83
Energy Audits
description under Section 7.6, Health and Safety, on how the Weatherization
Assistance handles health and safety items.
Thermostat Details
Inspections for heating systems
Inspections B This form contains mostly check boxes identifying potential hazards
associated with the heating system, such as a cracked heat exchanger, insufficient
clearances, gas leaks, etc. See the description under Section 7.6, Health and Safety,
on how the Weatherization Assistance handles health and safety items.
Thermostat - Characteristics associated with the thermostat used by the heating
system are entered on this form, including its type, set points, and anticipator settings.
7.4 Optional Entries under the Ducts/Infiltration Form
Air and duct leakage measurements used by the NEAT and MHEA audits are
entered on the "Air and Duct Leakages" sub-tab located under the "Ducts/Infiltration"
tab of these audits. These data include whole house blower-door readings before and
after retrofit as well as other blower-door and duct measurements if the Evaluate Duct
Sealing check-box is selected. See the respective users manuals of these audits for
more information on these entries.
Additional blower-door-related readings may be taken for diagnostic purposes.
These optional readings may be recorded under three additional sub-tabs under the
"Ducts/Infiltration" tab: "Optional Blower Door and Zonal Pressures," "Optional
Chapter Seven • 84
Energy Audits
Pressure Balance," and "Optional Pressure Pans." The data which may be recorded
under each of these sub-tabs will be discussed briefly below.
Optional Blower Door and Zonal Pressures
Blower-door readings other than those used by the audits may be taken to
measure the effects of various activities on the infiltration rate (e.g., dense pack
insulation installation), during an inspection of the work, or at other times. This subtab allows these additional blower-door readings to be recorded as well as zonal
pressure readings which might also be taken at the same time. Note that multiple
records of data may be entered accommodating any number of sets of readings. All
of the entries are optional.
Optional Blower Door and Zonal Pressures sub-form
Entries on this form include a date on which the blower-door readings were
taken, the occasion during which they were taken, and the equipment used. The
"Conducted During" comb-box items are: "Audit," "Pre-Installation," "During
Installation," "Post-Installation," "Inspection," and "Other."
The "Air Leakage Rate (CFM)" and "Building [to outside] Pressure Differential
(Pa)" are recorded in the "Blower Door Measurements" block on the form. If the
Chapter Seven • 85
Energy Audits
pressure differential is other than 50 Pascal, selecting the "Calculate" button will
automatically apply the "Can’t Reach 50" factor to provide you with a CFM at 50
Pascal in the adjoining field.
If "Audit" has been selected in the "Conducted During" combo-box, you will
be asked on exiting the form if you wish to overwrite any value which might already
exist in the "Pre Infiltration Reduction" fields on the "Air and Duct Leakages"
formCthe values used by the audits in computing energy savings from infiltration
reduction effortsCwith the leakage rates just entered. Choose "OK" to copy the data
to the "Air and Duct Leakages" form or "Cancel" to reject the offer. Data on the
"Optional Blower Door and Zonal Pressures" sub-form will be unaffected, regardless
of your choice.
Zonal pressures are pressure differences between the main part of the house
where the blower-door has been installed and various zones of the house, such as
attics, basements, attached garages, etc. These measurements may be made in
conjunction with a blower-door measurement for a variety of reasons, such as to help
identify the possible location of leakage sites, to locate where the functioning air
barrier is, or to identify potential health and safety problems associated with a
combustion appliance.
Zonal Pressures form
Zonal pressure readings associated with a specific blower-door setup can be
recorded by selecting the "Zonal Pressure Readings for this Blower Door setup"
button. This will take you to the Zonal Pressures form in which the readings may be
entered. On this form, you may enter the Location of the zone using the choices in
Chapter Seven • 86
Energy Audits
the combo-box list or by entering a location of your own if none of the choices meet
your needs. Enter the Pressure differential found, in Pascal, and whether any ducts
are present in the zone. You may also enter any comment.
Selecting the "Show All Zonal Pressure Readings for this Audit" button will
display all zonal pressure readings from all blower-door setups for the audit. The
form is the same as the Zonal Pressures form except for an additional column
designating your selection of "Conducted During" for each setup. Entries may be
altered when viewed from this form.
Optional Pressure Balance
When the air handler of a central forced air furnace or air-conditioner is on, it
provides conditioned air to rooms throughout a house. The air that is supplied is
intended to be returned to the furnace or air-conditioner through the return registers.
If supply air is blocked from reaching a return, pressure differences can be created
between the space and the location of the return register(s). This can hinder the
supply air from being delivered to the space as well as create a negative pressure in
the remainder of the house, increasing infiltration.
Optional Pressure Balance form
The Optional Pressure Balance form allows you to record pressure differentials
between various rooms of the house and the main body of the house (where the return
Chapter Seven • 87
Energy Audits
registers exist). The measurements are taken with the air handler operating. The
measurements do not involve use of a blower-door.
Enter each Location or room using the choices in the combo-box list or by
entering a location of your own if none of the choices meet your needs. Enter the
Pressure differential, in Pascal, found, between the room and the location where the
return registers exist. Space is provided for you to enter this pressure differential both
before and after any efforts to balance the pressure, such as undercutting a door.
Comments may be entered for each entry.
Optional Pressure Pan
Pressure pan measurements are taken with a home depressurized to 50 Pascal
using a blower-door. A pressure pan which fits snugly over a register and attached
to a digital manometer is used to measure the pressure differential at each supply or
return register with respect to the home. No pressure difference indicates that the
duct leading to the register is at the same pressure as the house and that little or no
leaks to the outside exist in that branch of the ducts.
Optional Pressure Pans form
Enter an optional Register # to uniquely identify the register, possibly
referenced in a drawing. Then enter the room in which the register is located using
the choices in the "Location" combo-box list or by entering a location of your own
if none of the choices meet your needs. Next, identify the register as Supply or
Chapter Seven • 88
Energy Audits
Return. Enter the Pressure differential, in Pascal, found, between the register and the
home. Space is provided for you to enter this pressure differential both before and
after any efforts to seal the ducts. Comments may be entered for each entry.
7.5 Optional Entries under the Baseloads Water Heaters Form
Similar to the feature described above for heating systems, the Water Heaters
form under Baseloads also has an optional capability of documenting observations
associated with the water heater which may be encountered during the audit. Some
of these items may also constitute potential health and safety concerns. These details
are accessed from buttons lying to the right of the "Optional Water Heater Details"
title at the bottom of the form. You must complete the description of the existing
water heater before accessing these optional details. Not all items under these buttons
may be applicable to the specific water heater described. No attempt is made in this
manual to describe correct procedures for obtaining the measurements or performing
the inspections. You should refer to literature on standard HVAC or plumbing
practices or consult with a qualified plumber.
Optional Water Heater Details - tests, measurements, and inspections
A summary of the items contained under each of the buttons is given below.
Each form allows addition of an extended comment if necessary. Close each form
using the customary Windows X box in the upper right corner. Each form must be
closed before any other form can be accessed.
Operational Tests B This form allows recording information resulting from flue
gas analysis and carbon monoxide measurements performed in association with the
water heater. The form allows recording of these measurements before and after
work has been performed B"Conducted During Audit" and "Conducted During
Inspection," respectively.
Vent Tests B The same Vent Tests form is used for both the Heating System and
the Water Heater. Information recorded includes characteristics of the flue and
damper as well as before and after draft measurements on the flue associated with the
water heater.
Chapter Seven • 89
Energy Audits
Operational Tests for water heaters
Vent Tests for water heaters
Inspections B This form contains
mostly check boxes identifying
potential hazards associated with
the water heater. Fuel related items
include insufficient clearances, gas
leaks, and lack of a fuel shut off.
Related to the water itself are check
boxes regarding the water
temperature, pressure relief, and
presence of leaks.
See the
description under Section 7.6,
Health and Safety, on how the
Weatherization Assistance handles
health and safety items.
Inspections for water heaters
Chapter Seven • 90
Energy Audits
7.6 Health and Safety
In addition to the potential health and safety hazards which can be identified
under the Heating and Water Heater tabs, the Health & Safety tab permits
identification and description of additional safety concerns. These additional safety
related tests are divided into three categories: Whole House, Equipment, and Building
Shell. Each will be discussed separately below. Each form also provides the
opportunity to record extended comments. In addition, the Weatherization
Assistant’s extended handling of health and safety issues will be discussed below.
This discussion applies to similar issues and hazards which may have been identified
under the Heating or Water Heater tabs.
Whole House B This form allows the need for smoke or CO detectors to be
identified as well as carbon monoxide concentrations in various rooms of the home
to be recorded.
Health & Safety - Whole House
Equipment B This form is divided into data blocks addressing (1) Worse Case
Condition Draft Measurements (for heating systems and water heater), (2) Wood
Stove/Fireplace, (3) Clothes Dryer, (4) Cook Stove, and (5) Exhaust Fans and Heat
Exchanger.
Chapter Seven • 91
Energy Audits
Health & Safety - Equipment
The worst case draft tests allow multiple measurements to be recorded in a spread
sheet format. NEAT and MHEA allow these measurements to be taken for each of
the heating systems described on the Heating tab. Improper venting is a concern for
wood stoves, fireplaces, clothes dryers, and exhaust fans. In addition, wood stoves or
fireplaces may have inadequate combustion air, and bathroom or kitchen exhaust fans
may be missing or not operational. Individual burner and oven CO measurements can
be recorded for a gas cook stove. A gas leak associated with the gas stove can also
be identified.
Heating system worst case draft tests table
Chapter Seven • 92
Energy Audits
Building Shell B The Building Shell tab is divided into data blocks for Attic,
Walls, and Basement/Crawlspace. All three of these areas have the potential for
wiring problems, water leaks, or moisture related problems. In the attic, additional
concerns may be related to recessed lighting, the chimney/flue, or the presence of
vermiculite. Walls may use lead based paint or have asbestos siding. The basement
Health & Safety - Building Shell
may be in need of a vapor barrier or exhibit plumbing problems. All areas can also
be described as having Other Problems, which could be explained in the comments.
Handling of Health and Safety Issues B With the
introduction of Version 8 of the Weatherization Assistant
comes an extended capability to handle health and safety
issues. Most of the data items under the Health & Safety
tab, as well as some under the Heating and Water Heater
Two check boxes, one
tabs, have check boxes which indicate potential hazards.
indicating a hazard
When selecting such a check box, a red broad border is
drawn around the box. All such noted hazards are reported under both the Heating
System and the Health & Safety Summary Reports for the audit.
In addition, a pre-defined weatherization activity suggesting action to remedy
the condition is associated with each potential hazard. These activities are defined
under the User Defined Measure tab of Setup (see Section 9.6, User Defined
Measures). If you have selected the feature to "Automatically generate Itemized Cost
Chapter Seven • 93
Energy Audits
Records for Health and Safety Problems," on the Preferences / Feature tab (see the
indicated topic in Section 11.4, Features), the program will present you with
additional options. When you select a check box indicating a potential hazard, the
Weatherization Assistant will ask you if you wish to add a specific Health and Safety
remedial measure as an Itemized Cost to your recommended measures lists. You may
review the specific Itemized Cost by clicking on the small square with three periods
in it, , which will be located just to the right of the check box. Thus, using this
feature, you may supplement your recommended measures produced by running the
audit with activities you intend to perform to alleviate potential health and safety
issues.
7.7 Itemized Costs
The Itemized Cost form on the Audits Main Menu item allows you to enter
additional costs which are expected to be incurred during weatherization that are not
associated with any specific activity otherwise addressed by the audit. The items
described on the form may have energy savings attributed to them. However, for the
purposes of this form, this energy savings would have to be assigned by the user.
You may specify these activities by supplying information to each individual
data field in the specific audit you are currently referencing. Used in this mode, the
form behaves as it did in Version 7 of the Weatherization Assistant with the exception
that you may specify the units of the energy saving as kWh, MMBtu, or therms. See
the "Itemized Additional Costs and User-Defined Measures" sections in the Version
7 NEAT or MHEA User’s Manuals for additional information on entering data on this
form.
Beginning with Version 8, you may alternatively call up activities you have
previously defined in your Setup Library and copy them to the audit. This is
accomplished by using the "Copy from User Defined Measures" or "Copy from
Library Health and Safety Measures" combo boxes. The former list will include costs
and measures you have defined in your Setup Library (see Section 9.6, User Defined
Measures). The latter are health and safety remediation items which come as part of
the program. and are the same items that are accessible from the Health and Safety
tab of the audit (see Section 7.6, Health and Safety). By choosing an item from either
of these combo box lists, the remaining information on the form will be automatically
copied from the Setup Library to the form, overwriting any existing information on
the form. The Measure Name will appear not only in the Measure Name field, but
also in the un-editable field under "Referenced User Defined Measure." An entry
Chapter Seven • 94
Energy Audits
Itemized Costs form (specific to audit)
Note: The entry could have had a “Material” associated with it
in this un-editable field is your indication that the measure displayed on the form is
a copy of one previously defined in the Setup Library. In addition, if the measure was
selected from the list of Health and Safety items in the Setup Library, the text,
"Health & Safety Item #" will appear in red in another un-editable field in the same
area of the form, where the # is a number uniquely identifying the specific health and
safety item in the Setup Library.
There is one major difference between a measure totally specified on the form
and one copied from the Setup Library. The former can have only one component to
its cost and material description, that entered on this form. On the other hand, items
defined in the Setup Library can have multiple material/labor components, each with
its own individual cost associated with it. In this latter case, only the component
designated by the user in the Setup Library (presumably the major component) will
be displayed in the Material field, followed by a plus sign (+), indicating that there
is more to the material description of the measure than this single entry. The Cost
field, however, will display the total cost of the measure, comprised of the sum of the
individual component costs. You may review the complete description of the userdefined measure in the Setup Library by clicking on the small square with three
periods in it, , which will be located just to the right of the un-editable display of
Chapter Seven • 95
Energy Audits
Itemized Costs form (health & safety measure taken from Setup Library
the measure name. Note, however, this button takes you to the actual Setup Library
entry. Any changes to the measure made at this point will change the measure
description for all future references.
Although the display of a measure copied from the Setup Library will show
only one component on the Itemized Cost form of the Audit, the complete description
with all of its individual components will be available in any work order created from
the audit. Any modifications to the measure can be made at that time.
If you have chosen to copy a pre-defined item in creating an Itemized Cost and
you do not want this detailed material costing to be forwarded to the Work Orders,
click on the "Clear Reference to User Defined Measure" button. You are then free to
alter any of the entries displayed on the Audit’s Itemized Cost form for this item.
However, now only the single Material and Cost entered there will be associated with
the item and forwarded to the Work Orders. WARNING: Modifying the information
for an Itemized Cost or User Defined Measure generated by copying an item from
your Setup Library without first clearing the reference to the pre-defined item will
cause inconsistencies in data reported in the NEAT or MHEA Recommended
Measures report and that reported in the Work Orders.
A comment field is available to add any comment you feel appropriate. If the
entry on the Itemized Cost form has been copied from the user-defined items in Setup,
Chapter Seven • 96
Energy Audits
Itemized cost with energy savings (copied from the Setup Library)
the comment will initially be populated with whatever comment you entered for the
item entered there.
A Data Sheet view of the Itemized Cost form is available. However, care must
be taken if any changes are made from this view, as it may not be obvious which
measures are copies of pre-defined measures from Setup.
Data Sheet View of Itemized Costs form
Note: Columns not displayed include “Fuel Saved,” “Health & Safety Item #,” and “Comment.”
Chapter Seven • 97
Energy Audits
7.8 Photos (Audit)
If you have selected the Photo Browser check box (Feature 1) on the
Preferences/ Features tab, the Photos tab will appear on the Audit form. From this
tab, you may select, view, and edit digital photos for the specific client currently
being referenced. See Section 13.1, Digital Photos, for more information on this
feature. Note that the ability to reference digital photos also exists at the Client and
Work Order levels. You should develop a consistent policy regarding where you
reference your photos.
7.9 Measures (Audit)
New to Version 8 of the Weatherization Assistant is the optional feature of
creating work orders. If you want these work orders to be created based on the results
from running either the NEAT or MHEA audits, the Measures tab of the Audit Main
Menu item is the starting point for this process. An alternate use of the work order
feature is to tailor the NEAT and MHEA recommendations to reflect actual
conditions or to add as much detail to the measure descriptions and costs as desired.
Following execution of either audit program, the Measures tab will list all
measure recommendations [similar to the listing in the Recommended Measures
report, see "Audit Report Block" in Section 7.1, Audit Information, and Appendix A].
For each measure, the measure name, any building component designations
applicable to the measure (see the appropriate NEAT or MHEA User’s Manual), the
total measure cost, and SIR will be displayed. Notice that "Est" prefaces the cost and
SIR header names. This reminds the user that these are estimated costs and SIRs
based on estimated costs, used by the audits to make their initial recommendations
and may not be the same as actual costs and SIRs seen following implementation of
the measures. These are all un-editable fields, reflecting the assumptions used by the
audits and their recommendations. A breakdown of the costs for the standard audit
measures can be viewed by either double clicking the mouse on the Cost entry itself
or selecting the Costs button to the right of the measure description. However, these
displays are still un-editable.
The following items on the Measures tab can be altered and are used in creating
the work order(s) associated with the audit.
Chapter Seven • 98
Energy Audits
Itemized Cost with energy savings (copied from the Setup Library)
WO? B The header name is short for "Include in work order?" Check this box for
each measure you want transferred to a work order. Measures not selected will not
be sent to a work order. You may wish not to send a specific measure to a work order
because a work order already exists which includes the measure or because you are
rejecting the audit’s recommendation with regard to the measure. The "Select All,"
"UnSelect All," and "Invert Select" buttons at the lower left of the form allow you to
accept all of the recommended measures, reject (unselect) all, or invert the selection
currently seen from the check boxes.
Contractor B This field allows you to assign each measure to a contractor. The
selection will determine how many work orders are created from the measure list. All
measures assigned the same contractor will be included in the same work order. The
choices displayed in the combo box list will be all Agency Contacts defined as
Contractor or Crew (see Section 5.2, Contacts (Agency)). The entry is optional. All
measures with an unassigned Contractor that are selected for transfer to a work order
will be assigned to the same work order with the contractor un-designated. If you
have assigned a Default Contractor to a particular measure in the Setup Library (see
"Default Contractor/Crew" under "The General Task Description" in Section 9.6,
Chapter Seven • 99
Energy Audits
User Defined Measures) and that measure is recommended, the default contractor will
automatically be entered for you. However, you may still change the selection if you
desire. Optional.
Cost Center B If you are tracking costs that are incurred by different funding
sources or programs, assign the cost of implementing this particular measure to the
appropriate Cost Center. The choices available in the combo box list will be those
you have defined under the Cost Center tab on the Agency Main Menu item for your
agency (see Section 5.3, Cost Centers). The entry is optional. If the entry is left unassigned, work orders can still be developed, but total costs over multiple audits will
not tracked. The costs which are assigned to the various cost centers are not the
estimated costs displayed on this Measures tab. They are the actual costs declared in
the work orders themselves (see "Quantity (Actual)" and "Unit Cost (Actual)" under
"The Materials/Labor Details Sub-Form" in Section 8.3, Measures (Work Order)).
If you have assigned a Default Cost Center to a particular measure in the Setup
Library (see "Default Cost Center" under "The General Task Description" in Section
9.6, User Defined Measures) and that measure is recommended, the default cost
center will automatically be entered for you. However, you may still change the
selection if you desire. Optional.
When you are satisfied with the choices made for the entries described above,
you will need to decide whether you wish to transfer the estimated costs associated
with each measure to the work orders you are about to create. The costs transferred
will include the detail displayed by selecting the Costs buttons to the right of the
measure descriptions on the form. For measures copied to the audit from the Setup
Library (see Section 7.7, Itemized Costs), this detail will include as many costing
components as were defined in the Setup Library (see "The Materials/Labor Details
Sub-form" in Section 9.6, User Defined Measures). If you do wish to include the cost
data, select the "Include Details for Materials" check box in the lower right of the
form. Work orders will be created having their estimated costs identical with the
detailed costing of each measure as seen by the audit.
If you would rather create work orders with no cost data associated with the
measures, do not select the "Include Details for Materials" check box. This may be
chosen in order to make it easier to enter costing of the measures in the work orders,
perhaps expected to have greater detail than available from the estimated costs used
by the audits. The costing used by the audits will still be available to you in the work
orders and you may still transfer these costs to the work orders individually, measure
by measure, if you so choose.
Chapter Seven • 100
Energy Audits
Select the "Create Work Order(s)" button when ever you are ready to actually
create the work orders based on the information provided on the Measures tab. If you
have previously created work orders from this specific audit, a form will be displayed
asking if you prefer to (1) Save the previously existing work orders and create
additional work orders B leaving the potential for duplicate measures being included,
(2) Replace all work orders previously generated from the audit with new ones based
on the criteria currently on the Measures form, or (3) Cancel the request to create
work orders. Any work orders not created from this specific audit are unaffected by
the request to create work orders from this Measures tab of the audit. Thus, if you
used the Work Order tab under the Client Main Menu item to initiate and then fill in
work orders for a client, then ran an audit for the same client and asked to create work
orders based on the audit recommendations, the two sets of work orders will exist for
the same client. The program’s behavior is intended to address situations where
agencies may implement some measures outside an audit (such as from a priority list),
but use the audit for recommendations on other measures.
The program will next provide a small window displaying how many work
orders were created as a result of your selections on the Measures tab. This should
correspond to the number of unique contractors, including un-designated, you
indicated on the form. Pressing the OK button will take you to the Work Order Main
Menu item for the first work order created as a result of your request. You will see
a work order whose default name will be of the form, "WO/<Client ID>/<Contractor
ID>/#." The <Client ID> is the Client ID supplied for the Client on the Client
Information tab of the Client Main Menu item and the <Contractor ID> will be the
Contact User Name assigned to the Agency Contact designated as a Contractor or
Crew on the Contacts tab of the Agency Main Menu item. The "#" is an integer
assigned to insure uniqueness of the Work Order Name.
Having created work orders from the audit recommendations, you are prepared
to make any modifications to them before printing out the actual work orders. See
Chapter 8, Work Orders, for additional information.
Chapter Seven • 101
Energy Audits
Chapter Seven • 102
Work Orders
Chapter 8
The Weatherization Assistant’s optional Work Order feature allows you to
prepare detailed listings of tasks to be performed as part of a home’s weatherization.
A work order can include as much material and costing detail as you wish to specify.
You may create as many work orders for a client as is necessary. Tasks assigned to
work orders can come from running the NEAT or MHEA audits, come from the
listing of measures you have previously defined in the Setup Library (as perhaps from
a priority list), or be described individually on the work order itself. The status of
individual work orders can be tracked. Work orders also allow you to track inventory
and costs by cost center (funding source).
Before you can create a work order, you must first have a client defined on
whose dwelling the work is to be performed. Do this from the Client Main Menu
item, see Chapter 6, Clients. You may initiate a new work order in any of three ways:
! (1) from either NEAT or MHEA recommendations using the "Create Work
Order(s)" button on the Measures Tab of the Audit Main Menu item (see
Section 7.9, Measures),
! (2) from the Work Orders tab under the Client Main Menu item (see Section
6.6, Work Orders (Client)), or
! (3) by using the new record button,
, or Copy button on the Work Order
Information Tab under the Work Order Main Menu item itself.
Using the first method will provide you with work orders which are
automatically assigned to the Client for whom the audit was run and populated with
measures assigned to contractors you have already selected. Starting a work order
from the Client’s Work Order tab will automatically assign the work order to the
client, but have no measures associated with it. Using the new record button on the
Work Order Information tab will initiate a new work order and assign it, by default,
to the same client assigned to the work order displayed when the new record button
was selected. This default assignment can be easily changed using the Client ID
combo box on the form.
The remainder of this chapter will be divided into sections describing the use
of each of the tabs seen under the Work Order Main Menu item: Work Order
Chapter Eight • 103
Work Orders
Information, Status, Measures, and Photos (if the pathname method of photo storage
has been activated in Preferences).
Refer to Appendix A, Reports, for an example of an actual Work Order
generated from information entered under this Work Order Main Menu item.
8.1 Work Order Information
This tab on the Work Order Main Menu item contains general information
about the work order, identifying the client, contractor, and supply library from which
inventoried items are to be selected. It also contains the Work Order Navigation
Block for locating additional work orders and the Report Block for requesting the
viewing or printing of the actual Work Orders.
The Work Order Information form
Individual entry items and controls on the form are described below:
Work Order B This field contains a name uniquely identifying this specific work
order. You may develop a consistent naming convention of your own or use the
program’s default names. A default work order name has the form, "WO/<Client
ID>/<Contractor ID>/#." The <Client ID> is the Client ID supplied for the Client
on the Client Information tab of the Client Main Menu item. The <Contractor ID>
Chapter Eight • 104
Work Orders
is the Contact User Name assigned to the Agency Contact designated as a Contractor
or Crew on the Contacts tab of the Agency Main Menu item and assigned this specific
work order. This portion of the name is present only if you have specified a
Contractor for the work order. The "#" is an integer assigned to insure uniqueness
of the Work Order Name. This naming convention is used if the work order has been
initiated in a manner that likely indicates that you would want the work order so
assigned and the information is available. Otherwise, the program will assign a work
order name of simply "Work Order (#)," where the # is an integer insuring uniqueness
of the name. In such cases, it is advised that you replace this name with a more
descriptive name. The Work Order name is printed on the Work Order. Required.
Client ID B This field identifies the Client for whom the work is being performed.
The entry will likely be supplied for you as the program anticipates the assignment.
If incorrect, use the list associated with the combo box to select the correct Client.
Client and Client Contact information are printed on the Work Order. Required.
Agency / State B These un-editable fields will automatically be set to correspond
to the agency performing the work for the client identified in the Client ID field
above. Changing the Client ID will immediately update the Agency Name and State,
if need be. Agency Information will be printed on the Work Order.
Audit Name B If the work order being viewed was generated from either the
NEAT or MHEA audits using the "Create Work Order(s)" button on the audits
Measure tab (see Section 7.9, Measures (Audit)), this field will display the name of
the audit from which the work order was generated. Otherwise the field will be
empty. If an audit name is displayed, it may be accessed simply by double clicking
your mouse on the name. The list associated with the combo box will show any
audits assigned to the client identified in the Client ID field above. Note that it would
be an unusual occurrence to change the audit to which a work order was associated
or even to have more than one audit associated with a given client. If supplied, the
Audit Name will be printed on the Work Order. Optional.
Supply Library B This field identifies the Supply Library (see Chapter 10,
Supplies) containing the inventory of materials from which any materials used by the
work order may be taken. In addition, if you have specified costs for materials in the
Supply Library, reference to these materials in the work order will automatically use
these costs. Only supply libraries associated with the agency specified in the Agency
field on the form will be visible in the combo box list, though most agencies would
likely have only one such library. If the work order was created from an audit or
copied from an existing work order, this field will be set initially to the same supply
library assigned to the record from which the work order was created. Required.
Chapter Eight • 105
Work Orders
Contractor/Crew B The Contractor/Crew field identifies the contractor assigned
to perform the work described by the work order. Only those Contacts defined as
Contractors or Crew for the Agency indicated in the Agency field on the Work Order
Information form will be displayed in the combo box list. If the work order was
initiated from the Measures tab under the Audit Main Menu item, the entry will
comply with your settings on that form. If the Contractor/Crew is specified, the
Contractor Company, Address, and Contractor Contact Name as well as phone
numbers and e-mail address will be printed on the Work Order. Optional.
Work Order Type B Choose the type which best describes this work order: (1)
Weatherization, (2) Re-Weatherization, (3) Emergency Repair or Replacement, (4)
Response to Client Request, and (5) Other. The Work Order Type is printed on the
Work Order, if available. Optional.
Comment B Comments may be entered directly in the comment field on the form.
Or, select the Comment button to the left of the field, which will take you to the
Comment Editor. This text editor is similar to Window’s Notepad and may be used
to edit extended comments. The total comment may have up to 65,000 characters.
Text from other sources may be copied and pasted into the Comment Editor’s
window. The Work Order Comment is displayed on the Work Order. Optional.
A feature unique to Comment fields under the Work Order Main Menu item is the
ability to automatically transfer any comment from the audit associated with the work
order (as prescribed by the "Audit Name" field) into the Work Order Comment fields.
At the bottom of the Comment Editor is the "Use an Audit Comment" combo box.
The list associated with this field contains all of the comments entered in any location
within the associated audit. Selecting one of the entries will automatically transfer
the comment to the Work Order Comment field you are currently accessing. This
feature is not only available here, for the comment on the Work Order Information
tab, but also for comments for individual measures described under the Work Order
Measures tab, as well as the comments associated with each individual
Material/Labor Detail entry under each measure (see Section 8.3, Measures (Work
Order)). If you wish to transfer an audit comment to the work order, you will need
to decide in which of the three locations the comment is most appropriate. Is it most
closely related to the entire work order, a measure within the work order, or a specific
material used by one of the measures?
Work Order Economic Summary Block B This block displays the following uneditable data: (1) the Number of Active Measures assigned to the work order, though
each measure can be composed of many components. Measures are declared "Active"
on the Measures tab of the Work Order Main Menu item for the specific work order.
Chapter Eight • 106
Work Orders
(2) The Cumulative Estimated Cost of all measures assigned to the work order. Costs
are "Estimated" until declared "Actual" on the Measures tab of the Work Order Main
Menu item for the specific work order. (3) The Cumulative Actual Cost of all
measures assigned to the work order.
Work Order Record Navigation Block B The Record Navigation block in the lower
left corner of the form allows you to find, copy, delete, navigate to, or create new
work orders in your database. See Section 4.1, Record Navigation, for information
on using the Weatherization Assistant’s Record Navigation Blocks. The combo box
lists will display only work orders associated with the Agency currently selected
(bookmarked) on the Agency Information tab under the Agency Main Menu item.
Normally the agency selected on this tab is your agency, so the combo box lists will
display only your agency’s work orders. If you have more than one agency defined
in your database (e.g., your agency and the Sample Agency) and you want the combo
box lists to display work orders from all defined agencies, un-check the "Use the last
bookmarked Agency record to filter find record lists," feature 9 from the Preferences
/ Features tab (see the indicated topic in Section 11.4, Features). Work orders may
be located using combo box lists arranged in alphanumeric order by five different
identifying criteria: Work Order Name, Client ID, Client Name, Alternate Client ID,
or Contractor. If you use the Copy button to copy an existing work order, the
program will ask you if you wish to copy all measures as well. A "Yes" response will
copy the measures and all associated measure data (e.g., costs and quantities). A
"No" response will simply copy the information on the Work Order Information form,
but no measure data. Use the new record button, , to initiate a whole new Work
Order. The work order will be assigned to the same client and agency as the work
order from which it was initiated from, but will be devoid of all other data.
Work Order Report Block B The Work Order Report Block located in the lower
right corner of the Work Order Information form allows you to view and/or print the
actual work order resulting from your input under the Work Order Main Menu item
for the specific work order accessed. Two forms of the work order are available, the
normal work order containing estimated costs for the measures and a bid form of the
work order designed to solicit bids from the contractor on costs for the measures.
This latter form has the same detail as the former, but leaves the costs blank. See
Appendix A, Sample Reports for an example work order and Section 4.13, The
Report Block, for the mechanics of using the Weatherization Assistant’s Report
Blocks.
Chapter Eight • 107
Work Orders
If you have selected the third party photo browser check box (feature 2) on the
Preferences/ Features tab, a Photo Folder field will appear on your Work Order
Information form just below the Comments field. Choose the Browse button to the
right of this field to locate and select a location on your computer in which you have
stored digital photos specific to this work order. Once selected, this location will be
displayed in the Photo Folder field and remain there for all subsequent visits to this
work order’s data. Selecting the View button will present you with a photo browser
in which you may view and edit these photos. See Section 13.1, Digital Photos for
more information on viewing and editing photos. Note that the ability to reference
digital photos also exists at the Client and Audit levels. You should develop a
consistent policy regarding where you store reference to your photos. Photos stored
with the Work Order Main Menu item might be those taken by a contractor
performing the work or by the person performing the inspection of the work.
8.2 Status (Work Order)
The Status tab under the Work Order Main Menu item allows you to view and
change the status of the work order currently being accessed. The setting and
tracking of statuses is an optional feature in the Weatherization Assistant.
At the Work Order level there are three categories of statuses that are tracked,
General, Inspection, and Payment. The settings for each are given in the following
table:
General
Inspection
Payment
Work Order Created from Audit On
Work Order Details Completed On
Work Order Approved On
Work Order Issued On
Work Scheduled to Start On
Work Started On
Work Completed On*
Client Signed Off On*
Work Refused by Client On*
Work Order Canceled On*
Work Order Modified On
Rework Completed On*
Delayed On
Other
Scheduled For
Passed On*
Failed On
Not Required*
Delayed On
Other
Invoice Received On
Invoice Approved On
Invoice Paid On*
Not Required*
Delayed On
Other
Chapter Eight • 108
Work Orders
The Work Order Status tab works in a manner similar to the status tabs under
both Client and Audit Main Menu item. The tab displays not only the current status,
but the date the status became effective, the date it was last changed, and who
changed it. You are also shown any comment which has been appended to this
current status setting. A Completed column on the form will display an asterisk (*)
when a status setting indicates completion or closure of the activity associated with
the status category, i.e., those followed with an asterisk in the table above.
The Status form
Status settings are changed by selecting the Edit button in the row of the setting
category you wish to change. You will be presented with the Status Editor form.
Choose the "H" button to see a history of all settings for a specific status category for
the current client. The Overall Work Order Status History button at the bottom right
of the Work Order Status form presents you with a Data Sheet View of all status
categories for the work order.
See Section 13.3, Status Tracking for additional information on the Status tabs
and changing status settings. Note that the status of a work order can also be changed
on the Status tab of the Client Main Menu item (see Section 6.2, Status (Client)).
8.3 Measures (Work Order)
The Measures tab of the Work Order Main Menu item is where you develop
the detailed task descriptions which constitute the work orders. Initially there may
be no tasks associated with a work order if, for example, it was initiated from the
Work Order tab of the Client Main Menu item. On the other hand, it may be
populated with tasks which originated from running a NEAT or MHEA audit for the
Chapter Eight • 109
Work Orders
client. In the latter case, these tasks will be the energy efficiency measures
recommended by the audit (and accepted by you on the Measures tab under the Audit
Main Menu item) as well as any Itemized Costs, User-Defined Measures, or either
manually or automatically generate Health and Safety items.
The Measures form
The form is divided into two areas: a general task description area and a
Materials/Labor Details sub-form, located approximately in the center of the form.
Although there is only one general task description area per task (or measure), the
Materials/Labor Details sub-form is in itself a multi-component form, allowing you
to list any number of materials or labor components to be associated with an
individual measure.
The discussion of the general task description area and the Materials/Labor
Details sub-form will be kept separate in order to distinguish information which
relates to a measure in general from the detailed materials or labor efforts which make
up the measure implementation.
The General Task Description Area
Each measure or task included in a work order has its own form under the
Measures tab of the Work Order Main Menu item. Navigation to other tasks within
Chapter Eight • 110
Work Orders
the same work order is done using the Measures Record Navigation Block in the
extreme lower left portion of the form (not the navigation bar above this block within
the Materials/Labor Details sub-form). You may also view all tasks within the work
order by going to Data Sheet View (see Section 4.8, Data Sheet and Form Views of
Records). Although you can make changes while in this view, it is not recommended
as standard practice since the form has more information associated with it than can
be displayed from this view (in particular the information within the Materials/Labor
Details sub-form).
The Measures form (Data Sheet View)
Note: “Cost Center” and “Comment” fields not displayed
Brief descriptions of the individual data items and controls in the general task
description area will be given here, followed by a discussion of the Materials/Labor
Details sub-form.
Order # B An integer entry which prescribes the order in which the measures
within the work order will be listed. Any measures not given an order number will
be listed first on the work order, but all those without a number will have random
order amongst themselves. This Order # will be listed on the actual work order just
prior to the Measure Name (e.g., "Measure 4 Wall Insulation"). Optional.
Active B This check box allows you to accept or reject this particular measure as
being a part of the work order being accessed. If a measure is not "Active," it is not
automatically assigned elsewhere but simply dropped from consideration. If not
selected, it would undoubtedly be wise to include a Comment indicating the reason
for the measure’s rejection.
Chapter Eight • 111
Work Orders
Measure Type B The Measure Type field allows you to assign a type to each
measure. Your choices are: (1) Baseloads, (2) Building Insulation, (3) Client
Education, (4) Doors and Windows, (5) General Heat Waste and Air Infiltration, (6)
General Repairs, (7) Health and Safety, (8) HVAC Systems, and (9) Other. Measures
generated from running either the NEAT or MHEA audit programs will be
automatically assigned a Measure Type, as prescribed on the Library Measures tab
in Setup (see "Measure Type" in Section 9.5, Library Measures). The Measure Type
does not appear in any reports, but could be used to sort the measures for a particular
work order if the Measures tab is being viewed in Data Sheet View. Optional.
Measure Name B This field contains the name of the measure. If the measure was
generated from running either the NEAT or MHEA audits, the name will be
automatically assigned to be the same as the measure name used on the Library
Measures tab of Setup. The Measure Name is the designation used to identify the
measure in the actual work order. Required.
Components B The Component field identifies the specific envelop or equipment
components to which the measure is to be applied. The entries will have been
automatically filled in if the measure originated from running either the NEAT or
MHEA audits and within the audit, specific components (e.g., walls, windows,
heating systems) where designated as the component upon which the specific measure
was to be applied. See the NEAT and MHEA Users Manuals for more details on
Component Codes. The Component Codes can also be used without reference to the
audits if you wish to designate them here and relay their significance to the
contractor, perhaps through a drawing that could be scanned and stored with the work
order. These Component Codes will be displayed on the work orders as indications
of where the measures are to be applied. They may not be of use if a sketch of the
house with the codes included is not attached to the work order. Optional.
Cost Center B If you are tracking costs that are incurred by different funding
sources or programs, the Cost Center is that source of funding to which the actual cost
of the measure will be charged. Cost Centers are defined under the Cost Centers tab
of the Agency Main Menu item for your agency (see Section 5.3, Cost Centers). The
Cost Center displayed here may have been automatically filled in if it was assigned
as the default Cost Center for the measures evaluated by NEAT and MHEA (see
"Default Cost Center" in Section 9.5, Library Measures) or assigned to the measures
at the time the measures were selected from the audit recommendations on the
Measures tab under the Audit Main Menu items (see Section 7.9, Measures (Audit)).
However, the settings made in these other locations are simply means to initially
assign the entry here. At this point, you may set or change the Cost Center
Chapter Eight • 112
Work Orders
assignment to any available entry, as determined under your Agency Main Menu
item. For measures not originating from either of the audits of the Weatherization
Assistant, this entry will be empty and, if you are tracking costs to cost centers, you
will want to select the appropriate Cost Center here. Optional.
Copy from Library Measures B If you have initiated a new measure to be included
in this work order, the "Copy from Library Measure" combo box will appear in the
upper right corner of the form. This allows you to optionally choose the measure
from those normally considered by the NEAT or MHEA audits, even though you may
not have run an audit for this client (see Section 9.5, Library Measures). When you
choose one of the audit measures in this manner, general measure information as well
as detail and costing information associated with the measure are automatically
copied to the Work Order Measures form and Material/Labor Detail sub-form. Of
course, you may alter this information, as you can for any measure on the Work Order
Measures tab. If the measure you chose from the
library is one of the insulation measures, you may
receive a message indicating that "There were more
than 3 Material Detail records added." This occurs
because most of the insulation measures have more
than one type of material associated with the
measure and material records for all types are
Message when copying insulation library
copied to the Material/Labor Details sub-form for
measure to work order
the copied measure. You will, therefore, have to
edit the data in the sub-form to include only those records for the insulation type you
intend to use.
Copy from User-Defined Measures B This field is similar to the "Copy from
Library Measures" described above except it provides access to the User-Defined and
Health and Safety Measures in your Setup Library (see Section 9.6, User Defined
Measures) when initiating a new measure for a work order. When you choose one of
these measures in this manner, general measure information as well as detail and
costing information associated with the measure are automatically copied to the Work
Order Measures form and Material/Labor Detail sub-form. However, after copying
the measure to the work order, you may alter this information, as you can for any
measure on the Work Order Measures tab.
Comment B Comments may be entered directly in the comment field on the form.
Or, select the Comment button to the left of the field, which will take you to the
Comment Editor. This text editor is similar to Window’s Notepad and may be used
to edit extended comments. Text from other sources may be copied and pasted into
Chapter Eight • 113
Work Orders
the Comment Editor’s window. You may also have comments from the audit
associated with the work order automatically transferred into this comment field. See
the discussion under Comments on the Work Order Information tab in Section 8.1 for
more details. The total comment may have up to 65,000 characters. Work Order
Measure Comments are displayed on the Work Order under the specific measure to
which the apply. Optional.
Actual/Estimated Adjustment Factor (%) B This field allows you to indicate that
the measure will likely not be as effective in saving energy as originally estimated by
NEAT or MHEA. For example, you may discover that only 80% of the wall area you
originally thought could be insulated can actually be insulated. Thus, you would
expect that the energy savings associated with this measure might also be affected by
approximately the same percentage. In this case, you would enter 80 in the
Actual/Estimated Adjustment Factor field. In this example, the situation discovered
would also likely affect your conversion of Estimated Costs to Actual Costs, as
performed under the Materials/Labor Details sub-form (see below).
Show/Hide Audit Material Detail - If the measure currently being viewed has been
generated from running either the NEAT or MHEA audits, selection of this button
will display the costing components used by the audits, as specified in the Setup
Library (see "Costs" in Section 9.5, Library Measures or "The Materials/Labor
Details Sub-Form in Section 9.6, User Defined Measures).
Example of material detail from audits displayed under the Work Order Measures form
These audit cost components are designed to be approximate costs used by the audits
in estimating the cost-effectiveness of the measures for determining the
recommendations. However, they may not be as detailed or as precise as you may
wish for the purposes of generating work orders for the measures. Nevertheless, you
may still wish to refer back to them. If, in initially forming the work orders from
audit recommendations, you chose to "Include Details for Materials" (see Section 7.9,
Measures (Audit)), these costing components will have already been transferred to the
work order. This would make what you view by selecting the "Show Audit Material
Detail" button the same as what is displayed in the Materials/Labor Details sub-form,
particularly if the latter is viewed in Data Sheet View. However, if you did not
choose to transfer these components or you have since altered the detail in the subChapter Eight • 114
Work Orders
form, this button still allows you to refer back to what the audits used for costing
components in making their recommendations. If the measure was generated by some
other means than the audits, no entries will be seen when selecting this button.
It is recommended that prior to selecting the "Show Audit Material Detail" button
you maximize the window the Weatherization Assistant program uses. Otherwise the
sub-window which is used to display this added data may fall outside the program
window, making it hidden.
Once the "Show Audit Material Detail" button has been selected, the name of the
button will change to "Hide Audit Material Detail." It is recommended that when you
no longer require viewing the audit material detail and prior to navigating to another
measure, you close the sub-window by selecting the "Hide Audit Material Detail"
button instead of using the traditional Windows X box in the upper right corner of the
sub-window. This allows the naming of the button to remain synchronized with the
display.
Create Materials Using Audit Detail B This button is used to transfer the audit
material detail for the measure being accessed (viewed using the "Show Audit
Material Detail" button) to the work order. This would not be necessary if, when
generating the work order from the Measures tab of the Audit Main Menu item, you
chose "Include Details for Materials" (see Section 7.9, Measures (Audit). The detail
would have already been transferred. However, if this was not your choice and you
now wish to transfer the information, this button will accomplish the action. Even if
you initially chose to transfer the audit data but have since altered it using the
Materials/Labor Detail sub-form, you may still go back to the original audit data
using this button. However, as you will be warned, this transfer will overwrite the
existing data in the work order for this measure. If the measure was not generated
from running either the NEAT or MHEA audits, selecting this button will indicate
"No material detail records to add."
Show Audit Economic Details - This button allows you to refer back to
information about the measure as seen by the NEAT or MHEA audits.
Example of audit measure economic detail displayed on the Work Order Measures form
Chapter Eight • 115
Work Orders
The display that opens shows the energy and dollar savings estimated by the audit for
the measure, the life of the measure and its life cycle present worth dollar savings, all
as un-editable fields. The life cycle present worth dollar savings of the measure is the
first year’s dollar savings multiplied by the measure life, then adjusted to account for
the fact that future dollar savings are not worth as much as current dollars (i.e.,
"discounted"). The value also attempts to adjust for forecasted changes in fuel costs.
At the bottom right of the window, the "Initial Cost" of the measure is displayed, or
the cost used by the audits. The SIR reported below the "Initial Cost" is the ratio of
the life cycle present work dollar savings and the cost of implementing the measure,
both displayed immediately above this entry. This is the same SIR that NEAT or
MHEA computes for the measure.
The only editable field in the Audit Economic Details form is the
"Actual/Estimated Adjustment Factor (%)." This is a repeat display of this same field
which appears on the general task description portion of the Work Order Measures
tab (see above). Changing the value here will automatically change the value
displayed in this other location. Since this parameter only affects the "Actual"
savings and SIR, changing it on this Audit Economic Details form will not affect any
other entries on the form. It is included here to allow you to make some conclusion
about actual energy savings while viewing the savings estimated by the audits.
Windows of the program can be arranged such that both this window and the main
Work Order Measures window are both visible, in which case you will be able to see
the effect of the "Actual/Estimated Adjustment Factor (%)" on the Actual SIR
viewed on this latter form. Close the form with the traditional X box in the upper
right corner of the form.
Measure Economics Block B This block of data located in the lower right corner
of the Measures tab summarizes the total Estimated and Actual Costs and SIRs for
the measure being considered. Estimated Costs are those initially coming from
whatever source generated the measure, such as the execution of either NEAT or
MHEA, although even these may be altered under the Materials/Labor Details subform (see below). Actual costs are assigned whenever you declare them under the
Materials/Labor Details sub-form. Care must be taken in interpreting these "Actual"
parameters. If you have only declared part of the costing components as "Actual"
under the Materials/Labor Details sub-form (see below), this cost may not reflect the
total cost of implementing the measure. The SIR will display "0.0" for measures
without energy savings associated with them.
Measures Record Navigation Block B The Measures Record Navigation Block in
the lower left corner of the form allows you to find, copy, delete, or navigate to
Chapter Eight • 116
Work Orders
measures associated with the work order currently being accessed. See Section 4.1,
Record Navigation, for information on using the Weatherization Assistant’s Record
Navigation Blocks. The combo box list will display all measures currently associated
with the work order. You may initiate a new measure for the work order by using the
new record button, , in the block.
The Materials/Labor Details Sub-Form
The Materials/Labor Details sub-form allows entry of as much information for
individual materials and labor components as you feel necessary to sufficiently
describe implementation of each measure. The level of detail included is totally up
to the user. However, there must be at least one valid Material/Labor Detail
associated with a measure in order to have that measure printed in the work order.
The Materials/Labor Details sub-form
If the measure was generated from running either the NEAT or MHEA audits,
this detail may (if the user so chooses) initially be composed of the costing detail
prescribed in the Setup Library. For Library measures, this detail is restricted to three
entries representing Material, Labor, and Other costs (see "Costs" in Section 9.5,
Library Measures). For User-Defined and Health and Safety measures, any amount
of detail given in Setup (see "The Materials/Labor Details Sub-Form" in Section 9.6,
User Defined Measures) will be copied over into the Work Order Material/Labor
Details sub-form. This detail is the same data viewed by selecting the "Show Audit
Material Detail" button described above.
The Materials/Labor Details sub-form is also where you indicate use of
materials from your Supply Library (see Chapter 10, Supplies) which then get
subtracted from your inventory once the material costs have been declared "Actual."
Below are descriptions of each individual data entry item or control involved
in specifying the measure detail on the Materials/Labor Details sub-form. As already
noted, this sub-form has multiple components and may be viewed in either Form
Chapter Eight • 117
Work Orders
View or Data Sheet View (see Section 4.8, Data Sheet and Form Views of Records).
Although both views allow full capabilities in entering data, the Form View is likely
somewhat easier to understand since the controls have their standard appearance and
do not need to be cast in a spreadsheet format. Therefore, this view will be assumed
in the following descriptions. However, the alternate Data Sheet View still offers the
added ability to quickly see all components of the measure detail at once, which is not
possible from the Form View.
The Materials/Labor Details sub-form (Data Sheet View)
Note: The form has been displayed wrapped since scrolling would normally be necessary to
see all columns
Order # - An integer entry which prescribes the order in which the costing
components of the measure will be listed on the work order. Any components not
given an order number will be listed first on the work order, but all those without a
number will have random order amongst themselves. Optional.
Type - If you are using the Supply Library (see Chapter 10, Supplies) to store
information about materials you use in your weatherization activities and possibly
taking advantage of the Weatherization Assistant’s inventory feature, select the
category under which the material is listed in the library. With the exception of
"Unspecified," these selections correspond to the material categories in the Supply
Library. The choices are:
Cooling Equipment
Construction Materials/Hardware
Doors
Health and Safety Items
Heating Equipment
Hot Water Equipment
Insulation
Labor
Lighting
Miscellaneous Supplies
Refrigerators
Windows
Other
Unspecified
The entry is used to narrow your search for the material when using the Copy Supply
combo box list at the upper right corner of the sub-form. If you do not plan to locate
this material detail component in your Supply Library, this entry may be left blank or
Chapter Eight • 118
Work Orders
designated as "Unspecified." If the measure to which this detail belongs originated
from a NEAT or MHEA audit recommendation, this entry will automatically be
assigned. Optional (unless locating the material in your Supply Library).
Description B Enter a brief description of the component detail of the measure.
If the Copy Supply field was used to select the material, this field will be
automatically entered. In such cases, you may change the description, but it may
complicate your ability to identify the item as one tracked in your inventory. The
entry will also be automatically filled in if the material entry stems from an audit
recommendation. However, this does not link the entry to an item in your Supply
Library. You must still use the Copy Supply field if you wish to associate the
material with one in that library. The entry may be 80 characters or less. Required.
Units - Enter the units to be associated with the Estimated and Actual Quantity
fields on the sub-form. WARNING: If the detail entry was copied from the supply
library using the Copy Supply combo box, do not change the Unit entry which is
automatically entered. The inventory kept in the Supply Library will expect the
Quantity and Unit Cost entries on the sub-form to be in these original units.
Required.
Copy Supply - This entry is used in conjunction with the Type entry on the subform to locate a specific material from your Supply Library. Selecting the material
using this combo box will automatically fill in most of the remaining fields on the
sub-form, provided you have specified the analogous entries in the Supply Library.
Locating a material in the Supply Library is essential if you are using the inventory
feature of the program for the specific material being described. Optional.
Comment B Comments may be entered directly in the comment field on the form.
Or, select the Comment button to the left of the field, which will take you to the
Comment Editor. This text editor is similar to Window’s Notepad and may be used
to edit extended comments. The total comment may have up to 65,000 characters.
Text from other sources may be copied and pasted into the Comment Editor’s
window. If the measure being viewed resulted from a Library or User-Defined
Measure in your Setup Library (see Sections 9.5, Library Measures and 9.6, UserDefined Measures) and you had entered comments there for the component detail,
those comments will be automatically copied to this form provided the request was
made to carry along the component detail when generating the work order (see
Section 7.9, Measures (Audit) or Section "Create Materials Using Audit Detail" in
Section 8.3, Measures (Work Order))..
Quantity (Estimated) B This is an estimate of the quantity of the material entered
in the Description field, in units specified in the Units field, needed to install the
Chapter Eight • 119
Work Orders
measure currently being considered. If this specific Material/Labor Details entry
originated from an audit recommendation, this field will initially be the quantity
specified in the recommendation. However, you may alter this value if a new, more
accurate estimate becomes available. You may always review the value from the audit
recommendation by selecting the "Show Audit Material Detail" button. Although the
entry is optional with regard to form completeness checks, if left blank, no value will
appear in the Work Order Report. Optional.
Unit Cost (Estimated) B This is an estimate of the cost per unit (as given in the
Units field) of the material entered in the Description field needed to install the
measure currently being considered. If this specific Material/Labor Details entry
originated from an audit recommendation, this field will initially be the cost used to
calculate SIR of the recommendation. However, you may alter this value if a new,
more accurate cost estimate becomes available. You may always review the value
from the audit recommendation by selecting the "Show Audit Material Detail" button.
Although the entry is optional with regard to form completeness checks, if left blank,
no value will appear in the Work Order Report. Optional.
Total (Estimated) B This un-editable field is the product of the Estimated Quantity
and the Unit Cost. It will be reported on the Work Order as an indication to the
contractor of your estimate of the cost for this particular component of the measure’s
installation. The sum of the Total Estimated Costs from all components of a measure
is displayed in Estimated Cost field of the Measure Economics Block (see this topic
under "The General Task Description Area," above).
Quantity (Actual) B This field allows you to record an actual quantity of material
used in installing this component of the measure, in the units specified in the Units
field. This value may not be available until after the work has actually been
performed. A blank field on the Work Order Report for this quantity allows the
contractor to record it such that it can be reported back to the agency. However, if
entered prior to the Work Order Report being printed, the value will appear on the
report in this field instead. If the Actual Quantity and Actual Unit Cost are found to
be the same as the Estimated values, clicking on the "Copy" button will automatically
copy the estimated values to the actual fields. If the material has been selected from
your Supply Library, it is only after the quantity of the material has been declared
"Actual" that the quantity will be subtracted from your inventory tracked in that
Supply Library (see "Used (button)" in Section 10.2, Common Entries on Material
Forms and the Copy Supply field described above). You may enter the Actual
Quantity without entering the associated Unit Cost. However, unless both the Actual
Chapter Eight • 120
Work Orders
Quantity and Actual Unit Cost are entered, no Actual Total will be computed.
Optional.
Unit Cost (Actual) - This field allows you to record an Actual Unit Cost of the
material used in installing this component of the measure, in the units specified in the
Units field. This value may not be available until after the work has actually been
performed. A blank field on the Work Order Report for this quantity allows the
contractor to record it such that it can be reported back to the agency. However, if
entered prior to the Work Order Report being printed, the value will appear on the
report in this field instead. If the Actual Quantity and Actual Unit Cost are found to
be the same as the Estimated values, clicking on the "Copy" button will automatically
copy the estimated values to the actual fields. You may enter the Actual Unit Cost
without entering the associated Quantity. This may be useful if a Unit Cost for the
material has been set by a contract, but the Actual Quantity is left for the contractor
to determine at the time the work is performed. However, unless both the Actual
Quantity and Actual Unit Cost are entered, no Actual Total will be computed.
Optional.
Total (Actual) B This un-editable field is the product of the Actual Quantity and
the Actual Unit Cost. The entries necessary for the program to compute this value
may not be available until after the work has been performed. However, if available
at the time the Work Order Report is printed, the value will appear on the report. The
sum of the Total Actual Costs from all components of a measure is displayed in
Actual Cost field of the Measure Economics Block (see this topic under "The General
Task Description Area," above).
8.4 Photos (Work Order)
If you have selected the Photo Browser check box (Feature 1) on the
Preferences/ Features tab, the Photos tab will appear under the Work Order Main
Menu item. From this tab, you may select, view, and edit digital photos associated
with the specific work order currently being referenced. See Section 13.1, Digital
Photos, for more information on this feature. Note that the ability to store digital
photos also exists at the Client and Audit levels. You should develop a consistent
policy regarding where you store reference to your photos. Photos stored with the
Work Order Main Menu item might be those taken by a contractor performing the
work or by the person performing the inspection of the work.
Chapter Eight • 121
Work Orders
Chapter Eight • 122
Setup Library
Chapter 9
NEAT and MHEA require more than a home’s description in order to select
energy efficiency measures for a dwelling. Using the Setup Library, you customize
the programs to your area by supplying fuel costs, material costs, and additional key
parameters. These are values which are not expected to change house-by-house. The
Setup Library is also where you have the opportunity to tell the programs which
measures to consider. This is most often decided with input from the state. You may
also define tasks you regularly perform as part of your weatherization work which are
not otherwise addressed by the programs. If you know energy savings associated
with any of these tasks, you may define actual User-Defined Measures which the
programs will treat exactly as they do the pre-defined "Library" Measures. The Setup
Library is also where you may designate the characteristics of User-Defined
Insulation Types used in NEAT.
As many setup library records as needed may be defined, each with their
individual set of material costs, settings, etc. For example, you may have more than
one contractor who has bid on work you perform. Thus, you would need a separate
Setup Library to contain the costs associated with each contractor. In addition, each
Setup Library itself can have multiple sets of fuel costs (see Section 9.3, Fuel Costs,
below) to accommodate the possibility of different utility service areas. Only one
Setup Library can be associated with each audit.
The remainder of this chapter will be divided into sections describing the use
of each of the tabs seen under the Setup Library Main Menu item: Setup Library
Information, Key Parameters, Fuel Costs, Fuel Price Indices, Library Measures, User
Defined Measures, and User-Defined Insulation Types. Although descriptions of all
the tabs available under the Setup Library Main Menu item will be given in this
manual, details of individual entry items specific to either NEAT or MHEA will be
left for the user manuals of these respective programs. The properties of the forms
unique to Version 8 of the Weatherization Assistant, however, will be covered here.
9.1 Setup Library Information
This tab under the Setup Library Main Menu item identifies the Setup Library
being displayed and the Agency to which the Setup Library is assigned. Individual
entry items on the form are discussed below:
Chapter Nine • 123
Setup Library
The Setup Library Information form
Library Name B Enter in this field a name by which the specific Setup Library can
be identified. If you have more than one Setup Library in your agency, the Library
Name may contain some reference to how this library differs from any other.
However, a complete description of the library should be saved for the Description
or the Comment fields. A default name will be supplied when a new Setup Library
is created. The name will use your installation’s ID (see Section 3.3, Starting the
Weatherization Assistant), if available. Otherwise the default name will contain the
time the library was created. Entries may be 50 characters or less. Required.
Agency B This field identifies the agency to which the Setup Library is associated.
Since the only way to create a new Setup Library is to copy an existing one or import
one with a client (see both topics on "Importing Clients" in Sections 12.3, Data
Transfer B Import/Export via Database Files and 12.4, Data Transfer B
Import/Export via Text Files), this entry will always be at least initially filled in for
you. The field is more for identification purposes, possibly on a state level,
identifying the agency within the state using the set of parameters in the library.
WARNING: The program allows you to change the Agency assignment of a Setup
Library. However, doing so when existing audits use the library will hide the link
between the audits and the library. Therefore, re-assigning the agency assignment of
a Setup Library is not recommended unless the library has just been created, insuring
no other references to it exist. Required.
State B This un-editable field displays the state associated with the Agency entered
in the previous field.
Chapter Nine • 124
Setup Library
Supply Library B This entry indicates what Supply Library is associated with the
Setup Library. The Supply Library is where your inventory of materials and supplies
exist. The Setup Library uses this designation to permit you to include materials from
your inventory in defining User-Defined Measures. If these materials are so chosen,
actual implementation of the User-Defined Measure will automatically update your
inventory within the specified Supply Library. (See Section 9.6, User Defined
Measures). The Supply Library entry will most often be automatically entered for you
whenever a new Setup Library is created or when associated with an imported client
(see both topics on "Importing Clients" in Sections 12.3, Data Transfer B
Import/Export via Database Files and 12.4, Data Transfer B Import/Export via Text
Files). WARNING: Changing the Supply Library assigned to a Setup Library can
cause confusion, unless the library has just been created. Even though the material
assignments used in existing work orders will remain unchanged, the Supply Library
and Setup Library designations in Audits and Work Orders may become inconsistent
and make it difficult to distinguish where inventoried materials are being drawn from.
Required.
Description B You may use this field to briefly describe the intended use of the
Setup Library, particularly if you use more than one Setup Library in your agency.
If you have multiple contracts for work with different costs, this field would be ideal
to record the contractor’s name, geographic area in which they work, etc. The entry
may be 255 characters or less. Optional.
Comment B Comments related to the Setup Library may be entered directly in the
comment field on the form. Or, select the Comment button to the left of the field,
which will take you to the Comment Editor. This text editor is similar to Window’s
Notepad and may be used to edit extended comments. The total comment may have
up to 65,000 characters. Text from other sources may be copied and pasted into the
Comment Editor’s window. The Work Order Comment is displayed on the Work
Order. Optional.
Setup Library Record Navigation Block B The Setup Library Record Navigation
Block may be used to find and access setup libraries, delete existing libraries, or
create a new library by copying and existing one. See Section 4.1, Record
Navigation, for information on using the Weatherization Assistant’s Record
Navigation Blocks. The combo box lists will display only setup libraries associated
with your agency currently selected (bookmarked) on the Agency Information tab
under the Agency Main Menu item. Normally the agency selected on this tab is your
agency, so the combo box lists will display only your agency’s setup libraries. If you
have more than one agency defined in your database (e.g., you agency and the Sample
Chapter Nine • 125
Setup Library
Agency) and you want the combo box lists to display setup libraries from all defined
agencies, un-check the "Use the last bookmarked Agency record to filter find record
lists," feature 9 from the Preferences / Features tab (see the indicated topic in Section
11.4, Features).
No Setup Library Report Block will be displayed on the Setup Library
Information form unless you have defined Setup Library related reports with the
external reporting feature (see Appendix B, Weatherization Assistant Customized
Reporting Feature Reference Document).
9.2 Key Parameters
The Key Parameters tab in Version 8 of the Weatherization Assistant is
unchanged from this tab in Version 7 with the exception that key parameters for both
NEAT and MHEA are now accessible under the same Main Menu item. Choose
which set of parameters you view by using the View combo box in the lower left
corner of the Key Parameters form. A banner line just above the View combo box
will indicate which set is currently being displayed (e.g., "MHEA - - MHEA - MHEA..."). See the NEAT and MHEA Users Manuals for information regarding the
individual parameters.
Key Parameters (Example from NEAT)
Chapter Nine • 126
Setup Library
9.3 Fuel Costs
Use the form under the Fuel Costs tab of the Setup Library Main Menu item
to record the average fuel prices in your agency’s area. Each Setup Library now
allows any number of fuel price tables to be entered. Use the Fuel Costs Record
Navigation Block at the lower left of the form to locate, copy, or delete sets of fuel
prices in your data base. See Section 4.1, Record Navigation, for information on
using the Weatherization Assistant’s Record Navigation Blocks. Note that as few as
one fuel may have a different price from one table to another. Use the Fuel Cost
Table Name and Comment fields to identify the applicability of this particular set of
fuel prices, particularly if you have multiple sets. The Name may be 80 characters or
less. The Comment field has the same characteristics as other comment fields,
allowing up to 65,000 characters.
The Fuel Costs form
The costs are entered in the same manner as in Version 7. See the NEAT and
MHEA Users Manuals for additional information regarding these entries. The Heat
Content field has been added to Version 8. These values give the number of MMBtu
(million British thermal units) derived from burning one unit of the fuel. These values
have been set to industry standards and should be changed only if you have
appropriate justification. Some natural gas companies post the heat content of their
Chapter Nine • 127
Setup Library
gas on their bills or would certainly be able to give you an average if contacted. They
do vary, but normally not more than a few percent.
9.4 Fuel Price Indices
As in former versions of the Weatherization Assistant, Fuel Price Indices are
used to adjust energy savings to account for anticipated changes in fuel prices over
the life of measures installed in a dwelling. Those distributed with the program and
viewed under this tab are national average indices, published annually by the
Department of Commerce, for the year of the program’s release (2005 for Version
8). Weatherization Program rules require these indices to be updated at least every
five years. Thus, unless your release of the program is more than five years old, you
do not need to make any changes in these entries.
The Fuel Price Indices form
An added column of data is available in Version 8 under this tab, the UPW
(Uniform Present Worth) Factor. This value is displayed for information purposes
only. It is based on the Fuel Price Indices and other parameters and gives the factor
by which the first year’s energy dollar savings of a measure is to be multiplied by to
Chapter Nine • 128
Setup Library
obtain its "discounted" life-time dollar savings. The discounted life-time dollar
savings of a measure is the value which, when divided by the cost of installing the
measure, gives the savings-to-investment ratio (SIR) reported by NEAT and MHEA.
9.5 Library Measures
The Library Measures tab is where you enter information regarding the
measures NEAT and MHEA considers installing in homes. The "Library" measures
are differentiated from any you may define under the User Defined Measures tab (see
Section 9.6, User Defined Measures). The format for entering this information in
Version 8 differs from that in Version 7. Version 8 also has two additional optional
entries, the Default Contractor and the Default Cost Center.
In previous versions, the entry of the material costs was not visibly linked with
the measures which actually used the material. In version 8, however, each measure
has its own sub-form for entering the material and labor costs incurred when
installing the measure.
Both NEAT and MHEA measures are accessed under the same Library
Measures tab of the Setup Library Main Menu item. Use the View combo box at the
lower left of the form to choose which program’s measures you display.
The Library Measures form
Chapter Nine • 129
Setup Library
Below are brief comments related to the individual data entry items and
controls on the Library Measures tab. Data entered on the measure Cost sub-forms
will be discussed separately.
Measure Type (Un-editable) B Each NEAT and MHEA Library Measure is
assigned a Measure Type. The Type is displayed on the Work Order Main Menu
item’s Measures tab for each library measure recommended (see Section 8.3,
Measures (Work Order)). The Measure Type is not used in any standard reports, but
can be used to sort the measure list displayed under Work Orders.
Measure Name (Un-editable) B This is the name the library measure will be
identified by in all locations throughout the program, including Audits, Work Orders,
and all reports that might be printed.
Active B Selection of this check box indicates your desire that the program
consider this measure when forming its recommendations. Even if selected here,
however, a measure will not be recommended unless it is cost-effective or is a
measure that may be declared mandatory and is so designated within a specific audit.
See additional information available in the separate NEAT and MHEA Users
Manuals. The "Select All," "UnSelect All," and "Invert Select" buttons at the bottom
of the form allow you to make all of the measures active, de-activate (unselect) all
measures, or invert the selection currently seen from the check boxes.
Default Contractor B The Weatherization Assistant gives you the optional feature
of designating the contractor who will install each measure. Measures recommended
for the same dwelling but assigned different contractors will be automatically added
to different work orders. The Default Contractor combo box allows you to assign a
default contractor for each measure. This assignment can be changed either when the
measure is recommended (see "Contractor" in Section 7.9, Measures (Audit)) or when
assigned to a specific work order (see "Contractor/Crew" in Section 8.1, Work Order
Information). Thus an entry here does not commit you to retain the assignment, but
simply may reduce your effort making such assignments later.
The choices available from the combo box will include only those Agency
Contacts declared as "Contractors" or "Crew" under the Contacts tab of the Agency
Main Menu item for the agency associated with this Setup Library (see Section 5.2,
Contacts (Agency)). Optional.
Default Cost Center B The Weatherization Assistant gives you the option to
attribute costs incurred in installing measures to different Cost Centers or funding
sources. The Default Cost Center combo box allows you to assign a default cost
center for each measure. This assignment can be changed either when the measure
Chapter Nine • 130
Setup Library
is recommended (see "Cost Center" in Section 7.9, Measures (Audit)) or when
assigned to a specific work order (see "Cost Center" in Section 8.3, Measures (Work
Order)). Thus an entry here does not commit you to retain the assignment, but may
reduce your effort making such assignments later.
The choices available from the combo box will include only those entries made
under the Cost Center tab of the Agency Main Menu item for the agency associated
with this Setup Library (see Section 5.3, Cost Centers). Cost Center assignments
need to be made only if you are tracking funds within the Weatherization Assistant.
Optional.
Life B NEAT and MHEA allow you to change the "Life" of each measure. The
lifetimes in the programs as shipped reflect industry standards and will likely be
sufficient for your use. However, if you have documented cause to alter them, you
may do so on this form. Note that lifetimes for "Lighting retrofits" are in thousands
of hours burn time for the replacement compact fluorescent, not years. The maximum
lifetime permitted by Program rules is 20 years. Required.
Costs B Each measure listed on the Library Measures tab of the Setup Library
Main Menu item has its own "Costs" button. Selecting this button for a specific
measure will take you to a data sheet view where cost components for implementing
the measure can be entered. These costs are those which the audits will use in making
their recommendations. Although you may have them initially transferred to work
orders, they likely do not represent as accurate or as detailed a costing scheme as you
may wish to have for the work orders. Within Setup, the costs components are
restricted to three entries: Material (or Insulation), Labor, and Other. Most of the
insulation measures and the lighting retrofit measures have multiple materials that
may be used in installing the measureBfor example blown cellulose, blown fiberglass,
or one of the User Types for insulating an attic, as demonstrated below..
The “Costs” Data Sheet View for the Attic Insulation R-30 measure
Chapter Nine • 131
Setup Library
In such instances, the first of the three components for each material has a right
pointing arrow (B>) in a column between the Units and Unit$ columns to help you
distinguish where one material ends and another begins.
The only data items which can be altered on the Costs Data Sheets are the Unit$
and the Comment. Enter into the Unit$ column the dollar cost per "Unit" for
installing the material. Separate entries may be made for the dollar cost per unit to
purchase the material and the dollar cost per unit for labor to install the material.
Both NEAT and MHEA simply add these two quantities together (they always have
the same "Units" associated with them) in determining the cost of installing the
measure.
The third component to the cost for each material, "Other," will likely have
different units than the material and labor components. Entry in this column may be
handled differently in NEAT versus MHEA and may not be appropriate for most
measures in NEAT. For example, an "Other" cost for an attic insulation measure in
NEAT has units of "Each Attic," implying that this dollar cost will be added to the
cost of insulating each individual attic segment, not to the total cost for insulating all
of the attics in an entire dwelling. Only in the case of a home having a single attic
segment qualifying for insulation would the entry have the likely intended purpose
of a setup cost for equipment necessary to install the insulation. MHEA does not
have the option to describe multiple attic segments for the mobile home, so doesn’t
suffer from this problem. The "Other" cost column in NEAT is more appropriately
used for window treatments where you have an option to cost the measure per
window ("Each") or per square foot of window area. See the NEAT and MHEA
Users Manuals for more discussion on measure costing.
The Comment field is a standard comment field capable of storing 65,000
characters or less, even though only a few of these would be visible in this Data Sheet
View. However, by double clicking your mouse on a particular Comment field, the
Comment Editor window will open allowing better entry and viewing of longer
comments. The comments entered here for each component of a measure cost will
be copied to the component costs displayed for each measure seen using the Costs
button on the Measures tab of the Audit Main Menu item if the measure gets
recommended (see Section 7.9, Measures (Audit)). Also, the comment will be
available on any work order that includes the measure using the material (see
"Show/Hide Audit Material Detail" and "Create Materials Using Audit Detail" in
Section 8.3, Measures (Work Orders)).
Chapter Nine • 132
Setup Library
You may use the abbreviated Record Navigation Bar at the lower left of the
window to move to other component entries. However, for most measures, all
components associated with the measure fit into the Costs sub-form window, making
it likely easier to simply use your mouse for this purpose.
All Library Measure Costs B Selecting the All Library Measure Costs button at the
lower right of the form presents you with a form view of all measures’ costing
components in a single window. In the standard Setup of Version 8, there are a total
of 353 costing components. Vertical scrolling will be necessary to see all of these
components. This format may not be the most favorable for editing the costs.
However, one key advantage of the form is that it allows you to quickly copy the cost
table or any portion of the table to another location for printing or electronic mailing
purposes (see Section 4.9, Copying and Pasting Data).
9.6 User Defined Measures
Under the User Defined Measures tab, you may pre-define weatherization
activities that you commonly encounter but which are not addressed within the
standard measures of the NEAT and MHEA audit programs. Defining these activities
within Setup allows you to copy them to any audit (see Section 7.7, Itemized Costs)
or work order (see "Copy from User-Defined Measures" in Section 8.3, "Measures
(Work Order)). All entries made in pre-defining a measure here in Setup get copied
to a work order, whether the request to copy came directly from the work order itself
or a user-defined measure that was passed through an audit, then used to create a
work order (see Section 7.9, Measures (Audit)).
The measures accessible from this User Defined Measures tab may be divided
into two major categories: those which are truly "User-Defined" and the "Health and
Safety" measures. The latter are not actually user-defined since they come with the
program. Although their names can be altered by the user, they cannot be deleted
since these are the measures associated with specific health and safety hazards which
may be observed during an audit (see "Handling of Health and Safety Issues" under
Section 7.6, Health and Safety).
Chapter Nine • 133
Setup Library
The User Defined Measures form
(with energy savings, Materials/Labor Details sub-form in Form View)
The User Defined Measures form
(Health & Safety measure, Materials/Labor sub-form in Data Sheet View)
Chapter Nine • 134
Setup Library
Measures which you define (those other than the Health and Safety measures)
can be divided into two categories: those with associated energy savings and those
without (considered simply "Itemized Costs"). Those for which you have energy
savings will be considered exactly as any of the Library Measures defined in the
program. They will be ranked by SIR and recommended if their SIR meets the
established criteria. Additional input is required for this type of user-defined
measure, as described below.
The User Defined Measures form of Setup is very similar to the Measures form
for the Work Orders (see Section 8.3, Measures (Work Order)), which receives the
pre-defined measure when copied to it. Both forms, when viewed in Form View, are
divided into two areas, the general task description area and a Materials/Labor Details
sub-form. This latter sub-form is multi-component, allowing any number of material
or labor components to be associated with each user-defined measure.
Both the general task description area, viewed under the User-Defined
Measures tab, and the sub-form on this form can be viewed in either Form View or
Data Sheet View (see Section 4.8, Data Sheet and Form Views of Records). The Data
Sheet View allows you to see more of the records at one time, possibly making it
easier to locate a particular record. However, the detail involved in each make it
normally more feasible to make changes while in the Form View, which will be
assumed in the discussion below.
The User Defined Measures form (Data Sheet View, All Measures)
(left-most columns)
Chapter Nine • 135
Setup Library
The discussion of the general task description area and the Materials/Labor
Details sub-form will be kept separate in order to distinguish information which
relates to a measure in general from the detailed materials or labor efforts which make
up the measure implementation.
The General Task Description
Brief descriptions of the individual data items and controls in the general task
description area will be given here, followed by a discussion of the Materials/Labor
Details sub-form.
Measure # B An integer entry which prescribes the order in which the measures
are displayed in Setup. Any measures not given a measure number will be listed first,
but all those without a number will have random order amongst themselves. If the
measure numbers are changed, Setup must be exited and re-entered before the
changes will automatically be reflected in the ordering. When in Data Sheet View,
the ordering of the measures may be temporarily changed using the Sort feature (see
4.8, Data Sheet and Form Views of Records), but this ordering will be lost once Setup
has been exited.
The program-defined Health and Safety Measures have pre-defined Measure
Numbers beginning with 101 and increasing consecutively. It would likely cause you
confusion to alter these or to define your own user-defined measure with one of the
same numbers. Optional.
Active B This check box allows a measure to be de-activated (un-checked), which
prevents it from being accessible from either the Audit or Work Order Main Menu
items. If de-activated, it would be wise to include a Comment indicating the reason
for the measure’s rejection. Use of this check-box is one means of selecting which
of the program’s Health and Safety measures get automatically recommended when
audit inspections identify the related hazardous condition (see "Handling of Health
and Safety Issues" under Section 7.6, Health and Safety).
Include in SIR - This entry pertains to the Recommended Measure Report
available from the Audit Main Menu item. If this check box is selected, the itemized
cost measure will appear at the top of this report’s list of measures and will be
included in the cumulative cost and SIR for the entire home. If you choose not to
include the cost in the SIR, the cost is placed at the end of the measure list. The cost
is added to the cumulate cost, but not used to compute the cumulative SIR.
Chapter Nine • 136
Setup Library
You must select "Include in SIR" if the record you are entering is to describe an
actual user-defined measure with energy savings associated with it, as opposed to an
Itemized Cost.
Measure Type B The Measure Type field allows you to assign a type to each
measure. Your choices are: (1) Baseloads, (2) Building Insulation, (3) Client
Education, (4) Doors and Windows, (5) General Heat Waste and Air Infiltration, (6)
General Repairs, (7) Health and Safety, (8) HVAC Systems, and (9) Other. The
program-defined Health and Safety Measures have "Health and Safety" declared as
their Type. Although the program allows you to alter this designation, it would likely
be misleading to do so. The Measure Type does not appear in any reports, but could
be used to sort the measures either here in Setup or in a particular work order if the
Measure eventually gets included there. Optional.
Measure Name B If you are defining your own measure, enter a unique name for
the measure in this field by which it will be identified elsewhere in the program. The
program-defined Health and Safety Measures already have Measure Names assigned.
Although you may alter these names as well, these measures’ associations with
hazards identified during an audit will not change. Any re-naming of these measures
would have to take this into account. An indication that you are accessing one of the
program-defined Health and Safety Measures will be the appearance of an extension
to the Measure Name field in which a number will be displayed in red with the text
"H&S Code," also in red, printed above it. This code cannot be changed. Initially it
is the same as the Measure # for the measure, which is the reason the recommendation
was made to not change the Measure #s for the Health and Safety Measures.
Required.
Default Contractor/Crew - If you wish to pre-assign a measure to a specific
contractor or crew, enter this indication here. The choices in the combo box list for
this field will be those entries on the Contacts tab under the Agency Main Menu item
which have been designated as either "Contractor" or "Crew" (see Section 5.2,
Contacts (Agency)). This information will be carried with the measure anytime it is
copied to an Audit, although it may then be changed. Anytime a measure is copied
to a Work Order, it will automatically be assigned the Contractor or Crew affiliated
with that work order. Optional.
Default Cost Center B If you are tracking costs that are incurred by different
funding sources or programs, the Cost Center is that source of funding to which the
actual cost of implementing the measure will be charged. Cost Centers are defined
under the Cost Centers tab of the Agency Main Menu item for your agency (see
Section 5.3, Cost Centers). The Cost Center entered here will be carried with the
Chapter Nine • 137
Setup Library
measure anytime the measure is copied to an Audit or Work Order, although it may
be changed in either of these locations. Optional.
Energy Savings B Indicate in this field whether you have an estimate of annual
energy savings to associate with the User-Defined Measure being described.
Otherwise, the record is viewed as an Itemized Cost without energy savings. Your
selection here determines whether additional fields will be displayed below this one
in which information necessary to define an energy efficiency measure is to be
entered. [NOTE: As of the initial release of Version 8, in order to have energy
information associated with a user-defined measure transferred to a work order, the
measure must have been implemented into either the NEAT or MHEA audits which
was then used to create the work order.]
The following entries are displayed only if "Estimated" has been chosen in the
Energy Savings entry above. All entries are then required.
Units B Enter the units of the annual energy savings to be assigned to the measure.
Choices are: Annual kWh, Annual MMBtu (million Btu), and Annual Therms.
Required.
Amount B Enter the numeric value of the amount of annual energy to be saved, in
the units indicated in the previous field. Required.
Fuel Saved B Enter the type of fuel to be saved. Choices are: Primary Heating
Fuel, Water Heating Fuel, Natural Gas, Oil, Electricity, Propane, Wood, Coal,
Kerosene, and Other. For the choices of Primary Heating Fuel and Water Heating
Fuel, the program will set the fuel type to be the same as the fuel used by the primary
heating system and water heater, respectively, as prescribed in the audit into which
the measure is copied. Required.
Life B Enter the expected life of the measure being installed. DOE rules do not
allow measure life times over 20 years. Required.
Available for Use In B Select the check boxes that indicate which building type(s)
the measure should be made available, Site Built and/or Mobile Home.
Measure Comment B Comments related to the measure on the User Defined
Measures form may be entered directly in the comment field on the form. Or, select
the Comment button to the left of the field, which will take you to the Comment
Editor. This text editor is similar to Window’s Notepad and may be used to edit
extended comments. The total comment may have up to 65,000 characters. Text
from other sources may be copied and pasted into the Comment Editor’s window.
The Measure Comment on this form will be carried along with the measure, where
Chapter Nine • 138
Setup Library
ever it is copied, through an audit to a work order or directly to a work order.
Optional.
All User Measure Costs B Selecting this button will display all of the costs
associated with all of the user-defined measures, including the Health & Safety
measures, in Data Sheet View. The columns displayed have the same definitions as
given above for viewing individual measures in Form View. Since each measure may
have any number of costing components, the first cost associated with a measure is
indicated by a right pointing arrow (B>) in the column just to the left of the Unit$
column. Changes may be made in this view instead of the Form View, if desired.
The All User Measures Cost form
Measures Record Navigation Block B The Measures Record Navigation Block in
the lower left corner of the form allows you to find, copy, delete, or navigate to
measures in the Setup Library being accessed. See Section 4.1, Record Navigation,
for information on using the Weatherization Assistant’s Record Navigation Blocks.
The combo box list will display all measures currently associated with the library of
the type chosen in the View combo box below the field. You may initiate a new
measure by using the new record button, , in the block.
View - Use this combo box to indicate which type of measures you wish to have
displayed in the Measure Record Navigation Block above or in the Data Sheet View
of the form. The choices are: Site Built (NEAT) Measures, Mobile Home (MHEA)
Measures, Health and Safety, or All User Defined Measures.
Chapter Nine • 139
Setup Library
The Materials/Labor Details Sub-Form
The Materials/Labor Details sub-form allows entry of as much information for
individual materials and labor components as you feel necessary to sufficiently
describe implementation of each measure. The level of detail included is totally up
to the user. A measure may even be defined with no detail and still be available to
an audit (see Section 7.7, Itemized Costs) or work order (see "Copy from UserDefined Measures," Section 8.3, Measures (Work Order)). However, if copied into
an audit or assigned to a work order, the measure must then have some cost
designated in the audit or work order. Although the Health and Safety measures
cannot be deleted, their Material/Labor Details may also be modified to meet your
needs. They also must have at least one material detail entry with cost or the program
will produce an error message if the program attempts to automatically use the
measure as a result of a hazard noted in an audit (see "Handling of Health and Safety
Issues" in Section 7.6, Health and Safety).
The Materials/Labor Details sub-form is also where you indicate use of
materials from your Supply Library (see Chapter 10, Supplies) which then get
subtracted from your inventory whenever the measure is used in a work order and its
costs declared "Actual."
Below are descriptions of each individual data entry item or control involved
in specifying the measure detail on the Materials/Labor Details sub-form. As already
noted, this sub-form has multiple components and may be viewed in either Form
View or Data Sheet View (see Section 4.8, Data Sheet and Form Views of Records).
Although both views allow full capabilities in entering data, the Form View is likely
somewhat easier to understand since the controls have their standard appearance and
do not need to be cast in a spreadsheet format. Therefore, this view will be assumed
in the following descriptions. However, the alternate Data Sheet View still offers the
ability to quickly see all components of the measure detail at once, not possible from
the Form View.
The Materials/Labor Details sub-form
Chapter Nine • 140
Setup Library
When a User Defined Measure is copied directly from the Setup Library to a
Work Order (see "Copy from User-Defined Measures" in Section 8.3, Measures
(Work Order)), all Material/Labor Details from the measure’s material sub-forms are
copied with it. If the measure is copied to an audit (see Section 7.7, Itemized Costs),
then used in creating a work order from the audit, the information on the measure’s
material sub-forms will be carried to the work order if the user so requests (see
Section 7.9, Measures (Audit) or Section "Create Materials Using Audit Detail" in
Section 8.3, Measures (Work Order)).
Order # - An integer entry which prescribes the order in which the costing
components of the measure will be listed on a work order when the measure is
implemented (see "Order #" in Section 8.3, Measures (Work Order)). Any
components not given an order number will be listed first on the work order, but all
those without a number will have random order amongst themselves.
If the measure being described here in the Setup Library is copied to an audit (see
Section 7.7, Itemized Costs) and it has more than one Material/Labor Detail
component, only one of these components can be displayed on the audit’s form, even
though all will get carried along with the measure. The audit will choose the detail
component with Order # of "1" then add a "(+)" after the detail name in the audit
indicating additional detail is associated with the measure. The exception to this
convention is if the detail Description (see below) is "Labor" or "Equipment," since
this latter designation was used in the Health and Safety measures to indicate a
nondescript detail whose inclusion on the audit form would not be of benefit.
Optional.
Type - If you are using the Supply Library (see Chapter 10, Supplies) to store
information about materials you use in your weatherization activities and possibly
taking advantage of the Weatherization Assistant’s inventory feature, select the
category under which the material is listed in the library. With the exception of
"Unspecified," these selections correspond to the material categories in the Supply
Library. The choices are:
Cooling Equipment
Construction Materials/Hardware
Doors
Health and Safety Items
Heating Equipment
Hot Water Equipment
Insulation
Labor
Lighting
Miscellaneous Supplies
Refrigerators
Windows
Other
Unspecified
Chapter Nine • 141
Setup Library
The entry is used to narrow your search for the material when using the Copy Supply
combo box list at the upper right corner of the sub-form. If you do not plan to locate
this material detail component in your Supply Library, this entry may be left blank or
designated as "Unspecified." Optional (unless locating the material in your Supply
Library).
Copy Supply - This entry is used in conjunction with the Type entry on the subform to locate a specific material from your Supply Library (see Chapter 10,
Supplies). Selecting the material using this combo box will automatically fill in most
of the remaining fields on the sub-form, provided you have specified the analogous
entries in the Supply Library. Locating a material from the Supply Library is
essential if you are using the inventory feature of the program for the specific material
being described. The Health and Safety measures have pre-entered materials, but
none that reference a Supply Library. If you wish to have these measures reference
Supply Library materials, make that association here. Optional.
Description B Enter a brief description of the component detail of the measure.
If the Copy Supply field was used to select the material, this field will be
automatically entered. In such cases, you may change the description, but it may
complicate your ability to identify the item as one tracked in your inventory. The
Health and Safety measures have pre-entered material Descriptions, though you may
change them here. The entry may be 80 characters or less. Required.
Qty (Quantity) B This is an estimate of the quantity of the material entered in the
Description field needed to install the measure currently being considered, in the units
also entered on the form. This value will be copied to a work order or carried through
an audit to a work order if the measure using the specific Material/Labor Details entry
becomes part of a work order. However, you may alter this value in the work order
if a new, more accurate estimate becomes available. When you create a new User
Defined Measure using the new record button,
, from the Measures Record
Navigation Block a default value of "1.00" will automatically be entered. Alter this
value as needed. Required.
Units - Enter the units to be associated with the Quantity field on the sub-form.
WARNING: If the detail entry was copied from the Supply Library using the Copy
Supply combo box, do not change the Unit entry which is automatically entered. The
inventory kept in the Supply Library will expect the Quantity and $/Unit entries on
the sub-form to be in these original units. Required.
$/Unit B This is an estimate of the cost per unit (as given in the Units field) of the
material entered in the Description field (or selected from your Supply Library)
needed to install the measure currently being considered. Required.
Chapter Nine • 142
Setup Library
Material Comment B Comments may be entered directly in the comment field on
the form. Or, select the Comment button to the left of the field, which will take you
to the Comment Editor. This text editor is similar to Window’s Notepad and may be
used to edit extended comments. The total comment may have up to 65,000
characters. Text from other sources may be copied and pasted into the Comment
Editor’s window. The Material Comment is carried along with the other material
information on the sub-form associated with a measure, as discussed above. Optional.
9.7 User Defined Insulation Types
This form allows you to name and characterize two wall and ceiling insulation
types of your choice for use in the NEAT audit. Its form has not changed from that
seen in Version 7 of the Weatherization Assistant. See the same topic in the NEAT
User’s Manual for more details.
Chapter Nine • 143
Setup Library
Chapter Nine • 144
Supply Library
Chapter 10
The Supply Library offers you the optional feature of listing materials or labor
components related to your weatherization work. If you use the inventory feature of
the Weatherization Assistant, the Supply Library becomes your mechanism for
tracking your inventory. It provides you with a means of recording material
purchases, tracks use of the materials through the work orders, and tallies up your
total remaining items. An additional optional element of the Supply Library is the
Energy Details tab present for most material categories that allows you to record
additional energy-related descriptive data regarding each entry in your Supply
Library.
Items in your Supply Library are accessed in several places throughout the
program, though none are required for nominal operation of the audits and/or the
creation of work orders. See Section 10.3, The Hot Water Equipment and
Refrigerator Forms for a possible exception related to water heater replacement.
If you create pre-defined, user-defined measures in your Setup Library (see
Section 9.6, User Defined Measures), you may designate materials needed to install
these measures as those from your Supply Library (see "Copy Supply" under "The
Materials/Labor Details Sub-Form" in the above reference).
The NEAT and MHEA audits use the Supply Library as a repository for
replacement refrigerators and water heaters that can be easily referenced from the
Baseloads tabs in these audits. It is envisioned that the user would visit a home
building supply store and choose from their stock the units to be used in
weatherization and enter the unit descriptions here in the Supply Library. See the
NEAT and MHEA User’s Manuals for more details.
Materials from the Supply Library may also be referenced directly from the
Work Order forms when specifying the materials needed in generating detailed work
orders (see "Copy Supply" under "The Materials/Labor Details Sub-Form" in Section
8.3, Measures (Work Order)).
You will likely need only one Supply Library, though any number of Supply
Libraries may be defined for an Agency. More than one Supply Library might be
used if materials are stored in multiple locations and you wish to track the inventory
at these locations separately. However, you would need to be continually aware of
this situation and know when a given library should be referenced. Thinking of the
Supply Library as an inventory of items may help you determine if more than one
library is necessary and how more than one should be used.
Chapter Ten • 145
Supply Library
Thirteen categories of items are available for entering into your inventory:
Cooling Equipment, Construction Materials/Hardware, Doors, Health and Safety
Items, Heating Equipment, Hot Water Equipment, Insulation, Labor, Lighting,
Miscellaneous Supplies, Refrigerators, Windows, and Other. Examples of entries in
each may be found in the Sample Supply Library assigned to the Sample Agency.
These are only examples, however, and not intended to be used in your actual
program.
The Construction Materials/Hardware Materials form (Data Sheet View)
“Note: Above is example for one category of material. Comment” field not displayed
Each of the material category tabs under the Supply Library Main Menu item
may be viewed and edited in either Form and Data Sheet Views (see Section 4.8,
Data Sheet and Form Views of Records). However, none of the Energy Details are
available from the Data Sheet View. Nevertheless, the Data Sheet View offers a
convenient way of reviewing the materials in your library, especially if it grows large.
Records in the view may also be copied and pasted either between Weatherization
Assistant databases or from the program to a spread sheet application.
10.1 General Information
The entry items and controls on the General Information tab of the Supply
Library Main Menu item are described below. Common entries and controls on each
of the categories’ forms are described in the following section.
Supply Name B Enter a name which will identify this particular Supply Library
throughout the program. Most often, an agency will have only one Supply Library.
If more than one is created, the name may contain an abbreviated indication as to why
one differs from another. Save any lengthier explanations for the Description and
Comment fields. A default name will be supplied when a new Supply Library is
Chapter Ten • 146
Supply Library
created. The name will use your installation’s ID (see Section 3.3, Starting the
Weatherization Assistant), if available. Otherwise the default name will contain the
time the library was created. The entry may be 50 characters or less. Required.
Agency B This field identifies the agency to which the Supply Library is
associated. Since the only way to create a new Supply Library is to copy an existing
one or import one with a client (see both topics on "Importing Clients" in Sections
12.3, Data Transfer B Import/Export via Database Files and 12.4, Data Transfer B
Import/Export via Text Files), this entry will always be at least initially filled in for
you. The field is more for identification purposes, possibly on a state level,
identifying the agency within the state using the materials in the library. WARNING:
The program allows you to change the Agency assignment of a Supply Library.
However, doing so when existing Setup Libraries, audits, or work orders use the
Supply Library will likely cause confusion. Therefore, re-assigning the agency
assignment of a Supply Library is not recommended unless the library has just been
created, insuring no other references to it exist. Required.
The General Information form
State B This un-editable field displays the state associated with the Agency entered
in the previous field.
Description B You may use this field to briefly describe the intended use of the
Supply Library, particularly if you use more than one Supply Library in your agency.
The entry may be 255 characters or less. Optional.
Comment B Comments related to the Supply Library may be entered directly in the
comment field on the form. Or, select the Comment button to the left of the field,
which will take you to the Comment Editor. This text editor is similar to Window’s
Chapter Ten • 147
Supply Library
Notepad and may be used to edit extended comments. The total comment may have
up to 65,000 characters. Text from other sources may be copied and pasted into the
Comment Editor’s window. The Supply Library Comment is not displayed anywhere
else in the program and is for the user’s benefit only. Optional.
Default (Un-editable) B The "Default Supply Library" assigned to the Sample
Agency is an empty Supply Library that is distributed with the program. It cannot be
altered. It is intended that you copy this library, assign the copy to your agency, then
populate this copy with materials specific to your agency. This field is visible only
for the "Default Supply Library."
Supply Library Record Navigation Block B The Supply Library Record Navigation
Block may be used to find and access supply libraries or copy or delete existing
libraries. See Section 4.1, Record Navigation, for information on using the
Weatherization Assistant’s Record Navigation Blocks. The combo box lists will
display only the Supply Libraries associated with the Agency currently selected
(bookmarked) on the Agency Information tab under the Agency Main Menu item.
Normally the agency selected on this tab is your agency, so the combo box lists will
display only your agency’s Supply Libraries. If you have more than one agency
defined in your database (e.g., your agency and the Sample Agency) and you want the
combo box lists to display Supply Libraries from all defined agencies, un-check the
"Use the last bookmarked Agency record to filter find record lists," feature 9 from the
Preferences / Features tab (see the indicated topic in Section 11.4, Features).
No Setup Library Report Block will be displayed on the Setup Library
Information form unless you have defined Setup Library related reports with the
external reporting feature (see Appendix B, Weatherization Assistant Customized
Reporting Feature Reference Document).
10.2 Common Entries on Material Forms
The following entry items and controls are common to most of the category
tabs in the Supply Library. Exceptions are noted in square brackets following the
field or control name. Additional discussion related to the Hot Water Equipment and
Refrigerator forms is given in Section 10.3 below.
Description B Enter a description of the item or labor category. You may examine
the Sample Supply Library under the Sample Agency for examples. Entries may be
80 characters or less. Required.
Chapter Ten • 148
Supply Library
Library B This check-box is visible only for the Default Supply Library. See
Section 10.5, The Default Supply Library Record for more information.
Manufacturer [except Labor] B Enter the name of the manufacturer of the item.
Your inventory may contain multiple entries for the same item but manufactured by
different companies. Entry may be 50 characters or less. Optional.
The Construction Materials/Hardware Materials form (Form View)
Note: Above is example for one category of material.
Model [except Labor] B Enter the model of the item being described. Your
inventory may have multiple entries of a specific item type but of varying models.
You may alternatively decide to include model information in the Description.
Entries may be 50 characters or less. Optional.
Supplier [except Labor] B Choose the Supplier of the material being described.
Choices in the combo box list will be those Agency Contacts declared as "Supplier"
on the Contacts tab under your Agency Main Menu item. Optional.
Units B Enter the units by which the item is costed. The choices are: Each, Hour,
Bag, Roll, Sqft, Linear Foot, Inch, Pound, Case, Box, United Inch. The units for
materials in the Supply Library do not need to be the same as those used in the audits.
However, you would need to convert the quantity required yourself when translating
the audit recommendation to a task in a work order. If this is undesirable, care should
be taken to set the Units here to be the same as those used in the audits. Required.
$/Unit B Enter the cost of the item in the Units entered in the previous field. Both
the Units and the $/Unit will be copied to any use of the item in the Work Orders.
Required.
Chapter Ten • 149
Supply Library
Comment B Supply material comments may be entered directly in the comment
field on the form. Or, select the Comment button to the left of the field, which will
take you to the Comment Editor. This text editor is similar to Window’s Notepad and
may be used to edit extended comments. The total comment may have up to 65,000
characters. Text from other sources may be copied and pasted into the Comment
Editor’s window. Supply material Comments are carried with the material when ever
the material is used in a User Defined Measure of Work Order. You may also wish
to include the comment in a user-designed report. Optional.
Supply Item Record Navigation Block B The supply item Record Navigation
Block, located at the bottom left of each material category tab, may be used to find,
access, copy, delete, or initiate new materials under the category being referenced.
See Section 4.1, Record Navigation, for information on using the Weatherization
Assistant’s Record Navigation Blocks. The listings of items in a given category may
be ordered by their Description, Manufacturer, or Supplier in the combo box lists of
the navigation block.
View B This combo box is visible only for the Default Supply Library. See Section
10.5, The Default Supply Library Record for more information.
The following data items and buttons fall under the
Inventory data block positioned in the lower right corner of all
material category tabs except Labor.
Purchased (data item) B This un-editable value indicates
the accumulated number of the item you have indicated as
Inventory Control
having been purchased.
Block
Purchased (button) B This button takes you to a data sheet
displaying all your entries documenting purchases or removal of the item currently
being accessed.
Inventory Purchase / Removal Summary
Enter the date of purchase or removal, the number of items (in the units displayed on
the parent form) purchased or removed, and any comment which you may wish to
associate with the entry. Only entries "Cleared" will actually affect the inventory.
Chapter Ten • 150
Supply Library
Uncleared entries may be anticipatory, rather than actual. The current date is the
default, though this may be changed. Items "Removed" are in addition to those which
will automatically be removed by use in work orders (see "Used (button)" below).
Entire records may be deleted from the table by selecting the entire row of data and
pressing your [Delete] key (see Section 4.10, Deleting Data).
Used (data item) B This un-editable value displays the total number of the items
which have been used in work orders. See "Used (button)" below.
Used (button) B The "Used" button takes you to a data sheet displaying all
instances in which the specific item being referenced has been used in work orders.
Inventory Used Summary
Only those materials declared as being "Actual" in their use will be included in the
table (see "Quantity (Actual)" under "The Materials/Labor Details Sub-Form" of
Section 8.3, Measures (Work Order)). The table displays the Client ID, the Alternate
Client ID, the Work Order in which the item was used, the status of the work order
and when this status was last changed, the material number within the measure on the
work order (if entered), the specific measure in the work order in which the item is
used, the quantity used by the specific work order entry, and any comment you
entered on the work order related to this item’s use. See "The Materials/Labor Details
Sub-Form" referenced above for more information on most of these data items. Note
that the headers for "Client," Work Order," and "Measure" in the table are within
angle brackets (< >), indicating that double clicking your mouse in any entry in these
columns will take you to the specific record indicated by the entry. This provides a
quick method of reminding yourself of any use of an item. The items within the table
may appear to be editable, but attempts to change them will fail. Changes must be
made in the actual record from which the data originated.
Available B This un-editable field displays the difference between the number of
items "Purchased" and those "Used", as given in the fields immediately above.
10.3 The Hot Water Equipment and Refrigerator Forms
The Supply Library’s listings for Hot Water Equipment and Refrigerators have
an additional purpose in the Weatherization Assistant beyond listing materials for
Chapter Ten • 151
Supply Library
inclusion in work orders. They are the only categories of materials in the library
which have data that may be copied to an audit and used in the audit calculations
themselves. Entries you make under these categories can be used to determine the
cost effectiveness of the water heater and refrigerator replacement measures.
Although information about a replacement refrigerator may be entered directly into
NEAT’s and MHEA’s audit input forms (see the respective User’s Manuals), data on
replacement water heaters must be entered in the program’s Supply Library in order
for the audits to consider replacing a unit. Thus, if you wish to consider replacing
water heaters, the Supply Library’s Hot Water Equipment form becomes required.
The Refrigerators Material form
The forms under the Hot Water Equipment and Refrigerator category tabs have
all of the fields described in Section 10.2 above, as well as two additional combo box
lists. These combo box lists access the Weatherization Assistant’s data base of water
heaters and refrigerators. This data base contains data on almost 8,000 water heaters
and 34,000 refrigerators. The green shading of the combo box list’s field is an
indication that you are accessing an entire data base, not simply selecting from a
menu. Choosing a Manufacturer first will restrict the listings in the Model combo
box list to those models of that manufacturer. Otherwise, the Model list will include
all models from all manufacturers. Some manufactures may be listed in more than
one way in the Pick Manufacturer combo box listings. If you don’t find a model by
first choosing the manufacturer, you might attempt to leave the Manufacturer field
blank and search for the model without specifying the manufacturer.
Chapter Ten • 152
Supply Library
Selecting a model from the databases automatically fills in all required data on
both the main form and the Energy Details form (see Section 10.4 below) except for
the Description on the main form, which you must provide. Choosing from the data
base is optional. However, if not chosen from the database and you plan to use the
listing in NEAT or MHEA appliance replacement measures, all required data on both
the main form and Energy Details form must then be manually supplied. See the
discussions in Section 10.4 below for images of the Energy Details forms related to
water heaters and refrigerators.
The Refrigerator category form has one additional field not present in the
others, the "Source" field. The database of refrigerators included with Version 8 of
the Weatherization Assistant is a combination of entries from two sources, the
Association of Home Appliance Manufacturers (AHAM) and the result of a joint
effort of the DOE Chicago Region and the State of Wisconsin. The source field
indicates from which source the refrigerator’s information was obtained. NOTE: The
data from the AHAM database of refrigerators in copyrighted and cannot be
duplicated outside its use in the Weatherization Assistant.
10.4 Energy Details
The following discussion relates to data accessed under the "Energy Details"
button, which exists on all but the "Construction Materials/Hardware," "Health and
Safety Items," "Labor," "Miscellaneous Supplies," and "Other" category tabs. With
the exception of entries under the Refrigerators and Hot Water Equipment tabs, the
data provided under these buttons is for documentation purposes only, having no
bearing on the material properties assumed by the NEAT and MHEA audits. (This
may change in future versions of the program.)
The fields presented under the Energy Details button depend on the specific
category of material being accessed. For example, Insulation materials ask for the
insulation type, R-Value related information, bag size (if applicable), and possibly
installed density. For records under the Lighting category, lamp type, life (in hours),
lumens, and wattage are among the fields displayed.
One of the fields common to many of the categories is the "Life" of the material
being described. Material lifetimes are often difficult to estimate. If you are in doubt
regarding what lifetime to use for a material and a similar material is used in one of
NEAT’s or MHEA’s standard library measures (see "Life" in Section 9.5, Library
Measures), you may use these values.
Chapter Ten • 153
Supply Library
A summary of data entered for each category is given below. All entries except
those on the Refrigerators and Hot Water Equipment forms are optional. On these
latter two forms, the indicated fields are required to provide sufficient information for
use in the audits.
Cooling Equipment B Enter the indicated information. The possible equipment
types (the same as in NEAT) are: Evaporative Cooler, Central Air Conditioner, Room
Air Conditioner, and Heat Pump. The choices for Efficiency Units are: COP, EER,
and SEER. EER ratings are commonly found on window or room air conditioning
units while SEER ratings are more common on central systems. COP ratings are
rarely found.
Energy Details Form for Cooling Equipment
Doors B Enter the Rated U Value of the door, likely included on a label attached
to the door when new. Most doors could be assumed to have a life of 20 years, the
maximum allowed by DOE regulations.
Energy Details Form for Doors
Heating Equipment B Entries on this form mimic the information used in the
NEAT and MHEA audits relating to heating equipment. The choices for Equipment
Type are Furnace, Heat Pump, and Space Heater. The fuel types are Natural Gas, Oil,
Electricity, Propane, Wood, Coal, Kerosene, and Other. The "Other" fuel type would
have to correspond to what you have defined this fuel to be in your agency’s Setup
Library (see Section 9.3, Fuel Costs). Choices for Efficiency Units are Steady State,
AFUE, COP, and HSPF. Steady State and AFUE ratings apply to fossil fueled or
Chapter Ten • 154
Supply Library
electric resistance systems while HSPF (and less commonly COP) are used to rate the
efficiencies of heat pumps.
Energy Details Form for Heating Equipment
Hot Water Equipment B If you consider replacing water heaters in your
weatherization program, this is where you enter information about your replacement
units. If you have chosen a unit from the database of water heaters, the information
on the Energy Details form for the unit will have been automatically entered (see
Section 10.3 above). Otherwise, enter the indicated information. All data on the
form is required if the unit is to be used in consideration of the water heater
replacement measure in NEAT and MHEA. The choices for Fuel Type are Natural
Gas, Electric, and Propane. Capacity is the gallon size of the water heater. The Input
rating may be entered in units of kBTU or kW. The Energy Factor and Recovery
Efficiency are ratings of a water heater’s efficiency and are required for estimating
the savings of replacing the existing water heater. They are available in the data base
of water heaters or from your local distributor. The standard life used for water
heaters is 15 years.
Energy Details Form for Hot Water Equipment
Insulation B Characterizing insulation requires several parameters. First, choose
the Insulation Type from one of the following: (1) Batts or rolls (unfaced), (2) Batts
or rolls (faced), (3) Loose (blown or pumped), or (4) Rigid. Give an R-value either
as "overall" or "per inch of thickness." If the Insulation Type is "Loose," you will be
Chapter Ten • 155
Supply Library
asked for the Installed Density" in "lb/cuft." Also indicate by the check boxes what
applications the insulation will be used for, either attics, Walls, sill boxes, and/or
foundations.
Energy Details Form for Insulation
Lighting B Enter information which describes each replacement lamp in your
inventory. The choices for Lamp Type are Compact Spiral (a-lamp replacement),
Spiral, Globe (decorative), Chandelier (decorative), Circline screw in, and Other.
Enter the estimated life of the lamp in hours, the light output in lumens, the wattage
of the lamp, and its color temperature in K. Use the check boxes to indicate whether
the bulb is three way and/or dimmable.
Energy Details Form for Compact Fluorescent Replacement Lamps
Refrigerators B The Energy Details form for refrigerators includes data necessary
for either the NEAT or MHEA audits to evaluate the cost-effectiveness of replacing
an existing unit with a unit described here. Required entries include the unit’s
Capacity, annual consumption (kWh/Year), the expected life (15 years is used as
standard in the audits), the Model Year (when the specific model was first sold), and
the number of years the model was available. Entries for the Model Year and Years
Made may be estimated. Also, select the Style of the unit. Choices are Top Freezer,
Side by Side, Single Door, Single Door with Freezer, Bottom Freezer, and Other. All
of the above required data will be entered automatically if the unit has been located
in the audits’ database of refrigerators. The dimensions of the refrigerator (Height,
Width, and Depth) (in inches) are optional entries, though they may be important if
the existing unit is located in a restricted space.
Chapter Ten • 156
Supply Library
Energy Details Form for Replacement Refrigerators
Windows B Enter data which describes the replacement windows you have in your
inventory. Most of the information requested can be found on the new window’s
label. Many manufacturers have adopted the National Fenestration Rating Council’s
(NFRC) labeling, which includes the information, though the leakage coefficient is
optional for manufacturers to report. Enter the U-Value of the window (Btu/hr-ft2hr), a measure of the heat conduction property of the window. The SHGC (solar heat
gain coefficient) measures how well the window blocks heat from the sun. Values
are between 0 and 1. The Rated Leakage Coefficient may be entered as NFRC’s air
leakage parameter having units of cfm/ft2 (cubic feet of air per square foot of window
area). A standard glass window may be normally assigned a life of 20 years.
If you have standard window sizes in your inventory, make separate entries in the
Supply Library for each standard size, indicating the size in the Description field of
the main form for the Windows.
Energy Details Form for Windows
10.5 The Default Supply Library Record
The Weatherization Assistant is distributed with a single default Supply
Library. It can be accessed by choosing "Default Supply Library" in the Supply
Library Navigation Block on the General Information tab under the Supply Library
Main Menu item. It is identified by having the Default check box located on this
form selected. This library cannot be deleted or modified. It is intended to be used
Chapter Ten • 157
Supply Library
as a shell which you can copy to another Supply Library from which to begin
describing your own inventory of items.
The General Information form for the Default Supply Library record
The default Supply Library has another feature which separates it from other
supply libraries. It is the only library that contains the database of refrigerators and
water heaters used by the program. When you copy this library, these records are not
copied, in order to save your computer’s memory. All other references to this
database simply copy individual records from it to the desired location (e.g., your own
inventory of replacement refrigerators).
The Refrigerators Material form for the Default Supply Library record (Form View)
Chapter Ten • 158
Supply Library
Version 8's Default Supply Library has been given the flexibility to extend this
concept of databases to other categories of items in later versions. Thus, on many of
the material category tabs you will see a blue shaded View combo box list. The
choices from the list are "Library Records," "Custom Records," and "Library and
Custom." Also on most forms of this library, there will be a "Library" check box.
"Library" records are those records from databases supplied with the program, such
as the current refrigerator and water heater databases. "Custom" records are those
that you enter yourself. Using the View combo box, you may choose to view and
access either or both of these record types from the material category tab. Thus, if
you go to the Hot Water Equipment material category tab and choose "Library" in the
View combo box, those records accessible from the Hot Water Equipment Record
Navigation Block will be those from the database of water heaters distributed with
the program. Also, if an entry from the database is chosen for display on the form,
the form’s Library check box will be selected, indicating this choice. Also, with the
choice of "Library Records" in the View combo box, the material tab’s form may be
viewed in Data Sheet View, which will then display all of the Library Records in
spread sheet format. See Section 4.8, Data Sheet and Form View of Records for a
descriptions of added features available to you from this view.
The Refrigerators Material form for the Default Supply Library (Data Sheet View)
Note: Columns not displayed include “$/Unit,” “Supplier,” “Available,” “Used,” “Comment,” “Life,”
“Height,” “Width,” and “Depth.”
Chapter Ten • 159
Supply Library
Chapter Ten • 160
Preferences
Chapter 11
Under the Preferences Main Menu item, you may choose various options
available in the Weatherization Assistant. Most of these options effect only the
appearance and operation of the interface to the program, not the audits themselves.
Thus, recommendations from the audits will not change because of differing choices
in the Preferences.
If you are using the Weatherization Assistant on a network, it will be important
for you to understand the difference between the locations where your data are stored
and where the settings for these preferences reside. Normal use of a network for the
program is to have each terminal linked to a database on the network server where all
of the data you, and others, enter into the program are stored (see the introductory
remarks in Chapter 12, Data Linking, Importing, and Exporting Data). Thus, all
users linked to the server’s database file share the same information. However, the
settings for the Preferences are stored locally at each terminal, regardless of where
you store your other data. Thus, you may see a difference in behavior of the program
from one terminal to the next, despite being linked to the same database. In Access
terminology, your data are stored in the "backend" (or "mdb") file, while the settings
for the Preferences is stored in the "frontend" (or "mde") file.
The Preferences Main Menu item has tabs for four categories of features. The
General tab controls settings for some in-depth run analyses, which may assist
developers investigate any apparent unusual behavior in the program, as well as allow
the user to designate images and text to appear at the top of reports which the
program generates. The Range Check and Default Values tab allows the user to set
his own ranges used by the audits to detect numeric entries which may be in error
based on their magnitude and to set field-by-field default settings for these same
fields. The Report Sections tab sets which segments of the NEAT and MHEA
Recommended Measures Report (see Appendix A, Reports) are displayed and/or
printed. Finally, the Features tab allows the user to select certain options which affect
the operation of the extended features added to Version 8.
Each tab will be discussed individually in the sections below.
11.1 The Preferences General Tab
Fields and controls on the General tab under the Preferences Main Menu item
include the following.
Chapter Eleven • 161
Preferences
The General form
Installation ID B When you first open Version 8 of the Weatherization Assistant
following installation, you are asked to enter an optional Installation ID (see Section
3.3, Starting the Weatherization Assistant). This field under Preferences allows you
to alter this parameter. The Installation ID identifies a specific installation of the
Weatherization Assistant. You may have as many installations of the same version
of the program as you wish. The parameter might identify different installations on
work stations all linked to the same database on a server, or different but unlinked
computers, all in the same agency. If you only have one installation in your agency,
this parameter will not be of much use since your agency name will then uniquely
identify the installation as well.
When you create a new Setup or Supply Library by copying an existing library,
the default name of the new library will be "Setup/Supply Library [<Installation ID><#>]," where <Installation ID> is the Installation ID for the installation creating the
new library and <#> is a number which insures uniqueness of the name, if necessary.
Although you will likely rename the library, if you have multiple installations of the
Weatherization Assistant in your agency, it might be wise to retain the installation ID
as part of the new name.
The Installation ID is also used when exporting files from an installation to
identify which computer the files are from (see both topics on "Exporting Clients" in
Chapter Eleven • 162
Preferences
Sections 12.3, Data Transfer B Import/Export via Database Files and 12.4, Data
Transfer B Import/Export via Text Files).
A person’s initials or the computer name are examples of useful Installation ID’s.
The entry may be 10 characters or less and is optional. If no Installation ID is
entered, the Weatherization Assistant will use a time stamp (e.g., "[15:31:05]") as the
Installation ID, identifying the time at which the operation creating the need for the
identification occurred (e.g., when a new Setup Library was initiated).
Run Control Block B The Run Control Block provides three check boxes
controlling reports which may be automatically displayed upon executing an audit.
If none of the check boxes are selected, no obvious change, other than the final
disappearance of the hour glass cursor, will be seen on your computer screen
following execution.
The first check box controls whether the Recommended Measure Report is
displayed after execution (see "Audit Report Block" in Section 7.1, Audit Information
and Appendix A, Reports). The report displays information related to the audit
recommendations for the house being analyzed. See the Appendix A for a sample of
this report. Having this as the only one of the three check boxes selected is the
default.
If the second check box is selected, the program will display run messages
produced during the execution of an audit. This display does require that your
computer have access to Microsoft WordPad, which is normally part of your
Windows installation. Use the normal Windows close button to exit the message
display. The program will also write these additional diagnostic messages to a file
named "last_neat_run.txt" or "last_mhea_run.txt," depending on which audit was last
executed, and save the file in the execution folder on your computer (by default,
c:\Program Files\Weatherization Assistant XXX, where the "XXX" represents the
version number of the program). Note, unless you manually rename these message
files, they will be overwritten each time you execute an audit of the same type, NEAT
or MHEA. These diagnostics data would likely be useful to program developers in
determining causes for unusual behavior of the program. The files may be viewed
with any text editor. Under normal operations, this check box should be left unchecked.
If selected, the third check box will add to the above diagnostic messages output
detailing the calculations performed by the audits. The display requires access to
Microsoft WordPad. The output can be lengthy and is not designed to be of
significant use to normal users. However, it may assist support personnel identify
problems which might be occurring. Use the normal Windows close button to exit
Chapter Eleven • 163
Preferences
the display. As above, the information is saved to your computer, may be viewed at
any time using a text editor, and is overwritten each time an audit of the same type is
executed. Under normal operations, this check box should be left un-checked.
Main Menu/Report Header Logos and Labels Block B Fields in this block allow
you to customize report headers and add your own logo to the Main Menu display.
Use the Left and Right Browse buttons to locate and choose logos to be displayed on
the upper left and right, respectively, of your reports and the Main Menu. Selection
of the buttons takes you to normal Windows browse displays where you can select
any file in most graphic formats (e.g., jpg, bmp, etc.) to be used as logos. The
graphics you use may have to be correctly sized using other graphics applications.
The field under each browse button displays the path and file name of the graphic file
you have chosen. The boxes below the path name fields display the actual graphics
which have been selected. For a Weatherization Program agency, it is customary to
retain the Program logo on the left.
Enter text you wish to have displayed in report headers into the Label fields
provided. Provision is made for Left, Right and Center text. Note, however, that no
attempt is made to truncate or create multiple lines of header from this text. Thus, if
text is entered for all three positions and the text is too lengthy, it has the possibility
of overlapping.
If you have multiple installations of the Weatherization Assistant in your agency,
you may wish to coordinate these settings. Below is an example of a report header
with left and right logos and text entered for all three positions. Notice that the text
almost overlaps.
Report displaying optional logo and header text
Restart B The restart button should be selected when ever changes are made on the
form to insure that the options selected take effect during the current session of
program use. Following the button’s selection, you will be taken to the Main Menu.
Chapter Eleven • 164
Preferences
11.2 Range Check and Default Values
As discussed in Sections 4.6, Field Defaults, and 4.7, Field Range Checking,
the Weatherization Assistant provides you with default values and range checks for
the various numeric input parameters in order to assist you in properly entering data.
Though the values for these defaults and ranges are set for a variety of parameters
during installation of the program, you may wish to alter or set additional defaults and
checks. This is done from the Range Check and Default Values tab under the
Preferences Main Menu item. Here, each parameter is listed by Main Menu Item and
form on which it lies and its field name. Designated columns allow you to adjust the
"Min," "Max," and "Default" values to meet your needs. No other fields are editable
and no records can be added or deleted.
Ranch Check and Default Values form
If any entry in the table is left blank, no default will be available or no range
checking will occur for that particular field. Also, any default computed by either of
the audits over-rides the default in the table. The Range Check and Default Values
form must be exited before any changes made during a visit to the form will take
effect.
Chapter Eleven • 165
Preferences
11.3 Report Sections
One of the reports available from either the NEAT or MHEA audits is the
Recommended Measure Report (see "Audit Report Block" in Section 7.1, Audit
Information and Appendix A, Reports). This report has multiple titled sections.
Under this tab of Preferences, you may select which sections to display in the report.
On the Report Sections form, the sections are listed by the audit Type (NEAT or
MHEA) and Section Name. The Report Name is the same for all entries. Check
boxes to the right of each listing allow you to make the selections. If the check box
is checked, the associated report section will be displayed.
Report Sections
11.4 Features
The Features tab under the Preferences Main Menu item allows you to indicate
preferences regarding many of the expanded features in Version 8 of the
Weatherization Assistant. Indicate the features you wish activated by selecting the
check boxes adjacent to the feature description. The feature selections are
independent of one another, except for the two related to Digital Photo Options. A
brief description of each feature is included below. Following any changes in the
Chapter Eleven • 166
Preferences
selections, click on the "Restart" button to implement them. You will be taken back
to the Main Menu.
Features
1) Photo browser tab for attaching individual image file pathnames to records B
Version 8 allows storage of digital photos associated with your weatherization work
(see Section 13.1, Digital Photos). The Weatherization Assistant offers you two
methods of storing, viewing, and editing these photos in your computer. The method
selected by this first check box allows you to store the location on your computer of
each individual photo image file. Thus, photos accessible from any location in the
Weatherization Assistant need not be in any particular location. Choice of this
method will add a tab to any Main Menu item’s form to which photos can be attached.
This is the photo feature initially selected. See the above reference for more
information on the photo browsers.
2) Third party photo browser for attaching a single directory of image files to
records B This second method of storing, viewing, and editing photos requires you to
assign a location on your computer where all photo files associated with a given
record for each Main Menu item of the program (e.g., Audits, Work Orders, etc.) will
be stored. Thus, all photos associated with a given work order must be stored
together and all those for the audit of a client in another (or the same if so chosen).
If selected, the browser will display a Photo Folder field on the Information tab of the
Chapter Eleven • 167
Preferences
Main Menu item asking for this location. Use the Browse button to find and select
the location, then the View button to view the photos stored in that location.
Photo Folder field for third party photo browser
See Section 13.1, Digital Photos for more information on the photo browsers.
3) Geographic information system (mapping) B This check box turns on the
Geographic Information System (GIS) which allows you to map the locations of
clients dwellings (see Section 13.2, Geographic Information System (GIS)). Using
this feature requires downloading additional files and an installation. If the feature is
selected without having performed this installation, you will receive a message upon
restarting the program that the installation has not been performed and that the feature
is subsequently turned off until installation is complete. If the required installation for
the feature has been performed, selecting this feature will place a "Map" button on
the Client Information form (see "Map" in Section 6.1, Client Information) and under
the Select Clients button of the Agency Information form (see "Select Clients" in
Section 5.1, Agency Information).
4) User logons with user names and passwords from the Agency/ Contacts/
Passwords tab B This feature allows regulation of the users for a specific installation
of the program. If implemented, users must logon with a User Name and Password
before being allowed to enter the program. See "Change LogOn Group and
Password" in Section 5.2, Contacts (Agency) for additional details on this feature.
5) Short codes for the definition and selection of measures, materials, etc. B This
feature allows an additional short code to be assigned to Supply Library materials and
user defined measures for easier identification in combo box lists and reports.
However, as of the first release of Version 8, this feature has not been fully
implemented. The feature is used for Health and Safety Measures in assigning an unalterable code to each of these program-defined measures (see "Measure Name" under
"The General Task Description" in Section 9.6, User-Defined Measures). Your
selection of this feature in the earliest release of Version 8 will not make a difference
in the operation of the program.
6) Display the internal Access long integer record IDs for test and debug B
Whenever a record (such as a Client, Audit, or Work Order) is created, Access
assigns the record a random integer ID number unique to the record. This ID number
will not change, even if you change the other information related to the record or
export the record to another computer. Under normal operation of the program, this
Chapter Eleven • 168
Preferences
Access ID number is of little use. Thus, the default mode is to not have them
displayed. Program analysts who may use other Microsoft products to debug or
otherwise analyze the execution of the program with relation to a particular record
may require the ID, however.
7) Log all Program Errors B Although many possible conditions that would cause
the Weatherization Assistant to not function properly have been anticipated and
provided with warnings or messages to the user, some likely remain unaddressed.
Under such circumstances the user will receive an Access or System error message
which the user is not expected to understand. If this feature is turned on, these "unhandled" errors will be logged giving more detailed information regarding the
condition of the program at the time the error occurred. This information, together
with the user’s description of what operation was being performed when the error
occurred and possibly the database which was being used at the time of the error, are
normally sufficient to allow developers of the program to determine the cause of the
problem.
Program Error History form
Chapter Eleven • 169
Preferences
Clicking on the "Show History of Program Errors" button to the right of this
feature’s check box will display a Form View showing the first error (if any) which
has occurred with all of the information the software can provide related to it. The
abbreviated navigation block at the bottom left of the form can be used to access
additional error entries, if they exist. The "Do a VBA Reference Check" button on
this form initiates an installation test which might be of use to program developers
in diagnosing irregular operation of a specific installation. You may use the
customary procedure (see Section 4.8, Data Sheet and Form Views of Records) to
display the error records in Data Sheet View, from which you may delete any records
no longer desired (see Section 4.10, Deleting Data). It is likely good policy to keep
the error messages recorded to a minimum so that if an error occurs which causes
considerable disruption in your operations, it can be easily recognized in the error
history. If an error occurs with which you need assistance to resolve and this feature
is not activated, turn it on then try to reproduce the error. If you have setup the e-mail
feature of the Weatherization Assistant (see Section 13.4, E-Mailing from Within
Weatherization Assistant), you may click on the "Email this Error Message" button
to quickly e-mail the error message to program support personnel.
The Log all Program Errors feature is initially selected for a new installation and
will remain selected unless de-selected on this form.
8) Bookmarks (automatically return to the last record edited) B This feature
automatically keeps track of which record of each specific type (Agency, Client,
Audit, Work Order, etc.) you last visited so that when that particular Main Menu item
is again selected, you will be presented with that record. Otherwise, the program will
present the first record in its list of records of that type. This order may not be
obvious and more likely will require you to access the desired record via the Record
Navigation Block. Upon installation of the Weatherization Assistant, this feature is
initially activated.
9) Use latest bookmarked Agency record to filter find record lists B Activation of
this feature will restrict the records displayed in the Record Navigation Blocks (see
Section 4.1, Record Navigation) of the other main record types (Client, Audit, Work
Order, etc.) to those belonging to the agency last visited via the Agency Main Menu
item. As distributed, the Weatherization Assistant Version 8 has two Agencies
already entered, the "Sample Agency" and the "Your Agency Name" agency. It is
anticipated that this latter agency will be renamed to identify your specific agency.
If this feature has not been selected, all of your record navigation combo box lists will
include not only records of your agency, but also those installed with the program
under the Sample Agency. This may not be desirable. In addition, you may be a state
Chapter Eleven • 170
Preferences
director with clients from all of the state’s agencies imported into a common database.
In this situation, lists of clients, audits, work orders, etc. would likely be long making
locating a specific record difficult. With this feature activated, you may look at only
records from a specific agency at any given time. The feature is initially activated
with the "Your Agency Name" agency bookmarked. You will have to de-activate this
feature or select the Sample Agency from the Agency Main Menu item in order to
view the Sample records included with the installation.
10) Check-in / Check-out client records B This feature is used by the Client Export
routines (see both topics on "Exporting Clients" in Sections 12.3, Data Transfer B
Import/Export via Database Files and 12.4, Data Transfer B Import/Export via Text
Files) of the Weatherization Assistant. Whenever activated, the program tracks
which clients have been exported and who was logged on when each was exported.
It is used in conjunction with the User Logons feature, item 4 above. The feature may
be of use if you routinely pass client information between computers. A client record
which is "checked out" will show what user checked the record out on the Client
Information tab for that specific client (see "Checked Out To" in Section 6.1, Client
Information).
11) Automatically generate Itemized Cost Records for Health and Safety Problems
B When activated this feature will automatically generate Itemized Cost Records in
the recommended measures lists of the audits that correspond to Health and Safety
problems that are indicated by the user during data input. See "Handling of Health
and Safety Issues" in Section 7.6, Health and Safety for more information on this
feature.
Chapter Eleven • 171
Preferences
Chapter Eleven • 172
Data Link - Database Linking, Importing and Exporting Data
Chapter 12
The facilities under the Data Link Main Menu item allow you to group client
information (such as for different program years), quickly link to various database
files, and share information on individual or groups of clients with others.
The Data Link form
All user-supplied data and audit results in the Weatherization Assistant are
stored in a file on the computer. The file is a Microsoft Access database file, termed
the "backend" file in Access terminology. Files on your computer are designated by
a name and an extension with the two separated by a period (e.g., "wa827.mdb").
This is, in fact, the default name of the file in which data in Version 8.2.7 of the
Weatherization Assistant will be stored, the "mdb" standing for "Microsoft database."
You may have as many database files as you like with whatever names you choose,
as long as their extensions are "mdb." You may wish to have a separate database file
for each program year. A state may have a different database file for each agency
Chapter Twelve • 173
Data Link - Database Linking, Importing and Exporting Data
within their state. The Data Link feature of the Weatherization Assistant allows you
to quickly "link" to various database files. When linked to a specific database file,
the program views only the client information contained in the file, thus allowing you
to more easily locate records.
Understanding the concept of the database file allows you to perform some
relatively simple operations outside of the Weatherization Assistant using standard
Windows capabilities. Although means within the program may accomplish the same
objectives, those with knowledge of Windows may prefer to use its features instead.
For example, database files may be copied using Windows, though the files’ names
must remain unique. If, immediately after installing the Weatherization Assistant, the
original "mdb" file (e.g., "wa827.mdb") is copied, this original file may be saved as
an empty database file for future use. If you plan to keep separate database files for
each program year, you might name the copied database file after the year whose data
it will contain (e.g., "PY2006.mdb"), then link to this database file (see Section 12.1
below) for use during that year. When you are ready to begin the 2007 program year,
make another copy of the original, empty database file and name it after the new
program year (e.g., "PY2007.mdb"), link to it, and begin using it. Thus, you are
provided with separate files, each with all the data applicable to a specific program
year. You may think of other reasons to have multiple database files with names you
choose to indicate specific characteristics.
In addition to allowing you to link to various database files, the facilities of the
Data Link Main Menu item of the Weatherization Assistant also provide means to
share information with others. Although this could be accomplished by simply
sending an entire database file, an "mdb" file, this may not be the best method under
some situations. The added features under this main menu item provide you with two
independent methods of sending others all or portions of the contents of database
files. These features might be used to move client data from a laptop used in the field
to the central agency computer in the office or to upload data to the state agency
periodically. You may select specific clients to include in your data transmission, you
may send them in a "compressed" and "encrypted" format, or you may send them in
a format more appropriate for use by other software applications. Files created by
these alternate approaches will have different "extensions" than the "mdb" files, but
they still contain similar information.
Reports that are available for you to print are stored in another file,
waReport.mde. The program must also link to this file before you may utilize these
reports. With the ability in Version 8 to have multiple reporting modules (see
Appendix B, Weatherization Assistant Customized Reporting Feature Reference
Chapter Twelve • 174
Data Link - Database Linking, Importing and Exporting Data
Document), you may need to select between various reporting modules. The Data
Link facility allows you to perform this operation.
The following sections will discuss in more detail the facilities available under
the Data Link Main Menu item of the Weatherization Assistant. The discussion is
subdivided into topics generally seen as falling within separate blocks within the form
displayed under this main menu item.
12.1 Currently Linked Backend Data File
As discussed above, you may have multiple database files in which your client
information is stored, perhaps dividing the data into different program years or as
coming from different sources. This facility allows you to quickly access any of these
databases. The fields and controls under this block are discussed separately.
The database linking block
Path B This un-editable field displays the path (location in your computer) and
name of the database file you are currently linked to. Thus, any data viewed
anywhere within the Weatherization Assistant will come from this file.
Size - This un-editable field reports the size of the database file displayed in the
Path field, in Megabytes (MB). This may be important to note if you intend to send
your entire database file via means that may have restrictions on the size of files that
can be transmitted or stored. Also, the time required to send files by e-mail will likely
depend on the size.
Description B This field provides you with a means of identifying the
characteristics or contents of the database file designated in the Path field. If the file
was sent to you, it may reveal identifying information to you regarding the file.
Optional.
Repair and Compact B With extended use, a database file may become disjoint or
even damaged. The Repair and Compact button examines the database file identified
in the Path field and attempts to repair any damaged segments, then compact the file
Chapter Twelve • 175
Data Link - Database Linking, Importing and Exporting Data
into its most efficient form. If selected, the operation will notify you that it "requires
exclusive use of the backend database." Thus, "If the currently linked backend
[database] is shared on a network, be sure everyone is logged off..." or not linked to
the database. You are then given the opportunity to continue or cancel the operation.
It is a good idea to execute the Repair and Compact operation periodically to insure
your database remains free of errors. If you should have an abnormal termination of
the program, such as due to a power failure, it would be particularly advisable to
execute it. Note, under such circumstances, some of the most recent data may be lost,
but the remaining data would be intact and in proper format for future use.
To Switch to a different backend database file, pick the new file then press the link
button [combo box and Browse and Link buttons] B A history of database files you
have recently accessed is kept by the program. These files are listed in this combo
box list. Selecting the database file from the list will automatically place the database
path and file name into the combo box’s field. If the file no longer exists, you will
be notified in a message. Otherwise, you may then immediately select the Link
button to link to the specific database file.
You may also use the associated Browse button to locate files you want to link to.
Selecting the Browse button will take you to a standard Windows browse window.
From here you may locate and select any Weatherization Assistant database file
anywhere on your computer or any network to which you are attached. Selecting a
file from the browse window will place the file’s path and file name into the combo
box’s field. Then, select the Link button to link to the database file.
Whenever the Link button is selected, you will be shown a progress bar in a small
sub-window which monitors the progress of the linking operation. When completed,
the message "Data Link was successful" should appear. Select the "OK" button in
this window. A similar linking process will then be performed for the Reporting
module associated with the database, which will indicate that "Reporting Data Link
was successful" when completed. Again, select "OK."
Following a successful linking operation, one of two courses will be taken by the
program. If you do not use the User Logons feature (see "User logons with user
names and passwords from the Agency/People/Passwords tab" in Section 11.4,
Features), the display will return to the Data Link Main Menu item form with the
newly linked database file information now visible in the upper portion of the data
block being discussed here. If you do use the User Logons feature, you will instead
be taken to the Weatherization Assistant’s Log On form (see Section 3.3, Starting the
Weatherization Assistant) where you will have to logon as a user of this specific
database.
Chapter Twelve • 176
Data Link - Database Linking, Importing and Exporting Data
12.2 Currently Linked Reporting File
This data block acts the same as the "Currently Linked Backend Data File"
block discussed above except that it links only to a Reporting file. Under most
circumstances, linking to a report file will be accomplished for you, either on
installation of the program or as you change database files (see Section 12.1 above).
However, Version 8 of the Weatherization Assistant allows for multiple reporting
modules (see Appendix B, Weatherization Assistant Customized Reporting Feature
Reference Document). This data block allows you to choose which reporting module
will be used in the current session of running the program.
12.3 Data Transfer - Import/Export via Database Files
The Weatherization Assistant provides you with two methods of sharing data
with others. The transfer via database files method is most applicable to sending
portions of your database or even single client records. The method is the same as
was first introduced in Version 7 of the program, thus it’s designation as "Version 7.4
Method." The method creates files either in the same format as your entire database
(i.e., "mdb" files), or compressed and encrypted "wdz" files, where the designations
relate to the "extensions" given to the file names of the files created. Whereas you
may directly link to "mdb" files, the "wdz" files must be "imported" before their
informaiton can be accessed. However, the latter files are smaller and their
information is "encrypted" such that only those with the Weatherization Assistant
software can view their contents.
Choosing the "Import/Export via Database (mdb, wdz) Files (Version 7.4
Method)" button will present you with the "Transfer between databases" form
pictured below, though initially there will be no entries in the window on the right.
The below figure has been produced with the "Check-in / Check-out" feature
activated. This adds the "Checked Out To" columns in each half of the form’s
windows and the "Check IN Selected Records" and "Check OUT Selected Records"
buttons.
Chapter Twelve • 177
Data Link - Database Linking, Importing and Exporting Data
Import/Export via Database Files (Transfer between databases) - Check-in/Check-out feature activated
Three clients selected for import
On the left of this form you will see a list of clients in the database you are
currently accessing (linked to). The database path and file name are displayed in the
"Local Database Path" box at the top of this half of the form as well as a reminder of
what version of the program created these entries. The “Checked Out To” column
will not be present if this feature is not activated during your session of program use
(see “Check-in / Check-out client records” in Section 11.4, Features). Additional
columns of data may be seen by using the horizontal scroll bar at the bottom of the
window. The data columns available are:
Client ID
Checked Out To
Contact Name
Alt. Client ID
City
Zip
Agency Name
State
Work Status
Work Status Date
Last Check In
Last Check Out
Last Imported
Last Exported
Importing Clients (via database files)
To import clients to your database (add to this list) from another database, you
must first locate the database file containing the clients you wish to import. If you
have imported or exported clients previously, the database files you used will be
displayed in the “External Database Path” combo box list at the top of the right half
of the form. You may select one of these previously accessed files to use again on
this occasion. Otherwise, select the Browse button to the right of this combo box.
Chapter Twelve • 178
Data Link - Database Linking, Importing and Exporting Data
This will take you to a standard Windows browse window, an example of which is
shown below..
Data Transfer browse window
Use standard Windows techniques to locate the “mdb” or “wdz” file which contains
the desired clients to import. The down arrow to the right of the “Save in” combo box
will present you with a Windows directory tree with which to navigate your
computer’s contents and connected networks in selecting a folder containing the file.
Notice that the default location, seen in the “Save in” field, will be the location of the
“mdb” file you are currently linked to. Once a location is selected, the contents of the
folder will appear in the white space below the combo box. Clicking your mouse on
the desired file from this listing will transfer the file name to the “File name” field
nearer the bottom of the browse window. Select the “Save” button to accept this file
as the one containing the desired clients, or “Cancel” to abort the search without
having selected a file. Either will return you to the “Transfer Between Databases”
form.
The right half of the "Transfer between databases" form will now contain a
listing of clients in the selected database from which you are going to import. Note
the display under the "Version" title indicates the version of the database whose
clients are being displayed. [As of the initial release of Version 8, no ability to import
prior versions’ data (Version 7 and below) has been implemented. The structure of
Chapter Twelve • 179
Data Link - Database Linking, Importing and Exporting Data
the information differs considerably, making this a difficult feature to provide.]
Select the clients to be imported by clicking on rows containing their information in
the listing on the right of the screen, and using the other standard Windows item
selection procedures. For example, you can select multiple clients lying adjacent to
each other by clicking on the first or last, then holding down the [Shift] key while
using the [Up Arrow] or [Down Arrow] keys to select others. Holding down the
[Cntl] key while clicking on clients will allow you to select multiple clients which are
not next to each other. To assist in the selection process, you may sort the listings by
any of the client identifying criteria, using the “Sort list of clients by” combo box at
the lower left of the form. The sort may be performed in “Ascending” or
“Descending” order, depending on the selection made in the check boxes under
“Order” to the right of the combo box. The sorting will sort clients on both halves of
the form. In the figure at the beginning of this section, three clients have been
selected.
Once you have completed the selection, click on the left pointing arrow which
lies between the two halves of the form. The clients will be copied over into the
database file you are currently using and the Client IDs and associated information
will appear on the left half of the form. The status bar at the lower left of the form
will monitor the progress of the operation.
Exporting Clients (via database files)
Exporting is somewhat a reverse process to that described above. You can
export any set of clients in the database you are currently linked to and place them in
either another existing database or have a new database created just for the clients you
wish to export. However, if exporting to an existing database, the database must
have been formed using the same version of the Weatherization Assistant. No
"backward" compatibility has been provided.
To export clients, enter the “Transfer between databases” form, as described
above for importing clients. If you will be exporting clients to an existing database,
choose the database in the same manner you would chose a database for importing.
Otherwise, use the “Browse” button on the form to specify only a location on your
computer where you wish a new database to be created and enter the name of this new
database in the "File name" field at the bottom of the browse window. You may
choose to create a standard "mdb" database file or a zipped "wdz" file using the "Save
as type:" combo box at the bottom of the form or simply by giving the file the
appropriate extension, “mdb” or “wdz.” The "wdz" files are compressed to about one
Chapter Twelve • 180
Data Link - Database Linking, Importing and Exporting Data
tenth the size of the standard file. They are also automatically encrypted to allow safe
transport of confidential client information over public media. Next, click on the
Save button to indicate your selection is complete. If the database file did not exist
previously, you will receive a notice stating this and that the program is “Creating a
database file so you can copy jobs to that database.”
You will be returned to the "Transfer between databases" form having the two
side-by-side client listings. Choose the clients you wish to export from those listed
on the left of the form . Multiple client selections may be accomplished as described
above in the discussion on importing clients. When your client selection is complete,
click on the right pointing arrow to initiate the export procedure. The status bar at the
lower left of the form will monitor the progress of the operation. This process may
be repeated to export additional clients, until all the desired clients have been
exported to the specified database.
If you have setup the e-mail feature of the Weatherization Assistant (see
Section 13.4, E-Mailing from Within Weatherization Assistant), you may click on the
"Email" button to initiate sending the database file as an attachment to an e-mail. The
file name may be automatically entered into the "Attach Files" field on the form. If
not, you may copy and paste the database path and file name from the "External
Database Path" field into the "Attach Files" field using standard techniques (see
Section 4.9, Copying and Pasting Data). You will need to enter the e-mail address
of the recipient and any Subject and Text you wish to include in the mailing. Then
click on the "Send Email" button to send your e-mail.
Checking Clients In or Out
Whether you are importing or exporting client information, you can use the
"Check IN Selected Records" and "Check OUT Selected Records" buttons to change
the status of any client record appearing on either the left (Local Database) or right
(External Database) halves of the "Transfer between databases" form. Simply select
the desired client as you would for importing or exporting, then click on the
appropriate button. If you choose the "Check OUT Selected Records" button, the
client record will be "Checked Out to" the current logged-on user. Recall that these
buttons appear on the form only if the "Check-in / Check-out" feature has been
activated (see "Check-in / Check-out client records" in Section 11.4, Features).
Chapter Twelve • 181
Data Link - Database Linking, Importing and Exporting Data
12.4 Data Transfer - Import/Export via Text Files
The Weatherization Assistant provides you with a second method of sharing
data. The transfer via text files method is most applicable to sending large quantities
of data. It also gives the user greater control over individual data items within the
client file. The method uses data formatted in "csv" (comma separated value) files
or CSV files that have been compressed into "zip" files. These files are text files
which could be read with any text editor, though the arrangement of data would be
difficult to use directly. As text files in this specific format, other computer
applications could be made to accept the data and integrate the information with other
data.
The Transfer between databases form (via Text Files)
Chapter Twelve • 182
Data Link - Database Linking, Importing and Exporting Data
Access this mode of data transfer by selecting the "Import/Export via Text
Files" button on the Data Link Main Menu item. You will be presented with a
"Transfer between databases" form designed specifically for transfer by text files.
The form has three areas, "Import," "Export," and "Progress Messages." Each will
be addressed separately below.
Importing Clients (via text files)
The "Import" block on the "Transfer between databases" form is shown below.
The form is used specifically to import data which is in the "csv" or alternate "zip"
formatted text files.
In order to import information, you must first "Pick the files(s) to import."
Although you could type in the path and name of a file into this field directly, most
often you will use the "Browse" button to the right of this field in making the file
selection. The button presents you with a Windows browse window designed for
selecting files.
Browse window for selecting files to import via text files
Chapter Twelve • 183
Data Link - Database Linking, Importing and Exporting Data
Use standard Windows techniques to locate the folder where the file or files you wish
to import are stored. The "Look in" combo box list will present you with a directory
tree with which to access other locations on your computer or any network you are
currently attached to. Most of the time you will be looking for files with extension
"zip." The file "cli-01.zip," seen in the figure above, is just such a file, having been
created using a default naming convention. Clicking on the file name as it appears
in the white space below the "Look in" field will transfer the name down to the "File
name" field below. Only one file of type "zip" can be imported at a time.
Though possibly used less often, the program can import individual or groups
of "records" of information using the "csv" files. All of the data related to any given
client is composed of many individual "records" of data, each related to a different
area of information (e.g., address, contacts, wall descriptions, etc). If, on exporting
information (see below), the user has chosen to export record-by-record instead of by
entire client, individual "csv" files will be created for each record type instead of a
single "zip" file containing all records for a given client. Thus, on import, you could
choose to import only data corresponding to specific record types. Adding to the
flexibility, each "csv" file may contain information of the same type but for multiple
clients. Thus, for example, you could choose to import only all of the billing data
records for a group of clients in a single import. In this example, the potential exists
for a utility to be able to provide client billing data in the "csv" format which could
then be directly imported to the Weatherization Assistant. The Browse window may
be used to select single or multiple "csv" files for importing (using the standard
Windows [Shift][Arrow] and [Control][Mouse Click] techniques). Doing so will
transfer multiple file names into the "File name" field.
Clicking on the "Open" button completes the file selection and returns you to
the "Transfer between databases" form with the file’s path and name automatically
transferred to the "Pick the file(s) to import" field. If more than one file has been
chosen in the file selection process ("csv" files only), the field will indicate "Multiple
Files Selected."
You must next choose what the importing process should do if client
information for the any specific client you are importing already exists in the database
you are currently linked to. The choice is made using the "Existing Records should
be" combo box list. The choices are, "Replaced," "Updated," and "Skipped." In
making your choice, you need to think of individual records of client information and
the data items or fields within the records. For example, a wall record within the
NEAT audit for a client contains fields describing the wall’s existing insulation type,
its orientation, etc. If a given record of specific information already exists for the
Chapter Twelve • 184
Data Link - Database Linking, Importing and Exporting Data
same client for which the importing process is being performed, selecting "Replaced"
will replace entire records with the same record from the imported file. If "Updated"
is selected, existing records are updated field-by-field, preserving any fields in the
existing record that don’t have information for matching fields in the record being
imported. The "Skipped" selection skips importing records that already exist in the
existing database for the same client. "Updated" is the default selection.
Choose the "Test Only?" check box if you wish to have the program perform
a "dry run" of the importing process without actually writing any information to the
database you are currently linked to. This will show you, in the Progress Messages
window, the list of client records which would be imported, without actually
performing the import, i.e. altering your existing database information. If importing
"csv" files, information for multiple clients may exist in a given file. At the end of
the messages produced in any import process, including an import using the "Test
Only" option, a list of Clients for whom records are included in the import will be
shown. This could be useful to review prior to actually performing the import which
will alter your database.
The "Convert on Import" check box is designed for importing records of Setup
Libraries from different versions. However, it is intended for use with future releases
of Version 8 only. As of the initial release of Version 8, no means of data conversion
from versions prior to Version 8 are yet available.
When all of the specifications for the import have been established, select the
"Do Import" button to actually perform the import. In the white space below the
"Progress Messages" header, record-by-record progress of the importing process will
be displayed. This may be too detailed for most users to be concerned with.
However, at the end of the process, the message will indicate the success or failure
of the import as well as the clients for which information was imported. If a failure
should occur, the messages will indicate exactly what record caused the failure. This
would allow an analyst to examine a specific location in the file being imported to
determine the potential cause of the failure. With the increased information collected
with Version 8, importing data can be relatively slow. It may be wise to copy the files
to be used in the import to a local drive on your computer, if necessary, before
initiating the process. Be patient and wait for the hour glass to disappear and the
Progress Message to report the outcome of the process.
Use the "Exit" button to return to the main Data Link Main Menu item form.
Chapter Twelve • 185
Data Link - Database Linking, Importing and Exporting Data
Exporting Clients (via text files)
The "Export" block on the "Transfer between databases" form is shown below.
It is used to export information to text files in either the "csv" or "zip" format.
To export information, you must first pick the type of export to be performed.
The program allows you to export three types of information, "Client Export,"
"Database Dump," and "Error History." The "Client Export" produces either "csv"
or "zip" formatted files for a client or group of clients selected in the next step of the
export process. The "Database Dump" process does the same, except that it performs
the process for all client records in the database you are currently linked to. This may
be used by local agencies who report regularly to the state. The "Error History"
export creates either a "zip" or "csv" formatted file of the run-time error messages.
These are the same error messages reported under the Preferences Main Menu item
(see "Log all Program Errors" in Section 11.4, Features).
If the type of export was chosen as "Client Export," you must tell the exporting
process which clients in your current database you wish to have exported. Do this by
clicking on the "Select Client Records to Export" button. Doing so will present you
with a "Select Client Records" form. This form has applicability elsewhere in the
program as well, specifically if any user-generated reports require selection of clients
(see "Select Clients" in Section 5.1, Agency Information). For an explanation in the
use of the "Selecting Client Records" form, see "Selecting Clients" below.
You must next tell the exporting procedure where to place the files it will
create. You may enter a path directly into the "Pick the path for export file(s)" field.
More often, though, you will use the Browse button to the right of this field to
designate the path. The button takes you to a standard Windows directory tree from
Chapter Twelve • 186
Data Link - Database Linking, Importing and Exporting Data
which to select the path. Use the tree to locate the desired folder, highlighting the
folder when found. Then click on "OK." The path will automatically be transferred
to the indicated field in the Export block of the "Transfer between databases" form.
If, in the next step, you do not choose to create a single "zip" file from your export,
you may wish to select an empty folder at this step to prevent the numerous "csv"
files created from becoming confused with other files, possibly from another export
procedure. It would be wise to first export a Database Dump to a local drive on your
computer to speed the process.
Indicate with the "ZIP the exported files" check box whether you wish to create
a single "zip" file as a result of the export. If the check box is not selected, multiple
"csv" files will be created. See additional discussion regarding "zip" versus "csv"
files at the beginning of the previous section on "Importing Clients (via text files)"
for more information regarding these file types. Note that "zip" files are customarily
about a tenth the size of their corresponding unzipped files.
The "ZIP Password for Import and Export" field gives users an optional added
control over the security of information in the files created. All zip files created with
the export process in the Weatherization Assistant have their information "encrypted,"
preventing non-users of the program from viewing their contents. However, the
encryption is standard with the program, allowing any user to import the information
and view it. If you wish to further restrict the accessibility of the information in the
files, enter a password in this field when exporting the data. That password will then
be required by any person importing the data in order to successfully accomplish the
import. WARNING: If you assign a password and it is forgotten, the information in
the exported files will no longer be retrievable by any means.
If a single "zip" file will be created by the export, the next two entry items
simply give you flexibility in specifying the name of the file which will be created.
The standard default name for a Client Export "zip" file is "cli-##.zip; for a Database
Dump "zip" file, the default name is "db-dump-##.zip; and for an Error History "zip"
file, "err-hist-##.zip." In all three cases, the "##" is a two digit integer insuring
uniqueness of the file. The integer will be selected automatically based on other
existing files in the location to which the file is to be exported. To add greater
specificity you may enter characters in the "ZIP File Name Prefix" field. If entered,
these characters will be added as a prefix to the default name. Similarly, if the
"Include Data Stamp in Prefix" check box is selected, a date will be used as part of
a prefix in the file name. The date format will be "yyyy-mm-dd-dow," for example,
"Prefix2005-09-30-Fri-cli-01.zip."
Chapter Twelve • 187
Data Link - Database Linking, Importing and Exporting Data
When all of the specifications for the export have been established, select the
"Do Export" button to actually perform the export. In the white space below the
"Progress Messages" header, record-by-record progress of the exporting process will
be displayed. This may be too detailed for most users to be concerned with.
However, at the end of the process, the message will indicate the success or failure
of the export as well as confirm the exported "zip" file name (if a "zip" file was
created) and that the process is "done." If a failure should occur, the messages will
indicate exactly what record caused the failure. This would allow an analyst to more
likely determine the potential cause of the failure. With the increased information
collected with Version 8, exporting can be relatively slow. It would be wise to export
the file(s) to a local drive on your computer. Be patient and wait for the hour glass
to disappear and the Progress Message to report the outcome of the process.
If you have setup the e-mail feature of the Weatherization Assistant (see
Section 13.4, E-Mailing from Within Weatherization Assistant), you may click on the
"Email" button to initiate sending the files created by the export as an attachment to
an e-mail. If a single "zip" file was created by the export, the file name will be
automatically entered into the "Attach Files" field on the form. You will need to enter
the e-mail address of the recipient and any Subject and Text you wish to include in
the mailing. Then click on the "Send Email" button to send your e-mail.
Selecting Client Records
The Client Selector form is used anytime there is a need to select specific
clients from your entire list of clients in a database. This occurs when specifying
which clients’ data are to be exported to a text file or included in a user-defined report
(see "Select Clients" in Section 5.1, Agency Information).
The form displays a list of the Client IDs for all clients in your database on the
left side of the form along with a column of check boxes denoted as "Selected." To
select clients, click on the check boxes next to the clients you wish to have included
in the selection. To assist in identifying the clients, the form will also display
additional information for each client, as chosen by the user in the "Fields to Display"
window. Use the standard Windows selection technique of the [Cntl][Mouse-Click]
combination to select which client information fields you wish displayed. If you
select a significant number of fields, you may need to use a horizontal scroll bar
which will appear at the bottom right of the listing to view some of the fields.
The form allows sorting and filtering of the entries. Once you have chosen the
client information fields to be displayed, you may click your mouse on the header of
Chapter Twelve • 188
Data Link - Database Linking, Importing and Exporting Data
any column of information (which will place the entire column in reverse video), then
click on the A->Z or Z->A sorting buttons at the top of the Weatherization Assistant
application window. This will sort the records displayed in alpha-numeric order
according to the data item chosen.
The Client Selector form (GIS feature on)
You may also "filter" the records to be displayed. For example, if one of the
fields you chose to have displayed included the City, and clients in your database
lived in various cities, you could click your mouse on any city entry of a particular
city you were interested in, then click on the filter button at the top of the window,
Chapter Twelve • 189
Data Link - Database Linking, Importing and Exporting Data
. Your display would then include only those clients from the city selected. Be
careful when using filtering. If you forget that your display of records is filtered, you
may wonder what happened to some records you would otherwise expect to see in the
display. To cancel filtering, select the remove filter button,
.
Buttons on the form allow alternate methods of selecting clients. The "Select
All" button will select all of the clients displayed. You could then individually uncheck the check boxes of those clients you do not want selected. The "UnSelect All"
button will eliminate all previously selected clients, allowing you to begin the
selection process again. The "Invert Select" button will cause all of the currently
selected clients to become un-selected and all of the un-selected clients to be selected.
If you use the Check-in/Check-out feature of the Weatherization Assistant (see
"Check-in / Check-out client records" in Section 11.4, Features) or have exported or
imported specific client records, as described elsewhere in this chapter, the client
selection methods under the "Other selection methods" combo box list may also be
useful. The selections from the list are:
Checked out to Me
Edited since last Check out
Edited since last Check in
Edited since last Import
Edited since last Export
The choices on the left in the list above apply only if you are using the Check-in /
Check-out feature. The first category will display only those client records currently
checked out by you, the current user logged on. The next two choices will display all
records which have been altered since they were last checked out or in, regardless of
who performed the check-out or check-in. This can be useful, not only in selecting
client records, but also in identifying records that you personally have checked out
or those which have been altered since having been checked out, possibly an
undesirable situation. The choices on the right in the table look for all clients that
have been exported or imported.
If you have implemented the Geographic Information System (GIS) feature (see
Section 13.2, Geographic Information System (GIS)) of the Weatherization Assistant,
an additional column will appear in the list of clients and several buttons will be
added to the form. The "Mapit" column of check boxes allows you to select which
clients you wish to have mapped. This is a separate selection process from that using
the "Selected" check boxes. The three buttons, "Map All," "UnMap All," and "Invert
Map" have the analogous effect on the mapping selection as do the three
corresponding buttons described above for the actual client selection process. Having
Chapter Twelve • 190
Data Link - Database Linking, Importing and Exporting Data
made the selection of clients to map, clicking on the "Use Map" button will display
a map with the locations of the clients’ homes indicated with stick pins. This may be
useful, for example, in deciding what homes are in the same vicinity for establishing
a visit schedule. However, there are also capabilities within the mapping routine to
"select" homes on the map for the actual client selection process (see the GIS
reference given above). Having made the selection using the map will automatically
check the "Selected" check boxes on the Client Selector form corresponding to the
homes selected on the map.
Use the "Refresh Client List" button if the Client Selector form has remained
open while other program activities have been performed which might change the
listing of clients included on the form.
Chapter Twelve • 191
Data Link - Database Linking, Importing and Exporting Data
Chapter Twelve • 192
Auxiliary Features - Photos, GIS, Status Tracking, E-Mail
Chapter 13
13.1 Digital Photos
Starting with Version 8 of the Weatherization Assistant, it is now possible to
organize digital photographs related to your weatherization work. Photos may be
saved at several levels, as associated with the Client, an Audit, or a specific Work
Order. Read the Photos section in each of the chapters discussing these three Main
Menu items for additional information.
There are two methods of photo storage and editing supported in the
Weatherization Assistant: the pathname method and the third party photo browser.
Use the Features tab under Preferences (see Items 1 and 2 in Section 11.4, Features)
to choose which method is displayed on your forms. Both methods assume that you
know how to use a digital camera to take pictures and that you know how to move
those pictures as JPG (jpeg) files to folders on your computer. The Weatherization
Assistant also gives you tools for cropping, rotating, adjusting, and annotating each
of your photographs. Your annotations are actually stored in the JPG file header thus
preserving your notes if the JPG files are moved.
With networked installations you can store all the digital JPG files in shared
folders with each client computer accessing the same images. However, note that in
order to have each client computer access these photos, each must have assigned the
same drive letter to the shared folder on the network server such that the pathnames
stored refer to the correct location.
Pathname Method of Photo Storage
The first method uses a photo tab displayed on the Client,
Audit, and Work Order forms to access the photo feature.
When selected, you will be presented with the pathname photo
browser form. The form is the same regardless of which of the
three Main Menu items access it. The form accessed for a work
order is shown below.
Tab for pathname
method of photo storage
Chapter Thirteen • 193
Auxiliary Features - Photos, GIS, Status Tracking, E-Mail
Pathname photo browser
Photos are added to the collection by using the "Add Link" button in the center
of the two panes on the form. The button will take you to a standard Windows
browse window designed for selecting files. This window is used in the same manner
as it is to choose files to be imported (see "Importing Clients (via text files)" in
Section 12.4, Data Transfer - Import/Export via Text Files), except now you will be
looking for the JPG files you downloaded from your digital camera. If you are
familiar with Windows Explorer, you may also use the standard drag and drop
procedure between this application and the Weatherization Assistant’s photo browser
to add photos to a collection. Simply drop the photo files into the left pane in
Weatherization Assistant’s photo browser window. The full pathname for each JPG
file is stored in the database and associated with each photo. This way, the JPG files
can be stored in whatever folders make sense for your installation. For example, you
might want each auditor to have their own shared folder for storing their photographs
or place all your digital photos in a single shared folder.
Each photo added to your collection will display a thumbnail in the browse
pane. Clicking on any of these thumbnails will select it and display the path to the
photo file in the Path field below the browse pane. You may also assign a category
to the photo using the Category combo box. Choices are: Existing Conditions, Health
and Safety Condition, Work Completed, Drawings and Documents, and Other. A
Chapter Thirteen • 194
Auxiliary Features - Photos, GIS, Status Tracking, E-Mail
photo is deleted from your collection by selecting the "Del Link" button. The actual
JPG file is not deleted, only the application’s link to the file, thus deleting the
thumbnail and accessibility to the file.
Highlighting a photo’s thumbnail in the browse pane and pressing the Edit
button or double clicking on a thumbnail will open the photo in the editor pane on the
right portion of the form. When the photo is opened in the editor, you can crop,
rotate, adjust brightness and contrast, add text or lines, and add comments of any
length using the controls below the image. Most of these processes are self-evident.
However, to add text to your photo, enter the text in the field to the right of the "A"
button below the photo, select the color of the text (white or black) with the buttons
just below the text, press the "A" button, locate the cross-hair cursor at the point in
the photo you want the upper left corner of the text to appear, and click your mouse.
Pressing the Save button saves your edits to the file pathname shown at the bottom
of the browser pane. If you want to preserve your original photos, change this
pathname before saving any of your changes.
Third Party Photo Browser
The second method of photo storage and editing available in the
Weatherization Assistant uses a licensed application program (IrfanView) to view and
edit photos. The method assumes that you will be storing all of the JPG files for each
client, audit and work order in unique folders (perhaps sub-folders under a shared
photos folder on a shared drive or in sub-folders under the Weatherization Assistant’s
"photos" folder ). With this method, only the path name to the folder is associated
with the record. The Photo
Folder field on the
Information tab of these
three record types contains
the path name to the folder
Controls on Information tab for third party photo browser
containing the JPG files.
Once you enter the path, either manually or using the "Browse" button, it will remain
with the record unless you change it. The "View" button is used to start IrfanView,
where thumbnails of all the files in that folder will be displayed. If chosen to be
viewed, a directory tree will also appear displaying the location of the folder currently
being accessed. Double clicking on any thumbnail will take to the photo editor.
Chapter Thirteen • 195
Auxiliary Features - Photos, GIS, Status Tracking, E-Mail
The editor for the third party browser also contains numerous tools to crop,
rotate, adjust, and annotate the JPG files.
Editor of third party browser
It is a full featured photo editor whose capabilities are beyond the scope of this
manual to totally describe. It is suggested that you experiment with the editor using
a photo which is not of value or a copy of a photo, though you could simply choose
to not save your changes. Use the "IPTC info" button under the Image/Information
menu option in the editor to add detailed comments related to each photo. Save your
changes to the photo using the File/Save or Save as menu item. The [Esc] key will
exit the editor.
Chapter Thirteen • 196
Auxiliary Features - Photos, GIS, Status Tracking, E-Mail
13.2 Geographic Information System (GIS)
An optional feature of the Weatherization Assistant Version 8 is geographical
encoding of each client location performed by the Graphic Information System (GIS).
The feature allows you to map the location of a single client or a group of clients. It
may be used to select clients to include in a user defined report (see "Select Clients"
in Section 5.1, Agency Information and Appendix B, Weatherization Assistant
Customized Reporting Feature Reference Document) or to select client data to export
(see "Exporting Clients (via text files)" in Section 12.4, Data Transfer Import/Export via Text Files). It may also be used simply for its own ability to locate
clients homes (see above referenced "Select Clients" and the discussion of the "Map"
button in Section 6.1, Client Information).
The Geographic Information System requires download of two additional files
(from the same Weatherization Assistance Program sponsored site on which the main
program is posted) and an installation procedure. The first file you will need to
download, "base.zip," is common to all states. Choose the second based on your state
of residence (e.g., "tn.zip" for Tennessee). You may download and install files for
more than one state if needed. Both the "base.zip" and the state specific file are "zip"
files requiring "unzipping." Most recent versions of Windows will include a routine
to do this. Once downloaded to a location on your computer, double clicking on
either zip file should present you with a request for a location on your computer
where the files are to be placed once unzipped. Select the GIS folder under the
location where you installed the Weatherization Assistant, normally, "C\Program
Files\Weatherization Assistant 827\GIS." Unzip both the base.zip and your state
specific file into this location. Make sure that all individual files are in this same
location, not in any sub-folders of this location. Sometimes the unzipping routine will
place the state specific files in a separate folder named after the abbreviation for the
state. If this occurs, use Windows Explorer, or some other file handling application,
to move them to the GIS folder.
Make sure to turn the feature on in Preferences the next time you start the
Weatherization Assistant program (see "Geographic information system (mapping)"
in Section 11.4, Features). After successful installation of the feature, the "zip" files
are no longer needed. All files associated with the GIS feature are used under a
license agreement and cannot be duplicate or further distributed.
Once installed and activated, the GIS mapping button will appear in two
locations within the program: the Client Information tab and the Client Selector form,
the latter accessible from the Agency Information tab and the Data Link Main Menu
Chapter Thirteen • 197
Auxiliary Features - Photos, GIS, Status Tracking, E-Mail
item. Use of the feature, as accessed from these two locations, differs as do some of
the controls on the resulting form. When accessed from the Client Information tab,
the primary use is to locate a single client. Thus, only one location will be indicated
on the map. When accessed from the Client Selector form, the purpose is to select a
group of clients from all those in your database. Thus, many locations may be
displayed on a single map. The two different applications will be discussed
separately below.
Client Location
When the "Map" button on the Client Information form of the Client Main
Menu item is selected for a client having an address understood by GIS, a map with
the location indicated is displayed.
GIS Map for Single Client Location
Note that the address of the location is automatically entered in the "Address to Find"
field with the location’s Latitude and Longitude also indicated. Attached to the pin
denoting the location is the Client ID. A feature of the Client Location GIS map is
Chapter Thirteen • 198
Auxiliary Features - Photos, GIS, Status Tracking, E-Mail
that if you find the location to be different from the originally displayed location, you
may click on the pin and drag it to its correct location. This will not change the
address, but will update the coordinates of the location, which preserves your change
for future references via the GIS mapping. On exiting the map, you will asked to
confirm your desire to preserve this change.
Most of the useful features associated with this use of GIS are accessed by right
clicking your mouse on the map. Doing so will produce a menu from which you may
zoom in or out, return to the previous scale ("Unzoom"), have the location displayed
on a map of the entire state or country, enter a different address to locate, or print the
map. An alternative method of zooming in is to outline a rectangular sub-area of the
map by holding down your left mouse button while moving your mouse across the
map. When you release the mouse button, the area outlined will then fill the window.
Client Selection
The second use for the GIS feature is to select clients or simply view a group
of clients. It will be accessed from the Select Clients button located either on the
Agency Information tab under the Agency Main Menu item or from the "Exporting
Clients (via text files)" button under the Data Link Main Menu item. See the
discussion on "Selecting Client Records" at the end of Section 12.4, "Data Transfer Import/Export via Text Files for initiation of the GIS map using the "Use Map"
button on the Client Selector form.
The map displayed when initiated in this mode will likely have multiple
locations denoted by pins. Note that the pins are of two different colors, red and
green. The map was initiated from a Client Selector form in which some clients may
have already been selected. The map indicates this by having the selected clients’
locations designated with the green pins. Un-selected clients have red pins.
One of the uses of the GIS map initiated from the Client Selector form is to
give you an alternative method of selecting clients. You may change a client from
being un-selected to selected, or vice versa, by simply clicking on the pin. If all the
locations within a specific area are to have their selection status changed, activate the
"Selects" check box at the top middle of the window, place your mouse at a corner
of a rectangle which is to enclose the clients of interest, and drag your mouse to the
opposite corner of the rectangle. All clients within the rectangle you have outlined
will have their selection status reversed.
Chapter Thirteen • 199
Auxiliary Features - Photos, GIS, Status Tracking, E-Mail
GIS Map for Client Selection
Any changes made in the selection status of clients made from the map will be
automatically transferred back to the client selector form from which the map was
initiated.
When you click your mouse on a specific client’s pin, that client’s ID will
appear in the Client ID field. Double clicking on this field will then take you to the
Client Information form (see Section 6.1, Client Information) for that client.
As with the map used to locate a single client, the client selector mode of the
GIS map has additional features accessible by right clicking your mouse on the map.
The menu then displayed allows you to zoom in or out, return to the previous scale
("Unzoom"), have the location displayed on a map of the entire state or country, enter
a different address to locate, or print the map. An alternative method of zooming in
is available. Activate the "Zooms" check box at the top middle of the window. Then,
outline a rectangular sub-area of the map by holding down your left mouse button
while moving your mouse across the map. When you release the mouse button, the
area outlined will then fill the window.
Chapter Thirteen • 200
Auxiliary Features - Photos, GIS, Status Tracking, E-Mail
13.3 Status Tracking
Version 8 of the Weatherization Assistant has an optional feature which allows
you to track the status of Clients, Audits, and Work Orders. The table on the
following page lists all status categories and their available settings. Settings of these
statuses are normally performed from the Status tab on each of the three Main Menu
item forms. See each of the Status sections for these Main Menu items, Sections 6.2,
7.2, and 8.2. See also Section 5.9, Status History, for information on reviewing the
history of settings.
The Status tab under the Client Main Menu item allows you to view the current
status in all three major categories, Client, Audit, and Work Order (for each work
order). Below is a sample display of this form.
Client Status tab
The left most column of the form lists the status category as well as the name
of the particular record for which the status is being reported (e.g., the Audit or Work
Order Name). The "Completed" column will contain an "X" if the status being
reported constitutes one which the program sees as indicating completion of the
specific phase related to the status (see the table on the following page).
Chapter Thirteen • 201
Auxiliary Features - Photos, GIS, Status Tracking, E-Mail
Client Status Categories and Settings
General
Application
Active On
Work Done, File Closed/Locked On*
No Work Done, File Closed/Locked On*
File Locked On
Delayed On
Other
Received On
Eligibility Verified On
Approved On*
Referred On*
Denied On*
Delayed On
Other
Audit Status Categories and Settings
Audit
Site Visit Scheduled For
Site Visit Completed On
Billing Data Collected On
Recommendations Generated On
Audit Complete and Locked On*
Walk Away by Auditor On*
Delayed On
Denied On
Other
Work Order Categories and Settings
General
Inspection
Payment
Work Order Created from Audit On
Work Order Details Completed On
Work Order Approved On
Work Order Issued On
Work Scheduled to Start On
Work Started On
Work Completed On*
Client Signed Off On*
Work Refused by Client On*
Work Order Canceled On*
Work Order Modified On
Rework Completed On*
Delayed On
Other
Scheduled For
Passed On*
Failed On
Not Required*
Delayed On
Other
Invoice Received On
Invoice Approved On
Invoice Paid On*
Not Required*
Delayed On
Other
Statuses tagged with an asterisk (*) are considered to represent completion.
Chapter Thirteen • 202
Auxiliary Features - Photos, GIS, Status Tracking, E-Mail
Following the designation of each current status are two dates, a reference to
an agency contact or user, and a comment. The first Date indicates when the current
status became effective. For example, the Application was "Approved On" this
particular "Date." The second date and the reference to the individual ("By") tells
when and who changed the status setting to its current level. Thus, even though the
application may have been approved on 7/22/05, the setting might not have been
changed to indicate this until a few days later.
Status settings are changed by selecting the Edit button in the row of the setting
category you wish to change. You will be presented with the Status Editor form. The
form will remind you in un-editable
fields of the status category you are
about to change and display for you
the client identification parameters.
The "Current Status" field will
indicate the existing status, if one
exists. If this is the first time you
have accessed this status category,
the field will be blank. Use the
Current Status combo box list to
change the status to the appropriate
Status Editor for Client Application
setting, i.e., one of those listed in the
table on the previous page.
Click on the Date combo box arrow to be presented with a calendar to select
the date on which the status became effective. The current date will be circled in red
on the calendar. Use the left and right arrow boxes at the top of the calendar to
display other months, if necessary. Click on the date you wish to select, and it will
automatically be entered in the Date field. If you save the status change without
entering a date in the Date field, it will automatically be assigned the current date.
Perform the same steps to set the "Changed On" date. However, this may not
be necessary since this date will be set to the current date if left blank, which is likely
what you would have entered.
Use the "By" combo box to select who is making this change, likely yourself.
The names which will appear are those you have entered in the Contacts tab under the
Agency Main Menu item. If left blank, this field will be automatically set to the
agency contact who has logged on for this specific use of the program, if you are
using the Logon Feature (see "User logons with user name and passwords" in Section
Chapter Thirteen • 203
Auxiliary Features - Photos, GIS, Status Tracking, E-Mail
11.4, Features). Otherwise, it will be set to "admin," indicating that if the Logon
Feature is not being used, all users are assumed to have administrative privileges.
When satisfied with your entries, select the OK button to save the changes or
select the Cancel button to exit without saving your changes to the status category.
You will be returned to the Client Status tab form.
On the main Client Status form, choose the "H" button to see a history of all
settings for a specific status category for the current client. The history will be
displayed in a Data Sheet View format. Since these listings are historical, no changes
can be made in the entries from this form, other than deletion of entire records. The
record deletion might be necessary to delete an incorrect status setting, which, even
if corrected, leaves the incorrect setting in the history. See Section 4.10, Deleting
Data for information on deleting records while in a Data Sheet View. Close out the
Status History form using the traditional Windows X box in the upper right corner of
the form. This will take you back to the main Status tab under the Client Main Menu
item.
Use the Refresh List button on the Status form to insure that any status changes
which may have been made since opening the form are reflected in the display.
The Overall Client Status History button at the bottom right of the Client Status
form presents you with a Data Sheet View of all status categories for the client. It
essentially combines all of the displays obtained by selecting each of the "H" buttons
for each category individually. However, there is a difference between the individual
displays and this overall history form. Note that the Record Name header on this
form is in angle brackets (<>). This implies that the Record Name for each record
whose status is being reported can be double clicked with your mouse to take you to
the record having the indicated status. This then allows you to make any changes you
desire, including status, to the record. When you exit the record opened with this
technique, you will be sent back to the Overall Client Status History form from which
it was referenced. You may exit this form in the customary manner to return to the
Status tab under the Client Main Menu item.
13.4 E-Mailing from Within Weatherization Assistant
The Weatherization Assistant allows you to send e-mails directly from within
the program using an address book of e-mail addresses generated from the Contacts
tab under the Agency Main Menu item. Messages and/or attachments may be
automatically linked to an e-mail when initiated using the "E-mail" buttons located
Chapter Thirteen • 204
Auxiliary Features - Photos, GIS, Status Tracking, E-Mail
on the Error History form (see "Log all Program Errors" in Section 11.4 Features) or
on either of the "Transfer between databases" forms used to export client information
(see discussions on "Exporting Clients" in Sections 12.3, Data Transfer Import/Export via Database Files and 12.4, Data Transfer - Import / Export via Text
Files).
For example, below is the form displayed having selected the "Email this Error
Message" button on the Error History form. The form is shown with the "Address
Book" combo box list displaying a sample list of e-mail addresses which were entered
under the Agency Contacts tab.
E-mail specification form for reporting error message
Selecting one of the entries in this combo box list will automatically transfer the
address to the "To" field. The "From" field is automatically filled in as the "From
Address" entered in the e-mail setup (see below). In this example, the Subject and
Message fields are automatically filled in, reflecting the entry in the Error History
Chapter Thirteen • 205
Auxiliary Features - Photos, GIS, Status Tracking, E-Mail
from which the e-mail was initiated. You may alter and add to the message to give
any additional information. If the e-mail had been initiated from one of the Export
forms having created a single file with the exported information, the file path would
have been automatically entered in the "Attached Files" field. Otherwise, use the
"Browse" button to locate and select files to attach. Once completed with the e-mail
specification, select the "Send Email" button to send the message and attached file(s).
The "Progress" field will notify you of the progress in sending the e-mail. If
attachments are large, it may take some time to complete the process. The field will
indicate to you how much (how many bytes of data) of the transmission has been sent
and how large (total bytes) the total transmission is. The "Activity Log" will contain
any messages from the e-mail server, more than likely the connection status and any
problems which might be encountered. The messages could be used by a system
administrator to debug any problem with e-mail transmissions that might occur.
In order to use the e-mail feature, you must have an e-mail account on a server
somewhere. The Setup for the e-mailing capability in the Weatherization Assistant
need be performed only once, though it may be altered at any time. The form
presented upon selecting the "Setup" button is shown below.
E-mail Setup form
Contact your system administrator for the information required to successfully initiate
your e-mail account according to local procedures. The administrator may also need
to address information on the two additional tabs: "Advanced" and "Fire Wall."
Chapter Thirteen • 206