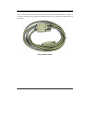
1
EVB8051 User’s Manual
Version 3.1.1
COPYRIGHT NOTICE
Copyright 2002 WIZnet, Inc. All Rights Reserved.
Technical Support: [email protected]
Sales & Distribution: [email protected]
General Information: [email protected]
For more information, visit our website at http://www.wiznet.co.kr
ii
EVB8051 User’s Manual
Table of Contents
1.
Getting Started..............................................................1
1.1
EVB8051 Package ........................................................................1
1.1.1 Components ............................................................................................1
1.1.2 Software CD............................................................................................7
1.2
System Configuration ...................................................................9
1.2.1 PC Setup..................................................................................................9
1.2.2 Evaluation Board Configuration...........................................................13
2.
User’s Guide.................................................................14
2.1
2.2
Evaluation Board Layout............................................................14
Function Testing..........................................................................15
2.2.1 Loopback Test.......................................................................................15
2.2.2 Web Server Test ....................................................................................21
2.2.3 SMTP Test.............................................................................................22
2.3
Troubleshooting Guide ...............................................................23
2.3.1 Ping........................................................................................................23
2.3.2 Misc.......................................................................................................24
3.
Programmer’s Guide...................................................25
3.1
API Function ...............................................................................25
3.1.1 Type of Functions .................................................................................25
3.2
Sample Source Codes .................................................................40
3.2.1 Loopback & TCP Server ......................................................................40
3.2.1.1 Source Codes : \Software\Firmware\DirectMode\............................40
LB_TCP_SERVER\..........................................................................................40
3.2.1.2 Flow Diagram ....................................................................................41
3.2.2 Loopback & TCP Client .......................................................................42
3.2.2.1 Source Codes : \Software\Firmware\DirectMode.............................42
EVB8051 User’s Manual
iii
\LB_TCP_CLIENT\ .........................................................................................42
3.2.2.2 Flow Diagram ....................................................................................42
3.2.3 Loopback & UDP .................................................................................43
3.2.4 Web Server............................................................................................44
3.2.5 SMTP_WEB.........................................................................................46
3.2.6 DHCP....................................................................................................46
3.2.6.1 Source Codes : \Software\Firmware\DirectMode\DHCP\ ...............47
3.2.6.2 Flow Diagram ....................................................................................47
3.3
Application Development Procedure .........................................49
3.3.1 Program Developing Procedure (based on the KEIL compiler)..........49
3.3.2 Program Downloading and Running Procedure (based on Flip by
ATMEL) 50
3.3.3 Memory Map ........................................................................................53
4.
Hardware Designer’s Guide.......................................54
4.1
4.2
4.3
EVB8051 Schematic...................................................................54
PAL..............................................................................................54
Parts List......................................................................................57
Appendix A. Quick Testing Procedure..............................58
A.1 Loopback Test .............................................................................58
A.2 Web Server Test...........................................................................58
Appendix B. Specification of Serial Cables .....................59
Appendix C. Specification of NM7010A ...........................60
C.1
C.2
C.3
C.4
C.5
Advantages ..................................................................................60
Components.................................................................................60
Block Diagram ............................................................................60
Module dimension.......................................................................61
Pin description .............................................................................62
Appendix D. Specification of NM7000A ...........................67
C.1 Advantages ..................................................................................67
iv
EVB8051 User’s Manual
C.2
C.3
C.4
C.5
Components.................................................................................67
Block Diagram ............................................................................67
Module dimension.......................................................................68
Pin description .............................................................................69
EVB8051 User’s Manual
v
Figures
<FIG. 1: EVB8051 PACKAGE> ............................................................................................... 1
<FIG. 2: ITEMS CONTAINED IN THE EVB8051> ...................................................................... 2
<FIG. 3: EVB8051> ............................................................................................................... 3
<FIG. 4: NM7010A>.............................................................................................................. 3
<FIG. 5: USER’S MANUAL>.................................................................................................... 4
<FIG. 6: POWER ADAPTOR (5V)> ........................................................................................... 4
<FIG. 7: SOFTWARE CD> ....................................................................................................... 5
<FIG. 8: UTP CABLE>............................................................................................................ 5
<FIG. 9: SERIAL CABLE>........................................................................................................ 6
<FIG. 10: DIRECTORY STRUCTURE OF THE SOFTWARE CD>................................................... 7
<FIG. 11: SYSTEM CONFIGURATION BETWEEN EVB8051 AND PC> ....................................... 9
<FIG. 12: BOOT-UP MESSAGE OF EVB8051> .........................................................................11
<FIG. 13: NETWORK CONFIGURATION MENU>......................................................................11
<FIG. 14: LAYOUT OF EVB8051> ........................................................................................ 14
<FIG. 15: RUNNING OF AX1.EXE PROGRAM> ...................................................................... 16
<FIG. 16: INPUT OF THE CONNECTION INFORMATION>......................................................... 16
<FIG. 17: CONNECTION SETUP COMPLETED>....................................................................... 16
<FIG. 18: FILE TRANSFER> .................................................................................................. 17
<FIG. 19: LOOPBACK TEST IN SUCCESSION>........................................................................ 17
<FIG. 20: INPUT OF THE LISTEN PORT > ................................................................................ 18
<FIG. 21: STARTING SCREEN OF TCP CLIENT> .................................................................... 18
<FIG. 22: STARTING SCREEN OF UDP LOOPBACK>.............................................................. 19
<FIG. 23: OPEN UDP SOCKET>............................................................................................ 19
<FIG. 24: INPUT OF THE EVB8051 INFORMATION AND DATA FORMAT>............................... 20
<FIG. 25: UDP TEST IN SUCCESSION >................................................................................. 20
<FIG. 26: HOME PAGE FOR WEB PAGE TEST OF THE EVB8051>........................................... 21
<FIG. 27: STARTING SCREEN FOR THE DEMO SMTP PAGE OF THE EVB8051 > ................... 23
<FIG. 28: UVISION-51> ........................................................................................................ 49
vi
EVB8051 User’s Manual
<FIG. 29: MAKING A NEW PROJECT> .................................................................................... 50
<FIG. 30: SETTING RS232>.................................................................................................. 50
<FIG. 31: FLIP BY ATMEL>................................................................................................ 52
<FIG. 32: MEMORY OF EVB8051>....................................................................................... 53
Tables
<TABLE1: LIST OF ITEMS CONTAINED IN THE EVB8051>.......................................................2
<TABLE2: LIST OF COMMAND FOR NETWORK CONFIGURATION FOR EVB8051>..................12
EVB8051 User’s Manual
vii
1. Getting Started
1.1
EVB8051 Package
1.1.1 Components
The EVB8051 is packaged as shown in <Fig. 1>, and its contents are as shown in <Fig. 2>.
<Fig. 1: EVB8051 Package>
EVB8051 User’s Manual
1
The EVB8051 contains the items described in the table below. Photographs of the items are
shown in <Fig. 3> through <Fig. 11>.
<Table 1: List of Items Contained in the EVB8051>
No.
Item
Quantity
1
MB-EVB8051
1
2
NM7010A (Plugged in MB-EVB8051)
1
2
User’s Manual
1
3
Power Adaptor (5V)
1
4
Software CD
1
5
UTP Cable
1
6
Serial Cable
1
<Fig. 2: Items contained in the EVB8051>
2
EVB8051 User’s Manual
<Fig. 3> shows the EVB8051 Board. It includes a LCD that is useful for testing the functions of
the web server and for debugging.
<Fig. 3: EVB8051>
<Fig. 4> shows a NM7010A plugged in the EVB8051. For more information, please refer to
Appendix C. Specification of NM7010A.
<Fig. 4: NM7010A>
EVB8051User’s Manual
3
<Fig.5> shows the User’s Manual of the EVB8051.
<Fig. 5: User’s Manual>
<Fig. 6> shows the 5V Power Adaptor for supplying power to the EVB8051.
<Fig. 6: Power Adaptor (5V)>
4
EVB8051 User’s Manual
<Fig. 7> shows the Software CD provided with the EVB8051. It contains Documents,
Schematics, Source Code, and Software.
<Fig. 7: Software CD>
<Fig. 8> shows the UTP Cable (Crossed Cable) for connecting the EVB8051 directly to the PC.
<Fig. 8: UTP Cable>
EVB8051User’s Manual
5
<Fig. 9> shows the Serial Cable (Female-to-Female) for connecting the EVB8051 to the PC. It
is used for monitoring and program downloading. Please refer to Appendix B. Specification of
serial cable.
<Fig. 9: Serial Cable>
6
EVB8051 User’s Manual
1.1.2 Software CD
The EVB8051 is supplied with a Software CD that contains various development tools
including Documents, Schematics, Source Codes, and PC Softwares. <Fig. 10> shows the
directory structure of the Software CD.
<Fig. 10: Directory Structure of the Software CD>
1.1.2.1
Document
Contains the data sheets of essential parts, including the W3100A. User manual is also included.
1.1.2.2
Schematic
Contains the circuit diagram of the EVB8051. The PAL subdirectory contains the PAL Source
that is necessary for interfacing the 8051 MCU and the W3100A.
EVB8051User’s Manual
7
1.1.2.3
Software
Software is provided for the Firmware and PC applications. The software for the Firmware
contains the W3100A API Driver for the 8051 and some samples of application source code.
The software for PC applications contains Loopback Test program and Serial Terminal program
for Windows.
8
EVB8051 User’s Manual
1.2
System Configuration
1.2.1 PC Setup
1.2.1.1
Connecting Cables
For testing the functions of the EVB8051 and for application development, the system should be
configured as shown in <Fig. 11>. First, the EVB8051 is connected to the PC using the crossed
UTP Cable (for data transmission) and the Serial Cable (for monitoring and for program
downloading).
SD
PRO
Serial Cable
Professional Workstation 6000
PC
UTP Cable
EVB8051
<Fig. 11: System Configuration between EVB8051 and PC>
1.2.1.2
Network Configuration
For convenience of development, the EVB8051 contains the following default network
information:
IP address: 192.168.0.2
MAC address: 00-08-DC-00-00-00
Gateway address: 192.168.0.1
Subnet Mask: 255.255.255.0
The above information contained in the EVB8051 can be modified at any time to suit the
developer’s purpose.
First, for testing purposes, set the PC network information as follows:
IP address: 192.168.0.5
Gateway address: 192.168.0.1
Subnet Mask: 255.255.255.0
After the above setup, confirm the operation of the EVB8051 on the PC using the Ping
command.
C:\> ping 192.168.0.2 –t
If the connection has been set up properly, the following message will be displayed on the
EVB8051User’s Manual
9
screen:
Pinging 192.168.0.2 with 32 bytes of data:
Reply from 192.168.0.2: bytes=32 time<10ms TTL=128
Reply from 192.168.0.2: bytes=32 time<10ms TTL=128
Reply from 192.168.0.2: bytes=32 time<10ms TTL=128
:
If the connection has not been set up properly, the following message will be displayed on the
screen:
Pinging 192.168.0.2 with 32 bytes of data:
Request timed out.
In this case, please refer to Troubleshooting Guide 2.3.1.
1.2.1.3 Changing network configuration of EVB8051.
When EVB8051 boots up, you can change the network configuration of EVB8051 by serial.
After you configure your PC as shown in <Fig. 11>, Run MiniTerm Program on your PC.
Set serial configuration with following values on PC.
Speed
57600
Parity
None
Data bit
8
Stop bit
1
Flow control
None
And reset EVB8051.
You can see the boot-up message as shown in <Fig. 12>.
10
EVB8051 User’s Manual
<Fig. 12: boot-up message of EVB8051>
<Fig. 13: Network Configuration Menu>
And when you press ‘C’, you can see the menu as shown in <Fig. 13>.
The menu consists of the Command Set as shown in <Table 2>.
EVB8051User’s Manual
11
<Table 2: List of Command for Network Configuration for EVB8051>
Command
D, d
G, g
S, s
I, I
H, h
E, e
12
Meaning
Display network information
Set Default Gateway IP address
Set Subnet Mask
Set EVB IP address
Set EVB MAC address
Exit menu and run program
EVB8051 User’s Manual
1.2.1.3
Program Installation
Since the EVB8051 uses an ATMEL 8051 MCU, you can use the development tools (InSystem-Programmer) provided by ATMEL. To download the tools required for development,
visit the ATMEL site and download the latest version of the FLIP Software for installation.
[8051 – Architecture – Software]
http://www.atmel.com/atmel/products/prod74.htm
FLIP Software (Download dev_tools3bc6c0cebce3f.zip now. 1.9M, updated Apr 24,
2002)
FLIP (Flexible In-system Programmer) software v1.6.0. Runs Windows
9x/Me/NT/2000/XP.
Supports RS232 or CAN link.
* Note: Above information may differ, Please refer to recent information on it from ATMEL.
1.2.2 Evaluation Board Configuration
1.2.2.1
W3100A mode setting
The W3100A’s mode has been fixed to CLOCKED mode as default.
1.2.2.2
PHY mode setting
The PHY mode has been set as follows;
-
Auto Negotiation: Yes
-
Full Duplex: Yes
-
Speed: 100Mbps
EVB8051User’s Manual
13
2. User’s Guide
2.1
Evaluation Board Layout
<Fig. 14> illustrates the layout of the EVB8051 Board. On the upper left is the processor area
that includes the 8051 MCU with 64 Kbytes of flash memory and 32 Kbytes of SRAM. On the
upper right is TEXT LCD area. The power section is located on the bottom left, which accepts
5V and supplies 5V and 3.3V to the board. On the bottom right, NM7010A, that includes
W3100A, PHY and MAC jack with transformer, is located.
RC Connector 1x8(F)
Network Camera Connector 2x17(F)
74573
Voice Module Connector 2x17(F)
32KByte
SRAM
16Mhz
Crystal
8051
LCD
Serial
Socket
MAX232
Mode Switch
256byte
EEPROM
16V8 PAL
25Mhz
Crystal
7414
i2Chip
W3100A
RJ45
IIM7010A
Power Part
DC
5V
Power
Switch
Reset
Switch
PHY LED
(for IIM7000A)
8051EVB REV3.1
<Fig. 14: Layout of EVB8051>
14
EVB8051 User’s Manual
2.2
Function Testing
2.2.1 Loopback Test
The Loopback is the operational mode for measuring the transmission performance of the
iinChipTM W3100A on the EVB8051. It is used for measuring data transfer speed when the
EVB8051 board receives data from the PC and sends it back to the PC. And they are the sample
code of TCP server mode and client mode.
2.2.1.1
Configuration
Since the EVB8051 board is equipped with default Loopback execution code (TCP Server) in
the internal flash memory, its operation can be verified immediately after a network has been set
up.
First, install the Axinstall.exe program (located in the “\Software\PC\LoopbackTest” folder
on the CD) on the PC. Once the AxinstallVX.X.EXE is installed, the Ax1.exe program is
created and is required by the PC for Loopback testing. To run the Loopback program
loaded on the EVB8051, slide the JP3 Slide Switch on the board to the right.
2.2.1.2
Loopback TCP Server Test
Run the ping command from the PC to the EVB8051 to check network operation.
※ By default, the IP of the EVB8051 is set to 192.168.0.2.
C:\> ping 192.168.0.2 –t
On the PC, run the AX1.exe program for connection setup. The screen will look like <Fig. 15>.
EVB8051User’s Manual
15
<Fig. 15: Running of AX1.exe Program>
From the ‘TCP’ menu of the AX1 program, select ‘Connect’ to display the dialog box as shown
in <Fig. 16>. Enter the IP address assigned to the EVB8051 (192.168.0.2) and the Port (5000)
number, and try the connection.
<Fig. 16: Input of the Connection Information>
Once a connection is set up between the EVB8051 and the computer, a box with the
‘Connected’ message appears as shown in <Fig. 17>.
<Fig. 17: Connection Setup Completed>
16
EVB8051 User’s Manual
After the connection setup, select ‘Send’ from the ‘File’ menu. The dialog box for file transfer
appears.
Select a file to start the loop back test. Refer to <Fig. 18>.
<Fig. 18: File Transfer>
※ You can perform the Loopback test successively using the ‘A(uto)’ command or the
‘I(teration)’ command. Make sure to perform the ‘S(end)’ command before the ‘A(uto)’
command or the ‘I(teration)’ command. <Fig. 19> shows the result of ‘I(teration)’ command
execution.
<Fig. 19: Loopback Test in Succession>
EVB8051User’s Manual
17
※ If the program does not run properly, try downloading the loopback program from the
Software CD (\Software\Firmware\DirectMode\LB_TCP_SERVER\TCPS.HEX) into
the EVB8051 again. For more information on program downloading, refer to Section
3.3.2.)
2.2.1.3
Loopback TCP Client Test
You can test Loopback TCP Client like Loopback Server.
On the PC, Run the AX1.exe program for connection setup.
From the ‘TCP’ menu of the AX1 program, select ‘Listen’ to display the dialog box as shown in
<Fig. 20>. Enter the Port (3000) number, and push the SET button.
<Fig. 20: Input of the Listen port >
Next, try downloading the loopback client program from the Software CD
(\Software\Firmware\DirectMode\LB_TCP_CLIENT\TCPC.HEX) into the EVB8051. For
more information on program downloading, refer to Section 3.3.2.)
After reset EVB8051, you can see the image as shown in <Fig 21>.
<Fig. 21: Starting Screen of TCP Client>
18
EVB8051 User’s Manual
Input IP Address of your PC (ex : 192.168.0.5). then you can see a box with the ‘Connected’
message appears as shown in <Fig. 17>.
The next flow for test is same with Loopback TCP Server.
2.2.1.4
Loopback UDP Test
Loopback UDP is the sample code of UDP.
Download
the
UDP
loopback
program
from
the
Software
CD
(\Software\Firmware\DirectMode\LB_UDP \UDP.HEX) into the EVB8051. For more
information on program downloading, refer to Section 3.3.2.)
After reset EVB8051, you can see the image as shown in <Fig 22>.
<Fig. 22: Starting Screen of UDP Loopback>
On the PC, Run the AX1.exe program.
From the ‘UDP’ menu of the AX1 program, select ‘Open’ to display the dialog box as shown in
<Fig. 23>. And set port # of UDP for PC.
<Fig. 23: Open UDP Socket>
EVB8051User’s Manual
19
Select ‘Send’ to display the dialog box as shown in <Fig. 24>. Enter Peer IP Address, port #,
data size and value for UDP loopback test of EVB8051. And push the OK button.
<Fig. 24: Input of the EVB8051 Information and Data Format>
Then, you can see the image as shown in <Fig. 25>. Now PC and EVB8051 are sending and
receiving each other.
<Fig. 25: UDP Test in Succession >
20
EVB8051 User’s Manual
2.2.2 Web Server Test
2.2.2.1
Outline
The EVB8051 provides the source code to control the equipment through the web and is
available for developing applications that require web server functions.
2.2.2.2
Testing Procedure
The test method for the web server is the same as for the Loopback test.
Download the web server program “\Software\Firmware\DirectMode\WEB_SERVER\
HTTPD.HEX” from the Software CD to the EVB8051 for testing. For more information on
program downloading, refer to Section 3.3.2.
Run the ping command to the EVB8051 to check network operation. By default, the IP address
of the EVB8051 is set to 192.168.0.2.
If the Ping command works properly, run the web browser on the PC and enter the IP address of
the EVB8051 (192.168.0.2) in the URL window to attempt to access the web server of the
EVB8051.
If the EVB8051 is running in web server mode, the starting screen of the web page will look like
<Fig. 26>.
<Fig. 26: Home page for Web Page test of the EVB8051>
EVB8051User’s Manual
21
2.2.2.3
(1)
(2)
Functions of the Home page
LCD Character Display
Entering characters in the LCD Text Box on the demo page will display the characters on
the LCD of the EVB8051.
LED Remote Control
It controls the LEDs on the board through the web. In actual applications, it can be used for
controlling other devices than the LED in remote places through the web. Selecting
LED#1 and LED#2 in <Fig. 26> will turn the LEDs (D1, D2) on the EVB8051 ON/OFF.
2.2.3 SMTP Test
2.2.3.1
Outline
The EVB8051 provides the source code to send E-Mail(SMTP) through the web and is
available for developing applications that require SMTP functions.
2.2.3.2
Testing Procedure
The test method for the SMTP is the same as for the Web Server test.
Download the web server program “\Software\Firmware\DirectMode\SMTP_WEB\
SMTPWEB.HEX” from the Software CD to the EVB8051 for testing. For more information on
program downloading, refer to Section 3.3.2.
Run the ping command to the EVB8051 to check network operation. By default, the IP address
of the EVB8051 is set to 192.168.0.2.
If the Ping command works properly, run the web browser on the PC and enter the IP address of
the EVB8051 (192.168.0.2) in the URL window to attempt to access the web server of the
EVB8051.
If the EVB8051 is running in SMTP mode, the starting screen of the web page will look like
<Fig. 27>.
Enter SMTP Server IP, Account, Sender Mail Address, Recipient Mail Address, Title, Contents.
And push Send button. When completed, you can see the initial screen.
* Note: For this function test, SMTP server is reachable from EVB8051 and EVB8051 should
be connected Internet.
22
EVB8051 User’s Manual
<Fig. 27: Starting Screen for the Demo SMTP Page of the EVB8051 >
2.3
Troubleshooting Guide
2.3.1 Ping
When you cannot reach EVB8051 by Ping command,
Step 1. Did you connect correctly between test PC and EVB8051 with UTP cable?
Step 2. Did you change your test PC's network environment (IP address, Gateway, Subnet)?
If no, you should change it first as follows:
IP address: 192.168.0.5
Gateway address: 192.168.0.1
Subnet Mask: 255.255.255.0
Step 3. Whether NM7010A's Link LED(D4) is on?
If off, you’d better check whether the UTP cable works correctly.
EVB8051User’s Manual
23
2.3.2 Misc.
2.3.2.1 When the screen remains blank with the power on after a connection is
made
Step 1. Check the connection condition of the serial cable.
Step 2. Check if the COM Port numbers of the PC and terminal coincide.
Step 3. Check the terminal configuration.
24
EVB8051 User’s Manual
3. Programmer’s Guide
3.1
API Function
3.1.1 Type of Functions
(1) Internal Function: Used inside the driver function
(2) API Function: Used in applications
Function Name
void Int0(void) interrupt 0
Arguments
None
Return value
None
Description
Interrupt handling function of the W3100A.
Stores the status information that each function waits for in the global
variable S_STATUS for transfer.
S_STATUS stores the interrupt status value for each channel.
Category
Internal Function
Function Name
void ISR_ESTABLISHED(SOCKET s)
Arguments
s: Channel number
Return value
None
Description
Established connection interrupt handling function.
Called upon connection establishment, and may be inserted in user
code if needed by the programmer.
Category
Internal Function
Function Name
void ISR_CLOSED(SOCKET s)
Arguments
s: Channel number
Return value
None
Description
Closed connection interrupt handling function.
Called upon connection closure, and may be inserted in user code if
needed by the programmer.
EVB8051User’s Manual
25
Category
26
Internal Function
EVB8051 User’s Manual
Function Name
void ISR_RX(SOCKET s)
Arguments
s: Channel number
Return value
None
Description
Received data interrupt handling function.
Called upon receiving data, and may be inserted in user code if needed
by the programmer.
Category
Internal Function
Function Name
void init W3100A(void)
Arguments
None
Return value
None
Description
W3100A initialization function.
Function for S/W resetting of the W3100A.
Sets the initial SEQ# to be used for TCP communication.
Category
API Function
Function Name
void sysinit(u_char sbufsize, u_char rbufsize)
Arguments
Sbufsize:tx memory size
Return value
rbufsize:rx memory size
Description
W3100A initialization function.
Sets the source MAC, source IP, gateway, and subnet mask to be used
by the W3100A to the designated values.
May be called when setting the concerned register to modify network
information and reflect it on the W3100A.
Category
API Function
Function Name
void setsubmask(u_char * addr)
Arguments
addr: Pointer having the value for setting up the subnet mask
Return value
None
Description
Subnet mask setup function
EVB8051User’s Manual
27
Category
API Function
Function Name
void setgateway(u_char * addr)
Arguments
addr: Pointer having the value for setting up the gateway IP
Return value
None
Description
Gateway IP setup function
Category
API Function
28
EVB8051 User’s Manual
Function Name
void setIP(u_char * addr)
Arguments
addr: Pointer having the value for setting up the source IP address
Return value
None
Description
W3100A IP address setup function
Category
API Function
Function Name
void setMACAddr(u_char * addr)
Arguments
addr: Pointer having the value for setting up the MAC address
Return value
None
Description
MAC address setup function
Category
API Function
Function Name
void settimeout(u_char * val)
Arguments
val: Pointer having the value for setting up the timeout.
Upper 2 bytes have the initial timeout value, while the last 1 byte has
the number of retransmissions until timeout.
Return value
None
Description
TCP timeout setup function.
Used for adjusting the TCP retransmission time.
A timeout interrupt takes place when retransmission is attempted for
establishing the connection or for data transfer beyond the set value.
Category
API Function
Function Name
void setINTMask(u_char mask)
Arguments
mask: Value of the mask to be set (‘1’ refers to interrupt enable)
Return value
None
Description
Interrupt mask setup function.
Enables/disables the concerned interrupt.
Category
API Function
EVB8051User’s Manual
29
Function Name
void setbroadcast(SOCKET s)
Arguments
s: Channel number
Return value
None
Description
Broadcast data transfer enable setup function
Enables/disables broadcasting data transfer in UDP or IP RAW mode.
Category
API Function
Function Name
void setTOS(SOCKET s, u_char tos)
Arguments
s: Channel number
tos: Value to be set for the TOS field of the IP header
Return value
None
Description
Handles protocol setup function in IP RAW mode
Category
API Function
Function Name
char socket(SOCKET s, u_char protocol, u_int port, u_char
flag)
Arguments
s: Channel number
protocol: Protocol designated for the channel
SOCK_STREAM(0x01) -> TCP
SOCK_DGRAM(0x02) -> UDP
SOCK_IPL_RAW(0x03) -> IP Layer RAW
SOCK_MACL_RAW(0x04) -> MAC Layer RAW
port: Source port designated for the channel
flag: Options designated for the channel
SOCKOPT_BROADCAST(0x80) -> ‘1’ refers to broadcast data
transfer in UDP mode
SOCKOPT_NDTIMEOUT(0x40) -> ‘1’ refers to use of only the
register that designates the timeout value
SOCKOPT_NDACK(0x20) -> ‘1’ refers to the delayed ACK not to be
used
SOCKOPT_SWS(0x10) -> ‘1’ refers to the silly window syndrome to
be used
Return value
Channel number if succeeded, or –1 if failed.
30
EVB8051 User’s Manual
Description
Initialization of the channel.
Initializes the designated channel and waits for completion of W3100A
handling.
Category
API Function
Function Name
char connect(SOCKET s, u_char * addr, u_int port)
Arguments
s: Channel number
addr: Destination IP address
port: Destination port number
Return value
1 if connection is established, or –1 if connection fails.
Description
Sets the connection to the designated peer.
Establishes a connection with a peer on the designated channel and
waits until the connection is established. (TCP client mode)
Category
API Function
EVB8051User’s Manual
31
Function Name
char listen(SOCKET s, u_char * addr, u_int * port)
Arguments
s: Channel number
addr: Peer IP address at the time of connection establishment
port: Peer Port number at the time of connection establishment
Return value
1 if connection is established, or –1 if connection fails.
Description
Waits for connection with a peer. (Blocking Mode)
The designated channel waits for connection by a peer. (TCP Server
mode)
Category
API Function
Function Name
char NBlisten(SOCKET s)
Arguments
s: Channel number
Return value
1
Description
Waits for connection with a peer. (Non-blocking Mode)
The designated channel waits for connection by a peer. (TCP Server
mode)
Category
API Function
Function Name
void initseqnum(SOCKET s)
Arguments
s: Channel number
Return value
None
Description
Generates random values for the initial SEQ# to be used for
establishing a TCP connection.
This function may be added to the code for generating random
numbers for assigning a random number to initial SEQ# used in TCP.
In an actual internet environment, the initial SEQ# must be a random
number. (A fixed number is used for EVB/DK.)
Category
API Function
Function Name
u_int send(SOCKET s, u_char * buf, u_int len)
32
EVB8051 User’s Manual
Arguments
s: Channel number
buf: Pointer indicating the data to be sent
len: Size of the data to be sent
Return value
Sent data size
Description
Function for sending TCP data.
Composed of the send()and send_in() functions.
The send() function is an application I/F function. It continues to call
the send_in() function to complete the sending of the data up to the
size of the data to be sent when the application is called. The send_in()
function receives the return value (the size of the data sent), calculates
the size of the data to be sent, and calls the send_in() function again if
there is any data left to be sent.
Category
API Function
EVB8051User’s Manual
33
Function Name
u_int send_in(SOCKET s, u_char * buf, u_int len)
Arguments
s: Channel number
buf: Pointer indicating the data to be sent
len: Size of the data to be sent
Return value
Sent data size
Description
Internal function for sending TCP data.
Called by the send() function for TCP transmission.
It first calculates the free transmit buffer size and compares it with the
size of the data to be transmitted to determine the transmission size.
After calculating the data size, it copies data from TX_WR_PTR.
It waits if there is a previous send command in process.
When the send command is cleared, it updates the TX_WR_PTR up to
the size to be transmitted and performs the send command.
Category
Internal Function
Function Name
u_int recv(SOCKET s, u_char * buf, u_int len)
Arguments
s: Channel number
buf: Pointer where the data to be received is copied
len: Size of the data to be received
Return value
Received data size
Description
TCP data receiving function.
The recv() function is an application I/F function. It continues to wait
for as much data as the application wants to receive.
Category
API Function
Function Name
u_int sendto(SOCKET s, const u_char * buf, u_int len,
u_char * addr, u_int port)
Arguments
s: Channel number
buf: Pointer indicating the data to send
len: Size of the data to send
addr: Destination IP address
Return value
Sent data size
34
EVB8051 User’s Manual
Description
UDP data sending function.
Composed of the sendto()and sendto_in() functions.
The send() function is an application I/F function. It continues to call
the send_in() function to complete the sending of the data up to the
size of the data to be sent when the application is called.
Unlike TCP transmission, it designates the destination address and the
port.
Category
API Function
EVB8051User’s Manual
35
Function Name
u_int sendto_in(SOCKET s, const u_char * buf, u_int len)
Arguments
s: Channel number
buf: Pointer indicating the data to send
len: Size of the data to send
Return value
Sent data size
Description
UDP data sending function.
An internal function that is the same as the send_in() function of the
TCP.
Category
Internal Function
Function Name
u_int recvfrom(SOCKET s, u_char * buf, u_int len, u_char
* addr, u_int * port)
Arguments
s: Channel number
buf: Pointer where the data to be received is copied
len: Size of the data to be received
addr: Peer IP address for receiving
port: Peer port number for sending
Return value
Received data size
Description
UDP data receiving function.
Function for receiving UDP and IP layer RAW mode data, and
handling the data header.
Category
API Function
Function Name
char close(SOCKET s)
Arguments
s: Channel number
Return value
1
Description
Channel closing function.
Function for closing the connection of the designated channel.
Category
API Function
36
EVB8051 User’s Manual
Function Name
u_int select(SOCKET s, u_char func)
Arguments
s: Channel number
func: SEL_CONTROL(0x00) -> return socket status
SEL_SEND(0x01)
-> return free transmit buffer size
SEL_RECV(0x02)
-> return data size in receive
buffer
Return value
Socket status or free transmit buffer size or received data size
Description
Function handling the channel socket information.
Category
API Function
Function Name
u_int read_data(SOCKET s, u_char * src, u_char * dst,
u_int len)
Arguments
s: Channel number
src: Receive buffer pointer of the W3100A
dst: System buffer pointer
len: Data size to be copied
Return value
Copied data size
Description
Copies the receive buffer data of the W3100A to the system buffer.
It is called from the recv()or recvfrom() function.
Category
Internal Function
Function Name
u_int write_data(SOCKET s, u_char * src, u_char * dst,
u_int len)
Arguments
s: Channel number
src: System buffer pointer
dst: Transmit buffer pointer of the W3100A
len: Data size to be copied
Return value
Copied data size
Description
Copies the system buffer data to the transmit buffer of the W3100A.
It is called from the send_in()or sendto_in() function.
Category
Internal Function
EVB8051User’s Manual
37
Function Name
void wait_10ms(int cnt)
Arguments
cnt: count
Return value
None
Description
Designates the delay.
Waits for 10 milliseconds.
Category
Internal Function
38
EVB8051 User’s Manual
Function Name
void wait_1ms(int cnt)
Arguments
cnt: count
Return value
None
Description
Designates the delay.
Waits for 1 millisecond.
Category
Internal Function
Function Name
void wait_1us(int cnt)
Arguments
cnt: count
Return value
None
Description
Designates the delay.
Waits for 1 millisecond.
Category
Internal Function
EVB8051User’s Manual
39
3.2
Sample Source Codes
3.2.1 Loopback & TCP Server
3.2.1.1
Source Codes : \Software\Firmware\DirectMode\
LB_TCP_SERVER\
40
EVB8051 User’s Manual
3.2.1.2 Flow Diagram
Initialization
8051
LCD
W3100A (Software Reset)
Network Configuation
Apply default netowrk
configuration in EEPROM
or
Update network
configuration
Create TCP Socket
Set the socket to server
mode
Error occurred?
Yes
End
No
Is socket connected?
Yes
Yes
Service Loopback
Closed by peer?
Receive data from W3100A
Transmit data via W3100A
No
Yes
EVB8051User’s Manual
Already closed?
No
Yes
No
Close socket
Calculate received
data size & the size > 0
No
41
3.2.2 Loopback & TCP Client
3.2.2.1
Source Codes : \Software\Firmware\DirectMode
\LB_TCP_CLIENT\
3.2.2.2 Flow Diagram
In itia liz a tio n
8051
LCD
W 3 1 0 0 A (S o ftw a re R e s e t)
N e tw o rk C o n fig u a tio n
A p p ly d e fa u lt n e to w rk
c o n fig u ra tio n in E E P R O M
or
U p d a te n e tw o rk
c o n fig u ra tio n
C re a te T C P S o c ke t
C lo se s o c k e t
T ry to co n n e c t to th e S e rv e r
Yes
Is su c c e s s fu lly
c o n n e c te d ?
No
Yes
E rro r o c c u rre d ?
T ry a g a in ?
No
Yes
End
No
Is s o ck e t co n n e c te d ?
Yes
Yes
S e rv ic e L o o p b a c k
C lo se d b y p e e r?
R e c e ive d a ta fro m W 3 1 0 0 A
T ra n sm it d a ta v ia W 3 1 0 0 A
No
Yes
42
A lre a d y clo s e d ?
No
Yes
No
C lo s e so c k e t
C a lcu la te re ce iv e d
d a ta s ize & th e siz e > 0
No
EVB8051 User’s Manual
3.2.3 Loopback & UDP
3.2.3.1 Source Codes : \Software\Firmware\DirectMode\LB_UDP\
3.2.3.2 Flow Diagram
Initialization
8051
LCD
W3100A (Software Reset)
Network Configuation
Apply default netowrk
configuration in EEPROM
or
Update network
configuration
Create UDP Socket
Error occurred?
Yes
End
No
No
Calculate received
data size & the size > 0
Yes
Service Loopback
Receive data from W3100A
Transmit data via W3100A
EVB8051User’s Manual
43
3.2.4 Web Server
3.2.4.1 Source Codes : \Software\Firmware\DirectMode\WEB_SERVER\
3.2.4.2 Flow Diagram
44
EVB8051 User’s Manual
Initialization
8051
LCD
W3100A (Software Reset)
Network Configuation
Apply default netowrk
configuration in EEPROM
or
Update network
configuration
Create TCP Socket with
port# 80
Set the socket to server
mode
Error occurred?
Yes
End
No
Is socket connected?
Yes
Yes
Receive data from W3100A
Closed by peer?
No
Yes
No
Yes
No
Close socket
Calculate received
data size & the size > 0
Analyze HTML request
message
Already closed?
Create HTML header
No
No
Request message type
= CGI?
Yes
Display text or LED
(Execute CGI function)
Create HTML body
Transmit HTML document
EVB8051User’s Manual
45
3.2.5 SMTP_WEB
3.2.5.1 Source Codes : \Software\Firmware\DirectMode\SMTP_WEB\
3.2.5.2 Flow Diagram
Initialization
8051
LCD
W3100A (Software Reset)
Network Configuation
Apply default netowrk
configuration in EEPROM
or
Update network
configuration via RS232
Is socket connected?
Close socket
Yes
Yes
Calculate received
data size & the size > 0
Yes
No
The size >
MAX_BUF_SIZE
Closed by peer?
Already closed?
Yes
The size =
MAX_BUF_SIZE
No
No
No
No
No
Request message type
= CGI?
Yes
Re-create Web server
socket
Yes
Analyze CGI parameter
Set
Mail Server IP address
Account
Sender Mail Address
Recipient Mail Address
Title
Mail Contents
Send Mail
Send default web page
46
Yes
SendMail
succeeded?
No
Send error web page
EVB8051 User’s Manual
3.2.6 DHCP
3.2.6.1
Source Codes : \Software\Firmware\DirectMode\DHCP\
3.2.6.2
Flow Diagram
EVB8051User’s Manual
47
Initialization
8051
LCD
W3100A (Software Reset)
DHCP Process
Set MAC address (unique
value) & IP address
(0.0.0.0) to W3100A
Create Broadcast UDP
socket for DHCP process
No
Generate DHCP Discover
Message & Broadcasting
the message
Try count > 10
Yes
Received OFFER Message
from DHCP Server?
No
Not found DHCP server.
Return error
End
Yes
Generate DHCP Request
Message & Broadcasting
the message
No
Received ACK Message from
DHCP Server?
No
Try count > 10
Yes
Yes
No ACK from DHCP server.
Return error
Apply received network
information from DHCP
server to W3100A
Return Success
Is DHCP succeeded?
End
End
Yes
Save received network
information from DHCP
server to EEPROM
No
Network Configuation
Apply default netowrk
configuration in EEPROM
or
Update network
configuration via RS232
Loopback Service
48
EVB8051 User’s Manual
3.3
Application Development Procedure
3.3.1 Program Developing Procedure (based on the KEIL compiler)
* Note: For this developing procedure, you need KEIL compiler and FLIP by ATMEL.
3.3.1.1 Configuration
1.
2.
Run uVision-51.
In Options->BL51 Code Banking Linker, set the Xdata Address arbitrarily in the SRAM
area and the Code Address to 0. (Refer to the section 3.3.3 Memory Map.)
<Fig. 28: uVision-51>
Making a New Project
1.
2.
3.
Make a new project and add startup.a51 and necessary sources.
(Startup.a51 file does not need to be modified.)
Modify or develop the program.
Compile it
EVB8051User’s Manual
49
<Fig. 29: Making a new project>
3.3.2 Program Downloading and Running Procedure (based on Flip by
ATMEL)
1.
2.
3.
4.
Connect the 8051EVB and the COM port of the PC with the serial cable.
Slide the switch on the JP3 to the left and turn on the power.
Run Flip, the ISP program of ATMEL, and select T89C51RD2 as the device.
(Device>Select… => T89C51RD2 )
Select Setting>Communication>RS232 and click the Connect button.
<Fig. 30: Setting RS232>
5.
6.
50
Execute File > Load HEX… to load the file to be downloaded.
Press the Run button to reprogram the internal flash memory of the 8051 in accordance
with the Operation Flow.
EVB8051 User’s Manual
7.
Turn off the power, slide the switch on JP3 to the right, and turn on the power back to run
the program that was downloaded in step 6.
EVB8051User’s Manual
51
<Fig. 31: FLIP by ATMEL>
* Note: Recent version of FLIP is highly recommended.
52
EVB8051 User’s Manual
3.3.3 Memory Map
ATMEL Version (EVB)
FFFFh
FFFFh
W3100A Rx Buf
E000h
W3100A Tx Buf
C000h
Reserved
A000h
Voice Module (DK)
64K Byte
Internal Flash
(Application Program)
9800h
Webcam (DK)
9400h
LCD
9000h
8200h
8000h
Reserved
W3100A Control Reg.
SRAM
(32K Byte)
0000h
0000h
<Fig. 32: Memory of EVB8051>
EVB8051User’s Manual
53
4. Hardware Designer’s Guide
4.1
EVB8051 Schematic
Please refer to schematics in Software CD (\Schematic\).
4.2
PAL
Please refer to detailed information in Software CD (\Schematic\PAL\).
library ieee;
use ieee.std_logic_1164.all;
entity test is
port(
Addr
: in std_logic_vector(5 downto 0);
nPSEN
: in std_logic;
nRD
: in std_logic;
nWR
: in std_logic;
nEA
: in std_logic;
nROMCS
: out std_logic;
nRAMCS
: out std_logic;
nCS_IINCHIP : out std_logic;
LCDCS
: out std_logic;
nCS_VM
: out std_logic;
nCS_CAM
: out std_logic;
nROMRD
: out std_logic;
nRAMRD
: out std_logic
);
ATTRIBUTE pin_numbers of test:ENTITY IS
"Addr(5):6 "
& "Addr(4):5 "
& "Addr(3):4 "
& "Addr(2):3 "
& "Addr(1):2 "
& "Addr(0):1 "
& "nPSEN:9 "
& "nRD:7 "
& "nWR:8 "
& "nEA:11 "
54
EVB8051 User’s Manual
& "nROMCS:12 "
& "nRAMCS:13 "
& "nCS_IINCHIP:15 "
& "LCDCS:14 "
& "nCS_VM:16 "
& "nCS_CAM:19 "
& "nROMRD:17 "
& "nRAMRD:18 ";
end test;
architecture arch_test of test is
begin
nROMRD <= nPSEN;
nRAMRD <= nRD;
-- nROMCS (0x0000 - 0x7fff) : External ROM
process(Addr, nPSEN)
begin
if (((Addr >= "000000") and (Addr < "100000")) and (nPSEN = '0')) then
nROMCS <= '0';
else
nROMCS <= '1';
end if;
end process;
--nRAMCS (0x0000 - 0x7fff) :
process(Addr, nPSEN)
begin
if (((Addr >= "000000") and (Addr < "100000")) and (nPSEN = '1')) then
nRAMCS <= '0';
else
nRAMCS <= '1';
end if;
end process;
--LCDCS (0x9000 - 0x93ff)
process(Addr, nRD, nWR)
begin
if (((Addr >= "100100") and (Addr < "100101")) and (nRD = '0' or nWR = '0')) then
LCDCS <= '1';
else
LCDCS <= '0';
end if;
EVB8051User’s Manual
55
end process;
-- CAM (0x9400 - 0x9800)
process(Addr)
begin
if ((Addr >= "100101") and (Addr < "100110")) then
nCS_CAM <= '0';
else
nCS_CAM <= '1';
end if;
end process;
-- VM (0x9800 - 0xA000)
process(Addr)
begin
if ((Addr >= "100110") and (Addr < "101000")) then
nCS_VM <= '0';
else
nCS_VM <= '1';
end if;
end process;
-- W3100A (0x8000 - 0x9000, 0xC000 - 0x10000)
process(Addr)
begin
if (((Addr >= "100000") and (Addr < "100100")) or (Addr >= "110000")) then
nCS_IINCHIP <= '0';
else
nCS_IINCHIP <= '1';
end if;
end process;
end arch_test;
-- W3100A (0x8000 - 0x9000, 0xC000 - 0x10000)
process(Addr, nRD, nWR)
begin
if (((Addr >= "100000") and (Addr < "100100")) or (Addr >= "110000")) and (nRD = '0' or
nWR = '0')then
nCS_IINCHIP <= '0';
else
nCS_IINCHIP <= '1';
56
EVB8051 User’s Manual
end if;
end process;
end arch_test;
4.3
Parts List
Please refer to part list in Software CD (\Schematic\DirectMode\Partlist\).
EVB8051User’s Manual
57
Appendix A. Quick Testing Procedure
A.1
Loopback Test
Step 1. Check whether EVB8051 is connected to PC correctly with UTP cable.
Step 2. Slide JP3 on EVB8051 to the right and turn on the power of EVB8051.
Step 3. Ping to EVB8051 (192.168.0.2) on the PC whether EVB8051 is connected to the PC
correctly.
Step 4. Install Axinstall.exe (only for the first time) and run Ax1.exe on the PC.
Step 5. Select TCP\Connect menu and enter EVB8051's IP address and Port number (5000).
Step 6. Select File\Send menu and select a file to transfer.
A.2
Web Server Test
Step 1. Connect the EVB8051 and the COM port of the PC with the serial cable.
Step 2. Slide the switch on the JP3 to the left and turn on the power.
Step 3. Run Flip and select T89C51RD2 as the device in Device\Select … menu.
Step 4. Select Setting\Communication\RS232 menu and click the ‘Connect’ button.
Step 5. Select File\Load HEX… to load httpd.hex to be downloaded.
Step 6. Press the ‘Run’ button to reprogram the internal flash memory of the 8051 in
accordance with the
Operation Flow.
Step 7. Turn off the power of EVB8051 and slide the switch on JP3 to the right, and turn on
the power back
to run the program that was downloaded in step 6.
Step 8. Run web browser on the PC and enter URL, “http://192.168.0.2”
58
EVB8051 User’s Manual
Appendix B. Specification of Serial
Cables
Serial 9 pin
(Female)
Serial 9 pin
(Female)
CD
1
1
CD
RD
2
2
RD
TD
3
3
TD
DTR
4
4
DTR
SG
5
5
SG
DSR
6
6
DSR
RTS
7
7
RTS
CTS
8
8
CTS
RI
9
9
RI
Used (Default)
Not Used
TD (Transmit Data) : Serial Data Output (TXD)
RD (Receive Data) : Serial Data Input (RXD)
CTS (Clear to Send) : This line indicates that the Modem is ready to exchange data.
DCD(Data Carrier Detect) : When the modem detects a "Carrier" from the modem at the other end of the phone line,
this Line becomes active.
DSR (Data Set Ready) : This tells the UART that the modem is ready to establish a link.
DTR (Data Terminal Ready) : This is the opposite to DSR. This tells the Modem that the UART is ready to link.
RTS (Request To Send) : This line informs the Modem that the UART is ready to exchange data.
RI (Ring Indicator) : Goes active when modem detects a ringing signal from the PSTN.
EVB8051User’s Manual
59
Appendix C. Specification of
NM7010A
NM7010A is a module that consists of W3100A, Ethernet PHY and Mac Jack. It’s used as
module like a component, no effort is required to interface W3100A, PHY chip,Transformer,
and RJ45. It’s the simplest and easiest solution to provide Internet connectivity.
C.1
Advantages
Easy design-win by reusing drop-in network module
Users don’t need to know details of network circuits
Auto-detects 10/100 Mbps Ethernet speed
C.2
Components
TCP/IP:W3100A
Ethernet physical layer:RTL8201BL
Connector:RJ45(with transformer)
C.3
Block Diagram
NM7010A
MAG
JACK
60
EVB8051 User’s Manual
C.4
Module dimension
B
E
D
C
A
NM7010A REV1.1
I
J
F
G
H
Symbol
Dimension (mm)
A
48.0
B
4.0
C
25.0
D
20.4
E
16.4
F
1.0
G
2.0
H
2.0
I
16.0
J
13.4
EVB8051User’s Manual
61
C.5
Pin description
I : Input
O : Output
I/O : Bi-directional Input and output
P : Power
Power & Ground
Symbol
Type
VCC
P
Pin No.
JP1
:
Description
1
, Power : 3.3 V power supply for
JP2 : 24
GND
P
JP1
NM7000A
8, Ground
:
JP1 : 13,
JP1
:
24,
JP2 : 1
JP2
:
7,
JP2 : 13
JP2
:
14,
JP2 : 23
MCU Interfaces
Symbol
Type
A14~A8
I
Pin No.
JP1
Description
:
7, Address / Device Address : Used as
JP1 : 10
Address[14-8] pin when set in Bus
JP1
:
9, access mode.
JP1 : 12
JP1
:
Used as Device Address[6-0] pin
11, when set in I2C interface mode.
JP1 : 14 JP1 :
15
62
EVB8051 User’s Manual
A7~A0
I
JP1 : 16 ~ Address : Used as Address[7-0] pin
when set in Bus access mode.
JP1 : 23
Not used when set in I2C interface
mode. Leave them NC or ground
them when they are not used.
D7~D0
I/O
JP2
:
21, Data : Used as Data[7-0] pin.
JP2 : 22
JP2
:
19,
JP2 : 20
JP2
:
17,
JP2 : 18
JP2
:
15,
JP2 : 16
/CS
I
JP1 : 5
Module Select : Active low. Drives
/CS of the W3100A
/RD
I
JP1 : 4
Read Enable : Active low. Drives /RD
of the W3100A
/WR
I
JP1 : 3
Write Enable : Active low. Drives
/WR of the W3100A
/INT
O
JP1 : 2
Interrupt : Active low
Indicates that the W3100A requires
MCU attention after reception or
transmission. The interrupt is cleared
by
writing
to
the
ISR
of
W3100A(Interrupt Status Register).
All interrupts are maskable by writing
IMG
of
W3100A(Interrupt
Mask
Register). This signal is active low.
I_SCL
I
EVB8051User’s Manual
JP2 : 25
SCL : clock used by I2C interface
63
mode.
This pin is positioned as pull-down
internally.
I_SDA
I/O
JP2 : 26
SDA : data used by I2C interface
mode.
This pin is positioned as pull-down
internally.
Network status Indicator LEDs
Symbol
Type
Pin No.
L_COL
O
JP2 : 6
Description
Collision LED : Active low when
collisions occur.
Link 100/ACT LED : Active low
L_100ACT
O
JP2 : 8
when linked 100 Base TX, and
blinking
when
transmitting
or
receiving data.
Link 10/ACT LED : Active low when
L_10ACT
O
JP2 : 10
linked 10 Base T, and blinking when
transmitting or receiving data.
Full Duplex LED : Active low when
L_DUPX
O
JP2 : 11
in full duplex operation. Active high
when in half duplex operation.
L_LINK
O
JP2 : 12
Link LED : Active low when linked
Miscellaneous Signals (Reset, Mode setting etc.)
Symbol
Type
Pin No.
RESET
I
JP1 : 6
Description
Reset : Active high
Initializes
W3100A.
64
or
Reinitializes
Asserting
this
pin
the
will
EVB8051 User’s Manual
force a reset process to occur which
will result in all internal registers
reinitializing to their default and all
strapping options are reinitialized.
For complete reset function, this pin
must be asserted low for at least
10us. Refer to W3100A datasheet for
further detail regarding reset.
/RESET
I
JP2 : 2
Reset : Active low
Reset
RTL8201BL
chip.
For
complete reset function, this pin
must be asserted low for at least
10ms.
MODE1~0
I
JP1 : 25 , Mode Select : This pin selects MCU
JP1 : 26
interface and operating mode. Since
each pin is positioned as pull-down
internally,
clocked
mode
–
the
default mode – is selected when the
pins is not connected.
M1 M0
Mode
0
0
Clocked
0
1
External clocked
1
0
Non-clocked
1
1
I2C interface
Refer to the W3100A datasheet for
more information of setting modes.
EXT_CLK
I
JP1 : 28
External clock : supplementary clock
used for external clocked mode.
In external clocked mode, W3100A
EVB8051User’s Manual
65
use this clock to interface with MCU.
Refer to the W3100A datasheet for
more information.
JP1
:
27, Not Connect
JP1 : 27Pin is used for factory test.
JP2 : 3
NC
-
JP2
:
5,
JP2 : 9
This pin must not be used by
users.
JP2 : 27 ,
JP2 : 28
66
EVB8051 User’s Manual
Appendix D. Specification of
NM7000A
NM7000A is a module that consists of W3100A and Ethernet PHY.
It’s used as a module like a component, no effort is required to interface W3100A and PHY chip.
So users can design quickly and easily and save the cost and time-to-market.
C.1
Advantages
Easy design by reusing drop-in network module
No need to know details of network circuits
Auto-detecting 10/100 Mbps Ethernet interface
C.2
Components
TCP/IP:W3100A
Ethernet physical layer:RTL8201BL
C.3
Block Diagram
NM7000A
EVB8051User’s Manual
67
C.4
Module dimension
B
A
JP1,1
JP1,2
JP2,1
JP2,2
NM7010A
D
C
68
Symbol
Dimension in mm
A
22.4
B
25.0
C
25.0
D
2.0
EVB8051 User’s Manual
C.5
Pin description
I : Input
O : Output
I/O : Bi-directional Input and output
P : Power
Power & Ground
Symbol
Type
VCC
P
Pin No.
JP1
:
Description
1
, Power : 3.3 V power supply for
JP2 : 24
GND
P
JP1
NM7000A
8, Ground
:
JP1 : 13,
JP1
:
24,
JP2 : 1
JP2
:
7,
JP2 : 13
JP2
:
14,
JP2 : 23
MCU Interfaces
Symbol
Type
A14~A0
I
Pin No.
JP1
:
Description
7, Address : 15 bit-wide address bus
JP1 : 10
JP1
:
9,
JP1 : 12
JP1 : 11
JP1 : 14 ~
JP1 : 23
EVB8051User’s Manual
69
D7~D0
I/O
JP2
:
21, Data : 8 bit-wide data bus
JP2 : 22
JP2
:
19,
JP2 : 20
JP2
:
17,
JP2 : 18
JP2
:
15,
JP2 : 16
/CS
I
JP1 : 5
Module Select : Active low.
/CS of W3100A
/RD
I
JP1 : 4
Read Enable : Active low.
/RD of W3100A
/WR
I
JP1 : 3
Write Enable : Active low
/WR of W3100A
/INT
O
JP1 : 2
Interrupt : Active low
Indicates that the W3100A requires
MCU attention after reception or
transmission. The interrupt is cleared
after writing values to the ISR of
W3100A (Interrupt Status Register).
All interrupts can be masked by
writing
values
to
the
IMR
of
W3100A(Interrupt Mask Register).For
more details refer to the W3100A
Datasheet
Network Interfaces & Network status Indicator LEDs
Symbol
Type
Pin No.
Description
TPTX+
O
JP2 : 3
Transmit Output : Differential pair shared
b
70
100 B
TX
d 10 B
M d
EVB8051 User’s Manual
TPTX-
JP2 : 5
TPRX+
JP2 : 9
I
TPRX-
JP2 :
11
L_COL
O
JP2 : 6
by 100 Base TX and 10 Base Modes.
When configured as 100 Base TX,
Receive Input : Differential pair shared by
100 Base TX and 10 Base T Modes.
Collision LED : Active low when collisions
occur.
Link 100/ACT LED : Active low when
L_100ACT
O
JP2 : 8
linked 100 Base TX, and blinking when
transmitting or receiving data.
L_10ACT
O
L_LINK
O
JP2 :
10
JP2 :
12
Link 10/ACT LED : Active low when
linked 10 Base T, and blinking when
transmitting or receiving data.
Link LED : Active low when linked
Reset
Symbol
Type
Pin No.
RESET
I
JP1 : 6
Description
Reset : Active high
Initializes
or
Reinitializes
the
W3100A.
Asserting this pin will force a reset process
to occur, which will result in all internal
registers reinitializing to their default and
all strapping options are reinitialized. For
complete reset function, this pin must be
asserted low for at least 10us. Refer to
W3100A
datasheet
for
further
detail
regarding reset.
/RESET
I
EVB8051User’s Manual
JP2 : 2
Reset : Active low
71
Reset RTL8201BL chip. For complete reset
function, this pin must be asserted low for
at least 10ms.
72
EVB8051 User’s Manual