1
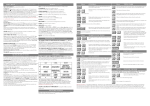
DYABOLA
CENSUS OF ANTIQUE WORKS OF
ART AND ARCHITECTURE KNOWN
IN THE RENAISSANCE
Manual
2. Edition May 2000
copyright 2000 by Biering & Brinkmann, München
Printed in Germany
All rights reserved
Multiple copying in any form is not permitted
Humboldt-Universität Berlin
Department of History of Art
CENSUS OF ANTIQUE WORKS OF ART AND ARCHITECTURE
KNOWN IN THE RENAISSANCE
Ed. Arnold Nesselrath
Coeditor:
Warburg Institute London
Bibliotheca Hertziana Rom
Getty Research Institute Los Angeles
Warburg-Haus Hamburg
This data base is subsidized by the German Ministery of
Education, Science and Technology
PROJEKT DYABOLA
copyright 2000 by
Verlag Biering & Brinkmann
Postfach 45 01 44
D-80901 München
Fax +49-89-32 35 21 82
E-Mail: [email protected]
Impressum
All rights reserved
Multiple copying in any form is not permitted
Licence Agreement
Program and electronic database are the property of Biering and Brinkmann GbR. The private licensee
receives the right to the unrestricted use of program and data-base in his own private computer. Institutes
receive the right to unrestricted use on the institute's computer. Passing on the program or database to
third parties is strictly forbidden.
DYABOLA - CENSUS-Manual
Table of Contents
1. Introduction
1.1 The Census Database
2. Simple Search
2.1 Search for an Antique Monument
2.2 Search for (Polyhierarchic) Monuments with Subdivisions
2.3 Search for a Renaissance-Document
2.4 Search for a Person or a Location
2.5 Creating a Dependent Result (e.g. all documents by one artist)
2.6 Search for a Date-Range
3. Advanced Queries
3.1 A Complex Search
3.2 All Renaissance-Documents of the Pantheon (1st Step)
3.3 All Documents by van Heemskerk (2nd Step)
3.4 Combining Search-Results (3rd Step)
4. Functions of the DYABOLA-Main-Menu
4.1 The Subject Tree
4.2 Key word Searches
4.3 The Free Search Option
5. Other Functions of the Program
5.1 History the Navigation
5.2 Viewing Images
5.3 Additional Information
DYABOLA - CENSUS-Manual
1.1 The Census-Database
Discovery and research of antiquity is one of keythemes of the 15th and 16th century. The antique
works of art and architecture are therefore a major source for renaissance artists. Long years ago
the CENSUS startet to collect the renaissance sources and combine the material with the research
of classical archeology.
The Census of Antique Works of Art and Architecture Known in the Renaissance was founded in
1946 at the Warburg Institute in London. It began as an index system, with antique monuments
and their renaissance documentation on index cards. In order to facilitate research queries and to
make all the information easily accessible it was decided at the beginning of the 1980's, to transfer
the project to an electronic database. Up until then the project had focused on antique sculpture,
and now antique architecture was to be included. The project was based at the Warburg Institute
and the Bibliotheca Hertziana from 1981 and since April 1995 it has been at the Humboldt
University Berlin and is affiliated to the Kunstgeschichtliches Seminar as a main focus of research.
The international board of the Census consists of the Directors of the Warburg Institute, London,
the Bibliotheca Hertziana (Max-Planck-Institut), Rome, the Getty Information Institute and the
Getty Center, Los Angeles, and the Warburg-Haus, Hamburg. The Federal Ministry of Education,
Science, Research and Technology is a supporting member.
The Census contains the following visual sources: drawings, sketchbooks, paintings, engravings,
sculpture, medals, applied arts etc. Among the written sources are inventories, guide books, lives
of artists, archival documents etc., many of which are exact transcriptions. In addition, there is a
detailed network of names-, dates- and location-references.
The Census is the electronic version of a Corpus. This Corpus is subdivided into several main
parts. The most important headers are antique monuments, renaissance documents, and the name,
location and date authorities. All parts are linked to each other. For example: an entry of an
antique monument contains also all relevant renaissance documents. The most common access to
the database will be via the antique monument or via the renaissance document. In addition to this
the access via names or locations will be important.
All entries are linked together in a structured way. Moving through the database will allow you to
reach any point in the database. The links are always established in the same way. You will soon
learn that the same keys are used again and again.
It is important to work through all the following examples. It will soon become clear that the
pattern of searching and combining search results is repetitive and easily applied.
Once this logic has been understood you will be able to execute queries which are not described in
detail in this manual and carry out very complex searches.
DYABOLA - CENSUS-Manual
2.1 Search for an Antique Monument
In this chapter you will learn the structure of simple queries by using examples. Simple query
means the free navigation through the data. For this you will need a starting point. This starting
point may be an antique monument, a renaissance document, or an artist etc..
From this point we can navigate through the links into other parts of the database, returning to
the starting point whenever we want to.
Any point reached by navigating through the data can be used as a new starting point. At first we
are searching for a monument.
To search for the antique monument Torso Belvedere position the cursor on the option
'monuments' in the "quick search menu" and press Return (For information about starting the
programme see "User-Manual").
Enter the first few letters, in this case 'Torso B' into the field search string. The cursor is
automatically positioned at the correct entry. (The programme is very case sensitive >>
Capitalizing and Diacritics !!!)
By pressing Return the abbreviated version of the entry, the so-called title card, is displayed in a
window in the top left corner of your screen. This will serve as the starting point for the following
navigation through the data.
To see the images of the antique monument press 'f'. If there is more than one photograph you
can browse through them by pressing 'cursor up/down'. Press Esc to return to the title card.
The bottom line of the window contains the information that there are 107 classifiers and 9 data
sheets connected to this entry.
The data sheets are as follows:
”monument description”
”monument history”
”link to provenance history”
”relationships”
”monument bibliography”
”comment”
”renaissance condition”
”preservation history”
”later known replicas”
To access all the information we have to display the data sheets. Use the right arrow key to move
from one data sheet to the next. The first data sheet is called 'monument description'.
Pressing the right arrow key displays the following data sheet, 'monument history':
The up arrow symbol ( ) indicates a link to another part of the database. 'Location' displays in the
data sheet the entry 'Roma, Musei Vaticani, Sala delle Muse'.
If you wish to follow this link, position the cursor on this entry and press 's'.
The abbreviated version of the relevant location authority is now displayed.
Pressing the right arrow key enables you to see all entries in this data sheet.
The header 'monument' contains all monuments held in the Sala delle Muse. (Positioning the
cursor on one of these monuments and pressing 's' will take you to the chosen monument.)
To return to the starting point, the title card of the Torso Belvedere, we have to press the Esc key
twice.
Pressing the right arrow key displays the data sheet 'links to provenance history'.
If we wish to obtain more information about individual entries in this programme list, position the
cursor onto this entry and press 's'. Again the abbreviated entry is displayed:
We learn that between 1432 and 1435 the Torso was in the Collection of Cardinal Prospero
Colonna.
By pressing the right arrow key the relevant data sheet is displayed.
The header 'documentation' contains all renaissance sources documenting the Torso Belvedere in
the collection of Cardinal Colonna between 1432 and 1435.
Position the cursor onto one of these entries and press 's' to obtain more information about this
document.
Alternatively, position the cursor onto one of these entries and press 'f' to view images (if
available) of these documents.
Press the Esc key twice to return to the data sheets of the Torso Belvedere.
Pressing the right arrow key displays the 'relationships' page of the monument. This data sheet
contains the links to all known renaissance documentations of the monument, and in addition, the
link to the images.
Position the cursor onto one of the entries and press 'f' to view images (if available) of the
documents.
Move the cursor to one of the entries and press 's' to obtain more information about individual
documents:
Press the right arrow key to view the first data sheet linked to the document 'document reference'.
Press the right arrow key again to display the following data sheet, 'document description'.
To obtain more information about the artist, we move the cursor to the heading 'artist' and press
's'.
Date of birth and date of death of the artist are displayed in the short abbreviated version of the
entry. Press the right arrow key.
The header 'documentation' contains all further works of the artist inserted into the CENSUS
database.
Move the cursor to one of the entries under the heading 'documentation' and press 'f' to view
images (if available) of the documents.
Alternatively position the cursor onto one of these entries and press 's' to access these documents.
Press the Esc key four times to return to the data sheet of the Torso Belvedere.
Pressing the right arrow key displays the next data sheet, 'monument bibliography'.
To view the complete citation of the abbreviated entries, move the cursor to the relevant entry and
press 's'.
Press the Esc key to return to the data sheet 'bibliography'.
Pressing the right arrow key again moves the comment page of the monument. Comments by
members of the CENSUS team are displayed.
If the comment is longer than one line the complete text is shown, after a short delay, in a blue
window (exit with Esc).
Pressing the right arrow key again displays the data sheet 'renaissance conditions' containing
information about the first renaissance observations of the monument:
Position the cursor onto one of the entries under the heading 'documentation' and press 'f' to view
images (if available) of the documents.
Alternatively move the cursor to one of the entries and press 's' to obtain more information about
individual documents reporting first observations on the Torso Belvedere.
By pressing the right arrow key again the data sheet 'links to preservation history' is displayed.
To obtain more information move the cursor to one of the entries and press 's'.
Pressing the Esc key brings you back to the monument.
Pressing the right arrow key again displays the data sheet 'later known replicas', i.e. the antique
replicas of the Torso Belvedere. So far no antique replicas are known.
We have now completed the navigation through an entire monument. We have left the data sheets
of this monument several times in order to follow up links to other parts of the database. We
have, however, always returned to the monument.
Creating a new starting point: Whenever a window (title card) is on display at the
bottom right corner of the screen you have the option to confirm this entry as a new
starting point for further navigation. Simply press the Return key: the entry is then
displayed in the top left corner of the screen, marking the new starting point for your
navigation.
DYABOLA - CENSUS-Manual
2.2 (Polyhierarchic) Monuments with subdivisions
An architectural monument is usually formed by a number of components. These architectures are
shown in the CENSUS in a hierarchic, subdivided structure.
A look at one of the most complex examples, the Pantheon in Rome, will clarify this. Choose the
option 'monuments' in the quick search menu by using the cursor and the Return key. Enter the
first few letters in the search string 'Panth', the cursor is automatically positioned at the Pantheon:
Pressing Return displays the abbreviated entry (title card) of the monument:
The main entry is shown. The asterisk on the bottom line indicates that there are further,
dependent, records related to the Pantheon.
To access these entries, press 'i'.
The lower window displays, in abbreviated version, the components of the building. In front of
the entries there are once again asterisks, indicating further dependent records.
Move the cursor to one of the entries and press Return, for example, to 'Porticus'.
The abbreviated line is automatically changed into a more extended title card. The dependent
architectural components i.e. dependent on the 'porticus', are now on display in the lower half of
the screen without having to press 'i' again.
Some of these dependent entries show an asterisk, referring again to further entries.
Pressing Return displays the list of the individual elements of the component:
To view photographs of the capital or base, move the cursor to the relevant entry and press Alt +
'f'.
To obtain more information about one of the entries, press the right arrow key several times in
order to browse through the nine monument data sheets.
The data sheet 'Relationships' contains all renaissance documents:
Move the cursor to one of the entries and press 'f' to view images (if available), or press 's' to
switch to the entry of the renaissance document (see the example 'Torso Belvedere').
DYABOLA - CENSUS-Manual
2.3 Search for a Renaissance-Document
Searching for documents is similar to searching for monuments. Please note that in most cases
you will be searching for a number of documents (e.g. a sketchbook), since single sheets are often
compiled in one codex. Searching for a document will, therefore, in many cases, be similar to the
search of a monument with a number of dependent elements (see above).
To obtain the main entry of the Codex Coburgensis, move the cursor in the quick search menu to
the field 'documents' and press Return.
Enter the first four letters, i.e. 'Codex Co' into the field search string. The cursor is automatically
positioned on the correct entry.
After pressing Return the abbreviated version of the entry (title card) is shown in the top left
corner of your screen. This will serve as the starting point for the following navigation through the
data:
This entry is a main entry. The asterisk on the bottom line indicates that there are dependent
entries.
To view these dependent entries, press 'i'.
In the bottom window the entries of the single sheets of the Codex Coburgensis are displayed in
abbreviated form. Some of these entries are again marked by an asterisk, indicating that further
subdivisions exist.
Move the cursor to one of the entries. In our example we will follow folio 81 of the Codex
Coburgensis:
To view photographs (if available) press Alt + 'f'. If there is more than one photograph you may
browse through them by using the 'page down' key. Press Esc to return to the entry.
Now press Return to establish folio 81 as the new starting point for your navigation.
The bottom line refers to 11 classifiers and 6 data sheets. Each document record contains these 6
data sheets. They are:
The data sheets are:
”document reference”
”document description”
”text on document”
”document relationships”
”document bibliography”
and ”comment”
To view all the information, the data sheets must be displayed. Press the right arrow key to move
from one data sheet to the next.
'document reference' is the first data sheet.
Press the right arrow key again to display the next data sheet, 'document description'.
Press the right arrow key again to display the next data sheet, 'text on document'.
Press the right arrow key again to display the next data sheet, 'document relationship'.
This data sheet contains the important reference to the antique monument documented on this
drawing.
Move the cursor to the heading 'Monuments'.
Press 'f' to view photographs (if available) of the antique monument. Press 's' to display the title
card of the monument.
Pressing the right arrow key will enable you to browse through the nine data sheets of the
monument.
Press Esc to return to the data sheets of the document.
Move to the next data sheet 'document bibliography' by using the right arrow key.
Position the cursor onto one of the entries in the bibliography and press 's' to obtain the complete
reference.
Press the right arrow key to move to the last data sheet, 'document comment'
DYABOLA - CENSUS-Manual
2.4 Search for a person or a location
We will be searching for works by Marten van Heemskerck.
Choose the heading 'Persons' in the quick search menu.
Insert the first four letters, i.e. 'Hee', into the field search string. The cursor is automatically
positioned on the correct entry.
After pressing Return the abbreviated version of the entry (title card) is shown in the top left
corner of your screen. This will serve as the starting point for the following navigation through the
data:
Press the right arrow key to view the data sheet of the name authority:
(This illustration shows all entries on the data sheet. You will have to scroll up and down by using
the cursor 'up' and 'down' keys.)
This page contains the variant names, the date of birth, the location etc, and the links to the
renaissance documents. These links represent a list of works by the artist.
Move the cursor to one of the entries (e.g. Berlin, SMBPK, KK, Heemskerck Skh. I, fol. 10r)
Press 'f' to view a photograph (if available) of the work.
Press 's' (and subsequently the right arrow key) in order to obtain more information about the
renaissance documents.
The search for a location is identical to the search for a person.
DYABOLA - CENSUS-Manual
2.5 Creating a dependent result
(for e.g. all documents by one artist)
The maximum number of references given under each heading in the data sheets is 15. If there are
more than 15 entries the exact number of these references is given on the last line.
In our example there are 362 further works by Heemskerck.
Move the cursor to one of the lines under the heading 'Documentation' and press Return. A menu
will appear offering various options.
Choose the option 'Collect all links/...' and press Return. A further menu will appear, used for
advanced searching (see the relevant chapter):
Choose the prefigured 'ignore linked entries' and press Return. A further menu will appear,
offering the option to create a new result file.
In our example we will continue by choosing the option 'expand existing result'.
(Eventually press Esc to switch from the quick search menu to the main menu.)
Move the cursor to the option '...display result' and press Return.
The right hand window displaying the results has the last result on the top of the list. Simply press
Return to access this result.
You can browse through the result by using the 'page up' and 'page down' keys.
Press 'f' for photographs (if available), and 's' for browsing through the data sheets.
DYABOLA - CENSUS-Manual
2.6 Search for a date-range
We will be searching for renaissance documents created between 1450 and 1460. Choose the
option 'Dates' in the quick search menu.
Now insert into a further menu the date range relevant for your search. In the top line (from:) the
first day, i.e. '1450:01:01'; and in the next line '1459:12:31'.
Please note the format 'YYYY:MM:DD'!
Pressing 'y' (yes) after the term 'overlapping' would include all dates overlapping the decade
1450/1460, e.g. 'ante 1500' in the search. In our example we will choose 'n' for 'no'.
Press Shift + Return to start the search.
We receive 19 entries. These entries are shown in the form of title cards. We can browse through
these by using the 'page up' and 'page down' keys. We stop at the entry '1452'.
Press the right arrow key to access the information contained on the data sheet:
The heading 'documentation' contains all renaissance documents which are dated to the year 1452.
The heading 'born' contains the name of Leonardo da Vinci.
Move the cursor to the desired entry and press 's' to access the data. You may wish to create a
single result containing all renaissance documents for the decade 1450-1460.
Simply open one of the 19 data records found, position the cursor on the heading
'documentation', and press Return. A familiar menu will appear.
Choose the option 'collect all links/...' and press Return. A green window will appear asking you
whether you want to collect links to renaissance documents from all 19 data entries found, or only
from the data entry you have currently accessed.
Here we will, of course, answer 'y' for 'yes'.
A menu will then appear which can be used for advanced searching (see the relevant chapter).
Simply choose the prefigured 'ignore linked entries' and press Return. A further menu will appear,
offering the option to create a new result file.
In our example we will continue by using the option 'replace existing result'. For Accessing the
new/expanding result press Esc to switch from the quick search menu to the main menu.
Move the cursor to the option '...display result' and press Return. The right hand window
displaying the results has the last result on the top of the list.
Simply press Return to access this result.
You can browse through the result by using the 'page up' and 'page down' keys.
Press 'f' for photographs (if available) and 's' for browsing through the data sheets.
DYABOLA - CENSUS-Manual
3.1 Advanced Queries - Complex Searches
An example for a complex query is the search for all antique monuments drawn by van
Heemskerck.
First we have to search for the entry for van Heemskerck by choosing the option 'persons' in the
quick search menu.
Insert only the first few letters, i.e. 'Hee' into the field search string. The cursor is automatically
positioned at the correct entry.
After pressing Return the abbreviated version of the entry (title card) is displayed.
Press the right arrow key to view the data sheet of the person (name authority).
Move the cursor to the heading 'Documentation' and press Return. A menu will appear offering
you various options:
Choose the option 'collect all links/...' and press Return. A further menu will appear, which can be
used for advanced queries:
Choose the heading 'Monuments' and press Return. Another menu will appear, offering the
option to create a new result.
In our example we will choose the option 'expand existing result'.
A result file is created, containing the name authority of van Heemskerck and all antique
monuments drawn by him.
To browse through this result press Esc to switch to the main menu, then choose the option
'-display result'.
DYABOLA - CENSUS-Manual
3.2 File containing all renaissance documents of the
Pantheon
(First step of a combined query)
An example for complex and combined queries is the search for all drawings by van Heemskerck
showing the Pantheon or parts of the Pantheon. This query is divided into three steps:
First we need to collect all renaissance documents for the Pantheon; then we have to collect all
drawings by van Heemskerck; and finally we have to combine the two results.
Choose the option 'Monuments' in the quick search menu by pressing Return. Type the first four
letters, i.e. 'Panth' into the browse list of antique monuments and the cursor will be automatically
positioned at the correct entry.
After pressing Return the abbreviated version of the monument entry (title card) is displayed:
This is the main entry. The asterisk on the bottom line indicates that there are further subdivisions
of the Pantheon.
To collect all components of the Pantheon in one file, press Return. Choose 'collect dependent
entries' from the following menu:
and press Return.
(Answer 'n' (No) to the following question whether to collect links for the complete result).
As we are searching for all renaissance documents of the Pantheon, we choose 'Documentation'
from the following menu:
A further menu will appear offering the option to create a new result:
Choose the option 'create new result'.
Insert the name you have chosen into the small window, e.g. 'DOCUPANT'.
The result will contain 428 (August 1998) entries.
Press Esc to return to the main menu.
DYABOLA - CENSUS-Manual
3.3 File containing all documents by Marten van
Heemskerck (second step of a complex query)
Call up the entry for Marten van Heemskerck. Choose the option 'persons' in the quick search
menu:
Insert the first few letters, e.g. 'Hee' into the field search string. The cursor is automatically
positioned at the correct entry.
After pressing Return the abbreviated version of the entry is displayed.
Press the right arrow key to access the data sheet of the person's entry (name authority):
Move the cursor onto the header 'documentation' and press Return. A menu offering a number of
options will appear.
Choose the option 'Collect all links/...' and press Return. A further menu appears, designed for
advanced searches.
Choose the prefigured 'ignore linked entries' and press Return. A further smaller menu appears,
offering the option to create a new result file.
Choose the option 'create new result'. In a small window you can choose the name of this result
yourself. Insert 'DOCUHEEM'. The result will contain 377 entries.
Return to the quick search menu by using the Esc key.
DYABOLA - CENSUS-Manual
3.4 Combining Search Results
(third step of a complex query)
In the last step we have to combine the two search results. The file 'DOCUPANT' contains all
renaissance documents related to the Pantheon. The file 'DOCUHEEM' contains all drawings by
van Heemskerck. By combining these two files, using operator AND, we will find all drawings by
Heemskerck after the Pantheon.
Switch from the quick search menu to the main menu by pressing Esc.:
Choose the option 'tools' and the option 'combine'.
Choose 'DOCUPANT' from the list of results.
Confirm the message
by pressing Return.
Choose the operator 'AND' from the menu offering the options for combining results.
Now choose 'DOCUHEEM' from the list of results.
You are asked to insert a name of your choice for the new search result. Choose 'HEEMPANT'.
Choose the option '--display result' from the main menu to access the records of the three
drawings by Heemskerck related to the Pantheon.
DYABOLA - CENSUS-Manual
4.1 The Subject-Tree
In addition to the prefigured search possibilities of the quick search menu, the main menu offers
access to all elements of the database. Switch from the quick search menu to the main menu by
pressing Esc.
The header 'Subjects' holds all headers of the database in hierarchical order according to groups.
Using the Return key you may open a sub-category of a specific term (if this term is marked by an
asterisk). The combination of the keys Shift and Return allows you to choose the category
highlighted by the cursor as the starting point for your search. We will demonstrate this by the
following example, searching for all drawings executed in the gouache-technique.
Move the cursor to the option 'subject' and press Return.
The top level of the hierarchic Subject Matter system is now displayed:
Move the cursor to 'Document' and press Return to access the subordinate level to 'Document'.
Now select 'Description' and you will find the next level, the header 'medium'.
The subheading of 'medium' offers you the choice to select between 'visual medium' and 'written
medium'. The missing asterisk means that there are no further levels present. The square brackets
at the end of the line indicates that alphabetical index lists exist.
Start selecting search criteria by moving the cursor to the desired header ('visual medium'), then
press Shift + Return. A red index list appears from which we select 'drawing: gouache'.
It is sufficient to type only the first few letters of the term and press Return. The cursor is then
positioned at the correct entry.
In a small window you are asked to name the result (max. 8 letters, no umlaut; this name has no
influence on the search).
To access the result switch to 'display result' in the main menu, then select the result from the list
of results on the right.
DYABOLA - CENSUS-Manual
4.2 Key word Searches
The option 'key word' allows you to see all components of an entry in an alphabetical list. Move
the cursor to the option 'key word' and press Return.
Once again you are asked to give the result a specific name (max. 8 letters, no umlaut; this name
has no influence on the search).
We will search again for 'drawing: gouache'. Insert the first four letters of the term into the red
index field:
After pressing Return the cursor moves to the index list. Here you can, if necessary, scroll up and
down to the correct entry.
Press Return at the correct entry.
To access the result switch to 'display result' in the main menu, then select the result from the list
of results on the right.
To relocate inside the index-list press "F5", enter the new search string and press
RETURN again.
DYABOLA - CENSUS-Manual
4.3 The Free Search Option
The option free search is part of the main menu. Leave the quick search menu by pressing Esc.
Move the cursor to the option free search.
Using this option you can search both in commentary fields and in bibliographic and title cards at
the same time.
It is sufficient to insert any part of the derived term.
This term may be truncated on the left and/or right. First you are asked to insert a name for the
result This name has no influence on the search, it only helps to recognise the result. After
inserting the name, press Return.
Now insert the search term into the small field in the next window.
After confirming the search term by pressing Return the programme asks you to specify your
search by choosing one of three options (window on the top left corner of your screen):
The search should ignore capital and accents; choose this option and press Return. After a few
moments the first title card appears containing the search term.
If this record is not the record you searched for, press Return to continue searching. You may
have to repeat this several times to find the desired result.
If you want to save one of the records found, press Shift + Return.
The search is finished once all titles are examined.
Press Esc if you wish to exit the Free Search Option. The result is displayed on the right side of
the screen in the list of results.
DYABOLA - CENSUS-Manual
5.1 History of Navigation
You may look up a list of records which served as the starting points of your navigation through
the database. Simply choose one entry and return to the desired record.
To do this you must exit all data sheets, only the title card of one record on the top left corner of
you screen should be opened. Press 'n'.
The list holding the history of navigation is displayed.
Move the cursor to the desired entry and press Return.
DYABOLA - CENSUS-Manual
5.2 Viewing Images
The 'f' key enables you to view photographs if only the title card of a record is displayed. If there
is more than one photograph, you may browse through them by using the cursor up/down keys.
If the cursor is positioned on a linked entry which holds an illustration, you may view this
illustration by pressing 'f'.
If you are looking through the content of a record (after pressing 'i', e.g. in a codex), you have to
press 'Alt' + 'f' to view an illustration linked to the entries.
Please note that it is not possible to see immediately whether there is a photograph linked to a
record. There will be some cases where pressing 'f' is not followed by displaying a photograph.
Not all records hold photographs yet.
For some types of records (unbraced monuments; written documents) there are no photographs.
It is possible to compare images in the same way as, for example, in a lecture or as you would do
at a light-box. To gather images on the light box press "m", while the Image is shown or use the
the right mouse button context menu.
For a full description of the Image-Viewer-Functionality consult the User-Manual.
DYABOLA - CENSUS-Manual
5.3 Additional Information
If you need some further assistence, please use the DYABOLA Short-Reference or consult the
DYABOLA User-Manual.
On the Short Reference you will find all Keys, a short explanation of program-functions and a
navigation-scheme.
The User-Manual contains the complete Reference of all DYABOLA-Search-Functions.
PROJEKT DYABOLA
Verlag Biering & Brinkmann
Postfach 45 01 44
D-80901 München
Fax +49-89-32 35 21 82
E-Mail: [email protected]
Homepage: www.dyabola.de
This DYABOLA manual is the printed version of the online-manual.
On our Homepage (www.dyabola.de) under the header MANUAL
you'll always find the most recent update of the DYABOLA Short Reference,
the DYABOLA User Manual and all project specific manuals.
Use the project specific manuals if you have no experience with DYABOLA
The Short Reference is only for advanced users and refers to explanations
given in the User Manual