1
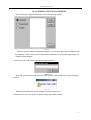
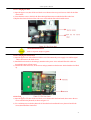
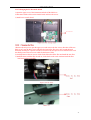
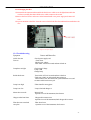
OPERATION MANUAL FOR
UT-2100C
Microplate Reader
M.R.C LTD.
OFFICES: HAGAVISH 3, HOLON 58394
P.O.B. 1684, TEL-AVIV 61016, ISRAEL
TEL: 972-3-5593105,972-3-5595252 FAX: 972-3-5594529
2100C Operator’s Manual
Table of Contents
How to use the menu ............................................................................................................4
Precautions............................................................................................................................5
1. INSTALLATION................................................................................................................ 9
1.1 Unpacking ....................................................................................................................... 9
1.2 Environmental Requirements ............................................................................................. 9
1.3 Electrical Setup ................................................................................................................ 9
1.4 External Printer Connection ............................................................................................. 10
1.5 Transporting for service ................................................................................................. 10
2. FUNCTIONAL DESCRIPTION..................................................................................... .11
2.1 Introduction ................................................................................................................. .11
2.2 General Description....................................................................................................... .11
2.2.1 2100C front view ..................................................................................................................11
2.2.2 2100C rear view .....................................................................................................................12
2.3 Measurement Principle...................................................................................................12
2.3.1 Photometic Measurements .................................................................................................... .12
2.3.2 Optical system .................................................................................................................... .12
2.3 Technical Specifications .............................................................................................. .13
3. OPERATION INSTRUCTIONS ...................................................................................15
3.1 Touch Panel & Pen........................................................................................................15
3.2 Digital Number Keyboard ...........................................................................................15
3.3 Character Soft Keyboard ...............................................................................................15
4. INSTRUMENT STARTUP .........................................................................................17
4.1 Power on.......................................................................................................................17
4.2 Main menu ...................................................................................................................18
5. PROGRAM ................................................................................................................. .19
5.1 Mode setting................................................................................................................ .19
5.1.1
5.1.2
5.1.3
ABS mode.................................................................................................................... 19
Cut-Off mode............................................................................................................... 19
Calculation mode ........................................................................................................ 19
5.2 Edit Program Setting ....................................................................................................20
5.3 Creating program ........................................................................................................23
5.4 Deleting program ........................................................................................................23
5.5 Standard .......................................................................................................................23
6. RUN THE TESTS ........................................................................................................25
6.1 Plate Parameters Setting ...............................................................................................25
6.2 Select Test Program......................................................................................................25
6.3 Mark well .....................................................................................................................26
6.4 Select All ....................................................................................................................27
6.5 Clear All .....................................................................................................................28
6.6 Test .............................................................................................................................28
6.7 Results..........................................................................................................................28
2
2100C Operator’s Manual
6.8 Calculation Results.......................................................................................................29
6.9
Printing..................................................................................................................30
6.10 Storing Test Results....................................................................................................30
7. REPORT ..................................................................................................................... 31
7.1 Report form ..................................................................................................................31
7.2 Report By Patient list ..................................................................................................31
7.2.1
7.2.2
7.2.3
7.2.4
7.3
7.3.1
7.3.2
7.3.3
7.3.4
Edit patient data ................................................................................................................. 31
Preview report ..................................................................................................................... 32
Delete patient data .............................................................................................................. 32
Print report .......................................................................................................................... 32
Print By Program list...............................................................................................32
Preview report ..................................................................................................................... 33
Delete program .................................................................................................................. 33
Print report .......................................................................................................................... 33
Gather print ......................................................................................................................... 33
8. COMMUNICATION.................................................................................................... 35
8.1 Remote service ............................................................................................................ 35
8.1.1
8.1.2
8.1.3
Dial up ........................................................................................................................ 35
Data transmission.......................................................................................................... 36
Exit communication ...................................................................................................... 38
8.2 Communication to 2600C ...........................................................................................38
8.3 Communication to PC ..................................................................................................39
9. SYSTEM SETTING ..................................................................................................... 40
10. INFORMATION MANAGEMENT ........................................................................... 42
11. SYSTEM LOG .......................................................................................................... 44
12. POWER OFF .............................................................................................................. 45
13. INSTRUMENT SERVICE ........................................................................................ 45
13. INSTRUMENT SERVICE ........................................................................................ 46
13.1 Maintenance .............................................................................................................46
13.2 Cleaning The Instrument ............................................................................................46
13.3 Changing Part Of Instrument ..................................................................................... 46
13.3.1 Changing the fuses ............................................................................................................. 46
13.3.2 Changing the lamp ............................................................................................................. 46
13.3.3
Changing the filter ...................................................................................................... 47
13.3.4 Changing the front board .................................................................................................. 47
13.3.4 Changing the photocell ..................................................................................................... 47
13.3.5 Changing the plate holder ................................................................................................. 48
13.3.6 Changing the driving board ............................................................................................... 48
13.3.7 Changing the LCD transfer board........................................................................................ 49
13.3.8 Changing the fibre ............................................................................................................ 49
13.3.9 Changing the fibre ............................................................................................................ 50
13.4 Troubleshooting .......................................................................................................50
3
2100C Operator’s Manual
How to use the menu
General
Welcome to be the user of 2100C.
This manual is a user’s guide for 2100C microplate reader, which includes system installation,
operating procedures, parameters setting and basic maintenance. Reading the manual carefully
before operation is strongly recommended.
For external printer, please refer to related external printer manuals.
Instruments with different software versions will have some different functions; this manual
describes the system 2100C and its software version.
Symbols description
Symbols in the manual
NOTE!
Notes contain additional information or tips when using the instrument.
ATTENTION! Cautions
Cautions should be followed carefully to ensure your instrument work correctly
and to avoid unnecessary personal injury.
Symbols on the instrument
4
2100C Operator’s Manual
Precautions
General
Before you start installing and working with themicroplate reader, you should read the safety precautions
and regulations shown in this chapter.
Operator Qualification
Please note that the operation with Microplate reader should be carried out only by the doctor or clinical
inspector who have undergone necessary training provided by the sales agent.
Service Technician Qualification
To install, maintain and repair the instrument, a service technician has to be trained on the instrument by
the manufacturer or their representative. A service technician is also expected to be familiar with the
normal operation of the instrument as described in the User’s manual and the special operations as
described in the service manual.
Electrical
To use microplate reader safely, pay attention to the following items:
To prevent the risk of electrical shock and/or damage to the instrument Operator should not open the
white cover of the instrument. Only authorized personnel, for example, service technicians, may open the
instrument to perform maintenance or repair.
Touching the main board when the power is on may cause severe injury or death. Any problem, please ask
for helps from your supplier.
Mechanical
There is no risk presented by the mechanical parts of the instrument when the instrument is closed. If the
covers of the instruments are removed, mechanical parts could cause personal injury or the instrument
may be damaged if the following advice is not being considered: DO NOT wear loose garments or
jewellery that could catch in mechanisms. DO NOT put your fingers/hands into the pathway or any part
while the microplate reader is in operation. DO NOT attempt mechanical repair unless the instrument is
not in operation or OFF.
Lamp
The source lamp becomes extremely hot during operation; never touch the lamp when it is on! Look
directly into the light path of the lamp may cause eyes damage, too.
5
2100C Operator’s Manual
If the lamp needs to be changed, always switch off the lamp by switching off the instrument and then wait
until the lamp has cooled down.
Chemical
The operator is responsible for taking all necessary precautions against hazards associated with the use of
clinical laboratory chemicals. Specific recommendations for each reagent used with the microplate reader are
normally found on the manufacturer’s package inserts or the on the product information sheets for each
chemical. Wipe up any reagent spillage on the instrument immediately.
Biohazardous Materials
As with all vitro diagnostic equipment, patient samples and serum-based quality control (QC) products that
are assayed on this system, as well as all waste from the waste container, should be treated as the potentially
biohazardous. All materials and mechanical components associated with the sampling and waste system
should be handled according to your facility’s biohazard procedure. Use the personal protective equipment
recommended by your facility when handling any of these components. Detailed recommendations:
Samples
Treat all samples as potentially biohaazardous and infectious. If any sample is spit on the instrument, utilize
the correct personal protective equipment ( PPE- gloves, lab coat, etc..), wipe it up immediately and clean the
contaminated with a disinfectant.
Biohazardous parts
Avoid direct contact with the microplate . Treat these areas as potentially biohazardous and /or infectious
Reagents
Avoid direct body-contact with reagents. Direct body-contact may result in irritation or damage to your skin.
Refer to the manufacturer’s reagent kit box and package inserts, or product information sheets for specific
instructions.
Avoid direct body-contact with cleaning solution. Direct body-contact amy result in skin irritation or
damage. Refer to the manufacturer’s kit box and package inserts, or product information sheets for specific
instructions.
6
2100C Operator’s Manual
ATTENTION! Cautions
Requirement for Samples and Reagents, calibrators and controls.
Our Microplate Reader is a Reagent open system. But before the testing, the following items should be noted
first.
Generally, all the reagent and samples have to be stored and prepared as per the manufactures’ instructions.
We do recommend that these reagent should from the manufactures with valid product quality
certificate and production permission legalized by local government or from the valid distributors
appointed by MRC LTD in your country. Before your test, please check the following.
Check the expiration date of the material
Check if the reagent is stored properly as the requirement. (e.g. cooled or frozen storage before using)
Check for proper programming in parameter setting menu according to the specified reagent instructions.
Check for volume required for each material.
Check for proper and calibrated pipette to prepare the solution.
Additional Precautions
Flammables
Avoid using dangerous flammable material around the instrument.
Accuracy/Precision of the Measured Results
For proper use of the instrument, measure control samples and monitor the instrument during the
operation.
An incorrectly measured result may lead to an error in diagnosis, thereby posing a danger to the
patient.
Treat all reagents according to the manufacturer’s recommendations. Refer to the reagent kit box and
package inserts, or product information sheets for specific instructions.
Make sure that the sample/reagent mixture does not contain any blood clots, dust or other insoluble
contaminants. If insoluble contaminants are contained in the sample, correct measuring values may not be
obtained.
Application
The instrument is designed for clinical immunity test analysis using water-soluble samples and
reagents.
Please note that other types of analysis may not be applicable to the instrument.
7
2100C Operator’s Manual
Operation and Maintenance
During operation and maintenance of the instrument, proceed according to the instructors and do not
touch any parts of the instrument other than those specified.
Verify the front covers closed while the instrument in operation.
Avoid touching the mechanism, such as the plate holder mechanism inside the instrument, while the
instrument is operating. This may cause operation stop or damage the instrument.
8
2100C Operator’s Manual
1. INSTALLATION
1.1 Unpacking
Unpack 2100C carefully and check for any damage that may have been caused during transportation.
check the components:~
● 2100C instrument
● 1 Operator’s manual
● 1 Packing list
● Accessories, panel pen, power cable, print cable, RS-232 serial cable, pstn line, lamp, fuses
Keep the original package for future transportation
NOTE!
● Report any damage or missing to you local representative.
● Retain the original packing material for future use in the event that
the instrument is placed in storage ,shipped to another location ,or
returned for service.
1.2 Environmental Requirements
Locate 2100C to avoid exposure to excess dust, vibrations, strong magnetic fields, direct sunlight,
draft, excessive moisture or large temperature fluctuations. Leave sufficient clearance (10 cm) at both
sides of the unit for adequate air circulation.
ATTENTION! Cautions
Instrument be operated within an ambient temperature range of 10ć-40ć
humidity of 20%-85%.
1.3 Electrical Setup
Power requirements
● AC110V - AC250V
● 50 - 60Hz
● 80W
ATTENTION! Cautions
● Ac power must be grounded at the main socket.Interuption of the
protective conductor inside or outside the instrument or
discoonection of the protective conductor terminal may make the
instrument dangerous.
● The circuit used should be substantially free of large transients such
as large pumps,large centrifuges.etc.
● If found smog,strange sound in instrument,please turn instrument
off immediately and contact your dealer.
9
2100C Operator’s Manual
Connect the supplied power cable to the rear of the instrument as shown. Plug the other end of the
power cable into an AC outlet which has a protective conductor also called as earth or ground.
1.4 External Printer Connection
With both the instrument and the external printer off, connect the parallel cable to the rear of the
instrument. Plug the other end of the parallel cable into the printer. Then plug power cable into printer.
Install printer paper if needed.
1.5 Transporting for service
Repack the instrument according to instructions enclosed in the package.Use the
original package.Indicate the fault.Inform about the use of hazardous materials.
10
2100C Operator’s Manual
2. FUNCTIONAL DESCRIPTION
2.1 Introduction
1) 2100C is a microprocessor –controlled, general purpose photometer system designed to read and calculate
the result of assays ,including contagion , tumorous mark , hemopathy , dyshormonism ,which are read
in microtiter plate.
2) Touch panel let your operation easily.
3) 100 pre-programmed tests.
4) Multiple calculations~
● Absorbance mode (ABS)
● Cut-Off mode
● Single standard mode
● Point to point mode
● % Absorbance Multi-Point Mode
● Linear regression mode
● Exponent regression mode
● Logarithm regression mode
● Power regression mode
5) visualization mark plate~you can set blank, control, sample ,standard in any place~and run mostly 12
different tests in one 96 microplate.
6) Test time ~5s/plate,and mix plate before test
7) Max save 500 program and 1000 patients data and 10000 sample records. 8)
generalization report ~support multi-type printers.
9) 2100C can update software. 2100C also can connect to 2600C and update 2600C’s software.
10) information manage function~Department database, operator database, system log database.
2.2 General Description
2.2.1 2100c front view
Figure 2.1 Front View
① power pilot lamp: It light when opens the instrument
11
2100C Operator’s Manual
② touch panel: display program
③ Plastic cover
④ Plate carrierer:Microplate in plate carrier
2.2.2 2100c rear view
① Power switch
② Power sokect
③ Fuses
④ PSTN connector
⑤ PRINTER interface
⑥ RS-232 interface
2.3 Measurement Principle
2.3.1 Photometic Measurements
2100C utilizes the concept of vertical photometry in which the light beam passes through the
whole sample.
In vertical photometry,the absorption of light is proportional to the amount of light absorbing
substance in the well.
Lamber-Beer’s law: A=a×b×c
Where A=absorbency,a=absorptivity of the substance,b=Optical length and c=Liquid
concentration.
The advantage of the vertical light path measurement are:
1) inaccurate pipetting of nonabsorbing liquids does not affect the measured absorbance values.
2) Evaporation of nonabsorbing liquids during the reaction does not affect the measured absorbance
values and a certain degree of inhomogeneity in the solution,for example as a result of layering
in turbidity measurements,does not affect the results.
2.3.2 Optical system
The optical system comprises the following components(Figure 2.3):
1
lamp
12
2100C Operator’s Manual
2
3
4
5
6
7
8
9
10
membrane board
heat absorbing board and lens
filter wheel
fibre
reference path
microplate
seconday lens
optical diode
A/D transfer board
2.3 Technical Specifications
Weight:
Overall dimensions:
Power:
Fuses:
Work Environment:
Store Environment:
Lamp:
Standard Wavelength:
Abs range:
Measurement range:
Accuracy:
Precision:
Linearity:
Reading speed:
Warm up time:
CPU:
Store content:
Interface:
Display:
10kg
450mm(L)×330mm(W)×140mm(H)
AC110V-AC250V~50-60Hz
250V/3.15A
temperature 10◦ć-40◦ć; Humidity 20%-85%
-20◦ć-50◦ć
OSRAM64607, 8V/50W
405, 450, 492, 630nm (substitute filters from 340-700nm
available on special order)
0-3.500A
0-2.000A
0-2.0A;
±1.0%or±0.007A
0-2.0A;
±0.5%or±0.005A
±2.0% or±0.007A
Continuous mode <5s, step by step mode<15s
1 minute
Embedded RISC cpu
500 test, 1000 patient information, 10000 test data
RS-232C serial interface, parallel printer interface, telephone line
(modem) interface
5.7 ” LCD display(320×240 discernibility,256 gray scale)
13
2100C Operator’s Manual
Input:
Touch panel and pen, external mouse (special order)
14
2100C Operator’s Manual
3. OPERATION INSTRUCTIONS
3.1 Touch Panel & Pen
2100C has a touch panel, you can operator the instrument by pen.
Input integer (age), float number (abs value), digital number (phone code), press “OK” button to saved,
or press “cancel” button to exit and no saved.
Edit : press ← button to del a character before cursor. Press “clear” button to clear all characters.
3.3
Character Soft Keyboard
Screen 3.2 Character Soft Keyboard
You can operator this keyboard like PC keyboard and move windows by dragging.
15
2100C Operator’s Manual
Use your mouse to click here and
drag away the soft-key board.
Please remember not to loose the
mouse during dragging
Figure 3.3 move the soft-keyboard
NOTE!
Click the area which is just above the soft-key board a little. See the figure
above.
16
2100C Operator’s Manual
4. INSTRUMENT STARTUP
Screen4.2 System Initialization
Loading system
System self-check
Initialization data
Initialization of system
Wait for the light of lamp stable, this will take about 1 minute.
NOTE!
The result will vibrate if the light is not stable.
Self-check of light path~
The filter wheel will turn around, and the plate holder will move in and out for one time. Error
report will be display if the instrument has not pass the self-check.
NOTE!
If the instrument has been connected to printer,plase turn on the
instrument before you turn on the printer.If the order is wrong,it may
cause self-check error or the printer can’t print normally.
17
2100C Operator’s Manual
4.2 Main menu
After self-check, system display main menu~
Screen 4.3 Main Menu
18
2100C Operator’s Manual
5. PROGRAM
Press “program ” icon, program list will be display:
Screen 5.1 Program List
You can pre-program 100 tests in 2100C.
5.1 Mode setting
2100C support 9 calculation modes~
5.1.1 ABS mode
2100C only display and print out absorbance of samples.
5.1.2 Cut-Off mode
Cut-Off formula: Cov X × = NC + Y × PC + Fac
In this cut-off mode, where NC is the mean of the negative controls, PC is the mean of the positive
controls, Cov is the cutoff absorbance .X, Y, Fac are coefficients that have any positive and negative
numerical value (including 0 and 1) e.g. sample OD/NCı2.1 is positive, that X=2.1, Y=0, Fac=0.
In regular cutoff mode, 2100C award that sample is positive if sample OD/Cov>1.
5.1.3 Calculation mode
1)
Single standard mode: A single calibrator material of known concentration is used so that
concentrations of unknown samples may be calculated according to Beer’s Law.
Abs
19
2100C Operator’s Manual
2) point to point mode: you can set 2-8 standards, the resulting calibrator curve is a series of lines
connecting the calibrator points, which may be entered in ascending or descending order of
absorbance.
Abs
Abs
Conc.
Fig u r e 5 . 2 P o int t o P o int Mo d e
3) %ABS: You can set 2-8 standards. The highest absorbance standard will be assigned a value of 100, and
each sample and standard is reported as a percent of the absorbance of the highest calibrator. The
resulting calibrator curve is a series of lines connecting the calibrator points, which may be entered in
ascending or descending order of absorbance.
4) Linear regression mode: You can set 2-8 standards. This is a multi-point standard mode that calculates a
best fit linear equation based upon the standard points.
Equations: Y = kX + b: This is used when the absorbance and the concentration is linear.
Abs
5) Index regression mode: You can set 2-8 standards. Equation: Y =ke bX ; This is used when the
natural log of the absorbance is plotted against the concentration.
6) Logarithm regression mode: you can set 2-8 standards. Equation: Y = kLnX + b ; This is used when
the natural log of the concentration is plotted against the absorbance
7) Exponent regression mode: You can set 2-8 standards. Equation: Y =kX b ; This is used when the
natural log of the absorbance is plotted against the natural log of the concentration.
5.2
Edit Program Setting
Select existed program (it will be marked), press “Edit” button, display the following windows:
20
2100C Operator’s Manual
Screen 5.2 Program Window
program: program name, don’t input the name existed.
● reagent: Input reagent name, you can ignore it.
● wavelength
● calibration mode
● Double sample: If select it, samples must be pipetted into consecutive two wells, the mean
absorbance reading will be used to calculate a single concentration.
● Blank: You can set range of the blank abs. If blank absorbance out of range, system will display:
“blank abs is out of range.”
●
You can press >> button, come to next windows, or press << button, come back this windows,
you can press “cancel” button, exit program configuration windows.
1) Standards mode setting windows:
Standard number: you can select up to 8.
● Concentration unit: you can select it from listing.
● Double standards: if select it, standards must be pipetted into consecutive two wells, the mean
absorbance reading will be used to calculate a single concentration
●
21
2100C Operator’s Manual
●
Standard conc.: double point standard conc. Listing, you can input standard concentration.
Screen 5.4 Input Concentration
Notice: Standards may be entered in ascending order of absorbance. Standard 1 is the lowest
concentration.
2) Cut-Off mode setting windows:
Cut-Off formula parameter:
(Please see section 5.1.3)
● Range of Negative and positive: if absorbance of negative control and positive control is out of
range, 2100C calculates as min or max abs.
● Double of controls: if select this, controls must be pipetted into consecutive two wells, the mean
absorbance reading will be used to calculate a single concentration
●
3) Positive and negative setting windows
22
2100C Operator’s Manual
Screen 5.6 Positive and Negative setting Window
Qualitative mode: In this option you can select regular cov, reverse cov, none.
● Regular cov: Samples with values higher than the positive cutoff are labeled as positive. Sample with
values lower than the negative cutoff are labeled as negative. Any samples with values falling between
the negative cutoff and the positive cutoff are labeled as equivocal.
● Reverse cov: Samples with values lower than the positive cutoff are labeled as positive. Sample with
values higher than the negative cutoff are labeled as negative.
● None: you can select none if you don’t award negative or positive.
Normal range: please input the values with reagent instruction
Press “Finished” button, come back program listing windows.
5.3
Creating program
Press “new” button to create a new program, then input the parameters. If the program name has existed,
system will warning:“program exists.”
5.4 Deleting program
Select one program in program listing, press “delete” button, system display windows:
Screen 5.7
Press “Yes” button to delete program. Press “NO” button to cancel.
5.5 Standard
Standard test results and curve will be stored. Operator can review and print the results.
Select one program in program listing, Press “standard” button, system display standard conc. and
23
2100C Operator’s Manual
abs.
Press “curve” button, system will display standard curve:
Press “print” button, system will print standard curve.
NOTE!
Old standards will be deleted if modifying program
setting.(Wavelength,calculate mode,standard number,standard conc.etc.)
24
2100C Operator’s Manual
6. RUN THE TESTS
6.1 Plate Parameters Setting
Press “test” icon in main menu, pop up such windows~
● Plate direction: A-H direction and 1-12 direction.
● Test mode: You can select continue mode(<5 seconds= or step mode (<15 seconds=.
● Mixer setting:
Mixer speed: you can select fast, normal, slow or none.
Mixer time: you can select 1-60 seconds.
Press “Ok” button, come to next windows:
Screen 6.2
6.2 Select Test Program
2100C support 12 programs in one plate, first press “New” button, the following windows display:
25
2100C Operator’s Manual
select the program, press “OK” button.
NOTE!
If you test multi-programs in one plate, you must set the programs one
by one.
STD: standard
CLR: clear
6.3
Mark well
You can set each well’s function. Select well’s function firstly, and click the well which you will mark.
mark label:
sample: 1–999
blank: B
negative controls: NC
positive controls: PC
standard: S1–S8
Quality Control: QC
6.2.1 Sample
Click the well which will be tested, then the well will be marked .If you modify sample No., please
click that well again. A windows display:
Input sample No.again. If you input No. already exist, system display “sample NO. Already exist,
input again.”
26
2100C Operator’s Manual
NOTE!
One patient is marked by only one sample NO. In one day. Negative
controls: NC Positive controls :PC
6.2.2 Blank
You can select blank well or no in different program. One program only set a blank well. Old blank
value will be saved automatically and be used.
6.2.3 Negative controls
You must set one negative control in one program other than negative control factor is 0.
6.2.4 Positive controls
You can see negative control setting. (Section)
6.2.5 Standard
This option is valid only when one program needs standards. If this program has old standards values,
you can select set standards or not.
NOTE!
If one program set standards and test good~new values of standards will
cover old values.
6.2.6 Clear
If you want delete marked wells, press “clear” button, then point wells that what you want.
6.4 Select All
Use this button; you can quickly mark the sample wells.
Press “select all” button, display such windows:
input start number(1-999) and start well(row number and line number), press “Ok” button. All wells in
this plate will be marked samples. Start No. is that you input.
In this option all set program and wells will be deleted. You should set standards and controls after
“select all”.
27
2100C Operator’s Manual
Screen 6.5
6.5 Clear All
Press “Clear all” button, system display:
Press “yes” button, clear all well setting.
6.6 Test
Press “start” button, system will test the plate:
You can press “stop” button to stop the test.
6.7 Results
The test results will be displayed:
28
2100C Operator’s Manual
1-6 columns abs results will be displayed, press 7-12>>
columns abs results.
Sample: 001 is sample number, 0.040 is abs results.
button, windows will display 7-12
NOTE!
if abs results> 3.500A, will display 3.500*,and calculate by 3.500,if
abs<0.000A,display 0.000*, and calculation by 0.000.
you can modify the well result by click the well~
Input abs value and press “ok” button.
Press “result” button in abs result windows, display calibration results:
You can see the values and negative/positive mark display in every well. If the values in some well
<0.0 ,“*” will be labeled to this well.
29
2100C Operator’s Manual
6.9 Printing
NOTE!
QTA: quantitative analysis
QLA: qualitative analysis
Press “Print” button in testing windows, 2100C will print all test results.
6.10 Storing Test Results
Press “cancel” button in Abs windows, The instrument will automatically store the test results in history
database.
30
2100C Operator’s Manual
7. REPORT
7.1 Report form
Press “report” in main menu, system display such windows:
Select report form:
● Report form: report by patient list or program list.
● Date range: today and all of days.
NOTE!
● Before you print the report,please check whether the cable between the
printer and instrument has been correctly connected and the printer
has power on.
● Always make sure that there is sufficient paper in the printer.Never use
the printer without paper.
7.2 Report By Patient list
Select “patient ”~press Ok button, display following windows:
Screen 7.2
1) Select one patient
2) Mark multi-patients: You can mark all patients by pointing first line in the title bar.
7.2.1 Edit patient data
Select one patient, press “Edit” button, patient’s information windows pop up:
31
2100C Operator’s Manual
Screen 7.3
Input the information. Press “Ok” button to save information, press “cancel” button to exit without save.
7.2.2 Preview report
Select a patient, press “preview” button, that patient ‘s data display in list.
7.2.3 Delete patient data
Press “delete” button, windows pop up:
Press “yes” button, all marked patient data will be delete. Press “no” button, exit without save.
7.2.4 Print report
Press “print” button, all marked patient report will be print.
7.3 Print By Program list
Select “program”, press “ok” button, and pop up program list windows:
32
2100C Operator’s Manual
7.3.1 Preview report
Select one program, press “preview” button, and pop up preview windows:
7.3.2 Delete program
Press “delete” button and “yes” button, all marked program and test data will be delete.
7.3.3 Print report
Press “print” button, all marked program’s standard curve and test data will be print.
7.3.4 Gather print
2100C support gather print, you can quickly print all negative or positive patient data in one day. Press
“gather” button, come to next windows:
Screen 7.8
33
2100C Operator’s Manual
Input date, select program and results from list, press “OK” button, all patients coincidence condition
display in listing windows~
Press “print” button, all data will be printed.
34
2100C Operator’s Manual
8. COMMUNICATION
Communication function is an option function for 2100C Plus.
Click “communication” icon in main menu, The following windows will be displayed:
8.1 Remote service
8.1.1 Dial up
Press “Telnet” button, come to dial up windows:
1) Connect to service center.
Input service center phone code, press “Dial-up” button.
2) Connect to internet
35
2100C Operator’s Manual
Operator input user name, password and Internet IP address. Press “Dial-up” button.
System will come to telnet service windows if dial-up succeeds:
Screen 8.5
8.1.2 Data transmission
“Connection successful” will be display in this telnet service window. Now you can press buttons to
transmit data.
1) Send data
Press “Send data” button, come to next windows:
Screen 8.6
Select sending content, press “Ok” button, and send data.
Screen 8.7
36
2100C Operator’s Manual
Press “Cancel” button to stop sending data.
2) Receive data
Press “Receive data” button, come to next windows:
Screen 8.9
Press “Cancel” button to stop receive data.
3) System update
Press “update” button, 2100C will receive update data.
Press “Cancel” button to stop receive data.
When system received data ok ,update data to Flash ROM~
Screen 8.11
37
2100C Operator’s Manual
ATTENTION! Cautions
The instrument may fail to operate normally if the power supply is
interrupted during this time.
System will display windows after update successful:
Now you can exit telnet, come back to main menu, turn instrument off.
8.1.3 Exit communication
Press “Cancel” button in telnet service windows, press “Cancel” button in dial-up windows, and come
back to main menu.
8.2 Communication to 2600C
2100C can connect to 2600C,update 2600C’s software~
1) Close 2600C power, connect 2100C with 2600C by serial port cable
2) Press “2600C” button in communication windows, system display such windows:
NOTE!
If serial mouse connect to 2100C, Please disconnect serial mouse from
2100C and connect serial cable to 2600C.
NOTE!
If system happens error, press “Cancel” button to stop mission. If this
error exists, Please contact your dealer.
38
2100C Operator’s Manual
8.3 Communication to PC
2100C can connect to pc, send data to pc. With software, you can store patient lists, see curves, print
reports, and collect QC data.
For more information regarding pc software, contact your dealer.
1) Turn 2100C and pc, connect serial cable to 2100C, and plug another end in pc COM1.
ATTENTION! Cautions
2100C and PC don’t open when connecting serial port, otherwise hardware
will be wrong.
2) Press “Pc” button in communication windows, come to next windows: Waiting
Screen 8.14
3) Run pc software, select data send menu, receive data.
4) Sending data finished, press “Cancel” button to come back main menu.
39
2100C Operator’s Manual
9. SYSTEM SETTING
Press “system setting” button in main menu:
1) Serial NO
2) Hospital: hospital name.
3) Date and time
4) Printer: 2100C support 5 series printers: Canon BJC 250 series, HP DJ 340/400 series, HP LJ 5L/6L
series, Epson LQ series, Epson Stylus series, please see such windows:
You can choose one of printers
NOTE!
If printer setting is wrong, maybe printer works error.
5) Contrast adjust: press
+ button to increase contrast, press - button to decrease contrast. New value
will be saved and used.
6) Sound switching: Turn on or off the speaker
7) Touch panel calibration : You can calibration touch panel. Press “touch panel ” button, come to
calibration windows:
40
2100C Operator’s Manual
Screen 9.3
Press the cross center by pen, wait one second, the cross moves to next place automatically. You
should continue press cross with pen again. The same operation repeats 5 times, system will display
next windows:
NOTE!
If the cross dosen’t move after press it for many times,the touch panel may
gose bad,please contact your dealer.
Screen 9.4
Please click anywhere in the panel, system will save new setting and come back system-setting
windows.
41
2100C Operator’s Manual
10. INFORMATION MANAGEMENT
Press “information ” button in main menu, come to the following windows:
Screen 10.1
2100C has operator database and department database. You can add or delete operators/department in
those database. 2100C can store 100 records in those two databases. Select operator or department. For
example operator database:
1) add record : press “add” button, input operator name in windows~
Press “OK” button, operator’s name add to list. If this operator’s name already exists, system will display
windows:
Screen 10.3
If database reach high range, system will report, “operator’s records is over.”
2) Deltree record: Select one operator in operators listing, press “Delete” button:
42
2100C Operator’s Manual
Screen 10.4
Press “Yes” button to deltree that record, press “No” button to cancel.
43
2100C Operator’s Manual
11. SYSTEM LOG
Press “event log” button in main menu, you can view history log:
Screen 11.1
Event log contain date, time, type and event status. 2100C can record max 2500 events. Last event
arrange firstly. You can press “Clear” button to deltree all event records. Press “Cancel” button to come back
main menu.
44
2100C Operator’s Manual
12. POWER OFF
Press “Power off” button in main menu, display such windows:
Press “yes” button, instrument will be turned off. Press “no” button, exit to main menu.
NOTE!
If don’t turn off instrument normally, results and parameters edit in this time
will not be save.
System will display such windows:
ATTENTION! Cautions
Please keep power when turn instrument off. The instrument may fail to
operate normally if the power is interrupted.
45
2100C Operator’s Manual
13. INSTRUMENT SERVICE
13.1 Maintenance
2100C is designed to be a maintenance free instrument. To insure optimum trouble free performance,
the instrument should be kept dry and operated in an area free from excessive dust.
13.2 Cleaning The Instrument
● Keep working environment clean
● Use a slightly damp soft cloth to remove dirt or spills. For decontamination, 70% isopropanol is
recommended.
● Use soft cloth to remove dirt or spills in LCD.
13.3 Changing Part Of Instrument
13.3.1 Changing the fuses
1) Disconnect power cord from mains supply before replacing fuses.
2) Open fuses box left in power, change fuses, close fuse box.
Fuse specification: 250V/3.15A.
3) Turn the instrument on.
13.3.2 Changing the lamp
1) Turn the instrument off, open instrument cover by unscrewing the one screw on the front of the
instrument.
2) Remove four screws of the optical assembly cover. Remove the cover.
3) Lift up the lamp with the terminal socket. Pull the terminal socket from the lamp contacts.
4) Refit the terminal socket to the contacts of the new lamp(OSRAM64607, 8V/50W).Place the new
lamp in its place.
5) Close the optical assembly cover. Replace the screws.
6) Close the instrument cover. Turn 2100C on again
46
2100C Operator’s Manual
13.3.3 Changing the filter
1) Open the upper cover,take off the two black covers.Remove the two special screws which fix the filter
wheel motor.
2) Loose the three screws which fix the filter wheel,pull the motor out and take the filter wheel out.
3) Replace the relative defective filter with a new one.Install the filter wheel and the motor.
ATTENTION!Cautions
Don’t scrape the surface of filter.
13.3.4 Changing the front board
1) Open the upper cover~take off the two black covers.Disconnect the power supply wire and flat signal
cables ,then remove the fixed screws.
2) Install the front board to its location,pay attention to the power wires and small flat cable which are
through the bottom of front board.
3) Connect the cables and wires, fix the screws and pay attention to the detector which should not be lifted
up.
13.3.4 Changing the photocell
1) Open the upper cover,take off the two black covers.Disassemble the front board, then remove the two
screws which fix the photocell,as shown in figure 13.3.
2) Use a soldering iron to take the photocell off from the front board.Install a new photocell and fix the
screws,then install the front board.
47
2100C Operator’s Manual
13.3.5 Changing the plate holder
1) Open the upper cover,remove the two black cover~remove the fixed screws which fix the frame,take off
the frame and rails.
2) Loose the adjusted screw which fix the belt,you can see the adjusted screw when moving the holder
out.Overturn the plate holder and remove the two fixed screws,then replace the plate holder with a new
one.
3) Screw the screws~overturn the plate holder back~screw the adjusted screw to adjust the belt to suitable
position~then install the rail and frame.
Figure 13.4 The plate carrier
13.3.6 Changing the driving board
1) Open the upper cover,take off the two big black boxes,remove the four special screws which fix
work area and the three screw which fix the head of fiber,then lift up the work area carefully.
2) Disconnect all the wires from the driving board,remove the screws and replace the driving board
with a new one,then recover all of them.
ATTENTION! Cautions
● Protect the fiber.
● Protect from static electricity.
● Don’t confuse the wires of the filter wheel motor and the wires of power
supply wires.
● Don’t leave out the insulated pad.
The driving board
48
2100C Operator’s Manual
13.3.7 Changing the LCD transfer board
1) Open the upper cover of the instrument and take off the black box.
2) Disconnect all the cables on the transfer board and loose the screws.
3) Install a new transfer board.
LCD transfer board
1)Remove the only screw, open the upper cover and remove the four screws ,then take off the two
black cover.Loose the three screws which fix the head of the fiber,use a stick to push the head
backward carefully,use a special screwdriver to remove the four special screws which fix the work
area,finally remove the two screws which fix the frame of fiber.
2) carefully.Remove the two screws which fix the fiber,take off the fiber and install the new fiber.
3) Install the frame with the fiber located on, fix the frame to the work area then install the fiber
head and work area carefully.
49
2100C Operator’s Manual
13.3.9 Changing the fibre
1) Disassemble the instrument,disassemble the black boxes which cover the light,disassemble the
work area carefully,disconnect all the wires which connect to the switch.
2) Remove the fixed screws and screws in the bottom.Install a new power supply and connect all
wire.
3) Pay more attention to the fiber~loose the screws which fix the fiber first and then disassemble the work
area.
Figure 13.6 The power supply
13.4 Troubleshooting
Symptom
Causes and Remedies
2100C does not
Turn on
Check power supply cord
Check fuses
Check power voltage
Turn 2100C off for 30 seconds and turn it back on.
Lamp does not light
Check lamp Voltage
Lamp is bad
Change lamp
RAM check error
Turn 2100C off for 30 seconds and turn it back on.
Firstly turn 2100C on and secondly turn printer on.
Cable connect error, turn 2100C off, open instrument cover, and
reconnect cable between two pcb.
Lamp is too high
Filters install in wrong place.
Lamp is too low
Lamp is bad and changes it.
Motor does not work
Motor is bad
Open the cover of the instrument, check motor.
Chopper wheel run faster
Chopper driver motor error
Open the cover of the instrument,check chopper driver motor .
Filter does not come back
zero place
Filter wheel error.
Open the cover of the instrument, check sensor.
50
2100C Operator’s Manual
Plate does not come back
original place
The plate may be does not place in right place.
Check it.
Plate don’t move
Driver Motor error, open cover, checks driver motor work or not.
Open COM port error
Maybe use serial mouse.
Turn 2100C off. Disconnect the mouse from instrument and turn on it
again.
Printer don’t work
Printer power works error.
Check power is ok.
Check ON/OFF button in printer.
Check printer type in system setting right or not.
Firstly turn 2100C on then turn printer on.
Check printer cable connect 2100C right or not.
The printing is dim or
incomplete
Change ink box, clean printer head. (See printer user manual)
The printing is jam
See printer user manual
Other printer error
See printer user manual
ATTENTION! Cautions
Trouble-shootings above are for trained operators’ reference, If
unsolvable error is found during the operation process or appears again
and again, untrained users should contact your supplier for further help.
51