1
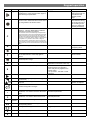
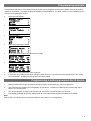
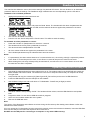
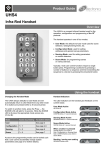
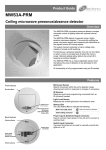
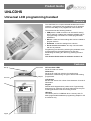
Product Guide UNLCDHS Universal LCD programming handset Overview The UNLCDHS is a compact infrared handset used for the operation, configuration and programming of CP products that have the ability to be programmed via IR and/or RF. The handset has the following features: USB port: the USB connection can be used for saving device settings, updating the handset’s software and as a programming connection for D-Mate programmable addressers. Macros: create and save settings that can be recalled to program devices. Readback: to read the settings from a device. An-10 wireless connection: two way communication with An-10 products. Programming is achieved by selecting the parameter to be programmed from the appropriate menu and then transmitting the setting to a device by pressing the send button. This Product Guide relates to software version 1.10. Features Belt clip IR transmitter USB port IR receiver IR Transmitter LEDs Sends IR code to a device. IR Receiver Receives IR code from a device for reading back parameters or determining the type of device that is being programmed. LCD Screen Backlit LCD screen with 4 lines of 20 characters. 5 levels of illumination. LCD 1234 P R O D567 U C T890 F A123 M I L456 Y 789 0 1234 0 S t a567 n d a890 l o n123 e 456 789> 1234 567 890 123 456 789>0 An -10 1234 0 D - M567 a t e890 123 456 789> Keypad Robust tactile keypad with a positive click. Ergonomically designed to be used with one hand. Alphanumeric keys for entering parameter levels and naming macros. USB port Connection port for a USB flash drive / memory stick, DMate programmable addresser programming adaptor or CP accessories only. Keypad Using the handset Pointing the handset You must point the handset directly at the device that you want to control or program (see opposite). When programming a device it is only necessary to point the handset when ‘Sending’ or ‘Reading’ a setting(s). Understanding Device Indicators All devices are fitted with LED indication which gives feedback on settings they receive from the handset (see individual device’s Product Guide). Ensuring line of sight Operation overview Selecting a product Select the CP product family from the main menu (SA-standalone, An-10 etc). Either select the product or ‘generic product’. ‘Generic product’ lists all the parameters that are available to a product family (some parameters may not be available for all products within a family). Select the parameter group to program (‘Detector param’ for example). Entering parameter values Select the item with up/down buttons (‘Timeout’ for example). + and - keys PRODUCT FAMILY Standalone An-10 D-Mate > > > Use to make small adjustments, or for On/Off, Yes/No parameters. Using the number keys When you type a number, it adds it on to the right and scrolls the digits left. It may be easier to enter a leading 0 before 2 digit numbers in a 3 digit field, and same for 1 digit numbers in 2 digit fields. Delete removes the right hand digit, unless it is the only one. Entering numbers outside the specific range for a setting will result is the message ‘Out Of Range’ or being prevented from entering an incorrect value. There is no need to press ‘Enter’ after entering a number. See page 5 for an example. Handset layout 2 Keypad operation Symbol Text Play ? Shift + Displays a full list of the items in the currently loaded macro. Press the Play button again to start sending the parameters. None. Brings up a list of saved macros that can be recalled for the selected product range. Prompts the user to select between saving the current macro or to start recording a new macro (by clearing all selected parameters). Selects an item so it is a member of the None. current macro. Delete the item from the macro by using delete in the review screen. Channel Asks the user to enter a channel number to switch to. This only takes effect on devices that have more than one channel. None. The Channel button works differently in Rapid and An10 products which consist of several identical channels. Start at channel 0 per product (except for Rapid LCM, Interface and Light Switch which default to channel 1), and press C to change channel. Select a channel either by Up/Down or by number. Press Enter or Right to select the channel. All channels is at the top of the list (0 on keypad). Current channel number is displayed top right in the menu and is the selected item in the channel menu. Display Increased backlight for 5 steps, then back to 0. None. On/Off None. Turns the device on/off. Help Displays the help screen/further explanation for the selected item. Press help again to cancel. Goes back to the root menu for the currently selected product range. None. Read Reads back the currently selected parameter. Send Sends the currently selected parameter. Reads back all the selected parameters in the active menu only. Sends all the selected parameters in the active menu only (similar to macro Play but only applies to the current menu). Lux Up / Down : will raise or lower light level. None. Home R Long press Record C D Action on Press S Selects the submenu. + 1 2-9 0 X Selects No, or decrements the selected parameter, or is used to remove a value from a list. Selects Yes, or increments the selected parameter, or is used to add a value to a list. Quickly/continuously decrements the selected parameter. Symbol Number 1, or cycles through a list of symbols. None. A-Z None. Shift Numbers 2 to 9, or cycles through the list of corresponding letters. Changes between uppercase and lowercase. Space Number 0, or the space character. None. Delete Deletes a single character, or item. Deletes all characters, or all items. No Yes Shows software version number. Goes back to the main root menu. To go back along the path you came (typically None. up one level). Scroll Up/Down through the current menu or None. help text. Selects the submenu. Also used for confirming None. handset configuration changes. - To step down backlighting levels. Use to scroll a page Up/Down of help text. Quickly/continuously increments the selected parameter. Toggles caps lock on/off. 3 Handset Configuration H A ND S ET C ON F IG S l ee p T im eo u t 120 C o nt r as t 50 B a ck l ig ht 0 I R S pa c in g 4 I R T X P ow er Med K e y Cl i ck 2 K e y Re p ea t 10 R e pe a t Se nd Ra te 2 2 M u te No T o B oo t lo ad e r S e cu r it y > H a nd s et T es t > Handset Config screen The screen shows the current values. To save a new value, press enter after changing the value. If value is out of range the unit beeps. Sleep Timeout The time (seconds) taken for the unit to power off when not in use. Default is 120. Range 1-999. Contrast LCD display contrast. Default is 50. Range 1-100. Backlight Sets the default backlight level. Default is 0, which is off. Range 0-100. Note, backlighting the display will reduce battery life. IR spacing Time (milliseconds) between IR messages when sending in macro mode. Default is 4 = 400ms spacing. Range 199. IR tx power There are 3 infrared transmit settings; Low, Med and High. Range: Low - 8m, medium - 15m and high - 25m. Default is Medium. Key Click Adds an audible beep when a key is pressed. The larger the number the louder the beep sounds . Use 0 for no key click. Default is 2. Range 0-100. Key Repeat The repeat rate (milliseconds) for a key that is held down. Default is 10. Range 1-99. Repeat Send rate When ‘Send’ is held down, eg for Lux up, it is the interval between IR messages (milliseconds). Default is 22. Range 1-99. Mute Disables all sounds. Default is No. To Bootloader Resets the handset. Used for updating the software (see ‘Updating UNLCDHS software‘ section of this document). To view Bootloader and Software versions, select ‘To Bootloader’ then turn handset on. The version information will then be displayed. To return the handset to the Config defaults. Hold button ‘1’ while turning the handset On until the ‘Product Family’ menu appears on the screen. Security Enter PIN When a special PIN number is entered the user can then access advanced Rapid programming menus and send specific IR codes. Contact Technical support for details. Handset Test Factory use only. Note Changes to Sleep Timeout, Contrast, Backlight are applied after Off/On cycle. Changes to the rest take effect immediately. 4 Programming example All parameters specified in the individual Product Guides can be programmed using this handset. Refer to the product guides for information on the default values and details on the parameters. The ‘Help’ function on this handset gives an overview of the parameter function. Select a product family P R OD U CT F AM I LY S t an d al on e > A n- 10 > D- M at e > Select ‘Select Product’ S T AN D AL ON E S e le c t > Select a product S E LE C T Pr od u ct PR OD U CT PRM > DD > AD > Select the programming subset DD D e te c to r > Ch . 1 > O u tp u t Ch . 2 > Scroll up or down to select the parameter to change D E TE C TO R PA R AM S W a lk T e st T i me Out M a nu a l Pa r am s O u tp u t LED (m i ns ) Ti me Ou t Off 20 10 Change the value as required. D E TE C TO R PA R AM S W a lk T e st T i me Out M a nu a l LED (m i ns ) Ti me Ou t Off 15 10 Press ‘Send’ to send parameter value to device. If more than one parameter has been changed. Press ‘Send’ for 2 seconds and all the parameters in the current menu will be sent, including those that have not been modified Programming a battery-powered An-10 device Battery-powered An-10 devices must be set into a receive mode before they can be programmed. This is achieved by pressing the Config Button on the device. The device’s LED indicator will then blink red to show it is in receive mode. The device will return to sleep mode if it does not receive any commands within 30 seconds. Permanently powered devices are always ready to receive the infrared signals provided by the handset. Note Please refer to the target device’s instruction leaflet for the location of its Config Button. 5 Macro function Creating a Macro The Macro function enables multiple parameters to be selected and saved as a group that can be sent to a device, Select the programming subset (see ‘Programming example’ step 3 on page 5) DD D e te c to r Pa r am s Ch . 1 > O u tp u t Ch . 2 > Scroll up or down to select the parameter to change D E TE C TO R T i me PA R AM S Out M a nu a l (m i ns ) Ti me S e ns i ti vi t y Ou t On 20 10 9 Change the value(s) as required. D E TE C TO R T i me PA R AM S Out M a nu a l (m i ns ) Ti me S e ns i ti vi t y > O u tp u t Ou t On 15 10 9 Press record once by each parameter you want to save to the macro. D E TE C TO R T i me PA R AM S Out M a nu a l (m i ns ) Ti me S e ns i ti vi t y Ou t On 15 10 4 An inverse arrow will appear to show it is marked as a macro item. Continue for as many parameters as you need. Parameters from other programming subset menus can also be added. Press Play to review the list. M A CR O T i me R EV IE W Out (m i ns ) S e ns i ti vi t y S w it c h On 15 4 On ly You can delete an item at this stage. Delete button deletes the item pointed at with the arrow. Long press delete clears all items. Press Play again to send. Saving a Macro At the Macro Review stage press Record M A CR O N AM E _ Enter a name for the Macro using the alphanumeric keys. Note An unsaved macro will be lost if the batteries are removed. Opening a saved Macro Press ‘Shift’ and ‘Play’ together and the list of saved Macros will appear. M A CR O N AM E C l as s ro om 1 C o rr i do r R e fe c to ry Scroll up or down to select the Macro to open. Press ‘Return’ to open the Macro The selected Macro’s parameters will appear in the ‘Macro Review’ screen Note Care should be taken when naming Macros so that names are not duplicated. The macros are listed in saved order. 6 Readback function The read function allows the user to find out the settings of a particular CP device. This can be done on an individual parameter basis or all the settings. The Readback range is between 8m and 10m depending upon the CP device. Readback of an individual parameter Highlight the parameter to be read from a unit. D E TE C TO R T e st T i me Out M a nu a l PA R AM S W a lk LED (m i ns ) Ti me Ou t Off 20 10 Direct the handset towards device and press the ‘Read’ button. The handset will click when the parameter has been read back, the device will flash its LED, and the value will be shown against the parameter in the menu. D E TE C TO R PA R AM S W a lk T e st T i me Out M a nu a l LED (m i ns ) Ti me Ou t Off 15 10 This can then be edited if necessary. Point the unit at a device and press the ‘Send’ button. This will then send the setting. To read back all of the parameters in a menu Press and hold the ‘R’ (Read) button for more than 1 second. The handset will click every time a parameter is received The device will show multiple flashes of its LED All of the values will be shown against the parameters in the menu. The individual parameters may be edited and then saved as a ‘Macro’. Notes If a parameter(s) has been missed because of a communication error, the missing value(s) is replaced by dashes. Press ‘Enter’ to reveal the previous value, or hold ‘Enter’ to reveal all the previous values for the menu. When reading back, the relay will temporarily be switched off, and will return to it’s normal state 2 seconds after the read back has been completed. Updating UNLCDHS software 1. Download the latest software from www.cpelectronics.co.uk. The product page for the UNLCDHS will contain the latest software and Product Guide. The software is in the form of a Zip file. Ensure that you computer can Unzip this type of file. 2. Unzip the file and copy the contents (HS_Data.cfg and HS_Fw.hex files) to the root of a USB flash drive. 3. Insert the USB flash drive into the USB port on the Handset. 4. Use Handset Config menu and scroll down to ’To Bootloader'. Press Enter (or Right) to select. H A ND S ET C ON F IG M u te To No B oo t lo ad e r H a nd s et T es t > 5. Hold down ‘Delete’ while pressing ‘On/Off’. The handset will then reboot, read the USB flash drive and update itself. 6. Progress is shown. Do not remove USB drive while in progress. 7. At the end, the handset restarts the menu system. 8. Remove the USB flash drive. Note The version of the Bootloader and software are shown during the first start-up after loading new software or after new batteries have been inserted. If for any reason the ‘To Bootloader’ function cannot be accessed, remove and reinsert the batteries, insert the USB flash drive into the USB port and follow the sequence above from item 5. DO NOT use the USB port for connecting to a computer or any other USB accessory. 7 Care and maintenance Replacing the Batteries The battery compartment is located at the rear of the handset. Accessing the internal batteries Press and slide the battery compartment door (see opposite). Lift out the batteries from the holders and insert a replacement batteries (AAA type) ensuring correct polarity. Slide the door back into the handset, ensuring that it clips in place. Cleaning the Handset The exterior of the handset can be cleaned by using a damp cloth. Stubborn marks may be removed by using a mild detergent. Technical data Dimensions Weight Battery 94mm x 160mm x 25mm 0.017kg 6Vdc 4 x AAA (supplied with unit) USB Type A socket Flash drive spec. 128MB min to 16GB max, FAT or FAT32, single partition drive. IR transmit range Low-8m, medium-15m and high-25m Temperature Humidity Compliance 0ºC to 35ºC 5 to 95% non-condensing EMC-2004/108/EC If any of these symbols are on the product or battery, the product or battery must be disposed of in the correct manner and must not be treated as household or general waste. FM 45789 EMS 534520 Due to our policy of continual product improvement CP Electronics reserves the right to alter the specification of this product without prior notice. 8 C.P. Electronics Ltd Brent Crescent London NW10 7XR United Kingdom Tel: + 44 (0) 333 900 0671 Fax: + 44 (0) 333 900 0674 www.cpelectronics.co.uk [email protected] Ref. #WD444 Issue 4