1
instrumentation and software for research
MEDLAB8™
BASIC SCHEDULES FOR MED-PC®
SOF-700LA-1
USER’S MANUAL
DOC-020
Rev. 1.7
Copyright ©2012
All Rights Reserved
Med Associates Inc.
P.O. Box 319
St. Albans, Vermont 05478
Phone: 802.527.2343
Fax: 802.527.5095
www.med-associates.com
Trademarks: MedLab8™, MED-PC™, MedState Notation™, SmartCtrl™, SoftCR™, MED Associates, Inc.
SOF-700LA-1, MEDLAB8
notes
i
SOF-700LA-1, MEDLAB8
Table of Contents
Chapter 1 | Introduction ............................................................................................. 1
Software Description .......................................................................................................... 2
Running the Hardware Configuration Utility ...................................................................... 2
Printing the MedLab8 (*.MPC) Files ................................................................................... 2
Chapter 2 | Editing ProcedurES ................................................................................... 3
Modifying MedLab8 Procedures......................................................................................... 3
Translating and Compiling the Modified File ...................................................................... 5
Chapter 3 | MED-PC IV Runtime System ...................................................................... 6
Introduction ........................................................................................................................ 6
Interface Test Screen .......................................................................................................... 6
The MED-PC IV Runtime Screen.......................................................................................... 6
Running the FR Procedure .................................................................................................. 8
Changing Variables.............................................................................................................. 9
Issuing START .................................................................................................................... 11
SHOW Data From a Box .................................................................................................... 11
The SHOW Command ....................................................................................................... 11
Miscellaneous ................................................................................................................... 12
The SHOW Display ............................................................................................................ 13
Issuing a Response (#R)..................................................................................................... 14
Ending a Session ................................................................................................................ 15
Saving Data........................................................................................................................ 16
Printing Data ..................................................................................................................... 17
Chapter 4 | The MedLab8 Procedures ....................................................................... 18
Introduction ...................................................................................................................... 18
MedLab8 Fixed Ratio.mpc ................................................................................................ 18
MedLab8 Fixed Interval.mpc ............................................................................................ 20
MedLab8 Variable Ratio.mpc............................................................................................ 21
MedLab8 Variable Interval.mpc........................................................................................ 23
ii
SOF-700LA-1, MEDLAB8
MedLab8 Random Ratio.mpc ........................................................................................... 24
MedLab8 Random Interval.mpc ....................................................................................... 25
MedLab8 Discrimination.mpc ........................................................................................... 27
MedLab8 Chain.mpc ......................................................................................................... 29
Appendix A | Data File Formats ................................................................................. 32
Format 1 – Annotated ....................................................................................................... 32
Full Headers – Nine Lines of Header ................................................................................. 34
Condensed Headers – Two Lines of Header ..................................................................... 34
Appendix B | SoftCR™ ............................................................................................... 35
Time Components ............................................................................................................. 35
Control Code Components................................................................................................ 35
Data Element Format ........................................................................................................ 35
Example of SoftCR ............................................................................................................. 37
Discrimination SoftCR Example......................................................................................... 39
Appendix C | Contact Information ............................................................................. 40
iii
MED ASSOCIATES INC.
S O F - 7 0 0 L A - 1 , M E D L AB 8
CHAPTER 1 | INTRODUCTION
MedLab8 is a set of eight MedState Notation™ (MSN) procedures first written for student lab
stations with minimum configurations. Each procedure is contained in a separate text file with
extension .MPC. These files provide complete ready to run procedures as well as a valuable
supplement to the MedState Notation programming manual supplied with MED-PC® IV. MSN is
a powerful developmental language that allows for much latitude in accomplishing any given
task. The files in MedLab8 illustrate just one way to create some basic schedules of
reinforcement, to document and collect simple data, to create an array for SoftCR™, the Soft
Cumulative Recorder, and to time a session.
Before the MedLab8 procedures may be run, it is necessary to run the MED-PC IV Hardware
Configuration Utility to assign the proper Port and Bit values for each Input and Output present.
It may also be necessary to edit the Input or Output constants in the procedures. Files may then
be translated and compiled with the Trans IV program. Detailed instructions are provided in the
next chapter. It is recommended that a backup copy of the procedure files be made before
modifying them to meet specific research or demonstration needs.
The sooner one becomes familiar with editing the MSN text files, as well as translating and
compiling the files with Trans IV, the more one may appreciate the tremendous advantages of
MED-PC IV. Additional information may be found in the MedState Notation Programming
Manual. In particular, sections on terminology, typing conventions, and general definitions, are
recommended before editing the .MPC files.
-1DOC-020 Rev 1.7 Copyright © 2012
MED Associates, Inc.
MED ASSOCIATES INC.
S O F - 7 0 0 L A - 1 , M E D L AB 8
Software Descripti on
The MedLab8 distribution contains eight MSN files as listed:
MedLab8 Fixed Ratio.mpc:
MedLab8 Fixed Interval.mpc:
MedLab8 Variable Ratio.mpc:
MedLab8 Variable Interval.mpc:
MedLab8 Random Ratio.mpc:
MedLab8 Random Interval.mpc:
MedLab8 Discrimination.mpc:
MedLab8 Chain.mpc
Default value of FR1 or CRF.
Default value of FI 1 second.
Default value of VR5 (Mean of 5 with a range from 1
to 20 responses).
Default value of VI10 (Mean of 10 seconds and a
range from 0.25 to 40 seconds).
Default value of RR5 (Mean probability of 20% chance
of reinforcement on each response).
Default value of RI10/Probability 20 (Mean interval of
10 seconds, i.e., a "timer" has a 20% chance of timing
out every 2 seconds).
GO/NO-GO The default procedure switches S+ and Severy 30 seconds for the duration of the procedure.
Two part chain with the first FR = 1 with the Left Lever
being the correct lever. The second FR = 5 and the
right lever is correct.
Running the Hardwar e Configur ation Utility
The Hardware Configuration Utility is an executable program supplied with MED-PC IV that is
used to configure each chamber accessory to specific interface modules. A wiring chart supplied
with chambers assembled by MED Associates, Inc. clearly identifies each I/O (Input/Output) by
function and provides the proper Port and Bit values for each chamber. If setting up a system
for the first time it is necessary to run this program before the MedLab8 procedures may be
used with the interface and test chambers1. Refer to the MED-PC IV Users Manual for
additional information on Ports, Bits, and the running of Hardware Configuration Utility.
Systems using the SmartCtrl™ Interface Modules require that the number of Boxes and the
model number of the SmartCtrl cards being used is identified.
Printing the MedLab8 (*.MPC) Files
The MSN files contain useful information on the function of each procedure. These files may be
loaded into the Trans IV, Notepad, or any other text editor and printed. For example, to open
and print the file MedLab8 Fixed Ratio.mpc with Trans IV, go to File | Open select the file
MedLab8 Fixed Ratio.mpc and then select File | Print. In order to gain insight on how the code
works, pay particular attention to the text that is preceded by a back slash (\). These are
Comments that are placed throughout the code to give the user information about the protocol.
-2DOC-020 Rev 1.7 Copyright © 2012
MED Associates, Inc.
MED ASSOCIATES INC.
S O F - 7 0 0 L A - 1 , M E D L AB 8
CHAPTER 2 | EDITING PROCEDURES
For users with a SmartCtrl interface system, the MedLab8 procedures should be ready to
translate and compile. In some instances, however, it will be necessary to make some
configuration or procedural changes to accommodate various hardware packages. These
changes are quickly and easily made and will help demonstrate the flexibility that MED-PC IV
permits for running in diverse environments with an infinite number of programming variations
not found in any other system.
Modifying MedLab8 Procedures
A basic understanding of the MedState Notation (MSN) language is necessary to edit the
procedures at the code level. It is recommended that the user read the MedState Notation
Programming Manual to gain this insight. It is not necessary to have this knowledge, however,
to parse, compile, and run MedLab8 Procedures or to make simple adjustments to the
predefined constants (if necessary).
The procedures of MedLab8 were written using the following constants to define each Input and
Output:
\ Standard Input Configuration
^LeftLever = 1
^RightLever = 2
\ Standard Output Configuration
^Pellet
= 3
^Dipper
= 3 \ If both Pellet and Dipper are ordered
\ It will be necessary to change one of these
^LeftLight = 4
^RightLight = 5
^HouseLight = 7
^Pump
= 8
NOTE: The procedures, as written, will work with either Pellet or Liquid Drop Dispensers without
modification. When using a Liquid Drop Dispenser, the word Pellet may be replaced with the
word Liquid for clarification. Although this is easily done with the search and replace feature of
most editors, it is not necessary for proper operation.
To demonstrate the use of the Trans IV Editor, the following illustration will change MedLab8
Fixed Ratio.mpc for a system in which the Pellet dispenser is wired to Output 4 instead of
Output 3.
-3DOC-020 Rev 1.7 Copyright © 2012
MED Associates, Inc.
MED ASSOCIATES INC.
S O F - 7 0 0 L A - 1 , M E D L AB 8
In Windows, open the Trans IV software:
Figure 2.1 – Open Trans IV
To open a file, go to File | Open. The default directory is C:\MED-PC IV\MPC and if the MedLab8
files were properly installed, all eight of the procedures should be showing on the screen. If not,
refer back to "Installing the Software" section in Chapter 1.
Open the file MedLab8 Fixed Ratio.mpc by double clicking on it in the "Open" pop-up window:
Figure 2.2 – Open the file MedLab8 Fixed Ratio.mpc
The open file should now appear on the screen.
-4DOC-020 Rev 1.7 Copyright © 2012
MED Associates, Inc.
MED ASSOCIATES INC.
S O F - 7 0 0 L A - 1 , M E D L AB 8
Once the file is loaded, use the Down Arrow key to move the cursor down to approximately Line
18 of the procedure. The Line/Character counter is in the lower right hand corner of the editor
screen. The line should read:
^Pellet = 3
Use the Right Arrow key, the End Key, or a Mouse to place the cursor over the three. Delete the
"3" and change it to a "4". To save the changed file, go to File | Save. The file has been saved.
Translati ng and C ompiling the Modified File
Before closing Trans IV a few additional steps are required to incorporate the above change into
the available procedure list in MED-PC IV:
1. On the menu bar, select Translation | Translate and Compile:
Figure 2.3 – Translate and Compile Menu Option
2. Highlight the file name MedLab8 Fixed Ratio.mpc and click Make. Note: The other
procedures may be excluded by highlighting them and clicking Exclude.
3. There should now be a letter “M” a tab space or two away from the file name.
4. Click OK and the procedure should automatically Translate (Parse) and Compile.
5. When it is finished, close Trans IV by selecting to File | Exit.
Figure 2.4 – Compiling the MedLab8 Fixed Ratio Procedure
-5DOC-020 Rev 1.7 Copyright © 2012
MED Associates, Inc.
MED ASSOCIATES INC.
S O F - 7 0 0 L A - 1 , M E D L AB 8
CHAPTER 3 | MED-PC IV RUNTIME SYSTEM
Introduction
Once the procedures have been properly compiled, simply selecting the proper procedure in the
MED-PC IV Loading Wizard or the Open Experimental Session Window allows the user to run
them.
Note: This chapter does not cover all runtime features. For more information see Chapter 4 of
the MED-PC IV User's manual.
Interface Test Screen
When MED-PC IV starts, an attempt is made to determine whether an interface is attached. If
MED-PC IV starts directly into the Loading Wizard or its Runtime Screen, it has detected that the
hardware is configured properly and turned on. If these conditions are not met, MED-PC IV will
give the following warning message:
Figure 3.1 – MED-PC IV Warning Message
1. Interface Present: In the event that an interface is present and MED-PC IV reports that it is
not, simply turn the power on and select "Yes."
2. Hardware Emulation:
Select "No" if the hardware is not present or is simply not
required, for example, when testing procedure changes with keyboard simulated responses.
The Hardware Emulation mode is a viable mechanism for doing all but final testing of
software and is useful for classroom teaching exercises. During Hardware Emulation
sessions, the interface hardware will be totally ignored, even if present, but responses may
be simulated via keyboard input commands. This will be discussed under "Responses (#R)"
later in this manual.
3. Exit to Windows: If necessary, MED-PC IV may be terminated at this point by selecting
"Cancel."
The MED -PC IV Runti me Screen
In most instances MED-PC IV proceeds directly to the Loading Wizard or the Runtime Screen
(shown below). This is the screen present when running any MED-PC IV procedure. It is divided
into three main sections: 1) the SHOW area 2) status lines for boxes 1-16, and 3) the row of
-6DOC-020 Rev 1.7 Copyright © 2012
MED Associates, Inc.
MED ASSOCIATES INC.
S O F - 7 0 0 L A - 1 , M E D L AB 8
buttons separating the two other sections (whose purpose will be described later). Note, if
fewer than 16 boxes are declared in the configuration file, status lines will be present only for
the number of boxes declared
Figure 3.2 – MED-PC IV Runtime Screen
-7DOC-020 Rev 1.7 Copyright © 2012
MED Associates, Inc.
MED ASSOCIATES INC.
S O F - 7 0 0 L A - 1 , M E D L AB 8
Running the FR Pr ocedure
This section deals with "Loading" and "Running" a procedure within the runtime system. For the
purposes of this example, the MedLab8 Fixed Ratio.mpc procedure will be used and just a few of
the features of the runtime system demonstrated.
Opening an Experimental Session
Opening an experimental session refers to assigning an experimental procedure to a Box and
causing the Box to begin executing the procedure. When MED-PC IV is first loaded, all Boxes are
"closed," or "unloaded," which is to say that there are no MSN procedures running within any of
the Boxes. To load a Box, select File | Open Session. The screen shown in Figure 3.3 will
appear.
Figure 3.3 – Open Experimental Session Window
Box Identifiers
The Subject, Experiment, and Group numbers (also referred to as Identifiers) are arbitrary
values that may be set to any character alphanumeric name. Bear in mind that these values are
also used in generating data file names if the "Append data to a file with name based on
experiment, group and subject identifiers" or "Create a new file for every session, named
according to date, time and subject" file naming option was selected during installation.
Procedure
Procedure refers to the MSN procedure (*.MPC file) that will be run. Any MSN procedure that
was compiled by Trans IV may be loaded into any compatible Box defined when the Hardware
Configuration Utility was run. If loaded and parsed (compiled) properly, all eight MedLab8
procedures should be listed under the "pull-down" menu. To confirm this, click the arrow and
see if all eight procedures are listed.
Boxes to Load
Check the Box number(s) to load. By default, the first available box is automatically offered.
-8DOC-020 Rev 1.7 Copyright © 2012
MED Associates, Inc.
MED ASSOCIATES INC.
S O F - 7 0 0 L A - 1 , M E D L AB 8
After completing the screen, clicking OK loads the box and causes a status line to appear for the
Box in the upper left hand corner of the screen. After loading Box 1 with "MedLab8 Fixed
Ratio," repeat the process to load Box 2 with "MedLab8 Fixed Ratio." A Box may be loaded even
while other Boxes are running without affecting those Boxes. Two or more Boxes may be
loaded at the same time just by selecting multiple check boxes. As soon as a Box is loaded, the
procedure is "started" although nothing may happen. This is the case with "MedLab8 Fixed
Ratio" since the first command in this procedure is #START. The use of #START is covered
shortly.
Changing Variables
Figure 3.4 – Named Variables Screen
The "Change Variables" screen may be brought up by selecting Configure | Changing Variables
(Figure 3.4). Changing the value of any appropriate field changes only the Box whose data are
displayed. All Boxes may be changed by clicking Select All, or only select Boxes may be changed
by clicking the appropriate number(s) in the Additional Boxes to Update section of the window.
Clicking on the Named Vars button will display a list of variables that have been given a more
descriptive name by the use of the Var_Alias command in the MSN procedure. The user is also
give the chance to change these named variables when a program is loaded using the Loading
Wizard.
-9DOC-020 Rev 1.7 Copyright © 2012
MED Associates, Inc.
MED ASSOCIATES INC.
S O F - 7 0 0 L A - 1 , M E D L AB 8
Changing the MedLab8 Fixed Ratio FR Value
To modify the FR variable's value, click on the Named Vars button. A list of two variables will be
displayed. One of the rows will be labeled "Fixed Ratio" and its default value will be 1. To
change this to an FR-5, replace 1 with 5 and click Issue.
NOTE: If FR-5 will be run for several days, it may be simpler to modify the procedure, save it
under its own name, and add it to the procedure list. Follow the same procedure previously
described for changing a constant value or the value for the reinforcement timer. The only
statements to change are contained in State 1 of State Set 1. The change to "A(FRVal)" has been
made below. Compare this with the current version of MedLab8 Fixed Ratio.mpc.
S.S.1,
S1,
0.001": SET A(^CorLever) = 1, A(^Reward)
= 1, A(^RewTime) = 0.05;
SET A(^TimeOut) = 0, A(^SessTime) = 60, A(^FRVal)
= 1;
SET A(^MaxReinf) = 50, A(^SoftCR)
= 1;
Changing the MedLab8 Fixed Ratio Session Time
Changing the Session Time is done in a similar manner by changing the value of the row labeled
"Session Time (Min)" on the Named Vars screen to the number of minutes desired for the
Session Time. For example, to set a 30-minute Session Time, replace the value 60 with 30 and
then click Issue.
To close the Named Variables Window, click Close.
- 10 DOC-020 Rev 1.7 Copyright © 2012
MED Associates, Inc.
MED ASSOCIATES INC.
S O F - 7 0 0 L A - 1 , M E D L AB 8
Issuing START
To actually start the MedLab8 Fixed Ratio procedure, a command must be issued. This feature
allows the user to load the program, change Ratios or Session Times, and place the animal in the
test chamber before actually activating the procedure.
The #START signal may be issued to Boxes by selecting Configure | Signals. The screen shown in
Figure 3.5 will appear.
Figure 3.5 – Send Signals to Boxes Window
The "Issue START Command" option is already highlighted, so simply select the check boxes next
to the Boxes to be run. Once all necessary buttons are selected (represented by check marks),
press the ISSUE button. The program is now running.
SHOW Data From a Box
As soon as MedLab8 Fixed Ratio is "started" in any one of the loaded boxes, a SHOW display will
appear at the bottom of the screen with Labeled counters for each lever, a reinforcement
counter, the FR ratio in effect, and the elapsed session time, in decimal minutes.
The SHOW C ommand
The SHOW command is covered in the MedState Notation Programming Manual. It is the
mechanism whereby MSN programs may place data on the screen. Each box may place the
values of up to 200 variables or array elements on the screen, along with descriptive labels for
each datum.
- 11 DOC-020 Rev 1.7 Copyright © 2012
MED Associates, Inc.
MED ASSOCIATES INC.
S O F - 7 0 0 L A - 1 , M E D L AB 8
Miscellaneous
SHOW commands are not displayed in real time. When a box issues a SHOW command, the
data values are retained, but the data is not actually displayed until the runtime system has time
to update the screen. The values eventually shown on the screen reflect the values of their
respective variables at the moment that their respective SHOW commands were issued. In
practice, the SHOW screen is usually updated within a small fraction of a second after any
changes are made by active Boxes. Most users would probably not even notice that updates are
not in "real time" except in the case of displaying running response totals for rapidly responding
subjects, in which case the response total shown on the screen appears to discontinuously count
up. For example, response totals might display as 1,3,7,8, etc. instead of 1,2,3,4,5,6,7,8, etc.
- 12 DOC-020 Rev 1.7 Copyright © 2012
MED Associates, Inc.
MED ASSOCIATES INC.
S O F - 7 0 0 L A - 1 , M E D L AB 8
The SHOW Display
Figure 3.6 – The SHOW Display
Looking at Figure 3.6, we are interested with the text that says "All Boxes" in red on the left
hand side of the screen. This is the way in which the display of data may be changed. By
default, the "All Boxes" option will be selected. This provides the user with a summary of data
from every Box loaded. It displays only "SHOW" positions 1-5.
If we are interested in one Box in particular, clicking on that Box’s name along the left hand side
will display all of the SHOW positions for that one Box. Up to 200 SHOW positions may be
displayed at one time. Double clicking on the red text will once again display all Boxes.
Right clicking on the red text that says "All Boxes" and selecting FLIP will cycle the display
through each Box one at a time and display all 200 SHOW positions from each Box for 5 seconds
at a time. That is, the SHOW output from the first Box is displayed for five seconds, followed by
the output from Box 2, etc. Before cycling back to the first Box, however, a summary of the data
(as if ALL was selected) is displayed.
It is worth noting that you may switch between these modes while the experiments are being
run without affecting the data collection.
- 13 DOC-020 Rev 1.7 Copyright © 2012
MED Associates, Inc.
MED ASSOCIATES INC.
S O F - 7 0 0 L A - 1 , M E D L AB 8
Issuing a Res ponse (#R)
Responses (#R Inputs) may be simulated from the keyboard with or without the interface and
test chambers. Selecting Configure | Signals on the menu bar accesses this feature.
Figure 3.7 – Issuing a Response
In order to issue the Response, first select the "Simulate Response" option, select to which Box
or Boxes the command should go to, then select which Input the command should come from
(e.g., if the Left Lever should be pushed, select 1, if the Right Lever should be pushed, select 2)
followed by clicking on the Issue button. Please note if 5 Responses are desired, click the Issue
button 5 times.
In the MedLab8 Fixed Ratio procedure several things happen when a Response #1 occurs. First,
the Lever1 count increments by one. Second, if the default FR value, FR-1, has not been
changed a number "3" flashes at the end of the Box status line for 50 ms in the upper right hand
corner. This indicates that Output 3 has been turned on for 50 ms2. If an interface and chamber
are connected, the Pellet or Liquid Drop Dispenser should have been activated. Issuing a
Response #2 simply increments the Lever2 counter.
2
Remember, because these displays are not in real time as discussed previously, short output
intervals such as this may not display consistently. The only way to verify their occurrence is
with the Interface and Output device connected.
- 14 DOC-020 Rev 1.7 Copyright © 2012
MED Associates, Inc.
MED ASSOCIATES INC.
S O F - 7 0 0 L A - 1 , M E D L AB 8
Ending a Session
As it stands, a Session Time has been entered for MedLab8 Fixed Ratio through the
"A(^SessionTime)" variable and the procedure will "STOPABORTFLUSH" automatically when the
Session Time reaches the value of "A(^SessionTime)" (the default is 60 minutes). A procedure
that is running may also be terminated from the menu in either of three ways.
The File | Close Session menu option brings up the following window:
Figure 3.8 – Close Session Window – STOPABORTFLUSH
Figure 3.9 – Close Session Window – STOPKILL
In order to issue the stop command, select the appropriate manner in which to stop the session
and the Box or Boxes to stop. Once this is done, select "OK."
- 15 DOC-020 Rev 1.7 Copyright © 2012
MED Associates, Inc.
MED ASSOCIATES INC.
S O F - 7 0 0 L A - 1 , M E D L AB 8
Saving Data
Two menu selections are provided for writing data to disk following the termination of a
procedure (terminated either from the menu or from within the procedure using the MSN
Command STOPABORT). Both options are located underneath the "File" option of the Menu
Bar. The first option, "Save Data Manually," allows the operator to monitor and intervene in
data writing operations. In contrast, "Save Data (Flush)" automatically transfers all data to disk
without requiring further intervention. The "Save Data (Flush)" selection is identical to an MSN
transition to STOPABORTFLUSH (the default setting in MedLab8 programs). Data may be written
to disk while boxes are running without in any way interfering with the processing of events in
those boxes. See STOPABORT, STOPABORTFLUSH, and FLUSH in the MED-PC IV Programmer's
Manual for more information.
Figure 3.10 – Saving Data Menu Options
Save Data (Flush)
Regardless of the file naming and internal file format options selected during installation, the
process whereby data is dumped to disk is similar. The simplest way to transfer data to disk is
with the Flush option. Once this command is invoked, all data is automatically written to the
appropriate disk, directory and file name(s) without further input from the operator.
The "Save Data (Flush)" option is recommended for most users and is the simplest and safest
way to transfer data to the hard disk in most situations. Generally speaking, this command is
preferable if all data is to be written to a single drive and directory. If a situation requires
frequent swapping of disks, or if data is destined for different disks and is likely to be written to
disk in close succession, then "Save Data (Flush)" option will probably not be suitable.
In the event that an error occurs either during a "Save Data (Flush)" option from the menu or
from a FLUSH command issued within an MSN program, then the rest of the data dumping
operation will proceed as though "Save Data Manually" was requested. This is done so that
error messages may be conveyed to the operator and so that the operator may indicate when
the source of the error has been corrected. Error conditions are normally reported by the
appearance of a message box on the screen along with a description of the error.
- 16 DOC-020 Rev 1.7 Copyright © 2012
MED Associates, Inc.
MED ASSOCIATES INC.
S O F - 7 0 0 L A - 1 , M E D L AB 8
Note that issuing a FLUSH or STOPABORTFLUSH from within an MSN program causes all data in
the dumping queue to be written to disk, not just the data associated with the box that initiated
the request.
Save Data Manually
This option is primarily intended for special situations in which a high degree of user control
over the transfer process is required or when a unique file name should be assigned to each file.
This option may also be used to correct disk errors, dump with ID Verification, dump multiple
copies of data to different floppy disks, etc. When this command is invoked, a panel will appear
with an input field containing the drive, directory and default file name. The file name may be
edited, if desired to any legal file name with any valid drive and directory.
Printing Data
As a general rule, it is not recommended that to print from the file menu primarily because all
MedLab8 programs are, by default, ended with a "STOPABORTFLUSH" command. Since this
command automatically saves the data and then wipes the resident memory clean, there is
nothing to print once the program has stopped running. To print out the raw data there are two
options. The first is to print out the file generated after the " STOPABORTFLUSH" command
saves the data. This file may be opened with any text editor (e.g., Trans IV or Notepad) or word
processor (e.g., Word or Word Perfect). The other option is to edit the code to generate a print
out of the data before flushing (saving) it. For assistance on this, please consult the MedState
Notation programming manual.
- 17 DOC-020 Rev 1.7 Copyright © 2012
MED Associates, Inc.
MED ASSOCIATES INC.
S O F - 7 0 0 L A - 1 , M E D L AB 8
CHAPTER 4 | THE MEDLAB8 PROCEDUR ES
Introduction
As stated earlier, a working knowledge of MedState Notation is not needed to run these
programs. In order to edit beyond the simple tasks laid out in Chapter 2, the MedState Notation
Manual should be read in its entirety. If all that is desired is a better understanding of the
commands (e.g., #R, #Z, #START, IF, ADD, SHOW, SET) we suggest using the index to lookup the
function of each command.
This chapter describes the function of the eight programs that make up MedLab8. Each
program name will be listed, followed by a brief description of what it was written to do as well
as the variables that may be easily changed via the Change Variables Window or displayed on
the screen or in data files. In addition, each program's text file (the *.mpc files) are full of
comments that explain what each section of the program does and in many cases why they are
done the way they are. This is a very powerful tool for the user that wants to change the
programs down the line or use these programs as a starting point for the development of
personal programs.
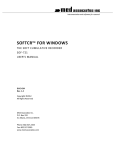
MedLab8 Fixed Ratio. mpc
Fixed Ratio is a schedule of reinforcement in which a response is reinforced only after a
specified number of responses. This schedule produces a high, steady rate of responding with
only a brief pause after the delivery of the reinforcer.
Change Named Variables
Correct Lever
Reward
Reward Time (sec)
Time Out Following Reward
Session Time (Min)
Fixed Ratio Value
Maximum Reinforcers
SoftCR Data Array
(Left = 1; Right = 2)
(Pellet = 1; Dipper = 2; Drug = 3)
(Yes = 1; No = 0)
Default = Left Lever
Default = Pellet
Default = 0.05 seconds
Default = 0 seconds
Default = 60 minutes
Default = 1
Default = 50
Default = Yes
- 18 DOC-020 Rev 1.7 Copyright © 2012
MED Associates, Inc.
MED ASSOCIATES INC.
S O F - 7 0 0 L A - 1 , M E D L AB 8
Data Variables
First Row in the B Array contains the following data:
Total Responses
Total Correct Response Count
Total Incorrect Response Count
Total % Correct
Total % Incorrect
Subsequent Rows in the B Array contain the following format:
1st Column: Trial Number
2nd Column: Correct Responses
3rd Column: Incorrect Responses
4th Column: Pause (sec)
5th Column: Run Time (sec)
F = Total Rewards
S = Elapsed Time in Session
Pause time starts counting after a reward is given.
Run time starts counting on the first correct response.
Figure 4.1 – Fixed Ratio Functional Diagram
- 19 DOC-020 Rev 1.7 Copyright © 2012
MED Associates, Inc.
MED ASSOCIATES INC.
S O F - 7 0 0 L A - 1 , M E D L AB 8
MedLab8 Fixed I nterv al.mpc
Fixed interval is a schedule of reinforcement in which the first response is rewarded only after a
specified amount of time has elapsed. This schedule causes high amounts of responding near
the end of the interval, but much slower responding immediately after the delivery of the
reinforcer.
Change Named Variables
Correct Lever
Reward
Reward Time (sec)
Time Out Following Reward
Session Time (Min)
Fixed Interval Value (sec)
Maximum Reinforcers
SoftCR Data Array
(Left = 1; Right = 2)
(Pellet = 1; Dipper = 2; Drug = 3)
(Yes = 1; No = 0)
Default = Left Lever
Default = Pellet
Default = 0.05 seconds
Default = 0 seconds
Default = 60 minutes
Default = 1 second
Default = 50
Default = Yes
Data Variables
First Row in the B Array contains the following data:
Total Responses
Total Correct Response Count
Total Incorrect Response Count
Total % Correct
Total % Incorrect
Subsequent Rows in the B Array contain the following format:
1st Column: Trial Number
2nd Column: Correct Responses
3rd Column: Incorrect Responses
4th Column: Pause (sec)
5th Column: Run Time (sec)
F = Total Rewards
S = Elapsed Time in Session
Pause time starts counting after a reward is given.
Run time starts counting on the first correct response.
- 20 DOC-020 Rev 1.7 Copyright © 2012
MED Associates, Inc.
MED ASSOCIATES INC.
S O F - 7 0 0 L A - 1 , M E D L AB 8
Figure 4.2 – Fixed Interval Functional Diagram
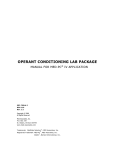
MedLab8 Variable R atio.mpc
Variable Ratio is a schedule of reinforcement in which a response is reinforced after an
unpredictable number of responses. This schedule creates a high steady rate of responding.
Gambling and lottery games are good examples of a reward based on a variable ratio schedule.
Change Named Variables
Correct Lever
Reward
Reward Time (sec)
Time Out Following Reward
Session Time (Min)
Mean Variable Ratio
Maximum Reinforcers
SoftCR Data Array
(Left = 1; Right = 2)
(Pellet = 1; Dipper = 2; Drug = 3)
(Yes = 1; No = 0)
Default = Left Lever
Default = Pellet
Default = 0.05 seconds
Default = 0 seconds
Default = 60 minutes
Default = 5
Default = 50
Default = Yes
- 21 DOC-020 Rev 1.7 Copyright © 2012
MED Associates, Inc.
MED ASSOCIATES INC.
S O F - 7 0 0 L A - 1 , M E D L AB 8
Data Variables
First Row in the B Array contains the following data:
Total Responses
Total Correct Response Count
Total Incorrect Response Count
Total % Correct
Total % Incorrect
Subsequent Rows in the B Array contain the following format:
1st Column: Trial Number
2nd Column: Correct Responses
3rd Column: Incorrect Responses
4th Column: Pause (sec)
5th Column: Run Time (sec)
F = Total Rewards
S = Elapsed Time in Session
Pause time starts counting after a reward is given.
Run time starts counting on the first correct response.
Figure 4.3 – Variable Ratio Functional Diagram
- 22 DOC-020 Rev 1.7 Copyright © 2012
MED Associates, Inc.
MED ASSOCIATES INC.
S O F - 7 0 0 L A - 1 , M E D L AB 8
MedLab8 Variable Interval.mpc
Variable Interval is a schedule of reinforcement in which a response is rewarded after an
unpredictable amount of time has passed. This schedule produces a slow, steady rate of
response.
Change Named Variables
Correct Lever
Reward
Reward Time (sec)
Time Out Following Reward
Session Time (Min)
Mean Variable Interval (sec)
Maximum Reinforcers
SoftCR Data Array
(Left = 1; Right = 2)
(Pellet = 1; Dipper = 2; Drug = 3)
(Yes = 1; No = 0)
Default = Left Lever
Default = Pellet
Default = 0.05 seconds
Default = 0 seconds
Default = 60 minutes
Default = 10 seconds
Default = 50
Default = Yes
Data Variables
First Row in the B Array contains the following data:
Total Responses
Total Correct Response Count
Total Incorrect Response Count
Total % Correct
Total % Incorrect
Subsequent Rows in the B Array contain the following format:
1st Column: Trial Number
2nd Column: Correct Responses
3rd Column: Incorrect Responses
4th Column: Pause (sec)
5th Column: Run Time (sec)
F = Total Rewards
S = Elapsed Time in Session
Pause time starts counting after a reward is given.
Run time starts counting on the first correct response.
- 23 DOC-020 Rev 1.7 Copyright © 2012
MED Associates, Inc.
MED ASSOCIATES INC.
S O F - 7 0 0 L A - 1 , M E D L AB 8
Figure 4.4 – Variable Interval Functional Diagram
MedLab8 Random Ratio.mpc
Random Ratio is a schedule of reinforcement in which the ratio specifies the probability with
which a response will be reinforced. For example, in RR 5 that probability is .20 (1/5) and is
independent of the number of responses emitted since the last reinforcer.
Change Named Variables
Correct Lever
Reward
Reward Time (sec)
Time Out Following Reward
Session Time (Min)
Probability Value
Maximum Reinforcers
SoftCR Data Array
(Left = 1; Right = 2)
(Pellet = 1; Dipper = 2; Drug = 3)
(Yes = 1; No = 0)
Default = Left Lever
Default = Pellet
Default = 0.05 seconds
Default = 0 seconds
Default = 60 minutes
Default = 5*
Default = 50
Default = Yes
* Mean Probability = 1 / 5 = 0.20
- 24 DOC-020 Rev 1.7 Copyright © 2012
MED Associates, Inc.
MED ASSOCIATES INC.
S O F - 7 0 0 L A - 1 , M E D L AB 8
Data Variables
First Row in the B Array contains the following data:
Total Responses
Total Correct Response Count
Total Incorrect Response Count
Total % Correct
Total % Incorrect
Subsequent Rows in the B Array contain the following format:
1st Column: Trial Number
2nd Column: Correct Responses
3rd Column: Incorrect Responses
4th Column: Pause (sec)
5th Column: Run Time (sec)
F = Total Rewards
S = Elapsed Time in Session
Pause time starts counting after a reward is given.
Run time starts counting on the first correct response.
Figure 4.5 – Random Routine Functional Diagram
MedLab8 Random Interval.mpc
This schedule consists of two elements working together to create a random interval schedule.
For example, RI 10 with Probability 20 means every two seconds conduct a probability test with
- 25 DOC-020 Rev 1.7 Copyright © 2012
MED Associates, Inc.
MED ASSOCIATES INC.
S O F - 7 0 0 L A - 1 , M E D L AB 8
a one in five chance of success. For RI 10 with Probability 50, change A(^Prob) = 50. If A(^RIVal)
remains 10 seconds, the S variable is now 5 seconds. In other words, every 5 seconds there is a
one in two chance of success. The Mean for both schedules is 10 seconds, but the distribution
of reinforcements is quite different.
Change Named Variables
Correct Lever
(Left = 1; Right = 2)
Default = Left Lever
Reward
Reward Time (sec)
Time Out Following Reward
Session Time (Min)
Mean Random Interval (sec)
(Pellet = 1; Dipper = 2; Drug = 3)
Default = Pellet
Default = 0.05 seconds
Default = 0 seconds
Default = 60 minutes
Default = 10 seconds
Probability Value (%)
Maximum Reinforcers
SoftCR Data Array
Default = 20 percent
Default = 50
Default = Yes
(Yes = 1; No = 0)
Data Variables
First Row in the B Array contains the following data:
Total Responses
Total Correct Response Count
Total Incorrect Response Count
Total % Correct
Total % Incorrect
Subsequent Rows in the B Array contain the following format:
1st Column: Trial Number
2nd Column: Correct Responses
3rd Column: Incorrect Responses
4th Column: Pause (sec)
5th Column: Run Time (sec)
F = Total Rewards
S = Elapsed Time in Session
Pause time starts counting after a reward is given.
Run time starts counting on the first correct response.
- 26 DOC-020 Rev 1.7 Copyright © 2012
MED Associates, Inc.
MED ASSOCIATES INC.
S O F - 7 0 0 L A - 1 , M E D L AB 8
Figure 4.6 – Random Interval Functional Diagram
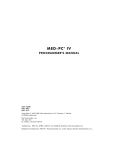
MedLab8 Discriminati on.mpc
This procedure is an extension of the fixed ratio procedure. It uses the stimulus light to break
the Session Time into alternating periods of extinction (no light) and fixed ratio (light on). The
fixed ratio defaults to an FR-1 unless the user changes the variable "A(^FRVal)". The stimulus
ON/OFF times default to a value of 30 seconds unless the user changes the variable
"A(^DiscrimDur)." A Session Time may also be entered by the user (variable "A(^SessionTime)”)
in minutes; otherwise, the default value of “A(^SessionTime)” is 60 minutes. Event marker #1 in
the SoftCR array is used to mark the status of the stimulus light, up for stimulus ON and down
for stimulus OFF.
Please note, all the variables may be changed and the variables A(^FRVal) and A(^DiscrimDur)
follow the previously explained rule (i.e., the change will take place after the current cycle has
been met). A change in A(^SessionTime), however, is immediate and must be made with care.
For example, if a procedure is started with the default A(^SessionTime) of 60 minutes and after
it has run for 15 minutes, it is decided that the procedure should end in 15 minutes,
A(^SessionTime) must equal the total time the procedure should run. Therefore, changing
A(^SessionTime) to 15 cause the program to stop immediately, and changing A(^SessionTime) to
30 will allow the program to run for 15 more minutes before stopping.
- 27 DOC-020 Rev 1.7 Copyright © 2012
MED Associates, Inc.
MED ASSOCIATES INC.
S O F - 7 0 0 L A - 1 , M E D L AB 8
Change Named Variables
Correct Lever
Reward
Reward Time (sec)
Time Out Following Reward
Session Time (Min)
Fixed Ratio Value
Maximum Reinforcers
SoftCR Data Array
Discriminative Stimulus Duration
(Sec)
Stimulus Light
(Left = 1; Right = 2)
(Pellet = 1; Dipper = 2; Drug = 3)
(Yes = 1; No = 0)
(Left=1; Right=2)
Default = Left Lever
Default = Pellet
Default = 0.05 seconds
Default = 0 seconds
Default = 60 minutes
Default = 1
Default = 50
Default = Yes
Default = 30 seconds
Default = Left Light
Data Variables
First Row in the B Array contains the following data:
Total Responses
Total Correct Response Count
Total Incorrect Response Count
Total % Correct
Total % Incorrect
Total Responses on Left Lever
Total Responses on Right Lever
Subsequent Rows in the B Array contain the following format:
1st Column: Trial Number
2nd Column: Correct Responses
3rd Column: Incorrect Responses
4th Column: Not Used
5th Column: Not Used
6th Column: Response on Left Lever
7th Column: Response on Right Lever
F = Total Rewards
S = Elapsed Time in Session
- 28 DOC-020 Rev 1.7 Copyright © 2012
MED Associates, Inc.
MED ASSOCIATES INC.
S O F - 7 0 0 L A - 1 , M E D L AB 8
Figure 4.7 – Discrimination Functional Diagram
MedLab8 Chain.mpc
This procedure chains two responses together and is intended be run in test chambers with two
standard response levers. The procedure begins by checking which lever has been user defined
as the first correct lever (A(^CorrectLev1)) and turn on the corresponding stimulus light. The
animal must then press the first correct lever enough times to meet the first user defined FR
(A(^FRVal1), default value FR-1).
Once the first FR has been met, the program turns off the stimulus light corresponding to the
first correct lever and turns on the stimulus light corresponding to the second correct lever
(A(^CorrectLev2)). The animal must now press the second correct lever enough times to meet
the second user defined FR (A(^FRVal2), default value FR-5).
Once the animal has met the second FR a reinforcement is issued.
A Session Time may also be entered by the user (variable "A(^SessionTime)") in minutes;
otherwise, the default value of A(^SessionTime) is 60 minutes. Changes may be made prior to or
after the procedure is started.
- 29 DOC-020 Rev 1.7 Copyright © 2012
MED Associates, Inc.
MED ASSOCIATES INC.
S O F - 7 0 0 L A - 1 , M E D L AB 8
Change Named Variables
First FR Correct Lever
Second FR Correct Lever
Reward
Reward Time (sec)
Time Out Following Reward
Session Time (Min)
First Fixed Ratio Value
Second Fixed Ratio Value
Maximum Reinforcers
SoftCR Data Array
(Left = 1; Right = 2)
(Left = 1; Right = 2)
(Pellet = 1; Dipper = 2; Drug = 3)
Default = Left Lever
Default = Right Lever
Default = Pellet
Default = 0.05 seconds
Default = 0 seconds
Default = 60 minutes
Default = 1
Default = 5
Default = 50
Default = Yes
(Yes = 1; No = 0)
Data Variables
B Array is for the first FR.
First Row in the B Array contains the following data:
Total Responses
Total Correct Response Count
Total Incorrect Response Count
Total % Correct
Total % Incorrect
Subsequent Rows in the B Array contain the following format:
1st Column: Trial Number
2nd Column: Correct Responses
3rd Column: Incorrect Responses
4th Column: Not Used
5th Column: Not Used
D Array is for the second FR.
First Row in the D Array contains the following data:
Total Responses
Total Correct Response Count
Total Incorrect Response Count
Total % Correct
Total % Incorrect
Subsequent Rows in the D Array contain the following format:
1st Column: Trial Number
2nd Column: Correct Responses
3rd Column: Incorrect Responses
4th Column: Not Used
5th Column: Not Used
F = Total Rewards
S = Elapsed Time in Session
- 30 DOC-020 Rev 1.7 Copyright © 2012
MED Associates, Inc.
MED ASSOCIATES INC.
S O F - 7 0 0 L A - 1 , M E D L AB 8
Figure 4.8 – Chain Functional Diagram
- 31 DOC-020 Rev 1.7 Copyright © 2012
MED Associates, Inc.
MED ASSOCIATES INC.
S O F - 7 0 0 L A - 1 , M E D L AB 8
Appendix A| Data File Formats
MED-PC IV can produce four format types and can place data in any array from A to Z as defined
by the procedure. MedLab8 always places IRT data in the C array, uses a simple variable for the
reinforcement counter, and uses both simple variables and array variables for response
counters. We recommend the use of the Annotated File Format, which we will explain in great
detail here. For detailed explanations of the other three file formats, please refer to the MEDPC IV User's Manual.
Format 1 – Annotated
The MED-PC IV "Annotated" file format creates an output file that is easy to read with, labels for
each data element. It may contain data from multiple sessions, depending upon the file naming
conventions used to generate the data. See the MED-PC IV manual for file naming conventions.
Annotated data files always begin with the name of the data file on line 1. Two lines are then
skipped and header information begins. All simple variables are listed next followed by all array
elements. These will normally be in alphabetical order unless otherwise specified in the
"DISKVARS" command. In the event that more than one data set is in the data file, two lines are
skipped following the last data element in the previous data set, and the "Start Date" forms the
first line of the next data set. The file designation line is not repeated.
Explanations of the contents of the B Array are shown in blue below. The first row of the B
Array is totals and each subsequent row contains trial data. The C Array is the SoftCR Array.
Sample Printout:
File: C:\MED-PC IV\DATA\!2007-09-11_21h03m.Subject 1
Start Date: 09/11/07
End Date: 09/11/07
Subject: 1
Experiment: 0
Group: 0
Box: 1
Start Time: 21:03:53
End Time: 22:06:24
MSN: MedLab8 Fixed Ratio
D:
0.000
E:
0.000
F:
15.000
G:
0.000
H:
0.000
I:
38.000
J:
80.000
K:
0.000
L:
0.000
M:
0.000
N:
0.000
O:
0.000
P:
0.000
Q:
0.000
R:
0.000
S:
3600.000
T:
980.000
U:
0.000
- 32 DOC-020 Rev 1.7 Copyright © 2012
MED Associates, Inc.
MED ASSOCIATES INC.
V:
W:
X:
Y:
Z:
A:
S O F - 7 0 0 L A - 1 , M E D L AB 8
0.000
0.000
0.000
0.000
0.000
0:
5:
1.000
1.000
Total
Responses
1.000
50.000
Total
Correct
0.050
1.000
Total
Incorrect
0.000
5.000
% Correct
Responses
60.000
0.000
% Incorrect
Responses
B:
0:
18.000
Correct
Trial
15.000
Incorrect
Responses
3.000
Pause
Responses
83.333
Run Time
(sec)
16.667
(sec)
5:
10:
15:
20:
25:
30:
35:
40:
45:
50:
55:
60:
65:
70:
75:
80:
1.000
2.000
3.000
4.000
5.000
6.000
7.000
8.000
9.000
10.000
11.000
12.000
13.000
14.000
15.000
16.000
1.000
1.000
1.000
1.000
1.000
1.000
1.000
1.000
1.000
1.000
1.000
1.000
1.000
1.000
1.000
0.000
0.000
0.000
0.000
0.000
0.000
0.000
0.000
0.000
0.000
0.000
0.000
0.000
0.000
0.000
0.000
3.000
0.000
126.000
2092.000
34.000
1.000
16.000
9.000
6.000
9.000
48.000
8.000
6.000
24.000
6.000
44.000
260.000
0.000
0.000
0.000
0.000
0.000
0.000
0.000
0.000
0.000
0.000
0.000
0.000
0.000
0.000
0.000
0.000
0:
5:
10:
15:
20:
25:
30:
35:
0.500
20924.100
0.200
68.100
0.200
247.100
0.200
2.600
9072.100
0.200
162.100
0.200
80.100
0.200
1556.600
0.500
0.200
342.100
0.200
99.100
0.200
61.100
0.500
980.310
1269.100
0.200
99.100
0.200
67.100
0.200
33.600
0.200
14.100
0.200
481.100
0.200
444.100
0.500
C:
Absolute time elements are elements in which every time value is the Elapsed Time since the
start of the procedure. To change from Relative to Absolute, simply remove that part of the
code that sets T = 0 and add T to those elements that now have a time value of 0.
- 33 DOC-020 Rev 1.7 Copyright © 2012
MED Associates, Inc.
MED ASSOCIATES INC.
S O F - 7 0 0 L A - 1 , M E D L AB 8
Full Headers – Nine Lines of Header
The above example uses the "Full" Header format, with nine lines of header information. Keep
in mind that the "start" date and time are defined the moment the procedure is loaded to a Box,
irrespective of the #START command. Note that times contain colons and the hour does not
necessarily contain a leading zero if the hour is less than 10;however, if the hour is 0, then a 0
will appear in the hour column. The last line of the header contains the name of the MedState
Notation .MPC procedure file that generated the data.
Condensed Headers – Two Lines of Header
The MED-PC IV DISKOPTIONS command permits the user to specify a "CONDENSED" header,
which in the Annotated format appears as shown below. Two blank lines still precede each
session's data, irrespective of header format.
BOX:
1 SUBJECT:
START: 09/22/04
1 EXPERIMENT:
10:54:47
1 GROUP:
END: 09/22/04
3 MSN:
MedLab8 Fixed Interval
10:59:51
- 34 DOC-020 Rev 1.7 Copyright © 2012
MED Associates, Inc.
MED ASSOCIATES INC.
S O F - 7 0 0 L A - 1 , M E D L AB 8
Appendix B| SoftCR™
Each MedLab8 procedure stores IRT data in array C that may be used by the SoftCR™ Cumulative
Recorder program to generate a graphical record on screen or to print a Cumulative Record
after the data has been collected. Each element in this "Cumulative Record" data array consists
of two components. The integer value or value to the left of the decimal point is the time
component. The decimal value or value to the right of the decimal point is a SoftCR code
component.
Time Components
Time components may be Relative or Absolute. In a Relative file, the time component of a
given data element is equal to the elapse time since the previous element. In an Absolute file, it
is equal to the elapse time since the beginning of the Record. The elements used in MedLab8
are all Relative with a resolution of 0.1 seconds (100 milliseconds). For example, if array C
contained just two elements 35.1 and 33.1, the record would consist of one Response Step at
3.5 seconds (35 * 0.1) and a second Response Step 3.3 seconds later at 6.8 seconds on the XAxis.
Contr ol Code C omponents
The control code component indicates whether the element is a Response Step, Reinforcement
Pip, Pen Reset, Event Pen Up, or Event Pen Down element. Up to 10 Event Pens (0 - 9) and 10
Trace Pens (0 - 9) may be specified in MED-PC. In addition, Resets may be made with the Pen
"Up" (no vertical tracing) or "Down." Additional coded information may be possible in the
future.
Data Element Format
Each data element must conform to the following format:
nnnnn.xyz
Where:
nnnnn = Time Component
xyz = Control Code Component
x = Datum Type
y = Datum Index
z = Don't Care Digit
NOTE: If there are more then three numbers past the decimal point, then the array will be
considered invalid and will be ignored by SoftCR.
Allowed datum types and indices are:
nnnnn.1yz = Response or Step
- 35 DOC-020 Rev 1.7 Copyright © 2012
MED Associates, Inc.
MED ASSOCIATES INC.
S O F - 7 0 0 L A - 1 , M E D L AB 8
y = Index (0 - 9) for Multi-Trace Files
"NULL" for Single Trace Files
nnnnn.2yz = Reinforcement or Pip
y = Index (0 - 9) for Multi-Trace Files
"NULL" for Single Trace Files
nnnnn.3yz = Reset Trace Pen
For Single Trace data files and y is Pen Mode where:
y = 0; Trace 0 Pen Up During Reset
y = 1; Trace 0 Pen Down During Reset
Note: This format overrides the Up/Down
option in edit parameters.
For Multi-Trace data files:
y = Index (0 - 9)
nnnnn.4yz = Unused
nnnnn.5yz = Set Event Pen To Level 0 ("Down" or at baseline), where
y = Event Pen Number (0 - 9)
nnnnn.6yz = Set Event Pen To Level 1 ("Up"), where
y = Event Pen Number (0 - 9)
nnnnn.7yz = Unused
nnnnn.8yz = Unused
nnnnn.9yz = Unused
Data in the array being plotted that does not conform to the above rules will be ignored.
SoftCR for Windows stores in memory the maximum number of array elements allowed in MEDPC IV, which is currently 1,000,00 elements. The maximum number of arrays allowed per
Record is 26 (the MED-PC limit).
- 36 DOC-020 Rev 1.7 Copyright © 2012
MED Associates, Inc.
MED ASSOCIATES INC.
S O F - 7 0 0 L A - 1 , M E D L AB 8
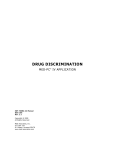
Example of SoftCR
Figure B1.1 is an example of what a Fixed Ratio schedule will look like in SoftCR after an
experiment is run. The red line records a Step for every correct response that is made. Since
this is a Fixed Ratio of 1 schedule the subject was reinforced for each response it made. A
reward is recorded as a Pip, or a hash mark on the red line. The black lines at the bottom of the
screen are called Event Pens and can be used in a variety of ways for a number of purposes. The
black line can go up and down, creating quick Spikes like the ones seen here, or long plateaus
that represent certain periods of time during an experiment. Here, the Event Pen 0 records a
Spike for every incorrect response that is made. Event Pen 1 records plateaus for Time-Out
times, if applicable.
The following programs follow the outline for responses and rewards as described above when
looking at SoftCR data:
Fixed Ratio
Fixed Interval
Variable Ratio
Variable Interval
Random Ratio
Random Interval
Chain*
*The Chain program switches the correct and incorrect lever during the program itself, so the
correct response Steps and incorrect response Spikes always reflect the current levers during
the program.
- 37 DOC-020 Rev 1.7 Copyright © 2012
MED Associates, Inc.
MED ASSOCIATES INC.
S O F - 7 0 0 L A - 1 , M E D L AB 8
Figure B1.1 – Example of a Fixed Ratio Schedule Shown in SoftCR
- 38 DOC-020 Rev 1.7 Copyright © 2012
MED Associates, Inc.
MED ASSOCIATES INC.
S O F - 7 0 0 L A - 1 , M E D L AB 8
Discrimination SoftCR Example
The Discrimination program uses the same Steps, Pips, incorrect responses on Event Pen 0, and
Time-Outs on Event Pen 1 as described above. In this case SoftCR Event Pen 2 records a plateau
(up) when the stimulus light in On, and records a valley (down) when the stimulus light is Off.
During the Stimulus Off period, SoftCR records Spikes on Event Pen 3 for responses on Lever 1
and Spikes on Event Pen 4 for responses on Lever 2. Correct and Incorrect Spikes are not
recorded during the stimulus off period; instead the Event Pens 3 and 4 are recorded as Spikes.
An example of this is shown in Figure B1.2.
Figure B1.2 – Example of Discrimination Program in SoftCR
- 39 DOC-020 Rev 1.7 Copyright © 2012
MED Associates, Inc.
MED ASSOCIATES INC.
S O F - 7 0 0 L A - 1 , M E D L AB 8
Appendix C | Contact Information
Please contact MED Associates, Inc. for information regarding any of our products.
Visit our website at www.med-associates.com for contact information.
For technical questions, email [email protected].
- 40 DOC-020 Rev 1.7 Copyright © 2012
MED Associates, Inc.