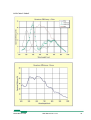
1
Instruction
Manual
MotionBLITZ Cube
Digital Motion Analysis Recorder
Version 1.8.0
Mikrotron GmbH
Landshuter Str. 20-22
D-85716 Unterschleissheim
Germany
Tel.: +49 89 726342 00
Fax: +49 89 726342 99
[email protected]
www.mikrotron.de
1
GENERAL......................................................................................................................................................5
1.1
ESSENTIALS OF MOTIONBLITZ CUBE ....................................................................................................5
1.2
CUSTOMER INDICATIONS .........................................................................................................................5
1.2.1 For customers in the U.S.A. ....................................................................................................................5
1.2.2 For customers in Canada .......................................................................................................................5
1.2.3 Pour utilisateurs au Canada...................................................................................................................6
1.2.4 Life Support Applications .......................................................................................................................6
1.3
DECLARATION OF CONFORMITY ..............................................................................................................6
1.4
WARRANTY NOTE ...................................................................................................................................7
1.5
REMARKS, WARNINGS ............................................................................................................................7
1.6
SIDE AND BACKSIDE VIEWS OF CUBE CAMERAS.......................................................................................8
1.6.1 The rear of the camera............................................................................................................................8
1.6.2 The right side of the camera ...................................................................................................................9
1.6.2.1 Connectors ........................................................................................................................................................9
1.6.2.2 Switches ..........................................................................................................................................................10
1.6.2.3 LEDs ...............................................................................................................................................................11
1.6.2.3.1
Upper LED: battery charging and power indication .........................................................................11
1.6.2.3.2
Lower LED: internal camera state ...................................................................................................12
1.6.3 The front of the camera.........................................................................................................................12
1.7
SCOPE OF DELIVERY ..............................................................................................................................13
1.8
MOTIONBLITZ CUBE VERSIONS: .........................................................................................................14
1.9
POWER SUPPLY AND CHARGING.............................................................................................................16
1.9.1 Battery charging ...................................................................................................................................16
2
OPERATING MODES................................................................................................................................17
2.1
STANDBY (FOR CUBE4 AND CUBE5 CAMERAS ONLY)............................................................................17
2.2
READY-TO-OPERATE .............................................................................................................................18
2.2.1 Live mode..............................................................................................................................................18
2.2.2 Prepare for recording ...........................................................................................................................18
2.2.3 Start recording......................................................................................................................................19
2.2.3.1 recording modes ..............................................................................................................................................19
2.2.3.2 Non circular mode...........................................................................................................................................19
2.2.3.2.1
Circular recording mode ...................................................................................................................19
3
INSTALLATION OF MOTIONBLITZ CUBE ........................................................................................20
3.1
MINIMAL SYSTEM REQUIREMENTS (PC) ................................................................................................20
3.2
INSTALLATION OF THE SOFTWARE .........................................................................................................20
3.2.1 Assigning an IP-address to the GigaBit Ethernet adapter ...................................................................21
3.2.2 IP-Adress of the camera .......................................................................................................................22
3.2.2.1 bootp-server installed ......................................................................................................................................22
3.2.2.2 No bootp-server installed ................................................................................................................................23
3.2.2.2.1
Assign IP-Address 192.168.2.1 to the GigaBit Network adapter ...........................................23
3.2.2.2.1.1 Assigning a different IP-Address to the MotionBLITZ Cube camera........................................23
3.2.3 The network configuration file "mfggb.ini". ........................................................................................24
3.2.3.1 Section [CAMERA_REL]...............................................................................................................................24
3.2.3.2 Section [IPORT_PARAMS] ...........................................................................................................................24
3.3
CONNECTING THE MOTIONBLITZ CUBE TO THE PC AND STARTING PROGRAM ....................................24
3.3.1 Selecting the network adapter...............................................................................................................24
3.3.2 Selecting the MotionBLITZ Cube camera.............................................................................................26
3.3.3 Camera name........................................................................................................................................26
3.3.4 Multi camera operation ........................................................................................................................27
3.3.4.1 Synchronizing cameras ...................................................................................................................................27
4
MOTIONBLITZ CUBE IN PRACTICE ...................................................................................................28
4.1
THE USER INTERFACE ............................................................................................................................28
4.2
SELECTING RESOLUTION, SPEED, GAIN, TRIGGER, SYNC, ARM AND WHITE BALANCE ..........................29
4.2.1 Gain ......................................................................................................................................................30
4.2.2 Black level.............................................................................................................................................30
4.2.3 Low Light Mode ....................................................................................................................................30
MotionBLITZ Cube
User Manual Ver. 1.8.0
2
4.2.4 Enable Sync in ......................................................................................................................................30
4.2.4.1 Framerates of master and slave camera...........................................................................................................31
4.2.5 Enable IRIG-B input ............................................................................................................................31
4.2.6 ARM or “Sync out” signal....................................................................................................................32
4.2.6.1 Sync out activated ...........................................................................................................................................32
4.2.6.2 ARM activated ................................................................................................................................................32
4.3
ARRANGE A SCENE ................................................................................................................................33
4.4
RECORDING IN NON CIRCULAR MODE ....................................................................................................33
4.5
RECORDING IN CIRCULAR MODE ............................................................................................................33
4.5.1 Start recording......................................................................................................................................34
4.5.2 Stop recording.......................................................................................................................................34
4.6
PLAYBACK OF A SEQUENCE ...................................................................................................................35
4.7
EDITING AND SAVING A SEQUENCE ........................................................................................................36
4.7.1 Editing a sequence by using frame slider or keys.................................................................................36
4.7.1.1 Set the beginning of a sequence ......................................................................................................................36
4.7.1.2 Set the end of a sequence ................................................................................................................................37
4.7.1.3 Copy the selected range into the frame list .....................................................................................................37
4.8
RETRIEVING SAVED BMP-FILES ..............................................................................................................37
4.9
WHITEBALANCE (COLOR CAMERAS) / HISTOGRAM (MONOCHROME CAMERAS) .....................................38
4.9.1 Do the white balance manually.............................................................................................................39
4.9.2 Automatic white balancing ...................................................................................................................39
4.9.3 Save the white balance values in the camera........................................................................................39
4.9.4 Provide the lenght of the check line .....................................................................................................40
5
CONTROLS AND MENUS IN THE MOTIONBLITZ CUBE SOFTWARE .......................................41
5.1
MOVING THE CAMERA IMAGE ................................................................................................................41
5.2
ZOOM IN AND ZOOM OUT .......................................................................................................................41
5.3
BRIGHTNESS AND CONTRAST.................................................................................................................42
5.4
MENU FILE ............................................................................................................................................42
5.4.1 Reload bmp-files ...................................................................................................................................43
5.4.1.1 Load loop ........................................................................................................................................................43
5.4.1.2 Load frame list ................................................................................................................................................44
5.4.2 Save images to bmp-files.......................................................................................................................45
5.4.2.1 Save Loop .......................................................................................................................................................45
5.4.2.2 Save frame list.................................................................................................................................................46
5.4.3 Make Avi File........................................................................................................................................47
5.5
THE CAMERA MENU ..............................................................................................................................48
5.6
THE VIEW MENU ...................................................................................................................................49
5.6.1 Raw .......................................................................................................................................................49
5.6.2 Input Ports ............................................................................................................................................49
5.6.2.1 Display Input ports..........................................................................................................................................49
5.6.2.2 Convert Analog Values ...................................................................................................................................50
5.6.3 Display while recording........................................................................................................................51
5.6.4 Marker ..................................................................................................................................................51
5.6.5 Infoline ..................................................................................................................................................51
5.6.6 “Infotext...“...........................................................................................................................................53
5.6.7 Language ..............................................................................................................................................53
5.7
RECORD SETTINGS .................................................................................................................................53
5.7.1 Standby after the end of a recording session ........................................................................................54
5.7.2 Non-circular mode................................................................................................................................54
5.7.2.1 Without trigger................................................................................................................................................55
5.7.2.2 With trigger facility.........................................................................................................................................55
5.7.2.2.1
Recording while trigger is active ......................................................................................................56
5.7.2.2.2
Fixed number of frames per trigger (burst trigger) ...........................................................................57
5.7.3 Circular mode .......................................................................................................................................58
5.7.3.1 Triggermodes ..................................................................................................................................................58
5.7.3.1.1
External trigger .................................................................................................................................58
5.7.3.1.2
ImageBLITZ – optional ....................................................................................................................59
5.7.3.1.2.1 ImageBLITZ parameters ............................................................................................................60
5.7.3.1.2.1.1 Pixel value difference ........................................................................................................60
5.7.3.1.2.1.2 Relative object size ............................................................................................................60
MotionBLITZ Cube
User Manual Ver. 1.8.0
3
5.7.3.1.2.1.3 ImageBLITZ Reference frame ...........................................................................................60
5.7.3.1.2.1.4 ImageBLITZ window colors..............................................................................................60
5.7.3.2 Multi sequence - optional................................................................................................................................61
5.8
PLAY SETTINGS .....................................................................................................................................64
5.8.1 Display of individual frames.................................................................................................................64
5.8.2 Display loop “from ... to“.....................................................................................................................64
5.8.3 Frame List.............................................................................................................................................65
5.8.4 Display loop with frame numbers from frame list ................................................................................65
5.8.5 Last frame number ................................................................................................................................65
5.8.6 Slow motion (time delay in display)......................................................................................................65
5.9
INFO FORM ............................................................................................................................................66
6
MAINTENANCE.........................................................................................................................................67
6.1
6.2
CLEANING OF THE MOTIONBLITZ CUBE INFRARED FILTER ..................................................................67
BATTERY ...............................................................................................................................................67
7
TROUBLESHOOTING ..............................................................................................................................68
8
APPENDIX...................................................................................................................................................69
8.1
TECHNICAL DATA ..................................................................................................................................69
8.1.1 Cube1 / Cube2 ......................................................................................................................................69
8.1.2 Cube3 ....................................................................................................................................................70
8.1.3 Cube4 ....................................................................................................................................................71
8.1.4 Cube5 ....................................................................................................................................................72
8.2
CONNECTOR ASSIGNMENTS ...................................................................................................................73
8.2.1 „Power“ connector, male, type Binder (Cube1/2/3) ............................................................................73
8.2.2 “Signal input / Sync” connector, male, type Binder (Cube1/2/3).........................................................73
8.2.3 „Power“ connector, male, type Lemosa (Cube1/2/3...-UPL, Cube4/5) ...............................................74
8.2.4 „Signal input / sync” connector, male, type Lemosa (Cube1/2/3...-UPL, Cube4/5) ............................74
8.2.4.1 IRIG-B input ...................................................................................................................................................75
8.2.4.2 Trigger/Sync input signal definition................................................................................................................75
8.2.4.3 Trigger connection example............................................................................................................................75
8.2.4.4 Analog input signal definition.........................................................................................................................76
8.2.5 Digital Inputs 1-3 signal definition.......................................................................................................77
8.2.5.1 Sync/Arm Output ............................................................................................................................................77
8.3
SPECTRAL RESPONSE .............................................................................................................................78
8.3.1 Cube1 / Cube2 ......................................................................................................................................78
8.3.2 Cube3 / Cube5 ......................................................................................................................................79
8.3.3 Cube4 ....................................................................................................................................................80
8.4
PIXEL SENSITIVE AREA ..........................................................................................................................81
8.4.1 Cube1 / Cube2 ......................................................................................................................................81
8.4.2 Cube3 / Cube5 ......................................................................................................................................81
8.4.3 Cube4 ....................................................................................................................................................81
8.5
DIMENSIONS ..........................................................................................................................................82
8.5.1 Top/bottom view Cube1/2/3 ..................................................................................................................82
8.5.2 Side view Cube1/2/3..............................................................................................................................83
8.5.3 Top/bottom view Cube4/5 .....................................................................................................................84
8.5.4 Side view Cube4/5.................................................................................................................................85
MotionBLITZ Cube
User Manual Ver. 1.8.0
4
1
General
Congratulations! MotionBLITZ Cube is an excellent choice, because MotionBLITZ
Cube is a extremely versatile, advanced and self contained digital camera system. Mikrotron Deutschland GmbH has combined progressive camera technology with software
which is very easy to operate. Thus MotionBLITZ Cube is the ideal solution for high
speed recording. This manual provides information about the features and operating
modes of MotionBLITZ Cube.
1.1
Essentials of MotionBLITZ Cube
With the MotionBLITZ Cube – the Digital Motion Analyzer Recorder – rapidly moving
or explosive processes can be continuously recorded and stored at up to 190.000 images per second (Cube5) and can be displayed and analyzed in detail immediately after the end of a sequence. The images are always initially stored in the internal frame
memory of the camera. Because of the built-in rechargable battery, the camera can
operate up to 30 (60 Cube4/5) minutes in record mode and can store the recorded
data in the internal frame memory for up to 2 hours. Switch on the camera and after a
few seconds it is ready for high speed recording at full resolution without any additional
components. The MotionBLITZ Cube must be connected to a host PC via fast Ethernet
only when downloading recorded sequences or when camera parameters need to be
modified or changed.
1.2
Customer indications
1.2.1 For customers in the U.S.A.
This equipment has been tested and found to comply with the limits for a Class A digital device, pursuant to Part 15 of the FCC Rules. These limits are designed to provide
reasonable protection against harmful interference when the equipment is operated in
a commercial environment. This equipment generates, uses, and can radiate radio frequency energy and, if not installed and used in accordance with the instruction manual,
may cause harmful interference to radio communications. Operation of this equipment
in a residential area is likely to cause harmful interference in which case the user will
be required to correct the interference at his own expense. You are cautioned that any
changes or modifications not expressly approved in this manual could void your authority to operate this equipment. The shielded interface cable recommended in this manual must be used with this equipment in order to comply with the limits for a computing
device pursuant to Subpart J of Part 15 of FCC Rules.
1.2.2 For customers in Canada
This apparatus complies with the Class A limits for radio noise emissions set out in
Radio Interference Regulations.
MotionBLITZ Cube
User Manual Ver. 1.8.0
5
1.2.3 Pour utilisateurs au Canada
Cet appareil est conforme aux normes Classe A pour bruits radioélectriques, spécifiées
dans le Règlement sur le brouillage radioélectrique.
1.2.4 Life Support Applications
These products are not designed for use in life support appliances, devices, or systems
where malfunction of these products can reasonably be expected to result in personal
injury. Mikrotron customers using or selling these products for use in such applications
do so at their own risk and agree to fully indemnify Mikrotron for any damages resulting
from such improper use or sale.
1.3
Declaration of conformity
Manufacturer:
Mikrotron GmbH
Address:
Landshuterstr. 20-22
85716 Unterschleissheim
Germany
Product:
High Speed Camera MotionBLITZ Cube
The dedicated products conform to the requirements of the Council Directives
2004/108/EG for the approximation of the laws of the Member States relating to electromagnetic consistency. The following standards were consulted for conformity testing
with regard to electromagnetic consistency.
EC Regulation
Description
EN 61000-6-3
EN 61000-6-1
Electromagnetic compatibility
Immunity
Unterschleissheim, August 31th 2006
Mikrotron GmbH
Bernhard Mindermann
Managing Director, Mikrotron GmbH
MotionBLITZ Cube
User Manual Ver. 1.8.0
6
1.4 Warranty Note
Do not open the body of the camera. The warranty becomes void if the camera body is
opened.
1.5 Remarks, Warnings
This document contains important remarks and warnings. See the corresponding symbols:
L
*
Important remark
Attention, Warning
MotionBLITZ Cube
User Manual Ver. 1.8.0
7
1.6
Side and backside views of Cube cameras
1.6.1 The rear of the camera
The identification type plate is to be found at the rear of the camera. It contains the serial number and the mac-address for identifying the device in a network.
MotionBLITZ Cube
User Manual Ver. 1.8.0
8
1.6.2 The right side of the camera
1.6.2.1 Connectors
There are 3 connectors, 2 switches and 2 LEDs mounted on the right side of the
Camera. The pin assignments of these connectors are described in chapter 8.2
Connector assignments
MotionBLITZ Cube
User Manual Ver. 1.8.0
9
1.6.2.2 Switches
For cameras with standby facility, press the power switch longer than 1 second for
swichting off the camera! See chapter 2.1 “Standby (for Cube4 and Cube5 cameras
only)” for details.
MotionBLITZ Cube
User Manual Ver. 1.8.0
10
1.6.2.3 LEDs
With the color LEDs of MotionBLITZ Cube the actual operating condition is indicated.
Three colors are possible (and off-state):
RED
GREEN
ORANGE
1.6.2.3.1 Upper LED: battery charging and power indication
Color
OFF
RED
GREEN
LED-state
constant
constant
ORANGE
constant
Camera state
Switched off
Switched off, battery charging in progress
Switched on, no charging (battery full or no power
supply connected)
Switched on, battery charging in progress
In addition for Cube4 und Cube5 with according hardware version supporting the
standby facility:
RED/ORANGE
flashing
Standby mode with external power supply
GREEN/ORANGE flashing
Swiched on, with internal power supply (battery)
*
With empty batteries it may take a few minutes of initial
charging until the camera can be switched on.
MotionBLITZ Cube
User Manual Ver. 1.8.0
11
1.6.2.3.2 Lower LED: internal camera state
Color
LED-state
RED
constant
ORANGE 15 sec after
power on
GREEN constant
ORANGE blinking
ORANGE steady
Camera state
Boot procedure failure. Switch off the camera and try again.
Power up boot procedure in progress
Ready for the first recording after power up
Circular recording in progress, waiting for stop.
Circular recording stopped. Wait for next start signal
1.6.3 The front of the camera
The c-mount for the lens is located at the front of the camera.
MotionBLITZ Cube
User Manual Ver. 1.8.0
12
1.7
Scope of delivery
The following components are included as part of the delivery
-
1 MotionBLITZ Cube version as ordered, see selection below
1 Interface cable GigaBit Ethernet
1 110-220V power supply
1 CD with MotionBLITZ Cube operating software
1 Binder connector for signal Input
MotionBLITZ Cube
User Manual Ver. 1.8.0
13
1.8
MotionBLITZ Cube Versions:
Identifier
(1)
Cube1 M3
Cube1 M3, C
Cube1 M6
Cube1 M6, C
Color
/b&w
(2)
B&w
Color
B&w
Color
Recording
time [s]
(3)
3
3
6
6
Max. Resolu- Max. framerate[fps]
tion (4)
(5)
640x512
1000
640x512
1000
640x512
1000
640x512
1000
Lens
mount
(6)
CM
CM
CM
CM
Cube2 M3
Cube2 M3, C
Cube2 M6
Cube2 M6, C,
B&w
Color
B&w
Color
3
3
6
6
1280x1024
1280x1024
1280x1024
1280x1024
32000
32000
32000
32000
CM
CM
CM
CM
Cube3 M3
Cube3 M3, C
Cube3 M6
Cube3 M6, C
B&w
Color
B&w
Color
3
3
6
6
512x512
512x512
512x512
512x512
128000
128000
128000
128000
CM
CM
CM
CM
Cube4 M
Cube4 M, C
Cube4 M3
Cube4 M3, C
B&w
Color
B&w
Color
1,5
1,5
3
3
1280x1024
1280x1024
1280x1024
1280x1024
93000
93000
93000
93000
CM/FM
CM/FM
CM/FM
CM/FM
Cube5
Cube5 C
Cube5 M3
Cube5 M3, C
B&w
color
B&w
color
1,5
1,5
3
3
512x512
512x512
512x512
512x512
1900000
1900000
1900000
1900000
CM/FM
CM/FM
CM/FM
CM/FM
(1)
Additional configuration options:
HG
indicates the Hi-G version (ruggedized for crash and vibration)
IB
Camera has ImageBLITZ option
IG
IRIG-B input processing option
MS
Camera has Multi-Sequence option
M6
6 seconds recording time
PB
Phoenix connector
(2)
b&w
black and white
(3)
Cube1
Cube2
Cube3
Cube4
Cube5
seconds when using 1000 fps and 640x512
seconds when using 500 fps and 1280x1024
seconds when using 2500 fps and 512x512
seconds when using 1000 fps and 1280x1024
seconds when using 5000 fps and 512x512
(4)
MotionBLITZ Cube
Width x height
User Manual Ver. 1.8.0
14
(5)
fps
Cube2
Cube3
Cube4
Cube5
frames per second
reduced resolution when using more than 500 fps
reduced resolution when using more than 2500 fps
reduced resolution when using more than 1000 fps
reduced resolution when using more than 5000 fps
(6)
Cube1 / Cube2 / Cube3
Cube4 / Cube5
Lens mount:
CM = „C-Mount“
CM = „C-Mount“, optional FM = „F-Mount“
Cube3 / Cube5 have an increased photosensitivity (six times higher than the
Cube1 / Cube2).
MotionBLITZ Cube
User Manual Ver. 1.8.0
15
1.9
Power supply and charging
MotionBLITZ Cube cameras contain an integrated, rechargable battery, which provides
the necessary voltage for operation. Use an external power supply for charging the battery and for external power operation.
*
Only voltages in the range from 10,5 to 24 Volts @ 15W max. are permitted. Higher input voltages may seriously damage the camera. Damage of
this type is not covered by our warranty.
1.9.1 Battery charging
MotionBLITZ Cube contains an integrated, rechargable battery. Thus the camera can
operate as stand alone without any power connection for up to 30 minutes of circular
recording with full resolution.
For Cube4/5 cameras this time will be increased to 60 minutes.
Stored images can be retained in the camera up to two hours with a fully charged battery .
The battery will be automatically charged when the power supply (10,5 – 24 V DC) is
connected to the camera and the camera is switched off. Charging of a completely
empty battery will take 3 hours.
If the camera is switched on and a power supply connected, the battery is charged to a
fraction of its total capacity, it will operate a few minutes when disconnected from
power supply.
If the camera is switched on and a power supply is connected, the battery will becharged as well.
A fully charged battery will discharge within a few days when not used.
L
Always use an external power supply if the battery condition is unknown.
MotionBLITZ Cube
User Manual Ver. 1.8.0
16
2
Operating Modes
After switching on the camera it is ready for operation within a few seconds.
Cube4 and Cube5 cameras with according hardware version have a standby mode
available.
2.1
Standby (for Cube4 and Cube5 cameras only)
The intended purpose of the standby mode is to store the camera’s recorded images
for a longer time (up to ca. 20 hours) without any external power supply.
To manage this, in standby mode several components of the camera’s electronic will
be shutdown and mainly only the the image memory will be provided with power.
In standby mode, there is no access to the camera’s image memory.
To get the camera into the standby mode you have to
-
press the camera’s power switch for a short moment (less than 1 second), when
the camera is ready-to-operate or
-
configure it with the cube software as described in chapter 5.7.1 “Standby after
the end of a recording session” or in chapter 5.5 “The Camera menu”.
To get the camera out of the standby mode you have to press the camera’s power
switch for a short moment (less than 1 second).
*
Please pay attention: If you press the switch longer
than 1 second, you will shut down the camera completely and the camera’s recording will be lost!
The standby mode will be indicated by the LEDs in the follwing manner:
-
the lower LED (TRIGGER) is switched off
-
die upper LED (POWER) is flashing:
Power LED color
Power supply
advice
red / orange constant
external
flashing
green flashing 1 .. 5 times internal (battery) If the battery is fully charged,
every 2 seconds
there is a quintuple blinking.
If the battery gets emtpy, there is
a single blinking.
MotionBLITZ Cube
User Manual Ver. 1.8.0
17
2.2
Ready-to-operate
By means of the MotionBLITZ Cube software (control program) the camera can be set
up for recording in different operating modes.
If the camera is disconnected from the PC, reconnect it and press the reconnect
button in order to establish the GigaBit Ethernet link.
L
It is very important to press the reconnect button after the camera is reconnected
with your system. If this button is not pressed after reconnection the chronology
of a meanwhile recorded sequence may be lost!
The same applies to a completed recording session, that has been started with
the camera’s trigger switch.
MotionBLITZ Cube holds up to 8 Gbyte internal frame memory. From this memory, a
very small part (only as much as required by one frame) is used for storing the frames
for the live mode. The remaining memory is used for sequence recording.
2.2.1 Live mode
The camera images are continuously recorded and displayed. This mode is optimal for
defining image detail, adjusting the focus and setting up the various camera
parameters. Switch the camera to live mode by pressing the "Live" button.
2.2.2 Prepare for recording
When the camera parameters are adjusted according to the users needs while the
camera is connected to the PC, the camera can be disconnected now from the PC and
recording can be started via the trigger switch on the camera.
MotionBLITZ Cube
User Manual Ver. 1.8.0
18
2.2.3 Start recording
After power up, the camera starts with the last used settings. If you need another resolution/frame speed, the new parameters must be entered via the MotionBLITZ Cube
control software.
There are 2 methods of starting the recording:
1. Press the Start/Stop recording switch on the right side of the camera.
In this case, a reconnect has to be accomplished after the completion of the recording sequence in order to save the chronology of the pictures.
2. Press the red start recording
control program
button in the MotionBLITZ Cube
2.2.3.1 recording modes
MotionBLITZ Cube has 2 recording modes. The difference is the usage of the camera’s
image memory.
2.2.3.1.1 Non circular mode
The camera stops recording when the internal frame buffer is full.
2.2.3.1.2 Circular recording mode
The camera records frames in a circular mode (i.e. the oldest frames are always overwritten by the newest) and waits for a signal to stop. There are 3 methods to stop recording:
1. press the Start/Stop recording switch on the camera
2. apply a trigger signal (rising or falling edge, depends on setting “Trigger edge” in
form “Camera Setup”) to the appropriate camera input connector
3. press the Stop button in the MotionBLITZ Cube control program
MotionBLITZ Cube
User Manual Ver. 1.8.0
19
3
Installation of MotionBLITZ Cube
3.1
Minimal system requirements (PC)
For error-free operation of MotionBLITZ Cube the following minimum PC specifications
are required:
-
Pentium III 1GHz CPU with MMX-technology
Windows 2000 or XP operating system
256 Mbyte PC Ram
10 Gbyte Harddisk
8 Mbyte graphic memory
Display with 1280 x 1024 pixels
GigaBit Ethernet Adapter
For optimal operation of MotionBLITZ Cube, a PC wth the following minimum
specifications is recommended:
3.2
Pentium IV 1.8 GHz
Windows XP
512 Mbyte PC Ram
40 Gbyte Harddisk
32 Mbyte graphic memory
Display with 1400 x 1050 pixels / 24 Bit
GigaBit Ethernet Adapter
Installation of the software
The GigaBit Ethernet adapter and driver should be installed before the MotionBLITZ
Cube software is installed. For details see the GigaBit Ethernet adapter manual.
Insert the MotionBLITZ Cube Setup-CD in the CD-Rom drive on the PC. Start the
setup.exe program and follow the instructions through the rest of the installation process. After successful installation some network settings may be necessary, depending
on the actual network configuration. These settings are needed for assigning an IPaddress to the GigaBit Ethernet adapter and to the camera and described in the next
chapters.
MotionBLITZ Cube
User Manual Ver. 1.8.0
20
3.2.1 Assigning an IP-address to the GigaBit Ethernet adapter
Assigning an IP-address to the adapter is only necessary, if no bootp-server is installed
in your network.
To assign an IP-address, perform the following steps:
1. Close all MotionBLITZ Cube applications.
2. Open the “Network and Dial-up Connections” window from the Windows ControlPanel.
Right click on the desired connection in the panel and click the “Properties” item. The
properties dialog for the connection, shown in the next figure on the next page, will be
displayed.
MotionBLITZ Cube
User Manual Ver. 1.8.0
21
-
Highlight the Internet Protocol (TCP/IP) by clicking on the text-part, not on the
check-box.
Click the “Properties” button. The next dialog will allow you to assign an IPAdress and the subnet-mask of the GigaBit network-adapter. See details on
next page in chapter
“ 3.2.2.2.1 Assign IP-Address 192.168.2.1 to the GigaBit Network adapter”
3.2.2 IP-Adress of the camera
Some settings are required depending on the Ethernet configuration:
3.2.2.1 bootp-server installed
The IP-address for the camera is assigned by the server. No other settings are necessary.
MotionBLITZ Cube
User Manual Ver. 1.8.0
22
3.2.2.2 No bootp-server installed
3.2.2.2.1 Assign IP-Address 192.168.2.1 to the GigaBit Network adapter
After assigning the IP-Address 192.168.2.1 to the network adapter, set the subnetmask to 255.255.255.0.
Later on, in the MotionBLITZ Cube program, the IP-address 192.168.2.2 will be
automatically assigned to the first camera used. No other settings are necessary.
3.2.2.2.1.1 Assigning a different IP-Address to the MotionBLITZ Cube camera
The camera-network configuration file "mfggb.ini", which contains a section called
[CAMERA_REL] resides in the installation directory.
The entry
##CameraIP00=192.168.2.2
can be found in this section. Delete the comment characters '##' and change the address "192.168.2.2." to the desired address.
Example:
The Network adapter has the IP-address 193.122.3.9.
An IP-address for the camera should be assigned, where the network part of the network adapter’s address and the part of the cameras’s address must be the same. How
many octets cover this part depends on the network address class:
Class A (beginning with 0…127) the first octet,
Class B (beginning with 128…191) the first and the second octet,
Class C (beginning with 192…223) the first,second and third octet.
In our example, 193.122.3.10, which is Class C, would be ok, because 192.122.3 are
the same in both addresses.
The entry in "mfggb.ini" could be:
CameraIP00=193.122.3.10
Be aware of address conflicts with other devices in the network!
MotionBLITZ Cube
User Manual Ver. 1.8.0
23
3.2.3 The network configuration file "mfggb.ini".
As mentioned in the paragraph above, "mfggb.ini" resides in the installation-directory
and contains 2 sections.
3.2.3.1 Section [CAMERA_REL]
This Section contains the MAC Address of the used camera and network adapter. The
addresses will be registered by the Cube control program; no changes are to be done
by the user.
Example:
AdapterMAC=00-0E-0C-4C-E2-F0
CameraMAC00=00-50-C2-1D-7E-20
Beside this, the camera’s IP-Address may be defined here. See above for details.
3.2.3.2 Section [IPORT_PARAMS]
##InterPacketDelay=2000
##InterPacketDelay=6000
##InterPacketDelay=100
InterPacketDelay=3000
PacketSize=1440
RequestTimeOut=1000
PacketTimeOut=1000
AnswerTimeOut=1000
FirstPacketTimeOut=0
TabQuantity=2
COMDelay = 100
// single camera on a Labtop computer
// camera is connected to an existing LAN
// Default
// Ethernet-switch
// in us
Depending on the system, use the appropriate parameter for the InterPacketDelay.
3.3 Connecting the MotionBLITZ Cube to the PC and starting program
To properly connect the camera to the PC please follow these steps:
1. connect the GigaBit Ethernet cable to the camera and then to the PC
2. connect the power supply to the camera
3. switch on the camera by pressing the power-switch
(see chapter Switches on page 10)
4. start the MotionBLITZ Cube Control programm. If it’s the first start after installation of the MotionBLITZ Cube software, two forms will be displayed for selecting
the GigaBit Ethernet adapter and the MotionBLITZ Cube camera. Please select
the network adapter, click on “Apply” and select the camera and click on “Apply”.
Now the MotionBLITZ Cube is ready to operate.
3.3.1 Selecting the network adapter
MotionBLITZ Cube
User Manual Ver. 1.8.0
24
The form for selecting the network adapter willl be shown automatically after the first
start of the MotionBLITZ Cube program after its installation. You may load this form in
the Camera menu (“Select Network Adapter”) as well.
Assign the network adapter for use with the program by clicking on the appropriate line
in the “installed network adapters” list and clicking on “Apply and proceed”. In the next
step, the form for selecting the camera will be shown automatically, if it’s a programm
start without successfully selecting a camera before:
MotionBLITZ Cube
User Manual Ver. 1.8.0
25
3.3.2 Selecting the MotionBLITZ Cube camera
The form for selecting MotionBLITZ Cube camera willl be shown automatically after the
first start of the MotionBLITZ Cube program after its installation. You may load this
form in the Camera menu (“Camera Select”) as well, if you want to switch to another
camera.
Assign a camera for use with the program by clicking on the appropriate line in the installed cameras list and clicking on “Apply (and proceed)”. After the next automatical
steps with the initialisations for the hardware the system is ready for use.
3.3.3 Camera name
If you like to use a name for your camera, you may enter this name in the “camera
name” field of the ““Select Camera”-line of the “Camera select”-form. By clicking on
“Apply” this name will be used in the title of all other forms of the MotionBLITZ Cube
program.
MotionBLITZ Cube
User Manual Ver. 1.8.0
26
3.3.4 Multi camera operation
If you want to use two cameras simultaneously, you have to copy the contents of your
MotionBLITZ Cube installation directory into a new directory and start MotionBLITZ_Cube.exe in this new directory as a second instance of the Cube control program. By copying the Cube directory contents into other, separate directories and starting MotionBLITZ_Cube.exe in this new directories you may use up to four cameras simultaneously.
For connecting the cameras with your PC you should use a Gigabit-Ethernet switch.
The following switches are recommended for use with the MotionBLITZ Cube cameras:
•
•
•
•
•
SMC TigerSwitch 86xxT family
3COM 3C1740x (3800 famliy)
Dlink DGS-10xxTx 10/100/1000 famliy
SMC 8505 or SMC 8508
NETGEAR ProSafe 16 Port Gigabit Smart Switch GS716T
3.3.4.1 Synchronizing cameras
For synchronizing MotionBLITZ Cube cameras you only have to connect the sync output of a master camera to sync input of the slave cameras, as described in detail in
“4.2.4 Enable Sync in” and “ARM or “Sync out” signal”
MotionBLITZ Cube
User Manual Ver. 1.8.0
27
4
MotionBLITZ Cube in practice
The full range of functions available and all camera parameters may be set by means
of the MotionBLITZ Cube software.
4.1
The user interface
The camera is completely controlled through the user interface. All parameters of the
camera for recording, playback and saving the frames after recording may be adjusted
here. After recording, stored sequences of images maybe subsequently edited. Start
the software by double clicking on the appropriate MotionBLITZ Cube symbol on the
PC. desktop or choose the application in the windows start menu. The following screen
mask will appear:
Select modes of operation or change parameters by pressing a command-button or by
selecting an item in a pulldown menu. If the mouse cursor is moved slowly over the
command buttons and symbols, information about each object will be displayed ("tool
tip text").
MotionBLITZ Cube
User Manual Ver. 1.8.0
28
4.2
Selecting resolution, speed, gain, trigger, sync, ARM and white balance
Click on the menu item "Camera" => "Camera Setup". This form will appear:
Once the changes to the parameters for resolution and framerate are set, click on
"Apply".
*
Changes of resolution or framerate may alter the quality of recorded images. Be sure that you have saved your recorded images to file before applying these changes because afterwards the images may be destroyed or
lost!
Now the new parameters will be sent to the camera. All other parameters, e.g. shuttertime or analog gain, will be sent immediately to the camera after entering.
If there is no connection to the camera, the following error message will appear:
MotionBLITZ Cube
User Manual Ver. 1.8.0
29
Please make sure the camera is connected correctly. If a link is not established by
clicking on the reconnect button, read more in chapter “7, Troubleshooting”.
4.2.1 Gain
The gain may be adjusted with the 4 option buttons. You may increase the gain up to 8
(or 4 for Cube3/4/5). But please note: the quality of the image decreases the more you
increase the gain.
4.2.2 Black level
With the black level parameter (controlled with slider or text field) you may adjust the
camera’s image sensor base black level. The base black level must be set to a value
between 0 and 255. Setting to the correct value, the sensor will deliver the pixel value 0
(which means totally black) for a complete black image.
If the value is too small, the sensor will deliver a pixel value above 0 (which means
gray).
If the value is too big, the sensor will deliver a pixel value 0 (totally black) for images,
that are gray and not completely black.
The whitebalance form (for color cameras) or the histogram form (for monochrome
cameras) is a good tool for adjusting the black level:
In live mode, close the lens of the camera for getting a completely black image, adjust
the black level until the black line in the whitebalance or the histogram touches the
“min” border of the chart.
4.2.3 Low Light Mode
In low light mode the camera's exposure-time is extended up to 1023 milliseconds in
order to increase it's sensitivity. This mode is good for setting up the frame size and the
focus in live-mode. Select your exposure-time with the slider "shutter time" or input it
directly in the appropriate number-field. Low light mode will be automatically finished if
a recording is started.
4.2.4 Enable Sync in
With “Sync in” enabled it is possible to synchronize a MotionBLITZ Cube with other
MotionBLITZ Cube cameras.
-
Connect the Sync out of your MotionBLITZ Cube master camera to the slave
cameras,
connect the ground of the master camera with the ground of the slave cameras,
select a frame rate for the slave cameras, that is slightly above the master cameras framerate. Thus the slave cameras will be synchronized with the master
camera.
MotionBLITZ Cube
User Manual Ver. 1.8.0
30
4.2.4.1 Framerates of master and slave camera
If you synchronize a slave camera by a master camera, then the framerate of the slave
camera must be slightly above the master camera’s frame rate (as mentioned before),
otherwise the slave camera will not provide the same framerate as the master camera.
Example:
You want to record with 1000 frames per second. Adjust the master camera to the desired 1000 fps, select 1004 fps for the slave camera. Then the slave camera will deliver
the master camera’s framerate (1000 fps)!
L
If “Sync in” is enabled and no “sync in” signal is provided, the camera will not
record and timeout will occur!
The framerate of the slave camera must be slightly above the master camera’s
frame rate:
Slave camera should be set up to framrate that is at least 2 fps higher than the
master’s framerate for Cube1 and Cube2 models and at least 20 fps higher for
Cube3 models.
Thus the maximal achievable real framerate will be about 2480 fps @ full
image resolution (512 * 512) for Cube3 slave cameras
4.2.5 Enable IRIG-B input
If the camera was deliverd with the option IRIG-B, the processing of the IRIG-B input
signal may be activated with the check box “Enable IRIG-B”. See chapter IRIG-B input
for details.
After activation, the signal will be processed in the following manner:
-
decoding of the modulated 1KHz time code that is typically derived from a GPS
receiver.
-
The time code will be displayed in the info line as day of the year and time of
day (GMT) in the following format:
ttt hh:mm:ss, whereas
ttt = day of the year
hh = hour
mm = minute
ss = second.
-
The internal frame rate timebase is then synchronized once per second to the
IRIG-B 1sec marker, and therefore phase aligned to the 1KHz IRIG-B signal.
MotionBLITZ Cube
User Manual Ver. 1.8.0
31
4.2.6 ARM or “Sync out” signal
You may choose between “ARM” or “Sync out” signal for pin 3 of the output connector
(see Table 8.2-2 )
4.2.6.1 Sync out activated
If you select “Sync out”, it is possible to synchronize other SpeedCam cameras.
The rising edge of the signal provided on pin 3 shows the beginning of the exposure of
the master camera’s image, the falling edge the end.
4.2.6.2 ARM activated
If you select “ARM”, you get a signal, if the camera is ready for triggering in the circular
recording mode.
For Cube4/5 cameras only: With the both check-boxes on the right side of the Sync
out/ARM you may define if ARM is active high or low. Please note: this does not apply
to the “Sync out” signal.
MotionBLITZ Cube
User Manual Ver. 1.8.0
32
4.3
Arrange a scene
Click on the "Live"-Button to get a live-image from the camera. The camera may now
be focused and aligned for the details of the scene. You may use low light mode to increase the camera's sensitivity (available only in live-mode because on the other side
the framerate will be decreased!)
4.4
Recording in non circular mode
Non-circular mode is selected in menu "Record" => "record setting" => "non circular..".
To start, click on the red button. Now the camera starts recording and stops when the
internal buffer is full. During recording, the recorded frames are displayed simultaneously. After recording, the first (oldest) recorded frame will be displayed.
For Cube4 and Cube5 cameras there are firmware versions available for triggering in
this mode. See details in chapter “Record settings”
L
4.5
Recording in non circular mode may only be achieved with MotionBLITZ Cube
user interface program and not with the trigger switch or the trigger signal!
Recording in circular mode
Circular mode should be used if a trigger is applied.
The trigger may be
- the closing of the camera's trigger switch,
- a trigger signal,
- the ImageBLITZ
- the clicking on the stop button in the MotionBLITZ Cube control software.
A trigger is necessary if images are needed before and/or after an event. The trigger
defines the point of time of your event.
Circular mode is selected with menu "Record" => "record setting" => "circular..".
There are 2 methods to start and 3 various methods to stop the circular recording as
described in the next chapters of this manual. In circular recording mode the recorded
frames are displayed simultaneously. The number of frames that will be recorded before the trigger, called “pre-trigger frames”, is determined in menu "Record" => "record setting" => "circular.."=> "Trigger Position ,Before [Frames]".
After recording, the frame immediately after the trigger will be displayed, the timestamps will be set in relation to the point of time of the trigger-moment, i.e. the first
frame after the trigger is set to 0 ms. Negative values indicate that the displayed frame
was recorded before the trigger, positive values indicate frames after the trigger, called
“post-trigger frames”
MotionBLITZ Cube
User Manual Ver. 1.8.0
33
4.5.1 Start recording
There are 2 various methods of starting a recording:
1. Press the Start/Stop recording switch of the camera.
In this case, a reconnect has to be accomplished after the completion of the recording sequence in order to save the chronology of the pictures.
2. Press the start recording button in the MotionBLITZ Cube control program.
The internal camera state LED (see 1.6.2.3.2 on page 12) will start flashing orange.
This indicates that recording is in progress and the camera is waiting for the trigger to
complete the sequence.
4.5.2 Stop recording
There are 3 various methods to stop recording
1. Press the Start/Stop recording switch of the camera.
2. Apply a triggersignal to the appropriate camera input connector.
3. Press the stop button in the MotionBLITZ Cube control program.
The internal camera state LED (see 1.6.2.3.2 on page 12) stops blinking orange. The
sequence is complete after the post-trigger frames have been recorded.
MotionBLITZ Cube
User Manual Ver. 1.8.0
34
4.6
Playback of a sequence
The frames in the camera may be accessed after recording. If the camera has been
disconnected from the PC's GigaBit-Ethernet it must now be reconnected and the
reconnect button in the MotionBLITZ Cube control program must be
clicked on.
L
It is very important to press the reconnect button after the camera is reconnected with your system. If this button is not pressed after reconnection, the chronology of a meanwhile recorded sequence may be lost!
The same applies to a completed recording session, that has been
started with the camera’s trigger switch.
Click on one of the forward or backward buttons. Now the frames will be displayed. Alternatively the play settings menu may be used for selecting the frames.
MotionBLITZ Cube
User Manual Ver. 1.8.0
35
4.7
Editing and saving a sequence
In high speed recordings usually only a portion of the frames contain relevant information. Therefore, it is useful to save only that range of frames which contains this essential information.
There are 2 methods of selecting the essential range of frames for saving:
- Enter the range of the frame numbers in the "from" and "to" input field of the
"Save" or the "Make Avi" menu.
Alternatively you may enter the frame range by means of mouse-button and
control keys as described in the next chapter.
The selected range will be shown as a blue bar in the frame slider.
- Create a list of frames in the "Play settings" menu.
The sequence may now be saved as single bmp-files in the "Save" menu or as an avifile in the "Make Avi" menu . See chapter 5.4.2 and 5.4.3 on page 45 and page 47 for
detais.
4.7.1 Editing a sequence by using frame slider or keys
If the frame slider has the focus you may use the mouse buttons or the key “b”, “e” and
“l” for editing a sequence.
L
This method works only if the frame slider has the focus! Click on the frame
slider for getting the focus
4.7.1.1 Set the beginning of a sequence
Press the right mouse button or the key “b”. The actual frame number, 2016 in the picture above, will be set as a start value for the range of frames. The selected range will
be shown as a blue bar in the frame slider.
MotionBLITZ Cube
User Manual Ver. 1.8.0
36
4.7.1.2 Set the end of a sequence
Press the shift key and the right mouse button or the key “e”. The actual frame number,
2837 in the picture above, will be set as a end value for the range of frames. The selected range will be shown as a blue bar in the frame slider.
4.7.1.3 Copy the selected range into the frame list
Press the key “l” for copying the selected range into the frame list.
4.8
Retrieving saved bmp-files
If the saved bmp-files are to be viewed, select the directory, the filename and the desired frame numbers in the "File" => "Load" menu (chapter 5.4.1 on page 43). Now the
image source for displaying frames is the selected directory with the appropriate files.
This is indicated by the
symbol in the status area of the MotionBLITZ Cube
control-programm.
The playback buttons or the "Play settings" menu allow navigation through the image
files as described in chapter 4.6 on page 35.
The MotionBLITZ Cube camera is set as image source by clicking on the "Live" button
or the red "Start Recording" button. This is indicated by the camera
symbol.
MotionBLITZ Cube
User Manual Ver. 1.8.0
37
4.9
Whitebalance (color cameras) / histogram (monochrome cameras)
Good illumination is extremley important for optimal true color display. Best results are
achieved by using daylight or halogen light. For recalibrating the color correction, click
first on "Live" and then in the menu Camera Setup on the button "white balance". The
following screen mask will be shown
L
White balance is available for color cameras only. For black & white
cameras a histogram will be provided instead. The histogramm contains only a chart without red, green and blue.
MotionBLITZ Cube
User Manual Ver. 1.8.0
38
4.9.1 Do the white balance manually
Adjust the size of the green check-line, which is automatically displayed in the camera
image, and move this line over a white area using the mouse. (Click and hold on the
line and move it).
The values of the pixels along this line will be shown as three curves – red, green and
blue. Using the "R", "G" and "B"-sliders, move the three curves until they are nearly
congruent as shown in the figure above.
4.9.2 Automatic white balancing
Take a picture of a scene, that contains in its middle area mostly white. Click on the
“Auto” button.
4.9.3 Save the white balance values in the camera
Click on "Apply" to assume these values and to save them in the camera. Click on
"Close" to close the form.
MotionBLITZ Cube
User Manual Ver. 1.8.0
39
L
Multiple white balancing adjustments may be performed. If the images are
saved to a file, it is no longer possible to correct the color of these image-files.
Only frames downloaded from the camera are correctable before saving.
4.9.4 Provide the lenght of the check line
The green check line may be used for approximately determing the length of distances
between the starting point and the endpoint of the line. The value will be shown in the
field “length of the check line”. This value and its physical unit may be calibrated by entering your values in both fields.
If you know e.g. in the upper example („204 pixel“), that this corresponds to 1.5 inch,
then input 1.5 inch. From now on the pixel will be converted into inch.
MotionBLITZ Cube
User Manual Ver. 1.8.0
40
5
Controls and menus in the MotionBLITZ Cube software
There are several menus and controls in the MotionBLITZ Cube program. Each will be
described in the following chapters
5.1 Moving the camera image
Click with the left mouse button on the camera image. Hold the button and move the
mouse. The image will move in the desired direction.
5.2 Zoom in and zoom out
For zooming, use the left vertical scrollbar. The range of the zoom factor is from 0.1
(smaller) to 10 (bigger) than the original.
Click on the zoom icon for the original size. The number next to the zoom icon
indicates the actual zoom factor. Doubleclick on the icon to fit the image into the form.
The icon gets green to indicate this.
MotionBLITZ Cube
User Manual Ver. 1.8.0
41
5.3 Brightness and contrast
The brightness of the image (right top vertical scrollbar) and the contrast (right middle
vertical scrollbar) are set. By clicking the scrollbar symbols with the left mouse button,
the initial state of the appropriate parameter is set. Adjust the base value for the contrast computation using ContrastBase. This is needed only in special light conditions.
L
5.4
Changes to contrast and brightness are relevant for the saved frames!
Menu File
The File menu allows
-
reloading bmp-files for display
start saving images as bmp-files,
create an avi-file and
exit the program
MotionBLITZ Cube
User Manual Ver. 1.8.0
42
5.4.1 Reload bmp-files
MotionBLITZ Cube loads only bmp-files with 5 digit name endings. Files with the same
part before these 5 digits are assumed to be from the same saved sequence. To
reload a sequence (or a part of it) select the volume, the directory and the filename
without the digits.
There are 2 methods of selecting the single files to be loaded:
Load loop
Load frame list
5.4.1.1 Load loop
Click on the radio button "Load loop".
Entries can be made in the fields “From“ and “To“ by clicking on files on the file list with
the mouse:
- Click the contents of the “From“ field with the left mouse button (number 1 in our
example). The background of the figure is blue.
- Click on the desired image file with the left mouse button, e.g. frames.bmp. “14“ is
added to the “From“ field. The blue background disappears.
- Proceed in the same manner for the field “To“
MotionBLITZ Cube
User Manual Ver. 1.8.0
43
5.4.1.2 Load frame list
Click on the radio button "Load frame list"
The list may be edited in the menu "Play settings" (chapter 5.8 on page 64). Only the
files whose numbers are included in the frame list will be loaded and displayed.
By clicking “OK“ the first file is loaded into the main window.
Use the replay buttons as described in 4.6 on page 35 for displaying the whole
sequence.
MotionBLITZ Cube
User Manual Ver. 1.8.0
44
5.4.2 Save images to bmp-files
Select a name from the file list below the bmp name field by clicking on it or by
entering a name on the keyboard. On the right side of the window it is possible to set
the hard disk drive and the path with the mouse.
It is essential to remember that if more than of 2 characters for the name are used, the
performance may decrease. Nevertheless, any name may be used which conforms to
Windows. MotionBLITZ Cube extends these characters by a 6-digit figure which
corresponds to the frame number. At present only “bmp“ data is supported, i.e. the
name suffix is permanently set to “.bmp“.
5.4.2.1 Save Loop
Click on "Save Loop“.
The numbers of the images in the range of “From“ and “To“ fields (including the values
themselves) are written to a file by clicking “OK“.
The frame numbers may be also entered by using the frame slider and mouse-buttons
or keys as described in “4.7.1 Editing a sequence by using frame slider or keys”
MotionBLITZ Cube
User Manual Ver. 1.8.0
45
5.4.2.2 Save frame list
Click on “Save frame list“.
The numbers of the images shown in the list are written to a file by clicking “OK“.
This list may be edited in the pull down menu “Play Settings”, described in chapter 5.8
on page 64.
In both cases (“from ... to“ and “Frame list“) each image and its file name are displayed
while being stored. If the "display frames" check box is NOT active, the frames will not
be displayed. In this case the saving procedure will be faster.
If a file with the same name already exists, a response to a message box is required.
Click on:
Yes
No
Cancel
The file and all the following files will be overwritten.
The image will not be stored and, if possible, the procedure continues with
the next image.
The image is not stored and no further images will be processed.
The recording will be written to a file either with or without a image caption depending
on whether “infoline“ has been switched on or off in the “View“ menu (chapter 5.6.5 on
page 51).
MotionBLITZ Cube
User Manual Ver. 1.8.0
46
5.4.3 Make Avi File
Select the avi-filename, the numbers of the frames to be compressed and the
compressor-type by clicking on the "Compressor-setup" button.
If only a special region of the sequence is to be processed, select this region by clicking on the "clipping" check box. An rectangle named "AVI clipping area" will be overlayed in the camera image. Adjust the size as needed and move the rectangle over the
region of interest with the mouse. Once all parameters have been set, click on
"Make AVI.."
The Avi progress bar and the estimated time to completion will appear.
If you click on “Cancel” while an Avi is created, the AVI will hold only the frames up to
the point of time of your cancellation.
MotionBLITZ Cube
User Manual Ver. 1.8.0
47
5.5
The Camera menu
Within this menu, you may
-
with „Camera Setup“ check and change the camera’s parameter. See chapter 4.2
„Selecting resolution, speed, gain, trigger, sync, ARM and white balance“ for details.
-
with „Camera Select“ connect with the camera via the ethernet. See chapter 3.3.2
„Selecting the MotionBLITZ Cube camera“
-
with „Select Network Adapter“ select the adapter as described in chapter 3.3.1
“Selecting the network adapter”
-
with „Standby“ set the connected camera into tzhe standby mode. More informaton
to this topic you will find in chapter 2.1”Standby”
MotionBLITZ Cube
User Manual Ver. 1.8.0
48
5.6
The View menu
5.6.1 Raw
The image is displayed as delivered from the camera without any modification and no
Bayer color-calculations. Thus in Raw mode always a black and white image will be
seen.
5.6.2 Input Ports
The values of the digital and analog input ports may be displayed, the value of the analog port may be converted to a physical unit like “Volt” or “degree“.
Display Input ports
Convert Analog Values
5.6.2.1 Display Input ports
If “Display Input Ports” is enabled (checked), the 4 Bit digital input and the 8 Bit analog
input values of the camera is displayed in the toolbar. If "Infoline" is enabled (checked),
the values are inserted in the infoline, too.
MotionBLITZ Cube
User Manual Ver. 1.8.0
49
5.6.2.2 Convert Analog Values
The camera’s A/D converter delivers 0 for an input voltage of 0 Volts and 255 for 2,5
Volts. To convert the A/D value to physical units, use the form “Convert AD Value” and
edit the values “A” and “B” of the conversion formula:
Converted unit = A * X + B, where X is the A/D converters value.
If you want to display Volts, use for the factor A:
2,5 / 255 = 0,0089039 and 0 for B.
With the display format string the number of integer and decimal places of the converted value will be defined.
The number of zeros before the decimal point defines the minimal numer of integer
places, the number of zeros after the decinal point defines the number of decimal
places.
Example for the format string and the resulting output:
Format comment
string
Values to output:
0,3894
12,532
00.0
00
0.00
0.000
.00
.000
00,4
00
0,39
0,389
,39
,389
At least 2 integer place, 1 decimal places
At least 2 integer place, no decimal places
At least 1 integer place, 2 decimal places
At least 1 integer place, 3 decimal places
2 decimal places
3 decimal places
MotionBLITZ Cube
User Manual Ver. 1.8.0
12,5
13
12,53
12,532
12,53
12,532
50
5.6.3 Display while recording
Disable this point if the images are not to be displayed during recording.
5.6.4 Marker
Up to 4 markers may be enabled. Markers are magenta colored lines that overlay the
camera image. The size may be adjusted and moved with the mouse. Markers are
used for tagging the position of an interesting part in the replayed sequence.
L
Markers have no relevance for the saved frames!
5.6.5 Infoline
Attaching information to the recorded images is switched on or off. The information
portion is displayed as follows:
The upper part of this section taken from the SpeedCam main window shows the remaining part of a recording and the information portion. It contains the following fields
with information at the time of recording:
Field:
Date
Time
IRIG-B time code (1), contains
3 characters day of the year
6 charcters for time of day, GMT
Frame number
rel. time after trigger [ms]
Sequence number (2)
Digital input (binary representation)
Analog input (decimal format)
Resolution, width x height
Frame rate
camera type
Serial number of camera
Software version
Free text to be entered via “Infotext“
MotionBLITZ Cube
Content in the example:
21.01.2009
18:08:01
021 17:08:01
6274
-1774,0 [ms]
S01
1111
0,72 Volt
512x512
1000 Hz
MotionBLITZ Cube
#00105
V1.7.34
This is the info text. It may be edited in
View => Infotext
User Manual Ver. 1.8.0
51
This information portion is stored along with the frames while recording in the image
information block in the first image-line to save on frame memory. It is interpreted from
that structure for playback and then attached to the images.
(1) IRIG-B is an optional camera feature
(2) Sequence number is not available for Cube1 camera versions. Sequence number
indicates the number of the recorded sequence in multi sequence mode. See
“5.7.3.2 Multi sequence ” for details.
MotionBLITZ Cube
User Manual Ver. 1.8.0
52
5.6.6 “Infotext...“
Open the window “Edit Info Text“:
The text entered here and confirmed by clicking “OK“ is added to the information
portion in the recording sequence.
5.6.7 Language
German or English may be selected as language for all texts in the program.
5.7
Record settings
The recording mode may be selected. There are 2 modes:
Non-circular mode
Circular mode
If Cube4 and Cube5 cameras have an according hardware version, they may switch to
standby mode automatically after the end of a recording session.
MotionBLITZ Cube
User Manual Ver. 1.8.0
53
5.7.1 Standby after the end of a recording session
If you have activated the check box “Activate Standby After End of Recording” in the
menu “Recording Settings”, the camera will switch to the standby mode automatically
after the end of the next recording session.
This activation is valid only for the next recoding session and will be deactivated automatically afterwards.
By getting into the standby mode, the camera stops communication with the PC: Timeout will be indicated therefore.
In order to get access to the camera’s image memory again, you must set the camera
into the ready-to-operate state: Please press the camera’s power switch for a short
moment (less than 1 second) and click at the “reconnect” button
5.7.2 Non-circular mode
Recording proceeds
- until the end of buffer is reached and stops afterwards or
- until the recording is aborted before by clicking on the “Stop” buttton or presseing
key F12.
MotionBLITZ Cube
User Manual Ver. 1.8.0
54
5.7.2.1 Without trigger
For Cube1, Cube2 and Cube3 there is basically no triggering in the non circular mode,
for Cube4 and Cube5 it depends on the hardware version, if triggering is possible.
5.7.2.2 With trigger facility
Cube4 and Cube5 cameras with an adequate hardware version provide the triggering
facility in the non circular recording mode.
L
During a non circular recording session with triggering actual images
are shown as long as the camera provides them on account of the active trigger. While waiting for the next trigger there are now images
shown.
MotionBLITZ Cube
User Manual Ver. 1.8.0
55
5.7.2.2.1 Recording while trigger is active
As long as the trigger is active, recording will proceed. When the trigger gets inactive
before the image buffer is full, the camera is waiting for the next trigger. Not until the
end of the buffer is reached the recording ends (or if the recording was aborted before
by clicking on the “stop” button or pressing the key F12).
The trigger may be:
1. the camera’s trigger switch
2. an external trigger signal connected with the camera’s trigger input, provided
that „Trigger With External Signal“ in „Record Settings” is activated. The active
edge or the active state of the signal may be selected in the menu “Camera
Setup” (Selecting resolution, speed, gain, trigger, sync, ARM and white balance)
3. changings of the contents in a specific part of the actual recorded image if ImageBLITZ is used, i.e. “Trigger With ImageBLITZ” is activated (see chapter
5.7.3.1.2 “ImageBLITZ – optional” for details of ImageBLITZ).
With this trigger setting, the active state of the trigger is essential, not the edge.
MotionBLITZ Cube
User Manual Ver. 1.8.0
56
5.7.2.2.2 Fixed number of frames per trigger (burst trigger)
For each trigger edge a preset number of frames will be recorded. The number may be
chosen between 1 and 1022.
Enter the number in the input field or move the slider into the desired position. In the
figure above 100 frames per trigger edge are selected.
After every recording, which was initiated by the trigger edge, the camera will wait for
the next edge as long as the end of the memory is not reached.
After reaching the end of the memory, the recording is completed. Alternatively the recording may be aborted via the Stop button or F12.
As described in the chapter before, the trigger could be the camera’s trigger switch, an
external trigger signal or the ImageBLITZ.
With this trigger setting, the active edge of the trigger is essential, not the state.
MotionBLITZ Cube
User Manual Ver. 1.8.0
57
5.7.3 Circular mode
The camera will record in a circular mode, i.e. the oldest frame is overwritten by the
newest. After triggering or the circular recording has beed stopped by clicking the stop
button or pressing the key F12 as many frames as defined in the input-field "Trigger
Position, Before [Frames]" (2025 in our example) will be kept and the rest of the frame
buffer will be filled up with frames. With the slider you may vary the triggerposition from
the first frame (“1”) to the last possible frame (“4049”) as well.
If you select “Before [Percent]” the before frames to total frames ratio will be retained
if the total number of frames is changed (e.g. by changing the frame size)
Trigger with ImageBLITZ and number of sequences are not availabel for Cube1 camera versions.
5.7.3.1 Triggermodes
MotionBLITZ Cube comes with two triggermodes, which may be selected independently. Select an external signal and / or ImageBLITZ by clicking on the appropriate
checkbox.
5.7.3.1.1 External trigger
If external trigger is selected, a rising or a falling edge, depending on the settings in the
menu “camera setup”, will bring the recording to completion.
MotionBLITZ Cube
User Manual Ver. 1.8.0
58
5.7.3.1.2 ImageBLITZ – optional
If ImageBLITZ is selected, changings of the contents in a specific part of the actual
recorded image will bring the recording to completion. This specific part is called the
“ImageBLITZ window”. The parameters of ImageBLITZ are adjusted in the “Recording
settings” menu in “Live” mode. The ImageBLITZ window is shown as a green, red or
yellow rectangle in the displayed frames.
L
ImageBLITZ is an optional camera version
Don’t move or alter the ImageBLITZ window while recording. Movements while recording have no effect.
MotionBLITZ Cube
User Manual Ver. 1.8.0
59
5.7.3.1.2.1 ImageBLITZ parameters
If ImageBLITZ is activated, the MotionBLITZ Cube camera compares the image detail
of the actual frame with the image detail of the reference frame. If the differences
within this image details exceed a limit, ImageBLITZ triggers (“releases”).
This two parameters for adjusting the ImageBLITZ may be set manually by entering
the values in the release parameters fields or automatically by clicking on “auto adjust”.
5.7.3.1.2.1.1 Pixel value difference
This parameter defines the absolute limit for the difference in the gray values within the
image details. The value range is 1 to 255.
With a small value small changings in the image detail let the ImageBLITZ trigger, with
a big value the ImageBLITZ trigger gets less sensitive. Under normal conditions, this
value should be between 10 and 70.
5.7.3.1.2.1.2 Relative object size
This parameter defines the relative size of the area within the ImageBLITZ window that
must be different from the reference frame before ImageBLITZ triggers. The value
range is 1 to 100 percent. If you use a small value, e.g. 5, then ImageBLITZ triggers
when 5% of the image details are different.
5.7.3.1.2.1.3 ImageBLITZ Reference frame
The ImageBLITZ reference frame is the first frame of a recording sequence, i.e. in Live
mode the first frame after starting Live, in record mode the first frame after starting the
recording. Using the auto adjust feature, the reference frame ist the next frame after
clicking on “auto adjust”
5.7.3.1.2.1.4 ImageBLITZ window colors
The color of the ImageBLITZ window borderlines is used for indicating the state of
ImageBLITZ:
color
meaning
Green
Red
Yellow
ImageBLITZ is active and waiting for a trigger situation
ImageBLITZ is active and has triggered
ImageBLITZ is not active (the system is not in Live- or recording mode)
MotionBLITZ Cube
User Manual Ver. 1.8.0
60
5.7.3.2 Multi sequence - optional
The frame memory may be divided into up to 16 same-sized memory ranges for sequences, called multi sequence mode. Each memory range is then filled by a trigger
event, i.e. by the occurrence of the external trigger signal or the ImageBLITZ trigger.
After a trigger event the post-trigger frames will be recorded and the camera switches
to the next sequence, beginning the recording of the pre-trigger frames. Thus the recording proceeds till all sequences are complete.
If a trigger event occurs before the predefined number of pre-trigger frames are recorded, the number of pre-trigger frames will be less than predefined, whereas the
number of post-trigger frames will be as expected.
If a multi sequence recording will be stopped with the camera’s “Start/Stop recording”
switch or the Cube control program’s Stop button or key F12, MotionBLITZ Cube fills
the rest of the sequences, that are not yet recorded, with the number of post-trigger
frames and brings the recording to an end.
Multi sequence mode is provided only by means of the MotionBLITZ Cube control program. There is no possibility to start a multisequence recording session if the camera is
not online.
L
Multi sequence is an optional camera version
There are 5 different numbers of sequences:
-
1
2
4
8
16
For establishing the multi sequence mode, click on the ComboBox “number of sequences“ in the form “record settings“ with the left mouse button and select the number
of sequences you would like to record.
Please note: This ComboBox is only available in the “circular buffer” recording mode!
MotionBLITZ Cube
User Manual Ver. 1.8.0
61
After selecting the number of sequences, during the next recording session the number
of sequences will be represented by sequence command buttons, labled with the sequence-number:
The number of the sequence, that will be recorded actually, is represented by the
green color of the sequence command button. In the example above, ImageBLITZ had
triggered while recording the first sequence. The command buttons are disabled during
the recording session.
MotionBLITZ Cube
User Manual Ver. 1.8.0
62
After finishing the recording session, the sequence command buttons are enabled, by
clicking on a button you navigate to the frame immediate after the trigger event in the
appropriate sequence.
Click here to use the frame slider for all sequences or one sequence only
MotionBLITZ Cube
User Manual Ver. 1.8.0
63
5.8
Play settings
In this form the number of the images that shall be displayed is defined. This is valid for
frame selection in the "file save" and "file Make Avi" form as well.
The behavior during playback in forward and reverse sequences is influenced by the
radio buttons; it is possible to set a time delay between the display of individual frames.
5.8.1 Display of individual frames
Click on the radio button “Single frame“. The frame with the number shown in the entry
field "Single frame” is retrieved from the MotionBLITZ Cube frame memory and displayed. Any image desired may be loaded from the memory by entering the frame
number into the entry field or by operating the “frame slider” in the main form.
5.8.2 Display loop “from ... to“
Click on “from“. Enter the frame number of the beginnning and ending of the desired
range or select the range by using the “frame slider” and mouse buttons, as decribed in
4.7.1 ”Editing a sequence by using frame slider or keys”.
MotionBLITZ Cube
User Manual Ver. 1.8.0
64
By clicking
“Forward playback“ or
“Reverse playback“ the frames within the
selected range will be loaded from the MotionBLITZ Cube frame memory and displayed in an infinite loop.
5.8.3 Frame List
The frame numbers selected via "Single frame" or “from … to” can be added to the
frame list by pressing the “=> frame list“ button.
By pressing “Delete“ the numbers which were marked previously with the mouse can
be removed.
The contents of this list can be used for saving / loading images from files (in the “File“
window), for saving frames as an AVI (in the “File” -> “Make AVI…” menu) or for defining a playback sequence.
5.8.4 Display loop with frame numbers from frame list
Click on “frames list“. By clicking
“Forward playback“ or
“Reverse playback“
all frame numbers are processed on the list in an infinite loop, i.e. the recorded images
are loaded from the MotionBLITZ Cube frame memory and displayed.
5.8.5 Last frame number
Depending on the size of the frame memory and the current frame size (line length and
number of lines) the last permissible frame number xxx is determined and displayed in
“Last frame number“. It is not possible to exceed this number in the display loop or
when displaying individual frames.
5.8.6 Slow motion (time delay in display)
To playback a sequence in slow motion, select the desired time delay in milliseconds in
the entry field “Delay [ms]:“. The time value may be entered in the field directly or
changed by using the appropriate horizontal scrollbar.
MotionBLITZ Cube
User Manual Ver. 1.8.0
65
5.9
Info form
In the Info form details about the MotionBLITZ Cube control software and the firmware
of the actually connected camera are displayed.
The first part holds the MotionBLITZ Cube control software version number and the
copyright statement.
The second part holds information about the connected camera:
- Serial number of the camera
- Model type (Cube1, Cube2, Cube3, Cube4)
- Sensor type
- Firmware-Version
- MAC Address
- IP Address
- The size of the frame memory
- Features
C
M3
M6
HG
IB
IG
MS
Color sensor
3 seconds recording time
6 seconds recording time
Hi-G version (crash proofed)
ImageBlitz
IRIG-B signal processing
Multi-sequence
MotionBLITZ Cube
User Manual Ver. 1.8.0
66
6
Maintenance
During normal use an occasional cleaning of the optical path is necessary. Information
about cleaning the lens is provided by the respective manufacturers.
6.1
Cleaning of the MotionBLITZ Cube infrared filter
MotionBLITZ Cube (color) contains a filter to suppress infrared light. Dust and dirt,
which may deposit on this filter is best removed by means of an oil free air pressure
spray or with a lens cleaning tissue. Sticky mud and fingerprints may be cleared away
with medical alcohol.
*
Improper cleaning agents may damage the filter. Such damage may alter
the quality of the images.
L
Infrared light is part of the visible light spectrum and warps the color in the
camera images. Therefore it is necessary to illuminate infrared light with the
filter.
6.2
Battery
The battery are four AA size NiMh accumulator cells.
*
Batteries can be replaced by removing the cameras rear cover
MotionBLITZ Cube
User Manual Ver. 1.8.0
67
7
Troubleshooting
Any known software errors are listed in the release notes.
Main problems:
Q: The MotionBLITZ Cube establishes no camera link. An error message box
appears or “timeout” will be indicated. What to do?
A: Check, if the camera and the PC are connected via the ethernet. Check if the
Camera LEDs are in a state as described in chapter 1.6.2.3 on page 11. Click on the
"Reconnect" button in the Cube control program. If the color of this
button does not change to green (=connected), switch the camera off, switch the camera on, wait until the lower LED turns green and try again.
A: Check if the camera LEDs indicate the ready-to-operate state (both LEDs must be
green or orange as described in chapter 1.6.2.3 on page 11)
A: Check if the windows firewall allows MotionBLITZ Cube to work! If the firewall
is active, set it to inactive, close MotionBLITZ Cube and start it again. If it works
now, you may configure MotionBLITZ Cube in the windows firewall as an exceptional program and activate the firewall again.
A: check if the MotionBLITZ Cube user has write-permission in the MotionBLITZ Cube
installation directory, e.g. c:\Program Files\Mikrotron GmbH\MotionBLITZ Cube. Write
permission in this directory is necessary!
A: If you are using an ethernet switch to establish the data exchange with the camera,
it could take several seconds up to minutes, until the camera is detected after power
on or after connecting with the switch. In this case you should wait for 1 to 2 minutes
before you click at the reconnect or the “scan net” button
Q: In Live-mode and record-mode timeouts occur while “Sync In” is enabled
A: If “Sync in” is enabled and no “sync in” signal is provided, the camera will not record
and timeouts will occur! In this case you must supply the “sync in” signal to avoid timeouts.
MotionBLITZ Cube
User Manual Ver. 1.8.0
68
8
8.1
Appendix
Technical data
8.1.1 Cube1 / Cube2
Sensor type
Number of pixel
Pixel size
Active area
Fill factor
Sensitivity at 550 nm @ Vref
= 1V (a2 = 66h)
Spectral response
Shutter
Trigger
Internal Dynamic
Power supply
Power consumption max.,
continuous recording @
1280x1024 resolution and
500 frames/sec.
Thermal resistance typ.
Serial data link
Digital video
Operating temperature
Shock & vibration
Dimensions
(WxHxD)
Weight
Lens mount
Software
Computer requirement
File format
Recording frequency
Shutter time
Recording modes
Frame buffer
Replay frequency
MotionBLITZ Cube
Monochrome or color withBayer Filter
Cube1 version:640 x 512 other versions:1280 x 1024
12 x 12 µm
15,36 (H) x 12,29 (V) mm
40%
1600LSB/lux-sec
400 … 800nm (color)
400 … 1000 nm (monochrome)
Electronic „Freeze Frame“ Shutter
Asynchronous shutter, shutter time selectable with internal timer
59 dB
10,5 ... 24 V
15W
6.25°/W
GigaBit Ethernet, Baud Rate 19200
GigaBit Ethernet
+5..45°C
100g, 10grms
94 x 70 x 106 mm
ca. 1050 g
C-mount
"click, drag and drop" for Windows XP
Min. Pentium III 650 MHz, 1024 * 768 pixel, 256 MB
RAM, 10 Gbyte Hard disk, GigaBit Ethernet
Avi or bmp
Cube1 version:
other versions:
Up to 1000
Up to 45.000
min. 4 µs
Non circular or circular wih pre- and post trigger.
2 Gbyte or 4 Gbyte
10 – 30, fps @ 1280 x 1024, depending on the performance of the PC
User Manual Ver. 1.8.0
69
8.1.2 Cube3
Sensor type
Number of pixel
Pixel size
Active area
Fill factor
Sensitivity at 550 nm @ Vref =
1V (a2 = 66h)
Spectral response
Trigger
Monochrome or color withBayer Filter
512 x 512
16 x 16 µm
8,19 (H) x 8,19 (V) mm
62 %
9 V/lux-sec
400 … 800nm (color)
400 … 1.000nm (monochrome)
External Signal,
ImageBLITZ Trigger (optional)
57 dB
10,5 ... 24 V
Internal Dynamic
Power supply
Power consumption max., continuous recording @ 512 x 512
15W
resolution and 2500
frames/sec.
Thermal resistance typ.
Serial data link
Digital video
Operating temperature
Shock & vibration
Dimensions
(WxHxD)
Weight
Lens mount
Software
Computer requirement
File format
Recording frequency
[frames per second = fps]
Shutter time
Recording modes
Frame buffer [Gbyte]
Replay frequency
MotionBLITZ Cube
6.25°/W
GigaBit Ethernet, Baud Rate 19200
GigaBit Ethernet
+5..45°C
100g, 10grms
94 x 70 x 106 mm
ca. 1050 g
C-mount
"click, drag and drop" for Windows XP
Min. Pentium III 650 MHz, 1024 * 768 Pixel,
256 MB RAM, 10 Gbyte Hard disk, GigaBit
Ethernet
Avi oder bmp
Up to 120.000
min. 4 µs
Non circular or circular wih pre- an post trigger
2 oder 4
30 – 100 fps @ 512 x 512, depending on the
performance of the PC
User Manual Ver. 1.8.0
70
8.1.3 Cube4
MC134x
Number of pixel
Pixel size
Active area
Fill factor
Sensitivity at 550 nm @ Vref = 1V (a2 = 6h)
Spectral response
Shutter
Trigger
Internal Dynamic
Power supply
Power consumption max., continuous
recording @ 1,3 GBytes/sec
Thermal resistance typ.
Serial data link
Digital video MC134x
Shock & vibration
Dimensions
(WxHxD)
Case temperature
Weight
Lens mount
MotionBLITZ Cube
Monochrome-Bayer Filter
1280 x 1024
12 x 12 µm
15,36 (H) x 12,29 (V) mm
40%
1600LSB/lux-sec
400..800nm (color)
400..1000nm (monochrome)
Electronic „Freeze Frame“ Shutter
Trigger and Sync input
59 dB
10,5 ... 30 V
15 W
6.25°/W
Thru GigaBit Ethernet,
baud rate 19.200 Bd
GigaBit Ethernet
100g, 10grms
93 x 69 x 92 mm (c-mount)
93 x 69 x 128 mm (f-mount)
+5 ... +45° C
ca. 900 g
C-mount or F-mount
User Manual Ver. 1.8.0
71
8.1.4 Cube5
Sensor type
Number of pixel
Pixel size
Active area
Fill factor
Sensitivity at 550 nm @ Vref =
1V (a2 = 66h)
Spectral response
Trigger
Monochrome or color withBayer Filter
512 x 512
16 x 16 µm
8,19 (H) x 8,19 (V) mm
62 %
9 V/lux-sec
400 … 800nm (color)
400 … 1.000nm (monochrome)
External Signal,
ImageBLITZ Trigger (optional)
57 dB
10,5 ... 24 V
Internal Dynamic
Power supply
Power consumption max., continuous recording @ 512 x 512
resolution and 2500
15W
frames/sec.
Thermal resistance typ.
Serial data link
Digital video
Operating temperature
Shock & vibration
Dimensions
(WxHxD)
Weight
Lens mount
Software
Computer requirement
File format
Recording frequency
[frames per second = fps]
Shutter time
Recording modes
Frame buffer [Gbyte]
Replay frequency
MotionBLITZ Cube
6.25°/W
GigaBit Ethernet, Baud Rate 19200
GigaBit Ethernet
+5..45°C
100g, 10grms
93 x 69 x 92 mm (c-mount)
93 x 69 x 128 mm (f-mount)
ca. 900 g
C-mount or F-mount
"click, drag and drop" for Windows XP
Min. Pentium III 650 MHz, 1024 * 768 Pixel,
256 MB RAM, 10 Gbyte Hard disk, GigaBit
Ethernet
Avi oder bmp
Up to 190.000
min. 2 µs
Non circular or circular wih pre- an post trigger
2 oder 4
30 – 100 fps @ 512 x 512, depending on the
performance of the PC
User Manual Ver. 1.8.0
72
8.2
Connector assignments
8.2.1 „Power“ connector, male, type Binder (Cube1/2/3)
connector (male), view: Solder side
180°; Binder # 99-0413-10-05 (shielded, recommend.)
90°: Binder # 99-0413-75-05 (shielded, recommend.)
www.binder-connector.de
Pin Nr.
1
2
3
4
5
Signal Level
Power
Power
n.c.
Power
Power
Description
+10,5..24V=
+10,5..24V=
GND
GND
Table 8.2-1
8.2.2 “Signal input / Sync” connector, male, type Binder (Cube1/2/3)
connector (male), view: Solder side
4
3
2
1
8
Pin Nr.
1
2
3
4
5
6
7
8
MotionBLITZ Cube
5
6
180°; Binder # 99-0425-10-08 (shielded, recommend.)
90°: Binder # 99-0425-75-08 (shielded, recommend.)
Signal Level
GND
0..2.5V@
1MΩ
LVTTL
LVTTL
LVTTL
LVTTL
LVTTL
LVTTL
Description
GND
Analog input voltage, 8-Bit resolution
7
www.binder-connector.de
Sync Output / ARM
Digital Input 1
Digital Input 2
Digital Input 3
Digital Input 4/ Trigger Input
SYNC Input
Table 8.2-2
User Manual Ver. 1.8.0
73
8.2.3 „Power“ connector, male, type Lemosa (Cube1/2/3...-UPL, Cube4/5)
Pinning of matching power plug
(male, solder side)
select the plug according to your requirements
(right-angle plug / water-resistant etc.) under
http://www.lemosa.com/
e.g. straight plug: FGG.1B.305.CLAD42ZN
(Mounted socket in camera: EEG.1B.305.CLL)
Pin Nr.
1
2
3
4
5
Signal Level
Power
Power
n.c.
Power
Power
Description
+10,5..24V=
+10,5..24V=
GND
GND
Table 8.2-3
8.2.4 „Signal input / sync” connector, male, type Lemosa (Cube1/2/3...-UPL, Cube4/5)
Pinning of matching signal plug
(male, solder side)
select the plug according to your requirements
(right-angle plug / water-resistant etc.) under
http://www.lemosa.com/
e.g. straight plug FGG.1B.308.CLAD52ZJ
(Mounted socket in camera: EEG.1B.308.CLL)
Pin Nr.
1
2
3
4
5
6
7
8
MotionBLITZ Cube
Signal Level
GND
0..2.5V@ 1MΩ
LVTTL
LVTTL
LVTTL
LVTTL
LVTTL
LVTTL
Description
GND
Analog input votage, 8-Bit resolution
Sync Output / ARM
Digital Input 1
Digital Input 2
Digital Input 3/ IRIG-B Input (optional Cube4/5)
Digital Input 4/ Trigger Input
SYNC Input
Table 8.2-4
User Manual Ver. 1.8.0
74
8.2.4.1 IRIG-B input
The level of the IRIG-B signal connected at pin nr. 6 should be typically 3V for ‚mark’,
1V for ‚space’. Important ist the ratio of the signal level of mark and space of 3 to 1.
8.2.4.2 Trigger/Sync input signal definition
The Digital Input 4/ Trigger and the Sync Input is isolated from the rest of the circuitry
by an optocoupler. The pull-up resistors R33/R32 are powered by a internal DC/DC
converter (X3.3V). The optocoupler will switch if the input is connected to the common
GND signal. (Pin 1 on Signal I/O connector).
A positive edge on the Sync input will output the next image.if the positive “Triggeredge” is selected in the camera menu.
A positive edge on the Trigger input will stop a circular recording if the positive “Trigger
edge” is selected in the camera menu.
The minimum diode current for an active signal is 5mA.
8.2.4.3 Trigger connection example
MotionBLITZ Cube
User Manual Ver. 1.8.0
75
8.2.4.4 Analog input signal definition
The analog input is protected by a 330kΩ series resistor and adjusted to deliver the
digital value of 255 for 2.55V input voltage.
MotionBLITZ Cube
User Manual Ver. 1.8.0
76
8.2.5 Digital Inputs 1-3 signal definition
The signals DIG IN1-3 are TTL input signals and are used as process signals, which
are superimposed to the image.
8.2.5.1 Sync/Arm Output
This pin can output a Sync signal or a arm signal, selected by a check box in the
camera menu. If Sync out is selected, this output will carry a Strobe that corresponds
to the selected exposure time of the camera. If Arm is selelcted, it will be active if the
camera runs in circular recording mode.
The optocouplers output will sink 13 mA with max. 0.6V output voltage. The output
polarity is positive when the selected signal is active. The suppressor diode protects
the output against reverse voltages. It starts conducting if the voltage on the output pin
is greater 6V.
MotionBLITZ Cube
User Manual Ver. 1.8.0
77
8.3
Spectral response
8.3.1 Cube1 / Cube2
MotionBLITZ Cube
User Manual Ver. 1.8.0
78
8.3.2 Cube3 / Cube5
MotionBLITZ Cube
User Manual Ver. 1.8.0
79
8.3.3 Cube4
MotionBLITZ Cube
User Manual Ver. 1.8.0
80
8.4
Pixel sensitive area
8.4.1 Cube1 / Cube2
Pixel size:
Fill factor:
Sensitive area:
12 x 12 µm
40 %
10,5 x 6,5 µm
8.4.2 Cube3 / Cube5
Pixel size:
Fill factor:
Sensitive area:
16x 16µm
62%
8.19(V)x 8,19(H)µm
8.4.3 Cube4
Pixel size:
Fill factor:
Sensitive area:
MotionBLITZ Cube
12x 12µm
40%
10,5(V)x 6,5(H)µm
User Manual Ver. 1.8.0
81
8.5
Dimensions
8.5.1 Top/bottom view Cube1/2/3
Maximum torque for M4 fastening screws: 2.5 Nm
MotionBLITZ Cube
User Manual Ver. 1.8.0
82
8.5.2 Side view Cube1/2/3
Maximum torque for M4 fastening screws: 2.5
MotionBLITZ Cube
User Manual Ver. 1.8.0
83
8.5.3 Top/bottom view Cube4/5
The camera body is with its dimensions of 93 x 69 x 92 mm (WxHxD, c-mount without
lens) very compact. To fasten the camera there are two mounting holes M4x7mm and
one tripod connection on each side available.
Maximum torque for M4 fastening screws: 2.5 Nm
c-mount
MotionBLITZ Cube
f-mount
User Manual Ver. 1.8.0
84
8.5.4 Side view Cube4/5
c-mount
MotionBLITZ Cube
f-mount
User Manual Ver. 1.8.0
85