1
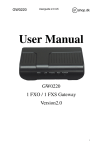
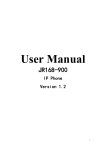
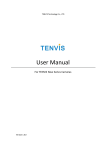
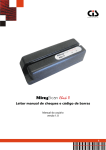
TENVIS Technology Co., Ltd
User Manual
For H.264 Cameras
Version 2.0.0
Catalogue
Basic Operation ......................................................................................................................... 3
Hardware Installation ........................................................................................................ 3
Search Camera ................................................................................................................... 3
Get live video ..................................................................................................................... 5
Camera Settings ......................................................................................................................... 8
System ............................................................................................................................... 8
Device Name.............................................................................................................. 9
Time ........................................................................................................................... 9
User ......................................................................................................................... 10
Multiple devices ...................................................................................................... 10
Network ........................................................................................................................... 11
IP .............................................................................................................................. 11
Port .......................................................................................................................... 11
WiFi .......................................................................................................................... 12
UPnP ........................................................................................................................ 12
DDNS........................................................................................................................ 13
Alarm ............................................................................................................................... 13
Motion Detection .................................................................................................... 14
Sound alarm............................................................................................................. 14
Linkage alarm........................................................................................................... 15
Email ........................................................................................................................ 15
E-mail Alert Configuration ....................................................................................... 16
FTP ........................................................................................................................... 17
Capture&Recording ......................................................................................................... 18
Timed recording....................................................................................................... 18
Timed capture.......................................................................................................... 19
Video................................................................................................................................ 19
Video Parameters .................................................................................................... 19
Video Quality ........................................................................................................... 20
Audio ....................................................................................................................... 20
Others .............................................................................................................................. 21
Pan/Tilt .................................................................................................................... 21
System Configuration............................................................................................... 21
2
Basic Operation
This section will focus on basic operation of the interface including pan/tilt, video, audio, etc.
For more information about mobile phone operation, please refer to Quick Start Guide.
Notice:
Certain functions mentioned in this manual may vary according to camera's model. For
example, pan and tilt function are for Pan/Tilt enabled cameras only.
When motion detection and/or sound detection are enabled especially during the night,
false alarm might occur because of sudden change in light. Thus it is not considered as a
product defect, and TENVIS is not responsible for the resulting loss.
Hardware Installation
Open the package. Connect the camera to your router by a network cable and plug it in with
the provided AC adapter.
For basic viewing operation, please refer to Quick Start Guide and follow the guide step by
step.
If you need to view your camera feed from the browser and for more information on the
advanced features of the camera, please continue to browse this manual.
Search Camera
Run TENVIS Search Tool.exe for Windows or Run TENVIS Search Tool.dmg for Mac to Install
TENVIS Search Tool in your PC.
Drag TENVIS Search Tool into Applications to install the search tool in MAC.
3
After installation, run
on desktop for Windows or
in launch
pad for Mac.
IP Address / Local IP
Subnet Mask
Gateway / Router
S/N / UID
Alais / Name
IP Address
Netmask / Subnet
Mask
Default Gateway /
Router
Your computer’s IP address
Your computer’s subnet Mask
Your computer’s Gateway/Router’s IP address
Camera’s serial number or P2P
Camera’s display name which is set to distinguish it from other
devices on your network
Camera’s local network IP address, which is used to view the
camera on the same local network. Specify a unique IP address for
your network camera.
Specify the mask for the subnet the network camera is located on
Specify the IP address of the default gateway (router) used for
connecting devices attached to different networks and network
segments
4
Service Port / Internet
Port
MAC / MAC address
Internet URL
DNS1 / DNS2
Camera’s communications port which is set to send video and
audio data, the default port is 8001
Camera’s Ethernet address
Camera’s remote view URL. You can click Open to view the camera
from Internet after you finish the Internet View configuration.
DNS automatically converts the names we type in our Web browser
address bar to the IP addresses of Web servers hosting those sites.
You can ask your ISP or copy your PC’s configuration.
Double click the IP shown in the search tool, the search tool will open your default web
browser and redirect to the camera’s URL.
Get live video
1. After inputting the camera’s LAN or Internet access URL in IE browser, the login
window shows. Then login the camera, the camera’s username and password will be
required. The default username and password are admin.
2. The camera will ask you to install the web browser plug-in. Click “allow” or download it
from the link shown on screen.
5
3. Refresh the page and watch the live video.
6
Instructions of the buttons of main panel
Click this button for camera settings
1 camera view, 4 cameras view, 9 cameras view
Power frequency
Resolution
Adjust power frequency to prevent image flicker
Changed the resolution of the video
HD means 1280*720, VGA means 640*360, QVGA means
320*180
There are 8 direction keys and the center button is take
snapshot.
(only available for camera with Pan/Tilt)
Patrol horizontal or vertical.
Go center when clicking “Center” button
Preset positions are IP camera's memorized P/T positions. Once
you set a preset position, you do not need to pan the camera to
your preferred position. You simply press the preset button that
corresponds to the preset you want to see and the camera will
move to that position automatically.
7
Set preset position; this camera supports 8 preset positions.
(only available for the camera with Pan/Tilt)
Go a specific preset position you have set
(only available for the camera with Pan/Tilt)
Turn on, off or auto IR-LED
Adjust the brightness and of the video
Invert the video horizontally and vertically
Zoom in
Zoom out
Receive audio from the camera
(only available for camera with 2-way audio)
Send audio to the camera
(only available for the camera with 2-way audio)
Record video to PC, you can change the path in the settings
menu
Full screen
Camera Settings
Click this Settings Button
for camera Settings.
Notice:
1. Certain functions mentioned in this manual may vary according to camera's model. For
example, pan and tilt function are for Pan/Tilt enabled cameras only.
System
Device Status
System Information & Status
8
Device’s Name
Mac address
Software Version
Device Date Time
SD Card Status
DDNS Status
UPnP Status
NTP Status
Local Storage Path
Language
Camera’s Name
Device’s MAC address of wired connection
Camera’s software version
Camera’s built-in time
Camera’s mirco-sd card status
Camera’s ddns status
Camera’s UPnP status
Whether camera got time from time server
The path of record files and snapshots located in your PC
Change camera’s default language
Device Name
Change camera’s name
Time
Camera’s time setting
Time zone
Network Time Protocol
Time zone of the place that the camera is located
Network time server which is connected to the camera
Tips:
1. What is a Network Time Protocol server?
Network Time Protocol server is a server computer that reads the actual time from a
reference clock and distributes this information to its clients using network. Your camera will
9
get the correct time through an NTP sever by offering the time zone of its location.
User
Adding and updating user accounts
Different user type has different access right of the camera
Multiple devices
Add more camera s and show them in the same page. Click
Camera X
IP address
Port
username
Password
to edit cameras.
Camera’s name
another camera’s ip address
another camera’s port
another camera’s username
another camera’s password
10
Network
IP
The Camera’s Basic Network Settings
DHCP
IP Address
Subnet Mask
Gateway
DNS
Enable or disable obtaining IP address from DHCP server automatically. If
it is enabled, IP address and other items cannot be changed manually.
Camera’s local network IP address, which is used to view the camera in
the same local area network.
Specify a unique IP address for your network camera.
Specify the mask for the subnet the network camera is located on
Specify the IP address of the default gateway (router) used for connecting
devices attached to different networks and network segments
DNS (Domain Name Service) provides the translation of host names to IP
addresses of your network
If your cam shall be used within Wi-Fi mode, you should setup the wireless options
and restart the camera and come back to this menu to finalize the IP address.
The reason is that the cam gets a new MAC address during Wi-Fi-mode and the IP
address provided by the router (when using DHCP) changes correspondingly.
Port
Camera’s communications port which is set to send video and audio data
HTTP Port
RTSP Port
The port to access the camera by web browser
The port to access the camera rtsp protocol. For example, you
could access the camera by VLC media play by rtsp port
11
WiFi
Configuring WI-FI connection
Enable WiFi
SSID List
Key
Check Wireless
Set
Enable or disable Wi-Fi connection
Select your wireless SSID in the list.
Enter your wireless password and click OK to set up wireless.
Check whether the Wi-Fi key is suit to the Wi-Fi.
We suggest you check Wi-Fi settings before save it.
The cam gets a new MAC address during Wi-Fi mode and the IP address provided by
the router (when using DHCP) changes correspondingly.
UPnP
Enable or disable UPnP and P2P function.
Universal Plug and Play (UPnP) is architecture for peer-to-peer network connectivity and it
will connect to the IP camera from Internet more seamlessly
Notice:
As UPNP is also easily affected by router or firewall, sometimes it may show failed status. If
this happens, please forward the camera’s port on your router manually. Whether UPNP
succeeds or not, it will not affect the camera’s remote access.
To be able to use UPnP your router must be enabled to allow UPnP-mode.
Be carefully, because UPnP not only opens a port for the camera. All other units within your
network are also able to open free accessible ports to internet and function for incoming
request from internet enabling to access your computers. So this is a potential security risk!
12
Ask an experience IT specialist to assist you, if you are not familiar with NAT/Port forwarding
on your router.
DDNS
Configuring the camera’s DDNS for remote view
Built-in DDNS URL
Third-Party DDNS
Server
Username
Password
Camera’s built-in DDNS URL
This camera supports multiple DDNS provider, select one of them
and click Register to get an account.
Enter the DDNS account.
Enter the DDNS password.
Tips:
1. What is DDNS?
DDNS (Dynamic DNS) is a service that maps Internet domain names to IP addresses. Thus we
do not need to know the changing IP address in order to view the camera through the
relevant DDNS server.
Alarm
Notice:
When motion detection and/or sound detection are enabled especially during the night,
false alarm might occur because of sudden change in light. Thus it is not considered as a
product defect, and TENVIS is not responsible for the resulting loss.
13
Motion Detection
Area X
There are 4 areas could be set at most. We could adjust the
area’s size and location on the image.
The sensitivity of the motion detection alarm.
100 is the most sensitivity.
Sound alarm
Enable sound detection Enable or disable sound detection
When the camera detects sound by microphone, the camera will alarm.
14
Linkage alarm
E-mail Alarm and Send
with Picture
Save Picture to FTP server
Save Video to FTP server
Save Picture to SD Card
Save Video to SD Card
IOS Alarm message push
Capture number
Time alarm
Enbale or disable e-mail alarm
Enbale or disable FTP alarm with snapshots
Enbale or disable FTP alarm with record video files
Enbale or disable save picture to Mirco-SD card
Enbale or disable save video to Mirco-SD card
Enable or disable iOS push
How many snapshots captured by the camera when the
camera is alarming
Set up camera’s detecting schedule, each small diamonds
means a quarter-hour
Email
Once the motion detection alarm is enabled, camera will send snapshots to the specified
email when it detects moving objects.
15
SMTP Server
Sender's
Password
SMTP Port
Recive E-mail
Subject
Sending emails provider ‘s SMTP server address
Email address for sending the alert email
Sender email’s login password
Service port of SMTP server. For Gmail, it is 587 or 465. For
other email service providers, please search on the Internet.
Enable or Disable SSL when sending alarm, it depends on the
SMTP server’s settings
E-mail address for receiving the alert email
The alarm e-mail’s subject
Message
The alarm e-mail’s message
SSL
E-mail Alert Configuration
SMTP Server: The SMTP (short for Simple Mail Transfer Protocol) works like a post assistant,
handling the sending of emails from the camera to an email server. SMTP Server receives
outgoing mail messages from users to the mail recipients they are intended for.
If your sender email provider is a public server, you can search the IP address of the email
provider’s SMTP server or DDNS from Google.
If your sender email provider is a private one, you can consult with the email provider’s
customer service.
Sender: The sender’s email address must correspond to the account, port and SMTP-server
settings above.
Password: The password you use to login to the SMTP server which is also the sender email
password.
Then click Save & Test. Once it says Success that means the camera has set up e-mail
settings.
16
Notice:
1. Please check the IP settings of the camera if it failed the test
2. There might be some delay for motion detection alarm since it is related to the network
condition and the service quality of the sender email’s provider. Thus it is beyond the control
of IP camera.
3. If you still cannot receive any email alert after receiving the test email, please check
your spam box and add your sender email address in the trust list of the recipient email once
your find it in spam.
Tips:
The email alert is sent via sender email’s provider server which is an SMTP server. Once the
camera signs in to the SMTP server, the email alert will be delivered to the recipient email
after getting SMTP server’s authentication. Therefore, the sender email, recipient email and
the SMTP server are all required.
FTP
Once the motion detection alarm is enabled, camera will send snapshots or video file to the
specified FTP server when it detects moving objects.
17
FTP Server
FTP Username
FTP Password
Passive mode
Port
The IP address of FTP server
The username of FTP server
The password of FTP server
Enable or disable passive mode
The port of FTP server, default is 21
Capture&Recording
Timed recording
Record video to Mirco-SD card according to schedule.
Resolution
Record files duration
Recording time
The resolution to record
The time limit of record file
The recording schedule
18
Timed capture
Video
Video Parameters
You can adjust the
Stream
Resolution
Output
Frame rate
The camera support 3 stream, that means the camera support send 3
kinds of video stream in the same time.
Resolution of video
Variable Bitrate and Constant Bitrate.
Variable Bitrate will use less bandwidth, but will affect the video
quality on moving objects.
Constant Bitrate will use more bandwidth, but will provide better
video quality on moving objects.
How many Frames per second but will provide better video quality on
19
Key frame interval
Bit rate control
moving objects.
Video buffer for motion recordings. The bigger the number is, the
more key frame there will be.
CBR means constant bit rate and VBR means Variable bit rate
CBR requires more network bandwidth but has static image quaility
Video Quality
Adjust video’s quality.
Audio
Adjust camera’s audio settings
20
Others
Pan/Tilt
PTZ Speed
configure camera ptz speed
Patrol
how many circles the camera patrols
Center
Go center when the camera it booting
Turnoff the alarm PTZ When the cameras is paning or tilting, the camera will not triger
operation
alarm when this enabled.
System Configuration
backup setting data
restore backup
Upgrade
factory default
Reboot
backup camera settings to data file
Restore camera settings by backup file
Upgrade camera’s firmwre
Restore camera to factory default
Reboot camera
Notice:
1. Please choose proper update package for your camera model.
2. Use an Ethernet cable NOT WI-FI to connect to your camera during the update process.
3. Make sure that the camera is not unplugged during the update process.
4. The whole process may take about 2-3 minutes. Please wait until camera reboots.
5. Please update only with the help of a professional in case of problems while updating.
6. TENVIS is not responsible for improper update attempts that lead to camera crash.
21