1
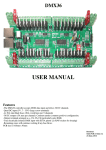
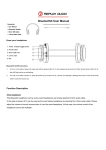
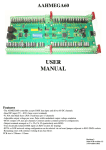
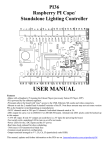
Hanson Learning Bale Tie Controller
Fig.1
Use:To replace manually controlled round bale controllers, faulty controllers or to upgrade the
features on older controllers. Usable on any brand of baler that uses an electric ram for the tying
process. Some brands include GEHL, INTERNATIONAL, VERMEER and NEW HOLLAND.
Benefits:Consistent and repeatable bale tying. Reduced strain on neck (no need to watch bale being tied).
Fully adjustable tie positions, fully adjustable wrap amount. Manual control still available for
inserting string or manually wrapping. Weatherproof enclosure allowing controller to be used
on tractors without cabins. Audible and visual indication of bale full and baler door open. Simple
teaching process. Up to 10 ties with different wrap amounts available for each wrap. Autostarting
(if selected) to start the wrapping process automatically after the bale is full.
Controls:There are 6 switches. They are:1. Power switch.
2. An EXTEND/RETRACT centre off switch for manually controlling the electric ram.
3. A START push button which starts the automatic tying process and is also used in the
‘teaching’ process.
4. A switch to select learning or normal.
5. A switch to disable the microprocessor. (Located on control PCB. Used in the event of CPU
failure)
6. A switch to enable/ disable the autostart feature. (Located on control PCB)
1
Specifications
!
!
!
Supply voltage:12VDC negative earth
Box:170mm x 120mm x 80mm (6.7" x 4.7" x 3.1")
Mount (2mm galvanised steel):200mm x 150mm x 80mm (7.9" x 6.0" x
3.1")
!
Number of tie positions:Up to ten. Dependant on number ‘taught’.
!
Memory:Memory retained without power for 100 years
Up to 1 million write cycles (ie changes to
process)
!
Operation:Manual and Automatic
!
Postioning method:Time
!
Adjustment method:CPU mimics ‘taught’ process
!
Wrap time:Maximum of 30 seconds per wrap
!
Time to extend:Up to maximum of 30 seconds for initial extend
!
Time for individual retract:Up to maximum 15 seconds per retract
!
Reverse voltage protection:Yes
!
Overcurrent protection:Fuse in control box. Needs changing to suit
actuator. Replace with same value as original
fuse. Supplied with 20A blade type car fuse fitted
and set of various current fuses.
!
Switching devices:2 Heavy duty replaceable ‘car’ relays
!
Run light to indicate auto operation or learning process.
!
Bale full light to indicate bale is full. Accompanied by rapid beeping until
wrapping
is started.
!
Gate open light to indicate rear gate of baler is open. Accompanied by slow
beeping.
!
Selectable autostart switch to allow the controller to start wrapping after the bale
reaches the full point.
!
Selectable CPU power switch to disable CPU in the event of failure. Allows the
use of control in manual.
!
Case and switches waterproof/ dustproof to allow use on tractors without cabins.
!
Case switchable top to bottom to allow connections from top or bottom.
Maintenance
Other than the possibility of a switch breaking the only other items that might need maintaining
are the possibility of a wire vibrating loose on the connectors on the control PCB, on the switches
or the ‘trailer’ plug. The 2 relays (see Fig. 2) have a an expected life of 100,000 operations at full
load (30Amps). As the actuator will typically draw significantly less than that (probably under
10 amps) the life can be expected to be at least that. As the retract relay does most of the
switching (2 to 9 operations per bale) it is expected to fail first. This relay should still give you
an expected life of between 10 to 50 thousand bales depending on the actuator current and the
number of ties per bale. I would suggest replacing both relays at the same time in the event of
failure. The relay/s can be removed by cutting the ‘dob’ of silicon and wriggling the relay out of
the base. The relay/s can be replaced with a similar 12V 5 pin car relay. A ‘dob’ of silicon should
be used to retain the relay/s.
Revision 2.1 Software. Date 6-September-2002
2
Operation (Automatic tying):1) Make sure that the learn/normal switch is in the normal position.
2) Press the start button. The controller will then take over the tying process.
3) The controller will now mirror the process that was last taught to it.
The manual control up/down (extend/retract) can be used if there is a problem whilst wrapping.
Using this control will immediately revert control back to manual and cause the buzzer to give
a long beep indicating an error.
Operation (Automatic tying-autostart):The autostart enable switch (AUTO) is on the control PCB. (See Fig.2 for position) This switch
needs to be in the on position to enable autostart. To disable change to the off position.
If the autostart switch has been turned on on the control PCB when the bale full switch has been
triggered for 4 seconds (8 rapid beeps) the control will start the same as if start had been pressed.
Teaching
The adjustments should be made with the tractor running. This is because the alternator output
of the tractor is rev dependant at low revs and the speed of the electric ram used to move the
string is related to the battery voltage. It is also possible that headlights/driving lights/ fog lights
may cause a drop in the battery voltage and so it may be necessary to ‘teach’ the controller again
if changing from day to night baling.
1) Change learn/ normal switch to learn.
2) Press start (The run light will flash to indicate learning)
3) Activate extend/ retract switch in the extend direction. Release at far side for initial
wrap.(Operating the retract at the first operation will cause an error beep and run light will stop
flashing and it will be necessary to go back to step 2).
4)Proceed to wrap / retract until bale wrapped. If time limits (see specifications) are exceeded
then control will cause an error beep and run light will stop flashing. It will then be necessary to
go back to step 2.
5)When finished press start to save process. Two short beeps will indicate a successful/valid
process. One long beep will indicate a failed process.
6)Change learn/ normal back to normal. The control is now ready for automatic operation.
Changing from learn to normal whilst the run led is flashing (ie in learning process), or
exceeding 10 switch activations will cause an error beep and stop learning process.
Revision 2.1 Software. Date 6-September-2002
3
Wiring-(actuator only)
1) Mount the bale tie controller.
2) The controller is supplied with a 20 amp fuse. This should be replaced with a
fuse of the same rating as the fuse in the previous unit. At least 1 spare fuse should be
carried whenever the baler is in use.
3) There should be 2 wires connecting the electric actuator on the baler with the
existing manual control. These 2 wires need to be connected to pins 1 and 4 of
7 pin plug that has been supplied. (At this stage which way around doesn't matter)
4) Now connect the Red and Black leads to the battery, alternator or fuse box. Red to positive
and black to negative.
Do not press the START button at this stage.
5) The manual extend/retract control should now be tried. If there is no movement of the actuator
then check the wiring and or fuse. If the actuator does not move at all the battery terminals are
possibly around the wrong way.
6) The retract position should return the actuator to the string cut off position. The extend
position should move the actuator away from the cut off position. If the actuator moves the
opposite direction then the two wires to pins 1 and 4 will need to be reversed.
Wiring-(bale full and door open switches)
The control will operate without the full and/ or door switches connected.
The requirements for the switches are
1) the switch for the bale full closes (makes contact) when the bale is full. The switch is wired
between pins 3 and 6 of the 7 pin plug. Operation of this switch will cause rapid beeping of the
control.
2) the switch for the door open closes (makes contact) when the door opens. The switch is wired
between pins 3 and 7.
See Fig.3 for wiring diagram.
Fig. 2
Revision 2.1 Software. Date 6-September-2002
4
Fig.3
Revision 2.1 Software. Date 6-September-2002
5
Faultfinding
Fault
1. Control will not work on manual
Cure
Check power switch turned on
Check learn / normal switch not on learn
Check fuse, plugs
Check for wires off inside control box
Check polarity of power wires
2. Control will not work on auto
Check learn / normal switch not on learn
Check CPU power switch not turned off. (See
fig.2 for location)
3. Control beeps to indicate failure of teaching Control requires extend as initial step.
process
Control requires at least 3 steps.
Time exceeds maximum for a given step
Start wasn’t pressed to save process.
Too many steps.
4. Tie positions appear to have moved
Positions are dependant on battery voltage.
Headlights, faulty alternator, loose wire or
faulty battery may be the cause. The position
will vary with tractor running/ not running.
5. Control appears to have hung
A) Turn off power for 10 seconds
B) If fault continues turn off CPU power (see
Fig.2). The control will still operate manually
but LED’s and buzzer will not work. The
control may need repair.
6. The control will no longer retract but will
extend (or possibly but less likely extend Most likely relay failure but possibly switch
but not retract)
failure. (This should not occur for at least
10000 bales).
Revision 2.1 Software. Date 6-September-2002
6
Fig. 4 Control with lid open
Fig 5. Control from below showing ‘trailer’ plug
Revision 2.1 Software. Date 6-September-2002
7
Warranty
This bale tie controller is covered by a warranty for a period of 12 months from the time of
purchase.
The warranty covers only faulty material and workmanship if properly setup and operated in
accordance with the specifications and setup sections of this document.
The repair and or replacement of this controller will only be at the workshop of Alan Hanson. The
cost of freight to/from will be born by the user.
The warranty does not cover damage due to misuse i.e.. cables broken by PTO shafts,switch
actuators broken etc..
Alan Hanson shall not be liable for any incidental damage, inconvenience, rental, loss of profits
or any other commercial loss due to the unsuitability, failure or use of this controller.
If the user does not agree to these terms the cost of the product (minus freight) will be refunded
on the return of the product. The controller must be in unused condition and must be returned
within 14 days.
Enquiries/Repairs :Alan Hanson
16 York St
Eaglehawk Victoria 3556
Phone 03 54463295
Mobile 0408 463295
email [email protected]
Revision 2.1 Software. Date 6-September-2002
8